
NP11210
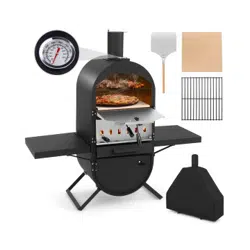
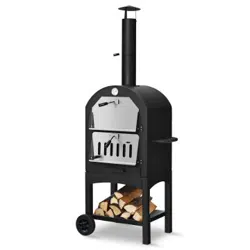
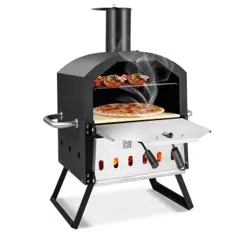
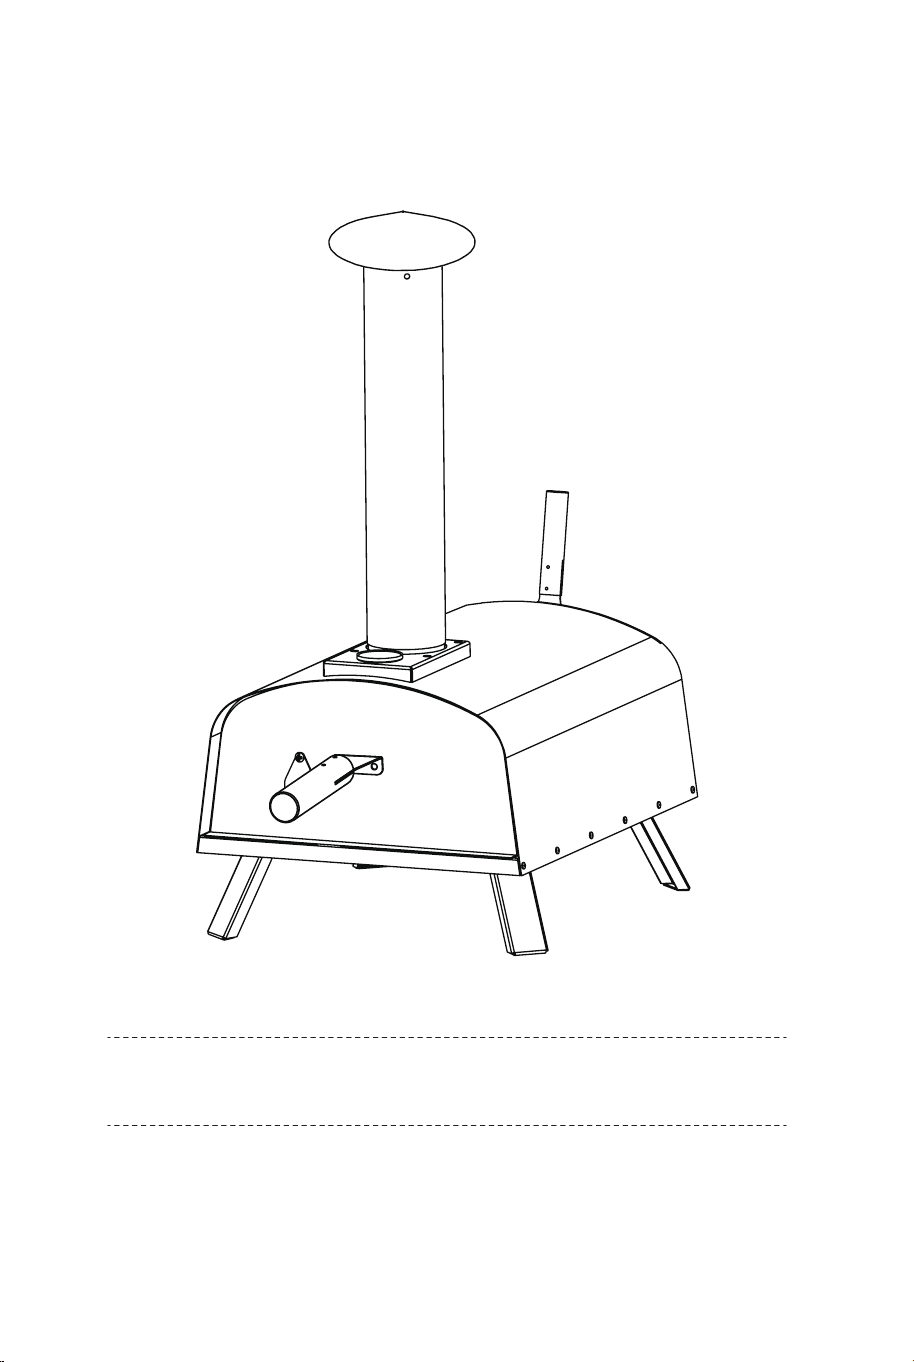
Pizza Oven
Four à Pizza
THIS INSTRUCTION BOOKLET CONTAINS IMPORTANT SAFETY INFORMATION. PLEASE READ AND KEEP FOR FUTURE REFERENCE.
USA office: Fontana AUS office: Truganina
GBR office: Ipswich FRA office: Saint Vigor d'Ymonville
EN
Before You Start
Please read all instructions carefully.
Retain instructions for future reference.
Separate and count all parts and hardware.
Read through each step carefully and follow the proper order.
We recommend that, where possible, all items are assembled near to the area in
which they will be placed in use, to avoid moving the product unnecessarily once
assembled.
Always place the product on a flat, steady and stable surface.
Keep all small parts and packaging materials for this product away from babies
and children as they potentially pose a serious choking hazard.
EN
FR
Veuillez lire attentivement toutes les instructions.
Conservez les instructions pour vous y référer ultérieurement.
Vérifiez toutes les pièces et les accessoires.
Lisez attentivement chaque étape et suivez l’ordre correct.
Nous recommandons que, dans la mesure du possible, tous les produits
soient assemblés à proximité de la zone où ils seront utilisés, afin d’éviter tout
déplacement inutile du produit une fois assemblé.
Placez toujours le produit sur une surface plane et stable.
Conservez toutes les petites pièces de ce produit et les matériaux d’emballage
hors de portée des bébés et des enfants, car ils pourraient présenter un risque
d’étouffement.
Avant de Commencer
Pizza Oven
Four à Pizza
02 03
EN
Before You Start
Please read all instructions carefully.
Retain instructions for future reference.
Separate and count all parts and hardware.
Read through each step carefully and follow the proper order.
We recommend that, where possible, all items are assembled near to the area in
which they will be placed in use, to avoid moving the product unnecessarily once
assembled.
Always place the product on a flat, steady and stable surface.
Keep all small parts and packaging materials for this product away from babies
and children as they potentially pose a serious choking hazard.
EN
FR
Veuillez lire attentivement toutes les instructions.
Conservez les instructions pour vous y référer ultérieurement.
Vérifiez toutes les pièces et les accessoires.
Lisez attentivement chaque étape et suivez l’ordre correct.
Nous recommandons que, dans la mesure du possible, tous les produits
soient assemblés à proximité de la zone où ils seront utilisés, afin d’éviter tout
déplacement inutile du produit une fois assemblé.
Placez toujours le produit sur une surface plane et stable.
Conservez toutes les petites pièces de ce produit et les matériaux d’emballage
hors de portée des bébés et des enfants, car ils pourraient présenter un risque
d’étouffement.
Avant de Commencer
Pizza Oven
Four à Pizza
02 03
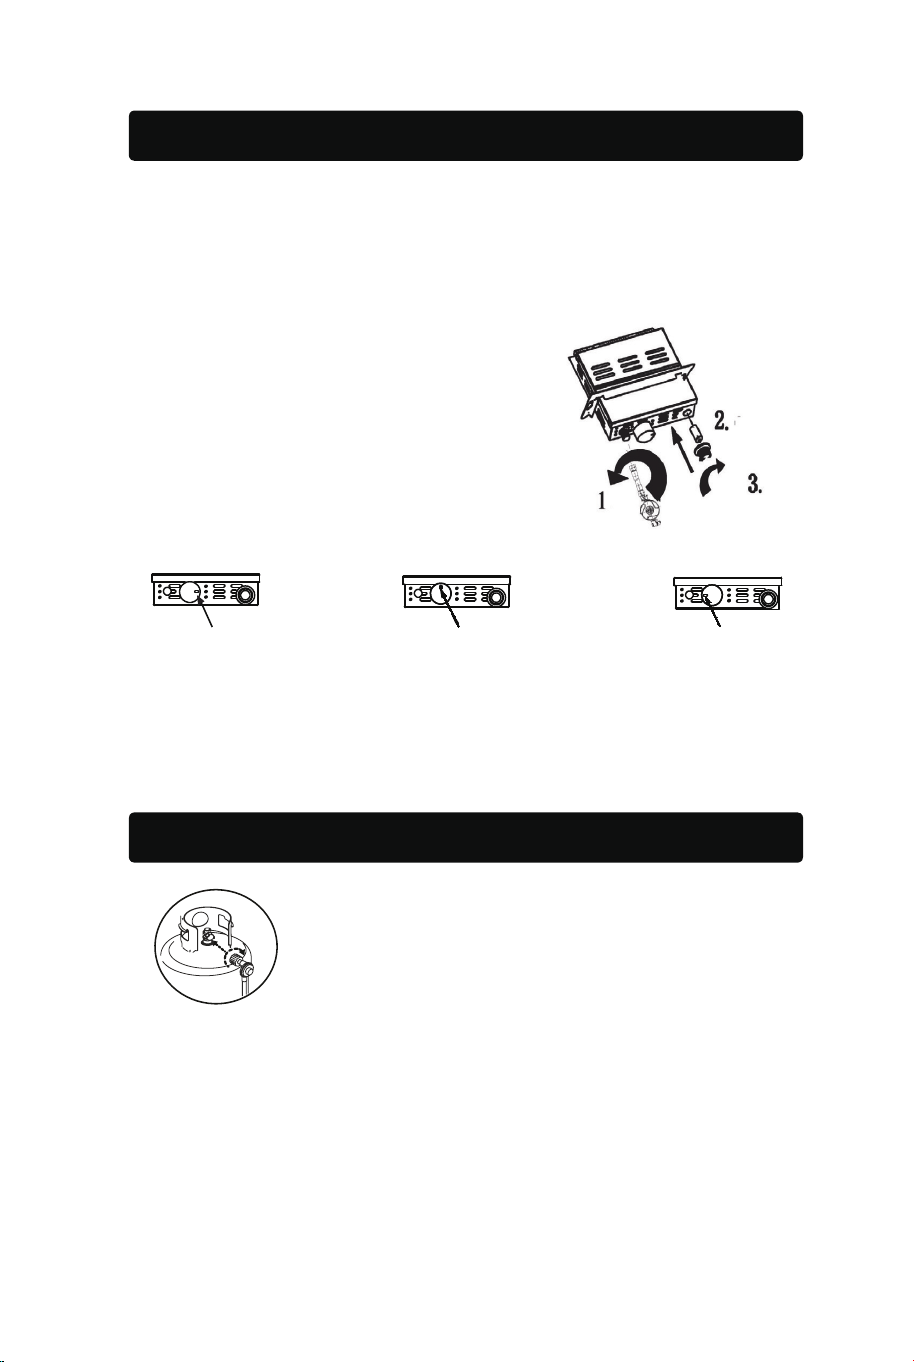
USE GAS BURNER
SAFETY INFORMATION
-Open the battery cap (2) and put in the battery. Screw the battery cap on
clockwise.
-Check all gas connections for gas leak before starting your oven.
-Do not lean over the oven when lighting.
Keep your face and body at least 50 cm/19.6
inches far from the oven door.
-When lighting the oven, the oven door must
be open.
-The burner control knob must be in the off
position before turning on the LGP cylinder
valve.
OFF
Turn knob to high
Press the knob and turn to "ON"
LIGHTING 1 AA battery is required.(Not included)
To ignite the pilot light, press and rotate the knob together with the piezo
ignition button that discharges a spark to ignite the pilot light. Lighting the
pilot light for the first time can be difficult as it takes time for the air in the
connection tube to be expelled and gas to flow out.
Gas regulator
This is a clockwise threaded gas fitting.Ensure the
tank is fully turned off and screw the regulator on to
the gas tank valve fitting until tight.
PRECAUTIONS
Should you need to change the gas cylinder, ensure that the cylinder valve
is closed, the appliance is switched off and there are no sources of ignition
(cigarettes, open flames, sparks, etc) nearby before proceeding. Inspect the
gas hose to ensure it is free of any twisting or tension. The hose should
hang freely with no bends, folds, or kinks that could obstruct the free flow of
gas. Apart from the connection point, no part of the hose should touch any
hot Gas Pizza Oven parts.
UTILISER LE BRÛLEUR À GAZ
INFORMATIONS DE SÉCURITÉ
- Ouvrez le couvercle de la pile (2) et insérez la pile. Vissez le couvercle
dans le sens des aiguilles d'une montre.
- Vérifiez que tous les raccords de gaz ne fuient pas avant de mettre le four
en marche.
- Ne vous penchez pas au-dessus du four
lorsque vous l'allumez. Maintenez votre
visage et votre corps à une distance d'au
moins 50 cm/19.6" de la porte du four.
- Lorsque vous allumez le four, la porte du
four doit être ouverte.
- Le bouton de commande du brûleur doit
être en position d'arrêt avant d'ouvrir le
robinet de la bouteille LGP.
ARRÊT
Tourner le bouton en
position haute
Appuyer sur le bouton et tourner
en position MARCHE
ALLUMAGE 1 pile AA est nécessaire. (Non incluse)
Pour allumer la veilleuse, appuyez sur le bouton et tournez-le en même
temps que le bouton d'allumage piézoélectrique qui décharge une étincelle
pour allumer la veilleuse. L'allumage de la veilleuse pour la première fois
peut être difficile car il faut du temps pour que l'air contenu dans le tube de
raccordement soit expulsé et que le gaz s'écoule.
Régulateur de gaz
Il s'agit d'un raccord de gaz fileté dans le sens des
aiguilles d'une montre.
Assurez-vous que le réservoir est complètement
fermé et vissez le régulateur sur le raccord du robinet
du réservoir de gaz jusqu'à ce qu'il soit bien serré.
PRÉCAUTIONS
Si vous devez changer la bouteille de gaz, assurez-vous que le robinet de
la bouteille est fermé, que l'appareil est éteint et qu'il n'y a pas de sources
d'inflammation (cigarettes, flammes nues, étincelles, etc.) à proximité avant
de procéder.
Inspectez le tuyau de gaz pour vous assurer qu'il n'est pas tordu ou tendu.
Le tuyau doit pendre librement et ne présenter aucune courbure, plis ou
pliures susceptibles d'entraver la libre circulation du gaz. Hormis le point de
raccordement, aucune partie du tuyau ne doit toucher les pièces chaudes
du four à pizza à gaz.
04 05
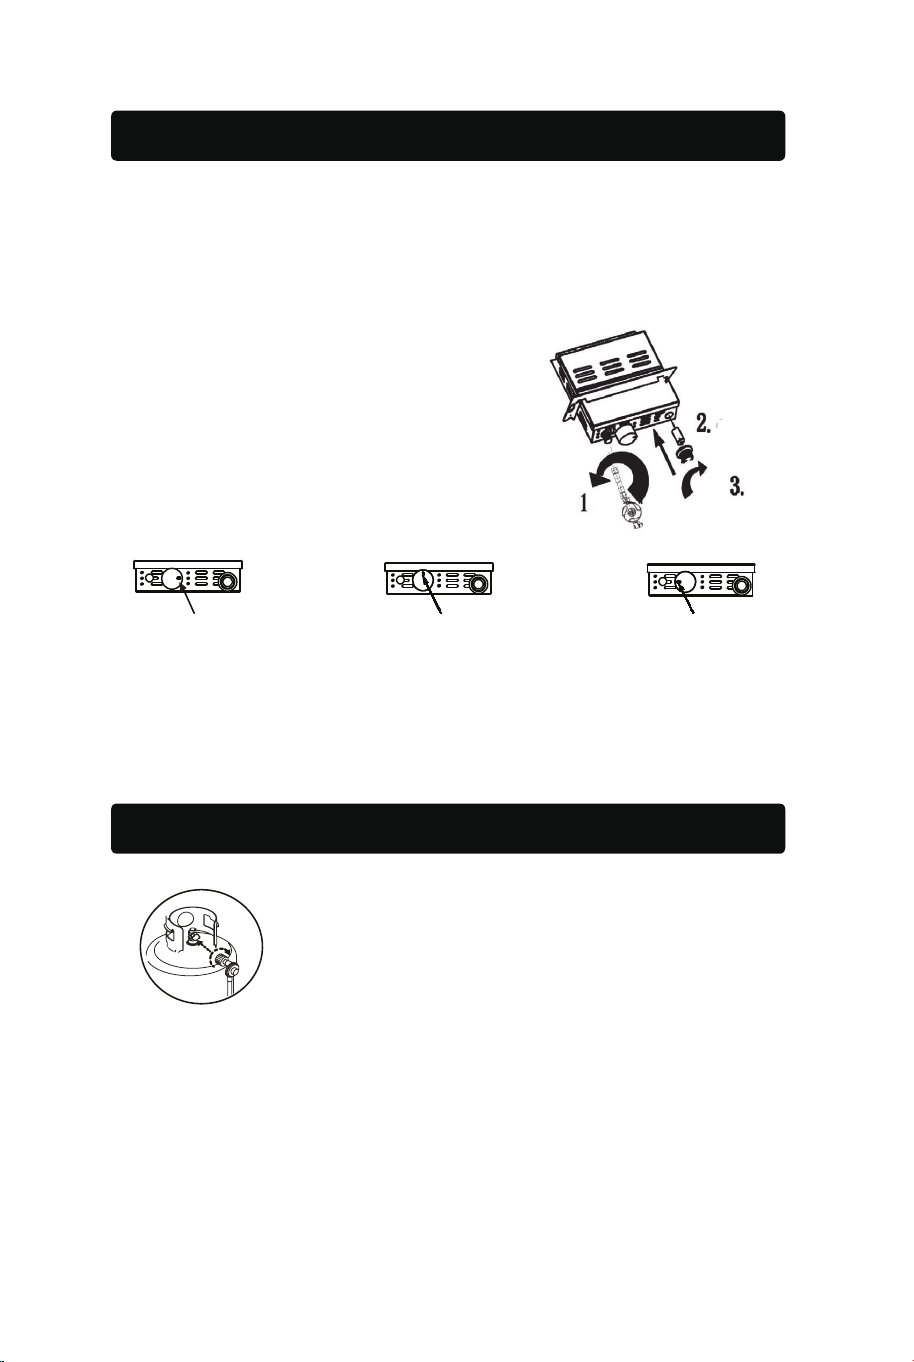
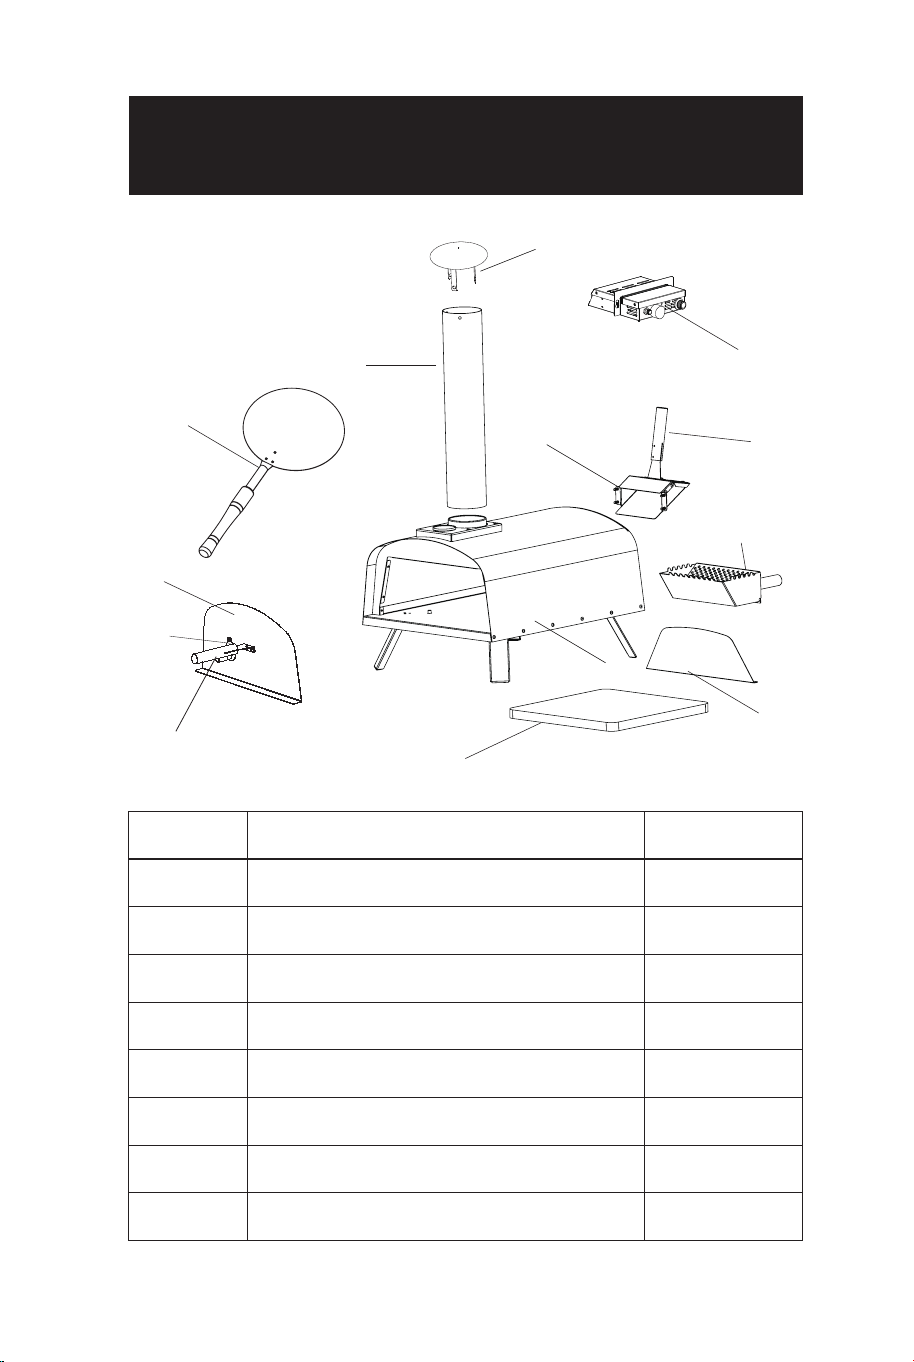
TABLE OF CONTENTS
/TABLE DU CONTENU
F
E
H
K
B
M
A
C
B
G
D
J
I
Ref QuantityPart
Réf QuantitéPièce
H
I
B
A
C
K
E
G
Chimney
Chimney Cap
Handle
Hopper
Fire Box
Pizza Peel
Window Cover
Body
1
1
3
1
1
1
1
1
H
I
B
A
C
K
E
G
D
F
J
L
Q
M
Cheminée
Chapeau de cheminée
Poignée
Trémie
Boîte à feu
Pelle à pizza
Couvercle de fenêtre
Corps
Pierre à pizza
Porte
Plaque d'isolation
Boulon M5
Vis à épaulement M5
Brûleur à gaz
1
1
3
1
1
1
1
1
1
1
1
13
1
1
D
F
J
L
Q
M
Pizza Stone
Door
Isolation Plate
M5 Bolt
M5 Shoulder Screw
Gas Burner
1
1
1
13
1
1
06 07
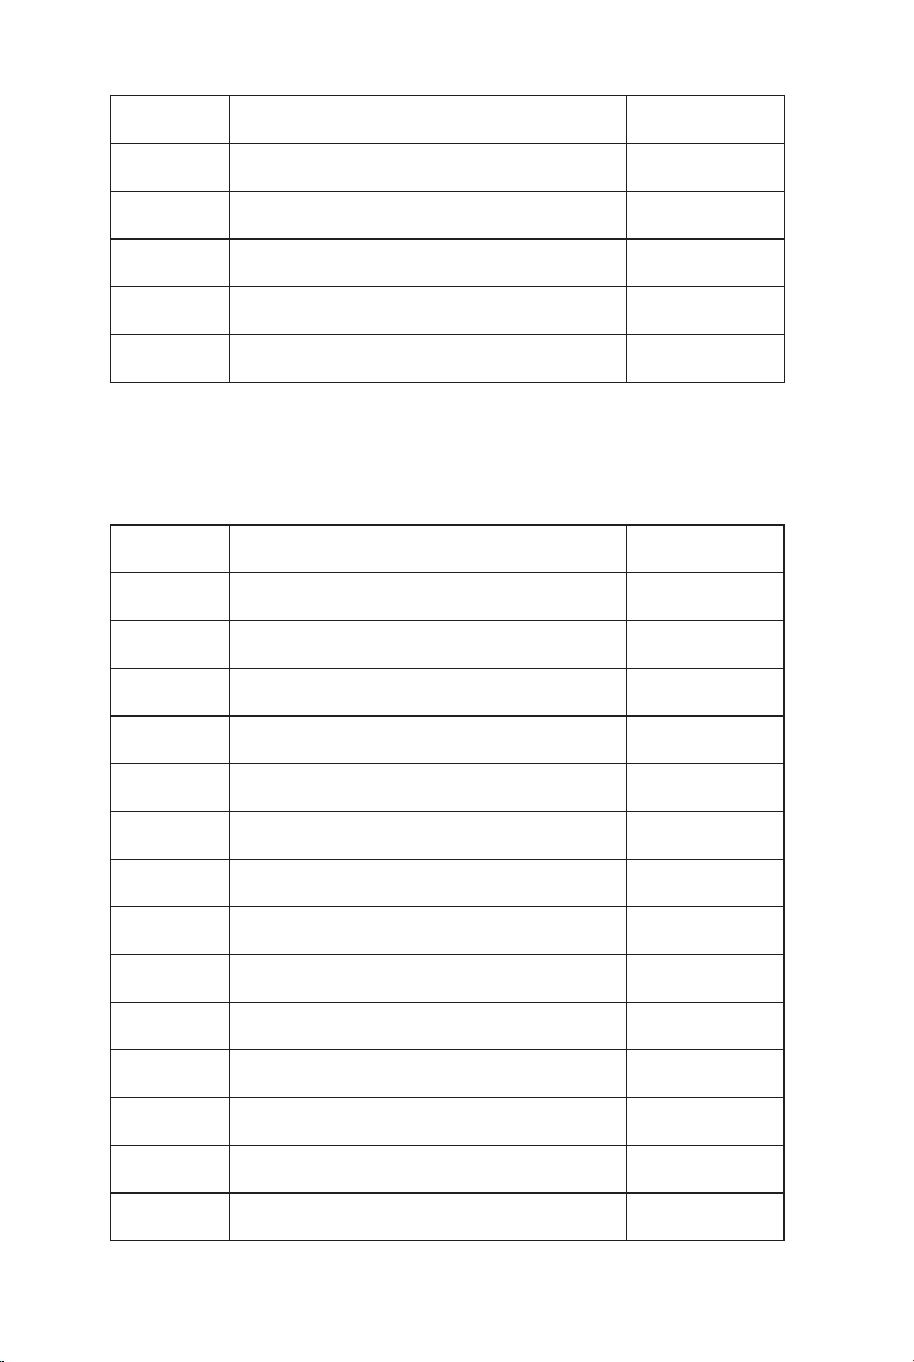
3
4
1
2
L
C
A
E
F
L
B
F
E
Q
G
J
L
J
L
EN
FR
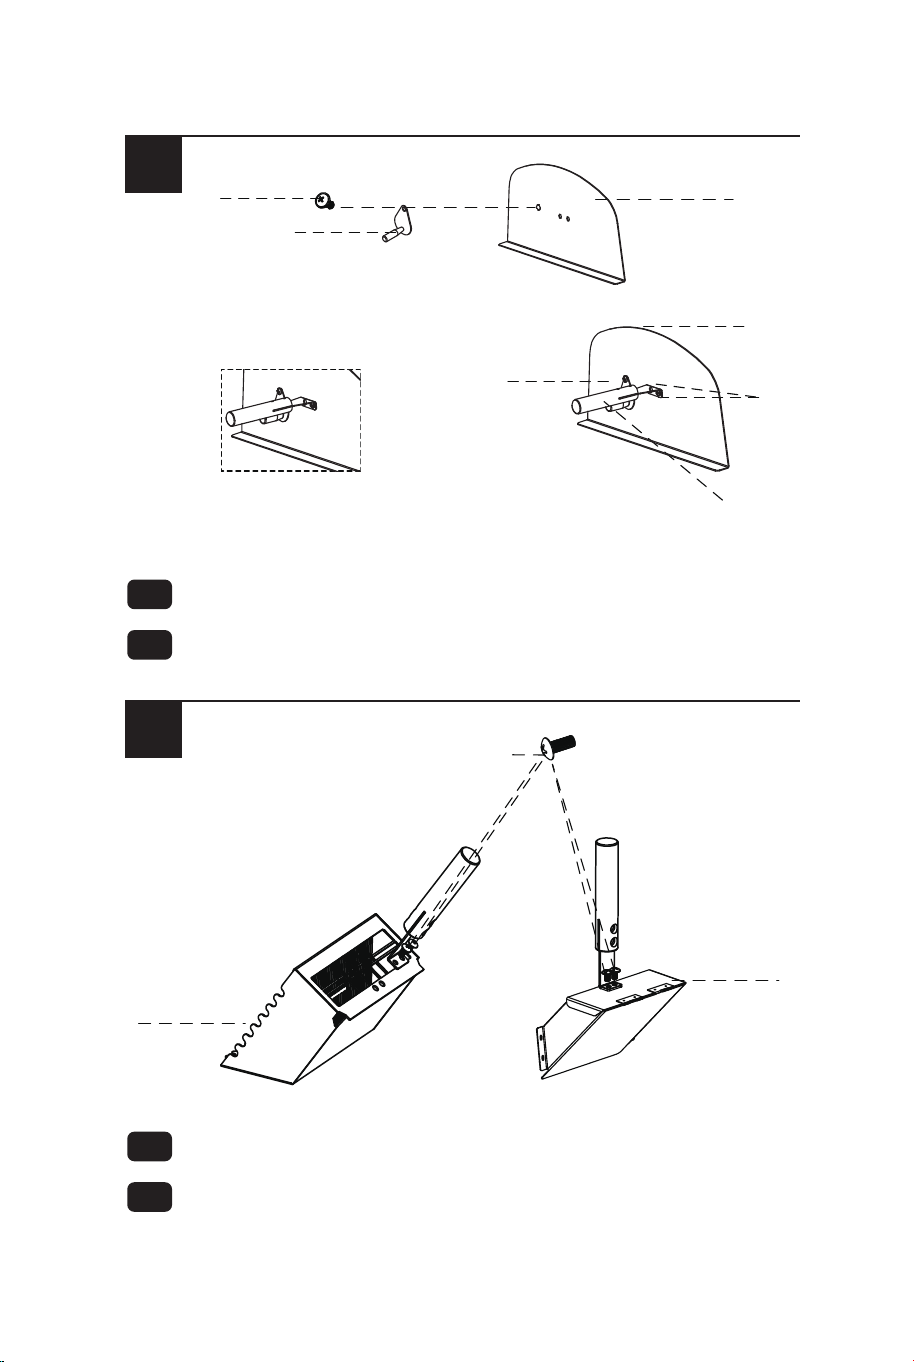
Attach the window cover and wooden handle to the door.
Fixez le couvercle de la fenêtre et la poignée en bois à la porte.
EN
FR
Attach the wooden handles onto the hopper and wood box.
Fixez les poignées en bois sur la trémie et la boîte à feu.
EN
FR
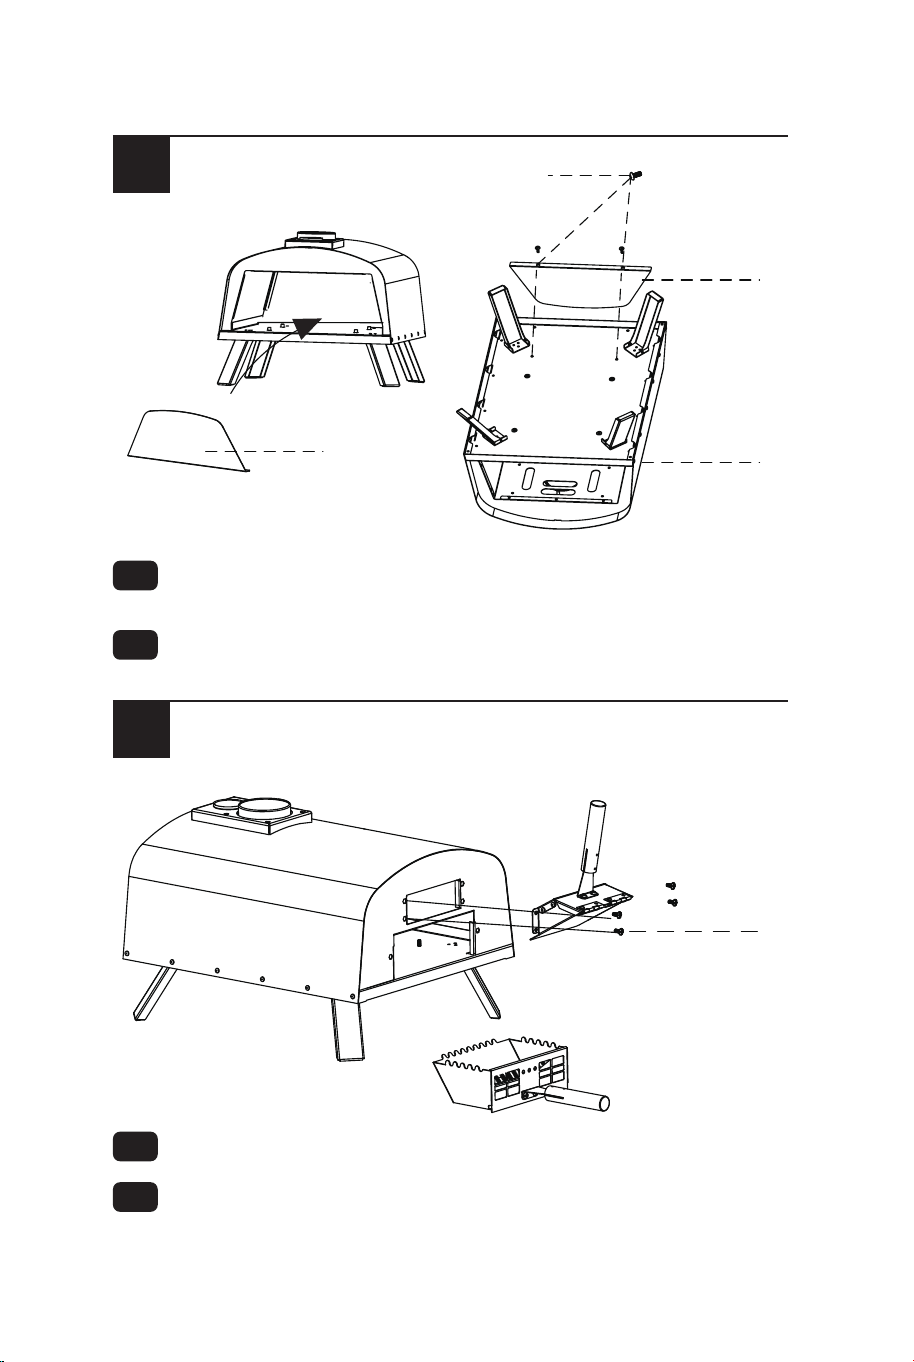
Attach the isolation plate to the body
( the narrow bending side towards back face of body).
Fixez la plaque d'isolation au corps
(le côté étroit plié vers la face arrière du corps).
EN
FR
Attach the hopper onto the body and fire box to the body too.
Fixez la trémie sur le corps et la boîte à feu sur le corps
également.
08 09
3
4
1
2
L
C
A
E
F
L
B
F
E
Q
G
J
L
J
L
EN
FR
Attach the window cover and wooden handle to the door.
Fixez le couvercle de la fenêtre et la poignée en bois à la porte.
EN
FR
Attach the wooden handles onto the hopper and wood box.
Fixez les poignées en bois sur la trémie et la boîte à feu.
EN
FR
Attach the isolation plate to the body
( the narrow bending side towards back face of body).
Fixez la plaque d'isolation au corps
(le côté étroit plié vers la face arrière du corps).
EN
FR
Attach the hopper onto the body and fire box to the body too.
Fixez la trémie sur le corps et la boîte à feu sur le corps
également.
08 09
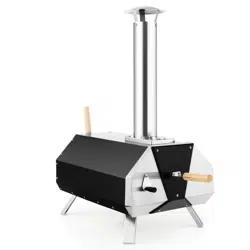
READY FOR PELLET PIZZA USE NOW!
/PRÊT POUR L'UTILISATION DE LA
PIZZA AUX PELLETS !
65
G
H
I
D
EN
FR
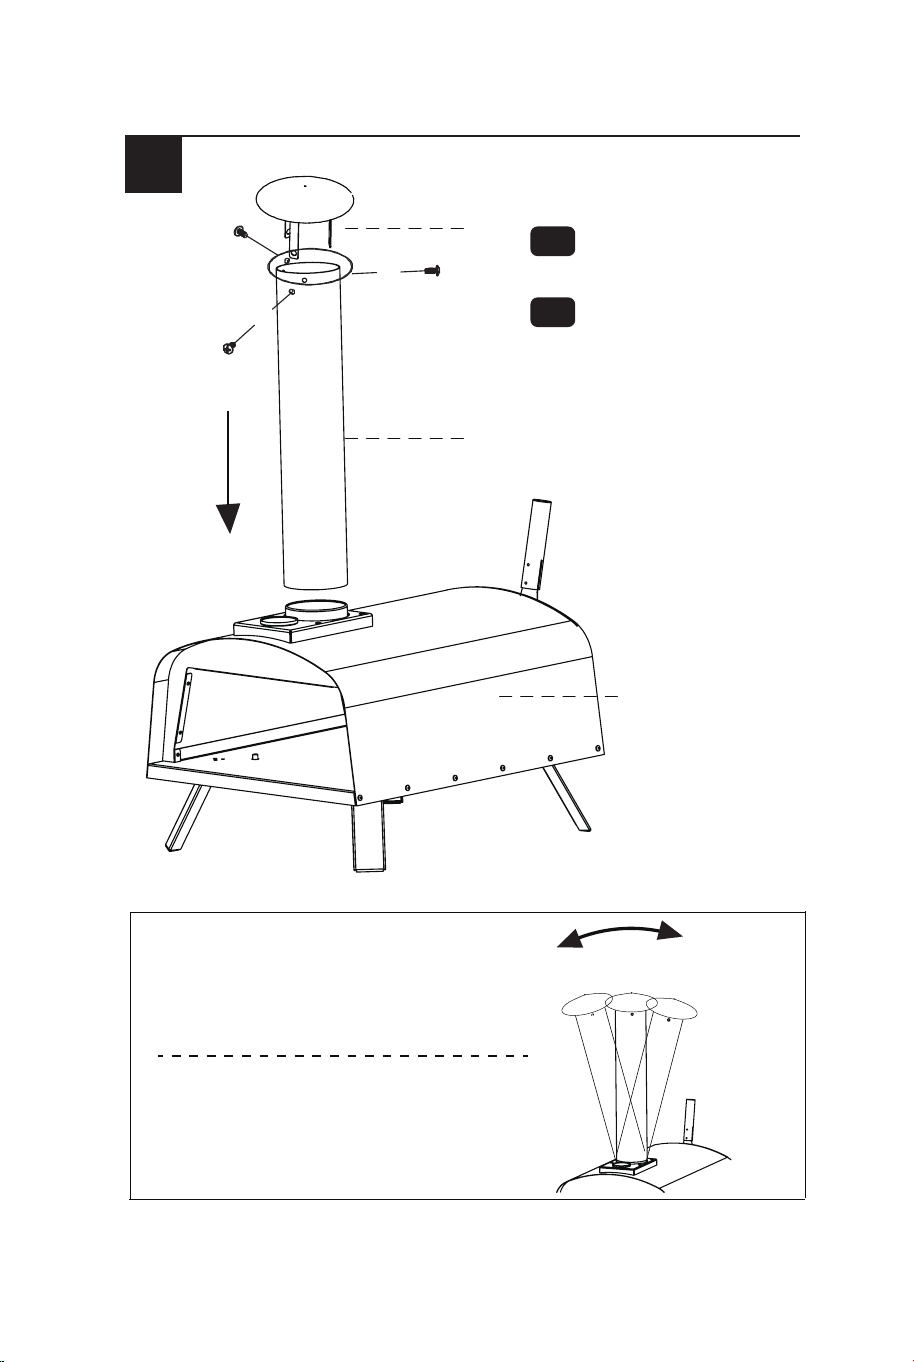
Attach the chimney
cap onto the chimney.
How to remove the chimeny?
Shake the chimney from side to side
and pull it up
Comment retirer la cheminée ?
Secouez la cheminée d'un côté à
l'autre et tirez-la vers le haut.
Fixez le chapeau de
cheminée sur la
cheminée.
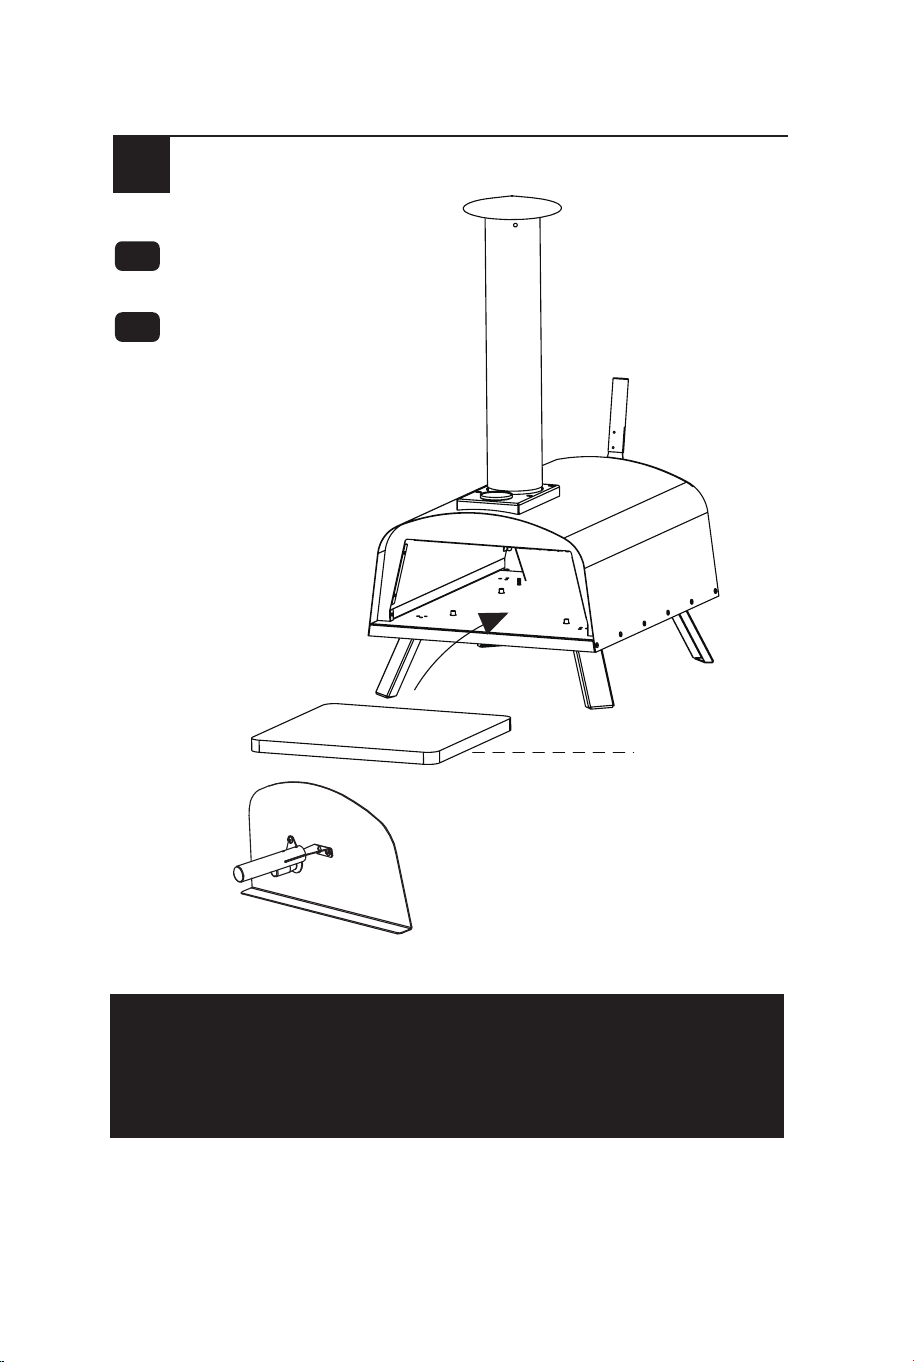
EN
FR
Put pizza stone in
and door on.
Placez la pierre à
pizza et ouvrez la
porte.
TIPS:
CONSEILS :
10 11
READY FOR PELLET PIZZA USE NOW!
/PRÊT POUR L'UTILISATION DE LA
PIZZA AUX PELLETS !
65
G
H
I
D
EN
FR
Attach the chimney
cap onto the chimney.
How to remove the chimeny?
Shake the chimney from side to side
and pull it up
Comment retirer la cheminée ?
Secouez la cheminée d'un côté à
l'autre et tirez-la vers le haut.
Fixez le chapeau de
cheminée sur la
cheminée.
EN
FR
Put pizza stone in
and door on.
Placez la pierre à
pizza et ouvrez la
porte.
TIPS:
CONSEILS :
10 11
FOR GAS PIZZA OVEN
/POUR LE FOUR À PIZZA À GAZ
A
B
M
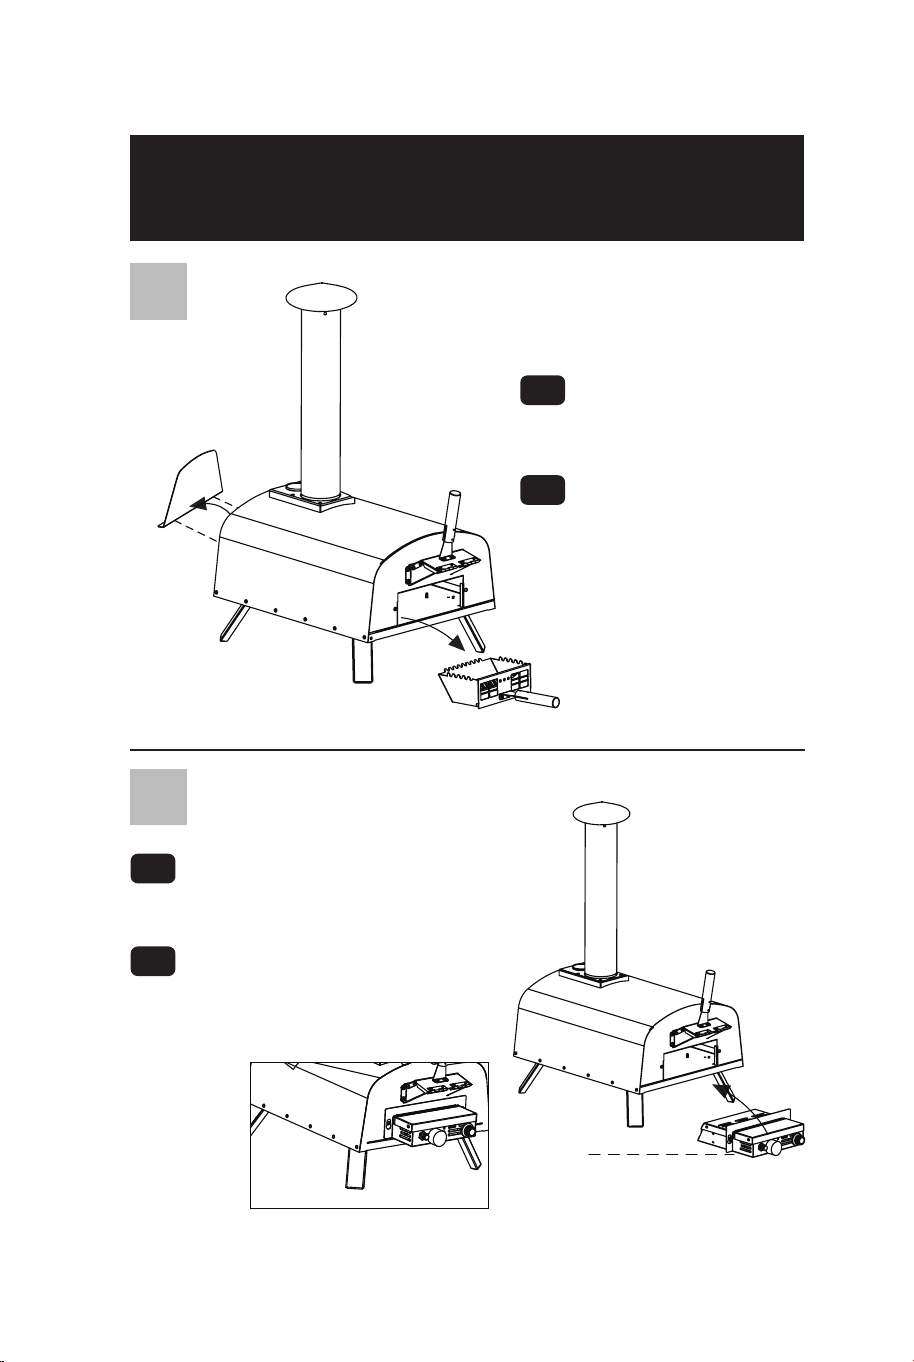
EN
FR
Remove the isolation
plate and fire box for
gas type using.
Retirez la plaque
d'isolation et la boîte à
feu pour une utilisation
du type à gaz.
EN
FR
Attach the gas mould onto the back
of the body with the 2 remaining
screws at back of the body.
Fixez le moule à gaz à l'arrière
du corps à l'aide des 2 vis
restantes à l'arrière du corps.
Instructions De Retour / Réclamation De Dommages
Dans le cas où un retour est requis, l'article doit être retourné dans sa boîte
d'origine. Sans cela, votre retour ne sera pas accepté.
NE PAS jeter la boîte/l'emballage d'origine.
Prenez une photo des marquages de la boîte.
Prenez une photo des dommages (le cas échéant).
Envoyez-nous un e-mail avec les images demandées.
Une photo des marquages (texte) sur le côté de la boîte est requise au cas où
une pièce serait nécessaire pour le remplacement. Cela aide notre personnel à
identifier votre numéro de produit pour s'assurer que vous recevez les bonnes
pièces.
Une photo des dommages est toujours requise pour déposer une réclamation et
obtenir rapidement votre remplacement ou votre remboursement. Assurez-vous
d'avoir la boîte même si elle est endommagée.
Envoyez-nous un e-mail directement depuis le marché où votre article a été
acheté avec les images ci-jointes et une description de votre réclamation.
FR
In case a return is required, the item must be returned in original box. Without this
your return will not be accepted.
DO NOT discard the box / original packaging.
Take a photo of the box markings.
Take a photo of the damaged part (if applicable).
Send us an email with the images requested.
A photo of the markings (text) on the side of the box is required in case a part is
needed for replacement. This helps our staff identify your product number to
ensure you receive the correct parts.
A photo of the damage is always required to file a claim and get your replacement
or refund processed quickly. Please make sure you have the box even if it is
damaged.
Email us directly from marketplace where your item was purchased with the
attached images and a description of your claim.
EN
Return / Damage Claim Instructions
Instructions De Retour / Réclamation De Dommages
12 13
FOR GAS PIZZA OVEN
/POUR LE FOUR À PIZZA À GAZ
A
B
M
EN
FR
Remove the isolation
plate and fire box for
gas type using.
Retirez la plaque
d'isolation et la boîte à
feu pour une utilisation
du type à gaz.
EN
FR
Attach the gas mould onto the back
of the body with the 2 remaining
screws at back of the body.
Fixez le moule à gaz à l'arrière
du corps à l'aide des 2 vis
restantes à l'arrière du corps.
Instructions De Retour / Réclamation De Dommages
Dans le cas où un retour est requis, l'article doit être retourné dans sa boîte
d'origine. Sans cela, votre retour ne sera pas accepté.
NE PAS jeter la boîte/l'emballage d'origine.
Prenez une photo des marquages de la boîte.
Prenez une photo des dommages (le cas échéant).
Envoyez-nous un e-mail avec les images demandées.
Une photo des marquages (texte) sur le côté de la boîte est requise au cas où
une pièce serait nécessaire pour le remplacement. Cela aide notre personnel à
identifier votre numéro de produit pour s'assurer que vous recevez les bonnes
pièces.
Une photo des dommages est toujours requise pour déposer une réclamation et
obtenir rapidement votre remplacement ou votre remboursement. Assurez-vous
d'avoir la boîte même si elle est endommagée.
Envoyez-nous un e-mail directement depuis le marché où votre article a été
acheté avec les images ci-jointes et une description de votre réclamation.
FR
In case a return is required, the item must be returned in original box. Without this
your return will not be accepted.
DO NOT discard the box / original packaging.
Take a photo of the box markings.
Take a photo of the damaged part (if applicable).
Send us an email with the images requested.
A photo of the markings (text) on the side of the box is required in case a part is
needed for replacement. This helps our staff identify your product number to
ensure you receive the correct parts.
A photo of the damage is always required to file a claim and get your replacement
or refund processed quickly. Please make sure you have the box even if it is
damaged.
Email us directly from marketplace where your item was purchased with the
attached images and a description of your claim.
EN
Return / Damage Claim Instructions
Instructions De Retour / Réclamation De Dommages
12 13

NP11210
Pizza Oven
Four à Pizza
THIS INSTRUCTION BOOKLET CONTAINS IMPORTANT SAFETY INFORMATION. PLEASE READ AND KEEP FOR FUTURE REFERENCE.
USA office: Fontana AUS office: Truganina
GBR office: Ipswich FRA office: Saint Vigor d'Ymonville