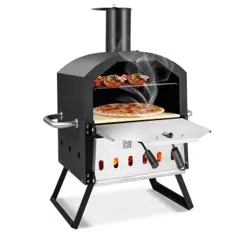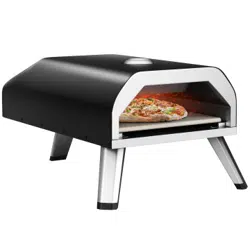

NP11115GB-BK
Gas Pizza Oven
THIS INSTRUCTION BOOKLET CONTAINS IMPORTANT SAFETY INFORMATION. PLEASE READ AND KEEP FOR FUTURE REFERENCE.
USA office: Fontana GBR office: Ipswich AUS office: Truganina
If you're having difficulty, our friendly
customer team is always here to help.
AUS:cs.au@costway.com
GBR:cs.uk@costway.com
Before You Start
Please read all instructions carefully.
Retain instructions for future reference.
Separate and count all parts and hardware.
Read through each step carefully and follow the proper order.
We recommend that, where possible, all items are assembled near to the
area in which they will be placed in use, to avoid moving the product
unnecessarily once assembled.
Always place the product on a flat, steady and stable surface.
Keep all small parts and packaging materials for this product away from
babies and children as they potentially pose a serious choking hazard.
• Do not store spare LP-gas cylinder under or near the appliance.
• Never fill the cylinder beyond 80 percent full.
• If the information beyond is not followed exactly, a fire causing death or
serious injury may occur.
• Not use the appliance under overhead combustible surfaces.
• Minimal clearance from sides and back of the unit to combustible
construction, 70cm from the sides and 70cm from the back.
• CAUTION: use only the gas pressure regulator supplied with this
appliance.
• This regulator is set for an outlet pressure of 11 iwc.
• Tum off the LPG supply at cylinder when appliance is not in use.
• Make sure the control knob is in OFF position, and then tum the liquid
propane cylinder valve ON by slowly turning counterclockwise.
• Push in and slowly turn the control knob anti clock wish until you heat a
click and the burner ignites.
• If burner doesn't light, turn the knob OFF, wait 5 minutes and repeat the
lighting.
LIGHTING INSTRUCTION – TO LIGHT THE BURNER
02 03
Gas
Pressure and type of gas
Power
Consumption
Use outdoors only. Read the instructions before using the appliance.
Warning: Accessible parts may be very hot. Keep young children away.
I
3+(28-30/37)
G30 Butane G31 Propane
Butane (G30) at 28-30 mbar.
Propane (G31) at 37 mbar
4.0kW
G30: 291g/h, G31: 286g/h
DANGER
WARNINGS
If you smell gas:
1. Shut off gas to the appliance.
2. Extinguish any open flame.
3. If odor continues, keep away from the appliance and immediately call
your fire department. Failure to follow these instructions could result in fire
or explosion which could cause property damage, personal injury or death.
WARNING
To reduce the risk of fire, burn hazard or other injury, read this safety
manual carefully and completely before using this appliance.
WARNING
Before cleaning, make sure the gas supply and control knob is in the OFF
position and that the burner and oven has cooled. Failure to follow these
instructions could result in fire, explosion or burn hazard which could
cause property damage, personal injury or death.
WARNING
FOR OUTDOOR USE ONLY.
WARNING
a. Keep the fuel supply hose away from any heated surface(s).
b. The use of alcohol, prescription or non-prescription drugs may impair the
consumer's ability to properly assemble or safely operate the appliance.
c. Keepchildren andpets away from the appliance atall times.
d. Do not move the appliance when in use.
e. This appliance is not intended for and should never be used as a heater.
WARNING
Spiders and insects can nest inside the burner of the appliance and disrupt
gas flow. Inspect the burner at least once a year.
This appliance is not intended for commercial use
04 05
BEFORE LIGHTING
WARNING
Do not store this appliance indoors unless the gas cylinder is disconnected.
WARNING
Do not store gas cylinder in a building, garage or any other enclosed area
and keep out of reach of children at all times.
WARNING
This appliance is not intended to be installed in or on recreational vehicles
and/or boats.
WARNING
Check all gas supply fittings for leaks before each use. Do not use the
appliance until all connections have been checked and do not leak.
WARNING
Do not smoke while leak testing. Never leak test with an open flame.
WARNING
When lighting, keep your face and hands as far away from the appliance as
possible.
WARNING
Minimum clearance from sides of unit to combustible construction is 686mm
(27 inches).Minimum clearance from back of unit to combustible
construction is 686mm (27 inches).
The parts which have been sealed by the
manufacturer should not be adjusted by the user
When the appliance is using LPG, A LPG
cylinder should be used
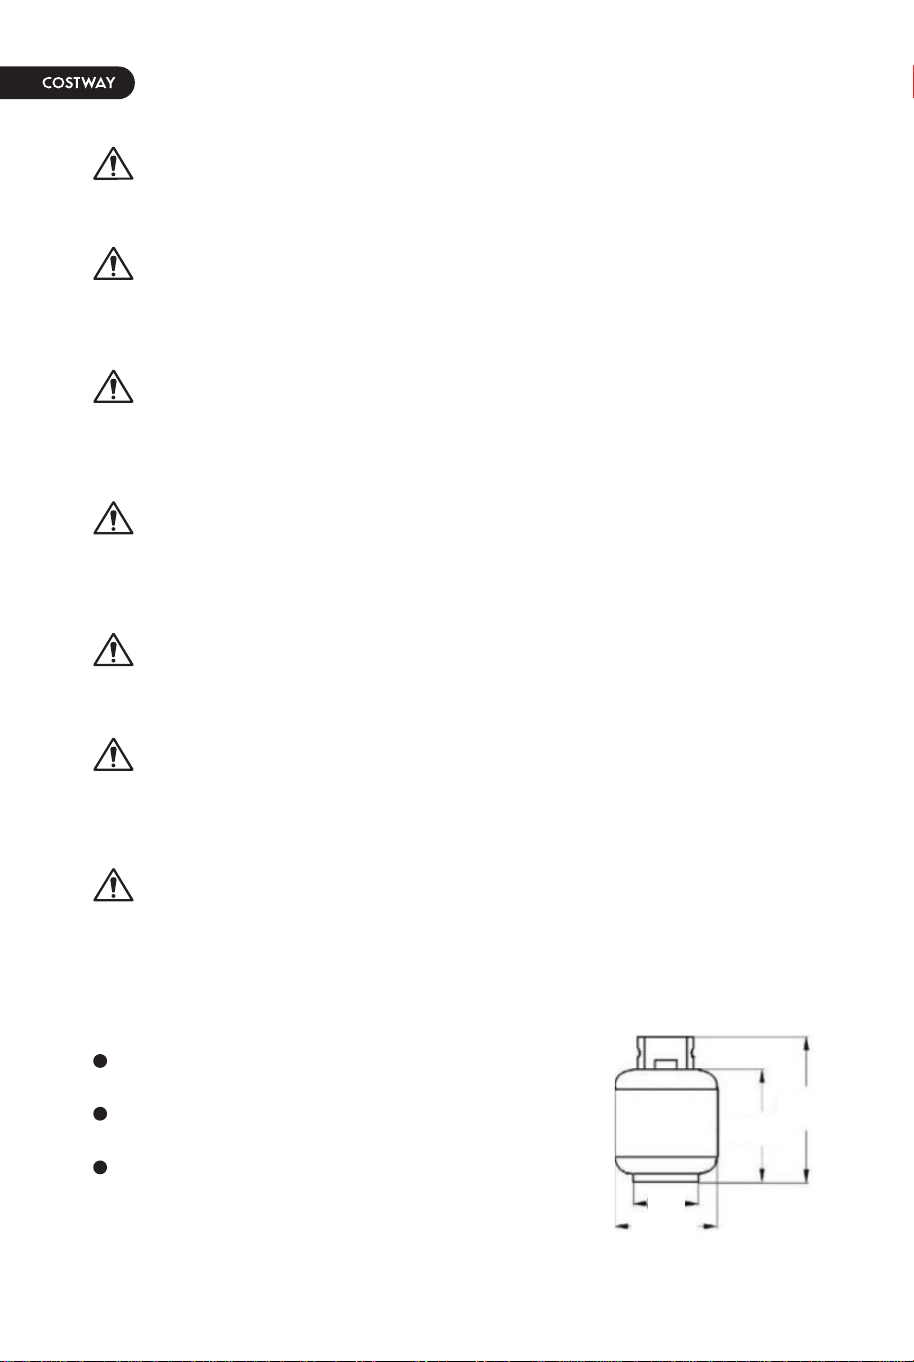
The LPG cylinder size: max diameter-312mm,
max height-460mm.
Inspect the gas supply hose prior to turning on the gas. If there is evidence
of cut, wear or abrasion, it must be replaced prior to use. Screw the
regulator onto the gas cylinder. Leak check the hose and regulator
connections with a soap and water solution before lighting the appliance.
The parts which have been sealed by the manufacturer should not be
adjusted by the user
The appliance is to be installed with sufficient ventilation to prevent the
occurrence of unacceptable concentrations of substances harmful to
health in the room in which the appliance is installed
The minimum distance between the appliance and adjacent walls is
686mm
The hose for the appliance should not exceed 1.5m
The appliance should be installed ina suitably ventilated room.
Permanent supply of fresh airis ensured and there is no accumulation of
unburned gases
The gas supply tubing or hose shall comply with the national
requirements in force and shall be periodically examined and replaced as
necessary
The hose and regulator assembly may not be provided with the appliance
in some regions.
The regulator should comply the standard EN16129 or local
requirements.
Changing the flexible tube when the national conditions require it and/or
depending on its validity (changing the hose for every 2 years or damage
found).
Check and suitably clean the inside ofthe oven before it is lit in order to
avoid the emission offire from the oils that have accumulated during
previous cooking.
The burner outlets should be checked for obstruction during previous
cooking. The burner outlets should be checked for obstruction and
cleaned regularly with a soft wire brush.
It is necessary to avoid obstruction and to allow for a good combustion.
The position of the connection flexible tube so as to ensure that it is not
subjected to twisting.
06 07
312mm
206mm
312mm
460mm
BEFORE LIGHTING
WARNING
Do not store this appliance indoors unless the gas cylinder is disconnected.
WARNING
Do not store gas cylinder in a building, garage or any other enclosed area
and keep out of reach of children at all times.
WARNING
This appliance is not intended to be installed in or on recreational vehicles
and/or boats.
WARNING
Check all gas supply fittings for leaks before each use. Do not use the
appliance until all connections have been checked and do not leak.
WARNING
Do not smoke while leak testing. Never leak test with an open flame.
WARNING
When lighting, keep your face and hands as far away from the appliance as
possible.
WARNING
Minimum clearance from sides of unit to combustible construction is 686mm
(27 inches).Minimum clearance from back of unit to combustible
construction is 686mm (27 inches).
The parts which have been sealed by the
manufacturer should not be adjusted by the user
When the appliance is using LPG, A LPG
cylinder should be used
The LPG cylinder size: max diameter-312mm,
max height-460mm.
Inspect the gas supply hose prior to turning on the gas. If there is evidence
of cut, wear or abrasion, it must be replaced prior to use. Screw the
regulator onto the gas cylinder. Leak check the hose and regulator
connections with a soap and water solution before lighting the appliance.
The parts which have been sealed by the manufacturer should not be
adjusted by the user
The appliance is to be installed with sufficient ventilation to prevent the
occurrence of unacceptable concentrations of substances harmful to
health in the room in which the appliance is installed
The minimum distance between the appliance and adjacent walls is
686mm
The hose for the appliance should not exceed 1.5m
The appliance should be installed ina suitably ventilated room.
Permanent supply of fresh airis ensured and there is no accumulation of
unburned gases
The gas supply tubing or hose shall comply with the national
requirements in force and shall be periodically examined and replaced as
necessary
The hose and regulator assembly may not be provided with the appliance
in some regions.
The regulator should comply the standard EN16129 or local
requirements.
Changing the flexible tube when the national conditions require it and/or
depending on its validity (changing the hose for every 2 years or damage
found).
Check and suitably clean the inside ofthe oven before it is lit in order to
avoid the emission offire from the oils that have accumulated during
previous cooking.
The burner outlets should be checked for obstruction during previous
cooking. The burner outlets should be checked for obstruction and
cleaned regularly with a soft wire brush.
It is necessary to avoid obstruction and to allow for a good combustion.
The position of the connection flexible tube so as to ensure that it is not
subjected to twisting.
06 07
312mm
206mm
312mm
460mm

LP GAS CYLINDERWARNING
SAFETY PRACTICES TO AVOID INJURY
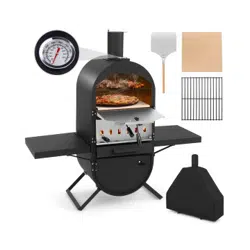
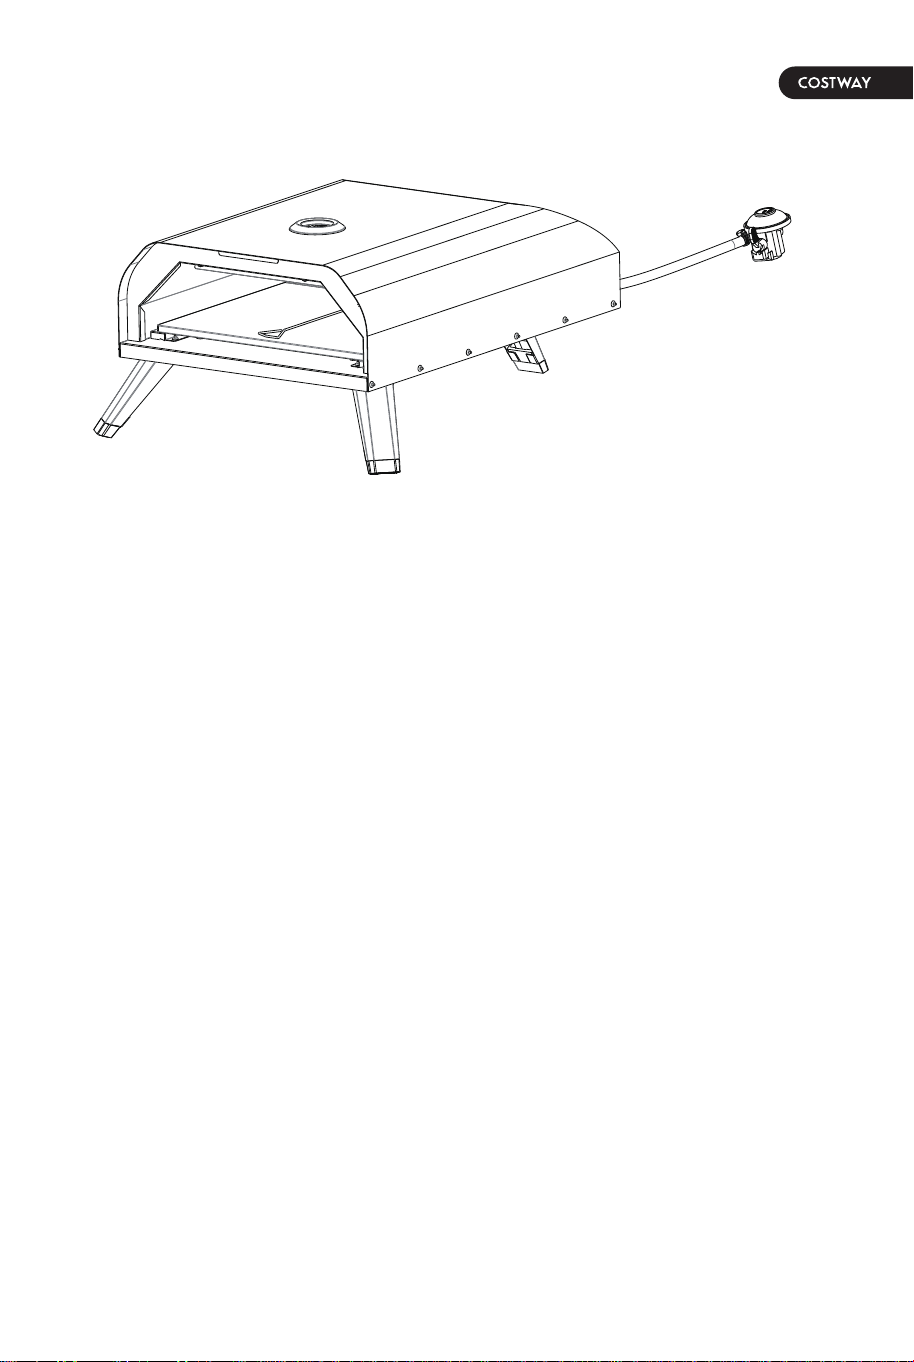
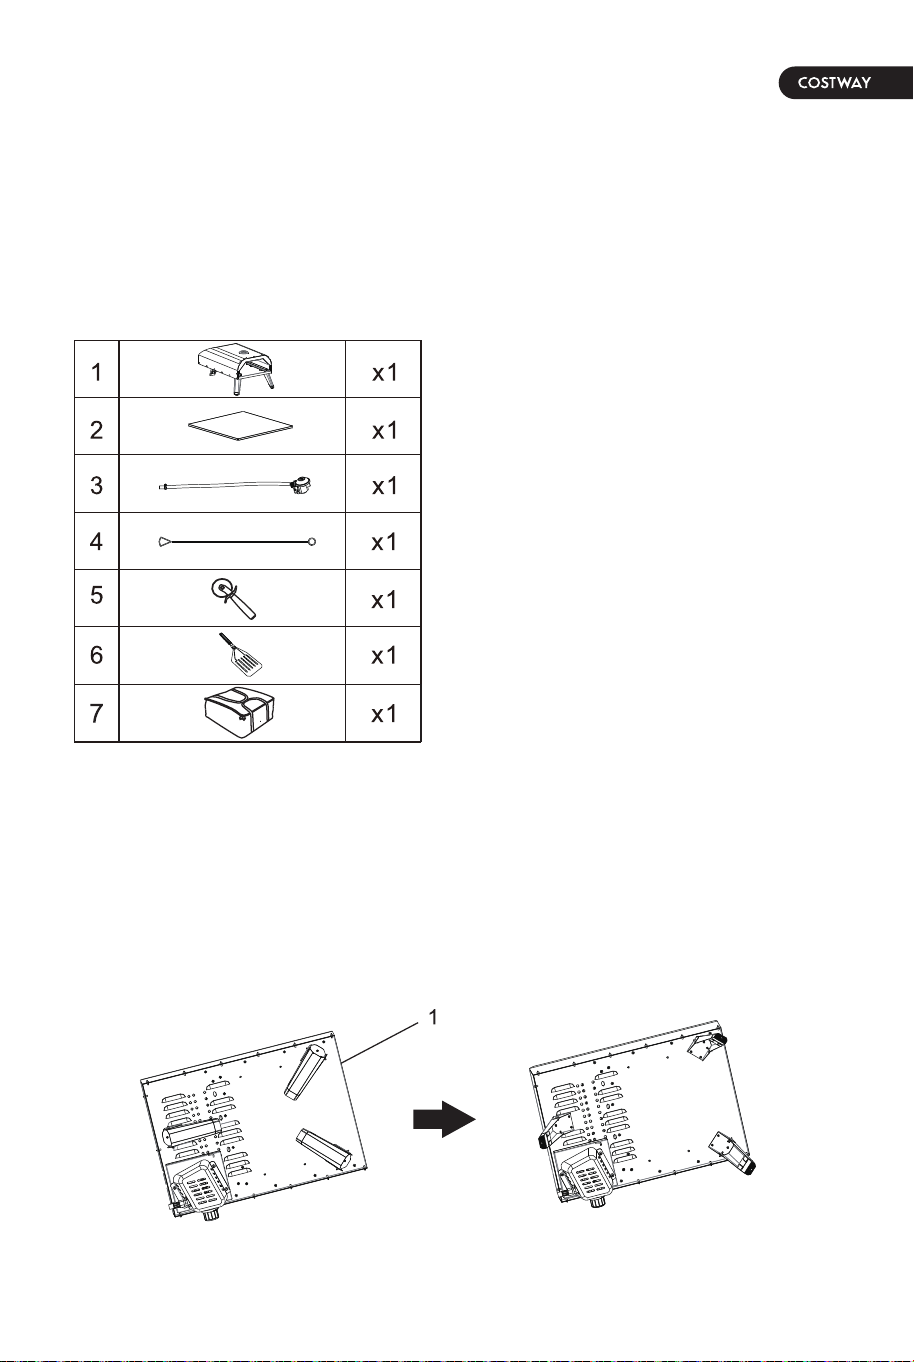
PARTS LIST
ASSEMBLY
1. Unfold legs.
When properly cared for, your oven will provide safe, reliable service for
many years. However, extreme care must be used as the oven produces
intense heat that can increase the risk of accidents.
When using this oven basic practices must be followed, including but not
limited to following
Do not repair or replace any part of the oven unless specifically
recommended in this manual. All other service should be referred to a
qualified technician Children should not be left alone or unattended in an
area where the oven is being used. Do not allow children to sit, stand or
play around the oven at any time.
Never let clothing or other flammables come in contact with or too close to
any burner or hot surface until it has cooled.The fabric could ignite, causing
serious personal injury.
For personal safety, wearproperapparel. Loose fittings garments or sleeves
should never be worn while using the oven. Some synthetic fabrics are
highly flammable and should not be worn while cooking.
Do not heat unopened food containers as a build up of pressure may cause
the containers to burst. When lighting the burner, always pay close
attention to what you are doing.
When using the oven, do not touch the outer shell, stone baking board
or immediate surroundings as these areas become extremely hot and could
cause burns
Do not use the oven to cook extremely fatty meats or other products which
increase flare-up.
Keep the area surroundings the oven free from combustible
material including fluids, trash and vapours such as gasoline or charcoal
lighter fluid.
Do not obstruct the flow of combustion and ventilation air.
Never use the oven in extremely windy conditions
The temperature under the oven is high. Do not place the oven on a table
with flammable table cloths, plastic or any other inflammable materials.
Before assembly, make sure all parts are present.
If any part is missing or damaged, do not attempt to assemble the appliance.
Contact customer service for replacement parts
1.Oven *1
2.Stone baking board *1
3.Gas hose *1
4.Match stick holder*1
5.Pizza cutter *1
6.Pizza Shovel *1
7.Carry bag*1
1. Do not store spare liquid propane gas cylinder under or near this
appliance.
2. Never fill the cylinder beyond 80 percent capacity
3. Liquid propane cylinder must be fitted with an OVERFILL PROTECTION
DEVICE (OPD).
4. If the information above is not followed exactly, a fire resulting in death or
serious injury may occur.
08 09
LP GAS CYLINDERWARNING
SAFETY PRACTICES TO AVOID INJURY
PARTS LIST
ASSEMBLY
1. Unfold legs.
When properly cared for, your oven will provide safe, reliable service for
many years. However, extreme care must be used as the oven produces
intense heat that can increase the risk of accidents.
When using this oven basic practices must be followed, including but not
limited to following
Do not repair or replace any part of the oven unless specifically
recommended in this manual. All other service should be referred to a
qualified technician Children should not be left alone or unattended in an
area where the oven is being used. Do not allow children to sit, stand or
play around the oven at any time.
Never let clothing or other flammables come in contact with or too close to
any burner or hot surface until it has cooled.The fabric could ignite, causing
serious personal injury.
For personal safety, wearproperapparel. Loose fittings garments or sleeves
should never be worn while using the oven. Some synthetic fabrics are
highly flammable and should not be worn while cooking.
Do not heat unopened food containers as a build up of pressure may cause
the containers to burst. When lighting the burner, always pay close
attention to what you are doing.
When using the oven, do not touch the outer shell, stone baking board
or immediate surroundings as these areas become extremely hot and could
cause burns
Do not use the oven to cook extremely fatty meats or other products which
increase flare-up.
Keep the area surroundings the oven free from combustible
material including fluids, trash and vapours such as gasoline or charcoal
lighter fluid.
Do not obstruct the flow of combustion and ventilation air.
Never use the oven in extremely windy conditions
The temperature under the oven is high. Do not place the oven on a table
with flammable table cloths, plastic or any other inflammable materials.
Before assembly, make sure all parts are present.
If any part is missing or damaged, do not attempt to assemble the appliance.
Contact customer service for replacement parts
1.Oven *1
2.Stone baking board *1
3.Gas hose *1
4.Match stick holder*1
5.Pizza cutter *1
6.Pizza Shovel *1
7.Carry bag*1
1. Do not store spare liquid propane gas cylinder under or near this
appliance.
2. Never fill the cylinder beyond 80 percent capacity
3. Liquid propane cylinder must be fitted with an OVERFILL PROTECTION
DEVICE (OPD).
4. If the information above is not followed exactly, a fire resulting in death or
serious injury may occur.
08 09
WARNING
Please always keep the gas bottle in upright position.
The size for 20 lbs LP gas cylinder is 30cm in diameter and 45cm tall
Iftheappliance is not in use, the gas mustbe turned offat the supply cylinder.
The cylinder used must include a collar to protect the cylinder valve
The minimum distance for the appliance and the 20lb gas tankis 100cm
apart.
A statement that the cylinder supply system
must be arranged for vapor withdrawal.
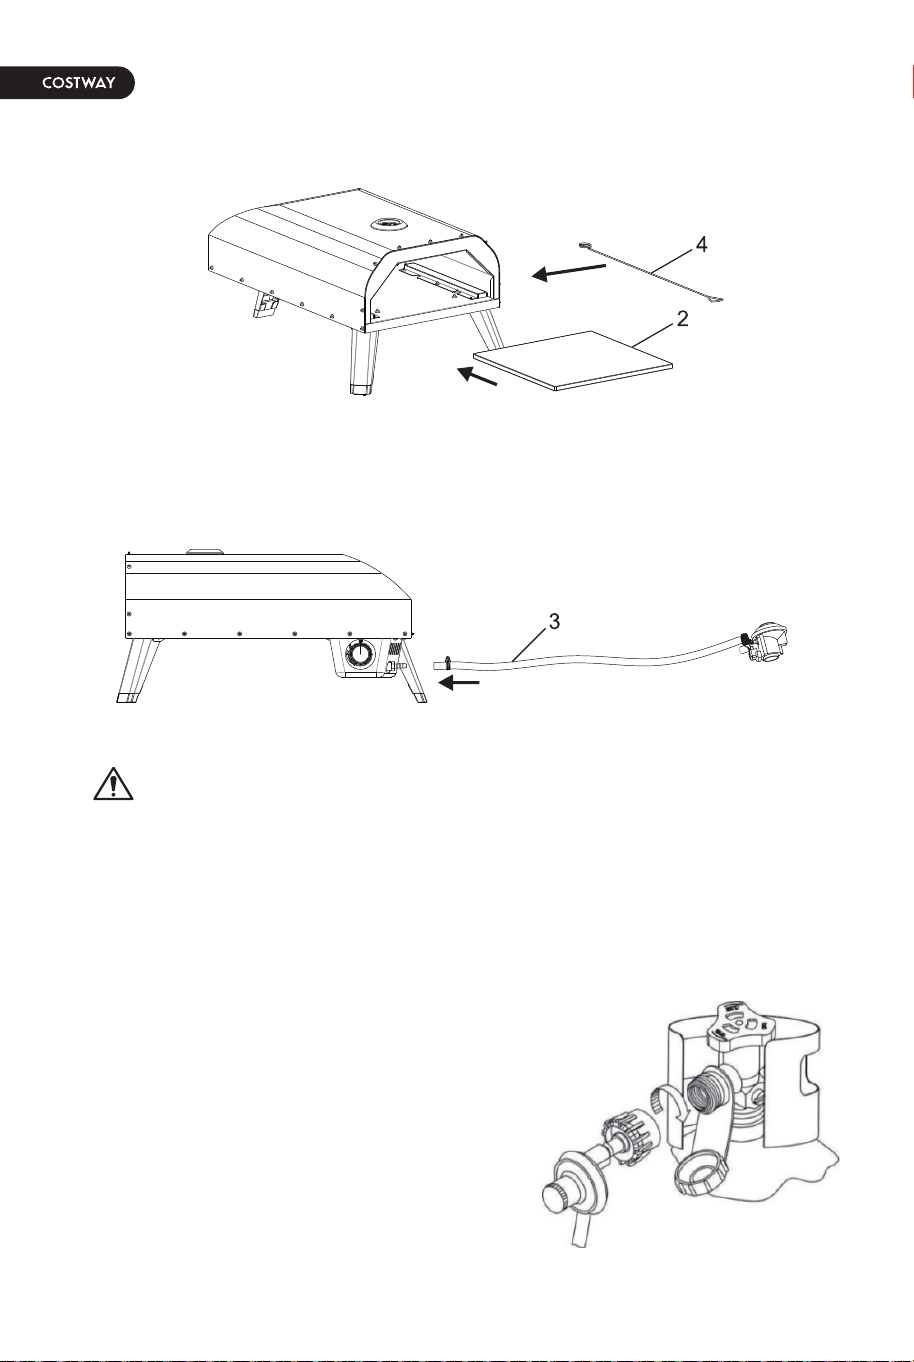
2. Insert the stone baking board.
3. Connecting gas hose
PATIO GAS REGULATOR
Thisis a push-on gas fitting. Ensure that the black switch is in the horizontal
position. Depress the button located below the black switch and press the
regulator onto the tank valve until it locks into place.
POL GAS REGULATOR
This gas fitting is counter clockwise. Make sure that the tank is completely
switched off and screw the regulatoras far as possible into the gas tank valve.
CONNECTING THE LIQUID PROPANE GAS CYLINDER
1. To connect the liquid propane gas cylinder
2. The cylinder valve should be in OFF position.
3. Make sure the burner valve is in OFF position
4. Inspect the valve connections, port and regulator assembly. Remove
debris and inspect the hose for damage.
5. When connecting the regulator assembly to the valve, use your hand to
tighten the nut clockwise until it stops. Use of a wrench could damage the
quick coupling nut and result in a hazardous situation.
6. Open the cylinder valve fully by turning the valve counterclockwise
7. Before lighting the oven, use a soap and water solution to check all
connections for leaks
8. If a leak is found, turn the cylinder valve OFF, do not use the oven and
conntact the qualified person to make repairs.
CONNECTING THE LIQUID PROPANE GAS CYLINDER
1. Turn the oven burner valve OFF and make sure the oven is cool.
2. Turn the liquid propane cylinder valve OFF by turning clockwise until it
stops.
3. Detach the regulator assembly from the cylinder valve by turning the quick
coupling nut counterclockwise.
4. Place dust cap for cylinder valve outlet whenever the cylinder is not in use.
10 11

WARNING
Please always keep the gas bottle in upright position.
The size for 20 lbs LP gas cylinder is 30cm in diameter and 45cm tall
Iftheappliance is not in use, the gas mustbe turned offat the supply cylinder.
The cylinder used must include a collar to protect the cylinder valve
The minimum distance for the appliance and the 20lb gas tankis 100cm
apart.
A statement that the cylinder supply system
must be arranged for vapor withdrawal.
2. Insert the stone baking board.
3. Connecting gas hose
PATIO GAS REGULATOR
Thisis a push-on gas fitting. Ensure that the black switch is in the horizontal
position. Depress the button located below the black switch and press the
regulator onto the tank valve until it locks into place.
POL GAS REGULATOR
This gas fitting is counter clockwise. Make sure that the tank is completely
switched off and screw the regulatoras far as possible into the gas tank valve.
CONNECTING THE LIQUID PROPANE GAS CYLINDER
1. To connect the liquid propane gas cylinder
2. The cylinder valve should be in OFF position.
3. Make sure the burner valve is in OFF position
4. Inspect the valve connections, port and regulator assembly. Remove
debris and inspect the hose for damage.
5. When connecting the regulator assembly to the valve, use your hand to
tighten the nut clockwise until it stops. Use of a wrench could damage the
quick coupling nut and result in a hazardous situation.
6. Open the cylinder valve fully by turning the valve counterclockwise
7. Before lighting the oven, use a soap and water solution to check all
connections for leaks
8. If a leak is found, turn the cylinder valve OFF, do not use the oven and
conntact the qualified person to make repairs.
CONNECTING THE LIQUID PROPANE GAS CYLINDER
1. Turn the oven burner valve OFF and make sure the oven is cool.
2. Turn the liquid propane cylinder valve OFF by turning clockwise until it
stops.
3. Detach the regulator assembly from the cylinder valve by turning the quick
coupling nut counterclockwise.
4. Place dust cap for cylinder valve outlet whenever the cylinder is not in use.
10 11

LEAK TESTING
OPERATING INSTRUCTIONS
LIGHTING INSTRUCTION
GENERAL
Although the gas connections of the appliance are leak tested prior packing
and shipment, a complete test must be performed at the installation site.
Before each use, check all the gas connections for leak testing using the
procedure listed below. If the smell of gas is detected at anytime, you should
immediately stop using and check the entire system for leaks.
BEFORE TESTING
USING THE OVEN
Make sure all packing material has been removed from the appliance
Make a solution of one part liquid detergent and one part water. You will
need a spray bottle, brush or rag to apply the solution to the fittings.
Each burner is rated at 4.0kW. To begin:
1. Make sure the oven has been leak tested and properly placed.
2. Remove any remaining packing material
3. Light the bumer using the LIGHTING INSTRUCTIONS below
TO LIGHT THE BURNER
1. Make sure the control knobis in OFF position,
and then turn the liquid propane cylindervalve ON
by slowly turningcounterclockwise.
2. Push in and slowly turn the control knob
anticlockwise until you hear a click and the burner
ignites.
3. If burner doesn't light, turn the knob OFF, wait 5
minutes and repeat the lighting.
TO TEST
1. Tum the burner valve OFF
2. Tum the liquid propane cylinder valve on counterclockwise to open the
valve
3. Apply the soap solution to all gas fittings. Soap bubbles would appear
where a leak is present.
4. Ifa leak is present, immediately turn the gas supply OFF and tighten leaky
fittings.
5. Turn the gas back ON and recheck.
6. Should the gas continue to leak from any ofthe fittings, turn the gas
supply OFF and contact customer service.
DANGER
1. Never operate this appliance unattended.
2. Do not fill cooking vessel beyond maximum fill line.
3. If a fire should occur,keep away from the appliance and immediately call
your fire department. Do not attempt to extinguish an oil or a grease fire
with water.
Failure to follow these instructions could result in fire or explosion which
could cause property damage, personal injury or death.
"This instruction manual contains important information necessary for the
proper assembly and safe use of the appliance.""Read and follow all
warnings and instructions before assembling and using the
appliance.""Follow all warnings and instructions when using the appliance
”"Keep this manual for future reference.”
A statement that the LP gas supply cylinder to be used must be constructed
and marked in accordancewith the specifications for LP gas cylinders,U.S.
Department of Transportation(DOT) or the Standard for Cylinders,Spheres
and Tubes for the Transportation of Dangerous Goods,CAN/CSA-B339. A
statement that the pressure regulator and hose assembly supplied with the
appliance must be used. Replacement pressure regulators and hose
assemblies shall be those specified by the appliance manufacturer
12 13

TO LIGHT WITH A MATCH
WARNING
1. If burner will not light after several at tempts using the control knob, the
burner maybe lit with a match.
2. If you have already attempted to light the burner using the control knob,
wait 5 minutes for any gas to dissipate.
3. Insert a match into the matchstick holder, ignite the match and insert
through the oven opening to the burner.
4. Push and turn the control knob to HI slowly, the burner should ignite
immediately.
5. If the burner does not light within seconds, turn the control knob OFF and
wait 5 minutes and try again.
CARE AND MAINTENANCE
Store out of direct sunlightandindoors where possible and when storing for
extended periods oftime. This appliance should not be exposed to harsh
weather conditions such as snow, heavy rain and strong winds
Wait to cool completely before moving.
The outer shell may fade over time and through use. This will not affect
performance.
Maintenance instructions (including recommended frequency guidelines
relative to
1. keeping appliance area clear and free from combustible materials,
gasoline, and other flammable vapors and liquids;
2. not obstructing the flow of combustion and ventilation air;
3. keeping the ventilation openings of the cyinder enclosure free and clear
from debris;
4. visually checking burner flames, with pictorial representations;
5. cleaning appliance, including special surfaces, with recommended
cleaning agents, if necessary;
6. checking and cleaning burner/venturi tubes for insects and insect nests. A
clogged tube can lead to a fire beneath the appliance.
• This appliance is designed to be used with a gas cylinder.
• The gas cylinder supply valve must be turned off when the appliance is not
in use.
• Gas cylinders must be stored outdoors, out of reach of children and must
not be stored in a building. garage or any other enclosed area.
• The gas cylinder used must incorporate a safety collar to protect the valve
assembly.
• Never store a spare cylinder under the barbecues shelves or inside the
trolley housing. Any LPG cylinder not attached to the appliance for use
should be stored outdoors and well away from this appliance.
• when disconnecting and removing the gas cylinder for the purpose of
refilling, always observe the following procedure.
• Ensure that all gas control valves on the appliance and the gas cylinder
are turned off before disconnecting thel regulator from the cylinder.
• Do not smoke or use a naked flame near the appliance or gas cylinder
while disconnecting the gas line between the appliance and gas cylinder.
• Remove the gas cylinder form the enclosure before disconnecting the
regulator from the appliance.
• Tighten all connections before placing gas cylinder back in its enclosure.
• The gas leak testing procedure should be conducted every time the gas
cylinder is refilled and reconnected to the appliance before using the
appliance.
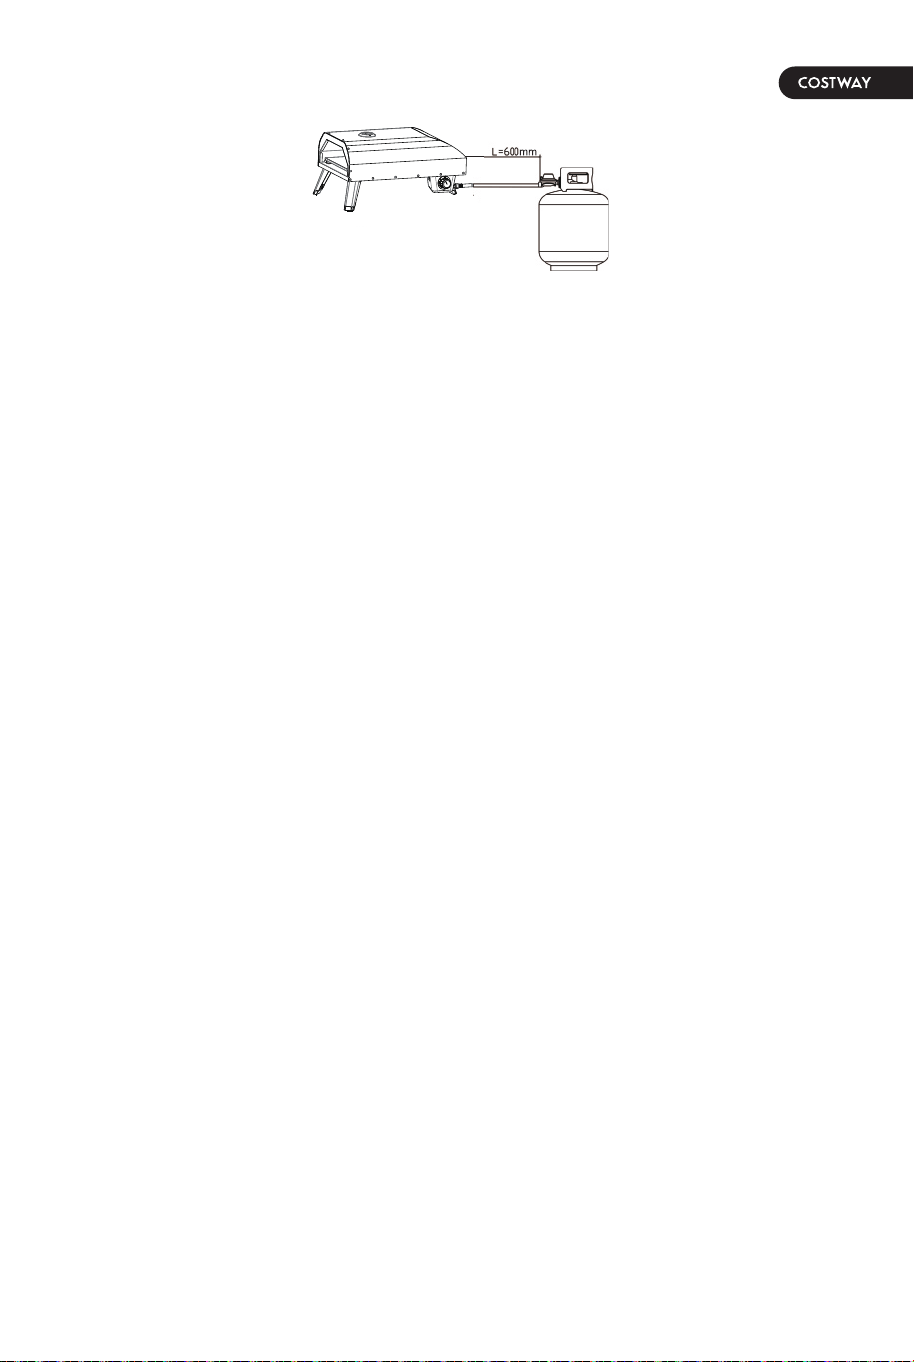
• The supplier's cylinder shall be of such a length 18inch of the cylinder.
• The hose connecting the appliance to the supplier's cylinder shall be of
such a length 900mm.
• User should pay attention to the dangers of tripping over hoses and
dumping of gas cylinders.
14 15
TO LIGHT WITH A MATCH
WARNING
1. If burner will not light after several at tempts using the control knob, the
burner maybe lit with a match.
2. If you have already attempted to light the burner using the control knob,
wait 5 minutes for any gas to dissipate.
3. Insert a match into the matchstick holder, ignite the match and insert
through the oven opening to the burner.
4. Push and turn the control knob to HI slowly, the burner should ignite
immediately.
5. If the burner does not light within seconds, turn the control knob OFF and
wait 5 minutes and try again.
CARE AND MAINTENANCE
Store out of direct sunlightandindoors where possible and when storing for
extended periods oftime. This appliance should not be exposed to harsh
weather conditions such as snow, heavy rain and strong winds
Wait to cool completely before moving.
The outer shell may fade over time and through use. This will not affect
performance.
Maintenance instructions (including recommended frequency guidelines
relative to
1. keeping appliance area clear and free from combustible materials,
gasoline, and other flammable vapors and liquids;
2. not obstructing the flow of combustion and ventilation air;
3. keeping the ventilation openings of the cyinder enclosure free and clear
from debris;
4. visually checking burner flames, with pictorial representations;
5. cleaning appliance, including special surfaces, with recommended
cleaning agents, if necessary;
6. checking and cleaning burner/venturi tubes for insects and insect nests. A
clogged tube can lead to a fire beneath the appliance.
• This appliance is designed to be used with a gas cylinder.
• The gas cylinder supply valve must be turned off when the appliance is not
in use.
• Gas cylinders must be stored outdoors, out of reach of children and must
not be stored in a building. garage or any other enclosed area.
• The gas cylinder used must incorporate a safety collar to protect the valve
assembly.
• Never store a spare cylinder under the barbecues shelves or inside the
trolley housing. Any LPG cylinder not attached to the appliance for use
should be stored outdoors and well away from this appliance.
• when disconnecting and removing the gas cylinder for the purpose of
refilling, always observe the following procedure.
• Ensure that all gas control valves on the appliance and the gas cylinder
are turned off before disconnecting thel regulator from the cylinder.
• Do not smoke or use a naked flame near the appliance or gas cylinder
while disconnecting the gas line between the appliance and gas cylinder.
• Remove the gas cylinder form the enclosure before disconnecting the
regulator from the appliance.
• Tighten all connections before placing gas cylinder back in its enclosure.
• The gas leak testing procedure should be conducted every time the gas
cylinder is refilled and reconnected to the appliance before using the
appliance.
• The supplier's cylinder shall be of such a length 18inch of the cylinder.
• The hose connecting the appliance to the supplier's cylinder shall be of
such a length 900mm.
• User should pay attention to the dangers of tripping over hoses and
dumping of gas cylinders.
14 15
STONE BAKING BOARD
1. DO NOT use the stone over an open flame
2. Avoid extreme temperature change to the stone. DO NOT place frozen
foods on a hot stone
3. The stone is fragile and can break if bumped or dropped
4. The stone is very hot during use and stays hot for a long time after use
5. DO NOT cool the stone with water when the stone is hot
6. After cleaning the stone with water, please dry the stone before use. This
can be done in a conventional oven at 60℃ for 2 hours.
Problem Possible Cause Prevention/Solution
Burner will not
light
1. No gas flow
2. Coupling nut and
regulator not fully
connected
3. Obstruction of gas flow
4. Disengagement of
burner to valve
5. Incorrect assembly
1. Check to see if propane
tank is empty
2. Turn the coupling nut
about one-half to three
quarters additional turn
until solid stop. Tighten by
hand only-do not use tools
3. Clear burner tube
4. Reengage burner and
valve
5. Check steps in
assembly instructions
1. Check for gas in
propane tank
2. Turn off gas control
knob, wait 30 seconds
and light oven. If flames
are still low, turn off gas
control knob and propane
tank valve. Disconnect
regulator. Reconnect
regulator and leak test.
Turn on propane tank
valve, wait 30 seconds
and then light oven.
1. Turn front of oven away
from wind
2. Refill propane tank
3. Refer to Sudden drop in
gas flow above
1. High or gusting winds
2. Low on propane gas
1. Grease buildup
2. Excessive fat in meat
3. Excessive cooking
temperature
4. Excess flour on the
cooking surface
1. Burner and/or burner
tubes are blocked
2. Pressure drops during
ignition
1. Clean oven
2. Trim fats from meat
before cooking
3. Adjust (lower)
temperature accordingly
4. Brush remnant flour
from cooking surface
5. Flip stone
1 Turn gas control knob
off. Clean burner .
2. Turn off oven, ensure
the tank valve is fully open
(if applicable) and relight.
3. You can use the
following methods to clean
the burner and/or burner
tubes: for example, after
brushing with a soft brush,
blow dry, etc.
1. Out of gasSudden drop in
gas flow or low
flame
Flames blow out
Flare-up
Flashback (fire
in burner tube,
roaring sound
from burner)
16 17
In case a return is required, the item must be returned in original
box. Without this your return will not be accepted.
DO NOT discard the box / original packaging.
Take a photo of the box markings.
Take a photo of the damaged part (if applicable).
Send us an email with the images requested.
A photo of the markings (text) on the side of the box is required in
case a part is needed for replacement. This helps our staff identify
your product number to ensure you receive the correct parts.
A photo of the damage is always required to file a claim and get
your replacement or refund processed quickly. Please make sure
you have the box even if it is damaged.
Email us directly from marketplace where your item was purchased
with the attached images and a description of your claim.
Return / Damage Claim Instructions
18

NP11115GB-BK
Gas Pizza Oven
THIS INSTRUCTION BOOKLET CONTAINS IMPORTANT SAFETY INFORMATION. PLEASE READ AND KEEP FOR FUTURE REFERENCE.
USA office: Fontana GBR office: Ipswich AUS office: Truganina
If you're having difficulty, our friendly
customer team is always here to help.
AUS:cs.au@costway.com
GBR:cs.uk@costway.com