
MSA F4 21DW W
2 IN 1 FAN WITH TRUE HEPA FILTER
Warning notices: Before using this product, please read this manual carefully and keep it for future reference.
The design and specifications are subject to change without prior notice for product improvement.
Consult with your dealer or manufacturer for details.
The diagram above is just for reference. Please take the appearance of the actual product as the standard.
USER MANUAL
Dow nlo ad t he ap p
& act iv at e p roduct

CONTENTS
THANK YOU LETTER
SAFETY INSTRUCTIONS
SPECIFICATIONS
PRODUCT OVERVIEW
0 1
0 2
06
1 0
07
08
PRODUCT INSTALLATION
OPERATION INSTRUCTIONS
APP SETUP AND OPERATION
THANK YOU LETTER
Thank you for choosing Midea! Before using your new Midea product, please read
this manual thoroughly to ensure that you know how to operate the features and
functions that your new appliance offers in a safe way.
01
1 2
USER SERVICING INSTRUCTIONS
TROUBLESHOOTING
TRADEMARKS, COPYRIGHTS AND LEGAL STATEMENT
1
1
1
DATA PROTECTION NOTICE
1 8
5
6
7
1 3
CLEANING AND MAINTENANCE
02
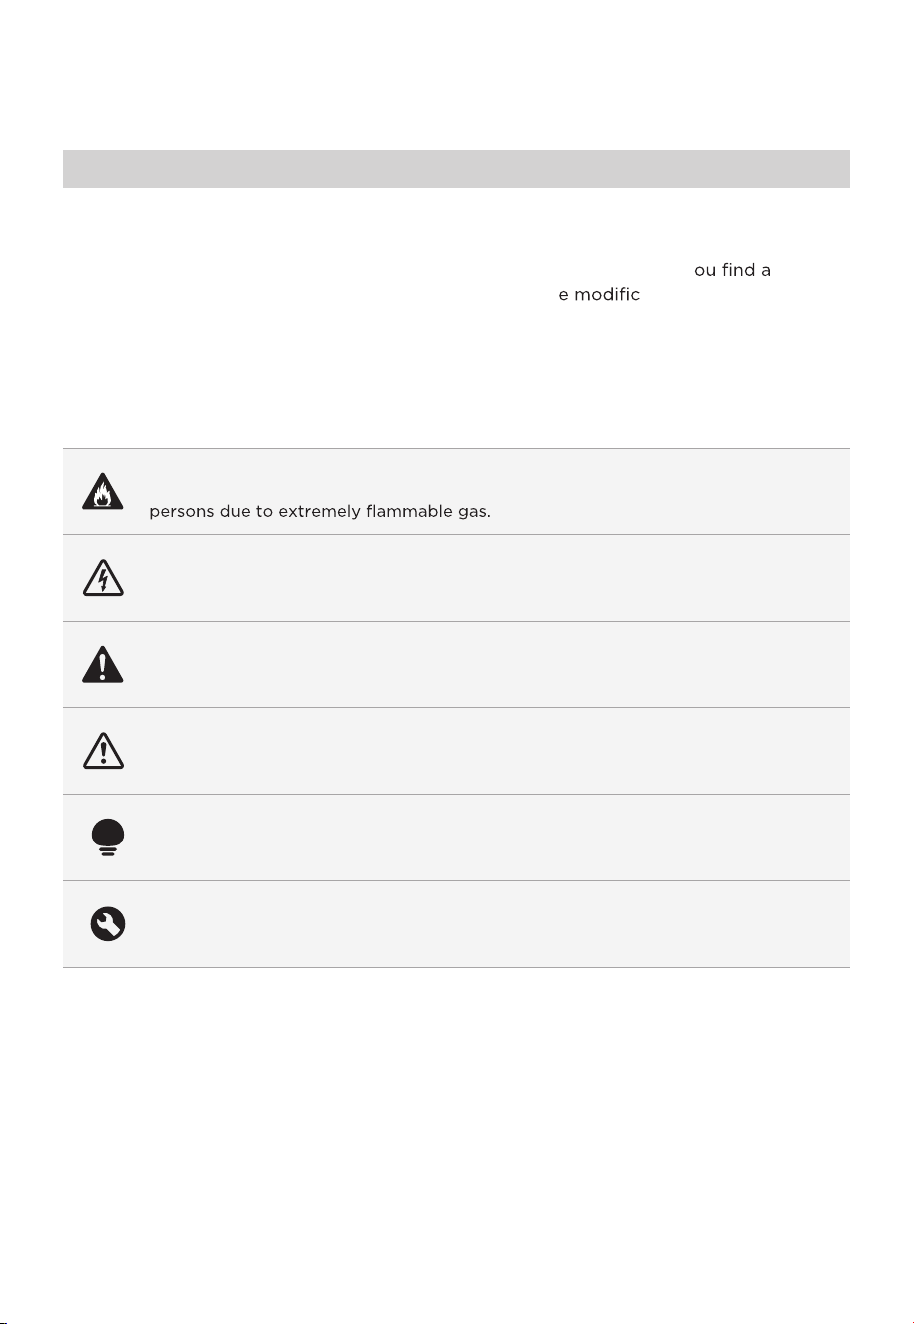
Danger
This symbol indicates that there are dangers to the life and health of
Warning of electrical voltage
This symbol indicates that there is a danger to life and health of
persons due to voltage.
Warning
The signal word indicates a hazard with a medium level of risk which, if
not avoided, may result in death or serious injury.
Caution
The signal word indicates a hazard with a low degree of risk which, if
not avoided, may result in minor or moderate injury.
Attention
The signal word indicates important information (e.g. damage to
property), but not danger.
Observe instructions
This symbol indicates that a service technician should only operate and
maintain this appliance in accordance with the operating instructions.
The following safety guidelines are intended to prevent unforeseen risks or damage from
unsafe or incorrect operation of the appliance. Please check the packaging and appliance
on arrival to make sure everything is intact to ensure safe operation. If y ny
damage, please contact the retailer or dealer. Please not ations or alterations to
the appliance are not allowed for your safety concern. Unintended use may cause
hazards and loss of warranty claims.
Read these operating instructions carefully and attentively before using/commissioning the
unit and keep them in the immediate vicinity of the installation site or unit for later use!
Intended Use
Explanation of Symbols
SAFETY INSTRUCTIONS
03
CAUTION
If the supply cord is damaged, it must be replaced by
manufacturer or its service agent or a similarly qualified
person in order to avoid a hazard.
To protect against the risk of electrical shock, do not
immerse the unit, cord or plug in water or other liquid.
When the appliance is not in use and before cleaning,
unplug the appliance from the outlet.
When the fan was assembled, the rotor blade guard shall
not be taken off anymore.
Ensure that the fan is switched off from the supply mains
before removing the guard.
The appliance is only to be used with the power supply
unit provided with the appliance.
●
●
●
●
●
●
WARNING
●
●
●
●
●
●
●
Read rules for safe operation and instructions carefully.
This appliance is not intended for use by persons
(including children) with reduced physical, sensory or
mental capabilities, or lack of experience and knowledge,
unless they have been given supervision or instruction
concerning use of the appliance by a person responsible
for their safety. Children should be supervised to ensure
that they do not play with the appliance.
Never insert fingers, pencils, or any other object through
the grille when fan is running.
Disconnect fan when moving from one location to another.
Be sure fan is on a stable surface when operating to
avoid overturning.
Keep electrical appliances out of reach from children or
infirm persons. Do not let them use the appliances without
supervision.
Household use only.

04
●
●
●
●
●
●
This appliance has a polarized plug (one blade is wider
than the other). To reduce the risk of electric shock, this
plug is intended to fit in a polarized outlet only one way.
If the plug does not fit fully in the outlet, reverse the plug.
If it still does not fit, contact a qualified electrician. Do
not attempt to defeat this safety feature.
WARNING—To reduce the risk of fire or electric shock,
do not use this fan with any solid-state speed control device.
This product employs overload protection (fuse).
A blown fuse indicates an overload or short-circuit
situation. If the fuse blows,unplug the product from the
outlet. Replace the fuse as per the user servicing
instructions (follow product marking for proper fuse
rating) and check the product. If the replacement fuse
blows, a short-circuit may be present and the product
should be discarded or returned to an authorized service
facility for examination and/or repair.
a) “Do not operate any fan with a damaged cord or plug.
Discard fan or return to an authorized service facility for
examination and/or repair.”
b) “Do not run cord under carpeting. Do not cover cord
with throw rugs, runners, or similar coverings. Do not
route cord under furniture or appliances. Arrange cord
away from traffic area and where it will not be tripped
over.”
Do not leave the fan running unattended.
This product complies with the maximum allowable
concentration of ozone of 0.050 parts per million by
volume (ppmv) in a 24-h period.

05
●
●
●
●
This device complies with Part 15 of the FCC Rules.
Operation is subject to the following two conditions:
(1) this device may not cause harmful interference, and
(2) this device must accept any interference received,
including interference that may cause undesired operation.
NOTE: This equipment has been tested and found to
comply with the limits for a Class B digital device, pursuant
to Part 15 of the FCC Rules. These limits are designed to
provide reasonable protection against harmful interference
in a residential installation. This equipment generates uses
and can radiate radio frequency energy and, if not installed
and used in accordance with the instructions, may cause
harmful interference to radio communications. However,
there is no guarantee that interference will not occur in a
particular installation.
Please note that any changes or modifications of this
product not expressly approved by the party responsible
for compliance could void the user's authority to operate
the equipment.
If this equipment does cause harmful interference to radio
or television reception, which can be determined by turning
the equipment off and on, the user is encouraged to try
to correct the interference by one or more of the following
measures:
--Reorient or relocate the receiving antenna.
--Increase the separation between the equipment and
receiver.
--Connect the equipment into an outlet on a circuit
different from that to which the receiver is connected.
--Consult the dealer or an experienced radio/TV technician
for help.
Midea America Corp.
Parsippany, NJ 07054
TEL : 1-866-646-4332

SPECIFICATIONS
06
MSAF421DWWProduct Model
Working Voltage
Rated Current
Noise
24V
1.2A
Parts
Adapter
≤
Input
Output
24V 1.5A
100-240V~ 50/60Hz 1.5A
61dB
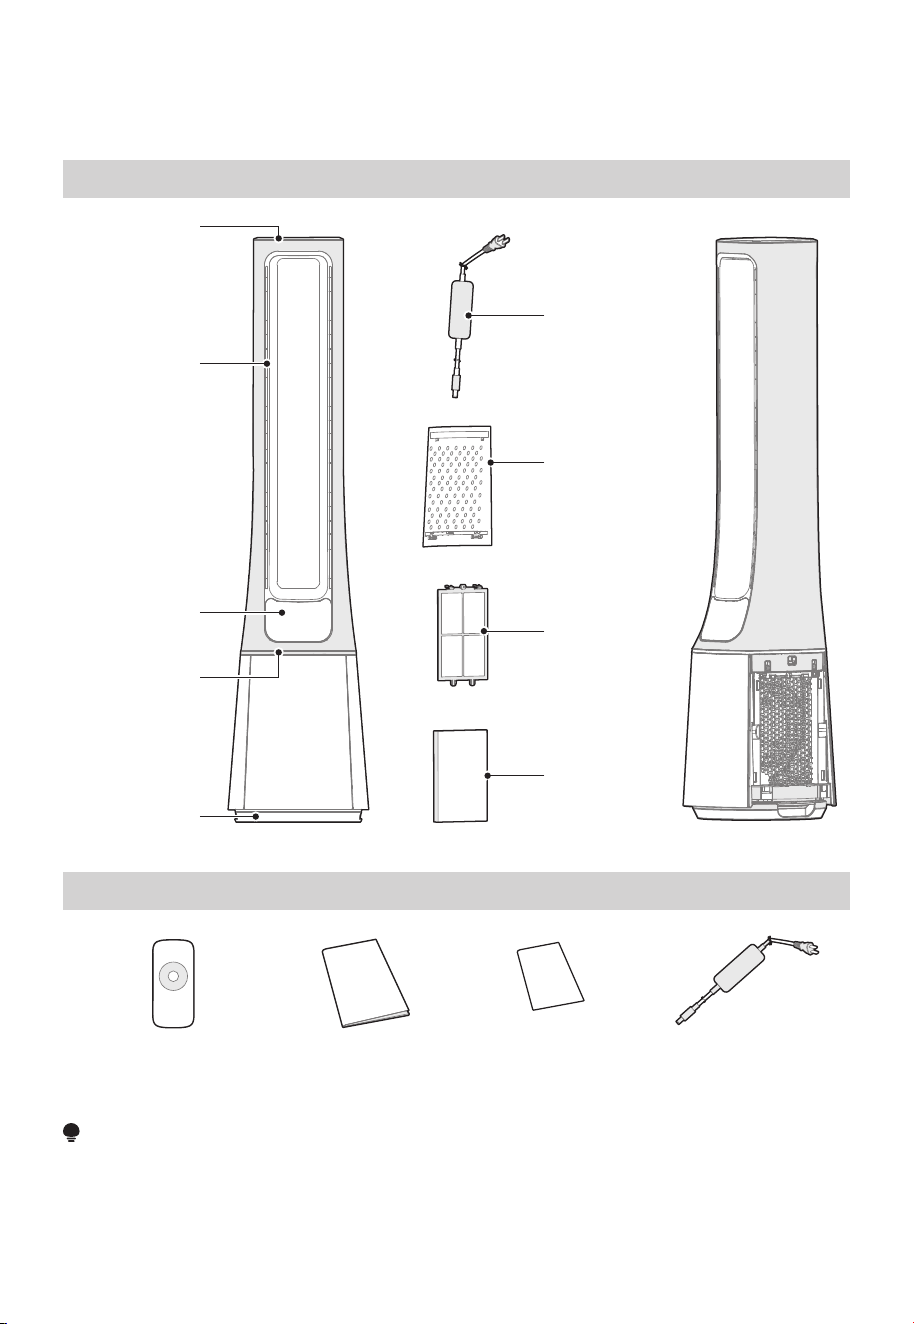
PRODUCT OVERVIEW
NOTE
All the pictures in this manual are for explanation purpose only. Any discrepancy
between the real object and the illustration in the drawing shall be subject to the real
subject.
07
Parts List
Part Name
Pre-filter x2
Air inlet grille x2
Adapter
HEPA filter x2
Top cover
Base
Display and
Control panel
Center piece
Air outlet
Remote Controller × 1
Manual × 1 Warranty card × 1
Adapter x 1
08
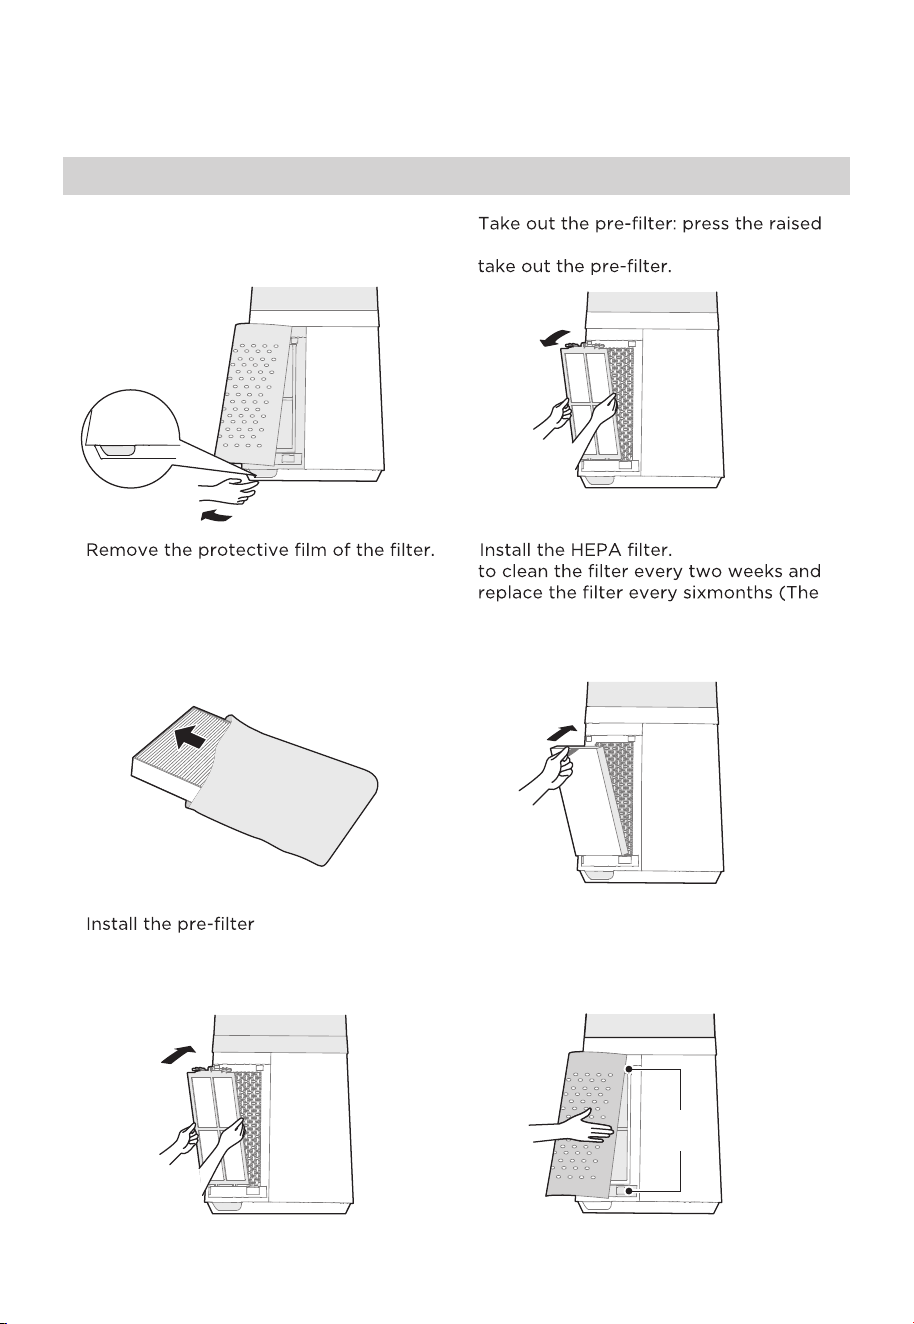
1
Remove the air inlet grille. 2
part on both sides to pull it outwards, and
3
4 It is recommended
cleaning and replacement cycle can
beadjusted according to the use
environment).
5 : align the slot
position at the bottom, and buckle up
the upper U-shaped buckle.
6 Install the air inlet grille: align the upper
two buckles and press them tightly, then
press the two sides at lower part, slowly
and gently buckle the air inlet grille.
Installation Procedures
PRODUCT INSTALLATION
Buckling
position
Buckle
09
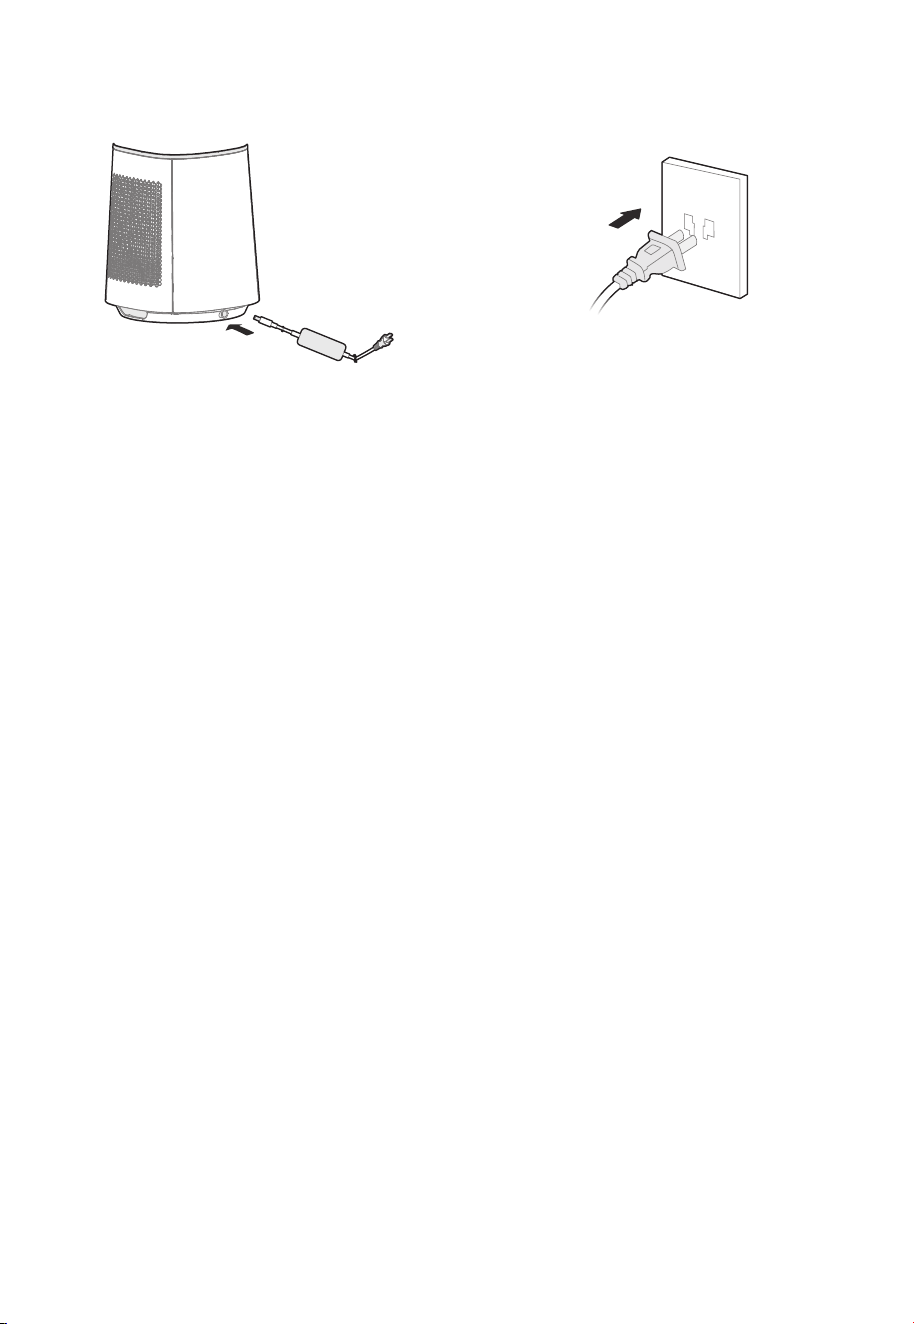
8
Plug power supply.Install the adapter,Tighten the plug
with the socket position of the base.
7
10
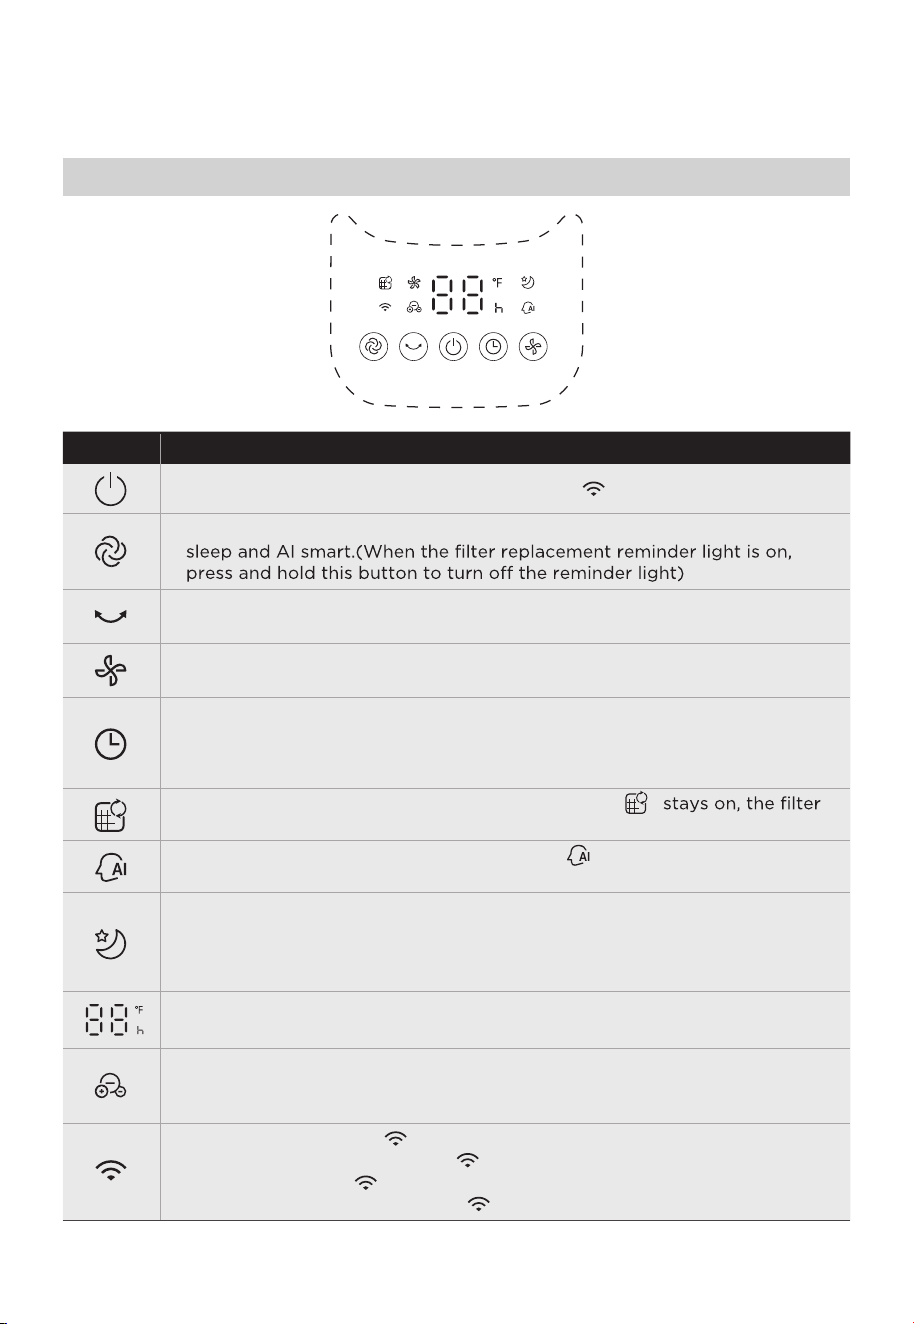
OPERATION INSTRUCTIONS
Function description
●
Startup/Standby, long press the on button, “ ” indicator lights up.
●
Touch this button to start/stop the swing.
●
Touch this button to switch the wind speed (cycles among level
1-2-3-•••-10-1-2).
●
●
Schedule to shut down in the power-on state, and schedule to start up in
the standby state.
Touch this button to set the timer (the display cycles among
0-1-2-•••-12-0h); 0h means that the timer is canceled.
●
Touch this button to switch the wind mode among normal, plasmacluster,
●
Filter replacement reminder icon; when the icon “ ”
needs to be replaced.
●
In AI smart wind mode, the indicator light “ ” is on, and the wind power
is automatically adjusted according to changes in ambient temperature.
●
This indicator light is on in sleep wind mode.Start the sleep wind function,
and the fan automatically adjusts the level according to the program; there
are three levels: 1, 2 and 3; you can adjust the level of the sleep wind by
pressing the wind speed button.
●
●
This indicator light is on in ion wind mode.
In this mode, plasmacluster is turned on, and level 1~10 wind has
plasmacluster.
●
●
●
This indicator light is “ ”.Long press the switch button for 3 seconds to
start matching or disconnect “ ”.
The lights are on, “ ” is connected.
The lights are blinking and the “ ” is disconnected or being connected.
●
Displays the wind speed level or set timer, and displays the temperature in
the wind mode.
Control Panel Operations
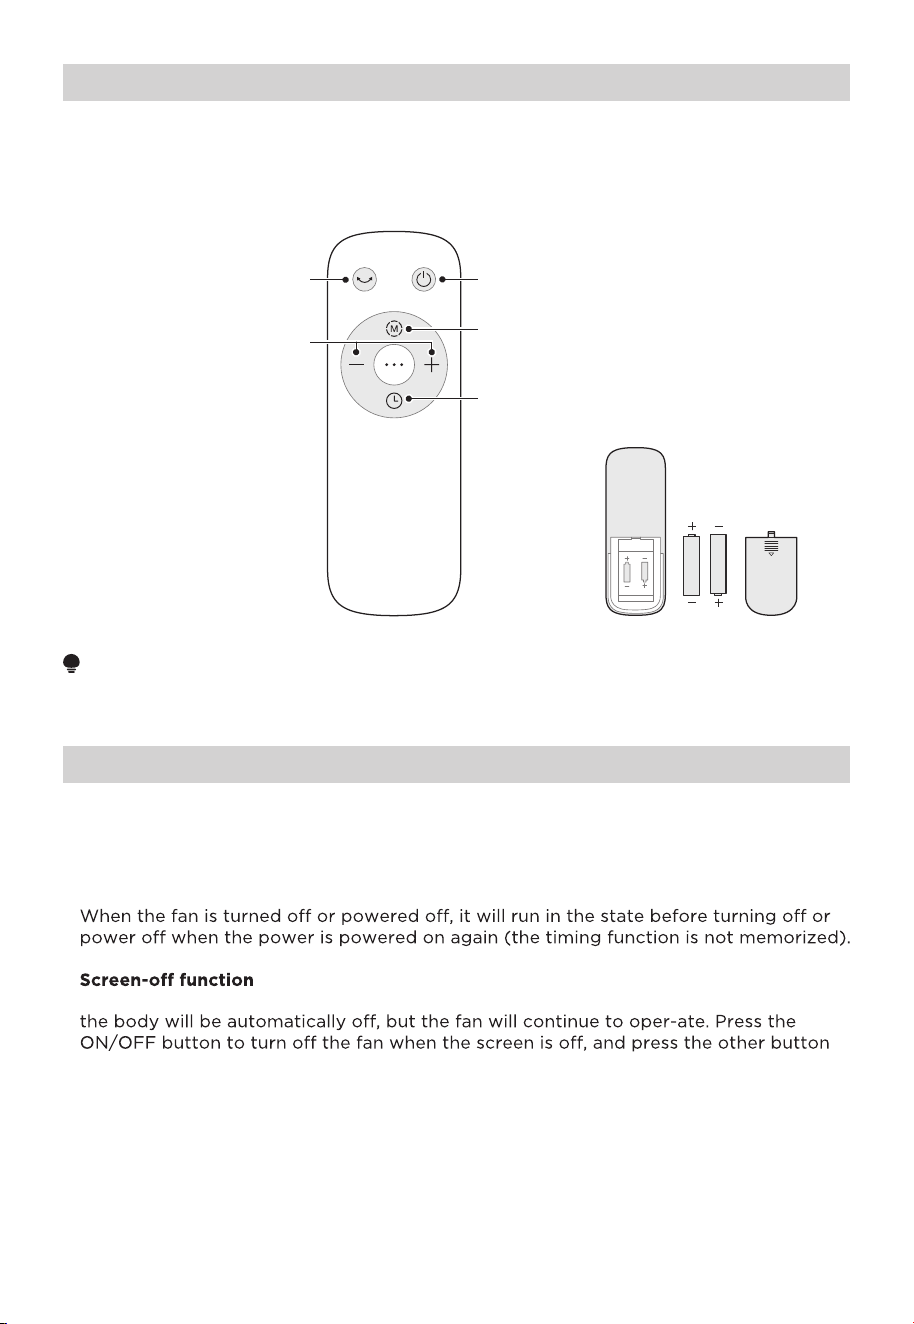
Use manganese or alkaline batteries of type "AAA". DO NOT use rechargeable batteries.
NOTE
●
●
The remote control should be normally used within 5 meters of the front of the
product and 30 degrees of the deviation angle.
●
The battery contains many heavy metals, acids and bases, etc., which may threaten
human's health. Waste batteries should be recycled separately.
Forced shutdown
There is no operation during the running of the fan, after 15 hours of continuous
operation, the fan will be forced to shut down auto-matically.
Intelligent memory
●
●
●
In case of no operation for 30 seconds during normal operation, the indicator light on
to restore display.
Remote Control
Additional Functions
11
AAA Battery. 1.5V
Battery
Startup/Standby
Press “+, -” to set the
winds peed or timing time
Set the timed shutdown
/reserved startup
Start up or shut down
oscillating
Switch the wind type
12
APP SETUP AND OPERATION
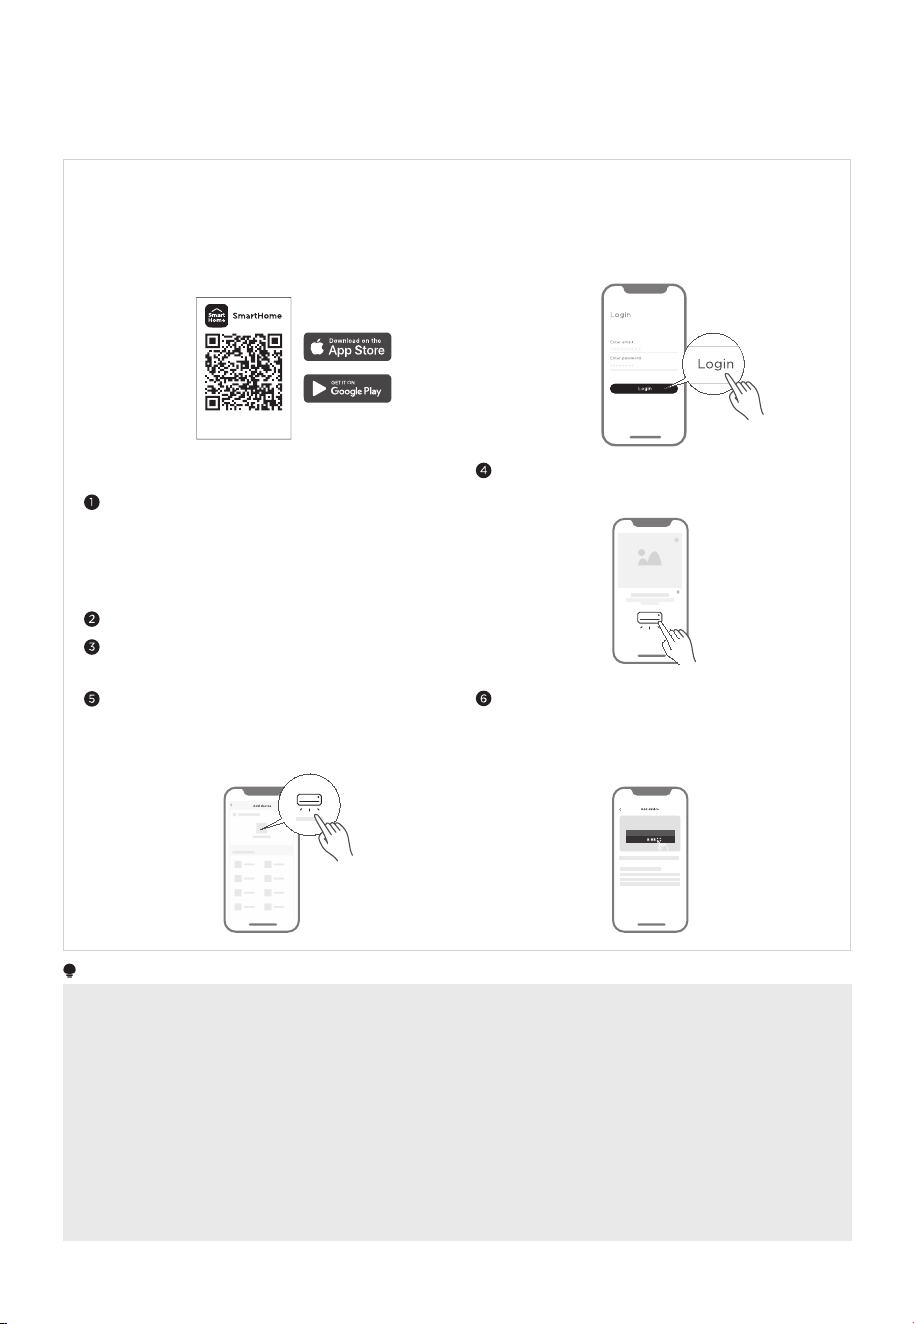
Register and log in
Please power on your devices.
Open SmartHome app on your phone.
Connect your devices to SmartHome
Download the SmartHome app
Washing machine
Make sure your mobile phone is connected to your
home’s wireless network. If it is not, go to Settings
and enable wireless networks and Bluetooth.
Connect your device to the wireless network
according to instructions in the app. If the
connection fails, please follow the instructions
provided by the app to continue with the
operation.
On an app market (Google Play Store, Apple App
Store), search for SmartHome and find the
SmartHome app. Download and install it on your
phone. You can also download the app by scanning
the QR code below.
Open the SmartHome app, and create a new account
to start (you can also register through a third-party
account). If you already have an existing account, use
the account to log in.
If a message of “Smart devices discovered
nearby” appears, tap to add.
If no message appears, select “+” on the page and
select your device in the list of nearby devices
available. If your device is not listed, please add
your device manually by the device category and
device model.
Download the app
& activate product
NOTE
• Make sure your devices are powered on.
• Keep your mobile phone close enough to your device when you are connecting your device to the network.
• Connect your mobile phone to the wireless network at home, and make sure you know the password of the
wireless network.
• Check if your wireless router supports 2.4 GHz band and turn it on. If you are not sure whether the router
supports 2.4 GHz band, please contact the router manufacturer.
• The device cannot connect to the wireless networks that requires authentication. These networks usually appear
in public areas such as hotels, restaurants, etc. Please connect to a wireless network that does not require
authentication.
• Turn off the WLAN+ (Android) or WLAN Assistant (iOS) function of your mobile phone when connecting your
device to the network.
• If your device was connected to a wireless network before but needs to reconnect, please tap “+” on the app
Home page, and add your device again by the device category and model according to the instructions in the
app.

CLEANING AND MAINTENANCE
The fan requires minimal maintenance. Do not try to fix it by yourself. Refer it to
qualified service personnel if service is needed.
Before cleaning and assembling, unplug the fan power.
To ensure adequate air circulation to the motor, keep vents at the rear of the motor free
of dust. Do not disassemble the fan to remove dust.
Please wipe the exterior parts with a soft cloth soaking a mild detergent.
Do not use any abrasive detergent or solvents to avoid scratching the surface.
Do not use any of the following as a cleaner: gasoline, thinner.
Do not allow water or any other liquid entering into the motor housing or interior parts.
Be sure to unplug from the electrical supply source before cleaning.
Plastic parts should be cleaned with a soft cloth moisten with mild soap Thoroughly
remove soapsuds with dry cloth.
1.
2.
3.
4.
5.
6.
7.
1 Unplug the power cord.
2
3 Remove the dust with vacuum cleaner. 4 Install the machine in reverse order and
plug power supply.
Pre-filter Cleaning
13
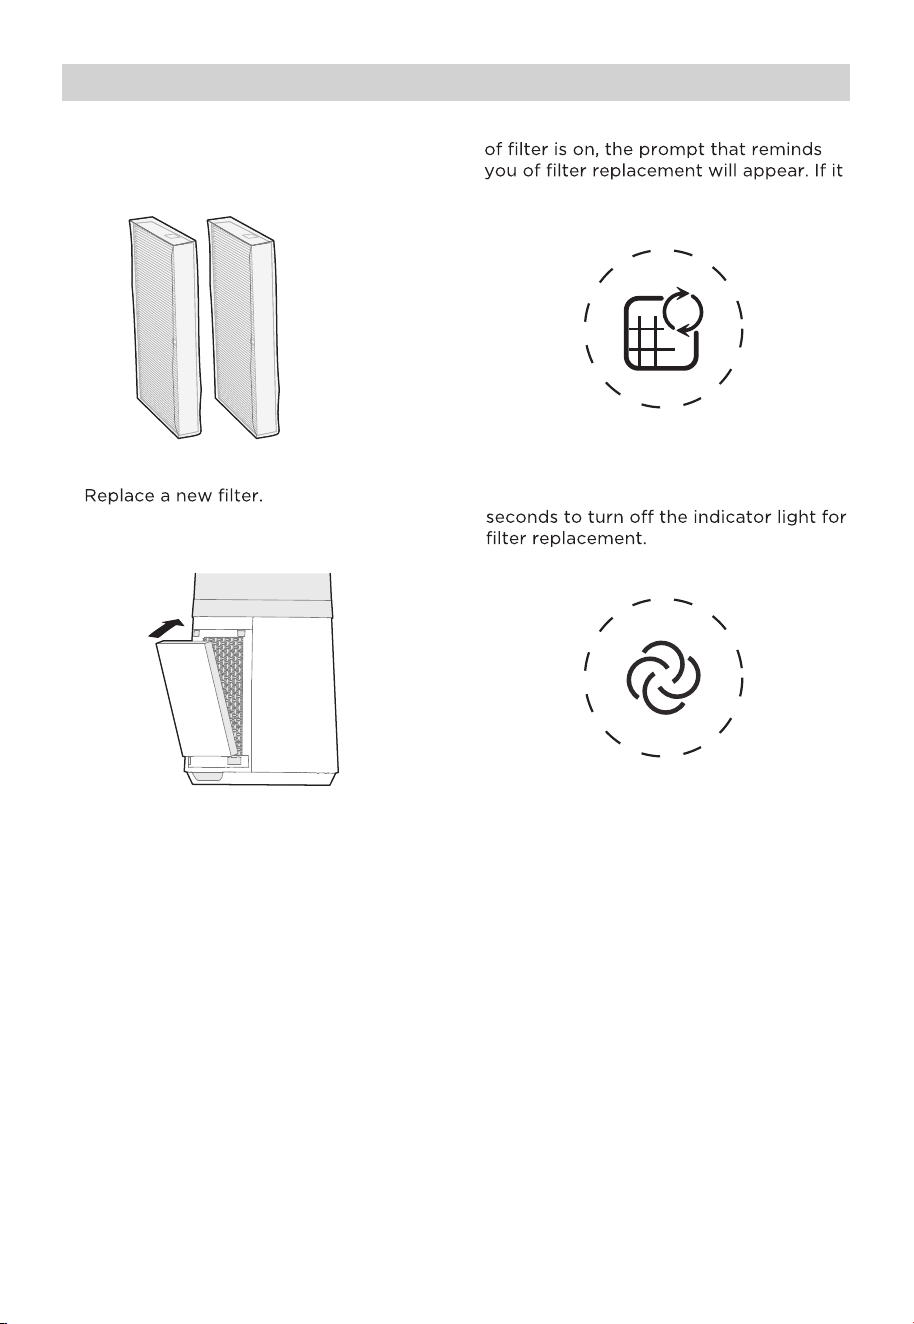
4 Long press the mode button for 3
2 When the indicator light for replacement
is not replaced in time, the prompt will
appear during each startup.
3
1 Filter model: FQ150CJ-2
(including 2 sets).
Filter Replacement
14
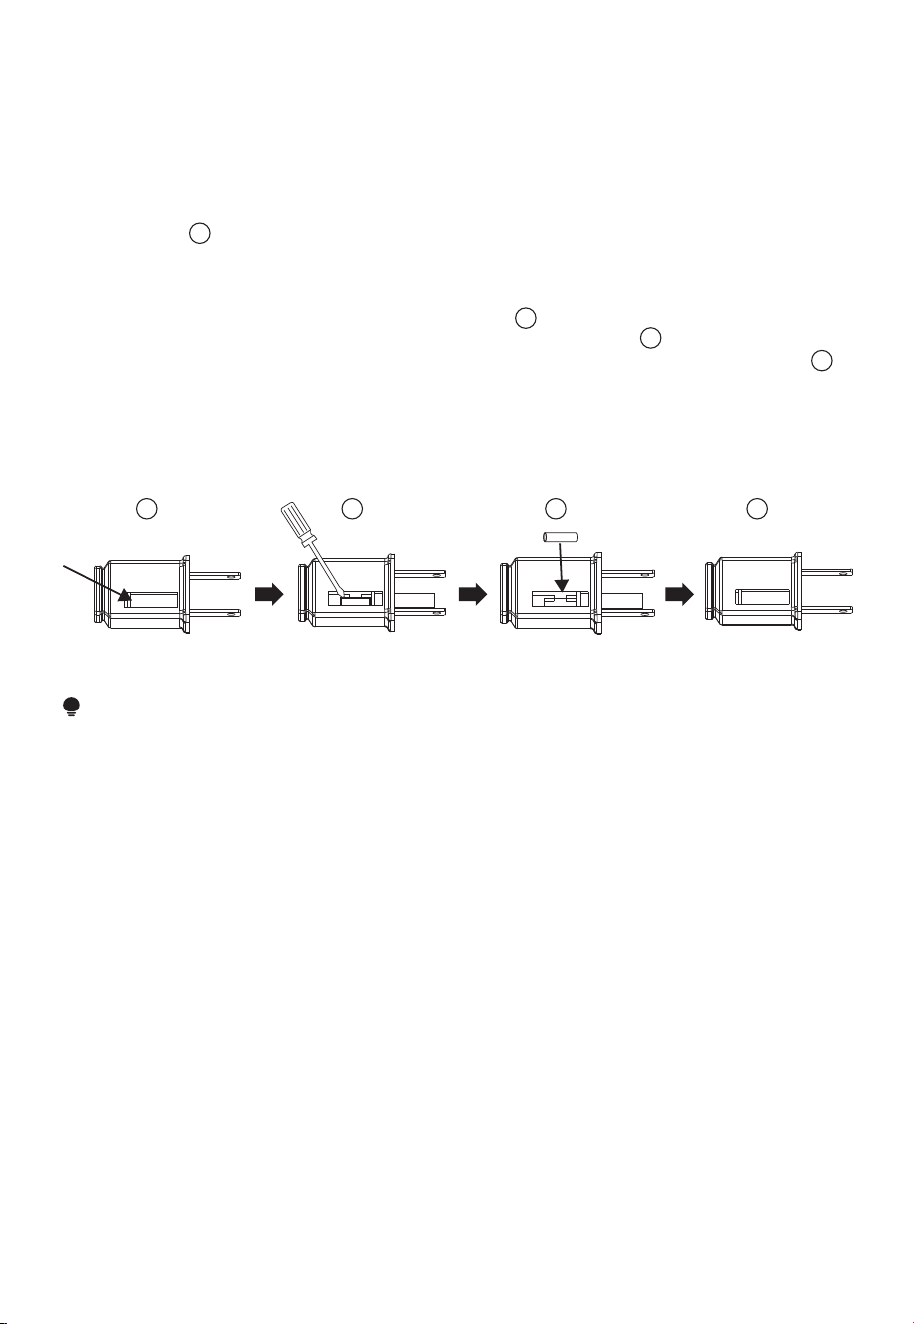
a)Grasp plug and remove from the receptacle or other outlet device. Do not unplug by
pulling on cord.
b)Open fuse cover. Slide open fuse access cover on top of attachment plug towards
blades.(Fig. )
c)Remove fuse carefully. Insert the tip of your tool into fuse slot(close with the terminal),
then pry the fuse gradually and slowly, but not overexert. If you feel tight, you can try
it at several times and pry the fuse little by little. When one side of the fuse has been
pried, then you can get the fuse out entirely.(Fig. )
d) Risk of fire. Replace fuse only with 2.5 Amp, 125 Volt fuse.(Fig. )
e)Close fuse cover. Slide close the fuse access cover on top of attachment plug.(Fig. )
f )Risk of fire. Do not replace attachment plug. Contains a safety device(fuse)that should
not be removed. Discard product if the attachment plug is damaged.
g)When the fan suddenly does not work during normal operation, please check whether
it is a problem with the fuse.
15
USER SERVICING INSTRUCTIONS
NOTE
• When you replace the fuse, please don’t operate suddenly or overexert, or else the
product will be damaged or cause accident.
• When you feel it hard to be operated, please make sure you have got the right way.
3
41
1
2
2
3
4

Solution
TROUBLESHOOTING
Operation of your appliance can lead to errors and malfunctions. The following tables
contain possible causes and notes for resolving an error message or malfunction. It is
recommended to read the table below carefully in order to save your time and money
that may cost for calling to the service center.
Cause SolutionProblem
The power cable is not
plugged in or has poor contact.
Make sure the plug is properly
inserted into the socket.
The switch on the body is
not turned on.
Turn on the switch on the
body.
The battery needs replacing. Replace the battery.
The remote is being used more
than 5m away from the fan.
●
●
●
●
The machine does
not work properly
after installed
The remote does
not work
Use the remote closer to the
fan and make sure it is pointing
directly at the display panel.
16

logo, word marks, trade name, trade dress and all versions there of are
trademarks, copyrights and other intellectual property rights, and all goodwill derived
valuable assets of Midea Group and/or its affiliates (“Midea”), to which Midea owns
from using any part of an Midea trademark. Use of Midea trademark for commercial
purposes without the prior written consent of Midea may constitute trademark
infringement or unfair competition in violation of relevant laws.
This manual is created by Midea and Midea reserves all copyrights thereof. No entity or
individual may use, duplicate, modify, distribute in whole or in part this manual, or
bundle or sell with other products without the prior written consent of Midea.
All the described functions and instructions were up to date at the time of printing this
manual. However, the actual product may vary due to improved functions and designs.
TRADEMARKS, COPYRIGHTS
AND LEGAL STATEMENT
17

DATA PROTECTION NOTICE
For the provision of the services agreed with the customer,
we agree to comply without restriction with all stipulations of applicable data protection
law, in line with agreed countries within which services to the customer will be delivered,
as well as, where applicable, the EU General Data Protection Regulation (GDPR).
Generally, our data processing is to fulfil our obligation under contract with you and for
product safety reasons, to safeguard your rights in connection with warranty and
product registration questions. In some cases, but only if appropriate data protection is
ensured, personal data might be transferred to recipients located outside of the
European Economic Area.
Further information are provided on request. You can contact our Data Protection
Officer via Mid eaDPO@mid ea.com . To exercise your rights such as right to object your
personal date being processed for direct marketing purposes, please contact us via
Mid eaDPO@midea.com . To find further information, please follow the QR Code.
18