Dishwasher
version A - 03 - 2023
MODEL NUMBER
USER MANUAL
en
Warning:
Before using this product,
please read this manual carefully
and keep it for future reference.
The design and specifications
are subject to change without
prior notice for product
improvement. Consult with your
dealer or manufacturer for
details.
Power supply: 120 V
Frequency: 60Hz
Capacity: 12 Place Settings
MDF24P1BST
Free 3 months
extension* of the
original limited warranty
period! Simply text a
picture of your proof of
purchase to:
1-844-22 4-1 6 1 4
three months immediately following
www.midea.com

DISHWA
SHER SAFETY
.....................................................................3
OPERA
TING REQUIREMENTS
..........................................................7
L
ocation Requirements
..........................................................................7
W
ater Supply Requirements
................................................................7
P
ARTS AND FEATURES
....................................................................8
Filt
er System
..............................................................................................9
Smart W
ash System
................................................................................9
A
djustable Upper Rack
........................................................................10
S
TART UP GUIDE
.............................................................................. 11
Ho
w your Dishwasher Cleans
............................................................. 11
Bef
ore Using Your Dishwasher
........................................................... 11
Using Y
our New Dishwasher
............................................................... 11
C
ONTROLS
....................................................................................... 12
Cycle and Option Charts ...................................................................... 15
Loading Suggestions ............................................................................. 16
Upper Rack ................................................................................
...............17
Load Upper Rack .................................................................................... 18
Lower Rack ............................................................................................... 19
Loading Silverware ................................................................................ 21
Recommended Load Patterns ........................................................... 22
Dear user
Thank you for letting Midea help you "make yourself at home."
This manual is part of our commitment to your total satisfaction.
Please read this manual carefully before use and keep it in a
convenient place for future reference.
By using the text option you will earn an additional 3 month
warranty extension immediately following the completion of
the product's original warranty.
To help us serve you better, please consider registering your
product using our convenient Midea app MSmartlife, by visiting
HYPERLINK http://www.midea.com, or by texting a picture of
your proof of purchase to 1-844-224-1614 .
3
Safety
Pr
ecautions
Opera
ting
Requirements
Parts and
F
eatures
Start Up
Guide
C
ontr
ols
Dishw
asher
Loading
Dishw
asher
Use
Dishw
asher
Care
T
r
oubleshooting
DISHWASHER USE ......................................................................... 24
Proper Use of Rinse Aid .....................................................................
Washing Special Items ........................................................................ 27
DISHWASHER CARE ......................................................................
Storing ....................................................................................................... 30
TROUBLESHOOTING ..................................................................... 31
Error Codes .............................................................................................. 36
WARRANTY ..................................................................................... 37
DISHWA
SHER SAFETY
YOUR S
AFETY AND THE SAFETY OF OTHERS ARE VERY
IMPORTANT
To pr
event injury to the user or other people and property damage, the
instructions shown here must be followed. Incorrect operation due to
ignoring of instructions may cause harm or damage, including death.
The level of risk is shown by the following indications.
CAUTION
WARNINGWARNING
WARNING
This symbol indicates the possibility of dangerous voltage
constituting a risk of electrical shock is present that could
result in death or serious injury.
This s
ymbol indicates the possibility of injury or damage to
property.
This s
ymbol indicates the possibility of death or serious
injury.
28
25

4
Safety
Pr
ecautions
Opera
ting
Requirements
Parts and
F
eatures
Start Up
Guide
Contr
ols
Dishw
asher
Loading
Dishw
asher
Use
Dish
w
asher
Car
e
Tr
oubleshooting
WARNING/
GROUNDING INSTRUCTIONS
Improper c
onnection of the equipment-grounding conductor can result
in a risk of electric shock. Check with a qualified electrician or service
representative if you are in doubt whether the appliance is properly
grounded. Do not modify the plug if provided with the appliance. If the
plug will not fit the outlet, have a proper outlet installed by a qualified
electrician.
For a grounded, cord-connected appliance:
This appliance must be grounded. In the event of a malfunction or
breakdown, grounding will reduce the risk of electric shock by providing
a path of least resistance for electric current. If this appliance is equipped
with a cord having an equipment-grounding conductor and a grounding
plug, the plug must be plugged into an appropriate outlet that is installed
and grounded in accordance with all local codes and ordinances.
For a permanently connected appliance:
This appliance must be connected to a grounded metal, permanent wiring
system, or an equipment-grounding conductor must be run with the
circuit conductors and connected to the equipment-grounding terminal or
lead on the appliance.
IMPORT
ANT SAFETY INSTRUCTIONS
WARNING
When using your dish
washer, follow basic precautions, including the
following:
•
Read all ins
tructions before using the dishwasher.
•
Use the dishw
asher only for its intended function.
•
Use only deter
gents or rinse/wetting agents recommended for use in
a dishwasher and keep them out of the reach of children.
•
When loading items t
o be washed:
•
Loca
te sharp items so that they are not likely to damage the door
seal.
•
Load sharp kniv
es with the handles up to reduce the risk of cut-
type injuries.
•
Do not wash plas
tic items unless they are marked “Dishwasher
Safe” or the equivalent. For plastic items not so marked, check the
manufacturer’s recommendations.
•
Items tha
t are not dishwasher safe may melt and create a potential
fire hazard.
•
Do not touch the hea
ting element during or immediately after use.
•
Do not opera
te your dishwasher unless all enclosure panels are
properly in place.

5
Safety
Pr
ecautions
Opera
ting
Requirements
Parts and
F
eatures
Start Up
Guide
C
ontr
ols
Dishw
asher
Loading
Dishw
asher
Use
Dishw
asher
Care
T
r
oubleshooting
•
Do not tamper with contr
ols.
•
Do not abuse, sit on, or s
tand on the dishwasher door, or dish racks.
•
To r
educe the risk of injury, do not allow children to play in or on a
dishwasher.
•
Under certain c
onditions, hydrogen gas may be produced in a
hot-water system that has not been used for two weeks or more.
HYDROGEN GAS IS EXPLOSIVE. If the hot-water system has not
been used for such a period, before using the dishwasher turn on
all hot-water faucets and let the water flow from each for several
minutes. This will release any accumulated hydrogen gas. As the gas
is flammable, do not smoke or use an open flame during this time.
•
Sev
ere product damage and/or injury could result from the use of
unqualified service technicians or non-original replacement parts.
All repairs must be performed by a qualified service technician using
only original equipment factory replacement parts.
•
Do not st
ore or use combustible materials, gasoline or other
flammable vapors and liquids in the vicinity of this or any other
appliance.
•
Keep y
oung children and infants away from dishwasher when it is
operating.
•
Do not use the dishw
asher if it has a damaged power line or plug,
and do not plug the dishwasher into a damaged outlet. Failure to
observe these instructions may result in electrical shock.
•
This manual does not c
over every possible condition or situation that
may occur.
•
Remo
ve the door to the washing compartment when removing an
old dishwasher from service or discarding it.
SA
VE THESE INSTRUCTIONS
THIS APPLIANCE IS FOR HOUSEHOLD USE ONL
Y
W
ARNING
Tip Ov
er Hazard
•
Do not use dishw
asher until completely installed.
•
Do not push down on open door
.
•
Doing so can result in serious injury or cuts.

6
Safety
Pr
ecautions
Opera
ting
Requirements
Parts and
F
eatures
Start Up
Guide
Contr
ols
Dishw
asher
Loading
Dishw
asher
Use
Dish
w
asher
Car
e
Tr
oubleshooting
Sta
te of California Proposition 65 Warnings:
WARNING:
Cancer and Reproductive Harm
-www.P65Warnings.ca.gov.
W
ARNING
Suffoca
tion Hazard
•
Befor
e you throw away your old appliance, remove the door or lid so
that children cannot hide or get trapped inside your old appliance.
•
Failur
e to follow these instructions can result in death or brain
damage.
CAUTION
•
Nev
er use harsh chemicals to clean your dishwasher. Some chloride-
containing products can damage your dishwasher and may present
health hazards!
•
Nev
er use steam cleaning products to clean your dishwasher. The
manufacturer will not be responsible for the possible damages or
consequences.
•
To a
void possible dishwasher damage, do not use harsh chemicals,
abrasive cleaners, scouring pads (metal or plastic), or abrasive
cloths/paper towels to clean your dishwasher’s exterior door panel.
Your dishwasher’s exterior door panel can be damaged by doing so.
•
It is highly rec
ommended that the user become familiar with the
procedure to shut off the incoming water supply and the procedure
to shut off the incoming power supply. See the Installation
Instructions or contact your installer for more information.
•
If the dishw
asher drains into a food disposer, make sure disposer is
completely empty before running dishwasher.
•
NSF/
ANSI 184 Certified residential dishwashers are not intended for
licensed food establishments.
•
Prot
ect your dishwasher from the elements. Protect against freezing
to avoid possible damage to the fill valve. Damage caused by
freezing is not covered by the warranty.
•
Not for out
door use.

7
Safety
Pr
ecautions
Opera
ting
Requirements
Parts and
F
eatures
Start Up
Guide
C
ontr
ols
Dishw
asher
Loading
Dishw
asher
Use
Dishw
asher
Care
T
r
oubleshooting
OPERATING REQUIREMENT
S
ELECTRICAL REQUIREMENTS
WARNING
Electrical Shock Hazard
•
Electrically ground dish
washer.
•
Connect gr
ound wire to green ground connector in terminal box.
•
Do not use an ext
ension cord.
•
Failur
e to follow these instructions can result in death, fire, or
electrical
shock.
This dish
washer is designed for operation on an adequately wired
individual 120 V, 60 Hz, 15- or 20-amp fused electrical supply with copper
wire only. It is recommended that a time-delay fuse or circuit breaker is
used, and that a separate circuit serving only this appliance is provided. If
an outlet is used, the outlet should be placed in adjacent cabinet.
LOCA
TION REQUIREMENTS
•
Install wher
e dishwasher is protected from the elements. Protect
against freezing to avoid possible rupture of fill valve. Such ruptures
are not covered by the warranty. For winter storage information, see
“Storing” in the “Dishwasher Care” section.
•
Install and le
vel dishwasher on a floor that will hold the weight and in
an area suitable for its size and use.
WA
TER SUPPLY REQUIREMENTS
•
The water supply temperature should be 120°F to 150°F (49°C to
66°C).
•
The water supply must maintain water pressure between 20 and 80 psi
for sufficient flow.
8
Safety Parts and Start Up
Guide
Dishwasher
Loading
Dishwasher
Use
Dishwasher
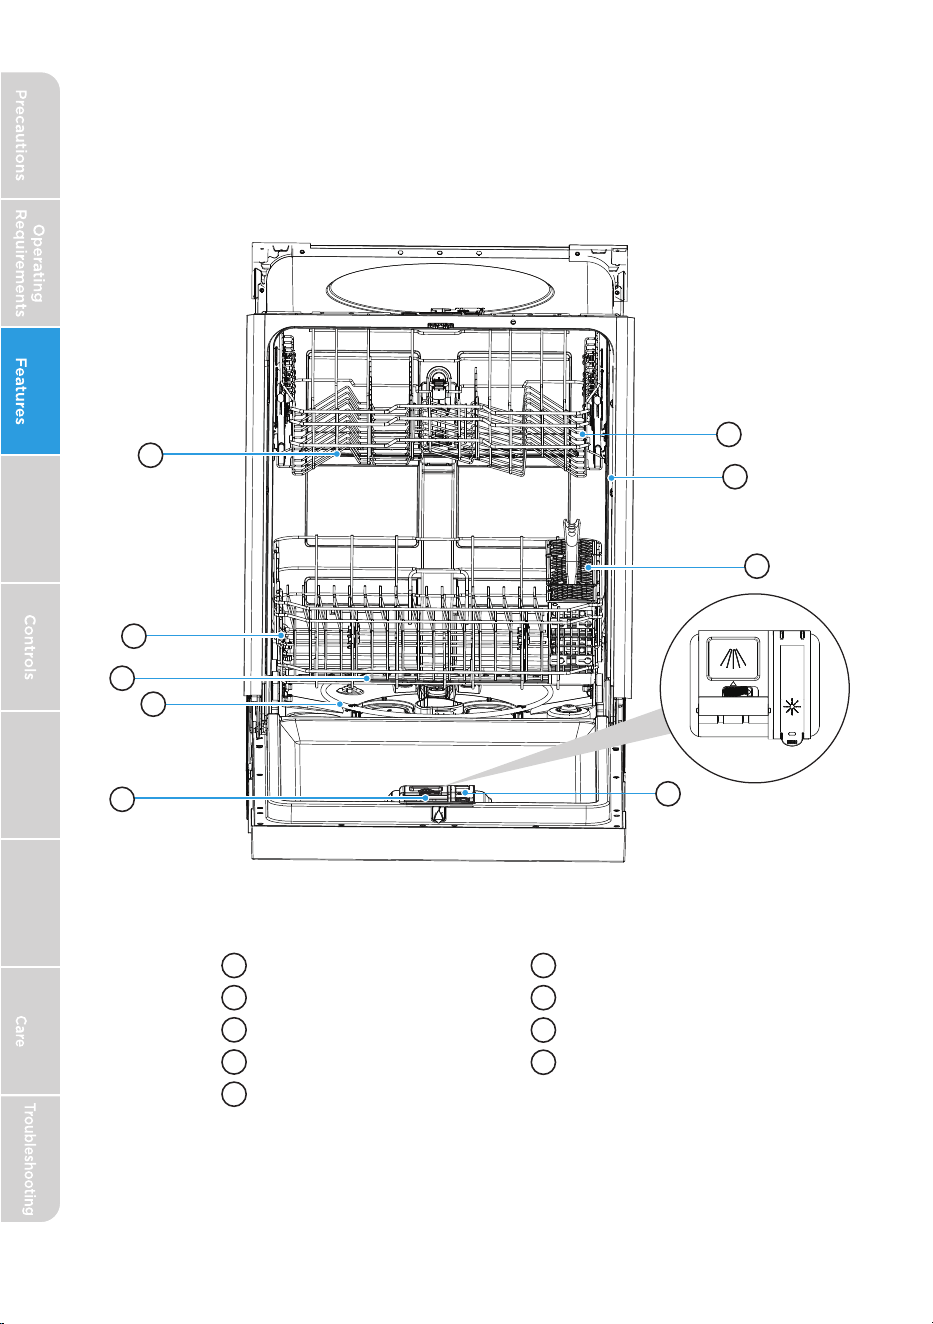
PARTS AND FEATURES
Middle Spray Arm
Rinse Aid Dispenser
A
B
C
D
E
Lower Spray Arm
Detergent Dispenser
Upper Rack
H
I
Lower Rack
Heating Element
F
Tub Gasket
G Silverware Basket
A
B
C
D
E
F
G
I
H
9
Safety
Precautions
Operating
R
equirements
Parts and
Fea
tures
Start Up
Guide
Controls
Dishwasher
Loading
Dishwasher
Use
Dishwasher
Car
e
Troubleshooting
SPECIFICATIONS
Capacity:
12 Place Settings
Dimensions (WxDxH):
Weight Unpacked:
70 lb
Power Supply: 120 volts, 60 Hz
Rated Power Usage: Wash motor 50 W Heater 840 W
Water Feed Pressure: 20 - 80 psi (138 - 552 kPa)
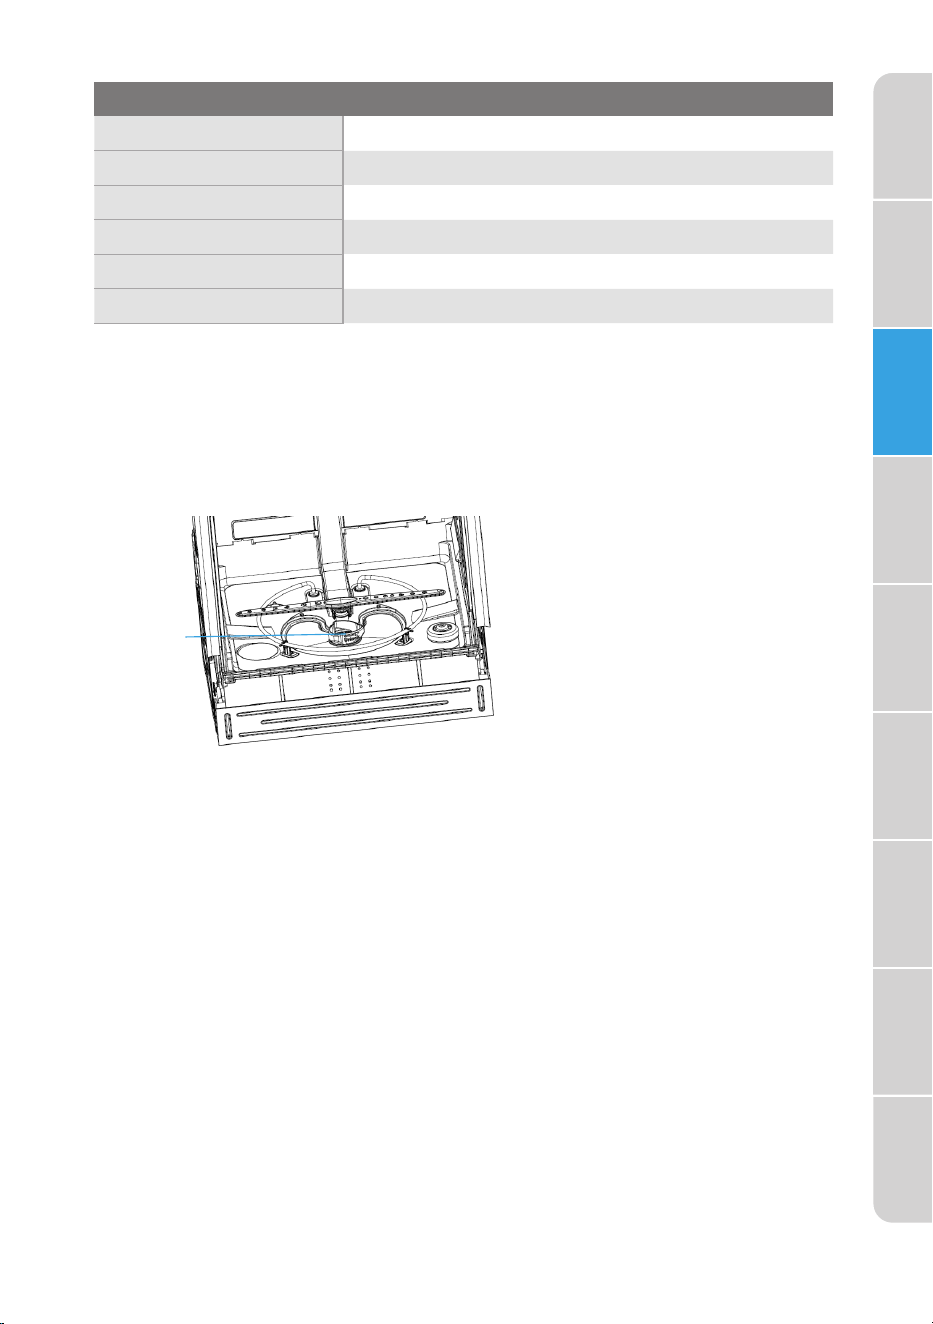
FILTER SYSTEM
Your dishwasher has a multiple filter system, which helps your dishwasher
perform better using less water and less energy.
The filter system includes three filters that work in combination to
separate dirty and clean water into different chambers.
a Filter Location
SMART WA
SH SYSTEM
Your dishw
asher has a Smart Wash system which can be used by selecting
the Auto cycle.
The Smart Wash system senses the soil level of the load and adjusts the
wash cycle accordingly. Your dishwasher can determine the type of cycle
required to clean the dishes and will clean more efficiently every time.
a
23 3/5" x 22 7/10" x 33 3/4" (600x576x855mm)

10
Safety
Pr
ecautions
Opera
ting
Requirements
Parts and
F
eatures
Start Up
Guide
Contr
ols
Dishw
asher
Loading
Dishw
asher
Use
Dishw
asher
Care
Tr
oubleshooting
AD
JUS
T
ABLE UPPER RA
CK
The A
djustable Upper Rack feature allows you to load taller items in either
the upper or lower rack.
The upper rack of your dishwasher can be adjusted 2" (5.08 cm).
Adjusting the clearance of the Upper Rack increases or decreases the
clearance of the lower rack, as shown.
For instructions, see the “Adjustable Upper Rack” section.
2" (5.
08 cm)

11
Safety
Pr
ecautions
Opera
ting
Requirements
Parts and
F
eatures
Start Up
Guide
Contr
ols
Dishw
asher
Loading
Dishw
asher
Use
Dishw
asher
Care
Tr
oubleshooting
ST
ART UP GUIDE
IMPORTANT
:
•
Properly dispose of
/recycle all packing material.
•
Read this entir
e User Manual. You will find important safety information
and useful operating tips.
HOW Y
OUR DISHWASHER CLEANS
Your dish
washer cleans by spraying a mixture of hot water and detergent
through the spray arms against soiled surfaces.
The dishwasher fills with water covering the filter area. Water is then
pumped through the multiple filters and spray arms. Soil particles are
separated from the water and go down the drain as the water is pumped
out and replaced with clean water.
The number of water fills will vary depending on the cycle selected.
BEFORE USING Y
OUR DISHWASHER
1. Check the filters f
or debris that may have been introduced from the
packaging or during installation. See the “Clean Filters” section.
2. Add Rinse Aid. See “Proper Use of Rinse Aid.”
USING YOUR NEW DISHW
ASHER
NOTE:
To decrease cycle time and possibly improve performance, turn on
the hot water faucet nearest to the dishwasher until the water runs hot.
Turn off the water.
1. Load dishwasher. See “Dishwasher Loading.”
2. Add detergent. See “Proper Use of Detergent.”
3. Select desired CYCLE and OPTIONS. See “Cycle and Option Charts.”
• Only the Options available for the Cycle selected will illuminate.
• The controls of the selected Cycle and Options will glow to indicate
they are selected.
4. Close the door firmly to latch.
5.
Press START.
12
Safety
Parts and
Start Up
Guide
Dishwasher
Loading
Dishwasher
Use
Dishwasher
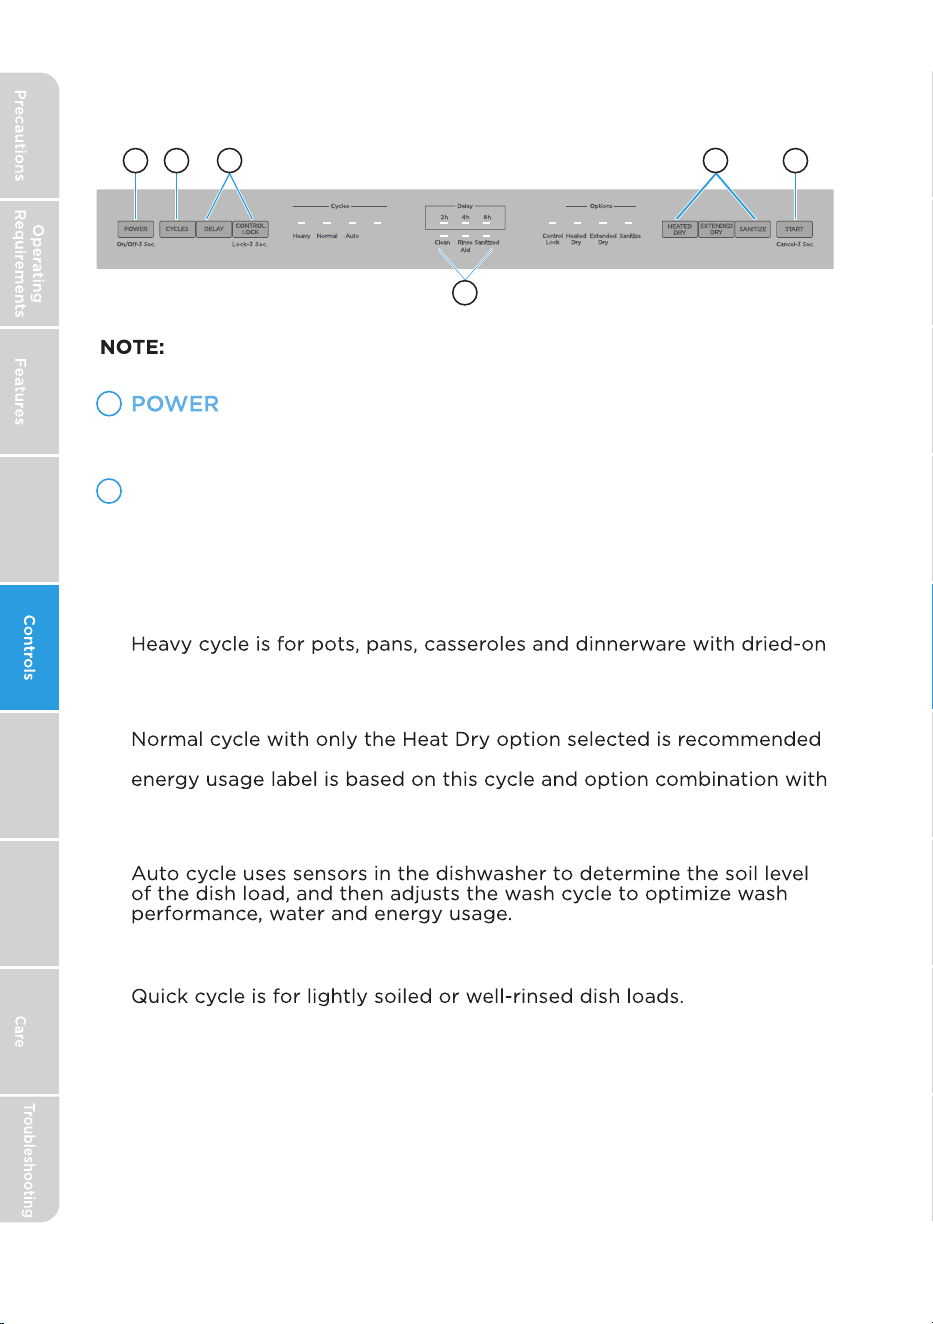
CONTROLS
When the door is closed.
CYCLES
Heavy
or baked on soil.
Normal
to completely wash and dry a full load of normally soiled dishes. The
the upper rack in the raised position.
A
B
A
B
C
E
F
Press this button to turn on or turn off the dishwasher.
Press this button to select corresponding washing cycle and the
cycle indicator will illuminate. Heavy, Auto, Normal, Express cycles
can be selected.
Auto
D
Quick
Quick
13
Safety
Precautions
Operating
R
equirements
Parts and
Fea
tures
Start Up
Guide
Controls
Dishwasher
Loading
Dishwasher
Use
Dishwasher
Car
e
Troubleshooting
ADDITIONAL FEATURES
OPTIONS
Options enhance the wash c
ycle. Some Options are available with only
certain Wash Cycles. Refer to the “Cycle and Options Charts” to see
which Options are available for the wash cycle you selected.
•
Pres
s the desired Option control(s). The Option control(s)
illuminates to indicate which option(s) have been selected.
WARNING: Only sanitizing c
ycles have been designed to meet the
requirements for soil removal and sanitization efficacy. There is no
intention, either directly or indirectly, that all cycles on a certified
machine have passed the sanitization performance test.
Delay+++=+
The Delay Time feature allows you to program the dishwasher to
begin the selected wash cycle 2, 4 or 8 hours later.
Press the DELAY control repeatedly to toggle between ( 2h/4h/8h ). The
LED next to the selected time will illuminate.
NOTE: To cancel the Delay feature, press and hold the START control
for 3 seconds to Cancel. To begin the wash cycle immediately, press
START again.
Control Lock+++=+
Use to lock all controls and prevent children from accidently changing the
dishwasher cycle or starting the dishwasher.
• Press and hold for 3 seconds Control Lock to either activate or
cancel the Control Lock
option.
After the function is selected the control
lock icon will illuminate. If the the function is canceled, the control lock
icon will light off.
Sanitize+++=+
The sanitize option sanitizes dishes and glassware in accordance with
NSF International NSF/ANSI Standard 184 for Residential Dishwashers.
Certified residential dishwashers are not intended for use in licensed
food establishments.
When the Sanitize option is selected, the water temperature will reach
156.2°F (69°C) maximum.
The Sanitize Control illuminates to indicate when the Wash cycle with
the Sanitize option is completed. The light will turn off after the door
has been opened for 30 seconds.
NOTE: It is possible that the water will not reach 156°F (69°C) in the
Sanitize mode, if the temperature of the incoming hot water does not
meet the minimum requirement of 120°F (49°C).
Heated Dry+++=+
When the Heated Dry option is selected, the heater will work during
the drying process.
d
c

14
Safety
Pr
ecautions
Opera
ting
Requirements
Parts and
F
eatures
Start Up
Guide
Contr
ols
Dishw
asher
Loading
Dishw
asher
Use
Dishw
asher
Care
Tr
oubleshooting
The cycle will begin.
PAUSE - If you need to pause or cancel a dishwasher cycle in process:
IMPORTANT: Open the door slightly, and then wait for the spray arms
and wash action to stop before opening the door completely. Doing
this will help keep you from being splashed with hot water.
1. Open the door slightly and wait a few seconds until the wash
action stops.
2. Open the door to add or remove items.
3. Close the door and then Press START to resume the wash cycle.
CANCEL - To cancel a cycle when the dishwasher is running, press
and hold Start for 3 seconds.
INDICATOR LIGHTS
Rinse Aid
The Rinse Aid indicator light illuminates when the rinse aid level is
low. Rinse Aid should be added to the Rinse Aid dispenser.
Sanitized
The Sanitized indicator light illuminates when the cycle using the
Sanitize option is finished.
The light turns off turns off when the door is opened and then closed or
Turns on after a cycle is finished. Turns off when the door is opened and
any button is pressed.
then closed or any button is pressed.
Clean
Start - Close the door and press Start.
START
e
f
Extended dry
When the Extended dry option is selected, the heater and fan operation
will be extended to further improve drying performance. The final rinse
will be elevated to 156.2°F (69°C) and extend the dry by 66 minutes.

CYCLE AND OPTION CHARTS
Depending on the Cycle selected, the Options available for selection will
illuminate.
Cycle times are approximate and will vary depending on the wash cycle
and options selected.
NOTE: Added Options can add more time and use more water.
Hot Water is necessary to activate the dishwasher detergent and melt
fatty food residue.
An automatic sensor checks the temperature of the incoming water. If the
water is not hot enough, the cycle will be lengthened to heat the water for
the main wash.
The Smart Wash Sensor detects the soil level of the dish load and may
increase or decrease cycle time depending on the number of water fills
required to clean the load.
Cycle Options Available Water Usage Cycle Time
Heavy
Normal
Auto
151 min
103 to 146 min
15
Safety
Precautions
Operating
Requirements
Parts and
Features
Start Up
Guide
Controls
Dishwasher
Loading
Dishwasher
Use
Dishwasher
Care
Troubleshooting
7.2 gal.
(27.2L)
Heated Dry or
Extend Dry, Sanitize
Heated Dry or
Extend Dry, Sanitize
Heated Dry or
Extend Dry, Sanitize
Heated Dry or
Extend Dry, Sanitize
3.1-7.13 gal.
11.7-27 L
3.1-7.13 gal.
11.7-27 L
4.1 gal.
(15.5L)
107 to 147 min
60 min
Quick
DISHWA
SHER LOADING
PREPARE DISHES
•
Empty liquids from glasses and cups.
•
Remove leftover food, bones, toothpicks and other hard items from the
dishes and discard.
•
It is not necessary to hand-rinse dishes before loading them into the
dishwasher with the following exceptions:
•
Foods such as mayonnaise, mustard, vinegar, lemon juice and
tomato-based products may discolor stainless steel and plastics if
allowed to remain on them for any length of time.
•
Burned-on foods should be loosened before loading the cookware
into the dishwasher.
LO
AD DISHES
•
It is IMPORT
ANT for the water spray to reach all soiled surfaces.
•
Load dishes so the
y are not stacked or overlapping if possible. For best
drying results, water must be able to drain from all surfaces.
•
Load hea
vy pots and pans carefully. Heavy items can dent the stainless
steel interior of the door if they are dropped or bumped.
•
Make sur
e pot lids and handles, pizza pans, cookie sheets, etc., do not
interfere with the spray arm rotation.
•
Make sur
e both the upper and lower spray arms are not blocked and
move freely.
QUIET OPERATING TIPS
To a
void thumping/clattering noises during operation:
•
Make sur
e lightweight items are secured in the racks.
•
Make sur
e pot lids and handles, pizza pans, cookie sheets, etc., do not
touch interior walls or interfere with the rotation of the spray arm.
•
Load dishes so the
y do not touch one another.
NOTE: For built-in models, keep sink drain plugs closed during
dishwasher operation to prevent noise transfer through drains.
Safety
Pr
ecautions
Opera
ting
Requirements
Parts and
F
eatures
Start Up
Guide
Contr
ols
Dishw
asher
Loading
Dishw
asher
Use
Dishw
asher
Care
Tr
oubleshooting
16
UPPER RA
CK
The upper dishw
asher rack is designed for cups, glasses, small plates,
bowls and plastic items marked dishwasher safe.
The upper rack can be easily adjusted 2" (5 cm) up or down to
accommodate taller items in either in the top or bottom rack.
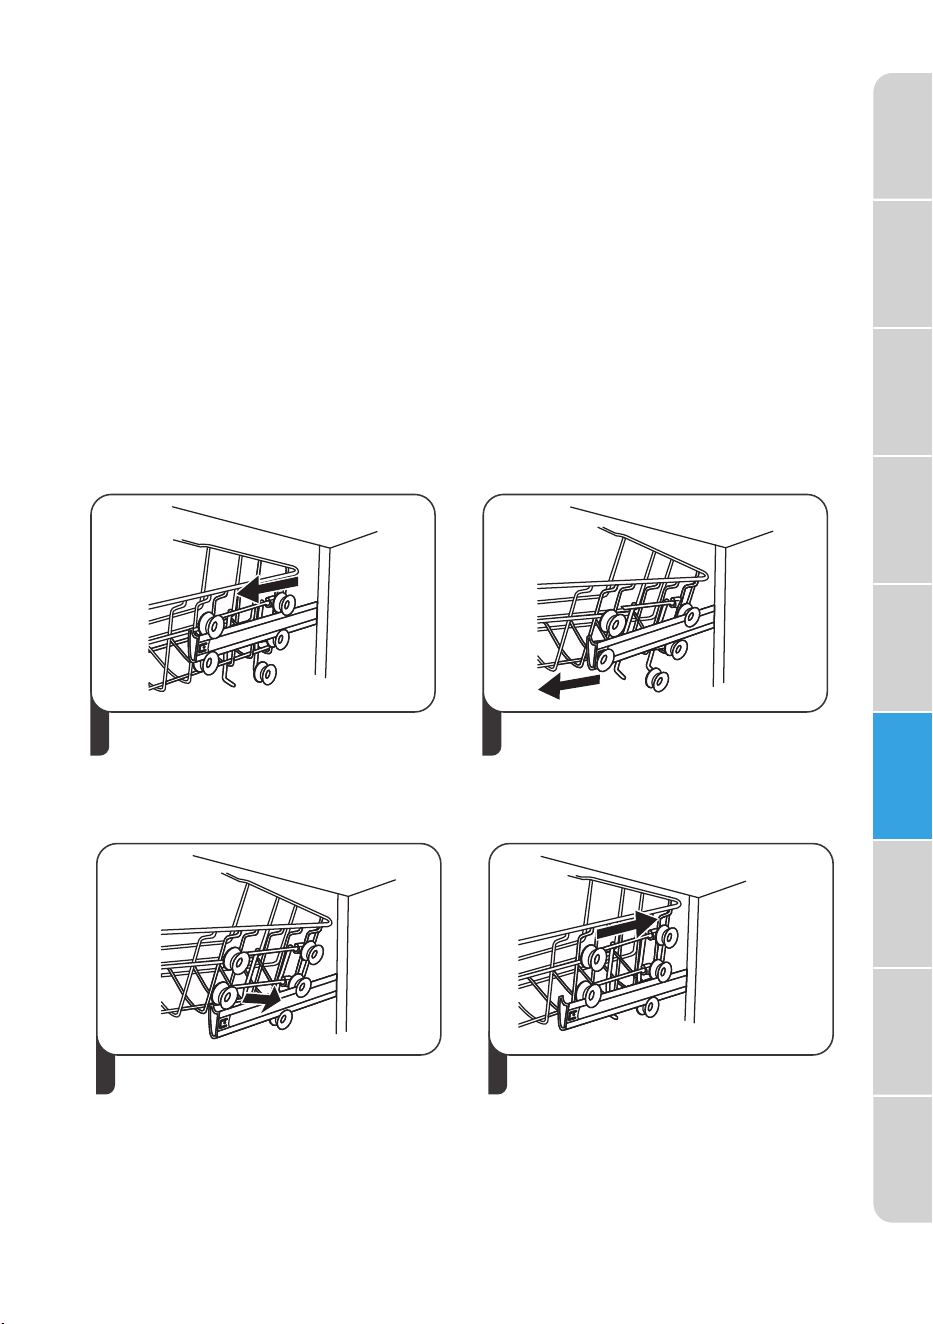
ADJUST UPPER RA
CK
IMPORTANT:
• Remove all items before adjusting the rack. The rack must be empty.
To adjust the height of the upper rack, follow these steps:
43
Re-attach the upper basket to upper
or lower rollers.
upper position
Push in the upper basket.
1
lower position
Pull out the upper basket.
2
Pull up on upper bascket to remove.
Safety
Precautions
Operating
R
equirements
Parts and
Fea
tures
Start Up
Guide
Controls
Dishwasher
Loading
Dishwasher
Use
Dishwasher
Car
e
Troubleshooting
17
Safety
Pr
ecautions
Opera
ting
Requirements
Parts and
F
eatures
Start Up
Guide
Contr
ols
Dishw
asher
Loading
Dishw
asher
Use
Dishw
asher
Care
Tr
oubleshooting
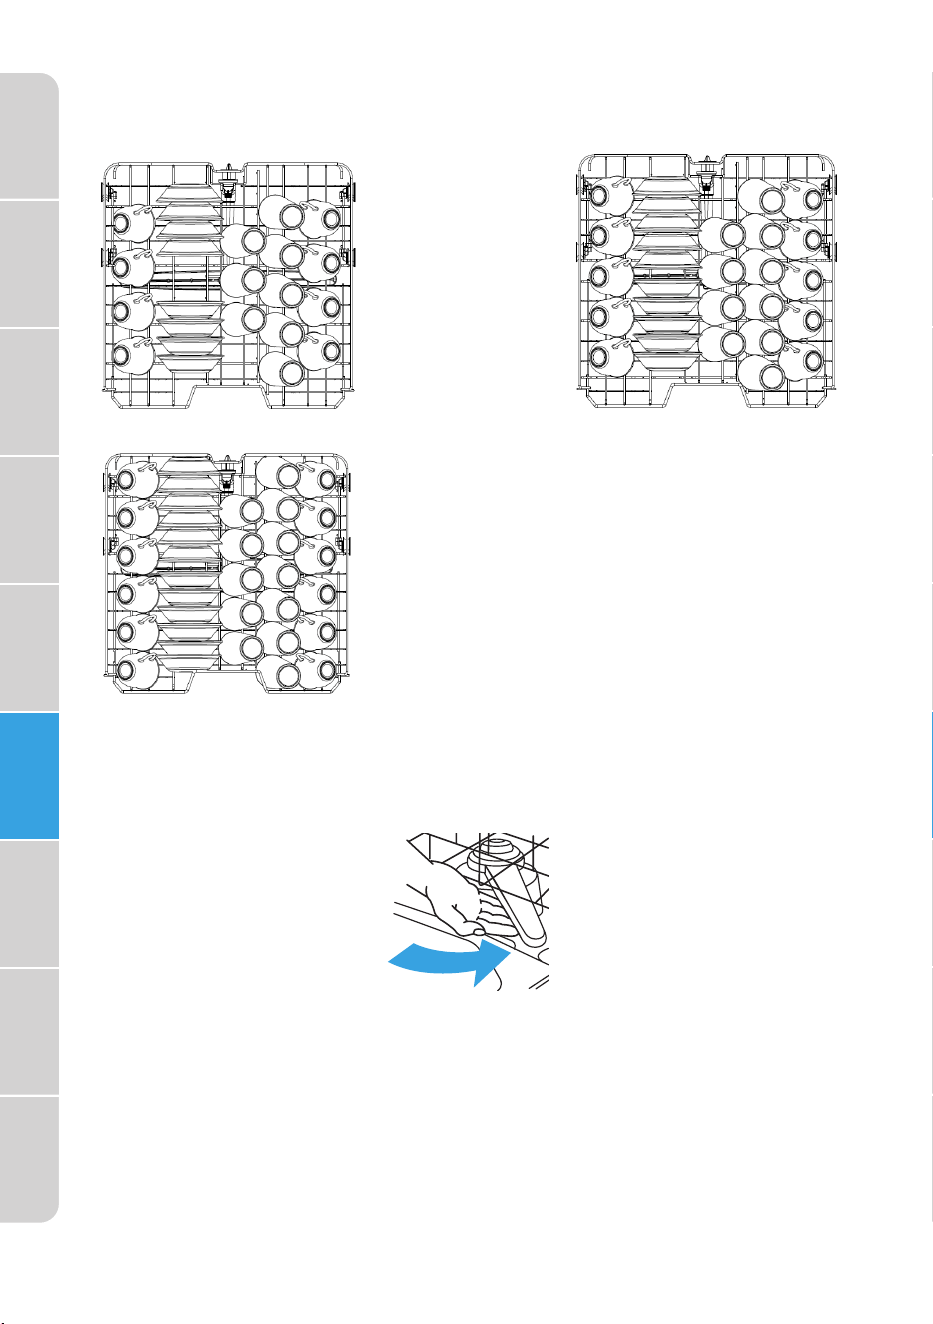
LO
AD UPPER RACK
NOTE:
The features on your dishwasher rack may vary from the drawings
shown.
IMPORTANT: Make sure the items loaded in the upper rack do not
interfere with the rotation of the middle spray arm located beneath
the upper rack. Check for interference by turning spray arm by hand.
•
Place it
ems so that the open ends face downward for cleaning and
draining.
•
Load glas
ses and cups in upper rack only. The lower rack is not
designed for glasses and cups. Damage can occur.
•
Place cups and glas
ses in the rows between tines. Placing them over
the tines can lead to breakage, water spots, and poor cleaning.
•
Small bowls, pans and other ut
ensils can be placed in the top rack.
Load bowls in the center section for best stability.
•
China, crys
tal and other delicate items must not touch each other
during dishwasher operation. Damage may occur.
•
Load plas
tic items so the force of the spray does not move them
during the cycle.
8 Place Setting
10 Place Setting
12 Place Setting
18
Safety
Precautions
Operating
Requirements
Parts and
Features
Start Up
Guide
Controls
Dishwasher
Loading
Dishwasher
Use
Dishwasher
Care
Troubleshooting
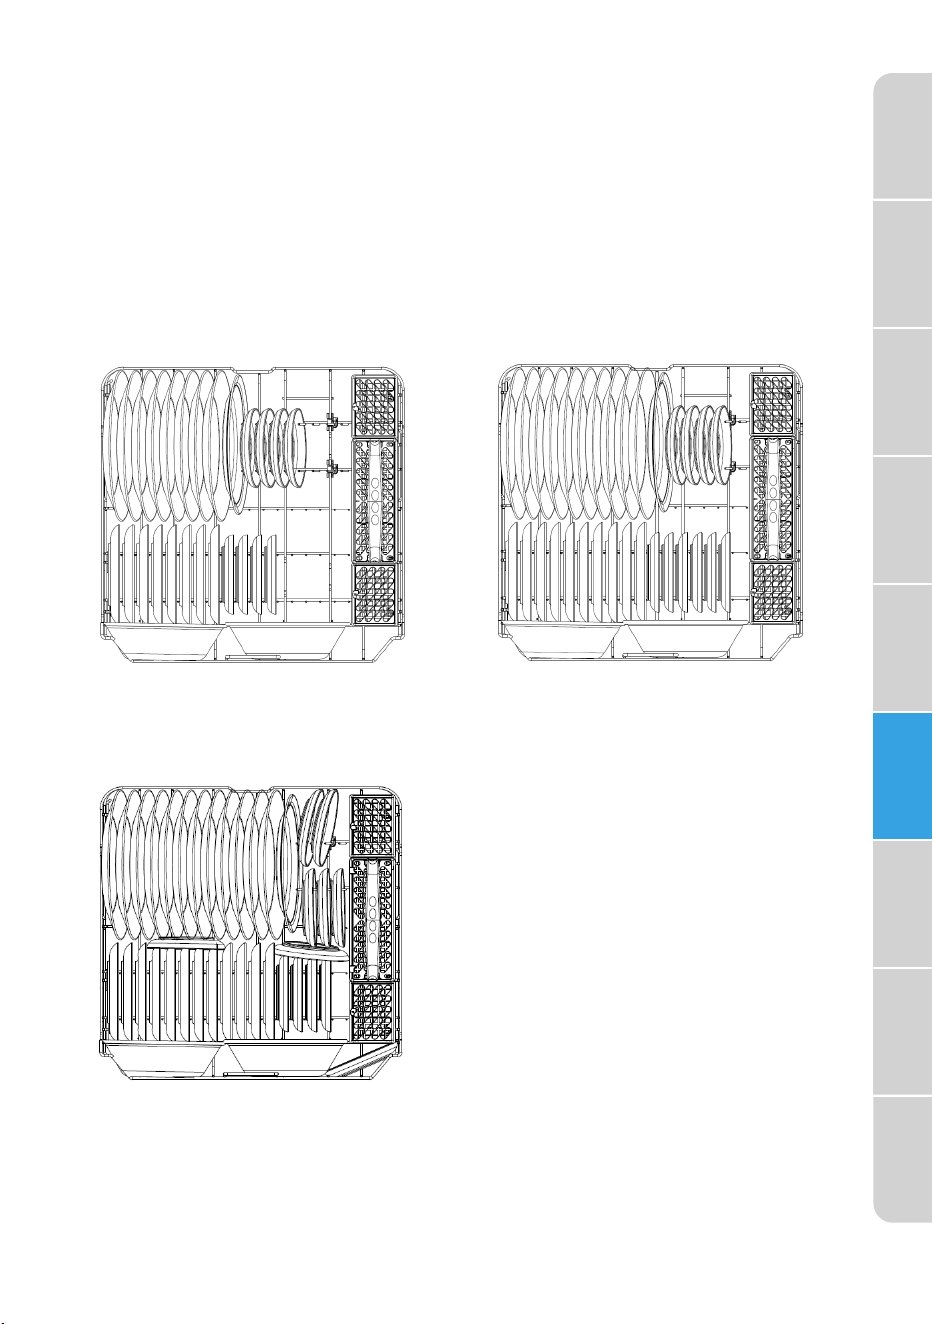
LOWER RACK
The lower rack is designed for plates, soup bowls, cookware and
bakeware.
The adjustable upper rack allows you to load items up to 12.6” in height in
the lower rack.
IMPORTANT: Items in the lower rack must be placed so that they do not
interfere with the rotation of the spray arms, block the water inlet, or keep
the water spray from reaching the detergent dispenser.
8 Place Setting
10 Place Setting
12 Place Setting
19
Safety
Precautions
Operating
Requirements
Parts and
Features
Start Up
Guide
Controls
Dishwasher
Loading
Dishwasher
Use
Dishwasher
Care
Troubleshooting
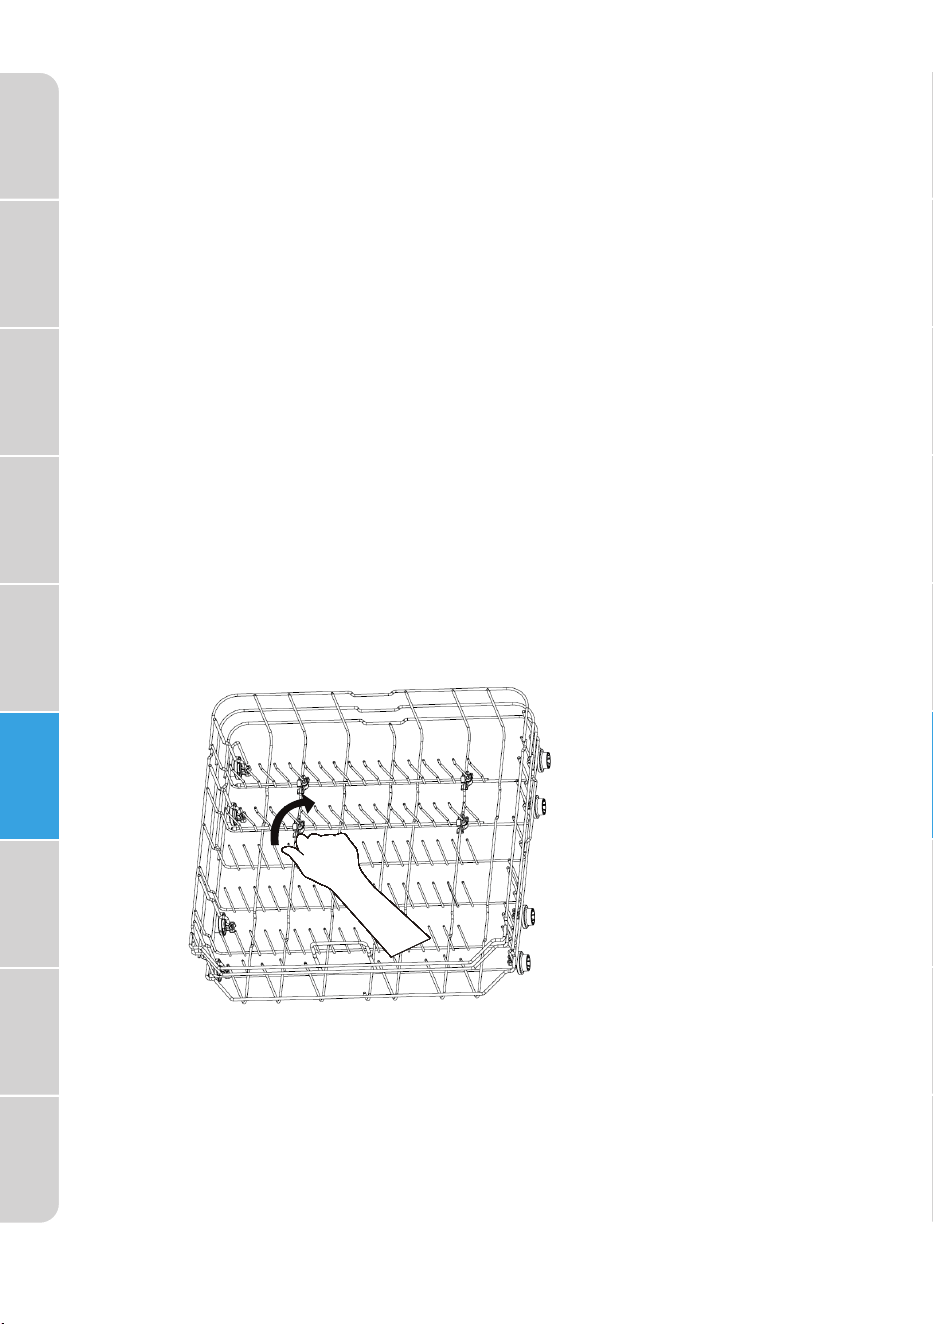
ADJUSTABLE RACK TINES
The fold-down tines in the lower rack make it easier to load extra large or
hard-to-fit items such as serving bowls and roasters. The tines may be left
in the up position for normal use, or folded down for more flexible loading.
LOAD LOWER RACK
NOTE: The features on your dishwasher rack may vary from the drawings
shown.
•
Do not load glasses, cups, or plastic items in the lower rack.
•
Load small items in the lower rack only if they are secured in place.
•
Load plates, soup bowls, etc. between tines. Do not nest bowls
because the spray will not reach all surfaces.
•
Do not load items between the bottom rack and the side of the
dishwasher tub.
•
Place heavily soiled cookware face down in the rack.
20
Safety
Precautions
Operating
Requirements
Parts and
Features
Start Up
Guide
Controls
Dishwasher
Loading
Dishwasher
Use
Dishwasher
Care
Troubleshooting
LOADING SILVERWARE
NOTES:
•
Do not load silver or silver-plated silverware with stainless steel. These
metals can be damaged by contact with each other during washing.
•
Some foods (such as salt, vinegar, milk products, fruit juices, etc.), can
pit or corrode silverware. DO NOT WASH ALUMINUM COOKWARE IN
YOUR DISHWASHER.
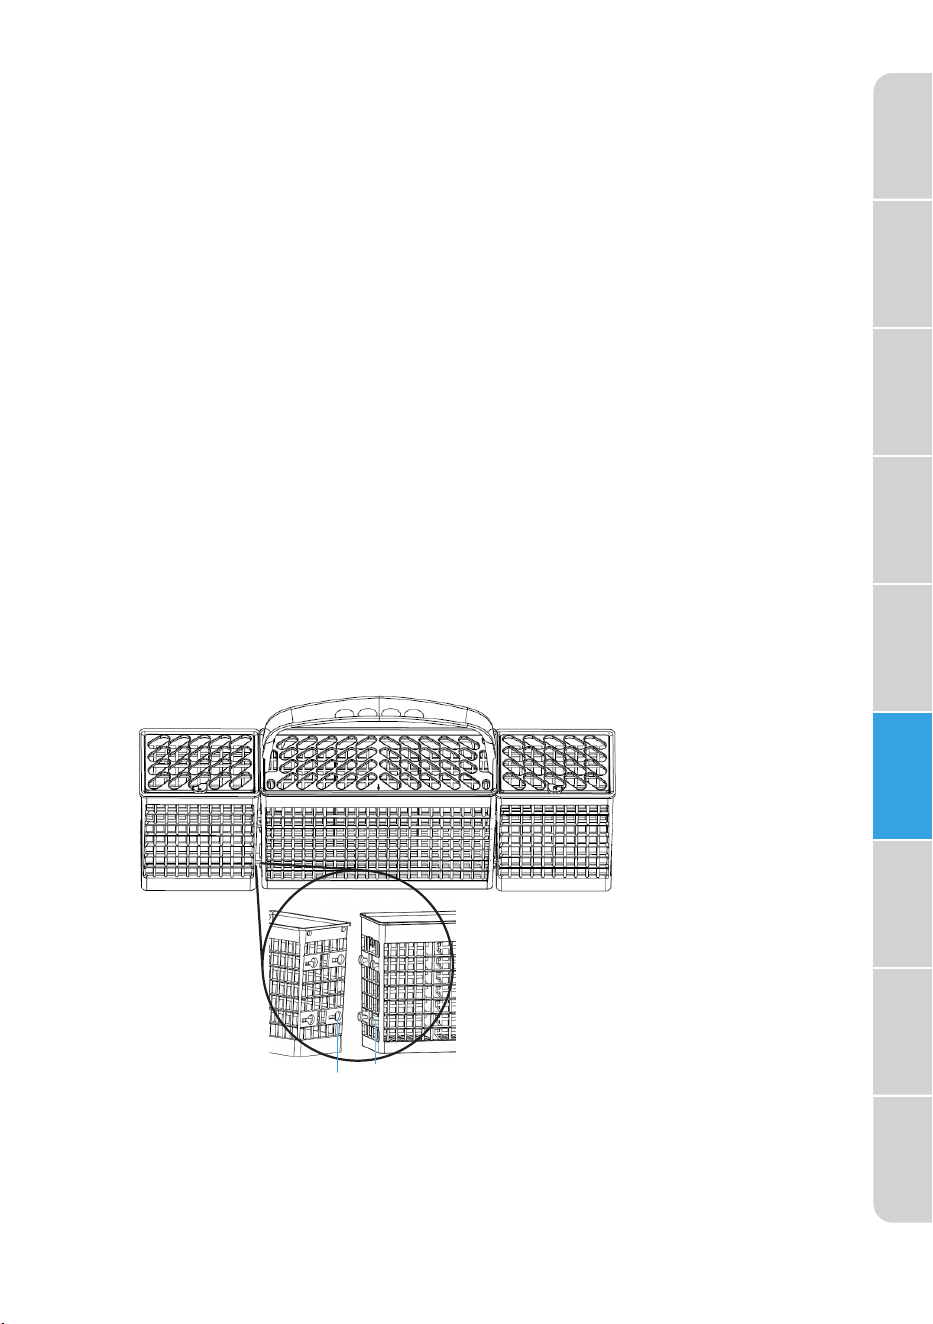
THREE-PIECE SILVERWARE BASKET
The silverware basket consists of three separate sections. For optimum
loading flexibility, the center section of the basket can be used
individually, joined with one or both side sections or removed.
•
Lift handle to remove the silverware basket and set the basket on a
counter or table top.
•
Lift up on each side section to disengage the center section from the
keyhole slots in the side sections.
•
Either replace the section(s) in the bottom rack and load the
silverware, OR load the silverware while the section(s) are on the
countertop and then replace the basket in the bottom rack.
a Keyhole Slots
b Prongs
a
b
21
Safety
Precautions
Operating
Requirements
Parts and
Features
Start Up
Guide
Controls
Dishwasher
Loading
Dishwasher
Use
Dishwasher
Care
Troubleshooting
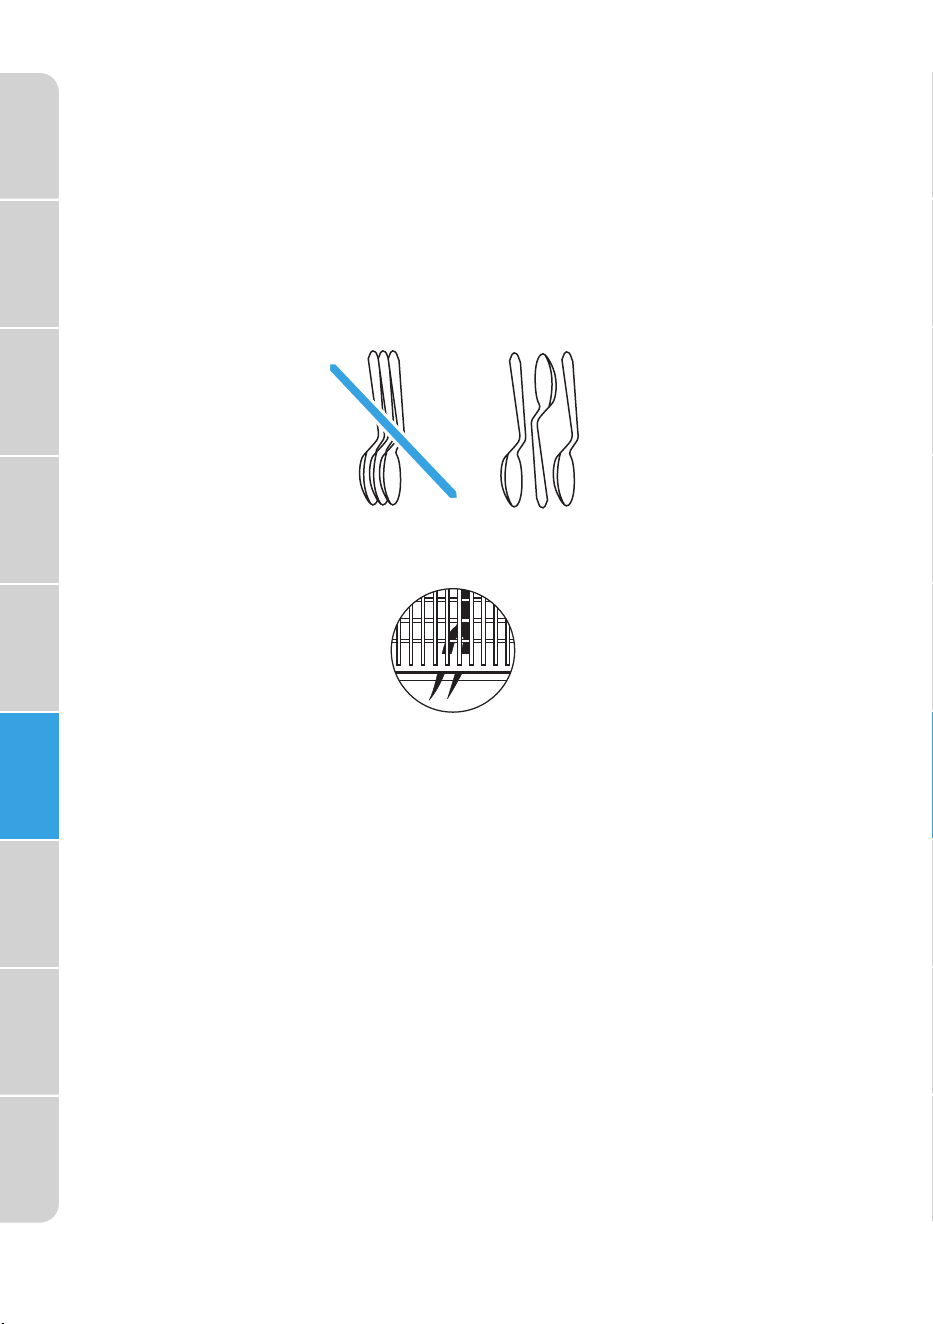
For Best Results:
•
Load items with handles down, using the separators to prevent
silverware from nesting.
•
Place small items such as baby bottle caps, jar lids, corncob holders,
etc. in the section(s) with hinged cover(s). Close the cover to hold
small items in place.
•
Unload or remove the basket before unloading the racks to avoid water
drops from falling on the silverware.
•
When handles are up, mix items in each section of the basket with
some pointing up and some down to avoid nesting. Spray cannot reach
nested items.
IMPORTANT: Always load sharp items (knives, skewers, etc.) pointing
down. Be sure that nothing protrudes through bottom of the basket or
rack that may block the wash arm.
22
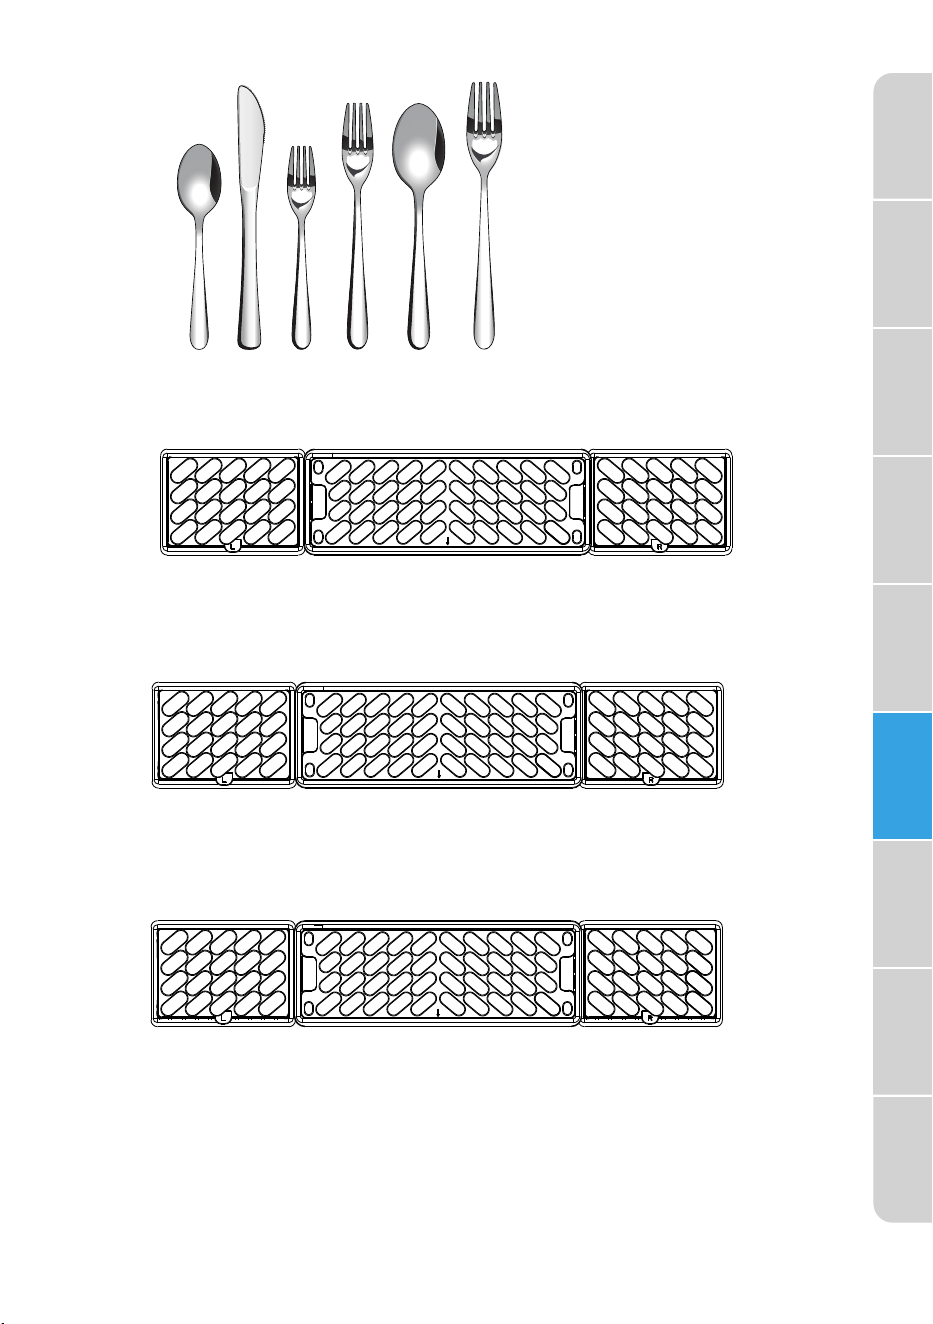
1 2 3 4 65
1. Spoons
2. Knives
3. Salad Forks
4. Forks
5. Large Spoons
6. Large Forks
8 Place Setting
10 Place Setting
12 Place Setting
2
2
2
2
2
2
2
2
2
2
2
2
2
2
2
2
2
2
2
2
2
3
3
3
3
3
3
3
3
3
3
3
3
4
4
4
4
4
4
4
4
4
4
4
4
5
1
1
1
1
2
2
2
2
2
2
2
2
2
4
4
4
4
3
3
3
3
3
4
2
2
2
2
2
2
4
4
4
4
4
3
3
3
1
1
1
1
1
1
1
1
1
1
1
1
1
1
1
1
1
1
1
1
6
5
2
2
2
3
3
1
1
1
1
1
1
1
1
5
1
1
1
1
1
1
6
5
1
1
1
1
1
1
2
2
2
2
2
2
2
4
4
4
3
3
3
3
4
2
2
2
2
4
4
4
4
3
3
2
2
2
3
3
1
1
1
1
1
1
1
1
5
1
1
1
1
6
5
1
1
1
1
Safety
Precautions
Operating
Requirements
Parts and
Features
Start Up
Guide
Controls
Dishwasher
Loading
Dishwasher
Use
Dishwasher
Care
Troubleshooting
23
DISHWASHER USE
PROPER USE OF DETERGENT
IMPORTANT:
•
Use automatic dish washing detergent only. Other detergents can
produce excessive suds that can overflow out of the dishwasher and
reduce washing performance.
•
Add detergent just before starting a cycle.
•
Store detergent tightly closed in a cool, dry place. Fresh automatic
dishwasher detergent results in better cleaning.
DETERGENT DISPENSER
1. Push the dispenser cover release catch to open the main wash
detergent compartment.
NOTE:
The flap is always open at the end of a dishwashing cycle.
2. Add the recommended amount of detergent to the detergent
compartment.
Safety
Precautions
Operating
Requirements
Parts and
Features
Start Up
Guide
Controls
Dishwasher
Loading
Dishwasher
Use
Dishwasher
Care
Troubleshooting
24

HOW MUCH DETERGENT TO USE
The amount of detergent to use depends on the soil level of your load, the
type of detergent used and the hardness of your water.
•
If you use too little detergent, dishes won’t be clean.
•
If you have soft water and use too much detergent, glassware will etch.
Water Hardness
Water hardness varies depending on your water source. For the best
results, your dishwasher is designed to operate with water that has a
hardness of no more than 7 grains per gallon. Test kits are available from
all major appliance parts retail outlets. If your water has a hardness over 8
grains per gallon, you may consider installing a water softener or regularly
use an additive to enhance the performance of your detergent.
PROPER USE OF RINSE AID
Rinse aid prevents water from forming droplets that can dry as spots or
streaks. A small amount of the rinse aid is released into the final rinse
water, which allows water to drain from the dishes.
Rinse aid greatly improves drying performance after the final rinse.
Your dishwasher is designed to use a LIQUID rinse aid. Do not use a solid
or bar-type rinse aid.
3. Press down on the top of the cover to secure.
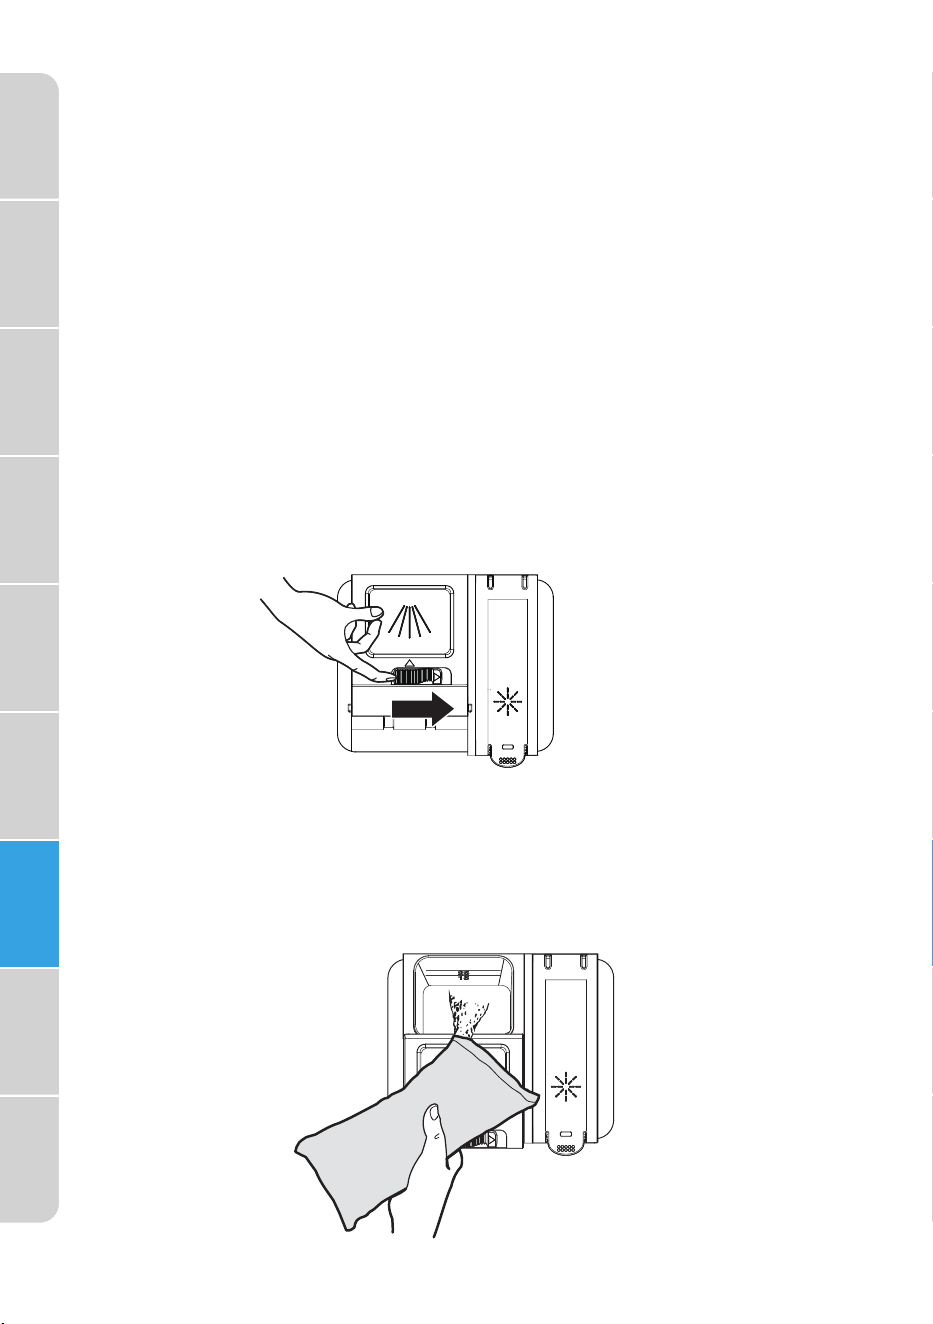
RINSE AID DISPENSER
Under normal conditions, you will need to fill the rinse aid dispenser
approximately once a month. Rinse aid is released through an opening in
the dispenser. You do not need to wait until the dispenser is empty to refill
it. Try to keep it full, but be careful not to overfill it.
Safety
Precautions
Operating
Requirements
Parts and
Features
Start Up
Guide
Controls
Dishwasher
Loading
Dishwasher
Use
Dishwasher
Care
Troubleshooting
25
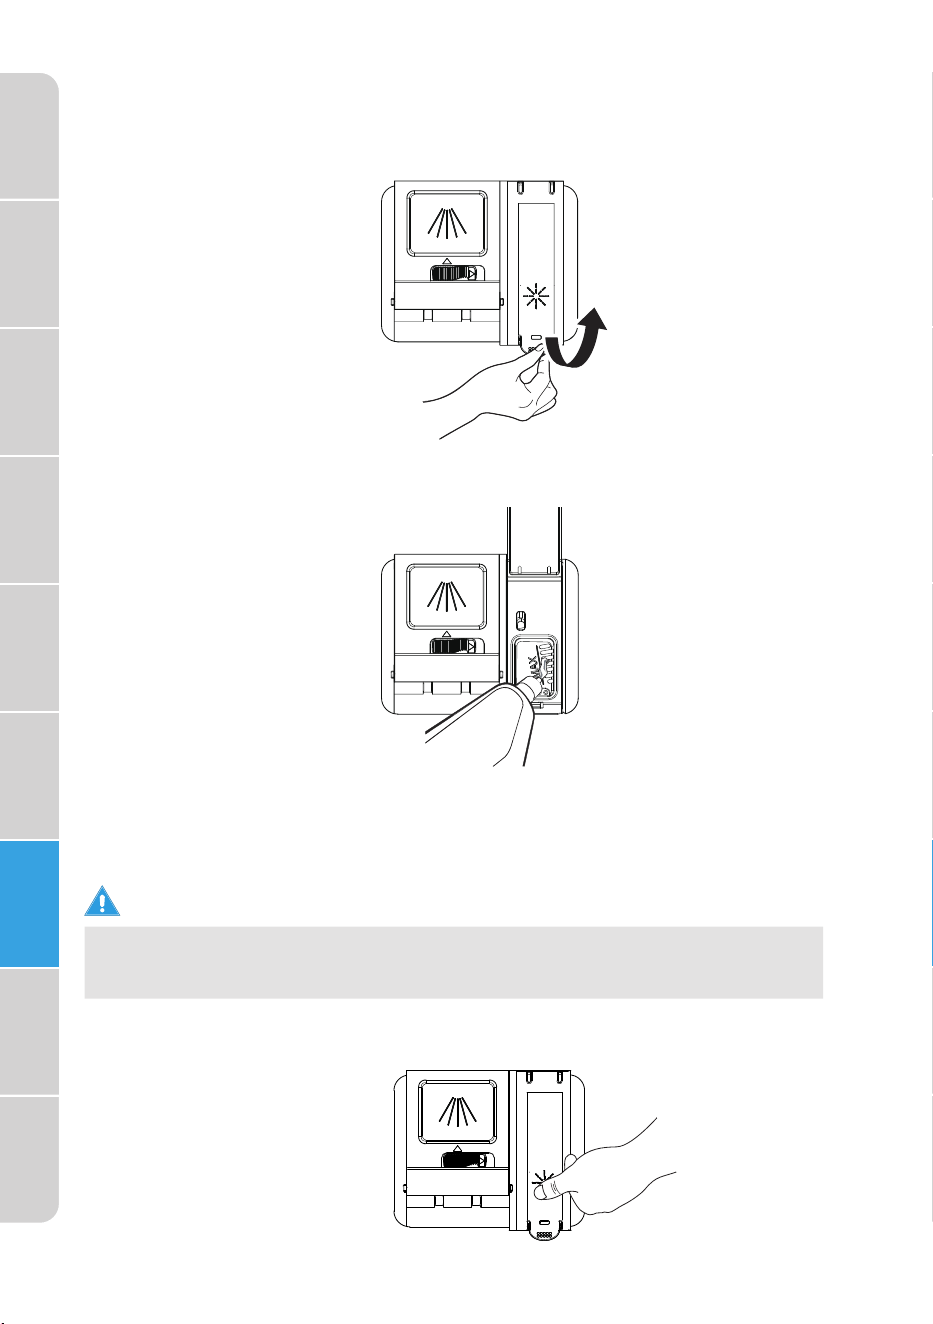
To refill the rinse aid dispenser
1. Lift up the end tab of rinse aid cover to open.
2. Fill the rinse aid dispenser with liquid rinse aid until full.
DO NOT overfill.
NOTE:
Use the viewing port when filling the rinse aid reservoir.
Do not fill the reservoir above the full level indicator. Excess rinse aid
can overflow during the wash cycle.
WARNING
3. Press the rinse aid cover down firmly to close.
Safety
Precautions
Operating
Requirements
Parts and
Features
Start Up
Guide
Controls
Dishwasher
Loading
Dishwasher
Use
Dishwasher
Care
Troubleshooting
26

WASHING SPECIAL ITEMS
If you have doubts about washing a particular item, check with the
dishware manufacturer to make sure it is dishwasher safe.
Material
Dishwasher
Safe
Comments
Aluminum Possible High water temperature and detergents
can affect finish of anodized aluminum.
Unfinished aluminum will be discolored.
Disposable
Aluminum
No Do not wash disposable aluminum pans in
the dishwasher These might shift during
washing and transfer black marks to dishes
and other items.
Bottles and
cans
No Wash bottles and cans by hand. Labels
attached with glue can loosen and clog the
spray arms or pump and reduce washing
performance.
Cast Iron No Seasoning will be removed and iron will rust.
China /
Stoneware
Yes Always check manufacturer’s
recommendations before washing. Antique,
hand-painted, or over-the-glaze patterns
may fade, gold leaf can discolor or fade.
Crystal Yes Check manufacturer’s recommendations
before washing. Some types of leaded crystal
can etch with repeated washing.
Gold No Gold-colored flatware will discolor.
Glass Yes Milk glass yellows with repeated dishwasher
washing.
Hollow-
Handle
Knives
No Handles of some knives are attached to
the blade with adhesive that can loosen if
washed in the dishwasher.
Pewter
Brass,
Bronze
No High water temperatures and detergent can
discolor or pit the finish.
Disposable
Plastics
No Cannot withstand high water temperatures
and detergents.
Plastics Yes Always check manufacturer’s
recommendations before washing. Plastics
vary in their capacity to withstand high
temperatures and detergents. Load plastics
in top rack only.
Stainless
Steel
Yes Run a rinse cycle if not washing immediately.
Prolonged contact with food containing
salt, vinegar, milk products, or fruit juice can
damage finish.
Safety
Precautions
Operating
Requirements
Parts and
Features
Start Up
Guide
Controls
Dishwasher
Loading
Dishwasher
Use
Dishwasher
Care
Troubleshooting
27

Material
Dishwasher
Safe
Comments
Sterling
Silver or
Silver Plate
Yes Run a rinse cycle if not washing immediately.
Prolonged contact with food containing
salt, acid, or sulfide (eggs, mayonnaise, and
seafood) can damage finish.
Tin No Can rust.
Wooden
Ware
No Wash by hand. Always check manufacturer’s
instructions before washing. Untreated wood
can warp, crack, or lose its finish.
DISHWASHER CARE
CLEANING
CLEANING THE EXTERIOR
In most cases, regular use of a soft, damp cloth or sponge and a mild
detergent is all that is necessary to clean outside of your dishwasher.
Clean the stainless steel door and handle regularly with a clean, soft cloth
to remove debris.
IMPORTANT: Do not use appliance wax, polish, bleach, or products
containing chlorine to clean the stainless steel door.
Control Panel
Gently clean the control panel with a clean, soft cloth.
CLEANING THE INTERIOR
The tub is made of stainless steel designed to resist rust and corrosion if
the dishwasher is scratched or dented.
Hard water minerals can cause a white film to build up on the inside
surfaces, especially just beneath the door area.
Do not clean the dishwasher interior until it has cooled. Wear rubber
gloves. Do not use any type of cleanser other than dishwasher detergent
because it may cause foaming or create suds.
DOOR GASKET
Clean the steel inner door and tub with a clean, soft damp cloth.
Using a damp cloth, clean around the door gasket regularly to remove
food particles.
Safety
Precautions
Operating
Requirements
Parts and
Features
Start Up
Guide
Controls
Dishwasher
Loading
Dishwasher
Use
Dishwasher
Care
Troubleshooting
28
CONTROL PANEL
Clean the Control Panel gently with a lightly dampened cloth.
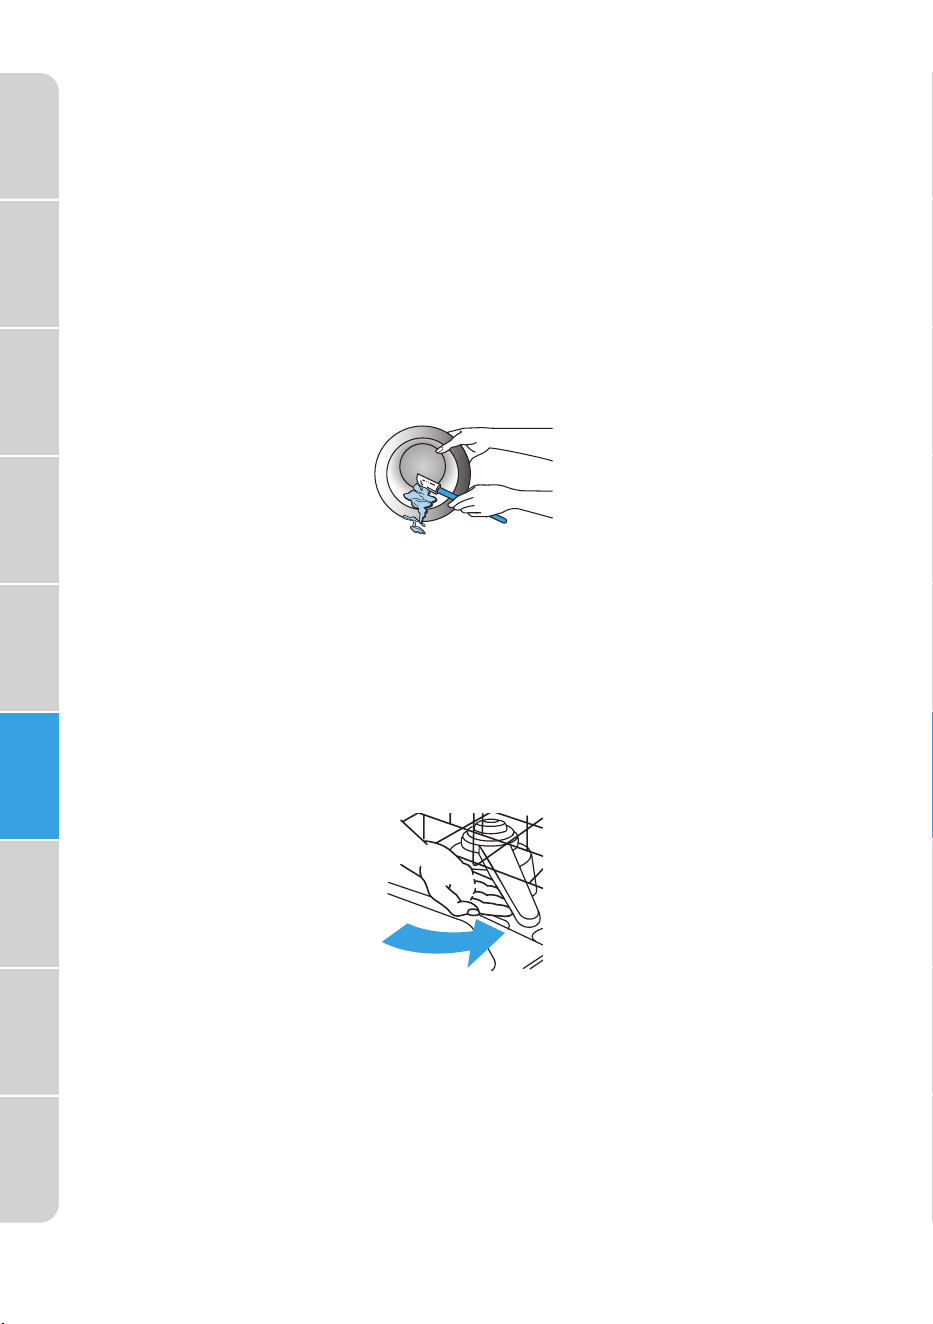
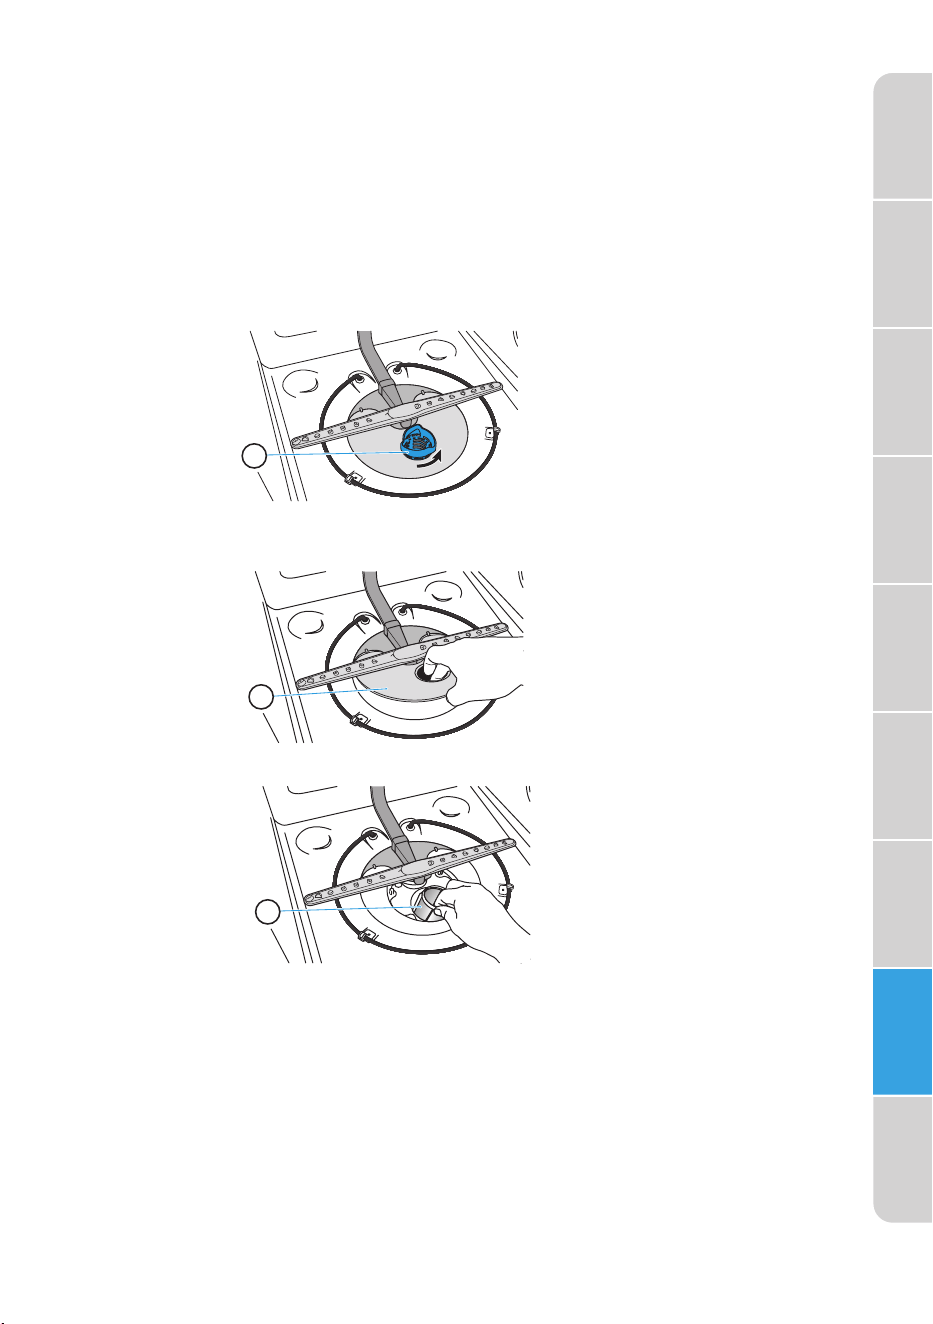
CLEANING THE FILTERS
Check and clean the filters regularly for best performance.
1. Remove the lower dishwasher rack.
2. Rotate the Cylinder filter counterclockwise a quarter turn and lift up to
remove.
a Cylinder Filter
3. Empty the Cylinder filter and rinse it under running water.
4. Remove the Fine filter.
a Fine Filter
5. Remove the Micro filter from the bottom of the tub.
a Micro Filter
6. Inspect both the Fine filter and the Micro filter for debris, and then
clean them by holding the filters under slow running water.
NOTE: A stiff, plastic bristle brush may be needed to remove some
debris.
7. Reinstall the filters in reverse order making sure the Cylinder filter locks
into place.
Safety
Precautions
Operating
Requirements
Parts and
Features
Start Up
Guide
Controls
Dishwasher
Loading
Dishwasher
Use
Dishwasher
Care
Troubleshooting
29
A
A
A
NOTE: Failure to correctly re-install the filters will result in diminished
performance and a potential need for service.

DRAIN AIR GAP
Check the drain air gap anytime your dishwasher isn’t draining well.
Some state or local plumbing codes require the addition of a drain air
gap between a built-in dishwasher and the home drain system. If a drain
is clogged, a drain air gap prevents water from backing up into the
dishwasher.
The drain air gap is usually located on top of the sink or countertop near
the dishwasher.
NOTE: The drain air gap is an external plumbing device that is not part of
your dishwasher. The warranty provided with your dishwasher does not
cover service costs directly associated with the cleaning or repair of the
external drain air gap.
To Clean the Drain Air Gap:
Clean the drain air gap periodically to ensure proper drainage of
your dishwasher. Follow the cleaning instructions provided by the
manufacturer.
With most types:
1. Turn off the dishwasher.
2. Lift off the metal cover, and then unscrew the plastic cap.
3. Clean the plastic cap with a toothpick.
STORING
STORING FOR THE SUMMER
Protect your dishwasher during the summer months by turning off the
water supply and power supply to the dishwasher.
WINTERIZING YOUR DISHWASHER
Protect your dishwasher and home against water damage caused by
freezing water lines. If your dishwasher is left in a seasonal dwelling or
could be exposed to near freezing temperatures, have your dishwasher
winterized by authorized service personnel.
Prepare for Storage:
1. Turn off electrical power to the dishwasher.
2. Turn off the water supply.
3. Place a pan under the inlet valve, and then disconnect the water line
from the inlet valve.
4. Disconnect the drain line from the pump and drain water into the pan.
Safety
Precautions
Operating
Requirements
Parts and
Features
Start Up
Guide
Controls
Dishwasher
Loading
Dishwasher
Use
Dishwasher
Care
Troubleshooting
30

Prepare for Use:
1. Reconnect the water, drain and electrical power supply.
2. Turn on water and electrical power supply.
3. Fill detergent cup and run the dishwasher through a heated wash
cycle.
4. Check the connections for leaks.
TROUBLESHOOTING
DISHWASHER NOT OPERATING PROPERLY
PROBLEM POSSIBLE CAUSE SOLUTION
Dishwasher
does not
run or stops
during a cycle
There is no power to the
dishwasher.
Replace fuse or reset
circuit breaker.
The door is not closed
tightly and latched.
Close and latch the door.
Most cycles pause for
5 minutes near the start
of a cycle to let the dishes
soak.
This is normal, and reduces
the energy required to
clean the dishes.
Certain cycles repeatedly
pause for 15 to 65 seconds
during the main wash.
This is normal.
The Delay feature is
selected.
To reset, see “Options” in
the Controls section.
Dishwasher
does not start
a cycle
Control Lock feature is
activated.
Deactivate Control Lock.
See “Additional Features”
in the Controls section.
Dishwasher
will not fill
The water shutoff valve is
not turned on.
Turn on the water valve.
The door is not closed
tightly and latched.
Close and latch the door.
Water pressure is too low. Verify a minimum of
20 psi water pressure is
maintained during the
filling operation.
Safety
Precautions
Operating
Requirements
Parts and
Features
Start Up
Guide
Controls
Dishwasher
Loading
Dishwasher
Use
Dishwasher
Care
Troubleshooting
31

PROBLEM POSSIBLE CAUSE SOLUTION
Dishwasher
seems to run
too long
The water supplied to
the dishwasher is not hot
enough.
The dishwasher runs
longer while heating water,
and a delay automatically
occurs in some wash
and rinse cycles until the
water reaches the proper
temperature.
Run the water in the
adjacent sink until it gets
hot before turning on the
dishwasher.
The Sanitize option is
selected.
The cycle time increases
to heat the water to the
correct temperature for
sanitizing.
The cycle time will vary
depending on soil level.
When heavy soil is
detected, the Normal cycle
will automatically increase
the cycle time.
Dishwasher is connected
to the Cold water supply.
Verify the dishwasher is
connected correctly to the
Hot water supply.
Water
remains in the
dishwasher
NOTE: A small
amount of
clean water
around the
outlet in the
bottom of
the tub is
normal. It
keeps the seal
lubricated.
The cycle is not complete
or it is in a pause.
The water will drain when
the cycle is completed.
The drain hose is kinked. Straighten the drain hose.
The knockout plug is still
in the garbage disposal.
Remove the knockout plug.
Drain hose is connected to
the garbage disposal, and
the garbage disposal is
not empty.
Run the garbage disposal
until it is empty.
Drain is clogged. Check the air gap.
Detergent
remains in the
dispenser
The cycle has not
completed.
Close the door and press
START to complete cycle.
The detergent is damp or
has clumped.
Remove detergent and
replace with fresh dry
dishwasher detergent.
An item was blocking the
dispenser.
Remove item. Remove
detergent and replace
with fresh dry dishwasher
detergent.
The spray arm is blocked. Load the dishes in a
manner that does not
block the spray arm from
rotating freely.
Safety
Precautions
Operating
Requirements
Parts and
Features
Start Up
Guide
Controls
Dishwasher
Loading
Dishwasher
Use
Dishwasher
Care
Troubleshooting
32

PROBLEM POSSIBLE CAUSE SOLUTION
Grinding,
grating,
crunching
or buzzing
sounds
A hard object or powder
detergent granules have
entered the wash module.
IMPORTANT: Clear glass
is hard to see in water.
and could result in a cut
wound.
Using care, remove the
hard object. If the noise
was caused by detergent
granules, the noise should
stop once the detergent is
ground up.
NOTE: If the noise persists
after a complete cycle, call
for service.
Beeps
Indicates the wash cycle is
completed.
NOTE: A rapid beep
indicates an error
condition.
This is normal.
See “Error Codes” for
further direction.
Suds in the
Tub
Used wrong type of
detergent.
Use only detergent
approved for automatic
dishwashers.
Dishwasher
Leaks
Excessive suds caused by
using improper detergent.
Use only detergent
approved for automatic
dishwashers.
Dishwasher is not level. Level the Dishwasher. See
Installation Instructions.
Rinse Aid
light is on
The Rinse Aid level is low. Add liquid Rinse Aid.
DISHES ARE NOT COMPLETELY CLEAN
PROBLEM POSSIBLE CAUSE SOLUTION
Food
residue
remains
on the
dishes
Dishwasher is not
loaded correctly.
See “Dishwasher Loading.”
The wrong wash
cycle for the dish
load was selected.
Select the wash cycle based on the
most difficult soil in the dishwasher load.
If you have some items with heavier
soils, use a heavier washing cycle.
Water
temperature is too
low.
For best results, the temperature of the
incoming water should be a minimum
of 120°F (49°C).
Used incorrect
amount of
detergent.
Use a minimum of 1 Tbsp. (15 g)
detergent per load. Heavy soil and/or
hard water generally requires additional
detergent.
Safety
Precautions
Operating
Requirements
Parts and
Features
Start Up
Guide
Controls
Dishwasher
Loading
Dishwasher
Use
Dishwasher
Care
Troubleshooting
33
Ineffective or
inferior detergent.
Midea recommends Industry leading
detergents, especially in the pod/tab form.

PROBLEM POSSIBLE CAUSE SOLUTION
Food
residue
remains
on the
dishes
(cont.)
Detergent is too
old.
Detergent must be fresh to be effective.
Store detergent in a cool, dry area.
Detergent is
caked in the
dispenser.
Do not allow detergent to sit for
several hours in a wet dispenser. Clean
dispenser and refill with fresh, dry
detergent.
The pump or
spray arm is
clogged with
labels from
bottles and cans.
Check pump and spray arm for labels
and remove the labels.
The pressure of
the water coming
into the home is
too low.
Water pressure should be 20 to 80 psi
(138 to 552 kPa) for proper dishwasher
fill. A booster pump on the water
supply can be added if pressure is too
low.
High suds are
slowing the wash
arm.
Use only detergent recommended for
the dishwasher. Do not use soap or
laundry detergents.
SPOTS AND STAINS ON DISHES
PROBLEM POSSIBLE CAUSE SOLUTION
Spotting and
filming on dishes
Rinse Aid dispenser
is empty.
Add a liquid rinse aid to the
dispenser.
Hard water. High
mineral content in
your water
Use a rinse aid and keep
the dispenser filled to help
eliminate spotting and
filming. Increase setting on
Rinse aid dispenser 1 number
per cycle until spotting is
eliminated.
NOTE: If your water hardness
is 13 grains (223 ppm)
or above, it is strongly
recommended that you
install a home water softener.
Water temperature
is too low.
For best results, water
should be a minimum 120°F
(49°C) as it enters the
dishwasher.
Did not use enough
detergent.
Use a minimum of 1 Tbsp.
(15 g) of detergent per
load. Heavy soil and/or hard
water generally require extra
detergent.
Safety
Precautions
Operating
Requirements
Parts and
Features
Start Up
Guide
Controls
Dishwasher
Loading
Dishwasher
Use
Dishwasher
Care
Troubleshooting
34

PROBLEM POSSIBLE CAUSE SOLUTION
Spotting and
filming on dishes
(cont.)
Detergent is too old. Detergent must be fresh and
dry to be effective. Store
detergent in a cool, dry area.
Home water
pressure is too low
to fill dishwasher
properly.
Water pressure to the home
should be 20 to 80 psi
(138 to 552 kPa) for proper
dishwasher fill. A booster
pump on the water supply
can be added if pressure is
too low.
Silica film or
etching
Using too much
detergent
If you have soft water use
less detergent, but do not
use less than 1 Tbsp. (15 g)
per load.
The inlet water
temperature
exceeds 150°F
(65°”C).
Lower the incoming water
temperature.
Black or gray
marks on dishes
Aluminum items
rubbing dishes
during washing.
Disposable
aluminum items
can break down in
the dishwasher and
cause marking.
Hand wash aluminum items.
Remove aluminum markings
by using a mild abrasive
cleaner.
Orange stains
on plastic dishes
or dishwasher
interior
Large amounts of
tomato-based foods
on dishes placed in
the dishwasher.
Use a stain removal product
to remove stains from
your dishwasher. Stains
will not affect dishwasher
performance.
DISHES DO NOT DRY COMPLETELY
PROBLEM POSSIBLE CAUSE SOLUTION
Dishes are not
completely dry
NOTE: Plastics
often need towel
drying.
Dishes are not
loaded properly
to allow water
drainage.
Do not overload dishwasher.
Place glasses and cups in
the rack so that the bottom
surface is slanted to allow
water to run off.
Rinse Aid not used
or dispenser is
empty.
Use a liquid rinse aid to
speed drying and keep the
dispenser full.
Used an air dry
or energy-saving
option.
For dryer dishes, select a
Cycle that allows a Heated
Dry option.
Safety
Precautions
Operating
Requirements
Parts and
Features
Start Up
Guide
Controls
Dishwasher
Loading
Dishwasher
Use
Dishwasher
Care
Troubleshooting
35

DISHES ARE DAMAGED DURING A CYCLE
PROBLEM POSSIBLE CAUSE SOLUTION
Dishes are chipped
NOTE: Some types of
china and glassware
might be too delicate
for automatic dish
washing. Wash by
hand.
Dishes not loaded
properly.
Load the dishes and
glasses so they are
stable and will not strike
together from washing
action.
Moving the rack
in or out of the
dishwasher too
quickly.
Minimize chipping by
moving the rack in and
out slowly.
36
Safety
Precautions
Operating
Requirements
Parts and
Features
Start Up
Guide
Controls
Dishwasher
Loading
Dishwasher
Use
Dishwasher
Care
Troubleshooting
ERROR C
ODES
CODE MEANING POSSIBLE CAUSE
POSSIBLE SOLUTION
Express light flashes
and dishwasher
beeps for 30
seconds
Either the water
flow is insucient,
or the water
pressure from the
incoming line is
too high
• Make sure that the water is turned on
to the dishwasher.
• Make sure that the water pressure is
20~100 psi.
• Check the drain hose.
• Contact Customer Service.
Normal thgil
flashes and
dishwasher beeps
for 30 seconds
Overflow or leak
sensor activated
• Faucet is not opened
• Water pressure is too low
• The drain hose is plugged.
• Other (parts failure of inlet or
drain system).
• A leak
• Too much water in the
tub
Turn o water to the dishwasher,
then check the filter system for
blockage. Unblock if necessary.
If there is no water in the tub, contact
Customer Service
flash and
dishwasher beeps
for 15 seconds
Communication
exception or issue
The display board can’t receive
or a dnes t’nac draob niameht
signal for over 20 seconds
Contact Customer Service.
Heavy, Normal and
Express lights

MIDEA
DISHWASHER
LIMITED
WARRANTY
ATTACH YOUR RECEIPT HERE. PROOF OF PURCHASE
IS REQUIRED TO OBTAIN WARRANTY SERVICE.
Please have the following information available when
you call the Customer Service Center:
■ Name, address and telephone number
■ Model number and serial number
■ A clear, detailed description of the problem
■ Proof of purchase including dealer or retailer
name and address
IF YOU NEED SERVICE:
1. Before contacting us to arrange service, please determine whether your product requires
repair. Some questions can be addressed without service. Please take a few minutes to
review the Troubleshooting section of the User Manual, or visit http://us.Midea.com/support
2. All warranty service is provided exclusively by our authorized Midea Service Providers, in the
U.S. and Canada.
Midea Customer Service
In the U.S.A. or Canada, call 1-866-646-4332.
If outside the 50 States of the United States or Canada, contact your authorized Midea dealer to
determine whether another warranty applies.
LIFETIME LIMITED WARRANTY
WHAT IS COVERED
FIRST YEAR LIMITED WARRANTY (PARTS AND LABOR)
For one year from the date of purchase, if this major appliance is installed, operated and
maintained according to instructions attached to or furnished with the product, Midea America
Corporation (hereafter “Midea”) will pay for factory specified replacement parts and repair
labor to correct defects in materials or workmanship that existed when this major appliance was
purchased, or at its sole discretion replace the product. In the event of product replacement, your
appliance will be warranted for the remaining term of the original unit’s warranty period.
LIFETIME LIMITED WARRANTY (STAINLESS STEEL TUB AND INNER DOOR LINER ONLY)
For the lifetime of the product from the date of original purchase, when this major appliance is
installed, operated and maintained according to instructions attached to or furnished with the
product, Midea will pay for factory specified parts and repair labor for the following components
to correct non-cosmetic defects in materials or workmanship that existed when this major
appliance was purchased:
■ Stainless steel tub
■ Inner door liner
YOUR SOLE AND EXCLUSIVE REMEDY UNDER THIS LIMITED WARRANTY SHALL BE PRODUCT
REPAIR OR REPLACEMENT AS PROVIDED HEREIN. Service must be provided by a Midea
designated service company. This limited warranty is valid only in the 50 States of the United
States or Canada and applies only when the major appliance is used in the country in which it
was purchased. This limited warranty is effective from the date of original consumer purchase.
Proof of original purchase date is required to obtain service under this limited warranty.
37

LIFETIME LIMITED WARRANTY
WHAT IS NOT COVERED
1. Commercial, non-residential or multiple-family use, or use inconsistent with published user,
operator or installation instructions.
2. In-home Instruction on how to use your product.
3. Service to correct improper product maintenance or installation, installation not in accordance
with electrical or plumbing codes or correction of household electrical or plumbing (i.e. house
wiring, fuses, plumbing or water inlet hoses).
4. Consumable parts (i.e. light bulbs, batteries, air or water filters, etc.).
5. Defects or damage caused by the use of non-genuine Midea parts or accessories.
6. Damage from accident, misuse, abuse, fire, floods, electrical issues, acts of God or use with
products not approved by Midea.
7. Repairs to parts or systems to correct product damage or defects caused by unauthorized
service, alteration or modification of the appliance.
8. Cosmetic damage including scratches, dents, chips, and other damage to appliance finishes
unless such damage results from defects in materials and workmanship and is reported to
Midea within 30 days.
9. Routine maintenance of the product.
10. Discoloration, rust or oxidation of surfaces resulting from caustic or corrosive environments
including but not limited to high salt concentrations, high moisture or humidity or exposure to
chemicals.
11. Pick-up or delivery. This product is intended for in-home repair.
12. Travel or transportation expenses for service in remote locations where an authorized Midea
servicer is not available.
13. Removal or reinstallation of inaccessible appliances or built-in fixtures (i.e. trim, decorative
panels, flooring, cabinetry, islands, countertops, drywall, etc.) that interfere with servicing,
removal or replacement of the product.
14. Service or parts for appliances with original model/serial numbers removed, altered or not
easily identified.
The cost of repair or replacement under these excluded circumstances shall be borne by the
customer.
DISCLAIMER OF IMPLIED WARRANTIES
IMPLIED WARRANTIES, INCLUDING ANY IMPLIED WARRANTY OF MERCHANTABILITY OR
IMPLIED WARRANTY OF FITNESS FOR A PARTICULAR PURPOSE, ARE LIMITED TO ONE
YEAR OR THE SHORTEST PERIOD ALLOWED BY LAW. Some states and provinces do not allow
limitations on the duration of implied warranties of merchantability or fitness, so this limitation
may not apply to you. This warranty gives you specific legal rights, and you also may have other
rights that vary from state to state or province to province.
DISCLAIMER OF REPRESENTATIONS OUTSIDE OF WARRANTY
Midea makes no representations about the quality, durability, or need for service or repair of this
major appliance other than the representations contained in this warranty. If you want a longer
or more comprehensive warranty than the limited warranty that comes with this major appliance,
you should ask Midea or your retailer about buying an extended warranty.
LIMITATION OF REMEDIES; EXCLUSION OF INCIDENTAL AND CONSEQUENTIAL DAMAGES
YOUR SOLE AND EXCLUSIVE REMEDY UNDER THIS LIMITED WARRANTY SHALL BE
PRODUCT REPAIR AS PROVIDED HEREIN. MIDEA SHALL NOT BE LIABLE FOR INCIDENTAL OR
CONSEQUENTIAL DAMAGES. Some states and provinces do not allow the exclusion or limitation
of incidental or consequential damages, so these limitations and exclusions may not apply to you.
This warranty gives you specific legal rights, and you also may have other rights that vary from
state to state or province to province.
11/19
38


r
、
�idea
make yourself at home

Version A - 03- 2023
MODELE N° :
FR
Avertissement :
MDF24P1BST
1-844-224-1 614
www.midea.com
Lave-vaisselle
Alimentation électrique : 120V
Fréquence : 60Hz
Capacité : 12 Couverts
Avant d'utiliser ce produit, merci
de lire attentivement ce manuel et
le conserver pour toute référence
ultérieure. La conception et les
spécifications sont susceptibles
d'être modifiées sans préavis pour
l'amélioration du produit. Consult-
er votre revendeur ou le fabricant
pour plus de détails.
MANUEL DE L'UTILISATEUR
Extension gratuite
de 3 mois* de la
période de garantie limitée
initiale ! Il vous suffit d'envoyer
une photo de votre preuve
d'achat par SMS via :
L'extension de garantie est
valable pour les trois mois suivant
immédiatement la fin de la
période de garantie initiale du
produit.

.....................................................3
...................................................7
..............................................................7
................................................7
....................................................8
................................................................................9
...................................................................9
...................................................................10
..................................................................11
......................... 11
............................................... 11
............................................. 11
......................................................................................12
.....................................................
15
..............................................................
......................................................................................
16
17
.....................................................18
........................................................................................19
............................................................... 21
...................................... 22
Cher utilisateur
Merci de laisser Midea vous aider à "faire comme chez vous". Ce
manuel fait partie de notre engagement à vous donner entière satis-
faction. Merci de lire attentivement ce manuel avant de l'utiliser et le
conserver dans un endroit pratique pour vous y référer ultérieurement.
Pour nous aider à mieux vous servir, merci d’envisager d'enregistrer
votre produit à l'aide de notre application pratique Midea MSmartlife,
en visitant HYPERLINK http://www.midea.com, ou en envoyant une
photo de votre preuve d'achat par SMS au 1-844-224-1614.
En utilisant l'option texto, vous obtiendrez une extension de garantie
supplémentaire de 3 mois immédiatement après l'expiration de la
garantie originale du produit.
SECURITE DU LAVE-VAISSELLE
EXIGENCES OPERATIONNELLES
PIECES ET CARACTERISTIQUES
GUIDE DE DEMARRAGE
CONTROLES
Exigences sur l'emplacement
Exigences sur l'alimentation en eau
Système de filtrage
Système de lavage Intuitif
Panier supérieur réglable
Méthode de nettoyage de votre Lave-vaisselle
Avant d'utiliser votre lave-vaisselle
Utiliser votre nouveau lave-vaisselle
Tableau des cycles et options
Chargement du lave-vaisselle
Panier Supérieur
Chargement du panier supérieur
Panier Inférieur
Chargement de l’argenterie
Modèles de chargement recommandés
3
............................................
...............................................
24
....................................................... 27
................................................................................................... 30
................................................................................... 31
............................................................................................ 36
....................................................................................... 37
SECURITE DU LAVE-VAISSELLE
28
25
UTILISATION DU LAVE-VAISSELLE
ENTRETIEN DU LAVE-VAISSELLE
DEPANNAGE
GARANTIE
Utilisation correcte du detergent
Lavage des eléments spéciaux
Stockage
Codes erreur
VOTRE SECURITE ET CELLE DES AUTRES SONT TRES IMPOR-
TANTES.
Afin d’éviter toute blessure à l'utilisateur ou à d'autres personnes et
tout dommage matériel, les instructions présentées ici doivent être
respectées. Un fonctionnement incorrect dû à l'ignorance des
instructions peut causer des dommages ou des dégâts, y compris
la mort.
Le niveau de risque est indiqué par les indications suivantes.
AVER-
TISSEMENT
ATTENTION
AVERTISSE-
MENT
Ce symbole indique un risque de mort ou de blessure grave.
Ce symbole indique la possibilité de blessures ou de
dommages matériels.
Ce symbole indique la possibilité d'une tension dangereuse
constituant un risque de choc électrique et pouvant entraîner
des blessures graves ou mortelles.
GUIDE DE
DEMARRAGE
CONTROLES DEPANNAGE
CHARGEMENT
DU LAVE-VAIS-
SELLE
UTILISATION DU
LAVE-VAISSELLE
ENTRETIEN DU
LAVE-VAISSELLE
PIECES ET
CARACTERIS-
TIQUES
EXIGENCES
OPERA-
TIONNELLES
Précautions de
sécurité
.......................................................

4
AVERTISSEMENT / INSTRUCTIONS DE MISE A LA TERRE
Pour un appareil relié à la terre via un cordon :
Pour un appareil connecté en permanence :
AVERTISSEMENT
Une mauvaise connexion du conducteur de mise à la terre de l'appareil
peut entraîner un risque de choc électrique. En cas de doute sur la mise à
la terre de l'appareil, consulter un électricien ou un technicien qualifié.
Ne pas modifier la fiche si elle est fournie avec l'appareil. Si la fiche ne
s'adapte pas à la prise, faire installer une prise appropriée par un
électricien qualifié.
Cet appareil doit être mis à la terre. En cas de dysfonctionnement ou de
panne, la mise à la terre réduira le risque de choc électrique en fournissant
un chemin de moindre résistance pour le courant électrique. Si cet appareil
est équipé d'un cordon comportant un conducteur de mise à la terre et
une fiche de mise à la terre, la fiche doit être branchée dans une prise
appropriée installée et mise à la terre conformément à tous les codes et
règlements locaux.
Cet appareil doit être connecté à un système de câblage permanent en
métal mis à la terre, ou un conducteur de mise à la terre de l'équipement
doit être installé avec les conducteurs du circuit et connecté à la borne ou
au câble de mise à la terre de l'équipement sur l'appareil.
CONSIGNES IMPORTANTES DE SE-
CURITE
En utilisant votre lave-vaisselle, respecter les précautions de base,
notamment les suivantes :
• Lire toutes les instructions avant d'utiliser le lave-vaisselle.
• N'utiliser le lave-vaisselle que pour sa fonction prévue.
• N'utiliser que des détergents ou des produits de rinçage/mouillage
recommandés pour une utilisation dans un lave-vaisselle et les tenir
hors de portée des enfants.
• Lors du chargement des articles à laver :
• Placer les articles tranchants de manière à ce qu'ils ne risquent pas
d'endommager le joint de la porte.
• Charger les couteaux tranchants avec les manches vers le haut pour
réduire le risque de blessures par coupure.
• Ne pas laver les articles en plastique à moins qu'ils ne portent la
mention "Dishwasher Safe (Lavable en Lave-vaisselle)" ou une men-
tion équivalente. Pour les articles en plastique qui ne portent pas cette
mention, vérifier les recommandations du fabricant.
• Les articles qui ne sont pas adaptés au lave-vaisselle peuvent fondre et
créer un risque d'incendie.
• Ne pas toucher l'élément chauffant pendant ou immédiatement après
l'utilisation.
GUIDE DE
DEMARRAGE
CONTROLES DEPANNAGE
CHARGEMENT
DU LAVE-VAIS-
SELLE
UTILISATION DU
LAVE-VAISSELLE
ENTRETIEN DU
LAVE-VAISSELLE
PIECES ET
CARACTERIS-
TIQUES
EXIGENCES
OPERA-
TIONNELLES
Précautions de
sécurité

5
SAUVEGARDER CES INSTRUCTIONS
AVERTISSEMENT
Risque de Basculement
• Ne pas faire fonctionner votre lave-vaisselle si tous les panneaux de
l'enceinte ne sont pas correctement en place.
• Ne pas modifier les commandes.
• Ne pas faire un usage abusif de l’appareil, s'asseoir ou se tenir debout
sur la porte du lave-vaisselle ou les paniers à vaisselle.
• Afin de réduire le risque de blessure, ne pas laisser les enfants jouer
dans ou sur un lave-vaisselle.
• Dans certaines conditions, de l'hydrogène gazeux peut être produit
dans un système à eau chaude qui n'a pas été utilisé pendant deux
semaines ou plus. LE GAZ D'HYDROGENE EST EXPLOSIF. Si le
système à eau chaude n'a pas été utilisé pendant une telle période,
avant d'utiliser le lave-vaisselle, ouvrir tous les robinets d'eau chaude
et laisser l'eau couler de chacun d'eux pendant plusieurs minutes. Cela
permettra de libérer toute accumulation d'hydrogène gazeux. Comme
ce gaz est inflammable, ne pas fumer et ni utiliser de flamme nue
pendant cette période.
• L'utilisation de techniciens non qualifiés ou de pièces de rechange non originales
peut entraîner des dommages graves au produit et/ou des blessures.
Toutes les réparations doivent être effectuées par un technicien
qualifié utilisant uniquement des pièces de rechange d'origine.
• Ne pas stocker ni utiliser de matériaux combustibles, d'essence ou
d'autres vapeurs et liquides inflammables à proximité de cet appareil
ou de tout autre appareil.
• Tenir les jeunes enfants et les nourrissons éloignés du lave-vaisselle
lorsqu'il fonctionne.
• Ne pas utiliser le lave-vaisselle si la ligne électrique ou la fiche sont
endommagées, et ne pas brancher le lave-vaisselle dans une prise
endommagée. Le non-respect de ces instructions peut entraîner un
choc électrique.
• Ce manuel ne couvre pas toutes les conditions ou situations possibles
qui peuvent se produire.
• Retirer la porte du compartiment de lavage en retirant un vieux
lave-vaisselle du service ou en le mettant au rebut.
CET APPAREIL EST DESTINE A UN USAGE DOMESTIQUE
UNIQUEMENT
• Ne pas utiliser le lave-vaisselle avant qu'il ne soit
complètement installé.
• Ne pas appuyer sur la porte ouverte.
• Cela pourrait entraîner des blessures graves ou des
coupures.
GUIDE DE
DEMARRAGE
CONTROLES DEPANNAGE
CHARGEMENT
DU LAVE-VAIS-
SELLE
UTILISATION DU
LAVE-VAISSELLE
ENTRETIEN DU
LAVE-VAISSELLE
PIECES ET
CARACTERIS-
TIQUES
EXIGENCES
OPERA-
TIONNELLES
Précautions de
sécurité

6
Avertissements relatifs à la Proposition 65 de l'Etat de Californie :
AVERTISSEMENT
Risque de Suocation
ATTENTION
• Avant de jeter votre ancien appareil, retirer la porte ou le couvercle
afin que les enfants ne puissent pas se cacher ou rester coincés à
l'intérieur de votre ancien appareil.
• Le non-respect de ces instructions peut entraîner la mort ou des
lésions cérébrales.
• Ne jamais utiliser de produits chimiques agressifs pour nettoyer votre
lave-vaisselle. Certains produits contenant du chlorure peuvent
endommager votre lave-vaisselle et présenter des risques pour la
santé !
• Ne jamais utiliser de produits de nettoyage à la vapeur pour nettoyer
votre lave-vaisselle. Le fabricant ne sera pas responsable des éventuels
dommages ou conséquences.
• Afin d’éviter d'endommager le lave-vaisselle, ne pas utiliser de produits
chimiques puissants, de nettoyants abrasifs, de tampons à récurer (en
métal ou en plastique), de chiffons abrasifs ou d'essuie-tout pour
nettoyer le panneau extérieur de la porte du lave-vaisselle.
Vous risqueriez d'endommager le panneau extérieur du lave-vaisselle.
• Il est fortement recommandé à l'utilisateur de se familiariser avec la
procédure de fermeture de l'arrivée d'eau et la procédure de fermeture
de l'arrivée d'électricité. Consulter les instructions d'installation ou
contacter votre installateur pour plus d'informations.
• Si le lave-vaisselle s'écoule dans un broyeur d'aliments, vérifier que le
broyeur soit complètement vide avant de faire fonctionner le
lave-vaisselle.
• Les lave-vaisselle résidentiels certifiés NSF/ANSI 184 ne sont pas
destinés aux établissements alimentaires agréés.
• Protéger votre lave-vaisselle des intempéries. Le protéger contre le gel
afin d’éviter d'endommager la valve de remplissage. Les dommages
causés par le gel ne sont pas couverts par la garantie.
• Ne pas utiliser à l'extérieur.
AVERTISSEMENT : Cancer et Troubles de la Reproduction
-www.P65Warnings.ca.gov.
GUIDE DE
DEMARRAGE
CONTROLES DEPANNAGE
CHARGEMENT
DU LAVE-VAIS-
SELLE
UTILISATION DU
LAVE-VAISSELLE
ENTRETIEN DU
LAVE-VAISSELLE
PIECES ET
CARACTERIS-
TIQUES
EXIGENCES
OPERA-
TIONNELLES
Précautions de
sécurité

7
EXIGENCES OPERATIONNELLES
EXIGENCES ELECTRIQUES
AVERTISSEMENT
Risque de Chocs Electriquesd
EXIGENCES SUR L’EMPLACEMENT
EXIGENCES SUR L’ALIMENTATION EN EAU
• Mettre le lave-vaisselle à la terre.
• Raccorder la prise de terre au connecteur de terre vert de la boîte à
bornes.
• Ne pas utiliser de rallonge électrique.
• Le non-respect de ces instructions peut entraîner la mort, un incendie
ou un choc électrique.
• Installer le lave-vaisselle à l'abri des intempéries. Protéger le
lave-vaisselle contre le gel pour éviter la rupture éventuelle de la vanne
de remplissage. De telles ruptures ne sont pas couvertes par la
garantie. Pour des informations sur l'entreposage en hiver, voir la
section "Entreposage" de la section "Entretien du lave-vaisselle".
• Installer et mettre le lave-vaisselle à niveau sur un sol qui supporte son
poids et dans un endroit adapté à sa taille et à son utilisation.
• La température de l'alimentation en eau doit être comprise entre 120°F
et 150°F (49°C et 66°C).
• L'alimentation en eau doit maintenir une pression d'eau entre 20 et 80
psi pour un débit susant.
Ce lave-vaisselle est conçu pour fonctionner sur une alimentation
électrique individuelle correctement câblée de 120 V, 60 Hz, 15 ou 20
ampères avec fusible et fil de cuivre uniquement. Il est recommandé
d'utiliser un fusible à retardement ou un disjoncteur, et de prévoir un
circuit séparé ne desservant que cet appareil. Si une prise de courant est
utilisée, elle doit être placée dans une armoire adjacente.
GUIDE DE
DEMARRAGE
CONTROLES DEPANNAGE
CHARGEMENT
DU LAVE-VAIS-
SELLE
UTILISATION DU
LAVE-VAISSELLE
ENTRETIEN DU
LAVE-VAISSELLE
PIECES ET
CARACTERIS-
TIQUES
EXIGENCES
OPERA-
TIONNELLES
Précautions de
sécurité
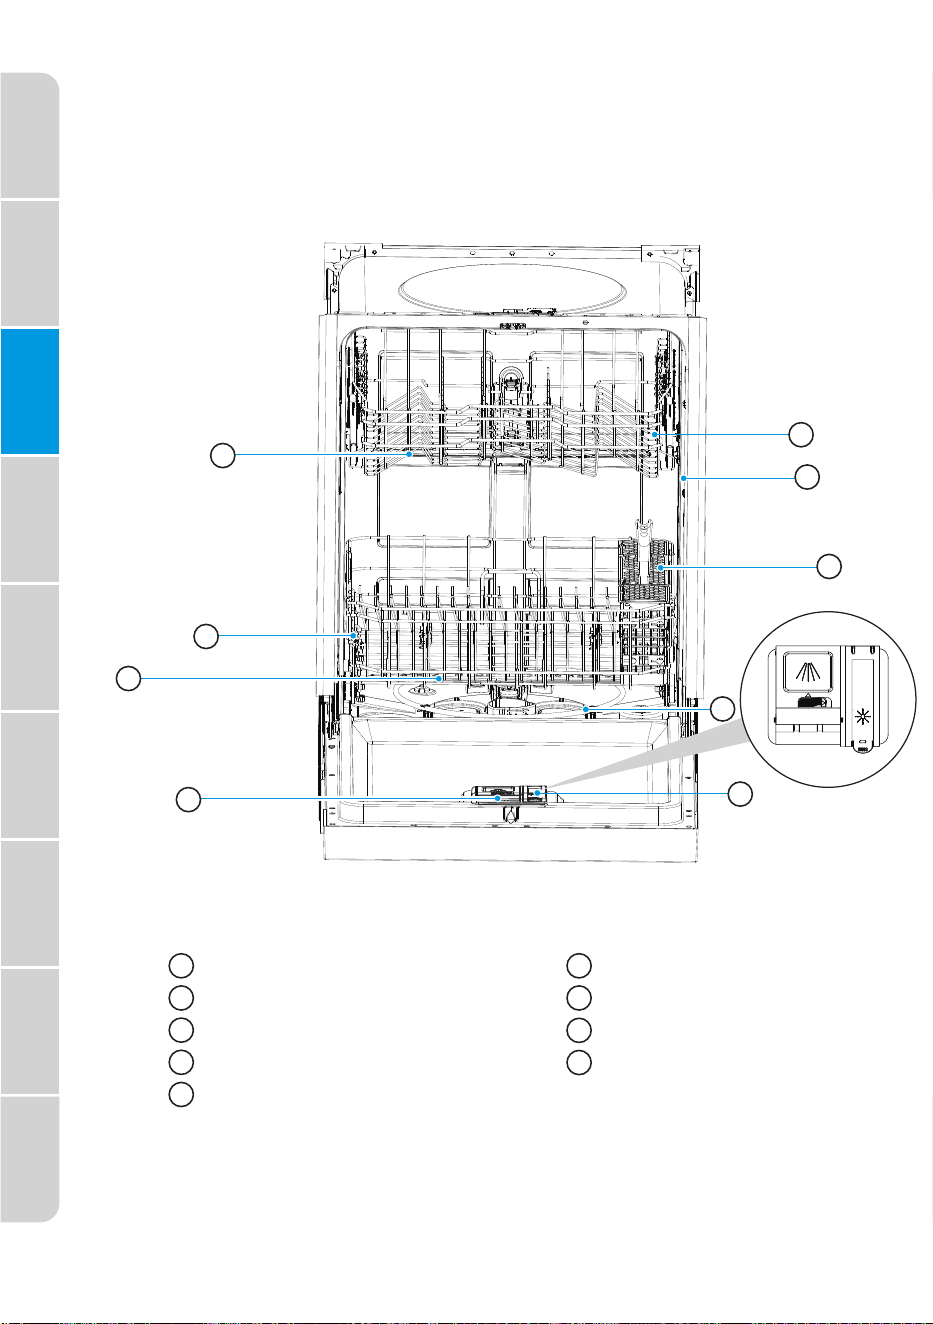
8
PIECES ET CARACTERISTIQUES
A
B
C
D
E
H
I
F
G
A
B
C
D
E
F
G
H
I
Bras de Pulvérisation Central
Bras de Pulvérisation Inférieur
Distributeur de Produit de Rinçage
Distributeur de Détergent
Panier Supérieur
Panier Inférieur
Elément Chauffant
Joint de la Cuve
Panier à Couverts
GUIDE DE
DEMARRAGE
CONTROLES DEPANNAGE
CHARGEMENT
DU LAVE-VAIS-
SELLE
UTILISATION DU
LAVE-VAISSELLE
ENTRETIEN DU
LAVE-VAISSELLE
PIECES ET
CARACTERIS-
TIQUES
EXIGENCES
OPERA-
TIONNELLES
Précautions de
sécurité
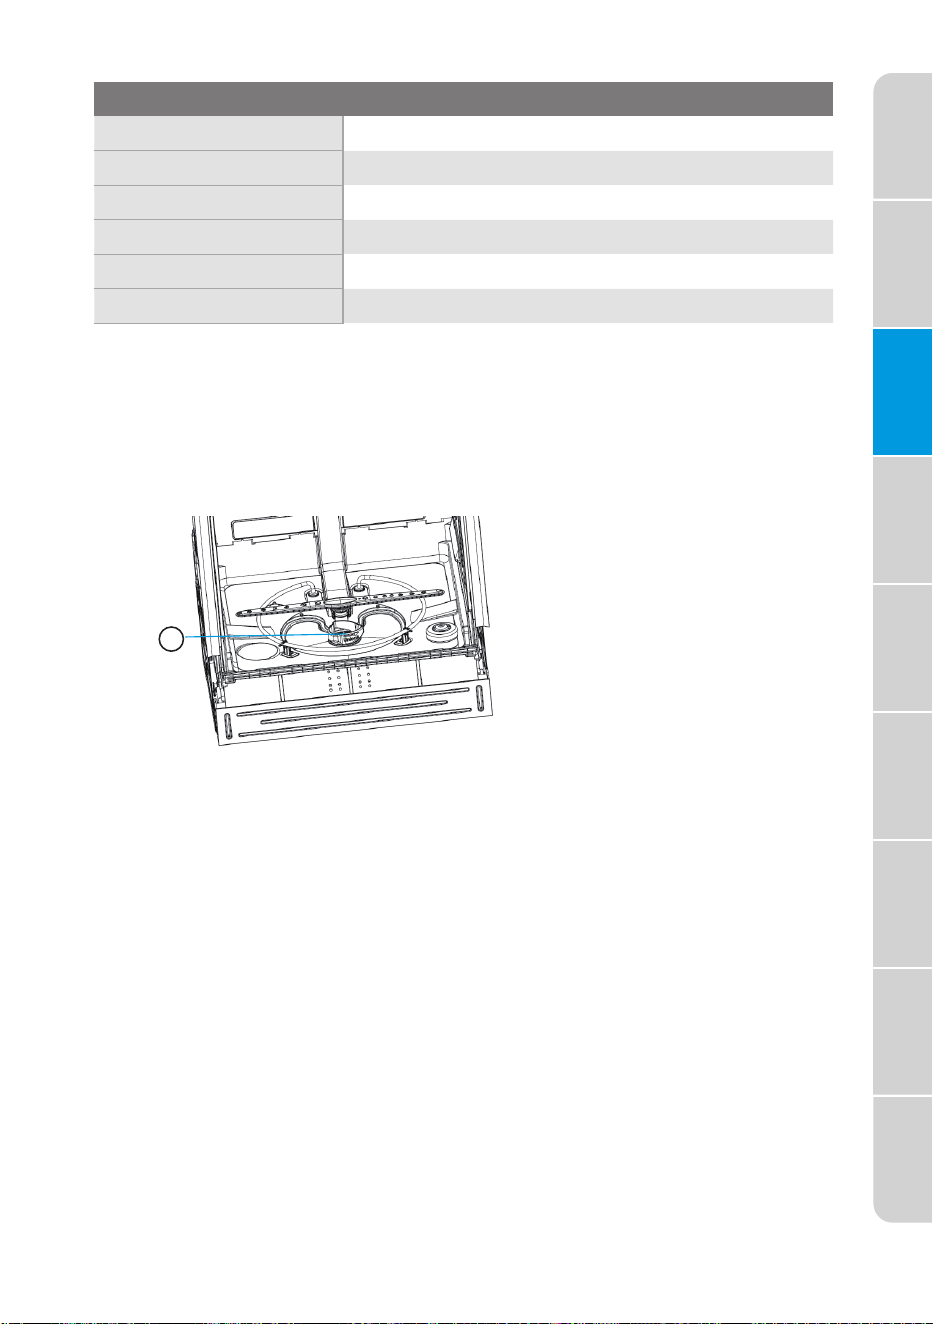
9
SPECIFICATIONS
12 Couverts
70 lb
120 volts, 60 Hz
Moteur de lavage 50 W Chauffage 840 W
20 - 80 psi (138 - 552 kPa)
SYSTÈME DE FILTRAGE
Emplacement du Filtre
SYSTÈME DE LAVAGE INTUITIF
23 3/5" x 22 7/10" x 33 3/4" (600x576x855mm)
A
Capacité:
Dimensions (LxPxH):
Poids Non Emballé:
Alimentation Electrique:
Puissance Nominale
Utilisée:
Pression d'Alimentation
en Eau:
Votre lave-vaisselle est équipé d'un système de filtres multiples, qui l'aide
à mieux fonctionner en utilisant moins d'eau et d'énergie.
Le système de filtration comprend trois filtres qui fonctionnent en combi-
naison pour séparer l'eau sale et l'eau propre dans des chambres
différentes.
Votre lave-vaisselle est équipé d'un système Smart Wash (Lavage Intuitif)
qui peut être utilisé en sélectionnant le cycle Automatique.
Le système Smart Wash détecte le niveau de saleté de la charge et ajuste
le cycle de lavage en conséquence. Votre lave-vaisselle peut déterminer
le type de cycle nécessaire pour nettoyer la vaisselle et nettoiera plus
ecacement à chaque fois.
GUIDE DE
DEMARRAGE
CONTROLES DEPANNAGE
CHARGEMENT
DU LAVE-VAIS-
SELLE
UTILISATION DU
LAVE-VAISSELLE
ENTRETIEN DU
LAVE-VAISSELLE
PIECES ET
CARACTERIS-
TIQUES
EXIGENCES
OPERA-
TIONNELLES
Précautions de
sécurité
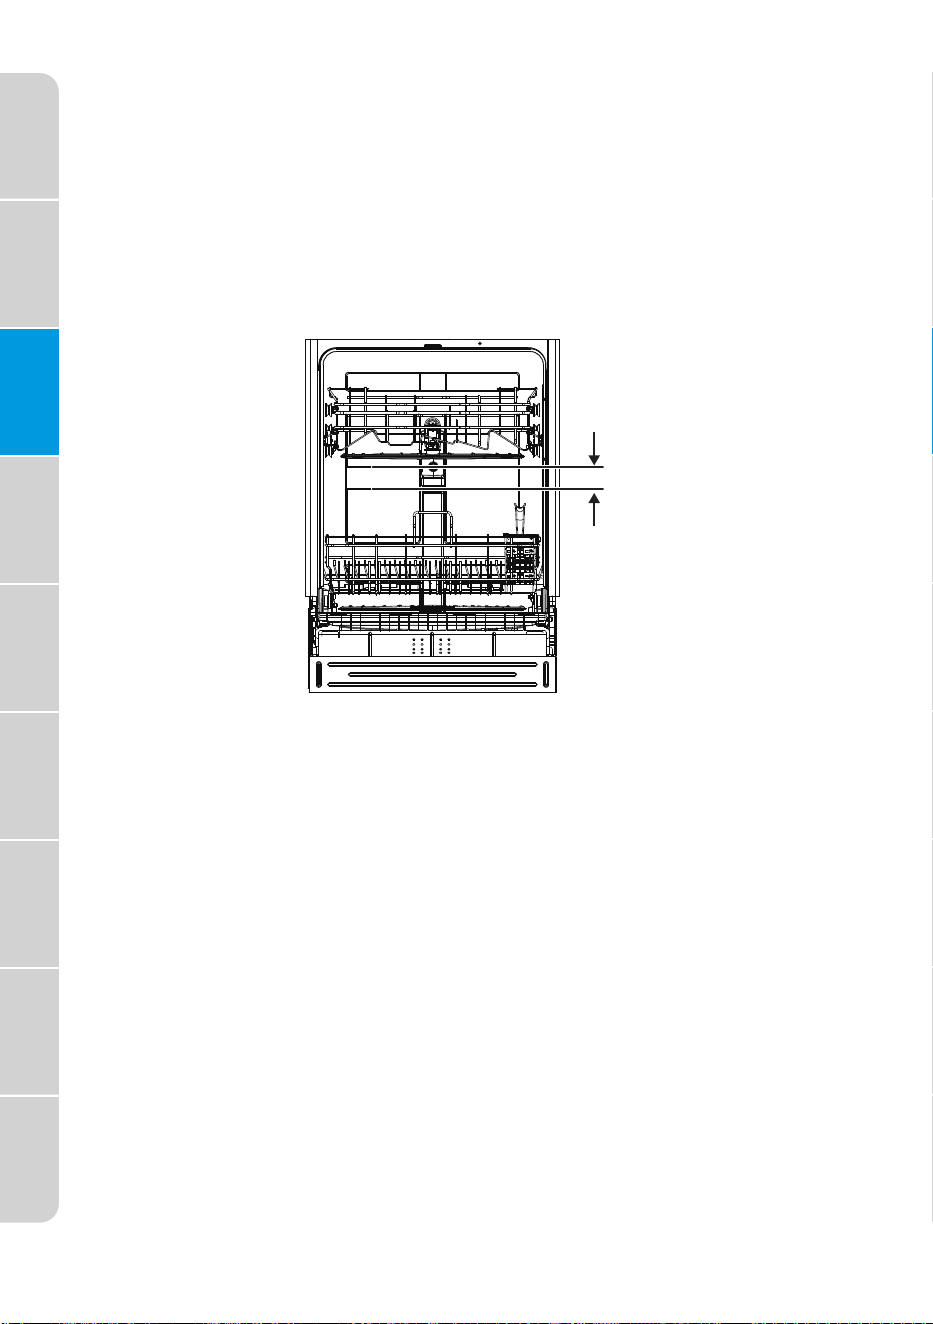
10
PANIER SUPÉRIEUR RÉGLABLE
2" (5,
08 cm)
La fonction de Panier Supérieur Réglable vous permet de charger des
articles plus grands dans le panier supérieur ou inférieur.
Le panier supérieur de votre lave-vaisselle peut être ajusté de 2" (5,08 cm).
Le réglage de l'espace libre du panier supérieur augmente ou diminue
l'espace libre du panier inférieur, comme indiqué.
Pour obtenir des instructions, consulter la section "Panier Supérieur Régla-
ble".
GUIDE DE
DEMARRAGE
CONTROLES DEPANNAGE
CHARGEMENT
DU LAVE-VAIS-
SELLE
UTILISATION DU
LAVE-VAISSELLE
ENTRETIEN DU
LAVE-VAISSELLE
PIECES ET
CARACTERIS-
TIQUES
EXIGENCES
OPERA-
TIONNELLES
Précautions de
sécurité

11
GUIDE DE DEMARRAGE
IMPORTANT :
MÉTHODE DE NETTOYAGE DE VOTRE LAVE-VAISSELLE
AVANT D’UTILISER VOTRE LAVE-VAISSELLE
UTILISER VOTRE NOUVEAU LAVE-VAISSELLE
GUIDE DE
DEMARRAGE
CONTROLES DEPANNAGE
CHARGEMENT
DU LAVE-VAIS-
SELLE
UTILISATION DU
LAVE-VAISSELLE
ENTRETIEN DU
LAVE-VAISSELLE
PIECES ET
CARACTERIS-
TIQUES
EXIGENCES
OPERA-
TIONNELLES
Précautions de
sécurité
• Eliminer/recycler correctement tous les matériaux d'emballage.
• Lire l'intégralité de ce manuel d'utilisation. Vous y trouverez des informa-
tions importantes sur la sécurité et des conseils d'utilisation utiles.
Votre lave-vaisselle nettoie en pulvérisant un mélange d'eau chaude et de
détergent via les bras d'aspersion contre les surfaces souillées.
Le lave-vaisselle se remplit d'eau qui recouvre la zone de filtration. L'eau est
ensuite pompée à travers les multiples filtres et bras d'aspersion. Les parti-
cules de saleté sont séparées de l'eau et sont évacuées par l'égout lorsque
l'eau est pompée et remplacée par de l'eau propre.
Le nombre de remplissages d'eau varie en fonction du cycle sélectionné.
REMARQUE : Afin de réduire la durée du cycle et éventuellement améliorer
les performances, ouvrir le robinet d'eau chaude le plus proche du lave-vais-
selle jusqu'à ce que l'eau soit chaude.
Couper l'eau.
1. Charger le lave-vaisselle. Voir "Chargement du Lave-Vaisselle".
2. Ajouter du détergent. Voir "Utilisation Correcte du Détergent".
3. Sélectionner le CYCLE et les OPTIONS souhaités. Voir "Tableaux des
Cycles et des Options".
• Seules les options disponibles pour le cycle sélectionné s'allument.
• Les commandes du cycle et des options sélectionnées s'allument pour
indiquer qu'elles sont sélectionnées.
4. Fermer fermement la porte pour la verrouiller.
5. Appuyer sur START.
1. Vérifier que les filtres ne contiennent pas de débris qui auraient pu être
introduits à partir de l'emballage ou pendant l'installation. Voir la section
"Nettoyage des Filtres".
2. Ajouter du produit de rinçage. Voir la section "Utilisation Correcte du
Produit de Rinçage".
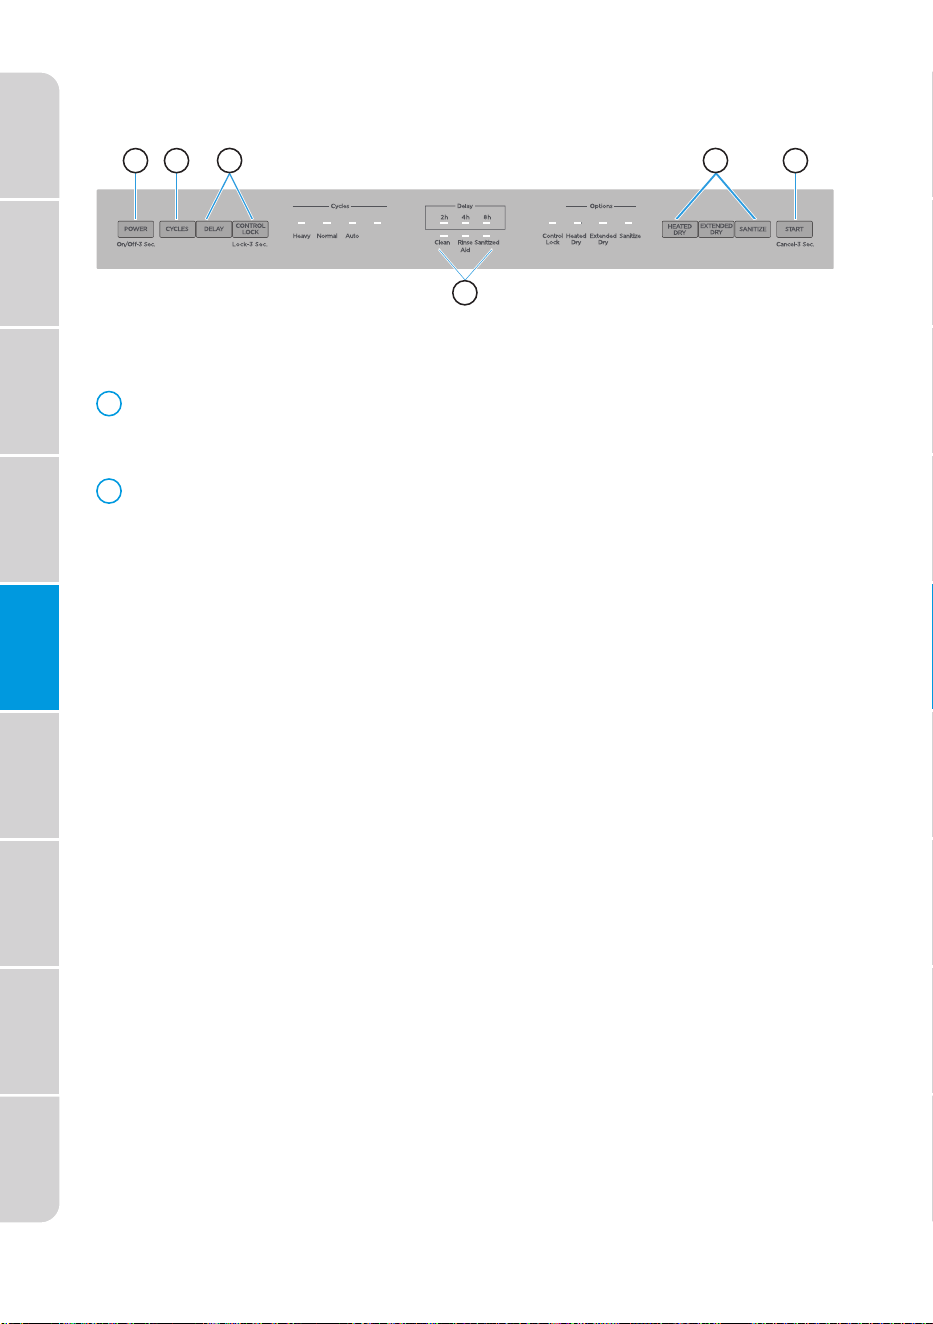
12
CONTROLES
REMARQUE : Lorsque la porte est fermée.
A
B
ALIMENTATION
Appuyer sur ce bouton pour mettre en marche ou arrêter le lave-vaisselle.
CYCLES
Appuyer sur ce bouton pour sélectionner le cycle de lavage correspon-
dant et l'indicateur de cycle s'allume. Les cycles Intensif, Automatique,
Normal, Express peuvent être sélectionnés.
Intensif
Le cycle intensif est destiné aux casseroles, poêles, cocottes et vaisselle
sur lesquelles la saleté a séché ou brûlé.
Normal
Le cycle normal, avec uniquement l'option Séchage à Chaud sélectionnée,
est recommandé pour laver et sécher complètement une charge complète
de vaisselle modérément sale. L'étiquette de consommation d'énergie est
basée sur cette combinaison de cycle et d'option avec le panier supérieur
en position haute.
Automatique
Le cycle automatique utilise des capteurs dans le lave-vaisselle pour
déterminer le niveau de saleté de la vaisselle, puis ajuste le cycle de lavage
pour optimiser les performances de lavage et la consommation d'eau et
d'énergie.
Quick
Le cycle quick
est destiné aux charges de vaisselle peu sales ou bien
rincées.
GUIDE DE
DEMARRAGE
CONTROLES DEPANNAGE
CHARGEMENT
DU LAVE-VAIS-
SELLE
UTILISATION DU
LAVE-VAISSELLE
ENTRETIEN DU
LAVE-VAISSELLE
PIECES ET
CARACTERIS-
TIQUES
EXIGENCES
OPERA-
TIONNELLES
Précautions de
sécurité
A
B
C
E
F
D
Quick

13
FONCTIONS ADDITIONNELLES
OPTIONS
C
D
Temporisation
La fonction de Temporisation vous permet de programmer le lave-vaisselle
afin qu'il commence le cycle de lavage sélectionné 2, 4 ou 8 heures plus tard.
Appuyer à plusieurs reprises sur la commande TEMPORISATION pour alterner
entre (2h/4h/8h). Le voyant situé à côté de l'heure sélectionnée s'allume.
REMARQUE : Pour annuler la fonction de temporisation, appuyer sur la
commande START pendant 3 secondes pour l'annuler. Pour commencer le
cycle de lavage immédiatement, appuyer de nouveau sur la touche START.
Verrouillage des commandes
Cette option permet de verrouiller toutes les commandes et d'empêcher
les enfants de modifier accidentellement le cycle du lave-vaisselle ou de le
mettre en marche.
• Appuyer sur la touche Verrouillage des Commandes pendant 3 secondes
pour activer ou annuler l'option de verrouillage des commandes. Une fois
la fonction sélectionnée, l'icône de verrouillage des commandes s'allume.
Si la fonction est annulée, l'icône de verrouillage des commandes s'éteint.
Assainir
Séchage à Chaud
Les options améliorent le cycle de lavage. Certaines options ne sont
disponibles qu'avec certains cycles de lavage. Se reporter aux "Tableaux des
Cycles et des Options" pour voir quelles options sont disponibles pour le
cycle de lavage que vous avez sélectionné.
• Appuyer sur la ou les commandes d'option souhaitées. La ou les commandes
d'option s'allument pour indiquer quelle(s) option(s) a (ont) été sélectionnée(s).
L'option d’assainissement permet de désinfecter la vaisselle et la verrerie
conformément à la norme NSF International NSF/ANSI 184 pour les lave-vais-
selle résidentiels.
Les lave-vaisselle résidentiels certifiés ne sont pas destinés à être utilisés dans
des établissements alimentaires agréés.
Lorsque l'option Assainir est sélectionnée, la température de l'eau atteint
69°C (156,2°F) au maximum.
Le témoin d'assainissement s'allume pour indiquer que le cycle de lavage
avec l'option d'assainissement est terminé. Le voyant s'éteint après l'ouver-
ture de la porte pendant 30 secondes.
REMARQUE : Il est possible que la température de l'eau n'atteigne pas 69°C
(156°F) en mode désinfection si la température de l'eau chaude entrante n'est
pas conforme aux exigences minimales de 49°C (120°F).
Lorsque l'option Séchage à Chaud est sélectionnée, le chauffage fonctionne
pendant le processus de séchage.
AVERTISSEMENT : Seuls les cycles d'assainissement ont été conçus
pour répondre aux exigences en matière d'élimination des salissures et
d'ecacité de l'assainissement. Il n'est pas prévu, directement ou
indirectement, que tous les cycles d'une machine certifiée aient passé
le test de performance d'assainissement.
GUIDE DE
DEMARRAGE
CONTROLES DEPANNAGE
CHARGEMENT
DU LAVE-VAIS-
SELLE
UTILISATION DU
LAVE-VAISSELLE
ENTRETIEN DU
LAVE-VAISSELLE
PIECES ET
CARACTERIS-
TIQUES
EXIGENCES
OPERA-
TIONNELLES
Précautions de
sécurité

E
F
14
TEMOINS LUMINEUX
DEMARRER
Séchage prolongé
Lorsque l'option de Séchage prolongé est sélectionnée, le fonctionnement du
chauffage et du ventilateur est prolongé afin d’améliorer encore les perfor-
mances de séchage. Le rinçage final est porté à 69°C (156,2°F) et prolonge le
séchage de 66 minutes.
Produit de Rinçage
Le témoin lumineux du produit de rinçage s'allume lorsque le niveau du
produit de rinçage est bas. Le produit de rinçage doit être ajouté dans le
distributeur de produit de rinçage.
Assainissement
Le témoin lumineux Assainissement s'allume lorsque le cycle utilisant l'option
Assainissement est terminé. Le voyant s'éteint lorsque la porte est ouverte
puis refermée.
Nettoyer
S'allume à la fin d'un cycle. S'éteint lorsque la porte est ouverte et que l'on
appuie sur un bouton, puis fermée ou que l'on appuie sur un bouton.
ANNULER - Pour annuler un cycle lorsque le lave-vaisselle est en marche,
appuyer sur la touche Démarrer pendant 3 secondes.
1. Ouvrir légèrement la porte et attendre quelques secondes que
l'action de lavage s'arrête.
2. Ouvrir la porte pour ajouter ou retirer des articles.
3. Fermer la porte, puis appuyer sur la touche DEMARRER pour
reprendre le cycle de lavage.
Démarrer - Fermer la porte et appuyer sur Démarrer. Le cycle commencera.
PAUSE - Si vous devez interrompre ou annuler un cycle de lavage en cours.
IMPORTANT : Ouvrir légèrement la porte, puis attendre que les bras
d'aspersion et l'action de lavage s'arrêtent avant d'ouvrir complètement la
porte. Vous éviterez ainsi d'être éclaboussé par de l'eau chaude.
GUIDE DE
DEMARRAGE
CONTROLES DEPANNAGE
CHARGEMENT
DU LAVE-VAIS-
SELLE
UTILISATION DU
LAVE-VAISSELLE
ENTRETIEN DU
LAVE-VAISSELLE
PIECES ET
CARACTERIS-
TIQUES
EXIGENCES
OPERA-
TIONNELLES
Précautions de
sécurité

TABLEAU DES CYCLES ET OPTIONS
Cycle
151 min
103 to 146 min
15
7.2 gal.
(27.2L)
3.1-7.13 gal.
11.7-27 L
3.1-7.13 gal.
11.7-27 L
4.1 gal.
(15.5L)
107 to 147 min
60 min
Selon le cycle sélectionné, les options disponibles pour la sélection s'allu-
ment.
Les durées des cycles sont approximatives et varient en fonction du cycle
de lavage et des options sélectionnées.
REMARQUE : Les options ajoutées peuvent allonger la durée du cycle et
utiliser plus d'eau.
L'eau chaude est nécessaire pour activer le détergent du lave-vaisselle et
faire fondre les résidus alimentaires gras.
Un capteur automatique vérifie la température de l'eau entrante. Si l'eau
n'est pas assez chaude, le cycle sera allongé afin de chauffer l'eau pour le
lavage principal.
Le capteur de lavage intuitif détecte le niveau de saleté de la charge de
vaisselle et peut augmenter ou diminuer la durée du cycle en fonction du
nombre de remplissages d'eau nécessaires pour nettoyer la charge.
Options Disponibles
Séchage à Chaud ou
Séchage Prolongé,
Assainissement
Séchage à Chaud ou
Séchage Prolongé,
Assainissement
Séchage à Chaud ou
Séchage Prolongé,
Assainissement
Séchage à Chaud ou
Séchage Prolongé,
Assainissement
Intensif
Normal
Automa-
tique
Q
uick
Utilisation d’Eau Durée du Cycle
GUIDE DE
DEMARRAGE
CONTROLES DEPANNAGE
CHARGEMENT
DU LAVE-VAIS-
SELLE
UTILISATION DU
LAVE-VAISSELLE
ENTRETIEN DU
LAVE-VAISSELLE
PIECES ET
CARACTERIS-
TIQUES
EXIGENCES
OPERA-
TIONNELLES
Précautions de
sécurité
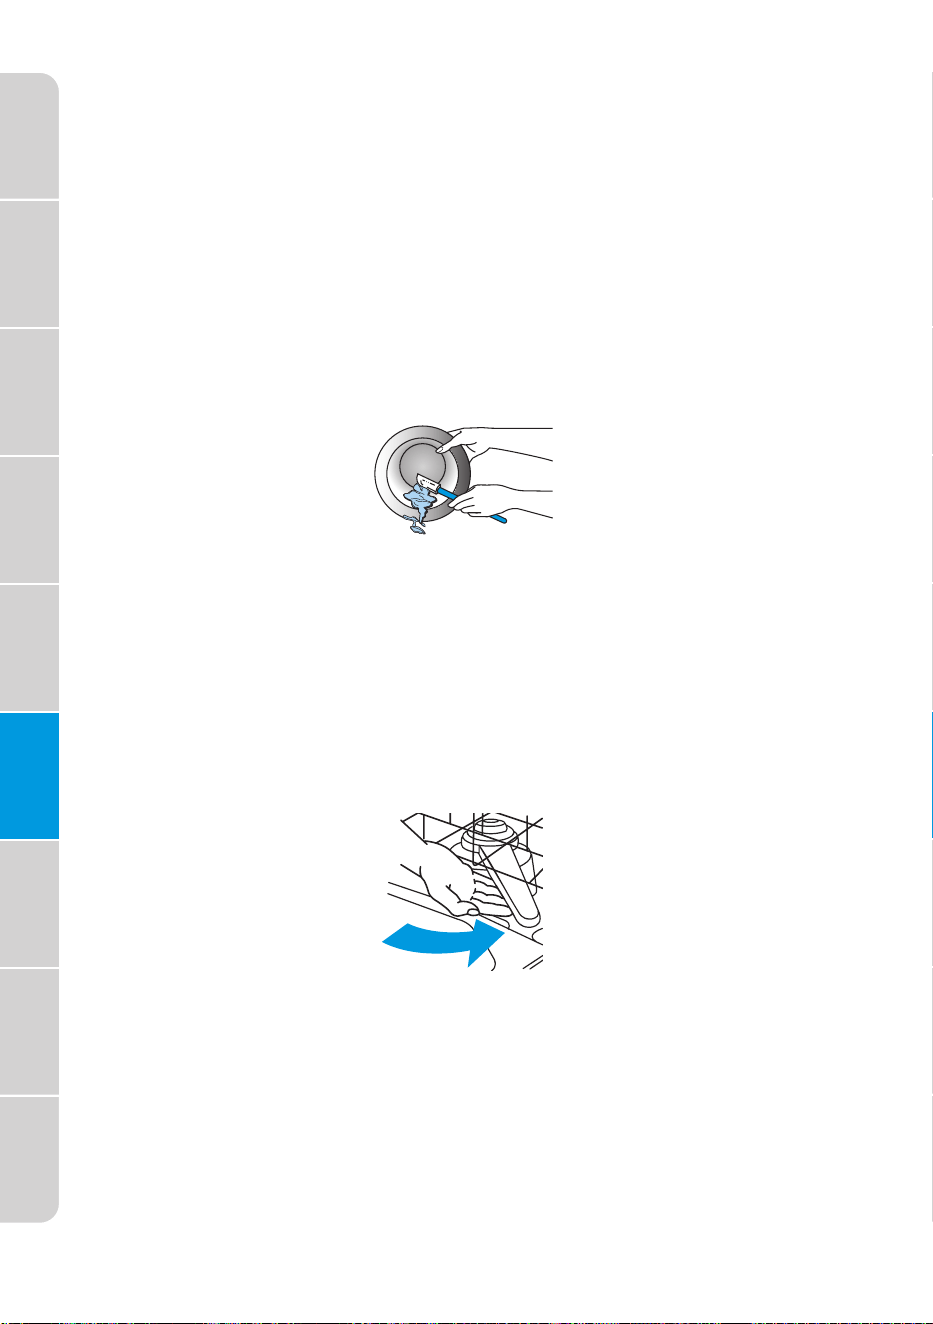
CHARGEMENT DU LAVE-VAISSELLE
PREPARER LES COUVERTS
CHARGER LES COUVERTS
CONSEILS D'UTILISATION POUR UN USAGE PEU BRUYANT
F
16
• Vider les liquides des verres et des tasses.
• Retirer les restes d'aliments, les os, les cure-dents et autres éléments durs
de la vaisselle et les jeter.
• Il n'est pas nécessaire de rincer la vaisselle à la main avant de la mettre
dans le lave-vaisselle, sauf dans les cas suivants :
• Les aliments tels que la mayonnaise, la moutarde, le vinaigre, le jus de
citron et les produits à base de tomate peuvent décolorer l'acier inoxy-
dable et les plastiques s'ils restent dessus pendant un certain temps.
• Les aliments brûlés doivent être détachés avant de mettre les ustensiles
de cuisine dans le lave-vaisselle.
• Il est IMPORTANT que le jet d'eau atteigne toutes les surfaces souillées.
• Charger la vaisselle de manière à ce qu'elle ne soit pas empilée ou qu'elle ne
se chevauche pas, si possible. Pour de meilleurs résultats de séchage, l'eau
doit pouvoir s'écouler de toutes les surfaces.
• Charger les casseroles et les poêles lourdes avec précaution. Les éléments lourds peuvent
abîmer l'intérieur en acier inoxydable de la porte s'ils tombent ou sont heurtés.
• Vérifier que les couvercles et les poignées des casseroles, les poêles à pizza,
les plaques à biscuits, etc. n'interfèrent pas avec la rotation du bras d'aspersion.
• Vérifier que les bras d'aspersion supérieurs et inférieurs ne sont pas bloqués
et se déplacent librement.
Afin d’éviter les bruits sourds et les claquements pendant le fonctionnement :
• Vérifier que les éléments légers sont bien fixés dans les supports.
• Vérifier que les couvercles et les poignées des casseroles, les poêles à pizza,
les plaques à biscuits, etc. ne touchent pas les parois intérieures et ne
gênent pas la rotation du bras d'aspersion.
• Charger la vaisselle de manière à ce qu'elle ne se touche pas.
REMARQUE : Pour les modèles encastrés, garder les bouchons de vidange
de l'évier fermés pendant le fonctionnement du lave-vaisselle afin d'éviter le
transfert de bruit par les drains.
GUIDE DE
DEMARRAGE
CONTROLES DEPANNAGE
CHARGEMENT
DU LAVE-VAIS-
SELLE
UTILISATION DU
LAVE-VAISSELLE
ENTRETIEN DU
LAVE-VAISSELLE
PIECES ET
CARACTERIS-
TIQUES
EXIGENCES
OPERA-
TIONNELLES
Précautions de
sécurité

PANIER SUPÉRIEUR
REGLER LE PANIER SUPERIEUR
IMPORTANT :
43
Position supérieure
1
Position inférieure
Sortir le panier supérieur.
2
17
Le panier supérieur du lave-vaisselle est conçu pour les tasses, les verres,
les petites assiettes, les bols et les articles en plastique portant la men-
tion "lavable au lave-vaisselle".
Le panier supérieur peut être facilement ajusté de 5 cm (2 po) vers le
haut ou vers le bas afin d’accueillir des éléments plus grands dans le
panier supérieur ou inférieur.
• Retirer tous les articles avant de régler la grille. La grille doit être vide.
Pour régler la hauteur de la grille supérieure, procéder comme suit :
Tirer le panier supérieur vers le
haut pour le retirer.
Fixer à nouveau le panier supérieur
aux roulettes supérieures ou
inférieures.
Pousser le panier supérieur.
GUIDE DE
DEMARRAGE
CONTROLES DEPANNAGE
CHARGEMENT
DU LAVE-VAIS-
SELLE
UTILISATION DU
LAVE-VAISSELLE
ENTRETIEN DU
LAVE-VAISSELLE
PIECES ET
CARACTERIS-
TIQUES
EXIGENCES
OPERA-
TIONNELLES
Précautions de
sécurité

CHARGEMENT DU PANIER SUPÉRIEUR
P S
10 P S
12 P S
18
REMARQUE : Les caractéristiques du panier de votre lave-vaisselle peuvent
varier par rapport aux dessins présentés.
IMPORTANT : Vérifier que les articles chargés dans le panier supérieur
n'interfèrent pas avec la rotation du bras d'aspersion central situé sous le
support supérieur. Vérifier l'absence d'interférence en tournant le bras
d'aspersion à la main.
• Placer les éléments de manière à ce que les extrémités ouvertes soient
orientées vers le bas pour le nettoyage et l'égouttage.
• Charger les verres et les tasses dans le panier supérieur uniquement. Le panier inférieur
n'est pas conçu pour les verres et les tasses. Vous risquez de les endommager.
• Placer les tasses et les verres dans les rangées entre les tiges. S'ils sont
placés au-dessus des tiges, ils risquent de se briser, de faire des taches d'eau
et d'être mal nettoyés.
• Les petits bols, les casseroles et autres ustensiles peuvent être placés dans le panier
supérieur. Charger les bols dans la section centrale pour une meilleure stabilité.
• La porcelaine, le cristal et les autres articles délicats ne doivent pas se toucher
pendant le fonctionnement du lave-vaisselle. Cela pourrait les endommager.
• Charger les éléments en plastique de façon à ce que la force du jet ne les
déplace pas pendant le cycle.
Organisation sur 8 Places
Organisation sur 10 Places
Organisation sur 12 Places
GUIDE DE
DEMARRAGE
CONTROLES DEPANNAGE
CHARGEMENT
DU LAVE-VAIS-
SELLE
UTILISATION DU
LAVE-VAISSELLE
ENTRETIEN DU
LAVE-VAISSELLE
PIECES ET
CARACTERIS-
TIQUES
EXIGENCES
OPERA-
TIONNELLES
Précautions de
sécurité

PANIER INFÉRIEUR
10
12
19
Le panier inférieur est conçue pour les assiettes, les bols à soupe, les
ustensiles de cuisine et de pâtisserie.
Le panier supérieur réglable vous permet de charger des articles d'une
hauteur maximale de 12,6 pouces dans le panier inférieur.
IMPORTANT : Les articles placés dans le panier inférieur doivent être
placés de manière à ne pas gêner la rotation des bras d'aspersion, à ne pas
bloquer l'arrivée d'eau et à ne pas empêcher le jet d'eau d'atteindre le
distributeur de détergent.
Organisation sur 8 Places
Organisation sur 12 Places
Organisation sur 10 Places
GUIDE DE
DEMARRAGE
CONTROLES DEPANNAGE
CHARGEMENT
DU LAVE-VAIS-
SELLE
UTILISATION DU
LAVE-VAISSELLE
ENTRETIEN DU
LAVE-VAISSELLE
PIECES ET
CARACTERIS-
TIQUES
EXIGENCES
OPERA-
TIONNELLES
Précautions de
sécurité
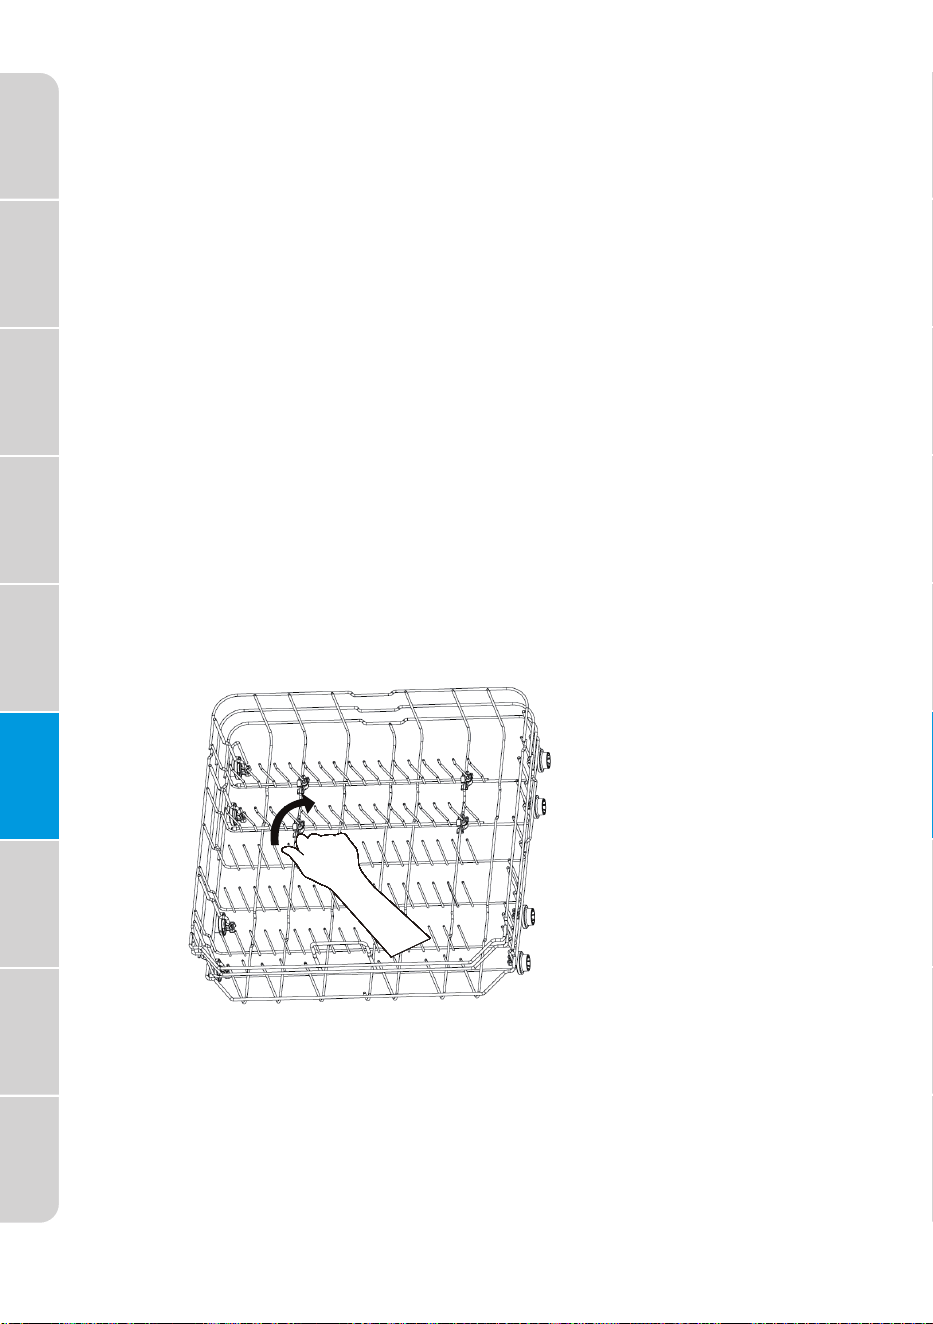
TIGES REGLABLES
CHARGER LE PANIER INFÉRIEUR
20
REMARQUE : Les caractéristiques du panier de votre lave-vaisselle
peuvent varier par rapport aux dessins illustrés.
Les tiges rabattables du panier inférieur facilitent le chargement d'articles
extra-larges ou difficiles à placer, comme les bols de service et les rôtis-
soires. Les tiges peuvent être laissées en position haute pour une utilisa-
tion normale, ou rabattues pour un chargement plus souple.
• Ne pas charger de verres, de tasses ou d'articles en plastique dans le panier
inférieur.
• Ne charger les petits articles dans le panier inférieur que s'ils sont fixés en
place.
• Charger les assiettes, les bols à soupe, etc. entre les tiges. Ne pas emboîter
les bols car le jet n'atteindra pas toutes les surfaces.
• Ne pas charger d'articles entre le panier inférieur et le côté de la cuve du
lave-vaisselle.
• Place les ustensiles de cuisine très sales face vers le bas dans le panier.
GUIDE DE
DEMARRAGE
CONTROLES DEPANNAGE
CHARGEMENT
DU LAVE-VAIS-
SELLE
UTILISATION DU
LAVE-VAISSELLE
ENTRETIEN DU
LAVE-VAISSELLE
PIECES ET
CARACTERIS-
TIQUES
EXIGENCES
OPERA-
TIONNELLES
Précautions de
sécurité
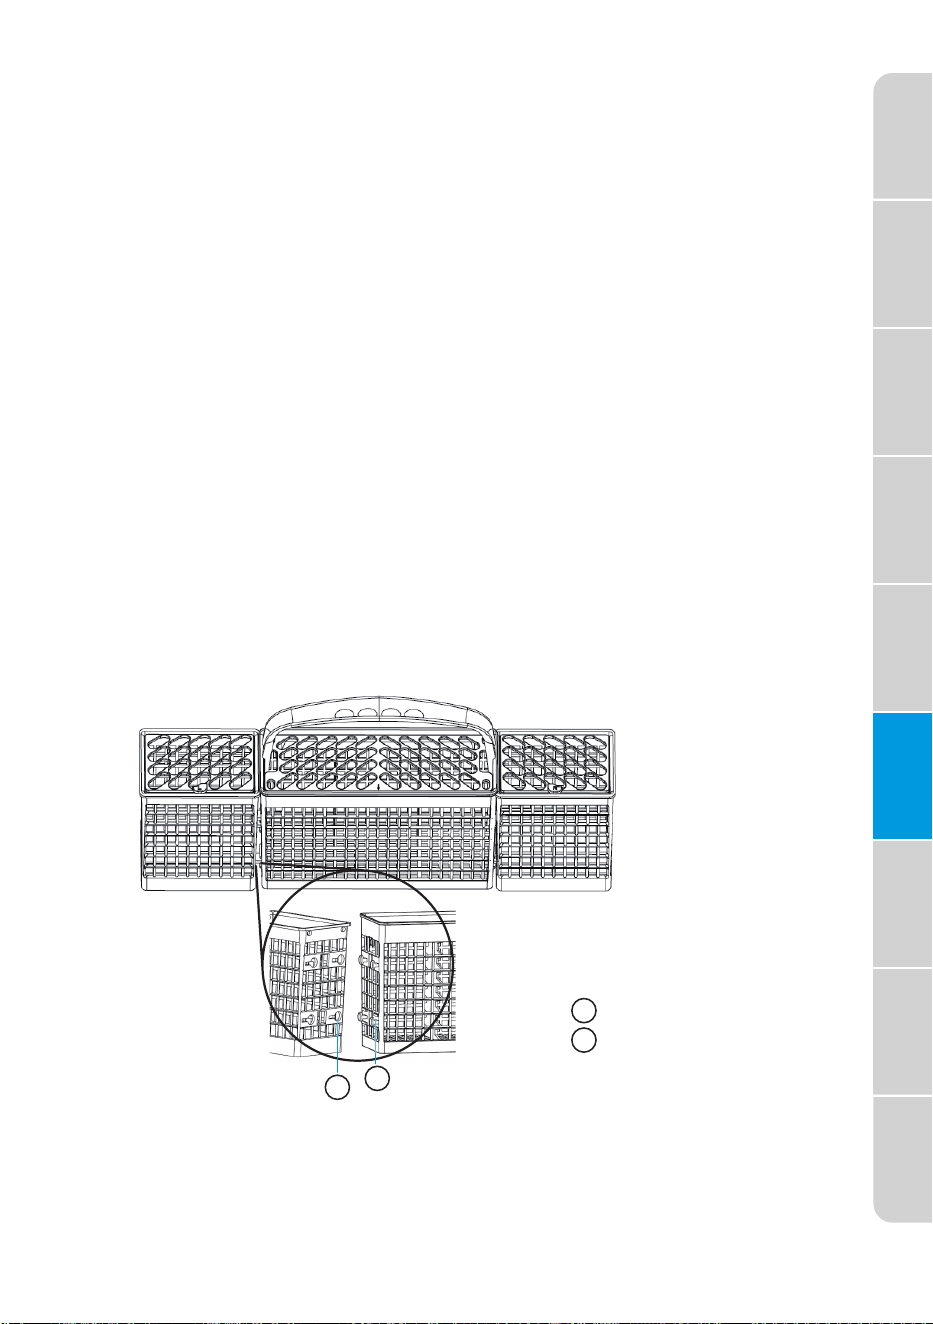
CHARGEMENT DE L'ARGENTERIE
REMARQUES :
PANIER A ARGENTERIE TROIS PIECES
Orifices
Pinces
21
• Ne pas mettre d'argenterie ou d'articles en argent plaqué avec de
l'acier inoxydable. Ces métaux peuvent être endommagés par le
contact entre eux pendant le lavage.
• Certains aliments (comme le sel, le vinaigre, les produits laitiers, les jus
de fruits, etc.) peuvent piqueter ou corroder l'argenterie. NE PAS
LAVER LES USTENSILES DE CUISINE EN ALUMINIUM DANS VOTRE
LAVE-VAISSELLE.
Le panier à argenterie se compose de trois sections distinctes. Pour une
flexibilité de chargement optimale, la section centrale du panier peut
être utilisée individuellement, jointe à l'une ou aux deux sections latérales
ou retirée.
• Soulever la poignée pour retirer le panier à argenterie et le poser sur un
comptoir ou une table.
• Soulever chaque section latérale pour désengager la section centrale
des orifices de vue des sections latérales.
• Replacer la ou les sections dans le support inférieur et charger l'argen-
terie, OU charger l'argenterie pendant que la ou les sections sont sur le
comptoir, puis replacer le panier dans le support inférieur.
A
A
B
B
GUIDE DE
DEMARRAGE
CONTROLES DEPANNAGE
CHARGEMENT
DU LAVE-VAIS-
SELLE
UTILISATION DU
LAVE-VAISSELLE
ENTRETIEN DU
LAVE-VAISSELLE
PIECES ET
CARACTERIS-
TIQUES
EXIGENCES
OPERA-
TIONNELLES
Précautions de
sécurité
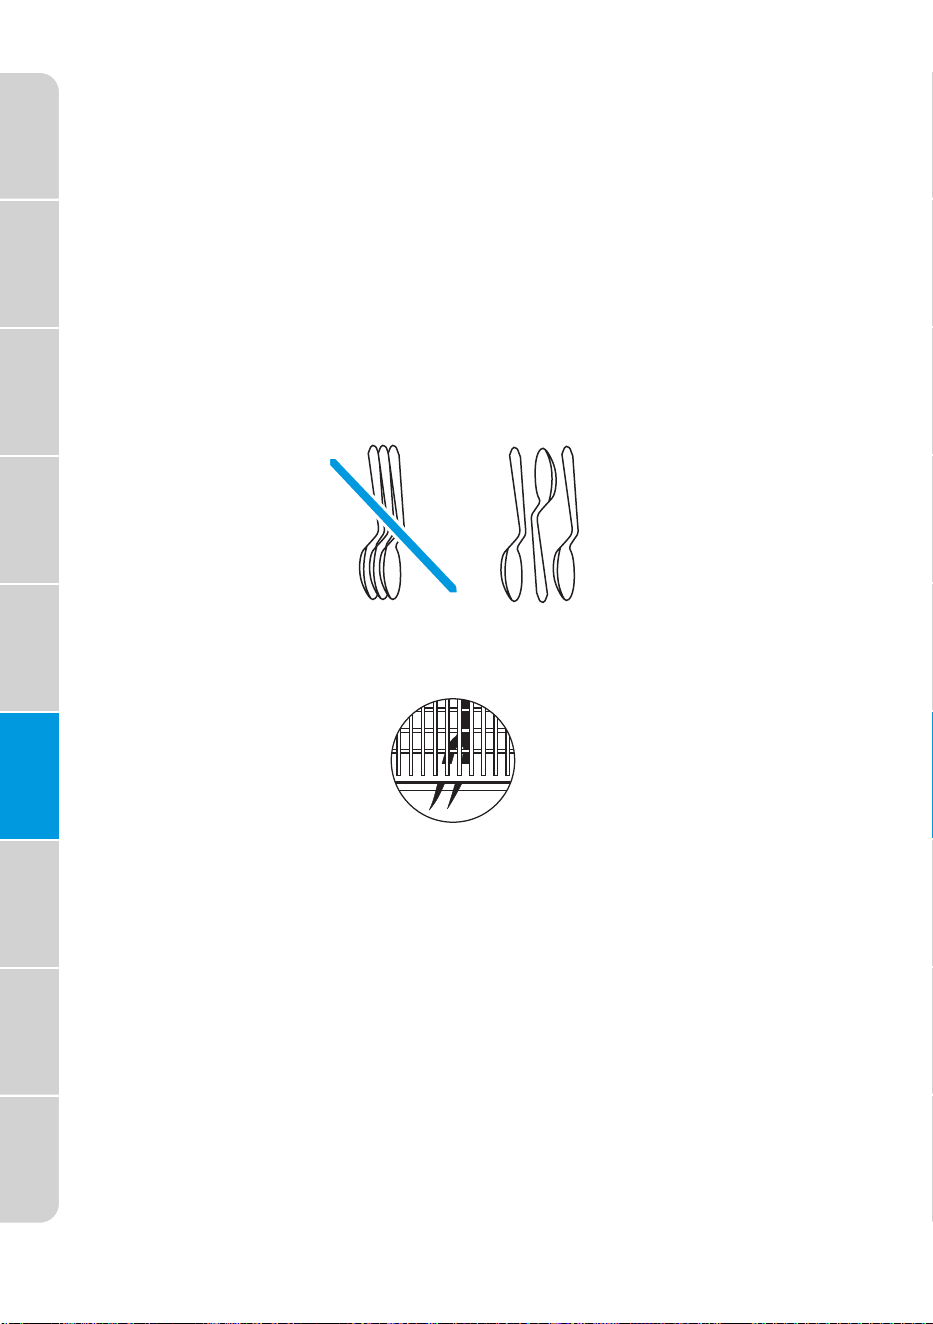
Pour des Résultats Optimaux :
22
• Charger les articles avec les poignées vers le bas, en utilisant les sépara-
teurs pour éviter que l'argenterie ne s'emboîte.
• Placer les petits objets tels que les bouchons de biberons, les couvercles
de bocaux, les supports d'épis de maïs, etc. dans la ou les sections munies
d'un ou de plusieurs couvercles à charnière. Fermer le couvercle pour
maintenir les petits objets en place.
• Décharger ou retirer le panier avant de décharger les casiers afin d’éviter
que des gouttes d'eau ne tombent sur l'argenterie.
• Lorsque les poignées sont relevées, mélanger les articles dans chaque
section du panier en orientant certains vers le haut et d'autres vers le bas
pour éviter qu'ils ne s'emboîtent. Le spray ne peut pas atteindre les articles
imbriqués.
IMPORTANT : Toujours charger les éléments tranchants (couteaux,
brochettes, etc.) en les orientant vers le bas. Veiller à ce que rien ne dépasse
du fond du panier ou du support qui pourrait bloquer le bras de lavage.
GUIDE DE
DEMARRAGE
CONTROLES DEPANNAGE
CHARGEMENT
DU LAVE-VAIS-
SELLE
UTILISATION DU
LAVE-VAISSELLE
ENTRETIEN DU
LAVE-VAISSELLE
PIECES ET
CARACTERIS-
TIQUES
EXIGENCES
OPERA-
TIONNELLES
Précautions de
sécurité
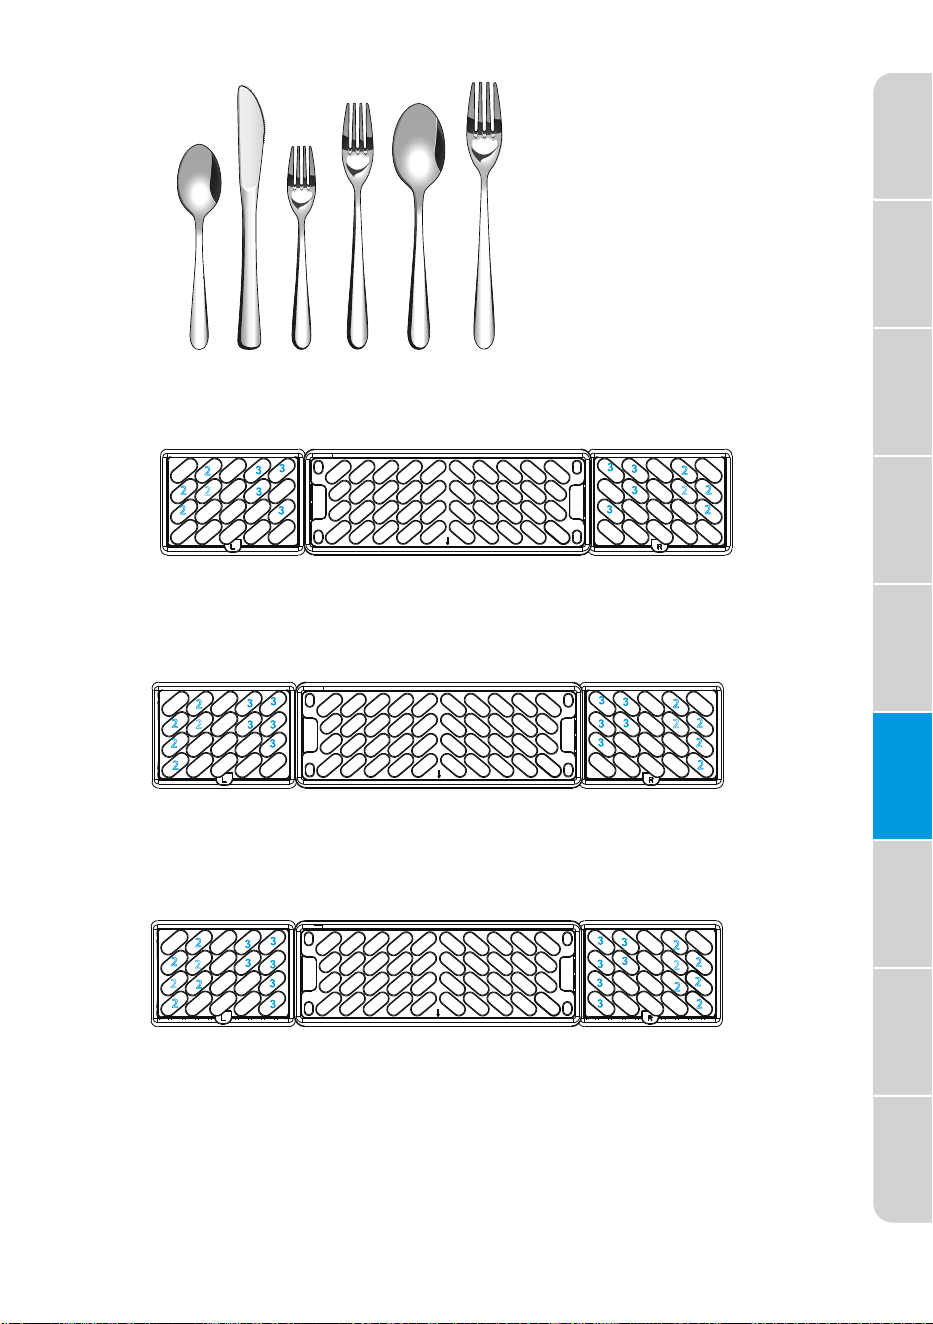
1 2 3 4 6 5
1.
2.
3.
4.
5.
6.
2
2
2
2
2
2
2
2
2
2
2
2
2
2
2
2
2
2
2
2
2
4
4
4
4
4
4
4
4
4
4
4
4
5
1
1
1
1
2
2
2
2
2
2
2
2
2
4
4
4
4
4
2
2
2
2
2
2
4
4
4
4
4
1
1
1
1
1
1
1
1
1
1
1
1
1
1
1
1
1
1
1
1
6
5
2
2
2
1
1 1
1
1
1
1
1
5
1
1
1
1
1
1
6
5
1 1
1
1
1
1
2
2
2
2
2
2
2
4
4
4
4
2
2
2
2
4
4
4
4
2
2
2
1
1
1
1
1
1
1
1
5
1
1
1
1
6
5
1
11
1
23
Cuillères
Couteaux
Fourchettes à Salade
Fourchettes
Grandes Cuillères
Grandes Fourchettes
Organisation sur 8 Places
Organisation sur 10 Places
Organisation sur 12 Places
GUIDE DE
DEMARRAGE
CONTROLES DEPANNAGE
CHARGEMENT
DU LAVE-VAIS-
SELLE
UTILISATION DU
LAVE-VAISSELLE
ENTRETIEN DU
LAVE-VAISSELLE
PIECES ET
CARACTERIS-
TIQUES
EXIGENCES
OPERA-
TIONNELLES
Précautions de
sécurité
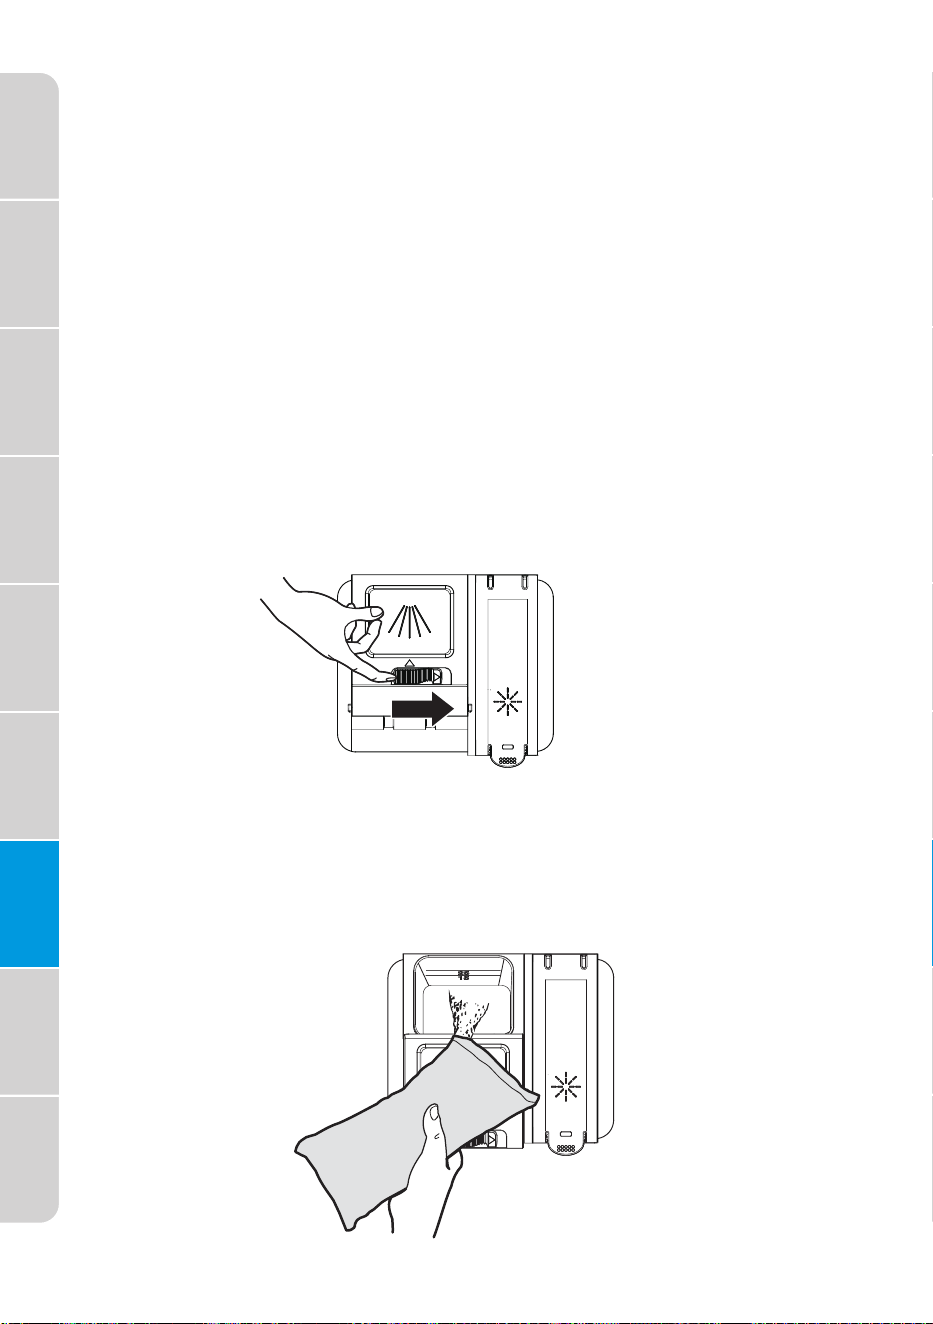
UTILISATION DU LAVE-VAISSELLE
UTILISATION CORRECTE DU DETERGENT
IMPORTANT :
DISTRIBUTEUR DE DETERGENT
1.
REMARQUE :
Le clapet est toujours ouvert à la fin d'un cycle de lavage de la vaisselle.
2.
24
• Utiliser uniquement un détergent pour lave-vaisselle automatique. Les
autres détergents peuvent produire une mousse excessive qui peut
déborder du lave-vaisselle et réduire les performances de lavage.
• Ajouter le détergent juste avant de commencer un cycle.
• Conserver le détergent hermétiquement fermé dans un endroit frais et
sec. Un détergent frais pour lave-vaisselle automatique permet un
meilleur nettoyage.
Pousser le loquet de déverrouillage du couvercle du distributeur pour
ouvrir le compartiment principal du détergent de lavage.
Ajouter la quantité recommandée de détergent dans le compartiment à
détergent.
GUIDE DE
DEMARRAGE
CONTROLES DEPANNAGE
CHARGEMENT
DU LAVE-VAIS-
SELLE
UTILISATION DU
LAVE-VAISSELLE
ENTRETIEN DU
LAVE-VAISSELLE
PIECES ET
CARACTERIS-
TIQUES
EXIGENCES
OPERA-
TIONNELLES
Précautions de
sécurité
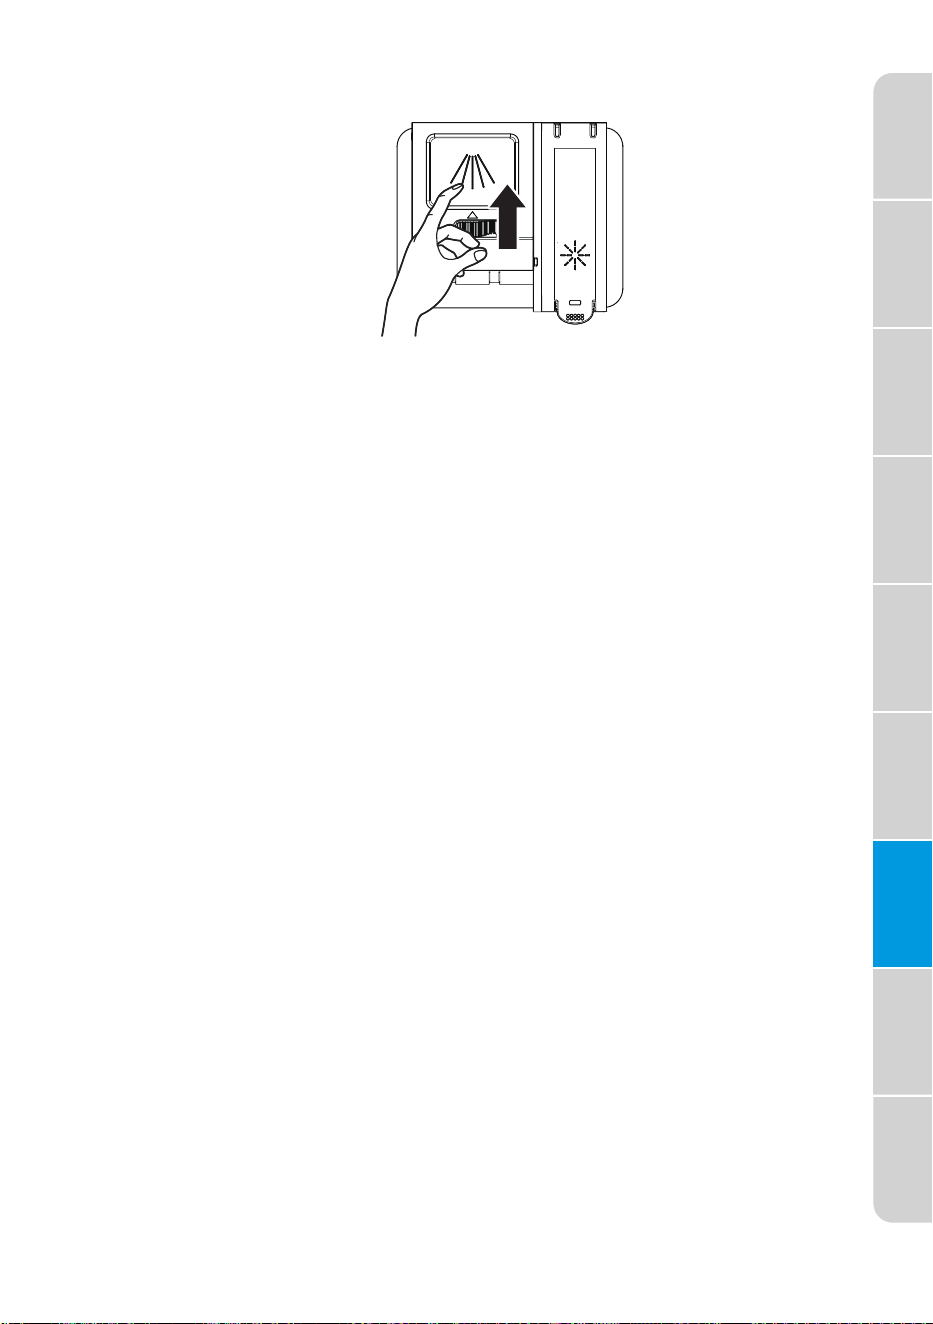
QUELLE QUANTITE DE DETERGENT UTILISER
UTILISATION CORRECTE DU PRODUIT DE RINÇAGE
3. Appuyer sur le haut du couvercle pour le fixer.
DISTRIBUTEUR DE PRODUIT DE RINÇAGE
25
La quantité de détergent à utiliser dépend du niveau de saleté de votre
charge, du type de détergent utilisé et de la dureté de votre eau.
• Si vous utilisez trop peu de détergent, la vaisselle ne sera pas propre.
• Si vous avez de l'eau douce et que vous utilisez trop de détergent, la
verrerie se décapera.
Dureté de l'Eau
La dureté de l'eau varie en fonction de votre source d'eau. Pour obtenir
les meilleurs résultats, votre lave-vaisselle est conçu pour fonctionner
avec une eau dont la dureté ne dépasse pas 7 grains par gallon. Des kits
d'analyse sont disponibles dans tous les points de vente de pièces pour
gros appareils électroménagers. Si la dureté de votre eau est supérieure à
8 grains par gallon, vous pouvez envisager d'installer un adoucisseur
d'eau ou d'utiliser régulièrement un additif pour améliorer les perfor-
mances de votre détergent.
Le produit de rinçage empêche l'eau de former des gouttelettes qui
peuvent sécher sous forme de taches ou de traces. Une petite quantité de
produit de rinçage est libérée dans l'eau du rinçage final, ce qui permet à
l'eau de s'écouler de la vaisselle.
Le produit de rinçage améliore grandement les performances de séchage
après le rinçage final.
Votre lave-vaisselle est conçu pour utiliser un produit de rinçage
LIQUIDE. Ne pas utiliser de produit de rinçage solide ou en forme de
barre.
Dans des conditions normales, vous devrez remplir le distributeur de
produit de rinçage environ une fois par mois. Le produit de rinçage est
libéré par une ouverture dans le distributeur. Il n'est pas nécessaire
d'attendre que le distributeur soit vide pour le remplir. Essayer de le
garder plein, mais veiller à ne pas le remplir excessivement.
GUIDE DE
DEMARRAGE
CONTROLES DEPANNAGE
CHARGEMENT
DU LAVE-VAIS-
SELLE
UTILISATION DU
LAVE-VAISSELLE
ENTRETIEN DU
LAVE-VAISSELLE
PIECES ET
CARACTERIS-
TIQUES
EXIGENCES
OPERA-
TIONNELLES
Précautions de
sécurité
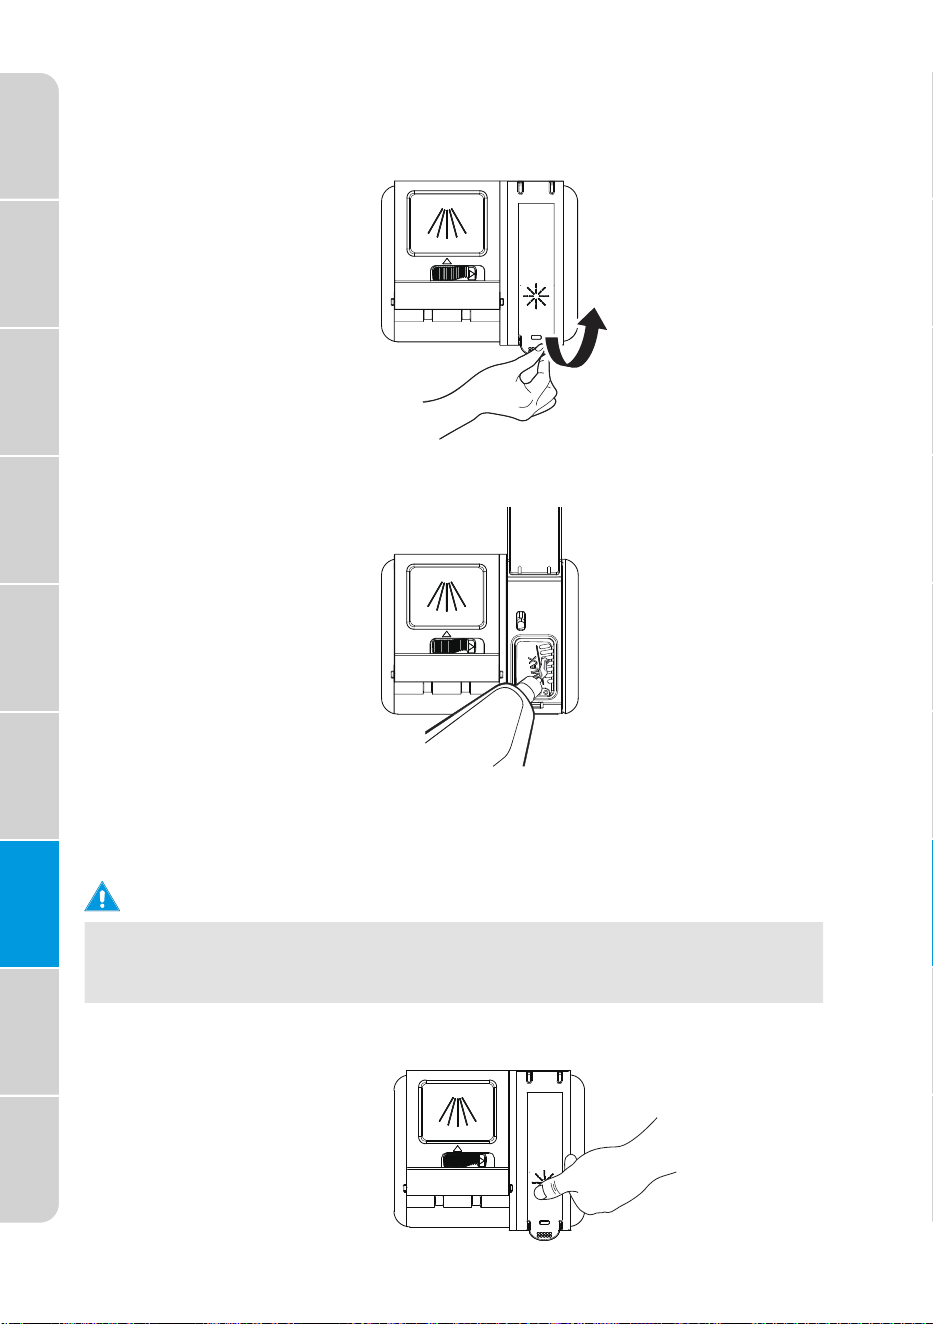
Pour remplir le distributeur de produit de rinçage
1.
2.
REMARQUE :
AVERTISSEMENT
3.
26
Soulever la languette d'extrémité du couvercle du dispositif
de rinçage pour l'ouvrir.
Remplir le distributeur de produit de rinçage avec du produit de
rinçage liquide jusqu'à ce qu'il soit plein. NE PAS trop remplir.
Utiliser l'orifice de visualisation pour remplir le réservoir de
produit de rinçage.
Appuyer fermement sur le couvercle du dispositif de rinçage
pour le fermer.
Ne pas remplir le réservoir au-dessus de l'indicateur de niveau plein.
L'excès de produit de rinçage peut déborder pendant le cycle de
lavage.
GUIDE DE
DEMARRAGE
CONTROLES DEPANNAGE
CHARGEMENT
DU LAVE-VAIS-
SELLE
UTILISATION DU
LAVE-VAISSELLE
ENTRETIEN DU
LAVE-VAISSELLE
PIECES ET
CARACTERIS-
TIQUES
EXIGENCES
OPERA-
TIONNELLES
Précautions de
sécurité

LAVAGE DES ELÉMENTS SPÉCIAUX
27
Si vous avez des doutes sur le lavage d'un élément particulier, vérifier auprès
du fabricant de la vaisselle qu'elle est compatible avec le lave-vaisselle.
Matière Commentaires
Lavable au
Lave-vaisselle
Non
Non
Non
Non
Non
Non
Oui
Oui
Oui
Oui
Oui
Aluminium à
usage unique
Bouteilles et
canettes
Fonte
Chine / Grès
Cristal
Or
Verre
Couteaux à
manches
creux
Laiton Etain,
Bronze
Plastiques à
Usage Unique
Plastiques
Acier
Inoxydable
PossibleAluminium
La température élevée de l'eau et les détergents
peuvent affecter la finition de l'aluminium anodisé.
L'aluminium non fini sera décoloré.
Ne pas laver les casseroles en aluminium jetables
dans le lave-vaisselle. Elles pourraient se déplacer
pendant le lavage et entraîner l’apparition de
marques noires sur les plats et autres objets.
Laver les bouteilles et les canettes à la main. Les
étiquettes fixées avec de la colle peuvent se
détacher et obstruer les bras de pulvérisation ou la
pompe et réduire les performances de lavage.
L'assaisonnement sera enlevé et le fer rouillera.
Toujours vérifier les recommandations du fabricant
avant de laver. Les motifs anciens, peints à la main
ou sur glaçure peuvent s'estomper, la feuille d'or
peut se décolorer ou s'estomper.
Vérifier les recommandations du fabricant avant de
procéder au lavage. Certains types de cristal au
plomb peuvent se décaper lors de lavages répétés.
Les couverts de couleur or se décolorent.
Les verres peuvent se teinter avec les lavages
répétés au lave-vaisselle.
Le manche de certains couteaux est fixé à la lame
par un adhésif qui peut se détacher s'il est lavé au
lave-vaisselle.
Les températures élevées de l'eau et les détergents
peuvent décolorer ou piqueter la finition.
Ne résiste pas aux températures élevées de l'eau et
aux détergents.
Vérifier toujours les recommandations du fabricant
avant de procéder au lavage. La capacité des
plastiques à résister aux températures élevées et
aux détergents varie. Charger les plastiques dans le
panier supérieur uniquement.
Effectuer un cycle de rinçage si le lavage n’est pas
immédiatement réalisé.
Un contact prolongé avec des aliments contenant
du sel, du vinaigre, des produits laitiers ou du jus de
fruit peut endommager la finition.
GUIDE DE
DEMARRAGE
CONTROLES DEPANNAGE
CHARGEMENT
DU LAVE-VAIS-
SELLE
UTILISATION DU
LAVE-VAISSELLE
ENTRETIEN DU
LAVE-VAISSELLE
PIECES ET
CARACTERIS-
TIQUES
EXIGENCES
OPERA-
TIONNELLES
Précautions de
sécurité

Non Susceptible de rouiller.
Non
ENTRETIEN DU LAVE-VAISSELLE
NETTOYAGE
NETTOYAGE DE L’EXTERIEUR
NETTOYAGE DE L'INTERIEUR
JOINT DE PORTE
28
Matière Commentaires
Lavable au
Lave-vaisselle
OuiArgent
Sterling ou
Plaqué
Argent
Etain
Produits en
Bois
Effectuer un cycle de rinçage si le lavage n’est pas
immédiatement réalisé.
Un contact prolongé avec des aliments contenant
du sel, de l'acide ou du sulfure (œufs, mayonnaise
et fruits de mer) peut endommager la finition.
Laver à la main. Vérifier toujours les instructions du
fabricant avant de laver. Le bois non traité peut se
déformer, se fissurer ou perdre sa finition.
Dans la plupart des cas, l'utilisation régulière d'un chiffon doux et humide
ou d'une éponge et d'un détergent doux sut pour nettoyer l'extérieur de
votre lave-vaisselle.
Nettoyer régulièrement la porte et la poignée en acier inoxydable à l’aide
d’un chiffon doux et propre pour enlever les débris.
IMPORTANT : Ne pas utiliser de cire pour appareils ménagers, de produit à
polir, d'agent de blanchiment ou de produits contenant du chlore pour
nettoyer la porte en acier inoxydable.
Panneau de Commandes
Nettoyer délicatement le panneau de commande à l’aide d’un chiffon
propre et doux.
La cuve est en acier inoxydable conçu pour résister à la rouille et à la
corrosion si le lave-vaisselle est rayé ou cabossé.
Les minéraux contenus dans une eau dure peuvent provoquer la formation
d'une pellicule blanche sur les surfaces intérieures, en particulier juste sous
la zone de la porte.
Ne pas nettoyer l'intérieur du lave-vaisselle avant qu'il n'ait refroidi. Porter
des gants en caoutchouc. N'utiliser aucun autre type de nettoyant que le
détergent pour lave-vaisselle, car il pourrait faire mousser ou créer de la
mousse.
Nettoyer la porte intérieure en acier et la cuve à l’aide d’un chiffon propre,
doux et humide.
À l'aide d'un chiffon humide, nettoyer régulièrement le pourtour du joint
de la porte afin d’éliminer les particules alimentaires.
GUIDE DE
DEMARRAGE
CONTROLES DEPANNAGE
CHARGEMENT
DU LAVE-VAIS-
SELLE
UTILISATION DU
LAVE-VAISSELLE
ENTRETIEN DU
LAVE-VAISSELLE
PIECES ET
CARACTERIS-
TIQUES
EXIGENCES
OPERA-
TIONNELLES
Précautions de
sécurité
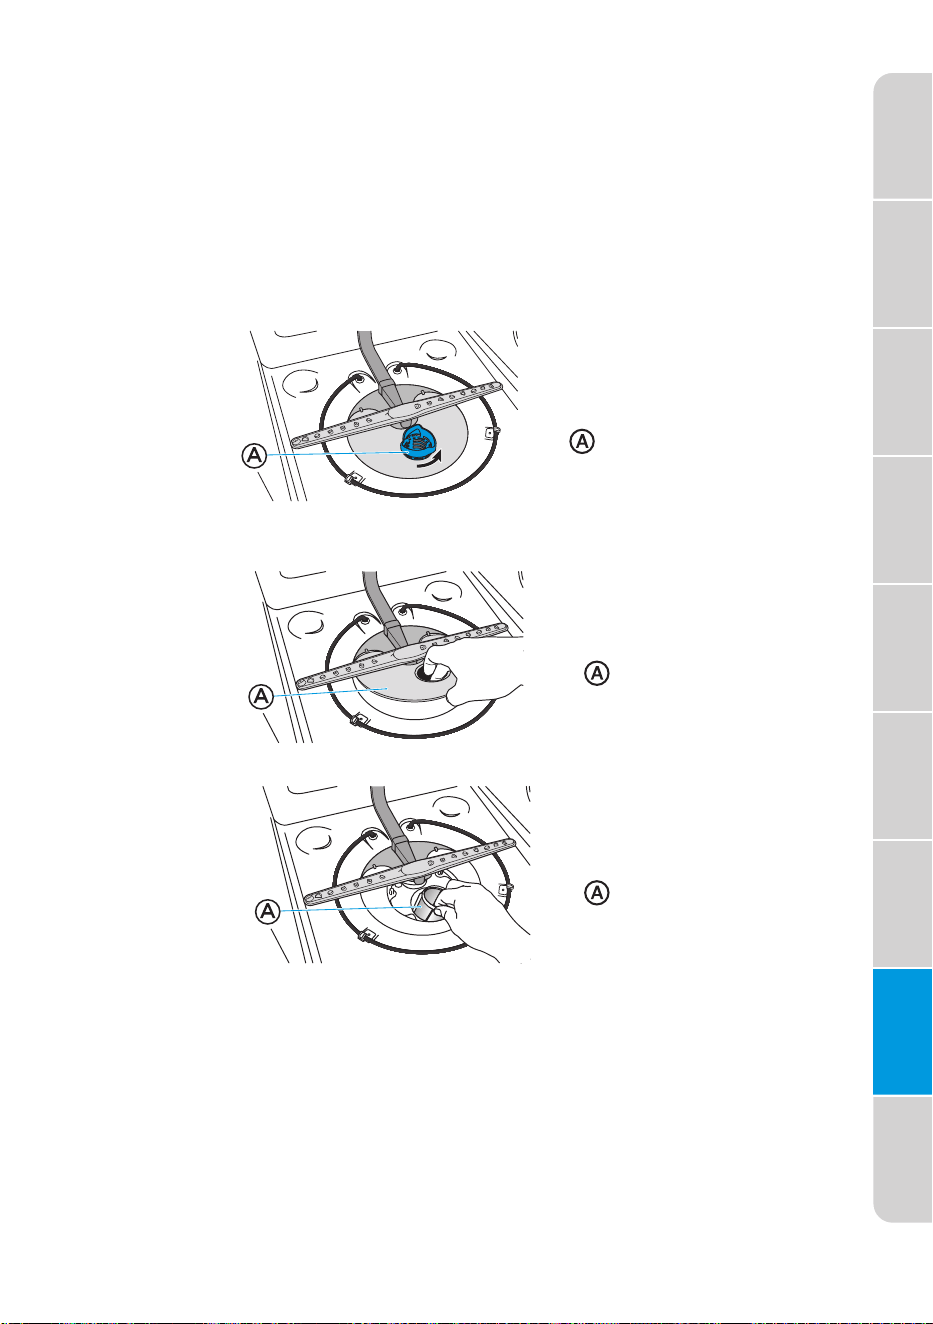
29
Filtre Cylindrique
Filtre Fin
Micro filtre
PANNEAU DE COMMANDES
NETTOYAGE DES FILTRES
Nettoyer le panneau de commande à l’aide d’un chiffon légèrement humide.
Vérifier et nettoyer régulièrement les filtres afin d’obtenir les meilleures
performances.
1. Retirer le panier inférieur du lave-vaisselle.
2. Tourner le Filtre cylindrique d'un quart de tour dans le sens inverse aux
aiguilles d'une montre et le soulever pour le retirer.
3. Vider le Filtre cylindrique et le rincer à l'eau courante.
4. Retirer le Filtre fin.
5. Retirer le Micro filtre du fond de la cuve.
6. Vérifier que le filtre fin et le micro filtre ne contiennent pas de débris,
puis les nettoyer en les passant sous l'eau courante.
REMARQUE : une brosse à poils durs en plastique peut être nécessaire
pour éliminer certains débris.
7. Réinstaller les filtres dans l'ordre inverse en vous assurant que le Filtre
cylindrique se verrouille en place.
REMARQUE : Si vous ne réinstallez pas correctement les filtres, les
performances seront réduites et vous devrez peut-être faire appel à un
service d'entretien.
GUIDE DE
DEMARRAGE
CONTROLES DEPANNAGE
CHARGEMENT
DU LAVE-VAIS-
SELLE
UTILISATION DU
LAVE-VAISSELLE
ENTRETIEN DU
LAVE-VAISSELLE
PIECES ET
CARACTERIS-
TIQUES
EXIGENCES
OPERA-
TIONNELLES
Précautions de
sécurité

ESPACE D’AIR DU DRAIN
Dans la plupart des cas :
STOCKAGE
STOCKAGE POUR L'ETE
HIVERNER VOTRE LAVE-VAISSELLE
30
Vérifier l'espace d'air du drain chaque fois que votre lave-vaisselle ne
s'écoule pas bien. Certaines directives de plomberie locales ou natio-
nales exigent l'ajout d'un espace d'air entre un lave-vaisselle encastré et
le système de drainage de la maison. Si le drain est bouché, l'entrefer
empêche l'eau de refluer dans le lave-vaisselle.
L'entrefer de vidange est généralement situé sur le dessus de l'évier ou
du comptoir, près du lave-vaisselle.
REMARQUE : L'interstice de vidange est un dispositif de plomberie
externe qui ne fait pas partie de votre lave-vaisselle. La garantie fournie
avec le lave-vaisselle ne couvre pas les frais d'entretien directement liés
au nettoyage ou à la réparation de l'entrefer de vidange externe.
Pour Nettoyer l'Espace d'Air du Drain :
Nettoyer périodiquement l'entrefer de vidange pour assurer une bonne
évacuation de votre lave-vaisselle. Suivre les instructions de nettoyage
fournies par le fabricant.
Protéger votre lave-vaisselle pendant les mois d'été en coupant l'alimen-
tation en eau et l'alimentation électrique du lave-vaisselle.
Protéger votre lave-vaisselle et votre maison contre les dommages
causés par le gel des conduites d'eau. Si votre lave-vaisselle est laissé
dans un logement saisonnier ou s'il risque d'être exposé à des tempéra-
tures proches du gel, le faire hiverner par un personnel de service agréé.
1. Eteindre le lave-vaisselle.
2. Soulever le couvercle métallique, puis dévisser le bouchon en
plastique.
3. Nettoyer le capuchon en plastique à l’aide d’un cure-dent.
Préparer pour le Stockage :
1. Couper l'alimentation électrique du lave-vaisselle.
2. Couper l'alimentation en eau.
3. Placer une casserole sous la vanne d'entrée, puis débrancher la
conduite d'eau de la vanne d'entrée.
4. Débrancher la conduite de vidange de la pompe et vider l'eau
dans le bac.
GUIDE DE
DEMARRAGE
CONTROLES DEPANNAGE
CHARGEMENT
DU LAVE-VAIS-
SELLE
UTILISATION DU
LAVE-VAISSELLE
ENTRETIEN DU
LAVE-VAISSELLE
PIECES ET
CARACTERIS-
TIQUES
EXIGENCES
OPERA-
TIONNELLES
Précautions de
sécurité

Préparer pour l'Utilisation :
DEPANNAGE
LE LAVE-VAISSELLE NE FONCTIONNE PAS CORRECTEMENT
PROBLEME CAUSE POSSIBLE SOLUTION
31
1. Reconnecter l'eau, la vidange et l'alimentation électrique.
2. Ouvrir l'eau et l'alimentation électrique.
3. Remplir le gobelet de détergent et faire fonctionner le lave-vaisselle
pendant un cycle de lavage chauffé.
4. Vérifier l'absence de fuites au niveau des raccords.
Le lave-vaisselle
ne fonctionne
pas ou s'arrête
pendant un
cycle
Le lave-vaisselle n'est pas
alimenté en électricité.
La porte n'est pas fermée
hermétiquement et verrouillée.
La plupart des cycles font une
pause de 5 minutes vers le
début d'un cycle pour laisser
tremper la vaisselle.
Certains cycles font des
pauses répétées de 15 à 65
secondes pendant le lavage
principal.
La fonction de Temporisation
est sélectionnée.
La vanne d'arrêt d'eau n'est
pas ouverte.
La porte n'est pas fermée
hermétiquement et verrouillée.
La pression de l'eau est trop
faible.
Ouvrir la vanne d'eau.
Fermer et verrouiller la porte.
Vérifier qu'une pression d'eau
minimale de
20 psi est maintenue pendant
l'opération de remplissage.
Remplacer le fusible ou
réinitialiser le disjoncteur.
Fermer et verrouiller la porte.
Ceci est normal et réduit
l'énergie nécessaire au
nettoyage de la vaisselle.
Ceci est normal.
Pour réinitialiser, voir
"Options" dans la section
Commandes.
La fonction de Verrouillage
des Commandes est activée.
Désactiver le Verrouillage des
Commandes. Voir "Fonctions
Supplémentaires" dans la
section Commandes.
Le lave-vaisselle
ne démarre pas
un cycle
Le lave-vaisselle
ne se remplit pas
GUIDE DE
DEMARRAGE
CONTROLES DEPANNAGE
CHARGEMENT
DU LAVE-VAIS-
SELLE
UTILISATION DU
LAVE-VAISSELLE
ENTRETIEN DU
LAVE-VAISSELLE
PIECES ET
CARACTERIS-
TIQUES
EXIGENCES
OPERA-
TIONNELLES
Précautions de
sécurité

32
PROBLEME CAUSE POSSIBLE SOLUTION
L'eau fournie au lave-vaisselle
n'est pas assez chaude.
Le lave-vaisselle fonctionne
plus longtemps pendant le
chauffage de l'eau, et un délai
se produit automatiquement
dans certains cycles de lavage
et de rinçage jusqu'à ce que
l'eau atteigne la température
appropriée.
L'option Assainissement est
sélectionnée.
La durée du cycle varie en
fonction du niveau de
salissure.
Le lave-vaisselle est connecté
à l'alimentation en eau froide.
Le cycle n'est pas terminé ou
est en pause.
Le cycle n'est pas terminé.
Le détergent est humide ou
s'est aggloméré.
Un obstacle a obstrué le
distributeur.
Le bras d'aspersion est
bloqué.
Fermer la porte et appuyer sur
START pour terminer le cycle.
Retirer le détergent et le
remplacer par un détergent
sec et frais pour lave-vaisselle.
Retirer l'obstacle. Retirer le
détergent et le remplacer par
du détergent pour lave-vais-
selle sec et frais.
Charger la vaisselle de
manière à ne pas empêcher le
bras d'aspersion de tourner
librement.
L'eau s'écoulera lorsque le
cycle sera terminé.
Retirer la fiche amovible.
Redresser le tuyau de vidange.
Faire fonctionner le broyeur à
déchets jusqu'à ce qu'il soit
vide.
Vérifier l'espace d'air.
Le tuyau de vidange est plié.
La fiche amovible est toujours
dans le broyeur à déchets.
Le tuyau de vidange est
connecté au broyeur à
déchets, et le broyeur à
déchets n'est pas vide.
Le tuyau de vidange est
bouché.
Désactiver le Verrouillage des
Commandes. Voir "Fonctions
Supplémentaires" dans la
section Commandes.
La durée du cycle augmente
pour chauffer l'eau à la
température correcte pour
l'assainissement.
Lorsqu'un niveau de salissure
élevé est détecté, le cycle normal
augmente automatiquement la
durée du cycle.
Vérifier que le lave-vaisselle
est correctement raccordé à
l'alimentation en eau chaude.
Le lave-vaisselle
semble fonction-
ner trop
longtemps
De l'eau reste
dans le
lave-vaisselle
REMARQUE :
Une petite
quantité d'eau
propre autour de
la sortie au fond
de la cuve est
normale. Cela
permet de
garder le joint
lubrifié.
Du détergent
reste dans le
distributeur
GUIDE DE
DEMARRAGE
CONTROLES DEPANNAGE
CHARGEMENT
DU LAVE-VAIS-
SELLE
UTILISATION DU
LAVE-VAISSELLE
ENTRETIEN DU
LAVE-VAISSELLE
PIECES ET
CARACTERIS-
TIQUES
EXIGENCES
OPERA-
TIONNELLES
Précautions de
sécurité

LA VAISSELLE N'EST PAS TOTALEMENT PROPRE
33
PROBLEME CAUSE POSSIBLE SOLUTION
PROBLEME CAUSE POSSIBLE SOLUTION
Un objet dur ou des granulés
de détergent en poudre ont
pénétré dans le module de
lavage.
IMPORTANT : Le verre
transparent est dicile à voir
dans l'eau et peut entraîner
une coupure.
Avec précaution, retirer l'objet
dur. Si le bruit était causé par
des granulés de détergent, le
bruit devrait cesser une fois le
détergent broyé.
REMARQUE: Si le bruit
persiste après un cycle
complet, appeler le service
après-vente.
Bruits de
broyage, de
grincement, de
craquement ou
de bourdonne-
ment.
Indique que le cycle de lavage
est terminé.
REMARQUE : Un bip rapide
indique une condition d'erreur.
Ceci est normal.
Voir la section "Codes Erreur"
pour plus d'informations.
Bips
Utilisation du mauvais type de
détergent.
N'utiliser que du détergent
approuvé pour un lave-vais-
selle automatique.
Mousse dans la
cuve
Mousse excessive due à
l'utilisation d'un détergent
inadéquat.
Le lave-vaisselle n'est pas à
niveau.
N'utiliser que du détergent
approuvé pour un lave-vais-
selle automatique.
Le niveau de Produit de
Rinçage est bas
Détergent inecace ou
de mauvaise qualité.
Midea recommande les détergents les plus
performants de l'industrie, en particulier sous
forme de pods ou de tablettes.
Le lave-vaisselle n'est pas
chargé correctement.
Voir "Chargement du Lave-vaisselle".
Le mauvais cycle de
lavage pour la
vaisselle a été
sélectionné.
Sélectionner le cycle de lavage en fonction de
la saleté la plus tenace dans la charge du
lave-vaisselle. Si vous avez quelques articles
avec des salissures plus lourdes, utiliser un
cycle de lavage plus lourd.
La température de
l'eau est trop basse.
Pour de meilleurs résultats, la température de
l'eau entrante doit être au minimum de 49°C
(120°F).
Utilisation d'une
quantité incorrecte
de détergent.
Utiliser au minimum 1 cuillère à soupe (15 g)
de détergent par charge. Les salissures
importantes et/ou l'eau dure nécessitent
généralement un détergent supplémentaire.
Ajouter du Produit de Rinçage
liquide.
Mettre le lave-vaisselle à
niveau. Voir les instructions
d'installation.
Fuites du
lave-vaisselle
Le témoin de
produit de
rinçage est
allumé
Des résidus
d'aliments
restent sur
la vaisselle
GUIDE DE
DEMARRAGE
CONTROLES DEPANNAGE
CHARGEMENT
DU LAVE-VAIS-
SELLE
UTILISATION DU
LAVE-VAISSELLE
ENTRETIEN DU
LAVE-VAISSELLE
PIECES ET
CARACTERIS-
TIQUES
EXIGENCES
OPERA-
TIONNELLES
Précautions de
sécurité

TACHES SUR LA VAISSELLE
34
PROBLEME CAUSE POSSIBLE SOLUTION
PROBLEME CAUSE POSSIBLE SOLUTION
Des
résidus
d'aliments
restent sur
la vaisselle
(suite)
Taches et pellicule
sur les plats
Le détergent est trop
ancien.
Le détergent s'est
accumulé dans le
distributeur.
La pompe ou le bras de
pulvérisation est
obstrué/bloqué par des
étiquettes de bouteilles
et de canettes.
La pression de
l'entrée d’eau
domestique est trop
faible.
Un niveau important
de mousse ralentit le
bras de pulvérisation.
Le distributeur de Produit
de Rinçage est vide.
Eau dure. Teneur
élevée en minéraux
dans votre eau
Ajouter un produit de rinçage
liquide dans le distributeur.
Utiliser un produit de rinçage et
garder le distributeur rempli pour
aider à éliminer les taches et les
films. Augmenter le réglage du
distributeur de produit de rinçage
d'un chiffre par cycle jusqu'à ce
que les taches soient éliminées.
Pour obtenir de meilleurs résultats,
l'eau doit être à une température
minimale de 49°C (120°F) lorsqu'elle
entre dans le lave-vaisselle.
Utiliser au minimum 1 cuillère à soupe
(15 g) de détergent par charge. Les
salissures importantes et/ou l'eau
dure nécessitent généralement un
supplément de détergent.
REMARQUE: Si la dureté de votre
eau est de 13 grains (223 ppm) ou
plus, il est fortement recommandé
d'installer un adoucisseur d'eau
domestique.
La température de
l'eau est trop basse.
Je n'ai pas utilisé assez
de détergent.
Le détergent doit être frais pour être ecace.
Conserver le détergent dans un endroit frais et sec.
Ne pas laisser le détergent reposer pendant
plusieurs heures dans un distributeur
humide. Nettoyer le distributeur et le
remplir avec du détergent frais et sec.
Vérifier la présence d'étiquettes sur la
pompe et le bras de pulvérisation et les
retirer le cas échéant.
La pression de l'eau doit être de 20 à 80 psi
(138 à 552 kPa) pour un remplissage correct
du lave-vaisselle. Une pompe de surpression
sur l'alimentation en eau peut être ajoutée si
la pression est trop faible.
N'utiliser que le détergent recommandé
pour le lave-vaisselle. Ne pas utiliser de
savon ou de détergent à lessive.
GUIDE DE
DEMARRAGE
CONTROLES DEPANNAGE
CHARGEMENT
DU LAVE-VAIS-
SELLE
UTILISATION DU
LAVE-VAISSELLE
ENTRETIEN DU
LAVE-VAISSELLE
PIECES ET
CARACTERIS-
TIQUES
EXIGENCES
OPERA-
TIONNELLES
Précautions de
sécurité

LA VAISSELLE NE SECHE PAS COMPLETEMENT
35
PROBLEME CAUSE POSSIBLE SOLUTION
PROBLEME CAUSE POSSIBLE SOLUTION
Le détergent est trop
vieux.
Le détergent doit être frais et
sec pour être ecace.
Conserver le détergent dans
un endroit frais et sec.
Utilisation de trop de
détergent
La température de
l'eau d'entrée dépasse
150°F (65°C).
Si votre eau est douce, utiliser
moins de détergent, cepen-
dant pas moins d'une cuillère à
soupe (15 g) par charge.
Baisser la température de l'eau
entrante.
La pression de l'eau
domestique est trop
faible pour remplir
correctement le
lave-vaisselle.
La pression de l'eau dans la maison
doit être de 20 à 80 psi (138 à 552
kPa) pour un bon remplissage du
lave-vaisselle. Une pompe de
surpression sur l'alimentation en eau
peut être ajoutée si la pression est
trop faible.
Taches et
pellicule sur les
plats (suite)
Pellicule de silice
ou corrosion
Les articles en alumini-
um frottent la vaisselle
pendant le lavage. Les
articles en aluminium
jetables peuvent se
décomposer dans le
lave-vaisselle et
provoquer des marques.
Laver à la main les articles en
aluminium. Enlever les
marques d'aluminium en
utilisant un nettoyant abrasif
doux.
Marques noires
ou grises sur la
vaisselle
De grandes quantités
d'aliments à base de
tomates sur la vaisselle
placée dans le lave-vais-
selle.
Utiliser un produit détachant
pour enlever les taches de
votre lave-vaisselle. Les taches
n'affecteront pas les perfor-
mances du lave-vaisselle.
Taches oranges sur
la vaisselle en
plastique ou à
l'intérieur du
lave-vaisselle
La vaisselle n'est pas
chargée correctement
pour permettre
l'écoulement de l'eau.
Le produit de rinçage
n'a pas été utilisé ou le
distributeur est vide.
Utiliser un séchage à
l'air ou une option
d'économie d'énergie.
Ne pas surcharger le lave-vais-
selle. Placer les verres et les
tasses dans le panier de
manière à ce que la surface
inférieure soit inclinée pour
permettre à l'eau de s'écouler.
Utiliser un produit de rinçage
liquide pour accélérer le
séchage et garder le distribu-
teur plein.
Pour la vaisselle séchée, sélec-
tionner un cycle qui permet
l'option de séchage chauffé.
La vaisselle n'est
pas complètement
sèche
REMARQUE : Les
plastiques doivent
souvent être séchés
avec une serviette.
GUIDE DE
DEMARRAGE
CONTROLES DEPANNAGE
CHARGEMENT
DU LAVE-VAIS-
SELLE
UTILISATION DU
LAVE-VAISSELLE
ENTRETIEN DU
LAVE-VAISSELLE
PIECES ET
CARACTERIS-
TIQUES
EXIGENCES
OPERA-
TIONNELLES
Précautions de
sécurité
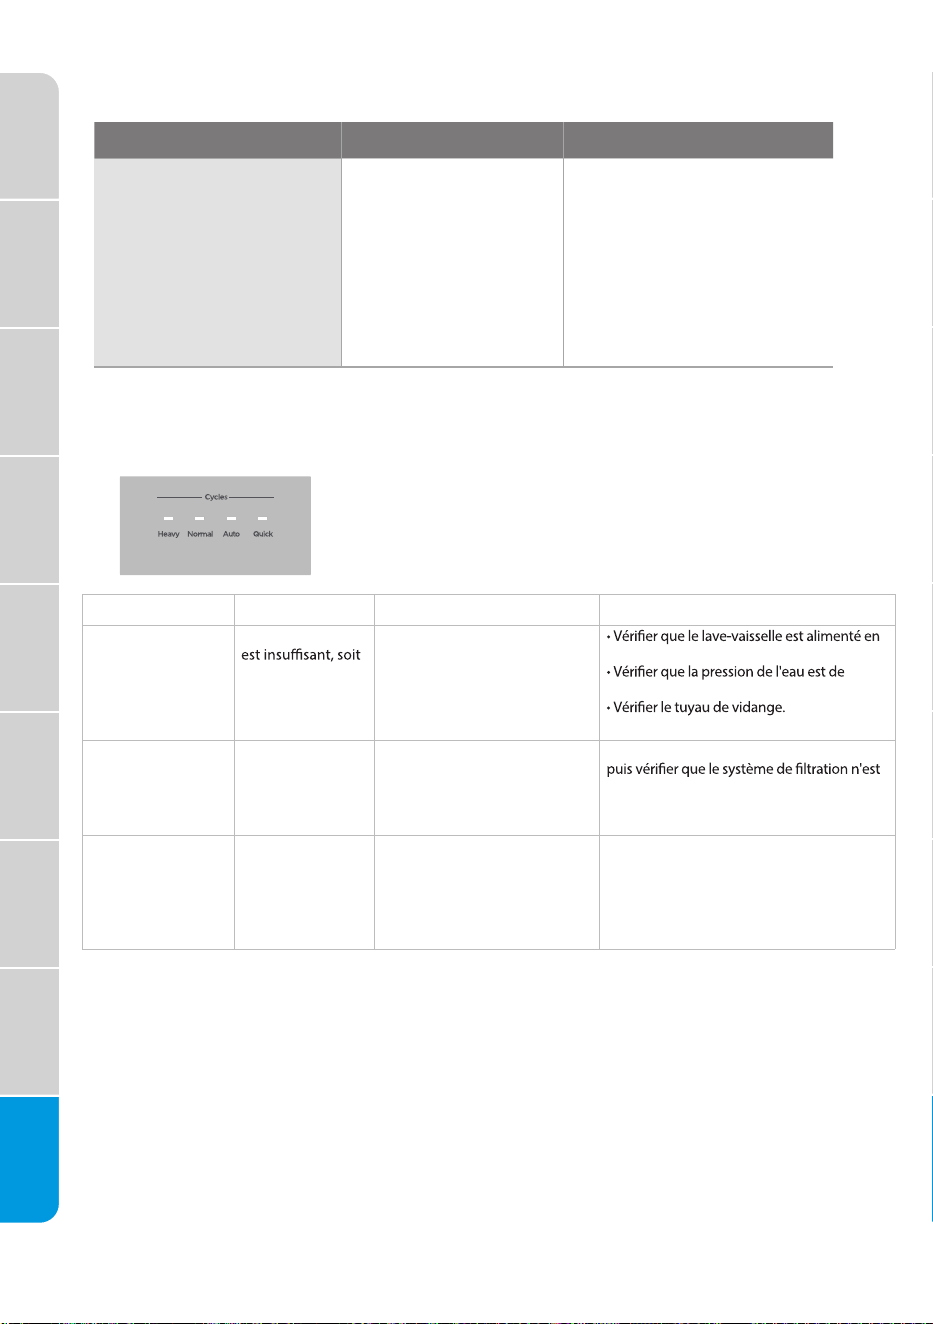
LA VAISSELLE EST ENDOMMAGEE LORS D'UN CYCLE
36
CODES ERREUR
CODE SIGNIFICATION CAUSE POSSIBLE
SOLUTION POSSIBLE
PROBLEME CAUSE POSSIBLE SOLUTION
La vaisselle n'est pas
chargée correctement.
Panier déplacé dans ou
hors du lave-vaisselle
trop rapidement.
Charger la vaisselle et les
verres de façon à ce qu'ils
soient stables et ne
s'entrechoquent pas sous
l'eet du lavage.
Minimiser l'écaillage en
déplaçant lentement le
panier.
La vaisselle est ébréchée
REMARQUE : certains
types de porcelaine et de
verrerie peuvent être trop
délicats pour le lavage
automatique de la
vaisselle. Les laver à la
main.
Le témoin Express
s’allume et le
lave-vaisselle émet un
bip pendant 30
secondes.
Soit le débit d'eau
la pression d'eau de
la conduite
d'arrivée est trop
élevée.
Capteur de fuite ou
de débordement
activé.
• Le robinet n'est pas ouvert
• La pression de l'eau est trop faible
• Le tuyau de vidange est bouché.
• Autre (défaillance de pièces du
système d'admission ou de
vidange).
eau.
20~100 psi.
• Contacter le Service Clientèle.
Le témoin Normal
s’allume et le
lave-vaisselle émet un
bip pendant 30
secondes.
• Une fuite
Trop d’eau dans la cuve
Couper la conduite d’eau du lave-vaisselle,
pas bloqué. Le débloquer si nécessaire.
S'il n'y a pas d'eau dans la cuve, contacter le
Service Clientèle.
Les témoins Intensif,
Normal et Express
s’allument et le
lave-vaisselle émet un
bip pendant 15
secondes.
Exception ou
problème de
communication.
Le tableau d'affichage ne peut
pas recevoir ou le tableau
principal ne peut pas envoyer de
signal pendant plus de 20
secondes.
Contacter le Service Clientèle.
GUIDE DE
DEMARRAGE
CONTROLES DEPANNAGE
CHARGEMENT
DU LAVE-VAIS-
SELLE
UTILISATION DU
LAVE-VAISSELLE
ENTRETIEN DU
LAVE-VAISSELLE
PIECES ET
CARACTERIS-
TIQUES
EXIGENCES
OPERA-
TIONNELLES
Précautions de
sécurité
SI VOUS AVEZ BESOIN D'UN SERVICE :
Service Clientèle Midea
Aux Etats-Unis ou au Canada, appeler le 1-866-646-4332.
GARANTIE LIMITEE A VIE
CE QUI EST COUVERT
GARANTIE LIMITEE DE PREMIERE ANNEE (PIECES ET MAIN D'ŒUVRE)
37
GARANTIE
LIMITÉE MIDEA
SUR LES
LAVE-VAISSELLE
JOINDRE VOTRE REÇU ICI. LA PREUVE D'ACHAT EST
REQUISE POUR OBTENIR LE SERVICE DE GARANTIE.
Merci de disposer des informations suivantes lorsque
vous appelez le Centre de Service à la Clientèle :
En dehors des 50 États des États-Unis ou du Canada, contacter votre revendeur Midea agréé
pour déterminer si une autre garantie s'applique.
Pendant un an à compter de la date d'achat, si ce gros appareil est installé, utilisé et entretenu
conformément aux instructions jointes ou fournies avec le produit, Midea America Corporation
(ci-après " Midea ") paiera les pièces de rechange spécifiées par l'usine et la main-d'œuvre pour
corriger les défauts de matériaux ou de fabrication qui existaient au moment de l'achat de ce
gros appareil ou, à sa seule discrétion, remplacera le produit. En cas de remplacement du
produit, votre appareil sera garanti pour la durée restante de la période de garantie de l'appareil
original.
GARANTIE LIMITEE A VIE (CUVE EN ACIER INOXYDABLE ET REVETEMENT INTERIEUR DE
LA PORTE UNIQUEMENT)
Pendant toute la durée de vie du produit à partir de la date d'achat initiale, lorsque ce gros
appareil est installé, utilisé et entretenu conformément aux instructions jointes ou fournies avec
le produit, Midea paiera les pièces spécifiées par l'usine et la main-d'œuvre pour la réparation
des composants suivants afin de corriger les défauts non esthétiques de matériaux ou de
fabrication qui existaient au moment de l'achat de ce gros appareil :
■ Bac en acier inoxydable
■ Revêtement intérieur de la porte
VOTRE SEUL ET UNIQUE RECOURS DANS LE CADRE DE CETTE GARANTIE LIMITEE SERA LA
REPARATION OU LE REMPLACEMENT DU PRODUIT COMME PREVU DANS LE PRESENT
DOCUMENT. Le service doit être fourni par une société de service désignée par Midea. Cette
garantie limitée est valable uniquement dans les 50 États des États-Unis ou au Canada et
s'applique uniquement lorsque le gros appareil est utilisé dans le pays où il a été acheté. Cette
garantie limitée entre en vigueur à partir de la date d'achat originale du consommateur. Une
preuve de la date d'achat originale est requise pour obtenir un service dans le cadre de cette
garantie limitée.
1. Avant de nous contacter pour organiser le service, merci de déterminer si votre produit
nécessite une réparation. Certaines questions peuvent être résolues sans intervention. Merci
de prendre quelques minutes pour consulter la section Dépannage du manuel de l'utilisateur,
ou visiter le site http://us.Midea.com/support.
2. Tous les services de garantie sont fournis exclusivement par nos fournisseurs de services
Midea agréés, aux Etats-Unis et au Canada.
■ Nom, adresse et numéro de téléphone
■ Numéro de modèle et numéro de série
■ Une description claire et détaillée du problème.
■ Une preuve d'achat comprenant le nom et l'adresse
du revendeur ou du détaillant.

GARANTIE LIMITEE A VIE
CE QUI N'EST PAS COUVERT
11/19
38
1. Utilisation commerciale, non résidentielle ou multifamiliale, ou utilisation non conforme aux
instructions publiées de l'utilisateur, de l'exploitant ou de l'installation.
2. Instructions à domicile sur la façon d'utiliser votre produit.
3. Service visant à corriger l'entretien ou l'installation inappropriés du produit, l'installation non
conforme aux codes de l'électricité ou de la plomberie ou la correction de l'électricité ou de la
plomberie de la maison (c'est-à-dire le câblage de la maison, les fusibles, la plomberie ou les
tuyaux d'arrivée d'eau).
4. Pièces consommables (ampoules, piles, filtres à air ou à eau, etc.).
5. Défauts ou dommages causés par l'utilisation de pièces ou d'accessoires Midea non authentiques.
6. Les dommages résultant d'un accident, d'une mauvaise utilisation, d'un abus, d'un incendie,
d'une inondation, d'un problème électrique, d'un cas de force majeure ou de l'utilisation de
produits non approuvés par Midea.
7. Les réparations de pièces ou de systèmes pour corriger les dommages ou les défauts du
produit causés par un service non autorisé, une altération ou une modification de l'appareil.
8. Les dommages cosmétiques, y compris les éraflures, les bosses, les éclats et autres dommag-
es aux finitions de l'appareil, à moins que ces dommages ne résultent de défauts de matériaux
et de fabrication et ne soient signalés à Midea dans les 30 jours.
9. L'entretien courant du produit.
10. La décoloration, la rouille ou l'oxydation des surfaces résultant d'environnements caustiques
ou corrosifs, y compris, mais sans s'y limiter, des concentrations élevées de sel, une humidité
élevée ou une exposition à des produits chimiques.
11. Enlèvement ou livraison. Ce produit est destiné à être réparé à domicile.
12. Les frais de déplacement ou de transport pour les réparations dans des endroits éloignés où
un réparateur Midea agréé n'est pas disponible.
13. L'enlèvement ou la réinstallation d'appareils inaccessibles ou d'installations intégrées
(c'est-à-dire les garnitures, les panneaux décoratifs, les revêtements de sol, les armoires, les
îlots, les comptoirs, les cloisons sèches, etc.
14. Service ou pièces pour appareils dont les numéros de modèle/de série originaux ont été
enlevés, modifiés ou ne sont pas facilement identifiables.
Le coût de la réparation ou du remplacement dans ces circonstances exclues est à la charge
du client.
EXCLUSION DE GARANTIES IMPLICITES
LES GARANTIES IMPLICITES, Y COMPRIS TOUTE GARANTIE IMPLICITE DE QUALITE MARCH-
ANDE OU D'ADEQUATION A UN USAGE PARTICULIER, SONT LIMITEES A UN AN OU A LA
PERIODE LA PLUS COURTE AUTORISEE PAR LA LOI.
Certains États et provinces n'autorisent pas la limitation de la durée des garanties implicites de
qualité marchande ou d'adéquation, de sorte que cette limitation peut ne pas s'appliquer à
vous. Cette garantie vous donne des droits légaux spécifiques, et vous pouvez également avoir
d'autres droits qui varient d'un état à l'autre ou d'une province à l'autre.
CLAUSE DE NON-RESPONSABILITE DE REPRESENTATION EN DEHORS DE LA GARANTIE
Midea ne fait aucune déclaration concernant la qualité, la durabilité ou la nécessité d'un
entretien ou d'une réparation de ce gros appareil ménager autre que les déclarations
contenues dans la présente garantie. Si vous souhaitez bénéficier d'une garantie plus longue
ou plus complète que la garantie limitée fournie avec ce gros appareil, demander à Midea ou à
votre détaillant s'il est possible d'acheter une garantie prolongée.
LIMITATION DES RECOURS ; EXCLUSION DES DOMMAGES ACCESSOIRES ET INDIRECTS
VOTRE SEUL ET UNIQUE RECOURS DANS LE CADRE DE CETTE GARANTIE LIMITEE SERA LA
REPARATION DU PRODUIT COMME PREVU DANS LE PRESENT DOCUMENT. MIDEA NE SERA
PAS RESPONSABLE DES DOMMAGES ACCESSOIRES OU INDIRECTS. Certains états et
provinces n'autorisent pas l'exclusion ou la limitation des dommages accessoires ou indirects,
de sorte que ces limitations et exclusions peuvent ne pas s'appliquer à vous. Cette garantie
vous donne des droits légaux spécifiques, et vous pouvez également avoir d'autres droits qui
varient d'un état à l'autre ou d'une province à l'autre.


MANUAL DEL USUARIO
NÚMERO DE MODELO MDF24P1BST
www.midea.com
es
Alimentación eléctrica: 120 V
Frecuencia: 60 Hz
Capacidad: 12
posiciones
Lavavajillas
Advertencia:
Antes de usar este producto,
lea atentamente este manual
y guárdelo para futuras
consultas. El diseño y las
especificaciones para mejorar
el producto están sujetos
a cambios sin previo aviso.
Para mayor información,
consulte con su distribuidor o
fabricante.
versión A - 03- 2023
¡Prórroga gratuita de
3meses* del periodo de
garantía limitada original!
Simplemente envíe una foto de
su comprobante de compra a:
1-844-224-1 614
* La prórroga de la garantía es para los
tres meses inmediatamente posteriores
a la finalización del periodo de garantía
original del producto.

SEGURIDAD DEL LAVAVAJILLAS ................................................. 3
REQUISITOS DE FUNCIONAMIENTO ............................................ 7
Requisitos de ubicación ........................................................................7
Requisitos del suministro de agua ....................................................7
PIEZAS Y CARACTERÍSTICAS ........................................................ 8
Sistema de filtrado ..................................................................................9
Sistema de lavado inteligente ............................................................. 9
Rejilla superior ajustable .....................................................................10
GUÍA DE MONTAJE ..........................................................................11
Cómo se limpia su lavavajillas ............................................................ 11
Antes de utilizar el lavavajillas ........................................................... 11
Uso de su nuevo lavavajillas ............................................................... 11
CONTROLES .....................................................................................12
Gráficos de Ciclos y Opciones .......................................................... 15
Sugerencias de carga ........................................................................... 16
Rejilla superior ......................................................................................... 17
Cargar la rejilla superior ...................................................................... 18
Rejilla inferior ........................................................................................... 19
Carga de cubiertos ................................................................................ 21
Patrones de carga recomendados ................................................. 22
Estimado usuario
Graciaspor dejar que Midea le ayude a "sentirse como en casa".
Este manual forma parte de nuestro compromiso con su total
satisfacción. Por favor, lea atentamente este manual antes de usarlo
y guárdelo en un lugar conveniente para futuras consultas.
Para ayudarnos a servirle mejor, por favor registre su producto
usando nuestra conveniente aplicación Midea MSmartlife, visitando
HYPERLINK http://www.midea.com, o enviando un mensaje de
texto con una foto de su prueba de compra a 1-844-224-1614.
Utilizando la opción de texto obtendrá una prórroga adicinal de
garantía de 3 meses inmediatamente después de la finalización de la
garantía original del producto.
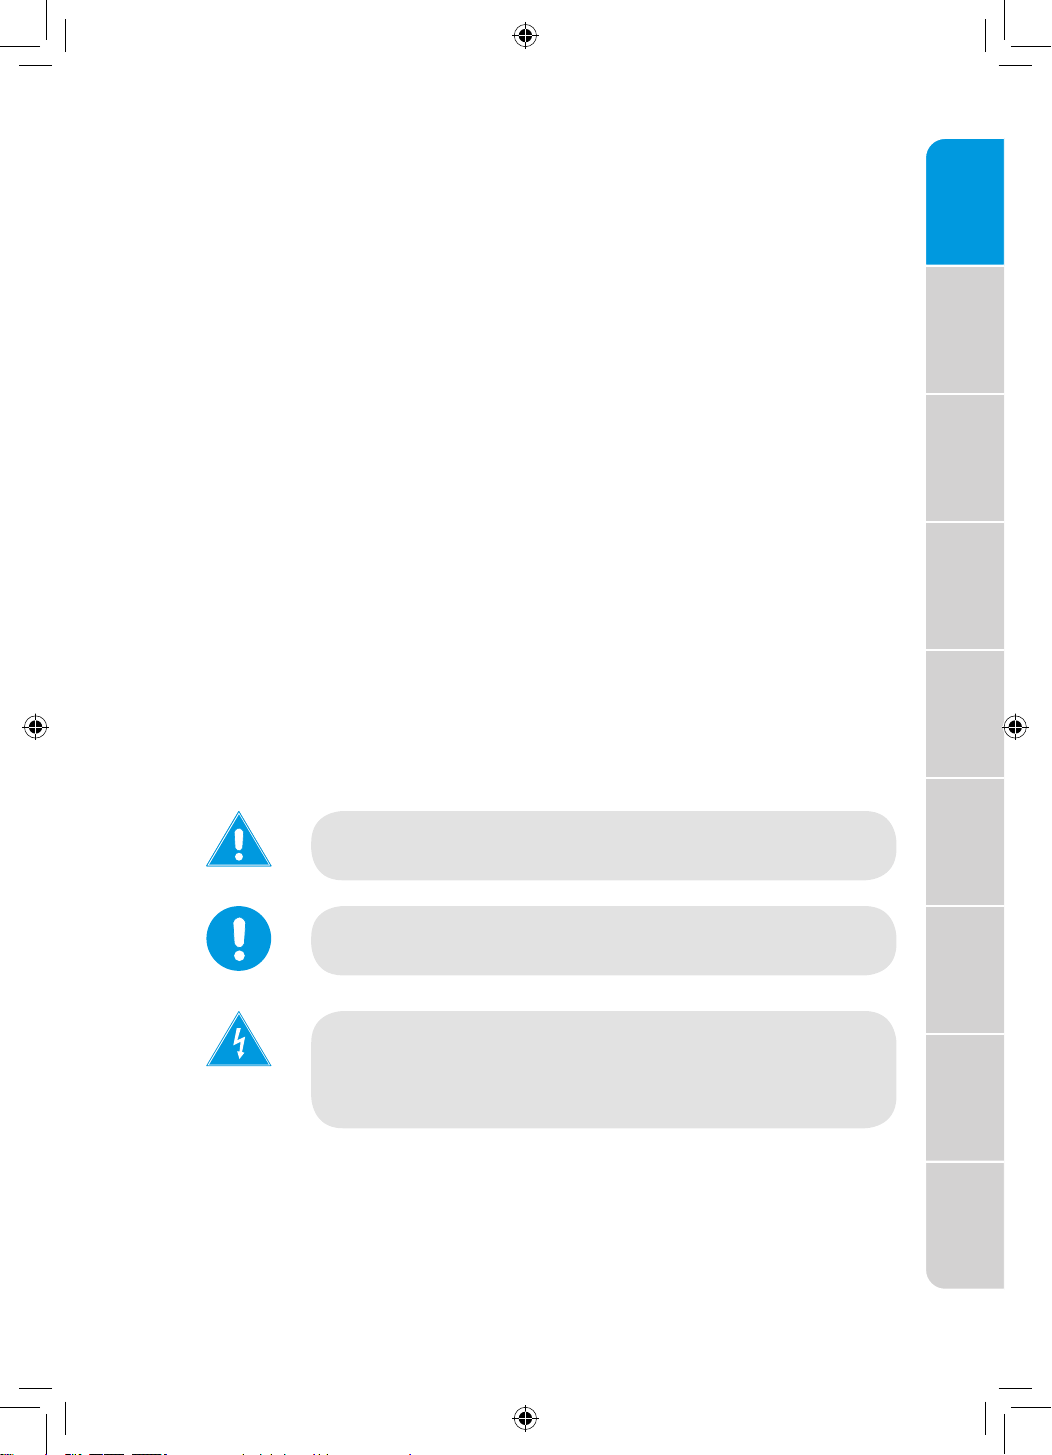
3
Precauciones
de seguridad
Requisitos de
funcionamiento
Piezas y
características
Guía de
puesta en
marcha
Controles
Carga del
Lavavajillas
Uso del
Lavavajillas
Cuidado del
Lavavajillas
Solución de
problemas
SEGURIDAD DEL LAVAVAJILLAS
SU SEGURIDAD Y LA DE LOS DEMÁS SON MUY IMPORTANTES
Para evitar lesiones al usuario o a otras personas y daños materiales, siga
las instrucciones aquí indicadas. El funcionamiento incorrecto debido a la
ignorancia de las instrucciones puede causar daños o lesiones, incluso la
muerte.
El nivel de riesgo se muestra mediante las siguientes indicaciones.
ADVERTENCIA
Este símbolo indica la posibilidad de muerte o
lesiones graves.
PRECAUCIÓN
Este símbolo indica la posibilidad de lesiones o
daños materiales.
ADVERTENCIA
Este símbolo indica la posibilidad de que exista
una tensión peligrosa que constituya un riesgo de
descarga eléctrica que podría provocar la muerte o
lesiones graves.
USO DEL LAVAVAJILLAS .............................................................24
Uso correcto del abrillantador ......................................................... 25
Lavado de prendas especiales......................................................... 27
CUIDADO DEL LAVAVAJILLAS ................................................... 28
Almacenamiento ...................................................................................30
SOLUCIÓN DE PROBLEMAS .......................................................... 31
Códigos de error ................................................................................... 37
GARANTÍA ....................................................................................... 38

4
Precauciones
de seguridad
Requisitos de
funcionamiento
Piezas y
características
Guía de
puesta en
marcha
Controles
Carga del
Lavavajillas
Uso del
Lavavajillas
Cuidado del
Lavavajillas
Solución de
problemas
INSTRUCCIONES DE ADVERTENCIA/ CONEXIÓN A TIERRA
La conexión incorrecta del conductor de puesta a tierra del equipo
puede provocar riesgo de descarga eléctrica. Consulte con un
electricista o representante de servicio si tiene dudas sobre la correcta
conexión a tierra del aparato. No modifique el enchufe suministrado
con el aparato. Si el enchufe no encaja en la toma de corriente, haga
que un electricista cualificado instale una toma de corriente adecuada.
Para un aparato conectado a tierra con cable:
Este aparato debe estar conectado a tierra. En caso de mal
funcionamiento o avería, la conexión a tierra reducirá el riesgo de
descarga eléctrica al proporcionar un camino de menor resistencia
para la corriente eléctrica. Si este aparato está equipado con un cable
que tiene un conductor de conexión a tierra del equipo y un enchufe
con conexión a tierra, el enchufe debe conectarse a un tomacorriente
apropiado que esté instalado y conectado a tierra de acuerdo con todos
los códigos y ordenanzas locales.
Para un aparato conectado permanentemente:
Este aparato debe estar conectado a un sistema de cableado permanente
de metal conectado a tierra, o se debe tender un conductor de conexión
a tierra del equipo con los conductores del circuito y conectarlo al
terminal o cable de conexión a tierra del aparato.
INSTRUCCIONES IMPORTANTES DE
SEGURIDAD
ADVERTENCIA
Cuando utilice su lavavajillas, siga estas precauciones básicas:
●
Lea todas las instrucciones antes de utilizar el lavavajillas.
●
Utilice el lavavajillas sólo para la función prevista.
●
Utilice únicamente detergentes o agentes de abrillantamiento/
humectación recomendados para su uso en lavavajillas y
manténgalos fuera del alcance de los niños.
●
Al cargar objetos para lavar:
●
Ubique los elementos afilados de modo que no dañen el sello de
la puerta;
●
Cargue los cuchillos afilados con los mangos hacia arriba para
reducir el riesgo de lesiones de tipo cortante.
●
No lave artículos de plástico a menos que estén marcados
como "Aptos para lavavajillas" o su equivalente. Para los
artículos de plástico que no estén marcados así, compruebe las
recomendaciones del fabricante.
●
Los artículos que no son aptos para el lavavajillas pueden derretirse
y crear un riesgo potencial de incendio.
●
No toque la resistencia durante o inmediatamente después de su uso.
●
No opere su lavavajillas a menos que todos los paneles del gabinete
estén en su lugar.
5
Precauciones
de seguridad
Requisitos de
funcionamiento
Piezas y
características
Guía de
puesta en
marcha
Controles
Carga del
Lavavajillas
Uso del
Lavavajillas
Cuidado del
Lavavajillas
Solución de
problemas
●
No altere los controles.
●
No maltrate la puerta del lavavajillas ni los estantes para platos, ni
se siente ni póngase de pie sobre ellos.
●
Para reducir el riesgo de lesiones, no permita que los niños jueguen
dentro o encima del lavavajillas.
●
En determinadas condiciones, puede producirse gas hidrógeno en
un sistema de agua caliente que no se haya utilizado durante dos
semanas o más. EL GAS HIDRÓGENO ES EXPLOSIVO. Si el sistema
de agua caliente no se ha utilizado durante ese período, antes de
utilizar el lavavajillas abra todos los grifos de agua caliente y deje
que salga agua de cada uno durante varios minutos. Esto liberará
el gas hidrógeno acumulado. Como el gas es inflamable, no fume ni
utilice una llama abierta durante este tiempo.
●
El uso de técnicos no cualificados o de piezas de repuesto
no originales puede provocar daños graves en el producto y/
o lesiones. Todas las reparaciones deben ser realizadas por un
técnicocualificado y se deben utilizar únicamente piezas de repuesto
originales de fábrica.
●
No almacene ni utilice materiales combustibles, gasolina ni otros
vapores y líquidos inflamables cerca de este o cualquier otro
electrodoméstico.
●
Mantenga a los niños pequeños y a los bebés alejados del lavavajillas
cuando esté en funcionamiento.
●
No utilice el lavavajillas si tiene la línea eléctrica o el enchufe
dañados, y no enchufe el lavavajillas en una toma de corriente
dañada. El incumplimiento de estas instrucciones puede provocar
una descarga eléctrica.
●
Este manual no cubre todas las posibles condiciones o situaciones
que puedan ocurrir.
●
Retire la puerta del compartimento de lavado cuando deje de usarlo
definitivamente o deseche un lavavajillas antiguo.
GUARDE ESTAS INSTRUCCIONES
ESTE APARATO ES SÓLO PARA USO DOMÉSTICO
ADVERTENCIA
Peligro de vuelco
●
No utilice el lavavajillas hasta que esté
completamente instalado.
●
No empuje hacia abajo la puerta abierta.
●
Hacerlo puede provocar lesiones graves o cortes.

6
Advertencias de la Proposición 65 del Estado de California:
ADVERTENCIA: Cáncer y daños reproductivos
-www.P65Warnings.ca.gov
ADVERTENCIA
Peligro de asfixia
●
Antes de deshacerse de su viejo electrodoméstico, retire la puerta
o la tapa para que los niños no puedan esconderse o quedar
atrapados dentro del aparato a descartar.
●
El incumplimiento de estas instrucciones puede causar la muerte o
lesiones cerebrales.
PRECAUCIÓN
●
Nunca utilice productos químicos agresivos para limpiar su
lavavajillas. Algunos productos que contienen cloruro pueden dañar
su lavavajillas y pueden presentar riesgos para la salud.
●
Nunca utilice productos de limpieza a vapor para limpiar su
lavavajillas. El fabricante no se hará responsable de los posibles
daños o consecuencias.
●
Para evitar posibles daños en el lavavajillas, no utilice productos
químicos agresivos, limpiadores abrasivos, estropajos (metálicos o
de plástico) o paños/toallas de papel abrasivos para limpiar el panel
exterior de la puerta de su lavavajillas. El panel exterior de la puerta
de su lavavajillas puede dañarse al hacerlo.
●
Se recomienda encarecidamente que el usuario se familiarice
con el procedimiento para cortar el suministro de agua entrante
y el procedimiento para cortar el suministro de energía entrante.
Consulte las Instrucciones de instalación o póngase en contacto con
su instalador para obtener más información.
●
Si el lavavajillas desagua en un triturador de alimentos, asegúrese
de que el triturador esté completamente vacío antes de poner en
marcha el lavavajillas.
●
Los lavavajillas residenciales con certificación NSF/ANSI 184 no
están diseñados para su uso en establecimientos alimentarios
comerciales.
●
Proteja su lavavajillas de los elementos. Protéjalo contra la
congelación para evitar posibles daños en la válvula de llenado.
Los daños causados por la congelación no están cubiertos por la
garantía.
●
No apto para uso en exteriores.
Precauciones
de seguridad
Requisitos de
funcionamiento
Piezas y
características
Guía de
puesta en
marcha
Controles
Carga del
Lavavajillas
Uso del
Lavavajillas
Cuidado del
Lavavajillas
Solución de
problemas

7
Precauciones
de seguridad
Requisitos de
funcionamiento
Piezas y
características
Guía de
puesta en
marcha
Controles
Carga del
Lavavajillas
Uso del
Lavavajillas
Cuidado del
Lavavajillas
Solución de
problemas
REQUISITOS DE FUNCIONAMIENTO
REQUISITOS ELÉCTRICOS
ADVERTENCIA
Peligro de descarga eléctrica
●
Conecte a tierra el lavavajillas.
●
Conecte el cable de tierra al conector verde de tierra de la caja de
terminales.
●
No utilice un cable de extensión.
●
El incumplimiento de estas instrucciones puede provocar la muerte,
un incendio o una descarga eléctrica.
Este lavavajillas está diseñado para funcionar con un suministro eléctrico
individual de 120 V, 60 Hz, 15 ó 20 amperios con fusibles y cable de cobre
solamente. Se recomienda utilizar un fusible de retardo o un disyuntor y
disponer de un circuito separado que sirva sólo a este electrodoméstico.
Si se utiliza un tomacorriente, éste debe colocarse en un gabinete
adyacente.
REQUISITOS DE UBICACIÓN
●
Instale el lavavajillas en un lugar protegido de la intemperie. Protéjalo
contra la congelación para evitar la posible rotura de la válvula de
llenado. Estas roturas no están cubiertas por la garantía. Para obtener
información sobre el almacenamiento durante el invierno, consulte
"Almacenamiento" en la sección "Cuidado del lavavajillas".
●
Instale y nivele el lavavajillas en un piso que soporte el peso y en un
área adecuada para su tamaño y uso.
REQUISITOS DEL SUMINISTRO DE AGUA
●
La temperatura del suministro de agua debe ser de 49°C a 66°C
(120°F a 150°F).
●
El suministro de agua debe mantener la presión del agua entre 20 y
80 psi para un flujo suficiente.
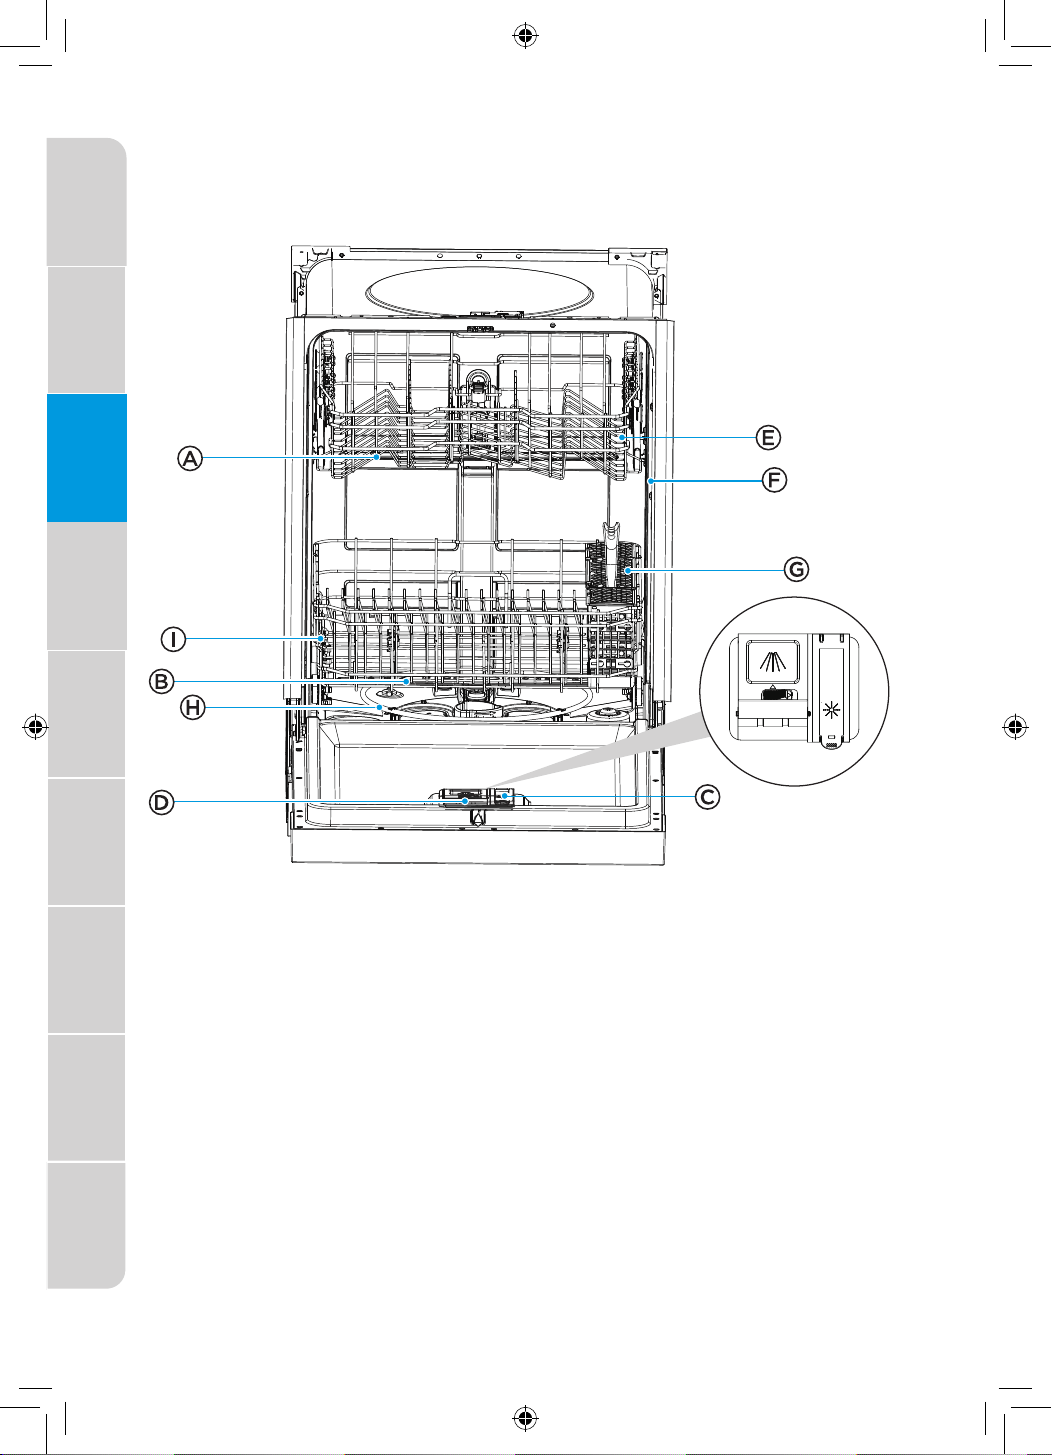
8
Precauciones
de seguridad
Requisitos de
funcionamiento
Piezas y
características
Guía de
puesta en
marcha
Controles
Carga del
Lavavajillas
Uso del
Lavavajillas
Cuidado del
Lavavajillas
Solución de
problemas
PIEZAS Y CARACTERÍSTICAS
A)
Brazo rociador central
B)
Brazo rociador inferior
C)
Dosificador de
abrillantador
D)
Dispensador de
detergente
E)
Rejilla superior
H)
Rejilla inferior
I)
Elemento calefactor
F)
Junta de la cuba
G)
Canasta para
cubiertos
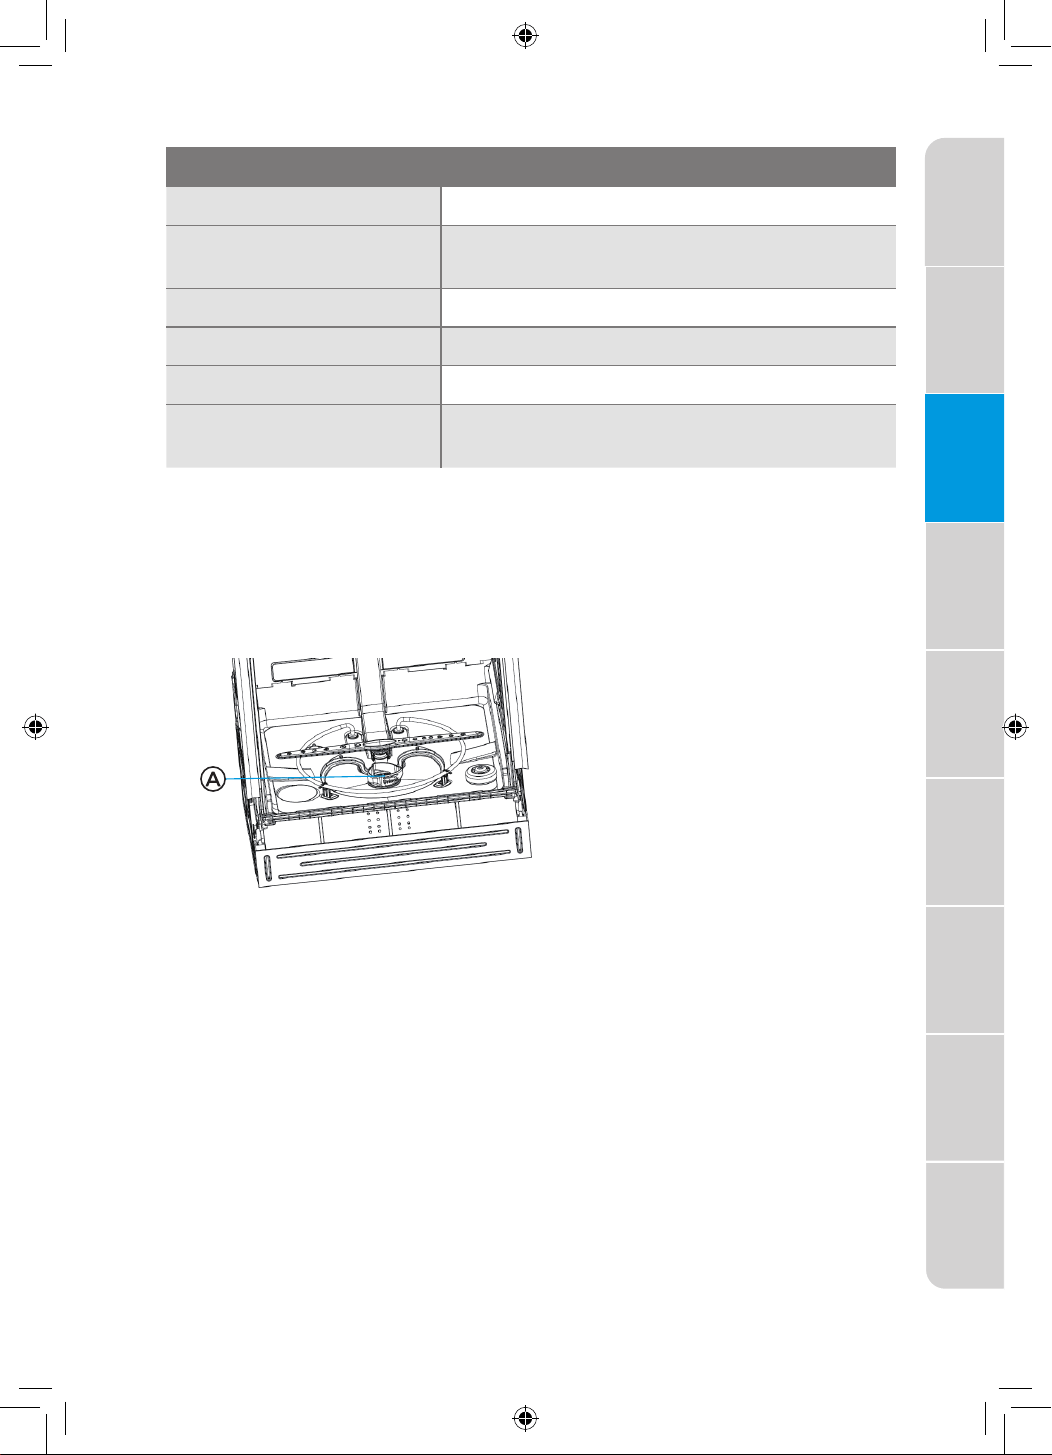
9
Precauciones
de seguridad
Requisitos de
funcionamiento
Piezas y
características
Guía de
puesta en
marcha
Controles
Carga del
Lavavajillas
Uso del
Lavavajillas
Cuidado del
Lavavajillas
Solución de
problemas
ESPECIFICACIONES
Capacidad: 12 posiciones
Dimensiones (AnxPrxAl):
23 3/5" x 22 7/10" x 33 3/4"
(600x576x855 mm)
Peso sin embalaje:
70
lb
Alimentación eléctrica: 120 voltios, 60 Hz
Potencia nominal de uso: Motor de lavado 50 W Calentador 840 W
Presión de alimentación
de agua:
20 - 80 psi (138 - 552 kPa)
SISTEMA DE FILTRADO
Su lavavajillas tiene un sistema de varios filtros, que permite un mejor
funcionamiento usando menos agua y menos energía.
El sistema de filtrado incluye tres filtros que trabajan en combinación
para separar el agua sucia y el agua limpia en diferentes cámaras.
A)
Ubicación del
filtro
SISTEMA DE LAVADO INTELIGENTE
Su lavavajillas tiene un sistema de Lavado Inteligente que se puede
utilizar seleccionando el ciclo Auto.
El sistema Lavado inteligente detecta el nivel de suciedad de la carga
y ajusta el ciclo de lavado en consecuencia. Su lavavajillas puede
determinar el tipo de ciclo necesario para limpiar la vajilla y limpiará de
forma más eficiente cada vez.
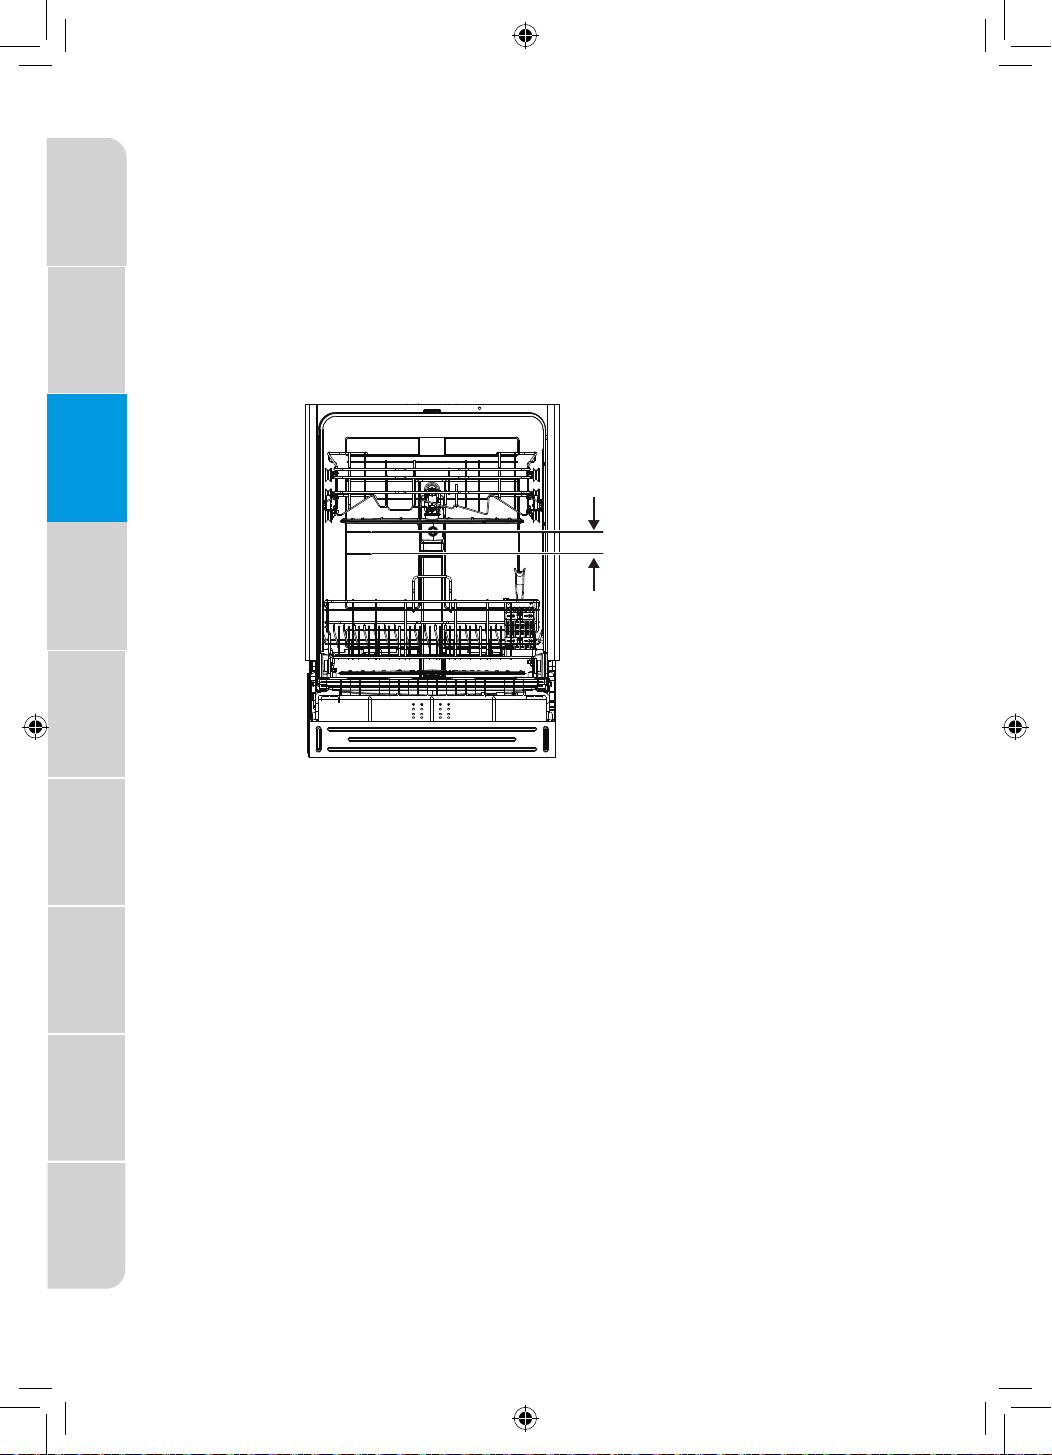
10
Precauciones
de seguridad
Requisitos de
funcionamiento
Piezas y
características
Guía de
puesta en
marcha
Controles
Carga del
Lavavajillas
Uso del
Lavavajillas
Cuidado del
Lavavajillas
Solución de
problemas
REJILLA SUPERIOR AJUSTABLE
La rejilla superior ajustable le permite cargar artículos más altos en la
rejilla superior o inferior.
La rejilla superior de su lavavajillas puede ajustarse 2" (5.08 cm). El ajuste
de la separación de la rejilla superior aumenta o disminuye la separación
de la rejilla inferior, como se muestra en el gráfico.
Para obtener instrucciones, consulte la sección "Rejilla superior ajustable".
2" (5.
08 cm)

11
Precauciones
de seguridad
Requisitos de
funcionamiento
Piezas y
características
Guía de
puesta en
marcha
Controles
Carga del
Lavavajillas
Uso del
Lavavajillas
Cuidado del
Lavavajillas
Solución de
problemas
GUÍA DE MONTAJE
IMPORTANTE:
●
Deseche/recicle adecuadamente todo el material de embalaje.
●
Lea este Manual del Usuario en su totalidad. Encontrará información
importante sobre seguridad y consejos útiles para su funcionamiento.
CÓMO SE LIMPIA SU LAVAVAJILLAS
Su lavavajillas se limpia rociando una mezcla de agua caliente y
detergente a través de los brazos rociadores contra las superficies sucias.
El lavavajillas se llena de agua cubriendo la zona del filtro. A continuación,
el agua se bombea a través de los múltiples filtros y brazos rociadores.
Las partículas de suciedad se separan del agua y se van por el desagüe a
medida que el agua se bombea y se sustituye por agua limpia.
El número de llenados de agua variará dependiendo del ciclo
seleccionado.
ANTES DE UTILIZAR EL LAVAVAJILLAS
1. Compruebe que los filtros no tengan residuos que puedan haberse
introducido desde el embalaje o durante la instalación. Consulte la
sección "Limpieza de los filtros".
2. Añada abrillantador. Consulte la sección "Uso adecuado del
abrillantador".
USO DE SU NUEVO LAVAVAJILLAS
NOTA: Para disminuir el tiempo del ciclo y posiblemente mejorar el
rendimiento, abra el grifo de agua caliente más cercano al lavavajillas
hasta que el agua salga caliente. Cierre el agua.
1. Cargue el lavavajillas. Consulte "Carga del lavavajillas".
2. Añada detergente. Consulte "Uso adecuado del detergente".
3. Seleccione el CICLO y las OPCIONES deseados. Ver "Tablas de ciclos
y opciones".
●
Sólo se iluminarán las Opciones disponibles para el Ciclo
seleccionado.
●
Los controles del Ciclo y Opciones seleccionados se iluminarán
para indicar que están seleccionados.
4. Cierre firmemente la puerta para que quede asegurada.
5. Pulse INICIO.
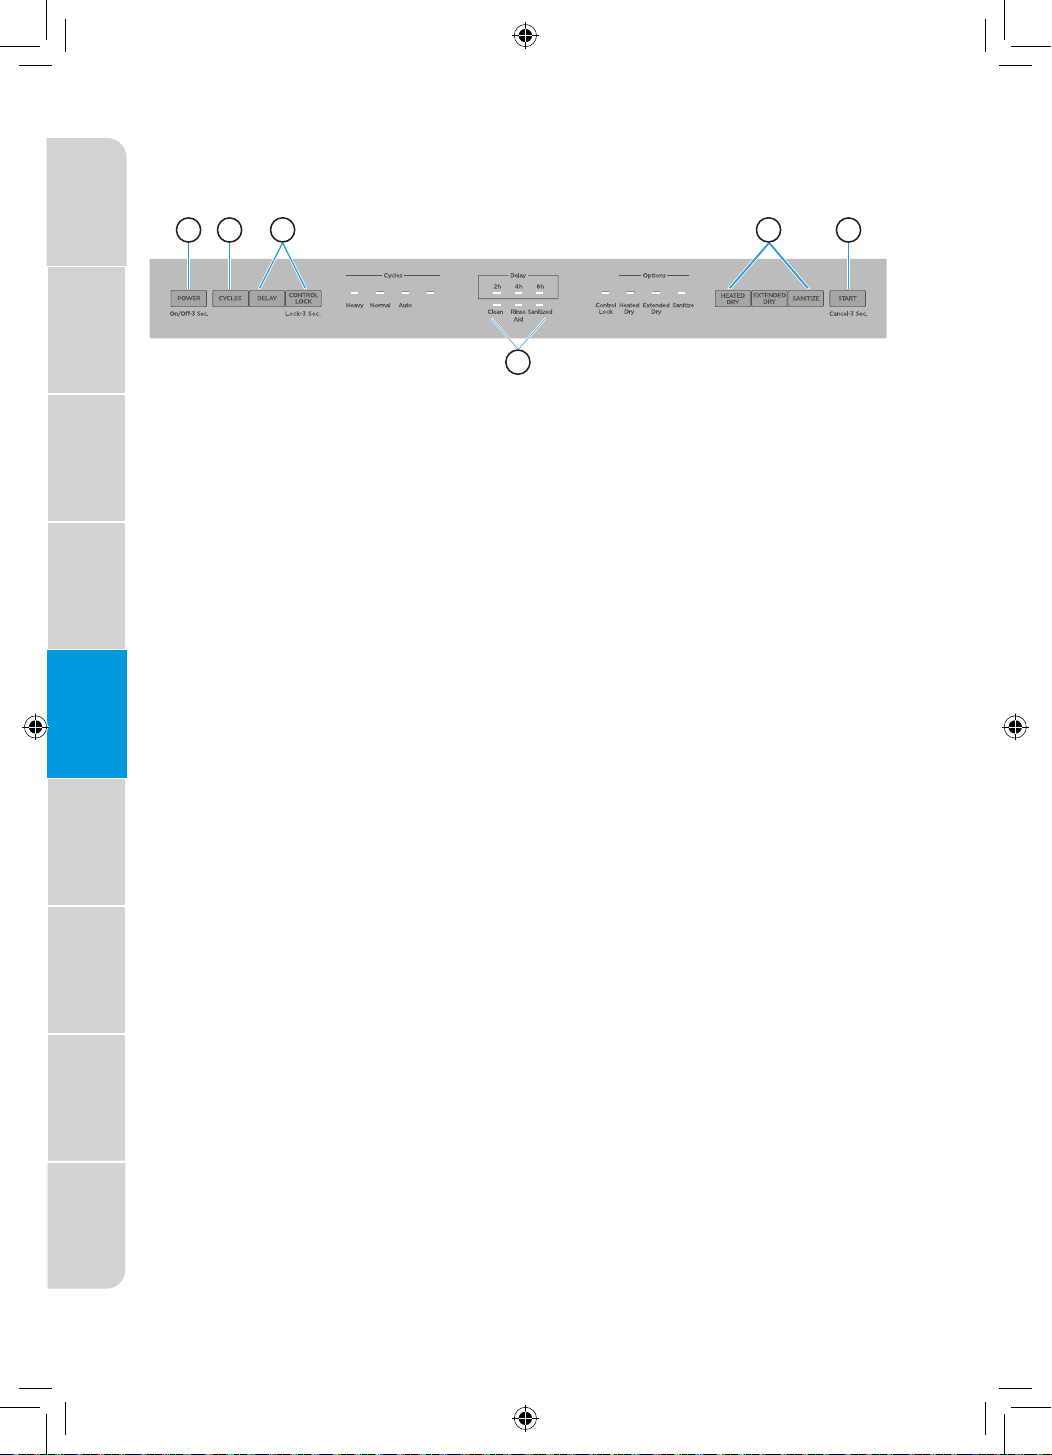
12
Precauciones
de seguridad
Requisitos de
funcionamiento
Piezas y
características
Guía de
puesta en
marcha
Controles
Carga del
Lavavajillas
Uso del
Lavavajillas
Cuidado del
Lavavajillas
Solución de
problemas
CONTROLES
NOTA: Cuando la puerta está cerrada.
A)
ENCENDIDO
Pulse este botón para encender o apagar el lavavajillas.
B)
CICLOS
Pulse este botón para seleccionar el ciclo de lavado correspondiente
y el
ciclo se iluminará. Puede optar entre los ciclos Heavy, Auto, Normal
y Express.
Pesado
El ciclo Pesado es para ollas, sartenes, cacerolas y vajillas con
suciedad seca u horneada.
Normal
El ciclo Normal con sólo la opción de Secado por Calor seleccionada
se recomienda para lavar y secar completamente una carga
completa de vajilla con suciedad normal. La etiqueta de consumo de
energía se basa en esta combinación de ciclo y opción con la rejilla
superior en posición elevada.
Auto
El ciclo Auto utiliza sensores en el lavavajillas para determinar el
nivel de suciedad de la carga de vajilla, y luego ajusta el ciclo de
lavado para optimizar el rendimiento del lavado y el uso de agua y
energía.
Rápido
El ciclo rápido es para cargas de vajilla poco sucias o bien aclaradas.
A
B
C
E
F
D
Quick
13
Precauciones
de seguridad
Requisitos de
funcionamiento
Piezas y
características
Guía de
puesta en
marcha
Controles
Carga del
Lavavajillas
Uso del
Lavavajillas
Cuidado del
Lavavajillas
Solución de
problemas
C)
FUNCIONES ADICIONALES
Retardo
La función Tiempo de Retardo le permite programar el lavavajillas para
que comience el ciclo de lavado seleccionado 2, 4 u 8 horas más tarde.
Presione el control RETARDO repetidamente para alternar entre
( 2h/4h/8h ). El LED junto a la hora seleccionada se iluminará.
NOTA: Para cancelar la función de Retardo, mantenga pulsado el control
START durante 3 segundos para Cancelar. Para comenzar el ciclo de
lavado inmediatamente, pulse nuevamente INICIO.
Bloqueo de Controles
Utilícelo para bloquear todos los controles y evitar que los niños cambien
accidentalmente el ciclo del lavavajillas o lo pongan en marcha.
●
Mantenga pulsado durante 3 segundos Bloqueo de Controles
para activar o cancelar la opción Bloqueo de Controles. Una vez
seleccionada la función, el icono de Bloqueo de Controles se
iluminará. Si se cancela la función, el icono de Bloqueo de Controles
se apagará.
D)
OPCIONES
Las Opciones mejoran el ciclo de lavado. Algunas Opciones sólo están
disponibles con determinados Ciclos de Lavado. Consulte las "Tablas de
Ciclos y Opciones" para ver qué Opciones están disponibles para el ciclo
de lavado que seleccionó.
●
Presione el(los) control(es) de Opción deseado(s). El(los) control(es)
de opción(es) se ilumina(n) para indicar qué opción(es) se ha(n)
seleccionado.
Higienizar
Advertencia: Sólo los ciclos de higienización han sido diseñados
para cumplir los requisitos de eliminación de suciedad y eficacia de
higienización. No se pretende, ni directa ni indirectamente, que todos
los ciclos de una máquina certificada hayan superado la prueba de
eficacia de higienización.
Esta opción higieniza la vajilla y la cristalería de acuerdo con la
norma internacional NSF/ANSI 184 para lavavajillas residenciales. Los
lavavajillas residenciales certificados no están diseñados para su uso en
establecimientos alimentarios comerciales.
Cuando se selecciona la opción Desinfectar, la temperatura del agua
alcanzará un máximo de 156.2°F (69°C).
El control de desinfección se ilumina para indicar que se ha completado
el ciclo de lavado con la opción de Higienizar. La luz se apagará después
de que la puerta haya estado abierta durante 30 segundos.
14
Precauciones
de seguridad
Requisitos de
funcionamiento
Piezas y
características
Guía de
puesta en
marcha
Controles
Carga del
Lavavajillas
Uso del
Lavavajillas
Cuidado del
Lavavajillas
Solución de
problemas
NOTA: Es posible que el agua no alcance los 156°F (69°C) en el modo
Higienizar, si la temperatura del agua caliente entrante no cumple con el
requisito mínimo de 120°F (49°C).
Secado Calentado
Cuando se selecciona la opción Secado Calentado, el calentador
funcionará durante el proceso de secado.
Secado extendido
Cuando se selecciona la opción Secado extendido, el funcionamiento
del calentador y del ventilador se extenderá para mejorar aún más el
rendimiento del secado. El enjuague final será elevado a 156.2°F (69°C) y
extenderá el secado por 66 minutos.
E)
LUCES INDICADORAS
Abrillantador
La luz indicadora del Abrillantador se enciende cuando el nivel de
abrillantador es bajo. El Abrillantador debe añadirse al dispensador
de abrillantador.
Higienizar
El piloto de Higienizar se ilumina cuando finaliza el ciclo con la
opción de Higienizar.
El piloto se apaga al abrir y cerrar la puerta o al pulsar cualquier
botón.
Limpiar
Se enciende al finalizar un ciclo. Se apaga al abrir y cerrar la puerta
o al pulsar cualquier botón.
F)
INICIO
Inicio - Cierre la puerta y pulse Inicio. El ciclo comenzará.
PAUSA- Si necesita pausar o cancelar un ciclo del lavavajillas en
curso:
IMPORTANTE: Abra ligeramente la puerta y espere a que los brazos
rociadores y la acción de lavado se detengan antes de abrir la
puerta por completo. De este modo evitará que le salpique agua
caliente.
1. Abra ligeramente la puerta y espere unos segundos hasta que
se detenga la acción de lavado.
2. Abra la puerta para añadir o quitar piezas de vajilla.
3. Cierre la puerta y pulse INICIO para reanudar el ciclo de
lavado.
CANCELAR- Para cancelar un ciclo cuando el lavavajillas está en
marcha, mantenga pulsado Inicio durante 3 segundos.
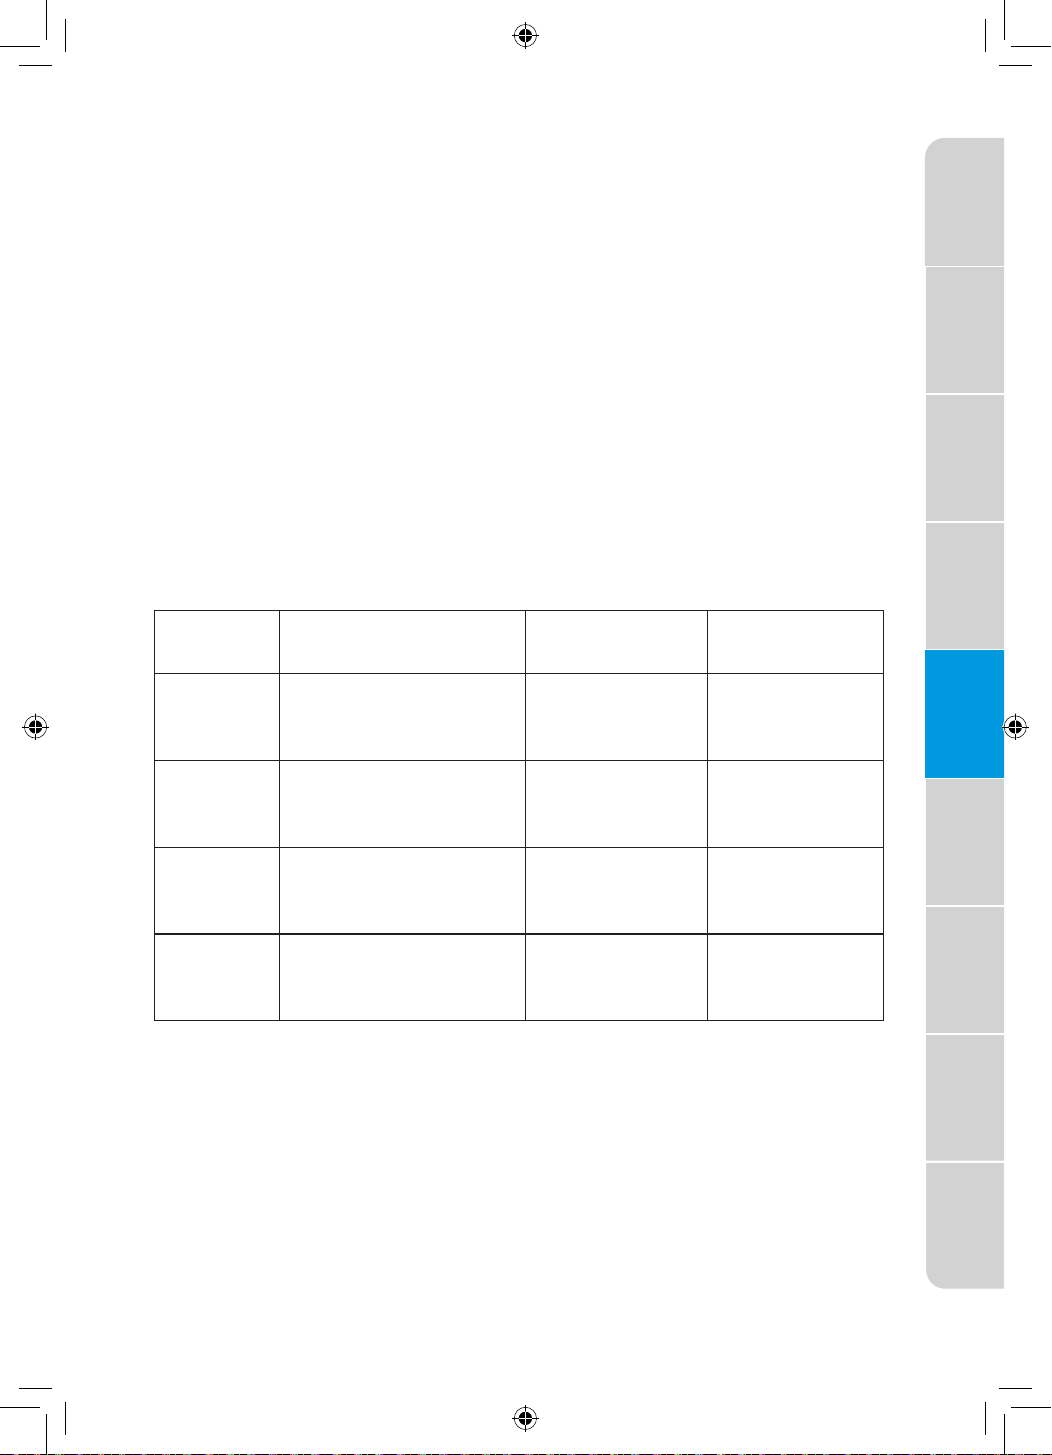
15
Precauciones
de seguridad
Requisitos de
funcionamiento
Piezas y
características
Guía de
puesta en
marcha
Controles
Carga del
Lavavajillas
Uso del
Lavavajillas
Cuidado del
Lavavajillas
Solución de
problemas
GRÁFICOS DE CICLOS Y OPCIONES
Dependiendo del ciclo seleccionado, se iluminarán las opciones
disponibles para seleccionar.
Los tiempos de ciclo son aproximados y variarán dependiendo del ciclo
de lavado y las opciones seleccionadas.
NOTA: Las Opciones añadidas pueden añadir más tiempo y utilizar más
agua.
El agua caliente es necesaria para activar el detergente del lavavajillas y
derretir los residuos grasos de los alimentos.
Un sensor automático comprueba la temperatura del agua entrante. Si el
agua no está lo suficientemente caliente, el ciclo se alargará para calentar
el agua para el lavado principal.
El sensor de lavado inteligente detecta el nivel de suciedad de la vajilla y
puede aumentar o disminuir la duración del ciclo en función del número
de llenados de agua necesarios para limpiar la carga.
Ciclo Opciones disponibles
Consumo de
agua
Duración del
ciclo
Pesado
Secado con calor o
secado prolongado,
desinfección
27.2 L 151 min
Normal
Secado con calor o
secado prolongado,
desinfección
11.7-27 L 103 a 146 min
Auto
Secado con calor o
secado prolongado,
desinfección
11.7-27 L 107 a 147 min
Rápido
Secado con calor o
secado prolongado,
desinfección
15.5 L 60 min
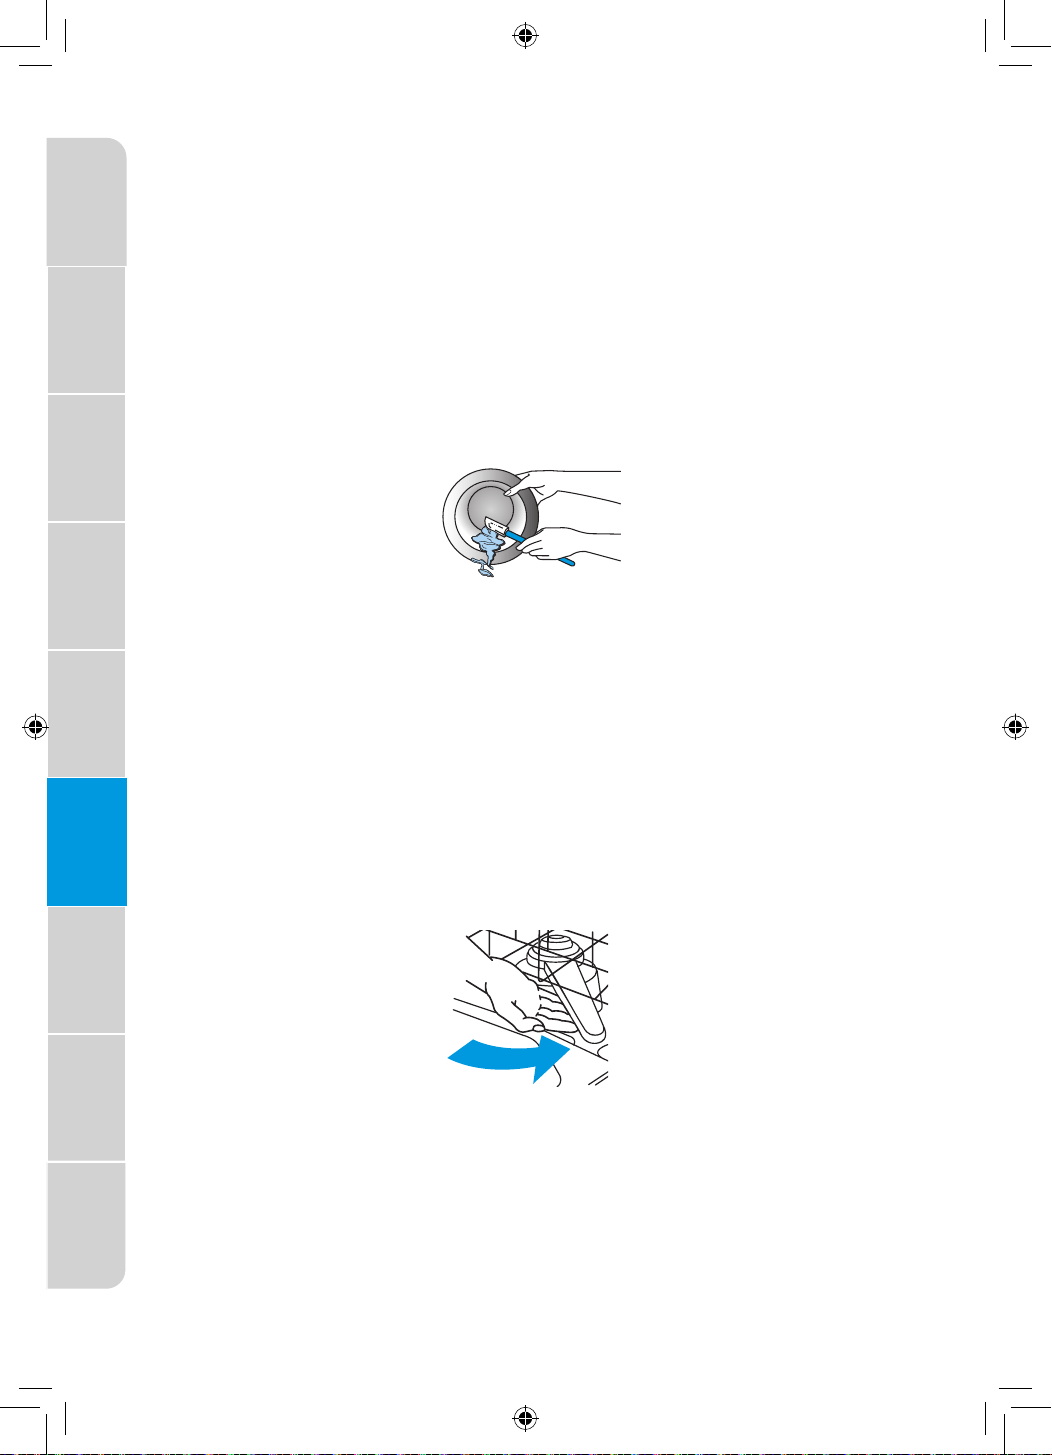
16
Precauciones
de seguridad
Requisitos de
funcionamiento
Piezas y
características
Guía de
puesta en
marcha
Controles
Carga del
Lavavajillas
Uso del
Lavavajillas
Cuidado del
Lavavajillas
Solución de
problemas
CARGA DEL LAVAVAJILLAS
SUGERENCIAS DE CARGA
PREPARAR LOS PLATOS
●
Vacíe los líquidos de vasos y tazas.
●
Retire los restos de comida, huesos, palillos y otros elementos duros de
la vajilla y deséchelos.
●
No es necesario enjuagar a mano los platos antes de cargarlos en el
lavavajillas con las siguientes excepciones:
●
Ingredientes como mayonesa, mostaza, vinagre,zumo de limón y los
productos a base de tomate pueden decolorar el acero inoxidable y
los plásticos si permanecen en ellos durante algún tiempo.
●
En utensilios con restos de alimentos quemados, primero afloje
estos residuos antes de introducir los utensilios en el lavavajillas.
CARGAR LOS PLATOS
●
Es IMPORTANTE que el chorro de agua llegue a todas las superficies
sucias.
●
Cargue los platos de forma que no estén apilados ni superpuestos, si es
posible. Para obtener los mejores resultados de secado, el agua debe
poder escurrir por todas las superficies.
●
Cargue las ollas y sartenes pesadas con cuidado. Los objetos pesados
pueden abollar el interior de acero inoxidable de la puerta si se caen o
golpean.
●
Asegúrese de que las tapas y asas de las ollas, moldes para pizza,
bandejas para galletas, etc., no interfieran con la rotación del brazo
rociador.
●
Asegúrese de que los brazos rociadores superior e inferior no estén
bloqueados y se muevan libremente.
CONSEJOS PARA UN FUNCIONAMIENTO SILENCIOSO
Para evitar ruidos durante el funcionamiento:
●
Asegúrese de que los objetos ligeros estén bien sujetos en las rejillas.
●
Asegúrese de que las tapas y asas de las ollas, pizzas, bandejas para
galletas, etc., no toquen las paredes interiores ni interfieran con la
rotación del brazo rociador.
●
Cargue los platos de forma que no se toquen entre sí.
NOTA: En los modelos empotrables, mantenga cerrados los tapones
de desagüe del fregadero durante el funcionamiento del lavavajillas
para evitar la transferencia de ruido a través de los desagües.
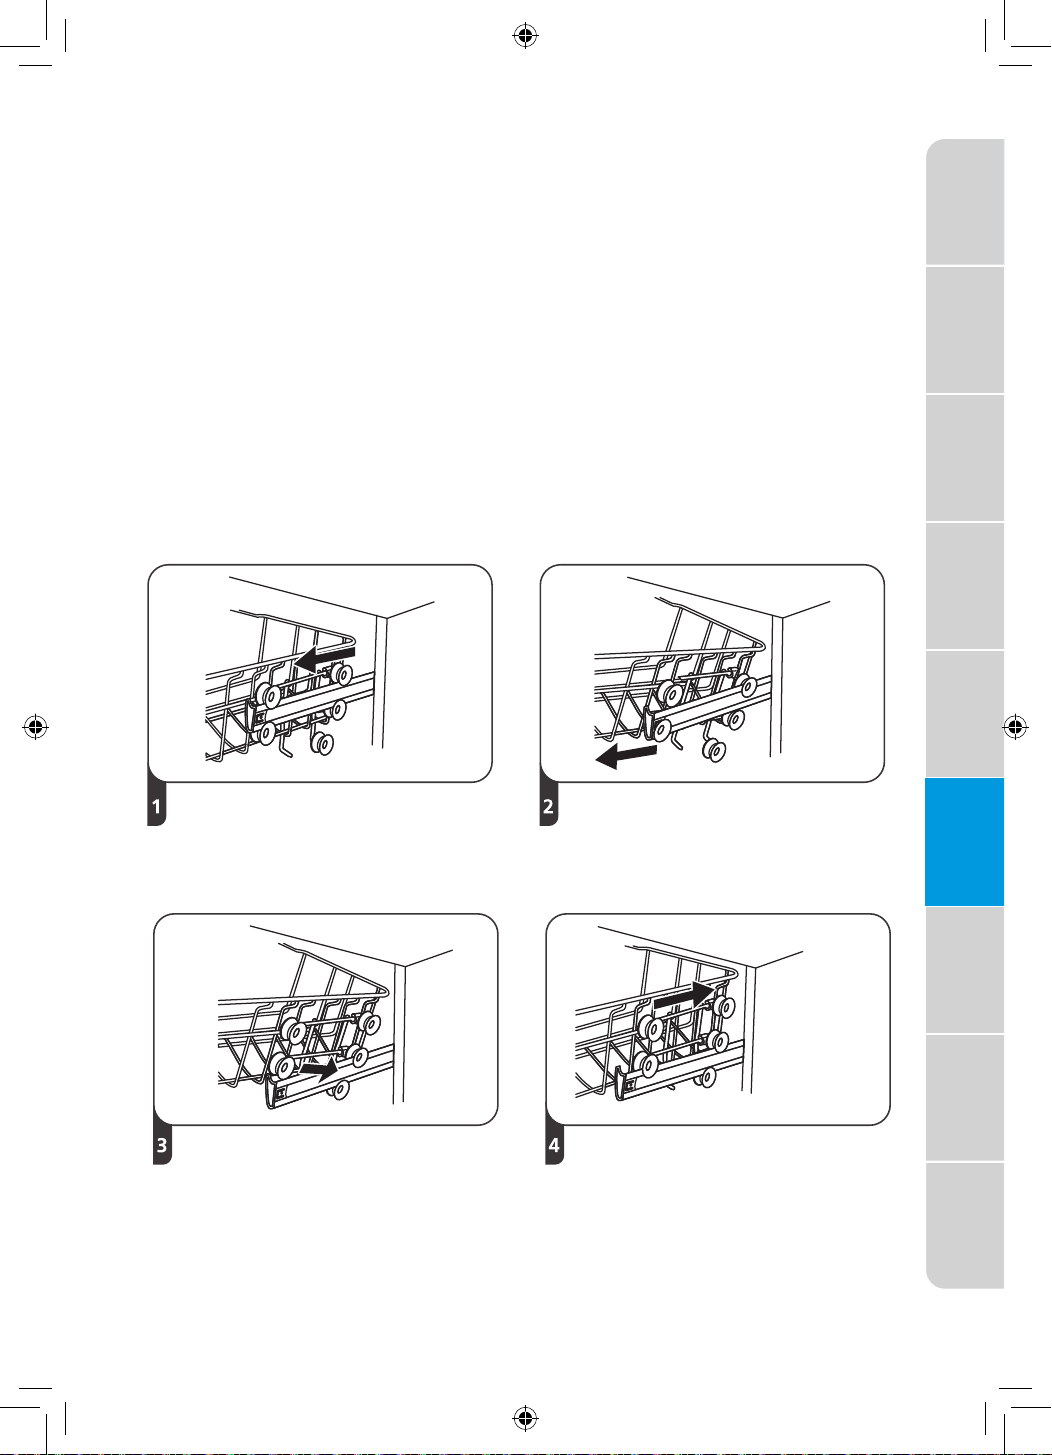
17
Precauciones
de seguridad
Requisitos de
funcionamiento
Piezas y
características
Guía de
puesta en
marcha
Controles
Carga del
Lavavajillas
Uso del
Lavavajillas
Cuidado del
Lavavajillas
Solución de
problemas
REJILLA SUPERIOR
La rejilla superior del lavavajillas está diseñada para tazas, vasos, platos
pequeños, cuencos y artículos de plástico marcados como aptos para el
lavavajillas.
La rejilla superior se puede ajustar fácilmente 2" (5 cm) hacia arriba o
hacia abajo para acomodar artículos más altos en la rejilla superior o
inferior.
AJUSTE DE LA REJILLA SUPERIOR
IMPORTANTE:
• Retire todos los artículos antes de ajustar la rejilla. La rejilla debe estar
vacía.
Para ajustar la altura de la cesta superior, siga estos pasos:
posición inferior
posición superior
Saque la cesta superior.
Vuelva a colocar la cesta
superior en los rodamientos
superiores o inferiores.
Tire hacia arriba la cansta
superior para retirarla.
Empuje hacia dentro la cesta
superior.
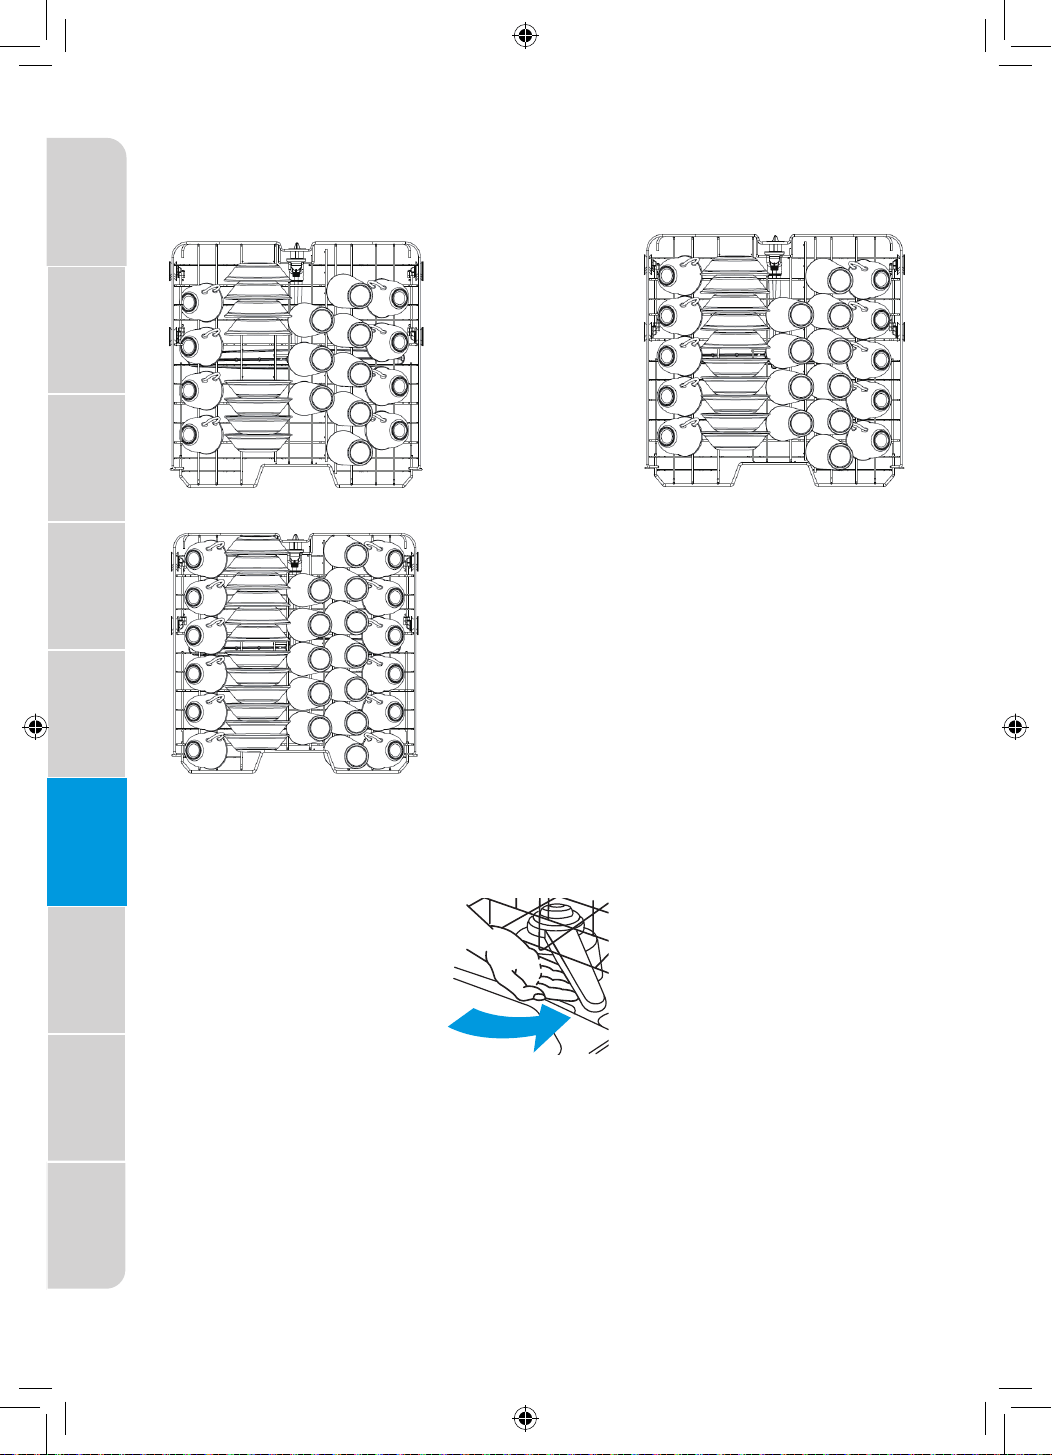
18
Precauciones
de seguridad
Requisitos de
funcionamiento
Piezas y
características
Guía de
puesta en
marcha
Controles
Carga del
Lavavajillas
Uso del
Lavavajillas
Cuidado del
Lavavajillas
Solución de
problemas
CARGAR LA REJILLA SUPERIOR
NOTA: Las características de la rejilla de su lavavajillas pueden variar con
respecto a los dibujos mostrados.
8 posiciones
12 posiciones
10 posiciones
IMPORTANTE: Asegúrese de que los artículos cargados en la rejilla
superior no interfieran con la rotación del brazo rociador central ubicado
debajo de la rejilla superior. Compruebe si hay interferencias girando el
brazo rociador con la mano.
●
Coloque los artículos de forma que los extremos abiertos queden hacia
abajo para su limpieza y escurrido.
●
Coloque los vasos y las tazas sólo en la rejilla superior. La rejilla inferior
no está diseñada para vasos y tazas. Pueden producirse daños.
●
Coloque los vasos y las tazas en las filas entre las púas. Colocarlos sobre
las púas puede provocar roturas, manchas de agua y una limpieza
deficiente.
●
Los cuencos pequeños, sartenes y otros utensilios pueden colocarse
en la rejilla superior. Cargue los cuencos en la sección central para una
mejor estabilidad.
●
La porcelana, el cristal y otros objetos delicados no deben tocarse
durante el funcionamiento del lavavajillas. Podrían producirse daños.
●
Cargue los artículos de plástico de forma que la fuerza del chorro no los
mueva durante el ciclo.
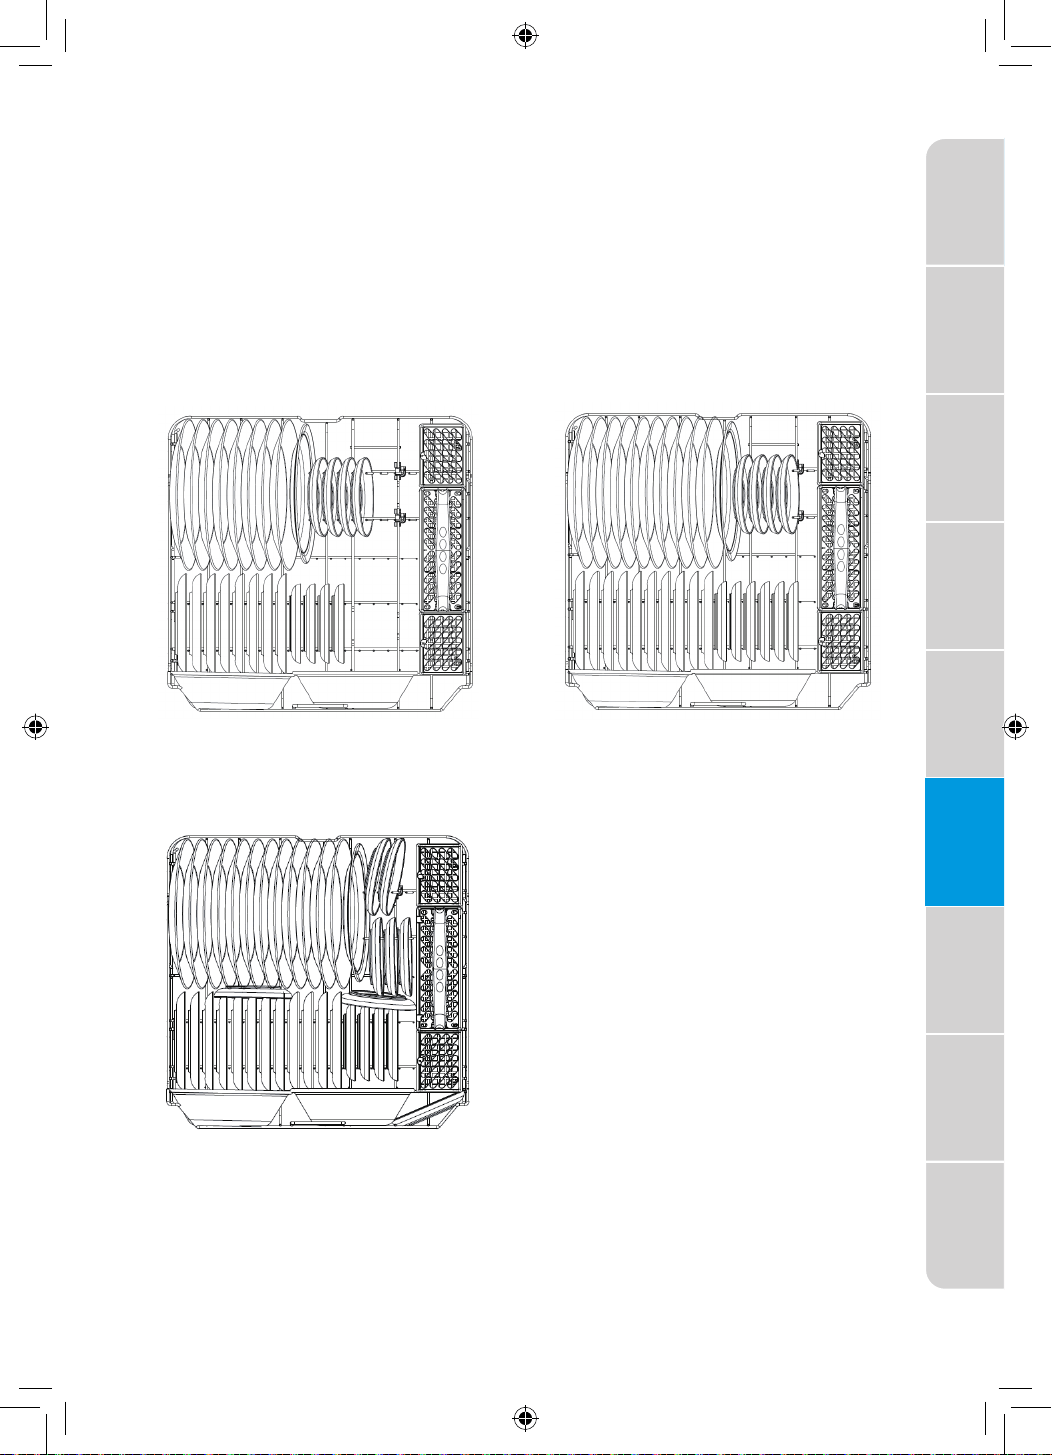
19
Precauciones
de seguridad
Requisitos de
funcionamiento
Piezas y
características
Guía de
puesta en
marcha
Controles
Carga del
Lavavajillas
Uso del
Lavavajillas
Cuidado del
Lavavajillas
Solución de
problemas
REJILLA INFERIOR
La rejilla inferior está diseñada para platos, soperas, utensilios de cocina
y utensilios para hornear.
La rejilla superior ajustable le permite cargar artículos de hasta 12,6" de
altura en la rejilla inferior.
IMPORTANTE: Los artículos en la rejilla inferior deben colocarse de
manera que no interfieran con la rotación de los brazos rociadores,
bloqueen la entrada de agua o impidan que el rocío de agua llegue al
dispensador de detergente.
8 posiciones
12 posiciones
10 posiciones
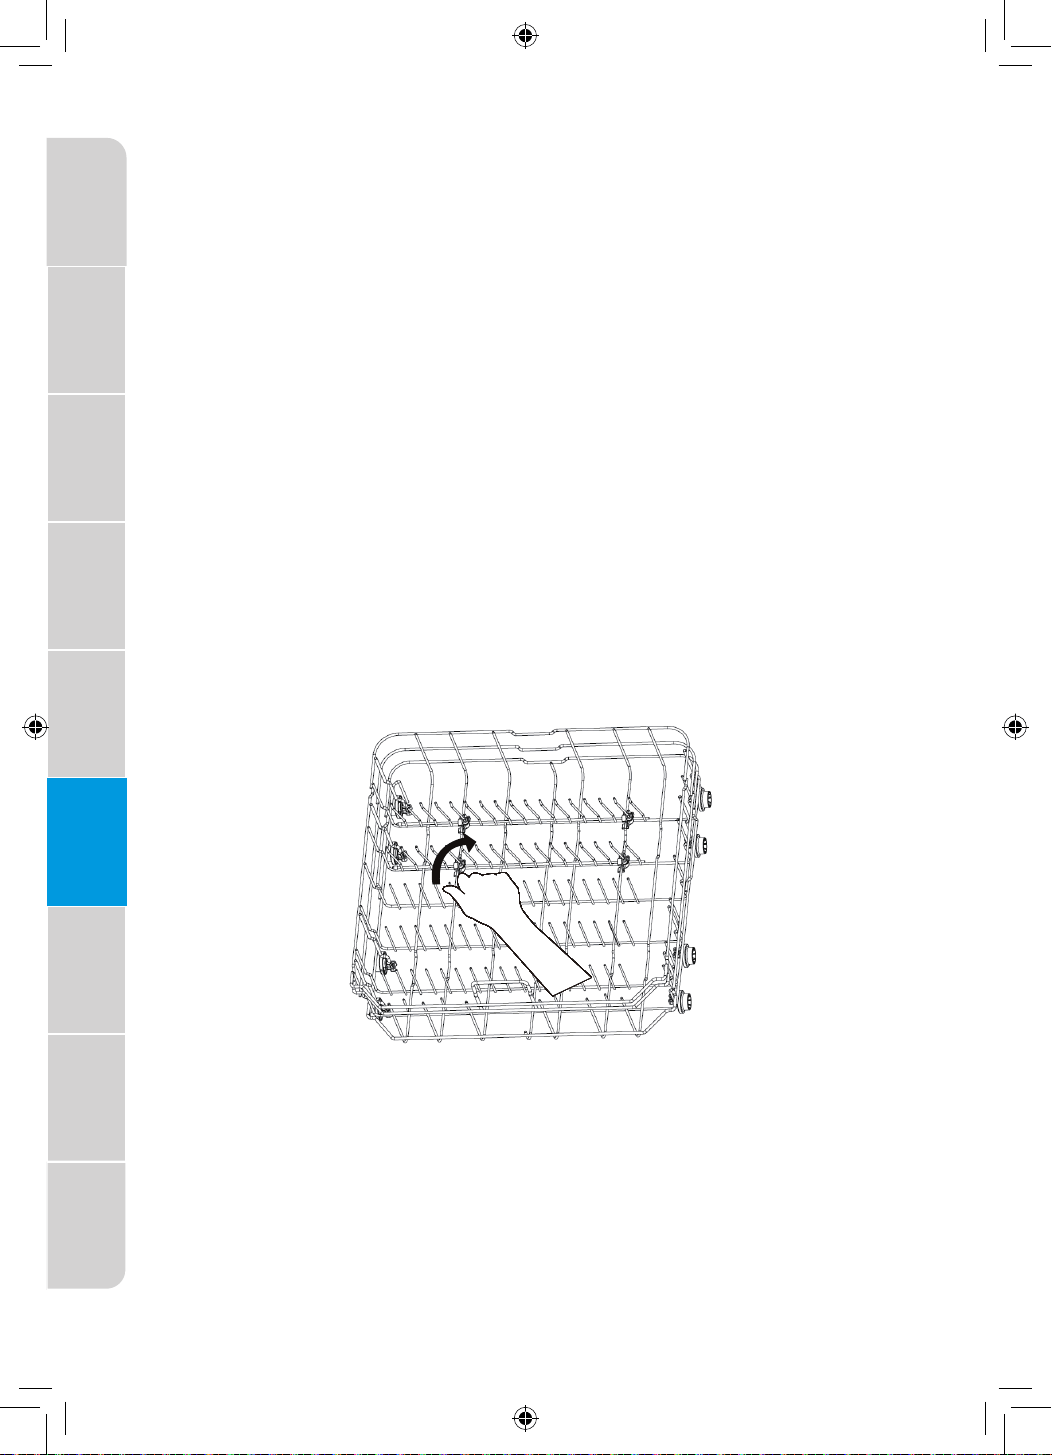
20
Precauciones
de seguridad
Requisitos de
funcionamiento
Piezas y
características
Guía de
puesta en
marcha
Controles
Carga del
Lavavajillas
Uso del
Lavavajillas
Cuidado del
Lavavajillas
Solución de
problemas
CARGAR LA REJILLA INFERIOR
NOTA: Las características de la rejilla de su lavavajillas pueden variar con
respecto a los dibujos mostrados.
●
No coloque vasos, tazas o artículos de plástico en la rejilla inferior.
●
Coloque objetos pequeños en la rejilla inferior sólo si están bien
sujetos.
●
Coloque platos, soperas, etc. entre las púas. No los coloque en nidos
porque el chorro de agua no llegará a todas las superficies.
●
No coloque objetos entre la rejilla inferior y el lateral de la cuba del
lavavajillas.
●
Coloque los utensilios de cocina muy sucios boca abajo en la rejilla.
PÚAS AJUSTABLES DE LA REJILLA
Las púas abatibles de la rejilla inferior facilitan la carga de objetos de
gran tamaño o difíciles de colocar, como fuentes y asadores. Las púas
pueden dejarse en posición elevada para un uso normal, o abatirse para
una carga más flexible.
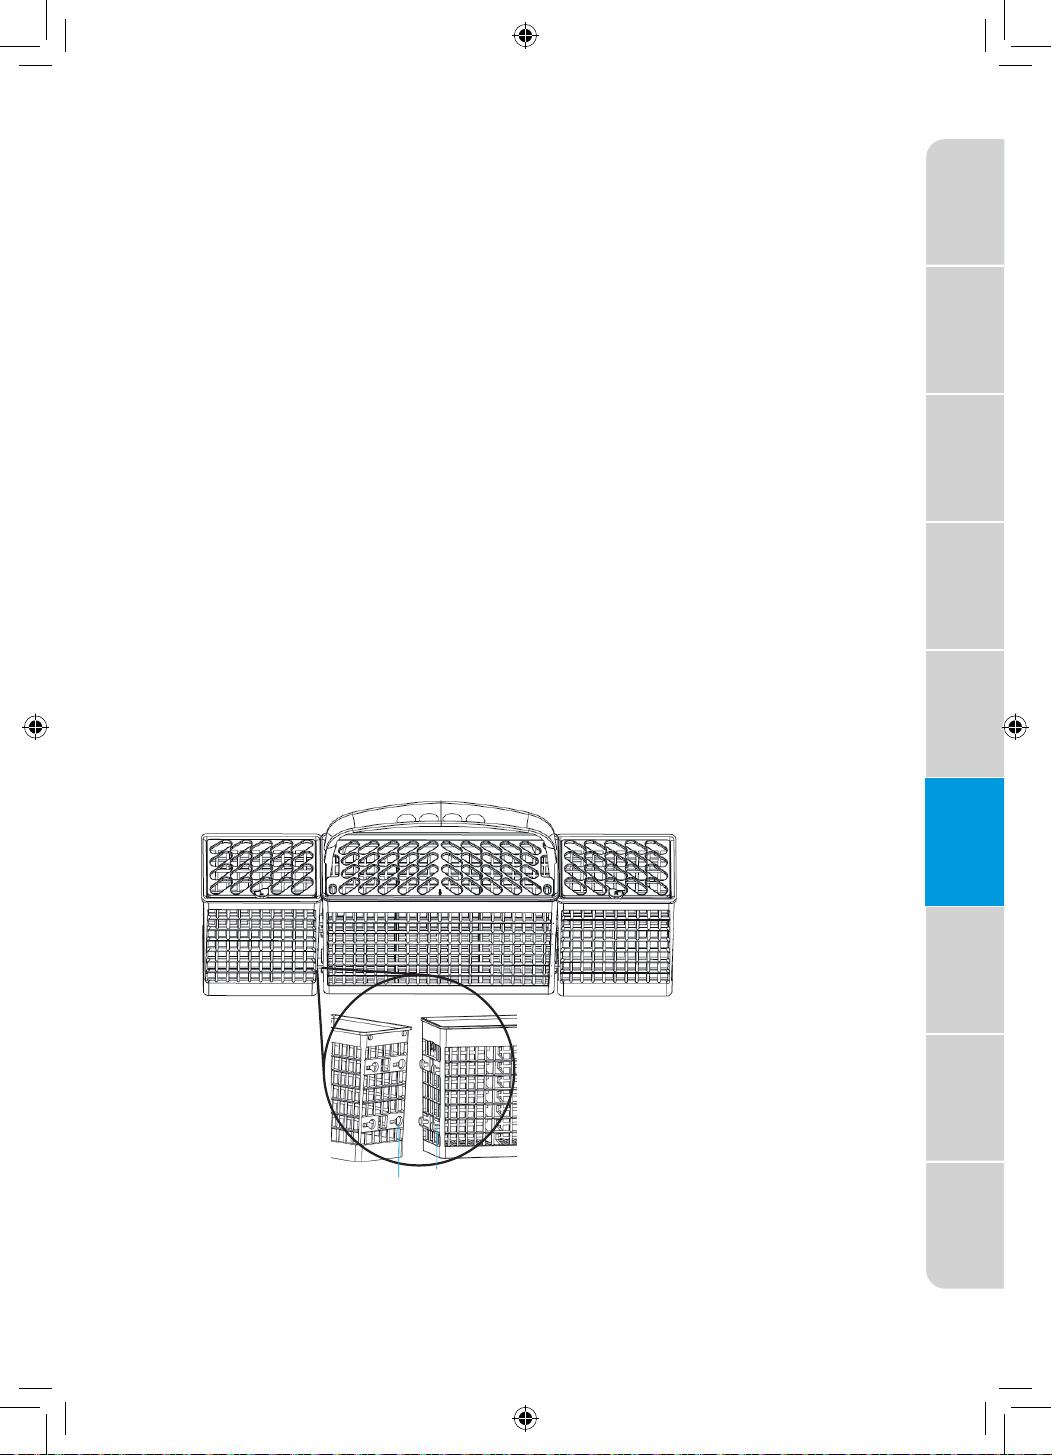
21
Precauciones
de seguridad
Requisitos de
funcionamiento
Piezas y
características
Guía de
puesta en
marcha
Controles
Carga del
Lavavajillas
Uso del
Lavavajillas
Cuidado del
Lavavajillas
Solución de
problemas
CARGA DE CUBIERTOS
NOTAS:
●
No cargue cubiertos de plata o plateados con acero inoxidable. Estos
metales pueden dañarse al entrar en contacto durante el lavado.
●
Algunos alimentos (como la sal, el vinagre, los productos lácteos, los
zumos de fruta, etc.) pueden dañar o corroer los cubiertos. NO LAVE
LOS UTENSILIOS DE ALUMINIO EN EL LAVAVAJILLAS.
CANASTA DE TRES SECCIONES PARA CUBIERTOS
La canasta para cubiertos consta de tres secciones separadas. Para
una óptima flexibilidad de carga, la sección central de la canasta puede
utilizarse individualmente, unirse con una o ambas secciones laterales o
retirarse.
●
Levante el asa para extraer la canasta y colóquela sobre la encimera
o la mesa.
●
Levante cada sección lateral para desenganchar la sección central de
las ranuras de las secciones laterales.
●
Vuelva a colocar la(s) sección(es) en la rejilla inferior y cargue los
cubiertos, O cargue los cubiertos mientras la(s) sección(es) está(n)
en la encimera y luego vuelva a colocar la cesta en la rejilla inferior.
A
B
A)
Ranuras
B)
Tenedores
horquilla
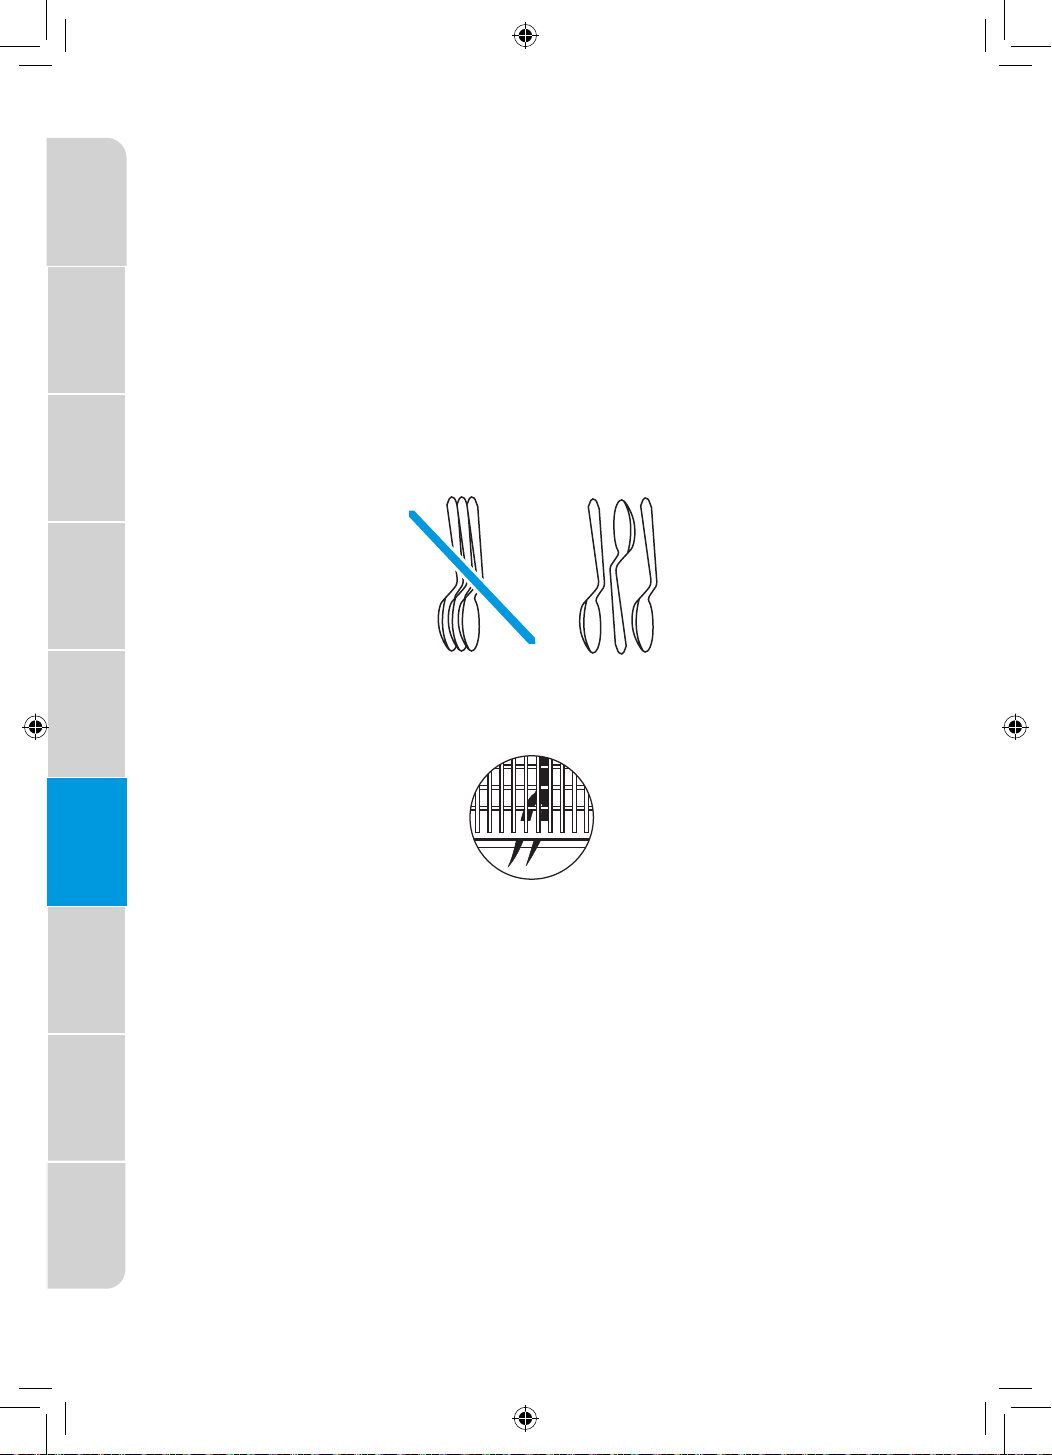
22
Precauciones
de seguridad
Requisitos de
funcionamiento
Piezas y
características
Guía de
puesta en
marcha
Controles
Carga del
Lavavajillas
Uso del
Lavavajillas
Cuidado del
Lavavajillas
Solución de
problemas
PATRONES DE CARGA RECOMENDADOS
Para obtener mejores resultados:
●
Cargue los artículos con las asas hacia abajo, utilizando los
separadores para evitar que los cubiertos se encajen.
●
Coloque los artículos pequeños, como tapas de biberones, tapas
de tarros, soportes para mazorcas de maíz, etc. en la(s) sección(es)
con tapa(s) abatible(s). Cierre la tapa para mantener los objetos
pequeños en su sitio.
●
Descargue o retire la canasta antes de descargar las rejillas para
evitar que caigan gotas de agua sobre los cubiertos.
●
Cuando las asas estén hacia arriba, mezcle los artículos en cada
sección de la canasta con algunos apuntando hacia arriba y otros
hacia abajo para evitar que se aniden. El pulverizador no puede
alcanzar los artículos anidados.
IMPORTANTE: Cargue siempre los artículos afilados (cuchillos, brochetas,
etc.) apuntando hacia abajo. Asegúrese de que no sobresalga nada por el
fondo de la canasta o de la rejilla que pueda bloquear el brazo de lavado.
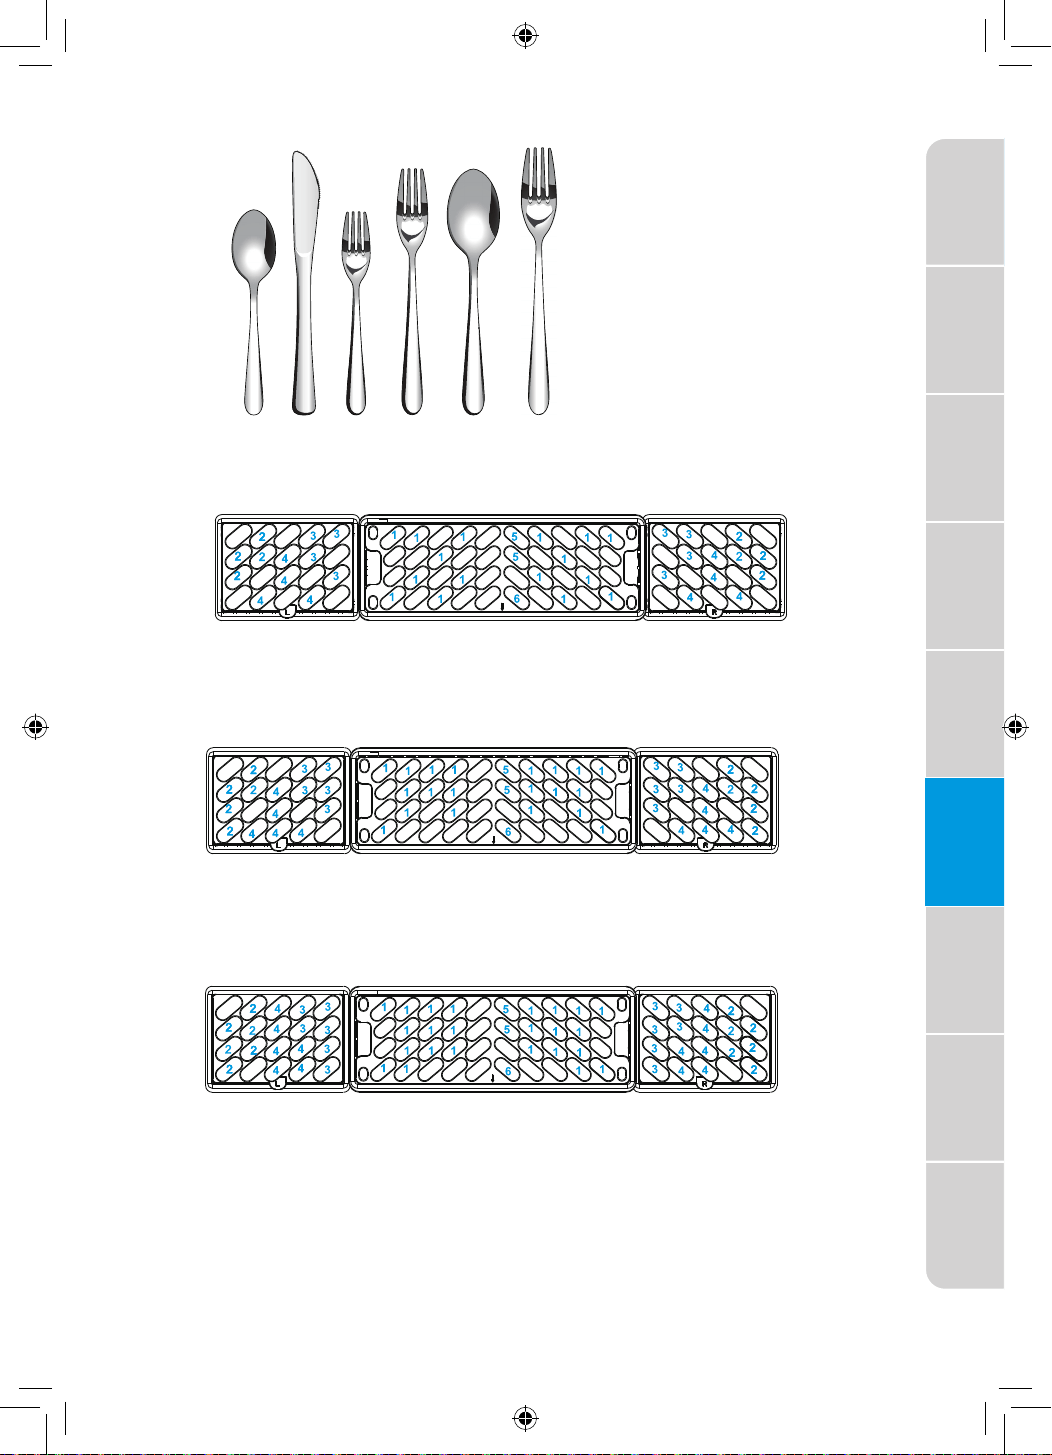
23
Precauciones
de seguridad
Requisitos de
funcionamiento
Piezas y
características
Guía de
puesta en
marcha
Controles
Carga del
Lavavajillas
Uso del
Lavavajillas
Cuidado del
Lavavajillas
Solución de
problemas
1 2 3 4 6 55
1. Cucharas
2. Cuchillos
3. Tenedores de
ensalada
4. Tenedores
5. Cucharas
grandes
6. Tenedores
grandes
8 posiciones
10 posiciones
12 posiciones
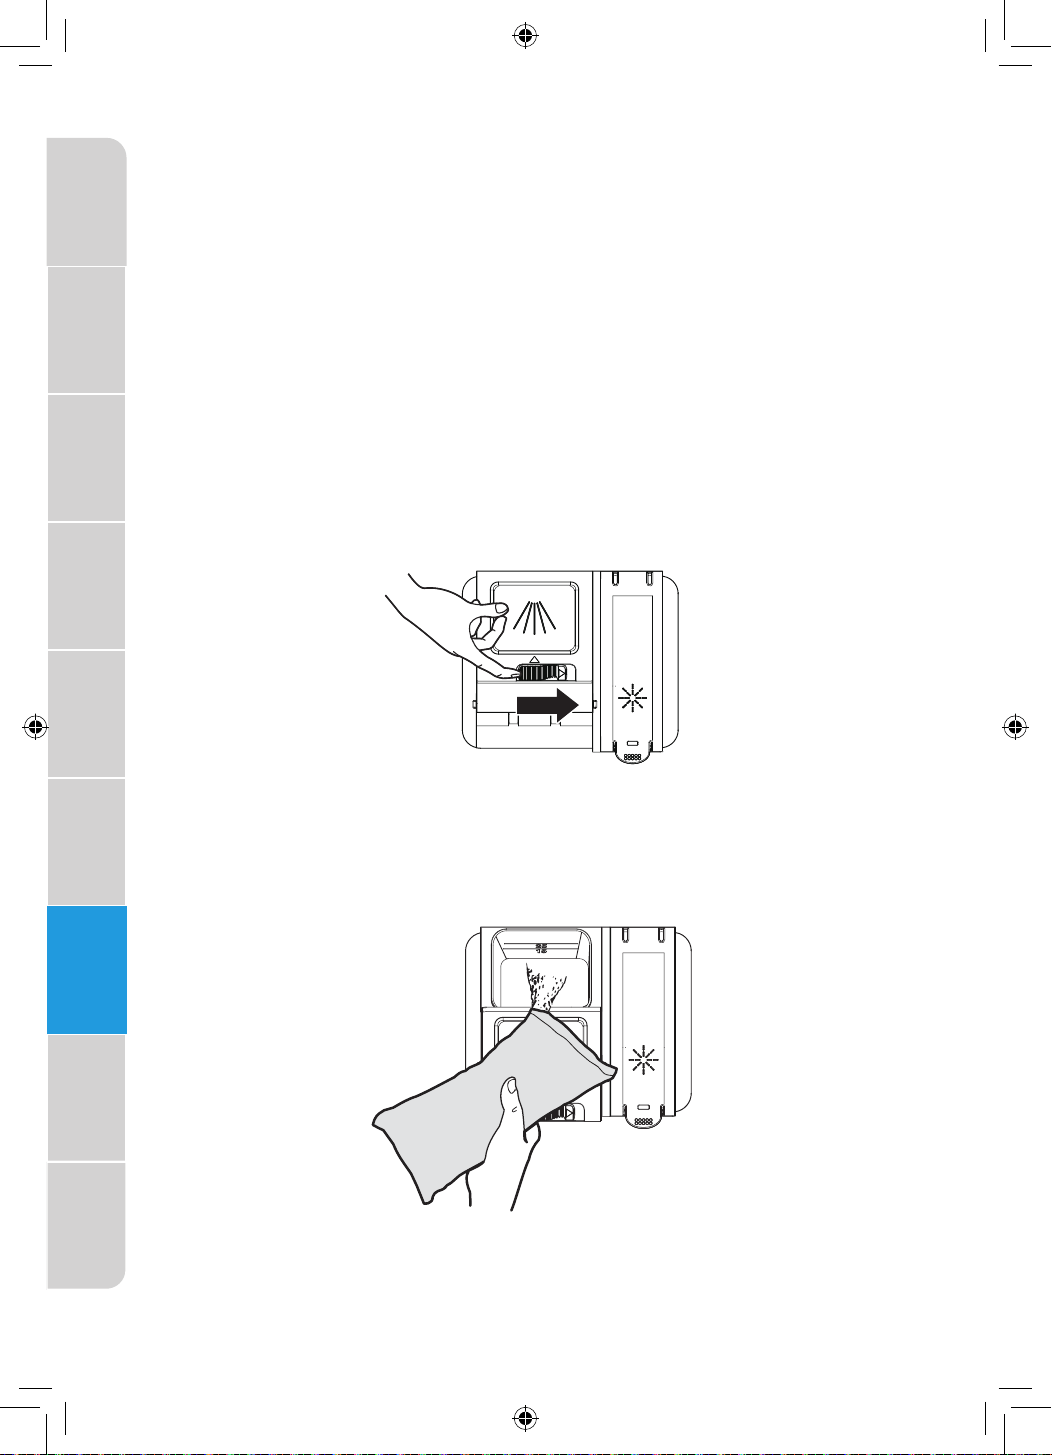
24
Precauciones
de seguridad
Requisitos de
funcionamiento
Piezas y
características
Guía de
puesta en
marcha
Controles
Carga del
Lavavajillas
Uso del
Lavavajillas
Cuidado del
Lavavajillas
Solución de
problemas
USO DEL LAVAVAJILLAS
USO ADECUADO DEL DETERGENTE
IMPORTANTE:
●
Utilice únicamente detergente para lavavajillas automático. Otros
detergentes pueden producir una espuma excesiva que puede
rebosar fuera del lavavajillas y reducir el rendimiento del lavado.
●
Añada detergente justo antes de iniciar un ciclo.
●
Guarde el detergente bien cerrado en un lugar fresco y seco. El
detergente fresco para lavavajillas automáticos da como resultado
una mejor limpieza.
DISPENSADOR DE DETERGENTE
1. Empuje el pestillo de apertura de la tapa del dispensador para abrir
el compartimento del detergente de lavado principal.
NOTA:
La tapa siempre está abierta al final de un ciclo de lavado de vajilla.
2. Añada la cantidad recomendada de detergente en el compartimento
del detergente.
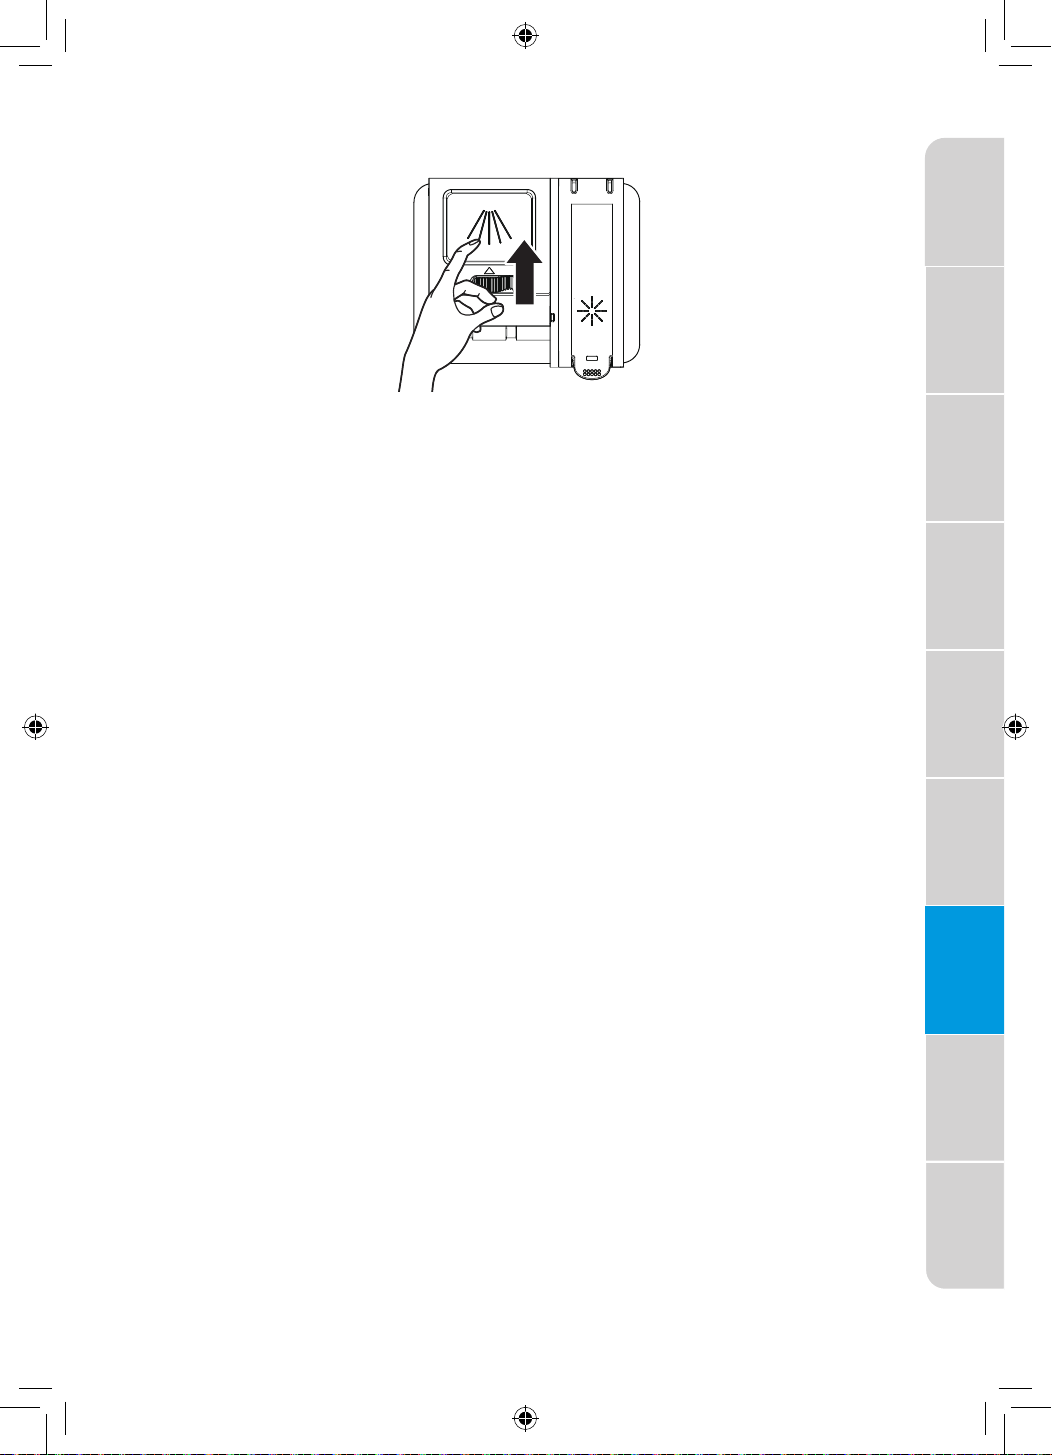
25
Precauciones
de seguridad
Requisitos de
funcionamiento
Piezas y
características
Guía de
puesta en
marcha
Controles
Carga del
Lavavajillas
Uso del
Lavavajillas
Cuidado del
Lavavajillas
Solución de
problemas
3. Presione hacia abajo la parte superior de la tapa para fijarla.
CUÁNTO DETERGENTE UTILIZAR
La cantidad de detergente a utilizar depende del nivel de suciedad de la
carga, del tipo de detergente utilizado y de la dureza del agua.
●
Si utiliza muy poco detergente, los platos no quedarán limpios.
●
Si el agua es blanda y utiliza demasiado detergente, la cristalería se
estropeará.
Dureza del agua
La dureza del agua varía en función de la fuente de agua. Para obtener los
mejores resultados, el lavavajillas está diseñado para funcionar con agua
cuya dureza no supere los 7 granos por galón. Los kits de prueba están
disponibles en los principales puntos de venta de electrodomésticos. Si
su agua tiene una dureza superior a 8 granos por galón, puede considerar
instalar un ablandador de agua o utilizar regularmente un aditivo para
mejorar el rendimiento de su detergente.
USO CORRECTO DEL ABRILLANTADOR
El abrillantador evita que el agua forme gotas que pueden secarse en
forma de manchas o rayas. Una pequeña cantidad del abrillantador se
libera en el agua del aclarado final, lo que permite que el agua escurra de
la vajilla.
El abrillantador mejora considerablemente el secado tras el aclarado
final.
Su lavavajillas está diseñado para usar abrillantadores líquidos. No utilice
abrillantadores sólidos o en barra.
DOSIFICADOR DE ABRILLANTADOR
En condiciones normales, deberá llenar el dosificador de abrillantador
aproximadamente una vez al mes. El abrillantador sale por una abertura
del dosificador. No es necesario esperar a que el dosificador esté vacío
para rellenarlo. Intente mantenerlo lleno, pero tenga cuidado de no
llenarlo en exceso.
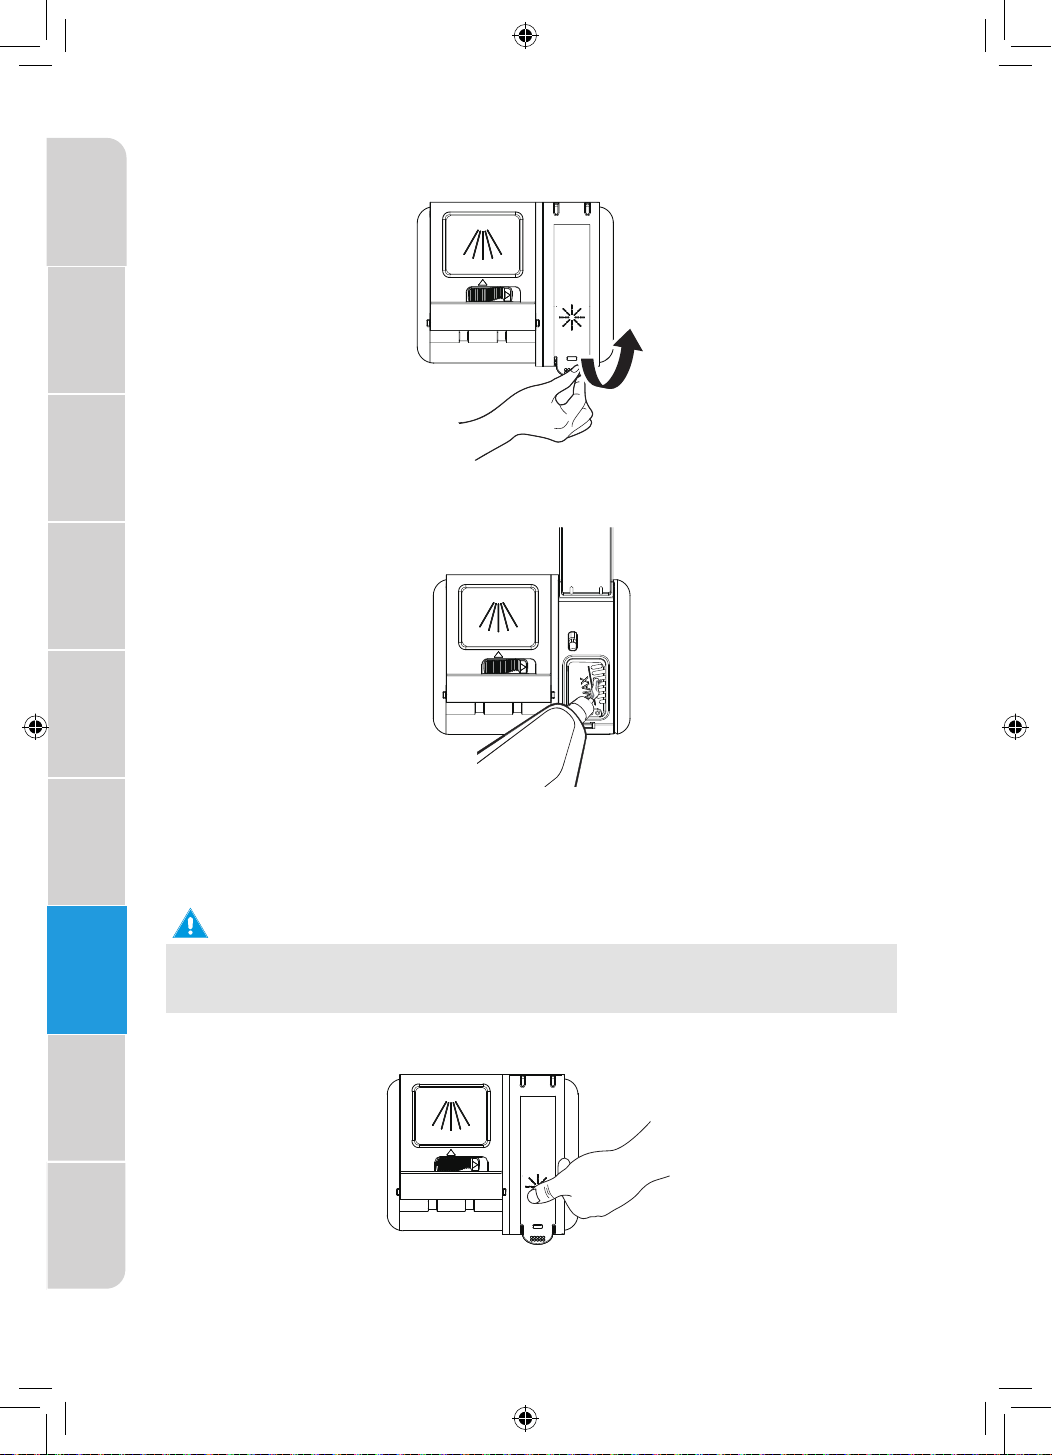
26
Precauciones
de seguridad
Requisitos de
funcionamiento
Piezas y
características
Guía de
puesta en
marcha
Controles
Carga del
Lavavajillas
Uso del
Lavavajillas
Cuidado del
Lavavajillas
Solución de
problemas
Para rellenar el dosificador de abrillantador
1. Levante la lengüeta de la tapa del abrillantador para abrirla.
2. Llene el dosificador de abrillantador con abrillantador líquido hasta
que esté lleno. NO lo llene en exceso.
NOTA:
Utilice el puerto de visualización cuando llene el depósito de
abrillantador.
ADVERTENCIA
No llene el depósito por encima del indicador de nivel lleno. El
abrillantador sobrante puede rebosar durante el ciclo de lavado.
3. Presione firmemente la tapa del abrillantador para cerrarla.
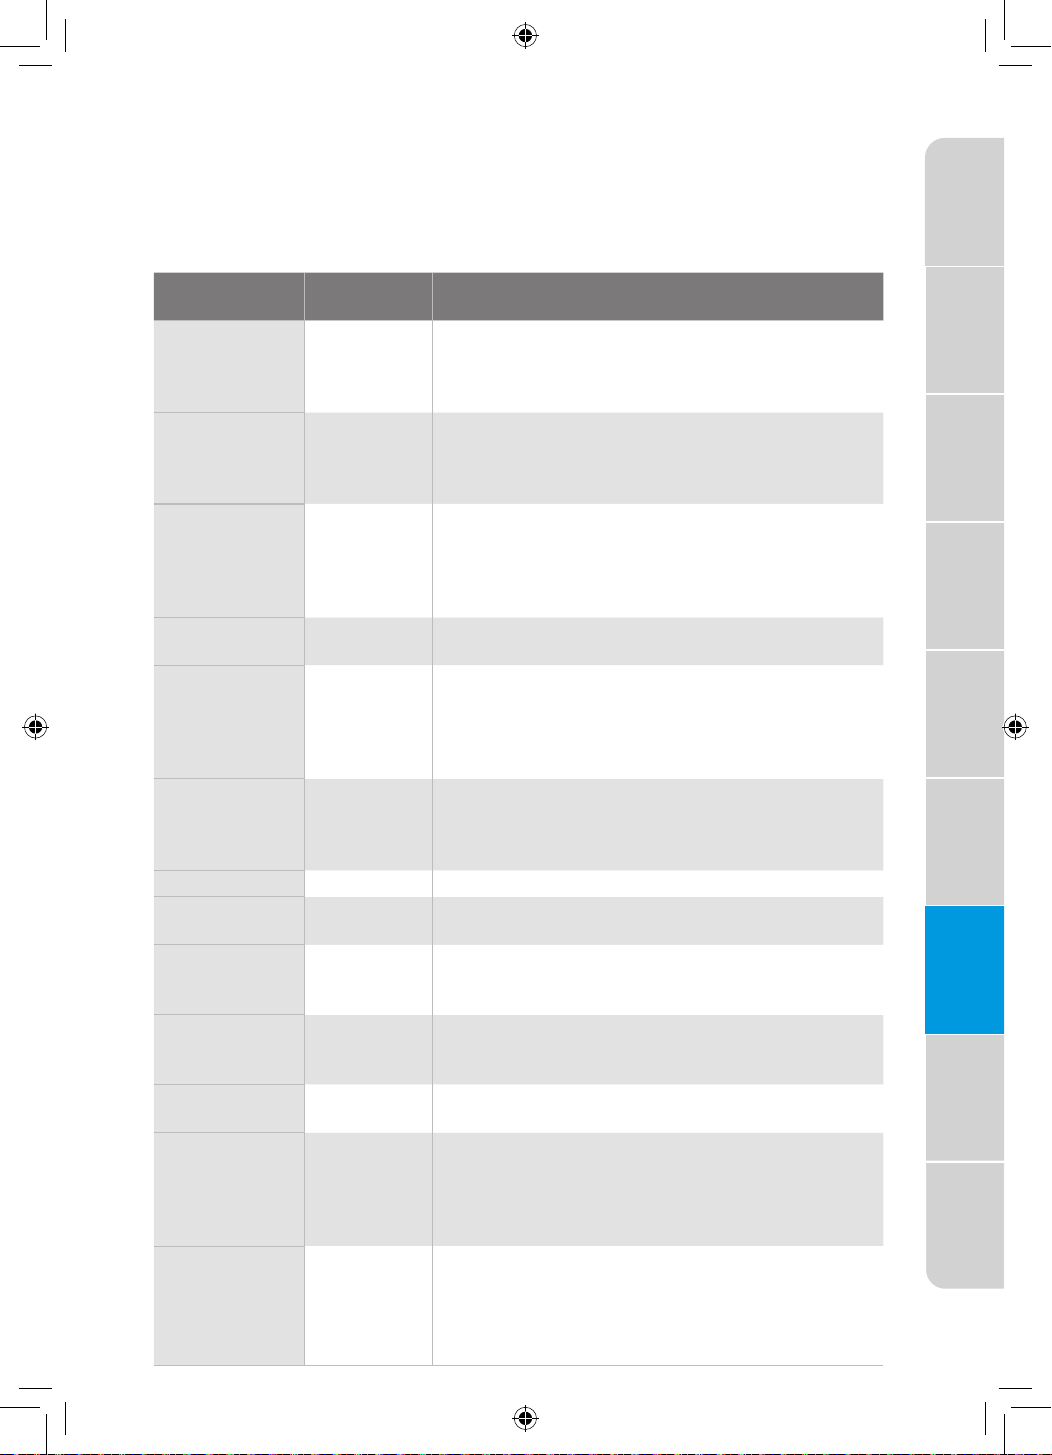
27
Precauciones
de seguridad
Requisitos de
funcionamiento
Piezas y
características
Guía de
puesta en
marcha
Controles
Carga del
Lavavajillas
Uso del
Lavavajillas
Cuidado del
Lavavajillas
Solución de
problemas
LAVADO DE PRENDAS ESPECIALES
Si tiene dudas sobre el lavado de algún artículo en particular, consulte
con el fabricante de la vajilla para asegurarse de que es apto para el
lavavajillas.
Material
Apto para
lavavajillas
Comentarios
Aluminio Posible Las altas temperaturas del agua y los
detergentes pueden afectar al acabado del
aluminio anodizado. El aluminio sin acabado
se decolorará.
Aluminio
desechable
No No lave ollas de aluminio desechables en
el lavavajillas Podrían desplazarse durante
el lavado y transferir marcas negras a los
platos y otros objetos.
Botellas y
latas
No Lave las botellas y latas a mano. Las
etiquetas pegadas con pegamento pueden
aflojarse y obstruir los brazos rociadores
o la bomba y reducir el rendimiento del
lavado.
Hierro
fundido
No Se eliminará el condimento y el hierro se
oxidará.
Porcelana/
Gres
Sí Compruebe siempre las recomendaciones
del fabricante antes de lavar. Los motivos
antiguos, pintados a mano o sobrevidriados
pueden desteñir, el pan de oro puede
decolorarse o desteñir.
Cristal Sí Compruebe las recomendaciones del
fabricante antes de lavar. Algunos tipos de
cristal emplomado pueden decolorarse con
los lavados repetidos.
Oro No La cubertería dorada se decolora.
Vasos Sí El cristal de leche amarillea con los lavados
repetidos en el lavavajillas.
Cuchillos
de mango
ahuecado
No Los mangos de algunos cuchillos están
unidos a la hoja con un adhesivo que puede
aflojarse si se lavan en el lavavajillas.
Peltre Latón,
Bronce
No Las altas temperaturas del agua y el
detergente pueden decolorar o dañar el
acabado.
Plásticos
desechables
No No resisten las altas temperaturas del agua
y los detergentes.
Plásticos Sí Compruebe siempre las recomendaciones
del fabricante antes de lavar. Los plásticos
varían en su capacidad para soportar altas
temperaturas y detergentes. Cargue los
plásticos sólo en la rejilla superior.
Acero
inoxidable
Sí Realice un ciclo de aclarado si no lava
inmediatamente.
El contacto prolongado con alimentos que
contengan sal, vinagre, productos lácteos o
zumo de frutas puede dañar el acabado.
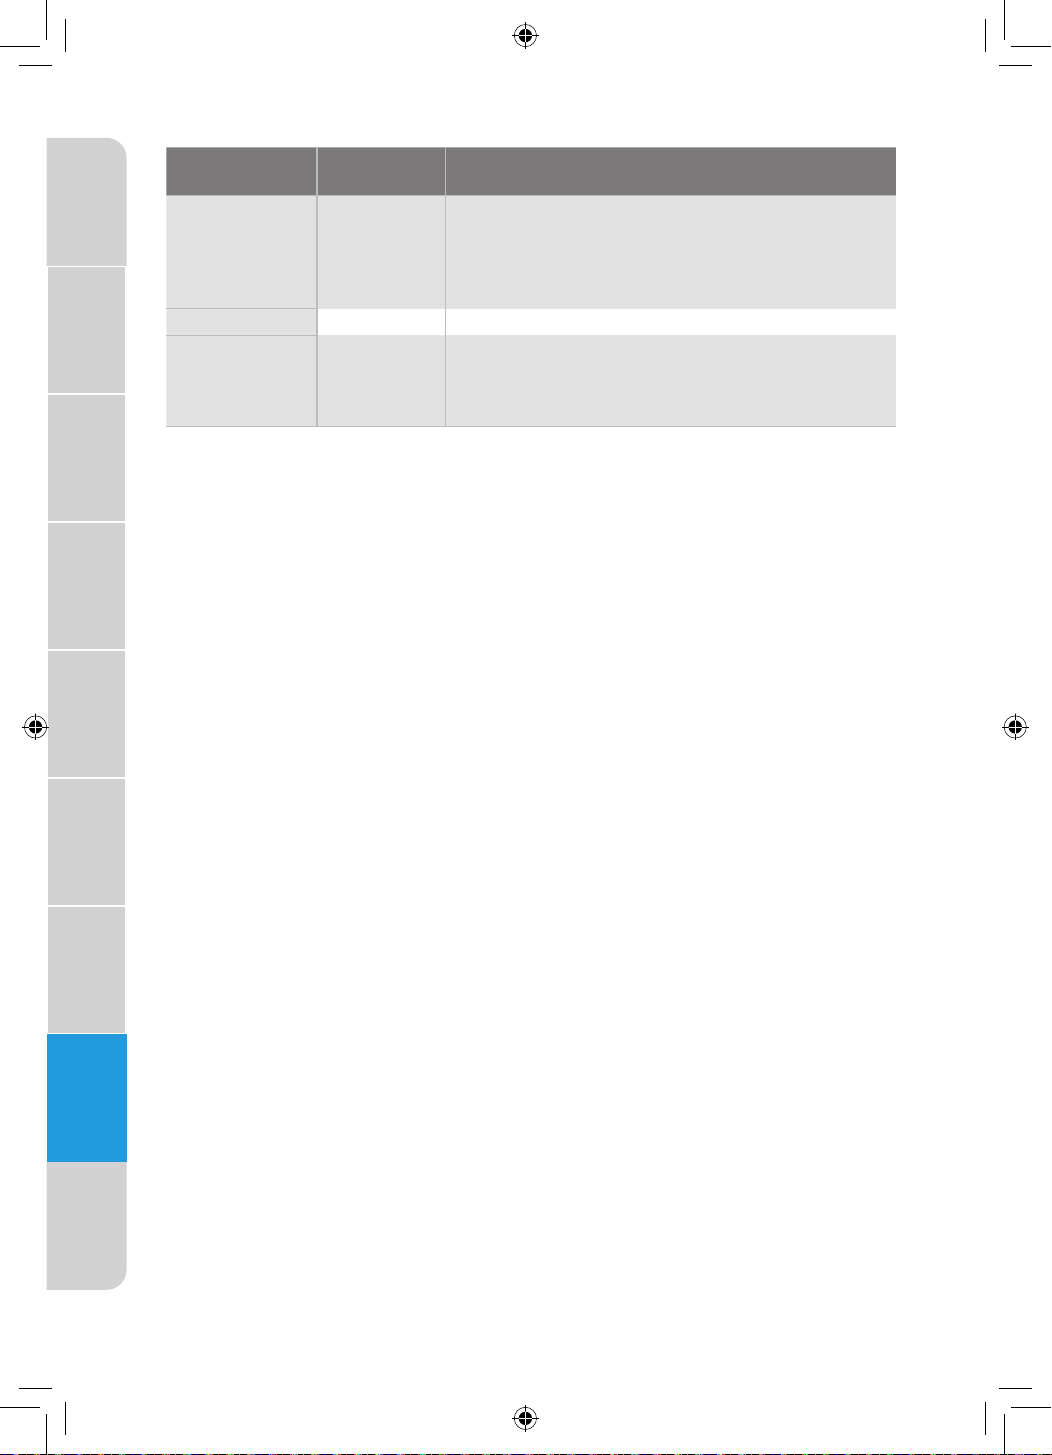
28
Precauciones
de seguridad
Requisitos de
funcionamiento
Piezas y
características
Guía de
puesta en
marcha
Controles
Carga del
Lavavajillas
Uso del
Lavavajillas
Cuidado del
Lavavajillas
Solución de
problemas
Material
Apto para
lavavajillas
Comentarios
Plata de ley o
plateado
Sí Realice un ciclo de aclarado si no lava
inmediatamente. El contacto prolongado
con alimentos que contengan sal, ácido
o sulfuro (huevos, mayonesa y marisco)
puede dañar el acabado.
Estaño No Puede oxidarse.
Vajilla de
madera
No Lavar a mano. Consulte siempre las
instrucciones del fabricante antes de lavar.
La madera sin tratar puede deformarse,
agrietarse o perder su acabado.
CUIDADO DEL LAVAVAJILLAS
LIMPIEZA
LIMPIEZA DEL EXTERIOR
En la mayoría de los casos, el uso regular de un paño suave y húmedo
o una esponja y un detergente suave es todo lo que se necesita para
limpiar el exterior de su lavavajillas.
Limpie regularmente la puerta y el tirador de acero inoxidable con un
paño limpio y suave para eliminar los residuos.
IMPORTANTE: No utilice cera para electrodomésticos, abrillantadores,
lejía o productos que contengan cloro para limpiar la puerta de acero
inoxidable.
Panel de control
Limpie suavemente el panel de control con un paño limpio y suave.
LIMPIEZA DEL INTERIOR
La cuba es de acero inoxidable diseñado para resistir el óxido y la
corrosión si el lavavajillas se raya o se abolla.
Los minerales del agua dura pueden hacer que se acumule una película
blanca en las superficies interiores, especialmente justo debajo de la zona
de la puerta.
No limpie el interior del lavavajillas hasta que se haya enfriado. Utilice
guantes de goma. No utilice ningún tipo de limpiador que no sea detergente
para lavavajillas, ya que puede provocar la formación de espuma.
JUNTA DE LA PUERTA
Limpie la puerta interior de acero y la cuba con un paño limpio, suave y
húmedo.
Con un paño húmedo, limpie regularmente alrededor de la junta de la
puerta para eliminar las partículas de comida.
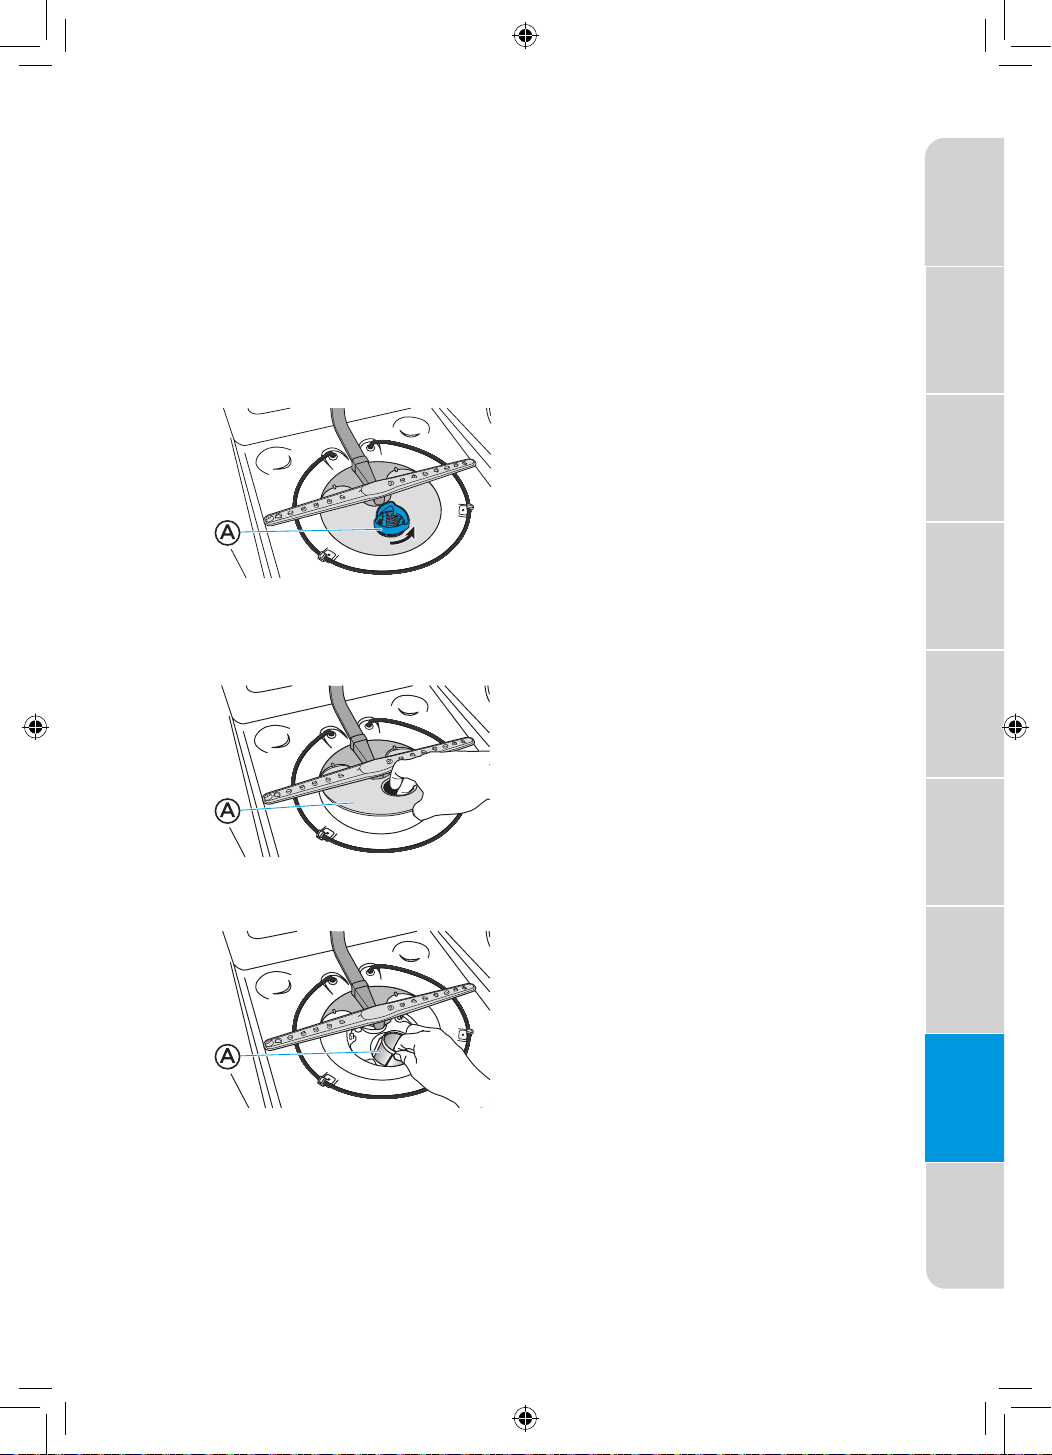
29
Precauciones
de seguridad
Requisitos de
funcionamiento
Piezas y
características
Guía de
puesta en
marcha
Controles
Carga del
Lavavajillas
Uso del
Lavavajillas
Cuidado del
Lavavajillas
Solución de
problemas
PANEL DE CONTROL
Limpie el panel de control suavemente con un paño ligeramente humedecido.
LIMPIEZA DE LOS FILTROS
Compruebe y limpie los filtros con regularidad para obtener el mejor
rendimiento.
1. Retire la rejilla inferior del lavavajillas.
2. Gire el filtro cilíndrico un cuarto de vuelta en el sentido contrario a las
agujas del reloj y levántelo para extraerlo.
A)
Filtro cilíndrico
3. Vacíe el filtro cilíndrico y enjuáguelo con agua corriente.
4. Retire el filtro fino.
A)
Filtro fino
5. Retire el microfiltro del fondo de la cuba.
A)
Microfiltro
6. Inspeccione el filtro fino y el microfiltro en busca de suciedad y
límpielos manteniéndolos bajo un chorro lento de agua.
NOTA: Es posible que necesite un cepillo de cerdas de plástico duras
para eliminar algunos residuos.
7. Vuelva a instalar los filtros en orden inverso, asegurándose de que el
filtro cilíndrico encaje en su sitio.
NOTA: Si no se reinstalan correctamente los filtros, el rendimiento
disminuirá y será necesario repararlos.
30
Precauciones
de seguridad
Requisitos de
funcionamiento
Piezas y
características
Guía de
puesta en
marcha
Controles
Carga del
Lavavajillas
Uso del
Lavavajillas
Cuidado del
Lavavajillas
Solución de
problemas
ESPACIO DE AIRE DE DRENAJE
Compruebe el entrehierro del desagüe siempre que su lavavajillas
no desagüe bien. Algunos códigos de plomería estatales o locales
requieren la adición de un espacio de aire de drenaje entre un lavavajillas
empotrado y el sistema de drenaje de la casa. Si el desagüe está
obstruido, el entrehierro evita que el agua se acumule en el lavavajillas.
El entrehierro de desagüe suele estar situado en la parte superior del
fregadero o en la encimera, cerca del lavavajillas.
NOTA: Se trata de un dispositivo de fontanería externo que no forma
parte del lavavajillas. La garantía proporcionada con su lavavajillas no
cubre los costes de servicio directamente asociados con la limpieza o
reparación del entrehierro de drenaje externo.
Para limpiar el entrehierro de drenaje:
Limpie el entrehierro de drenaje periódicamente para asegurar el
drenaje adecuado de su lavavajillas. Siga las instrucciones de limpieza
proporcionadas por el fabricante.
Con la mayoría de los tipos:
1. Apague el lavavajillas.
2. Levante la tapa metálica y desenrosque el tapón de plástico.
3. Limpie la tapa de plástico con un palillo de dientes.
ALMACENAMIENTO
ALMACENAMIENTO PARA EL VERANO
Proteja su lavavajillas durante los meses de verano cerrando el suministro
de agua y la alimentación eléctrica del lavavajillas.
PREPARACIÓN DEL LAVAVAJILLAS PARA EL INVIERNO
Proteja su lavavajillas y su hogar contra los daños causados por la
congelación de las tuberías de agua. Si su lavavajillas se deja en una
vivienda de temporada o podría estar expuesto a temperaturas cercanas
al punto de congelación, haga que su lavavajillas sea preparado para el
invierno por personal de servicio autorizado.
Preparación para el almacenamiento:
1. Desconecte la alimentación eléctrica del lavavajillas.
2. Cierre el suministro de agua.
3. Coloque una bandeja debajo de la válvula de entrada y desconecte la
línea de agua de la válvula de entrada.
4. Desconecte la línea de drenaje de la bomba y drene el agua en la
bandeja.
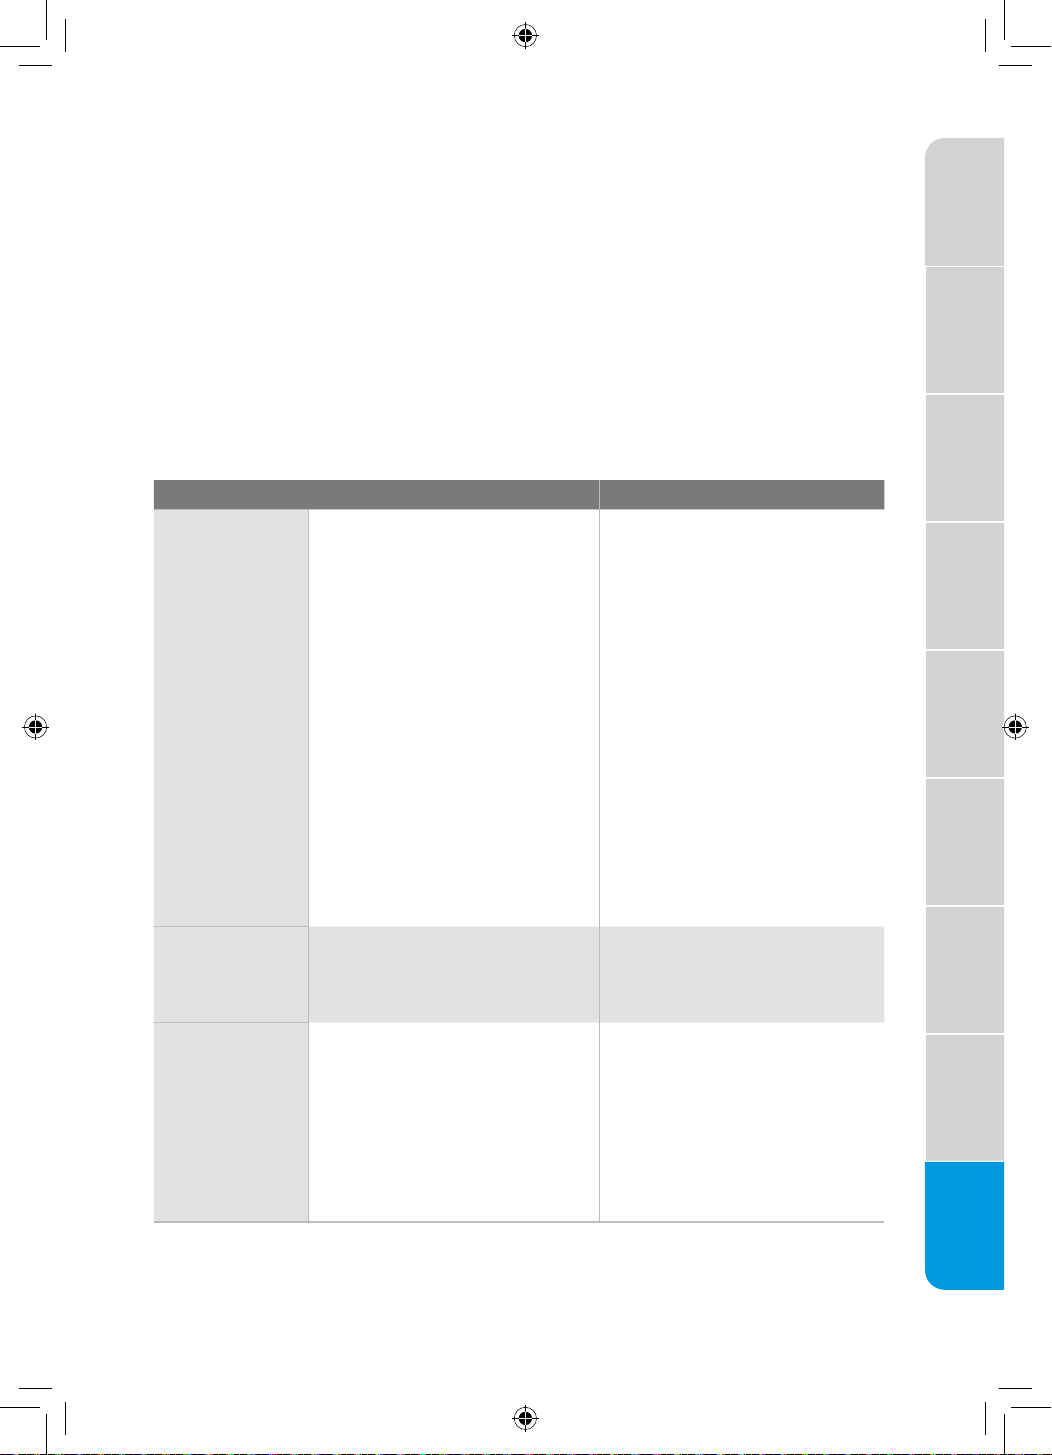
31
Precauciones
de seguridad
Requisitos de
funcionamiento
Piezas y
características
Guía de
puesta en
marcha
Controles
Carga del
Lavavajillas
Uso del
Lavavajillas
Cuidado del
Lavavajillas
Solución de
problemas
SOLUCIÓN DE PROBLEMAS
EL LAVAVAJILLAS NO FUNCIONA CORRECTAMENTE
PROBLEMA POSIBLE CAUSA SOLUCIÓN
El lavavajillas
no funciona
o se detiene
durante un
ciclo
No hay corriente en el
lavavajillas.
Reemplace el fusible o
active el interruptor de
circuito.
La puerta no está bien
cerrada.
Cierre y asegure la puerta.
La mayoría de los ciclos
hacen una pausa de
5 minutos cerca del inicio
del ciclo para dejar la vajilla
en remojo.
Esto es normal y reduce
la energía necesaria para
limpiar la vajilla.
Algunos ciclos se detienen
repetidamente entre 15 y
65 segundos durante el
lavado principal.
Esto es normal.
La función Retardo está
seleccionada.
Para restablecerla, consulte
"Opciones" en la sección
Controles.
El lavavajillas
no inicia un
ciclo
La función Bloqueo de
control está activada.
Desactive el Bloqueo
de Controles. Consulte
"Funciones adicionales" en
la sección Controles.
El lavavajillas
no se llena
La válvula de cierre de agua
no está abierta.
Abra la válvula de agua.
La puerta no está bien
cerrada.
Cierre y asegure la puerta.
La presión del agua es
demasiado baja.
Verifique que se mantenga
un mínimo de 20 psi de
presión de agua durante la
operación de llenado.
Prepare el aparato para su uso:
1. Vuelva a conectar el agua, el desagüe y la alimentación eléctrica.
2. Abra el suministro de agua y energía eléctrica.
3. Llene el vaso de detergente y haga funcionar el lavavajillas durante
un ciclo de lavado con agua caliente.
4. Compruebe si hay fugas en las conexiones.
32
Precauciones
de seguridad
Requisitos de
funcionamiento
Piezas y
características
Guía de
puesta en
marcha
Controles
Carga del
Lavavajillas
Uso del
Lavavajillas
Cuidado del
Lavavajillas
Solución de
problemas
PROBLEMA POSIBLE CAUSA SOLUCIÓN
El lavavajillas
parece
funcionar
demasiado
tiempo
El agua suministrada
al lavavajillas no está
suficientemente caliente.
Deje correr el agua en el
fregadero adyacente hasta
que se caliente antes de
encender el lavavajillas.
El lavavajillas funciona
durante más tiempo
mientras calienta el
agua, y se produce
automáticamente un
retraso en algunos ciclos
de lavado y aclarado hasta
que el agua alcanza la
temperatura adecuada.
Se selecciona la opción
Higienizar.
El tiempo del ciclo aumenta
para calentar el agua a la
temperatura correcta para
higienizar.
La duración del ciclo variará
en función del nivel de
suciedad.
Si se detecta mucha
suciedad, el ciclo
Normal aumentará
automáticamente la
duración del ciclo.
El lavavajillas está
conectado al suministro de
agua fría.
Compruebe que el
lavavajillas está conectado
correctamente al
suministro de agua
caliente.
Queda
agua en el
lavavajillas
NOTA: Una
pequeña
cantidad de
agua limpia
alrededor de
la salida en la
parte inferior
de la cuba
es normal.
Mantiene
la junta
lubricada.
El ciclo no se ha
completado o está en
pausa.
El agua se drenará cuando
se complete el ciclo.
La manguera de desagüe
está doblada.
Enderece la manguera de
desagüe.
El tapón ciego todavía está
en el triturador de basura.
Retire el tapón ciego.
La manguera de desagüe
está conectada al triturador
de basura y éste no está
vacío.
Haga funcionar el triturador
de basura hasta que se
vacíe.
El desagüe está obstruido. Compruebe el entrehierro.
33
Precauciones
de seguridad
Requisitos de
funcionamiento
Piezas y
características
Guía de
puesta en
marcha
Controles
Carga del
Lavavajillas
Uso del
Lavavajillas
Cuidado del
Lavavajillas
Solución de
problemas
PROBLEMA POSIBLE CAUSA SOLUCIÓN
Queda
detergente
en el
dispensador
El ciclo no se ha
completado.
Cierre la puerta y pulse
INICIO para completar el
ciclo.
El detergente está húmedo
o se ha apelmazado.
Retire el detergente y
sustitúyalo por detergente
lavavajillas seco nuevo.
Un objeto ha bloqueado el
dosificador.
Retire el objeto. Retire el
detergente y sustitúyalo
por detergente lavavajillas
seco nuevo.
El brazo rociador está
bloqueado.
Cargue la vajilla de forma
que no impida que el brazo
aspersor gire libremente.
Sonidos de
molienda,
chirrido,
crujido o
zumbido
Un objeto duro o gránulos
de detergente en polvo han
entrado en el módulo de
lavado.
IMPORTANTE: El cristal
transparente es difícil de
ver en el agua y podría
provocar un corte.
Con cuidado, retire el
objeto duro. Si el ruido ha
sido causado por gránulos
de detergente, el ruido
debería cesar una vez
que el detergente se haya
triturado.
NOTA: Si el ruido persiste
después de un ciclo
completo, llame al servicio
técnico.
Pitidos Indican que el ciclo de
lavado se ha completado.
Esto es normal.
NOTA: Un pitido rápido
indica una condición de
error.
Consulte "Códigos de
error" para obtener más
información.
Suciedad en
la cuba
Se ha utilizado un tipo de
detergente incorrecto.
Utilice sólo detergente
aprobado para lavavajillas
automáticos.
Fugas en el
lavavajillas
Excesiva espuma causada
por el uso de un detergente
inadecuado.
Utilice sólo detergente
aprobado para lavavajillas
automáticos.
El lavavajillas no está
nivelado.
Nivele el lavavajillas.
Consulte las instrucciones
de instalación.
La luz del
abrillantador
está
encendida
El nivel de abrillantador es
bajo.
Añada líquido
abrillantador.
34
Precauciones
de seguridad
Requisitos de
funcionamiento
Piezas y
características
Guía de
puesta en
marcha
Controles
Carga del
Lavavajillas
Uso del
Lavavajillas
Cuidado del
Lavavajillas
Solución de
problemas
LA VAJILLA NO ESTÁ COMPLETAMENTE LIMPIA
PROBLEMA POSIBLE CAUSA SOLUCIÓN
Quedan
restos de
comida en la
vajilla
Detergente
ineficaz o de
calidad inferior.
Midea recomienda detergentes de
marcas reconocidas, especialmente
en forma de pastillas.
El lavavajillas
no está cargado
correctamente
Consulte "Carga del lavavajillas".
Se seleccionó el
ciclo de lavado
incorrecto para la
carga de vajilla.
Seleccione el ciclo de lavado
basándose en la suciedad más difícil
de la carga del lavavajillas. Si tiene
algunos artículos con suciedad más
pesada, utilice un ciclo de lavado
más pesado.
La temperatura
del agua es
demasiado baja.
Para obtener mejores resultados, la
temperatura del agua entrante debe
ser de un mínimo de 120°F (49°C).
Utilizó una
cantidad
incorrecta de
detergente.
Utilice un mínimo de 1 cucharada.
(15 g) de detergente por carga. La
suciedad pesada y/o el agua dura
generalmente requieren detergente
adicional.
Quedan
restos de
comida en la
vajilla (cont.)
El detergente es
demasiado viejo.
El detergente debe estar fresco
para ser eficaz. Guárdelo en un lugar
fresco y seco.
El detergente está
apelmazado en el
dispensador.
No deje que el detergente
permanezca varias horas en
un dosificador húmedo. Limpie
el dispensador y rellénelo con
detergente fresco y seco.
La bomba o el
brazo rociador
están obstruidos
con etiquetas de
botellas y latas.
Compruebe si hay etiquetas en la
bomba o en el brazo aspersor y
quítelas.
La presión del
agua que entra
en la vivienda es
demasiado baja.
La presión del agua debe ser de
20 a 80 psi (138 a 552 kPa) para que
el lavavajillas se llene correctamente.
Se puede añadir una bomba de
refuerzo en el suministro de agua si
la presión es demasiado baja.
El brazo de lavado
se ralentiza debido
a la gran cantidad
de espuma.
Utilice sólo detergente recomendado
para el lavavajillas. No utilice jabón
ni detergentes para ropa.

35
Precauciones
de seguridad
Requisitos de
funcionamiento
Piezas y
características
Guía de
puesta en
marcha
Controles
Carga del
Lavavajillas
Uso del
Lavavajillas
Cuidado del
Lavavajillas
Solución de
problemas
MANCHAS EN LA VAJILLA
PROBLEMA POSIBLE CAUSA SOLUCIÓN
Manchas y
películas en
la vajilla
El dosificador de
abrillantador está vacío.
Añada un abrillantador líquido
al dispensador.
Agua dura. Alto
contenido mineral en el
agua
Utilice un abrillantador y
mantenga el dosificador lleno
para eliminar las manchas y las
películas. Aumente el nivel del
dosificador de abrillantador
un número por ciclo hasta que
desaparezcan las manchas.
NOTA: Si la dureza del agua
es de 13 granos (223 ppm)
o superior, se recomienda
encarecidamente instalar un
descalcificador doméstico.
La temperatura del
agua es demasiado
baja.
Para obtener mejores
resultados, el agua debe tener
un mínimo de 120°F (49°C) al
entrar en el lavavajillas.
No ha utilizado
suficiente detergente.
Utilice un mínimo de 1
cucharada. (15 g) de detergente
por carga. La suciedad pesada
y/o el agua dura generalmente
requieren detergente adicional.
Manchas y
películas en la
vajilla (cont.)
El detergente es
demasiado viejo.
El detergente debe estar fresco
y seco para ser eficaz. Guárdelo
en un lugar fresco y seco.
La presión del agua en
casa es demasiado baja
para llenar el lavavajillas
correctamente.
La presión del agua de la
casa debe ser de 20 a 80 psi
(138 a 552 kPa) para llenar
correctamente el lavavajillas.
Se puede añadir una bomba
de refuerzo en el suministro de
agua si la presión es demasiado
baja.
Película
de sílice o
grabado
Uso de demasiado
detergente
Si tiene agua blanda use menos
detergente, pero no use menos
de 1 cucharada. (15 g) por
carga.
La temperatura del
agua de entrada excede
los 150°F (65°C).
Reduzca la temperatura del
agua de entrada.
36
Precauciones
de seguridad
Requisitos de
funcionamiento
Piezas y
características
Guía de
puesta en
marcha
Controles
Carga del
Lavavajillas
Uso del
Lavavajillas
Cuidado del
Lavavajillas
Solución de
problemas
PROBLEMA POSIBLE CAUSA SOLUCIÓN
Hay marcas
negras o
grises en la
vajilla
Los artículos de
aluminio rozan los
platos durante el
lavado. Los artículos de
aluminio desechables
pueden romperse en
el lavavajillas y causar
marcas.
Lave a mano los artículos de
aluminio. Elimine las marcas
de aluminio con un limpiador
abrasivo suave.
Manchas
naranjas en
la vajilla de
plástico o en
el interior del
lavavajillas
Grandes cantidades
de alimentos a base
de tomate en los
platos colocados en el
lavavajillas
Utilice un producto
quitamanchas para eliminar
las manchas de su lavavajillas.
Las manchas no afectan el
rendimiento del lavavajillas.
LOS PLATOS NO SE SECAN COMPLETAMENTE
PROBLEMA POSIBLE CAUSA SOLUCIÓN
Los platos
no se secan
completamente
NOTA: Los
plásticos
a menudo
necesitan
secarse con una
toalla.
Los platos no
están cargados
correctamente para
permitir el drenaje
del agua.
No sobrecargue el lavavajillas.
Coloque los vasos y tazas en la
rejilla de forma que la superficie
inferior quede inclinada para
permitir el escurrimiento del agua.
No se ha utilizado
abrillantador o el
dispensador está
vacío.
Utilice un abrillantador líquido
para acelerar el secado y
mantener el dispensador lleno.
Ha utilizado una
opción de secado
al aire o de ahorro
de energía.
Para secar la vajilla, seleccione
un ciclo que permita la opción de
secado con calor.
LA VAJILLA SE DAÑA DURANTE UN CICLO
PROBLEMA POSIBLE CAUSA SOLUCIÓN
La vajilla está
astillada
NOTA: Algunos
tipos de vajilla
y cristalería
pueden ser
demasiado
delicados
para el lavado
automático de
vajilla. Lavar a
mano.
La vajilla no
se ha cargado
correctamente.
Cargue la vajilla y los vasos
de forma que estén estables y
no se golpeen entre sí por la
acción del lavado.
No mueva
demasiado rápido la
rejilla dentro o fuera
del lavavajillas.
Minimice el desconchado
moviendo la rejilla hacia dentro
y hacia fuera lentamente.
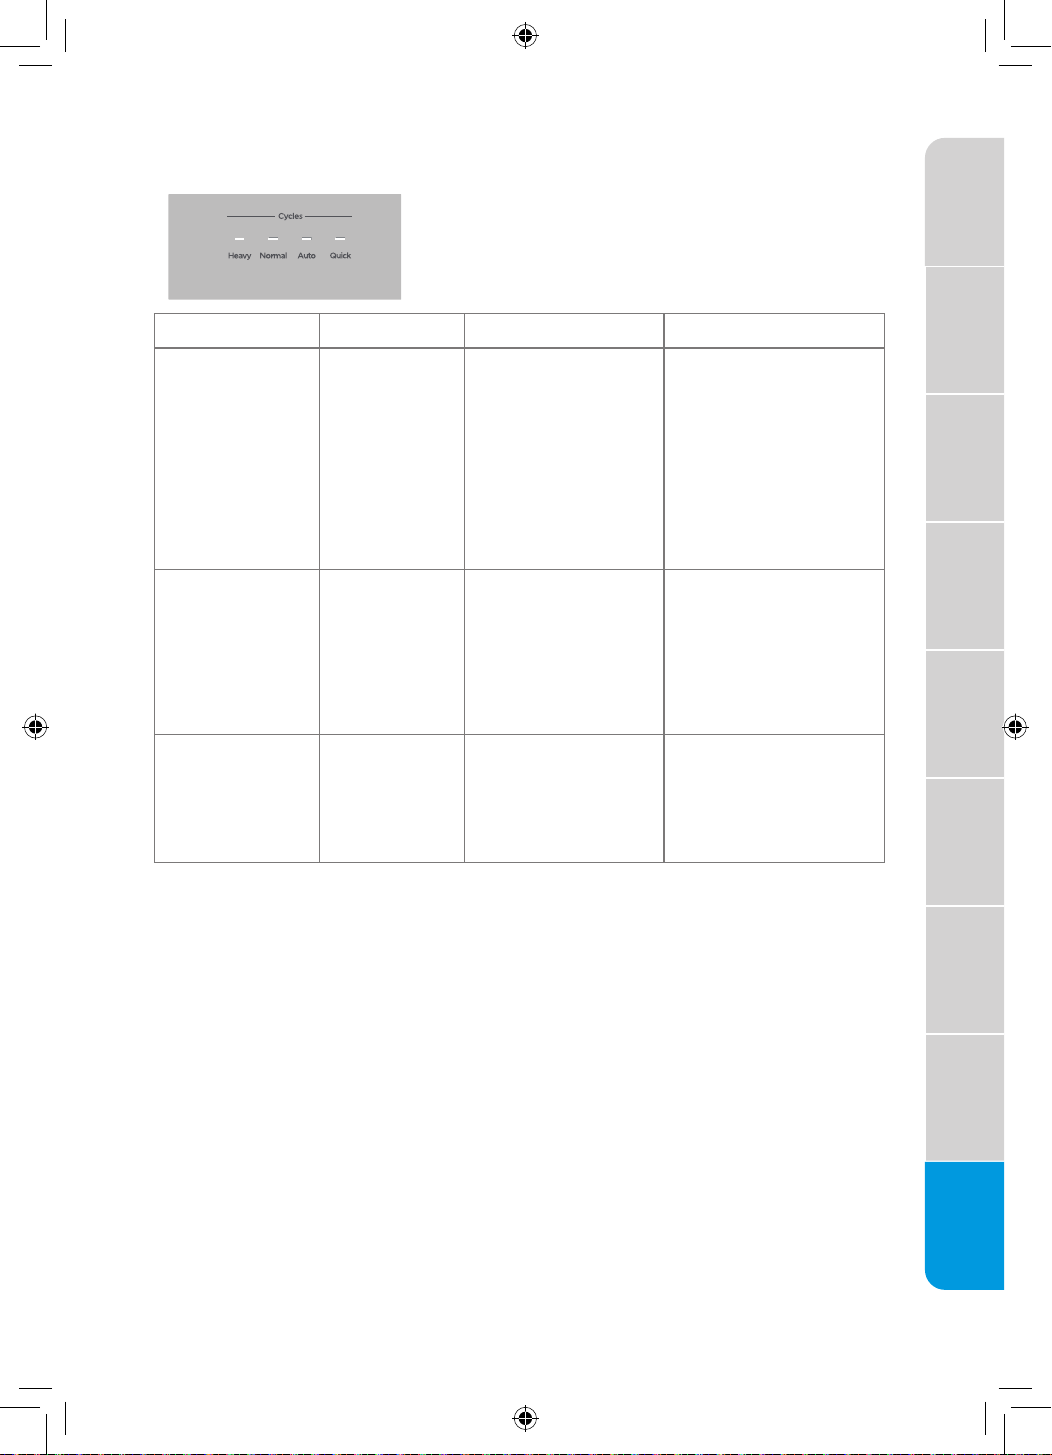
37
Precauciones
de seguridad
Requisitos de
funcionamiento
Piezas y
características
Guía de
puesta en
marcha
Controles
Carga del
Lavavajillas
Uso del
Lavavajillas
Cuidado del
Lavavajillas
Solución de
problemas
CÓDIGOS DE ERROR
CÓDIGO SIGNIFICADO POSIBLE CAUSA POSIBLE SOLUCIÓN
La luz Exprés
parpadea y el
lavavajillas emite
un pitido durante
30 segundos
El caudal
de agua es
insuficiente o
la presión del
agua de la línea
de entrada es
demasiado alta
●
El grifo no está
abierto
●
La presión del agua
es demasiado baja
●
La manguera de
desagüe está
obstruida
●
Otros (fallo de
piezas del sistema
de entrada o de
desagüe).
●
Asegúrese de que el
agua está abierta en el
lavavajillas.
●
Asegúrese de que la
presión del agua es de
20~100 psi.
●
Verifique la manguera
de desagüe.
●
Póngase en contacto
con el Servicio de
Atención al Cliente.
La luz normal
parpadea y el
lavavajillas emite
un pitido durante
30 segundos.
Sensor de
desbordamiento
o fuga activado
●
Una fuga
●
Demasiada agua en
la cuba
Cierre el paso de agua al
lavavajillas y compruebe si
el sistema de filtrado está
obstruido. Desbloquee
si es necesario. Si no hay
agua en la cuba, póngase
en contacto con el Servicio
de Atención al Cliente
Las luces de
Pesado, Normal y
Exprés parpadean y
el lavavajillas emite
un pitido durante
15 segundos
Excepción o
problema de
comunicación
La placa de la pantalla
no puede recibir o
la placa principal no
puede enviar una señal
durante más de 20
segundos.
Póngase en contacto con
el Servicio de Atención al
Cliente.

38
GARANTÍA
LIMITADA DEL
LAVAVAJILLAS
MIDEA
ADJUNTE AQUÍ SU RECIBO DE COMPRA. LA PRUEBA
DE COMPRA ES NECESARIA PARA OBTENER EL
SERVICIO DE GARANTÍA.
Por favor, tenga a mano la siguiente información cuando
llame al Centro de Atención al Cliente:
Nombre, dirección y número de teléfono
Número de modelo y número de serie
Una descripción clara y detallada del problema
Prueba de compra, incluyendo el nombre y la dirección
del distribuidor o minorista.
SI NECESITA SERVICIO:
1.
Antes de ponerse en contacto con nosotros para organizar el servicio, por favor
determine si su producto requiere reparación. Algunas cuestiones pueden resolverse sin
necesidad de servicio. Por favor, dedique unos minutos a revisar la sección Solución de
problemas del Manual del usuario, o visite http://us.Midea.com/support
2.
Todo el servicio de garantía es proporcionado exclusivamente por nuestros Proveedores
de Servicio Midea autorizados,en los EE.UU. y Canadá.
Servicio de atención al cliente de Midea
En EE.UU. o Canadá, llame al 1-866-646-4332.
Si se encuentra fuera de los 50 estados de EE.UU. o Canadá, póngase en contacto con su
distribuidor autorizado de Midea para determinar si se aplica otra garantía.
GARANTÍA LIMITADA DE POR VIDA
QUÉ ESTÁ CUBIERTO
PRIMER AÑO DE GARANTÍA LIMITADA (PIEZAS Y MANO DE OBRA)
Durante un año a partir de la fecha de compra, si este electrodoméstico principal se
instala, utiliza y mantiene de acuerdo con las instrucciones adjuntas o suministradas con el
producto, Midea America Corporation (en adelante "Midea") pagará las piezas de repuesto
especificadas de fábrica y la mano de obra de reparación para corregir los defectos de
materiales o mano de obra que existían cuando se compró este electrodoméstico principal
o, a su entera discreción, reemplazará el producto. En caso de sustitución del producto, su
electrodoméstico estará garantizado durante el plazo restante del período de garantía de la
unidad original.
GARANTÍA LIMITADA DE POR VIDA (SÓLO CUBA DE ACERO INOXIDABLE Y
REVESTIMIENTO INTERIOR DE LA PUERTA)
Durante la vida útil del producto a partir de la fecha de compra original, cuando este
electrodoméstico principal se instale, utilice y mantenga de acuerdo con las instrucciones
adjuntas o suministradas con el producto, Midea pagará las piezas especificadas de
fábrica y la mano de obra de reparación de los siguientes componentes para corregir
defectos no estéticos en materiales o mano de obra que existían cuando se compró este
electrodoméstico principal:
Cubeta de acero inoxidable
Revestimiento interior de la puerta
SU ÚNICO Y EXCLUSIVO RECURSO EN VIRTUD DE ESTA GARANTÍA LIMITADA SERÁ LA
REPARACIÓN O SUSTITUCIÓN DEL PRODUCTO SEGÚN LO DISPUESTO EN EL PRESENTE
DOCUMENTO. El servicio debe ser prestado por una empresa de servicio designada por Midea.
Esta garantía limitada sólo es válida en los 50 estados de los Estados Unidos o Canadá y sólo
se aplica cuando el electrodoméstico principal se utiliza en el país en el que se compró. Esta
garantía limitada es efectiva a partir de la fecha de compra original del consumidor. Se requiere
prueba de la fecha de compra original para obtener servicio bajo esta garantía limitada.
GARANTÍA

39
GARANTÍA LIMITADA DE POR VIDA
QUÉ NO ESTÁ CUBIERTO
1.
El uso comercial, no residencial o multifamiliar, o el uso contrario a las instrucciones
publicadas para el usuario, el operador o la instalación.
2.
Instrucción en el hogar sobre cómo utilizar el producto.
3.
Servicio para corregir el mantenimiento o la instalación inadecuados del producto, la
instalación no conforme con los códigos eléctricos o de fontanería o la corrección de la
instalación eléctrica o de fontanería del hogar (es decir, el cableado de la casa, los fusibles,
la fontanería o las mangueras de entrada de agua).
4.
Piezas consumibles (es decir, bombillas, pilas, filtros de aire o agua, etc.).
5.
Defectos o daños causados por el uso de piezas o accesorios no originales de Midea.
6.
Daños por accidente, mal uso, abuso, incendio, inundaciones, problemas eléctricos, casos
fortuitos o uso con productos no aprobados por Midea.
7.
Reparaciones de piezas o sistemas para corregir daños o defectos del producto causados
por servicio no autorizado, alteración o modificación del aparato.
8.
Daños estéticos, incluidos arañazos, abolladuras, desconchones y otros daños en los
acabados del aparato, a menos que dichos daños sean consecuencia de defectos en los
materiales y en la mano de obra y se notifiquen a Midea en un plazo de 30 días.
9.
Mantenimiento rutinario del producto.
10.
Decoloración, herrumbre u oxidación de las superficies resultantes de ambientes cáusticos
o corrosivos, incluyendo pero no limitado a altas concentraciones de sal, alta humedad o
exposición a productos químicos.
11.
Recogida o entrega. Este producto requiere reparación a domicilio.
12.
Gastos de viaje o transporte para el servicio en lugares remotos donde no esté disponible
un servicio técnico autorizado de Midea.
13.
Retirada o reinstalación de electrodomésticos o accesorios empotrados inaccesibles (es
decir, molduras, paneles decorativos, suelos, armarios, islas, encimeras, paneles de yeso,
etc.) que interfieran con el mantenimiento, la retirada o la sustitución del producto.
14.
Servicio o piezas para electrodomésticos cuyos números de modelo/serie originales hayan
sido retirados, alterados o no sean fácilmente identificables.
El coste de la reparación o sustitución en estas circunstancias excluidas correrá a cargo del
cliente.
EXCLUSIÓN DE GARANTÍAS IMPLÍCITAS
LAS GARANTÍAS IMPLÍCITAS, INCLUIDA CUALQUIER GARANTÍA IMPLÍCITA DE
COMERCIABILIDAD O GARANTÍA IMPLÍCITA DE IDONEIDAD PARA UN FIN DETERMINADO,
ESTÁN LIMITADAS A UN AÑO O AL PERIODO MÁS BREVE PERMITIDO POR LA LEY. Algunos
estados y provincias no permiten limitaciones en la duración de las garantías implícitas de
comerciabilidad o idoneidad, por lo que es posible que esta limitación no se aplique en su caso.
Esta garantía le otorga derechos legales específicos, y también puede tener otros derechos que
varían de un estado a otro o de una provincia a otra.
RENUNCIA DE REPRESENTACIONES FUERA DE GARANTÍA
Midea no hace ninguna declaración sobre la calidad, durabilidad o necesidad de servicio o
reparación de este electrodoméstico principal que no sean las declaraciones contenidas en esta
garantía. Si usted desea una garantía más larga o más completa que la garantía limitada que viene
con este electrodoméstico principal, usted debe preguntar a Midea o a su distribuidor sobre la
compra de una garantía extendida.
LIMITACIÓN DE RECURSOS; EXCLUSIÓN DE DAÑOS INCIDENTALES Y CONSECUENTES
SU ÚNICO Y EXCLUSIVO RECURSO BAJO ESTA GARANTÍA LIMITADA SERÁ
LA REPARACIÓN DEL PRODUCTO SEGÚN LO DISPUESTO EN EL PRESENTE DOCUMENTO. MIDEA
NO SERÁ RESPONSABLE POR DAÑOS INCIDENTALES O CONSECUENTES. Algunos estados y
provincias no permiten la exclusión o limitación de daños incidentales o consecuentes, por lo que
es posible que estas limitaciones y exclusiones no se apliquen en su caso. Esta garantía le otorga
derechos legales específicos, y también puede tener otros derechos que varían de un estado a otro
o de una provincia a otra.
11/19