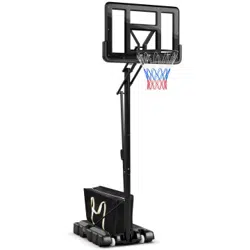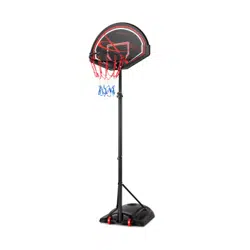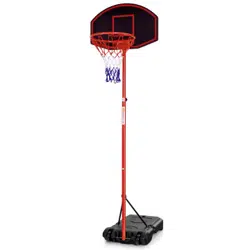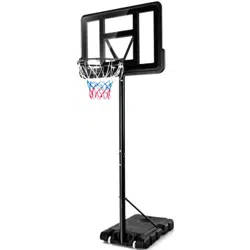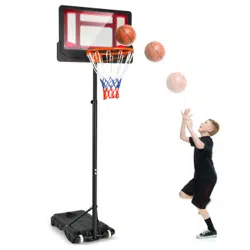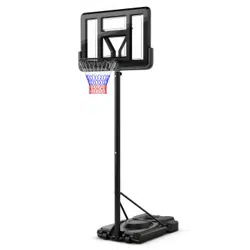

SP38140
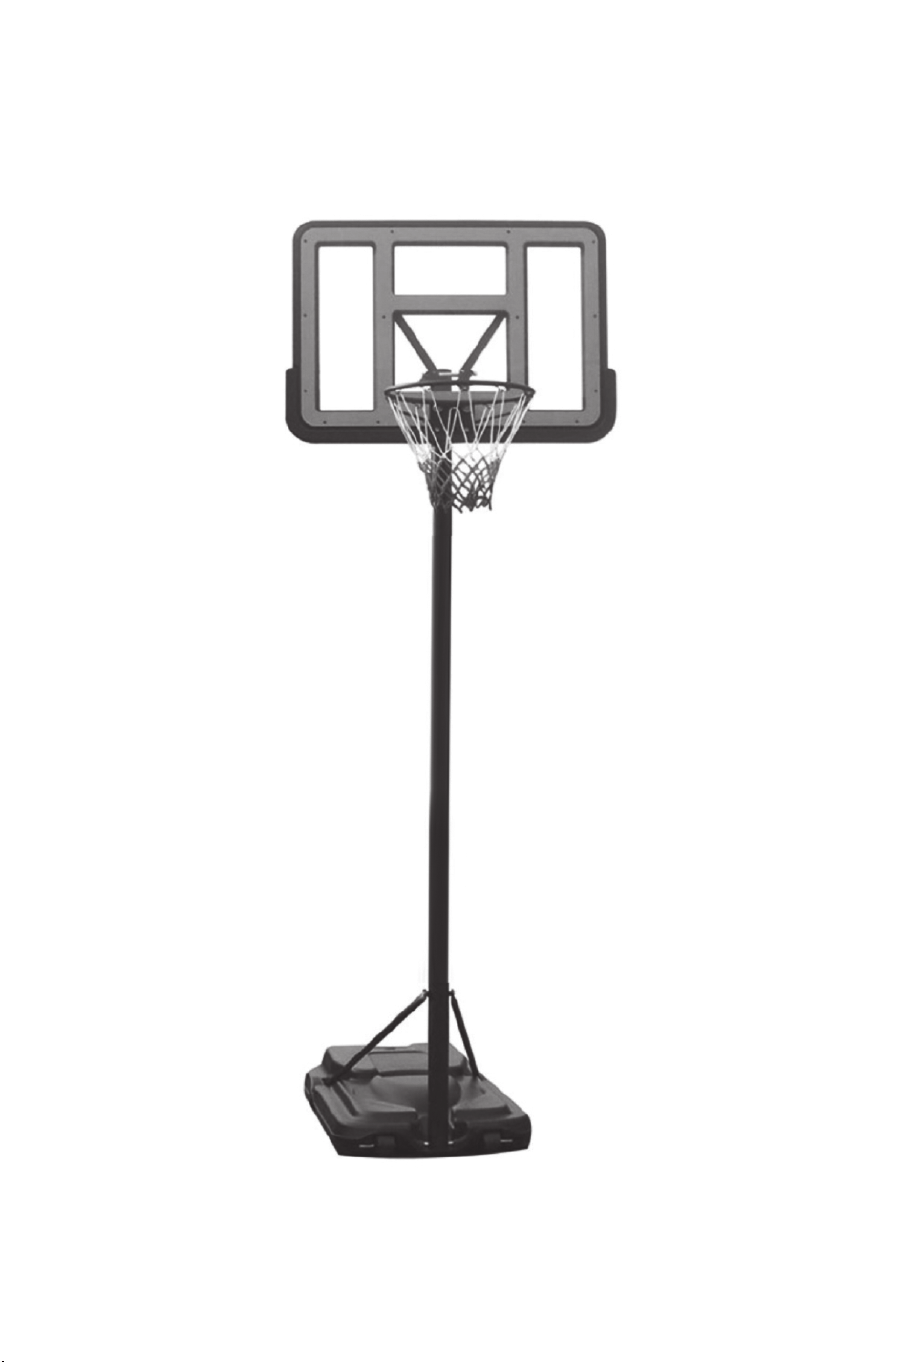
Basketball Hoop System
Basketballkorb-System
Panier de Basket-Ball
Sistema de Canasta de Baloncesto
Sistema di Canestro da Basket
Wolnostojący kosz do koszykówki
DEU office: FDS GmbH, Neuer Höltigbaum 36, 22143 Hamburg, Deutschland
ITA office: Milano
FRA office: Saint Vigor d'Ymonville
POL office: Gdańsk
GBR office: FDS Corporation Limited,Unit 4, Blackacre Road, Great Blakenham,Ipswich, Ip6 0FL,United Kingdom
AUS office: TruganinaUSA office: Fontana
THIS INSTRUCTION BOOKLET CONTAINS IMPORTANT SAFETY
INFORMATION. PLEASE READ AND KEEP FOR FUTURE REFERENCE.
Before You Start
Please read all instructions carefully.
Retain instructions for future reference.
Separate and count all parts and hardware.
Read through each step carefully and follow the proper order.
We recommend that, where possible, all items are assembled near to the area in
which they will be placed in use, to avoid moving the product unnecessarily once
assembled.
Always place the product on a flat, steady and stable surface.
Keep all small parts and packaging materials for this product away from babies
and children as they potentially pose a serious choking hazard.
EN
DE
Vor dem Beginnen
FR
Veuillez lire attentivement toutes les instructions.
Conservez les instructions pour vous y référer ultérieurement.
Vérifiez toutes les pièces et les accessoires.
Lisez attentivement chaque étape et suivez l'ordre correct.
Nous recommandons que, dans la mesure du possible, tous les produits soient
assemblés à proximité de la zone où ils seront utilisés, afin d'éviter tout
déplacement inutile du produit une fois assemblé.
Placez toujours le produit sur une surface plane et stable.
Conservez toutes les petites pièces de ce produit et les matériaux d'emballage
hors de portée des bébés et des enfants, car ils pourraient présenter un risque
d'étouffement.
Lea atentamente todas las instrucciones.
Conserve las instrucciones para futuras consultas.
Separe y cuente todas las piezas y los accesorios.
Lea detenidamente cada paso y siga el orden correcto.
Recomendamos que, siempre que sea posible, todos los elementos se monten
cerca de la zona en la que se van a utilizar, para evitar mover el producto
innecesariamente una vez montado.
Coloque siempre el producto sobre una superficie plana, estable y firme.
Mantenga todas las piezas pequeñas y los materiales de embalaje de este
producto lejos de los bebés y los niños, ya que pueden representar un grave
riesgo de asfixia.
ES
Avant de Commencer
Antes de Empezar
02 03
Si prega di leggere attentamente tutte le istruzioni.
Conservare le istruzioni per riferimento futuro.
Separare e contare tutte le parti e gli accessori.
Leggere attentamente ogni passo e seguire l'ordine corretto.
Si consiglia, ove possibile, di assemblare tutti gli articoli vicino alla zona in cui
verranno posti in uso, per evitare di spostare inutilmente il prodotto una volta
assemblato.
Posizionare sempre il prodotto su una superficie piana, stabile.
Tenere tutte le piccole parti e i materiali di imballaggio di questo prodotto lontano
dalla portata di neonati e bambini, in quanto possono costituire un serio pericolo
di soffocamento.
Zapoznaj się z instrukcją.
Zachowaj instrukcję do wglądu.
Posortuj części i upewnij się, że zestaw jest kompletny.
Zapoznaj się ze sposobem montażu i postępuj zgodnie z instrukcją.
Zalecamy, aby montaż odbywał się możliwie najbliżej miejsca docelowego
położenia produktu, aby uniknąć niepotrzebnego przesuwania.
Upewnij się, że produkt znajdzie się na płaskiej i stabilnej po wierzchni.
Upewnij się, że materiały wykorzystane podczas pakowania produktu oraz jego
elementy znajdują się poza zasięgiem dzieci, gdyż stwarzają potencjalne ryzyko
zadławienia.
IT
PL
Prima di Iniziare
Zanim Zaczniesz
04 05

WARNING
IMPROPER INSTALLATION OR SWINGING ON THE
RING MAY CAUSE SERIOUS INJURY OR DEATH
EN
Installation Alert:
*To save your time and safety, please read the instructions carefully
and check all the accessories in the package before installing,
weighing, displaying and disassembling the basketball stand, master
the installation steps and details before starting to install
* This product requires at least 2 adult installation, please prepare 2
movable wrenches.
*If there are any problems on the installation and use, please contact
qualified technician for help.
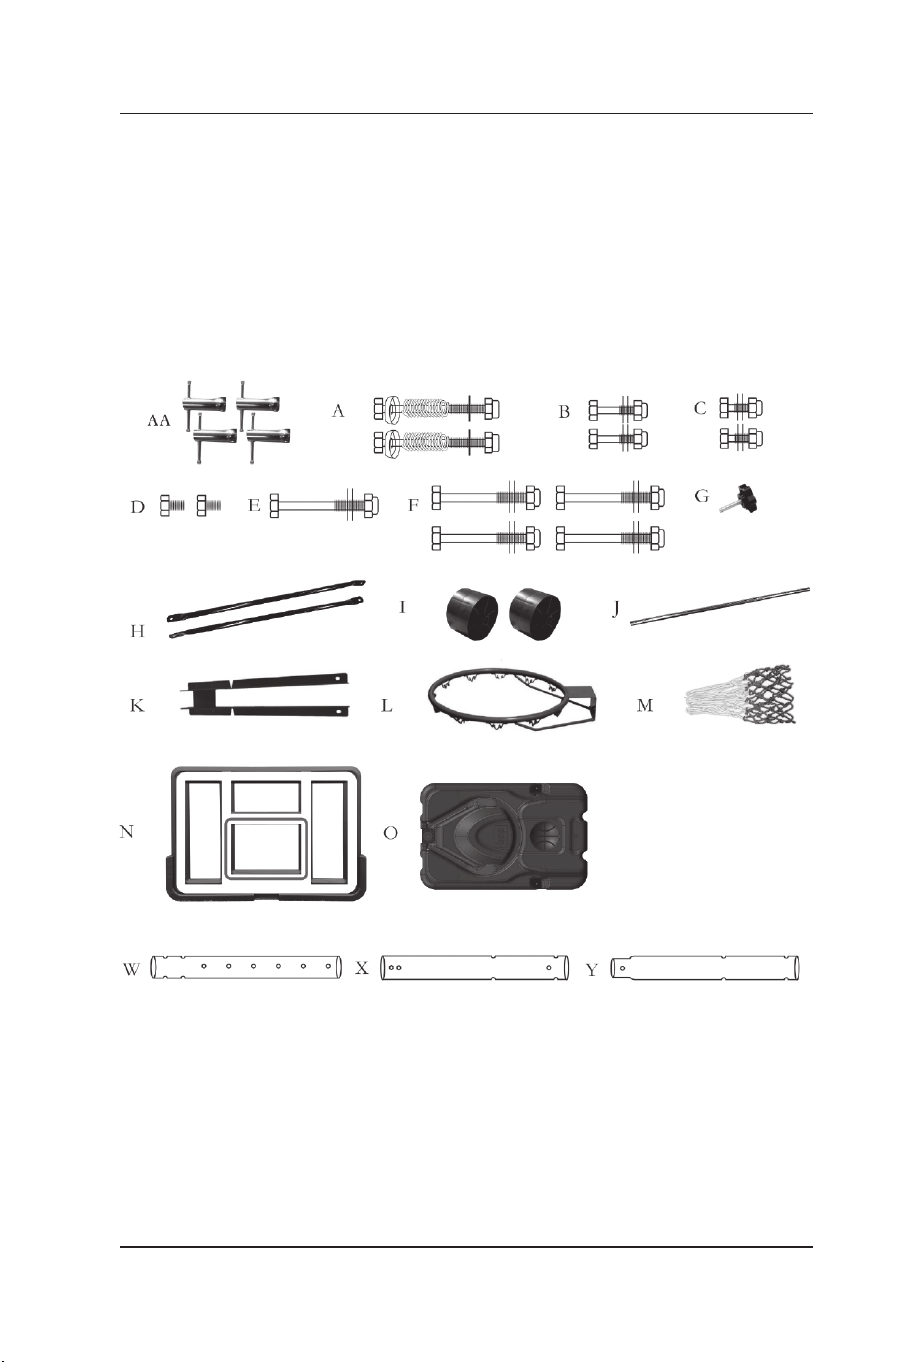
Sleeve WrenchX4
M8*110mmSpring screw X2
M8*40mmBoltX2
M8*20mmBolt X2
M8*16mmBolt X2
M10*100mmBolt X1
M10*90mmBolt X4
Knob X1
Pole Brace X2
Wheel X 2
AA
A
B
C
D
E
F
G
H
I
J
K
L
M
N
O
W
X
Y
Wheel Shaft X1
Board Bracket X1
Ring X1
Net X2
Board X1
Base X1
Top Pole X1
Middle Pole X1
Bottom Pole X1
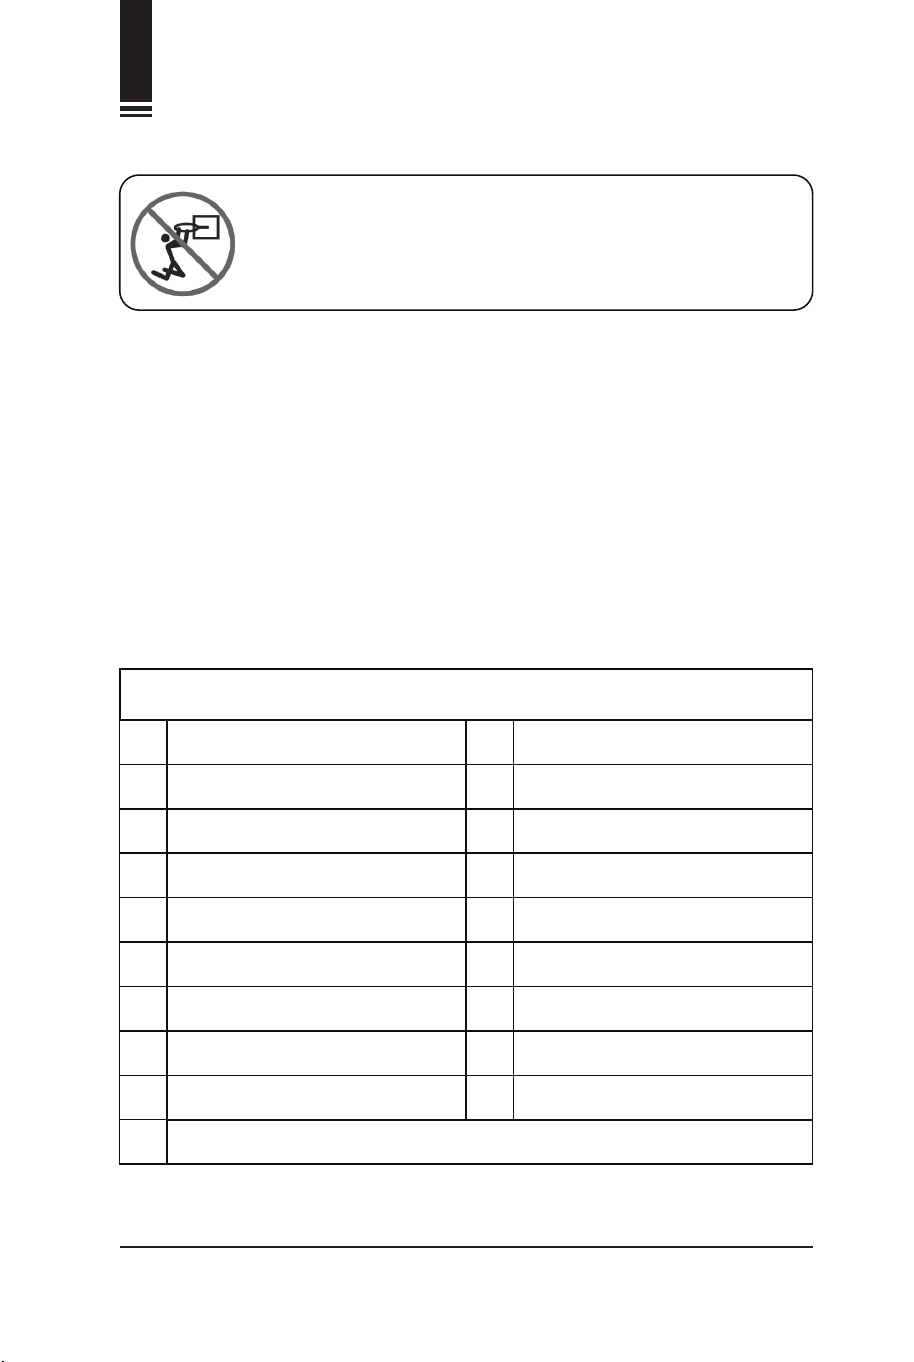
Parts List
ACHTUNG
UNSACHGEMÄSSE INSTALLATION ODER
SCHWINGEN AUF DEM KORB KANN ZU SCHWEREN
VERLETZUNGEN ODER ZUM TOD FÜHREN
DE
Installations-Hinweis:
*Um Ihre Zeit zu sparen und Sicherheit zu garantieren, lesen Sie bitte
die Anweisungen sorgfältig durch und überprüfen Sie alle Zubehörteile
in der Verpackung, bevor Sie den Basketballständer installieren,
wiegen, ausstellen und demontieren, beherrschen Sie die
Installationsschritte und Details, bevor Sie mit der Installation
beginnen.
* Dieses Produkt erfordert mindestens 2 Erwachsene für die
Installation, bitte halten Sie 2 bewegliche Schraubenschlüssel bereit.
*Wenn es irgendwelche Probleme bei der Installation und
Verwendung gibt, wenden Sie sich bitte an einen qualifizierten
Techniker für Hilfe.
Hülsenschlüssel X4
M8*110mm Federschraube X2
M8*40mm Bolzen X2
M8*20mm Bolzen X2
M8*16mm Bolzen X2
M10*100mm Bolzen X1
M10*90mm Bolzen X4
Knopf X1
Stangenhalterung X2
Rad X2
AA
A
B
C
D
E
F
G
H
I
J
K
L
M
N
O
W
X
Y
Radwelle X1
Board-Halterung X1
Korb X1
Netz X2
Rückwand X1
Sockel X1
obere Stange X1
mittlere Stange X1
untere Stange X1
Teileliste
06 07

WARNING
IMPROPER INSTALLATION OR SWINGING ON THE
RING MAY CAUSE SERIOUS INJURY OR DEATH
EN
Installation Alert:
*To save your time and safety, please read the instructions carefully
and check all the accessories in the package before installing,
weighing, displaying and disassembling the basketball stand, master
the installation steps and details before starting to install
* This product requires at least 2 adult installation, please prepare 2
movable wrenches.
*If there are any problems on the installation and use, please contact
qualified technician for help.
Sleeve WrenchX4
M8*110mmSpring screw X2
M8*40mmBoltX2
M8*20mmBolt X2
M8*16mmBolt X2
M10*100mmBolt X1
M10*90mmBolt X4
Knob X1
Pole Brace X2
Wheel X 2
AA
A
B
C
D
E
F
G
H
I
J
K
L
M
N
O
W
X
Y
Wheel Shaft X1
Board Bracket X1
Ring X1
Net X2
Board X1
Base X1
Top Pole X1
Middle Pole X1
Bottom Pole X1
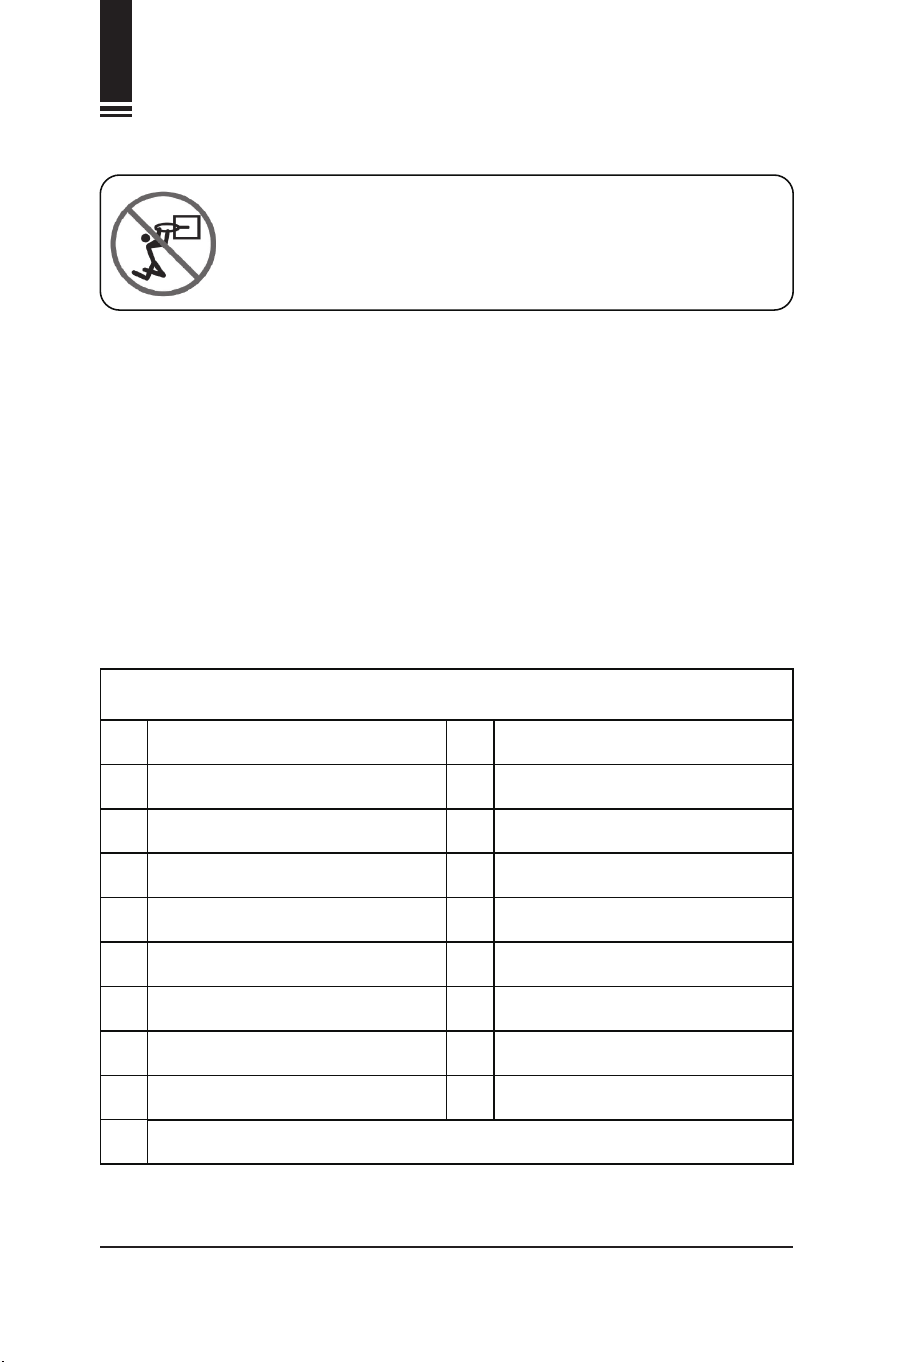
Parts List
ACHTUNG
UNSACHGEMÄSSE INSTALLATION ODER
SCHWINGEN AUF DEM KORB KANN ZU SCHWEREN
VERLETZUNGEN ODER ZUM TOD FÜHREN
DE
Installations-Hinweis:
*Um Ihre Zeit zu sparen und Sicherheit zu garantieren, lesen Sie bitte
die Anweisungen sorgfältig durch und überprüfen Sie alle Zubehörteile
in der Verpackung, bevor Sie den Basketballständer installieren,
wiegen, ausstellen und demontieren, beherrschen Sie die
Installationsschritte und Details, bevor Sie mit der Installation
beginnen.
* Dieses Produkt erfordert mindestens 2 Erwachsene für die
Installation, bitte halten Sie 2 bewegliche Schraubenschlüssel bereit.
*Wenn es irgendwelche Probleme bei der Installation und
Verwendung gibt, wenden Sie sich bitte an einen qualifizierten
Techniker für Hilfe.
Hülsenschlüssel X4
M8*110mm Federschraube X2
M8*40mm Bolzen X2
M8*20mm Bolzen X2
M8*16mm Bolzen X2
M10*100mm Bolzen X1
M10*90mm Bolzen X4
Knopf X1
Stangenhalterung X2
Rad X2
AA
A
B
C
D
E
F
G
H
I
J
K
L
M
N
O
W
X
Y
Radwelle X1
Board-Halterung X1
Korb X1
Netz X2
Rückwand X1
Sockel X1
obere Stange X1
mittlere Stange X1
untere Stange X1
Teileliste
06 07
AVERTISSEMENT
UNE INSTALLATION INCORRECTE OU UN
BALANCEMENT SUR L'ANNEAU PEUT PROVOQUER
DES BLESSURES GRAVES, VOIRE MORTELLES.
FR
Alerte d'Installation :
* Pour gagner votre temps et assurer votre sécurité, veuillez lire
attentivement les instructions et vérifier tous les accessoires dans
l'emballage avant d'installer, de peser, d'afficher et de démonter le
panier de basket-ball, maîtrisez les étapes et les détails de
l'installation avant de commencer.
* Ce produit nécessite l'installation d'au moins 2 adultes, veuillez
préparer 2 clés à molette.
* En cas de problème lors de l'installation et de l'utilisation, veuillez
contacter un technicien qualifié pour obtenir de l'aide.
Clé à douille X4
Vis à ressort M8*110mm X2
Boulon M8*40mm X2
Boulon M8*20mm X2
Boulon M8*16mm X2
Boulon M10*100mm X1
Boulon M10*90mm X4
Bouton X1
Support de poteau X2
Roue X2
AA
A
B
C
D
E
F
G
H
I
J
K
L
M
N
O
W
X
Y
Arbre de roue X1
Support de panneau X1
Anneau X1
Filet X2
Panneau X1
Base X1
Poteau supérieur X1
Poteau central X1
Poteau inférieur X1
Liste des Pièces
AVVERTENZA
L'INSTALLAZIONE O L'OSCILLAZIONE IMPROPRIA
DELL'ANELLO PUÒ CAUSARE GRAVI LESIONI O
MORTE.
ES
Alerta de instalación:
* Para ahorrar su tiempo y seguridad, por favor lea las instrucciones
cuidadosamente y compruebe todos los accesorios en el paquete
antes de instalar, pesar, mostrar y desmontar el soporte de
baloncesto, domine los pasos de instalación y los detalles antes de
comenzar a instalar.
* Este producto requiere la instalación de al menos 2 adultos, por
favor prepare 2 llaves movibles.
* Si hay algún problema en la instalación y el uso, por favor póngase
en contacto con un técnico cualificado para obtener ayuda.
Llave de manguito x4
Tomillo de muelle M8* 110mm x2
Perno M8* 40mm x2
Perno M8* 20mm x2
Perno M8* 16mm x2
Perno M10*100mm x1
Pemo M10*90mm x4
Perilla x1
Abrazadera de poste x2
Rueda x2
AA
A
B
C
D
E
F
G
H
I
J
K
L
M
N
O
W
X
Y
Eje de rueda x1
Soporte de tablero x1
Anillo x1
Red x2
Tablero x1
Base x1
Poste superior x1
Poste medio x1
Poste inferior x1
Lista de Piezas
08 09

AVVERTENZA
L'INSTALLAZIONE O L'OSCILLAZIONE IMPROPRIA
DELL'ANELLO PUÒ CAUSARE GRAVI LESIONI O
MORTE.
IT
Avviso di Montaggio:
*Per risparmiare tempo e sicurezza, leggere attentamente le istruzioni
e controllare tutti gli accessori presenti nella confezione prima di
installare, pesare, esporre e smontare il supporto per pallacanestro.
* Questo prodotto richiede l'installazione da parte di almeno 2 adulti, si
prega di preparare 2 chiavi mobili.
*In caso di problemi di installazione e utilizzo, contattare un tecnico
qualificato.
Chiave a manicotto X4
M8*110mm Vite a molla X2
M8*40mm Bullone X2
M8*20mm Bullone X2
M8*16mm Bullone X2
M10*100mm Bullone X1
M10*90mm Bullone X4
Manopola X1
Supporto del palo X2
Ruota X2
AA
A
B
C
D
E
F
G
H
I
J
K
L
M
N
O
W
X
Y
Asse della ruota X1
Staffa della scheda X1
Anello X1
Rete X2
Scheda X1
Base X1
Palo superiore X1
Palo centrale X1
Palo inferiore X1x
Lista delle Parti
OSTRZEŻENIE:
NIEPRAWIDŁOWY MONTAŻ LUB ZAWISANIE NA
OBRĘCZY KOSZA DO KOSZYKÓWKI MOŻE
SPOWODOWAĆ POWAŻNE OBRAŻENIA, A NAWET
ŚMIERĆ.
PL
Uwagi dotyczące montażu:
* Aby zaoszczędzić czas i zapewnić bezpieczeństwo, przed
przystąpieniem do montażu lub demontażu produktu dokładnie
zapoznaj się z instrukcją i sprawdź, czy w opakowaniu znajdują się
wszystkie potrzebne części. Przed przystąpieniem do montażu
dokładnie zapoznaj się z etapami montażu i wszystkimi instrukcjami.
* Wymagany montaż przez dwie osoby dorosłe. Do montażu
potrzebne są 2 klucze nastawne.
* W razie jakichkolwiek pytań dotyczących produktu podczas jego
montażu lub użytkowania, prosimy o kontakt z naszym działem
obsługi klienta. Dołożymy wszelkich starań, aby pomóc ci rozwiązać
napotkany problem.
Klucz nasadowy x4
Śruba sprężynowa M8x110mm x2
Śruba M8x40mm x2
Śruba M8x20mm x2
Śruba M8x16mm x2
Śruba M10x100mm x1
Śruba M10x90mm x4
Pokrętło x1
Wspornik x2
Kółko x2
AA
A
B
C
D
E
F
G
H
I
J
K
L
M
N
O
W
X
Y
Oś kółek x1
Wspornik tablicy x1
Obręcz x1
Siatka x2
Tablica x1
Podstawa x1
Górny drążek x1
Środkowy drążek x1
Dolny drążek x1
Lista części
10 11
1
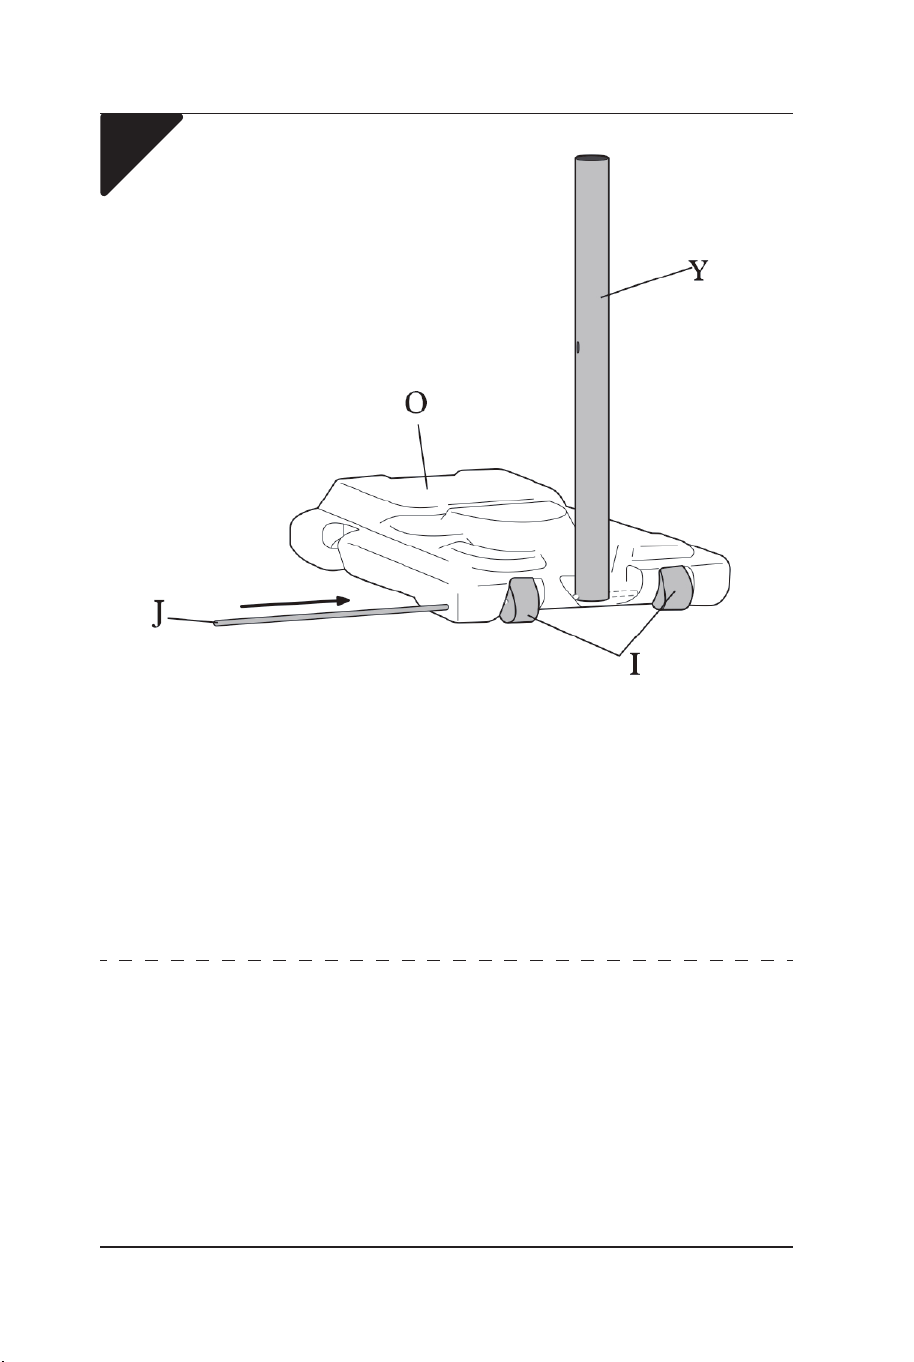
EN: Take out the base(O) and extract the wheel
shaft(J),locate the base(O) and insert the bottom pole(Y), use
the wheel shaft(J) to attach two wheels(l), place the wheels(I)
into the recesses on the front of the base(O) then slide wheel
shaft(J) through the hole on the side. Make the shaft (J)
passes through the base(O), wheel(l), bottom pole(Y), and
then through the other wheel(l)
DE: Nehmen Sie den Sockel (O) heraus und ziehen Sie die
Radwelle (J) heraus, setzen Sie den Sockel (O) und die
untere Stange (Y) ein, verwenden Sie die Radwelle (J), um
zwei Räder (l) zu befestigen, setzen Sie die Räder (I) in die
Aussparungen an der Vorderseite des Sockels (O) und
schieben Sie die Radwelle (J) durch das Loch an der Seite.
Führen Sie die Welle (J) durch den Sockel (O), das Rad (l),
die untere Stange (Y) und dann durch das andere Rad (l).
12 13
1
EN: Take out the base(O) and extract the wheel
shaft(J),locate the base(O) and insert the bottom pole(Y), use
the wheel shaft(J) to attach two wheels(l), place the wheels(I)
into the recesses on the front of the base(O) then slide wheel
shaft(J) through the hole on the side. Make the shaft (J)
passes through the base(O), wheel(l), bottom pole(Y), and
then through the other wheel(l)
DE: Nehmen Sie den Sockel (O) heraus und ziehen Sie die
Radwelle (J) heraus, setzen Sie den Sockel (O) und die
untere Stange (Y) ein, verwenden Sie die Radwelle (J), um
zwei Räder (l) zu befestigen, setzen Sie die Räder (I) in die
Aussparungen an der Vorderseite des Sockels (O) und
schieben Sie die Radwelle (J) durch das Loch an der Seite.
Führen Sie die Welle (J) durch den Sockel (O), das Rad (l),
die untere Stange (Y) und dann durch das andere Rad (l).
12 13

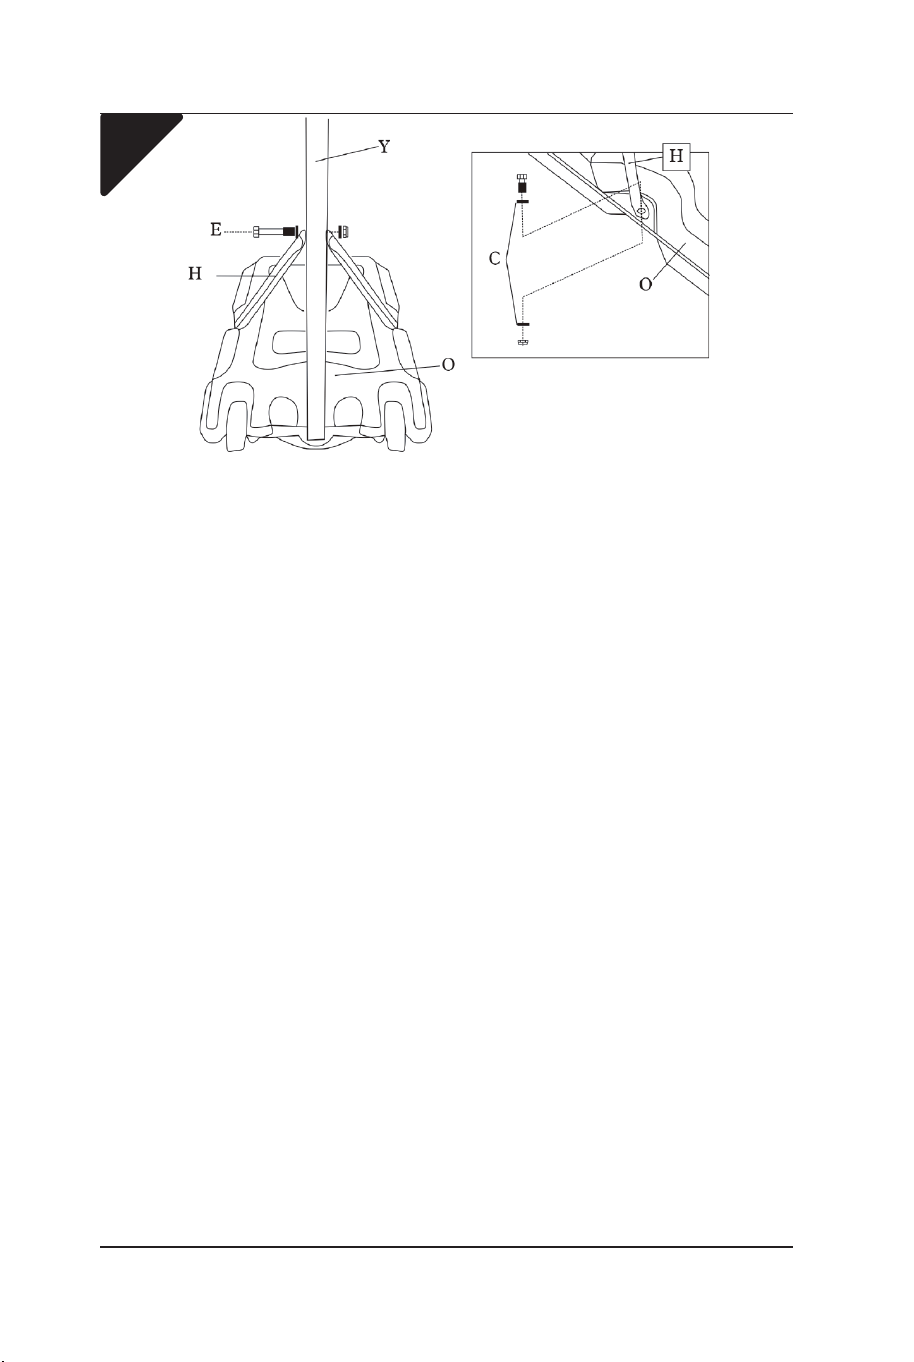
EN: Fix one end of pole brace(H) on bottom pole(Y) by bolt
set (E), then fix the other end of pole brace(H) on two sides of
base(O) by bolt set (C)as shown.
DE: Befestigen Sie ein Ende der Stangenhalterung (H) an
unterer Stange (Y) mit dem Bolzensatz (E), dann befestigen
Sie das andere Ende der Stangenhalterung (H) an zwei
Seiten des Sockels (O) mit dem Bolzensatz (C) wie gezeigt.
FR: Fixez une extrémité du support de poteau (H) sur le
poteau inférieur (Y) à l'aide du jeu de boulons (E), puis fixez
l'autre extrémité du support de poteau (H) sur les deux côtés
de la base (O) à l'aide du jeu de boulons (C), comme indiqué.
ES: Fije un extremo de la abrazadera del poste (H) en el
poste inferior (Y) con el conjunto de pernos (E), luego fije el
otro extremo de la abrazadera del poste (H) en dos lados de
la base (O) con el conjunto de pernos (C) como se muestra.
IT: Fissare un'estremità del supporto del palo (H) sul palo
inferiore (Y) con il set di bulloni (E), quindi fissare l'altra
estremità del supporto del palo (H) sui due lati della base (O)
con il set di bulloni (C) come illustrato.
PL: Przymocuj jeden koniec każdego wspornika (H) do
dolnego drążka (Y) za pomocą zestawu śrub (E). Następnie
przymocuj drugi koniec wsporników (H) po obu stronach
podstawy (O) za pomocą zestawu śrub (C), jak pokazano.
FR: Sortez la base (O) et extrayez l'arbre de roue (J),
localisez la base (O) et insérez le poteau inférieur (Y), utilisez
l'arbre de roue (J) pour attacher deux roues (l), placez les
roues (I) dans les évidements à l'avant de la base (O) puis
glissez l'arbre de roue (J) à travers le trou sur le côté. Faites
passer l'arbre (J) à travers la base (O), la roue (l), le poteau
inférieur (Y), puis à travers l'autre roue (l).
ES: Saque la base(O) y extraiga el eje de la rueda(J), coloque
la base(O) e inserte el poste inferior(Y), utilice el eje de la
rueda(J) para fijar dos ruedas(l), coloque las ruedas(l) en los
huecos de la parte delantera de la base(O) y luego deslice el
eje de la rueda(J) por el orificio del lateral. Haga que el eje (J)
pase a través de la base(O), la rueda(l), el poste inferior(Y), y
luego a través de la otra rueda(l).
IT: Estrarre la base (O) ed estrarre l'albero della ruota (J),
individuare la base (O) e inserire il palo inferiore (Y), utilizzare
l'albero della ruota (J) per collegare due ruote (l), posizionare
le ruote (I) negli incavi sulla parte anteriore della base (O),
quindi far scorrere l'asse della ruota (J) attraverso il foro sul
lato. Far passare l'asse (J) attraverso la base (O), la ruota (l),
il palo inferiore (Y) e poi attraverso l'altra ruota (l).
PL: Przygotuj podstawę (O) i oś kółek (J). Postaw podstawę
(O) na równym podłożu i umieść w niej dolny drążek (Y).
Następnie zamocuj oś kółek (J) oraz dwa kółka (I). Umieść
kółka (I) w zagłębieniach z przodu podstawy (O), a następnie
przełóż oś kółek (J) przez otwory po bokach podstawy. Oś
kółek (J) powinna przechodzić przez podstawę (O), kółko (l),
dolny słupek (Y), a następnie przez drugie kółko (l).
2
14 15
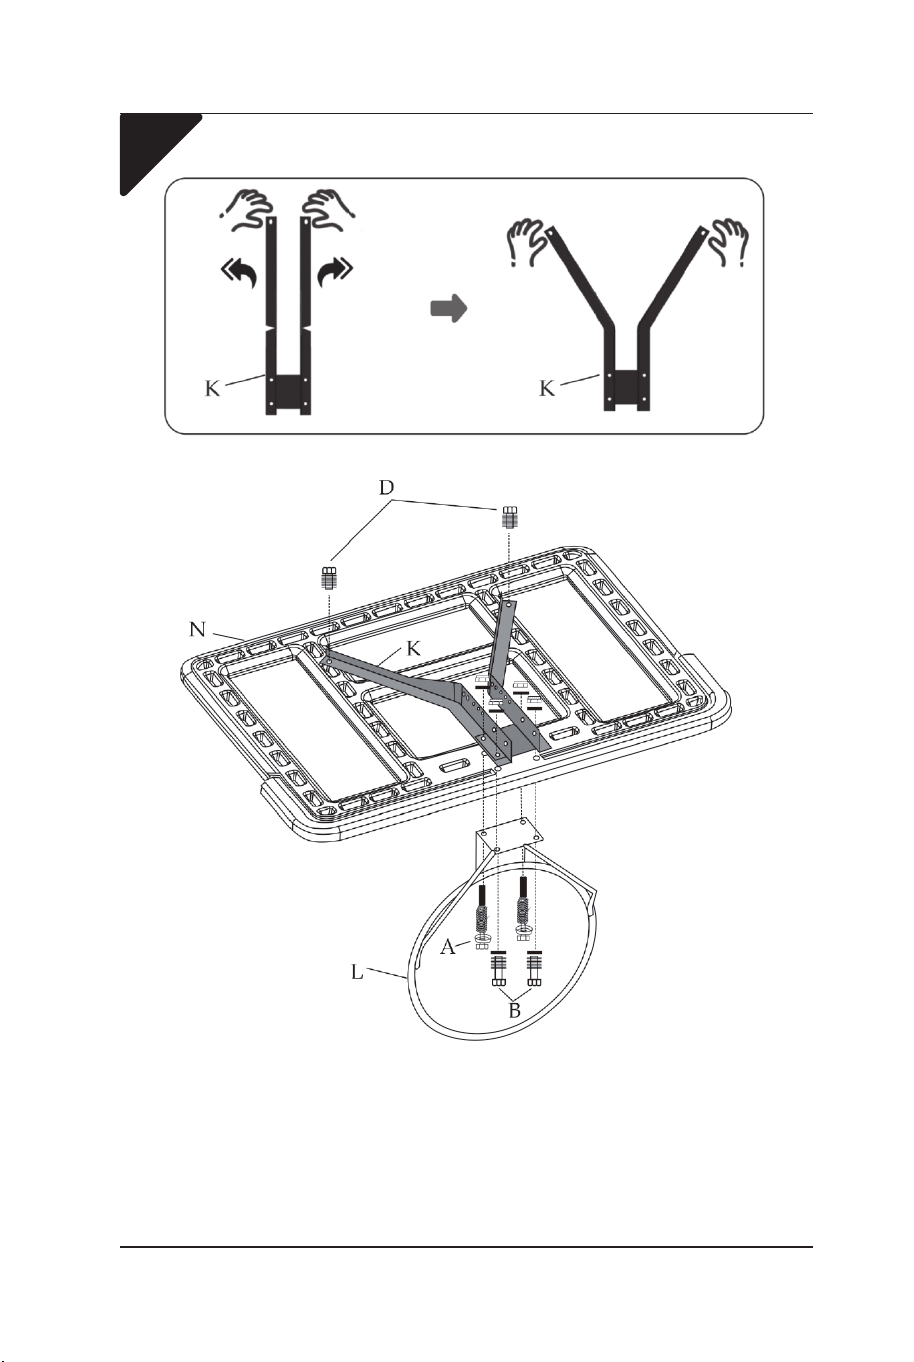
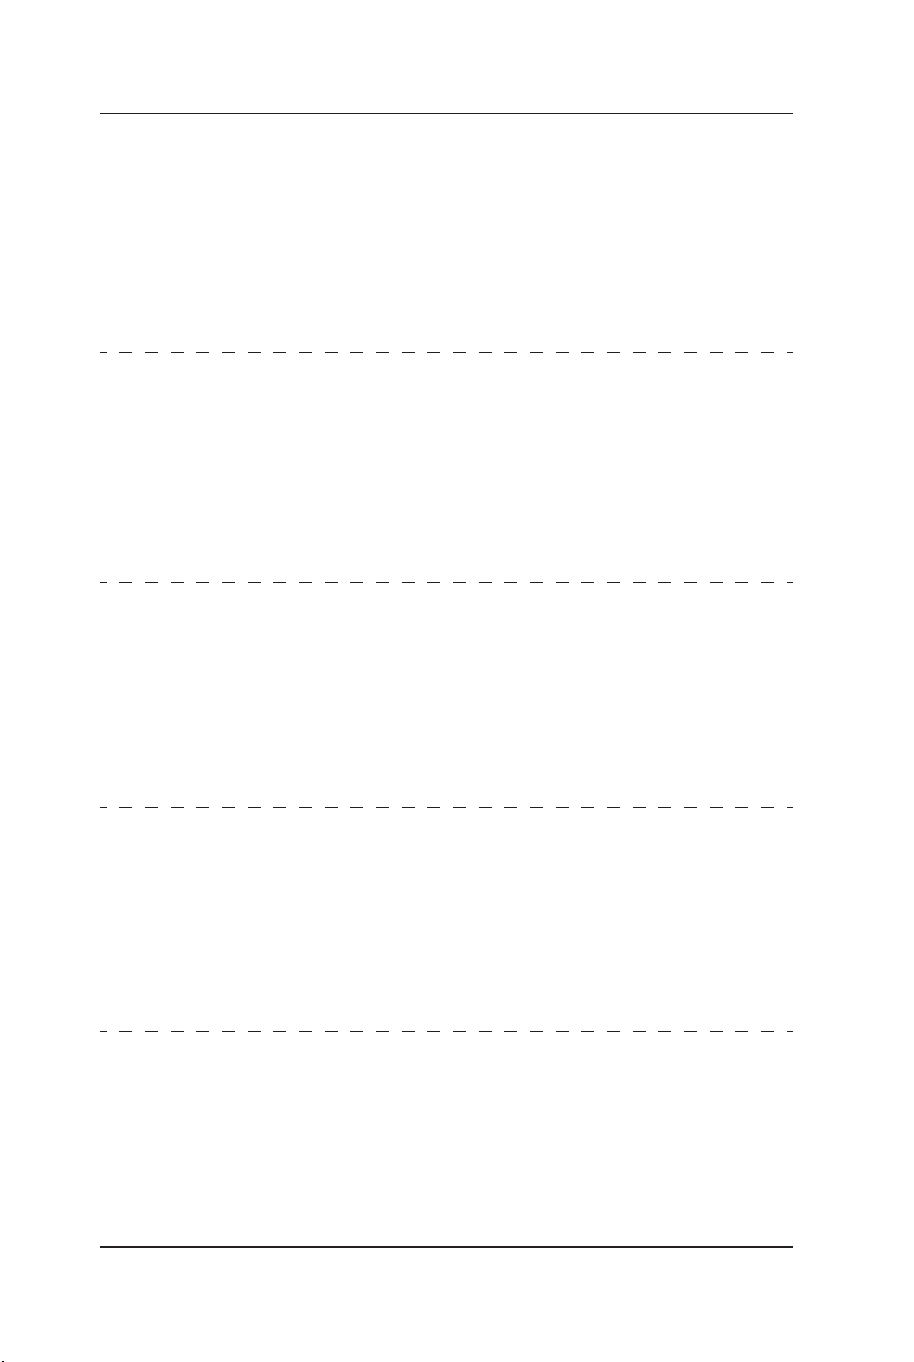
EN: As shown, please bend the board bracket(K) into a Y
shape before installation. Fix ring(L) and board bracket(K) on
backboard(N) by spring screws(A) and bolts(B). Then use
bolts(D) to fix the top of board bracket(K) on the back of
board(N) tightly.
DE: Biegen Sie die Board-Halterung (K) vor dem Einbau wie
gezeigt in Y-Form. Befestigen Sie den Korb (L) und die
Board-Halterung (K) mit Federschrauben (A) und Bolzen (B)
auf der Rückwand (N). Verwenden Sie dann die Bolzen (D),
um die Oberseite der Board-Halterung (K) an der Rückseite
der Rückwand (N) fest zu befestigen.
FR: Comme indiqué, pliez le support de panneau (K) en
forme de Y avant l'installation. Fixez l'anneau (L) et le support
de panneau (K) sur le panneau arrière (N) à l'aide des vis à
ressort (A) et des boulons (B). Utilisez ensuite les boulons (D)
pour fixer fermement le haut du support de panneau (K) à
l'arrière du panneau (N).
ES: Como se muestra, por favor doble el soporte del
tablero(K) en forma de Y antes de la instalación. Fije el anillo
(L) y el soporte del tablero (K) en el tablero trasero (N) con
tornillos de resorte (A) y pernos (B). A continuación, utilice
pernos (D) para fijar la parte superior del soporte del tablero
(K) en la parte trasera del tablero (N) firmemente.
IT: Come illustrato, piegare la staffa del pannello (K) a Y prima
dell'installazione. Fissare l'anello (L) e la staffa del pannello
(K) sul pannello posteriore (N) con viti a molla (A) e bulloni
(B). Quindi utilizzare i bulloni (D) per fissare saldamente la
parte superiore della staffa del pannello (K) sul retro del
pannello (N).
PL: Jak pokazano na rysunku, przed montażem zegnij
wspornik tablicy (K) w kształt litery Y. Przymocuj obręcz (L) i
wspornik tablicy (K) do tablicy (N) za pomocą śrub
sprężynowych (A) i śrub (B). Następnie użyj śrub (D), aby
przymocować górną część wspornika tablicy (K) do tylnej
części tablicy (N).
3
16 17
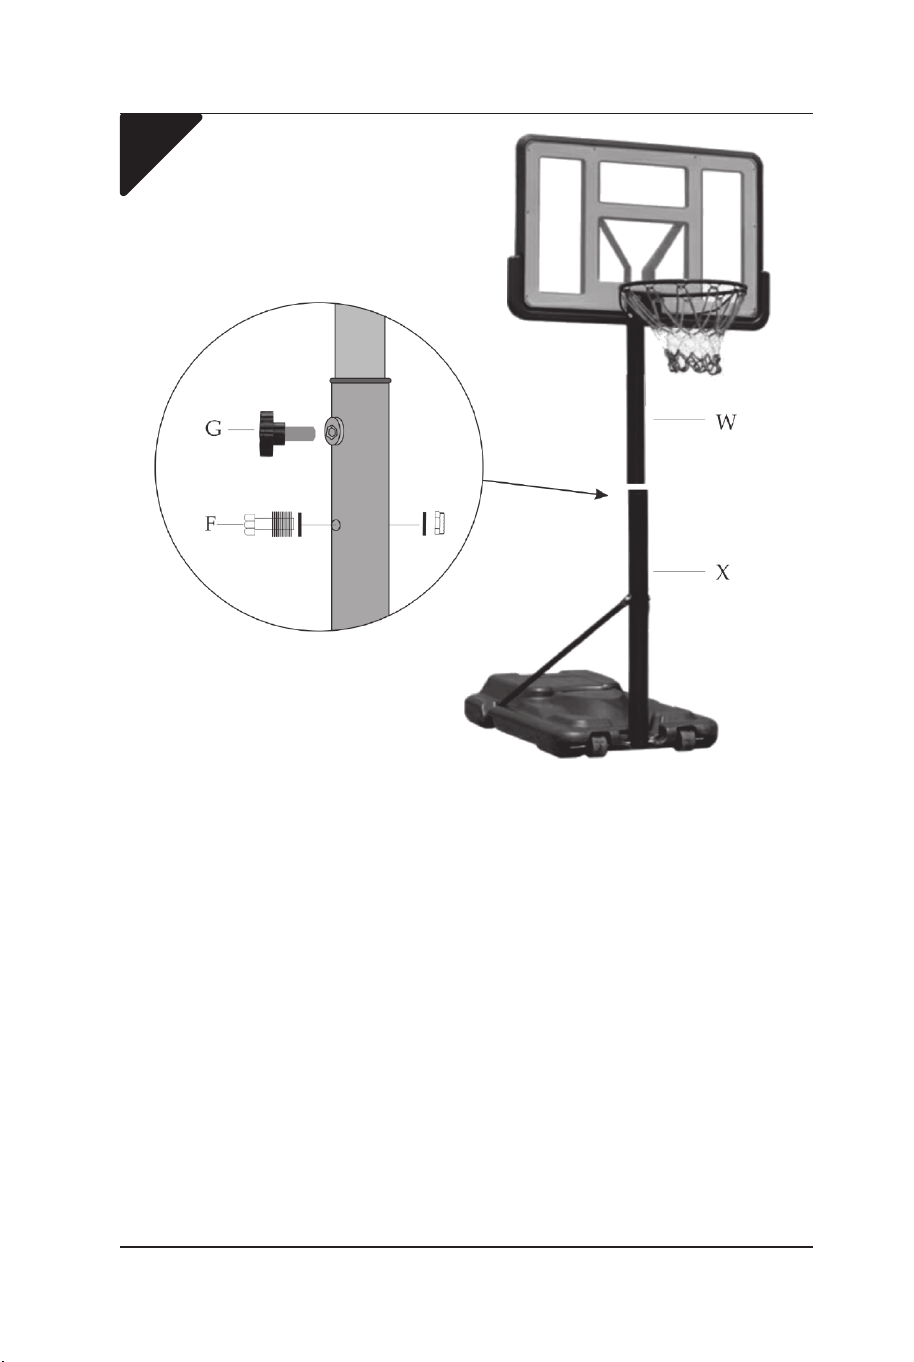
54
EN: As shown, fix the top pole (W) to the board bracket (K)
with the bolts (F).
DE: Befestigen Sie die obere Stange (W) mit den Bolzen (F)
wie abgebildet an der Board-Halterung (K).
FR: Comme indiqué, fixez le poteau supérieur (W) au support
de panneau (K) avec les boulons (F).
ES: Como se muestra, fije el poste superior (W) al soporte del
tablero (K) con los pernos (F).
IT: Come illustrato, fissare il palo superiore (W) alla staffa
della scheda (K) con i bulloni (F).
PL: 4)Jak pokazano na rysunku, przymocuj górny drążek (W)
do wspornika tablicy (K) za pomocą śrub (F).
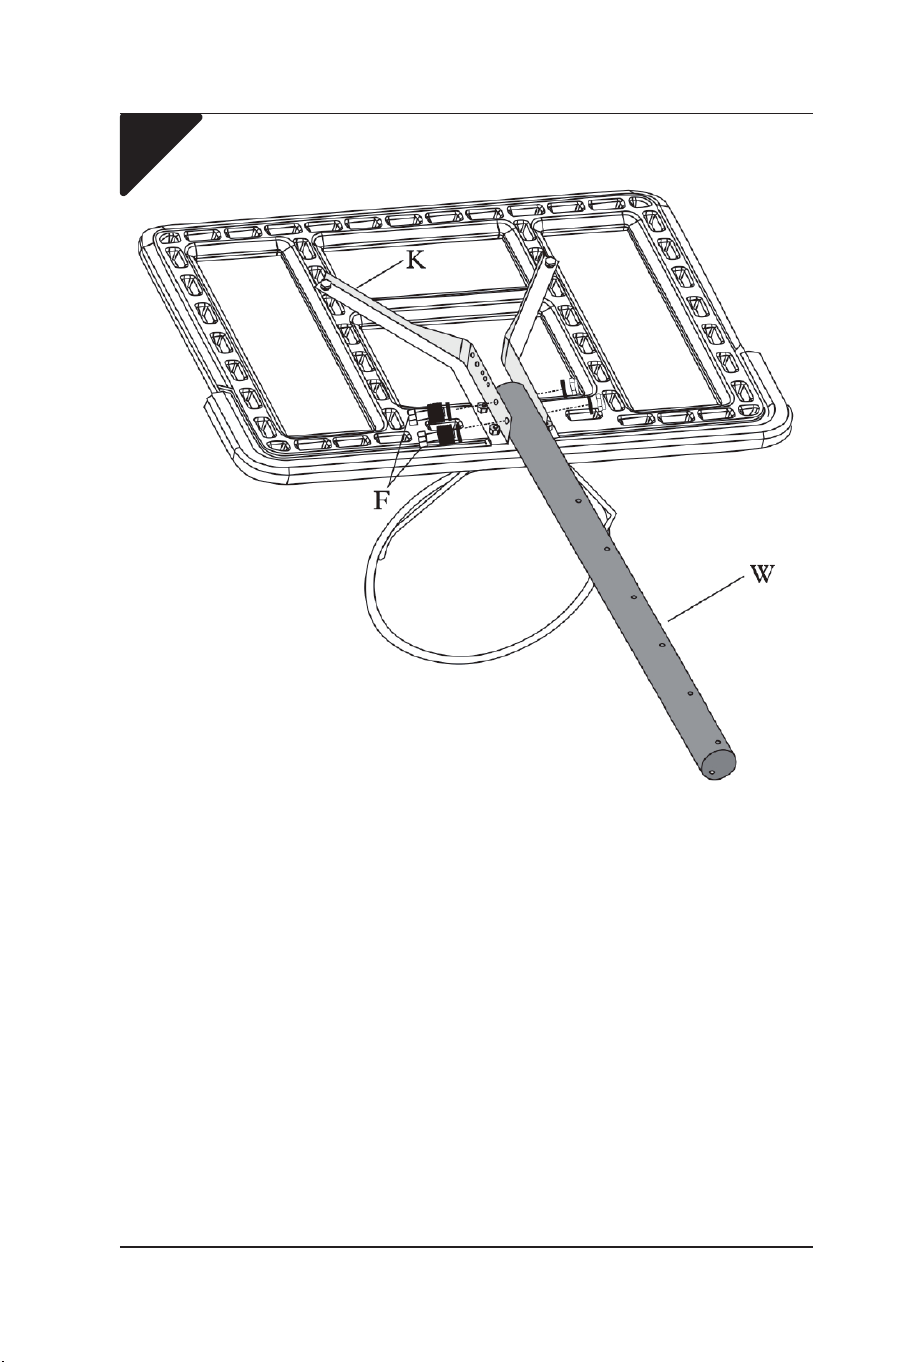
EN: As shown, install the ring (L) and net (M)
DE: Installieren Sie den Korb (L) und das Netz (M) wie
abgebildet.
FR: Comme indiqué, installez l'anneau (L) et le filet (M).
ES: Como se muestra, instale el anillo (L) y la red (M).
IT: Come illustrato, installare l'anello (L) e la rete (M).
PL: Jak pokazano na rysunku, zamontuj obręcz (L) i siatkę
(M).
18 19
54
EN: As shown, fix the top pole (W) to the board bracket (K)
with the bolts (F).
DE: Befestigen Sie die obere Stange (W) mit den Bolzen (F)
wie abgebildet an der Board-Halterung (K).
FR: Comme indiqué, fixez le poteau supérieur (W) au support
de panneau (K) avec les boulons (F).
ES: Como se muestra, fije el poste superior (W) al soporte del
tablero (K) con los pernos (F).
IT: Come illustrato, fissare il palo superiore (W) alla staffa
della scheda (K) con i bulloni (F).
PL: 4)Jak pokazano na rysunku, przymocuj górny drążek (W)
do wspornika tablicy (K) za pomocą śrub (F).
EN: As shown, install the ring (L) and net (M)
DE: Installieren Sie den Korb (L) und das Netz (M) wie
abgebildet.
FR: Comme indiqué, installez l'anneau (L) et le filet (M).
ES: Como se muestra, instale el anillo (L) y la red (M).
IT: Come illustrato, installare l'anello (L) e la rete (M).
PL: Jak pokazano na rysunku, zamontuj obręcz (L) i siatkę
(M).
18 19
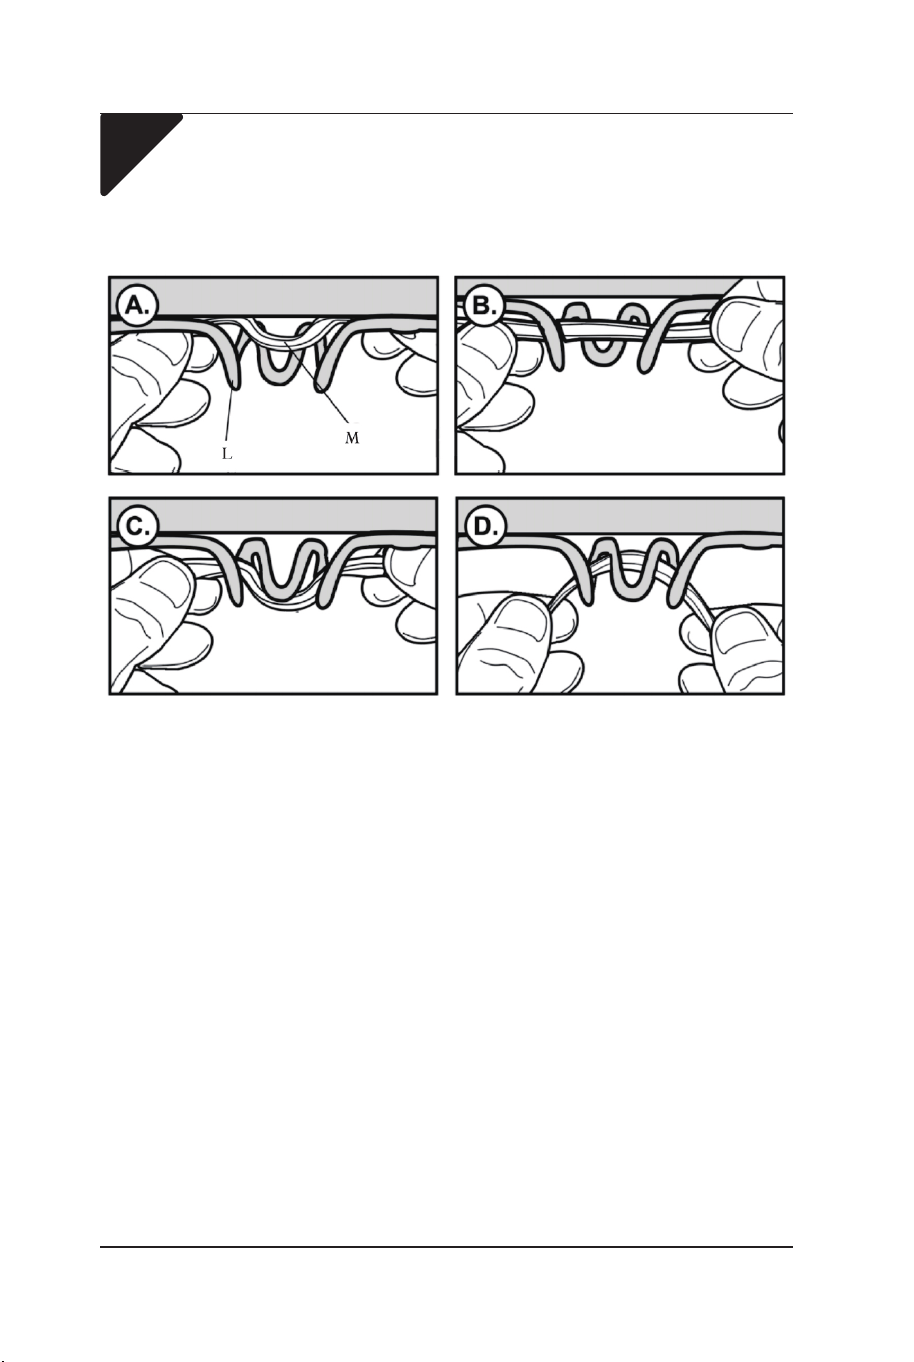
6
EN: As shown, put the middle pole (X) into the bottom pole
(Y), and then put the top pole (W) into the middle pole (X)and
fix it with bolts(F), screw the knob (G) on the middle pole (X),
and the lifting height: 2.3-3.05 m
DE: Wie gezeigt, stecken Sie die mittlere Stange (X) in die
untere Stange (Y), und dann stecken Sie die obere Stange
(W) in die mittlere Stange (X) und befestigen Sie sie mit
Bolzen (F), schrauben Sie den Knopf (G) auf die mittlere
Stange (X), und die Hubhöhe: 2,3-3,05 m
FR: Comme indiqué, placez le poteau central (X) dans le
poteau inférieur (Y), puis placez le poteau supérieur (W) dans
le poteau central (X) et fixez-le avec les boulons (F), vissez le
bouton (G) sur le poteau central (X), et la hauteur de levage :
2,3-3,05 m.
ES: Como se muestra, coloque el poste medio (X) en el poste
inferior (Y), y luego coloque el poste superior (W) en el poste
medio (X) y fíjelo con pernos (F), atornille la perilla (G) en el
poste medio (X), y la altura de elevación: 2,3-3,05 m.
IT: Come illustrato, inserire il palo centrale (X) nel palo
inferiore (Y), quindi inserire il palo superiore (W) nel palo
centrale (X) e fissarlo con i bulloni (F), avvitare la manopola
(G) sul palo centrale (X) e l'altezza di sollevamento: 2,3-3,05
m.
PL: Jak pokazano na rysunku, włóż środkowy drążek (X) w
dolny drążek (Y). Następnie włóż górny drążek (W) w
środkowy drążek (X) i zamocuj za pomocą śrub (F). Dokręć
pokrętło (G) na środkowym drążku (X). Zakres regulacji
wysokości wynosi teraz 2,3-3,05 m.
20 21
7
EN: As shown, remove the bottom pole(X), and the lifting
height:1.72-2.02 m
DE: Wie gezeigt, entfernen Sie die untere Stange (X), und die
Hubhöhe: 1,72-2,02 m
FR: Comme indiqué, retirez le poteau inférieur (Y), et la
hauteur de levage : 1,72-2,02 m.
ES: Como se muestra, retire el poste inferior (X), y la altura
de elevación:1,72-2,02 m
IT: Come illustrato, rimuovere il palo inferiore (X) e l'altezza di
sollevamento: 1,72-2,02 m.
PL: 7)Jak pokazano na rysunku, zdemontuj dolny drążek (X),
aby zakres regulacji wysokości wynosił 1,72-2,02 m.
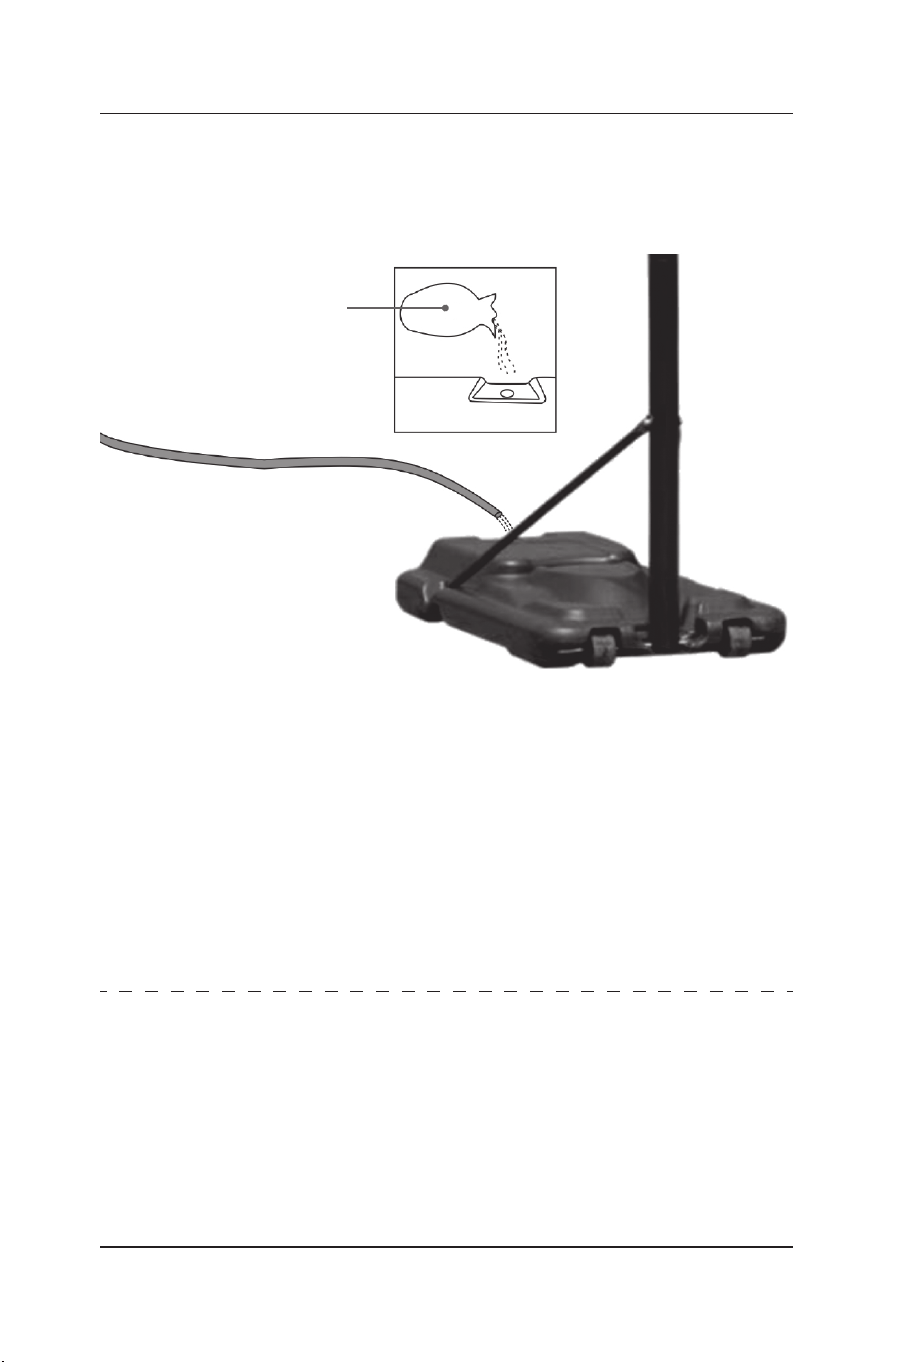
SAND
/SAND
/SABLE
/ARENA
/SABBIA
/PIASEK
90% Water
/90% Wasser
/90% Eau
/90% Agua
/90% Acqua
/90% Wody
EN: If the product does not need to be moved frequently, we
recommend filling the base with sand instead of water.
Because water freezes below 0
°C, it can damage the base.
Note, however, that the sand can not be poured out after
being loaded into the base.
DE: Wenn das Produkt nicht häufig bewegt werden muss,
empfehlen wir, den Sockel mit Sand statt mit Wasser zu
füllen. Da Wasser unter 0
°C gefriert, kann es den Sockel
beschädigen. Beachten Sie jedoch, dass der Sand nicht
ausgegossen werden kann, nachdem er in den Sockel gefüllt
wurde.
22 23
7
EN: As shown, remove the bottom pole(X), and the lifting
height:1.72-2.02 m
DE: Wie gezeigt, entfernen Sie die untere Stange (X), und die
Hubhöhe: 1,72-2,02 m
FR: Comme indiqué, retirez le poteau inférieur (Y), et la
hauteur de levage : 1,72-2,02 m.
ES: Como se muestra, retire el poste inferior (X), y la altura
de elevación:1,72-2,02 m
IT: Come illustrato, rimuovere il palo inferiore (X) e l'altezza di
sollevamento: 1,72-2,02 m.
PL: 7)Jak pokazano na rysunku, zdemontuj dolny drążek (X),
aby zakres regulacji wysokości wynosił 1,72-2,02 m.
SAND
/SAND
/SABLE
/ARENA
/SABBIA
/PIASEK
90% Water
/90% Wasser
/90% Eau
/90% Agua
/90% Acqua
/90% Wody
EN: If the product does not need to be moved frequently, we
recommend filling the base with sand instead of water.
Because water freezes below 0
°C, it can damage the base.
Note, however, that the sand can not be poured out after
being loaded into the base.
DE: Wenn das Produkt nicht häufig bewegt werden muss,
empfehlen wir, den Sockel mit Sand statt mit Wasser zu
füllen. Da Wasser unter 0
°C gefriert, kann es den Sockel
beschädigen. Beachten Sie jedoch, dass der Sand nicht
ausgegossen werden kann, nachdem er in den Sockel gefüllt
wurde.
22 23

In case a return is required, the item must be returned in original box. Without this
your return will not be accepted.
DO NOT discard the box / original packaging.
Take a photo of the box markings.
Take a photo of the damaged part (if applicable).
Send us an email with the images requested.
A photo of the markings (text) on the side of the box is required in case a part is
needed for replacement. This helps our staff identify your product number to
ensure you receive the correct parts.
A photo of the damage is always required to file a claim and get your replacement
or refund processed quickly. Please make sure you have the box even if it is
damaged.
Email us directly from marketplace where your item was purchased with the
attached images and a description of your claim.
Falls eine Rücksendung erforderlich ist, muss der Artikel in der
Originalverpackung zurückgeschickt werden. Andernfalls wird Ihre Rücksendung
nicht angenommen.
Werfen Sie den Karton / die Originalverpackung NICHT weg.
Machen Sie ein Foto von der Beschriftung des Kartons.
Machen Sie ein Foto des beschädigten Teils (falls zutreffend).
Schicken Sie uns eine E-Mail mit dem gewünschten Foto.
Für den Fall, dass ein Ersatzteil benötigt wird, benötigen wir ein Foto der
Beschriftung (Text) auf der Seite des Kartons. So können unsere Mitarbeiter Ihre
Artikelnummer identifizieren und sicherstellen, dass Sie die richtigen Teile
erhalten.
Ein Foto des beschädigten Teils ist immer erforderlich, um eine Reklamation
einzureichen und eine schnelle Bearbeitung Ihres Ersatzteils oder Ihrer
Rückerstattung zu gewährleisten. Bitte stellen Sie sicher, dass Sie den Karton
haben, auch wenn er beschädigt ist.
Schicken Sie uns eine E-Mail direkt vom Marktplatz, auf dem Sie den Artikel
gekauft haben, mit den angehängten Fotos und einer Beschreibung Ihrer
Reklamation.
EN
DE
Return / Damage Claim Instructions
Rücksendung / Beschädigung Anweisungen
FR: Si le produit n'a pas besoin d'être déplacé fréquemment,
nous recommandons de remplir la base de sable au lieu
d'eau. Comme l'eau gèle en dessous de 0℃, elle peut
endommager la base. Notez toutefois que le sable ne peut
pas être versé après avoir été chargé dans la base.
ES: Si no es necesario mover el producto con frecuencia,
recomendamos rellenar la base con arena en lugar de agua.
Como el agua se congela por debajo de 0℃, puede dañar la
base. Tenga en cuenta, sin embargo, que la arena no se
puede verter después de haberla cargado en la base.
IT: Se il prodotto non deve essere spostato frequentemente, si
consiglia di riempire la base con sabbia anziché con acqua.
Poiché l'acqua congela al di sotto di 0℃, può danneggiare la
base. Si noti, tuttavia, che la sabbia non può essere versata
dopo essere stata caricata nella base.
PL: Jeśli nie zamierzasz często przesuwać produktu,
zalecamy wypełnienie podstawy piaskiem zamiast wody.
Woda zamarza w temperaturze poniżej 0°C i może uszkodzić
podstawę. Uwaga: Pamiętaj jednak, że piasek dużo trudniej
wysypać z podstawy.
24 25
Instructions De Retour / Réclamation De Dommages
Dans le cas où un retour est requis, l'article doit être retourné dans sa boîte
d'origine. Sans cela, votre retour ne sera pas accepté.
NE PAS jeter la boîte/l'emballage d'origine.
Prenez une photo des marquages de la boîte.
Prenez une photo des dommages (le cas échéant).
Envoyez-nous un e-mail avec les images demandées.
Une photo des marquages (texte) sur le côté de la boîte est requise au cas où une
pièce serait nécessaire pour le remplacement. Cela aide notre personnel à
identifier votre numéro de produit pour s'assurer que vous recevez les bonnes
pièces.
Une photo des dommages est toujours requise pour déposer une réclamation et
obtenir rapidement votre remplacement ou votre remboursement. Assurez-vous
d'avoir la boîte même si elle est endommagée.
Envoyez-nous un e-mail directement depuis le marché où votre article a été
acheté avec les images ci-jointes et une description de votre réclamation.
Instrucciones de Devolución / Reclamación de Daños
En caso de que se requiera una devolución, el artículo debe ser devuelto en la
caja original. Sin esto su devolución no será aceptada.
NO deseche la caja/embalaje original.
Tome una foto de las marcas de la caja.
Tome una foto de las piezas dañadas (si procede).
Envíenos un correo electrónico con las imágenes solicitadas.
Se requiere una foto de las marcas (texto) en el lado de la caja en caso de que se
necesite una pieza para reemplazarla. Esto ayuda a nuestro personal a identificar
su número de producto para asegurarse de que recibe las piezas correctas.
Una foto de los daños es siempre necesaria para presentar una reclamación y
conseguir que su reemplazo o reembolso sea procesado rápidamente. Por favor,
asegúrese de tener la caja aunque esté dañada.
Envíenos un correo electrónico directamente desde el mercado donde se compró
su artículo con las imágenes adjuntas y una descripción de su reclamación.
FR
ES
Nel caso in cui sia richiesto un reso, l'articolo deve essere restituito nella scatola
originale. Senza la scatola originale il tuo reso non sarà accettato.
NON scartare la scatola / confezione originale.
Fare una foto dei contrassegni sulla scatola.
Fare una foto di Danno (se è applicabile).
Inviarci una mail con le immagini richieste.
È necessaria una foto dei contrassegni (testo) sul lato della scatola nel caso in
cui la parte debba essere sostituita. Questo aiuta il nostro staff a identificare il
numero del tuo prodotto per assicurarti di ricevere le parti corrette.
Una foto del danno è sempre necessaria per presentare un reclamo e ottenere
rapidamente la sostituzione o il rimborso. Assicurati di avere la scatola anche se
è danneggiata.
Inviarci un'e-mail direttamente dal mercato in cui è stato acquistato il tuo articolo
con le immagini allegate e una descrizione del tuo reclamo.
Jeśli chcesz zwrócić produkt, musi znajdować się on w oryginalnym opakowaniu.
Towar zwrócony w nieoryginalnym opakowaniu nie zostanie przyjęty.
Nie wyrzucaj oryginalnego opakowania.
Zrób zdjęcie oznaczeń na opakowaniu.
Zrób zdjęcie uszkodzonej części (jeśli dotyczy).
Skontaktuj się z nami.
Jeśli jakakolwiek część wymaga wymiany, zrób zdjęcie oznaczeń kodu produktu,
który znajduje się na opakowaniu. Pozwoli nam to zidentyfikować produkt i
dostarczyć ci właściwą część.
Jeśli chcesz złożyć reklamację, zrób zdjęcie uszkodzonej części. Pozwoli nam to
zatwierdzić reklamację i zlecić zwrot środków na twoje konto. Do złożenia
reklamacji potrzebne będzie oryginalne opakowanie.
Skontaktuj się z nami telefonicznie, mailowo lub poprzez formularz kontaktowy.
Załącz zdjęcia produktu i opis roszczenia.
IT
PL
Istruzioni Per La Restituzione / Reclamo Per Danni
Zwroty i reklamacje
26 27

SP38140
Basketball Hoop System
Basketballkorb-System
Panier de Basket-Ball
Sistema de Canasta de Baloncesto
Sistema di Canestro da Basket
Wolnostojący kosz do koszykówki
DEU office: FDS GmbH, Neuer Höltigbaum 36, 22143 Hamburg, Deutschland
ITA office: Milano
FRA office: Saint Vigor d'Ymonville
POL office: Gdańsk
GBR office: FDS Corporation Limited,Unit 4, Blackacre Road, Great Blakenham,Ipswich, Ip6 0FL,United Kingdom
AUS office: TruganinaUSA office: Fontana
THIS INSTRUCTION BOOKLET CONTAINS IMPORTANT SAFETY
INFORMATION. PLEASE READ AND KEEP FOR FUTURE REFERENCE.