

650ML 20V CORDLESS HANDHELD VACUUM
CLEANER - BODY ONLY
MODEL NO: CP20VCV
Thank you for purchasing a Sealey product. Manufactured to a high standard, this product will, if used according to these
instructions, and properly maintained, give you years of trouble free performance.
IMPORTANT: PLEASE READ THESE INSTRUCTIONS CAREFULLY. NOTE THE SAFE OPERATIONAL REQUIREMENTS, WARNINGS & CAUTIONS. USE
THE PRODUCT CORRECTLY AND WITH CARE FOR THE PURPOSE FOR WHICH IT IS INTENDED. FAILURE TO DO SO MAY CAUSE DAMAGE AND/OR
PERSONAL INJURY AND WILL INVALIDATE THE WARRANTY. KEEP THESE INSTRUCTIONS SAFE FOR FUTURE USE.
1. SAFETY
1.1. GENERAL SAFETY
WARNING! The warnings, cautions and instructions in this manual cannot cover all possible conditions and situations that may
occur. It must be understood by the operator that common sense and caution are factors which cannot be built into this
product, but must be applied by the operator.
WARNING! This appliance can be used by children aged 8 years and older and persons with reduced physical, sensory or mental
capabilities or lack of experience and knowledge, if they have been given supervision or instruction concerning use of the appliance
in a safe way and can understand the hazards involved.
WARNING! Stop use of the handheld vacuum cleaner immediately if you notice anything abnormal.
WARNING! If the handheld vacuum cleaner is dropped or struck check carefully for cracks or damage before use. Replace or repair
any damaged parts.
8 DO NOT use outdoors or on wet surfaces.
8 DO NOT use to pick up hot materials, ammable liquids, wet dirt, water, oil or similar. Hard pieces with sharp edges such as stone,
glass, nails or pins.
8 DO NOT vacuum toxic materials to avoid health hazards from vapours or dusts.
8 DO NOT block the intake hole or vents.
8 DO NOT leave or place near or on a heat source.
8 DO NOT operate the handheld vacuum cleaner when you are tired or under the inuence of alcohol, drugs or intoxicating medication.
8 DO NOT operate the handheld vacuum if any parts are missing or damaged, as this may cause failure and/or personal injury.
8 DO NOT allow persons unfamiliar with the handheld vacuum or these instructions to operate the handheld vacuum.
8 DO NOT use without lter in place.
9 This handheld vacuum cleaner is intended for light duty use only, in the home, workshop or in car body only.
9 Keep free of dust, lint, hair and anything that may reduce air ow. Keep hair, loose clothing, ngers away from openings and moving
parts.
2. INTRODUCTION
Lightweight cordless handheld vacuum cleaner with soft comfortable grip convenient for use in the home, workshop or car - body only.
Removable collection chamber with easy release button to dispose of waste eciently. Supplied with 4-piece accessory pack. Requires
compatible 20V battery and mains charger, sold separately.
3. SPECIFICATION
Model no: ...............................................................CP20VCV
Battery: ......................... 20V 2Ah - Lithium-ion (not included)
Consumable parts (battery): ...................................................
2Ah ...................................................................... CP20VBP2
4AH ...................................................................... CP20VBP4
6AH ...................................................................... CP20VBP6
Consumable part (lter)..................................... CP20VCVCF
Drum capacity: ............................................................. 650ml
Filter type: ........................................................Cartridge lter
Maximum vacuum pressure: .......................................8.5Kpa
Motor power: .................................................................100W
4. OPERATION
Unpack the product and check contents. Should there be any damaged or missing parts contact your supplier immediately.
4.1. BATTERY INSTALLATION
4.1.1. To insert the battery align the tongue on the battery cartridge (g 1 - 1) with the groove in the vacuum cleaner handle housing
(g 1 - 10) and slide it into place. Insert the battery all the way in until it locks into place.
4.2. BATTERY REMOVAL
4.2.1. Hold the vacuum cleaner handle housing tightly and push the battery latch button (g 1 - 2), then slide and remove the battery.
CP20VCV Issue 1 06/05/21
Original Language Version
© Jack Sealey Limited
Refer to
instructions
Electrical shock
hazard
Indoor use
only
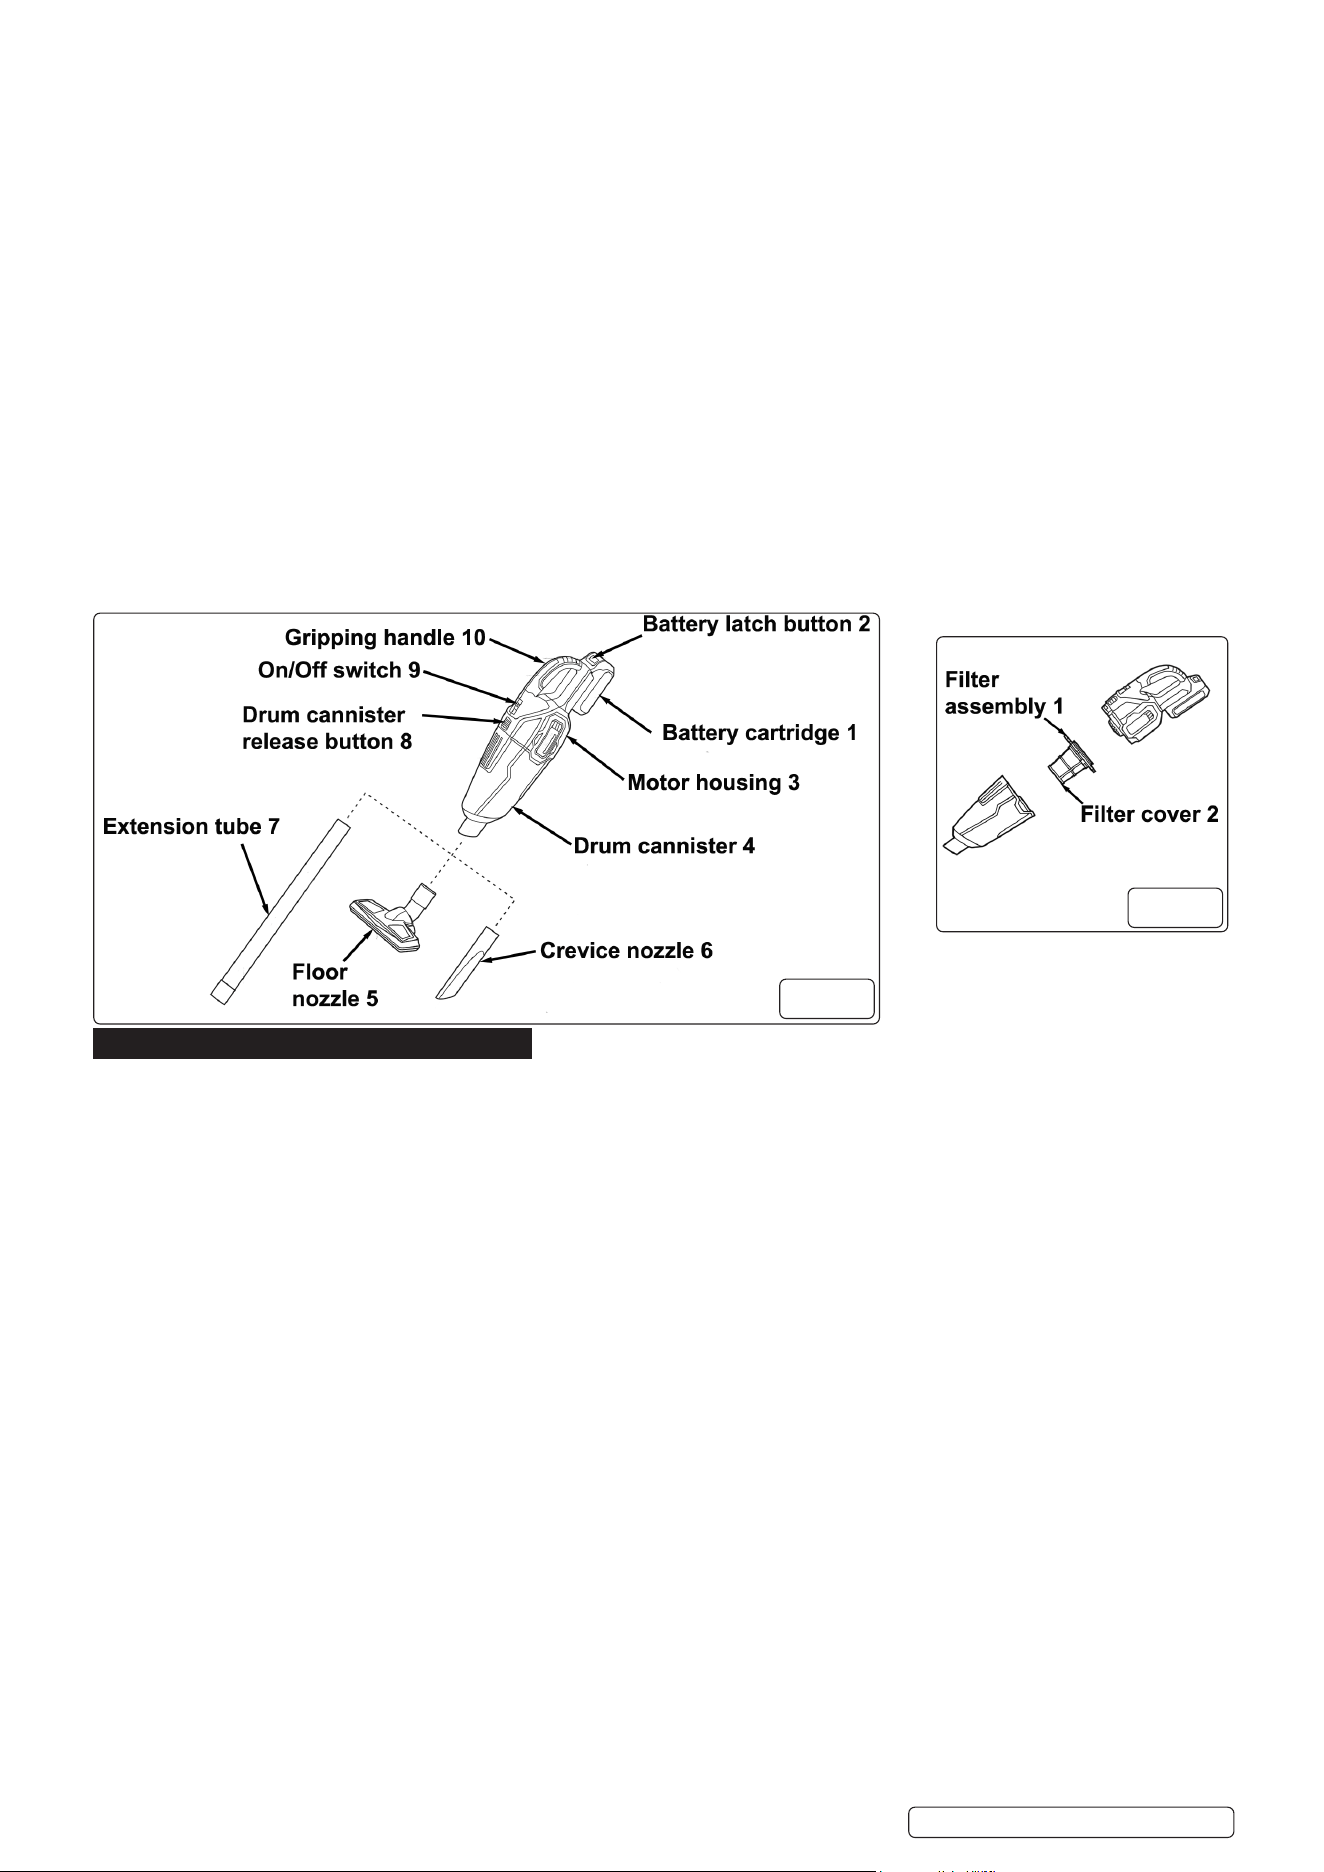
4.3. ATTACHING AND REMOVING NOZZLES
4.3.1. To install, rmly push either the oor nozzle (g 1 - 5) or the crevice nozzle (g 1 - 6) completely onto the intake port on the drum
cannister (g 1 - 4).
4.3.2. To remove simply pull the nozzle o the drum cannister.
4.4. ATTACHING AND REMOVING THE EXTENSION TUBE
4.4.1. To install the extension tube (g 1 - 7) push the end marked ‘32’ completely onto the end of the intake port on the drum cannister,
then attach either the oor or crevice nozzle.
4.4.2. To remove simply pull the extension tube o the drum cannister.
NOTE: The cordless handheld vacuum cleaner is also supplied with a brush nozzle. Not shown on diagrams.
4.5. TURNING THE VACUUM CLEANER ON/OFF
4.5.1. To turn the vacuum cleaner on, push the on/o switch (g 1 - 9) forward.
4.5.2. To turn the vacuum cleaner o, push the on/o switch backwards.
4.6. USING THE VACUUM CLEANER
4.6.1. Select the most suitable nozzle for the task. Attach the extension tube if required.
4.6.2. Hold the vacuum cleaner by the gripping handle (g 1 - 10).
4.6.3. Switch the vacuum cleaner on, and push it at an even speed for cleaning.
4.7. EMPTYING THE DRUM CANNISTER
To maintain optimal performance the vacuum cleaner should be emptied after each use, or whenever the suction power becomes
weaker.
4.7.1. Press the drum cannister release button (g 1 - 8) and remove from the motor housing (g 1 - 3). Remove the lter assembly
(g 2- 1) from the drum cannister.
4.7.2. Shake/tap out the drum cannister over a suitable waste bin.
4.7.3. Re-assemble in reverse order.
5. MAINTENANCE
5.1. Use a clean cloth to remove dirt, dust oil, grease etc.
8 DO NOT use solvents to clean the cordless handheld vacuum cleaner.
5.2. CLEANING THE DRUM CANNISTER
5.2.1. Remove the drum cannister and lter assembly as described in section 4.7.1.
Clean the drum cannister (fig 1 - 4) with a moist cloth.
5.3. CLEANING THE FILTER ASSEMBLY
5.3.1. Remove the lter assembly (g 2 - 1) from the drum cannister (g 1 - 4).
5.3.2. Twist the lter cover (g 2 - 2) clockwise to remove.
5.3.3. Brush the fabric of the lter with a soft brush over a suitable waste bin.
5.3.4. Re-attach the lter cover (g 2 - 2) and lock into place by turning anti-clockwise.
NOTE: The filter, if required, can be cleaned by washing under running water. All parts must be fully dried prior to re-assembly.
CP20VCV Issue 1 06/05/21
Original Language Version
© Jack Sealey Limited
g.1
g.2

CP20VCV Issue 1 06/05/21
Original Language Version
© Jack Sealey Limited
Sealey Group, Kempson Way, Suffolk Business Park, Bury St Edmunds, Suffolk. IP32 7AR
01284 757500 01284 703534 sales@sealey.co.uk www.sealey.co.uk
ENVIRONMENT PROTECTION
Recycle unwanted materials instead of disposing of them as waste. All tools, accessories and packaging should be sorted, taken to
a recycling centre and disposed of in a manner which is compatible with the environment. When the product becomes completely
unserviceable and requires disposal, drain any fluids (if applicable) into approved containers and dispose of the product and fluids
according to local regulations.
Note: It is our policy to continually improve products and as such we reserve the right to alter data, specifications and component parts without prior
notice.
Important: No Liability is accepted for incorrect use of this product.
Warranty: Guarantee is 12 months from purchase date, proof of which is required for any claim.
WEEE REGULATIONS
Dispose of this product at the end of its working life in compliance with the EU Directive on Waste Electrical and Electronic Equipment
(WEEE). When the product is no longer required, it must be disposed of in an environmentally protective way. Contact your local solid
waste authority for recycling information.
