

20V CORDLESS PRUNING SHEARS
- BODY ONLY
MODEL NO: CP20VPS
Thank you for purchasing a Sealey product. Manufactured to a high standard, this product will, if used according to these instructions,
and properly maintained, give you years of trouble free performance.
IMPORTANT: PLEASE READ THESE INSTRUCTIONS CAREFULLY. NOTE THE SAFE OPERATIONAL REQUIREMENTS, WARNINGS & CAUTIONS. USE
THE PRODUCT CORRECTLY AND WITH CARE FOR THE PURPOSE FOR WHICH IT IS INTENDED. FAILURE TO DO SO MAY CAUSE DAMAGE AND/OR
PERSONAL INJURY AND WILL INVALIDATE THE WARRANTY. KEEP THESE INSTRUCTIONS SAFE FOR FUTURE USE.
1. SAFETY
1.1. WORK AREA SAFETY
9 Keep work area clean and well lit. Cluttered or dark areas invite accidents.
8 DO NOT operate power tools in explosive atmospheres, such as in the presence of ammable liquids, gases or dust. Power tools create
sparks which may ignite the dust or fumes.
9 Keep children and bystanders away while operating a power tool. Distractions can cause you to lose control.
9 Avoid body contact with earthed or grounded surfaces, such as pipes, radiators, ranges and refrigerators. There is an increased risk of
electric shock if your body is earthed or grounded.
8 DO NOT expose power tools to rain or wet conditions. Water entering a power tool will increase the risk of electric shock.
1.2. PERSONAL SAFETY
9 Stay alert, watch what you are doing and use common sense when operating a power tool. Do not use a power tool while you are tired or
under the inuence of drugs, alcohol or medication. A moment of inattention while operating power tools may result in serious personal
injury.
9 Use personal protective equipment. Always wear eye protection. Protective equipment such as a dust mask, non-skid safety shoes, hard
hat or hearing protection used for appropriate conditions will reduce personal injuries.
9 Prevent unintentional starting. Ensure the switch is in the o-position before connecting to power source and/or battery pack, picking
up or carrying the tool. Carrying power tools with your nger on the switch or energising power tools that have the switch on invites
accidents.
9 Remove any adjusting key or wrench before turning the power tool on. A wrench or a key left attached to a rotating part of the power tool
may result in personal injury.
8 DO NOT overreach. Keep proper footing and balance at all times. This enables better control of the power tool in unexpected situations.
9 Dress properly. Do not wear loose clothing or jewellery. Keep your hair and clothing away from moving parts. Loose clothes, jewellery or
long hair can be caught in moving parts.
8 DO NOT let familiarity gained from frequent use of tools allow you to become complacent and ignore tool safety principles. A careless
action can cause severe injury within a fraction of a second.
8 DO NOT force the power tool. Use the correct power tool for your application. The correct power tool will do the job better and safer at
the rate for which it was designed.
8 DO NOT use the power tool if the switch does not turn it on and o. Any power tool that cannot be controlled with the switch is dangerous
and must be repaired.
9 Remove the battery pack, if detachable, from the power tool before making any adjustments, changing accessories, or storing power
tools. Such preventive safety measures reduce the risk of starting the power tool accidentally.
9 Store idle power tools out of the reach of children and do not allow persons unfamiliar with the power tool or these instructions to operate
the power tool. Power tools are dangerous in the hands of untrained users.
9 Maintain power tools and accessories. Check for misalignment or binding of moving parts, breakage of parts and any other condition
that may aect the power tool’s operation. If damaged, have the power tool repaired before use. Many accidents are caused by poorly
maintained power tools.
9 Keep cutting tools sharp and clean. Properly maintained cutting tools with sharp cutting edges are less likely to bind and are easier to
control.
9 Use the power tool, accessories and tool bits etc. in accordance with these instructions, taking into account the working conditions and
the work to be performed. Use of the power tool for operations dierent from those intended could result in a hazardous situation.
9 Keep handles and grasping surfaces dry, clean and free from oil and grease. Slippery handles and grasping surfaces do not allow for
safe handling and control of the tool in unexpected situations.
9 Have your power tool serviced by a qualied repair person using only identical replacement parts. This will ensure that the safety of the
power tool is maintained.
Refer to
instructions
Wear eye
protection
Wear protective
gloves
Original Language Version
© Jack Sealey Limited
CP20VPS Issue 2 (1) 22/11/22
Keep Dry
2. INTRODUCTION
Cordless 20V pruning shears - body only. Power assisted pruning shears makes pruning stems and branches quick and easy. Cuts through
thin and thicker branches up to 25mm. Brushless motor which gives improved performance and requires less maintenance than the brushed
equivalent, making a more ecient, longer lasting tool. Additional safety switch for extra protection. Ergonomic and lightweight in design, this tool
makes a great addition to your garden equipment. Requires compatible 20V battery and mains charger, sold separately.
3. SPECIFICATION
Model: ............................................................................CP20VPS
Battery ............................20V 2Ah - 6Ah Lithium-ion (not included)
Consumable parts ................................. CP20VBP2 - 2Ah Battery,
....................... CP20VBP4 - 4Ah Battery, CP20VBP6 - 6Ah Battery
Replacement parts ........CP20VMC - Mains Charger (not included)
Blade Length ......................................................................... 30mm
Running Time: ............2Ah - 25mins, 4Ah - 45mins, 6Ah - 60 mins
Voltage: ..............................................................................20V DC
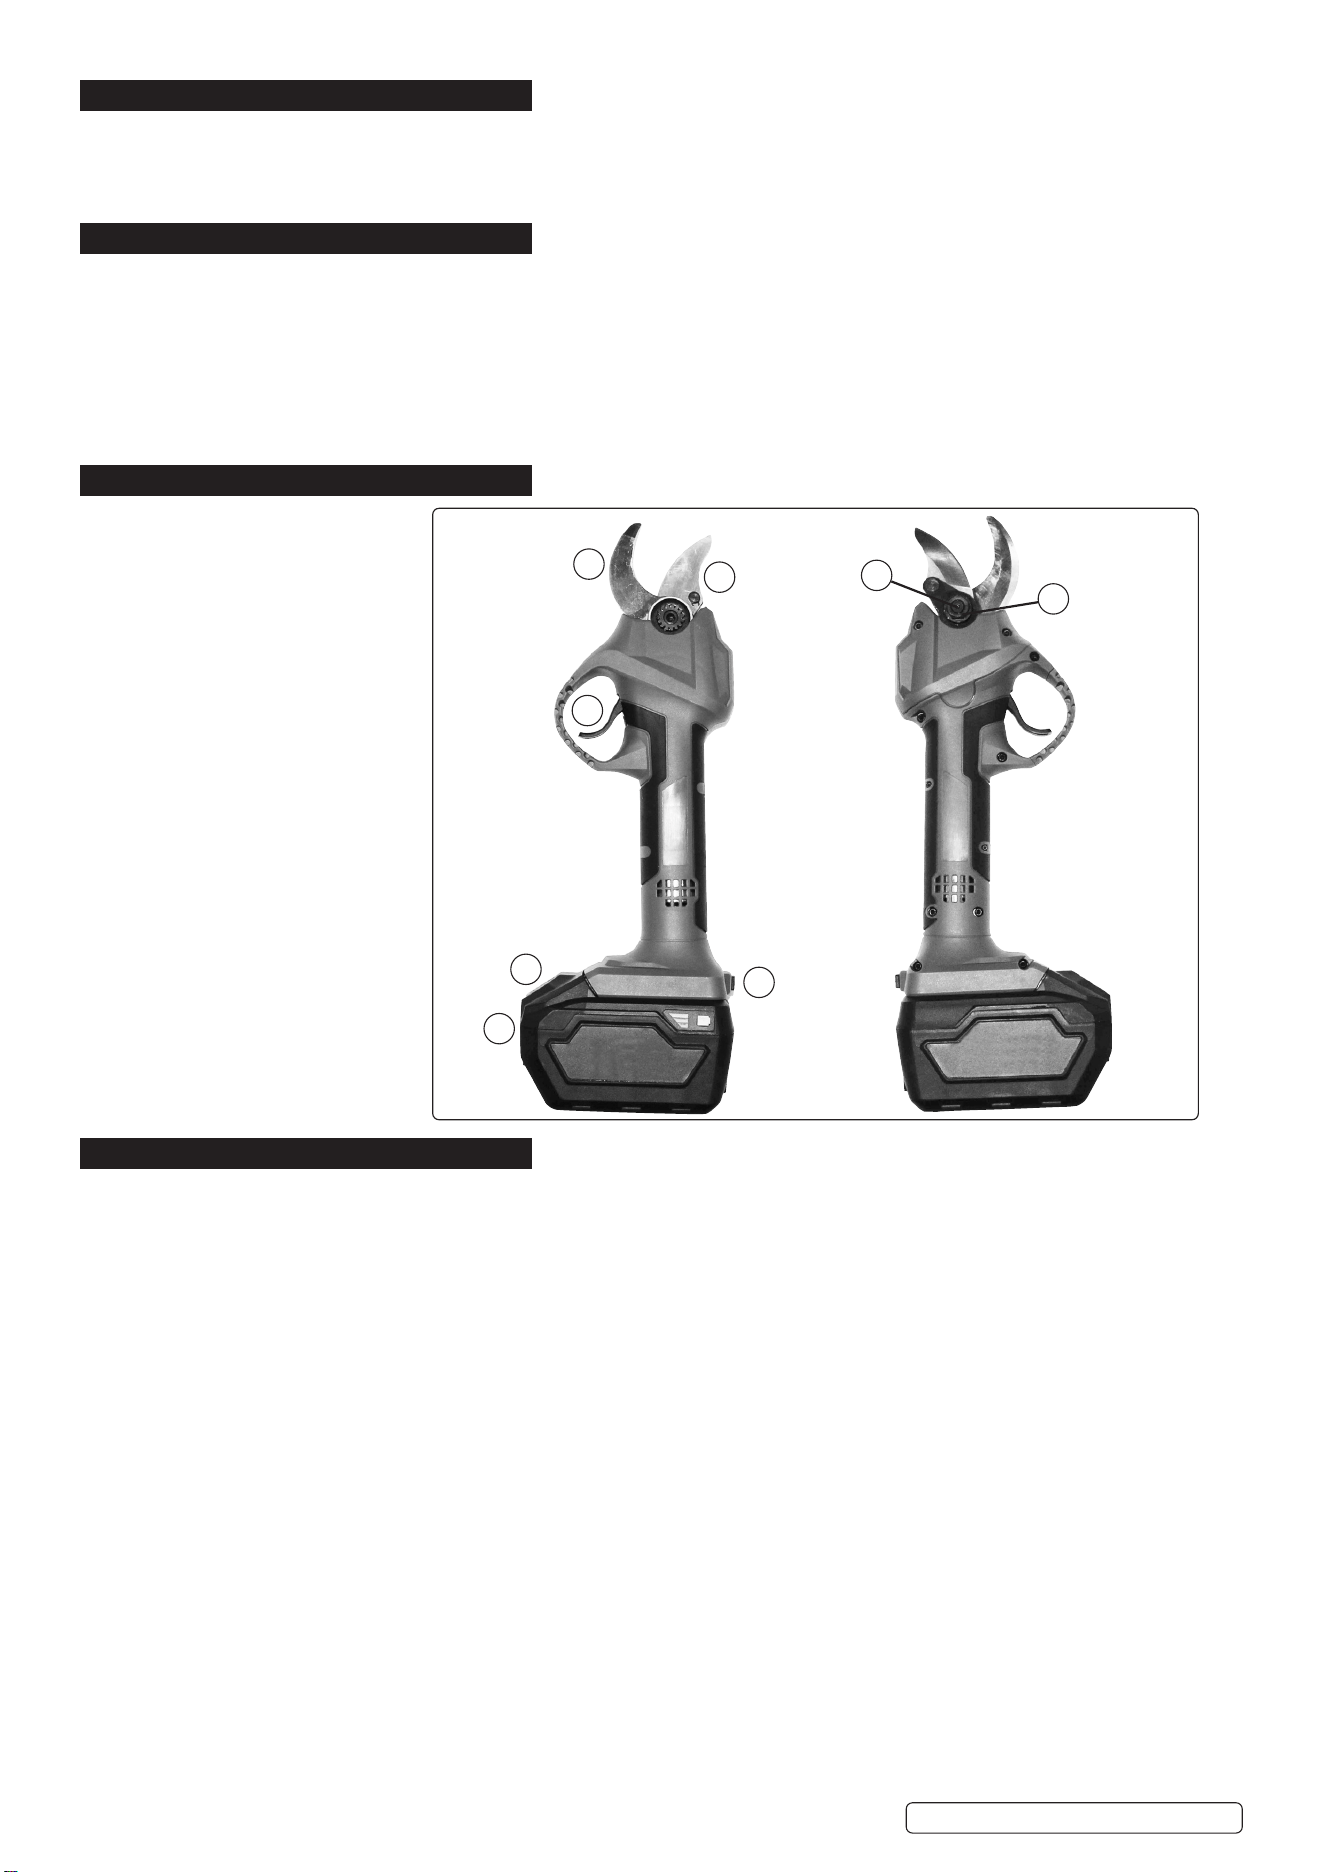
4. FEATURES
1. Lower shear blade
2. Upper shear blade
3. Hex Screw
4. Switch Trigger
5. Blades tightening nut
6. Button of Battery Pack
7. Battery Pack
8. On/O switch (I/O)
1
2
4
6
7
8
3
5
Original Language Version
© Jack Sealey Limited
5. OPERATION
5.1. TURN ON
5.1.1. Insert the battery pack.
5.1.2. Hold the shears rmly, and slide the I/O switch to the “I” (on) position. The tool makes a single beep to indicate that the I/O switch
has been on the “I” (on) position.
5.1.3. The shear blades are in locked-mode when the I/O switch is on. To release the lock, depress the switch trigger two times. The upper
shear blade opens automatically.
5.1.4. To close the shear blade, depress the switch trigger once again.
5.2. TURN OFF
5.2.1. Depress down and hold on the switch trigger for about three seconds and then the tool makes two ticking sounds.
5.2.2. Slide the I/O switch to the “O” (o) position. The tool makes continuous ticking sound to indicate that the I/O switch has been moved to
the “O” (o) position.
5.2.3. Remove the battery pack.
5.3. ACCIDENTAL RE-START PREVENTIVE FUNCTION
5.3.1. Even if the battery pack is inserted and switch trigger is pressed when the I/O switch is locked on the “I (ON)” position and the
shear blades are on unlocked-mode with the battery removed, the tool does not start to prevent accidental operation. To start the tool,
depress the switch trigger two times and then depress the switch trigger once.
5.4. AUTO LOCKED-MODE AND SHUT-OFF MODESHIFT
5.4.1. For safety reasons, the tool shifts into shut-o mode automatically if the tool is left untouched for approximately 10 minutes: The tool
is shift into shut-o mode. Slide the I/O switch to the “O” (o) position once and slide the I/O switch to the “I” (on) position again, then
depress the switch trigger two times to release the lock.
5.5. PRUNING OPERATION
5.5.1. Cut branches one by one. The maximum thickness of branches which can be cut with these shears is about 30mm. Maintain
proper footing and balance at all times.
5.5.2. AFTER USE
5.5.3. Close the shear blades, press the I/O switch to the “O” (o) position, and remove the battery pack. Store the shears in dry, high or
locked-up place out of reach of children.
CP20VPS Issue 2 (1) 22/11/22
Original Language Version
© Jack Sealey Limited
6. MAINTAINANCE
6.1. REPLACE THE UPPER SHEAR BLADE
6.1.1. Insert the battery pack. Remove the blade cover.
6.1.2. Switch on the tool, and pull the switch trigger to open the upper shearblade fully.
6.1.3. With the upper shear blade open, switch o the tool and remove the battery pack.
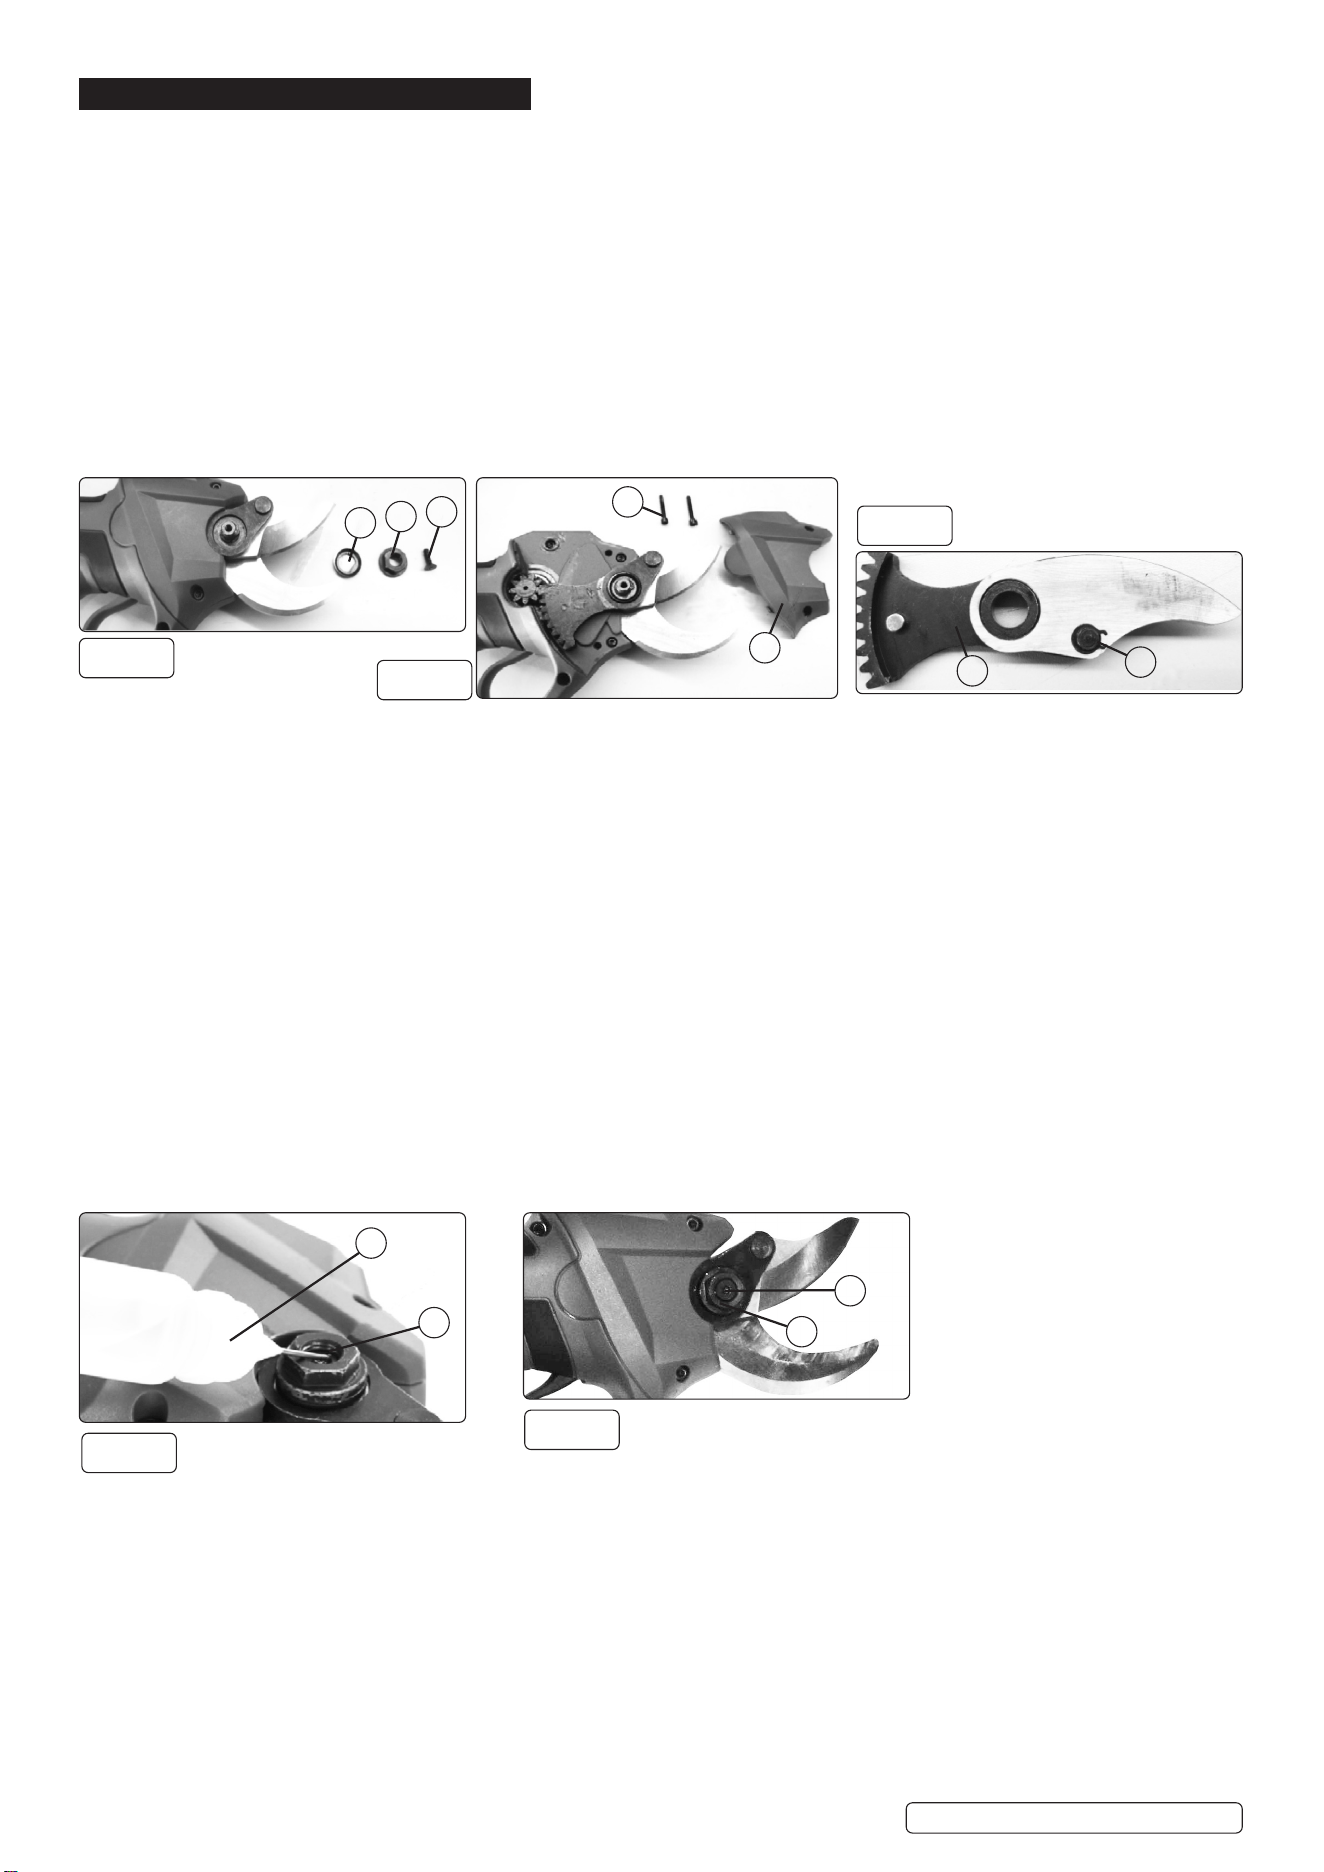
6.1.4. Remove the hex screw (g.1.1) near the shear blades with the hex wrench by turning it anticlockwise. Remove the blades tightening
nut (g.1.2) near the shear blades with a suitable wrench or alike by turning it anticlockwise and take out the washer (g.1.3).
6.1.5. Remove two bolts (g.2.1) near the shear blades with a hexwrench by turning anticlockwise. Remove the head cover (g.2.2) by
separating the tongue on the head cover from the groove of the housing. Take out the upper shear blade assembly.
6.1.6. Remove the circlip on the link arm (g.3.1) with circlip pliers and replace the upper shear blade (g.3.2) with a new one.
6.1.7. To install the upper shear blade, perform the removal steps in reverse. When installing the shear blades, pay attention to the following
points:
6.1.8. 1. Apply machine lubricating oil (not included, please see www.sealey.co.uk for more information) on to the shear blade.
6.1.9. When installing the head cover, align the tongue of the head cover with the groove of the housing.
6.1.10. Make sure all the bolts are securely tightened. After installing the blade, always adjust blade clearance. (Refer to section 7.2)
g.1
g.2
g.3
1
2
3
1
2
2
1
6.2. LUBRICATING THE SHEAR BLADE
6.2.1. The shear blades require lubricating every time before using. To apply machine oil (not included, please see www.sealey.co.uk for
more information) on to the shear blades, perform the following steps:
6.2.2. Insert the battery pack. Remove the blade cover.
6.2.3. Switch on the tool, and pull the switch trigger to open the upper shearblade fully.
6.2.4. With the upper shearblade open, switch o the tool and remove the battery pack.
6.2.5. Remove the hex screw (g.4.1) near the shear blades with the hex wrench by turning it anticlockwise. Squeeze the oil from the
machine oil bottle into the threaded hole (g.4.2).
6.2.6. Reinstall the hex bolt by turning it clockwise.
6.2.7. Turn on the tool and operate several times to distribute the lubricant evenly.
6.3. ADJUSTMENT FOR BLADE CLEARANCE
6.3.1. From time to time, adjust the clearance of the shear blades as follows:
6.3.2. Insert the battery pack. Remove the blade cover.
6.3.3. Switch on the tool, and pull the switch trigger to open the upper shearblade fully.
6.3.4. With the upper shear blade open, switch o the tool and remove the battery pack.
6.3.5. Loosen the hex screw (g.5.1) near the shear blades with the hex wrench by turning it anticlockwise (g.5).
6.3.6. Adjust the tightness of the blades tightening nut (g.5.2) with a suitable wrench by turning it clockwise or anticlockwise (fastening
torque for the blade tightening nut: approximately 0.5 Nm).
6.3.7. Tighten the hex bolt again.
6.3.8. Check the tightness of the blades whether the blades never rattle or swing sideways. If the blades are too tight or loose, adjust the
clearance again.
g.4
g.5
1
2
2
1
CP20VPS Issue 2 (1) 22/11/22
Original Language Version
© Jack Sealey Limited
6.4. BLADE MAINTENANCE
WARNING! Failure to perform blade maintenance may cause excessive blade friction and shorten the operating time per battery
charge.
6.4.1. Before and after operation, check the shear blades carefully. After operation, clean o the blades with a sti brush.
6.4.2. Then wipe the blades with a cloth. And apply machine oil onto the blade edge and movable part.
6.5. SHARPENING BLADES
Upper shearblade
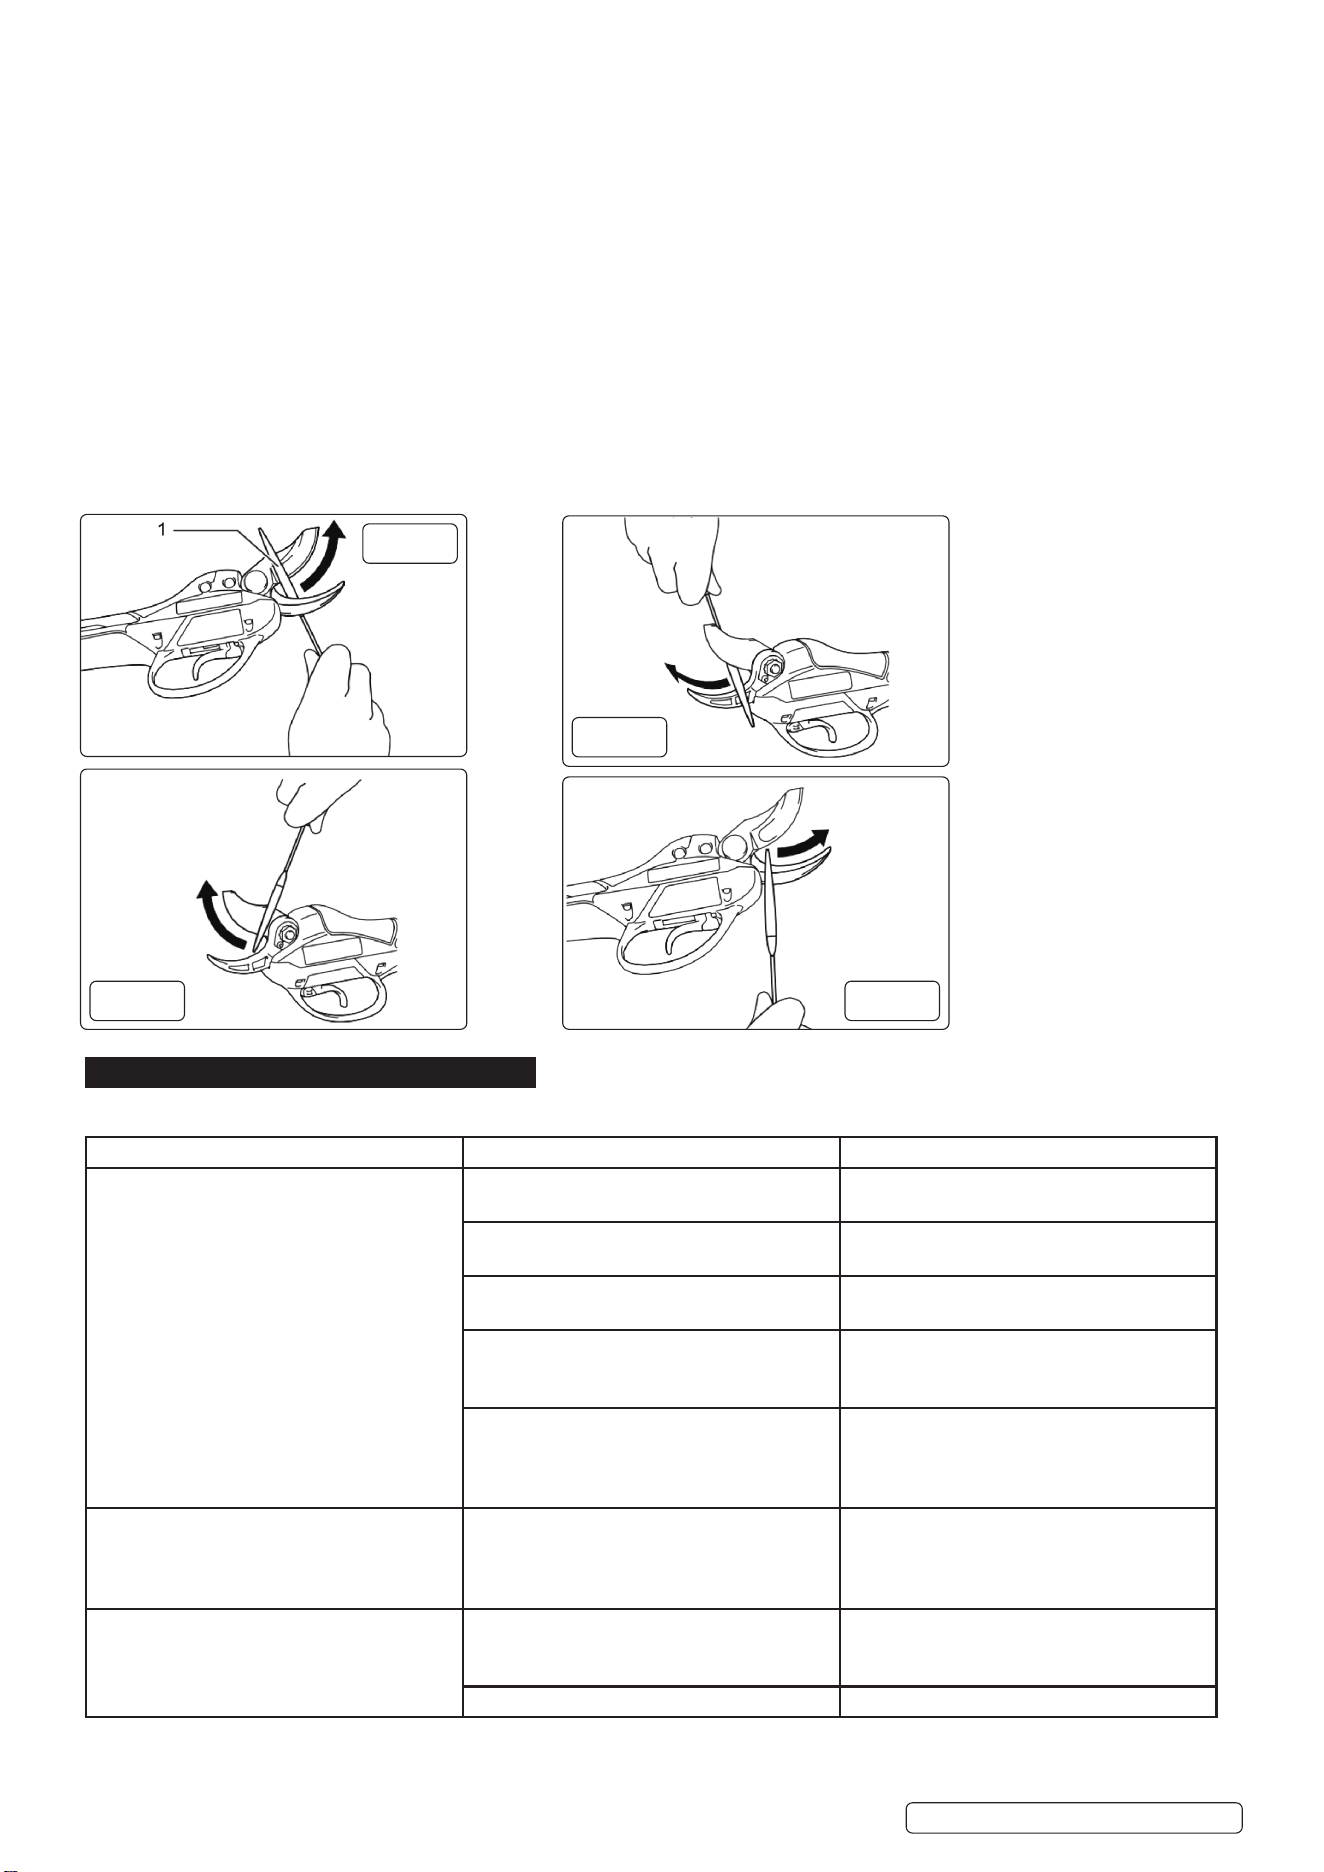
6.5.1. Apply the at surface of the diamond le (not included, please see www.sealey.co.uk for more information) to the blade edge. Push
the diamond le towards the tip of the blade to sharpen along the entire blade edge. Maintain the same at contact with the le
consistently along the entire blade edge (g.6).
6.5.2. Apply the at surface of the diamond le lightly to the opposite side of the blade. Move the diamond le towards the tip of the blade
lightly to remove burrs (g.7).
Lower shearblade
6.5.3. Apply the round surface of the diamond le to the blade edge. Push the diamond le towards the tip of the blade to sharpen along the
entire blade edge (g.8).
6.5.4. Apply the at surface of the diamond le lightly to the opposite side of the blade. Move the diamond le towards the tip of the blade
lightly to remove burrs (g.9).
8 DO NOT sharpen this side too much. File lightly only for removing burrs. Otherwise the blade clearance may become too much
or the blade life may be shortened.
g.6
g.8
g.7 g.9
7. TROUBLESHOOTING
WARNING! Remove battery before carrying out any maintenance.
PROBLEMS POSSIBLE CAUSE SOLUTION
The shear blade does not move even after
pulling the switch trigger.
The battery is low. Charge the battery.
I/O switch is”O” position. Press the I/O switch to “I”position.
The shears are locked. Unlock the shears by performing the steps
in “Switch action”.
I/O switch is“on” position when inserting the
battery pack.
Press the I/O switch to the “O”(o) position
Once, and press the I/O switch to the “I” (on)
position again.
Switch trigger defect. Stop using the tool immediately, and ask
your local authorized service centre for
repair.
The shear blades are stuck on the branch. The branch is too thick. Release the switch trigger. Press the I/O
switch to “O” position. Then pull the blades
straight out slowly from the branch.
The cut is not smooth. The shear blades are dull. Sharpen the shear blades, or adjust blade
clearance.
The shear blades are worn out. Replace the shear blades.
CP20VPS Issue 2 (1) 22/11/22

Sealey Group, Kempson Way, Suffolk Business Park, Bury St Edmunds, Suffolk. IP32 7AR
01284 757500 01284 703534 sales@sealey.co.uk www.sealey.co.uk
ENVIRONMENT PROTECTION
Recycle unwanted materials instead of disposing of them as waste. All tools, accessories and packaging should be sorted, taken to
a recycling centre and disposed of in a manner which is compatible with the environment. When the product becomes completely
unserviceable and requires disposal, drain any fluids (if applicable) into approved containers and dispose of the product and fluids
according to local regulations.
Note: It is our policy to continually improve products and as such we reserve the right to alter data, specifications and component parts without prior
notice.
Important: No Liability is accepted for incorrect use of this product.
Warranty: Guarantee is 12 months from purchase date, proof of which is required for any claim.
WEEE REGULATIONS
Dispose of this product at the end of its working life in compliance with the EU Directive on Waste Electrical and Electronic Equipment
(WEEE). When the product is no longer required, it must be disposed of in an environmentally protective way. Contact your local solid
waste authority for recycling information.
Original Language Version
© Jack Sealey Limited
CP20VPS Issue 2 (1) 22/11/22
IMPORTANT SAFETY NOTICE
CP20VPS PRUNING SHEARS/CORDLESS SECATEURS
The blades on this device are capable of severing body parts if safety warnings are not heeded.
For this reason the product incorporates a hidden safety lock that prevents inadvertent use and specically use by children.
You will nd reference to this safety lock in the instructions under operation 5.1.2.
Before using the product or allowing its use ensure all the safety instructions are read by authorised operators, do not allow ngers anywhere
near the blades at any time and:
BE AWARE THAT THE TWO APPLICATIONS OF THE SWITCH THAT ARE NEEDED TO OVERRIDE THE SAFETY LOCK MUST BE VERY
FAST AND REPETITIVE CLICKS. THIS SECURITY IS FOR YOUR PROTECTION AND THE NATURE OF OVERRIDING THE SAFETY LOCK
SHOULD BE SHARED ONLY WITH AUTHORISED OPERATORS OF THE TOOL.