

Thank you for purchasing a Sealey product. Manufactured to a high standard, this product will, if used according to these instructions,
and properly maintained, give you years of trouble free performance.
IMPORTANT: PLEASE READ THESE INSTRUCTIONS CAREFULLY. NOTE THE SAFE OPERATIONAL REQUIREMENTS, WARNINGS & CAUTIONS. USE
THE PRODUCT CORRECTLY AND WITH CARE FOR THE PURPOSE FOR WHICH IT IS INTENDED. FAILURE TO DO SO MAY CAUSE DAMAGE AND/OR
PERSONAL INJURY AND WILL INVALIDATE THE WARRANTY. KEEP THESE INSTRUCTIONS SAFE FOR FUTURE USE.
1. SAFETY
9 Always wear appropriate eye protection, ear protection, substantial footwear, gloves, long trousers whilst operating.
9 Always use head protection when operating the extended-reach hedge trimmer overhead. Falling debris can result in serious personal injury.
9 Remove ill fitting clothing. Remove ties, watches, rings and other loose jewellery and contain long hair.
9 Inspect and ensure equipment is in good working order before use.
9 Maintain and clean tool and battery pack, regularly. Check air holes are clear.
9 Must be serviced by an authorised agent. Use genuine parts only. Non authorised parts will invalidate the warranty.
9 Keep all parts of the body away from the blade. Do not remove cut material or hold material to be cut when blades are moving. Blades
continue to move after the switch is turned off. A moment of inattention while operating the hedge trimmer may result in serious personal
injury.
9 Make sure the switch is off when clearing jammed material.
9 Carry the hedge trimmer by the handle with the blade stopped and taking care not to operate any power switch. Proper carrying of the hedge
trimmer will decrease the risk of inadvertent starting and resultant personal injury from the blades.
9 When transporting or storing the hedge trimmer, always fit the blade cover. Proper handling of the hedge trimmer will decrease the risk of
personal injury from the blades.
9 Hold the hedge trimmer by insulated gripping surfaces only, because the blade may contact hidden wiring.
9 Always use two hands when operating the extended-reach hedge trimmer. Hold the extended-reach hedge trimmer with both hands to avoid
loss of control.
WARNING! Remove battery before: performing maintenance, carrying out adjustments, inspecting the machine after striking an object,
before clearing a blockage, before leaving the tool unattended, before moving to the next job location.
9 WARNING! Risk assess the work area. Keep bystanders away from the work area. DO NOT operate with anyone or pets nearby. Check
intended work area for wildlife.
8 DO NOT use in bad weather conditions, especially when there is a risk of lightning. DO NOT expose to rain. Only use in good light.
8 DO NOT use if tool vibrates abnormally, switch off, remove battery and then inspect.
8 DO NOT touch hazardous moving parts. Allow to come to a complete stop first.
8 DO NOT operate whilst tired, ill under the inuence of alcohol or other intoxicating drugs.
8 DO NOT overreach and keep balance at all times.
8 DO NOT use if damaged. DO NOT operate with defective guards or shields or without safety devices.
8 DO NOT use for a task it was not designed to perform.
9 Store with the battery removed and separate from the machine, in a dry, childproof location.
WARNING! Never allow children, persons with reduced physical sensory or mental capabilities or lack of experience and knowledge or
people unfamiliar with these instructions to use the machine, local regulations may restrict the age of the operator.
WARNING! To reduce the risk of electrocution, never use the
extended-reach hedge trimmer near any electrical power lines.
Contact with or use near power lines may cause serious injury
or electric shock resulting in death.
WARNING! Always check hedges and bushes for foreign
objects, e.g. wire fences and hidden wiring.
2. INTRODUCTION
Cordless telescopic Hedge Trimmer head – body only. Ideal for
precision cutting tall hedges and shrubs. Must be used in conjunction
with telescopic pole Model No. CP20VTP (sold separately). High
quality cutting performing trimmer with 90° rotating head which is ideal
for those hard-to-reach areas. No-load speed of 1300spm and cutting
depth of 15mm. Requires compatible 20V battery and mains charger,
sold separately.
Original Language Version
© Jack Sealey Limited
Refer to
instruction
manual
Wear protective
gloves
Wear face
shield
Wear ear
protection
Wear protective
clothing
20V CORDLESS POLE HEDGE TRIMMER -
BODY ONLY
MODEL NO: CP20VPHT
Wear
appropriate
footwear
Keep away
from rain
CP20VPHT Issue 2 (2) 24/06/22
Wear Head
Protection
CP20VPHT
CP20VTP (sold separately)
Beware of
Electrical
Power Cables
3. SPECIFICATION
Model No: ......................................................................CP20VPHT
Battery: ................................... CP20VBP2, CP20VBP4, CP20VBP6
Blade length ..........................................................................450mm
No load speed .....................................................................1300rpm
Running time approx: ..........................2Ah - 50mins; 4Ah -100mins
Teeth distance .........................................................................15mm
Voltage ........................................................................................20V
Sound pressure level, L
PA
....................................................78dB(A)
Sound power level, L
WA
........................................................91dB(A)
Vibration value ..................................................................1.843m/s²
Uncertainty ............................................................................1.5m/s²
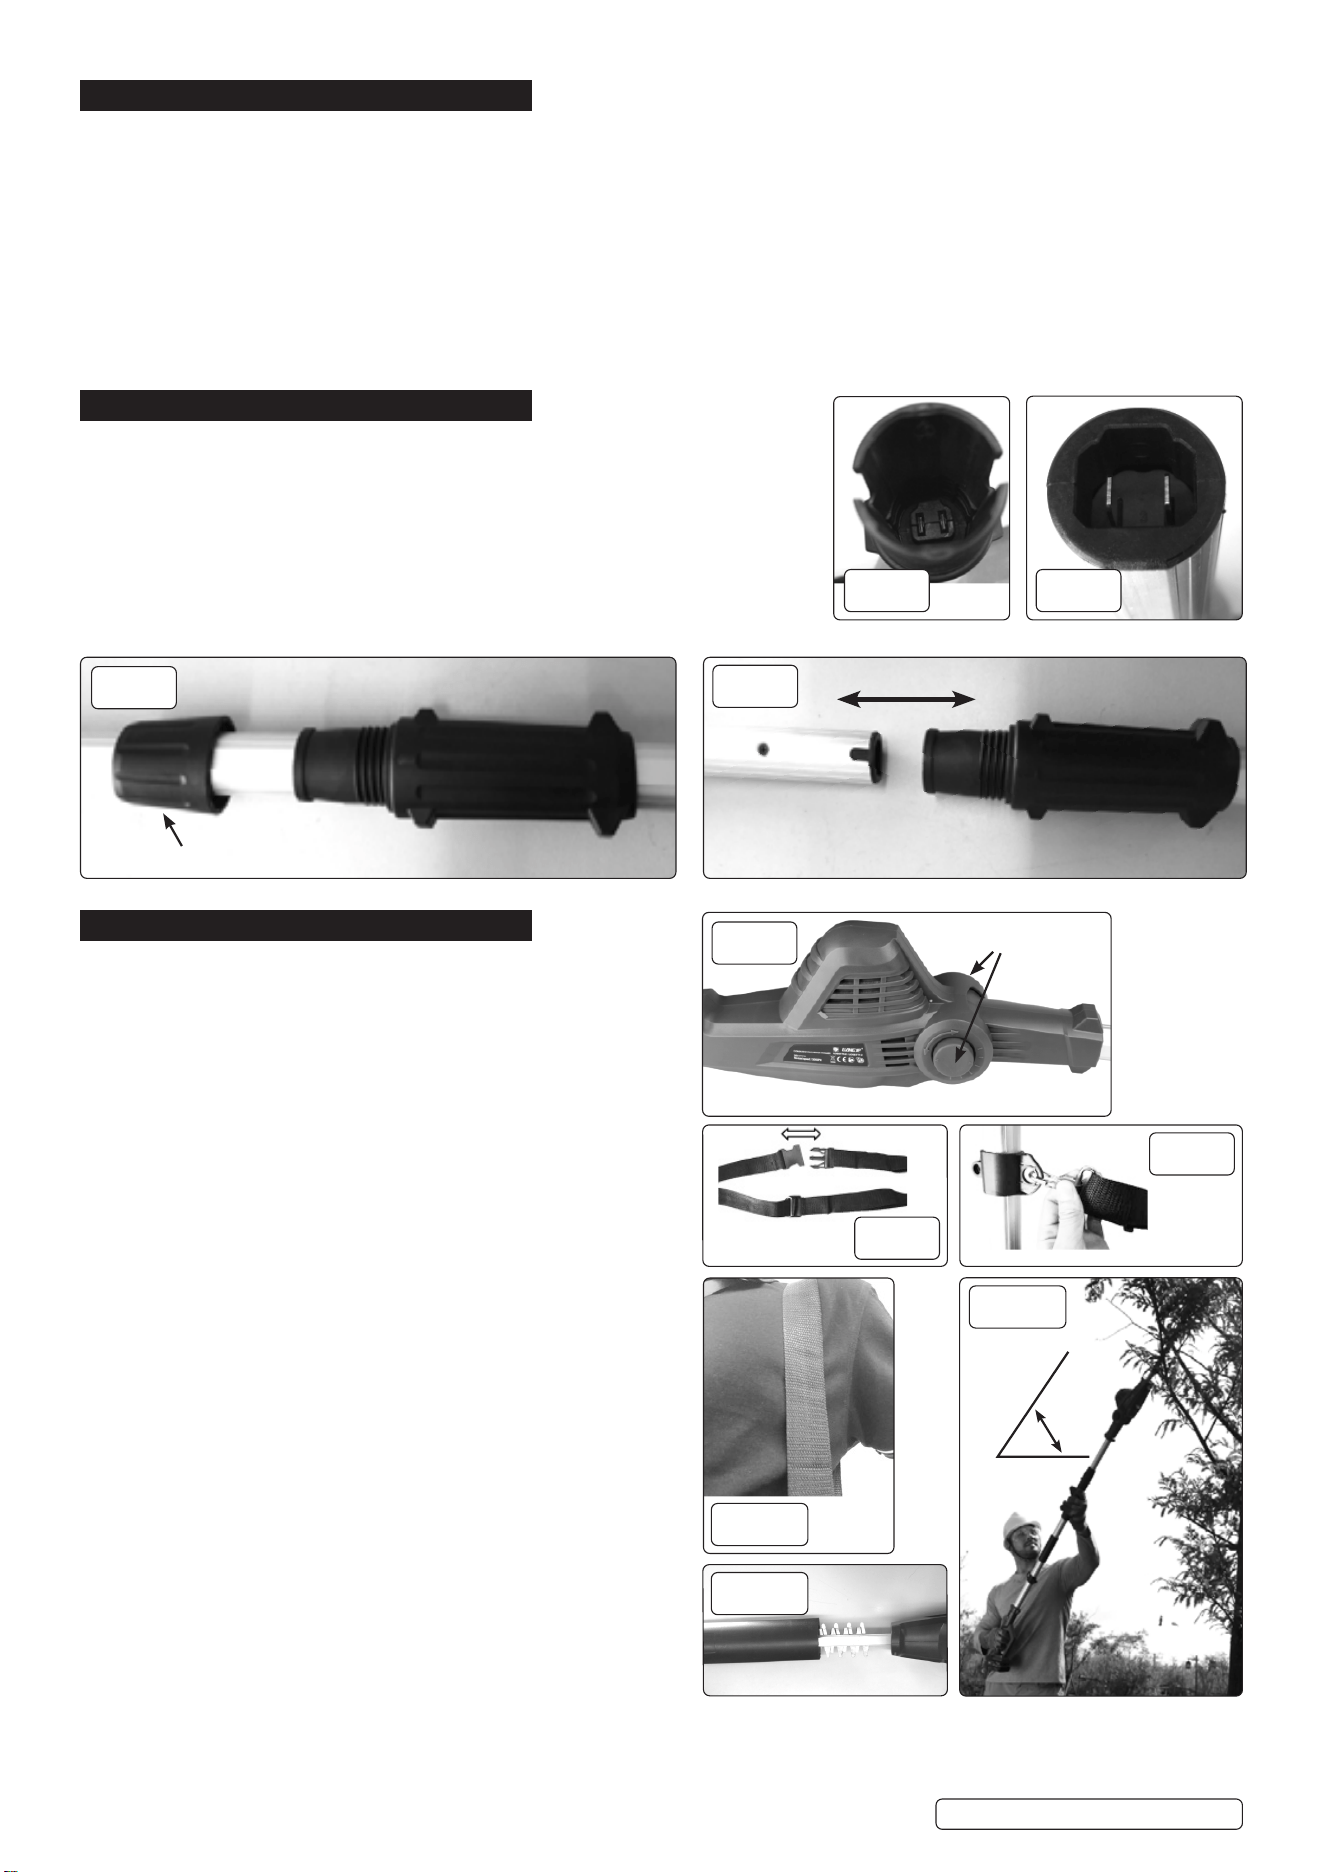
4. ATTACHMENT TO POLE
4.1. ATTACHMENT TO THE TELESCOPIC POLE
WARNING! Before tting trimmer head to pole switch o and remove the battery.
4.1.1. Turn the attachment locking nut (g.3) at the end of the telescopic pole Model
No.CP20VTP (sold separately) so that the Hedge Trimmer head can be inserted.
Push the Trimmer head home (g.4) making sure the electrical contacts at the end
of both components are aligned correctly (telescopic pole contact (g.1), trimmer
head contact (g.2)).
4.1.2. Tighten the attachment locking nut to secure both components together (g.3).
4.1.3. To separate again reverse sections 4.1.1 and 4.1.2
5. OPERATION
WARNING! Ensure all Safety Instructions in Section 1 are read
and understood and carried out before use. Save the instructions
and warnings for future reference
5.1. SWIVEL HEAD ADJUSTMENT
WARNING! Before making swivel head adjustments switch o
and remove the battery.
5.1.1. The hedge trimmer is tted with a head that can be adjusted
through 6 dierent positions to a total of 112.5°.
5.1.2. To adjust the position, unlock the head by pressing both of
the two large adjustment buttons either side of the cutter head
(g.5).
5.1.3. Rotate the head to the desired position and then release the
buttons to lock the head in place.
5.2. SHOULDER HARNESS
5.2.1. Securely fasten the buckle (g.6) and hook the harness clasp
onto the telescopic poles hook xing bracket (g.7).
5.2.2. Place the harness over your right shoulder only (g.8).
5.3. USING THE TRIMMER HEAD
5.3.1. Stand on a stable surface, and hold the tool away from the
branches so that the angle of the tool is at 60° or less against
the horizontal ground (g.9).
5.3.2. Start the tool, and then press the shear blades onto the branch
lightly. When cutting long and thin branches, in order to control
the drop position of cut branches, divide the branch in sections
and cut the branch from the tip.
WARNING! Pay attention to the falling branches since they may
bounce in the direction of the operator after hitting the ground.
5.4. CARRYING THE CORDLESS TRIMMER
5.4.1. Prior to carrying the cordless trimmer remove the battery and t
the blade guard (g 10).
fig.
3
Attachment locking nut
fig.
5
Adjustment buttons
Original Language Version
© Jack Sealey Limited
60°
fig.
9
fig.
6
fig.
7
fig.
8
fig.
10
fig.
1
fig.
2
Trimmer tube
Telescopic pole
fig.
4
CP20VPHT Issue 2 (2) 24/06/22

Original Language Version
© Jack Sealey Limited
6. MAINTENANCE
WARNING! Remove battery before attempting any cleaning, maintaining or
storing the device.
6.1. CLEANING
6.1.1. Keep all safety devices, air vents and the motor housing free of dirt and dust as far
as possible. Wipe the equipment with a clean cloth or blow it with compressed air
at low pressure.
6.1.2. Clean the equipment immediately after use.
6.1.3. Clean the equipment regularly with a moist cloth and some soft soap.
8 DO NOT use cleaning agents or solvents; these could attack the plastic parts of
the equipment.
6.1.4. Ensure that no water can seep into the device. The ingress of water into an electric
tool increases the risk of an electric shock.
6.1.5. Remove deposits from the guard hood with a brush.
6.2. MAINTENANCE
6.2.1. Before operation or once per hour during operation, apply low-viscosity oil
(machine oil, or spray-type lubricating oil) to the shear blades (fig.11).
6.2.2. After operation, remove dust from both sides of the shear blades with a wired
brush, wipe it off with a cloth and then apply low-viscosity oil (machine oil, or spray-
type lubricating oil) to the shear blades (fig.12).
6.2.3. There are no parts inside the equipment which require additional maintenance.
6.3. STORAGE
6.3.1. Store the trimmer with blade guard fitted (fig.10).
6.4. CARBON BRUSHES
6.4.1. In case of excessive sparking, have the carbon brushes checked only by a qualified electrician.
WARNING! The carbon brushes should not be replaced by anyone but a qualified electrician.
7. TROUBLESHOOTING
PROBLEM CAUSE SOLUTION
Motor does not run. Battery is not installed. Install the battery.
Battery problem (low charge). Recharge the battery. If recharging is not effective, replace battery.
The drive system does not work
correctly.
Ask your local authorized Sealey service center for repair.
Motor stops running after
minimal use.
Battery charge level is low. Recharge the battery. If recharging is not effective, replace battery.
Overheating. Stop using of tool to allow it to cool down.
Tool does not reach
maximum RPM.
Battery is installed incorrectly. Install the battery correctly.
Battery power drops during use. Recharge the battery. If recharging is not effective, replace battery.
The drive system does not work
correctly.
Ask your local authorized Sealey service center for repair.
Shear blades do not move
STOP IMMEDIATELY
Inappropriate angle of shear blades. Make sure that the head is properly fixed in the operational angle.
Foreign objects are caught between the
shearblades.
Switch off the tool and remove the battery, and then remove the
foreign objects using tools such as pliers.
The drive system does not work
correctly.
Ask your local authorized service centre for repair.
Abnormal vibration
STOP IMMEDIATELY
Shear blades are broken, bent or worn. Replace the shear blades.
The drive system does not work
correctly.
Ask your local authorized Sealey service centre for repair.
Shear blades and motor
cannot stop:
REMOVE THE BATTERY
IMMEDIATELY!
Electric malfunction. Remove the battery and ask authorized Sealey service centre for
repair.
fig.
11
fig.
12
CP20VPHT Issue 2 (2) 24/06/22

Original Language Version
© Jack Sealey Limited
Sealey Group, Kempson Way, Suffolk Business Park, Bury St Edmunds, Suffolk. IP32 7AR
01284 757500 01284 703534 sales@sealey.co.uk www.sealey.co.uk
ENVIRONMENT PROTECTION
Recycle unwanted materials instead of disposing of them as waste. All tools, accessories and packaging should be sorted, taken to
a recycling centre and disposed of in a manner which is compatible with the environment. When the product becomes completely
unserviceable and requires disposal, drain any fluids (if applicable) into approved containers and dispose of the product and fluids
according to local regulations.
Note: It is our policy to continually improve products and as such we reserve the right to alter data, specifications and component parts without prior
notice.
Important: No Liability is accepted for incorrect use of this product.
Warranty: Guarantee is 12 months from purchase date, proof of which is required for any claim.
WEEE REGULATIONS
Dispose of this product at the end of its working life in compliance with the EU Directive on Waste Electrical and Electronic Equipment
(WEEE). When the product is no longer required, it must be disposed of in an environmentally protective way. Contact your local solid
waste authority for recycling information.
WARNING! – Risk of Hand Arm Vibration Injury.
This tool may cause Hand Arm Vibration Syndrome if its use is not managed adequately.
This tool is subject to the vibration testing section of the Machinery Directive 2006/42/EC.
This tool is to be operated in accordance with these instructions.
Measured vibration emission value (a): 1.843m/s²
Uncertainty value (k): 1.5m/s²
Please note that the application of the tool to a sole specialist task may produce a different average vibration emission. We recommend that a
specific evaluation of the vibration emission is conducted prior to commencing with a specialist task.
A health and safety assessment by the user (or employer) will need to be carried out to determine the suitable duration of use for each tool.
NB: Stated Vibration Emission values are type-test values and are intended to be typical.
Whilst in use, the actual value will vary considerably from and depend on many factors.
Such factors include; the operator, the task or consumable.
The state of maintenance of the tool itself is also an important factor, a poorly maintained tool will also increase the risk of Hand Arm Vibration
Syndrome.
Health surveillance.
We recommend a programme of health surveillance to detect early symptoms of vibration injury so that management procedures can be modified
accordingly.
Personal protective equipment.
We are not aware of any personal protective equipment (PPE) that provides protection against vibration injury that may result from the
uncontrolled use of this tool. We recommend a sufficient supply of clothing (including gloves) to enable the operator to remain warm and dry and
maintain good blood circulation in fingers etc. Please note that the most effective protection is prevention, please refer to the Correct Use and
Maintenance section in these instructions. Guidance relating to the management of hand arm vibration can be found on the HSE website
www.hse.gov.uk - Hand-Arm Vibration at Work.
CP20VPHT Issue 2 (2) 24/06/22
