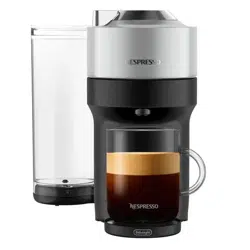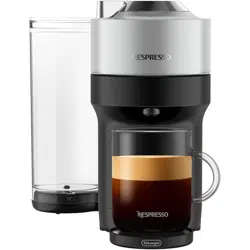
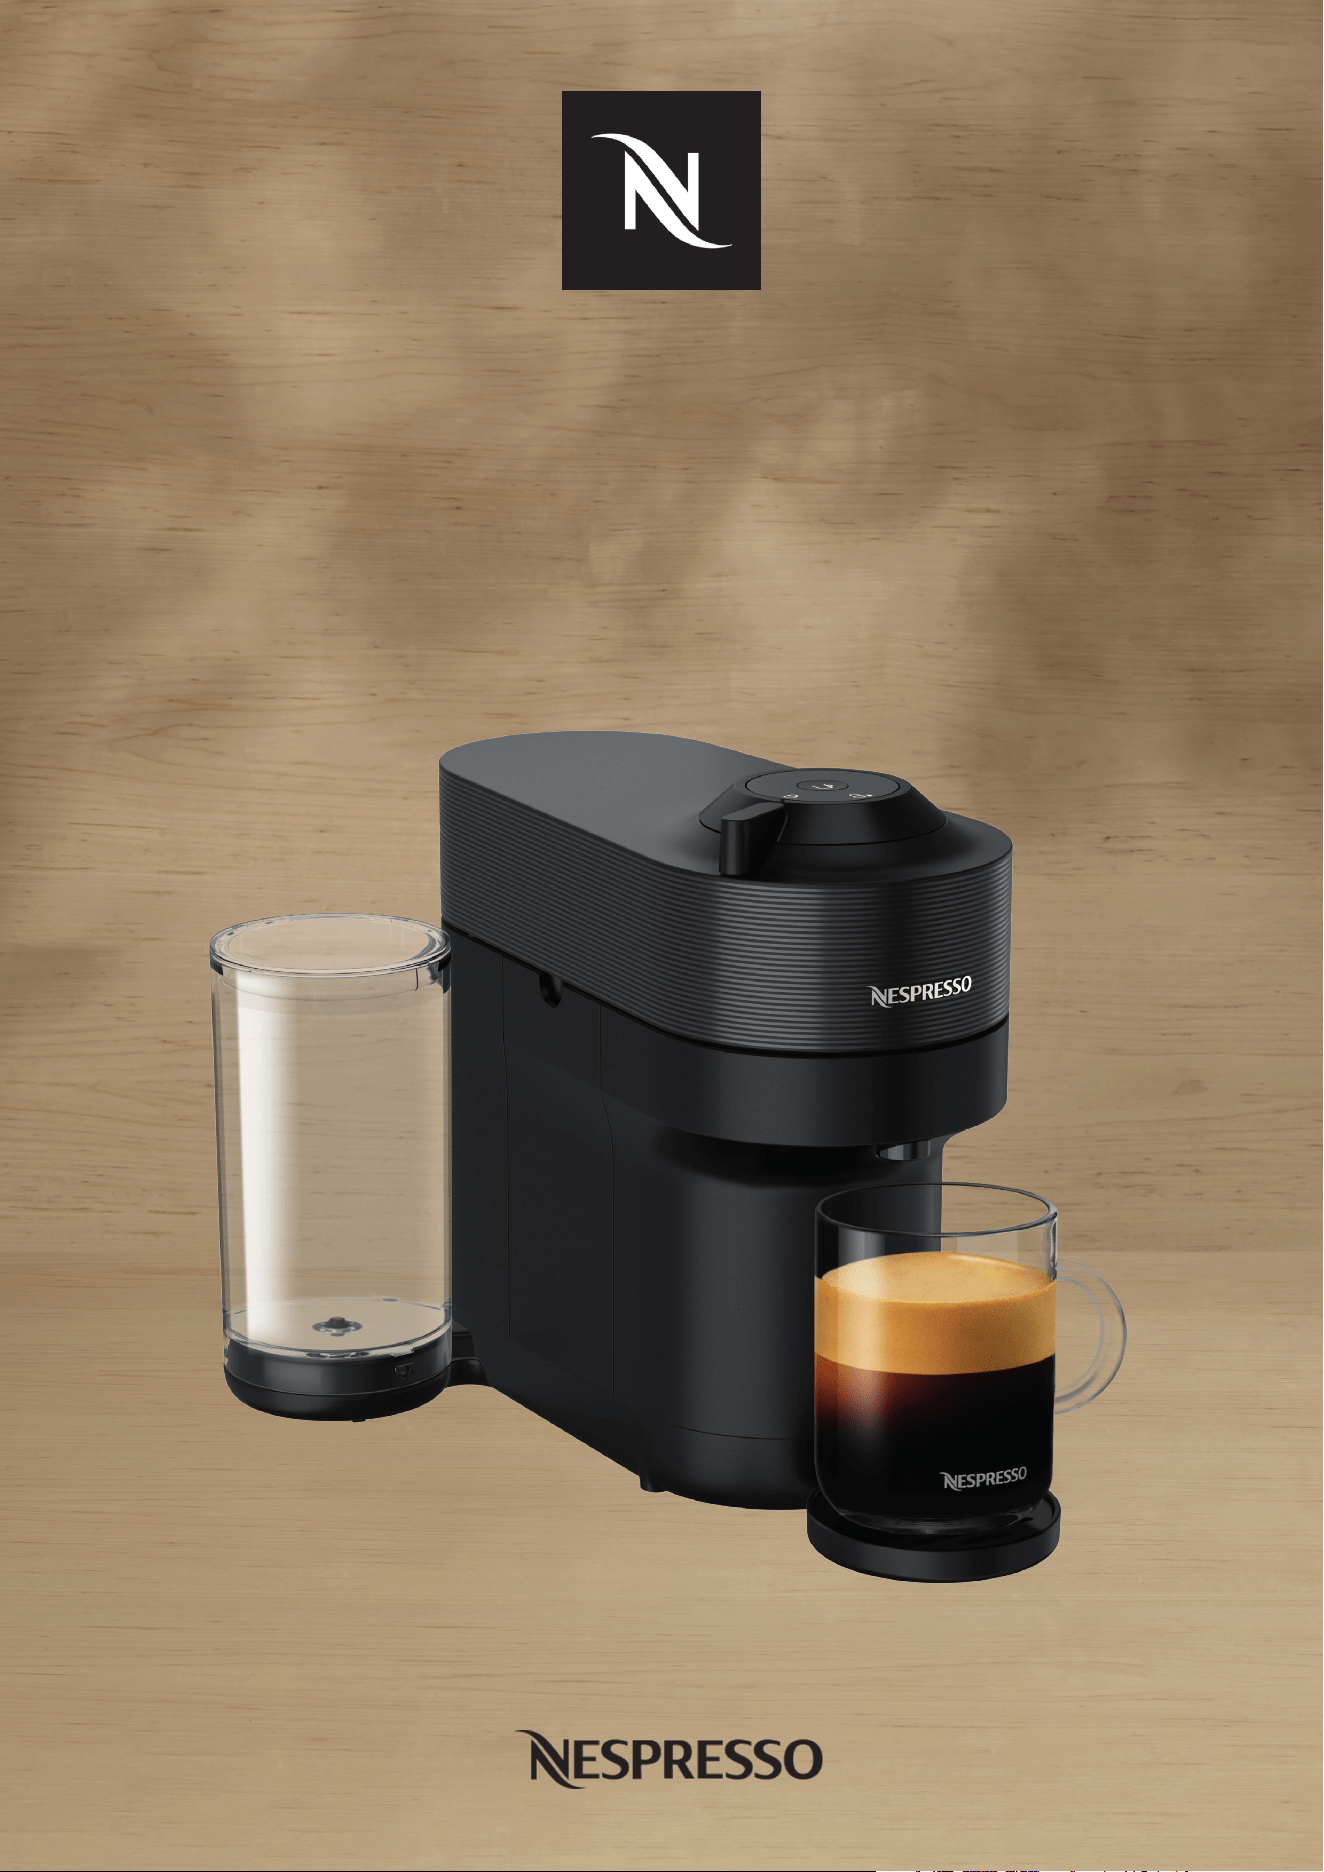
VERTUO POP+

EN
.
4
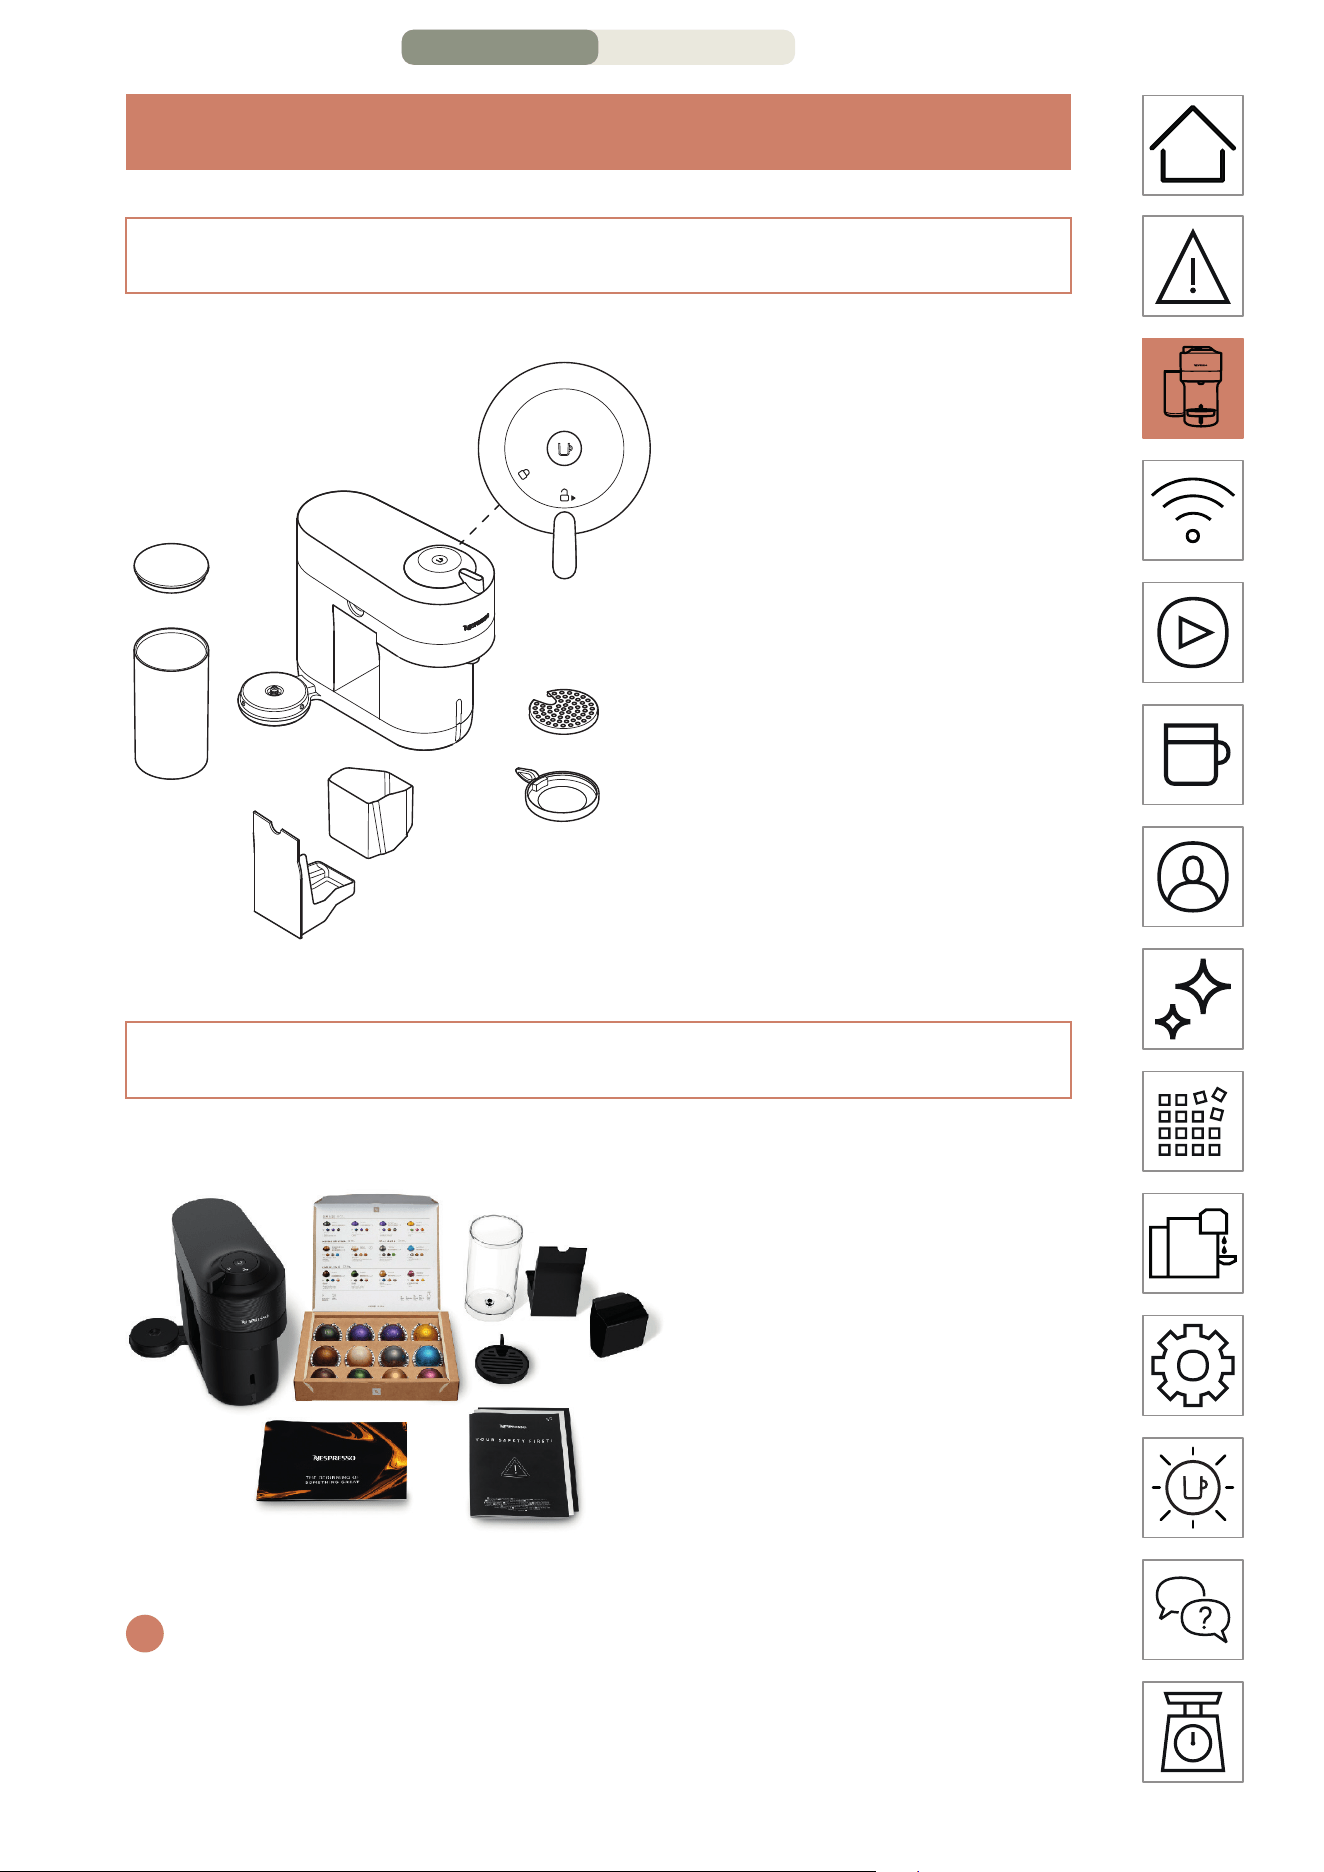
OVERVIEW
PACKAGING CONTENT
MACHINE OVERVIEW
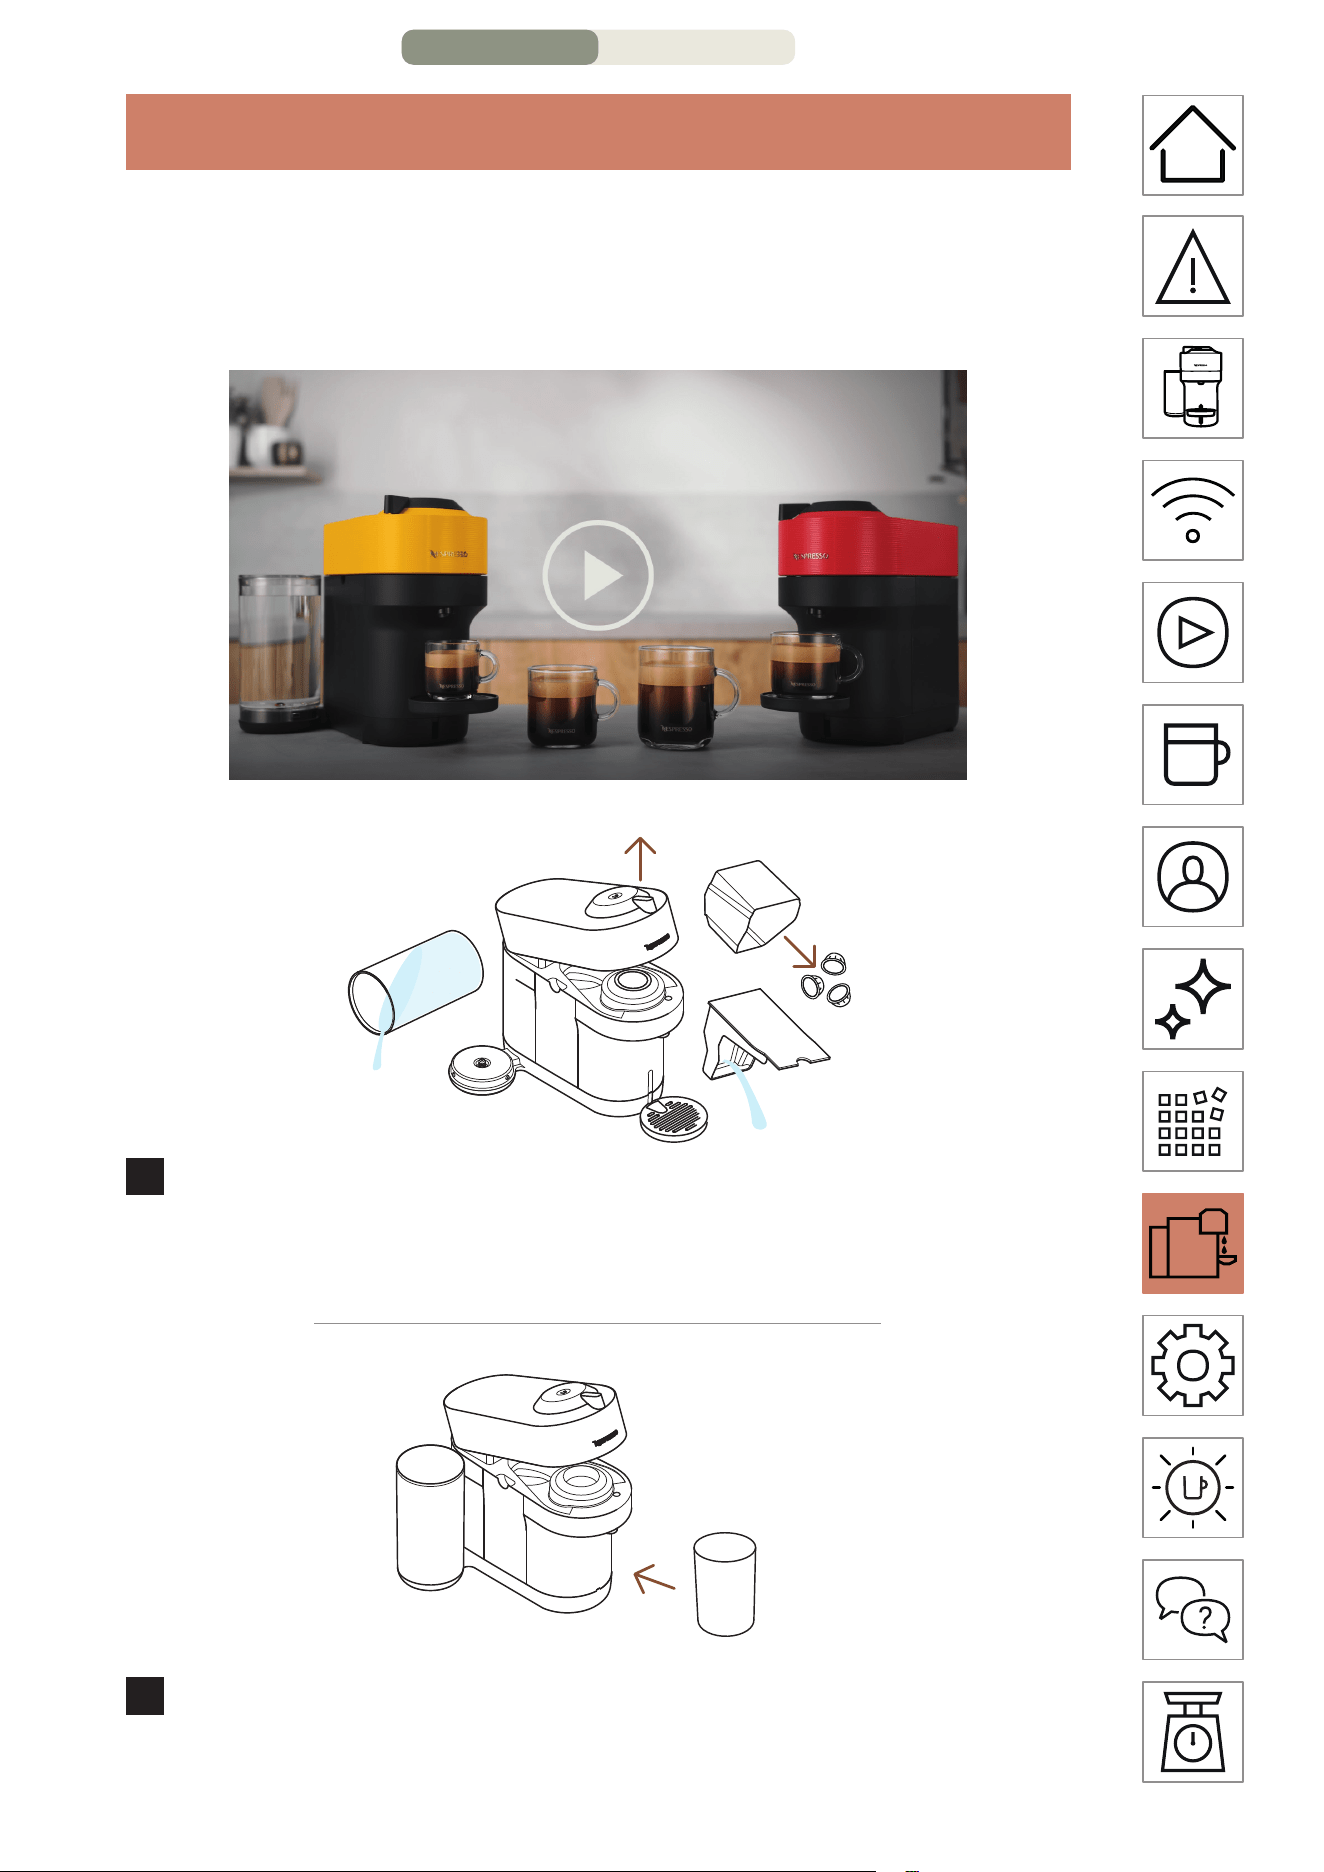
1 Water tank and lid
2 Drip tray
3 Container for used
capsules
4 Coee outlet
5 ON/OFF and coee
buon
6 Locking/Unlocking
lever
7 Drip grid
8 Adjustable cup support
1 Coee machine
2 Nespresso capsules set
3 Nespresso welcome
booklet
4 Safety instructions
5 Quick Start Guide
6 Warranty
1
3
2
5
6
4
7
8
3
1
2
4 + 5 + 6
i
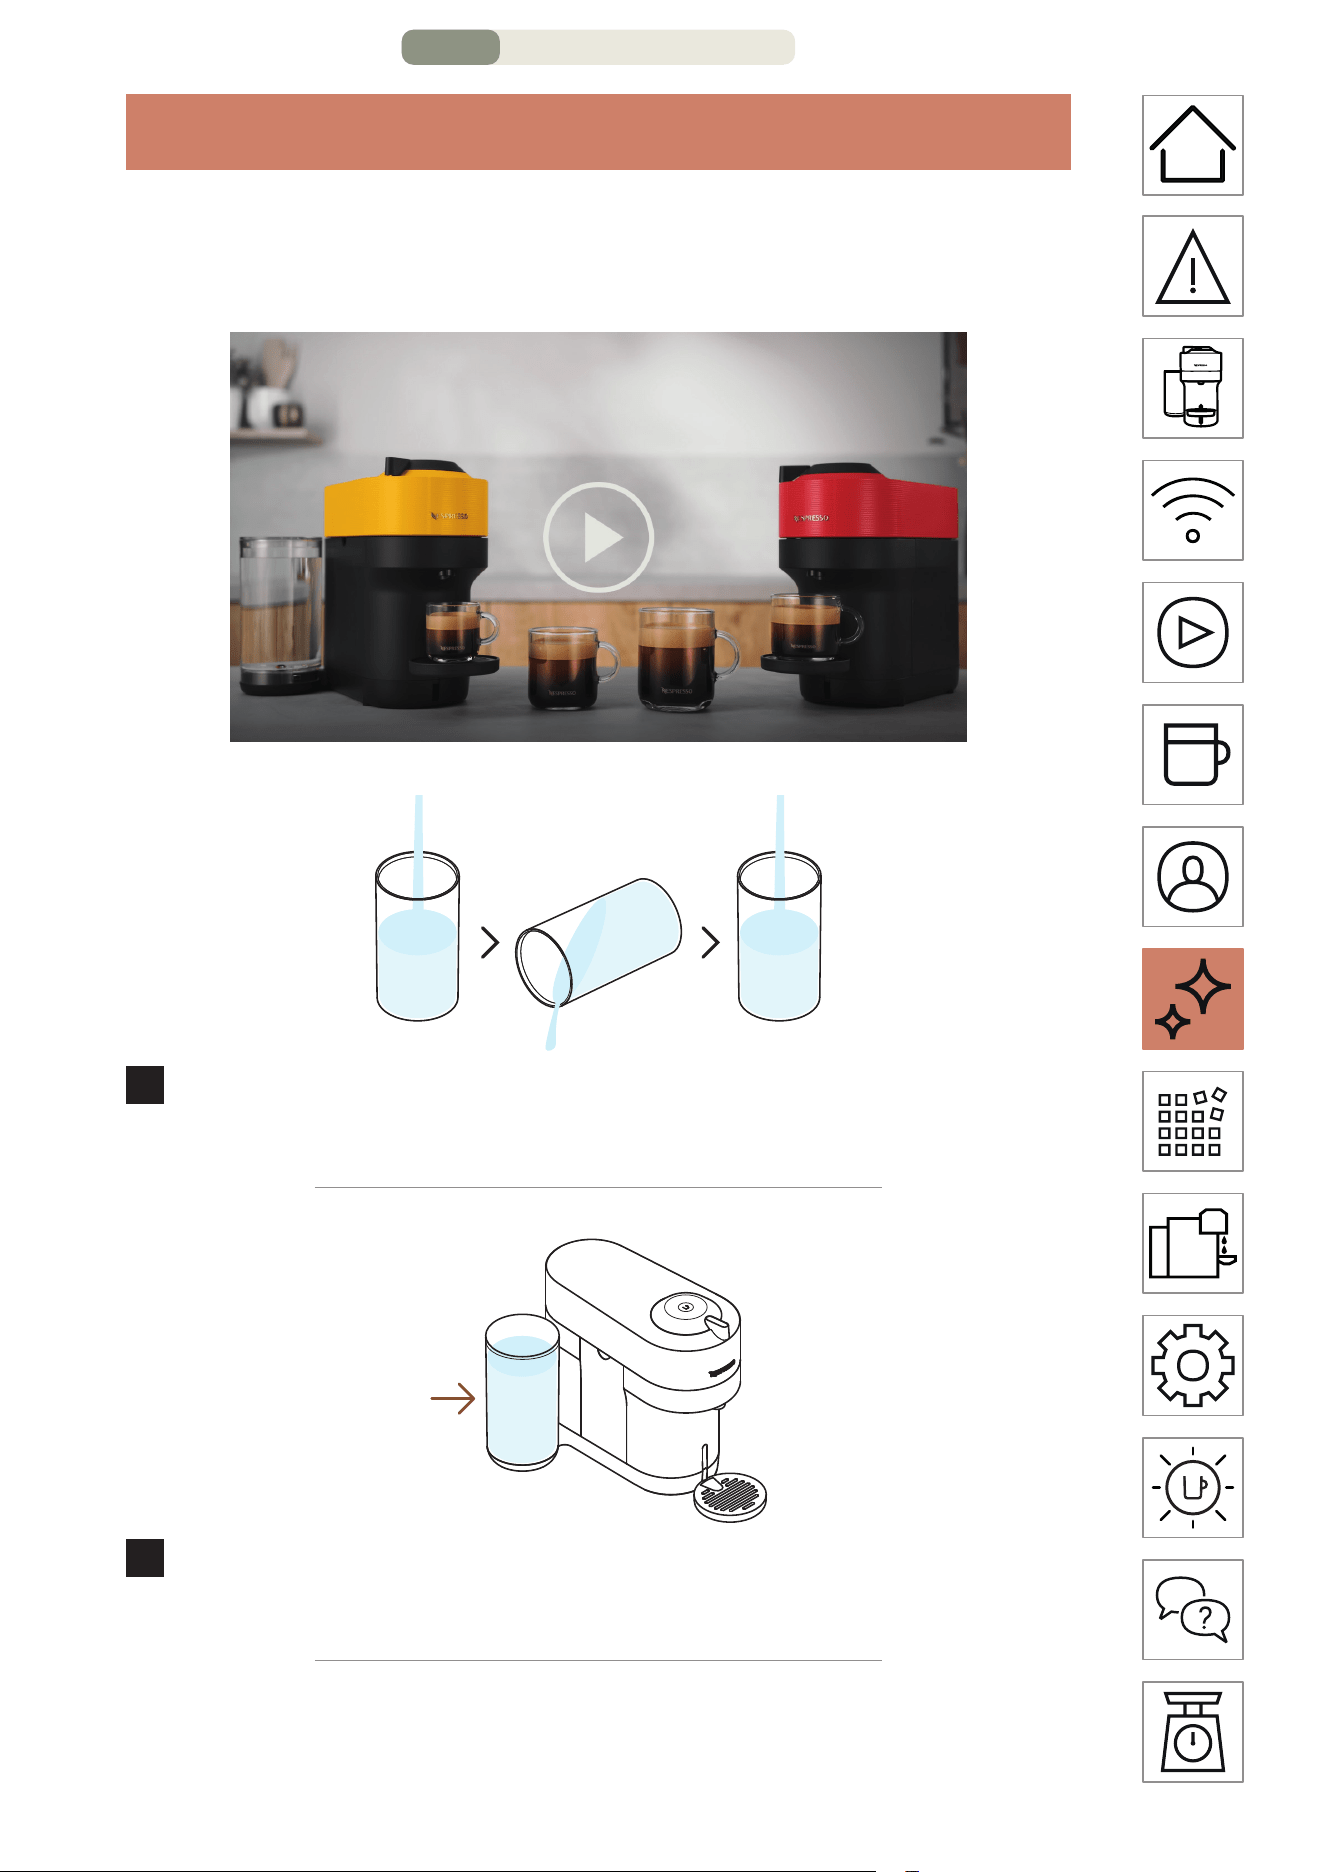
Unboxing: Some dust may be present on the surface of the machine
due to the recycled materials used in the packaging. This is not
dangerous, simply clean with a so tissue.
OVERVIEW – PAGE 1/2

EN
.
5
OPEN / CLOSE
OPEN CLOSE
THE VERTUO SYSTEM
SUITABLE CAPSULES
S M L XL
S
Espresso
(40 ml / 1.4 oz)
S M L XL
M
Double Espresso
(80 ml / 2.8 oz)
Gran Lungo
(150 ml / 5.1 oz)
S M L XL
L
Mug
(230 ml / 7.8 oz)
S M L XL
XL
Alto, Cold Brew Style
(355 ml / 12.5 oz)
Carafe
(535 ml / 18.8 oz)
ACCESSORIES
Suitable
accessories
Espresso Double
Espresso
Gran Lungo Mug Reveal Glass
Not suitable
accessories
Alto Carafe
Discover our full accessory collection on www.nespresso.com
OVERVIEW – PAGE 2/2
EN
.
6
CONNECTIVITY
WHY SHOULD YOU PAIR YOUR VERTUO POP+ MACHINE?
=+
Smart
coee
Expert
advice
Machine
care
BENEFITS OF CONNECTING YOUR VERTUO POP+ MACHINE
• Smart Coee: Enjoy the latest coee innovations from
Nespresso by always keeping your machine up to date.
• Expert advices: Receive real-time tips with step by step
instructions for descaling, rinsing and cleaning your machine.
• Machine care: Get support and tutorials for your machine
care via your smartphone.
HOW TO CONNECT YOUR VERTUO POP+ MACHINE?
CONNECTIVITY – PAGE 1/2
EN
.
7
*
**
1
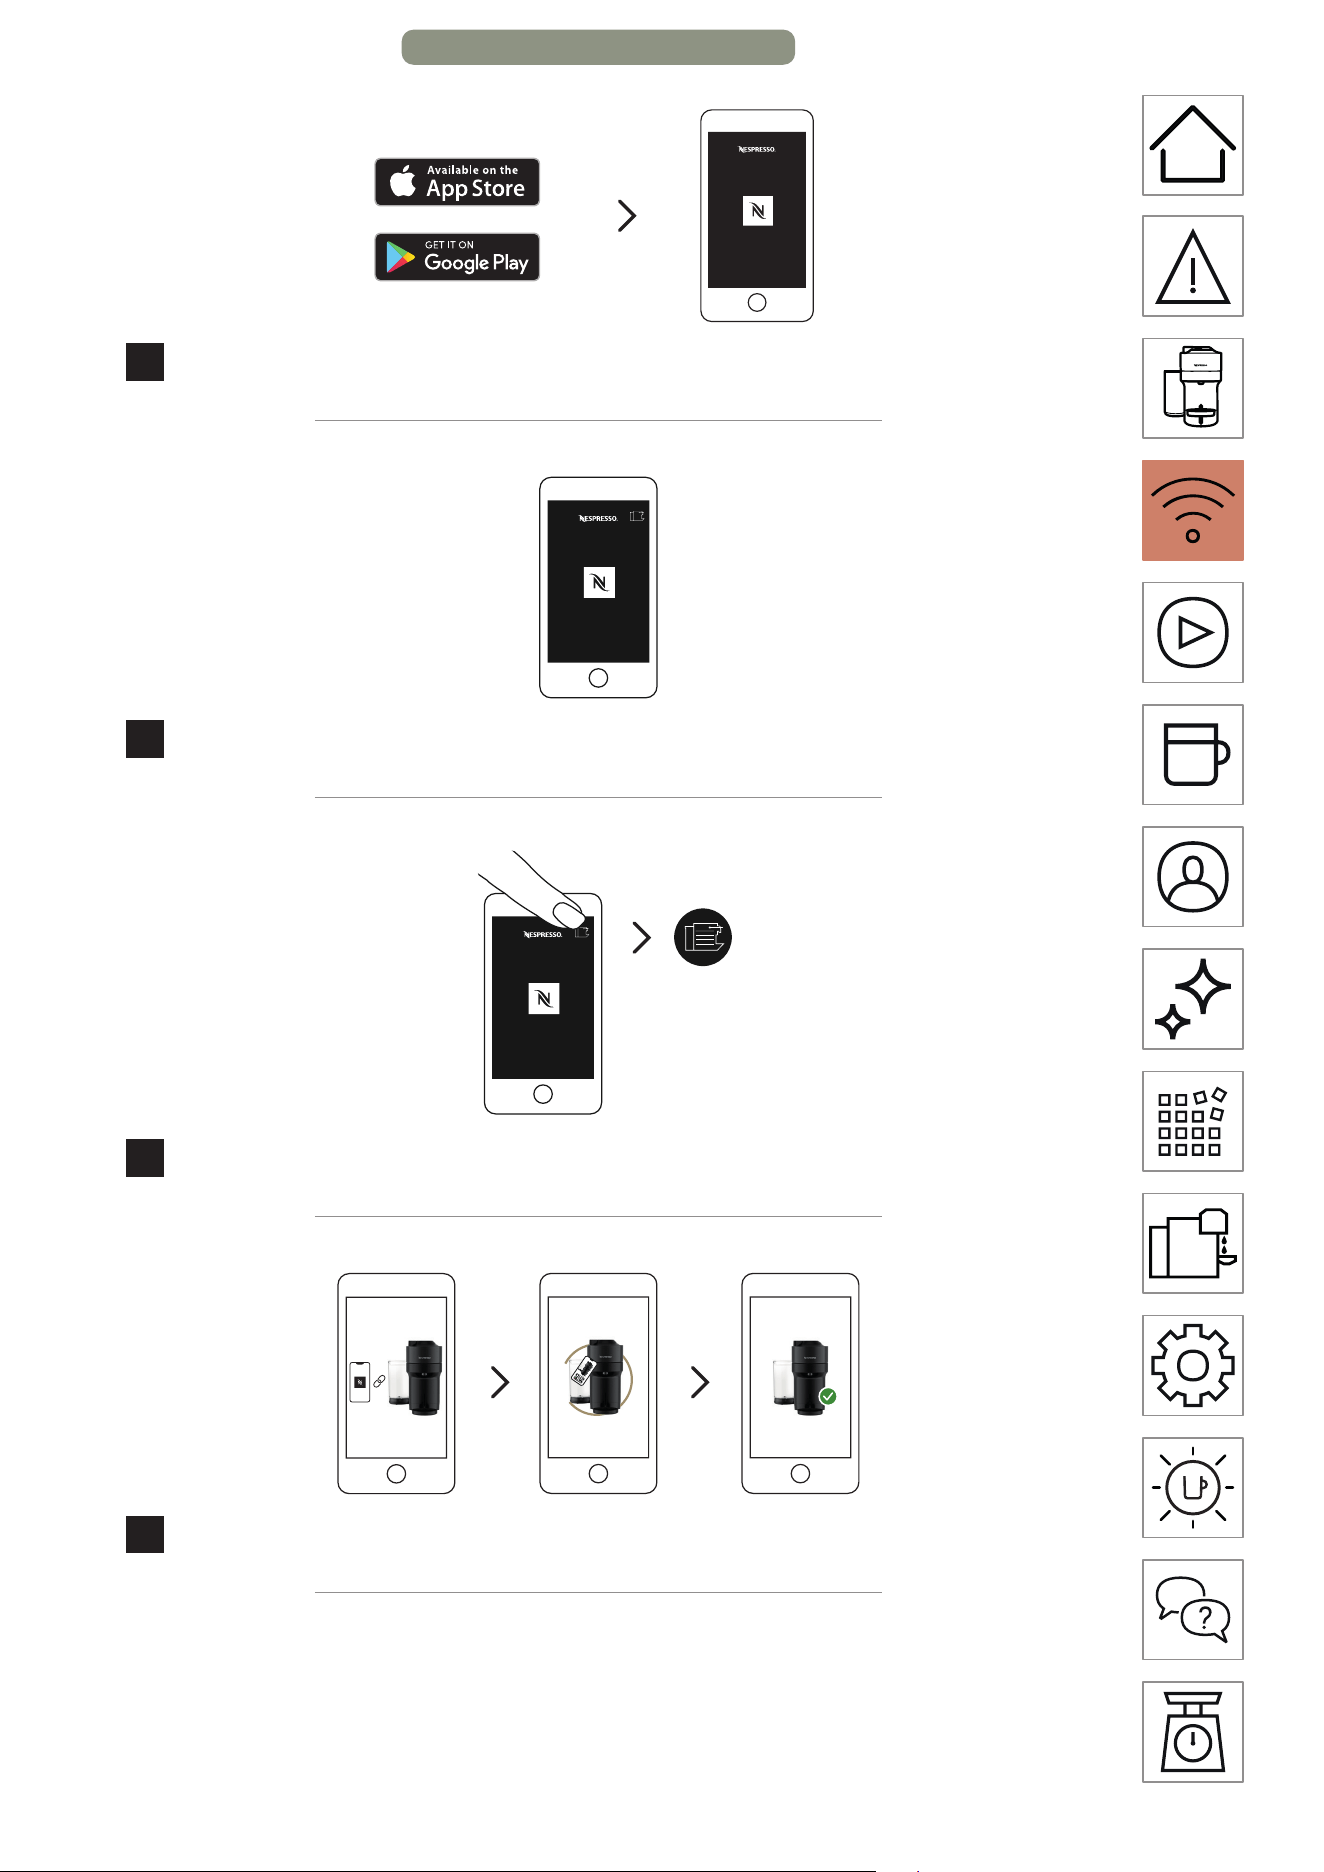
Download or update the Nespresso App.
2
Launch the Nespresso App on your smartphone or your
tablet.
3
Click on the machine icon at the top right of your screen.
4
Follow the instructions via the Nespresso App.
* AppStore
®
is a trademark of Apple Inc.,registered in the U.S.and other
countries.
** Google Play and the Google Play logo are trademarks of Google LLC.
CONNECTIVITY – PAGE 2/2
EN
.
8
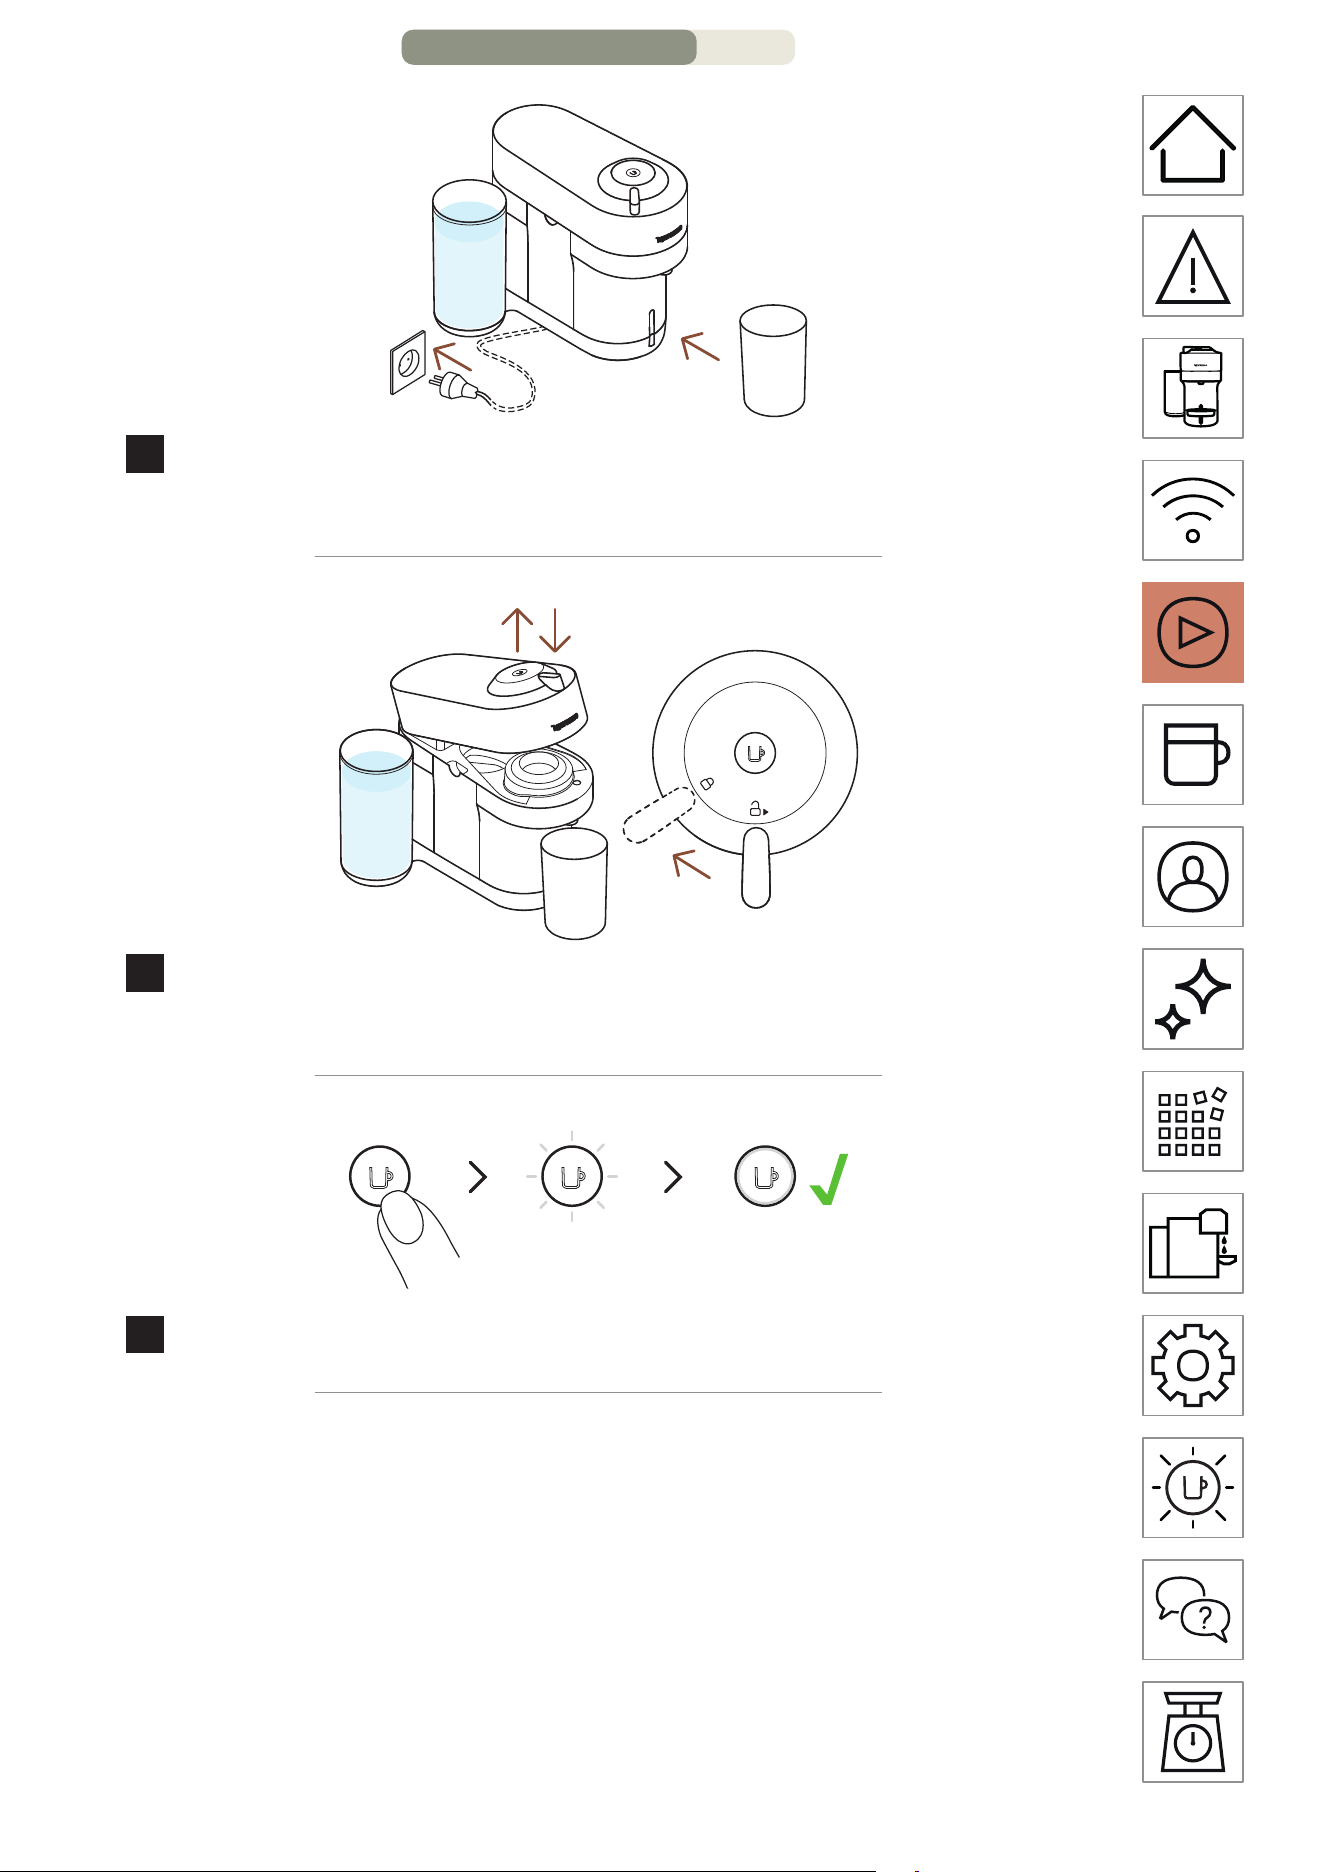
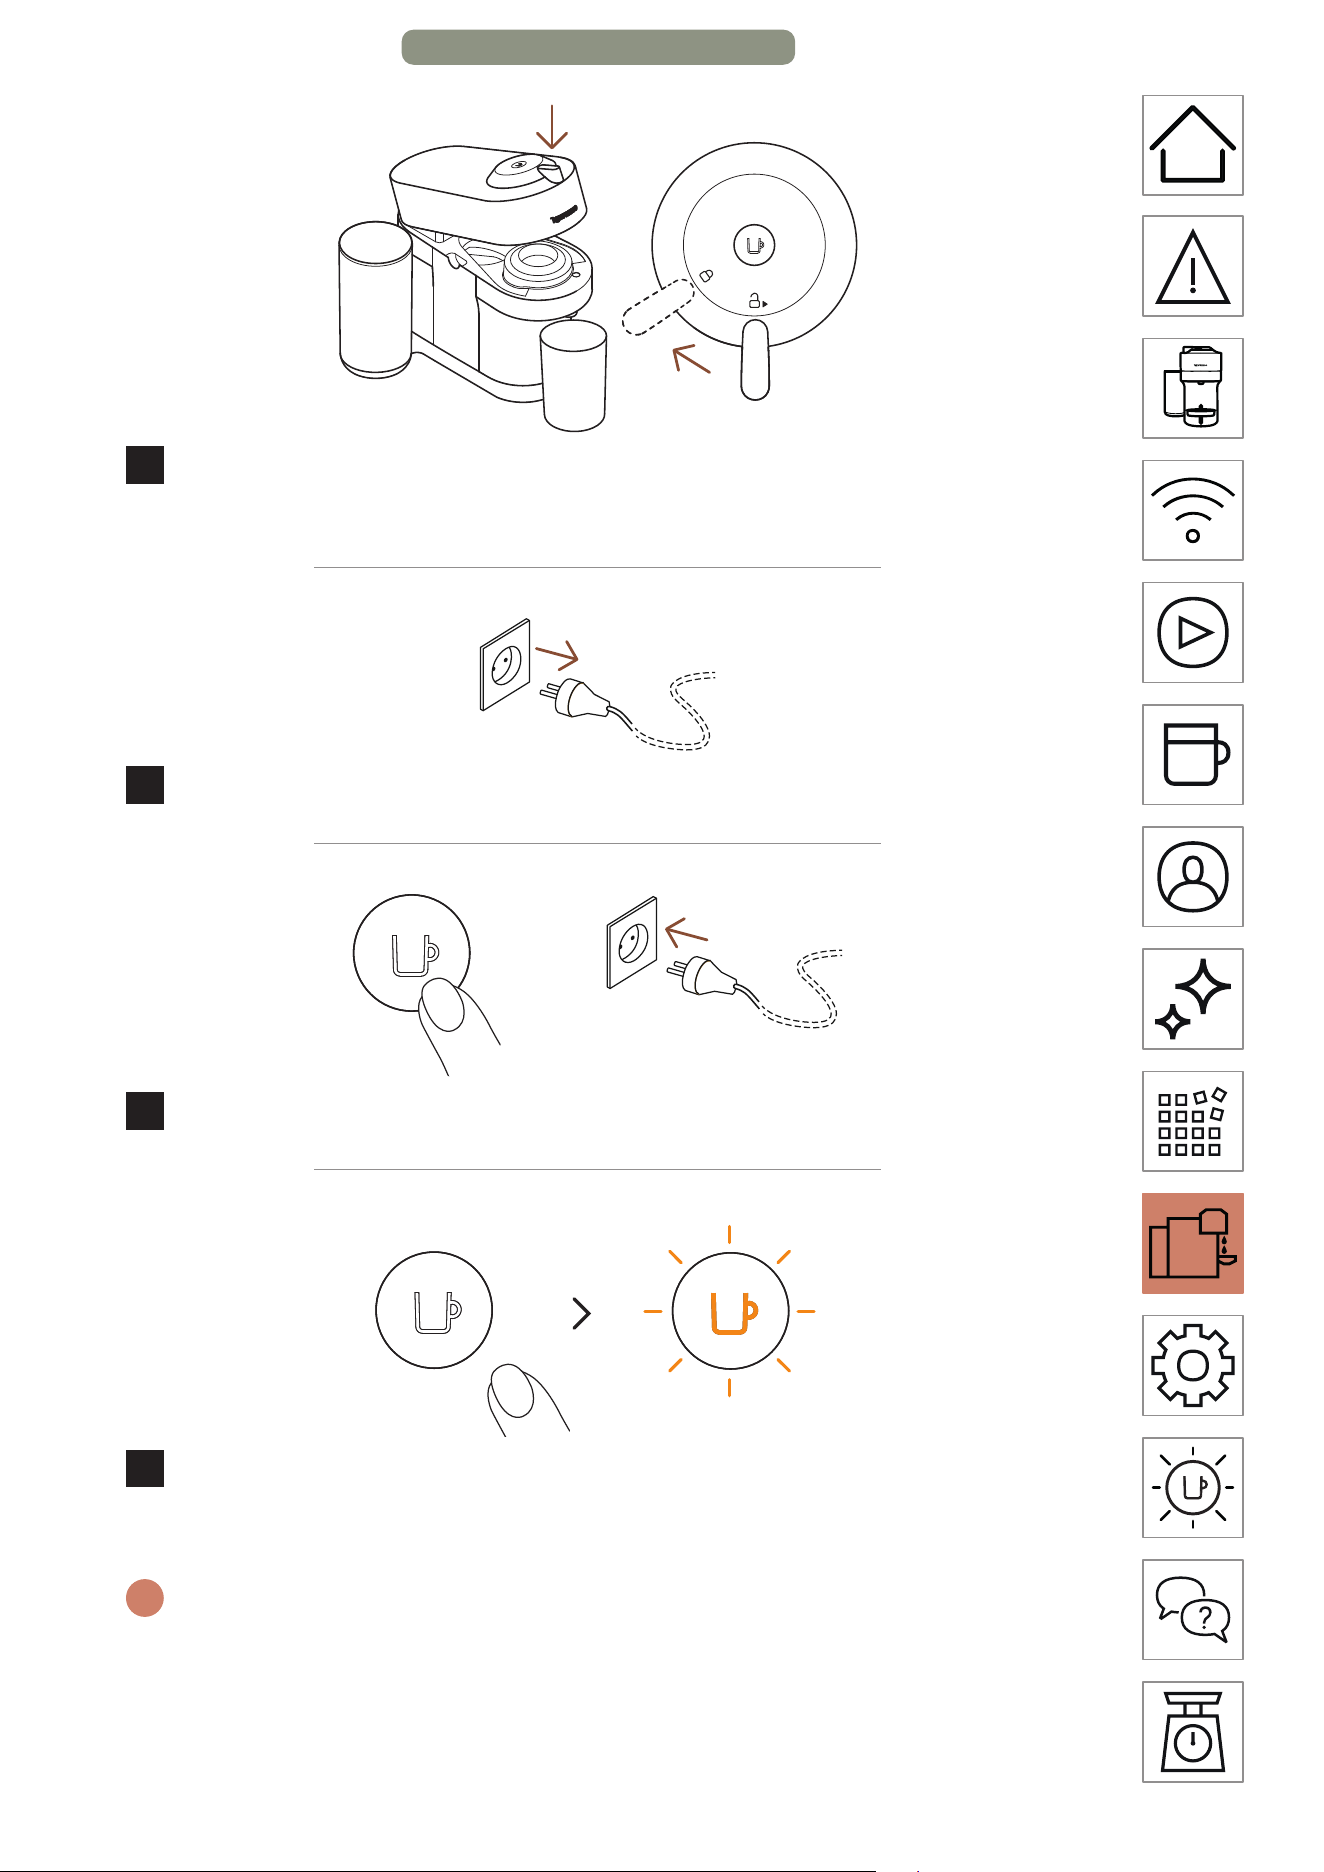
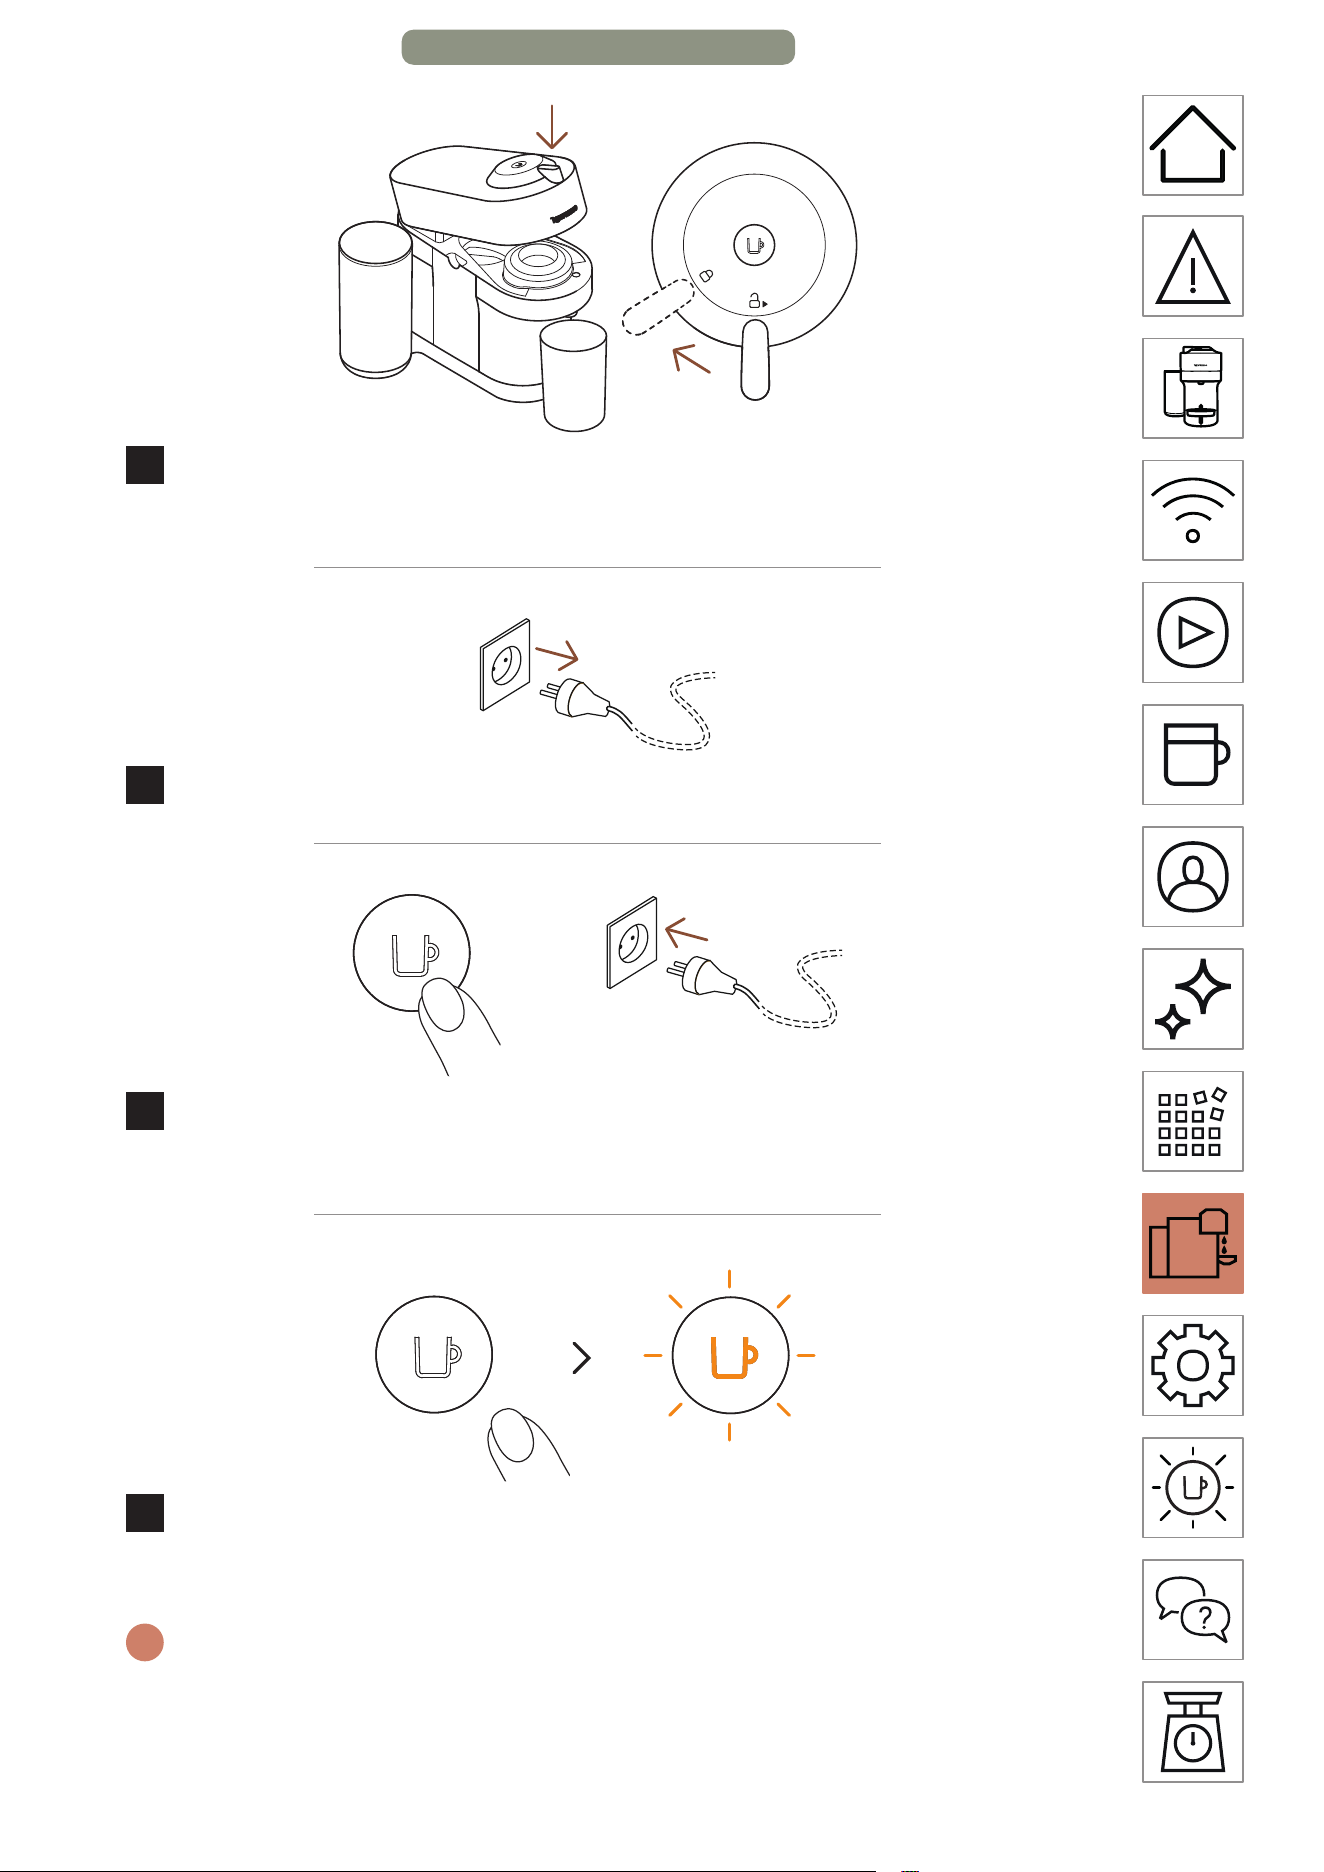
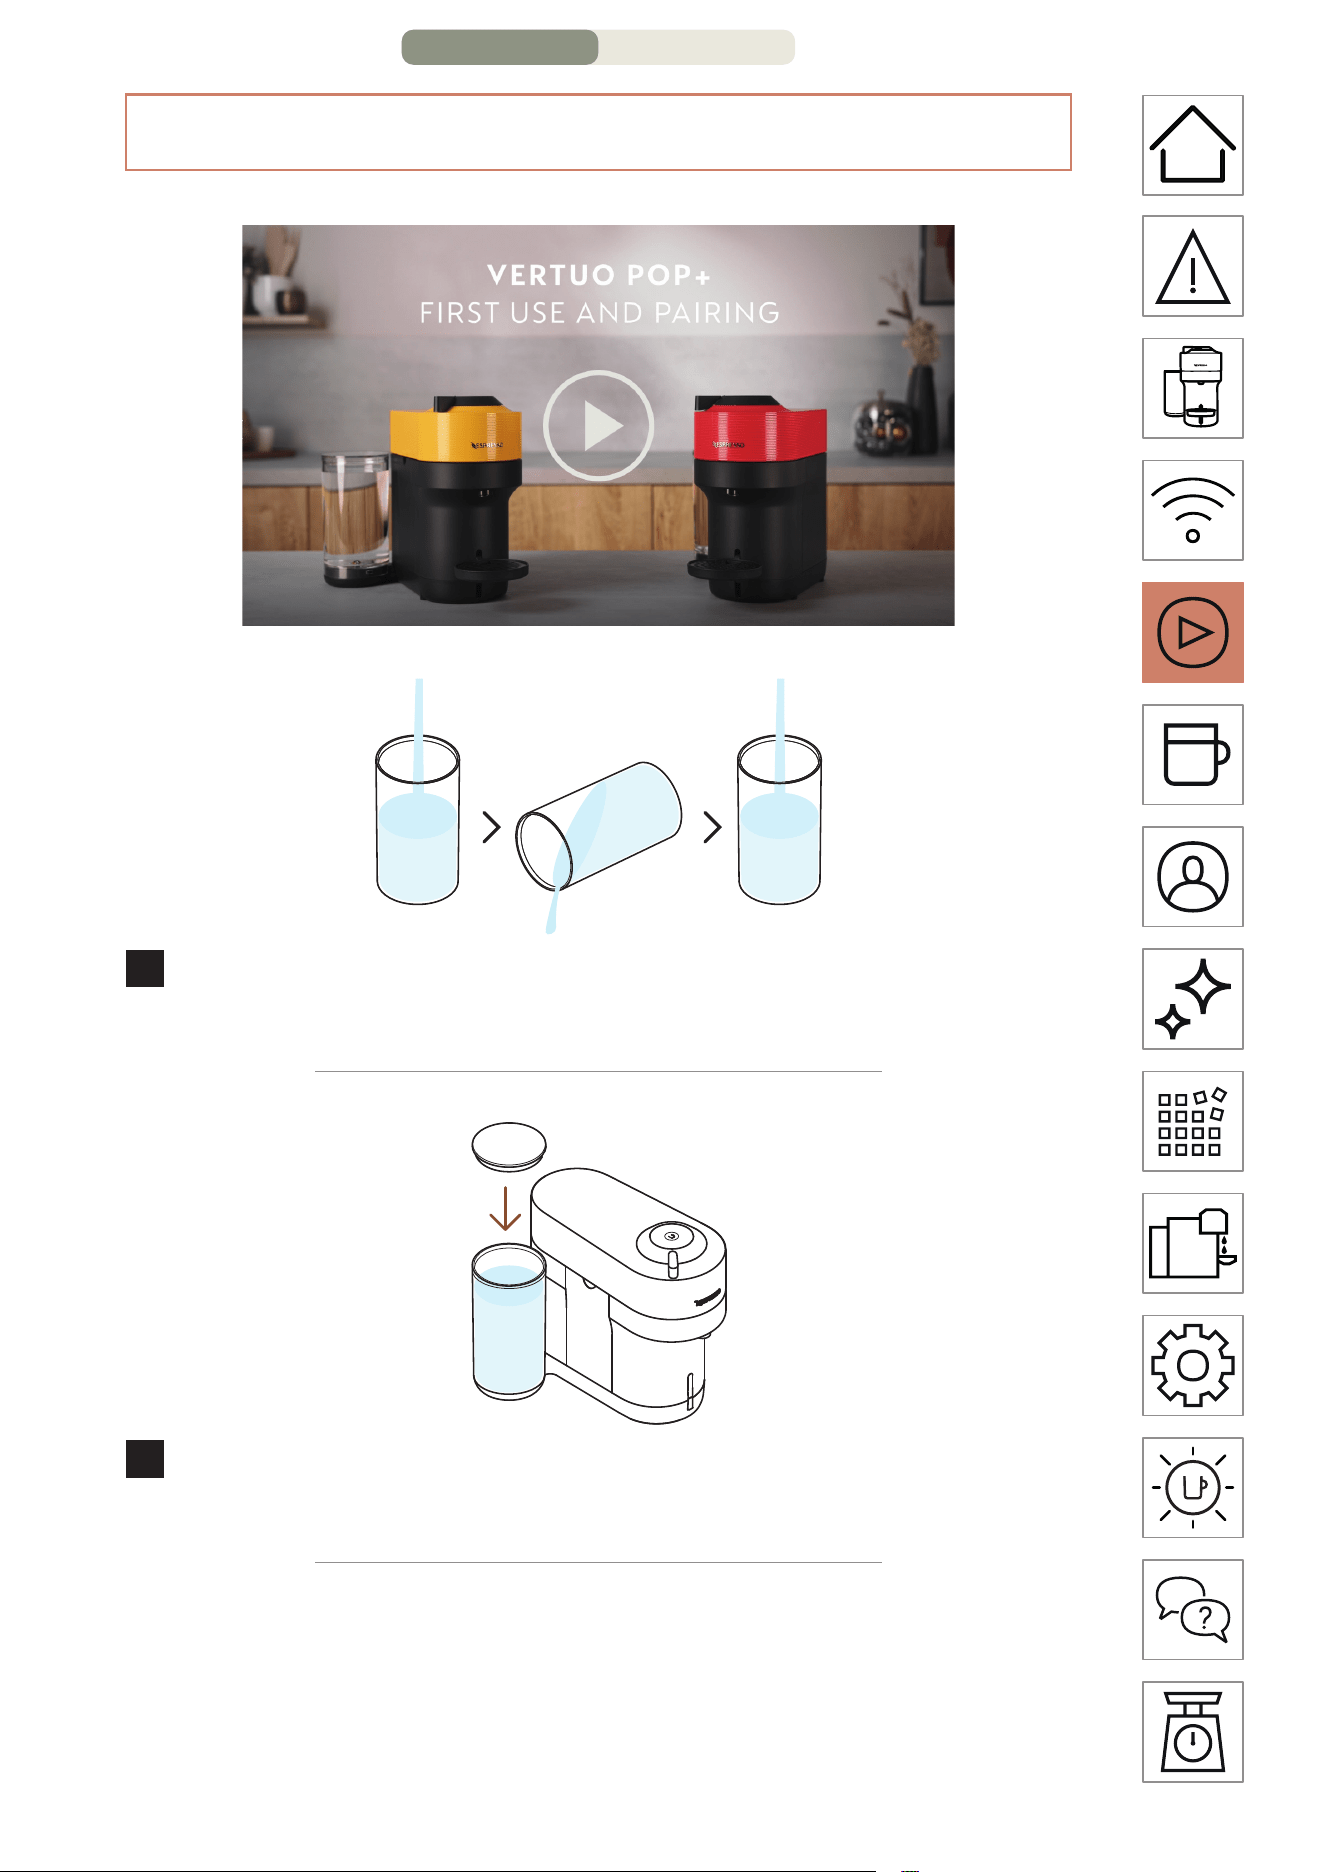
FIRST USE
OR
ON
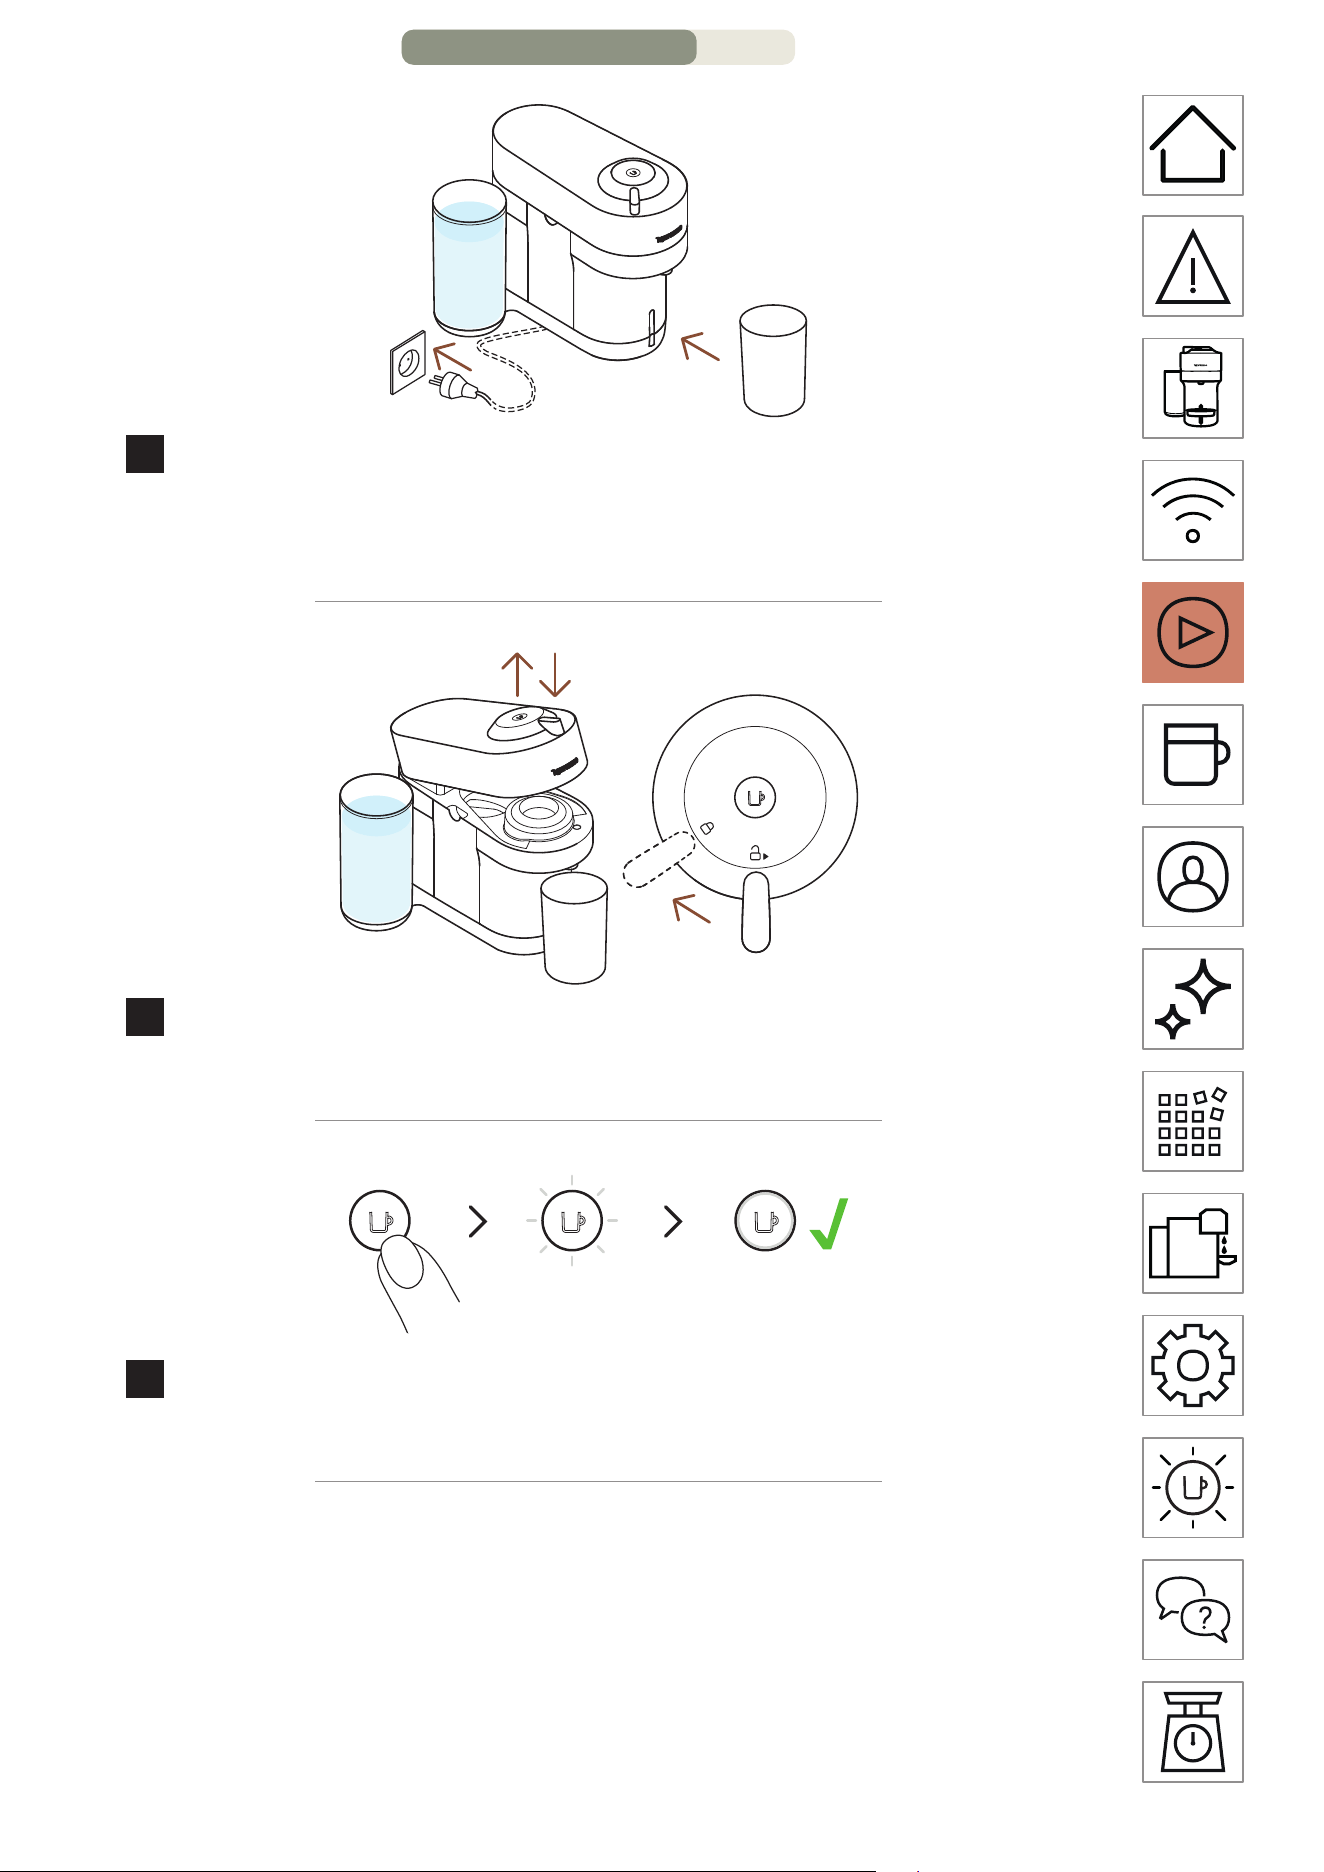
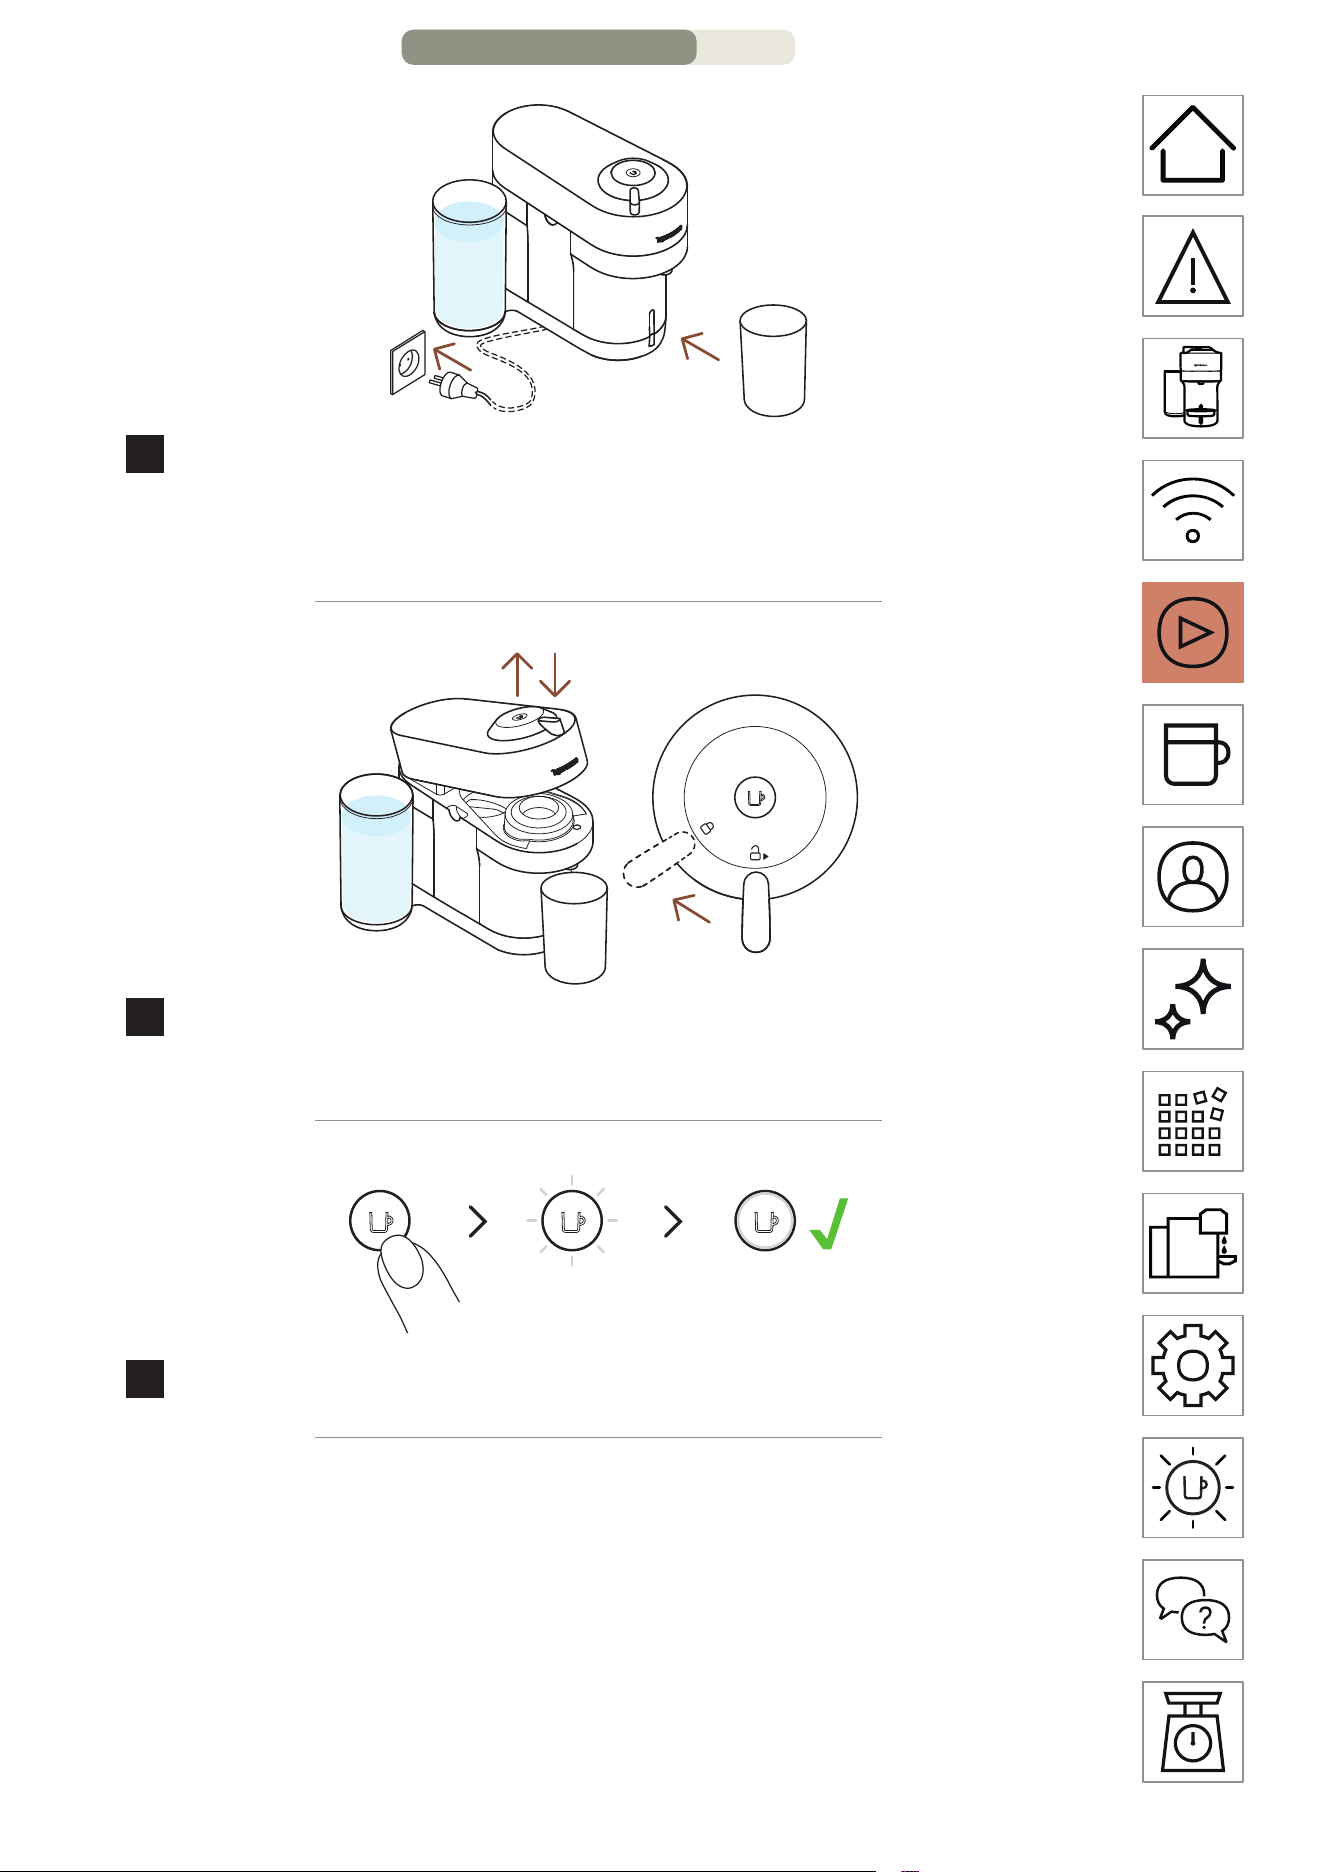
Once the machine is plugged in, turn on by pressing once on
the buon or by closing the lever in the lock position (with the
head closed).
i
The light will blink for approximatively 30 seconds while the machine is
heating up. Once the light is steady, the machine is ready to be used.
OR
AUTO-OFF
2 min
3
s
OFF
To save energy, the machine will turn o automatically aer
2 minutes of non-use.
i
The machine can be turned “OFF” manually at any time (when not in
use) by pressing and holding the buon for 3 seconds.
ON / OFF
FIRST USE – PAGE 1/4


EN
.
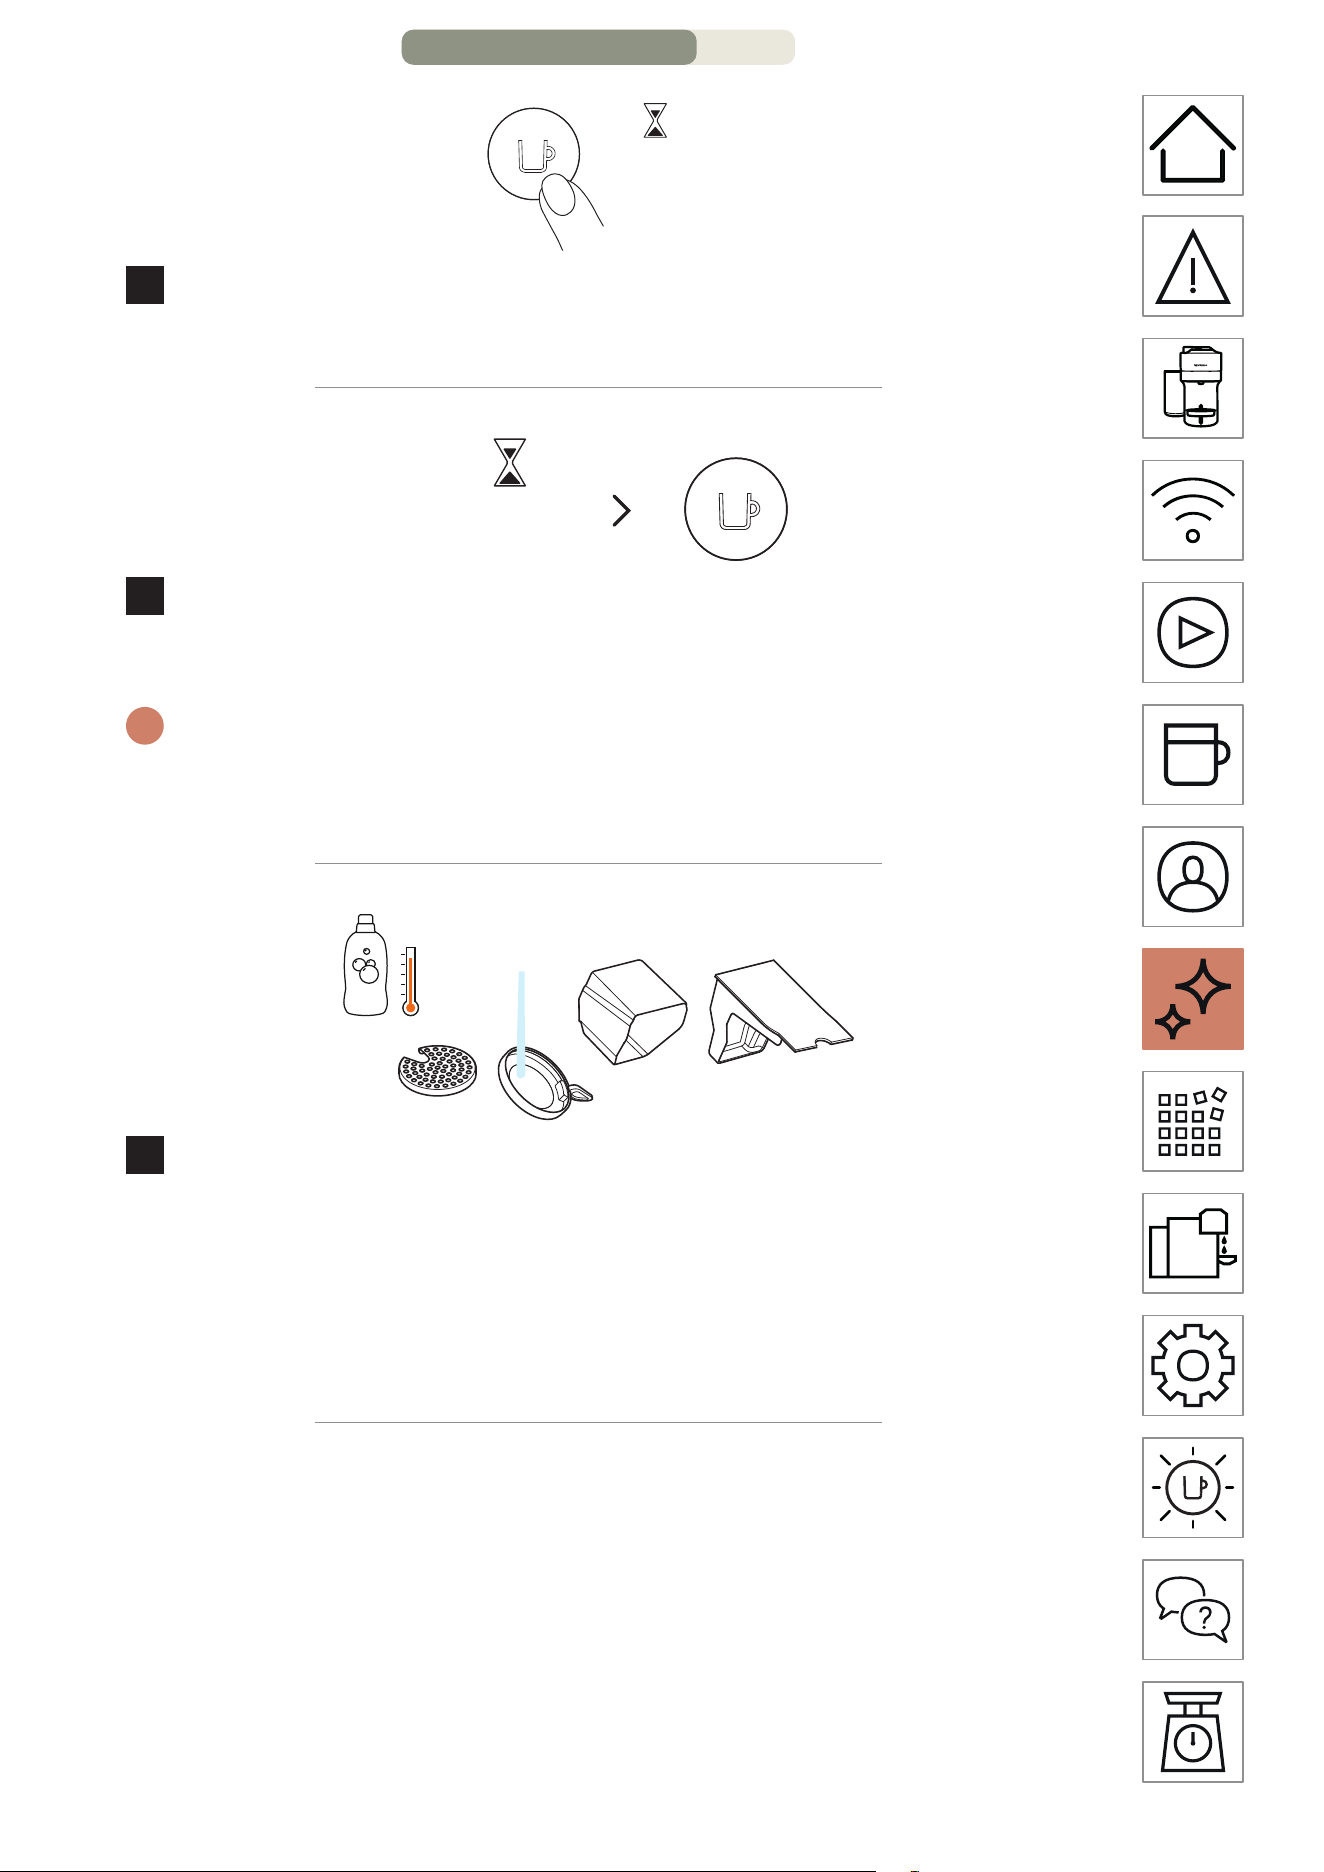
11
3x <2s
6
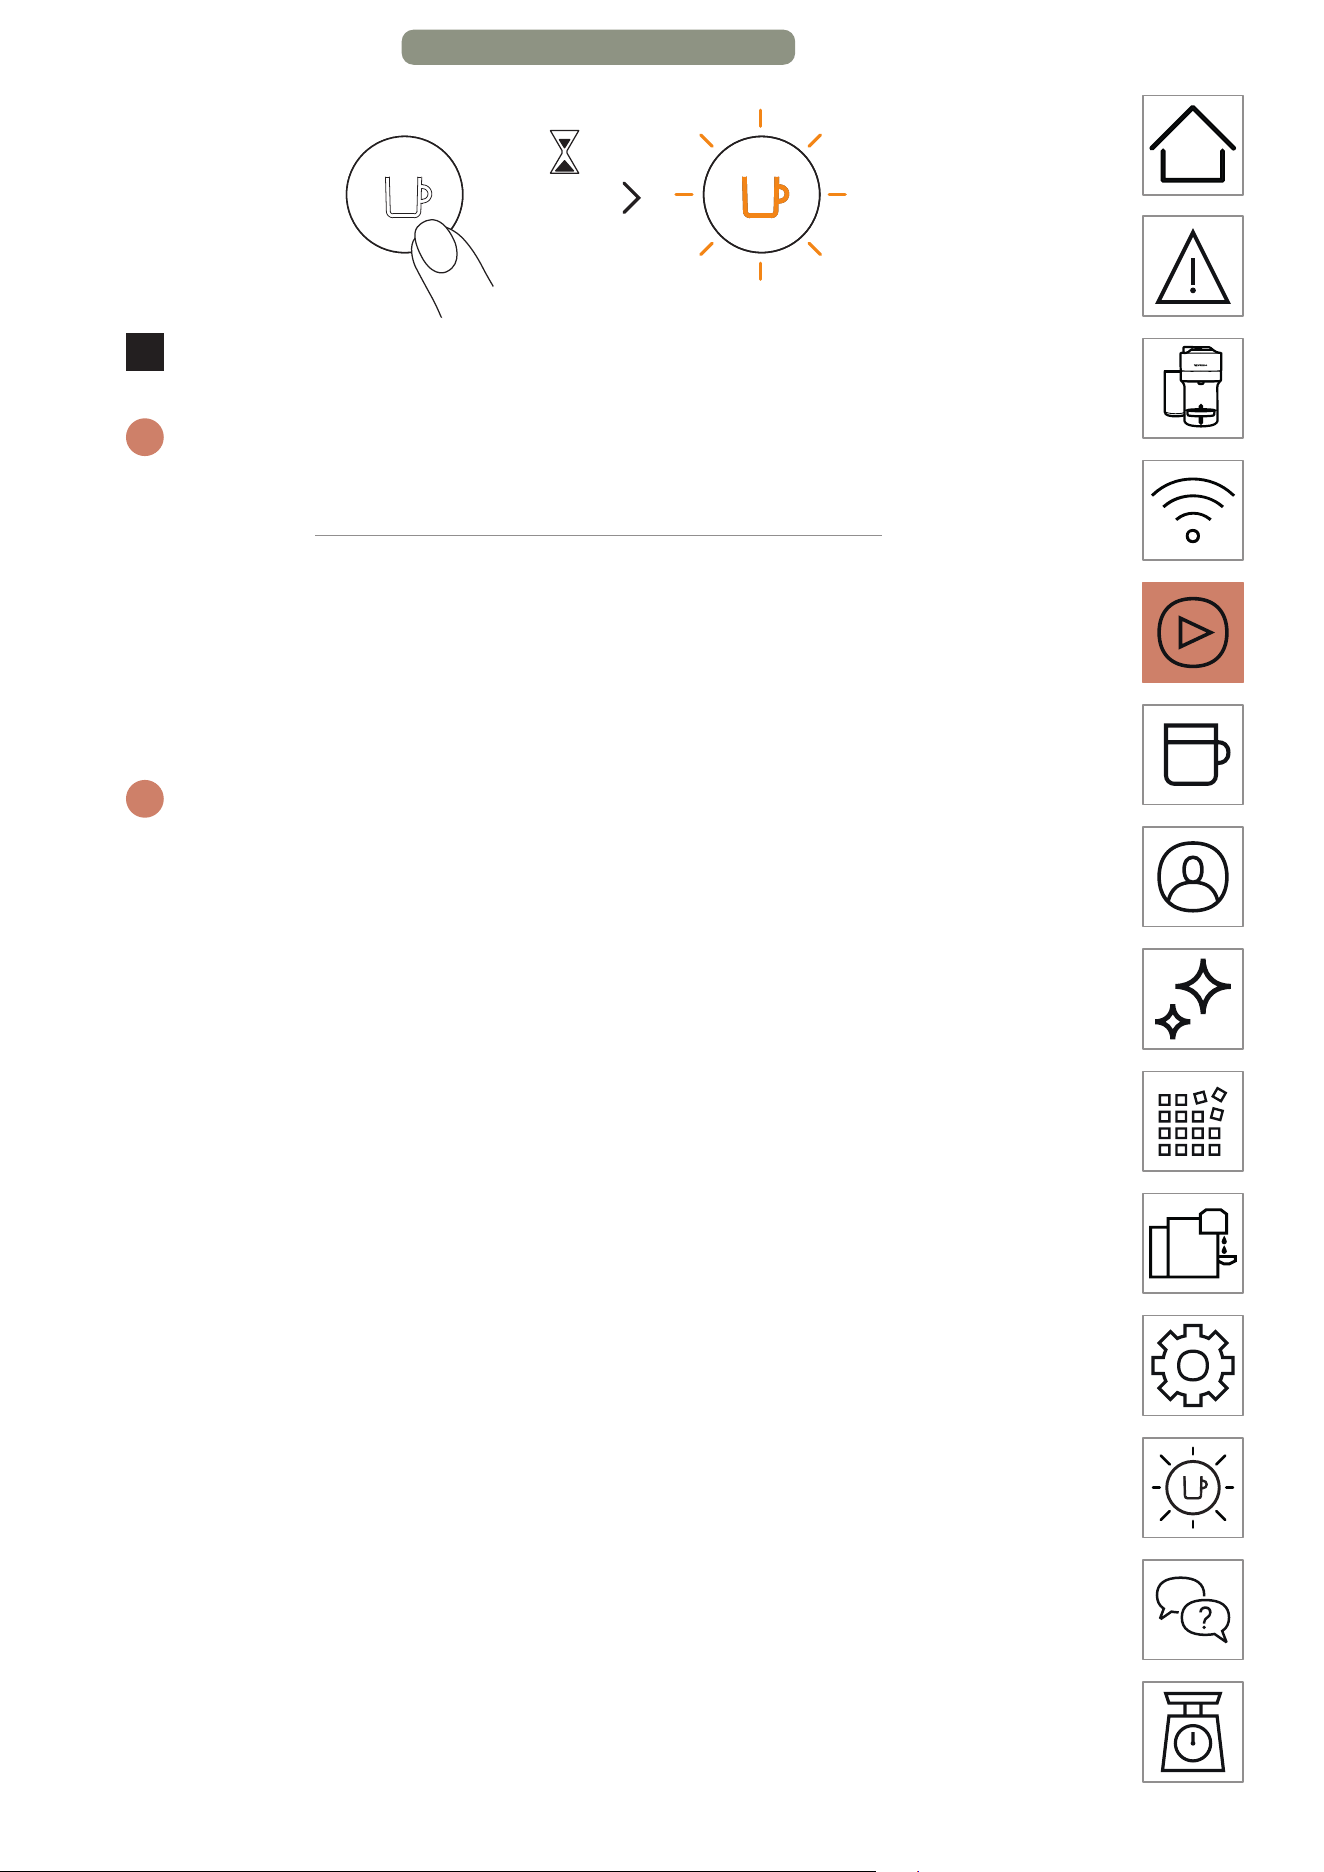
Press the buon 3 times within 2 seconds.
i
The machine will start rinsing. This procedure may take up to
7 minutes.
CAUTION: First read the safety precautions to avoid risks of fatal
electrical shock and fire. Please ensure ground continuity when plugging
the machine in the power outlet.
i
When unpacking the machine, remove the plastic films.
FIRST USE – PAGE 4/4


EN
.
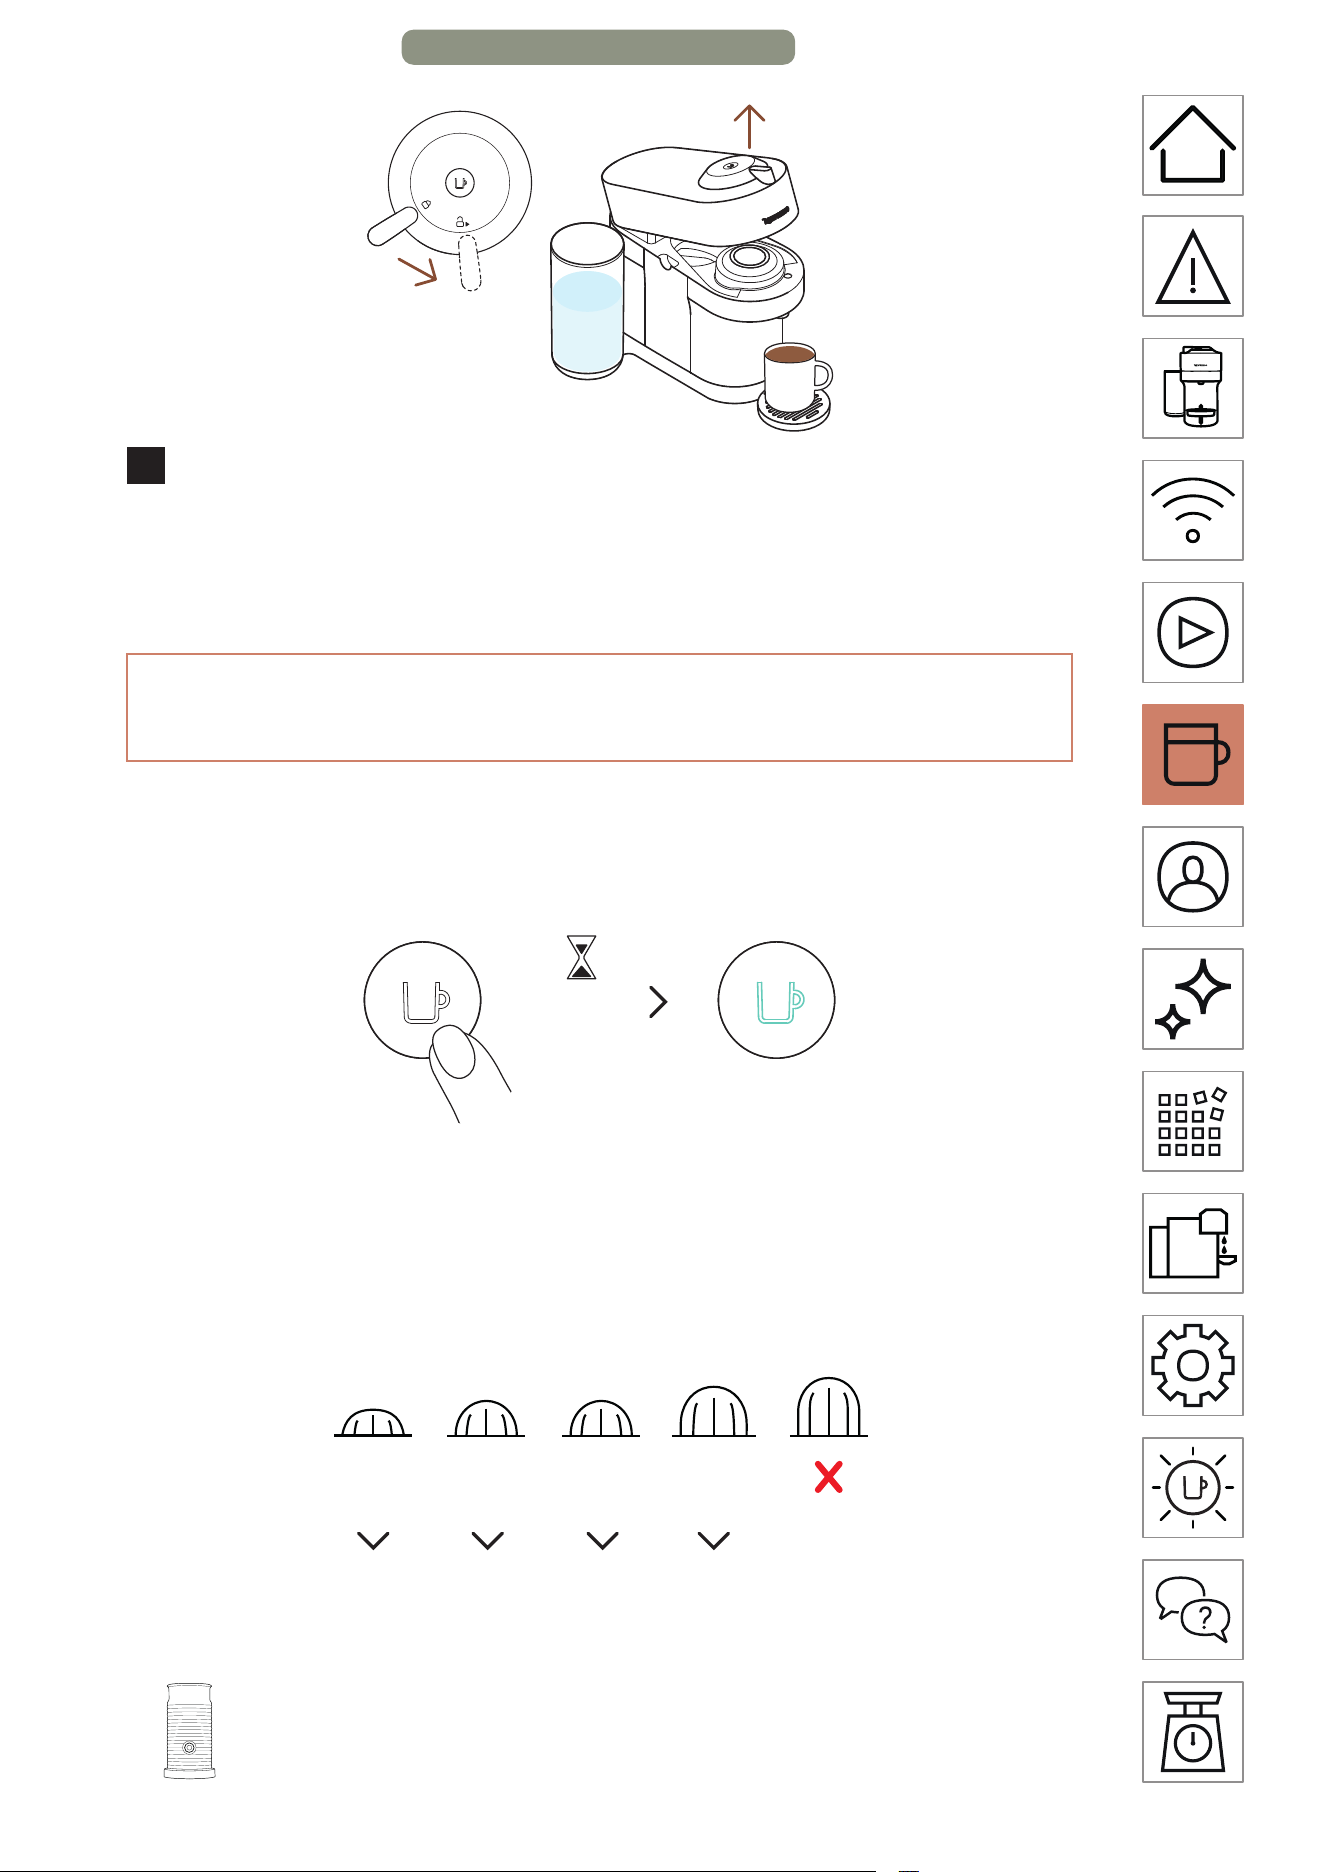
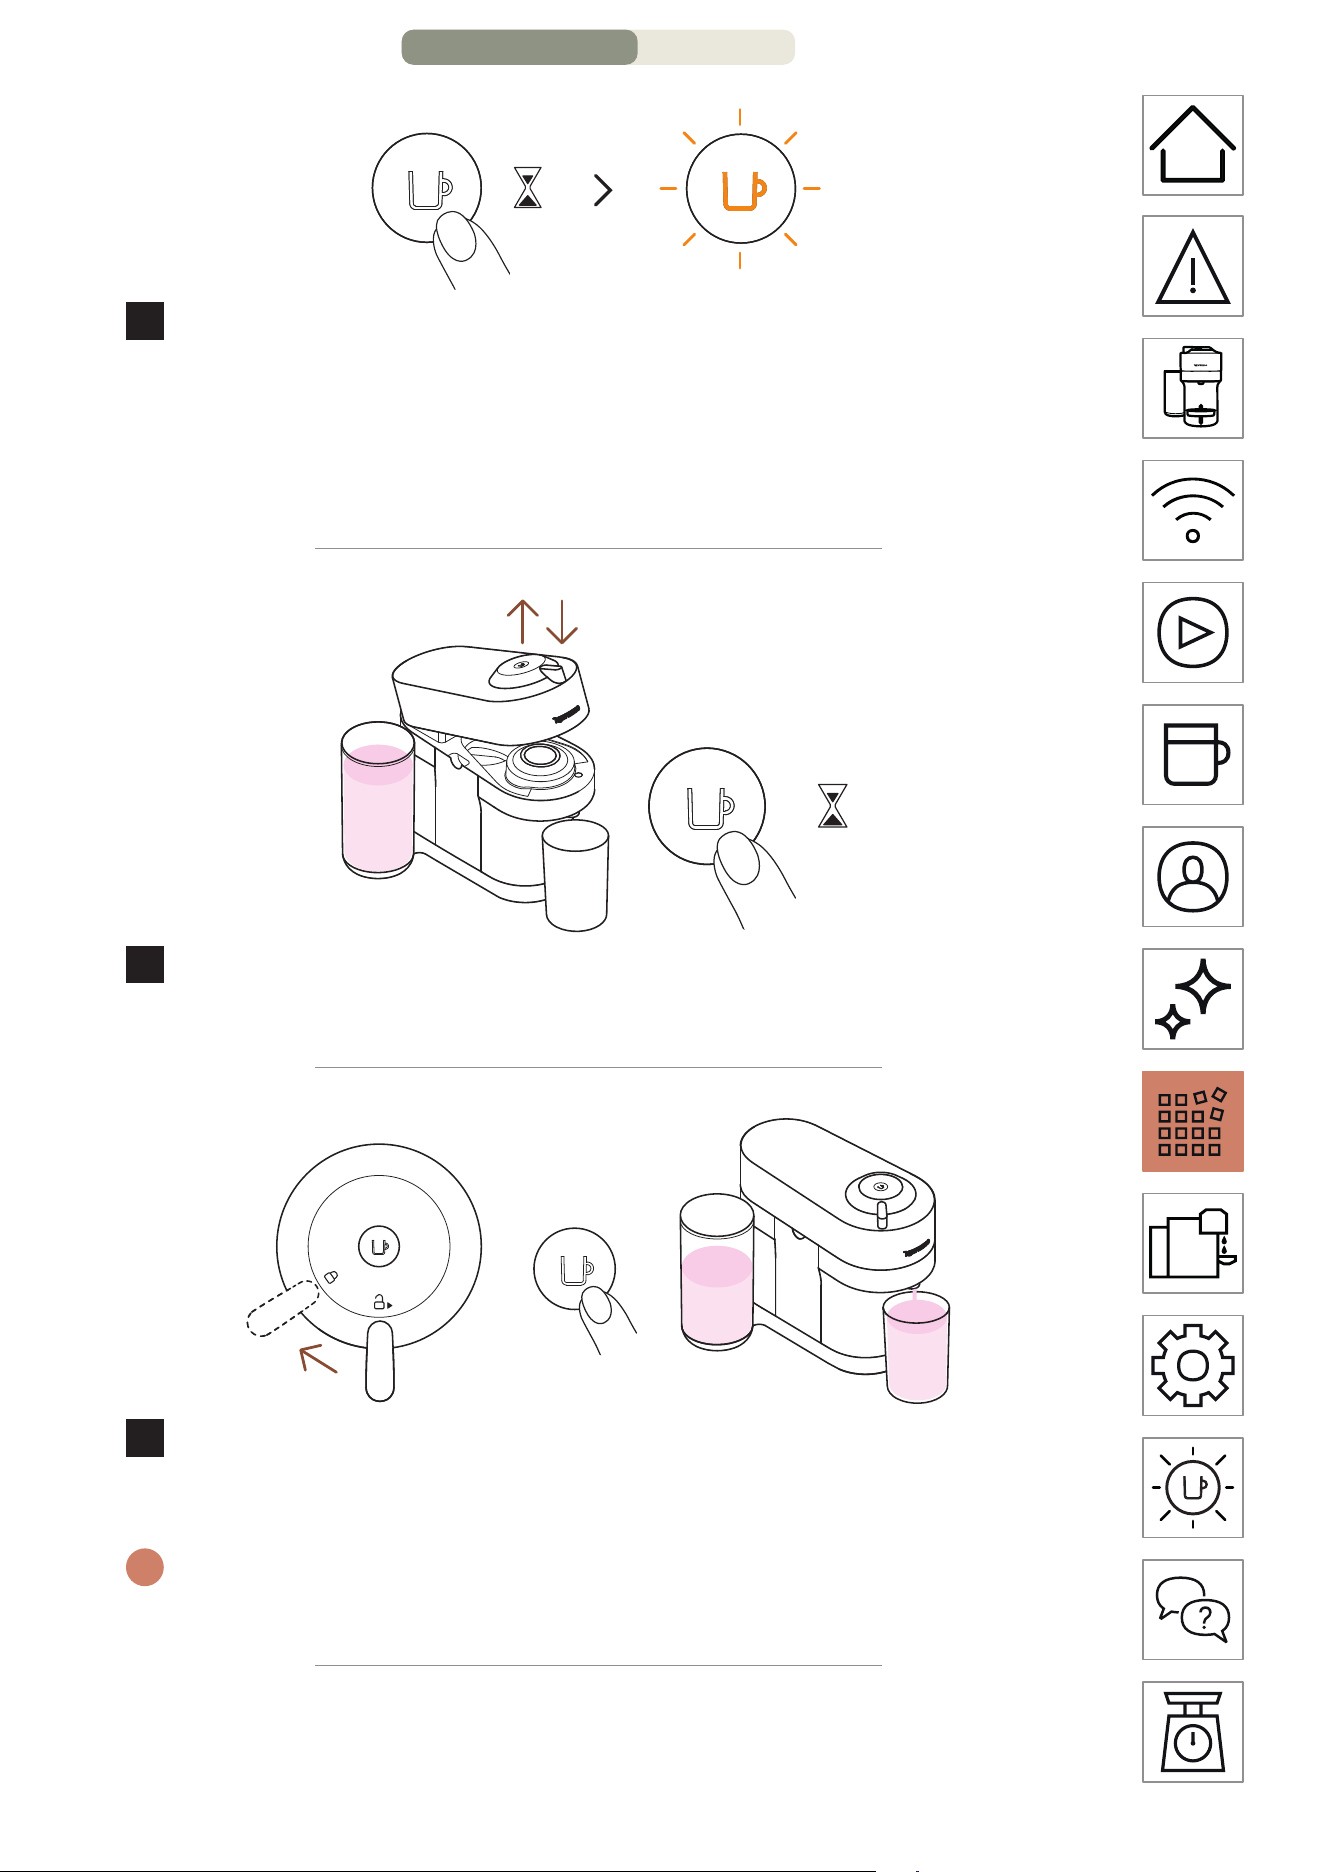
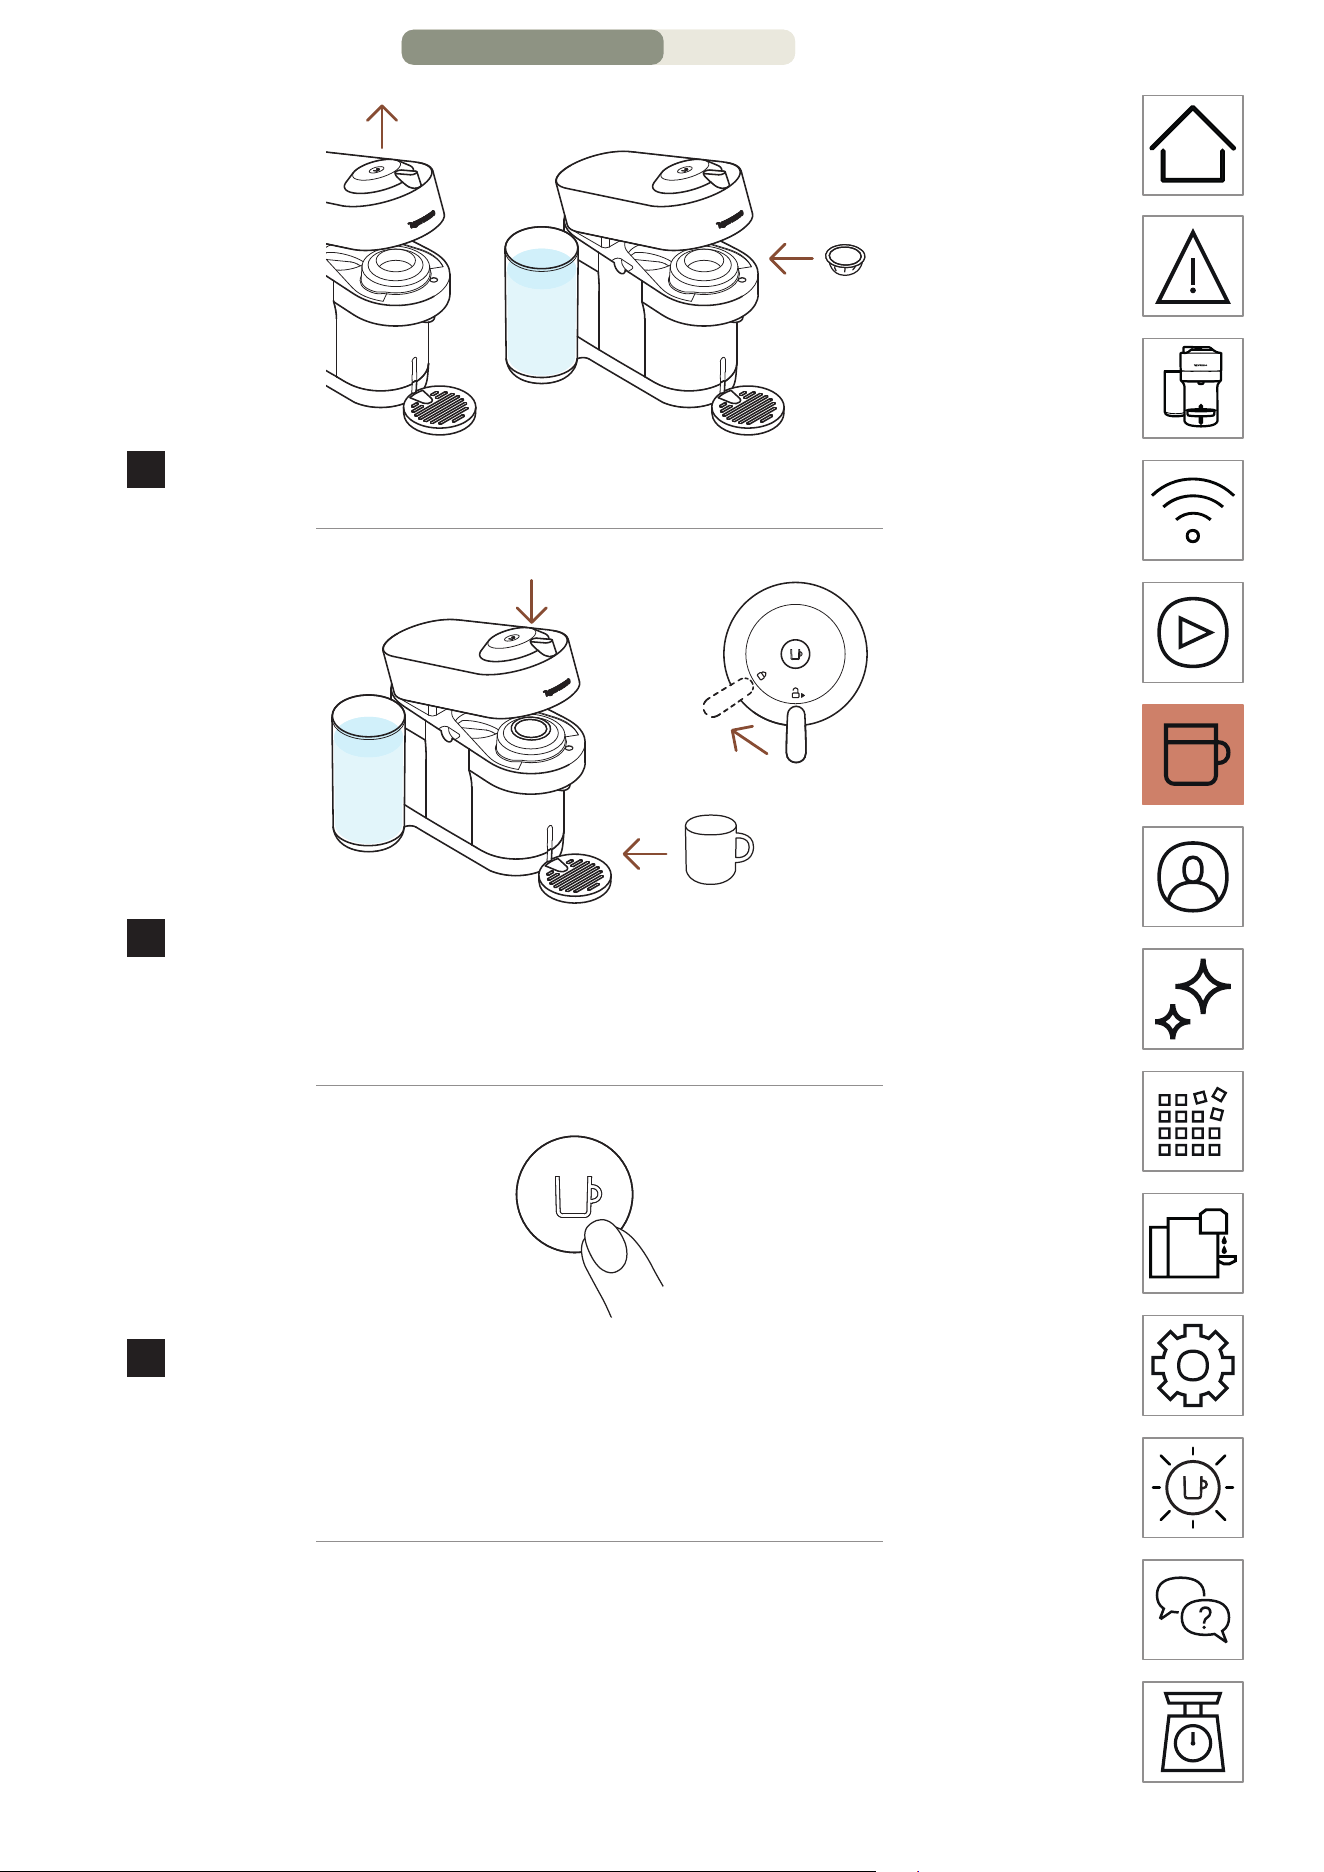
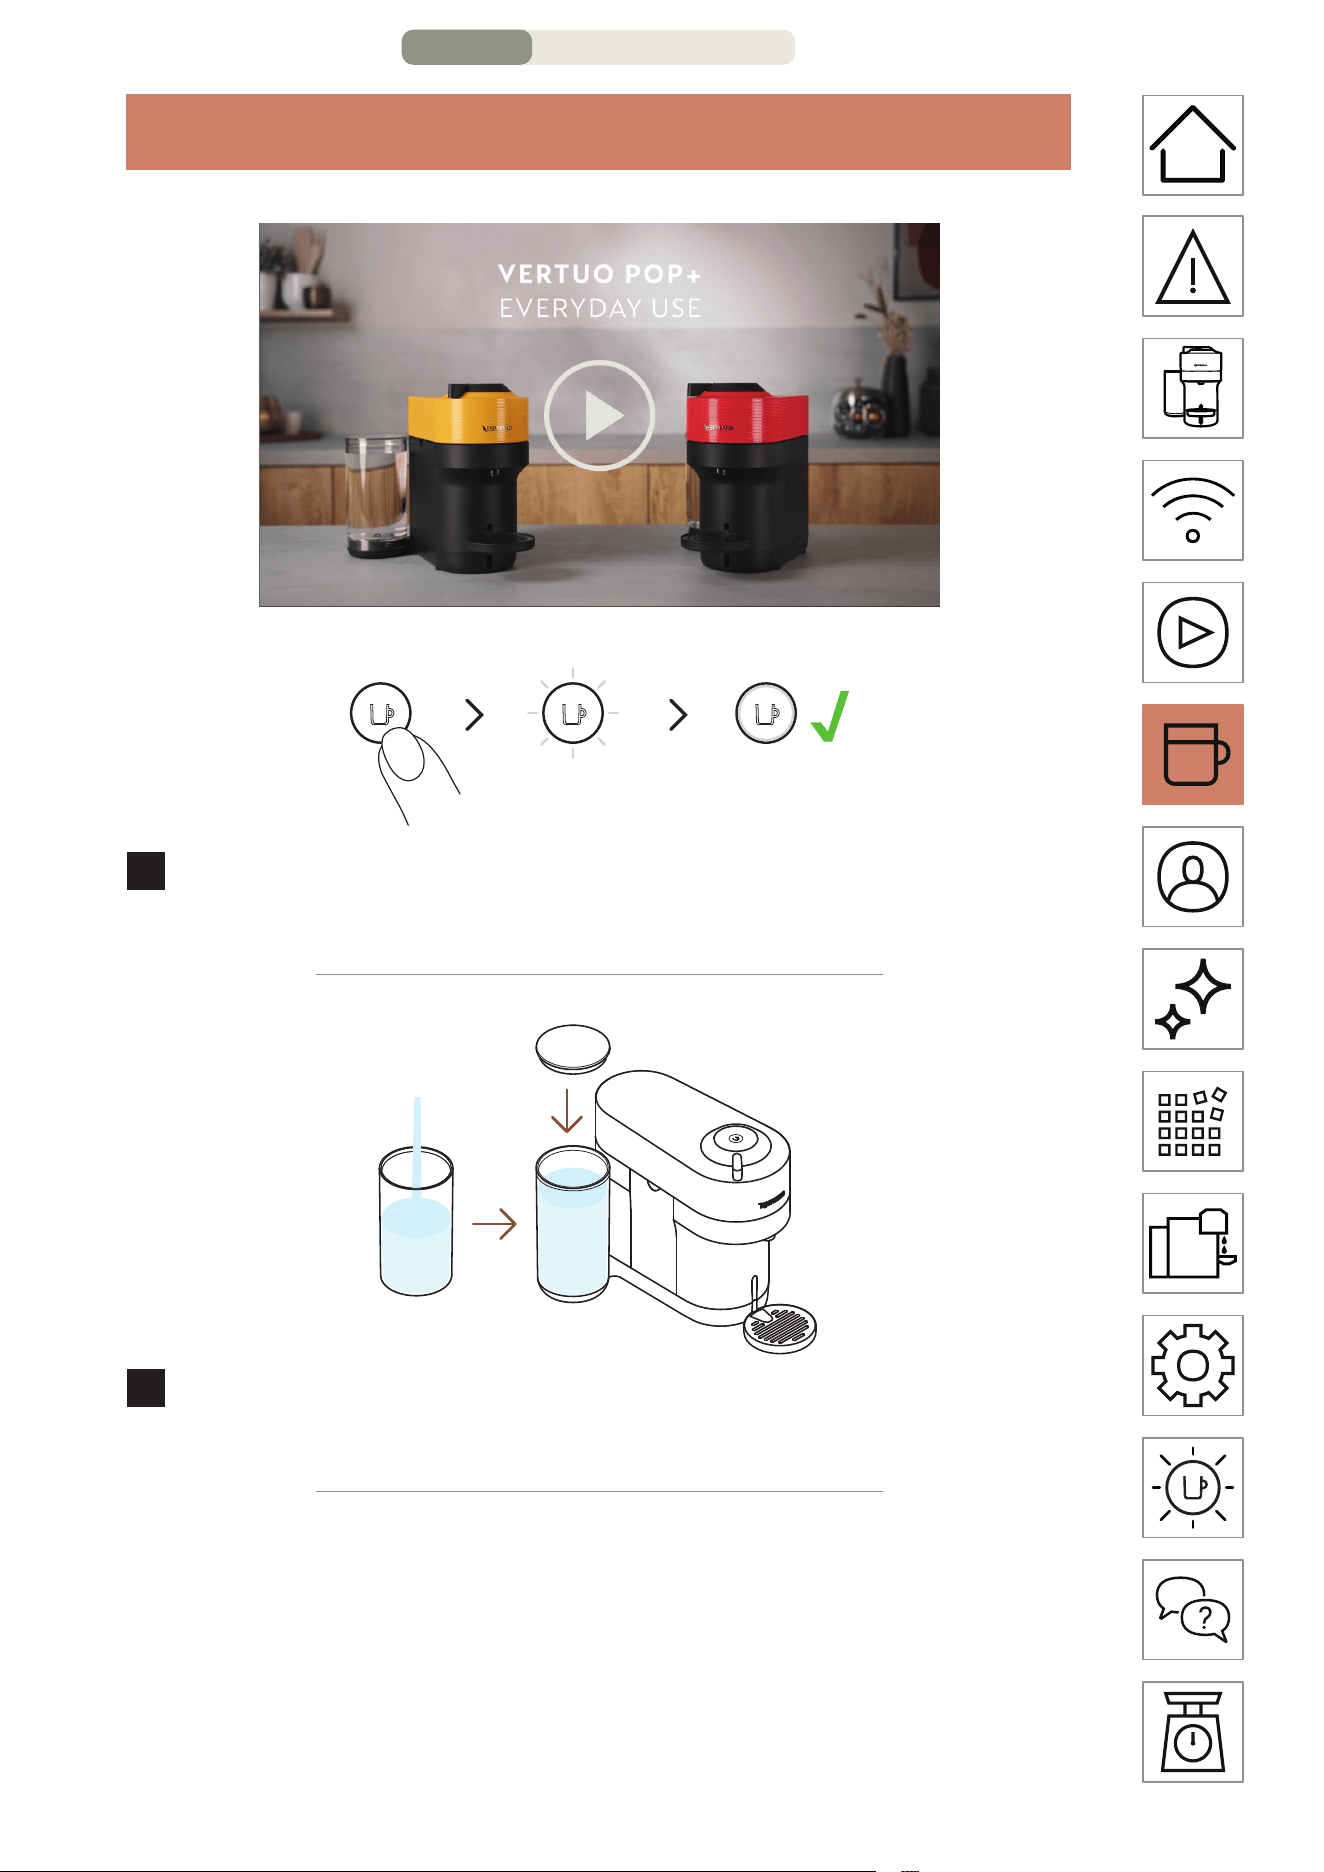
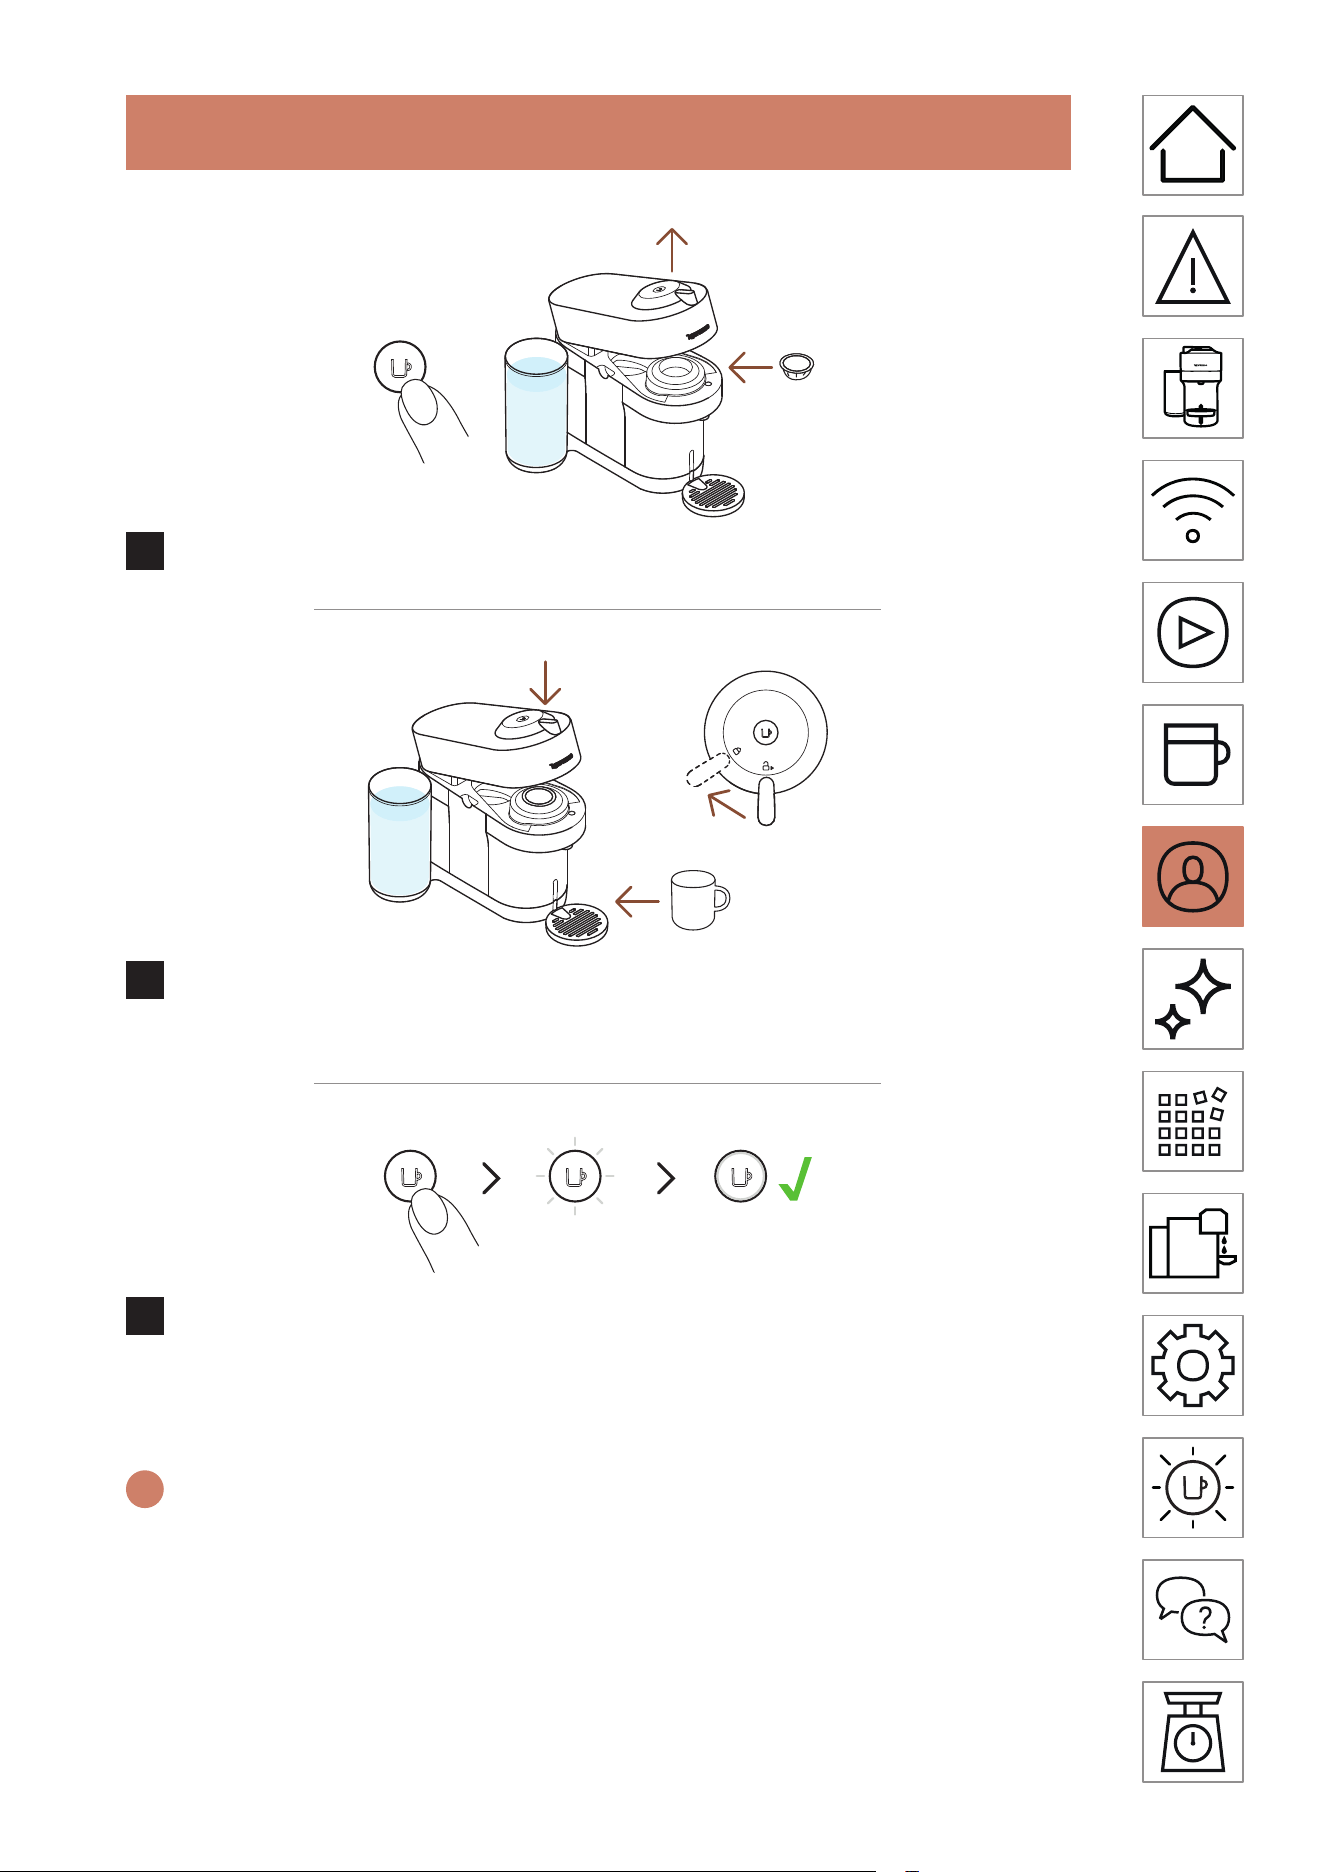
13
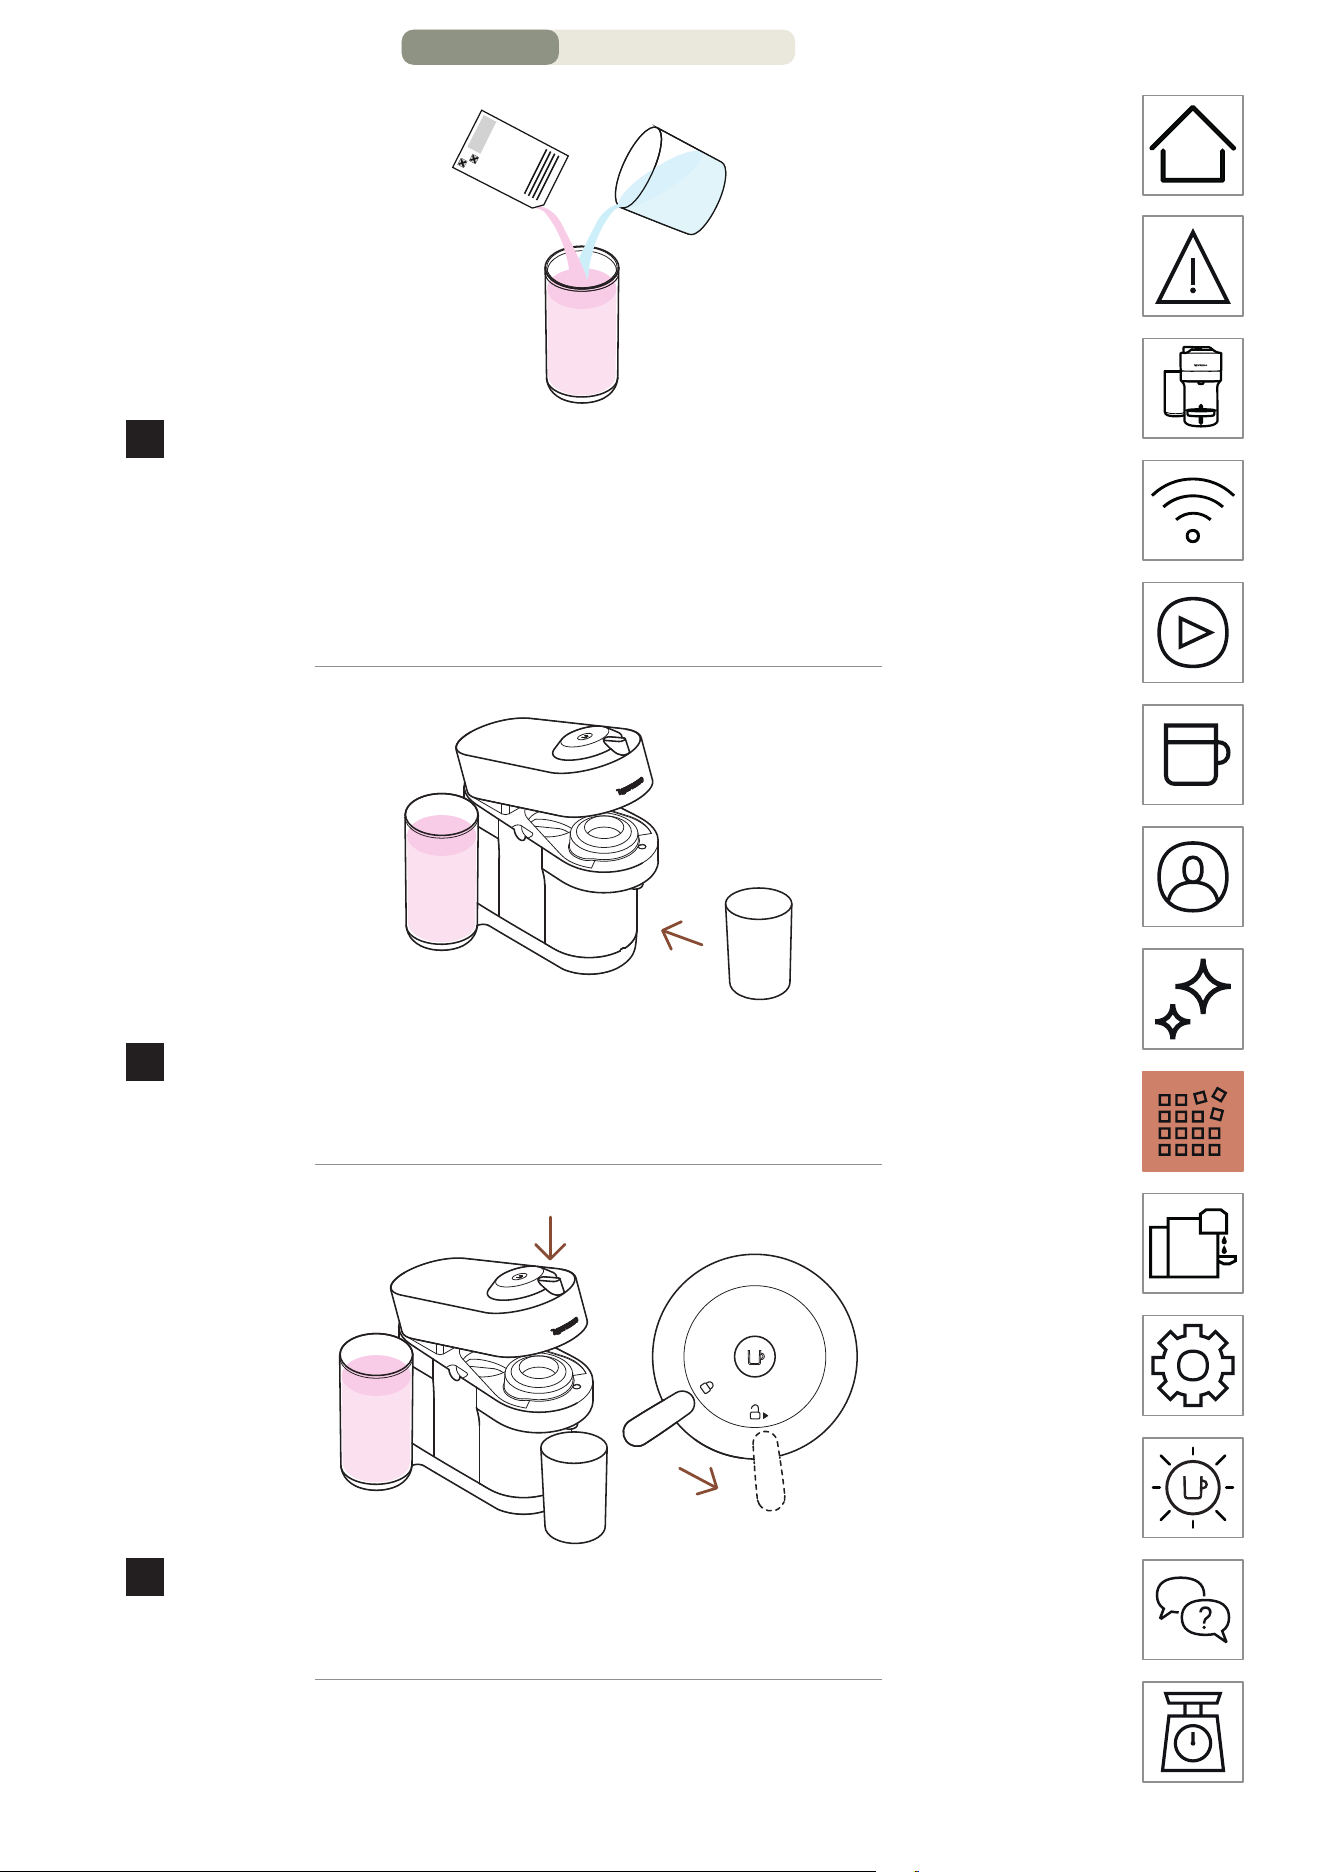
3
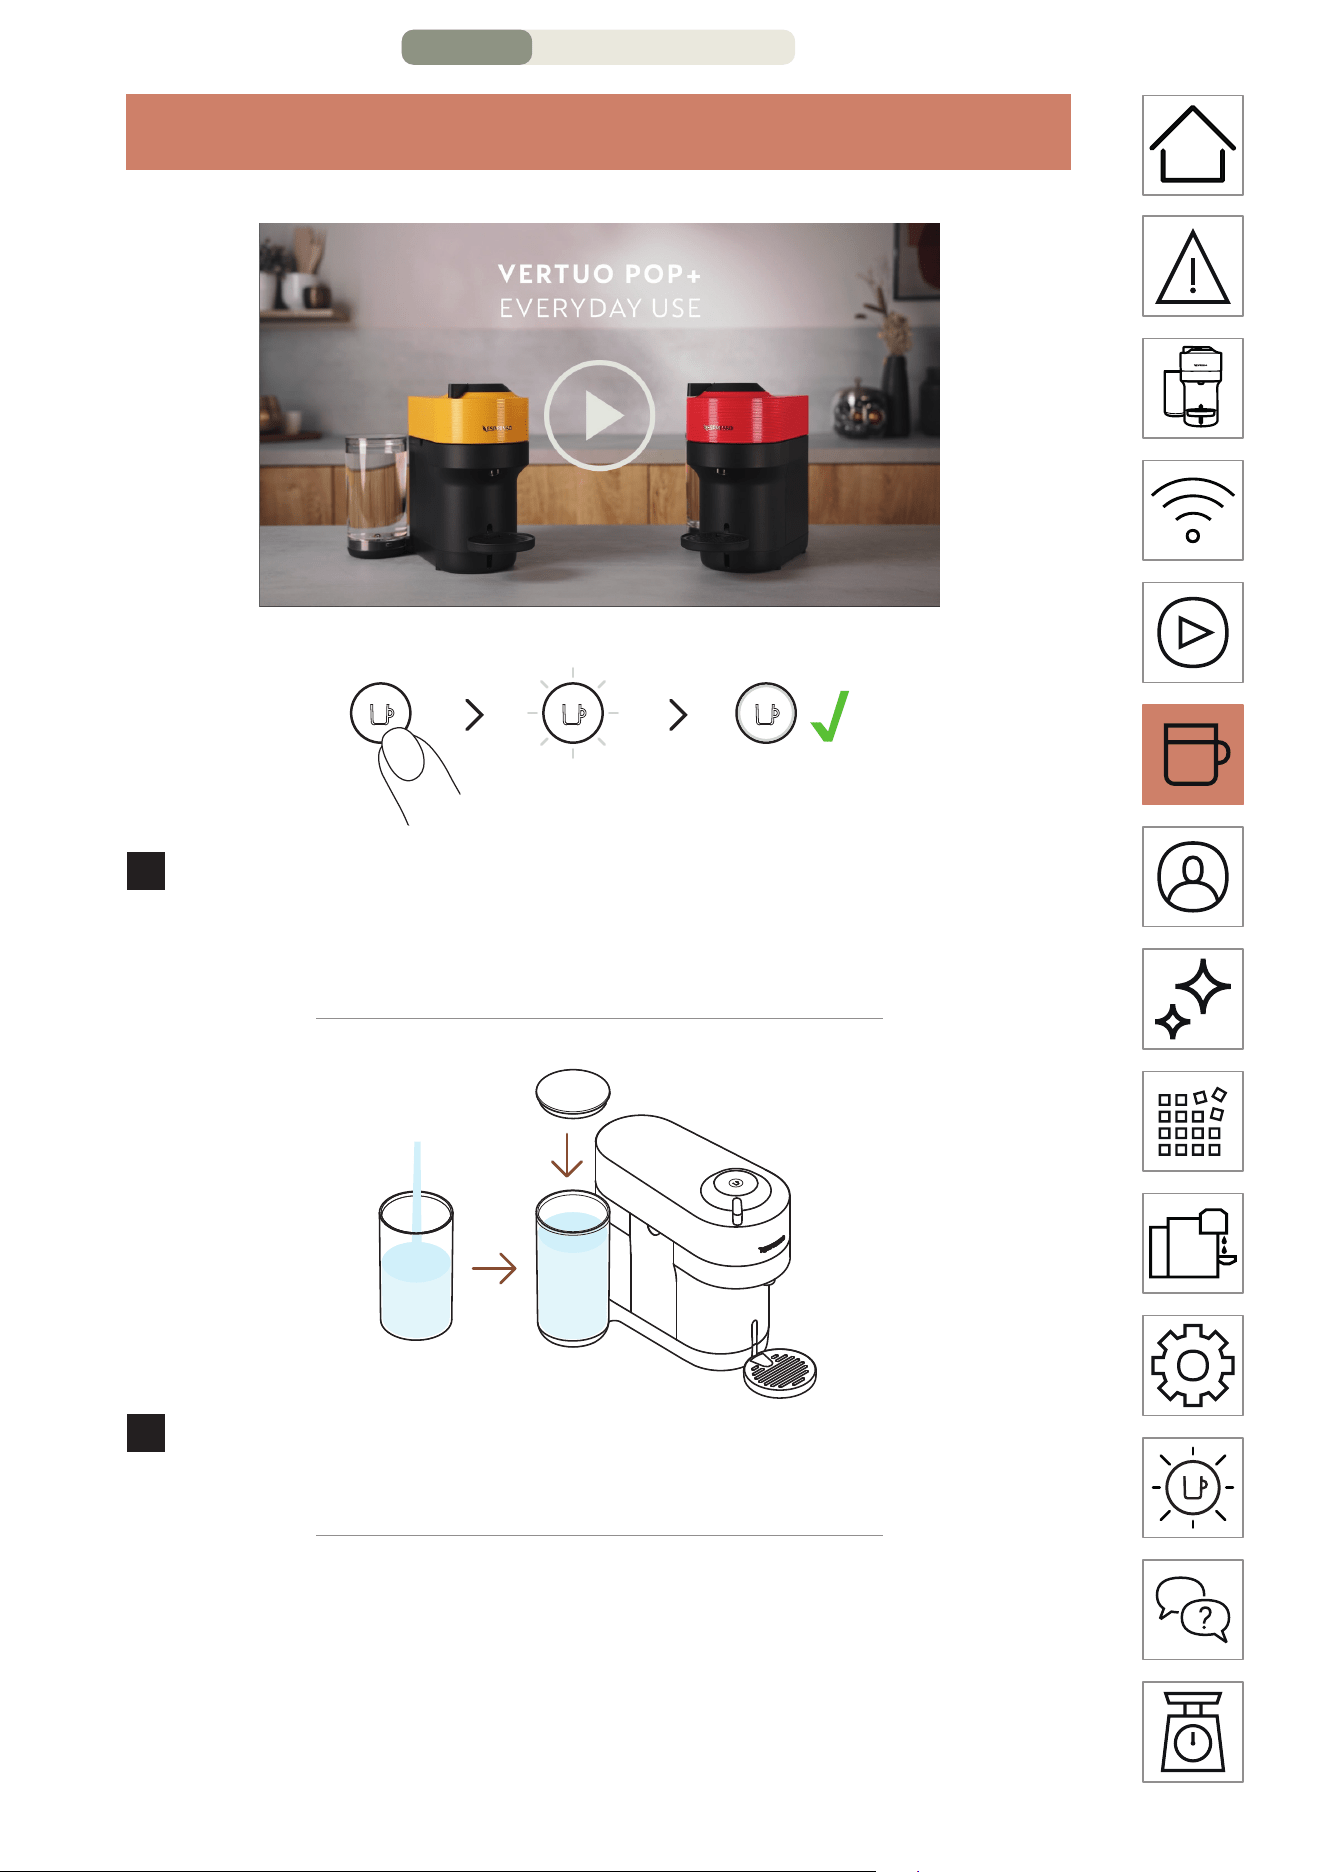
Open the machine and insert a Vertuo capsule.
4
Close the machine by turning the lever until the lock position
and place a cup. The cup support can be adjusted to
accommodate your cup size.
1x
5
Start brewing by clicking on the buon once.
NOTE: water may accumulate inside the machine’s head, please dry visible
parts with a clean dry cloth.
COFFEE PREPARATION – PAGE 2/3
EN
.
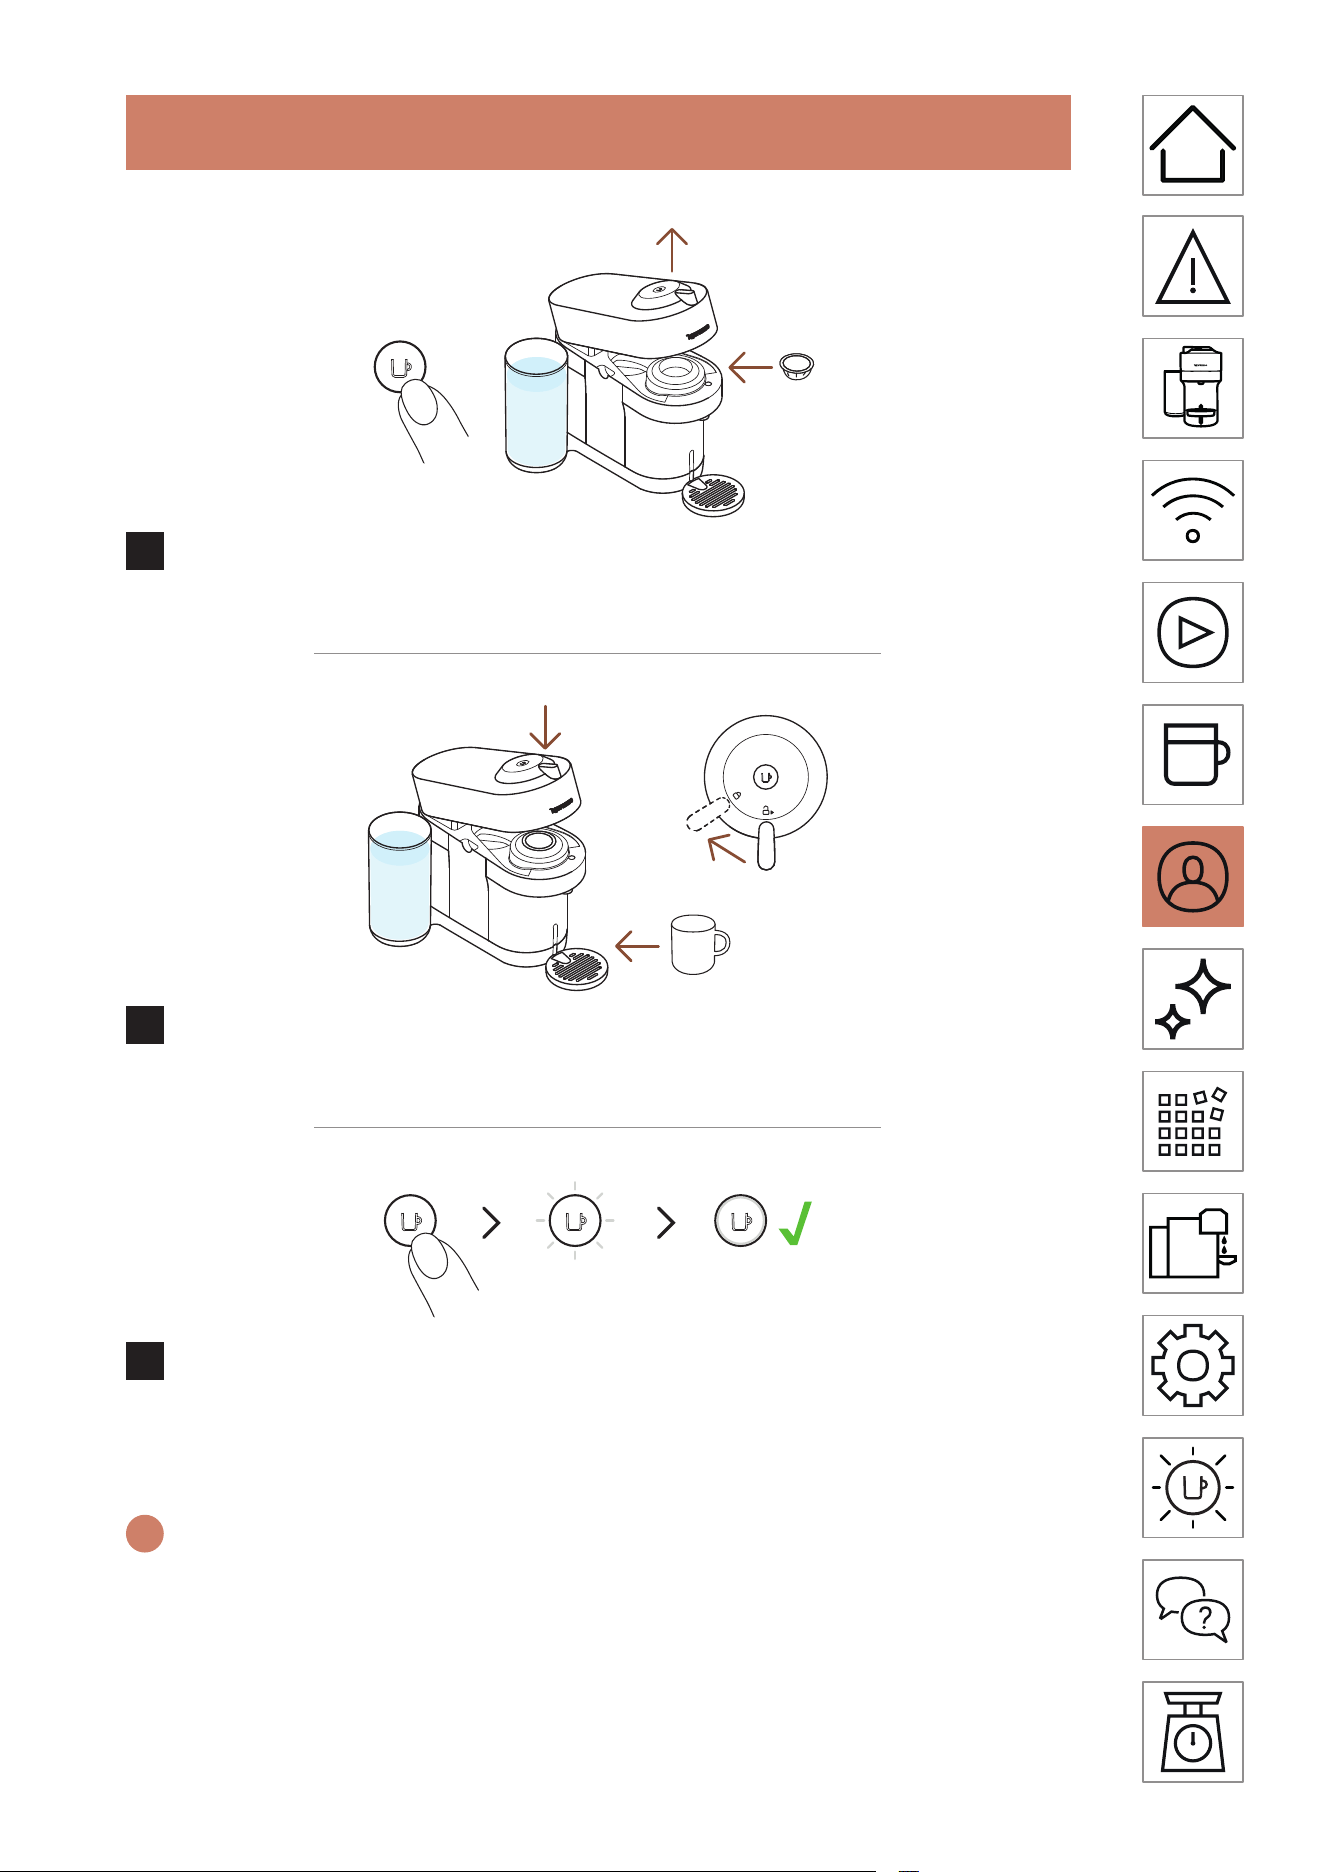
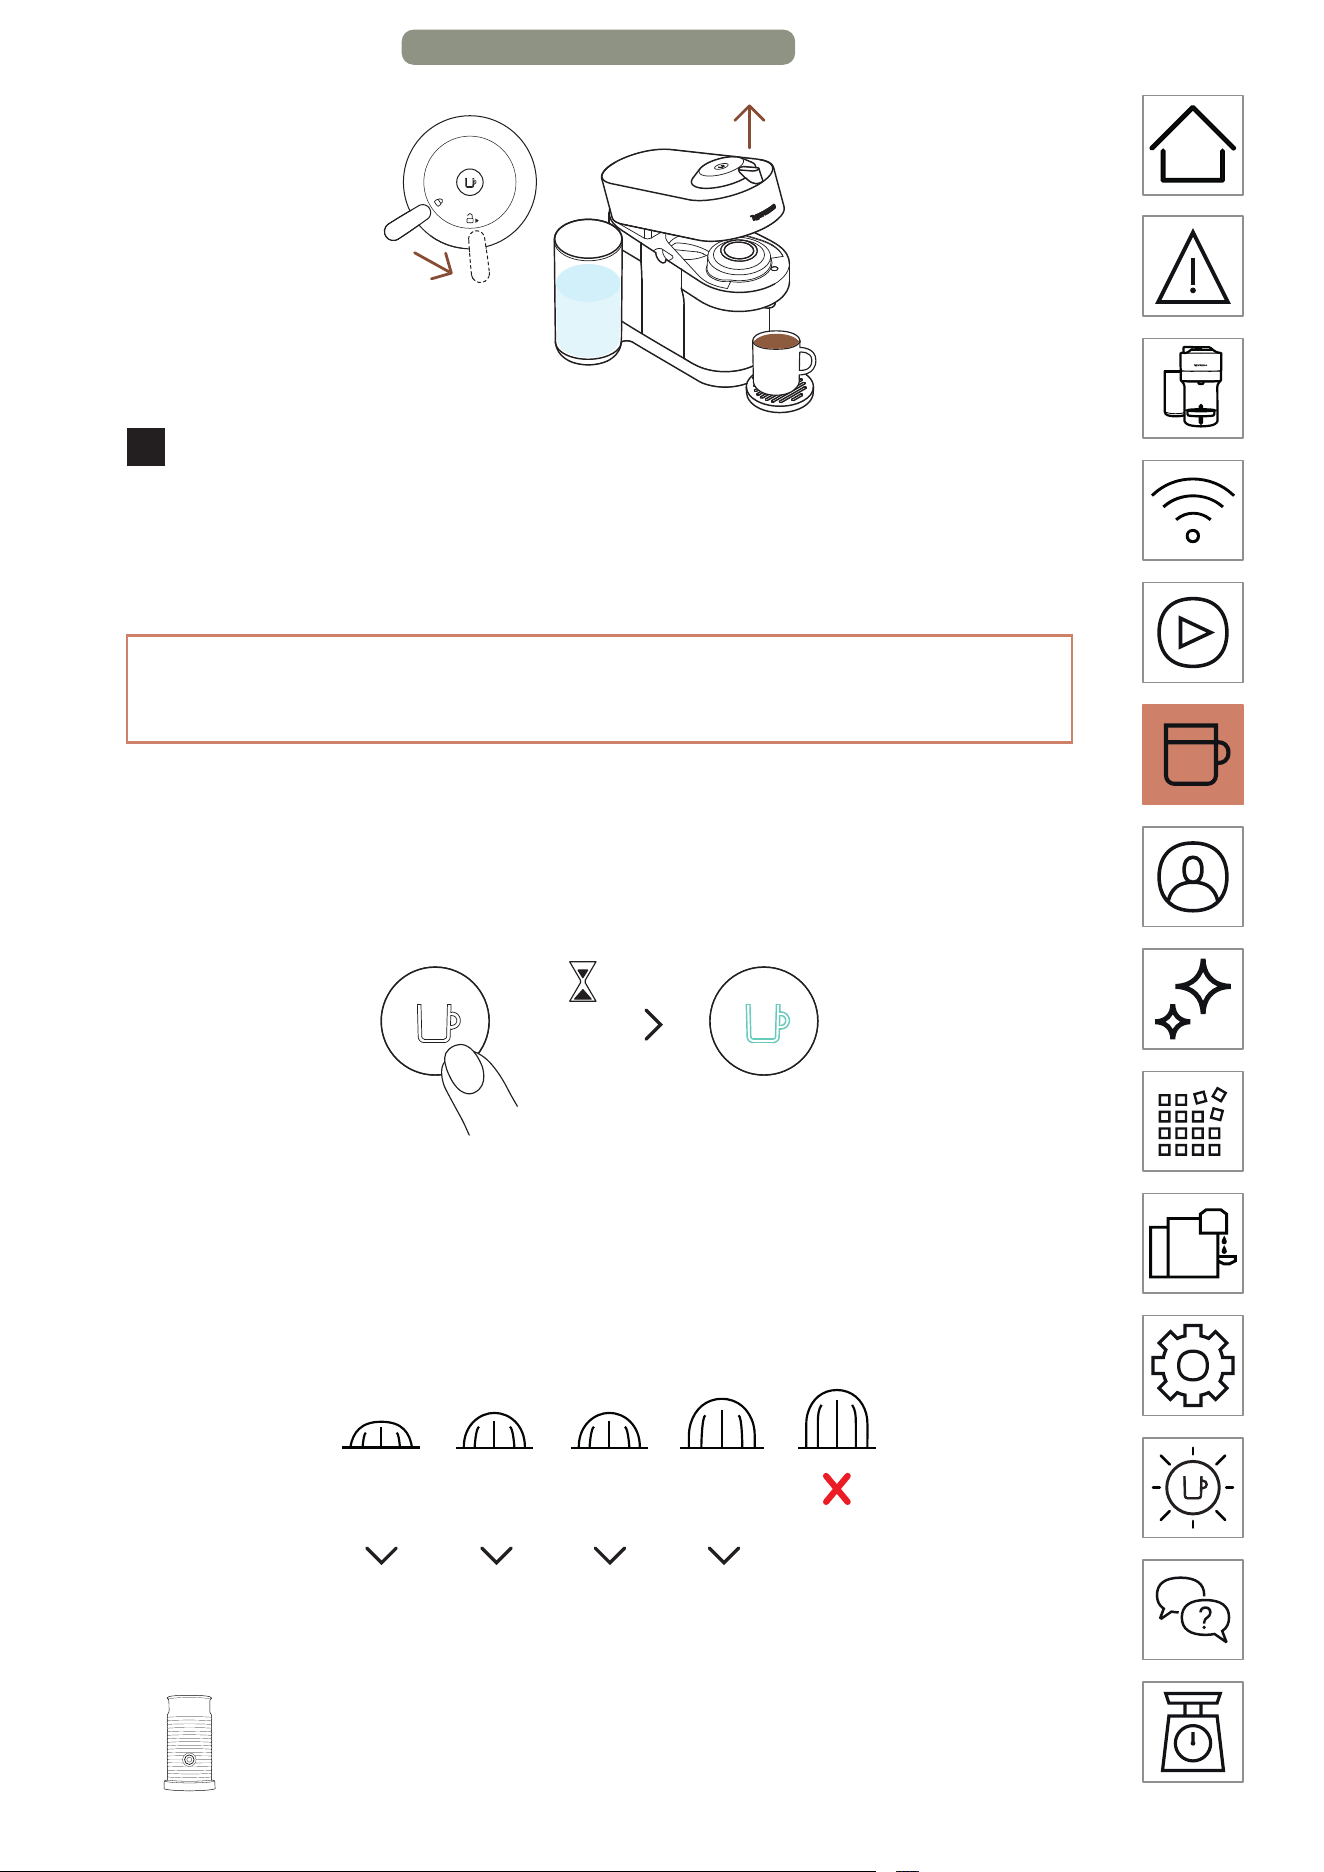
14
6
When the coee stops brewing, open the machine by
turning the lever towards the unlock position, eject the
capsule and enjoy your coee.
DISCOVER OUR CONCENTRATED EXTRACTION
FOR BARISTA RECIPES
With this machine, Nespresso oers you a specific function to
concentrate your coee extractions to create your own recipes.
2x <1s
With your machine on, quickly click 2 times on the coee buon.
It will blink turquoise and your coee brew will be concentrated,
enhancing the coee taste in recipes with add-ons (milk,
creamer, over ice...).
40 ml /
1.4 oz
80 ml /
2.7 oz
150 ml /
5.1 oz
230 ml /
7.8 oz
25 ml /
0.85 oz
40 ml /
1.4 oz
40 ml /
1.4 oz
80 ml /
2.7 oz
Discover how to upgrade your machine with our
Aeroccino range on www.nespresso.com
COFFEE PREPARATION – PAGE 3/3
EN
.
15
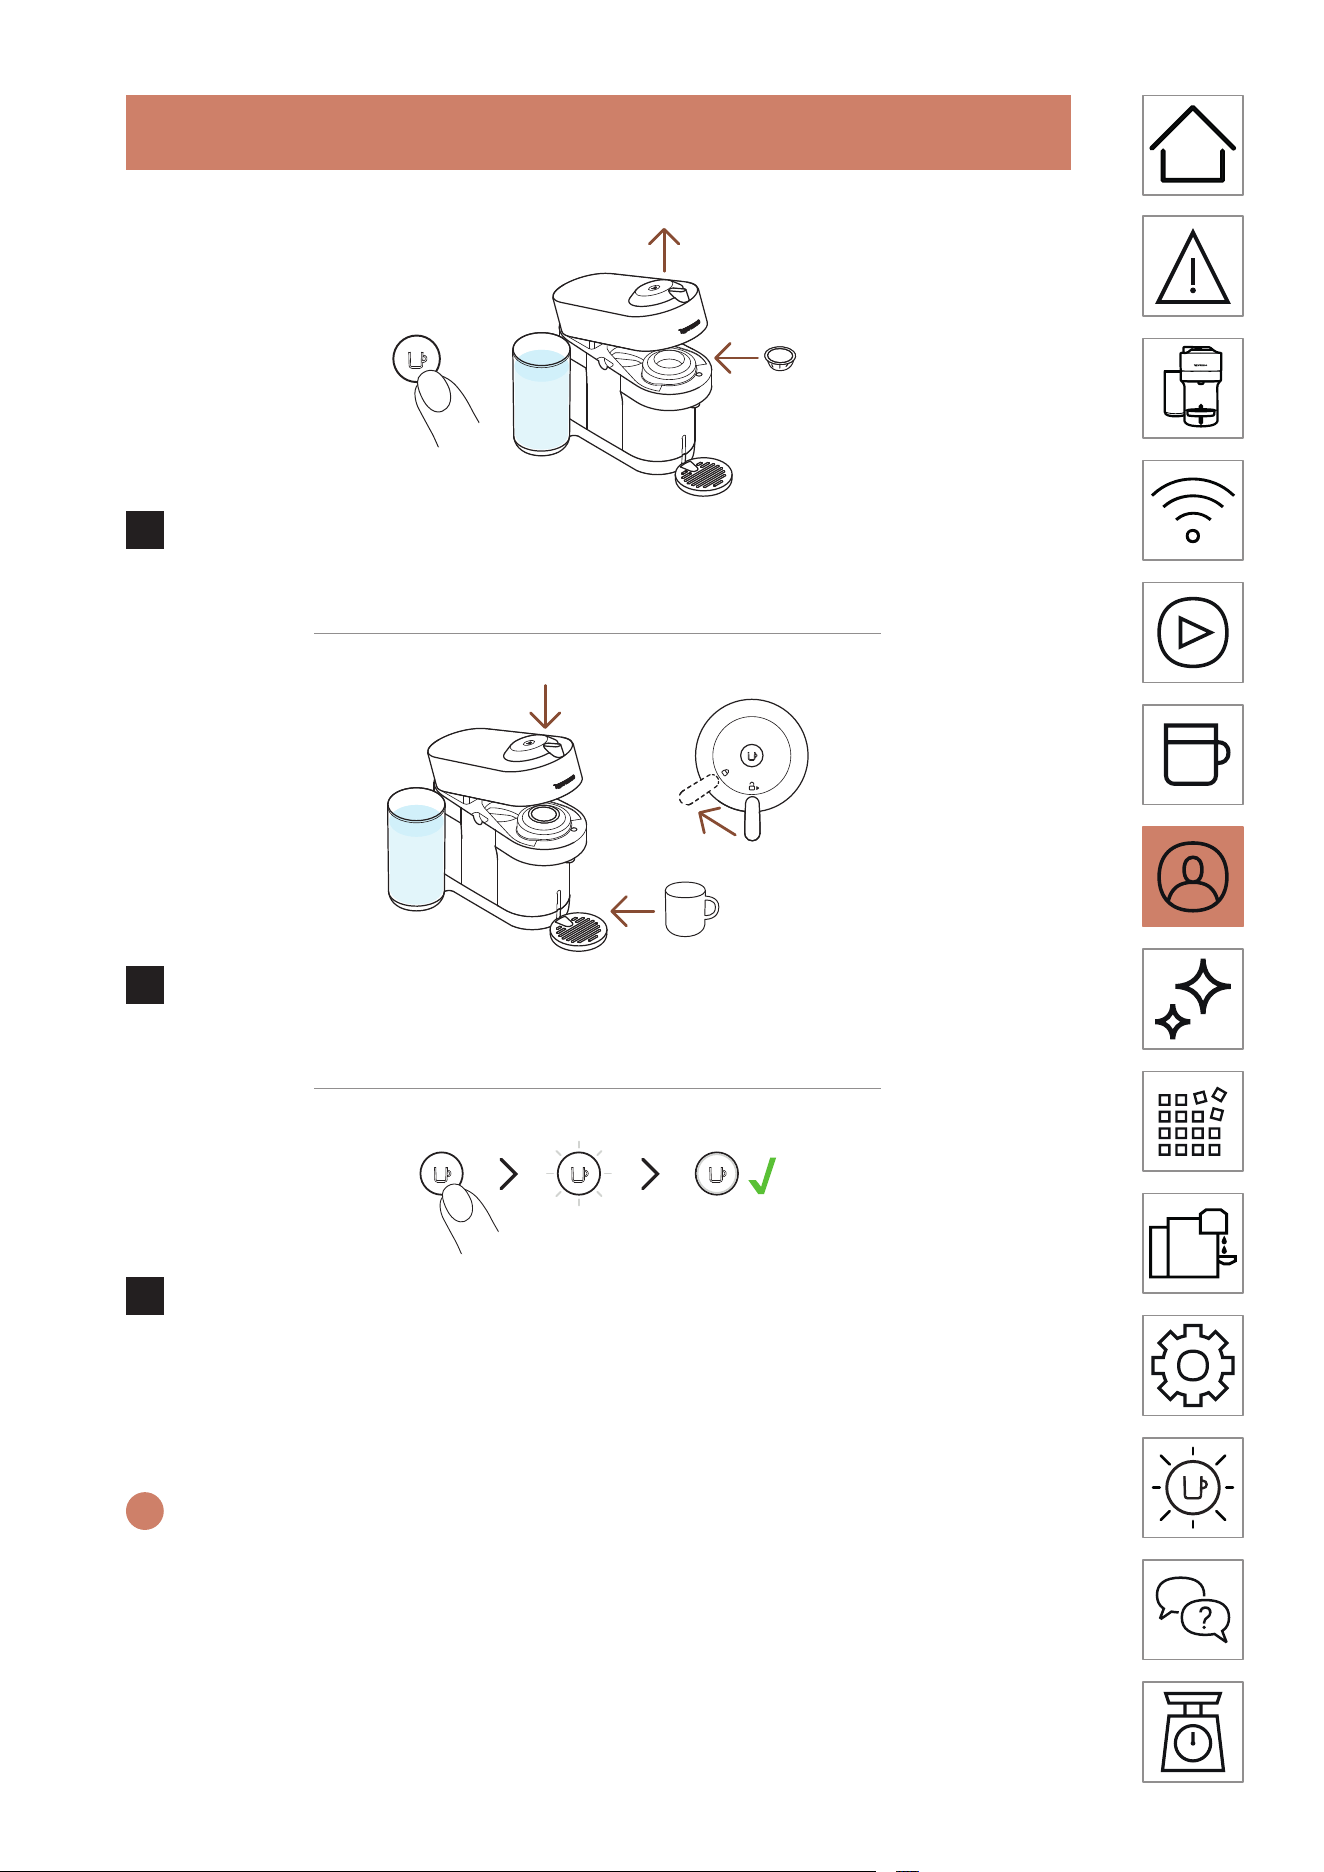
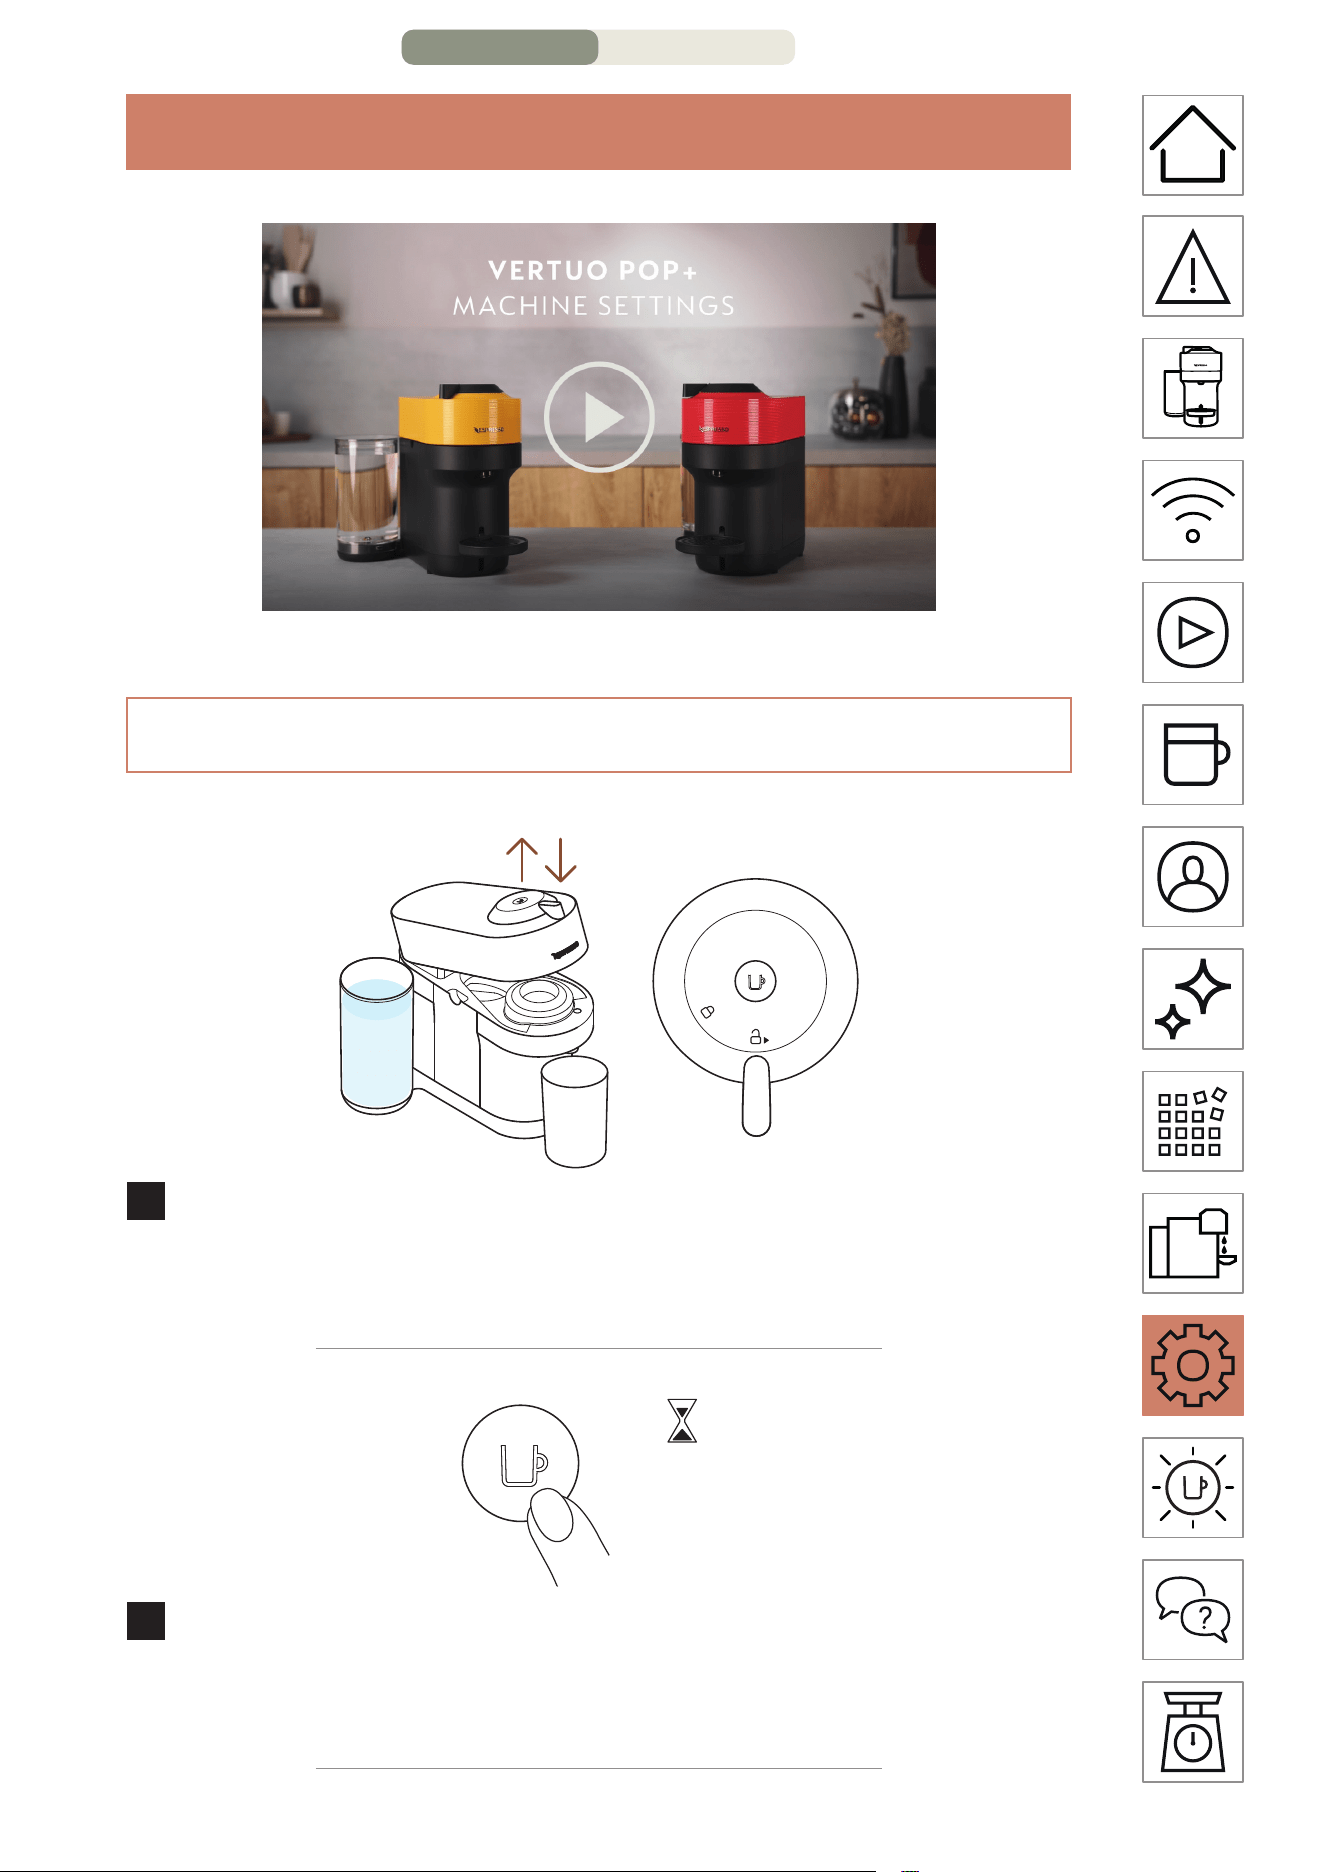
ADAPT YOUR COFFEE VOLUMES
1
Turn on the machine by clicking on the buon once, open
the machine and insert the capsule you want to brew.
2
Close the machine, turn the lever towards the lock position
and place a cup.
3
Press and hold the buon until the desired volume is
reached. The new water volume is now programmed for the
capsule type used during the seing.
i
The programming is specific to each capsule type. Cup sizes may be
programmed from 20 ml / 0.7 oz to 535 ml / 18 oz.
NOTE: Once a customer-specific volume is programmed by the user,
every time that capsule type is inserted in the machine, the preparation
will stop at the user-programmed cup size. If you wish to come back to the
default parameters see the paragraph “Reset to factory seings”.
EN
.
16
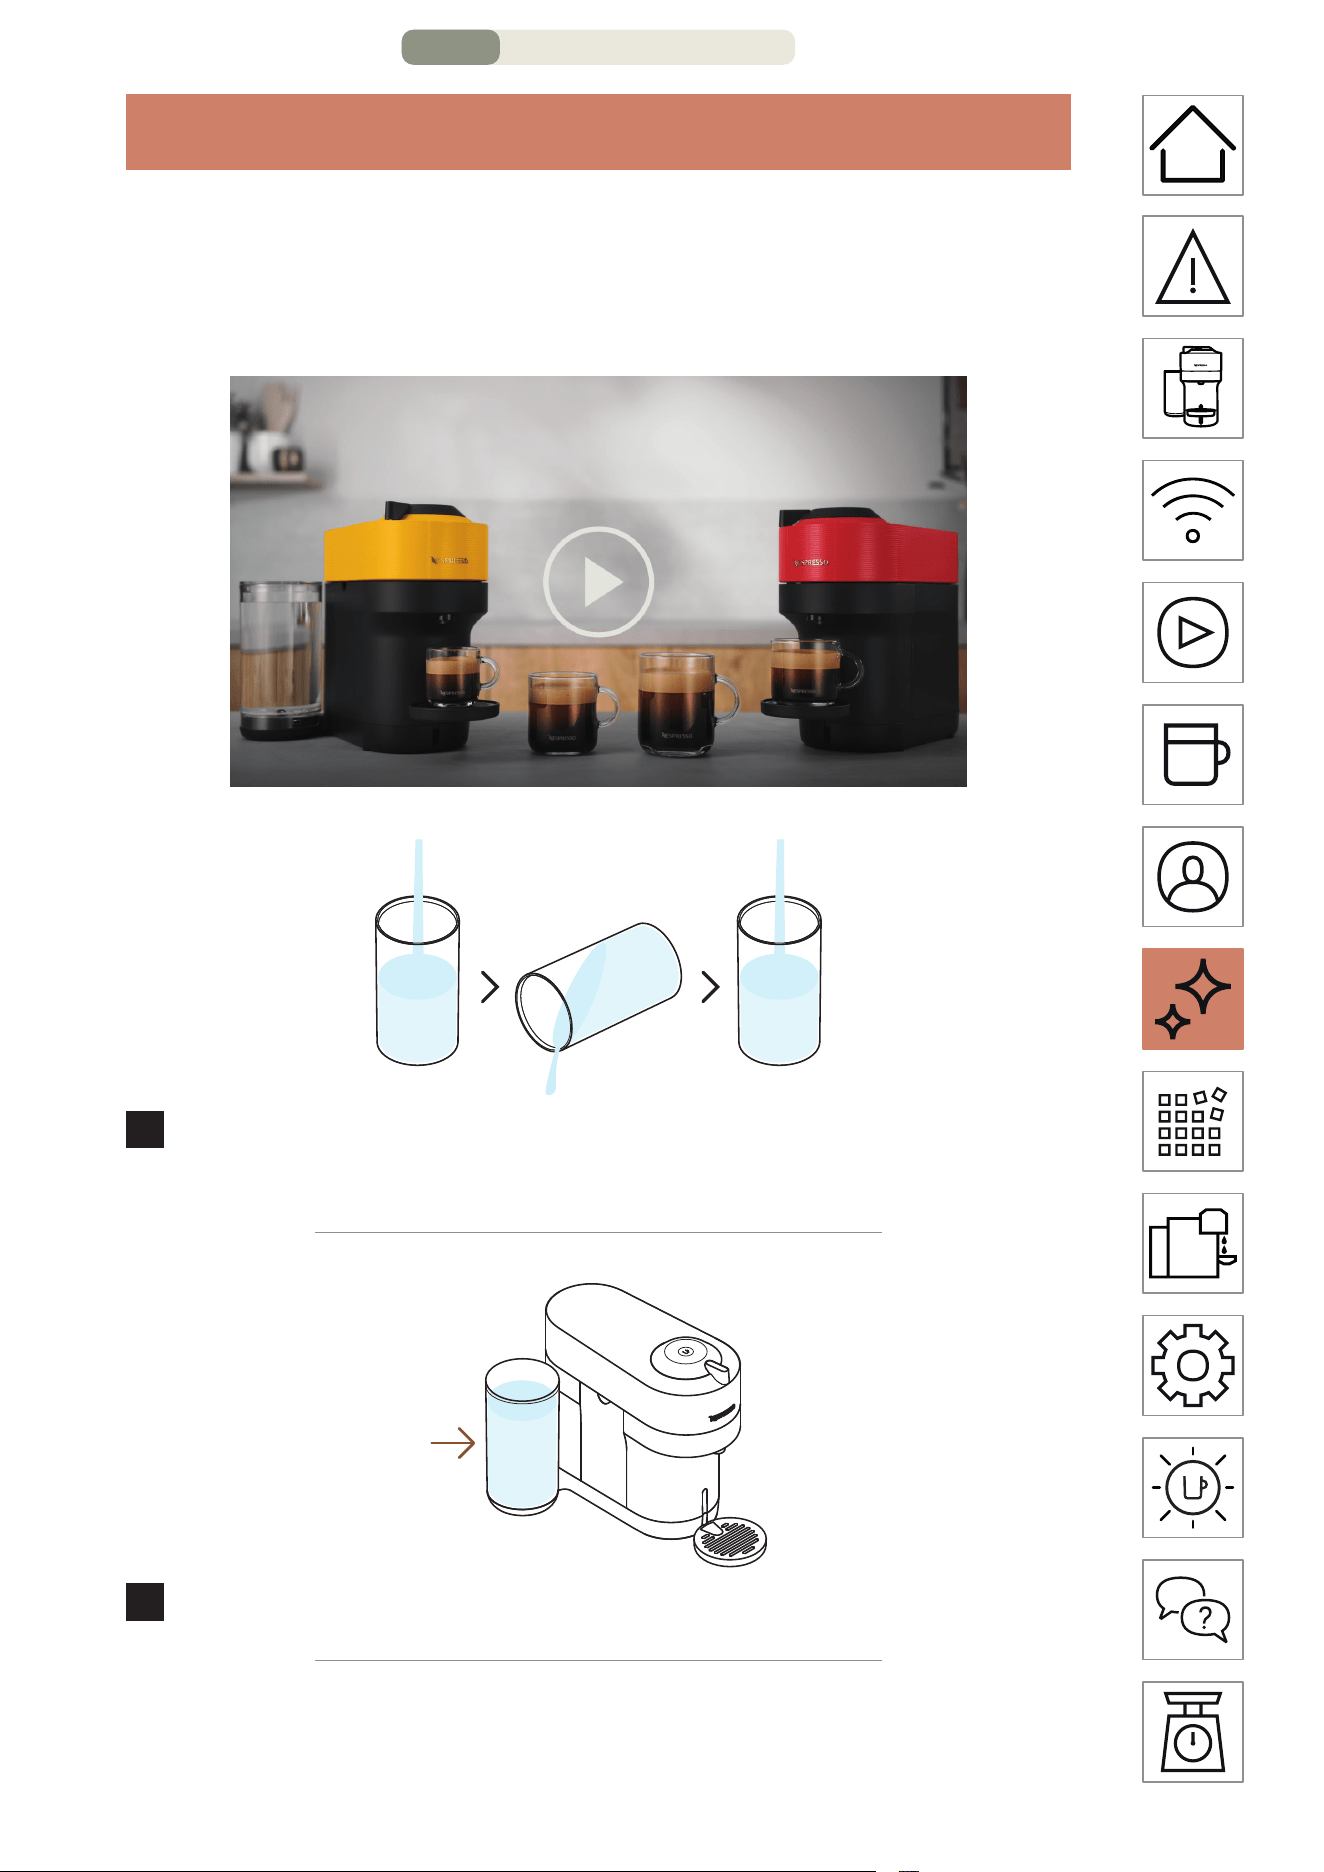
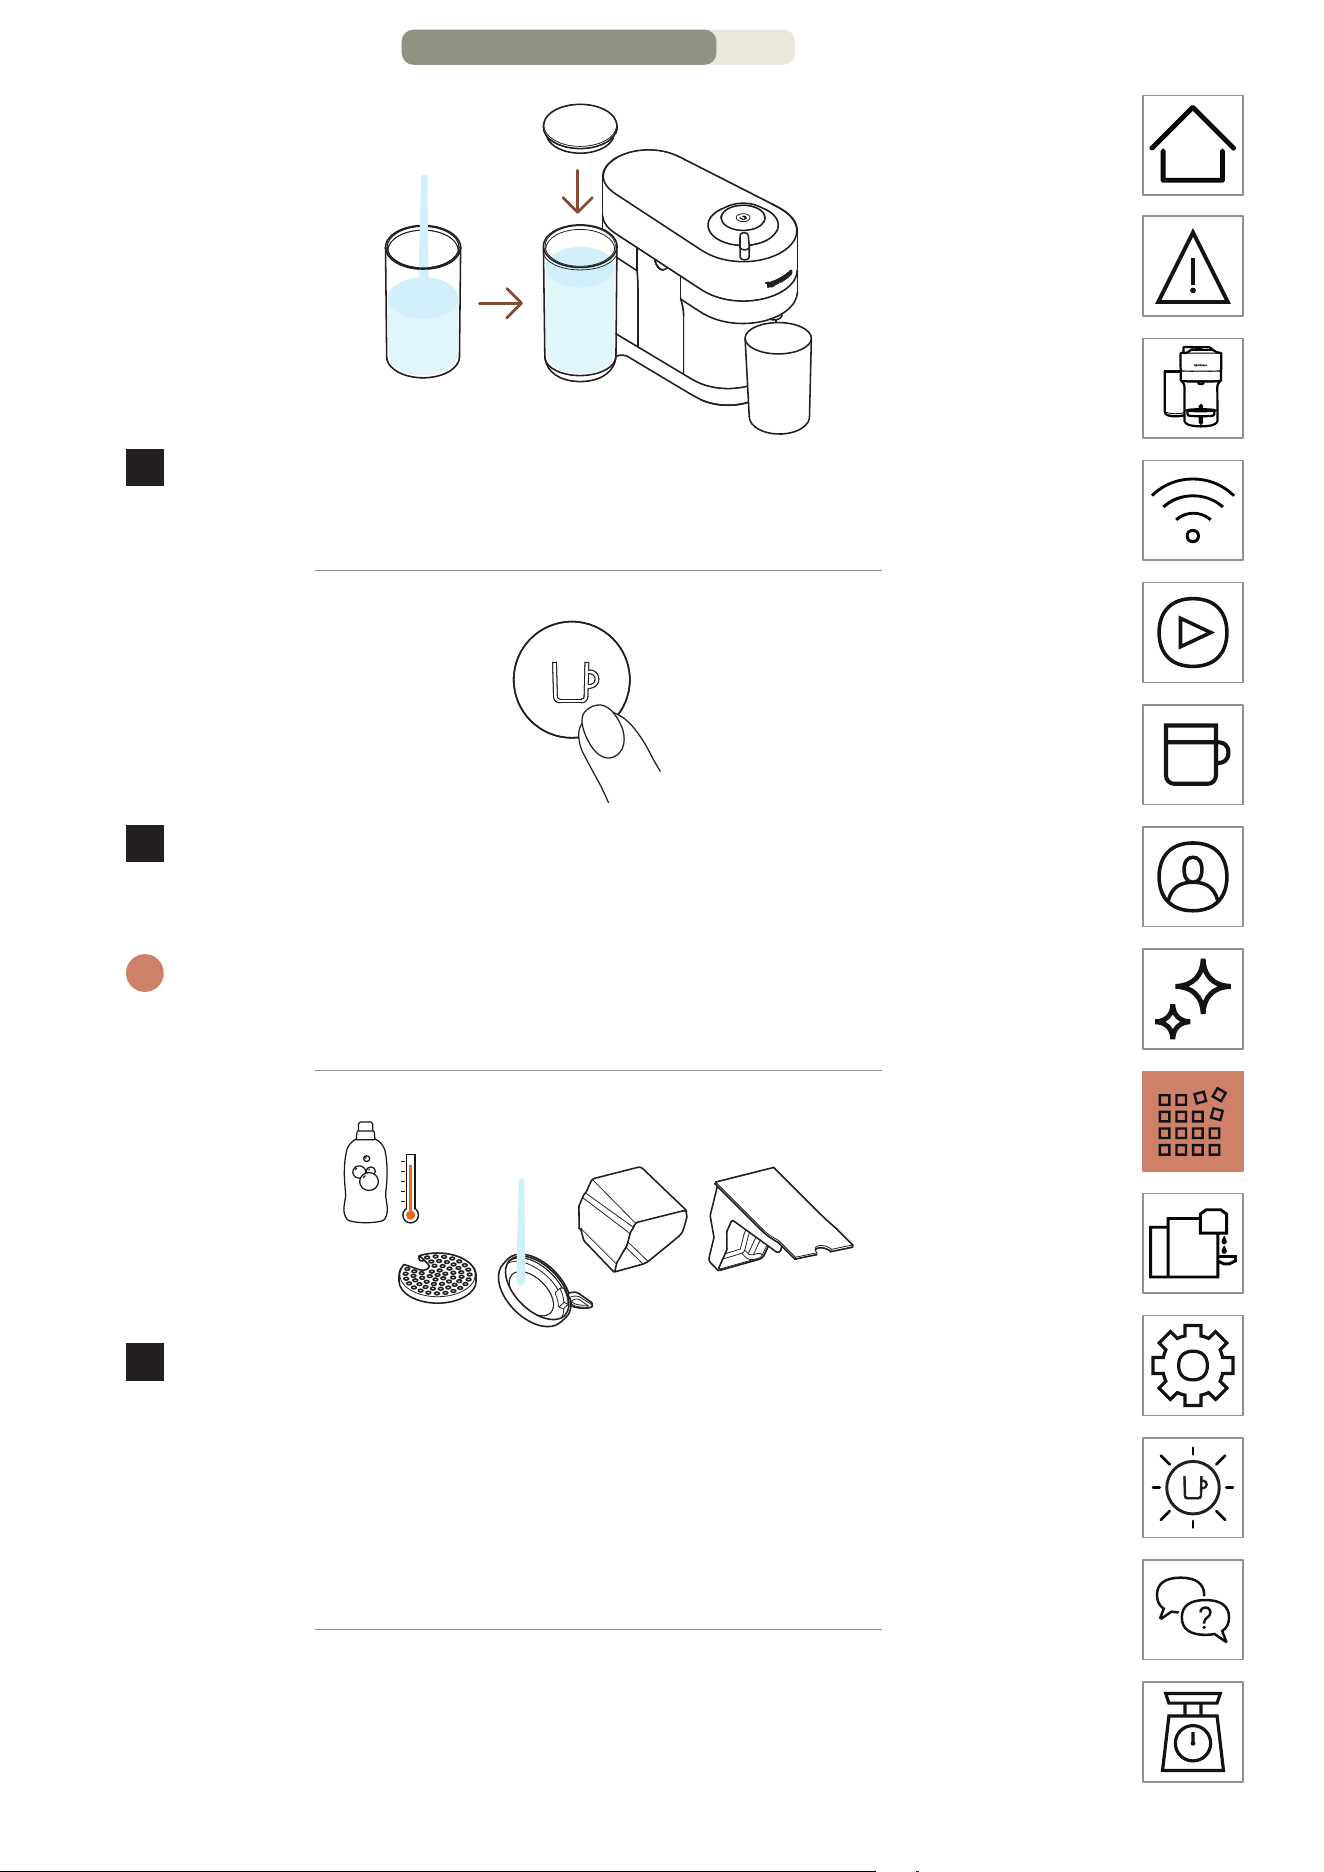
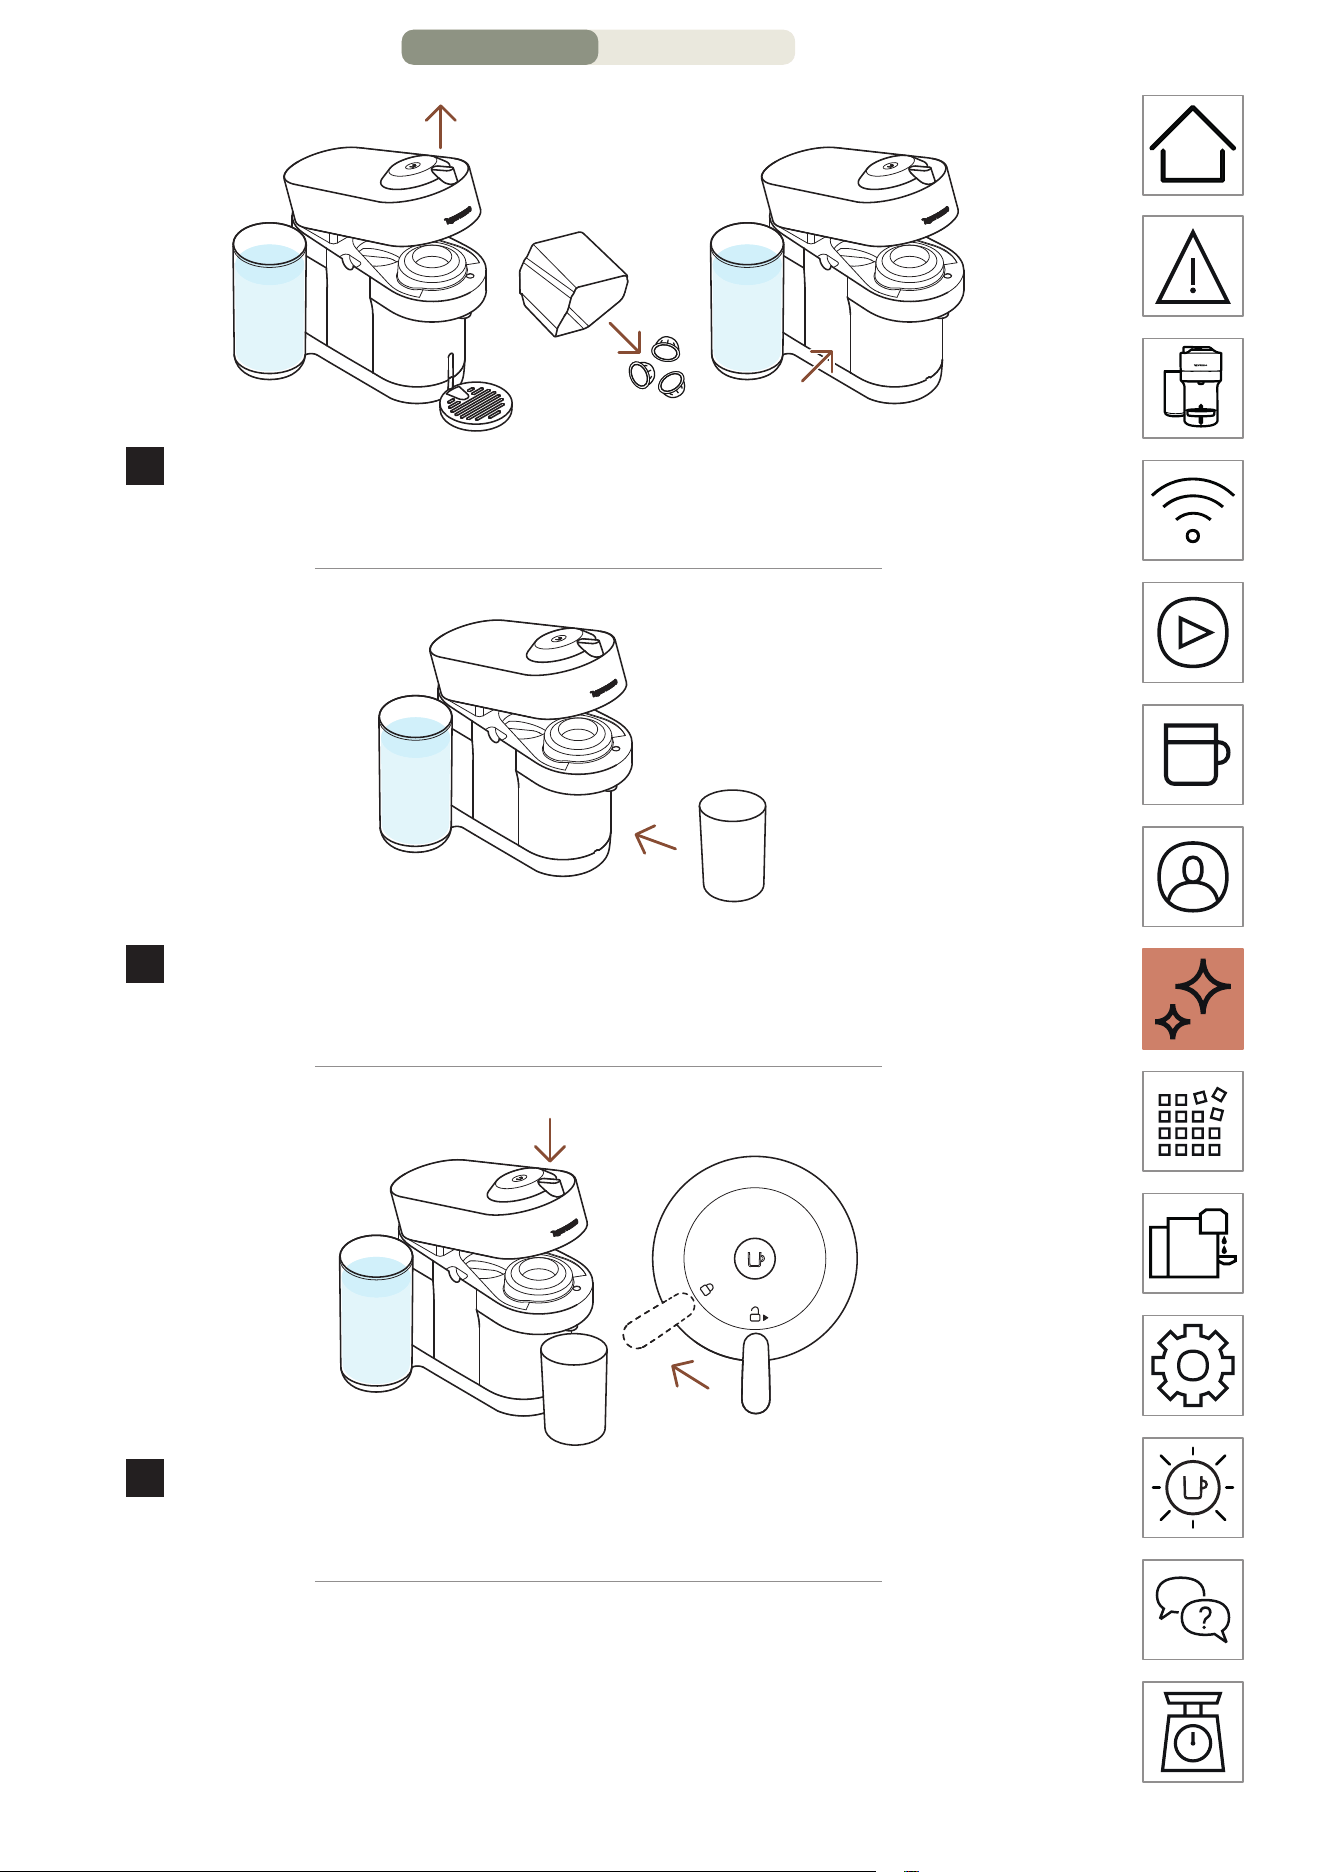
CLEANING
Clean your machine on a monthly basis, when you start having
coee residue inside the machine head or aer a long period of
non-use.
1
Rinse and clean the water tank and the lid before filling it
with fresh potable water.
2
Put the water tank back in position on the machine.
CLEANING – PAGE 1/4

EN
.
17
3
Open the machine and let the used capsule be ejected.
Empty the capsule container and put it back in place.
1 L / 34 oz
4
Remove the cup support and place an empty container
(at least 1 L / 34 oz) under the coee outlet.
5
Close the machine head and turn the lever le towards lock
position.
CLEANING – PAGE 2/4
EN
.
18
3x <2s
6
With the machine on, press the buon 3 times within
2 seconds.
~7min
7
The cleaning procedure will run automatically for ~7 minutes.
A steady light appears when the cleaning is done.
i
It takes ~2 minutes before water begins to flow out of the coee
outlet. The procedure can be stopped at any time by pressing the
buon.
8
Wash the capsule container, the cup support and the drip
tray with hot water and mild odourless detergent.
CAUTION: Do not use any strong or abrasive cleaning agent or solvent
cleaner. Do not put the machine in a dishwasher. Never immerse the
appliance or part of it in water.
CLEANING – PAGE 3/4

EN
.
19
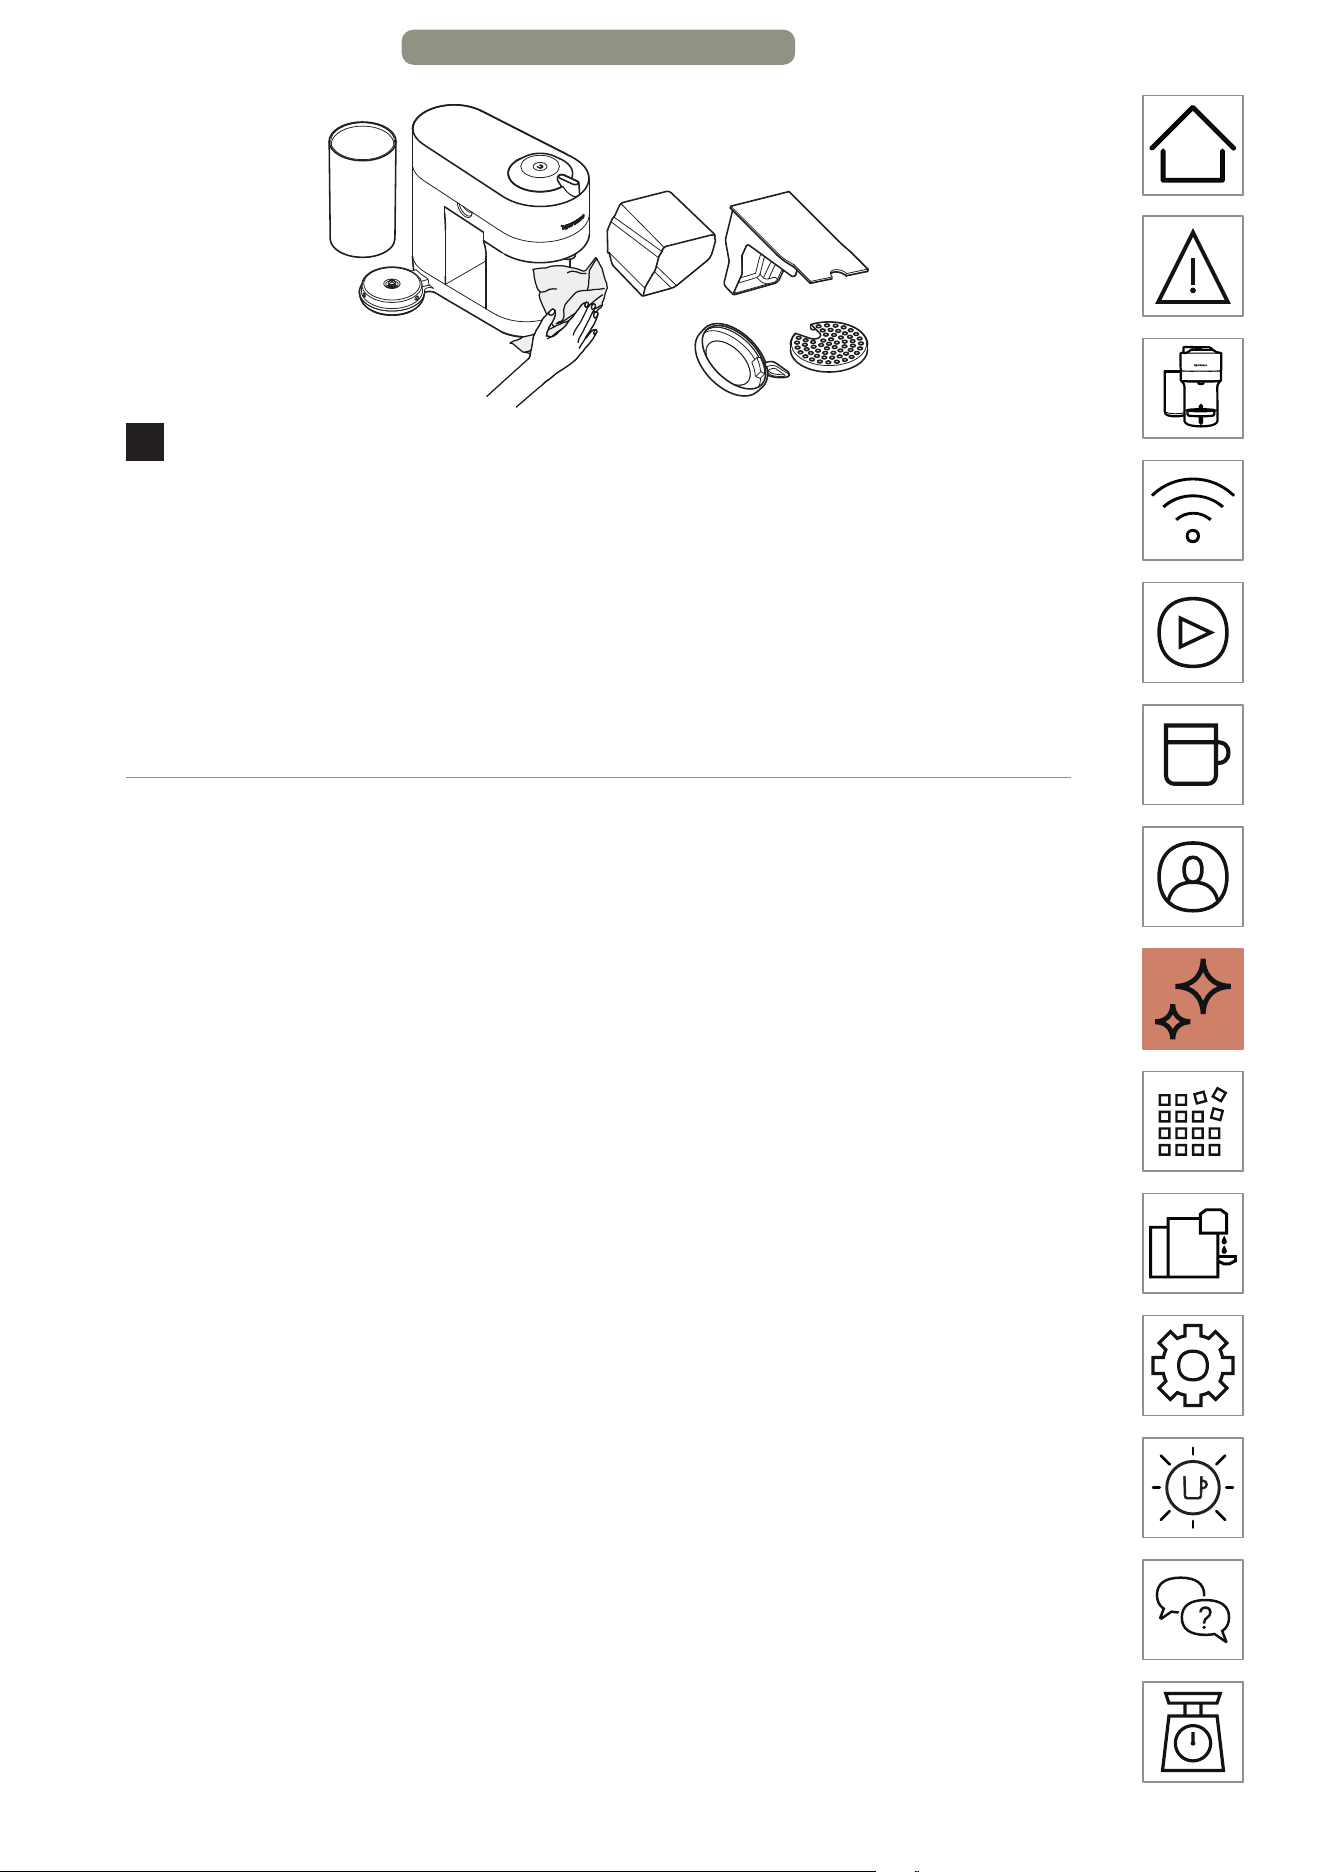
9
Dry the machine with a clean and fresh towel.
CAUTION: Clean the coee outlet regularly with a clean damp cloth.
Always use so cloths to clean the machine.
NOTE: Water may accumulate inside the machine’s head during cleaning.
If this happens, please dry visible parts with a clean dry cloth.
CLEANING – PAGE 4/4
EN
.
20
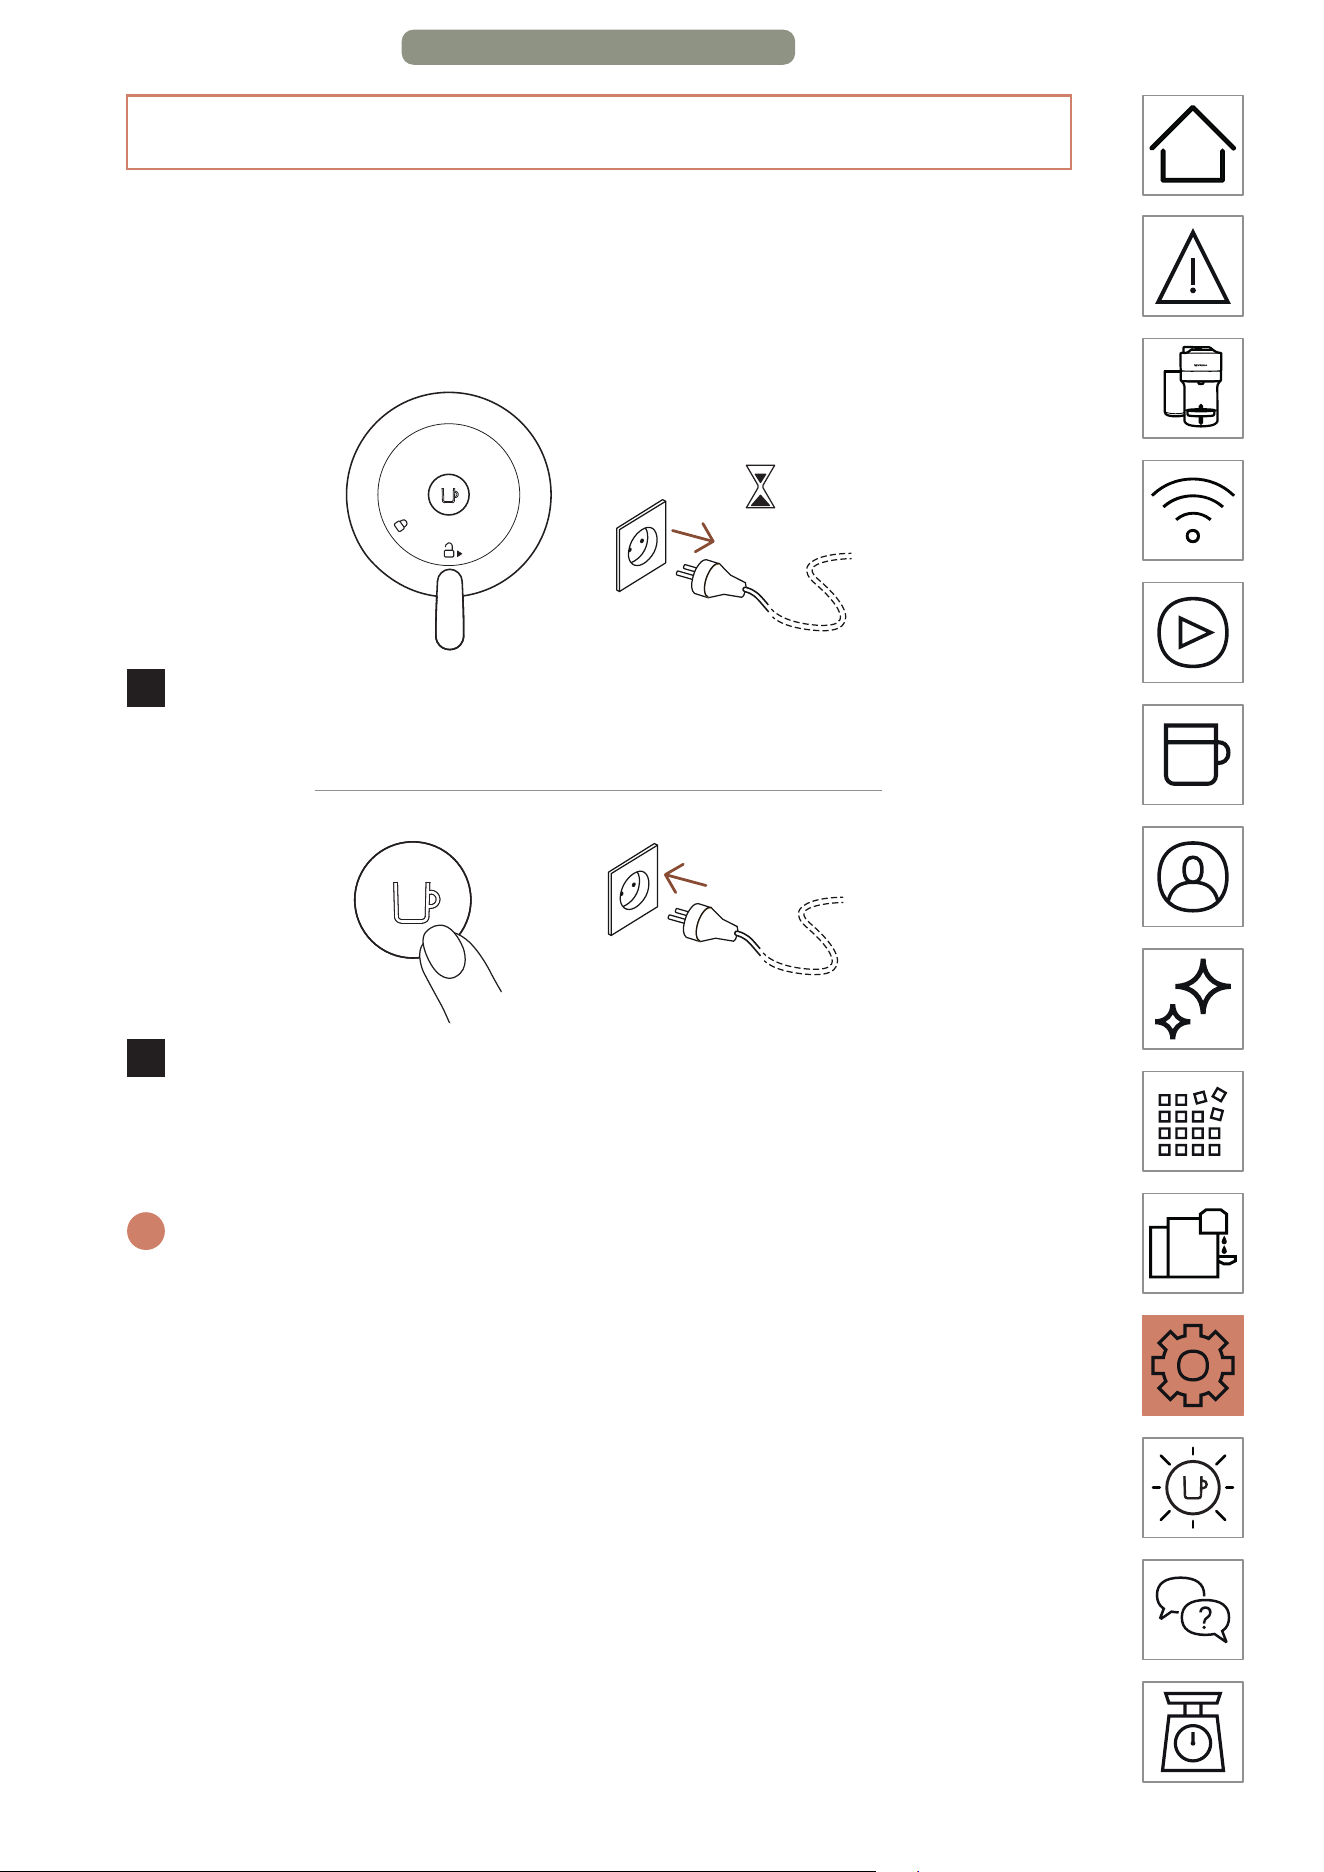
DESCALING
Descaling your machine will ensure that it functions properly
throughout its lifetime and will make your coee experience as
incomparable as it was the first day. Your machine will indicate
when descaling is needed by blinking orange 3 times before
steady white.
i
The descaling procedure takes ~20 minutes and cannot be
interrupted.
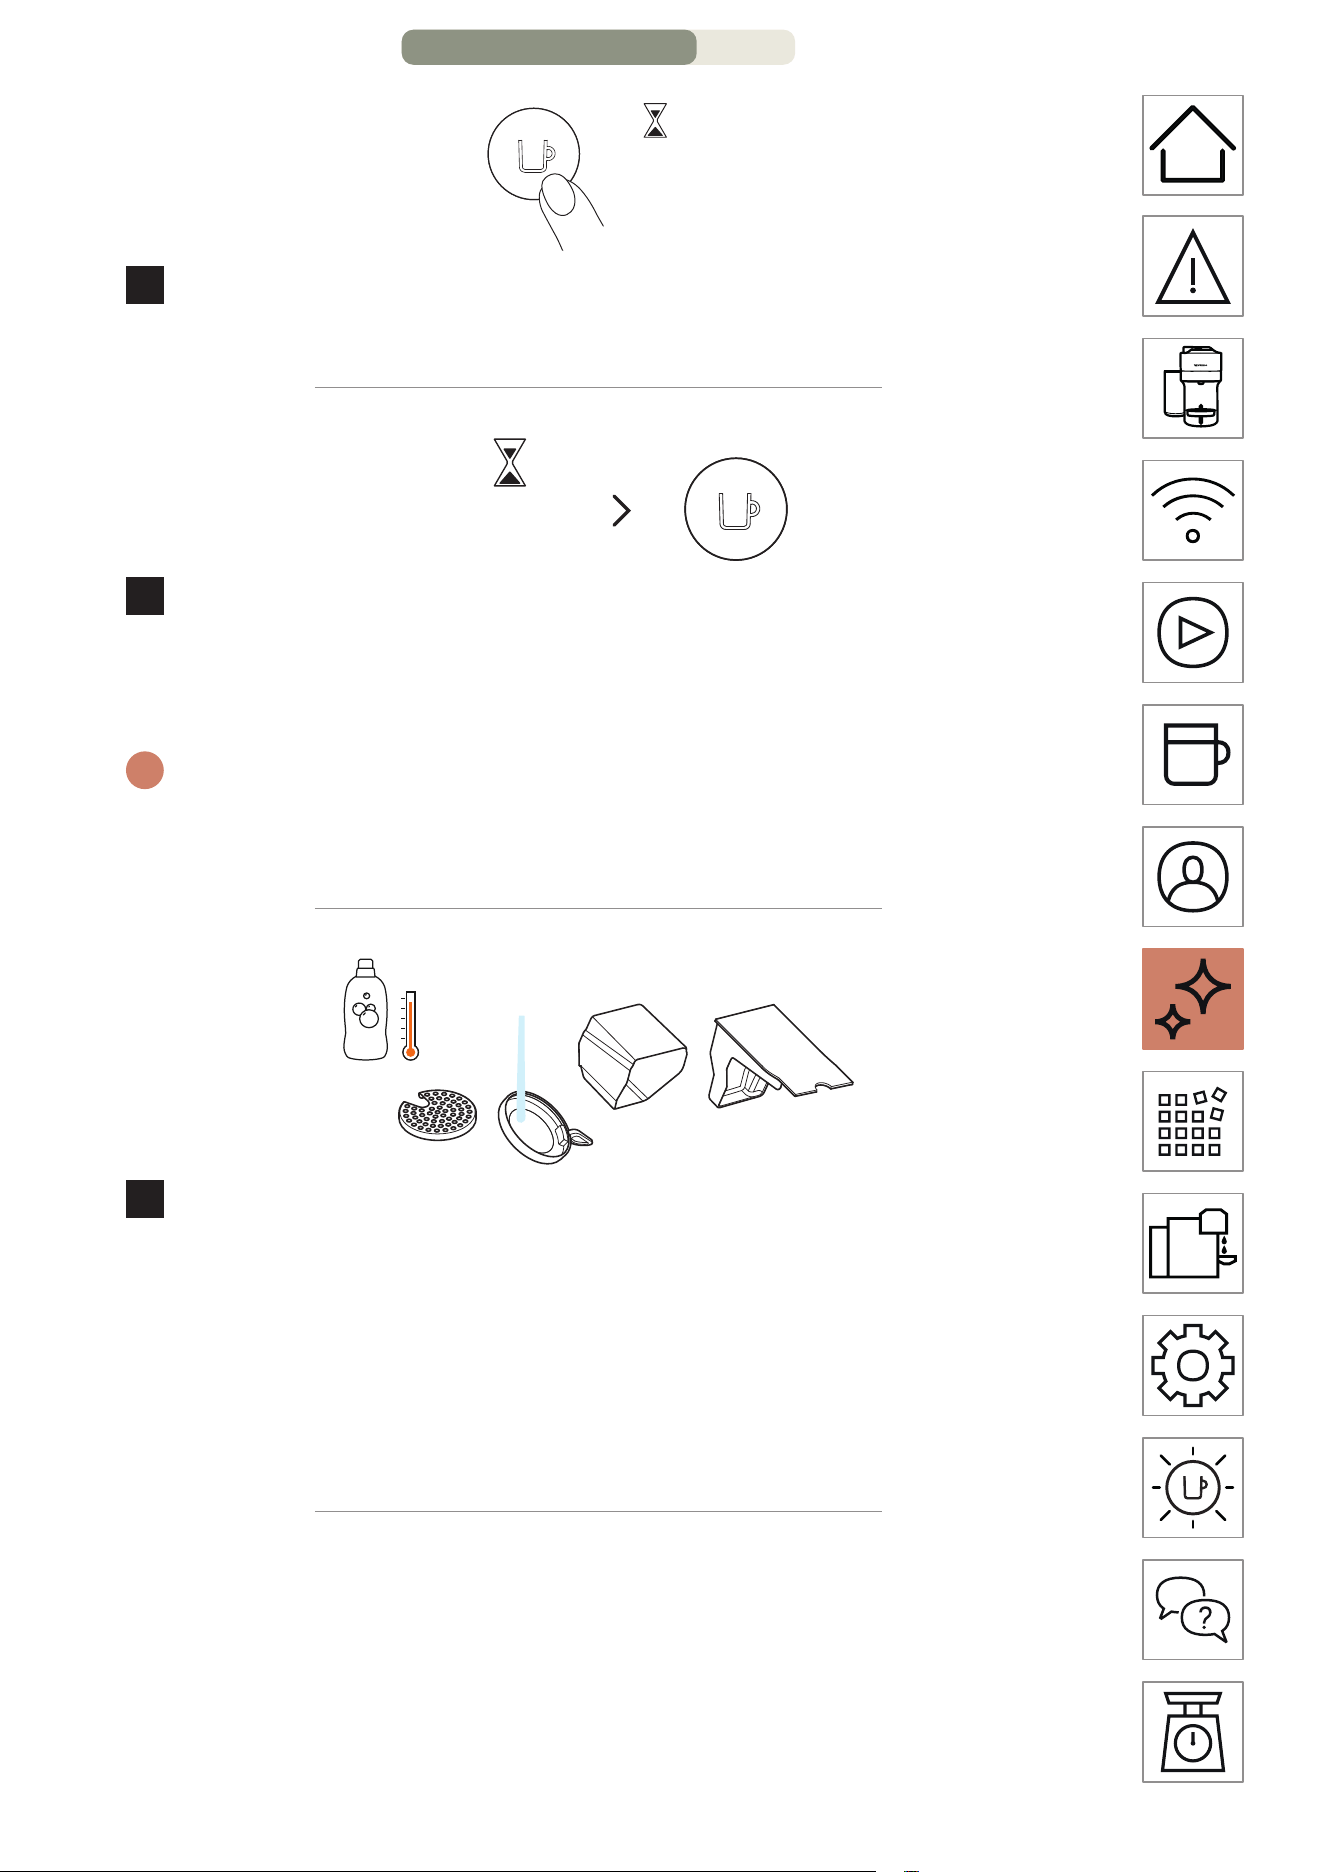
You will need:
• A descaling kit available on www.nespresso.com
• An empty container (1L / 34 oz)
1
Open the machine and let the used capsule be ejected.
Empty the capsule container and the drip tray and place
them back in position on the machine.
DESCALING – PAGE 1/5

EN
.
21
0.5 L / 17 oz
1 x
2
Fill the water tank with 0.5 L / 17 oz of water and add 1 unit
of Nespresso descaling liquid.
CAUTION: Please note that the descaling solution can be harmful.
Avoid contact with eyes, skin and surfaces.
1 L / 34 oz
3
Remove the cup support and place an empty container
(at least 1 L / 34 oz) under the coee outlet.
4
With machine on, close the machine head and leave the
lever in unlock position.
DESCALING – PAGE 2/5
EN
.
22
7s
5
Hold the buon for at least 7 seconds. The buon starts
blinking orange rapidly.
CAUTION: You now have 45 seconds to enter the descaling mode,
otherwise the machine will return to the brewing mode.
7s
6
Open and close the machine head and leave the lever in
unlock position. Hold the buon again for at least 7 seconds.
+ =
7
Turn the lever le towards the lock position and press on the
buon once.
i
The machine will stop automatically when the first phase of descaling
is completed.
DESCALING – PAGE 3/5
EN
.
23
8
Now, it’s time to rinse the machine. Rinse the water tank and
fill it with fresh potable water. Put it back in place.
9
Push the buon to rinse the machine. When the buon stops
blinking rapidly, the descaling procedure is completed.
i
The machine will stop automatically when the procedure is
completed.
10
Wash the capsule container, the cup support and the drip
tray with hot water and mild odourless detergent.
CAUTION: Do not use any strong or abrasive cleaning agent or solvent
cleaner. Do not put the machine in a dishwasher. Never immerse the
appliance or part of it in water.
DESCALING – PAGE 4/5

EN
.
24
11
Dry the machine with a clean and fresh towel.
CAUTION: Do not use any strong or abrasive cleaning agent or solvent
cleaner. Do not put the machine in a dishwasher. Never immerse the
appliance or part of it in water.
NOTE: Water may accumulate inside the machine’s head during cleaning.
If this happens, please dry visible parts with a clean dry cloth.
DESCALING – PAGE 5/5
EN
.
25
EMPTYING
Emptying the system is a process that could be done before a
period of non-use, for frost protection or prior to sending the
machine for a repair.
1
Empty the water tank, open the machine head, and let the
used capsule be ejected. Empty the capsule container and
the drip tray.
0.5 L / 17 oz
2
Place them back in position on the machine, remove the cup
support and place an empty container (0.5 L / 17 oz) under
the coee outlet.
EMPTYING – PAGE 1/2
EN
.
26
3
With machine plugged, open and close the machine head
and turn the lever towards the lock position.
4
Unplug the machine.
+
5
Press and hold the buon while plugging the machine.
6
Release the buon. It will blink orange and the emptying
process will start.
i
It will take approximatively 30 seconds for the machine to complete
the emptying process. The machine turns o automatically when it is
empty.
EMPTYING – PAGE 2/2

EN
.
28
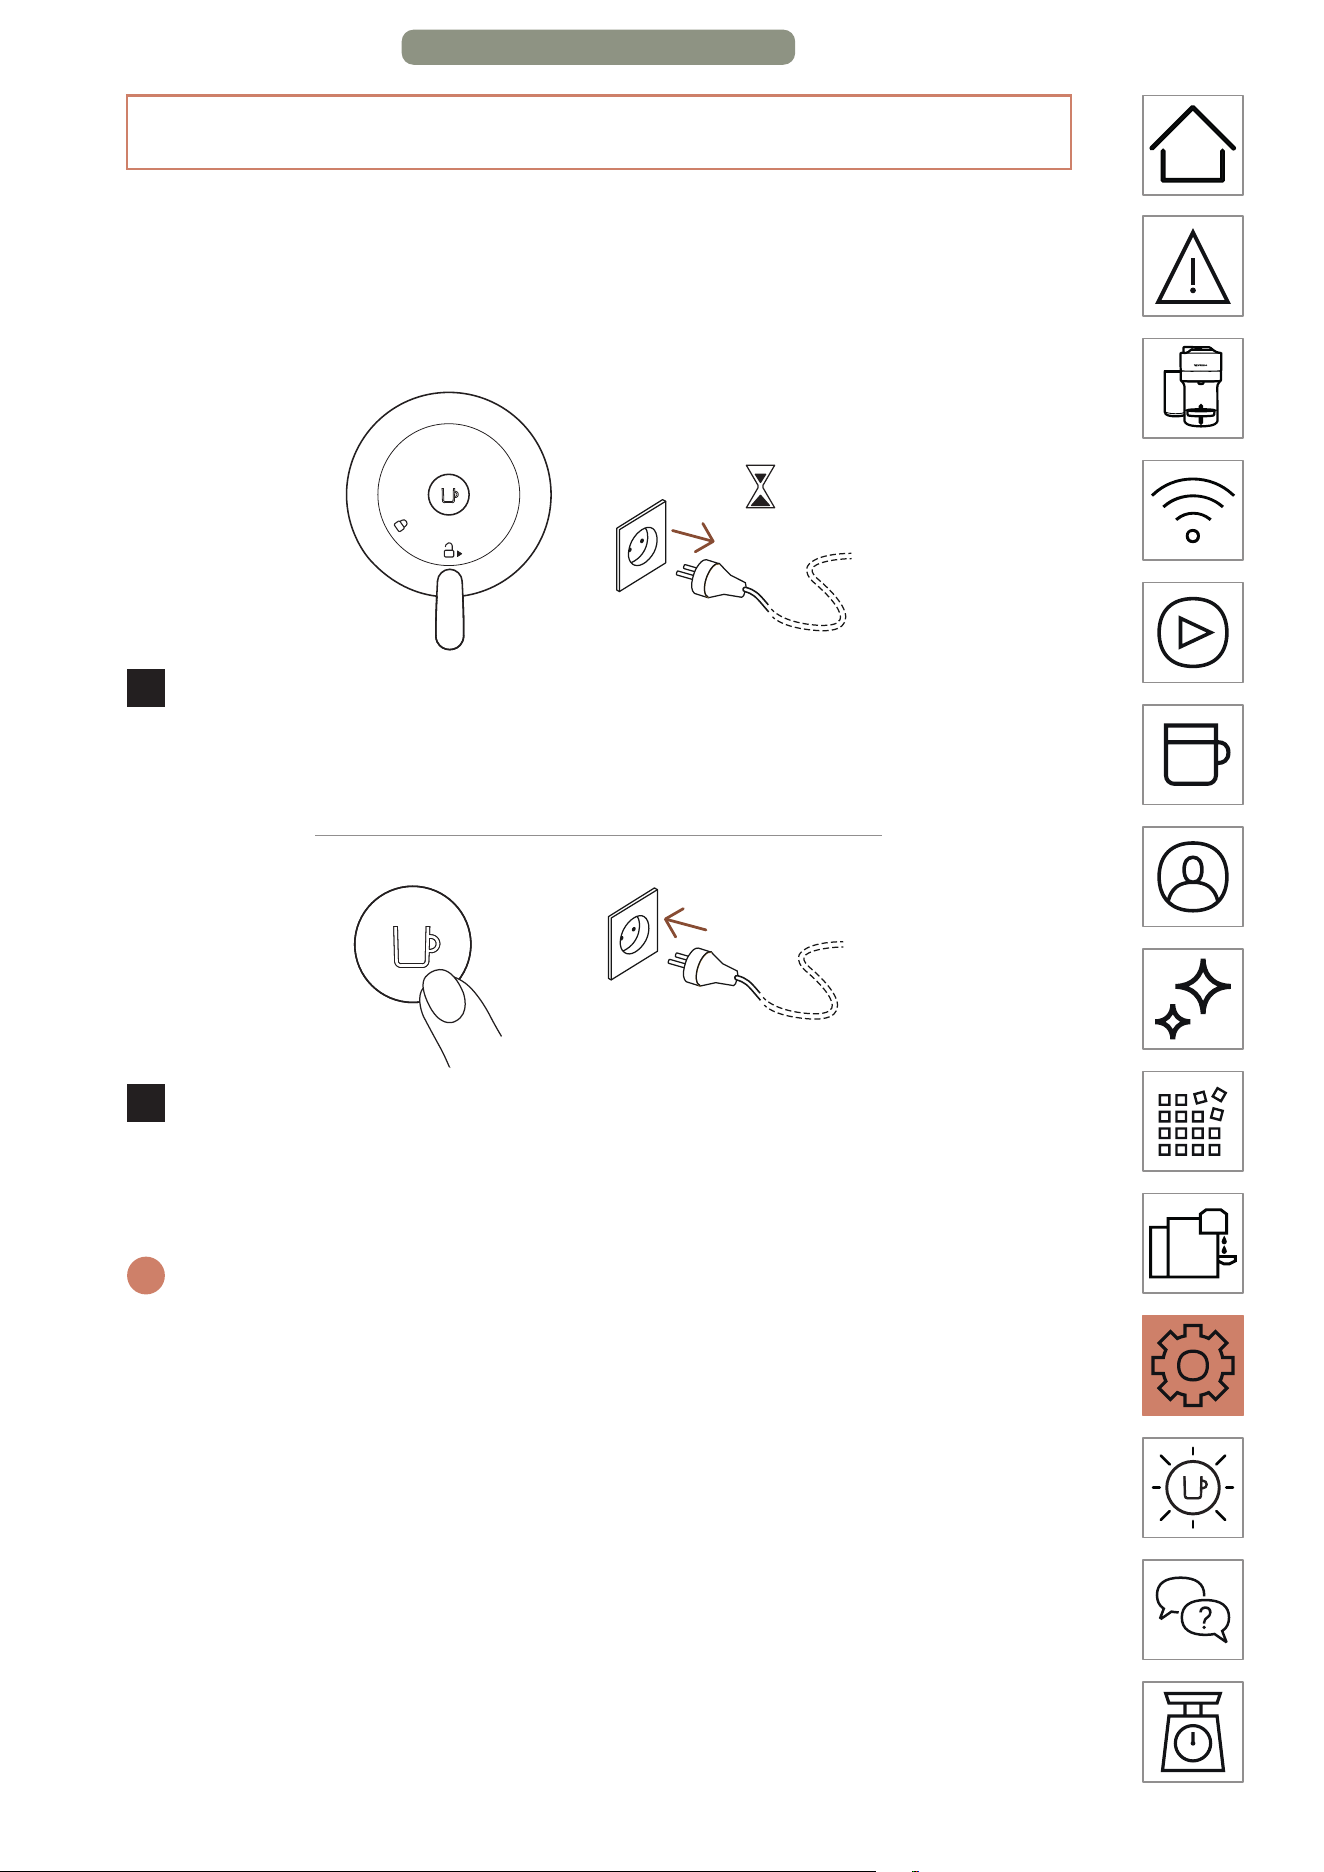
MACHINE BLUETOOTH AND WI-FI
The machine comes with a connectivity module, enabled
by default. It gives access to additional features, enhancing
your coee experience. To disable the connectivity module,
follow these steps:
10s
1
With the machine closed and the lever in unlocked position,
unplug the machine for at least 10 seconds.
+
2
Press and hold the buon whilst plugging the machine.
The buon will blink orange to confirm that the connectivity
module has now been disabled.
i
Follow the same steps to set the connectivity module back on again.
The buon will blink white to confirm that the module has been
reactivated.
MACHINE SETTINGS – PAGE 2/2

EN
.
30
TROUBLESHOOTING
No light on the buon. • The machine has turned OFF automatically;
push the buon or “UNLOCK” the machine.
• Check the mains, plug, voltage, and fuse.
No coee, no water. • Check that the water tank is filled.
• Check that a fresh capsule is inserted in the
correct position, that the lever is properly
locked and push the buon to start.
• Descale if necessary.
• Open the machine head and let the capsule
be ejected. Then perform a cleaning as per
cleaning section.
Coee is not hot
enough.
• Preheat the cup with hot drinking water
from the tap.
• Descale if necessary.
Leakage or unusual
coee flow.
• Check that the water tank is well positioned.
• Descale if necessary.
Machine turns to “OFF
mode”.
• To save energy the machine will turn o
aer 2 minutes of non-use.
• The machine can be turned “OFF” manually
at any time (when not in use) by pressing
and holding the buon for 3 seconds.
Coee grounds in the
cup.
• Perform the cleaning procedure twice.
• See paragraph on “Cleaning”.
The machine doesn’t
start and has light
steady on. If blinking,
see next points.
• Check that the lever is properly locked.
• If you want to brew a Coee, check that
a fresh capsule is inserted in the correct
position, that the lever is properly locked
and push the buon to start.
• If you are cleaning, descaling or emptying
the system, check that no capsule is
inserted then close, lock the machine
and push the buon to start one of these
operations.
The machine doesn’t
start and light blinks
alternately; 1 blink and
1 pause.
• Fill the water tank and push the buon to
start.
• Check that the lever is properly locked.
TROUBLESHOOTING – PAGE 1/3

EN
.
31
Light blinks while
machine is running.
• If the coee is flowing normally, this
indicates the machine is working properly.
• If only water is flowing, the machine is
executing a user request for either cleaning,
descaling or emptying the system. Refer
to the corresponding section in this user
manual.
• Turn the machine to “OFF mode” by
pushing the buon for 3 seconds and then
push it again to turn the machine ON. Now
wait approximately 20 minutes to allow the
machine to cool down aer extensive use.
Light blinks and
machine is not running.
• It will take some time before the coee flow
comes out (due to code reading and pre-
weing the coee).
• Check that a fresh capsule is inserted in the
correct position, that the lever is properly
locked and push the buon to start.
• Fill the water tank and push the buon to
start.
• Turn the machine to “OFF mode” by
pushing the buon for 3 seconds and then
push it again to turn the machine ON. Now,
wait approximately 20 minutes to allow the
machine to cool down aer extensive use.
Light blinks alternately
2 blinks and 1 pause
continuously. Machine is
not running.
• During regular Coee preparation:
1) Unlock the lever and open the machine
head to check that a fresh undamaged
capsule is inserted in the correct position.
2) Check that the lever is in “LOCKED”
position.
3) Check that the water tank is filled.
• During Descaling, Emptying and Cleaning:
1) Check that the capsule is ejected.
2) Check that the lever is in “LOCKED”
position.
• During Programming Volume:
1) Check if a capsule has been well inserted.
2) Please refer to the corresponding
chapter.
TROUBLESHOOTING – PAGE 2/3
EN
.
32
• If the problem persists:
1) Unlock the lever and open the machine
head.
2) Replace the capsule (if needed).
3) Disconnect the power cord from the
outlet and plug the machine back into the
outlet aer 10 seconds.
4) Close the head and press the buon to
turn ON and press again to start brewing.
If the problem persists, call Nespresso.
Light alternately
blinking 3 times and
then steady on.
• Descaling needed: the machine can be
used only a few times aer the descaling
alert appears before it becomes necessary.
TROUBLESHOOTING – PAGE 3/3

EN
.
33
SPECIFICATIONS
Power
US, CA: 120 V, 60 Hz, 1500 W
MX: 127 V~, 60 Hz, 1650 W
Frequency 2.402–2.480 GHz
RF output power (EIRP)
Bluetooth 4 dBm Max. e.i.r.p. and Wi-Fi
<20 dMm max. e.i.r.p.
Dimensions (W x D x H) 219 x 356 x 265 mm / 8.6 x 14 x 10.4 in
Weight
Vertuo Pop+: 3.6 kg / 7.9 lbs
Vertuo Pop+ Deluxe: 3.7 kg / 8.1 lbs
Water tank capacity
Vertuo Pop+: 0.75 L / 25.4 oz
Vertuo Pop+ Deluxe: 1.1 L / 37.2 oz
Capsule container
capacity
8 espresso or 5 mug capsules
MACHINE CODES
Nespresso Breville Delonghi
GCV6 GDV6 BNV520, BNV550,
BNV530, BNV560,
BNV540, BNV570
ENV92B, ENV92BAE,
ENV92Y, ENV92YAE,
ENV92AAE, ENV95S,
ENV95SAE

FR
.
36
VUE D’ENSEMBLE
CONTENU DE L’EMBALLAGE
APERÇU DE LA MACHINE
1 Réservoir d’eau et
couvercle
2 Bac d’égouage
3 Collecteur de capsules
usagées
4 Orifice de sortie du café
5 Bouton café et
MARCHE/ARRÊT
6 Poignée de verrouillage/
déverrouillage
7 Grille d’égouage
8 Support de tasse
réglable
1 Machine à café
2 Ensemble de capsules
Nespresso
3 Kit Nespresso de
bienvenue
4 Consignes de sécurité
5 Guide de démarrage
rapide
6 Garantie
1
3
2
5
6
4
7
8
i
Déballage : de la poussière peut être présente à la surface de la
machine à cause des matériaux recyclés utilisés dans l’emballage.
Ce n’est pas dangereux, il sut de neoyer avec un chion doux.
3
1
2
4 + 5 + 6
VUE D’ENSEMBLE – PAGE 1/2

FR
.
37
OUVERTURE / FERMETURE
OUVERTURE FERMETURE
LE SYSTÈME VERTUO
CAPSULES DISPONIBLES
S M L XL
P
Espresso
(40 ml / 1,4 oz liq)
S M L XL
M
Double Espresso
(80 ml / 2,8 oz liq)
Gran Lungo
(150 ml / 5,1 oz liq)
S M L XL
G
Tasse
(230 ml / 7,8 oz liq)
S M L XL
TG
Alto, Café infusé
à froid
(355 ml / 12,5 oz liq)
Carafe
(535 ml / 18,8 oz liq)
ACCESSOIRES
Accessoires
adaptés
Espresso Double
Espresso
Gran Lungo Tasse Verre Reveal
Accessoires
non adaptés
Alto Carafe
Découvrez notre collection complète d’accessoires sur
www.nespresso.com
VUE D’ENSEMBLE – PAGE 2/2
FR
.
38
CONNECTIVITÉ
POURQUOI JUMELER VOTRE MACHINE VERTUO POP+ ?
=+
Café
intelligent
Conseils
d'experts
Entretien
de la
machine
LES AVANTAGES DE CONNECTER VOTRE MACHINE
VERTUO POP+
• Café intelligent : Profitez des dernières innovations de
Nespresso en matière de café en maintenant toujours votre
machine à jour.
• Conseils d’experts : Recevez des conseils en temps réel avec
des instructions étape par étape pour détartrer, rincer et
neoyer votre machine.
• Entretien de la machine : Obtenez une assistance et des
tutoriels pour l’entretien de votre machine via votre téléphone
intelligent.
COMMENT CONNECTER VOTRE MACHINE VERTUO POP+ ?
CONNECTIVITÉ – PAGE 1/2
FR
.
39
*
**
1
Téléchargez ou meez à jour l’application Nespresso.
2
Lancez l’application sur votre appareil mobile ou tablee.
3
Cliquez sur l’icône machine en haut à droite de votre écran.
4
Suivez les instructions via l’application Nespresso.
* AppStore
®
est une marque d’Apple Inc. déposée aux États-Unis et dans
d’autres pays.
** Google Play et le logo Google Play sont des marques déposées de
Google LLC.
CONNECTIVITÉ – PAGE 2/2

FR
.
40
PREMIÈRE UTILISATION
OU
MARCHE
Une fois la machine branchée, meez-la en marche en appuyant
une fois sur le bouton ou en fermant le levier en position de
verrouillage (avec la tête fermée).
i
La lumière clignotera pendant environ 30 secondes pendant que la
machine chaue. Lorsque le voyant est allumé, la machine est prête.
3
s
OU
Arrêt Automatique
2 min
ARRÊT
Pour économiser de l’énergie, la machine s’éteindra
automatiquement après 2 minutes de non-utilisation.
i
La machine peut être éteinte manuellement à tout moment
(lorsqu’elle n’est pas utilisée) en appuyant sur le bouton et
en le maintenant enfoncé pendant 3 secondes.
MARCHE / ARRÊT
PREMIÈRE UTILISATION – PAGE 1/4

FR
.
42
3
Branchez le cordon d’alimentation, retirez le support de
tasse et placez un récipient vide (au moins 1 L / 34 oz liq)
sous la sortie du café.
4
Ouvrir et fermer la machine. S’assurer que le levier est en
position de verrouillage.
5
Meez la machine en marche en cliquant une fois
sur le bouton.
PREMIÈRE UTILISATION – PAGE 3/4
FR
.
43
3x <2s
6
Appuyez sur le bouton 3 fois en moins de 2 secondes.
i
La machine commencera à rincer. Cee procédure peut prendre
jusqu’à 7 minutes.
ATTENTION : Lisez d’abord les consignes de sécurité pour éviter les
risques de choc électrique mortel et d’incendie. Veuillez assurer la
continuité de la mise à la terre lorsque vous branchez la machine
sur la prise de courant.
i
Lors du déballage de la machine, retirez les films plastiques.
PREMIÈRE UTILISATION – PAGE 4/4
FR
.
45
3
Ouvrez la machine et insérez une capsule Vertuo.
4
Fermez la machine en tournant le levier jusqu’à la position
de verrouillage et placez une tasse. Le support de tasse peut
être réglé pour s’adapter à votre taille de tasse.
1x
5
Commencez l’infusion en cliquant une fois sur le bouton.
NOTE : de l’eau peut s’accumuler à l’intérieur de la tête de la machine,
veuillez sécher les parties visibles avec un chion propre et sec.
PRÉPARATION DU CAFÉ – PAGE 2/3
FR
.
46
6
Lorsque le café ne coule plus, ouvrez la machine en tournant
le levier vers la position de déverrouillage, éjectez la capsule
et savourez votre café.
DÉCOUVREZ NOTRE EXTRACTION CONCENTRÉE
POUR LES RECETTES BARISTA
Avec cee machine, Nespresso vous propose une fonction
spécifique pour concentrer vos extractions de café afin de créer
vos propres recees.
2x <1s
Une fois votre machine allumée, cliquez rapidement 2 fois sur
le bouton café, il clignotera en turquoise et votre café sera
concentré, améliorant le goût du café dans les recees avec
ajouts (crème, sur glace...).
40 ml /
1.4 oz liq
80 ml /
2.7 oz liq
150 ml /
5.1 oz liq
230 ml /
7.8 oz liq
25 ml /
0.85 oz liq
40 ml /
1.4 oz liq
40 ml /
1.4 oz liq
80 ml /
2.7 oz liq
Découvrez comment perfectionner votre machine avec
notre gamme Aeroccino sur www.nespresso.com
PRÉPARATION DU CAFÉ – PAGE 3/3
FR
.
47
ADAPTER LES VOLUMES DE CAFÉ
1
Allumez la machine en cliquant une fois sur le bouton, ouvrez
la machine et insérez la capsule que vous voulez infuser.
2
Fermez la machine, tournez le levier vers la position de
verrouillage et placez une tasse.
3
Appuyez sur le bouton et maintenez-le enfoncé jusqu’à ce
que le volume souhaité soit aeint. Le nouveau volume d’eau
est maintenant programmé pour le type de capsule utilisé
lors du réglage.
i
La programmation est spécifique à chaque type de capsule. Les tailles
de tasses peuvent être programmées de 20 ml / 0,7 oz à 535 ml / 18 oz.
REMARQUE : Une fois qu’un volume spécifique au client est programmé
par l’utilisateur, chaque fois que ce type de capsule est inséré dans la
machine, la préparation s’arrêtera à la taille de tasse programmée par
l’utilisateur. Si vous souhaitez revenir aux paramètres par défaut, consultez
le paragraphe « Réinitialisation aux paramètres d’usine ».

FR
.
48
NETTOYAGE
Neoyez votre machine tous les mois, lorsque vous commencez
à avoir des résidus de café à l’intérieur de la tête de la machine
ou après une longue période de non-utilisation.
1
Rincer et neoyer le réservoir et le couvercle avec de l’eau
potable.
2
Remere le réservoir en place.
NETTOYAGE – PAGE 1/4
FR
.
49
3
Ouvrez la machine et laissez la capsule usagée être éjectée.
Videz le conteneur à capsules et remeez-le en place.
1 L / 34 oz liq
4
Retirer le suppport de tasse. Placer un récipient d’au moins
1 L / 34 fl oz liq. sous l’orifice de sortie du café.
5
Fermer la machine et tourner la poignée jusqu’à la position
« VERROUILLÉE ».
NETTOYAGE – PAGE 2/4
FR
.
50
3x <2s
6
Lorsque la machine est allumée, appuyez sur le bouton 3 fois
en 2 secondes.
~7min
7
La procédure de neoyage se met automatiquement en
marche pour une durée de 7 minutes. Une lumière fixe
apparaît lorsque le neoyage est terminé.
i
Il faut environ 2 minutes pour que l’eau commence à s’écouler de
la sortie du café. La procédure peut être arrêtée à tout moment en
appuyant sur le bouton.
8
Lavez le contenant de la capsule, le support de la tasse et
le plateau d’égouage à l’eau chaude et avec un détergent
doux et inodore.
ATTENTION : ne pas utiliser de solvants ou de produits neoyants
puissants ou abrasifs. Ne pas mere au lave-vaisselle. Ne jamais immerger
la machine ou ses pièces dans l’eau.
NETTOYAGE – PAGE 3/4

FR
.
51
9
Séchez la machine avec une serviee propre et fraîche.
ATTENTION : Neoyez régulièrement l’orifice de sortie du café à l’aide
d’un linge propre et humide. Utilisez toujours des linges doux pour
neoyer la machine.
NOTE : De l’eau peut s’accumuler à l’intérieur de la tête de la machine
pendant le neoyage. Si cela se produit, veuillez sécher les parties visibles
avec un chion propre et sec.
NETTOYAGE – PAGE 4/4

FR
.
52
DÉTARTRAGE
Le détartrage de votre machine garantira son bon
fonctionnement tout au long de sa durée de vie et rendra votre
expérience du café aussi incomparable que le premier jour. Votre
machine vous indiquera qu’un détartrage est nécessaire en
clignotant 3 fois en orange avant de redevenir blanche.
i
La procédure de détartrage dure environ 20 minutes et ne peut pas
être interrompue.
Vous aurez besoin :
• Un kit de détartrage disponible sur www.nespresso.com
• Un récipient vide (1L / 34 oz liq)
1
Ouvrez la machine et laissez la capsule usagée être éjectée.
Videz le conteneur de la capsule et le bac de récupération et
remeez-les en place sur la machine.
DÉTARTRAGE – PAGE 1/5
FR
.
53
0,5 L / 17 oz liq
1 x
2
Mere 0,5 L / 17 oz liq. d’eau dans le réservoir et ajouter
la solution détartrante Nespresso.
ATTENTION : la solution détartrante peut être nocive. Éviter tout contact
avec les yeux, la peau et les surfaces.
1 L / 34 oz liq
3
Retirez le support de tasse et placez un récipient vide
(au moins 1 L / 34 oz liq) sous la sortie du café.
4
Lorsque la machine est en marche, fermez la tête de la
machine et laissez le levier en position de déverrouillage.
DÉTARTRAGE – PAGE 2/5

FR
.
54
7s
5
Maintenez le bouton enfoncé pendant au moins 7 secondes.
Le bouton commencera à clignoter orange rapidement.
ATTENTION : Vous avez maintenant 45 secondes pour passer en mode
de détartrage, sinon la machine repasse en mode «Prêt à infuser du café».
7s
6
Ouvrez et fermez la tête de la machine et laissez le levier
en position déverrouillée. Maintenez à nouveau le bouton
pendant au moins 7 secondes.
+ =
7
Tournez le levier vers la gauche en position de verrouillage et
appuyez une fois sur le bouton.
i
La machine s’arrête automatiquement lorsque la première phase de
détartrage est terminée.
DÉTARTRAGE – PAGE 3/5
FR
.
55
8
Maintenant, il est temps de rincer la machine. Rincez le
réservoir d’eau et remplissez-le d’eau potable fraîche.
Remeez-le en place.
9
Appuyez sur le bouton pour rincer la machine. Lorsque le
bouton cesse de clignoter rapidement, la procédure de
détartrage est terminée.
i
La machine s’arrête automatiquement lorsque la procédure est
terminée.
10
Lavez le contenant de la capsule, le support de la tasse et
le plateau d’égouage à l’eau chaude et avec un détergent
doux et inodore.
ATTENTION : ne pas utiliser de solvants ou de produits neoyants
puissants ou abrasifs. Ne pas mere au lave-vaisselle. Ne jamais immerger
la machine ou ses pièces dans l’eau.
DÉTARTRAGE – PAGE 4/5

FR
.
56
11
Séchez la machine avec une serviee propre et fraîche.
ATTENTION : ne pas utiliser de solvants ou de produits neoyants
puissants ou abrasifs. Ne pas mere au lave-vaisselle. Ne jamais immerger
la machine ou ses pièces dans l’eau.
NOTE : L’eau peut s’accumuler à l’intérieur de la tête de la machine
pendant le neoyage. Si cela se produit, essuyez les parties visibles avec
un chion propre et sec.
DÉTARTRAGE – PAGE 5/5
FR
.
57
VIDAGE
La vidange du système peut être eectuée avant une période
de non-utilisation, pour la protection contre le gel ou avant
d’envoyer la machine en réparation.
1
Videz le réservoir d’eau, ouvrez la tête de la machine et
laissez la capsule usagée être éjectée. Videz le récipient à
capsules et le bac de récupération.
0,5 L / 17 oz liq
2
Remeez-les en place sur la machine, retirez le support de
tasse et placez un récipient vide (0,5 L / 17 oz liq) sous la
sortie du café.
VIDAGE – PAGE 1/2
FR
.
58
3
La machine étant branchée, ouvrez et fermez la tête de la
machine et tournez le levier vers la position de verrouillage.
4
Débranchez la machine.
+
5
Appuyez sur le bouton et maintenez-le enfoncé tout
en branchant la machine.
6
Relâchez le bouton. Il clignotera en orange et le processus
de vidange commencera.
i
Il faut environ 30 secondes à la machine pour eectuer le processus
de vidange. La machine s’éteint automatiquement lorsqu’elle est vide.
VIDAGE – PAGE 2/2
FR
.
59
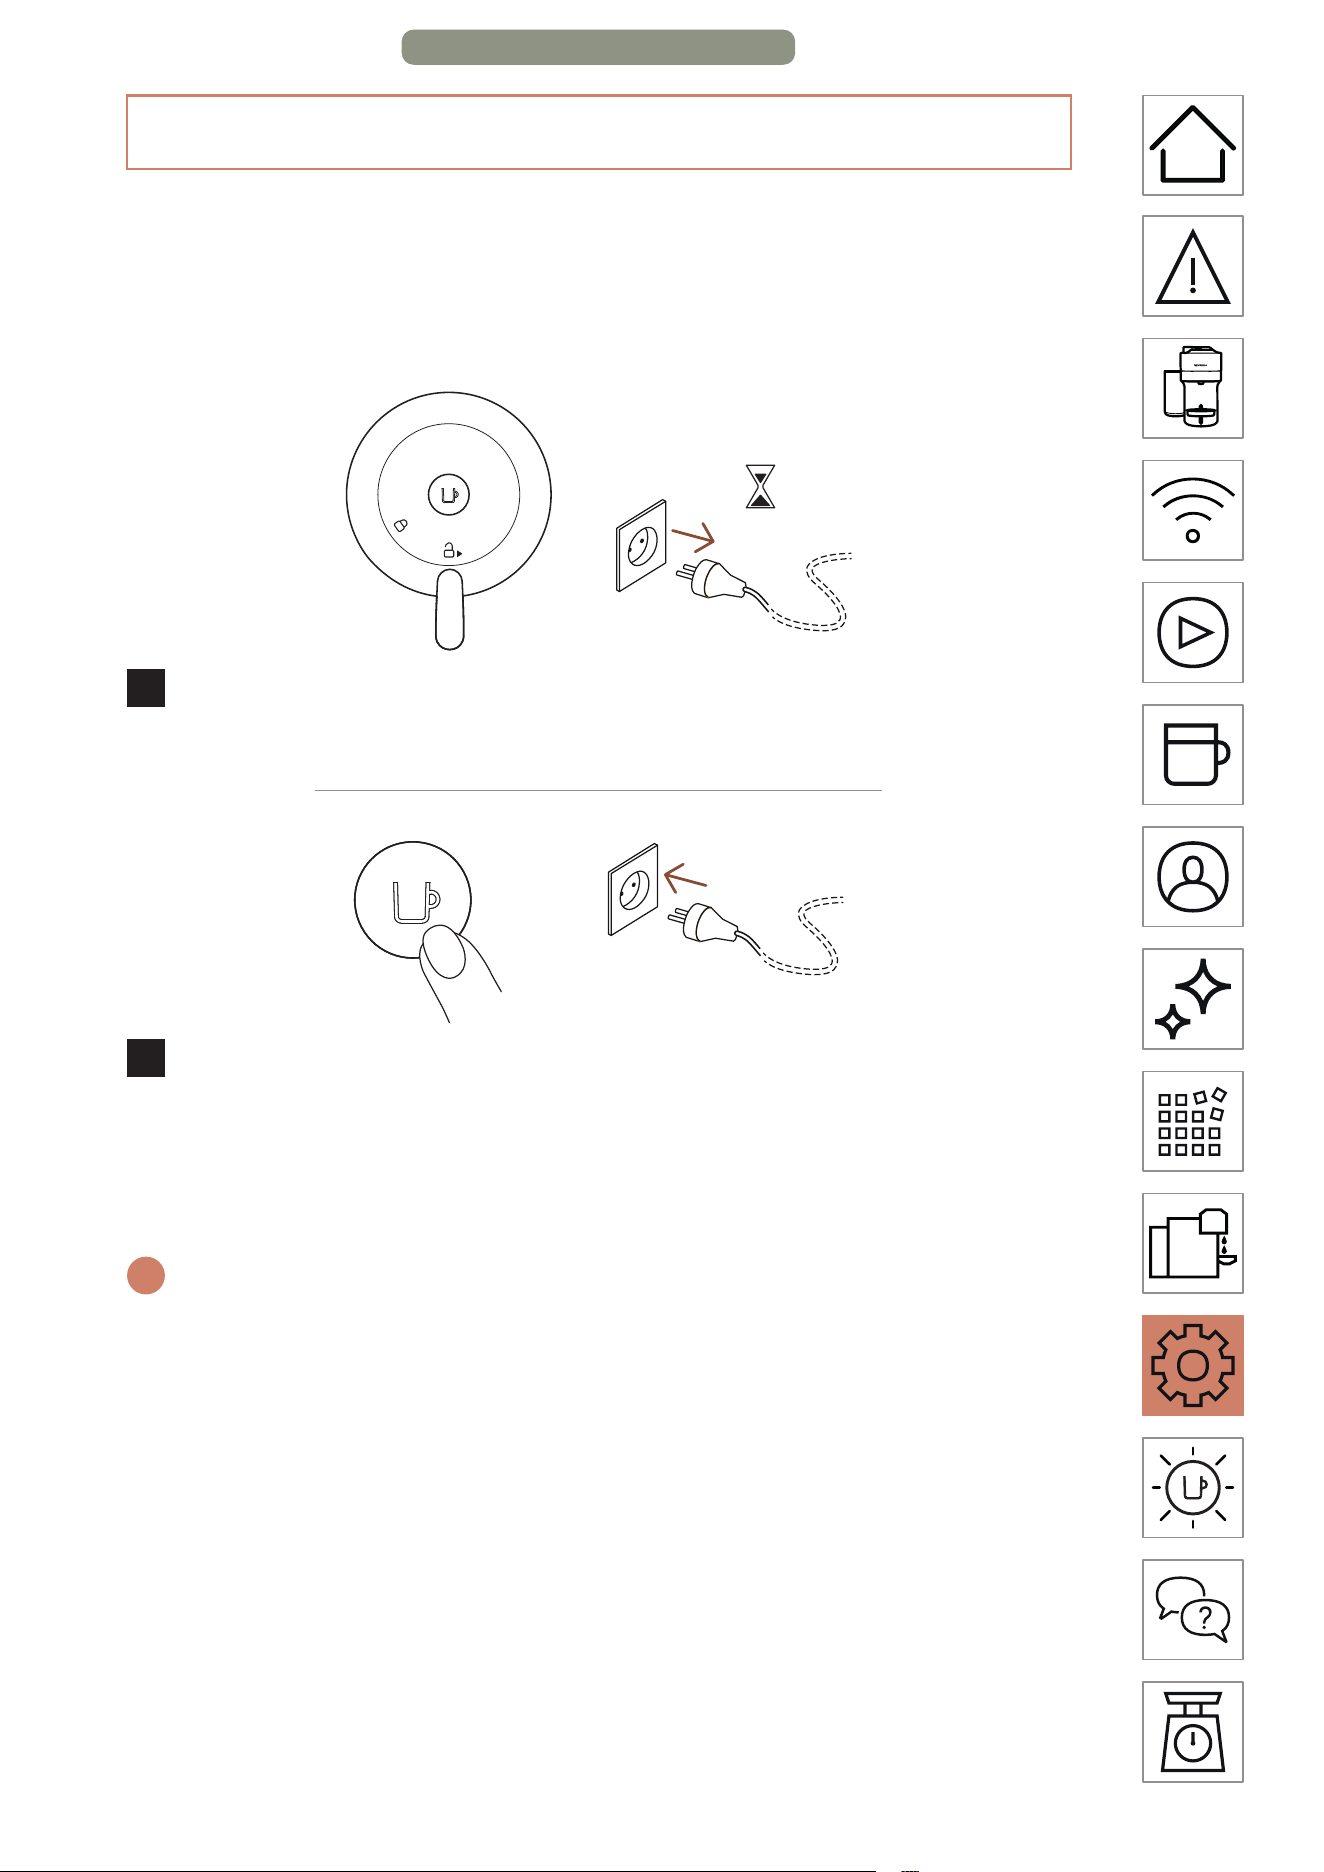
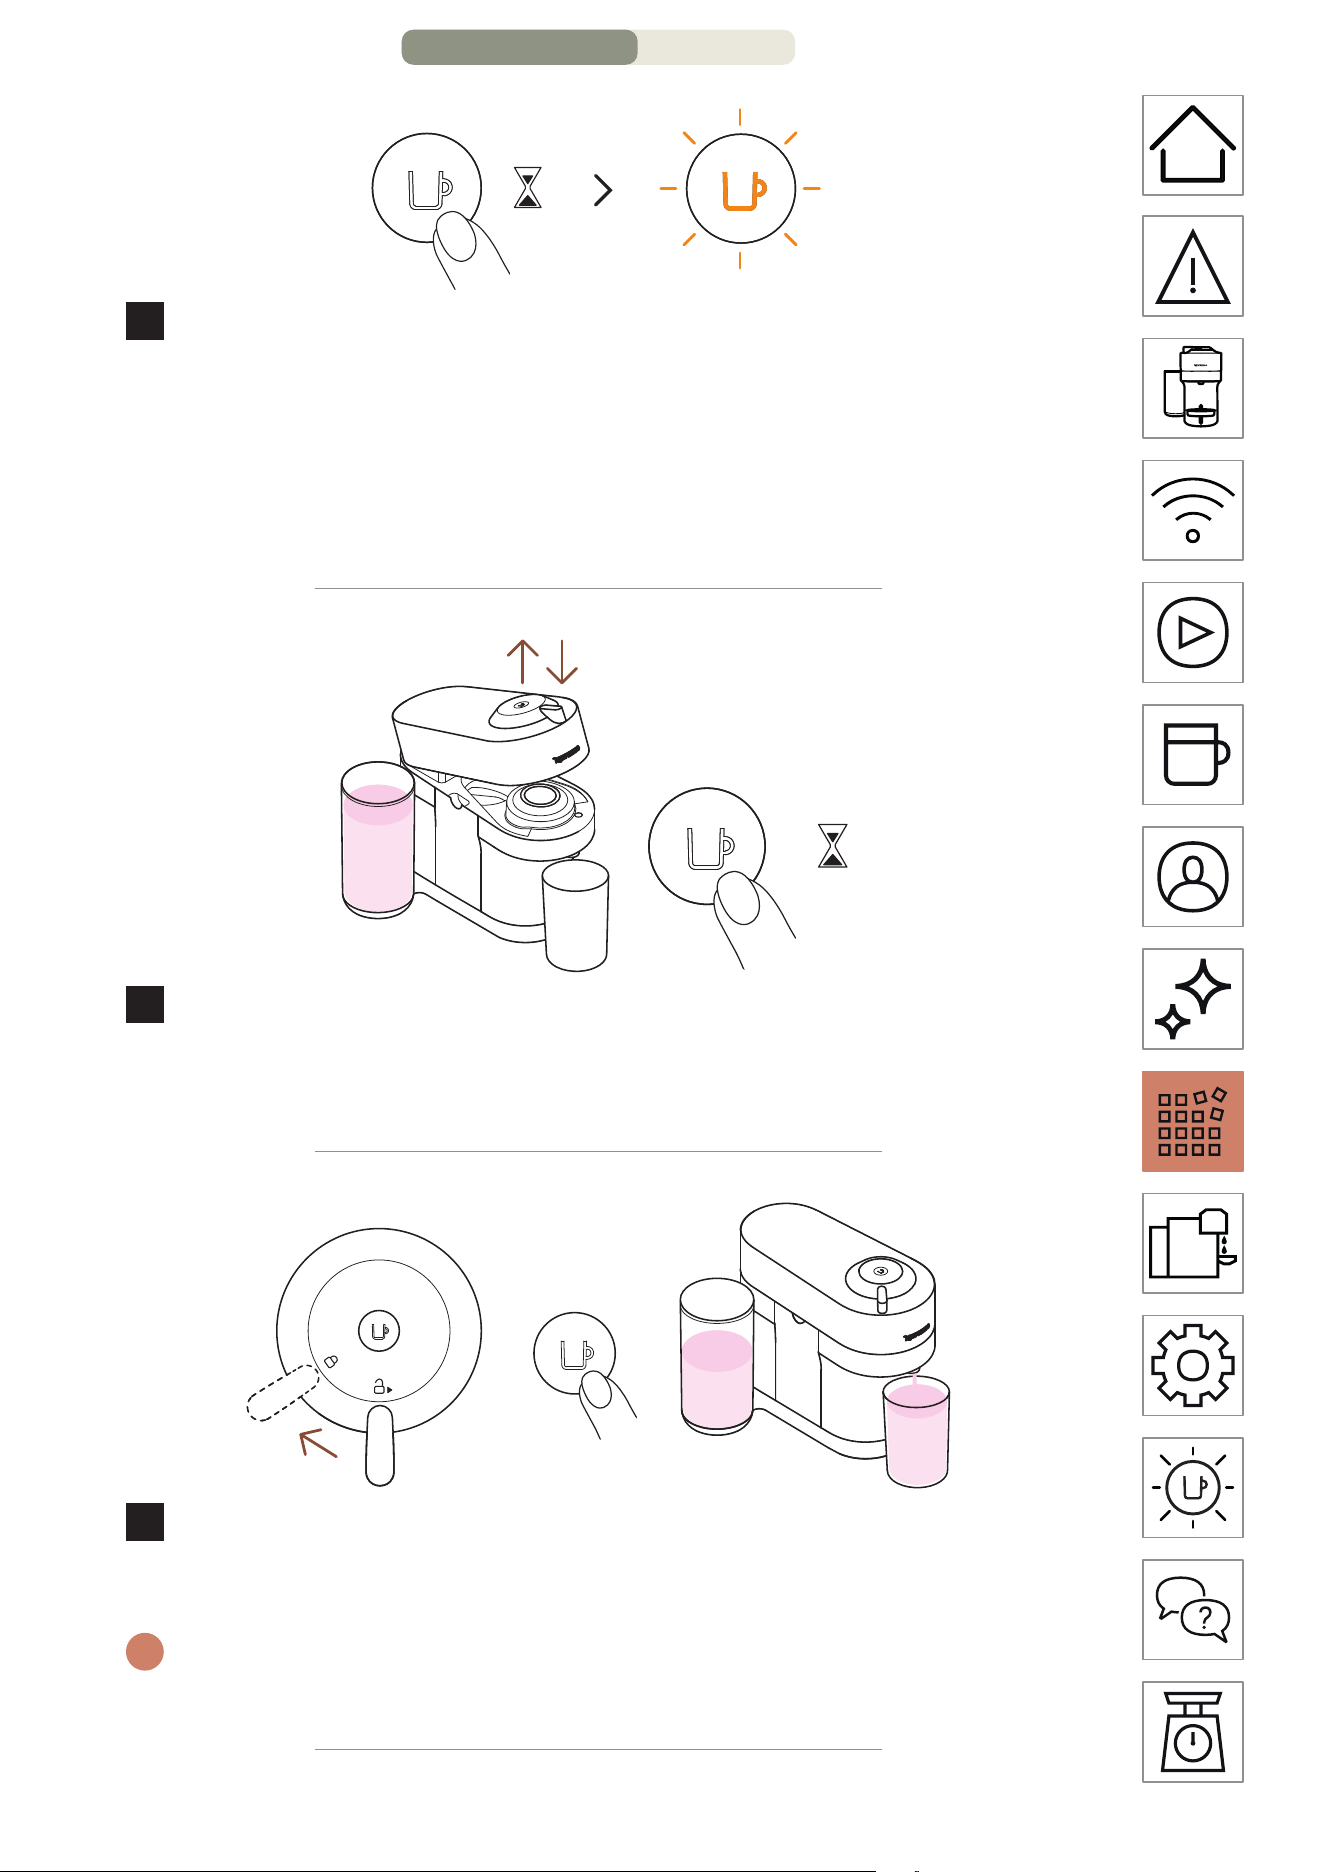
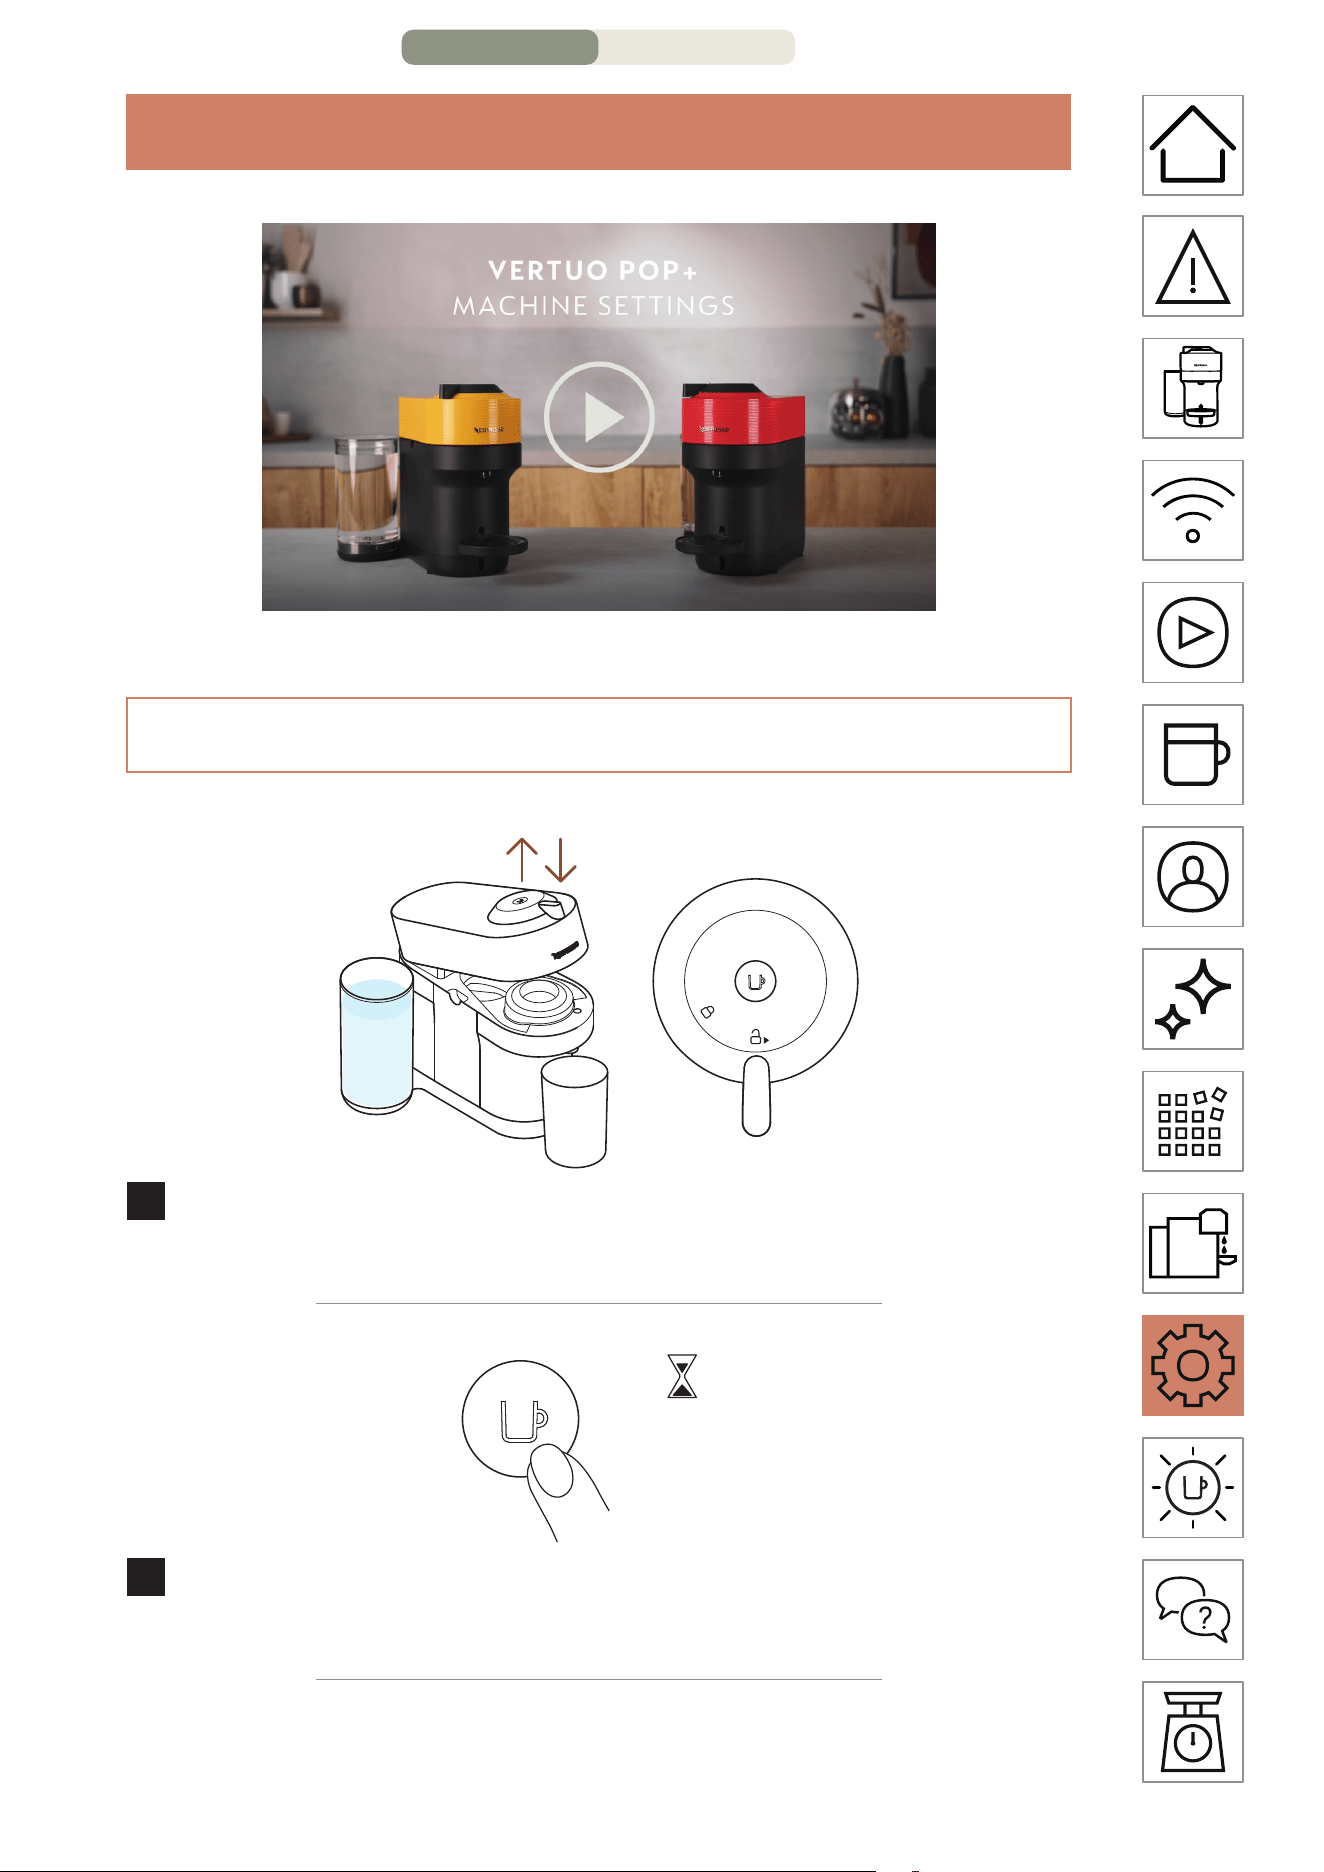
RÉGLAGES DE LA MACHINE
RÉINITIALISATION AUX PARAMÈTRES D’USINE
1
Lorsque la machine est branchée, ouvrez puis fermez la
tête de la machine avant de laisser le levier en position de
déverrouillage.
5x <3s
2
Appuyez sur le bouton 5 fois dans les 3 secondes. La
machine est maintenant programmée avec les réglages
d’usine.
RÉGLAGES DE LA MACHINE – PAGE 1/2
FR
.
60
BLUETOOTH ET WI-FI DE LA MACHINE
La machine est dotée d’un module de connectivité, activé par
defaut. Il permet d’accéder à des fonctions supplémentaires qui
améliorent votre expérience du café. Pour désactiver le module
de connectivité, procédez comme suit :
10s
1
Avec la machine fermée et le levier en position déverrouillée,
débranchez la machine pendant au moins 10 secondes.
+
2
Appuyez sur le bouton et maintenez-le enfoncé tout en
branchant la machine. Le bouton clignotera en orange pour
confirmer que le module de connectivité est maintenant
désactivé.
i
Suivez les mêmes étapes pour remere le module de connectivité en
marche. Le bouton clignotera en blanc pour confirmer que le module
a été réactivé.
RÉGLAGES DE LA MACHINE – PAGE 2/2


FR
.
62
DÉPANNAGE
Bouton éteint. • La machine s’est éteinte automatiquement ;
appuyez sur le bouton ou « déverrouillez »
la machine.
• Vérifiez le secteur, la prise, la tension et le
fusible.
Pas de café, pas d’eau. • Vérifiez que le réservoir d’eau est rempli.
• Vérifiez qu’une capsule fraîche est insérée
dans la bonne position, que le levier est
correctement verrouillé et appuyez sur le
bouton pour démarrer.
• Détartrez si nécessaire.
• Ouvrez la tête de la machine et laissez la
capsule être éjectée. Eectuez ensuite un
neoyage comme indiqué dans la section
neoyage.
Le café n’est pas assez
chaud.
• Préchauer la tasse avec de l’eau chaude du
robinet.
• Détartrer si nécessaire.
Il y a une fuite ou le
café s’écoule de façon
inhabituelle.
• Vérifier si le réservoir d’eau est
correctement positionné.
• Détartrer si nécessaire.
La machine s’éteint
automatiquement.
• Pour économiser de l’énergie, la machine
s’éteint automatiquement après 2 minutes
d’inutilisation.
• La machine peut être éteinte manuellement
à tout moment (lorsqu’elle n’est pas
utilisée) en appuyant sur le bouton et en le
maintenant enfoncé pendant 3 secondes.
Des résidus de café
présents dans la tasse.
• Lancer la procédure de neoyage deux fois
de suite.
• Voir la section intitulée « Neoyage ».
La machine ne fonc-
tionne pas et le voyant
est allumé en continu
sur «marche». Si le
voyant clignote, voir les
points suivants.
• Vérifier si la poignée est adéquatement
verrouillée.
• Pour préparer un Café ou un Espresso, véri-
fier si la capsule est neuve et correctement
insérée, et si la poignée est adéquatement
verrouillée, puis appuyer sur le bouton.
DÉPANNAGE – PAGE 1/3

FR
.
63
• Pour la procédure de neoyage, de dé-
tartrage ou de vidange, vérifier que le
compartiment de capsules est bel et bien
vide, fermer et verrouiller la machine, puis
appuyer sur le bouton pour lancer la procé-
dure voulue
La machine ne fonc-
tionne pas et le voyant
clignote de façon inter-
miente (un clignote-
ment, puis une pause).
• Remplir le réservoir d’eau, puis appuyer sur
le bouton.
• Vérifier si la poignée est adéquatement
verrouillée.
Le voyant clignote
pendant que la machine
fonctionne.
• Si le café coule normalement, la machine
fonctionne bien.
• Si la machine n’expulse que de l’eau, elle ef-
fectue un neoyage, un détartrage ou une
vidange, selon la demande de l’utilisateur.
Se référer au chapitre correspondant dans
ce manuel d’utilisation.
• Meez la machine en mode arrêt en ap-
puyant sur le bouton pendant 3 secondes,
puis appuyez de nouveau sur le bouton
pour mere la machine en marche. Aen-
dez maintenant environ 20 minutes pour
permere à la machine de refroidir après
une utilisation intensive
Le voyant clignote
alors que la machine
ne fonctionne pas.
• Il y a un temps d’aente pour observer un
écoulement de l’orifice de la machine (dû à
la lecture du code barres et l’ajout d’eau au
café).
• Vérifier si la capsule est neuve et
correctement insérée, et si la poignée est
adéquatement verrouillée, puis appuyer sur
le bouton.
• Remplir le réservoir d’eau, puis appuyer sur
le bouton.
• Éteindre la machine en appuyant sur le
bouton pendant 3 secondes, puis appuyer
à nouveau pour remere la machine sous
tension. Ensuite, laisser la machine refroidir
pendant environ 20 minutes après une
utilisation prolongée.
DÉPANNAGE – PAGE 2/3

FR
.
64
Le voyant clignote
alternativement
2 clignotements et
1 pause en continu.
La machine ne
fonctionne pas.
• Pendant la préparation du Café ou d’un
Espresso:
1) Déverouiller le levier, ouvrir la tête de
la machine et vérifier qu’il n’y ait pas de
capsules endommagées à l’intérieur.
2) Vérifier que le levier est en position
« VERROUILLÉ ».
3) Vérifier que le réservoir d’eau est rempli.
• Pendant le détartrage, la vidange et le
neoyage:
1) Vérifier que la capsule est éjectée.
2) Vérifier que le levier est en position
« VERROUILLÉ ».
• Durant la programmation du volume:
1) Vérifier si une capsule a bien été insérée
2) Se réferer au chapitre correspondant
• Si le problème persiste;
1. Déverouiller le levier et ouvrir la tête de la
machine.
2. Remplacer la capsule (si nécessaire).
3. Déconnecter le câble de la machine et le
brancher au bout de 10 secondes.
4. Fermer la tête et appuyer sur le bouton
pour allumer la machine et appuyer de
nouveau pour commencer la préparation
de café. Si le problème persiste, appeler
Nespresso.
Le voyant clignote de
façon intermiente à
3 reprises, puis demeure
allumé.
• Détartrage requis: une fois que l’alerte
apparaît, l’utilisateur peut encore préparer
quelques cafés avant que le détartrage ne
devienne obligatoire.
DÉPANNAGE – PAGE 3/3

FR
.
65
SPÉCIFICATIONS
Puissance
US, CA: 120 V, 60 Hz, 1500 W
MX: 127 V~, 60 Hz, 1650 W
Fréquence 2.402–2.480 GHz
Puissance de sortie RF
(EIRP)
Bluetooth 4 dBm Max. e.i.r.p. et Wi-Fi
<20 dMm max. e.i.r.p.
Dimensions (L x P x H) 219 x 356 x 265 mm / 8.6 x 14 x 10.4 pouces
Poids
Vertuo Pop+: 0,75 L / 25.4 oz liq
Vertuo Pop+ Deluxe: 3,7 kg / 8.1 lbs
Capacité du réservoir
d’eau
Vertuo Pop+: 0,75 L / 25.4 oz liq
Vertuo Pop+ Deluxe: 1,1 L / 37.2 oz liq
Capacité du conteneur à
capsules
Capacité du conteneur à capsules
CODES DE LA MACHINE
Nespresso Breville Delonghi
GCV6 GDV6 BNV520, BNV550,
BNV530, BNV560,
BNV540, BNV570
ENV92B, ENV92BAE,
ENV92Y, ENV92YAE,
ENV92AAE, ENV95S,
ENV95SAE

ES
.
68
VISIÓN GENERAL
CONTENIDO
VISIÓN GENERAL DE LA MÁQUINA
1 Tanque de agua y tapa
2 Charola de goteo
3 Contenedor de
cápsulas usadas
4 Salida de café
5 Botón de encendido y
apagado (ON/OFF) y
café
6 Palanca de bloqueo y
desbloqueo
7 Rejilla de goteo
8 Soporte para tazas
ajustable
1 Máquina de café
2 Set de cápsulas de
regalo
3 Brochure de bienvenida
Nespresso
4 Instrucciones de
seguridad
5 Guía de inicio rápido
6 Garantía
1
3
2
5
6
4
7
8
i
Desempaque: Un poco de polvo puede estar presente en la
superficie de la máquina debido al uso de materiales reciclados. Esto
no representa un riesgo, solo retírelo con un paño seco y suave.
3
1
2
4 + 5 + 6
VISIÓN GENERAL – PÁGINA 1/2

ES
.
69
ABRIR / CERRAR
ABRIR CERRAR
EL SISTEMA VERTUO
CÁPSULAS COMPATIBLES
S M L XL
S
Espresso
(40 ml)
S M L XL
M
Double Espresso
(80 ml)
Gran Lungo
(150 ml)
S M L XL
L
Mug
(230 ml)
S M L XL
XL
Alto, Cold Brew Style
(355 ml)
Carafe
(535 ml)
ACCESORIOS
Accesorios
compatibles
Espresso Double
Espresso
Gran Lungo Mug Reveal Glass
Accesorios no
compatibles
Alto Carafe
Descubra nuestra colección completa de accesorios en:
www.nespresso.com
VISIÓN GENERAL – PÁGINA 2/2
ES
.
70
CONECTIVIDAD
¿POR QUÉ DEBERÍA CONECTAR SU MÁQUINA VERTUO POP+?
=+
Smart
coee
Expert
advice
Machine
care
BENEFICIOS DE CONECTAR SU MÁQUINA VERTUO POP+
• Café inteligente: disfrute las innovaciones más recientes de
Nespresso al mantener su máquina actualizada.
• Consejos de expertos: reciba consejos en tiempo real e
instrucciones paso a paso sobre descalcificación, enjuague y
limpieza de su máquina.
• Cuidado de su máquina: obtenga soporte y tutoriales para su
máquina mediante su smartphone.
¿CÓMO CONECTAR SU MÁQUINA VERTUO POP+?
CONECTIVIDAD – PÁGINA 1/2
ES
.
71
*
**
1
Descargue o actualice la App de Nespresso.
2
Ejecute la App de Nespresso en su smartphone o su tableta.
3
Presione el botón de máquina en la parte superior derecha
de su pantalla.
4
Siga las instrucciones mediante la App de Nespresso.
* AppStore
®
es una marca registrada de Apple Inc., y registrada en EUA y
otros países.
** Google Play y el logo de Google Play son marcas registradas de
Google LLC.
CONECTIVIDAD – PÁGINA 2/2
ES
.
72
PRIMER USO
O
ENCENDIDO (ON)
Una vez que la máquina esté conectada, presione el botón una
vez o mediante el cierre de la palanca en la posición de bloqueo
(con el cabezal cerrado).
i
La luz parpadeará por aproximadamente 30 segundos mientras la
máquina está en calentamiento. Una vez que la luz esté fija, la máquina
está lista para su uso.
3
s
O
Apagado automático
2 minutos
APAGADO (OFF)
Para ahorrar energía, la máquina se apagará automáticamente
después de 2 minutos sin uso.
i
La máquina puede apagarse de manera manual en cualquier
momento (cuando no esté en uso) al presionar y mantener el botón
por 3 segundos.
ENCENDIDO / APAGADO
PRIMER USO – PÁGINA 1/4
ES
.
74
3
Conecte el cable de alimentación eléctrica, retire el soporte
de tazas y coloque un contenedor vacío (de al menos 1 L)
debajo de la salida de café.
4
Abra y cierre la máquina. Asegure que la palanca está en la
posición de bloqueo.
5
Encienda la máquina al presionar el botón una vez.
PRIMER USO – PÁGINA 3/4

ES
.
75
3x <2s
6
Presione el botón 3 veces en un periodo de 2 segundos.
i
La máquina empezará el proceso de enjuague. Este proceso puede
tomar hasta 7 minutos.
PRECAUCIÓN: Primero lea las precauciones de seguridad para evitar
riesgos fatales o shock eléctrico e incendios. Asegure la conexión a tierra
al conectar la máquina a la luz eléctrica.
i
Al desempacar la máquina, retire la protección de plástico.
PRIMER USO – PÁGINA 4/4

ES
.
77
3
Abra la máquina e inserte una cápsula Vertuo.
4
Cierre la máquina mediante el giro de la palanca hacia la
posición de bloqueo y coloque una taza. El soporte de tazas
puede ajustarse para acomodar su tamaño de taza.
1x
5
Inicie la extracción al presionar el botón una vez.
NOTA: Se acumular agua dentro del cabezal de la máquina.
Por favor seque las partes visibles con un paño seco.
PREPARACIÓN DE CAFÉ – PÁGINA 2/3

ES
.
78
6
Cuando el café termine de extraerse, abra la máquina
mediante el giro de la palanca hacia la posición de
desbloqueo, retire la cápsula y disfrute su café.
DESCUBRE NUESTRA EXTRACCIÓN CONCENTRADA
PARA RECETAS DE BARISTA
Con esta máquina, Nespresso te ofrece una función específica
para concentrar tu extracción de café para crear tus propias
recetas.
2x <1s
Con tu máquina encendida, rápidamente presiona el botón de
café. Este, parpadeará en color turquesa y tu café se concentrará
para aumentar el sabor y aroma de tu café con acompañantes
(leche, cremador, sobre hielo...).
40 ml 80 ml 150 ml 230 ml
25 ml 40 ml 40 ml 80 ml
Descubre cómo mejorar tu máquina con nuestros
Aeroccinos en www.nespresso.com
PREPARACIÓN DE CAFÉ – PÁGINA 3/3
ES
.
79
AJUSTA EL VOLUMEN DE CAFÉ
1
Abra la máquina e inserte una cápsula Vertuo.
2
Cierre la máquina, gire la palanca hacia la posición de
bloqueo y coloque una taza.
3
Mantenga presionado el botón hasta que alcance el volumen
deseado. El volumen de agua ha sido programado para el
tipo de cápsula usada durante el ajuste.
i
La programación es específica para cada tipo de cápsula. Los tamaños
de taza pueden ser programados desde 20 ml hasta 535 ml.
NOTA: Una vez que se programa el volumen deseado por el usuario, cada
vez que ese tipo de cápsula sea colocada en la máquina, la preparación
parará en el volumen programado por el usuario. Si desea restaurar los
valores de fábrica, ve la sección “Restablecer los valores de fábrica”.
ES
.
80
LIMPIEZA
Limpie su máquina mensualmente, cuando perciba residuos de
café dentro del cabezal o después de un periodo largo sin uso.
1
Enjuague y limpie el tanque de agua y la tapa llenándolo con
agua potable fresca.
2
Coloque el tanque de agua de nuevo en la posición
de la máquina.
LIMPIEZA – PÁGINA 1/4

ES
.
81
3
Abra la máquina y permita que la cápsula sea retirada. Vacíe
el contenedor de cápsulas y colóquelo de nuevo en su lugar.
1 L
4
Retire el soporte de tazas y coloque un contenedor de
al menos 1 L de capacidad debajo de la salida de café.
5
Cierre el cabezal y gire la palanca hacia la posición de cierre.
LIMPIEZA – PÁGINA 2/4
ES
.
82
3x <2s
6
Con la máquina encendida, presione el botón 3 veces
en los siguientes 2 segundos.
~7min
7
El procedimiento de limpieza se realizará automáticamente
por aproximadamente 7 minutos. Una luz fija permanece
cuando el proceso haya terminado.
i
Toma aproximadamente 2 minutos antes de que el agua empiece
a fluir por la salida de café. El procedimiento puede detenerse en
cualquier momento al presionar el botón.
8
Lave el contenedor de cápsulas, el soporte de tazas y la
charola de goteo con agua caliente y detergente sin aroma.
PRECAUCIÓN: No utilice agentes de limpieza abrasivos. No coloque la
máquina en el lavavajillas. No sumerja el aparato o parte de el en agua.
LIMPIEZA – PÁGINA 3/4
ES
.
83
9
Seque la máquina con un paño limpio.
PRECAUCIÓN: Limpie la salida de café regularmente con un paño
húmedo. Siempre utilice paños suaves para realizar la limpieza de la
máquina.
NOTA: Se puede acumular agua dentro del cabezal durante el proceso de
limpieza. Si esto pasa, seque las partes visibles con un paño limpio.
LIMPIEZA – PÁGINA 4/4

ES
.
84
DESCALCIFICACIÓN
El proceso de descalcificación asegura que su máquina funcione
apropiadamente durante su tiempo de vida y hará que su
experiencia de café sea como el primer día. Su máquina le
indicará cuando deba descalcificarla mediante el parpadeo de
las luces en color naranja antes de la luz fija blanca.
i
El proceso de descalcificación toma aproximadamente 20 minutos y
no puede interrumpirse.
Necesitará:
• El kit de descalcificación disponible en www.nespresso.com
• Un contenedor vacío de al menos 1 L de capacidad
1
Abra el cabezal y permita que la cápsula sea retirada.
Vacíe el contenedor de cápsulas y la charola de goteo y
colóquelas nuevamente en su lugar.
DESCALCIFICACIÓN – PÁGINA 1/5
ES
.
85
0,5 L
1 x
2
Llene el tanque de agua con 0,5 L de agua y añada 1 unidad
del líquido descalcificante de Nespresso.
PRECAUCIÓN: La solución descalcificante puede ser dañina. Evite el
contacto con los ojos, la piel y las superficies.
1 L
3
Retire el soporte de tazas y coloque un contenedor vacío de
al menos 1 L de capacidad debajo de la salida de café.
4
Con la máquina encendida, cierre el cabezal y mantenga la
palanca en la posición de desbloqueo.
DESCALCIFICACIÓN – PÁGINA 2/5
ES
.
86
7s
5
Mantenga el botón presionado por al menos 7 egundos. El
botón empezará a parpadear en color naranja rápidamente.
PRECAUCIÓN: Cuenta con 45 segundos para entrar al modo de
descalcificación, de lo contrario, la máquina regresará al modo de
extracción.
7s
6
Abra y cierre el cabezal de la máquina y deje la palanca en la
posición de desbloqueo. Mantenga el botón por al menos
7 segundos.
+ =
7
Gire la palanca hacia la posición de bloqueo y presione una
vez el botón.
i
La máquina se detendrá automáticamente cuando el proceso esté
completo.
DESCALCIFICACIÓN – PÁGINA 3/5

ES
.
87
8
Ahora es momento de enjuagar la máquina. Enjuague el
tanque de agua y llénelo con agua potable. Colóquelo de
nuevo en su lugar.
9
Presione el botón para enjuagar la máquina. Cuando el
botón parpadee rápidamente, el proceso de descalcificación
está completo.
i
La máquina se detendrá automáticamente cuando el proceso esté
completo.
10
Lave el contenedor de cápsulas, el soporte de tazas y la
charola de goteo con agua caliente y detergente sin aroma.
PRECAUCIÓN: No utilice jabón o limpiadores abrasivos. No coloque
la máquina en el lavavajillas. No sumerja la máquina o una parte de la
máquina en agua.
DESCALCIFICACIÓN – PÁGINA 4/5

ES
.
88
11
Seque la máquina con un paño limpio.
PRECAUCIÓN: No utilice agentes de limpieza abrasivos. No coloque la
máquina en el lavavajillas, ni sumerja el aparato o parte de el en agua.
NOTA: Se puede acumular agua dentro del cabezal durante la limpieza, si
esto pasa, seque las partes visibles con un paño limpio.
DESCALCIFICACIÓN – PÁGINA 5/5

ES
.
89
VACIADO
El vaciado del sistema es un proceso que puede er realizado
antes de un periodo sin uso, para protección contra las heladas o
previo al envío de la máquina a servicio técnico.
1
Vacíe el tanque de agua, abra el cabezal de la máquina y
retire la cápsula usada. Vacíe el contenedor de cápsulas y la
charola de goteo.
0.5 L
2
Coloque los removibles de nuevo en su lugar y retire el
soporte de tazas y coloque un contenedor vacío de al menos
0,5 L de capacidad debajo de la salida de café.
VACIADO – PÁGINA 1/2

ES
.
90
3
Con la máquina conectada, cierre el cabezal y coloque la
palanca en la posición de bloqueo.
4
Desconecte la máquina.
+
5
Mantenga presionado el botón mientras vuelve a conectar la
máquina.
6
Deje de presionar el botón. Parpaderá en color naranja y se
iniciará el proceso.
i
Tomará aproximadamente 30 segundos para completar el proceso.
La máquina se apaga automáticamente cuando el proceso está
terminado.
VACIADO – PÁGINA 2/2
ES
.
92
BLUETOOTH Y WIFI DE LA MÁQUINA
La máquina cuenta con un módulo de conectividad que está
encendido por default. Brinda opciones adicionales, mejorando
su experiencia de café. Para desconectar el módulo de
conectividad, siga los siguientes pasos:
10s
1
Con el cabezal de la máquina cerrado y la palanca en la
posición de desbloqueo, desconecte la máquina por al
menos 10 segundos.
+
2
Mantenga presionado el botón mientras vuelve a conectar
la máquina. El botón parpadeará en color naranja para
confirmar que el módulo de conectividad está desactivado.
i
Siga los mismos pasos para encender de nuevo el módulo de
conectividad. El botón parpadeará en color blanco para confirmar
que se ha reactivado el módulo.
AJUSTES DE LA MÁQUINA – PÁGINA 2/2

ES
.
94
SOLUCIÓN DE PROBLEMAS
No hay luz en el botón • No hay luz en el botón: La máquina se
apagó automáticamente. Presione el botón
o desbloquee la máquina.
• Revise el conector, el voltaje y los fusibles.
No extrae café ni agua • Revise que el tanque de agua esté lleno.
• Revise que una cápsula nueva haya sido
colocada en el cabezal y que la palanca está
correctamente cerrada y presione el botón.
• Descalcifique de ser necesario.
• Abra el cabezal de la máquina y permita
que la cápsula usada se retire. Realice la
limpieza como lo menciona la sección de
limpieza.
El café no está caliente • Precaliente la taza con agua caliente
de la llave.
• Descalcifique de ser necesario.
Fuga o flujo de café
anormal
• Revise que el tanque de agua está bien
posicionado.
• Descalcifique de ser necesario.
La máquina se apaga • Para ahorrar energía, la máquina se apaga
automáticamente después de 2 minutos sin
uso.
• La máquina puede apagarse en cualquier
momento al presionar el botón durante
3 segundos.
Hay restos de café
en la taza
• Realice el proceso de limpieza dos veces.
• Vea la sección “Limpieza”.
La máquina no inicia
y tiene una luz fija.
Si parpadea, vea los
siguientes puntos.
• Revise que la palanca está correctamente
cerrada.
• Si desea preparar café, revise que se
haya colocado una cápsula nueva en el
cabezal y que la palanca de bloqueo está
correctamente cerrada.
• Si está en el proceso de limpieza,
descalcificación o vaciado, revise que
no haya cápsulas en el cabezal, cierre la
máquina y asegure que la palanca está en
la posición de bloqueo. Presione el botón
para inicar el proceso.
SOLUCIÓN DE PROBLEMAS – PÁGINA 1/3
ES
.
95
La máquina no inicia
la extracción y las
luces parpadean
alternadamente.
1 parpadeo, 1 pausa
• Llene el tanque de agua y presione el botón
para iniciar la extracción.
• Verifique que la palanca está correctamente
bloqueada.
Las luces parpadean
mientras se extrae café
• Si el café fluye de manera normal, indica que
la máquina funciona de manera correcta.
• Si solo fluye agua, la máquina está
procesando la solicitud de limpieza,
descalcificación o vaciado. Refiérase a la
sección que corresponda.
• Apague la máquina presionando el botón
por 3 segundos y después presiónelo de
nuevo para encenderla. Ahora espere
aproximadamente 20 minutos para permitir
que la máquina se enfríe después de un uso
continuo
La luz parpadea y la
máquina no funciona
• Tomará algo de tiempo antes de que el café
fluya por la salida, esto, por la lectura del
código de barras y el remojo del café.
• Revise que se haya colocado una cápsula
nueva en el cabezal y que la palanca se
encuentra en la posición de bloqueo.
• Llene el tanque de agua y presione el botón
para iniciar.
• Apague la máquina presionando el
botón por al menos 3 segundos. Prenda
nuevamente la máquina al presionar el
botón y espere aproximadamente
20 minutos para permitir que la máquina
se enfríe después de un uso constante.
Las luces parpadean
alternadamente.
2 parpadeos y 1 pausa.
La máquina no inicia la
extracción.
• Durante la preparación regular de café:
1) Desbloquee la palanca y abra el cabezal
para revisar que la cápsula no está dañada.
2) Revise que la palanca está en la posición
de bloqueo
3) Revise que el tanque de agua esté lleno
• Durante la descalcificación:
1) Revise que no haya cápsulas en el cabezal
2) Revise que la palanca está en la posición
de bloqueo
• Durante la programación de volumen:
1) Revise que la cápsula está correctamente
colocada
2) Refiérase a la sección correspondiente
SOLUCIÓN DE PROBLEMAS – PÁGINA 2/3

ES
.
96
• Si el problema persiste:
1) Desbloquee la máquina y abra el cabezal.
2) Remplace la cápsula (de ser necesario).
3) Desconecte la máquina de la luz y
conéctela después de 10 segundos.
4) Cierre el cabezal y presione el botón para
encenderla; presione nuevamente el botón
para iniciar la extracción
Si el problema persiste, llame a Nespresso.
La luz parpadea
alternadamente 3 veces
y después está fija
• Descalcificación necesaria: la máquina
puede ser utilizada unas pocas veces más
antes de que la descalcificación se vuelva
necesaria.
SOLUCIÓN DE PROBLEMAS – PÁGINA 3/3

ES
.
97
ESPECIFICACIONES
Voltaje
US, CA: 120 V, 60 Hz, 1500 W
MX: 127 V~, 60 Hz, 1650 W
Frecuencia 2.402–2.480 GHz
Radiofrecuencia
Bluetooth 4 dBm Máx. e.i.r.p. y Wi-Fi
<20 dMm máx. e.i.r.p.
Dimensiones (W x D x H) 219 x 356 x 265 mm
Peso
Vertuo Pop+: 3,6 kg
Vertuo Pop+ Deluxe: 3,7 kg
Capacidad del tanque
de agua
Vertuo Pop+: 0,75 L
Vertuo Pop+ Deluxe: 1,1 L
Capacidad del contenedor
de cápsulas
8 espresso o 5 mug capsules
CÓDIGOS DE MÁQUINA
Nespresso Breville Delonghi
GCV6 GDV6 BNV520, BNV550,
BNV530, BNV560,
BNV540, BNV570
ENV92B, ENV92BAE,
ENV92Y, ENV92YAE,
ENV92AAE, ENV95S,
ENV95SAE