1
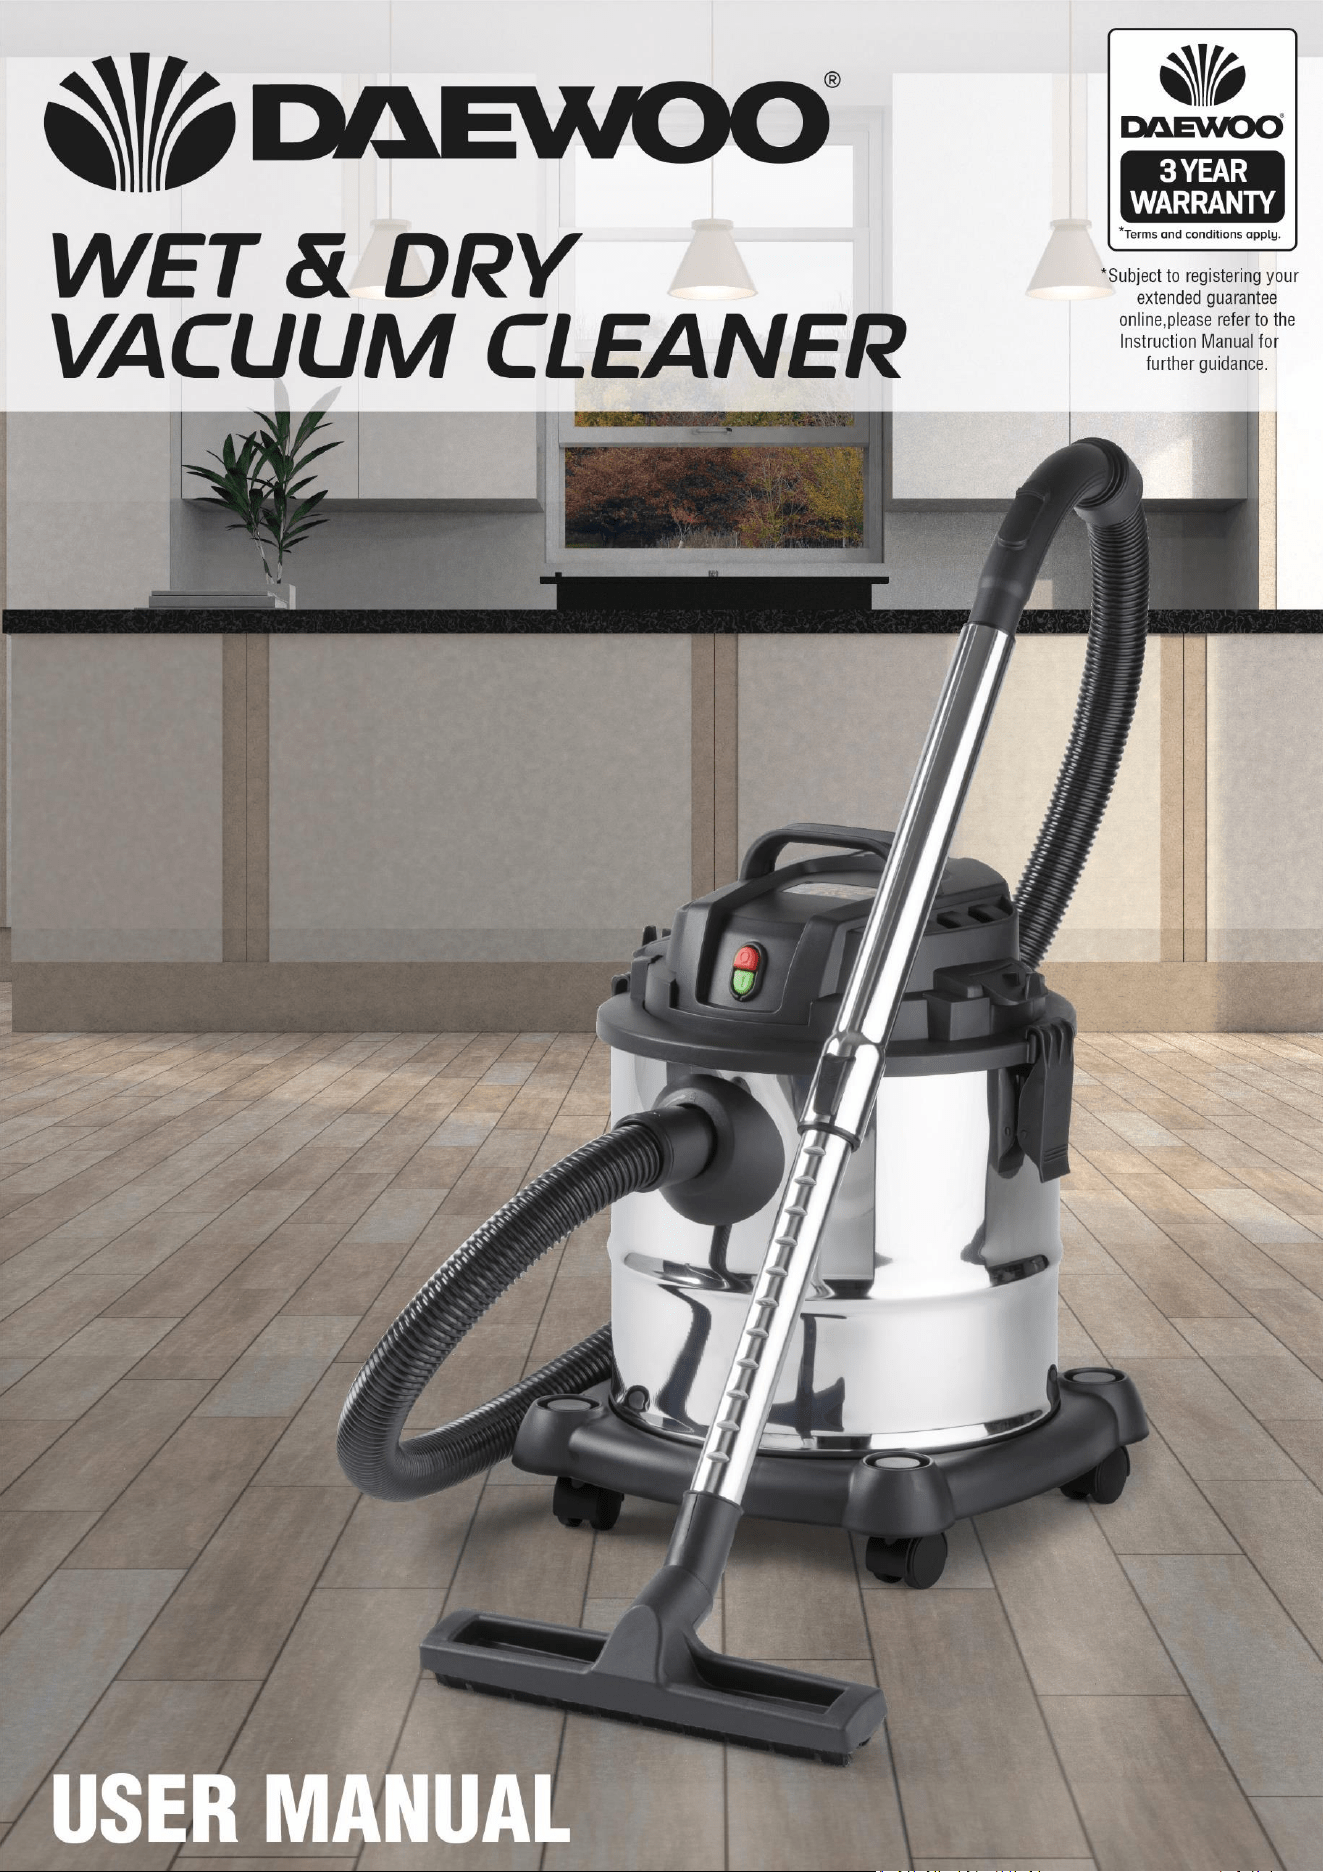
Wet & Dry Vacuum Cleaner
Model No. FLR00141
User Manual
IMPORTANT – RETAIN THESE INSTRUCTIONS FOR FUTURE REFERENCE
User Manual
User Manual

2
Wet & Dry Vacuum Cleaner
Model No. FLR00141
User Manual
IMPORTANT – RETAIN THESE INSTRUCTIONS FOR FUTURE REFERENCE
Contents
Page No.
2 Contents
3 Reading and Storing the User Manual
3 Important Safety Instructions for Proper Use
6 Explanation of Symbols
7 Description of Part & Accessories
7 Before First Use of Your Wet & Dry Vacuum Cleaner
8 Assembling For Dry Vacuuming
10 Choosing the Correct Tool
11 Setting the Correct Working Height
11 Using Your Vacuum for Dry Vacuuming
12 Assembling For Wet Vacuuming
14 Choosing the Correct Tool
14 Setting the Correct Working Height
15 Using Your Vacuum for Wet Vacuuming
15 Cleaning and Maintenance of Your Wet and Dry Vacuum
16 Replacement Dust Bag and Filter Information
16 Using the Air Outlet
17 Fitting a New Plug
17 Technical Specification
18 Recycling Information
19 Customer Support
Back Page Warranty Information

3
Wet & Dry Vacuum Cleaner
Model No. FLR00141
User Manual
IMPORTANT – RETAIN THESE INSTRUCTIONS FOR FUTURE REFERENCE
READING AND STORING THE USER MANUAL
Before using this product, please read through this
manual carefully paying particular attention to the safety
instructions. Failure to do so may result in personal injury
or damage to the product.
Carefully save this instruction manual for future reference.
Ensure the user manual is included when passing the product on
to any third parties.
IMPORTANT SAFETY INSTRUCTIONS FOR PROPER USE
When using electrical appliances, basic safety precautions
should always be followed.
Only use the product as described in this user manual. Any other
use is considered improper and may result in damage to property
or persons.
The manufacturer or vendor cannot be held liable for damages or
injury incurred through improper or incorrect use.
• Read and familiarise yourself with all operating
instructions before using this Vacuum Cleaner.
• Before plugging your unit into the mains, visually check
that the unit is intact and has not suffered any transit
damage.
• Check that the voltage indicated on the data plate
corresponds with that of the local network before
connecting the appliance to the mains power supply.
• This appliance can be used by persons with reduced
physical, sensory or mental capabilities or lack of
experience and knowledge if they have been given
supervision or instruction concerning use of the appliance
in a safe way and understand the hazards involved.
• Children shall not play with the appliance.
• Keep the appliance and its cord out of reach of children
less than 8 years when it is energised or cooling down.
• DO NOT immerse the appliance or its cord in water or any
other liquids.
• DO NOT leave the appliance unattended during use.

4
Wet & Dry Vacuum Cleaner
Model No. FLR00141
User Manual
IMPORTANT – RETAIN THESE INSTRUCTIONS FOR FUTURE REFERENCE
• DO NOT leave the appliance unattended whilst connected
to the mains supply.
• DO NOT use this appliance outdoors.
• It is imperative to unplug the power cord after the
appliance has been used, before it is cleaned and whilst
being repaired.
• Repairs to electrical appliances should only be performed
by a qualified electrician. Improper repairs may place user
at serious risk.
• DO NOT operate this appliance with a damaged plug or
cord, after a malfunction or after being dropped or
damaged in any way.
• Regular, periodic checks should be carried out on the
mains cable to
• ensure no damage is evident. Should there be any signs of
damage the appliance should not be used.
• If the power cable is damaged, it should only be replaced
by the manufacturer or a suitable qualified after-sales-
service in order to avoid a hazard
• DO NOT allow the mains cable to hang over sharp edges
or come in contact with hot surfaces.
• Allow the unit to cool before storage.
• Before cleaning, disconnect the appliance from the mains
supply and allow to cool.
• This appliance is intended for household use only and
should not be used for industrial purposes.
• DO NOT use any accessories or attachments with this
appliance other than those supplied or recommended by
supplier.
• DO NOT use this appliance for anything other than its
intended use.
• DO NOT push objects into any openings as damage to the
appliance and/or electric shock may occur.
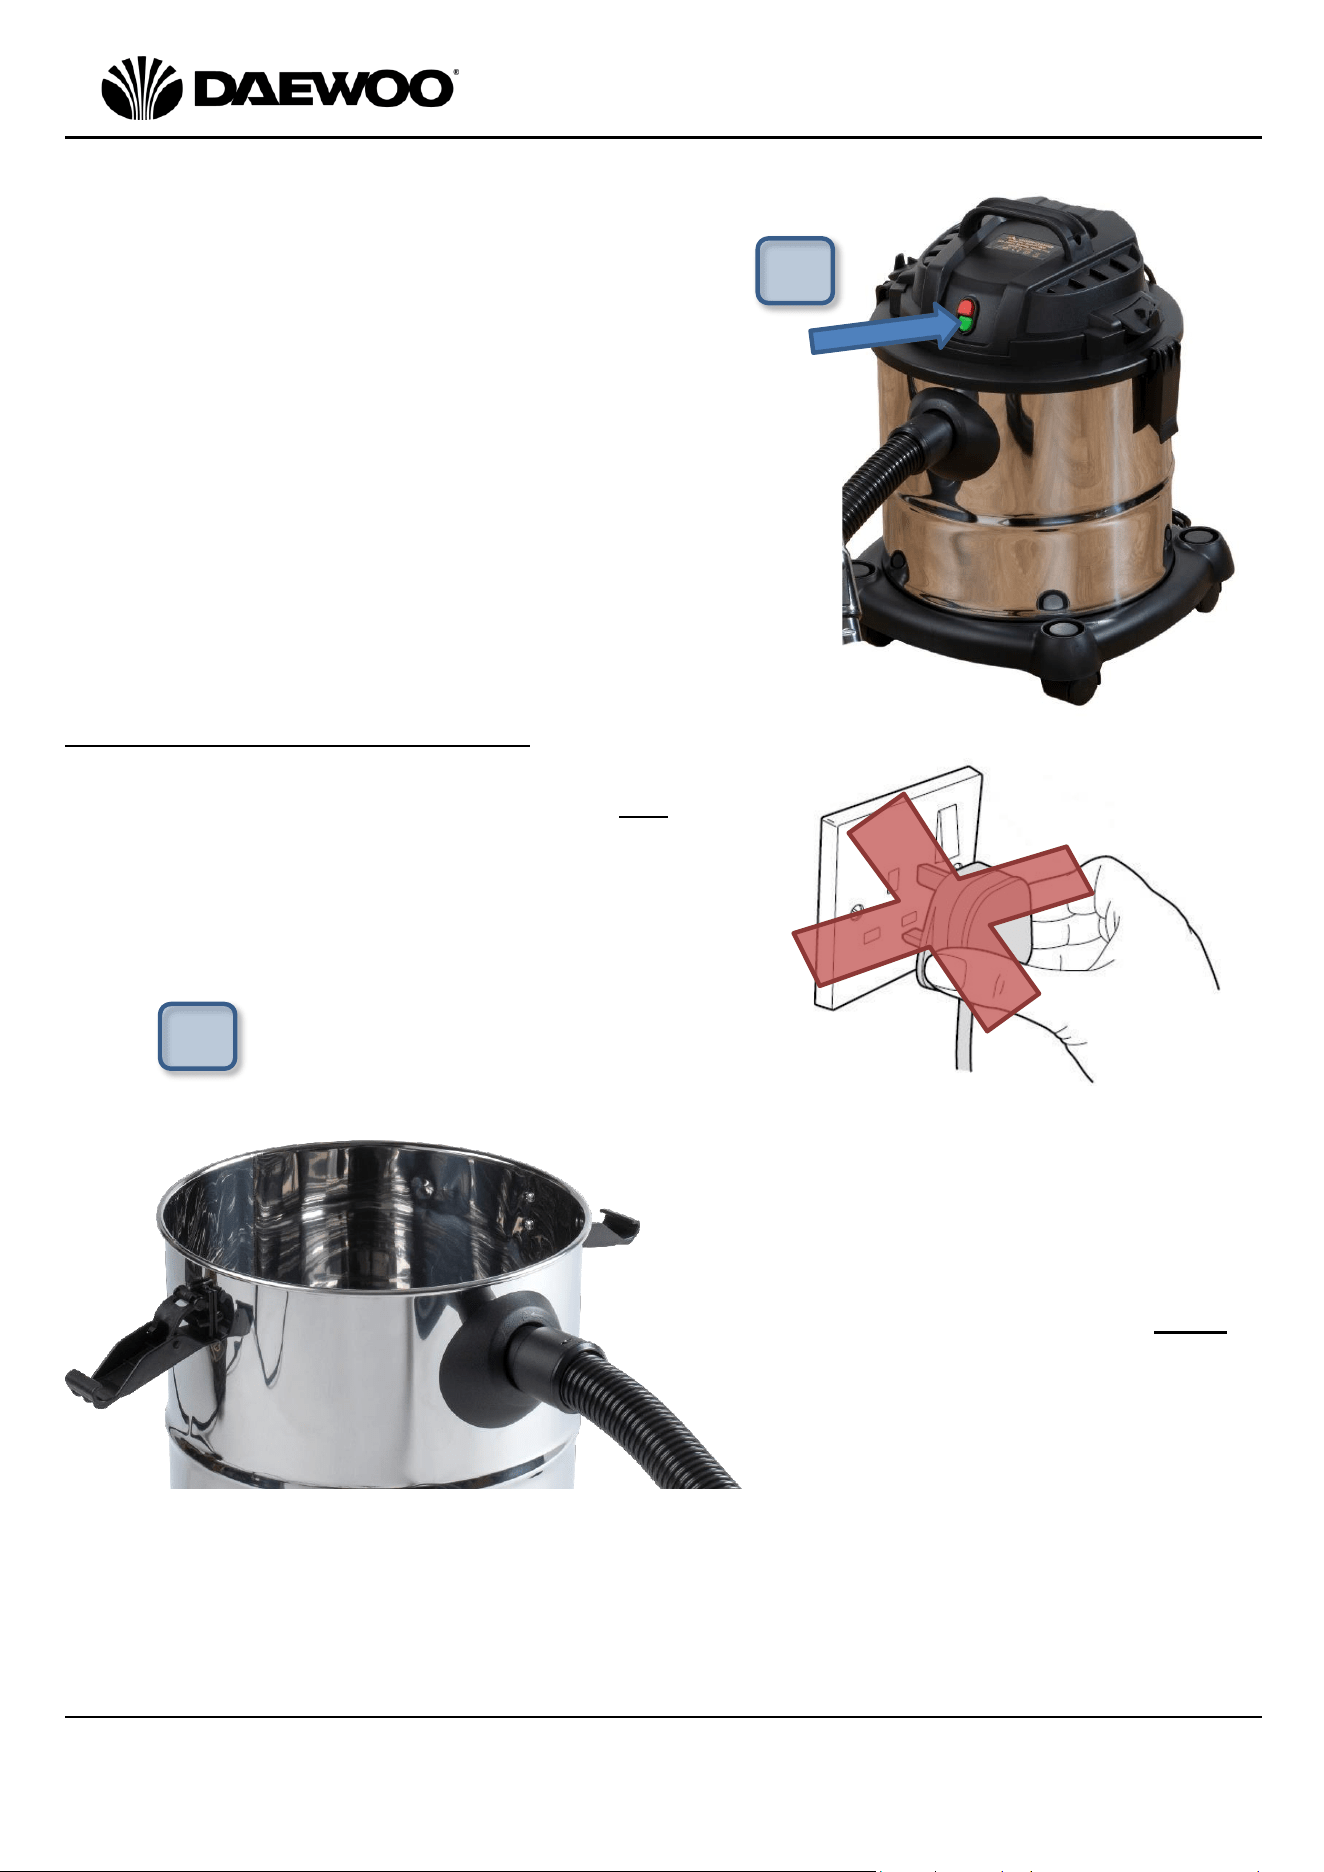
• Unplug after each use. Grasp the plug, not the cord.
• DO NOT pull or carry the Vacuum Cleaner by the electrical

5
Wet & Dry Vacuum Cleaner
Model No. FLR00141
User Manual
IMPORTANT – RETAIN THESE INSTRUCTIONS FOR FUTURE REFERENCE
cord, use the handle provided.
• Ensure fingers and other objects are never placed in any
part of the vacuum cleaner. Clothing or hair may become
trapped if the vacuum is used improperly.
• Keep hair, loose clothing, jewellery, fingers and all parts of
the body away from openings and moving parts.
• Keep all air vents clear and free of dust, lint, hair and
anything else that may reduce airflow.
• Avoid directing the appliance towards naked flames as the
air discharged may extinguish gas fires or pilot lights and
may disturb ashes in open fires.
• DO NOT Vacuum water or any other liquids with this
vacuum.
• DO NOT Vacuum hot ashes or lit cigarettes, etc.
• Caution: Always wear suitable shoes when using the
Vacuum Cleaner and when changing accessories, do not
wear slippers or open toed footwear.
6
Wet & Dry Vacuum Cleaner
Model No. FLR00141
User Manual
IMPORTANT – RETAIN THESE INSTRUCTIONS FOR FUTURE REFERENCE
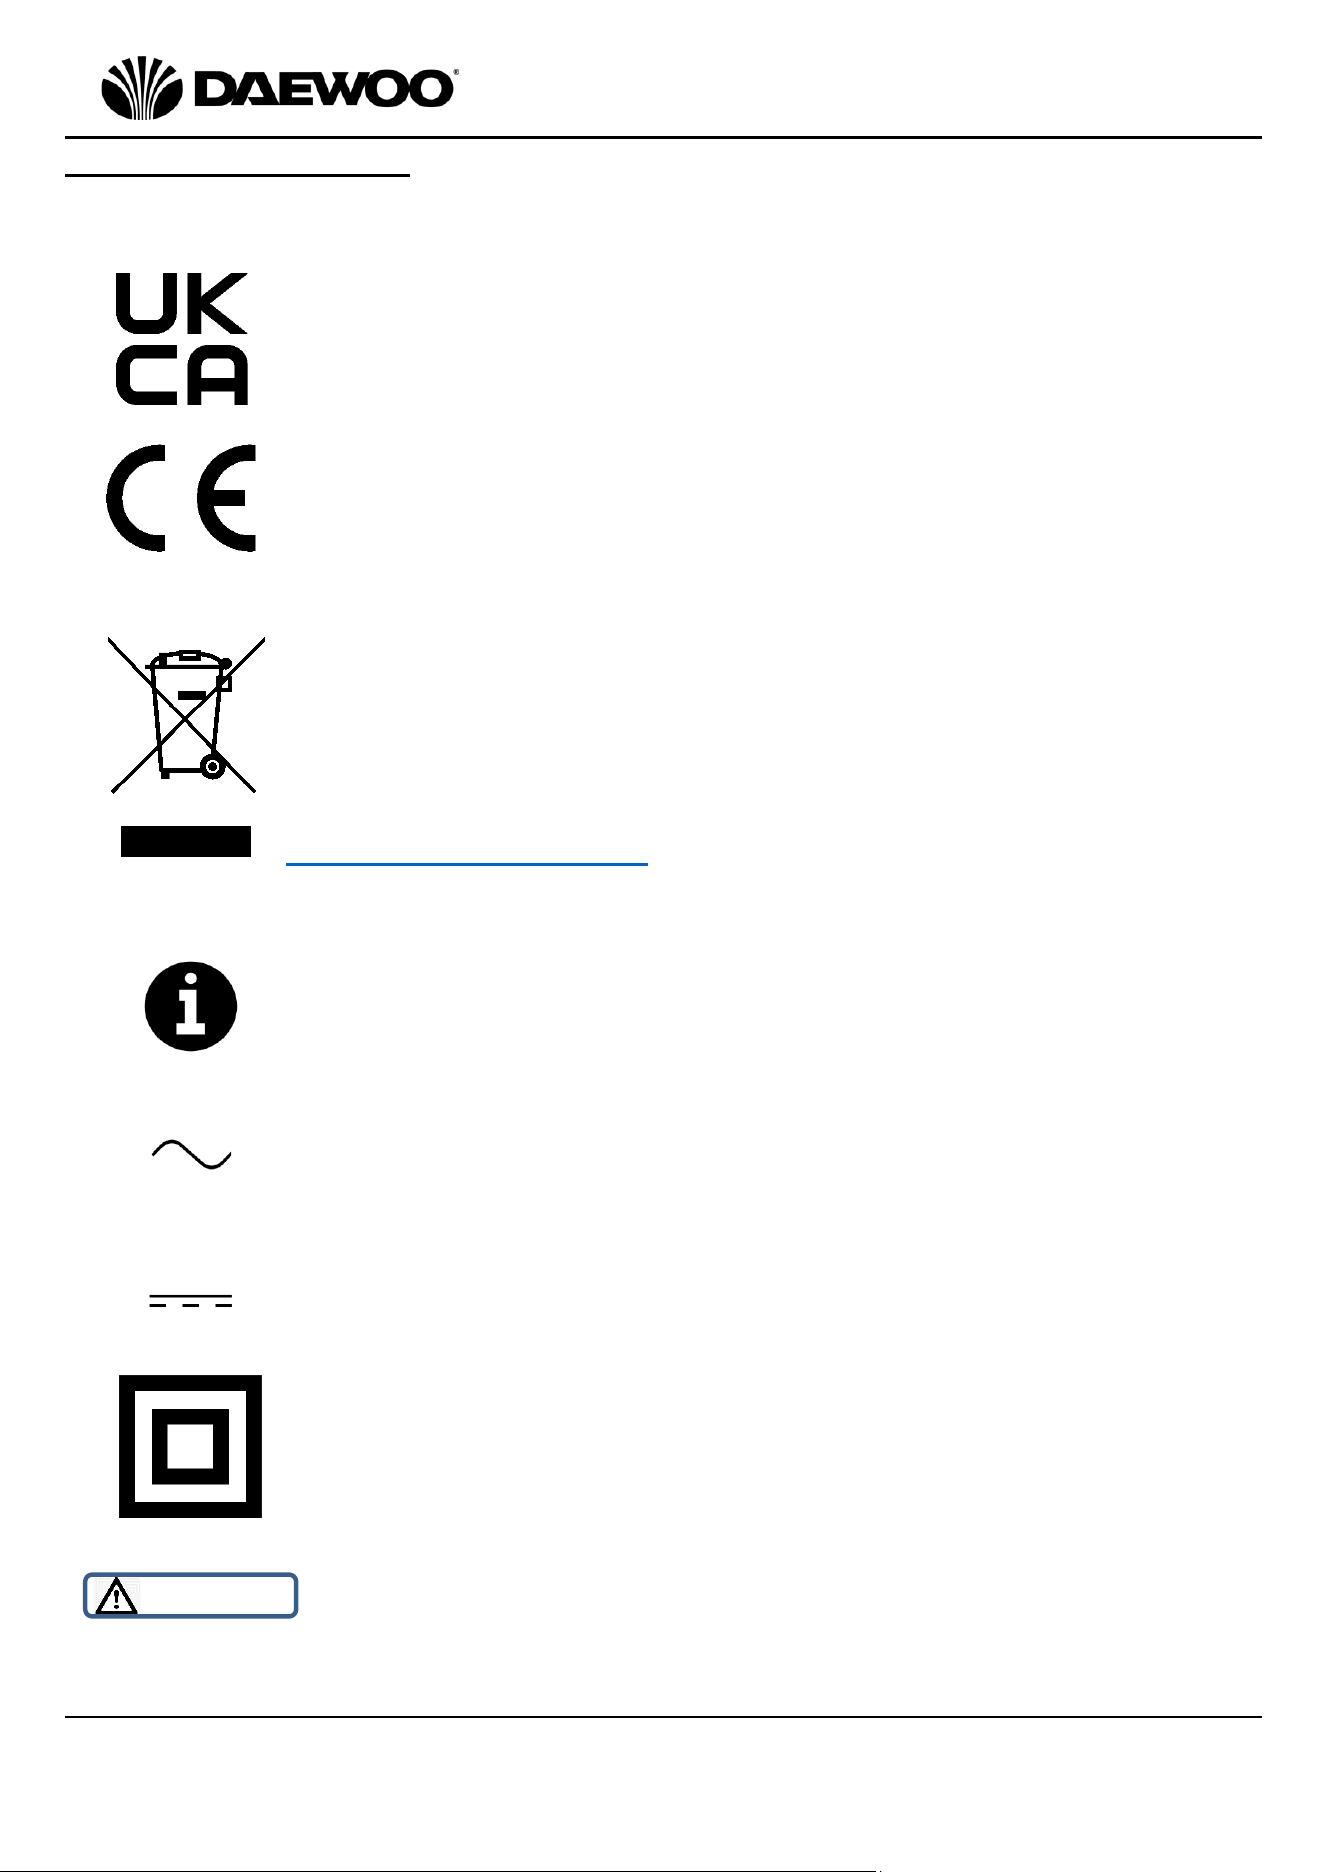
Explanation of Symbols
The following warning symbols or words are used in this instruction manual:
Products labelled with UK Conformity Assessment identifies
products conforming to UK statutory requirements.
Products labelled with this symbol conform to applicable
provisions of the European Economic Area.
You should now recycle your waste electrical goods and in doing
so help the environment. This symbol means waste electrical
products at the end of their useful life should not be disposed of
with normal household waste and not sent to landfill. Please
ensure it is taken to a suitable facility for disposal. Check with
your Local Authority or retailer for recycling advice or visit
www.recycle-more.co.uk, enter your postcode to find out your
nearest recycling site.
This symbol provides useful additional information on the
use of this product.
This symbol indicates that the supply uses an alternating current
mains supply.
This symbol identifies voltage and the current rating for direct
current.
This symbol indicates that the product is double insulated
and therefore does not require an earth connection.
WARNING!
This designates a hazard with moderate risk, which may result
in severe injury or damage to the product if not adhered to.
7
Wet & Dry Vacuum Cleaner
Model No. FLR00141
User Manual
IMPORTANT – RETAIN THESE INSTRUCTIONS FOR FUTURE REFERENCE
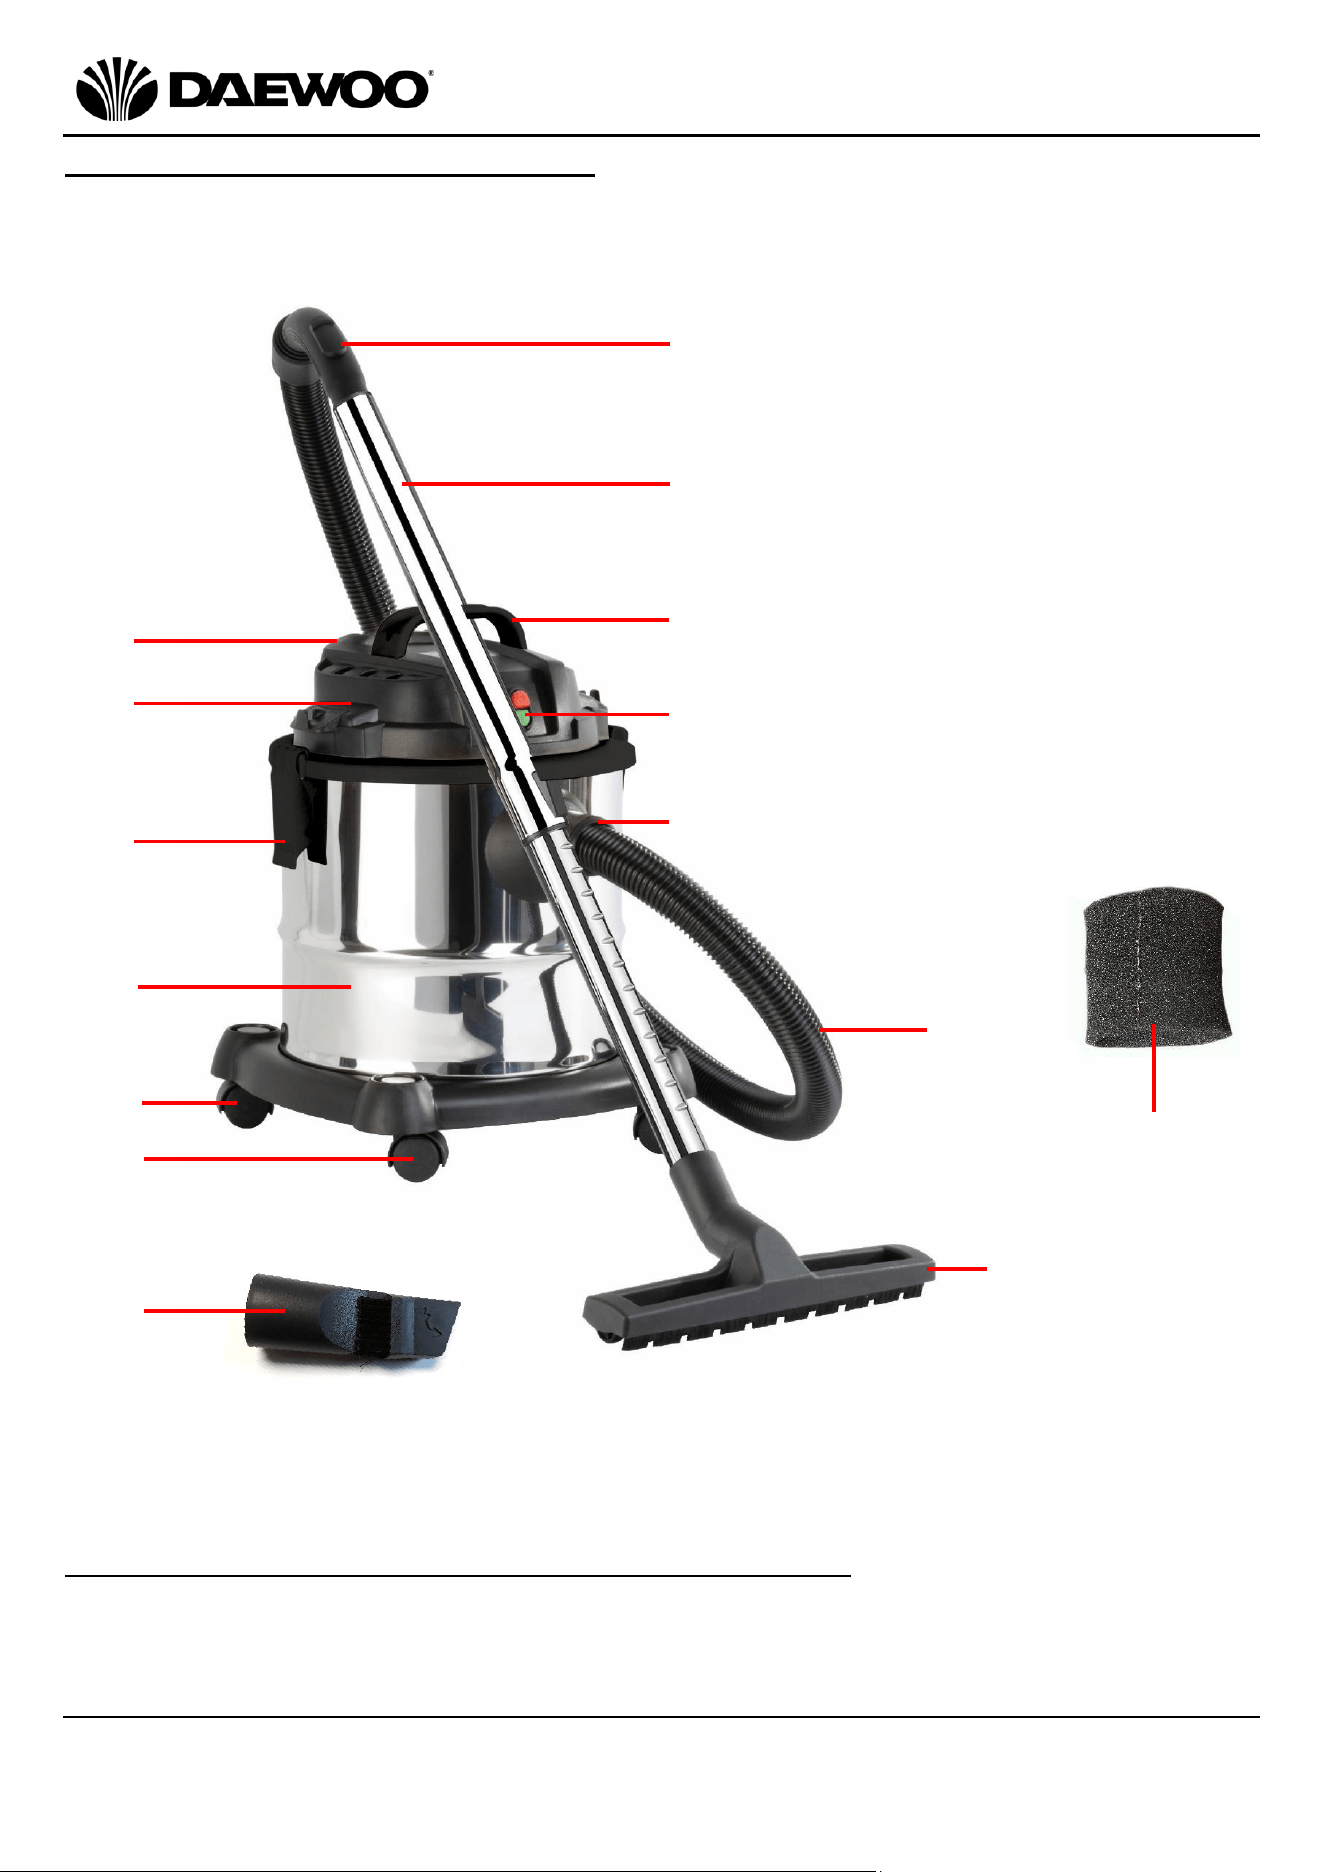
Description of Parts and Accessories
Before First use of Your Wet and Dry Vacuum Cleaner
Remove all packing materials and discard responsibly.
Ensure all parts are present – see Description of Parts above:
1. Air Valve.
2. Telescopic Tube
3. Handle.
4. On/Off Switch(es).
5. Air Intake.
6. Flexible Hose.
7. Floor Attachment.
8. Crevice Tool with Brush
9. Castor Wheels (x4)
10. Tank.
11. Latches. (x2)
12. Motor Unit.
13. Air Outlet – (Rear - used for Blow
Function).
14. Foam Filter
6
7
4
2
3
1
5
9
10
11
13
12
8
14
9
8
Wet & Dry Vacuum Cleaner
Model No. FLR00141
User Manual
IMPORTANT – RETAIN THESE INSTRUCTIONS FOR FUTURE REFERENCE
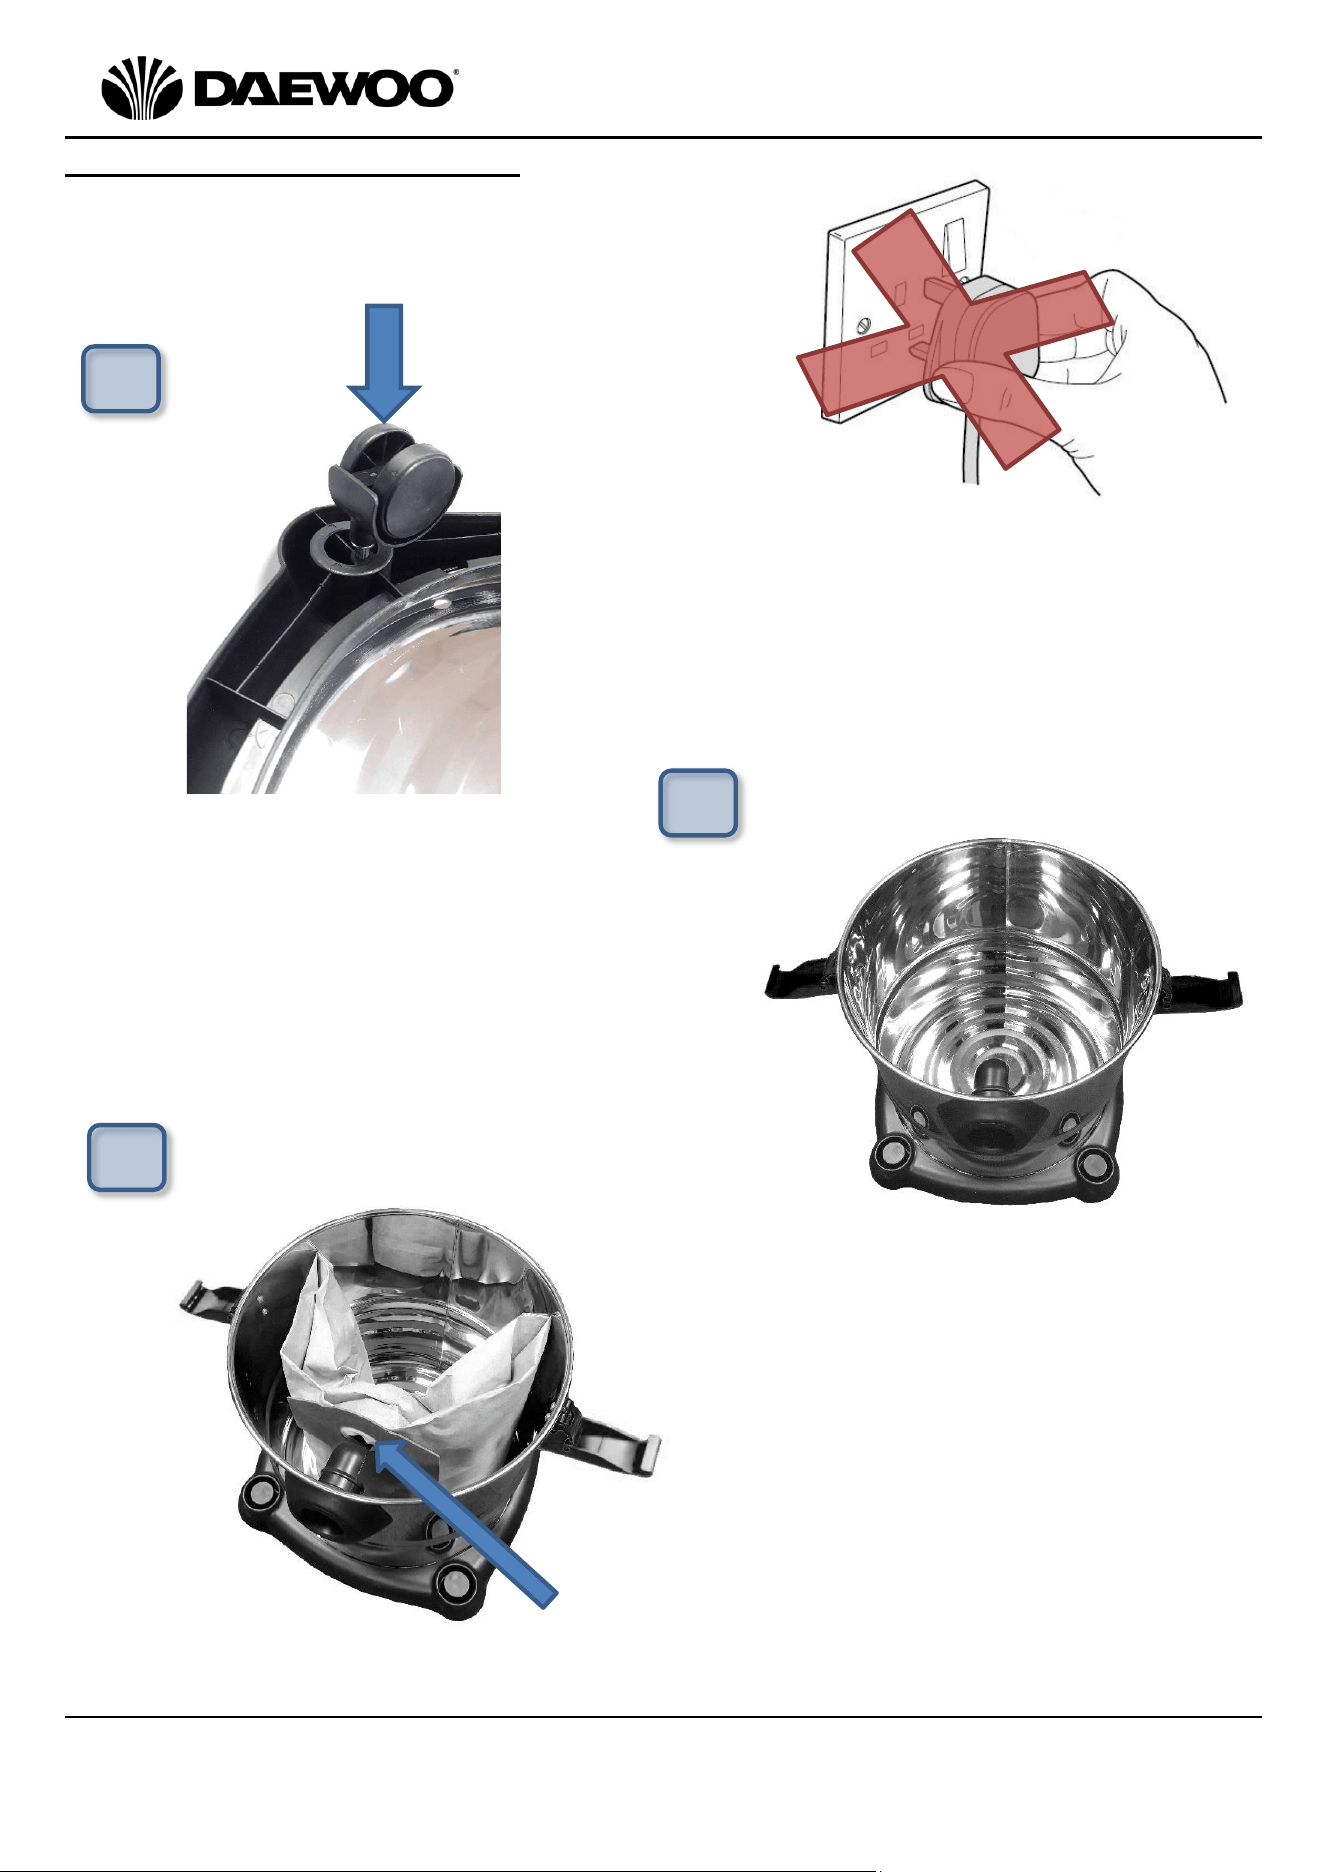
Assembling for Dry Vacuuming
WARNING! Before assembling the Vacuum
Cleaner, ensure that the mains plug is not inserted
into the mains socket:
2. Right: Turn the vacuum onto its
Castors (9) then pull both
Latches (11) outwards and lift off
the Motor Unit (12) with the
Handle (3).
3. Left: Place the dust bag inside
the Tank (10) as shown with
the opening in the bag lined up
with the Air Intake assembly
(5).
1
2
3
1. Left: First push all four Castors (9)
into the four holes at each corner
on the underside of the vacuum
cleaner.
9
Wet & Dry Vacuum Cleaner
Model No. FLR00141
User Manual
IMPORTANT – RETAIN THESE INSTRUCTIONS FOR FUTURE REFERENCE
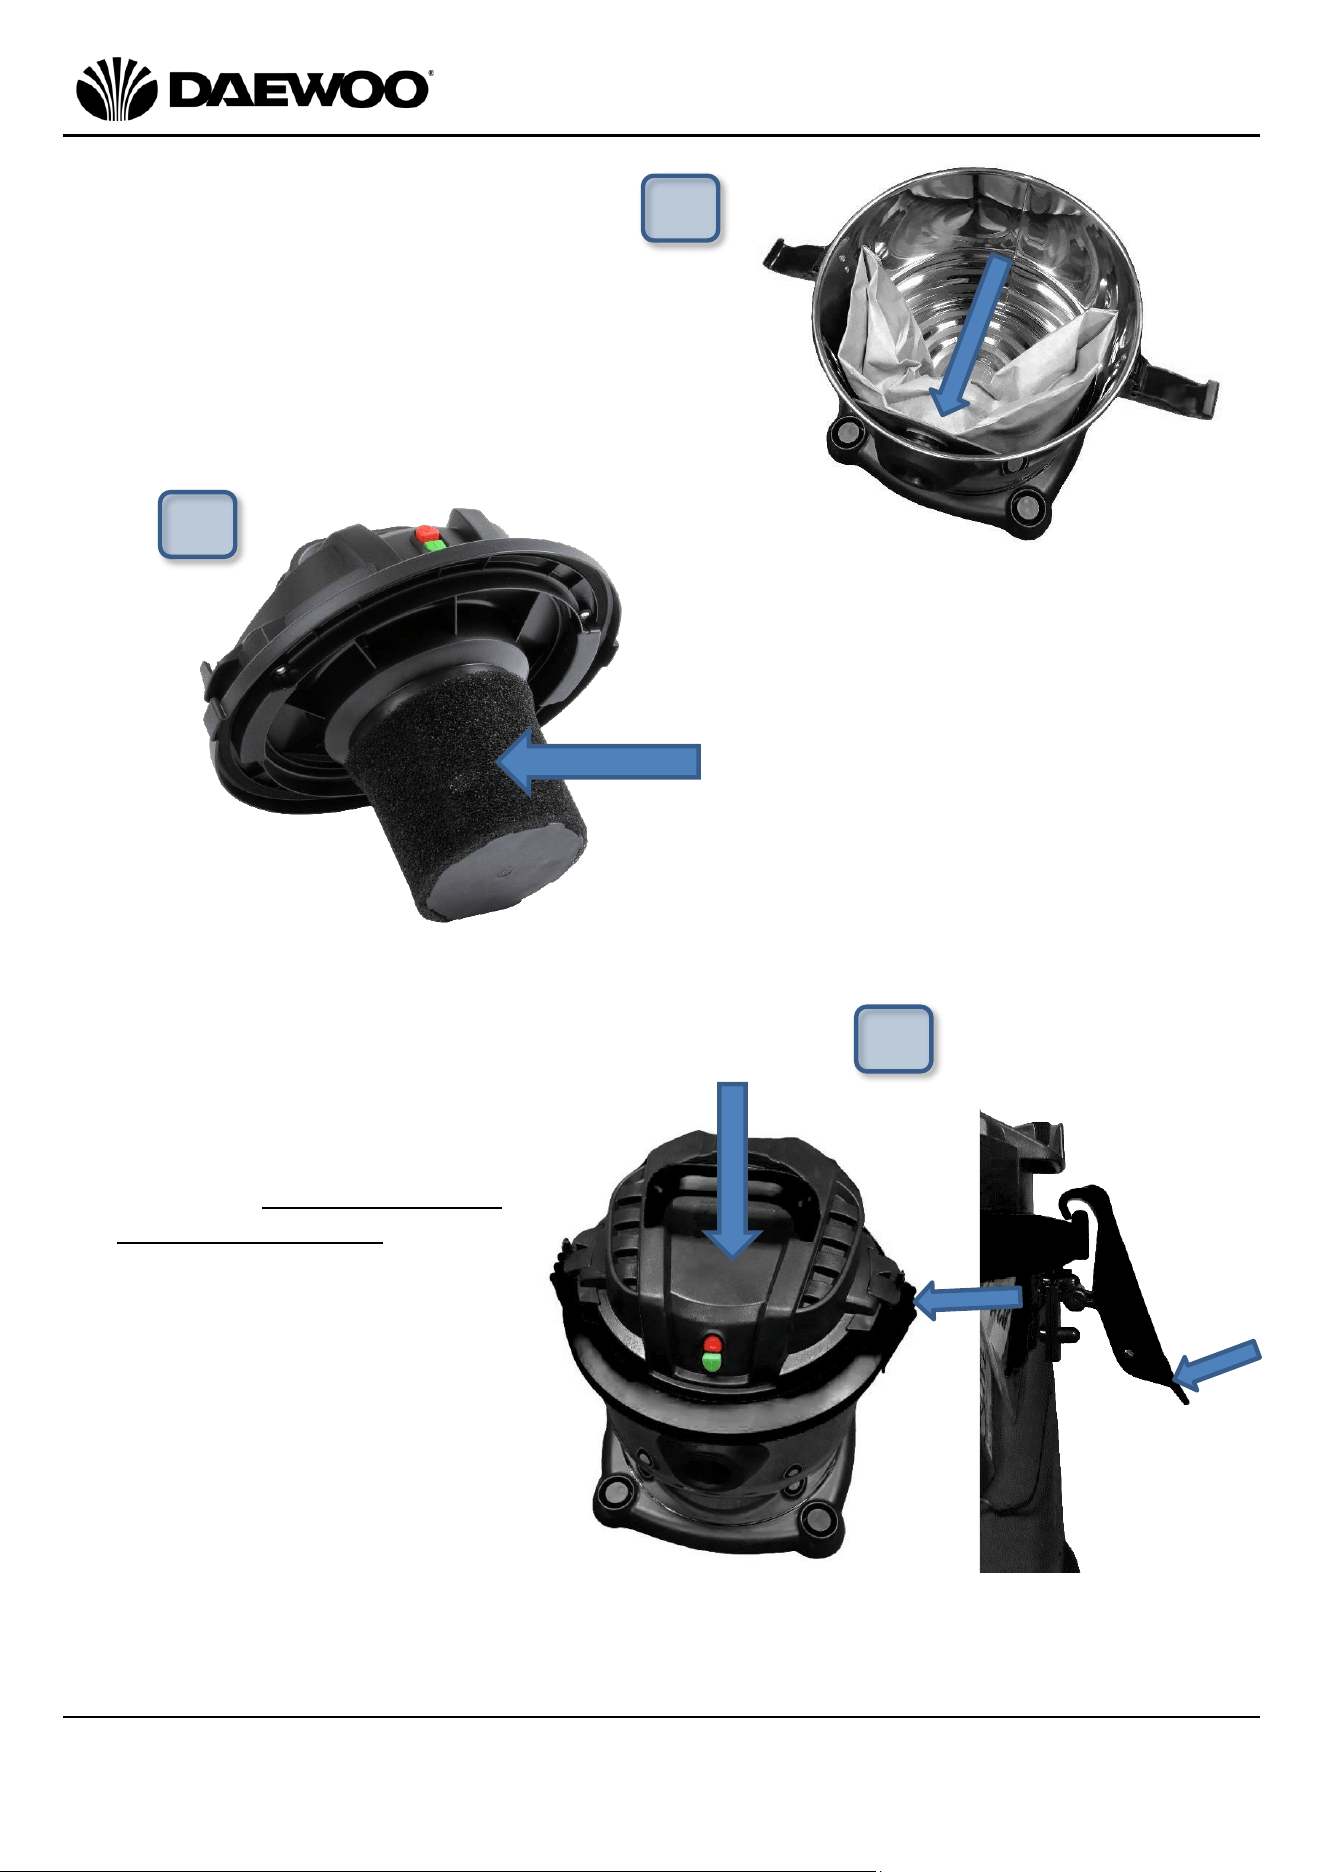
4. Right: Push the opening in the dust
bag until it catches over the ridge on
the Air Intake assembly (5) as shown.
5. Left: Ensure that the Foam Filter
(14 – arrowed) is clean and fitted
to the Motor Unit (12) as shown.
5
6
4
12
6. Right: Place the Motor
Unit (12 – arrowed right)
back onto the top of the
Tank (10) ensuring it is the
correct way round such
that the On/Off Switches
(4) are above the Air
Intake (5) as shown, hook
the Latches (11) onto the
edge of the Motor Unit
(12) and push them down
against the sides of the
Tank (10) to lock the
Motor Unit (12) in place.
10
Wet & Dry Vacuum Cleaner
Model No. FLR00141
User Manual
IMPORTANT – RETAIN THESE INSTRUCTIONS FOR FUTURE REFERENCE
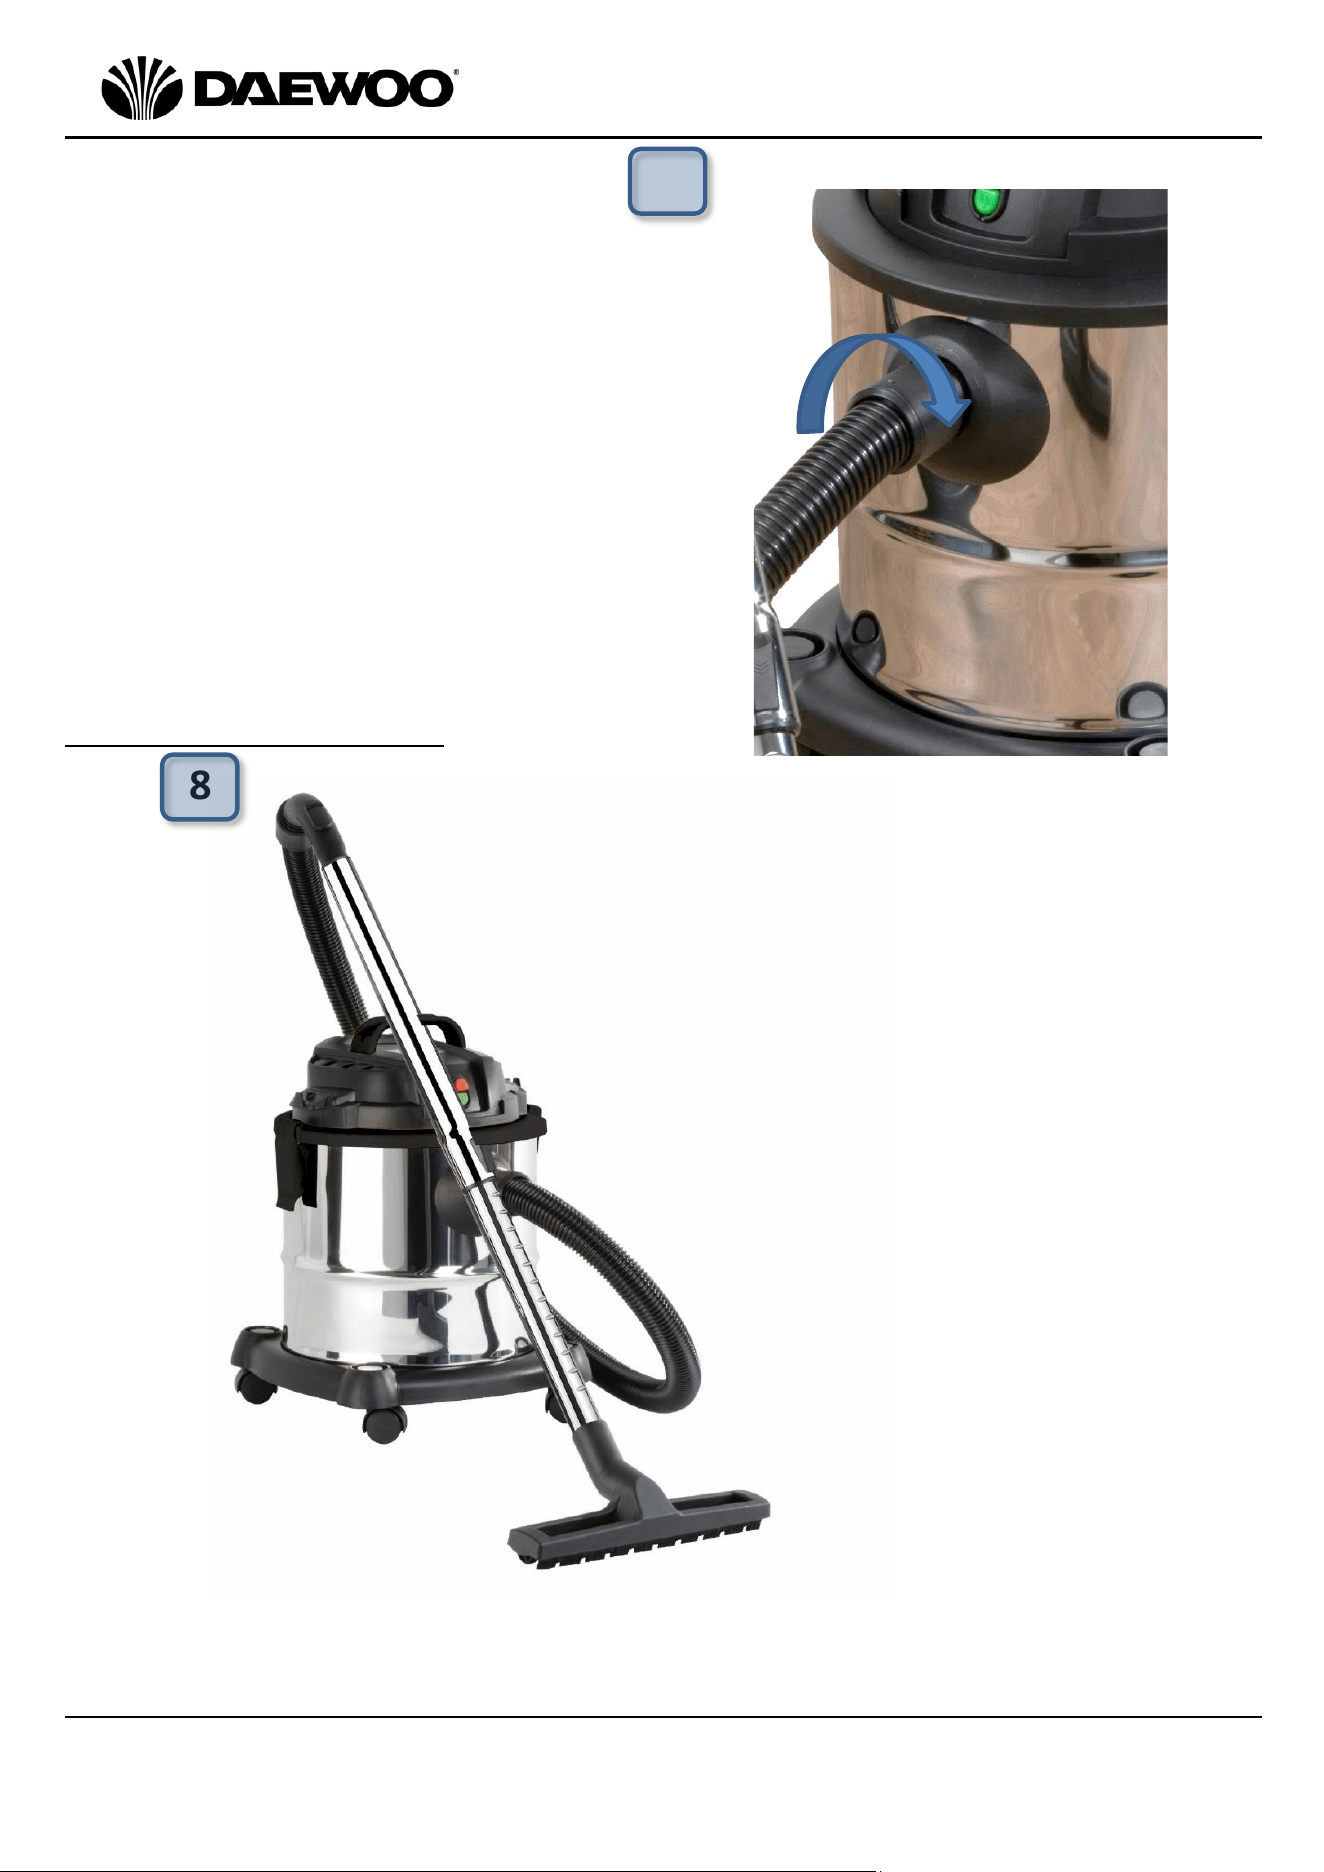
Choosing the Correct Tool
7. Right: Connect the Flexible Hose (6)
by pushing it into the Air Intake (5)
and rotating it clockwise until it locks
into place.
8. Left: For cleaning floors, attach the
Telescopic Tube (2) to the end of the
Flexible Hose (6) and then push the Floor
Attachment (7) onto the end of the
Telescopic Tube.
7
8
11
Wet & Dry Vacuum Cleaner
Model No. FLR00141
User Manual
IMPORTANT – RETAIN THESE INSTRUCTIONS FOR FUTURE REFERENCE
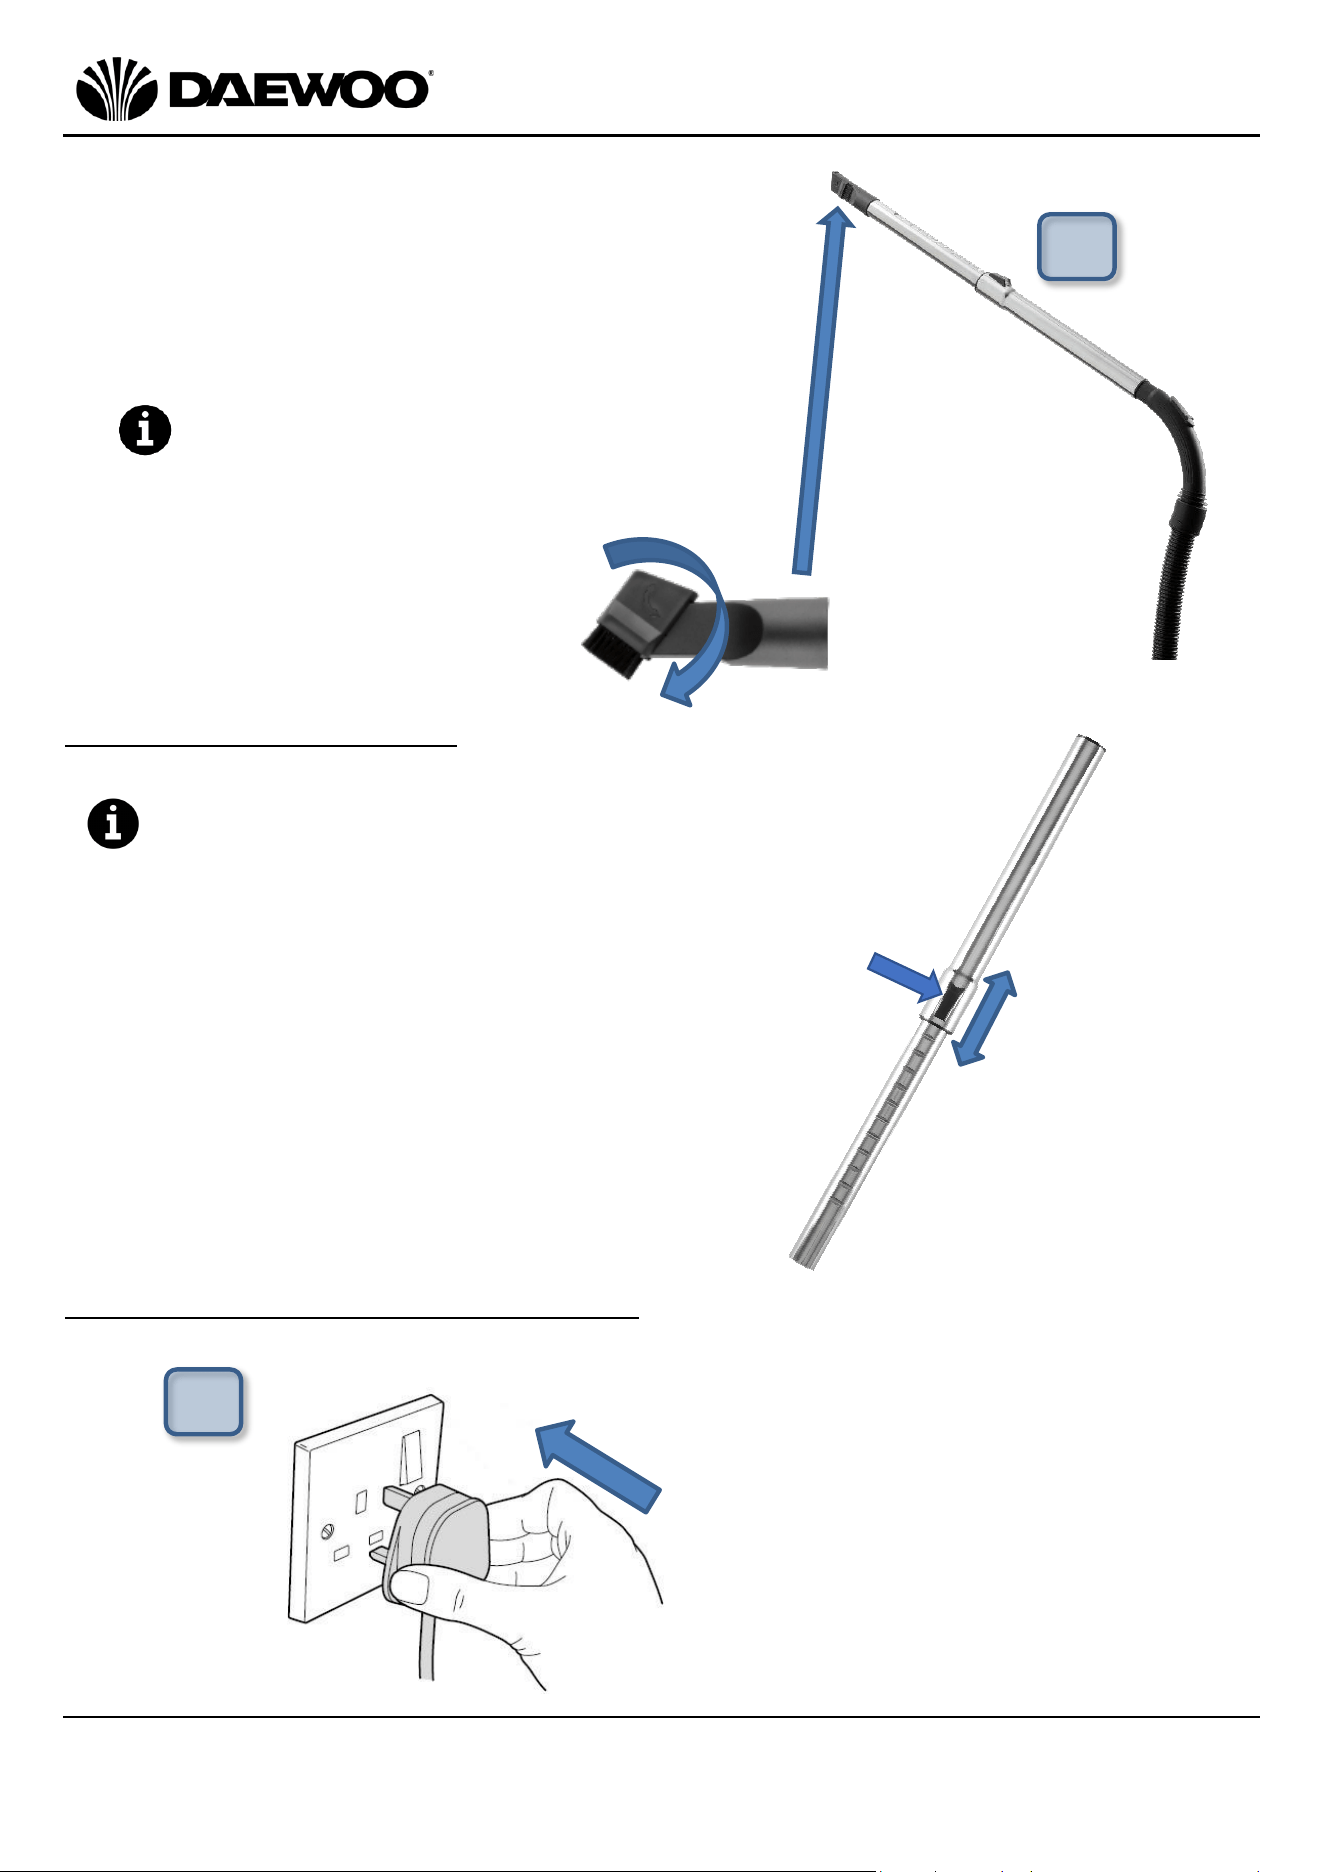
Setting the Working Height
To set the required working height of the
Flexible Hose (6), push the catch down on the
Telescopic Tube (2) and push or pull the tube to
lengthen or shorten to the required length/height:
Using Your Vacuum for Dry Vacuuming
1
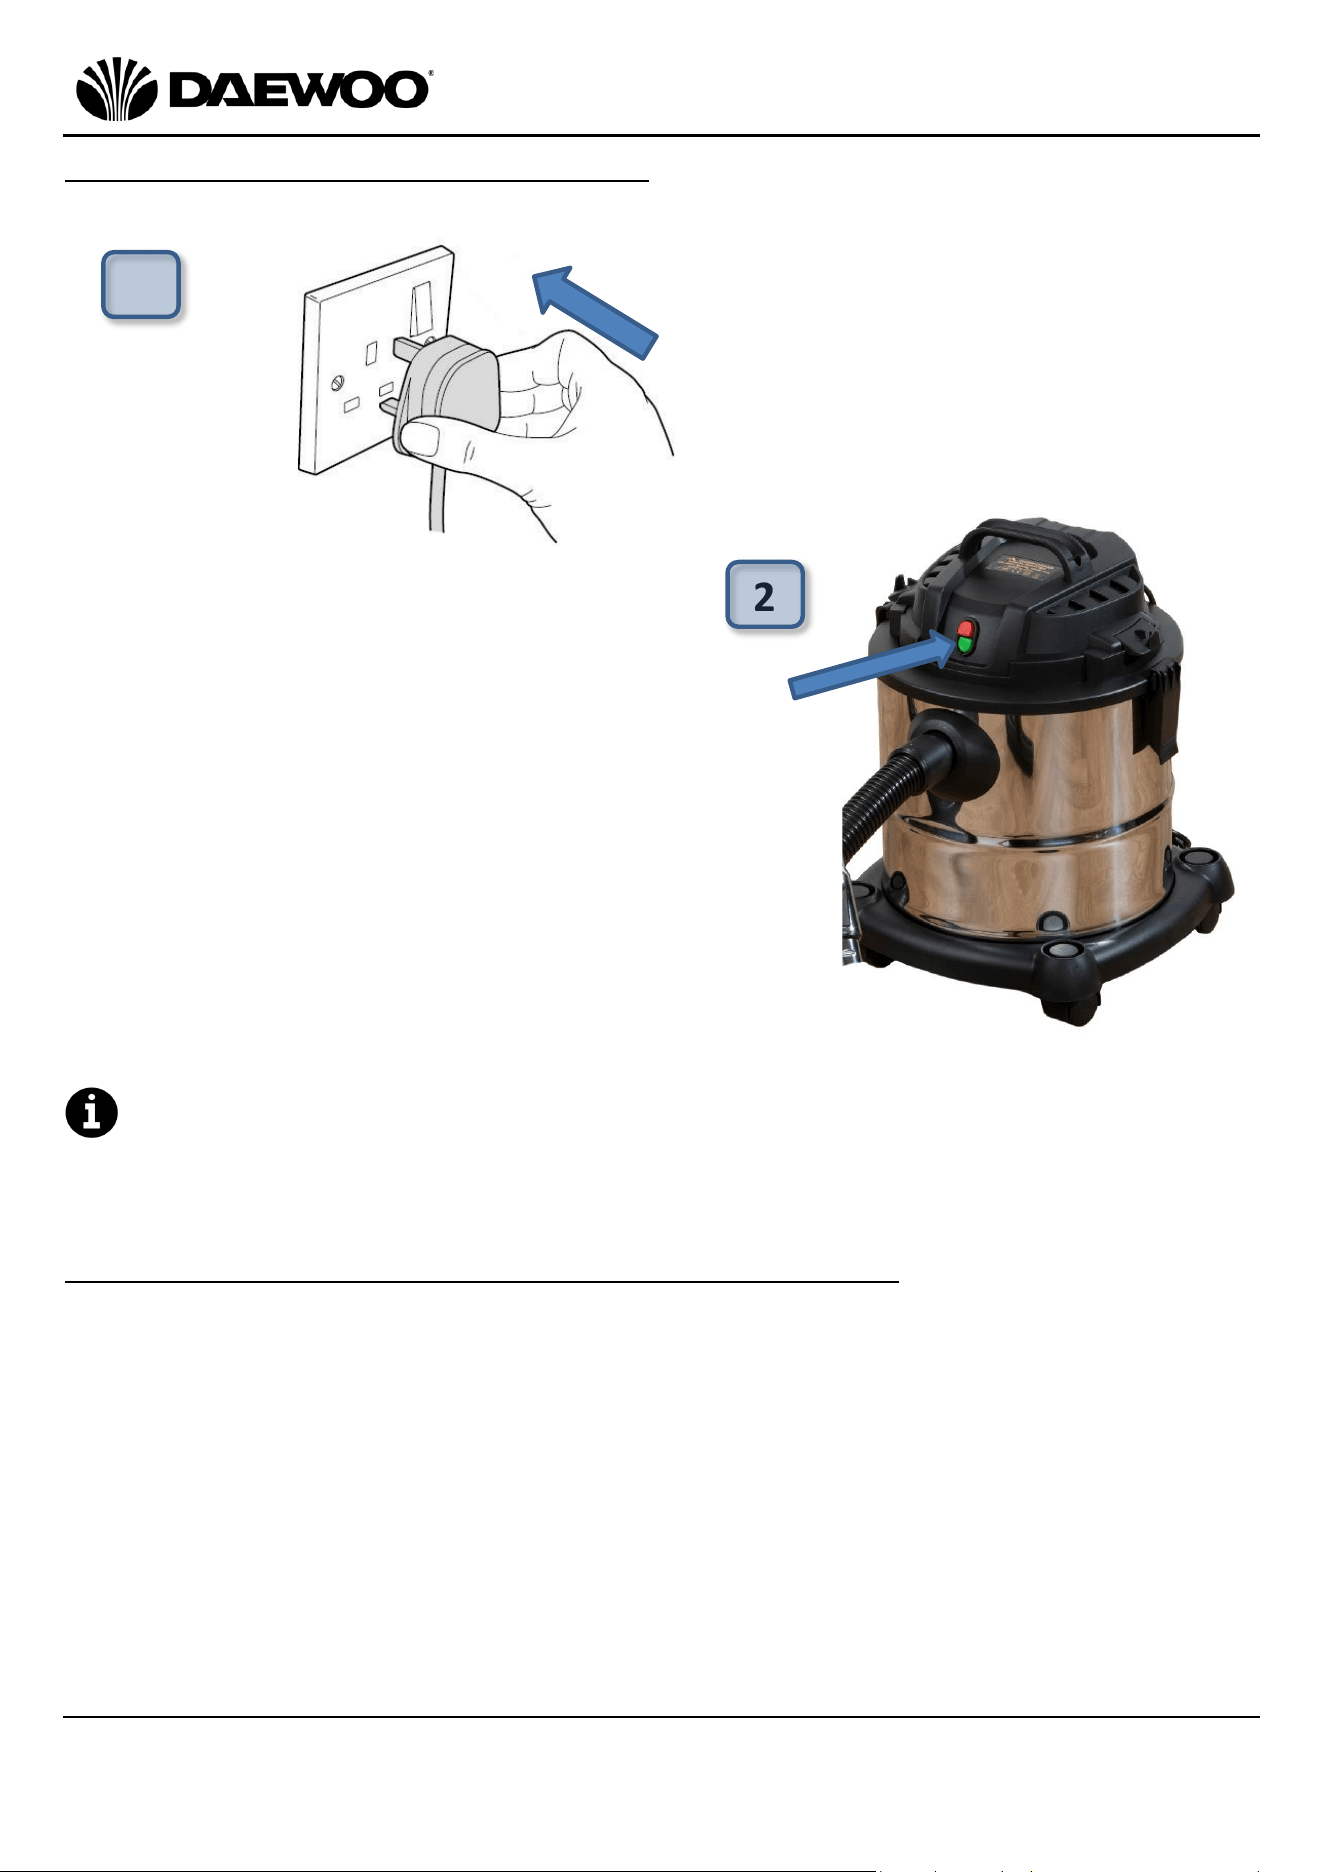
1. Left: Insert the Mains plug (with dry
hands) into the nearest socket.
9. Right: Alternatively, for cleaning floor edges
and hard to get at areas, push the Crevice
Tool (8) onto the end of the Telescopic
Tube.
Rotate the brush on the end of the
Crevice Tool (8) as shown below, to brush
dust out of the hard to get at areas:
9
12
Wet & Dry Vacuum Cleaner
Model No. FLR00141
User Manual
IMPORTANT – RETAIN THESE INSTRUCTIONS FOR FUTURE REFERENCE
Assembling for Wet Vacuuming
WARNING! Before assembling the Vacuum
Cleaner, ensure that the mains plug is not inserted
into the mains socket:
2. Right: Press the green On Switch (4) to
operate the vacuum and begin cleaning.
Press the red Off Switch (4) to switch off
the vacuum.
2
1
1. Left: First pull both Latches (11)
outwards and lift off the Motor Unit
(12) with the Handle (3) and remove
the dust bag.
WARNING! The paper dust bag must
be removed for wet vacuuming use.
13
Wet & Dry Vacuum Cleaner
Model No. FLR00141
User Manual
IMPORTANT – RETAIN THESE INSTRUCTIONS FOR FUTURE REFERENCE
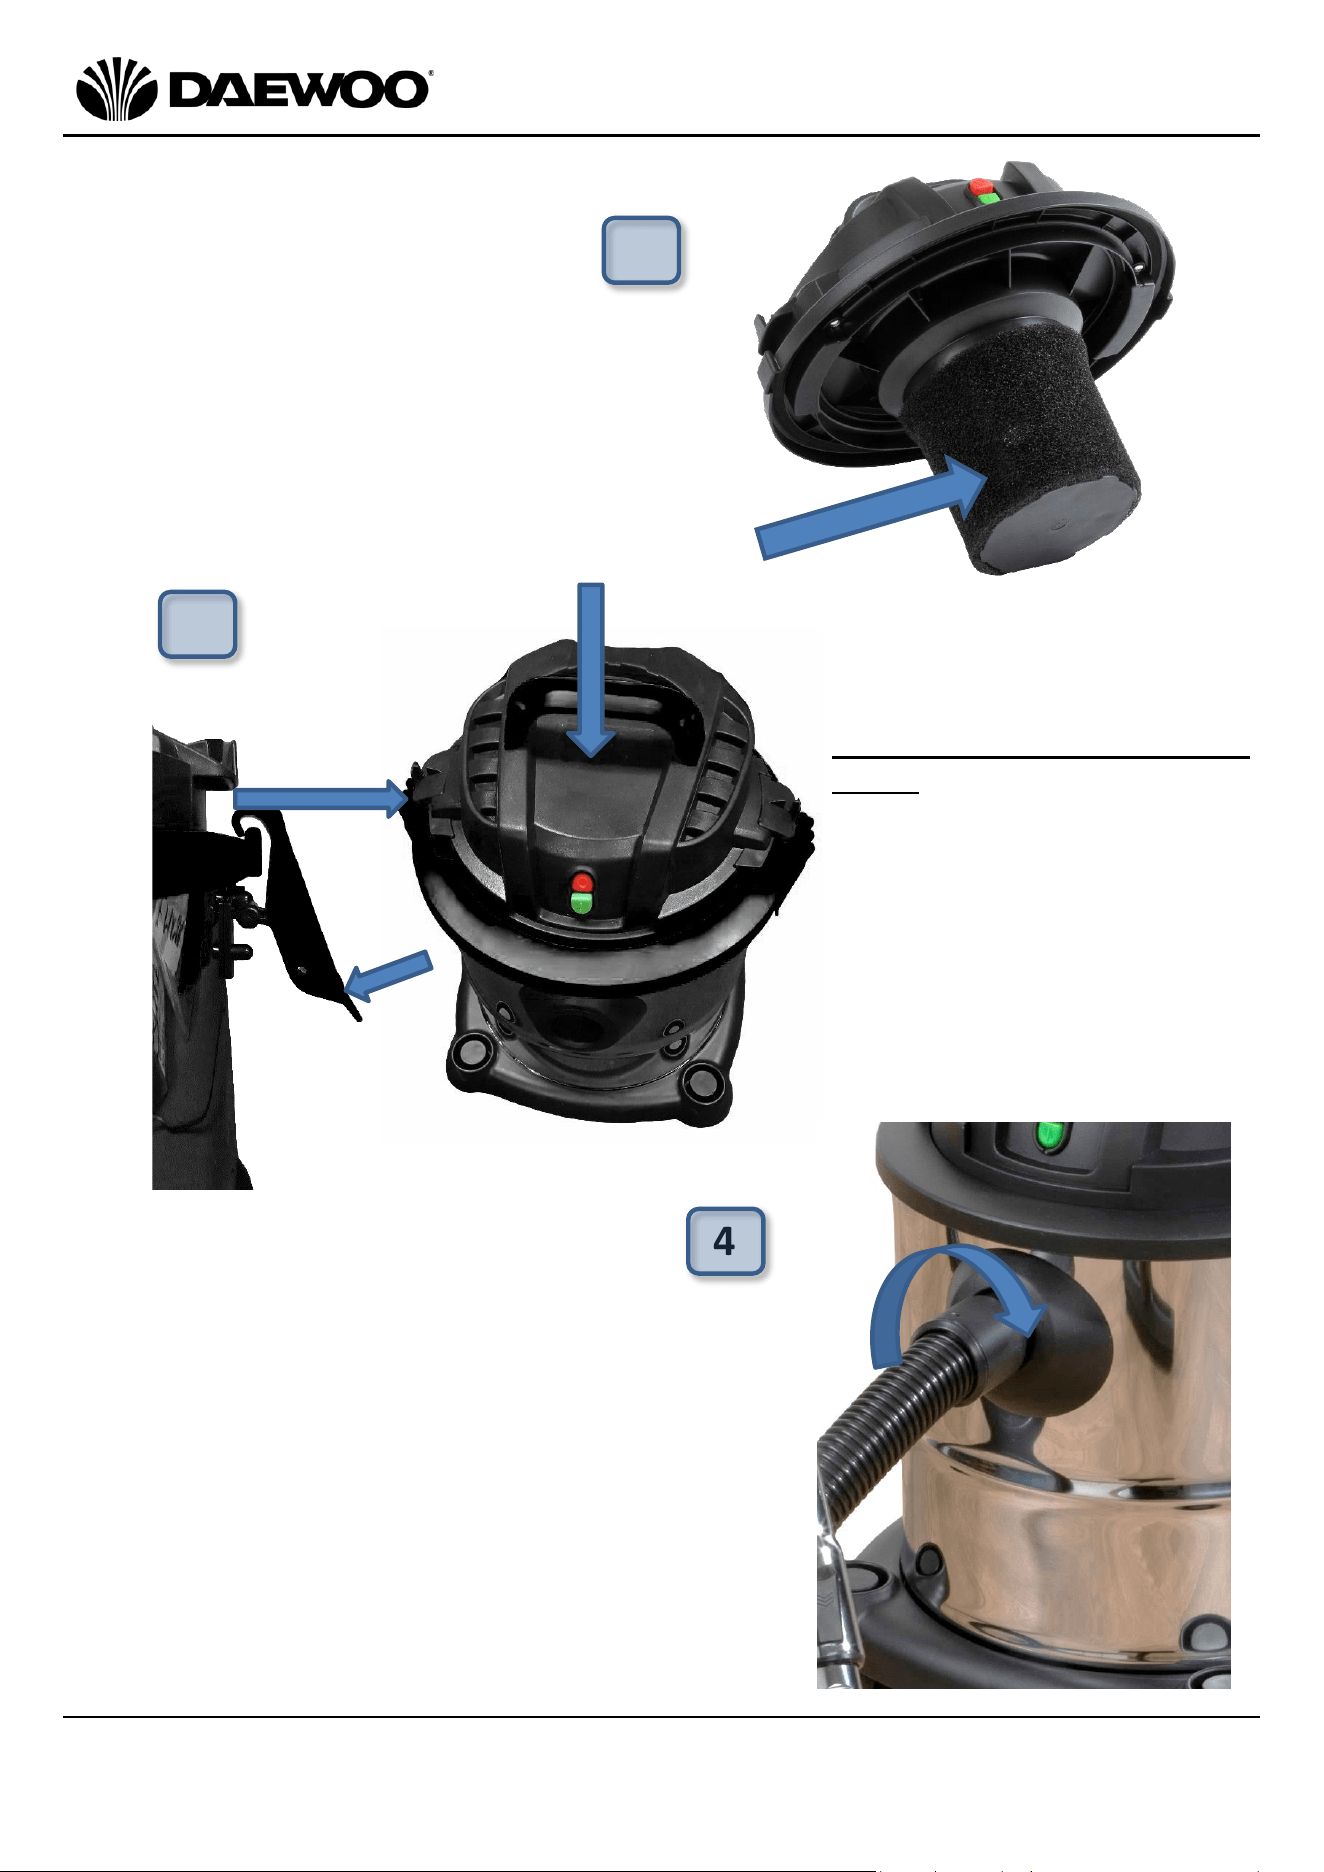
3. Left: Place the Motor Unit
(12 – arrowed right) back
onto the top of the Tank (10)
ensuring it is the correct way
round such that the On/Off
Switches (4) are above the
Air Intake (5) as shown, hook
the Latches (11) onto the
edge of the Motor Unit (12)
and push them down against
the sides of the Tank (10) to
lock the Motor Unit (12) in
place.
4. Right: Connect the Flexible Hose (6) by
pushing it into the Air Intake (5) and rotating
it clockwise until it locks into place.
2. Right: Ensure that the Foam
Filter (14 – arrowed) is clean and
fitted to the Motor Unit (12).
2
3
4
12
14
Wet & Dry Vacuum Cleaner
Model No. FLR00141
User Manual
IMPORTANT – RETAIN THESE INSTRUCTIONS FOR FUTURE REFERENCE
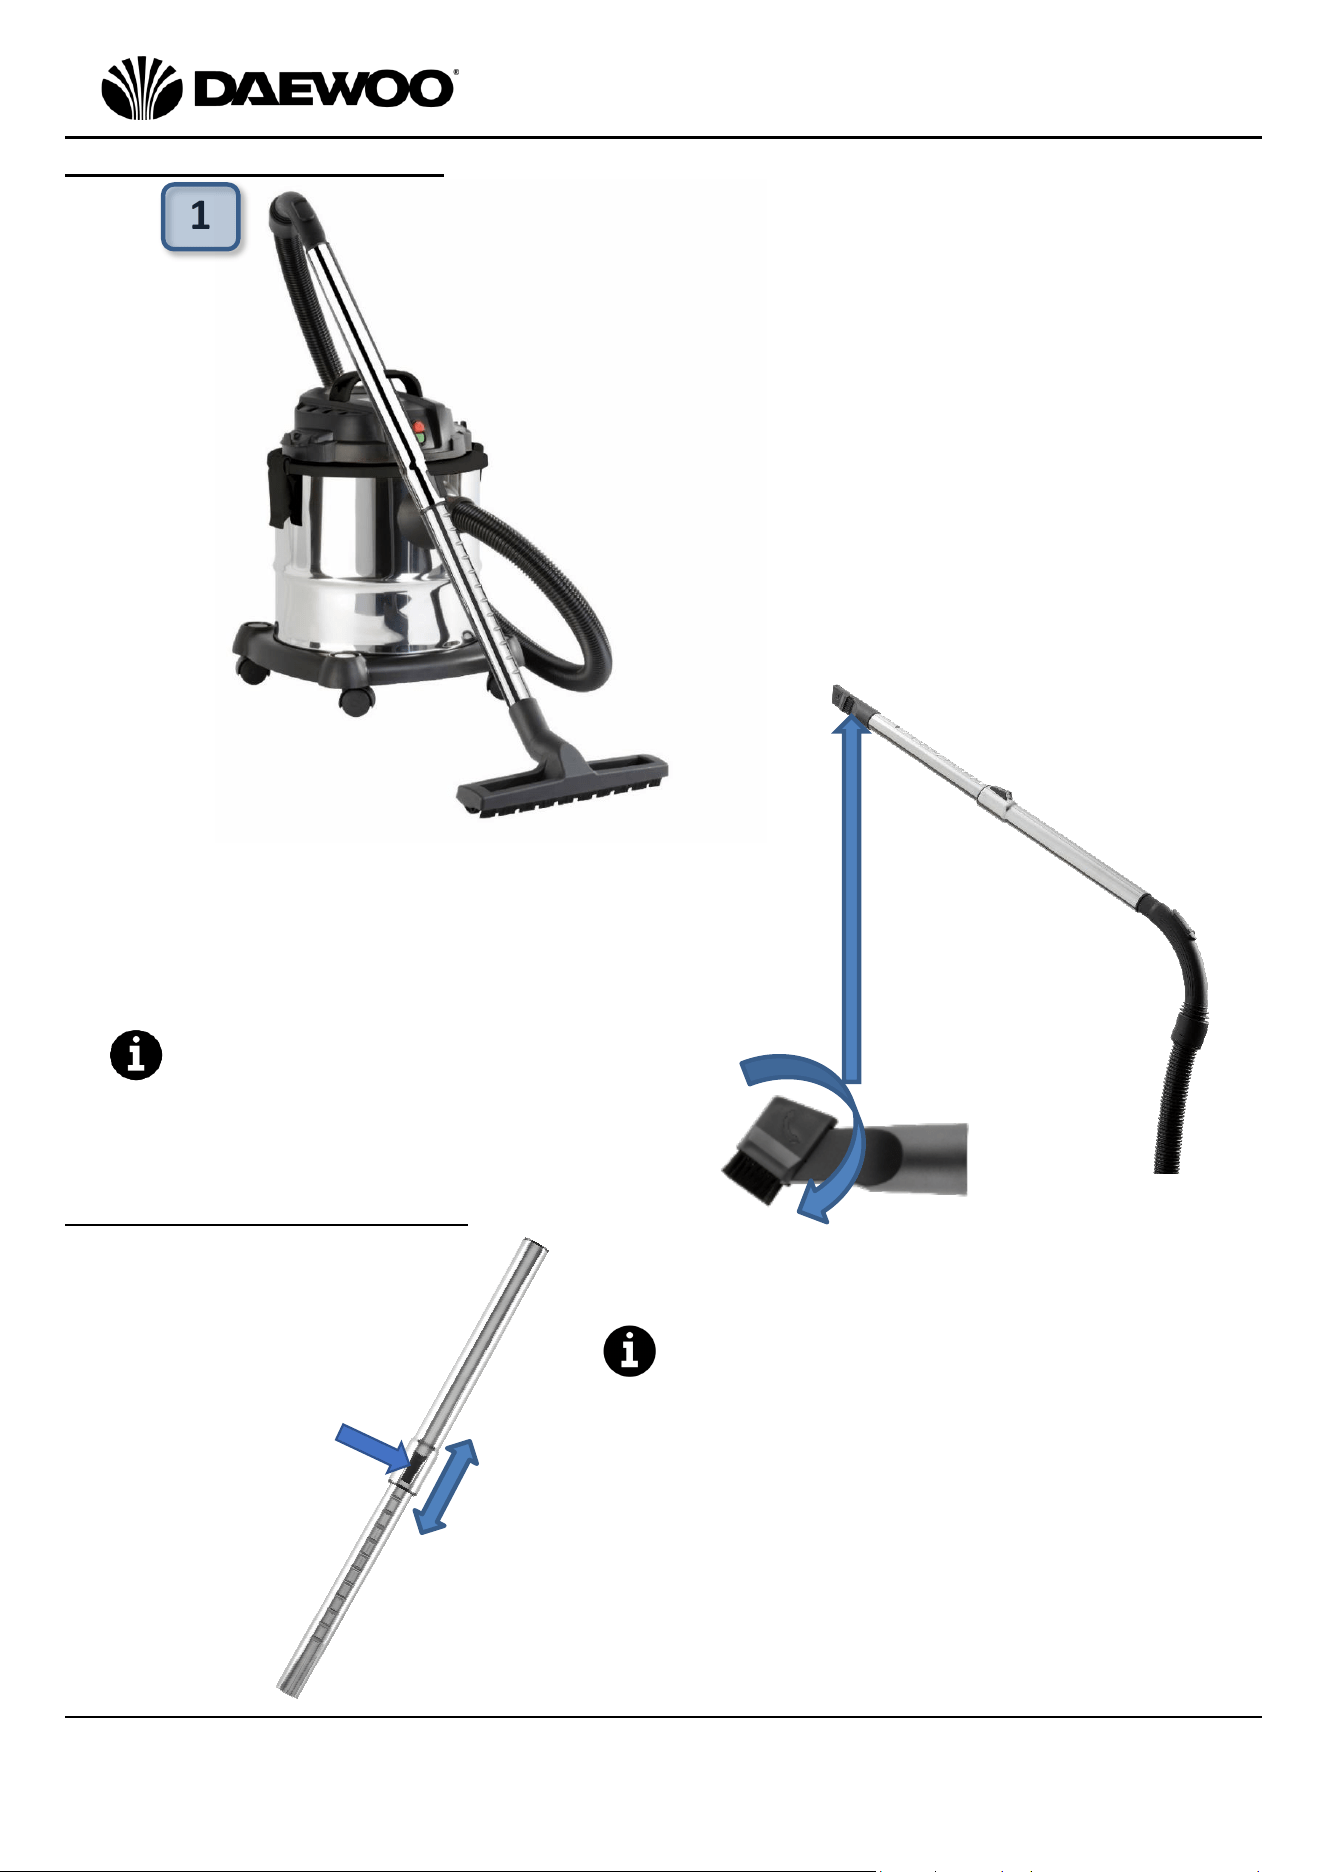
Choosing the Correct Tool
Setting the Working Height
1. Left: For cleaning floors, attach the
Telescopic Tube (2) to the end of the
Flexible Hose (6) and then push the Floor
Attachment (7) onto the end of the
Telescopic Tube.
1
1
2. Right: Alternatively, for cleaning floor edges
and hard to get at areas, push the Crevice
Tool (8) onto the end of the Telescopic
Tube.
Rotate the brush on the end of the
Crevice Tool (8) as shown below, to brush
dust out of the hard to get at areas:
To set the required working height of
the Flexible Hose (6), push the catch
down on the Telescopic Tube (2) and
push or pull the tube to lengthen or
shorten to the required length/height:
15
Wet & Dry Vacuum Cleaner
Model No. FLR00141
User Manual
IMPORTANT – RETAIN THESE INSTRUCTIONS FOR FUTURE REFERENCE
Using Your Vacuum for Wet Vacuuming
The vacuum cleaner will stop vacuuming water once it has reached its full limit.
The tank must be emptied first before resuming use of the cleaner.
Cleaning and Maintenance of Your Wet and Dry Vacuum
Before cleaning, ensure the Vacuum Cleaner is switched off, disconnected from
the mains supply and fully cooled.
• Do not immerse the appliance in water or any other liquids.
• Empty out any water from the Tank (10).
• Dry the Tank (10) thoroughly after use.
• Before dry cleaning, ensure the Tank (10) is thoroughly dry and the dust bag
inserted as above.
• Clean the external surface with a clean soft cloth, do not use harsh or abrasive
cleaning products.
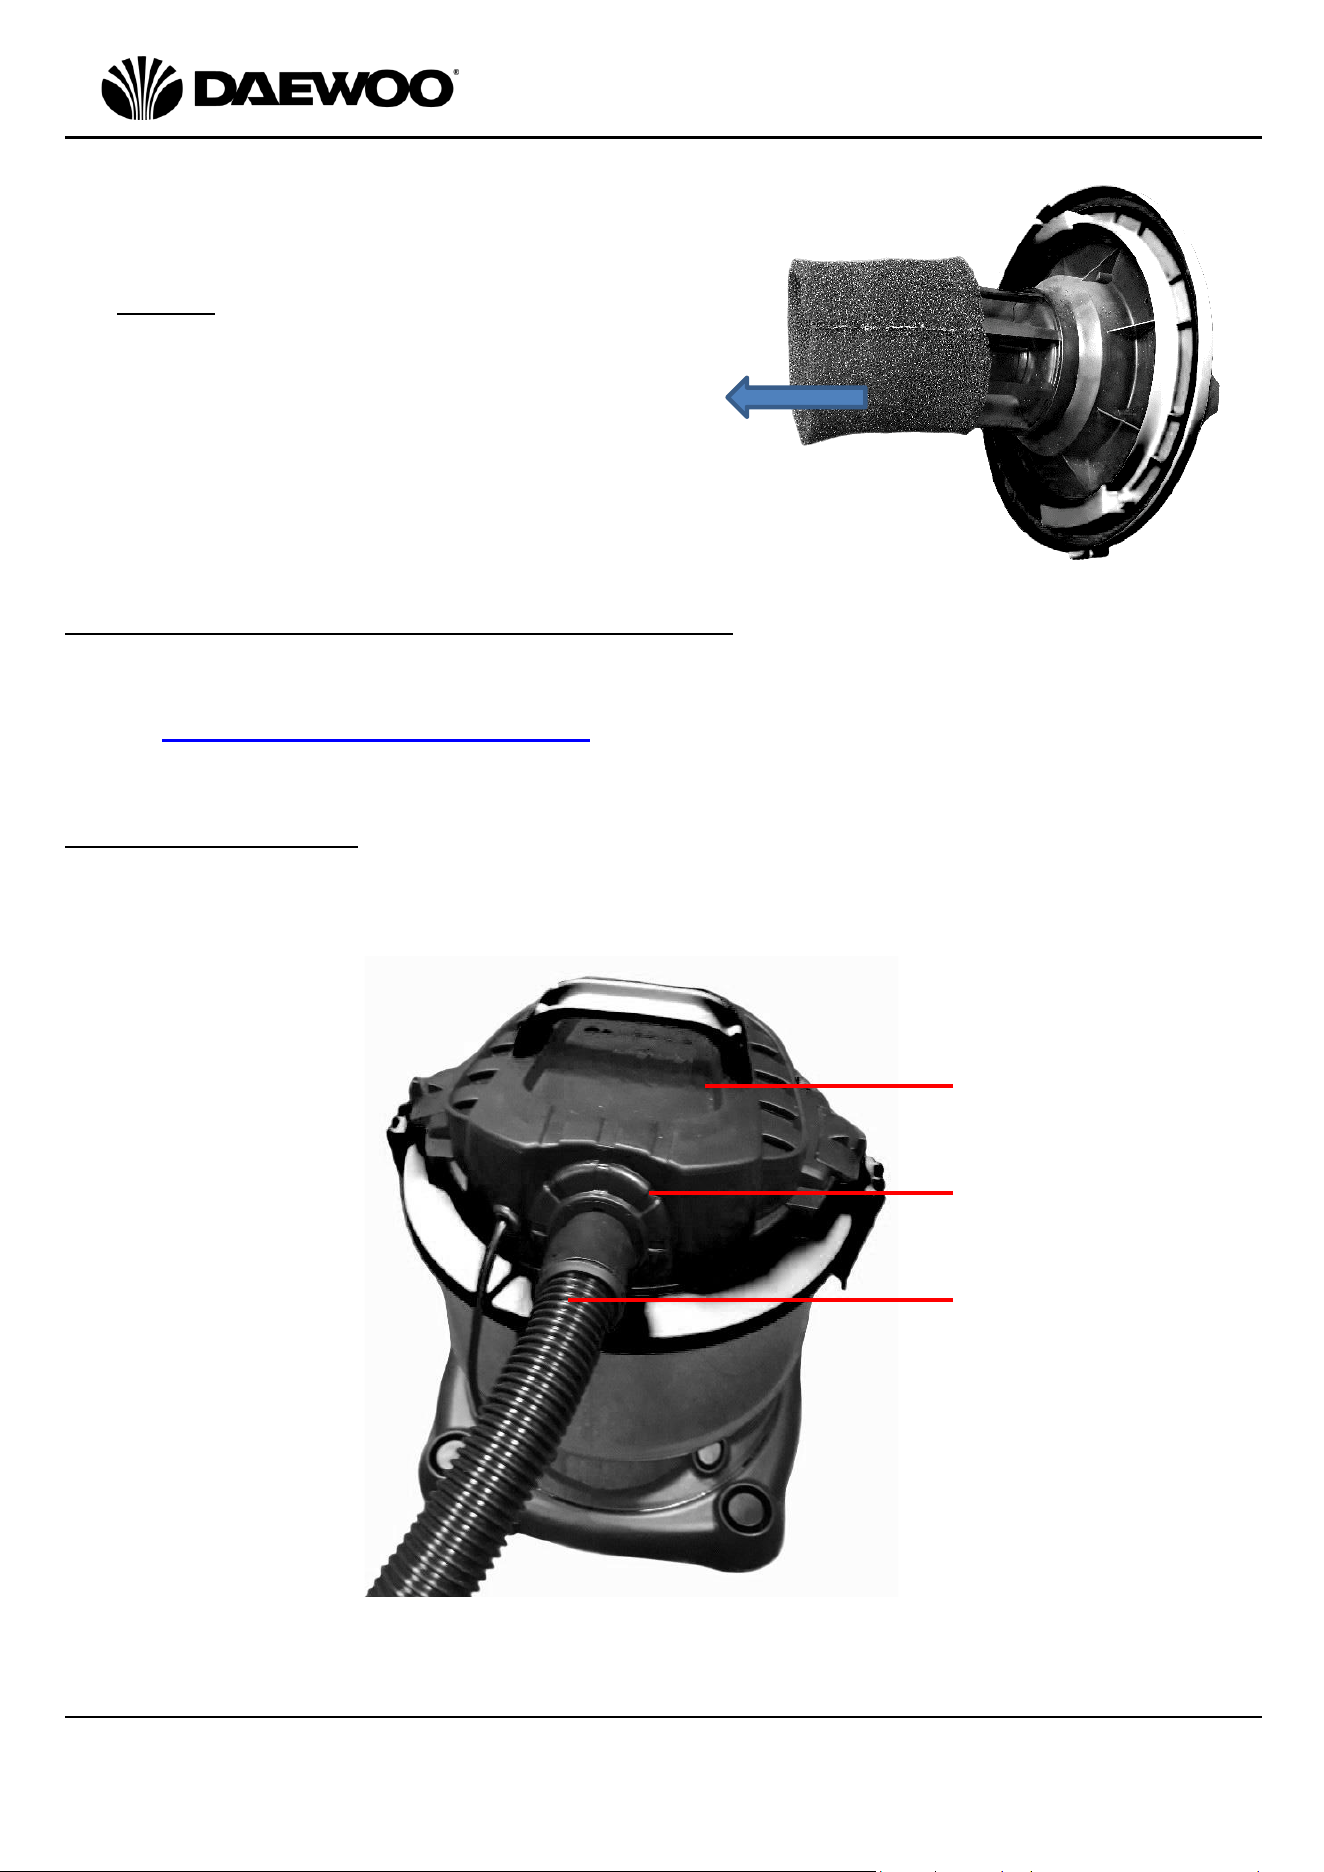
• Remove the Foam Filter (14) periodically (as below) and wash clean in warm
water. Allow the filter to dry thoroughly before replacing it back onto the motor
unit:
1. Left: Insert the Mains plug (with dry
hands) into the nearest socket.
2. Right: press the green On Switch (4) to
operate the vacuum and begin cleaning.
Press the red Off Switch (4) to switch
off the vacuum.
1
2
16
Wet & Dry Vacuum Cleaner
Model No. FLR00141
User Manual
IMPORTANT – RETAIN THESE INSTRUCTIONS FOR FUTURE REFERENCE
NB Do not under any circumstances use the
vacuum cleaner with the Foam Filter
removed as damage to the appliance will
occur.
Replacement Dust Bag and Filter Information
Replacement dust bags and filters are available by telephoning 0161 831 7879
(9.00am-5.00pm Monday-Thursday, 8.00am – 4.00pm Friday) or contacting us via
email: help@daewooelectricals.com
Using the Air Outlet
Connect the Flexible Hose (6) to the Air Outlet (12) on the rear of the Motor Unit
(12) as shown below, this enables the cleaner to blow air out of the hose:
13
6
12
17
Wet & Dry Vacuum Cleaner
Model No. FLR00141
User Manual
IMPORTANT – RETAIN THESE INSTRUCTIONS FOR FUTURE REFERENCE
Fitting a new plug
This appliance is fitted with a fused three-pin 13 amp plug to BS 1363. If the plug
has to be removed, it should be cut off and carefully disposed of immediately. To
avoid a possible shock hazard, do not insert the discarded plug into a mains
socket.
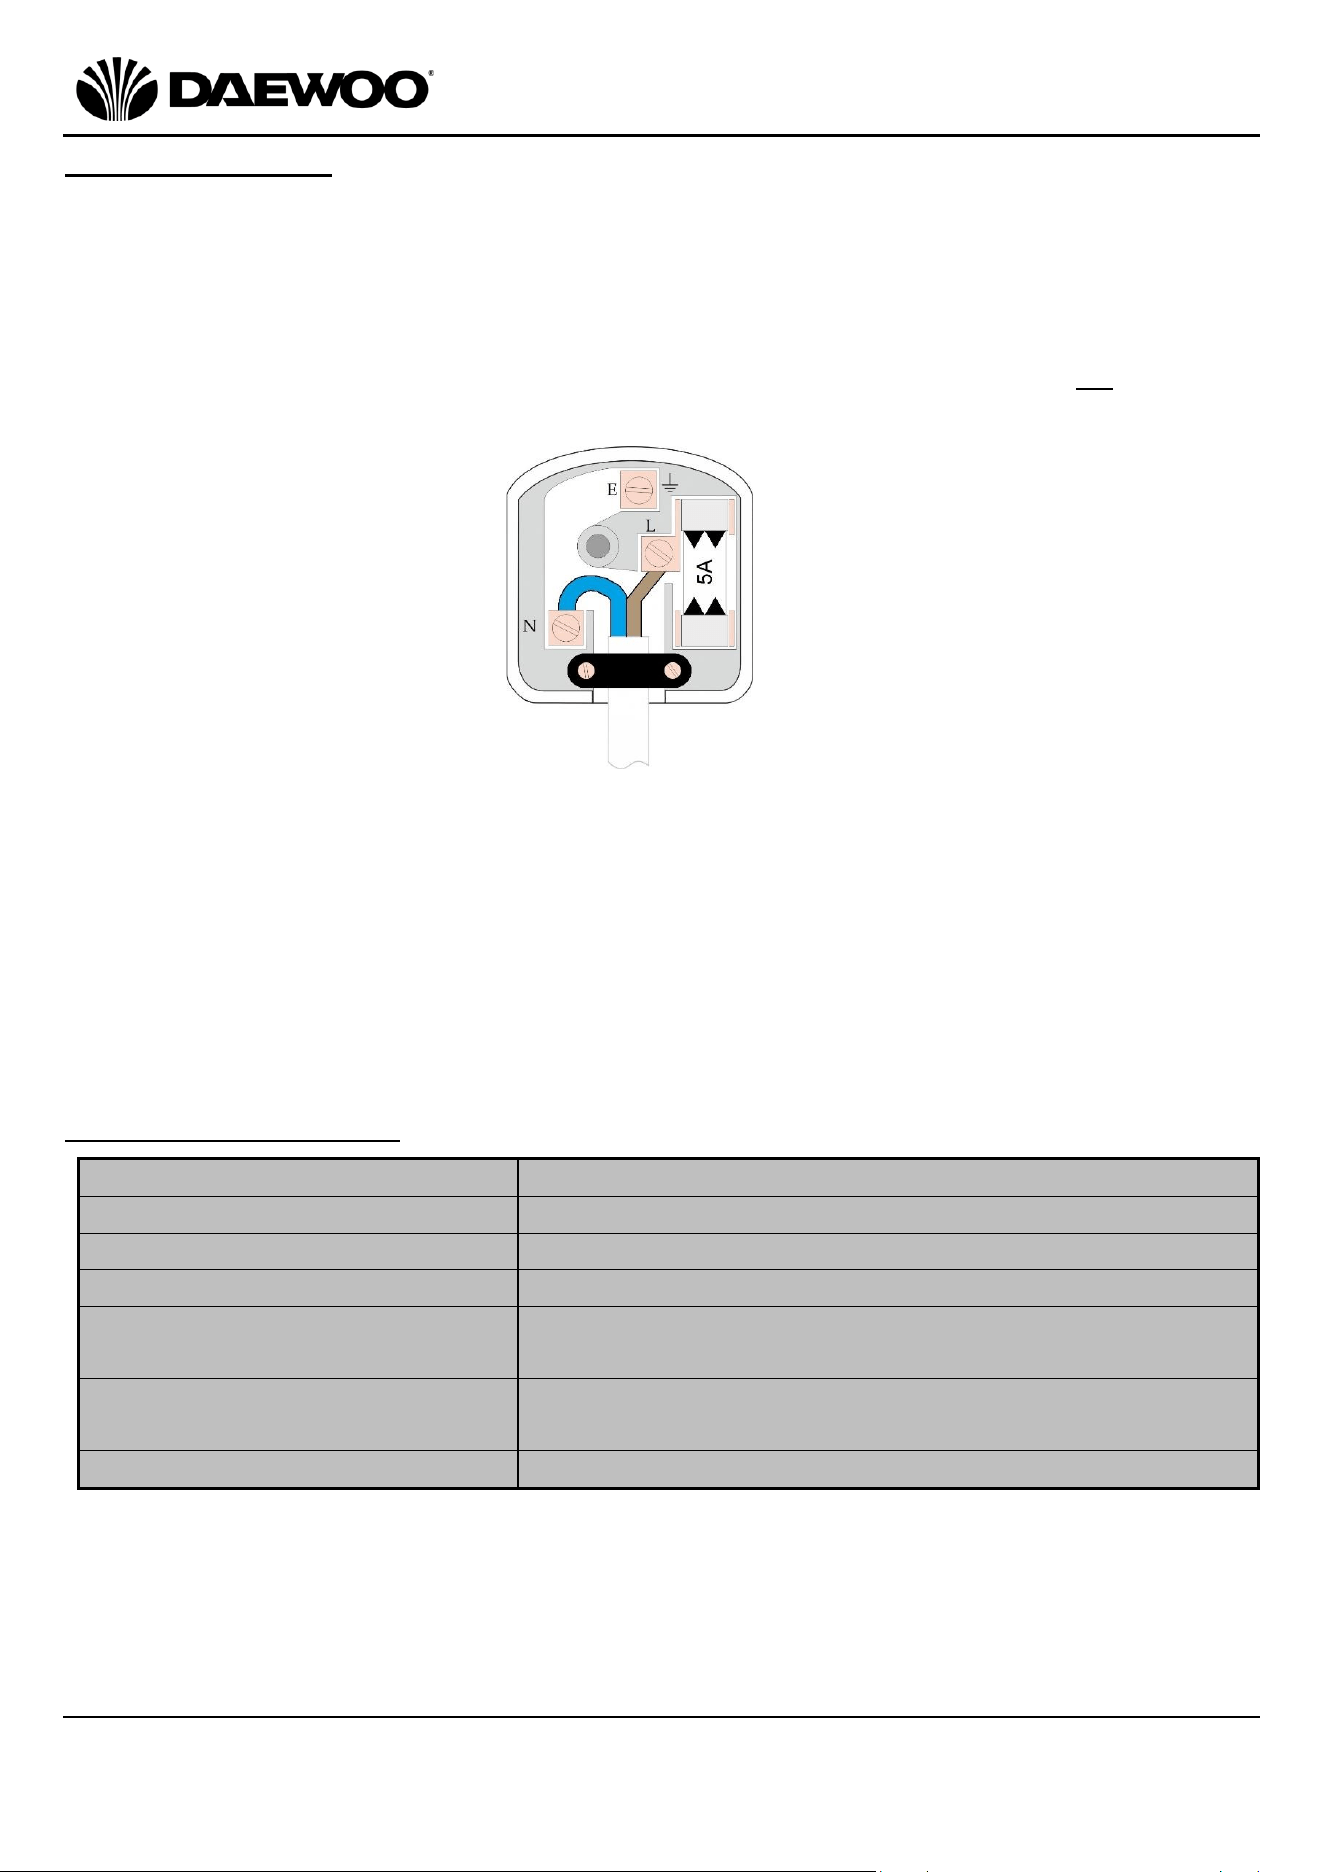
The mains lead must be connected as shown below. The wires are coloured with
the following code - Brown wire = Live (L), Blue wire = Neutral (N). NB no
connection must be made to the Earth terminal pin (E) under any circumstances.
• The Blue wire must be connected to the terminal marked N or coloured Black.
• The Brown wire must be connected to the terminal marked L or coloured Red.
• Check that there are no cut or stray strands of wire inside the plug.
• Use a 5 Amp BS 1362 fuse, only use BSI or ASTA approved fuses.
• If you are in any way unsure which plug or fuse to use, always refer to qualified
personnel.
• After replacing or changing a fuse on a moulded plug, the cover must be
refitted to the plug; the appliance must not be used without a fuse cover.
Technical Specification
Model Number
FLR00141
Supply Voltage
AC 220-240V ~ 50/60Hz
Rated Power
1000W
Protection Class
II
Unpacked Weight (Motor
Unit)
3.1 Kgs (approx.)
Filtration
Sponge Filter (Wet Use) Sponge & Paper Filter
(Dry Use)
Dimensions
34.5cm (d) x 34.5cm (w) x 47.5cm (h) (approx.)
Connect
Brown to
Live (L)
Connect
Blue to
Neutral (N)
Ensure the outer sheath is
securely held by the cord clamp
18
Wet & Dry Vacuum Cleaner
Model No. FLR00141
User Manual
IMPORTANT – RETAIN THESE INSTRUCTIONS FOR FUTURE REFERENCE
Recycling Information
Disposal of the Packaging
Dispose of paper and cardboard in appropriate paper re-cycling facilities.
Dispose of recyclable plastics in appropriate plastic re-cycling facilities.
Dispose of non-recyclable plastics in the appropriate plastics collection service.
Disposal of the Product
You should now recycle your waste electrical goods and in doing so
help the environment. This symbol means waste electrical products
at the end of their useful life should not be disposed of with normal
household waste and not sent to landfill. Please ensure it is taken to
a suitable facility for disposal. Check with your Local Authority or
retailer for recycling advice or visit www.recycle-more.co.uk, enter
your postcode to find out your nearest recycling site.

19
Wet & Dry Vacuum Cleaner
Model No. FLR00141
User Manual
IMPORTANT – RETAIN THESE INSTRUCTIONS FOR FUTURE REFERENCE

20
Wet & Dry Vacuum Cleaner
Model No. FLR00141
User Manual
IMPORTANT – RETAIN THESE INSTRUCTIONS FOR FUTURE REFERENCE
WARRANTY
Thank you for purchasing your Daewoo Vacuum.
As part of our commitment to quality, we are offering you an extra 2 years warranty in
addition to your 1 year guarantee
Your Daewoo vacuum product is guaranteed for 1 year from the date of original purchase,
with proof of purchase or receipt. If any defect should occur due to faulty workmanship or
material, your faulty vacuum should be returned to the place of purchase, replacement or refund is
at the discretion of the retailer.
The guarantee is subject to the following provisions:
•
The product must be correctly installed and operated in accordance with the
requirements contained in the instruction manual.
•
The product must be used solely for domestic purposes.
•
It does not cover general wear and tear, damage, misuse or any consumable parts.
•
The guarantee will be rendered invalid if the product is re-sold or has been damaged through
inexpert repair.
•
The guarantee is only valid within the UK and Eire.
Your standard 1 year guarantee will only be extended to the maximum available for your
individual product upon registration. (Note: products must be registered individually and
covers the main body and housing). If you do not register your product within 28 days of the
original purchase date, your product will only be guaranteed for 1 year.
To validate your extended 2 year warranty*please register your purchase online within 28
days of the original purchase date by registering at:
https://help.daewooelectricals.com
or
Contact Us (daewooelectricals.com)
*Your extended warranty is only valid with proof of purchase receipt and subject to the
conditions outlined above.
Daewoo is a registered trademark.
Produced and imported under licence by
Eurosonic Group Limited
Brightgate House
1 Brightgate Way
Manchester M32 0TB UK
EU Rep: EuroSonic Magppie (ESM) Ltd. Ireland D05 X006
www.esgltd.com