
1
1111 W. 35th Street, Chicago, IL 60609 USA
tripplite.com/support
Copyright © 2023 Tripp Lite. All rights reserved.
Installation Instructions
WARRANTY REGISTRATION
Register your product today and be automatically entered
to win an ISOBAR
®
surge protector in our monthly drawing!
tripplite.com/warranty
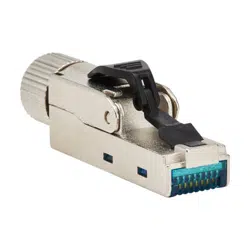
Cat6a Class EA STP
Field Termination Plug,
568A/568B
Model: N232-SHC6A-1
Este manual está disponible en español en la página
de Tripp Lite: tripplite.com
Ce manuel est disponible en français sur le site Web
de Tripp Lite : tripplite.com
Русскоязычная версия настоящего руководства
представлена на веб-сайте компании Tripp Lite по
адресу: tripplite.com
Dieses Handbuch ist in deutscher Sprache auf der
Tripp Lite-Website verfügbar: tripplite.com

2
Installation
JACK PIN
DESIGNATIONS
TIA / EIA
T568A
TIA / EIA
T568B
INDUS-
TRIAL
1
2
White/Green
Green
White/Orange
Orange
Yellow
Orange
3
6
White/Orange
Orange
White/Green
Green
White
Blue
4
5
Blue
White/Blue
7
8
White/Brown
Brown
3
Installation
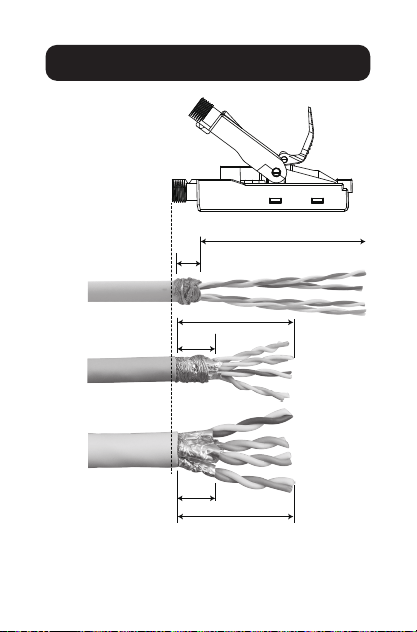
1.2 in. (30 mm)
1.2 in. (30 mm)
0.2 in.
(5 mm)
2 in. (50 mm)
OD Φ0.3~0.4 in.
(8~9 mm)
OD Φ0.2~0.3 in.
(6.1~7.9 mm)
OD Φ0.2~0.24 in.
(5~6 mm)
0.3 in.
(8 mm)
0.3 in.
(8 mm)
Cable Preparation
(No folded braiding)
4
Installation
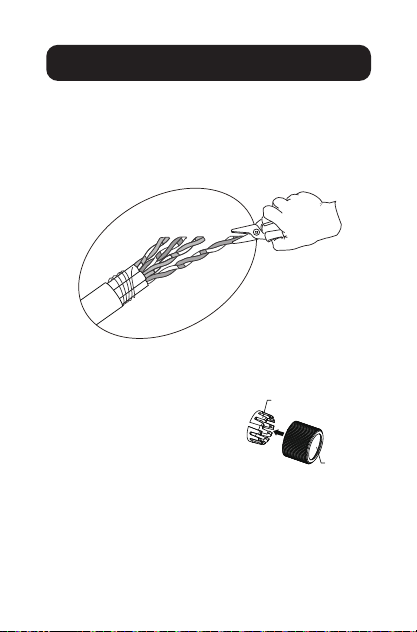
Step 1:
Insert cable through cable gland, follow the Cable
Preparation diagrams according to cable used. Fan
out all four twisted pairs and cut the conductors as
shown.
Notes:
• The cable bushing is inserted
inside the cable gland during
production. If the cable
bushing is pushed out while
inserting a cable with a large
outer diameter (OD) or cable
with a jagged surface through
the cable gland, reinsert the
cable bushing as shown and
continue installation.
• The cable bushing may be
displaced when using cabling
with an outer diameter (OD)
greater than 0.3 in. (8 mm).
Cable
Bushing
Cable
Gland
5
Installation
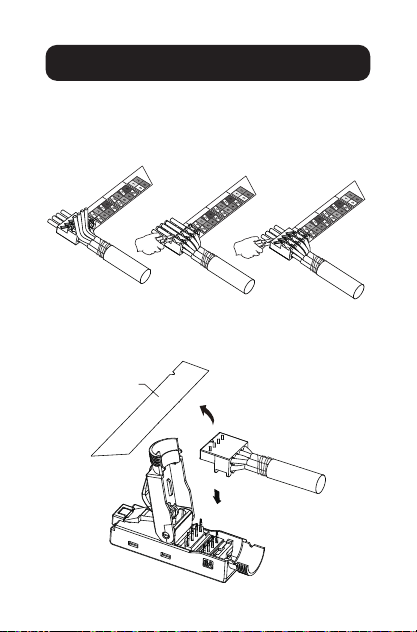
Step 2:
Follow the color-coding label and insert each
conductor into the proper slots on the wiring cap.
Trim the ends of the excess conductors.
Step 3:
Remove the wiring label before placing the wiring
cap on the plug.
T568A
T568B
INDUSTRIAL
T568A
T568B
INDUSTRIAL
T568A
T568B
INDUSTRIAL
Wiring Label

6
Installation
Step 4:
Place the wiring cap on the plug. Clamp down the
wiring cap with pliers until it completely snaps in to
establish the connection. Ensure the drain wire or
braiding are in contact with the grounding clip.
Grounding clip
Drain wire and braid
Drain wire and braid
cannot exceed
housing
Ensure drain wire and braid does not
get stuck between housing and cover
7
Installation
Step 5:
Close the plug cover. Make sure the drain wire is in
proper contact with the grounding clip on the plug.
Screw on the cable gland to fasten and complete
the installation.

8
Uninstalling the Cable
Release Cable Gland
Open Plug Cover
Release Wiring Cap
Step 1:
Step 2:
Step 3:

9
Warranty and
Product Registration
Lifetime Limited Warranty
Seller warrants this product, if used in accordance with
all applicable instructions, to be free from original defects
in material and workmanship for its lifetime. If the product
should prove defective in material or workmanship within that
period, Seller will repair or replace the product, in its sole
discretion. Service under this Warranty can only be obtained
by your delivering or shipping the product (with all shipping
or delivery charges prepaid) to: TRIPP LITE; 1111 W. 35th
Street, Chicago, IL 60609. Seller will pay return shipping
charges. Visit tripplite.com/support before sending any
equipment back for repair.
THIS WARRANTY DOES NOT APPLY TO NORMAL
WEAR OR TO DAMAGE RESULTING FROM ACCIDENT,
MISUSE, ABUSE OR NEGLECT. SELLER MAKES NO
EXPRESS WARRANTIES OTHER THAN THE WARRANTY
EXPRESSLY SET FORTH HEREIN.
EXCEPT TO THE EXTENT PROHIBITED BY APPLICABLE
LAW, ALL IMPLIED WARRANTIES, INCLUDING ALL
WARRANTIES OF MERCHANTABILITY OR FITNESS, ARE
LIMITED IN DURATION TO THE WARRANTY PERIOD
SET FORTH ABOVE; AND THIS WARRANTY EXPRESSLY
EXCLUDES ALL INCIDENTAL AND CONSEQUENTIAL
DAMAGES. (Some states do not allow limitations on how
long an implied warranty lasts, and some states do not allow
the exclusion or limitation of incidental or consequential
damages, so the above limitations or exclusions may not
apply to you. This Warranty gives you specic legal rights,
and you may have other rights which vary from jurisdiction
to jurisdiction.)

10
Warranty and
Product Registration
WARNING: The individual user should take care to
determine prior to use whether this device is suitable,
adequate or safe for the use intended. Since individual
applications are subject to great variation, the manufacturer
makes no representation or warranty as to the suitability or
tness of these devices for any specic application.
PRODUCT REGISTRATION
Visit tripplite.com/warranty today to register your new Tripp
Lite product. You’ll be automatically entered into a drawing
for a chance to win a FREE Tripp Lite product!*
* No purchase necessary. Void where prohibited. Some
restrictions apply. See website for details.
Regulatory Compliance Identication Numbers
For the purpose of regulatory compliance certications and
identication, your Tripp Lite product has been assigned a
unique series number. The series number can be found on
the product nameplate label, along with all required approval
markings and information.
When requesting compliance information for this product,
always refer to the series number. The series number should
not be confused with the marketing name or model number
of the product.
Tripp Lite has a policy of continuous improvement.
Specications are subject to change without notice.

11

12
1111 W. 35th Street, Chicago, IL 60609 USA
tripplite.com/support
22-11-155 93-46DC RevA
