Looking for help?
Contact us to get expert support.
DR-HAF003S
www.dreo.com
support@dreo.com (888) 290-1688
Mon - Fri, 9:00 am-5:00 pm PST/PDT
www.dreo.com
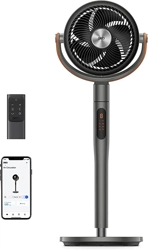
Smart Pedestal
Air Circulator Fan
USER MANUAL

Your support means the world to us. We
hope you enjoy our product as much as
we did creating it.
Thanks for
Choosing
DREO!
@
Dreo
CONTENTS
4
2
6
1
5
3
3-51-2
CLEANING
AND MAINTENANCE
IMPORTANT SAFETY
INSTRUCTIONS
USING YOUR
PEDESTAL AIR
CIRCULATOR
6
7-8
14-16
9-13
7
17
TROUBLESHOOTING
8
18-20
DREO CUSTOMER
CARE
ASSEMBLING YOUR
PEDESTAL AIR
CIRCULATOR
CONNECTING TO
YOUR PEDESTAL
AIR CIRCULATOR
KNOWING YOUR
PEDESTAL AIR
CIRCULATOR
,,

1
IMPORTANT SAFETY
INSTRUCTIONS
1
Children shall not play with the appliance. Cleaning and maintenance shall
not be performed by children without supervision.
Use the appliance as described in the user manual only. Any other use not
injury.
This appliance can be used by children aged above 8 years and persons with
reduced physical, sensory or mental capabilities or lack of experience and
knowledge if they have been given supervision or instruction concerning use
of this appliance in a safe way and understand the hazards involved.
Do not immerse in water and any other liquids.
Do not use the appliance until the base is installed.
6. Do not operate the unit close to the curtain. Do not hang foreign objects
on the grille to prevent damaging the balance of the fan or rotational structure.
7. Do not operate the fan under overly humid, high-temperature, dusty environment
or the place where acid or alkali is stored.
8. Fans should never blow directly on infants, the elderly, and patients for a long time.
Do not
under any circumstances.
Do not dismantle, repair, or modify. All servicing should be performed by
General Safety
Operation Safety
1.
2.
3.
1.
2.
3.
4.
5.
2
FOR HOUSEHOLD USE ONLY READ
AND SAVE THESE INSTRUCTIONS
Make sure that the voltage of your electricity supply is the same as that
indicated on the appliance.
Always unplug before cleaning or leaving the appliance unused for a long
period of time. Keep your hands dry when plugging/unplugging.
Do not operate any air circulator with a damaged cord or plug. Discard air
circulator or return to an authorized service facility for examination and/or repair.
Do not run cord under carpeting. Do not cover cord with throw rugs, runners,
or similar coverings. Do not route cord under furniture or appliances. Arrange
WARNING:
air circulator with any solid-state speed control device.
Use 24V/1.5A power adapter only. Turn off the appliance before plugging.
Electricity Safety
1.
2.
3.
4.
5.
6.
WARNING: To reduce the risk of fire, electric shock or injury to persons, do not use
replacement parts that have not been recommended by the manufacturer (e.g. parts
made at home using a 3D printer).
7.
If the supply cord is damaged, it must be replaced by the manufacturer or its service
agent or a similarly qualified person in order to avoid a hazard.
8.
Check the appliance regularly and
refer to TROUBLESHOOTING or
contact our customer support if it
shows any of the following signs:
- Power cord or plug is damaged.
- Loud noise, unusual smell or excessive heat.
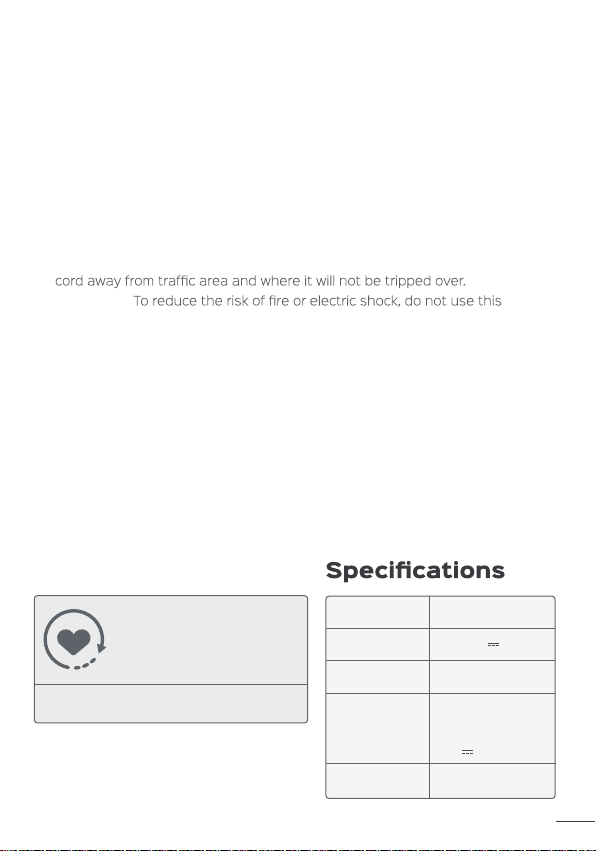
Gentle Reminder:
Model DR-HAF003S
Power Supply
24V 1.5A
Rated Power 36W
Battery Type CR2025 3V
Power Adapter
Input:
120V~60Hz 1.0A
Output:
24V 1.5A
WARNING:
READ ALL CAUTIONARY
MARKINGS ON THE APPLIANCE
AND SAFETY INSTRUCTIONS
IN THE USER MANUAL BEFORE
Do not cover the
air inlet and outlet
while in operation.
Do not use the air
circulator near
flammables and
combustibles.
1
IMPORTANT SAFETY
INSTRUCTIONS
1
Children shall not play with the appliance. Cleaning and maintenance shall
not be performed by children without supervision.
Use the appliance as described in the user manual only. Any other use not
injury.
This appliance can be used by children aged above 8 years and persons with
reduced physical, sensory or mental capabilities or lack of experience and
knowledge if they have been given supervision or instruction concerning use
of this appliance in a safe way and understand the hazards involved.
Do not immerse in water and any other liquids.
Do not use the appliance until the base is installed.
6. Do not operate the unit close to the curtain. Do not hang foreign objects
on the grille to prevent damaging the balance of the fan or rotational structure.
7. Do not operate the fan under overly humid, high-temperature, dusty environment
or the place where acid or alkali is stored.
8. Fans should never blow directly on infants, the elderly, and patients for a long time.
Do not
under any circumstances.
Do not dismantle, repair, or modify. All servicing should be performed by
General Safety
Operation Safety
1.
2.
3.
1.
2.
3.
4.
5.
2
FOR HOUSEHOLD USE ONLY READ
AND SAVE THESE INSTRUCTIONS
Make sure that the voltage of your electricity supply is the same as that
indicated on the appliance.
Always unplug before cleaning or leaving the appliance unused for a long
period of time. Keep your hands dry when plugging/unplugging.
Do not operate any air circulator with a damaged cord or plug. Discard air
circulator or return to an authorized service facility for examination and/or repair.
Do not run cord under carpeting. Do not cover cord with throw rugs, runners,
or similar coverings. Do not route cord under furniture or appliances. Arrange
WARNING:
air circulator with any solid-state speed control device.
Use 24V/1.5A power adapter only. Turn off the appliance before plugging.
Electricity Safety
1.
2.
3.
4.
5.
6.
WARNING: To reduce the risk of fire, electric shock or injury to persons, do not use
replacement parts that have not been recommended by the manufacturer (e.g. parts
made at home using a 3D printer).
7.
If the supply cord is damaged, it must be replaced by the manufacturer or its service
agent or a similarly qualified person in order to avoid a hazard.
8.
Check the appliance regularly and
refer to TROUBLESHOOTING or
contact our customer support if it
shows any of the following signs:
- Power cord or plug is damaged.
- Loud noise, unusual smell or excessive heat.
Gentle Reminder:
Model DR-HAF003S
Power Supply
24V 1.5A
Rated Power 36W
Battery Type CR2025 3V
Power Adapter
Input:
120V~60Hz 1.0A
Output:
24V 1.5A
WARNING:
READ ALL CAUTIONARY
MARKINGS ON THE APPLIANCE
AND SAFETY INSTRUCTIONS
IN THE USER MANUAL BEFORE
Do not cover the
air inlet and outlet
while in operation.
Do not use the air
circulator near
flammables and
combustibles.
3
ASSEMBLING
YOUR PEDESTAL
AIR CIRCULATOR
2
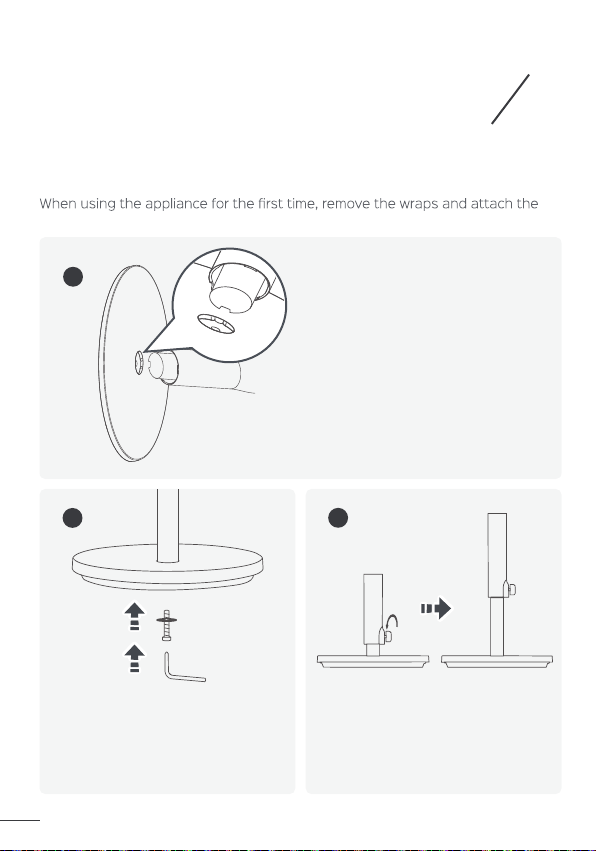
Assembly Instructions
parts by following the steps below.
1
2
3
Push the air circulator into the
base by aligning the cutout on
the bottom of the air circulator
with the jutting point in the
middle of the base.
Thread the screw through the flat
washer, insert into the base, and
use the included screwdriver to
drive the screw into the bottom of
the air circulator.
Put the air circulator upright, hold
the main body while rotating the
Adjustment Collar counterclockwise
to raise or lower the air circulator to
the desired height.
Adjustable:
0-5.9 inch
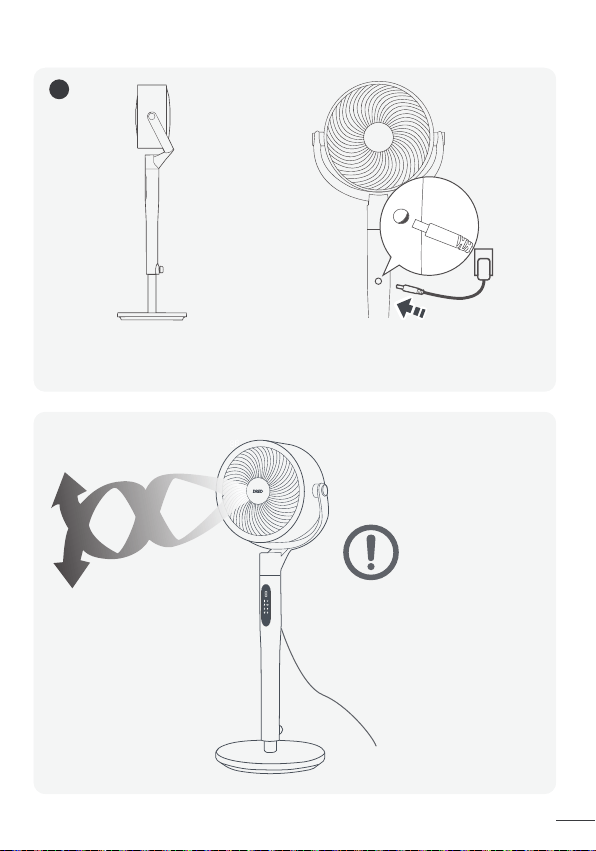
4
4
Tighten the adjustment collar by rotating clockwise. Plug the power
adapter into the power (located at the back of the air circulator), and into
the power outlet.
CAUTION
Do not operate the air
circulator if the base has not
been installed.
3
ASSEMBLING
YOUR PEDESTAL
AIR CIRCULATOR
2
Assembly Instructions
parts by following the steps below.
1
2
3
Push the air circulator into the
base by aligning the cutout on
the bottom of the air circulator
with the jutting point in the
middle of the base.
Thread the screw through the flat
washer, insert into the base, and
use the included screwdriver to
drive the screw into the bottom of
the air circulator.
Put the air circulator upright, hold
the main body while rotating the
Adjustment Collar counterclockwise
to raise or lower the air circulator to
the desired height.
Adjustable:
0-5.9 inch
4
4
Tighten the adjustment collar by rotating clockwise. Plug the power
adapter into the power (located at the back of the air circulator), and into
the power outlet.
CAUTION
Do not operate the air
circulator if the base has not
been installed.
5
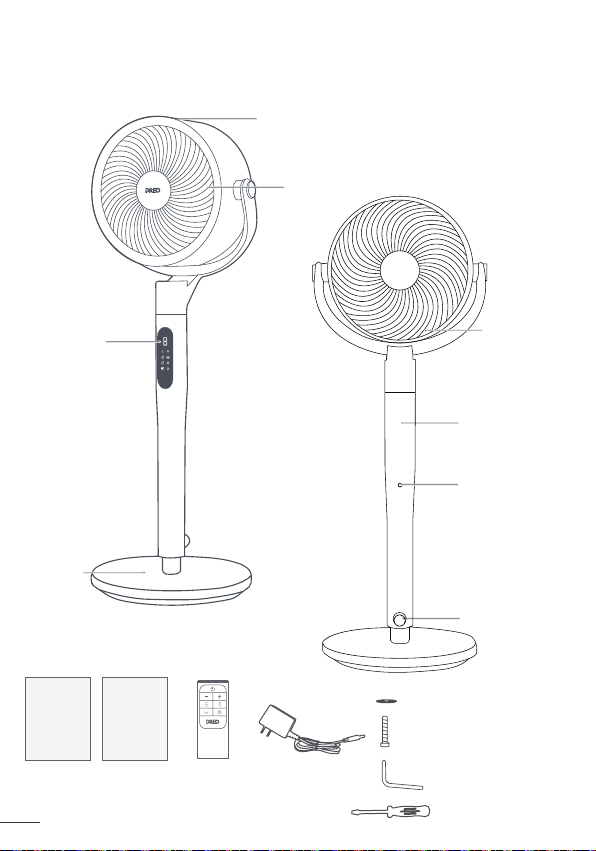
Package Contents
Base
Air Inlet
Carry from
Here
Air Outlet
User
Manual
Remote Control
(Battery Included)
Quick Start
Guide
Control Panel
Power Input
Adjustment
Collar
Power Adapter
Flat Washer
Screw for Base
Screwdriver for Base
Screwdriver for Grilles
6
CONNECTING TO
YOUR PEDESTAL
AIR CIRCULATOR
3
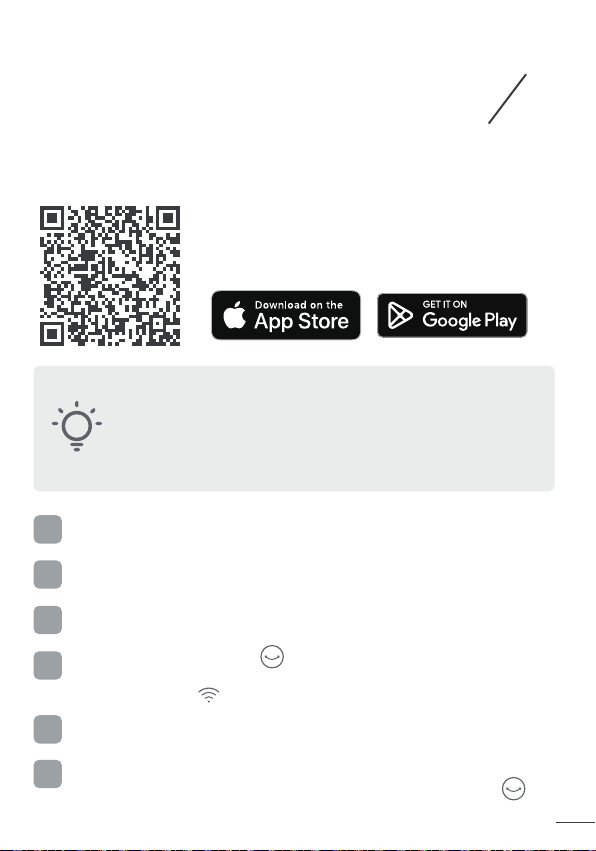
Before connecting the appliance to your mobile
This device includes the radio transmitting module whose
CMIIT ID is FCC ID: 2A3SYMBL02.
device, please scan the QR code on the left or go
to the app store and search “Dreo”, then select
and download the app.
You can use the Dreo app to connect your smart pedestal air
circulator to Amazon Alexa or Google Assistant.
Please follow the in-app instructions to set up your voice
assistant.
NOTE: You must create a Dreo account to access voice
assistants.
Launch Dreo and sign in or create account by following in-app
Enable Bluetooth on your mobile device and plug in your air circulator.
instructions.
Hold the Oscillation button for 5 seconds to start WiFi connection
settings.
Follow in-app instructions to complete WiFi connection.
Tap + Add Device and select the air circulator you want to link.
1
4
5
3
2
(Tip: The WiFi icon will keep flashing when pairing.)
You're now ready to control the appliance on your app.
6
(Tip: To restart connection settings, hold the Oscillation button
again for 5 seconds.)
LED Display
5
Package Contents
Base
Air Inlet
Carry from
Here
Air Outlet
User
Manual
Remote Control
(Battery Included)
Quick Start
Guide
Control Panel
Power Input
Adjustment
Collar
Power Adapter
Flat Washer
Screw for Base
Screwdriver for Base
Screwdriver for Grilles
6
CONNECTING TO
YOUR PEDESTAL
AIR CIRCULATOR
3
Before connecting the appliance to your mobile
This device includes the radio transmitting module whose
CMIIT ID is FCC ID: 2A3SYMBL02.
device, please scan the QR code on the left or go
to the app store and search “Dreo”, then select
and download the app.
You can use the Dreo app to connect your smart pedestal air
circulator to Amazon Alexa or Google Assistant.
Please follow the in-app instructions to set up your voice
assistant.
NOTE: You must create a Dreo account to access voice
assistants.
Launch Dreo and sign in or create account by following in-app
Enable Bluetooth on your mobile device and plug in your air circulator.
instructions.
Hold the Oscillation button for 5 seconds to start WiFi connection
settings.
Follow in-app instructions to complete WiFi connection.
Tap + Add Device and select the air circulator you want to link.
1
4
5
3
2
(Tip: The WiFi icon will keep flashing when pairing.)
You're now ready to control the appliance on your app.
6
(Tip: To restart connection settings, hold the Oscillation button
again for 5 seconds.)
LED Display
7
KNOWING YOUR
PEDESTAL AIR
CIRCULATOR
4
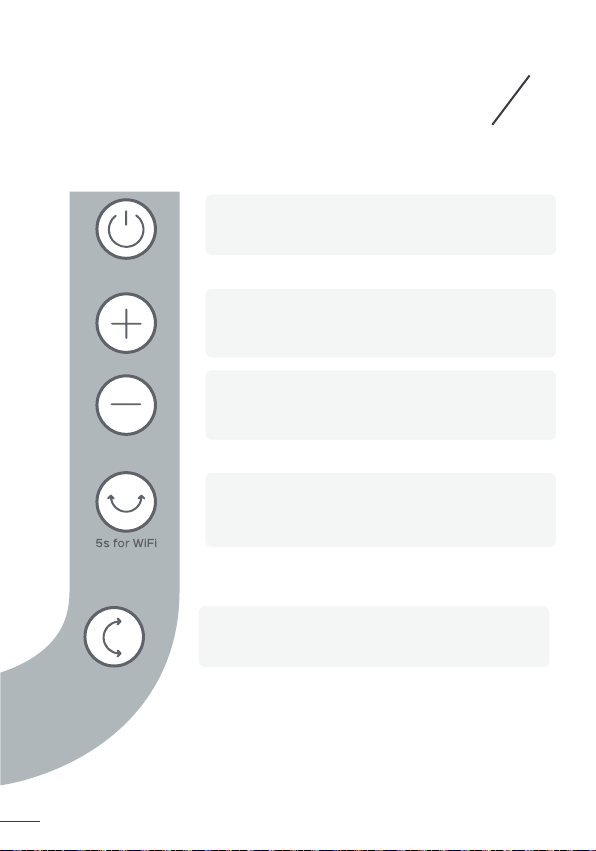
Control Panel
Horizontal Oscillation
• Sweep airflow horizontally (0°/60°/90°/120°)
• Long press 5 seconds to start network settings
and device pairing
Power Button
• Turn power on/off
• Long press 10 seconds to reset to factory settings
Decrease Speed Button
• Decrease airflow speed (1-8 levels)
• Exit Turbo Mode
Vertical Oscillation
• Sweep airflow vertically (90°)
• Long press 3 seconds to mute/unmute
Increase Speed Button
• Increase airflow speed (1-8 levels)
• Exit Turbo Mode
8
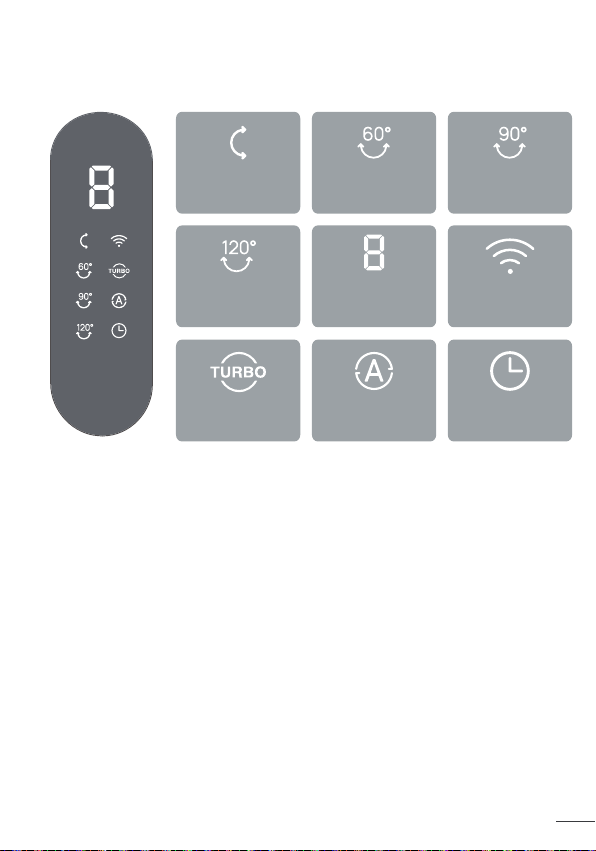
LED Display
Vertical
Oscillation
120° Horizontal
Oscillation
60° Horizontal
Oscillation
90° Horizontal
Oscillation
Air Circulator
Speed /
Timer Hour
WiFi
Connection
Auto ModeTurbo Mode Timer
Note: This appliance is mute by default. To turn on button
sounds, go to the Dreo app.
7
KNOWING YOUR
PEDESTAL AIR
CIRCULATOR
4
Control Panel
Horizontal Oscillation
• Sweep airflow horizontally (0°/60°/90°/120°)
• Long press 5 seconds to start network settings
and device pairing
Power Button
• Turn power on/off
• Long press 10 seconds to reset to factory settings
Decrease Speed Button
• Decrease airflow speed (1-8 levels)
• Exit Turbo Mode
Vertical Oscillation
• Sweep airflow vertically (90°)
• Long press 3 seconds to mute/unmute
Increase Speed Button
• Increase airflow speed (1-8 levels)
• Exit Turbo Mode
8
LED Display
Vertical
Oscillation
120° Horizontal
Oscillation
60° Horizontal
Oscillation
90° Horizontal
Oscillation
Air Circulator
Speed /
Timer Hour
WiFi
Connection
Auto ModeTurbo Mode Timer
Note: This appliance is mute by default. To turn on button
sounds, go to the Dreo app.
9
USING YOUR
PEDESTAL AIR
CIRCULATOR
10
General Operations
Working Modes
1
2
3
55
Getting the Most out of Your
Air Circulator
Press to turn on the air
circulator.
Press or to adjust the
airflow speed.
Press or to change the
airflow direction.
Normal Mode
Air circulator runs at the fixed
speed.
Auto Mode
Air circulator speed adapts to the
ambient temperature.
Natural Mode
Air circulator runs at alternating
speeds.
(Available in the Dreo
app)
Turbo Mode
Air circulator runs at the maximum
speed.
Sleep Mode
(Available in the Dreo
app)
Mute auto on.
Air circulator speed decreases
every 30 minutes.
Speed decreases by two levels at
most and will remain constant if at
level 3, 2, or 1:
For level 8: 8 7 6
For level 7: 7 6 5
For level 6: 6 5 4
For level 5: 5 4 3
For level 4: 4 3
For level 3: 3
For level 2: 2
For level 1: 1
Air circulator speed changes
according to temperatures or time
you desire.
Custom Mode
(Available in the Dreo
app)
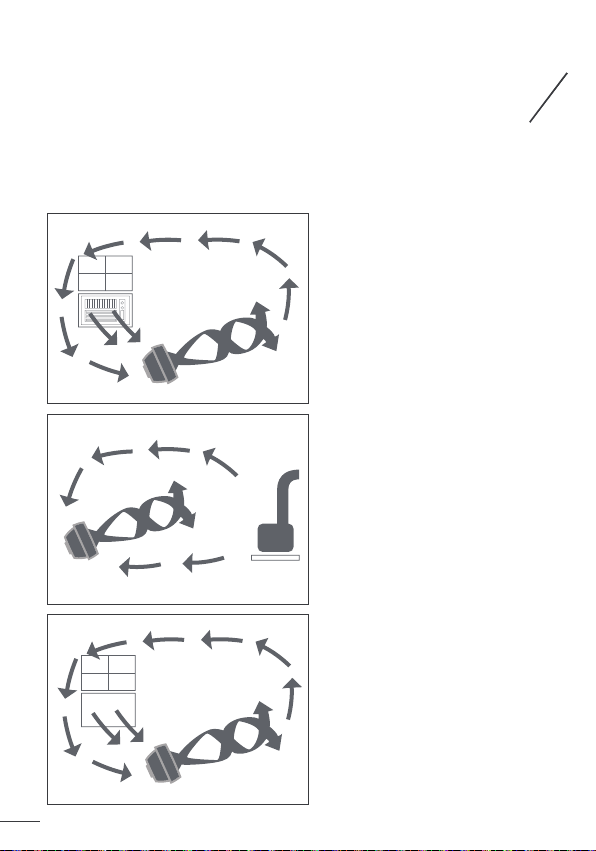
Use with Air Conditioner
Position the air circulator in front
of your AC to circulate cold air and
provide better cooling.
Summer:
Use with Heater
Send the heat to corner of the
room and circulate warm air faster.
Winter:
Circulation
Make the indoors as fresh and
pleasant as the outdoors.
Spring & Fall:
(Press on the remote)

9
USING YOUR
PEDESTAL AIR
CIRCULATOR
10
General Operations
Working Modes
1
2
3
55
Getting the Most out of Your
Air Circulator
Press to turn on the air
circulator.
Press or to adjust the
airflow speed.
Press or to change the
airflow direction.
Normal Mode
Air circulator runs at the fixed
speed.
Auto Mode
Air circulator speed adapts to the
ambient temperature.
Natural Mode
Air circulator runs at alternating
speeds.
(Available in the Dreo
app)
Turbo Mode
Air circulator runs at the maximum
speed.
Sleep Mode
(Available in the Dreo
app)
Mute auto on.
Air circulator speed decreases
every 30 minutes.
Speed decreases by two levels at
most and will remain constant if at
level 3, 2, or 1:
For level 8: 8 7 6
For level 7: 7 6 5
For level 6: 6 5 4
For level 5: 5 4 3
For level 4: 4 3
For level 3: 3
For level 2: 2
For level 1: 1
Air circulator speed changes
according to temperatures or time
you desire.
Custom Mode
(Available in the Dreo
app)
Use with Air Conditioner
Position the air circulator in front
of your AC to circulate cold air and
provide better cooling.
Summer:
Use with Heater
Send the heat to corner of the
room and circulate warm air faster.
Winter:
Circulation
Make the indoors as fresh and
pleasant as the outdoors.
Spring & Fall:
(Press on the remote)
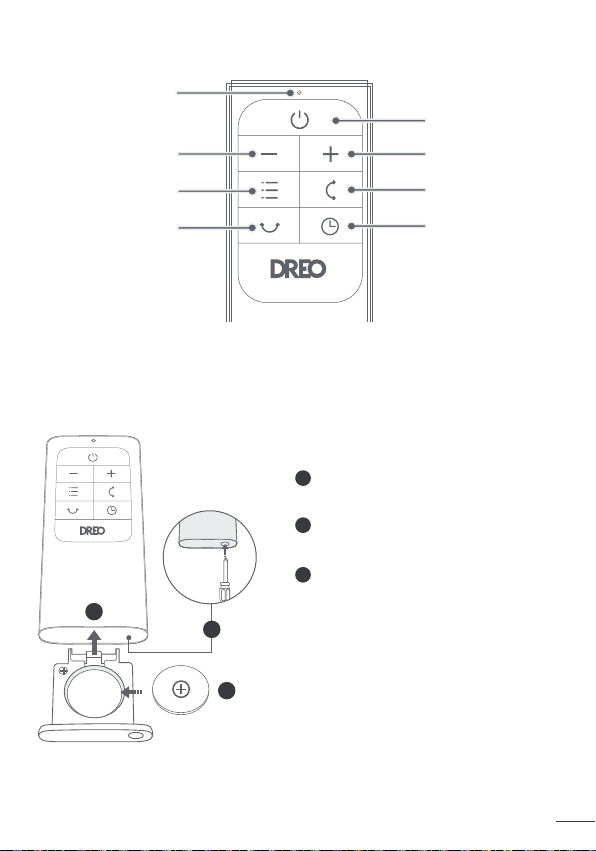
Battery Replacement
Note:
If the indicator on the remote
control doesn’t turn on any more,
please consider replacing the battery.
1
Press the locking button to pop
out the battery holder.
2
Replace with the same battery
type with the (+) side facing up.
3
Push in the holder until securely
locked into place.
Remote Control
Power
Power Indicator
Increase
Speed
Decrease
Speed
Vertical Oscillation
Mode
Timer
Horizontal
Oscillation
Additional Features
Memory
If the fan is turned OFF or disconnected from power,
it will operate under the previous settings (except the
Timer setting ) when it is turned ON again.
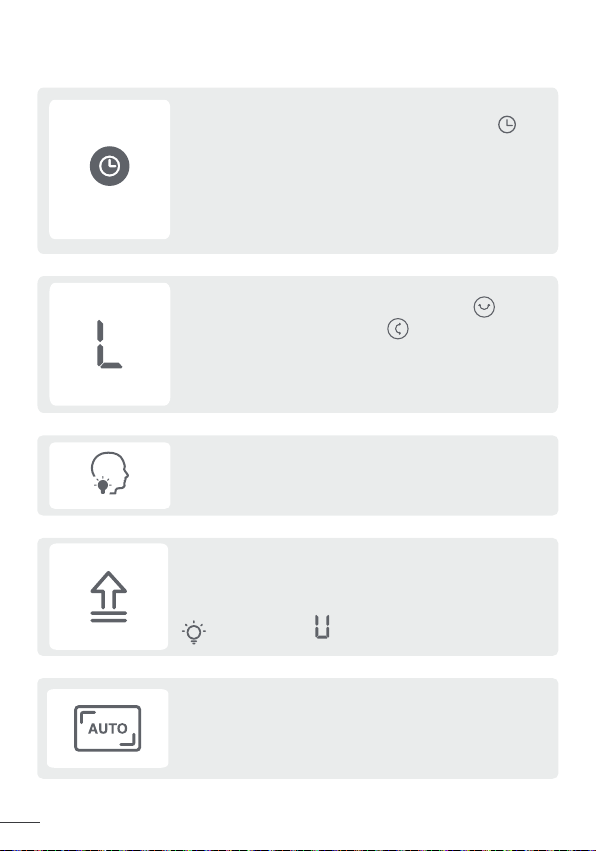
When the fan is ON/OFF, touch the timer button
repeatedly to set a timer from 1 to 8 hours. When
the timer ends, the fan will stop/start running
automatically. To cancel, set the time to 0 hour.
Note: When the auto off timer is enabled, display will return
Display will show 8 if the timer is beyond 8 hours. To set a
timer beyond 8 hours, please go to the Dreo app.
to fan speed after 3 seconds.
Timer
Display will show “ ” during the update process. Do
not operate until the update is completed.
Check the firmware version on the Dreo app and
update regularly for the air circulator to work more
efficiently.
Firmware Update
Display turns off after 1 minute (after 5 seconds in
sleep mode).
Wake up the display with any button.
To disable this feature, please go to the Dreo app.
Display Auto Off
12
11
Child Lock
Long press the Horizontal Oscillation button
and Vertical Oscillation button
3 seconds to turn on/off Child Lock.
at the same time for
Note: Child Lock doesn't apply to operations from the remote
control and the Dreo app.
You can also turn off Child Lock by re-plugging in, resetting to
factory settings, or through the Dreo app.
CR2025 3V
1
2
3
Battery Replacement
Note:
If the indicator on the remote
control doesn’t turn on any more,
please consider replacing the battery.
1
Press the locking button to pop
out the battery holder.
2
Replace with the same battery
type with the (+) side facing up.
3
Push in the holder until securely
locked into place.
Remote Control
Power
Power Indicator
Increase
Speed
Decrease
Speed
Vertical Oscillation
Mode
Timer
Horizontal
Oscillation
Additional Features
Memory
If the fan is turned OFF or disconnected from power,
it will operate under the previous settings (except the
Timer setting ) when it is turned ON again.
When the fan is ON/OFF, touch the timer button
repeatedly to set a timer from 1 to 8 hours. When
the timer ends, the fan will stop/start running
automatically. To cancel, set the time to 0 hour.
Note: When the auto off timer is enabled, display will return
Display will show 8 if the timer is beyond 8 hours. To set a
timer beyond 8 hours, please go to the Dreo app.
to fan speed after 3 seconds.
Timer
Display will show “ ” during the update process. Do
not operate until the update is completed.
Check the firmware version on the Dreo app and
update regularly for the air circulator to work more
efficiently.
Firmware Update
Display turns off after 1 minute (after 5 seconds in
sleep mode).
Wake up the display with any button.
To disable this feature, please go to the Dreo app.
Display Auto Off
12
11
Child Lock
Long press the Horizontal Oscillation button
and Vertical Oscillation button
3 seconds to turn on/off Child Lock.
at the same time for
Note: Child Lock doesn't apply to operations from the remote
control and the Dreo app.
You can also turn off Child Lock by re-plugging in, resetting to
factory settings, or through the Dreo app.
CR2025 3V
1
2
3
This product contains a lithium button/coin cell battery. If a new or
used lithium button/coin cell battery is swallowed or enters the body,
it can cause severe internal burns and can lead to death in as little
as 2 hours. Always completely secure the battery compartment. If the
battery compartment does not close securely, stop using the product,
remove the battery, and keep it away from children. If you think
batteries might have been swallowed or placed inside any part of the
body, seek immediate medical attention.
The batteries must be disposed of properly, including keeping them
away from children. Even used cells may cause injury.
Chemical Burn Hazard. Keep batteries away
from children.
WARNING
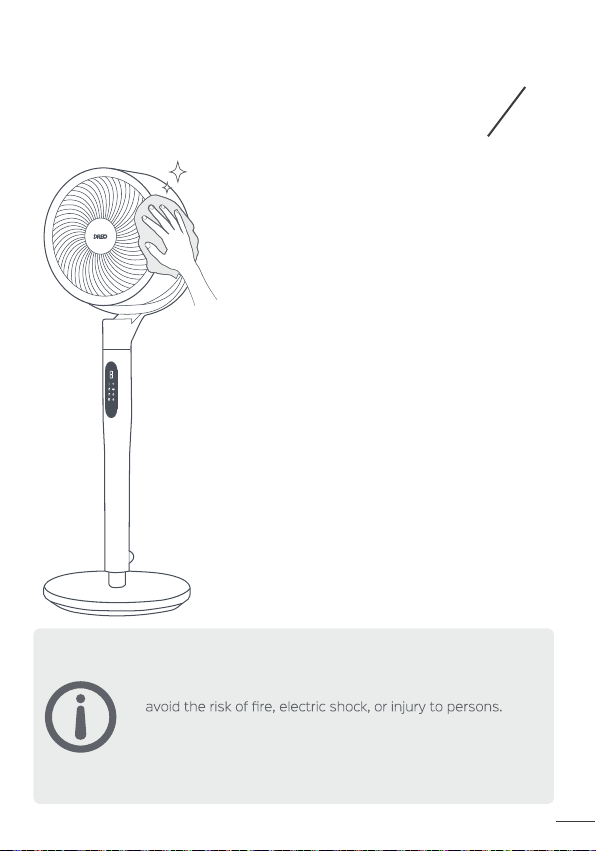
Always unplug the fan before any cleaning or maintenance to
Do not immerse in water or get water inside the motor
housing.
Do not use any chemical agents when cleaning the fan.
Store in a cool, dry place and cover it to protect from dust.
CAUTION
CLEANING AND
MAINTENANCE
6
Outer Surface
Base
Gently wipe off the dust with a soft,
dry cloth.
The base can be disassembled in the
reverse order of assembly.
1.
2.
3.
4.
14
13
This product contains a lithium button/coin cell battery. If a new or
used lithium button/coin cell battery is swallowed or enters the body,
it can cause severe internal burns and can lead to death in as little
as 2 hours. Always completely secure the battery compartment. If the
battery compartment does not close securely, stop using the product,
remove the battery, and keep it away from children. If you think
batteries might have been swallowed or placed inside any part of the
body, seek immediate medical attention.
The batteries must be disposed of properly, including keeping them
away from children. Even used cells may cause injury.
Chemical Burn Hazard. Keep batteries away
from children.
WARNING
Always unplug the fan before any cleaning or maintenance to
Do not immerse in water or get water inside the motor
housing.
Do not use any chemical agents when cleaning the fan.
Store in a cool, dry place and cover it to protect from dust.
CAUTION
CLEANING AND
MAINTENANCE
6
Outer Surface
Base
Gently wipe off the dust with a soft,
dry cloth.
The base can be disassembled in the
reverse order of assembly.
1.
2.
3.
4.
14
13
2
15
16
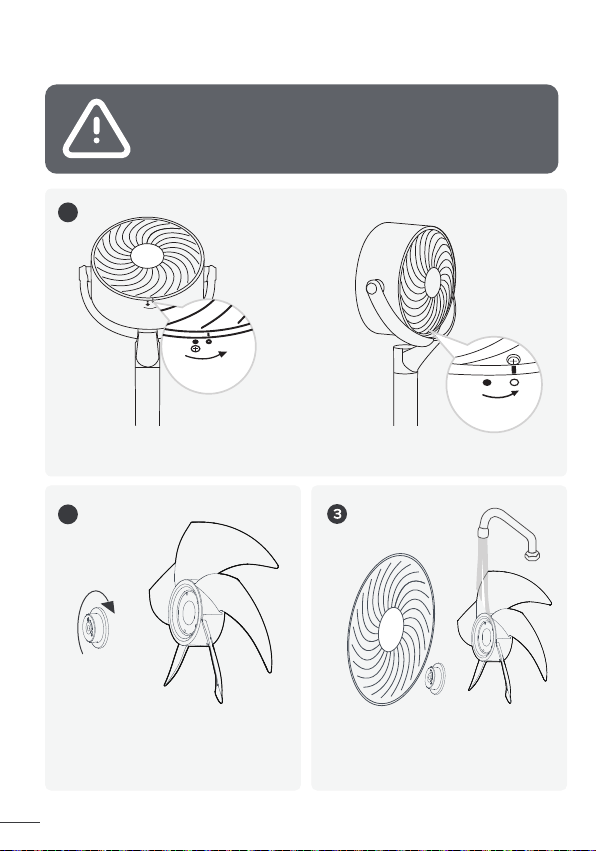
Grilles
To reduce the risk of electrical shock and injury
to persons, turn off and unplug the appliance
before any cleaning and maintenance.
WARNING
1
Remove the screws on the front and rear grilles, rotate the grilles
counterclockwise to take them off.
Remove the blade cap by rotating it
as shown and take the blade
assembly out of the shaft.
Front Rear
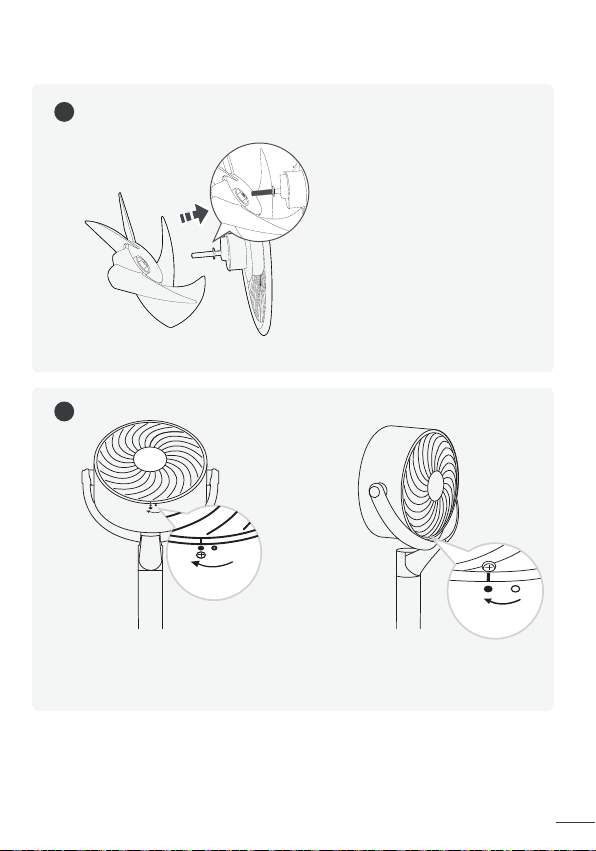
5
Align the point on the front grille with the right point on the casing,
then rotate the grille clockwise and install the screw back in place.
Repeat the steps for the rear grille.
Front Rear
Rinse cap, blades, and grilles under
running water or with a clean, damp
cloth.
4
Dry up all parts, and insert the
blade assembly back into the
shaft by aligning the D-shaped
points on the center.
2
15
16
Grilles
To reduce the risk of electrical shock and injury
to persons, turn off and unplug the appliance
before any cleaning and maintenance.
WARNING
1
Remove the screws on the front and rear grilles, rotate the grilles
counterclockwise to take them off.
Remove the blade cap by rotating it
as shown and take the blade
assembly out of the shaft.
Front Rear
5
Align the point on the front grille with the right point on the casing,
then rotate the grille clockwise and install the screw back in place.
Repeat the steps for the rear grille.
Front Rear
Rinse cap, blades, and grilles under
running water or with a clean, damp
cloth.
4
Dry up all parts, and insert the
blade assembly back into the
shaft by aligning the D-shaped
points on the center.

17
Make sure that the cord is connected to a powered outlet and the
mains voltage corresponds with the voltage indicated on the air
circulator.
Incorrect installation might also cause shakiness. Please refer to the
Place the air circulator on a flat, level surface.
Place the air circulator on a flat, level surface.
assembly instructions in page 3-4.
Be sure not to insert anything into the air inlet and outlet.
TROUBLESHOOTING
My air circulator won’t turn on!
My air circulator is shaky and wobbling!
My air circulator is making vibration
and noise!
1.
2.
1.
2.
7
DREO CUSTOMER
CARE
Default 12-Month Warranty
Extend Your Warranty
This appliance is covered by Dreo warranty for 12 months from the date of its
original purchase.
We can only provide after-sales service for products that are sold by Dreo or
Dreo authorized retailers and distributors. If you have purchased the appliance
from a different place, please contact your seller for return and warranty issues.
Accident, misuse, or repairs performed by unauthorized personnel.
Any unit that has been tampered with or used for commercial purposes.
Normal wear and tear of wearable parts.
Damage caused by non-observance of the User Manual, e.g. connection to
an unsuitable mains supply or noncompliance with the instructions.
Partially or completely dismantled appliances.
Defects caused by or resulting from damages from shipping or from repairs,
service, or alteration to the product or any of its parts that have been
perform ed by a repair person not authorized by Dreo.
The warranty will not apply in cases of:
Extend your warranty by registering your new appliance on our website
https://dreo.com/warranty.
1.
2.
3.
4.
5.
6.
7.
support@dreo.com(888) 290-1688
Mon - Fri, 9:00 am-5:00 pm PST/PDT
www.dreo.com
8
18
If your problem is not listed or still persists, please contact our
Customer Support (see page 18)
This device complies with Part 15 of the FCC Rules.
This equipment has been tested and found to comply with the limits for a
Consumer ISM equipment, pursuant to Part 15 of the FCC Rules.These limits
are designed to provide reasonable protection against harmful interference
in a residential installation.This equipment generates, uses and can radiate
radio frequency energy and,if not installed and used in accordance with the
instructions, may cause harmful interference to radio communications. However,
there is no guarantee that interference will not occur in a particular installation.
approved by the party responsible for compliance could void the user's authority
to operate the equipment.
If this equipment does cause harmful interference to radio or television
reception, which can be determined by turning the equipment off and on, the
user is encouraged to try to correct the interference by one or more of the
following measures:
-Reorient or relocate the receiving antenna.
-Increase the separation between the equipment and receiver.
-Connect the equipment into an outlet on a circuit different from that to which
the receiver is connected.
-Consult the dealer or an experienced radio/TV technician for help.
FCC STATEMENT
Rev_1.2_EN
www.dreo.com
Shenzhen Hesung Innovation
Technology Co., LTD
26F, Bldg A7, Creative City, Shenzhen, China
MADE IN CHINA
19
20
3189196
Intertek
CM

Looking for help?
Contact us to get expert support.
DR-HAF003S
www.dreo.com
support@dreo.com (888) 290-1688
Mon - Fri, 9:00 am-5:00 pm PST/PDT
www.dreo.com
Smart Pedestal
Air Circulator Fan
USER MANUAL