MBOX Studio Guide

Legal Notices
© 2022 Avid Technology, Inc., (“Avid”), all rights reserved. This guide may not be duplicated in whole or in part without the written consent of Avid.
For a current and complete list of Avid trademarks visit:
www.avid.com/legal/trademarks-and-other-notices.
Bonjour, the Bonjour logo, and the Bonjour symbol are trademarks of Apple Computer, Inc.
Thunderbolt and the Thunderbolt logo are trademarks of Intel Corporation in the U.S. and/or other countries.
This product may be protected by one or more U.S. and non-U.S. patents. Details are available at
www.avid.com/patents.
Product features, specifications, system requirements, and availability are subject to change without notice.
This product incorporates JetPLL™ clocking technologies, used under license from Sonopsis. JetPLL™ designs are covered by Sonopsis copyright and/or multiple
patents. The JetPLL™ word and logo are trademarks of Sonopsis. More information can be found at the JetPLL.info website:
http://JetPLL.info.
Guide Part Number 9329-66417-00 REV A 11/22

Important
Model: MBOX Studio
Rating: 12vDC, 3.0A
Safety Compliance
This equipment has been tested to comply with safety certifications in accordance with: UL 62368-1 ed.3-2019, CAN/CSA-C22.2 No. 62398-1:19,BS EN
62368-1:2014+A11:2017, EN 62368-1:2014/AC:2015, IEC 62368-1:2018. Avid Technology Inc., has been authorized to apply the appropriate NRTL mark on its
compliant equipment.
Important Safety Instructions
1) Read these instructions.
2) Keep these instructions.
3) Heed all warnings.
4) Follow all instructions.
5) Do not use this equipment near water.
6) Clean only with dry cloth.
7) Do not block any ventilation openings. Install in accordance with the manufacturer’s instructions.
8) Do not install near any heat sources such as radiators, heat registers, stoves, or other equipment (including amplifiers) that produce heat.
9) Protect power cords from being walked on or pinched particularly at plugs, convenience receptacles, and the point where they exit from the equipment.
10) Only use attachments/accessories specified by the manufacturer.
11) For products that are not rack-mountable: Use only with a cart, stand, tripod, bracket, or table specified by the manufacturer, or sold with the equipment. When a cart
is used, use caution when moving the cart/equipment combination to avoid injury from tip-over.
12) Unplug this equipment during lightning storms or when unused for long periods of time.
13) Refer all servicing to qualified service personnel. Servicing is required when the equipment has been damaged in any way, such as power-supply cord or plug is dam-
aged, liquid has been spilled or objects have fallen into the equipment, the equipment has been exposed to rain or moisture, does not operate normally, or has been
dropped.
14) For products that are a Mains powered device: The equipment shall not be exposed to dripping or splashing and no objects filled with liquids (such as vases) shall be
placed on the equipment.
WARNING! To reduce the risk of fire or electric shock, do not expose this equipment to rain or moisture.
Do not defeat the safety purpose of the polarized or grounding-type plug. A polarized plug has two blades with one wider than the other. A grounding type plug has two
blades and a third grounding prong. The wide blade or the third prong are provided for your safety. If the provided plug does not fit into your outlet, consult an electrician
for replacement of the obsolete outlet.
15) For products with a power switch: It should remain accessible after installation.
16) The equipment shall be used at a maximum ambient temperature of 40° C.
LED Safety Notices
Avid hardware might contain LED or Laser devices for communication use. These devices are compliant with the requirements for Class 1 LED and Laser Products and
are safe in the intended use. In normal operation the output of these laser devices does not exceed the exposure limit of the eye and cannot cause harm.


Contents v
Chapter 1. Introduction . . . . . . . . . . . . . . . . . . . . . . . . . . . . . . . . . . . . . . . . . . . . . . . . . . . . . . . . . . . . . . . . . . . . . . . . . . 1
System Requirements and Compatibility Information . . . . . . . . . . . . . . . . . . . . . . . . . . . . . . . . . . . . . . . . . . . . . . . . 3
Conventions Used in Pro Tools Documentation . . . . . . . . . . . . . . . . . . . . . . . . . . . . . . . . . . . . . . . . . . . . . . . . . . . . 3
Resources . . . . . . . . . . . . . . . . . . . . . . . . . . . . . . . . . . . . . . . . . . . . . . . . . . . . . . . . . . . . . . . . . . . . . . . . . . . . . . . 4
Part I Installation
Chapter 2. Installation and Setup . . . . . . . . . . . . . . . . . . . . . . . . . . . . . . . . . . . . . . . . . . . . . . . . . . . . . . . . . . . . . . . . . . 7
Unpack the Box . . . . . . . . . . . . . . . . . . . . . . . . . . . . . . . . . . . . . . . . . . . . . . . . . . . . . . . . . . . . . . . . . . . . . . . . . . . 7
Register MBOX Studio and Activate your Avid Master Account. . . . . . . . . . . . . . . . . . . . . . . . . . . . . . . . . . . . . . . . . 8
Connect Cables . . . . . . . . . . . . . . . . . . . . . . . . . . . . . . . . . . . . . . . . . . . . . . . . . . . . . . . . . . . . . . . . . . . . . . . . . . . 9
Download and Install Pro Tools and MBOX Control Software . . . . . . . . . . . . . . . . . . . . . . . . . . . . . . . . . . . . . . . . . 10
Launch and Configure MBOX Control Software . . . . . . . . . . . . . . . . . . . . . . . . . . . . . . . . . . . . . . . . . . . . . . . . . . . 11
Launch Pro Tools. . . . . . . . . . . . . . . . . . . . . . . . . . . . . . . . . . . . . . . . . . . . . . . . . . . . . . . . . . . . . . . . . . . . . . . . . 12
Configure Pro Tools for MBOX Studio . . . . . . . . . . . . . . . . . . . . . . . . . . . . . . . . . . . . . . . . . . . . . . . . . . . . . . . . . . 12
How to Proceed . . . . . . . . . . . . . . . . . . . . . . . . . . . . . . . . . . . . . . . . . . . . . . . . . . . . . . . . . . . . . . . . . . . . . . . . . . 13
Starting Up and Shutting Down Your System . . . . . . . . . . . . . . . . . . . . . . . . . . . . . . . . . . . . . . . . . . . . . . . . . . . . . 14
Part II Hardware and Software Overview
Chapter 3. MBOX Studio Hardware Overview . . . . . . . . . . . . . . . . . . . . . . . . . . . . . . . . . . . . . . . . . . . . . . . . . . . . . . . 17
MBOX Studio Front Panel. . . . . . . . . . . . . . . . . . . . . . . . . . . . . . . . . . . . . . . . . . . . . . . . . . . . . . . . . . . . . . . . . . . 17
MBOX Studio Top Panel. . . . . . . . . . . . . . . . . . . . . . . . . . . . . . . . . . . . . . . . . . . . . . . . . . . . . . . . . . . . . . . . . . . . 18
MBOX Studio Back Panel . . . . . . . . . . . . . . . . . . . . . . . . . . . . . . . . . . . . . . . . . . . . . . . . . . . . . . . . . . . . . . . . . . . 19
Example Audio Connections . . . . . . . . . . . . . . . . . . . . . . . . . . . . . . . . . . . . . . . . . . . . . . . . . . . . . . . . . . . . . . . . . 20
Chapter 4. MBOX Control Software Overview . . . . . . . . . . . . . . . . . . . . . . . . . . . . . . . . . . . . . . . . . . . . . . . . . . . . . . . 21
Toolbar . . . . . . . . . . . . . . . . . . . . . . . . . . . . . . . . . . . . . . . . . . . . . . . . . . . . . . . . . . . . . . . . . . . . . . . . . . . . . . . . 21
Channel Focus. . . . . . . . . . . . . . . . . . . . . . . . . . . . . . . . . . . . . . . . . . . . . . . . . . . . . . . . . . . . . . . . . . . . . . . . . . . 28
Monitor . . . . . . . . . . . . . . . . . . . . . . . . . . . . . . . . . . . . . . . . . . . . . . . . . . . . . . . . . . . . . . . . . . . . . . . . . . . . . . . . 33
Hardware Input . . . . . . . . . . . . . . . . . . . . . . . . . . . . . . . . . . . . . . . . . . . . . . . . . . . . . . . . . . . . . . . . . . . . . . . . . . 34
Software Input . . . . . . . . . . . . . . . . . . . . . . . . . . . . . . . . . . . . . . . . . . . . . . . . . . . . . . . . . . . . . . . . . . . . . . . . . . . 34
Hardware Output . . . . . . . . . . . . . . . . . . . . . . . . . . . . . . . . . . . . . . . . . . . . . . . . . . . . . . . . . . . . . . . . . . . . . . . . . 34
Preferences . . . . . . . . . . . . . . . . . . . . . . . . . . . . . . . . . . . . . . . . . . . . . . . . . . . . . . . . . . . . . . . . . . . . . . . . . . . . . 35
Part III Using MBOX
Chapter 5. Using MBOX Studio . . . . . . . . . . . . . . . . . . . . . . . . . . . . . . . . . . . . . . . . . . . . . . . . . . . . . . . . . . . . . . . . . . . 40
MBOX Studio Basics . . . . . . . . . . . . . . . . . . . . . . . . . . . . . . . . . . . . . . . . . . . . . . . . . . . . . . . . . . . . . . . . . . . . . . 41
Audio Input and Output. . . . . . . . . . . . . . . . . . . . . . . . . . . . . . . . . . . . . . . . . . . . . . . . . . . . . . . . . . . . . . . . . . . . . 45
Using the Tuner . . . . . . . . . . . . . . . . . . . . . . . . . . . . . . . . . . . . . . . . . . . . . . . . . . . . . . . . . . . . . . . . . . . . . . . . . . 50
Contents

MBOX Studio Guidevi
About Variable-Z . . . . . . . . . . . . . . . . . . . . . . . . . . . . . . . . . . . . . . . . . . . . . . . . . . . . . . . . . . . . . . . . . . . . . . . . . 51
Using MBOX Studio and Pro Tools . . . . . . . . . . . . . . . . . . . . . . . . . . . . . . . . . . . . . . . . . . . . . . . . . . . . . . . . . . . . 52
Using AVID FX. . . . . . . . . . . . . . . . . . . . . . . . . . . . . . . . . . . . . . . . . . . . . . . . . . . . . . . . . . . . . . . . . . . . . . . . . . . 55
Re-Amplification. . . . . . . . . . . . . . . . . . . . . . . . . . . . . . . . . . . . . . . . . . . . . . . . . . . . . . . . . . . . . . . . . . . . . . . . . . 57
Using FX Loops . . . . . . . . . . . . . . . . . . . . . . . . . . . . . . . . . . . . . . . . . . . . . . . . . . . . . . . . . . . . . . . . . . . . . . . . . . 59
Using S/PDIF . . . . . . . . . . . . . . . . . . . . . . . . . . . . . . . . . . . . . . . . . . . . . . . . . . . . . . . . . . . . . . . . . . . . . . . . . . . . 62
Customizing the User Action Buttons 1–4 . . . . . . . . . . . . . . . . . . . . . . . . . . . . . . . . . . . . . . . . . . . . . . . . . . . . . . . 63
Using Talkback . . . . . . . . . . . . . . . . . . . . . . . . . . . . . . . . . . . . . . . . . . . . . . . . . . . . . . . . . . . . . . . . . . . . . . . . . . 64
Using Loopback . . . . . . . . . . . . . . . . . . . . . . . . . . . . . . . . . . . . . . . . . . . . . . . . . . . . . . . . . . . . . . . . . . . . . . . . . . 65
Integrating an External MIDI Device . . . . . . . . . . . . . . . . . . . . . . . . . . . . . . . . . . . . . . . . . . . . . . . . . . . . . . . . . . . 65
Reducing Monitoring Latency . . . . . . . . . . . . . . . . . . . . . . . . . . . . . . . . . . . . . . . . . . . . . . . . . . . . . . . . . . . . . . . . 66
Appendix A. Specifications . . . . . . . . . . . . . . . . . . . . . . . . . . . . . . . . . . . . . . . . . . . . . . . . . . . . . . . . . . . . . . . . . . . . . . 67
Analog I/O . . . . . . . . . . . . . . . . . . . . . . . . . . . . . . . . . . . . . . . . . . . . . . . . . . . . . . . . . . . . . . . . . . . . . . . . . . . . . . 67
Environmental Specifications . . . . . . . . . . . . . . . . . . . . . . . . . . . . . . . . . . . . . . . . . . . . . . . . . . . . . . . . . . . . . . . . 68
Appendix B. Compliance . . . . . . . . . . . . . . . . . . . . . . . . . . . . . . . . . . . . . . . . . . . . . . . . . . . . . . . . . . . . . . . . . . . . . . . . 69
Index . . . . . . . . . . . . . . . . . . . . . . . . . . . . . . . . . . . . . . . . . . . . . . . . . . . . . . . . . . . . . . . . . . . . . . . . . . . . . . . . . . . . . . . . 72
Introduction 1
Introduction
Welcome to MBOX
™
Studio by Avid
®
. MBOX Studio is a versatile multi-channel audio interface that integrates with Pro Tools
®
software and is compatible with third-party audio and MIDI applications that support the Core Audio (Mac) or ASIO (Windows)
standard.
MBOX Studio delivers exceptional audio conversion and fidelity, along with everything you need for tracking, mixing, streaming,
podcasting and more.
MBOX Studio can be controlled using its top panel controls and using the MBOX Control application, and can also function as a
standalone monitor controller.
MBOX Studio Features
• Up to 21 x 22 simultaneous input and output (“I/O”, @ 44.1/48k). Maximum I/O varies with sample rate, as follows:
• 4x XLR/¼-inch TRS Combo Microphone/Line/Instruments Inputs (2 on the back panel, 2 on the front panel), each with:
• High quality microphone preamps
•Variable Z impedance circuit to provide more tonal options and compatibility for Mic and Instrument inputs
• Large dual-function (rotate/push) encoder
• Link button to link stereo inputs
• 48V phantom power
• HPF (High Pass Filter)
• –10 dB Pad
• Polarity invert
• Soft-Limit
• 9-segment input meters
• Hardware inserts assignable via FX Loops 1–2
• 2x ¼-inch TRS Line inputs
MBOX Studio Max I/O per Sample Rate
Sample Rate Maximum Inputs Maximum Outputs
44.1/48 kHz 21 22
882/96 kHz 17 18
176.4/192 kHz 8 10

Introduction
2
• 4x ¼-inch TRS Line outputs
• L/R Main Monitor outputs
• 1/2 Alt outputs
• 2x ¼-inch TRS effect loops (hardware inserts) with Level and Impedance matching
• 2x ¼-inch TRS outputs
• 2x ¼-inch TRS inputs
• Switchable impedance between “Line” and “Hi-Z/Stomp Box”
• Control Room section
• Large dual-function (rotate/push) encoder to control output levels (rotate) and Speaker Output select Main/Alt (push)
•
Mute, Dim, and Mono buttons
• Bluetooth input/output source select button
• Monitor
Link Button to link output levels on Main/Alt/Bluetooth
• 4x User Action buttons, color coded with custom color selection (push and push /hold dual functionality)
• Stereo Bluetooth input
• Stereo Bluetooth output
• 1x Coax S/PDIF I/O
• 1x Optical I/O (supports ADAT, SMUX and S/PDIF)
• 8x Pro Tools (or other DAW) software inputs
• 2x ¼-inch headphone outputs with individual mixes and rotary controls
• 1x ¼-inch
Hi-Z Out to Amp output for re-amplification
• MBOX button (launches MBOX Control)
• Input channel-based EQ, and Avid Reverb and Delay FX
• Built-in instrument Tuner
• 1x1 MIDI I/O
• 2x Footswitch and/or Expression Pedal inputs
• Low Latency Direct Monitoring (LLM) via MBOX Control
• USB 2.0 Type C Connector
• Supports iOS (compatible with camera kit (not included))
• External 12V Power Supply
• Kensington Security Slot
Included Software, Plug-ins, and Sound Libraries
With your purchase and registration of MBOX Studio, you are entitled to the following:
• Pro Tools Studio software, with 1-year subscription and Standard Avid support contract
• Sibelius Artist software, with 1-year subscription
• Bundled effects and instrument plug-ins from Avid and several Avid Development Partners.
• Sound libraries that include samples for almost all of your music production needs, including sound effects, hits, loops, and phrases
of a wide variety of instruments, a range of tempo options (for rhythmic material), in many different styles.
For complete, detailed information about what you get with MBOX Studio, visit
www.avid.com/mbox-support.
Introduction
3
System Requirements and Compatibility Information
MBOX Studio is supported by Pro Tools Artist, Pro Tools Studio, and Pro Tools | Ultimate 2022.9 or later.
For detailed system requirements, visit www.avid.com/mbox-support.
Avid can only assure compatibility and provide support for hardware and software it has tested and approved.
For a complete list of optimizations for your Pro Tools computer, visit:
Pro Tools Computer Optimizations.
For complete Pro Tools system requirements and a list of qualified computers, operating systems, hard drives, peripherals, and
third-party devices, visit
www.avid.com/compatibility.
Conventions Used in Pro Tools Documentation
Pro Tools documentation uses the following conventions to indicate menu choices, keyboard commands, and mouse commands:
:
The names of Commands, Options, and Settings that appear on-screen are in a different font.
The names of physical controls on Pro Tools | Carbon are in displayed in bold text.
Hyper-links and cross-reference links are displayed
in blue text.
The following symbols are used to highlight important information:
Convention Action
File > Save Choose Save from the File menu
Command+N Hold down the Command key and press the N key
Command-click Hold down the Command key and click the mouse button
Right-click Click with the right mouse button
User Tips are helpful hints for getting the most from your Pro Tools system.
Important Notices include information that could affect your Pro Tools session data or the performance of your Pro Tools system.
Shortcuts show you useful keyboard or mouse shortcuts.
Cross References point to related sections in this guide and other Avid documentation.

Introduction
4
Resources
The Avid website (www.avid.com) is your best online source for information to help you get the most out of your Avid system.
Account Activation and Product Registration
Activate your product to access downloads in your Avid account (or quickly create an account if you do not have one). Register your
purchase online, download software, updates, documentation, and other resources.
www.avid.com/account
Support and Downloads
For help with MBOX Studio, visit:
MBOX Studio Learn & Support
Contact Avid Customer Success (technical support), download software updates and the latest online manuals, browse the Compatibil-
ity documents for system requirements, search the online Knowledge Base or join the worldwide Avid user community.
www.avid.com/support
Video Tutorials
Learn how to use MBOX Studio by watching some or all of its video Tutorials.
The Pro Tools Quick Tips series of online videos provide tutorials to help if you are new to Pro Tools.
Pro Tools Quick Tips
You can browse the videos or use the Pro Tools Quick Reference Guide to find and learn exactly what you want.
Training and Education
Study on your own using courses available online, find out how you can learn in a classroom setting at an Avid-certified training center,
or view video tutorials and webinars.
www.avid.com/education
Products and Developers
Learn about Avid products, download demo software, or learn about our Development Partners and their plug-ins, applications, and
hardware.
www.avid.com/products
Avid Store
Visit the Avid store for plug-ins and control surfaces to extend the capabilities of your Pro Tools system.
shop.avid.com

Part I: Installation


Installation and Setup 7
Installation and Setup
Installing and setting up MBOX Studio is simple and involves the following steps:
1
Unpack the Box
2 Register MBOX Studio and Activate your Avid Master Account
3 Connect Cables
4 Download and Install Pro Tools and MBOX Control Software (including authorizing your software with iLok License Manager,
and updating MBOX Studio firmware)
5 Launch and Configure MBOX Control Software
6 Launch Pro Tools
Unpack the Box
Before you get started installing MBOX Studio, unpack the box, which contains the following:
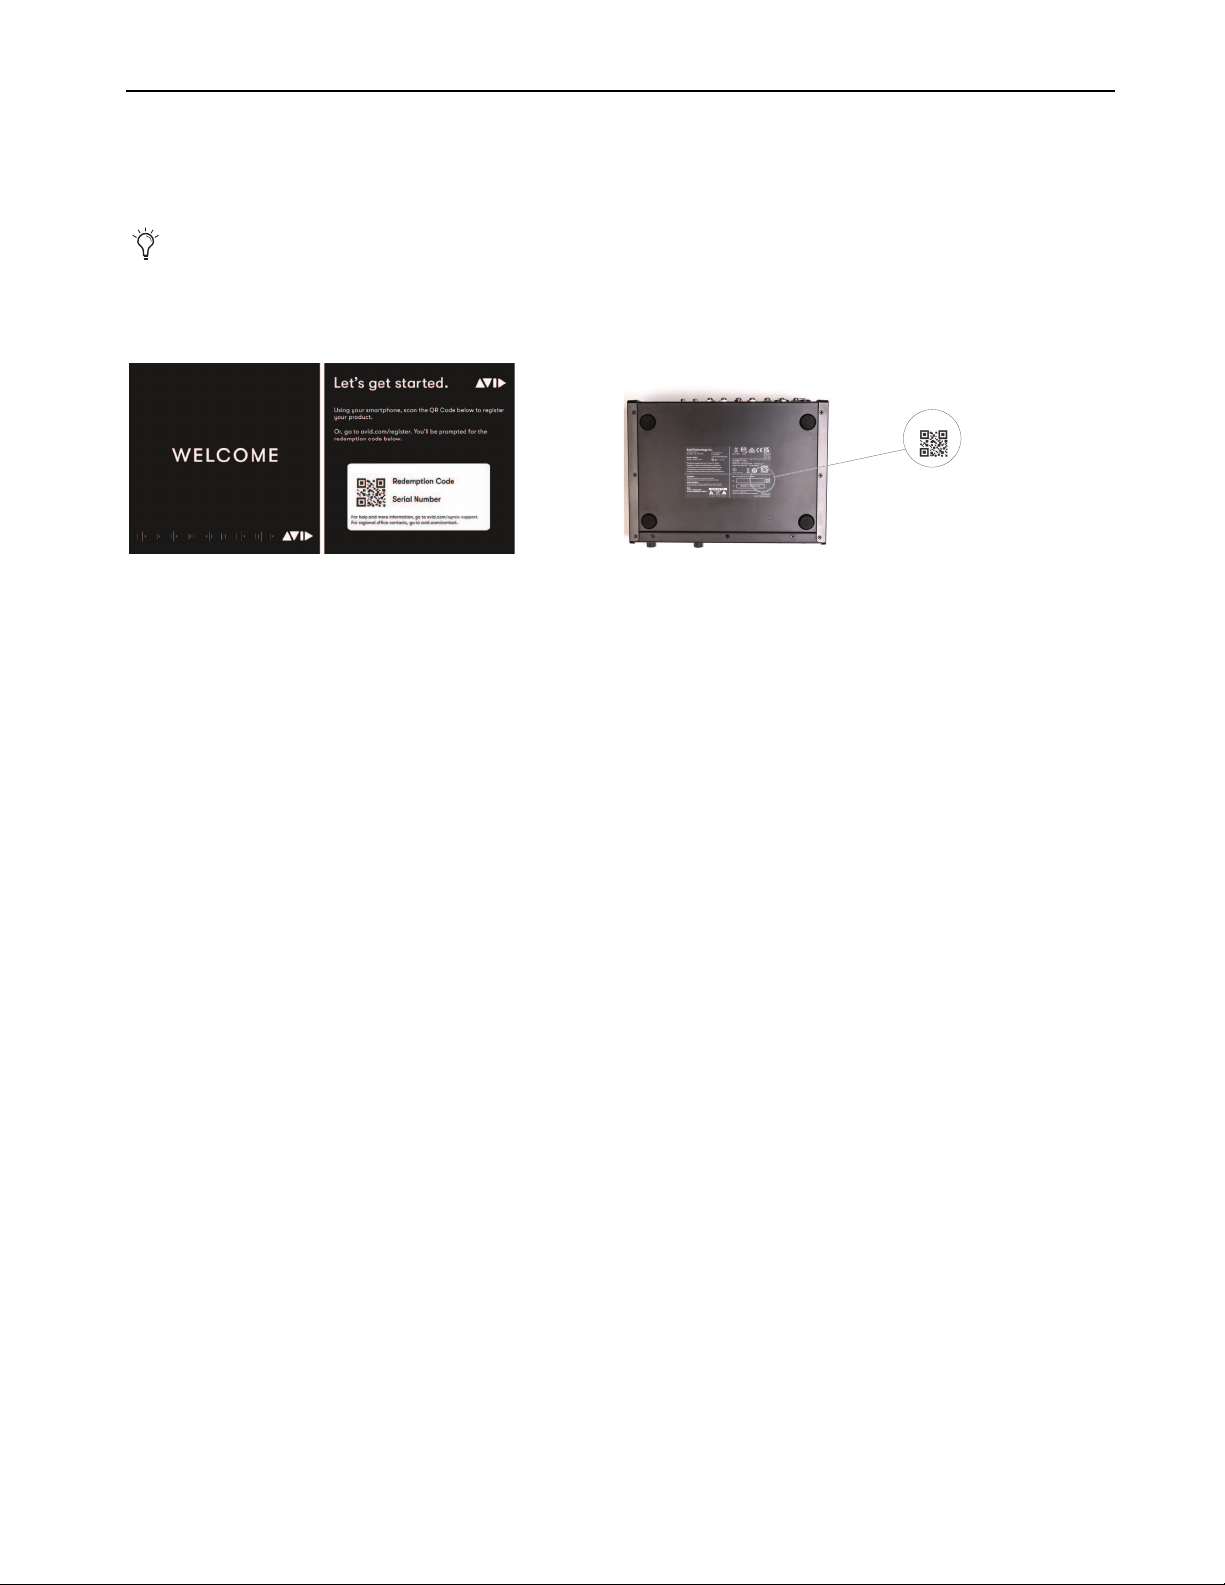
• Welcome card with redemption code, QR code, and serial number
• MBOX Studio Quick Setup Guide
• MBOX Studio audio interface. Be sure to remove the protective plastic covering the top panel.
• External 12V Power Supply with adapters
• USB C-Type Cable
• USB C-Type to USB A-Type Adapter
Keep the Welcome card on hand to register MBOX Studio and access software, sound libraries, and documentation downloads. Set
the cables aside until you are ready to start making cable connections. Remove MBOX Studio from the box and packaging, and
place it on a hard, dry surface.
Proceed to
Register MBOX Studio and Activate your Avid Master Account.
Installation and Setup
8
Register MBOX Studio and Activate your Avid Master Account
MBOX Studio includes a Welcome card with a redemption code and a QR code that lets you register the unit. Registering lets you access
software and PDF documentation through your online Avid Master Account. (The QR code is also provided on the underside of the
MBOX Studio unit.)
To register your MBOX Studio unit and access MBOX-related downloads through your Avid Master Account:
1 Locate the Welcome card and codes.
2 Do one of the following:
• With your mobile device, scan the QR code on the Welcome card, follow the on-screen instructions then continue with the next
step.
•Visit
https://www.avid.com/register and continue with the next step.
3 Log in to your Avid Master Account. If you do not already have an Avid Master Account, create a new one and log in.
4 Enter the redemption code on the Welcome card and click Register. If you scanned the QR code, your redemption code is entered au-
tomatically.
5 Enter the MBOX Studio serial number (it is located on a sticker on the underside of the unit).
6 Select your iLok.com account and click Use This Account, or create a new iLok account by following the on-screen instructions.
You are directed to the My Products page for your Avid Master Account.
7 Proceed to Connect Cables.
For step-by-step instructions on registration and license options, visit MBOX Registration.
Example Welcome card (shown at left) and location of the serial number and QR code on the unit (shown at right)
MBOX Studio
MBOX
MBOX Studio

Installation and Setup
9
Connect Cables
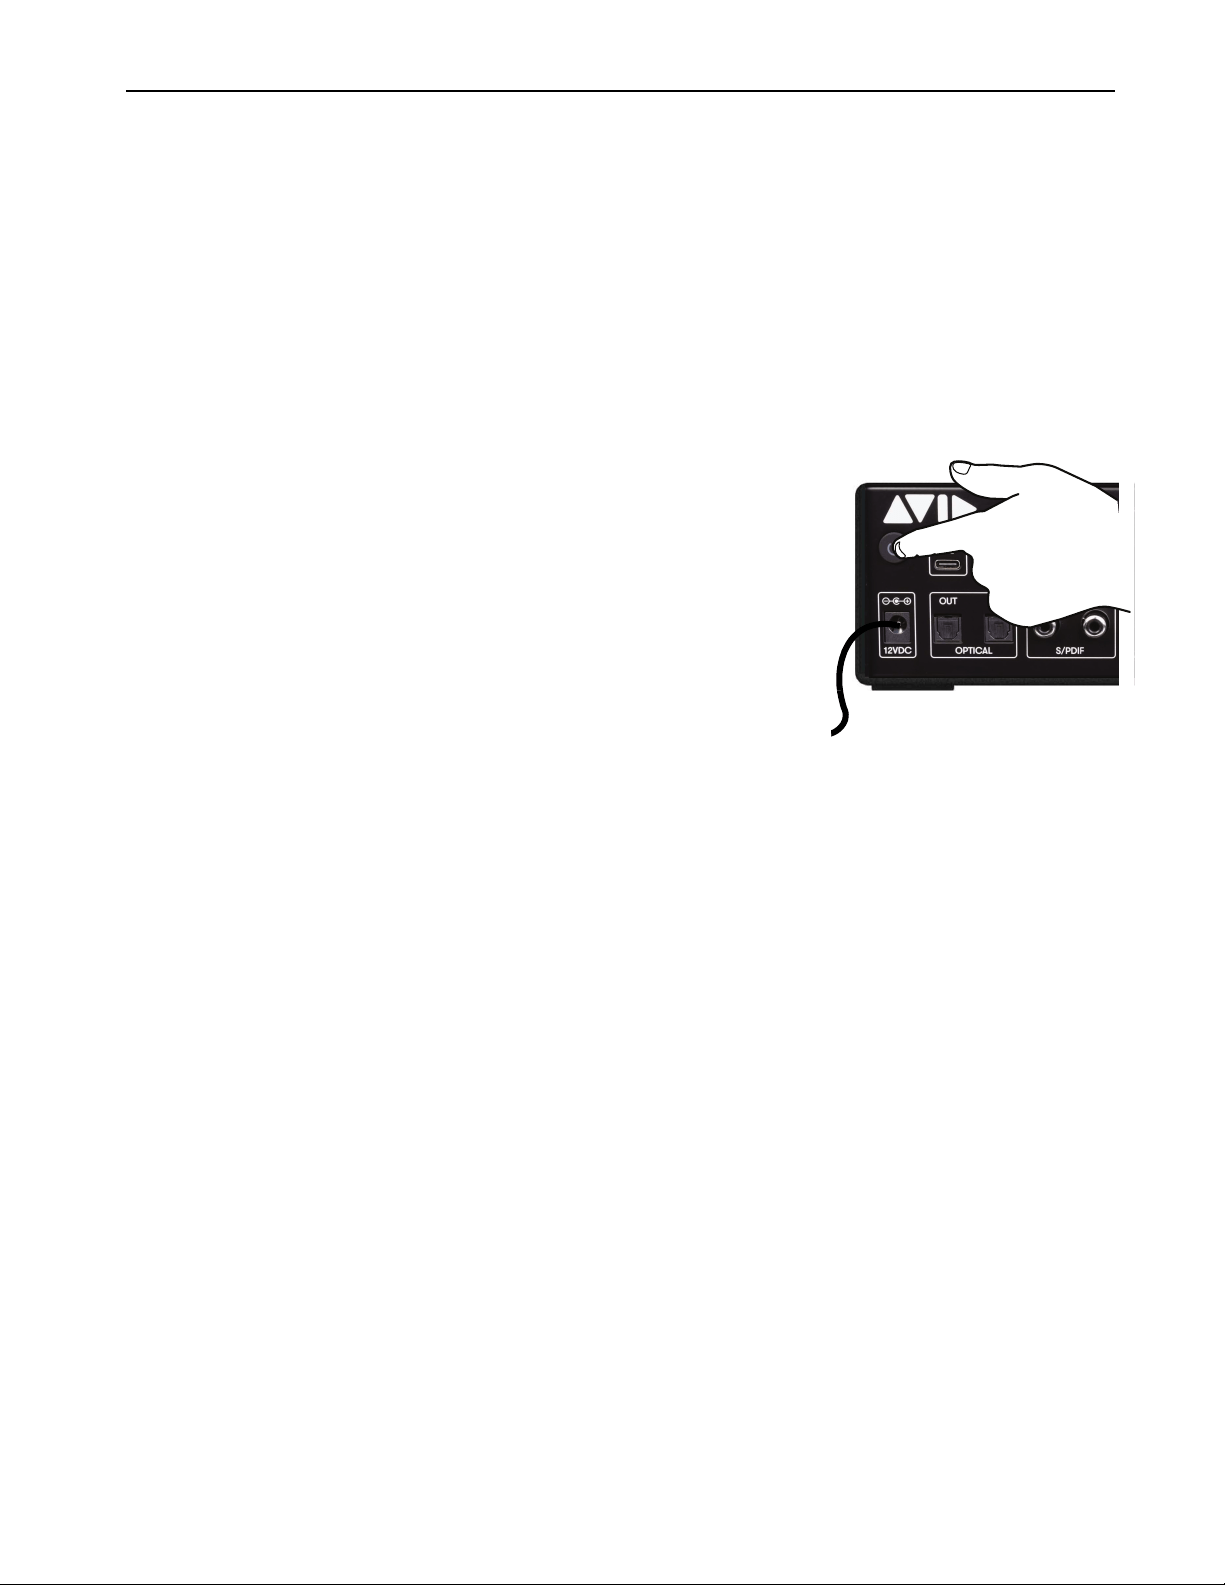
To install MBOX Studio, make USB and Power Connections as shown below.
• If necessary use the included USB-to-USB-C adapter.
• Choose the power adapter appropriate for your region.
USB and Power Connections
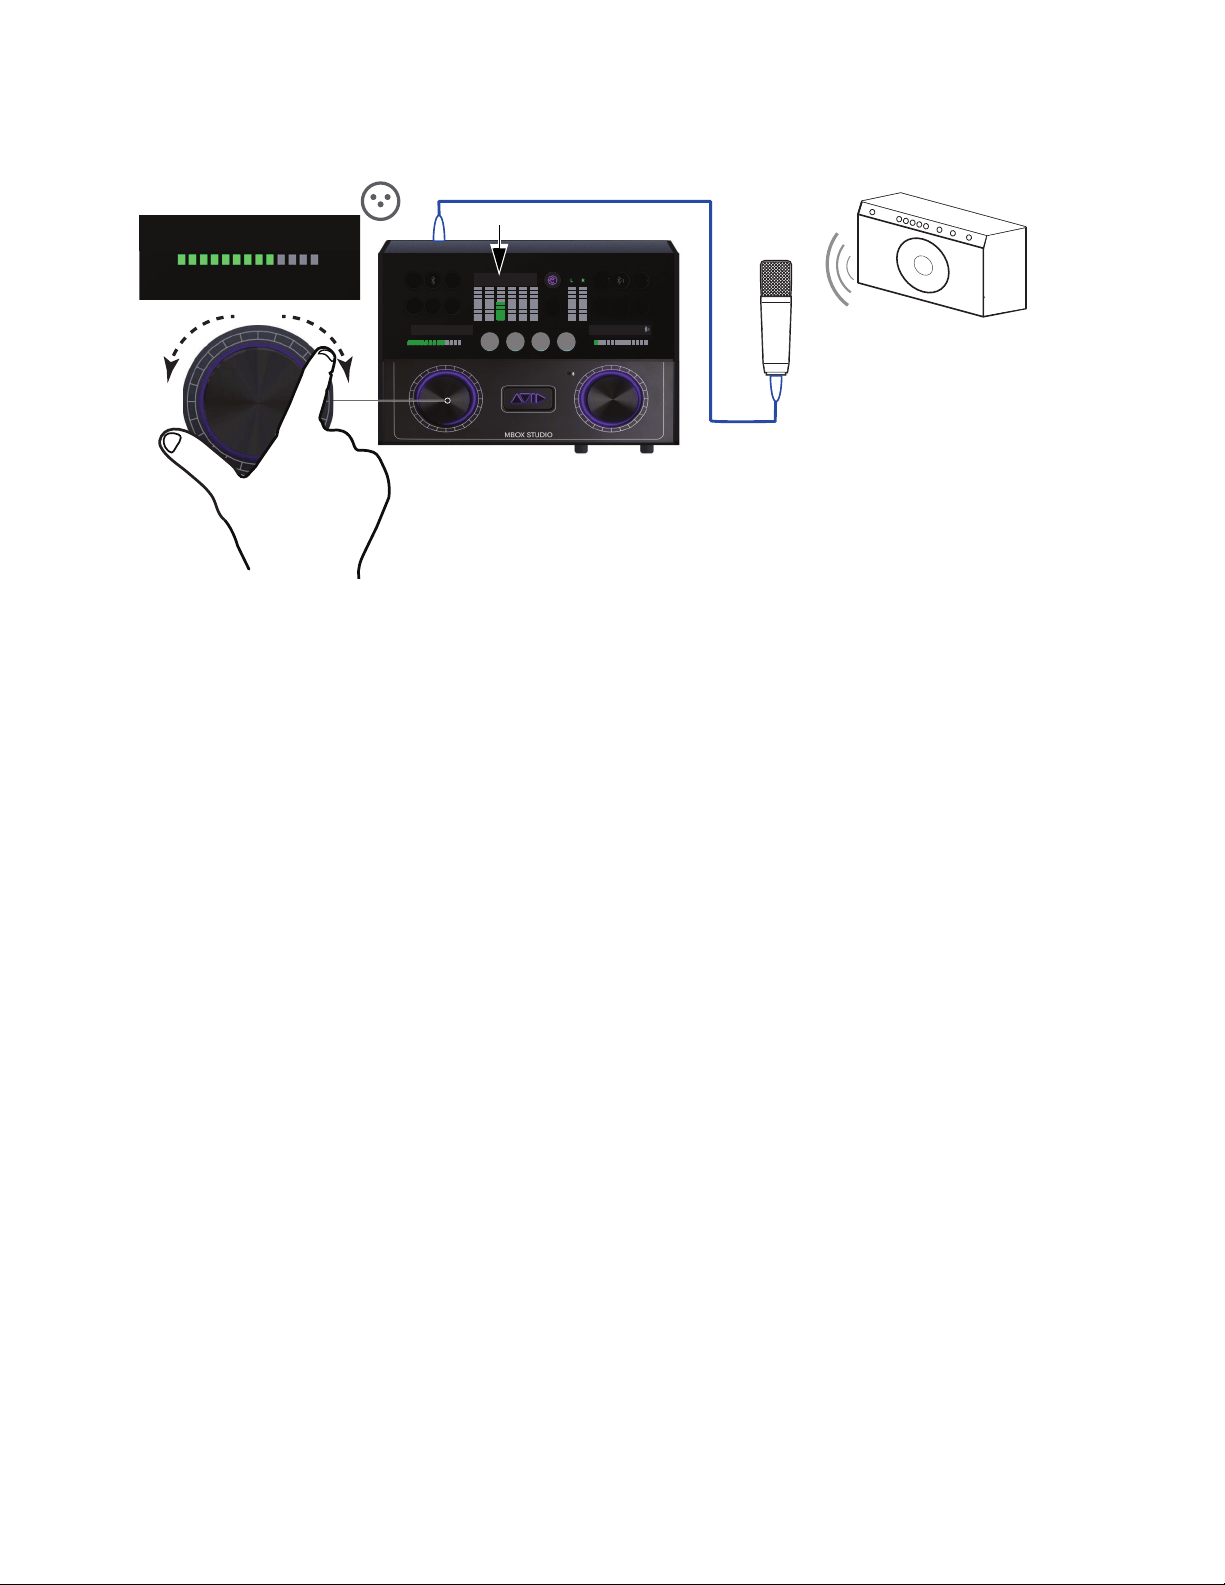
Audio Connections
The following diagrams show example audio connections. Consider making only minimal input and output connections now while you
are completing the installation process, and connecting the rest of your audio equipment later.
Basic Input and Output Connections
Connect a single set of speakers and/or headphones, and a single input source (such as a microphone, electric guitar, or similar). This
will let you play back, listen, and record to confirm a successful installation.
For details about front and back panel connectors and more example diagrams, see
Download and Install Pro Tools and MBOX Control
Software
.
Minimal audio output and input connections

Installation and Setup
10
Download and Install Pro Tools and MBOX Control Software
Once you have registered MBOX Studio, you can download and install Pro Tools Studio software, including plug-ins, and sound librar-
ies from your Avid Master Account. PDF documentation for MBOX Studio and Pro Tools software is also available through your Avid
Master Account.
Download and Review PDF Documentation
Download and review PDF documentation for MBOX Studio and Pro Tools software from your Avid Master Account. Be sure to con-
sult any Read Me documentation for the latest known issues.
Download and Install Pro Tools and MBOX Control Software
To download Pro Tools and MBOX Control software:
1 From the computer where you will be installing Pro Tools Artist, log in to your Avid Master Account (if you are not already).
2 Under My Products, locate and click MBOX Studio in the Products list.
3 Click the View Software Download Links & Product Details link for your platform (macOS or Windows) to show download links for all
software installers and PDF documentation included with MBOX Studio.
4 Download the installers for each of the following:
• MBOX Control installer
• Pro Tools software installer
• Plug-in installer(s) such as Ignition Pack or other, as available.
• Demo Sessions, sound libraries and other content.
5 Locate and extract (uncompress) each of the downloaded installers.
6 Locate and launch the MBOX Control installer. Follow the on-screen instructions to complete the installation.
7 Locate and launch the Pro Tools installer. Follow the on-screen instructions to complete the installation, then restart your computer
when prompted.
8 After your computer restarts, install plug-ins and sound libraries download from your Avid Master Account (you can also do this us-
ing the Avid Link desktop application that is installed with Pro Tools).
9 Proceed to
Power On MBOX Studio.
Power On MBOX Studio
To power on MBOX Studio:
1 Press and hold the Power button on the back panel for at least half a second. The encoders and other elements illuminate.
2 Proceed to Launch and Configure MBOX Control Software.
If you are an existing customer who already owns an eligible Pro Tools product, you may choose between getting an additional
Pro Tools license or extending the duration of the term of your current product.

Installation and Setup
11
Launch and Configure MBOX Control Software
MBOX Control software lets you configure MBOX Studio hardware settings, signal routing, and many other parameters including the
on-board Avid FX and User Action Button assignments. Preference settings can be saved as MBOX Control User Presets and recalled
at any time to optimize MBOX Studio for different workflows, such as live audio tracking, re-amping, or effects processing.
To configure MBOX Control:
1 Make sure you have already installed MBOX Control software.
2 Launch MBOX Control by doing the following:
• Double-click the MBOX Control icon in Applications (Mac), or launch MBOX Control from the Start menu (Windows).
3 Be sure to update firmware if prompted to do so (for more information see
Firmware Update).
4 MBOX Control opens in its default view.
5 Click the Settings (gear) icon to open MBOX Control Preferences.
6 In the Clocking Options section, configure Clock Source and Sample Rate as desired.
• Leave Clock Source set to Internal, or choose the digital I/O ports you want to set as the clock leader.
• Choose a Sample Rate and any other settings as desired. For complete descriptions of all Preference settings, see Preferences.
7 Optional: Click the Presets button and save your settings as a custom Preset. For more information, see
Presets.
8 Leave MBOX Control running and proceed to Launch Pro Tools.
Launching MBOX Control
Update Firmware dialog
MBOX Control default view, and the Settings icon to access MBOX Control Preferences

Installation and Setup
12
Launch Pro Tools
To launch Pro Tools:
1 Double-click the Pro Tools icon in the Applications folder or in the Dock (Mac), or choose it from the Start menu (Windows).
2 If prompted to Activate your Pro Tools software license, follow the on-screen instructions.
iLok Authorization Using iLok License Manager
Once you have registered MBOX Studio and downloaded and installed software from your Avid Master Account, use iLok License
Manager to authorize iLok Cloud or your physical USB iLok (purchased separately) with your entitlements. When launching Pro Tools
for the first time, you are prompted to Activate your software license using your registered iLok account.
Firmware Update
Required firmware updates are included with MBOX Control software.
Configure Pro Tools for MBOX Studio
When you first launch Pro Tools you see the Dashboard, which lets you create and open Pro Tools Session files, open a Session Tem-
plate, access Getting Started resources, and more. Before creating or opening a session, do the following to configure Pro Tools for
MBOX Studio.
Playback Engine
The Playback Engine (Setup > Playback Engine) lets you adjust Pro Tools performance by changing system settings that affect its ca-
pacity for processing, playback, and recording. In most cases, the default settings for your system provide optimum performance.
For now, use the Playback Engine dialog to confirm communication with MBOX Studio as described below.
To configure Playback Engine:
1 If the Dashboard is open, click Cancel to close it (but do not quit out of Pro Tools).
2 Choose Setup > Playback Engine.
3 Make sure MBOX Studio is the current Playback Engine. If it is not, choose it from the Playback Engine selector.
You can return to the Playback Engine dialog at any time to adjust settings to accommodate large or processing-intensive Pro Tools ses-
sions, or to optimize performance for your computer.
I/O Setup
Like a virtual patchbay, I/O Setup controls let you route physical inputs and outputs on audio interfaces to Pro Tools input and output
channels, create internal mix busses, and more. In most cases, the default settings provide all the signal paths you will need. For now,
visit the I/O Setup dialog to confirm it is configured appropriately for MBOX Studio.
To configure I/O Setup:
1 Choose Setup > IO.
Pro Tools application icon
Press and hold the N key when launching Pro Tools to open the Playback Engine dialog. If MBOX Studio is not selected as the
Playback Engine, select it and click OK. Alternatively, you can select MBOX Studio in the Playback Engine after you have
launched Pro Tools (Setup > Playback Engine). For more information, see
Playback Engine.

Installation and Setup
13
2 Click to view the Input, Output, and Bus tabs to make sure you see MBOX Studio at the top, with signal paths appropriate for your
audio interface in the grid, below.
3 If the I/O Setup does not show MBOX Studio, make sure you have selected it as the
Playback Engine and try again.
4 If any tabs list de-activated signal paths, reset them by doing the following:
• Click to select a tab (such as Inputs).
• Click to select any path Name then press Command+A (Mac)/Control+A (Windows) to select all paths in that tab.
•Click Delete.
•Click Default.
• Repeat for the Outputs and Busses tabs.
Default Input paths are created for each hardware and software input.
5 Click OK to close the I/O Setup dialog.
6 Your MBOX Studio is ready to use with Pro Tools.
How to Proceed
To start learning about MBOX Studio and how to use it, refer to the following sections of this guide:
• MBOX Studio Hardware Overview
• MBOX Control Software Overview
• Using MBOX Studio
I/O Setup Input tab (at left) and Output tab (at right)
Input Output
Installation and Setup
14
Starting Up and Shutting Down Your System
Day-to-Day Power Up and Down
To ensure that the components of your Pro Tools system communicate properly with each other, it is advised that you power them on
in the following order.
Start up your Pro Tools system in this order:
1 Make sure all your equipment (including your computer) is off.
2 Mute your MBOX Studio monitor speakers and lower the volume of all output devices in your system.
3 Turn on any external hard drives.
4 Turn on any control surfaces (such as Avid S1).
5 Turn on any MIDI interfaces, MIDI devices, or synchronization peripherals.
6 Power on MBOX Studio. Wait at least fifteen seconds for it to initialize.
7 Turn on your computer.
8 Launch Pro Tools or any third-party audio or MIDI applications.
9 Unmute your MBOX Studio monitor speakers.
Shut down your Pro Tools system in this order:
1 Mute your MBOX Studio monitor speakers and turn off or lower the volume of all output
devices in your system.
2 Quit Pro Tools and any other running applications. To quit Pro Tools, choose
Pro Tools > Quit (Mac) or File > Exit (Windows).
3 Shut down your computer.
4 Turn off MBOX Studio (press and hold the power button for 2 seconds).
5 Turn off any MIDI interfaces, MIDI devices, or synchronization peripherals.
6 Turn off any control surfaces (such as Avid S1).
7 Turn off any external hard drives.
Powering on MBOX Studio

Part II: Hardware and Software
Overview

MBOX Studio Hardware Overview 17
MBOX Studio Hardware Overview
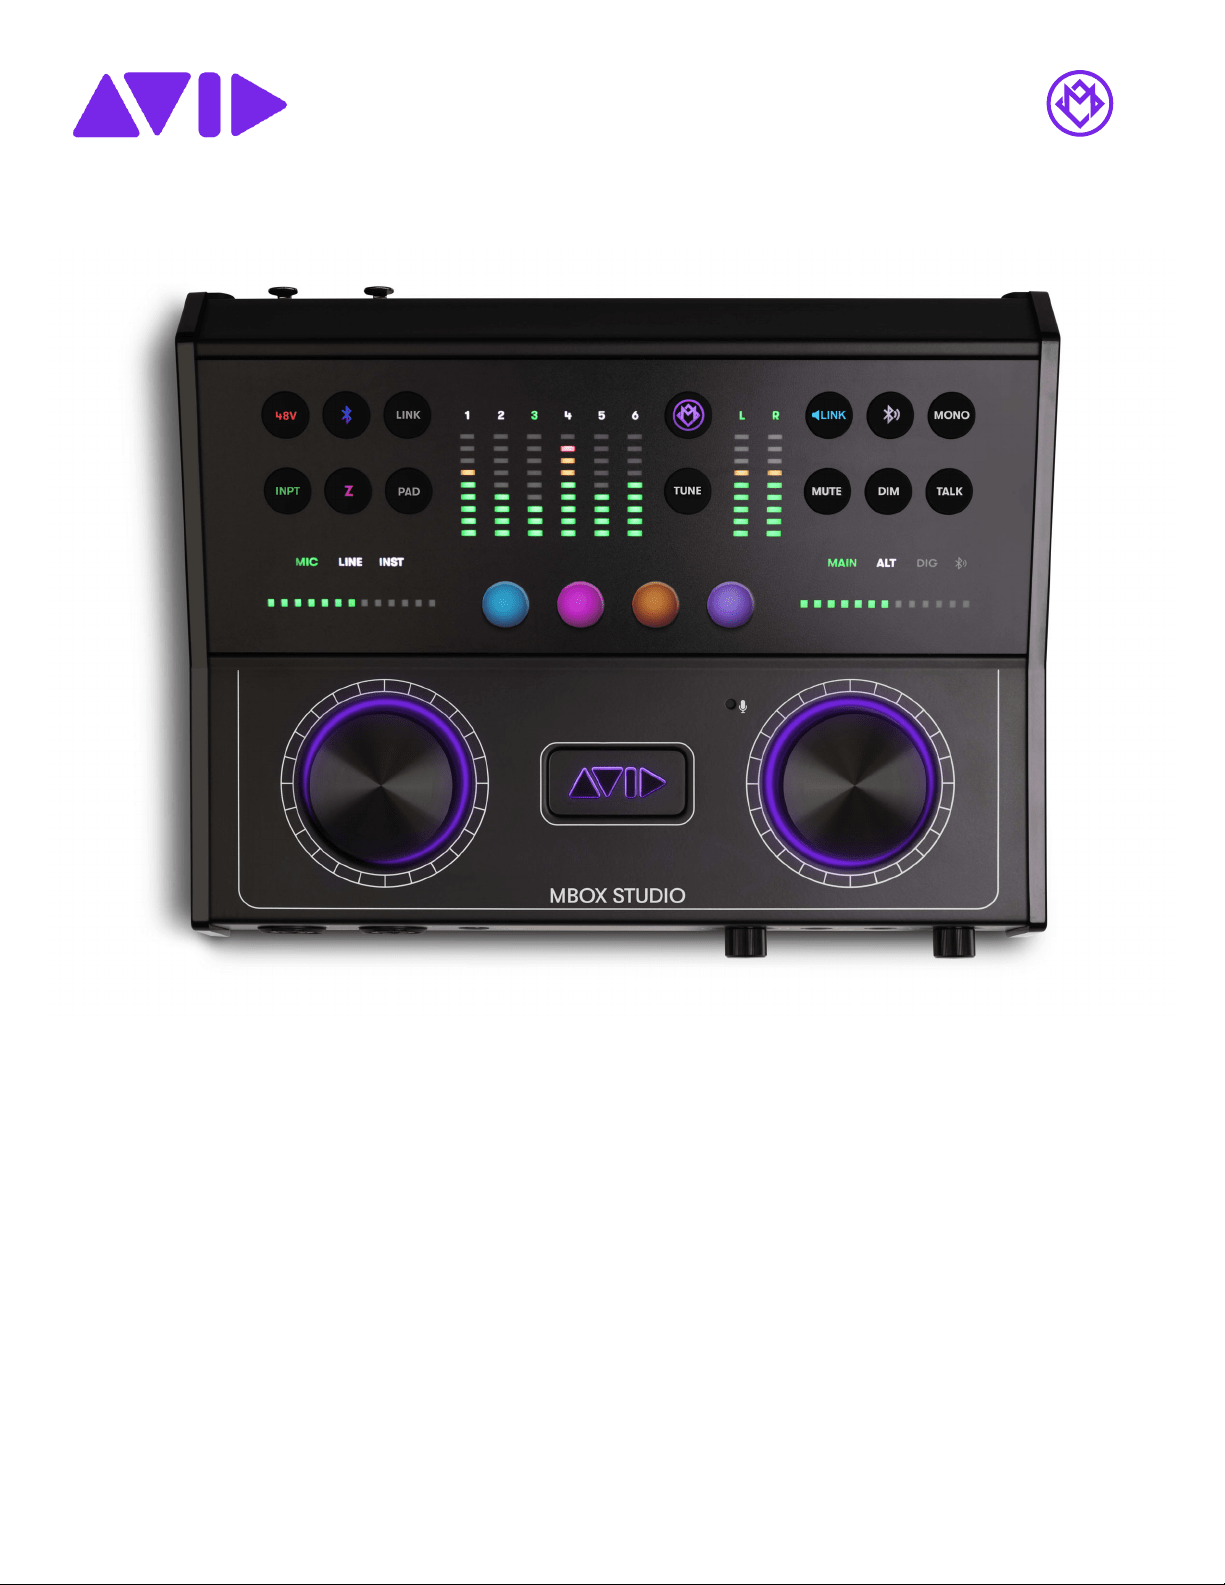
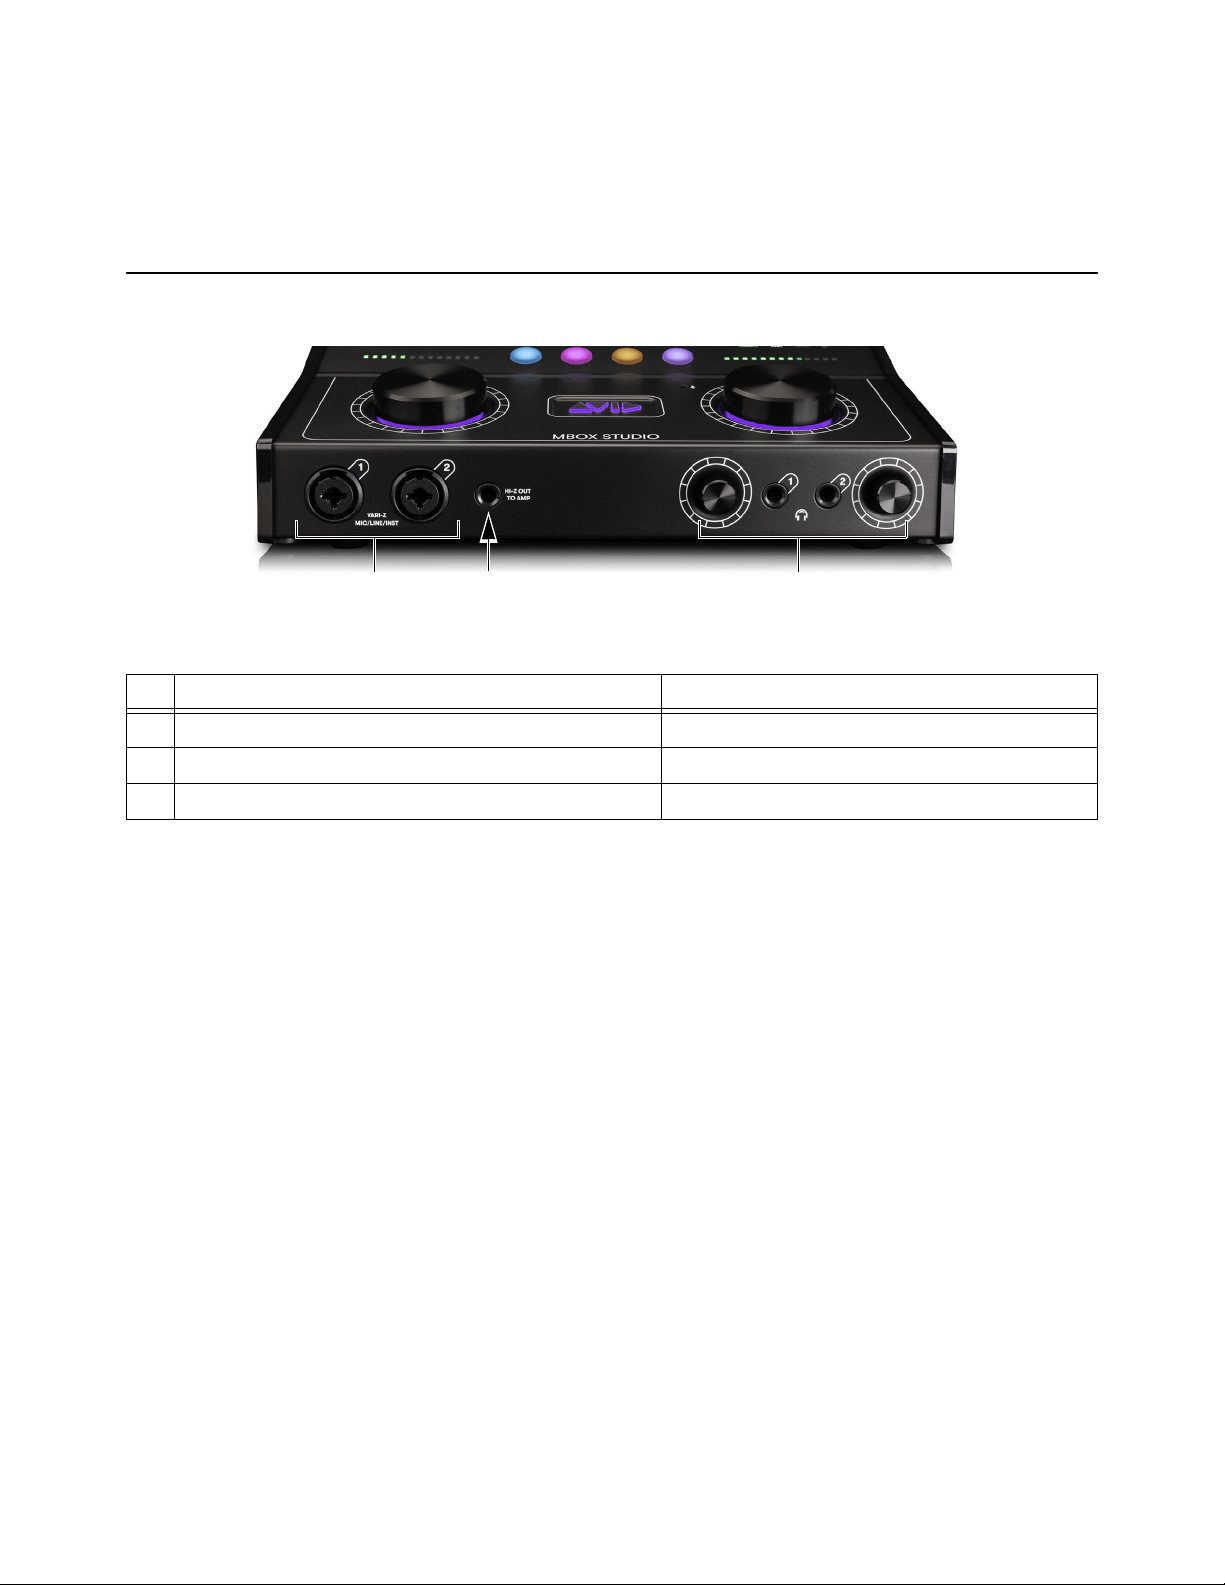
MBOX Studio Front Panel
MBOX Studio front panel
MBOX Studio Front Panel
#Item Notes
1 Inputs 1–2 combo XLR/TRS Accepts XLR, 1/4-inch TRS, and 1/4-inch TS
2 Hi-Z Out to Amp Mirrors FX Send 2
3 Headphones 1 and 2 outputs (TRS) and level controls Digital level controls
1 23
MBOX Studio Hardware Overview
18
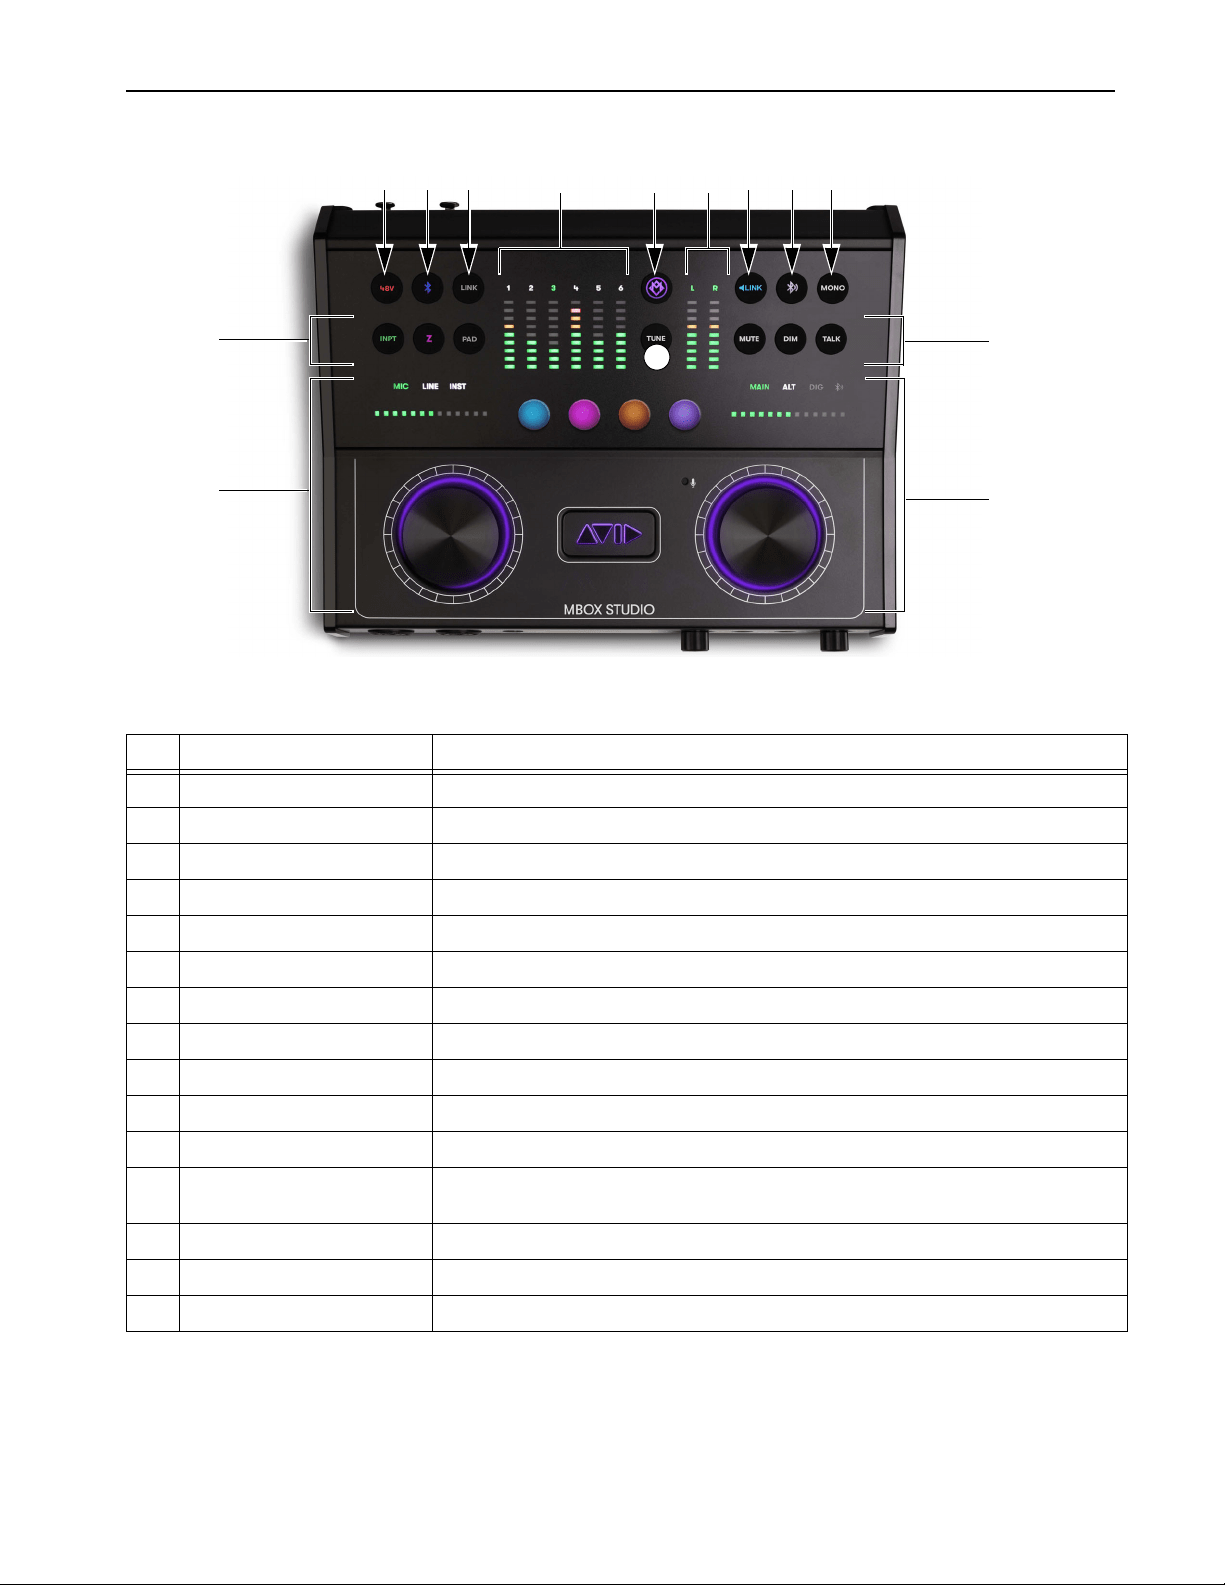
MBOX Studio Top Panel
MBOX Studio top panel
MBOX Studio Top Panel
# Item Description
4 +48V Phantom Power
5 Bluetooth Input switch (see
Bluetooth Input)
6 Stereo LINK
7 Input meters
8 MBOX Open MBOX Control
9 Output meters
10 Monitor
LINK switch
11 Bluetooth Output switch (see
Bluetooth Output)
12 MONO switch Fold the currently selected monitor outputs to mono
13 INPT, Z, and PAD switches Input selector switch (mic/line/inst), input impedance switch, and –10 dB pad switch
14 TUNE switches
15 MUTE, DIM, and TALK
switches
Mute or dim outputs, enable talkback
16 Left Encoder section Push/turn encoders, and input gain indicator LEDs
17 Right Encoder section Push/turn encoders and monitor level indicator LEDs
18 User Action switches 1–4 Customizable buttons (see
User Action Buttons 1–4 Assignment)
4 5 6
7 8 9 10 11 12
13
15
14
16
17

MBOX Studio Hardware Overview
19
MBOX Studio Back Panel
MBOX Studio back panel
MBOX Studio Back Panel
#Item
19 Power switch
20 USB
21 MIDI IN / OUT
22 MONITOR OUTS (ALT and MAIN)
23
FX LOOPS
24 LINE IN Inputs 5-6
25 MIC/LINE IN 3-4 combo inputs
26 Power input
27
OPTICAL IN / OUT
28 Coax S/PDIF IN / OUT
29 EXP/SW footswitch inputs
30 Kensington Lock
19
26
20 21 22 23 24 25
27 28 29 30
MBOX Studio Hardware Overview
20
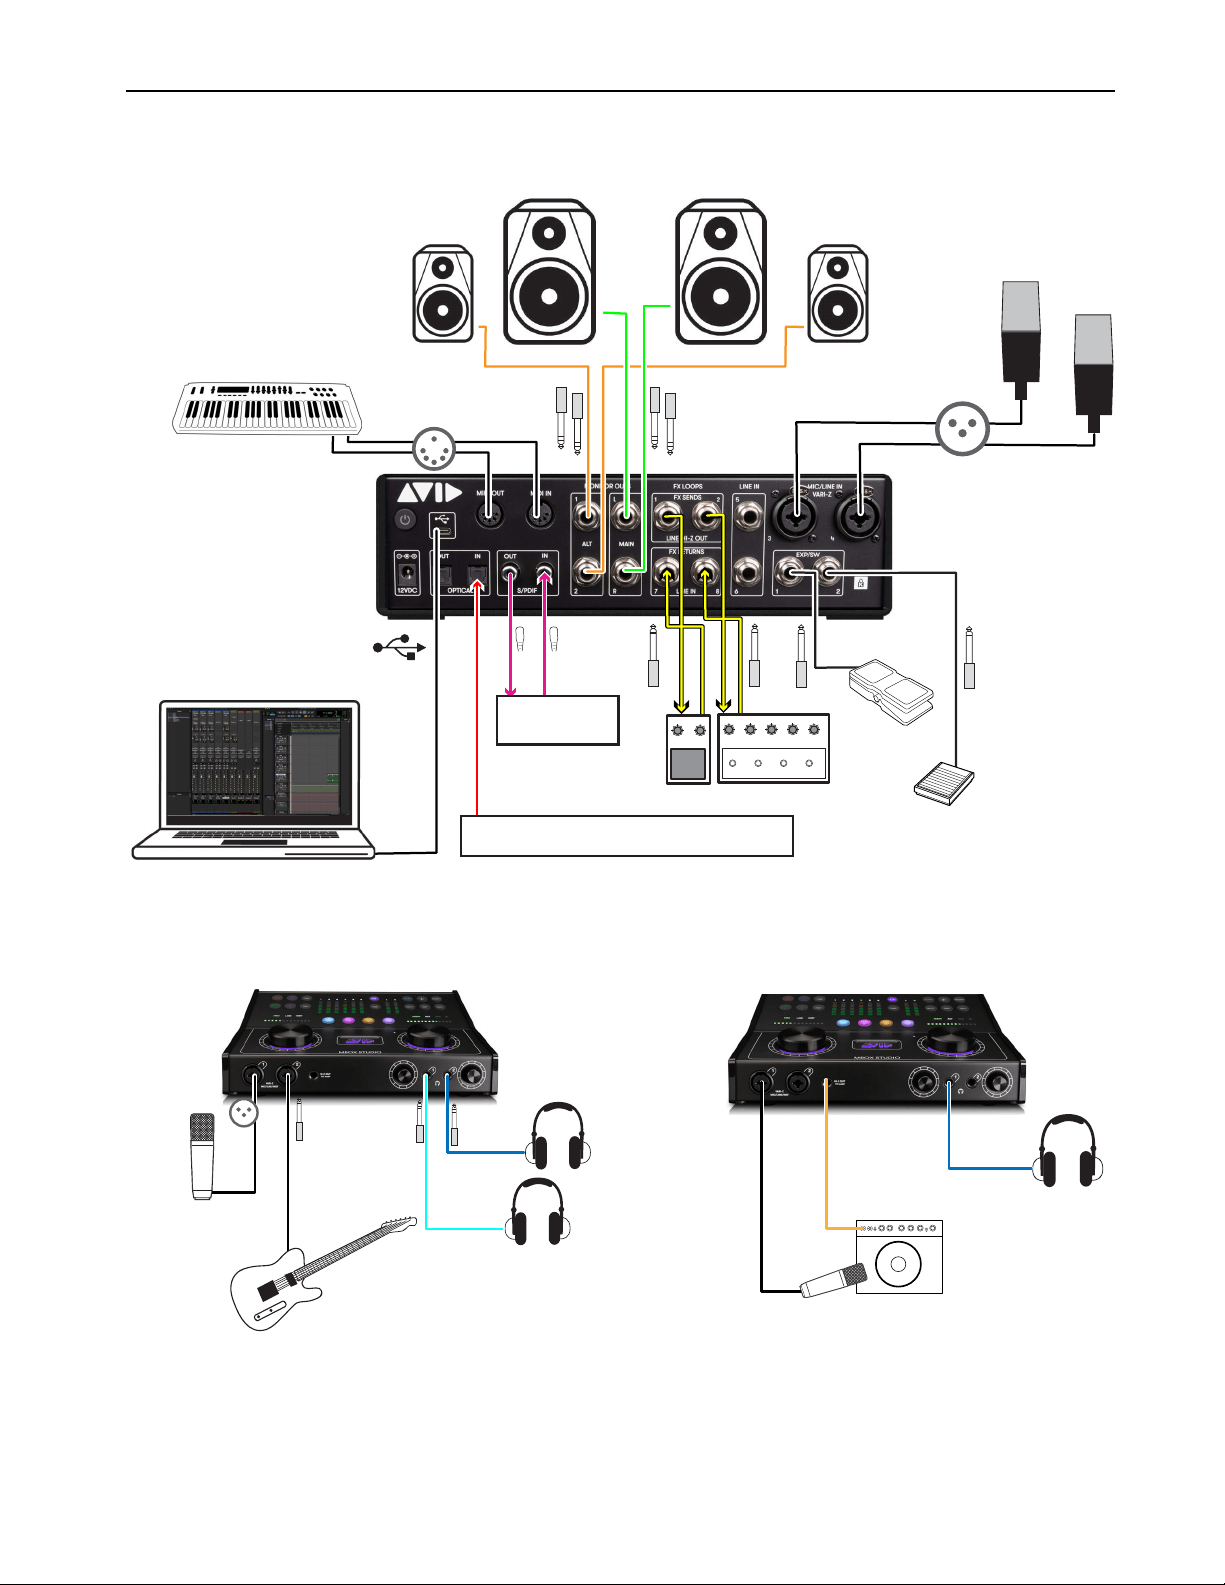
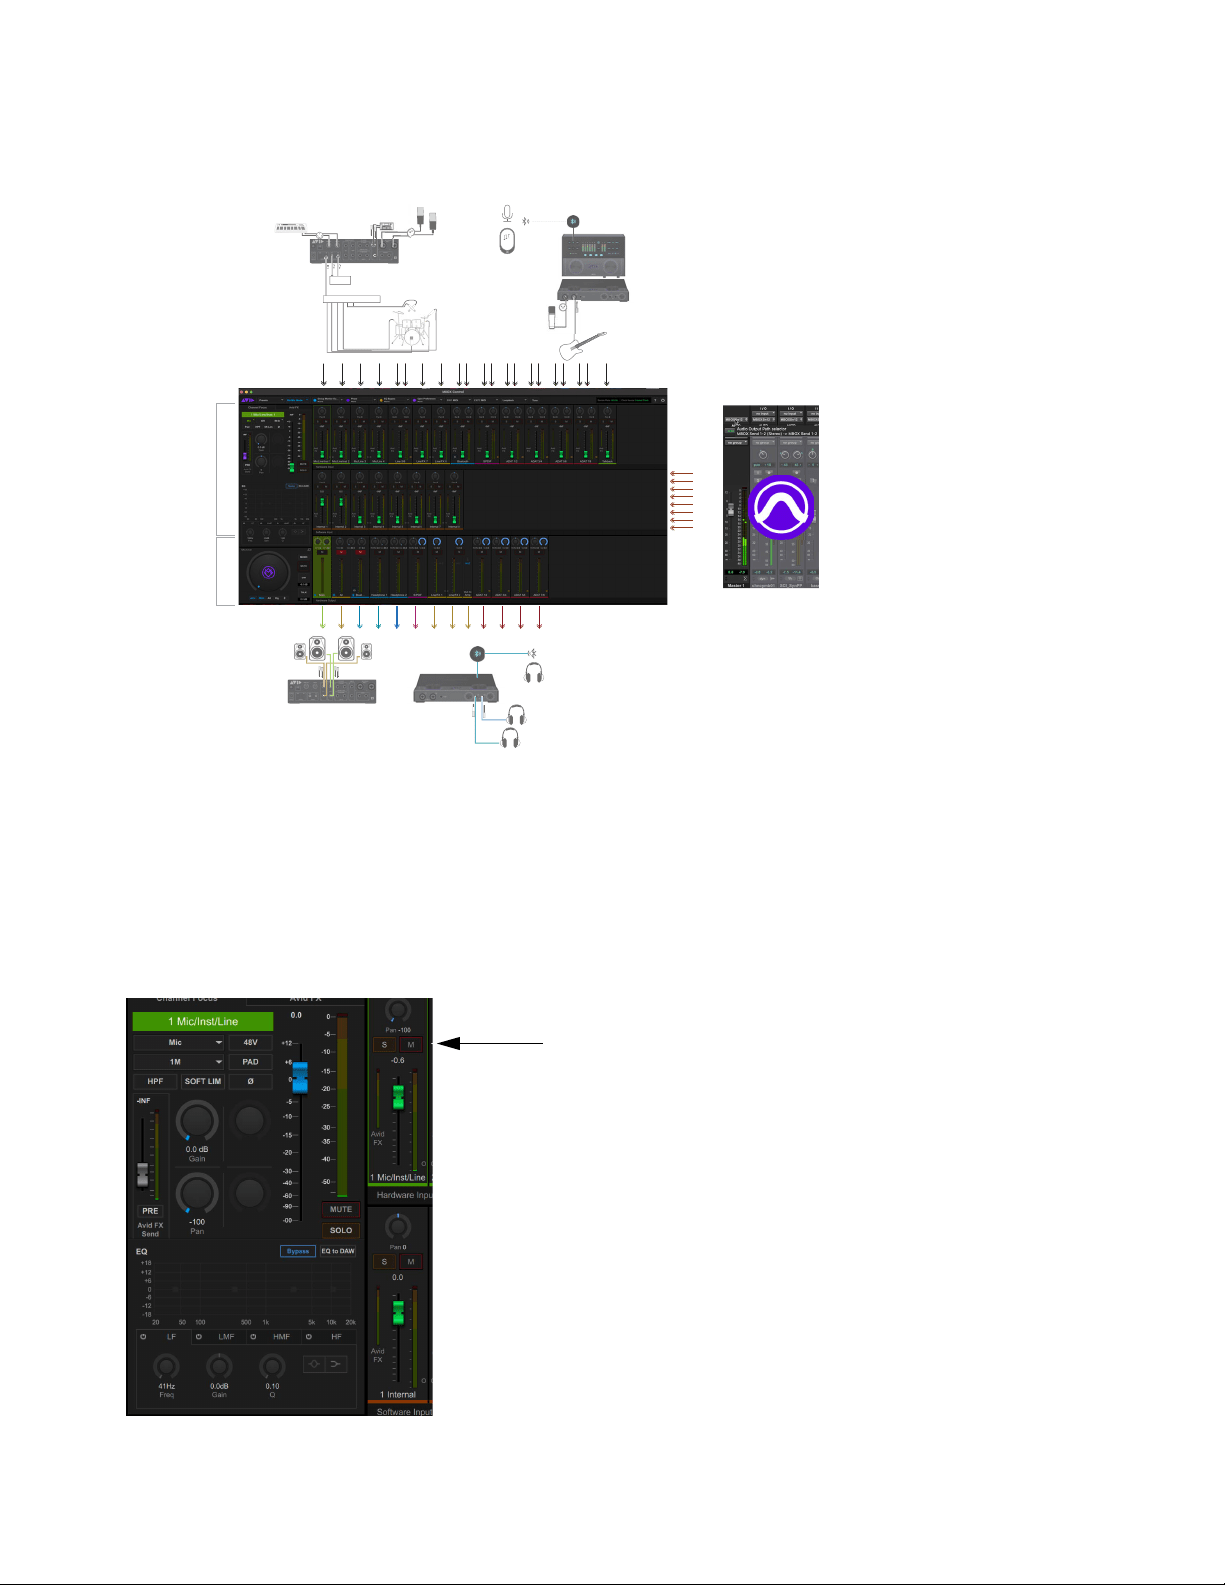
Example Audio Connections
Connect equipment to MBOX Studio as suggested in the following diagrams.
Example Front Panel Audio Connections
That’s a lot of gear!
8-channel ADAT Mic Pre
Optical
S/PDIF
Multi-FX, digital
monitors, or other
ABCD
Vocal and guitar
Guitar Re-amplification
Vocal and guitar
MBOX Control Software Overview 21
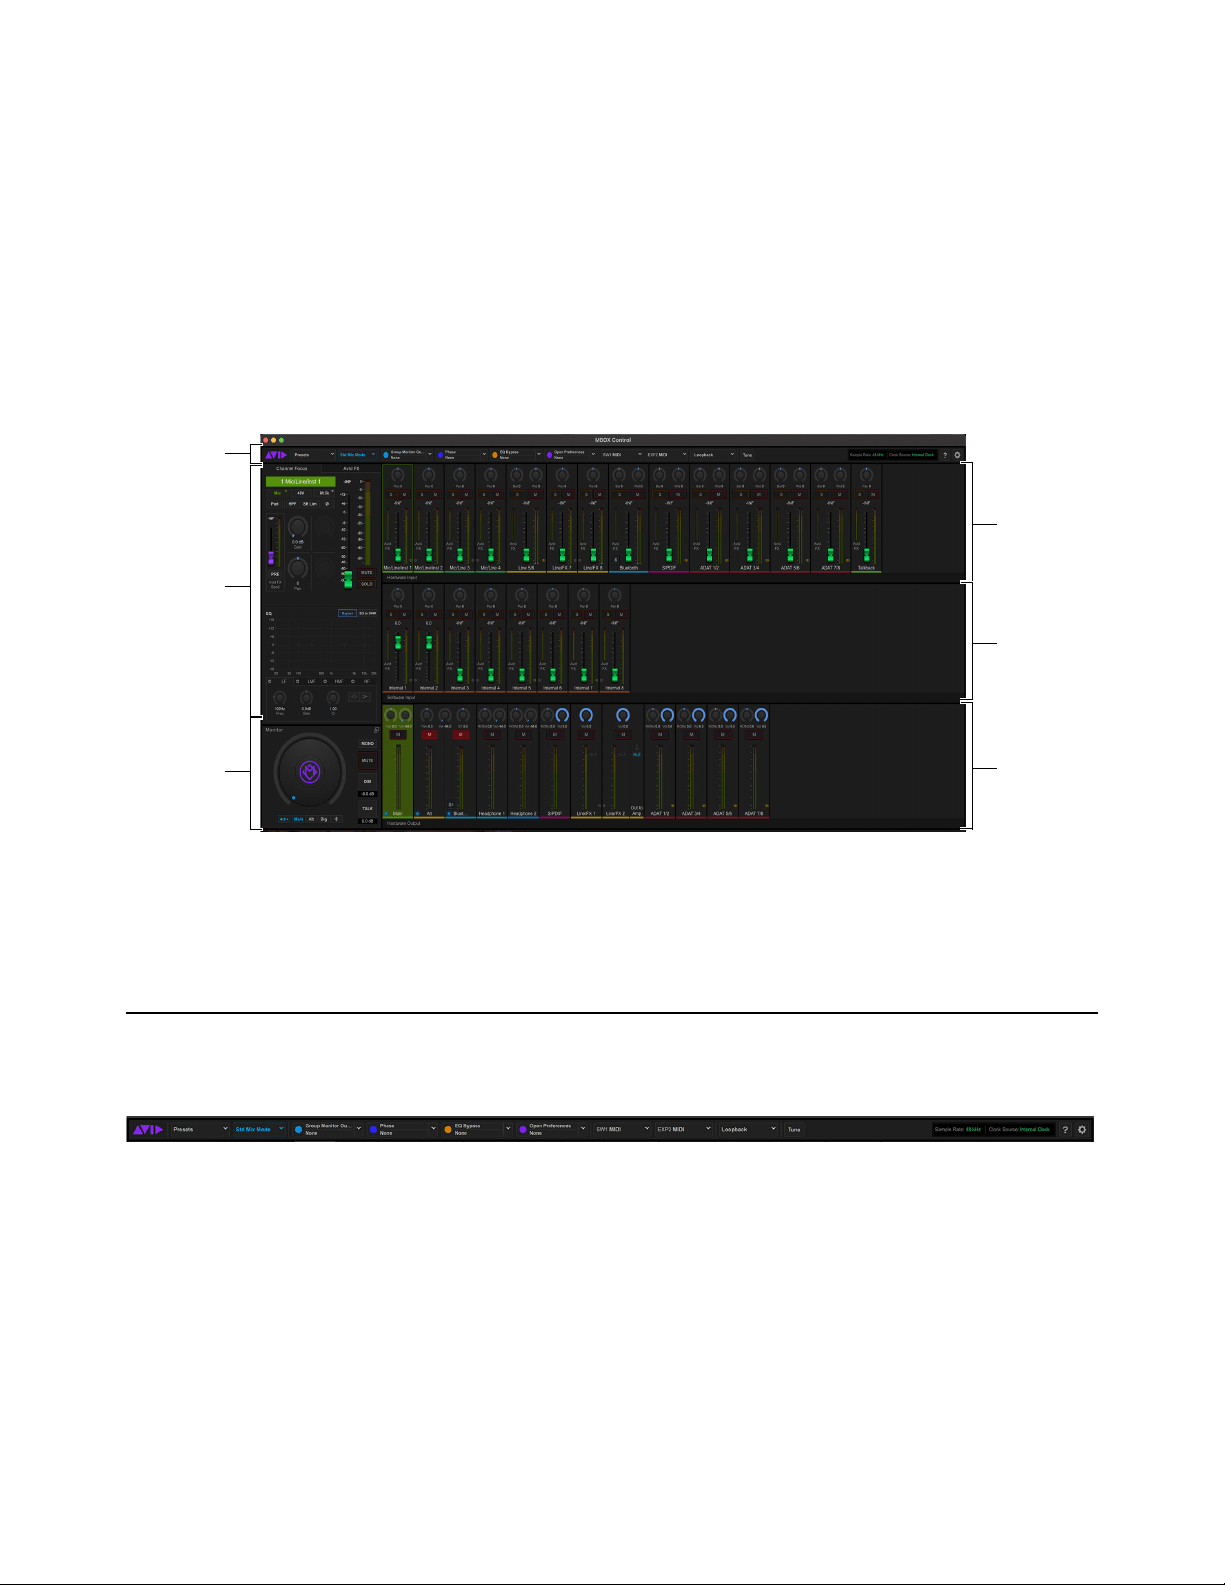
MBOX Control Software Overview
MBOX Control software lets you configure settings for your audio interface for use with Pro Tools, for other audio applications
that support the Core Audio (Mac) or ASIO (Windows) standard, and even for MBOX Studio as a standalone monitor controller.
MBOX Control provides a Toolbar across the top, the Channel Focus and Monitor sections along the left side, and Hardware In-
put, Software Input, and Hardware Output sections in the main part of the window. Channels can be renamed by clicking their dis-
played name.
Many features of MBOX Studio can be accessed directly from the MBOX Studio front and top panels, such as input gain, the tuner,
and monitoring volume. Many more parameters and features are available from the MBOX Control application, including its
on-board Avid FX (delay and reverb), EQ, User Action Button 1–4 assignments, footswitch settings, and more. All settings can be
saved as a User Layout Preset.
Toolbar
The Toolbar provides the following settings and indicators:
•
Presets
• Mix Options
• User Action Buttons 1–4 Assignment
• Footswitch / Expression Pedal 1 and 2
• Loopback
• Tune
• Sample Rate and Clock Source Display
• Help
• Settings
MBOX Control
Toolbar
Toolbar
Monitor
Channel
Focus
Hardware
Input
Software
Input
Hardware
Output
MBOX Control Software Overview
22
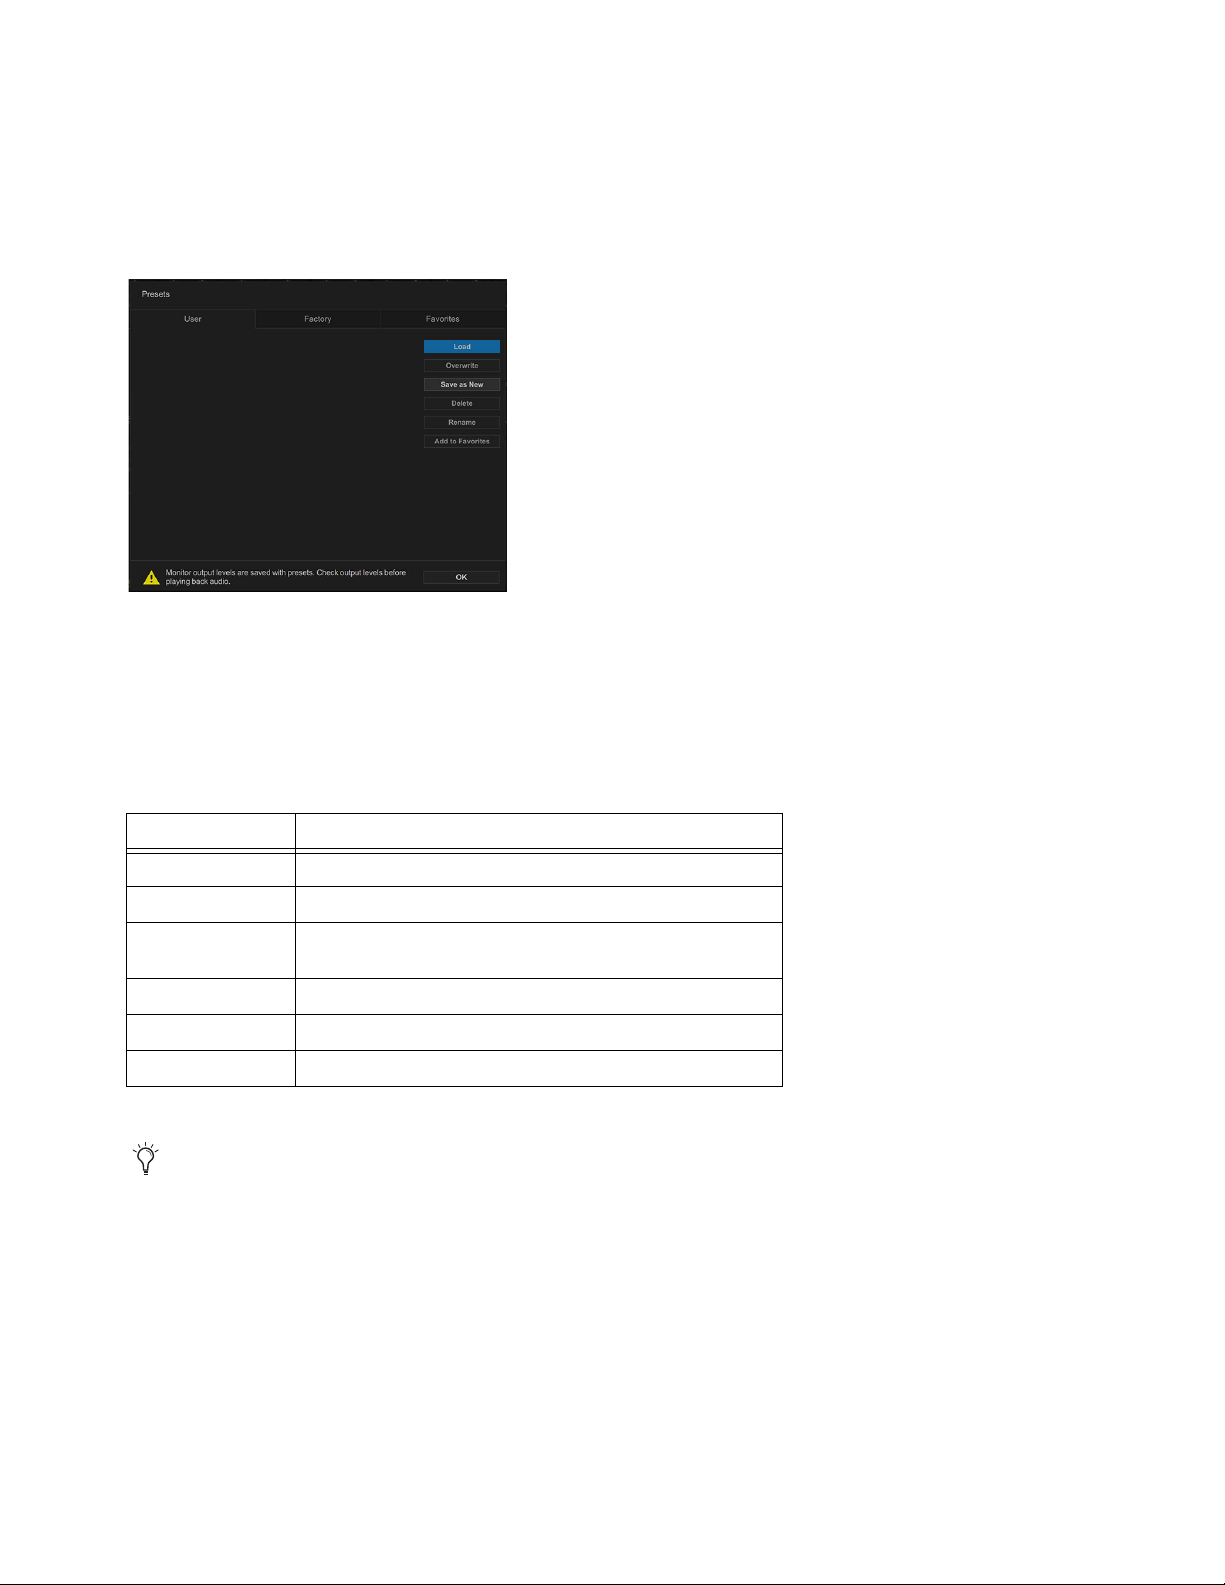
Presets
Opens the Presets window to manage MBOX Control Presets. Presets store all settings including signal routing, levels, pan, User Action
1–4 assignments, and all other controls. Presets include custom (User), Factory, and Favorites.
To use MBOX Control Presets:
1 Click the Presets button in the Toolbar.
2 Click to show User, Factory, or Favorites.
3 Do the following:
• To store the current MBOX Control state as a Preset, click Save as New, enter a name for the new Preset, and click OK.
• To load, overwrite, delete, rename, or add a Preset as a Favorite, click to select an available Preset and choose any of the following
commands:
4 When done, click OK.
Preset files are stored in Documents > MBOX Studio Presets.
Presets
Commands for MBOX Control Presets
Command Action
Load Loads the currently selected Preset (replaces all current settings).
Overwrite Replaces the saved Preset on disc with the current settings.
Save as New
Saves a new Preset based on the current settings, without affecting
the current settings.
Delete Deletes the currently selected Preset file.
Rename Lets you rename the current Preset.
Add to Favorites Adds the current Preset to Favorites.
When you add a Preset to Favorites, the preset becomes available for assignment to a User Action button 1–4. This lets you save dif-
ferent MBOX setups for different workflows and recall them with a single button or footswitch press (or a press and hold). For more
information, see
Customizing the User Action Buttons 1–4.

MBOX Control Software Overview
23
Mix Options
MBOX Studio can operate in either of two Mix Modes, Standard or Advanced, and both provide other options for output grouping and
mirroring. By default (and whenever Advanced Mix Mode is not enabled) MBOX Studio operates in
Standard Mix Mode.
To access Mix Modes and options:
Click the Mix Mode button.
The Mix Mode dialog opens. Available settings include:
•
Advanced Mix Mode
• Group All Monitor Mixes
• Mirror Main to S/PDIF
Standard Mix Mode
In Standard Mix mode, faders in the Hardware Input and Software Input strips control channel levels being sent to outputs and can be set
uniquely for each Hardware Output mix. Gain and other input parameters can be adjusted in Channel Focus.
One output channel (mono or stereo) is always selected, and only one output can be selected at a time. The only exceptions are ALT and
Bluetooth: Bluetooth output always mirrors ALT. Selecting either
Bluetooth or ALT selects both. ALT and Bluetooth still have inde-
pendent monitoring level, Mono, Mute, and Dim control. S/PDIF output can mirror MAIN (see
Mirror Main to S/PDIF), and you can
Group All Monitor Mixes.
For a signal flow diagram, see
Help.
Advanced Mix Mode
When Advanced Mix mode is enabled, you can access the “top of channel” input level by first deselecting all outputs and then adjusting
channel faders in the
Hardware and Software Input sections. Adjusting “top of channel” input faders affects all output mixes globally.
(For a signal diagram, see
Help.)
To use Advanced Mix mode:
1 Click Std Mix Mode in the Toolbar.
2 In the Mix Mode dialog select Advanced Mix Mode then click OK. The Toolbar button lights amber and displays Adv Mix Mode.
3 In the Hardware Output section, click the currently highlighted Output mix to deselect it (so no Output mixes are highlighted). Input
faders are set to unity (0 dB) and pans are centered.
4 Adjust controls in the Hardware Input and Software Input sections to affect that channel’s input controls in all outputs.
5 To adjust channel send level to outputs (as in Standard Mix Mode) select the desired Output.
Mix Mode (Standard Mix Mode shown)
Advanced Mix Mode after deselecting all Hardware Output mixes

MBOX Control Software Overview
24
Group All Monitor Mixes
When enabled, Alt, Headphone 1, Headphone 2, and Bluetooth outputs mirror Main. Group All Monitor Mixes can be enabled in either
Standard or Advanced Mix Mode.
• All Monitor outputs share the same Input to Output Mix. Individual mix layer controls are linked together so that, for example,
when you move the
Internal 1/2 fader in the single mix monitor group, that fader moves for all of those grouped/linked output mix-
ers).
• Main Mix Layer (which is only accessible in Advanced Mix Mode) is locked out for the user and input faders are set at unity and
pans centered.
• S/PDIF is included in the Monitor output single mix group if the
Mirror Main to S/PDIF preference is enabled.
• FX 1, FX 2/Hi-Z Output and ADAT 1–8 are not part of the single Mix monitor group and are mixed the same way as in Standard
Mix Mode.
Mirror Main to S/PDIF
When Mirror Main to S/PDIF is enabled, the mix routed to the MAIN output is also sent (mirrored) to the S/PDIF output. This provides
a convenient way to use the S/PDIF output as another monitor output option. Cycling through monitor outputs will cycle from Main, to
Alt to Dig (S/PDIF). When S/PDIF is selected, MUTE, DIM, and other monitor controls apply to the Dig (S/PDIF) output the same as
they do for MAIN and ALT.
User Action Buttons 1–4 Assignment
Each of the four User Action buttons can be assigned to perform two separate functions, one for when the corresponding User Action
button is pressed and a second function for when that button is pressed and held. The current User assignments are shown in the Toolbar.
Actions
The following tables list the available Internal Actions.
Internal Actions
For more information, see
Customizing the User Action Buttons 1–4.
Available Internal Actions
Internal Actions Notes
MAIN Monitor Mute Toggle between Muted and Unmuted states
ALT Monitor Mute Toggle between Muted and Unmuted states
Bluetooth Monitor Mute Toggle between Muted and Unmuted states
Standard/Advanced Mix Mode Toggle On/Off
Group Monitor Outputs Toggle “Group All Monitor Mixes” option on/off
Phase (of selected channel)
High Pass Filter (of selected channel)
Soft Limit (of selected channel)
EQ Bypass (of selected channel)
EQ to DAW (of selected channel)
Solo (of selected channel)
Mute (of selected channel)
User Presets Opens the User Presets dialog
Preferences
HI-Z OUT TO AMP Ground Lift Toggle ground lift on HI-Z OUT TO AMP
MBOX Control Software Overview
25
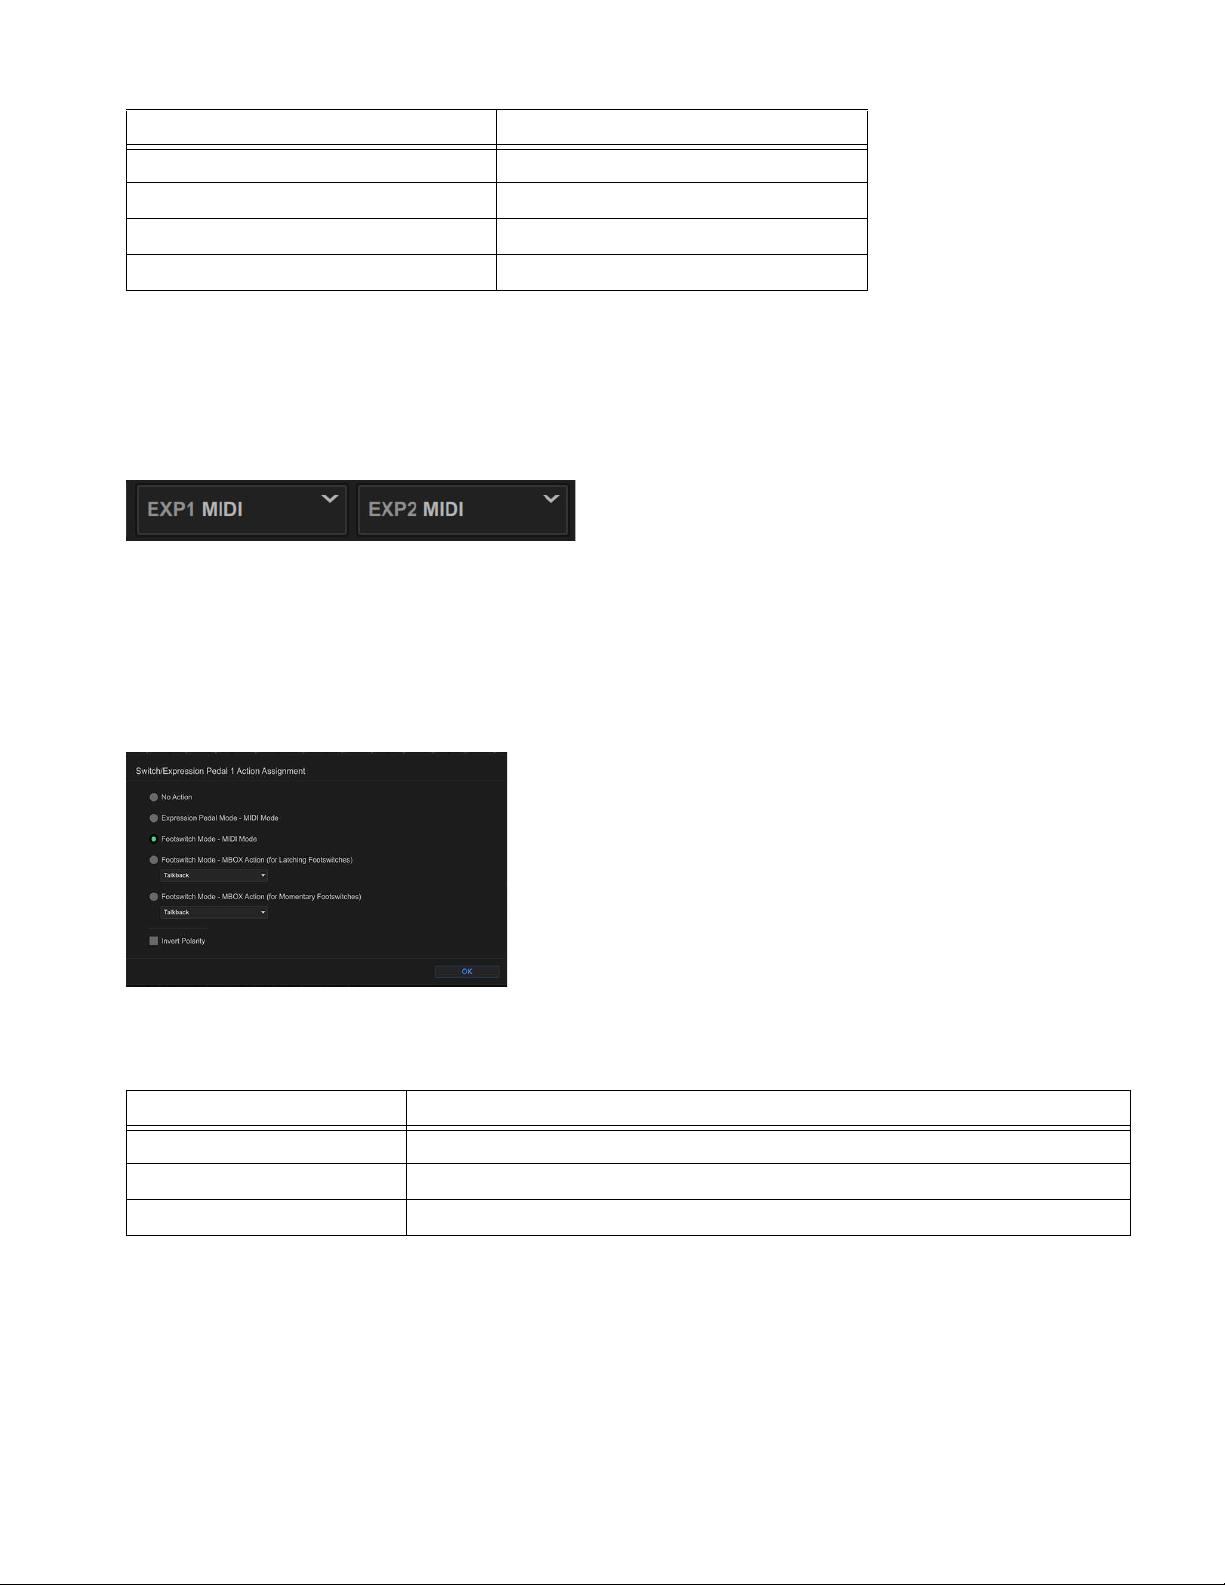
Footswitch / Expression Pedal 1 and 2
The footswitch buttons in the MBOX Control toolbar let you assign functions to the footswitch/Expression pedal inputs 1 and 2. The
buttons show the currently assigned function. Clicking either button opens the Function Assignment dialog where you can choose from
a variety of functions including MBOX Monitor mute and dim, FX Loop bypass, Continuous Controller mapping to plug-in parameters
for filter sweeps, “wah” effects, and similar (the plug-in must support MIDI Learn).
To assign footswitch functions:
1 Connect footswitches to either or both the EXP/SW IN 1 and EXP/SW IN 2 inputs on the back panel. You can use momentary and/or
continuous (expression) pedals.
2 In MBOX Control, click the SW/EXP 1 or 2 button. (The button text indicates the current assignment, such as “EXP1 MIDI, indi-
cating that EXP/SW In 1 is assigned to Continuous Control/Expression MIDI mode. Button names may differ on your system.)
3 Choose the desired footswitch function.
AVID FX Mute
FX 1 Bypass (FX 1 and FX 2 when stereo linked)
FX 2 Bypass (FX 1 and FX 2 when stereo linked)
Input Selection Follows Hardware Toggle On/Of
Footswitch buttons
Switch/Expression Pedal 1 Function Assignment
MBOX Footswitch settings
Footswitch Setting Description
No Action Footswitch has no effect
Expression Pedal Mode - MIDI Mode Connect an expression pedal to be able to assign it to parameters using MIDI Learn in Pro Tools.
Footswitch Mode - MIDI Mode Connect a momentary footswitch to be able to assign parameters using MIDI Learn in Pro Tools.
Available Internal Actions
Internal Actions Notes

MBOX Control Software Overview
26
Loopback
Enabling Loopback routes audio from Software Inputs Internal 7–8 directly to inputs ADAT 7–8 (at 48 kHz) for routing digitally to a
DAW. This lets you route and re-record computer audio from an application other than Pro Tools. Note that at 88.2 and 96 kHz, audio
is routed to
ADAT 3–4. Loopback is not available at 176.4/192 kHz.
Tune
Opens the built-in Tuner, and the MBOX top panel enters Tuner mode.
Reference
Choose a tuning reference from the Reference selector. Choices include 438, 439, 440, 441, and 442 Hz.
Mute
Mutes the output of the tuner.
Input
Indicates the current Tuner input.
Sample Rate and Clock Source Display
Shows the current MBOX Sample Rate and Clock Source. You can change these in MBOX Control settings (gear icon). For more in-
formation, see
Preferences.
Footswitch Mode - MBOX Action MBOX-specific functions:
Talkback
Monitor Mute
Monitor Dim
Main Alt Switch
Bluetooth
Tuner
FX1 Bypass
FX2 Bypass
For more information, see
Using Loopback.
Tuner window (shown at left) and tuning using the top panel (shown at right).
For instructions, see
Using the Tuner.
MBOX Footswitch settings
Footswitch Setting Description
TUNE
123456
MBOX STUDIO
TUNE
48V LINK
INPT
ZPAD
LINK MONO
MUTE
DIM TALK
MIC LINE INST
INST
MAIN
DIG
ALT
MBOX Control Software Overview
27
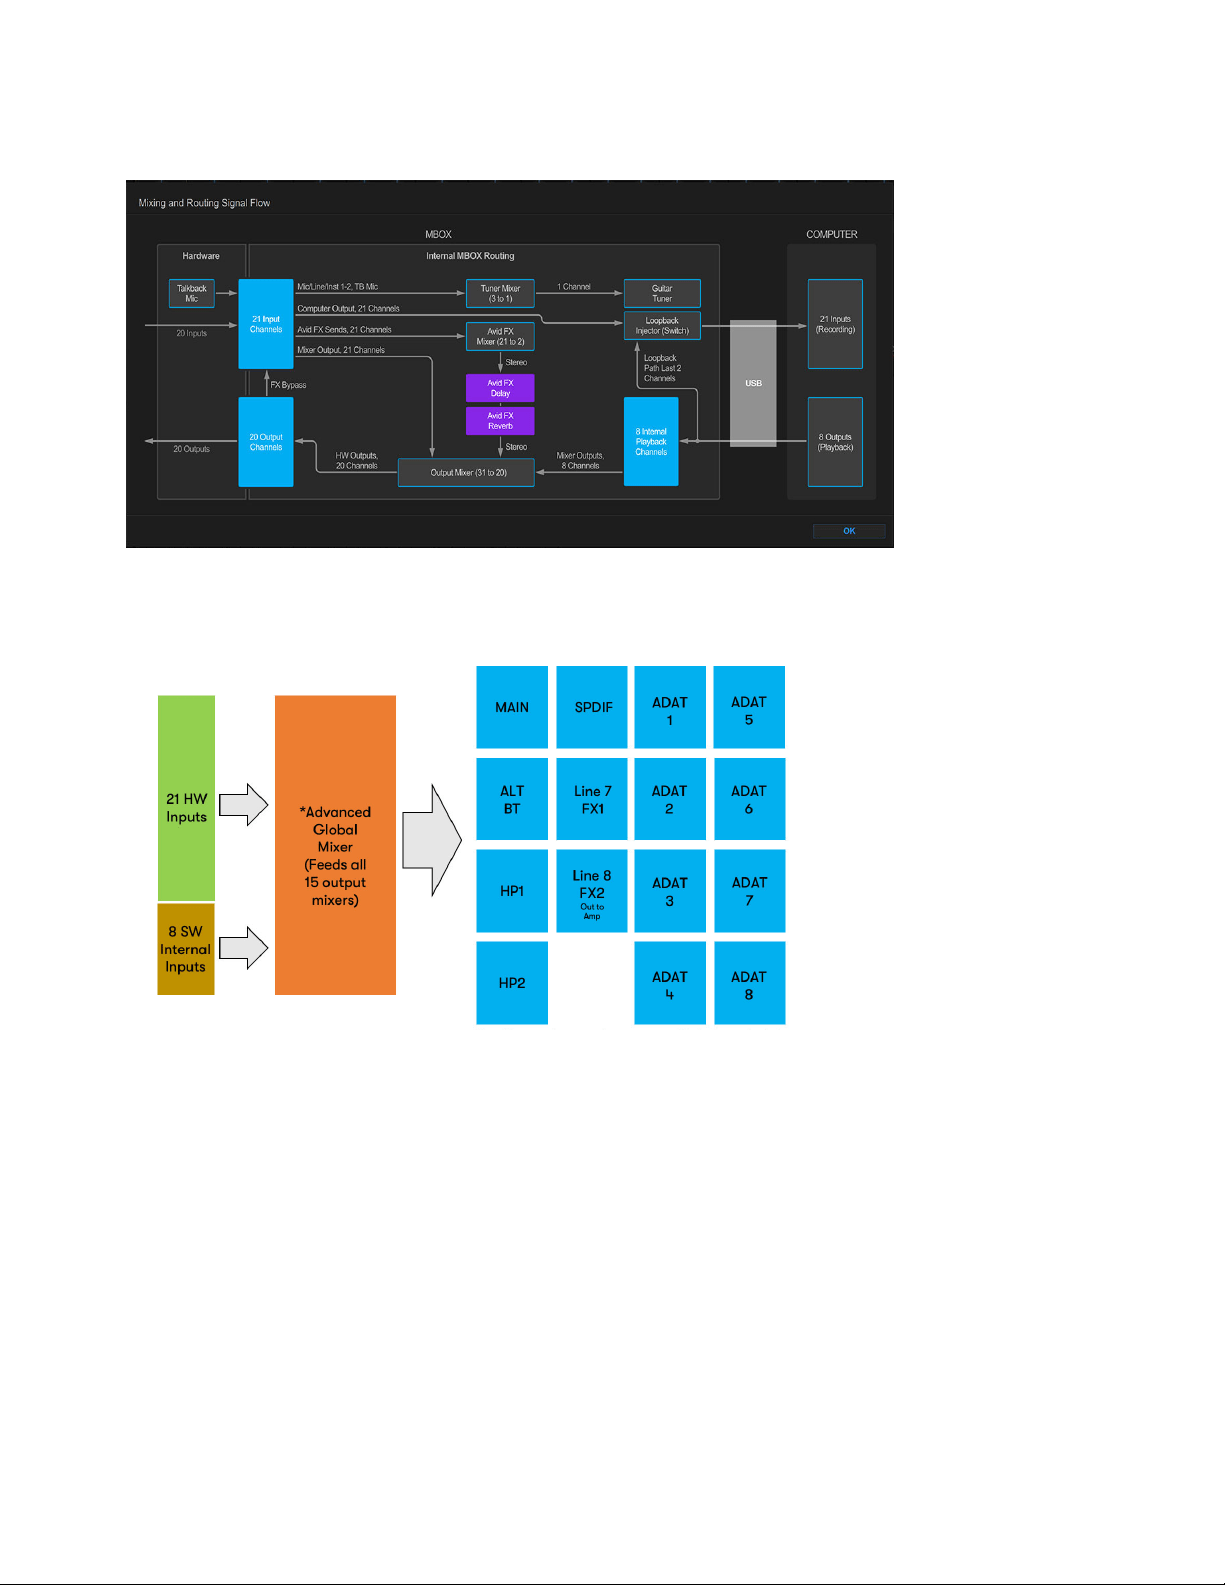
Help
Shows the Mixing and Routing Signal Flow.
The following diagram illustrates signal flow in Advanced Mix Mode.
Settings
Preferences let you optimize MBOX Studio hardware and MBOX Control settings. For more information, see Preferences.
Signal Flow
MBOX Control Advanced Mix Mode
MBOX Control Software Overview
28
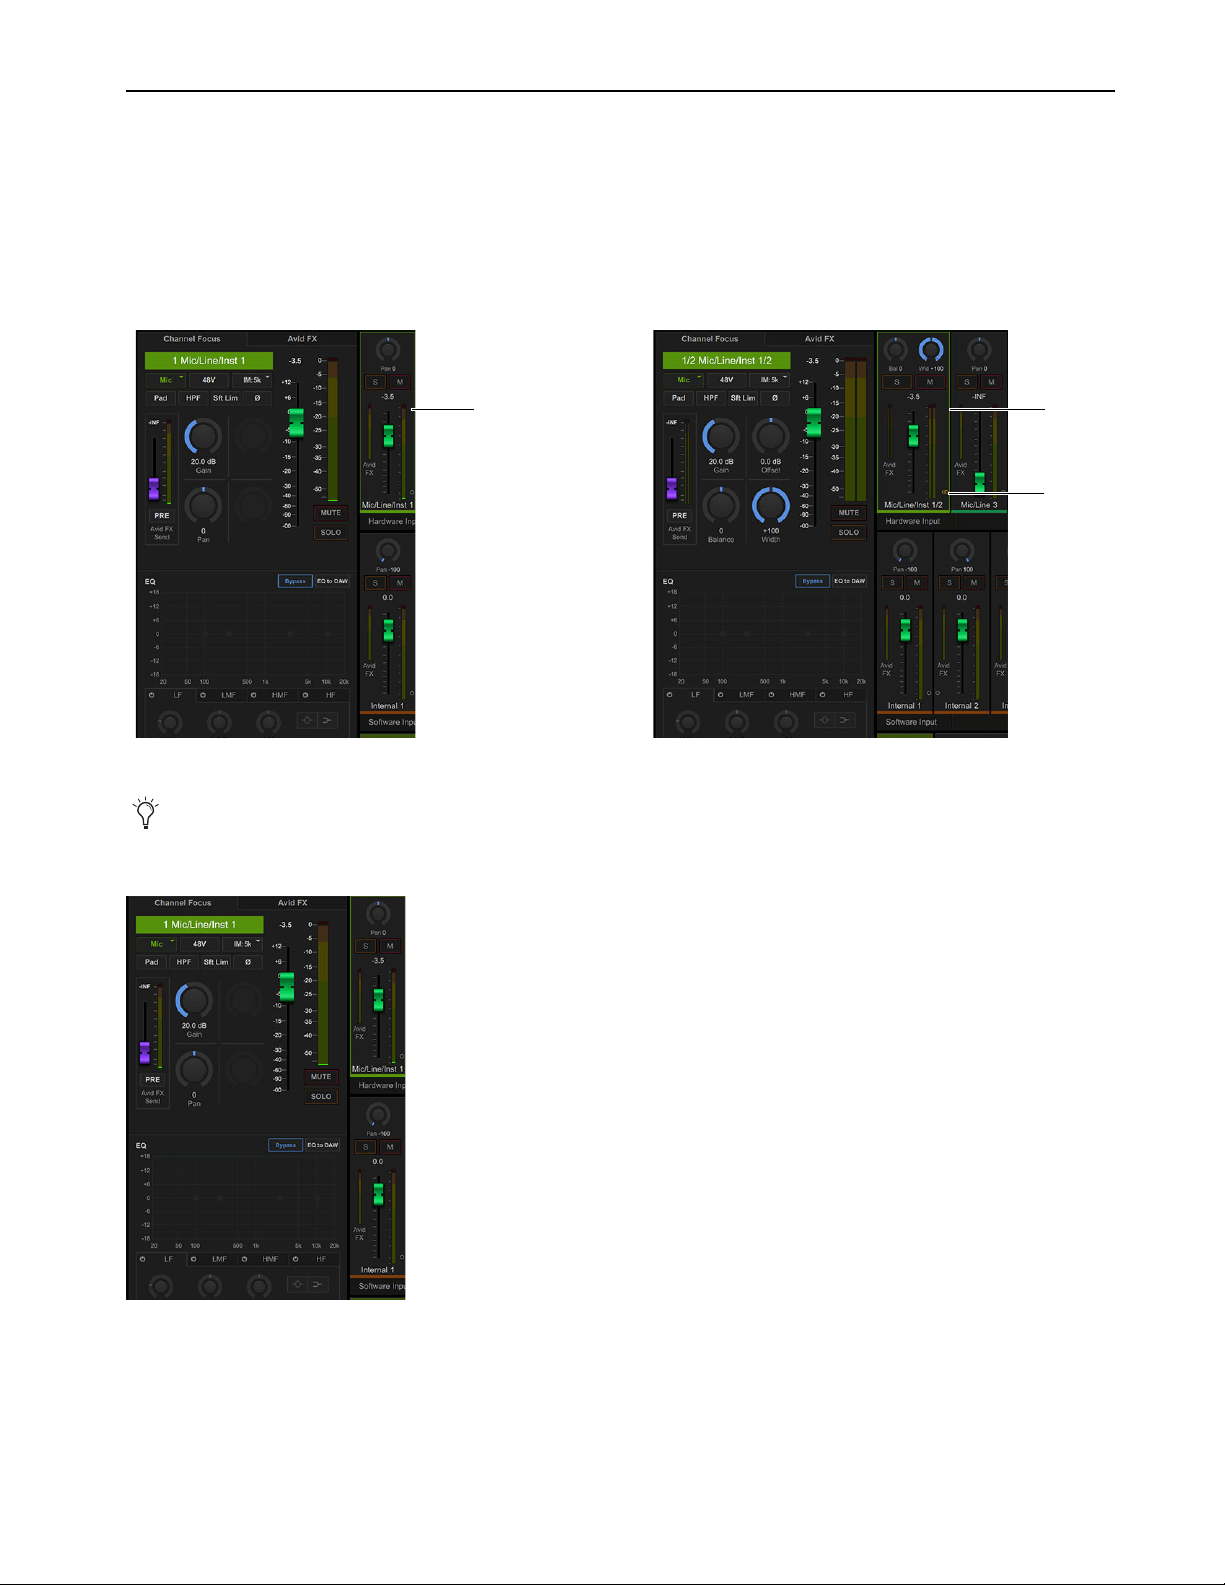
Channel Focus
In MBOX Control the Channel Focus tab shows all parameters for the currently selected channel or bus. That selected channel or bus
is indicated on-screen with a lit colored border (the color corresponds to the currently selected Output mix).
To focus a channel using MBOX Control:
1 Click an output mix, such as Main.
2 Click the desired Hardware Input or Software Input channel.
Channel Focus provides access to many channel parameters not directly available from the top panel.
Channel Focus with Input 1 Mic/Inst/Line selected (shown at left), and when Input 1 and 2 are linked (shown at right)
You can configure MBOX Control Channel Focus to follow top panel channel selection in
Preferences.
Channel Focus
Selected Selected
stereo
linked

MBOX Control Software Overview
29
Availability of some parameters is determined by whether the channel is mono or stereo, input type (mic, line, or instrument), and other
characteristics.
Channel Focus
Item Description
Channel Focus and Avid FX Tabs Selects Channel Focus or Avid FX view
Channel Focus Name Shows the name of the currently focused channel
Mic/Line/Inst Input Select Selects the input type (MIC/LINE/INST) for the currently focused Hardware Input
Z
Selects the impedance for the currently focused Hardware Input (see
Mic and Instrument Imped-
ance Settings
)
PAD button Enables a -10 dB pad for the currently focused Hardware Input
48V (Phantom Power) Enables +48V Phantom Power for the currently focused Hardware Input channel’s Mic input
Sft Lim (Soft Limiter) Enables a soft-knee compressor on the focused Hardware Input, to protect against clipping.
Ø (Polarity) Inverts the polarity (“flips the phase”) on the currently focused Hardware Input
Channel Fader Adjust the level of the input channel.
Meters - Mono and Stereo Displays input level for selected input channel.
MUTE Button Mutes (silences) the channel.
SOLO Button Solos the channel (silences all channel that are not also soloed)
AVID FX Send Level Adjusts how much level is sent to the AVID FX (XMOS) Reverb/Delay Return
AVID FX Send Meter Shows how much signal of selected input channel is being send to the AVID FX bus
AVID FX Send Pre/Post Fader When enabled, the pickoff point for channel send to AVID FX is pre-fader/input gain
EQ Section Provides 4-band parametric EQ
EQ Bypass Button Bypasses EQ for the selected channel.
EQ to DAW Button Sends the current input signal to Pro Tools with EQ processing.
Gain Sets mic preamp gain level of selected input.
Pan Available on mono channels only, places the signal in the stereo field left-to-right.
Offset Available on stereo channels only, sets the right channel gain offset.
Balance Available on stereo channels only, adjusts left-to-right stereo image.
Width Available on stereo channels only, adjusts stereo image width.
MBOX Control Software Overview
30
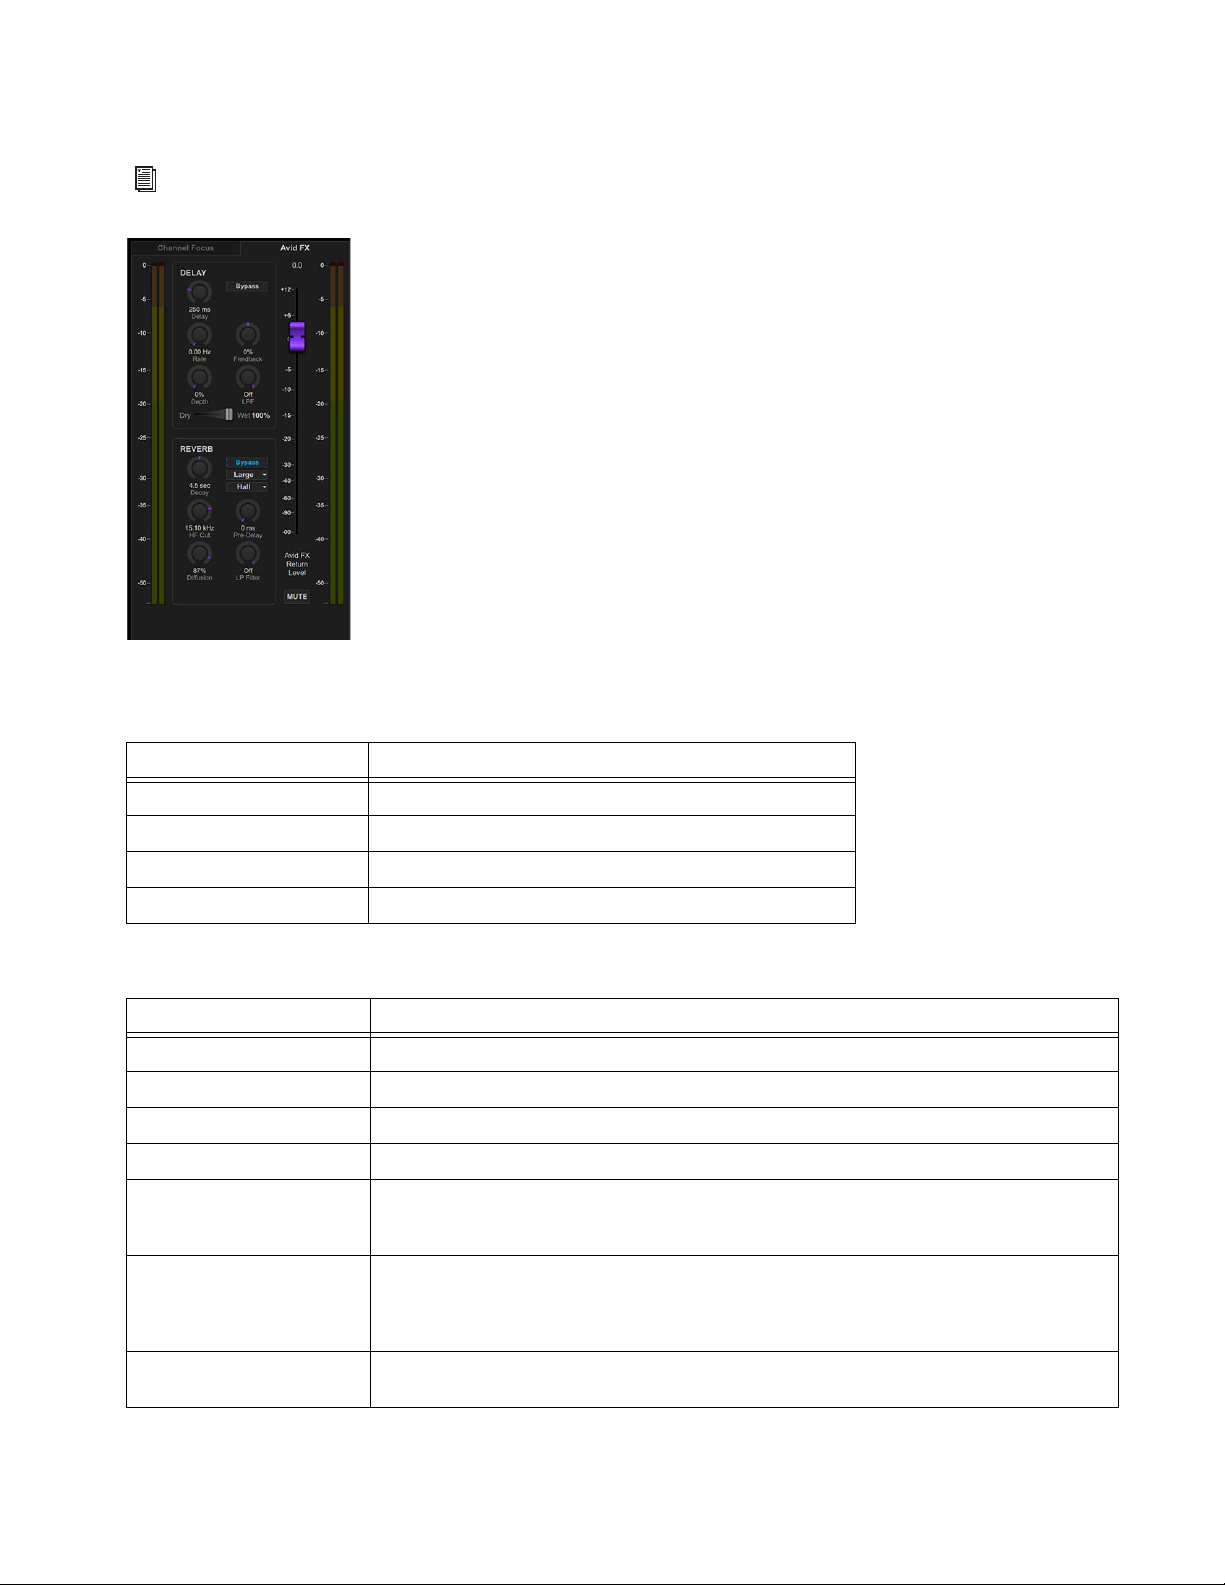
Avid FX Delay and Reverb
When selected, this section of the mixer shows the global controls for AVID FX Delay and Reverb.
AVID FX Global Controls and Indicators
DELAY Controls
For instructions, see Using AVID FX.
Avid FX
AVID FX Globals
Item Description
Meters (Input) Indicate level of signals being sent to Avid FX
Avid FX Return Level (Fader) Adjusts Avid FX output level
Meters (Output) Indicate level of Avid FX output
MUTE Mutes Avid FX output
AVID FX Delay
Item Description
Bypass Disables the effect.
Delay Time Sets the delay time between the original signal and the delayed signal (from 0.0 ms to 320 ms).
Rate Sets the rate of modulation of the delayed signal (from 0.00 Hz to 20.0 Hz).
Depth Sets the depth of the modulation applied to the delayed signal (from 0% to 100%).
Feedback
Controls the amount of feedback applied from the output of the delay back into its input (from –100% to
100%). It also controls the number of repetitions of the delayed signal. Negative feedback settings give
a more intense “tunnellike” sound to flanging effects.
LPF (Low Pass Filter)
Controls the cutoff frequency of the Low Pass Filter (from 10 Hz to 22 kHz). Use the LPF setting to atten-
uate the high frequency content of the feedback signal. The lower the setting, the more high frequencies
are attenuated. The maximum value for LPF is Off. This lets the signal pass through without limiting the
bandwidth of the plug-in.
Mix
Sets the balance between the delayed signal (wet) and the original signal (dry). If you are using a delay
for flanging or chorusing, you can control the depth of the effect somewhat with the Mix setting.

MBOX Control Software Overview
31
REVERB Controls
AVID FX Reverb
Item Description
Bypass Disables the effect
Size
In conjunction with the Room (Algorithm) control, adjusts the overall size of the reverberant space. There are three
sizes: Small, Medium, and Large. The character of the reverberation changes with each of these settings (as does the
relative value of the Decay setting). Size can be used to vary the range of a reverb from large to small. Generally, you
should select an algorithm first, and then choose the size that approximates the size of the acoustic space that you
are trying to create.
Room (Algorithm)
Selects one of seven reverb algorithms: Hall, Church, Plate, Room 1, Room 2, Ambience, or Non-linear. Selecting an
algorithm changes the preset provided for it. Switching the Size setting changes characteristics of the algorithm that
are not altered by adjusting the decay time and other user-adjustable controls. Each of the seven algorithms has a dis-
tinctly different character.
Decay
Controls the rate at which the reverb decays after the original direct signal stops. The value of the Decay setting is
affected by the Size and Algorithm controls.
HF Cut
Controls the decay characteristic of the high frequency components of the reverb. It acts in conjunction with the Low
Pass Filter control to create the overall high frequency contour of the reverb. When set relatively low, high frequencies
decay more quickly than low frequencies, simulating the effect of air absorption in a hall. The maximum value of this
control is Off (which effectively means bypass).
Diffusion
Sets the degree to which initial echo density increases over time. High settings result in high initial build-up of echo
density. Low settings cause low initial buildup. This control interacts with the Size and Decay controls to affect the
overall reverb density. High settings of diffusion can be used to enhance percussion. Use low or moderate settings for
clearer and more natural-sounding vocals and mixes.
Pre-Delay
Determines the amount of time that elapses between the original audio event and the onset of reverberation. Under
natural conditions, the amount of pre-delay depends on the size and construction of the acoustic space, and the rel-
ative position of the sound source and the listener. Pre-Delay attempts to duplicate this phenomenon and is used to
create a sense of distance and volume within an acoustic space. Long Pre-Delay settings place the reverberant field
behind rather than on top of the original audio signal.
LPF
Controls the overall high frequency content of the reverb by setting the frequency above which a 6 dB per octave filter
attenuates the processed signal. The maximum value of this control is Off (which effectively means bypass).
MBOX Control Software Overview
32
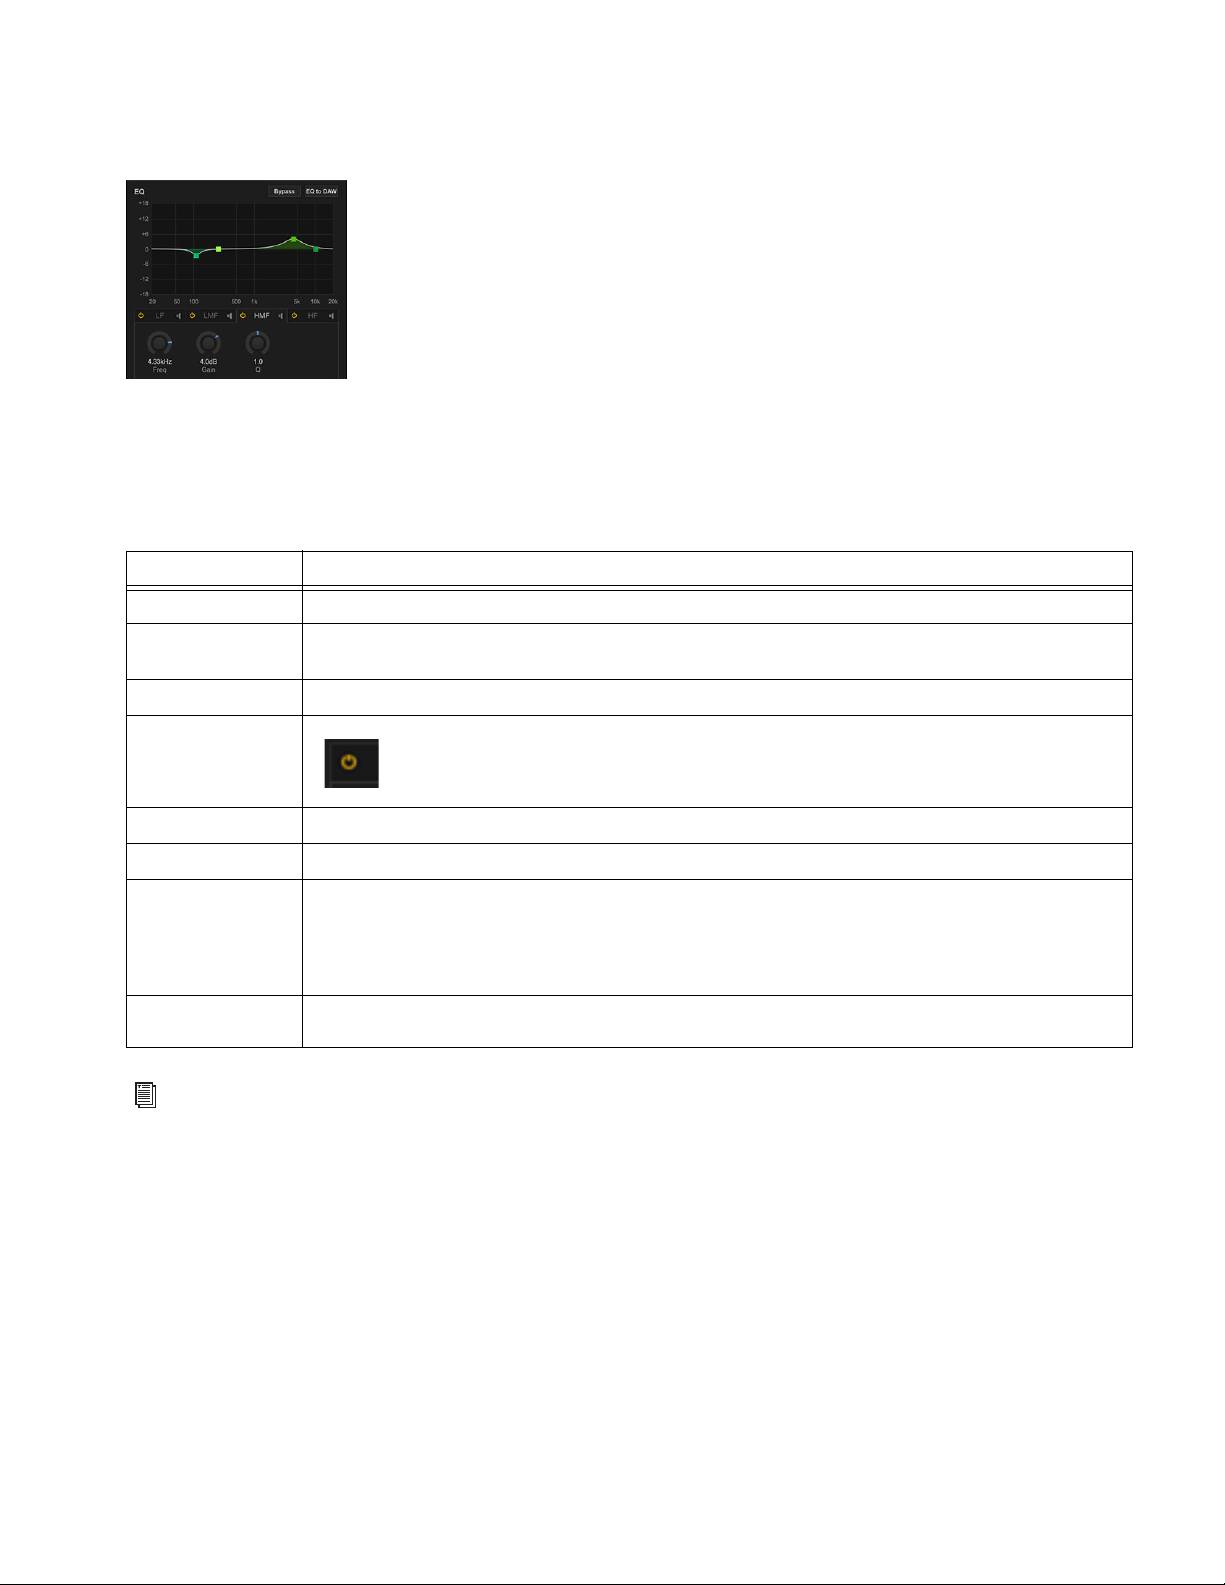
EQ
The lower section of Channel Focus is the built-in EQ.
Based on Avid ChannelStrip, MBOX EQ can be used either on channel feeds to MBOX outputs such as headphones, or applied to chan-
nel feeds to Pro Tools. Each Hardware Input channel (including Talkback) can have their own Channel Focus EQ settings.
EQ Controls
EQ in Channel Focus
AVID FX EQ
Item Description
Bypass When enabled (lit) the effect of the EQ is silenced.
EQ to DAW
When enabled (lit) EQ is applied to channel feeds going to Pro Tools. When not enabled, EQ is only applied to chan-
nel feeds to MBOX hardware outputs.
Bands LF (Low Frequency), LMF (Low-Mid Frequency), HMF (High-Mid Frequency), HF (High Frequency), Each with:
Band On/Off
Toggles that band in/out (on/off)
Freq
Sets the center frequency for that band
Gain
Boosts or attenuates the corresponding frequencies for that band
Q
Changes the width of the band.
• With the HF or LF band set to Peak, the Q control changes the width of the EQ band. (Higher Q values represent
narrower bandwidths. Lower Q values represent wider bandwidths.)
• With the HF or LF band set to Shelf, the Q control changes the Q of the shelving filter. Higher Q values represent
steeper shelving curves. Lower Q values represent broader shelving curves.
Filter Type
(HF and LF only)
Sets the HF or LF band to Peak or Shelf
For instructions, see
Using AVID FX EQ.
MBOX Control Software Overview
33
Monitor
The Monitor section provides a master volume knob, Mono, Mute, and other parameters that apply to Monitor outputs (only): Main,
Alt/Bluetooth, Headphone 1 and Headphone 2.
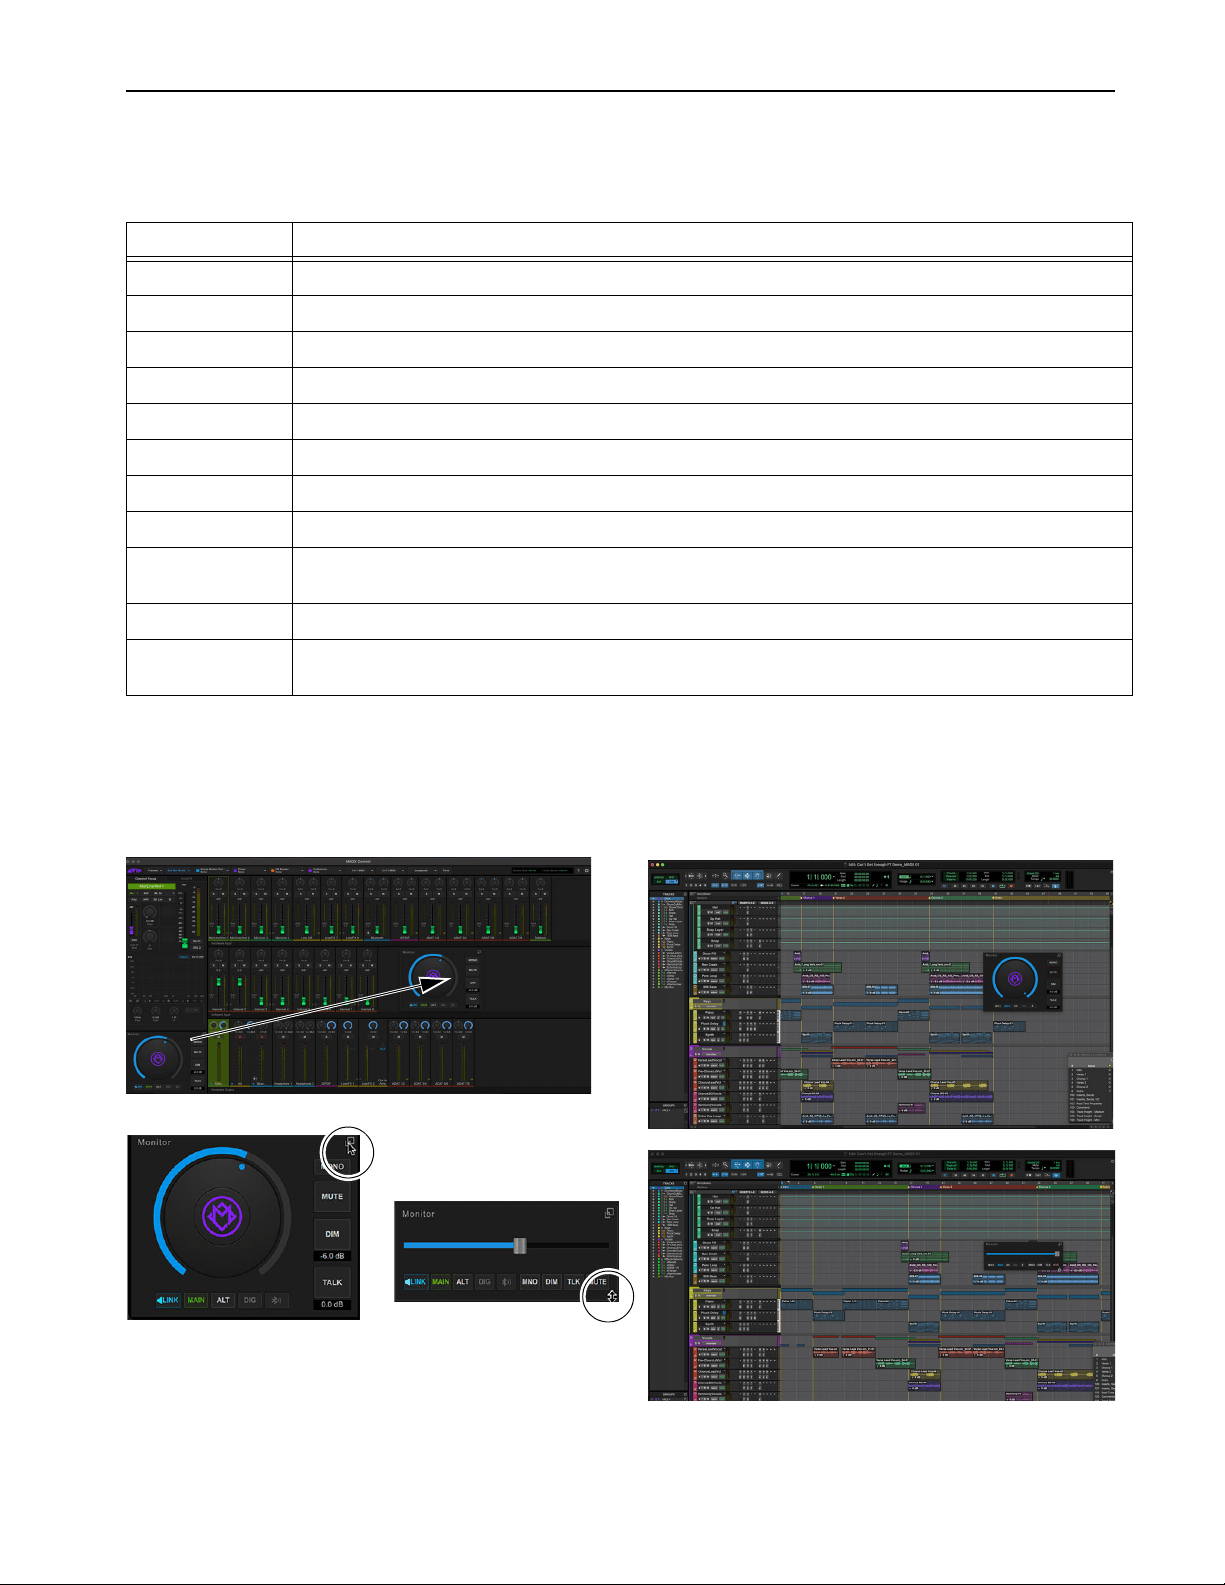
Floating Monitor Window
The Monitor section in MBOX Control can be detached from the main screen to become a floating window that can be resized and
placed anywhere on the screen and remains “on top,” to maintain direct access to level, mute, and other monitor parameters even while
working in Pro Tools.
Monitor Section Controls and Indicators
Item Description
Knob Controls output level of the selected mix(es).
LINK Links Main, Alt, Dig, and Bluetooth outputs for linked level control from the Main Monitor Encoder.
MAIN Focuses Monitor controls on Main.
ALT Focuses Monitor controls on Alt.
DIG Focuses Monitor controls on digital outputs (only available when Mirror MAIN to S/PDIF option is selected.).
Bluetooth Focuses Monitor controls on Bluetooth.
MONO Folds the current Monitor output to mono.
MUTE Mutes the current Monitor output(s).
DIM Lowers the current Monitor output(s) by the editable value shown directly below (default is -6 dB, the minimum Dim
amount). Dim can be applied globally (affecting all outputs) or per channel in
Preferences.
TALK Unmutes the built-in Talkback mic input.
Detach The upper right corner of the Monitor section provides a Detach icon. Detaches the Monitor Section and turns it into
a floating, “always on top” window. To close the detached Monitor window, click its Detach icon again.
Detaching and moving the Monitor section (shown at left) and floating above Pro Tools before and after resizing (shown at right)

MBOX Control Software Overview
34
Hardware Input
The Hardware Input section shows fader strips for all MBOX hardware inputs. The view is scrollable left and right.
Each fader strip provides a Pan knob, Solo and Mute buttons, input meter(s), and Avid FX Send level meters. Each fader adjusts the out-
put level of the input channel (the level fed to MBOX output mixes). These controls mirror the same settings in the Channel Focus tab,
letting you adjust pan, solo, and mute even when a channel is not the current channel focus.
Adjacent channels can be stereo-linked (see
Stereo Linking). Double-clicking on a channel strip collapses it to a narrow view, to con-
serve screen real estate. Double-click again to expand.
For more information on these and all other input controls, see
Channel Focus.
Software Input
The Software Inputs section shows fader strips for all “internal” inputs (software inputs from Pro Tools). In Pro Tools, these appear as
MBOX Send 1–2, MBOX Send 3–4, and so on. These controls mirror those in Channel Focus when a Software Input is selected.
Double-clicking on a channel strip collapses it to a narrow view, to conserve screen real estate. Double-click again to expand.
Hardware Output
The Hardware Output section shows fader strips for all MBOX hardware outputs.
Clicking to select an output shows the current levels and settings for that output mix. Fader caps change color to match that of the se-
lected output. Double-clicking a channel strip collapses it to a narrow view, to conserve screen real estate. Double-click again to expand.
Hardware Input
Software Input
Hardware Output
MBOX Control Software Overview
35
Hardware Outputs can be controlled from their fader strip controls (Trim, Volume, Mute, when available), and from the
Monitor sec-
tion. The following are available from output fader strips.
Main, Alt and Bluetooth Output levels can be controlled by the Monitor knob, or from the
Vol knob in their fader strip. If Monitor Link
is enabled, the Main, Alt and Bluetooth output levels all follow the Monitor knob and show the same levels. If you need to adjust an in-
dividual output (Main, or Alt, or Bluetooth) use their fader strip
Trim knobs, or unlink the outputs.
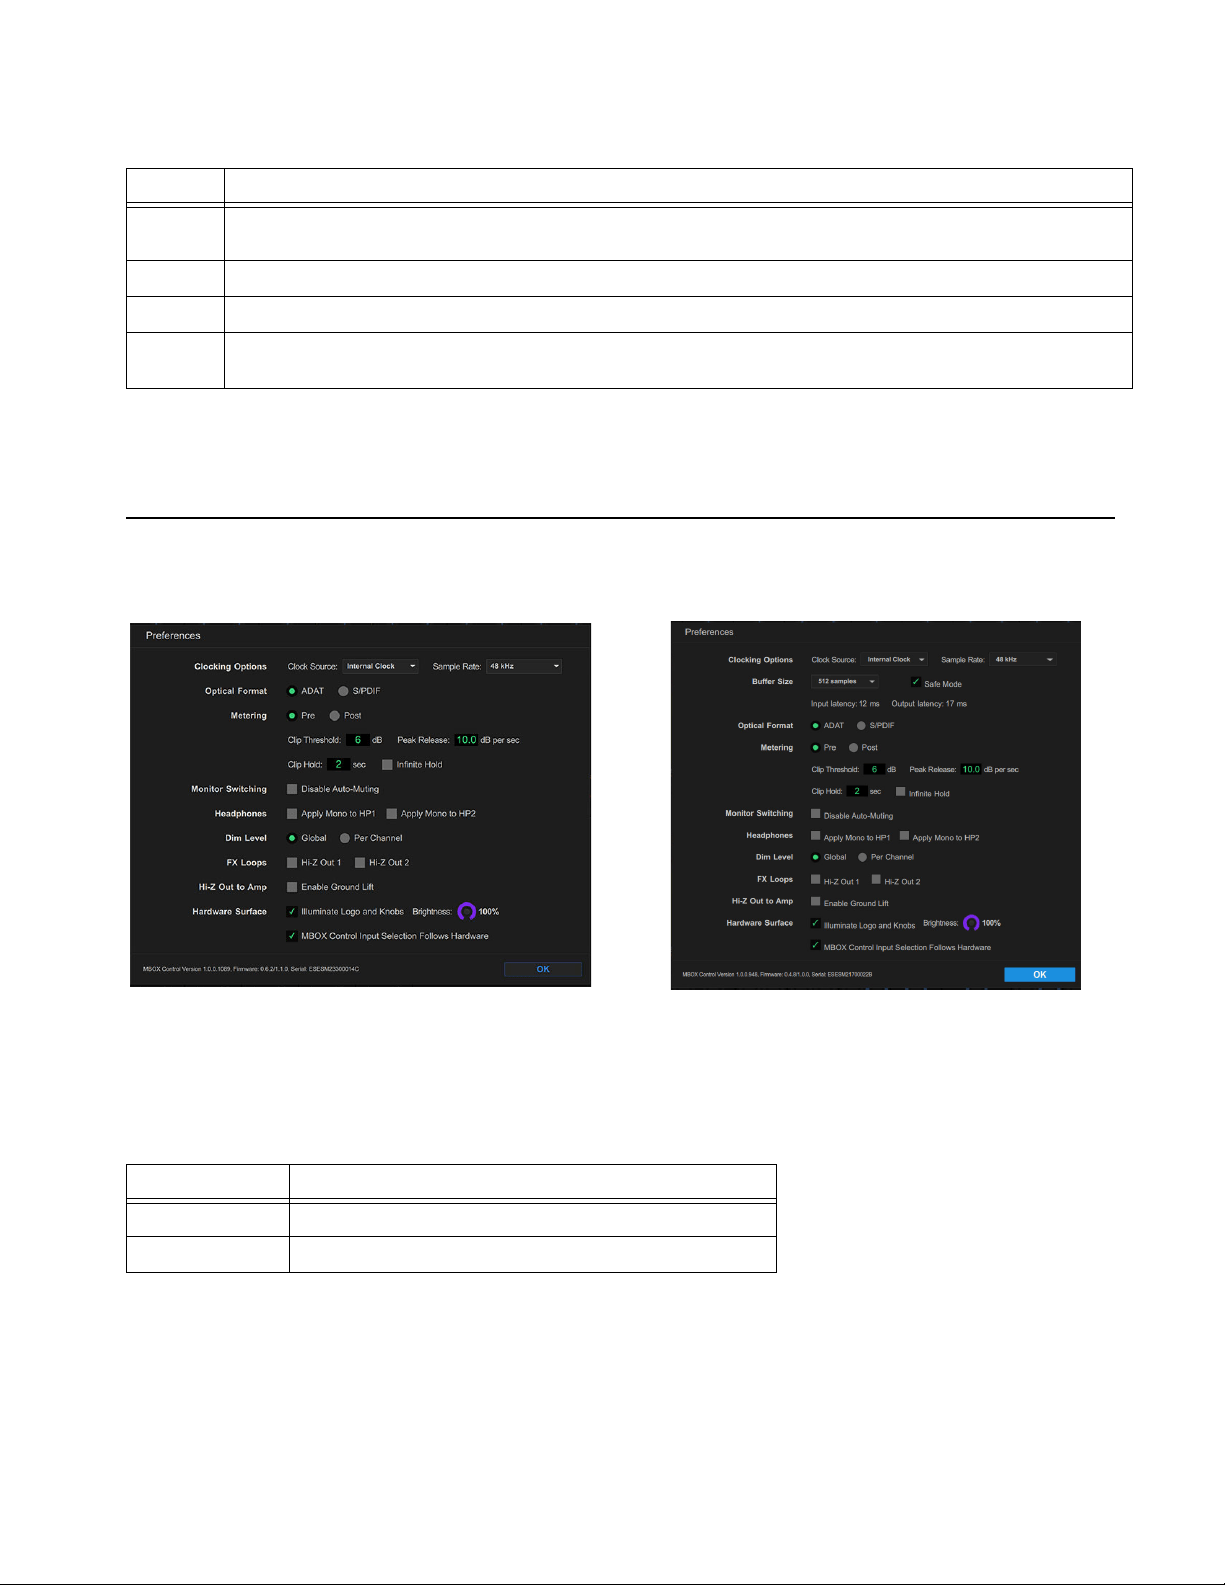
Preferences
Preferences let you optimize MBOX hardware and MBOX Control settings.
Clocking Options
(Sample Rate and Clock Source)
Clocking Options let you set the MBOX Sample Rate, and choose a Clock Source.
* Sample rates of 88.2 kHz and above affect some MBOX capabilities. For example,
Loopback is not available at 176.4 and 192 kHz.
Buffer Size (Windows Only)
The Buffer Size (Hardware Buffer Size) on Windows controls the size of the buffer used to handle host processing tasks such as pro-
cessing with host-based, or “Native” plug-ins. Use low HW Buffer settings for audio recording (low latency). Use high buffer settings
for mixing and plug-in processing (high latency).
Hardware Output Controls
Item Description
Trim
Adjusts (trims) volume level for Main, Alt, and Bluetooth outputs so that they all have the same audible loudness. This is most
useful for speaker calibration and level matching when Main/Alt/BT levels are linked, or when they are not linked.
Volume Adjusts the overall hardware output level of a given output channel.
Mute Silences the output.
Right
Offset
Lets you level balance the left and right outputs separately on supported outputs. On Main or Alt, right-click the Trim knob to
access Right Offset.
Preferences on Mac (at left) and WIndows (at right
MBOX Clocking Options
Item Description
Sample Rate MBOX supports 44.1, 48, 88.2, 96, 176.4, and 192 kHz.*
Clock Source Choose an available clock source: Internal, S/PDIF, or ADAT.

MBOX Control Software Overview
36
Safe Mode
(Windows Only)
On some Windows systems, the use of a large number of effects can cause Pro Tools or other DAWs to cause high CPU usage, which
can lead to drop-outs during playback.
To avoid drop-outs, make sure Safe Mode is enabled.
Input / Output Latency
(Windows Only)
These indicators provide latency values for MBOX Studio when used on a Windows computer.
Optical Format
The Optical ports on MBOX support both ADAT and S/PDIF formats. Use the Optical Format settings to specify which format you are
using.
Metering
Metering preferences let you optimize MBOX hardware and MBOX Control metering.
Monitor Switching
When enabled, Disable auto-muting makes on-screen Monitor output selection latching (no auto-mute of other outputs). When not en-
abled, Monitor output selection is non-latching (selecting a new output automatically mutes all others).
Headphones
Headphones preferences are available to fold either or both Headphones 1 and 2 stereo outputs to mono. This can be useful when you
are recording talent that likes to keep headphones off of one ear to hear their instrument or voice acoustically. If you had already con-
figured a stereo mix for headphones, folding to mono can let them hear everything they need.
Dim Level
Lets you configure DIM to apply globally (all outputs) or per channel (only Dim the currently selected output).
If drop-outs contiune even with Safe Mode enabled, try reducing the number of Avid FX and/or plug-ins in your session.
MBOX Input and Output Latency
Item Description
Input Latency Shows the input latency of the audio driver.
Output Latency Shows the output latency of the audio driver.
For more information, see Audio Input and Output.
MBOX Metering Preferences
Item Description
Pre/Post
Sets meters to indicate pre- or post-fader levels. When pre-fader metering is selected, the level meters show levels
independent of fader position. With post-fader metering, the level meters respond to fader position.
Clip Threshold Sets the level in decibels (dB) at which meters indicate clipping (red).
Peak Release Sets how long meter peaks are displayed. Enter a value for the number of dB per second for meter peaks to recover.
Clip Hold Sets how long clips are indicated in meters.
Infinite Hold If you clip, you’re gonna have to look at it for your whole session.
MBOX Control Software Overview
37
FX Loops
Lets you switch FX 1 or FX 2 outputs to Hi-Z (high impedance) to integrate guitar pedals (“stomp boxes”), many of which expect a
high-impedance signal at their input. When using rack mount or other Line level devices in MBOX effects loops, disable these settings.
Hi-Z Out to Amp
(Ground Lift)
Enables a ground lift (also known as “earth lift”) on the front panel Hi-Z Out to Amp output. If you are connected for re-amplification
but there is excessive buzz or other electrical noise, try enabling the Ground Lift.
Hardware Surface
These settings let you control how MBOX looks, and how its top panel does or does not affect MBOX Control.
About MBOX Control
Across the bottom of Preferences is the About MBOX Control area, showing MBOX Control software and firmware versions, and the
hardware serial number.
Hardware Surface Settings
Item Description
Illuminate Logo and Knobs Enable to have the Avid logo and encoders lit. Disable for stealth mode.
Brightness Controls the brightness of the Avid logo and encoders.
MBOX Control Input Selection
Follows Hardware
When enabled, MBOX Control Hardware Input selection is linked to MBOX hardware top panel input selec-
tion.

Part III: Using MBOX


Using MBOX Studio 40
Using MBOX Studio
•
MBOX Studio Basics
• Audio Input and Output
• Using the Tuner
• About Variable-Z
• Using MBOX Studio and Pro Tools
• Using AVID FX
• Re-Amplification
• Using FX Loops
• Using S/PDIF
• Customizing the User Action Buttons 1–4
• Using Talkback
• Using Loopback
• Integrating an External MIDI Device
• Reducing Monitoring Latency
Using MBOX Studio
41
MBOX Studio Basics
The following are some basics to get you started learning your way around MBOX Studio and MBOX Control software.
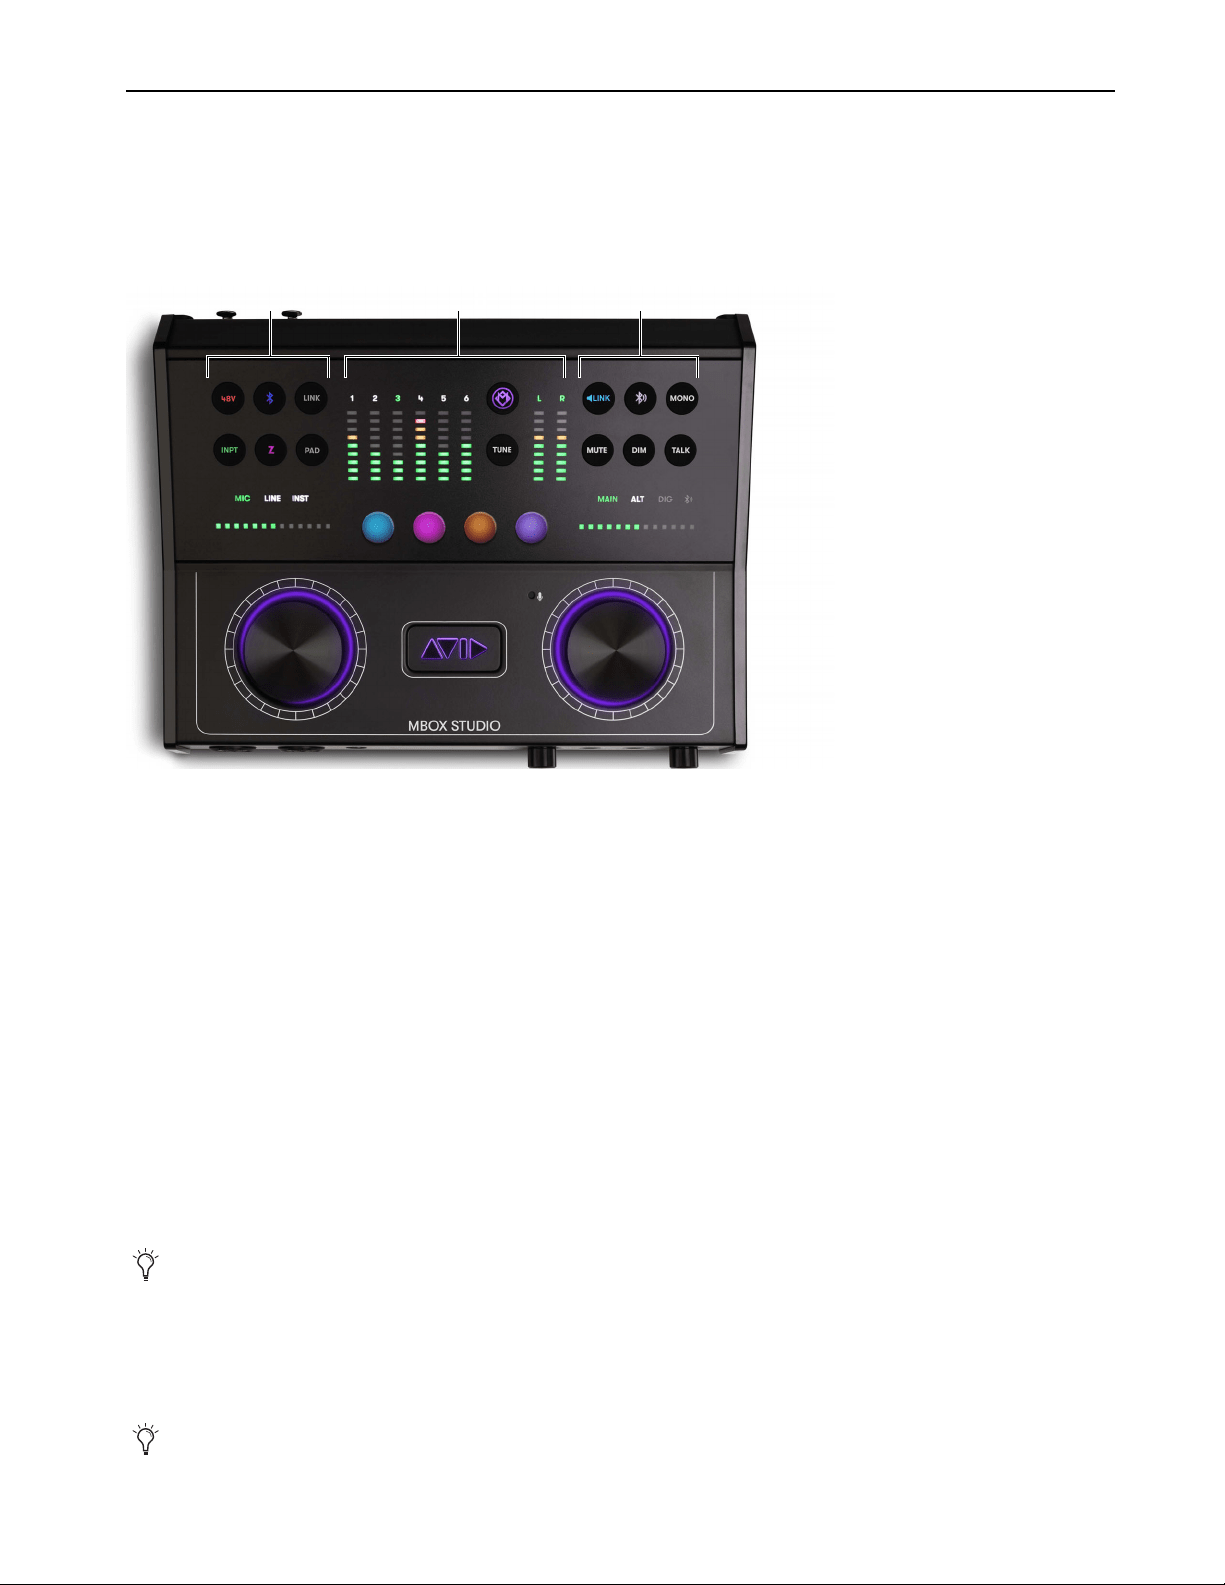
Top Panel
The top panel provides input controls on the left, meters and global controls in the center, and output controls on the right.
Left and Right Dual-Function Encoders
The large left (input) and right (output) encoders on the top panel are dual-function rotate/press controls. The encoders and their other
associated input or output controls provide direct access to many of the most often used functions such as phantom power and stereo
linking for inputs, monitor volume and mute, and Talkback.
For both the input and output sections, you first focus on a hardware input or output, then use the top panel controls to affect whichever
input and output channels are their respective
Hardware Focus.
Hardware Focus
The top panel controls affect the currently focused hardware input or output. For example:
To focus and adjust a vocal mic input:
1 Press the left encoder repeatedly until the connected input (1, 2, 3, or 4) lights green above the input meters.
2 Press the top panel INPT button repeatedly until MIC is lit green above the input gain indicator, which is also lit green.
3 Rotate the left encoder to increase or decrease input gain.
To focus and adjust a Monitor output:
1 Press the right encoder repeatedly until the desired output (such as MAIN for the Main Left/Right monitor outputs) is lit green above
the output meters, which are also lit green.
2 Rotate the right encoder to increase or decrease volume.
MBOX Studio top panel
For more information see
Audio Input.
For more information see
Audio Output.
Input OutputMeters and Global
Using MBOX Studio
42
MBOX Control
MBOX Control software provides a row of hardware inputs across the top, a row of software inputs (“internal” sources from Pro Tools
or other application) in the middle, and a row of hardware outputs across the bottom.
Channel Focus
On MBOX Studio, the encoders and buttons in the input and output sections affect the currently focused (selected) MBOX Hardware
Input or Hardware Output channel (for more information see
Hardware Focus).
In MBOX Control the Channel Focus tab shows all parameters for the currently selected channel or bus. That selected channel or bus
is indicated on-screen with a lit colored border. The color corresponds to the currently selected Output mix. For example, when Main
is selected in the Hardware Output section, all input fader caps light in the same green color as Main.
MBOX Control display of hardware inputs (top row), Pro Tools sources (middle row), and hardware outputs (bottom row)
Channel Focus with Input 1 Mic/Inst/Line selected
8
-channel ADAT Mic Pr
e
S/
PDIF
Mul
t
i
-
FX
o
r
o
t
her
Output
Input
Hardware
Software
Inputs
Inputs
Selected
Using MBOX Studio
43
Pro Tools Sources
Audio from Pro Tools or other DAW can be mixed into the currently selected output using the Internal 1–8 channel strips in the Soft-
ware Input section.
Custom Headphone Mixes
To create custom cue mixes for headphones or any hardware output, see Output Mixes for Speakers and Headphones. Custom head-
phone mixes can be saved as an MBOX Control Preset (see
Presets).
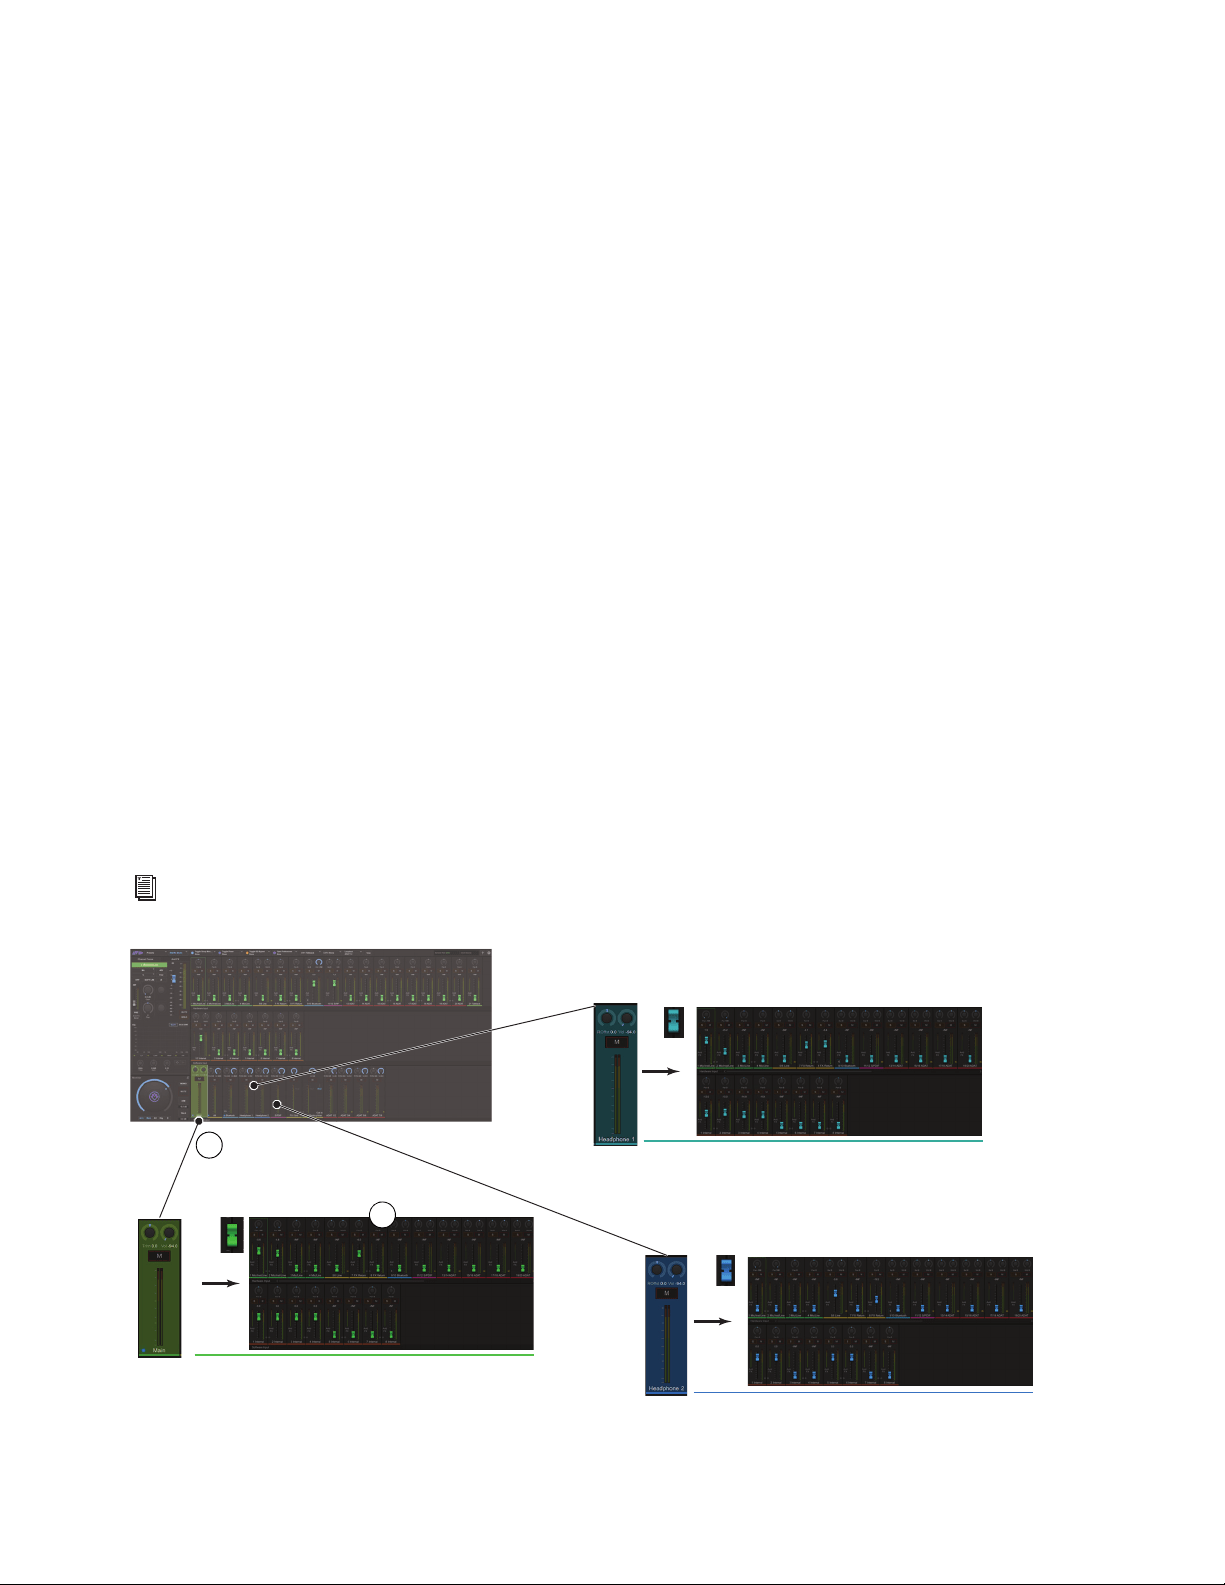
Output Mixes for Speakers and Headphones
In MBOX Control, select any output to set up its own unique mix.
To set up and control Main and Alt monitor mix:
1 Begin playing or playback.
2 Select Main by clicking its strip in the bottom row. All input fader caps are colored to match that of the currently selected output mix
(such as green for Main).
3 Adjust input channel levels and other parameters as desired.
• To include a hardware input, adjust that input in the top row of channels (Hardware Input).
• To include audio from Pro Tools or other DAW, adjust the Software Input. Note that Pro Tools tracks must be routed to MBOX Stu-
dio Internal 1–2, 3–4, 5–6, or 7–8. For more information see
Configure Pro Tools for MBOX Studio.
• To access all controls for an input channel, click on a channel strip to focus it, then use the controls in Channel Focus.
4 Optional: Adjust settings for the focused output mix using its channel strip controls such as Vol (volume) and Trim. Additional Mon-
itor controls are available in the
Monitor section of MBOX Control.
5 Click to select a different output (such as Alt) then repeat the previous steps. Input level settings are saved uniquely per output mix.
To set up Heaphone 1 or 2 mix:
Click to select Headphone 1 or Headphone 2. and repeat the previous steps to set input levels feeding the cue mixes for each head-
phones output.
To learn how to have reverb and/or delay in headphone mixes, see
Using AVID FX.
Output selection, fader cap colors, and discrete mixes
Main
Headphone 1
Headphone 2
2
3
Using MBOX Studio
44
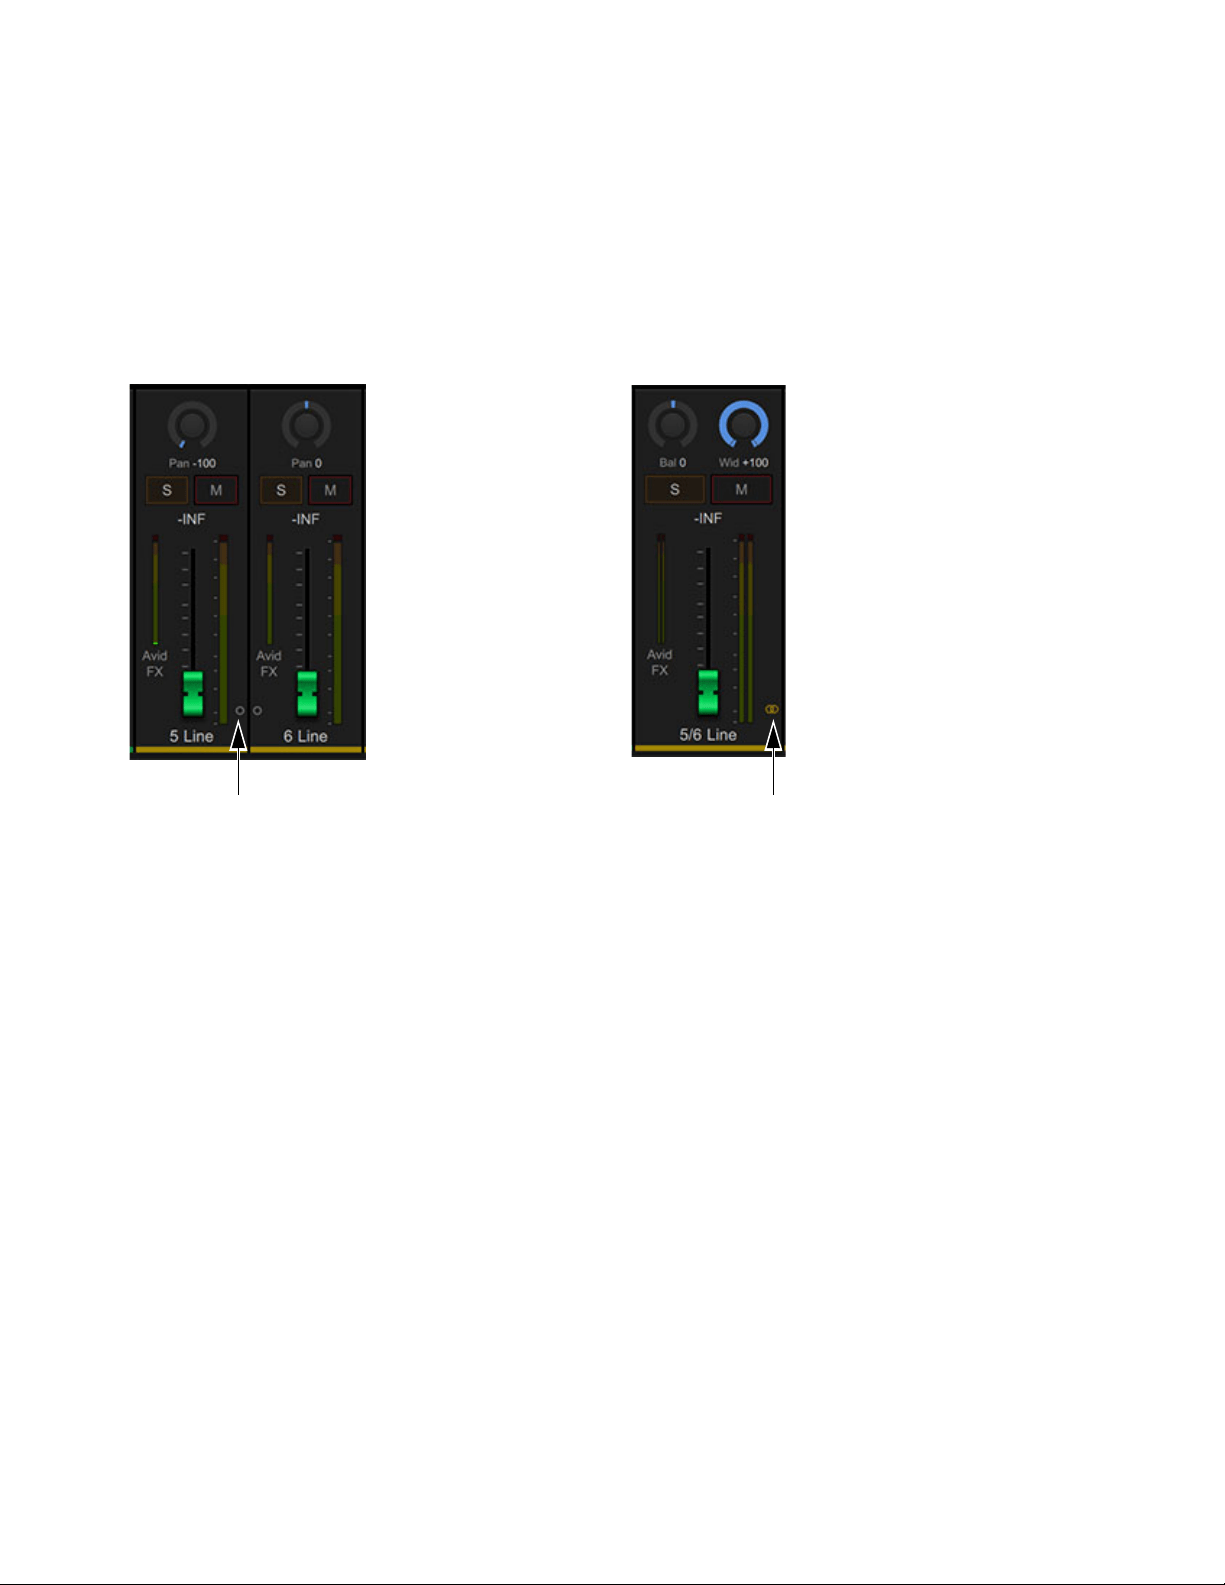
Stereo Linking
All input channels and some Hardware Output channels provide Link buttons. When enabled, the parent channel is stereo linked to its
adjacent channel. When two channels are linked, their single level, gain, and other input controls affect both channels identically.
When two mono channels are initially linked to become stereo, settings for the left channel are copied to the right channel. When a stereo
channel is unlinked, settings are copied to both resulting mono channels.
Channels can be linked and unlinked from MBOX Control, and from the MBOX Studio top panel.
To link or unlink channels using MBOX Control:
Click the Link icon in either adjacent channel strip.
To link or unlink channels using MBOX Studio top panel:
1 Press the left encoder repeatedly to cycle through available hardware inputs until one of the desired inputs is selected.
2 Press the LINK button to link (it lights green) or unlink (unlit).
When linked, both the selected channel (such as 5) and the adjacent channel (6) light green above the input meters, and the LINK button
also lights green.
Reset and Fine Control
When adjusting on-screen controls in MBOX Control:
To reset a control to its default setting, Option-click (Mac) or Alt-click (Windows) on the control.
To adjust a knob or fader with finer resolution, hold Command (Mac) or Control (Windows) while adjusting the control.
Naming Channels
MBOX Control input and output channels can be renamed by clicking their displayed name.
Channel Link button in unlinked channels (Line In 5 and 6, shown at left) and linked (shown at right)
Using MBOX Studio
45
Audio Input and Output
You can select (focus), configure, and control MBOX Studio audio inputs and outputs from the top panel and from MBOX Control.
Some parameters and settings are only available from MBOX Control.
Audio Input
This section shows how to select and adjust inputs.
Quickstart
• Focus on a hardware input (press the left encoder repeatedly, each press selects the next input).
• Set the input type for mic, line, or instrument (press the INPT button repeatedly).
• Set other input settings (use top panel buttons for some, use MBOX Control for all input controls).
• Adjust input gain (rotate the left encoder).
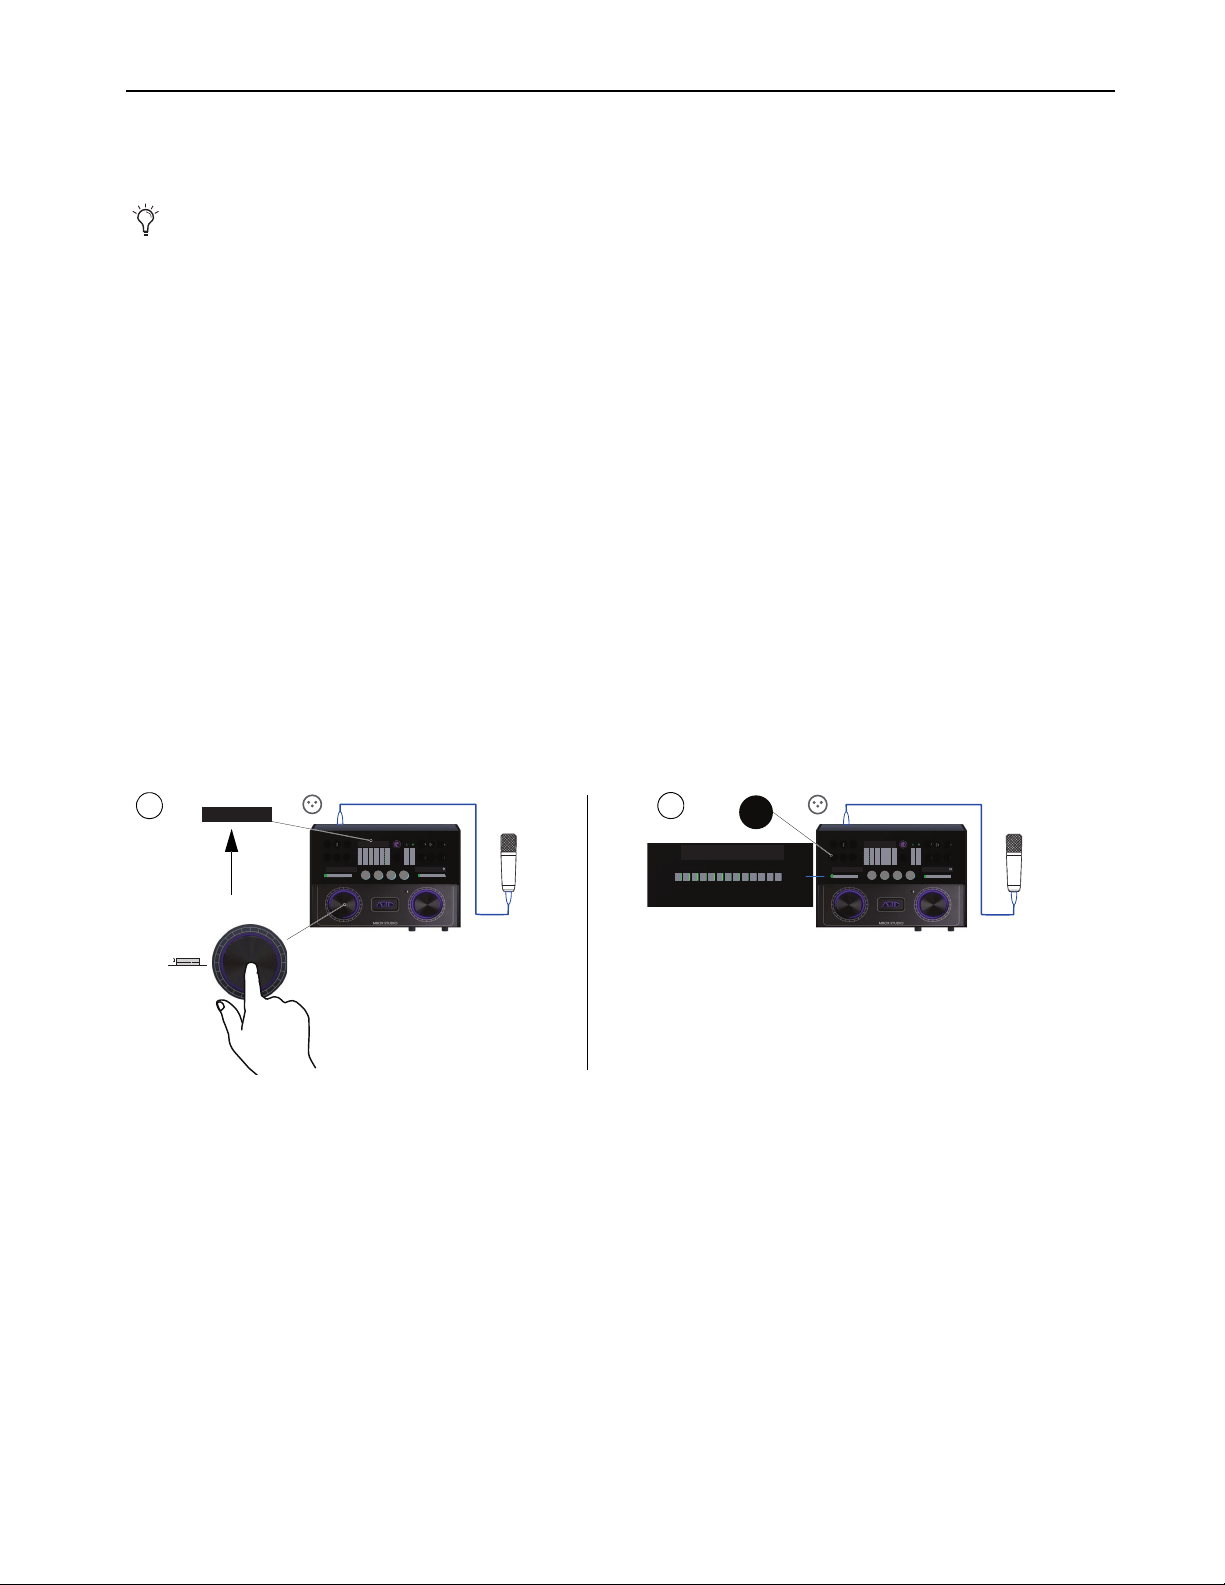
Microphones
To use a mic input:
1 Select the desired hardware input (1–4, whichever input your mic is connected to) by repeatedly pressing the left Encoder to cycle
through available inputs. The number of the currently selected input is shown above the meter.
For example, if you connected a microphone to Mic/Line Input 3 on the back panel, repeatedly press the left Encoder until 3 is lit
green above the channel 3 Input meter.
2 Make sure MIC is selected and lit green above the input gain indicators. If it is not, select the appropriate input type (MIC, LINE, or
INST) by pressing the INPT button to cycle through types. Depending on the currently selected hardware input, choices include Mic
(green), Line with gain control (yellow), and Inst (amber) for input 1.
3 If your microphone requires phantom power, press the 48V button so it becomes lit.
4 Optional: Select a Variable Z impedance setting by pressing the top panel Z button. When a hardware input is set to Mic, choices in-
clude 1k (Z lights magenta), 5k (white), and 10k.
If you are not sure which setting to use, start at the 5k setting (white). For more information, see
About Variable-Z.
5 To invert polarity, apply the Soft-Limiter, or engage the HPF (high-pass filter), do the following in MBOX Control:
• Make sure the desired channel is selected and shown in Channel Focus.
• Click the desired controls so they become lit. For polarity click
Ø, for the Soft-Limiter click Soft Lim, and for the high-pass filter
click
HPF.
Connect microphones, guitars, and other input sources to MBOX Studio (see
Example Audio Connections).
Selecting a hardware input (shown at left) and specifying the input type (shown at right)
123 456
TUNE
48V LINK
INPT
ZPAD
LINK MONO
MUTE
DIM TALK
MIC LINE INST
INST
MAIN
DIG
ALT
MBOX STUDIO
Mic In 3
123 456
123 456
TUNE
48V LINK
INPT
ZPAD
LINK MONO
MUTE
DIM TALK
MIC LINE INST
INST
MAIN
DIG
ALT
MBOX STUDIO
Mic In 3
INPT
MIC LINE INST
1
2
Using MBOX Studio
46
6 Adjust input gain by rotating the left Encoder while singing or playing into the microphone. Gain value is indicated by the horizontal
LEDs above the encoder. Use the top panel input meter and your ears to set a level that sounds good to you.
7 If the input signal is too high even with MBOX Studio input gain set low, press the PAD button to apply a –10db pad.
8 To start recording in Pro Tools, see
Using MBOX Studio and Pro Tools. To start using the built-in Avid FX for EQ, reverb, and delay,
see Using AVID FX.
Electric Guitar and Bass
Connect electric guitar and bass to hardware inputs 1 and 2 on the front panel. Each of these hardware inputs accept 1/4-inch TS
(tip/sleeve) instrument connections, and provide Variable-Z impedance selection for compatibility, tone, and “feel.”
Variable-Z alters the frequency response of a guitar signal by loading the pickups in the same manner as plugging into a real amp or ef-
fect. This setting only affects instruments with passive pickups. Generally, the lower the impedance setting the darker it might sound
(not all pickups respond in the same way).
To use an electric guitar:
1 Select the desired input (1–2, whichever input your guitar is connected to) by repeatedly pressing the left Encoder to cycle through
available inputs. For example, if you plugged your electric guitar into Mic/Line/Inst
1 on the front panel, repeatedly press the left En-
coder until 1 is lit above the Input meters.
2 Select the appropriate input type by repeatedly pressing the INPT button to cycle through types until INST is selected (lit amber).
3 Experiment with different input impedance settings by doing the following:
• Press the Z button repeatedly to cycle through available impedance-only settings (the button changes color for each available set-
ting).
• To use an impedance + capacitance (Cap) setting, select any impedance setting then press and hold the
Z button (it begins to slowly
pulse, indicating “+ CAP” mode). For more information, including a list of available settings, see
About Variable-Z.
Adjusting input gain
123 456
TUNE
48V LINK
INPT
ZPAD
LINK MONO
MUTE
DIM TALK
MIC LINE INST
INST
MAIN
DIG
ALT
MBOX STUDIO
MIC LINE INST
Input Meter
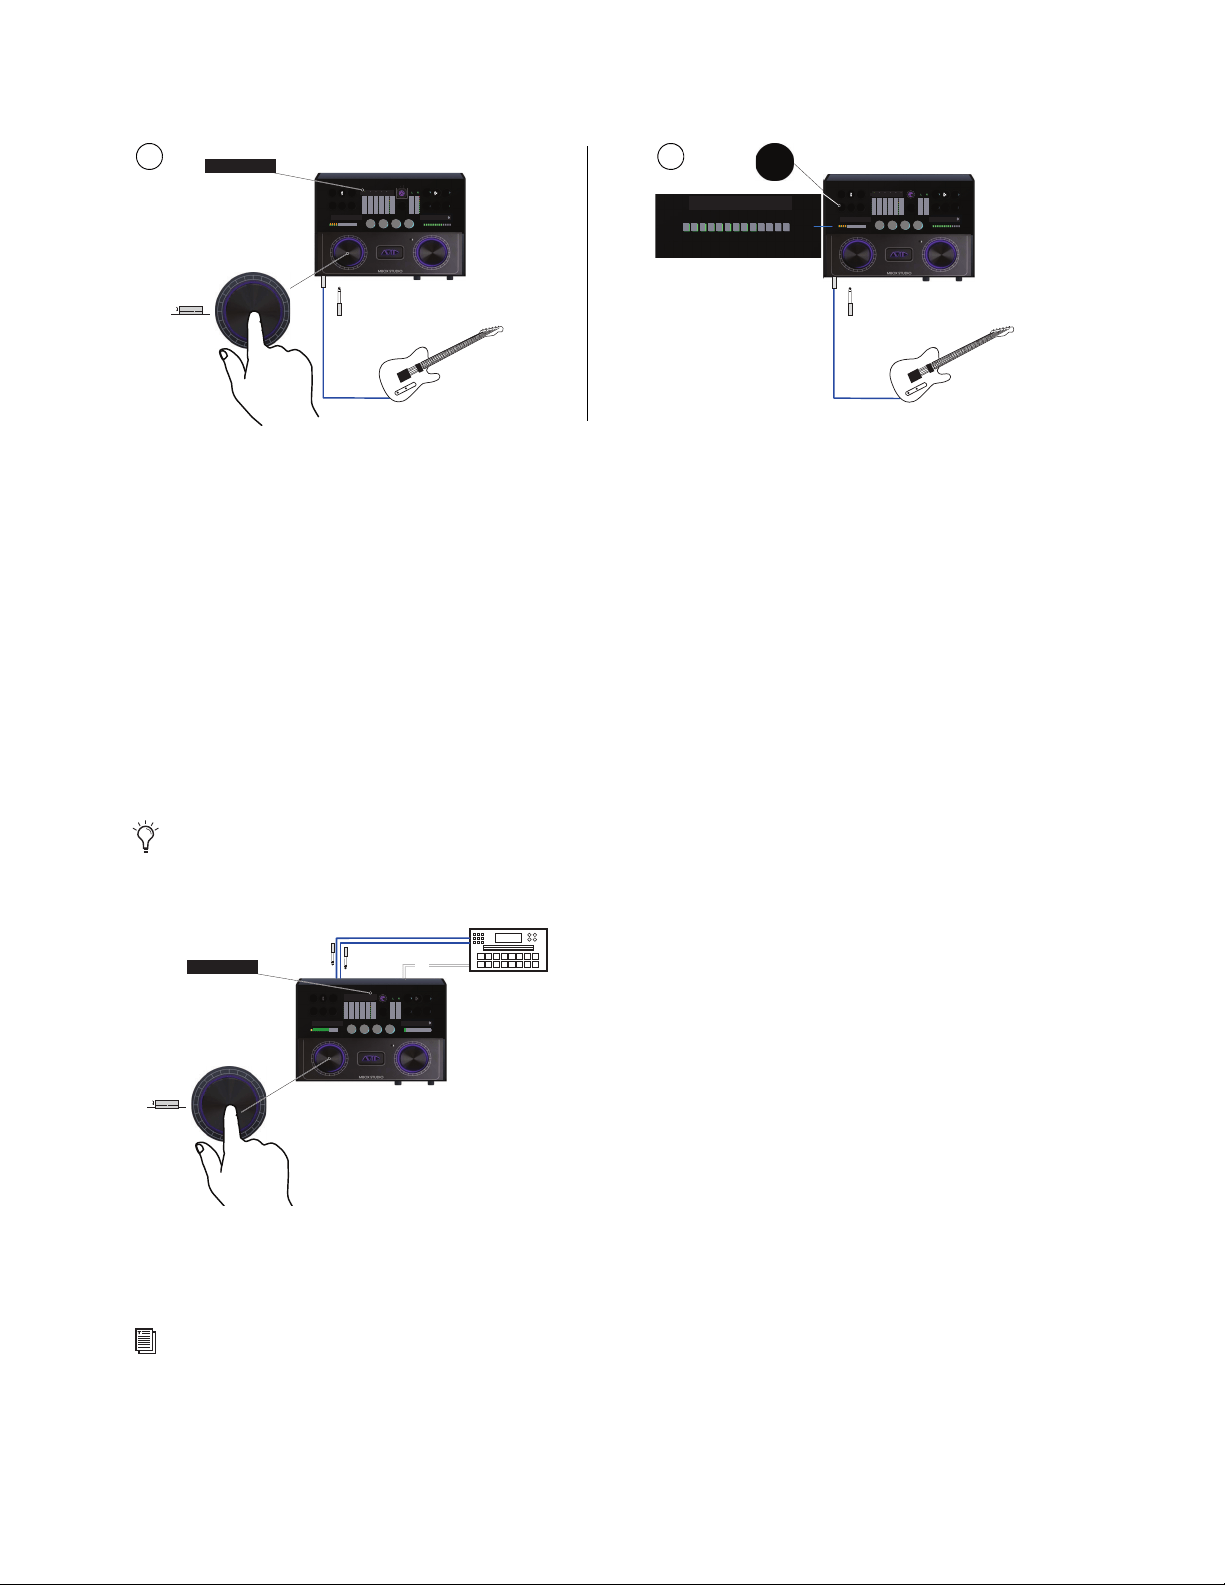
Using MBOX Studio
47
4 Adjust gain by rotating the left Encoder while playing. Use the front panel input meters to set a level that sounds good to you.
Stereo Line Input
In addition to inputs 1–2 and 3–4, MBOX Studio provides Line Inputs 5–6 on the back panel, to connect stereo sources such as sam-
plers, turntables, and synthesizers.
To use a stereo source:
1 Connect the left and right outputs of your stereo source device:
• Use MBOX Studio LINE IN 5–6 inputs for the left and right outputs from synths, drum machines/samplers, turntables, external
sub-mixers, and similar “line level” sources.
• To use a stereo pair of microphones or other sources, connect them to any pair of MBOX Studio inputs. For example, for two XLR
microphones use inputs 1 and 2 on the front panel, or 3 and 4 on the back panel.
2 Press (or press and rotate) the left encoder until 5 and 6 light green above the Input meters. Line Inputs 5 and 6 are linked by default,
so you only need to select input 5 to automatically select both 5 and 6.
Input type (
LINE) is automatically selected for hardware inputs LINE IN 5–6.
3 Rotate the left encoder to adjust input gain.
4 To start recording in Pro Tools, see
Using MBOX Studio and Pro Tools.
Selecting a hardware input (shown at left) and specifying the input type (shown at right)
If you need independent control over input 5 (mono) and 6 (mono) press the LINK button in the Input section so it becomes unlit.
Selecting hardware inputs 5–6
See also
Integrating an External MIDI Device.
1 23456
TUNE
48V LINK
INPT
ZPAD
LINK MONO
MUTE
DIM TALK
MIC LINE INST
INST
MAIN
DIG
ALT
MBOX STUDIO
1
1 23456
1 23456
1 23456
TUNE
48V LINK
INPT
ZPAD
LINK MONO
MUTE
DIM TALK
MIC LINE INST
INST
MAIN
DIG
ALT
MBOX STUDIO
INPT
1 23456
MIC LINE INST
1
1 2
123 456
TUNE
48V LINK
INPT
ZPAD
LINK MONO
MUTE
DIM TALK
MIC LINE INST
INST
MAIN
DIG
ALT
MBOX STUDIO
123456
LINK
56
123456
L audio output
R audio output
(MIDI)
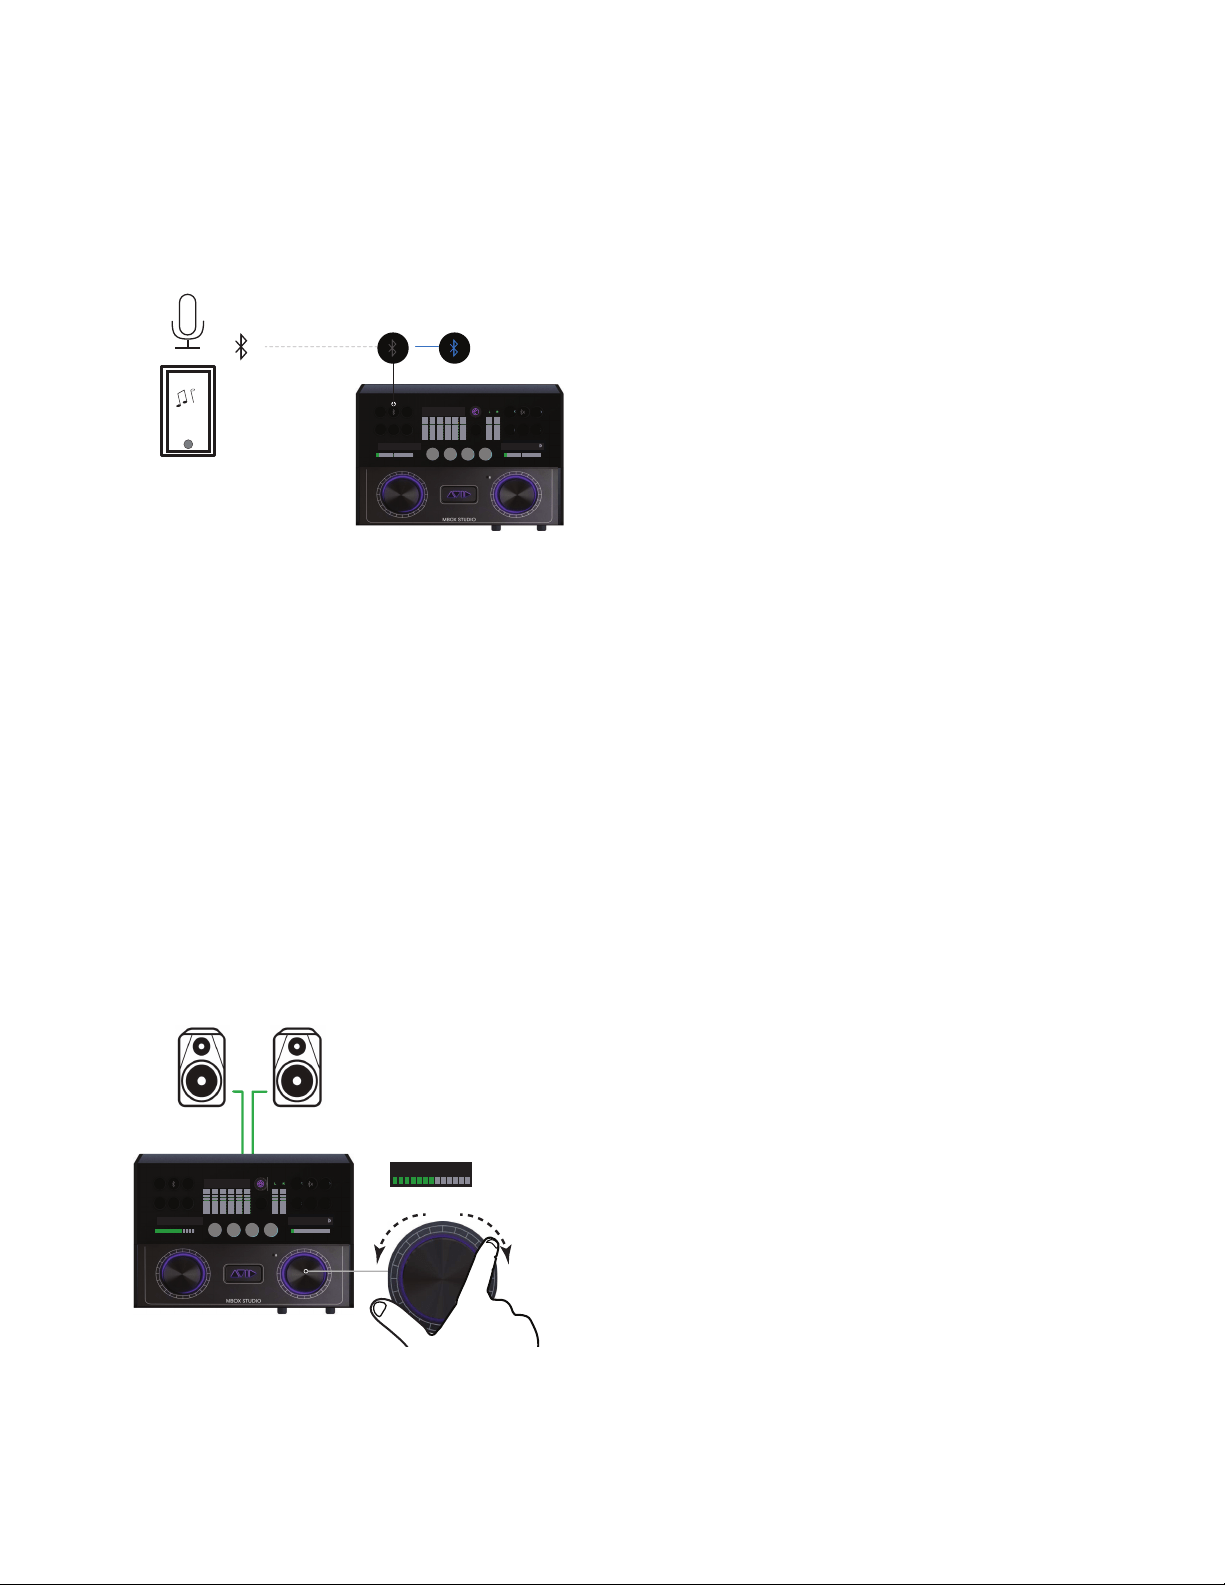
Using MBOX Studio
48
Bluetooth Input
MBOX Studio can be paired with other Bluetooth devices for wireless audio input and output.
To use a Bluetooth source:
1 Make sure Bluetooth is enabled on the tablet, computer, or other source device.
2 Press and hold the Bluetooth button in the Input section for 2 seconds. The Bluetooth button flashes blue while waiting to be paired.
3 On the Bluetooth source device, select MBOX in its list of discovered connections (such as MBOX IN 84EF). When the connection
is established the MBOX Studio Bluetooth (input) button stops flashing and lights blue.
4 To disconnect Bluetooth press and hold the MBOX Studio Bluetooth (input) button for 2 or more seconds. Or turn off Bluetooth on
your source device.
Audio Output
Connect speakers and headphones to MBOX Studio (see Example Audio Connections). The following section shows how to select and
adjust audio outputs.
Main and Alt Monitor
Use the controls on the right side of the MBOX Studio top panel to focus and adjust outputs.
To select and adjust MAIN or ALT output from MBOX Studio:
1 Repeatedly press the right encoder until MAIN or ALT is selected. MAIN lights green and ALT lights yellow.
2 Rotate the right encoder, or the Monitor encoder on-screen, to adjust output volume.
3 Press MUTE or DIM to silence (Mute) or soften (Dim) the selected output.
Pairing MBOX Studio with a Bluetooth source device
Adjusting output level
123 456
TUNE
48V LINK
INPT
ZPAD
LINK MONO
MUTE
DIM TALK
MIC LINE INST
INST
MAIN
DIG
ALT
MBOX STUDIO
123 456
TUNE
48V LINK
INPT
ZPAD
LINK MONO
MUTE
DIM TALK
MIC LINE INST
INST
MAIN
DIG
ALT
MAIN
DIG
ALT
MAIN
DIG
ALT
MBOX STUDIO
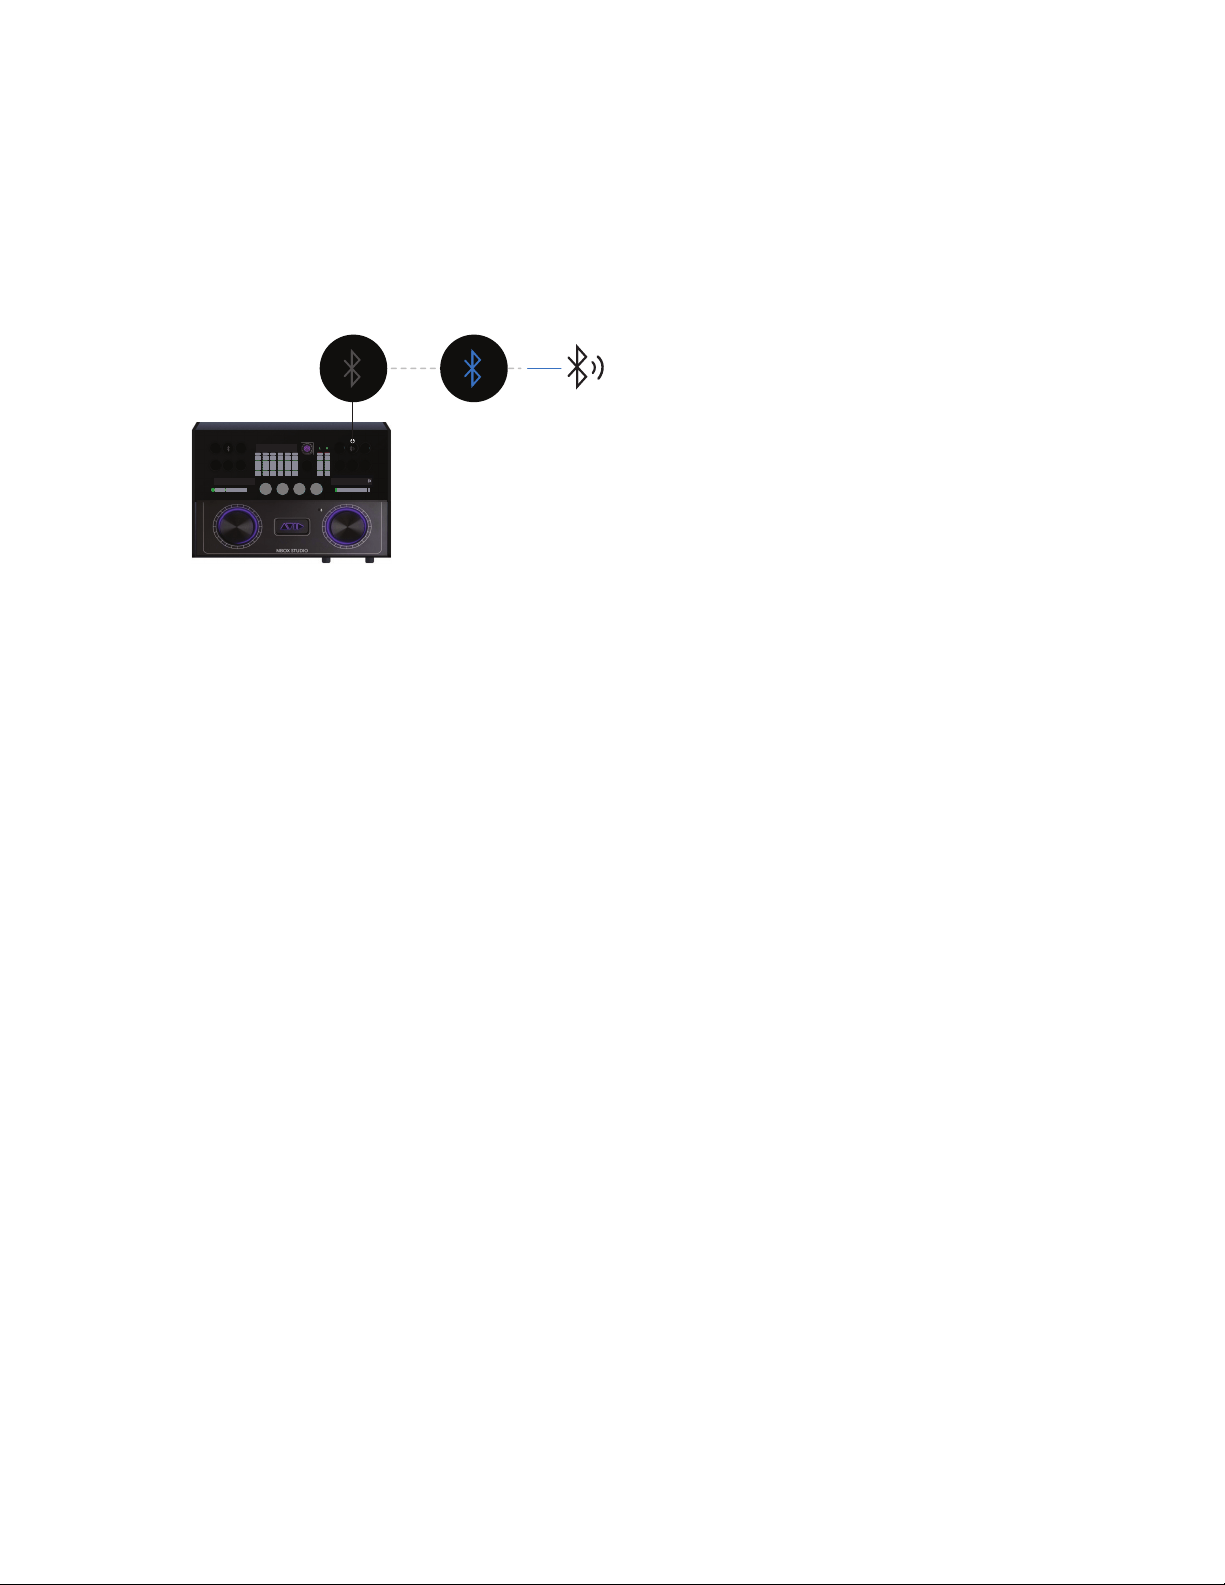
Using MBOX Studio
49
Bluetooth Output
MBOX Studio can be paired with other Bluetooth device for wireless audio input and output.
Bluetooth output always mirrors the ALT mix.
To use Bluetooth output:
1 Make sure Bluetooth is enabled on the tablet, computer, or other receiving device.
2 Press and hold the Bluetooth button in the Output section for 2 seconds. The Bluetooth (output) button flashes blue.
3 Put your external Bluetooth speaker or headphones into Bluetooth pairing mode. When the connection is established the
MBOX Studio Bluetooth (output) button stops flashing and lights blue.
4 To disconnect Bluetooth press and hold the MBOX Studio Bluetooth (input) button for 2 or more seconds. Or turn off Bluetooth on
your source device.
Pairing MBOX Studio with a Bluetooth device (speaker, headphone, or other)
123 456
TUNE
48V LINK
INPT
ZPAD
LINK MONO
MUTE
DIM TALK
MIC LINE INST
INST
MAIN
DIG
ALT

Using MBOX Studio
50
Using the Tuner
MBOX Studio provides a built-in tuner that can be used from both the top panel and in MBOX Control.
To use the tuner:
1 On the MBOX Studio top panel, press the TUNE button.
2 Select the Tuner input by pushing the top panel left encoder until the correct input number is shown.
Each press cycles through INST input 1 or 2 (MBOX Studio must detect an instrument connection) and the Talkback Mic input. The
Talkback Mic will be the Tuner source if nothing is connected to INST 1 or 2. When MBOX Studio detects only one Instrument input
connection, that input is automatically chosen for the tuner.
3 Begin playing and tuning.
• The on-screen Tuner window shows a traditional tuner bar.
• The detected pitch is shown in the top panel input meters.
• The horizontal input gain LEDs indicate sharp or flat by lighting red from center to the left for flat and to the right for sharp.
4 Press TUNE again to exit Tuner mode and close the on-screen Tuner window.
Tuner Options
You can vary the Tuning reference pitch, and Mute the Tuner output signal in the MBOX Control Tuner window.
To set the Tuning reference:
In MBOX Control Tuner window, choose a pitch from the Reference selector.
To mute:
Click the MUTE button in the Tuner window.
Setting the tuner input (shown at left) and tuning (shown at right)
Tuner
1 23456
1 23456
MBOX STUDIO
TUNE
1
TUNE
48V LINK
INPT
ZPAD
LINK MONO
MUTE
DIM TALK
MIC LINE INST
INST
MIC LINE INST
INST
MAIN
DIG
ALT
1
2
TUNE
123456
MBOX STUDIO
TUNE
48V LINK
INPT
ZPAD
LINK MONO
MUTE
DIM TALK
MIC LINE INST
INST
MAIN
DIG
ALT
3
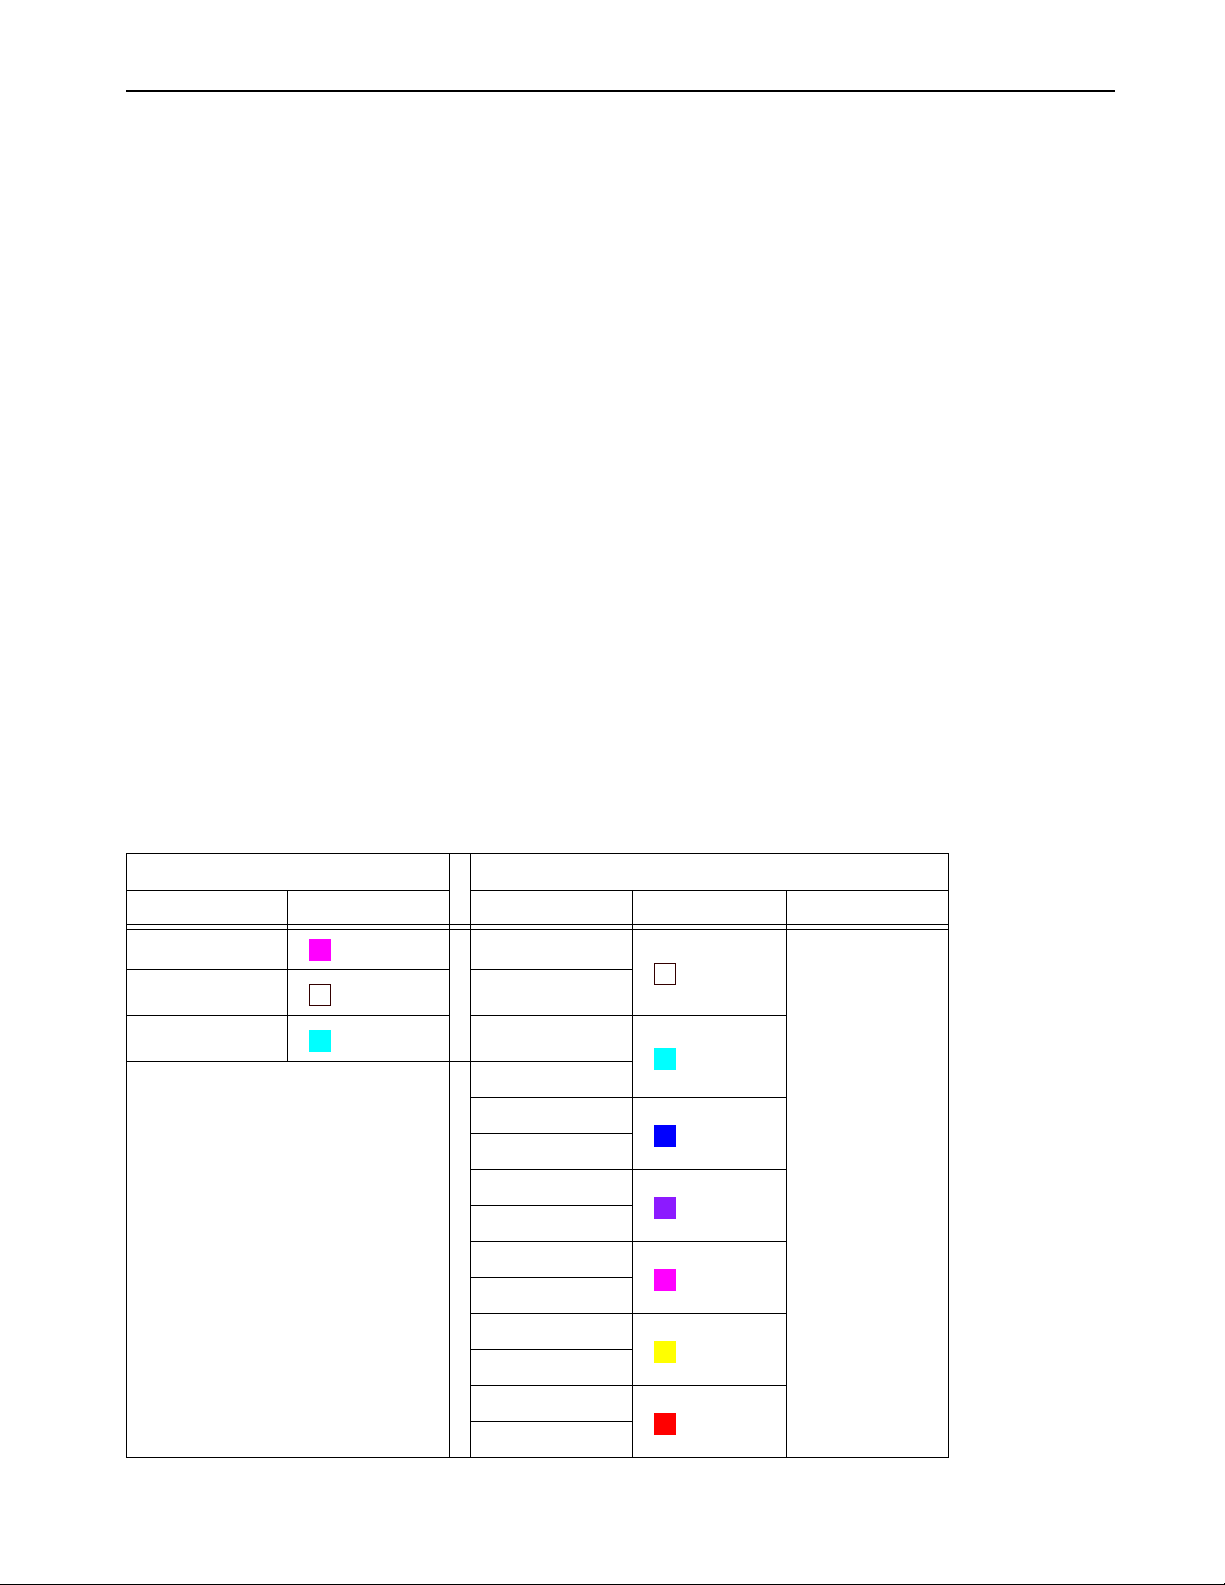
Using MBOX Studio
51
About Variable-Z
(Variable Impedance)
MBOX Studio Mic/Line/Inst inputs 1–2 and Mic/Line inputs 3–4 provide Variable-Z input impedance selection for mic, instrument,
and effect compatibility, tone, and “feel.” In addition, FX Sends 1–2 offer optional Hi-Z output impedance. Using different impedance
settings on microphones gives different tonal characteristics to the mic. With guitar, Variable-Z alters the frequency response by loading
the pickups in the same manner as plugging into a real amp or effect. This setting only affects instruments with passive pickups. Gen-
erally, the lower the impedance setting the darker it might sound.
FX Sends 1–2 on the back panel operate by default at Line/Lo-Z for connection to external, line level devices such as effects proces-
sors. These outputs can be individually switched to Hi-Z (high impedance) for connection to stomp boxes and other devices that expect
a high impedance signal. The front panel
Hi-Z Out to Amp connector always operates at high impedance. An optional ground (earth)
lift can be applied in MBOX Control
Preferences. (The Hi-Z Out to Amp mix always mirrors FX Send 2.)
+ CAP
Impedance settings with “+ Cap” in their name indicate settings that also apply modeled input capacitance. Variable Z is an all analog
circuit including the + Cap capacitor. For a basic guideline, try one of the + Cap settings when using an amp simulation plug-in preset
that has a tube (valve) amp, or a stomp box as the first device in the chain. In MBOX Control you can choose a
+ Cap setting from the
Z selector in Channel Focus. You can also choose +Cap settings from the MBOX Studio top panel.
To choose + CAP values using the MBOX Studio top panel:
1 Press and hold the Z button to enter +CAP mode. The Z button pulses slowly to indicate impedance settings are now including +CAP.
2 Press Z again to exit +CAP mode to cycle through impedance values without +CAP. Button should reflect value selected in software,
solid color without +CAP and slight pulsing color with +CAP.
Mic and Instrument Impedance Settings
The following impedance settings are available for mic and instrument inputs. (For a good explanation of input impedance and some
specific recommended settings for different equipment, see The Truth about True-Z.)
MBOX Studio Mic and Instrument Input Impedance Settings
Mic Instrument
Impedance Color Indication Impedance Color Indication + Cap Indication
1K Ohm 1M Ohm (Hi-Z)
(white)
Light pulses
5k Ohm (white) 1M Ohm + Cap
10k Ohm 230k Ohm
(cyan)
230k Ohm + Cap
90k Ohm
(blue)
90k Ohm + Cap
70k Ohm
(violet)
70k Ohm + Cap
32k Ohm
(fuchsia)
32k Ohm + Cap
22k Ohm
(yellow)
22k Ohm + Cap
HiZ
(red)
HiZ + Cap

Using MBOX Studio
52
Using MBOX Studio and Pro Tools
Pro Tools and MBOX Studio optimize tracking and mixing workflows by providing tactile control of many frequent tasks including in-
put selection, discrete headphones/cue setup and mixing, and more.
When Pro Tools and MBOX Studio have been installed for the first time, Pro Tools automatically detects MBOX Studio as the
Playback
Engine
, and configures I/O Setup with default MBOX Studio Input, Output, and Bus paths.
When opening sessions created on a different system without MBOX Studio, be sure to check the Playback Engine and if necessary se-
lect MBOX Studio.
Recording and Tracking
MBOX Studio provides up to 21 discrete hardware inputs (at 44.1/48k) that are available in Pro Tools as track input paths. In MBOX
Control, these are the channels in the Hardware Input section. Use these controls, and the complete set of controls in Channel Focus, to
shape the sounds of what you will record in Pro Tools.
MBOX Studio also provides 8 channels of “returns” (outputs) from Pro Tools or other software. In MBOX Control, these are the chan-
nels in the
Software Input section. Use these for your speakers and headphones.
Recording Audio
To record an audio track:
1 Make sure you have already installed Pro Tools, set up the
Playback Engine and I/O Setup for MBOX Studio and MBOX Control,
and confirmed speakers, headphones, or other Audio Output for monitoring.
2 If not already running, launch MBOX Control (press the MBOX button on the top panel, or manually launch it on your computer).
then click the gear icon to open Preferences and do the following:
• Configure
Clocking Options: Choose a Clock Source and Sample Rate for your session.
• (Optional) Configure Metering.
3 In Pro Tools, create one or more audio tracks for what you want to record.
4 From the track’s Input Path selector, select the MBOX Studio input(s) you want to record (such as Mic/Line 3).
5 From the track’s Output Path selector, select the MBOX Send 1–2 (Stereo) monitoring path.
Pro Tools Artist can use up to 16 of the available hardware inputs simultaneously. Pro Tools Intro can use up to 4.
If you are new to Pro Tools, see the Pro Tools Quick Reference Guide, available from the Getting Started tab of the Pro Tools Dash-
board (File > Open Dashboard). For complete Pro Tools documentation, choose Help > Pro Tools Help.
If recording electric guitar, consider creating and recording to two mono audio tracks: one for the sound of your guitar through any
pedals, effects, amps, or microphone(s), and a second track to record a “dry” (direct) signal. Then use the dry track for
Re-Amplifi-
cation through the Hi-Z Output to Amp.
Assigning track input and output
4
5
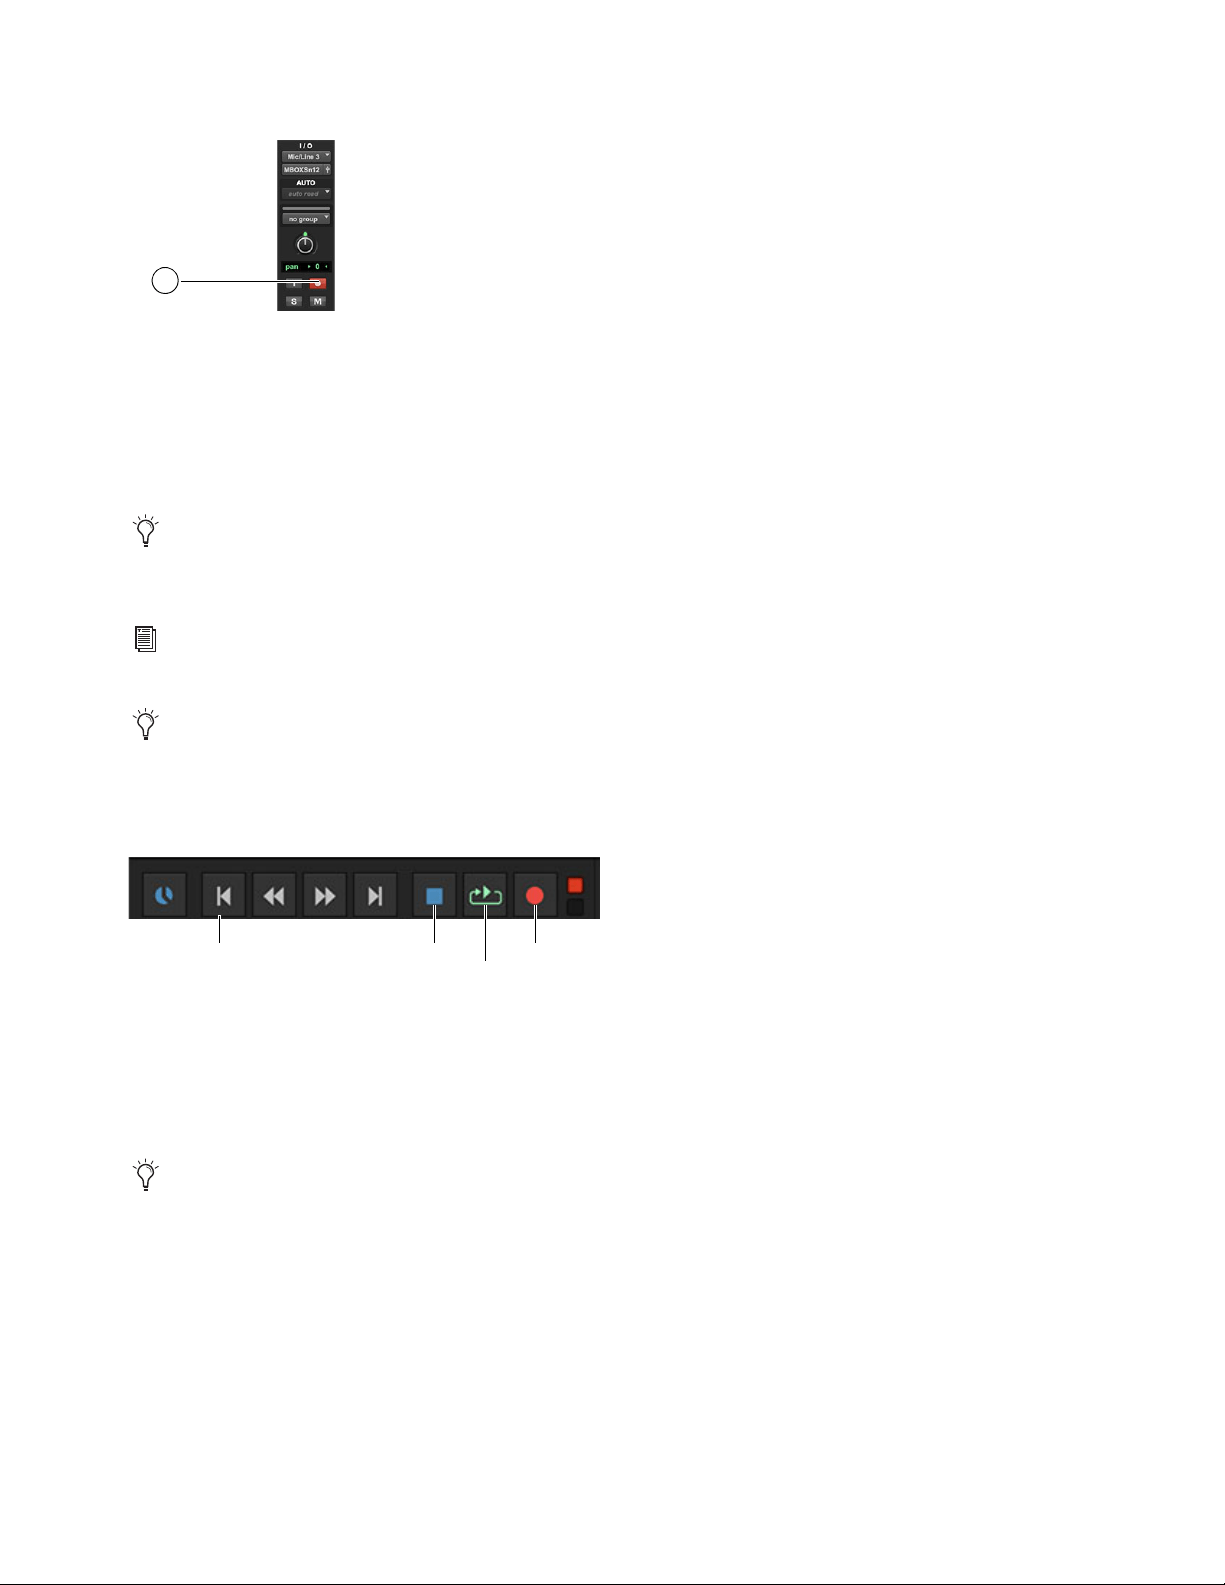
Using MBOX Studio
53
6 Click the Record Enable button for the audio track. It lights red. (You can also enable Input Monitoring, and record enable later.)
7 Begin performing to check levels.
• Adjust MBOX Studio gain and other settings for
Audio Input as appropriate for your source(s).
• Monitor the track’s meter levels in Pro Tools. Signals should meter green most of the time, only light yellow for the loudest pas-
sages, and never light red (clipped).
8 In Pro Tools, adjust track volume and pan. These settings are for monitoring purposes only and do not affect the recorded material.
9 If you are performing to any pre-recorded material but it or your input signal sounds late or delayed (known as “latency”) choose Op-
tions > Low Latency Monitoring.
Any plug-ins and sends on record-enabled tracks are automatically bypassed.
10 Click Record in the Transport window to arm Pro Tools for recording. The Record button flashes red.
11 When you are ready to start recording, make sure the track is record enabled, click Play or press the Spacebar, and record your per-
formance.
12 Click Stop in the Transport window or press the Spacebar when you are finished recording.
To play back the audio track:
1 Click the Record Enable button for the audio track so that it is no longer record-enabled. Track volume faders now function as play-
back level controls.
2 To have playback start from the beginning of the session, click Return to Zero in the Transport.
3 To start playback, click Play in the Transport or press the Spacebar.
4 Use the MBOX Studio right encoder to adjust overall listening volume (for more information, see
Main and Alt Monitor).
Assigning track input and output, and record enabling a track in the Mix window
See also
Setting Up Pro Tools for Headphone Mixes.
For more information see
Reducing Monitoring Latency.
To use reverb and delay in headphone mixes, see
Using AVID FX.
Stop, Play, and Record buttons
If a record-enabled track is in Auto Input Monitor mode, you will hear “through” the input while the Transport is stopped. The track
automatically switches to playback when you press play, then back to Input mode when you either stop, or punch into record. For more
information about Auto Input Monitor mode, see Help > Pro Tools Help.
6
Record
Play
Stop
Return to Zero

Using MBOX Studio
54
Setting Up Pro Tools for Headphone Mixes
MBOX Studio provides 8 channels of inputs from Pro Tools in the Software Input section. The following example suggests one way
you can configure Pro Tools signal routing for maximum flexibility when creating and managing headphone mixes.
To configure Pro Tools for headphone mixes:
1 Include an “everything” mix by making sure your stereo Pro Tools mix is assigned to MBOX Studio Internal 1–2. This could be from
an Auxiliary Input that is submixing all Pro Tools audio, or directly from each Pro Tools track output.
2 Next, use Pro Tools Sends and Auxiliary Inputs to set up submixes for up to 6 mono or up to 3 stereo sends that need to be individually
adjustable in each different mix. For example, to create an Auxiliary Input for a stereo submix of all drums do the following:
• Select all the drum tracks.
• Hold Option+Shift (Mac) or Alt+Shift (Windows) and click an available Send selector on any of the drum tracks.
• Choose
new track...
• The New Track dialog opens pre-configured to create one new stereo Auxiliary Input track. Enter a custom name for the new track
(such as “Drums cue”) and click OK.
Pro Tools adds a new Send to each selected track, creates a new stereo bus, creates a new Auxiliary Input, and automatically assigns
its input to the newly created bus.
3 Assign the new Auxiliary Input track’s output to an available MBOX Send (such as MBOX Studio Internal 3–4 for a stereo send, or
an available sub-path such as MBOX Studio Internal 3 for a mono send).
4 For each track (each drum track in this example) click the newly added send to open its control window, then raise the fader to set
how much of the track signal is sent to the Auxiliary Input.
5 Raise the Auxiliary Input fader as needed to send sufficient signal back to MBOX Studio.
6 In MBOX Control, make sure to select the desired output mix (such as Headphone 1) then raise the appropriate Software Input fader
(such as Internal 7) to include its Pro Tools source audio in the selected output mix.
7 Repeat for other instruments, submixes, or tracks.
Creating a new stereo Aux Input in the New Tracks dialog
Assigning track output to an available MBOX Send (shown at left) and the Send window (shown at right)
43
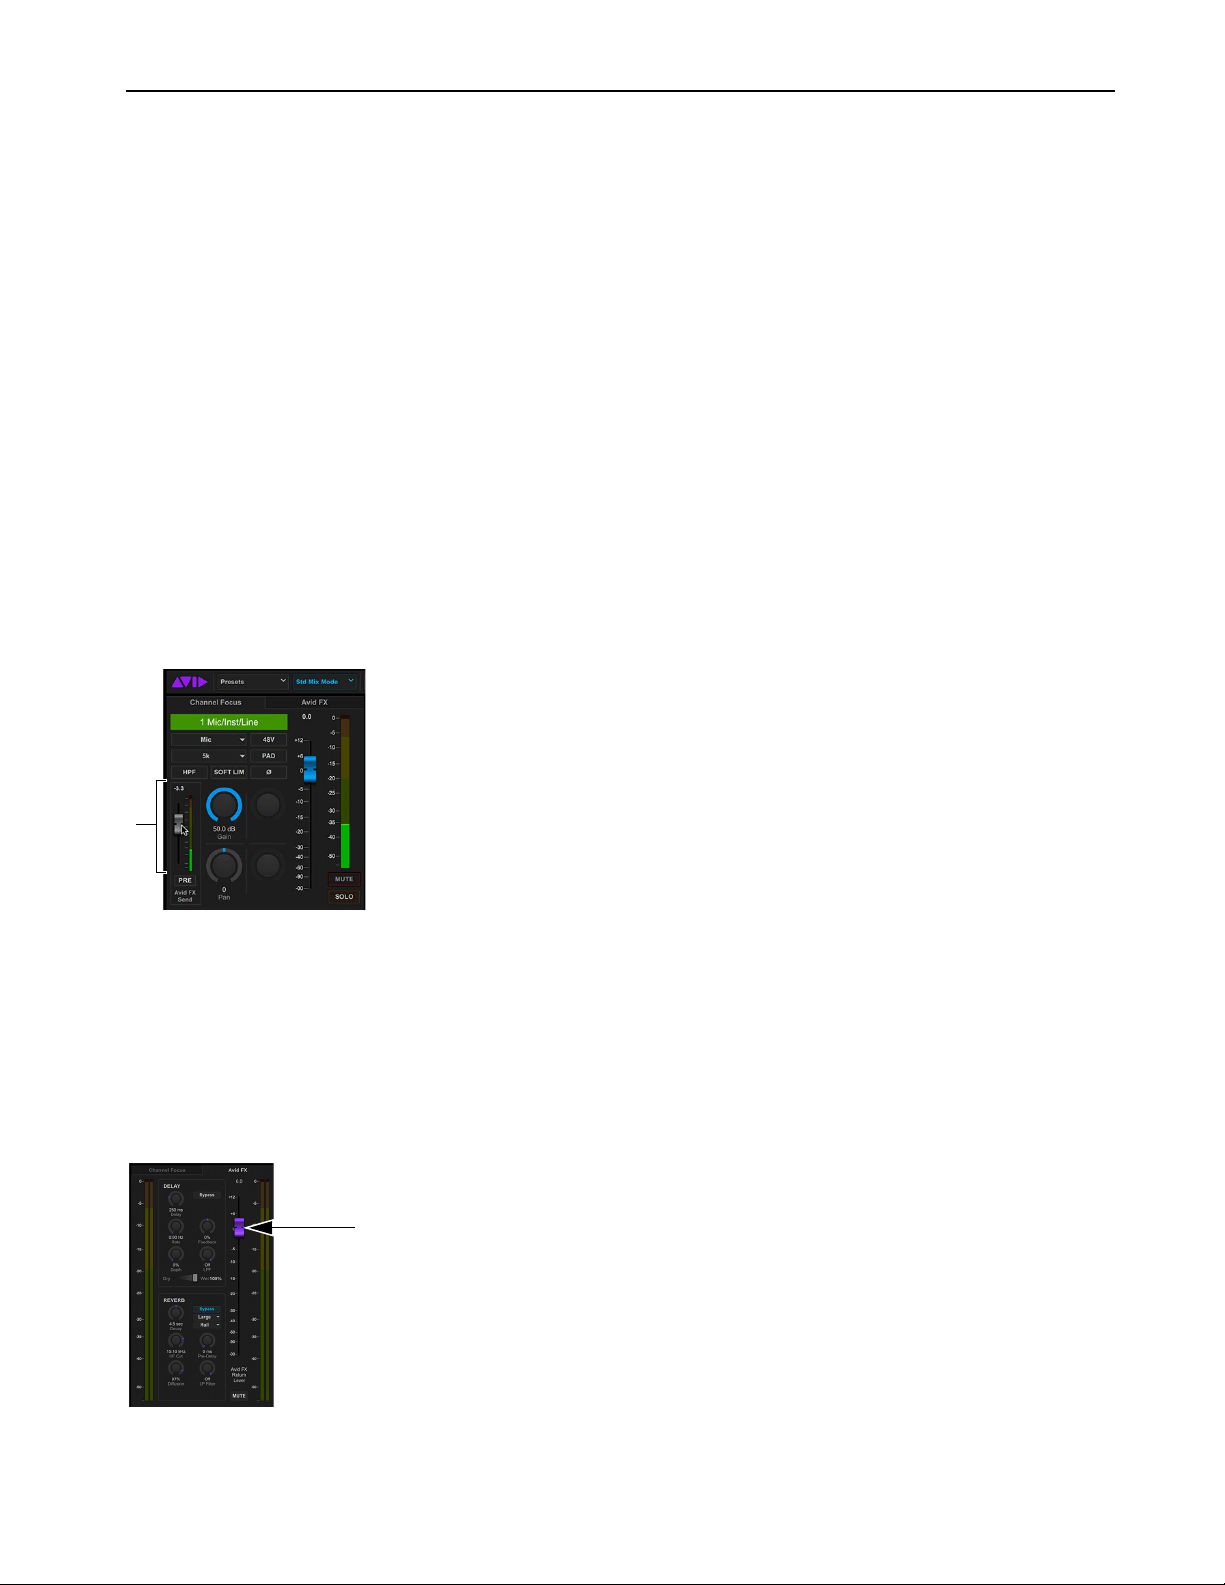
Using MBOX Studio
55
Using AVID FX
MBOX Reverb and Delay
MBOX Studio includes built-in EQ, delay and reverb using AVID FX.
• Use built-in 4-band EQ on input channels. Channel EQ can be applied to headphone and other MBOX Studio monitoring outputs
only, or applied to the channel send going to Pro Tools.
• Use AVID FX Delay and Reverb to have effects in headphones or other mixes for low latency monitoring.
AVID FX send faders are available on all input channels to set the level being sent to effects (all channels share the same delay and re-
verb settings).
Using AVID FX for Headphone Mixes
To apply AVID FX delay and reverb to a headphone mix:
1 In MBOX Control, click to select Headphone 1 or Headphone 2 in the Hardware Output section.
2 Adjust Hardware Input and Software Input levels and pan.
3 Click to select the first desired input channel. That channel is shown in Channel Focus.
4 In Channel Focus, raise the Avid FX Send fader until you see levels on its meter. The Channel Focus AVID FX Send fader controls
the FX send level for the currently focused channel.
5 Optional: Enable PRE to make the AVID FX send be tapped at the “top of channel” (meaning without any Channel Focus EQ).
6 Click AVID FX to open the AVID FX tab.
7 In the Hardware and Software Input sections all fader caps light purple; adjust a purple input fader to set its AVID FX Send level.
8 In the Hardware Output section the knobs at the top of each channel strip light purple; adjust a purple output channel encoder to set
the AVID FX Return level to that individual output.
9 Make sure the Avid FX Return Level is not muted, then raise the fader. This fader controls the level of AVID FX being returned in
all outputs.
Adjusting the AVID FX Send level for a channel
AVID FX Return Level fader
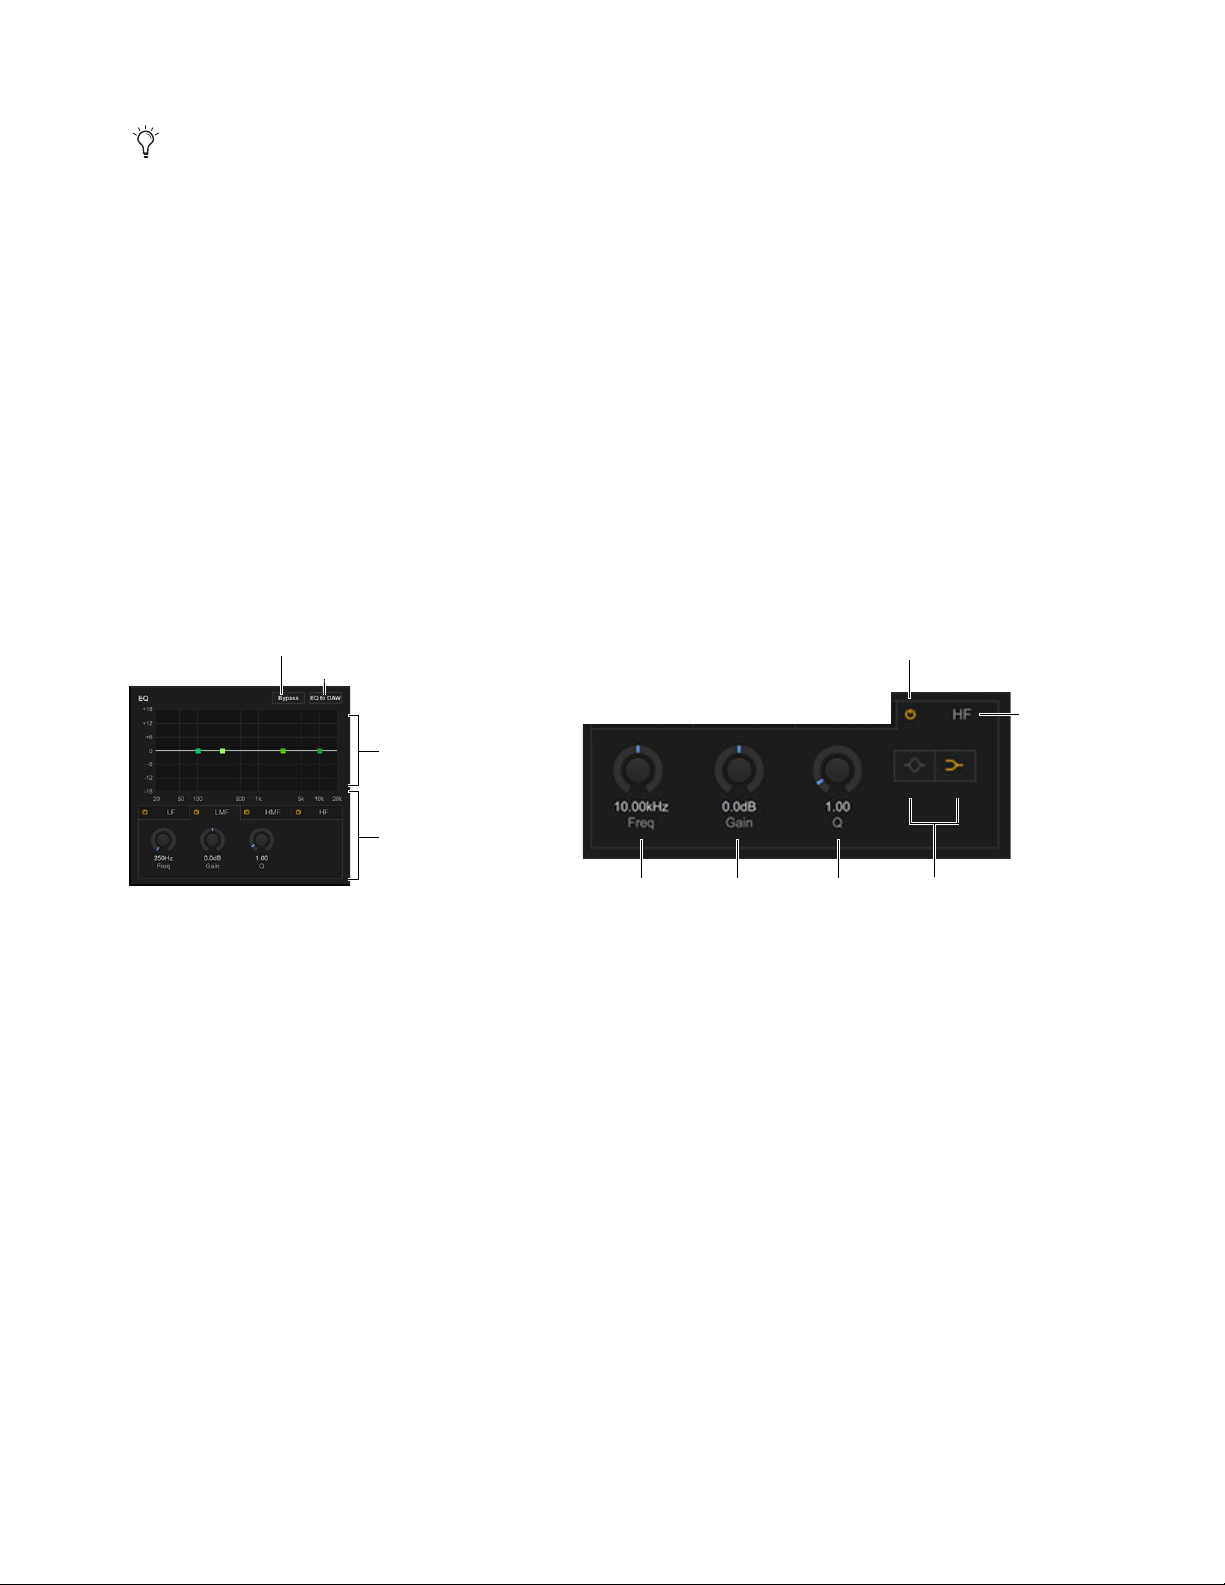
Using MBOX Studio
56
10 Configure delay and reverb parameters as desired (for descriptions see
Avid FX Delay and Reverb).
11 Adjust individual channel AVID FX Send levels using their purple faders in the Hardware Input, Software Input, and Hardware Out-
put sections. Adjusting the AVID FX Return faders on output channels lets you quickly raise or lower all effects in headphones or
other mixes.
Using AVID FX EQ
Channel Focus provides a 4-band parametric EQ for each Hardware Input channel. The built-in 4-band EQ can be used either on channel
feeds to MBOX Studio outputs such as headphones, or it can be applied to channel feeds going to Pro Tools.
To use AVID FX EQ:
1 Click to select the first desired input channel. That channel is shown in Channel Focus.
2 In the EQ section, make sure the Bypass button is off (not lit).
3 Adjust band parameters by clicking and dragging breakpoints in the graph. Or use the controls below the graph (click to select a band
(
LF, LMF, HMF, or HF) then adjust the available controls).
4 Repeat for other bands.
5 If you want to EQ the input channel going to Pro Tools, click to enable EQ to DAW.
AVID FX Delay and Reverb settings are saved and recalled in MBOX Control Presets.
EQ section of Channel Focus (shown at left) and band controls (shown at right)
Bypass
EQ to DAW
Graph
Bands
Band In/Out
Shape
(LF and HF only)
Frequency Gain Q
Band Select
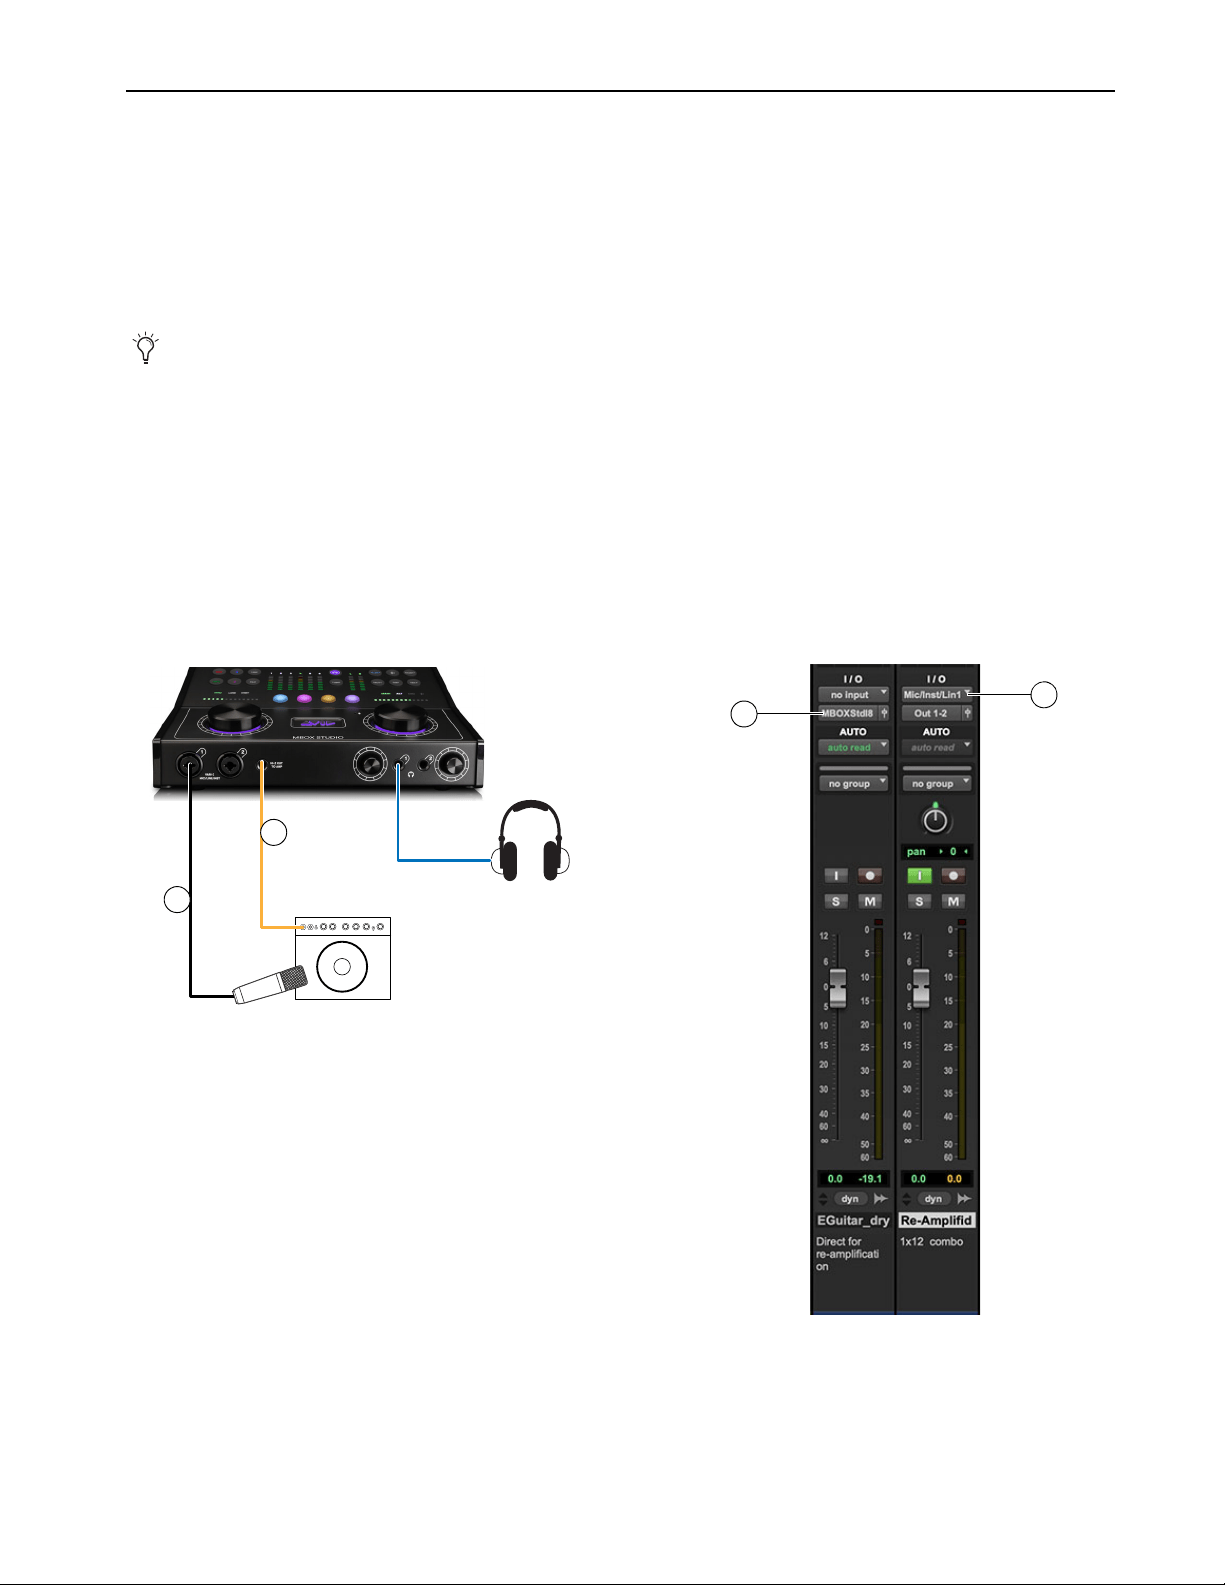
Using MBOX Studio
57
Re-Amplification
Re-amplification is the process of sending pre-recorded audio to an external amplifier and then re-recording the processed audio to a
new track. Often used on guitar tracks that were recorded direct, with no effects or amps, re-amplification can provide the same tonal
options, ambiance, and flexibility to vocals, drums, sound effects, and virtual instrument tracks.
Tracks can be sent from Pro Tools through the
Hi-Z Out to Amp output on MBOX Studio into one or more external amps or processors
and re-recorded through an MBOX Studio input.
A ground lift is provided on Hi-Z Out to Amp, providing the correct type of buzz kill when necessary.
The Hi-Z Out to Amp output and FX Send 2 always carry the same output mix.
To send a signal out the Hi-Z Output to Amp for re-amplification with an external amp:
1 Connect a TS (Tip/Sleeve) cable from the Hi-Z Out to Amp on MBOX Studio front panel to the input of your amp or other device.
2 Position and connect a microphone to an available MBOX Studio Mic/Line input, such as Mic/Line/Inst 1 on the front panel. (If you
need to change input focus, type, or other parameters, see
Audio Input and Output.)
3 In Pro Tools, choose the track to be re-amplified and assign its output to MBOX Studio Internal 8.
4 Create a new audio track and assign its input to the MBOX Studio input you connected the microphone to in step 2, above (such as
Mic/Inst/Line 1).
MBOX Studio also provides FX Loops 1–2 for integrating pedals, stomp boxes, and other effects devices. See Using FX Loops.
Connections for re-amplification
1
2
3
4
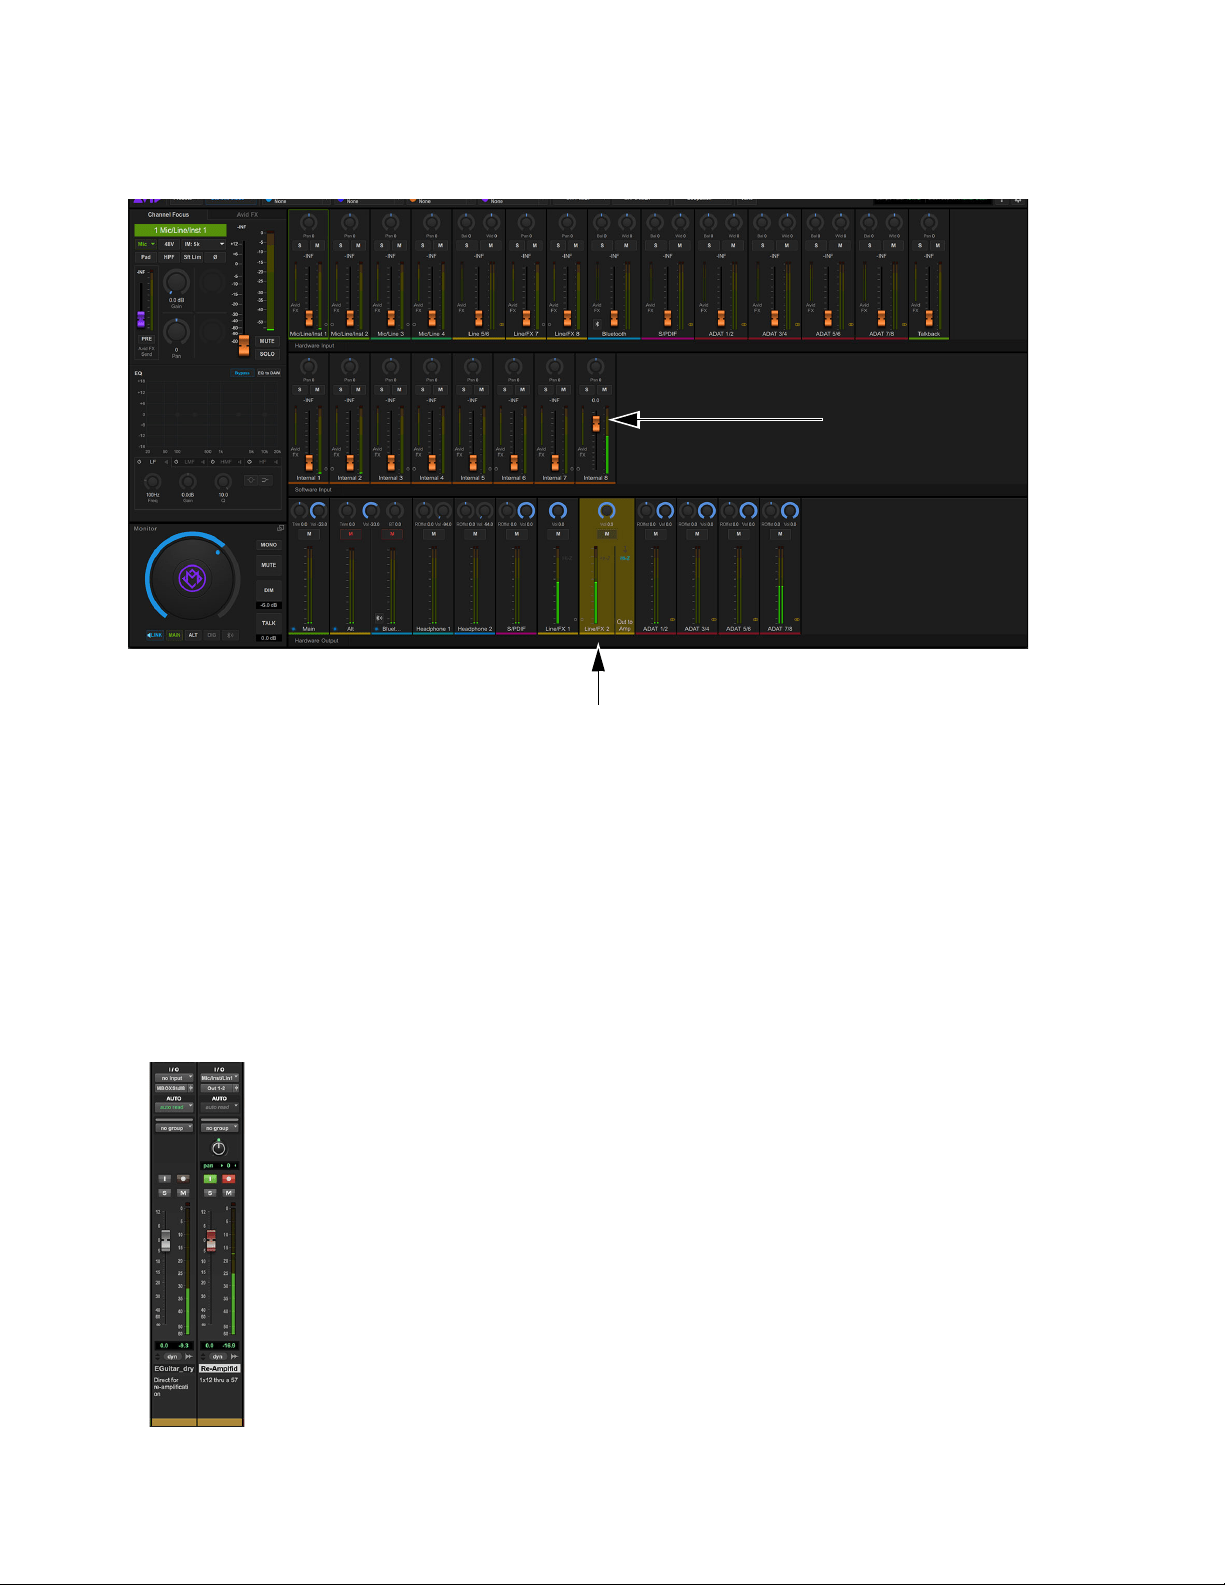
Using MBOX Studio
58
5 Start Pro Tools playback.
6 In MBOX Control, select the Line/FX2 / Out to Amp hardware output, then slowly raise the fader for Internal 8 (in the Software In-
put section) to adjust the level going to the amp.
7 While the track and session play, dial in the amp sound (adjust amp gain, volume, and tone controls as desired).
8 Set MBOX Studio input gain so input meters light green most of the time, and only light amber for louder signals.
9 In Pro Tools, record enable the destination (record) track for the re-amplified signal you created in step 4, above. Adjust device levels
as needed to have the Pro Tools track meter (on the recording track) only light amber when the loudest parts are playing.
10 When ready:
• Locate Pro Tools to the beginning of the material you want to re-amplify.
• Click Record in the Transport window to arm Pro Tools for recording. The Record button flashes red.
• Make sure the destination track is record enabled (its record button also flashes red) and then click Play or press the Spacebar.
11 Click Stop in the Transport window or press the Spacebar when you are finished recording.
Selecting Line/FX 2 output and adjusting Internal 8
Recording a re-amplified track
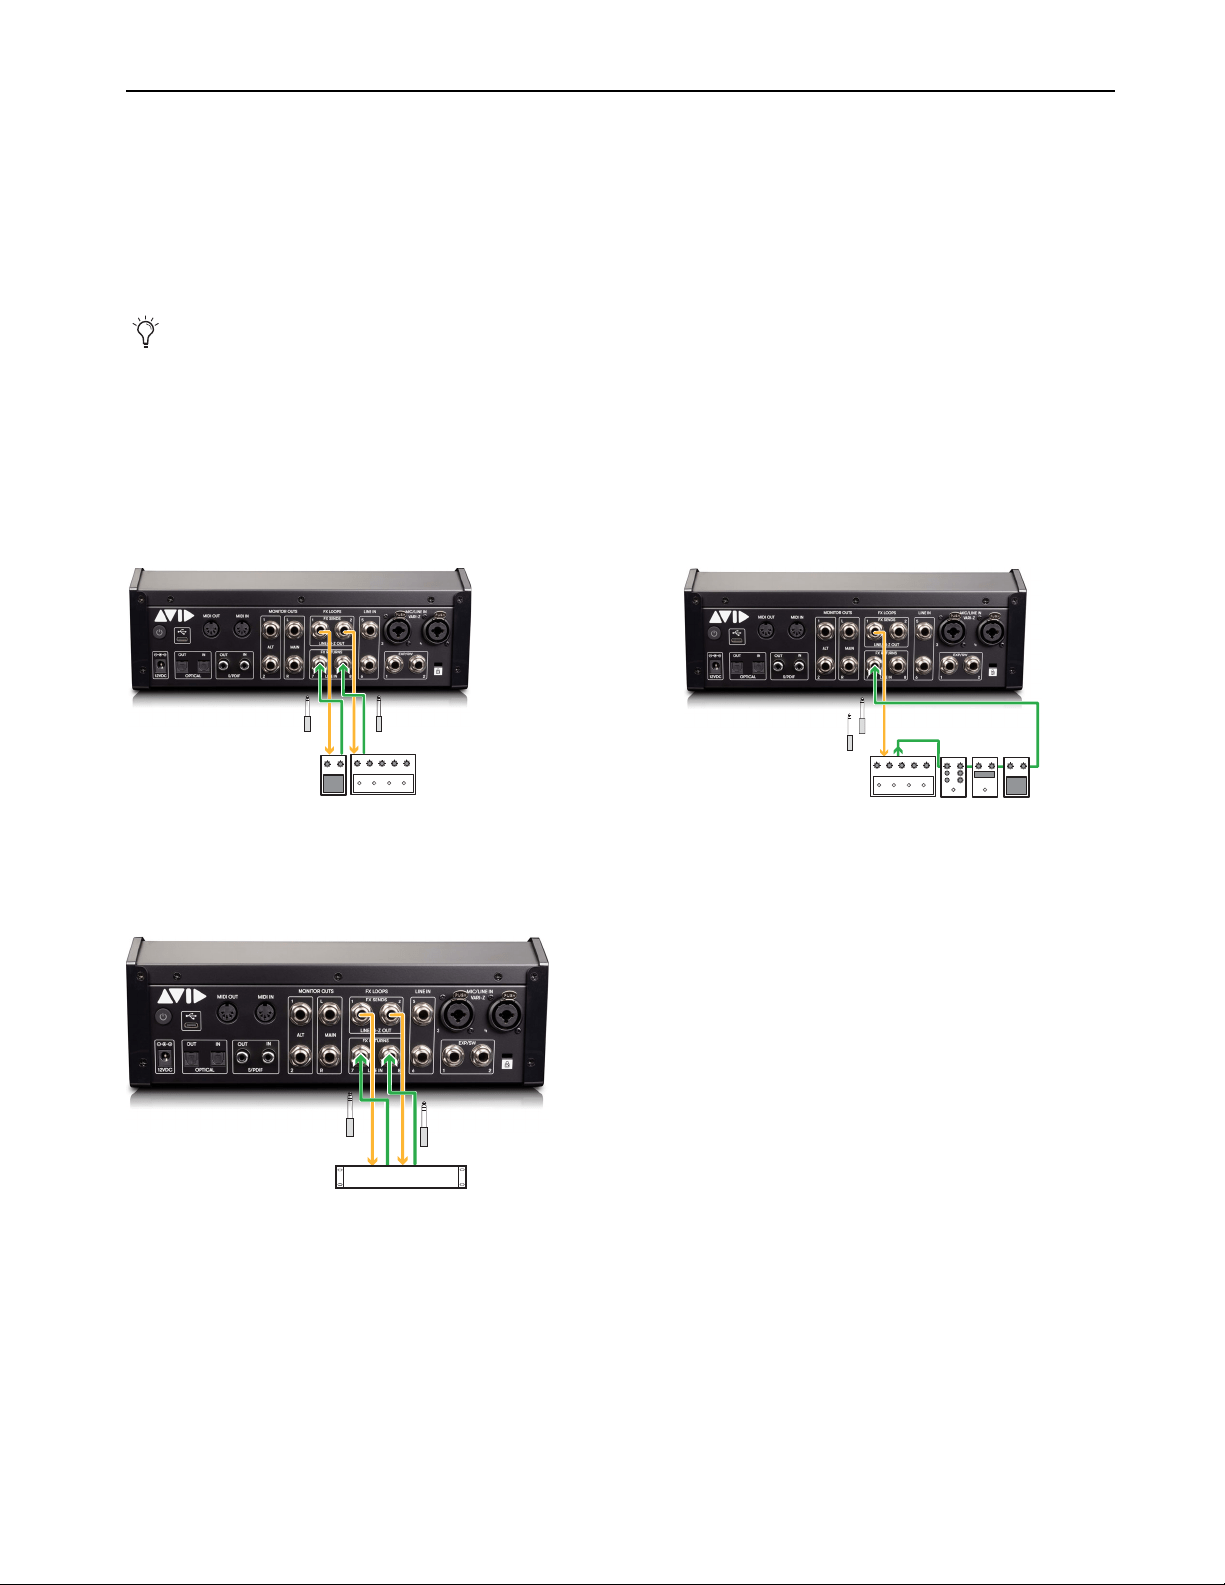
Using MBOX Studio
59
Using FX Loops
MBOX Studio provides two FX Loop inserts on the back panel. These four jacks (FX Sends 1 and 2, and FX Returns 1 and 2) let you
integrate external effects processors that can be applied to MBOX Studio audio, or to Pro Tools tracks. FX Sends 1 and 2 can be also
be used for additional outputs, and FX Returns 1 and 2 as additional inputs.
Both FX Sends 1 and 2 can be switched to high impedance (Hi-Z) when connecting to stomp boxes (guitar pedals) or other devices that
expect a high impedance signal at their input. Otherwise FX Sends operate at line level, to integrate rack mount or any other type of de-
vice that expects a line level input. You can enable or disable Hi-Z on each FX Send separately in
Preferences.
To use FX Loops:
1 Using 1/4-inch TS instrument cables, connect your device(s) to FX Sends 1 and/or 2:
• Connect FX Send 1 to the input of a mono device (such as a guitar pedal).
• Connect the output of that device to FX Return 1.
• If using a 2nd device, repeat the previous two steps to connect it to FX Send 2 and FX Return 2. Or connect multiple mono pedals
in series to either FX Loop 1 or FX Loop 2.
• If your external device is stereo, connect FX Send 1 to the left input of the device, and FX Send 2 to the right input. Then connect
the L and R outputs of the device to FX Returns 1 and 2, respectively.
You can also use the S/PDIF Out and In connectors to connect external digital devices such as a multi-effects box. See
Using S/PDIF.
Connecting two mono guitar pedals to FX Loops 1–2 (shown at left) and multiple pedals in series to a single FX Loop (shown at right)
Connecting a stereo rack mount effects processor
ABCD
ABCD
FX
1/Left 2/Right
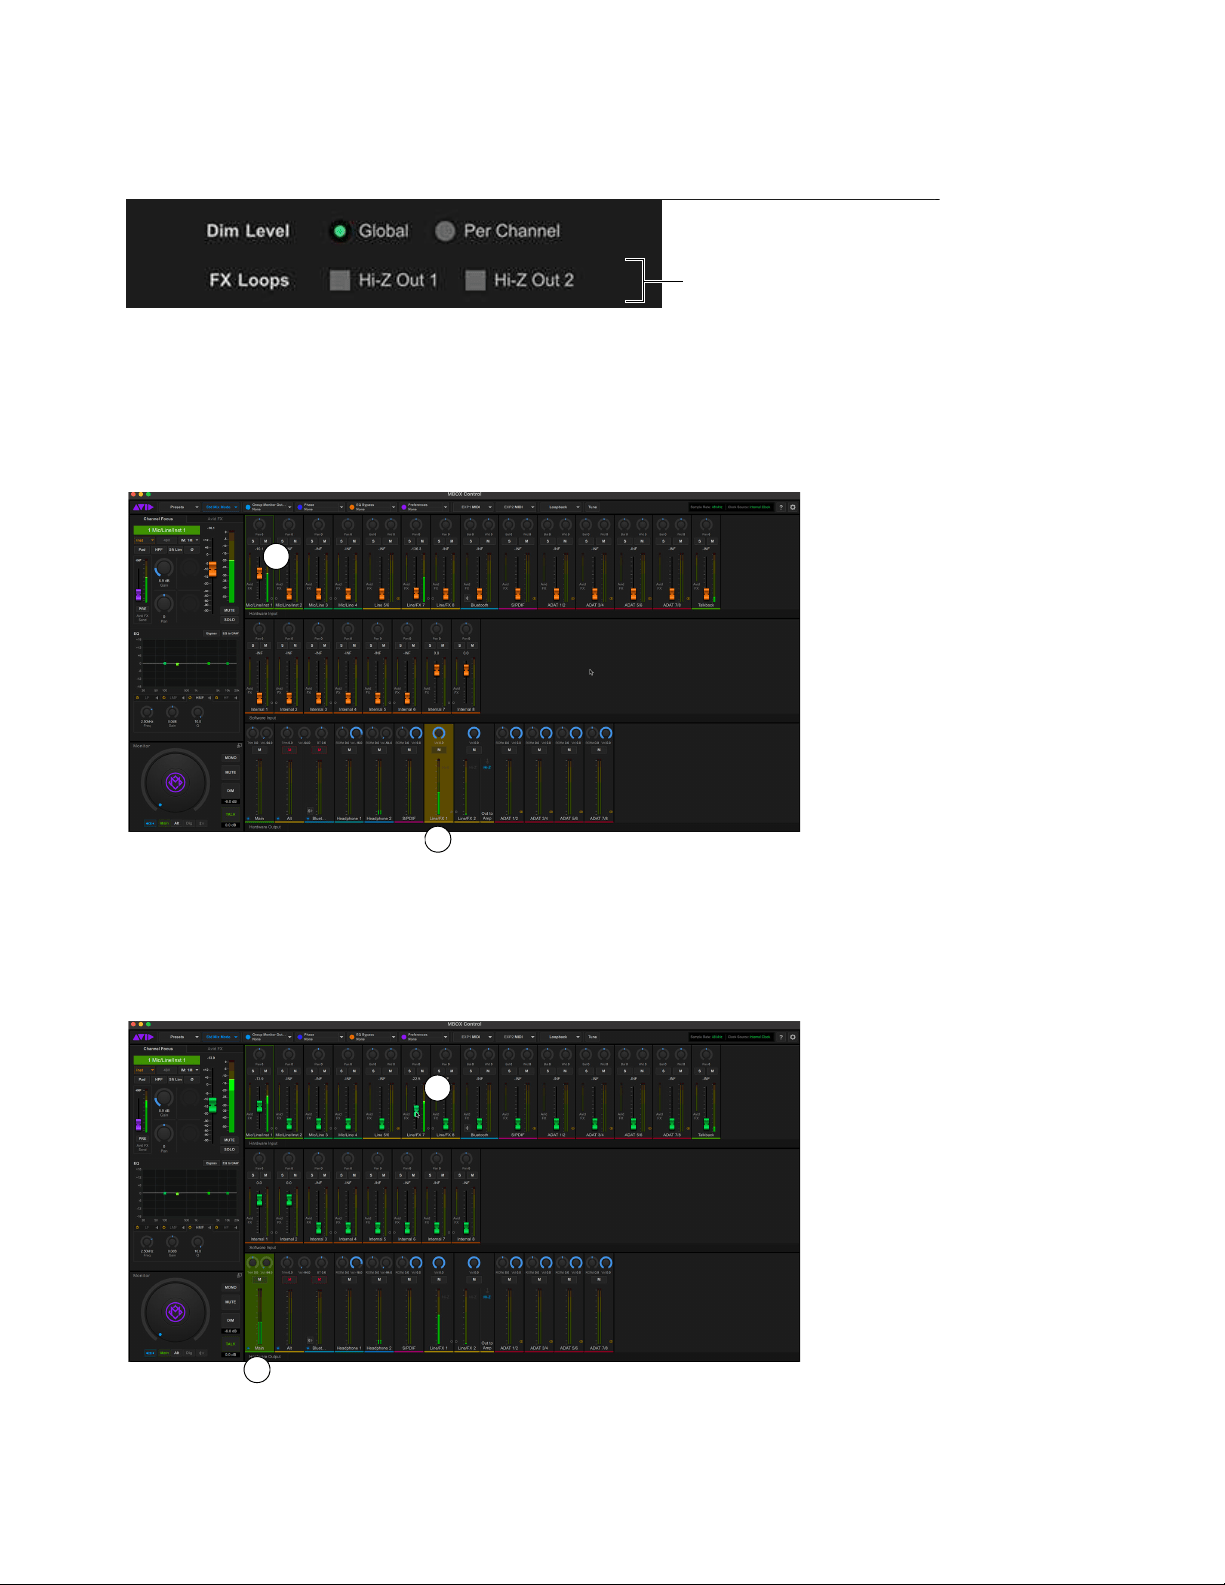
Using MBOX Studio
60
2 If connecting to guitar pedals or other high impedance devices, do the following in MBOX Control:
• Click the gear icon to open Preferences.
• In the FX Loops section, click to enable
Hi-Z Out 1 or Hi-Z Out 2, or both.
3 Click to select an FX return (Line/FX 1 or Line/FX 2) in the Hardware Output section.
4 In the Hardware Input or Software Input section, raise the input fader for the desired source. For example, if a guitar is connected to
Mic/Line/Inst In 1 on the front panel, use the Mic/Line/Inst 1 fader to raise or lower the level of Mic/Line/Inst In 1 signal being sent
to the FX Send 1 output on the back panel.
5 Click to select an Output mix (such as Main or a headphone mix).
6 In the Hardware Input section, adjust the fader(s) for Line/FX 7 (FX Return 1) or Line/FX 8 (FX Return 2) to set the overall amount
of FX return signal in the selected Output mix.
FX Loops settings in MBOX Control Preferences.
Adjusting the FX 1 Send level for Mic/Line/Inst 1
Adjusting the FX 1 Return level in Main
3
4
5
6

Using MBOX Studio
61
Using FX Loops 1–2 and Pro Tools
MBOX Studio FX Loops 1 and 2 are available for use in Pro Tools, making it easy to integrate high impedance stomp boxes and other
devices.
To use MBOX Studio FX Loops with Pro Tools:
1 Connect your external device(s) to FX Loop Sends and Returns as previously described.
2 In Pro Tools, assign a Send to the desired source track(s), set it to an available MBOX Studio Send path (such as MBOX Studio In-
ternal 7), then raise the Send fader level in the Send window that opens.
3 Create a new track:
• To be able to record the signal processed through MBOX FX Loops, create a new audio track (mono or stereo, depending on the
external device).
• If you only need to hear the external effect (and not record it into Pro Tools) create one new Auxiliary Input track.
4 Assign input on the new audio or Auxiliary Input track to the desired MBOX FX Return(s).
5 Begin playback.
6 In MBOX Control, raise the corresponding Internal input in the Software Input section.
7 Adjust the Pro Tools Send to raise or lower the signal being sent to the effect. To raise or lower the signal returning into Pro Tools,
adjust the output level of the external device(s).
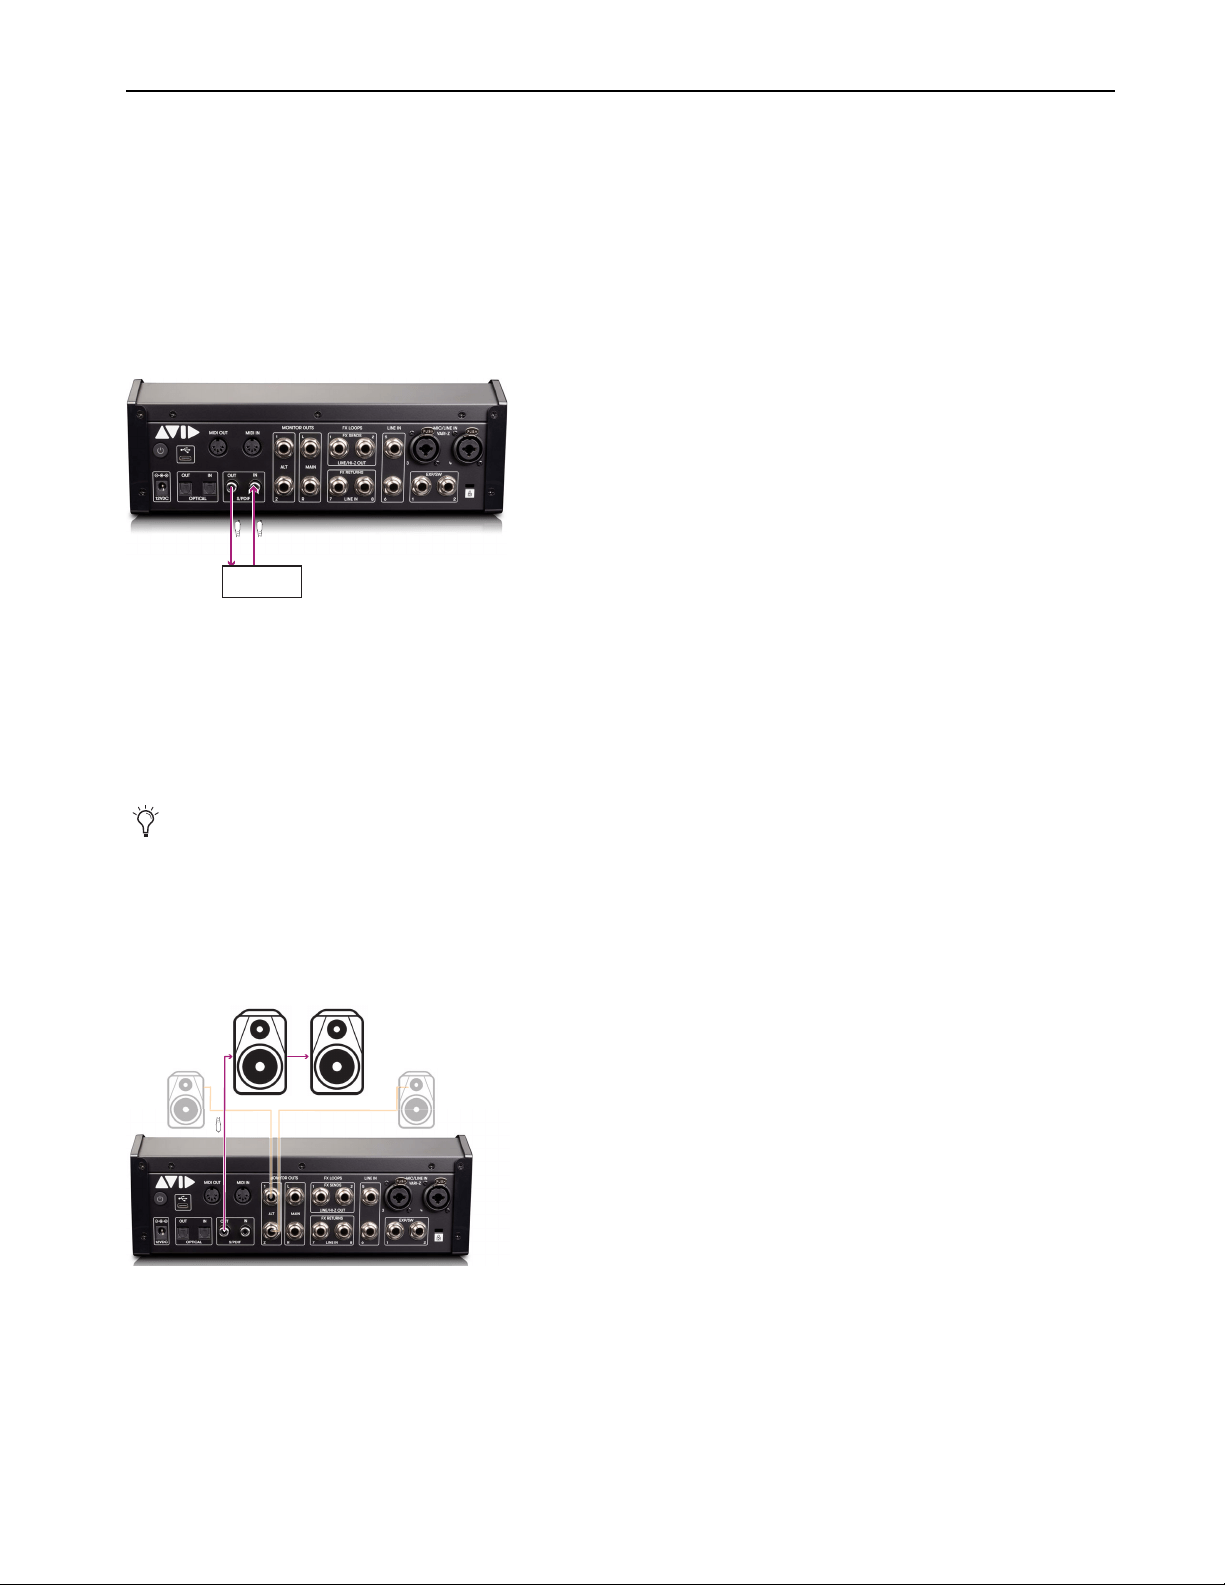
Using MBOX Studio
62
Using S/PDIF
MBOX Studio provides S/PDIF In and Out connectors to integrate digital devices. Use S/PDIF to connect an external effects unit for
send/return processing of MBOX Studio inputs, or use S/PDIF output from MBOX Studio to connect directly to digital speakers. Note
that the S/PDIF I/O are unavailable at 176.4/192k.
To connect a S/PDIF pre-amp or effects unit:
1 Make sure all devices are set to the same sample rate.
2 Using RCA cables, connect MBOX Studio S/PDIF Out to the S/PDIF input on the external device, then connect the S/PDIF output
of that device to the MBOX Studio S/PDIF In.
3 In MBOX Control, click the gear icon to open Preferences then set the desired Clock Source.
• Choose Internal, if you want the external device to synchronize to (follow) MBOX clock.
• Choose S/PDIF if you need MBOX Studio to synchronize to the external device.
4 Raise the S/PDIF Hardware Input channel fader to include it in the currently select hardware output mix. Adjust other channel pa-
rameters, then repeat for other mixes.
5 In Pro Tools, create a stereo audio track and assign its input to MBOX S/PDIF In.
To use S/PDIF for digital monitors:
1 Using RCA cables, connect MBOX Studio S/PDIF Out to the S/PDIF input on the first S/PDIF monitor, then use another RCA cable
to daisy-chain to the second monitor.
2 If necessary, configure the digital monitors for the same sample rate as MBOX Studio. (MBOX Studio does not provide sample rate
conversion (SRC) on the S/PDIF output, so external devices must be set to either the same sample rate as MBOX Studio, or have SRC
applied at their S/PDIF input (if available).
3 In MBOX Control, click Std Mix Mode in the Toolbar then select Mirror MAIN to S/PDIF. The Main mix is mirrored at the S/PDIF
output.
Using S/PDIF to integrate an external digital multi-fx unit
You can also have the S/PDIF output always mirror the Main mix by enabling
Mirror Main to S/PDIF in the Mix Mode dialog.
Connecting digital monitors
S/PDIF
Multi-FX or other

Using MBOX Studio
63
Customizing the User Action Buttons 1–4
MBOX Studio features four User Action buttons on the top panel, each of which can be custom assigned and colored.
Each of the four User Action buttons can be assigned to perform two separate functions, one for when the button is pressed and a second
function for when that button is pressed and held. The current User assignments are shown in the Toolbar, and stored with Presets. You
can customize the User Action buttons using the User Action button Function Assignments dialog in MBOX Control.
To customize a User switch assignment:
1 In MBOX Control, click the current assignment for the desired User button. The Function Assignments dialog is shown.
2 Click to choose a custom color for the switch.
3 In the When pressed: section, click the Internal Action selector and choose an available action.
4 Repeat for the When pressed and held: section, if desired.
To apply a function using a User button:
1 If necessary, select a track, clip, or other session element.
2 To apply the primary User Action button fuction, press the button. To apply the secondary function, press and hold.
User Action buttons
User 1 Button Function Assignments dialog
123 456
TUNE
48V LINK
INPT
ZPAD
LINK MONO
MUTE
DIM TALK
MIC LINE INST
INST
MAIN
DIG
ALT
MBOX STUDIO
1234
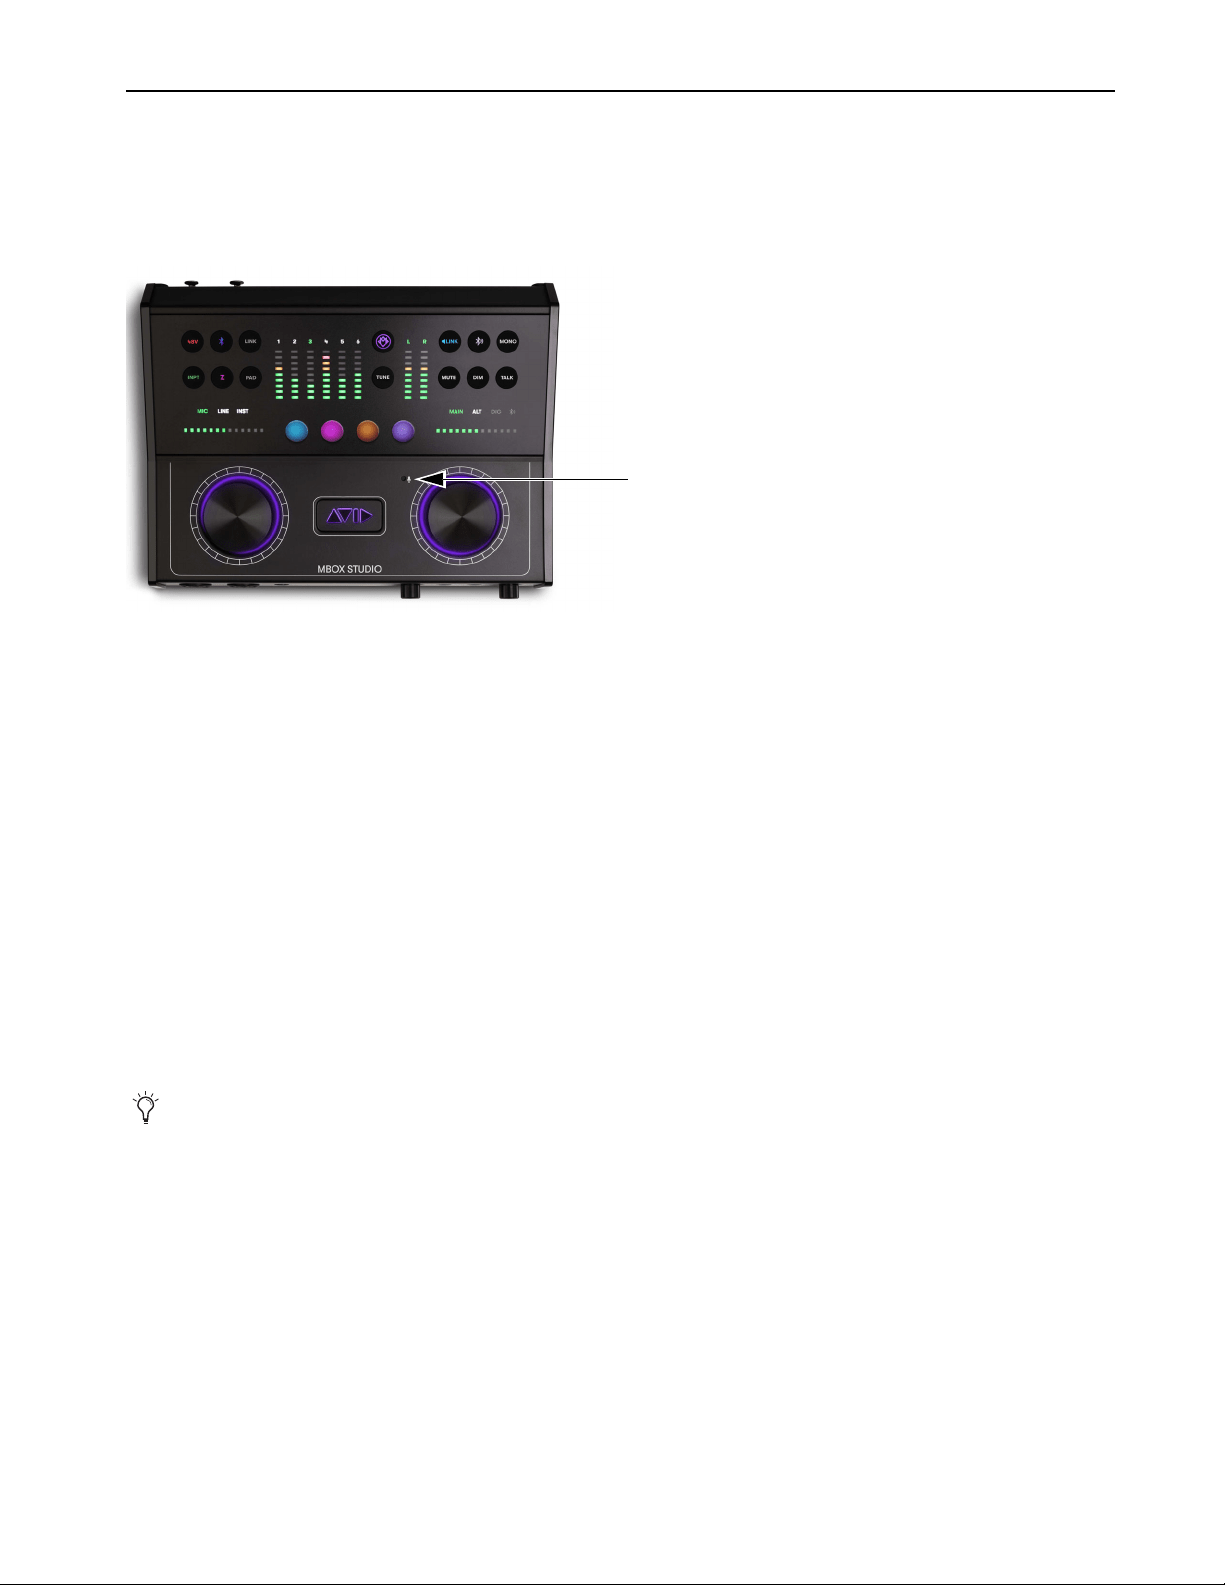
Using MBOX Studio
64
Using Talkback
MBOX Studio provides a built-in Talkback mic on the top panel. This Talkback mic can be mixed just like any other hardware of hard-
ware input (click to select an Output mix then adjust Talkback), processed with and can be routed to Pro Tools to be recorded. High-pass
filtering and limiting is applied to the Talkback input signal. This allows audio sources of varying distances from the mic to be heard
clearly. The Talkback mic can also be used as the input source for the tuner (for more information, see
Using the Tuner).
Once configured, Talkback can be opened (unmuted) and closed (muted) using the top panel
TALK button, a footswitch, or a
User button.
To set up Talkback:
1 In MBOX Control, choose a Hardware Output for Talkback (such as a headphone mix).
2 Set Talkback level by doing the following:
•In the Hardware Input section, select the Talkback strip.
• Start talking and adjust Talkback Gain (in Channel Focus), pan, or other parameters as desired.
3 Repeat for any other mixes you want to include Talkback.
To use Talkback:
1 On MBOX Studio, press TALK. The button lights green.
A single press of TALK opens Talkback.
2 Press again to close (mute) the Talkback channel. You can also press and hold TALK and it will disengage (close) after a 2 second
hold time.
To slate (record Talkback):
1 In Pro Tools, create a mono audio track and assign its input to Talkback (mono). If you do not see this choice in the Input selector
for a mono audio track, check
I/O Setup.
2 Record enable the track, and click the Record button in the Transport controls to arm Pro Tools for recording.
3 When ready, press Play to begin recording.
Talkback mic
Talkback can also be controlled using Footswitch / Expression Pedal 1 and 2 or by Customizing the User Action Buttons 1–4.
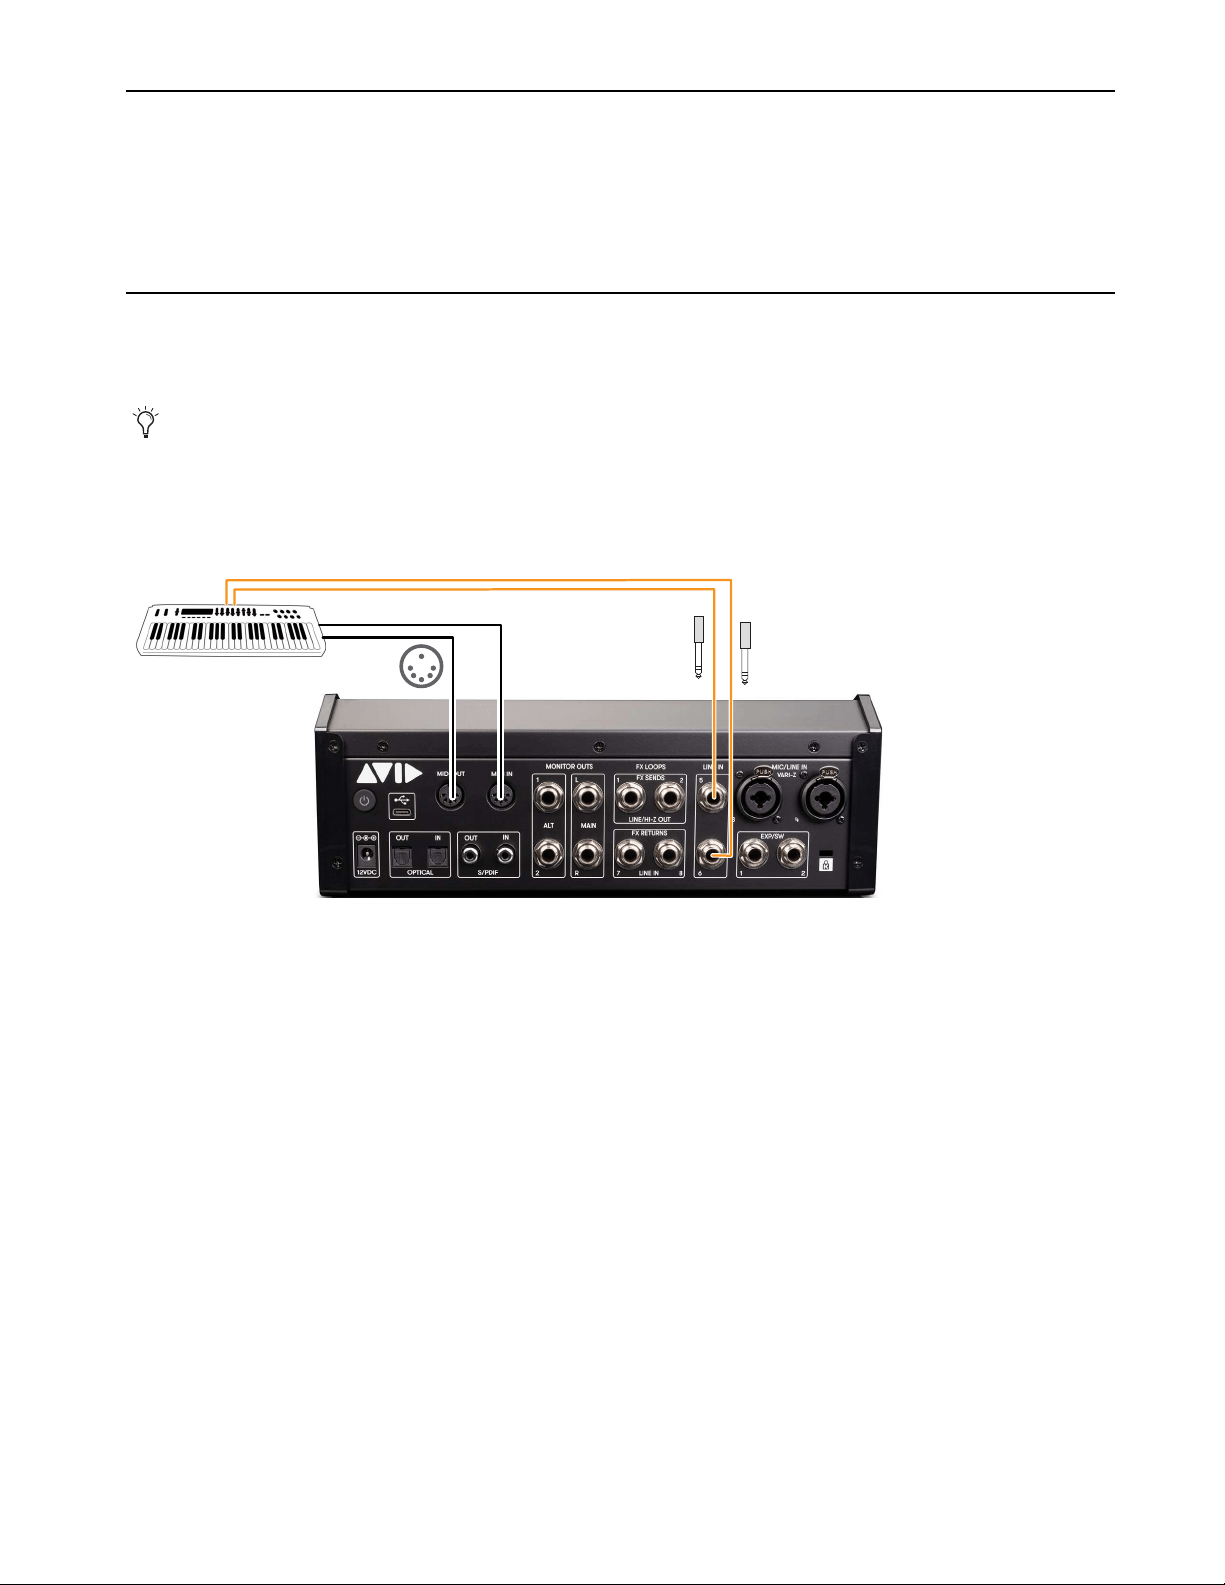
Using MBOX Studio
65
Using Loopback
When Loopback is enabled, Software Inputs 7–8 become available for audio from a different application, such as when recording for
podcasting, or using a secondary music application on the same computer.
At 48k Loopback routes Software Inputs 7–8 to ADAT Inputs 7–8. At 88.2k or 96k, Loopback uses ADAT Inputs 3–4. Loopback is not
available at 176.4/192k.
Integrating an External MIDI Device
MBOX Studio provides standard 5-pin MIDI In and Out ports. These can be used to connect an external MIDI sound module, or MIDI
controller keyboard, or other device.
To integrate an external MIDI device:
1 Using standard 5-pin MIDI cables, connect your external device to the MBOX Studio MIDI In and/or MIDI Out ports.
2 Using 1/4-inch TRS cables, connect the Left and Right audio outputs of your device to Line In 5-6.
3 Configure Audio MIDI Setup (Mac) or MIDI Studio Setup (Windows).
4 In Pro Tools, configure Instrument or MIDI tracks as needed. For more information, see the MIDI sections in Pro Tools Help (Help
> Pro Tools Help).
If your computer does not have any available USB ports, use these 5-pin MIDI ports instead.
Integrating an external MIDI keyboard by connecting MIDI and audio

Using MBOX Studio
66
Reducing Monitoring Latency
There will inevitably be some audio delay, or latency, in the monitoring signal (even if only a few samples) due to the process of con-
verting an analog signal to a digital signal (input) and back again (output). There may be additional latency due to mixer configurations
and processing.
Software-only (also known as “Host-based”) Pro Tools systems use the host processor in your computer for all audio processing, play-
back, and recording, so there is always a small amount of latency in the system. For example, there may be some audible delay between
the incoming signal and outgoing signal when monitoring recording through Pro Tools.
Low Latency Monitoring
MBOX Studio can use the Low Latency Monitoring option in Pro Tools to record with an extremely small amount of monitoring latency.
(Likewise, certain Core Audio and ASIO audio interfaces that have a built-in mixer can use the Low Latency Monitoring option.)
In Pro Tools, enabling Low Latency Monitoring automatically bypasses plug-ins and sends on record-enabled audio tracks. You can use
MBOX Control to set up its on-board delay and reverb to be able to provide low latency monitoring with effects.
Configuring Pro Tools for Low Latency Monitoring
To use Low Latency Monitoring:
1 Record enable audio tracks by clicking their Record Enable buttons.
2 Select Options > Low Latency Monitoring.
When Low Latency Monitoring is enabled, any plug-ins and sends assigned to record-enabled tracks are automatically bypassed, and
must remain bypassed. Also, these tracks do not register on meters for Master Faders.
Pro Tools Preference to Allow Sends to Persist During LLM
All plug-ins and sends are bypassed by default when Low Latency Monitoring (LLM) is enabled (Options > Low Latency Monitoring).
Enable the
Allow Sends to persist during LLM preference to maintain sends audio signal output with Low Latency Monitoring.
To maintain (or bypass) sends with Low Latency Monitoring enabled:
1 Choose Setup > Preferences and click the Mixing tab.
2 Select (or deselect) the Allow Sends to persist during LLM option.
3 Click OK.
For more information on Low Latency Monitoring see Help > Pro Tools Help.

Appendix A: Specifications 67
Appendix A: Specifications
Avid MBOX Studio
Analog I/O
Input Specifications
Output Specifications
MBOX Studio Input Specifications
Input
Channel
Type
Max Input Level
minimum dBu
Gain
Range
(dB)
THD %
Dynamic
Range
(dB)
EIN dBu
A-wt
Frequency Response
+/- dB
1,2,3,4 Mic 14 60 0.001 112 -129 20 Hz–20 kHz, ±0.125 dB
1,2,3,4 Line 14 60 0.001 112 na 20 Hz–20 kHz, ±0.125 dB
1,2 Inst 14 60 0.004 108 na 20 Hz–20 kHz, ±0.125 dB
5,6 Line 8 na 0.002 112 na 20 Hz–20 kHz, ±0.125 dB
7,8 FX 8 na 0.002 112 na 20 Hz–20 kHz, ±0.125 dB
MBOX Studio Output Specifications
Output Channel
Max Output
dBu min
THD % Dynamic Range (dB)
Frequency
Response
+/- dB
Power into 32
ohm min mW
MAIN_L 19 0.0012 110 0.125
MAIN_R 19 0.0012 110 0.125
ALT_1 19 0.0012 110 0.125
ALT_2 19 0.0012 110 0.125
FX_SEND_1 19 0.0012 110 0.125
FX_SEND_2 18.8 0.002 107.5 0.125
Re-Amp 0 0.002 103 0.3
HP 1,2 na na 102 0.2 120

MBOX Studio Guide68
Environmental Specifications
Specification Units Notes
Storage Temperature -0° F to 140° F (-18° C to 60° C) deg
Operating Temperature 40° F to 95° F (4° C to 35° C) deg
Storage humidity range 5 to 95 % Non-condensing
Operating humidity range 20 to 80 % Non-condensing

Appendix B: Compliance 69
Appendix B: Compliance
Important
Model: MBOX Studio
Rating: 12vDC, 3.0A
Safety Compliance
This equipment has been tested to comply with safety certifications in accordance with: UL 62368-1 ed.3-2019, CAN/CSA-C22.2 No. 62398-1:19,BS EN
62368-1:2014+A11:2017, EN 62368-1:2014/AC:2015, IEC 62368-1:2018. Avid Technology Inc., has been authorized to apply the appropriate NRTL mark on
its compliant equipment.
Important Safety Instructions
1) Read these instructions.
2) Keep these instructions.
3) Heed all warnings.
4) Follow all instructions.
5) Do not use this equipment near water.
6) Clean only with dry cloth.
7) Do not block any ventilation openings. Install in accordance with the manufacturer’s instructions.
8) Do not install near any heat sources such as radiators, heat registers, stoves, or other equipment (including amplifiers) that produce heat.
9) Protect power cords from being walked on or pinched particularly at plugs, convenience receptacles, and the point where they exit from the equipment.
10) Only use attachments/accessories specified by the manufacturer.
11) For products that are not rack-mountable: Use only with a cart, stand, tripod, bracket, or table specified by the manufacturer, or sold with the equipment. When
a cart is used, use caution when moving the cart/equipment combination to avoid injury from tip-over.
12) Unplug this equipment during lightning storms or when unused for long periods of time.
13) Refer all servicing to qualified service personnel. Servicing is required when the equipment has been damaged in any way, such as power-supply cord or plug
is damaged, liquid has been spilled or objects have fallen into the equipment, the equipment has been exposed to rain or moisture, does not operate normally, or
has been dropped.
14) For products that are a Mains powered device: The equipment shall not be exposed to dripping or splashing and no objects filled with liquids (such as vases)
shall be placed on the equipment.
WARNING! To reduce the risk of fire or electric shock, do not expose this equipment to rain or moisture.
Do not defeat the safety purpose of the polarized or grounding-type plug. A polarized plug has two blades with one wider than the other. A grounding type plug
has two blades and a third grounding prong. The wide blade or the third prong are provided for your safety. If the provided plug does not fit into your outlet, consult
an electrician for replacement of the obsolete outlet.
15) For products with a power switch: It should remain accessible after installation.
16) The equipment shall be used at a maximum ambient temperature of 40° C.
LED Safety Notices
Avid hardware might contain LED or Laser devices for communication use. These devices are compliant with the requirements for Class 1 LED and Laser Products
and are safe in the intended use. In normal operation the output of these laser devices does not exceed the exposure limit of the eye and cannot cause harm.
Environmental Compliance
Disposal of Waste Equipment by Users in the European Union
This symbol on the product or its packaging indicates that this product must not be disposed of with other waste. Instead, it is your responsibility
to dispose of your waste equipment by handing it over to a designated collection point for the recycling of waste electrical and electronic equip-
ment. The separate collection and recycling of your waste equipment at the time of disposal will help conserve natural resources and ensure that
it is recycled in a manner that protects human health and the environment. For more information about where you can drop off your waste equip-
ment for recycling, please contact your local city recycling office or the dealer from whom you purchased the product.
Proposition 65 Warning
This product can expose you to chemicals including Pb and Pb compounds, which is known to the State of California to cause cancer and birth
defects or other reproductive harm. For more information go to www.P65Warnings.ca.gov.
Perchlorate Notice
This product may contain a lithium coin battery. The State of California requires the following disclosure statement: “Perchlorate Material – special handling may ap-
ply, See www.dtsc.ca.gov/hazardous waste/perchlorate.”
WARNING

Appendix B: Compliance 70
Recycling Notice
EMC (ELECTROMAGNETIC COMPLIANCE)
Avid declares that this product complies with the following standards regulating emissions and immunity:
FCC Part 15 Class B, Part 15.247
CAN ICES-003 Class B, RSS-247
ETSI EN 300 328 v2.1.1, ETSI EN 301 489-1 v2.1.1, ETSI EN301 489-17 v3.1.1
EN 55032:2012, BS EN 55032:2012
EN 55035:2017+A11:2020, BS EN 55035:2017+A11:2020
EN 62479:2010
AS/NZS 4268
FCC ID: 2A64A-MBOXSTUDIO
FCC COMPLIANCE STATEMENTs
This device complies with Part 15 of the FCC Rules. Operation is subject to the following two conditions: (1) this device may not cause harmful interference, and (2)
this device must accept any interference received, including interference that may cause undesired operation.
Note: This equipment has been tested and found to comply with the limits for a Class B digital device, pursuant to Part 15 of the FCC Rules. These limits are designed
to provide reasonable protection against harmful interference in a residential installation.
This equipment generates, uses and can radiate radio frequency energy and, if not installed and used in accordance with the instructions, may cause harmful inter-
ference to radio communications. However, there is no guarantee that interference will not occur in a particular installation.
If this equipment does cause harmful interference to radio or television reception, which can be determined by turning the equipment off and on, the user is encour-
aged to try to correct the interference by one or more of the following measures:
• Reorient or relocate the receiving antenna.
• Increase the separation between the equipment and receiver.
• Connect the equipment into an outlet on a circuit different from that to which the receiver is connected.
• Consult the dealer or an experienced radio/TV technician for help.
Caution: Changes or modifications not expressly approved by the party responsible for compliance could void the user’s authority to operate the equipment.
This equipment complies with FCC radiation exposure limits set forth for an uncontrolled environment. This equipment should be installed and operated with mini-
mum distance 20cm between the radiator and your body. This transmitter must not be co-located or operating in conjunction with any other antenna or transmitter.
CANADA ICES-003 COMPLIANCE
This device meets the IC requirements for RF exposure in public or uncontrolled environments.
Cet appareil est conforme aux conditions de la IC en matière de RF dans des environnements publics ou incontrôlée
IC: 28596-MBOXSTUDIO
Supplier’s Declaration of Conformity
Unique Identifier
Trade Name: AVID
Model No.: MBOX Studio
Responsible Party – U.S. Contact Information
US Company Name: Avid Technology Inc.
Address: 75 Network Drive, Burlington MA 01803 USA
www.avid.com
ISED COMPLIANCE STATEMENTS
This device contains licence-exempt transmitter(s)/receiver(s) that comply with Innovation, Science and Economic Development Canada’s licence-exempt RSS(s).
Operation is subject to the following two conditions:
(1) This device may not cause interference.
(2) This device must accept any interference, including interference that may cause undesired operation of the device.
This equipment complies with IC RSS-102 radiation exposure limits set forth for an uncontrolled environment. This equipment should be installed and operated with
minimum distance 20cm between the radiator and your body.
L’émetteur/récepteur exempt de licence contenu dans le présent appareil est conforme aux CNR d’Innovation, Sciences et Développement économique Canada ap-
plicables aux appareils radio exempts de licence. L’exploitation est autorisée aux deux conditions suivantes :
(1) L’appareil ne doit pas produire de brouillage;
(2) L’appareil doit accepter tout brouillage radioélectrique subi, même si le brouillage est susceptible d’en compromettre le fonctionnement.
Cet équipement est conforme aux limites d’exposition aux radiations IC CNR-102 établies pour un environnement non contrôlé. Cet équipement doit être installé et
utilisé avec une distance minimale de 20cm entre le radiateur et votre corps.
Australian Compliance

Appendix B: Compliance 71
CE Compliance
(EMC, Safety and RoHS, RED)
Avid is authorized to apply the CE (Conformite Europenne) mark on this compliant equipment thereby declaring conformity to EMC Directive
2014/30/EU, Low Voltage Directive 2014/35/EU, RoHS Directive 2011/65/EC, and RED Directive 2014/53/EU.
Bluetooth Enabled Device
Avid Technology International B.V.
Citywest Business Campus
4051 Kingswood Drive,
Dublin 24, D24 T021, Ireland

Index 72
Symbols
+ Cap 51
A
About MBOX Control 37
Allow Sends to persist during LLM option 66
ALT 43
audio connections
example diagrams 20
minimal for installation 9
audio input
Bluetooth 48
audio input and output 45
audio output
Alt 48
Bluetooth 49
Main 48
AVID FX
using 55
Avid FX
and headphone mixes 55
EQ 56
B
basics 41
bass 46
Bluetooth
input 48
output 49
Brightness 37
Buffer Size 35
C
Channel Focus
using 42
Clock Source 35
Clocking Options
Sample Rate 35
Clockint Options
Clock Source 35
compatibility 3
copy protection (see iLok) 12
D
Day-to-Day Power Up and Down 14
Dim level 36
Disable auto-muting 36
E
EQ
using 56
F
Fine Control (fine adjust) 44
firmware 12
Floating Monitor window 33
focus (selection) 41
FX Loops 37
settings for 37
using 59
G
guitar 46
H
Hardware Input 34
hardware inserts 59
Hardware Output 34
Mute 35
trim 35
Volume 35
headphone 1 and 2 mixes 43
Headphones 36, 43
preferences for 36
headphones
and Pro Tools 52, 54
Hi-Z Out to Amp 37
I
Illuminate Logo and Knobs 37
iLok 12
iLok License Manager 12
impedance (Vari-Z) 51
input 45
inserts (hardware) 59
installing 7
MBOX Control software 10
Pro Tools 10
IO Setup 12
L
latency 36
reducing monitoring latency 66
LINK 44
Loopback 65
Low Latency Monitoring option 66
M
Main and ALT 43
MBOX Control
About 37
Hardware Input 34
Hardware Output 34
overview 21
Preferences 35
Software Input (Internal) 34
Index

MBOX Studio Guide73
Toolbar 21
MBOX Control Input Selection Follows Hardware 37
MBOX Studio
back panel 19
front panel 17
operational basics 41
top panel 18
Metering 36
mic input 45
MIDI
integrating an external MIDI device 65
MIDI Learn (footswitch) 25
Monitor 33
Monitor Switching 36
N
naming channels 44
O
Operations menu
Low Latency Monitoring option 66
Optical Format 36
Output Mixes for Speakers and Headphones 43
P
Playback Engine 12
playing
tracks 53
Preferences 35
Pro Tools
configuring for MBOX Studio 12
headphone mixes 52, 54
IO Setup 12
launching 10, 12
Playback Engine 12
recording and tracking 52
using with MBOX Studio 52
R
Re-amplification 57
register MBOX Studio 8
Reset 44
resources 4
Right Offset 35
S
S/PDIF
using for digital monitors 62
using for pre-amp or effects 62
Sample Rate 35
send and return 59
settings for 37
Software Input 34
Stereo Line Input 47
stereo linking 44
system requirements 3
T
Talkback 64
Toolbar 21
tracks
playing 53
Trim 35
tuner
Options 50
using 50
U
User Action buttons
customizing 63
V
Variable-Z input impedance 51