_oeoo_o_mo®oo_ OwneF_s
nstructions
This device is a Class B digital apparatus.
Register your product at www.samsung.com/global/register
hnportant Warranty Information Regarding Television Format Viewing
Wide screen format PDP Displays (16:9, the aspect ratio of the screen width to height) are primarily designed to view wide
screen format full-motion video. The images displayed on them should primarily be in the wide screen 16:9 ratio format,
or expanded to fill the screen if your model offers this feature and the images are constantly moving. Displaying stationary
graphics and images on screen, such as the dark side-bars on nonexpanded standard format television video and
programming, should be limited to no more than 5% of the total television viewing per week.
Additionally, viewing other stationary images and text such as stock market reports, video game displays, station Iogos,
web sites or computer graphics and patterns, should be limited as described above for all televisions. Displaying stationary
images that exceed the above guidelines can cause uneven aging of PDP Displays that leave subtle, but permanent
burned-in ghost images in the PDP picture, To avoid this, vary the programming and images, and primarily display
full screen moving images, not stationary patterns or dark bars,
On PDP models that offer picture sizing features, use these controls to view different formats as a full screen picture.
Be careful in the selection and duration of television formats used for viewing. Uneven PDP aging as a result of format
selection and use, as well as burned-in images, are not covered by your Samsung limited warranty.
U.S.A Only
The product unit accompanying this user manual is licensed under certain intellectual property rights of certain third
parties. In particular, this product is licensed under the following US patents: 5,991,715, 5,740,317, 4,972,484,
5,214,678, 5,323,396, 5,539,829, 5,606,6t8, 5,530,655, 5,777,992, 6,289,308, 5,6t0,985, 5,48t,643, 5,544,247,
5,960,037, 6,023,490, 5,878,080, and under US Published Patent Application No. 2001-447t3-A1.
This license is limited to private non-commercial use by end-user consumers for licensed contents. No rights are
granted for commercial use. The license does not cover any product unit other than this product unit and the
license does not extend to any unlicensed product unit or process conforming to ISO/IEC 11172-3 or ISO/IEC
13818-3 used or sold in combination with this product unit. The license only covers the use of this product unit to
encode and/or decode audio files conforming to the ISO/IEC 11172-3 or ISO/IEC 13818-3. No rights are granted
under this license for product features or functions that do not conform to the ISO/IEC 11172-3 or ISO/IEC 13818-3.
Other countries
The product unit accompanying this user manual is licensed under certain intellectual property rights of certain third
parties. This license is limited to private non-commercial use by end-user consumers for licensed contents. No rights
are granted for commercial use. The license does not cover any product unit other than this product unit and the
license does not extend to any unlicensed product unit or process conforming to ISO/IEC 11172-3 or ISO/IEC
13818-3 used or sold in combination with this product unit. The license only covers the use of this product unit to
encode and/or decode audio files conforming to the ISO/IEC 11172-3 or ISO/IEC 13818-3. No rights are granted
under this license for product features or functions that do not conform to the ISO/IEC 11172-3 or ISO/IEC 13818-3.
English 2
User Instructions
O Screen Image retention
Do not display a still image (such as on a video game) on the plasma display panel for more than several minutes
as it can cause screen image retention. This image retention is also known as "screen burn". To avoid such image
retention, refer to page 26 of this manual to reduce the degree of brightness and contrast of the screen when
displaying a still image.
Altitude
The PDP can only operate normally at heights under 6500ft.
Heat on the top of the PDP TV
The top side of the product may be hot after long periods duse as heat dissipates from the panel through the vent
hole in the upper part of the product.
This is normal and does not indicate any defect or operation failure of the product.
However, children should be prevented from touching the upper part of the product.
The product is making a 'cracking' noise.
A 'cracking' noise may occur when the product contracts or expands due to a change of surrounding environment
such as temperature or humidity. This is normal and not a defect of the unit.
@ Cell Defects
The PDP uses a panel consisting of 1,230,000(SD-level) to 3,t50,000(HD-level) pixels which require sophisticated
technology to produce. However, there may be a few bright or dark pixels on the screen. These pixels will have no
impact on the performance of the product.
Avoid operating the TV at temperatures below 5°C (41°F)
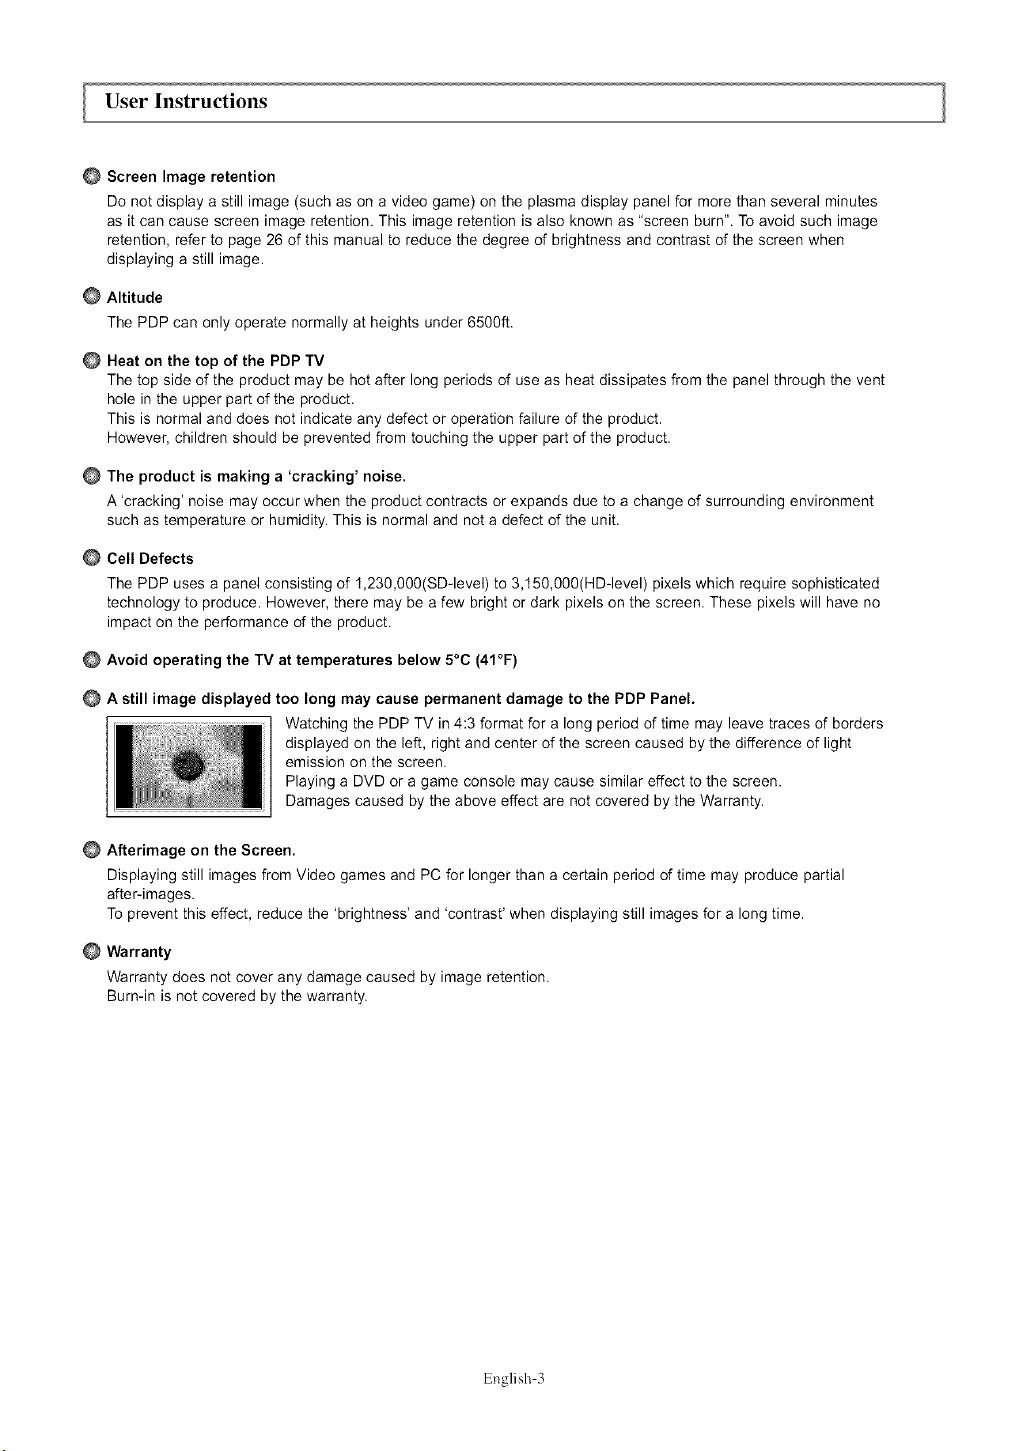
A still image displayed too long may cause permanent damage to the PDP Panel.
Watching the PDP TV in 4:3 format for a long period of time may leave traces of borders
displayed on the left, right and center of the screen caused by the difference of light
emission on the screen.
Playing a DVD or a game console may cause similar effect to the screen.
Damages caused by the above effect are not covered by the Warranty.
Afterimage on the Screen.
Displaying still images from Video games and PC for longer than a certain period of time may produce partial
after-images.
To prevent this effect, reduce the 'brightness' and 'contrast' when displaying still images for a long time.
Warranty
Warranty does not cover any damage caused by image retention.
Burn-in is not covered by the warranty.
English 3
Contents
• Listof Features 5
• Accessones. 5
• Viewing the Control Panel ..... 6
• vlewlnc the Connection Panel .... -
• Remote Contr( .................................................................................. 8
• Insiamng Batteries in the Remote ConOc 9
• Connecting VHF and UHF Antennas 9
• Connecting Cat eT'. 10
• Connecting a VCR
• Con lec[ing an S-VHS VCR
• Connecung a Camcorder ................................................................... 12
• Connecting a DVD Player/Set-Top Box ............................................. 12
• Connecting a DVD PlayeriSe6Top Box via DVl 12
• Connecting a DVD PlayeriSet-To_ Box via HDM 13
• Con lecung a Digital Audio System .... 13
• Connecting an Am_ QeriDVD Home Theatei 1_
• Connecting a PC lzt
• Selecting the Antan )a
• Adding and Erasing Channels
• To set-uc Your Favorite Channels
• Viewing me Channel LISTS
• Suit ng the Default Channel List Mode
• Labelinq Channels
• Pine Tuning Analog Channels
• Checking me Digital-Signal StrengO
• LNA Low NoiseAmDlifiert
3_
3E
37
38
38
39
39
4C
40
• Using Your TV as a Computar (PC) Displa!. _
• Display Moues. 41
• Setting up the TV wig/your PC 42
•Se0in0 theTim_ ............................................................................ 44
• Turning [heTVOnand Off 15
• Plug & Play Feamre 15
• Changing Channels .. 17
• Aajusong me VOlume 18
• Viewing the Displa_ ........................................................................... 18
• viewing the Menus 18
• Memorizing the Channels 19
• Seiting U_ Your Remote Contrc 20
• To Select the Source ....................................................................... 25
• To EdiHhe ir-)ui Source Name .......................................................... 25
• Using Automatic Picture Settings
• DJg0al Noise RedL ;lion
• Changing file Screen Size
• DNle (Dig tal Natural Image engine/
• Selectint! the Film Mode
• Setting the Blue Screen Moee
•vle,_ ng Picture-in-Picture
• Freezing the Current Picture
•Selecung a Menu Language zt7
•Uslr g the Game Mode 47
• V awing Closed Captions (On-Screen Text Messages) - Dig [a 88
•viewing Closed Captions (C _-Screen Text Messages) - Analog 4 £
• Menu Transparency Leve 50
•Using the Energy Saving Feature 50
• Preventing Screen Bumdn 51
• Reducing the Effects of Screen Burn 51
•Buff ng the Function Helo . 5,_
• Setting the Blue Eye 52
•Using the V-Chip 53
26
28
29 •Ider fyinti Problems 59
• Wall InS_allaflon ins{ruc[ions °O
29
29 • How _o assem[ge the Stand-Base 62
30 • SDecOcatJoqs 62
3" • Dimensions 63
•Using Automatic Sound Settings .................................................. 32
• Customizing [he Sounu 32
• Setting me TruSurround XT 33
•Choosing a MultkChannel Sound (MTS/track -Digital 33
•Choosing a MultkChannel Souno (MTS) track - Analog 34
•Autema_lc /olume Control 34
• Selecting me Internal Mute 35
• SeOing the Qn/OO Melody 35
• Listenir g to the Sound of the Sub (PIPt Picture 35
Symbol
A
Press Important Note One-Touch
Buttor
English-4
General Information
List of Features
* Adjustable picture settings that can be stored in the TV's memory.
* Automatic timer to turn the TV on and off.
* A special sleep timer.
* V-Chip function.
* Excellent Digital interface & Networking :
With a built-in HD digital tuner, non-subscription HD broadcasts can be viewed with no Set-Top Box needed.
* Remote Contmt
The supplied mmole can be used to operate the TV as well as most DVD players, Set-top boxes, Cable Boxes and VCRs.
* Excellent Picture Quality
- DNIe technology provides life-like clear images.
*SRS TruSun'ound XT
- SRS TruSurmund XT provides a virtual Dolby smTound system.
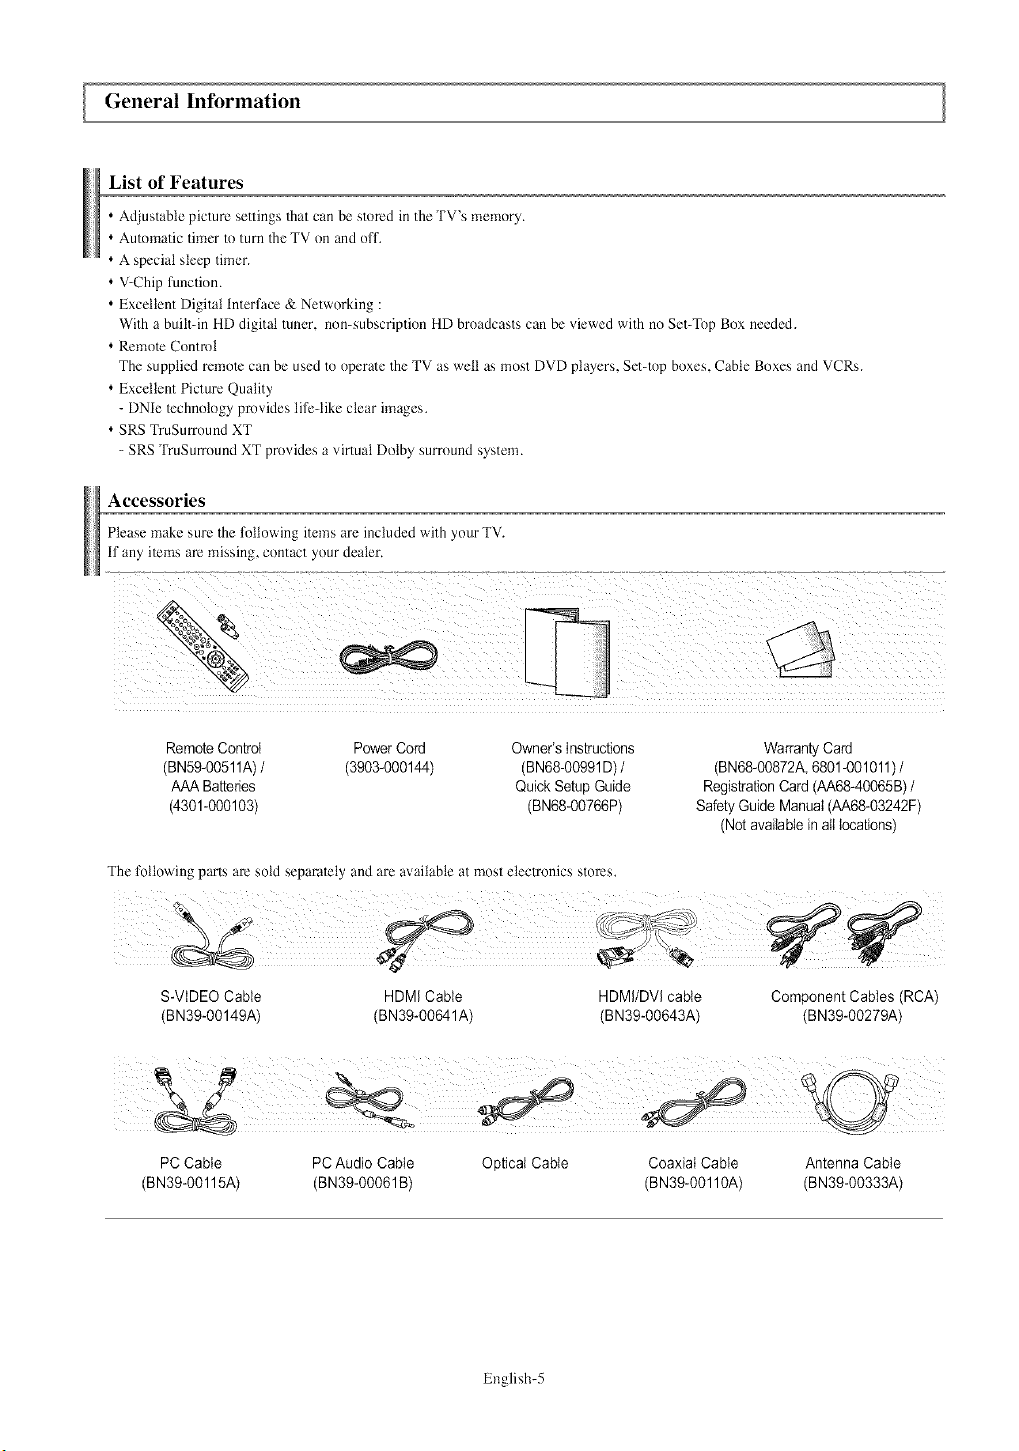
Accessories
Please make sure the following items are included with your TV.
if any items am missing, contact your dealer.
RemoteControl Power Cord
(BN59-00511A)/(3903-000144)
AAA Batteries
(4301-000103)
Owner'slnsguctions
(BN68-OO991D)/
Quick Setup Guide
(BN68-00766P
Warranty Card
(BN68-OO872A6801-0O1011) /
RegistrationCard (AA68-4OO65B)/
Safety Guide Manual (AA68-03242F)
(Not available inall locations)
The lk_ltowing parts are sold separately and are available at most electronics stores.
S-VIDEO Cable HDMI Cable HDMI/DVl cable
(BN39-OO149A) (BN39-OO641A) (BN39-00643A)
Component Cables (RCA)
(BN39-OO279A)
PC Cable PC Audio Cable Optical Cable Coaxial Cable Antenna Cable
(BN39-O0115A) (BN39-O0061B) (BN39-00110A) (BN39-O0333A)
English-5
Viewingthe Control Panel
Buttons on the Lower-Right Part of the Panel
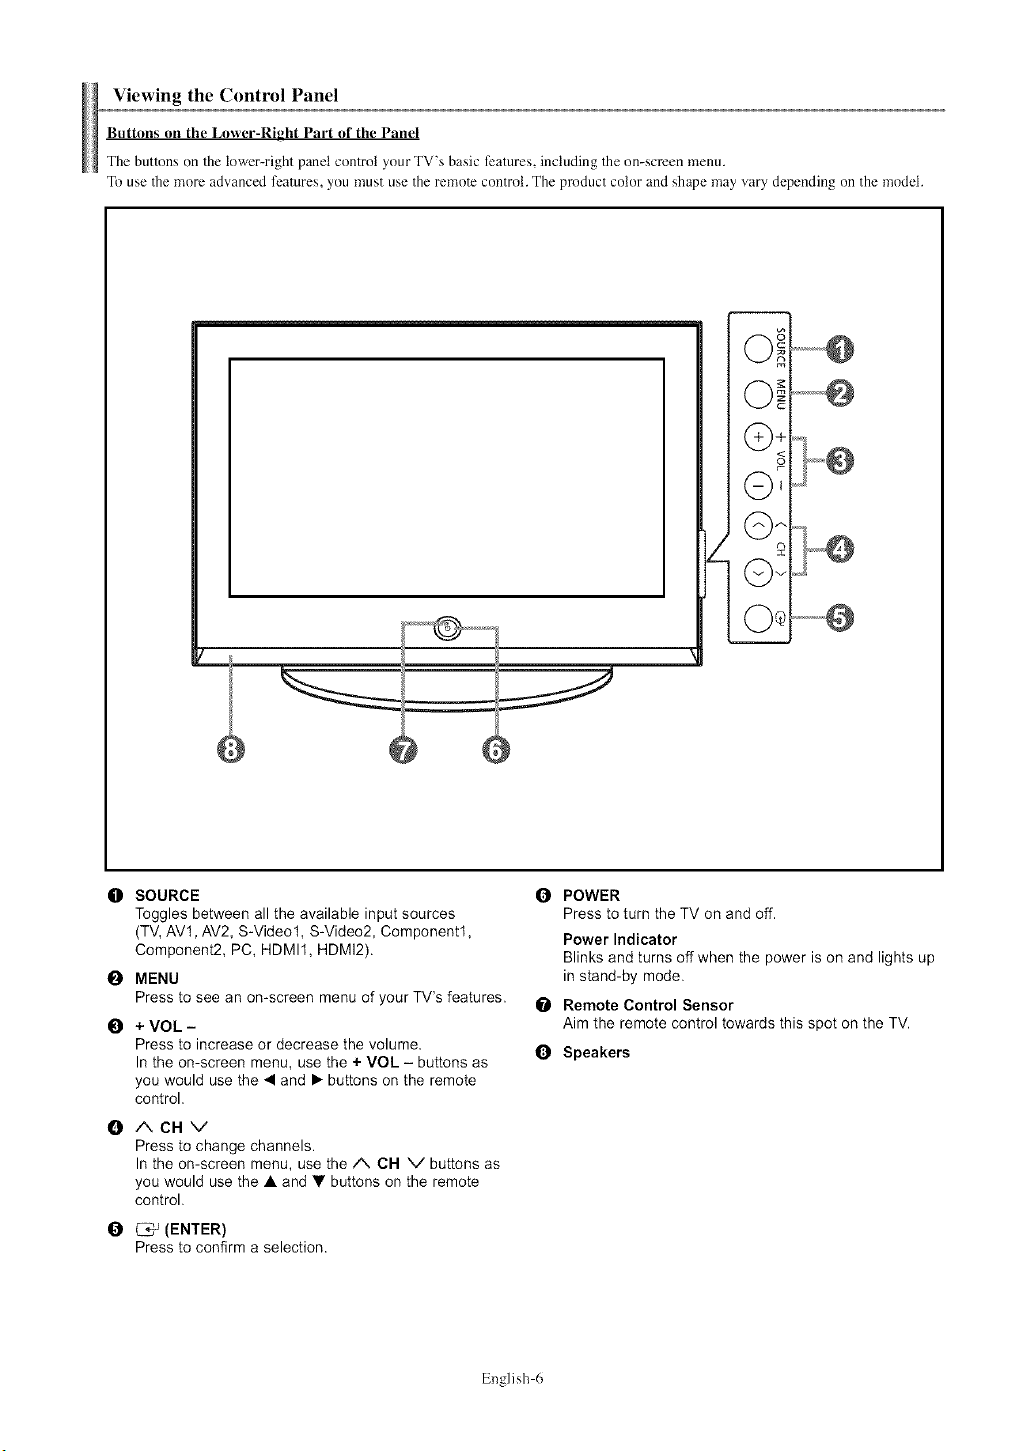
The buttons on the lower-right panel control your TV's basic features, including the on-screen menu.
To use the more advanced features, you must use the remole control. The product color and shape may vary depending on the model.
O SOURCE
Toggles between all the available input sources
(TV, AV1, AV2, S-Video1, S-Video2, Component1,
Component2, PC, HDMI1, HDMI2).
0MENU
Press to see an on-screen menu of your TV's features.
0+VOL-
Press to increase or decrease the volume.
In the on-screen menu, use the + VOL - buttons as
you would use the 4 and • buttons on the remote
control.
0/%CHV
Press to change channels.
In the on-screen menu, use the A CH V buttons as
you would use the • and • buttons on the remote
control.
_ (ENTER)
Press to confirm a selection.
OPOWER
Press to turn the TV on and off.
Power Indicator
Blinks and turns off when the power is on and lights up
in stand-by mode.
Remote Control Sensor
Aim the remote control towards this spot on the TV.
0Speakers
Eng]ish 6
Viewingthe Connection Panel
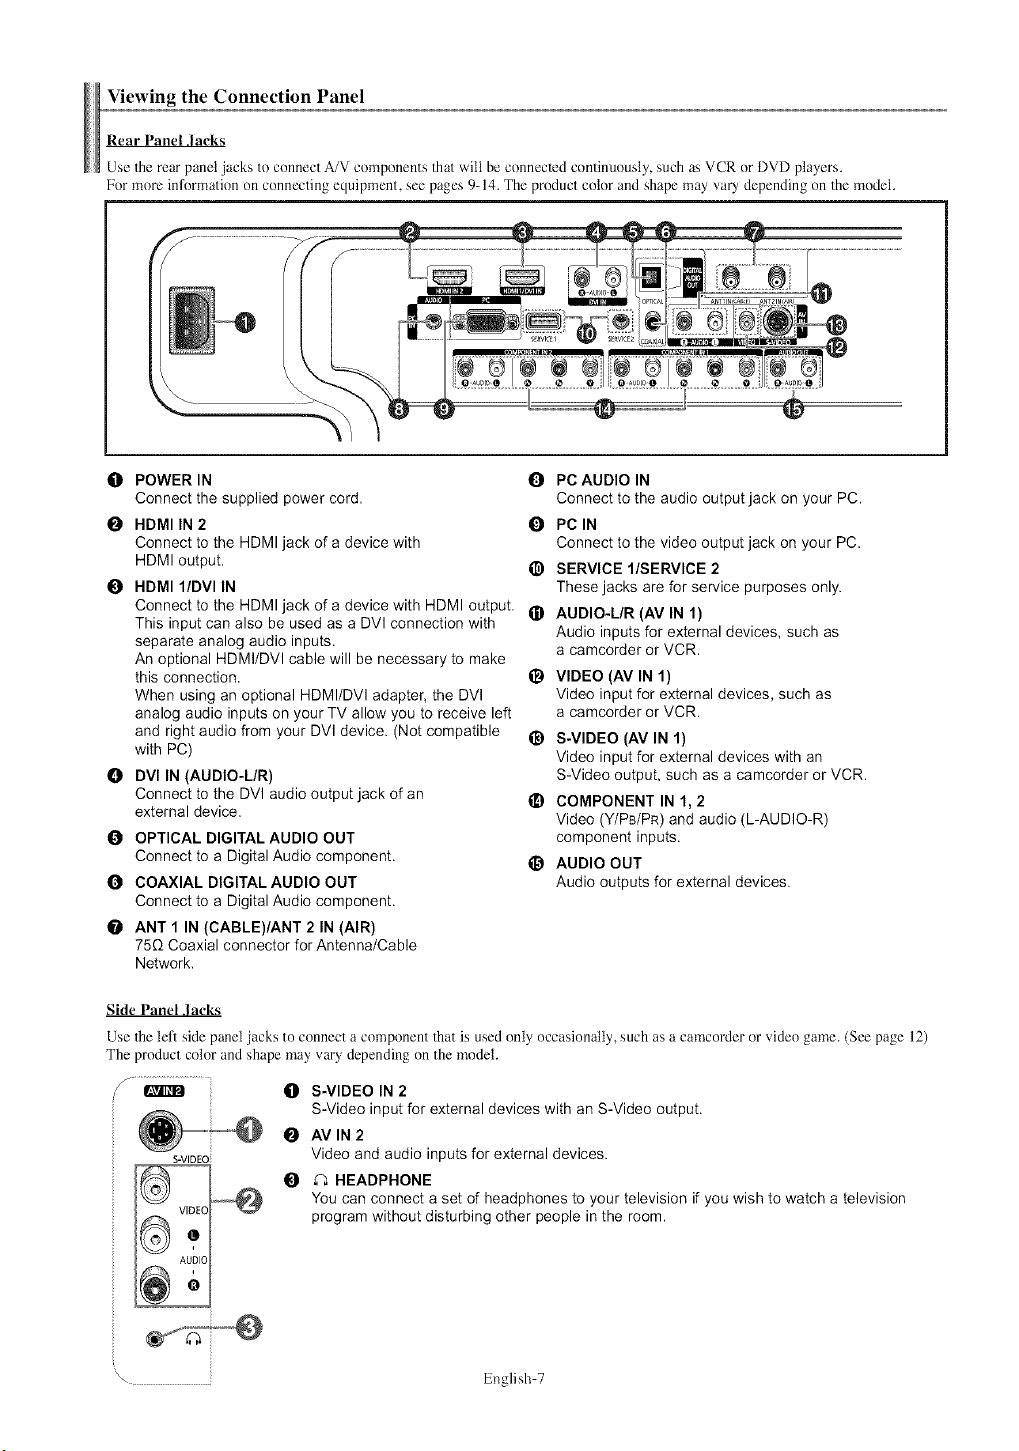
Rear Panel lacks
Use the rear panel jacks to connect A/V components that will be conneclcd continuously, such as VCR or DVD players.
For more information on connecting equipment, see pages 9-14. The product color and shape may vary depending on the model.
O POWER IN 0
Connect the supplied power cord.
OHDMI IN 2 O
Connect to the HDMI jack of a device with
HDMI output. _)
HDMI l/DVl IN
Connect to the HDMI jack of a device with HDMI output. _)
This input can also be used as a DVl connection with
separate analog audio inputs.
An optional HDMI/DVl cable will be necessary to make
this connection. _)
When using an optional HDMI/DVI adapter, the DVI
analog audio inputs on your TV allow you to receive left
and right audio from your DVl device. (Not compatible _)
with PC)
0DVl IN (AUDIO-LIR)
Connect to the DVI audio output jack of an
external device.
O OPTICAL DIGITAL AUDIO OUT
Connect to a Digital Audio component.
O COAXIAL DIGITAL AUDIO OUT
Connect to a Digital Audio component.
0 ANT 1 IN (CABLE)/ANT 2 IN (AIR)
75G Coaxial connector for Antenna/Cable
Network,
@
PC AUDIO IN
Connect to the audio output jack on your PC.
PC IN
Connect to the video output jack on your PC.
SERVICE l/SERVICE 2
These jacks are for service purposes only.
AUDIO-L/R (AV IN 1)
Audio inputs for external devices, such as
a camcorder or VCR.
VIDEO (AV IN I)
Video input for external devices, such as
a camcorder or VCR.
S-VIDEO (AV IN I)
Video input for external devices with an
S-Video output, such as a camcorder or VCR.
COMPONENT IN 1, 2
Video (Y/PBIPR) and audio (L-AUDIO-R)
component inputs.
AUDIO OUT
Audio outputs for external devices.
Side Panel lacks
Use the left side panel jacks to connect a component that is used only occasionally, such as a camcorder or video game. (See page 12)
The product color and shape may vary depending on the model.
f ..............................
OS-VIDEO IN 2
S-Video input for external devices with an S-Video output.
0AVIN2
S-VIDEO Video and audio inputs for external devices.
0 _ HEADPHONE
You can connect a set of headphones to your television if you wish to watch a television
program without disturbing other people in the room.
, English 7
Remote Control
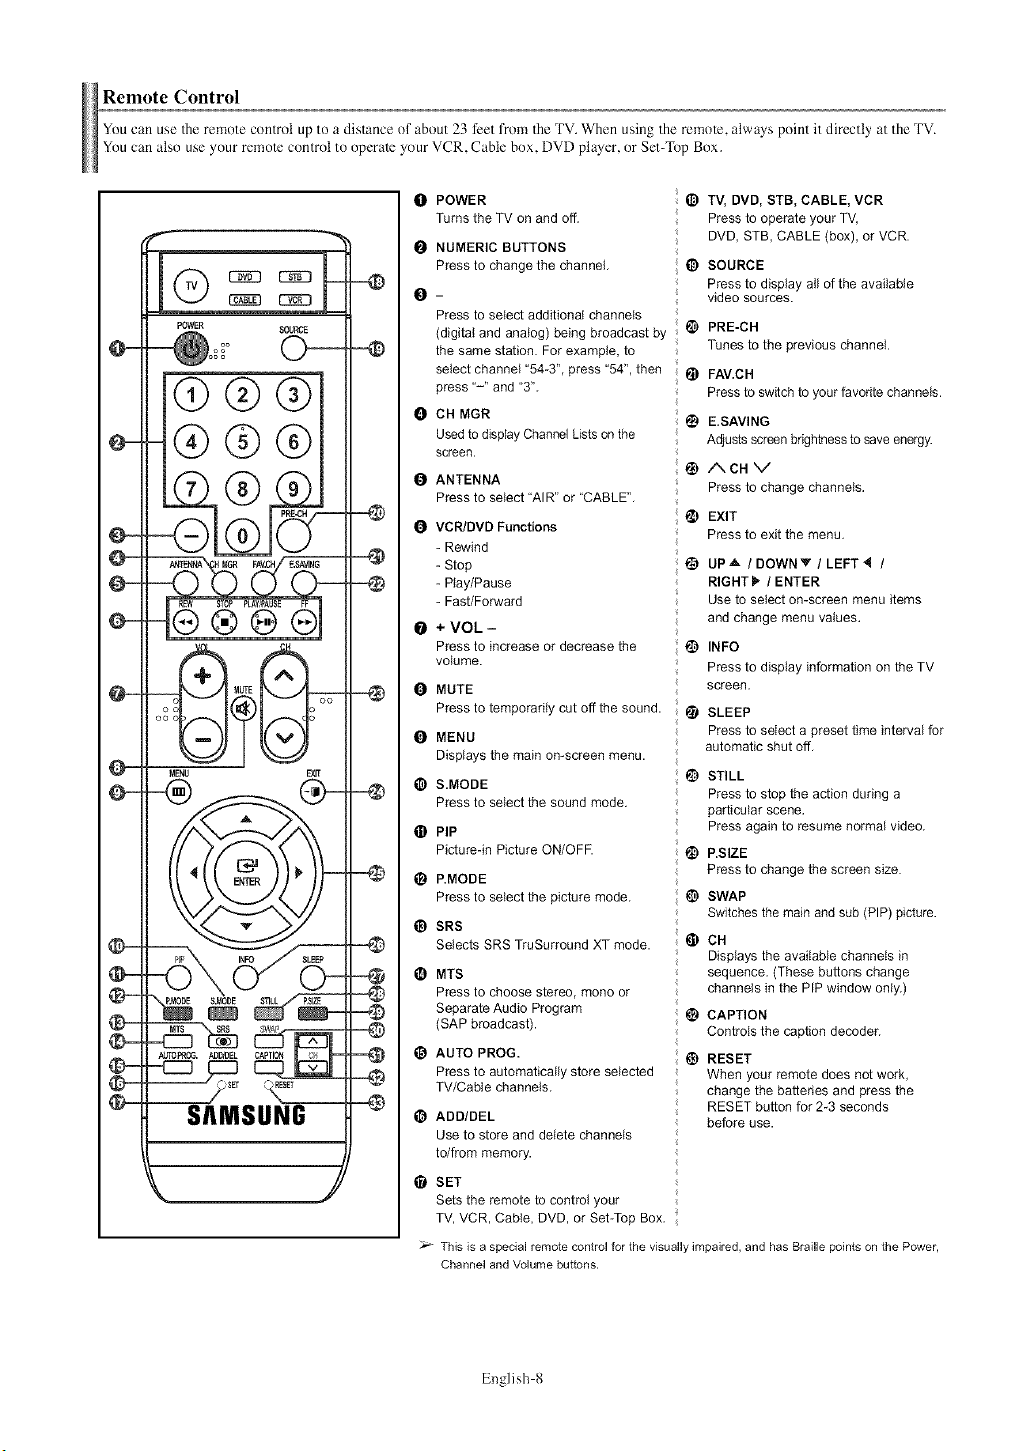
You can use the remote control up to adistance of about 23 feet fl'om the TV. When using the remote, always point it directly at the TV.
You can also use your remote control to operate ynur VCR, Cable box, DVD player, nr Set-Top Box.
@@@
®@@
@@@(9
MENU EXIT
=@
=@
-O
OPOWER _) TV, DVD, STB, CABLE, VCR
Turns the TV on and off. Press to operate your TV,
DVD, STB, CABLE (box), or VCR.
O NUMERIC BUTTONS
Press to change the channel. _) SOURCE
Press to display all of the available
O- video sources.
Press to select additional channels
PRE-CH
(digital and analog) being broadcast by _1
Tunes to the previous channel.
the same station. For example, to
select channe_ "54-3", press "54", then @FAV.CH
press "-" and "3". Press to switch to your favorite channels.
eCHMGR • E.SAVING
Used to display Channel Lists on the Adjusts screen brightness to save energy.
screen.
I_) I_,CN V
O ANTENNA Press to change channels,
Press to select "AIR" or "CABLE".
_) EXIT
O Press to exit the menu.
@
@
VCR/DVD Functions
-Rewind
-Stop
-Play/Pause
-Fast/Forward
+ VOL -
Press to increase or decrease the
volume.
OMUTE
Press to temporarily cut off the sound,
OMENU
Displays the main on-screen menu.
S.MODE _) STILL
Press to select the sound mode, Press to stop the action during a
particular scene.
PIP Press again to resume normal video,
Picture-in Picture ON/OFF. t_) P.SIZE
O P.MODE Press to change the screen size.
Press to select the picture mode, _ SWAP
Switches the main and sub (PIP) picture.
_) SRS
Selects SRS TruSurround XT mode. _) CH
Displays the available channels in
OMTS sequence. (These buttons change
Press to choose stereo, mono or channels in the PIP window only.)
Separate Audio Program
(SAP broadcast). _ CAPTION
Controls the caption decoder.
eAUTO PROG. @) RESET
Press to automatically store selected When your remote does net work,
TV/Cable channels, change the battedes and press the
RESET button for 2-3 seconds
before use.
I_) ADD/DEL
Use to store and delete channels
to/from memory.
• SET
Sets the remote to control your
TV, VCR, Cable, DVD, or Set-Top Box.
UP.& /DOWNY / LEFT_ /
RIGHT _" /ENTER
Use to select on-screen menu items
and change menu values.
INFO
Press to display information on the TV
screen,
SLEEP
Press to select a preset time interval for
automatic shut off,
This is a special remote control for the visually impaired, and has Braille points on the Power,
Channel and Volume buttons.
English g
Installing Batteries in the Remote Control
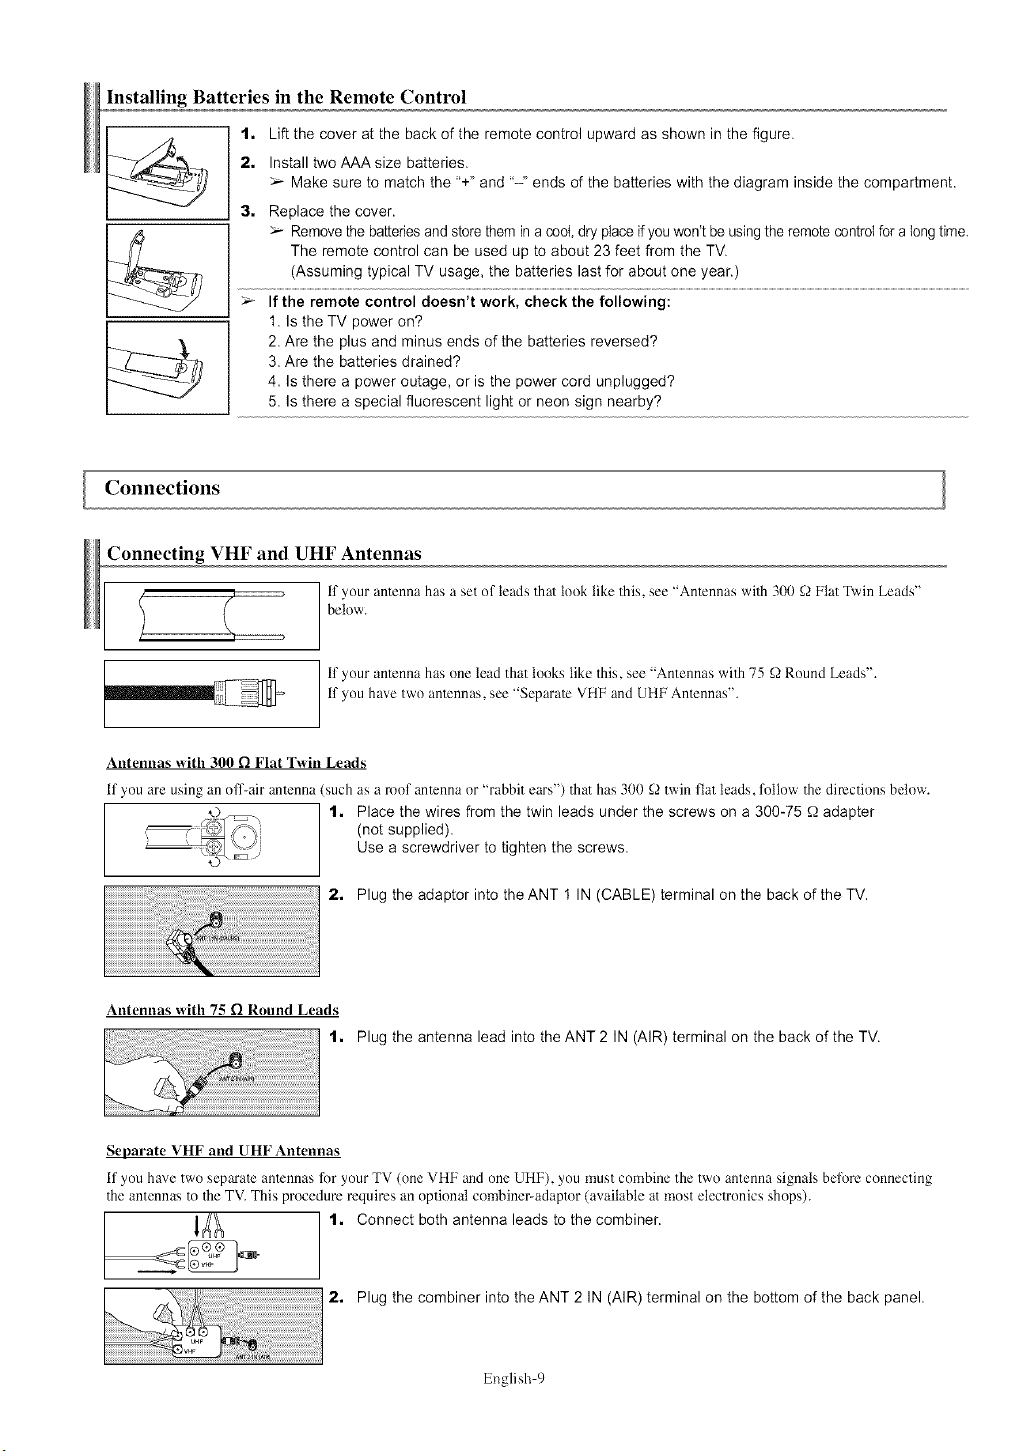
1. Lift the cover at the back of the remote control upward as shown in the figure.
2. Install two AAA size batteries.
Make sure to match the "+" and "-" ends of the batteries with the diagram inside the compartment.
3. Replace the cover.
:;.--Remove the batteries and store them in a cool, dry place if you won't be using the remote controlfor a longtime.
The remote control can be used up to about 23 feet from the TV.
............................................typicalTV ........................................................................................................................................................................................................
>If the remote control doesn t work, check the following:
1. Is the TV power on?
2. Are the plus and minus ends of the batteries reversed?
3. Are the batteries drained?
4. Is there a power outage, or is the power cord unplugged?
5. Is there a special fluorescent light or neon sign nearby?
Connections
Connecting VHF and UHF Antennas
if your antenna has aset ol"leads that took like this, see "Antennas with 300 _2Flat Twin Leads"
below.
2Eb if your antenna has one lead that looks like this, see "Antennas with 75 ':2.2Round Leads".
if you ha',e two antennas, see "Separate VHF and UHF Antennas".
Antennas Mth 300 f! Flat TMn Leads
if you are using an off-air antenna (such as a roof antetana or "rabbit ears") that has 300 _2 twin fiat leads, follow the directions below.
1. Place the wires from the twin leads under the screws on a 300-75 _2adapter
(not supplied).
Use a screwdriver to tighten the screws.
2. Plug the adaptor into the ANT 1 IN (CABLE) terminal on the back of the TV.
Antennas x_ith 75 D Round Leads
1. Plug the antenna lead into theANT2 IN (AIR) terminal on the back of the TV.
Separate VHF and UHF Antennas
if you have two sepm'atc anlennas for your TV (one VHF and one UHF), you must combine the two antenna signals befl)re connecting
the antennas to the TV. This procedure requires an optional combinel_adaptor (available at most electronics shops).
]_ 1. Connect both antenna leads to the combiner.
2. Plug the combiner into the ANT 2IN (AIR) terminal on the bottom of the back panel.
English 9

ConnectingCableTV
To connect to a cable TV system, follow the instructions below.
Cable *_itbout a Cable Box
1, Plug the incoming cable into the ANT 1 IN (CABLE) terminal on the back of the TV.
BecausethisTV is cable-ready,youdo not needa cablebox to viewunscrambledcablechannels.
Connecting to a Cable Box that Descrambles All Channels
ANT IN ANT OUQt_}=
t, Find the cable that is connected to the ANT OUT terminal on your cable box.
This terminal might be labeled"ANT OUT", "VHFOUT" or simply,"OUT".
2, Connect the other end of this cable to the ANT 1 IN (CABLE) terminal on the back of the TV.
Cnnnectinu to a Cable Box that Descrambles Some Channels
if your cable box descrambles only some channels (such as premium channels), follow the instructions below. You wilt need a two-way
splitter, an RF (A/B) switch, and four lengths of Antenna cable. (These items are available at most electronics stores.)
:o+T 1, Find and disconnect the cable that is
connected to the ANT IN terminal on your
cable box.
Thisterminal might be labeled"ANT IN",
"VHF IN"or simply, "IN".
_T@ ""* [_
Incoming
cable SpIRter
Incoming
cable Splitter
Cable Box
2, Connect this cable to a two-way splitter.
3. Connect an Antenna cable between an
OUTPUT terminal on the splitter and the
IN terminal on the cable box.
Incoming
cable
Splitter
Cable Box
4,
Switch
Connect an Antenna cable between the
ANT OUT terminal on the cable box and
the B-IN terminal on the RF(A/B) switch.
Incoming
cable
m
Cable Box
RF (AIB)
Switch
5, Connect another cable between the other
OUT terminal on the splitter and the A-IN
terminal on the RF (A/B) switch.
6, Connect the last Antenna cable between the
OUT terminal on the RF (A/B) switch and
the ANT 1 IN (CABLE) terminal on the rear
of the TV.
Switch
After you have made Ibis connection, set the A/B switch to the %" position for normal viewing. Set the A/B switch to the "B" position to view scrambled
channels. (When you set the A/B switch to "B", you will need to tune your TV to the cable box's output channel, which is usually channel 3 or 4.)
English l(t
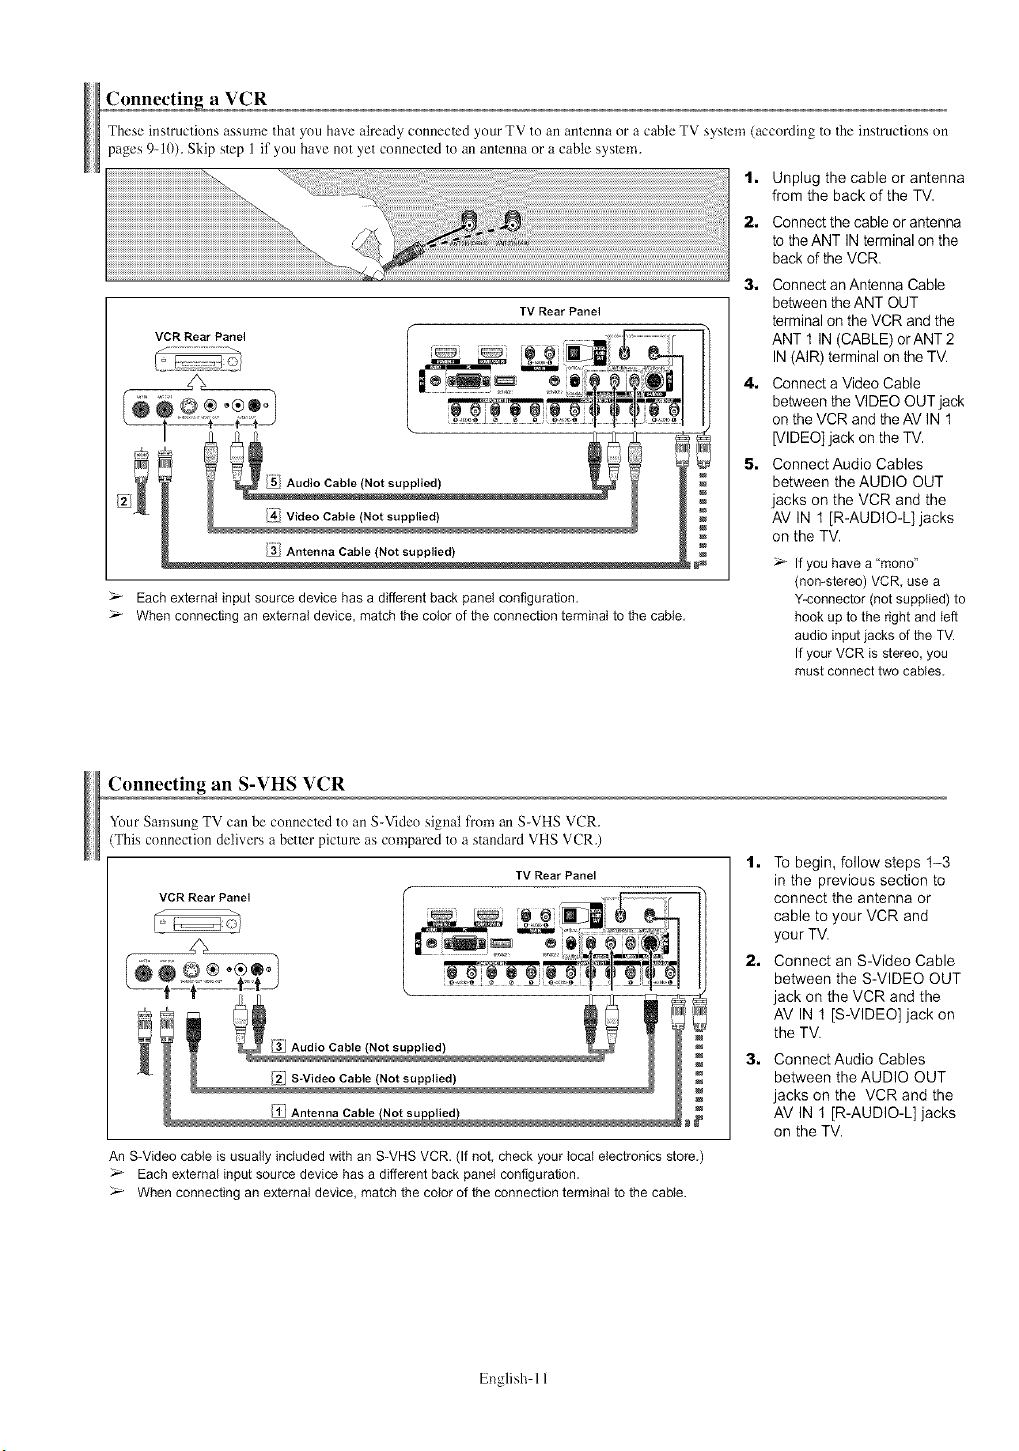
Connecting aVCR
These instructions assume that you have ah'cady connecled your TV to an antenna or acable TV syslem (according to the instructions on
pages 9-10). Skip slep 1 if you have not yet connected to an anlcnna or acable syslem.
TV Rear Panel
Audio Cable (Not supplied)
/4-i Video Cable (Not supplied)
/3_ Antenna Cable (Not supplied)
VCR Rear Panel
_- Each external input source device has a different back panel configuration.
When connecting an external device, match the color of the connection terminal to the cable.
1, Unplug the cable or antenna
from the back of the TV.
2, Connect the cable or antenna
to the ANT IN terminal on the
back of the VCR.
3, Connect an Antenna Cable
between the ANT OUT
terminal on the VCR and the
ANT 1 IN (CABLE) orANT 2
IN (AIR) terminal on the TV.
4, Connect a Video Cable
between the VIDEO OUT jack
on the VCR and theAV IN t
[VIDEO] jack on the TV.
5, ConnectAudio Cables
between the AUDIO OUT
jacks on the VCR and the
AV IN 1 [R-AUDIO-L] jacks
on the TV.
If youhave a "mono"
(non-stereo)VCR. use a
Y-connector(not supplied)to
hookup to the dght and left
audio input jacks of the TV.
If your VCR is stereo,you
mustconnecttwo cables.
Connecting an S-VHS VCR
Your Samsung TV can be conneclcd to an S-Video signal from an S-VHS VCR.
]'his connection delivers a better picture as compared to a standard VHS VCR.)
VCR Rear Panel
z;
TV Rear Panel
[¥! Antenna Cable
An S-Video cable is usually included with an S-VHS VCR. (If not, check your local electronics store.)
Each external input source device has a different back panel configuration.
When connecting an external device, match the color of the connection terminal to the cable.
1, To begin, follow steps t-3
in the previous section to
connect the antenna or
cable to your VCR and
your TV.
2, Connect an S-Video Cable
between the S-VIDEO OUT
jack on the VCR and the
AV IN t [S-VIDEO] jack on
the TV.
3. Connect Audio Cables
between the AUDIO OUT
jacks on the VCR and the
AV IN 1 [R-AUDIO-L] jacks
on the TV.
English 11
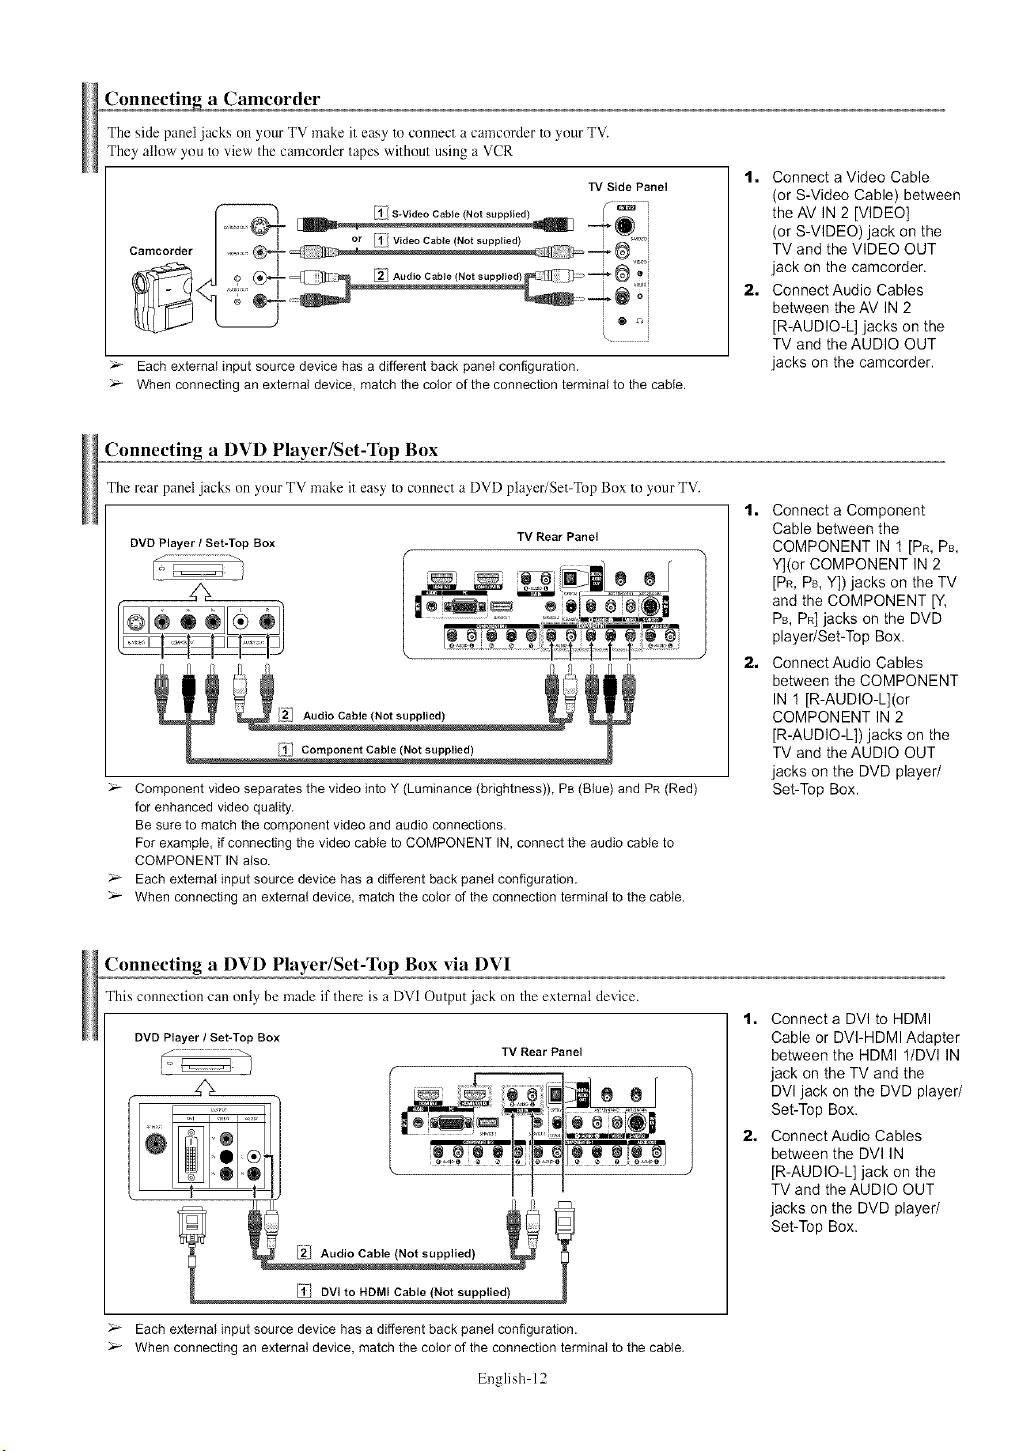
aCamcorder
The side panel jacks on your TV make it easy to connect a camcorder to your TV.
They allow you to view the camcra'der tapes without using a VCR
TV Side Panel
/l-i S-Video Cable (Not supplied) _ _ i
I .....@_- ....... _ ........... '..... -_
I-- ] or I¥ _ Video Cable (Not supplied) _'_'°i
i
Each external inputsource device hasa different back panel configuration.
Whenconnecting an external device,match the color of the connectionterminal to the cable.
1, Connect a Video Cable
(or S-Video Cable) between
the AV IN 2 [VIDEO]
(or S-VIDEO) jack on the
TV and the VIDEO OUT
jack on the camcorder.
2, ConnectAudio Cables
between the AV IN 2
[R-AUDIO-L] jacks on the
TV and the AUDIO OUT
jacks on the camcorder.
Connecting aDVD Player/Set-Top Box
The rear panel jacks on your TV make it easy to connect a DVD player/Set-Top Box to your TV.
DVD Player/Set-Top Box TV Rear Panel
Audio Cable (Not supplied)
Component video separates the video into Y (Luminance (brightness)), PB (Blue) and PR (Red)
for enhanced video quality.
Be sure to match the component video and audio connections.
For example, if connecting the video cable to COMPONENT IN, connect the audio cable to
COMPONENT IN also.
Each external input source device has a different back panel configuration.
When connecting an external device, match the color dthe connection terminal to the cable.
t. Connect a Component
Cable between the
COMPONENT IN t [PR, PB,
Y](or COMPONENT IN 2
[PR, Ps, Y]) jacks on the TV
and the COMPONENT [Y,
PB, PR]jacks on the DVD
player/Set-Top Box.
2. ConnectAudio Cables
between the COMPONENT
IN 1 [R-AUDIO-L](or
COMPONENT IN 2
[R-AUDIO-L]) jacks on the
TV and the AUDIO OUT
jacks on the DVD player/
Set-Top Box.
Connecting a DVD Player/Set-Top Box via DVI
This connection can only be made if there is a DVI Output jack on Theexternal device.
DVD Player /Set-Top Box
&
,O ,®
,0 ®
TV Rear Panel
1, Connect a DVI to HDMI
Cable or DVI-HDMI Adapter
between the HDMI I/DVl IN
jack on the TV and the
DVl jack on the DVD player/
Set-Top Box.
2, ConnectAudio Cables
between the DVl IN
[R-AUDIO-L] jack on the
_ [2"/ Audio Cable Not su bed _ _'_ l
/';I-i DVi to HDM[ Cable (Not supplied)
TV and the AUDIO OUT
jacks on the DVD player/
Set-Top Box.
Each external input source device has a different back panel configuration.
When connecting an external device, match the color of the connection terminal to the cable.
English 12
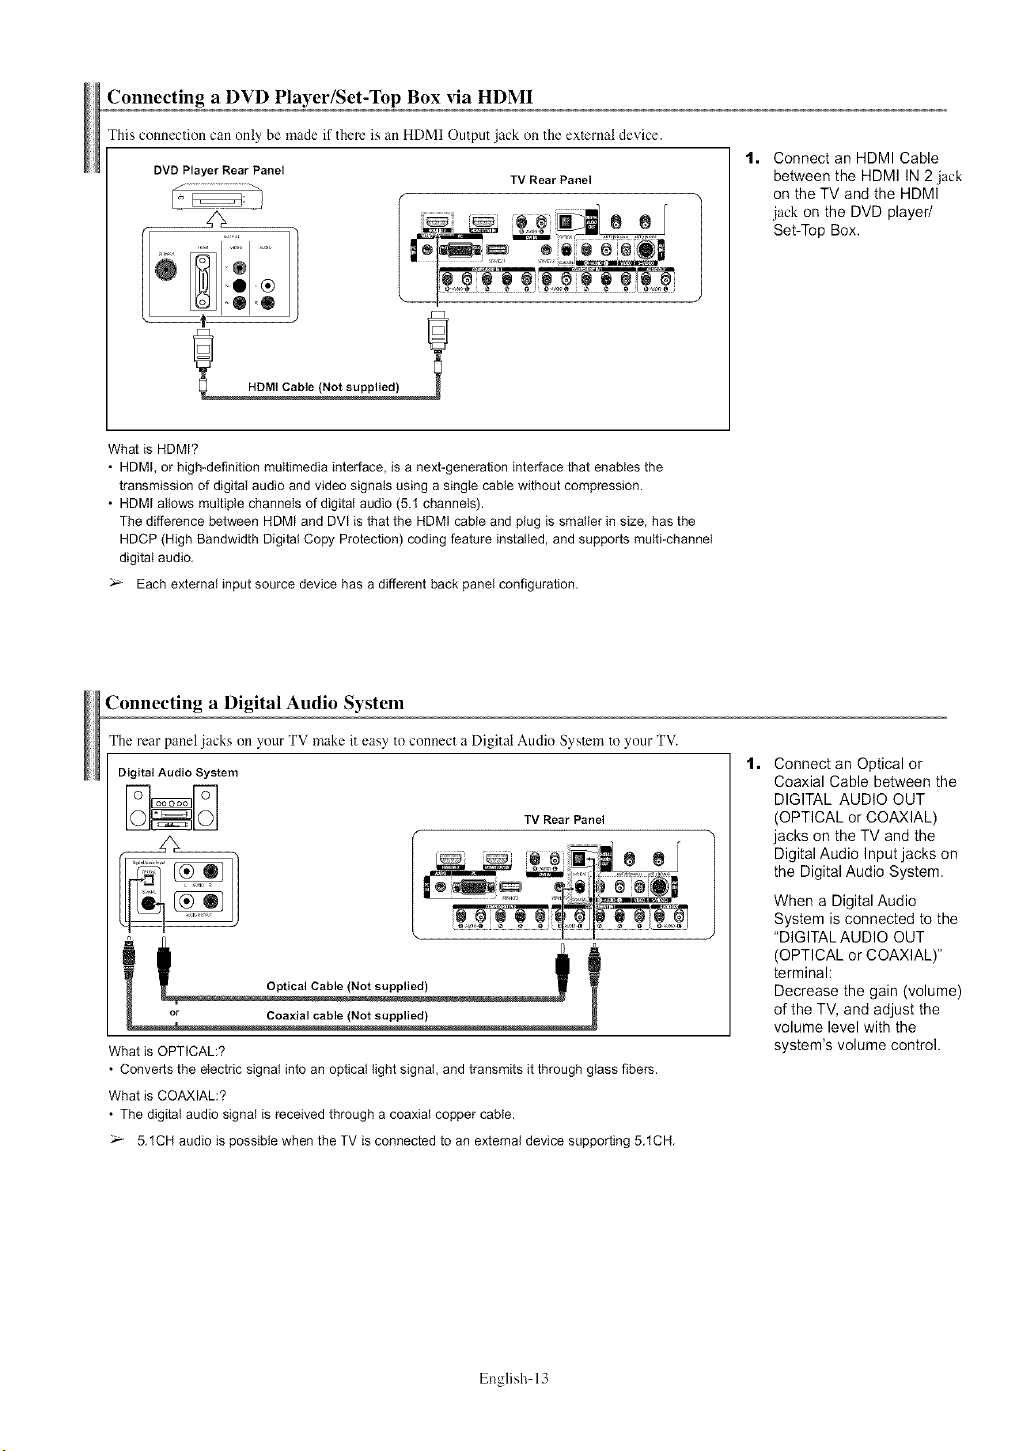
Connecting aDVD Player/Set-Top Box via HDMI
This connection can only be made if there is an HDMI Output jack oll the exTcrnat device.
DVD Player Rear Panel TV Rear Panel
HDMI Cable (Not supplied)
1. Connect an HDMI Cable
between the HDMI IN 2 jack
on the TV and the HDMI
jack on the DVD player/
Set-Top Box.
What is HDMI?
•HDM[, or high-definition multimedia interface, is a next-generation interface that enables the
transmission of digital audio and video signals using a single cable without compression.
• HDMI allows multiple channels of digital audio (5.t channels).
The difference between HDMI and DVl is that the HDMI cable and plug is smaller in size, has the
HDCP (High Bandwidth Digital Copy Protection) coding feature installed, and supports multi-channel
digital audio,
Each external input source device has a different back panel configuration,
Connecting a Digital Audio System
The rear panel jacks on your TV make it easy to connect a Digital Audio Syslem to your TV.
Digital Audio System
i
Optical Cable (Not Supplied)
What is OPTICAL:?
• Convertsthe etectricsignalinto an optical light signal, and transmitsit through glass fibers,
What is COAXIAL:?
• The digital audio signal is receivedthrough a coaxial copper cable.
5,1CH audio is possiblewhen the TV is connectedto an extemaldevice supporting5,1CH,
t. Connect an Optical or
Coaxial Cable between the
DIGITAL AUDIO OUT
(OPTICAL or COAXIAL)
jacks on the TV and the
Digital Audio Input jacks on
the Digital Audio System.
When a Digital Audio
System is connected to the
"DIGITAL AUDIO OUT
(OPTICAL or COAXIAL)"
terminal:
Decrease the gain (volume)
of the TV, and adjust the
volume level with the
system's volume control.
English 13

Connecting an Amplifier/DVD Home Theater
Ampiifier/DVD Home Theater
@
Audio Cable(Notsupplied)
TV Rear Panel
t. ConnectAudio Cables
between the AUDIO OUT
[R-AUDIO-L] on the TV
and AUDIO IN [R-AUDIO-L]
on the Amplifier/DVD Home
Theater.
When an audio amplifier is
connected to the "AUDIO
OUT [R-AUDIO-L]"
terminals: Decrease the
gain (volume) of the TV,
and adjust the volume level
with the Amplifier's volume
control.
Each extemal input source device has a different back panel configuration.
When connecting an external device, match the color of the connection terminal to the cable.
Connecting a PC
TV Rear Panel
1. Connect a D-Sub Cable
between PC IN [PC]
jack on the TV and the
PC output jack on your
computer.
2. Connect a PCAudio Cable
between PC IN [AUDIO]
jack on the TV and the
Audio Out jack of the sound
card on your computer.
_'v Each extemal input source device has a different back panel configuration.
When connecting an extemal device, match the color of the connection terminal to the cable.
The HDMI/DVI jacks do not support PC connection.
When "Internal Mute" is set to "On", Sound menus except "Multi-Track Options" and "Digital Output" cannot be adjusted.
English 14

Operation
Turning the TV On and Off
Press the POWER button on the mmole control.
You can also use the POWER button on the TV.
Plug &Play Feature
When the TV is initially powered On, basic customer settings proceed automatically and subsequently:
1. Press the POWER button on the remote control.
The message "Menu language, Channels and Time will be set," is displayed,
Press the ENTER button, then "Select the language of the OSD" menu is
automatically displayed,
2. Press the ENTER button to enter the language,
Press the • or •button to select language, then press the ENTER button,
"Select the antennas to memorize," menu is automatically displayed,
3, Press the •or • button to memorize the channels of the selected connection.
Press the ENTER button to select "Start",
If the antenna is connected to ANT 2 IN (AIR), select "Air" and if it is connected to
ANT 1 IN (CABLE), select "Cable",
If both ANT 2 IN (AIR) and ANT 1 IN (CABLE) are connected, select the 'Air + Cable",
In Cable mode, you can select the correct signal source among STD, HRC, and [RC
by pressing the • or •button, then press the ENTER button,
Contact your local cable company to identify the type of cable system that exists in your
particular area,
Continued,,.
English 15
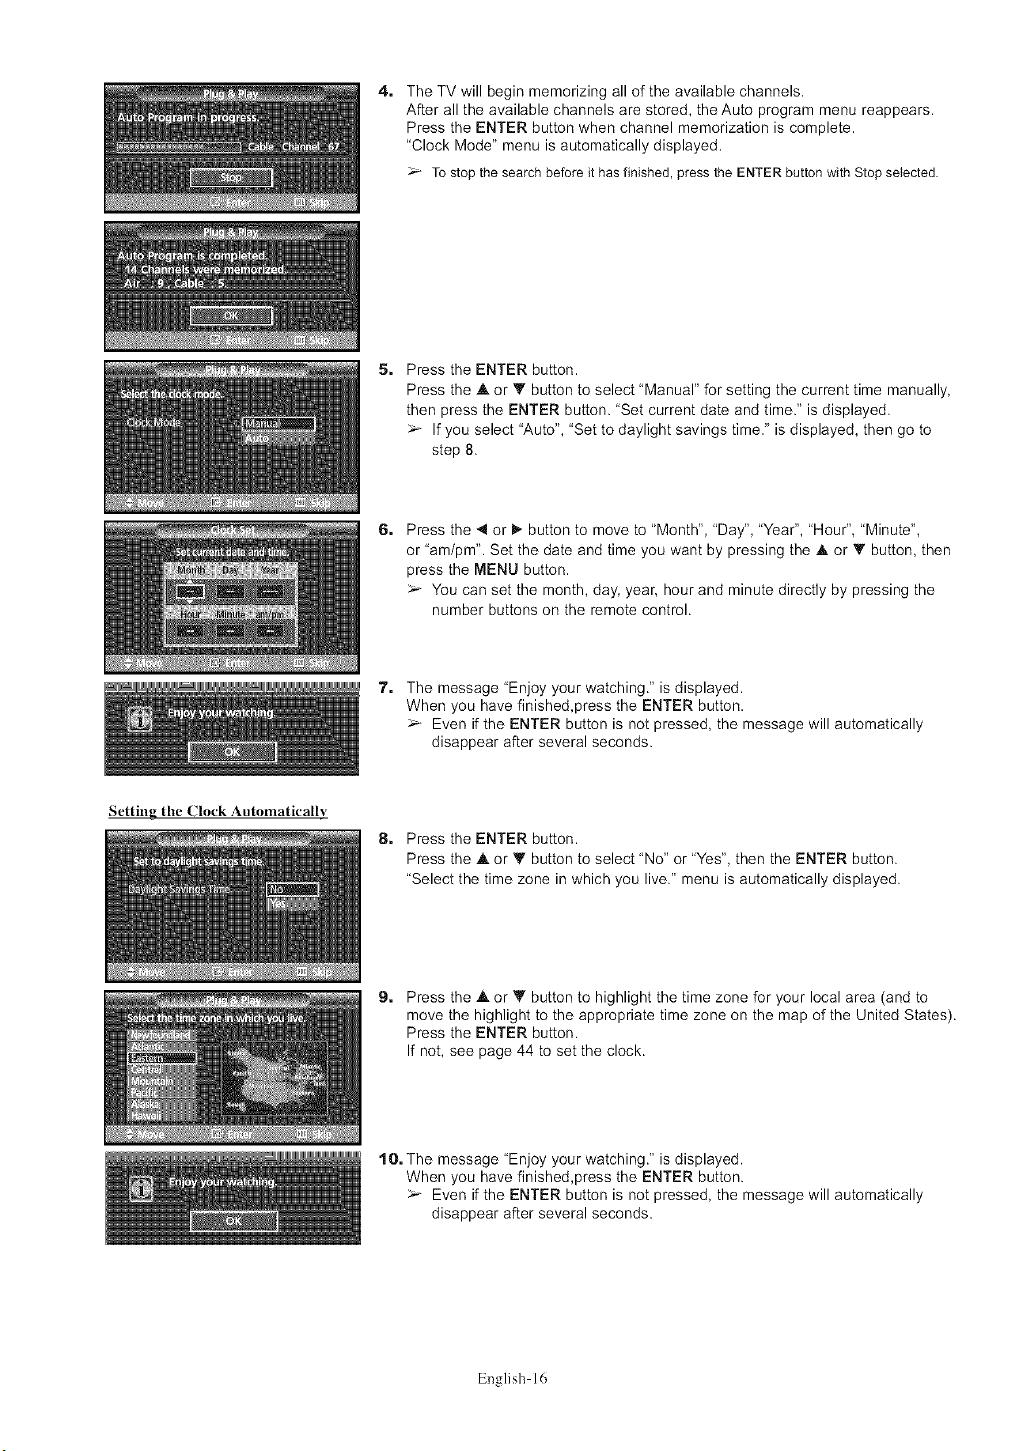
4. The TV will begin memorizing all of the available channels.
After all the available channels are stored, the Auto program menu reappears.
Press the ENTER button when channel memorization is complete.
"Clock Mode" menu is automatically displayed.
To stop the search before it hasfinished,press the ENTERbutton with Stopselected.
5. Press the ENTER button.
Press the A or Y button to select "Manual" for setting the current time manually,
then press the ENTER button. 'Set current date and time." is displayed.
If you select "Auto", "Set to daylight savings time." is displayed, then go to
step 8.
G. Press the _1or D,-button to move to "Month", "Day", "Year", "Hour", "Minute",
or 'am/pm". Set the date and time you want by pressing the A or 'It button, then
press the MENU button.
You can set the month, day, year, hour and minute directly by pressing the
number buttons on the remote control.
7. The message "Enjoy your watching." is displayed.
When you have finished,press the ENTER button.
Even if the ENTER button is not pressed, the message will automatically
disappear after several seconds.
Setting the Clock Automatically
8. Press the ENTER button.
Press the A or Y button to select 'No" or "Yes", then the ENTER button.
"Select the time zone in which you live." menu is automatically displayed.
9. Press the .A or Y button to highlight the time zone for your local area (and to
move the highlight to the appropriate time zone on the map of the United States).
Press the ENTER button.
If not, see page 44 to set the clock.
1 O. The message "Enjoy your watching." is displayed.
When you have finished,press the ENTER button.
Even if the ENTER button is not pressed, the message will automatically
disappear after several seconds.
English 16
If you want to reset this feature...
1. Press the MENU button to display the menu.
Press the &or _' button to select "Setup", then press the ENTER button.
2, Press the ENTER button to select "Plug & Play".
For further details on setting up options, refer to the page 15-16.
Plug & Play can only be accessedin the TV mode.
Changing Channels
Using the Channel Buttons
_UTE
ooo
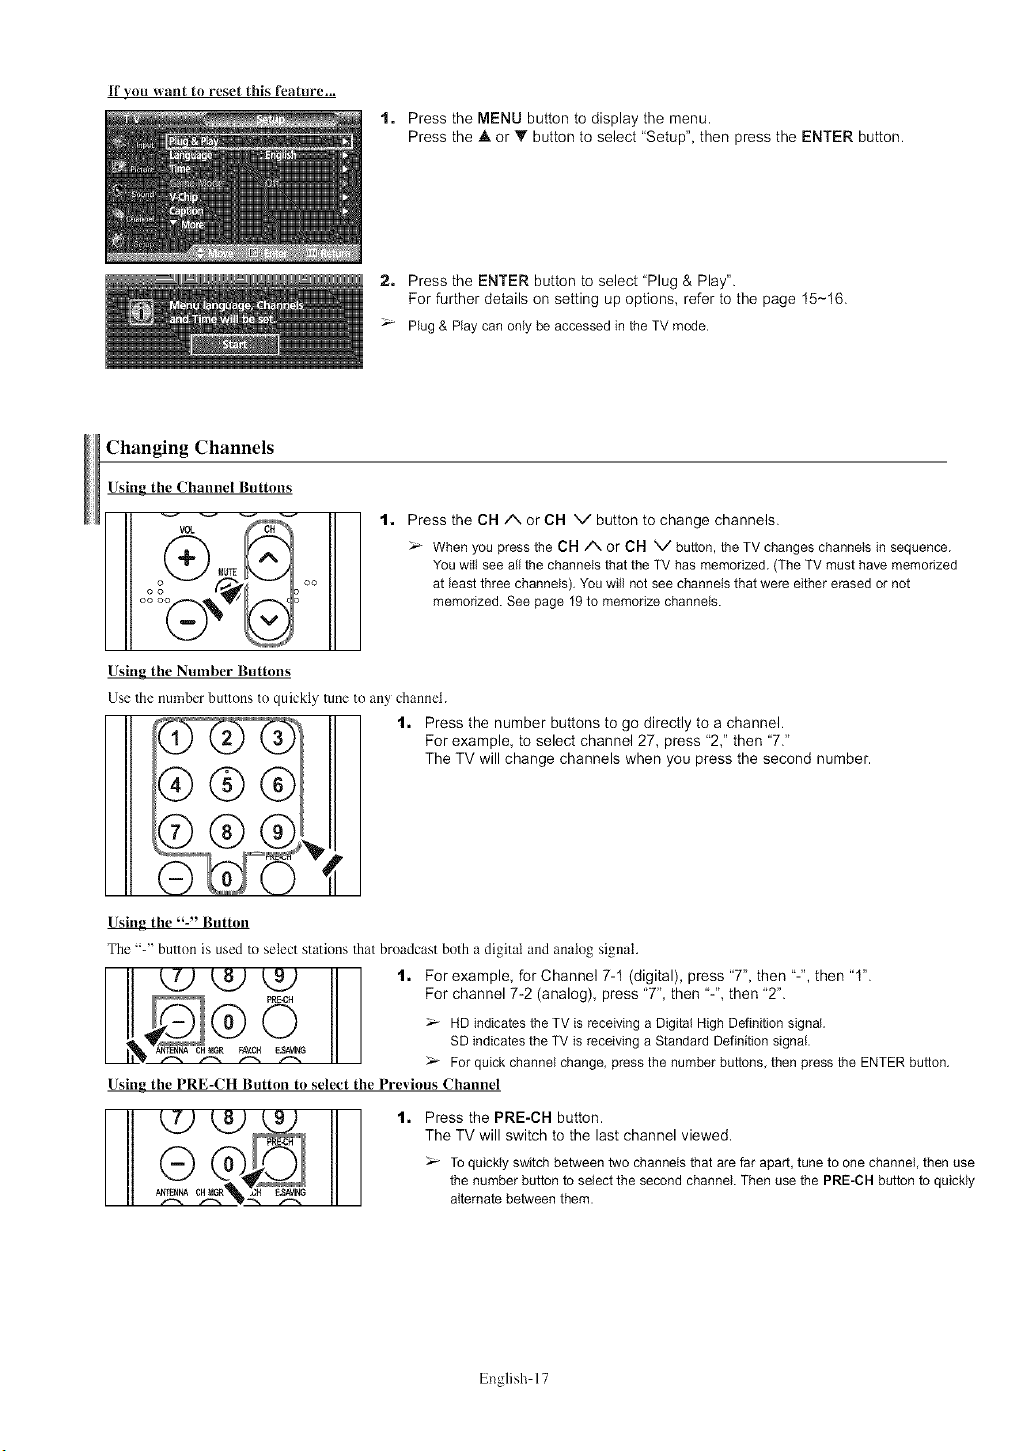
1. Press the CH/N or CH V button to change channels.
When you press the CH/'-. or CH V button, the TV changes channels in sequence.
You will see all the channels that the TV has memorized. (The TV must have memorized
at least three channels). You will not see channets that were either erased or not
memorized. See page 19 to memorize channels.
Using the Number Buttons
Use the number buttons to quickly tune to any channel.
'_[_P" 1. Press the number buttons to go directly to a channel.
For example, to select channel 27, press "2," then "7."
_ _ _ TheTVwillchangechannelswhenyoupressthesecondnumber.
Using the "-" Button
The "-" button is uscd to select stations that broadcast both a digital and analog signal.
II[ [7) tB) _9) t. For example, for Channel 7-1(digital), press "7", then "-", then "t".
E MGR(__ _.-CH For channel 7-2 (analog), press "7", then "-", then "2".
Ow_ _ HD indicates the TV is receiving a Digital High Definition signal.
CH SD indicates the TV is receiving a Standard Definition signal.
LLL'_ _ _ _ 1".- _- For quick channel change, pressthe number buttons, then press the ENTER button.
Using the PRE-CH Button to select tile Previous Channel
Press the PRE-GH button.
The TV will switch to the last channel viewed.
_- To quickty switch between two channels that are far apart, tune to one channel, then use
the number button to select the second channel. Then use the PRE-CH button to quickly
alternate between them.
English 17
Adjusting the Volume
CH
oo
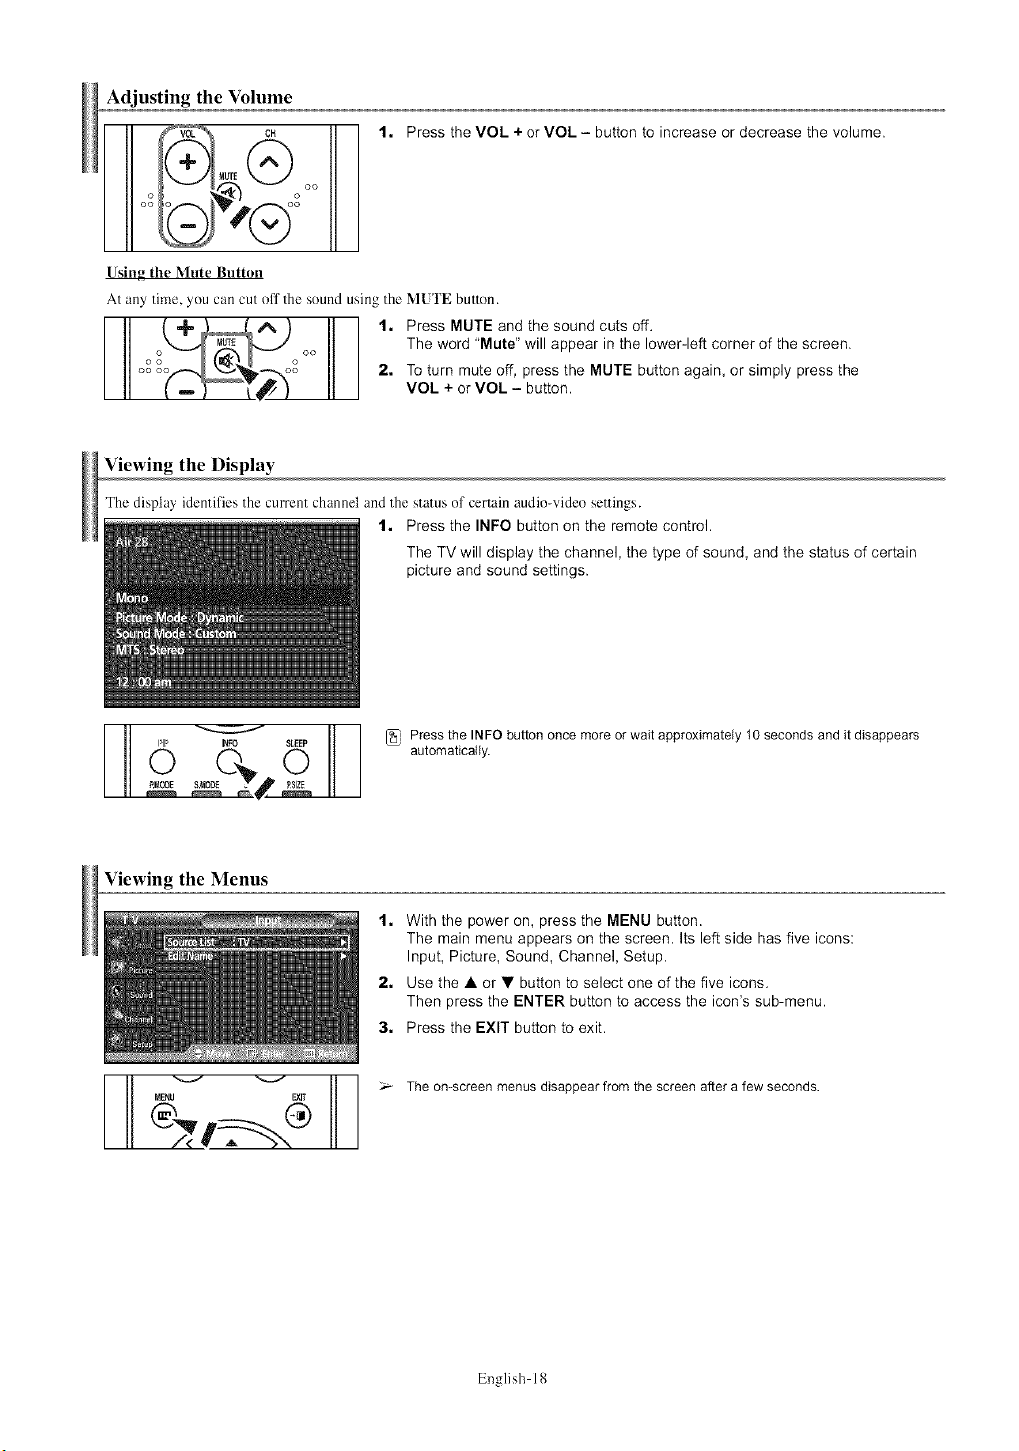
t. Press the VOL +or VOL - button to increase or decrease the volume.
Using the Mute Button
At any time, you can cut off The sound using the MUTE button.
t. Press MUTE and the sound cuts off.
The word "Mute" will appear in the lower-left corner of the screen.
o°oo 2. To turn mute off, press the MUTE button again, or simply press the
VOL + or VOL - button,
Viewing the Display
The display identifies the CmTCntchannel and the status of certain audio-video settings.
1. Press the INFO button on the remote control.
The TV will display the channel, the type of sound, and the status of certain
picture and sound settings.
/R' Pressthe INFO buttononce more or wait approximately10 secondsand it disappears
_EP
_op,EO_17S 0 automatically.
Viewing the Menus
t. With the power on, press the MENU button.
The main menu appears on the screen. Its left side has five icons:
Input, Picture, Sound, Channel, Setup.
2. Use the A or • button to select one of the five icons.
Then press the ENTER button to access the icon's sub-menu.
3. Press the EXIT button to exit.
_l _( _ >- The on-screen menus disappear from the screen after a few seconds.
English I g
Memorizing the Channels
Your TV can memorize and store all of the available channels for bolh "off-air" (amenna) and cable channels.
After the available channels are memorized, use the CH/', or CH \,/button to scan through 1he channels.
This eliminates the need to change channels by enlcring the channel digits. Them are throe steps fnr memorizing channels:
selecting a broadcast source, memorizing the channels (automatic) and adding and deleting channels (manual).
Selecting the Video Signal-source
Before your television can begin memorizing the available channels, you must specify the type of signal source that is connected to the
TV (iv. an anlcnna or a cable system).
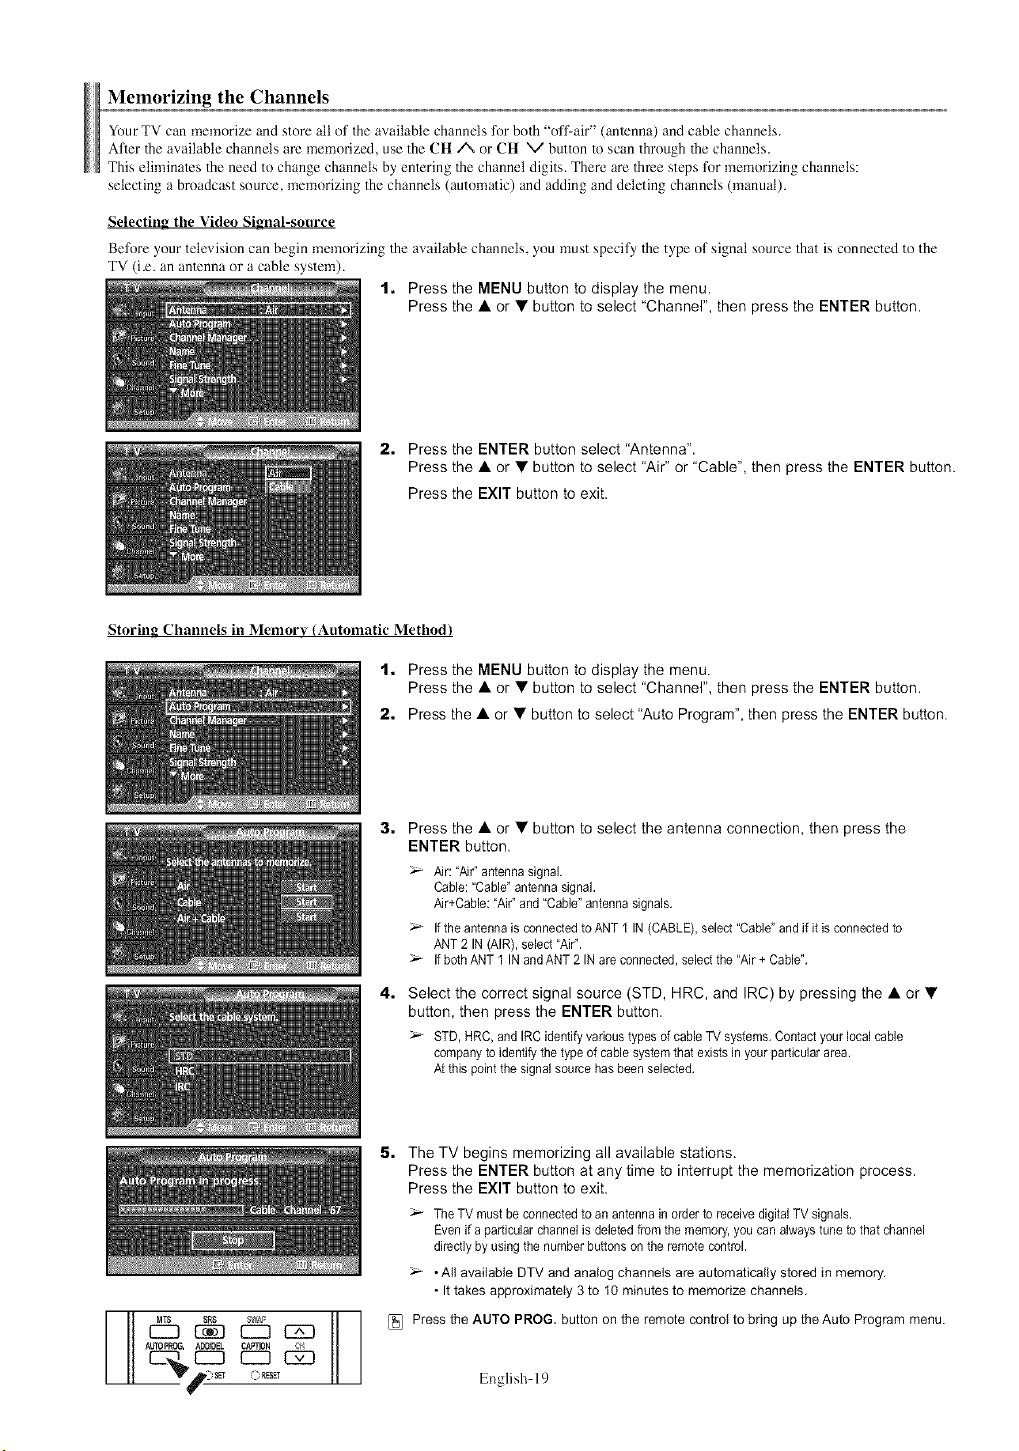
1, Press the MENU button to display the menu.
Press the • or • button to select "Channel", then press the ENTER button.
2, Press the ENTER button select "Antenna".
Press the • or • button to select "Air" or "Cable", then press the ENTER button.
Press the EXIT button to exit,
Storing Channels in Memory (Automatic Method)
1, Press the MENU button to display the menu.
Press the • or • button to select "Channer', then press the ENTER button.
2, Press the • or • button to select "Auto Program", then press the ENTER button.
3, Press the • or • button to select the antenna connection, then press the
ENTER button.
Air: "Air" antenna signal.
Cable: "Cable" antenna signal.
Air+Cable: "Air" and "Cable" antenna signals.
Ifthe antenna is connected to ANT I IN (CABLE),select "Cable" and if it is connected to
ANT 2 IN (AIR), select "Air".
If both ANT I IN and ANT 2 IN are connected, select the "Air + Cable".
4. Select the correct signal source (STD, HRC, and IRC) by pressing the • or •
button, then press the ENTER button.
STD, HRC, and IRC identify varioustypes of cable TV systems. Contact your local cable
companyto identify the type of cable system that exists in your particular area.
At this point the signal source has been selected.
E_ _ C23_12D
AUTOPRC6, ADDJDEL CA_TDN
5, The TV begins memorizing all available stations.
Press the ENTER button at any time to interrupt the memorization process.
Press the EXIT button to exit.
TheTV must be connected to an antenna in order to receive digital TV signals.
Even if a particular channel is deleted from the memory, you can always tune to that channel
directly by using the number buttons on the remote control.
•All available DTV and analog channels are automatically stored in memory,
•It takes approximately 3 to t0 minutes to memorize channels,
Press the AUTO PROG. button on the remote control to bring up the Auto Program menu.
English 19
SettingUpYourRemote Control
After it has been set up properly, your remote control can operate in five different modes: TV, VCR, Cable, DVD, or Set-Top Box.
Pressing the cowesponding button on the remote control allows you to switch between these modes, and control whichever piece of
equipment you choose.
2s_ The remote connol might not be compatible with all DVD Players. VCRs, Cable boxes, and SebTop Boxes.
¢ 5
CZ CZ3 CZ3 _
_AMSUNG
s
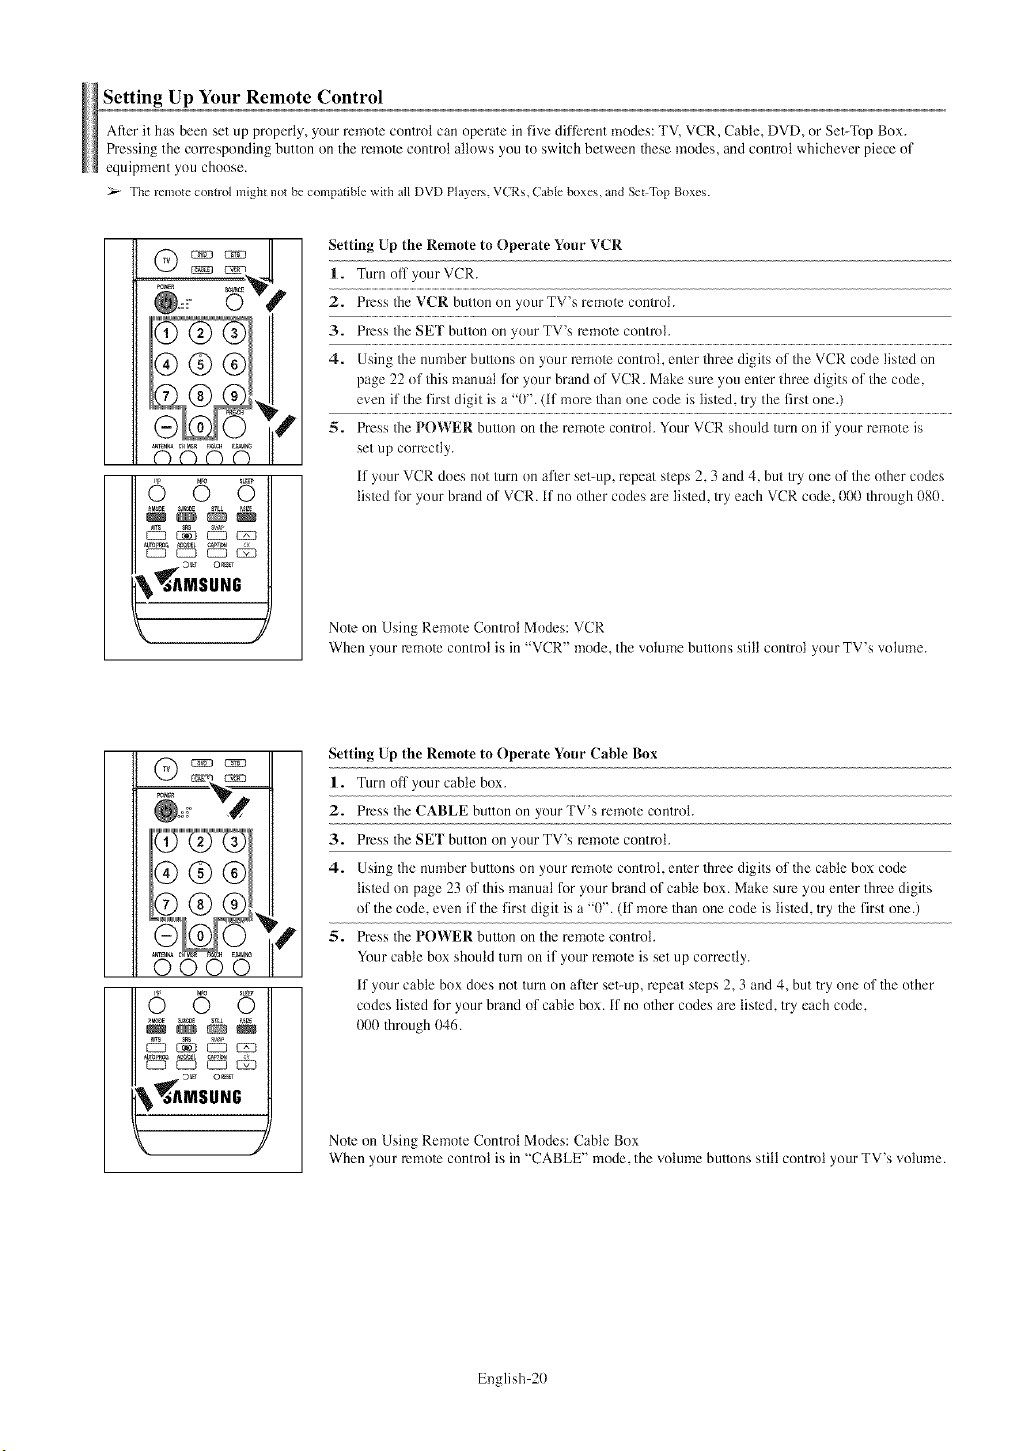
Setting Up the Remote to Operate Your VCR
1. Turn off your VCR.
2. Press fire VCR button nn your TV's remn/e contrnt.
3. Press rite SET button on ynur TV's remote controh
4. Using the number buttons on your mmo/e control, en/er flaree digits of the VCR code listed on
page 22 nf finismanuat for your brand of VCR. Make sure ynu enter three digits of rite code,
even if the first digit is a "0". (If more titan one code is listed, try the first one.)
5. Press rite POWER button on the remote control. Your VCR shnuld turn on if ynur remote is
set up correctly.
if ynur VCR dnes nnt turn on afier set-up, repeat steps 2, 3 and 4, but/ry nne nf fire other codes
lis/ed lot your brand of VCR. If no other codes are lis/cd, try each VCR cnde, 000 thrnugh 080.
Note on Using Remote Control Mndes: VCR
When your remote cnntn)t is in "VCR" mnde, the volume buttons still cnntrnl your TV's "_ntume.
65 5
EZt EZ_ CZt _
_MSUNG
Setting Up the Remote to Operate Your Cahle Box
1. Turn off your cane box.
2. Press the CABLE button on your TV's remote controh
3. Press the SEF button on your TV's mmole contmh
4. Using the number buttons on your remote control, enler three digits of the cable box code
lisled on page 23 of this manual for your brand of cable box. Make sum you enler throe digits
of the code, even if the first digit is a "0". (if more than one code is tisled, try the first one.)
5. Press the POWER button on the remote controh
Your cable box should turn on if your remo_e is set up correctly.
if your cable box does not turn on after set-up, repeat s_eps 2, 3 and 4, but try one of the other
codes fished tbr your brand of cable box. if no o_her codes am fished, try each code,
000 through 046.
Note on Using Remote Cnntrol Modes: Cable Box
When your remote control is in "CABLE" mode, the volume buttons still control your TV's volume.
English 20
5 6 5
_ EZ3 EZ3 _
\ MSU.G
k J
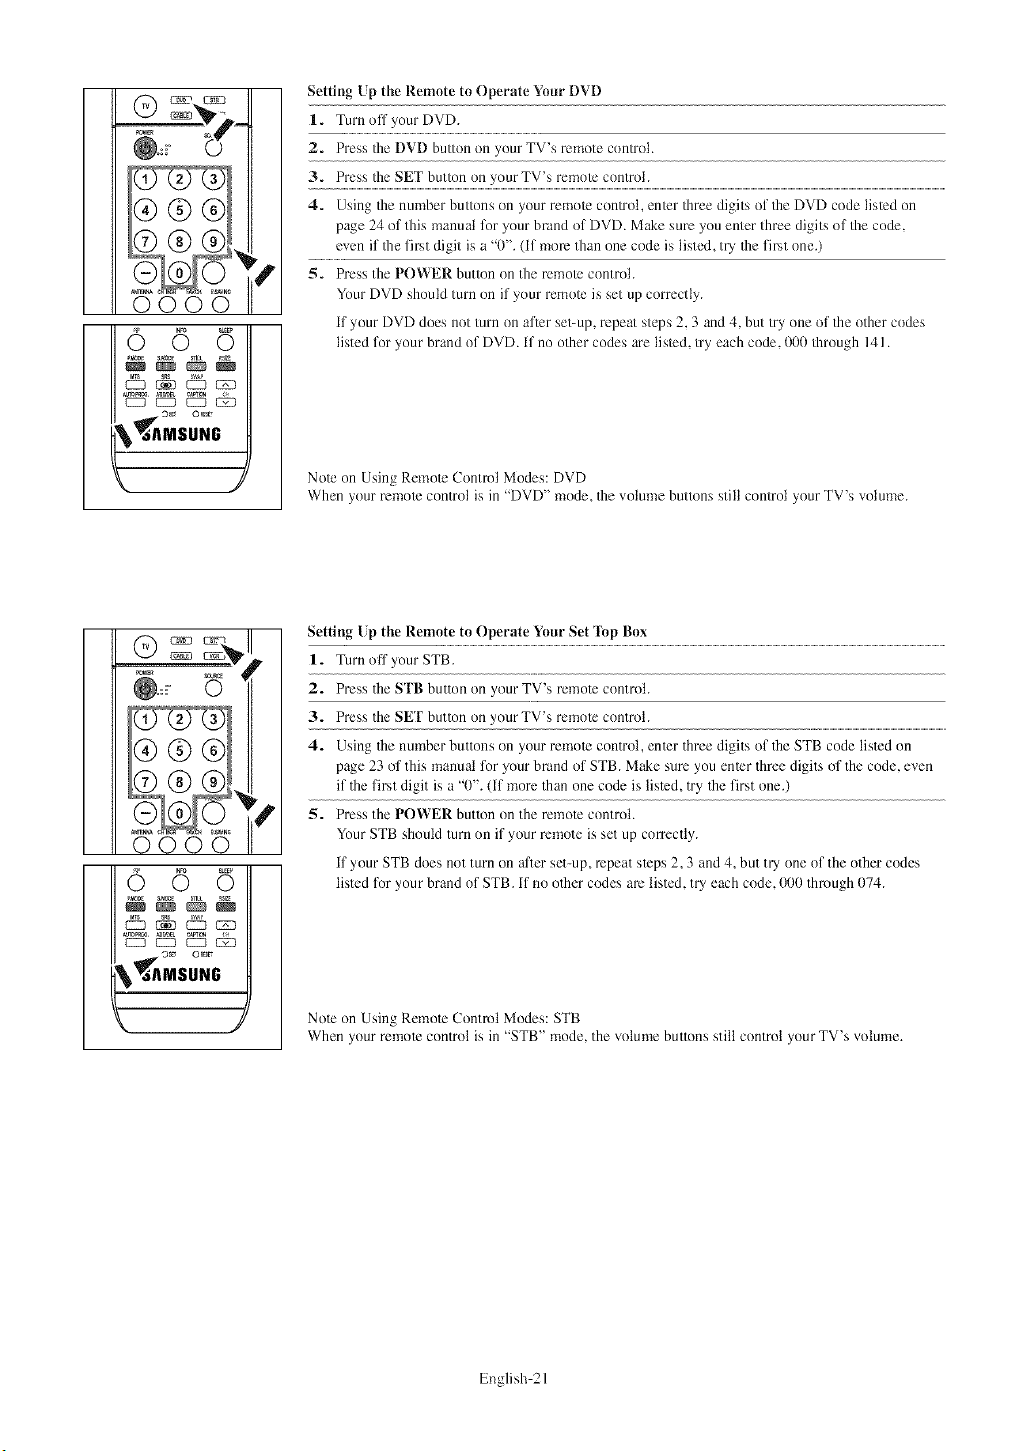
Setting Up the Remote to Operate Your DVD
1. Turn off },our DVD.
2. Press the DVD button on your TV's remote controh
3 _ !!!sEl b.!!oo you TY _e,_o_on!_o:...............................................................................................................................................................................................................................................................
4. Using the number buttons on your remote con/ml, enter three digits of the DVD code listed on
page 24 of this manual for >'ourbrand of DVD. Make sure you enter tbree digits of the code,
esen if the first digit is a "0". (if more than one code is listed, try' the first one.)
5. Press tbe POWER button on tbe remote controL
Your DVD sbould turn on if your remote is set up correctly.
If your DVD does not turn on after set-up, repeat steps 2, 3 and 4, but try one of the otber codes
listed for your brand of DVD. If no other codes are listed, try eacb code, 000 throu _b 141
Note on Using Remote Control Modes: DVD
Wben your remote control is in "DVD" mode, the ",otume buttons still control your TV's ",olume.
6 6 6
_c_
EZ_ EZD EZ_ _
\ MSU.
k, )
Setting/p the Remote to Operate Yuur Set lbp Bux
1. Turn off your STB.
2. Press the SI'B button on your TV's remote control.
3. Press the SEI' button on yourTV's remote control.
4. Using the nmnber buttons on your remote control, enter three digits of the STB code listed on
page 23 of this manual for your brand of STB. Make sure you enter three digits of the code, esen
if the first digit is a "0". (if more than one code is listed, try the first one.)
5. Press the POWER button on the remote control.
Your STB should turn on if your remote is set up con'ectly.
if your STB does not turn on after set-up, repeat steps 2,3 and 4, but try one of the other codes
listed tor your brand of STB. if no other codes are listed, try each code, 000 through 074.
Note on Using Remote Contmt Modes: STB
When your remote control is in "STB" mode, the volume buttons still control your TV's volume.
English 21

Remote Control Codes
VCR
Brand
SAMSUNG
ADMIRAL
AIWA
AKAI
AUDIODYNAMICS
BELL&HOWELL
BROKSONIC
CANDLE
CANON
CITIZEN
DOLORTYME
CRAIG
CURTISMANES
DAEW00
DB
DIMENSIA
DYNATEDH
ELECTROHOME
EMERSON
Code
000001002003004008077078079
O2O
O25
004027032
007026
018
022
002003006008015055
021056
002003006008015055
007
002024
002007008017021025056064066
003010011012013014015016
007026
017
O25
034
001003006021022025030032034040047050
052060063065066067069073
FISHER 018024028029048081061
FUNAI 025
GENERALELECTRIC 002005017021056
GOVIDEO 002
LG(Goldstar) 006007008009010
HARMANKARDON 007
HITACHI 019025041042074
INSTANTREPLAY 021
JCPENNEY 002007018019021026037041054056
JCL 007008018021026037
KENWOOD 007008018026037
KLH 070
LLOYD 025
LOGIK 038
LXI 025
JVC 081082083
MAGNAV0X 021056059
MARANTZ 007008018021026037062
MARTA 006
KONIA 036
ORION 073074075076
MEI 021
MEMOREX 006021024025
MGA 034
MIDLAND 005
MINOLTA 019041075
Brand Code
MITSUBISHI 019034041046
MONTGOMERYWARD020
MTC 002025
MULTITECH 002005025038
NEC 007008018026037062064
OPTIMUS 020
PANASONIC 021056071072
PENTAX 019N1 075
PENTEXRESEARCH+008
PHILCO 021056059
PHILIPS 021080
PIONEER 019026039053
PORTLAND 015N9 055
PROSCAN 017
QUARTZ 018
QUASAR 021056
RADI0SHACK/REALISTIC006018020021024025029034048056
RCA 002017019021035041043057068076
SANSUI 026
SANYO 018024
SCOTT 003N7 052067
SEARS 006018019024028029041048051
SHARP 020034N5 015
SHIMTOM 027033038058
SIGNATURE 025
SONY 027033044
SYLVANIA 021025056059
SYMPHONIC 025
TANDY 018025
TASHIKA 006
TATUNG 037
TEAC 025037068
TECHNICS 021
TEKNIKA 006021025031
TMK 066
TOSHIBA 003019029051052
TOTEVISION 002006
UNITECH 002
VECTORRESEARCH 007026
VICTOR 026
VIDEOCONCEPTS 007026
VlDEOSONIC 002
WARDS 002003006019020021024025034038041
YAMAHA 007008018026037
ZENITH 023027033
English 22
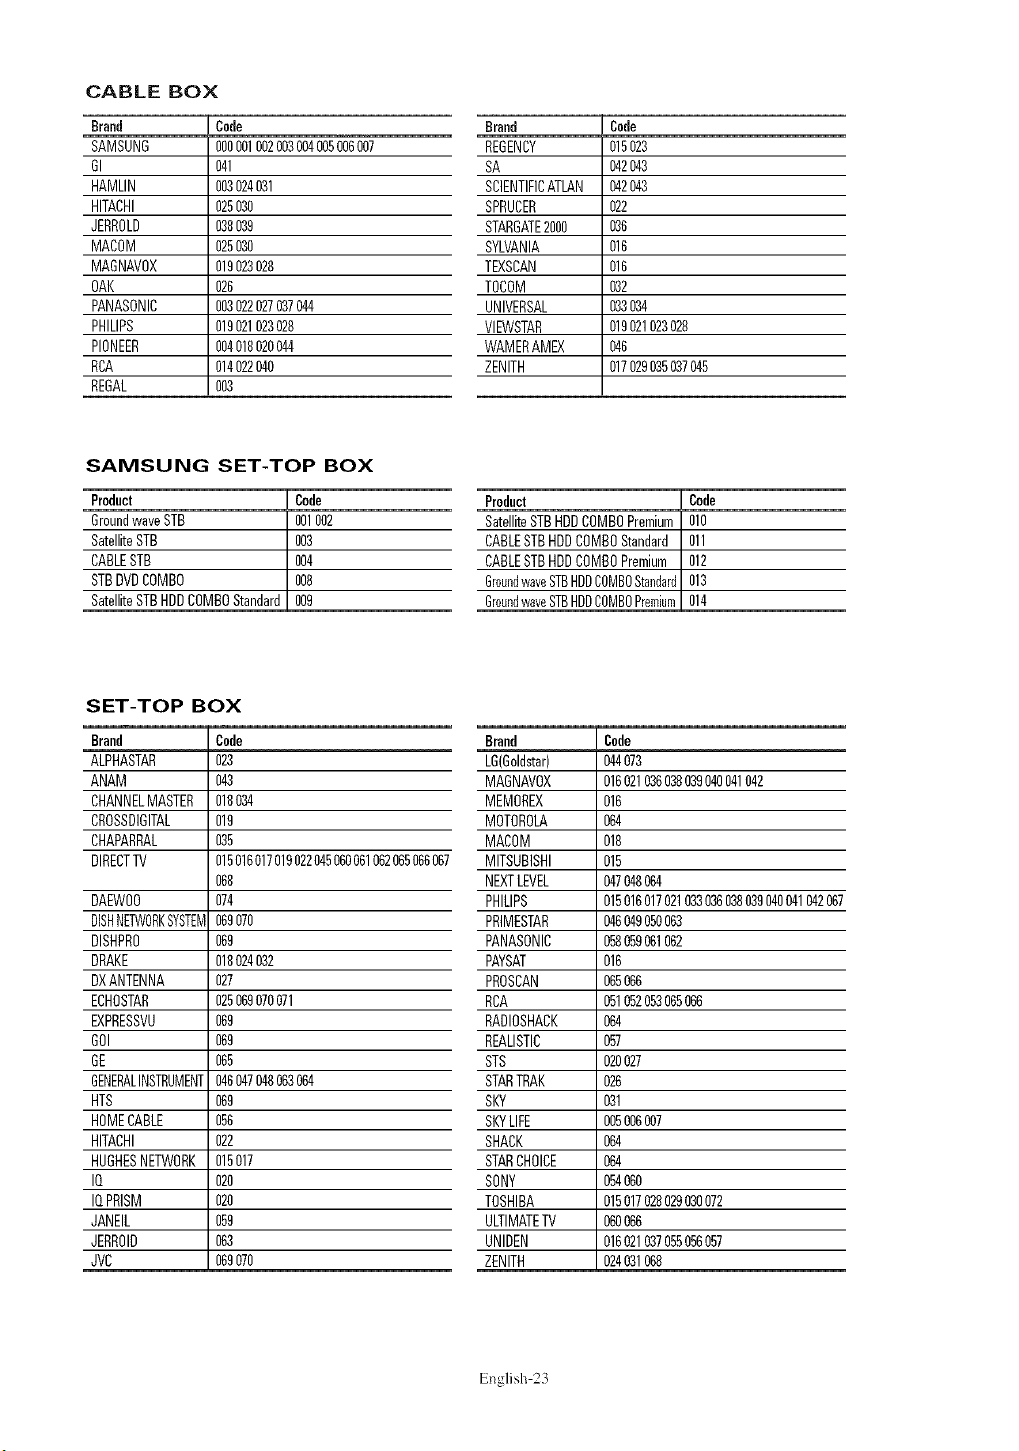
CABLE BOX
Brand
SAMSUNG
GI
HAMLIN
HITACHI
JERROLD
MACOM
MAGNAV0X
OAK
PANASONIC
PHILIPS
PIONEER
RBA
REGAL
Code
000001002003004005006007
041
003024031
025030
038039
025030
019023028
026
003022027037044
019021023028
004018020044
014022040
OO3
Brand Code
REGENCY 015023
SA 042043
SCIENTIFICATLAN 042043
SPRUCER 022
STARGATE2000 036
SYLVANIA 016
TEXSCAN 016
TOCOM 032
UNIVERSAL 033034
VlEWSTAR 019021023028
WAMERAMEX 046
ZENITH 017029035037045
Product Code
SatelliteSTBHDDCOMBOPremium 010
CABLESTBHDDCOMBOStandard 011
CABLESTBHDDCOMBOPremium 012
GroundwaveSTBHDDCOMBOStandard013
GroundwaveSTBHDDCOMBOPremium014
Brand Code
LG(Goldstar) 044073
MAGNAVOX 016021036038039040041042
MEMOREX 016
MOTOROLA 064
MACOM 018
MITSUBISHI 015
NEXTLEVEL 047048064
PHILIPS 015016017021033036038039040041042067
PRIMESTAR 346349050063
PANASONIC 058059061062
PAYSAT 016
PROSCAN 065066
RCA 051052053065066
RADIOSHACK 064
REALISTIC 057
STS 020027
STARTRAK 026
SKY 031
SKYLIFE 005006007
SHACK 064
STARCHOICE 064
SONY 054060
TOSHIBA 015017028029030072
ULTIMATETV 060066
UNIDEN 016021037055056057
ZENITH 024031068
SAMSUNG SET-TOP BOX
Product
GroundwaveSTB
SatelliteSTB
CABLESTB
STBDVDCOMBO
SatelliteSTBHDDCOMBOStandard
Code
001002
OO3
OO4
OO8
OO9
SET-TOP BOX
Brand
ALPHASTAR
ANAM
CHANNELMASTER
CROSSDIGITAL
CHAPARRAL
DIRECTTV
DAEWO0
DISHNETWORKSYSTEM
DISHPRO
DRAKE
DXANTENNA
ECHOSTAR
EXPRESSVU
GOI
GE
GENERALINSTRUMENT
HTS
HOMECABLE
HITACHI
HUGHESNETWORK
IQ
IQPRISM
JANEIL
JERROID
JVC
Cede
O23
O43
018034
019
O35
015016017019022045060061062065066067
O68
O74
069070
069
018024032
027
025069070071
069
069
O65
046347048063064
069
056
022
015017
O2O
O2O
O59
063
069070
English 23
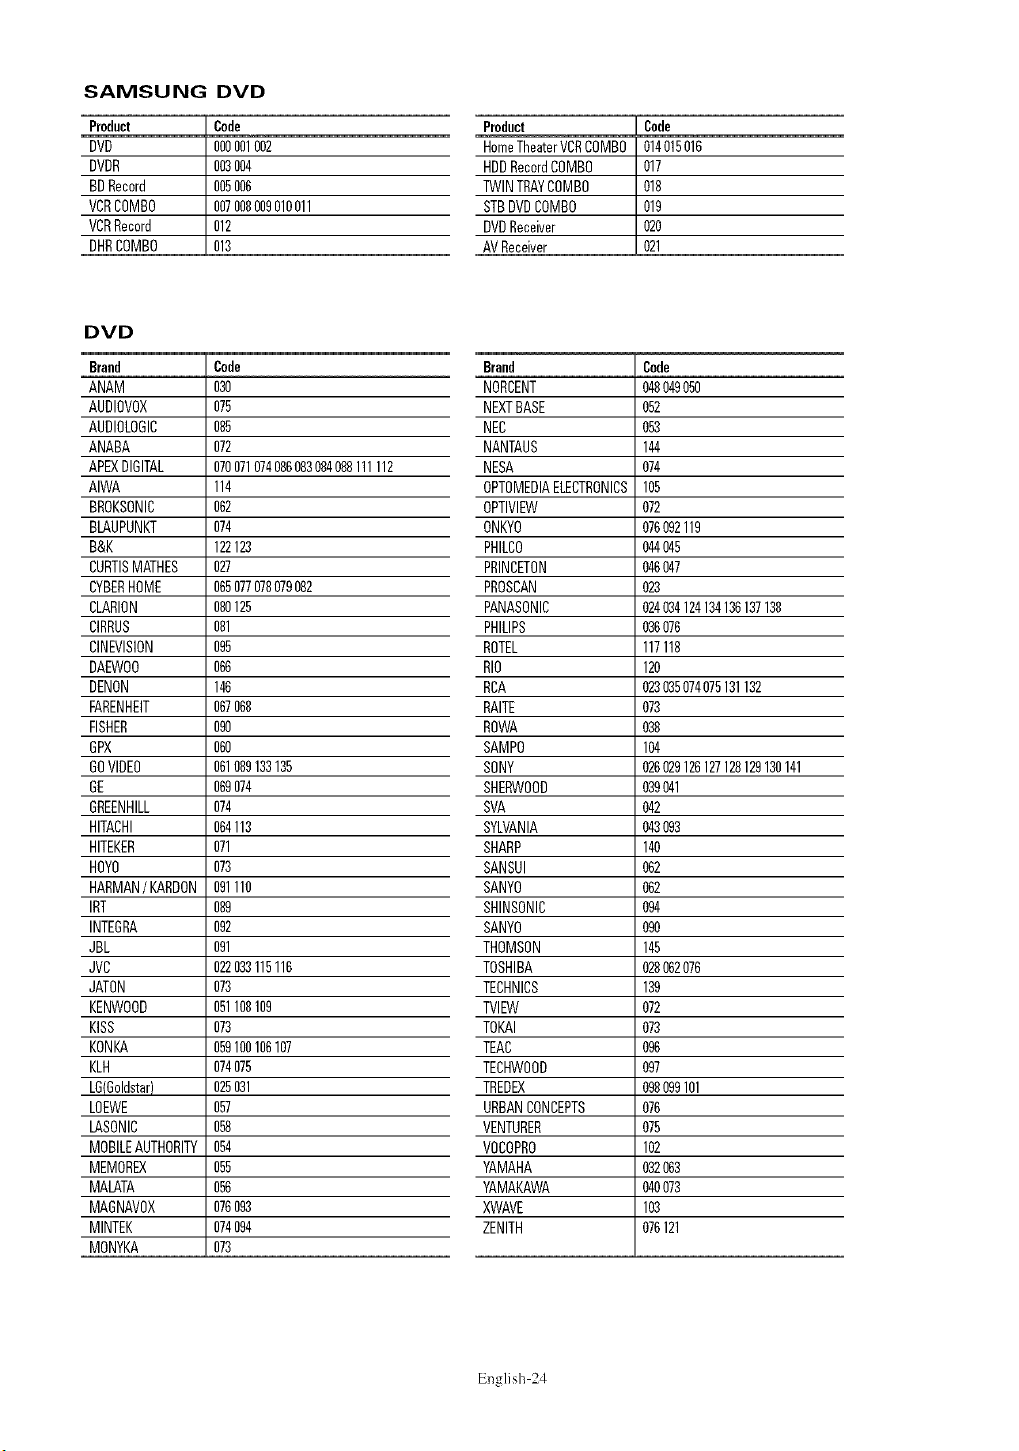
SAMSUNG DVD
Product Code
DVO 000001002
DVOR 003004
BDRecord 005006
VCRCOMBO 007008009010011
VCRRecord 012
DHRCOMBO 013
DVD
Brand Code
ANAM 030
AUDIOVOX 075
AUDIOLOGIC 085
ANABA 072
APEXDIGITAL 070071074086083084088111112
AIWA 114
BROKSONIC 062
BLAUPUNKT 074
B&K 122123
CURTISMATHES 027
CYBERHOME 065077078079082
CLARION 080125
CIRRUS 081
CINEVISION 095
DAEWO0 066
DEMON 146
FARENHEIT 067068
FISHER 090
GPX 060
GOVIDEO 061089133135
GE 069074
GREENHILL 074
HITACHI 064113
HITEKER 071
HOYO 073
HARMAN/KARDON091110
IRT 089
INTEBRA 092
JBL 091
JVC 022033115116
JATON 073
KENWOOD 051108109
KISS 073
KONKA 059100106107
KLH 074075
LG(Goldstar) 025031
LOEWE 057
LASONIC 058
MOBILEAUTHORITY054
MEMOREX 055
MALATA 056
MABNAV0X 076093
MINTEK 074094
MONYKA 073
Product l Code
HomeTheaterVCRCOMBO 014015016
HDDRecordCOMBO 017
TWINTRAYCOMBO 018
STBDVOCOMBO 019
DVOReceiver I 020
i
AVReceiver
Brand Code
MORDENT (_8049050
NEXTBASE 052
NED 053
NANTAUS 144
MESA 074
OPTOMEDIAELECTRONICS105
OPTIVIEW 072
ONKYO 076092119
PHILCO 044045
PRINCETON (_6047
PROSCAN 028
PANASONIC 024094124134136137138
PHILIPS 096076
ROTEL 117118
RIO 120
RCA 023035074075131132
RAITE 073
ROWA 038
SAMPO 104
SONY 026029126127128129130141
SHERWOOD 039041
SVA 042
SYLVANIA 043093
SHARP 140
SANSUI 062
SANYO 062
SHINSONID O_
SANYO 090
THOMSON 145
TOSHIBA 028062076
TECHNICS 199
TVIEW 072
TOKAI 079
TEAC 096
TECHWOOD 097
TREDEX 098099101
URBANCONCEPTS 076
VENTURER 078
VOCOPRO 102
YAMAHA 092069
YAMAKAWA (_0073
XWAVE 103
ZENITH 076121
English 24
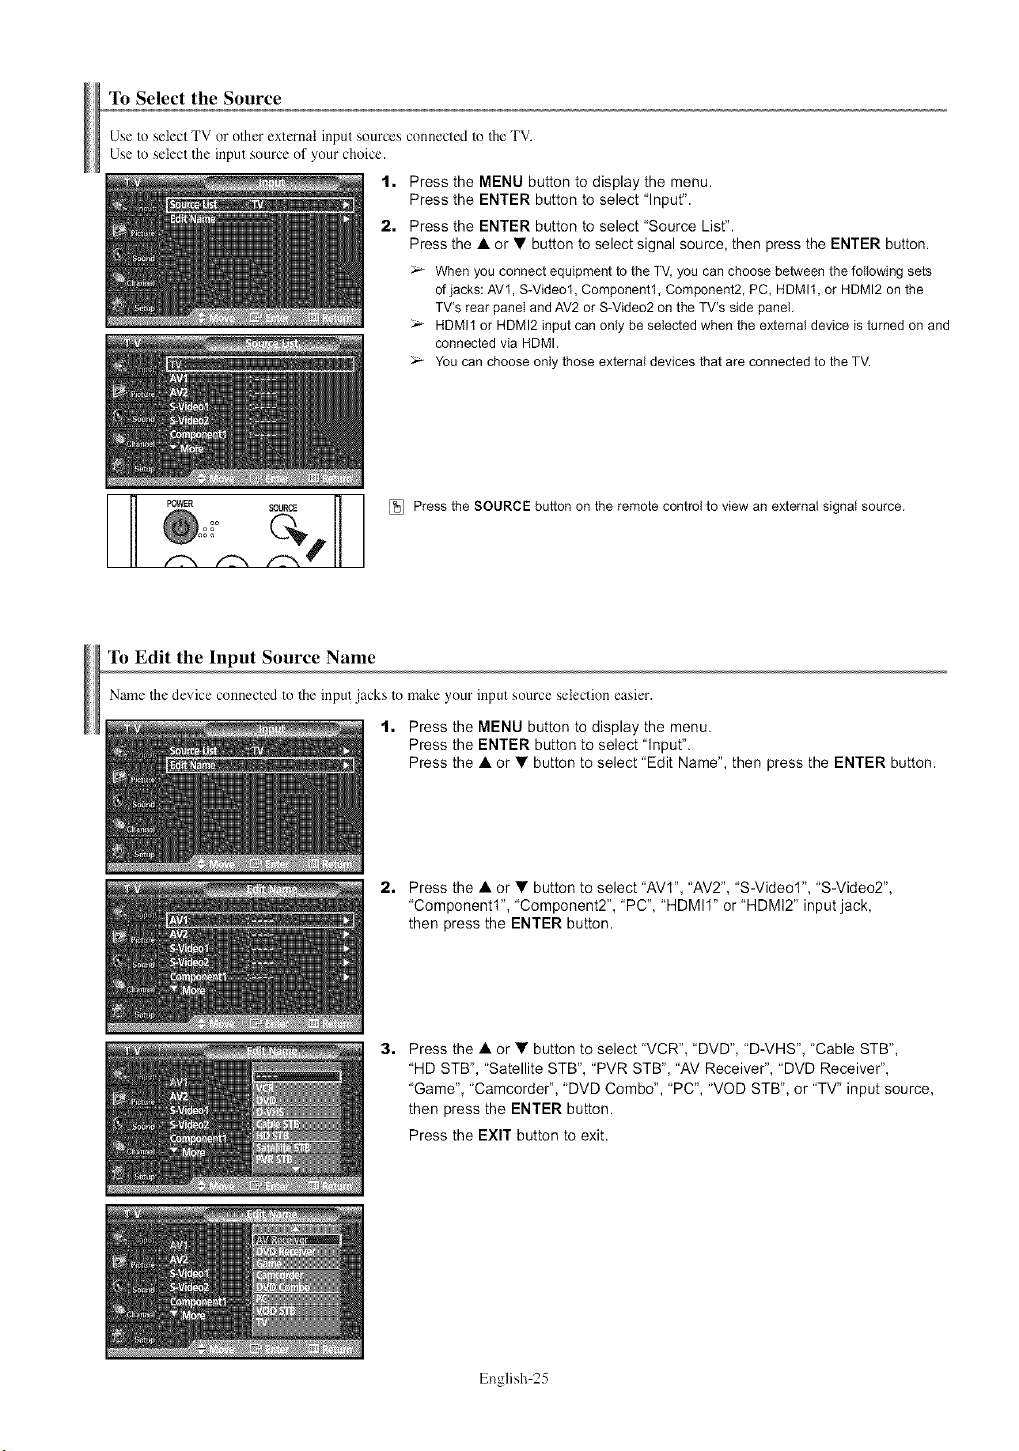
To Select the Source
Use to select TV or other external input sources connected to the TV.
Use to select the input source of your choice.
1. Press the MENU button to display the menu.
Press the ENTER button to select "Input".
2. Press the ENTER button to select "Source List".
Press the A or •button to select signal source, then press the ENTER button.
When youconnect equipmentto the TV, you can choosebetweenthe following sets
of jacks: AV1, S-Video1,Component1,Component2,PC, HDMIt, or HDMI2 on the
TV's rear panel and AV2or S-Video2on the TV's side panel,
HDMI1or HDMI2 inputcan only be selectedwhen the external deviceis turned on and
connectedvia HDMI,
Youcan chooseonly thoseexternal devicesthat are connectedto the TV.
_] OWER SOURCE _ _ Pressthe SOURCEbutton on the remote control to viewan external signalsource,
Ill
To Edit the Input Source Name
Name the device connected to the input jacks to make your input source selection easier.
t. Press the MENU button to display the menu.
Press the ENTER button to select "Input".
Press the A or • button to select "Edit Name", then press the ENTER button,
2. Press the A or • button to select "AVI", "AV2", "S-Video1", "S-Video2",
"Component1", "Component2", "PC", "HDMII" or "HDMI2" input jack,
then press the ENTER button.
3. Press the A or • button to select "VCR", "DVD", "D-VHS", "Cable STB",
"HD STB", "Satellite STB", "PVR STB", "AV Receiver", "DVD Receiver",
"Game", "Camcorder', "DVD Combo", "PC", "VOD STB", or "TV" input source,
then press the ENTER button.
Press the EXIT button to exit.
English 25
Picture Control
Using Automatic Picture Settings
Your TV has four automatic picture settings ("Dynamic", "Standard", "Movie", and "Custom") that arc preset at the factory.
You can activate either Dynamic, Standard, Movie, or Custom by making a selection from the menu.
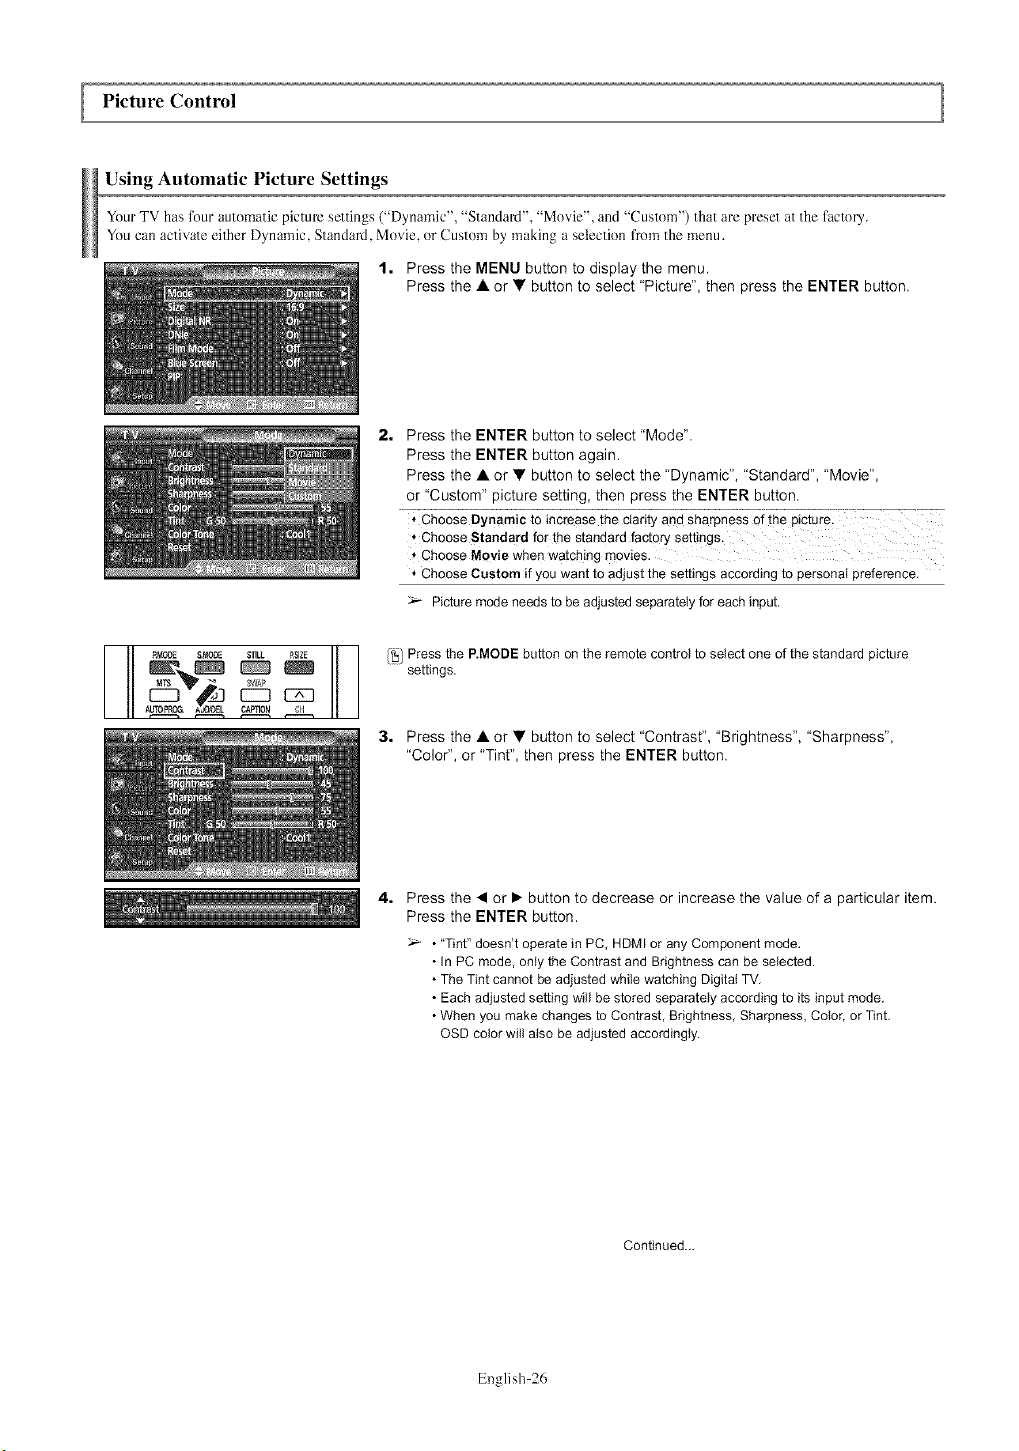
t. Press the MENU button to display the menu.
Press the ,& or • button to select "Picture", then press the ENTER button.
- RMODE &I_ODE $TILL _,SIZE
2. Press the ENTER button to select "Mode".
Press the ENTER button again.
Press the ,& or • button to select the "Dynamic", "Standard", "Movie",
or "Custom" picture setting, then press the ENTER button.
* Choose Standard for the standard factory settings,
* Choose Movie when watchingmovies.
* Choose Custom if you want to adjustthe settings accordingto personal preference.
Picturemode needsto be adjustedseparatelyforeachinput.
l'_] Press the P.MODE button on the remote control to select one of the standard picture
settings.
3. Press the A or • button to select "Contrast", "Brightness", "Sharpness",
"Color", or "Tint", then press the ENTER button.
4. Press the • or • button to decrease or increase the value of a particular item.
Press the ENTER button.
• "Tint" doesn't operate in PC, HDMI or any Component mode.
• In PC mode, only the Contrast and Brightness can be selected.
• The Tint cannot be adjusted while watching Digitat TV.
• Each adjusted setting will be stored separately according to its input mode.
• When you make changes to Contrast, Brightness, Sharpness, Color, or Tint.
OSD color will also be adjusted accordingly.
Continued._
English 26
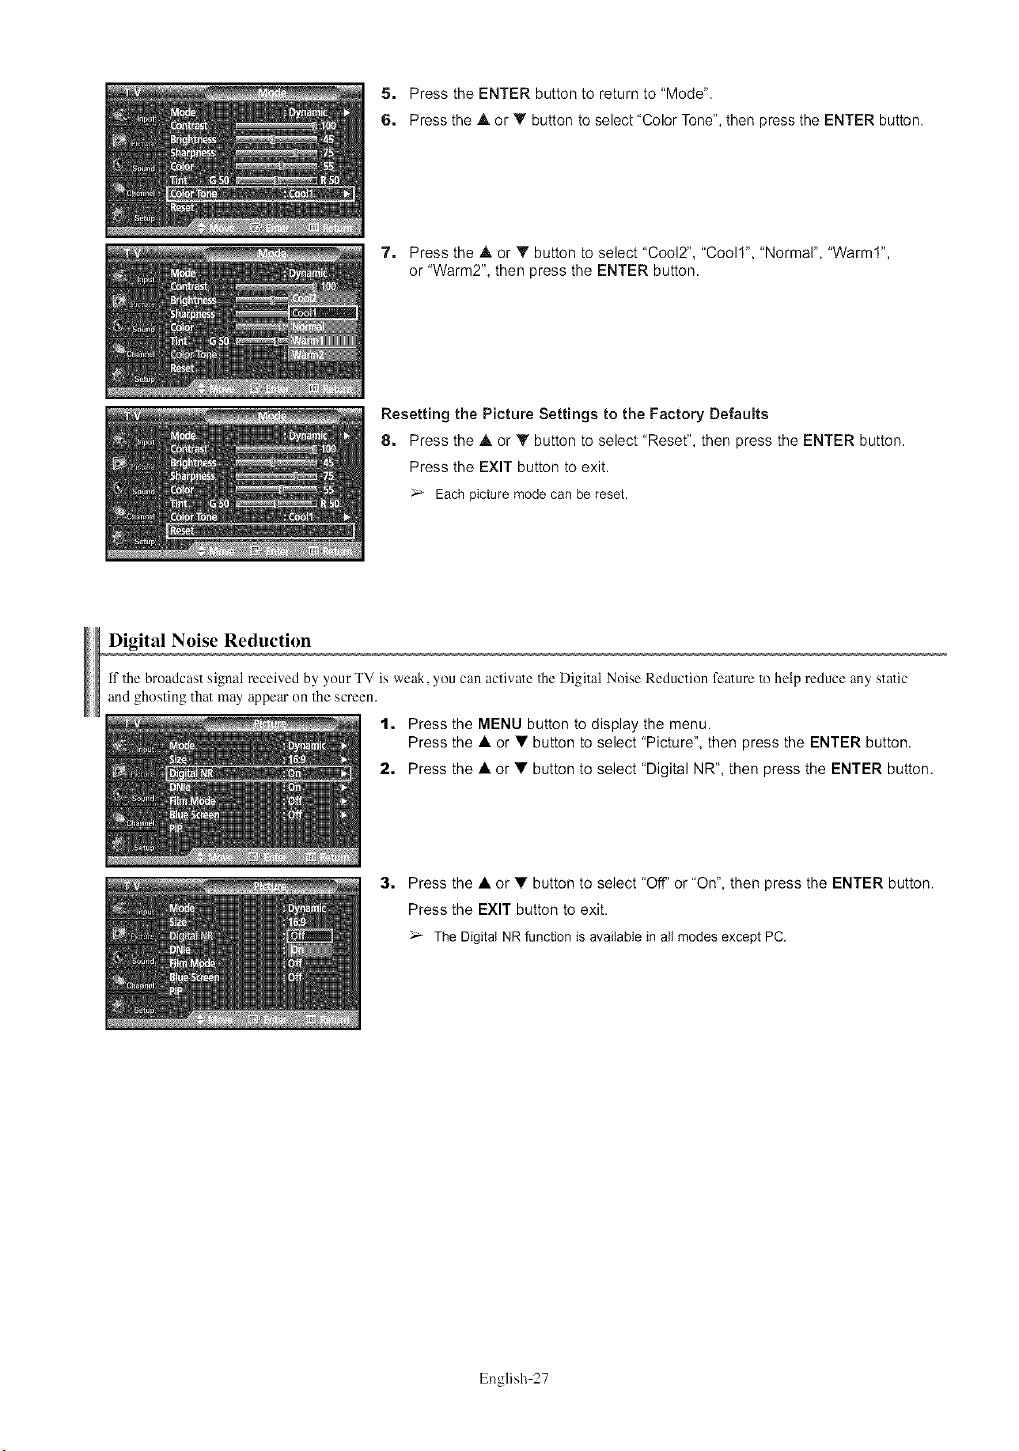
5. Press the ENTER button to return to "Mode".
6. Press the • or • button to select "Color Tone", then press the ENTER button.
7. Press the A or V button to select "Cool2", "Coo11", "Normal", "Warm1",
or "Warm2", then press the ENTER button.
Resetting the Picture Settings to the Factory Defaults
8. Press the • or • button to select "Reset", then press the ENTER button.
Press the EXIT button to exit.
Eachpicture mode can be reset.
Digital Noise Reduction
if Thebroadcast signal received by your TV is weak, you can activate TheDigital Noise Reduction feature to help reduce any static
and ghosting that may appear on the screen.
1. Press the MENU button to display the menu.
Press the A or •button to select "Picture", then press the ENTER button.
2. Press the A or • button to select "Digital NR", then press the ENTER button.
3. Press the •or • button to select "Off' or "On", then press the ENTER button.
Press the EXIT button to exit.
The Digital NR function is available in all modesexcept PC.
English 27

Changing the Screen Size
Screen size selection depends on the type of video input.
1, Press the MENU button to display the menu,
Press the • or •button to select "Picture", then press the ENTER button.
2, Press the • or • button to select "Size", then press the ENTER button,
II I
3, Press the • or • button to select the screen format you want.
Press the ENTER button,
Press the EXIT button to exit.
-i_ ;7GTthop--_i_re--t;_;iG.:J; ....... ------ ........................7-
•Zooral : Magnifies the size of the picture on the screen.
• Zoom2 : Expands the Zoom1 fomlat picture.
• 4:3 : Sets the picture to 4:3 normal mode.
[_! Press the P.SIZE button on the remote control to change the picture size,
If you watch a still image or the 4:3 (Normal) mode for a long time (over 2 hours), an image may be burned
onto the screen. View the TV in 16:9 (Wide) mode as much as possible.
16:9_
Sets the picture to 16:9 _ oe moae,
Zoom2
The screen size when the Zoom1 screen is
verbcatI!, enlarged.
Zoom1_
The screer s_ze when Wide screen *s
verucaw emargeo
4:3_
Sets the oicture to 4:3 normal moae,
_-_ •In TV, VIDEO. S-VIDEO. and COMPONENT(480i, 48%) modes, all screen modes can be selected
(16:9 _ Zoom1 _ Zoom2 _ 4:3)
• In TV(DTV), COMPONENT(720p, 10800, PC. HDMI modes, only 16:9 & 4:3 modes can be selected
• In Zoom1 and Zoom2 modes, you can move the picture on screen by pressing the • or • button
• You can not change the picture size when PiP is set to Double
English 28

DNIe (Digital Natural Image engine)
This TV includes the DNIe function so as to provide a high visual quality, if you set DNIe to On, you can view the applied DNIe and
normal pictures on the screen, for demonstration purposes. Using this function, you can view the difl'crence in the visual quality.
1. Press the MENU button to display the menu.
Press the • or • button to select "Picture", then press the ENTER button.
2. Press the • or • button to select "DNle", then press the ENTER button.
This function doesn't work when the Input Source is PC.
3, Press the •or • button to select "Off', "Demo" or "On", then press the ENTER
button.
Press the EXIT button to exit.
; Off: Switchesoff the DNle mode.
', Demo:The screen before applying DNle appearson the !eft and the screen after
apptyingDNle appears onthe right,
• On: Switcheson the DNle mode.
The DNle function is not supported in the Movie mode. (It is inactivated.)
Selecting the Film Mode
Automatically senses and processes filra signals from all sources and adjusts the picture for optiraura quality.
1. Press the MENU button to display the menu.
Press the • or • button to select "Picture", then press the ENTER button.
2. Press the • or • button to select "Film Mode", then press the ENTER button.
3, Press the •or • button to select "Off' or "On", then press the ENTER button.
Press the EXIT button to exit.
Setting the Blue Screen Mode
if no signal is being received or The signal is rely weak, a blue screen automatically replaces the noisy picture background.
if you wish to continue viewing the poor picture, you must set the "Blue Screen" mode to "OFF'.
"1. Press the MENU button to display the menu.
Press the • or • button to select "Picture", then press the ENTER button.
2. Press the • or • button to select "Blue Screen", then press the ENTER button.
3, Press the •or • button to select "Off' or "On", then press the ENTER button.
Press the EXIT button to exit.
Blue Screenis displayedwhen there is no signalfrom an external device,regardlessof the
Blue Screen Setting.
English 29
Viewing I_cture-in-Picture
This product has one built-in tuner, which does not allow PIP to function in the saree mode. For example, you cannot watch one TV
channel in the main screen, and a different one in the PIP screen. Please see 'PIP Settings' below for details. You can use the PIP feature
to simultaneously watch two video sources. (See page 35 to select the PIP picture sound.)
>- While V-Chip is in operation, the PIP function cannot be used.
Activating Picture-in-Picture
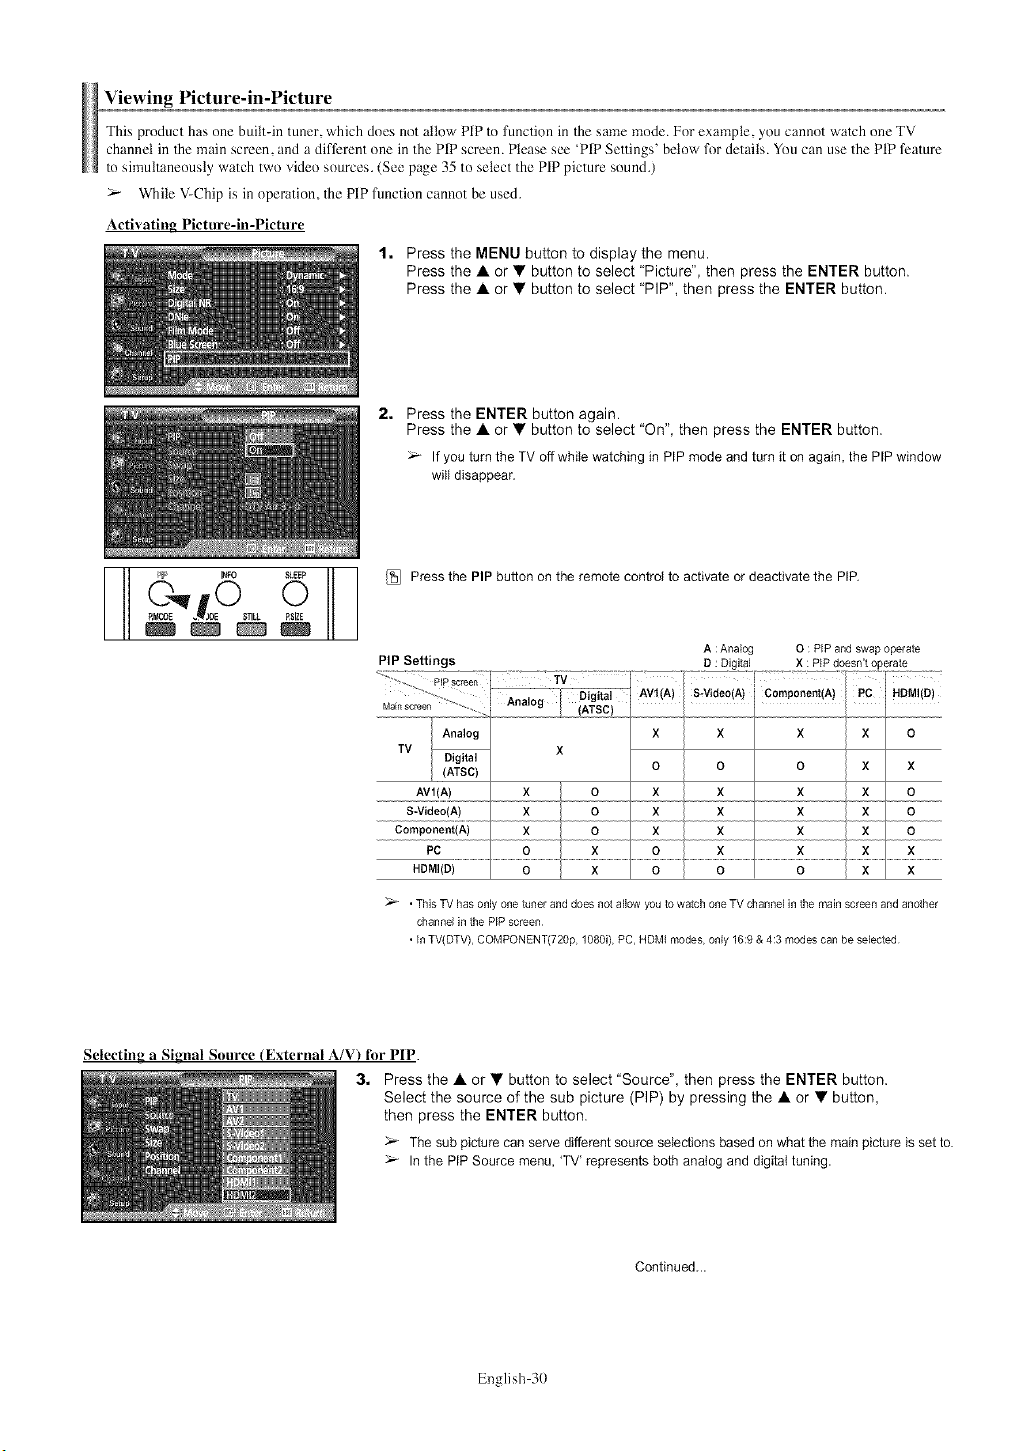
1. Press the MENU button to display the menu.
Press the A or • button to select "Picture", then press the ENTER button.
Press the • or • button to select "PIP", then press the ENTER button.
2. Press the ENTER button again.
Press the A or • button to select "On", then press the ENTER button.
If you turn the TV off while watching in PIP mode and turn it on again, the PIP window
will disappear.
Press the PIP button on the remote control to activate or deactivate the PIP.
A: Analog O : PiP and swap operate
PIP Settings D: Digital X : PiP doesn't operate
_" •This TV has only one tuner and does not allow you to watch one TV channel in the main screen and another
channel in the PiP screen
• In TV(DTV), COMPONENT(720p, 1080i), PC, HDMi modes, only 16:9 & 4:3 modes can be selected
Selecting aSignal Source (External A/V) for PIP.
3. Press the • or • button to select "Source", then press the ENTER button.
Select the source of the sub picture (PIP) by pressing the • or • button,
then press the ENTER button.
The sub picture can serve different source selections based on what the main picture is set to.
In the PIP Source menu, 'TV' represents both analog and digital tuning.
Continued...
English 30

Swapping the Contents of the PIP and Main Picture
4. Press the &or •button to select "Swap", then press the ENTER button.
The image in the PIP window will appear on the main picture, and vice versa.
(Refer to page 30)
If main picture is in PC mode,Swap is not available.
c%e OR_SEf
Chauging tile Size of the PIP Windo_
[_ Press the SWAP button on the remote control to interchange the main picture and the
sub picture.
5. Press the •or • button to select "Size", then press the ENTER button.
Press the • or • button to select the desired size of the PIP window, then press
the ENTER button.
Press the EXIT button to exit.
If main picture is in PC mode,Size is not available.
Youmay notice that the picture in the PIP window becomesslightly unnaturalwhen
you use the main picture to view a game or karaoke,
Changing the Position of the PIP Window
6. Press the • or • button to select "Position", then press the ENTER button.
Press the • or • button to select the desired PIP window position, then press the
ENTER button.
_- In Double Window ( [_ ) and Double Wide ( _'_ ) modes, Position cannot be selected.
Changing the PIP Channel
7. Press the •or • button to select "Channel", then press the ENTER button.
Press the • or • button at the bottom of the remote to select the desired channel
in the PIP window, then press the ENTER button.
_- The channelcan be activewhen the sub pictureis set to TV.
[_ _ _'_r' r,_-----.1 _ Pressthe PIP CH Aand V buttons on the remote control to changethe PIPchannel.
,'-)SEt
Freezing the Current Picture
1, Press the STILL button to freeze a moving picture.
_- Normal sound will still be heard. Press again to cancel.
This function will automatically cancel five minutes later.
English 31
Sound Control
Using Automatic Sound Settings
Your TV has automatic sound settings ("Standard", "Music", "Movie", "Speech", and "Custom") lhat are preset at the factory.
Or, you can select "Custom", which automatically recalls your personalized sound settings.
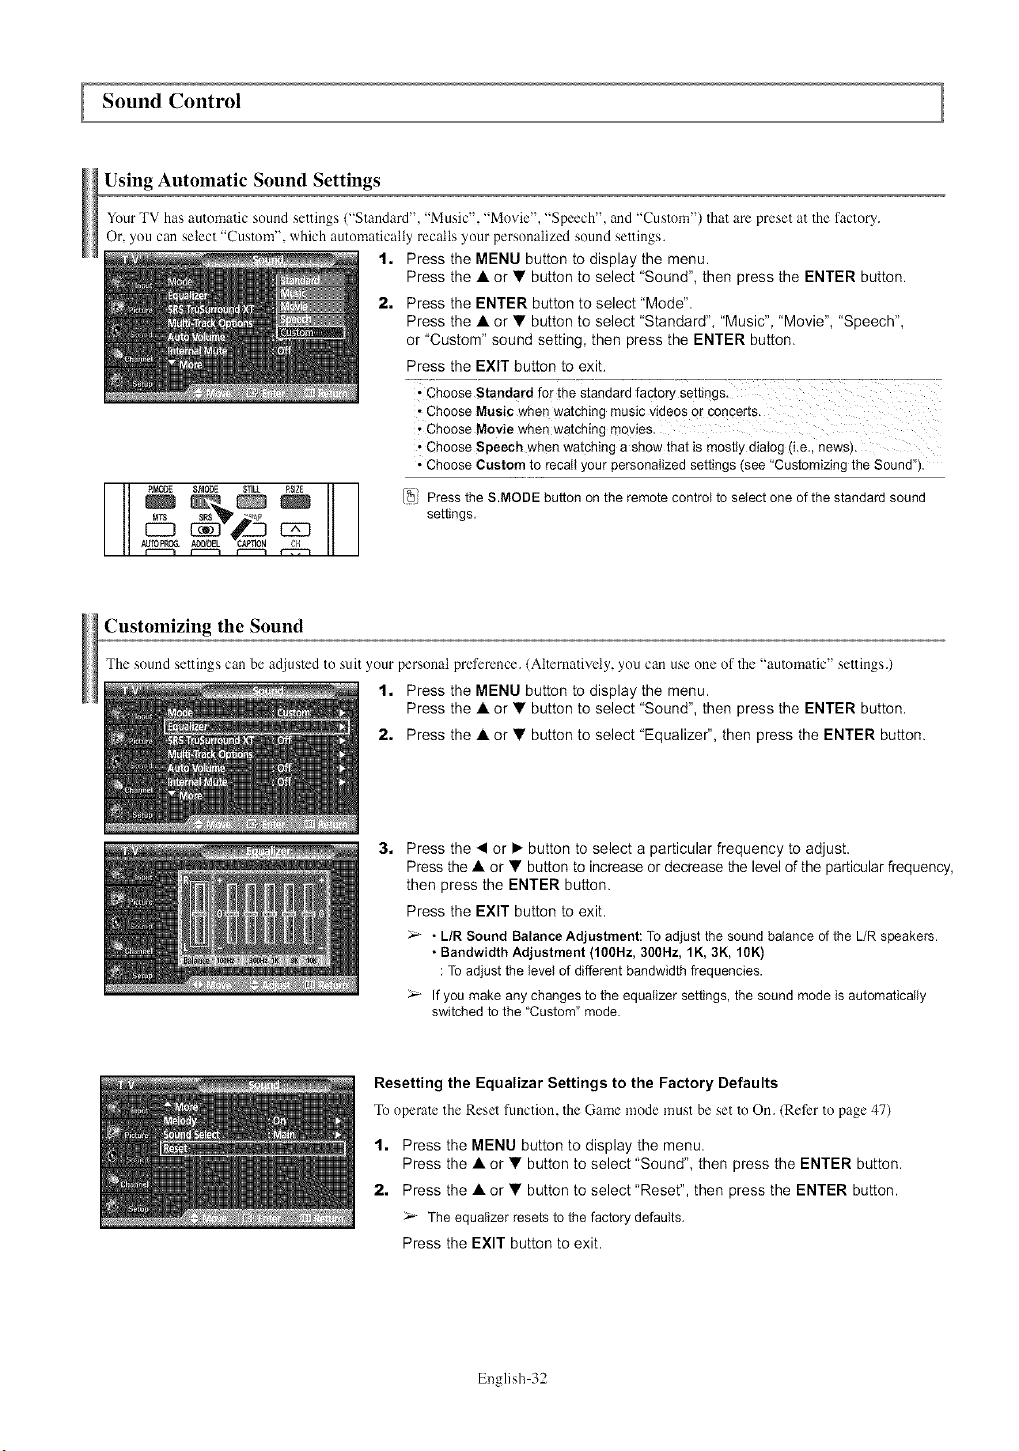
t. Press the MENU button to display the menu.
Press the • or • button to select "Sound", then press the ENTER button.
2. Press the ENTER button to select "Mode".
Press the • or • button to select "Standard", "Music", "Movie", "Speech",
or "Custom" sound setting, then press the ENTER button.
Press the EXIT button to exit.
i Choose Standard for the standardfactory settings.
• Choose Musicwhen watching music videosc
, Choose Moviewhen watching movies.
'Choose speech when watchinga show that is mostlydialog (i.e.i news).
• Choose Custom to recall your personalizedsettings (see"Customizingthe Sound").
[_: Press the S.MODE buttonon the remote controlto select one of the standardsound
settings.
c3
Customizing the Sound
The sound settings can be adjusled to suit your personal preference. (AlTernatively, you can use one of The "automatic" settings.)
1. Press the MENU button to display the menu.
Press the • or • button to select "Sound", then press the ENTER button.
2. Press the • or • button to select "Equalize€', then press the ENTER button.
3. Press the • or • button to select a particular frequency to adjust.
Press the • or • button to increase or decrease the level of the particular frequency,
then press the ENTER button.
Press the EXIT button to exit.
- L/R Sound Balance Adjustment: To adjust the sound balance of the L/R speakers.
• Bandwidth Adjustment (100Hz, 300Hz, 1K, 3K, 10K)
: To adjust the level of different bandwidth frequencies.
If you make any changes to the equalizer settings, the sound mode is automatically
switched to the "Custom" mode.
Resetting the Equalizar Settings to the Factory Defaults
To operale the Reset function, the Game mode must be set to On. (Refer to page 47)
1. Press the MENU button to display the menu.
Press the • or • button to select "Sound", then press the ENTER button.
2. Press the • or • button to select "Reset", then press the ENTER button.
The equalizer resets to the factory defaults.
Press the EXIT button to exit.
English 32
Setting the TruSurround XT
TruSurmund XT is a patented SRS Technology Thatsolves The prublem of playing 5.1 multichannel content over two speakers.
TruSurruund delivers a compelling, virtual sun'ound sound experience Thruugh any two-speaker playback syslem, including inlernal
Television speakers, it is fully compatible with all multichannet formats.
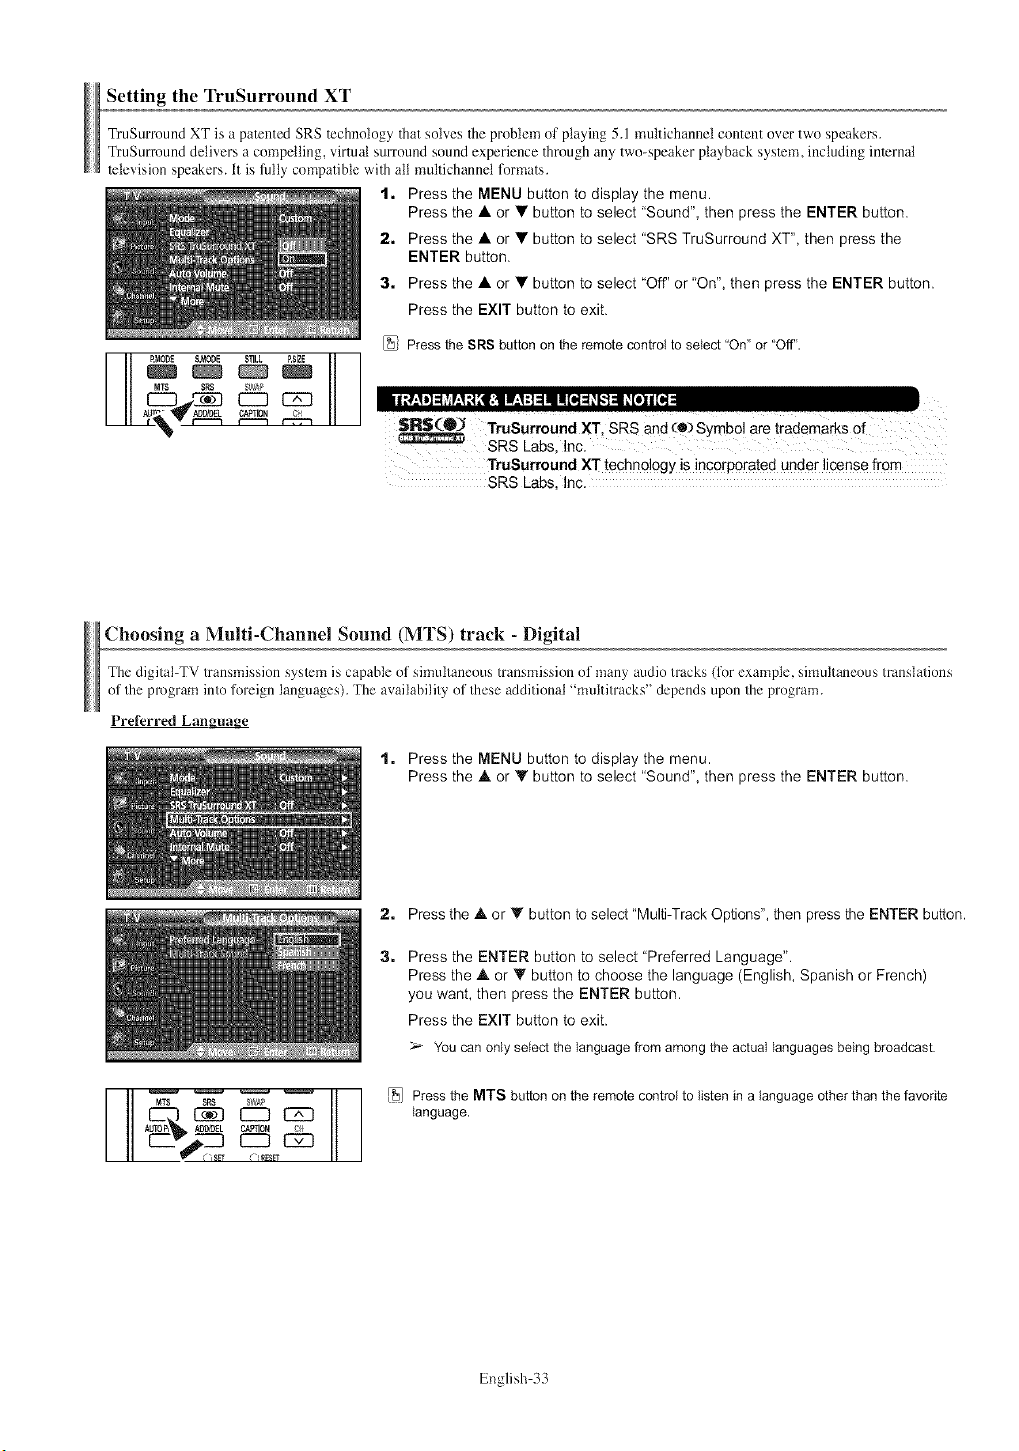
1. Press the MENU button to display the menu.
Press the • or •button to select "Sound", then press the ENTER button.
2. Press the • or • button to select "SRS TruSurround XT', then press the
ENTER button.
3. Press the • or • button to select "Off' or "On", then press the ENTER button.
Press the EXIT button to exit.
Press the SRS button on the remote control to select"On"or "Off".
SR$(O_ TruSurroundXT SRS and (e) Symbol are trademarks of
SRS Labs, Inc.
TruSurround XT techno!ogy is incorporated under license from
SRS Lsbs, Inc,
Choosing aMulti-Channel Sound (MTS) track - Digital
The digital-TV transmission sys/em is capable of simultaneous transmission of many audio tracks (lk_rexample, simultaneous translations
of/he program into foreign languages). The availability of these additional "multitracks" depends upon the program.
Preferred Language
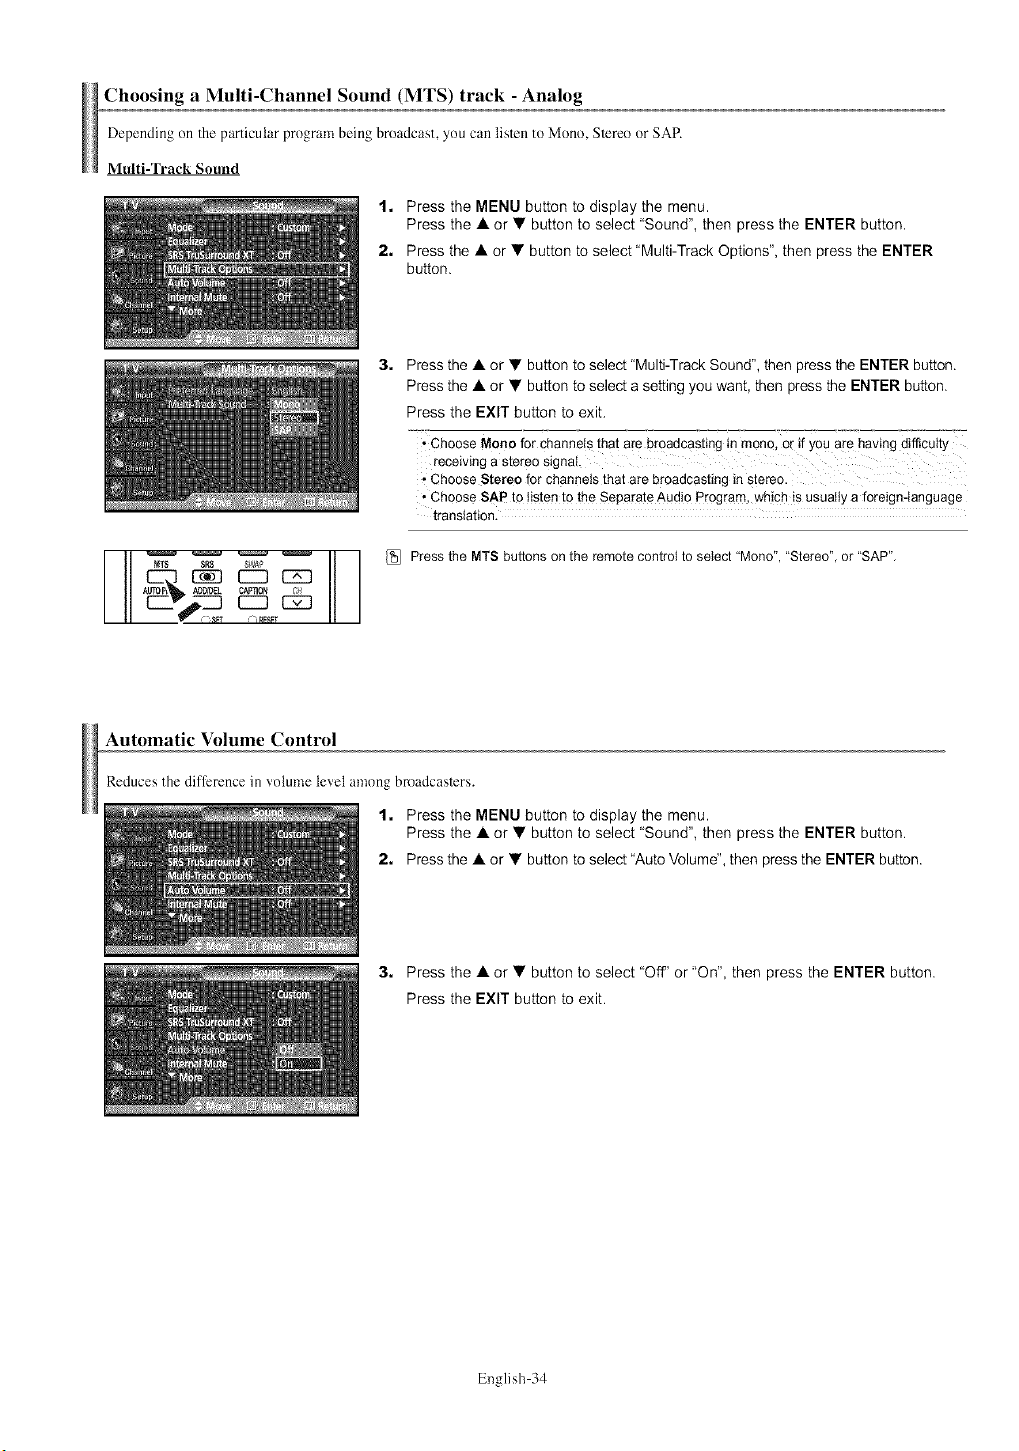
1. Press the MENU button to display the menu.
Press the • or • button to select "Sound", then press the ENTER button.
v C "_8FI (h RF3Fr
2. Press the • or • button to select "Mul_Track Options", then press the ENTER button.
3. Press the ENTER button to select "Preferred Language".
Press the • or • button to choose the language (English, Spanish or French)
you want, then press the ENTER button.
Press the EXIT button to exit.
You can only select the language from among the actual languages being broadcast.
_J Press the MTS button on the remote control to listen in a language other than the favorite
language.
English 33
Choosing aMulti-Channel Sound (MTS) track - Analog
Dependingon Theparticularprogrambeing broadcast,you cantislen to Mono, STereoor SAP.
Multi-qYack Sound
1. Press the MENU button to display the menu.
Press the &or •button to select "Sound", then press the ENTER button.
2. Press the • or • button to select "Multi-Track Options", then press the ENTER
button.
E23 {Z3
AUTOP_ A_ CAFflON /:_l
%RFSF?
3. Press the • or • button to select "Multi-Track Sound", then press the ENTER button.
Press the • or • button to select a setting you want, then press the ENTER button.
Press the EXIT button to exit.
"Choose Mono for channels that are broadcasting in mono, or if yo u ale having difficulty
receiving a stereo signa!,
• Choose Stereo for channels that are broadcasting in stereo.
• Choose SAP to !isten to the Separate Audio Program, wh!ch is usually a foreign-language
translation.
_:_ Press the MTS buttons on the remote control to select "Mono', "Stereo", or "SAP",
Automatic Volume Control
Reduces the difference in volume level among bmadcaslcrs.
1. Press the MENU button to display the menu.
Press the • or • button to select "Sound", then press the ENTER button.
2. Press the • or • button to select "Auto Volume", then press the ENTER button.
3. Press the • or • button to select "Off' or "On", then press the ENTER button.
Press the EXIT button to exit.
English 34

Selectingthe Internal Mute
Sound output from TheTV speakers is muted. This is useful when you want to listen to audio through your sound system inslead of the TV.
1. Press the MENU button to display the menu.
Press the • or •button to select "Sound", then press the ENTER button.
2. Press the • or • button to select "Internal Mute", then press the ENTER button.
3, Press the • or • button to select "Off" or "On", then press the ENTER button.
Press the EXIT button to exit.
- When Internal Mute is set to "On", Sound menus except Multi-track Options cannot be
adjusted.
• The left/right audio outputs and digital audio outputs (Optical, Coaxial) remain enabled.
• The VOL +, VOL - and MUTE buttons do not operate when the Internal Mute is set to On.
• When Internal Mute is On, only MTS is selectable for the Sound.
Setting the On/Off Melody
A melody sound can be set to come on when TheTV is powered On or Off.
1. Press the MENU button to display the menu.
Press the • or • button to select "Sound", then press the ENTER button.
2. Press the • or • button to select "Melody", then press the ENTER button.
3, Press the • or • button to select "Off" or "On", then press the ENTER button.
Press the EXIT button to exit.
Listening to the Sound of the Sub (PIP) Picture
When the PIP lbatm'c is activated, you can listen to the sound of the sub (PIP) picture.
1. Press the MENU button to display the menu.
Press the • or • button to select "Sound", then press the ENTER button.
2. Press the • or • button to select "Sound Select", then press the ENTER button.
3, Press the • or • button to select "Sub", then press the ENTER button.
Press the EXIT button to exit.
,Main: Used to listen to the s°und of the main picture.
,Sub: Used to listen to the sound of the sub picture.
You can select this option when "PIP" is set to "On".
English 35
Channel Control
Selecting the Antenna
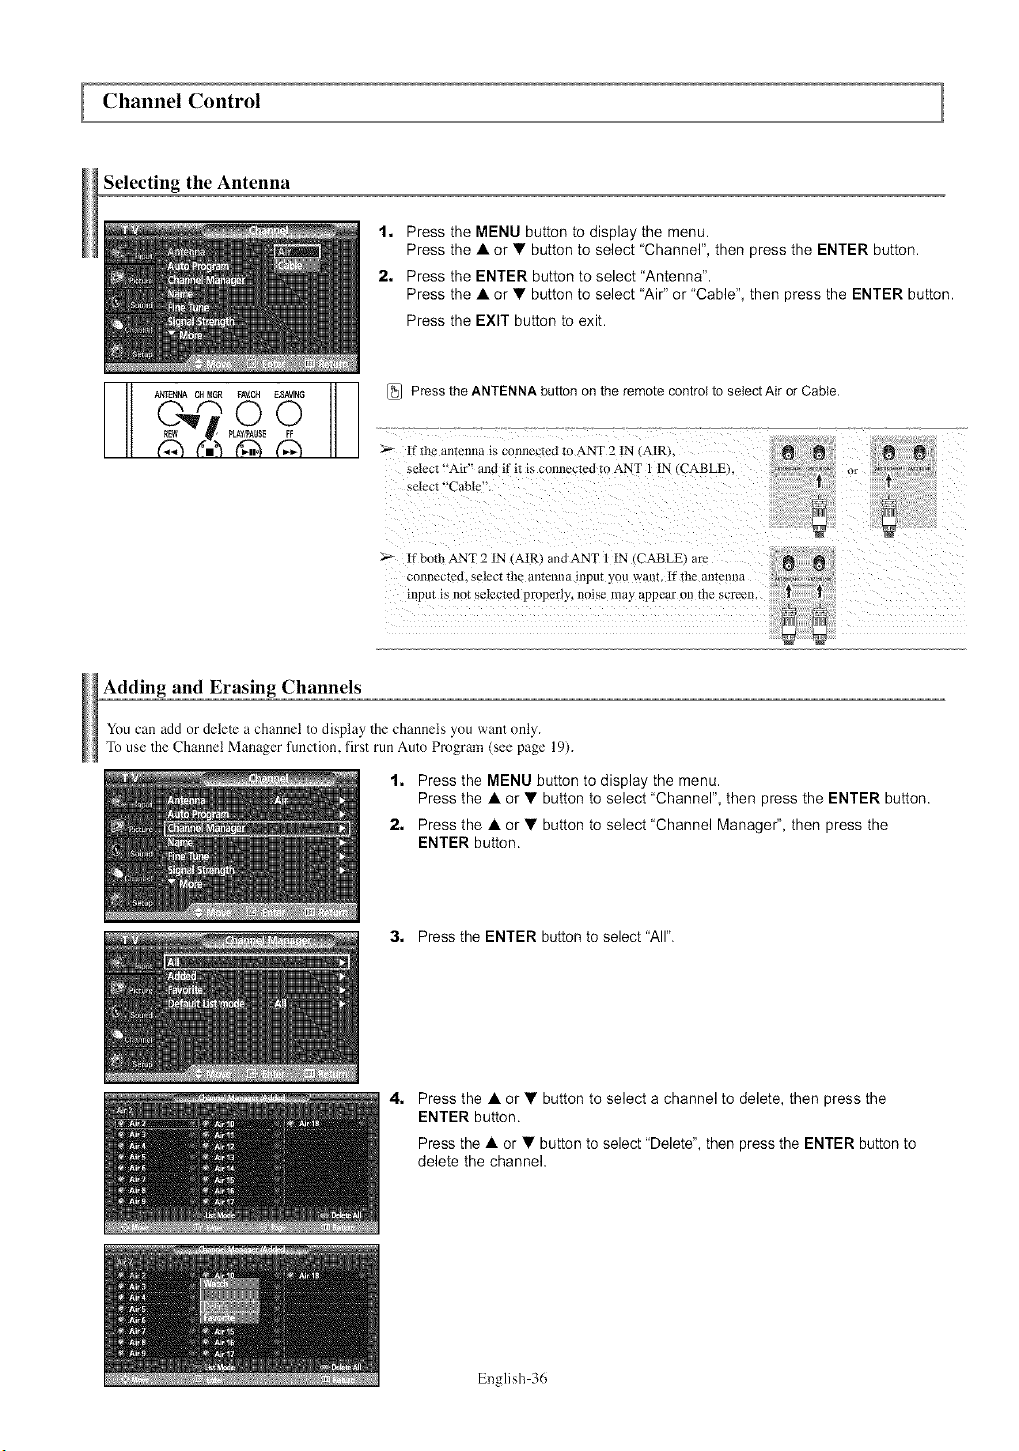
1, Press the MENU button to display the menu.
Press the •or • button to select "Channel", then press the ENTER button.
2, Press the ENTER button to select "Antenna".
Press the • or • button to select "Air" or "Cable", then press the ENTER button.
Press the EXIT button to exit.
[_ Press the ANTENNA button on the remote control to select Air or Cable.
_'_ if the amenna _s connecmd tu ANT 2 IN (AIR}.
select "'Ak'" and if it i_ cunncctcd to ANT 1 IN (CABLE}
_elcct "Cable".
If buth ANT 2 IN (AIRI andANT 1 IN CABLE arc
connec[ed, select th_ al/tttlllla {l/ptl_ yOU want. If the antclma
nlptlt i_, not selected pruperly, noise may appear on the scrccn #2
Adding and Erasing Channels
You can add or delete a channel to display the channels you want only.
To use the Channel Manager function, first run Auto Program (see page 19).
1, Press the MENU button to display the menu.
Press the •or • button to select "Channel", then press the ENTER button.
2, Press the •or • button to select "Channel Manage¢', then press the
ENTER button,
3, Press the ENTER button to select "All".
4, Press the •or • button to select a channel to delete, then press the
ENTER button.
Press the •or • button to select "Delete", then press the ENTER button to
delete the channel.
English 36
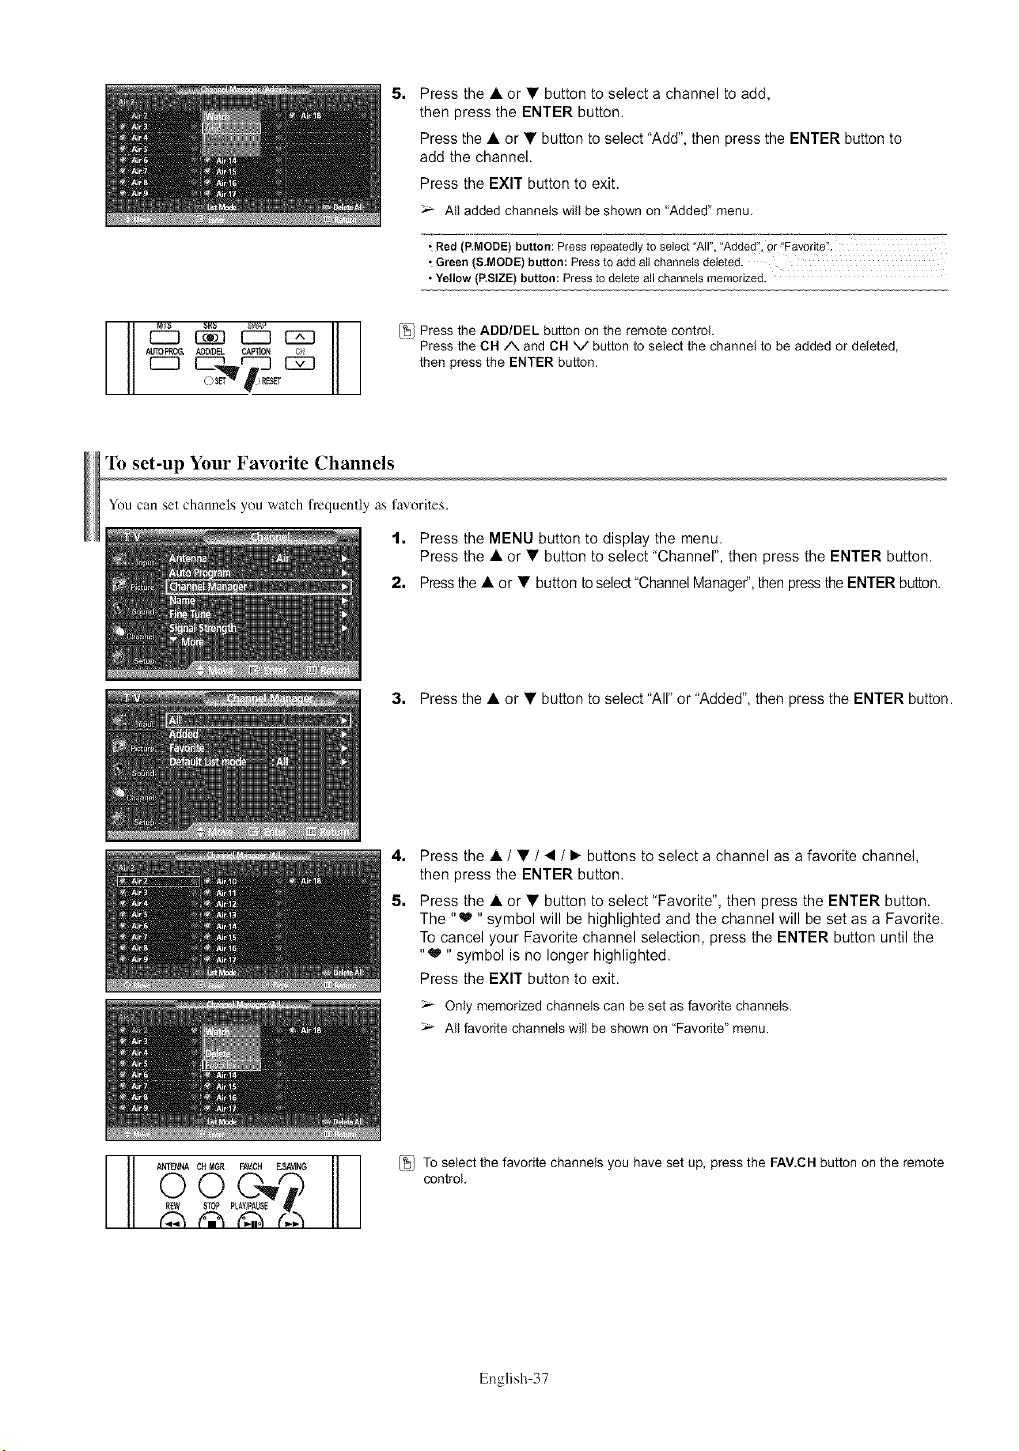
Press the A or • button to select a channel to add,
then press the ENTER button.
Press the • or • button to select "Add", then press the ENTER button to
add the channel.
Press the EXIT button to exit.
All addedchannels will be shown on "Added" menu.
Red (P,MODE) button: Press repeatedly to select "All", "Added", or "Favorite'!.
Green (&MODE) button: Press to add all channels deleted.
• Yellow (P,SIZE) button: Press to delete all channels memorized.
__ [_3 _ _ _ _L_ _ Pressthe ADD/DEL button on the remotecontrol.
A_L C#_10N e_ Pressthe CH/X and CH V buttonto selectthe channe_to be addedor deleted,
A_ O_S_ l J RE$'T
_,,_r"'_--j _ then press the ENTER button.
To set-up Your Favorite Channels
You can set channels you watch frequently as favorites.
1. Press the MENU button to display the menu.
Press the • or • button to select "Channer', then press the ENTER button.
2. Pressthe • or • button to select "ChannelManageP, then press the ENTER button.
3. Press the •or • button to select "All" or "Added", then press the ENTER button.
4,
5.
Press the •/•/•/• buttons to select a channel as a favorite channel,
then press the ENTER button.
Press the • or • button to select "Favorite", then press the ENTER button.
The "_" symbol will be highlighted and the channel will be set as a Favorite.
To cancel your Favorite channel selection, press the ENTER button until the
"_'" symbol is no longer highlighted.
Press the EXIT button to exit.
Only memorized channels can be set as favorite channels.
All favorite channels will be shown on "Favorite" menu.
_- AfNA C_{i'i_GR FAV.CH E.._.',,1N6 _ _ To select the favorite channels you have set up, press the FAV.CH button on the remote
0O'_N) control.
_ PLAYI_AUSE
English 37

Viewing the Channel Lists
You can display a list of all channels, added channels or your favorite channels.
1. Press the MENU button to display the menu.
Press the &or •button to select "Channel", then press the ENTER button.
2. Press the &or • button to select "Channel Manage€', then press the ENTER
button,
3. Press the • or • button to select "Air', "Added" or "Favorite", then press the
ENTER button,
To toggle between your all channels, add channels, or favorite channels,
use the red (P.MODE) button on the remote control.
• Red (RMODE) button: Press repeatedly to select "All", 'Added", or "Favorite?.
• Yellow (STILl.) button: Press to delete all channels memorized.
_MOOE $_ STILL P,SIZE
SRS S_Pl_
Setting the Default Channel List Mode
Displays the channel list automatically when you press CH MGR button on the remote control. (Choose All, Added, or Favorite)
1. Press the MENU button to display the menu.
Press the • or • button to select "Channel", then press the ENTER button.
2. Press the • or • button to select "Channel Manager", then press the ENTER
button.
ANEN_OW_ CH MGR_ _.11_sT_OP_P_USEFAV,CH F_SA_NoFG
3. Press the • or • button to select "Default List mode", then press the ENTER
button.
Press the • or • button to select "Air',"Added" or "Favorite" then press the
ENTER button.
The Channel list youwant to appear when you press the CH MGRbutton.
t All: Shows All the channels when you press the CH.MGR bulton on the remote control.
t Added: Shows Added channels when you press CH.MGR bullon on the remote control.
•Favorite: Shows Favorite channels when you press CH.MGR butlon on the remote control.
Press the EXIT button to exit.
/_/ Pressthe CH MGRbutton on the remote control to bring up the Channel Lists.
English 38
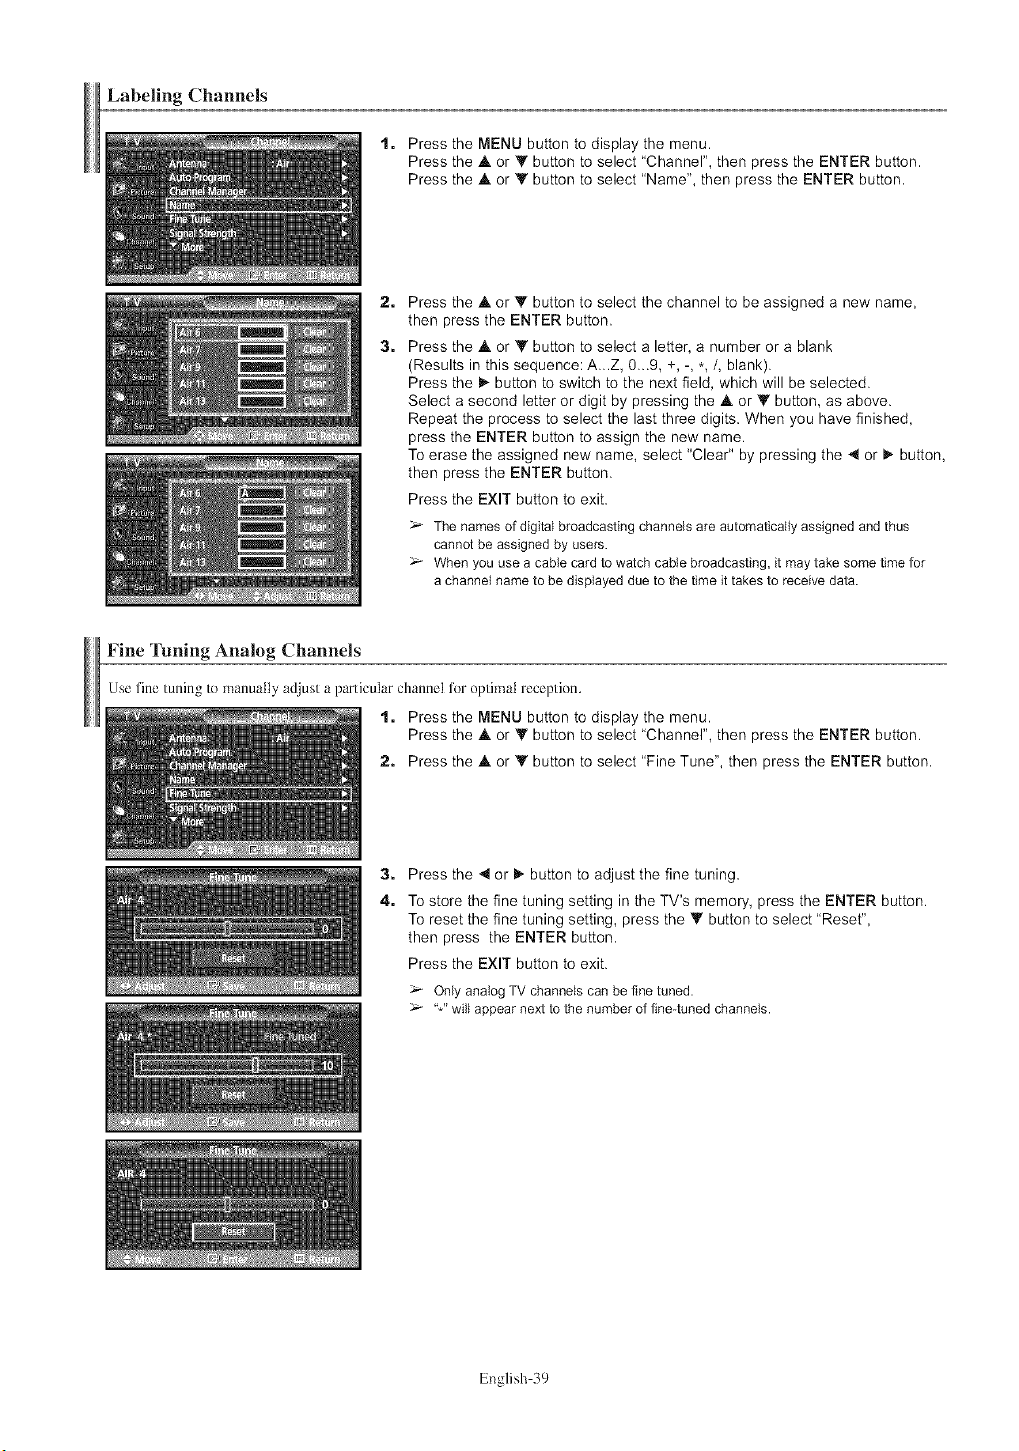
Labeling Channels
1. Press the MENU button to display the menu.
Press the A or Y button to select "Channel", then press the ENTER button.
Press the .& or V button to select "Name", then press the ENTER button.
2,
3,
Press the .& or T button to select the channel to be assigned a new name,
then press the ENTER button.
Press the .& or Y button to select a letter, a number or a blank
(Results in this sequence: A...Z, 0...9, +, -, *,/, blank).
Press the _,-button to switch to the next field, which will be selected.
Select a second letter or digit by pressing the .& or Y button, as above.
Repeat the process to select the last three digits. When you have finished,
press the ENTER button to assign the new name.
To erase the assigned new name, select "Clear" by pressing the 41 or _ button,
then press the ENTER button.
Press the EXIT button to exit.
The names of digita) broadcasting channels are automatically assigned and thus
cannot be assigned by users.
When you use a cable card to watch cable broadcasting, it may take some time for
a channel name to be displayed due to the time it takes to receive data.
Fine Tuning Analog Channels
Use fine tuning te manually adjust a particular channel h_r optimal reception.
1. Press the MENU button to display the menu.
Press the A or Y button to select "Channel", then press the ENTER button.
2. Press the .& or V button to select "Fine Tune", then press the ENTER button.
3. Press the _1or I_. button to adjust the fine tuning.
4. To store the fine tuning setting in the TV's memory, press the ENTER button.
To reset the fine tuning setting, press the _' button to select "Reset",
then press the ENTER button.
Press the EXIT button to exit.
Only analog TV channels can be fine tuned.
"*" will appear next to the number of fine-tuned channels.
English 39
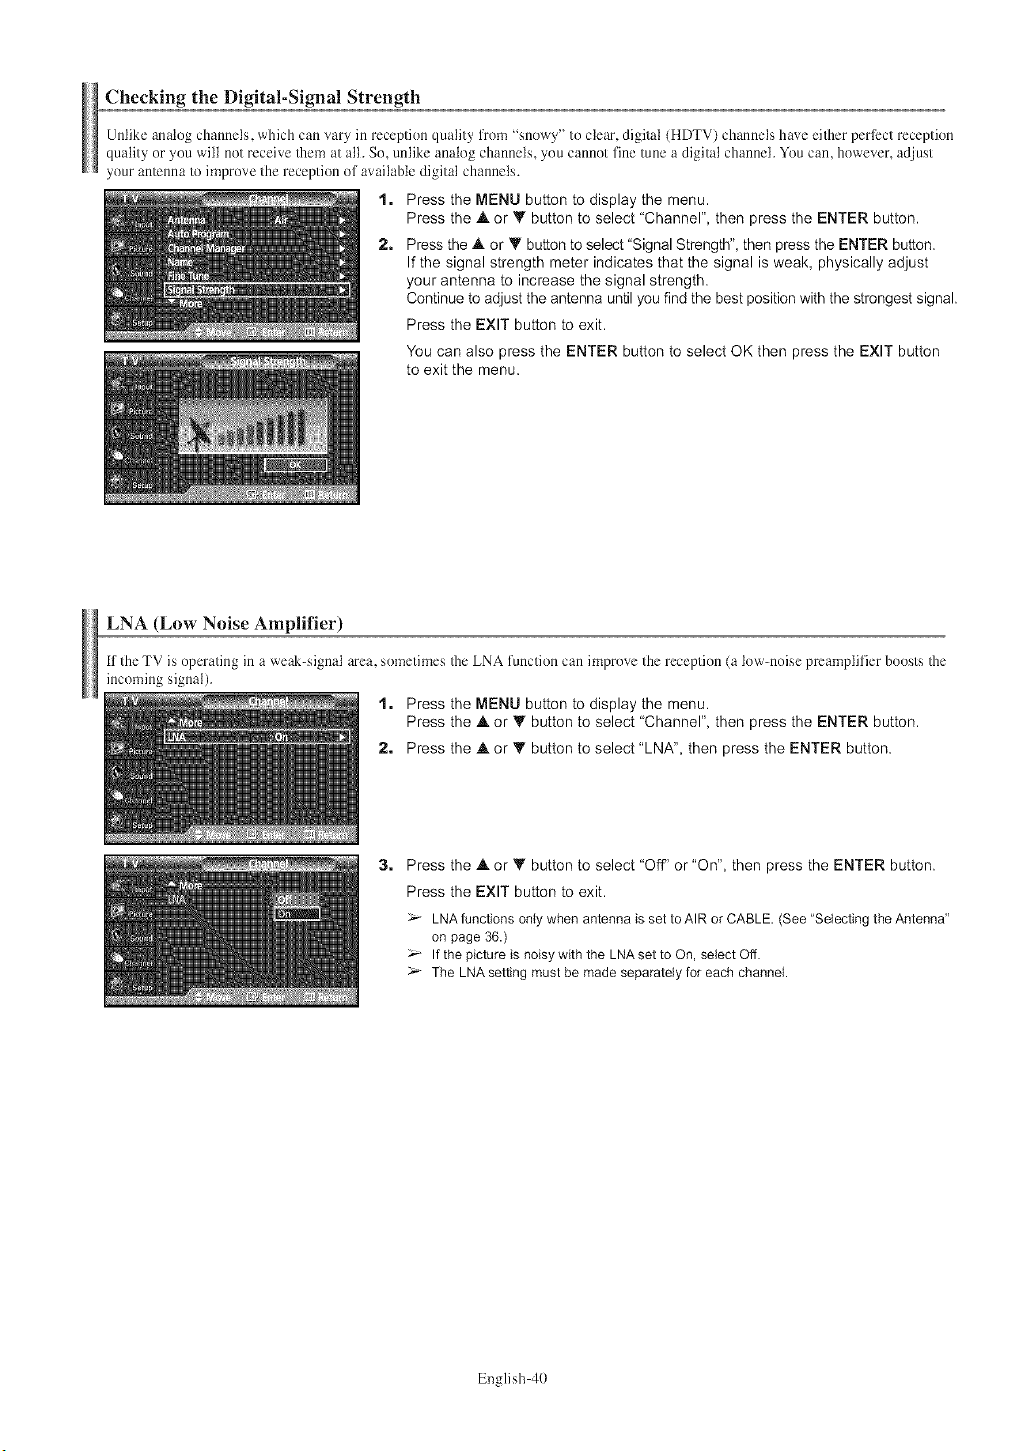
Checking the Digital-Signal Strength
Unlike analog channels, which can vary in receptinn quality from "snnwy" tn clear, digital (HDTV) channels have eiflaer perIi_ct receptinn
quality or you will not receive/hem at all. So, unlike analog channels, you cannot fine tune a digital channeh You can, however, adjust
your an/cnna to improve the reception of available digital channels.
1. Press the MENU button to display the menu.
Press the _. or Y button to select "Channel", then press the ENTER button.
2. Press the .& or _' button to select "Signal Strength", then press the ENTER button.
If the signal strength meter indicates that the signal is weak, physically adjust
your antenna to increase the signal strength.
Continue to adjust the antenna until you find the best position with the strongest signal.
Press the EXIT button to exit.
You can also press the ENTER button to select OK then press the EXIT button
to exit the menu.
LNA (Low Noise Amplifier)
If the TV is operating in a weak-signal area, snmetimes/he LNA lunction can imprnve the reception (a low-noise preamplifier bonsts/he
incoming signal).
1. Press the MENU button to display the menu.
Press the .& or Y button to select "Channel", then press the ENTER button.
2. Press the .& or _' button to select "LNA', then press the ENTER button.
3, Press the .& or _' button to select "off' or "On', then press the ENTER button.
Press the EXIT button to exit.
LNA functions only when antenna is set to AIR or CABLE. (See "Selecting the Antenna"
on page 36.)
If the picture is noisy with the LNA set to On, select Off.
The LNA setting must be made separately for each channel.
English 40

PC Display
Using Your TV as a Computer (PC) Display
ti
Setting Up Your PC Software (Based on Windows XP)
The Windows disptay-settings for a typical compu/er are shown belnw. The actual screens on your PC will probably be different,
depending upon your particular version of Windows and your particular video card. However, even if your actual screens look different,
/he same basic set-up inlk_rmation will apply in almost a1I cases. (If not, contact your cnmpu/er manufacturer or Samsung Dealer.)
1. First, click on "Control Panel" on the Windows start menu,
2. When the control panel window appears, click on "Appearance and Themes" and a
display dialog-box will appear.
3. When the control panel window appears, click on "Display" and a display dialog-box
will appear.
4. Navigate to the "Settings" tab on the display dialog-box.
The correct size setting (resolution)
Optimum: 1024 x 768 pixels
If a vertical-frequency option exists on your display settings dialog box,
the correct value is "60" or "60 Hz". Otherwise, just click "OK" and exit the dialog box.
Display Modes
It the signal from the system equals the standard signal mode, the screen is adjusted automatically. If the signal from the system deesn't equal the standard
signal mode, adjust the mode by retlm-ing to youl: videtx:ard user guide; otherwise there may be no video. For the display medes listed below, the semen
image has been optimized during manufacture.
Resolution Vertical I Horizontal IHorizontal Vertical
Video Signal Dot XLine
( ) Frequency (Hz) Frequency(KHz) Polarity I Polarity
640 X 350 70,086 31,469 P N
720 X 400 70.087 31.469 N P
640 X 480 59.940 31.469 N
70.000 35.000 N/P N/P
72.809 37.861 N N
75.000 37.500 N N
IBM PC /AT
CompatiNe 800 X 600 56.250 35.156 N/P N/P
60.317 37.879 P P
70.000 43.750 N/P N/P
72.188 48.077 P P
75.000 46.875 P P
848 X 480 60.000 31.020 P P
74.769 37.684 N P
• The interlace mode is not supported.
• The TV operates abnormally if a non-standard video format is selected.
• The table above conforms to IBMNESA regulations and is based on using the Analog Input,
:;" • The PC text quality is optimum inWVGA mode (848 x 480@60Hz)
• When this TV is used as a PC display, 32-bit color is supported
• Depending on the manufacturer, your PC display screen might appear different
(and depending on your particular version of Windows )
Check your PC instruction book for information about connecting your PC to a TV
• If a vertical and hodzontal frequency-select mode exists, select 60Hz (vertical) and 48 4KHz (hodzontal)
• In some cases, abnormal signals (such as stripes) might appear on the TV screen when the PC power is turned off (or if the PC is disconnected)
If so, press the SOURCE button on the remote control or SOURCE button on the side panel to enter a VIDEO mode Also, make sure that the PC is connected
English 41
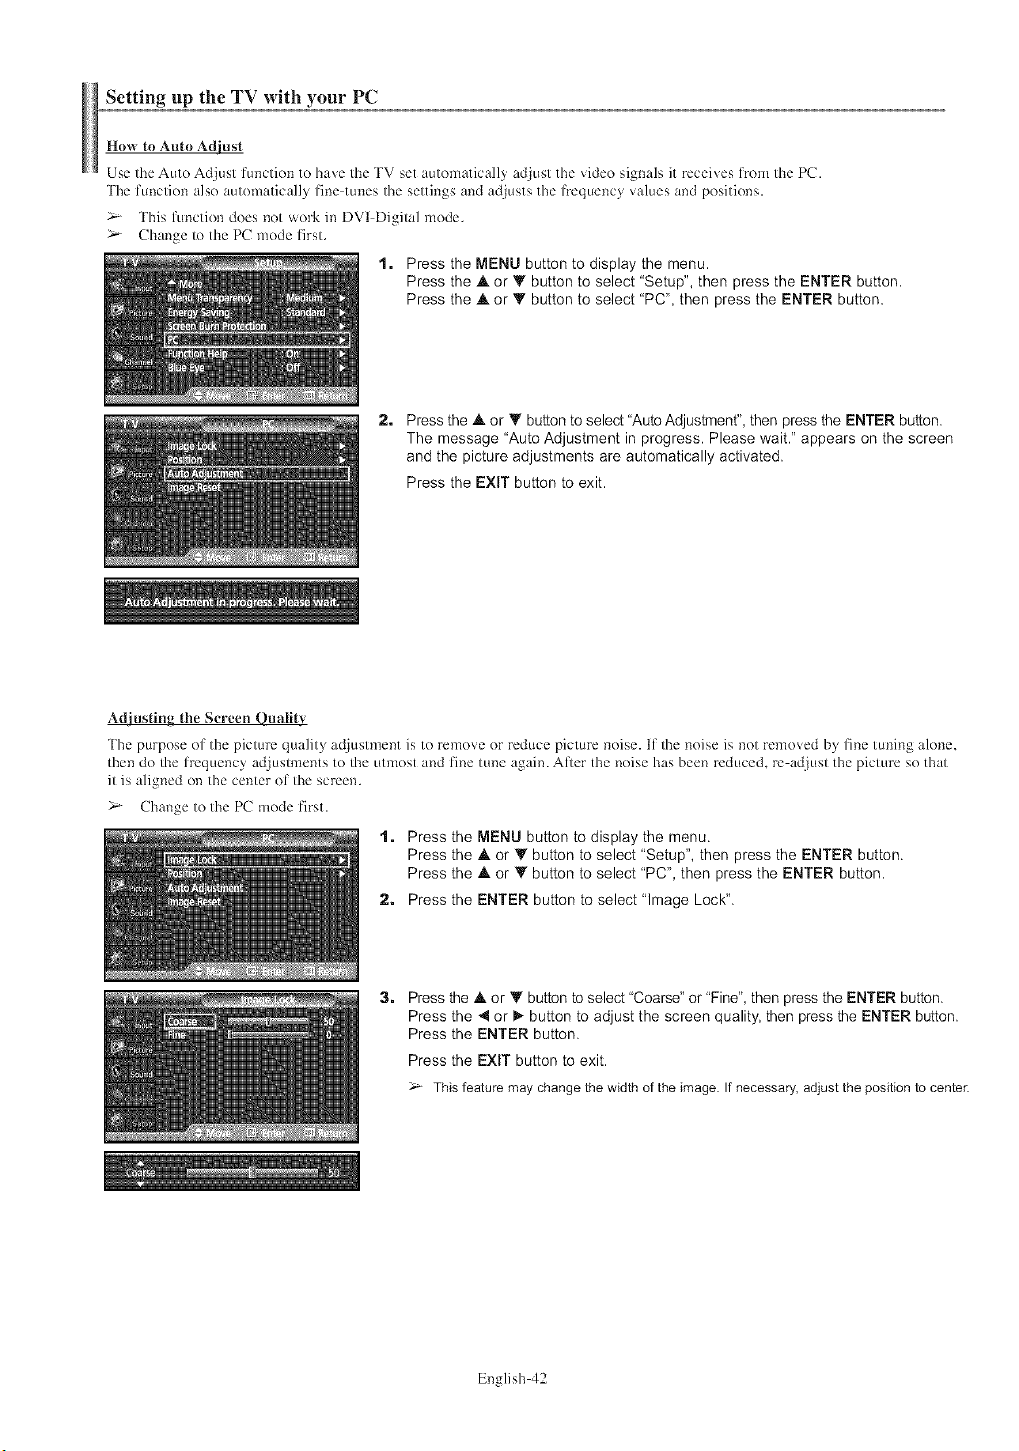
Setting up the TV with your PC
How to Auto Adiust
Use the Auto Adjust function to have the TV set automatically adjust the video signals it receives lrom the PC,
The ftmction also automatically fine tunes the settings and adjusts the frequency values and positions,
> This ftmction does not work in DVI Digital mode,
>- Change to the PC mode first,
1. Press the MENU button to display the menu.
Press the A or _" button to select "Setup", then press the ENTER button.
Press the .& or Y button to select "PC", then press the ENTER button,
2. Press the .& or _" button to select "Auto Adjustment", then press the ENTER button.
The message 'Auto Adjustment in progress, Please wait," appears on the screen
and the picture adjustments are automatically activated,
Press the EXIT button to exit,
Adiusting the Screen Quality
The purpose of the picture quality adjustment is to remove or reduce picture noise. If the noise is not removed by fine tuning alone.
then do the frequency adjustments to the utmost and fine tune again. Afer the noise has been reduced, m adjust the picture so that
it is aligned on the center of the scmerL
>- Change to the PC mode first,
1, Press the MENU button to display the menu.
Press the .A or Y button to select "Setup", then press the ENTER button.
Press the & or _' button to select "PC", then press the ENTER button.
2, Press the ENTER button to select "Image Lock".
3, Press the .& or Y button to select "Coarse" or "Fine", then press the ENTER button.
Press the _1or I_ button to adjust the screen quality, then press the ENTER button,
Press the ENTER button,
Press the EXIT button to exit.
This feature may change the width of the image. If necessary, adjust the position to center.
English 42
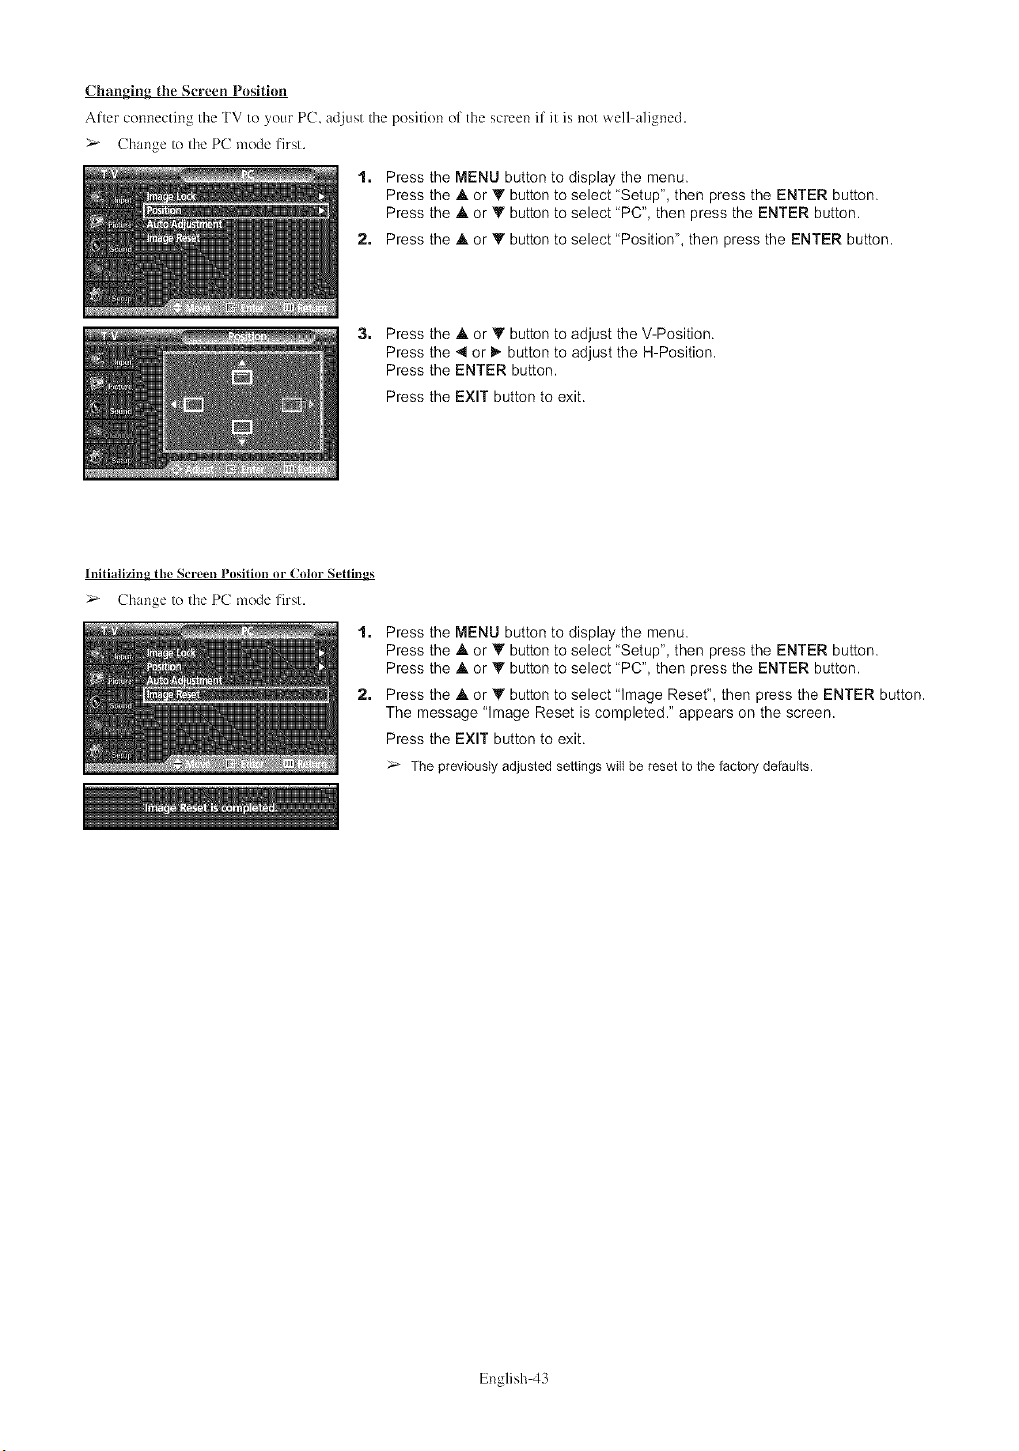
Changing the Screen Position
After connecting the TV to your PC, adjust the position of the screen if it is net well aligned,
> Change to the PC mode first,
1. Press the MENU button to display the menu.
Press the A or Y button to select "Setup", then press the ENTER button.
Press the .A or Y button to select "PC", then press the ENTER button.
2. Press the A or V button to select "Position", then press the ENTER button.
3. Press the J, or _' button to adjust the V-Position.
Press the _ or t_ button to adjust the H-Position.
Press the ENTER button.
Press the EXIT button to exit.
Initializing, the Screen Position or Color Settings
> Change to the PC mode first.
1. Press the MENU button to display the menu.
Press the .A or Y button to select "Setup", then press the ENTER button.
Press the A or Y button to select "PC", then press the ENTER button.
2. Press the .A or Y button to select "Image Reset", then press the ENTER button.
The message "Image Reset is completed." appears on the screen.
Press the EXIT button to exit.
The previously adjusted settings will be reset to the factory defaults.
English 43
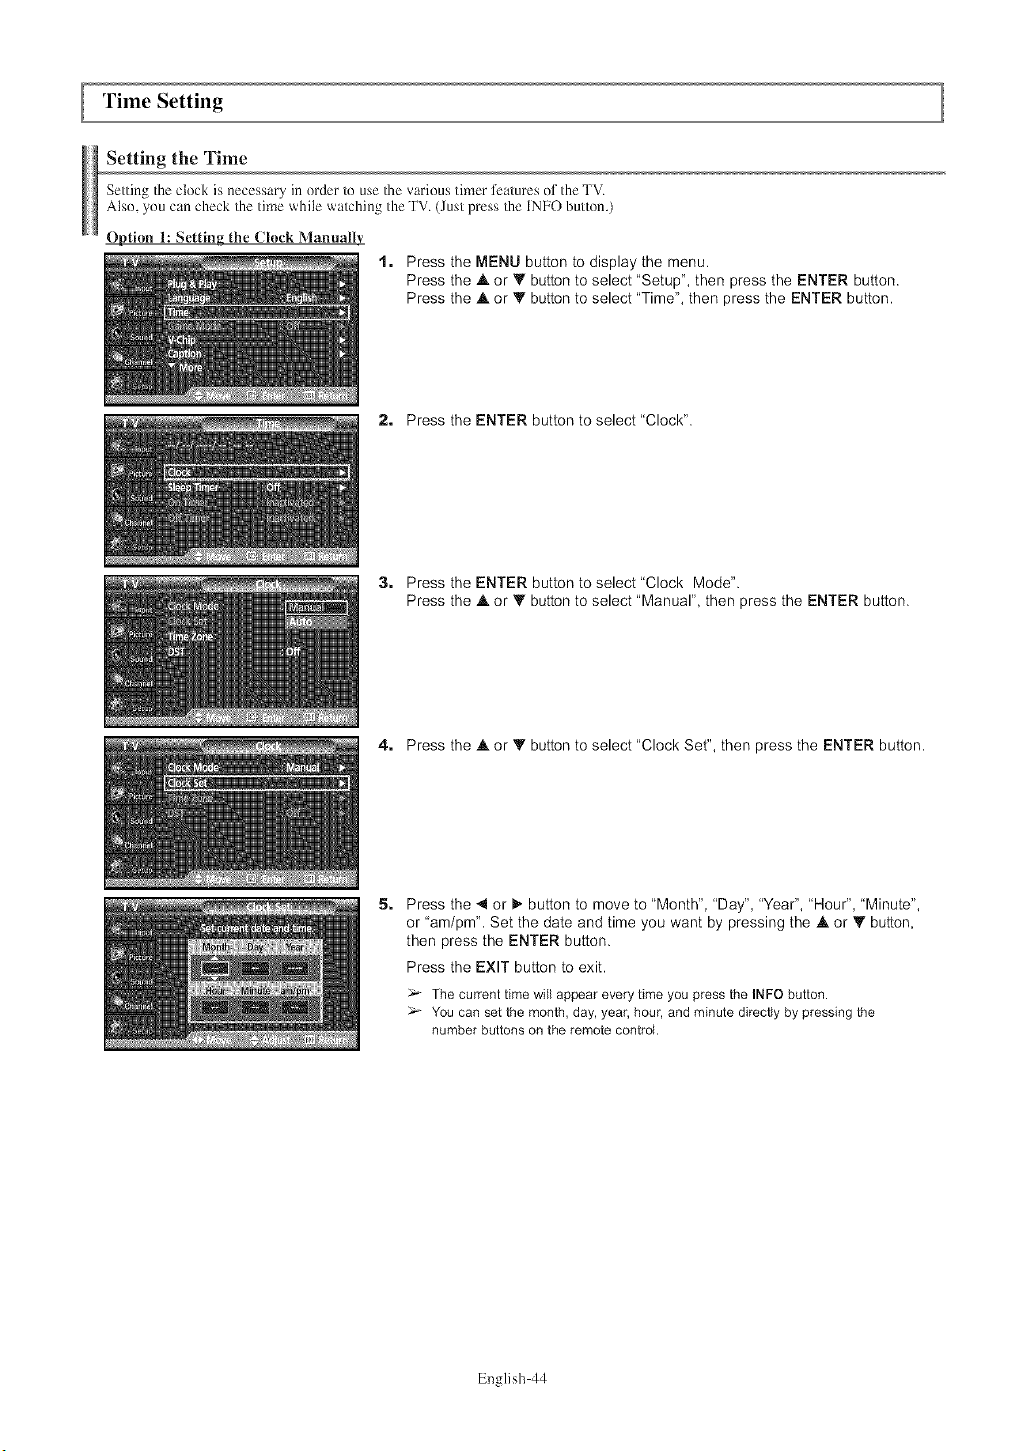
ITime Setting
Setting the Time
Setting/he clock is necessary in order to use/he various timer ti:atures of the TV.
Also, ynu can check/he time while watching the TV. (Just press/he INFO button.)
Option 1: Setting the Crock Manuatlv
1. Press the MENU button to display the menu.
Press the A or Y button to select "Setup", then press the ENTER button.
Press the ,tk or V button to select "Time", then press the ENTER button.
2. Press the ENTER button to select "Clock".
3, Press the ENTER button to select "Clock Mode".
Press the &or Y button to select "Manual", then press the ENTER button,
4. Press the &or V button to select "Clock Set", then press the ENTER button.
5, Press the _1or _,"button to move to "Month", "Day", "Year", "Hour", 'Minute",
or "am/pm". Set the date and time you want by pressing the A or Y button,
then press the ENTER button.
Press the EXIT button to exit.
The current time will appear every time you press the INFO button.
You can set the month, day, year, hour, and minute directly by pressing the
number buttons on the remote control.
English 44
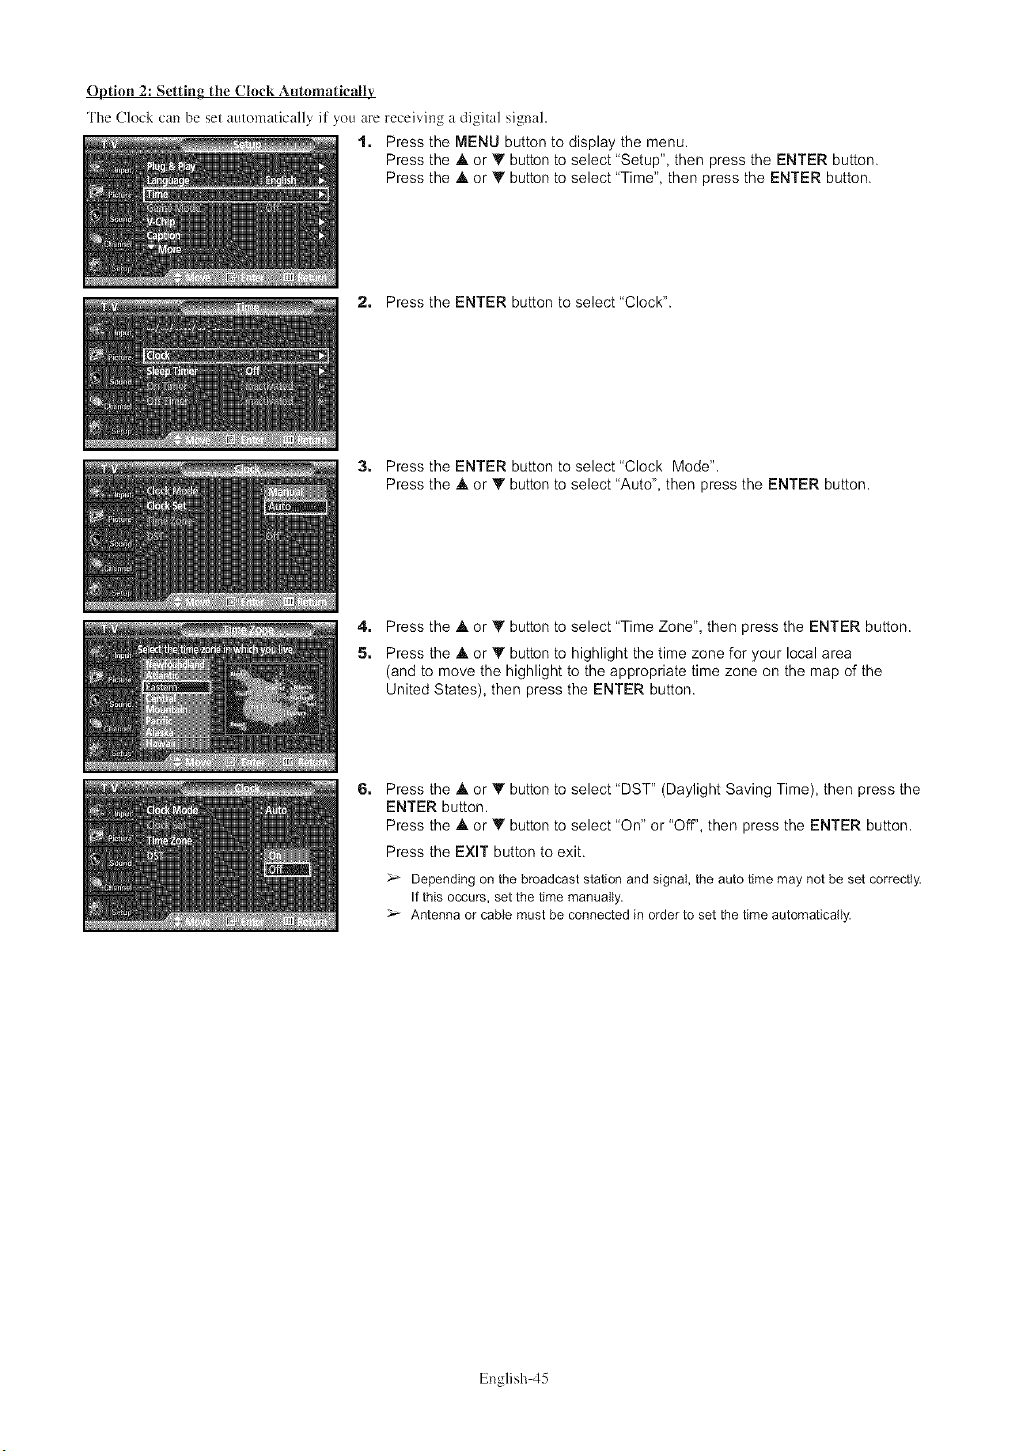
Option 2: Setting the Clock Antomaticaltv
The Clock can be set automatically if you are receiving a digital signal.
1. Press the MENU button to display the menu.
Press the .A or T button to select "Setup", then press the ENTER button.
Press the .A or _' button to select "Time", then press the ENTER button.
2. Press the ENTER button to select "Clock".
3, Press the ENTER button to select "Clock Mode".
Press the .A or _' button to select "Auto", then press the ENTER button.
4. Press the .A or Y button to select "Time Zone", then press the ENTER button.
5, Press the A or Y button to highlight the time zone for your local area
(and to move the highlight to the appropriate time zone on the map of the
United States), then press the ENTER button.
6, Press the .A or Y button to select "DST" (Daylight Saving Time), then press the
ENTER button.
Press the .A or V button to select "On" or "Off', then press the ENTER button.
Press the EXIT button to exit.
Depending on the broadcast station and signal, the auto time may not be set correctly.
If this occults, set the time manually.
Antenna or cable must be connected in order to set the time automatically.
English 45
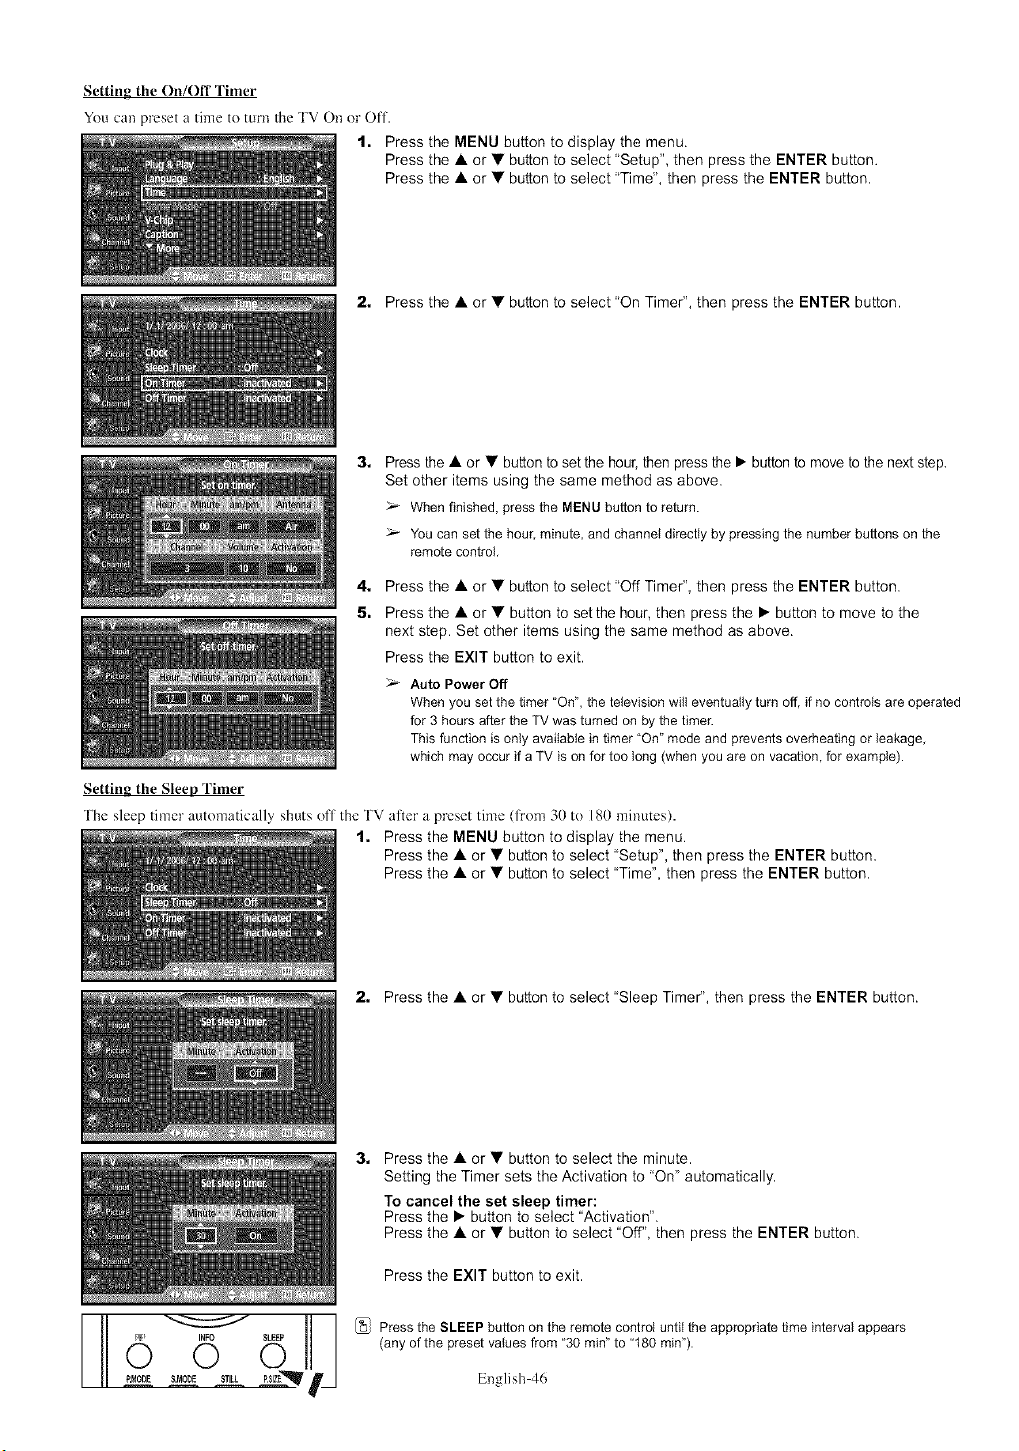
Setting the On/Off Timer
You can preset a time to turn the TV On or Off.
1. Press the MENU button to display the menu.
Press the • or • button to select "Setup", then press the ENTER button.
Press the • or • button to select "Time", then press the ENTER button.
Setting the Sleep Timer
2. Press the •or • button to select "On Timer", then press the ENTER button.
3,
4,
5.
Press the •or • button to set the hour, then press the • buttonto move to the next step.
Set other items using the same method as above.
When finished, press the MENUbuttonto return.
You can set the hour, minute, and channel directly by pressing the number buttons on the
remote control,
Press the •or • button to select "Off Timer", then press the ENTER button.
Press the • or • button to set the hour, then press the • button to move to the
next step. Set other items using the same method as above.
Press the EXIT button to exit.
>- Auto Power Off
When you set the timer "On", the television will eventually turn off, if no controls are operated
for 3 hours after the TV was tumed on by the timer.
This function is only available in timer "On" mode and prevents overheating or leakage,
which may occur if a TV is on for too long (when you are on vacation, for example).
The sleep timer automatically shuts off the TV after a preset time (from 30 to 180 minutes).
1. Press the MENU button to display the menu.
Press the • or • button to select "Setup", then press the ENTER button.
Press the • or • button to select "Time", then press the ENTER button.
2. Press the •or • button to select "Sleep Timer", then press the ENTER button.
0 0
_M00Es._E sTl_.__PszE'_q' f/
3, Press the • or • button to select the minute.
Setting the Timer sets the Activation to "On" automatically.
To cancel the set sleep timer:
Press the • button to select "Activation".
Press the • or • button to select "Off", then press the ENTER button.
Press the EXIT button to exit.
[_ Press the SLEEP button on the remote control until the appropriate time interval appears
(any of the preset values from "30 rain" to "180 rain').
English 46
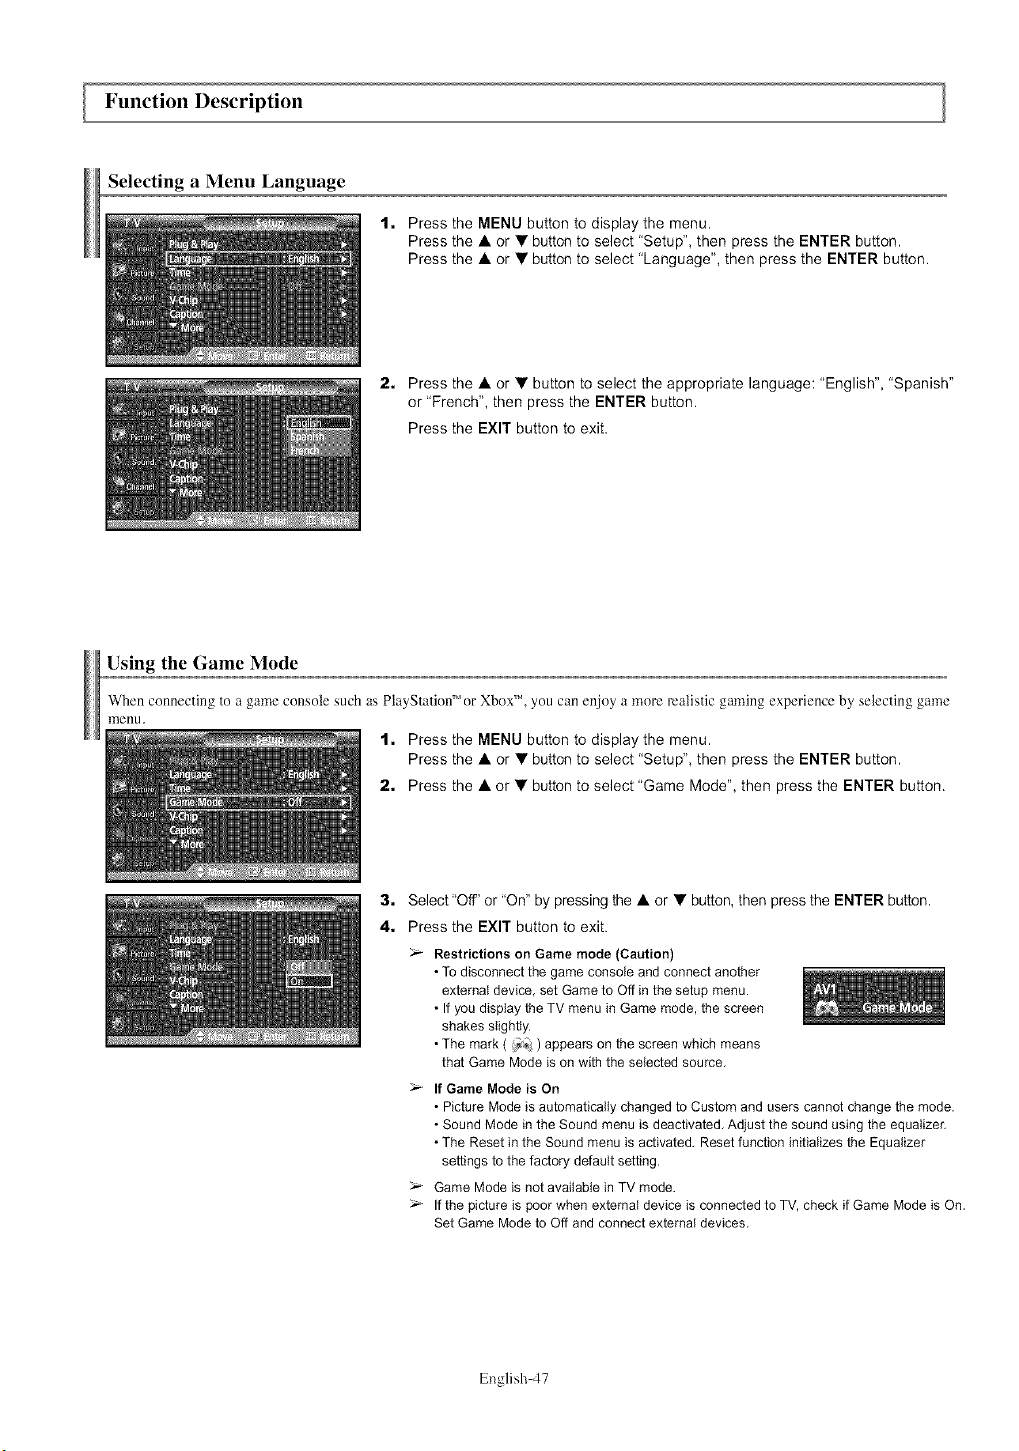
Function Description
Selecting aMenu Language
1. Press the MENU button to display the menu.
Press the &or • button to select "Setup", then press the ENTER button.
Press the A or • button to select "Language", then press the ENTER button.
2. Press the &or • button to select the appropriate language: "English", "Spanish"
or "French", then press the ENTER button.
Press the EXIT button to exit.
Using the Game Mode
When connecting to a game console such as PlayStation'" or XboxTM, you can enjoy a more realistic gaming experience by selecting game
menu.
1. Press the MENU button to display the menu.
Press the A or • button to select "Setup", then press the ENTER button.
2. Press the A or • button to select "Game Mode", then press the ENTER button.
3, Select"Off' or "On" by pressing the •or • button, then press the ENTER button.
4, Press the EXIT button to exit.
Restrictions on Game mode (Caution)
•To disconnect the game console and connect another
external device, set Game to Off in the setup menu.
• If you display the TV menu in Game mode, the screen
shakes slightly.
• The mark ( _. ) appears on the screen which means
that Game Mode is on with the selected source.
If Game Mode is On
• Picture Mode is automatically changed to Custom and users cannot change the mode.
• Sound Mode in the Sound menu is deactivated. Adjust the sound using the equalizer.
• The Reset in the Sound menu is activated. Reset function initializes the Equalizer
settings to the factory default setting.
Game Mode is not available in TV mode.
If the picture is poor when external device is connected to TV, check if Game Mode is On.
Set Game Mode to Off and connect external devices.
English 47
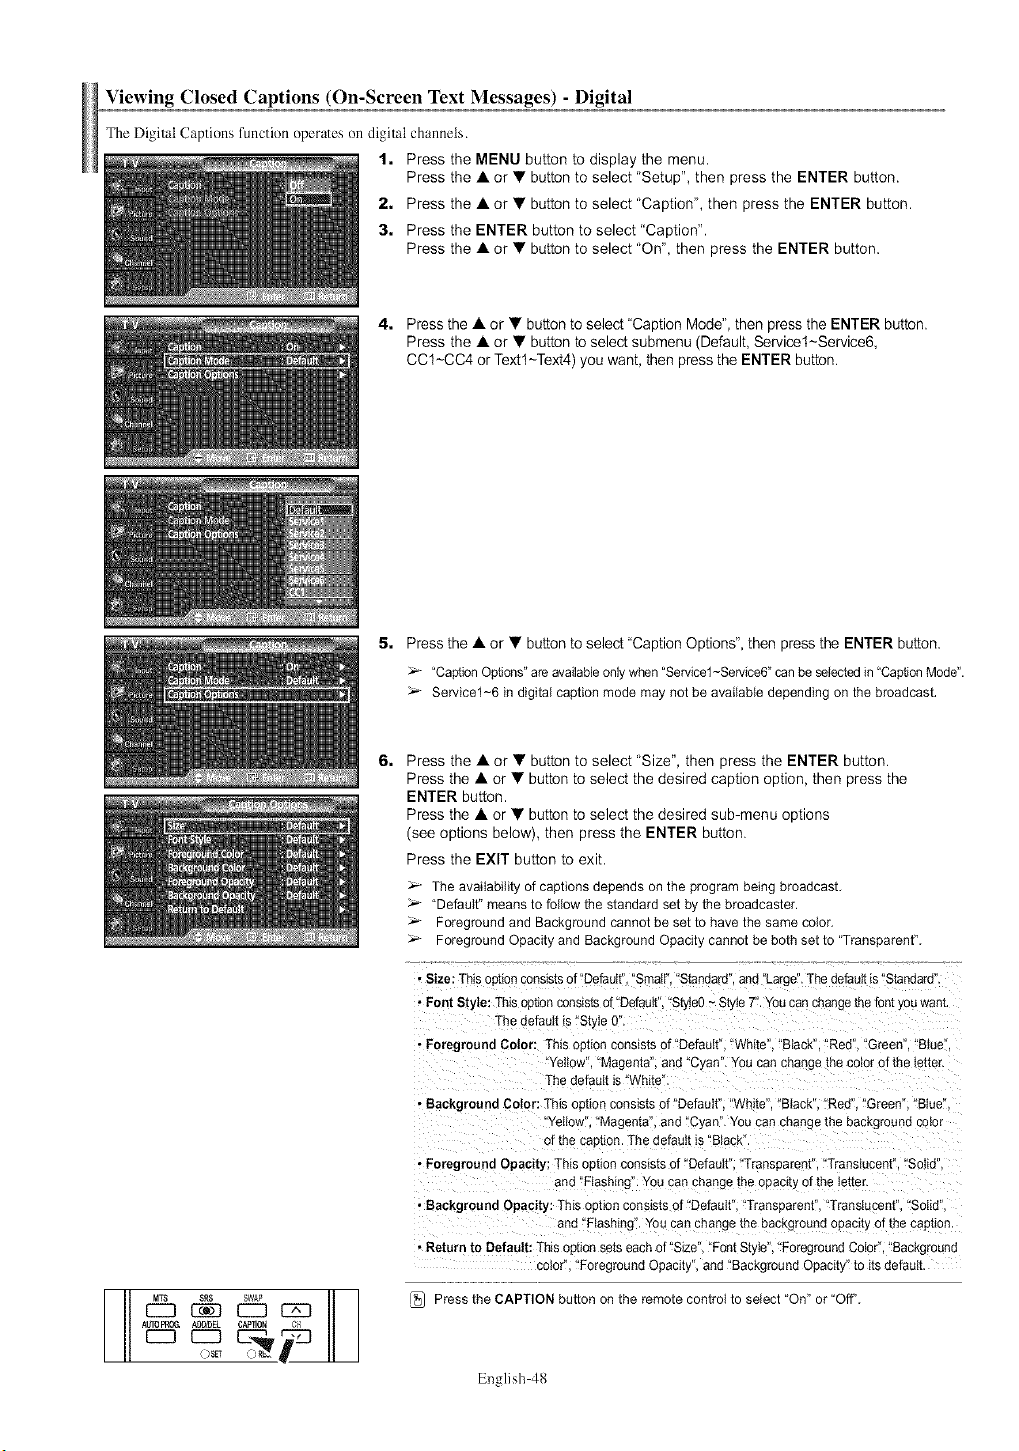
Viewing Closed Captions (On-Screen Text Messages) - Digital
The Digital Captions function operates on digital channels.
1. Press the MENU button to display the menu.
Press the • or •button to select "Setup", then press the ENTER button.
2. Press the • or • button to select "Caption", then press the ENTER button.
3. Press the ENTER button to select "Caption".
Press the • or • button to select "On", then press the ENTER button.
4. Press the •or • button to select "Caption Mode", then press the ENTER button.
Press the • or • button to select submenu (Default, Service1~Service6,
CC1-CCA or Textl-Text4) you want, then press the ENTER button.
5, Press the •or • button to select "Caption Options", then press the ENTER button.
"Captbn Options" are available only when "Se_vicel-Se_vice6" can be selected in "Caption Mode".
Service1-6 in digital caption mode may not be available depending on the broadcast,
6, Press the •or • button to select "Size", then press the ENTER button.
Press the • or • button to select the desired caption option, then press the
ENTER button.
Press the • or • button to select the desired sub-menu options
(see options below), then press the ENTER button.
Press the EXIT button to exit.
The availability of captions depends on the programbeing broadcast.
"Default"meansto follow the standardset by the broadcaster.
Foregroundand Background cannot be set to have the same color.
ForegroundOpacity and BackgroundOpacity cannot be both set to "Transparent".
• Size: This oetion consists of"Default" Small". "Standard", and "Large". The default is "Standard'
• Font Style: This oet_onconsists d"Default", "StyteO~Style T'. You can change the font you warn
The default is "Style 0
• Foreground Color: This option consists of "Default "White". "Black". "Red". "Green". "Blue"
Yellow 'Magenta", and "C_an". You can change the color of the letter.
The default is "White'
• Background Color: This oueon consists of "Default Wh te". "Black". "Red". "Green". "Blue'
Yellow' Magenta", and "Cyan". You can change the background color
of the caotion. The default is "BtacK
• Foreground Opacity: This option consists of"Defautt 'Transearent". "Translucent' "Solid
and "Flashing You can change me opacity of the letter
• Background Opacity: This option consists d"Defautt' Transearent". "Translucent". "Solid"
and "Ftashing You can change me background opacity of the caption
, Return to Default: This option sets each of"Slze 'Font Style", "Foreground Color", "Background
coior Foreground Opacity", and "Background Opacib to its default
Press the CAPTION button on the remote control to select "On" or "Off'.
English 48

Viewing Closed Captions (On-Screen Text Messages) -Analog
1, Press the MENU button to display the menu.
Press the A or •button to select "Setup", then press the ENTER button.
2, Press the A or • button to select "Caption", then press the ENTER button.
3, Press the ENTER button to select "Caption".
Press the • or • button to select "On", then press the ENTER button,
AOIOPRC_, CAPTION
c:J t25
OSET
4. Press the • or • button to select "Caption Mode", then press the ENTER button.
Press the • or • button to select submenu (CCl-CCA or Textl-Text4) you want,
then press the ENTER button,
Press the EXIT button to exit,
• The default is "CCl".
* CCl: The Pnmary Synchronous Cap]_on Service. These are cap_oqs in the primary language
that must be in sjnc with the sound, preferably ma[cnea [o a specific frame.
• CC2: The Special Non-S_ qchronous Use Caphons.
This channel carries data that is intended to augment information carried in the 3rogram.
• CC3: Secondary Synchronous Caption Service.
Alternate program-related cap[_on gala, typically second tanguage caphons.
• CC4: Special Non-Synchronous Use Captions. Similar to CC2.
• Text1: Eirst Te^t Service. This may be various non-program reia[ea ea[a.
• Text2: Second Text Service. Addihona{ data. usually no[ program related.
• Text3fText4: Third and Fourth Text Serwces.
These data channels should be used only if Text1 and Tex12are not sufficient.
:' •The Caption feature doesn't work in COMPONENT, PC. HDMI(DVl) modes.
•The availability of captions depends on the program being broadcast.
_] Press the CAPTION button on the remote control to select "On" or "Off".
English 49

Menu Transparency Level
Adjusts the transparency of the menu screen.
t. Press the MENU button to display the menu,
Press the • or • button to select "Setup", then press the ENTER button.
2. Press the • or • button to select "Menu Transparency", then press the ENTER
button.
3, Press the • or • button to select level, then press the ENTER button.
Press the EXIT button to exit.
Using the Energy Saving Feature
This feature adjusts the screen brightness automatically depending on the smTounding lighting conditions.
1. Press the MENU button to display the menu.
Press the •or • button to select "Setup", then press the ENTER button.
2. Press the • or • button to select "Energy Saving", then press the ENTER button.
Press the • or • button to select submenu (Standard, Auto Saving, Super Saving)
you want, then press the ENTER button.
Press the EXIT button to exit.
*Standard: Operates in standard mode regardless 0fth e surrounding
illumination,
* Auto Saving: Automatically adjusts to the surrounding illumination,
* Super Saving: Enters maximum power saving mode regardless of the
surrounding illumination,
mrEN_ CHMGR FA'_t_ 2.,_ _[ _OOp EE_WG [_ Press the E.SAVING button to select the energy saving setting.
English 50
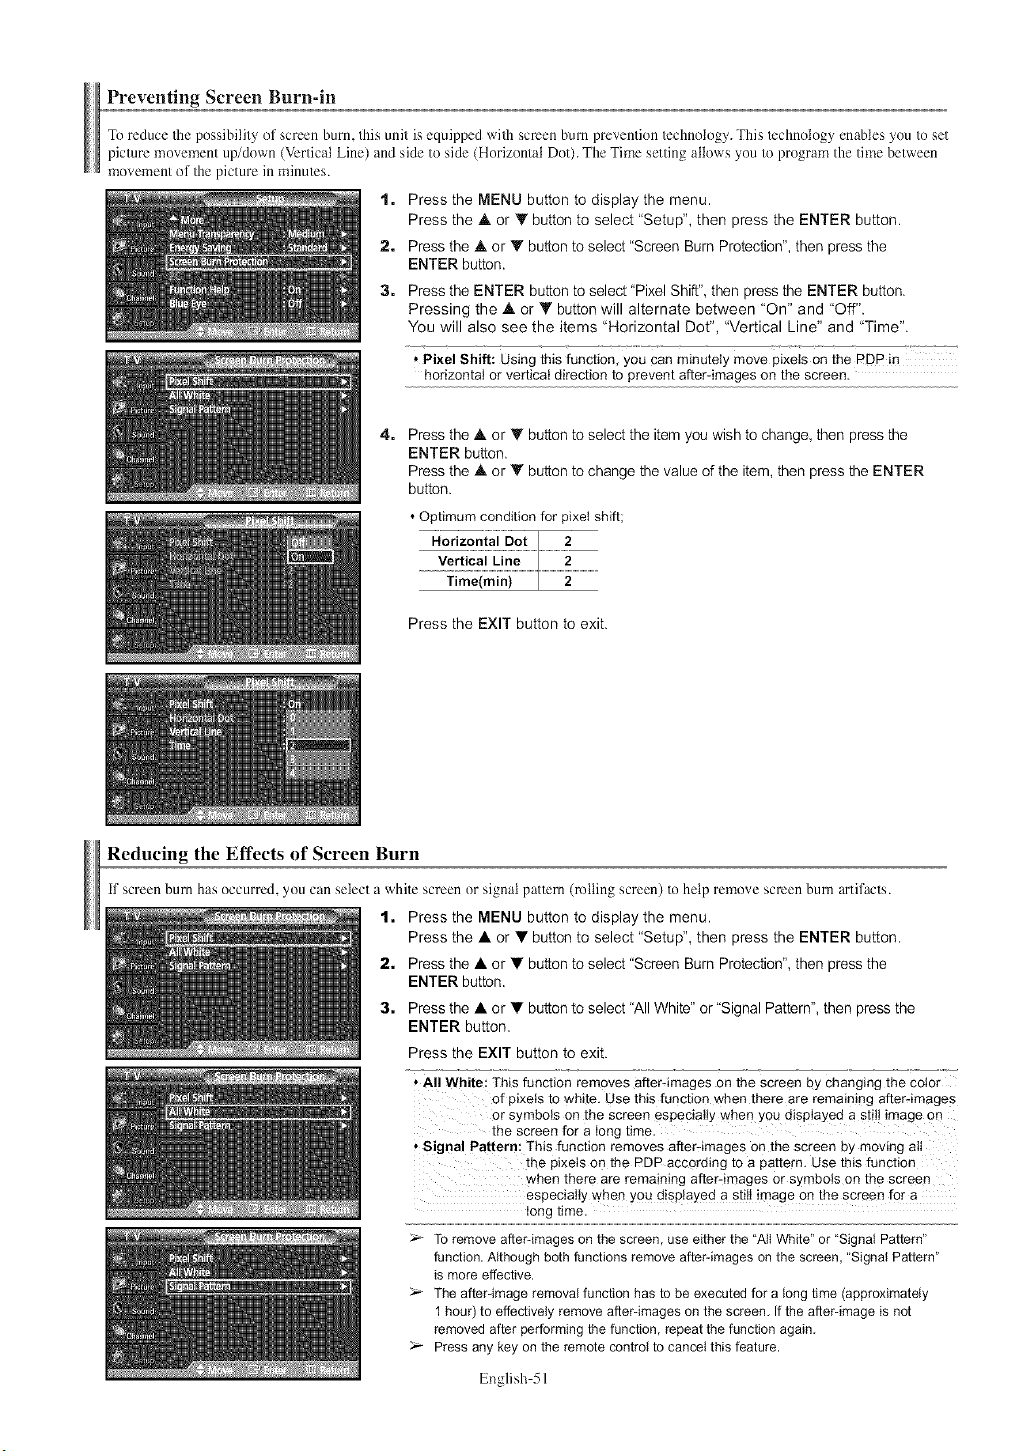
Preventing Screen Burn-in
To reduce die possibility of screen burn, fills unit is equipped widl screen bum prevention/echnology. This/echnotogy enables you to set
picture movement up/down (Vertical Line) and side to side (Horizontal Dot). The Time setting allows you to program the time between
movement of the picture in minu/cs.
1. Press the MENU button to display the menu.
Press the • or • button to select "Setup", then press the ENTER button.
2. Press the • or • button to select "Screen Burn Protection", then press the
ENTER button.
3. Press the ENTER button to select "Pixel Shift", then press the ENTER button.
Pressing the • or • button will alternate between 'On" and 'Off".
You will also see the items "Horizontal Dot", "Vertical Line" and "Time".
* Pixel Shift: Using this function, you can minutely move pixets on the PDP in
horizontal or vertical direction to prevent after-images on the screen.
4. Press the • or • button to select the item you wish to change, then press the
ENTER button.
Press the • or • button to change the value of the item, then press the ENTER
button.
• Optimum condition for pixeI shift;
Horizontal Dot 2
Vertical Line 2
Time(rain) 2
Press the EXIT button to exit.
Reducing the Effects of Screen Burn
if screen bum has occurred, you can select a while screen or signal pauem (rolling screen) to help remove screen bum artifacts.
2,
3.
1. Press the MENU button to display the menu.
Press the • or •button to select "Setup", then press the ENTER button.
Press the • or • button to select "Screen Burn Protection", then press the
ENTER button.
Press the • or • button to select "All White" or "Signal Pattern", then press the
ENTER button.
Press the EXIT button to exit.
*All White: This function removes afterdmages on the screen by changing the color
of pixets to white. Use this function when there are remaining after-images
or symbols on the screen especially when you displayed a still image on
the screen for a long time.
• Signal pattern: This function removes after-images on the screen by moving all
the pixels on the PDP according to a pattern. Use this function
when there are remaining after-images or symbols on the screen
especially when you d!splayed a still imageon the screen for a
long time.
To removeafter-imageson the screen, use eitherthe "All White" or "Signal Pattern"
function.Although bothfunctions removeafter-images onthe screen, "Signal Pattern"
is more effective.
The after-imageremovalfunction has to be executedfor a long time (approximately
1 hour)to effectively removeafter-imageson the screen, If the after-imageis not
removedafter performingthe function, repeat the functionagain,
Press anykey on the remote control to cancelthis feature.
English 51
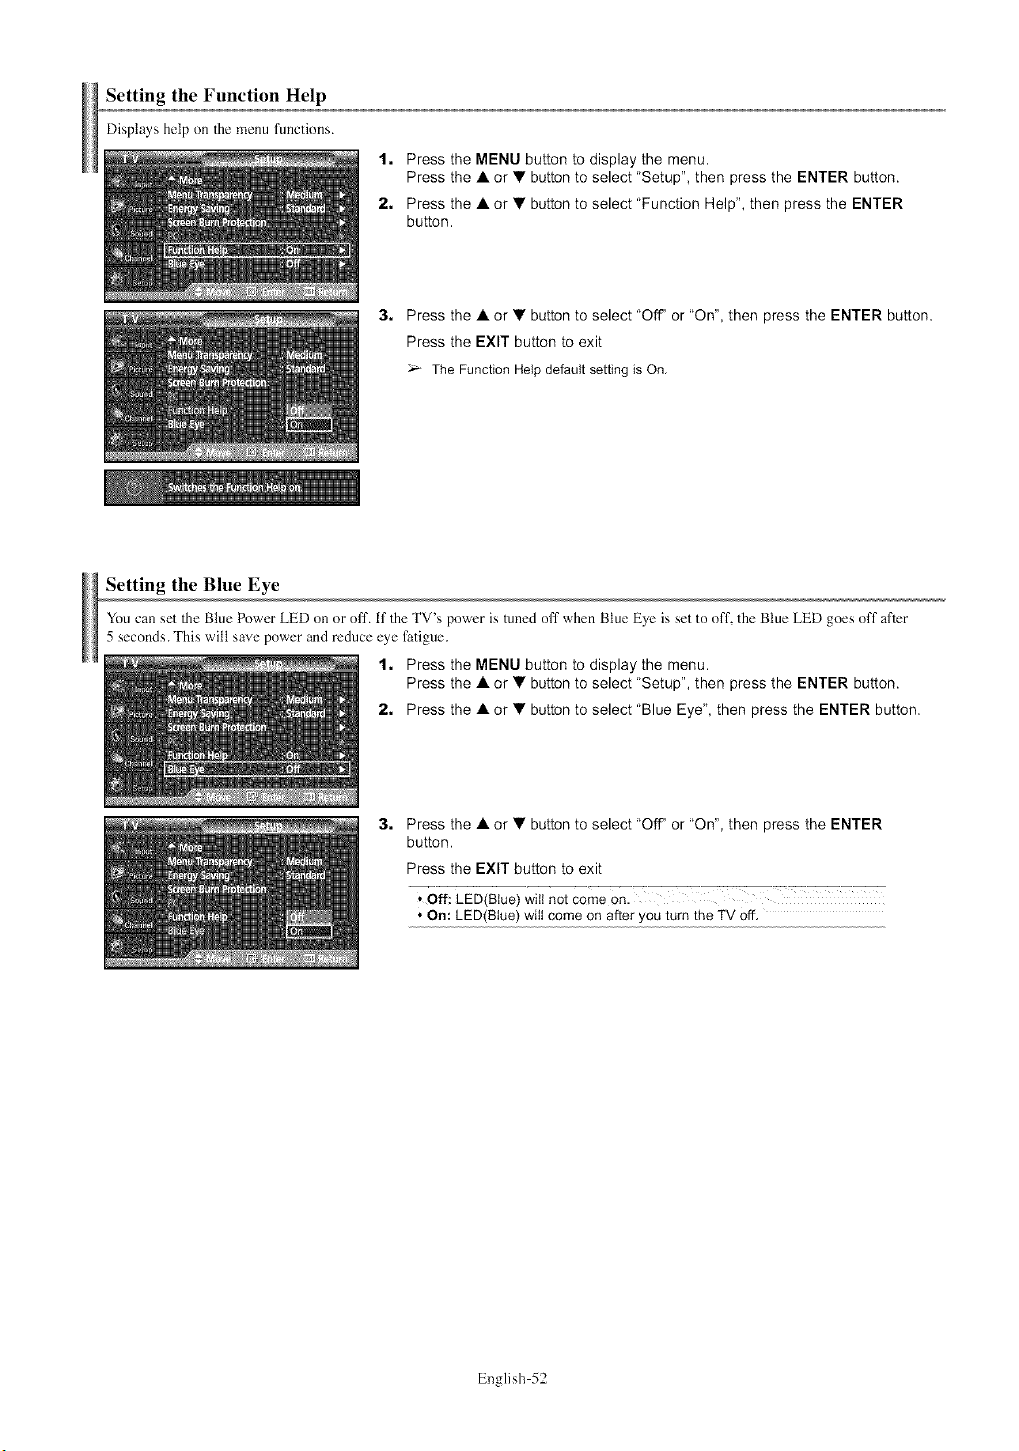
Setting the Function Help
Displayshelp on Themenu functions.
1. Press the MENU button to display the menu.
Press the A or • button to select "Setup", then press the ENTER button.
2. Press the A or • button to select "Function Help", then press the ENTER
button,
3. Press the A or • button to select "Off' or "On", then press the ENTER button,
Press the EXIT button to exit
The Function Helpdefault setting is On.
Setting the Blue Eye
You can set The Blue Power LED on or off. if TheTV's power is tuned off when Blue Eye is set to off, the Blue LED goes off after
5 seconds. This will save power and reduce eye fatigue.
t. Press the MENU button to display the menu.
Press the A or • button to select "Setup", then press the ENTER button,
2. Press the • or • button to select "Blue Eye", then press the ENTER button,
3. Press the • or • button to select "Off' or "On", then press the ENTER
button,
Press the EXIT button to exit
• Off: LED(Blue) wilt not come on.
* On: LED(Blue) wilt come on after you turn the TV off.
English 52
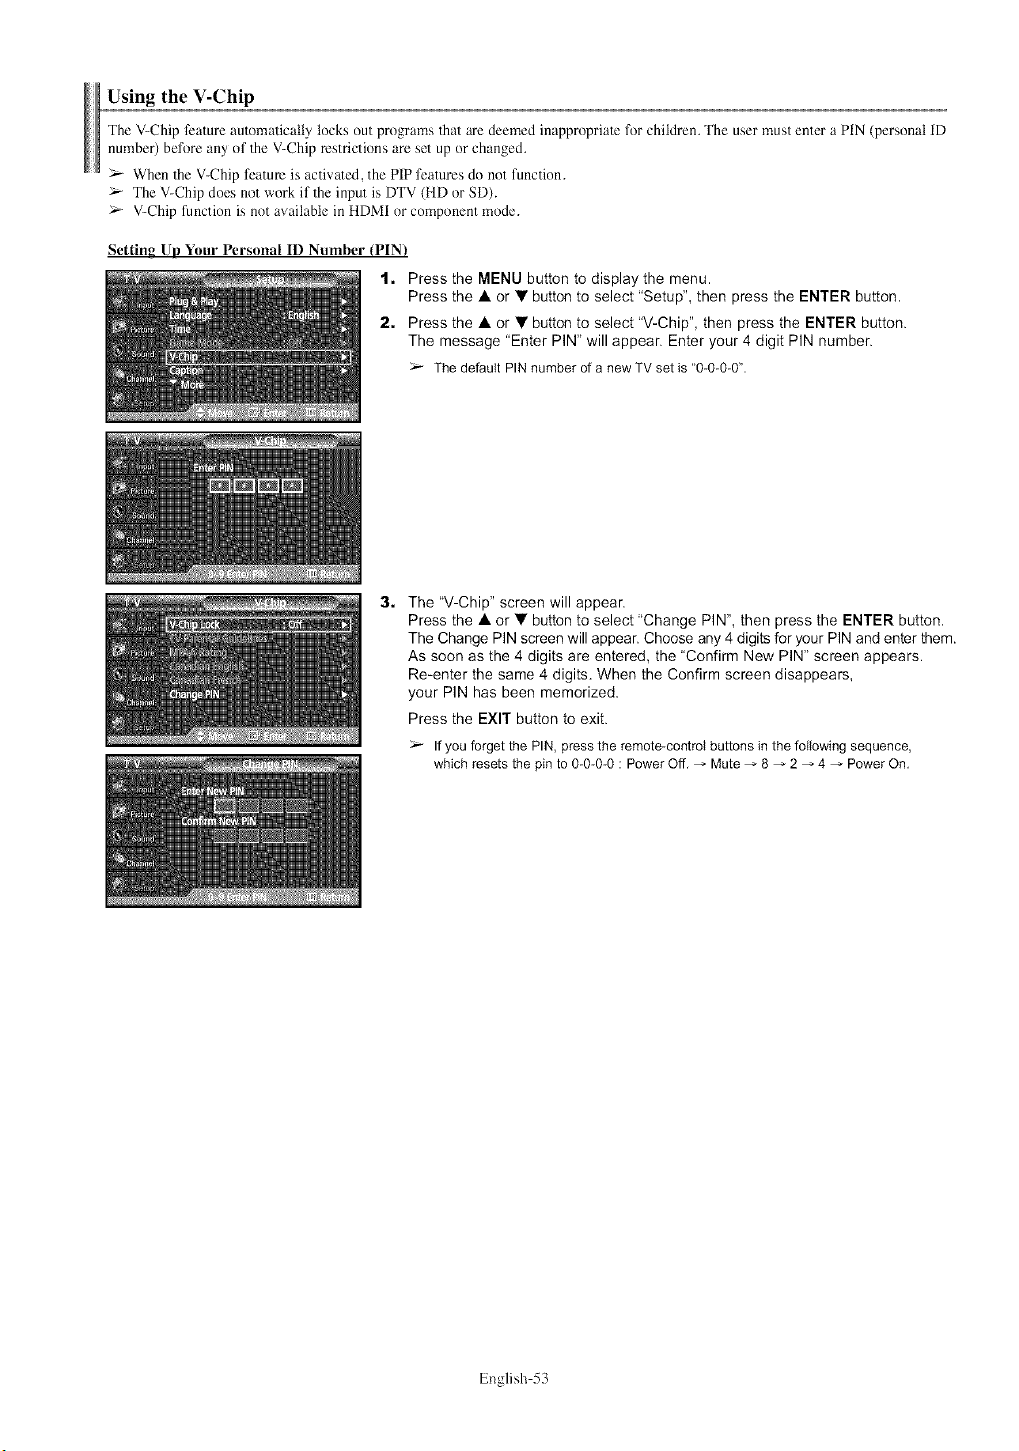
Using the V-Chip
The V-Chip feature automatically locks out programs that are deemed inappropriate for children. The user must enter a PIN (personal ID
number) before any of the V-Chip restrictions are set up or changed.
>- When 1he V-Chip feature is activated, the PIP features do not function.
> The V-Chip does not work if the input is DTV (HD or SD).
> V-Chip function is not available in HDMI or component mode.
Setting Up Your Personal ID Number (PIN}
1. Press the MENU button to display the menu.
Press the •or • button to select "Setup", then press the ENTER button.
2. Press the • or • button to select "V-Chip", then press the ENTER button.
The message "Enter PIN" will appear. Enter your 4 digit PIN number.
The defaultPIN number of a new TV set is "0-0-0-0".
3. The "V-Chip" screen will appear.
Press the • or • button to select "Change PIN", then press the ENTER button.
The Change PIN screen will appear. Choose any 4 digits for your PIN and enter them.
As soon as the 4 digits are entered, the "Confirm New PIN" screen appears.
Re-enter the same 4 digits. When the Confirm screen disappears,
your PIN has been memorized.
Press the EXIT button to exit.
If you forget the PIN, press the remote-control buttons in the following sequence,
which resets the pin to 0-0-0-0 : Power Off, _ Mute _ 8 _ 2 _ 4 _ Power On.
English 53
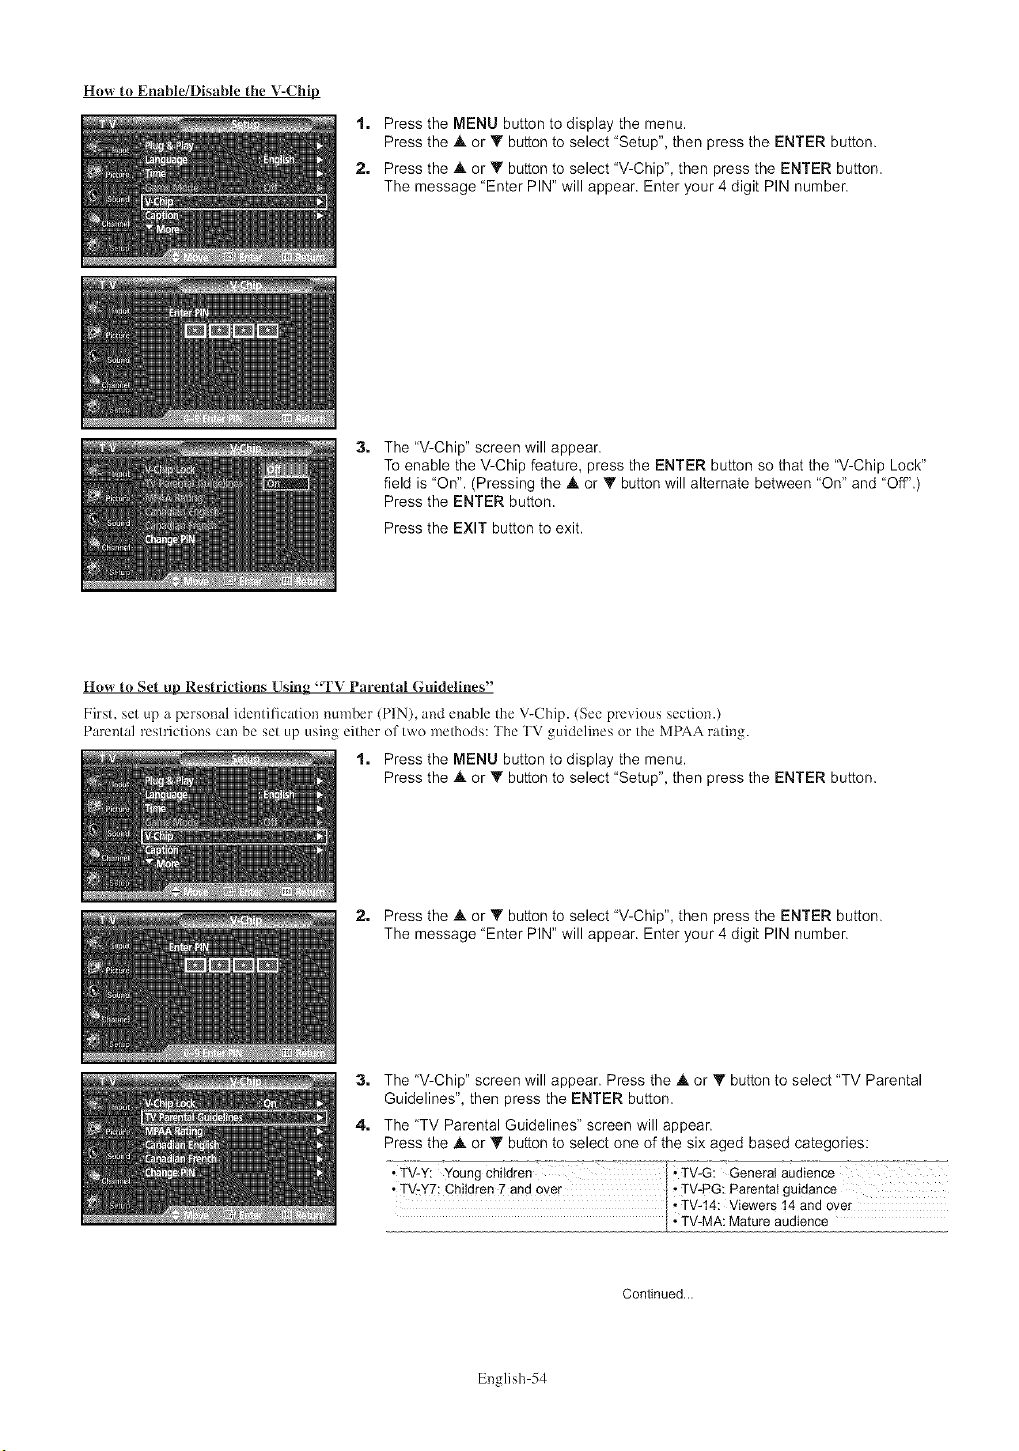
How to Enable/Disable the V-Chip
1. Press the MENU button to display the menu.
Press the A or Y button to select "Setup", then press the ENTER button.
2. Press the Jk or V button to select 'V-Chip", then press the ENTER button.
The message "Enter PIN" will appear. Enter your 4 digit PIN number.
3. The "V-Chip" screen will appear.
To enable the V-Chip feature, press the ENTER button so that the "V-Chip Lock"
field is "On". (Pressing the Jk or _' button will alternate between "On" and "Off".)
Press the ENTER button.
Press the EXIT button to exit.
Hew to Set up Restrictions Using "TV Parental Guidelines"
First. set tip a personal identilicatior_ number (PIN), and enzJble the V-Chip. (See previous section.)
Parental restrictions can be set up using either of two ]nethods: The TV guidelines or the MPAA rating.
1. Press the MENU button to display the menu.
Press the A or _' button to select "Setup", then press the ENTER button.
2. Press the A or _' button to select "V-Chip", then press the ENTER button.
The message "Enter PIN" will appear. Enter your 4 digit PIN number.
3. The "V-Chip" screen will appear. Press the Jk or _' button to select "TV Parental
Guidelines", then press the ENTER button.
4. The 'TV Parental Guidelines" screen will appear.
Press the Jk or T button to select one of the six aged based categories:
•TV_-Y:_YoungCh_ldre-n--_--:--- ..........I" TV-G: General audience
*TV-y7; Children 7 andoyer [ • TV-PG:Parental guidance
, TV-14: Viewers 14 andover
[ • TV-MA:Mature audience
Continued...
English 54
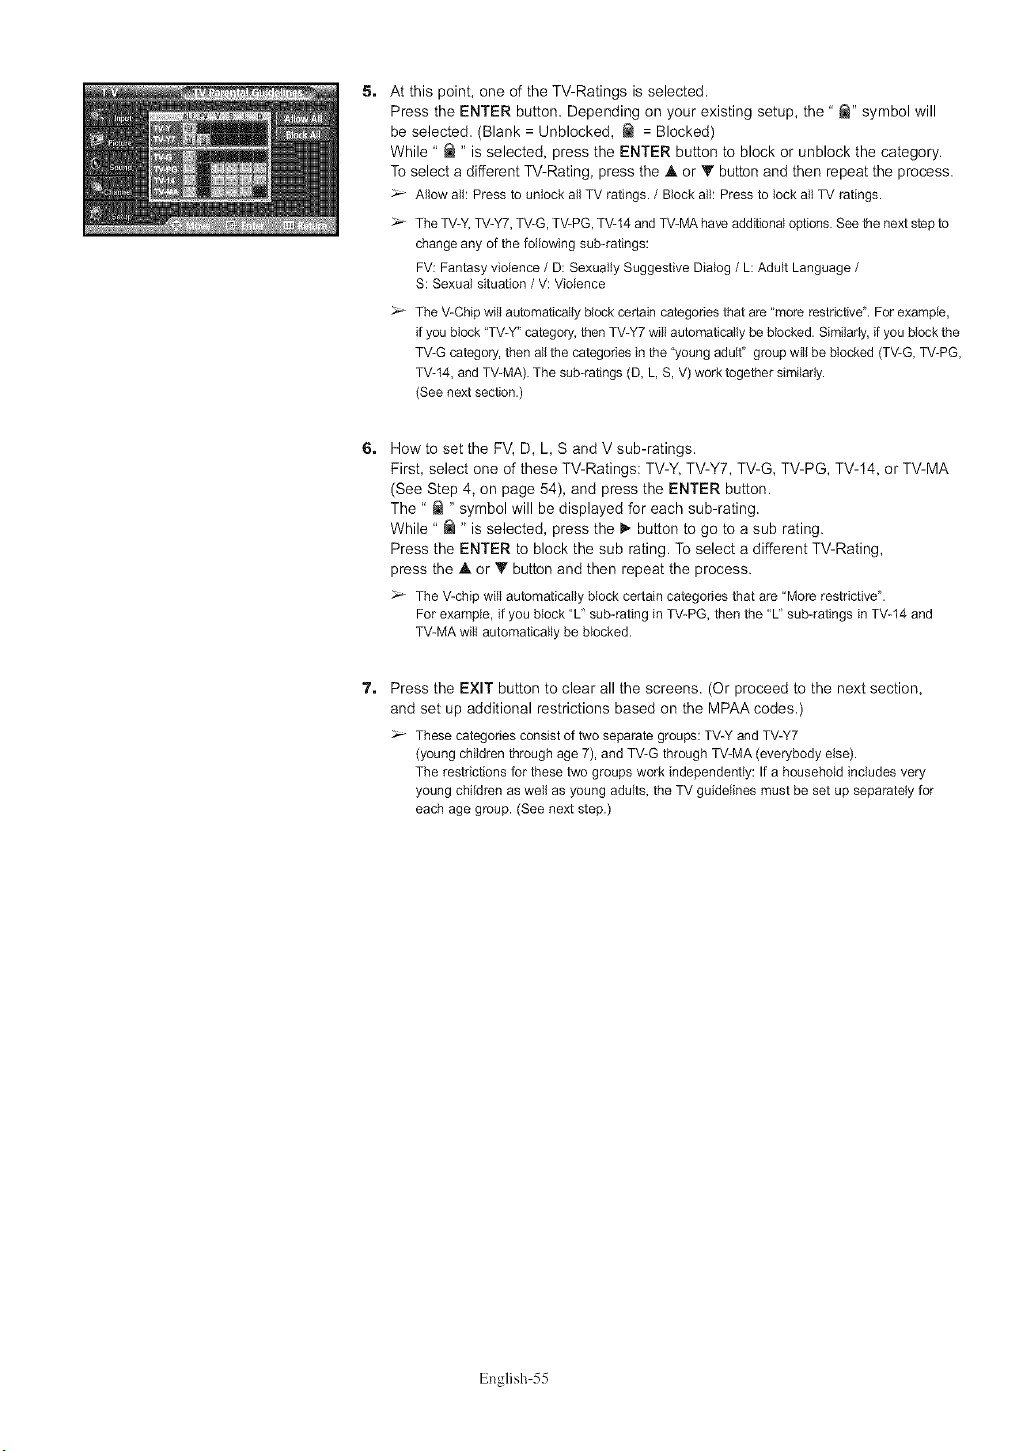
5. At this point, one of the TV-Ratings is selected.
Press the ENTER button. Depending on your existing setup, the " _" symbol will
be selected. (Blank = Unblocked, _ = Blocked)
While " _ " is selected, press the ENTER button to block or unblock the category.
To select a different TV-Rating, press the A or Y button and then repeat the process.
Allow all: Press to unlock all TV ratings./Block all: Pressto lock all TV ratings.
The TV-Y,TV-Y7,TV-G,TV-PG,TV-14andTV-MAhaveadditionaloptions.Seethenextstep to
changeany of the following sub-ratings:
FV: Fantasyviolence/D: SexuallySuggestive Dialog/L: Adult Language/
S: Sexual situation /V: Violence
The V-Chip will automatically block cedain categories that are "more restrictive". For example,
if you block "TV-Y" category, then TV-Y7 will automatically be blocked. Similarly, if you block the
TV-G category, then all the categories in the "young adult" group will be blocked (TV-G, TV-PG,
TV-14, and TV-MA). The sub-ratings (D, L, S, V) work together similarly.
(See next section.)
6. How to set the FV, D, L, S and V sub-ratings.
First, select one of these TV-Ratings: TV-Y, TV-Y7, TV-G, TV-PG, TV-14, or TV-MA
(See Step 4, on page 54), and press the ENTER button.
The " _ " symbol will be displayed for each sub-rating.
While " _ " is selected, press the _" button to go to a sub rating.
Press the ENTER to block the sub rating. To select a different TV-Rating,
press the A or Y button and then repeat the process.
_- The V-chipwill automaticallyblock certain categodesthat are "Morerestrictive".
For example,if youblock "L' sub-ratingin TV-PG,then the "L' sub-ratingsin TV-14and
TV-MAwill automaticallybe blocked.
7, Press the EXIT button to clear all the screens. (Or proceed to the next section,
and set up additional restrictions based on the MPAA codes.)
_'- These categories consist of two separate groups: TV-Y and TV-Y7
(young children through age 7), and TV-G through TV-MA (everybody else).
The restrictions for these two groups work independently: If a household includes very
young children as well as young adults, the TV guidelines must be set up separately for
each age group. (See next step.)
English 55

How to Set up Restrictions Using the MPAA Ratings: G, PG, PG-13, R, NC-17, X, NR
The MPAA rating system uses the Motion Picture Association of America (MPAA) system, and its main application is lk)r movies.
When the V Chip lock is on, the TV will automatically block any programs that am coded with objectionable ratings (either MPAA
or TV Ratings),
1. Press the MENU button to display the menu.
Press the A or Y button to select "Setup", then press the ENTER button.
2. Press the at or V button to select 'V-Chip", then press the ENTER button.
The message "Enter PIN" will appear. Enter your 4 digit PIN number.
3. The "V-Chip" screen will appear. Press the at or _' button to select "MPAA Rating",
then press the ENTER button.
4, Press the at or V button to select a appropriate restriction.
Press the ENTER button to activate the restriction selected. The " @ " symbol is
indicated.
Press the EXIT button to exit.
Allow all: Press to unlock all TV ratings./Block all: Press to lock all TV ratings.
• G: General audience(no restrictions).
• PC: Parentatguidancesuggested.
• PG.'I3: Parents strongly cautioned.
• R: Restricted,Children under 17 shouldbe accompaniedby an adulL
• NC-17: No children under age 17,
• X: AduRsonty.
• NR: Not rated,
The V-Chip will automatically block any category that is "more restrictive".
For example, if you block the "PG-13' category, then "R", "NC-IT' and "X" will automatically
be blocked also.
English 56
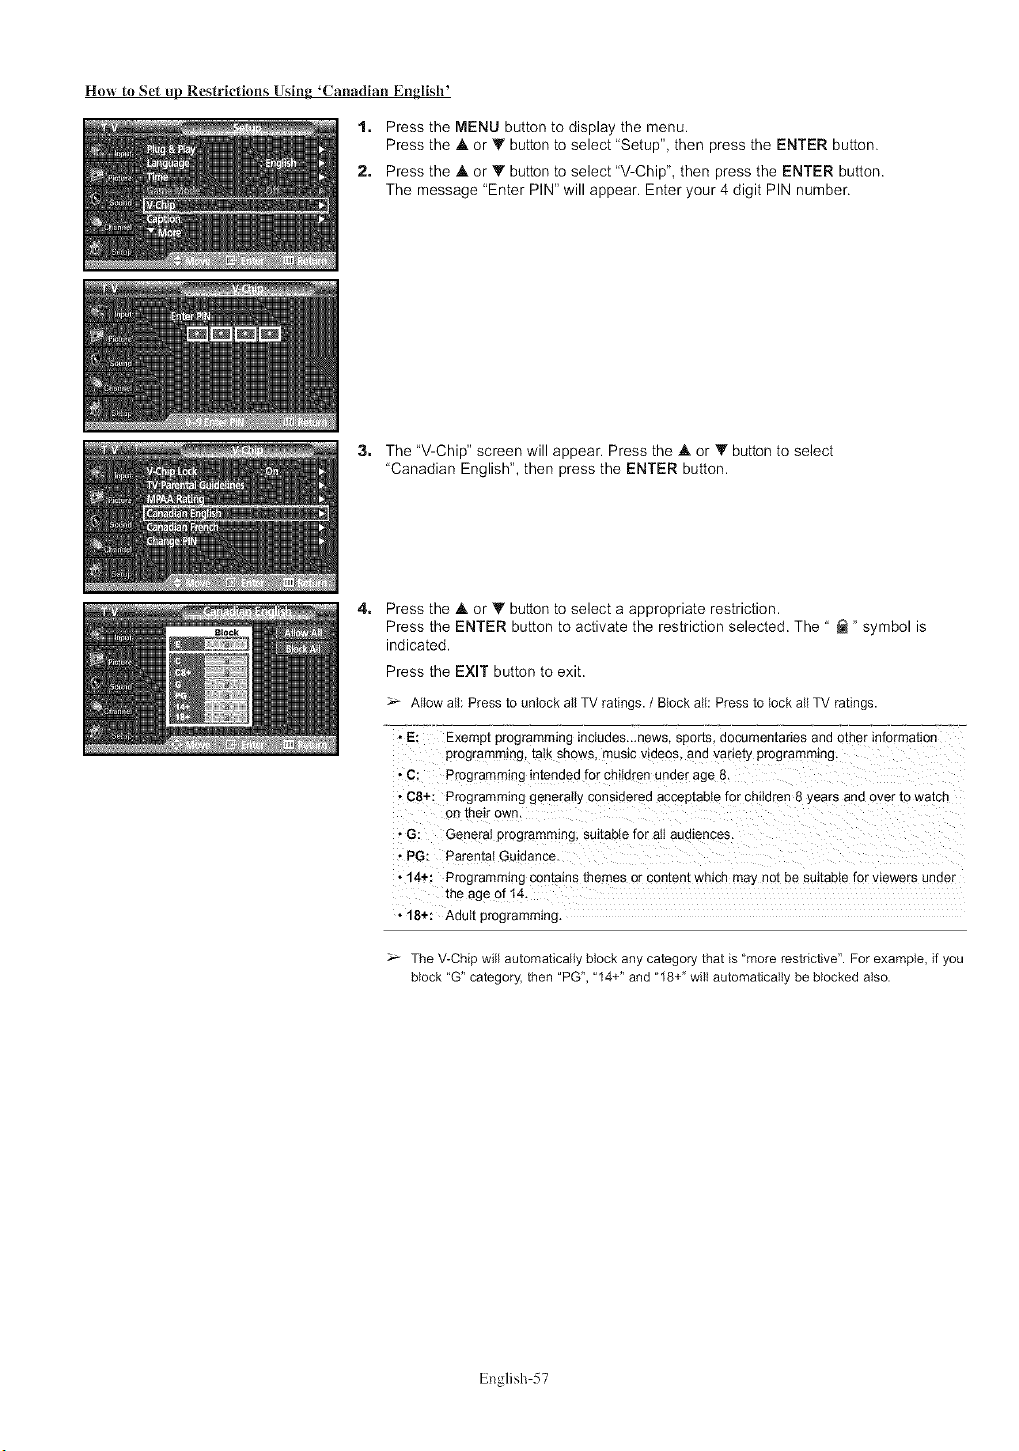
How to Set up Restrictions Using 'Canadian English +
1. Press the MENU button to display the menu.
Press the A or Y button to select "Setup", then press the ENTER button.
2. Press the .& or V button to select "V-Chip", then press the ENTER button.
The message "Enter PIN" will appear. Enter your 4 digit PIN number.
3. The "V-Chip" screen will appear. Press the A or V button to select
"Canadian English", then press the ENTER button.
4. Press the .& or _' button to select a appropriate restriction.
Press the ENTER button to activate the restriction selected. The " _ " symbol is
indicated.
Press the EXIT button to exit.
Allow all: Press to unlock all TV ratings. /Block all: Press to lock all TV ratings.
• E: Exempt programming *nctudes.-news. sports, aocumen':anes and other *nforma[_o['
programming, talk shows, music videos, and variety programming.
• C: Programming intended for children under age 8.
• C8+: Programming generally consideree acceptable for children 8 ,,ears and over [o wa[cn
on their own.
• G: General programming, suitable for all aL Jiences.
• PG: Parental Guidance
• 14+: Programming con[a*ns [nemes or content which ma, not be suitable for viewers under
the age of 14.
• 18+: Adult programming.
The V-Chip will automatically block any category that is "more restrictive". For example, if you
block "G" category, then "PG", "14+" and "18+" will automatically be blocked also.
English 57
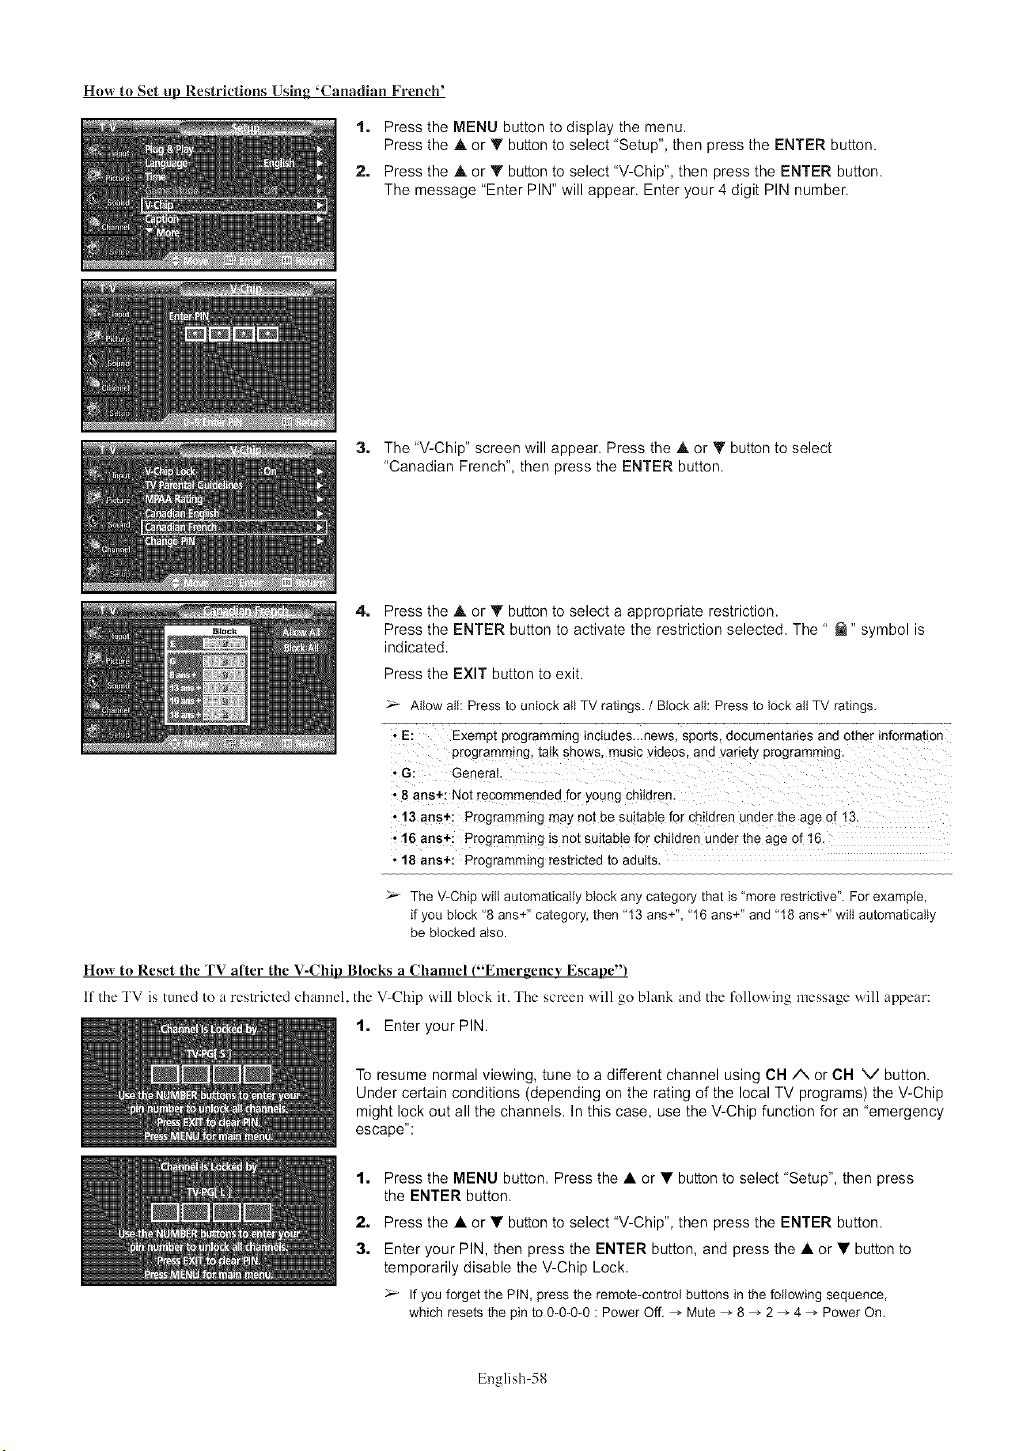
How to Set up Restrictions Using 'Canadian French'
1. Press the MENU button to display the menu.
Press the h, or Y button to select "Setup", then press the ENTER button.
2. Press the • or • button to select "V-Chip", then press the ENTER button.
The message "Enter PIN" will appear. Enter your 4 digit PIN number.
3, The "V-Chip" screen will appear. Press the • or • button to select
"Canadian French", then press the ENTER button.
4, Press the • or • button to select a appropriate restriction.
Press the ENTER button to activate the restriction selected. The " _" symbol is
indicated.
Press the EXIT button to exit.
Allow all: Press to unlockall TV ratings. /Blockall: Press to lock all TV ratings.
" E: Exemptprogramminginctudes._news,sports,documentariesand other information
programmingtalk shows musicvideos and variety programming.
• G: General.
•8 ans+: Not recommendedfor young children.
"! 3 aos÷i Programmingmaynot be su!tabiefor childrenunder the age or 13.
,, 16 ans+: Programming is not suitable for childrenunder the age of 16.
• 18 ans+: Programmingrestrictedto adults.
The V-Chip will automatically block any category that is "more restrictive". For example,
if you block "8 ans+" category, then "13 ans+", "16 ans+" and "18 ans+" will automatically
be blocked also.
Host to Reset tile TV after tile V-Chip Blocks a Channel ("Emergenc_' Escape")
11 the TV is tuned to a restricted channel, tile V-Chip ,.,.'ill block it. The screen will go blank and tile following message will appear:
1. Enter your PIN.
To resume normal viewing, tune to a different channel using CN A or CN V button.
Under certain conditions (depending on the rating of the local TV programs) the V-Chip
might lock out all the channels. In this case, use the V-Chip function for an "emergency
escape":
1, Press the MENU button. Press the • or • button to select "Setup", then press
the ENTER button.
2. Press the • or • button to select "V-Chip", then press the ENTER button.
3. Enter your PIN, then press the ENTER button, and press the • or • button to
temporarily disable the V-Chip Lock.
If youforget the PIN, press the remote-controlbuttonsin the following sequence,
which resets the pinto 0-0-0-0 : PowerOff. _ Mute _ 8 _ 2 _ 4 _ Power On.
English 58
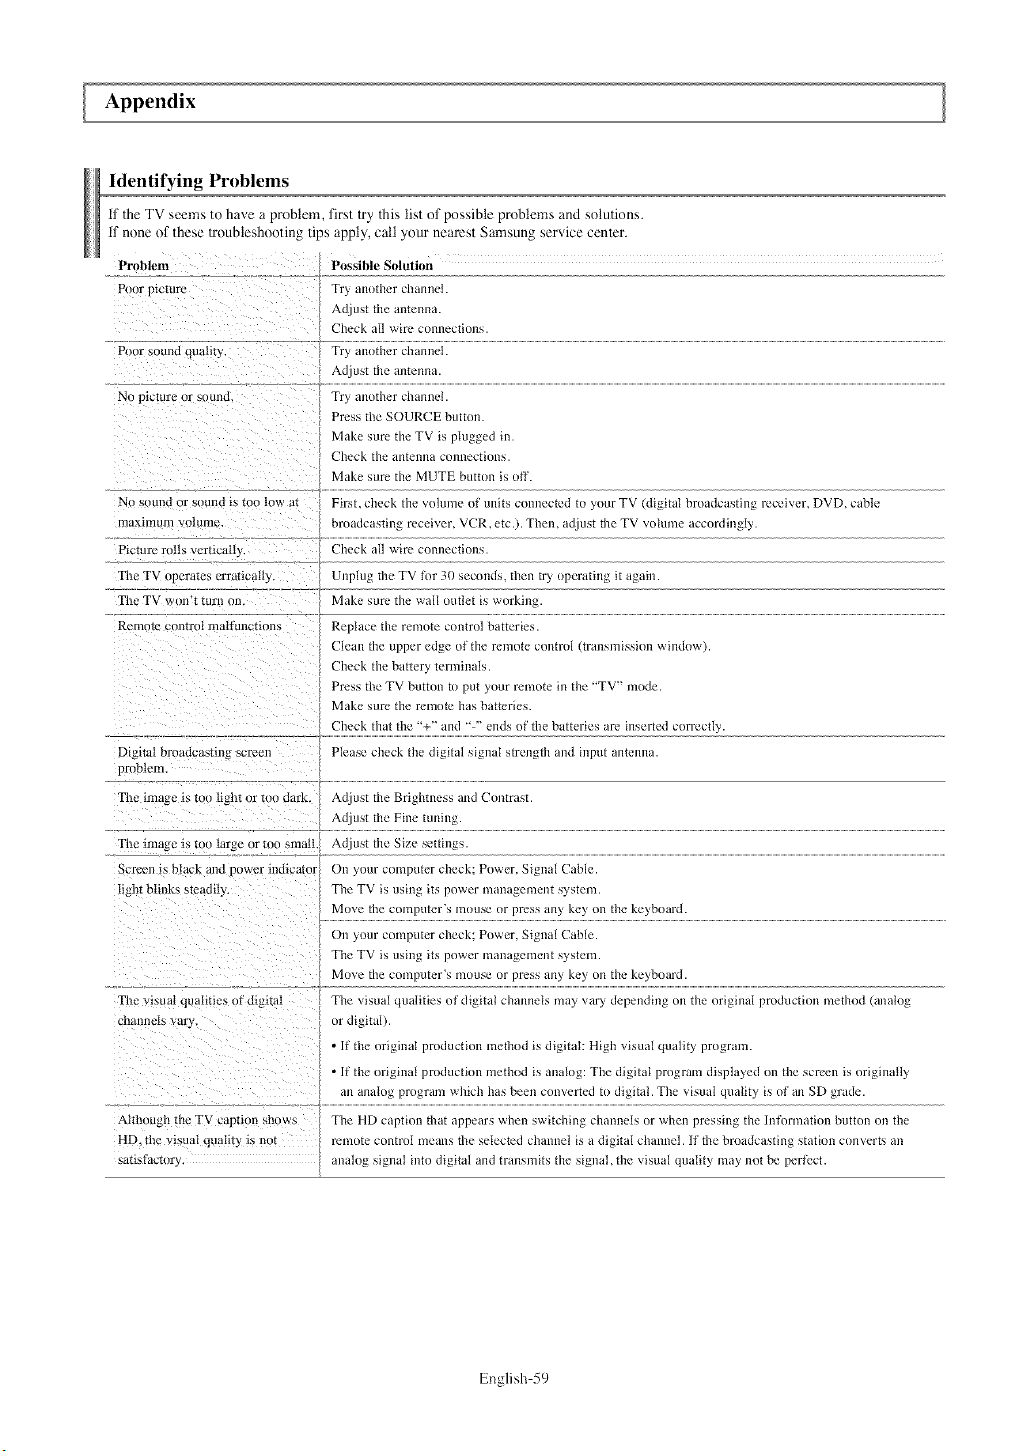
Appendix
Identifying Problems
if the TV seems to have a problem firs1 try this list of possible problems and solutions,
if none of these troubteshooling tips apply, call your nearest Samsung service center,
Problem Possible Solution
Poor ptcrur_ Try another chanlle_.
Adjust the antelma.
Check all `sire COlllleCtiDn'_
Pou* sound quality, Try, another channel.
Adjust the antenna.
No picture or suund. Try another chunnel.
Pre% the SOURCE button
Make sure the TV is plugged in.
Check the ann2nna ctJIlnectiDn_
Make >ure the MUTE button i> uff
No sound or s(Jund is too low at Fir>t check the volume of units connected tu your TV (digital bruadca>ting receiver, DVD, cable
maxunum volmne, broadcasting receiver, VCR, etc.). Then, adjust the TV vohlme accordingl),.
Picture ro|b, vcrticalt) Check all 'sire connection_
Tile TV operatex erratically, Unplug the TV for 30 second_, then try,upcrating it again.
Tile TV won'_ turu on. Make sure the walt uutlet is `sorking.
Remote control malftlllctionb Replace the remote control batteries.
Clean the upper edge of the remote cuntrul (transmission `sinduw).
Check the battery ternainals.
Pres> the TV buttun to put your remote in the "'TV- mode.
Make sure the renaote has batteries
Check that the "%'" and '" '" ends uf the batteries are in_erted correctly.
Please check the digital signal strength and input antenna.Digital broadcasting screen
problem
Tile mlage is tOO light or nJo dark.
The hlla_e is too larue or too small.
Scre_.n ia black and puwer indicator
light btink_, steadily.
The viaual qualities of digital
chanl_c|s vary,
Although the TV caption shows
HD. the visual qua|it} ts not
sa_tsmcmry.
Adjust the Brightness and Contrast.
Adjust the Fine tuning.
Adjust the Size settings.
Dn your computer check; Power, Signal Cable.
The TV is using its power management system.
Move the computer's mouse or press any key on the keyboard.
Dn your computer check; Power, Signal Cable.
The TV is using its power management system.
Move the computer's mouse or press any key on the keyboard.
The visual qualities of digital channels ]nay vary depending on the original production method (analog
or digital).
• If the original production method is digital: High visual quality program.
• If the original production method is analog: The digital program displayed on the scrcx:n is originally
an analog program which has been converted to digital. The visual quality is of an SD grade.
The HD caption that appears when switching channels or when pressing the Infurmation button on the
remote control means the selected channel is a digital channel. If the broadcasting station converts an
analog signal into digital and transmits the signal, the visual quality ]nay not be perlk.ct.
English 59
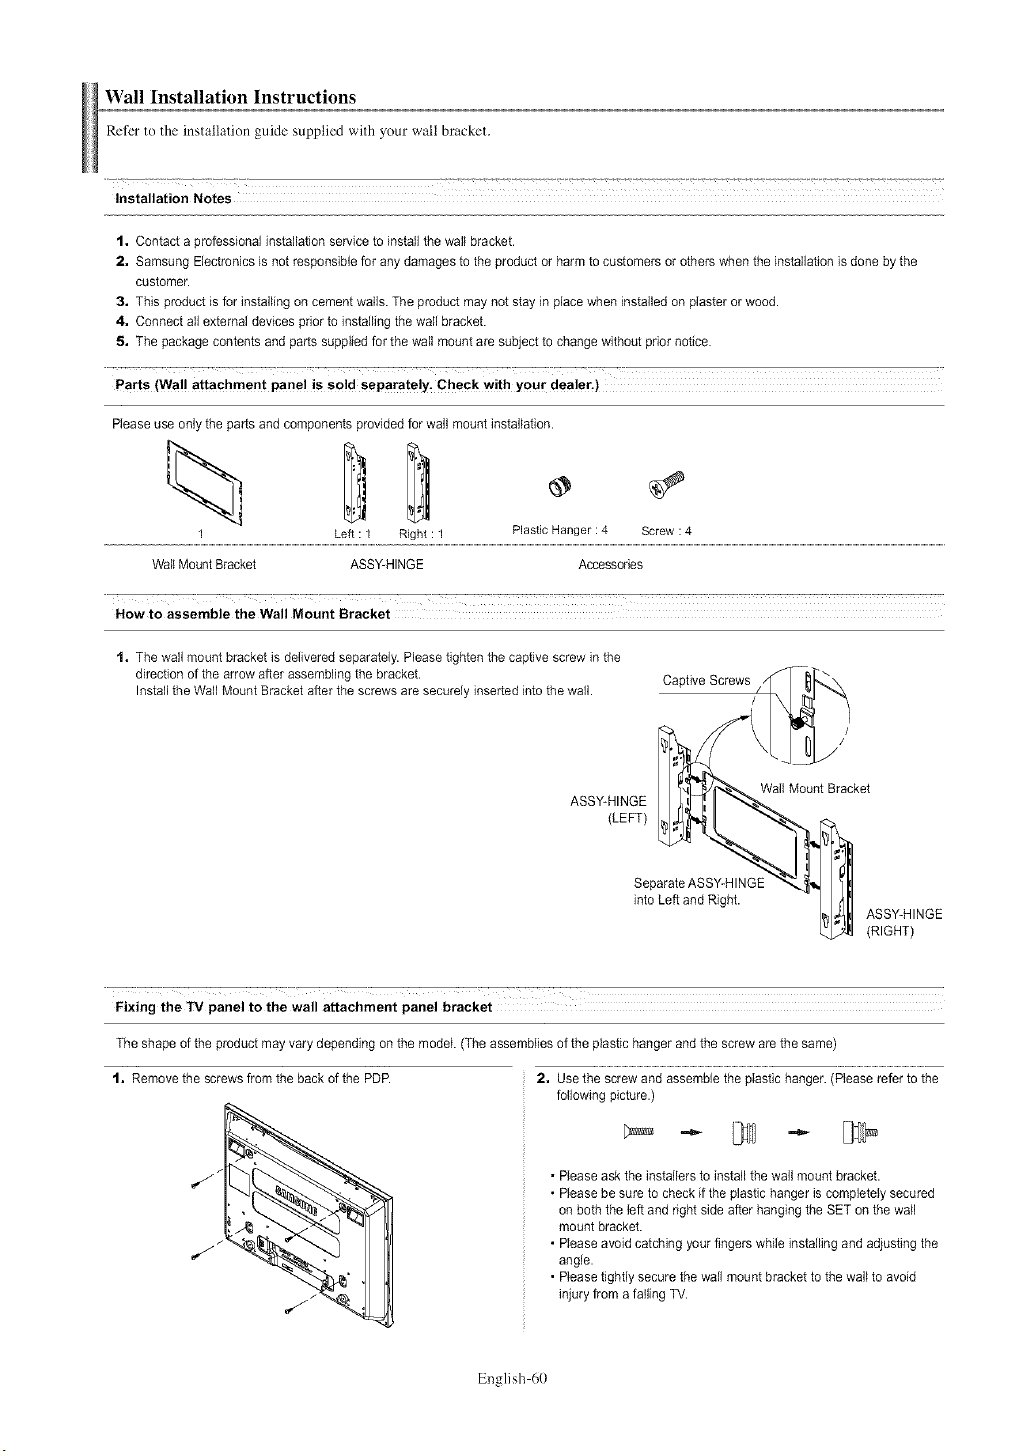
Wall Installation Instructions
Refer to the installation guide supplied with your wall bracket.
Installation Notes
1, Contact a professional installation service to install the wall bracket.
2, Samsung Electronics is not responsible for any damages to the product or harm to customers or others when the installation is done by the
customer.
3, This product is for installing on cement wails. The product may not stay in place when installed on piaster or wood.
4, Connect all external devices prior to installing the wail bracket.
5, The package contents and parts supplied for the wall mount are subject to change without prior notice.
Parts (Wa!! attachment pane! is so!d separate!y_ Check with yQur dealer.)
Please use only the parts and components provided for wail mount installation.
1 Left : I Right : I Plastic Hanger : 4 Screw : 4
Wail Mount Bracket ASSY-HINGE Accessories
Now to assemble the Wall Mount Bracket
1, The wall mount bracket is defivered separately. Please tighten the captive screw in the
direction of the arrow after assembling the bracket, r,a_t_ve Screws
Install the Wall Mount Bracket after the screws are securely inserted into the wall. /
ASSY-HINGE
(LEFT)
Wall Mount Bracket
Separate ASSY-HINGE
into Left and Right.
ASSY-HINGE
(RIGHT)
Fixing the TV panel to the wall attachment panel bracket
The shape of the product may vary depending on the model. (The assemblies of the plastic hanger and the screw are the same)
1, Remove the screws from the back of the PDP. 2, Use the screw and assemble the plastic hanger. (Please refer to the
following picture.)
•Please ask the installers to install the wail mount bracket.
•Please be sure to check if the plastic hanger is completely secured
on both the left and right side after hanging the SET on the wail
mount bracket.
• Please avoid catching your fingers while installing and adjusting the
angle.
• Please tighfiy secure the wall mount bracket to the wail to avoid
injury from a failing TV.
English 60
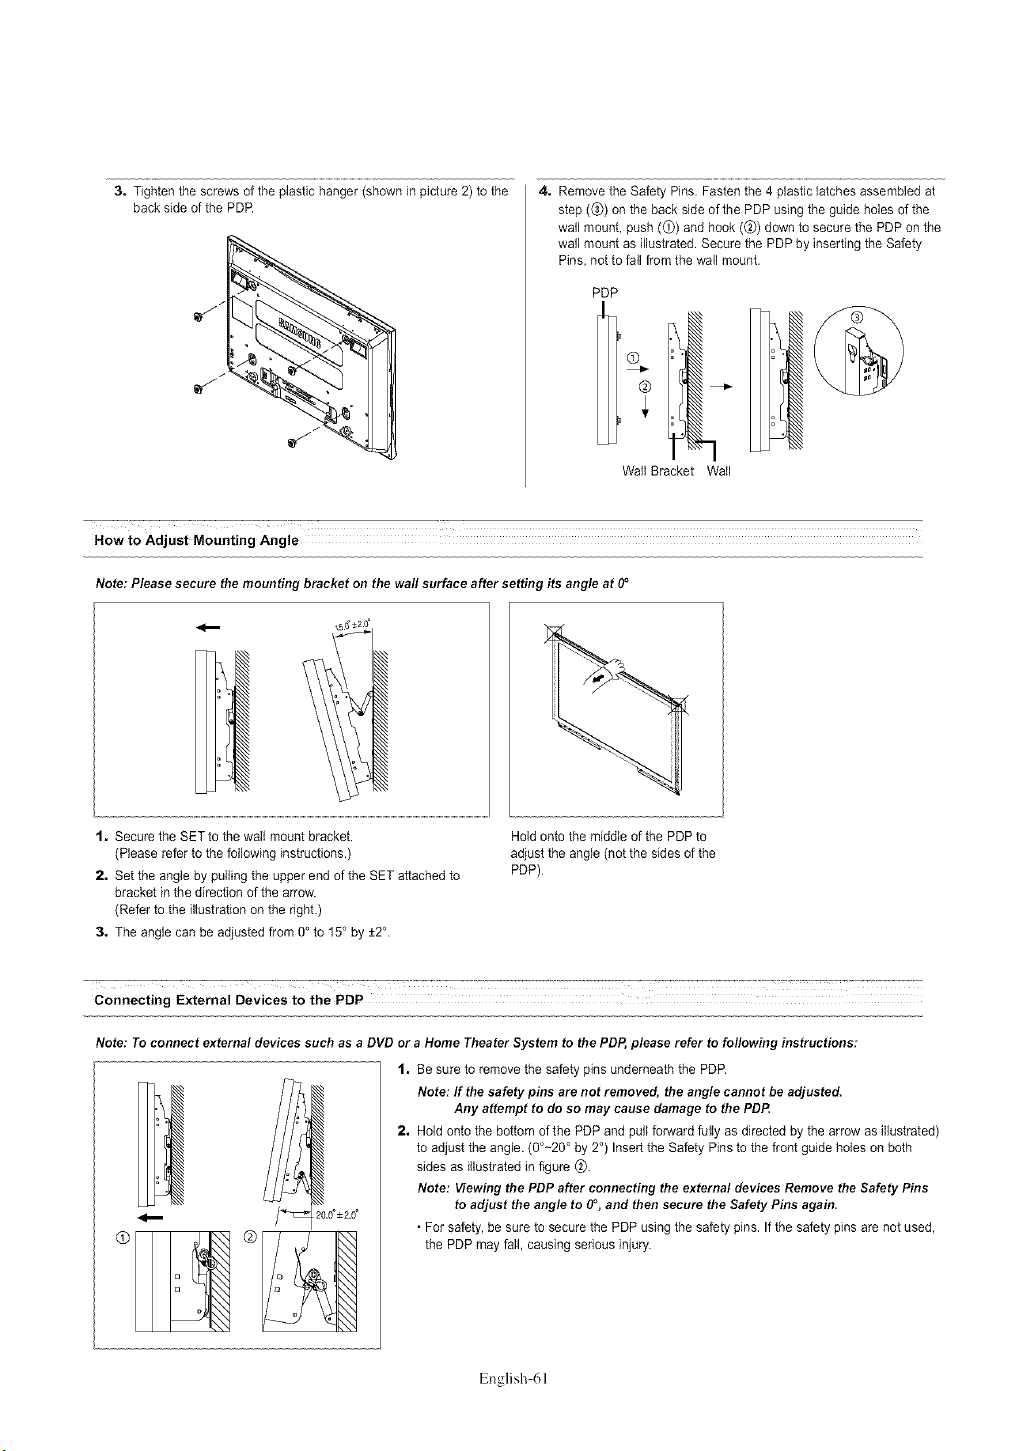
3, Tighten the screws of the plastic hanger (shown in picture 2) to the
back side of the PDR
iI°
4, Remove the Safety Pins. Fasten the 4 plastic latches assembled at
step (_) on the back side of the PDP using the guide holes of the
wall mount, push (_) and hook (@) down to secure the PDP on the
wall mount as illustrated. Secure the PDP by inserting the Safety
Pins, not to fall from the wall mount.
PDP
Wall Bracket Wall
How to Adjust Mounting Angle
Note: Please secure the mounting bracket on the wall surface after setting its angle at 0°
1, Secure the SETto the wall mount bracket.
(Please refer to the following instructions.)
2, Set the angle by pulling the upper end of the SET attached to
bracket in the direction of the arrow.
(Refer to the illustration on the right.)
3, The angle can be adjusted from O° to 15° by +2°.
Hold onto the middle of the PDP to
adjust the angle (not the sides of the
PUP).
.......:- _: _:: _-: _--::-_ :--:--i: __::_': __::T_T7T TTTTTTTTTTTTTTTTTTTTTT_T_-:T : _" _" _ :-
Connecting External Devices to the PDP
Note: To connect external devices such as a DVD or aHome Theater System to the PDP, please refer to following instructions:
1, Be sure to remove the safety pins underneath the PDR
Note: If the safety pins are not removed, the angle cannot be adjusted.
Any attempt to do so may cause damage to the PDP.
2, Hold onto the bottom of the PDP and pull forward fully as directed by the arrow as illustrated
to adjust the angle. (0°-20 ° by 2°) Insert the Safety Pins to the front guide holes on both
sides as illustrated in figure _).
Note: Viewing the PDP after connecting the external devices Remove the Safety Pins
to adjust the angle to 0°, and then secure the Safety Pins again.
• For safety, be sure to secure the PDP using the safety pins. If the safety pins are net used
the PDP may fail, causing serious injury.
English 61
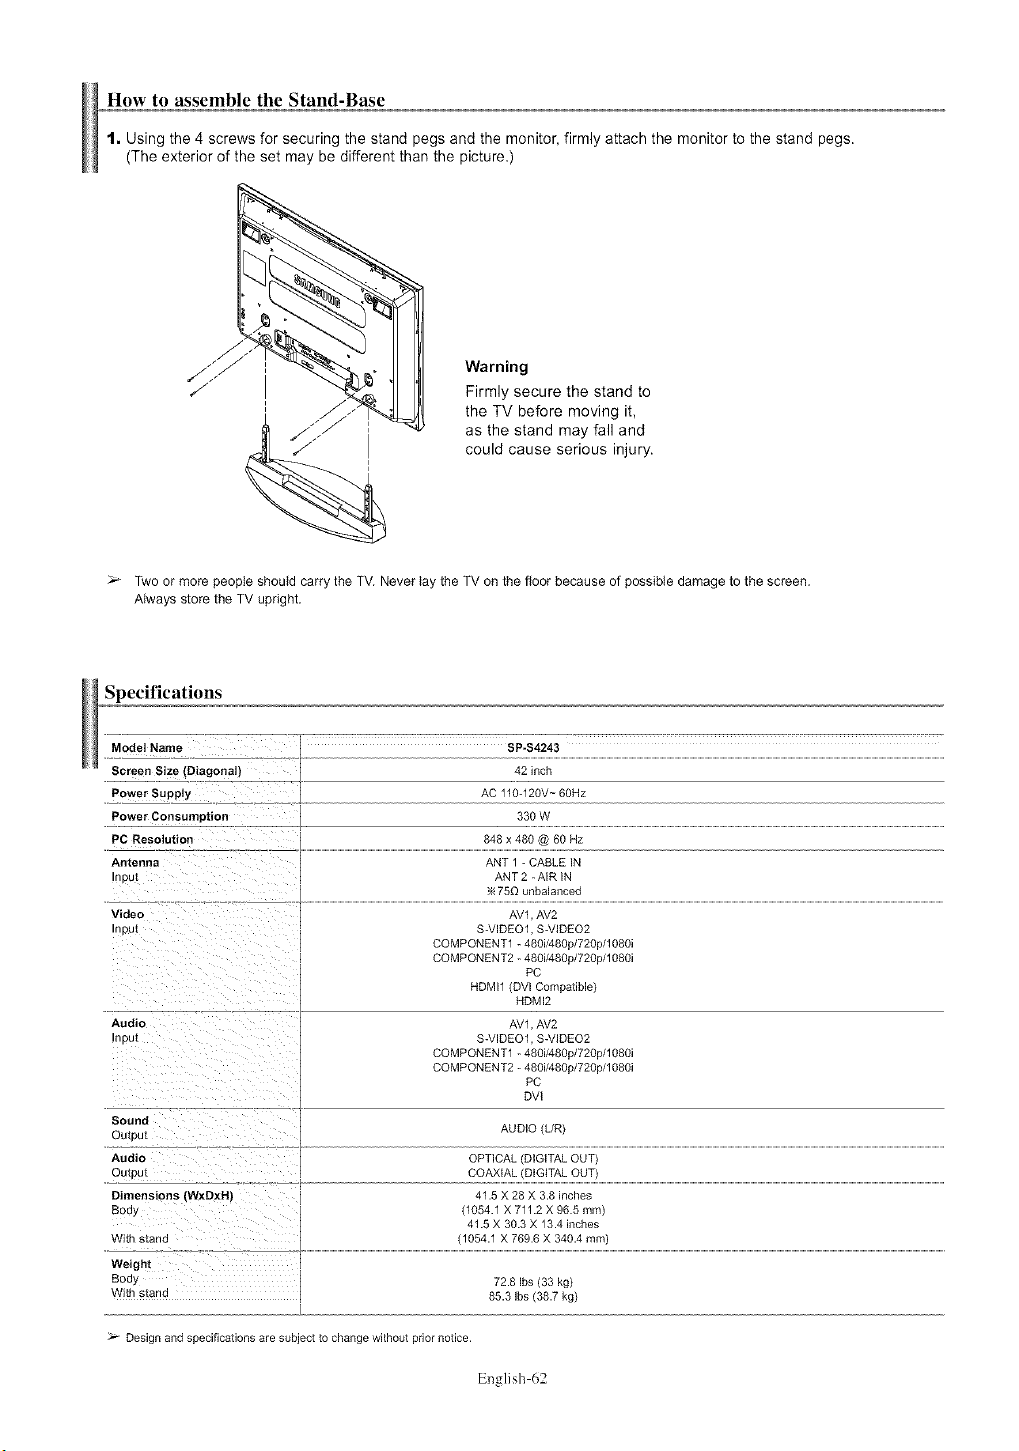
How to assemble the Stand-Base
1, Using the 4 screws for securing the stand pegs and the monitor, firmly attach the monitor to the stand pegs.
(The exterior of the set may be different than the picture
Warning
Firmly secure the stand to
the TV before moving it,
as the stand may fall and
could cause serious injury.
Two or more people should carry the TV, Never lay the TV on the floor because of possible damage to the screen,
Always store the TV upright.
Specifications
Model Name
Screen Size [Diagonal)
Power Suppl_
Power Consumption
PC Resolution
Antenna
nDut
Video
nout
Audio
nDU[
SP-$4243
42 inch
AC 110-120V- 69Hz
339 W
848 x 480 @ 60 Hz
ANT 1 - CABLE IN
ANT 2 - AIR IN
760 unbalanced
AV1, AV2
S-VIDEO1, S-VIDEO2
COMPONENT1 - 480i/480p/720p/1080i
COMPONENT2 - 480i/480p/720p/1080i
PC
HDMI1 (DVI Compatible)
HDMI2
AV1, AV2
S-VIDEO1, S-VIDEO2
COMPONENT1 - 480i/480p/720p/1080i
COMPONENT2 - 480i/480p/720p/1080i
PC
DVt
Sound
OutDu[ AUDIO (L/R)
Audio OPTICAL (DIGITAL OUT)
Oral)u[ COAXIAL (DIGITAL OUT)
Dimensions (WxDxH)
Body
With stand
Weight
Body
With s_sno
41.5 X 28 X 3.8 inches
(1054.1 X 711.2 X 96.5 mm)
41.5 X 30.3 X 13.4 inches
(1954.1 X 769.6 X 349.4 ram)
72.8 Ibs (33 kg)
85.3 Ibs (38.7 kg)
_'_ Design and specifications are subject to change without prior notice.
English 62
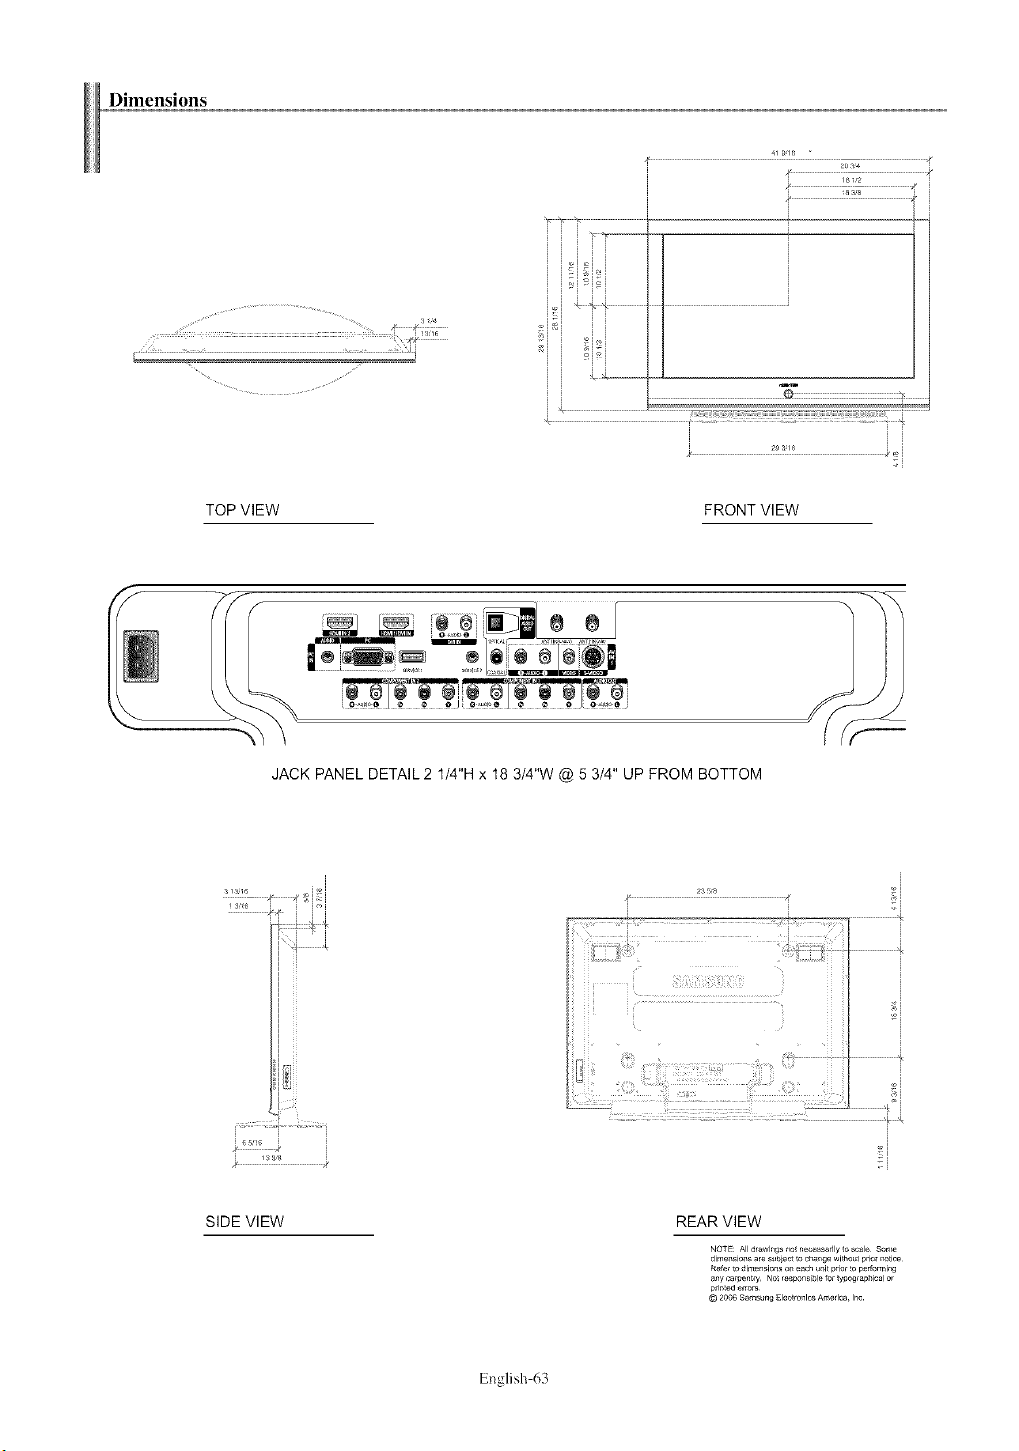
Dimensions
.... :::7
i i i
ii ,oioi i
i i
i
J
_::::::::::::::::::::::::::::::::::::::::::::::::::::::::::::
TOP VIEW
...... i i
i
FRONT VIEW
m
JACK PANEL DETAIL 2 1/4"H x 18 3/4"W @ 5 3/4" UP FROM BOTTOM
"_j ,i
SIDE VIEW REAR VIEW
NOTE: All drawings f_o{necess#Jly to scale Some
dimensions are s_,bie_ to _a_ge wi_hol_prier no_i_
Rely, to _imen_ion_ o_ each _i_ prior _o performing
any camentry Ne_responsible fo_ _ypog,ap_icalor
© 2OO6S_msun_ El_ctrO,11_SAmerica I_c
English 63
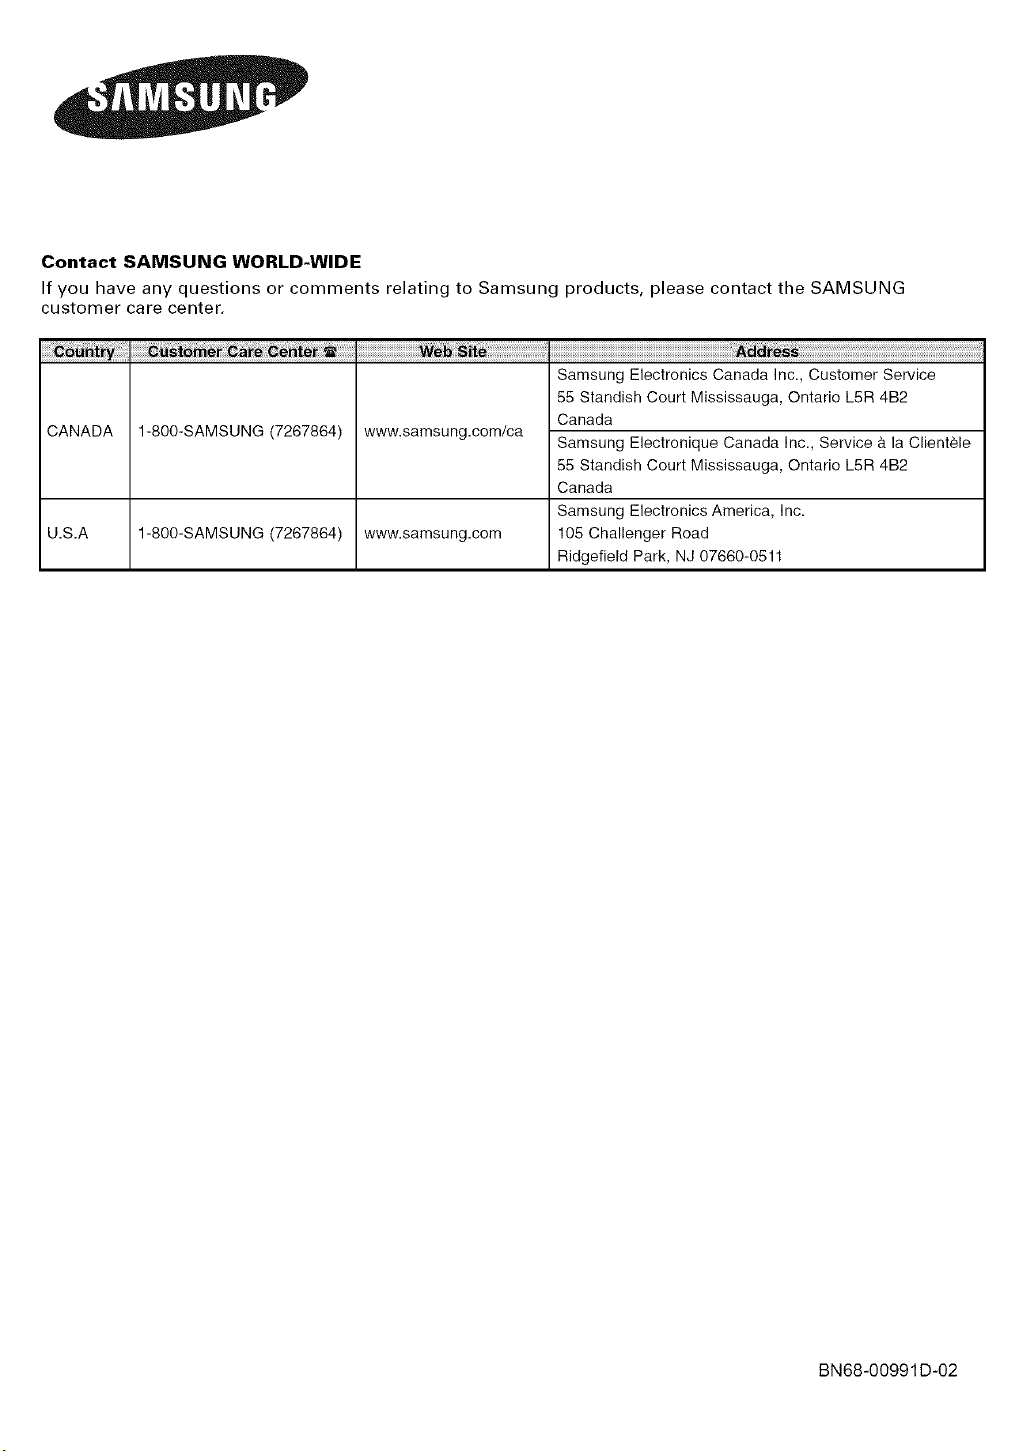
Contact SAMSUNG WORLD-WIDE
If you have any questions or comments relating to Samsung products, please contact the SAMSUNG
customer care center.
CANADA www.samsung.com/ca1-800-SAMSUNG (7267864)
U.S.A 1-800-SAMSUNG (7267864) www.samsung.com
Samsung Electronics Canada Inc., Customer Service
55 Standish Court Mississauga, Ontario L5R 4B2
Canada
Samsung Electronique Canada Inc., Service & la Clientele
55 Standish Court Mississauga, Ontario L5R 4B2
Canada
Samsung Electronics America, Inc.
105 Challenger Road
Ridgefield Park, NJ 07660-0511
BN68-00991D-02