HPoPS031
T
i
Wide screen format PDP Displays (16:9,the aspect ratio of the screen width to height) are primarily
designed to view wide screen format full-motion video. The images displayed on them should primarily be
in the wide screen 16:9 ratio format,or expanded to fill the screen if your model offers this feature and the
images are constantly moving. Displaying stationary graphics and images on screen, such as the dark
side-bars on nonexpanded standard format television video and programming, should be limited to no
more than 5% of the total television viewing per week.
Additionally, viewing other stationary images and text such as stock market reports, video game
displays,station Iogos,web sites or computer graphics and patterns,should be limited as described above
for all televisions_ Displaying stationary images that exceed the above guidelines cart
cause uneven aging of PDP Displays that leave subtle, but permanent burned=in
9hosf in, ages in the PDPpicfureo To avoid this, vary the programming and in_ages_
and primarily display fulls€teen ntoving intages, nof sfafionary pa#erns or dark barrio
Qn PDP models that offer picture sizing features,use these controls to view different formats as a fuji screen
picture.
Be careful in the selection and duration of television formats used for viewing. Uneven PDP aging as a
result of format selection and use,as well as burned-in images, are not covered by your Samsung limited
warranty.
@
Screenimage retentbn
Do riot display a still image (such as on a video game or when hooking up a PC to this PDP) on the plasma
display panel for more than,several minutes as it can cause screen image retentiom This image retention is
also known as screen burn . To avoid such image retention, refer to page 44 of this manual to reduce the
degree of brightness and contrast of this screen when displaying a still image.
@
©
@
CeJJJ)eJe_t
The plasma display panel consists of fine cells. Although the panels are produced with more than 99.9
percent active cells, there may be some cells that do not produce light or remain lit.
Altitude
The PDPwiJJnot operate normally at altitudes above 6500 ft.
Warrau|y
Warranty does not cover any damage caused by image retention.
Burndn is not covered by the warranty.

GeneralInformation
Your New Plasma Display Panel ...................... 6
Remote Control Buttons .................................. 8
WaN Installation Instructions .......................... 10
Connecting Speakers .................................. 14
How to assemble the Stand-Base .................. 16
Connections
Connecting VHF and UHF Antennas .............. 18
Connecting Cable TV .................................. 19
Connecting a VCR ...................................... 21
Connecting a Camcorder ............................ 22
Connecting a DVD Player ............................ 23
Connecting a DTV Receiver .......................... 24
Operation
Turning the PDPOn and Off ........................ 26
Plug & Play Feature ...................................... 28
Memorizing the Channels ............................ 31
Setting Up Your Remote Control .................... 36
Viewing an External Signal Source .............. 38
PictureControl
Customizing the Picture .............................. 42
Using Automatic Picture Settings .................. 43
Selecting the Color Tone .............................. 44
DNle (Digital Natural Image engine) ............ 45
Changing the Screen Size .......................... 46
Freezing the Picture ................................... 48
Viewing the Picture-in-Picture ....................... 49
Selectinga SignalSource(Antennaor CaBle)forPIP ..... 54
Setting the MCC(My Control Color) Mode ..... 56
SoundControl
Customizing the Sound ................................ 62
Using Automatic Sound Settings ................... 63
Choosinga Multi-ChannelSound(MTS)Soundtrack...... 64
Using the Auto Volume ................................ 65
Setting the TruSurround XT............................ 66
Listening to the Sound of the Sub(PIP) Picture ..67
Selecting the Internal Mute ............................ 68
ChannelControl
Fine Tuning Channels .................................. 70
LNA (Low Noise Amplifier) .......................... 71
Connectinga PCandOperation
Connecting a PC ........................................ 74
Adjusting the PC Screen .............................. 78
Changing the Position of the Image ................ 79
Picture Quality Adjustment .......................... 80
Information ................................................ 83
11meSetting
Setting the Clock ........................................ 86
Setting the Sleep Timer ................................ 87
Setting the Timers ........................................ 88
FunctionDescription
Selecting a Menu Language ........................ 92
Digital Noise Reduction .............................. 93
Selecting the Film Mode .............................. 94
Using the Color Weakness EnhancementOption ..95
Setting the Melody Sound ............................ 96
Setting the Blue Screen ................................ 97
Viewing Closed Captions ............................ 98
Using the V-Chip .......................................... 99
Appendix
Troubleshooting ........................................ 106
Care and Maintenance .............................. 107
Specifications ............................................ 108

YourNewPlasmaDisplayPanel......................................................6
RemoteControlButtons..................................................................8
WallInstallationInstructions..........................................................10
ConnectingSpeakers....................................................................14
HowtoassembletheStand-Base....................................................16
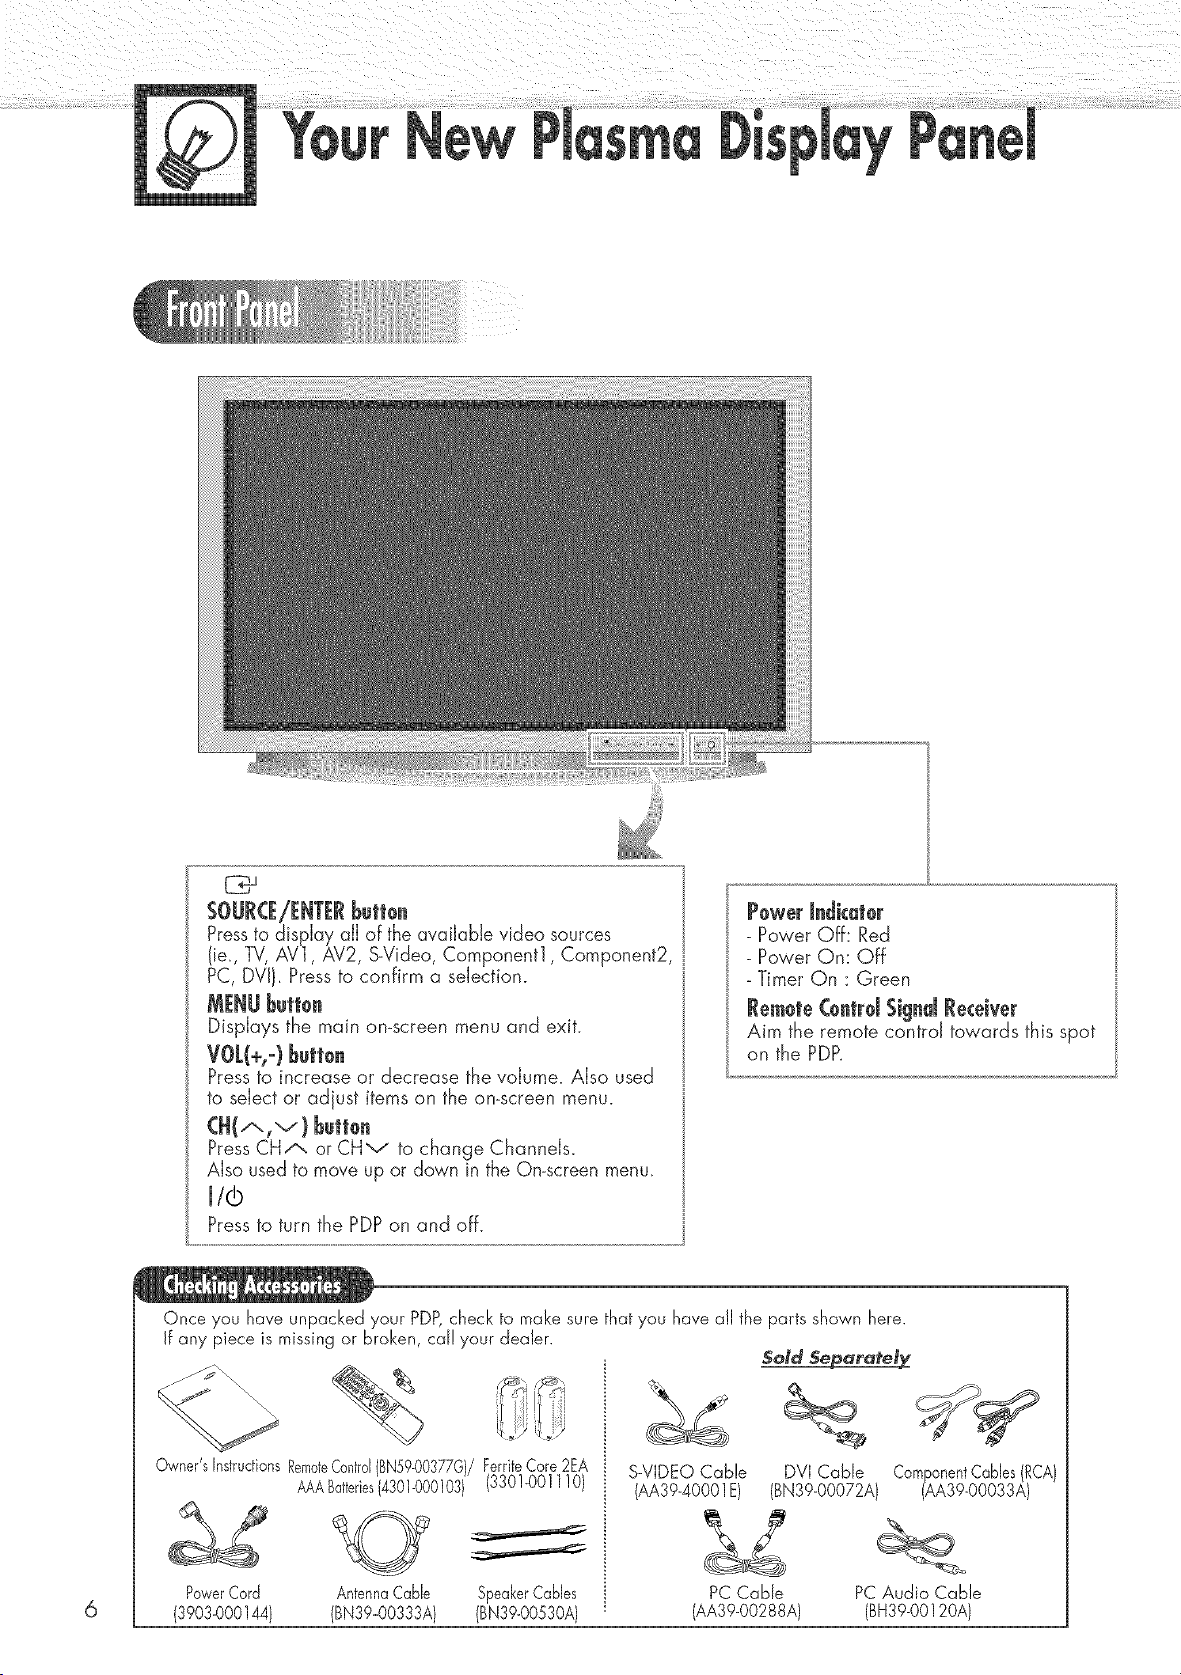
SOURCE/EHTERbutton
Pressto display all of the available video sources
(ie., TV,AV1, AV2, SoVideo,Component1, Component2,
PC, DVI/. Press to confirm a selection.
Displays the main on-screen menu and exit.
Pressto increase or decrease the volume. Also used
to select or adjust items on the on-screen menu.
CH(,'xlv) Button
PressCH/x. or CHv to change ChanneJs_
Also used to move up or down in the On-screen menu.
i/l@
Pressto turn the PDPon and off.
Powerindicator
- Power Off: Red
- Power On: Off
- Timer On : Green
Re_ote (ontrd Signal Receiver
Aim the remote control towards this spot
on the PDP.
Once you have unpacked your PDP,check to make sure that you have all the parts shown here.
If any piece is missing or broken, cal! your dealer.
Owner'sInstructionsRemoteControl{BN59-0037;G)/FerriteCore2EA
AAABatteries14301-000103)(330!-0011!0)
PowerCord AntennaCable SpeakerCables
(3903-000144) (BN39_00333A) (BN39-00530A)
S-VIDEO Cable
(AA39-40001E)
PC Cable
(AA39-00288A)
5old Separately
DVICable
(BN39-00072A)
ComponentCablesRCA
(AA39-00033A
PC Audio Cable
(BH39-00120A)

@ IVJ J_PUT({)VJ-{)/ L-AU{)JO-R)
Connect to the digitaJ video and audio
output jack of a device with DVI output.
@ _AONJ1FOROIT (VJiEO/ L-AUJ)JO-RJ
Outputs for externaJ devices.
@P__NPI_(RGiJN/ AU{)IO)
Connect to the video and audio output
jack on your PC.
@ FOR SERVICEONk¥
Connector for service onJy.
_S-VJD_O
(S-VI)EO/ k-AUDIO-R}
Video and audio inputs for externaJ
devices with an S-Video output, such as
a camcorder or VCR.
@AV], AV2
(VIDEO/ L-AUDJO-R}
Video and audio inputs for externaJ
devices, such as a camcorder or VCR.
COMPONENT], CO_PONENT_
Video (Y/Pb/Pr) and audio (L-AUDIO-R)
inputs for Component.
@ANT INVHF/UIF(7S_)
75_ Coaxia) connector For
AntennaiCabJe Network.
@ I_XI"SPI_AJ(I_R(B_)
Connectors ForexternaJ rear speakers.
@ POWER Jt_
Connect the suppled power cord.
7
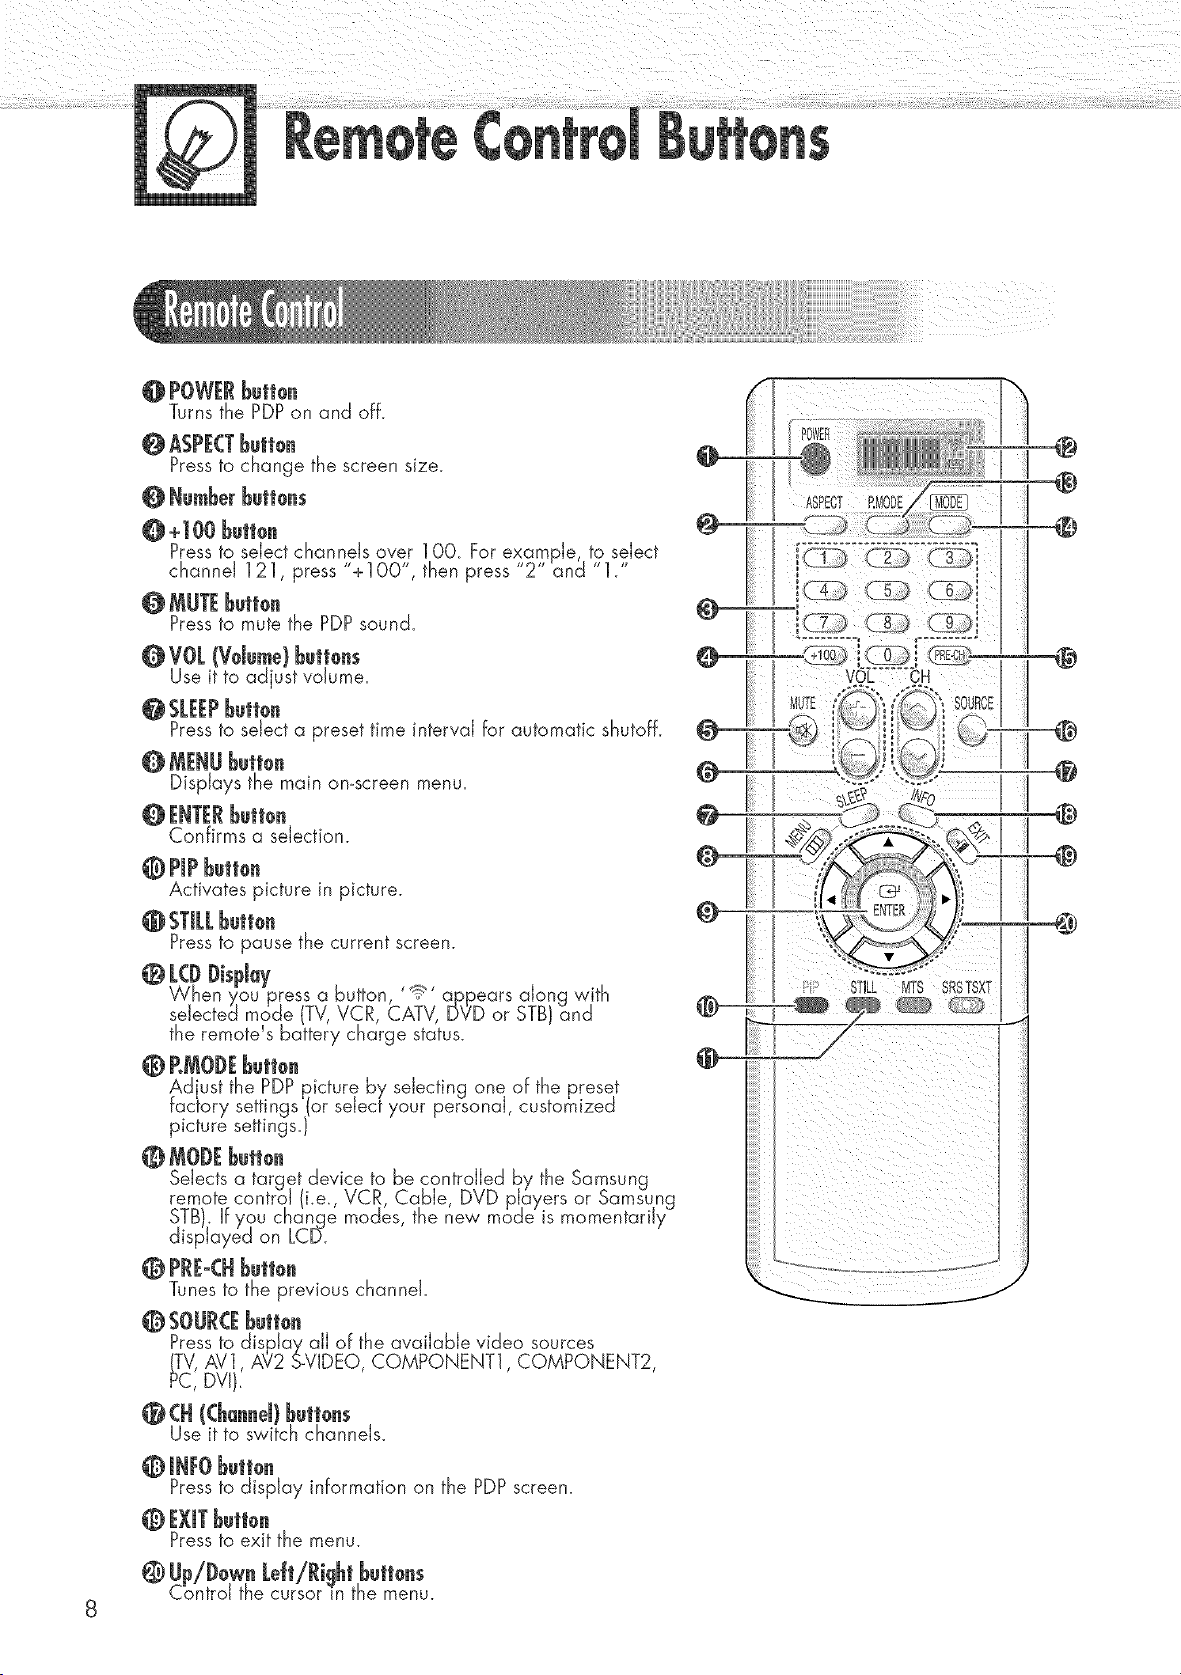
@ POWERBelie.
Turns the PDPon and off.
@ ASPECTBull0.
Pressto change the screen size.
@ Numberbutl0.s
O +100 butl0n
Pressto select channels aver 1OO. For example, to select
channel 121, press "+1OO", then press 2 and 1.
Pressto mute the PDP sound.
0 VO[ (Vdu_e) bull0.s
Use it to adjust volume.
Pressto select a preset time interval for automatic shutoff.
@ MENUbutt0.
Displays the main omscreen menu.
0 ENTERbetion
Confirms a selection.
0 Propbutten
Activates picture in picture.
Pressta pause the current screen.
O [(D l)ispJa7
When you press a button '!_ apEears along with
selected mode (TV,VCR, CATV, DVD or STB)and
the remote s battery charge status.
@ RMOI)Ebutte.
Ad ust the PDPpicture by selecting one of the preset
factory settings (or select your personal, customized
picture settings.}
@ IVIOI)Ebutte.
Selects a target device to be controlled by the Samsung
remote control (i.e., VCR, Cable, DVD players or Samsung
STB). If you change modes, the new mode is momentarily
displayed on LC[5.
@ PRE-CHbuiton
Tunes to the previous channel.
@ SOURCEbuli0n
Pressto display all of the available video sources
(TV,AV], A?2 S-VIDEO, COMPONENT1,COMPONENT2,
PC, DVI),
@ (H ((ha..eJ)l_utt0.s
Use it to switch channels.
0 JlIFOl_utt0.
Pressto display information on the PDPscreen.
0 EXiTl_ult0n
Pressto exit the menu.
@ Up/Dow. LeJt/Ri!lhtbutt0.s
Control the cursor in the menu.
ASRECT _MODE
I I ®
ril®
@
@
_@
@
@
@
@
P' STILL MTS SRSTSXT
i i iii i i
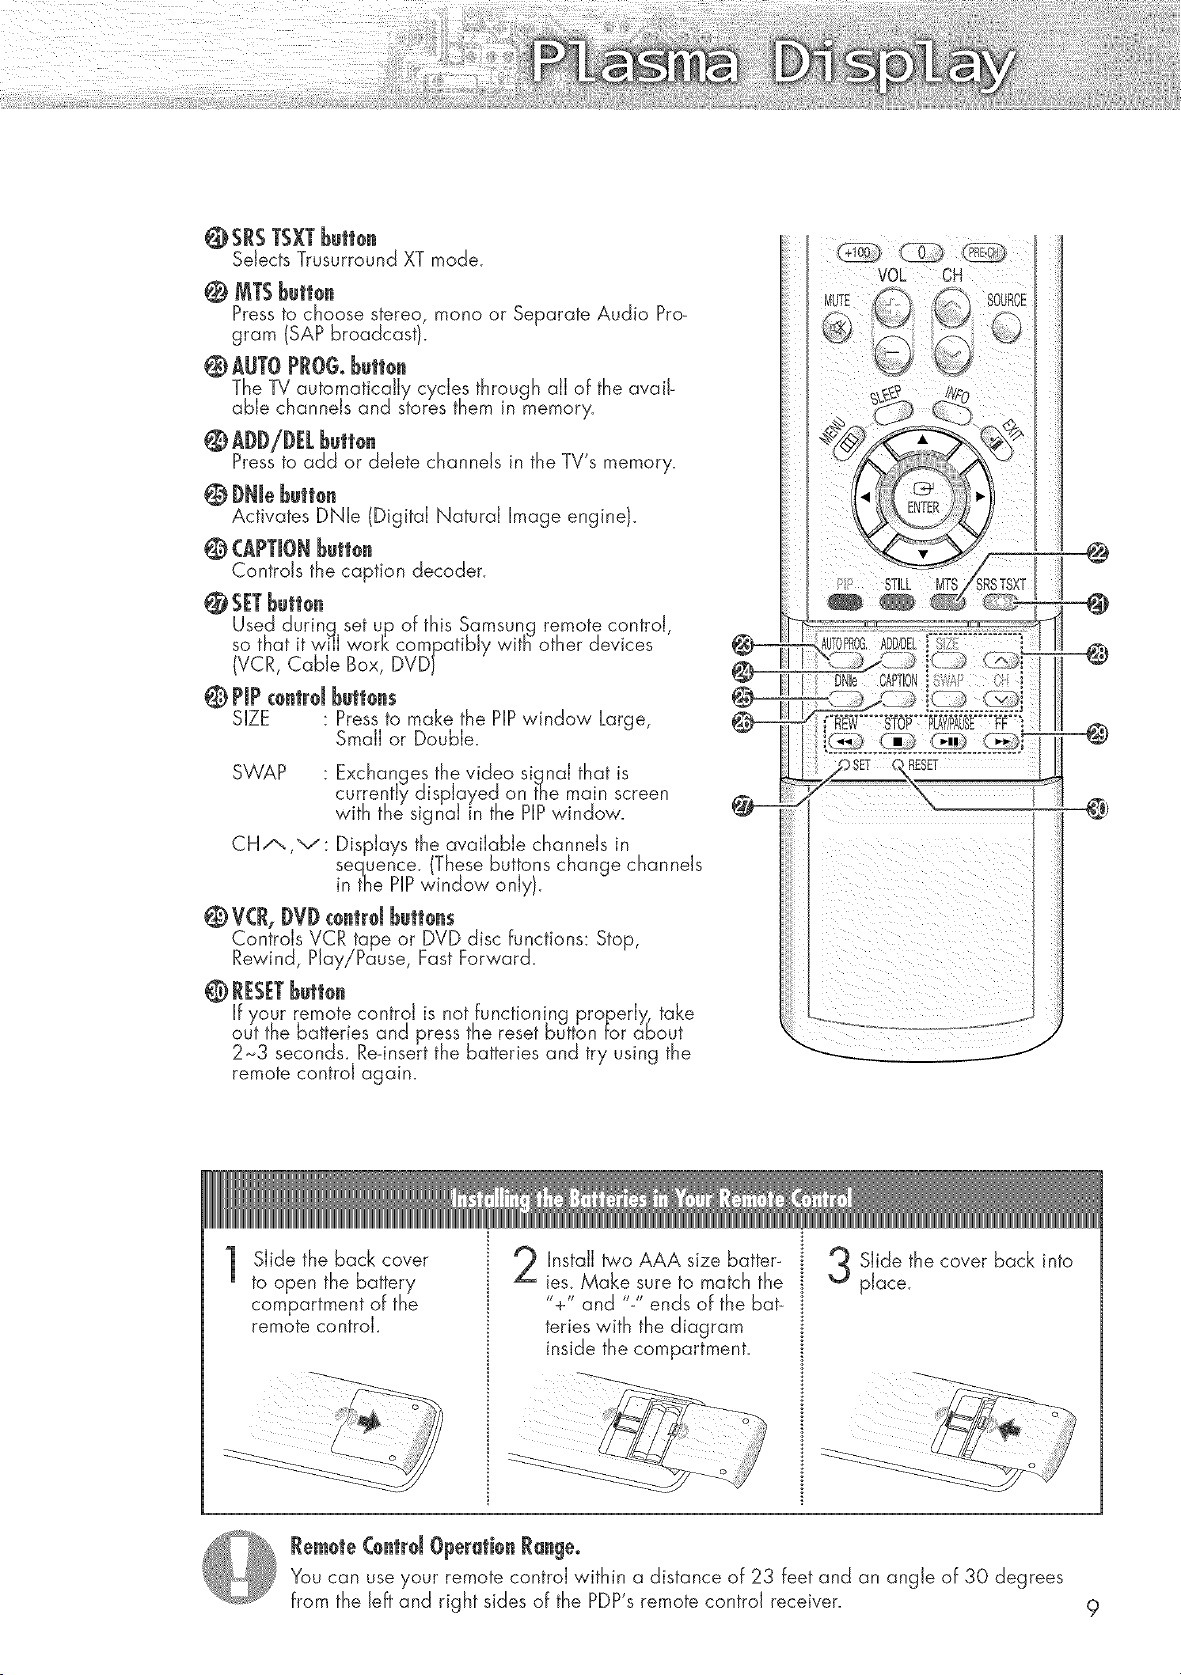
@SRSTSXTbutto.
Selects Trusurround XT mode.
@ MTSbutton
Pressto choose stereo, mono or Separate Audio Pro-
gram (SAP broadcast}.
@ AUTOPRGGobutton
The TV automatically cy.des through all of the avail-
able channels and stores them in memory.
Pressto add or delete channels in the TV's memory.
@ DNJebutt0.
Activates DNle (Digital Natural Image engine}.
@ CAPTIONButton
Controls the caption decoder.
@ SETbutt0.
Used durinq set up of this Samsung remote control,
so that it wi'lJ work compatibly witB other devices
(VCR, Cable Box, DVD}
@ PIPc0ntrd but|0ns
SIZE : Pressto make the PIPwindow Large,
Small or Double.
SWAP : Exchanges the video signal that is
currently displayed on the main screen
with the signal in the PIPwindow.
CH-"-.,v: Displays the available channels in
sequence. These buttons change channels
inthe PIPwindow only.
@ V(R, DVD€0.trd butt0.s
Controls VCR tape or DVD disc functions: Stop,
Rewind, Play/Pause, Fast Forward.
@ RESETButt0n
If your remote control is not functioning properly., take
out the batteries and press the reset button for about
2_3 seconds. Re-insert the batteries and try using the
remote control again.
@
@
RESET
@
1
Slide the back cover
to open the battery
compartment of the
remote controk
Install two AAA size batter-
ies. Make sure to match the
"+" and "-" ends of the bat-
teries with the diagram
inside the compartment.
Slide the cover back into
place.
Rem0te Contrd Operati0n Range.
You can use your remote control within a distance of 23 feet and an angle of 30 degrees
from the Jeffand right sides of the PDP's remote control receiver. 9
This waJJ mount bracket installation guide is for the following modeJs:HP-P5031
Do not install the PDP on any location other than a vertical wail.
To protect the performance of the PDPand prevent problems, avoid the following locations:
o Do not install next to smoke and fire detectors_
', Do not install in an area subjected to vibration or high voltage.
', Do not install near or around any heating apparatus.
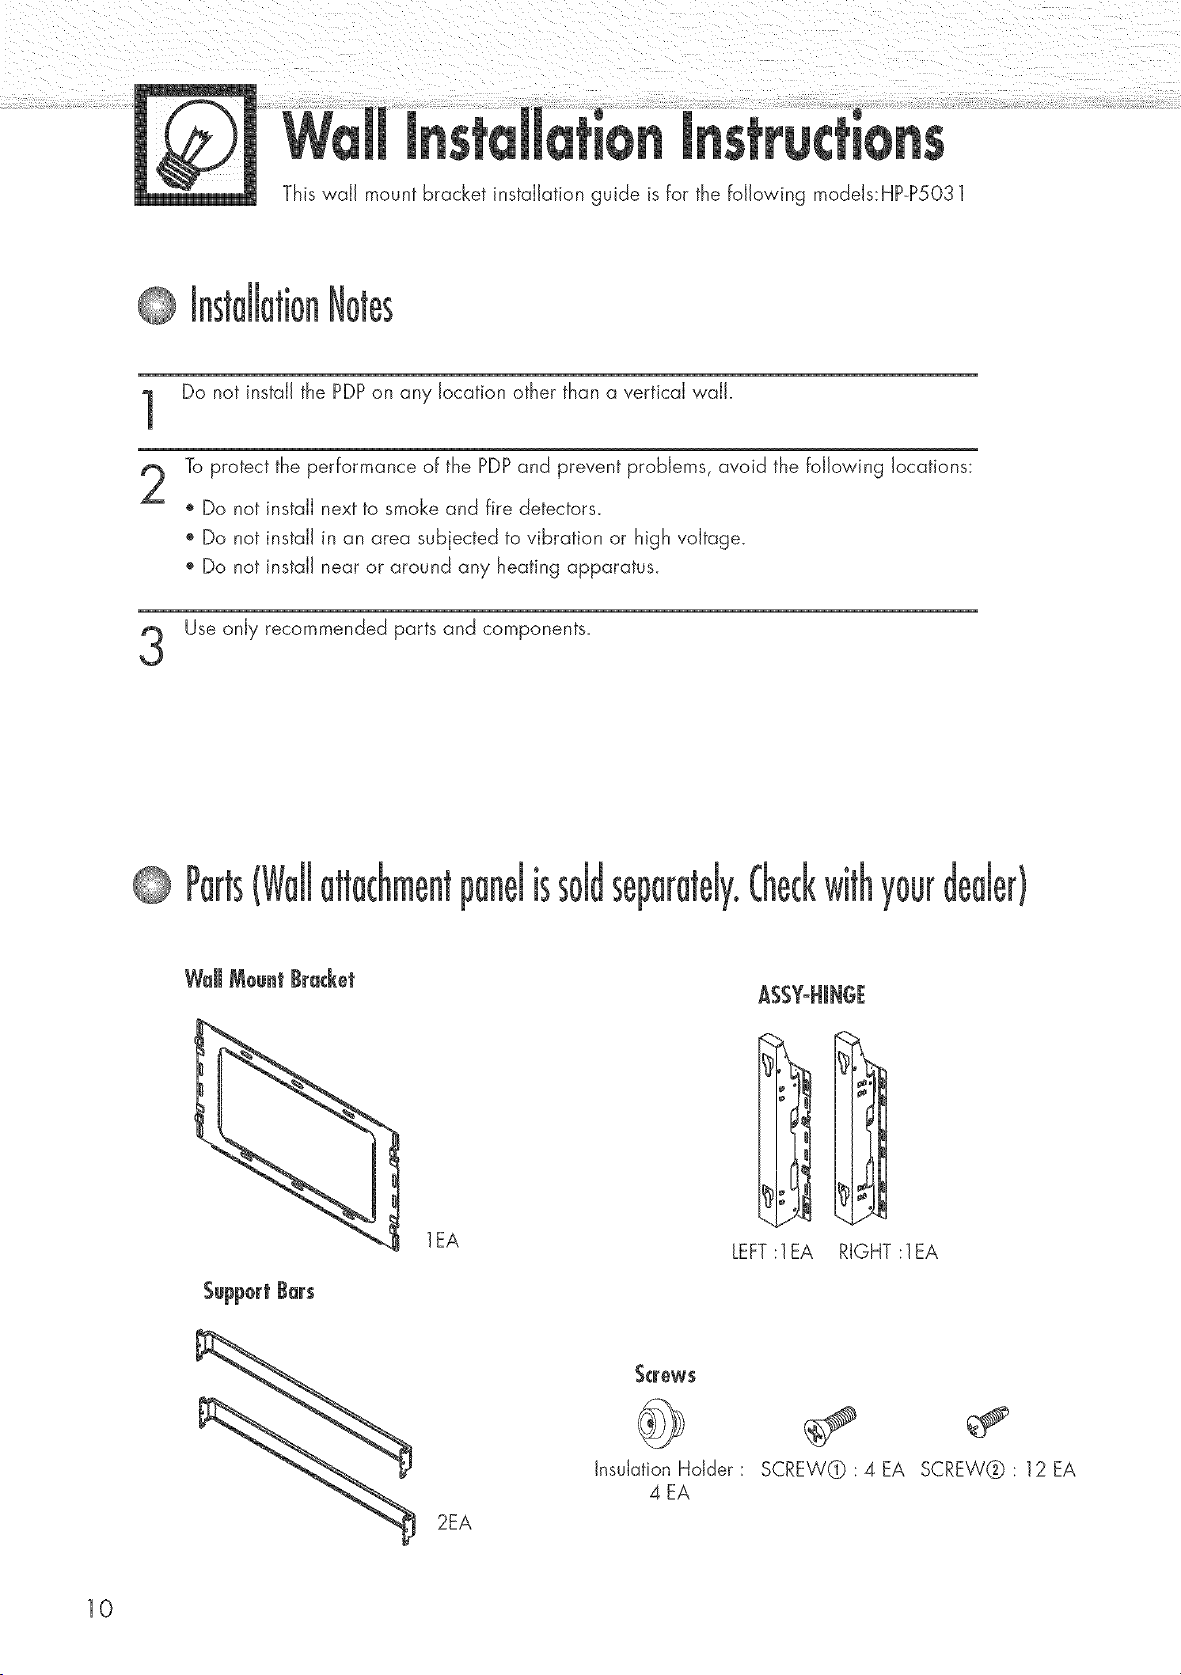
Use only recommended parts and components.
se[ y0uF
lEA
2EA
ASSY-HJNGE
LEFT:lEA RIGHT :lEA
_crew$
Insulation Hdder :
4 EA
SCREW@ :4EA SCREW@: 12EA
10
to sse
!nt
1
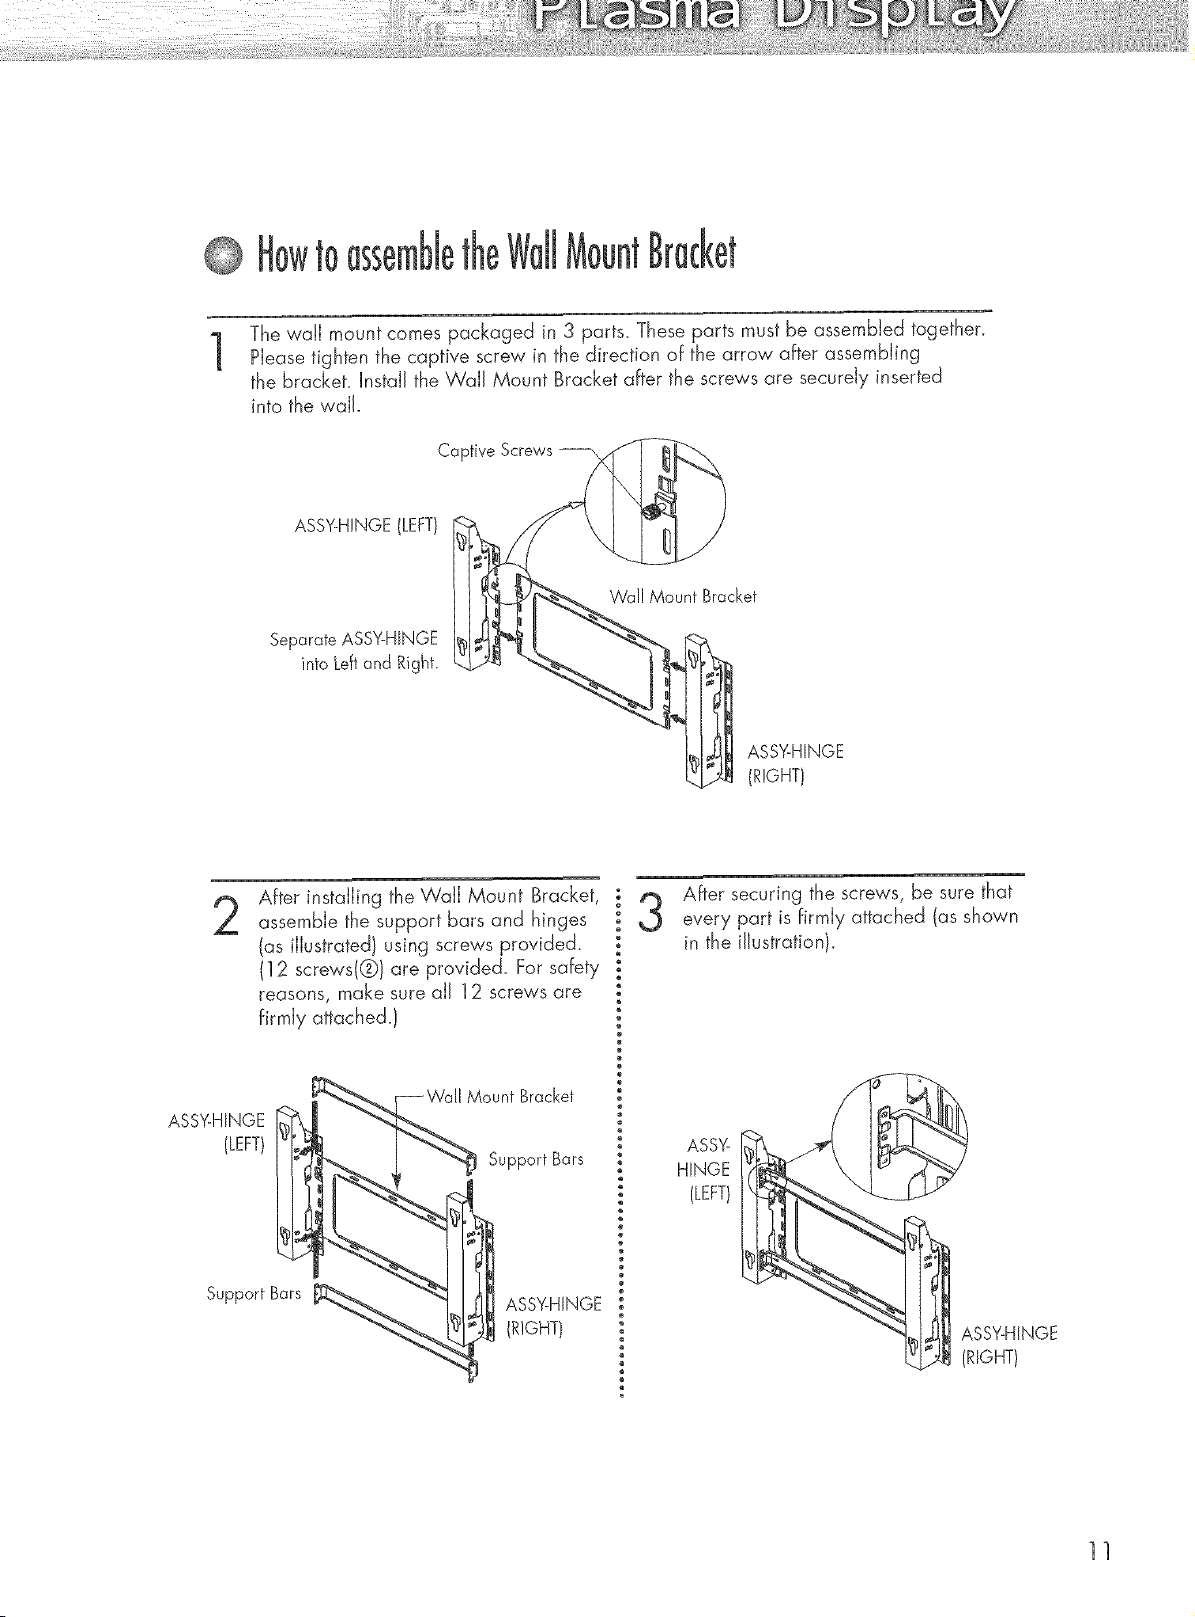
The wail mount comes packaged in 3 parts. These parts must be assembled together.
Please tighten the captive screw in the direction of the arrow after assembling
the bracket. Install the WaJl Mount Bracket after the screws are securely inserted
into the v,,aJJ.
Captive Screws
ASSY-HINGE (LEFT)
Separate ASSY-HINGE
into Leftand Right.
Wall Mount Bracket
ASS%HINGE
(RIGHT)
After installing the Wail Mount Bracket,
assemble the support bars and hinges
(as illustrated) using screws provided.
(12 screws(@)are provided. For safety
reasons, make sure all 12 screws are
firmly attached.)
ASSY-HINGE
(LEFT)
Mount Bracket
Support Bars
Support Bars
After securing the screws, be sure that
every part is firmly attached (as shown
in the illustration).
ASS%
HINGE
(LEFT)
ASSY-HINGE
(RIGHT)
11
1
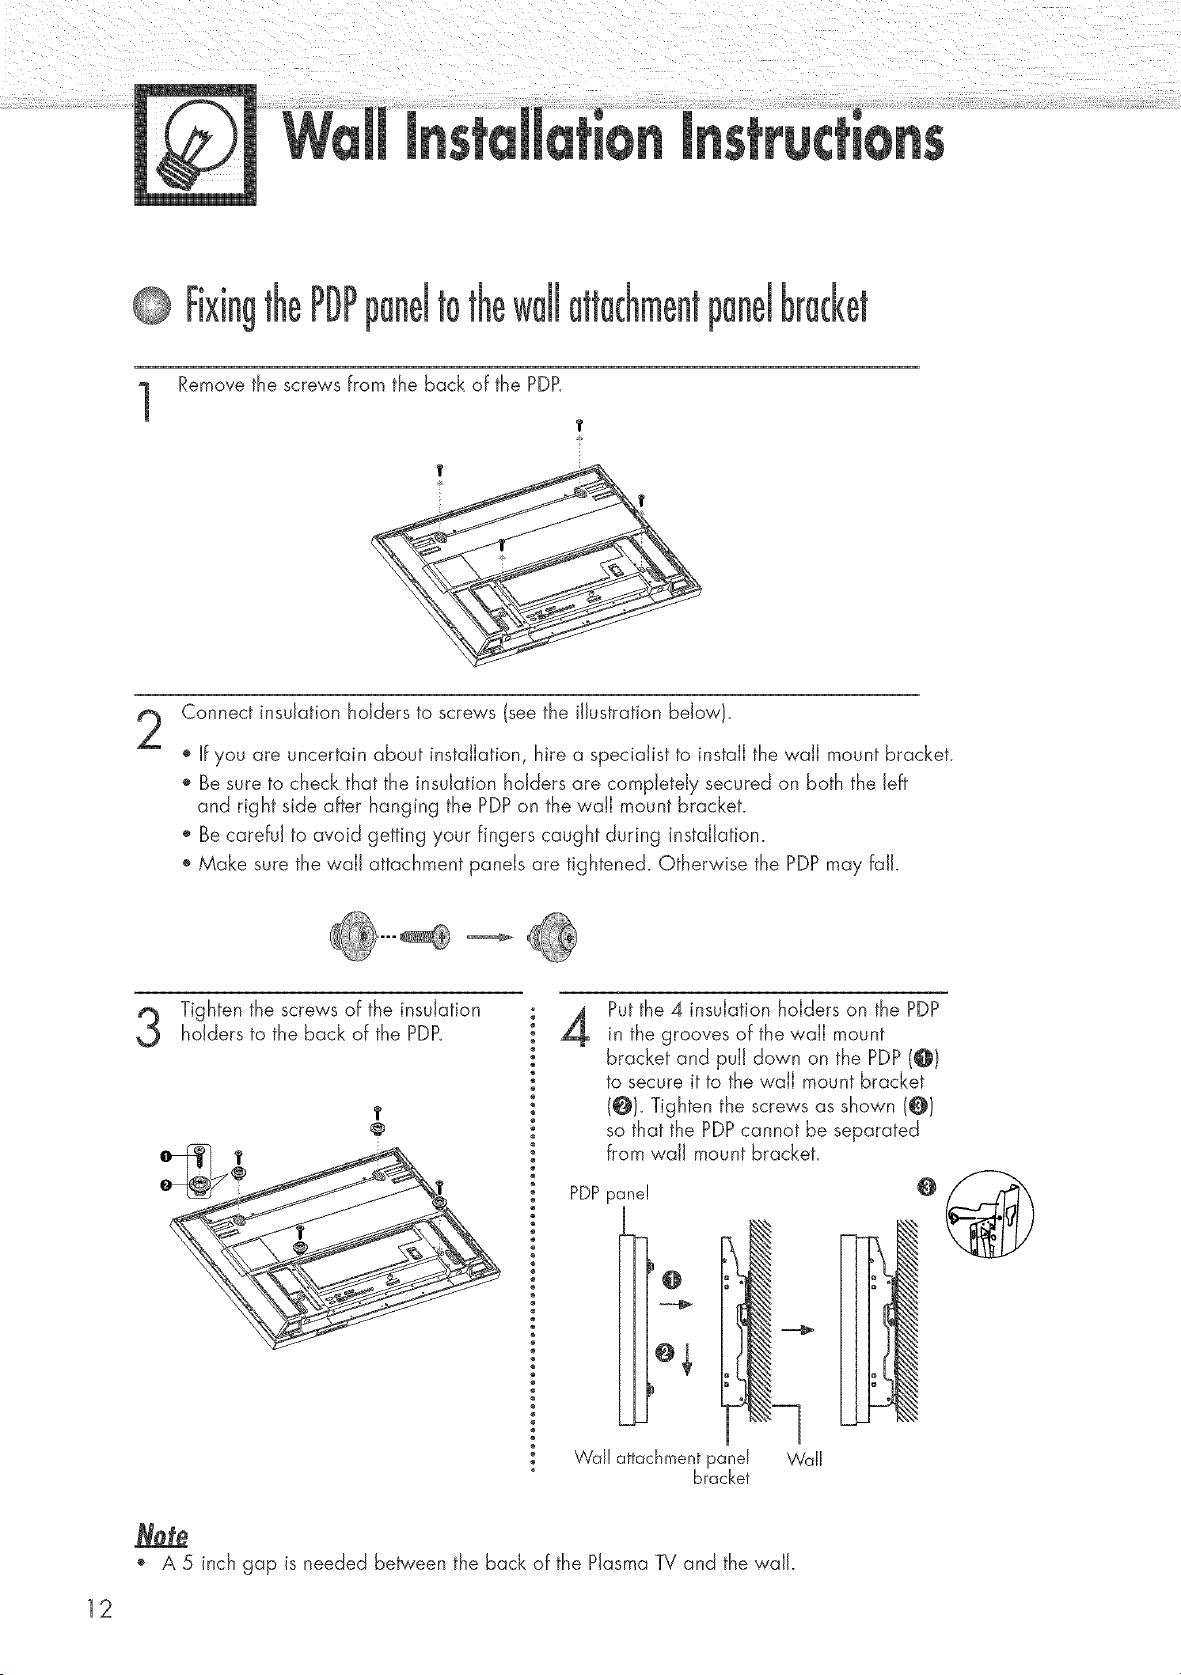
Remove the screws from the back of the PDP.
T
Connect insulation holders to screws (see the illustration below).
If you are uncertain about installation, hire a specialist to install the wall mount bracket.
Be sure to check that the insulation holders are completely secured on both the left
and right side after hanging the PDPon the wall mount bracket.
Be careful to avoid getting your fingers caught during installation.
Make sure the wall attachment panels are tightened. Otherwise the PDP may fall.
Tighten the screws of the insulationholders to the back of the PDP.
T
4
Put the 4 insulation holders on the PDP
in the grooves of the wail mount
bracket and pull down on the PDP (@t
to secure it to the wail mount bracket
(@}. Tighten the screw's as shown (@)
so that the PDPcannot be separated
from wall mount bracket.
PDPpanel
o,
.J
Wal! attachmentpanel W'all
bracket
o@
o A 5 inch gap is needed be_'een the back of the Plasma TV and the wall.
12
toAdjust 9
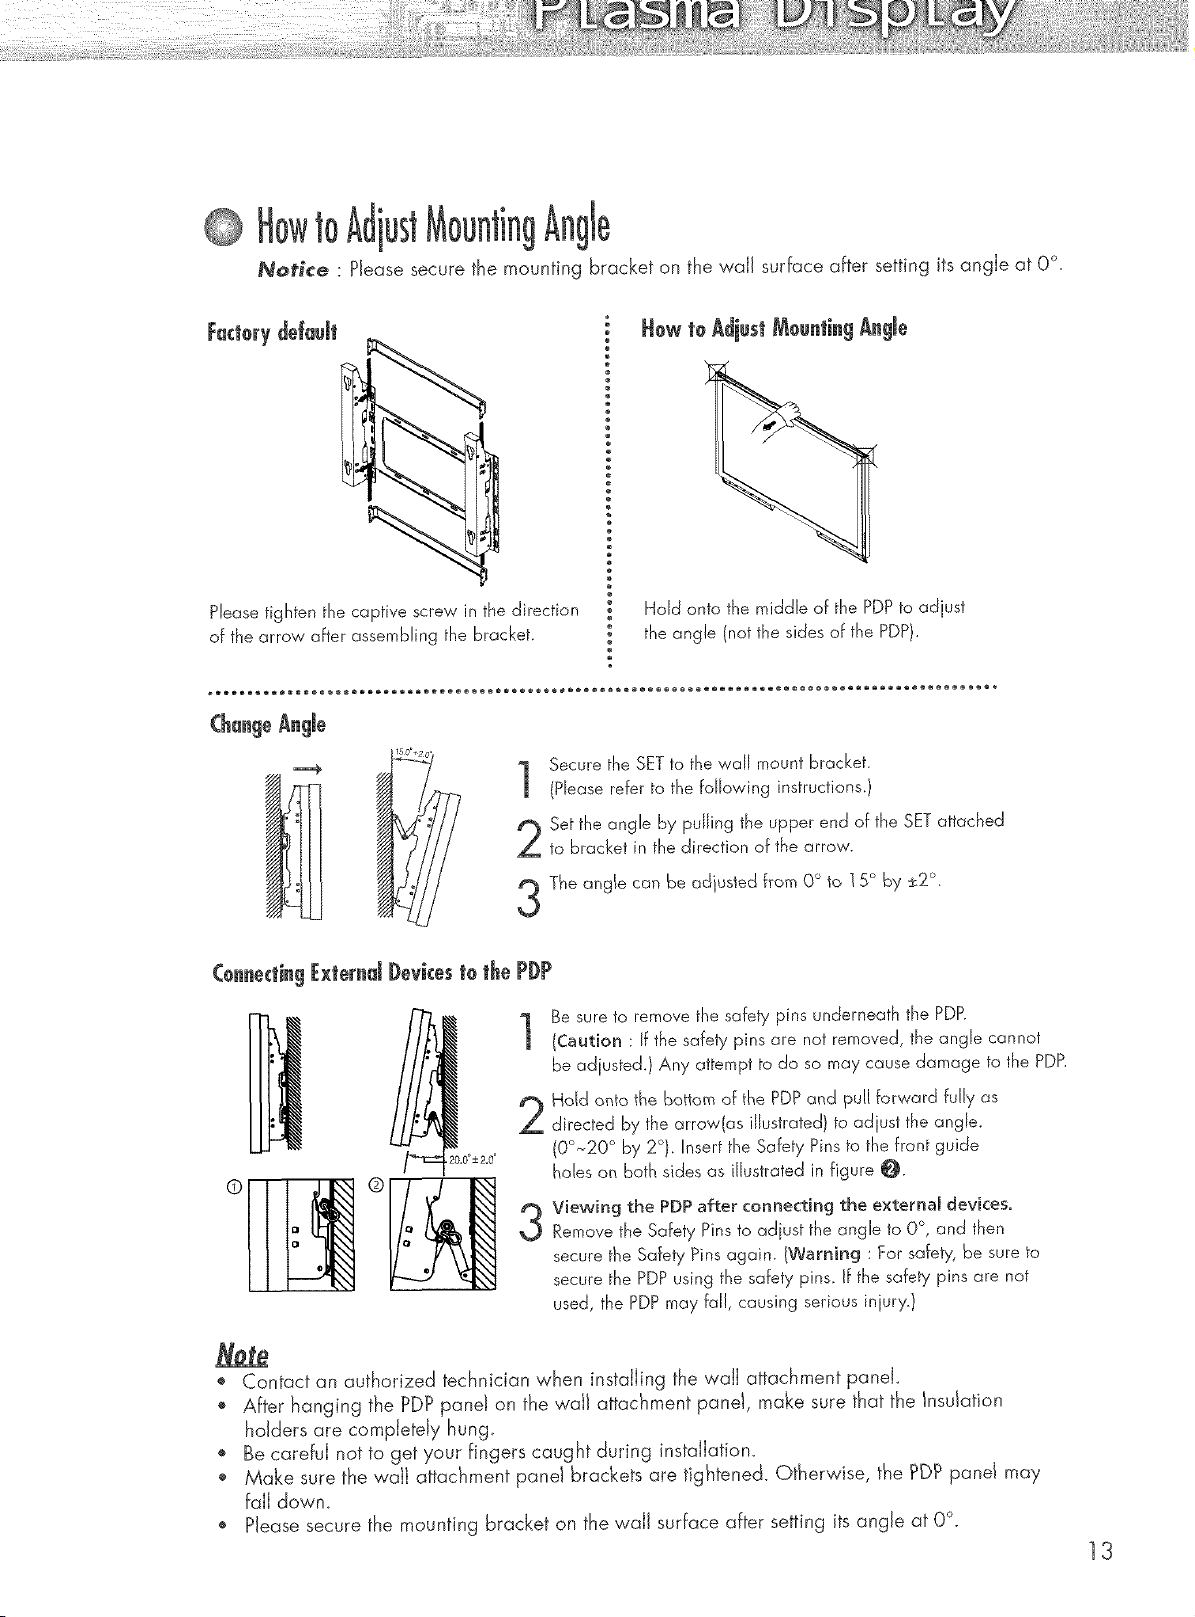
,Notice : Please secure the mounting bracket on the wail surface after setting its angle at 0 °.
FactorydeJa@
Please tighten the captive screw in the direction
of the arrow after assembling the bracket.
Hold onto the middle of the PDP to adjust
the angle (not the sides of the PDP).
(h ge
1
Secure the SET to the wall mount bracket.
(Please refer to the following instructions.)
Set the angle by pulling the upper end of the SET attached
to bracket in the direction of the arrow.
,_, ®
The angle can be adjusted from O° to ] 5° by _2 .
C@_e_ti_gJbctemd J)e_iceste the PJ)P
Be sure to remove the safety pins underneath the PDP.
(Caution : If the safety pins are not removed, the angle cannot
be adjusted. ) Any attempt to do so may cause damage to the PDP.
Hdd onto the bottom of the PDP and pull forward fully as
directed by the arrow(as illustrated) to adjust the angle.
(00~20 ° by 2°). Insert the Safety Pins to the front guide
holes on both sides as illustrated in figure O.
3
Viewing the PDP after connecting the external devices.
Remove the Safety Pins to adjust the angle to O°, and then
secure the Safety Pins again. (Warning : For safety, be sure to
secure the PDP using the safety pins. if the safety pins are not
used, the PDP may fal!, causing serious injury.)
o Contact an authorized technician when installing the wall attachment panel.
o After hanging the PDP panel on the waJJattachment paneI, make sure that the Insulation
holders are completely hung
', Be careful not to get your fingers caught during installation.
,, Make sure the waJJattachment panel brackets are tightened. Otherwise, the _DP panel may
fail down.
o Please secure the mounting bracket on the wall surface after setting its angle at 0°.
13
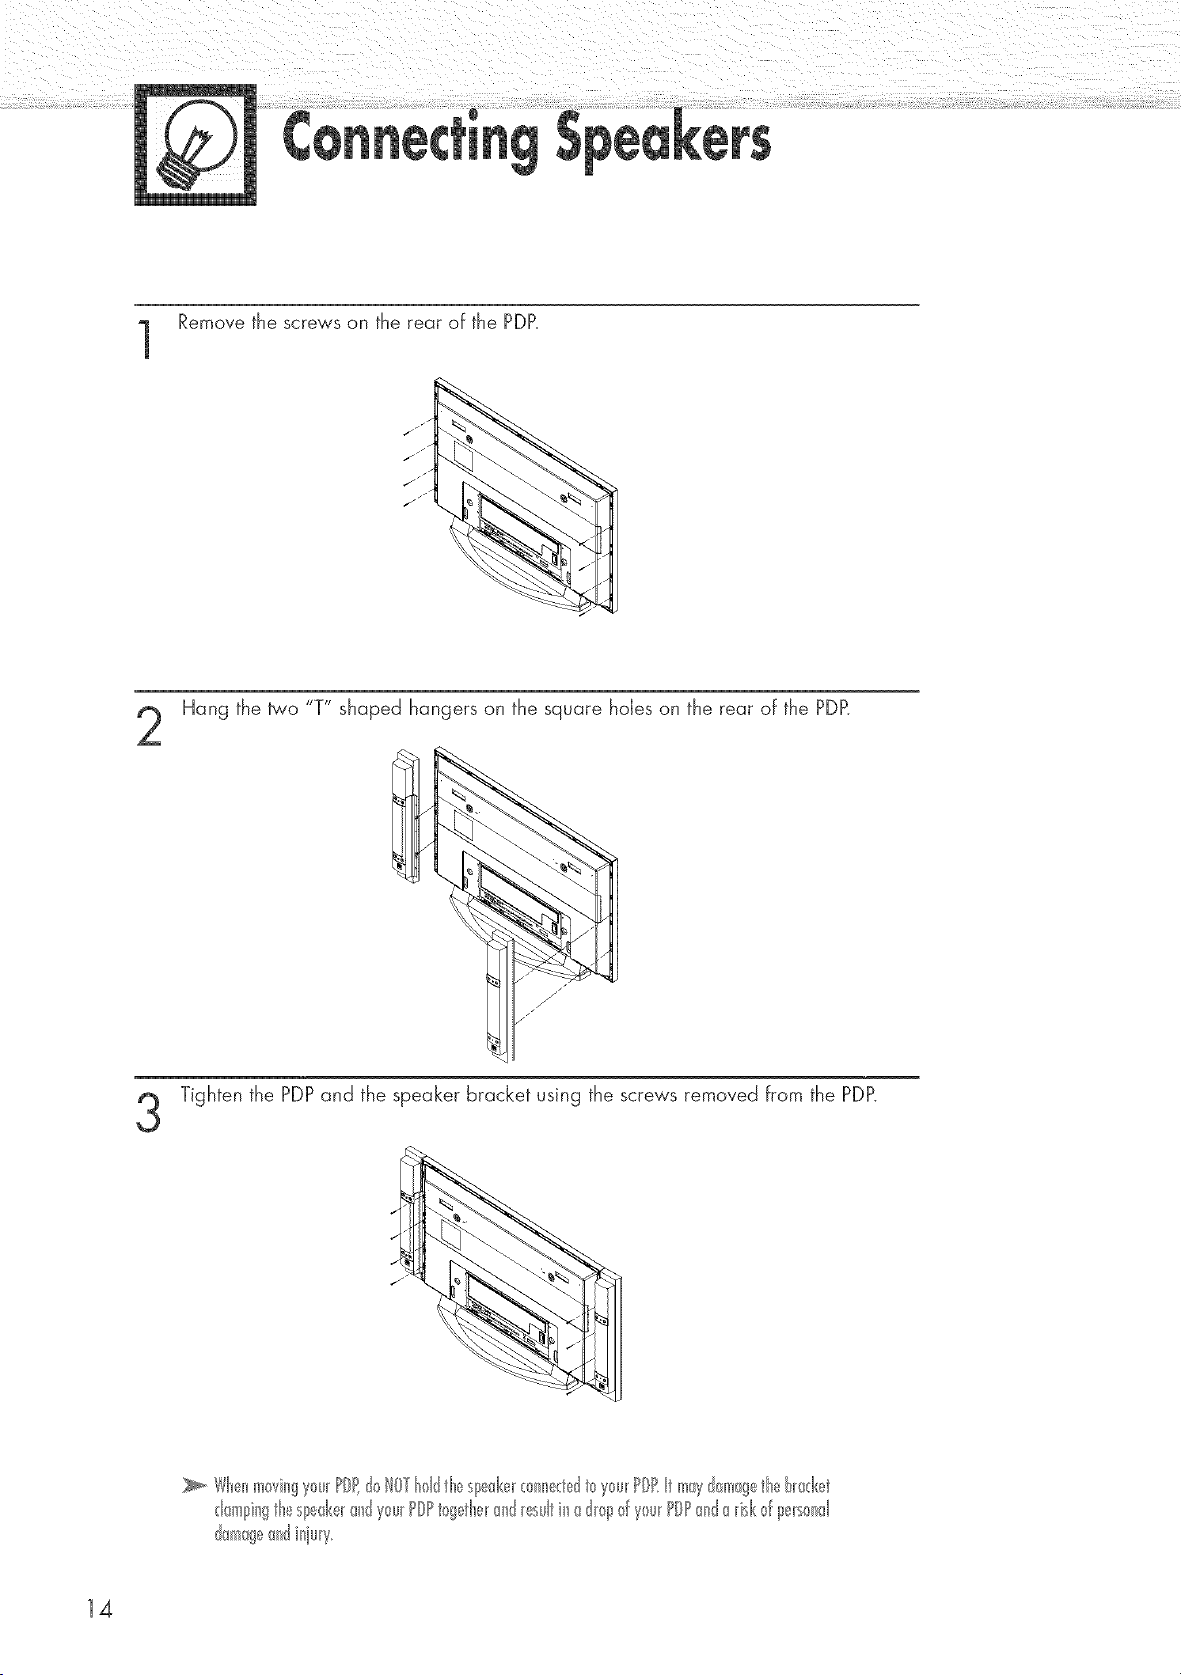
Remove the screws on the rear of the PDP.
J
jJ
/
jJ
jJ
Hang the _'o "T" shaped hangers on the square holes on the rear of the PDR
Tighten the PDPand the speaker bracket using the screws removed from the PDP.
Wb,_nm0vingy0u_PD dolOTt01dtL_Sl_@,__0nn<d t_y_u_PIRt mWd_mg tb t_ad<_tt
danl!ingtte Sl_ed<e_andy_u_POPt_gette_and_esultinad_p _fy_u_PIPanda_isl<_f pe_s_>nd
damageandiquw
14

Connect the speaker audio cable to the external speaker output jack on the rear of the PDP matching the
"+" and "-" ends of the cable with the diagram on the PDP_
FerriteC0res
The ferrite cores are used to attenuate undesired signals_
When connecting cables, attach one of these ferrite cores to the cable
near the connector.
15
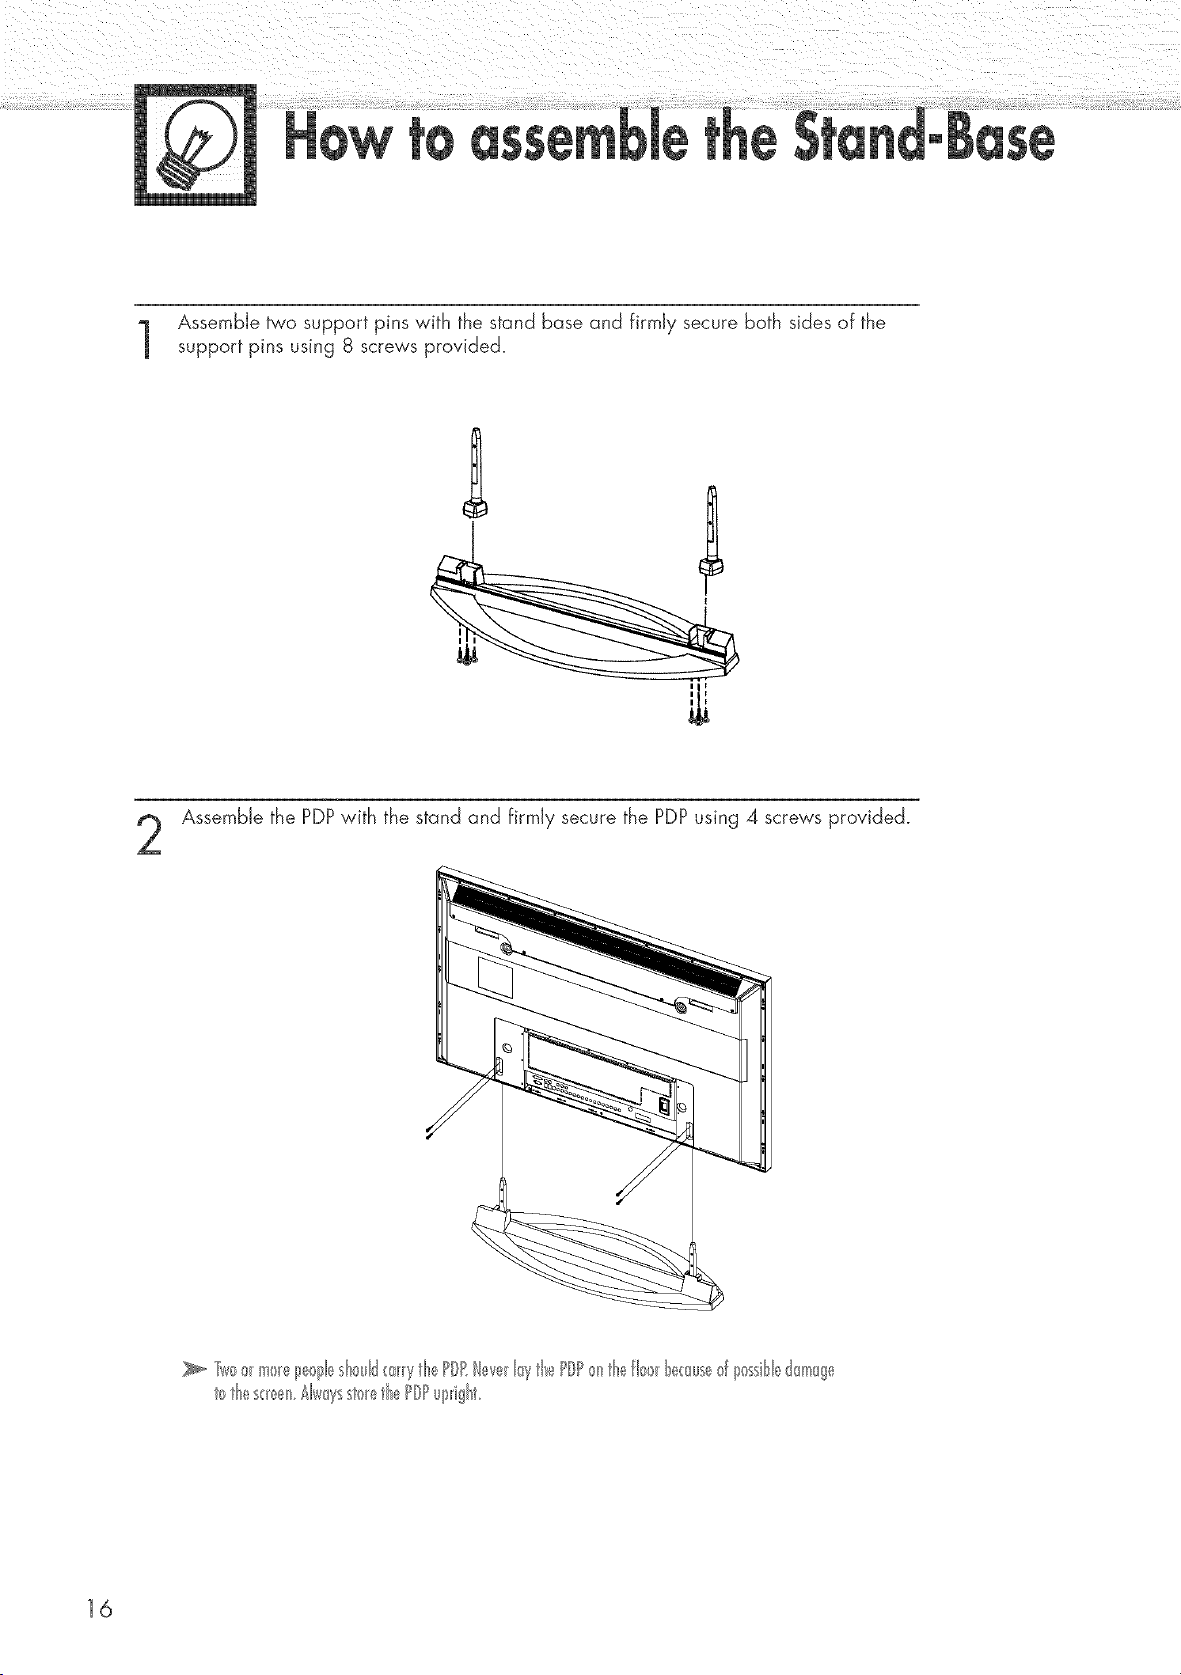
Assemble two support pins with the stand base and firmly secure both sides of the
support pins using 8 screws provided.
Ill
Assemble the PDPwith the stand and firmly secure the PDPusing 4 screws provided.
16
Connecting VHF and UHF Antennas .............................................. 18
Connecting Cable TV .................................................................... 19
Connecting a VCR ........................................................................ 21
Connecting a Camcorder .............................................................. 22
Connecting a DVD Player .............................................................. 23
Connecting a DTV Receiver .......................................................... 24
_nnas 75°ohm
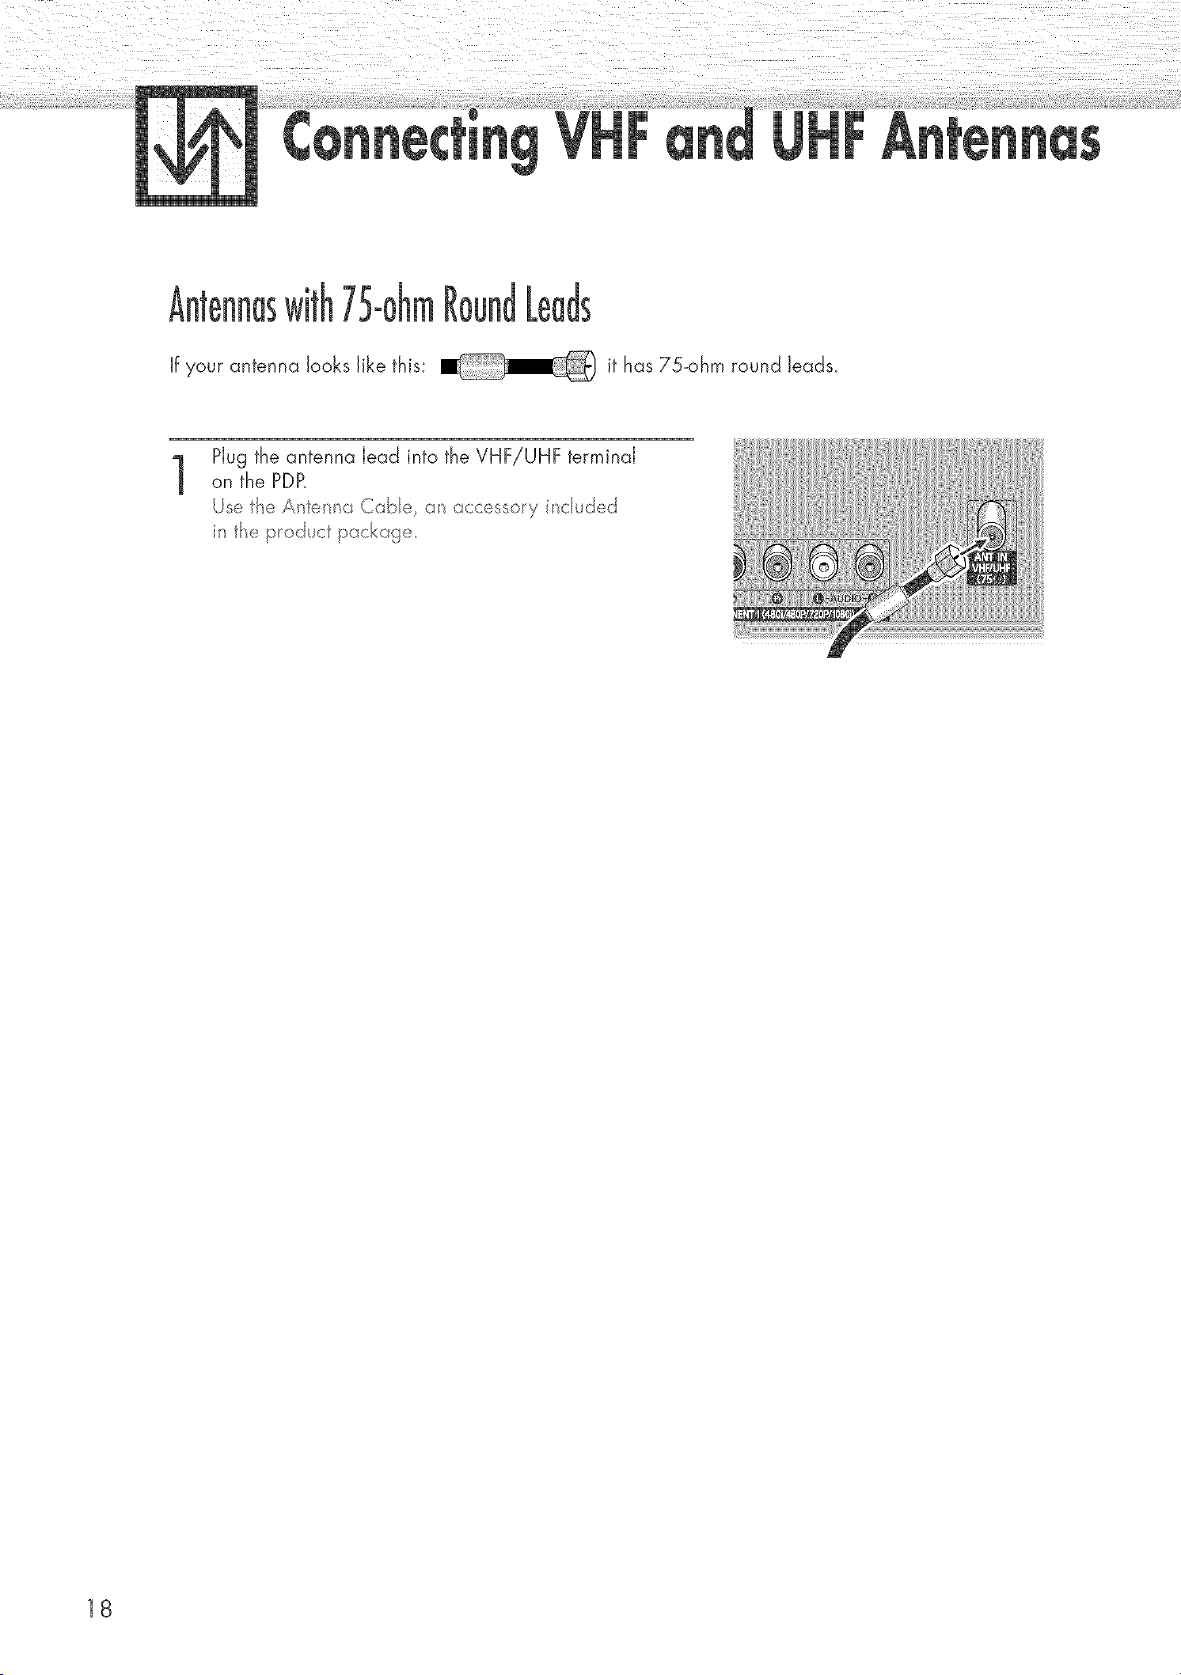
If your antenna looks like this: it has 75-ohm round leads.
1
Plug the antenna lead into the VHF!UHF terminal
on the PDP.
Js t_e A _ _/a Cabe, accessory i_cu ted
i_ the p_o tuct pockage_
18

You can connect different cable systems to your PDB including cable without a cable box,
and cable with a cable box that descrarnbJes some or aJJchanneJs_
jt a
1
Plug the incoming cable into the VHFiUHF terminal on
the PDR
/se t_e A _te_i a Cabe, a_ acc _ssoy inc ud _,_d
i t_e productp_ckag
1]
AJJ
Find the cable connected to the ANTENNA OUT
terminal on your cable box_ This terminal might be
labeled _ANT OUT _, _VHF OUT _ or simply _OUT _.
2
Connect the cable to the VHF!UHF terminal on the
PDR
i_ the p_oduct packa :te_
19
(l
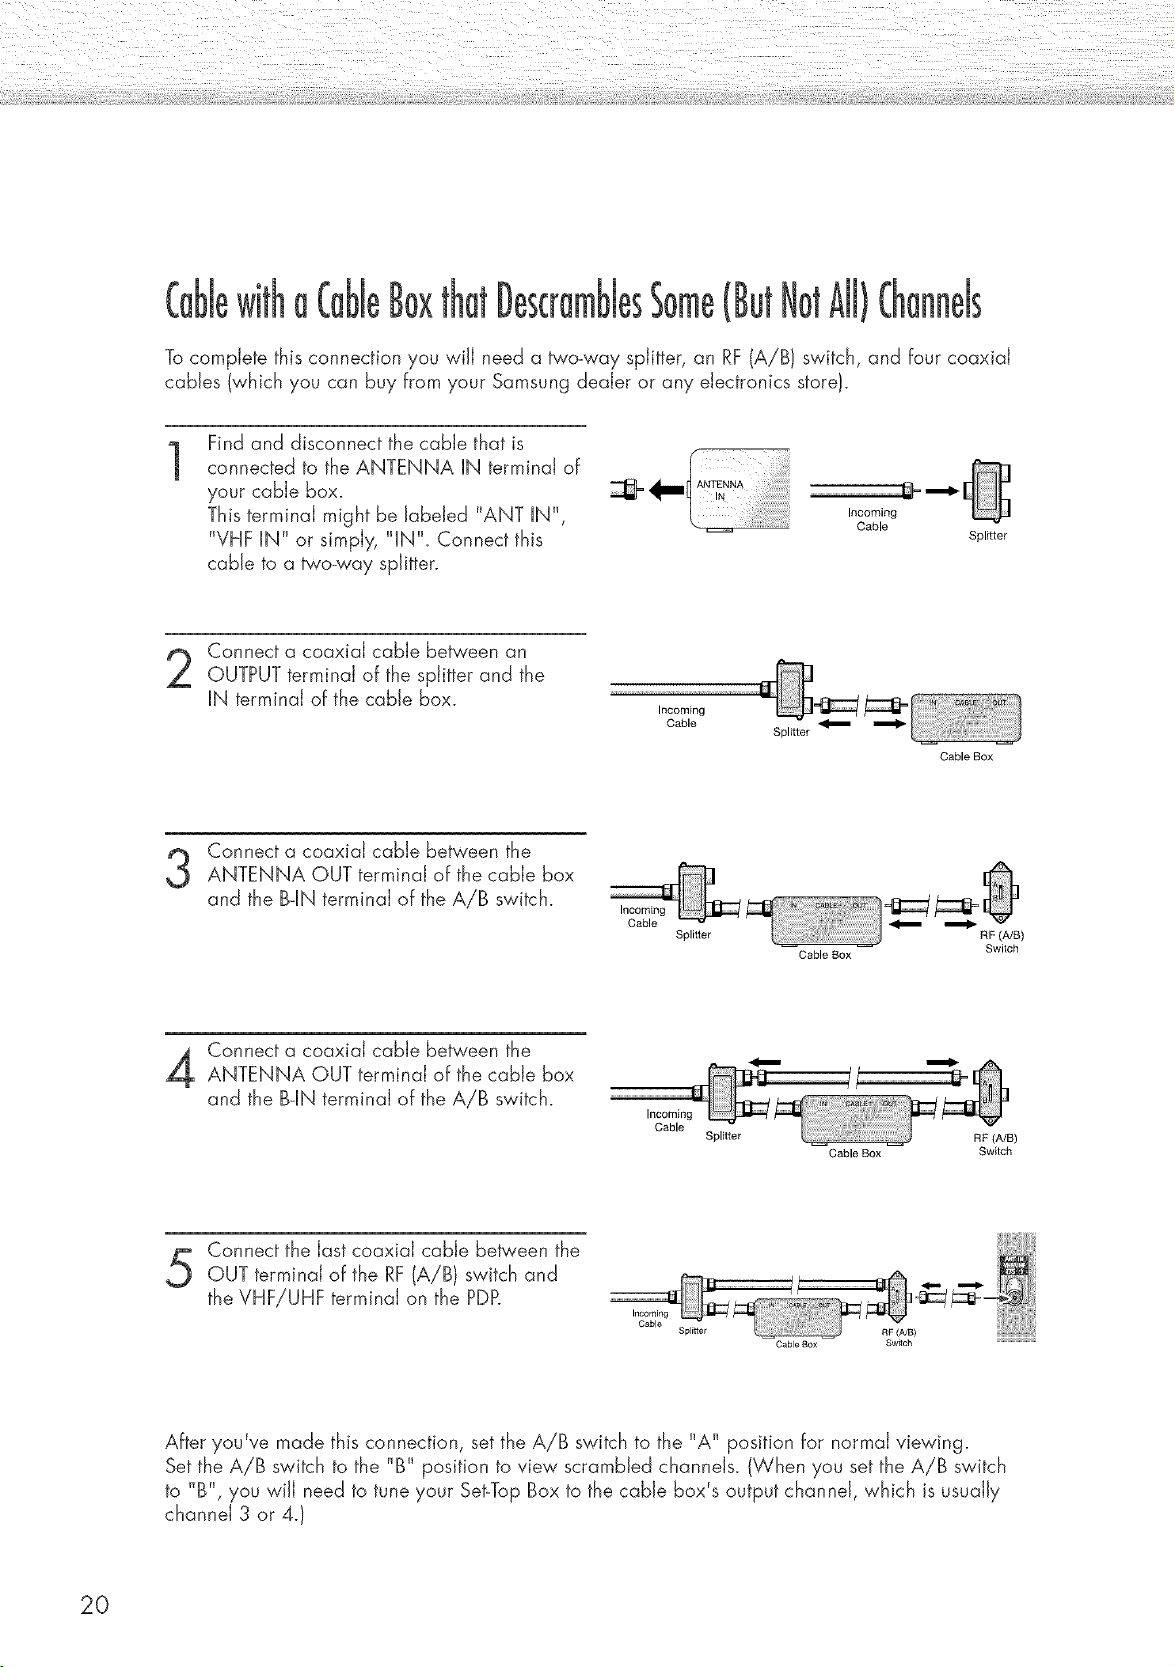
To complete this connection you will need a two-way splitter, an RF (A/B} switch, and four coaxial
cables (which you can buy from your Samsung dealer or any electronics store).
1
Find and disconnect the cable that is
connected to the ANTENNA IN terminal of
your cable box.
This terminal might be Jabeled "ANT IN",
"VHF IN" or simply, "IN". Connect this
came to a two-way splitter.
iiii:ii,i,i ! ! i!ii!iiiiiii i
Incoming
Cable
Splitter
Connect a coaxial cable between an
OUTPUT terminal of the splitter and the
IN terminal of the cable box.
Incoming
Cable
Splitter
Cable Box
Connect a coaxial cable between the
ANTENNA OUT terminal of the cable box
and the B-IN terminal of the AiB switch.
Incoming
Cable
Splitter
Cable Box
RF (A/B)
Switch
Connect a coaxial cable between the
ANTENNA OUT terminal of the cable box
and the B-IN terminal of the A/B switch.
Incoming
Cable
Splilter
Cable BOX
Cable Box
RF (A/B)
Switch
Connect the last coaxial cable be_'een the
OUT terminal of the RF (A/B) switch and
the VHF!UHF terminal on the PDP.
Splitter
After you've made this connection, set the A/B switch to the "A" position for normal viewing.
Set the A/B switch to the "B" position to view scrambled channels. (When you set the A/B switch
to "B", you win need to tune your Set-Top Box to the cable box's output channel, which is usually
channel 3 or 4.}
20

PDP
JO Videoor
VCR
S-VideoCaNe
or Video Cable
Connect the Video!Audio cables between the VIDEO or S_VIDEO/ L- AUDIO - R iacks on the PDP
and VIDEO or S_VIDEO/ L- AUDIO - R output jacks on the VCR. (Note: For bettervideo, you can use
ar_S-Videocabb.)
Videotape PJaybQ&:
I. Turn on your PDP.
2. Pressthe SOURCE button to select "Video(AV] or AV2V or "S-Video.
3. Turn on your VCR, insert a videotape and press the play button.
21
PDP
i i
:: :
??r ::: ; ; :: :; ? : ;: ?; ? :: :: ?; : ;: : ; ;
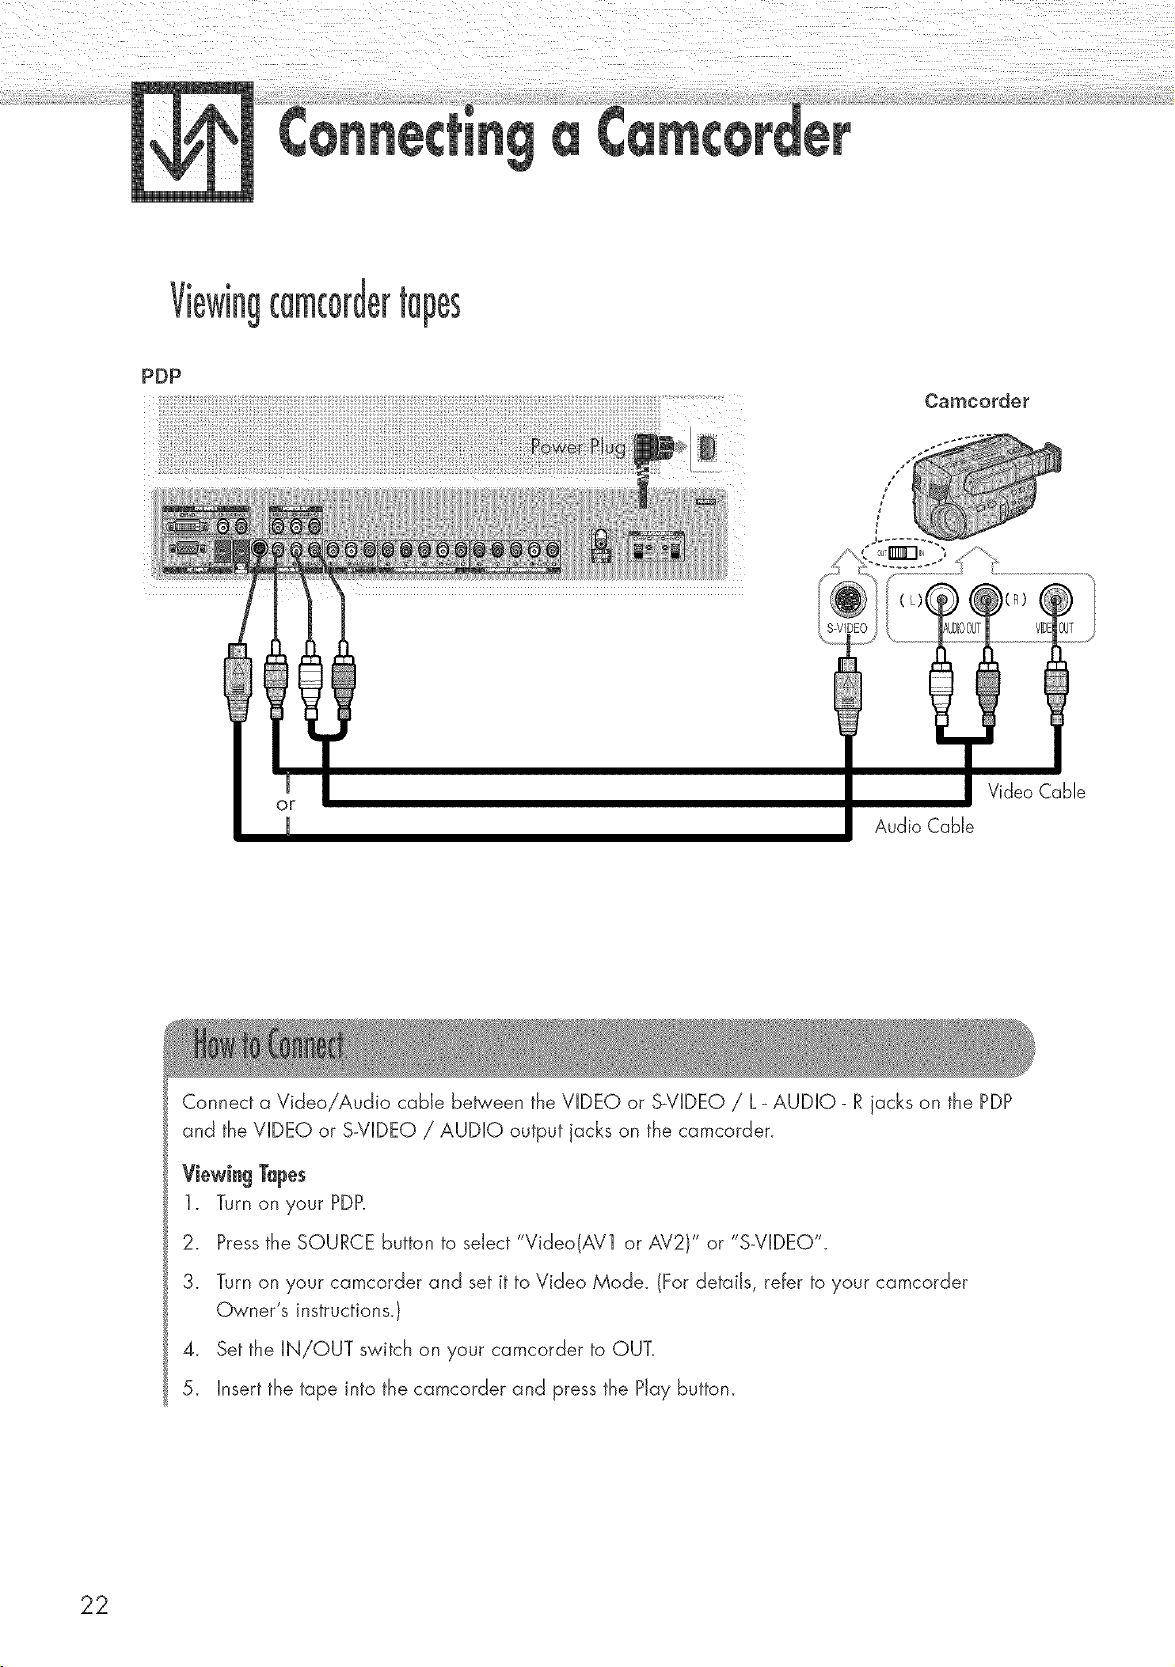
Camcorder
Video Cable
Audio Cable
Connect a Video/Audio cable be_'een the VIDEO or S_VIDEO / L_ AUDIO- R jacks on the PDP
and the VIDEO or S-VIDEO / AUDIO output jacks on the camcorder.
ViewingTapes
1. Turn on your PDP.
2. Pressthe SOURCE button to select "Video(AV1 or AV2)" or "S-VIDEO".
3. Turn on your camcorder and set it to Video Mode. (For details, refer to your camcorder
Owner's instructions.)
4. Set the IN/OUT switch on your camcorder to OUT.
5. Insert the tape into the camcorder and press the Play button.
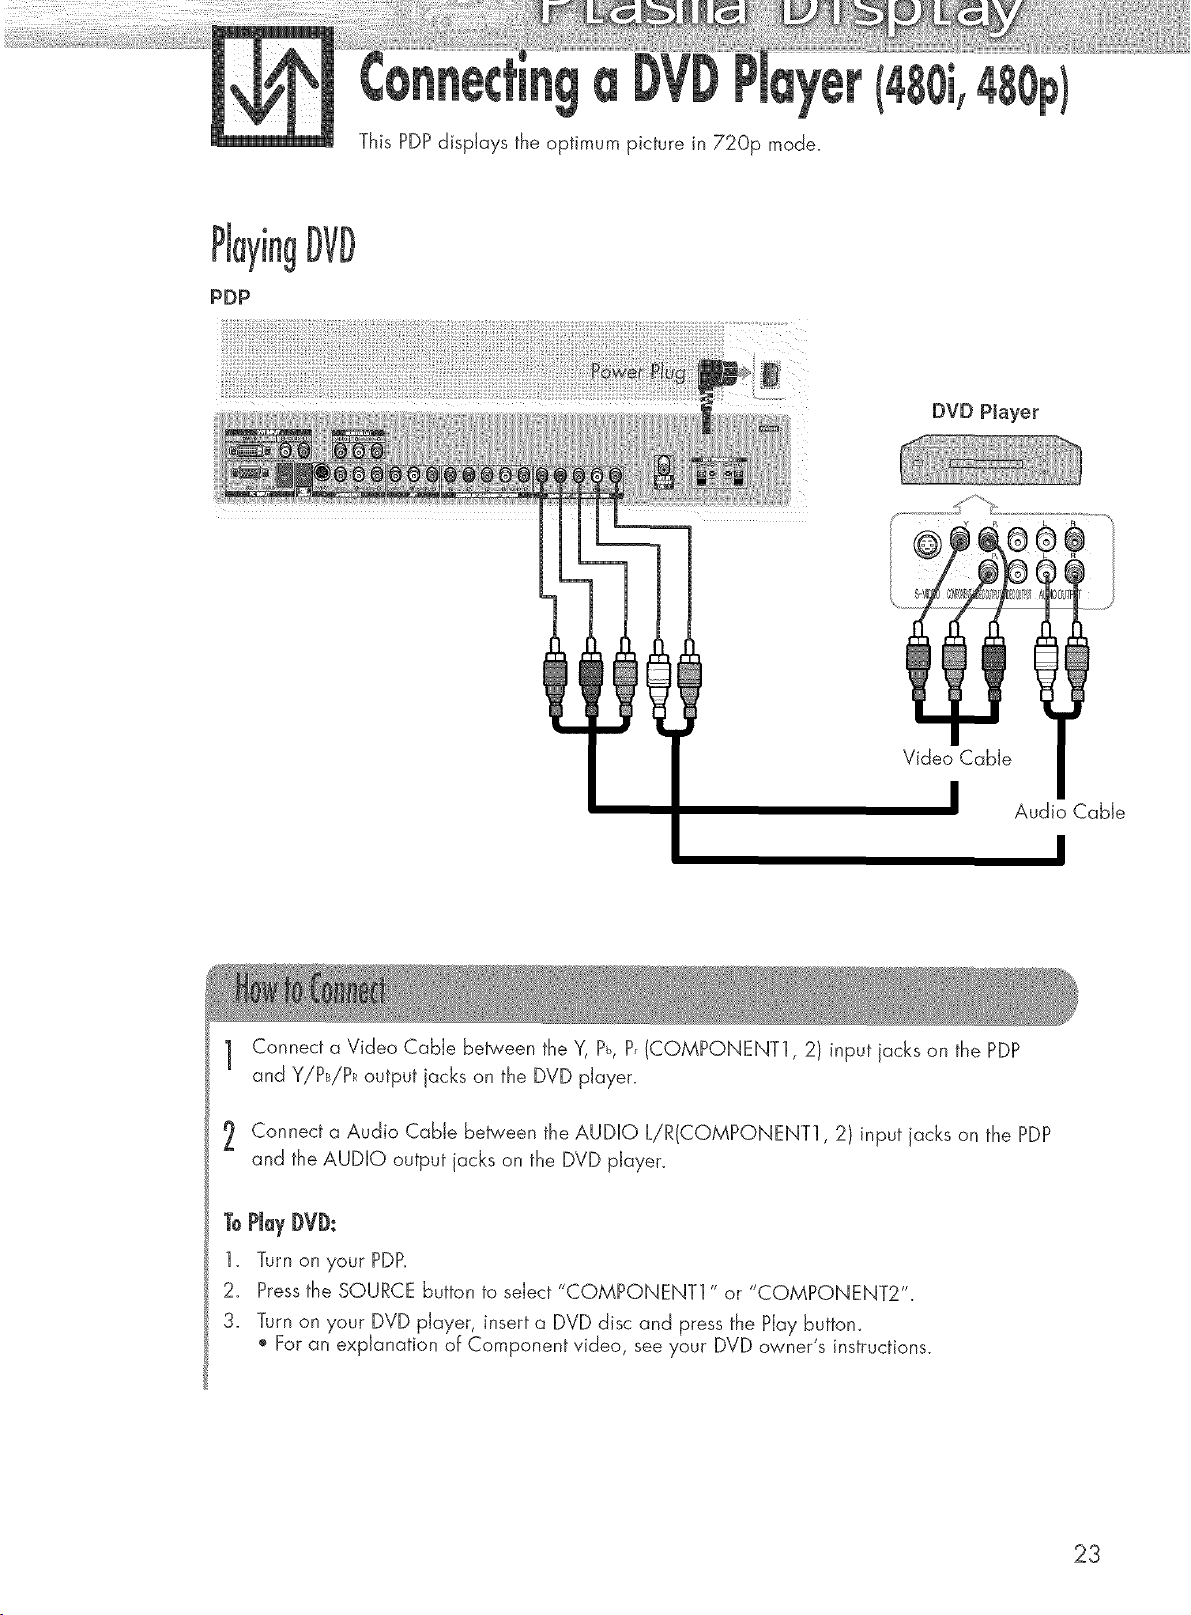
ThisPDPdisplaystheoptimumpicturein 720p mode.
PDP
DVD Player
Video Cable
Audio Cable
I
1 Connect a Video Cable between the Y, P_,P, (COMPONENT1,2) input jacks on the PDP
and Y!PB!PRoutput jacks on the DVD player.
Connect a Audio Cable between the AUDIO L/R(CQMPONENT1,2) input acks on the PDP
and the AUDIO output jacks on the DVD player.
ToPJayDVD:
1. Turn on },our PDP.
2_ Pressthe SOURCE button to select "COMPONENT1 " or "COMPONENT2"
3. Turn on your DVD player, insert a DVD disc and press the Play buttom
For an explanation of Component video, see your DVD owner's instructions.
23
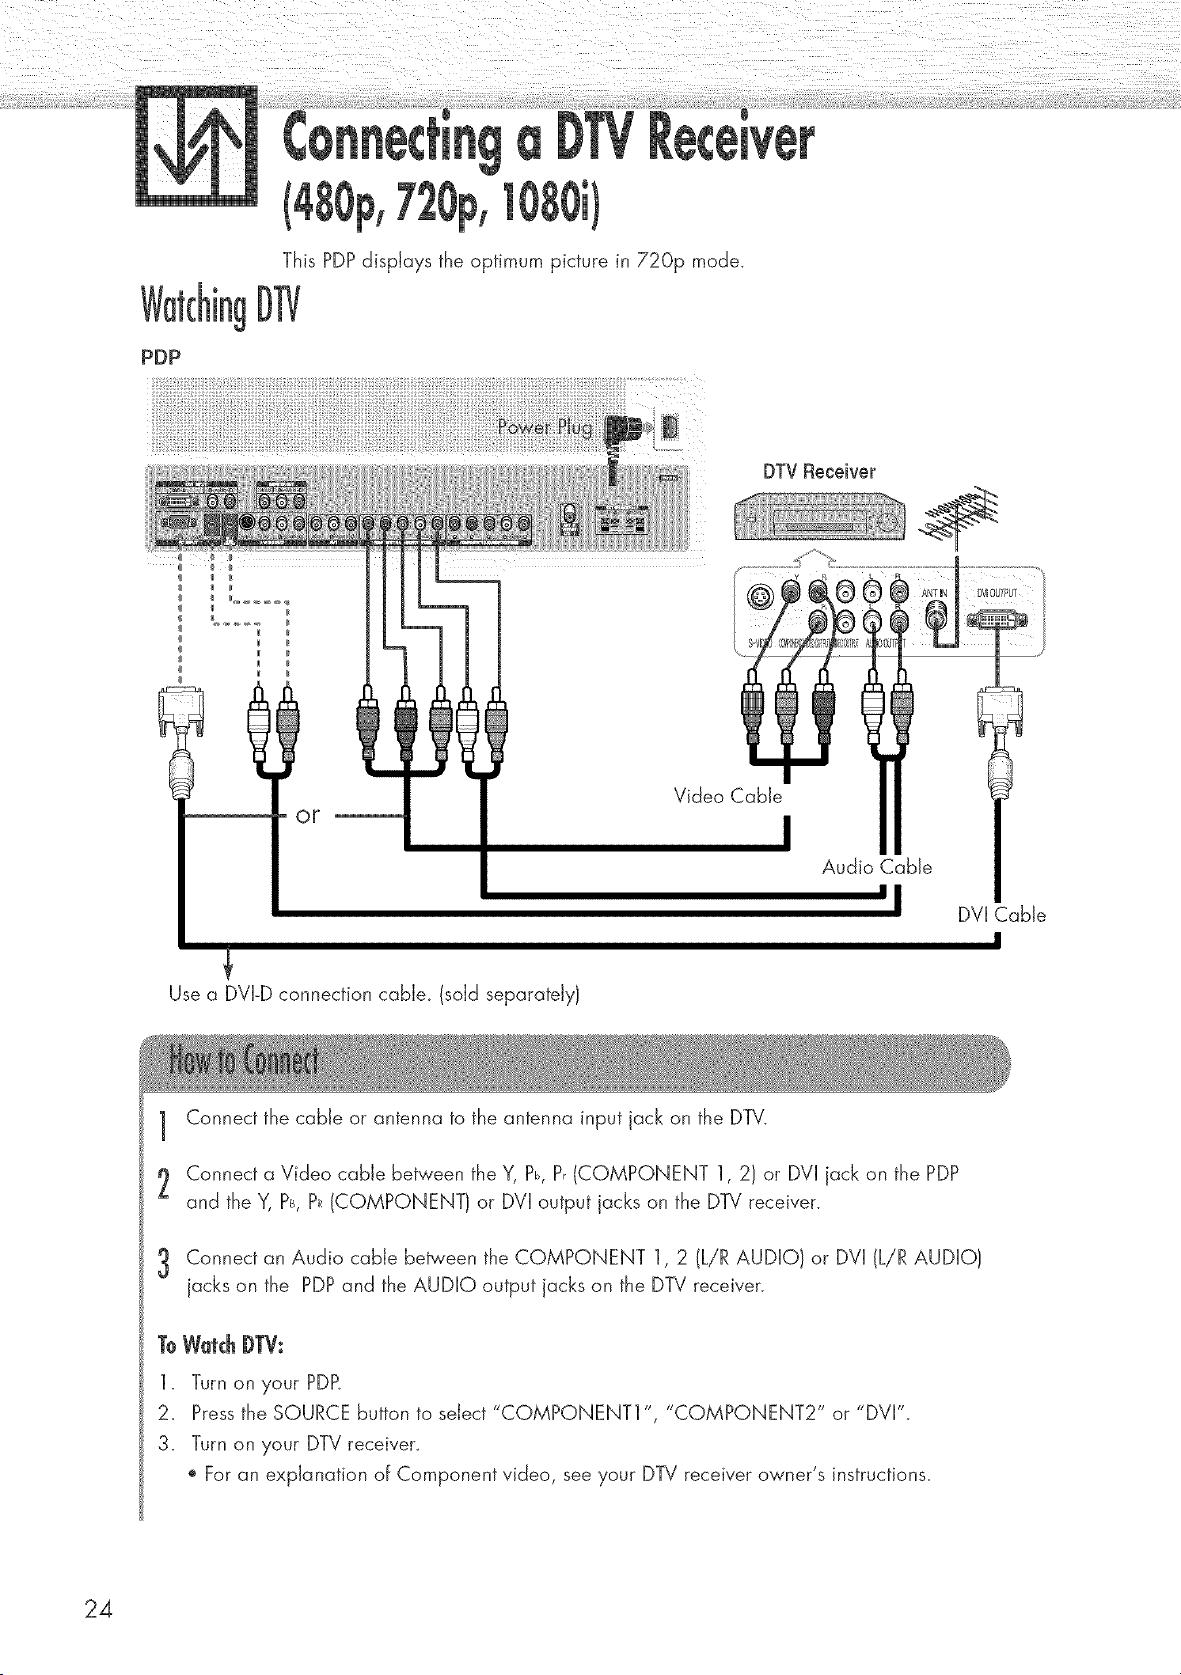
PDP
This PDP displays the optimum picture in 720p mode.
kgD1]/
I
Use a DVI-D connection cabJe_ (sold separately)
Video Cable
Audio Cable
'1
DVI Cable
I
1 Connect the cable or antenna to the antenna input jack on the DTV.
2 Connect a Video cable between the Y, Pb, P,(COMPONENT 1, 2) or DVI jack on the PDP
and the Y, Ps, P_(COMPONENT) or DVI output jacks on the DTV receiver.
3 Connect an Audio came between the COMPONENT 1, 2 (LiR AUDIO} or DVI (LiR AUDIO}
jacks on the PDP and the AUDIO output jacks on the DTV receiver.
ToW_tc_DTV:
1. Turn on your PDP,
2_ Pressthe SOURCE button to select "COMPONENT1 ", "COMPONENT2" or "DVI".
3. Turn on your DTV receiven
For an explanation of Component video, see your DTV receiver owner's instructions.
24
Turning the PDPOn and Off .......................................................... 26
Plug & Hay Feature ...................................................................... 28
Memorizing the Channels .............................................................. 31
Setting Up Your Remote Control .................................................... 36
Viewing an External Signal Source ................................................ 38
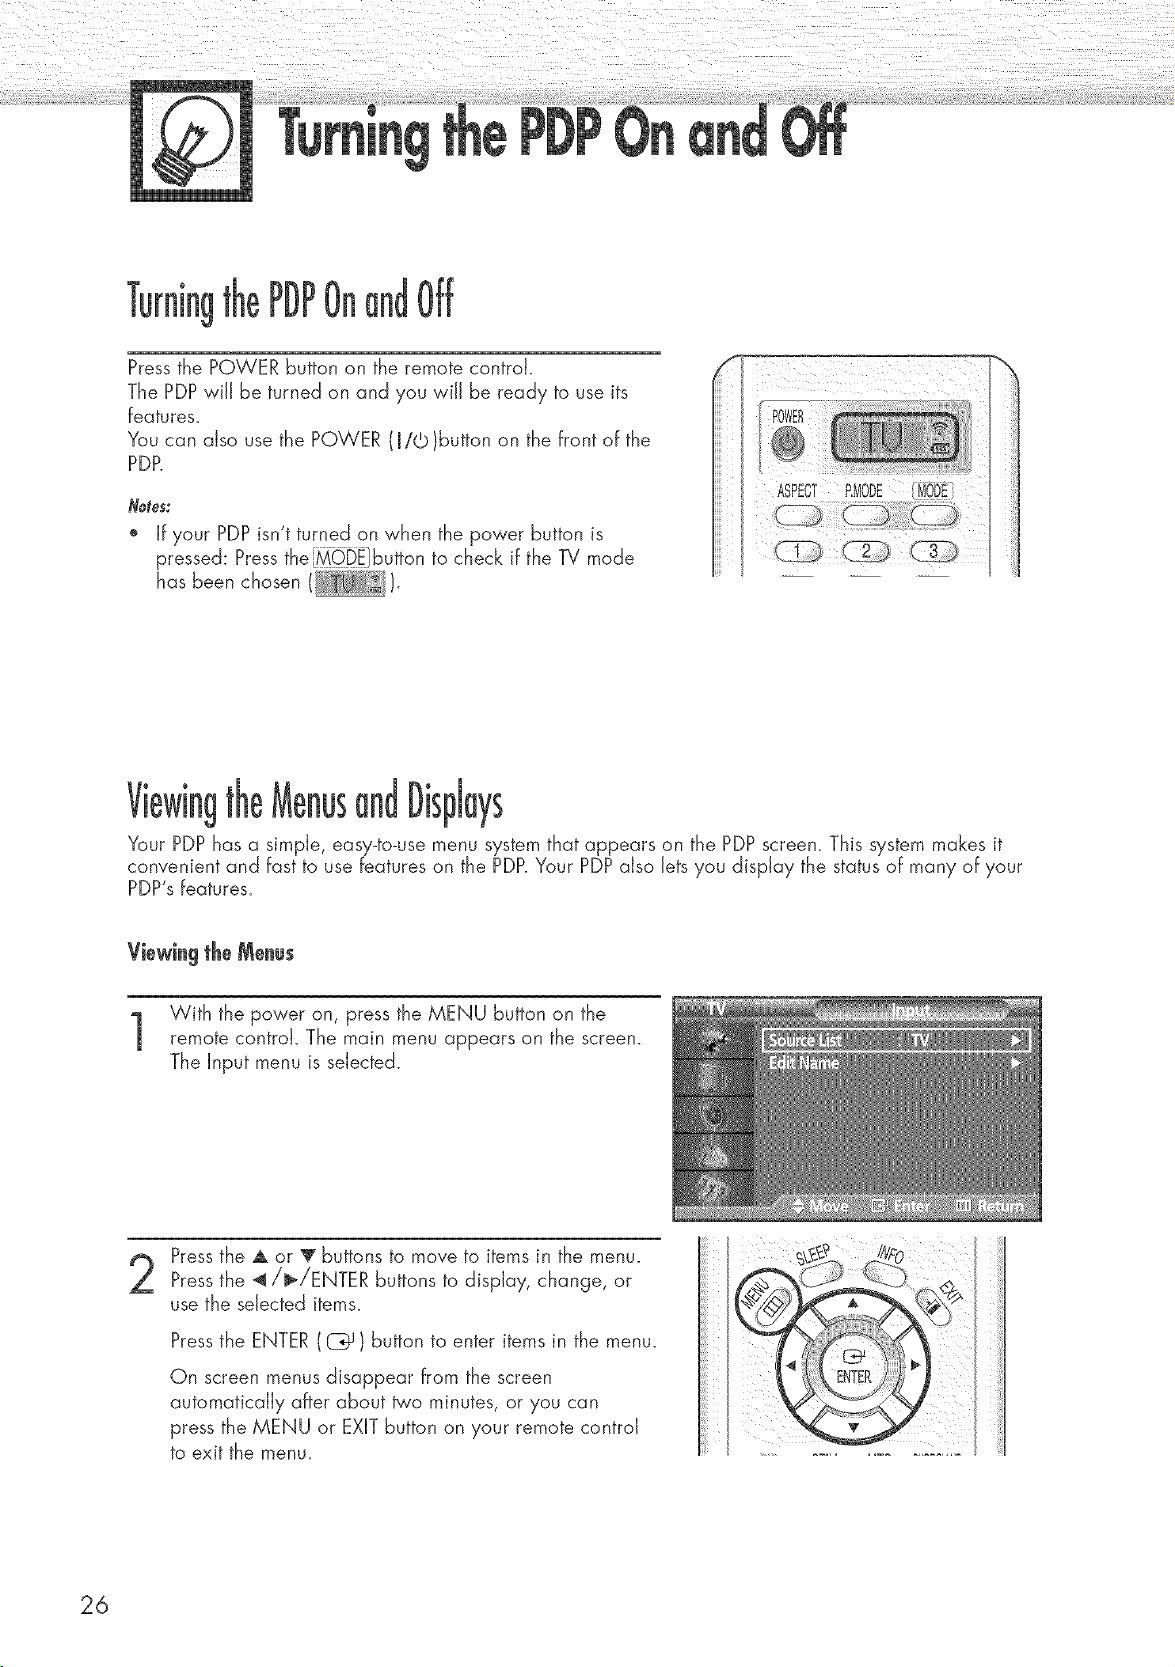
Pressthe POWER button on the remote control.
The PDP wiJJbe turned on and you wiJJ be ready to use its
features.
You can also use the POWER (R/©)button on the front of the
PDP.
Notes:
" If your PDP isn't turned on when the power button is
pressed: Pressthe _iDi]button to check if the Bi mode
has been chosen (I i_'_'_''F_'_).
ii I I ................................++ ii
POWE£
@
:Mo i
I ASPECT iliODi ........
i /
Viewin! lispJays
Your PDP has a simple, easy-to-use menu system that appears on the PDP screen. This system makes it
convenient and fast to use features on the PDP.Your PDPalso lets you display the status of many of your
PDP's features.
Viewingthe Menus
With the power on, press the MENU button on the
remote control. The main menu appears on the screen.
The Input menu is selected.
Pressthe A or V buttons to move to items in the menu.
Pressthe _/b>/ENTER buttons to display, change, or
use the selected items.
Pressthe ENTER ((Z_) button to enter items in the menu.
On screen menus disappear from the screen
automatically after about _'o minutes, or you can
press the MENU or EXITbutton on your remote control
to exit the menu.
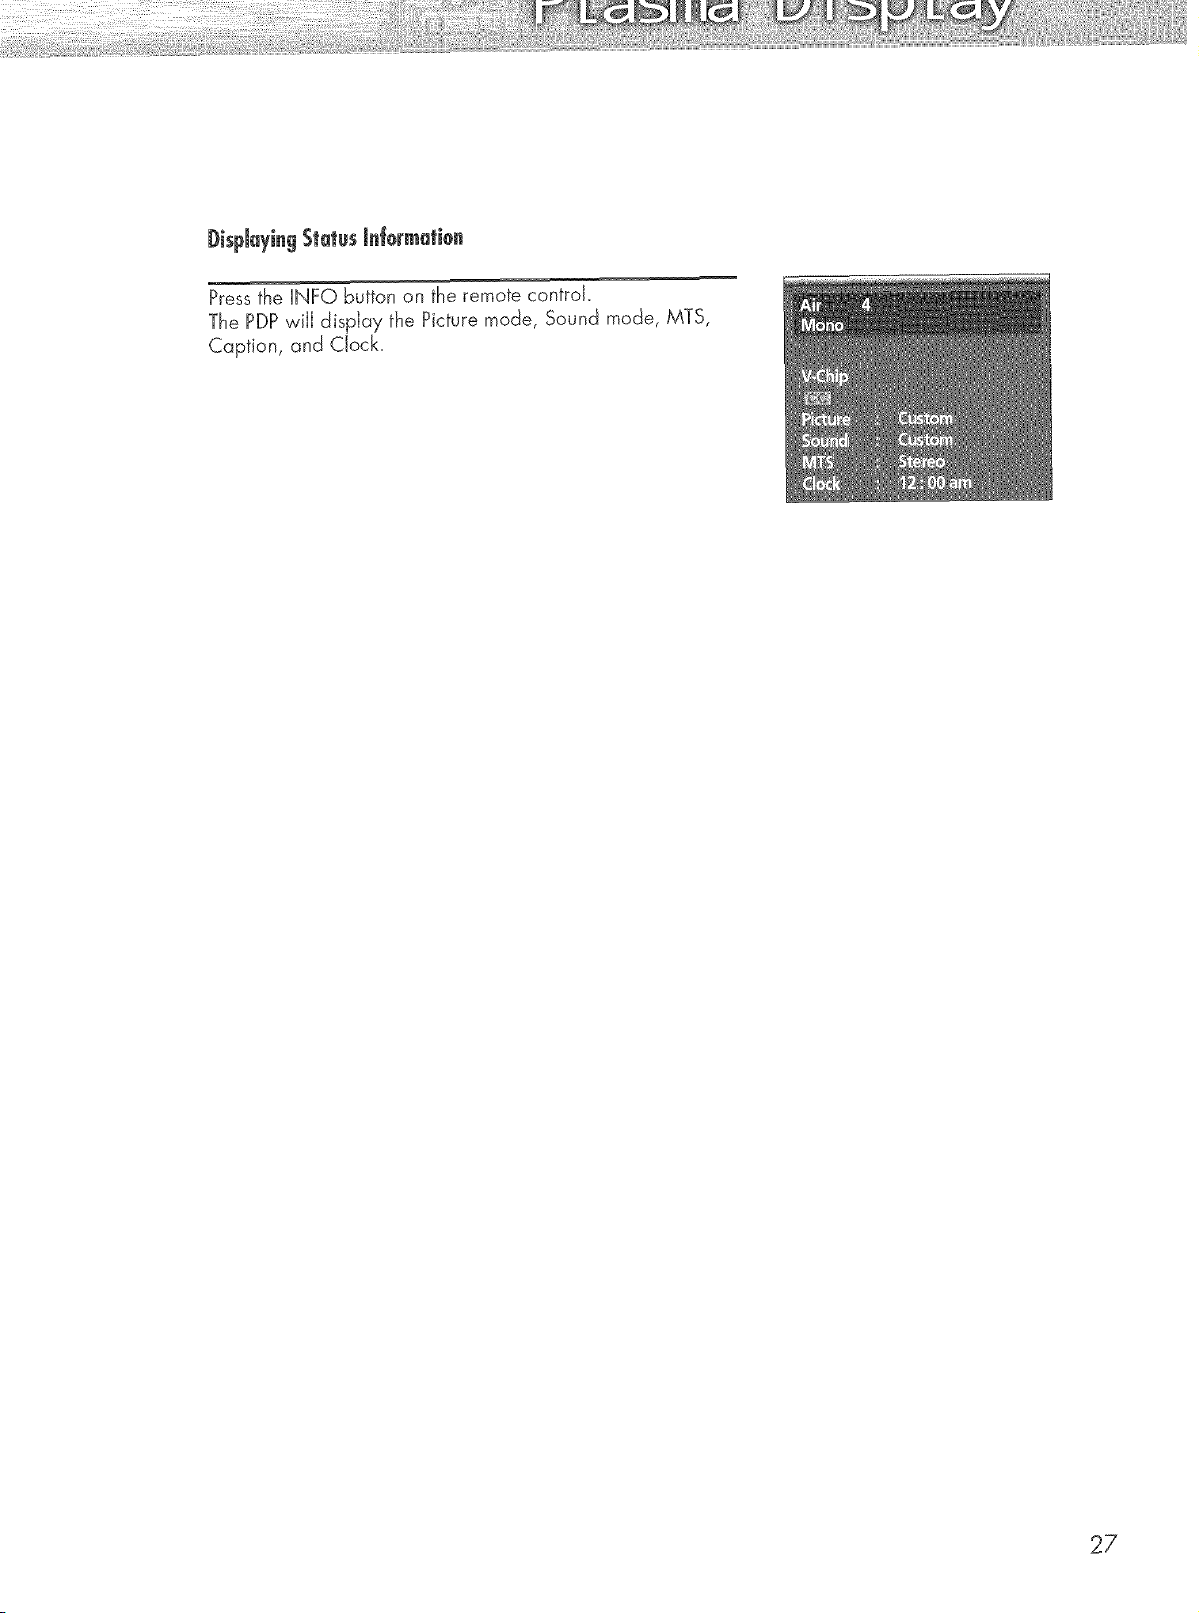
DispJayingStatusinformation
Press the INFO button on the remote controk
The PDPwill display the Picture mode, Sound mode, MTS,
Caption, and Clock.
27
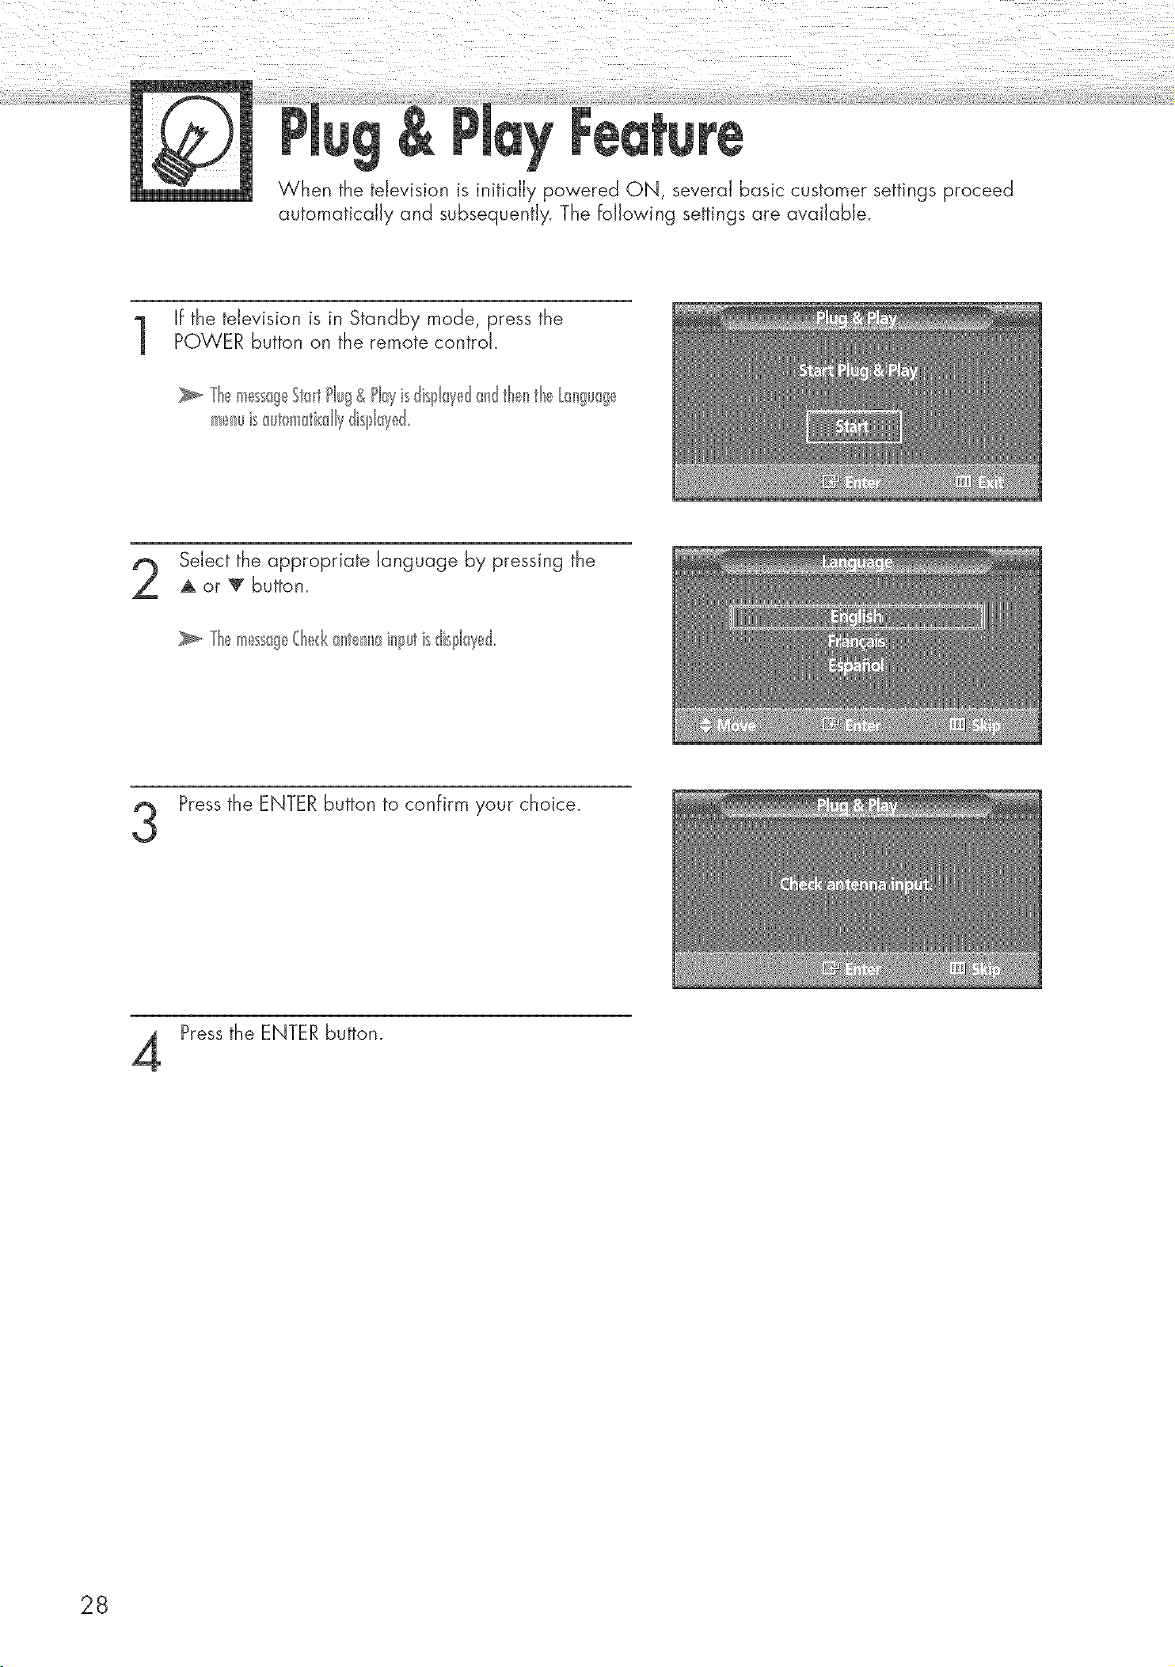
When the television is initially powered ON, several basic customer settings proceed
automatically and subsequently. The fo/owing settings are available.
If the television is in Standby mode, press thePOWER button on the remote control.
TI_,_mess0g_StaidPlug&Playisdisplayed_mdtl_el_thetr_nguag_
meIwisauton_@dlydisl31ayd
Select the appropriate language by pressing the
A or _' button.
Pressthe ENTER button to confirm your choice.
Pressthe ENTER button.
28

Setect the correct signal source lAir, STD, HRC and
IRC) by pressing the _ or '_ button, then press the
ENTER button.
To start the channeJ search, press the ENTER button.
an)[del whklMle_tsthd_ I_sitionin tbt f_equenq_ange(witl
Wl_e_i l_s inisl_ed,l-_e@_d_I meHiiis dispk_yed.
Pressthe ENTER button.
Pressthe _ or 1_ button to move to the Hour, Minute,
or am/pro.
Set the Hour, Minute, or am!!ro by pressing the
• - or Y button.
Pressthe ENTER button.
When it has finished, the message "Enjoy your
watching" is dispIayed, and the channds which
have been stored can be viewed.
29
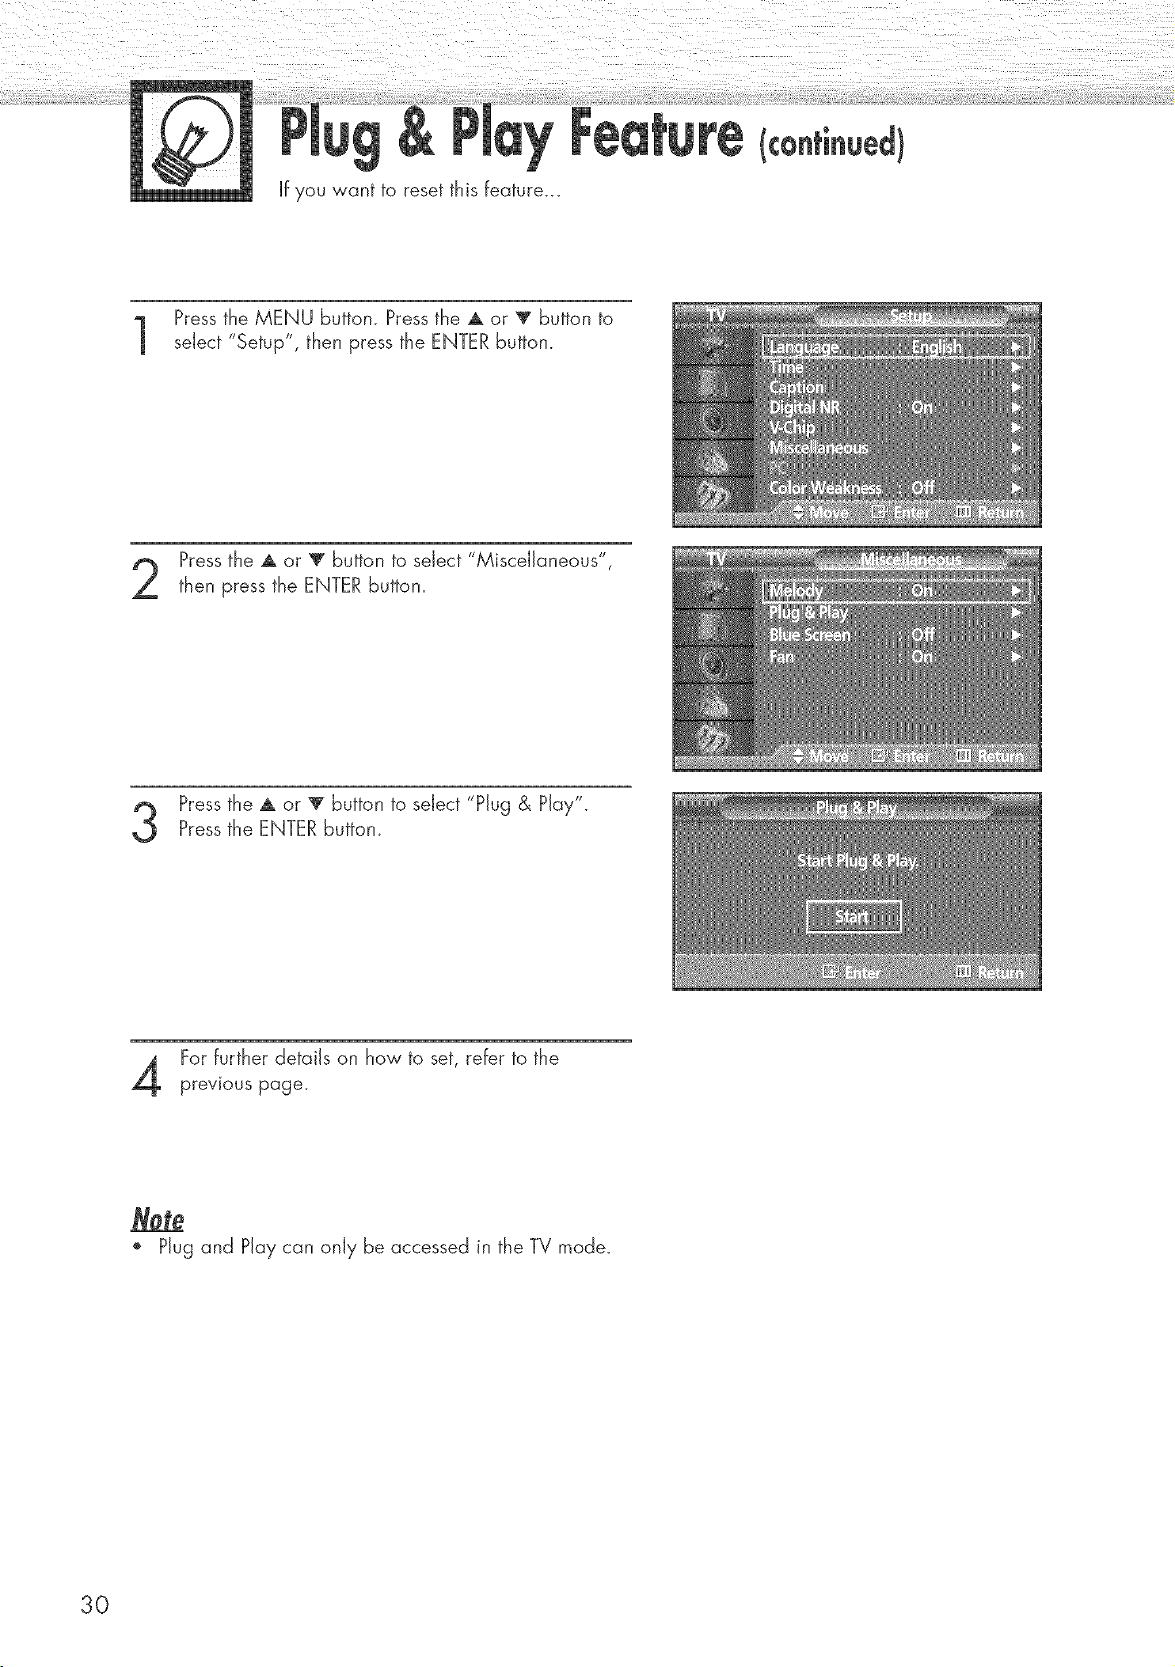
If you want to reset this feature...
Pressthe MENU button. Press the A or V button to
select "Setup", then press the ENTER button.
Pressthe A or T button to select "Miscellaneous",
then press the ENTER button.
Pressthe A or 'V" button to select "Plug & Play".
Pressthe ENTER button.
For further details on how to set, refer to the
previous page.
', Plug and Play can only be accessed in the TV mode.
30
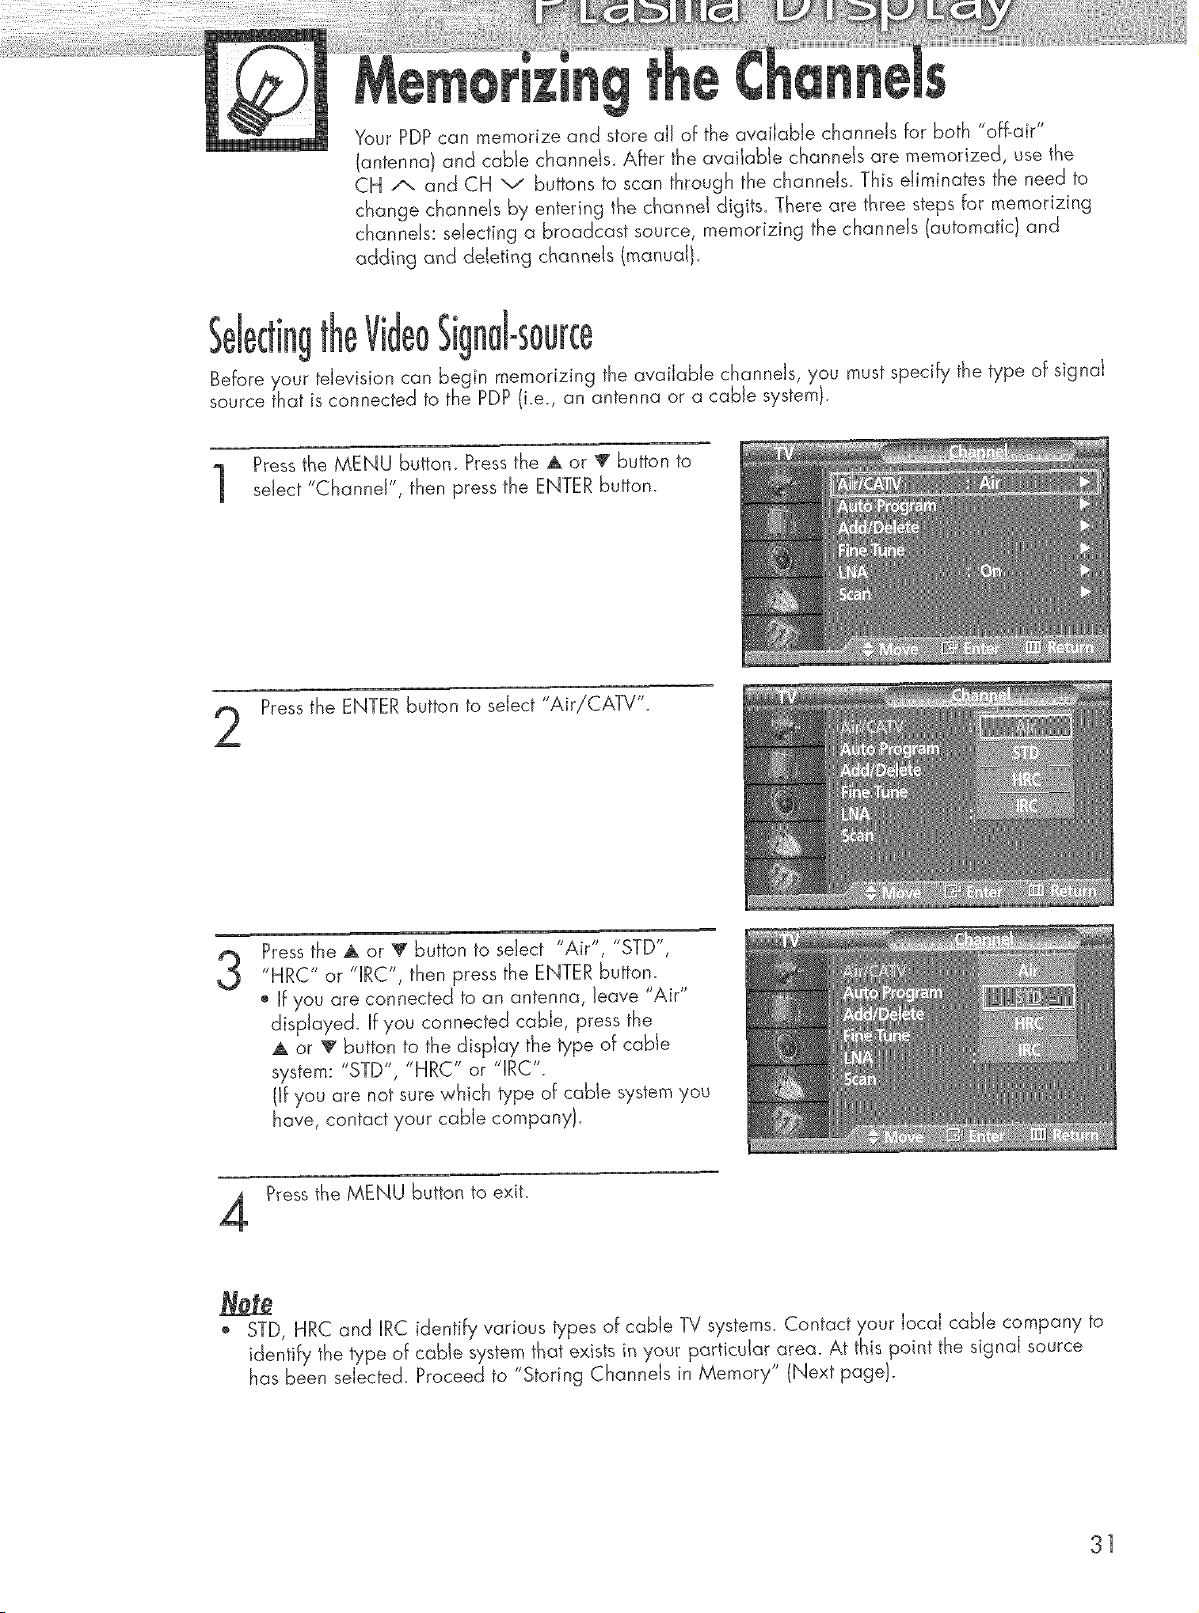
Your PDP can memorize and store aiJ of the available channels for both "off-air"
(antenna) and cane channeis_ After the avaiiabte channds are memorized, use the
CH /x. and CH v buttons to scan through the channets_ This eliminates the need to
change channds by entering the channel digits. There are three steps for memorizing
channels: selecting a broadcast source, memorizing the channels (automatic) and
adding and deIeting channels (manual).
Jrce
Before },our television can begin memorizing the available channels, you must specify the type of signal
source that is connected to the PDP (i.e., an antenna or a cable system).
Pressthe MENU buttom Press the _ or _ button to
select "Channel", then press the ENTER button.
Pressthe ENTER button to select "Air!CATV"_
3
Pressthe _ or V button to select "Air", "STD",
"HRC" or "iRC", then press the ENTER buttom
o if you are connected to an antenna, leave "Air"
displayed. Hfyou connected cable, press the
A or _' button to the display the type of cable
system: "STD", "HRC" or "IRC".
(If you are not sure which type of cable system you
have, contact your cabie company}.
Pressthe MENU button to exit.
o STD, HRC and IRC identify various types of cable TV systems. Contact your local cable company to
identify the type of cable system that exists in your particular area. At this point the signal source
has been selected. Proceed to "Storing Channels in Memory" (Next page).
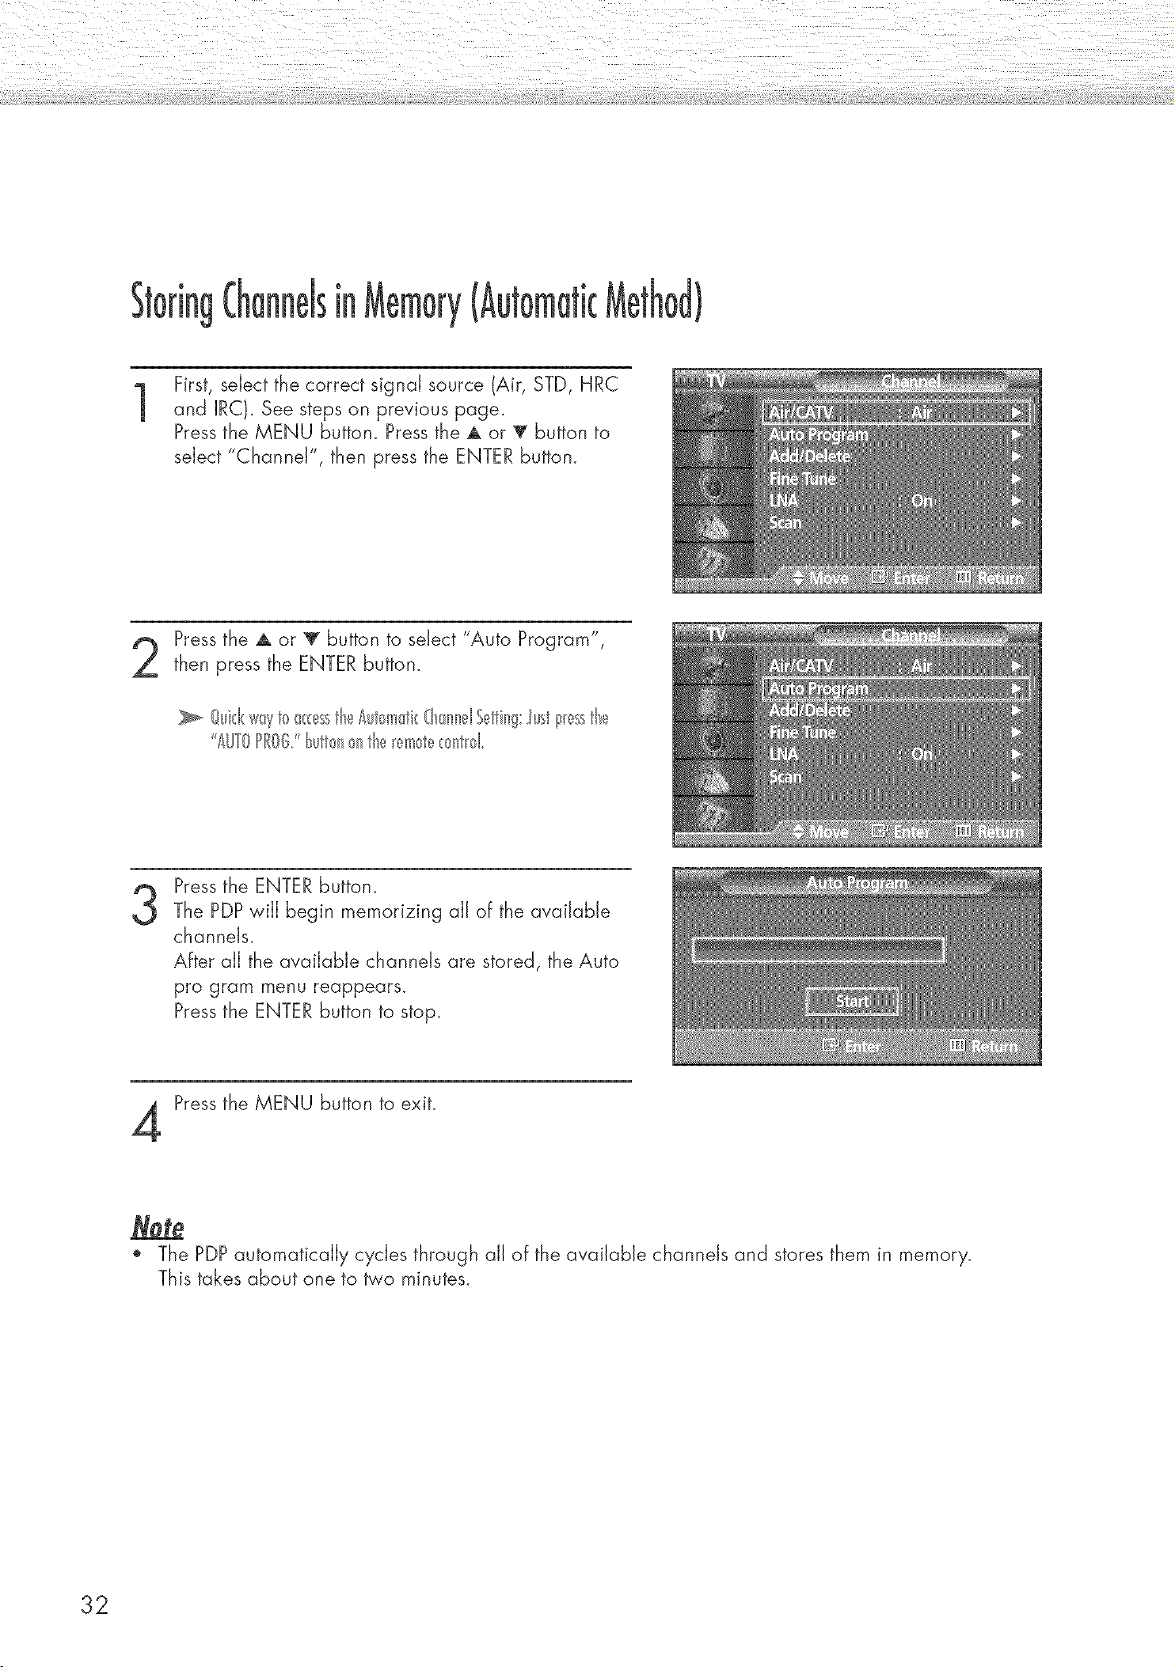
1
First, select the correct signal source (Air, STD, HRC
and IRC). See steps on previous page.
Pressthe MENU button. Press the A or _ button to
select "Channel", then press the ENTER button.
Pressthe A or V button to select "Auto Program",
then press the ENTER button.
A/JY0PROGButton_ntie _m_t__nt_d
3
Pressthe ENTERbutton.
The PDPwill begin memorizing all of the available
channels.
After all the available channels are stored, the Auto
pro gram menu reappears.
Pressthe ENTER button to stop.
Pressthe MENU button to exit.
The PDP automatically cycles through all of the available channels and stores them in memory.
This takes about one to two minutes.
32
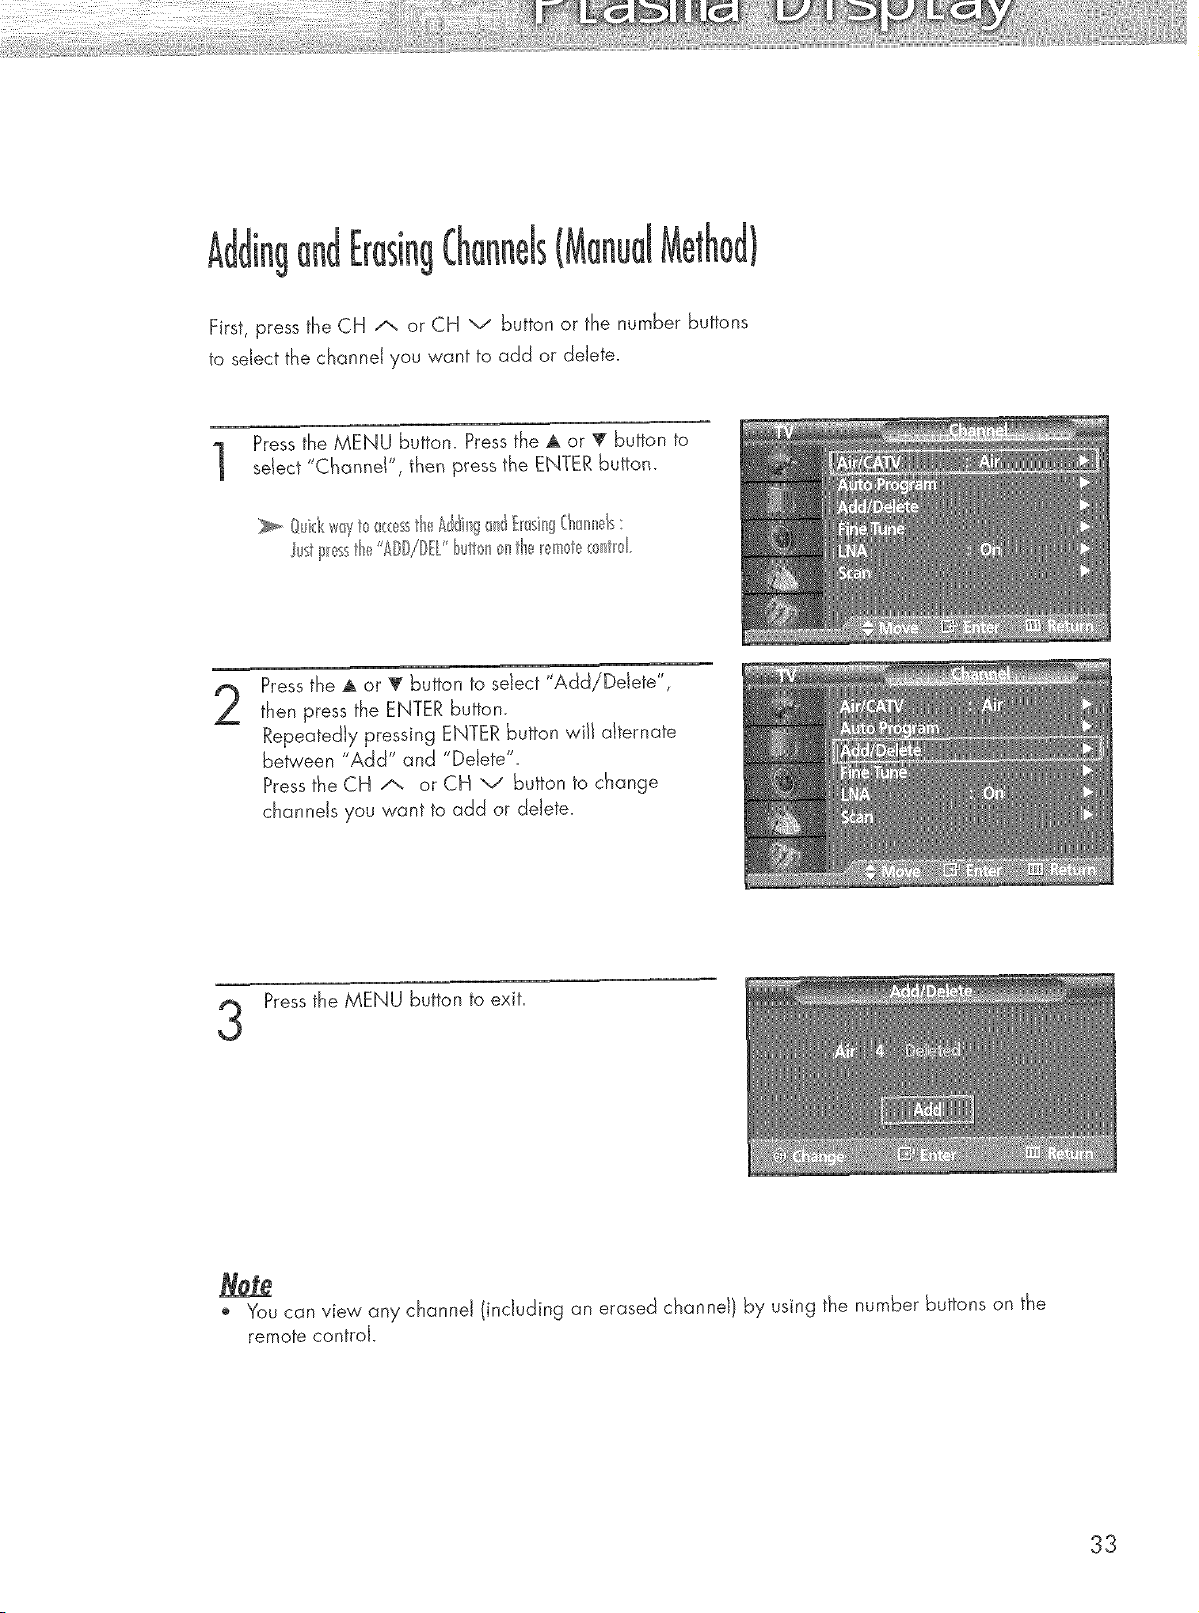
and
First, press the CH A or CH v button or the number buttons
to sdect the channel you want to add or delete.
Pressthe MENU button. Press the _ or _ button to
select "Channel", then press the ENTER button.
ust l_ssth_,_"A////fL' bul0nonth_,__m _t__:0ntM
2
Pressthe A or _' button to select "Add/Delete",
then press the ENTER button.
Repeatedly pressing ENTER button wilt alternate
between "Add" and "Delete".
Pressthe CH /'-, or CH v button to change
channels you want to add or delete.
Pressthe MENU button to exit.
o You can view any channel (including an erased channd) by using the number buttons on the
remote control.
33

(PiP
Pressthe MENU button. Press the A or _ button to
select "Channel", then press the ENTER button.
Pressthe A or _' button to select "Scan", then pressthe ENTER button.
Only the memorized channels are chosen.
P_esstte PPbult0nt_exitPIPmale
Pressthe MENU button to stop.
34
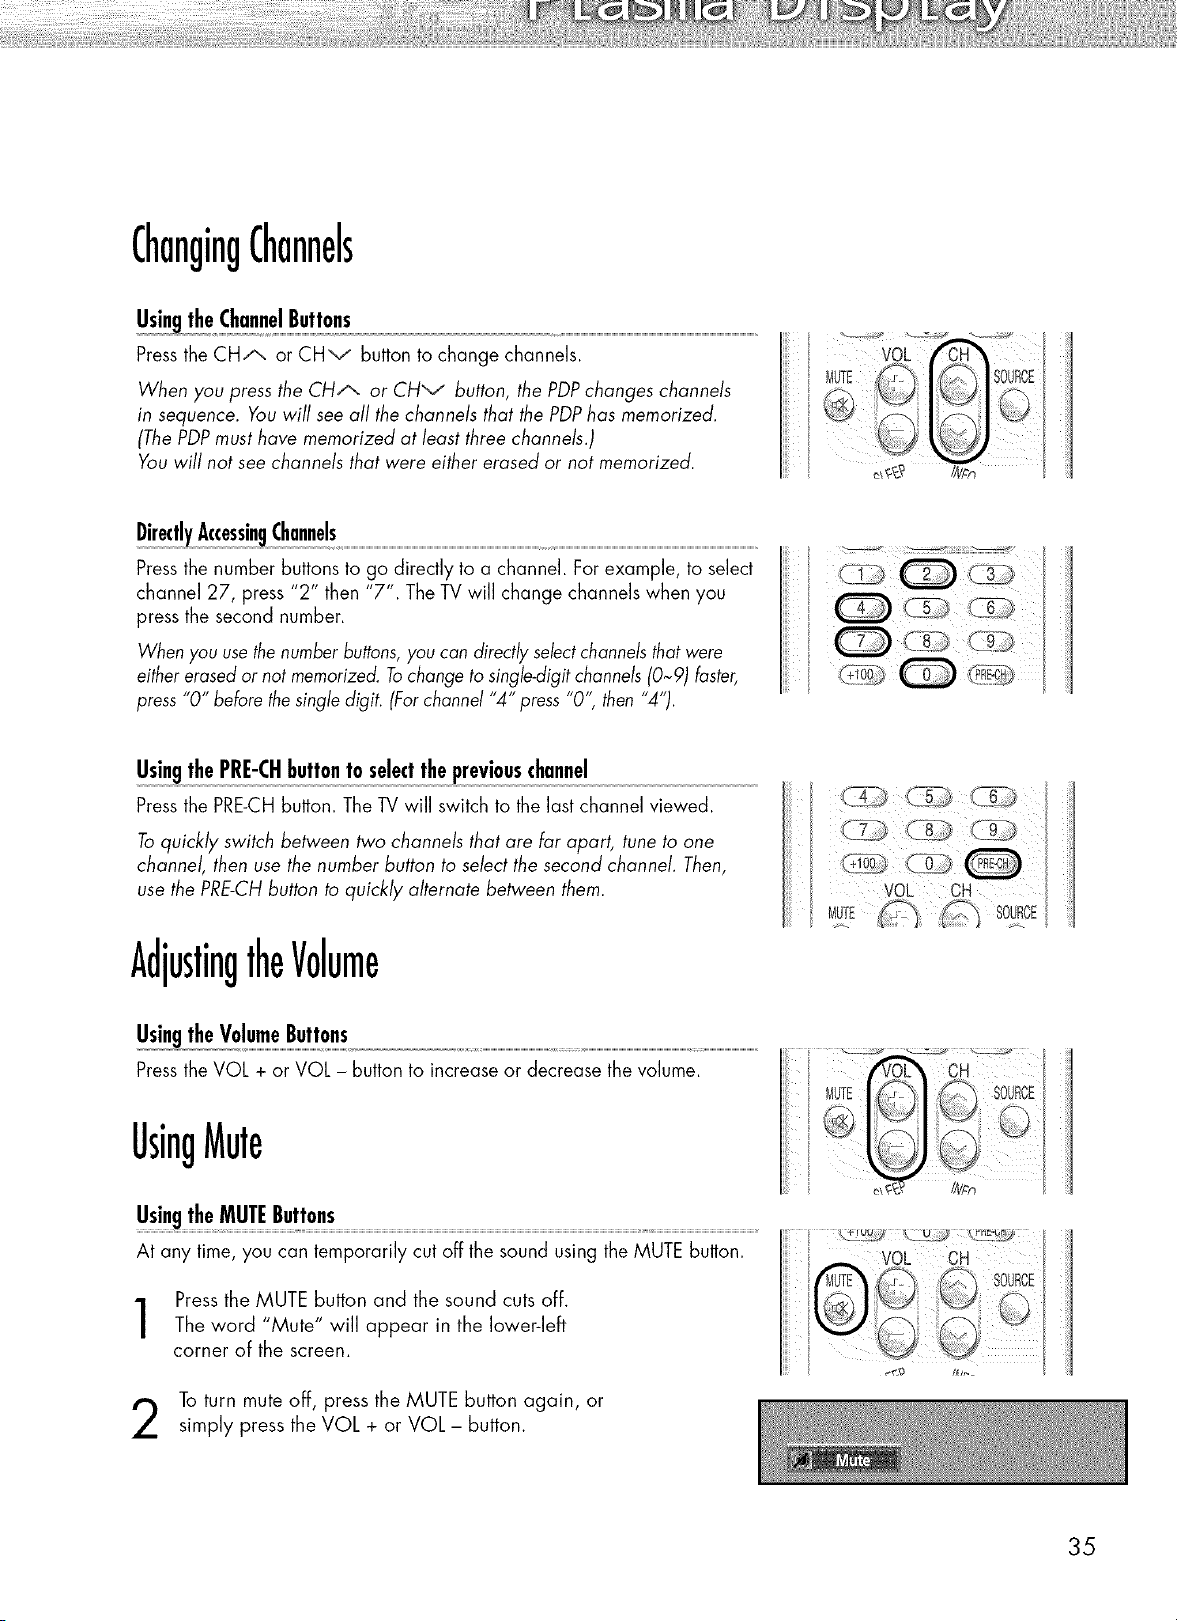
ChangingChannels
Pressthe CHA or CHv button to change channels.
When you press the CHA or CHv button, the PDPchanges channels
in sequence. You will see all the channels that the PDPhas memorized.
(ThePDPmust have memorized at least three channels.)
Youwill not see channels that were either erased or not memorized.
Pressthe number buttons to go directly to a channel. For example, to select
channel 27, press "2" then "7". The TV will change channels when you
press the second number.
When you usethe numberbuttons,you can directly sebct channelsthatwere
either erasedor not memorized.Tochange to singJe-digitchannels(0~9) faster,
press"0" bebre thesingle digit. (Forchannel "4" press "0", then "4").
ii '
Pressthe PRE-CHbutton. The TV will switch to the last channel viewed.
Toquickly switch between two channels that are far apart, tune to one
channel, then use the number button to select the second channel. Then,
use the PRE-CHbutton to quickly alternate between them.
AdjustingtheVolume
Pressthe VOL + or VOL - button to increase or decrease the volume.
UsingMute
UsingtheMUTEButtons
At any time, you can temporarily cut off the sound using the MUTE button.
Pressthe MUTE button and the sound cuts off.
The word "Mute" will appear in the lower-left
corner of the screen.
To turn mute off, press the MUTE button again, or
simply press the VOL + or VOL - button.
MuTE iOURoE
VOL CH
MUTE " i
iiii _o
35
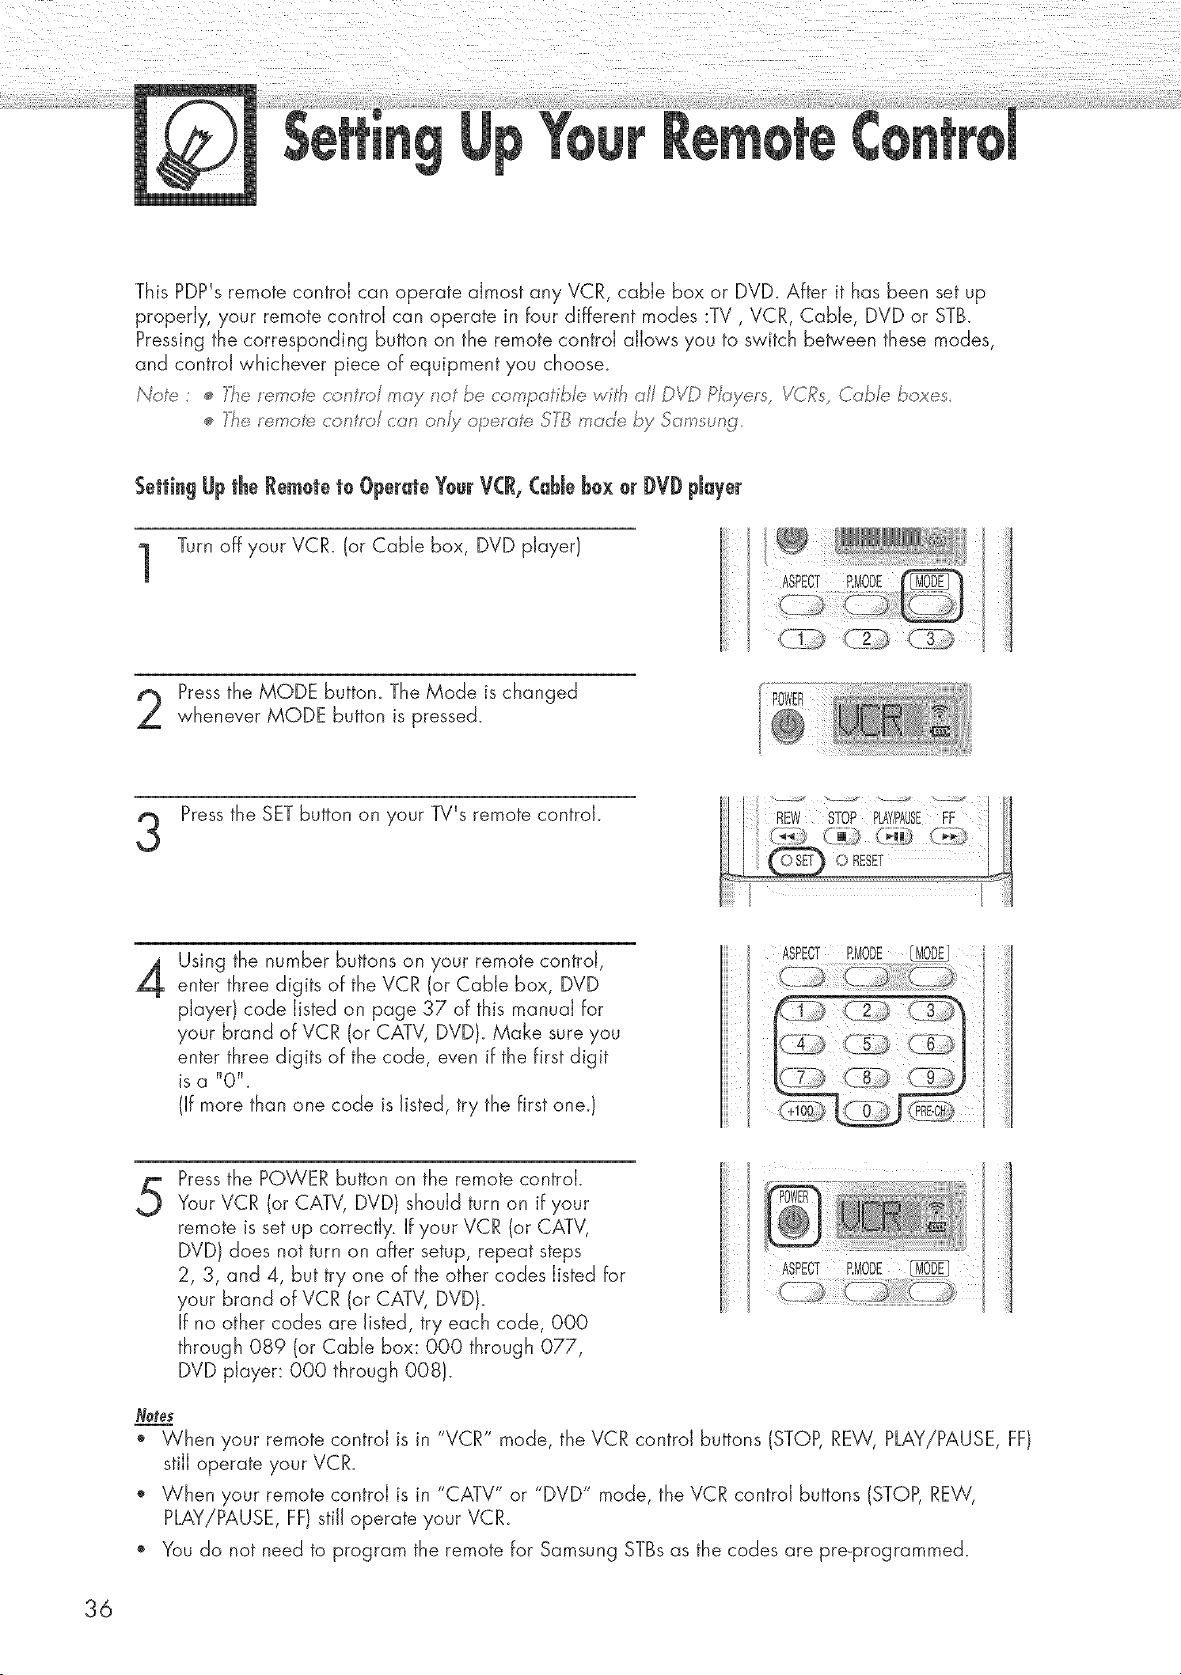
This PDP's remote control can operate almost any VCR, cable box or DVD_After it has been set up
properly, your remote control can operate in four different modes :TV, VCR, Cable, DVD or STB.
Pressing the corresponding button on the remote control allows you to switch between these modes,
and control whichever piece of equipment you choose_
Not_'_: _ _he emof_;÷control _ay not be co npafibb w _ha/J D_q_Pbyets, VCRs, Cobb boues
]_heremoi'e car#to/can orlJ.voperaP_;,SI_8mad_, by San'stag
Setting Up the Remoteto OperateY0urVCR,Cd_Jeb0x 0r J)VJ)player
Turn off your VCR. (or Cable box, DVD player}
Pressthe MODE button. The Mode is changed
whenever MODE button is pressed.
3
Pressthe SET button on your TV's remote control.
4
Using the number buttons on your remote control,
enter three digits of the VCR (or CaMe box, DVD
pJayerl code listed on page 37 of this manual for
your brand of VCR (or CATV, DVD}. Make sure you
enter three digits of the code, even if the first digit
Jsa "0",
(Ifmore than one code is listed,try the firstone. 1
5
Pressthe POWER button on the remote control.
Your VCR (or CATV, DVD} should turn on if your
remote is set up correctly. If your VCR (or CATV,
DVD} does not turn on after setup, repeat steps
2, 3, and 4, but try one of the other codes listed for
your brand of VCR (or CATV, DVD}.
If no other codes are listed, try each code, 000
through 089 (or Cable box: 000 through 077,
DVD player: 000 through 008).
ASPECT P,MODE
Nefe_
o When your remote controJ is in "VCR" mode, the VCR controJ buttons (STOP, REW, PLAY!PAUSE, FF}
stiJJoperate your VCR.
o When your remote controJ is in "CATV" or "DVD" mode, the VCR controJ buttons (STOP,REW,
PLAY!PAUSE, FF} stiJJoperate your VCR.
o You do not need to program the remote for Samsung STBsas the codes are pre-programmed.
36

Remote(ontrd Codes
VCR Codes
Brand Codes Brand Codes Brand Codes
Admiral 020 JVC 007 008 018 021 026 037 RCA
Aiwa 025
Akai 027 (304 032
Audio Dy_amics 007 026
Bel!&Howell 018
Broksonic 022
Candle 002 006 003 0!5 008 055
Canon 021 056
Citizen 002 003 006 008 015 055
Colortyme 007
Craig 002 024
Curtis Mathes 002 017 007 008
021 025 056 064 066
Daewoo 003 015 010 011 012 013
014 016
DBX 007 026
Dimensia 0! 7
Dynatech 034
Emerson 001 003 006 021 022 025
030 032 034 040 047 050
052 060 063 065 066 067
069
Fisher 018 024 028 029 048 051 061
Funai 025
General Electric 027 002 021
005 056
Go Video 002
LG(GoIdstar) 006 007008 009 010
Harman Kardon 007
ttitachi 019 025 041 042
InstantReplay 021
]C Penny 002 007 018 019 021
026 037 041 054 056
Kenwood 007 008 018 026 037
KLH 070
Lloyd 025
Logik 038
LX_ 025
Magnavox 02! 036 056 059
Marantz 008 0{37018 021 026 036
037 062
Marta 006
ME1 021
Memorex 006 021 024 025
MGA 034
Midland 005
Minolta 0"19 041
Mftsubishi 019 034 041 046
Montgomery Ward 020
MTC 002 025
Multitech 002 025 038 005
NEC 018 007 026 037 008 062 064
Optimus 020
Panasonic 021 056 071 072
Pentax 019 041
Pentex Research 008
Pihilco 021 036 056 059
Phi/ips 021 036
Pioneer 019 026 039 053
Portland 015 049 055
PROSCAN 017
Quartz 018
Quasar 021 056
Radio Shack/P.ealistie
006 018 020 021 024 025 029 034 048 056
017 019 002 021 035 041 043 057 068
Samsung 000 001 002 003 004 005
Sansui 026
Sanyo 018 024
Scott 003 047 052 067
Sears 018 019 006 024 028 029 041
048 05!
Sharp 020 034 045 015
SMmom 027 033 038 058
Signature 025
Sony 027 033 044
Sylvania 02! 025 036 056 059
SymphoMc 025
'lhndy 018 025
Tashika 006
Tatung 037
Teac 025 037 068
Technics 021
3>knika 021 006 025 031
TMK 066
Toshiba 003 019 029 051 052
[btevision 002 006
Unitech 002
VPctorResearoh 007 026
Victor 026
Video Concepts 007 026
Videosomc 002
Wards 002 003 006 019 020 02!
024 025 034 038 041
Yamaha 007 008 018 026 037
Zenith 023 027 033 073
CabJe Box Codes
Brand Codes Brand Codes Brand Codes
Anvision 017 018 Phi/ips 019 021 023 028 Sprucer 022
GI 041
Han-t_in 003 024 031
Hitachi 025 030
Jerrold 038 039
Maconr 025 030
Magnavox 019 023 028
Oak 026
Partasonic 003 022 027 037 044
Pioneer 018 020 004 044
RCA 014 022 040
Regal 003
Regency 015 023
SA 042 043
Sarnsung 000 001 002 003 004 005
006 007
Scientific Atlanta 042 043
Stargate 2000 036
Sylvania 016
Texscan O]6
Tocom 032
Universal 033 034
Viewstar 039 02! 023 028
Warner amex 046
Zenith 017 029 035 037 045
DVD Codes
Brar_d Codes
Samsung 000 00!
VC 002
PROSCAN 003
RCA 003
LG(Go]dstar) 006
Sony 007
Denon 008
Curtis Mathes 009
37
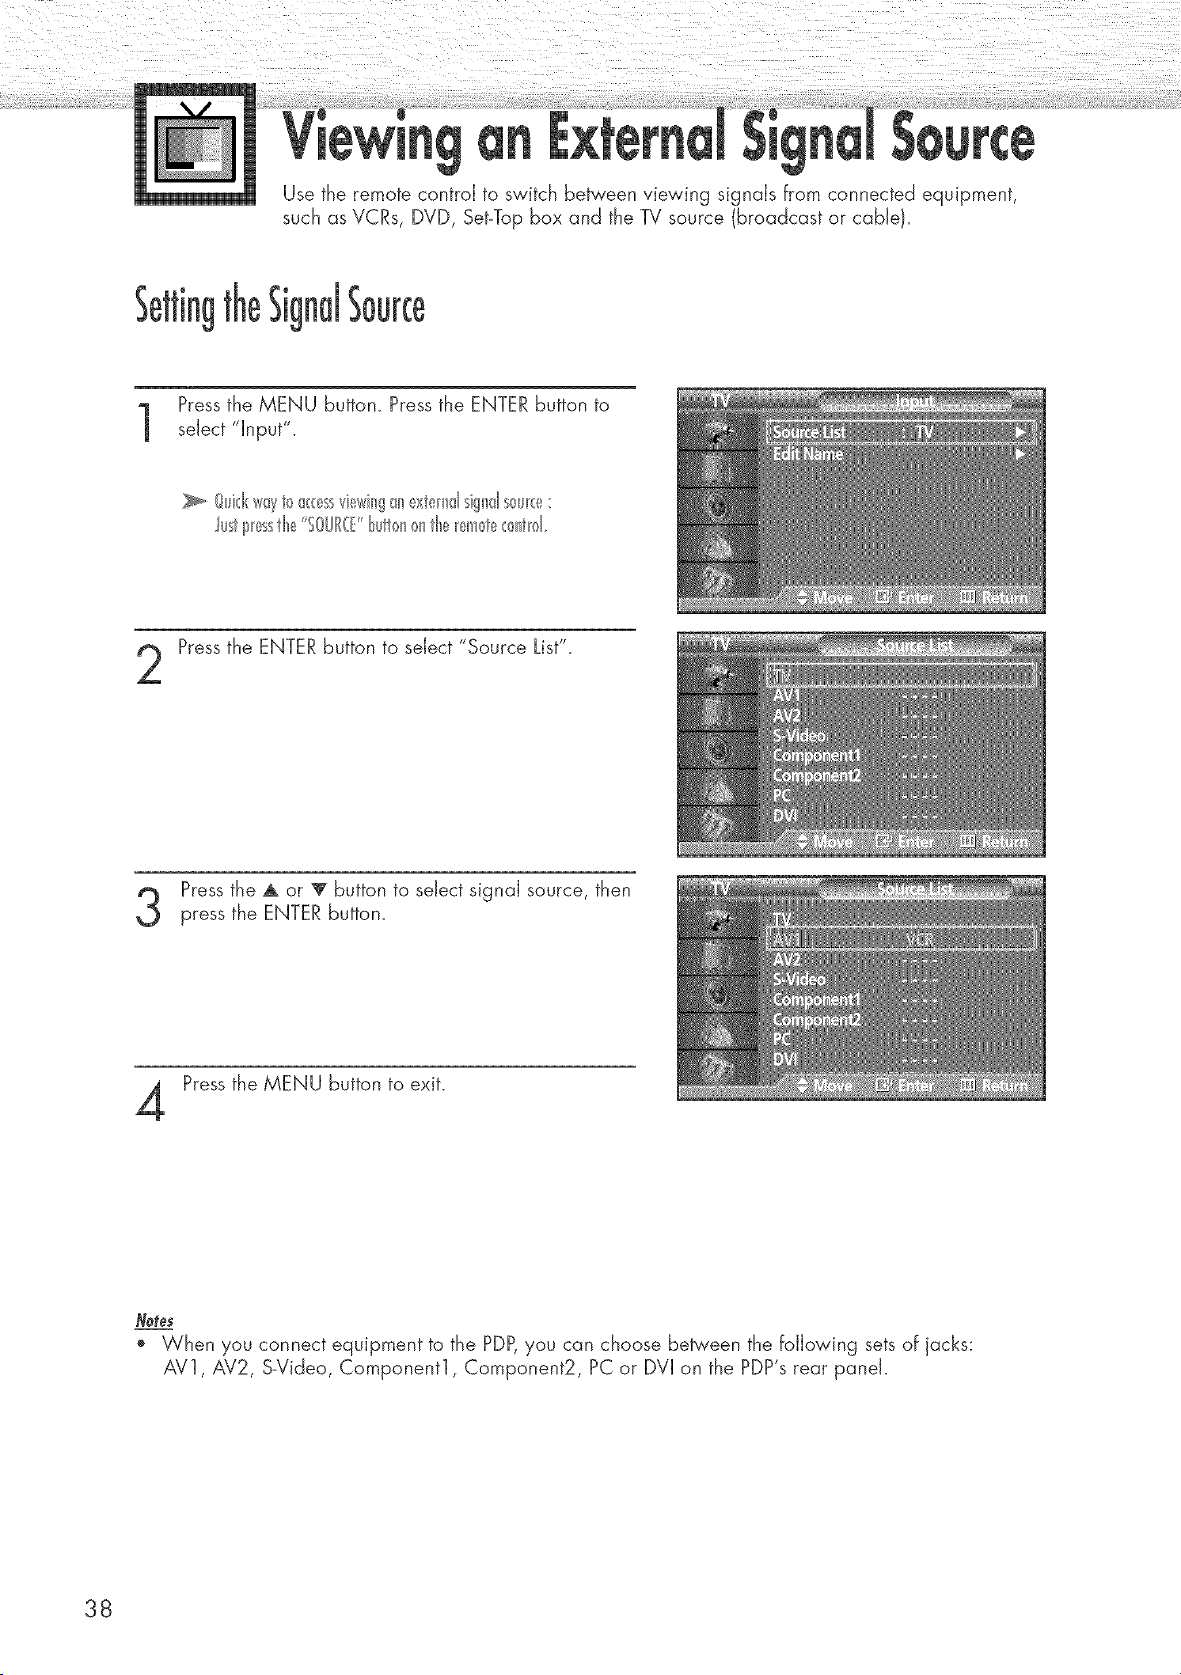
Use the remote control to switch between viewing signals from connected equipment,
such as VCRs, DVD, Set-Top box and the TV source (broadcast or cable!.
Pressthe MENU button. Press the ENTER button to
select "Input".
lustI_esstl_e%0/JIR(f"t_utt<_n_ntl_e_em0t__:_nt_d
Pressthe ENTERbutton to select "Source List".
Pressthe A or T button to select signal source, then
press the ENTER button.
Press the MENU button to exit.
Notes
When you connect equipment to the PDP,you can choose between the following sets of jacks:
AV1, AV2, S-Video, Component1, Component2, PC or DVI on the PDP's rear panel.
38
tO
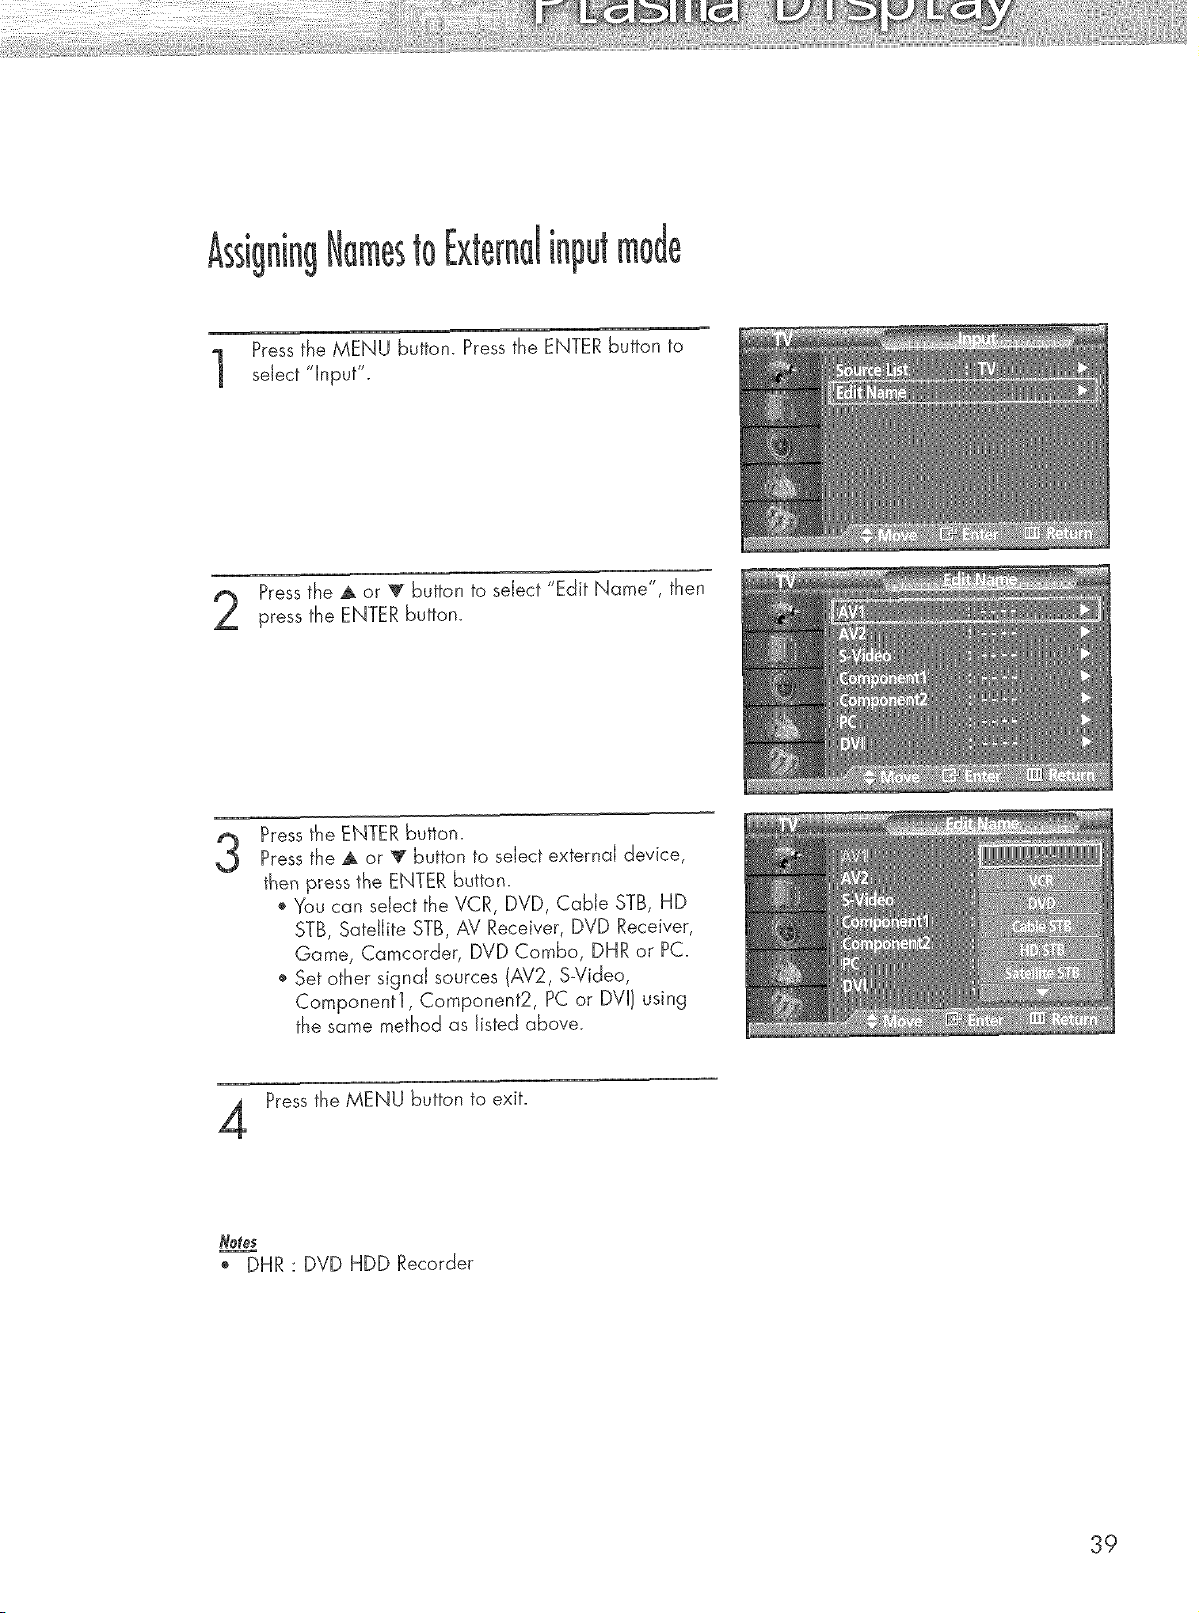
Pressthe MENU button. Press the ENTER button to
sdect "Input".
Pressthe J. or _ button to select "Edit Name", then
press the ENTER button.
3
Press the ENTER button.
Pressthe A or _r button to select external device,
then press the ENTER button.
o Y'aucan sdect the VCR, DVD, Cable STB, HD
STB, Satellite STB, AV Receiver, DVD Receiver,
Game, Camcorder, DVD Combo, DHR or PC.
o Set other signal sources (AV2, S_Video,
Cornponentl, Component2, PC or DVI) using
the same method as listed above.
Pressthe MENU button to exit.
_, DHR : DVD HDD Recorder
39

Customizing the Picture ................................................................ 42
Using Automatic Picture Settings .................................................... 43
Selecting the Color Tone................................................................ 44
DNJe (Digital Natural image engine} ............................................ 45
Changing the Screen Size ............................................................ 46
Freezing the Picture ...................................................................... 48
Viewing the Picture-in-Picture .......................................................... 49
Selecting a Signal Source (Antenna or Cable) for PiP........................ 54
Setting the MCC(My Control Color 1 Mode ...................................... 56
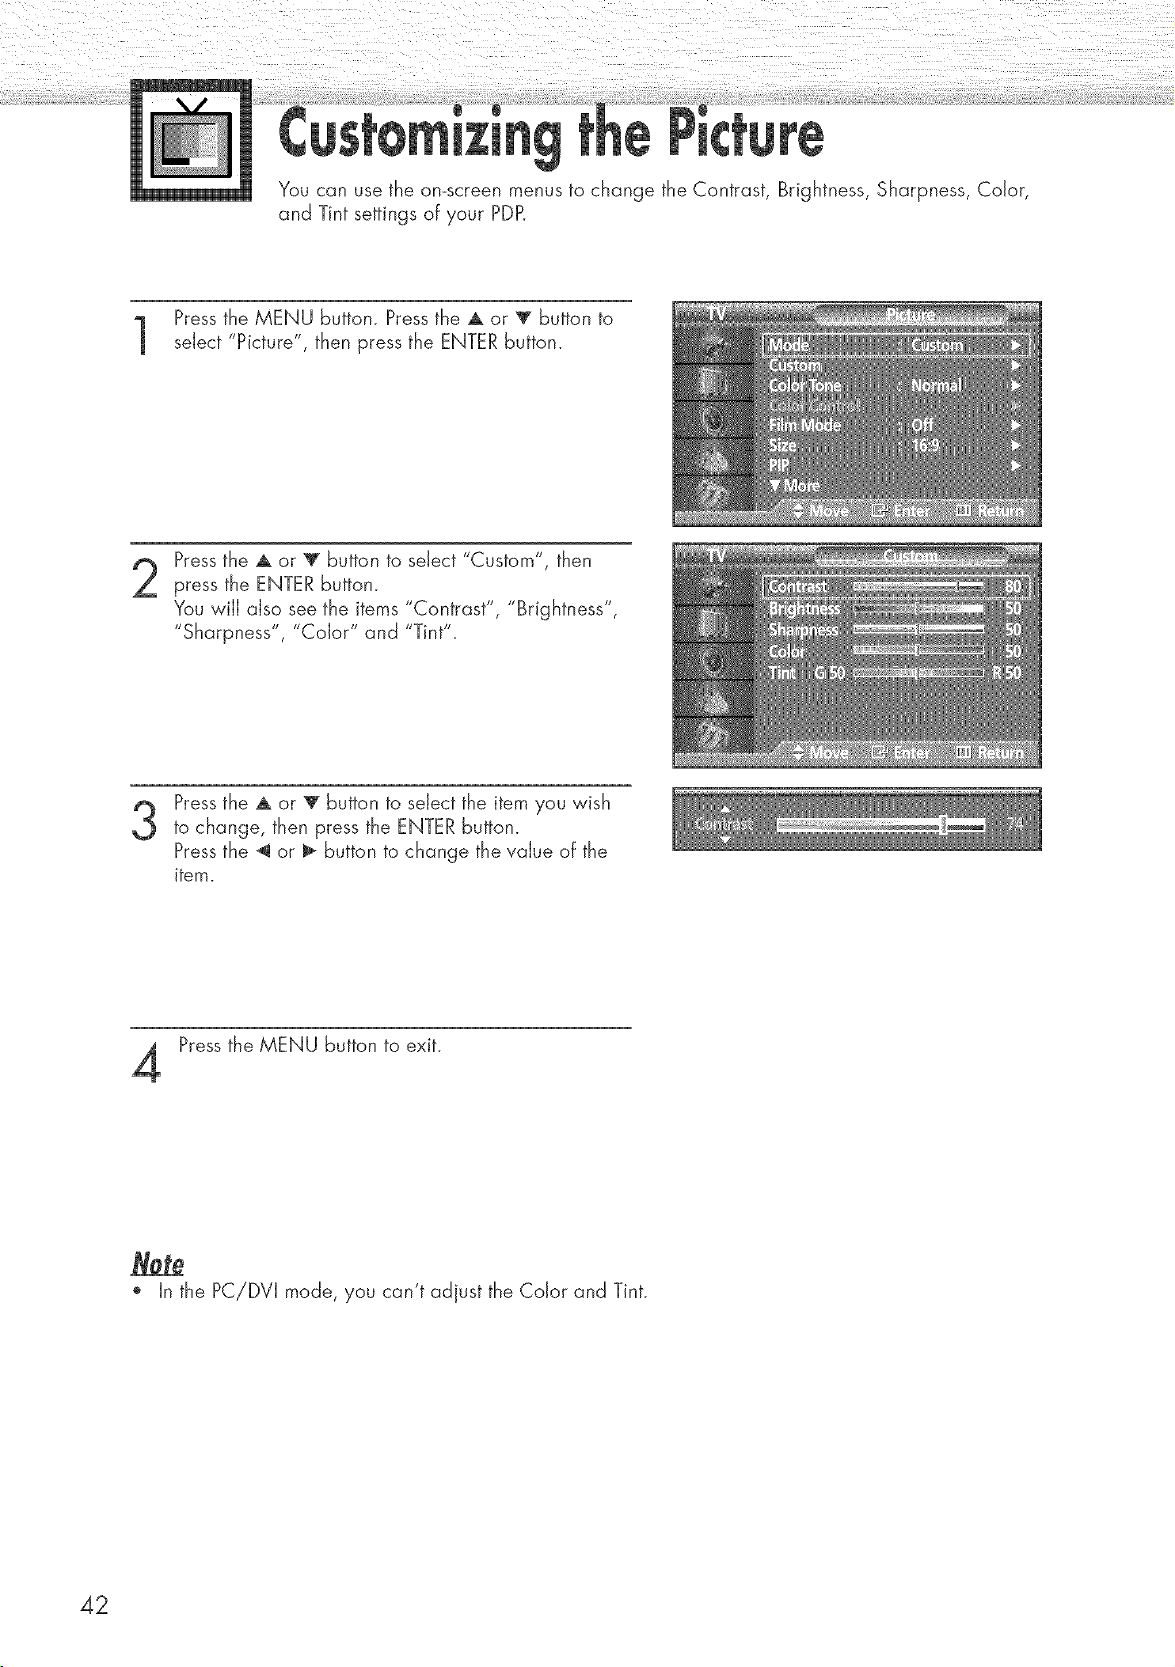
You can use the on-screen menus to change the Contrast, Brightness, Sharpness, Color,
and Tint settings of your PDR
Pressthe MENU button. Press the A or T button to
select "Picture", then press the ENTER button.
2
Pressthe A or T button to select "Custom", then
press the ENTER button.
You wiJJalso see the items "Contrast", "Brightness",
"Sharpness", "Color" and "Tint".
3
Pressthe A or V button to select the item you wish
to change, then press the ENTER button.
Pressthe _ or _ button to change the value of the
item.
Press the MENU button to exit.
o In the PC!DVI mode, you can't adjust the Color and Tint.
42
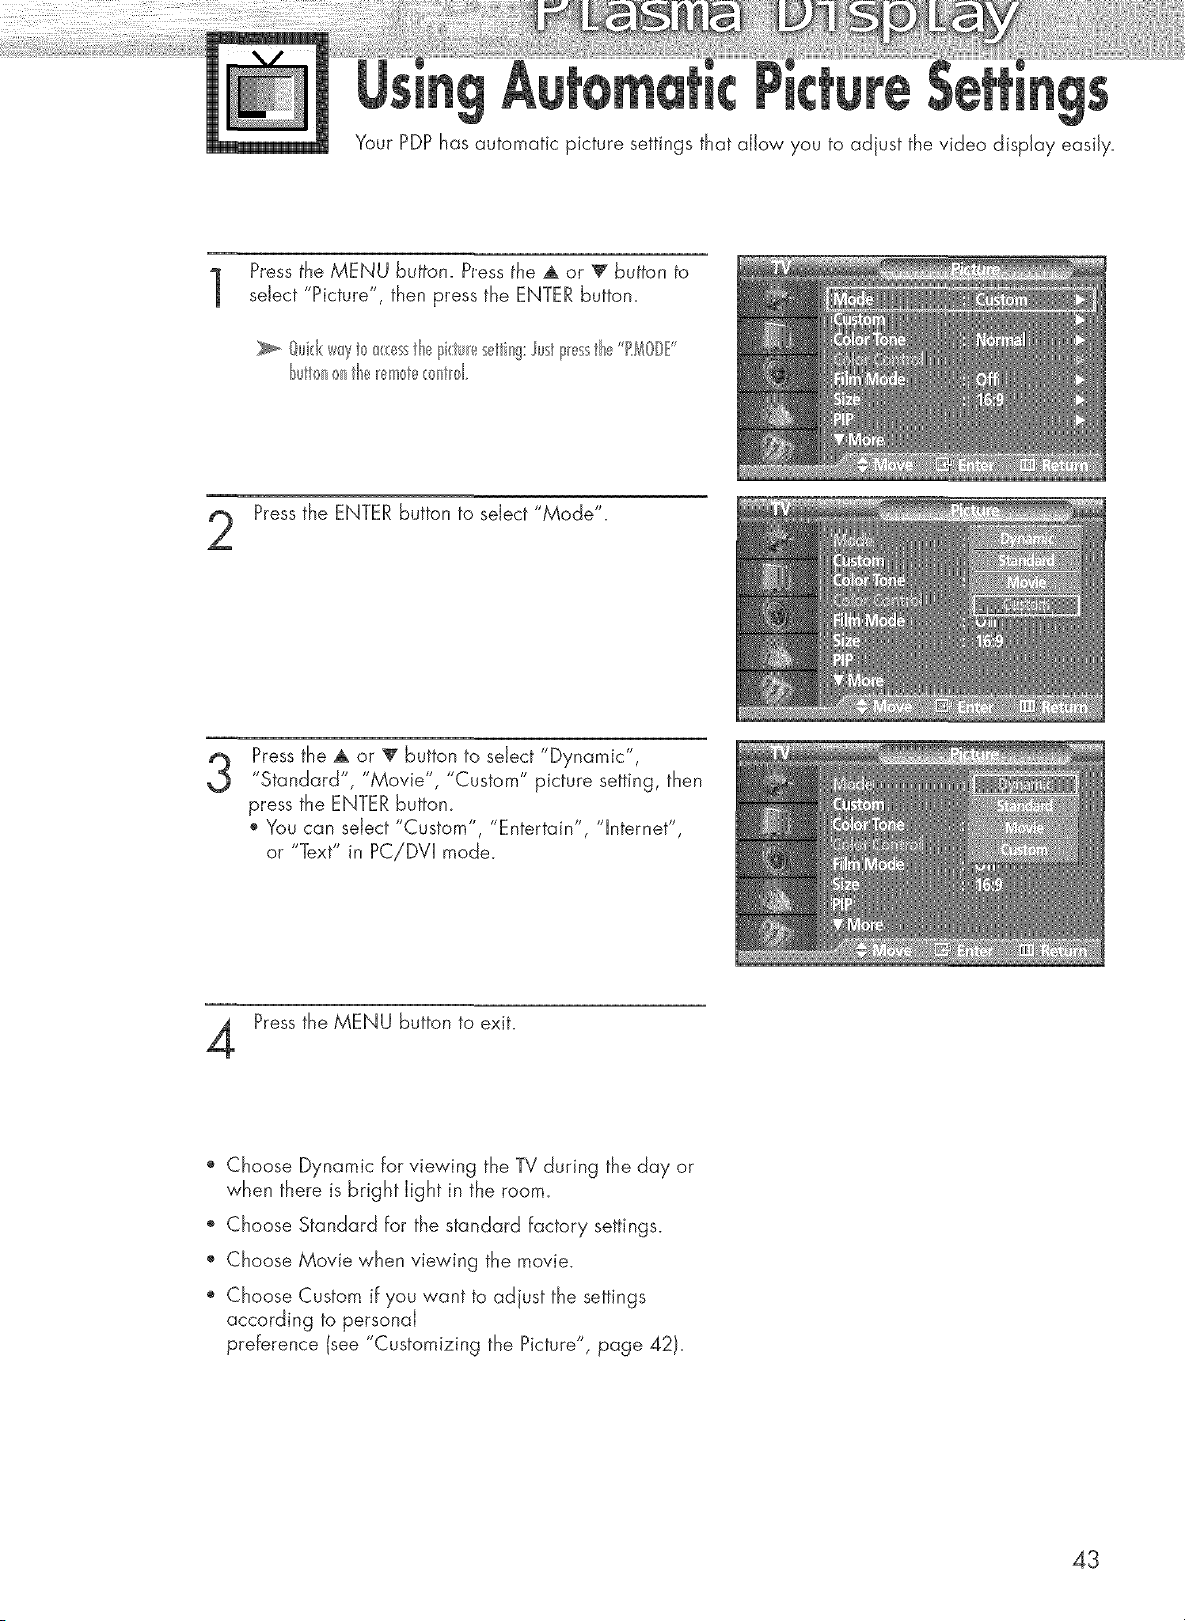
Your PDP has automatic picture settings that allow you to adjust the video display easily.
Pressthe MENU Sultan. Press the A or _ bulton b
select "Picture", then press the ENTER button.
t_utt<nonthe_em>t_<:_>nt_>1
Pressthe ENTER button to select "Mode".
3
Pressthe A or _' button to select "Dynamic",
"Standard", "Movie", "Custom" picture setting, then
press the ENTER button.
', You can select "Custom", "Entertain", "lnternet",
or "Text" in PC!DVI mode.
Pressthe MENU button to exit.
o Choose Dynamic for viewing the TV during the day or
when there is bright light in the room.
', Choose Standard for the standard factory settings.
Choose Movie when viewing the movie.
" Choose Custom if you want to adjust the settings
according to personal
preference (see "Customizing the Picture", page 421.
43
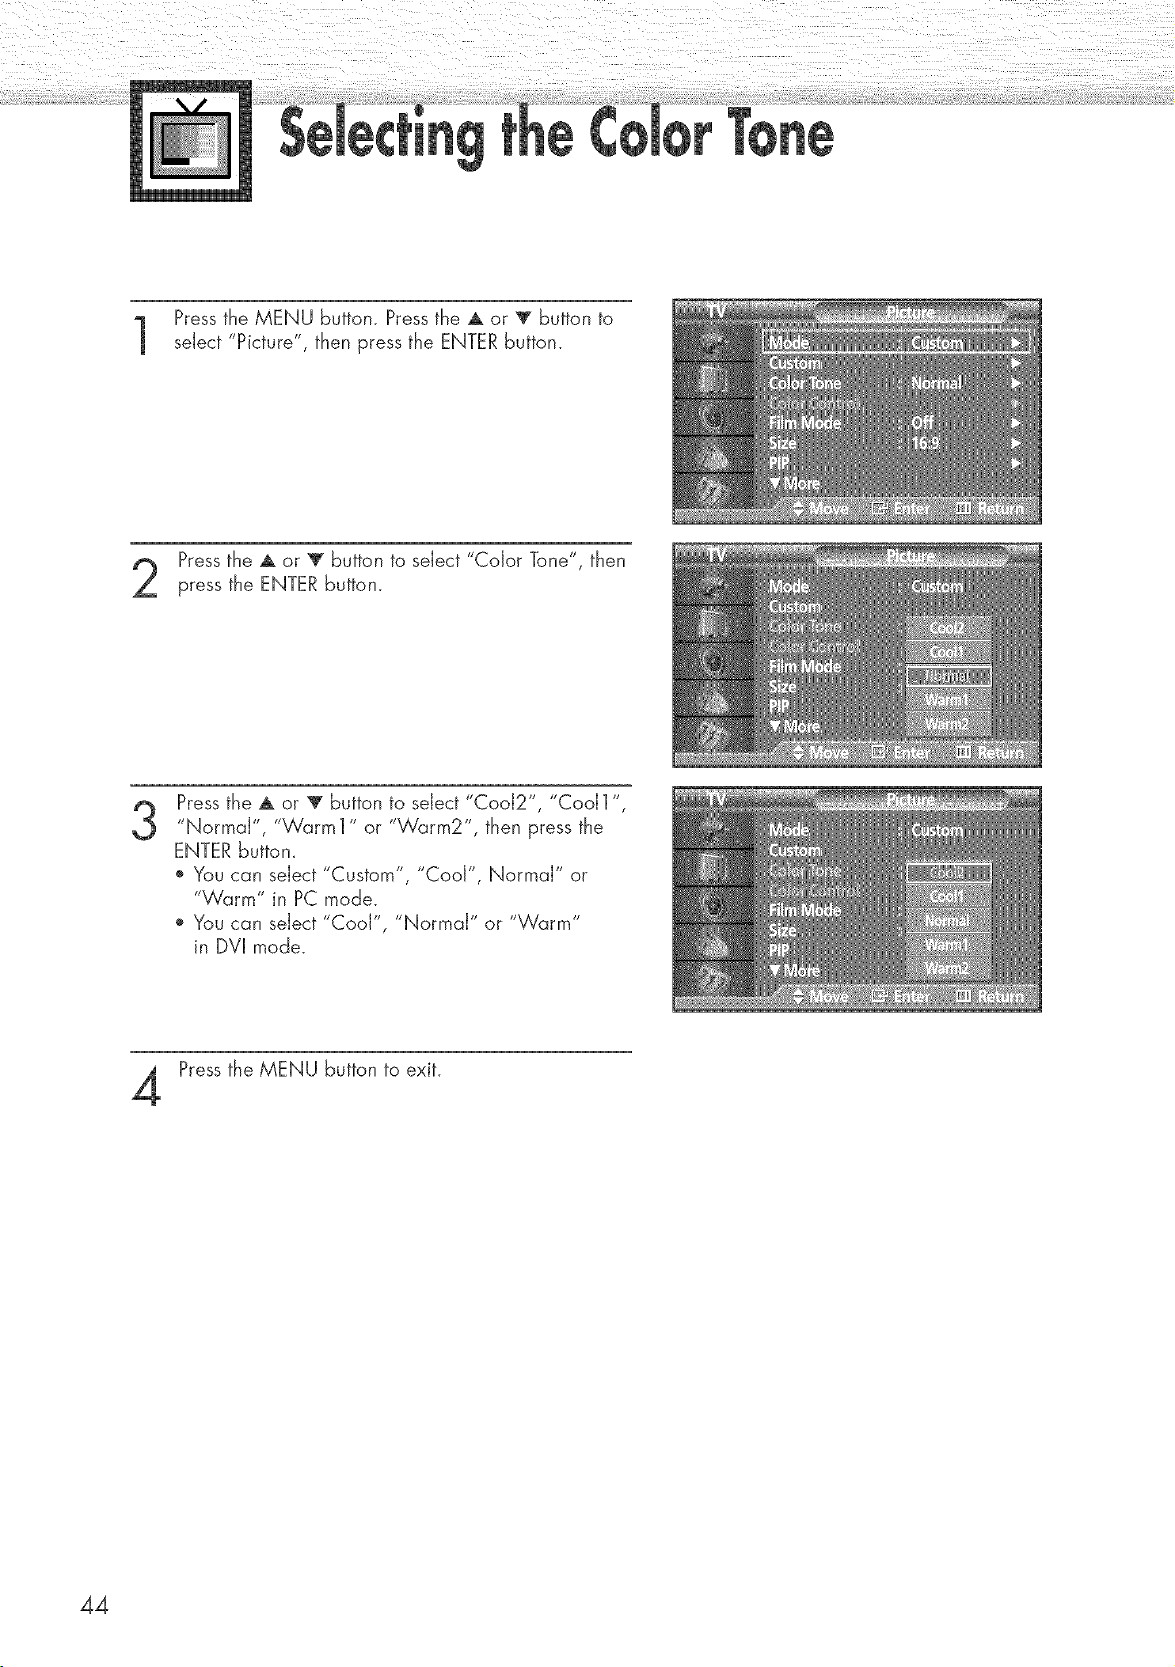
Pressthe MENU button. Press the A or T button to
select "Picture", then press the ENTER button.
Pressthe A or _ button to select "Color Tone", then
press the ENTER button.
3
Press the A or V button to select "Cool2", "Cool1",
"Normal", "Warm1" or "Warm2", then press the
ENTER buttom
o You can select "Custom", "Cool", Normal" or
"Warm" in PC mode.
o You can select "Cool", "Normal" or "Warm"
in DVI mode.
Press the MENU button to exit.
44
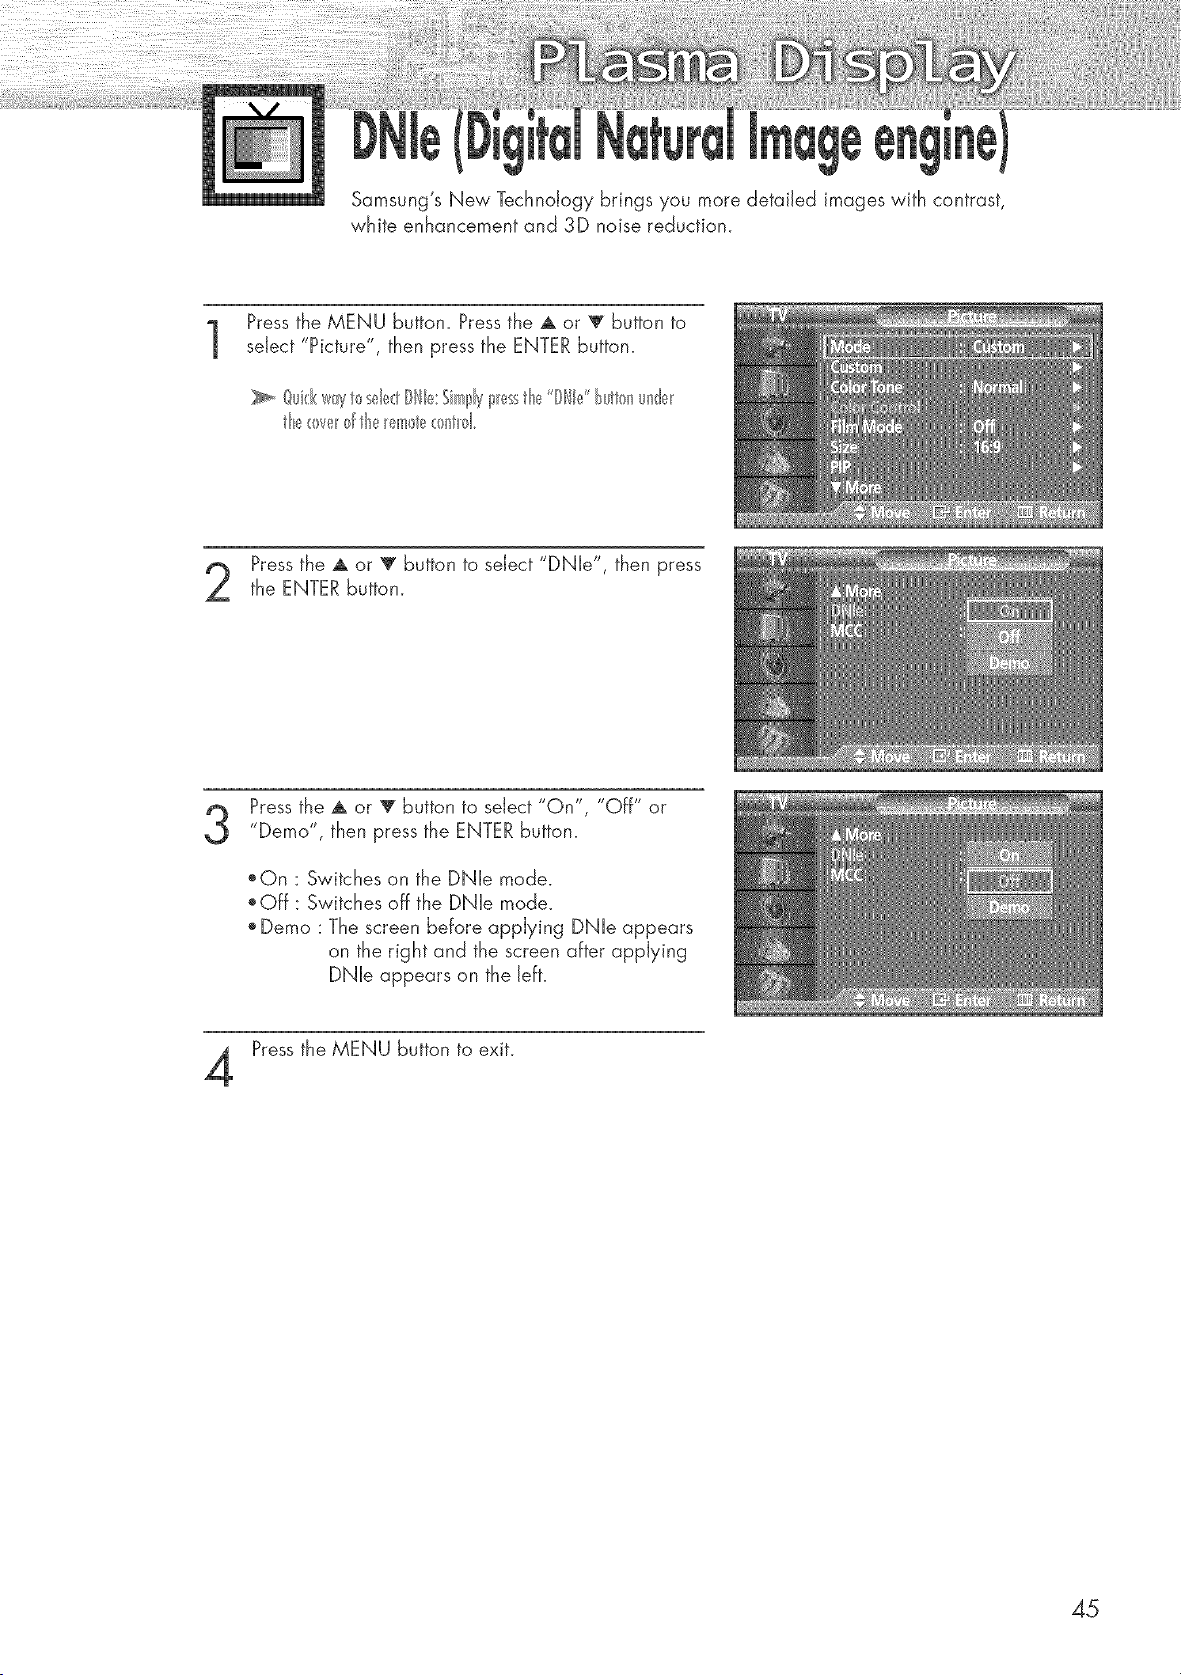
Samsung's New Technology brings you more detailed images with contrast,
white enhancement and 3D noise reduction.
Press the MENU button. Pressthe A or _ button to
select "Picture", then press the ENTER button.
Quk:l('_w_ytosel_;_:tISle: ShnlslyI_essth_,_"ISle' buttonunde_
Pressthe A or _' button to select "DNle", then press
the ENTER button.
Pressthe A or _' button to select "On", "Off" or
"Demo", then press the ENTER button.
_On : Switches on the DNle mode.
_Off: Switches off the DNle mode.
Demo : The screen before applying DNle appears
on the right and the screen after applying
DNle appears on the left.
Pressthe MENU button to exit.
45
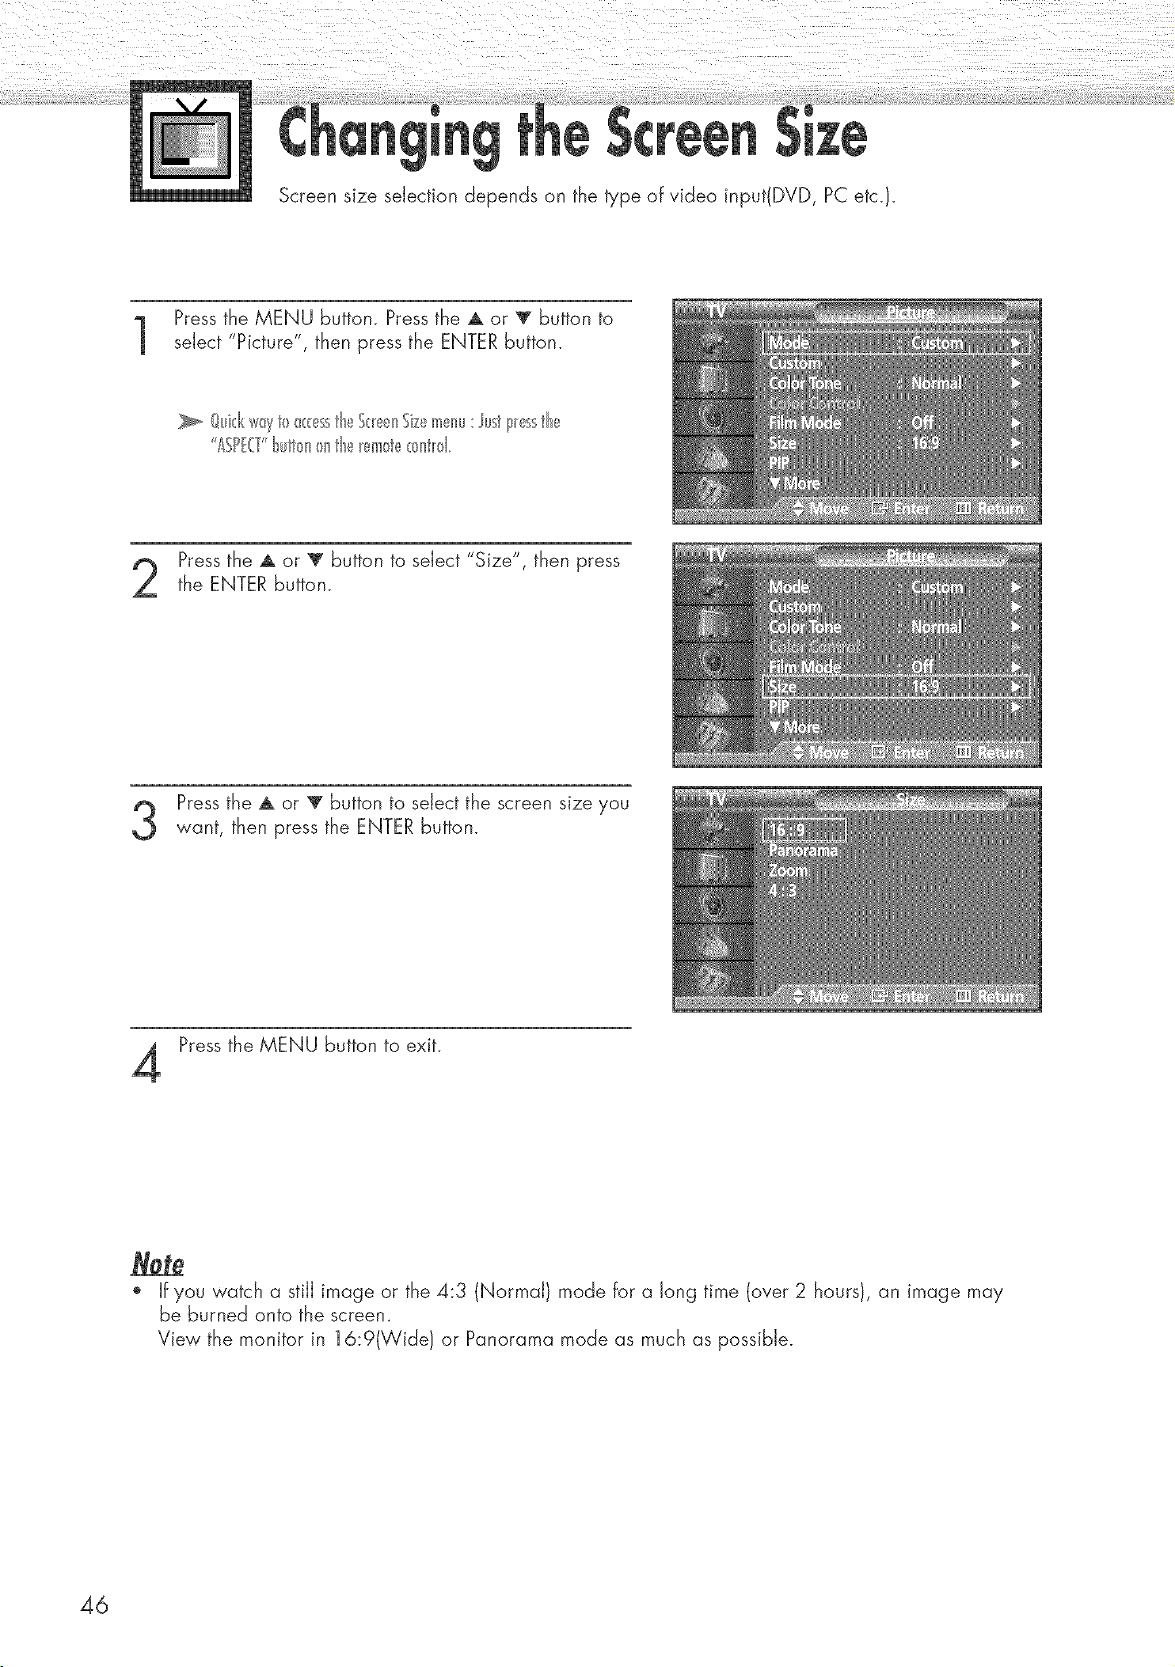
Screen size selection depends on the type of video input(DVD, PC etc.}.
Pressthe MENU button. Press the A or T button to
select "Picture", then press the ENTER button.
Quid(s*_yt0 _<:esstheS(_e_nSizemenu: ust I_essth_._
ASP.T lult_>n_ntle _em_te_>nt_>1
Pressthe A or _' button to select "Size", then press
the ENTER button.
Press the A or V button to select the screen size you
want, then press the ENTER button.
Press the MENU button to exit.
o If you watch a still image or the 4:3 (Normal} mode for a long time (over 2 hours}, an image may
be burned onto the screen.
View the monitor in 16:9(Wide} or Panorama mode as much as possible.
46
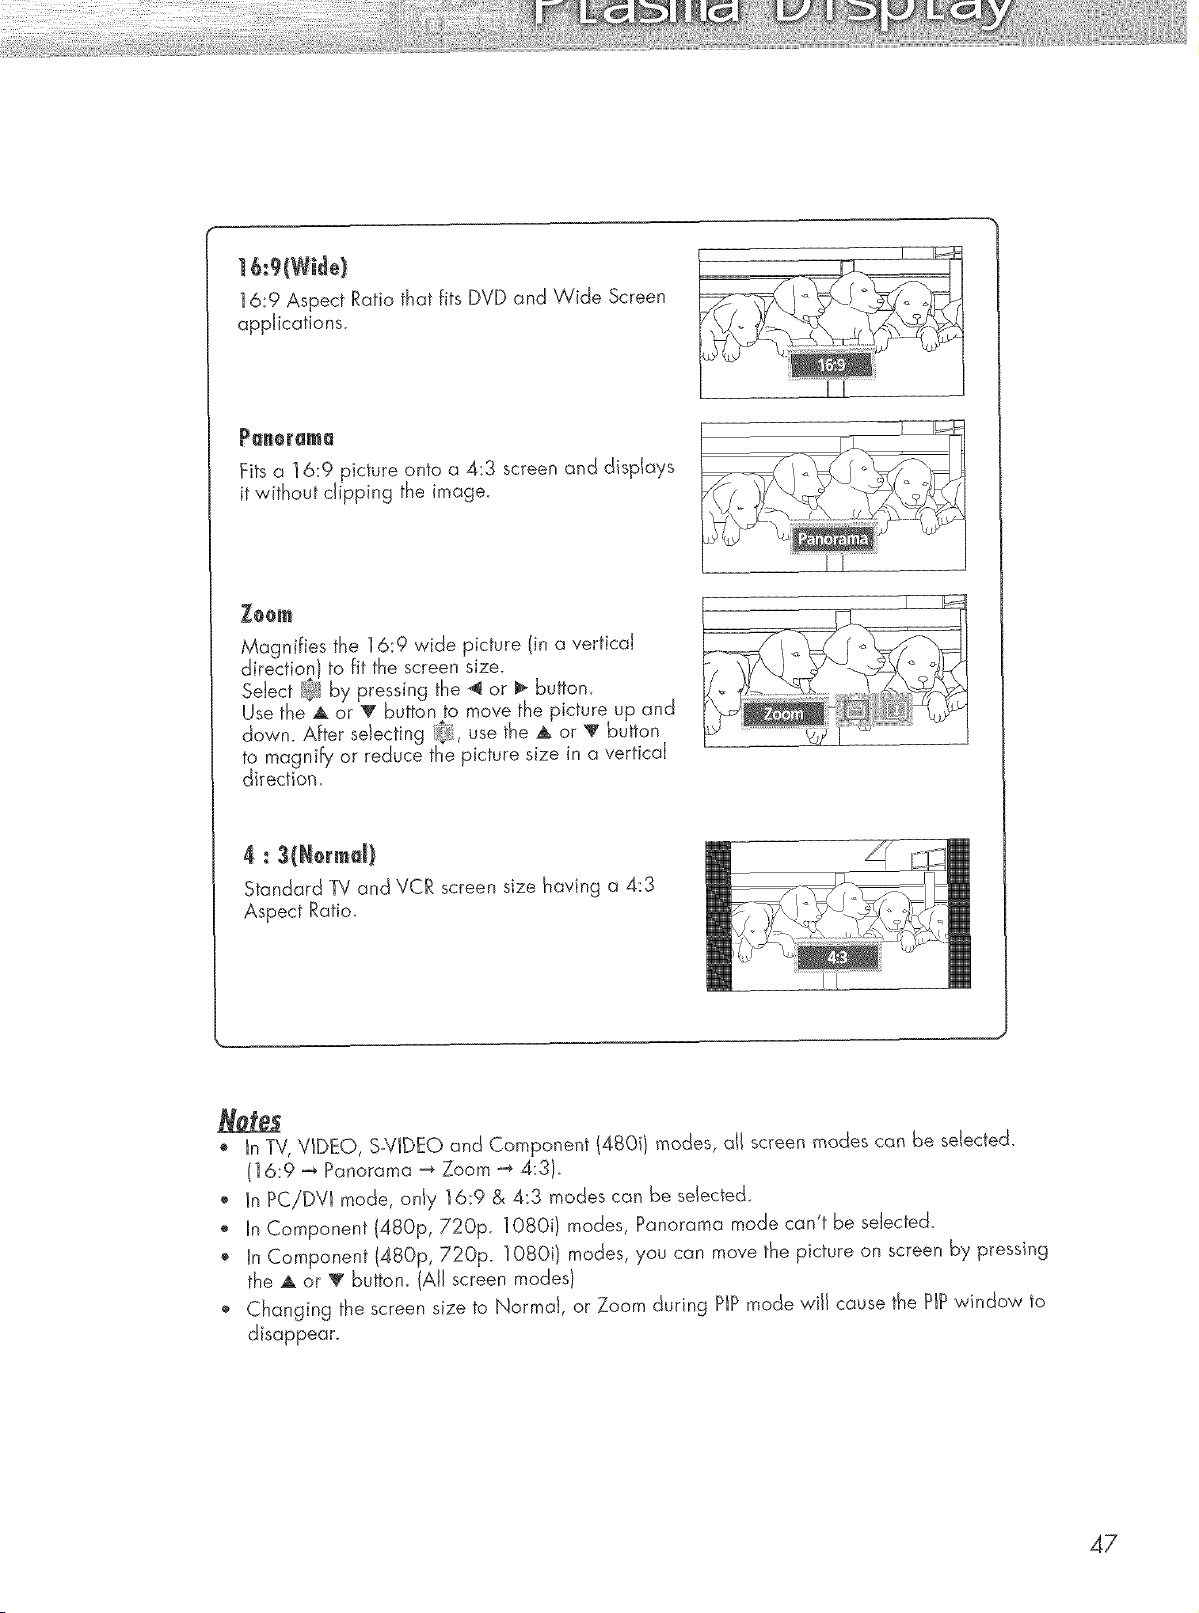
6:9 W de
16:9 Aspect Ratio that fits DVD and Wide Screen
appJications.
_aROF_m_
Fits a ] 6:9 picture onto a 4:3 screen and displays
it without dipping the image.
_o0_
Magnifies the 16:9 wide picture (in a verticaJ
direction J to fit the screen size.
SeJect B_Iby pressing the 4 or _ button.
Use the A or _r button to move the picture up and
down. AFter sdecting _, use the A or V button
to magnify or reduce the picture size in a verticaJ
direction.
UU
JJ
4 : (N0rrnd)
Standard TV and VCR screen size having a 4:3
Aspect Ratio_
In TV, VIDEO, S-VIDEO and Component (480il modes, all screen modes can Be seJected.
(]6:9 _ Panorama _ Zoom _ 4:31_
, In PC/DVI mode, only 16:9 & 4:3 modes can be selected
o JnComponent (480p, 720p. ] 080i} modes, Panorama mode can't be seJected_
o In Component (480p, 720p. 1080i/modes, you can move the picture on screen by pressing
the A or V buttom (All screen modes}
, Changing the screen size to NormaJ, or Zoom during P)P mode will cause the PIPwindow to
disappear.
47
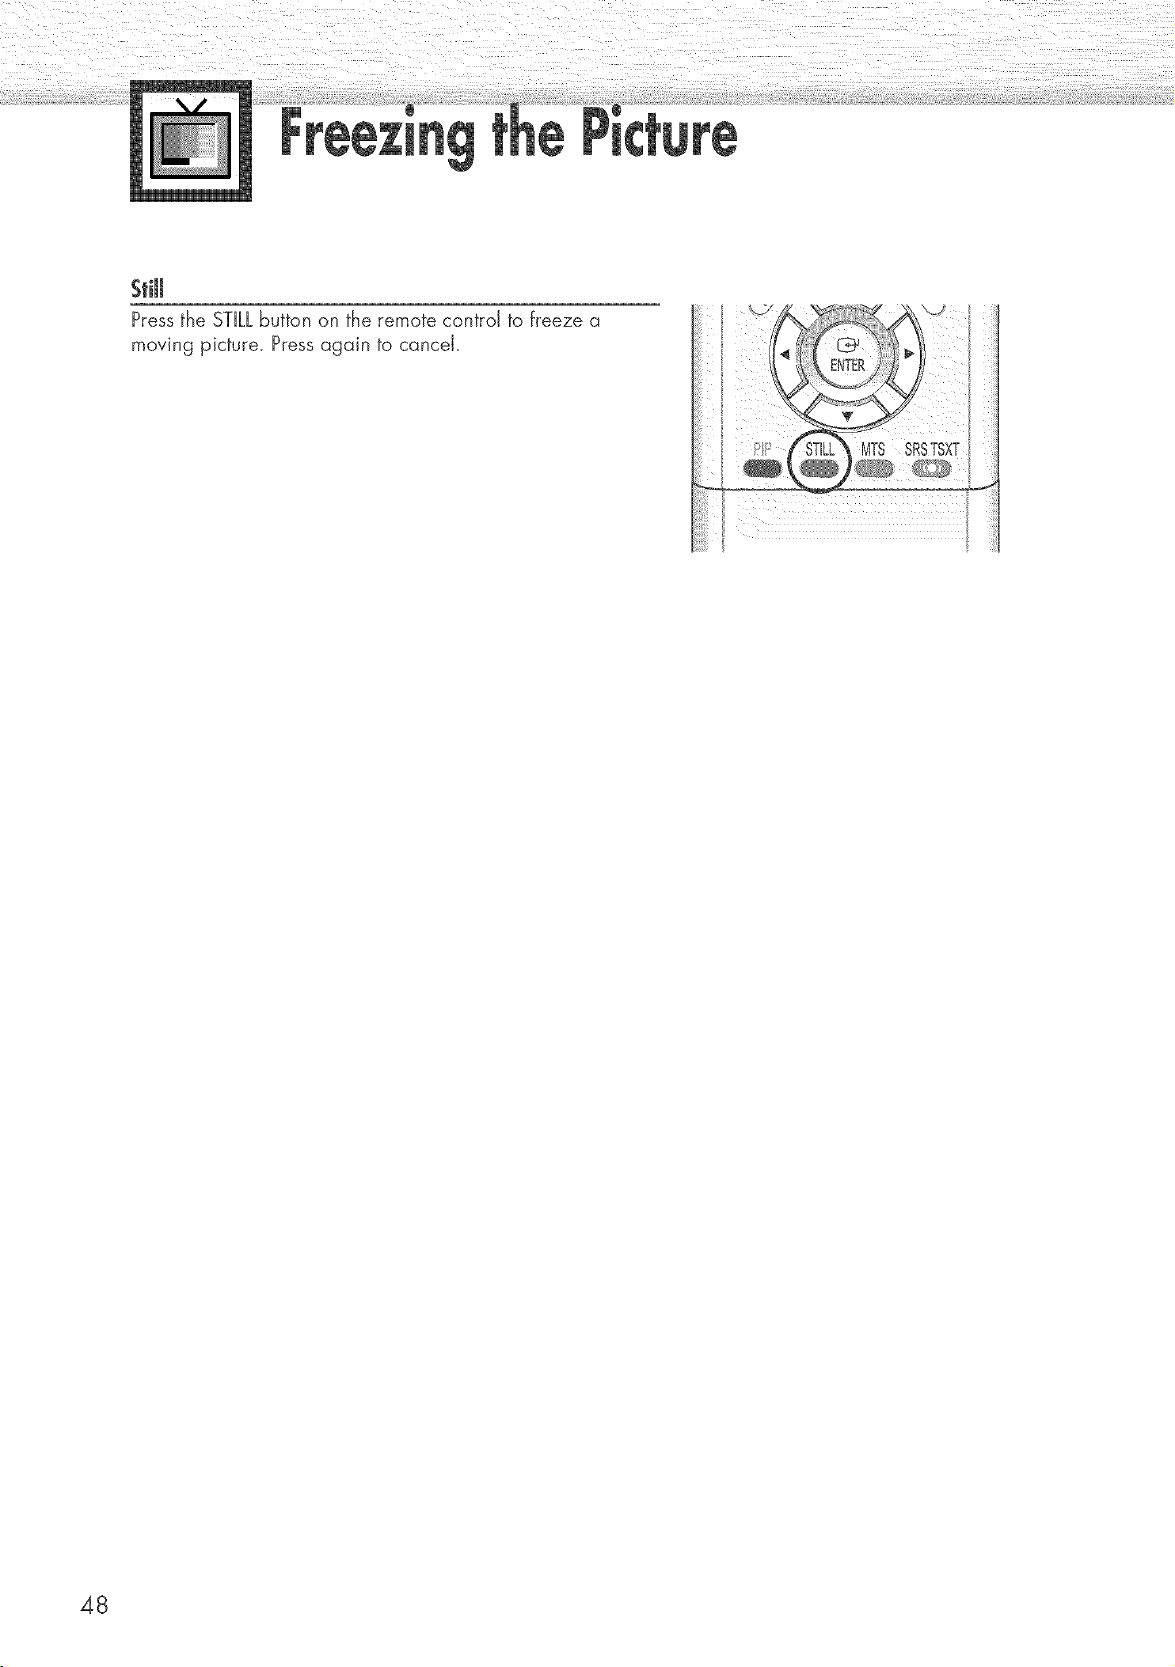
Stl
Pressthe STILLbutton on the remote control to freeze a
moving picture. Pressagain to cancel.
48
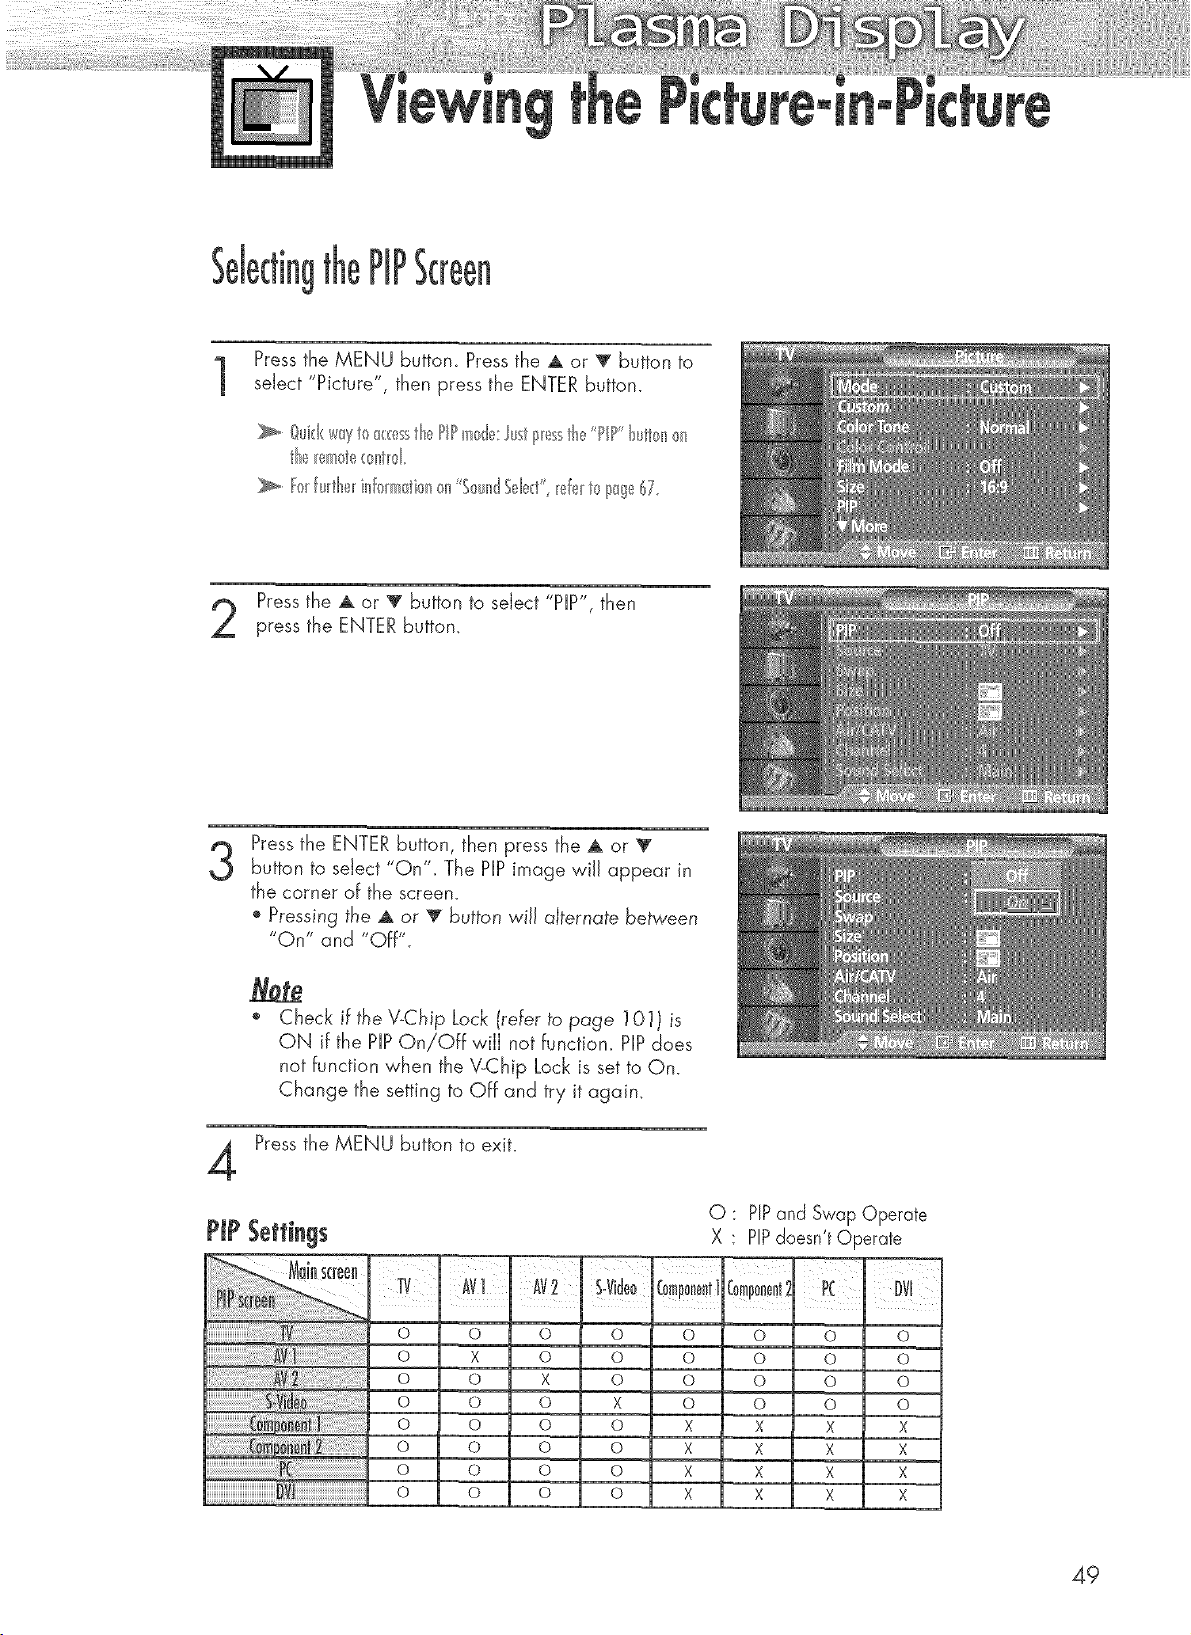
PIPScreen
Pressthe MENU button. Press the ,A or V button to
select "P'cture , then press the ENTER button.
Pressthe _ or 'V' button to select "PIP", then
press the ENTER button,
3
Pressthe ENTER button, then press the A or V
button to select "On". The PiP image wiJJappear in
the corner of the screen.
o Pressing the A or 'V button wiJJalternate between
"On" and "Off".
4
Check iFthe V-Chip Lock (reFerto page ] 01} is
ON if the PiPOn/Off wiJJnot Function. PiP does
not function when the \LChip Lock is set to On.
Change the setting to Off and try it again,
Pressthe MENU button to exit.
PiP Seffirtgs
O
O
O
O
O
O
O
O
i Av2¸¸
i
I
X O
O X
O O
O O
O O
O O
O O
O
O
X
O
O
O
O
O : PiPand Swap Operate
X PiPdoesn't Operate
c0miiiiit!
0
0
0
X
X
X
X
ram--
0mp0nen!',
o
o
o
o
X
X
X
X
Pc Dvl
o o
0 0
0 0
0 0
X X
X X
X X
X X
49
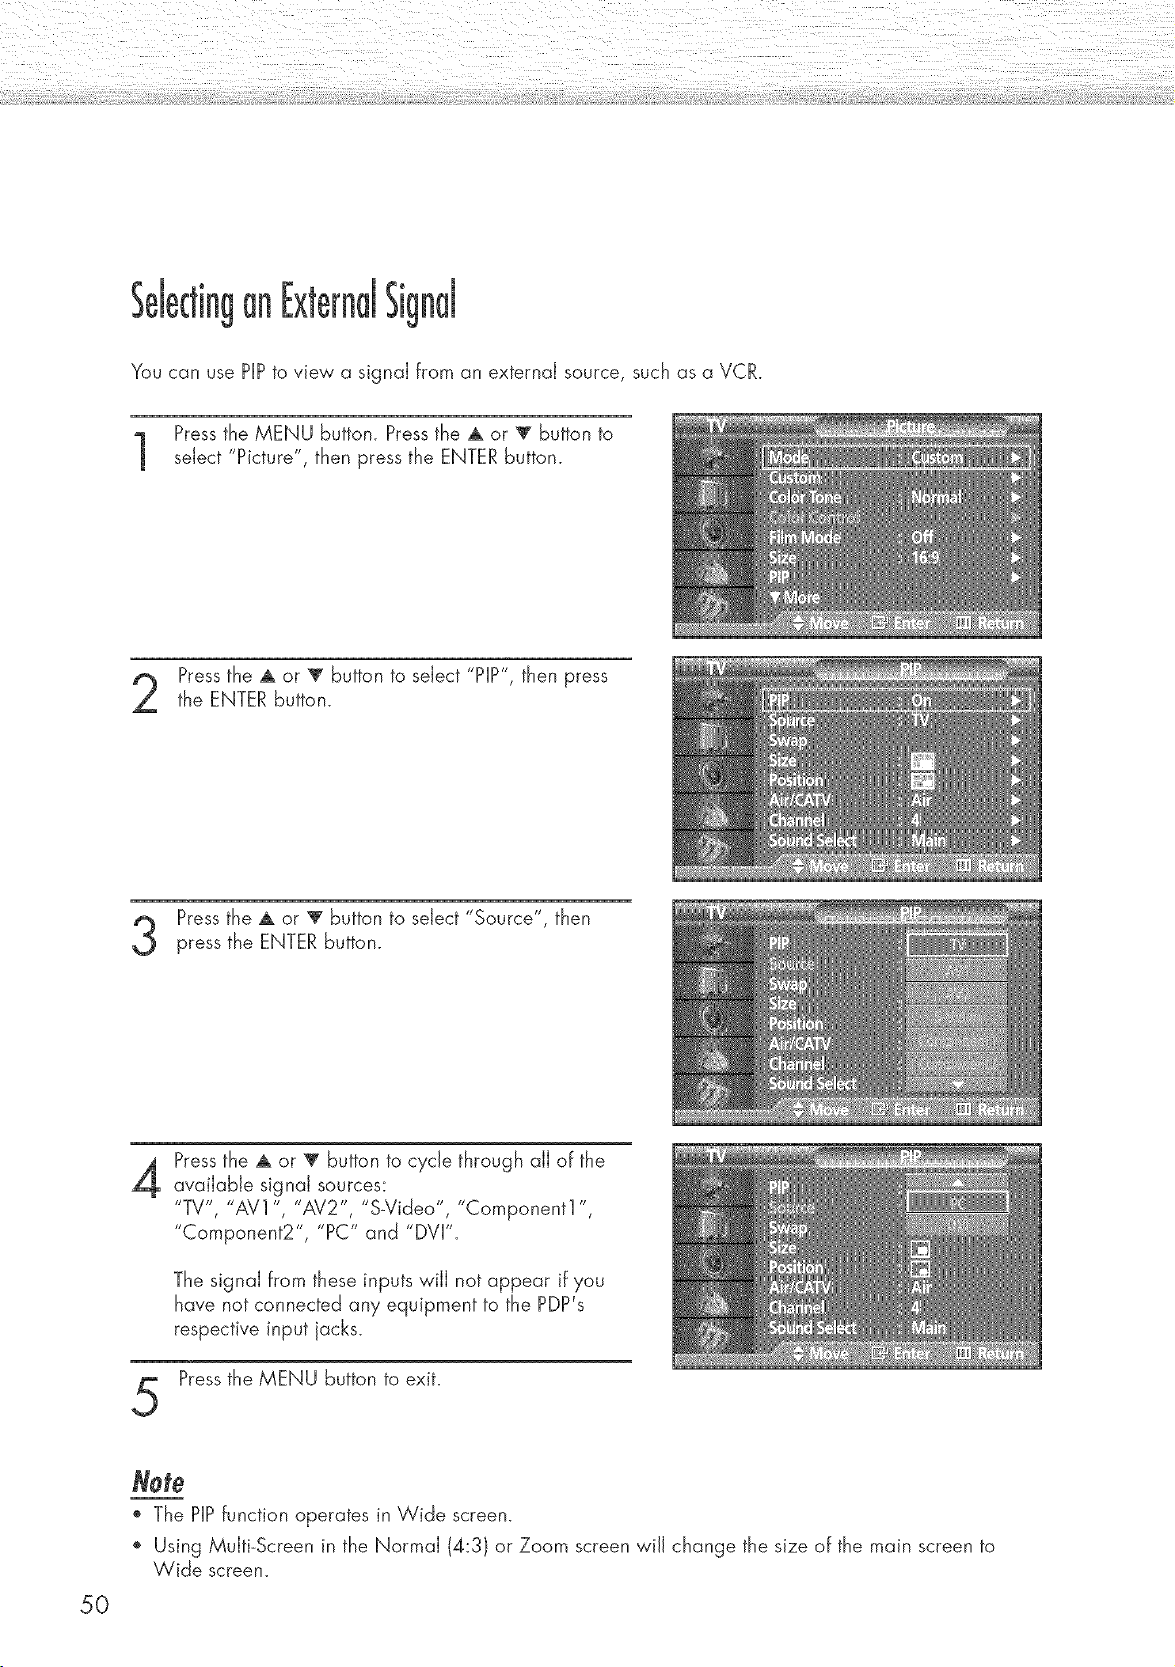
an Sig
You can use HP to view a signai from an externai source, such as a VCR.
Pressthe MENU button. Press the A or T button to
select "Picture", then press the ENTER button.
Pressthe A or _' button to select "PIP", then press
the ENTER button.
Press the A or 'V"button to select "Source", then
press the ENTER button.
4
Pressthe A or T button to cycle through all of the
available signal sources:
"TV', "AV1 ", "AV2", "S-Video", "Component1 ",
"Component2", "PC" and "DVI".
The signal from these inputs will not appear if you
have not connected any equipment to the PDP's
respective input jacks.
Pressthe MENU button to exit.
50
Note
o The HP function operates in Wide screen.
Using Multi-Screen in the Normal (4:3) or Zoom screen wiJJchange the size of the main screen to
Wide screen.
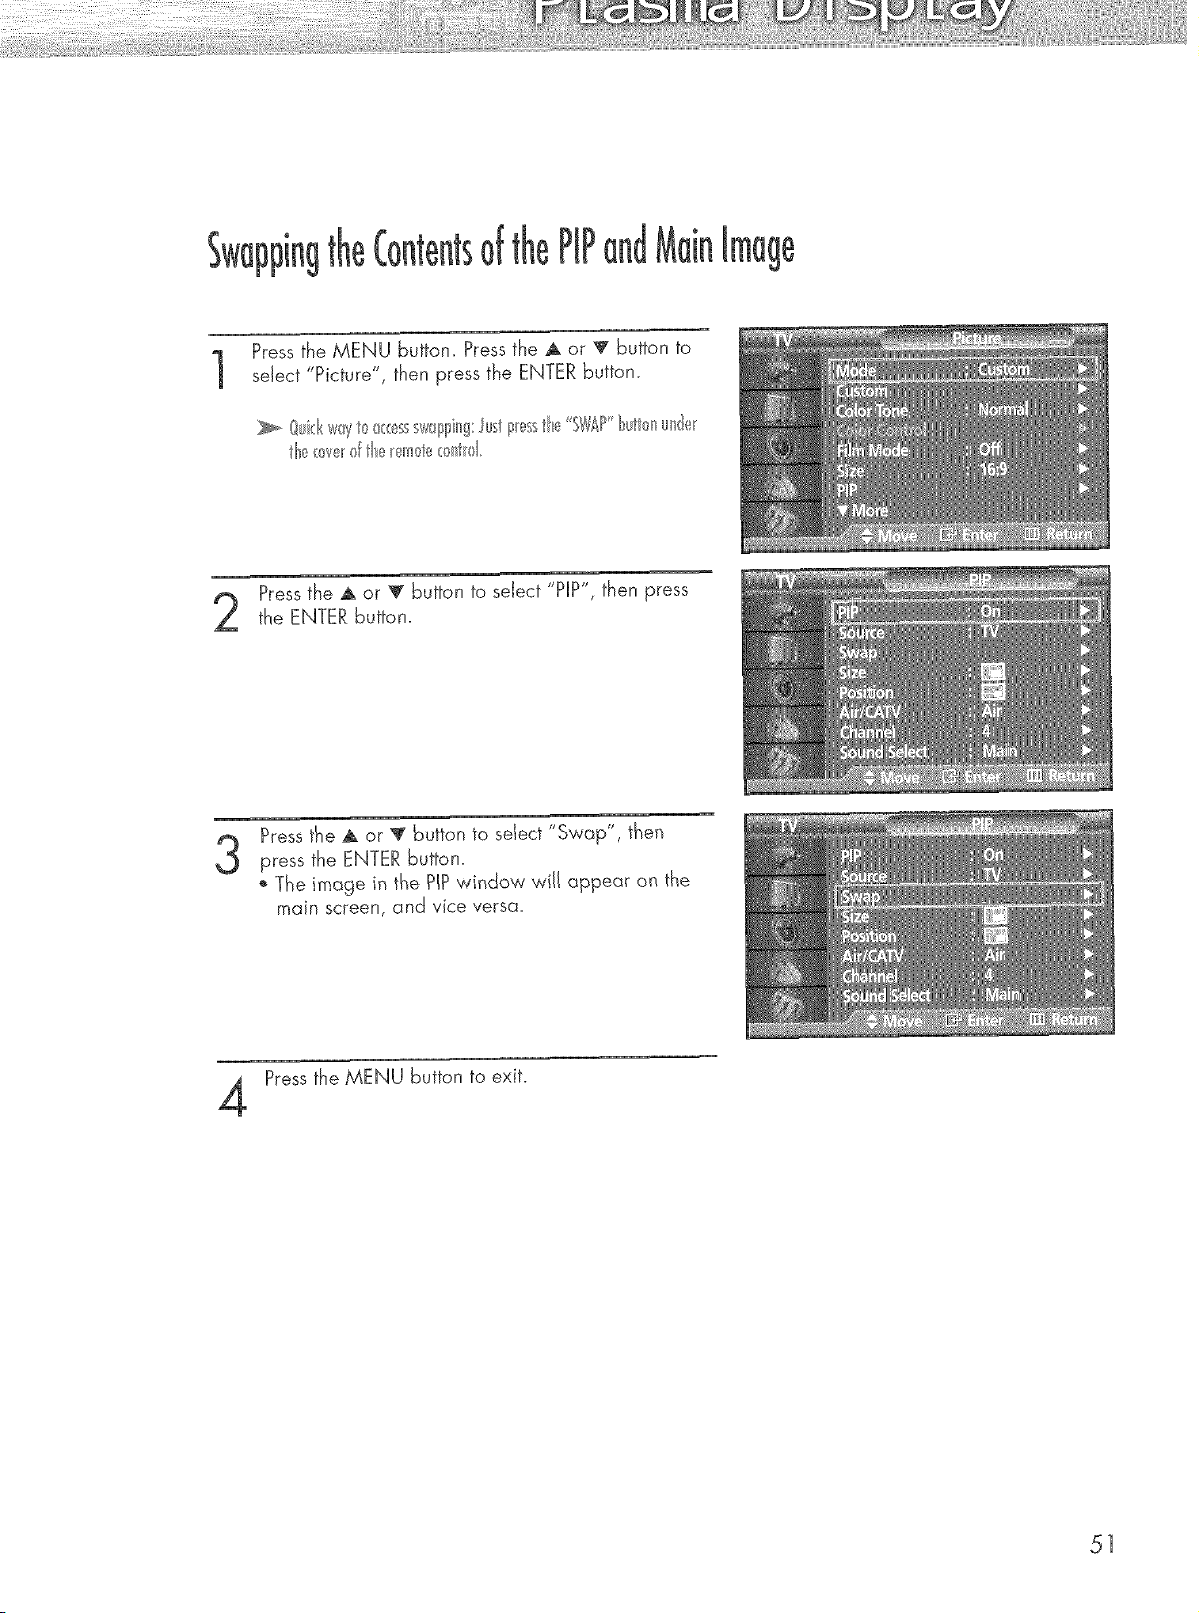
of
Pressthe MENU button. Press the ,A or v button to
select "Picture", then press the ENTER button.
Pressthe A or '_' button to seJect "PIP", then press
the ENTER button.
3
Press the A or '_ button to seIect "Swap", then
press the ENTER buttan.
The image in the PiPwindow will appear on the
main screen, and vice versa.
Pressthe MENU button to exit.
51
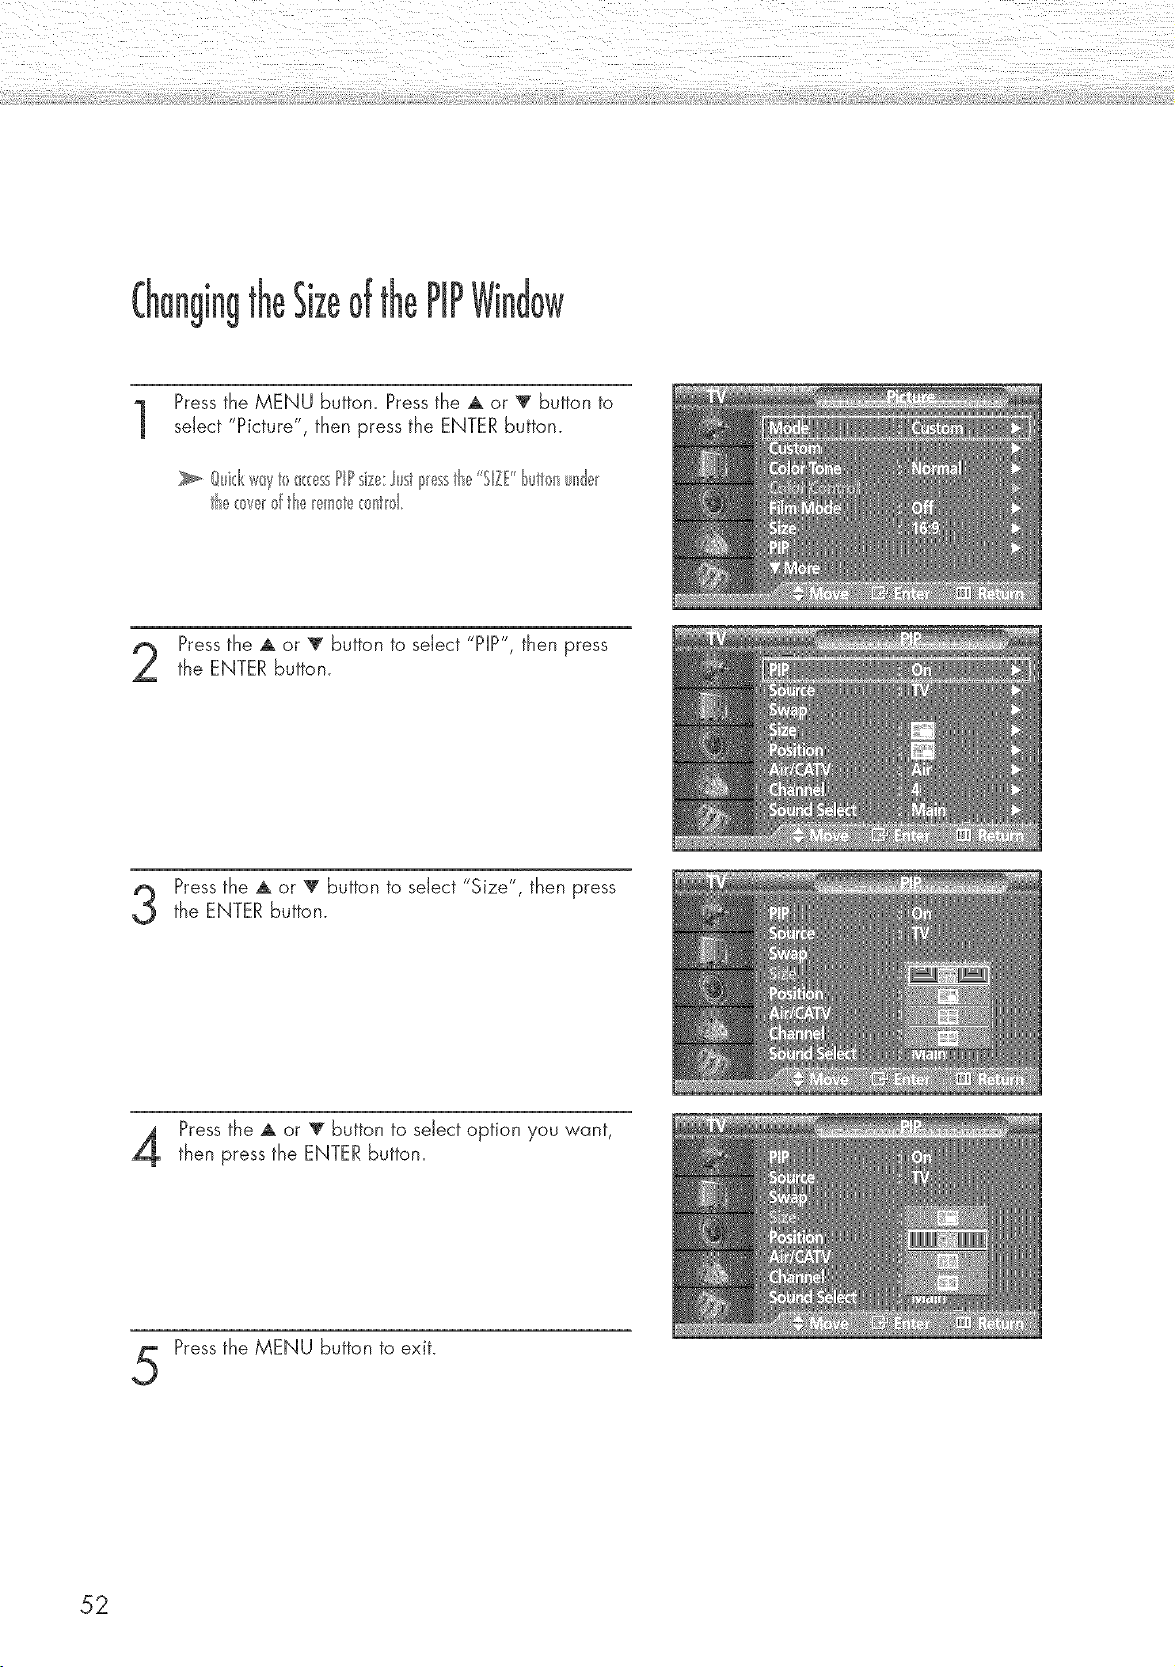
the PIP
Pressthe MENU button. Press the A or _ button to
select "Picture", then press the ENTER button.
_, @k:kway10_( _ssPIPsize;:]usti_,=sstb,="SlZf bul_nun@
the_ve_d the_l__te_ntld
Pressthe A or _' button to select "PIP", then press
the ENTER button.
Pressthe A or _' button to select "Size", then pressthe ENTER button.
Press the A or T button to select option you want,
then press the ENTER button.
Pressthe MENU button to exit.
52
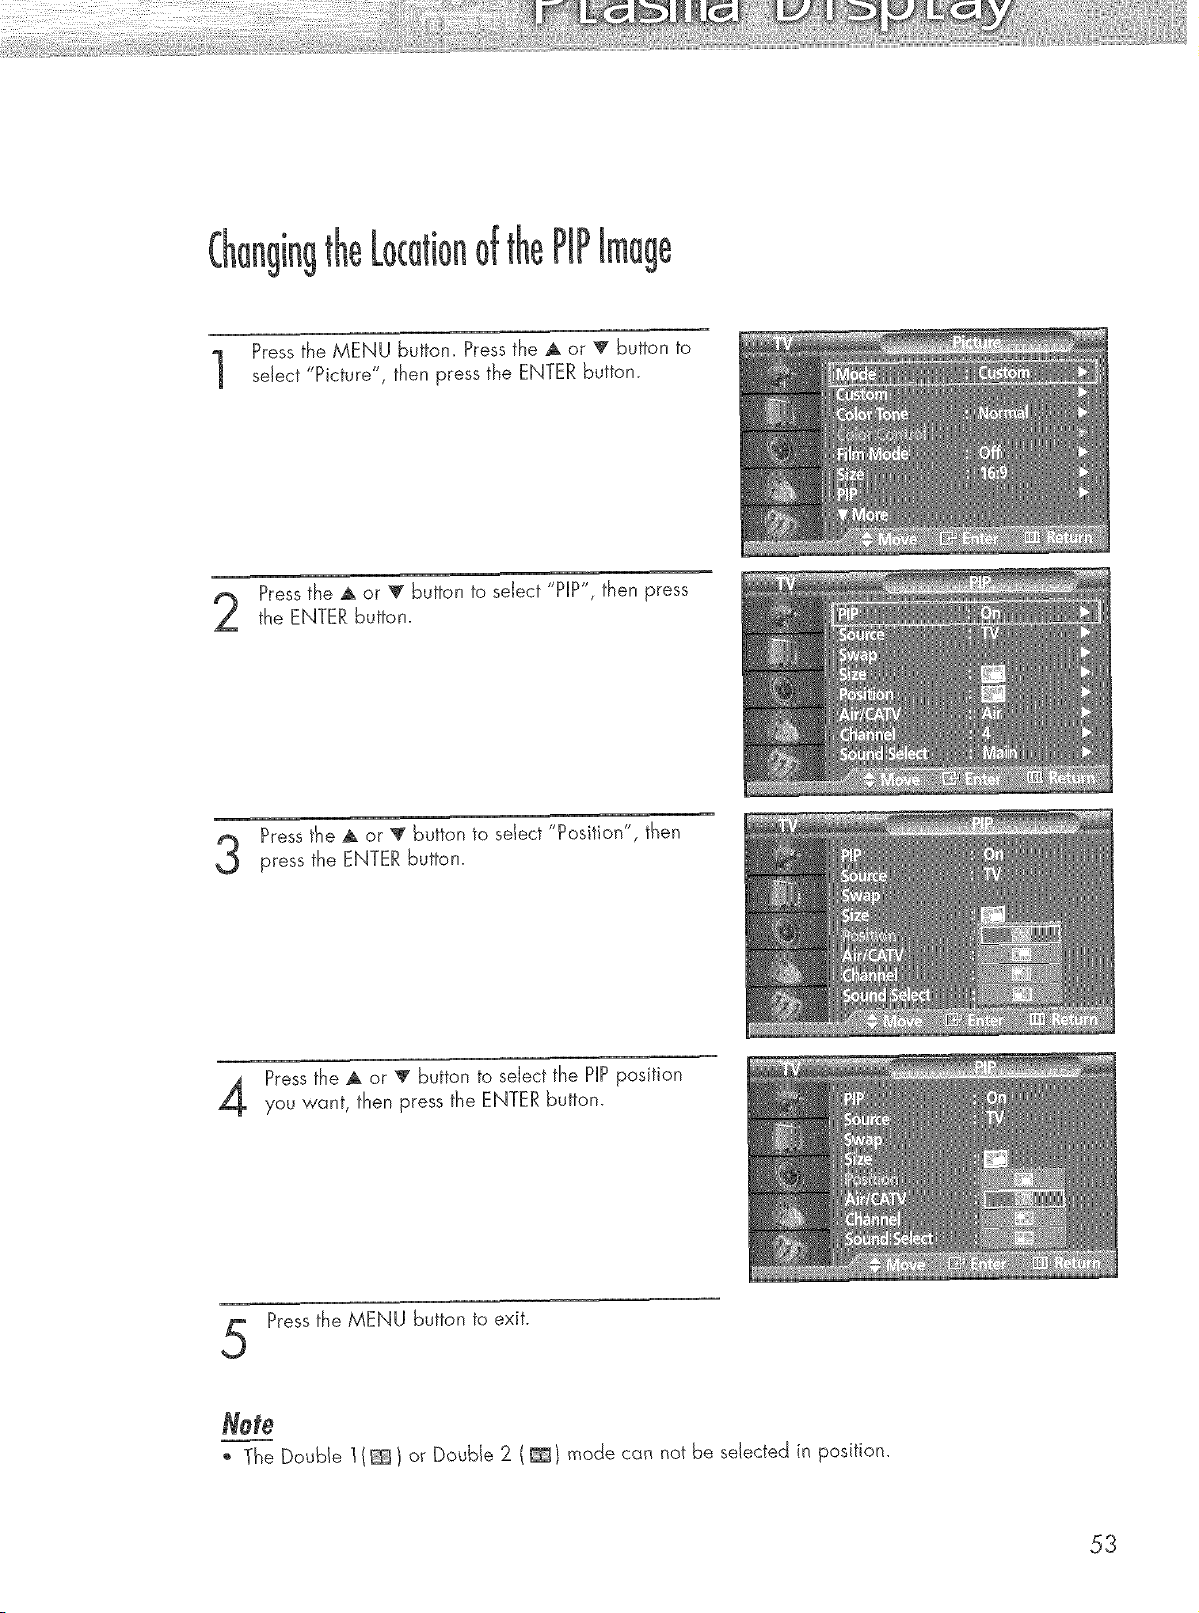
of PiP
age
Pressthe MENU button. Press the _ or '_' button to
sdect "Picture", then press the ENTER button.
Pressthe A or _' button to seJect "PIP", then press
the ENTER button.
Press the A or '_ button to seIect 'Pos'tion", then
press the ENTER button.
Pressthe A or '_' button to seJect the PnPposition
you want, then press the ENTER button.
Pressthe MENU button to exit.
Note
*_ The Double 1(_ ) or Double 2 ( _t mode can not be selected in position.
53
,r
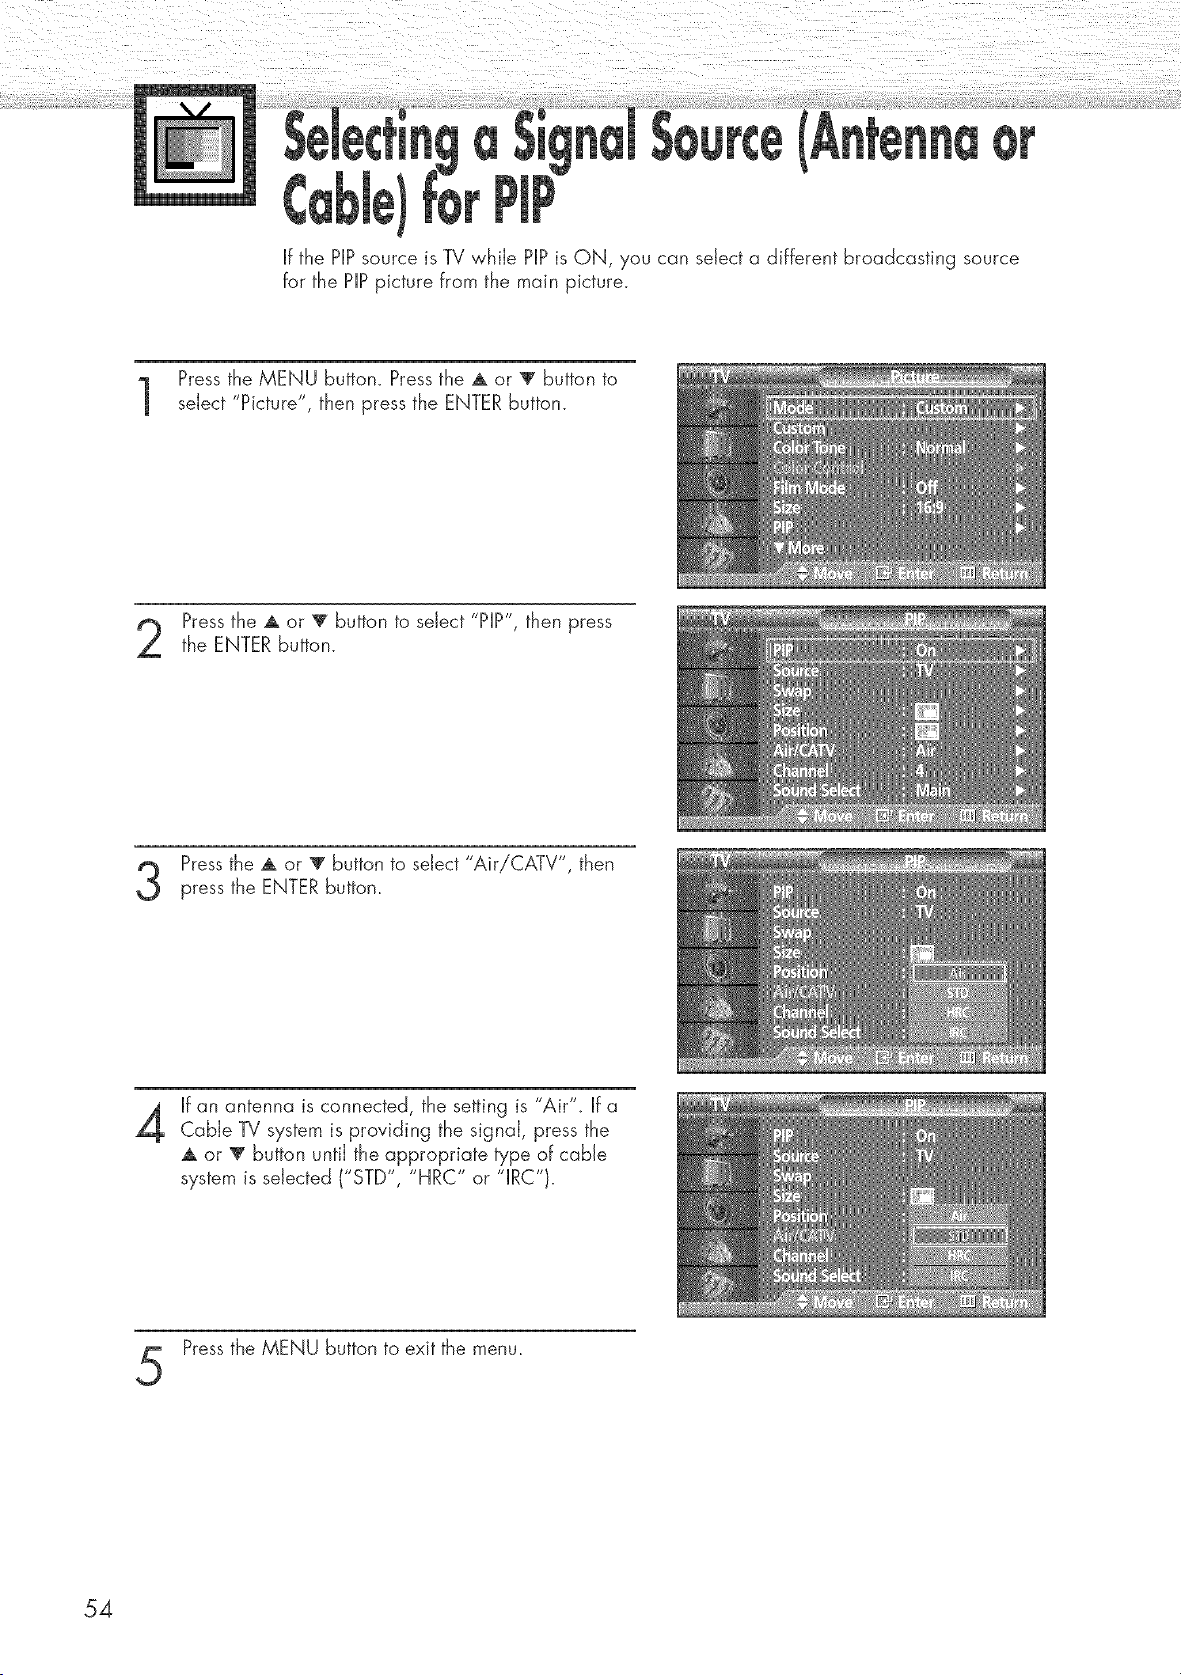
If the PIPsource is TV while PIPis ON, you can select a different broadcasting source
for the PIPpicture from the main picture.
Pressthe MENU button. Press the ,& or _' button to
select "Picture", then press the ENTER button.
Pressthe A or 'V button to select "PIP", then press
the ENTER button.
Pressthe A or _' button to select "AiriCATV", then
press the ENTER button.
4
If an antenna is connected, the setting is "Air". If a
Cable TV system is providing the signal, press the
,& or V button until the appropriate type of cable
system is selected ("STD", "HRC" or "IRC"}.
Pressthe MENU button to exit the menu.
54
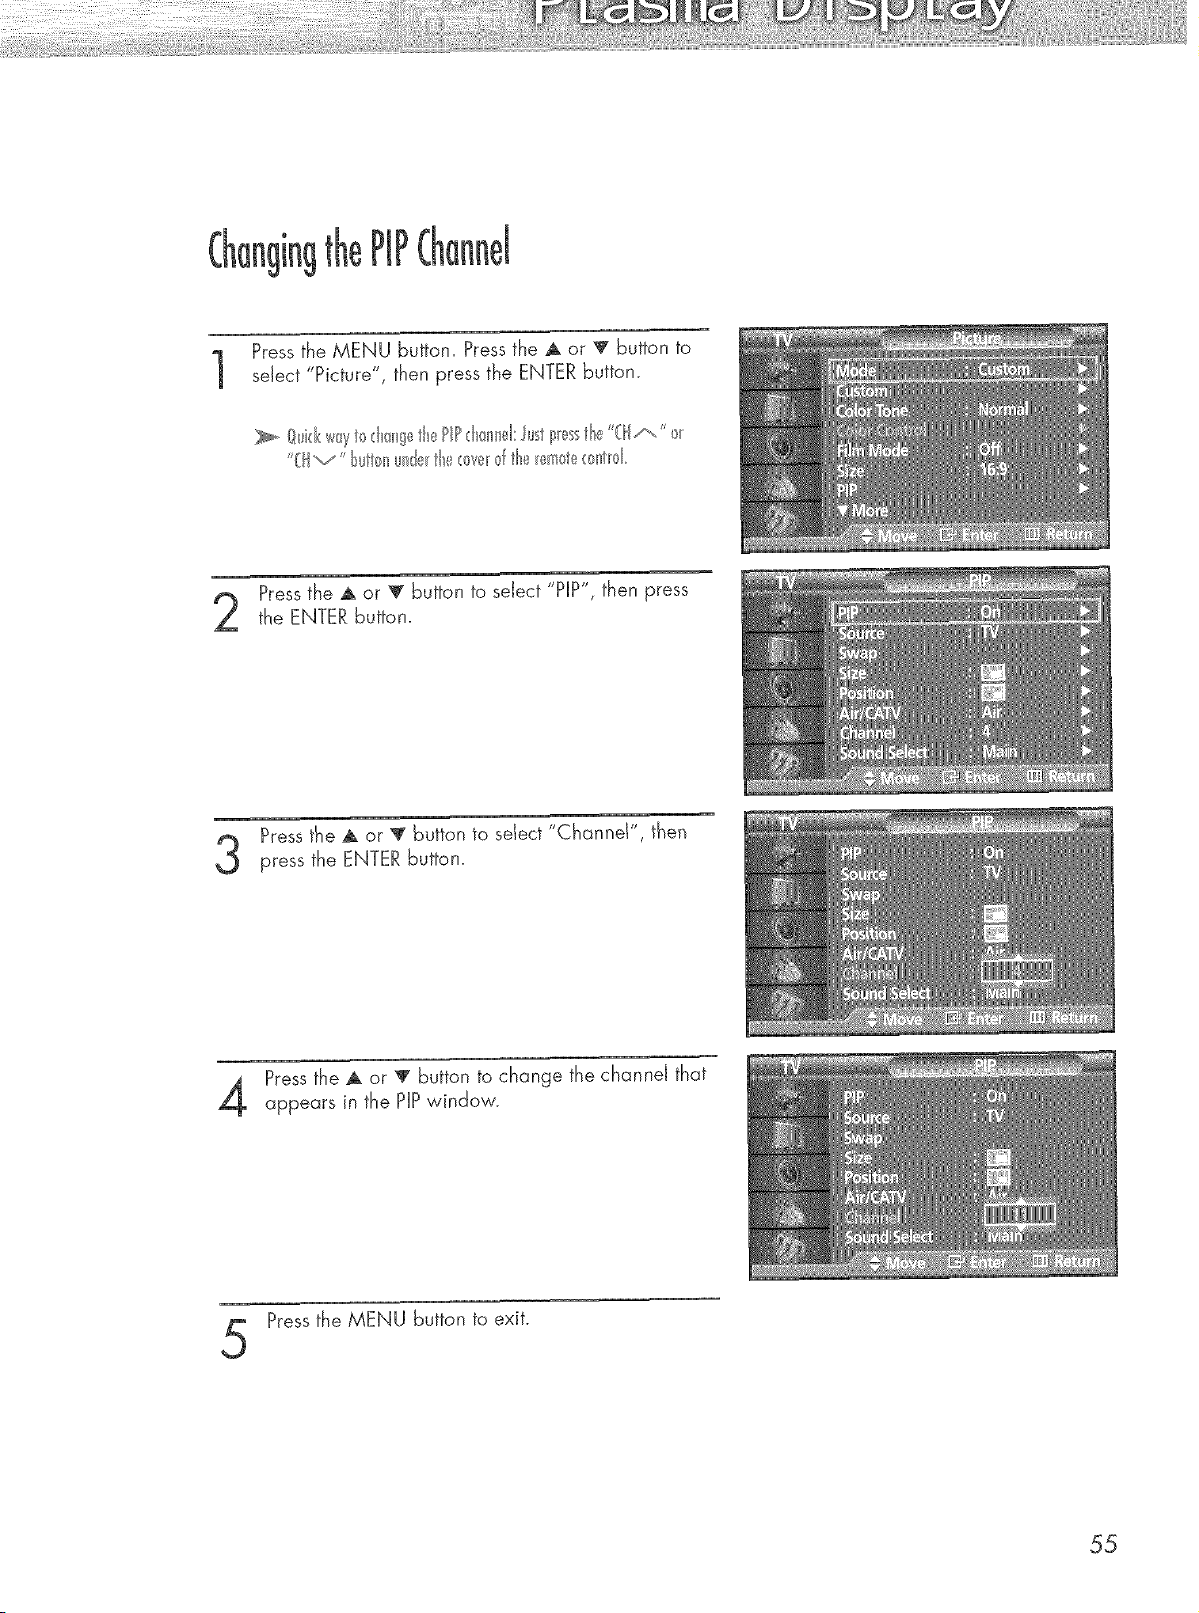
Pressthe MENU button. Press the A or T button to
sdect "Picture", then press the ENTER button.
Pressthe A or !r button to seJect "PIP", then press
the ENTER button.
Press the A or V button to seIect "Channel", then
press the ENTER button.
Pressthe A or T button to change the channeJ that
appears in the PiPwindow.
Pressthe MENU button to exit.
55
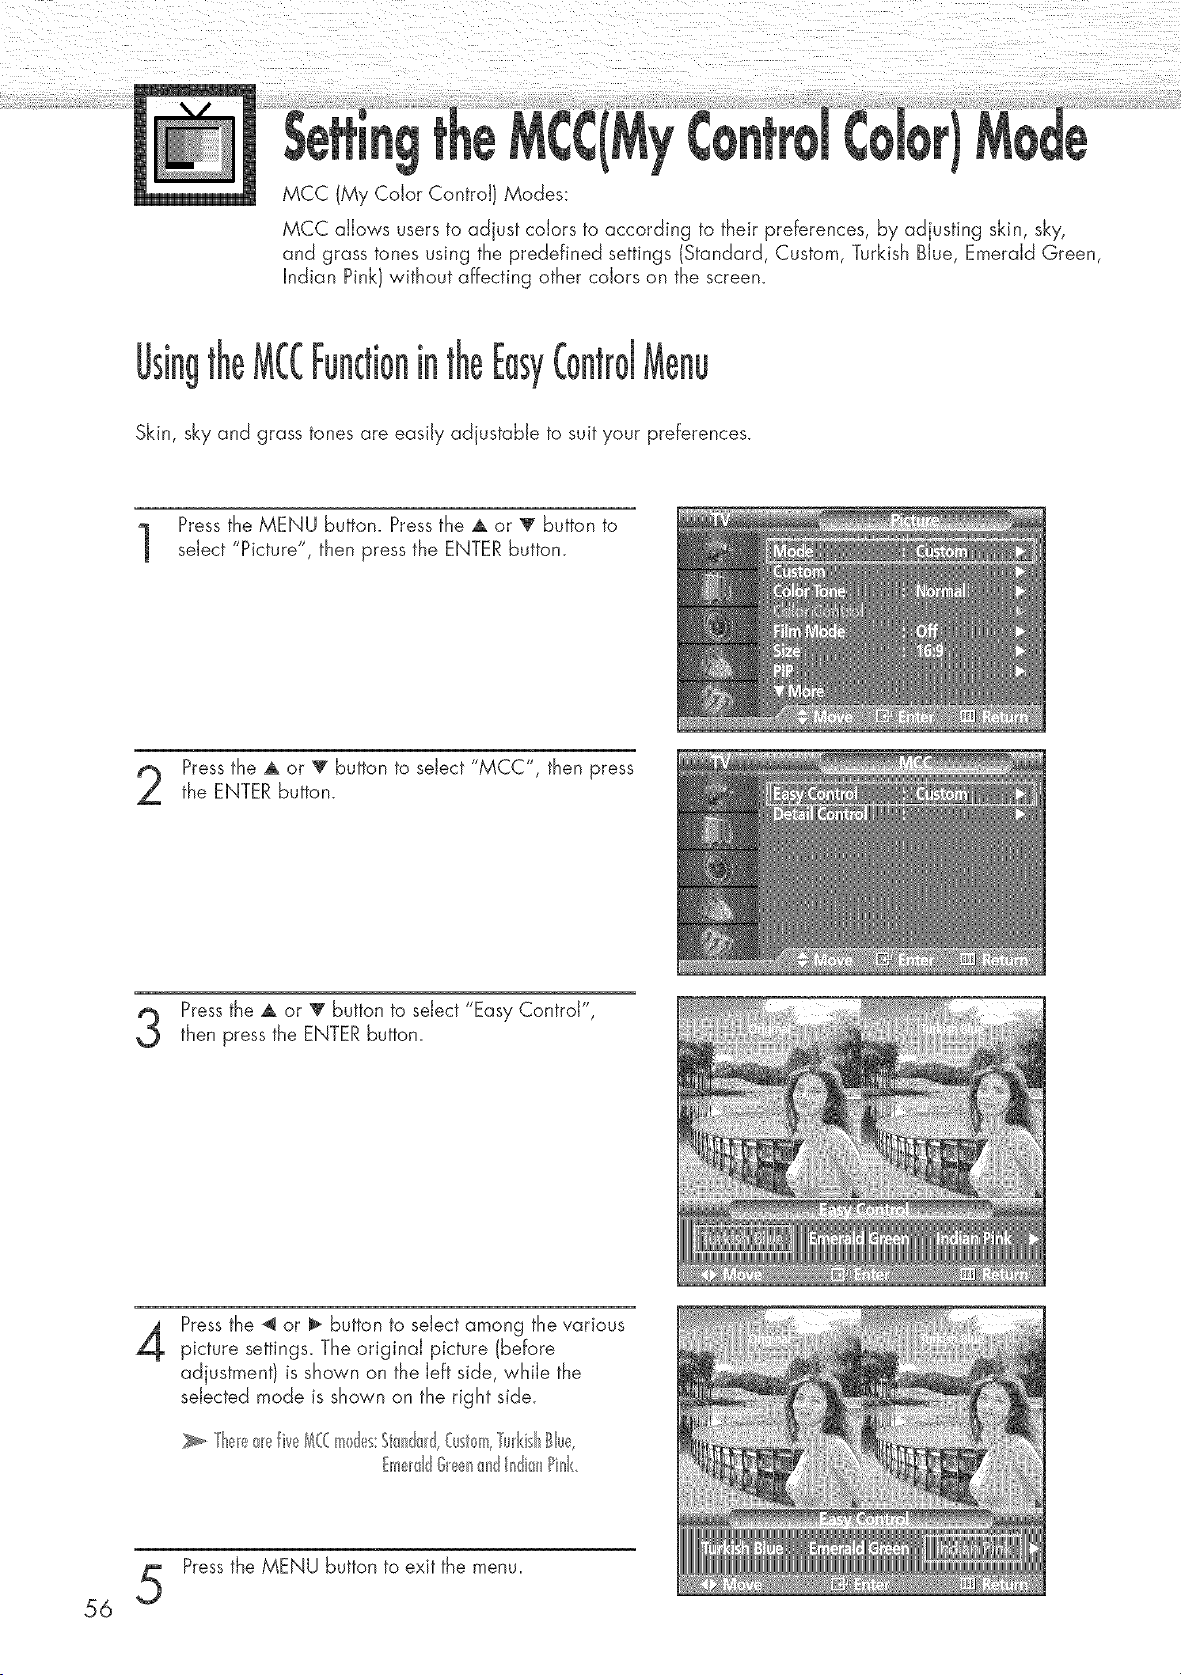
MCC (My Color Control) Modes:
MCC allows users to adjust colors to according to their preferences, by adjusting skin, sky,
and grass tones using the predefined settings (Standard, Custom, Turkish Blue, Emerald Green,
Indian Pink) without affecting other colors on the screen.
g theEasy
Skin, sky and grass tones are easily adjustable to suit your preferences.
Pressthe MENU button. Press the A or V button to
select "Picture", then press the ENTER button.
Pressthe A or _ button to select "MCC", then press
the ENTER button.
Pressthe A or T button to select "Easy Control",
then press the ENTERbutton
4
Pressthe _ or I_ button to select among the various
picture settings_ The original picture (before
adjustment) is shown on the left side, while the
selected mode is shown on the right side.
_, Th_n__ fi_u_bS(€m@,_s:St_n@dCust@mTurkisl'_BHu_t,
meldd @_!l__ndHdi_'_Pink
Pressthe MENU button to exit the menu
56
!@
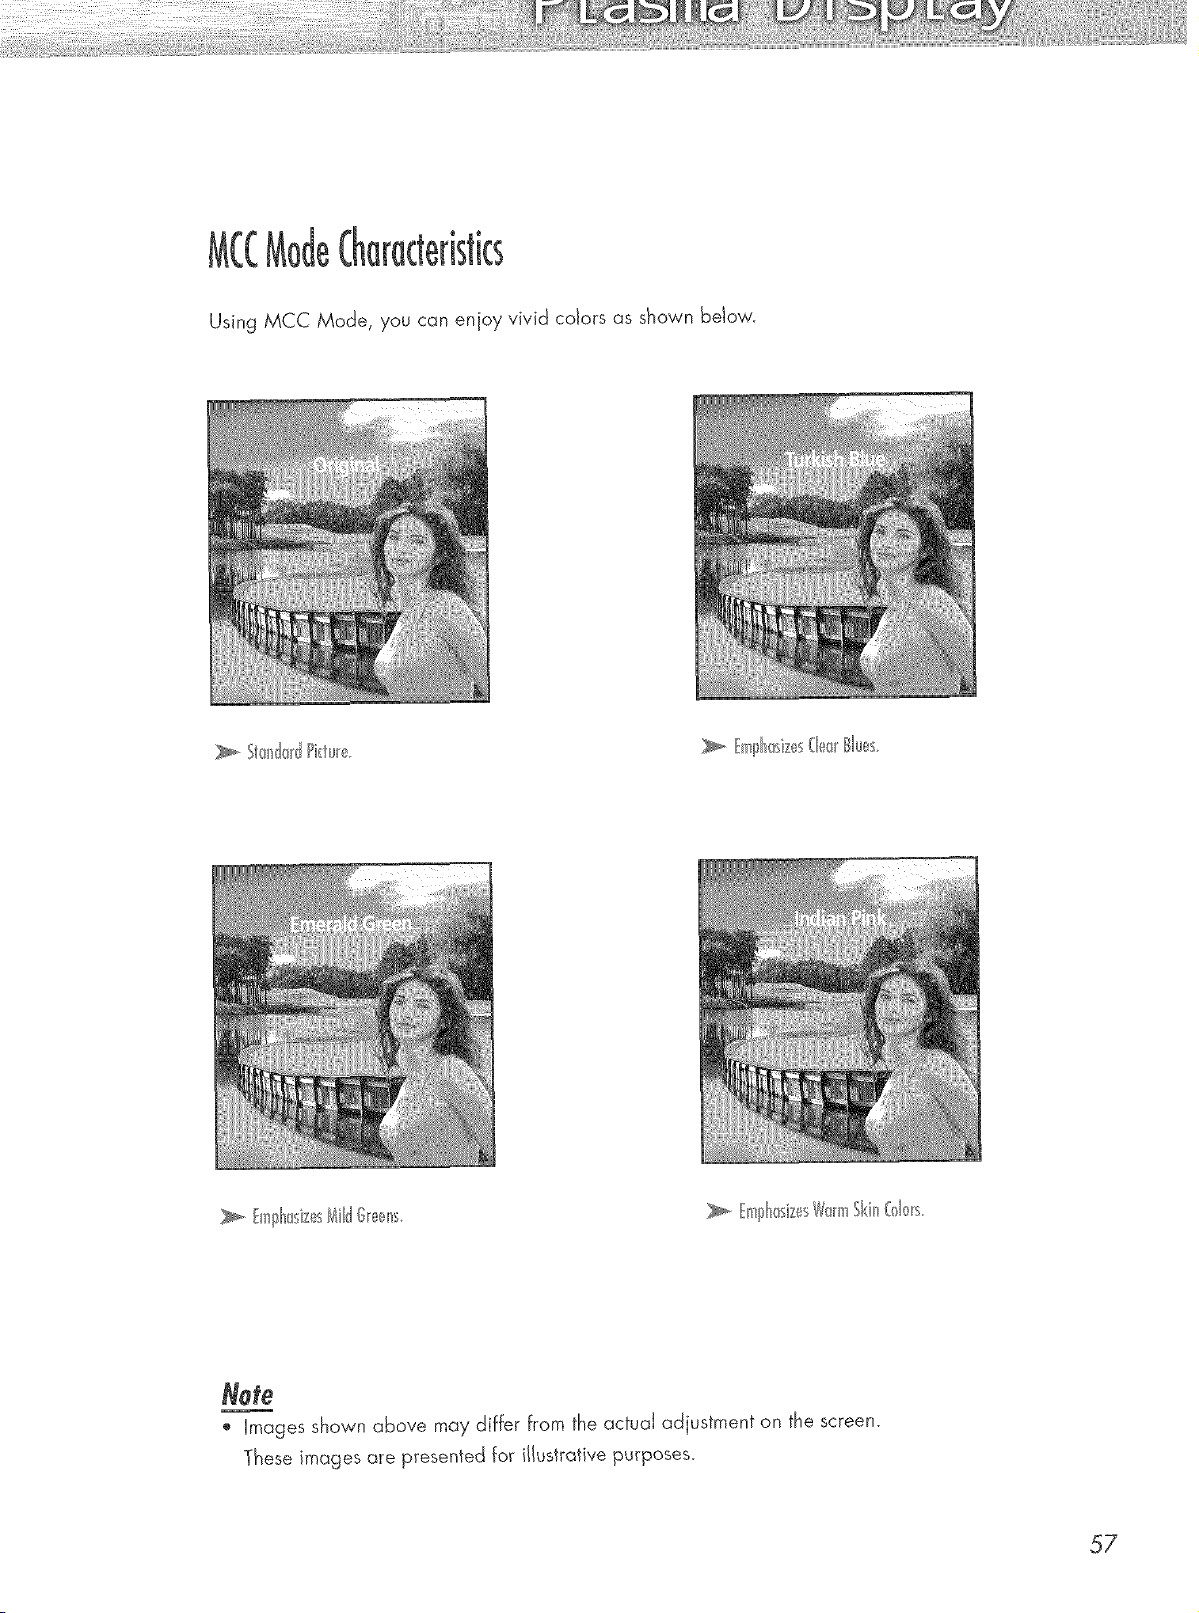
Using MCC Mode, you can enjoy vivid cdors as shown below.
>, fmll_asizes(le_/lues.
NOte
o images shown above may differ from the actuaJ adjustment on the screen.
These images are presented for illustrative purposes.
57
gs
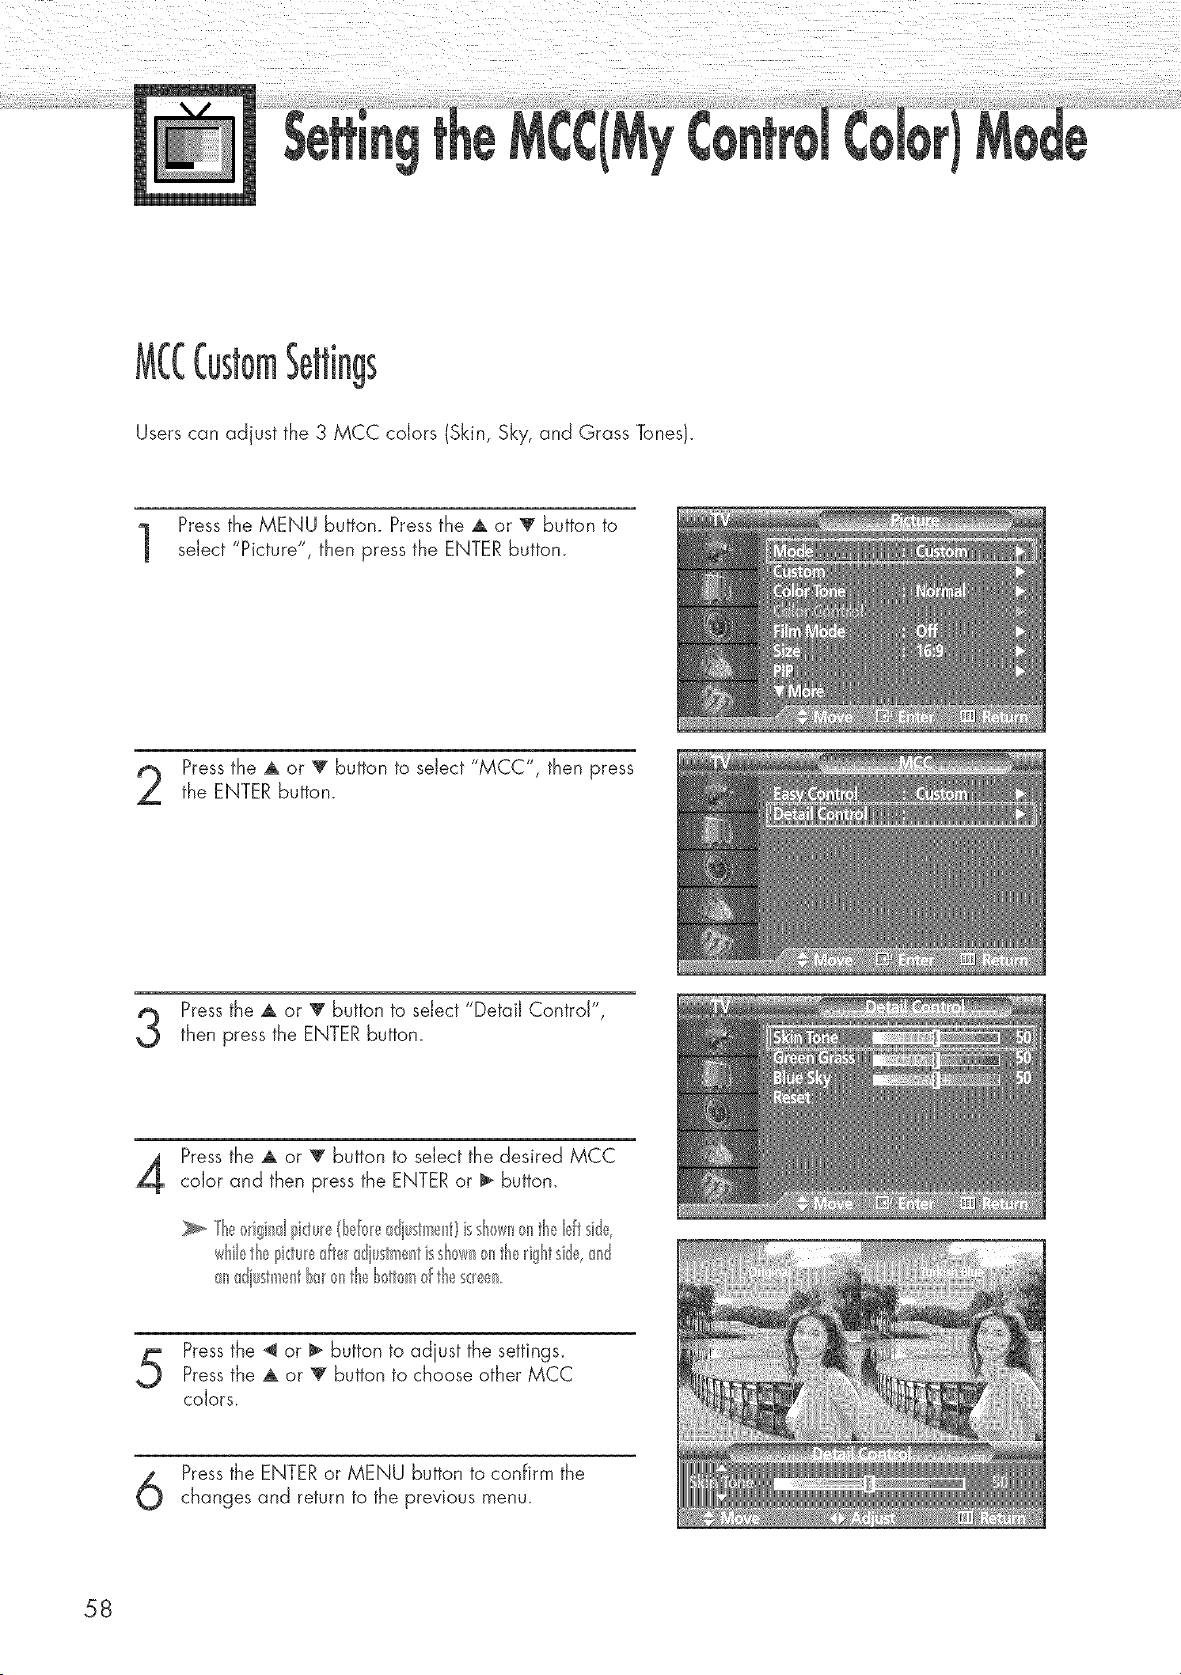
Users can adjust the 3 MCC colors (Skin, Sky, and Grass Tones}.
Pressthe MENU button. Press the A or V button to
select "Picture", then press the ENTER button.
Pressthe A or _' button to select "MCC", then press
the ENTER button.
Pressthe A or 'V' button to select "Detail Control",
then press the ENTERbutton
Pressthe A or _' button to select the desired MCC
color and then press the ENTERor _ button
whiletheI3i<:tu_edte_diustmeHtisshrs*_ll_>nthe_ightside,and
andiustment_x_ontheh_tu>m_fthes_en
Pressthe _ or _ button to adjust the settings
Pressthe A or 'V' button to choose other MCC
colors,
Pressthe ENTERor MENU button to confirm the
changes and return to the previous menu,
58
MCC
tO
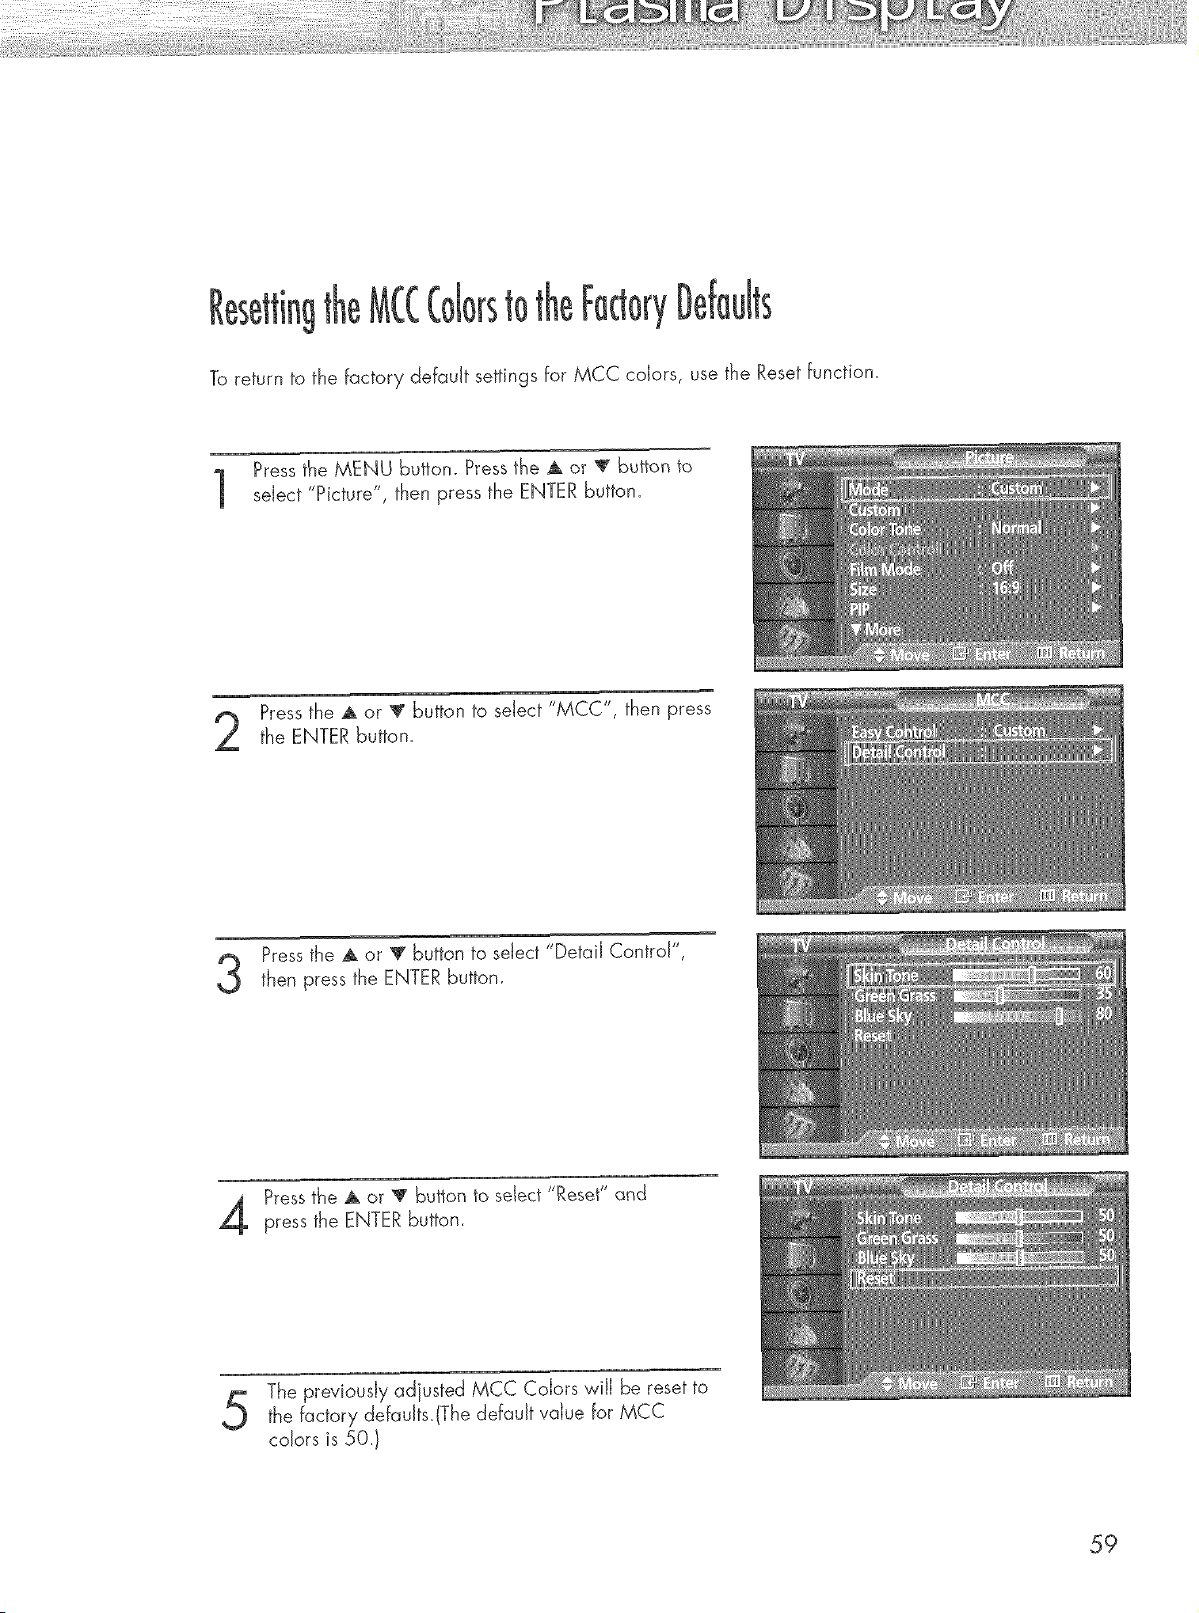
To return to the factory default settings for MCC colors, use the Reset function.
Pressthe MENU button. Press the ,_ or V button to
select "Picture", then press the ENTER button.
Pressthe _ or _" button to select "MCC", then press
the ENTER button.
Pressthe A or '_ button to select "Detail Control",
then press the ENTERbutton
Pressthe A or _' button to select "Reset" and
press the ENTERbutton
The previously adiusted MCC Colors v,,ilIbe reset to
the factory defauJts.(The default value for MCC
colors is 50.)
59

Customizing the Sound ................................................................ 62
Using Automatic Sound Settings .................................................... 63
Choosing a Multi-Channel Sound (MTS)Soundtrack .......................... 64
Using the Auto Volume .................................................................. 65
Setting the TruSurround XT ............................................................ 66
Listening to the Sound of the Sub(PiP) Picture.................................... 67
Selecting the internal Mute ............................................................ 68
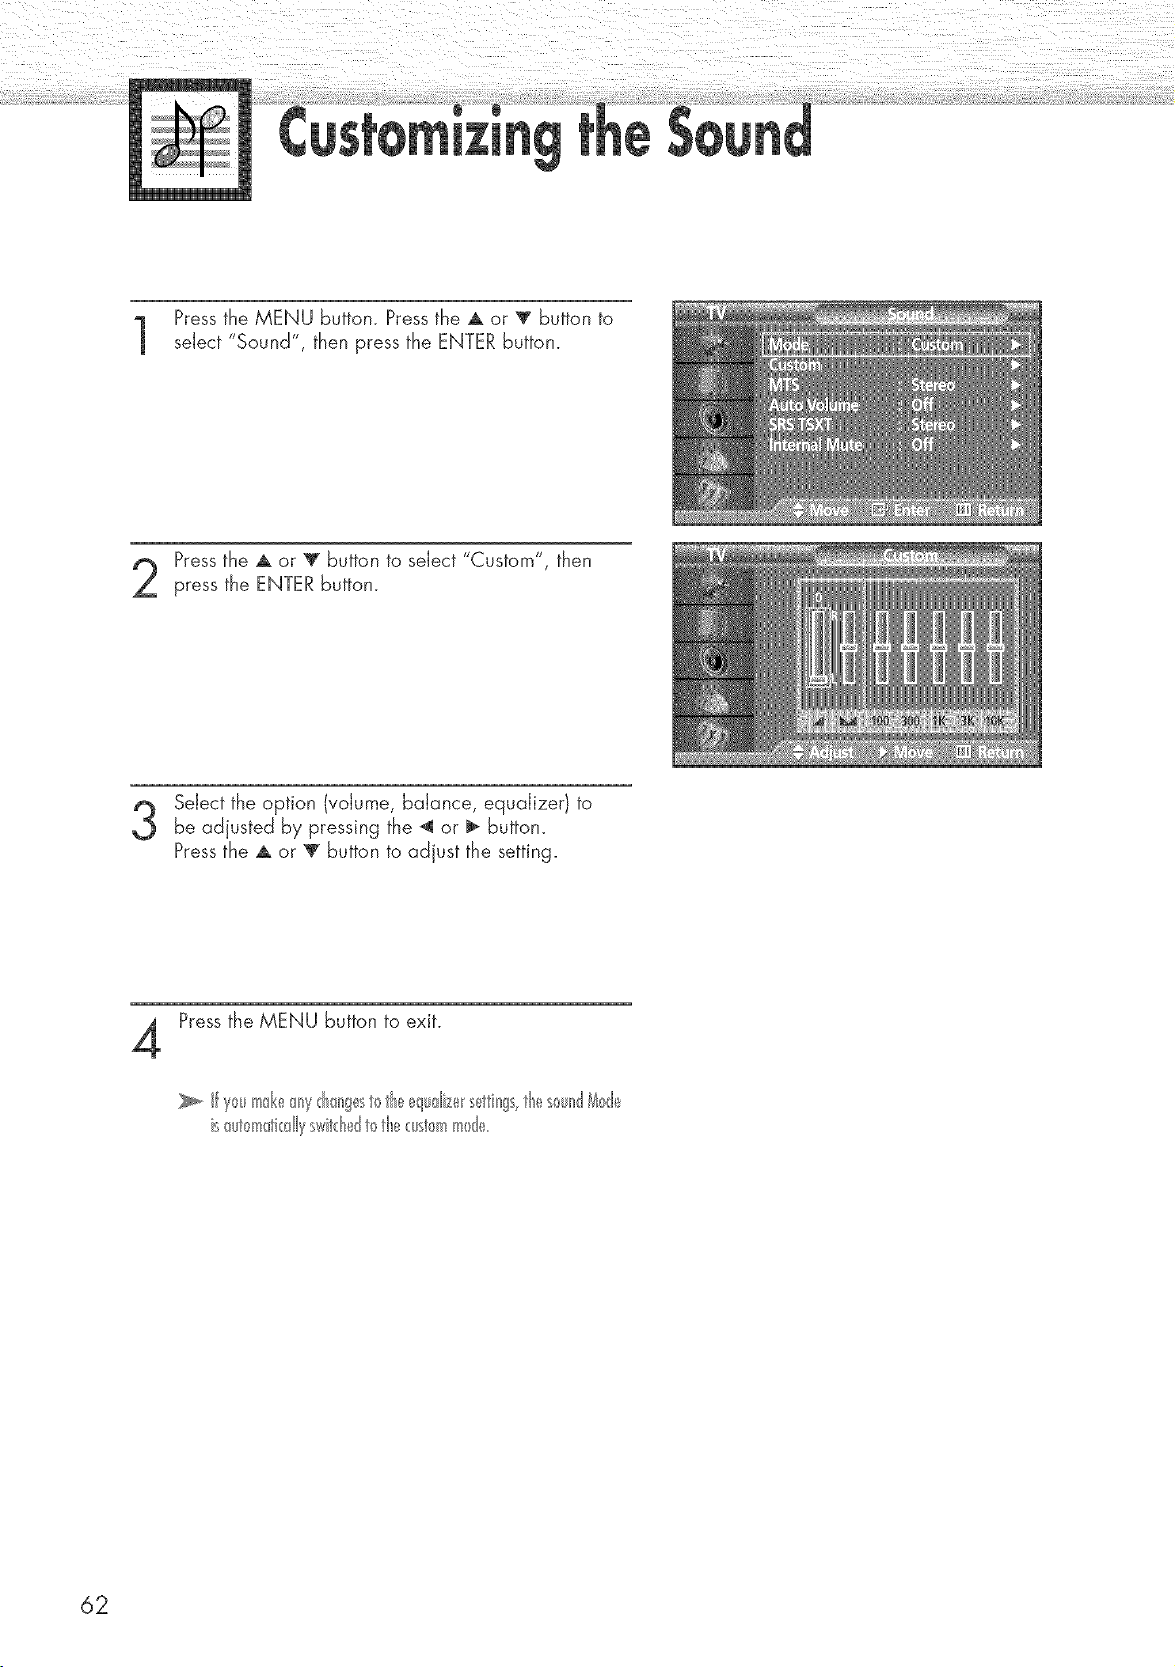
Pressthe MENU button. Press the A or _ button to
select "Sound", then press the ENTER button.
Pressthe A. or T button to select "Custom", then
press the ENTER button.
Select the option (volume, balance, equalizer) to
be adjusted by pressing the _ or ll_ button.
Pressthe A or 'V' button to adjust the setting.
Press the MENU button to exit.
is_ut_mti_:dlyswitd_dt_the_:ust0mm_de
62
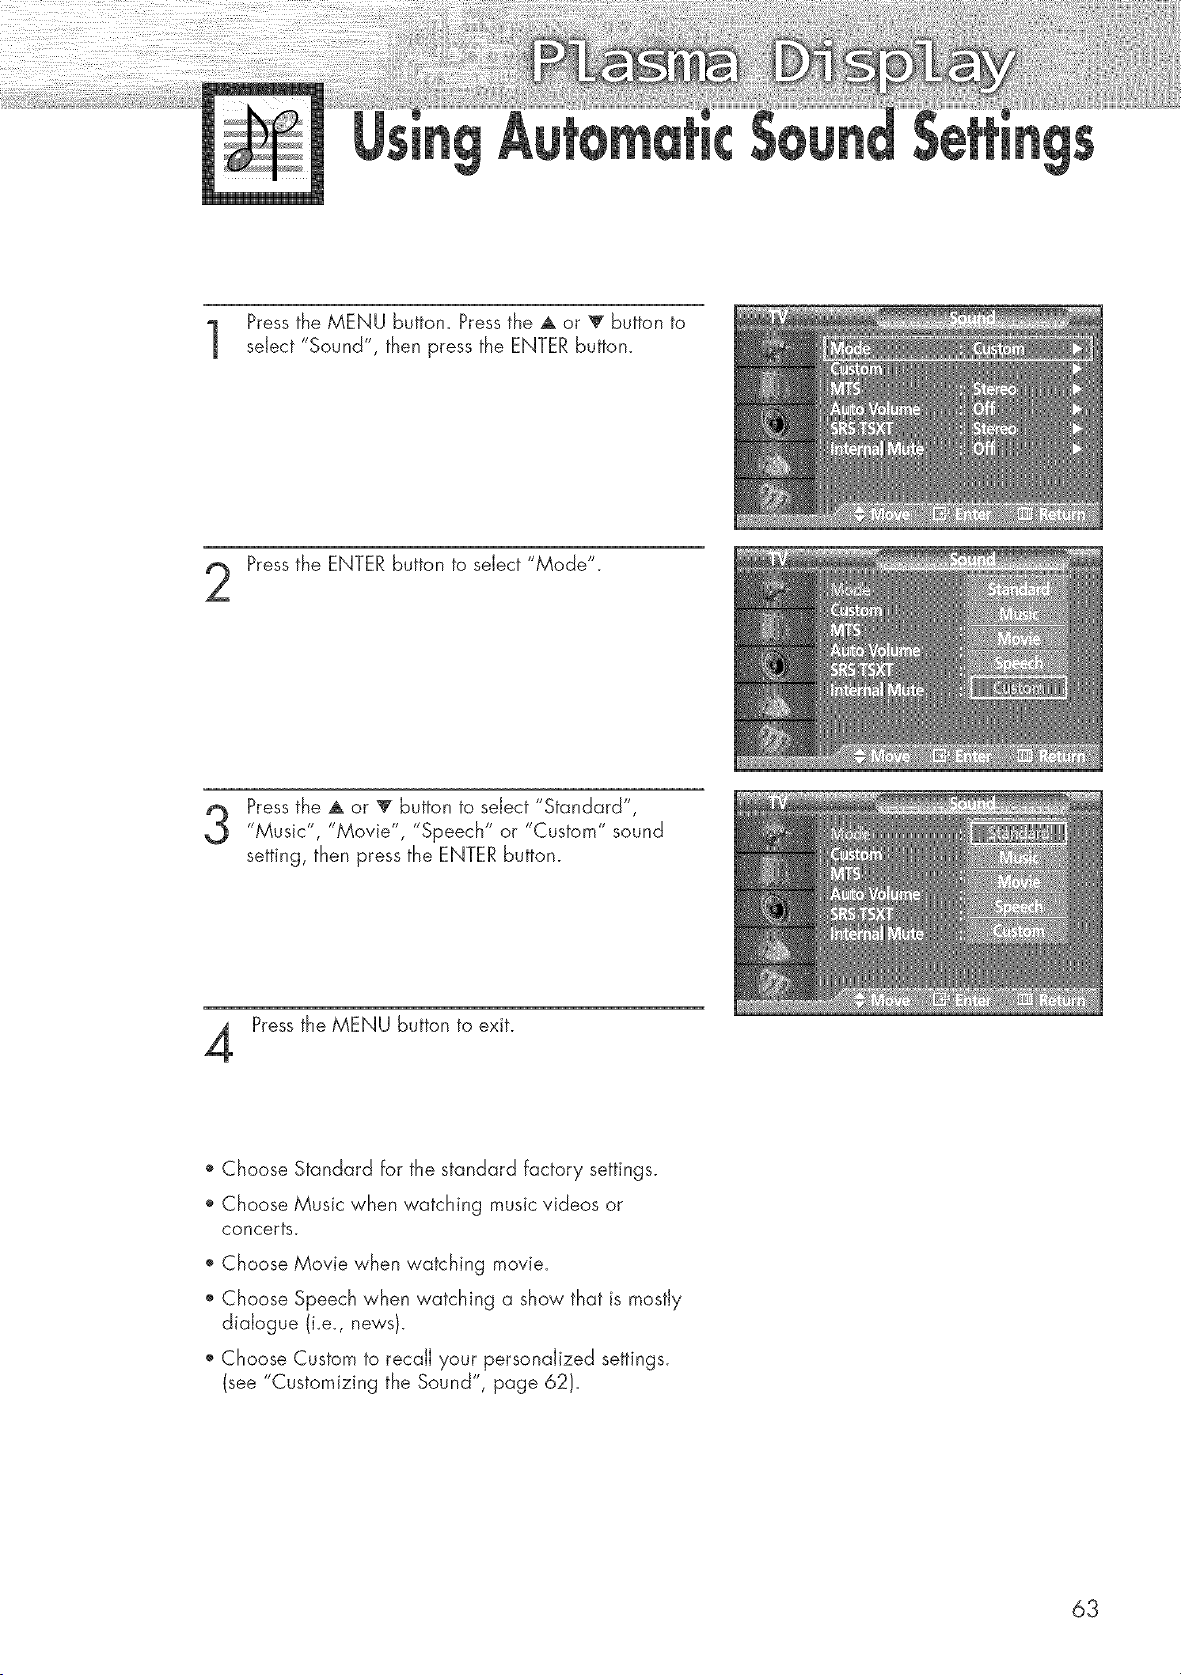
Press the MENU button. Pressthe A or _ button to
select "Sound", then press the ENTER button.
Pressthe ENTER button to select "Mode".
Pressthe A or V button to select "Standard",
"Music", "Movie", "Speech" or "Custom" sound
setting, then press the ENTERbutton.
Pressthe MENU button to exit.
Choose Standard for the standard factory settings.
Choose Music when watching music videos or
concerts.
Choose Movie when watching movie.
Choose Speech when watching a show that is mostly
dialogue (i.e., news/.
Choose Custom to recall your personalized settings.
(see "Customizing the Sound", page 62).
63
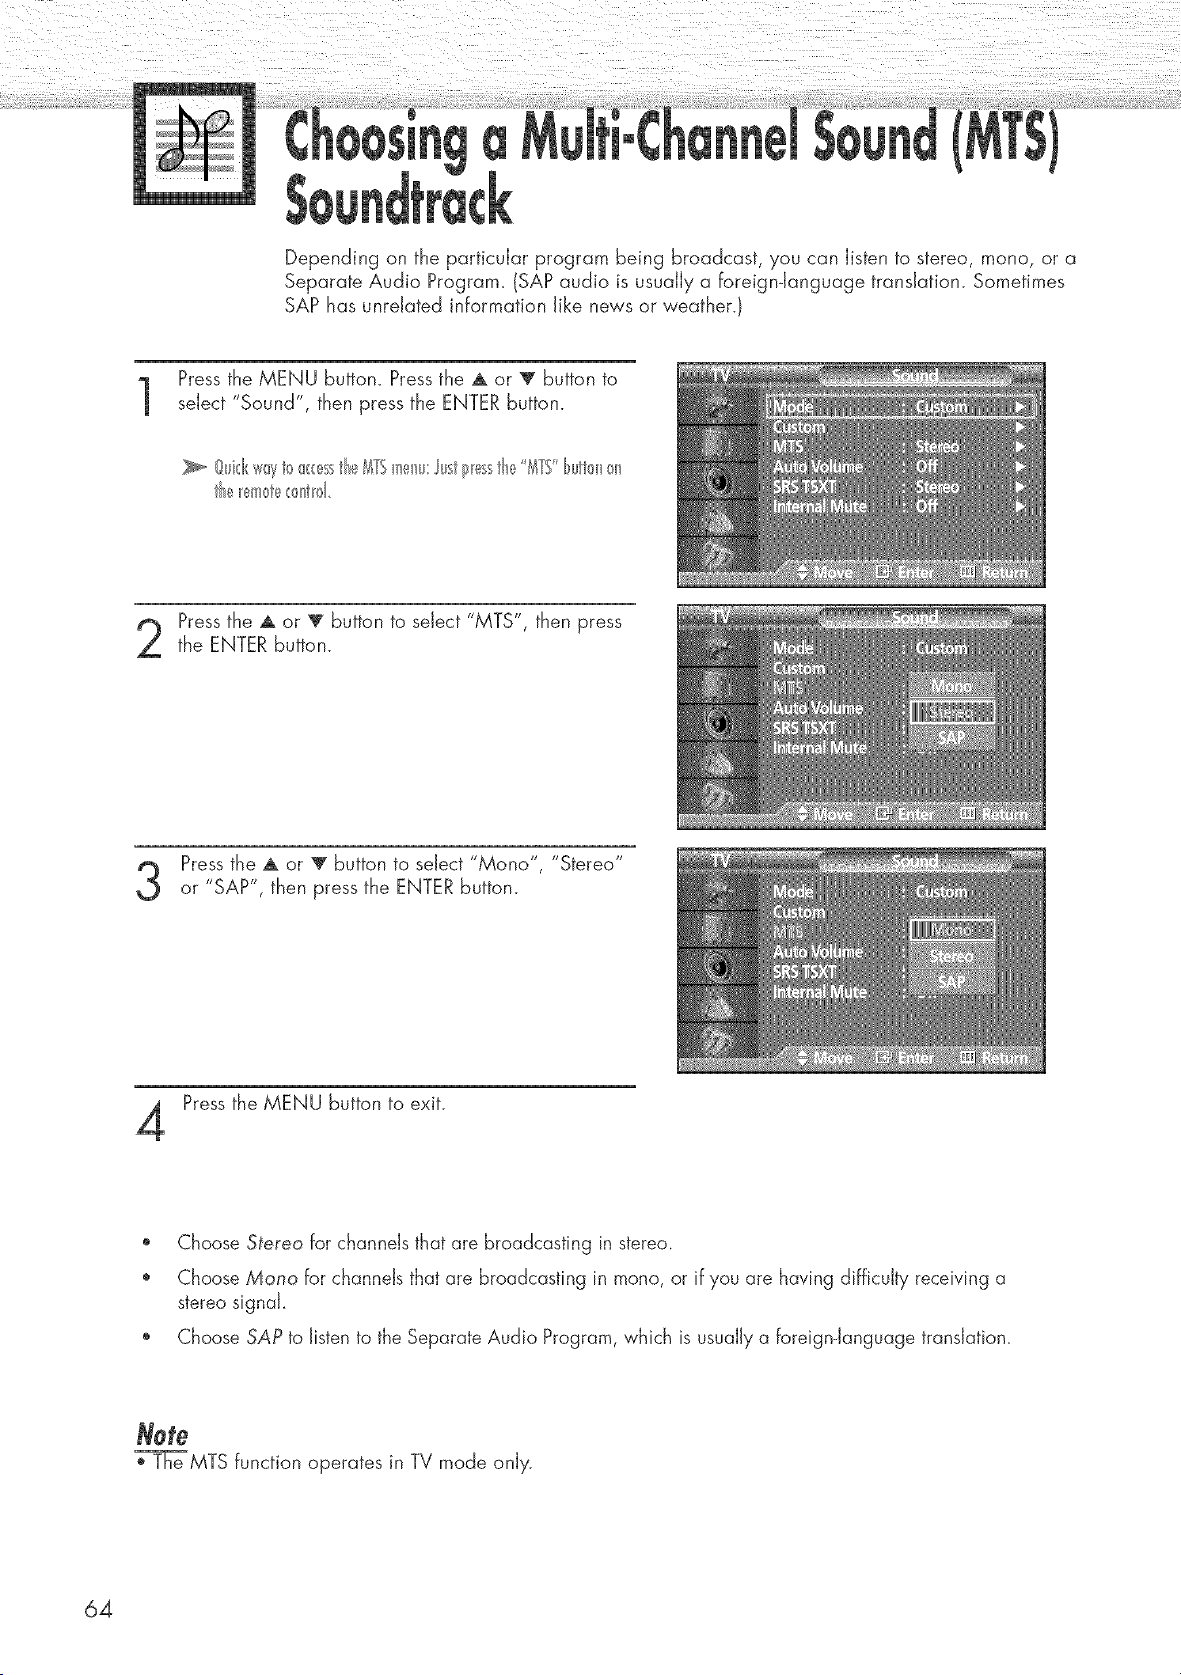
Depending on the particular program being broadcast, you can listen to stereo, mono, or a
Separate Audio Program. (SAP audio is usually a foreign-language translation. Sometimes
SAP has unrelated information like news or weather.)
Pressthe MENU button. Press the A or V button to
select "Sound", then press the ENTER button.
@id<w_yt_>_:_:sstl_,__YSm_,_lw:Justl_tsstl_ '_YS'tutl0n_n
the_em_t__:_nt_d
Pressthe A or _' button to select "MTS", then press
the ENTER button.
Pressthe A or V button to select "Mono", "Stereo"
or "SAP", then press the ENTER button.
Press the MENU button to exit.
Choose 5_ereo for channels that are broadcasting in stereo.
Choose Mono for channels that are broadcasting in mono, or if you are having difficulty receiving a
stereo signal
Choose SAP to listen to the Separate Audio Program, which is usually a foreign-language translation.
Note
_T'_'_]_eMTS function operates in TV mode only.
64
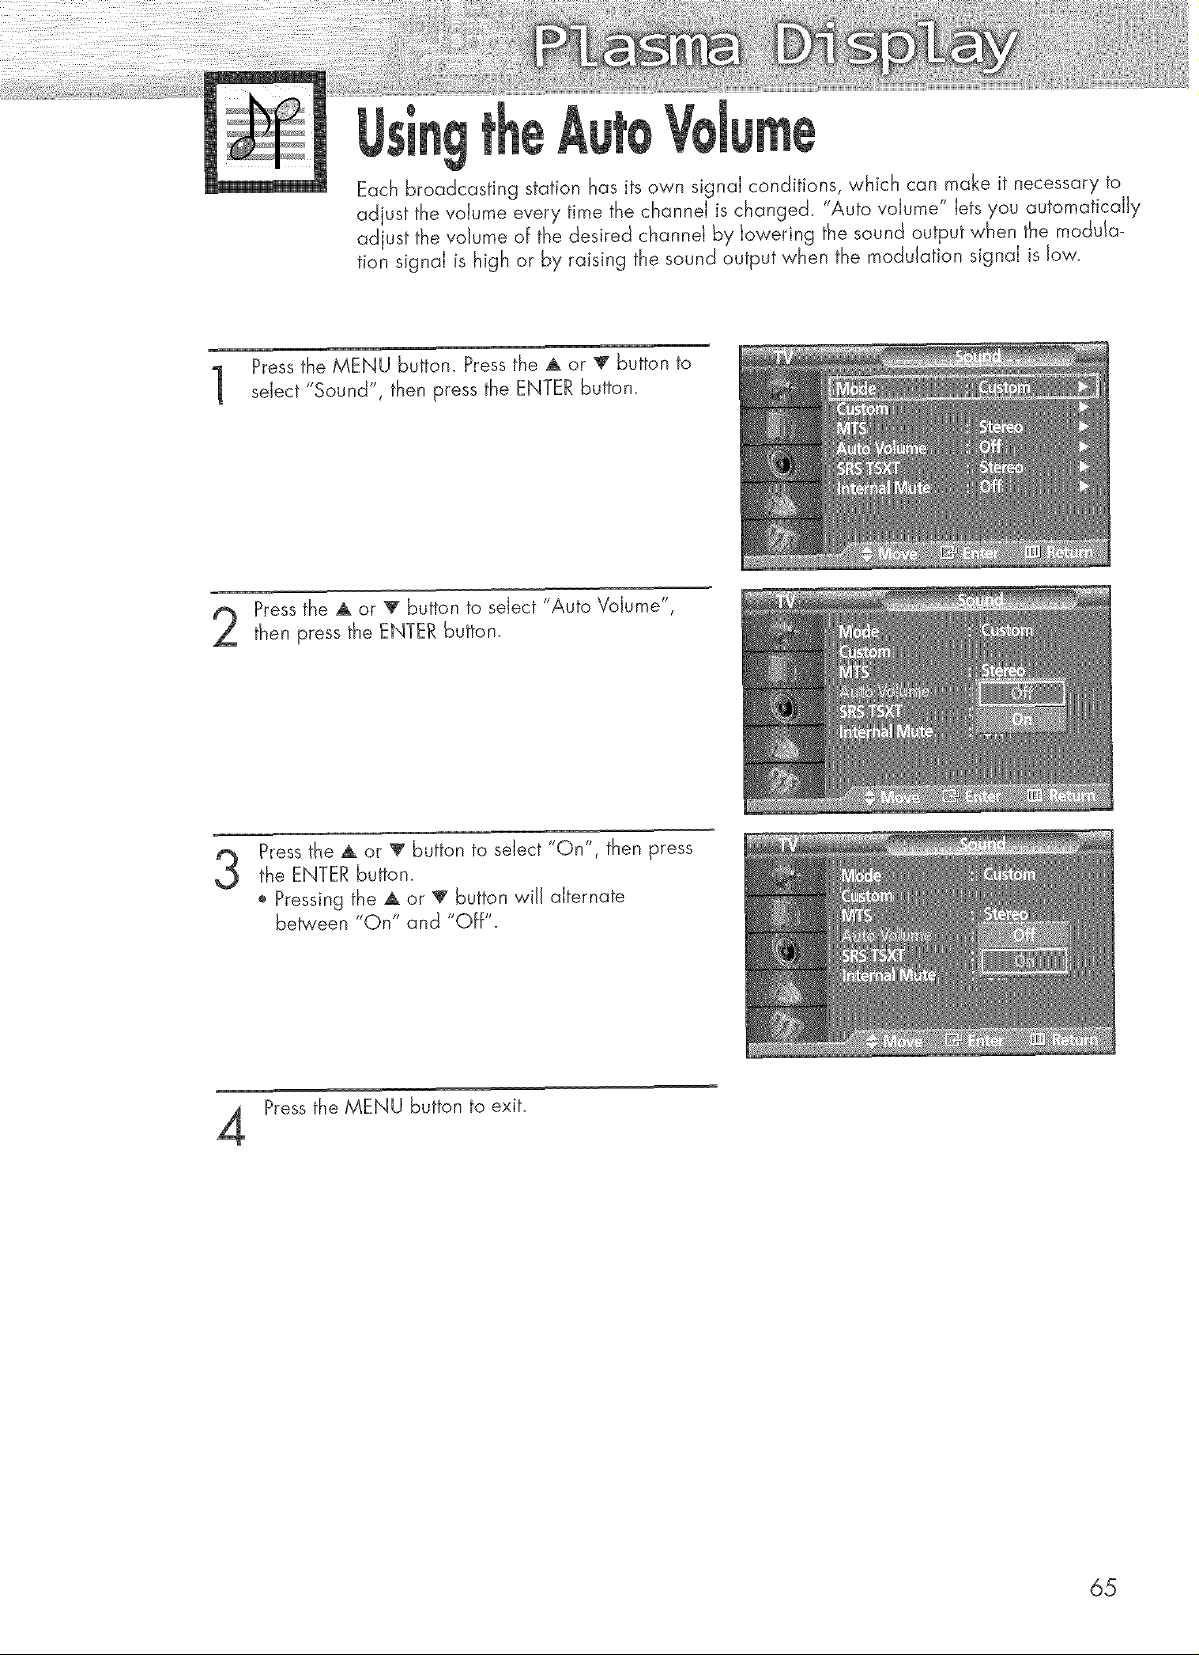
Each broadcasting station has its own signal conditions, which can make it necessary to
adjust the voIume every time the channeI is changed. "Auto vdume" Iets you automatically
adjust the volume of the desired channel by lowering the sound output when the modula-
tion signaJ is high or by raising the sound output when the modulation signal is low.
Press the MENU button. Pressthe _ or V button to
select "Sound", then press the ENTER button.
Pressthe A or 'V" button to select "Auto Volume",
then press the ENTER button.
3
Press the A or V button to sdect "On", then press
the ENTER button.
o Pressing the A or V button will alternate
between "On" and "Off".
Pressthe MENU button to exit.
65
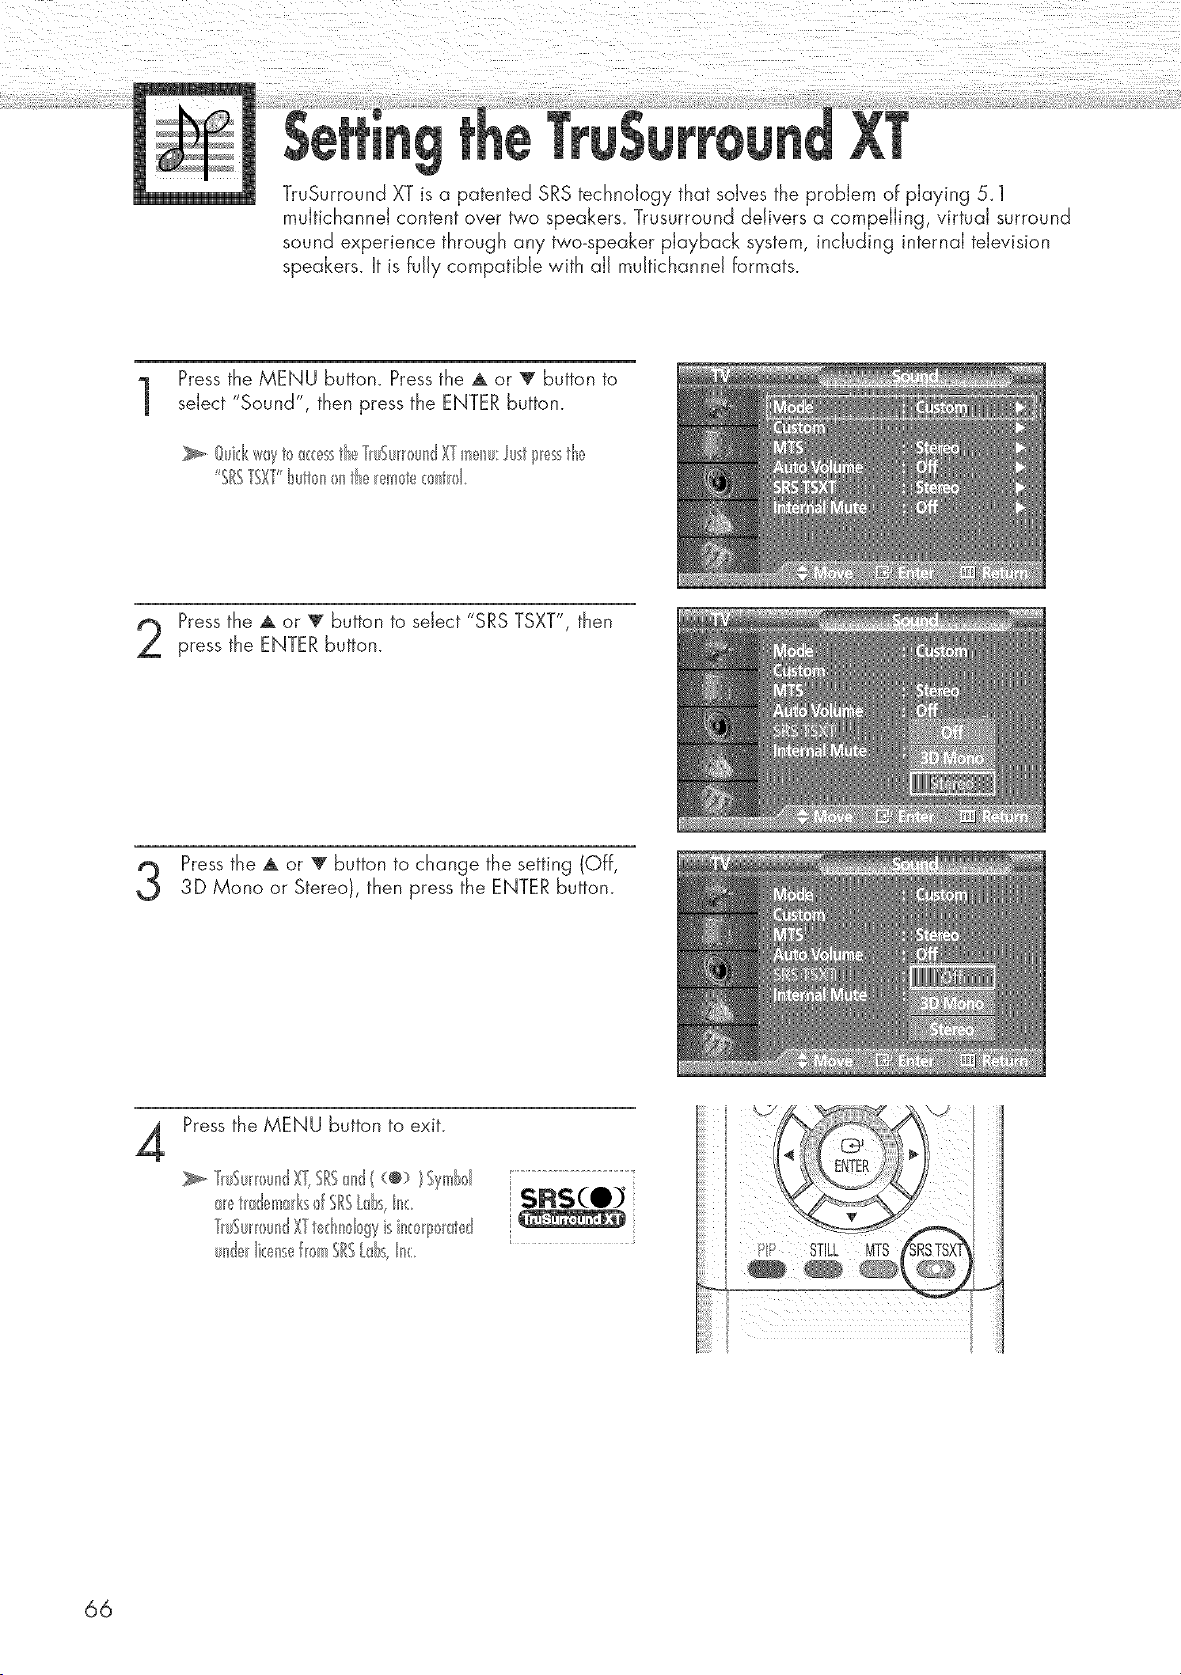
TruSurround XT is a patented SRS technology that solves the problem of playing 5_1
muItichanneJ content over two speakers_ Trusurround delivers a compelling, virtual surround
sound experience through any two-speaker playback system, including internal television
speakers. It is fully compatible with all muJtichanneJ formats.
Pressthe MENU button. Press the A or V button to
select "Sound", then press the ENTER button.
_. Oui_:kwayt<__<<'esstl_eY_u%_0undXYmeIw:lustp_essthe
"SISTSXY't_utl0n)n tl_e_l'__te_ntl01
Pressthe A or V button to select "SRS TSXT", then
press the ENTER button.
Pressthe A or V button to change the setting (Off,
3D Mono or Stereo), then press the ENTER button.
4
Press the MENU button to exit.
T_uSu_)undX_,SRS{_nd( (@> t Symbd :................................................
_,_tmd_!m_ksf SRSLd_s,n_: _SRS(O_
Y_uSu_r>undXYtedu_I gyisin_/0_ated ':
undelIi<:ensef_(>mSRSLdss,I_<:
fP STILL MTS
66
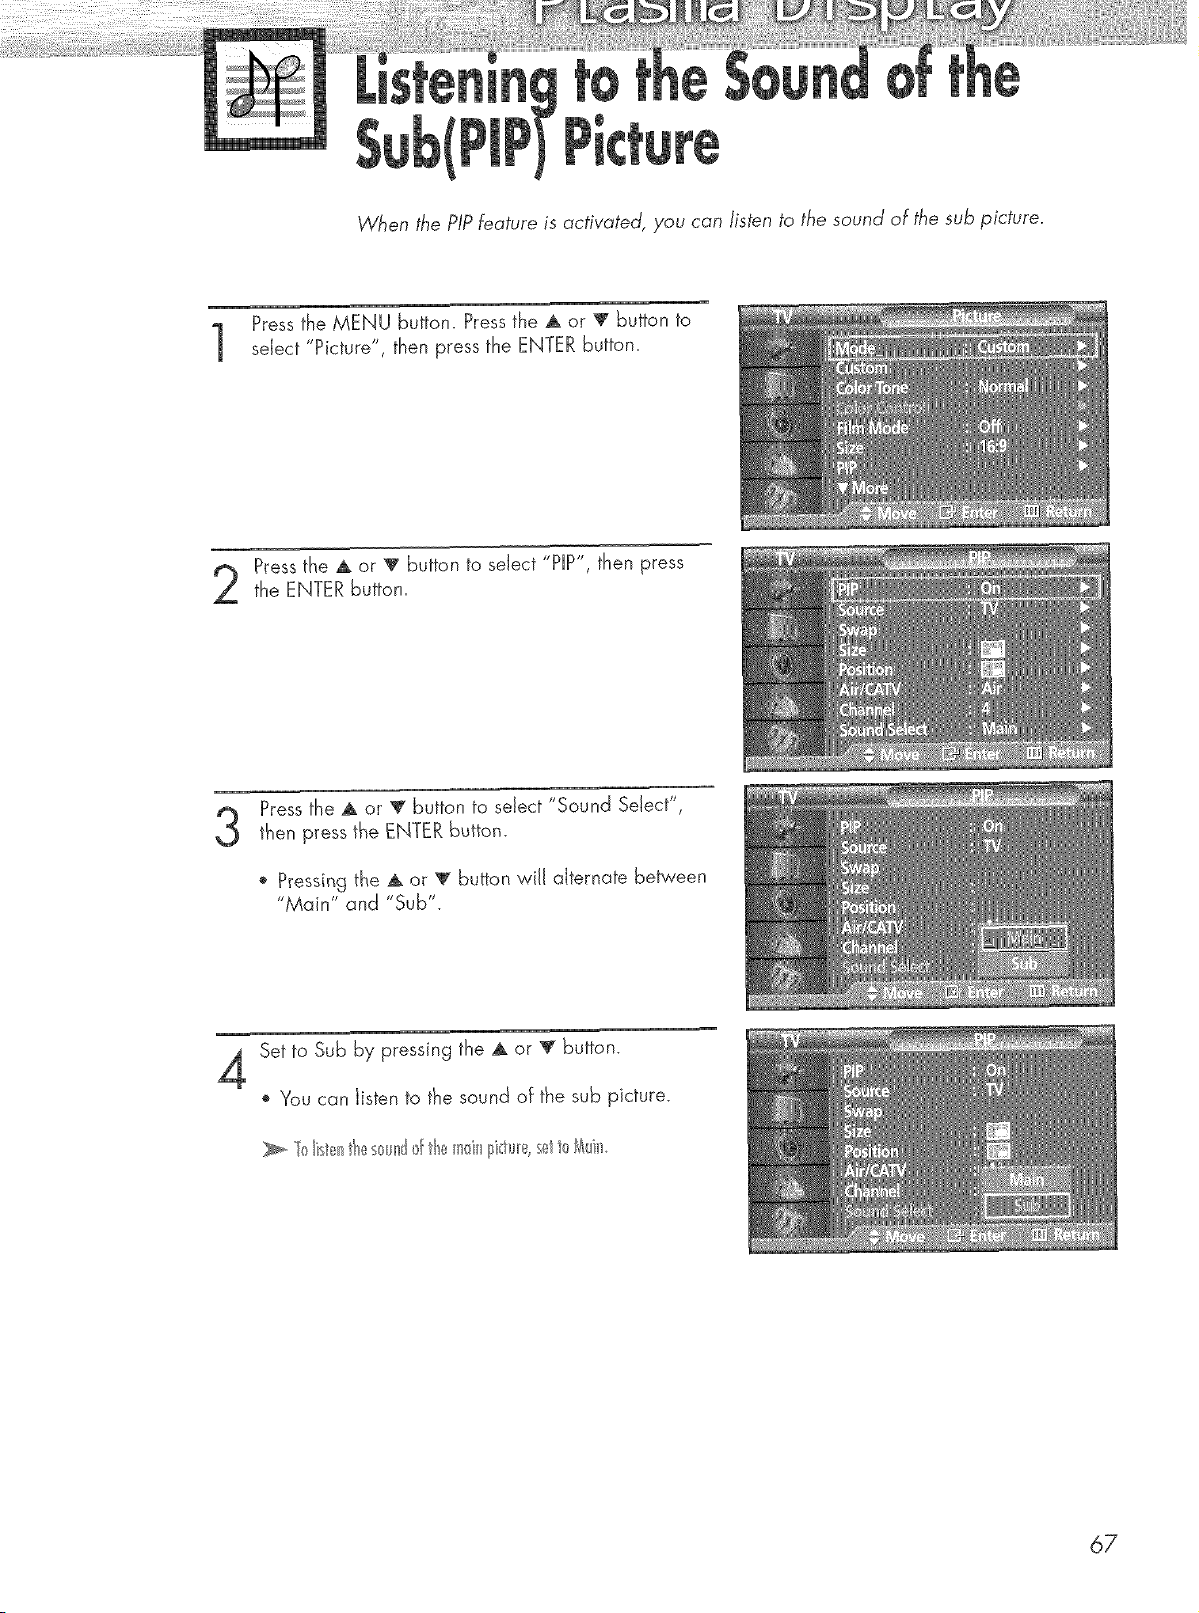
When the PIPfeature is activated, you can listen to the sound of the sub picture.
Pressthe MENU button. Press the _ or v button to
select "Picture", then press the ENTER button.
Pressthe A or v button to select "PIP", then pressthe ENTER button.
Pressthe A or T button to select "Sound Select',
then press the ENTER button.
o Pressing the A or V button will alternate between
"Main" and "Sub".
4
Set to Sub by pressing the _ or _ button.
', You can listen to the sound of the sub picture.
67
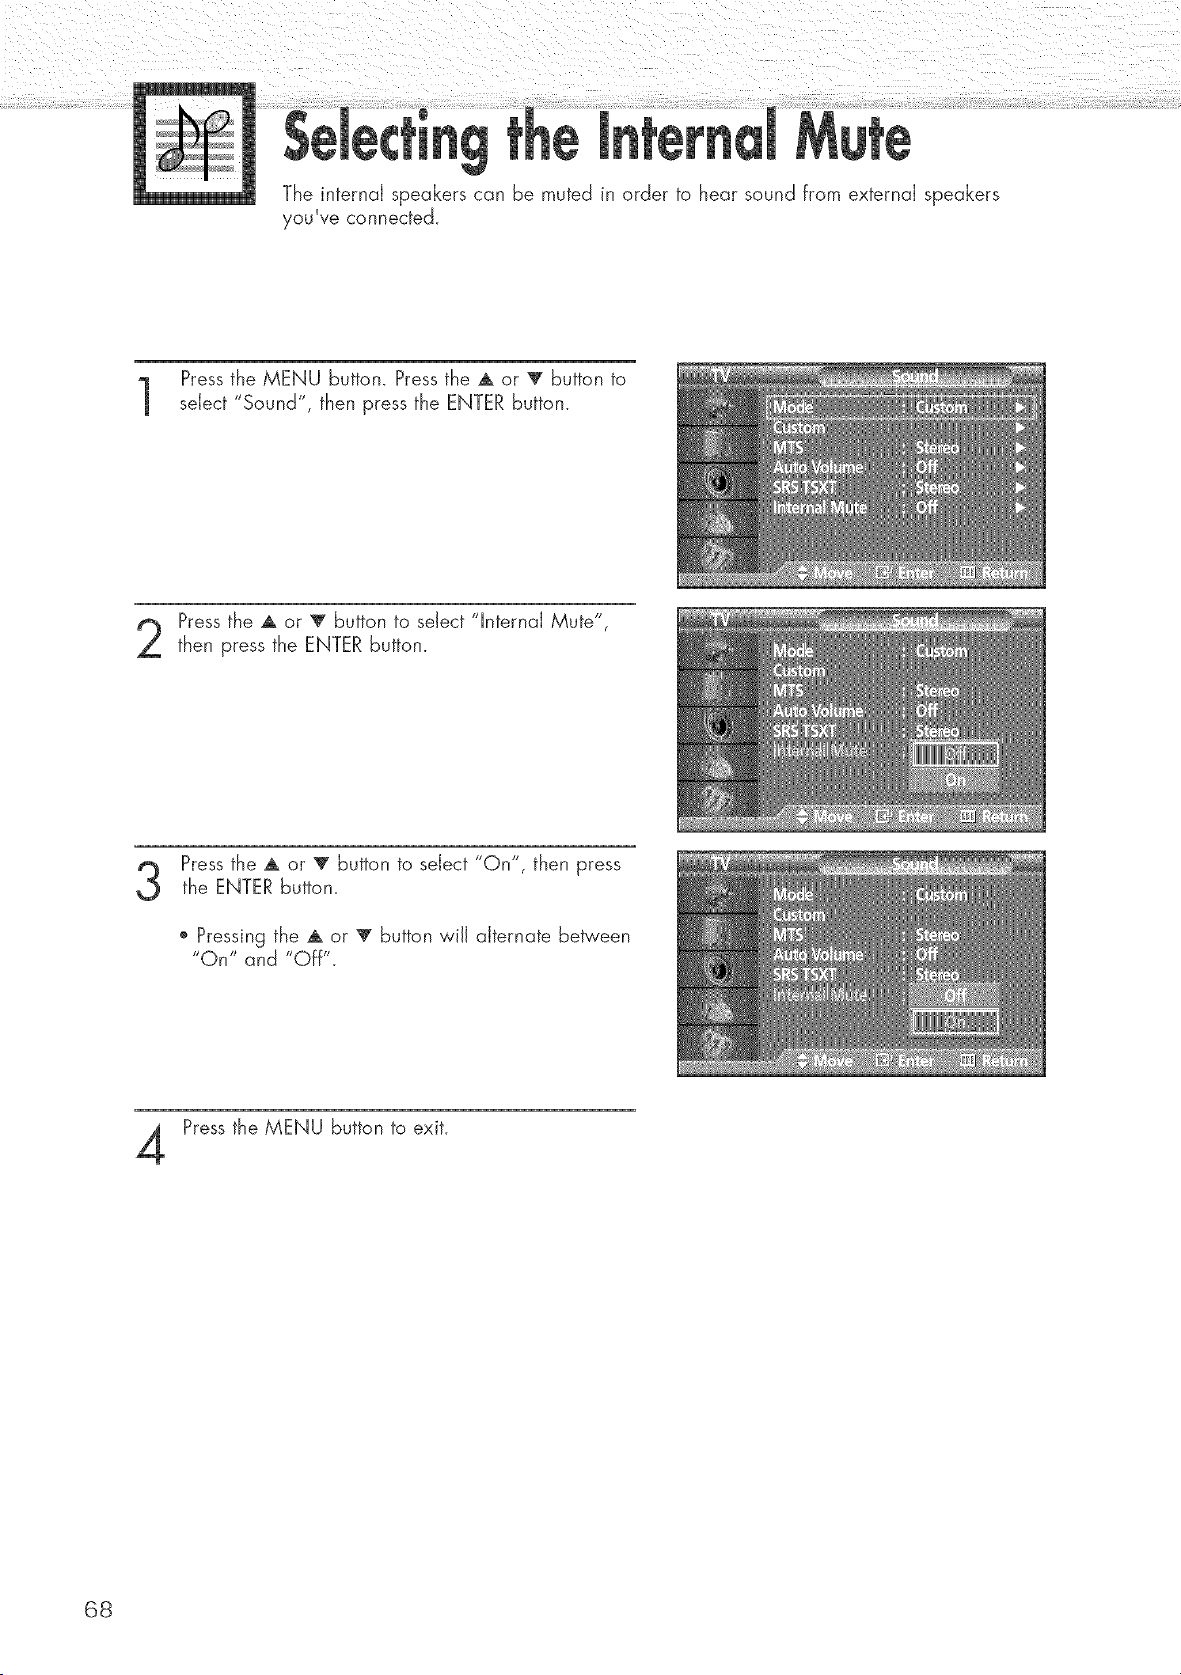
M
The internal speakers can be muted in order to hear sound from external speakers
you've connected.
Pressthe MENU button. Press the A or V button to
select "Sound", then press the ENTER button.
Pressthe A or V button to select "Internal Mute",
then press the ENTER button.
Pressthe A or V button to select "On", then pressthe ENTER button.
o Pressing the A or 'V' button will aiternate between
"On" and "Off".
Press the MENU button to exit.
68

Fine Tuning Channels .................................................................... 70
LNA (Low Noise Amplifier 1............................................................ 71
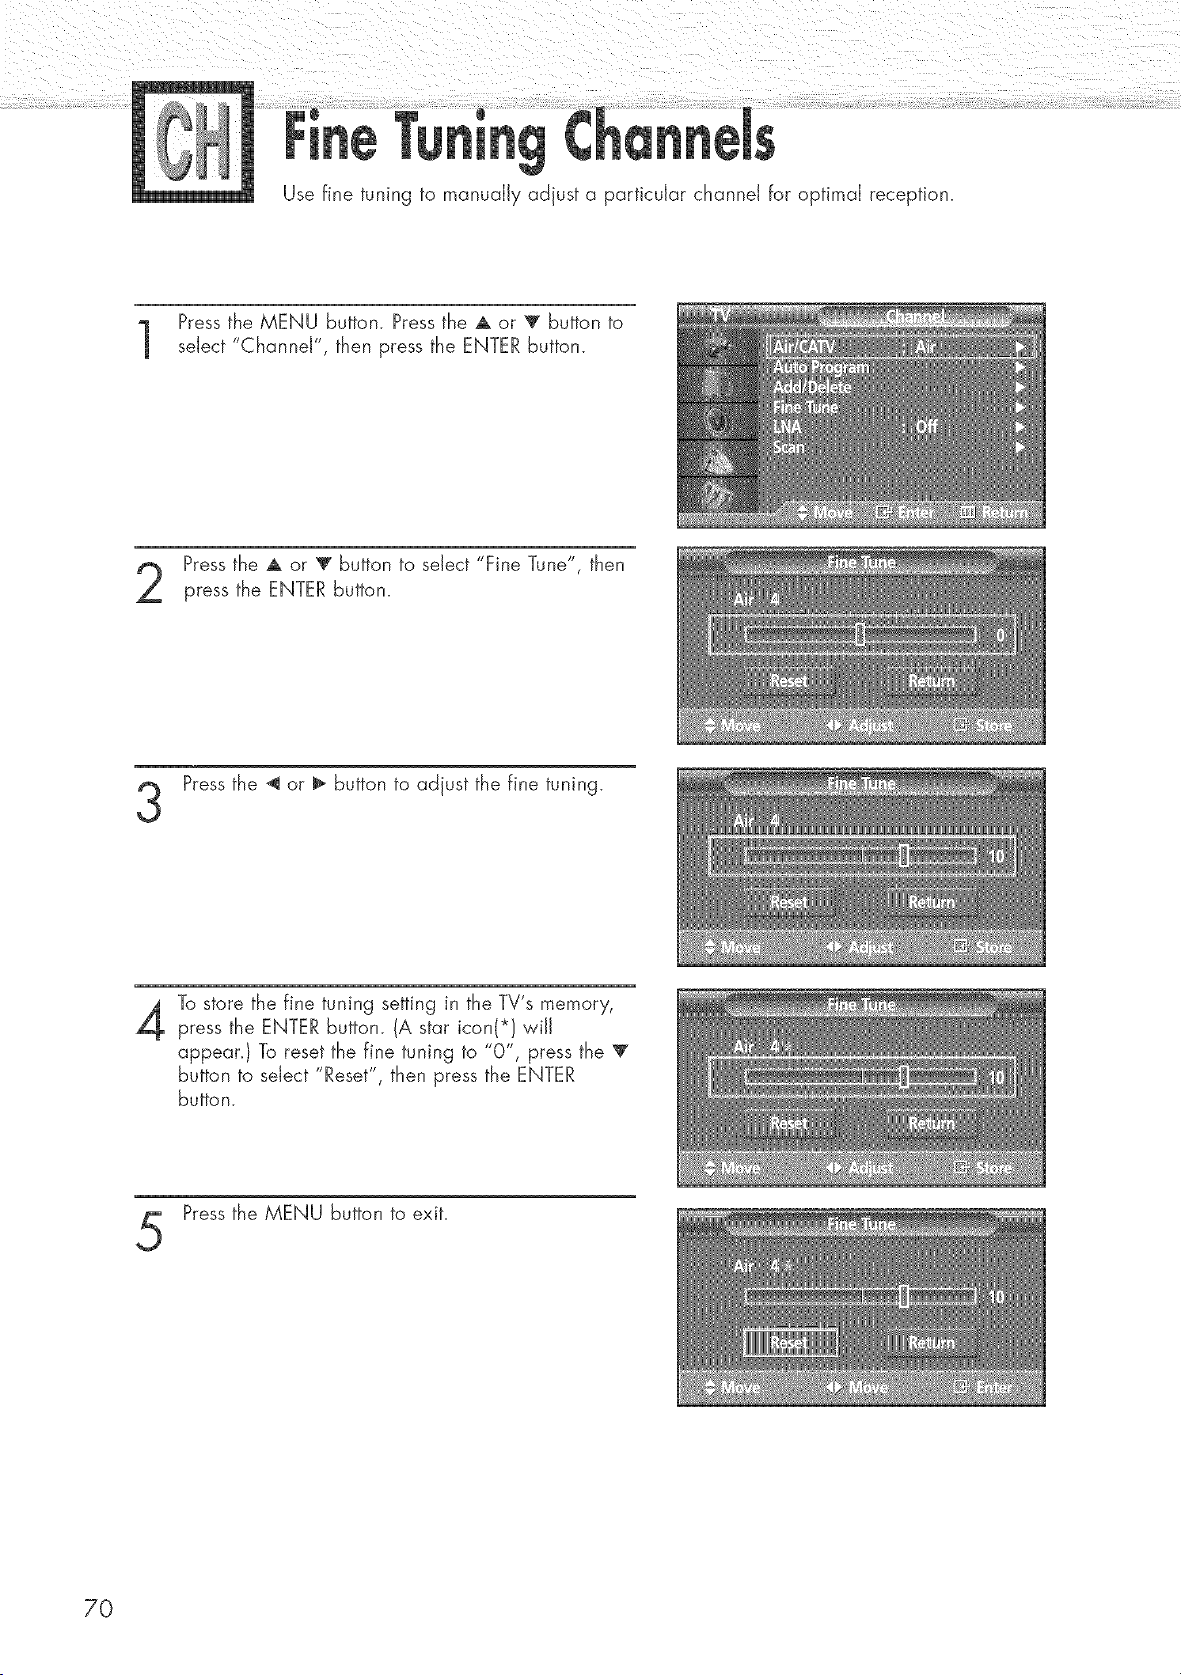
Use fine tuning to manually adjust a particular channel for optimal reception.
Pressthe MENU button. Press the A or T button to
select "Channel", then press the ENTER button.
Pressthe A or T button to select "Fine Tune", then
press the ENTER button.
Press the _ or _ button to adjust the fine tuning.
To store the fine tuning setting in the TV's memory,
press the ENTER button. (A star icon(*} wiJJ
appean) To reset the fine tuning to "0", press the 'V"
button to select "Reset", then press the ENTER
button.
Press the MENU button to exit.
7O
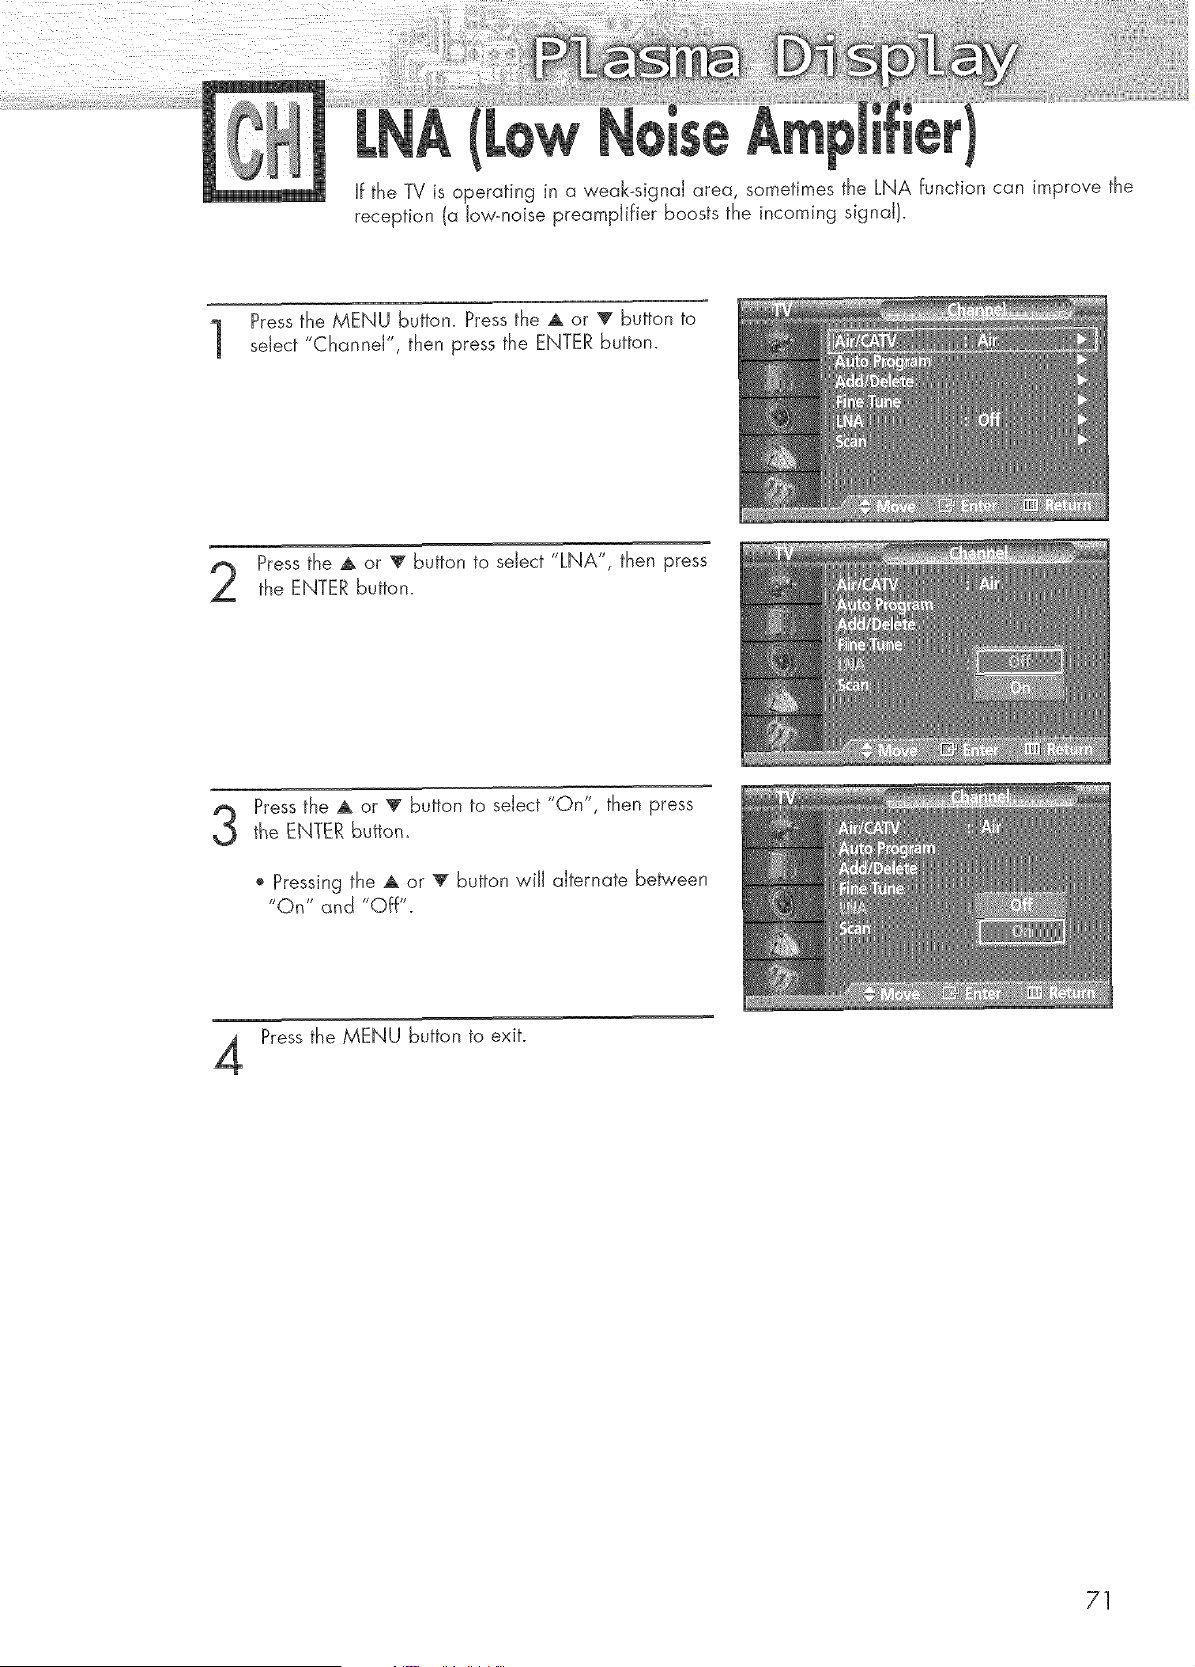
If the TV is operating in a weak-signal area, sometimes the LNA function can improve the
reception (a low-noise preamplifier boosts the incoming signal!.
Pressthe MENU button. Press the A or T button to
select "Channel", then press the ENTER button.
Pressthe A or _' button to select "LNA", then press
the ENTER button.
3
Pressthe A or T button to select "On", then press
the ENTER button_
o Pressing the A or v button will alternate between
"On" and "Off".
Pressthe MENU button to exit.
71

Connecting a PC.......................................................................... 74
Adiusting the PC Screen ................................................................ 78
Changing the Position of the image ................................................ 79
Picture Quality Adjustment ............................................................ 80
information .................................................................................. 83
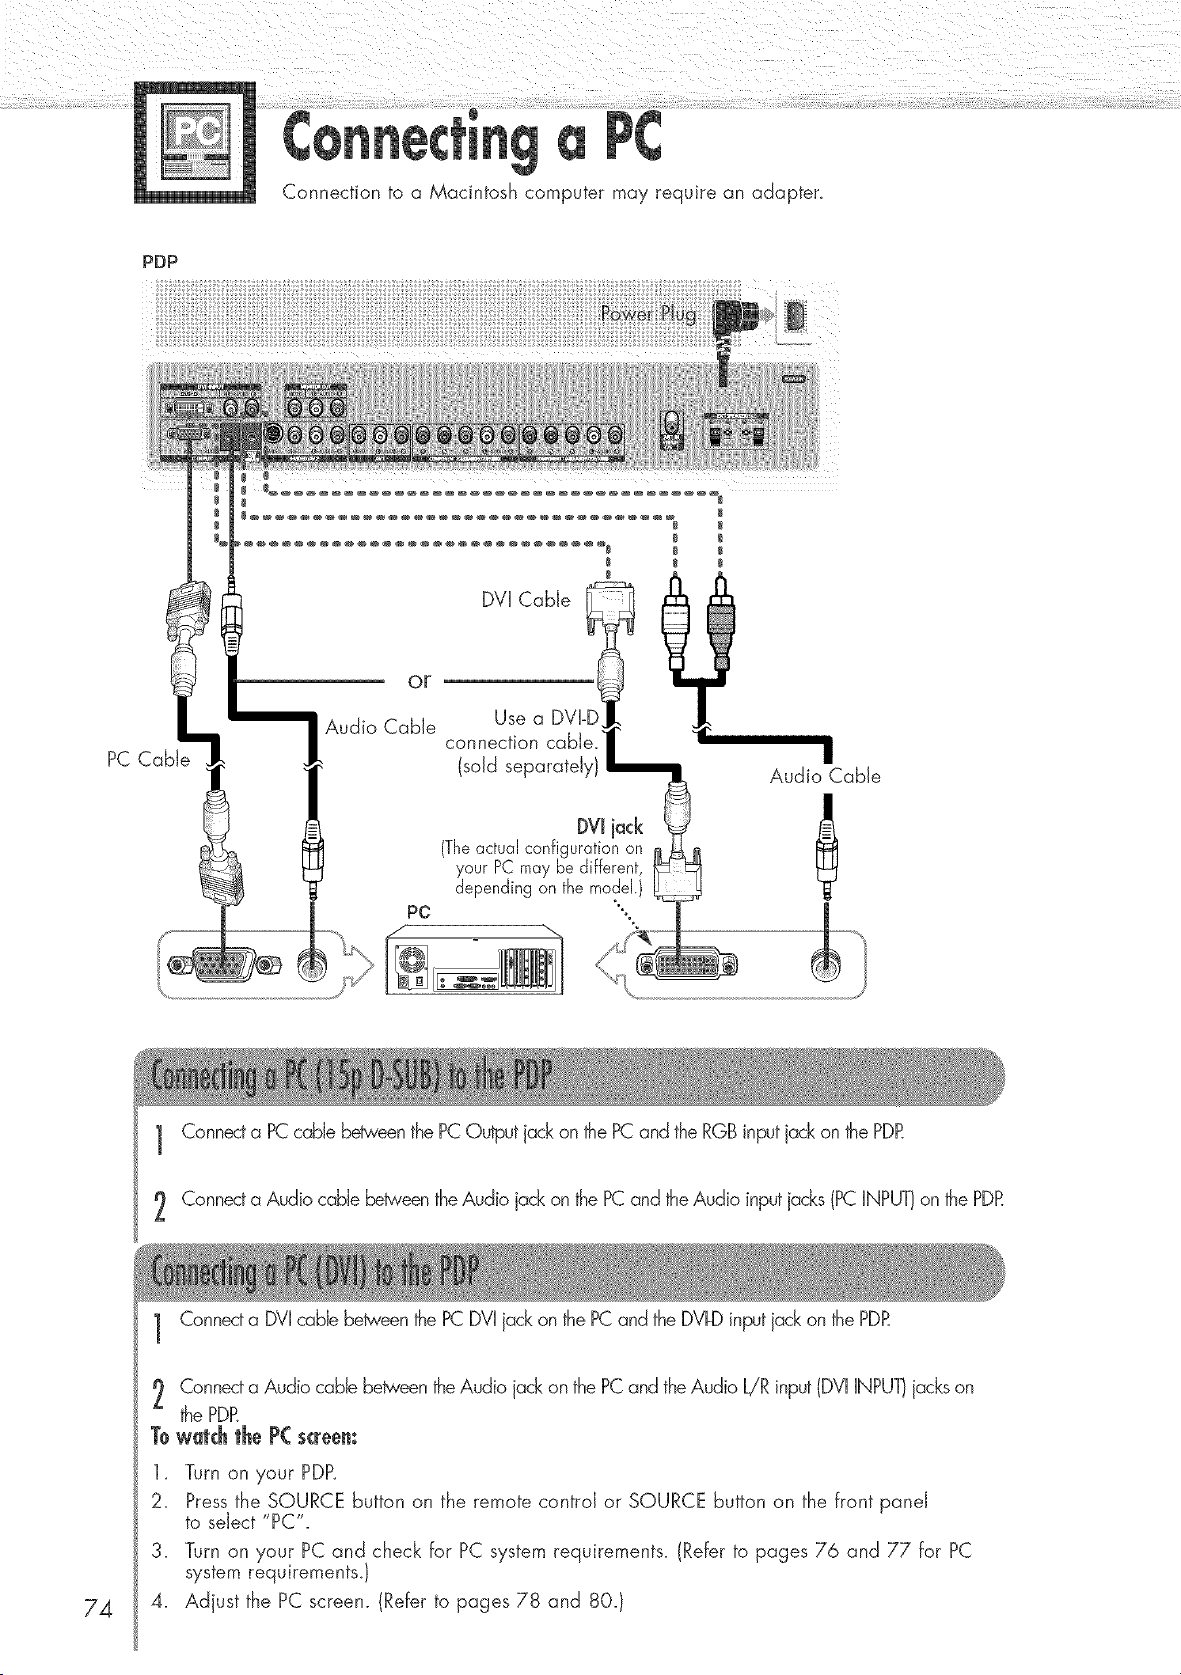
Connection to a Macintosh computer may require an adapten
PDP
PC CaNe
Audio Cable
Use a DVI-!
connection cable/ "
(sold separately)
DVIiack
(Theactualconfigurationon
your PCmaybe different,
E
dependingon the model.)
Audio Cable
1 Connecta PCcable between the PCOutput jackon the PCand the RGBinput jack on the PDR
2 Connecta Audio cable b@veen the Audio jack on the PCand the Audio inputjacks (PCINPUT)on the PDR
74
1 Connecta DVI cable betweenthe PC DVI jackon the PC and the DVI-Dinput jack on the PDR
2 Connec¢a Audio cable betweenthe Audio jack on the PC and the Audio L!R input (DVIINPU1]jackson
the PDR
Towatch the P( screen:
1, Turn on your PDP,
2. Pressthe SOURCE button on the remote control or SOURCE button on the front panel
to select "PC".
3. Turn on your PC and check for PC system requirements. (Refer to pages 76 and 77 for PC
system requirements,)
4. Adjust the PC screen. (Refer to pages 78 and 80.)
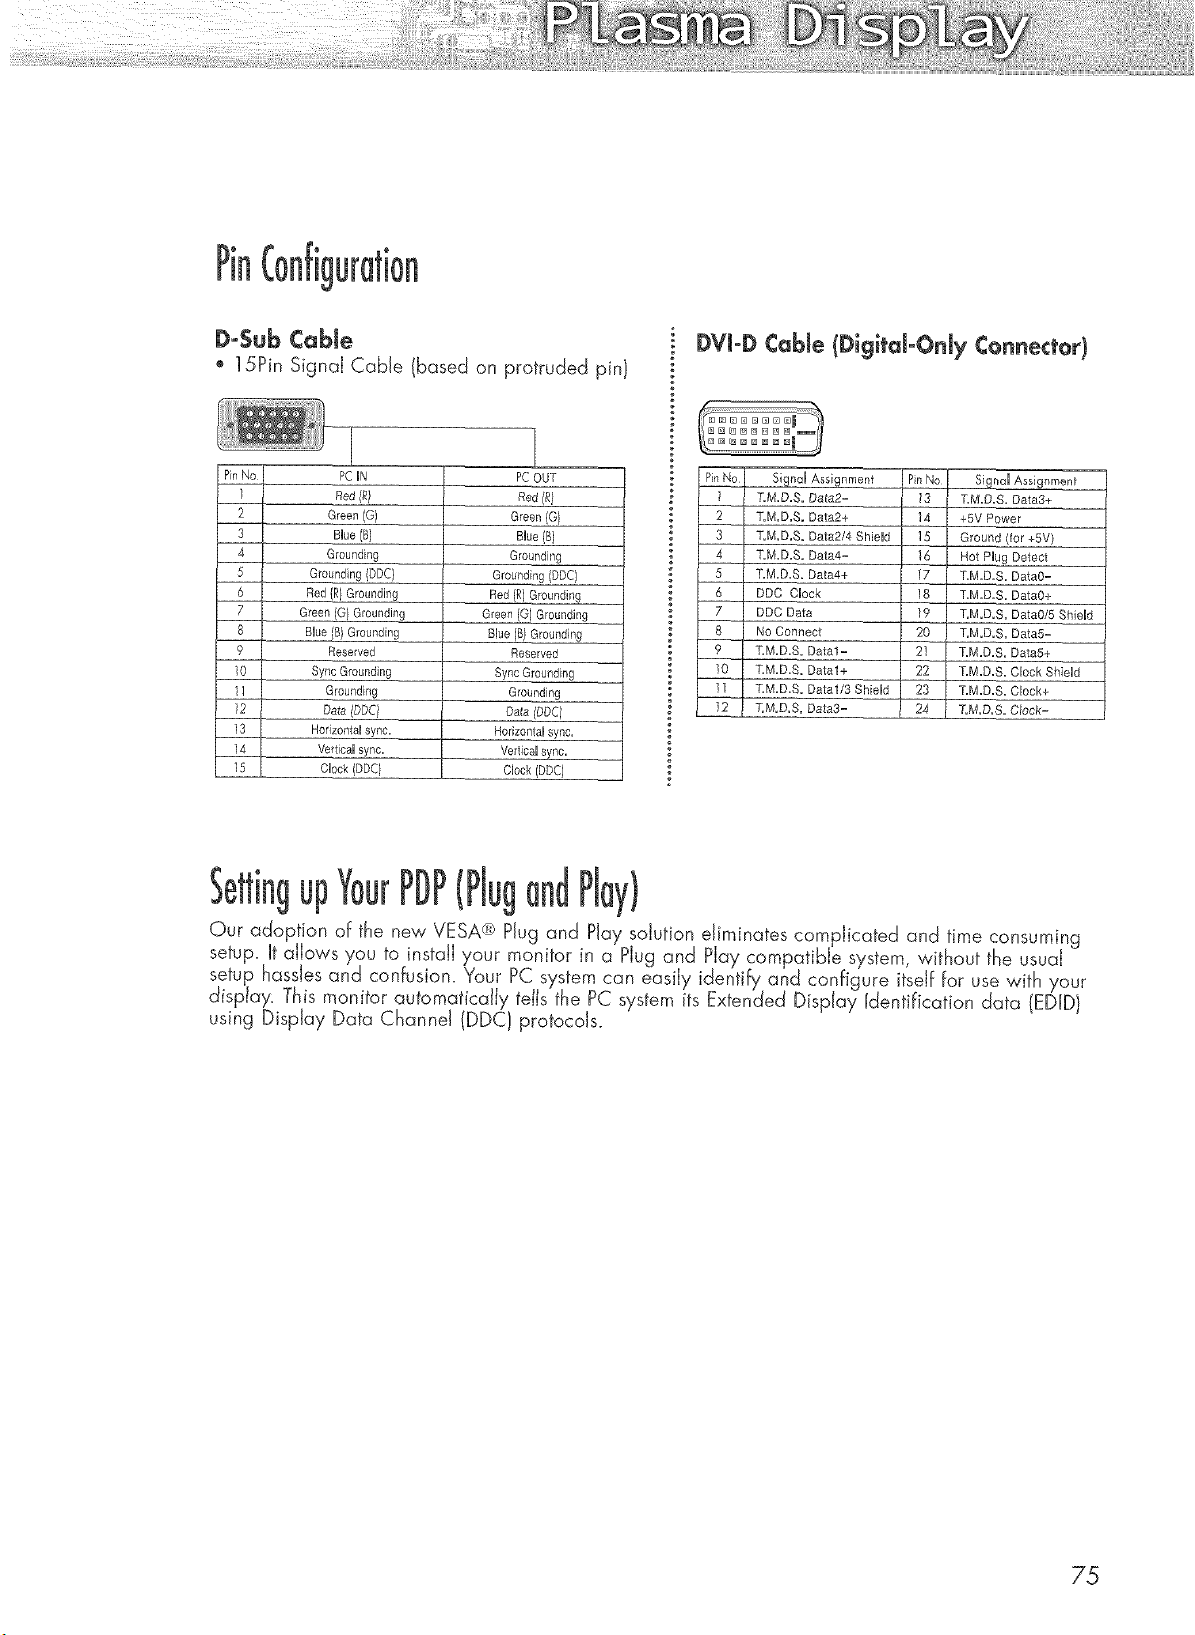
Pin
Do$ubCable
o 15Pin Signal Cable (based on protruded pin)
DVJoDCable (DigitdoOnJy Connector)
PC UN
Red#/
Green(G)
Blue (B)
Grounding
Grounding (DDC)
Red (R) Grounding
Green (Ol Grounding
BUue{B) Grounding
Reserved
Sync Grounding
Grounding
Date(_q
Horizontal eyrie.
Vertica] sync.
qeck (DDC)
1
PC OUT
Green (O}
Blue (B)
Grounding
Grounding (DDC)
Red (R) Grounding
Green (G) Grounding
Blue IB} Grounding
Reserved
Sync Grounding
Grounding
Da_a (DDC I
Horizontal sync.
VerticaU sync.
Clock (DDC)
Signal Assignment Pin No Signal Assignment
1 T.M.D.S. Data2= 73 T,M.D.S. Data3+
2 T.M.D.S. Data2+ 14 +5V Power
3 T.M.D.S. Data2/4 Shield ] 5 Ground (for +5V)
4 T.M.D.S. Data4= 16 Hot Plug Detect
5 ]:M.D.S. Data4+ ]7 T.M.D.S. DataO=
6 DDC Clock 18 T.M.D.S. Data0+
7 DDC Data ]9 T.M.D.S. Data0/5 ShieUd
8 No Connect 20 T.M.D.S. Data5=
9 T.M.D.S. Data1= 21 T.M.D.S. Data5+
10 T.M.D.S. Data1+ 22 T.M.D.S. Clock Shield
11 T.M.D.S. Data1/3 Shield 23 T.M.D.S. Clock+
12 T.M.D.S. Oa_a3= 24 T.M.D.S. Clock=
up (Plug PiW)
Our adoption of the new VESA® Plug and Play solution eliminates complicated and time consuming
setup. It aiiows you to install your monitor in a Plug and Play compatible system without the usual
setup hassles and confusion. Your PC system can easily identify and configure itself for use with your
display. This monitor automatically tells the PC system its Extended Display Identification data (DID}
using Display Data Channel (DDC} protocols.
75
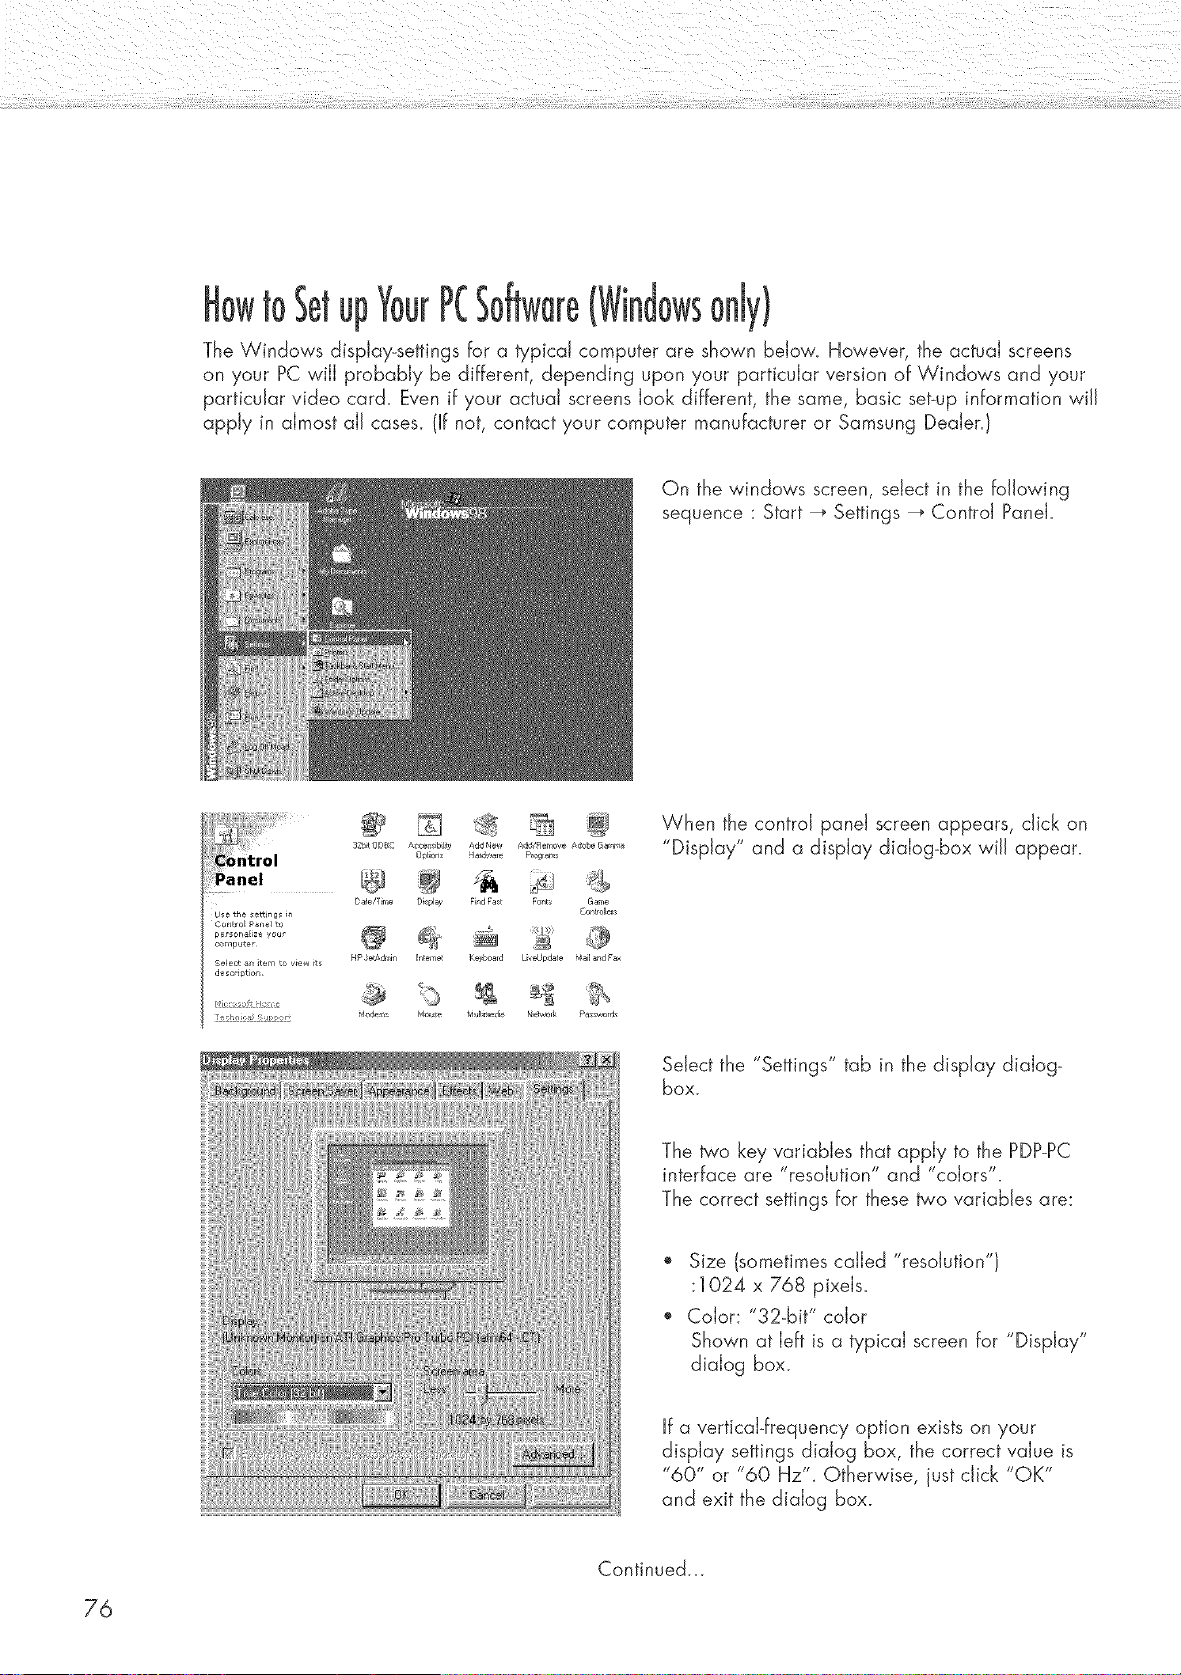
toSetup PC
The Windows display-settings for a typical computer are shown below. However, the actual screens
on your PC will probably be different, depending upon your particular version of Windows and your
particular video card. Even if your actual screens look different, the same, basic set-up information will
apply in almost all cases. (If not, contact your computer manufacturer or Samsung DeaJen}
On the windows screen, select in the following
sequence : Start _ Settings _ Control Panel.
f ........ @
32bt ODSC AC_ ¢iblty Add Nev_ Add/Rem0ve gr_0be GaF_n_
Date/T me Displa_ Rnd Fas_ F0nts Gar_,e
Use the settings in C_ntroller$
CorLtralP_el ",_
pers0n_E _ _ou @
, ,_mpute_
HP 3e_dmin Ir _eme Keyboard U, egp@te _ail _,d F_
Select an item to view its
d_scdpdan
4, ,s,t a e
_doderr_, Nr, ue tf _tir _di4 _etwork p sswnrr_s
_ec ,h, _], t> c;
When the control panel screen appears, click on
"Display" and a display dialog-box wiJJappear.
Select the "Settings" tab in the display dialog-
box.
The b'o key variables that apply to the PDP-PC
interface are "resolution" and "colors".
The correct settings for these two variables are:
Size (sometimes called "resolution")
:1024 x 768 pixels.
Color: "32-bit" color
Shown at left is a typical screen for "Display"
dialog box.
If a vertical-frequency option exists on your
display settings dialog box, the correct value is
"60" or "60 Hz'L Otherwise, just click "OK"
and exit the dialog box.
Continued...
76
_otes:
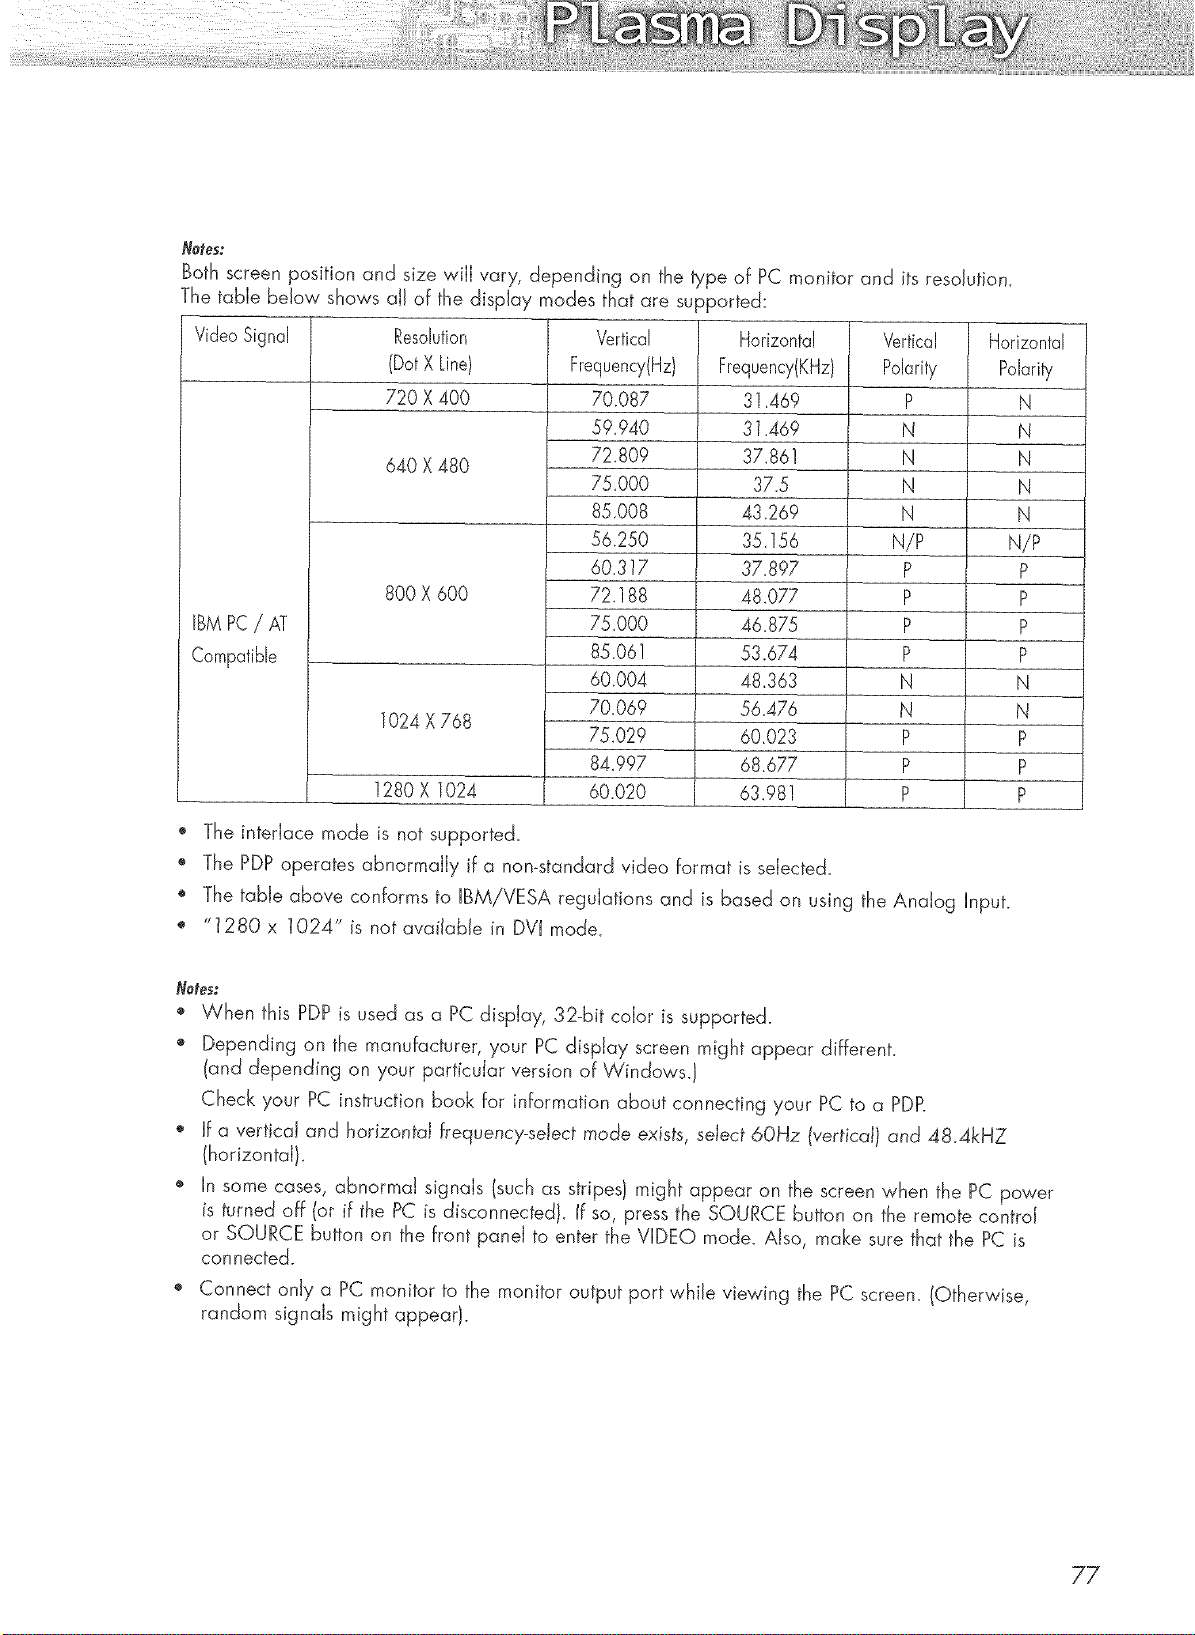
Both screen position and size will vary, depending on the type of PC monitor and its resolution.
The table below shows aJJof the display modes that are supported:
Video Signal Resolution
(DotX Line)
720 X 400
640 X 480
Vertical
Frequency(Hz)
70.087
59.940
72+809
75.000
85.008
56.250
60.317
72.188
75.000
85.06!
60.004
70.069
Horizontal
Frequency(KHz)
3]+469
31.469
37.861
37+5
43.269
35.156
37.897
48.077
46.875
53.674
48.363
56.476
Vertical Horizontal
Polarity Polarity
P N
N N
N N
N N
N N
N/P N/P
P P
P P
P P
P P
N N
N N
P P
P P
P P
BM PC/ AT
Compatible
800 X 600
1024 X 768
1280 X 1024
75.029
84.997
60.020
60.023
68.677
63.981
+ The interlace mode is not supported+
+ The PDP operates abnormally if a non+standard video format is selected.
" The table above conforms to IBM/VESA regulations and is based on using the Analog Input.
+ "1280 x 1024" is not available in DVI mode.
Note_:
', When this PDP is used as a PC display, 32-bit color is supported.
" Depending on the manufacturer, your PC display screen might appear different.
(and depending on your parficuIar version of Windows.)
Check your PC instruction book for information about connecting your PC to a PDP.
+ If a vertical and horizontal frequency-select mode exists, select 6OHz (vertical} and 48+4kHZ
(horizontal)+
" In some cases, abnormal signals (such as stripes) might appear on the screen when the PC power
is turned off (or if the PC is disconnected}, ff so, press the SOURCE button on the remote control
or SOURCE button on the front panel to enter the VIDEO mode. Also, make sure that the PC is
connected.
+ Connect only a PC monitor to the monitor output port while viewing the PC screen. (Otherwise,
random signals might appear).
77
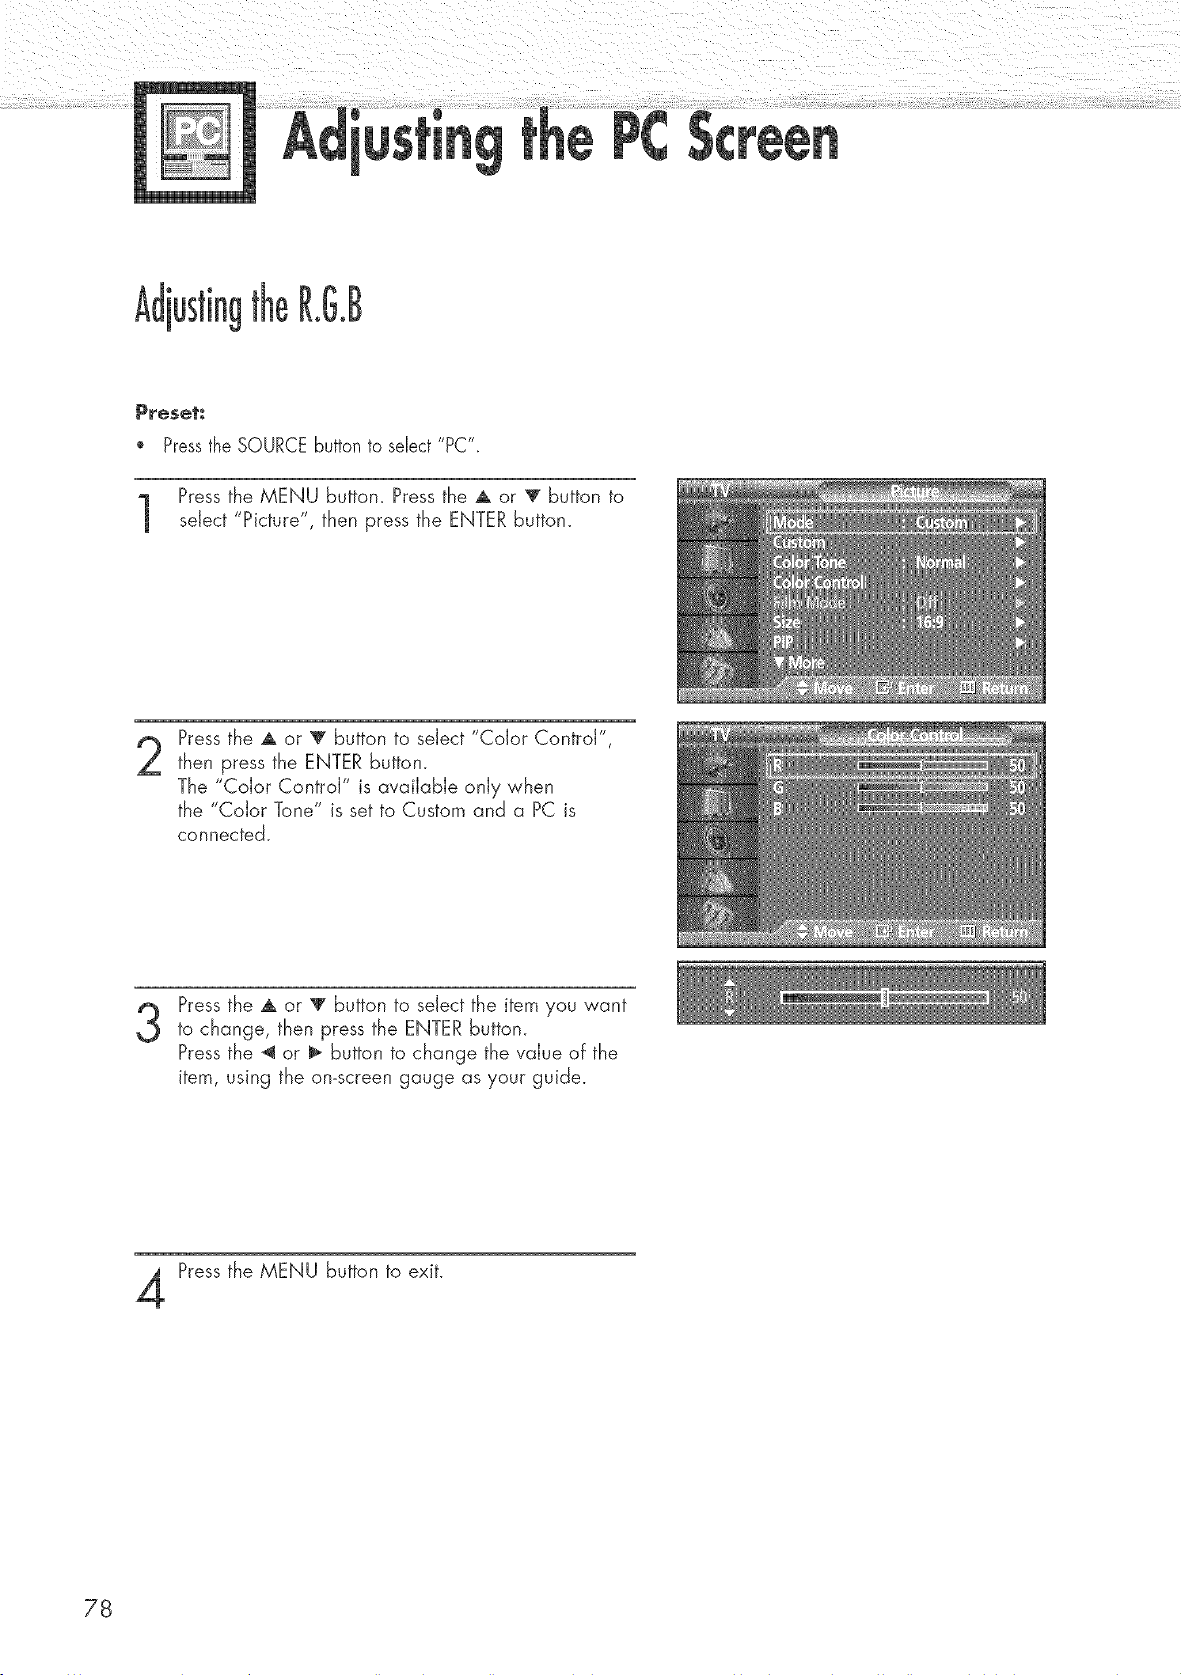
R.G.B
P_eset_
Pressthe SOURCEbutton to select "PC".
Press the MENU buttom Press the A or T button to
select "Picture", then press the ENTER button.
2
Pressthe A or _' button to select "Color Control",
then press the ENTER button.
The "Color Control" is available only when
the "Color Tone" is set to Custom and a PC is
connected.
3
Pressthe A or V button to select the item you want
to change, then press the ENTER button.
Pressthe _ or I_ button to change the value of the
item, using the omscreen gauge as your guide.
Pressthe MENU button to exit.
78
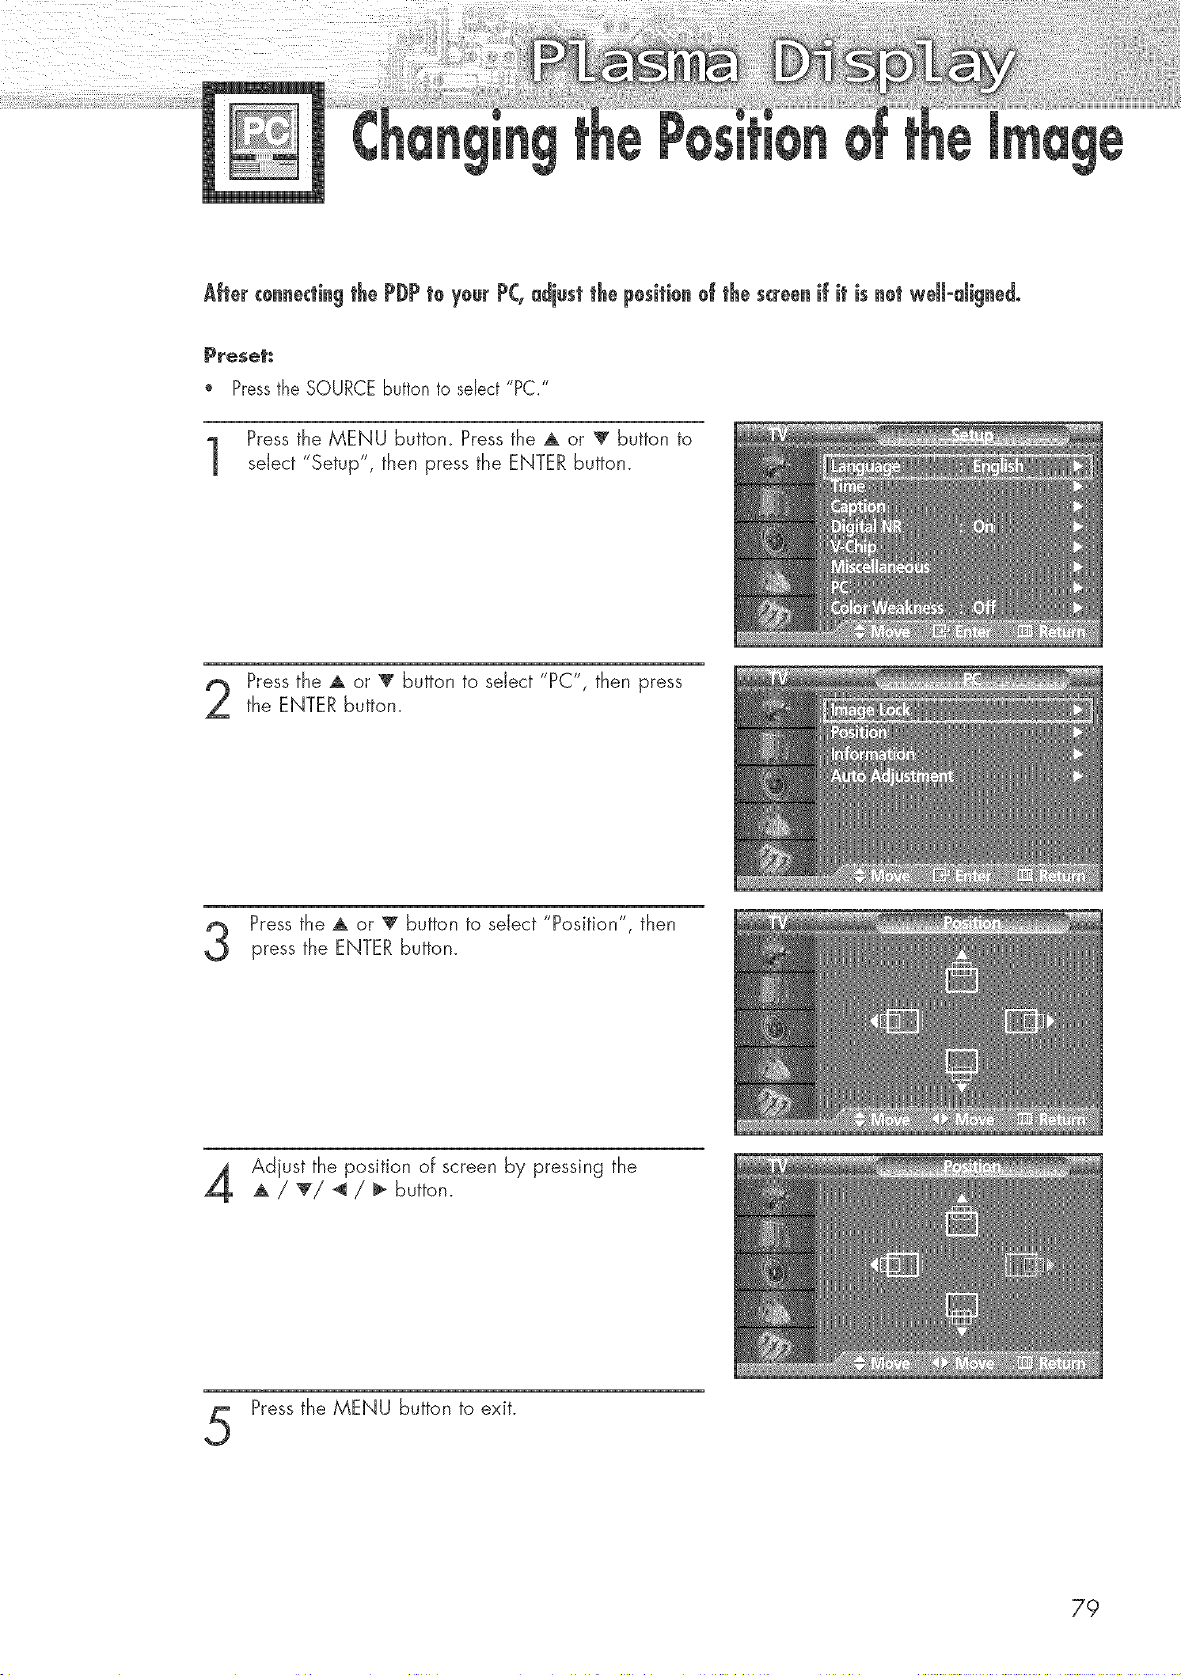
After cennectingthe PDP te yeur PC,adjust the pesitienef the screenif it is net weH-digned°
Preset:
" Pressthe SOURCEbutton to select "PC."
Press the MENU button. Press the A or _' button to
select "Setup", then press the ENTER button.
Press the A or _' button to select "PC", then press
the ENTER button.
Pressthe A or '_ button to select "Position", then
press the ENTER button.
Adjust the position of screen by pressing the
A / 'V'! _ / _ button.
Pressthe MENU button to exit.
79

P_eset_
Pressthe SOURCEbutton to select "PC".
Press the MENU buttom Press the A or T button to
sdect "Setup", then press the ENTER button.
Pressthe A or T button to seJect "PC", then press
the ENTER button.
3
Pressthe A or V button to seJect
"Auto Adjustment", then press the ENTER button.
The message "Auto Adjustment in progress."
appears on the screen and the picture adjustments
are automaticaJJy activated.
Press the MENU button to exit.
8O
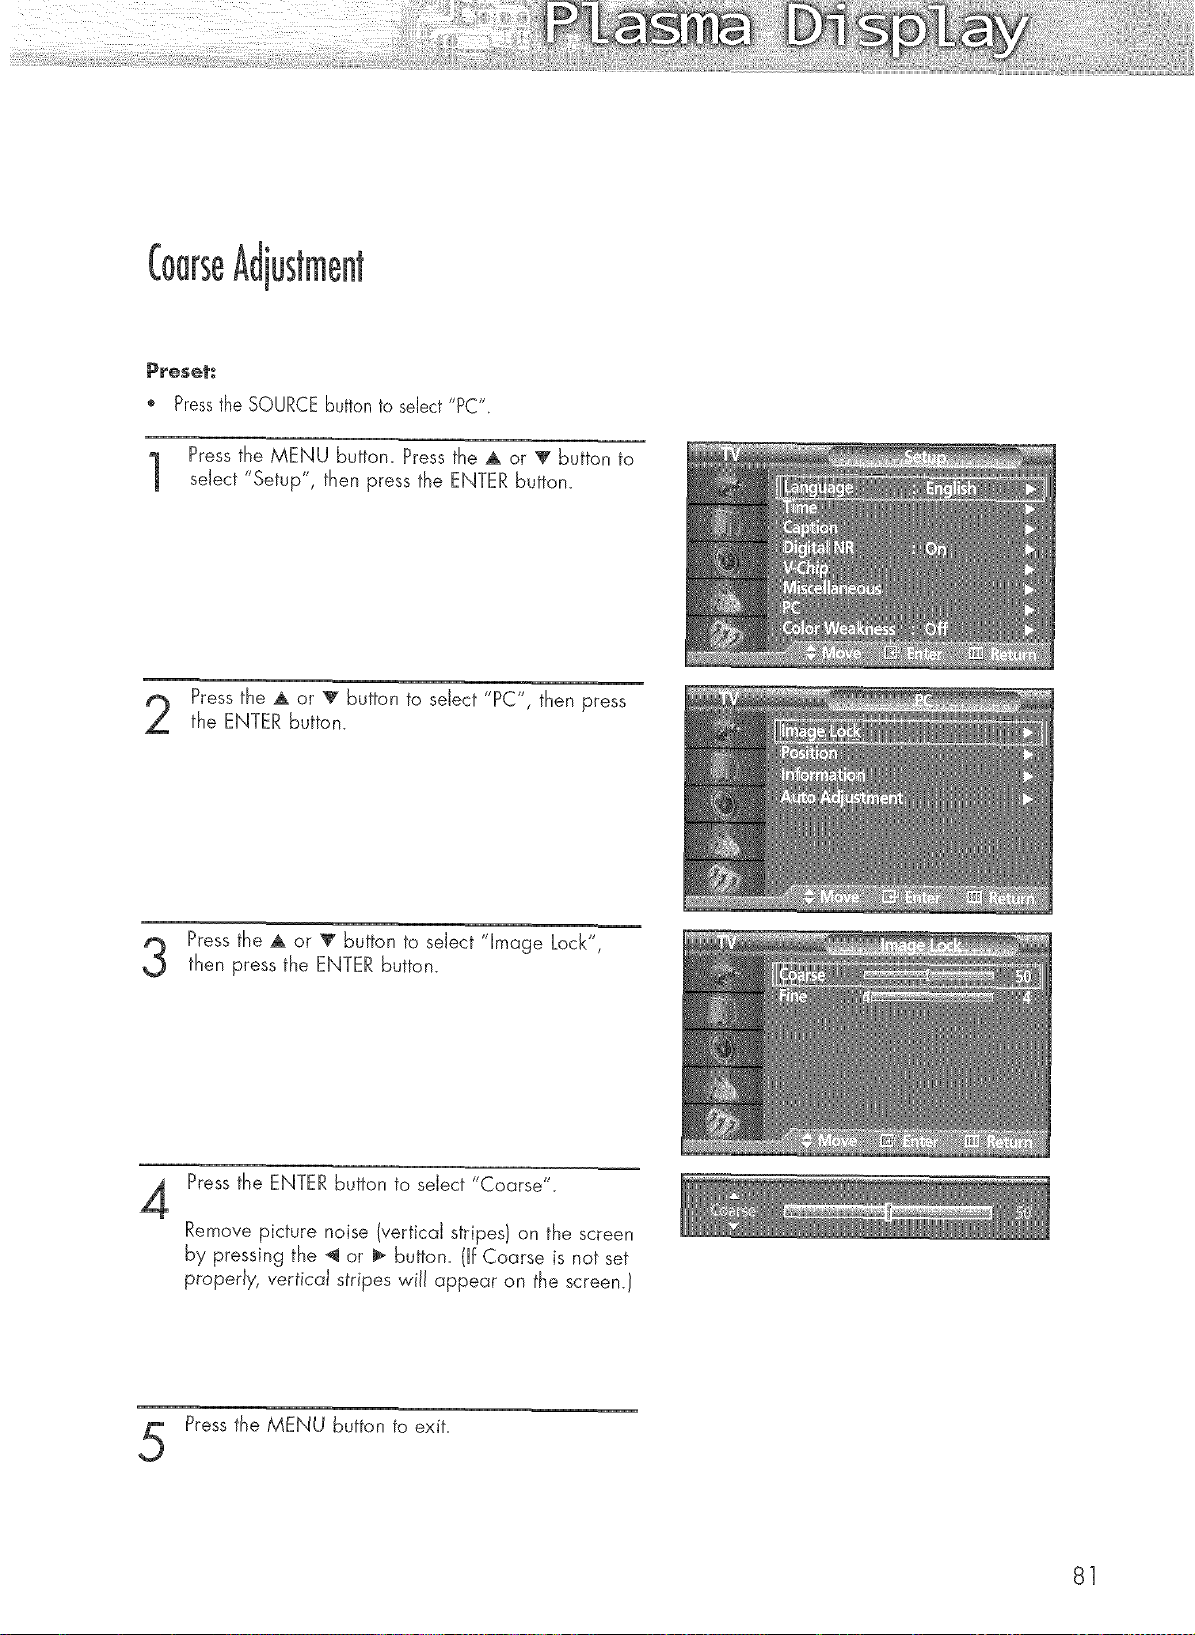
Coarseustment
P_eset_
" Pressthe SOURCEButtonto select "PC".
Press the MENU button. Press the A or _' button to
select "Setup", then press the ENTER button.
Press the A or _ button to seiect "PC", then press
the ENTER button.
Pressthe A or T button to select 'qmage Lock",
then press the ENTER button.
4
Pressthe ENTER button to select "Coarse".
Remove picture noise (vertical stripes} on the screen
by pressing the _ or I_ button. (If Coarse is not set
properly, vertical stripes will appear on the screen.!
Pressthe MENU button to exit.
81
Fine g(Fine)
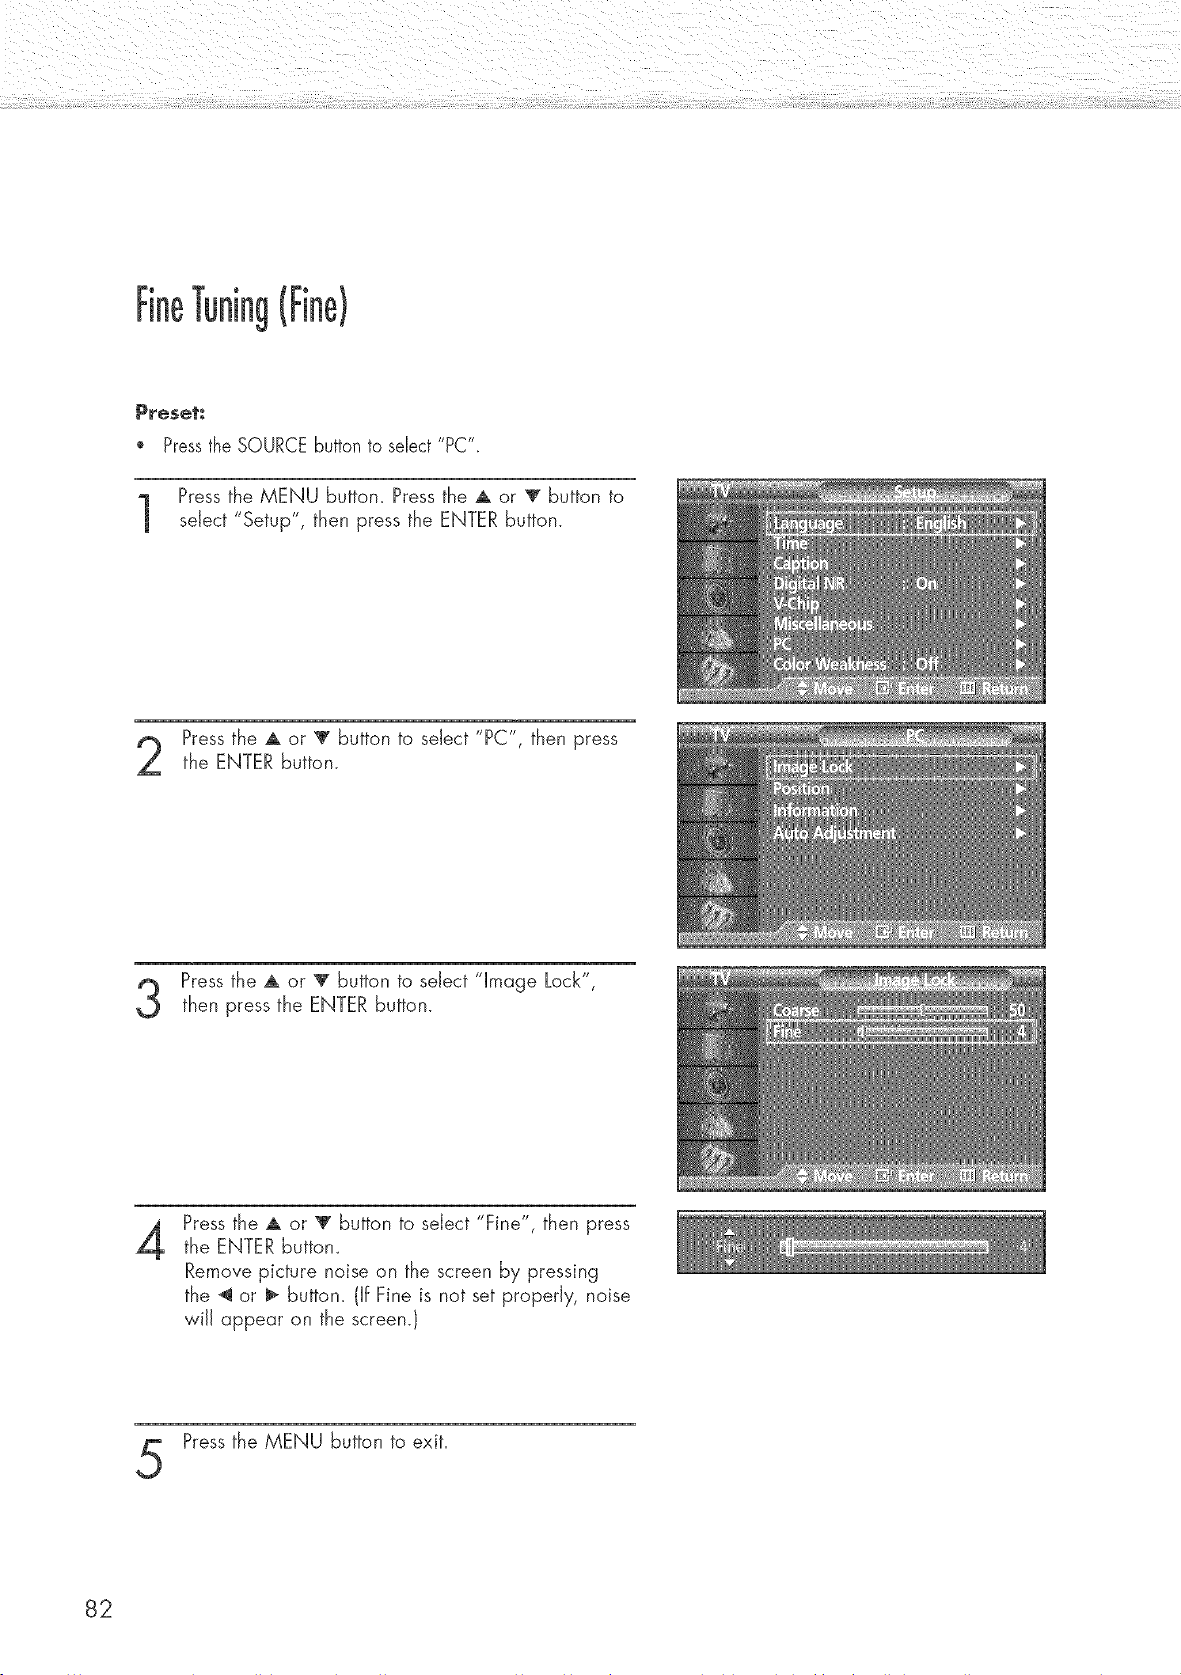
P_eset.*
Pressthe SOURCEbutton to select "PC".
Press the MENU buttom Press the A or T button to
select "Setup", then press the ENTER button.
Pressthe A or T button to select "PC", then press
the ENTER button.
Pressthe A or T button to select "Image Lock",
then press the ENTER button.
4
Press the A or _' button to select "Fine", then press
the ENTER buttom
Remove picture noise on the screen by pressing
the _ or _ buttom (If Fine is not set properly, noise
wiJJappear on the screen.)
Press the MENU button to exit.
82

P_ese_:
* Pressthe SOURCEbutton to select "PC"
Press the MENU button. Press the A or V button to
select "Setup", then press the ENTER button.
Press the A or V button to select "PC", then pressthe ENTER button.
Press the A or T button to select 'qnformation',
then press the ENTER button. The vertical,
horizontal frequencies and resolution appear.
Pressthe MENU button to exit.
83

Setting the Clock ....................................................................... 86
Setting the Sleep Timer ............................................................... 87
Setting the Timers ...................................................................... 88
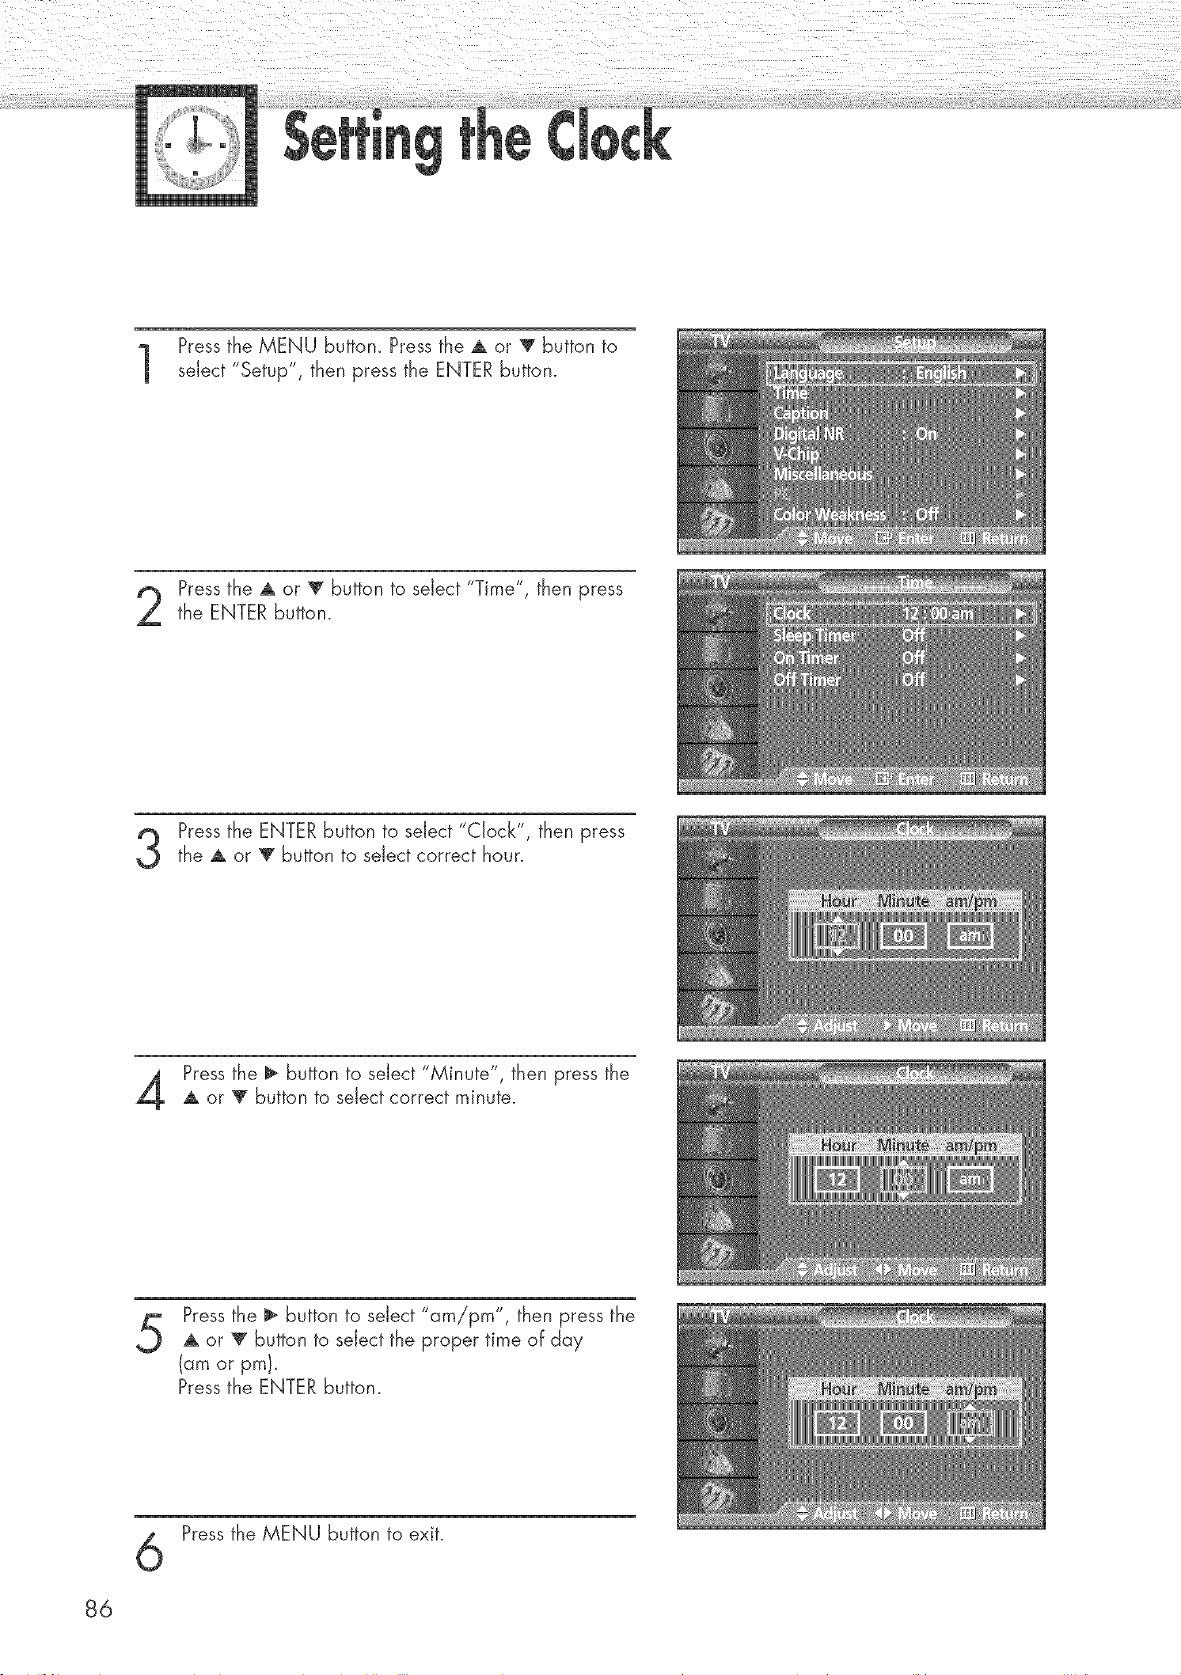
Pressthe MENU buttom Press the A or T button to
select "Setup", then press the ENTER button.
Pressthe A or _' button to select "Time", then press
the ENTER button.
Pressthe ENTERbutton to select "Clock", then pressthe A or _ button to select correct hour.
Press the _ button to select "Minute", then press the
A or _ button to select correct minute.
Pressthe _ button to select "am/pro", then press the
A or T button to select the proper time of day
(am or pm/_
Pressthe ENTER button.
Pressthe MENU button to exit.
86
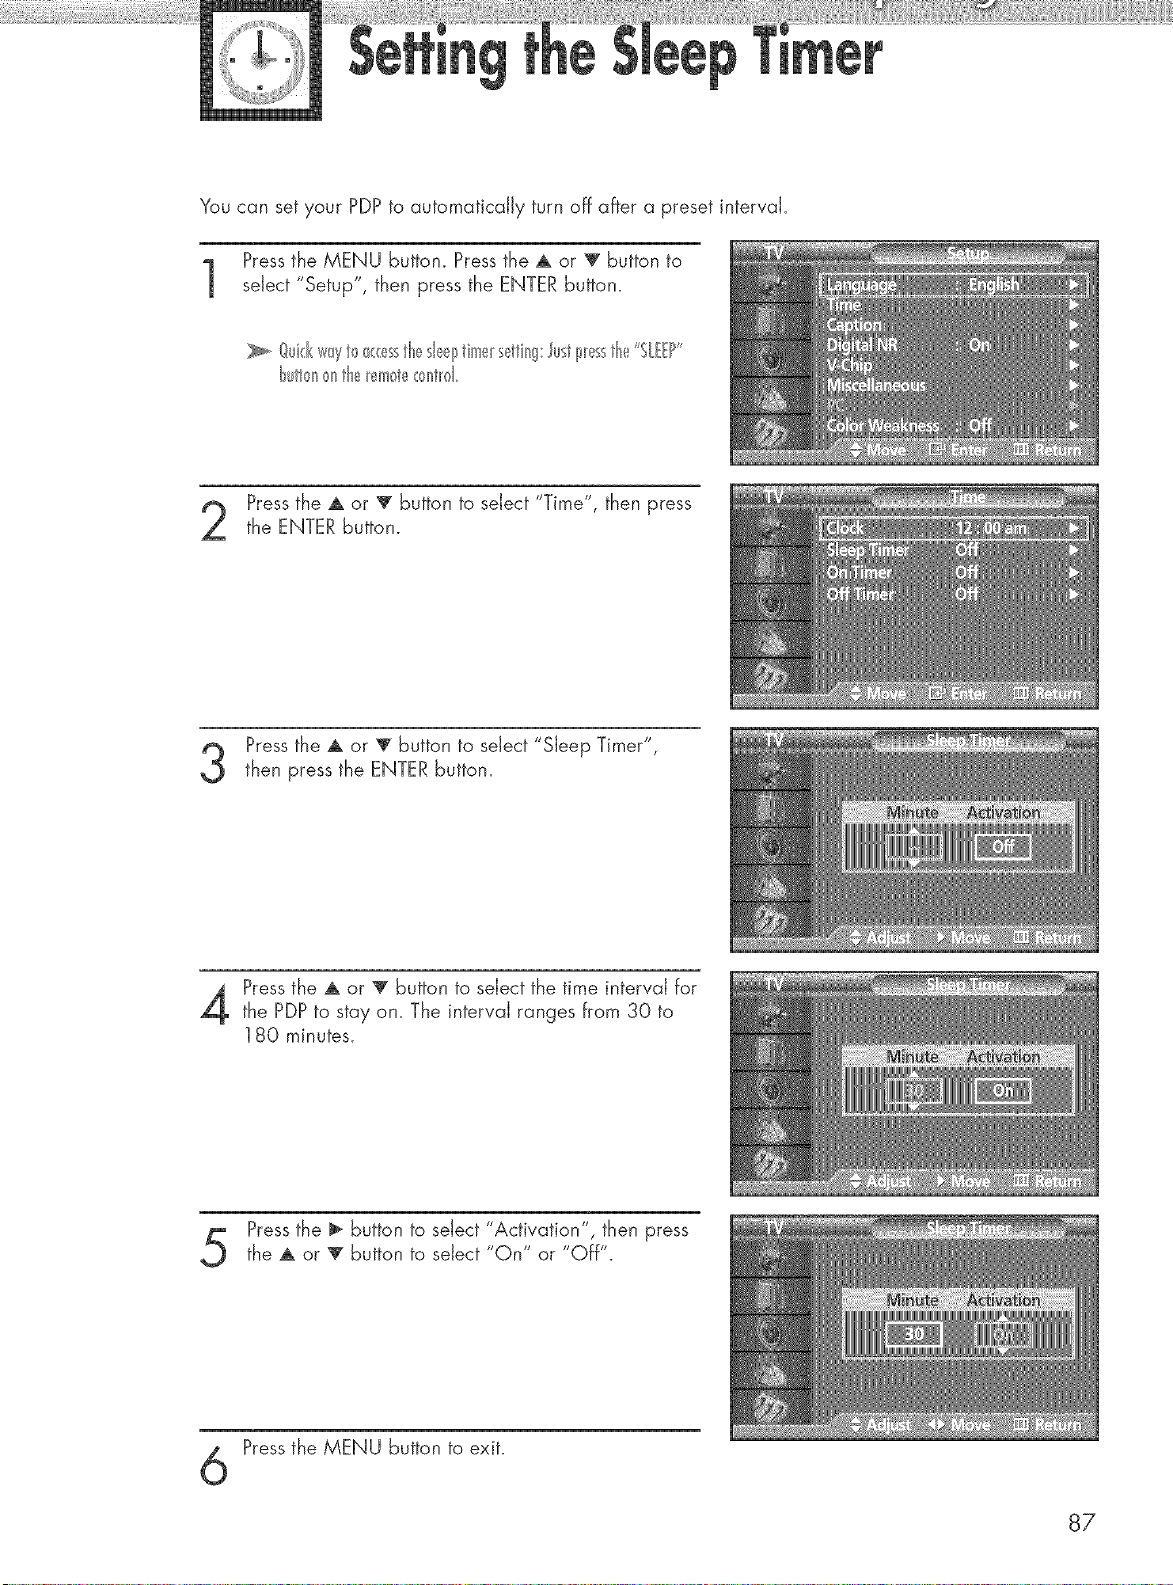
You can set your PDP to automatically turn off after a preset interval.
Pressthe MENU button. Press the ,a, or _ button to
select "Setup", then press the ENTER button.
_. @id(w_yt0_(( sstheshellstimers_tti_'_g:Justpl_sstH_,_"SL ?"
t_ullr_n>ntie _em0t(_<:ont_d
Pressthe A or T button to select "Time", then press
the ENTER button.
Pressthe A or V button to select "Sleep Timer",
then press the ENTERbutton.
Pressthe A or '_' button to select the time interval for
the PDPto stay on. The interval ranges from 30 to
180 minutes.
Pressthe _ button to select "Activation", then press
the ,a, or 'V"button to seiect "On" or "Off".
Pressthe MENU button to exit.
87
1'
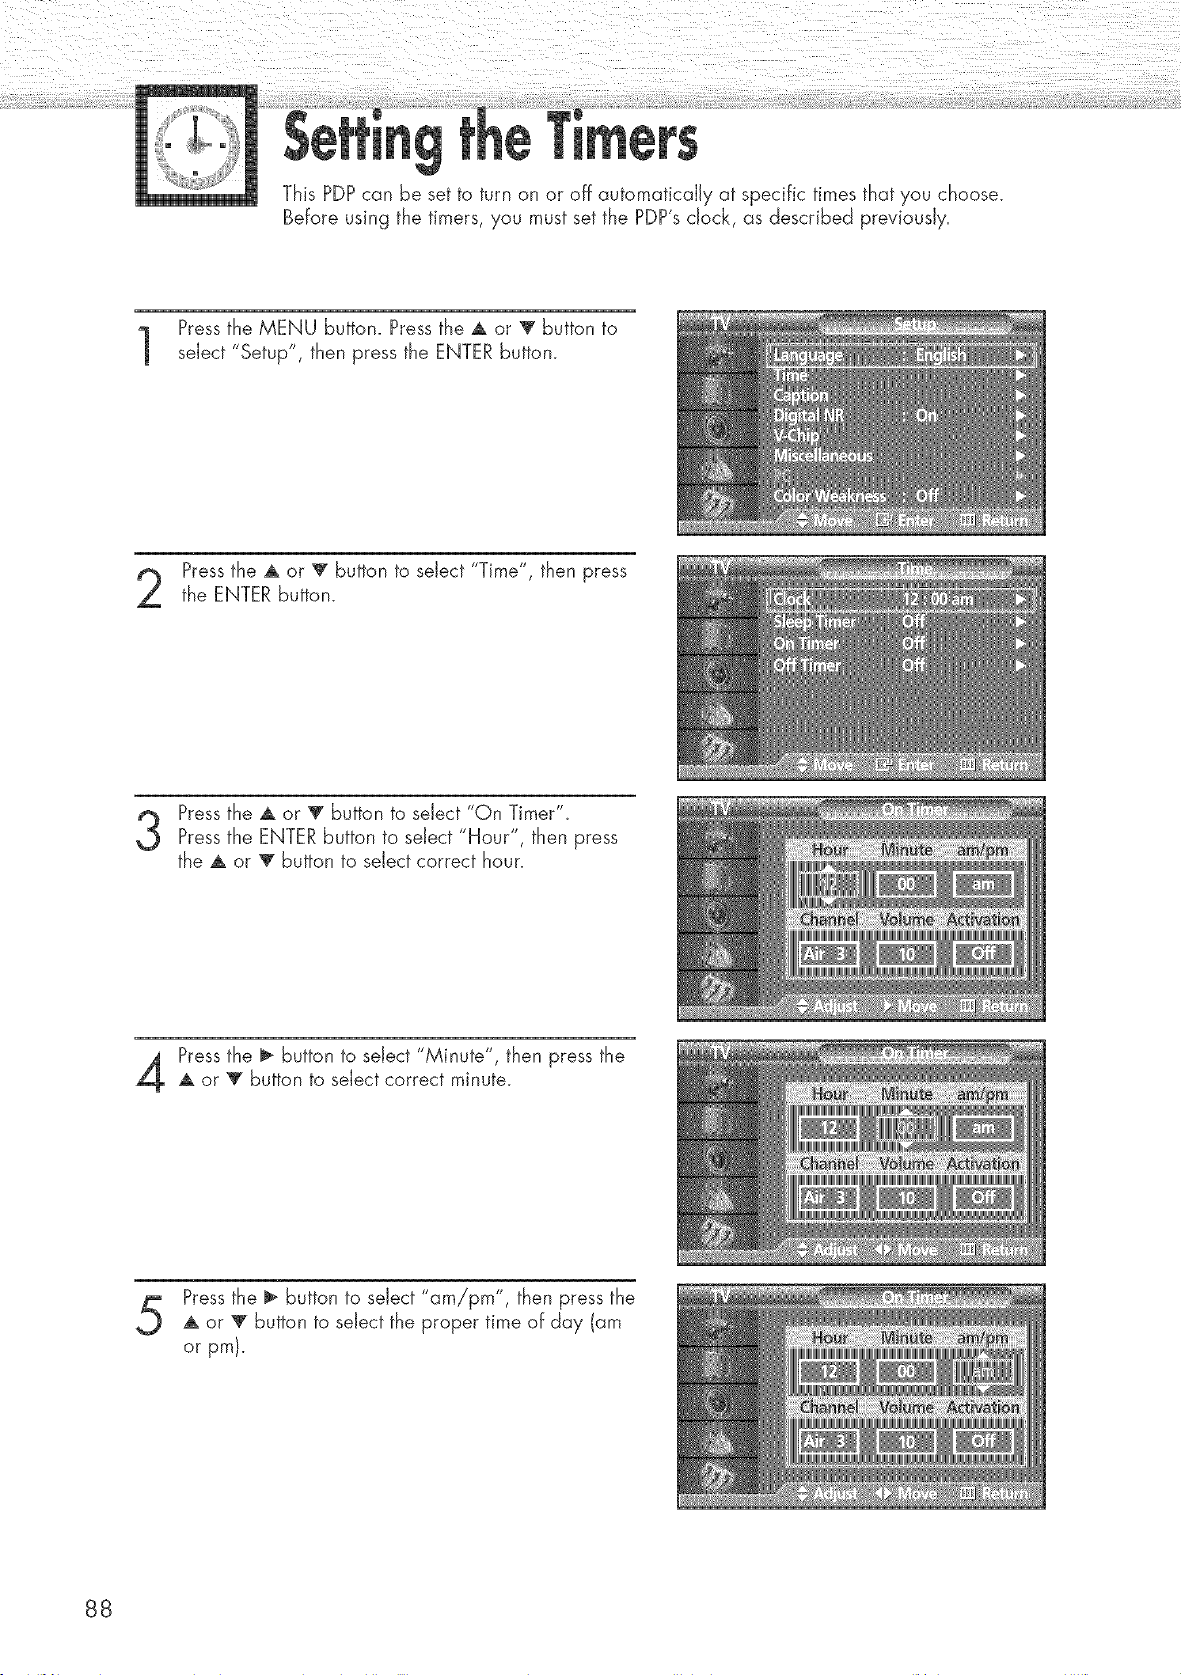
This PDP can be set to turn on or off automatically at specific times that you choose.
Before using the timers, you must set the PDP's clock, as described previously.
Pressthe MENU button. Press the A or V button to
select "Setup", then press the ENTER button.
Pressthe A or V button to select "Time", then press
the ENTER button.
Pressthe A or T button to select "On Timer"_
Pressthe ENTERbutton to select "Hour", then press
the A or 'v' button to select correct hour.
Pressthe _ button to select 'M'nute ", then press the
A or 'V"button to select correct minute.
Pressthe ll_ button to select "am!pm", then press the
A or V button to select the proper time of day (am
or pm).
88
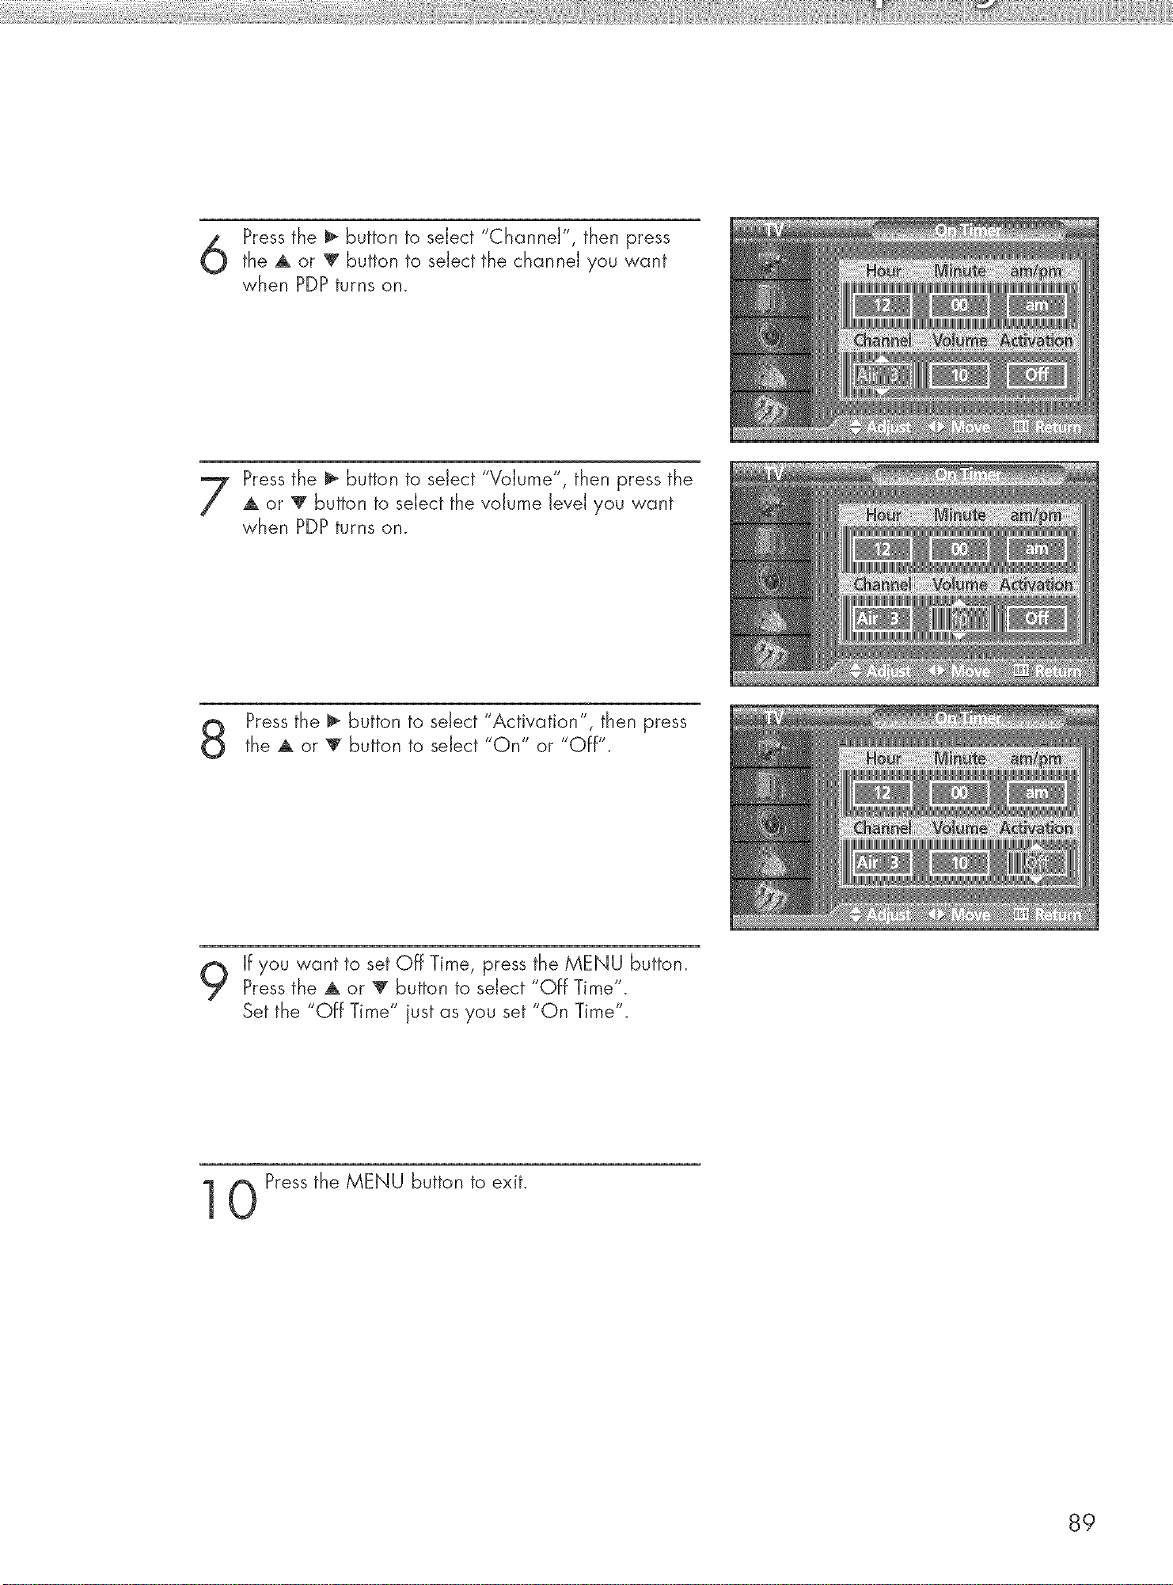
Pressthe _ button to select "Channel", then press
the A or _ button to select the channel you want
when PDPturns on.
Pressthe _ button to select "Volume", then press the
A or V button to select the volume level you want
when PDPturns on.
Pressthe _ button to select 'Activation ", then press
the A or _ button to select "On" or "Off".
If you want to set Off Time, press the MENU button.
Pressthe A or _' button to select "Off Time".
Set the "Off Time" just as you set "On Time".
0 Pressthe MENU button to exit.
89

Selecting a Menu Language ..................................................... 92
Digital Noise Reduction ........................................................... 93
Selecting the Film Mode ........................................................... 94
Using the Color Weakness Enhancement Option ......................... 95
Setting the Melody Sound ........................................................ 96
Setting the Blue Screen ............................................................. 97
Viewing Closed Captions ......................................................... 98
Using the V-Chip ..................................................................... 99
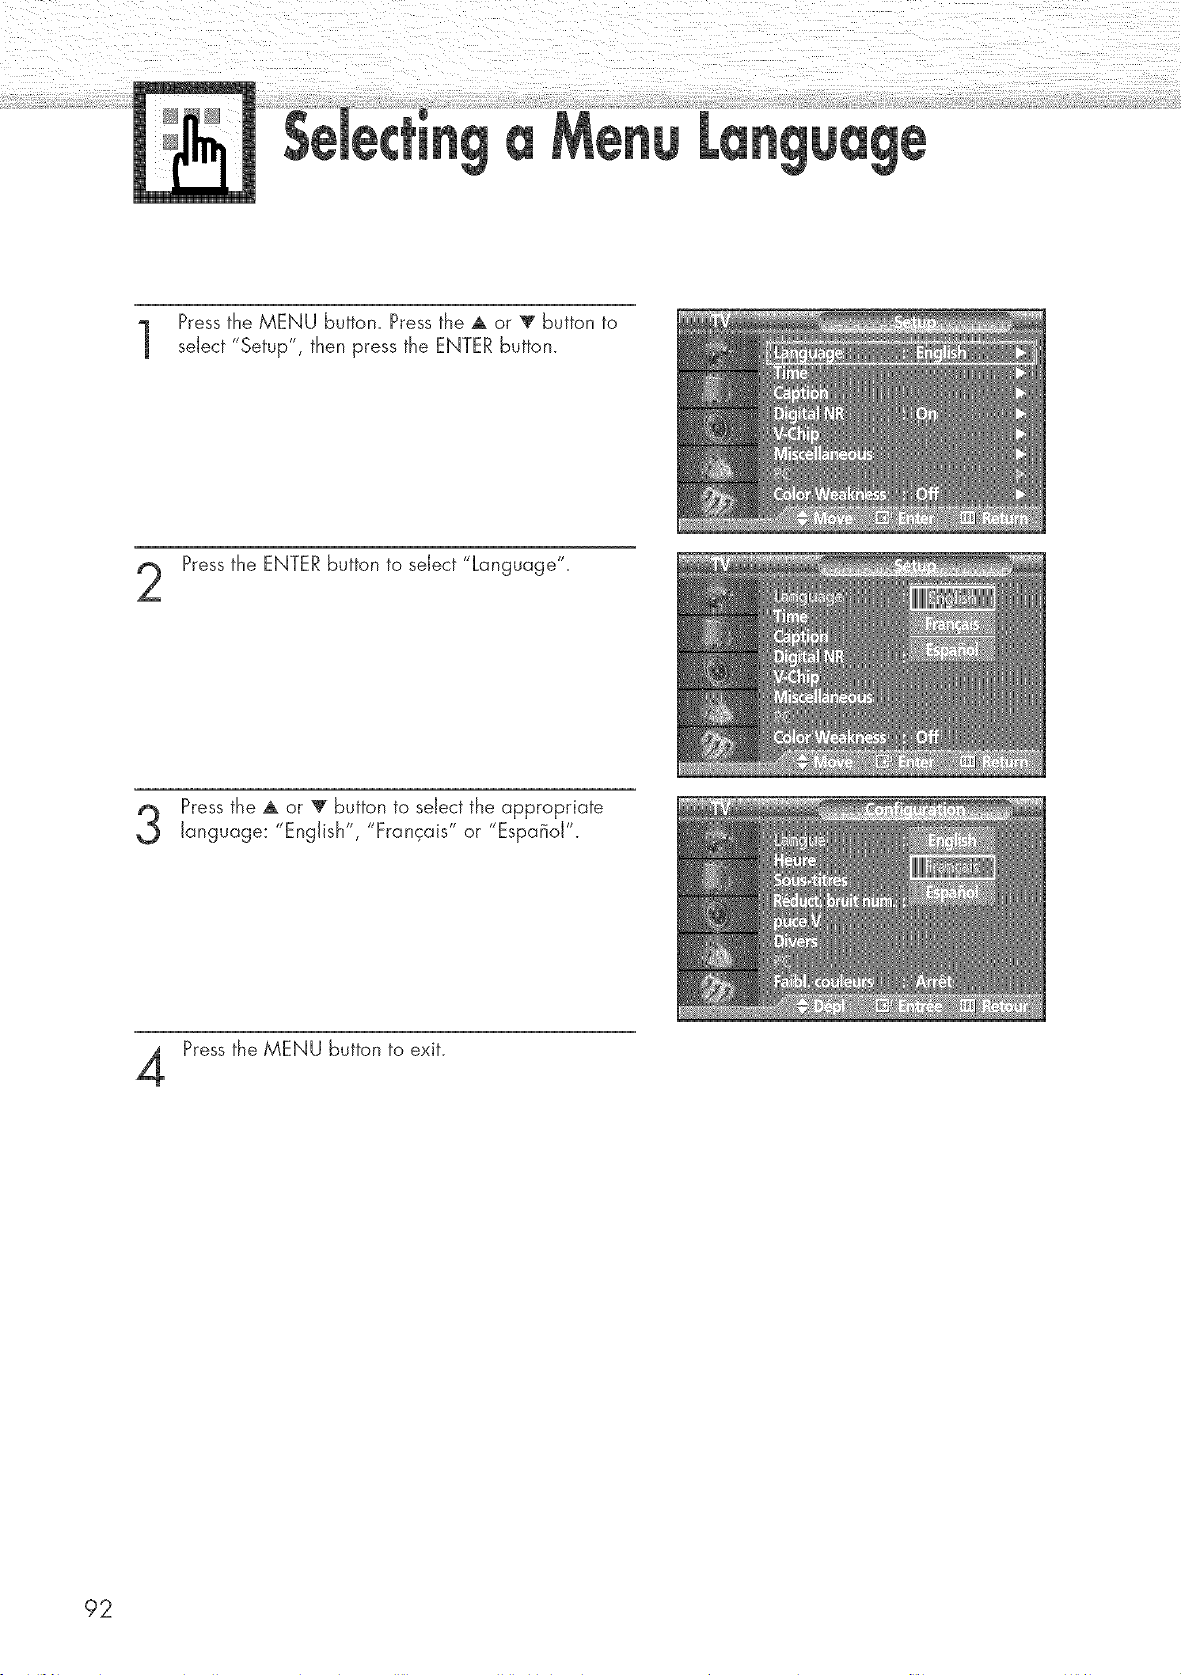
Pressthe MENU button. Press the A or V button to
select "Setup", then press the ENTER button.
Pressthe ENTERbutton to select "Language".
Pressthe A or V button to select the appropriate
language: "English", "Francais" or "EspaBoJ".
Press the MENU button to exit.
92
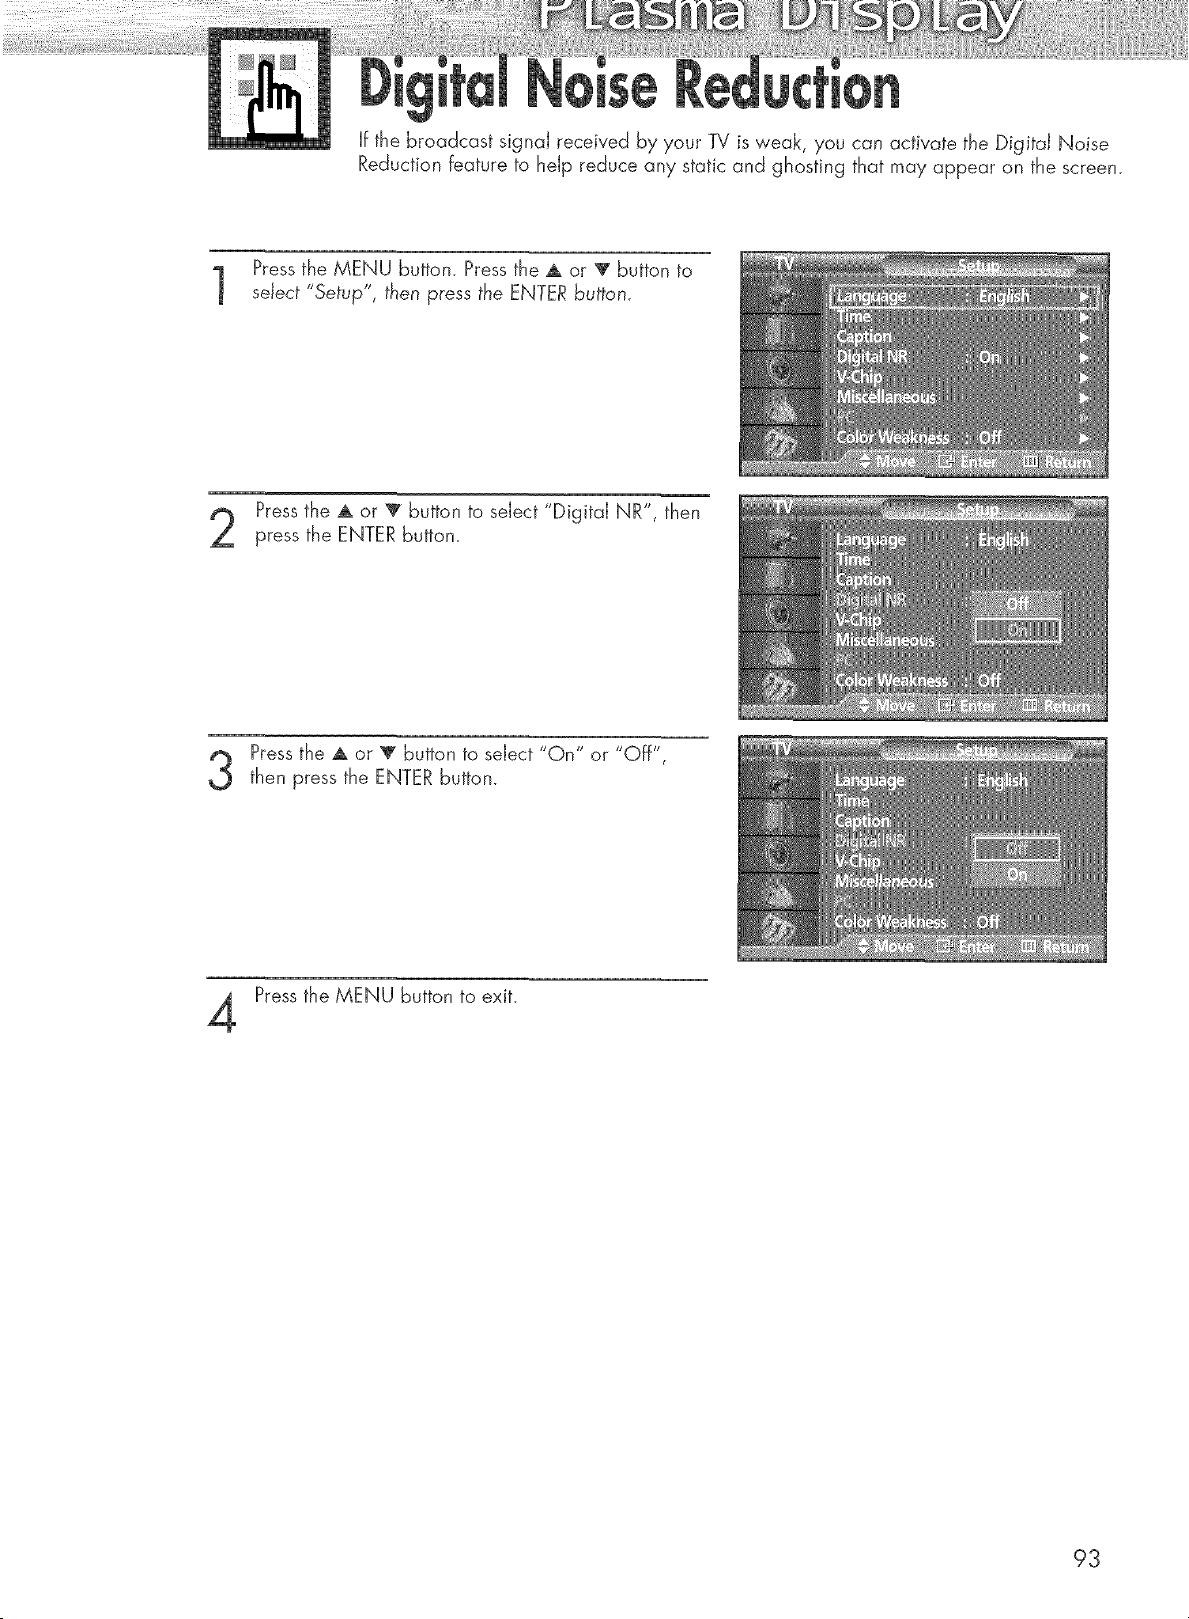
If the broadcast signal received by your TV is weaR, you can activate the Digital Noise
Reduction feature to help reduce any static and ghosting that may appear on the screen.
Pressthe MENU button. Press the A or _ button to
select "Setup", then press the ENTER button.
Pressthe A or T button to select "Digital NR", then
press the ENTER button.
Pressthe A or _' button to select "On" or "Off",
then press the ENTER button.
Pressthe MENU button to exit.
93

On: Automatically senses and processes film signals from all sources and adjusts the
picture for optimum quality.
Off: Switches off the Film mode.
Pressthe MENU button. Press the ,a, or _' button to
select "Picture", then press the ENTER button.
Pressthe A or 'V' button to select "Film Mode", then
press the ENTER button.
Pressthe A or 'V' button to select "On" or "Off",
then press the ENTER button.
Press the MENU button to exit.
o Film mode is supported in TV, VIDEO, S-VIDEO and COMPONENT 480i.
94
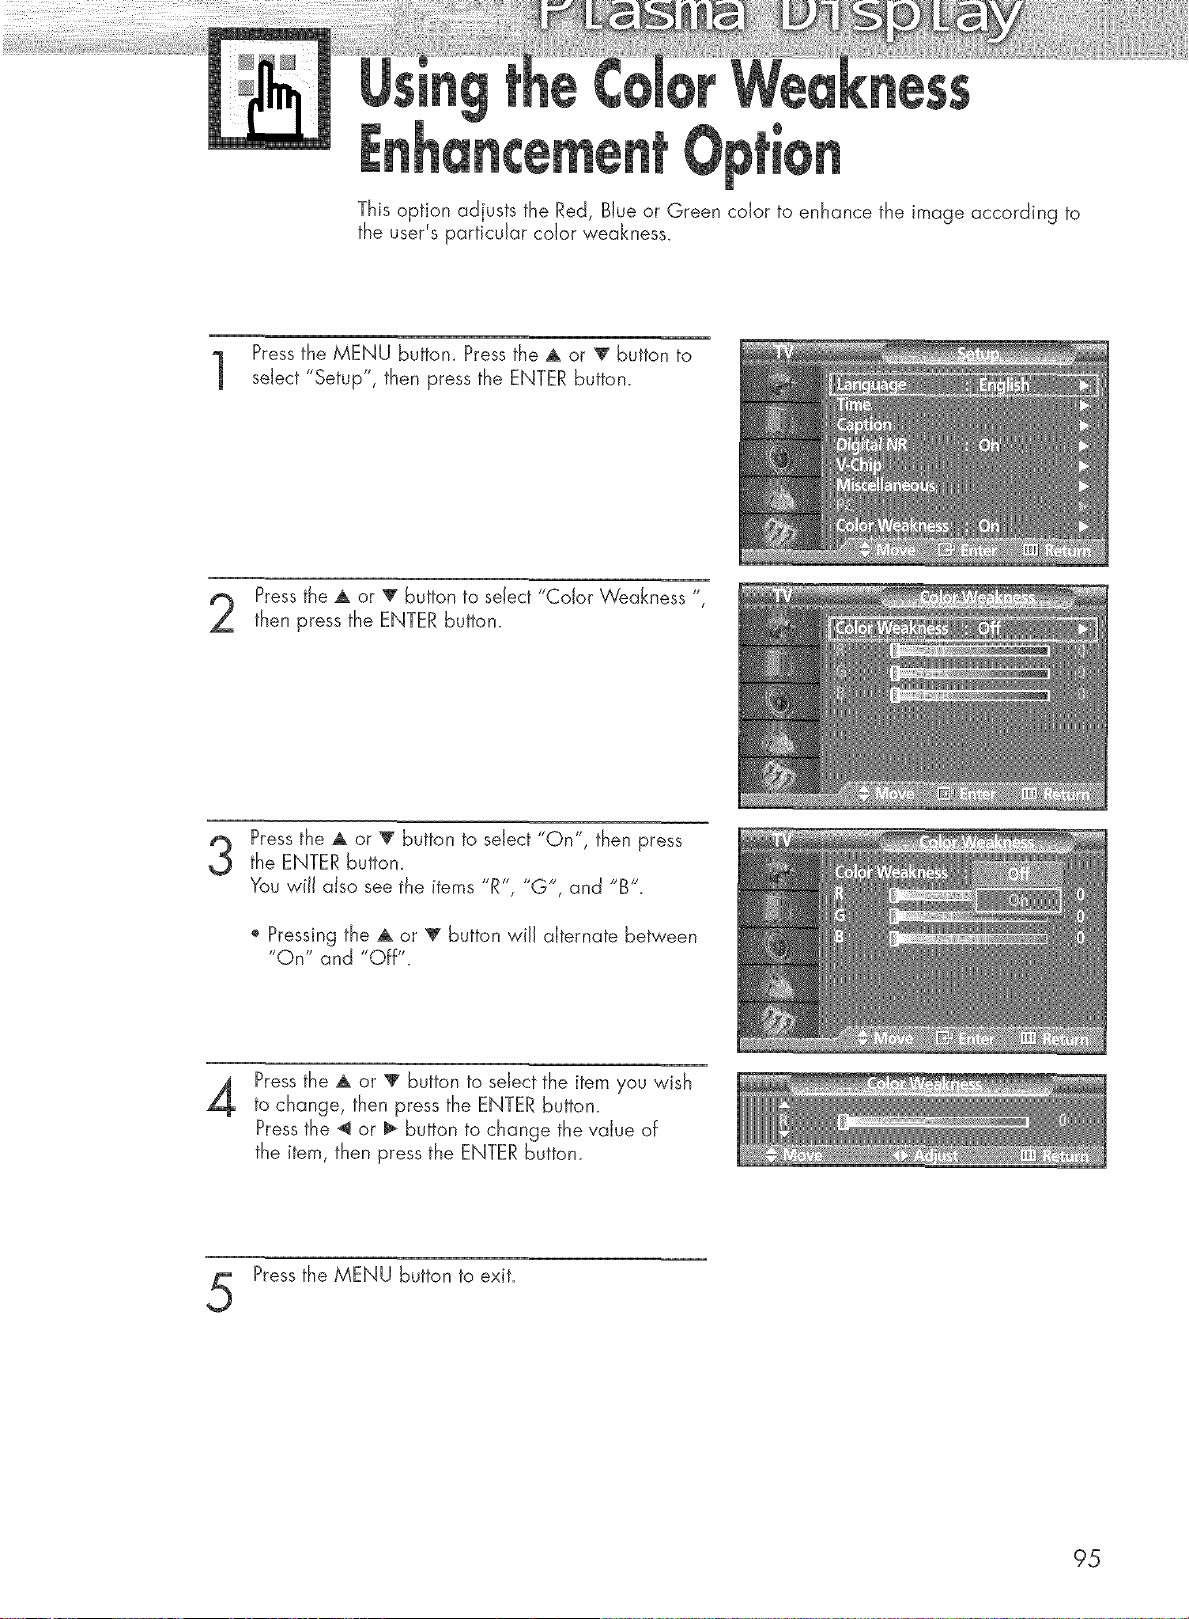
This option adjusts the Red, Blue or Green color to enhance the image according to
the user's particular color weakness.
Pressthe MENU buttom Press the A or _ button to
select "Setup", then press the ENTER button.
Pressthe A or V button to select "Color Weakness "_
then press the ENTER button.
Pressthe A or T button to select "On", then press
the ENTER button_
You will also see the items "R"_ "G'_ and "B'.
o Pressing the A or V button wiJJalternate between
"On" and "Off".
4
Pressthe A or _' button to select the item you wish
to change, then press the ENTER button.
Pressthe _ or i_ button to change the value of
the item, then press the ENTER button.
Pressthe MENU button to exit.
95
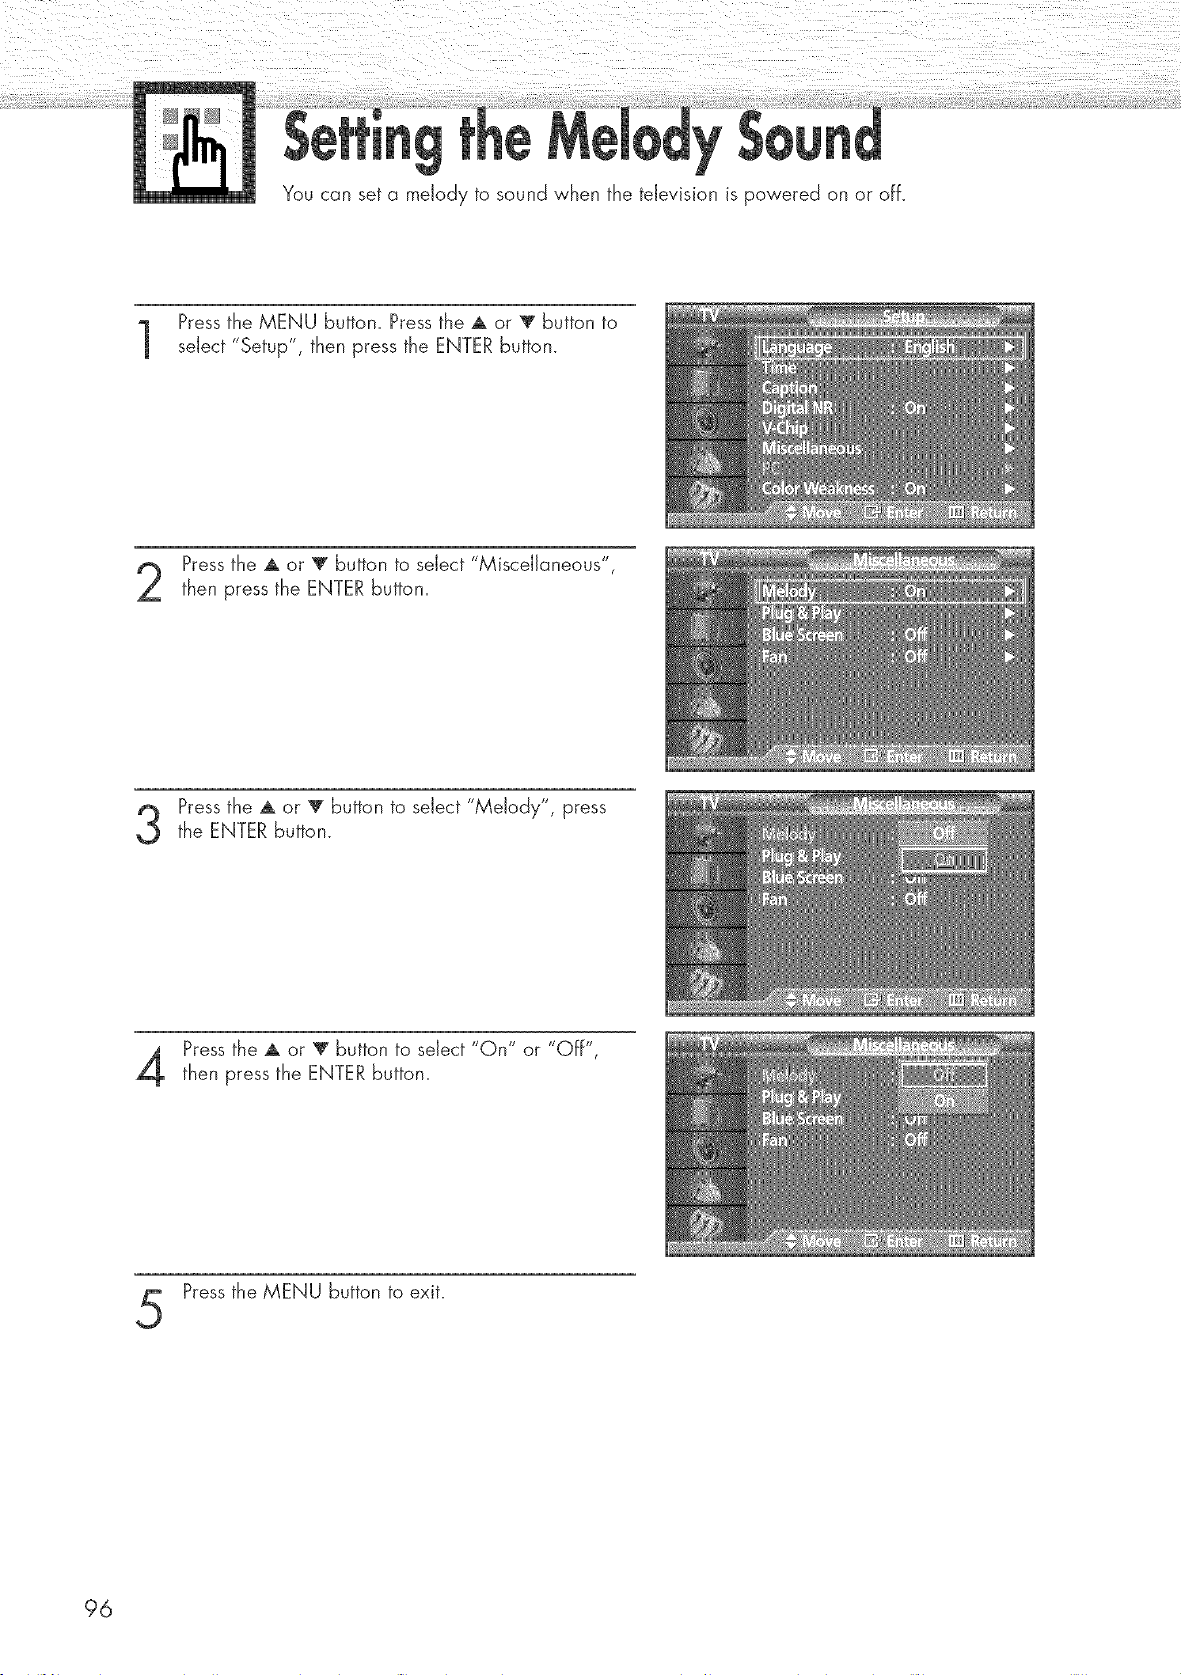
You can set a melody to sound when the television is powered on or off.
Pressthe MENU button. Press the A or V button to
select "Setup", then press the ENTER button.
Pressthe A or T button to select "Miscellaneous",
then press the ENTER button.
Pressthe A or T button to select "Melody", press
the ENTER button.
Press the A or T button to select "On" or "Off",
then press the ENTER button.
Pressthe MENU button to exit.
96
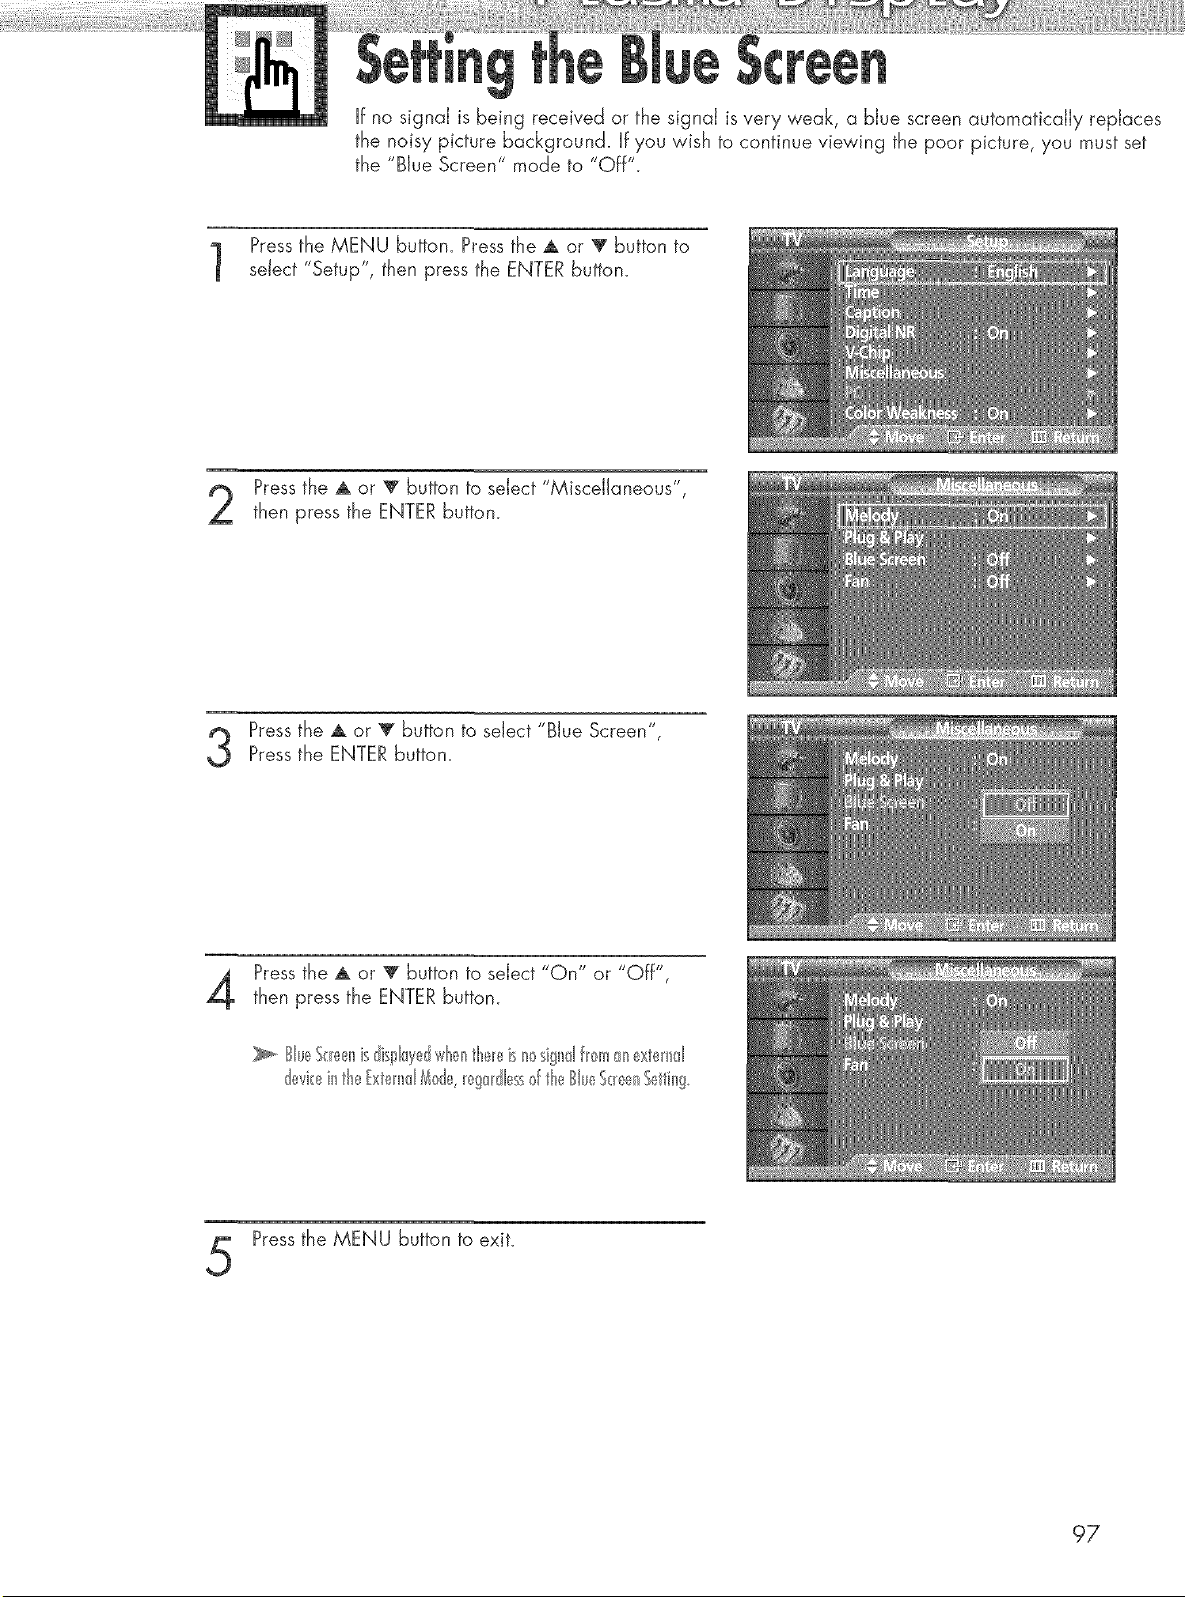
If no signal is being received or the signal is very weak, a blue screen automatically replaces
the noisy picture background. If you wish to continue viewing the poor picture, you must set
the "Blue Screen" mode to "Off".
Pressthe MENU button. Press the A or T button to
sdect "Setup", then press the ENTERbutton.
Pressthe A or T button to select "Miscellaneous",
then press the ENTER button.
Pressthe A or T button to select "Blue Screen",Pressthe ENTER button.
Pressthe A or T button to select "On" or "Off",
then press the ENTER button.
Sb_S<_e_tnisdissJayd'¢_'H'_eH'_tb,_eisnc_signII fl<>manextend
devkeinthextemd _de, _!g_dlessd theSlu_,_S_!enSetting
Pressthe MENU button to exit.
97
1
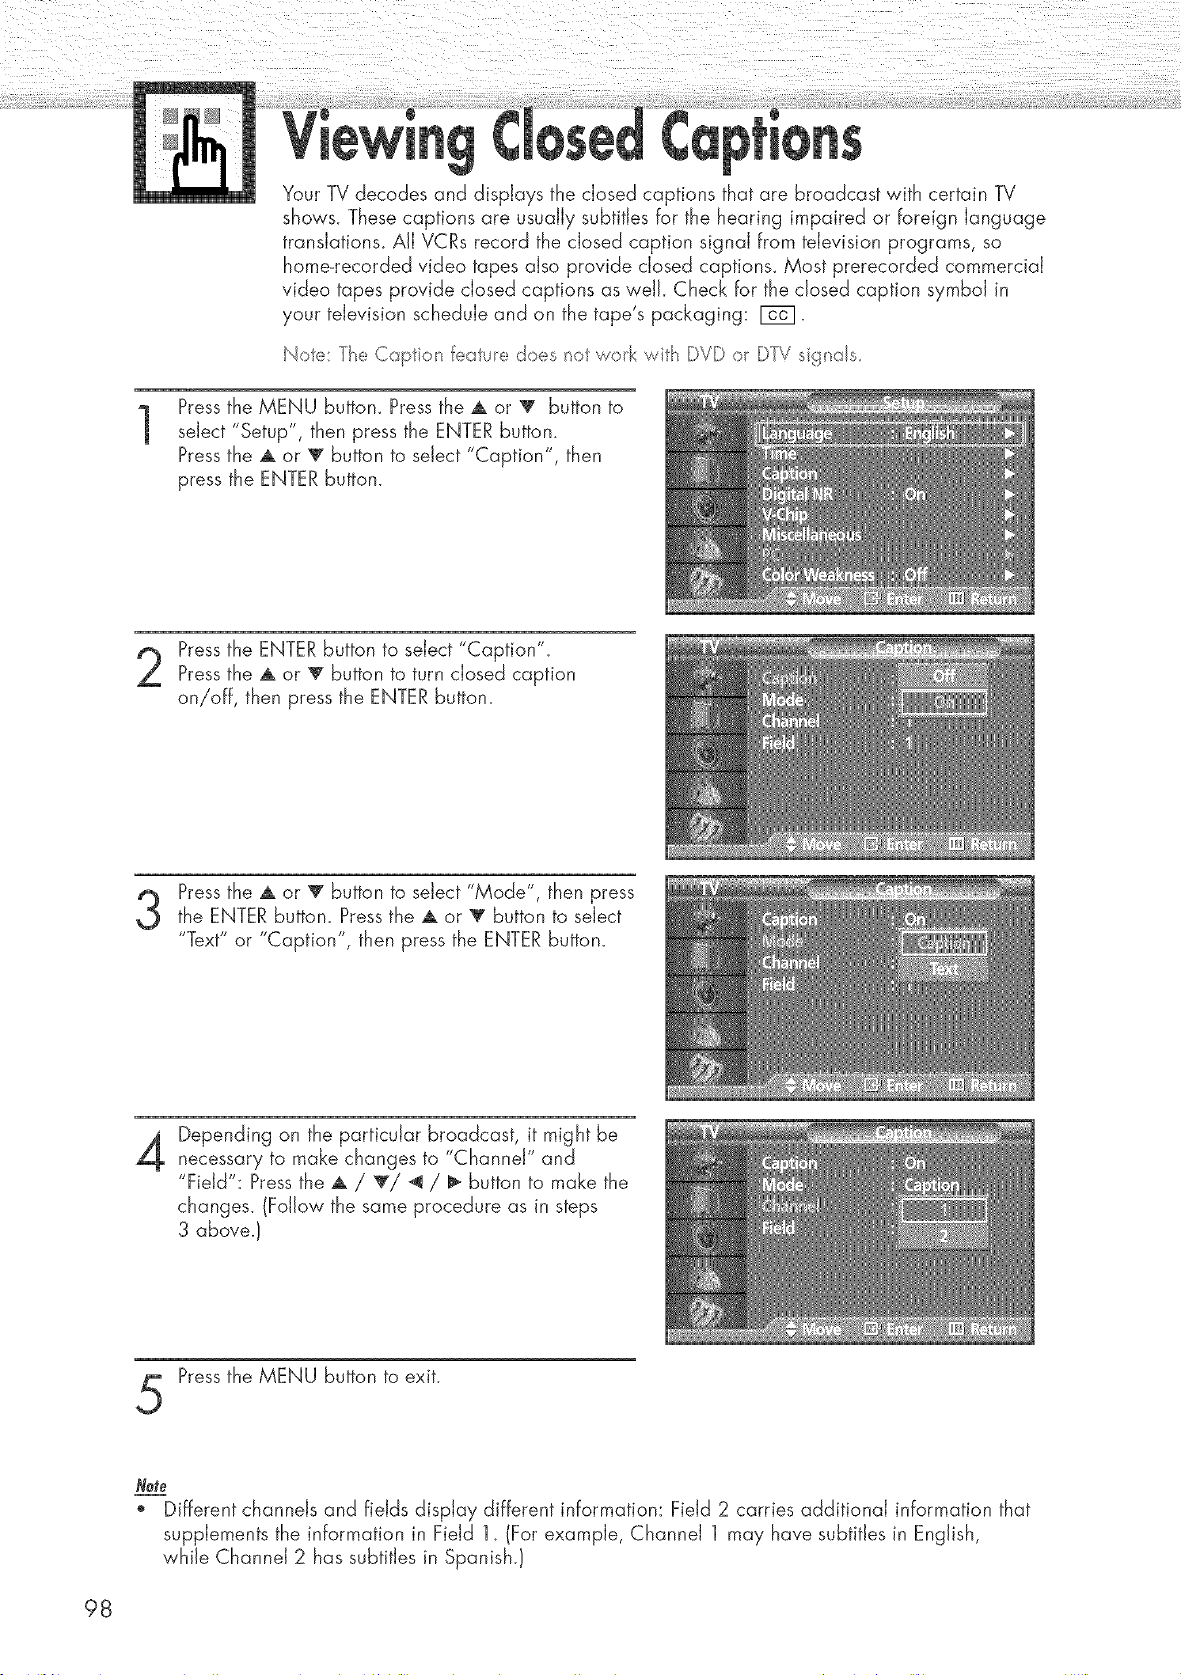
Your TV decodes and displays the closed captions that are broadcast with certain TV
shows. These captions are usually subtitles for the hearing impaired or foreign language
transJations_ All VCRs record the dosed caption signal from television programs, so
home-recorded video tapes also provide closed captions_ Most prerecorded commercial
video tapes provide closed captions as well. Check for the closed caption symbol in
your television schedule and on the tape's packaging: F6_1.
ote: The Capto_ featue do_s _otwork wit_ DVD or DTV sg_ss_
Pressthe MENU buttom Press the A or V button to
select "Setup", then press the ENTER button.
Pressthe A or v button to select "Caption", then
press the ENTER button.
Pressthe ENTERbutton to select "Caption"_
Pressthe A or T button to turn closed caption
on/off, then press the ENTER button.
Pressthe A or T button to select "Mode", then pressthe ENTER button_ Pressthe A or _ button to select
"Text" or "Caption", then press the ENTER button.
Depending on the particular broadcast, it might be
necessary to make changes to "Channel" and
"Field": Pressthe A / T/_ / _ button to make the
changes. (Follow the same procedure as in steps
3 above.!
Pressthe MENU button to exit.
Not_
o Different channels and fields display different information: Field 2 carries additional information that
supplements the information in Field 1_ (For example, Channel 1 may have subtitles in English,
while Channel 2 has subtitles in Spanish.!
98
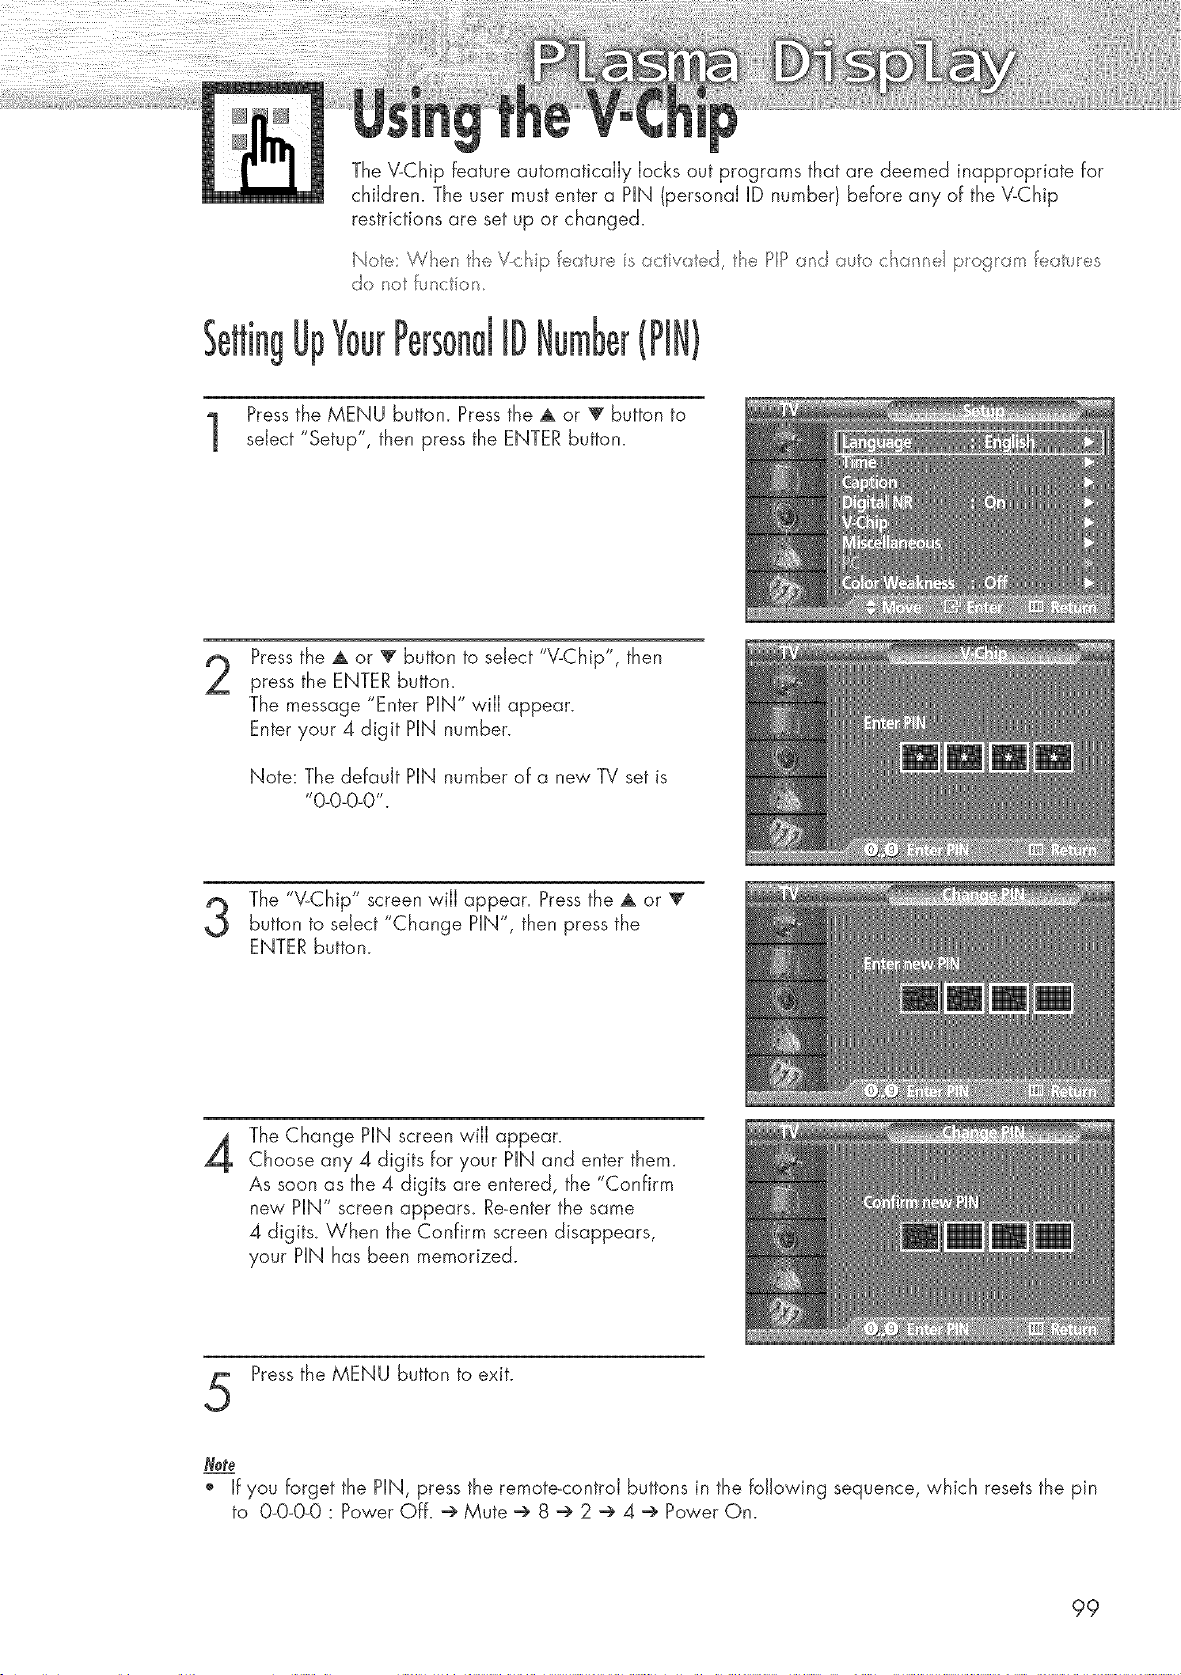
Up
The V-Chip feature automatically locks out programs that are deemed inappropriate for
children. The user must enter a PIN (personal ID number) before any of the V-Chip
restrictions are set up or changed.
ote:W_e_t e V_ _ipfe:_tueis_-_clivsted, t_ePP _-_d sutoc a _e p_ogemfeatues
do u'_t functo _
ID (PIN)
Pressthe MENU button. Press the ,a, or _ button to
select "Setup", then press the ENTER button.
Pressthe A or 'V" button to select "V-Chip", then
press the ENTER button.
The message "Enter PIN" will appear.
Enter your 4 digit PiN number.
Note: The default PiN number of a new TV set is
"0-0-0-0".
The "V-Chip" screen wiJJappear. Pressthe A or 'V"
button to select "Change PIN", then press the
ENTER button.
4
The Change PiN screen wiJJappear.
Choose any 4 digits for your PiN and enter them_
As soon as the 4 digits are entered, the "Confirm
new PIN" screen appears_ Re_enterthe same
4 digits_ When the Confirm screen disappears,
your PiN has been memorized.
Pressthe MENU button to exit.
o if you forget the PiN, press the remote_controJ buttons in the following sequence, which resets the pin
to 0-0-0-0 : Power Off. @ Mute @ 8 @ 2 @ 4 @ Power On.
99
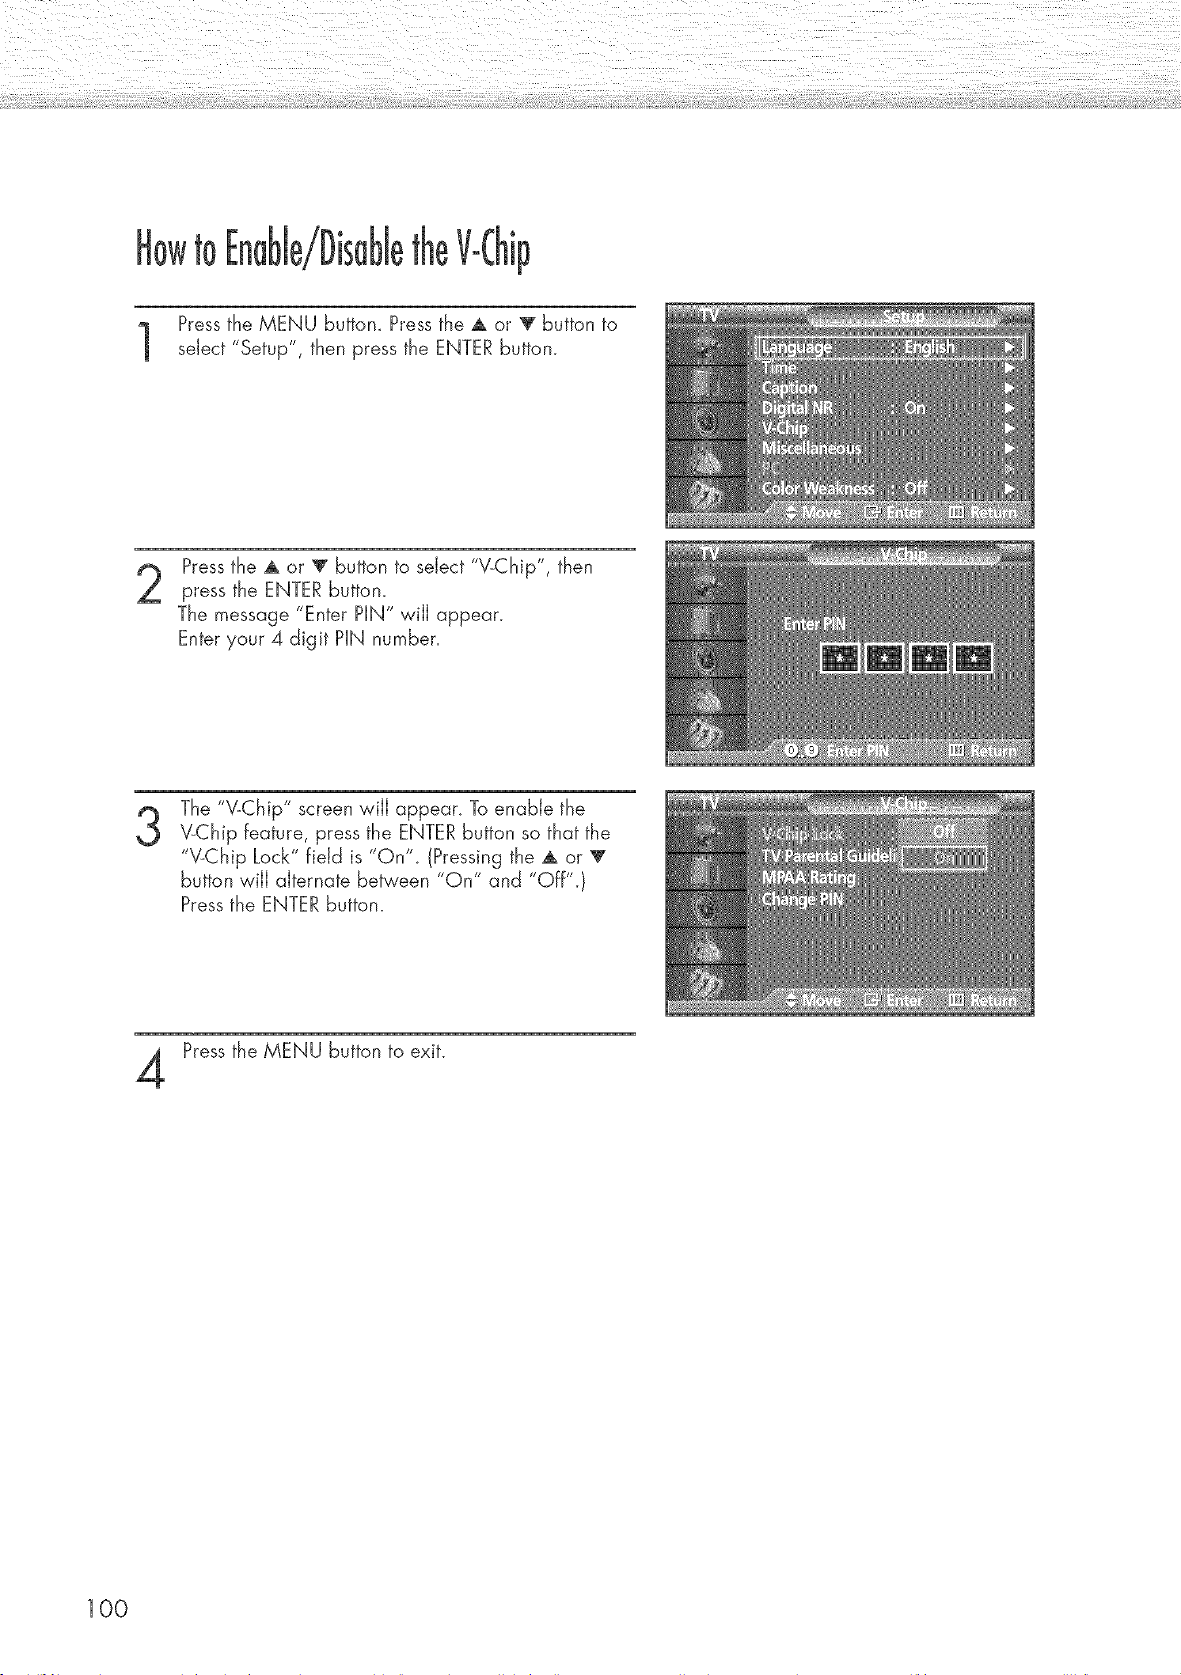
tO
Pressthe MENU buttom Press the A or _ button to
select "Setup", then press the ENTER button.
Pressthe A or T button to select "V-Chip", then
press the ENTER buttom
The message "Enter PIN" will appear.
Enter your 4 digit PIN number.
3
The "V-Chip" screen wiJJappear. To enable the
"v-Chip feature, press the ENTER button so that the
"V-Chip Lock" field is "On'_ (Pressing the A or T
button will alternate between "On" and "Off".}
Pressthe ENTER button.
Press the MENU button to exit.
100
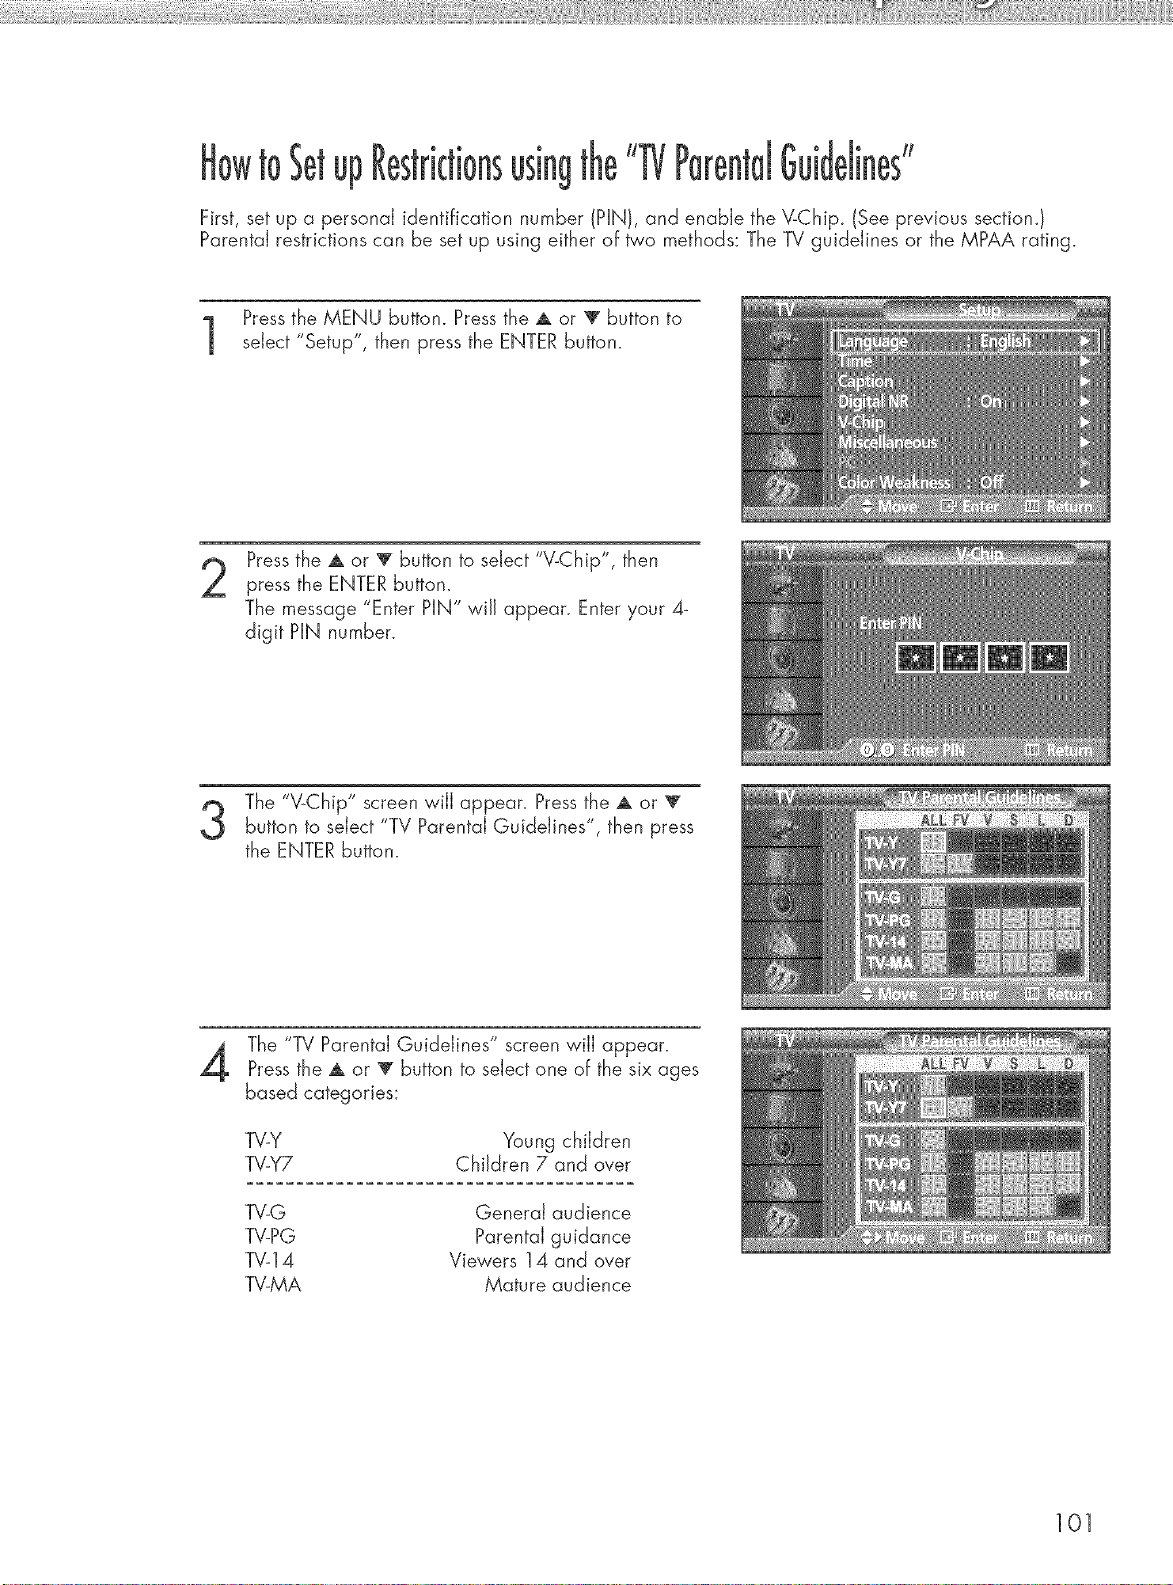
toSetup usingthe Guidelines"
First, set up a personal identification number (PIN), and enable the V-Chip_ (See previous sectiom)
Parental restrictions can be set up using either of _o methods: The TV guidelines or the MPAA rating.
Pressthe MENU button. Press the A or T button to
select "Setup", then press the ENTER button.
Pressthe A or _!' button to select "V-Chip", then
press the ENTERbutton_
The message "Enter PIN" wiJJappear. Enter your 4_
digit PIN number.
The "V-Chip" screen wiJJappear. Pressthe A or V
button to select "TV Parental Guidelines", then press
the ENTER button.
The "TV Parental Guidelines" screen wiJJappear.
Pressthe A or _!' button to select one of the six ages
based categories:
TV-Y Young children
TV-Y7 Children 7 and over
TV-G General audience
TV-PG Parental guidance
TV-14 Viewers 14 and over
TV-MA Mature audience
101
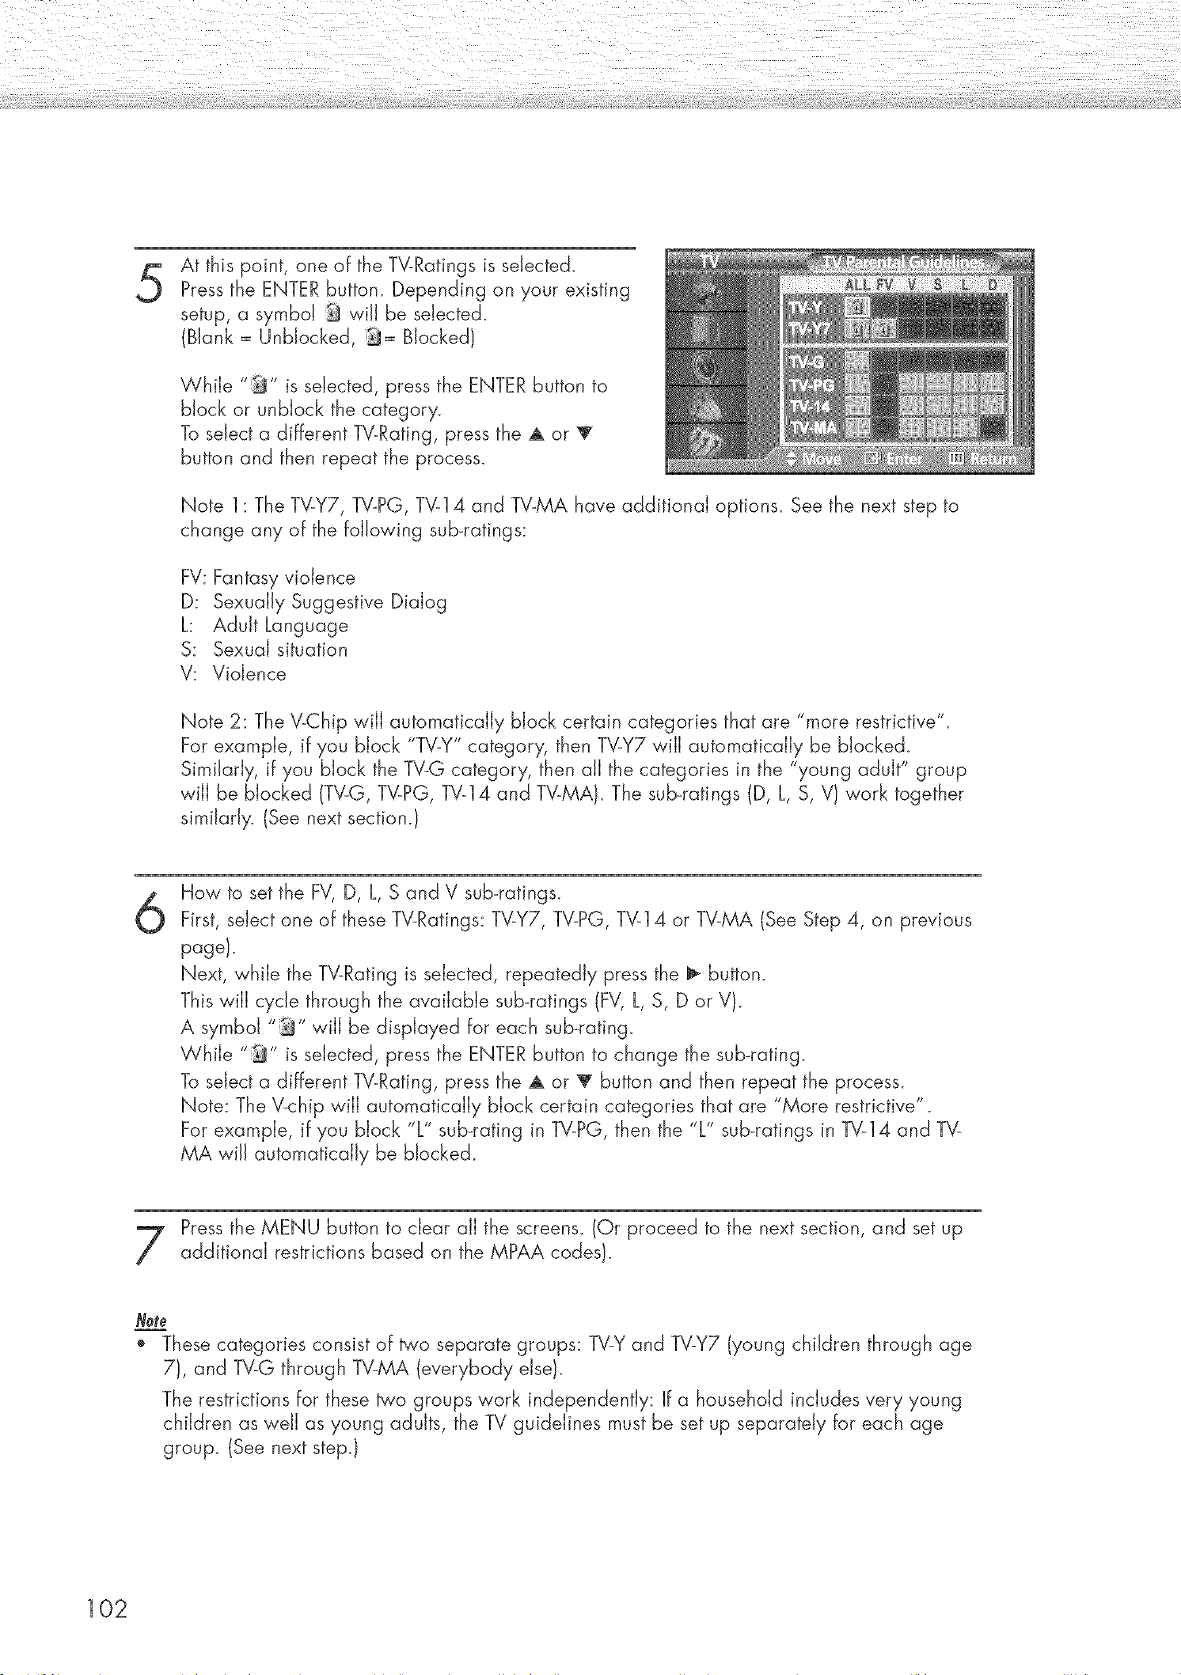
At this point, one of the TV-Ratings is selected.
Pressthe ENTER button. Depending on your existing
setup, a symbol _ wiJJbe selected.
(Blank = UnbJocked, _= Blocked/
While "_" is selected, press the ENTERbutton to
block or unbJock the category.
To select a different TV-Rating, press the A or
button and then repeat the process.
Note 1: The TV-Y7, TV-PG, TV-14 and TV-MA have additional options. See the next step to
change any of the following sub-ratings:
FV: Fantasy violence
D: Sexually Suggestive Dialog
L: Adult Language
S: Sexual situation
V: Violence
Note 2: The V-Chip wiJJautamaticaJJy block certain categories that are "more restrictive".
For example, if you block "TV-Y" category, then TV-Y7 will automatically be b!ocked_
Similarly, if you block the TV-G category, then all the categories in the "young adult" group
will be blacked (TV-G, TV-PG, TV-14 and TV-MA). The sub-ratings (D, L, S, V/work together
similarly. (See next section.!
6
How to set the FV, D, L, S and V sub-ratings.
First, select one of these W-Ratings: TV-Y7, TV-PG, TV-14 or TV-MA (See Step 4, on previous
page/.
Next, while the TV-Rating is selected, repeatedly press the _ button.
This will cycle through the available sub-ratings (FV, L, S, D or V).
A symbol "_" will be displayed for each sub-rating_
While "_" is selected, press the ENTERbutton to change the sub_rating_
To select a different W-Rating, press the A or T button and then repeat the process.
Note: The V-chip wiJJautomatically block certain categories that are "More restrictive".
For example, if you block "L" sub-rating in TV-PG, then the "L" sub-ratings in TV-14 and TV-
MA wiJJautomatically be blocked.
Pressthe MENU button to clear all the screens. (Or proceed to the next section, and set up
additional restrictions based on the MPAA codes!.
Note
" Thesecategories consist of _'o separate groups: TV-Yand TV-Y7 (young children through age
7), and TV-G through TV-MA (everybody else!.
The restrictions for these two groups work independently: If a household includes very young
children as well as young adults, the TV guidelines must be set up separately for each age
group. (See next step.l
102
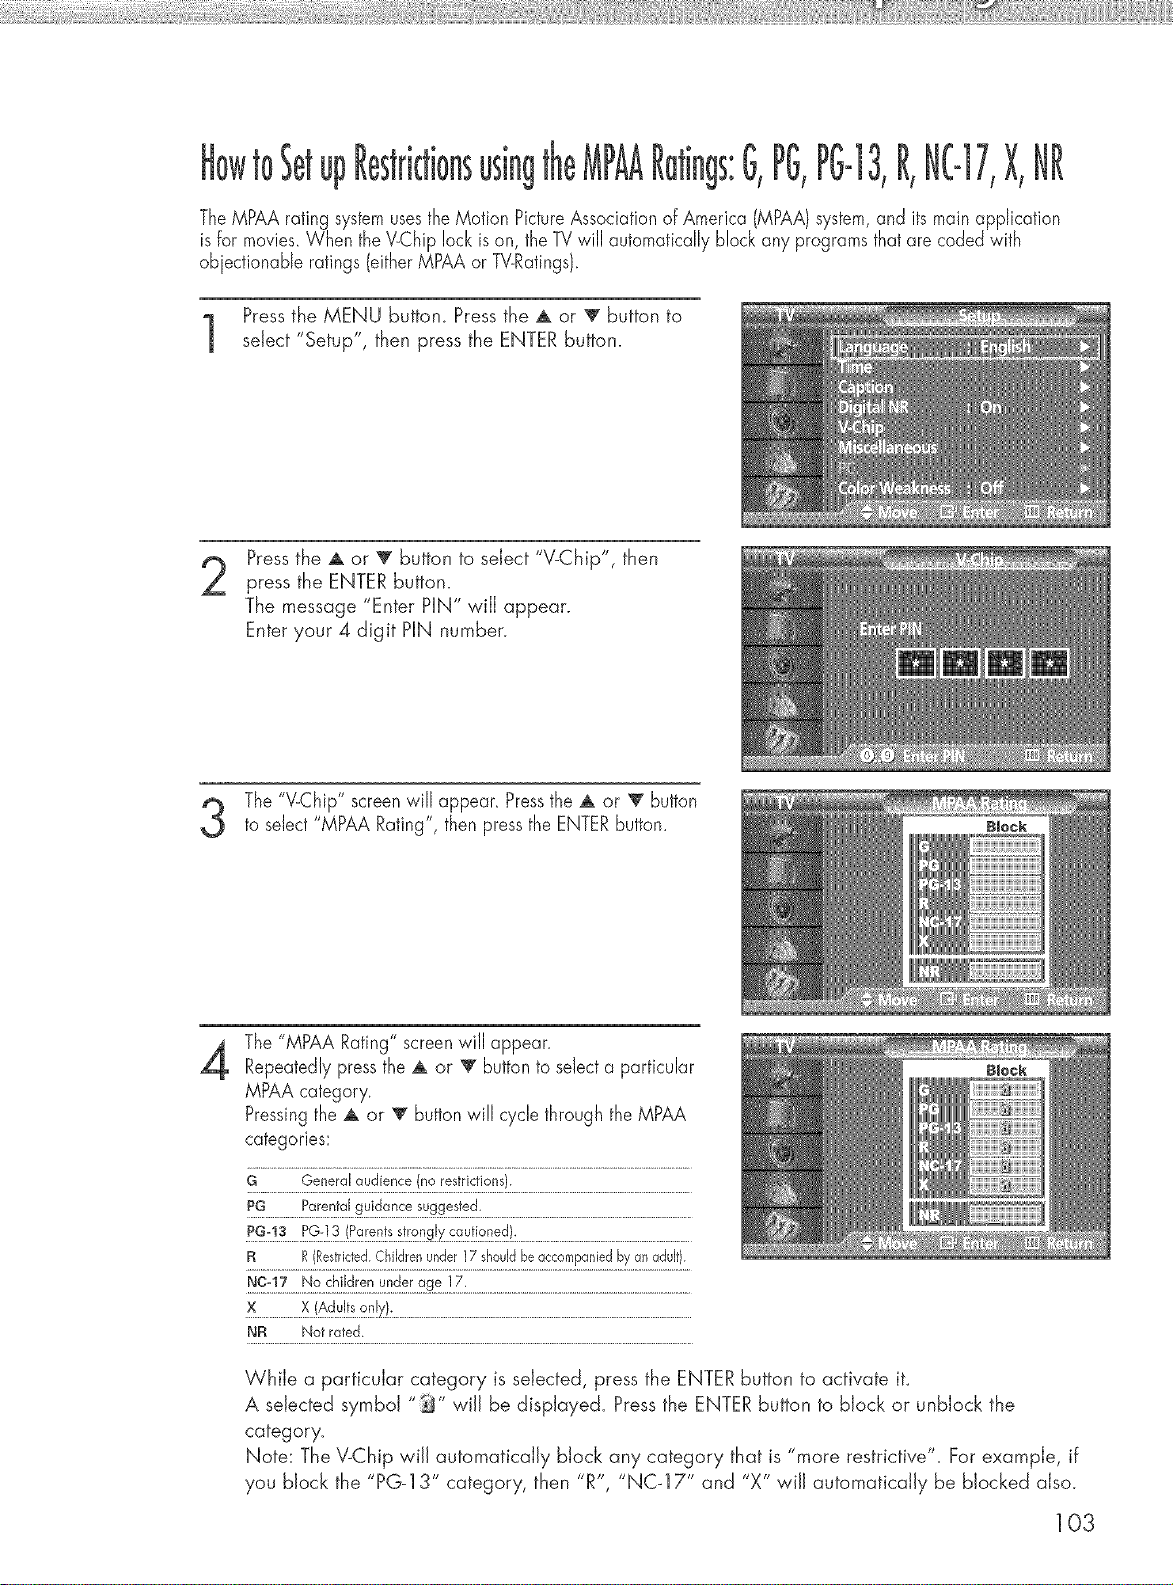
up using s:G,PG,PG-13,R,NC-17,X,
The MPAArating systemusesthe Motion PictureAssociationof America (MPAA)system,and itsmain application
is for movies_When the V-Chiplock is on, the TVwill automatically block any programsthat are coded with
obiectionable ratings (eitherMPAAor TV-Ratings).
Pressthe MENU button. Press the ,A or V button to
select "Setup", then press the ENTER button.
Pressthe A or 'V' button to select "V-Chip", then
press the ENTERbutton.
The message "Enter HN" will appear.
Enter your 4 digit HN number.
The "V-Chip" screenwill appear. Pressthe ,A or T button
to select "MPAA Rating", then pressthe ENTERbutton.
4
The "MPAA Rating" screenwill appear
Repeatedly pressthe ,A or 'V button to selecta particular
MPAA category.
Pressingthe ,A or '_ buttonwill cycle through the MPAA
categories:
G General audience (no restrictions}.
R R(Restricted.Ch@en under17 shouldbe accompaniedby an adult).
NF_ Not rated.
While a particular category is selected, press the ENTER button to activate it.
A selected symbd "_" wiJJbe displayed. Pressthe ENTER button to block or unbJock the
category.
Note: The V-Chip will automatically block any category that is "more restrictive". For example, if
you block the "PG-13" category, then "R", "NC_I 7" and "X" will automatically be blocked also.
103
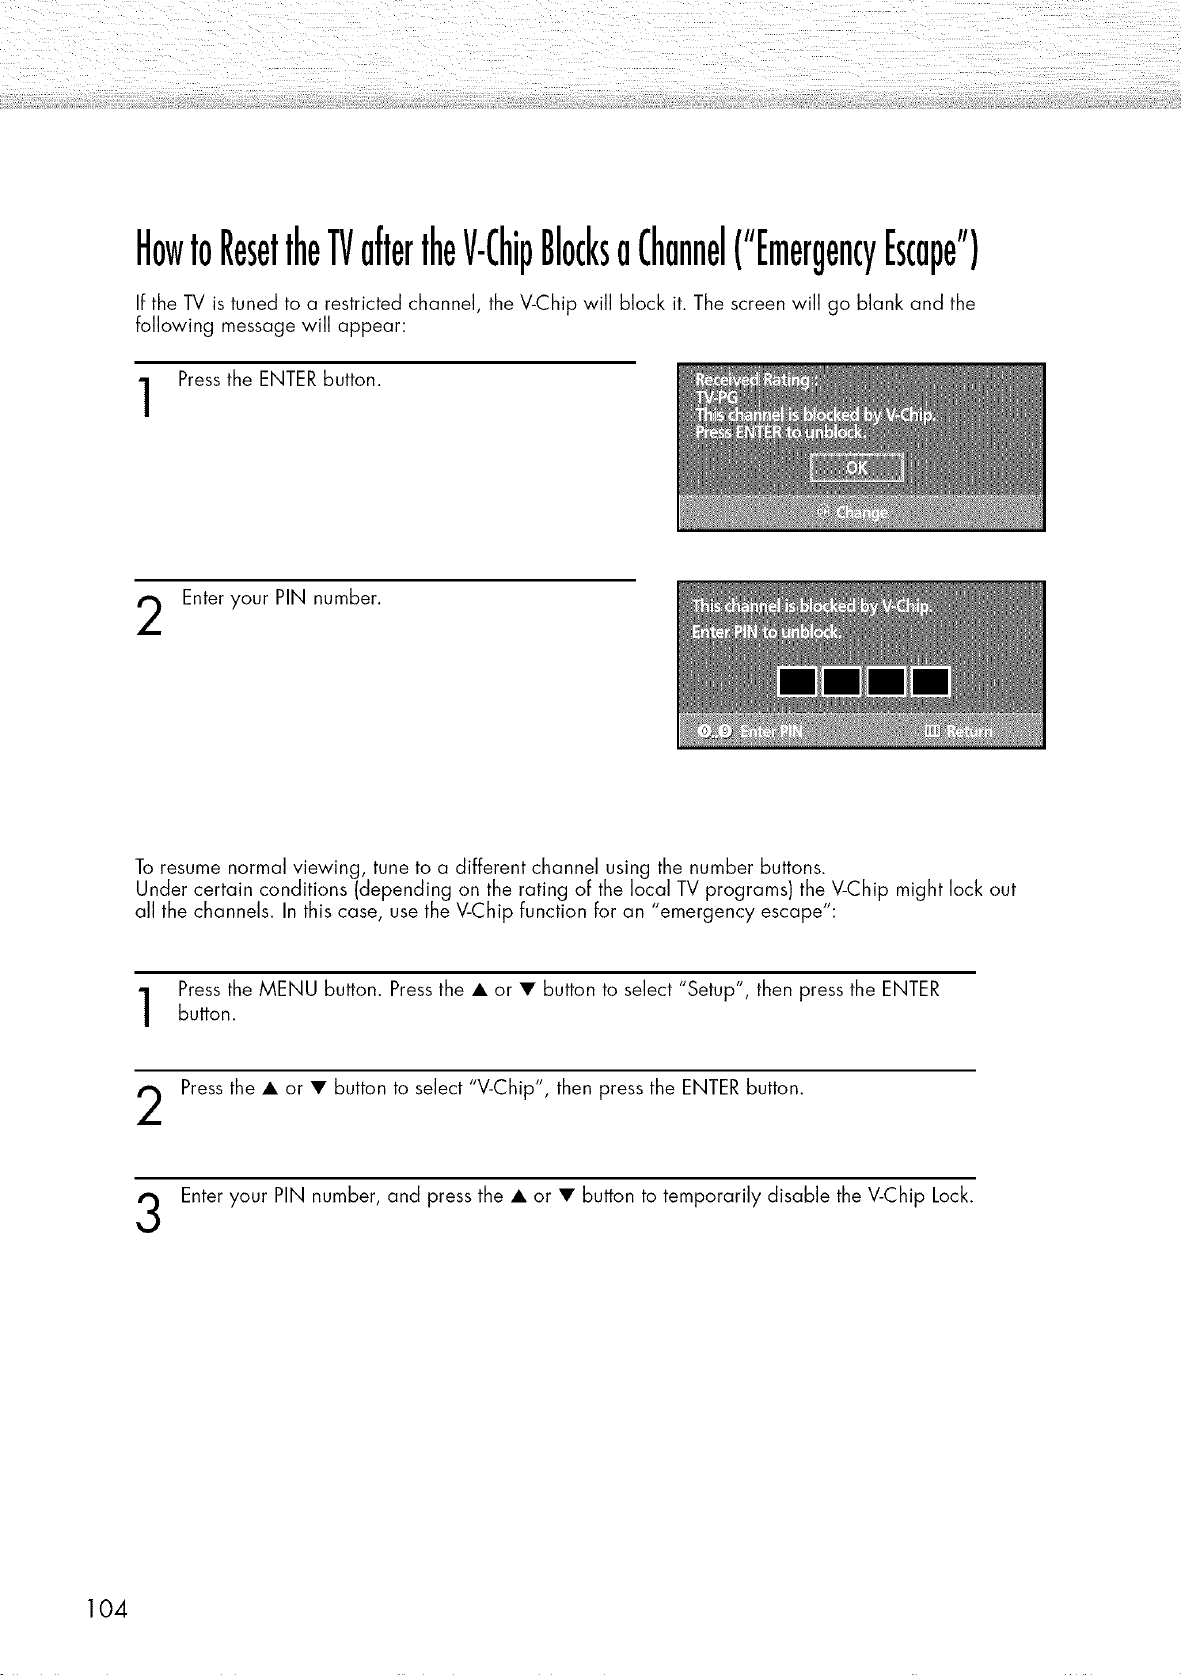
HowtoResettheTVaftertheV-ChipBlocksaChannel("EmergencyEscape")
If the TV is tuned to a restricted channel, the V-Chip will block it. The screen will go blank anct the
following message will appear:
Pressthe ENTERbutton.
Enter your PIN number.
To resume normal viewing, tune to a different channel using the number buttons.
Under certain conditions (depending on the rating of the local TV programs) the V-Chip might lock out
all the channels. In this case, use the V-Chip function for an "emergency escape":
Pressthe MENU button. Press the • or • button to select "Setup", then press the ENTER
button.
Pressthe • or • button to select "V-Chip", then press the ENTER button.
Enter your PIN number, anct press the • or • button to temporarily disable the V-Chip Lock.
104

['f.
Appendix
Troubleshooting .......................................................................... 106
Care and Maintenance .............................................................. 107
Specifications ............................................................................ 108
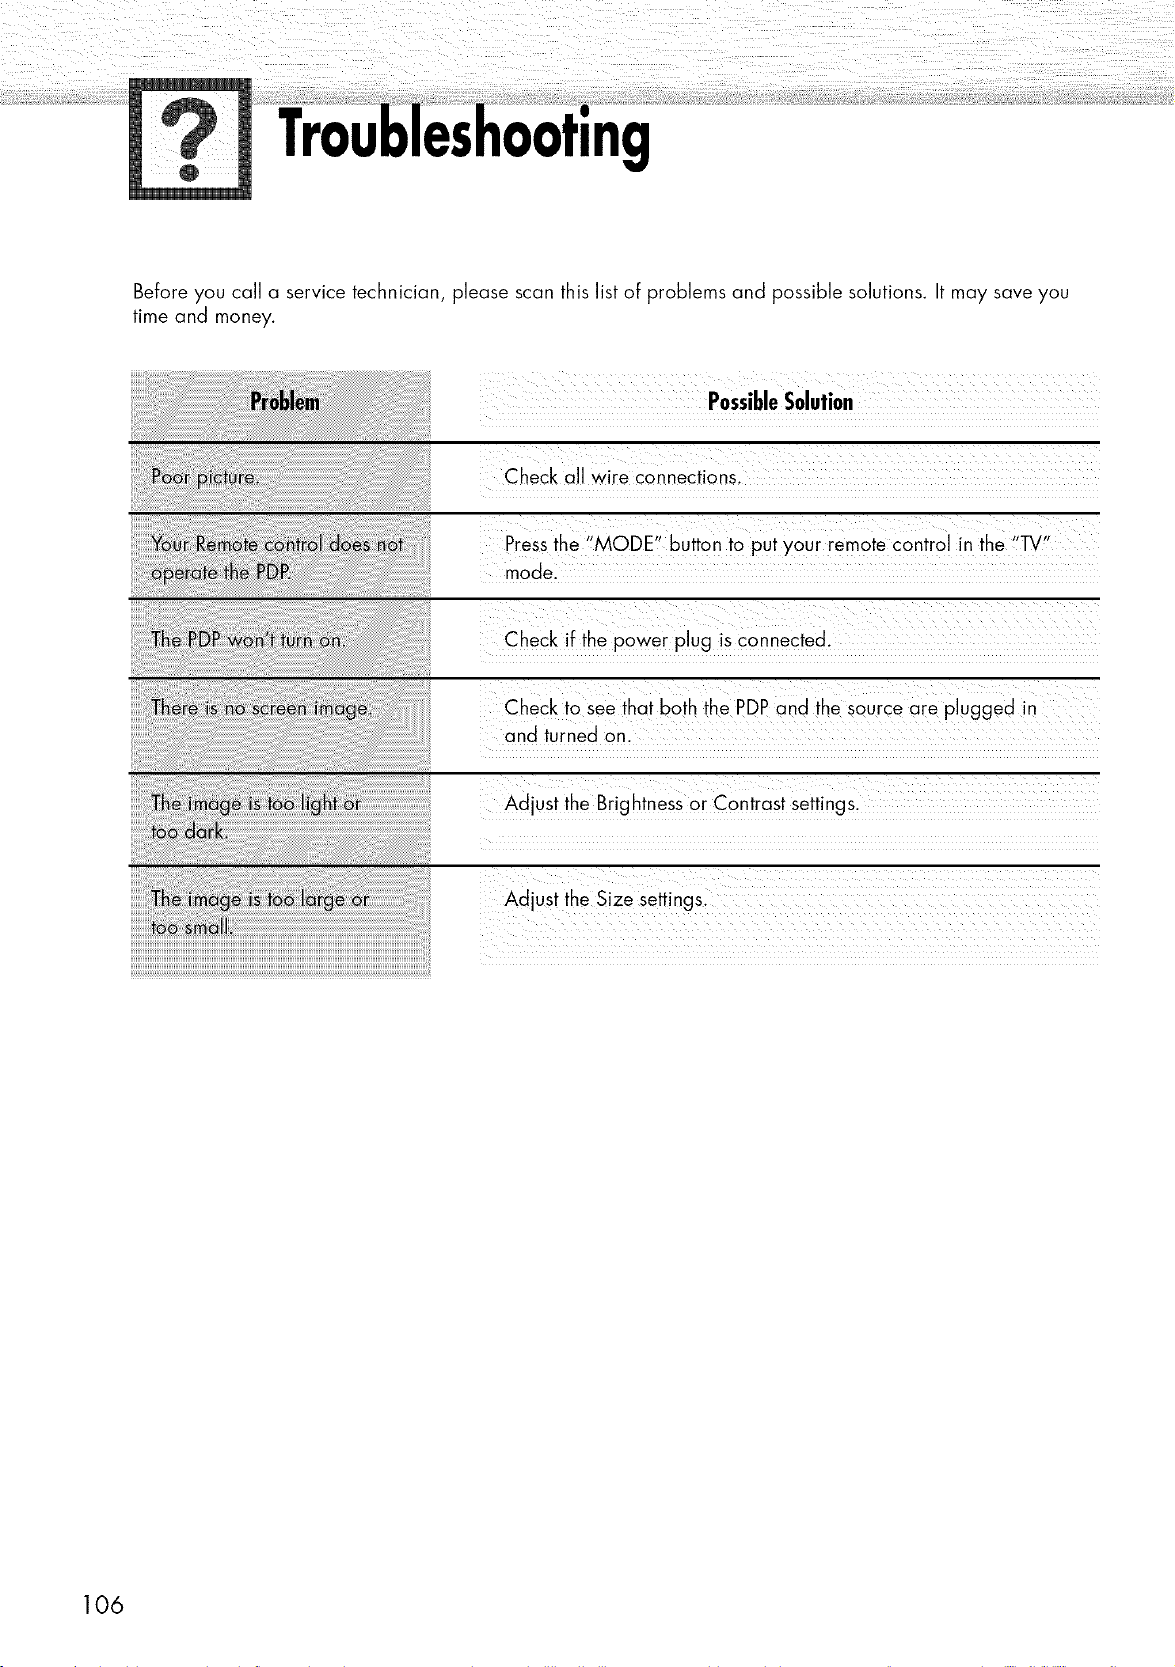
ng
Before you call a service technician, please scan this list of problems and possible solutions. It may save you
time and money.
PossibleSolution
k k ¸L F ::::::::::::::::::::::::
Check aJJwire cannections.
Press the "M °DE" button to Put y0ur rem0te c0ntro! i n the 'i_!'
model
Check if the p0wer plug is connected.
Check to see that both the PDP and the source are plugged in
and turned on.
Adjust the BrightneSs ar contrast settingsl
106
With proper care, your PDPwill give you many years of service. Please follow these guidelines to get
the maximum performance from your PDP.
Identifyin9 Problems
• Do not put the PDPnear extremely hot, cold, humid or dusty places.
• Do not put the PDPnear appliances that create magnetic fields.
• Keep the ventilation openings clear.
• Do not place the PDPon a rough and slanted surface, such as cloth or paper.
Liquids
• Do not place liquids near or on the PDP.
Cabinet
• Never open the cabinet or touch the parts inside.
• Wipe your PDPwith a clean, dry cloth. Never use water, cleaning fluids, wax, or chemicals.
• Do not put heavy objects on top of the cabinet.
Temperature
• If your PDPis suddenly moved from a cold to a warm place, unplug the power cord for at least two
hours so that moisture that may have formed inside the unit can dry completely.
107
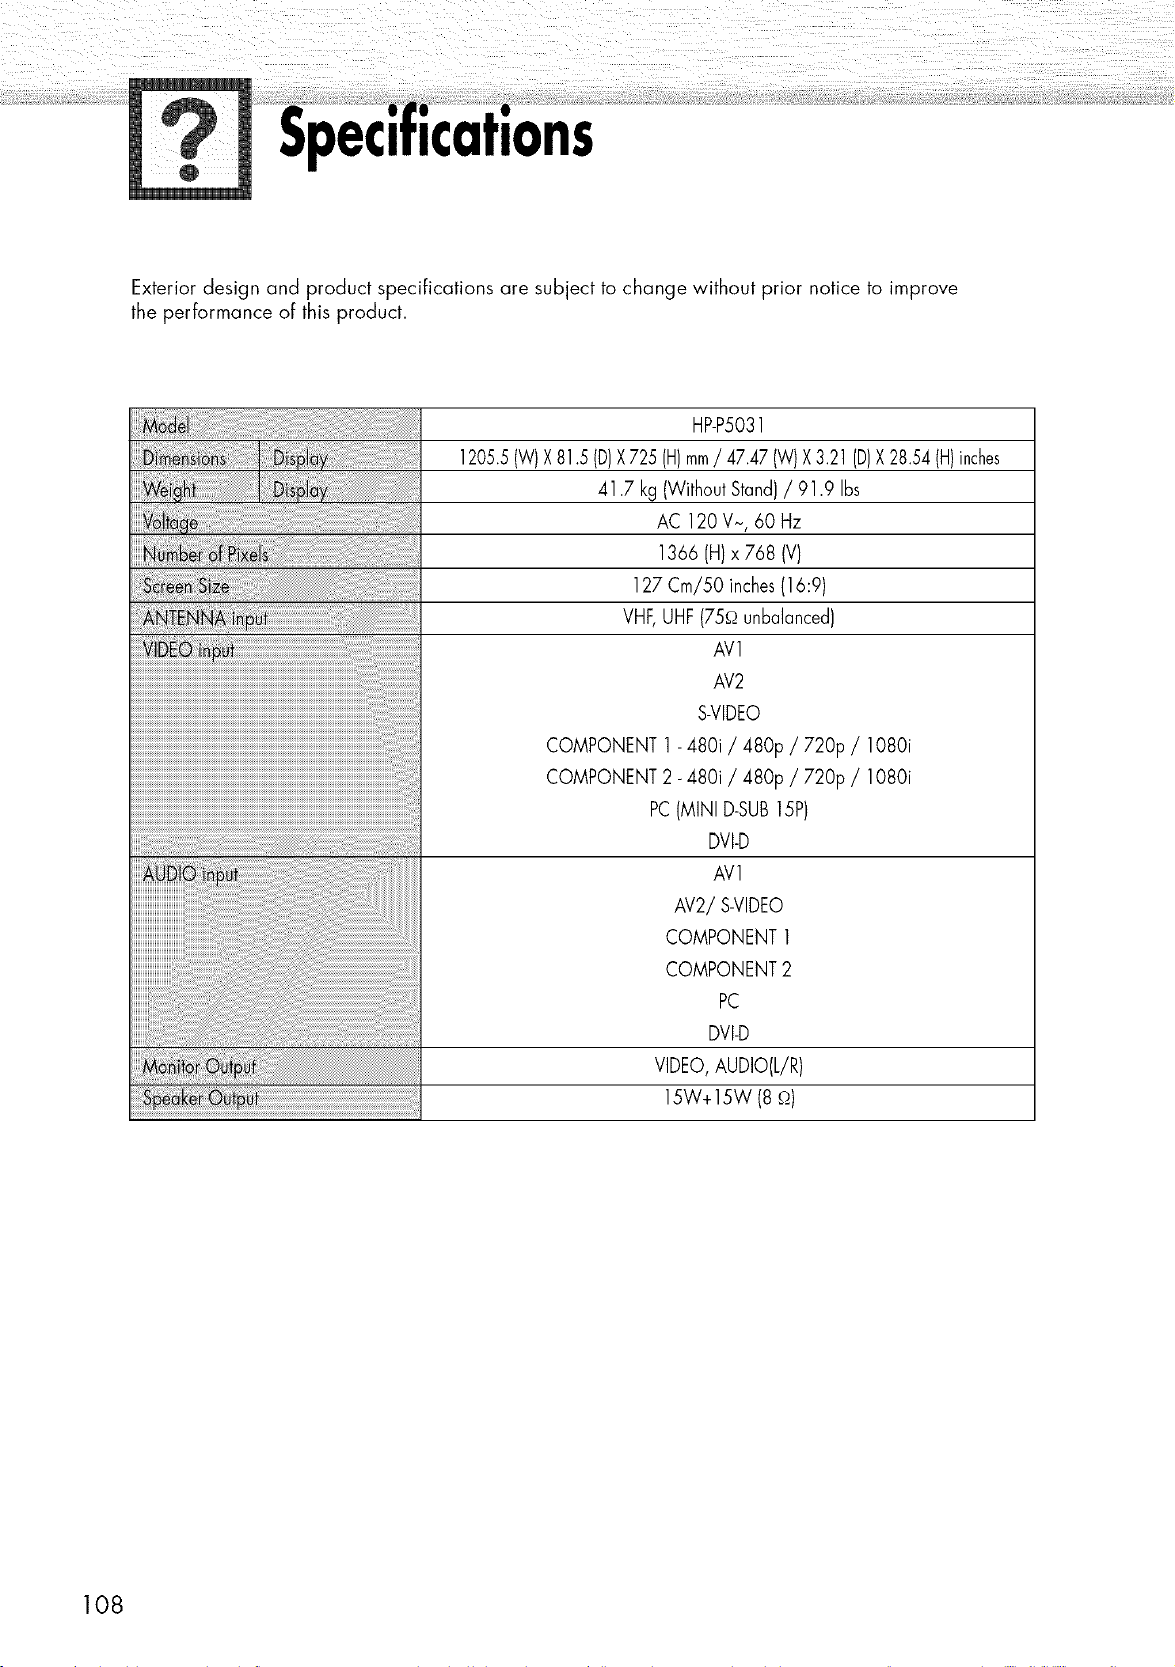
Exterior design and product specifications are subject to change without prior notice to improve
the performance of this product.
HP-P5031
1205.5(W)X81.5 (D)X 725(H)mm/ 47.47 (W)X3.21 (D)X 28.54(H)inches
41.7 kg (WithoutStand)/ 91.9 Ibs
AC 120 V~, 60 Hz
1366 (H)x 768 (V)
127 Cm/50 inches(16:9)
VHF,UHF(75_ unbalanced)
AV1
AV2
S-VIDEO
COMPONENT1- 480i / 480p / 72% / 1080i
COMPONENT2- 480i / 480p / 72% / 1080i
PC(MINI D-SUB15P)
DVI-D
AVl
AV2/S-VIDEO
COMPONENT1
COMPONENT2
PC
DVI-D
VIDEO,AUDIO(L/R)
15W+15W (8 .q)
108

Memo
109
1-80_-SAMSUNG (1-8_0-726-7864)
Samsung Electronics America
Service Division
400 Valley Road, Suite 201
Mount Arlington, NJ 07856
www.samsungusa.com
Samsung Electronics Canada Inc.
Samsung Customer Care
7037 Financial Drive
Mississauga, Ontario
L5N 6R3
www.samsHBg .ca
BN68-00714A-O0