Contact SAMSUNG WORLD=WIDE
ifyou haveany questions or comments relating to Samsung products, please contact the SAMSUNG customer care center,
Comment contacter Samsung dans le monde
Si vous avez des suggestions ou des questions concernant les produitsSamsung, veuillez contacter ie Service
Consommateurs Samsung,
CANADA
1-800-SAMSUNG(726-7864) www.samsung.com/us
1-800-SAMSUNG(726-7864) www.samsung.com/ca
Samsung ElectronicsAmerica, Inc. 105 Challenger Road
Ridgefield Park, NJ 07660-0511
Samsung Electronics Canada Inc., Customer Service 55
Standish Court Mississauga, Ontario L5R 4B2 Canada
Samsung Electronique Canada Inc., Service & la Clientele
55 Standish Court Mississauga, Ontario L5R4B2
Canada
BN68-01920A-00
importantWarrantyinformationRegardingTelevisionFormatViewing
Widescreenformat PDP Displays (16:9, the aspect ratio ofthe screen width to height) areprimarily designed to viewwide
screenformat full-motion video. Theimages displayed on them should primarily be in the wide screen 16:9 ratio format,
orexpanded to fill the screen if your modeloffers thisfeature and the images areconstantly moving. Displaying stationary
graphics and images on screen, such as the dark side-bars on nonexpanded standard formattelevision video and
programming, should be limited tono morethan 5% of the totaltelevision viewing perweek.
Additionally, viewing otherstationary images and text suchas stock market reports, video game displays, station Iogos,
web sitesor computer graphics and patterns, should be limited as described abovefor all televisions. Displaying stationary
imagesthat exceed the above guidelines can cause uneven aging of PDP Displays that leave subtle, but permanent
burned=inghost images inthe PDP picture, To avoid this, varythe programming and images,and primarily display
full screen movingimages, not stationary patterns ordark bars,
On PDP models that offer picturesizing features, use these controls toview different formats as a fullscreen picture.
Be careful in the selection and duration of television formats usedfor viewing. Uneven PDP agingas a resultofformat
selection and use, aswell asburned-in images, arenot covered byyour Samsung limitedwarranty.
U.S,A Only
The product unitaccompanying thisuser manual islicensed under certain intellectual property rightsof certain third parties.
In particular, this product islicensed under the following US patents:5,991,715, 5,740,317, 4,972,484, 5,214,678, 5,323,396,
5,539,829, 5,606,618, 5,530,655, 5,777,992, 6,289,308, 5,610,985, 5,481,643, 5,544,247, 5,960,037, 6,023,490, 5,878,080, and
underUS Published PatentApplication No.2001-44713-A1.
This license islimitedto privatenon-commercial use byend-user consumers for licensed contents. No rights aregranted for
commercial use. Thelicense does not cover any productunit other than this product unitand thelicense doesnot extend toany
unlicensed product unitor process conforming to ISO/IEC 11172-3or ISO/IEC 13818-3 usedor sold in combination with this product
unit.Thelicense only covers the use ofthis product unittoencode and/or decode audio files conforming to the ISO/IEC 11172-3
or ISO/IEC 13818-3. No rightsare granted underthis licensefor productfeatures orfunctions that do not conform tothe ISO/IEC
11172-3 or ISO/IEC 13818-3.
Other countries
The product unitaccompanying thisuser manual islicensed under certain intellectual property rightsof certain third parties.This
license islimited to privatenon-commercial useby end-user consumers for licensed contents. Norightsare granted forcommercial
use.Thelicense doesnot cover any product unit otherthan this product unit and the licensedoes not extendto any unlicensed
product unit or process conforming to ISO/IEC 11172-3 or ISO/IEC 13818-3 used orsold in combination with this product unit.The
license onlycovers the use of thisproduct unit toencode and/or decodeaudio files conforming to the ISO/IEC 11172-3 or ISO/IEC
13818-3. Norightsare granted underthis licensefor product features orfunctions that do notconform tothe ISO/IEC 11172-3 or
ISO/IEC 13818-3.
© 2009 Samsung Electronics Co.,Ltd. All rights reserved.
I User instructions
O Screen image retention
Donot display astillimage (suchas on a videogame) on the plasma display panel formore than several minutes as it can cause
screen image retention.This image retention isalso known as"screen burn". Toavoid such image retention, refer to page 23 ofthis
manual to reduce the degree ofbrightness and contrast of the screenwhen displaying a still image.
Altitude
The PDP can onlyoperate normally at heights under6500ft.
Heat on the top of the Plasma TV
The top sideof the product may be hotafter long periodsof use as heat dissipates from the panelthrough the venthole in the upper
part ofthe product.
This isnormal and does not indicate anydefect oroperation failure ofthe product.
However, children should be preventedfrom touching the upperpartof the product.
The product is making a 'cracking' noise,
A 'cracking' noise may occurwhen the product contracts or expands due to achange in the surrounding environment such as
temperature or humidity.This isnormal and not adefect of theunit.
Cel! Defects
The PDP uses a panelconsisting of 2,360,000(HD-level) to 6,221,000(FHD-level) pixelswhich require sophisticated technology to
produce. However, there maybeafew bright or dark pixelson the screen. These pixelswill have no impact onthe performance ofthe
product.
Avoid operating the TV at temperatures below 41°F (5°0)
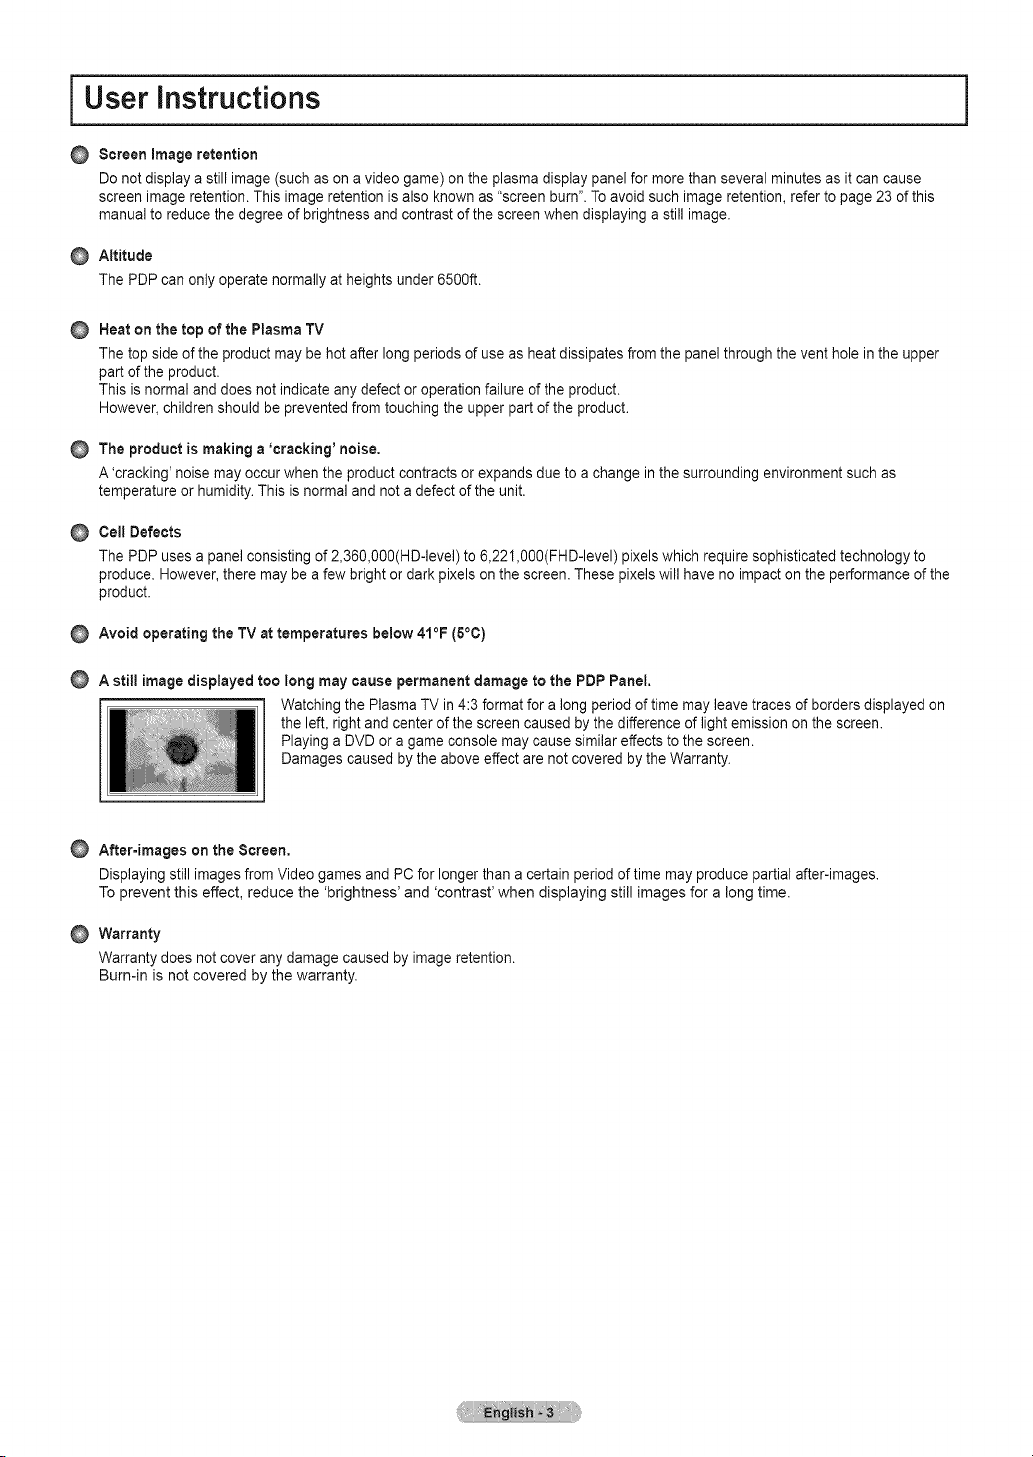
A still image displayed too long maycause permanent damage tothe PDPPanel.
Watching the Plasma TV in 4:3 format for a long period of time mayleave traces ofborders displayed on
the left, right and center ofthe screen caused by the difference of lightemission on the screen.
Playing a DVDor agame console may cause similar effects tothe screen.
Damages caused by the aboveeffect are not covered by the Warranty.
After-images on the Screen,
Displaying still images fromVideo gamesand PC for longer than acertain period of time may produce partialafter-images.
To prevent this effect, reduce the 'brightness' and 'contrast' when displaying still images for along time.
Warranty
Warranty does not coverany damage caused by image retention.
Burn-in is not covered by the warranty.

IContents
,,,List of Features.......................................................................... 5
,,,Checking Parts.......................................................................... 5
,,,Viewing the Control Panel ......................................................... 6
,,,Viewing the Connection Panel................................................... 7
,,,Remote Control ......................................................................... 8
,,,Connecting VHF andUHFAntennas ......................................... 9
,,,Connecting CableTV................................................................ 9
,,,Connecting a DVD /Blu-Ray Player orCable Box/
Satellite receiver (Set-TopBox) via HDMI ............................... 11
,,,Connecting a DVD/Blu-Ray PlayerorCable Box/
Satellite receiver (Set-TopBox) via DVl.................................. 11
,,,Connecting a DVD /Blu-Ray Player orCable Box/
Satellite receiver (Set-TopBox) via Component cables.......... 12
,,,Connecting a Camcorder ........................................................ 12
,,,Connecting a VCR................................................................... 13
,,,Connecting a Digital Audio System ......................................... 14
,,,Connecting an Amplifier / DVDHome Theater........................ 14
,,,Connecting a PC ..................................................................... 15
,,,Turning the TV Onand Off ...................................................... 16
,,,Changing Channels ................................................................. 16
,,,Adjusting the Volume............................................................... 16
,,,Using the TOOLS Button......................................................... 17
,,,Viewing the Display................................................................. 17
,,,Viewing the Menus.................................................................. 18
,,,Plug & Play Feature................................................................ 19
,,,Using Your TVas aComputer (PC) Display............................ 26
,,,Display Modes......................................................................... 27
,,,Setting up the TVwith your PC ............................................... 27
,,,Changing theSound Settings.................................................. 28
,,,Configuring the Setup Menu.................................................... 29
,,,Setting the Time ...................................................................... 33
,,,Source List / EditName........................................................... 34
,,,Support.................................................................................... 34
,,,Connecting Anynet +Devices.................................................. 36
,,,Troubleshooting forAnynet +................................................... 39
,,,Troubleshooting....................................................................... 40
,,,Preparation before installing the Wall-Mount........................... 41
,,, How to attachthe Stand-Base ................................................. 41
,,,Securing the TVto the Wall..................................................... 42
,,,Wall Mount KitSpecifications (VESA) ..................................... 43
,,,Specifications .......................................................................... 44
,,,Dimensions (PN42B450B1D).................................................. 45
,,,Dimensions (PNSOB450B1D).................................................. 46
,,,Storing Channels ..................................................................... 20
,,,Managing Channels ................................................................ 20
,,,Changing thePicture Settings................................................. 22
,,,Using the 3DFunction ............................................................. 25
Symbol
m
Press Note One-TouchButton TOOLS
Connecting and Preparing Your TV
List of Features
• Adjustable picture settingsthat canbestored in the TV'smemory.
• Automatic timer to turn the TVon and off.
• A special sleep timer.
• V-Chip function.
• Excellent Digital Interface & Networking :
With abuilt-in HD digitaltuner, non-subscription HDbroadcasts can be viewed with no Cable Box/Satellite receiver (Set-TopBox)
needed.
• HDMI/DVl connection ofyour PC to thisTV.
• SRS TruSurround HDprovides avirtual surround system.
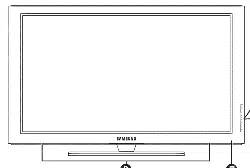
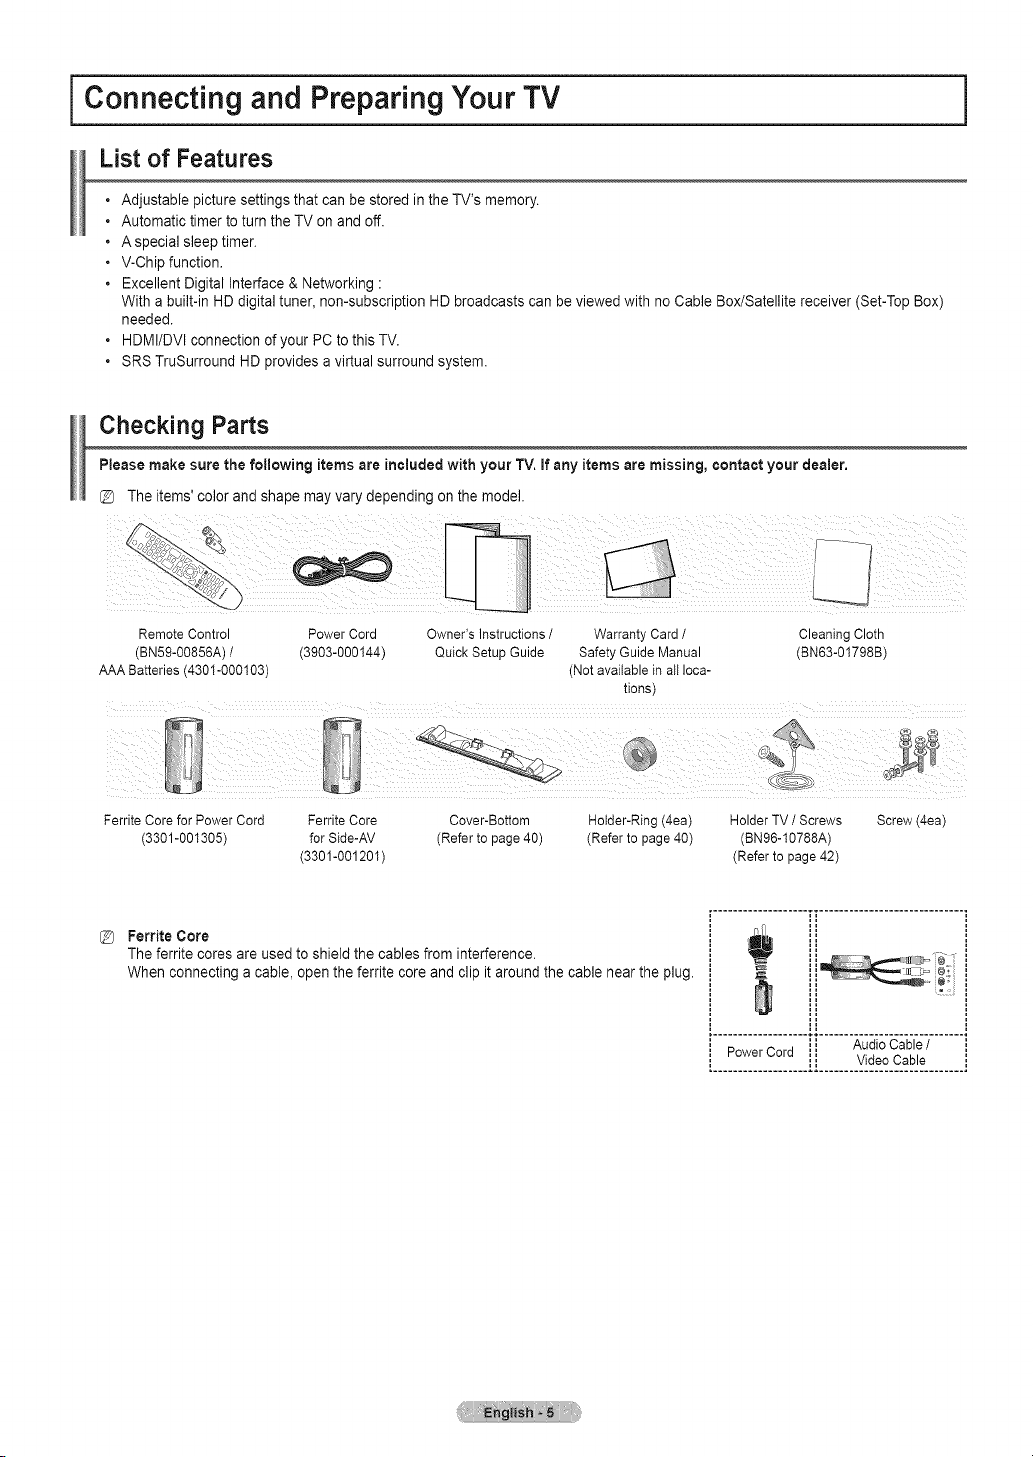
Checking Parts
Please make sure the following items are included with your TV.ifany items are missing, contact your dealer.
The items'color and shape mayvary depending on the model.
Remote Control Power Cord Owner's Instructions /
(BN59-00856A) / (3903-000144) Quick Setup Guide
AAA Batteries (4301-000103)
Warranty Card / Cleaning Cloth
Safety Guide Manual (BN63-01798B)
(Not available in all loca-
tions)
Ferrite Core for Power Cord Ferrite Core Cover-Bottom Holder-Ring (4ea) Holder TV / Screws
(3301-001305) for Side-AV (Refer to page 40) (Refer to page 40) (BN96-10788A)
(3301-001201 ) (Refer to page 42)
Screw (4ea)
Ferrite Core
The ferritecores areused to shieldthe cablesfrom interference.
When connecting acable, open the ferrite core and clip it around the cable nearthe plug.
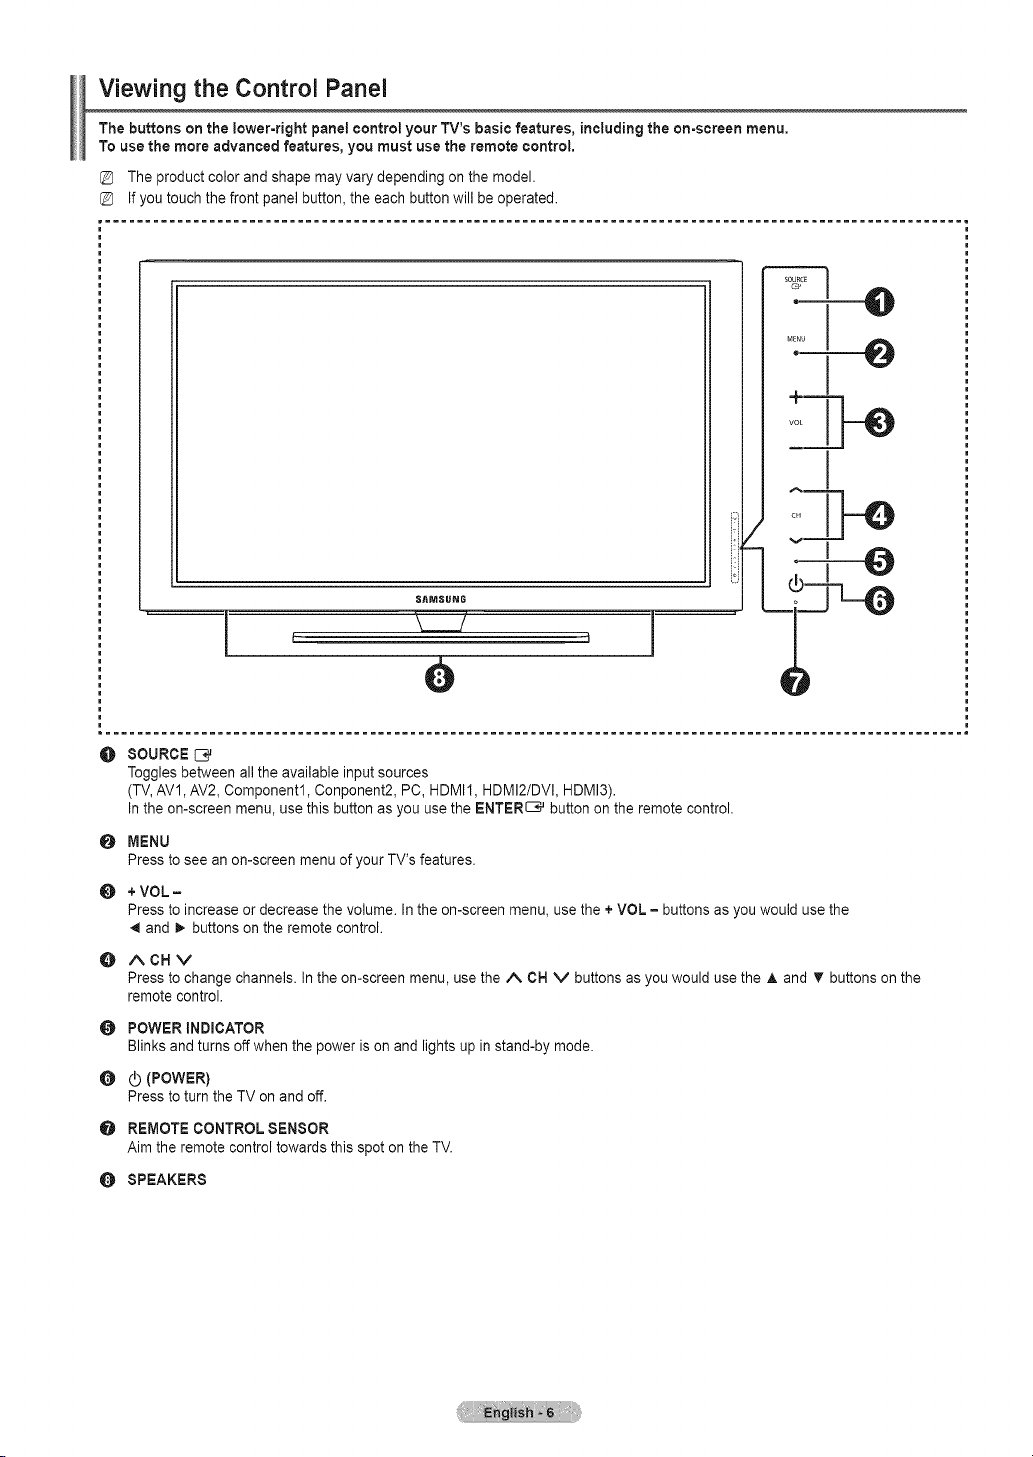
Viewing the Control Panel
The buttons on the lower-right panel control your TV's basicfeatures, including the on-screen menu,
To usethe more advanced features, you must usethe remote control,
The product colorand shape may varydepending onthe model.
Ifyou touchthe front panel button,the eachbutton will be operated.
SAMSUNG
e
^1
O
0
O
SOURCE
Togglesbetween allthe available input sources
(TV,AV1,AV2, Component1, Conponent2, PC, HDMI1, HDMI2/DVI, HDMI3).
In theon-screen menu, use thisbutton as you usetheENTER_ button on the remote control.
MENU
Pressto seeanon-screen menu of your TV'sfeatures.
+VOL =
Pressto increase ordecrease thevolume. In theon-screen menu, use the +VOL= buttonsas youwould usethe
and _. buttons onthe remote control.
O ACHV
Press tochangechannels.Inthe on-screen menu, use the A CN V buttonsas you would usethe A and T buttonson the
remote control.
O
0
POWER INDICATOR
Blinks and turns off when the power ison and lightsup in stand-by mode.
(POWER)
Pressto turnthe TVon and off.
O REMOTECONTROL SENSOR
Aim the remotecontrol towards thisspot on the TV.
O SPEAKERS
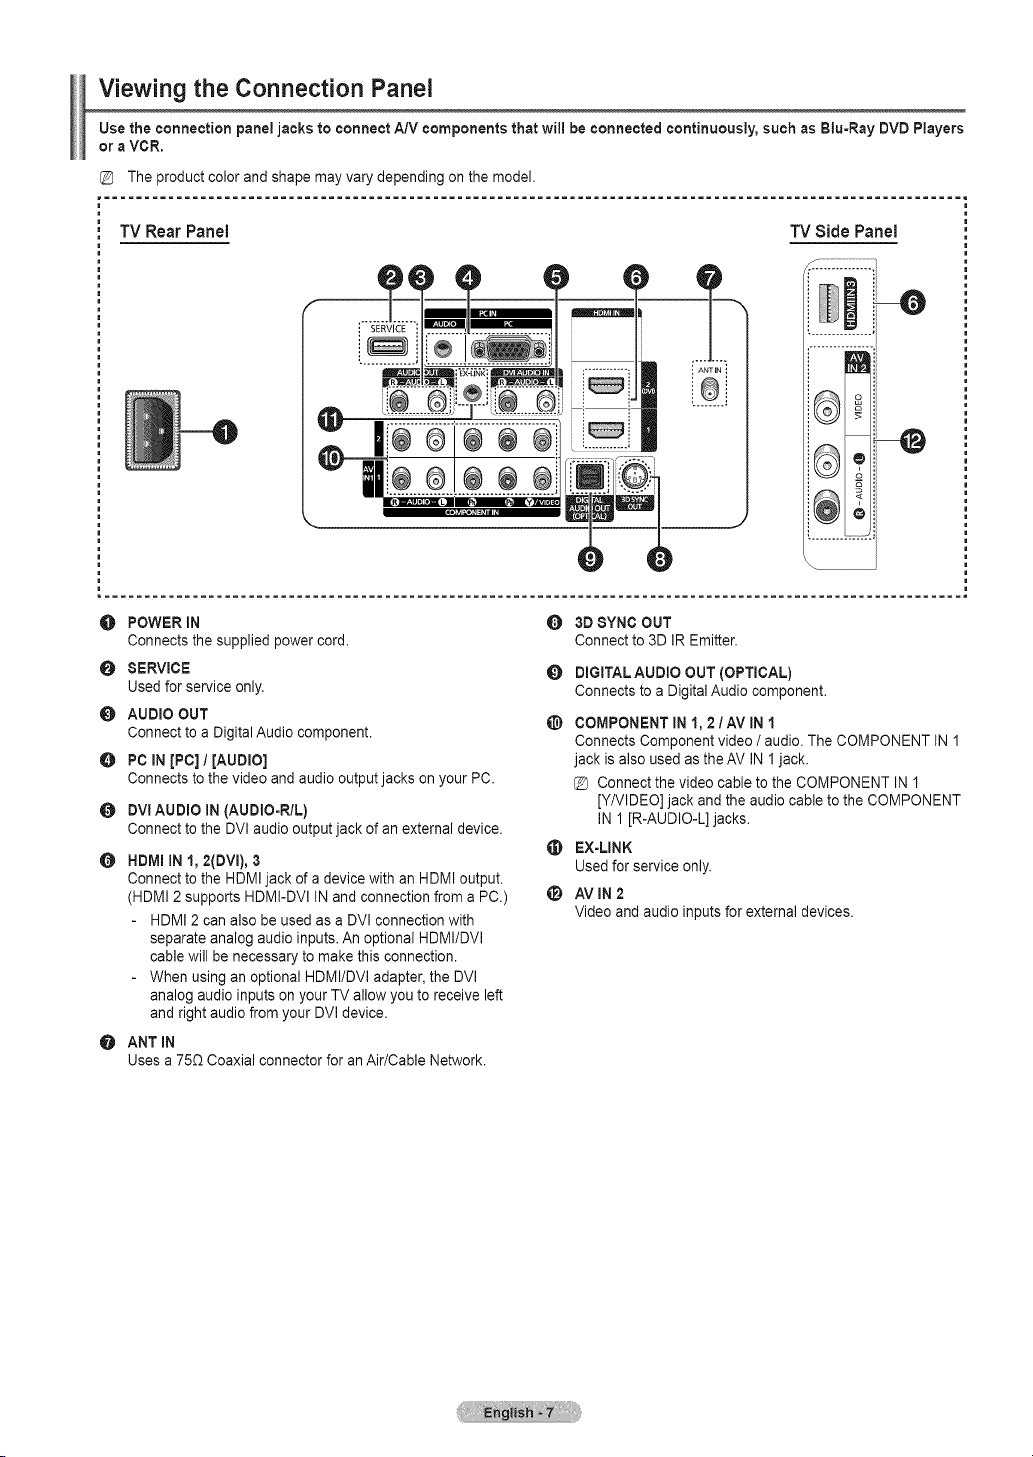
Viewing the Connection Panel
Usethe connection panel jacks to connect A/V components that will be connected continuously, such as Blu-Ray DVD Players
oraVCR.
TV Rear Panel "iVSide Panel
-0
-@
O POWER IN
Connects the supplied powercord.
O SERVICE
Used for serviceonly.
AUDIO OUT
Connecttoa Digital Audio component.
O PC IN[PC] / [AUDIO]
Connects to the video and audio output jacks onyour PC.
DVlAUDIO IN (AUDIO-R/L)
Connecttothe DVI audio output jack of anexternal device.
0 HDMIiN 1, 2(OVl), 3
Connecttothe HDMI jack of adevicewith an HDMIoutput.
(HDMI2supports HDMI-DVl INand connection from aPC.)
HDMI2 can also be usedas a DVl connection with
separate analogaudio inputs. An optional HDMI/DVl
cable will be necessary tomakethis connection.
When using an optional HDMI/DVl adapter, the DVl
analogaudio inputs onyour TVallow youtoreceive left
and right audiofrom your DVl device.
ANT IN
Usesa 750. Coaxial connector for an Air/Cable Network.
O
O 3DSYNC OUT
Connect to3D IREmitter.
O DIGITAL AUDIO OUT (OPTICAL)
Connects to a Digital Audiocomponent.
COMPONENT IN1, 2/AV IN 1
Connects Component video /audio.The COMPONENT IN1
jack isalso used astheAV IN 1jack.
@ Connect the video cable to the COMPONENT IN1
[Y/VIDEO]jack and the audio cable to the COMPONENT
IN1[R-AUDIO-L] jacks.
EX-LINK
Used forservice only.
AVIN2
Videoand audio inputs forexternal devices.

Remote Control
You can use the remote control up to a distance of about 23 feet from the TV.
The product color and shape may vary depending on the model.
The performance of the remote control may be affected by bright light.
(t)-=-
@-=.
--4)
_)
POWER TV
,,
o-
{ =
J
__SAMSU_
0
0
0
0
0
0
POWER
Turns the TV on and off.
NUMERIC BUTTONS
Press to change the channel.
J
Press to select additional channels (digital
and analog) being broadcast by the same
station. For example, to select channel
"54-3", press "54", then press "L-;" and "3".
_: MUTE
Press to temporarily cut off the sound.
Press to increase or decrease the volume.
SOURCE
Press to display and select the available
video sources.
CH LIST
Used to display Channel Lists on the screen. _
0 TOOLS
Use to quickly select frequently used _)
functions.
UPA / DOWN _' / LEFT.ql /
RIGHT_ / ENTER_
Use to select on-screen menu items and _)
change menu values.
@ INFO _)
Press to display information on the TV
screen.
t[_ COLOR BUTTONS
Use these buttons in the Channel list.
@ S.MODE
Press to select the sound mode.
_) P.MODE
Presstoselectthepicturemode.
Use these buttons in the DMA, Anynet+
modes. (_ • ,:This remote can be used to
control recording on Samsung recorders
with the Anynet+ feature)
TV
Selects the TV mode directly.
_) PRE-CH
Tunes to the previous channel.
e i^ _CH_J
Press to change channels.
@ MENU
Displays the on-screen menu.
_) FAV.CH
Press to switch to your favorite channels.
_) RETURN
Returns to the previous menu.
EXIT
Press to exit the menu.
P.SIZE
Picture size selection.
SRS
Selects SRS TruSurround HD mode.
CC
Controls the caption decoder.
MTS
Press to choose stereo, mono or Separate
Audio Program (SAP broadcast).
_3
1.
2,
3,
Installing Batteries inthe RemoteControl
Lift the cover at the back of the remote control upward as shown in the figure.
Install two AAA size batteries.
@ Make sure to match the "+" and "-" ends of the batteries with the diagram inside the compartment.
Close the cover as shown in the figure.
@ Remove the batteries and store them in a cool, dry place if you won't be using the remote control for a
long time. (Assuming typical TV usage, the batteries should last for about one year.)
@ If the remote control doesn't work, check the following
1. Is the TV power on?
2. Are the plus and minus ends of the batteries reversed?
3. Are the batteries drained?
4. Is there a power outage or is the power cord unplugged?
5. Is there a special fluorescent light or neon sign nearby?
I Connections
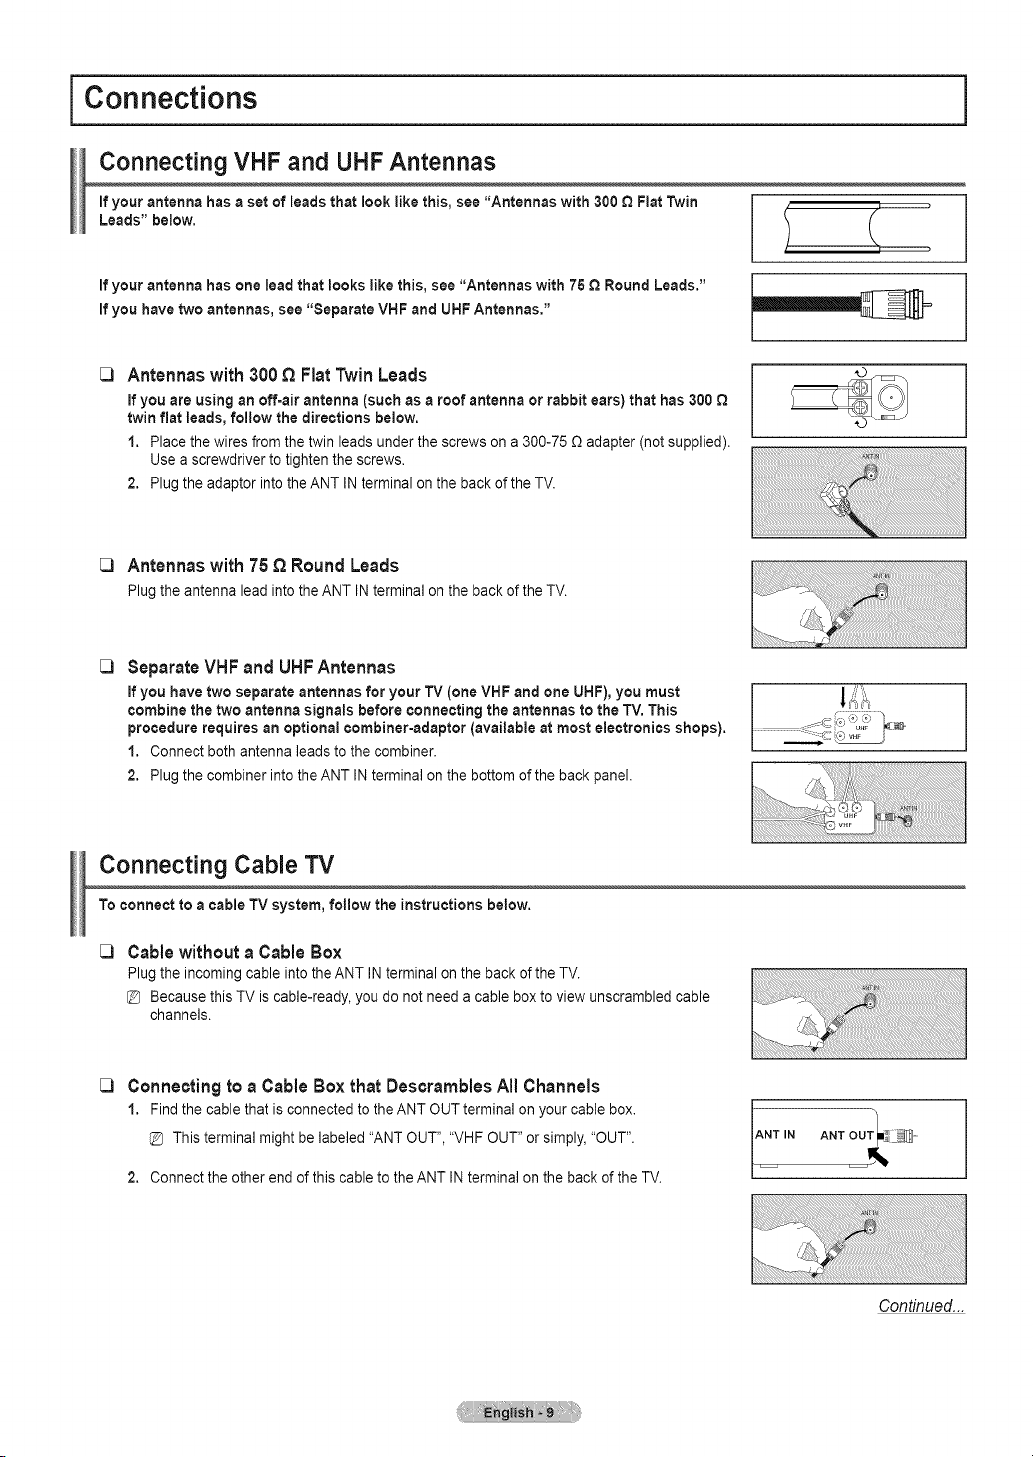
Connecting VHF and UHFAntennas
ifyour antenna hasa set of leads that look like this, see "Antennas with300 QFlat Twin
Leads" below.
ifyour antenna hasone leadthat looks like this, see "Antennas with 75 £_Round Leads."
ifyou have twoantennas, see "Separate VHFand UHFAntennas."
[_ Antennas with 300 E_Fiat Twin Leads
ifyou are using an off=airantenna (such as a roof antenna or rabbit ears) that has300 £_
twinflat leads, follow the directions below.
1. Place the wiresfrom the twin leads underthe screws on a300-75 £)adapter(not supplied).
Use a screwdriver to tighten the screws.
2. Plugthe adaptor into the ANTINterminal on the back of the TV.
[_ Antennas with 75 E_Round Leads
Plugthe antenna lead intothe ANT IN terminal on the back of the TV.
C)
SeparateVHFand UHFAntennas
ifyou have twoseparate antennas for your TV (one VHF and one UHF), you must
combine the two antenna signals before connecting the antennas to the TV.This
procedure requires anoptional combiner-adaptor (available atmost electronics shops).
1. Connect both antenna leads to the combiner.
2. Plugthe combiner into the ANT IN terminal on the bottom of the backpanel.
Connecting Cable TV
To connect to acable TV system, follow the instructions below.
_3 Cablewithout a Cable Box
Plugthe incoming cable into the ANT INterminal onthe back ofthe TV.
Because this TViscable-ready, you donot need acable box to viewunscrambled cable
channels.
C)
Connectingtoa CableBox thatDescramblesAll Channels
1. Find the cable that isconnected tothe ANTOUT terminal onyour cable box.
This terminal might be labeled "ANT OUT","VHF OUT" orsimply, "OUT".
2. Connectthe other end of this cable tothe ANT IN terminal onthe back ofthe TV.
Continued...
C)
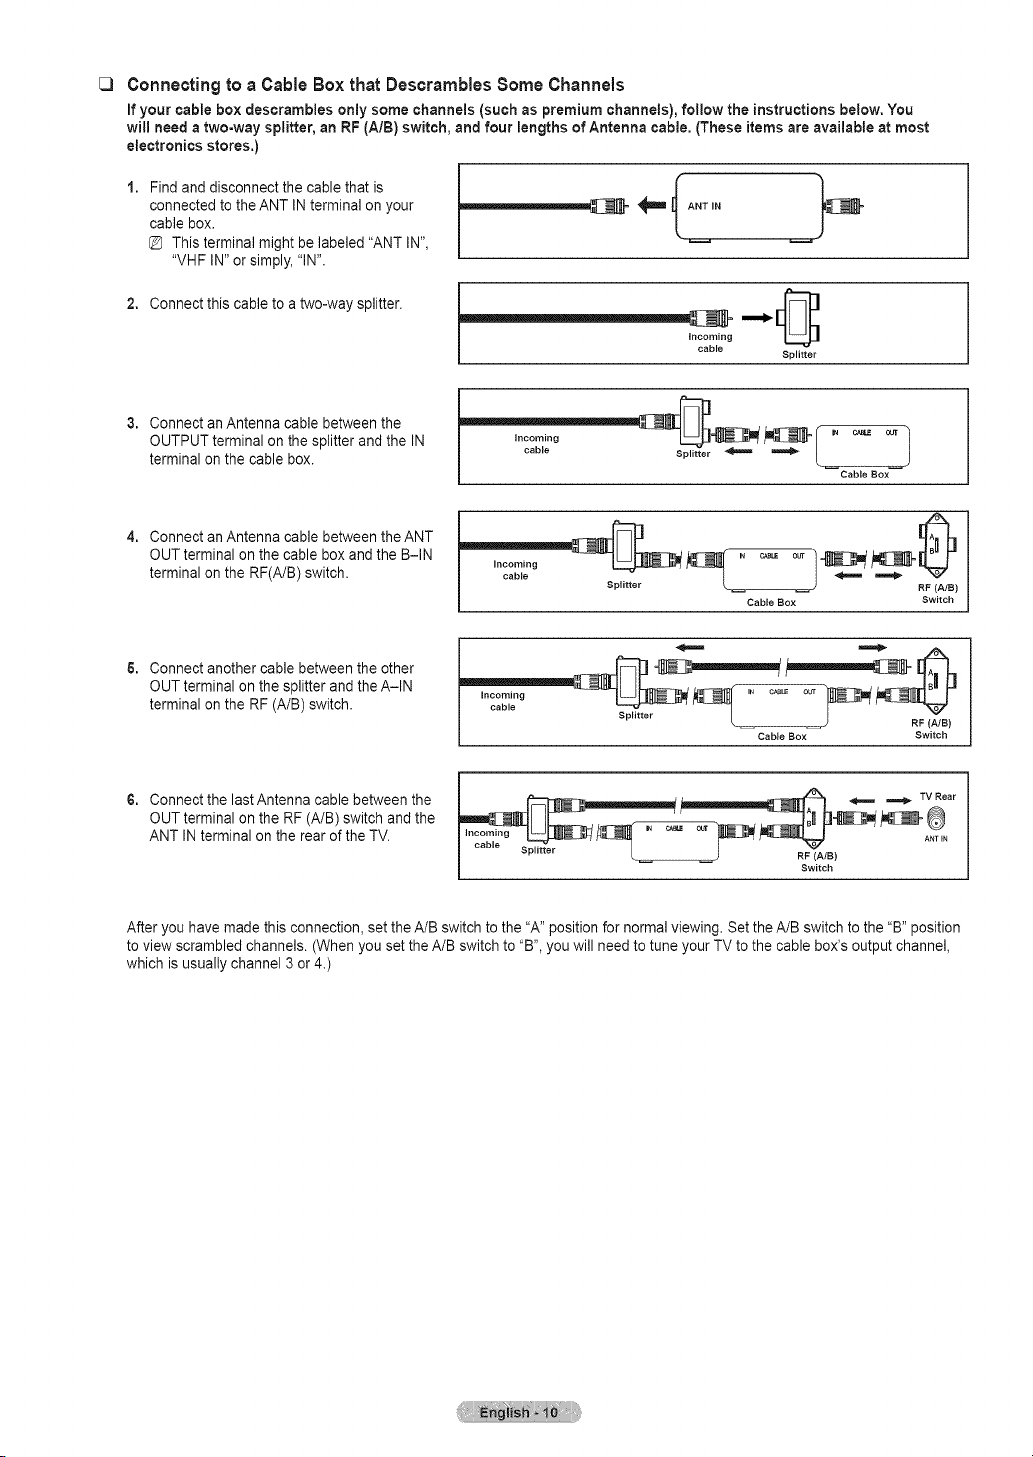
Connectingtoa Cable Boxthat DescramblesSome Channels
ifyour cable box descrambies only some channels (such as premium channels), follow the instructions below, You
will need a two-way splitter, an RF (A/B) switch, and four lengths of Antenna cable, (These itemsare available at most
electronics stores,)
Find and disconnect the cable that is
connected to the ANT INterminal on your
cable box.
Thisterminal might belabeled "ANT IN",
"VHF IN"or simply, "IN".
2, Connectthiscable to atwo-way splitter.
incoming
cable
Splitter
Connectan Antenna cable between the
OUTPUT terminal on thesplitter and the IN
terminal on the cable box.
Cable Box
Connectan Antenna cable between the ANT
OUT terminal on the cable boxand the B-IN
terminal on the RF(A/B)switch.
incoming
cable
Splitter
RF (AIB)
Cable Box Switch
Connectanother cablebetween the other
OUT terminal on the splitter and the A-IN
terminal on the RF (A/B)switch.
Connectthe lastAntenna cable between the
OUT terminal on the RF (A/B) switch and the
ANT INterminal on the rear of the TV.
incoming IN c_uE our
Splitter L ) RF {_JB)
Cable Box Switch
__ _ _ TV RAN_TEIar
I ..... Sp,it,_r L j RF(ffIS)
Switch
After you have made thisconnection, settheA/Bswitch to the "A" position fornormal viewing. Set the A/B switch tothe "B" position
toview scrambled channels. (When youset the A/B switch to "B", youwill need to tune your TV to the cable box's outputchannel,
which isusually channel 3 or4.)

Connecting a DVD / Blu-Ray Player or Cable Box / Satellite receiver
(Set-Top Box) via HDIVll
This connection canonly bemade ifthere isanHDMI Outputjack on the externaldevice. This connection will provide the
highest quality picture,
1. Connect an HDMI Cable between the HDMIIN(1,2(DVI), or 3)jack on the TV and the HDMIjack on the DVD/ Blu-RayPlayer or
Cable BoxISatellite receiver (Set-TopBox).
DVD/BJu-Ray Player or Cable
Box / Satellite receiver
TV Rear Panel TV Side Panel
_HDMI Cable (Not supplied)
What isHDMI?
• HDMt, orhigh-definition multimedia interface, is an interface that enables the transmission of digital audioand video signals using a
single cable.
• The difference between HDMIand DVl isthat theHDMI device is smaller in size and hasthe HDCP (High Bandwidth Digital Copy
Protection) coding feature installed.
Each DVD Playeror CableBox/ Satellite receiver(Set-TopBox) has a different back panelconfiguration.
TheTV maynot output sound and pictures may be displayed with abnormal colorwhen DVD IBlu-Ray Player orCable BoxI
Satellite receiver supporting HDMIversions older than 1.3 areconnected. Whenconnecting an older HDMI cable and there isno
sound, connect the HDMI cableto the HDMIIN2(DVl) jack and the audiocables tothe DVlAUDIO IN[R-AUDIO-L] jacks onthe
back of the TV.If thishappens, contact the company that provided the DVD /Blu-Ray PlayerorCable Box/ Satellite receiver to
confirm the HDMIversion, then request an upgrade.
HDMIcables that are not 1.3 maycause annoying flicker ornoscreen display.
Connecting a DVD/Blu-Ray Player orCable Box / Satellite receiver
(Set-Top Box) via DVI
This connection canonly bemade ifthere is aDVl Output jack on the external device.
1. Connect aHDMI/DVI Cable or DVI-HDMIAdapter between the HDMI IN2(DVI)jack on theTV and the DVI jack on the DVD/ Blu-
Ray Player or Cable Box/Satellite receiver (Set-TopBox).
2. ConnectAudio Cables between the DVlAUDIO IN[R-AUDIO-L] jack on the TVand the DVD/Blu-Ray Player or CableBox/ Satellite
receiver.
OVO/Blu-Ray Player or Cable Box /
Satellite receiver
TV Rear Panel
_ Audio Cable
(Not supplied)
_ HDMi/DVI Cable (Not supplied}
Each DVD / Blu-Ray Player orCable Box/Satellite receiver (Set-TopBox) hasadifferent back panel configuration.
When connecting aDVD Playeror Cable BoxISatellite receiver(Set-Top Box), match the colorof the connection terminal to the
cable.
When using an HDMI/ DVlcable connection, youmust usethe HDMI IN2(DVl) jack.
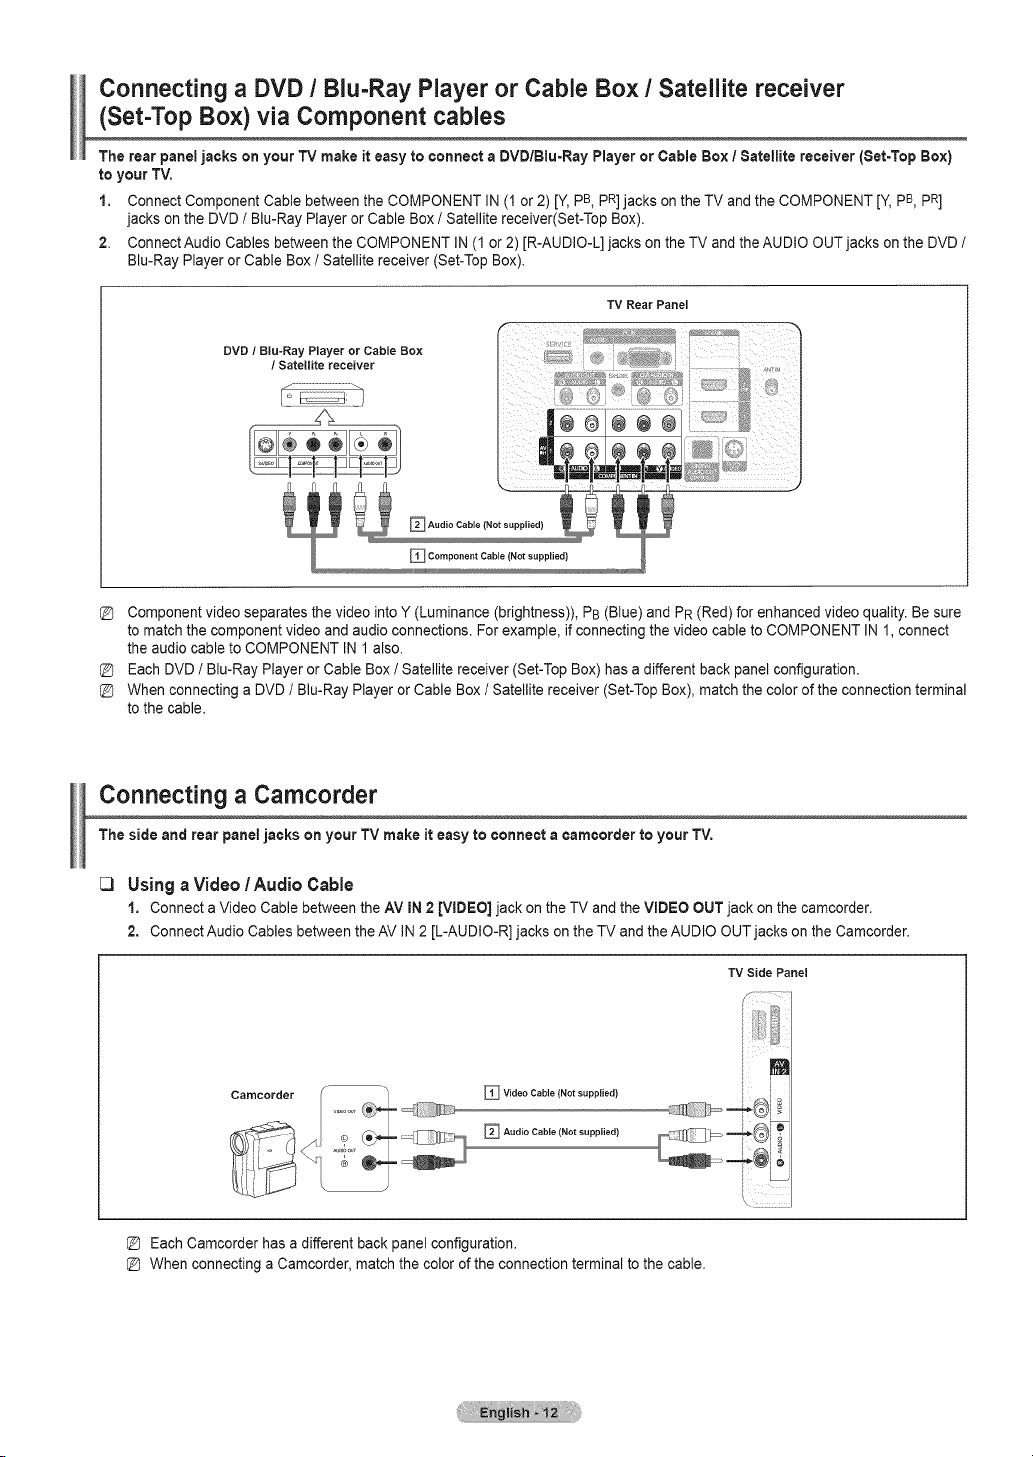
Connecting a DVD / Blu-Ray Player or Cable Box / Satellite receiver
(Set-Top Box) via Component cables
The rear paneljacks on your TVmake it easy to connecta DVD/Blu=RayPlayeror CableBox / Satellite receiver [Set=TopBox)
to yourTV.
1. Connect Component Cablebetween the COMPONENT IN (1or 2) [Y, pB pR] jacks on the TVand the COMPONENT [Y, pB, pR]
jacks on the DVD/ Blu-Ray PlayerorCable BoxI Satellite receiver(Set-Top Box).
2. ConnectAudio Cables between the COMPONENT IN(1or2) [R-AUDIO-L] jacks on the TVand the AUDIO OUT jacks on the DVD/
Blu-RayPlayer or Cable Box/ Satellite receiver (Set-Top Box).
TV Rear Panel
DVD / Biu-Ray Player or Cable Box
/ Satellite receiver
j .......................................
Component video separates the video into Y (Luminance (brightness)), PB(Blue) and PR (Red) for enhanced video quality. Be sure
to matchthe component video and audioconnections. For example, if connecting the video cable to COMPONENT IN1, connect
the audio cable to COMPONENT IN1 also.
EachDVD /Blu-Ray PlayerorCable Box/ Satellite receiver (Set-TopBox) hasadifferent back panelconfiguration.
When connecting aDVD I Blu-RayPlayer or Cable BoxISatellite receiver (Set-TopBox), match the colorofthe connection terminal
tothe cable.
Connecting a Camcorder
The side and rear panel jacks on your TV make iteasy to connect a camcorder to your TV.
[3 UsingaVideo I Audio Cable
1. ConnectaVideo Cable between the AV IN2 [VIDEO] jack on the TV and the VIDEO OUTjack on the camcorder.
2. ConnectAudio Cables between the AV IN2 [L-AUDIO-R] jacks on the TVand the AUDIO OUT jacks on the Camcorder.
TV Side Panel
Carttcorder _ Video Cable (Not supplied)
_ Audio Cable (Not supplied)
[D Each Camcorder hasadifferent back panelconfiguration.
[D When connecting aCamcorder, matchthe color of the connection terminal to the cable.

C3
Usingan HDMI C=ble
1. Connectan HDMICable between the HDMI IN (1,2(DVl), or3) jack on the TVand the HDMIjack on the camcorder.
TV Rear Panel TV Side Panel
Carncorder
HDMI Cable (Not supplied)
[D Each Camcorder hasadifferent back panelconfiguration.
Connecting aVCR
Video Connection
These instructions assume that you havealready connected your TVto anantenna or a cableTV system (according to the
instructions onpages9~10). Skip step 1 if you have not yet connected toan antenna or acable system.
1. Unplugthe cable orantenna fromthe back ofthe TV.
2. Connectthe cable or antenna to the ANTIN terminal on the back of the VCR.
3. Connectan Antenna Cable between the ANT OUT terminalon the VCR and the ANT INterminal on the TV.
4. ConnectaVideo Cable between the AV IN1 [YNIDEO] or AVIN2[VIDEO)jack on the TV and theVIDEO OUT jack on the
VCR.
6. ConnectAudio Cables between the AV IN 1 (or AV IN2)[R-AUDIO-L] jacks on the TV and the AUDIO OUT jacks on the VCR
VCR Rear Panel
TV Rear Panel
%
[D If you havea"mono" (non-stereo) VCR, use aY-connector (notsupplied) to connect to the right and leftaudio inputjacks of the
TV.Alternatively,connect the cable to the "R"jack.
Ifyour VCR isstereo, you mustconnect two cables.
[D Each VCR has a different back panelconfiguration.
[D When connecting aVCR, matchthe color of the connectionterminal tothe cable.
[D When connecting toAVIN 1,the color of theAVIN1[YNIDEO] jack (Green)doesnotmatchthe color of the video cable (Yellow).

Connecting a Digital Audio System
The rear paneljacks on your TVmake it easy to connecta Digital AudioSystem(Home theater/Receiver) to your TV.
Connect an Optical Cable betweenthe DIGITALAUDIO OUT (OPTICAL)jacks on the TVand the Digital Audio Input (OPTICAL)
jacks on the Digital Audio System.
When a Digital Audio System isconnected to the DIGITALAUDIO OUT (OPTICAL) jack :Decreasethe volume ofthe TV, and
adjust the volume level with the system's volume control.
TV Rear Panel
Digital Audio System
Optical Cable {Not supplied)
t
5.1CH audio ispossible when the TVisconnected to an externaldevice supporting 5.1CH.
EachDigital Audio System hasadifferent back panelconfiguration.
When the receiver (home theater) isset toOn,you can hearsound outputfrom the TV's Optical jack. When the TV isdisplaying a
DTV(air) signal,the TVwill send out 5.1 channel sound tothe Home theater receiver.Whenthe sourceisadigital component such
as aDVD and isconnected to the TV viaHDMI, only 2channel soundwill be heard fromthe Home Theater receiver.
Ifyou want to hear 5.1 channel audio,connect the DIGITALAUDIO OUT (OPTICAL)jack on the DVD /Blu-Ray playeror Cable/
Satellite Boxdirectly toan Amplifier orHomeTheater, not the TV.
Connecting an Amplifier / DVD Home Theater
ConnectAudio Cables between the AUDIO OUT JR-AUDIO-L]jackson the TV and AUDIO IN[L-AUDIO-R] jacks on the Amplifier/
DVD Home Theater.
When an audio amplifier isconnected to the AUDIO OUT JR-AUDIO-L]jacksterminals :Decrease the volume ofthe TV, and adjust
the volume level with the Amplifier's volume control.
TV Rear Panel
Amplifier / DVD Home Theater
"1
EachAmplifier / DVD Home Theater hasadifferent back panel configuration.
When connecting anAmplifier / DVD Home Theater,match the colorofthe connection terminal tothe cable.
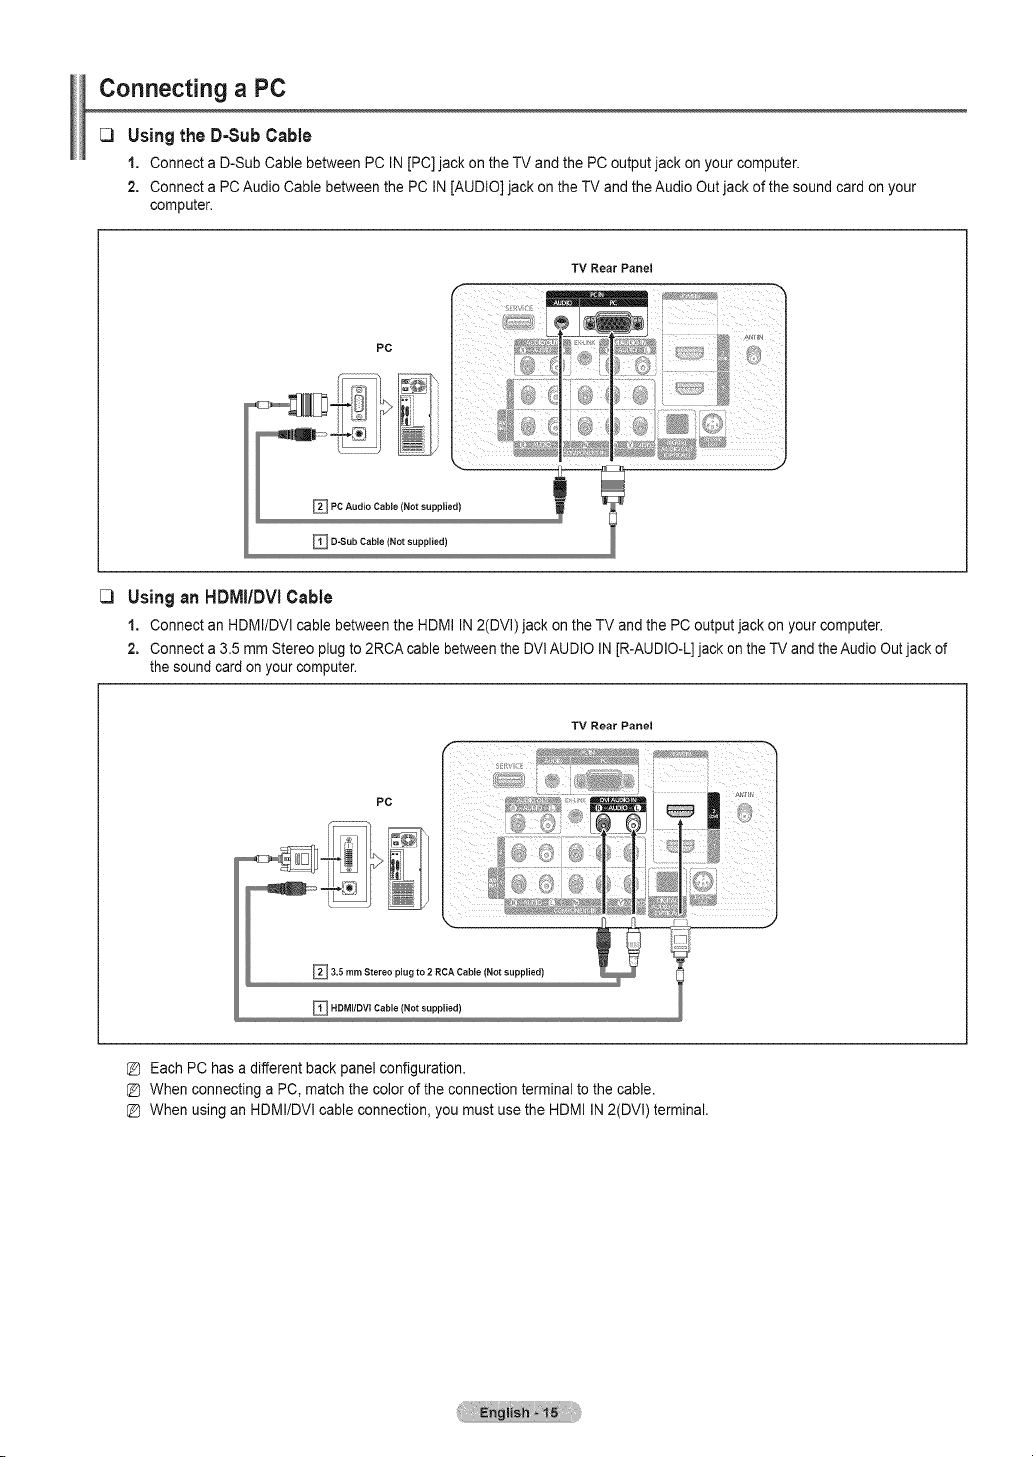
Connecting a PC
UsingtheD-SubCable
1. Connecta D-Sub Cable between PC IN[PC] jack on the TV and the PC output jack onyour computer.
2. Connecta PC Audio Cablebetween the PC IN[AUDIO]jack on the TV and the Audio Outjack of the soundcard on your
computer.
TV Rear Panel
PC
_PC Audio Cable (Not suppled}
_ D-Sub Cable (Not supplied)
Usingan HDMI/DVICable
1. Connectan HDMI/DVI cable between the HDMI IN2(DVI)jack on theTV and thePC outputjack on your computer.
2. Connecta3.5 mm Stereo plugto2RCA cable between the DVlAUDIO IN[R-AUDIO-L] jack on theTV and the AudioOutjack of
the soundcard on your computer.
TV Rear Panel
PC
jj *J . ,::
_ 3.5 ram Stereo 111g to 2 RCA Cable (Not slppled) !
_ NDMI/DVl Cable (Not supplied)
[D Each PC has adifferent back panelconfiguration.
[D When connecting aPC, match the color ofthe connection terminal to the cable.
[D When using an HDMI/DVl cable connection, you mustuse the HDMI IN2(DVl) terminal.
I Operation
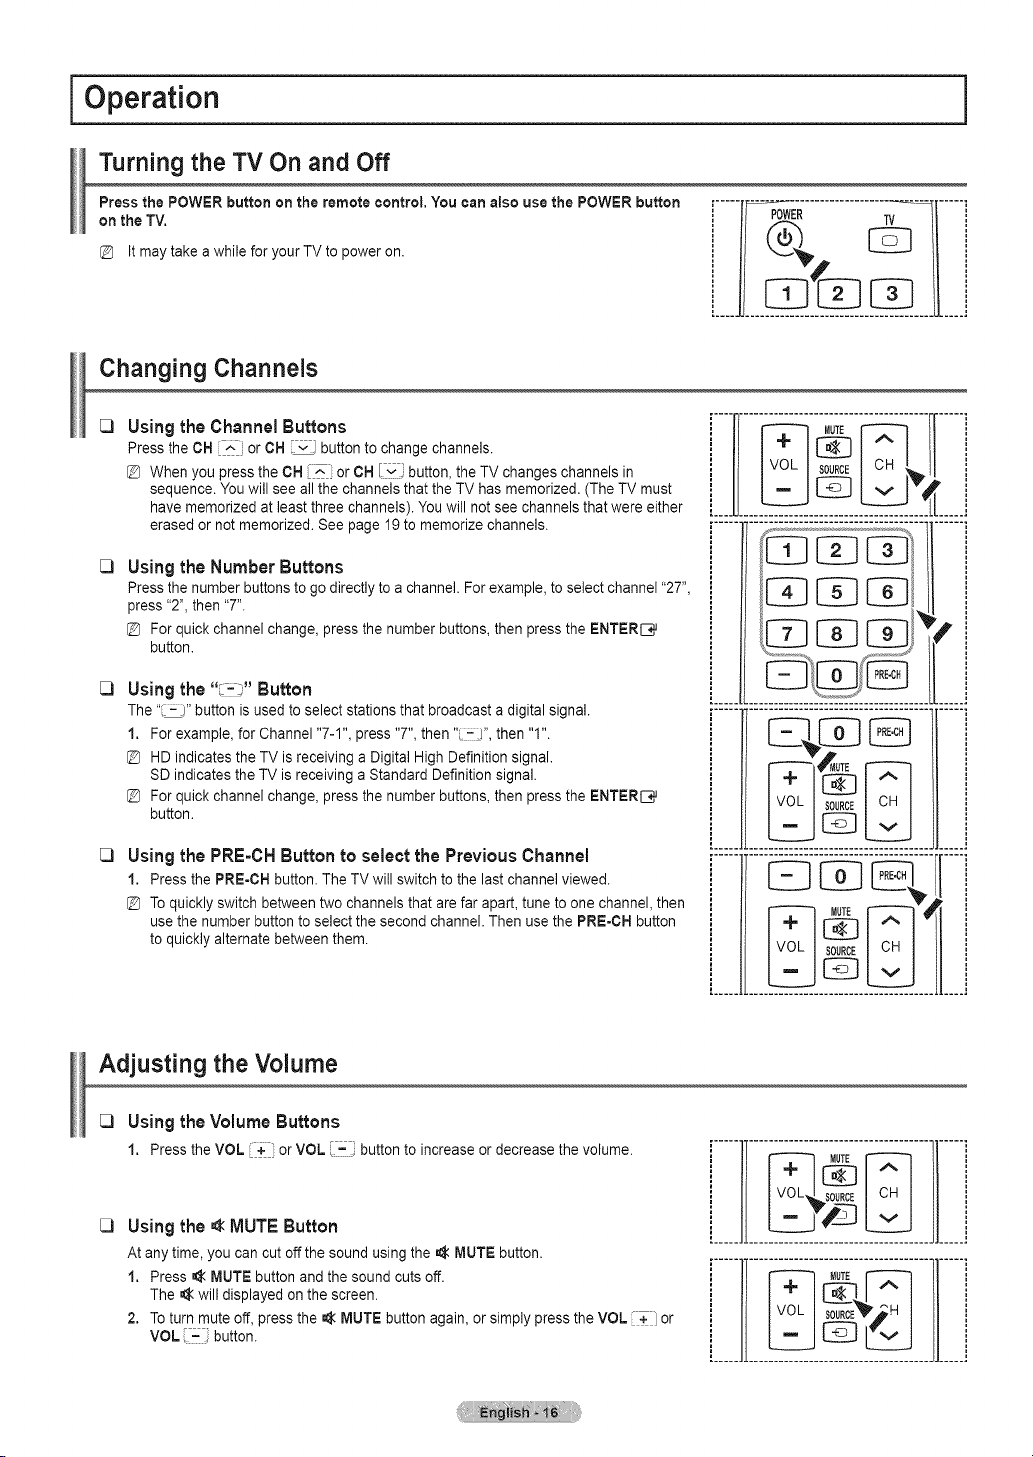
Turning the TV On and Off
Press the POWER button on the remote control, You can also use the POWER button
on the TV.
Itmaytake a while foryour TVto poweron.
Changing Channels
C)
C)
C)
C)
Using theChannelButtons
Pressthe CH_: or CH iY button to change channels.
Whenyou press the CH[-'- orCH I_i button, the TVchanges channels in
sequence. You will see allthe channelsthat the TV hasmemorized. (The TV must
havememorized atleast three channels). Youwill not seechannels that were either
erased ornotmemorized. See page 19 to memorize channels.
Using the Number Buttons
Pressthe number buttonsto go directly to a channel. Forexample, to selectchannel "27",
press"2",then "7".
For quickchannel change, press the number buttons, then pressthe ENTERI_q_
button.
Usingthe" =_"Button
The "_" button isused toselect stationsthat broadcast a digital signal.
1. For example, forChannel "7-1", press"7", then" :_", then "1".
HDindicates the TV isreceiving aDigital High Definitionsignal.
SD indicates the TVis receivingaStandard Definitionsignal.
For quickchannel change, press the number buttons, then pressthe ENTERI_q_
button.
Using thePRE-CHButton toselect thePreviousChannel
1. Pressthe PRE-CH button. TheTV will switch to the last channel viewed.
Toquickly switch betweentwo channels that arefarapart, tune toone channel, then
usethe number button to selectthe second channel. Then use the PRE-CH button
toquickly alternate between them.
i .....i
.............11.......
,..... J,.....
i li
Adjusting the Volume
C)
C)
Using the Volume Buttons
1. PresstheVOL + orVOL '=_ buttontoincreaseordecreasethevolume.
Usingthe_ MUTE Button
At any time,you can cutoffthe sound using the =_MUTE button.
1. Press =_ MUTEbutton and the sound cuts off.
The _ will displayed on the screen.
2. Toturn mute off, pressthe _ MUTE button again,or simply pressthe VOL +i or
VOL :,::i button.
il i
i II................................................['_ MUTE_ m ]} _
[............... !

Using the TOOLS Button
You can use the TOOLS button to select your frequently used functions quickly and easily. The Tools menu changes
2. Pressthe A/T button toselect amenu, then pressthe ENTER_ button.
3. Pressthe A/T/_/_/ENTER_ buttonstodisplay, change, oruse the selected items.
For a more detailed description ofeachfunction, refertothe corresponding page. ................
S!eepTimer,see page 32
-Add to Favorite (or DeletefromFavorite), seepage 20
, Switch to Cable(or Air), see page !9
, AutoAdjustment, seepage26
Viewing the Display
The display identifies the current channel and the status of certainaudJowideo
settings.
1. Pressthe INFO button onthe remote control. TheTV will display the channel the type of
sound, and the status ofcertain picture and soundsettings.
Pressthe INFO button once more orwait approximately 10 seconds and it disappears
automatically.

Viewing the Menus
Before using the TV, follow the steps below to learn howto navigatethe menu inorderto select and adjust differentfunctions,
1. Press the MENU button.
The mainmenu isdisplayed on the screen. Its left side hasthe following icons: Picture, Bound, Channel, Setup, Input,
Application, Support,
2. Press the A or T button to select one ofthe icons.
Press the _ or _. button toaccess the icon's sub-menu.
3. Press the A or T button to move to items in the menu.
Press the ENTERI_ button to enter items in the menu.
4. Press the A/T/_I/_, button tochange the selected items.
Press the RETURN button to returntothe previous menu.
6. Press the EXIT button to exitfromthe menu.
Using the remote control buttons
MENU Displaythe mainon-screen menu. Movethe cursor and select an item.
...............................................................................................................................................................................................AITI'_ID,'I
RETURN Returnto the previous menu. Select the currently selected item.
ENTER_
EXtT Exit the on-screen menu. Confirm the setting.
[3 Example:Setting theTV'sBrightness in the PictureMenu
;;;;;,,Adjusting the Brightness to 80
1. Pressthe MENU button to display the menu.
2. Pressthe ENTER[_ button toselect Picture.
3. Pressthe ,_.or T button to select Brightness.
4. Pressthe ENTERI_ button.
& Pressthe _1or _,-button until the Brightness changes to 80.
6. Pressthe ENTERI_ button.
Pressthe EXIT button to exit from the menu.
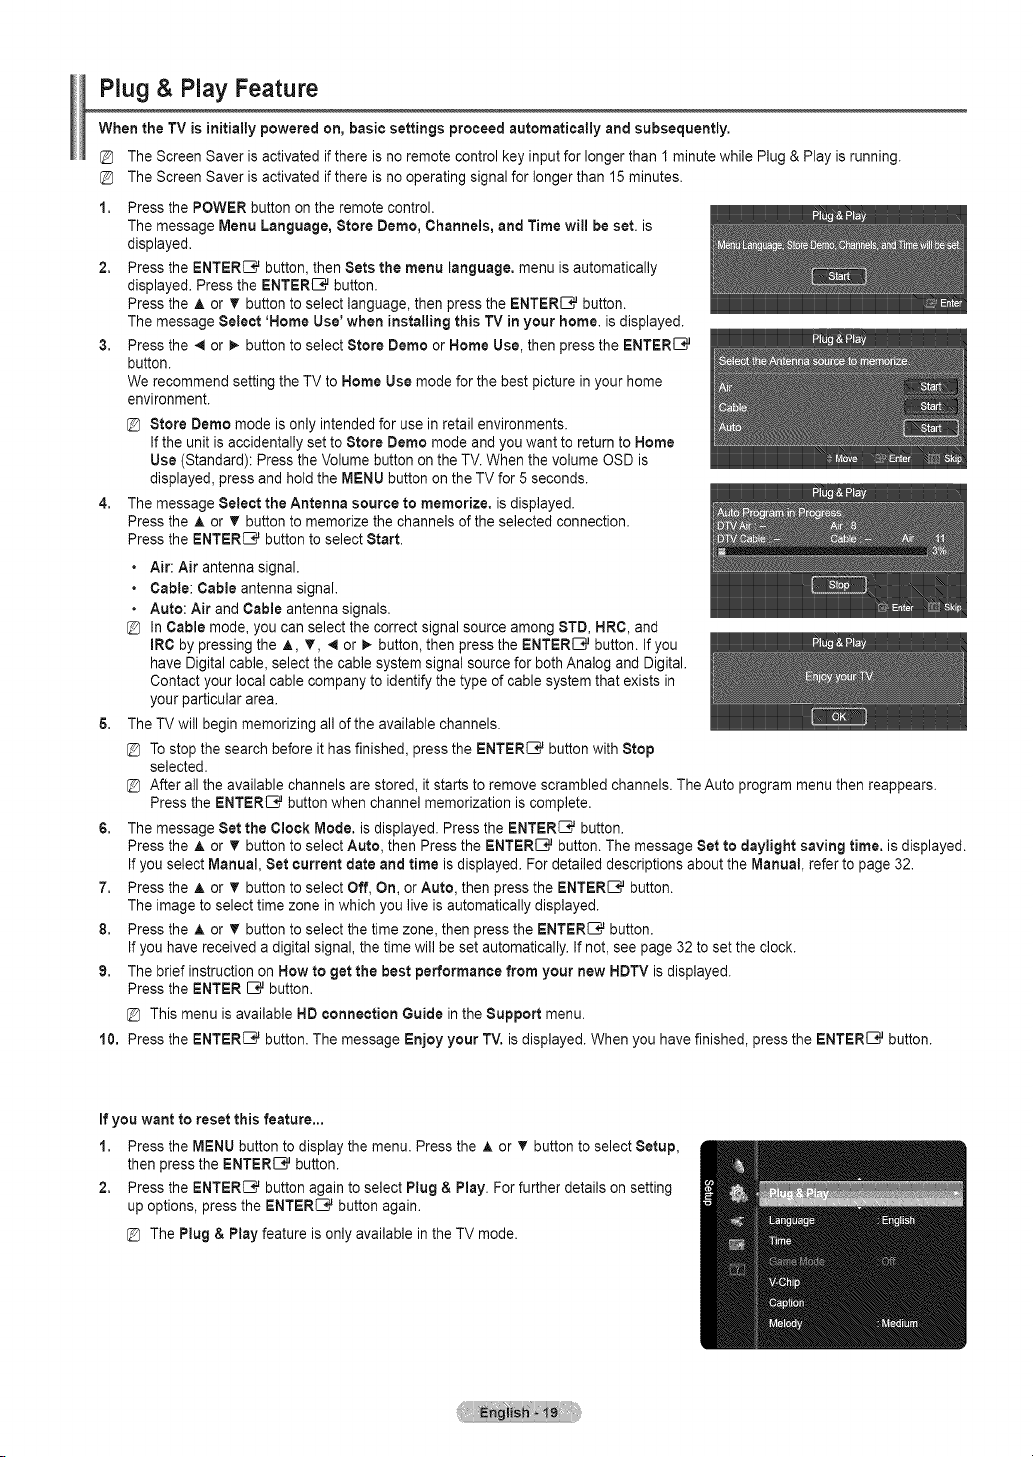
Plug & Play Feature
When the TVis initially powered on, basic settings proceed automatically and subsequently,
The Screen Saver isactivated if there isno remote control keyinputfor longer than 1 minutewhile Plug& Play is running.
The Screen Saver isactivated if there isno operating signalfor longer than 15 minutes.
1. Pressthe POWER button on the remote control.
The message Menu Language, Store Dome, Channels, and Time will be set. is
displayed.
2. Pressthe ENTER_ button, then Sets the menu language, menu isautomatically
displayed. Press the ENTER[_ button.
Pressthe A or v button to select language, then pressthe ENTERI_ button.
The message Select 'Home Use' when installing this TVin your home. isdisplayed.
3. Pressthe _ or _. button to select Store Dome orHome Use, then press the ENTERI_
button.
We recommend setting the TV to HomeUse mode for the best picturein your home
environment.
4.
6.
G.
7.
8.
9.
@ Store Dome mode isonly intendedfor usein retailenvironments.
Ifthe unit isaccidentally set to Store Demo mode and you want toreturn toHome
Use (Standard): Pressthe Volume button on the TV.Whenthe volume OSD is
displayed, press and holdthe MENU button on the TVfor 5seconds.
The message Select the Antenna source to memorize, isdisplayed.
Pressthe A or T button to memorize the channels of the selected connection.
Pressthe ENTER_ button to select Start.
• Air: Air antenna signal.
• Cable:Cable antenna signal.
• Auto: Air and Cable antenna signals.
@ In Cable mode, you can selectthecorrect signal source among STD,HRC, and
mRCby pressing the A, _, _ or _ button, then pressthe ENTERI:_ button. If you
have Digitalcable, selectthe cable systemsignal source forboth Analog and Digital.
Contact your local cable company to identifythetype ofcable system that exists in
your particular area.
The TVwill beginmemorizing all of the available channels.
@ Tostop the search before it hasfinished, pressthe ENTER_ button with Stop
selected.
@ After all the available channels are stored, it starts to remove scrambled channels. TheAuto program menu then reappears.
Pressthe ENTERI:_ buttonwhen channel memorization iscomplete.
The message Set the Clock Mode. isdisplayed. Pressthe ENTER_ button.
Pressthe A or T button toselect Auto, then Press the ENTERI:_ button.The message Set to daylight saving time. isdisplayed.
Ifyou select Manual,Set current date and time isdisplayed. For detailed descriptions about the Manual, refer to page 32.
Pressthe A or T button toselect Off, On, orAuto, then press the ENTERI:3_ button.
The imagetoselect time zone in which you live isautomatically displayed.
Pressthe A or T button toselect the time zone,then pressthe ENTER_ button.
Ifyou have received a digital signal,thetime will beset automatically. If not,see page 32 tosettheclock.
The brief instruction on How to get the best performance from your new HDTVisdisplayed.
Pressthe ENTER _ button.
@ Thismenu isavailable HDconnection Guide in the Support menu.
10. Press the ENTER_ button. Themessage Enjoy your TV.isdisplayed. When you havefinished, pressthe ENTERI:3_button.
Ifyou want to reset this feature,.,
1. Pressthe MENU button to display the menu. Pressthe A or T button to selectSetup,
then press the ENTERI:3_button.
2. Pressthe ENTER_ button again to select Plug& Play. For further details on setting
up options, pressthe ENTER_ button again.
@ ThePlug & Play feature isonly available in the TV mode.

iChannel Control i
Storing Channels
[3 Antenna _ Air/Cable
Before your television can begin memorizing the available channels, you mustspecify the
type of signal sourcethat isconnected to the TV(i.e. an Air or a Cable system)•
_3
_3
_3
You can also switch the antenna by se!ectingTools-+ Switch to Cab!e (or Air)
Auto Program
• Air: Air antenna signal.
• Cable:Cable antenna signal.
• Auto: Air and Cable antenna signals
STD,HRC and IRCidentify various types ofcable TV systems. Contact your local
cable company to identify the type ofcable systemthat existsin your particular area.
At this pointthe signal source has been selected.
After allthe available channelsare stored, itstarts to remove scrambled channels.
TheAuto programmenu then reappears.
Ifyouwantto stopAuto Programming, pressthe ENTER_ button.
TheStop Auto Program?message will be displayed. Select Yesby pressing the
or _. button, then pressthe ENTER_ button.
ClearingScrambled Channel(Digital)
The Clear Scrambled Channel function is usedtofilter out scrambled channels after
Auto Program iscompleted.
This process may take up to 20~30 minutes.
@ Tostop searching scrambled channels: Press the ENTER_ button to select Stop.
Pressthe _ button to select Yes,then pressthe ENTER_ button.
@ Thisfunction isonly available in Cable mode.
FineTune (Analog)
Use fine tuningtomanually adjust a particularchannel for optimal reception•
Ifyoudonot store the fine-tuned channel in memory, adjustments arenotsaved•
.....will appear nexttothe name of fine-tuned channels.
Toreset the fine tuning setting, pressthe T buttonto select Reset, then pressthe
ENTER_ button.
Managing Channels
[3 ChannelList
Usingthis menu, youcan Add / Delete or set Favoritechannels and use the program guidefor digital broadcasts•
• All Channels: Shows allcurrently available channels.
. Added Channels: Showsalladded channels. _t _.__ _
• Favorite: Showsallfavorite channels.
• Programmed: Shows allcurrent reserved programs.
/__) Pressthe CH LiST button on the remote controltobring up the channel lists.
Using the Color buttons with the Channel List
• Green (Zoom): Enlarges orshrinks a channel number.
• Yellow (Select): Selects multiplechannel lists.
• ,_--_TOOLS(Tools): Displays the Add (or Delete), Add to Favorite (or Delete from Favorite), Timer Viewing, Channel Name
Edit, Select All, Deselect All, and Auto Program menus (The Options menus maydiffer depending onthe situation.)
ChannelStatus Display Icons
• } •
"!"................................................................................ _ .....................r
Q Areserved program J I:_ ,Aprogram currently being broadcast.
Continued...
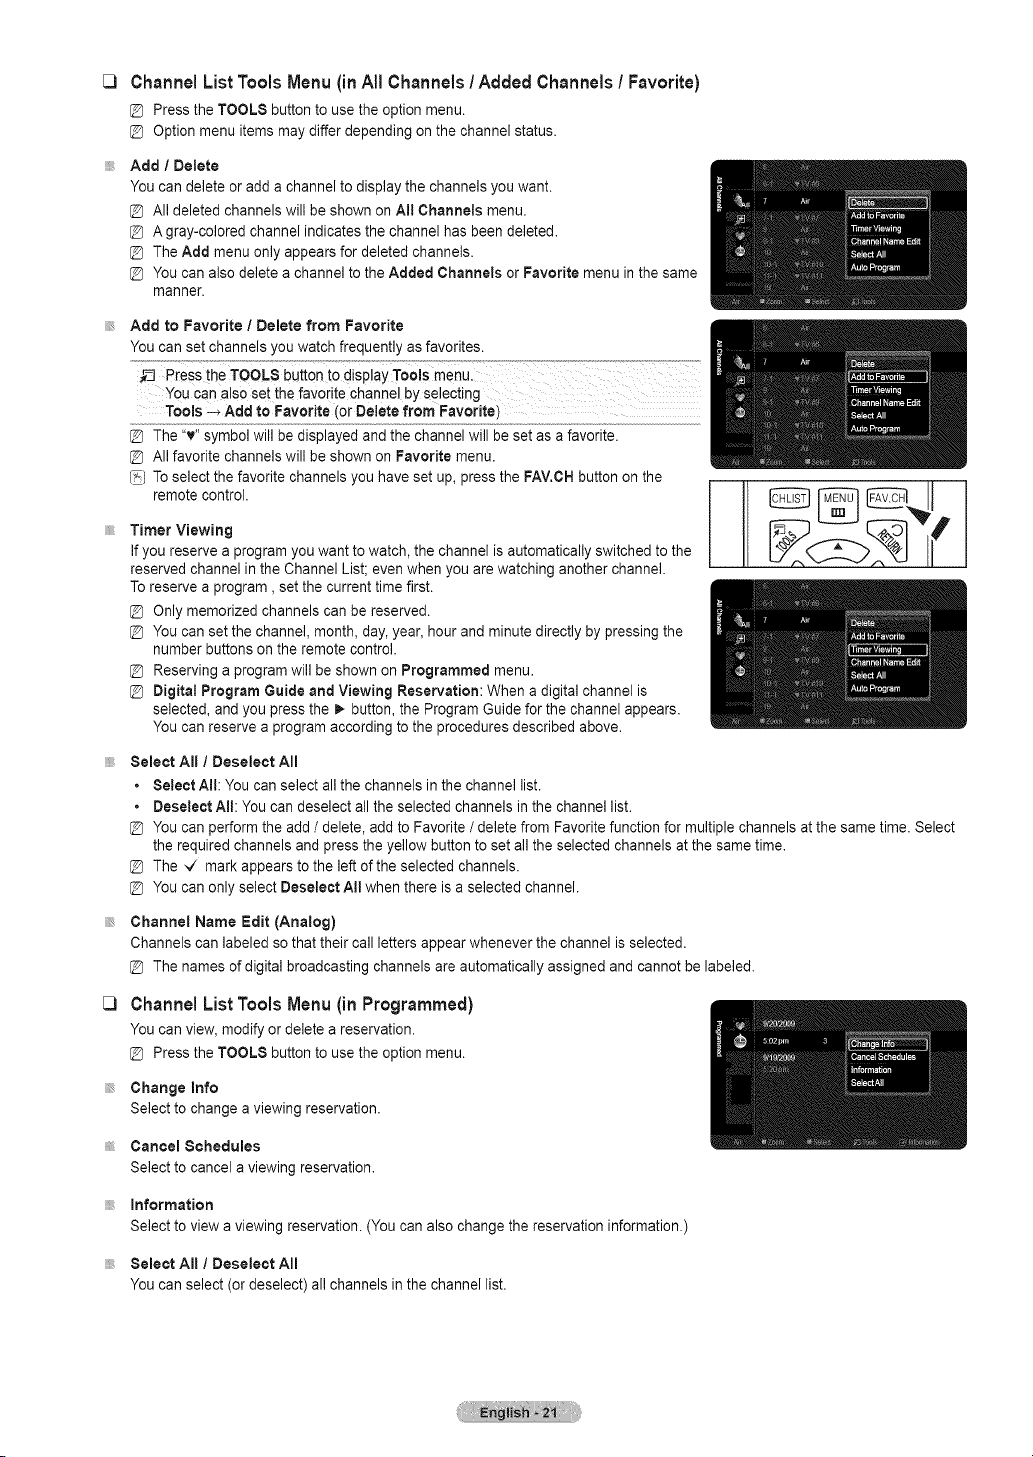
Channel List Tools Menu (inAll Channels / Added Channels / Favorite)
PresstheTOOLSbuttonto usetheoptionmenu.
@ Optionmenuitemsmaydifferdependingonthechannelstatus.
Add / Delete
You can deleteor add achannelto display the channels youwant.
@ All deleted channelswill be shownonAI! Channels menu.
@ A gray-colored channel indicates the channel hasbeen deleted.
@ TheAdd menu only appears for deleted channels.
@ You can alsodelete a channel to the Added Channels orFavorite menu inthesame
manner.
Add to Favorite / Delete from Favorite
You can set channels you watch frequently as favorites.
You can alsoset the favoritechannel byselecting
Tools-_ Add to Favorite (or Delete from Favorite)
The"v" symbolwill be displayed and the channel will be set as afavorite.
@ All favorite channelswill be shownon Favorite menu.
/__) Toselect the favorite channels you haveset up, pressthe FAV.CHbutton on the
remote control.
Timer Viewing
Ifyoureserve a programyou want to watch, the channel isautomatically switched to the
reserved channel in the Channel List; evenwhenyou arewatching another channel.
Toreserve a program, set the current time first.
Only memorized channelscan be reserved.
You can set the channel, month, day,year, hourand minutedirectly by pressing the
number buttonson theremote control.
Reserving a programwill be shown onProgrammed menu.
@ Digital Program Guideand Viewing Reservation: When adigital channel is
selected, and you pressthe I_button, the Program Guide forthe channel appears.
You can reserve aprogram according to the procedures described above.
Select All / Deselect All
• Select All: You can select allthe channels in the channel list.
• Deselect All: You candeselect all the selected channels inthe channel list.
You can perform the add / delete,add to Favorite/delete from Favorite function for multiple channels atthe sametime. Select
the required channelsand presstheyellow button to set allthe selected channelsatthe sametime.
The ,,/ mark appears to the left of the selected channels.
You can onlyselect Deselect All when thereisaselected channel.
Channel Name Edit (Analog)
Channels can labeled so that their call lettersappear whenever the channel isselected.
@ The namesof digital broadcasting channels areautomatically assigned and cannot belabeled.
Channel List Tools Menu (in Programmed)
Youcanview,modifyordeletea reservation.
PresstheTOOLSbuttonto usetheoptionmenu.
Change Info
Select to changea viewing reservation.
Cancel Schedules
Select to cancel a viewing reservation.
information
Select to viewa viewing reservation. (You can alsochange thereservation information.)
Select All / Deselect All
You can select (or deselect) all channels inthechannel list.

I Picture Control
Changing the Picture Settings
_3
_3
_3
Mode
You canselect the typeof picturewhich best corresponds to your viewing requirements.
• Dynamic: Select ahigh-definition picture for bright environments.
• Standard: Selects the optimal picture display for normal environments. This
setting is convenient for most situations.
• Movie: Selects a comfortable picture display for dark environments.
/__) You canselect these options simply by pressing the RMODE button on the remote
control.
Cell Light/ Contrast/Brightness/ Sharpness/ Color/Tint (G/R)
Your television has several setting options that allow you tocontrolthe picturequality.
• Cell Light: Adjusts the pixel brightness. 10isthe brightest setting.
• Contrast: Adjusts the contrast level.
• Brightness: Adjuststhe brightness level.
• Sharpness: Adjusts thesharpness.
• Color: Adjusts thecolorsaturation ofthe picture using the baron the screen.
• Tint (GtR):The closer to Red 100, the moresaturated the redcolor becomes.
Whenyou make changes toCeil Light, Contrast, Brightness, Sharpness, Color or
Tint (GtR),the OSDwillbe adjusted accordingly.
[_ When in PC mode, Tint (G/R), Sharpness and Colorare not available.
@ Settings canbeadjusted and stored for each externaldevice you haveconnected to
an inputof the TV.
@ Theenergy consumed during use can be significantly reduced if thebrightness level is
lowered, which will reduce the overall running cost.
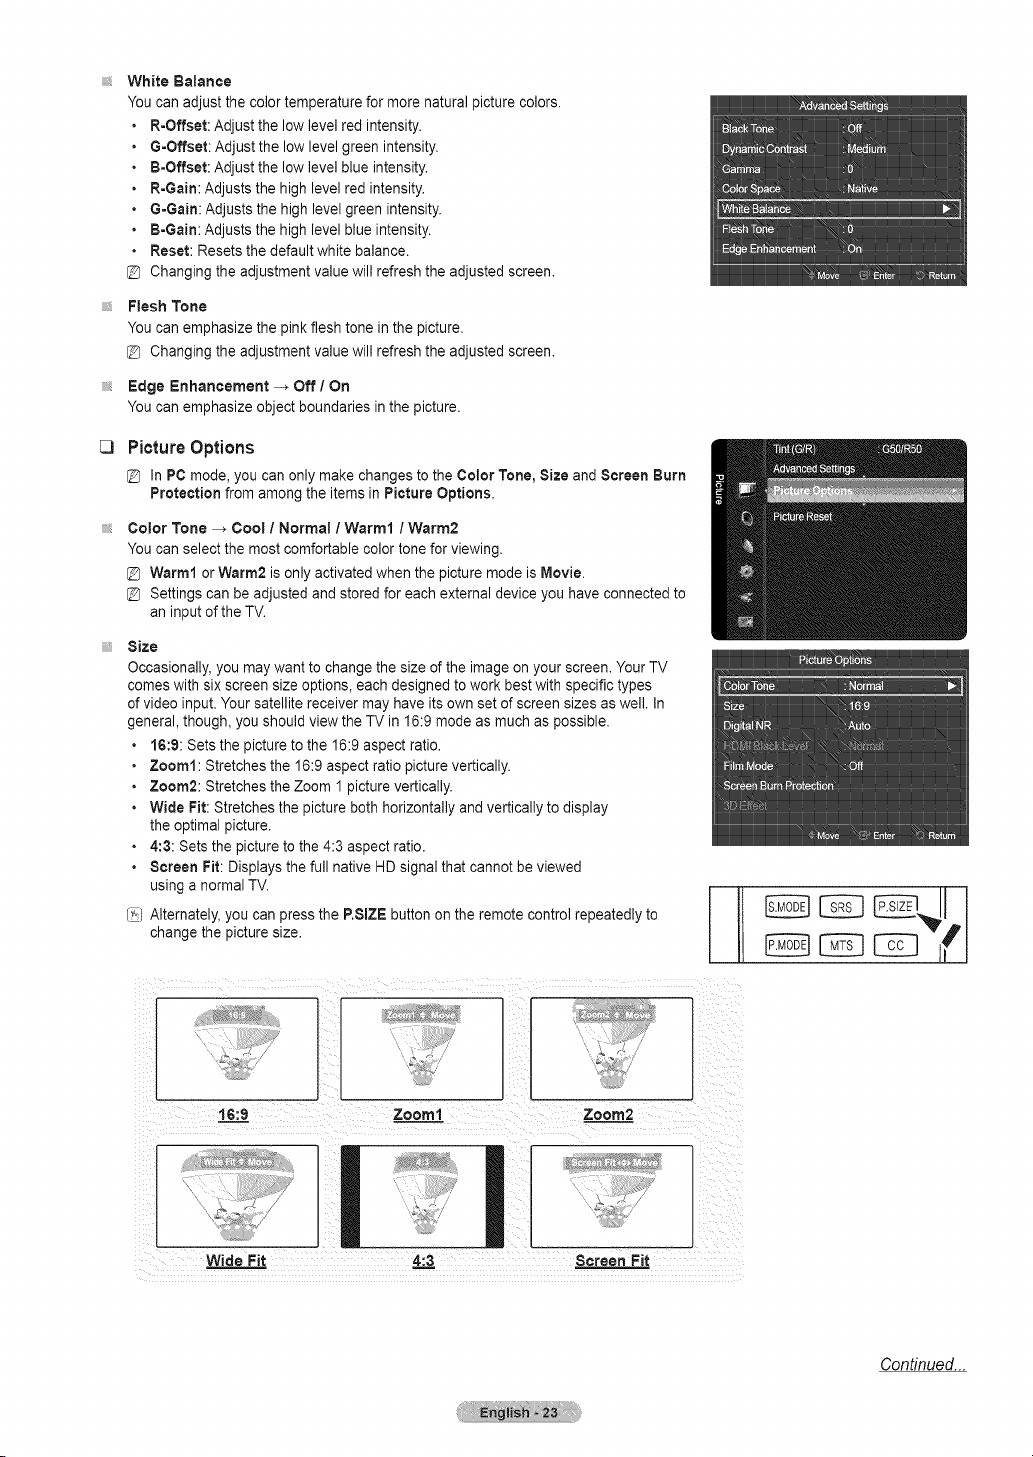
Advanced Settings
You canadjust the detailed settingsfor your screen including the colorand contrast.
Advanced Settings isavailable in Standard orMovie mode.
InPC mode, youcan only make changes to Gamma and White Balance from among
the Advanced Settings items.
Black Tone
You canselect the black level on the screento adjust the screen depth.
• Off: Turnsthe BlackAdjust function off.
• Dark: Setsthe black color depth to dark.
• Darker: Setsthe black colordepth todarker.
• Darkest: Setsthe blackcolor depth to darkest.
Dynamic Contrast
You canadjust the screen contrast sothatthe optimal contrast isprovided.
• Off: Turnsthe Dynamic Contrast function off.
• Low:Sets Dynamic Contrast tolow.
• Medium: Sets DynamicContrast to medium.
• High: Sets Dynamic Contrast to high.
Gamma
You canadjust the PrimaryColor(Red, Green, Blue) Intensity.
Color Space
Color Spaceisa color matrixcomposed of red,greenand bluecolors. Select your Favoritecolor space toexperience the most
natural color.
• Native: Sets the colorrange wider than that of the inputvideo source.
• Auto: Automatically sets the color range depending onthe inputvideo source.
Continued...
_3
White Balance
You canadjust the color temperature formore natural picturecolors.
R-Offset: Adjust the low levelred intensity.
G=Offset:Adjust the low level green intensity.
B-Offset: Adjust the low levelblue intensity.
R-Gain: Adjuststhe highlevel red intensity.
G=Gain:Adjusts the high levelgreen intensity.
B-Gain: Adjuststhe highlevel blue intensity.
Reset: Resets the defaultwhite balance.
@ Changing the adjustment value will refresh the adjusted screen.
Flesh Tone
You canemphasize the pink fleshtone in the picture.
@ Changing the adjustment value will refresh the adjusted screen.
Edge Enhancement -_ Off / On
You canemphasize object boundaries inthepicture.
Picture Options
in PCmode,youcanonlymakechangesto theColorTone,SizeandScreenBurn
Protectionfromamongtheitemsin Picture Options.
Color Tone --_ Cool / Normal / Warm1 / Warm2
You canselect the most comfortable color tone forviewing.
@ Warm1 orWarm2 isonly activated when the picture mode isMovie.
@ Settings canbeadjusted and stored for each externaldevice you haveconnected to
an inputof the TV.
Size
Occasionally, youmay wantto change the size of the imageon your screen.Your TV
comes with six screen sizeoptions, eachdesigned to work bestwith specific types
ofvideo input.Your satellite receiver mayhave itsown set ofscreen sizes as well. In
general, though, you should view theTV in 16:9 mode as much as possible.
• 16:9: Setsthe picturetothe 16:9 aspect ratio.
• Zoom1: Stretches the 16:9 aspect ratio picturevertically.
• Zoom2: Stretches the Zoom 1picture vertically.
• Wide Fit: Stretches the picture both horizontally and vertically to display
the optimal picture.
• 4:3: Setsthe pictureto the 4:3 aspect ratio.
• Screen Fit:Displays the fullnative HDsignal that cannot beviewed
using anormal TV.
{_,)Alternately, you canpress the RSIZE button on the remote control repeatedly to
changethe picturesize.
16:9 Zoom1 Zoora2
Screen Fit
Continued...
Temporaryimage retention mayoccurwhen viewing a static imageonthe set for morethan twohours.
After selecting Zoom1, Zoom2 orWide Fit:
Pressthe 4 or !_ button toselect Position,then pressthe ENTER_ button.
Pressthe A or _rbutton to move the pictureup and down.
Reset: Press the 4 or _. button to select Reset,then press the ENTER_ button.
You can initializethe setting.
After selecting Screen Fit in HDMI (1080i/I080p) orComponent (I080i/I080p) mode, you made need to center the picture:
Pressthe 4 or I_ button toselect Position, then press the ENTER_ button.
Pressthe A, V, _ or _. button to movethepicture.
Reset: Press the ,,qor _. button to select Reset, then press the ENTER_ button. TheTVwill be reset to 16:9.
HD (High Definition): 16:9- I080i/I080p (1920x1080), 720p (1280x720)
Settings can be adjusted and stored for each external device you haveconnected to an inputof the TV.
InPC Mode, only 16:9 and 4:3 mode can be adjusted.
Settings can be adjusted and stored for each external device you haveconnected to an inputofthe TV.
ATV, Video, Component (480i, 480p) 16:9, Zoom1, Zoom2, 4:3
Component (720p) 16:9, Wide Fit, 4:3
DTV(1080i), Component (1080i, 1080p), HDMI(720p, I080i, I080p) 16:9, 4:3, Wide Fit, Screen Fit
PC 16:9, 4:3
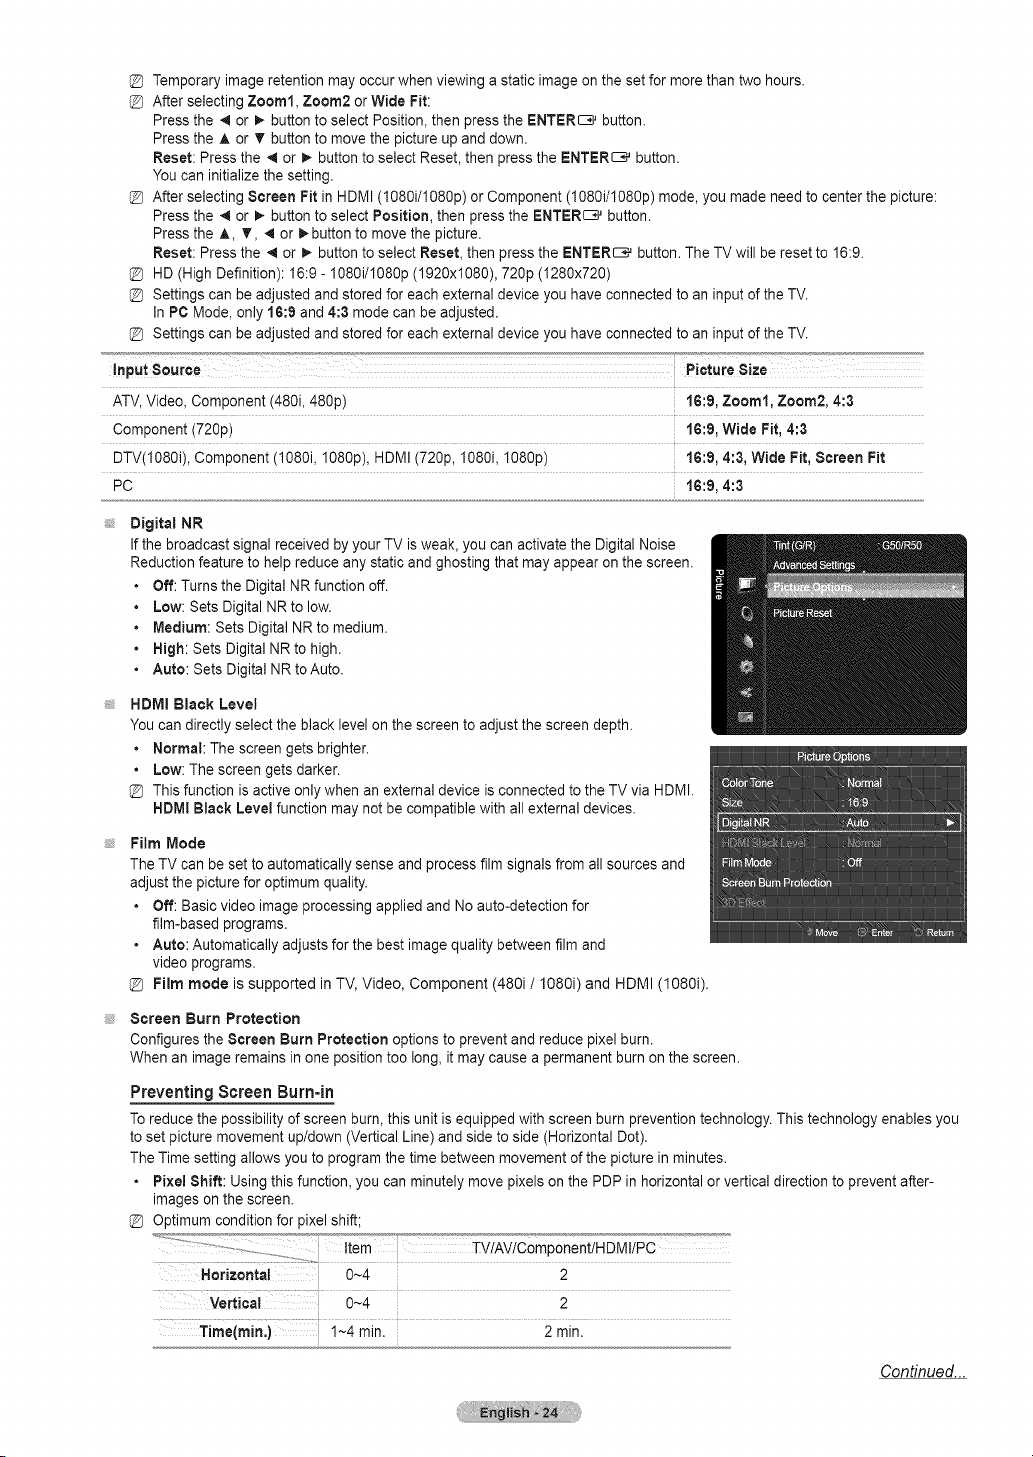
Digital NR
Ifthe broadcast signal received by your TVisweak, you canactivate the Digital Noise
Reduction feature to helpreduce any static and ghosting that mayappear on the screen.
• Off: Turnsthe Digital NR function off.
Low: SetsDigital NRtolow.
Medium: Sets Digital NRto medium.
High: Sets Digital NRtohigh.
• Auto: Sets Digital NRtoAuto.
HDMI Black Level
You candirectly select the black level on the screento adjust the screen depth.
Normal: Thescreen gets brighter.
Low: The screengets darker.
Thisfunction isactive only when an external device isconnected to the TV via HDMI.
HDMIBlack Level function may not becompatible with all externaldevices.
Film Mode
TheTVcan be settoautomatically sense and process filmsignals from allsources and
adjust the picturefor optimum quality.
• Off: Basic video image processing applied and Noauto-detection for
film-based programs.
• Auto: Automatically adjustsfor the best imagequality between film and
video programs.
Film mode is supported in TV, Video, Component (480i/1080i) and HDMI (1080i).
Screen Burn Protection
Configuresthe Screen Burn Protection options to prevent and reduce pixel burn.
Whenan imageremains inoneposition too long, it may cause a permanent burnon the screen.
Preventing Screen Burn-in
Toreduce the possibility of screen burn,this unit isequipped with screen burnprevention technology. Thistechnology enables you
tosetpicture movement up/down (Vertical Line) and sideto side(Horizontal Dot).
TheTime setting allows youto programthe time between movement of the picture inminutes.
Pixe! Shift: Using thisfunction, you can minutely movepixels on the PDPin horizontal orvertical direction to prevent after-
images on the screen.
Optimum condition for pixelshift;
Horizantal 0~4 2
Vertical 0~4 2
i _4 minl 2min.
Continued...
Side Gray:When you watch TV with the screenratio of 4:3, the screen isprevented from anydamage by adjustingthe white
balance on both extreme left and right sides. Toprevent the screen burn from happening, select Dark or Light.
- Dark: Whenyou setthe screenratio to4:3, it darkensthe leftandright sides.
- Light: When you setthescreen ratio to 4:3, it brightens the left and right sides.
Reducing the Effects of Screen Burn
Ifscreenburn has occurred, you canselect scrolling tohelpremove screen burnartifacts.
• Scrolling: This function removes after-images on the screen by moving allthe pixels onthe PDP according to apattern. Use
this function when there are remaining after-images orsymbols on the screen, especially when you displayed a still image on
the screenfor a longtime.
The after-image removalfunction hastobe executed foralongtime (approximately 1hour)toeffectively remove after-images
on the screen. Ifthe after-image isnot removedafter performing the function, repeat the function again.
Pressanykeyon the remotecontrolto cancel this feature.
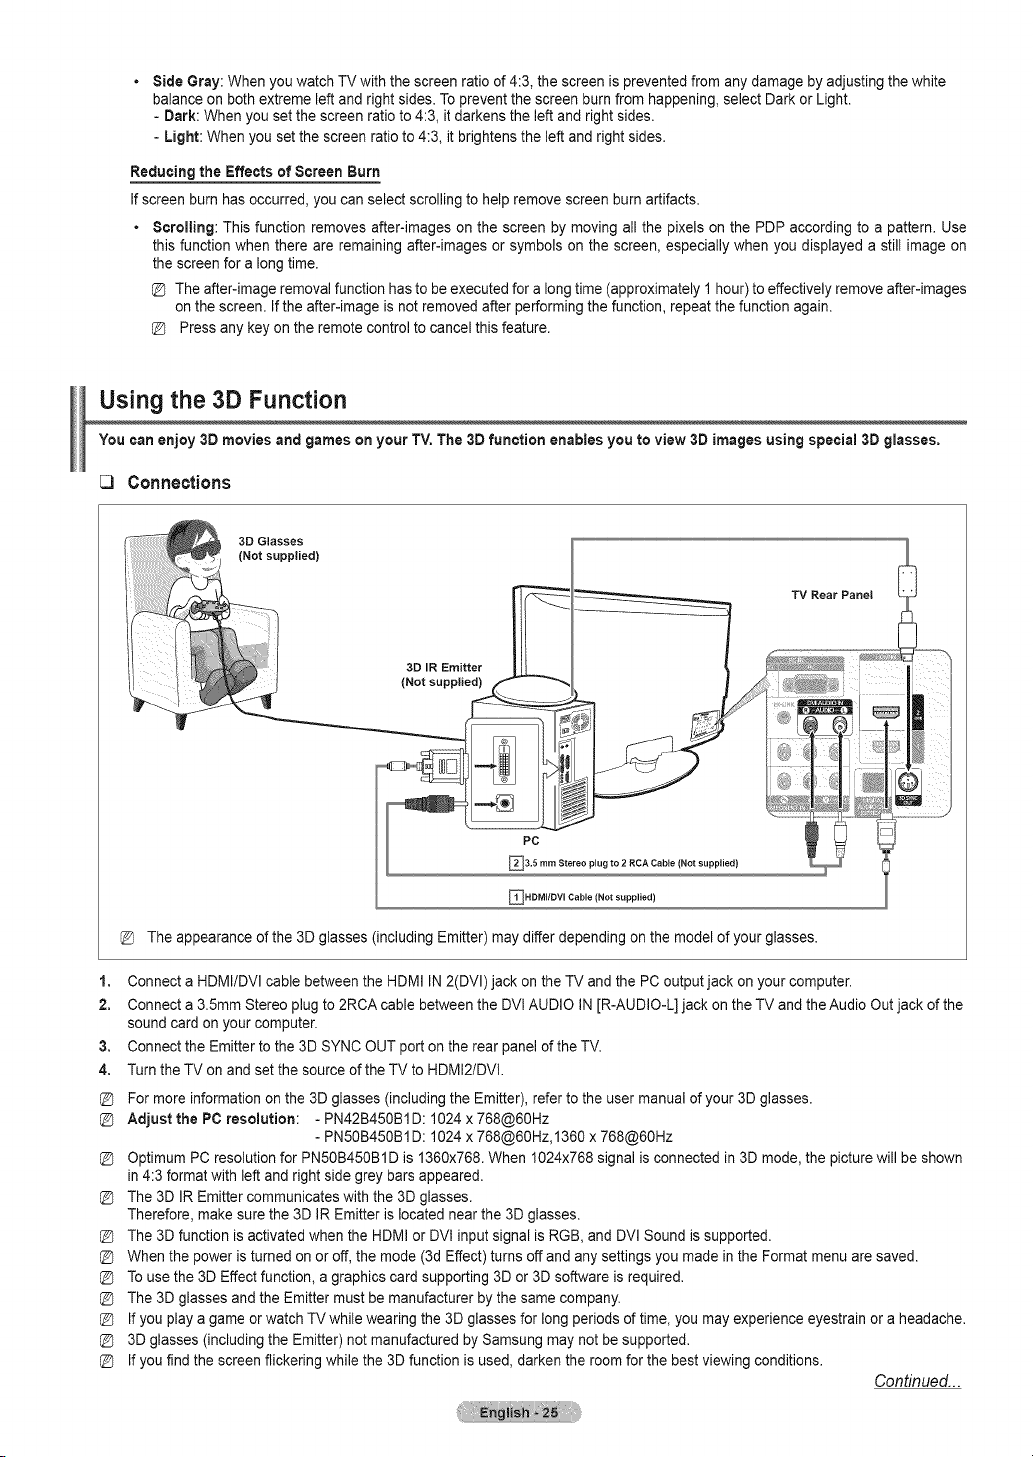
Using the 3D Function
Youcanenjoy 3D moviesand games on your TV.The 3Dfunction enables you to view3D images using special 3Dglasses.
Connections
1,
2.
3,
4.
3D Glasses
(Not supplied)
TV Rear PaneJ
3D IR Emitter
(Not supplied)
PC
_3.5 rnm plug to (Not supplied}
Stereo 2 RCA Cable
_HDMIIDVl Cable (Not supplied)
The appearance of the 3D glasses (including Emitter) maydiffer depending on the modelof your glasses.
Connect aHDMI/DVl cable between the HDMI IN2(DVl) jack on the TVand the PC output jack on your computer.
Connect a3.5mm Stereo plug to2RCA cable between the DVlAUDIO IN[R-AUDIO-L] jack onthe TV and theAudio Out jack of the
sound card on your computer.
Connect the Emitter to the 3D SYNC OUT port on the rear panelof the TV.
Turn the TV on and setthe source of the TVto HDMI2/DVl.
For more information on the 3D glasses (includingthe Emitter), refertothe user manualof your 3Dglasses.
Adjust the PC resomution: - PN42B450B1D: 1024 x 768@60Hz
- PN50B450B1D: 1024 x 768@60Hz,1360 x 768@60Hz
Optimum PC resolution for PN50B450BI Dis 1360x768. When 1024x768 signal isconnected in3Dmode, the picture will be shown
in 4:3 format with left and right sidegrey bars appeared.
The 3DJREmitter communicates with the 3Dglasses.
Therefore, makesure the 3D IREmitter islocated nearthe 3D glasses.
The 3Dfunction isactivated when the HDMIor DVlinput signal isRGB, and DVl Soundis supported.
When the power isturnedon or off, the mode (3dEffect) turns off and anysettings you made in the Formatmenu are saved.
Touse the 3D Effect function, a graphics card supporting 3D or 3Dsoftware isrequired.
The 3Dglasses and the Emittermust be manufacturer by the samecompany.
Ifyou playa game orwatch TVwhile wearing the 3Dglasses for long periodsof time, you mayexperience eyestrain or aheadache.
3Dglasses (includingthe Emitter) not manufactured by Samsung may not be supported.
Ifyou findthe screenflickering while the3D function isused,darken the roomfor the best viewing conditions.
Continued...
C)
C)
C)
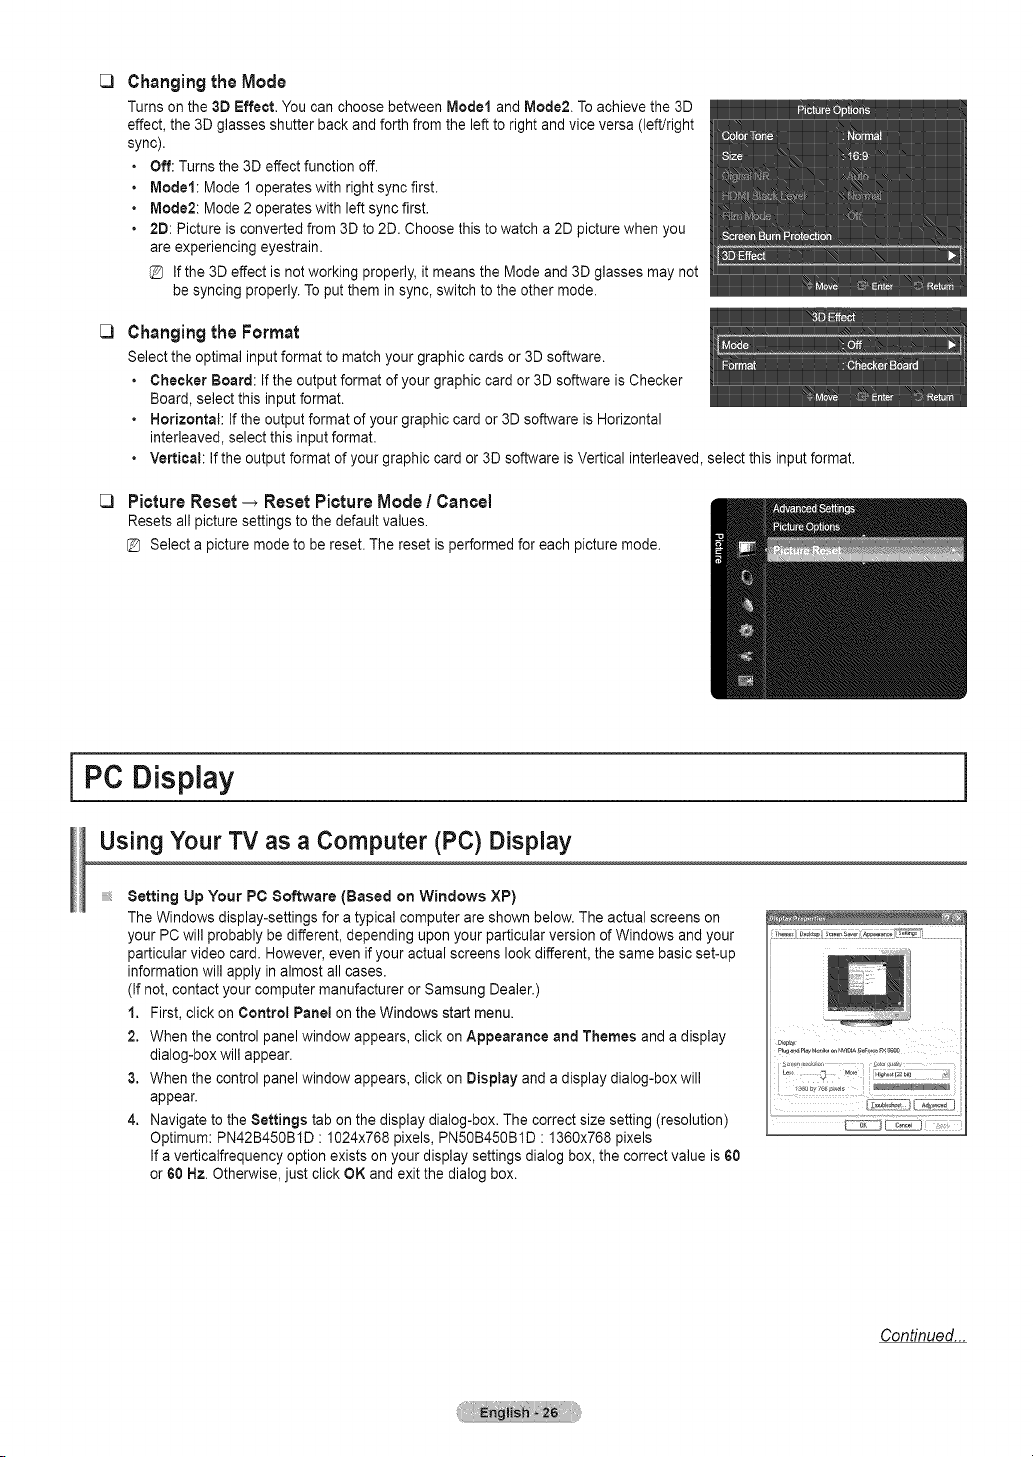
ChangingtheMode
Turns on the 3DEffect, You canchoose between Model and Mode2.Toachievethe 3D
effect, the 3Dglasses shutter back and forth fromthe lefttoright and vice versa (left/right
sync).
• Off: Turnsthe 3Deffect function off.
• Model: Mode 1 operates with right sync first.
• Mode2: Mode 2 operates with left sync first.
• 2D: Picture isconverted from3D to2D. Choose this towatch a2Dpicture when you
areexperiencing eyestrain.
Ifthe 3Deffect isnot working properly,it meansthe Mode and 3D glasses may not
be syncing properly.Toput them in sync, switch tothe other mode.
Changing the Format
Select the optimal inputformat to matchyour graphic cardsor 3Dsoftware.
• Checker Board: Ifthe output formatof your graphic card or3D software isChecker
Board, select this inputformat.
• Horizontal: Ifthe output formatof your graphic card or3D software isHorizontal
interleaved, select thisinputformat.
• Vertical: If theoutput format of your graphiccard or 3Dsoftware isVertical interleaved, select this inputformat.
PictureReset_ ResetPictureMode /Cancel
Resets all picture settings to the defaultvalues.
Select a picturemode to be reset. The reset isperformed for each picturemode.
I PC Display
UsingYour TV asaComputer (PC) Display
Setting UpYour PC Software (Based on Windows XP)
The Windows display-settings for atypical computer are shown below.Theactualscreens on
your PC will probably be different, depending upon your particular version of Windows and your
particular video card. However, even if your actual screens lookdifferent, the same basicset-up
information will apply in almost all cases.
(Ifnot,contact your computer manufacturer orSamsung Dealer.)
1. First, click on Control Panel onthe Windows start menu.
2. Whenthe controlpanelwindow appears, click on Appearance and Themes and a display
dialog-box will appear.
3. Whenthe controlpanelwindow appears, click on Display and adisplay dialog-box will
appear.
4. Navigate to the Settings tab on the display dialog-box. Thecorrect size setting (resolution)
Optimum: PN42B450B1D : 1024x768 pixels,PN50B450B1D :1360x768 pixels
Ifa verticalfrequency option existson your display settingsdialog box,thecorrect value is60
or60Hz. Otherwise, just click OKand exitthe dialog box.
Continued...
Display Modes
Ifthe signal fromthesystem equals the standard signal mode,thescreen isadjusted automatically. Ifthe signalfrom the system
doesn't equal the standard signal mode, adjust the mode by referring to your videocard user guide; otherwise there may be no video.
For the display modeslisted below,thescreen image has been optimized during manufacturing.
D-Sub and HDIVli/DVl input
one I.{esomton PN42B450BiD PN50B450BiD
Frequency(kHz) Frequency(Hz) Frequency(MHz) (H/V}
640x 350 31.469 70.086 25.175 +/- v" v"
IBM
720x 400 31.469 70.087 28.322 -/+ v" v"
640x 480 35.000 66.667 30.240 - /- _/ _/
MAC ...............................................................................................................................................................................................................................................................................................................................................................................................................................................................................................................................................................................
832x 624 49.726 74.551 57.284 - / - v" v"
31.469 59.940 25.175 - / - V" V"
640x 480 37.861 72.809 31.500 - /- v" v"
37.500 75.000 31.500 -/- V" V"
37.879 60.317 40.000 + /+ ,/ ,/
800x 600 48.077 72.188 50.000 +/+ v" v"
VESADMT
[
46.875 75.000 49.500 +/+ v" v"
48.363 60.004 65.000 - / - ,/ ,/
1024x768 56.476 70.069 75.000 - / - v" v"
60.023 75.029 78.750 +/ + v" v"
1360x768 47.712 60.015 85.500 +/+ v"
720 x 576 35.910 59.950 32.750 -/ + v" v"
VESACVT 44.772 59.855 74.500 -/+ v"
1280x720
56.456 74.777 95.750 -/+ v"
VESAGTF 1280x720 52.500 70.000 89.040 -/+ v"
When using an HDMI/DVI cable connection, you mustuse the HDMI IN2(DVI) terminal.
Setting up the TV with your PC
C)
C)
Auto Adjustment
Use the auto adjustment function to havetheTV set automatically adjust the video
signals it receives.Thefunction also automatically fine-tunesthe settings and adjusts the
frequency values and positions.
Pressthe TOOLS b_ttOnt0 displayTools menu.
You can also setthe auto adjustment byselectingTools _. Auto Adjustment
@ Preset: Pressthe SOURCE buttonto select PC mode.
@ Thisfunction doesnot work in DVI-Digital mode.
Screen
The purpose of the picture qualityadjustment is to remove orreduce picture noise. If the
noise isnot removed by fine tuning alone,then make the verticalfrequency adjustments
on your PC and fine tune again.
After the noise has been reduced, re-adjustthe pictureso that it isaligned on the center
ofthe screen.
@ Preset: Pressthe SOURCE button to select PC mode.
Coarse
Adjusts the frequency when vertical noise appears on the screen.
Fine
Adjusts the screen to beclearer.
PC Position
Adjust the PC's screen positioning if it does not fit the TVscreen. Press the A or T button
toadjusting theVertical-Position. Pressthe _1or i.button to adjust the Horizontal-Position.
Image Reset
You canreplace allimage settingswith the factory defaultvalues.

I Sound Control
Changing the Sound Settings
C)
C)
C)
Mode
You canselect the sound mode to bestsuitthe programming you'rewatching.
• Standard: Thissound mode isfor general purposes.
• Music: Music mode enables you to listento musicas if youare sitting
in a concert hall.
• Movie:Movie mode enables youtoexperience liveandfull movie soundas if you are
sitting in amovie theater.
• Clear Voice: Emphasizesvoice over other sounds. Select this sound mode when
watching news, soap operas, or documentaries.
• Custom:You cancustomize the soundsettings to suityour personal preferences.
/__) You canselect these options simply by pressing the &MODE button on the remote
control.
Equalizer
The soundsettings can be adjusted to suityour personal preferences.
• Mode: Selectsthe sound mode among the predefined settings.
• Balance LIR:Adjusts the balance between the right and leftspeaker.
• 100Hz, 300Hz, lkHz, 3kHz, 10kHz (BandwidthAdjustment): Adjusts thelevel of
different bandwidthfrequencies.
• Reset: Resets the equalizer settings to the defaultvalues.
SRS TruSurroundHD-_ Off /On
8RS TruSurround HDenables you to enjoy a virtual 5.1 SurroundSound effectover the
TV's two speakers.
This function provides not only rich deep bass also improves highfrequency resolution.
/__) You canselect these options simply by pressing the 8RS button on the remote
control.
D I G I T A L
TruSurround HD,SRS and the (o) symbol aretrademarks of SRS Labs, Inc.
TruSurround HDtechnology is incorporated under license from SRS Labs,Inc.
C3
PreferredLanguage(Digital)
DigitaI-TVbroadcasts are capable of simultaneous transmission of manyaudio tracks (for example, simultaneous translationsof the
programinto foreign languages).
You canonly selectthe language fromamong the actual languages being broadcast.
{;_) You canlisten in alanguage otherthan the Preferred Language by pressing the MTS button on the remote control.
[3 Multi-TrackSound (MTS)(Analog)
C)
o
• Stereo: Choose forchannels that are broadcasting in stereo.
• SAP: Choosetolisten to the Separate Audio Program,which isusuallya foreign-
language translation.
Depending on the particularprogram being broadcast, you canlisten to Mono,
Stereo, orSAP.
/__) Pressthe MT8 button on the remote controlrepeatedly to select Mono, Stereo, or
SAP.
Mono: Choose forchannels that arebroadcasting in mono or if you arehaving difficulty receiving a stereo signal.
Auto Volume _ Off / On
Eachbroadcasting station has its own signal conditions, and so it isnot easy toadjust the volume everytime the channel is
changed. This feature lets you automatically adjust thevolume of the desired channel by loweringthe sound output when the
modulation signal ishighor byraising the soundoutput when the modulation signalis low.
Continued...
C3
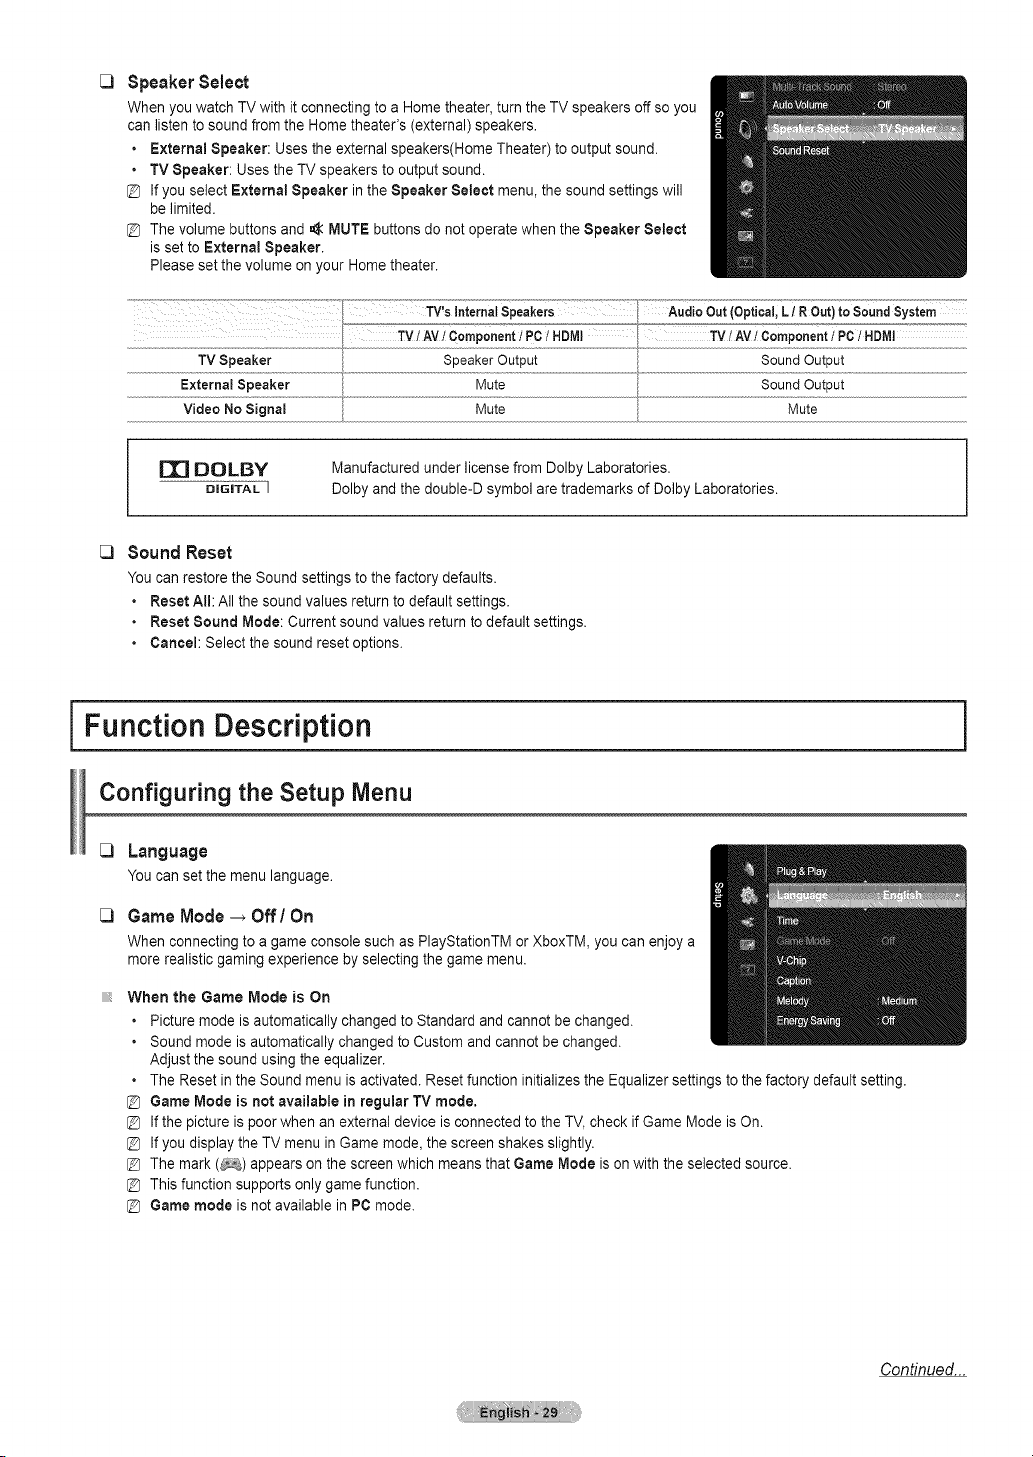
Speaker Select
When youwatch TV with it connecting toa Home theater, turnthe TV speakers off so you
can listen to soundfrom the Home theater's (external) speakers.
• External Speaker: Uses the externalspeakers(Home Theater) to output sound.
• TV Speaker: Usesthe TVspeakers to output sound.
[_ Ifyouselect External Speaker intheSpeaker Select menu, the sound settings will
be limited.
Thevolume buttons and _ MUTE buttons do not operatewhen the Speaker Select
is set to External Speaker.
Please set the volume on your Home theater.
Mute SoundOutput
Mute Mute
DE] OOLBY
DiGiTAL ]
Manufactured under licensefrom DolbyLaboratories.
Dolbyand the double-D symbol aretrademarks ofDolby Laboratories.
C3Sound Reset
You canrestore the Soundsettings to the factory defaults.
• Reset All: Allthe soundvalues return todefault settings.
• Reset Sound Mode: Currentsound values return to defaultsettings.
• Cancel:Select the sound reset options.
iFunction Description i
Configuring the Setup Menu
[:3 Language
Youcanset themenulanguage.
C3 Game Mode _ Off/On
When connecting toa game console such as PlayStationTM orXboxTM, you can enjoy a
morerealistic gaming experience by selecting the game menu.
When the Game Mode is On
• Picture mode isautomatically changed to Standard and cannot be changed.
• Sound mode isautomatically changedto Custom and cannot bechanged.
Adjust the sound using the equalizer.
• The Resetin the Soundmenu isactivated. Resetfunction initializes the Equalizer settingsto the factory default setting,
@ Game Mode is not available in regular TVmode.
Ifthe picture ispoorwhen an external device isconnected to the TV, check if Game Mode isOn.
Ifyoudisplay the TVmenu in Game mode, the screen shakesslightly.
Themark (#_) appears on the screenwhich meansthat Game Mode ison with the selected source.
Thisfunction supportsonly game function.
[_ Game mode isnot available inPCmode.
Continued...
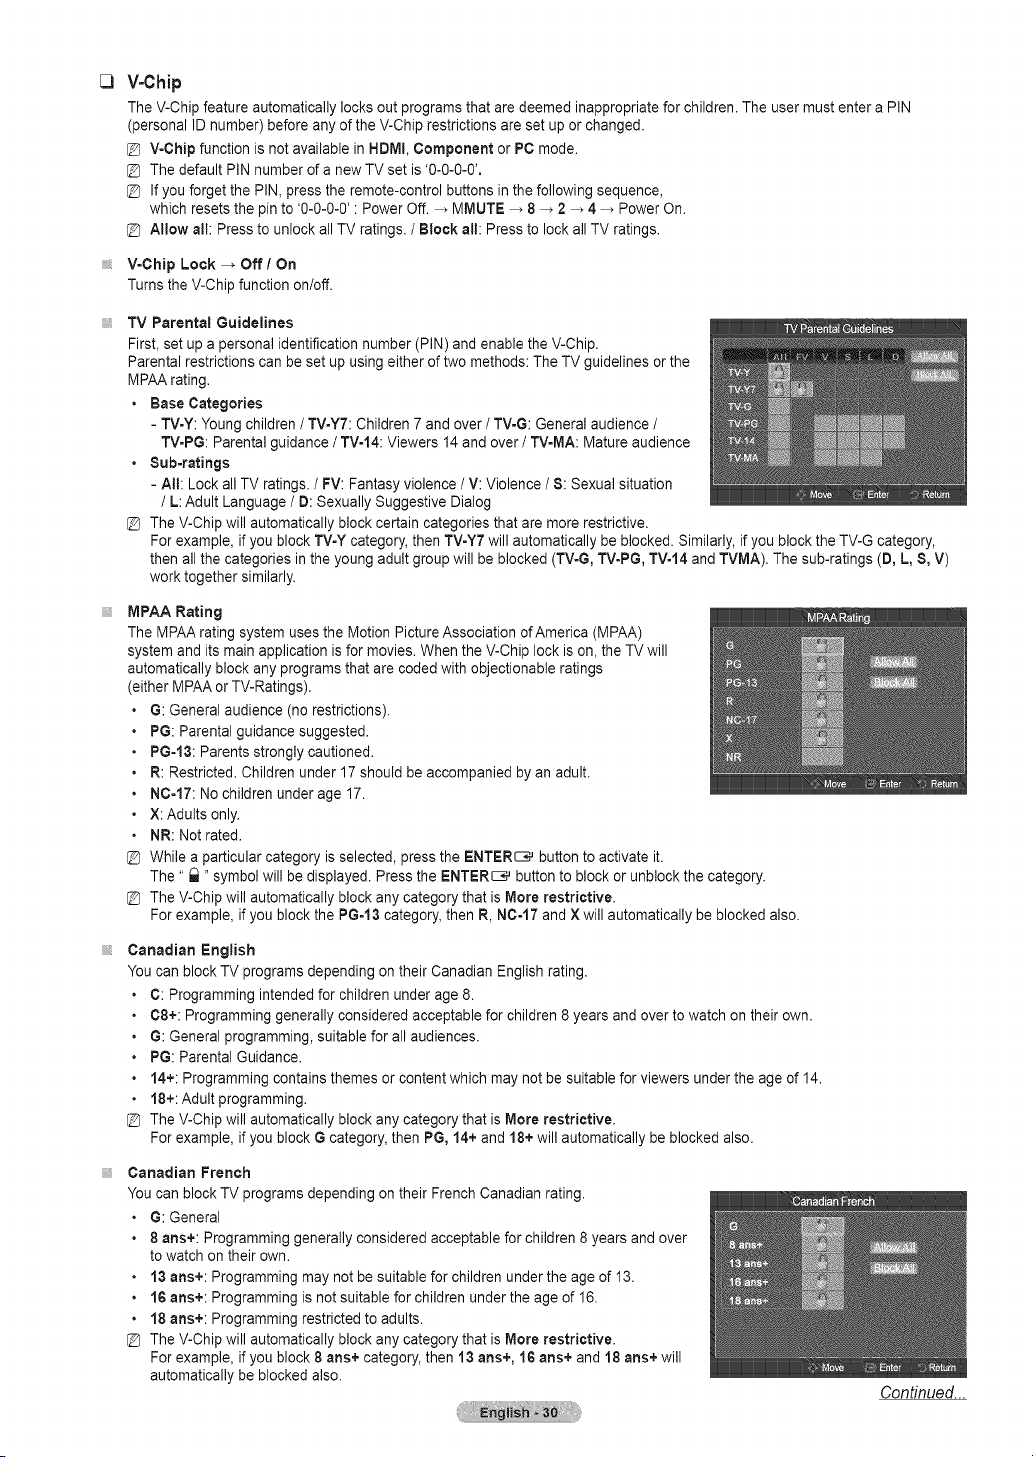
V-Chip
The V-Chip feature automatically locksout programs that aredeemed inappropriate for children. Theuser must entera PIN
(personal ID number)before anyofthe V-Chip restrictions areset up orchanged.
V-Chip function isnot available in HDMI,Component or PC mode.
Thedefault PIN number ofa newTV set is'0-0-0-0'.
Ifyouforget the PIN, pressthe remote-control buttons in the following sequence,
which resets the pinto '0-0-0-0' : Power Off._ MMUTE _ 8 -_ 2_ 4 _ PowerOn.
Allow all: Press to unlockallTV ratings./ Block all: Press to lock allTVratings.
V=Chip Lock -_ Off / On
Turnsthe V-Chip function on/off.
TV Parental Guidelines
First, set up apersonal identification number (PIN) and enablethe V-Chip.
Parentalrestrictions can besetupusing either of two methods:TheTV guidelines orthe
MPAA rating.
• Base Categories
- TV=Y:Youngchildren / TV-YT: Children7 and over /TV-G:General audience /
TV=PG:Parental guidance / TV-14: Viewers 14 and over / TV=MA:Mature audience
• Sub=ratings
- Att: Lock allTVratings. / FV:Fantasyviolence /V: Violence /8: Sexual situation
/ L:Adult Language/ D: Sexually Suggestive Dialog
TheV-Chip will automatically blockcertain categories that are more restrictive.
For example, if you block TV=Ycategory, then TV-Y7will automatically be blocked. Similarly, ifyou blocktheTV-G category,
then allthe categories in the youngadult group will beblocked(TVoG,TV-PG, TV-14and TVMA). Thesub-ratings (D, L,S,V)
work together similarly.
MPAA Rating
The MPAA rating system uses the MotionPicture Association of America (MPAA)
system and its main application is for movies. When the V-Chip lock ison, the TVwill
automatically blockany programs that are codedwith objectionable ratings
either MPAA orTV-Ratings).
G: General audience (no restrictions).
PG:Parental guidance suggested.
PG=13:Parentsstrongly cautioned.
R:Restricted. Children under 17 should be accompanied by an adult.
NC-17: No children underage 17.
X: Adults only.
NR:Notrated.
While a particularcategory isselected, pressthe ENTER_ button to activate it.
The" t_" symbol will be displayed. Press theENTER_ button to block or unblockthe category.
TheV-Chip will automatically blockany category that isMore restrictive.
For example, if you block the PG-13 category, then R,N0-17 and X will automatically be blockedalso.
Canadian English
You canblock TVprograms depending on their Canadian English rating.
C: Programming intendedfor children under age 8.
C8+: Programming generally considered acceptable for children 8years and over to watch on their own.
G: General programming, suitable for allaudiences.
PG:Parental Guidance.
14+:Programming contains themes or contentwhich may not besuitablefor viewers underthe age of 14.
18+: Adult programming.
TheV-Chip will automatically blockany category that isMore restrictive.
For example, if you block G category, then PG,14+and 18+ will automatically be blocked also.
Canadian French
You canblock TVprograms depending on their French Canadianrating.
• G: General
• 8 arts+: Programming generally considered acceptable forchildren 8years and over
towatchon their own.
• 13 arts+: Programming maynotbe suitable forchildren underthe age of 13.
• 16 arts+: Programming isnot suitablefor children underthe age of 16.
• 18 arts+: Programming restricted toadults.
@ TheV-Chip will automatically blockany category that isMere restrictive.
For example, if you block 8 arts+ category, then 13 arts+, 16 arts+ and 18 arts+will
automatically be blocked also.
Continued...
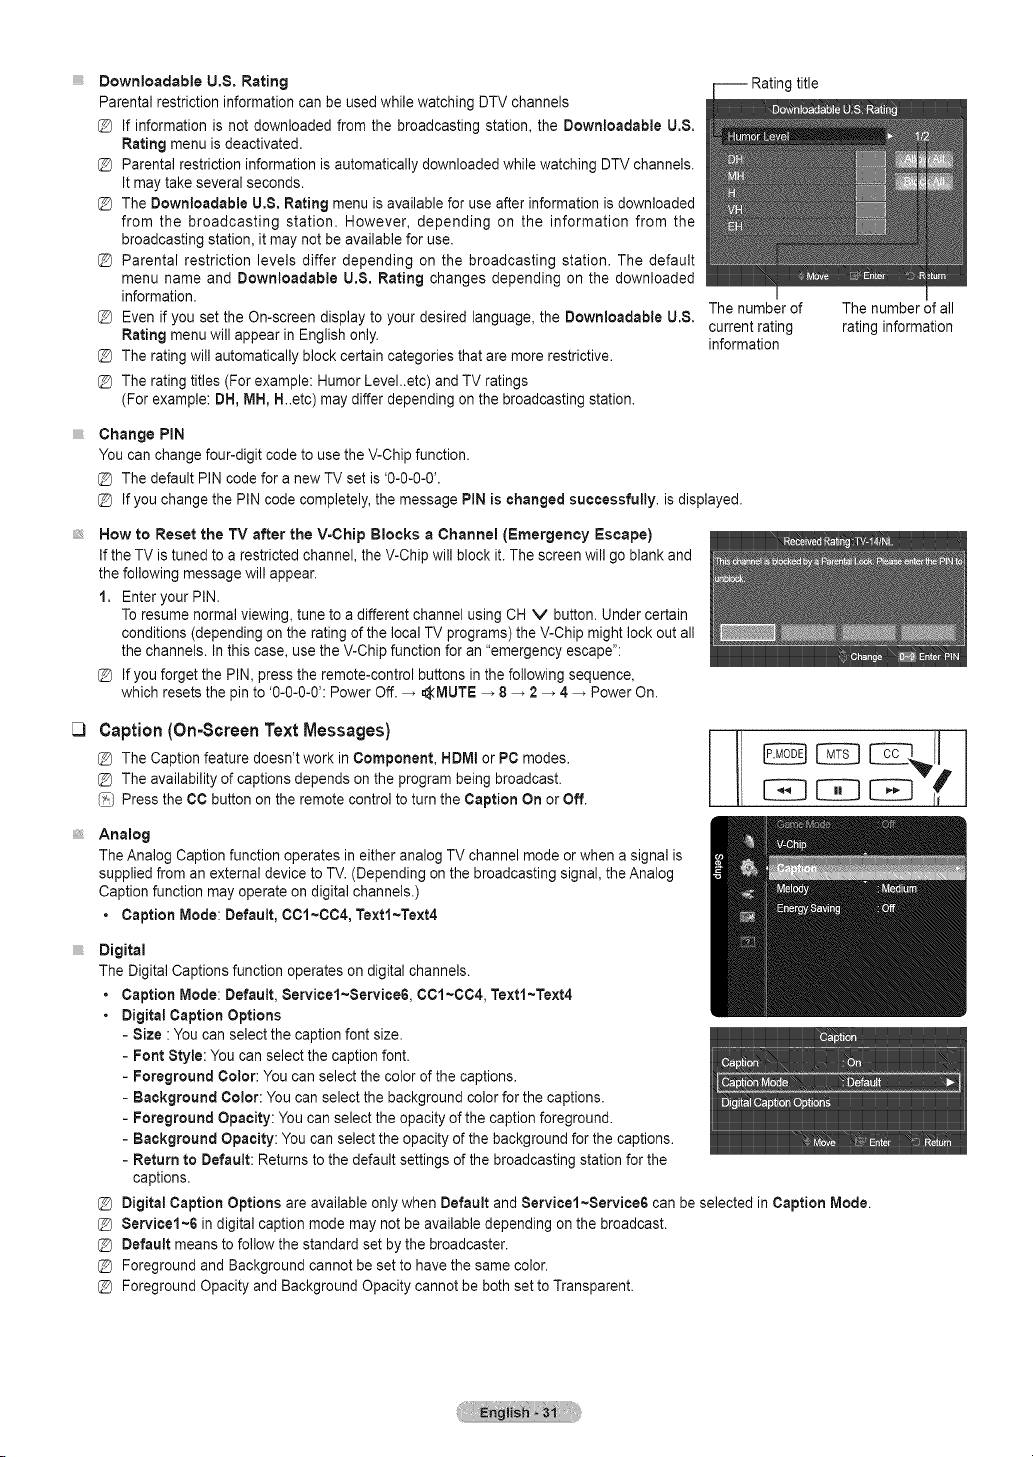
title
C)
Downloadable U.$. Rating
Parental restriction information canbe usedwhilewatching DTVchannels
@ Ifinformation is not downloaded from the broadcasting station, the Downloadable U,S.
Rating menu isdeactivated.
@ Parentalrestriction information isautomatically downloaded while watching DTVchannels.
Itmaytake several seconds.
@ The Downloadable U,S. Rating menu isavailable for useafter information isdownloaded
from the broadcasting station. However, depending on the information from the
broadcasting station, it maynot be available for use.
@ Parental restriction levels differ depending on the broadcasting station. The default
menu name and Downloadable U,S, Rating changes depending on the downloaded
information.
@ Even if you set the On-screen display toyour desired language,the Downloadable U.S.
Rating menu will appear inEnglishonly.
@ The rating will automatically block certain categories that aremore restrictive.
@ The rating titles (For example: Humor Level..etc) and TVratings
(Forexample: DH,MH, H..etc) maydiffer depending on the broadcasting station.
Thenumber of
current rating
information
The number ofall
rating information
Change PIN
You can changefour-digit code to use the V-Chip function.
@ The default PIN codefor anew TVset is'0-0-0-0'.
@ If you change thePIN codecompletely, the message PIN ischanged successfully, isdisplayed.
How to Reset the TV after the V-Chip Blocks a Channel (Emergency Escape)
Ifthe TVistuned to arestricted channel, the V-Chip will block it. The screen will go blank and
the following message will appear.
1. Enter your PIN.
Toresume normal viewing, tune toa different channel using CHV button. Under certain
conditions (depending on the rating of the local TV programs) the V-Chip mightlock out all
the channels. In thiscase, use the V-Chip function for an"emergency escape":
@ If you forget the PIN, presstheremote-control buttonsin the following sequence,
which resetsthe pinto'0-0-0-0': Power Off._ _MUTE _ 8_ 2 _ 4 _ PowerOn.
Caption (On-Screen Text Messages)
@ The Caption feature doesn't work in Component, HDMIor PC modes.
@ The availability of captions depends on the program beingbroadcast.
/__] Pressthe CCbutton on the remote controlto turn the Caption On orOff.
E2E]CE3
Analog
TheAnalog Captionfunction operates in either analog TV channel mode orwhen a signal is
supplied froman external device to TV. (Depending on the broadcasting signal,the Analog
Caption function may operate on digital channels.)
• Caption Mode: Default, 001~004, Textl~Text4
Digital
The Digital Captions function operates ondigital channels.
• Caption Mode: Default, Servicel~Service6, 001~C04, Textl~Text4
• DigitalCaption Options
- Size : You canselect the caption font size.
- Font Style: You can selectthecaption font.
- Foreground Color: Youcan select the color of thecaptions.
- Background Color: You can select the background color forthe captions.
- Foreground Opacity: Youcan selectthe opacity of the caption foreground.
- Background Opacity: You canselect the opacity of the background for the captions.
- Return to Default: Returns to the defaultsettings of the broadcasting station for the
captions.
@ Digital Caption Options areavailable only when Default and Servicel~Service6 can be selected in Caption Mode.
@ Service1~6 in digital caption mode may not beavailable depending onthe broadcast.
@ Default meanstofollow the standard set bythebroadcaster.
@ Foreground and Background cannot be setto havethe same color.
@ Foreground Opacity and Background Opacity cannot be both settoTransparent.
C3
C3
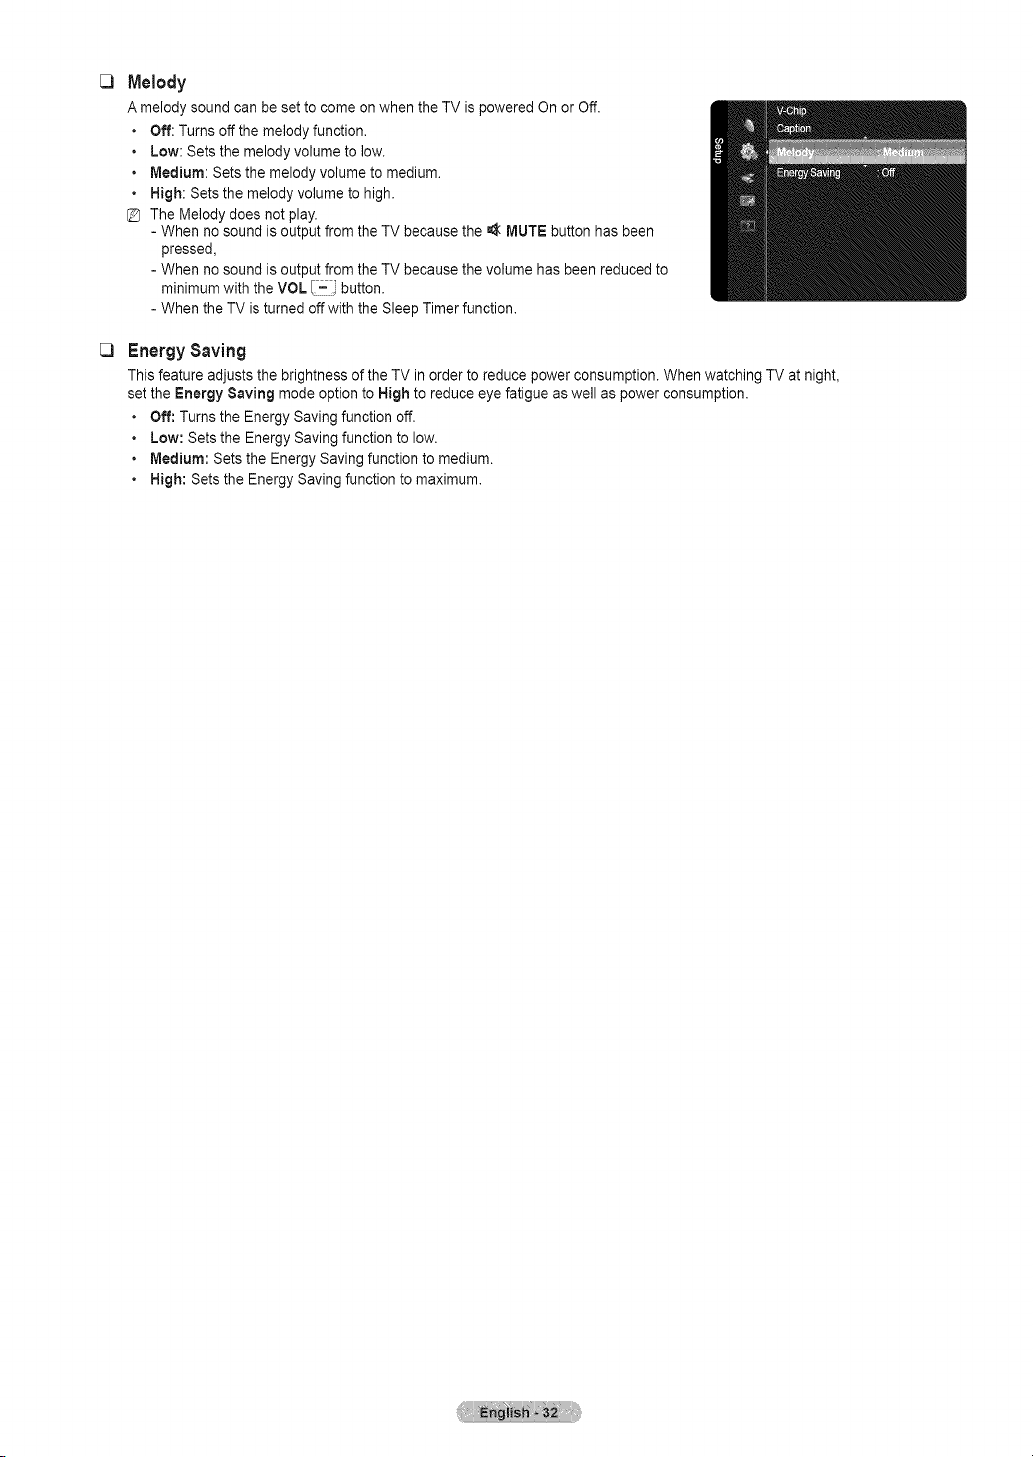
Melody
A melody sound canbeset to come on when the TV ispowered On or Off.
• Off: Turnsoff the melody function.
• Low: Setsthe melody volume to low.
• Medium: Setsthe melody volume tomedium.
• Nigh: Sets the melody volume to high.
TheMelody does not play.
- When no sound isoutput from the TV because the _ MUTEbutton has been
pressed,
- When no sound isoutput from the TV because the volume has been reducedto
minimum with the VOL I-i button.
- When the TV is turned off with the SleepTimer function.
EnergySaving
This feature adjusts the brightness ofthe TV inorder to reduce power consumption. When watching TV at night,
set the Energy Saving mode optionto Nigh to reduce eyefatigue aswell as powerconsumption.
• Off: Turnsthe Energy Savingfunction off.
• Low: Setsthe Energy Saving function to low.
• Medium: Sets the Energy Saving function to medium.
• Nigh: Sets the Energy Saving function to maximum.
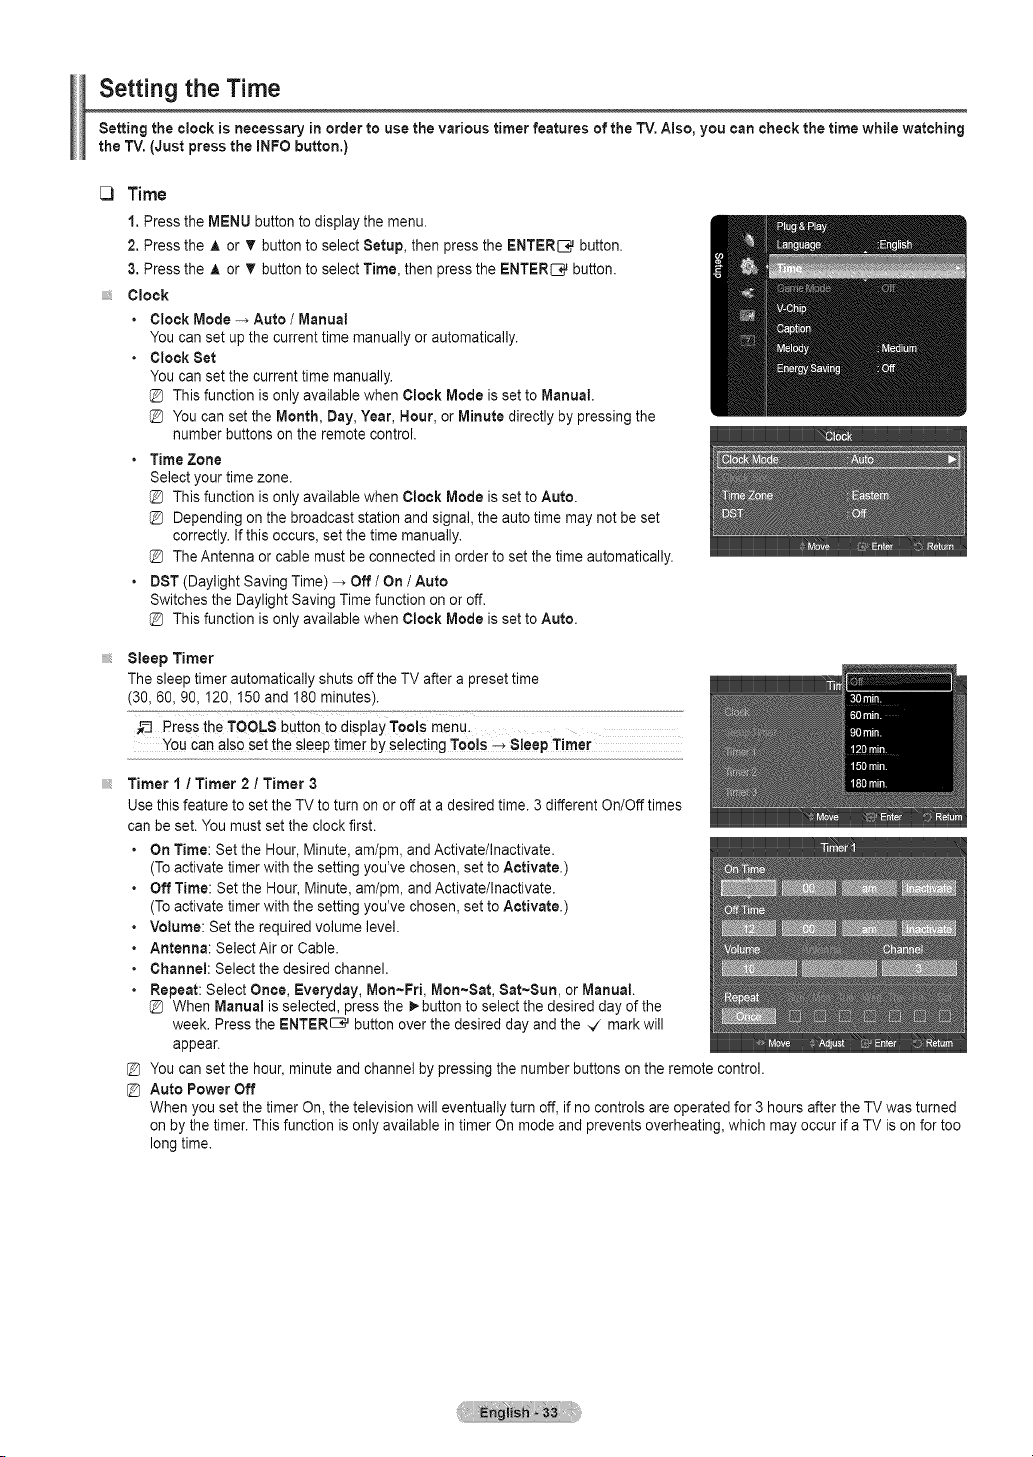
Setting the Time
Setting the clock is necessary inorder to usethe varioustimer features of the TV, Also,you can checkthe time while watching
the TV,(Just press the INFO button,)
[3 Time
1.Press the MENU button to display themenu.
2. Press the A or T buttonto selectSetup, then pressthe ENTER[__ button.
3. Press the A or T buttonto selectTime, then pressthe ENTER_ button.
Clock
• ClockMode -_ Auto / Manual
You canset upthe current time manually or automatically.
• ClockSet
You canset the currenttimemanually.
This function isonlyavailable when Clock Mode isset toManual.
You can set the Month, Day, Year, Hour, or Minute directly by pressing the
number buttonson theremote control.
• Time Zone
Select your timezone.
This function isonlyavailable when Clock Mode isset toAuto.
Depending on the broadcast station and signal,the auto time may not be set
correctly. Ifthis occurs, set the timemanually.
TheAntenna orcable mustbe connected in order to setthetime automatically.
• DST(Daylight Saving Time) -_ Off /On / Auto
Switchesthe Daylight Saving Time function on or off.
This function isonlyavailable when Clock Mode isset toAuto.
Sleep Timer
The sleep timer automatically shutsoff the TVafter a preset time
(30,60, 90,120,150 and 180 minutes).
Pressthe TOOLS button t0 displayTools menu.
You can a!soset the sleep timer byselecting Tools -_ 8!eep Timer
Timer 1/ Timer 2 / Timer 3
Use this feature to settheTVto turn on oroff ata desired time.3different On/Off times
can be set. You mustset the clockfirst.
• On Time: Set the Hour, Minute,am/pm, and Activate/Inactivate.
(To activate timer with the setting you've chosen, settoActivate.)
• Off Time: Set the Hour,Minute,am/pm, and Activate/Inactivate.
(To activate timer with the setting you've chosen, settoActivate.)
• Volume: Set the required volume level.
• Antenna: SelectAir or Cable.
• Channel: Select the desired channel.
• Repeat: Select Once, Everyday, Mon-Fri, Men-Sat, Sat~Sun, or Manual.
@ When Manual isselected, pressthe _.button to select the desired dayofthe
week. Press the ENTER_ button over the desiredday and the _ mark will
appear.
@ You canset the hour,minute and channel by pressing the number buttons on the remote control.
@ Auto Power Off
Whenyou set the timer On,the television will eventually turnoff, if no controls areoperated for 3hours after the TVwas turned
on bythetimer. Thisfunction isonly available in timer On mode and prevents overheating, which may occur if a TV ison for too
longtime.

Source List / Edit Name
C)
C)
Source List
Use to select TVorother external inputsources suchas DVD / Blu-Ray players /Cable
Boxes / Satellite/receivers (Set-Top Box) connected tothe TV. Use to select the input
source of your choice.
TV,AV1, AV2, Component1, Component2, PC, HDMI1, HDMI2/DVI, HDMI3.
[_ You canchoose only thoseexternal devices that areconnected to the TV.In the
Source List, connected inputs will be highlightedand sorted to the top. Inputsthat
arenot connected will besorted to the bottom.
@ Using the Color buttons onthe remote with the Source list
• Red (Refresh): Refreshesthe connected external devices.
Pressthis if your Source ison and connected, but does not appear in the list.
• _-_TOOLS(Tools): Displays the EditName and Information menus.
(_) Press the SOURCE button on the remotecontrol to viewan external signal source.
Edit Name
Youcannamethedeviceconnectedto theinputjacksto rnakeyourinputsource
selectioneasier.
VCR /DVD / Cable STB / Satellite STB / PVR 8TB /AV Receiver / Game /
Camcorder / PC / DVl PC / DVl / TV / iPTV / Blu-Ray / HD DVD / DMA
@ When a PC with aresolution of640x480@60Hz isconnected to theHDMI IN2(DVI)
port,you should setthe HDMI2/DVI mode to PC inthe EditName menu.
Suppo
C3
Self Diagnosis
Picture Test
Ifyou think you have a pictureproblem, perform the picturetest. Check the colorpattern
on the screen to see if the problem still exists.
@ Does the problem still exist with this test photo? appears on thescreen.
Ifthe test pattern does not appear orthere isnoise in the testpattern, selectYes
Ifthe test pattern isproperly displayed, select No
• Yes: There maybe aproblemwith the TV. Contactthe Samsung Callcenter.
• No: There may be aproblemwith your external equipment. Please checkyour
connections.
Ifthe problem stillpersists, refer to the external device's user manual.
Sound Test
Ifyou think you have a soundproblem, please perform the soundtest. Youcan check the
sound by playing a built-in melody soundthrough the TV.
@ Does the problem still exist with this sound test? appears on the screen.
Ifduring the soundtest you canhear soundonlyfrom one speaker or not at all, select
Yes.
Ifyoucan hearsound fromthe speakers, selectNo.
• Yes: There maybe aproblemwith the TV. Contactthe Samsung Callcenter.
• No: There may be aproblemwith your external equipment. Please checkyour connections. Ifthe problem stillpersists, refer to
the externaldevice's user manual.
@ Ifyou hearno soundfrom the TV's speakers, before performing the soundtest, make sure Speaker Select isset to TVspeaker
in the Soundmenu.
@ Themelody will be heardduring the testeven if Speaker Select isset to External Speaker orthe soundismuted by pressing
the ,_ MUTE button.
Continued...

Signal Strength (Digital)
Unlike analog channels, which can vary in reception qualityfrom snowyto clear,digital
(HDTV) channels haveeither perfect reception quality or youwill not receive them at all.
So, unlike analogchannels, you cannotfine tune adigital channel. Youcan, however,
adjust your antennato improvethe reception ofavailable digital channels.
[D If the signal strength meterindicates that the signal isweak, physically adjust your
antennato increase the signal strength. Continueto adjust the antenna untilyoufind
the bestposition with the strongest signal.
Drive
C]
Software Upgrade
Samsung mayoffer upgradesfor your TV's firmware inthefuture. Please visitSamsung.
corn orcontact the Samsung call center at 1-800-SAMSUNG (726-7864) to receive
information about downloading upgrades and using aUSBdrive. Upgrades will be
possible by connecting aUSB driveto the USB port.
[D Please be carefulnot todisconnect the poweror remove the USB drivewhile
upgrades arebeing applied. TheTV will shut off and turnonautomatically after
completingthe firmware upgrade.
[D When software isupgraded, video and audiosettings you havemade will return to
their default (factory) settings.
[D We recommend you write down your settings so that youcan easily reset them after
the upgrade.
TV Panel
C] HD ConnectionGuide
A brief instructionon How to getthe best performance from your new
HDTV.isdisplayed.
Followtheguide forthe best connection method for your HDdevices..
C] Contact Samsung
YoucanknowtheSamsungCall center,websiteandinformationfor product.
[D Youcanmovethepreviousornextpageby pressingtheA or _rbutton,
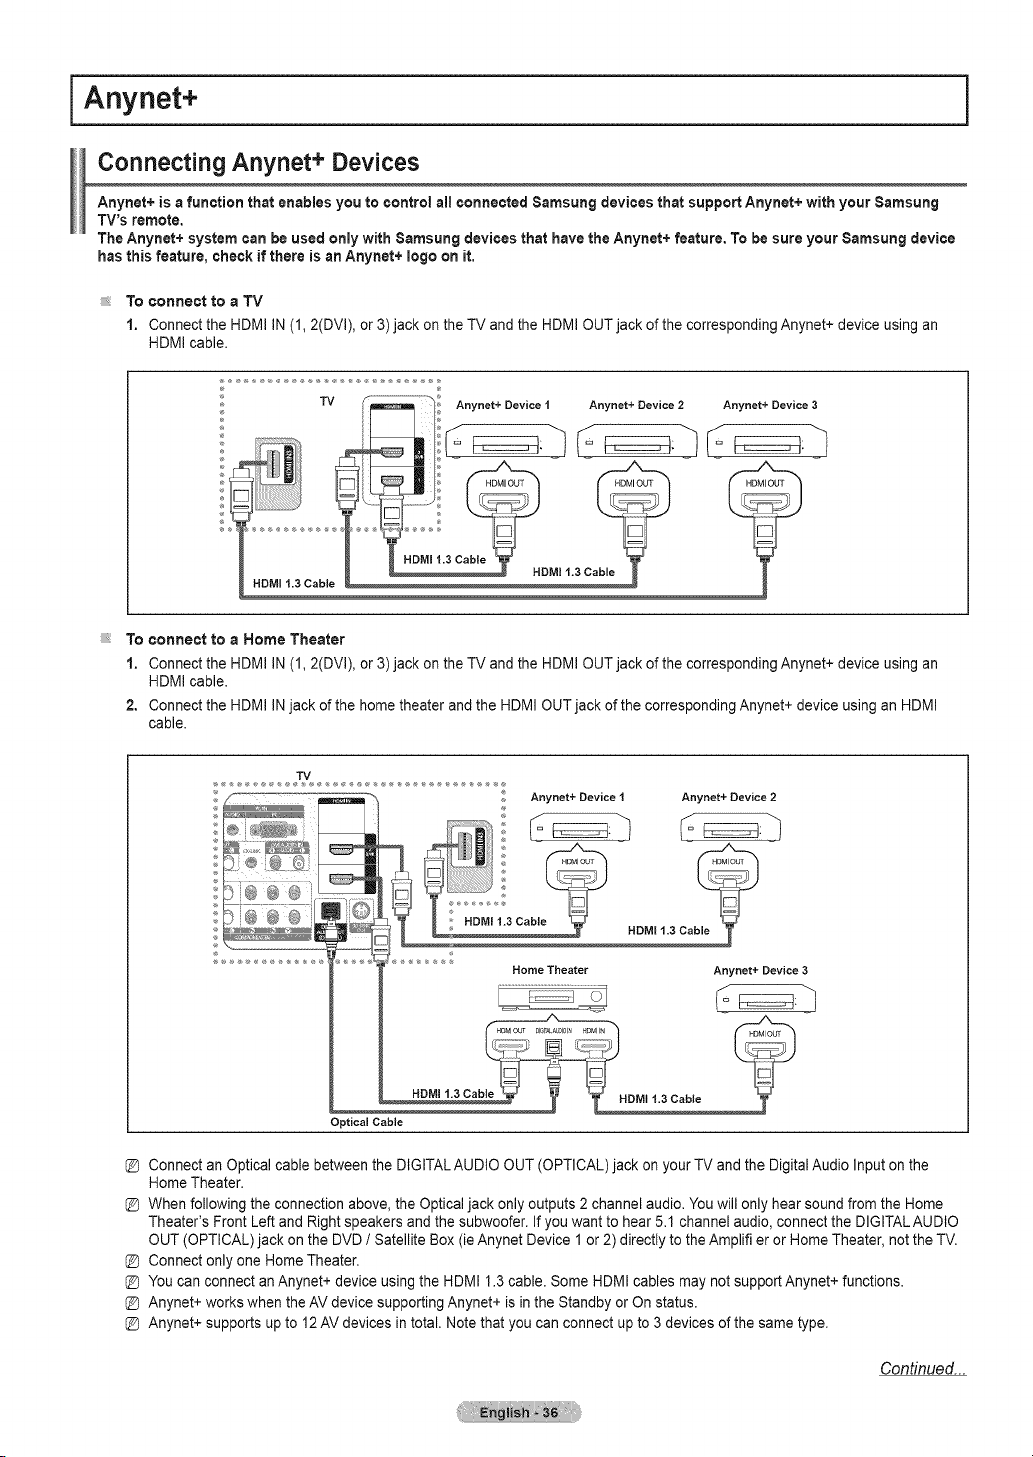
i Anynet+
Connecting Anynet+ Devices
Anynet+ is afunction that enablesyou to control all connected 8amsung devices that support Anynet+ with your 8amsung
TV's remote.
The Anynet+ systemcan beused only with Samsung devices that havethe Anynet+ feature. To besure your 8amsung device
hasthis feature, check ifthere isanAnynet+ logoon it,
To connect to a TV
1. Connect the HDMI IN (1, 2(DVI), or3)jack on the TV and the HDMIOUT jack of thecorresponding Anynet+device using an
HDMIcable.
To connect to a Home Theater
1. Connect the HDMI IN (1, 2(DVI), or3)jack on the TV and the HDMIOUT jack of thecorresponding Anynet+device using an
HDMIcable.
2. Connect the HDMI IN jack ofthe home theater and the HDMI OUT jack of the corresponding Anynet+ device using an HDMI
cable.
TV
_,_ Anynet+ Device 1 Anynet+ Device 2
HDM_ 1.3 Ca
Home Theater
Anynet+ Device 3
HDMI 1.3 Cabte
Optical Cable
HDMI 1.3 Cable
Connect an Optical cable between the DIGITALAUDIO OUT (OPTICAL)jack on your TVand the Digital Audio Input on the
Home Theater.
When following the connection above,the Opticaljack only outputs2 channel audio.You will only hear soundfrom the Home
Theater's Front Left and Right speakers and the subwoofer. If youwantto hear 5.1 channel audio, connect the DIGITALAUDIO
OUT (OPTICAL) jack on the DVD / Satellite Box(ie Anynet Device 1 or2) directly to the Amplifier or Home Theater, not the TV.
Connect onlyone Home Theater.
You can connect an Anynet+ device using the HDMI 1.3 cable. Some HDMIcables may not support Anynet+functions.
Anynet+works when the AVdevice supporting Anynet+ isin the Standby or Onstatus.
Anynet+ supports up to 12 AV devices in total. Note that youcan connect up to3 devices ofthe sametype.
Condnued...
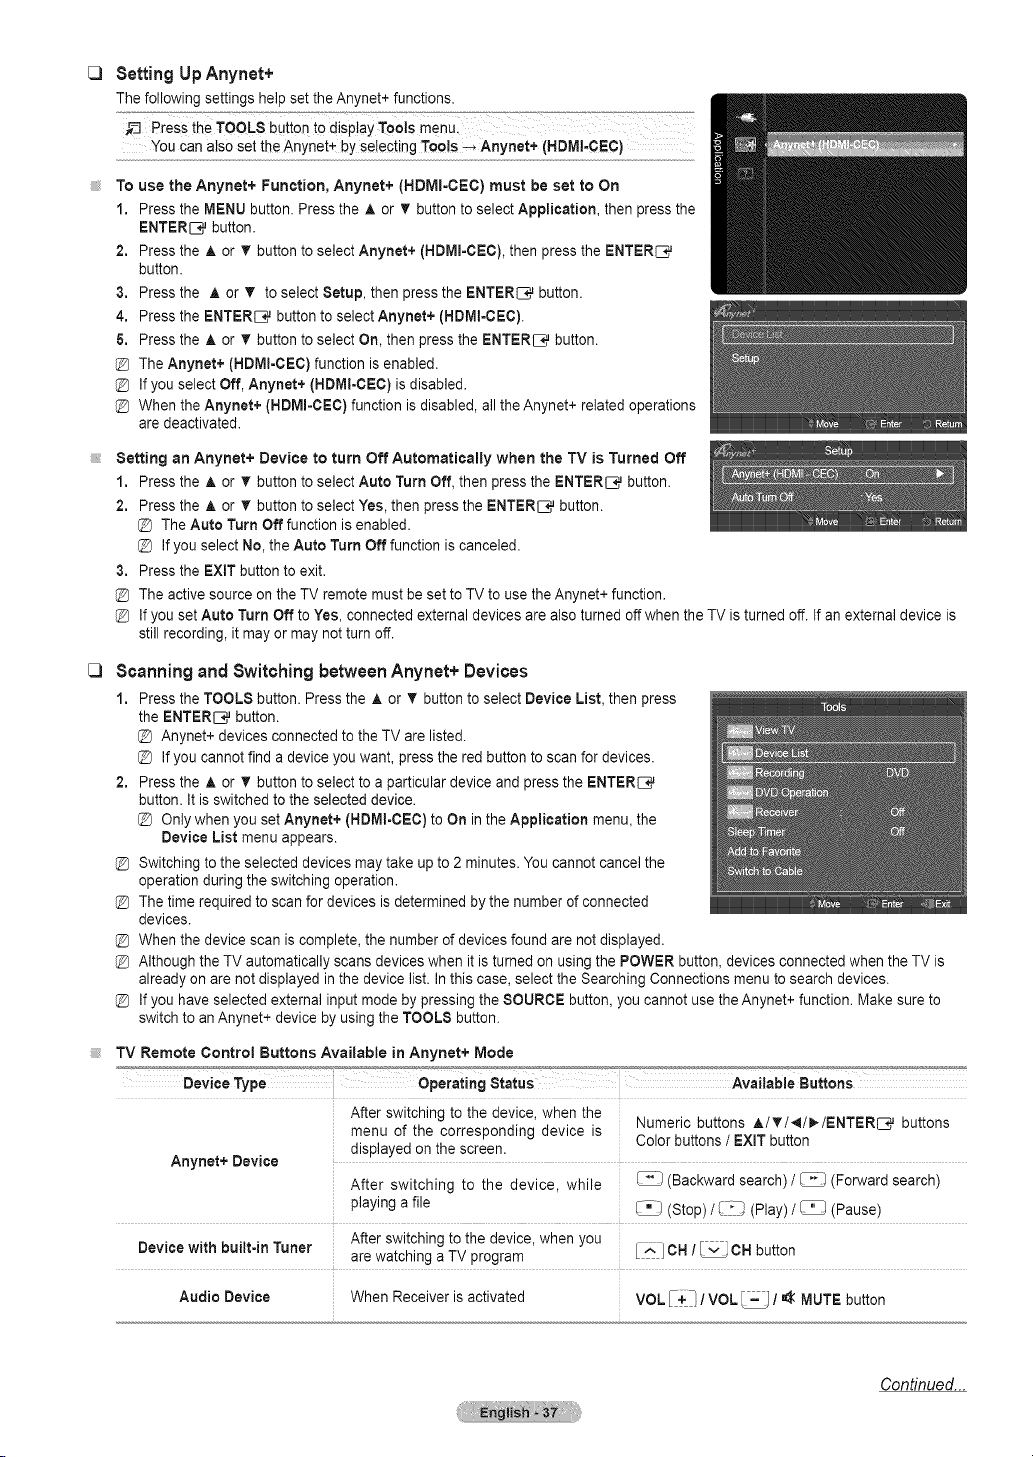
SettingUp Anynet+
Thefollowing settings helpset the Anynet+ functions.
You can alsoset the Anynet+ by selecting Tools--_ Anynet+ (HDMI-CEC) .....
To use the Anynet+ Function, Anynet+ (HDMI-CEC) must be set to On
1. Pressthe MENU button. Press the A or T button to select Application, then pressthe
ENTERI:_ button.
2. Pressthe A or _rbutton to select Anynet+ (HDMI=CEC),then press the ENTER_
button.
3. Pressthe A. or ,!r to select Setup, then pressthe ENTER_ button.
4. Pressthe ENTER[_q}j button toselectAnynet+ (HDM!-CEC).
& Press the A or T button to select On, then pressthe ENTER[q_ button.
TheAnynet+ (HDMI-CEC) function isenabled.
Ifyou select Off, Anynet+ (HDMI-CEC)is disabled.
When the Anynet+ (HDMI=CEC}function isdisabled,allthe Anynet+ related operations
aredeactivated.
Setting an Anynet+ Device to turn Off Automatically when the TV is Turned Off
1. Pressthe A or V"button toselect AutoTurn Off, then press the ENTER[_q_button.
2. Pressthe A or _rbutton toselect Yes,then press the ENTER[q_ button.
The Auto Turn Off function isenabled.
Ifyou select No, the Auto Turn Off function iscanceled.
3. Pressthe EXIT button to exit.
The activesource on the TVremote mustbesettoTV to use the Anynet+function.
Ifyou set Auto Turn Off toYes, connected external devices are alsoturned off whenthe TV isturnedoff. Ifan external device is
still recording, itmay ormay not turnoff.
Scanningand Switching between Anynet+ Devices
1. Pressthe TOOLS button. Pressthe A or T button to select Device List,thenpress
the ENTERI:_ button.
Anynet+ devices connected to the TV arelisted.
Ifyou cannotfind a device youwant, pressthe redbutton to scan fordevices.
2. Pressthe ,i, or T button to select to aparticular deviceand pressthe ENTER_
button. Itisswitched tothe selected device.
[_ Only when you setAnynet+ (HDMI-CEC) toOn intheApplication menu, the
Device List menu appears.
Switching to the selected devices maytake up to2 minutes. You cannotcancel the
operation during the switching operation.
Thetime required to scanfor devices isdetermined bythenumber ofconnected
devices.
When the device scan iscomplete, the number ofdevices found are not displayed.
Although the TV automatically scans devices when it isturnedon using the POWER button, devices connected when the TV is
already on arenotdisplayed in the device list. In this case, select the Searching Connections menu tosearch devices.
Ifyou haveselected external inputmode by pressing the SOURCE button, you cannot use the Anynet+ function. Make sure to
switch to an Anynet+ device by using the TOOLS button.
TV Remote Control Buttons Available in Anynet+ Mode
Device Type Operating Status
After switching to the oevlce. _nen the
menu of the corresponding device s
dtsplayeaon the screen.
Anynet+ Device
After switching to me device while
playing a file
Device with built-in Tuner
After switching to me clevtcewnen you
arewa[cnlng aTV program
Available Buttons
'4umeric buttons A/T/_I/_/ENTER_ buttons
Color buttons/EXiT button
-_- Backwardsearch) /_ (Forward search)
StoD_ _,_!_)(Play)/_ (Pause)
[^] OH /_ OH button
Audio Device When Receiver IS ac_lvatea
VOL [+1 / VOL_ /_ MUTEbutton
Continued...

TheAnynet+function only workswhen the active sourceon theTV remote control isset to TV.
The_ button works onlywhile in the recordable state.
You cannot control Anynet+ devices using the buttonson the TV.Youcan controlAnynet+ devices onlyusing the TVremote
control.
TheTVremote controlmay not work undercertain conditions. In this case, reselect the Anynet+ device.
TheAnynet+functions do not operate with other manufacturers' products.
The I-4_), _ operations may differ depending onthe device.
Anynet+ Menu
The Anynet+menu changes depending on the type and status ofthe Anynet+ devices connected to the TV.
C3
C3
View TV Switches fromAnynet+ to TV broadcast mode.
Device List Displays the Anynet+ device list.
Recording Starts a recording. (This menu works onlyfor a devicesupporting recording.)
Shows the menu of the connected device.
Menu
Example:When aDVD Recorder isconnected, the DVD Recorder's title menu appears.
Shows the playcontrol menu of the connected device.
Operation
Example:When aDVD Recorder isconnected, the playcontrolmenu of the DVDRecorder appears.
TimerRecording Allows reserving arecording. (This menu works onlyfora device supporting recording reservations.)
Stop Recording Stops recording.
Receiver Sound is output through the receiver (home theater).
Setup You canset the Anynet+ (HDMI-CEC), auto turnoff, and searching connections for using Anynet+.
Recording
You canmake a recording of a TV program using a Samsung recorder.
1. Pressthe TOOLS button.
Pressthe A or T button toselect Recording Immediately and press the ENTER_
button, Recording begins,
When there !smore than one recording device
When multiplerecording devices areconnected, the recording devices arelisted.
Press the ior T button toselectarecording deviceand pressthe ENTERC_
buttonl Recording begins:
When the recording device is not displayed
Select Device List and pressthe red button tosearchdevices
3. Pressthe EXIT button to exit.
Pressing the _") button will record whatever you arecurrentlywatching. If you arewatching video from another device, the video
from the device isrecorded.
Before recording, check whether the antenna jack isproperly connected tothe recording device.Toproperly connect an antenna
toa recording device, refer tothe recording device's users manual.
Listeningthrougha Receiver(Hometheater)
You canlisten tosoundthrough a receiver instead of the TVspeaker.
1. Pressthe TOOLS button. Pressthe A or T button toselect Receiver.
2. Pressthe _ or _. button to select to On.
Nowyou can listentosound through the receiver.
3. Pressthe EXIT button to exit.
Ifyour receiver supportsaudio only, it may not appear in the device list.
The receiverwill work when you have properly connected the Optical INjack of the receiverto the OpticalOutjack of the TV.
When the receiver (home theater) isset to On,you can hearsoundoutput from theTV's Optical jack. When the TVis
displaying aDTV(air) signal, the TVwill send out 5.1 channel sound to the Home theater receiver. When the source isadigital
component such as a DVDand isconnected tothe TVvia HDMI,only 2channel sound will beheard from the Home Theater
receiver.
When listening through the receiver,there are restrictions for using the audio-related (MTS, Preferred language) menus.
Ifthere isapowerinterruption to the TV when the Receiver issettoOn (by disconnecting the powercord ora powerfailure),
the Speaker Select may besetto External Speaker when you turnthe TV onagain.
Troubleshooting for Anynet+
Symptom Solution ................." '_J"_°'
Anynet+ does not work. • Check if the device isan Anynet+ device.TheAnynet+ system supports Anynet+ devices
only.
• Connect only one receiver(home theater).
Checkif the Anynet+ device powercord isproperly connected.
Checkthe Anynet+ device's Video/Audio/HDMI 1.3 cable connections.
Checkwhether Anynet+ (HDMI-CEC) isset toOn inthe Anynet+setup menu.
Checkwhether the TV remote control isin TV mode.
Checkwhether it isAnynet+ exclusive remotecontrol.
Anynet+ doesn't work in certain situations. (Searching channels, Operating Media Play,
Plug& Play, etc.)
• When connecting or removing the HDMI1.3 cable, please make sure to searchdevices
againor turnyour TVoff and on again.
• Check if the Anynet+ Function of Anynet+ device isseton.
Iwant to start Anynet+. • Check if the Anynet+ device isproperly connected to the TVand check if the Anynet+
(HBMm-CEC)isset to On in the Anynet+ Setup menu.
• Press the TV button on the TV remote controlto switchtoTV.Then press the TOOLS
button to showtheAnynet+ menu and select a menuyou want.
Iwant to exit Anynet+. • Select ViewTV intheAnynet+ menu.
• Press the SOURCE button on the TVremote control and select a device otherthan
Anynet+ devices.
• Press OH, OH LIST,PRE=CH,and FAV.CHto change the TV mode.
(Notethat the channel button operates only when atuner-embedded Anynet+ device isnot
connected.)
The message Connecting to • You cannot usethe remote controlwhen you areconfiguring Anynet+ orswitching toa view
Anynet+ mode.
device.., appears on the screen, ° Use the remote controlwhen the Anynet+ setting or switching to view mode iscomplete.
TheAnynet+ device does not play. You cannot usethe play function when Plug& Play isin progress.
The connected device is not • Check whether ornot the device supports Anynet+ functions.
displayed. • Check whether ornot the HDMI 1.3 cable isproperly connected.
• Check whetherAnynet+ (HDIVlI=CEC)isset to On in the Anynet+ setup menu.
• SearchAnynet+ devices again.
• You can connect an Anynet+ device using the HDMI 1.3 cable only. Some HDMI cables
may not support Anynet+ functions.
• If it isterminated by an abnormal situation such as disconnecting the HDMIcable or power
cord orapower failure, please repeat the device scan.
The TV program cannot be Check whether the antenna jack on the recording device isproperly connected.
recorded,
The TV sound is not output Connect the optical cable between TV and the receiver.
through the receiver.
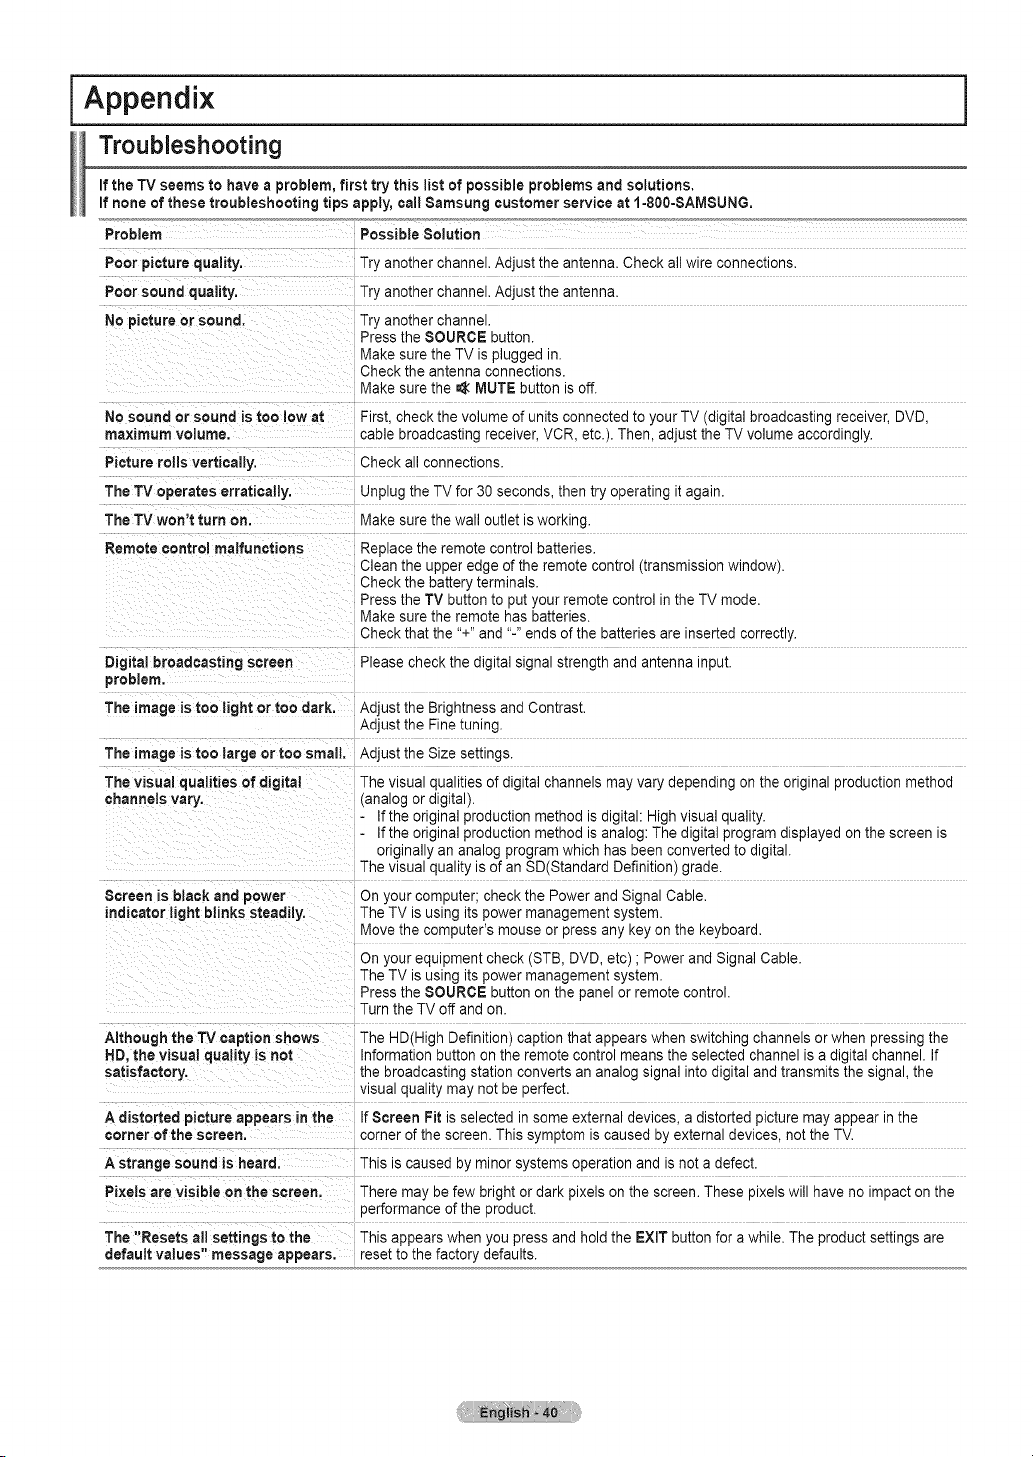
I Appendix
Troubleshooting
ifthe TV seems to haveaproblem, first try this list of possible problems and solutions.
If none of these troubleshooting tips apply,call Samsung customer service at 1=800-SAMSUNG.
Possible Solution
Problem
Poor picturequality.
Poorsound quality.
No picture orsound.
No soundorsound istoo low at
maximum VOlume,
Picture rotls vertically.
Tryanother channel. Adjust the antenna. Check allwire connections.
Tryanother channel. Adjust the antenna.
Tryanother channel.
Pressthe SOURCE button.
Makesure the TV ispluggedin.
Checkthe antenna connections.
Makesure the =_MUTE button isoff.
First. checkthevolume of units connected to your TV(digital broadcasting receiver, DVD,
cable broadcasting receiver, VCR, etc.). Then, adjust the TV volume accordingly.
Checkall connections.
The TV operates erratically. UnplugtheTV for 30 seconds, then try operating it again.
The TV won'tturn on.
Remote control malfunctions
Digital broadcasting screen
problem.
The image istoo light ortoo dark.
Makesure the wall outletisworking.
Replace the remotecontrol batteries.
Cleanthe upperedge of the remote control (transmission window).
Checkthe battery terminals.
Pressthe TVbutton to put your remote control intheTV mode.
Makesure the remote hasbatteries.
Checkthat the "+"and "-"ends of thebatteries areinserted correctly.
Please check the digital signal strength and antenna input.
Adjust the Brightness and Contrast.
Adjust the Fine tuning.
The image is too large ortoo small, Adjust the Size settings.
The visual qualities of digital
channels vary.
Thevisualqualities of digital channels mayvary depending on the original production method
[analog ordigital).
Ifthe original production method isdigital: High visualquality.
Ifthe original production method isanalog: The digital program displayed on the screen is
originally an analog program whichhas been converted to digital.
Thevisualquality isofan SD(Standard Definition) grade.
Screen is black and power Onyourcomputer; check the Power and Signal Cable.
indicator light blinkssteadily, TheTVisusing itspowermanagement system.
Movethe computer's mouseor pressany key onthe keyboard.
On your equipment check (STB, DVD, etc) ; Power and Signal Cable.
TheTVisusing itspowermanagement system.
Pressthe SOURCE button on the panelor remote control.
Turn the TV off and on.
Although the TVcaption shows
HD.the visual quality isnot
satisfactory,
Adistorted picture appears in the
corner of the screen.
Astrange sound is heard.
Pi×els arevisible on the screen.
TheHD(High Definition) caption that appears when switching channels orwhen pressing the
Information button on the remote control meansthe selected channel isa digital channel. If
the broadcasting station converts an analog signal intodigital and transmits the signal, the
vlsua quality may not beperfect.
IfScreen Fit is selected in some externaldevices, adistorted picture mayappear inthe
cornerof the screen.This symptom iscaused by external devices, not the TV.
Thisiscaused by minor systems operation and isnot a defect.
Theremay be few bright or dark pixelson the screen.These pixelswill have no impact on the
oerformance of theproduct.
The "Resets all settings to the Thisappears when you press and holdthe EXiT button for a while. Theproduct settings are
defaultvalues" message appears, rese_to thefactory defaults.
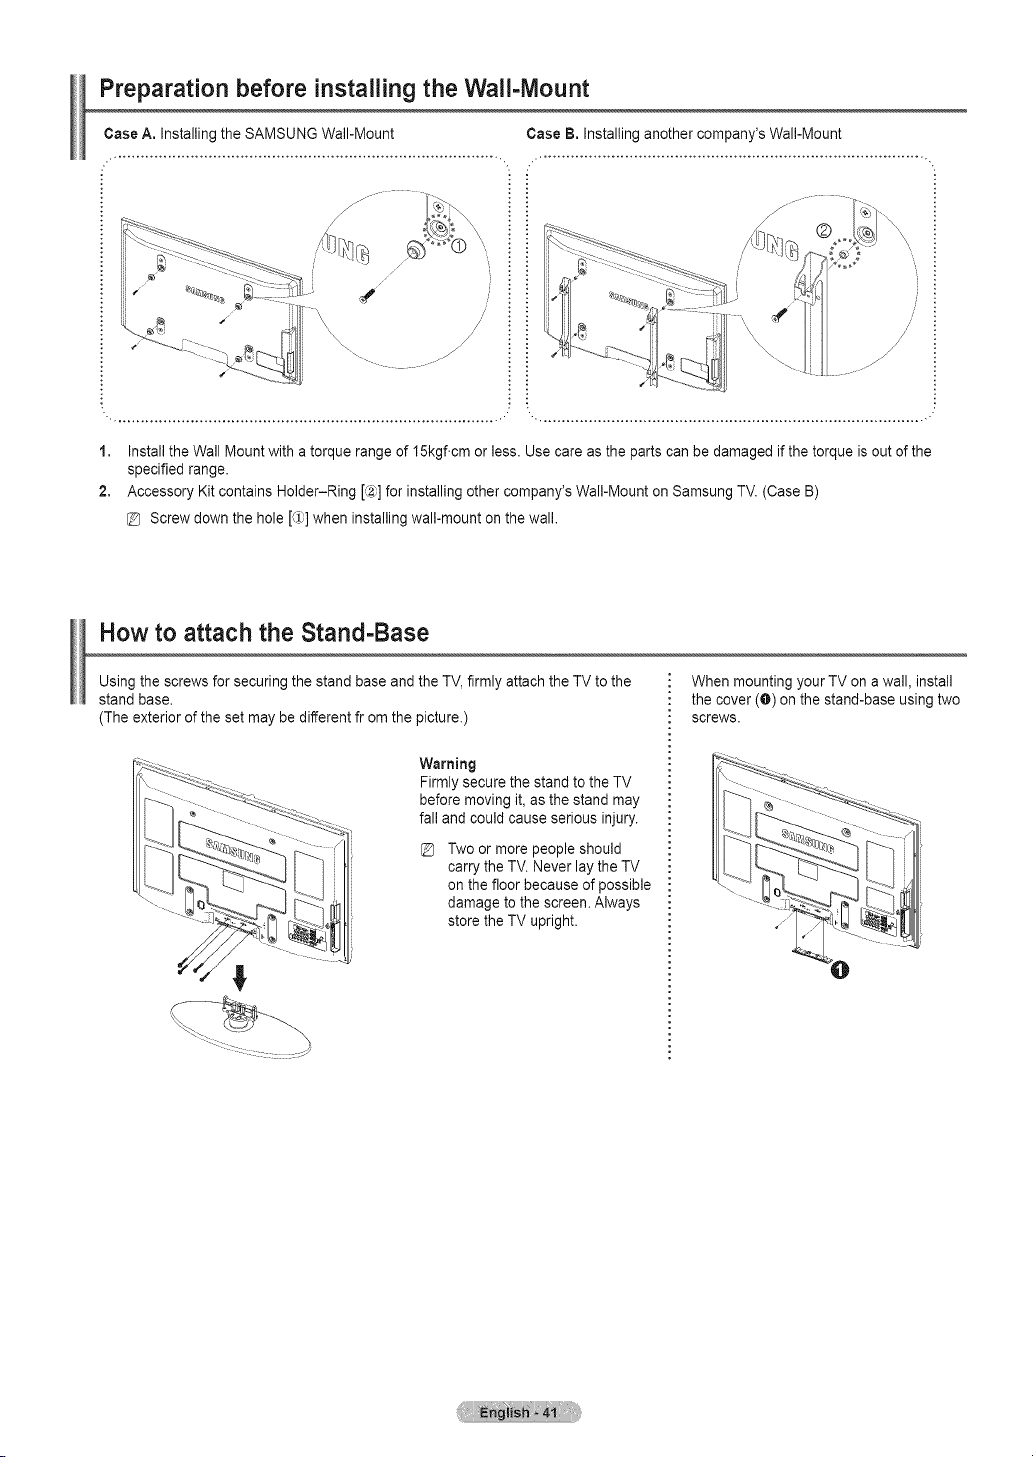
Preparation before installing the Wali-lVlount
Case A. Installing the SAMSUNG Wall-Mount Case B, Installing another company's Wall-Mount
ii
/ i !
/ : :
1, InstalltheWall Mount with atorque range of 15kgf.cm orless. Use care as the parts can be damaged if the torqueisout of the
specified range.
2. Accessory Kitcontains Holder-Ring [,:2_]for installing othercompany's Wall-Mount on Samsung TV. (Case B)
@ Screw down the hole [_1)]when installingwall-mount on the wall.
How to attach the Stand-Base
Using the screws forsecuring the standbase and the TV, firmlyattach the TVto the
stand base.
(The exterior ofthe set maybe different from the picture.)
Warning
Firmlysecurethe standtothe TV
beforemoving it, as the stand may
fall and could cause serious injury.
Two ormore peopleshould
carry the TV.Never lay the TV
on the floor because of possible
damage to thescreen. Always
store the TV upright.
When mounting your TVon awall,install
the cover (O) on the stand-base using two
screws.
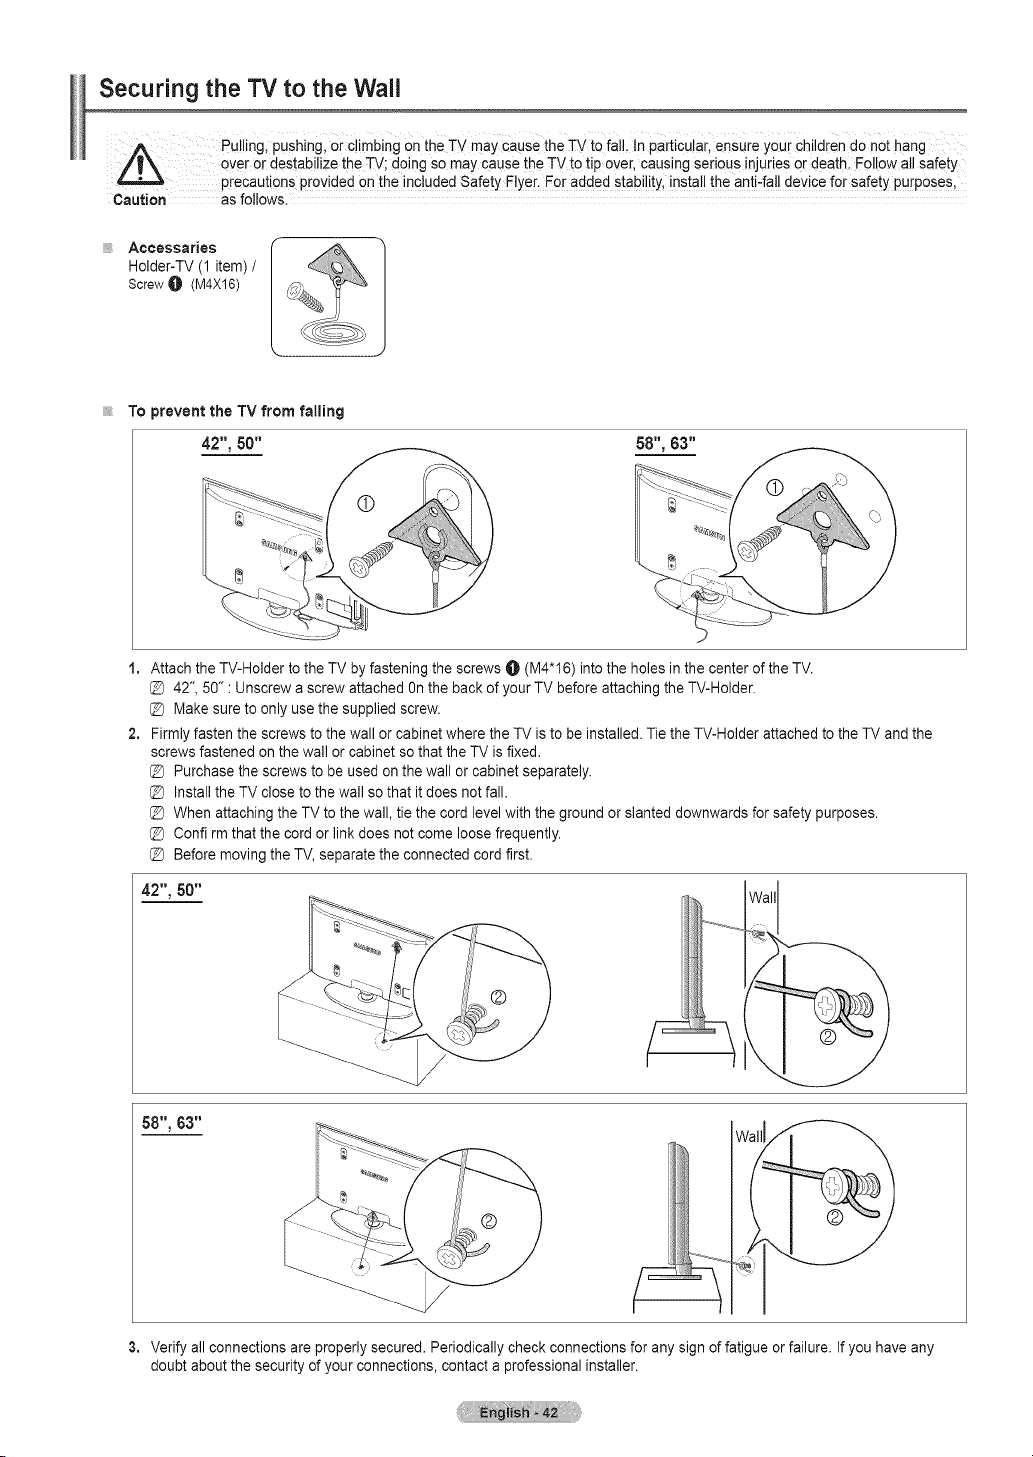
Securing the "IV to the Wall
Pullingl pushingl orc!imbing on the TV maYCausethe TV to fa!!, !nparticu!arl ensure your children do not hang
over or destabilizethe TV;doing somay cause the TVtotip over, causing serious injurieser death, Follow allsafety
precaut ons pr0v ded on thenc uded Safety E yer_For added stab ty, nsta the ant-fa dev ce 1=orsafety purposes,
Caution as follows.
Aceessaries
Holder-TV (1 item) /
ScrewO (M4X16)
To preventthe TVfrom falling
42", 50" 58",63"
1,
2,
Attachthe TV-Holder tothe TV byfastening the screws O (M4"16) into the holes in the center ofthe TV.
@ 42", 50" : Unscrew ascrew attached Onthe back of your TVbefore attaching the TV-Holder.
@ Makesure to only use the supplied screw.
Firmlyfasten the screws to the wall or cabinet where the TV isto be installed. Tie the TV-Holder attachedto the TV and the
screws fastened on the wall orcabinet so that the TV isfixed.
@ Purchase the screws tobe used on the wallor cabinet separately.
@ InstalltheTV close tothe wall sothatit doesnotfall.
@ When attaching the TVto the wall, tiethe cord level with the ground orslanted downwards for safety purposes.
@ Confirm that the cord orlink does not comeloose frequently.
@ Before moving the TV, separate the connected cord first.
42", 50"
58",63"
Wali
3. Verifyall connections areproperly secured. Periodically check connections for any sign offatigue orfailure. If youhave any
doubt about the security of your connections, contact aprofessional installer.

Wall Mount Kit Specifications (VESA)
Install your wall mount on a solid wall perpendicular tothe floor.
When attaching to other building materials, please contact your nearest dealer.
Ifinstalled on aceiling orslanted wall,it mayfalland resultin severe personalinjury.
A
Pr0duct Fami!y inch VE$A speci (A, B) Standard Screw Quantity
19"~22" 100 * 100
M4
23"~29'' 200 * 100
30"~40'' 200 * 200 M6
LCD-TV .... 4
46"~55" 400* 400
57"~70" 800* 400 M8
80" ~ 1400 * 800
42"~ 50" 400*400
58''~ 63" 800*400
PDP-TV M8
70 "~ 800*400
80"~ 1400"800
/L
The standard dimensions forwall mount kits areshown inthe tableabove.
When purchasing our wallmount kit,a detailed installation manualand all parts necessaryfor assembly are provided.
Donot usescrews longer than the standard dimension, as they maycause damagetothe insideofthe TVset.
For wall mounts that do not comply with the VESA standard screw specifications, the length of the screws may differ depending on
their specifications.
Donot usescrews that do not complywith the VESA standard screw specifications.
Donot usefasten the screws too strongly, this may damage the product orcause the product to fall, leading topersonal injury.
Samsung isnot liable forthese kinds ofaccidents.
Samsung isnot liable forproduct damage or personal injury when anon-VESA or non-specified wall mount isused ortheconsumer
fails to follow the product installation instructions.
Our 57" and 63" models do not comply with VESA Specifications. Therefore, you should useour dedicated wall mount kitfor this
model.
Donot exceed 15 degrees tiltwhen mounting thisTV.
Donot installyour Wall Mount Kitwhile your TVisturned on.
Itmay resultin personal injury due to electricshock.
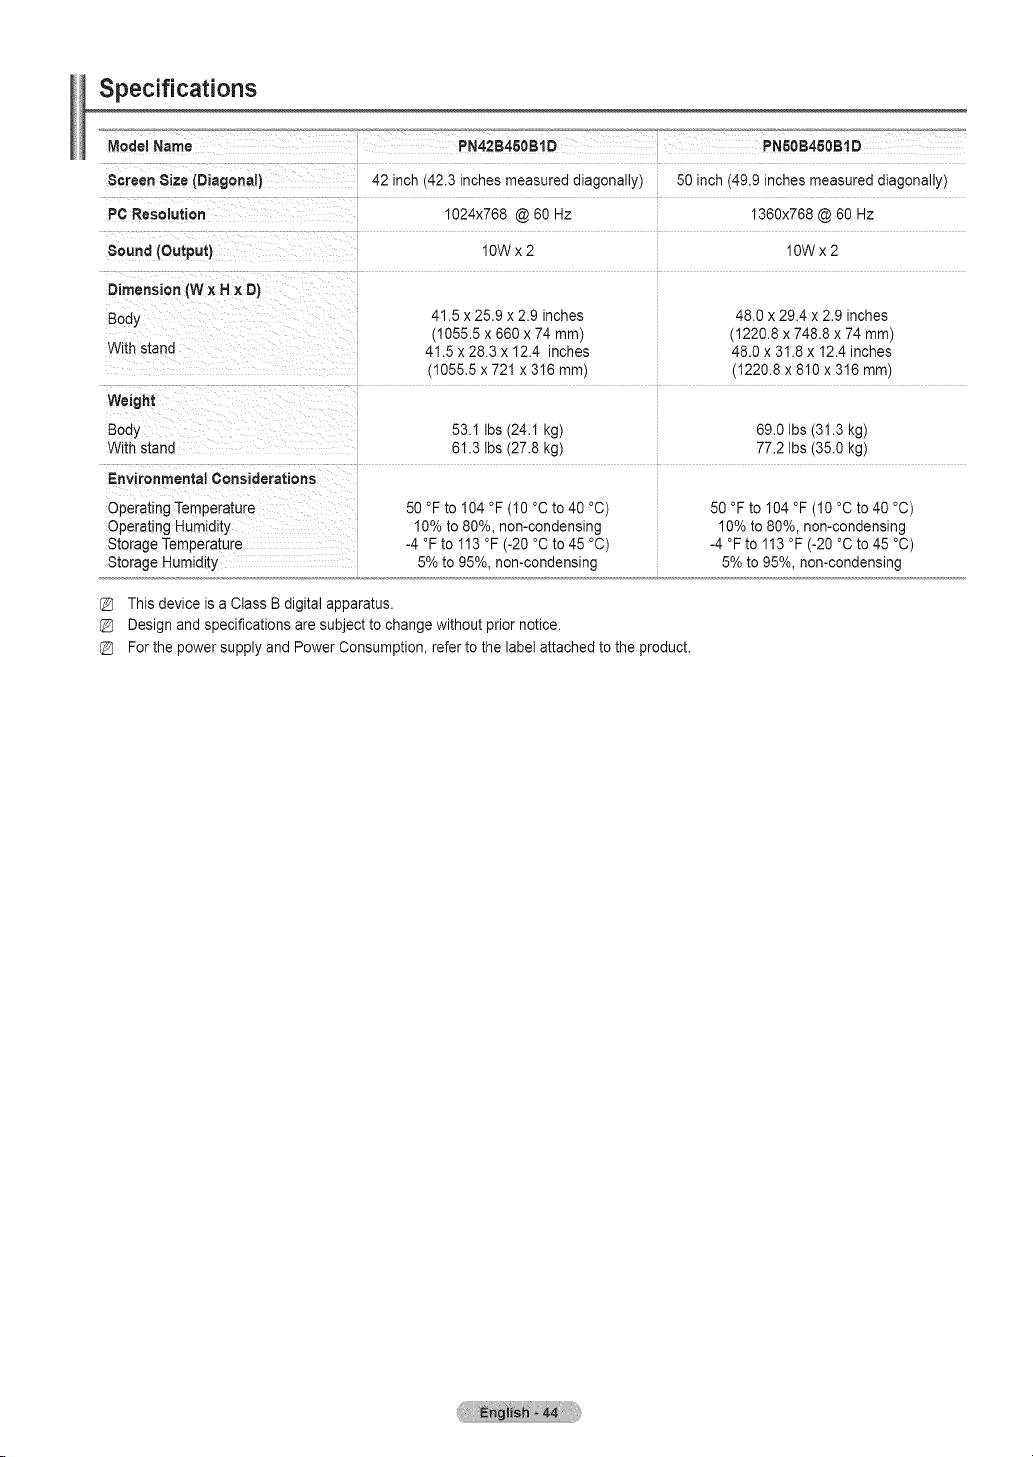
Specifications
Screen S ze(Diagonat)
PC Resolution
Sound (Output)
42 inch(42.3inches measured diagonally) 50inch (49.9inches measured diagonally)
1024x768 @60Hz 1360x768 @60 Hz
10Wx2 10Wx2
Dimension (WxHx D)
Bod_
With stand
41.5 x 25.9 x 2.9 inches
(1055.5 x 660 x 74 mm)
41.5 x 28.3 x 12.4 inches
(1055.5 x 721 x 316 mm)
48.0 x 29.4 x 2.9 inches
(1220.8 x 746.8 x 74 mm)
48.0 x 31.8 x 12.4 inches
(1220.8 x 810 x 316 mm)
Weight
Body
With stand
Environmental Considerations
Operating Temperature
Operating Humidity
Storage Temperature
Storage Humidity
53.1 Ibs (24.1kg)
61.3 Ibs(27.8kg)
50 °Fto 104 °F (10°Cto 40°C)
10%to 80%, non-condensing
-4 °Fto 113 °F (-20 °C to45 °C)
5%to 95%, non-condensing
69.0 Ibs (31.3kg)
77.2 Ibs (35.0kg)
50 °Fto 104 °F (10°Cto 40°C)
10%to 80%, non-condensing
-4 °Fto 113 °F (-20°Cto45 °C)
5%to95%, non-condensing
This device isaClass B digital apparatus.
Design and specifications are subjectto change without prior notice.
For the powersupply and Power Consumption, refer to the labe} attachedto the product.

Dimensions (PN42B450B1 D)
/ :z:z::z : I _ r T ....
i _ 369
[
[ I
[
[
\ J
TOP VIEW FRONTVIEW
JAC'K PANEL DETAIL 7;2X &7 inches
'i
'i
'i
'i
[ i]qi::
15 7(400ram)
81DE VIEW REARVIEW
NOTE: All drawings not necessarily to scale Some
dimensions are subject to change without prior notice.
Refer to dimensions on each unit prior to performiag
any carpentry Not responsible for typographical or
printed errors
© 2009 Samsung Electronics America, Inc
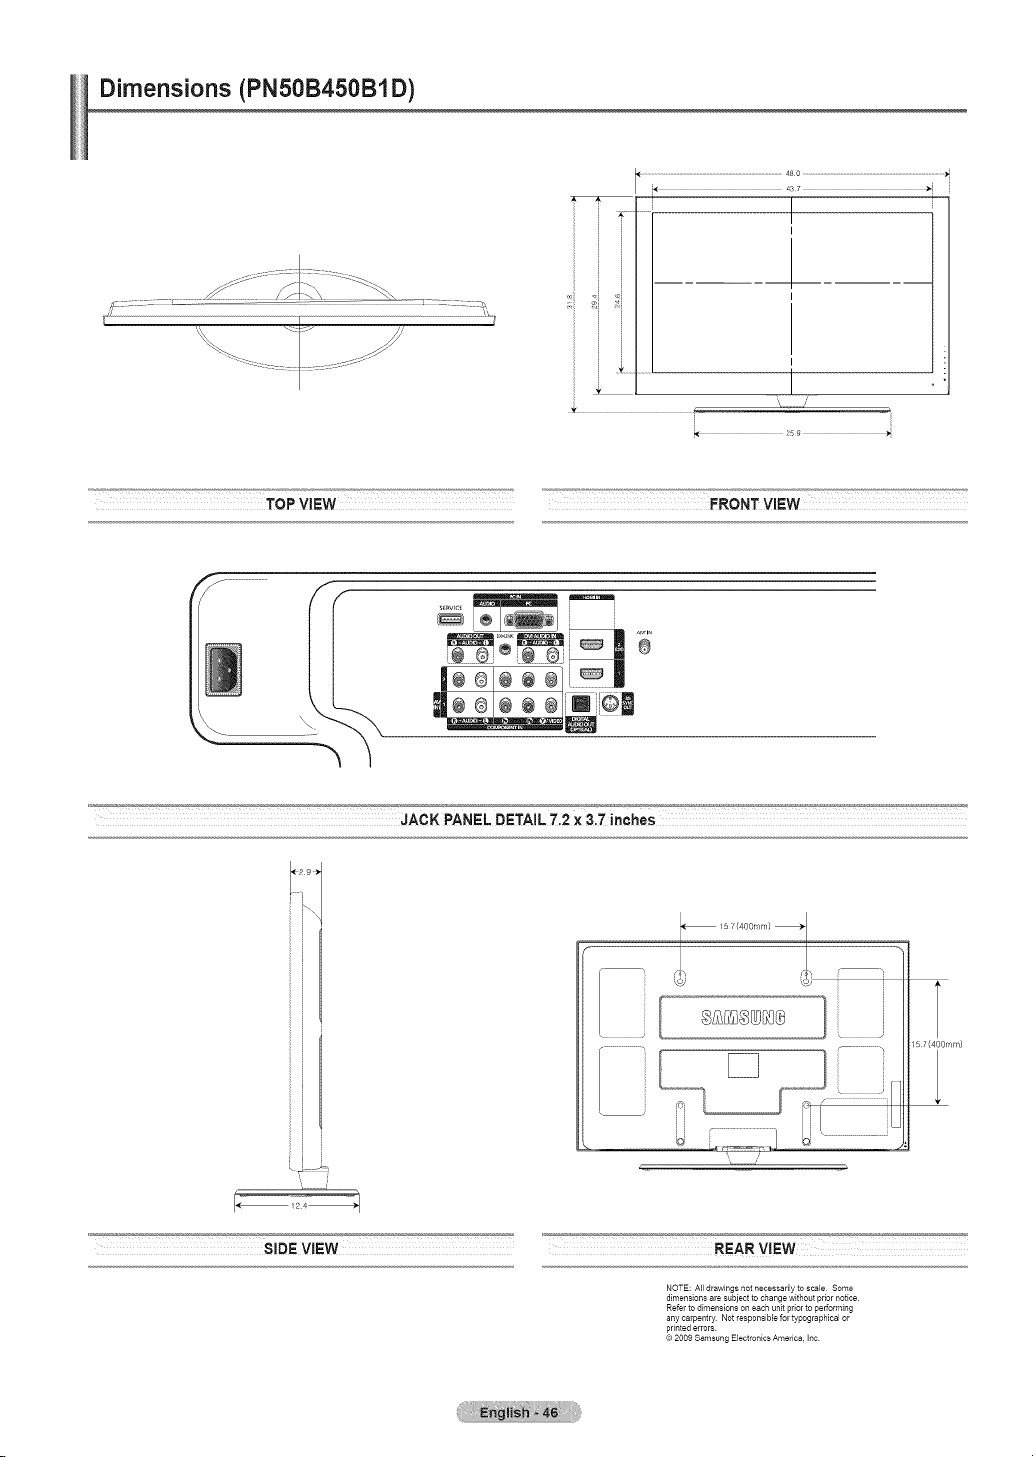
Dimensions (PNSOB450B1D)
I
i T
J
i \ /
................................................................................................4SO ...............................................................................................
487
I
I
TOP VIEW FRONT VIEW
# !i # !_
I÷®1÷÷ ®1i_ii
m",om
JACK PANEL DETAIL7.2X 3
'i
'i
'i
ii i
_ /5 £(400rnm}
L _J:_i:1 i, iiiiiiiiiiiiiiiiiii]
-Z
15 7(400ram)
•SIDEVIEW REEARVIEW
NOTE: All drawings not necessadly to scale Some
dimensions are subject to change without prior notice
Refer to dimensions on each unit prior to performing
any carpentry Not responsible for typographical or
printed errors
© 2009 Samsung Electronics America, Inc
Informaci6nimportantesobrelagarantJarelativaalformatodevisualizaci6ndeltelevisori
Laspantallas PDP conformato de pantalla panoramica (16:9,la relaci6n de aspecto ancho:alto de la pantalla)estan dise5adas
principalmente para visualizar videos de movimiento de formato panoramico. En estas pantallas debe ver las imagenes enel formato 16:9
de pantalla panoramica o ampliadas para Ilenar la pantalla siel modelotiene esta opci6n, yen movimiento constante. La visualizaci6n de
imageries y graficos estaticos en la pantalla, comolas barras oscuras laterales en programaci6ny videos de televisi6n en formato estandar
no ampliados, debe limitarsea nomas del 5% del tiempo total de visualizaci6n del televisor pot semana.
Ademas, la visualizaci6n de otras imagenes estaticas y texto, como losinformes debolsa, pantallas de videojuegos, Iogotipos de
emisoras, sitiosWeb o graficos y dibujos de ordenador, debera limitarse en todos los televisores como yase ha descrito. Lavisuaiiza¢ion
de imbgenes estaticas que supere loslimites de las instrucciones anteriores puede preducir un envejecimiento desJgual de
ias pantalias PDP, Ioque provocar_ una reproduccibn superpuesta sutil pero permanente de laimagen. Para evitarlo, varie la
programacion y ias imageries y, sobre todo,visualice imageries en movimJento a toda pantalla, no gr_ficos estaticos nibarras
oscuras,
En modelos de PDP que ofrezcan opciones parael tamar_o de la imagen,utilice estos controles para ver los distintos formatos como
imagena toda pantalla.
Tenga cuidado en laselecci6n y duraci6n de los formatos de televisi6n utilizadospara la visualizaci6n. La garantia limitada de Samsung no
cubre el envejecimiento desigual de la PDPcomo resultado delaselecci6n y usodeformatos, asi como otras imageries retenidas.
S61oEE,UU,
La unidad del producto que se incluye con este manualdel usuario se suministra con licencia bajoderechos de propiedad intelectual
de otras empresas. En concreto, este producto se suministracon licencia bajo lassiguientes patentes de EE.UU.: 5,991,715,
5,740,317, 4,972,484, 5,214,678, 5,323,396, 5,539,829, 5,606,618, 5,530,655, 5,777,992, 6,289,308, 5,610,985, 5,481,643,
5,544,247, 5,960,037, 6,023,490, 5,878,080y bajo elnQmero de aplicaci6n de patentes publicadas de EE.UU. 2001-44713-A1.
Estalicencia esta limitadaal uso no comercial privado de consumidores que seanusuarios finales para contenido con licencia. No
se otorganingQn derecho para usocomercial. La licencia nocubre ninguna unidad del producto que no sea esta y la licencia no se
extiende a ningunaunidad delproducto o proceso sinlicencia en conformidad con elISO/IEC 11172-3 o ISO/IEC 13818-3 utilizada
ovendida en combinaci6n con estaunidad del producto. La licencias61ocubre eluso de esta unidadpara codificary/o descodificar
archivos de audio en conformidad con el ISO/IEC 11172-3o ISO/IEC 13818-3. Noseotorganingt_nderecho bajo esta licenciapara
caracteristicas ofunciones del producto que noest_n conformes con el ISO/IEC 11172-3o ISO/IEC 13818-3.
Otros paises
La unidad del producto que se incluye con este manualdel usuario se suministra con licencia bajoderechos de propiedad intelectual
de otras empresas. Estalicencia esta limitada al usonocomercial privadode consumidores que sean usuarios finales para
contenido conlicencia. No se otorga ningt_nderecho para usocomercial. La licencia no cubre ninguna unidad del producto que no
sea _sta yla licencia no se extiende a ninguna unidad del producto o procesosinlicencia enconformidad con el ISO/IEC 11172-3
o ISO/IEC 13818-3 utilizada o vendida en combinaci6n con esta unidad del producto. La licencia s61ocubre el uso de esta unidad
paracodificary/o descodificar archivos de audio en conformidad conel ISO/IEC 11172-3 o ISO/IEC 13818-3. Nose otorga ningt_n
derecho bajoesta licencia paracaracteristicas o funciones del producto que no est6n conformes con el ISO/IEC 11172-3 oISO/IEC
13818-3.
@2009 Samsung Electronics Co., Ltd. Reservados todos los derechos.
I lnstrucciones para el usuario
O Retencion de im_genes enla pantalla
Nodeje imagenes fijas visibles (como lasde un videojuego) en el paneldela pantalla de plasma durante muchotiempo, ya que se
podria producir la retenci6n de la imagen en la misma. Estefen6meno de retenci6n de imagenes tambi_n se denomina "quemadura de
pantalla". Para evitar dicha retenci6n de la imagen, consulte lapagina 23 de este manualpara reducir el gradode brillo y contraste de
la pantalla al mostrar una imagenfija.
Altitud
La PDP s61opuede funcionar normalmente hastaaltitudes de 2.000 metros.
Calor en ia parte superior del TVde plasma
La parte superior del aparato puede calentarse tras un uso prolongado ya que el calorse disipa desde el panel a traves de losorificios
de ventilaci6n de la partesuperior.
Esto es normal y no indica ningt_ndefecto ni fallo defuncionamiento delaparato.
Noobstante, debe evitarse que los niSos toquen la parte superior del aparato.
El aparato emite una especie de crujido.
El ruido similaraun crujido puede producirse cuando elaparato secontrae o se expande debidoaun cambio ambiental detemperatura
ohumedad. Estehechoes normal y no se trata de ningOndefecto enla unidad.
Defecto decelda
La PDP utiliza un panel compuesto de 2,360,000 (nivel HD) a 6,221,000(nivel FHD) pixeles que requieren una sofisticada tecnologia
para su producci6n. No obstante,puede que existan unos cuantos pixeles brillantes uoscuros en la pantalla. Estos pixeles no influiran
en el rendimiento del aparato.
Evite que el TVfuncione a temperaturas por debajo de41°F (G°C)
La imagen fija visualizada durante demasiado tiempo puede causar dahos permanentes enelpanel de ia PDP.
VerelTV de plasma en formato 4:3 durante untiempo prolongado puededejar rastros de bordes en la
izquierda, derecha o centrode la pantalla causados por la diferencia de emisi6n de luzen la pantalla.
La reproducci6n de un DVDo el usode una consola de videojuegos pueden provocar un efectosimilar en
la pantalla.
Los dar_osprovocados porlosefectos mencionados no quedan cubiertos porla garantia.
Imageries fantasma en lapantalla.
Verimagenes fijas de videojuegos y PC durante un periodo prolongado puede producir restosde imagenes parciales.
Para evitar este efecto, reduzca el 'brillo' y el 'contraste' al mostrar imageries fijas durante un tiempo prolongado.
Garantia
La garantia no cubre ningQndar_ocausado porla retenci6n de imagenes.
La garantia no cubre el desgaste de la pantalla.
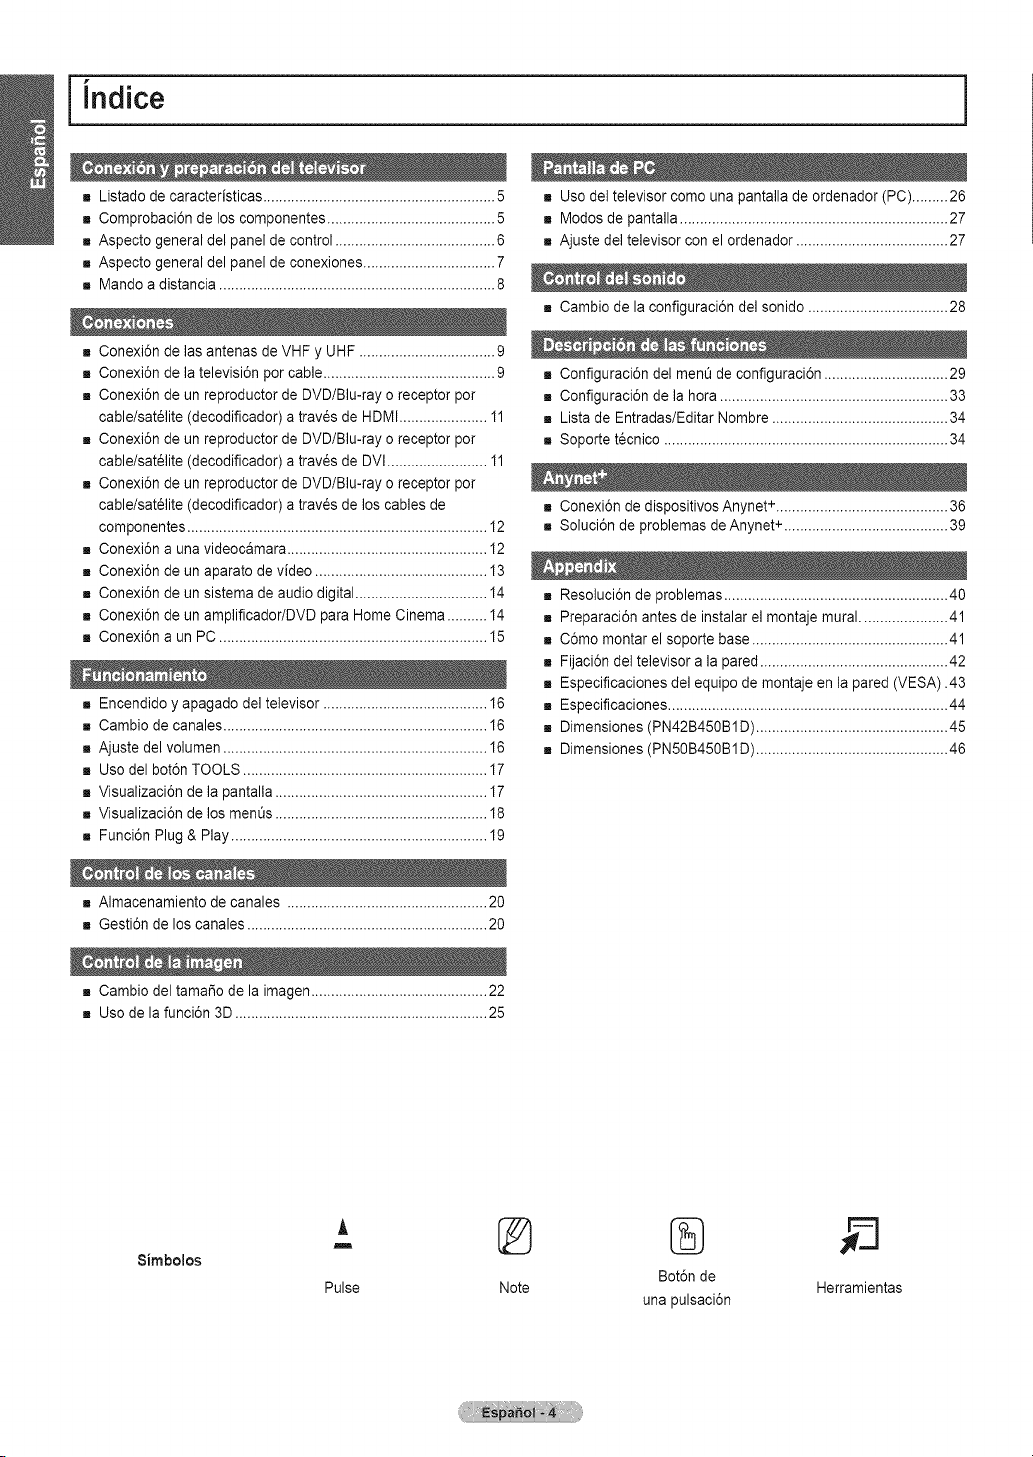
[ indite
,,,Listado de caracteristicas .......................................................... 5
,,,Comprobaci6n de loscomponentes.......................................... 5
,,,Aspecto general del panelde control ........................................6
,,,Aspecto general del panelde conexiones................................. 7
,,,Mando a distancia ..................................................................... 8
,,,Conexi6n de lasantenas de VHF y UHF ..................................9
,,,Conexi6n de la televisi6n por cable ........................................... 9
,,,Conexi6n de unreproductor de DVD/Blu-rayo receptor por
cable/sat_lite (decodificador) atray,s de HDMI...................... 11
,,,Conexi6n de unreproductor de DVD/Blu-rayo receptor por
cable/sat_lite (decodificador) atrav6sde DVl......................... 11
,,,Conexi6n de unreproductor de DVD/Blu-rayo receptor por
cable/sat_lite (decodificador) atrav6sde los cables de
componentes........................................................................... 12
,,,Conexi6n auna videocamara.................................................. 12
,,,Conexi6n de unaparato de video ........................................... 13
,,,Conexi6n de unsistemade audio digital................................. 14
,,,Conexi6n de unamplificador/DVD paraHome Cinema.......... 14
,,,Conexi6n aun PC ................................................................... 15
,,,Encendido y apagado deltelevisor ......................................... 16
mCambio de canales.................................................................. 16
,,,Ajuste del volumen.................................................................. 16
,,,Uso del bot6n TOOLS ............................................................. 17
,,,Visualizaci6n de la pantalla ..................................................... 17
,,,Visualizaci6n de losment_s..................................................... 18
,,,Funci6n Plug& Play ................................................................ 19
,,,Almacenamiento de canales .................................................. 20
,,,Gesti6n de loscanales............................................................ 20
,,,Cambio deltamaifio de la imagen ............................................22
,,,Uso de la funci6n 3D............................................................... 25
,,, Usodel televisor comouna pantalla de ordenador (PC).........26
,,, Modos de pantalla ................................................................... 27
,,,Ajuste del televisor conel ordenador ......................................27
,,, Cambiode la configuraci6n delsonido ...................................28
,,, Configuraci6n del ment_de configuraci6n ............................... 29
,,, Configuraci6n de la hora......................................................... 33
,,, Lista de Entradas/Editar Nombre ............................................ 34
,,, Soporte t_cnico ....................................................................... 34
,,, Conexi6n de dispositivosAnynet +........................................... 36
,,, Soluci6n de problemas de Anynet+.........................................39
,,, Resoluci6n deproblemas ........................................................ 40
,,, Preparaci6n antes de instalar el montajemural ......................41
,,, C6mo montar el soporte base................................................. 41
,,, Fijaci6ndel televisor a la pared ............................................... 42
,,, Especificaciones del equipode montaje enla pared(VESA).43
,,, Especificaciones...................................................................... 44
= Dimensiones (PN42B450B1D) ................................................ 45
,,, Dimensiones (PN50B450B1D) ................................................ 46
Simbolos
A
m
Pulse
Bot6nde
Note Herramientas
una pulsaci6n
Conexi6n y preparaci6n del televisor
Listado de caracteristicas
• Valores ajustables de la imagenque se pueden almacenar en la memoria deltelevisor.
• Temporizador automatico paraencender oapagar el televisor.
• Temporizador de desconexi6n especial.
• Funci6n V-chip.
• Excelente interfaz digitaly capacidad detrabajo en red
Elsintonizador digital HDincorporado permite ver las emisiones HDque no exigen una suscripci6n sin que sea necesario disponer
de unreceptor de televisi6n porcable/satelite (decodificador).
• Conexi6n HDMI/DVl del PC con estetelevisor.
• SRSTruSurround HDproporciona un sistema surround virtual.
Comprobaci6n de loscomponentes
Compruebe que los articulos siguientes vengan ineluidos con su televisor. 8i falta alguno, pongase encontacto con su
distribuidor.
Elcolor y laforma delos componentes pueden variar seg_n el mode]o.
Mandoadistancia Cablede alimentaci6n Manualdelusuario/ Tarjetade garantia/ Patiodelimpieza
(BN59-00852A)/ (3903-000144) Guia deconfiguraci6n r&pida Manualdeeeguridad (BN63-01798B)
PitasAAA (4301-000103) (Nodisponibleen todos los
lugares)
Nt_cleode ferritapara Nt_cteode ferritapara Cubiertainferior Soportesanilia(4) SoporteTV /Tornillos
cable dealimentacion cable de AV lateral (Consultelapagina40) (Consuttelapagina40) (Consultelapagina42)
(3301-001305) (3301-001201)
i_i iiiii_ ii_i i__
Torniltos(4)
N_cleo de ferrita
Losn_cleos de ferrita se utilizan para proteger los cables de lasinterferencias.
Cuando conecte un cable, abra el nt_cleodeferrita y suj_telo con un cable cerca del
enchufe.
\_ iti
Cablede Cabledeaudio/cabledevideo
alimentaci6n ($61oPN58B550T2F)
....................................................
Aspecto general del panel de control
Los botonesde laparte inferiorderechadelpanel controlanlas funciones basicas deltelevisor,incluidos losmenusen pantalla.
Parautilizar las funciones raas avanzadas debeusarseelmando a distancia.
Elcolor y iaforma del producto pueden variar seg_nel modelo.
Sitoca el bot6n del panelfrontal, se activan losbotones.
...........................................................................................................
SAMSUNG
e
,/ v I
O
0
O
O
O
0
O
80URCEI_j
Cambiaentretodas lasfuentes de entrada disponibles
(TV,AV1,AV2, Componentel, Componente2, PC, HDMI1, HDMI2/DVI, HDMI3).
En el menu de la pantalla, utilice este bot6n del mismo modo que el bot6n ENTER[3_ del mando a distancia.
MENU
POlseloparaver en pantalla un menu delas caracteristicas del televisor.
+VOL =
POlselosparasubiro bajar el volumen. En el menu de la pantalla, uselos botones+VOL =del mismo modo que losbotones
y _. de] mando a distancia.
ACHV
Permitencambiarde canal.En elmenO de lapantalla,use losbotonesA OH V delmismo modo que losbotonesA y T del
mando a distancia.
INDIOADOR DE ENOENDIDO
Parpadea y se apaga cuandose enciende el aparato y se iluminaen el modo en espera.
(ENCENDmDO)
Sepulsaparaencendero apagarel televisor.
SENSOR DELMANDO A DISTANClA
Elmando a distancia debe dirigirse hacia estepunto del televisor.
O ALTAVOCE8
Aspecto general dei panel de conexiones
Use losterminales deipanel de conexion paraconectar componentes de AN que estar_n disponibles permanentemente,
como un reproduetor de Blu-ray/DVD o un aparato devideo,
E_osterior del TV
Panel lateraldel TV
: ANTIN :
@
@
O POWER IN
Permiteconectar elcable de alimentaci6n suministrado.
O 3DSYNC OUT
Conexi6n para un emisorde infrarrojos3D.
O SERVICE
$61oparaservicio.
DIGITAL AUDIO OUT(OPTICAL)
Se conecta al componente de audio digital.
O
O
O
O
@
AUDIO OUT
Conexi6n paraun componente de audiodigital.
PC iN[PC] / [AUDIO]
Conexi6n paralos terminales de salidade audio y video del
PC.
DVI IN(HDMI2)(AUDIO-RIL)
Conexi6n parael terminalde sa]ida de audio DVI deun
dispositivo externo.
HDMIIN1, 2, 3, 4
Conexi6n parael terminal HDMI de un dispositivo que tenga
salida HDMI. (HDMI2es compatible con HDMI-DVI INy con
la conexi6n de un ordenador.)
HDMI2 se puede utilizar tambi6ncomo una conexi6n
DVI conentradas de set,ales de audio anal6gicas
independientes. Para realizaresta conexi6n se requiere
un cable opcional HDMI/DVI.
Cuando se usaunadaptador HDMI/DVI. lasentradas de
seSalesde audioanal6gicas DVI deltelevisor permiten
recibirset,ales deaudio pot lasentradas derecha e
izquierda desde undispositivo DVI.
ANT IN
Usa un conector coaxialde 75 _ paraantena o red pot
cable.
@ COMPONENT IN1, 2/AV IN 1
Permite conectarel video/audio decomponentes. Elterminal
COMPONENT INI tambi_nse usa comoterminal AV IN1.
@ Conecte el cable de video al terminal COMPONENT
IN1[Y/VIDEO]y el cable de audio a losterminales
COMPONENT IN I [R-AUDIO-L].
EX-LINK
$61opara servicio.
li_ AVIN2
Entradas de audioy video paradispositivos externos.
Mando a distancia
Puede utilizar el mando a una distancia del televisor de hasta 7 metros,
El color y la forma del producto pueden variar seg_n el modelo.
El exceso de luz puede influir en el rendimiento del mando a distancia.
¢,.==
._...@
--4)
@
POWER TV
t .....
e---4IZ] I:Z]',
i i
i i
e II-L:J L
______'___-_ , _---_--J,,
_ANSUNG
<T
O POWER
Enciende y apaga et televisor.
BOTONES NUM_:RICOS
Permiten cambiar de canal.
e
0
0
0
0
0
Q
@
@
@
@
Permite seleccionar canales adicionales
(digitales y anal6gicos) emitidos por ta misma
emisora. Porejemplo, para seieccionar el canal
"54-3", pulse "54" y despues pulse ",_-_"y "3".
@MUTE
Interrumpe temporaimente et sonido.
_+ VOL [Zi
Permiten subir o bajar et volumen.
SOURCE
Permite very seleccionar tas fuentes de
video disponibles.
CH LIST
Muestra las listas de canales en ta pantalla.
TOOLS
Permite seleccionar rapidamente tas
@
funciones que se usan con mayor
frecuencia.
ARRIBA AIABAJO V lIZQUIERDA _I
DERECHAP'/ENTER
Permiten seleccionar los elementos del !_
merit] en pantalta y cambiar los valores det
men& t_
INFO
Muestra informacion en ta pantaita det
televisor.
BOTONES DE COLORES
Use estos botches en ta tista de canales.
&MODE
Permite seleccionar el mode de ta sonido.
P.MODE
Permite seleccionar el mode de ta imagen.
Utitice estos botches en tos modes DMAy
Anynet +.('#: Este mando a distancia se
puede usar para controlar la grabaci6n de
las grabadoras de Samsung con la funcion
Anynet+).
TV
Setecciona directamente et modo TV.
PRE-OH
Sintoniza el canal anterior.
Permiten cambiar de canal.
@ MENU
Muestra et menu en ta pantaila,
_) FAV.CH
Permite sintonizar los canales favoritos.
_) RETURN
Vuelve ai menOanterior.
EXIT
Se pulsa para salir del men&
P.SIZE
Setecci6n del tamaSo de la imagen.
SRS
Setecciona el mode Trusurround SRS HD.
CO
Controta el decodificador de subtitu!os.
MTS
Permite elegir estereo, monoaura! o un
programa de audio independiente (emisi6n
SAP).
1
2
instalacibnde laspilas en elmandoa distancia
Levante la tapa de la parte posterior del mando a distancia, corno se muestra en la ilustraci6n.
Instale dos pilas de tamai_o AAA.
Asegt_rese de respetar los extremos "+" y "-" de las pilas indicados en el diagrama del interior de]
compartimento.
Cierre la tapa, como se muestra en la ilustraci6n.
Saque las pilas y guardelas en un lugar fresco y seco si no va a utilizar el mando a distancia durante
un periodo de tiempo prolongado. (Suponiendo un uso normal del televisor, las pilas deberian durar
aproximadamente un a_o.)
Si el mando a distancia no funciona, haga estas comprobaciones
1. _,Esta encendido el televisor?
2. _,Estan intercambiados los polos positivos y negativos de las pilas?
3. _,Se han agotado las pilas?
4. _,Ha habido un corte de energia o se ha desenchufado el cable?
5. _,Hay en las proximidades un fluorescente o un ne6n?
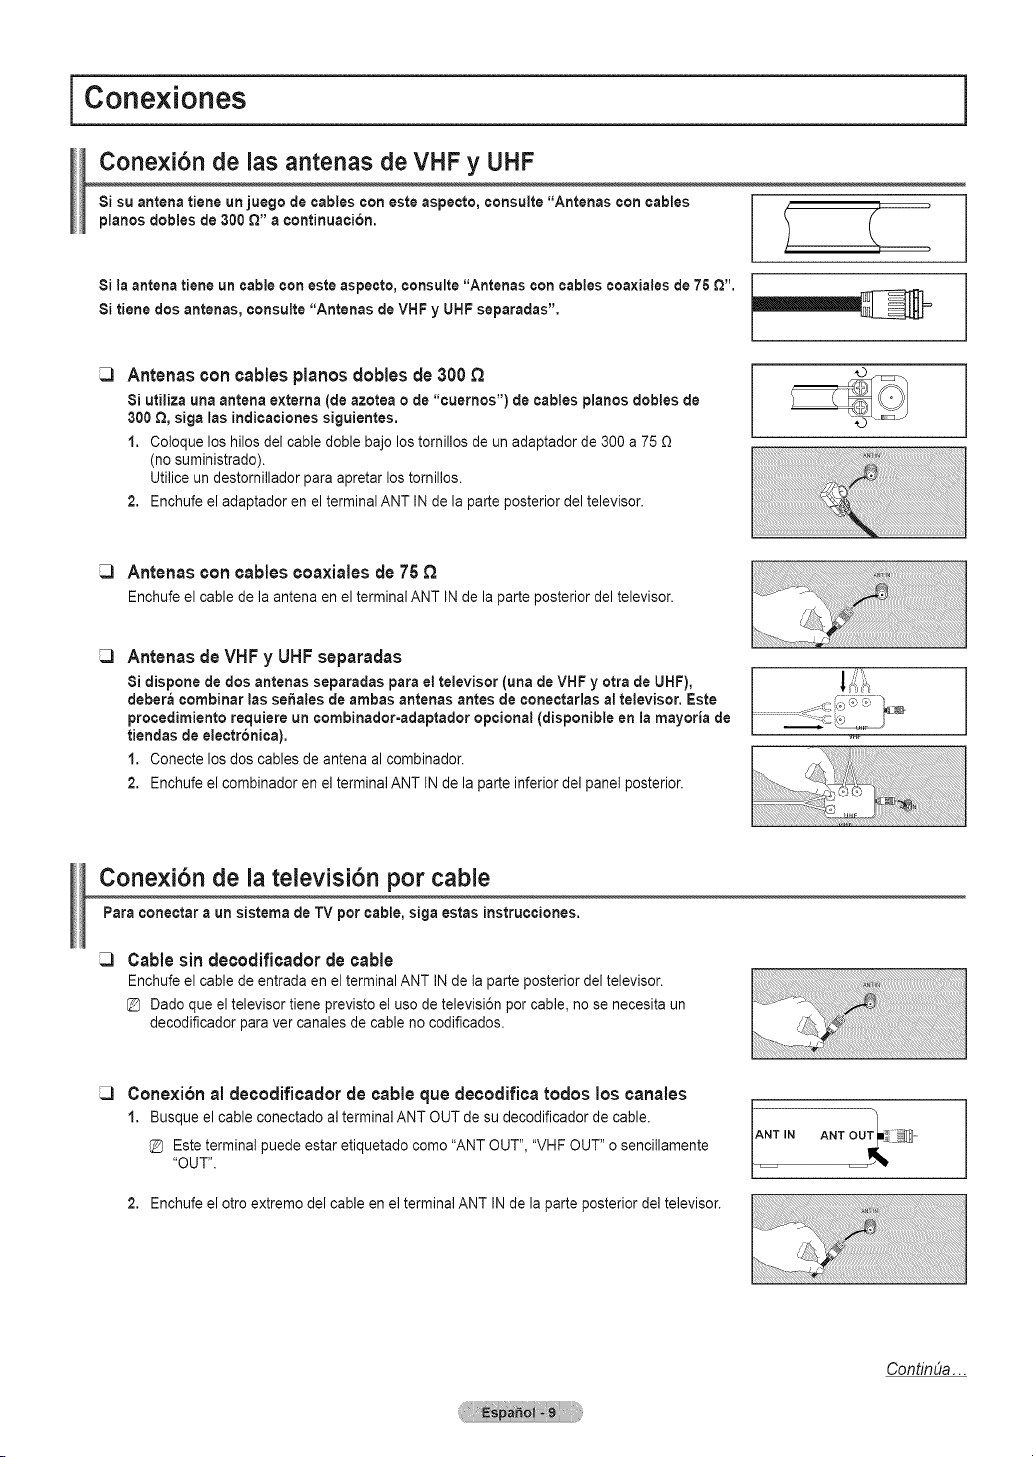
I Conexiones
Cone×i6n de las antenas de VHF y UHF
Si suantena tiene un juego de cables con esteaspecto, consulte "Antenas con cables
pianos dobles de300 £_"a continuation.
Si la antena tiene un cable con esteaspecto, consulte "Antenas con cables coaxialesde 75 Q".
Si tiene dos antenas, consulte "Antenas deVHF y UHF separadas", ll!=_=_=_=__
Antenas con cables pianos dobles de 300
Si utiliza una antena externa (de azotea o de"cuernos') decables pianos dobles de
300 _, siga las indicaciones siguientes,
1. Coloque loshilos delcabledoble bajo los tornillos de un adaptador de 300 a75 £)
(nosuministrado).
Utiliceun destornillador paraapretar los tomillos.
2. Enchufe el adaptador en el terminal ANT INde la parle posterior del televisor.
Antenas concables ¢oaxialesde 75
Enchufe el cable de la antena en el terminal ANT INde la parte posterior deltelevisor.
Antenas de VHF y UHF separadas
8i dispone de dos antenas separadas para ettelevisor (una de VHFy otrade UHF),
debera combinar las sehales deambas antenas antes de conectarlas al televisor, Este
procedimiento requiere un combinador-adaptador optional (disponible enlamayoria de
tiendas de electronica).
1. Conecte losdoscables de antena al combinador.
2. Enchufe el combinador en el terminal ANT INde la parte inferior delpanel posterior.
Conexi6n de la televisi6n per cable
Para conectar aun sistema de TVper cable, siga estasinstrucciones.
Cablesin decodificadordecable
Enchufe el cable de entrada enelterminal ANTINde la parte posterior del televisor.
@ Dado que el televisor tiene previsto el usedetelevisi6n per cable, no se necesita un
decodificador paraver canales decable no codificados.
Conexi6nal decodificadorde cable quedecodificaredes los eanales
1. Busque el cable conectado al ten-ninalANTOUT desu decodificador de cable.
Esteterminal puede estar etiquetado come"ANT OUT", "VHFOUT" o sencillamente
"OUT".
2. Enchufe el otroextreme del cable enelterminalANT INde la parteposterior de] televisor.
ContinUa...
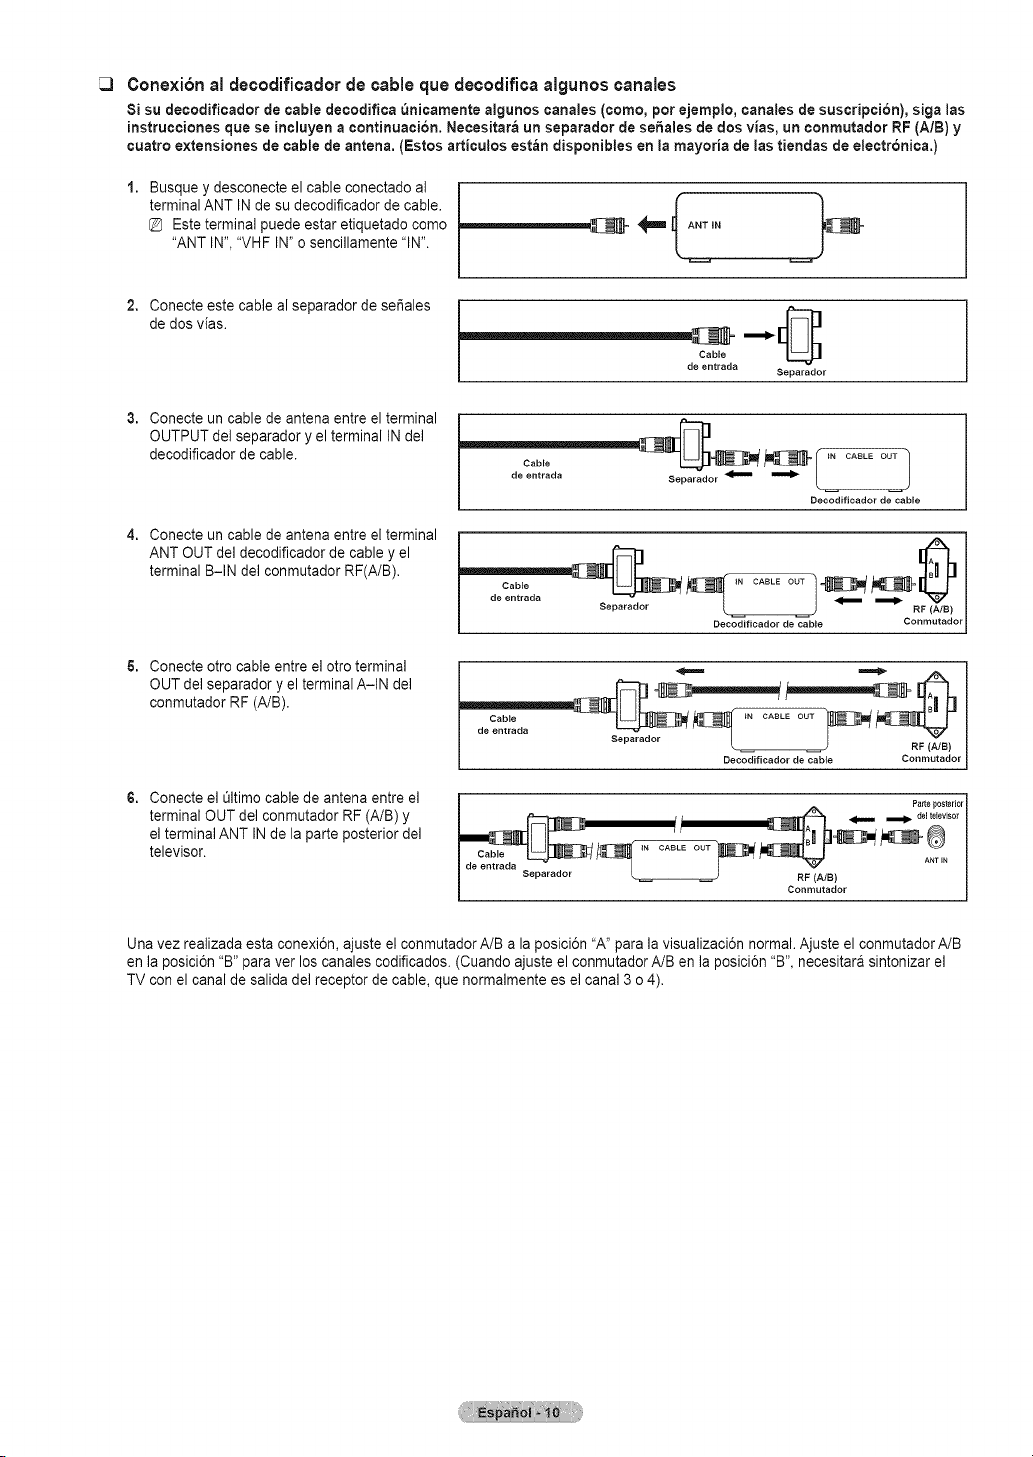
Cone×i6n _l decodific_clor de ¢_ble que decodifica _lgunos ¢an_les
8i su decodiflcador de cable decodiflca _nicarnente algunos canales (corno, porejernplo,canaies de suscripci6n), sigaias
instrucciones que se incluyen a continuaci6n. Necesitara un separador desehaies dedos vias, un conmutador RF (A/B) y
cuatro extensiones de cable de antena. (Estos articulos estbn disponibles en ia mayoria de ias tiendas de electr6nica.)
Busque y desconecte el cable conectado al
terminal ANTIN de su decodificador de cable.
Esteterminal puede estar etiquetado como
"ANT IN","VHF IN" o sencillamente"IN".
' 'fANT'N
Conecteeste cable al separador de set,ales
de dos vias.
Cable
de erltrada
Separador
Conecteun cable de antena entreel terminal
OUTPUT del separador y el terminal INdel
decodificador de cable.
Conecteun cable de antena entreel terminal
ANT OUT del decodificador de cable y el
terminal B-IN del conmutador RF(A/B).
Conecteotro cable entreel otroterminal
OUT del separador y elterminal A-IN del
conmutador RF(A/B).
Conecteel L_ltimocablede antena entre el
terminal OUT del conmutador RF(A/B) y
el terminal ANT INde la parte posterior del
televisor.
..........
de entrada Separador _ _ L 1
Decodificador de cable
Cable IN CABLE OUT
Separador _ RF (A/B)
Decodificador de cable Conmutador
Decodificador de cable Conmutador
Parteposterior
Separador [ RF (A/B)
Conmutador
Unavez realizada estaconexi6n, ajuste el conmutadorA/B ala posici6n "A" parala visualizaci6n normal.Ajuste el conmutador A/B
en la posici6n "B" paraver los canales codificados. (Cuando ajuste el conmutadorA/B en la posici6n "B", necesitara sintonizar el
TVcon el canal de salida de] receptor decable, que normalmente es el canal 3 o 4).
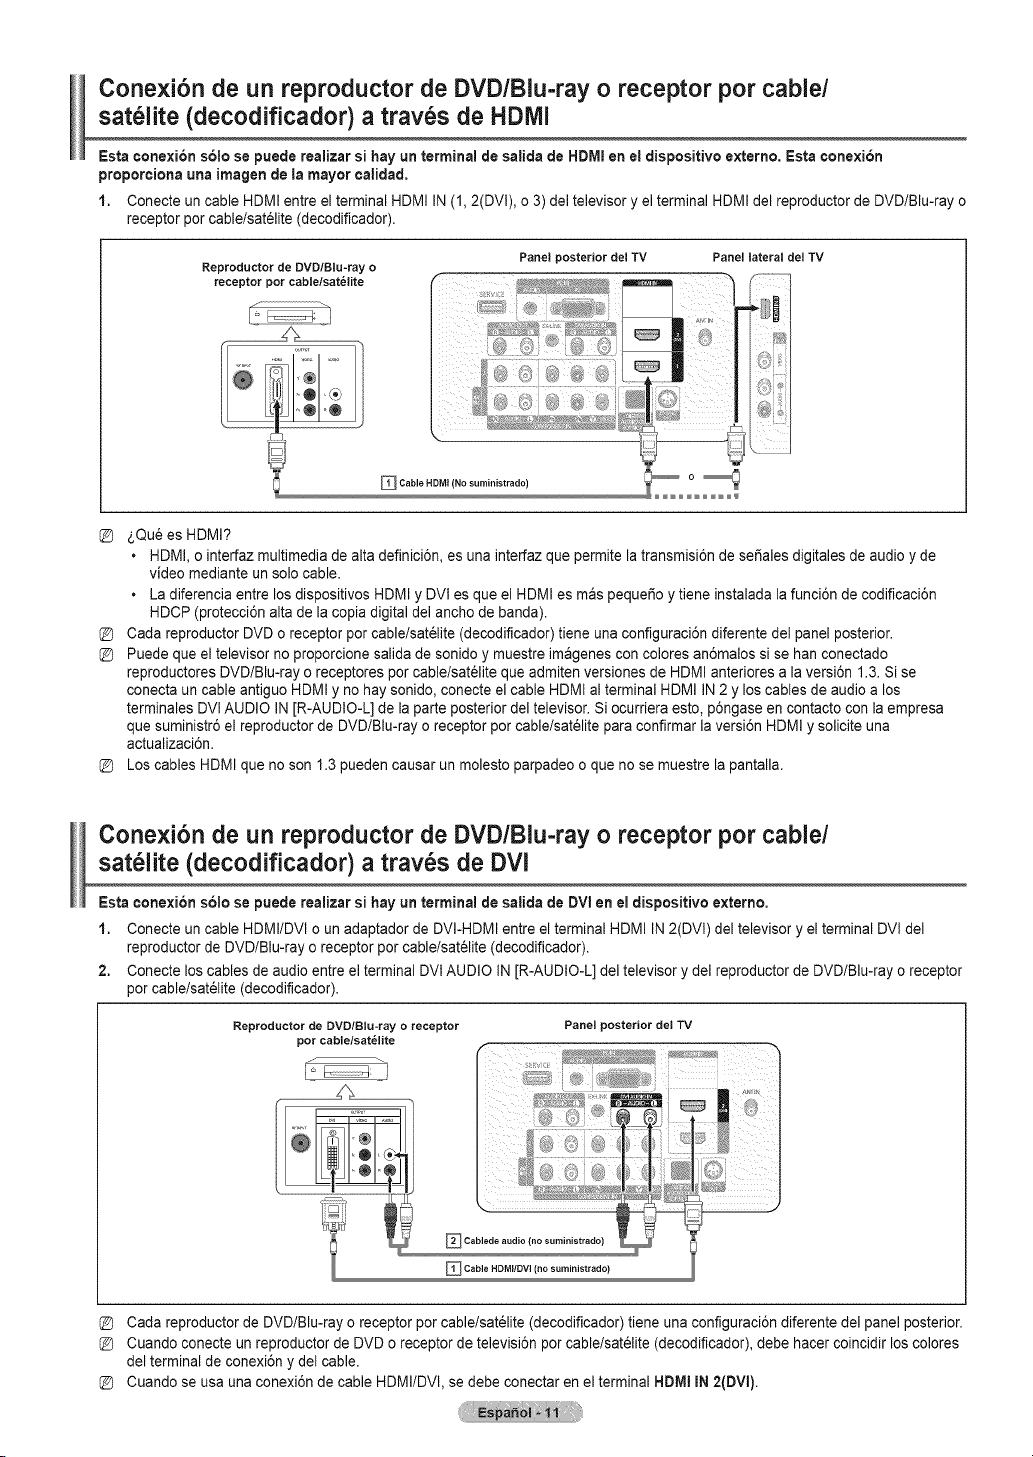
Conexi6n de un reproductor de DVD/Blu-ray o receptor pot cable/
sat_lite (decodificador) a trav_s de HDIVll
Esta conexi6n s61ose puede realizar si hayun terminal de salida de HDMIeneldispositivo externo. Esta ¢onexi6n
proporeiona una imagen dela mayor¢alidad.
1. Conecte un cable HDMI entre el terminal HDMI IN(1,2(DVI), o3)del televisor y el terminal HDMI del reproductor de DVD/Blu-ray o
receptor pot cablelsatelite (decodificador).
Reproductor de DVD/Blu-ray o
receptor pot cable/sat_lite
Panel posterior del TV
Panel lateral del TV
_ Cable HDM] (No suministrado) O _
_,Quees HDMI?
• HDMI,o interfaz multimediade alta definici6n, es una interfazque permite la transmisi6n de seSales digitales de audio y de
video mediante un solo cable.
• Ladiferencia entrelosdispositivos HDMIy DVt es que el HDMI es maspequeSoy tiene instalada la funci6n de codificaci6n
HDCP(protecci6n alta de la copia digitaldel ancho de banda).
Cada reproductorDVD o receptor porcable/sat_lite (decodificador) tiene una configuraci6n diferente del panel posterior.
Puede que el televisor no proporcione salida de sonido y muestre imagenes con colores an6malos sise han conectado
reproductores DVDIBlu-ray o receptores porcablelsatelite que admiten versiones de HDMI anteriores a la versi6n 1.3. Sise
conecta un cable antiguoHDMIy no hay sonido, conecte el cable HDMIal terminal HDMI IN2y loscables de audioa los
terminales DVlAUDIO IN[R-AUDIO-L] de la parte posterior deltelevisor. Siocurriera esto,p6ngase en contacto con la empresa
que suministr6 el reproductor de DVDIBlu-ray oreceptor porcable/sat_lite para confirmar laversi6n HDMIy solicite una
actualizaci6n.
Los cables HDMI que no son 1.3 pueden causar unmolesto parpadeo o que no se muestre lapantalla.
Conexi6n de un reproductor de DVD/Blu-ray o receptor por cable/
sat61ite (decodificador) a trav6s de DVl
Esta eonexi6n s61ose puede realizar si hayun terminal de salida de DVlen el dispositivo externo.
1. Conecte un cable HDMI/DVl o un adaptador de DVI-HDMI entreel terminal HDMI IN2(DVl) deltelevisor y el terminal DVl del
reproductor deDVDIBlu-ray oreceptor por cable/sat_lite (decodificador).
2. Conecte loscables deaudio entreelterminal DVlAUDIO IN[R-AUDIO-L] deltelevisor y del reproductor deDVD/Blu-ray oreceptor
porcable/sat_lite (decodificador).
Reproductor de DVD/Blu-ray o receptor Panel posterior del TV
pot cable/sat_lite
_ Cablede audio
(nosuministrado)
_ Cable HDMItDVI (no suministrado)
Cada reproductorde DVD/Blu-ray o receptor porcable/sat_lite (decodificador) tiene una configuraci6n diferente del panelposterior.
Cuando conecte un reproductorde DVD o receptor de televisi6n porcable/sat_lite (decodificador), debe hacer coincidir loscolores
del terminal de conexi6n y delcable.
Cuando se usa una conexi6n de cable HDMI/DVl, se debe conectar enel terminal HDMIIN2(DVl).
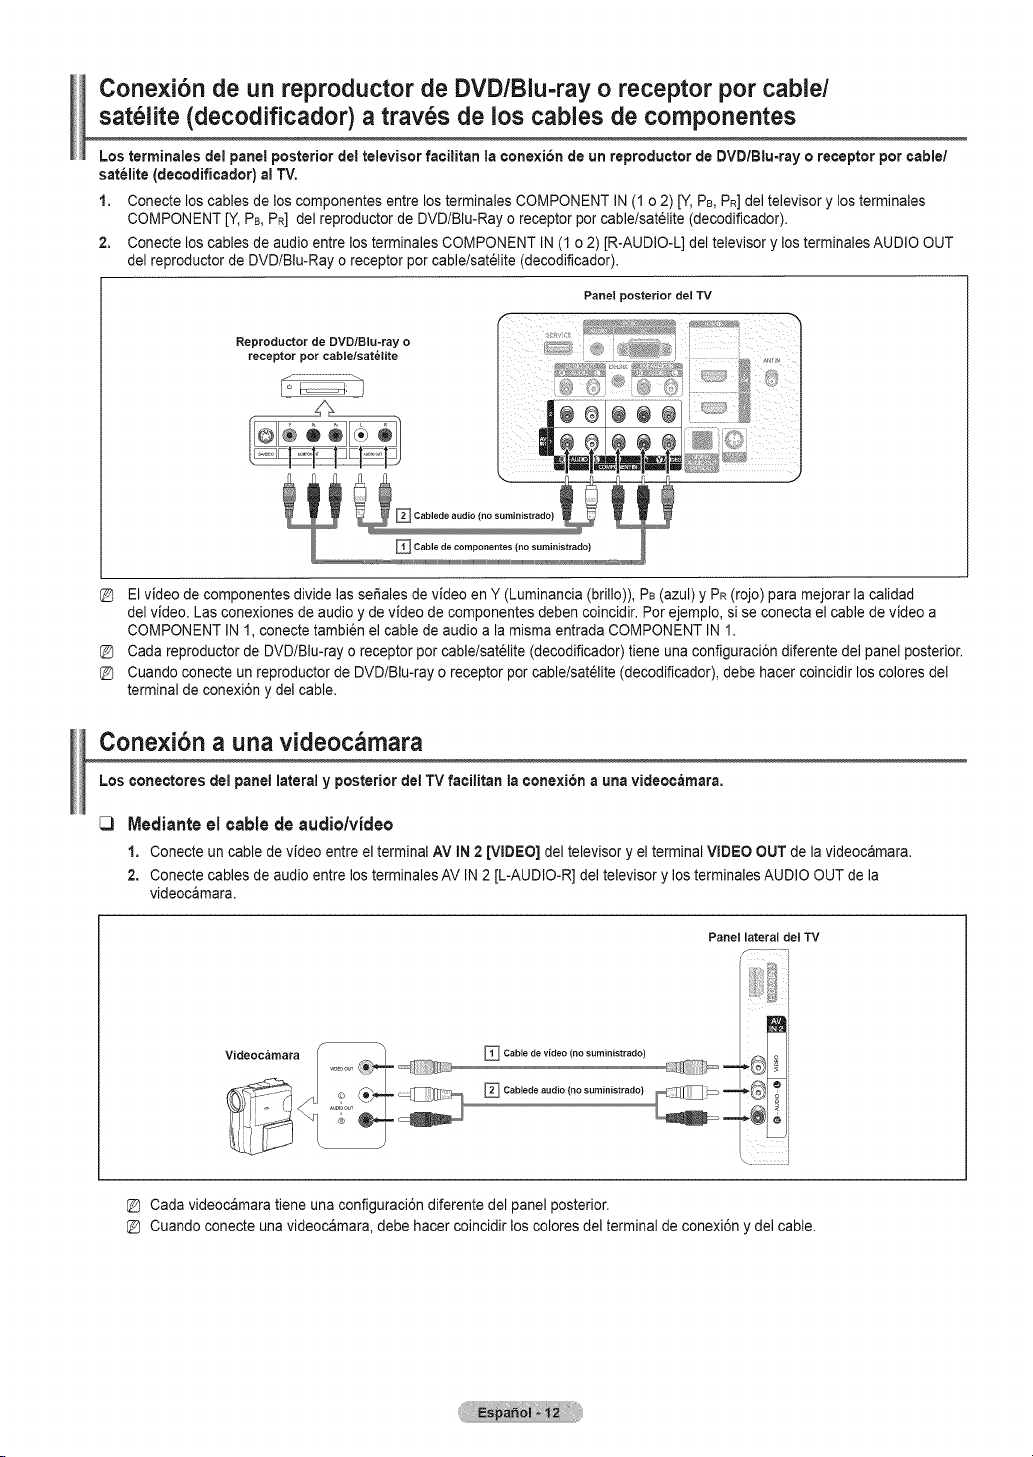
Cone×i6n de un reproductor de DVD/Blu-ray o receptor pot cable/
sat_lite (decodificador) atray, s de los cables de componentes
Los terrninales delpanel posterior del televisor facilitan la cone×i6n de un reproductor de DVD/Blu=ray oreceptor porcable/
satelite (decodificador) al "iV.
1. Conecte loscables delos componentes entre losterminales COMPONENT IN(1 o2)[Y, PB,PR] del televisor y losterminales
COMPONENT [Y, PB,PR] del reproductor de DVDIBlu-Ray oreceptor porcablelsatelite (decodificador).
2. Conecte loscables deaudio entrelos terminales COMPONENT IN (1o2)[R-AUDIO-L] deltelevisor y losterminales AUDIO OUT
del reproductor deDVD/Blu-Ray o receptor porcable/sat_lite (decodificador).
Panel posterior del TV
Reprodoctor de DVD/Blu-ray o
receptor pot cable/sat_lite
Elvideode componentes divide las sefiales de video en Y (Luminancia (brillo)), PB(azul) y PR(rojo) paramejorar la calidad
del video. Lasconexiones de audioy de videode componentes deben coincidir. Por ejemplo, sise conecta el cable de video a
COMPONENT IN 1, conecte tambien el cable de audioa la misma entrada COMPONENT IN1.
Cada reproductorde DVDIBlu-rayo receptor porcable/sat_lite (decodificador) tiene una configuraci6n diferente del panel posterior.
Cuando conecte un reproductor de DVD/Blu-rayo receptor pot cablelsatelite (decodificador), debe hacer coincidir loscolores del
terminal de conexi6n y del cable.
Cone×i6n a una videocamara
Los conectores del panel lateral y posterior delTV facilitan la cone×i6n a una videocarnara,
tVledianteel cable de audio/video
1. Conecte un cablede video entre elterminal AV IN 2 [VIDEO] del televisor y elterminal VIDEO OUT de lavideocamara.
2. Conectecables de audio entrelosterminales AV IN2 [L-AUDIO-R] del televisor y losterminalesAUDIO OUT de la
videocamara.
Panel lateral del TV
/" 7:_ i
Videoc_mara
Cable de video (no suministrado)
Cablede audio {no suministrado}
[D Cada videocamara tiene una configuraci6n diferente del panel posterior.
[D Cuando conecte una videoc_mara, debe hacer coincidir los colores del terminalde conexi6n y del cable.
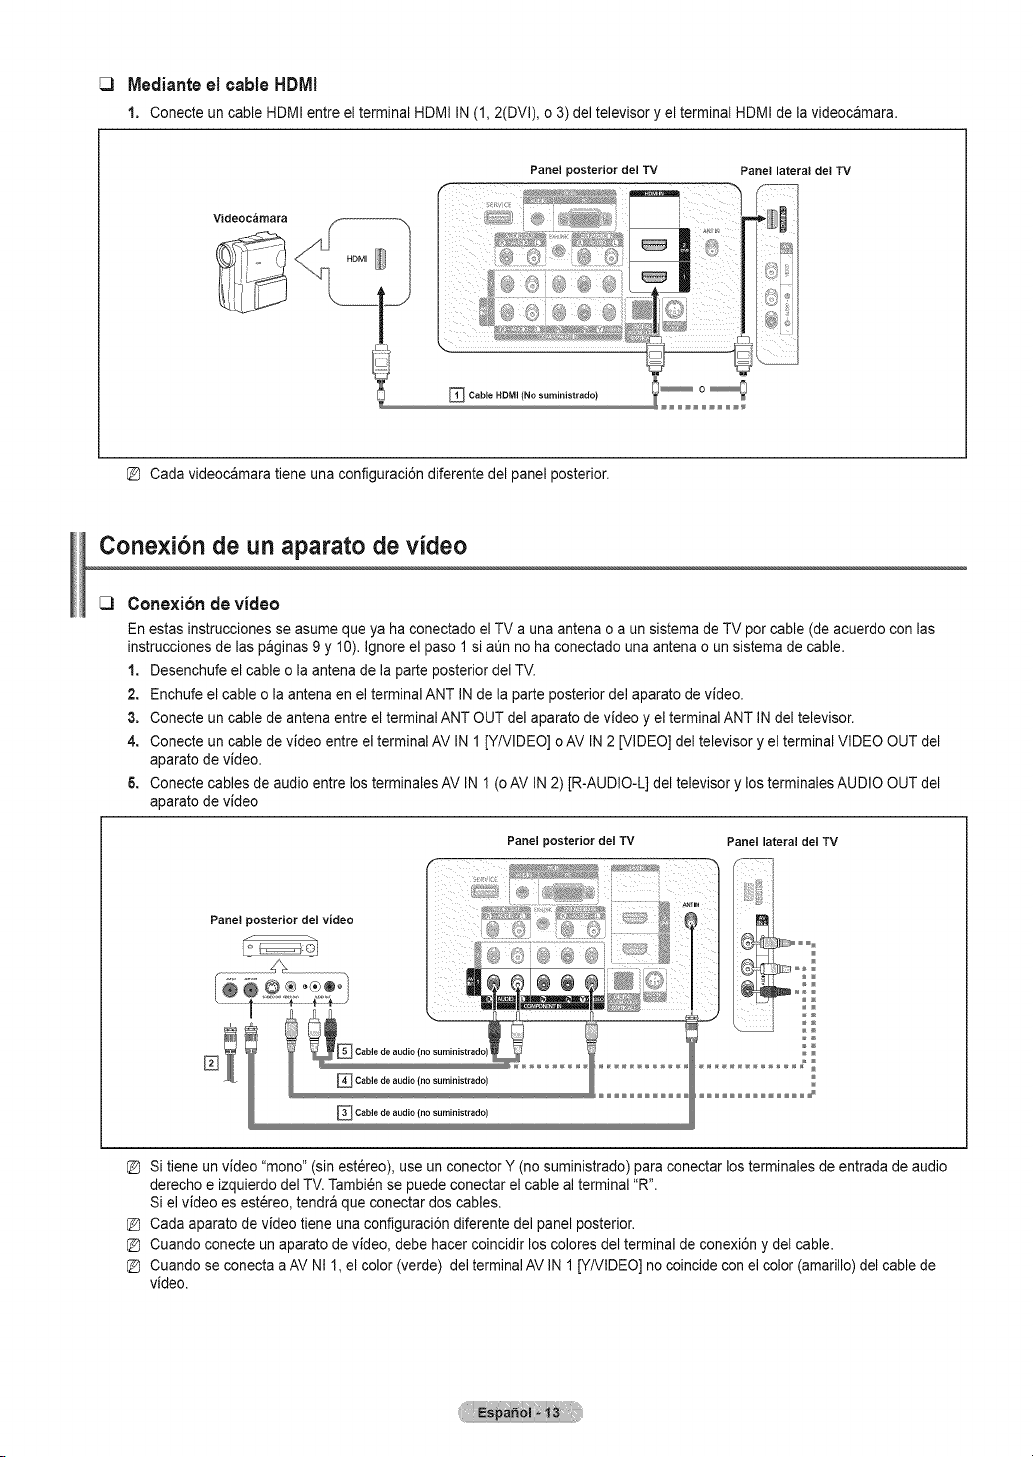
tVledianteel cable HDMI
1. Conecte un cableHDMI entreel terminal HDMI IN(1, 2(DVI),o 3)del televisor y el terminal HDMI de la videocamara.
Panel posterior del TV
Panel lateral del TV
Videoc_mara
_ Cable HDMI (No suministrado)
[D Cada videoc_mara tiene una configuraci6n diferente del panel posterior.
Cone×i6n de un aparato de video
Conexi6n de video
En estas instruccionesse asumeque yahaconectado el TV a una antena oa un sistema de TVporcable (deacuerdo con las
instruccionesde laspaginas 9y 10).Ignore el paso 1si aQnno ha conectado una antena o unsistema de cable.
1. Desenchufe el cable ola antena de laparte posterior delTV.
2. Enchufe el cable o la antena en el terminal ANT INde la parte posterior del aparato de video.
3. Conecte un cable de antena entreel terminal ANTOUT del aparato de video y el terminalANT INdeltelevisor.
4. Conecte un cable de video entre el terminalAV IN1 [Y/VIDEO] o AV IN2 [VIDEO] del televisor y el terminalVIDEO OUT del
aparato devideo.
6. Conectecables de audio entrelosterminales AV IN1(oAV IN2)JR-AUDIO-L]del televisor y losterminales AUDIO OUT del
aparato devideo
Panel posterior del video
Panel posterior del TV Panel lateral del TV
%
[D Sitiene un video "mono" (sin estereo), use un conectorY (nosuministrado) para conectar losterminales de entrada de audio
derecho eizquierdo delTV.Tambi_nse puede conectar el cable al terminal "R".
Siel video es est_reo, tendraque conectar dos cables.
[D Cada aparato de video tiene una configuraci6n diferente del panel posterior.
[D Cuando conecte un aparato de video, debe hacer coincidir los colores delterminal deconexi6n y del cable.
[D Cuando se conecta a AV NI1, el color (verde) del terminal AV IN1 [Y/VIDEO] no coincideconel color(amarillo)del cable de
video.
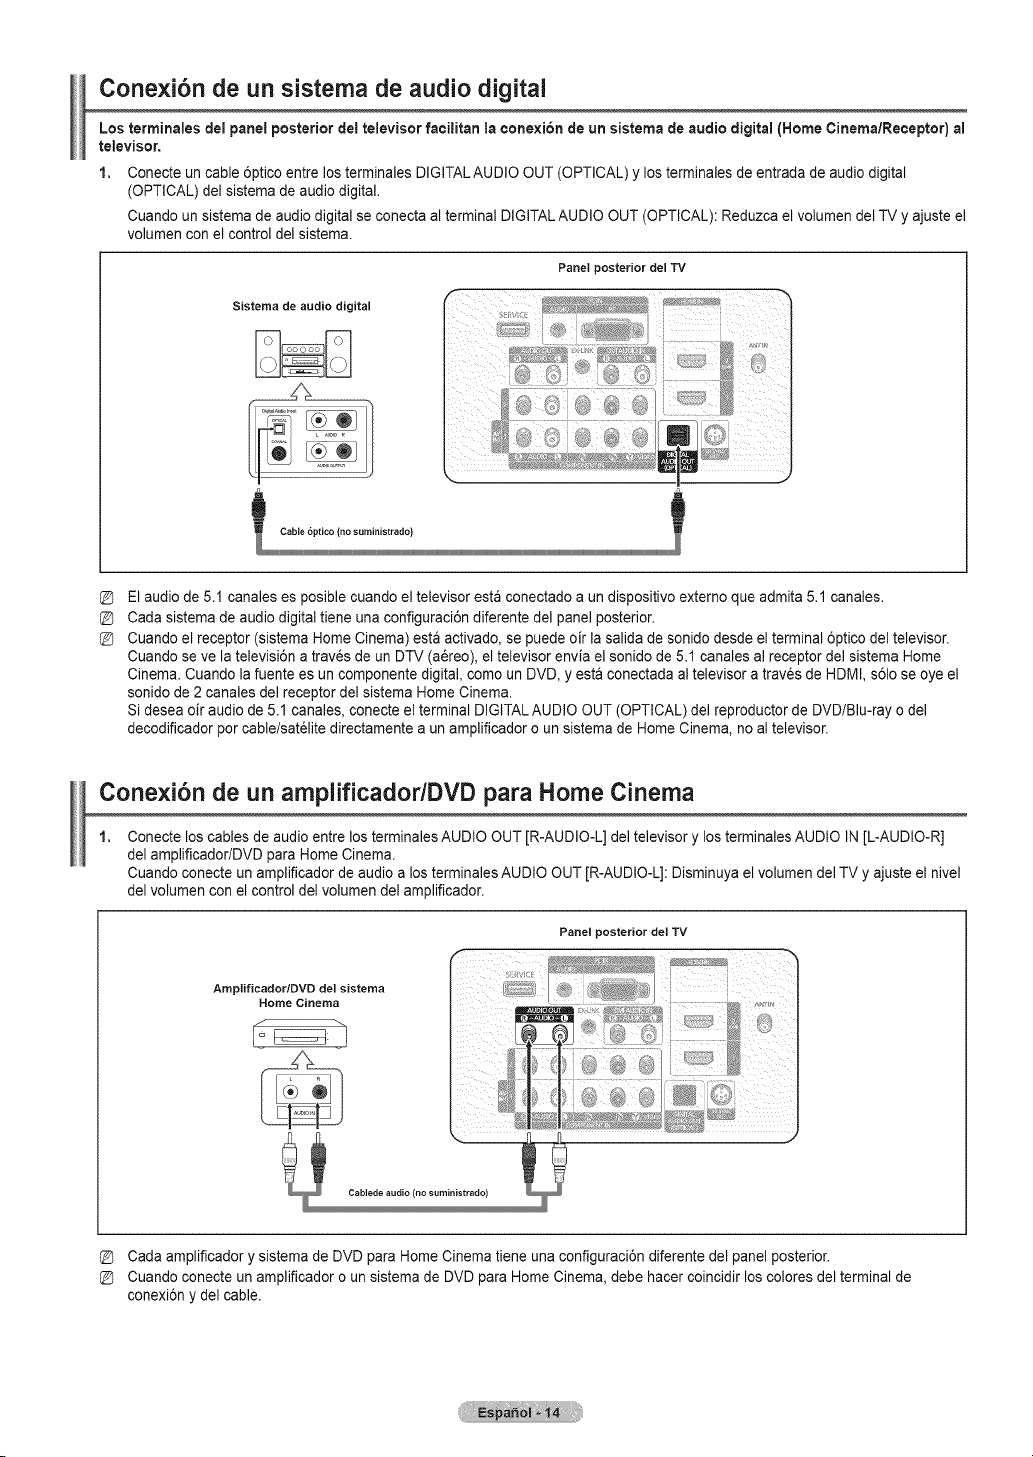
Conexi6n de un sistema de audio digital
Los terminales delpanel posterior del televisor facilitan la ¢onexi6n de un sistemade audio digital (Home Cinema/Receptor) al
televisor.
1. Conecte un cable 6ptico entre los terminales DIGITALAUDIO OUT (OPTICAL) y losterminales de entrada de audio digital
(OPTICAL) del sistemade audio digital.
Cuando un sistemade audiodigital se conecta al terminal DIGITALAUDIO OUT (OPTICAL): Reduzca el volumen del TVy ajuste el
volumen con el control del sistema.
Panel posterior del TV
Sistema de audio digital
Elaudiode5.1 canales es posiblecuando el televisor est_conectado aun dispositivo externo que admita 5.1 canales.
Cada sistemadeaudio digital tiene una configuraci6n diferente del panel posterior.
Cuando el receptor (sistema Home Cinema) est_ activado, sepuede oir lasalida de sonido desde elterminal 6ptico del televisor.
Cuando se ve la televisi6n a trav_s deun DTV (a_reo), el televisor envia el sonido de 5.1 canales al receptor del sistema Home
Cinema. Cuando lafuente es un componente digital, como un DVD, y esta conectada al televisor a traves de HDMI, s61ose oye el
sonido de 2canales del receptor del sistema Home Cinema.
Si deseaoir audiode5.1 canales, conecte el terminal DIGITALAUDIO OUT (OPTICAL) del reproductor de DVD/Blu-ray odel
decodificador porcable/sat_lite directamente a un amplificador oun sistema de Home Cinema, no al televisor.
Conexi6n de un amplificador/DVD para Home Cinema
Conecte loscables de audio entrelos terminales AUDIO OUT [R-AUDIO-L] deltelevisor y losterminales AUDIO IN[L-AUDIO-R]
del amplificador/DVD para Home Cinema.
Cuando conecte un amplificadorde audioalos terminales AUDIO OUT [R-AUDIO-L]: Disminuya elvolumen del TVy ajuste el nivel
del volumen con el control del volumen delamplificador.
Panel posterior del TV
Amplificador/DVD del sistema
Home Cinema
Cada amplificador y sistema de DVDpara Home Cinematiene una configuraci6n diferente del panelposterior.
Cuando conecte un amplificadoro un sistemade DVD paraHome Cinema, debe hacer coincidir loscolores delterminal de
conexi6n y delcable.

Cone×i6n a un PC
Usodelcable D-Sub
1. Conecte un cableD-Sub entre elterminal PC IN [PC] del televisor y elterminal de salida PC del ordenador.
2. Conecte un cable de audio PC entre el terminal PC IN [AUDIO] deltelevisor y el terminal Audio Out de latarjeta de sonido del
ordenador.
Panel posterior del TV
PC
t
_ Cable de audiodel ordenador (no surainistrado)
_3 Uso delcable HDtVl/DVI
1. Conecte un cableHDMI/DVI entre elterminal HDMIIN2 del televisor y el terminalde salida PC del ordenador.
2. Conecte un cable estereo miniclavija/2 RCA de 3,5 mm entre e! terminalDVlAUDIOIN[L-AUDIO-R] del televisory el terminal de
salidadeaudiode la tarjeta de sonido delordenador.
Panel posterior del TV
PC
jj *J . ,::
Conector est_reo de 3,5rnm parael cable 2RCA(nosuministrado) !
_ Cable HDMIIDVl (no suministrado}
[D Cada ordenador tiene una configuraci6n diferente del panel posterior.
[D Cuando conecte un ordenador, debe hacer coincidir los colores del terminal deconexi6ny del cable.
[D Cuando se usaunaconexi6n de cable HDMIIDVl, se debe conectar enelterminal HDMI IN2.
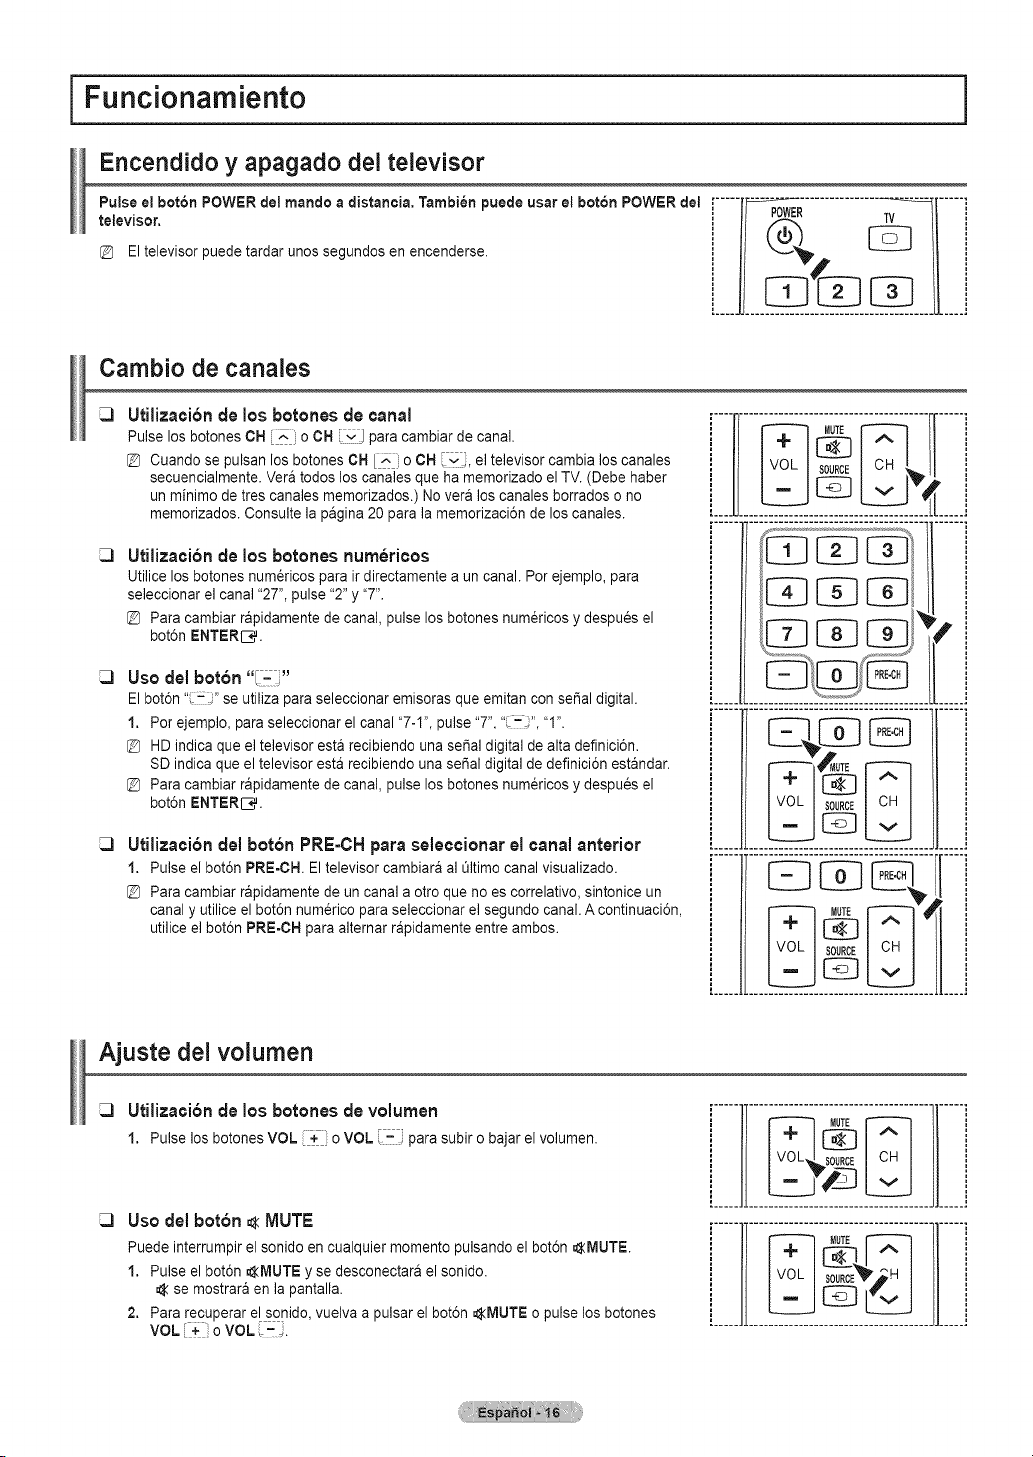
I Funcionamiento
Encendido y apagado dei televisor
televisor. POWER TV
Eltelevisor puede tardar unossegundos en encenderse.
Cambio de canales
Utiliza¢i6n de los botches de canal
Pulse los botones CH E". oCH ivJ paracambiar de canal.
@ Cuando se pulsan losbotones OHE_ oOH i','_, el televisor cambia loscanales
secuencialmente. Vera todosloscanales que ha memorizado el TV.(Debe haber
un minimo de tres canales memorizados.) Novera loscanales borrados o no
memorizados. Consulte la pagina 20 parala memorizaci6n de loscanales.
Utilizaci6n de los botches num6ricos
Utilicelosbotones num6ricos para irdirectamente a uncanal. Por ejemplo, para
seleccionar el canal "27", pulse "2"y "7".
@ Para cambiar rapidamente decanal, pulse losbotones num_ricos y despues el
bot6n ENTERIC.
Uso del bot6n "I- J"
Elbot6n" :: "se utilizapara seleccionar emisoras que emitan conserial digital.
1. Porejemplo, paraseleccionar el canal "7-I", pulse "7",'_-_", "I".
@ HDindica que el televisor esta recibiendo una serial digital de alta definici6n.
SD indica que el televisor esta recibiendo una sepal digital de definici6n estandar.
@ Para cambiar rapidamente decanal, pulse losbotones num_ricos y despues el
bot6n ENTERIC.
Utilizaei6n del bot6n PRE=CHpara seleccionar el canal anterior
1. Pulseelbot6nPRE-CH.El televisorcambiaraal _ltimocanalvisualizado.
@ Para cambiar rapidamente deun canal aotroque no es correlativo, sintonice un
canal y utilice el bot6n num_rico para seleccionar el segundo canal. A continuaci6n,
utiliceel bot6n PRE-CH para alternar rapidamente entre ambos.
L.U.
.............11.......
,..... .....
i li
Ajuste del volumen
Utilizaei6nde los botches devolumen
1. Pulse los botonesVOL _+ . oVOL parasubir obajar elvolumen.
Usodel bot6n _<MUTE
Puedeinterrumpir el sonido encualquier momento pulsando el bot6n AMUTE.
1. Pulse elbot6n AIVlUTEy se desconectara el sonido.
se mostrara en la pantalla.
2. Para recuperar el sonido, vuelva a pulsar el bot6n AMUTE opulse losbotones
VOL oVOL (-_.
ill..... Jli.....
i ]l................................................['_ _TE_ H ]} _
[............... !

Uso del bot6n TOOLS
Se puede usar e!bot6n TOOLS para seleccionar rapida y facilmente las funciones que se usan con m_s frecuencia. Ei menO
Herramientas cambia seg_n el modo deentrada externo que se estaviendo,
1. Pulse el bot6n TOOLS.Aparece el men0 Herramientas.
2. Pulselos botonesA/_' paraseteccionar unmen0y, acontinuaci6n,pulse etbot6n ENTERS.
3. Pulse los botones A/T/_/_/ENTER_ paraver,cambiar ousar las opciones
seleccionadas.
Para ver una descripci6n mas detallada de cadafunci6n, consulte la pagina
correspondiente.
i.................
, Add to Favorite (ASadir a fav0dtos)o De!ete from Favorite (Borrar de favoritos)i
p_gina 20
Cambiar aCable (0 a Aire), pAgina 19
Ajuste Automatico, pagina26
Visualizaci6n de la pantalla
La pantalla identifica el canal actual y el estado de algunos ajustes deaudio=video.
1. Pulse el bot6n INFO del mando a distancia. Eltelevisor mostrara el canal, eltipo de sonido
y el estadode ciertos ajustes deimagen y sonido.
Pulse el bot6n tNFO otravez oespere unos 10 segundos y desaparecera
automaticamente.
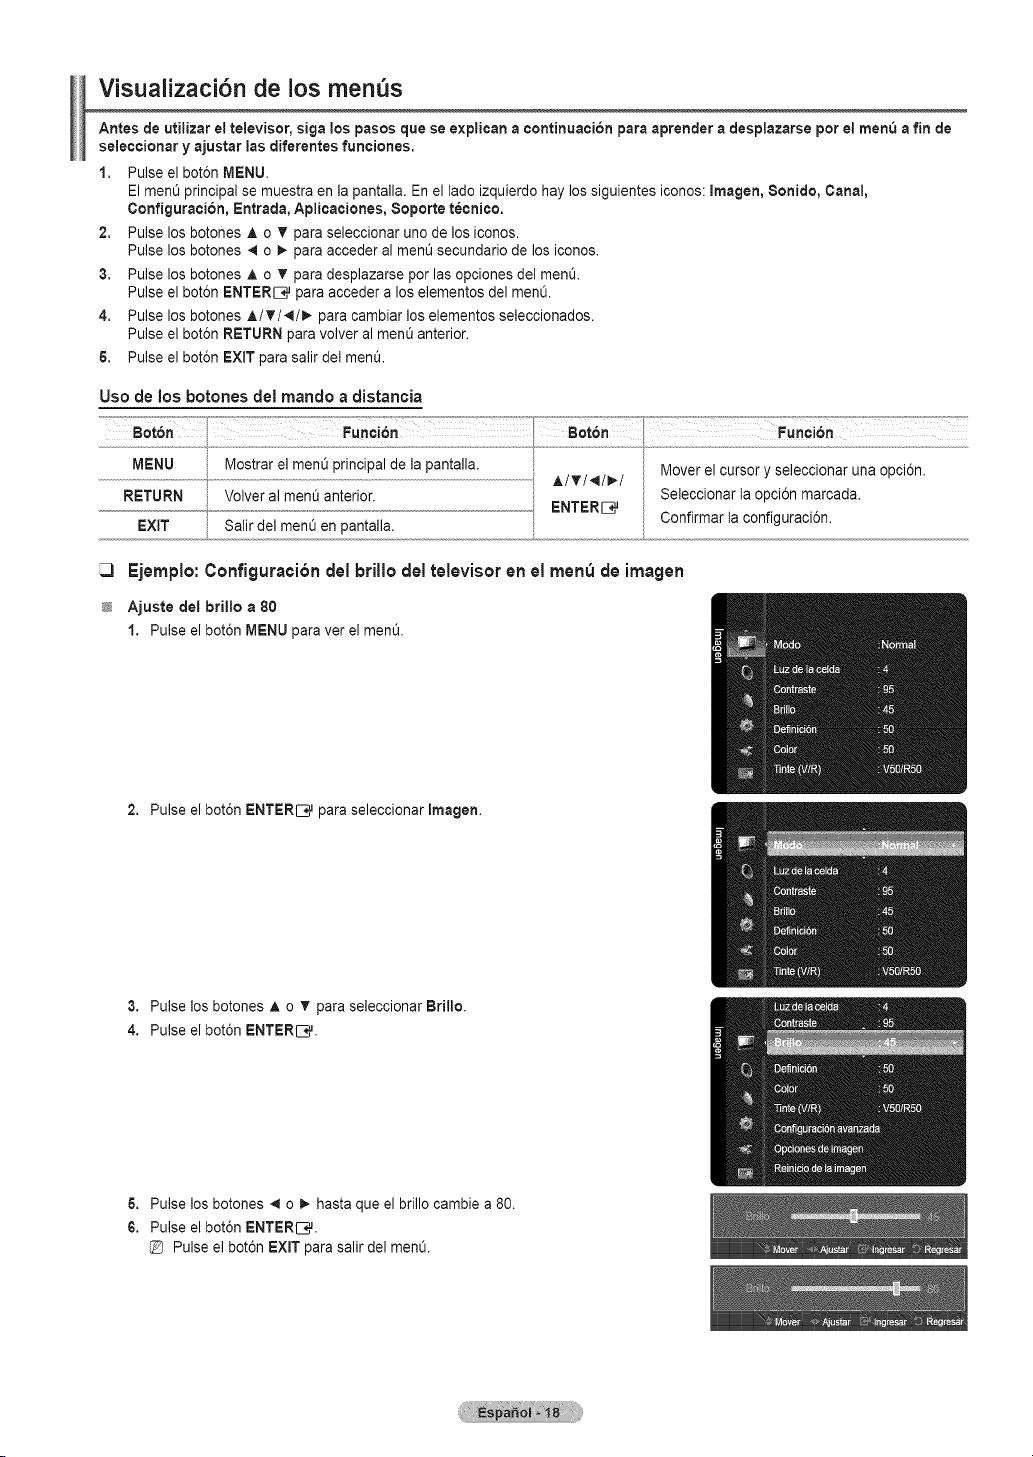
Visualizaci6n de los menus
Antes de utilizar el televisor, siga lospasos que se explican a continuaeion para aprender a desplazarse perel rnen_afin de
seleccionar y ajustar ias diferentes funciones.
1. Pulse el bot6n MENU•
ElmenOprincipalse muestra enla pantalla. En el ladeizquierdo hay lossiguientes iconos:Imagen, 8onido, Canal,
Configuracion, Entrada, Aplicaciones, 8oporte tecnico.
2. Pulse los botones A o T paraseleccionar uno de los iconos.
Pulse los botones 4to 1,, paraacceder al ment_secundario delos iconos.
3. Pulse los botones A o T paradesplazarse perlasopciones del men&
Pulse el bot6n ENTER[_ para acceder a loselementos del men&
4. Pulse los botones A/T/,I/I_ paracambiar loselementos seleccionados.
Pulse el bot6n RETURN paravolver al menOanterior.
& Pulse el bot6n EXIT parasalir del men&
Use de los botones del mando a distancia
Fuoo 6n
MENU Mostrarel menQprincipal de la pantalla v ' _ "
• Mover e cursor _ se ecc onar una o,_con
RETURN Volver al ment3anterior. Seleccionar la opci6n marcada.
EXIT Salirdel rnen_len pantalla. ENTERIC, Conflrrnarla conflguraclon.
Ejemplo:Configuraei6ndel brillo del televisoren el rnen_ de irnagen
Ajuste del brillo a 80
1. Pulse elbot6n MENU paraver el men&
2. Pulse elbot6n ENTER[_q_paraseleccionar Imagen.
3. Pulse los botones A o T paraseleccionar Brillo.
4. Pulse elbot6n ENTERIC,.
6. Pulse los botones 41 o_. hastaque elbrillocambie a 80.
6. Pulse elbot6n ENTERIC,.
Pulse el bot6n EXiT parasalir del men&
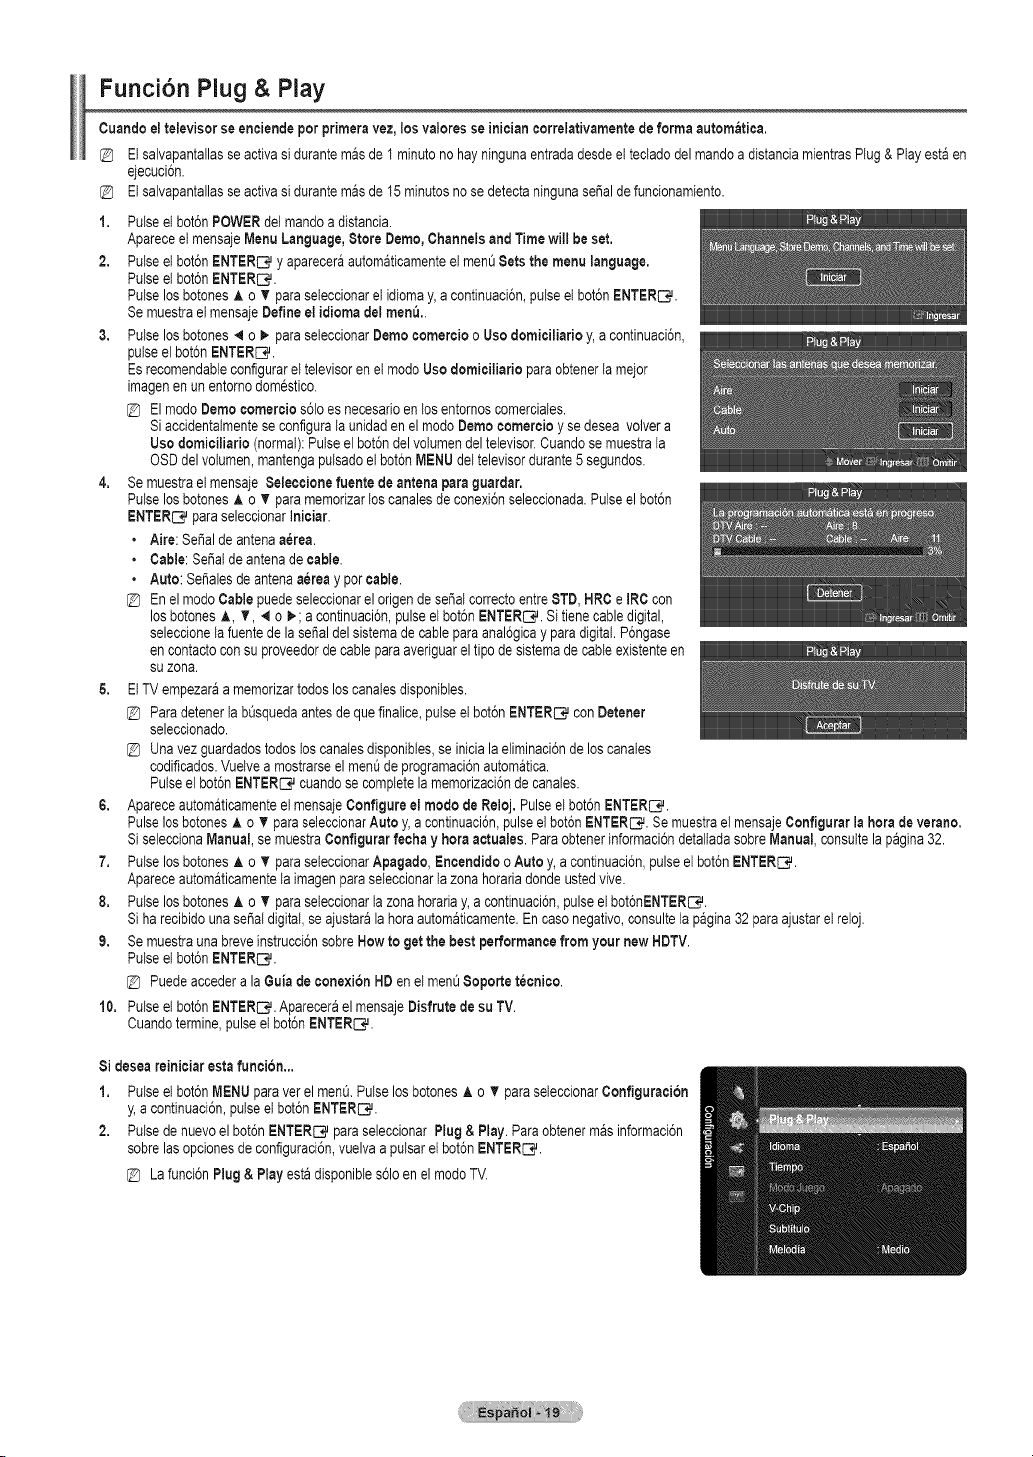
Funci6n Plug & Play
Cuandoeltelevisorseenciendeper primeravez,losvaloresse iniciancorrelativamentedeformaautomatica.
Elsalvapantallasse activasidurantemasde 1minuteno hayningunaentradadesdeet tecladodelmandoa distanciamientrasPlug &Playestaen
ejecuci6n.
Etsalvapantallasse activasidurantemasde 15 minutesno sedetectaningunasepaldefuncionamiento.
1. Pulseet bot6nPOWERdelmandoa distancia.
Apareceel mensajeMenuLanguage,Store Dome,Channelsand Timewill beset.
2. Pulseelbot6nENTER_ y apareceraautomaticamenteel men_Setsthe menulanguage.
Pulseet bot6nENTERS.
Pulselos botonesA oT para seteccionarel idiomay, a continuaci6n,pulse elbot6nENTERS.
Se muestrael mensajeDefineel idiomadelmen&.
3. Pulselos botches4 o _ para seleccionarCemocomerciooUse domiciliario y,a continuaci6n,
pulseelbot6nENTERS.
Esrecomendableconfigurarel televisorenet modeUse domiciliarioparaobtenerlameier
imagenen unentornodomestico.
ElmodeDomecomercios61oes necesarioen losentornoscomerciales.
Siaccidentalmenteseconfigurata unidadenelmodeDomecomercioy sedeseavolvera
Use domiciliario(normal):Pulseel bot6ndelvolumendeltelevisor.Cuandosemuestrala
OSDdel votumen,mantengaputsadoelbot6nMENUdeltelevisordurante5segundos.
4. Se muestrael mensaje$eleccionefuente de antenapara guardar.
Pulselos botchesA oT paramemorizarloscanalesde conexi6nseleccionada.Pulseelbot6n
ENTERC*_paraseleccionarIniciar.
• Aire:SePalde antenaa_rea.
• Cable:SePalde antenade cable.
• Auto:Sei_alesde antenaa_reay percable.
@ EnelmodeCablepuedeseleccionarelorigende sei_alcorrectoentreSTD, HRCeIRCcon
losbotchesA, T, 4 o _; acontinuaci6n,pulseel bot6nENTER_. Sitienecabledigital,
seleocionelafuentede la sepaldelsistemade cableparaanal6gicayparadigital.P6ngase
en contactoconsuproveedorde cableparaaveriguareltipodesistemade cableexistenteen
suzona.
& EtTVempezaraa memorizartodosloscanalesdisponibles.
Paradetenerlab_squedaantesdeque finalice,pulseel bot6nENTER_ conCoroner
seleccionado.
Unavez guardadostodosloscanalesdisponibles,se inicialaeliminaci6nde loscanales
codificados.Vuelvea mostrarseel menQde programaci6nautomatica.
Pulseelbot6nENTERC#cuandose completelamemorizaci6nde canales.
6. Apareceautomaticamenteel mensajeConfigureel mode deReloj. Pulseelbot6nENTER_.
Pulselos botonesA oV paraseleccionarAuto y,acontinuaci6n,pulseel bot6nENTERS. Semuestrael mensajeConflgurar la herade verano.
SiseleccionaManual,semuestraConflgurar fechay heraactuales. Paraobtenerinformaci6ndetaltadasobreManual, consuttelapagina32.
7. Pulselos botchesA oT paraseleccionarApagado,EncendidooAutoy,acontinuaci6n,pulseet bot6nENTERS.
Apareceautomaticamenteta imagenparaseleccionarla zonahorariadondeustedvive.
8. Pulselos botchesA oT paraseleccionarla zonahorariay,a oontinuaci6n,pulseel bot6nENTERC#.
Siharecibidounasepaldigital,seajustarala heraautomaticamente.Encase negative,consulteta pagina32paraajustaret reloj.
9. Se muestraunabreveinstrucci6nsobreHowto get thebestperformancefromyour new HDTV.
Pulseelbot6nENTERS.
Puedeaccederala Guiade conexi6nHDen elmenO8oporte t_cnico.
10. Pulseel bot6nENTERS. ApareceraelmensajeCisfrutedesu TV.
Cuandotermine,pulseetbot6nENTERC*L
Si deseareiniciaresta funci6n...
1. Pulseelbot6nMENUparaver elmen&PulselosbotchesA o T paraseteccionarConfiguraci6n
y, a continuaci6n,pulseelbot6nENTERS.
2. Pulsede nuevoel bot6nENTER_ para seleccionarPlug& Play. Paraobtenermasinformaci6n
sobrelas opcionesde configuraci6n,vuelvaapulsarel bot6nENTERS.
Lafunci6nPlug& Play estadisponibles61oen el modeTV.
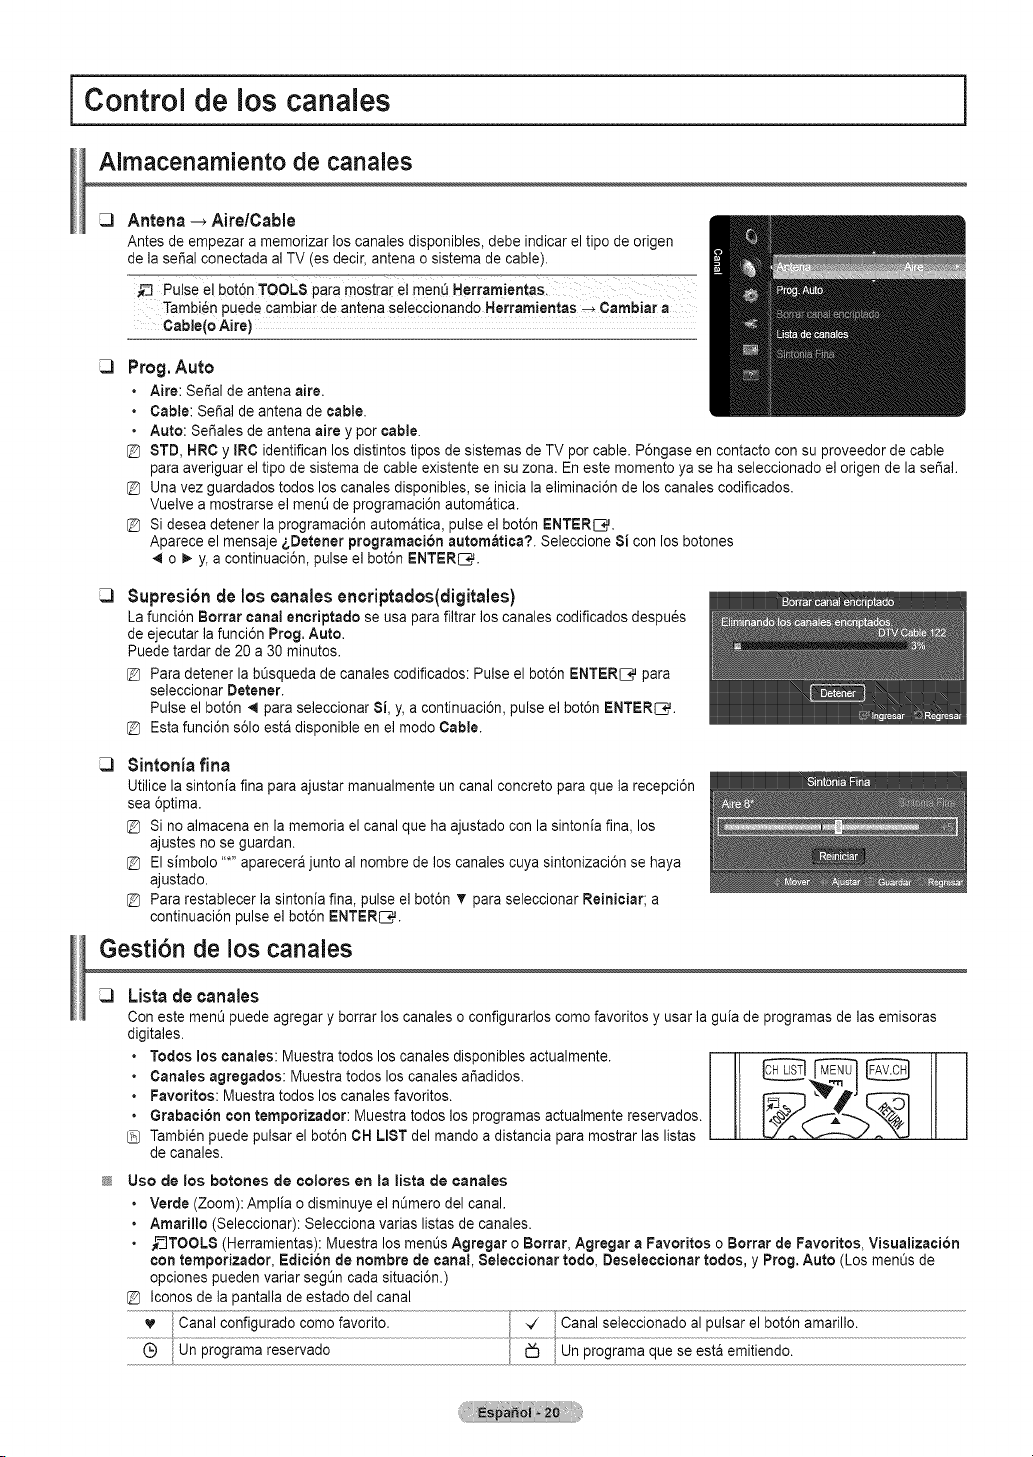
jControl de los canales i
Aimacenamiento de canaJes
Antena _ Aire/Cable
Antes de empezar a memorizar loscanales disponibles, debe indicar el tipo de origen
de la seSal conectada al TV(es decir,antena o sistema decable).
Tambi6npuede cambiarde antena se!ecci0nand0 HerramientaS _ Cambiar a
Cable(o Aire)
Prog.Auto
• Aire: SePal de antena aire.
• Cable:SePalde antena de cable.
• Auto: So,ales de antena aire y percable.
@ STD,HRC y IRC identifican losdistintos tipos de sistemas deTV percable. P6ngase en contacto consu proveedor de cable
paraaveriguar el tipodesistema de cable existente en su zona. En este memento yase ha seleccionado el origen de la serial.
@ Una vez guardados todos loscanales disponibles, se inicialaeliminaci6n de loscanales codificados.
Vuelve a mostrarseel ment_de programaci6n automatica.
@ Sidesea detener la programaci6n automatica, pulse el bot6n ENTERIC.
Aparece el mensaje sDetener programaci6n autom_tica?. Seleccione 8i con los botones
._o _. y,acontinuaci6n, pulse el bot6n ENTERS.
Supresion de los canales encriptados(digitales)
La funci6n Borrar canal encriptado se usaparafiltrar loscanalescodificados despu_s
de ejecutar la funci6n Prog.Auto.
Puedetardar de 20 a30 minutes.
@ Para detener la bQsquedadecanalescodificados: Pulse el bot6n ENTER[_ para
seleccionar Detener.
Pulse elbot6n 4 para seleccionar Si, y, a continuaci6n, pulse el bot6n ENTERS.
@ Estafunci6n s61oestadisponible en el mode Cable.
SintonJa finn
Utilicela sintonia finnpara ajustar rnanualmente un canal concrete paraque la recepci6n
sea @tim&
@ Sinoalmacena en la memoria el canal que haajustado con lasintonia fin& los
ajustes no se guardan.
@ Elsimbolo .....aparecera junto al nombre de loscanales cuya sintonizaci6n sehaya
ajustado.
@ Para restablecer la sintonia fina, pulse el bot6n V paraseleccionar Reiniciar;a
continuaci6n pulse el bot6n ENTERS.
Gesti6n de loscanales
Lista de canales
Conestement_puedeagregaryborrarloscanaleso configurarloscomefavoritesy usarlaguiade programasdelasemisoras
digitales.
• Todos los canales: Muestratodos loscanales disponibles actualmente.
• Canales agregados: Muestra todoslos canalesar_adidos.
• Favorites: Muestra todos loscanales favorites.
• Grabaci6n con temporizador: Muestra todoslos programas actualmente reservados.
Tambi_npuede pulsar el bot6n CH LISTdel mando a distancia para mostrar laslistas
de canales.
Use de los botches de coJores en Ja Jistade canaies
• Verde (Zoom): Amplia odisminuye el nQmerodel canal.
• Amarillo (Seleccionar): Selecciona varias listas de canales.
• ,_--_TOOLS(Herramientas): Muestra los menL_sAgregar o Borrar, Agregar aFavorites o Borrar de Favorites, Visualizaci6n
con temporizador, Edici6n de hombre decanal, 8eleccionar redo, Deseleccionar redes, y Prog. Auto (Los men_s de
opciones pueden variar segt_n cada situaci6n.)
@ Iconos de la pantalla de estadodel canal
Q Un programa reservado
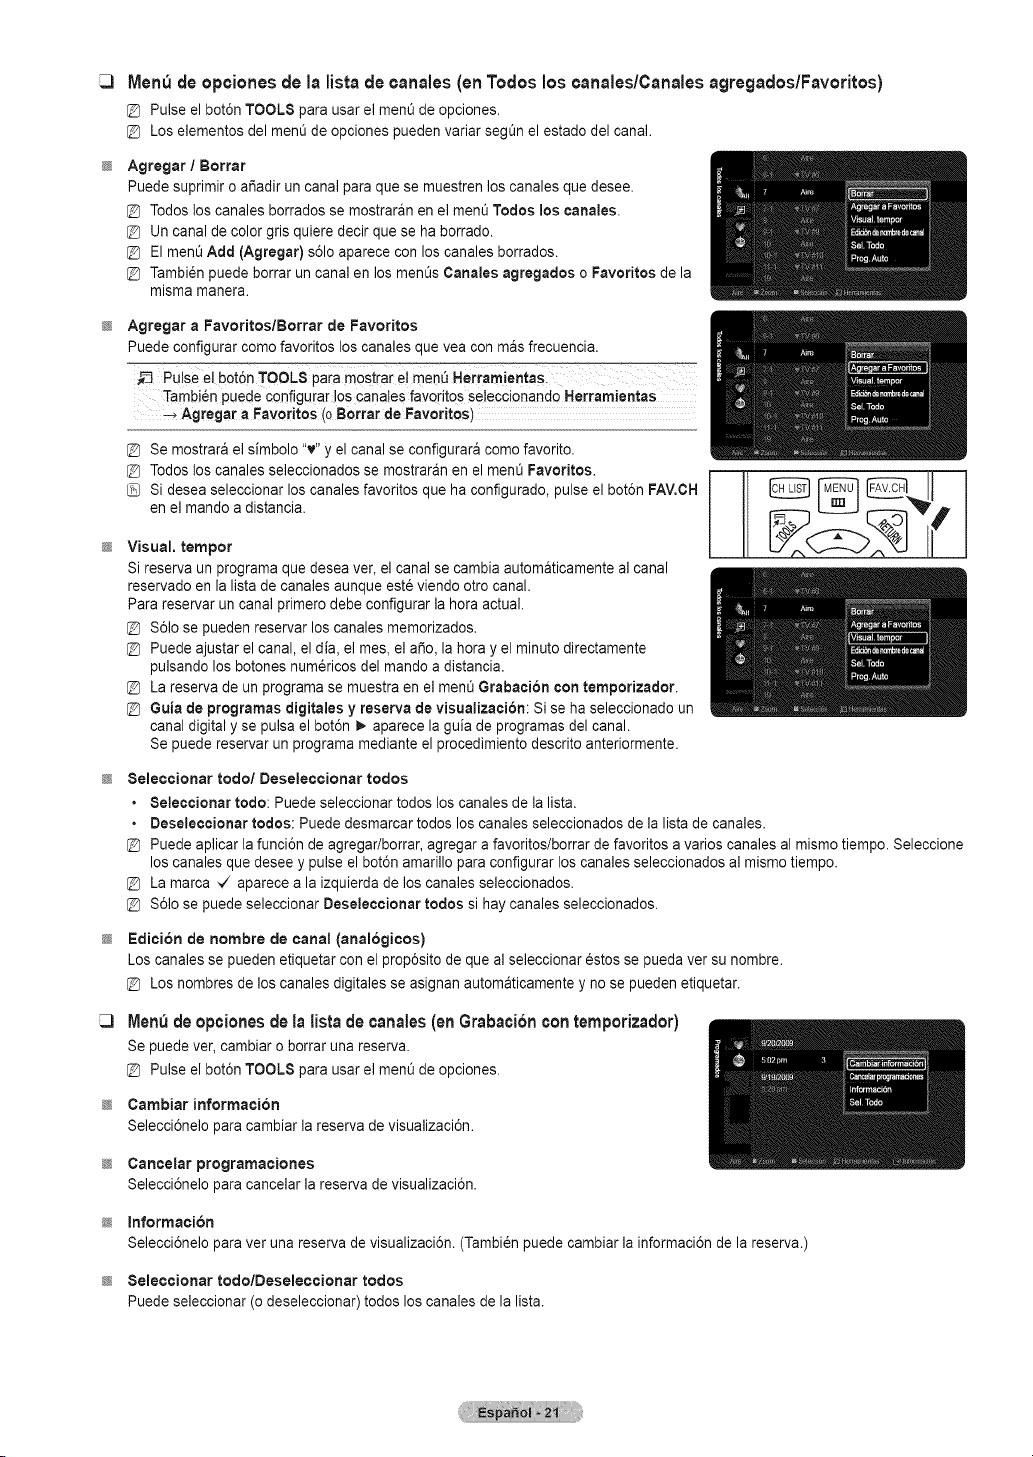
Men_ de opciones de la lista de canales (en Todos los canales/Canales agregados/Favoritos)
[_ Pulse elbot6n TOOLS para usar el ment_de opciones.
@ Loselementos delmenO de opciones pueden variar segQn el estado delcanal.
Agregar / Borrar
Puedesuprimir oafiadir un canal paraque se muestren los canales que desee.
@ Todos los canales borrados se mostraran en el ment_Todos los canales.
@ Uncanal de color grisquiere decir que se ha borrado.
@ ElmenL_Add (Agregar) s61oaparece conlos canalesborrados.
@ Tambi_npuede borrar un canal enlos menL_sCanales agregados o Favorites dela
misma manera.
Agregar a Favoritos/Borrar de Favorites
Puedeconfigurar come favorites los canales que vea con mas frecuencia.
_-3 Puise el bot6n TOOLS pa[a mostrar el men_ Herram!entaSl
Tambi6n puede configurar !oscana!es favorites seleccionando Herramientas
_ Agregar a Favorites (oBorrar de Favorites)
@ Se mostrara el simbolo "v" y elcanalse configurara comefavorite.
@ Todos los canales seleccionados se mostraran en el ment_Favorites.
Sidesea seleccionar loscanalesfavorites que ha configurado, pulse el bot6n FAV.CH
en elmando a distancia.
Visual. temper
Sireserva un programa que deseaver, el canal se cambia automaticamente al canal
reservadoen lalista de canales aunque esteviendo otro canal.
Para reservar un canal primero debe configurar la hera actual.
@ $61ose pueden reservar los canales memorizados.
@ Puedeajustar el canal, eldia, el rues, el afio, laheray el minute directamente
pulsando losbotones num6ricos del mando adistancia.
@ La reserva de un programase muestra enel ment_Grabaci6n con temporizador.
@ Guia deprogramas digitales y reserva devisualizaciSn: Si se ha seleccionado un
canal digital y se pulsa el bot6n _ aparece la guia de programas del canal.
Se puede reservar un programa medianteel procedimiento descrito anteriormente.
8eleocionar rode/Deseleccionar redes
• Seleccionar rode: Puede seleccionar todos loscanales de la lista.
• Deseleccionar redes: Puede desmarcar todos loscanales seleccionados de la lista de canales.
@ Puedeaplicar la funci6n de agregar/borrar, agregar afavoritos/borrar de favorites avaries canales al mismo tiempo. Seleccione
loscanales que deseey pulse el bot6n amarillo paraconfigurar loscanalesseleccionados al mismo tiempo.
@ La marca -,/ aparece a la izquierda de loscanales seleccionados.
@ $61ose puede seleccionar Deseleccionar redes sihay canales seleccionados.
Edition de hombre de canal (anal6gicos)
Loscanales se pueden etiquetar con el prop6sito de que al seleccionar estos se pueda ver su hombre.
@ Loshombres de los canales digitales seasignan automaticamente y no se pueden etiquetar.
Men_ de opcionesde la lista decanales (en Grabacibn con temporizador)
Sepuedever,cambiaro borrarunareserva.
@ Pulseelbot6nTOOLSparausarelment_de opciones.
Cambiar information
Selecci6nelo para cambiarla reserva de visualizaci6n.
Cancelar programaciones
Selecci6nelo para cancelar la reserva de visualizaci6n.
Information
Selecci6nelo paravet una reserva de visualizaci6n. (Tambi_n puede cambiar lainformaci6n de la reserva.)
8eleo¢ionar todolDesele¢¢ionar redes
Puedeseleccionar (odeseleccionar) todos loscanales de la list&
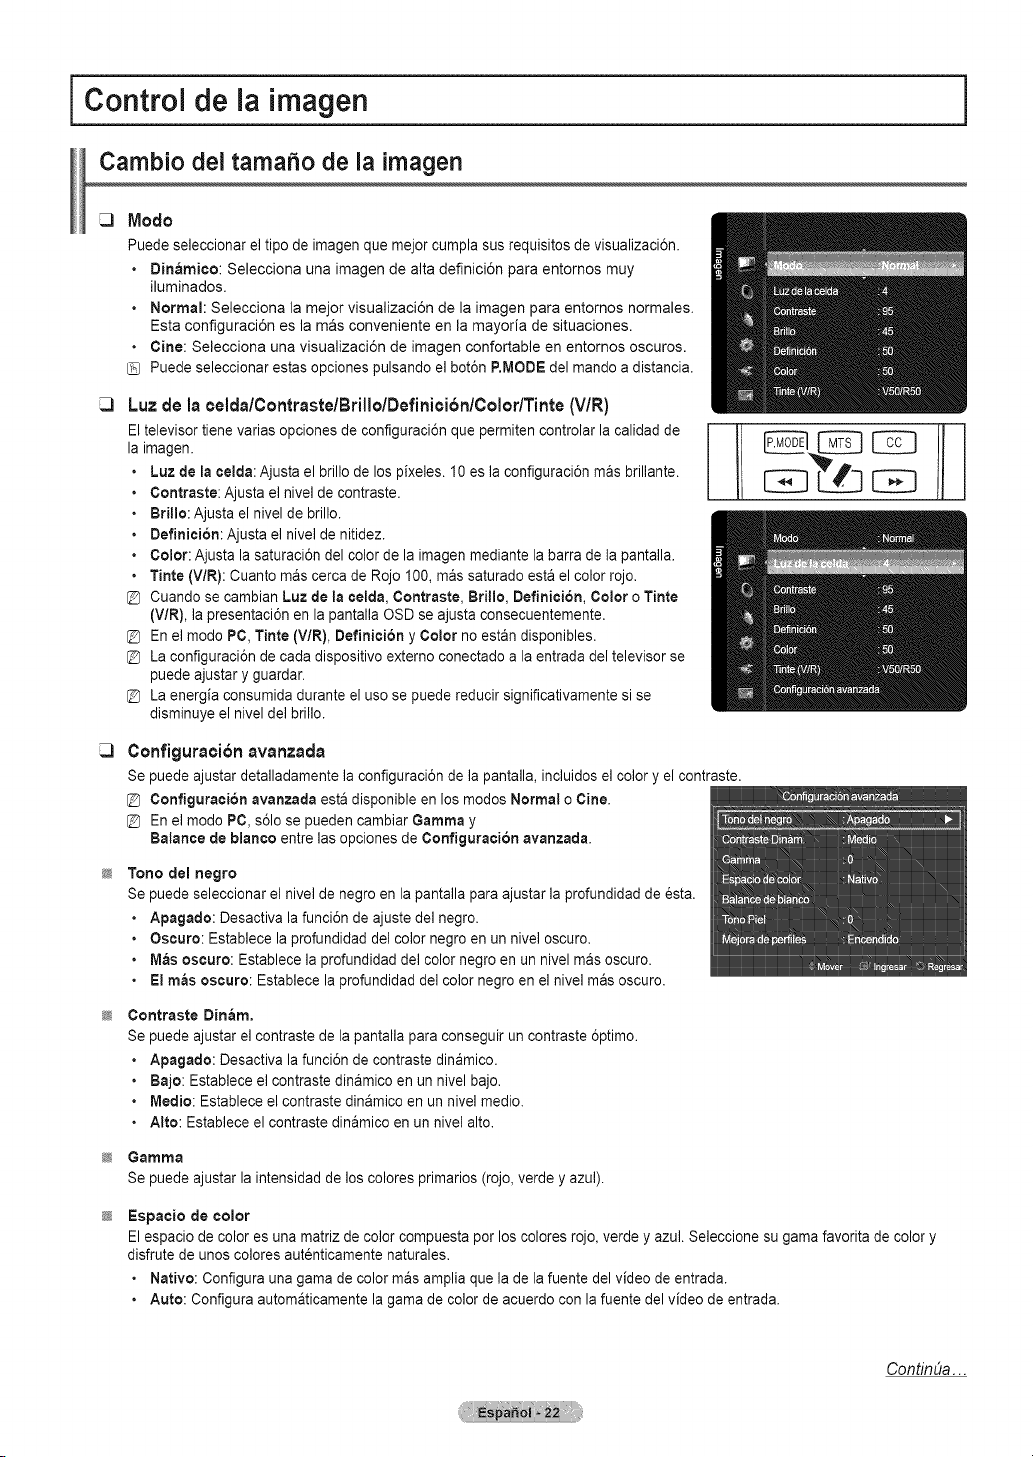
I Control de la
imagen
Cambio deltamafio de la imagen
Modo
Puedeseleccionar el tipo de imagenque mejor cumpla susrequisites devisualizaci6n.
• B[nam[co: Selecciona una imagen de alta definici6n para entornos muy
iluminados.
• Normal: Selecciona la mejor visualizaci6n de la imagen para entornos normales.
Esta configuraci6n es lamas conveniente en la mayoria de situaciones.
• Cine: Selecciona una visualizaci6n de imagen confortable en entornos oscuros.
Puedeseleccionar estas opciones pulsando el bot6n P.IVIODEdel mando adistancia.
Luz de la celdalContrastelBrillolDefini¢i6nlColor/Tinte(V/R)
Eltelevisor tienevarias opciones de configuraci6n que permiten controlar la calidadde
la imagen.
Luzde la celda:Ajusta el brillo de los pixeles. 10 es la configuraci6n mas brillante.
Contraste:Ajusta el nive] de contraste.
Brillo: Ajusta el nivel debrillo.
Definicion: Ajusta el hive] denitidez.
Color: Ajusta la saturaci6n del colordela imagenmediante la barradela pantalla.
Tinte (V/R): Cuanto mascerca de Rojo 100, mas saturado estael colorrojo.
[_ Cuando se cambian Luzde la celda, Contraste, Britlo, Definition, Color o Tinte
(VlR), lapresentaci6n en la pantalla OSD se ajusta consecuentemente.
[_ En el modo PC, Tinte (VlR), Definicibn y Color no estan disponibles.
[_ La configuraci6n de cada dispositivo externo conectado ala entrada deltelevisor se
puede ajustar y guardar.
[_ La energia consumida durante el uso se puede reducir significativamente si se
disminuye el niveldel brillo.
Configuraci6navanzada
Se puede ajustar detalladamente la configuraci6n de la pantalla, incluidos el colory el contraste.
Configuracion avanzada estadisponible enlos modes Normal oCine.
En el mode PC, s61ose pueden cambiar Gamma y
Balance de blanco entrelas opciones deConfiguration avanzada.
Tono del negro
Se puede seleccionar elnivel de negroen la pantalla para ajustarla profundidad de _sta.
• Apagado: Desactiva la funci6n de ajuste del negro.
• Oscure: Establece la profundidad del color negro en un nivel oscuro.
• M_s oscuro: Establece la profundidad del colornegro en un nivel masoscuro.
• El m_s oscuro: Establece la profundidad del color negroen el nivel mas oscuro.
Contraste Dinam.
Se puede ajustar el contraste de la pantalla paraconseguir un contraste 6ptimo.
• Apagado: Desactiva la funci6n de contraste dinamico.
• Bajo: Establece el contraste dinamico en unnivel bajo.
• IVledio:Estableceel contraste dinamico en unnive] medic.
• Alto: Establece el contraste dinamicoen un nive] alto.
Gamma
Se puede ajustar la intensidad de los colores primaries (rojo,verde yazul).
Espacio de color
Elespacio de color es una matrizde color cornpuesta per los colores rojo, verde y azul. Seleccione su gama favorita de color y
disfrute de unos colores autenticamente naturales.
• Native: Configura una gama de color masamplia que la de la fuente delvideo de entrada.
• Auto: Configura automaticamente la gama de color de acuerdo con lafuente del video de entrada.
ContinUa...
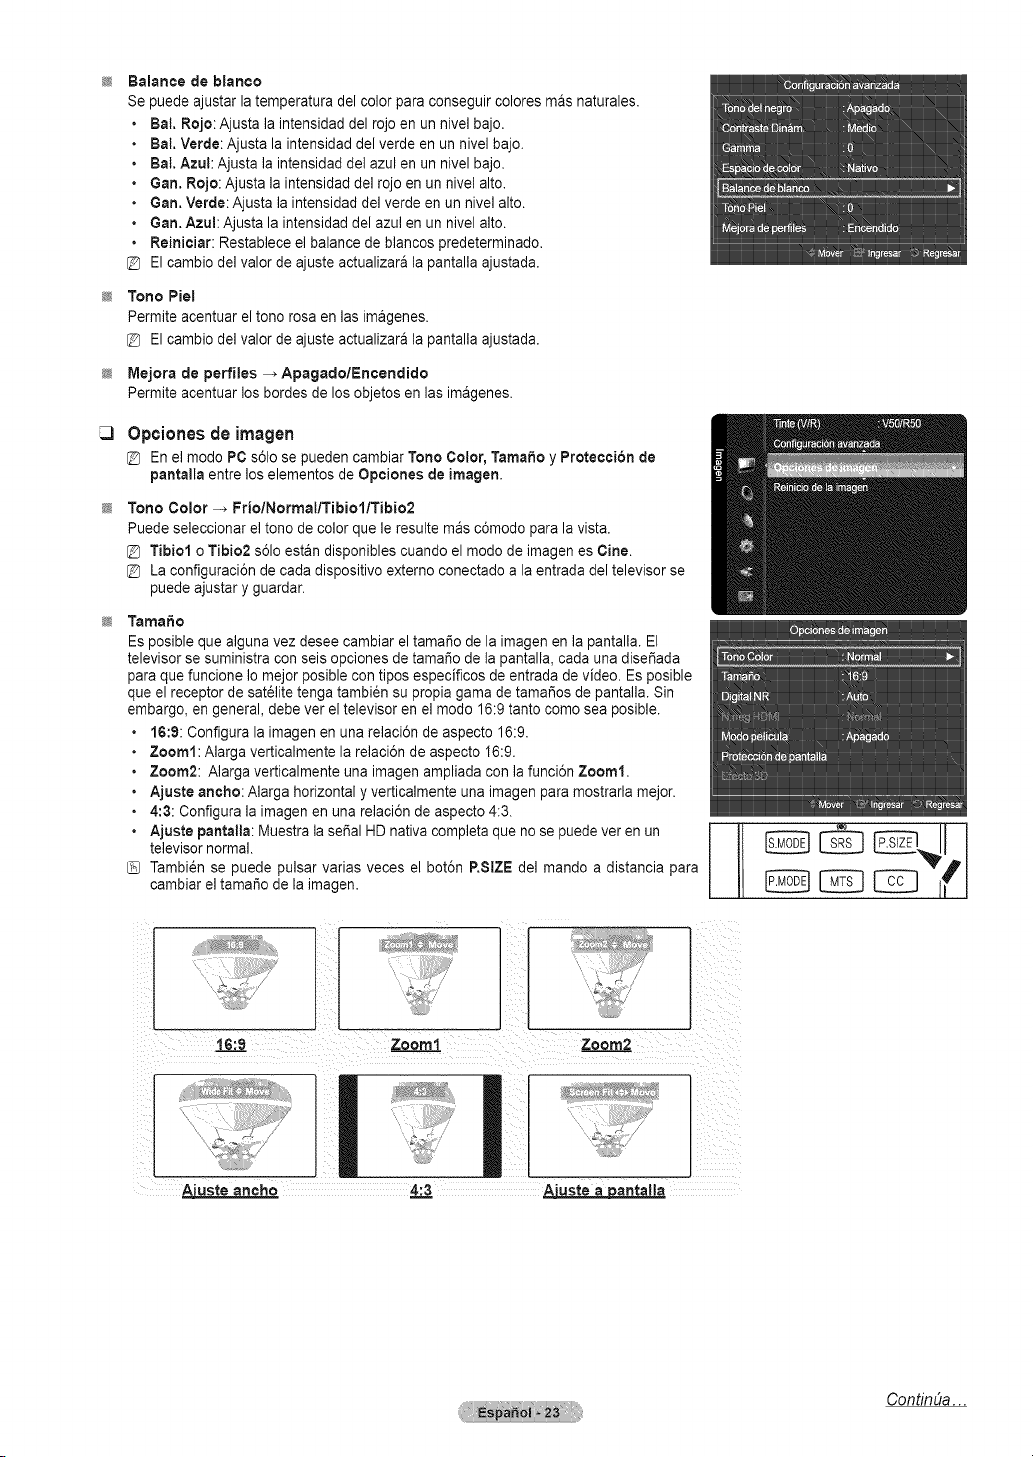
Balance de blanco
Se puede ajustar la temperatura del color paraconseguir colores mas naturales.
Bal. Rojo: Ajusta laintensidad del rojo en unnivelbajo.
Bal. Verde: Ajusta la intensidad del verde en un nivel bajo.
Bal. Azul: Ajusta la intensidad del azulen un nivel bajo.
Gan. Rcjo: Ajusta la intensidad delrojo enun nivel alto.
Gan.Verde: Ajusta la intensidaddel verde en unnivel alto.
Gan. Azul: Ajusta la intensidad delazul en un nivelalto.
Reiniciar: Restablece el balance de blancos predeterminado.
@ Elcambio del valor deajuste actualizara la pantalla ajustada.
Tono Piel
Permiteacentuar el tono rosa en lasimagenes.
Elcambio del valor de ajuste actualizara la pantalla ajustada.
Mejora de perfiles -_ Apagado/Encendido
Permiteacentuar los bordes de losobjetos enlas imagenes.
Opciones de imagen
En el mode PC s61ose pueden cambiar Tone Color, Tamale y Proteccion de
pantalla entre loselementos de Opciones de imagen.
Tone Color -, FriolNormallTibiollTibio2
Puedeseleccionar el tone de color que le resultemas c6modo para la vista.
@ Tibiol o Tibio2 s61oestan disponibles cuando el mode de imagenes Cine.
@ La configuraci6n de cada dispositivo externo conectado a la entrada deltelevisor se
puede ajustar y guardar.
Tama#o
Esposible que algunavez deseecambiar el tamale de la imagen enlapantalla. El
televisor se suministra conseis opciones de tamale de la pantalla, cadauna dise_ada
paraque funcione Io mejor posiblecon tipos espedficos de entrada devideo. Esposible
que el receptor de sat_lite tenga tambi_n su propia gama de tamales de pantalla. Sin
embargo, en general, debe ver el televisor en el mode 16:9 tanto come seaposible.
16:9: Configura la imagen en una relaci6n de aspecto 16:9.
Zoom1: Alarga verticalmente larelaci6n deaspecto 16:9.
Zoom2: Alargaverticalmente una imagenampliada con lafunci6n Zoom1.
Ajuste ancho: Alarga horizontal yverticalmente una imagen paramostrarla mejor.
4:3: Configura la imagen enuna relaci6n de aspecto 4:3.
Ajuste pantalta:Muestrala sepal HDnativa completa que no se puedeveren un
televisornormal.
Tambi_n se puede pulsar varias veces el bot6n RStZE del mando a distancia para
cambiarel tamar_ode la imagen.
Zoom2
_antalla
ContinUa...
Puede producirse una retenci6n temporal de imagencuando se veunaimagen estatica durante mas dedoshoras.
Despues de seleccionar Zoom1, Zoom2 o Ajuste aneho
Pulse los botones _ o_. paraseleccionar Posicion y,acontinuaci6n, pulse el bot6n ENTERS.
Pulse los botones _, o T paradesplazar laimagen hacia arriba ohacia abajo.
Reinieiar: Pulse losbotones 4 o !_-para seleccionar Reinieiar y, a continuaci6n, pulse el bot6n ENTERS. Eltelevisor
recupera la relaci6n 16:9.
Despues de seleccionar Ajuste apantalla en los modes HDMI(1080i/I080p) o Componente (I080i/1080p), quizas deba
centrar la imagen: Pulse losbotones _1o _,-para seleccionar Posieion y,acontinuaci6n, pulse el bot6n ENTERS.
Pulse los botones _,, T, _ o _. para mover la imagen.
Reinieiar: Pulse losbotones 4 o _,-para seleccionar Reinieiar y, a continuaci6n, pulse el bot6n ENTERS. Eltelevisor
recupera la relaci6n 16:9.
HD(alta definici6n): 16:9- 1080i/I080p (1920x1080), 720p (1280x720)
Se puede ajustary almacenar laconfiguraci6n decadadispositivo que est_ conectado a una entrada del televisor.
En el mode PC, s61ose pueden ajustar losmodes 16:9 y4:3.
La configuraci6n de cada dispositivo externo conectado a la entrada deltelevisor sepuede ajustar y guardar.
Fuente de entrada TamafiOde imagen
ATV, Video, Componente (480i, 480p) 16:9, Zoom1, Zoom2, 4:3
Componente (720p) 16:9, Ajuste ancho, 4:3
DTV(1080i), Componente (I080i, I080p), HDMI (720p, 1080i,1080P) 16:9, 4:3, Ajuste aneho, Ajuste a pantalla
PC 16:9, 4:3
Digital NR
Sila serial de emisi6n que recibeel TV es d_bil, puede activarse la funci6n Digital NR
(Reducci6n digital delruido) parareducir la estaticay lasimagenes superpuestas que
pueden aparecer en la pantalla.
• Apagado: Desactiva la funci6n de reducci6n deruido digital.
• Bajo: Configura lareducci6n de ruido digital en el nivel bajo.
• Mealie: Configura la reducci6n de ruido digitalen el nive] medio.
• Alto: Configura la reducci6n de ruido digital enelnivel alto.
• Auto: Configura la reducci6n de ruido digital en Automatico.
N.neg HDMI
Se puede seleccionar directamente el nivel de negroen la pantalla paraajustar la
profundidadde esta.
• Normal: La pantalla seve mas brillante.
• Bajo: La pantalla se ve masoscura.
Estafunci6n s61oestaactiva cuando un dispositivo externo esta conectado al
televisoratrav_s de HDMI. La funci6n
N,neg HDMIpuede que no sea compatible con todos losdispositivos externos.
Mode pelicula
Eltelevisor sepuede configurar para que percibay proceseautomaticamente las sefiales
de pelicula de todas lasfuentes y ajuste la mejor calidad de imagen.
• Apagado: Aplicado procesamiento basico de imagenes devideo y no detecci6n
automatica paraprogramas de peliculas.
• Auto: Ajusta automaticamente paraobtener la mejor calidad de imagen entreprogramas de peliculas y video.
@ Mode pelicula es compatible con TV, Video, Componente (480i/1080i) y HDMI (1080i).
Protection de pantalla
Configura lasopciones de Proteccion depantalla paraevitary reducir el quemado de pixeles.
Cuando una imagenpermanece enuna posici6n permucho tiempo,puede ocasionar un quemado permanente en la pantalla.
Prevencion del desgaste de la pantalla
Estapantalla esta equipada con tecnologia de prevenci6n para reducir laposibilidad de que se queme. Esta
tecnologia permite definirel movimiento de laimagen arribao abajo (linea vertical) y de ladealade (punto horizontal).
Elajustedeltiempo permite programar intervalostemporales entrelos movimientos dela imagen en minutes.
• Gamble de pixel: Con esta funci6n podra mover pixeles de forma detallada en el PDP,ensentido horizontal o vertical, para
evitarrestos deimagenes en la pantalla.
@ Condici6n 6ptimapara cambio de pixel:
Horizonta! 0~4 2
0_4 2
imini i_4 minl 2min.
ContinUa...
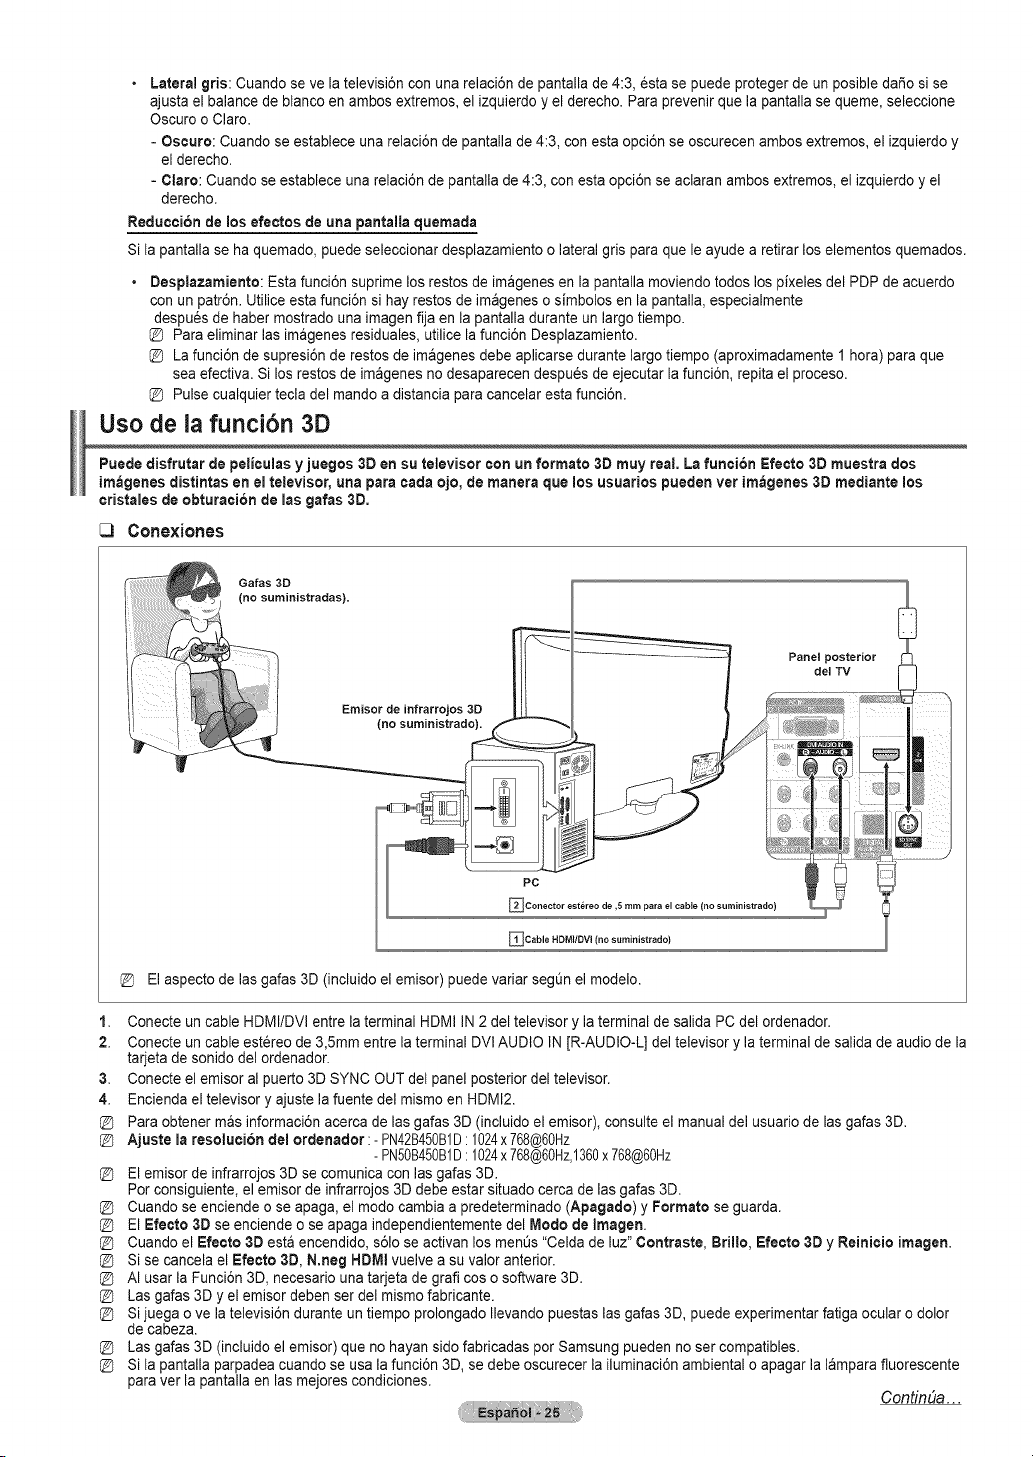
• Lateral gris: Cuando se ve latelevisi6n conunarelaci6n de pantalla de 4:3, 6sta se puede proteger de un posibledafio sise
ajusta el balance de blanco en ambos extremes,el izquierdo y el derecho. Para prevenir que la pantalla se queme, seleccione
Oscuro o Clare.
- Oscure: Cuando se establece una relaci6n de pantalla de 4:3, con esta opci6n se oscurecen ambos extremes, el izquierdo y
el derecho.
- Clare: Cuando se establece una relaci6n de pantalla de 4:3, conesta opci6n se aclaran ambosextremes, el izquierdo y el
derecho.
ReduccJ6n de ruesefectes de una pantalla quemada
Si lapantalla se ha quemado, puede seleccionar desplazamiento o lateralgris para que le ayude aretirar los elementos quemados.
Use
Desplazamiento: Estafunci6n suprime los restosde imagenes en la pantalla moviendo todos lospixeles del PDP de acuerdo
conunpatr6n. Utiliceesta funci6n sihay restos de imagenes o simbolos en la pantalla, especialmente
despues de haber mostradouna imagen fija enla pantalla durante un largo tiempo.
Para eliminar lasimagenes residuales, utilice la funci6n Desplazamiento.
La funci6n de supresi6n de restosde imagenes debe aplicarse durante largo tiempo (aproximadamente 1 hera) paraque
sea efectiva.Si los restos deim_genes no desaparecen despues de ejecutar la funci6n, repita el proceso.
Pulse cualquier tecla del mando adistancia para cancelar esta funci6n.
de lafunci6n 3D
Puede disfrutar depeliculas y juegos 3Den su televisor con un formate 3D muy real. Lafunci6n Efecto 3Dmuestra dos
im_genes distintas eneltelevisor, una para cadaejo, demanera que losusuarios pueden ver im_genes 3D mediante los
cristales de obturaci6n de las galas 3D.
_3 Conexiones
Galas 3O
(no suministradas).
Emisor de infrarrojos 3D
(no
Panel posterior
del TV
PC
_Conector est6reo de ,5 ram para el cable (ilo surainistrado)
_Cable HDMI/DW (no suministrado)
Elaspecto de las galas 3D(incluido el emisor) puede variar segQn el modelo.
1. Conecte un cable HDMI/DVI entrela terminal HDMI IN2deltelevisor y la terminal de salida PC del ordenador.
2. Conecte un cable est@eode 3,5ram entre laterminal DVI AUDIO IN[R-AUDIO-L] del televisor y la terminal de salida de audiodela
tarjeta de sonido delordenador.
3. Conecte el emisor al puerto 3D SYNC OUT del panelposterior deltelevisor.
4. Enciendael televisor y ajuste la fuente del mismo en HDMI2.
Para obtener mas informaci6n acercade las galas 3D (incluidoel emisor), consulteel manual del usuario delas galas 3D.
Ajuste maresoluci6n demordenador :- PN42B450B1D:1024x 768@60Hz
- PN50B450B1D:1024x 768@60Hz,1360x 768@60Hz
Elcruiserde infrarrojos3Dse comunica con lasgalas 3D.
Perconsiguiente, el emisor de infrarrojos 3Ddebe estar situado cercade lasgalas 3D.
Cuando se enciende o se apaga, el mode cambia a predeterminado (Apagado) y Formate se guarda.
ElEfecto 3Dseenciende o se apaga independientemente del Mode deImagen.
@ Cuando elEfecto 3D esta encendido, s61ose activan los menQs "Celda deluz" Centraste, Brimlo, Efecto 3Dy Reinicio imagen.
@ Si se cancela el Efecte 3D, N.neg HDMI vuelve a su valor anterior.
@ AI usar la Funci6n 3D,necesario una tarjeta de graftcos o software 3D.
@ Lasgalas 3D y el emisordeben ser del mismo fabricante.
@ Sijuega o ve la televisi6n durante un tiempo prolongado Ilevando puestas lasgalas 3D, puede experimentar fatigaocular o dolor
de cabeza.
@ Lasgalas 3D (incluido el emisor) que no hayan side fabricadas per Samsung pueden no ser compatibles.
@ Si la pantalla parpadea cuandose usa la funci6n 3D,sedebe oscurecer la iluminaci6n ambiental o apagarla lampara fluorescente
paraver la pantallaen lasmejores condiciones.
ContinUa...
Cambio de modo
AI cambiarel modo se intercambian lasset,ales de salida izquierda y derecha y, conello,
Ins imagenes destinadas a cadaojo.
• Apagado :Desactiva la funci6n de efecto 3D.
• Modot :Algunos contenidos pueden no ajustarse almodo I.
• Modo2 : Sino se encuentra c6modo en el Modo 1, cambie al Modo 2.
• 2D: Picture isconverted from3D to2D. Choose this towatch a2Dpicture when you
areexperiencing eyestrain.
Ifthe 3Deffect isnot working properly,it meansthe Mode and 3D glasses may not
be syncing properly.Toput them in sync, switch tothe other mode.
Carrtbio de forrrtato
Seleccione el formato deentrada 6ptimo para que se ajuste a Ins tarjetas graficas o al
software 3D.
• Tablero ajedrez: Siel formato de salida de la tarjeta graficao del software 3Des
Tablero ajedrez, seleccione esteformato de entrada.
• Horizontal: Siel formato desalida de la tarjeta grafi caodel software 3D es
Horizontal interlazado, seleccione este formato de entrada.
• Vertical: Si elformato de salida de la tarjeta grafica o delsoftware 3D esVertical interlazado, seleccione este formato de
entrada.
Reinioio de la imogen _ Reinio. modo irnagen/Cancelar
Restablecetodos losajustes predeterminados.
@ Seleccione un modo deimagen que deseerestaurar. La restauraci6n se realiza en
cadamodo de imagen.
Pantalla de PC
Uso del televisor como una pantalla de ordenador (PC)
ConfiguracJ6n del software del PC (basado en Windows XP)
A continuaci6n se muestra laconfiguraci6n de pantalla de Windows paraun ordenador tipico.
Probablemente la pantalla real de su PC seadistinta, segt_n la versi6n concreta deWindows y
de la tarjeta de video que tenga. Aunque laspantallas reales seandiferentes, la informaci6n de
configuraci6n basica que se aplicaen casitodos loscasos es lamisma.
(Encaso contrario, p6ngase en contacto conel fabricante del ordenador o con el distribuidor de
Samsung.)
1. Primero, haga clicen Panel de control en el ment3de iniciode Windows.
2. Cuando aparezca la ventana del panel de control, haga clicen Apariencia y temas y
aparecera un cuadro de dialogo.
3. Cuando aparezca la ventana del panel de control, haga clicen Pantalla y aparecera un
cuadro dedialogo.
4. Vayaa lapestar_aConfiguracJ6nen el cuadro de dialogo. Configuraci6n correcta del
tamar_o(resoluci6n) 6ptima: 1920 x 1080 pixeles Si existe una opci6n de frecuencia vertical
en elcuadro de dialogo de configuraci6n de la pantalla, el valorcorrecto es de60 o 60 Hz. Sino,haga clic en Aceptar y salga
del cuadro dedialogo.
Contin_Ja...
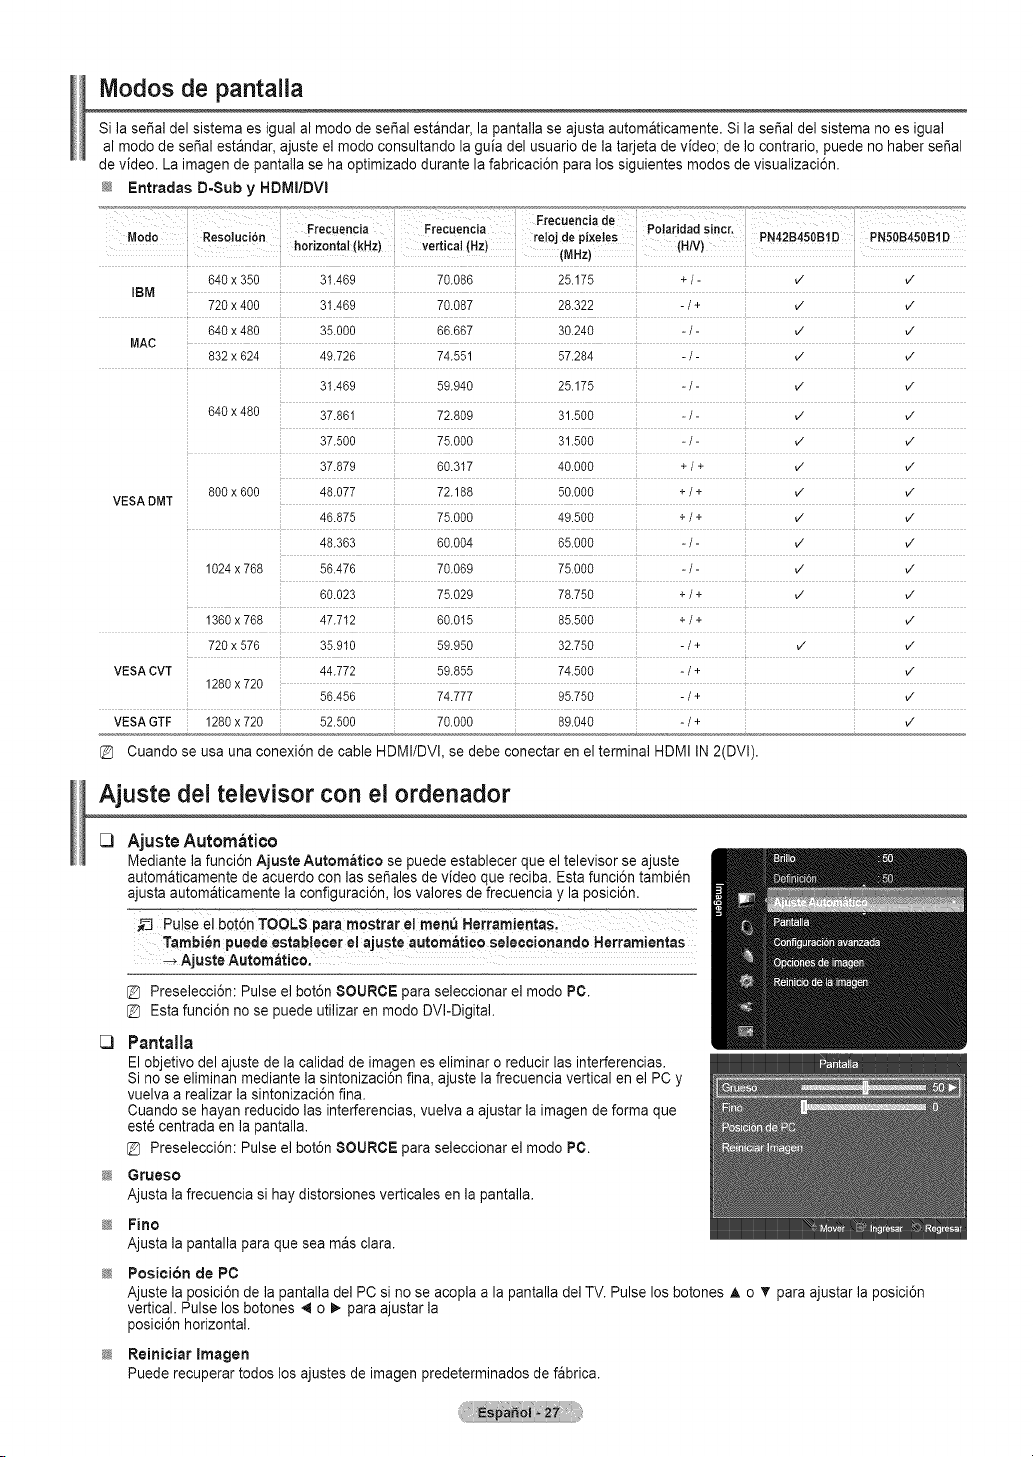
Modos de pantalla
Si laserialdel sistema es igual al modo de serial estandar, la pantalla se ajusta automaticamente. Si la serial del sistema noesigual
al modo de serial estandar, ajuste el modo consultando la guia del usuario de la tarjeta de video; de 1ocontrario, puede no haberserial
de video. La imagende pantalla sehaoptimizado durante la fabricaci6n paralos siguientes modos de visualizaci6n.
_JZ Entradas D-Sub y HDIVlI/DVI
640x 350 31.469 70.086 25.175 +/- v" v"
IBM
720x 400 31.469 70.087 28.322 -/+ v" v"
640x 480 35.000 66.667 30.240 - /- v" v"
MAC ...............................................................................................................................................................................................................................................................................................................................................................................................................................................................................................................................................................................
832x 624 49.726 74.551 57.284 -/- ,/ ,/
31.469 59.940 25.175 - /- ,/ ,/
640x 480 37.861 72.809 31.500 - /- ,/ ,/
37.500 75.000 31.500 - / - V" V"
37.879 60.317 40.000 + /+ V" V"
800x 600 48.077 72.188 50.000 +/ + ,/ ,/
VESADMT
[
46.875 75.000 49.500 + /+ v" v"
48.363 60.004 65.000 - / - V" V"
1024x768 56.476 70.069 75.000 - / - ,/ ,/
60.023 75.029 78.750 +/ + v" v"
1360x768 47.712 60.015 85.500 +/ + v"
720 x 576 35.910 59.950 32.750 -/ + v" v"
VESACVT 44.772 59.855 74.500 -/+ v"
1280x720
56.456 74.777 95.750 -/+ v"
VESAGTF 1280x720 52.500 70.000 89.040 -/+ v"
Cuando se usa una conexi6n de cable HDMI/DVl, se debe conectar enel terminal HDMIIN2(DVl).
Ajuste del televisor con el ordenador
C)
C)
Ajuste Autom_ti¢o
Mediante lafunci6n Ajuste Automati¢o se puede establecer que el televisor se ajuste
autom&ticamente de acuerdo conlassefiales devideo que reciba. Esta funci6n tambi_n
ajusta automaticamente la configuraci6n, losvalores de ffecuencia y laposici6n.
_J PUbe el bot6n TOOLS p.ra rnostrar e!me"_ Herramie.taSl
Tambien puede estab!ecer e!ajuste autom_t!co seleccionando Herram!entas
_ Ajuste Automatico.
@ Preselecci6n: Pulse el bot6n SOURCEpara seleccionar el modo PC.
@ Estafunci6n no se puede utilizar en modo DVI-Digital.
Pantalla
Elobjetivo delajuste de la calidad de imagenes eliminar oreducir las interferencias.
Sinoseeliminan mediante la sintonizaci6n fina, ajuste lafrecuencia vertical en el PC y
vuelva a realizar la sintonizaci6n fina.
Cuando se hayan reducido las interferencias, vuelva a ajustarla imagen deforma que
est6 centrada enla pantalla.
Preselecci6n: Pulse el bot6n SOURCEpara seleccionar el modo PC.
Grueso
Ajusta la frecuencia si haydistorsiones verticales en la pantalla.
Pirto
Ajusta la pantalla para que seamas clara.
Position de PC
Ajuste la posici6n de la pantalla del PC sino se acopla ala pantalla delTV.Pulse los botones A o T paraajustar la posici6n
vertical. Pulse losbotones 4 o _.para ajustarla
posici6n horizontal.
Reiniciar Imagen
Puederecuperar todos los ajustes de imagenpredeterminados de fabrica.
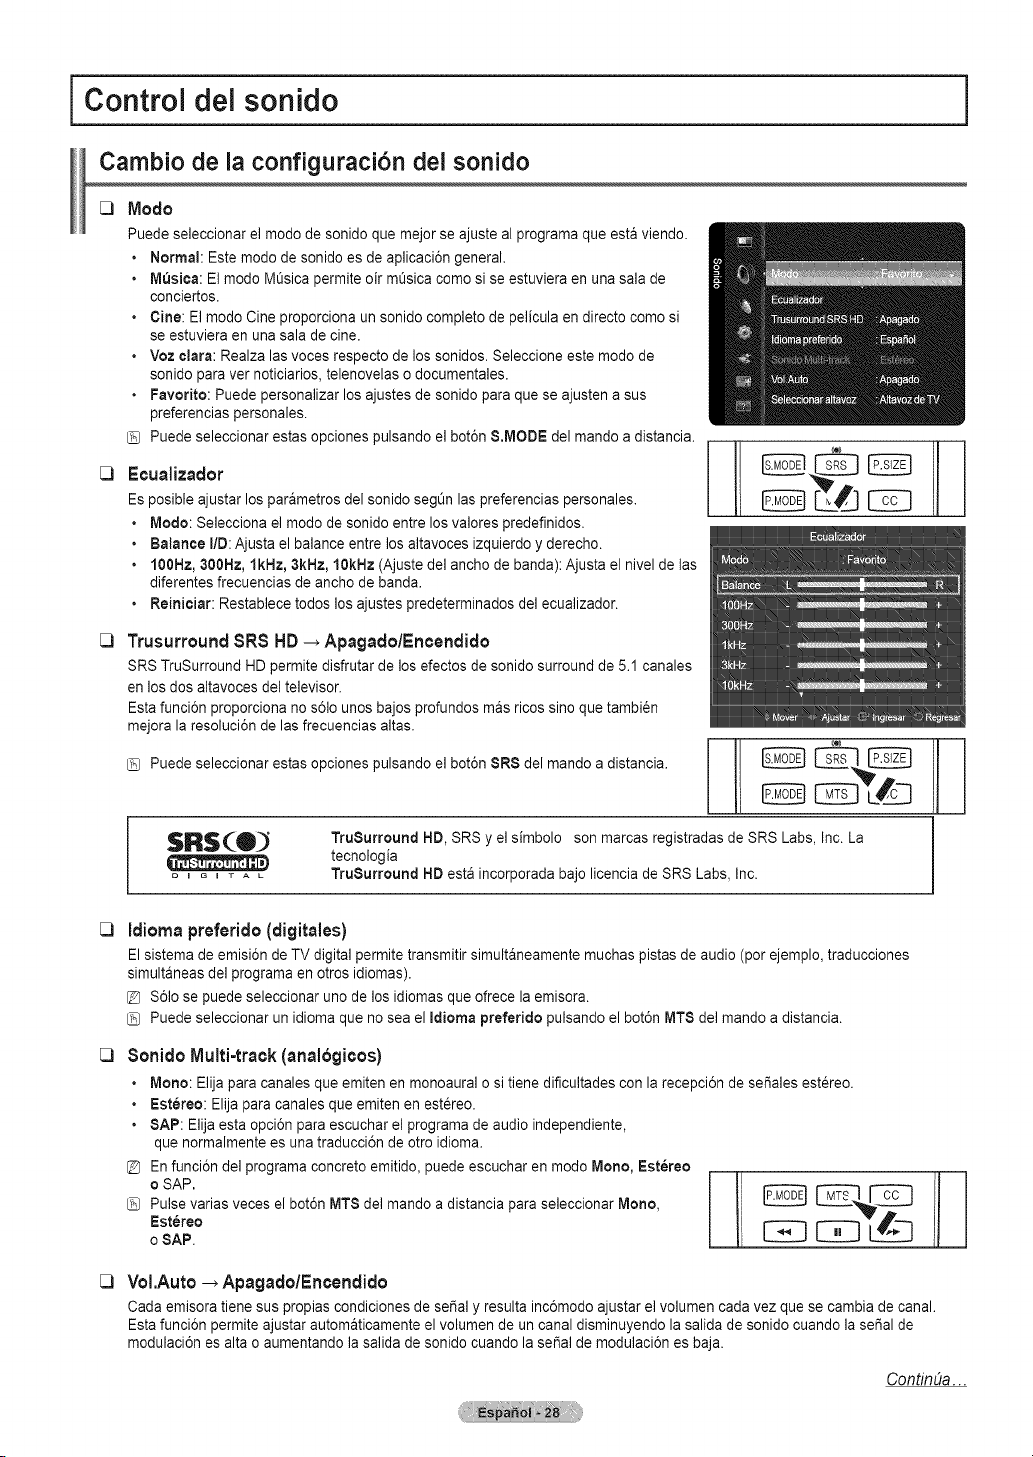
I Control del sonido
Cambio de la configuraci6n dei sonido
C)
C)
Modo
Puedeseleccionar el mode de sonido que mejor se ajuste al programa que estaviendo.
• Normal: Estemode de sonido es deaplicaci6n general.
• M_sica: El mode M@sicapermite oir m@sicacome sise estuviera en una salade
conciertos.
• Cine: Elmode Cine proporciona unsonido complete de pelicula en directo come si
se estuviera en una sala de cine.
• Voz clara: Realza lasvoces respecto de los sonidos. Seleccione este mode de
sonido paraver noticiarios, telenovelas o documentales.
• Favorite: Puede personalizar losajustes de sonido para que se ajusten asus
preferencias personales.
Puedeseleccionar estas opciones pulsando el bot6n &MODE del mando a distancia.
Ecualizador
Esposible ajustarlosparAmetros delsonido segL_nlas preferencias personales.
• IVledo: Selecciona el mode de sonido entre losvalores predefinidos.
• Balance liD:Ajusta el balance entrelos altavoces izquierdo y derecho.
• 100Hz, 300Hz, lkHz, 3kHz, 10kHz (Ajuste del anchode banda): Ajusta el nivel de las
diferentes frecuencias de ancho de banda.
• Reiniciar: Restablece todos losajustes predeterminados del ecualizador.
[I
@ @iN@
Trusurround8R8 HD _ Apagado/Encendido
SRS TruSurround HD permite disfrutar de losefectos de sonido surround de 5.1 canales
en los dos altavoces deltelevisor.
Estafunci6n proporciona nos61ounos bajos profundos mas rices sine que tambi_n
mejora la resoluci6n delas frecuencias altas.
Puedeseleccionar estas opciones pulsando el bot6n 8R8 del mando adistancia.
SRS(O_ TruSurround HD,SRS y elsimbolo sonmarcas registradas deSRS Labs, Inc. La
tecnologia
....... TruSurround HDesta incorporada bajo licencia de SRS Labs,Inc.
_3
_3
_3
Idioma preferido (digitales)
Elsistema de emisi6n de TVdigital permite transmitir simultaneamente muchas pistas de audio (per ejemplo, traducciones
simultaneas delprograma en otros idiomas).
S61ose puede seleccionar uno de los idiomasque ofrece la emisora.
Puedeseleccionar un idioma que no sea el Idioma preferido pulsando el bot6n MT8 de] mando adistancia.
Sonido Multi-track(anal6gieos)
• Mono:Elija paracanales que emitenen monoaural ositiene dificultades con la recepci6n de set,ales estereo.
• Est6reo: Elijaparacanales que emiten en estereo.
• SAP: Elija esta opci6n paraescuchar elprograma de audio independiente,
que normalmente esunatraducci6n de otroidioma.
En funci6n de] programa concrete emitido, puede escuchar en mode Mono, Est6reo
oSAP.
Pulse varias veces el bot6n MT8de] mando a distancia paraseleccionar Mono,
Est_reo
oSAP.
VoI.Auto_ Apagado/Encendido
Cada emisoratiene suspropias condiciones desepal y resultainc6modo ajustar elvolumen cadavez que se cambia de canal.
Estafunci6n permite ajustar automaticamente el volumen de un canal disminuyendo la salida de sonido cuando lasei_alde
modulaci6n es altao aumentando la salida de sonido cuando laserial de modulaci6n es baja.
ContinUa...

C3Seleccionar altavoz
Cuando se ve el televisor conectado aun sistemaHome Cinema,se debe apagar el
altavoz del televisor para que la salidade audiodeltelevisor utilice losaltavoces del
Home Cinema (externos).
• Altavoz externo: Utiliza losaltavoces externos(Home Cinema) parala salida de
sonido.
• Altavoz de TV: Utiliza losaltavoces de] TV para la salida de sonido.
@ Sise seleccionaAltavoz externo en el ment_8eleecionar altavoz, se limita la
configuraci6n delsonido.
@ Losbotones de volumen y AMUTE no funcionan si 8eleeeionar altavoz esta
establecido enAttavoz externo.
Configure el volumen delsistema Home Cinema.
Salida de sonido
Silencio
DOLBY
DiGiTAL I
Fabricadobajo licencia de Dolby Laboratories.
Dolby y el sJmbolo dela doble Dsonmarcas comerciales de Dolby Laboratories.
C3 Reinicio del sonido
Puederestaurar la configuraci6n del sonido con losvalores predeterminados de fabrica,
• Reiniciar rode: Todos losvalores del sonido vuelven alaconfiguraci6n predeterminada.
• Reinic. mode sonido: Losvalores actuales del sonido vuelven ala configuraci6n predeterminada.
• Cancelar: Seleccione lasopciones de reinicio de sonido.
iDescripci6n de las funciones i
Configuraci6n del men de configuraci6n
[3 Idioma
Se puede configurar el idioma de losmen_s.
C3
Modo Juego _ Apagado/Encendido
Sise conecta a una consola de videojuegos come PlayStationTM o XboxTM, podra
obtener sensaciones mas realistasseleccionando el menQde juegos.
8i
o
o
el mode Juego esta eneendido
Elmode Imagen cambia automaticamente a Normal y no se puede cambiar.
Elmode Sonido cambia automaticamente aFavorite y no se puede cambiar. Ajuste el
sonido con el ecualizador.
• La funci6n Reiniciar se activa en el menOSonido. La funci6n Reinieiar inicializa laconfiguraci6n del Eeualizador con los
parametros defabrica.
@ Mode Juego no esta disponible en el mode normal de TVoMode Juego esta establecido come Apagado.
@ Sila calidadde la imagenes deficiente cuando undispositivo externo esta conectado al televisor,compruebe si laopci6n Mode
Juego esta establecida come Encendido.
@ Cuando se muestrael menO deTVen el Mode Juego, la pantalla tiembla ligeramente.
@ La marca (#_) que aparece en la pantalla indica que la opci6n Mode Juego esta activa conla fuente seleccionada.
@ Estafunci6n s61oadmirela funci6n de juegos.
@ Mode Juego no esta disponible en el mode PC.
ContinUa...
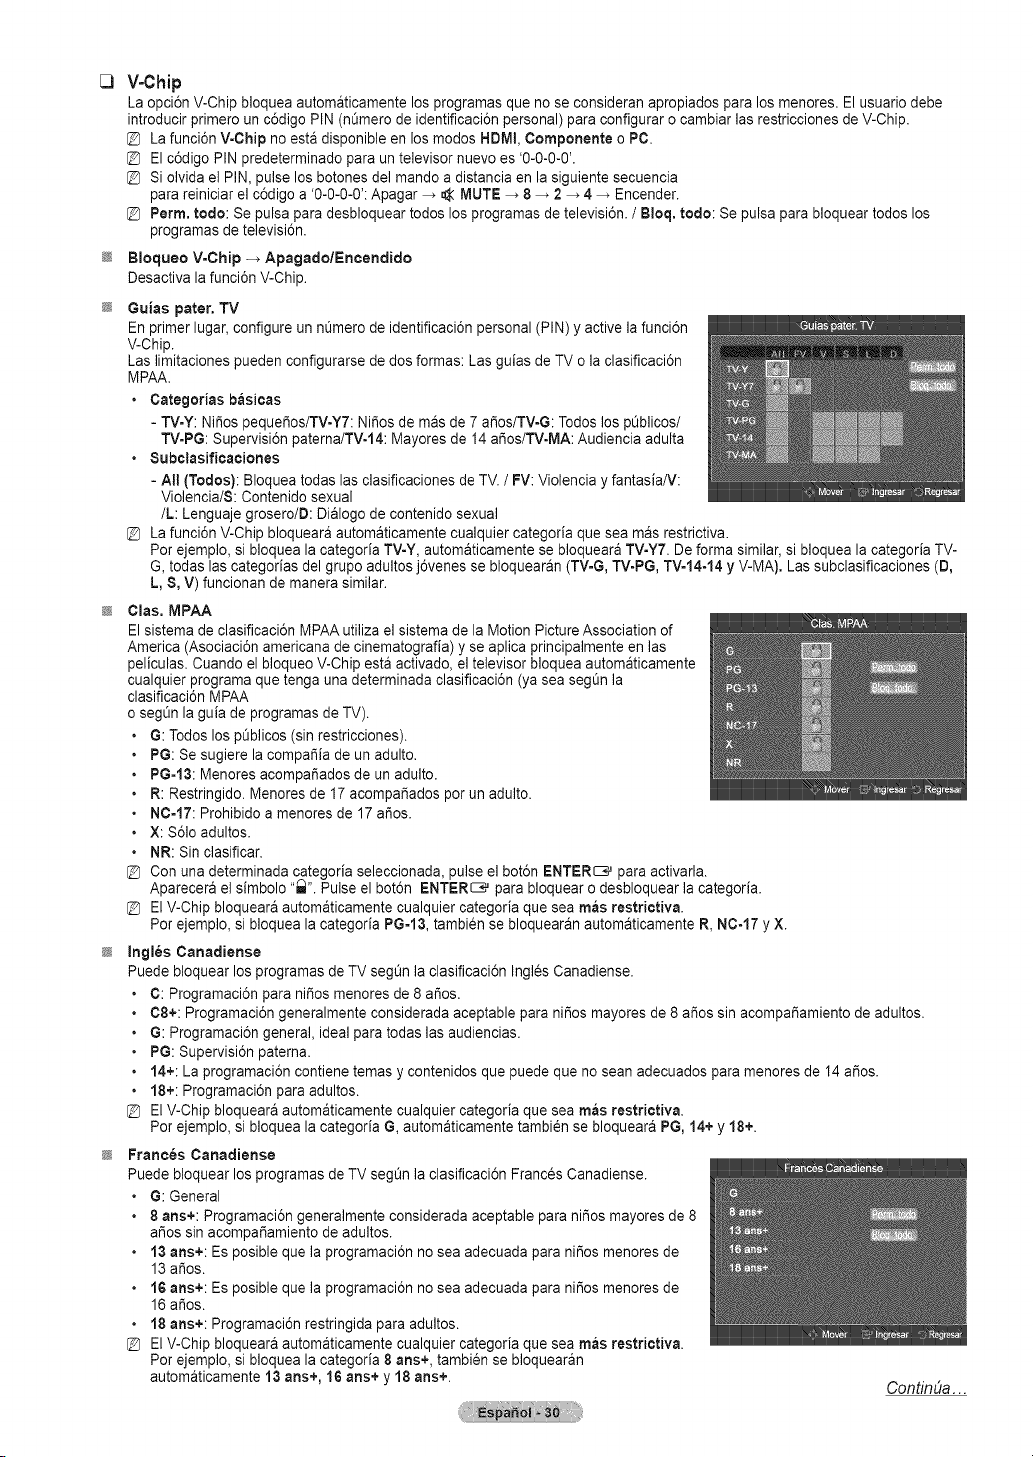
V-Chip
La opci6n V-Chip bloquea automaticamente losprogramas que noseconsideran apropiados para los menores. Elusuario debe
introducir primero un c6digo PIN (nOmero de identificaci6n personal) para configurar ocambiar lasrestricciones de V-Chip.
La funci6n V-Chip no estadisponible en losmodes HDMI, Componente o PC.
Elc6digo PIN predeterminado paraun televisor nuevo es'0-0-0-0'.
Siolvida el PiN, pulse losbotones delmando a distancia enlasiguiente secuencia
parareiniciar el c6digo a '0-0-0-0': Apagar _ _( MUTE -> 8 _ 2_ 4 _ Encender.
Perm, rode: Se pulsa para desbloquear todos losprogramas de televisi6n./ Bloq. redo: Se pulsa para bloquear todos los
programas de televisi6n.
Bloqueo V-Ohip -_ Apagado/Eneendido
Desactiva la funci6n V-Chip.
Guias pater. TV
En primer lugar, configure unnOmerode identificaci6n personal (PIN) y active lafunci6n
V-Chip.
Laslimitaciones pueden configurarse de dos formas: Lasguias de TVo la clasificaci6n
MPAA.
• Categerias basieas
- TV-Y: Ni_os pequei_os/TV-Y7:Ni_osde masde7 ar_os/TV-G:TodoslospLiblicos/
TV=PG:Supervisi6n paterna/TV-14: Mayores de 14 ar_os/TV-MA:Audiencia adulta
• 8ubclasificaciones
- All (Todos):Bloquea todas lasdasificaciones de TV. / FV:Violencia y fantasia/V:
Violencia/8: Contenido sexual
/L: Lenguajegrosero/D: Dialogo de contenido sexual
[_ La funci6n V-Chip bloqueara automaticamente cualquier categoria que sea masrestrictiva.
Perejemplo, si bloqueala categoria TV-Y,automaticamente se bloquearaTV=Y7. De forma similar,si bloquea la categor[a TV-
G, todas las categorias del grupo adultos j6venes se bloquearan(TVoG, TV-PG,TV-14-14 y V-MA). Las subclasificaciones (D,
L,8, V)funcionan de manera similar.
Clas. MPAA
Elsistema de clasificaci6n MPAAutiliza el sistema de la MotionPicture Association of
America (Asociaci6n americana de cinematografia) y se aplica principalmente en las
)eliculas. Cuando el bloqueo V-Chip esta activado,el televisor bloqueaautomaticamente
cualquier programaque tenga una determinada clasificaci6n (yasea segOn la
clasificaci6n MPAA
osegOn la guia de programas de TV).
G: Todos lospOblicos(sin restricciones).
PG: Se sugiere la compaifi[ade un adulto.
PG-13: Menores acompafiados de un adulto.
R:Restringido. Menoresde 17 acompaSados porunadulto.
NC-17: Prohibido amenores de 17 ar_os.
X: S61oadultos.
NR:Sin clasificar.
Conuna determinada categoda seleccionada, pulse el bot6n ENTER_ para activarla.
Aparecera el simbolo "_". Pulse el bot6n ENTER_ para bloquearodesbloquear la categoria.
ElV-Chip bloqueara automaticamente cualquier categoria que sea mas restrictiva.
Porejemplo, si bloqueala categoria PG-13,tambien se bloquearan automaticamente R,NC-17 y X.
ingles Canadiense
Puedebloquear los programas de TVsegt_n la clasificaci6n Ingles Canadiense.
C: Programaci6n paranifios menoresde 8 ar_os.
C8+: Programaci6n generalmente considerada aceptable para ni_os mayores de 8 ariessin acompafiamiento de adultos.
G: Programaci6n general, ideal para todaslas audiencias.
PG: Supervisi6n paterna.
14+:La programaci6n contiene temas y contenidos que puede que no sean adecuados para menores de 14 aries.
18+:Programaci6n paraadultos.
ElV-Chip bloqueara automaticamente cualquier categoria que sea mas restrictiva.
Perejemplo, si bloqueala categoria G, automaticamente tambi_n se bloqueara PG,14+y 18+.
Frances Canadiense
Puedebloquear los programas de TVseg_n laclasificaci6n Frances Canadiense.
• G: General
• 8 arts+: Programaci6n generalmente considerada aceptable parani_os mayores de8
ar_ossin acompafiamiento de adultos.
• 13 arts+: Esposible que la programaci6n no sea adecuada para ni_os menores de
13 ar_os.
• 16 arts+: Esposible que la programaci6n no sea adecuada para ni_os menores de
16 ar_os.
• 18 arts+: Programaci6n restringida paraadultos.
ElV-Chip bloqueara automaticamente cualquier categoria que sea mas restrictiva.
Perejemplo, si bloqueala categoria 8arts+, tambien se bloquearan
automaticamente 13arts+, 16 arts+ y 18 arts+.
ContinDa...
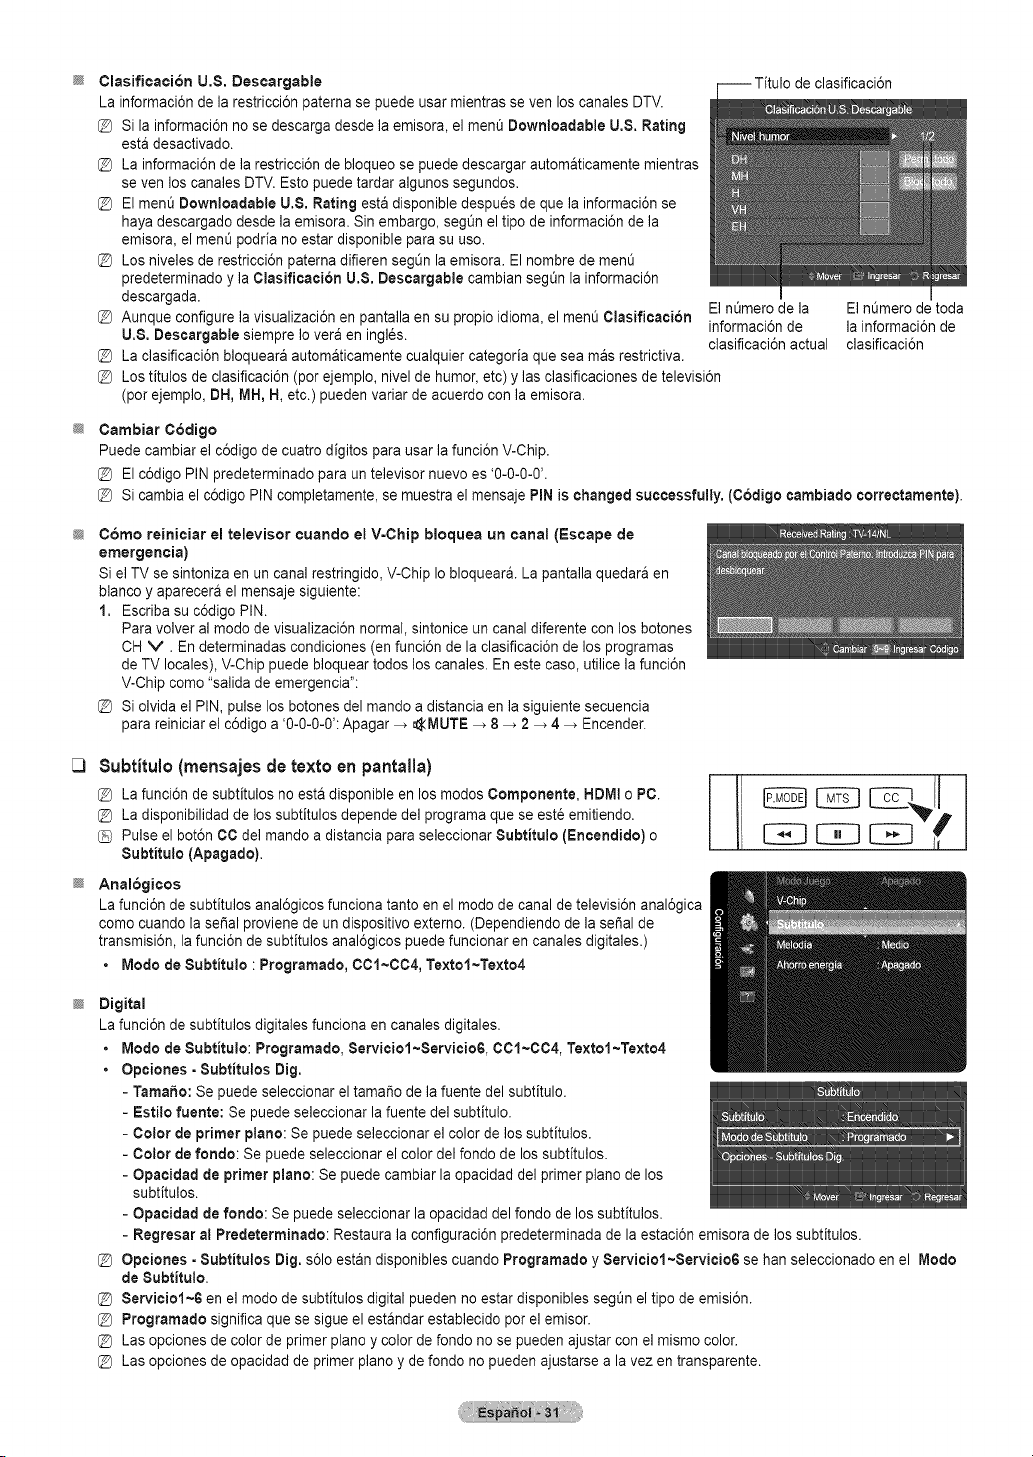
;# de clasificaci6n
Clasificacion U.$. Descargable
La informaci6ndela restricci6n patema se puede usar mientras seven los canales DTV.
Sila informaci6n nosedescarga desde la emisora, el ment_Downloadable U.8.Rating
esta desactivado.
La informaci6nde la restricci6n debloqueo se puede descargarautomaticamente mientras
se yen loscanales DTV.Esto puede tardar algunos segundos.
Elment_Downloadable U.8. Rating esta disponible despues de que la informaci6n se
hayadescargado desdela emisora. Sinembargo, segQnel tipo de informaci6nde la
emisora, el ment_podria no estar disponible parasu use.
Losniveles de restricci6n paterna difierensegL_nla emisora. El hombre demen@
predeterminado y laClasificacion U.$. Descargable cambian segt_nla informaci6n
descargada.
Aunque configure la visualizaci6n en pantalla en su propio idioma, el menOClasificaai6n
U.8. Descargable siempre Ioveraen ingl6s.
La clasificaci6n bloqueara autom&ticamente cualquier categoria quesea masrestrictiva.
ElnL_merode la ElnL_merodetoda
informaci6n de la informaci6n de
[_ clasificaci6n actual clasificaci6n
Lostitulos de clasificaci6n (per ejemplo, nivel de humor, etc) y lasclasificaciones de televisi6n
(per ejemplo, DH,MH, H,etc.) puedenvariar deacuerdo con la emisora.
Cambiar C6dige
Puede cambiar el c6digo de cuatro digitos parausar lafunci6n V-Chip.
@ Elc6digo PIN predeterminado paraun televisor nuevoes '0-0-0-0'.
@ Sicambia el c6digo PIN completamente, se muestra el mensaje PiN is changedsuccessfully. (Codige cambiado correctamente).
C6mo reinieiar el televisor cuando el V=Chip bloquea un canal (Escape de
emergencia)
Si elTVse sintoniza en un canal restringido, V-Chip Io bloquear& La pantalla quedara en
blanco y aparecera el mensaje siguiente:
1. Escriba su c6digo PIN.
Para volver al mode de visualizaci6n normal,sintonice un canal diferente con losbotones
CHV. En determinadas condiciones (enfunci6n de laclasificaci6n de losprogramas
de TV locales),V-Chip puede bloquear todos los canales. En estecase,utilice la funci6n
V-Chip come "salida de emergencia":
Siolvida el PIN, pulse losbotones del mando adistancia en la siguiente secuencia
parareiniciar el c6digo a '0-0-0-0': Apagar _ _MUTE _ 8 _ 2 _ 4_ Encender.
[3 Subtitulo (mensajes de texto en pantalla)
@ La funci6n de subtitulos no estadisponible enlos modes Componente, HDMt oPC.
@ La disponibilidad de lossubfitulos depende del programa que seeste emitiendo.
Pulse elbot6n CCdel mando a distancia paraseleccionar 8ubtitulo (Encendido) o
Subtitulo (Apagado).
Analogieos
La funci6n de subfitulos anal6gicos funciona tanto enel mode de canal de televisi6n anal6gica
come cuando la serial proviene deun dispositivo externo. (Dependiendo delasei_alde
transmisi6n, la funci6n de subtitulos anal6gicos puede funcionar encanales digitales.)
• Mode de 8ubtitulo : Programado, 0C1~C04, Textol~Texto4
I
EB
Digital
La funci6n de subtitulos digitales funciona en canales digitales.
• Mode de8ubtitulo: Programado, Serviciol~Servicio6, CC1~004, Textol~Texto4
• Opciones =8ubtitulos Dig.
- Tamaho: Se puede seleccionar eltamale delafuente del subfitulo.
- Esti[o fuente: Se puede seleccionar la fuente delsubtitulo.
- Color de primer piano: Se puede seleccionar el colorde lossubfitulos.
- Color de rondo: Se puede seleccionar elcolor delrondode los subtitulos.
- Opacidad de primer piano:Se puede cambiar la opacidad del primer piano delos
subtitulos.
- Opacidad derondo: Se puede seleccionar laopacidad delfondo delos subtitulos.
- Regresar al Predeterminado: Restaura laconfiguraci6n predeterminada dela estaci6n emisorade lossubfitulos.
@ Opciones - 8ubtitulos Dig. s61oestandisponibles cuando Programado y 8erviciol~Servicio6 se han seleccionado enel Mode
de Subtitulo.
[_ 8erviciel~6 en el mode de subtitulos digital pueden noestar disponibles seg_n el tipo de emisi6n.
Programado significa que sesigue elestandar establecido perel emisor.
Lasopciones de colorde primer plane y color defondo no se puedenajustar con el mismo color.
Lasopciones de opacidad de primer pianoy de fondo no pueden ajustarse ala vez entransparente.
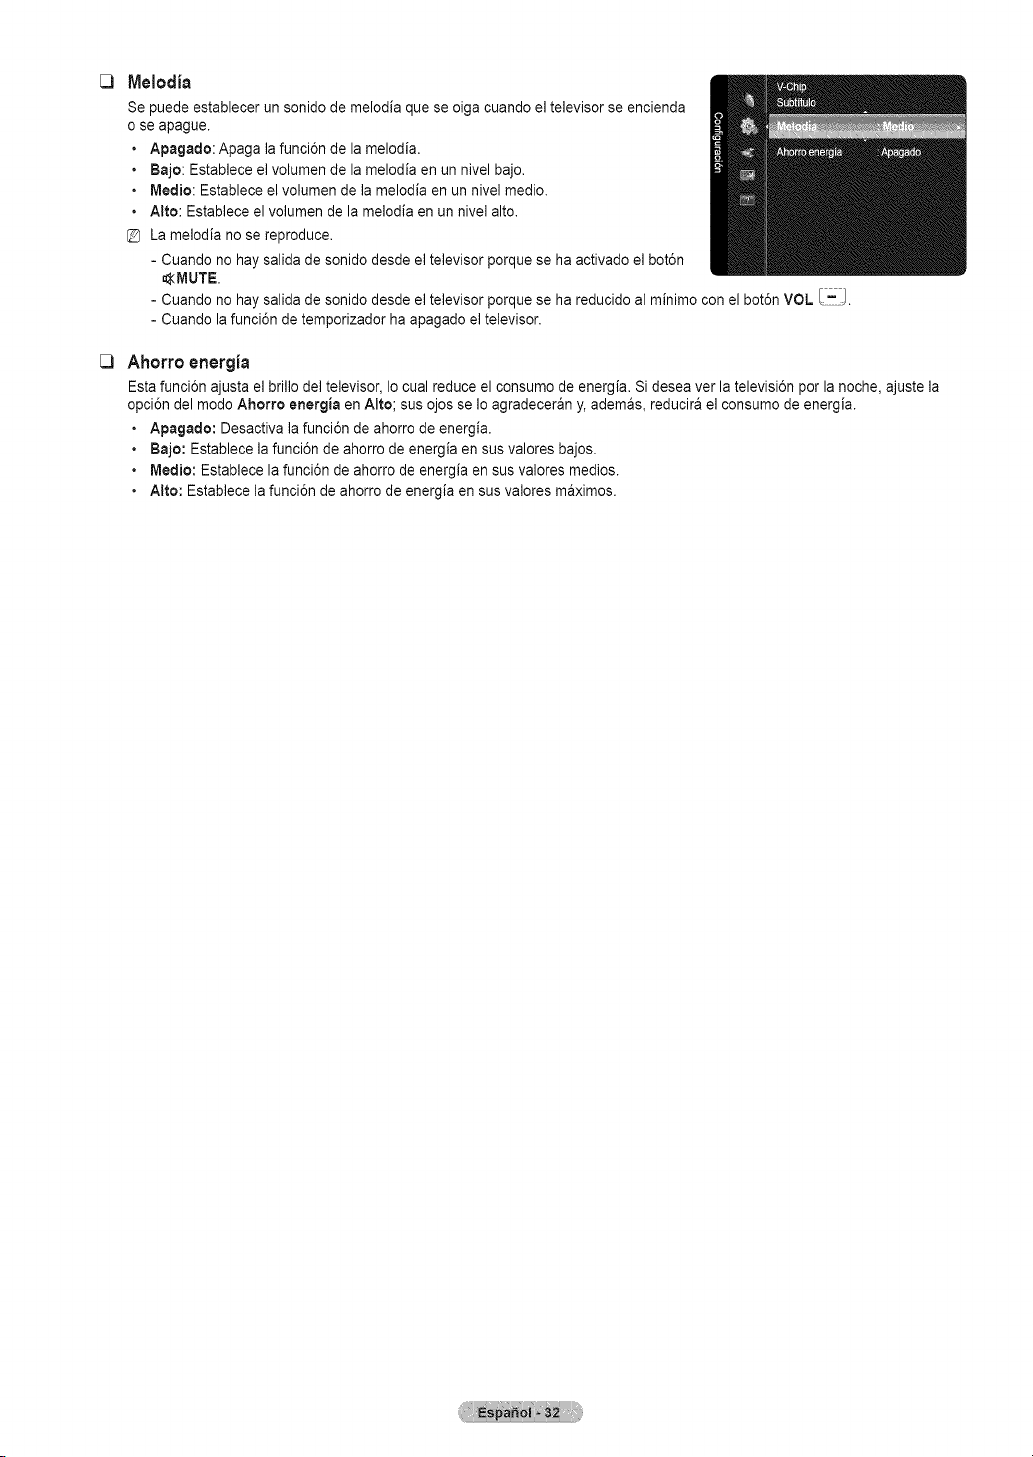
Melodia
Se puede establecer un sonido demelodia que se oigacuando el televisor seencienda
ose apague.
• Apagado: Apaga la funci6n de la melodia.
• Bajo: Establece elvolumen de la melodia en un nivel bajo.
• Medio: Establece el volumen de la melodia en unnive] medio.
• Alto: Establece el volumen de la melodia en unnive] alto.
La melodia no se reproduce.
- Cuando no haysalida de sonido desde eltelevisor porque se ha activado el bot6n
_MUTE.
- Cuando no haysalida de sonido desde eltelevisor porque se ha reducido al minimo con el bot6n VOL
- Cuando lafunci6n de temporizador ha apagado el televisor.
Ahorro energia
Estafunci6n ajusta el brillo del televisor, Io cual reduce el consumo de energia. Sidesea ver la televisi6n porla noche, ajuste la
opci6n delmodo Ahorro energia en Alto; sus ojosse Io agradeceran y, ademas, reducira el consumo de energia.
• Apagado: Desactiva la funci6n de ahorro de energia.
• Bajo: Establece la funci6n de ahorro de energia ensus valores bajos.
• Medio: Establece la funci6n de ahorro de energia en susvalores medios.
• Alto: Establece lafunci6n de ahorro de energia en susvalores maximos.
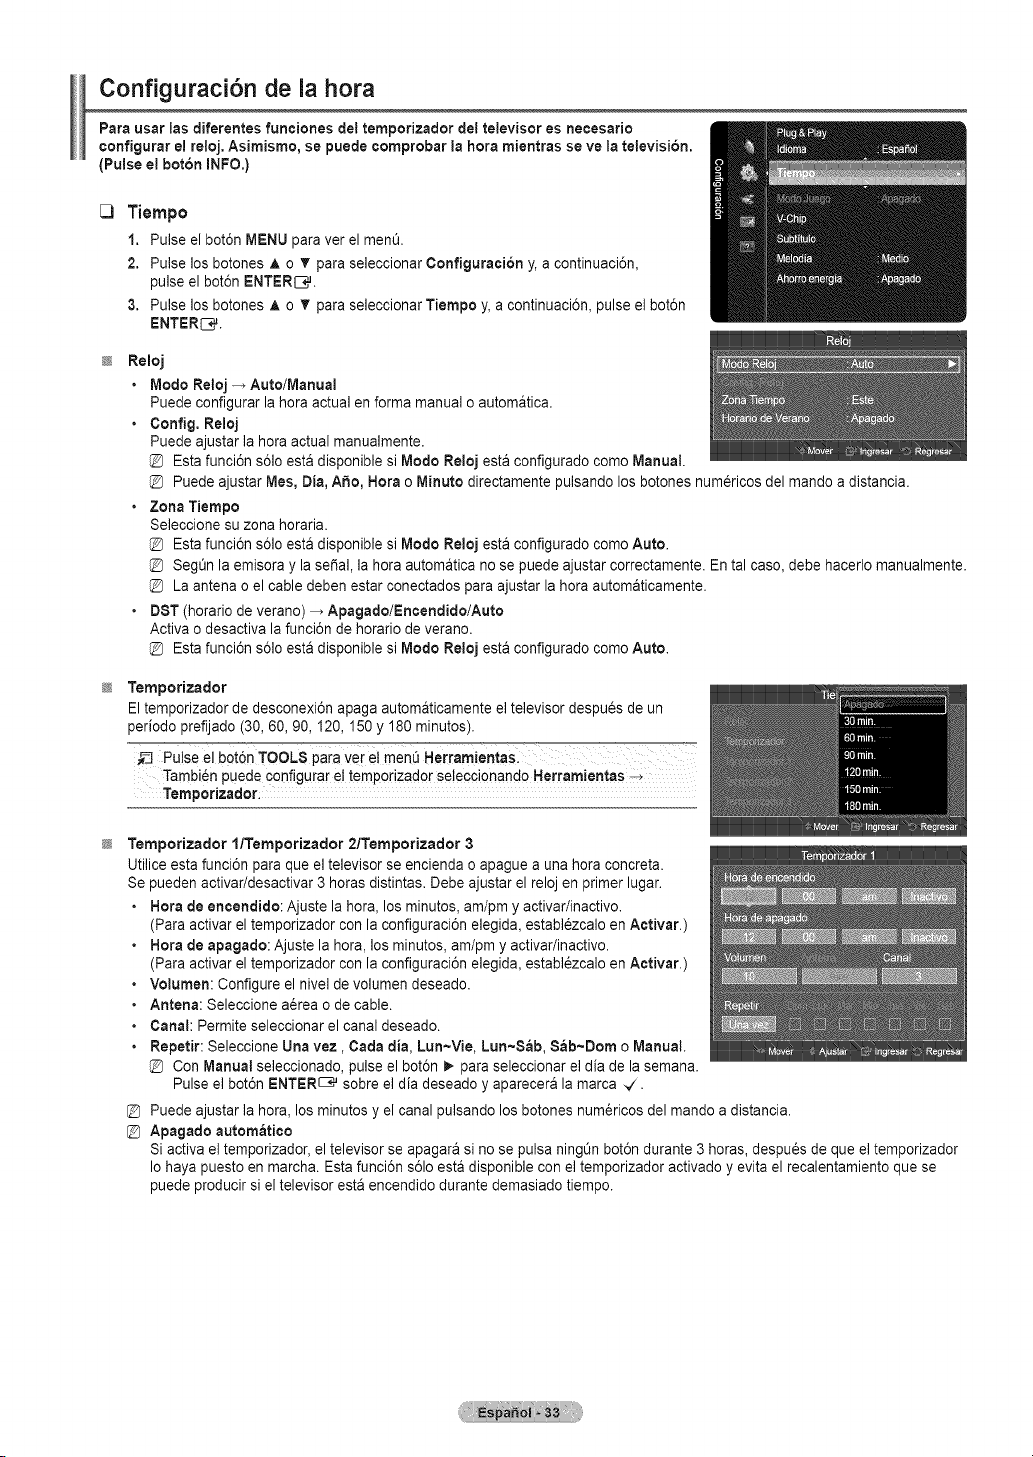
Configuraci6n de la hera
Para usar insdiferentes funciones del temporizador del televisor es necesario
eonfigurar e!reloj.Asimisrno,se puede ¢omprobar ia hera mJentrasse ve latelevisi6n.
(Pulse el boron INFO.)
C)
Tiempo
1. Pulse elbot6n MENU paraver el men&
2. Pulse los botones A o T paraseleccionar Configuraei6n y, a continuaci6n,
pulse el bot6n ENTER[3_.
3. Pulse los botones A o _' paraseleccionar Tiempo y,acontinuaci6n, pulse el bot6n
ENTERS.
Reloj
• Mode Reloj-, Auto/Manual
Puedeconfigurar la hera actual en forma manual o automatica.
• ConfJg.Reloj
Puedeajustar la heraactual manualmente.
Estafunci6n s61oestadisponible siMode Reloj esta configurado come Manual.
Puede ajustar Mes, Din, Abe, Nora o Minute directamente pulsando los botones num@icosdel mando a distancia.
• Zona Tiempo
Seleccione suzona horaria.
Estafunci6n s61oestadisponible siMode Reloj esta configurado come Auto.
Segt_nlaemisora y lasedal,la heraautomatica no se puede ajustar correctamente. En tal case, debe hacerlo manualmente.
La antena o el cable deben estar conectados paraajustar la hera automaticamente.
• DST(horatio de verano) _ Apagado/Encendido/Auto
Activa odesactiva la funci6n dehoratio de verano.
Estafunci6n s61oestadisponible siMode Reloj esta configurado come Auto.
Ternporizador
Eltemporizador de desconexi6n apaga automaticamente el televisor despues de un
perJodoprefijado (30,60, 90, 120,150 y 180 minutes).
Pulse el b0t6n TOOLS pain vet e! menQHerramienta
Tambi6npuede configurar el temporizador seleccionando HerramJentas
Temporizador:
Ternporizador l/Temporizador 2/TernporJzador 3
Utiliceestafunci6n paraque el televisor seencienda o apaguea una heraconcreta.
Se pueden activar/desactivar 3horas distintas. Debe ajustar el reloj en primerlugar.
• Nora de encendido: Ajuste la hera, los minutes, am/pmy activar/inactivo.
(Paraactivar el temporizador con la configuraci6n elegida, establ6zcalo enActivar.)
• Nora de apagado: Ajuste la hera, losminutes, am/pm y activar/inactivo.
(Paraactivar el temporizador con la configuraci6n elegida, establ6zcalo enActivar.)
• Volumen: Configure el niveldevolumen deseado.
• Antena: Seleccione a@ea o de cable.
• Canal: Permiteseleccionar el canal deseado.
• Repetir: Seleccione Unavez, Carla din, Lun~Vie, Lun~S_b, Sab~Dom o Manual.
Con Manualseleccionado, pulse el bot6n _. paraseleccionar el dia de la semana.
Pulse el bot6n ENTER_ sobre el dia deseado y aparecera la marca -V.
@ Puedeajustar la hera, los minutes y el canal pulsando losbotones num@icosdel mando a distancia.
@ Apagado autom_tico
Siactiva eltemporizador, el televisor se apagara sino sepulsa ning_nbot6n durante 3horas, despu_s de que el temporizador
Io haya puesto en march& Estafunci6n s61oesta disponible con el temporizador activadoy evita el recalentamiento quese
puede producir siel televisor esta encendido durante demasiado tiempo.
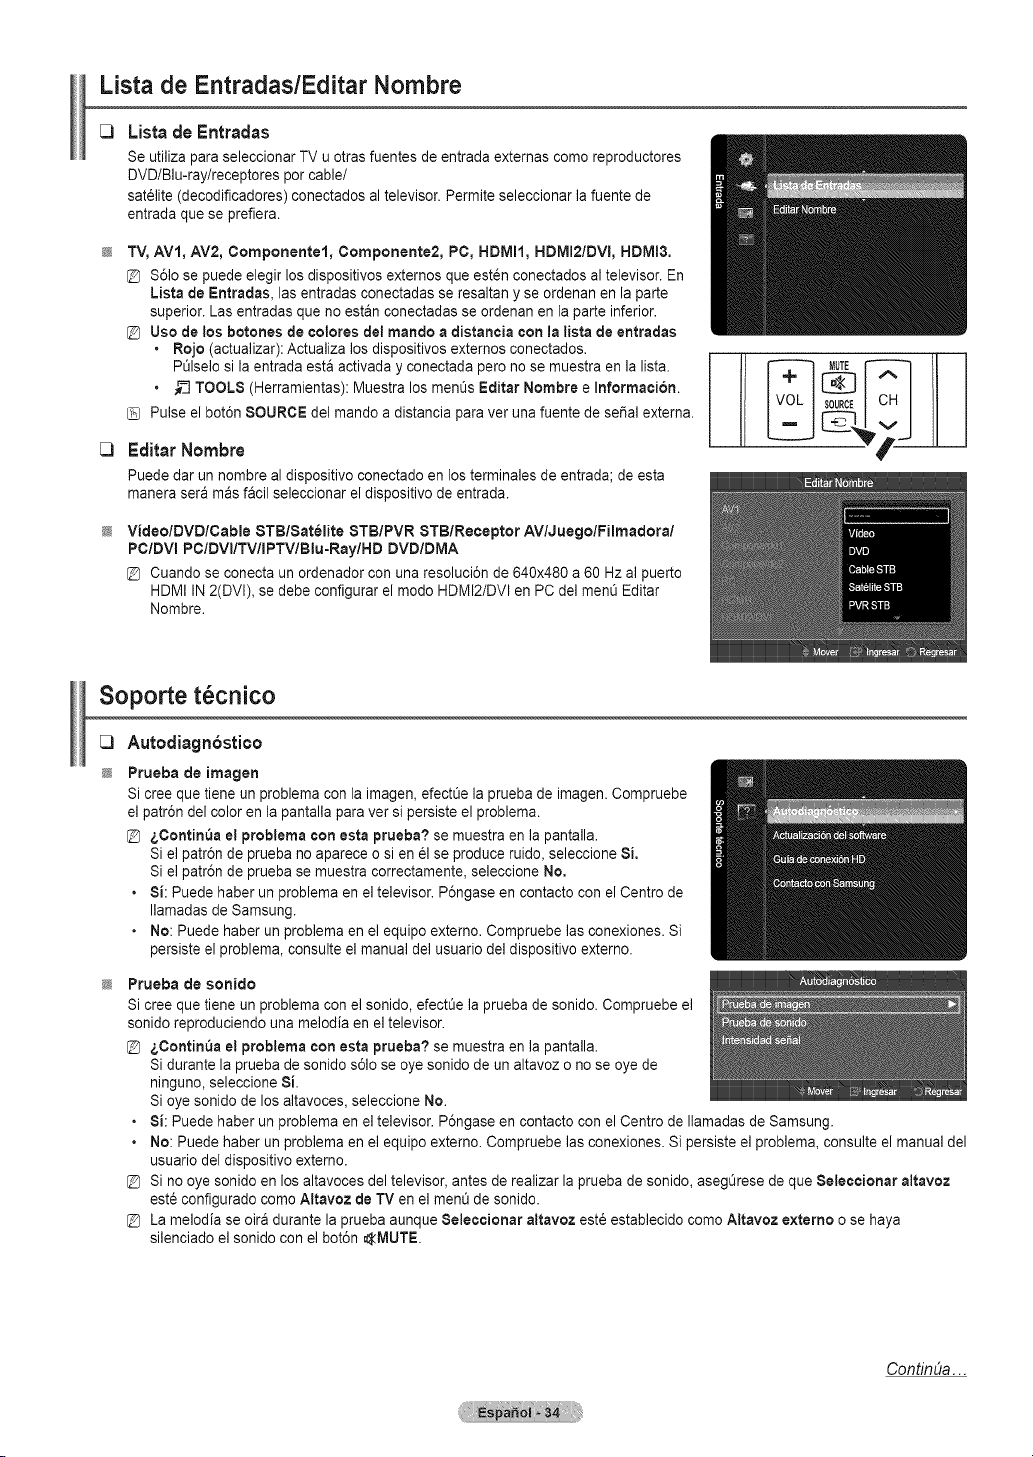
Lista de Entradas/Editar Nombre
Lista de Entradas
Se utiliza para seleccionar TV uotras fuentes de entrada externas come reproductores
DVD/Blu-ray/receptores percable/
sat_lite (decodificadores) conectados al televisor.Permite seleccionar lafuente de
entrada que se prefiera.
TV,AV1, AV2, Componentel, Componente2, PC, HDMII, HDMI2/DVI, HDMI3.
S61ose puede elegir los dispositivos externos que esten conectados al televisor. En
Lista deEntradas, lasentradas conectadas seresaltan y seordenan en la parte
superior. Lasentradas que no estan conectadas se ordenan en la parte inferior.
[_ Usode los botones de coleres del mande adistancia con la lista deentradas
• Rejo (actualizar): Actualiza los dispositivos externos conectados.
PL_lselosila entrada esta activada y conectada pero no se muestra en la lista.
• __TOOLS (Herramientas): Muestra los men0sEditar Nombre eInformacion.
Pulse elbot6n 8OUROE del mando adistancia paraver una fuente de sepal externa.
EditarNombre
Puededar un nombre al dispositivo conectado en los terminales de entrada; de esta
manera sera masfacil seleccionar el dispositivo de entrada.
Video/DVD/Cable 8TBlSatelite 8TB/PVR 8TB/Receptor AVlJuegolFilmadoral
PC/DVI PC/DVI/TV/IPTVIBlu-Ray/HD DVD/DMA
[_ Cuando se conecta un ordenador conunaresoluci6n de640x480 a60 Hz al puerto
HDMI IN 2(DVl), se debe configurar el mode HDMI2/DVl en PC del men0 Editar
Nombre.
Soporte t cnico
[_ Autodi_gn6stico
Prueba de imagen
Sicree que tiene un problema conla imagen, efectOe la pruebade imagen. Compruebe
el patr6n del color enlapantalla paraver sipersiste el problema.
[_ _,Contin_a e! problema con esta prueba? se muestra enla pantalla.
Siel patr6n de prueba no aparece o sienelse produce ruido, seleccione 8i.
Siel patr6n de prueba se muestra correctamente, seleccione No.
• 8i: Puedehaber un problema en el televisor. P6ngase en contacto con el Centrede
Ilamadas de Samsung.
• No: Puede haber un problema enelequipo externo. Compruebe las conexiones. Si
persiste el problema, consulteel manual del usuario del dispositivo externo.
Prueba de sonido
Sicree que tiene un problema conel sonido, efectOe la pruebade sonido. Compruebe el
sonido reproduciendo una melodia en el televisor.
[_ _,Contin_a e!problema conesta prueba? se muestra en ]apantalla.
Sidurante laprueba de sonido s61ose eyesonido deun altavoz ono se eyede
ninguno,seleccione 8i.
Sieye sonido delos altavoces, seleccione No.
• 8i: Puedehaber un problema en el televisor. P6ngase en contacto con el Centrede Ilamadas de Samsung.
• No: Puede haber un problema enelequipo externo. Compruebe las conexiones. Sipersiste elproblema, consulte el manual del
usuariodel dispositivo externo.
@ Sinoeye sonido en los altavoces del televisor, antesde realizar la prueba de sonido, asegOresedeque 8eleccionar altavoz
est6configurado comeAltavoz deTV en el menOde sonido.
@ La melodia se oira durante la pruebaaunque 8eleccionar altavoz est6 establecido come Altavoz externo osehaya
silenciado el sonido con el bot6n _IVlUTE.
ContinUa...
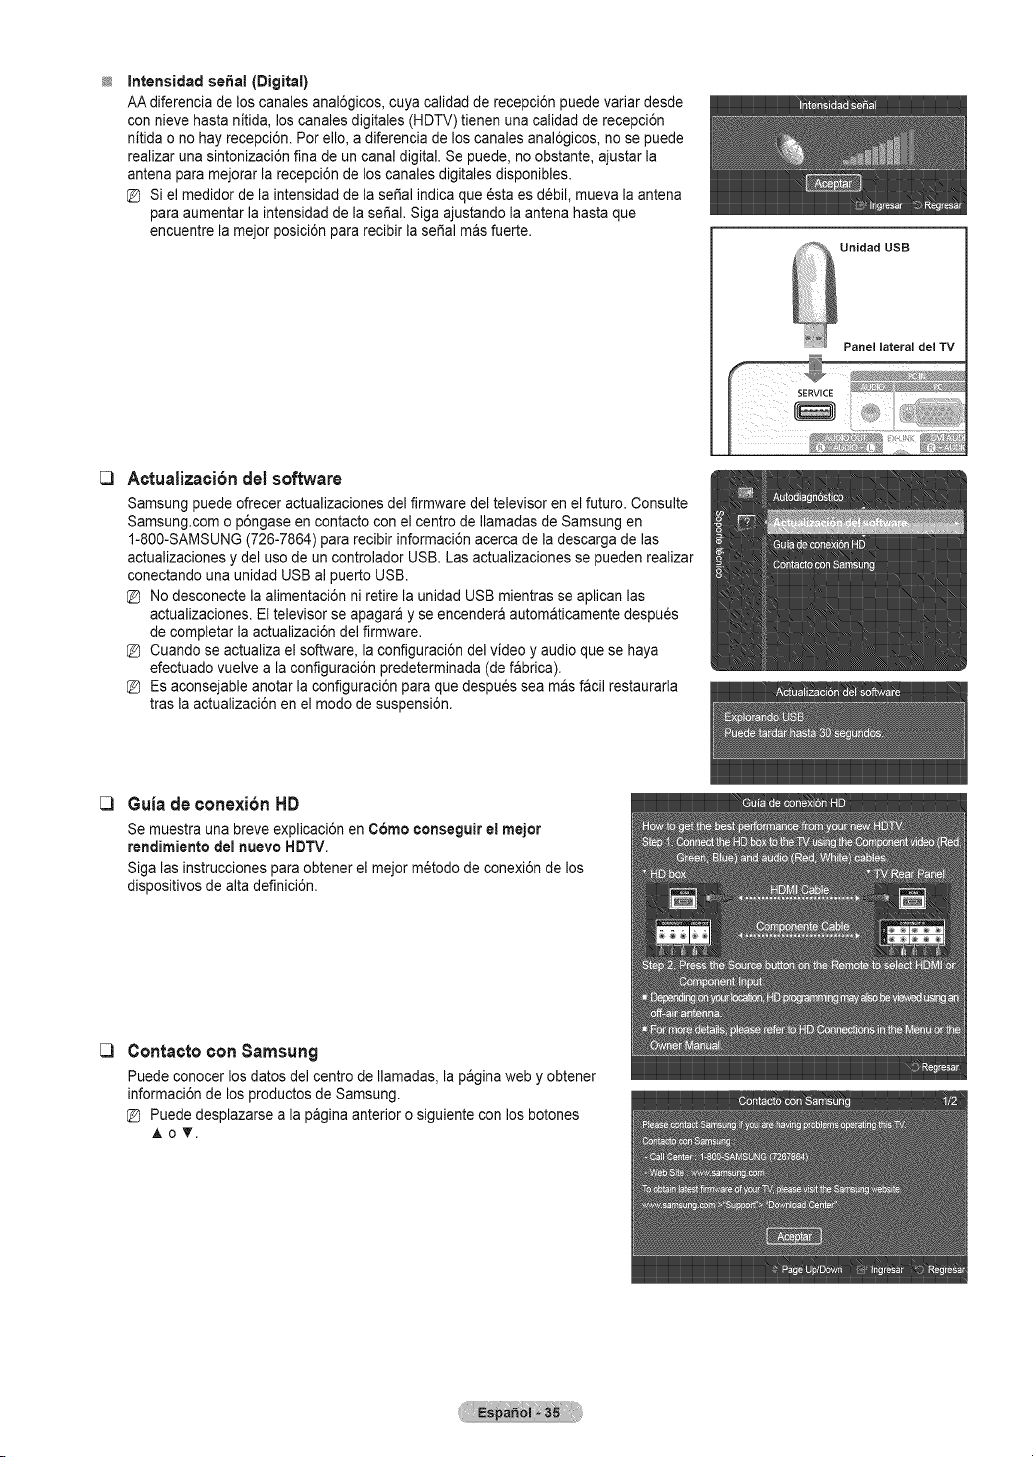
Intensidad seSai (Digital)
AA diferencia de loscanales anal6gicos, cuya calidad de recepci6n puede variar desde
con nieve hasta nitida, loscanalesdigitales (HDTV) tienen una calidad de recepci6n
nitida ono hay recepci6n. Per ello,a diferencia de los canales anal6gicos, no se puede
realizaruna sintonizaci6n fina de un canal digital. Se puede, no obstante, ajustar la
antena paramejorar la recepci6n de loscanales digitales disponibles.
Siel medidor de la intensidadde la seSalindica que _staes debil, mueva laantena
paraaumentar laintensidad de la seSal. Siga ajustando laantena hasta que
encuentre lamejor posici6n pararecibir la seSal masfuerte.
_ Unidad USB
Panel lateral del TV
[3 Actualizaci6ndel software
Samsung puede ofrecer actualizaciones del firmware del televisor enelfuture. Consulte
Samsung.com o p6ngase en contacto con el centre de IlamadasdeSamsung en
1-800-SAMSUNG (726-7864) pararecibir informaci6n acercade la descarga de las
actualizaciones y del usede un controlador USB.Las actualizaciones se pueden realizar
conectando una unidadUSB al puerto USB.
Nodesconecte la alimentaci6n ni retire la unidadUSB mientras se aplican las
actualizaciones. El televisor se apagara y seencendera automaticamente despues
de completar laactualizaci6n del firmware.
Cuando se actualiza el software, la configuraci6n del video y audioque se haya
efectuado vuelve ala configuraci6n predeterminada (defabrica).
Esaconsejable anotar la configuraci6n para que despues sea masf_cil restaurarla
tras la actualizaci6n en el modede suspensi6n.
[3 Guiade conexi6n HD
Se muestra una breve explicaci6n en C6me ¢onseguir el meier
rendimiento delnueve HDTV.
Siga lasinstrucciones paraobtener el mejor m_todo de conexi6n delos
dispositivos de altadefinici6n.
C3
ContactoconSamsung
Puedeconocer losdatesdel centre deIlamadas, la paginaweb y obtener
informaci6nde los productos de Samsung.
Puededesplazarse a la pagina anterior o siguiente con los botones
&oT.
i Anynet+
Cone×i6n de dispositivos Anynet+
Anynet+ es una funci6n clue perrniteeontrolar redes los dispesitivos 8arnsung eonectados compatibles con Anynet+ per
medic del rnando adistancia del televisor Sarnsung.
El sisterna Anynet+ se puede utilizer s61e con los dispositivos Samsung que tengan lafunci6n Anynet+, Pareasegurarse de
que el dispesitivo de8arnsung tenga diche funci6n, eornpruebe si lleva el legotipo Anynet+.
Pare conectar al televisor
1. Conecte losterminales [HDMI IN 1], [HDMI IN2(DVI)] o [HDMI IN 3] deltelevisor y el terminal HDMIOUT del dispositivo
Anynet +correspondiente mediante uncable HDMI.
_ Televisor Frm _i !oispositivo Anynet + t Dispositivo Anynet + 2 Dispositivo Anynet + 3
Pare conectar al sisterna Home Cinema
1. Conecte losterminales [HDMI IN 1], [HDMI IN2]o [HDMI IN 3] deltelevisor y el terminal HDMI OUTdel dispositivo Anynet +
correspondiente mediante un cable HDMI.
2. Conecteel terminal HDMI IN del sistema Home Cinema y el terminal HDMI OUT del dispositivo Anynet+correspondiente
mediante uncable HDMI.
Televisor
Dispositivo Anynet + 1 Dispositivo Anynet + 2
Sistema Home Cinema
HDr,41OUT D4GF_LA_010IN H_f_flIN
Cab,e,o,,,., Cab,e,O,,,.,
Cable 6ptico
Dispositivo Anynet + 3
[_ Conecte un cable 6ptico entre el terminal DIGITALAUDIO OUT (OPTICAL) del televisor y elterminal deentrada de audiodigital
del sistema Home Cinema.
[_ Sise sigue la conexi6nanterior, la toma Optical s61oproduce lasalida de 2 canales de audio.$61o oira sonido de losaltavoces
frontales izquierdo y derecho y del subwoofer delsistema Home Cinema. Para escuchar el canal de audio 5.1, conecte el
terminal DIGITALAUDIO OUT (OPTICAL) del reproductor de DVDo del decodificador de sat_lite (dispositivoAnynet 1 o2)
directamente al amplificador oalsistema Home Cinema, no al televisor.
[_ Conectes61ounsistema Home Cinema.
[_ Puedeconectar un dispositivo Anynet + mediante el cable HDMI1.3. Algunos cables HDMI pueden no admitirlas funciones
Anynet +.
[_ Anynet +funciona cuando el dispositivo de AV que admite Anynet +se encuentra en estadode espera ode encendido.
[_ Anynet +admite hasta 12 dispositivos de AVen total. Tenga en cuenta que puede conectar hasta3dispositivos del mismo tipo.
ContinUa...
ConfigurationdeAnynet+
Losparametrossiguientesayudana configurarlasfuncionesAnynet+.
_-_ Pulse elb0t6n TOOLS pa[a mostrar elmenQHerramientaS:
Tarnbi_n puede configurarAnynet+ selecci0nand0 Herram!enta s
Anynet÷ (HDMI.OEO)
Pareuserle funci6n Anynet÷,Anynet+(HDMI-CEC)debeestereonfiguredocomeEncendido.
1. Pulseelbot6nMENU.Pulselosbotones,L oT pareseleccionarApliceeionesy,acontinuaci6n,
pulseel bot6nENTERS.
2. Pulselos botonesA o T pareseleccionarAnynet+(HDMI-¢EC),y, acontinuaci6n,pulseel
bot6nENTER_.
3. Pulselos botonesA o T pareseleccionarConfiguraciony,a continuaci6n,pulseet bot6n
ENTER_*L
4. Pulseelbot6nENTERS,'_pareseleccionarAnynet+(HDMI-CEC).
& Pulselos botonesA o T pareseleccionarEncendidoy,a continuaci6n,pulseel bot6n
ENTER_*L
La funci6nAnynet+(HDMI-CEC)estaactivada.
SiseleccionaApagado,Anynet+(HDMI-CEC)sedesactiva.
Cuandolafunci6nAnynet+(HDMI-CEC)estadesactivada,todaslasoperacionesrelacionadas
conAnynet+se desactivan.
Configurationde undispositivo Anynet+pare quese desective autom_ticemente euendoel
televisorseepege
1. Pulselos botonesA o T pareseleccionarApegedoAutomatico,a continuaci6npulseel bot6nENTERS.
2. Pulselos botonesA o T pareseleccionarSiy, acontinuaci6n,pulseelbot6nENTERS.
Lafunci6nApagadoAutomatieoseactiva.
@ SiseleccionaNo,tafunci6nApagedo Automaticose cancel&
3. Pulseelbot6nEXITpara salir.
La fuenteactivadelmandoadistanciadeltelevisorsedebeconfigurarpareque esteutilicelafunci6nAnynet+
SiestableceApagadoAutomatico comeSi,losdispositivosexternosconectadostambiensedesactivancuandoseapaga el televisor.Siun
dispositivoexternotodaviaestagrabando,puedeapagarseo no.
B_squeday¢arnbiodedispositivosAnynet+
1. Pulseeibot6nTOOLS.
Pulselos botonesA o T pareseleccionarListeDisp. y,a continuaci6n,pulseet bot6n
ENTERC,'J.
+
Se muestrantodoslos dispositivosAnynet conectadosal televisor.
Sinoencuentrael dispositivoque desea,pulseel bot6nrojo parabuscarlosdispositivos.
2. Pulselos botonesA o T pareseleccionarundispositivodeterminadoy pulseetbot6nENTERS.
Se cambiaaldispositivoseleccionado.
@ $61ocuandoAnynet+ (HDMI-CEC)se configuracomeEncendidoen elmenOAplicaciones,
apareceel menuListaDisp.
Elcambioa losdispositivosseleccionadospuedetardarunos2 minutes.Nosepuedecancelarla
operaci6nde cambiode dispositivomientrasestase estaefectuando.
EltiemponecesarioparalabOsquedade dispositivosdependede lacantidadde dispositivos
conectados.
Cuandofinalizata bOsquedade dispositivos,no se muestraelnOmerodedispositivosencontrados.
Aunqueel televisorexploraautomaticamentetosdispositivoscuandose enciendeconelbot6nPOWER,losdispositivosconectadoscuando
el televisorya estaencendidono aparecenen lalistade dispositivos.Ental case,seleccioneel menuBuscandoConexionesparabuscarlos
dispositivos.
+
Sihaseleccionadoelmodede entradaexternapulsandoelbot6nSOURCE no podrausarlafunci6nAnynet. AsegOresede cambiaral
+
dispositivoAnynet medianteel bot6nTOOLS.
8otonesdelmando adistencie del televisordisponiblesenel mode Anynet+
Tipo de dispositivo
Dispositivo Anynet÷
Estado de funcionamiento
Desou_s oe camblar al dlsposl_lvo
cuando el ment_de este aoarece en
la pantalla.
Desou6s oe cambiar a CIISpOSI'[IVO
mlen_rasse reproduce un arcl_lvo
Botones disponibles
3otones num_ricos A/V/41/_. ENTERI_
botonesde colores/bot6n EXIT
_ (BQsquedaatr&s)/_; (BOsquedaadelante'
[] _ Detener)/_/Reproducir)/_ (Pausa)
Dispositivo con sirttonizador Desou_s oe camb_ar al u_spositivo
mcorporado mlen_rasse ve un programa _e TV
-'- Botones CH/I'_ OH
Dispositivo deaudio Cuando el receotor esta actlvado Botones VOL + /VOL - _/_tMUTE
ContinOa...
La funci6nAnynet+s61ofuncionacuandolafuenteactivadelmandoa distanciadeltelevisorestaajustadaen TV.
Elbot6n_ funcionas61ocuandola grabaci6nesposible.
LosdispositivosAnynet+no se puedencontrolarconlosbotchesdetTV.LosdispositivosAnynet+s6tosepuedencontrolarmedianteel mandoa
distanciadettelevisor.
Elmandoa distanciadeltelevisorpuedenofuncionarendeterminadascircunstancias.Enesecaso,vuelvaaseleccionareldispositivoAnynet+.
LasfuncionesAnynet+no funcionanconlosproductosde otrosfabricantes.
Lasfuncionesr-_ !, C;;-_puedenverierseg0neldispositivo.
Men_Anynet+
Elmen0Anynet+ cambiasegOneltipoy elestadode losdispositivosAnynet+conectadosaltelevisor.
Men_Anynet +
VerTV
Lista Disp,
Grabando
Menu
Funcionamiento
Grabaoi6n con
temporizador
Detener grabaci6n
Receptor
Configuraci6n
Descripci6n
Cambia de Anynet+al mode de emisi6n deTV.
Muestra la istaae alspositivos deAnynet÷
Comienza una grabaci6n. (Este ment_s61ofunciona con dlspositivos que admiten grabaci6n.)
Muestra el ment_del disoosltlvo conectado
Ejemplo: Cuando hay un grauaaor ae DVD conectado aparece el menOde titulos del grabador de
DVD.
Muestra el ment_de control de reDroducci6n deldlsposluvo conec_aao.
Ejemplo: Cuando hay un grabador de DVDconectado, aparece el menOde control de reproducci6n
del grabador ae DVD.
Permite reservar una grabaci6n. Este menQs61ofunciona en un dispositivo que admita reservas de
grabaci6n.)
Detiene la grabaci6n.
La salldade somdose efectOa atrav_s delreceptor sls_emaHome Cinema).
Se puede configurar que Anynet+ (HDMI-CEC/se apague automaticamente asi como la bOsqueda
ae las conexiones para usar Anynet",-.
Grabando
La grabadorade Samsungpermiteefectuaruna grabaci6ndeunprogramade tetevisi6n.
1. Pulseelbot6nTOOL8.
2. Pulselos botonesA o T pareseleccionarGrabendoinmediatamentey pulseel bot6nENTERC#.
Comienzalagrabaci6n.
Cuando hay varios dispositivos de grabaci6n conectados, estos se muestranen
una listal Pulse los botches A o _' pareseleccionar el dispesitivo de grabaci6n
qUedesee y pulse el bot6n m=NTER_. Comienza la grabaci6n_
cua_donoSe_ueSt_el d!_po_t_vodograb_c_6n
Se!eccione ListaDisp. y pu!se e! bot6n rojo pare buster !os dispositivos
3. Pulseelbot6nEXITpara salir.
Sipulseelbot6n_ se grabarato queestaviendoenesemomento.Siesta viendoun videodesdeotrodispositivo,segrebeelvideode este.
Antesde grabar,compruebesila tomede antenaestaconectadacorrectamenteal dispositivode grabaci6n.Pareconectarcorrectamenteuna
antenaaundispositivode grabaci6n,consutteel manualdelusuariodotdispositivode grabaci6n.
Escuchaatravesdeun receptor(HomeCinema)
Sepuedeescucharsonidoa travesde un receptoren lugarde hacerlomedianteetaltavozdetTV.
1. Pulseelbot6nTOOL8.PulselosbotchesA o v"paraseleccionarReceptor.
2. Pulselos botones4 o _ pareseleccionarEncendido.
Ahorapodraescucharelsonidoa travesdelreceptor.
3. Pulseelbot6nEXITpare salir.
Siel receptors61oadmiteaudio,quizasno semuestrela listade dispositivos.
Elreceptorno funcionarasino seha conectadocorrectamenteel terminalOpticalINdelreceptorconel terminalOpticalOUTdeltelevisor.
Cuandoelreceptor(sistemaHomeCinema)estaactivado,sepuedeoir la salidade sonidodesdeel terminal6pticodeltelevisor.Cuando
se vela televisi6natravesde un DTV(aereo),eltelevisorenvia elsonidode 5.1canalesal receptordelsistemaHomeCinema.Cuando
la fuenteesun componentedigital,comoun DVD,y estaconectadaal televisoratravesde HDMI,s61ose oyeel sonidode 2canalesdel
receptordel sistemaHomeCinema.
Cuandoseescuchaa travesdel receptor,hayrestriccionesparaelusode losmenQsrelativosalaudio(MTS,idiomaspreferidos).
Sihayuna interrupci6nentaalimentaci6ndeltelevisorconlaopci6nReceptorconfiguradaen Encendido(pordesconectarel cablede
alimentaci6noporunfallo decorriente),puedeque8eleccionar AltavozesteestablecidocomoAltavozexternoal volvera encenderel
televisor.
Soiuci6n de probiemas deAnynet+
funciona.
Anynet+ no • Compruebe si el dispositivo es un dispositivo Anynet +. ElsistemaAnynet+s61oadmite
dispositivosAnynet+.
• Conecte s61ounreceptor (sistema Home Cinema).
• Compruebe si e] cablede alimentaci6n de Anynet+esta debidamente conectado.
• Compruebe lasconexiones de loscables de Video/Audio/HDMI 1.3 deldispositivo
Anynet +.
• Compruebe siAnynet +(HDMI-CEC) esta establecido como Encendidoen e] menQde
configuraci6n de Anynet+.
• Compruebe si e] mando adistancia de] televisor esta enmodoTV.
• Compruebe si es un mando adistancia exclusivo para Anynet +.
• Anynet + no funciona en algunas situaciones. (Bt_squeda decanales,funcionamiento de
Plug & Play, etc.)
• Cuando se conecta o sedesconecta el cable HDMI 1.3, se han de buscar de nuevo los
dispositivos o volver aapagar y encender e] televisor.
• Compruebe si la funci6n Anynet+de] dispositivo Anynet +esta activada.
Deseo iniciar Anynet +, • Compruebe si el dispositivo Anynet +esta debidamente conectado al TVy sila opci6n
Anynet +(HDMI-CEC) del ment_de configuraci6n estaestablecida en Encertdido.
• Pulse el bot6n TV delmando a distancia del televisor paracambiar a TV.A continuaci6n
pulse el bot6n TOOLS paravisua]izar el menO Anynet+y seleccionar el menOque desee.
Deseo salir deAnynet +, • Seleccione VerTV enelmen_ deAnynet +.
• Pulse el bot6n SOURCE del mando a distancia del televisory se]eccione un dispositivo
que no seaAnynet+.
• Pulse CH,CH LIST, PRE-CH y FAV.CH paracambiar al modo TV.
(Tengaencuentaque el bot6n decanal s61ofunciona cuando nohay ningOndispositivo
Anynet +con sintonizador incorporado conectado.)
En la pantalla aparece el mensaje • Elmando adistancia no se puede utilizar cuando se est&configurando Anynet +o
Cortectando al dJspositivo cambiando aun modo de visualizaci6n.
o +
Anynet +,., Utilicee] mando adistancia cuando hayaterminado la configuraci6n de Anynet oe]
cambio al modo de visualizaci6n.
El dispositivo Anynet + no Nose puede usar la funci6n de reproducci6n mientras se efectt_a una conexi6n Plug & Play.
funciona.
El dJspositivo conectado no • Compruebe si eldispositivo admitelas funciones Anynet+
se visualiza, • Compruebe si elcable HDMI 1.3 estadebidamente conectado.
• Compruebe siAnynet +(HDMI-CEC) esta establecido como Encendidoen el menOde
configuraci6n de Anynet+.
• Vuelva a efectuar una bOsquedade dispositivos Anynet+.
• $61opuede conectar un dispositivo Anynet +mediante el cable HDMI 1.3. Algunos cables
HDMIpueden no admitir lasfunciones Anynet +.
• Sise hainterrumpido poruna situaci6n anormal comola desconexi6n de] cable HDMI o
el de alimentaci6n o perunfallo enla corriente electrica, debera repetir lab_squeda del
dispositivo.
El programa de televisi6n no se Compruebe laconexi6n de la toma de antena del dispositivo de grabaci6n.
puede grabar.
El sonido deltelevisor no sale a Conecte el cable 6ptico entre el televisor y elreceptor,
traves del receptor.
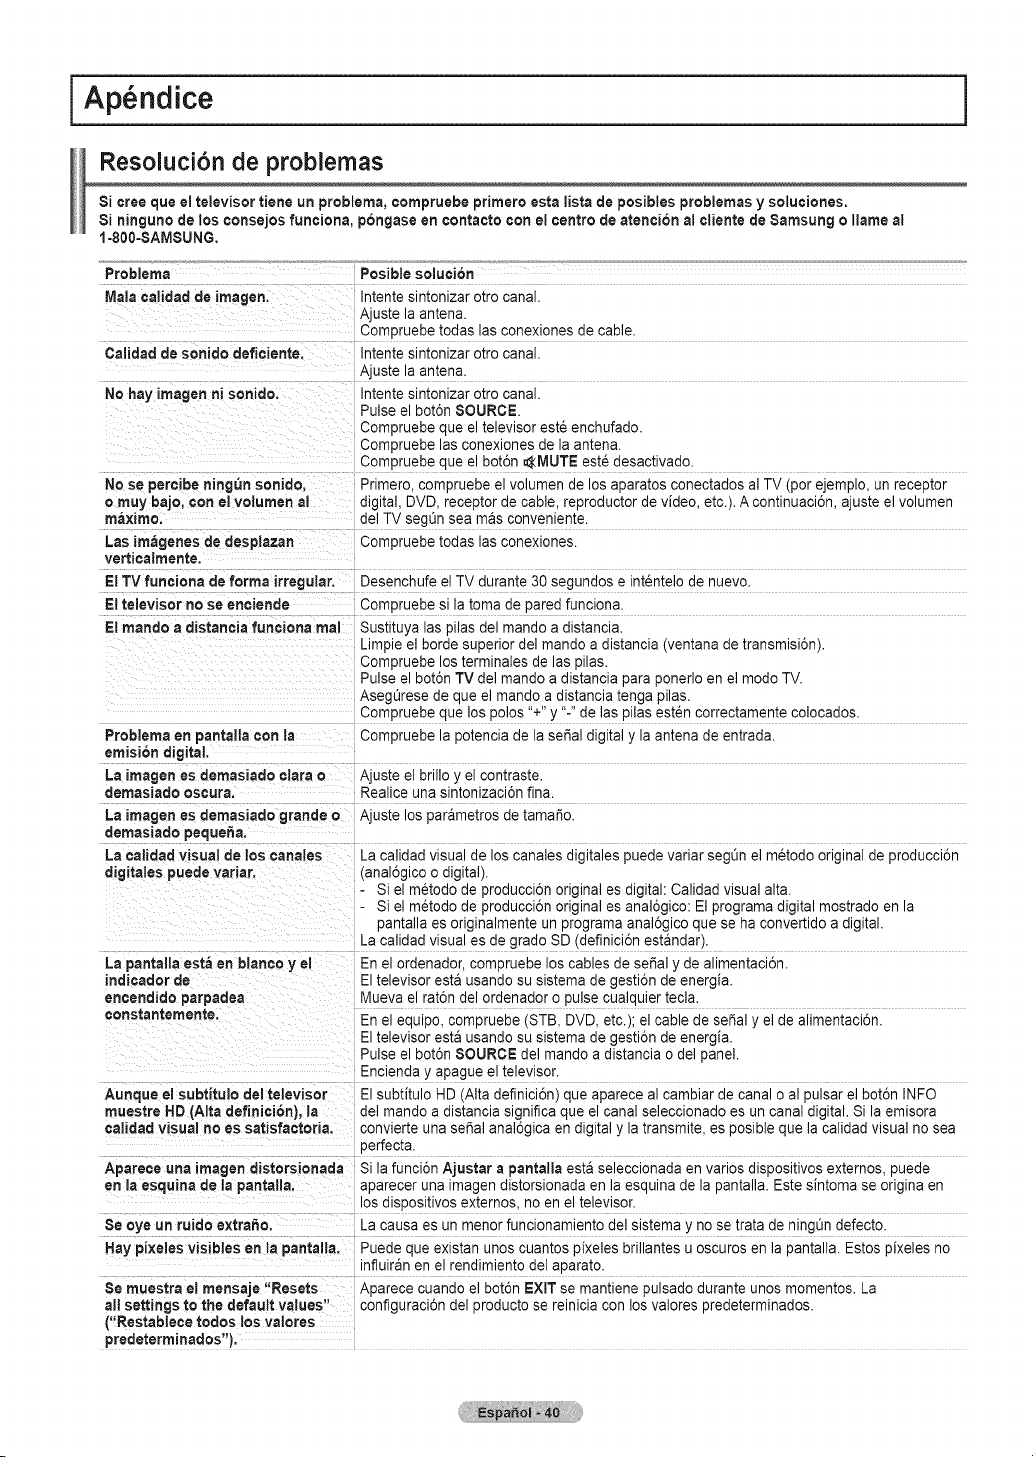
I Ap ndice
Resoluci6n de problemas
Si cree que el televisor tiene un preblema, compruebe primero esta listadepesibles problemas y soluciones.
Si ninguno de loscensejes funciena, pongase en centacte con el centre de atencion ai cliente de Samsung ellame a!
1-800=SAMSUNG.
Preblema Pesible selucibn
Maincalidad deimagen. Intente sintonizarotro canal.
Ajuste laantena.
Compruebe todas lasconexiones de cable.
Calidad de sonido deficiente. Intente sintonizarotro canal.
Ajuste laantena.
No hayirnagenni senido. Intente sintonizarotro canal.
Pulse elbot6n SOURCE.
Compruebe que el televisor est6enchufado.
Compruebe lasconexiones de la antena.
Compruebe que el bot6n AMUTE este desactivado.
No se percibening_n sonide, Primero, compruebe el volumen de losaparatos conectados al TV(per ejemplo, un receptor
ornuy bajo, con el volumen al digital, DVD, receptor de cable, reproductor devideo, etc.). A continuaci6n, ajuste el volumen
maxirno, delTVseg_n sea masconveniente.
Lasirn_genes dedesplazan Compruebe todas lasconexiones.
verticatmente.
ElTV funciona de forma irregular. Desenchufe elTV durante 30 segundos e intentelo de nuevo.
Eltelevisor no se enciende Compruebe si la toma de paredfunciona.
El mande a distaneia funeiena real Sustituyalas pilas del mando a distancia.
Limpie el borde superior delmando adistancia (ventana de transmisi6n).
Compruebe losterminales de las pilas.
Pulse elbot6n TVdel mando adistancia paraponedo en el mode TV.
Asegt_rese de que el mando adistancia tenga pilas.
Compruebe que los polos "+"y "-" de laspilas est_n correctamente colocados.
Preblerna enpantalla con la Compruebe la potencia de la serial digitaly la antena deentrada.
emision digital
La imagenes demasiado clara o Ajuste el brillo y el contraste.
demasiade oscura. Realice una sintonizaci6n fina.
La irnagenes dernasiado grandeo Ajuste los parametros de tamale.
demasiade peque_a.
Lacalidad visual delos canales
digitates puede variar.
La calidadvisual delos canales digitales puede variar seg0n el metodooriginal deproducci6n
(anal6gico odigital).
Si elm6todo de producci6n original esdigital: Calidad visual alta.
Si elm_todo de producci6n original esanal6gico: Elprograma digital mostrado en la
pantalla es originalmente un programa anal6gico quese ha convertido a digital.
La calidadvisual es de grade SD (definici6n estandar).
La pantallaesta en blanco y el En el ordenador, compruebe loscablesde seSa]y de alimentaci6n.
indicador de Eltelevisor esta usando su sistemade gesti6n de energia.
encendide parpaaea Muevael rat6ndel ordenador opulse cualquier tecla.
censtantemente. En el equipo, compruebe (STB, DVD, etc.); el cable de seSal y el de alimentaci6n.
E televisor esta usandosu sistemade gesti6n de energia.
Pulse elbot6n SOURCE del mando adistancia ode] panel.
Encienday apague el televisor.
Aunque el subtitule del televisor E subtitulo HD (Alta definici6n) que aparece al cambiar de canal o al pulsarel bot6n INFO
muestre HD(Alta definici6n), la del mando a distancia significa que el canal seleccionado esuncanal digital. Si la emisora
¢aiidad visual no es satisfaeteria, convler[e una seSal anal6gica endigitaly la transmite, es posible que la calidad visual nosea
oerfecta.
Apareee una imagen distorsionada S la funci6n Ajustar a pantalia esta seleccionadaen varies dispositivos externos, puede
en laesquina de la pantalla, aparecer una imagen distorsionada en la esquina de la pantalla. Estesintoma se originaen
os a_spositivosexternos, no eneltelevisor.
Se eye un ruido extra£te. La causa es un menor funcionamiento delsistema y no setrata dening0ndefecto.
Haypixeles visibies enla pantalla. Puede que existan unos cuantos pixeles brillantes u oscuros en la pantalla. Estos pixeles no
influiran en el rendimiento del aparato.
Se muestra el rnensaje "Resets Aparece cuando el bot6n EXiT semantiene pulsado durante unosmementos. La
nit settings to the default values" configuraci6n del producto se reiniciacon los valores predeterminados.
("Restabtece redes los valores
predeterminades").

Preparaci6n antes de instalar el montaje mural.
Caso A. Instalaci6n del montaje mural SAMSUNG Caso B, Instalaci6n del montaje mural de otra empresa
° .
° .
° .
° .
° .
° .
° .
o .
\ :
il
,/ i
/ !
.. ................................................................................... ..
1. Instale el montaje mural con un parde apriete de 15 kgf cm omenos. Tengaen cuenta que laspiezas se pueden da_arsi elpar de
apriete es diferente del especificado.
2. Eljuego de accesorios incluye soporte y anilla [®] para la instalaci6nen un montaje mural de otraempresa. (Caso B)
Se ha de fijar en el orificio [{1_]cuando instale el montaje mural en la pared.
C6mo montar el soporte base
Utilizando lostornillos paraasegurar el soporte y el televisor, fijefirmemente _ste al
soporte.
(Es posible que el exterior del equipo seadiferente del que se muestraen laimagen.)
Advertencia
Sujetefirmemente el soporte al televisor
antes demoverlo, ya que el soporte puede
caer y causar lesiones graves.
Eltelevisor Io deben transportar doso
mas personas. Nuncadeje el televisor
en el suelo ya que la pantalla puede
sufrir dados.Almacene siempre el
televisor en su posici6n vertical.
Cuando instale el televisor en una pared,
fije la tapa (O) al soporte con dos tornillos.
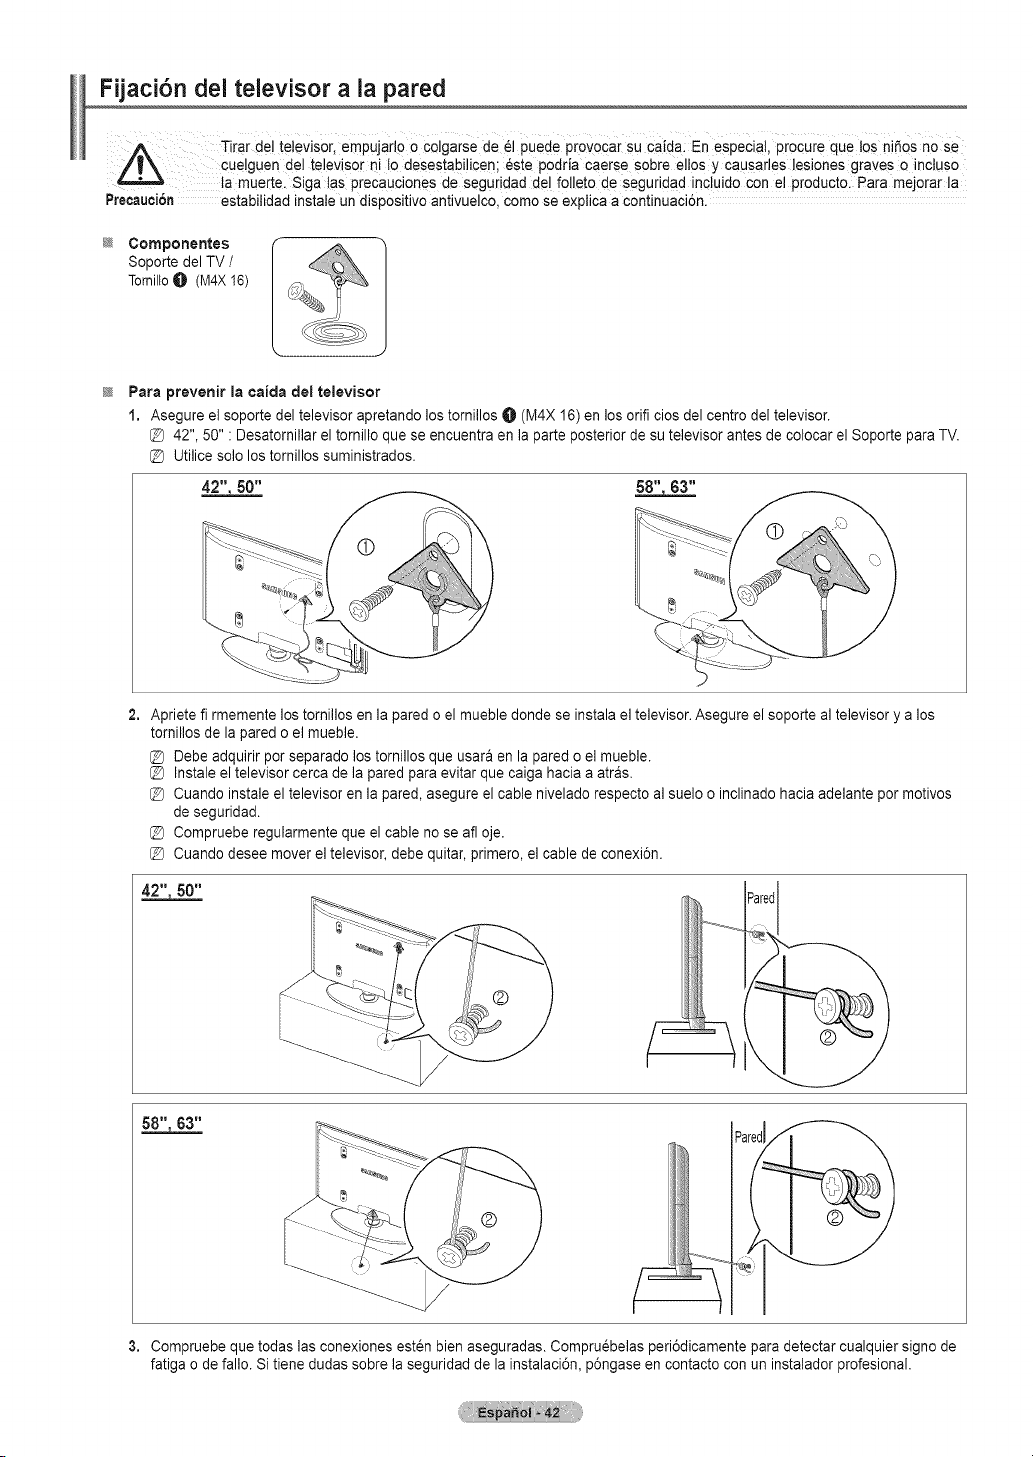
Fijaci6n dei televisor a la pared
Tirar del televisor, empujarlo o Colgarsede 61puede provoca[ su Caid@ En especial, procure que los ni_os nose
cuelguen del televisor ni to desestabilicen; 6ste podda caerse sobre olios y causarles lesiones graves oincluso
!a mue[te. Siga tas precauciones de seguridad del fo!leto de seguridad inc!uid0 con e!Pr0duct0. Para mejorar !a
Precauci6n estabitidad instaleun dispositivo antivuelco, como se explica acontinuaci6n.
@ Componentes
Soporte delTV /
TomilloO (M4X16)
@
Para prevenir la caida del televisor
1. Asegure el soporte del televisorapretando lostornillos O (M4X 16)enlos orifi cios del centro deltelevisor.
@ 42", 50" : Desatornillar el tornillo que se encuentra en la parte posteriordesu televisor antes de colocar el Soporte paraTV.
@ Utilicesolo los tornillos suministrados.
2. Apriete fi rmemente lostornillos en la pared oel muebledonde se instala eltelevisor.Asegure el soporte al televisor y a los
tomillos dela pared oel mueble.
@ Debe adquirir porseparado los tornillos que usara en la pared oel mueble.
@ Instale el televisor cerca delapared paraevitar que caiga hacia a atras.
@ Cuando instaleel televisor enla pared, asegure el cable nivelado respecto al suelo o inclinado hacia adelante por motivos
de seguridad.
@ Compruebe regularmente que el cable no se alloje.
@ Cuando deseemover el televisor,debe quitar, primero, el cable de conexi6n.
Parec
iii:!
3. Compruebe que todaslas conexiones esten bienaseguradas. Compruebelas peri6dicamente paradetectar cualquier signo de
fatiga ode fallo. Sitiene dudassobre la seguridad dela instalaci6n, p6ngase encontacto con uninstalador profesional.
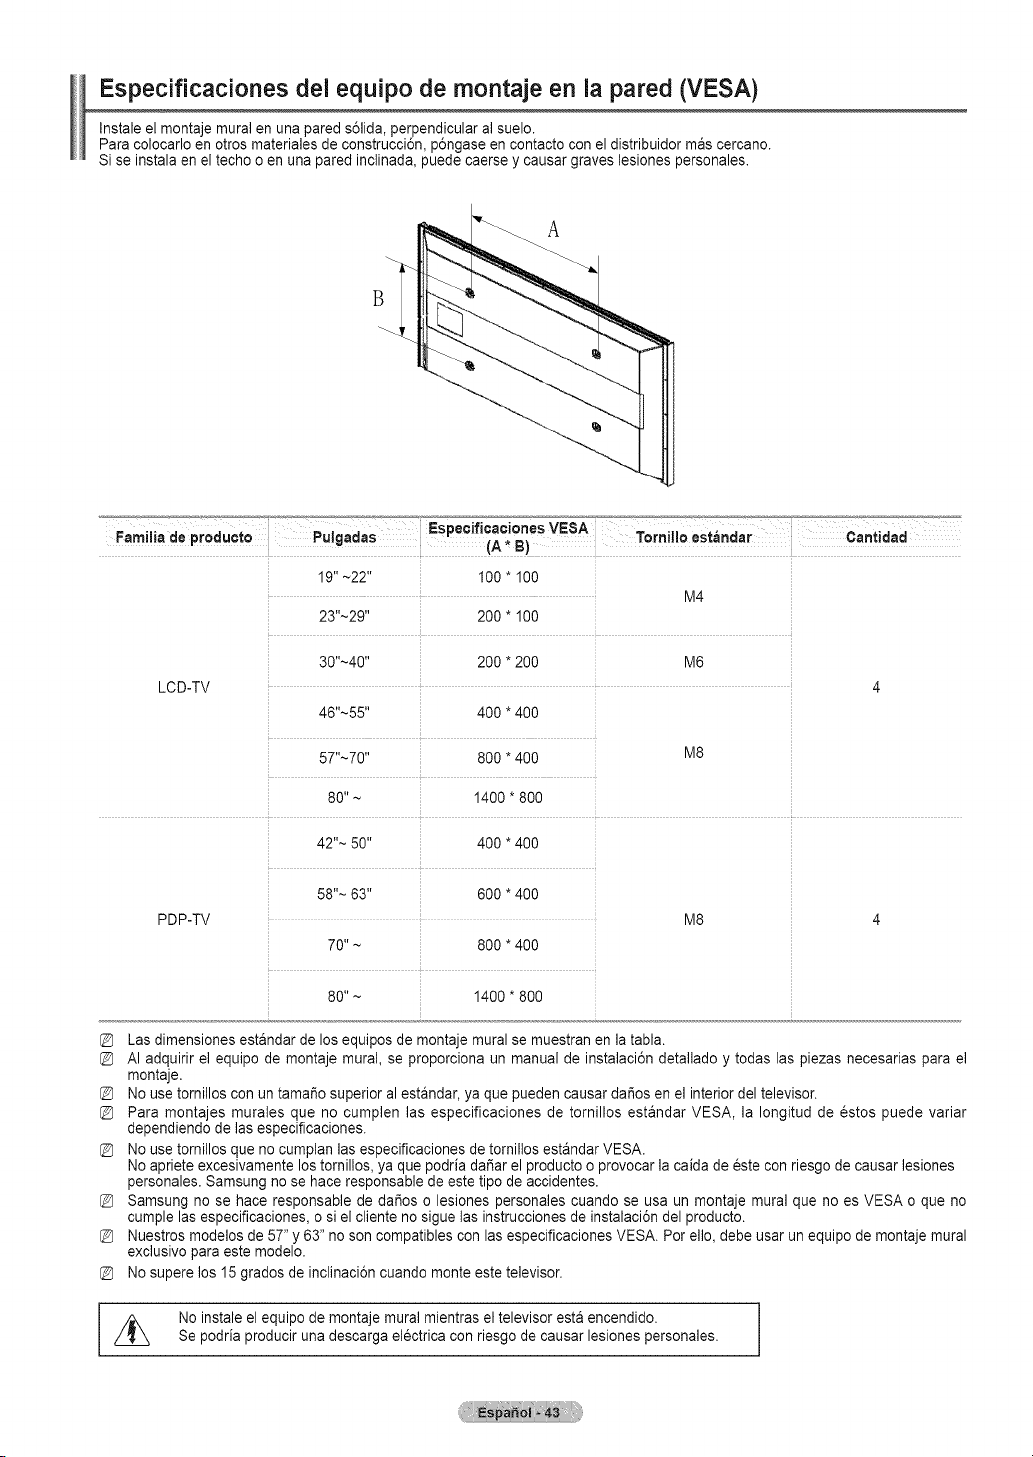
Especificaciones dei equipo de montaje en la pared (VESA)
Instale el montaje mural en una pared s61ida,perpendicular al suelo.
Para colocarlo enotros materiales de construcci6n, p6ngase encontacto conel distribuidor mas cercano.
Si seinstala eneltecho o en una pared inclinada, puede caerse y causar graves lesiones personales.
.............'_JJ_ Espec ficac ones VESA _'_'_'_J_J_: ..........'°_
Faml!!ede PrOdUCto Pu!gadas (A,B) Tornlllo estandar Cant!dad
19"~22" 100 * 100
M4
23"~29'' 200 * 100
30"~40'' 200 * 200 M6
LCD-TV 4
46"~55" 400* 400
57"~70" 800* 400 M8
80" ~ 1400 * 800
42"~ 50" 400*400
58''~ 63" 800*400
PDP-TV M8
70 "~ 800*400
80"~ 1400"800
Lasdimensiones estandar delos equipos de montaje mural se muestran en la tabla.
AI adquirir el equipo de montaje mural, se proporciona un manual de instalaci6n detallado y todas las piezas necesarias para el
montaje.
Nousetornillos con un tamafio superior al estandar, ya que pueden causar dafios en el interior del televisor.
Para montajes murales que no cumplen las especificaciones de tornillos estandar VESA, la Iongitud de estos puede variar
dependiendo de lasespecificaciones.
Nousetornillos que no cumplan las especificaciones detornillos estandar VESA.
Noapriete excesivamente lostornillos,ya que podria dafiar el producto oprovocar la caida de este conriesgo de causarlesiones
personales. Samsung no se haceresponsable de este tipo de accidentes.
Samsung no se hace responsable de dafios o lesiones personales cuando se usa un montaje mural que no es VESA o que no
cumple lasespecificaciones, osiel cliente no sigue las instrucciones deinstalaci6n delproducto.
Nuestrosmodelos de57" y 63" noson compatibles con lasespecificaciones VESA. Porello, debe usar un equipo de montaje mural
exclusivo paraeste modelo.
Nosupere los15 grados de inclinaci6n cuando monte estetelevisor.
z_ Noinstale el equipo de montaje mural mientras el televisor estaencendido.
Se podria producir una descarga electricacon riesgo de causar lesiones personales.
Especificaciones
i !!:ii!i!{ ¸ i ¸i!!i ¸¸i:!i i! ?iy •
Tamale de pantalia (diagonal) 42 pulgadas (42.3 pulgadas medidas 50 pulgadas (49.9pulgadas medidas
diagonalmente) diagonalmente)
Resoluci6n de PC I024x768 @60 Hz 1360x768 @60Hz
10Wx 2
Dimens!ones (An. ×AI. x pr.)
i
cue[p0 p[incipaI 41.5 x 25.9 x 2.9 pulgadas 48,0 x 29.4 x 2.9 pulgadas
(1055,5 x 680 x 74 ram) (1220,8 x 748,8 x 74 mm)
con el s0p0rte 41.5 x 28.3 x 12.4 pulgadas 48.0 x 31.8 x 12.4 pulgadas
(1055.5 x 721 x 316 mm) (1220.8 x 810 x 316 ram)
i
cuerpo principal 53.1 Ibs(24.1kg) 69.0 Ibs (31.3 kg)
Conelsoporte 61.3 Ibs(27.8kg) 77.2 Ibs (35.0 kg)
Consideraciones
i
Temperatura de funcionamiento 50°Fto 104 °F(10 °C to40 °C) 50 °Fto 104 °F (10°C to40 °C)
Humedad de funcionamiento : 10%to 80%, sincondensaci6n 10%to 80%, sin condensaci6n
Temperatura de a!macenamiento -4°F to 113 °F(-20 °C to 45 °C) -4 °F to 113 °F(-20 °C to45 °C)
Humedad de a!macenamiento 5% to95%, sincondensaci6n 5% to95%, sin condensaci6n
Estedispositivo es un aparato digitaldela Clase B.
Eldise_o y lasespecificaciones pueden cambiarsin previoaviso.
Para conocer la fuente de alimentaci6n y el consumo de energia, consulte la etiquetaadherida al producto.

Dimensiones (PN42B450B1 D)
/ :_:z::z : I _ r z ....
\ J
VISTASUPERIOR VISTA FRONTAL
JJ
i
'i
'i
'i
JJ
i
,j
i
_J
[ i]qi::................
_,, /'
5 7(400ram)
VISTA LATERAL VISTA POSTERIOR
NOTA: No todos los dibujos est&n necesafiamente a escaEa
Algunas dimensiones estan suietas a cambio sin prevlo aviso
Consulte 1as dimensiones de cada u#idad a_tes de adaptar el
mueble para el televisor La empresa _o se responsabiliza de
los errores tipograficos o de impresi6n
© 2009 Samsung Electronics America, Inc
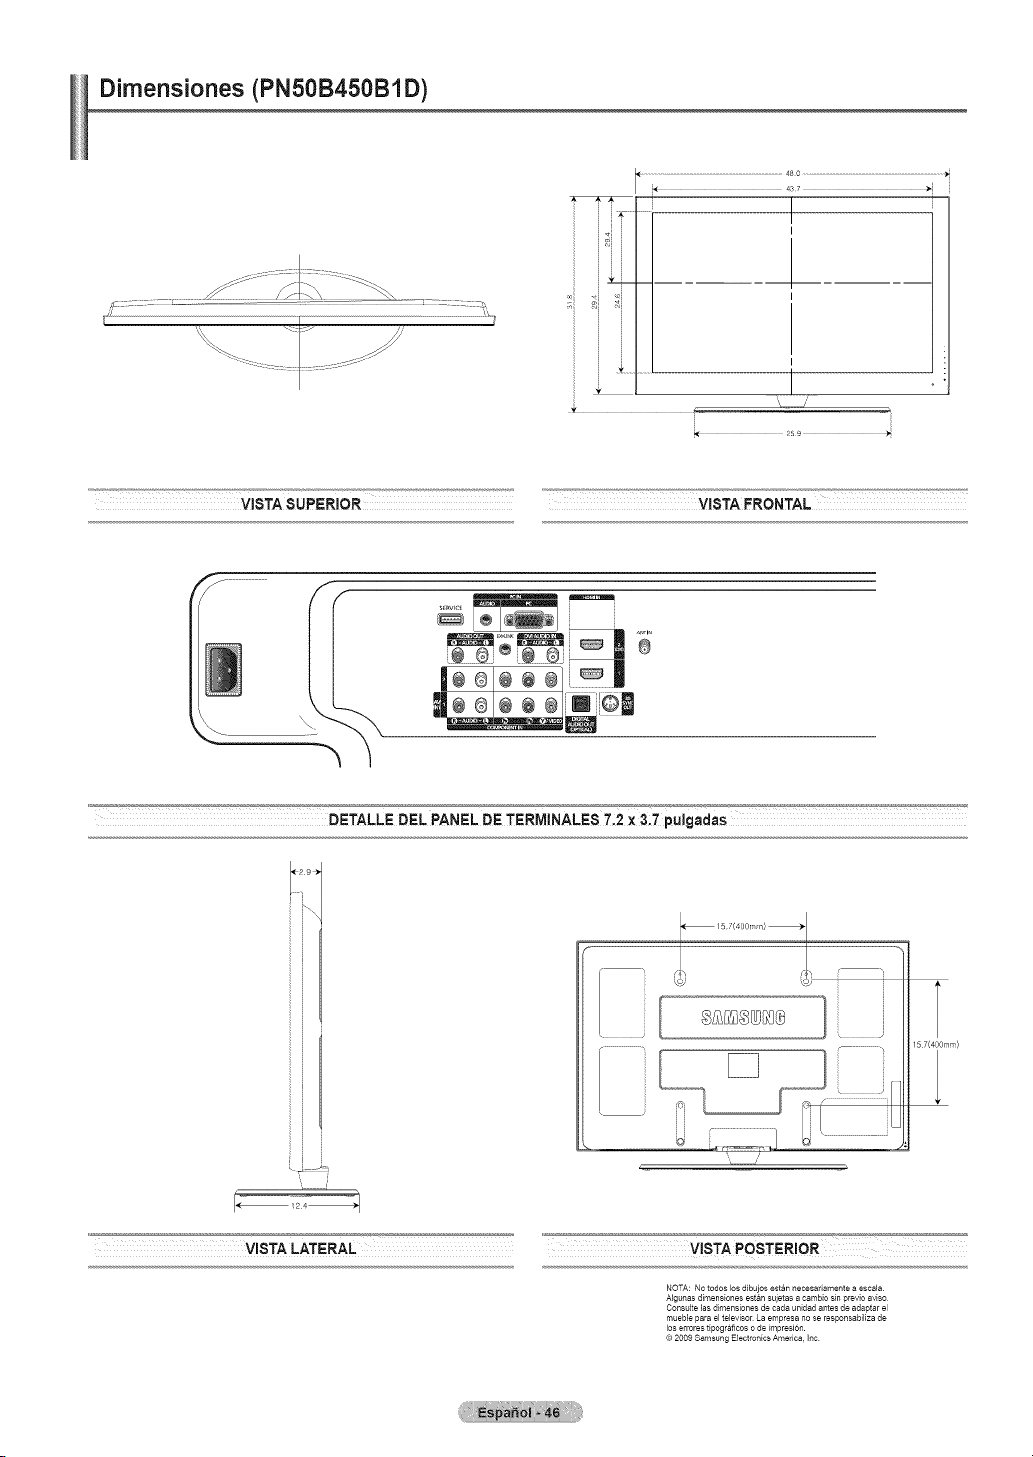
Dimensiones (PNSOB450B1D)
I
iF
ii
.............................................................................................480 ................................................................................................
437
I
I
I
I
VISTASUPERIOR VISTAFRONTAL
# !J # !_
I÷®1÷÷ ®1i_ii
DETALLE DEL PANEL DE TERMINALES 7_2X &7 pulgadas
VISTA LATERAL _='-'
_ !5 7(400r _q)
i L )
W _J :_i:1 i, iiiiiiiiiiiiiiiiiii]
-Z
16 T(4OOmm)
VISTA POSTERIOR
NOTA: No todos los dibuios estan necesariamente a escala
AIgunas dimensiones estan sujetas a cambio sin previo avis<)
Cow,suite las dimensiones de cada unidad antes de adaptar el
mueble para el tebvisor La empresa no se responsabiliza de
los errores tipograflcos o de impresi@_.
© 2009 Samsung Electronics America, t_c