
Instruction Manual
4.0 Amp Motor
13 Inch Cutting Path/0.065 In. Line
ELECTRIC WEEDWACKER ®
Model No.
358.745270
• Safety
• Assembly
• Operation
• Maintenance
• Espahol
®
WARNING:
Read and follow all Safety Rules and Operating
Instructions before first use of this product.
For answers to your questions about this product:
Call 7 am-7 pm, Mon-Sat; 10 am-7 pm, Sun
1-800-235-5878 (Hours{istedareCentralTime)
Sears, Roebuck and Co., Hoffman Estates, IL 60179 U.S.A.
530163929 4/4/03
Warranty Statement 2 Parts Available 9
Safety Rules 2 Storage 9
Assembly 5 Troubleshooting Table 10
Operation 6
Maintenance 8 Spanish 11
Service & Adjustments 9 Parts Ordering Back Cover
FULL ONE YEAR WARRANTY ON CRAFTSMAN ELECTRIC WEEDWACKER ®
LINE TRIMMER
If this Craftsman Electric Weedwacker _" Line Trimmer fails to perform properly
due to a defect in material or workmanship within (1) one year from the date of
purchase, Sears will replace it free of charge.
This warranty does not cover the nylon line.
WARRANTY SErViCE IS AVAILABLE BY RETURNING THE CRAFTSMAN ELECTRIC
WEEDWACKER'- LINE TRIMMER TO THE NEAREST SEARS STORE OR SERVICE CEN-
TER IN THE UNITED STATES.
This warranty gives you specific legal rights, and you may also have other dghts
which vary from state to state.
Sears, Roebuck and Co., D/817WA, Roffrnan Estates, IL 60179
z% _
_ILWARNING: When using electric
gardening appliances, basic safety
precautions must always be followed
to reduce the risk of fire, electric
shock, and serious injury. Read and
follow all instructions.
SAFETY INFORMATIONON THE UNIT
This power unit can be dangerous!
Operator is responsible for following
the warnings and instructions in this
manual and on the unit. Read entire
instruction manual before using unit!
Be thoroughly familiar with the con-
trois and the proper use of the unit.
Restrict the use of this unit to persons
who read, understand, and follow unit
and manual warnings and instruc-
tions. Never allow children to operate
this unit. Close attention is necesary
when used near children.
z% =_____
4_LDANGER: Never use blades or
flailing devices. Unit is designed for line
trimmer use only. Use of any other ac-
cessories or attachments will increase
the risk of injury.
@OO
At=
_IbWARNING: Trimmer line throws
objects violenfiy. You and others can
be blinded/injured. Wear safety
glasses, boots, and leg protection.
Keep body parts clear of rotating line.
Keep children, bystanders, and ani-
mals 50 feet (15 meters) away. If ap-
proached stop unit immediately.
If situations occur which are not cov-
ered in this manual, use care and
good judgement. If you need assis-
tance, call 1-800-235-5878.
OPERATOR SAFETY
• Dress properly. Always wear safety
glasses or similar eye protection
when operating, or performing main-
tenance on your unit. (Safety
2
glasses are available.) Always wear
face or dust mask if operation is
dusty. Always wear heavy, long
pants, long sleeves, boots, and
gloves. Do not go barefoot or wear
sandals.
• Secure hair above shoulder length.
Secure or remove loose clothing
and jewelry or clothing with loosely
hanging ties, straps, tassels, etc.
They can be caught in moving parts.
• Being fully covered also helps pro-
tect you from debris and pieces of
toxic plants thrown by spinning line.
• Stay Alert. Do not operate unit when
you are tired, ill, or under influence
of alcohol, drugs, or medication.
Watch what you are doing; use com-
mon sense.
• Avoid unintentional starting of the
unit. Never carry unit with your fin-
ger on the switch. Be sure the
switch is in OFF position when con-
necting extension cord.
ELECTRICAL SAFETY
_WARNING: Avoid a dangerous
environment. To reduce the risk of
electrical shock, do not use in rain, in
damp or wet locations, or around
swimming pools, hot tubs, etc. Do not
expose to snow, rain, or water to avoid
the possibility of electrical shock.
• Use a voltage supply as shown on
unit.
• Avoid dangerous situations. Do not
use in the presence of flammable
liquids or gases to avoid creating a
fire or explosion and/or causing
damage to unit.
• To reduce lhe risk of electrical shock,
this equipment has a polarized plug
(one blade is wider than the other)
and will require the use of a polarized
extension cord. The appliance plug
will fit into a polarized extension cord
only one way. If the plug does not fit
fully into the extension cord, reverse
the plug. If the plug still does not fit,
obtain a correct polarized extension
cord. A polarized extension cord will
require the use of a polarized wall out-
let. This plug will fit into the polarized
wall outlet only one way. If plug does
not fit fully into the wall outlet, reverse
the plug. If the plug still does not fit,
contact a qualified electrician to install
the proper wall outlet. Do not change
the equipment plug, extension cord
receptacle, or extension cord plug in
any way.
• To reduce risk of electrical shock,
use extension cords specifically
marked as suitable for outdoor ap-
pliances having electrical rating not
less than the rating of unit. Cord
must be marked with suffix "W-A" (in
Canada "W"). Make sure your exten-
sion cord is in good condition. In-
spect extension cord before use and
replace if damaged. Do not use a
damaged cord. Cord insulation
must be intact with no cracks or de-
terioration. Plug connectors must be
undamaged. An undersized exten-
sion cord will cause a drop in line
voltage resulting in loss of power
and overheating. If in doubt, use the
next heavier gauge. The lower the
gauge number, the heavier the cord
(see SELECT AN EXTENSION CORD
in the OPERATION section).
• Do not use multiple cords.
• Do not abuse cord. Never carry the
unit by the extension cord or yank
extension cord to disconnect unit.
• Use cord retainer to prevent discon-
nection of extension cord from unit
and possible damage to the unit due
to plug movement. See ATTACH THE
EXTENSION CORD TO YOUR TRIM-
MER in the OPERATION section.
• Do not use the unit if the switch
does not turn the unit on and off
properly. Repairs to the switch must
be made by your Sears Service
Center.
• Keep the extension cord clear of op-
erator and obstacles at all times. Do
not expose cords to heat, oil, water,
or sharp edges.
• To avoid the possibility of electric
shock, avoid body contact with any
grounded conductor, such as metal
fences or pipes.
• Ground Fault Circuit Interrupter
(GFCl) protection should be pro-
vided on circuit or outlet to be used.
Receptacles are available having
built-in GFCl protection and may be
used for this measure of safety.
UNIT SAFETY
• Inspect unit before use. Replace
damaged parts. Make sure all han-
dles, guards, and fasteners are in
place and securely fastened. Parts
that are damaged must be repaired
or replaced by a Sears Service Cen-
ter. These include head parts that
are cracked, or chipped, guards,
and any other part that is damaged.
• Do not repair unit yourself.
3
• Use only 0.065" (1.65 mm) diame-
ter recommended trimmer line. (See
SERVtCE AND ADJUSTMENTS). Nev-
er use wire, rope, string etc.
• Use specified trimmer spool. Make
sure spool is properly installed and
all parts are securely fastened.
• Use only recommended replace-
ment parts and accessories.
CUTTING SAFETY
• Inspect area to be cut. Remove ob-
jects (rocks, broken glass, nails,
wire, string, etc.) which can be
thrown or become entangled in cut-
ting head.
• Do not overreach or stand on unsta-
ble support. Keep firm footing and
balance.
• Keep the cutting head below waist
level. Do not raise handles above
your waist. Cutting head can come
dangerously close to your body.
• Keep away from cutting head and
spinning line.
• Use unit properly. Use only for trim-
ming, edging, scalping, and mow-
ing. Do not force unit. It will do the
ob better and with less risk of injury
at the rate for wh ch t was des gned.
• Use only in daylight or in good artifi-
cial light.
MAINTENANCE SAFETY
_WARNING: Disconnect unit
from the power supply before perform-
ing maintenance, or when changing
trimmer line.
• Maintain unit according to recom-
mended procedures. Keep cutting
line at proper length. Follow instruc-
tions for changing trimmer line.
• Have all service and maintenance
not explained in this manual per-
formed by a Sears Service Center to
avoid creating a hazard.
• Never douse or squirt the unit with
wateror any other liquid. Clean unit
and labels with a damp sponge.
Keep handles dry, clean, and free
from oi! and grease.
• Keep the air vents clean and free of
debris to avoid overheating the mo-
tor. Clean aftereach use.
TRANSPORTING AND STORAGE
• Stop the unit and disconnect the
power source when not in use.
• Carry the unit with motor stopped.
• Store the unit so the line limiter
blade (on underside of shield) can-
not cause injury.
• Store unit indoors in a high, dry
place out of the reach of children.
Store unit unplugged.
• Do not hang unit so that the trigger
switch is depressed.
DOUBLE INSULATION CONSTRUC-
TION
This unit is double insulated to help
protect against electric shock. Double
suIation construction consists of two
separate "layers" of electrical insula-
tion instead of grounding.
Tools built with this insulation system
are not intended to be grounded. No
grounding means is provided on this
unit, nor should a means of grounding
be added to this unit. As a result, the
extension cord used with your unit can
be plugged into any polarized 120 volt
electrical outlet.
Safety precautions must be observed
when operating any electrical tool.
The double insulation system only
provides added protection against in-
jury resulting from an internal electrical
insulation failure.
_kWARNING: All electrical repairs
to this unit, including housing, switch,
motor, etc., must be diagnosed and
repaired by qualified service person-
neL Replacement parts fora double
insulated appliance must be recom-
mended by the manufacturer. A
double insulated appliance is marked
with the words "double insulation" or
"double insulated". The symbol
(square within a square) [] may also
be marked on the appliance. Failure
to have the unit repaired by qualified
service personnel can cause the
double insulation construction to be-
come ineffective and result in serious
injury.
SAVE THESE INSTRUCTIONS
4
CARTON CONTENTS
Check carton contents against the fol-
lowing Iist.
Model 358.745278
• Trimmer
• Shield
Examine parts for damage. Do not
use damaged parts.
NOTE: If you need assistance or find
parts missing or damaged, call
1-800-235-5878.
ASSEMBLY
_I_WARNING: If received as-
sembled, review all assembly steps to
ensure your unit is properly as-
sembled and all fasteners are secure.
• Extend the tube until it snaps into
place.
ADJUSTING ASSIST HANDLE
1. Loosen wing nut on handle.
2. Rotate the handte on the tube to
an upright position; place in a
comfortable position and retighten
wing nut.
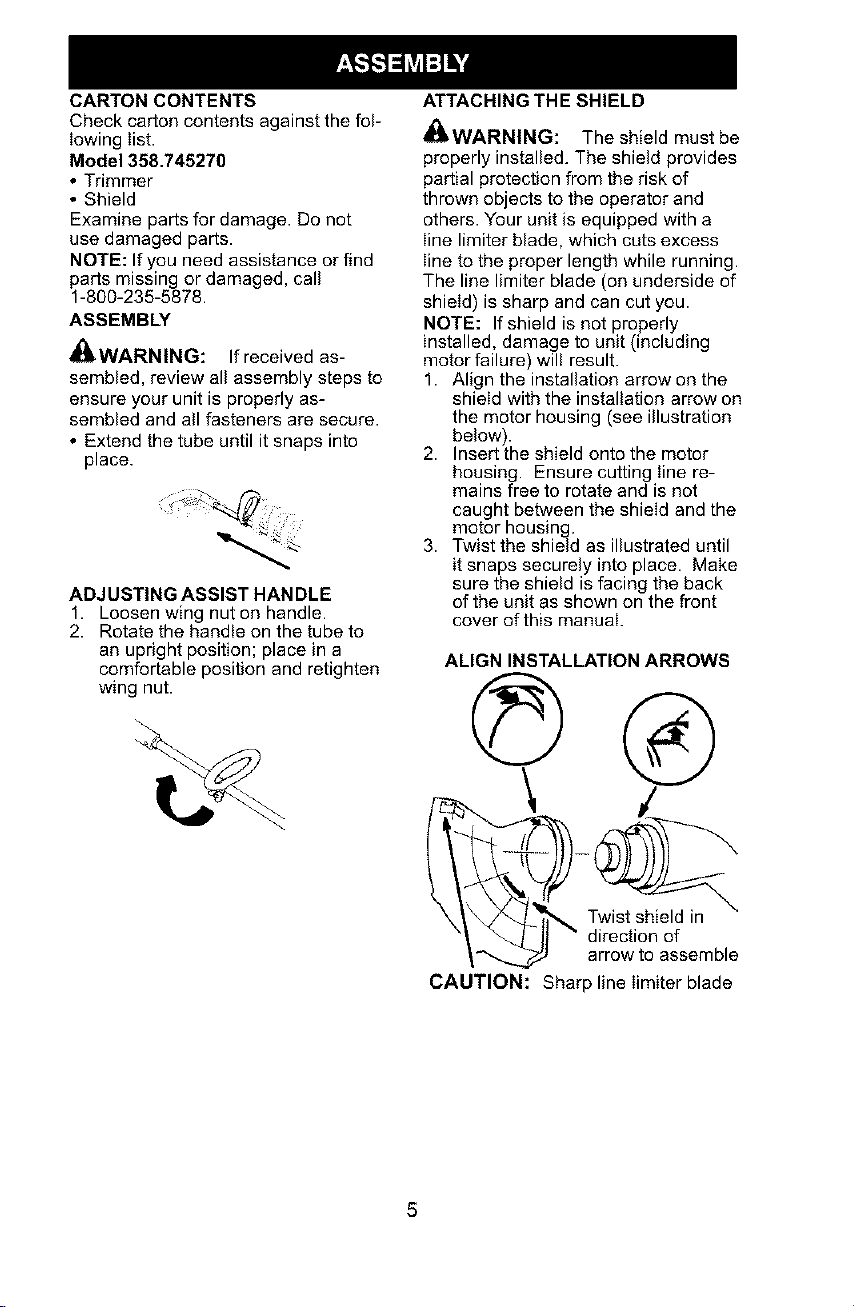
ATTACHING THE SHIELD
_WARNING: The shield must be
properly installed. The shield provides
partial protection from the risk of
thrown objects to the operator and
others. Your unit is equipped with a
line limiter blade, which cuts excess
line to the proper length while running.
The line limiter blade (on underside of
shield) is sharp and can cut you.
NOTE: Ifshield is not properly
installed, damage to unit (including
motor failure) will result.
1. Align the installation arrow on the
shield with the installation arrow on
the motor housing (see illustration
below).
2. Insert the shield onto the motor
housing. Ensure cutting line re-
mains free to rotate and is not
caught between the shield and the
motor housing.
3. Twist the shield as illustrated until
it snaps securely into place. Make
sure the shield is facing the back
of the unit as shown on the front
cover of this manual.
ALIGN INSTALLATION ARROWS
©
Twist shield in
arrow to assemble
CAUTION: Sharp line Iimiter blade
5
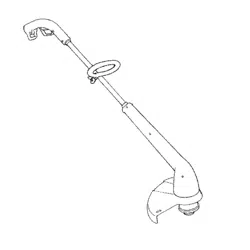
KNOW YOUR TRIMMER
READ THIS INSTRUCTION MANUAL AND SAFETY RULES BEFORE OPERATING YOUR
UNIT Compare the illustrations with your unit to familiarize yourself with the loca-
tion of the various controls and adjustments. Save this manual for future refer-
ence.
Recessed
Plug
Cord
Retainer
Trigger
Switch
Assist Handle
Air Vents
_, Motor Housing
Semi-automatic
Head with
RECESSED PLUG
The RECESSED PLUG is where you at-
tach your extension cord to the unit.
TRIGGER SWITCH
The TRIGGER SWITCH is used to turn
on the unit. Squeeze the trigger switch
to operate the unit.
LINE LIMITER
The LINE LIMITER cuts the cutting line
to the proper cutting length.
Tap Button
Line Limiter Blade
ASSIST HANDLE
The ASSIST HANDLE is used to help
hold and guide the unit.
SEMI-AUTOMATIC HEAD
The SEMI-AUTOMATIC HEAD holds De
cutting line and rotates during operation.
TAP BUTTON
The TAP BUTTON is used to advance
the cutting line during operation and to
remove the spool during line replace-
ment.
OPERATING INSTRUCTIONS
Use only a voltage supply as specified
on your unit.
SELECT AN EXTENSION CORD
Extension Cord Gauge Chart
Length of Cord Gauge
25 Ft. (7.5 m) 18 Gauge
50 Ft. (15 m) 16 Gauge
100 Ft. (30 m) 16 Gauge
Extension cords are available for this
unit at Sears.
Extension Cord
(16 Guage) ............ 71-85708
ATTACH THE EXTENSION
CORD TO YOUR TRIMMER
Loop your extension cord through the
handle and around the hook. insure
the plug and cord are firmly and fully
engaged.
6
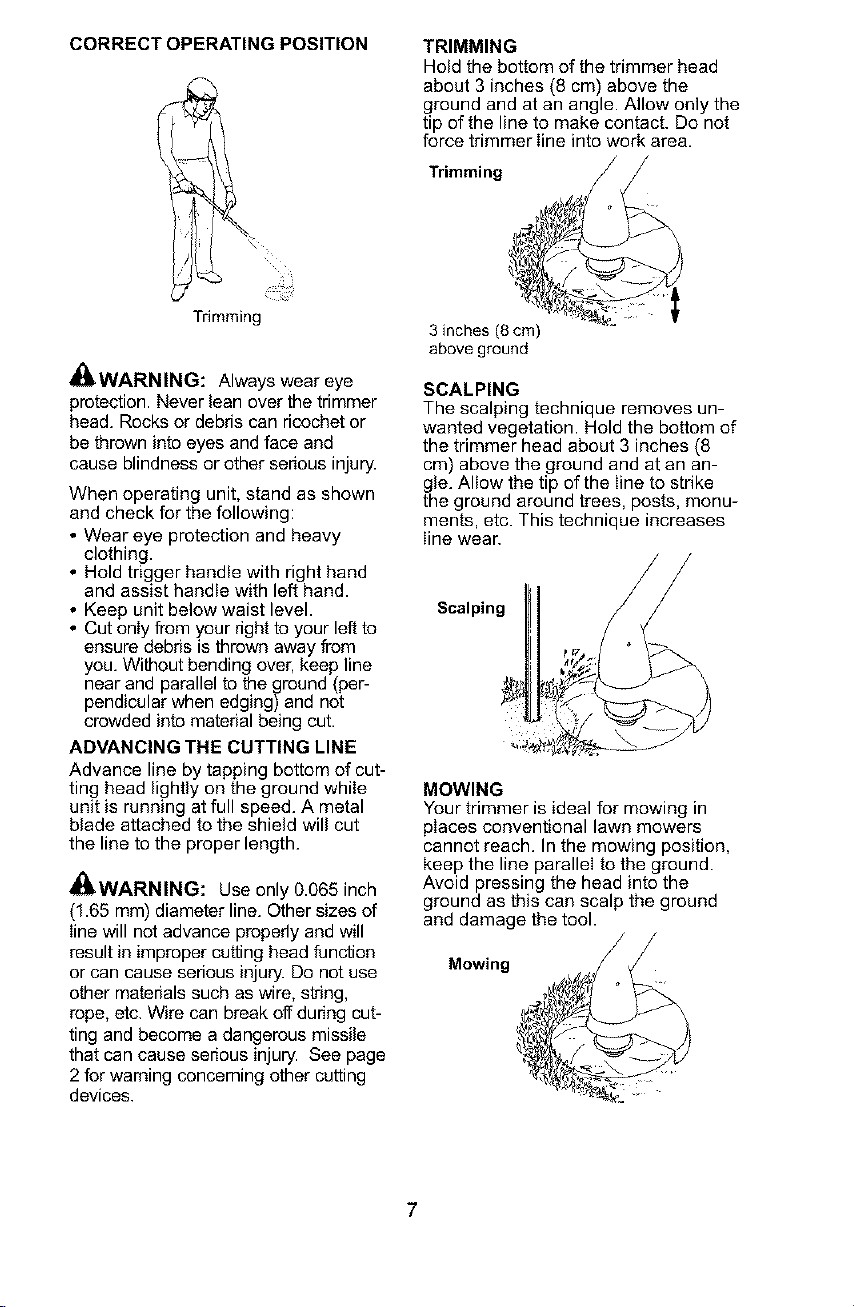
CORRECT OPERATING POSITION
TRIMMING
Hold the bottom of the trimmer head
about 3 inches (8 cm) above the
ground and at an angle• Allow only the
tip of the line to make contact. Do not
force trimmer Iine into work area.
Trimming
Trimming
dl_ WARNING: Always wear eye
protection. Never lean over the trimmer
head. Rocks or debris can ricochet or
be thrown into eyes and face and
cause blindness or other serious injury.
When operating unit, stand as shown
and check for the following:
• Wear eye protection and heavy
clothing•
• Hold trigger handle with right hand
and assist handle with left hand.
• Keep unit below waist level•
• Cut only from your right to your left to
ensure debris is thrown away from
you. Without bending over, keep line
near and parallel to the ground (per-
pendicular when edging) and not
crowded into material being cut.
ADVANCING THE CUTTING LINE
Advance line by tapping bottom of cut-
ting head lightly on the ground whiIe
unit is running at full speed. A metal
blade attached to the shield will cut
the line to the proper length.
z% _
_I),WARNING: Use only 0.065 inch
(1.65 mm) diameter line. Other sizes of
line will not advance properly and will
result in improper cutting head function
or can cause serious injury. Do not use
other materials such as wire, string,
rope, etc. Wire can break off during cut-
ting and become a dangerous missile
that can cause serious injury. See page
2 for warning concerning other cutting
devices.
3 inches (8 cm)
above ground
SCALPING
The scalping technique removes un-
wanted vegetation• Hold the bottom of
the trimmer head about 3 inches (8
cm) above the ground and at an an-
gle. Allow the tip of the line to stdke
the ground around trees, posts, monu-
ments, etc. This technique increases
line wear.
Scalping
MOWING
Your trimmer is ideal for mowing in
pIaces conventional lawn mowers
cannot reach. In the mowing position,
keep the line parallel to the ground•
Avoid pressing the head into the
ground as this can scalp the ground
and damage the tool.
Mowing
7
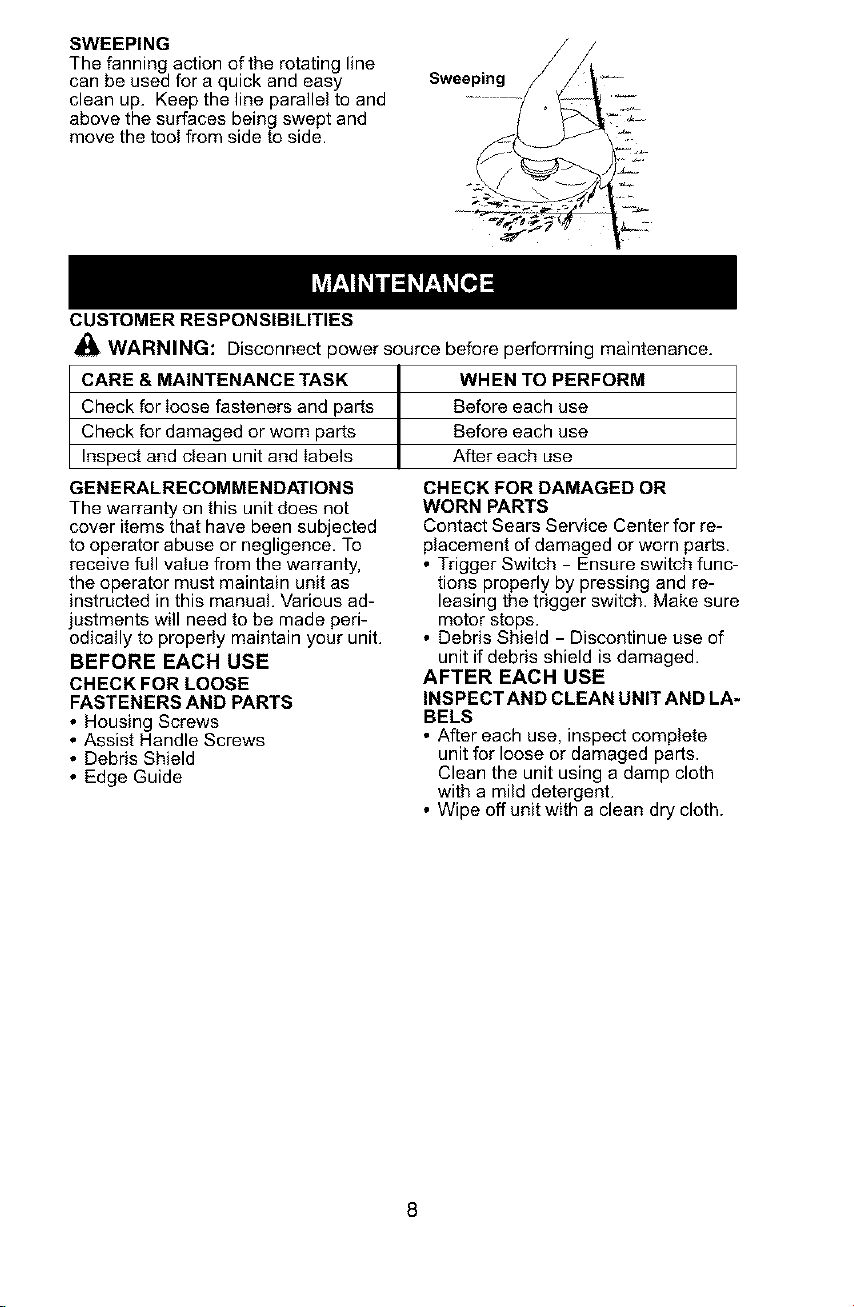
SWEEPING
The fanning action of the rotating line
can be used for a quick and easy
clean up. Keep the line parallel to and
above the surfaces being swept and
move the tool from side to side.
Sweeping _--
CUSTOMER RESPONSIBILITIES
_1_ WARNING: Disconnect power source before performing maintenance.
CARE & MAINTENANCE TASK WHEN TO PERFORM
Check for loose fasteners and parts Before each use
Check for damaged or worn parts Before each use
Inspect and clean unit and labels After each use
GENERALRECOMMENDATIONS
The warranty on this unit does not
cover items that have been subjected
to operator abuse or negligence. To
receive full value from the warranty,
the operator must maintain unit as
instructed in this manual Various ad-
justments will need to be made peri-
odically to properly maintain your unit.
BEFORE EACH USE
CHECK FOR LOOSE
FASTENERS AND PARTS
• Housing Screws
• Assist Handle Screws
• Debris Shield
• Edge Guide
CHECK FOR DAMAGED OR
WORN PARTS
Contact Sears Service Center for re-
placement of damaged or worn parts.
• Trigger Switch - Ensure switch func-
tions properly by pressing and re-
leasing the trigger switch. Make sure
motor stops.
• Debris Shield - Discontinue use of
unit if debris shield is damaged.
AFTER EACH USE
INSPECT AND CLEAN UNIT AND LA-
BELS
• After each use, inspect complete
unit for loose or damaged parts.
Clean the unit using a damp cloth
with a mild detergent.
• Wipe off unit with a clean dry cloth.
8
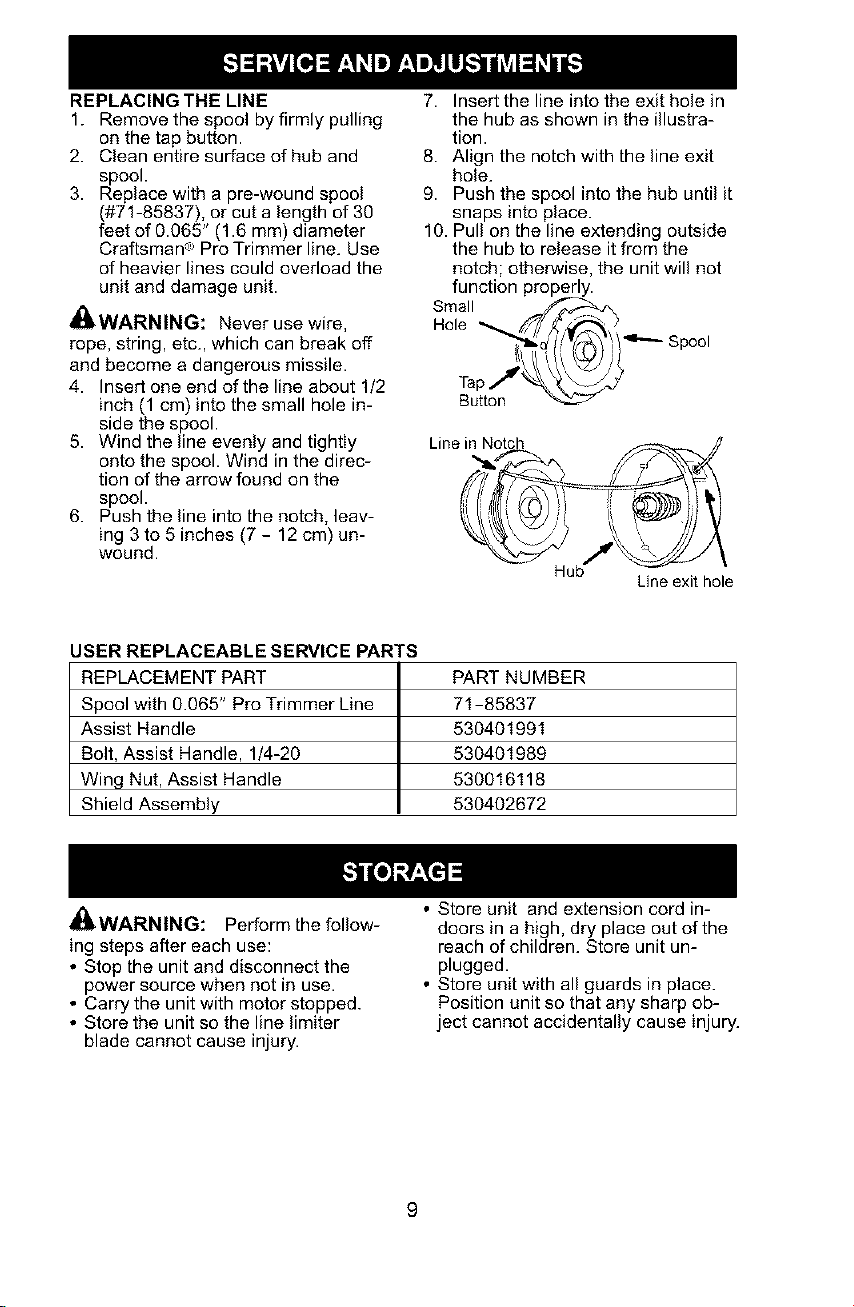
REPLACING THE LINE
1. Remove the spool by firmly pulling
on the tap button.
2. Clean entire surface of hub and
spool.
3. Replace with a pre-wound spool
(#71-85837), or cut a length of 30
feet of 0.065" (1.6 mm) diameter
Craftsman o Pro Trimmer line. Use
of heavier lines could overload the
unit and damage unit.
_WARNING: Never use wire,
rope, string, etc., which can break off
and become a dangerous missile.
4. Insert one end of the line about 1/2
inch (1 cm) into the small hole in-
side the spool.
5. Wind the line evenly and tightly
onto the spool. Wind in the direc-
tion of the arrow found on the
spool.
6. Push the line into the notch, leav-
ing 3 to 5 inches (7 - 12 cm) un-
wound.
7. Insert the line into the exit hole in
the hub as shown in the illustra-
tion.
8. Align the notch with the line exit
hole.
9. Push the spool into the hub until it
snaps into place.
10. Pull on the line extending outside
the hub to release it from the
notch; otherwise, the unit will not
function properly.
Hole _ "=""- Spool
_t l/_/ t_YJA
Tap,,f _
Sutton ,-._%c7
Line exit hole
USER REPLACEABLE SERVICE PARTS
REPLACEMENT PART
Spool with 0.065" Pro Trimmer Line
Assist Handle
Bolt, Assist Handle, 1/4-20
Wing Nut, Assist Handle
Shield Assembly
PART NUMBER
71-85837
530401991
530401989
530016118
530402672
_IWARNING: Performthe follow-
ing steps after each use:
• Stop the unit and disconnect the
power source when not in use.
• Carry the unit with motor stopped.
• Store the unit so the line limiter
blade cannot cause injury.
• Store unit and extension cord in-
doors in a high, dry place out of the
reach of children. Store unit un-
plugged.
• Store unit with all guards in place.
Position unit so that any sharp ob-
ject cannot accidentally cause injury.
9
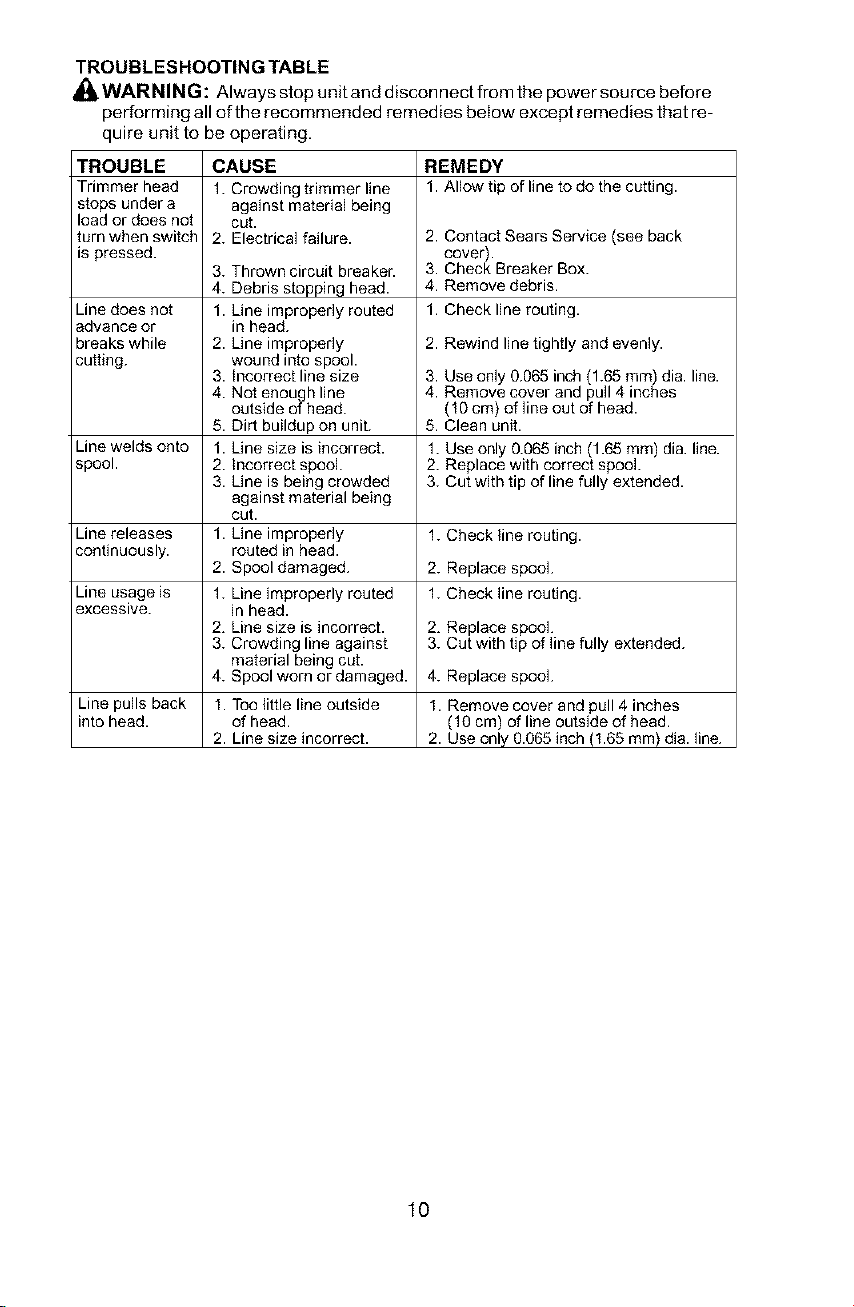
TROUBLESHOOTING TABLE
_kWARNING: Always stop unit and disconnect from the power source before
performing all of the recommended remedies beIow except remedies that re-
quire unit to be operating.
TROUBLE
Trimmer head
stops under a
load or does not
turn when switch
is pressed.
Line does not
advance or
breaks while
cutting.
CAUSE
1. Crowding trimmer line
against material being
cut.
2. Electrical failure.
REMEDY
1. Allow tip of line to do the cutting.
3. Thrown circuit breaker.
4. Debris stopping head.
1. Line improperly routed
in head.
2. Line improperly
wound into spool.
3. Incorrect line size
4. Not enough line
outside of head.
6. Dirt buildup on unit.
1. Line size is incorrect.
2. incorrect spool
3. Line is being crowded
against material being
cut.
1. Line improperly
routed in head.
2. Spool damaged.
1. Line improperly routed
in head.
2. Line size is incorrect.
3. Crowding line against
material being cut.
4. Spool worn or damaged.
2. Contact Sears Service (see back
cover).
3. Check Breaker Box.
4. Remove debris.
1. Check line routing.
2. Rewind line tightly and evenly.
3. Use only 0.066 inch (1.65 ram) dia. line.
4. Remove cover and pull 4 inches
(10 cm) of line out of head.
6. Clean unit.
1. Use only 0.065 inch (1.65 mm) dia. line.
2. Replace with correct spool.
3. Cut with tip of line fully extended.
Line welds onto
spool.
Line releases 1. Check line routing.
continuously.
2. Replace spool.
Line usage is 1. Check line routing.
Bxcessive.
2. Replace spool.
3. Cut with tip of line fully extended.
4. Replace spool.
Line pulls back I. Too little line outside I. Remove cover and pull 4 inches
into head. of head. (10 cm) of line outside of head.
2. Line size incorrect. 2. Use only 0.065 inch (I.65 mm) dia. line.
10
Declaraci6n de Garantla Umitada 11 Servicio y Ajustes 18
Reglas de Seguridad 11 Piezas de Repuesto 18
Montaje 14 Alrnacenamiento 19
Uso 15 Tabla Diagn6stica 19
Mantenimiento 17 Piezas y Encargos Contratapa
GARANTIA COMPLETA DE UN AI_O PARA LA CORTADORA A LINEA ELEC-
TRICO CRAFTSMAN®
Siesta cortadora el6ctrica Weedwacker e Craftsman tiene alguna falla de funcio-
namiento debida a materiales o mano de obra, durante un afio a partir de Ia fe-
cha de compra, Sears la reparara o cambiar_.
Esta garantia excluye la linea de nylon.
EL SERVlClO BAJO GARANTIA ESTA A SU DISPOSICION CON SOLO DEVOLVER LA
CORTADORA A LINEA ELECTRICA WEEDWACKER¢_ CRAFTSMAN AL TIENDA CE
SEARS O CENTRO DE SERVlClO SEARS MAS CERCANO EN LOS ESTADOS UNIDOS.
Esta garantia le confiere derechos juridicos especificos' adem&s ud. Podr_ tener
otros derechos que varian entre estados.
Sears, Roebuck and Co., D/817 WA, Hoffman Estates, IL. 60179
_kADVERTENCIA: Siempre que
se use cualquier cortador el6ctrico, de-
ben observarse precauciones b_sicas
de seguridad para reducir el riesgo de
incendio, choque el6ctrico y graves
heridas. Lea y cumpla con todas las
instrucciones.
/_ INFORMACION DE
SEGURIDAD EN EL
APARATO
Este aparato de fuerza puede ser peli-
groso. El usuario tiene la responsabili-
dad de cumplir con todas las instruc-
clones y advertencias en el aparato yen
el manual. Lea el manual de instruc-
clones en su totalidad antes de usar el
aparato! Familiar'icese completamente
con los controles y el uso correcto del
aparato. Limite el uso de este aparatc a
aquellas personas que lean, compren-
dan, y cumplan con las advertencias e
instrucciones en el aparato yen el
manual. Nunca permita a los nifios que
usen el aparato. Toda su atenci6n es
necesaria cuando use este aparato cer-
ca de Iugares en donde haya niSos.
PELIGRO: Nunca use cuchillas ni
dispositivos desgrandores. Este apa-
rato ha sido diseSado exclusivamente
como cortador a linea. El uso de cual-
guier otro accesorio o pieza incremen-
tar& el peligro de heridas.
-O@O
_JkADVERTENCIA: La linea de
corte arroja objetos viotentamente. Los
objetos arrojados pueden cegarlo o
herirlo a usted y a terceros. Use ante-
ojos de seguridad, botas y protecdci6n
para las piemas. Mantenga el cuerpo
alejado de la linea girante.
Anteojaos de seguridad o protecci6n simi-
de°i°s-'qr . 0,o
Mantenga a los niSos, los animales y
los espectadores a una distancia mini-
ma de 15 metros (50 pies). Pare eI
aparato inmediatamente si alguien se
le acerca.
11
Siacontecealgunasituaci6nnopre-
vistaenestemanual,tengacuidadoy
usebuencriterio,sinecesitaayuda,
Ilameal1-800-235-5878.
SEGURIDAD DEL USUARIO
• Vitese de forma apropiada. Siempre
use anteojos de seguridad o protec-
ci6n de ojos similar al hacer uso o
mantenimiento del aparato. (Existen
anteojos de seguridad.) Use siempre
m_scara protectora de la cara o
m_scara anti-polvo al usar el apara-
to en ambientea polvorientos. Use
siempre pantalones largos gruesos,
mangas largas, botas y guantes. No
use el aparato descalzo ni con san-
dallas.
• Mantenga el cabello por encima de
los hombros, at_ndolo para tal efecto
si es necesario. No use joyas, ropa
suelta o ropa con tiras, corbatas,
bodas, etc. que cuelguen libremente;
pueden enredarse en las piezas en
movimiento.
• Si est_ completamente tapado, es-
tar_ m_s protegido de los escombros
y pedazos de plantas t6xicas arroja-
dos por la linea girante.
• Mant_ngase alert& No use este apa-
rato cuando est6 cansado, enfermo o
bajo la influencia deI alcohol, de dro-
gas o de remedios. Vigile bien Io que
est_ haciendo; use del sentido comUn.
• Evite los arranques no intenoionales
del motor. AI Ilevar el aparato de un
lado a otro, nunca ponga el dedo en
el interruptor. AsegUrese de que el
interruptor est6 en la posici6n OFF al
conectar el cable de extensi6n
SEGURIDAD ELECTRICA
_kADVERTENCIA: Evite los ambi-
entes peligrosos. Para reducir el riesgo
de choque el6ctrico, no use los aparatos
en lugares hUmedos o majados ni cerca
de piscinas, de los hidromasajes, etc.
No exponga el aparato a la nieve, a la
Iluvia ni al agua para evitar la posibilidad
de choque el6ctrico.
• Use el voltaje especificado en el
aparato.
• Evite las situaciones peligrosas. No
use el aparato en la presencia de
gases o Iiquidos inflamables para
evitar incendios, explosiones y/o
daSos al aparato.
• Para reducir et riesgo de choque
el6ctrico, este equipo viene con en-
chufe potarizado (una aleta es m_s
ancha que Ia otra) y requerir_ el uso
de un cable de extensi6n potarizado.
Este enchufe entrar_ solamente en
una posici6n en el enchufe polarizado
del cable de extension. Si este en-
chufe no entrara completamente den-
tro del enchufe dei cabte de extensi6n,
invierta el enchufe. Si continua sin en-
trar, obtenga el cable de extensi6n po-
larizado correcto. El enchufe polariza-
do det cable de extensi6n requedr_ el
uso de un tomacorriente de pared po-
ladzado. El enchufe polarizado del
cable de extensi6n entrar_ en el toma-
cornente de una sola forma. Si el en-
chufe no entra completamente en el
tomacorriente de pared, invieria el en-
chufe. Si continua sin entrar, contacte
un electricista autorizado para que isn-
tale et tomacorriente apropiado. No
cambie el equipo del enchufe, el re-
cept_culo del cable de extensi6n o el
enchufe deI cable de extensi6n de
ninguna manera.
• Para reducir el riesgo de choque
el6ctrico, use cables de extensi6n que
vengan especificamente marcados
como apropiados para aparatos de
uso en exteriores y que tengan una
clasificaci6n el_ctrica no menor que la
del aparato. El cable deber_ venir
marcado con el sujifo "W-A" ("W" en
Canad6). AsegUrese de que el cable
de extensi6n est6 en buenas condi-
clones. Inspeccione el cable de exten-
si6n antes de usarlo y si est_ dafiado,
c_mbielo. No utilice una cable de ex-
tension daSada. El aislante deI cable
de la extensi6n debe ser intacto sin
las grietas o la deterioraci6n. Los con-
ectores det enchufe deben ser in-
demnes. Los cables demasiado finos
causar&n una baja en el voltaje de
line& Io que provocar6 falta de poten-
ciay exceso de temperatura. En caso
de duda entre dos cables, use el m&s
grueso. Cuanto m_s pequefio es et
nUmero de clasificaci6n, m_s grueso
es el cable (vea SELECCION DEL
CABLE DE EXTENSION en la secci6n
USO).
• No utilice m_s de uno los cables de
extensi6n.
• No use el cable indebidamente. Nun-
ca Ileve el aparato por eI cable de
extensi6n ni Ia desconecte del en-
chufe tirando del cable.
• Use el retentor de cables para evitar
que el cable de extensi6n se desco-
necte del aparato y cause posible
dafio a el aparato debido al movi-
rniento del enchufe. Vea ENCHUFE
EL CABLE DE EXTENSION AL APARA-
TO en la secci6n USO DEL APARATO.
12
• No use el aparato si el interruptor no
Io prende y apaga correctamente. El
Centro de Servicio Sears deber&
hacer todas Ias reparaciones al inter-
ruptor.
• Mantenga el cable de extensi6n ale-
jado del usuario y de los obst_culos
en todo momento. No exponga los
cables al calor, al aceite, al agua o a
los bordes filosos.
• Evite todo contacto del cuerpo con
los conductores a tierra, tales como
las cercas o los carlos de metal para
evitar la posibilidad de choque
el6ctrico.
• El circuito o el tomacorriente que se
use con este aparato deber_ estar
provisto de protecci6n de Interruptor
de Fallas en el Circuito a Tierra
(Ground Fault Circuit Interruptor--
GFCI). Los tomacorrientes con pro-
tecci6n GFCI incorporada pueden
set usados para esta medida de se-
guridad.
SEGURIDAD DEL APARATO
• Inspeccione el aparato completa-
mente antes de cada uso. Haga que
un Proveedor de Sears Service Cen-
ter repare o cambie las piezas daSa-
das. Esto incluye las piezas del ca-
bezaI que est_n resquebrajadas o
descantilladas, los protectores y cu-
alquier otra pieza dafiada.
• No intente reparar ud. mismo el apa-
rato.
• Use exclusivamente la Iinea de corte
con di_metro de 1,65 mm (0,065 de
pulgada) recomendado. (Vea Sec-
ci6n SERVICIO YAJUSTES). Nunca
use alambre, soga, hilo, etc.
• Use la bobina especificada.
AsegL)rese que la bobina est_ cor-
rectamente instatada y que el aro de
retenci6n est6 bien fijo.
• Use exclusivamente los repuestos y
accesorios recomendados de la
marca Craftsman.
SEGURIDAD AL CORTAR
• Inspeccione el _rea a ser cortada.
Retire los objetos (piedras, vidrio
roto, clavos, alambre, hilo, etc.) que
puedan ser arrojados o que se pue-
dan enredar en eI cabezal de corte.
• No se incline excesivamente ni se
pare en superficies inestables. Man-
tenga el equilibrio, con los pies en
una superficie firme y estable, en
todo momento.
• Mantenga el cabezal de corte por
debajo del niveI de la cintura. No le-
vante las manijas por encima del ni-
veI de la cintura. El cabezaI de corte
se le puede acercar peligrosamente
• al cuerpo.
Evite de cabezal de corte y la linea
girante.
• Use el aparato debidamente. Uselo
exclusivamente para recortar y para
cortar c_sped. No sobrecargue el
aparato; dar_ memor rendimiento
con menor probabilidad de heridas si
se Io hace funcionar al ritmo para el
cual fue disefiado.
• Use el aparato Qnicamente de dia o
en luz artificial fuerte.
SEGURIDAD EN EL MANTENIMIENTO
_kADVERTENCIA: Desconecte el
aparato de la fuente de electdcidad an-
tes de hacer cualquier mantenimiento.
• Haga el mantenimiento del aparato
de acuerdo a los procedimientos re-
comendados. Mantenga la linea de
corte al largo que corresponde.
• Todo servicio y mantenimiento no
explicado en este manual deber_ ser
efectuado por el Centro de Servicio
Sears Sears Service Center para ev-
itar peligros.
• Nunca Ie heche agua ni ningt]n otro
liquido al aparato, nile direccione
chorros de agua ni de ningt)n otto
liquido. Limpie el aparato y las calco-
manias y placas con una esponja
ht_meda. Mantenga las manijas secas,
limpias y libres de aceite y grasa.
• Mantenga las aberturas de vetilaci6n
limpias y libres de escombros para ev-
itar el calentamiento excesivo del mo-
toe Limpielas despu6s de cada uso.
TRANSPORTE Y ALMACENADO
• Pare el motor y desconecte el apara-
to de la corriente el6ctrica siempre
que no est6 en uso.
• Cuando cargue el aparato en Ias
manos, mantenga el motor apagado.
• Guarde el aparato de modo que el
cuchilla limitadora de linea (debajo
de la protector) no pueda causar
heridas accidentalmente.
• Guarde el aparato al abrigo de la in-
tempede, desenchufado, en un lugar
alto, seco y fuera del alcance de los
nifios.
• No cueIgue eI aparato para no pres-
ionar el gatillo interruptor.
CONSTRUCCION CON DOBLE
AISLAMIENTO
Este aparato tiene aislamiento doble
para incrementar la protecci6n contra
el choque el6ctrico. El aislamiento
doble consiste de dos "capas" separa-
das de aislamiento el6ctrico en vez de
cable a tierra.
13

Las herramientas y los electrodom6sti-
cos con aislamiento doble no necesi-
tan cable a tierra. No se le ha provisto
ningt]n medio de conexi6n a tierra a
este aparato, tampoco se le debe
agregar ningL]n medio de conexi6n a
tierra. Como resultado, el cable de ex-
tensi6n usado con su aparato puede ser
enchufado en cualquier tomacorriente
el_ctrico polarizado de 120 voltios.
Deben observarse precauciones de
seguridad a! trabajar con toda herra-
mienta el6ctrica. El sistema de aisla-
miento dobIe solamente provee una
protecci6n adicional contra las heridas
provocadas pot una falla en el aisla-
miento eI_ctrico interno.
_1_ ADVERTENCIA: Todo
diagn6stico y reparaci6n de indole
eI_ctrica a este aparato, incluyendo a
Ia caja, el interruptor, el motor, etc.,
deber_n ser efectuados por personal
de servicio capacitado. Los repuestos
para un aparato con aislamiento dobIe
deben set recomendados por el fabri-
cante. Los aparatos con aislamiento
doble vienen marcados con ias pala-
bras "double insulation" (aislamiento
doble) o "double insulated" (doble-
mente aislado). Tambi6n puede apa-
recer el simbolo, cuadroado dentro de
un cuadroado) U en el aparato. El
aparato debe ser reparado por un
Centro de Servicio Sears (Authorized
Service Dealer); de Io contrario el sis-
tema de aislamiento dobIe puede que-
dar inutilizado, acarreando graves her-
idas.
GUARDE ESTAS INSTRUCCIONES
CONTENIDO DE LA CAJA
Verifique el contenido de Ia caja por la
Iista siguiente.
Modelo 358.745278
• Cortadora
• Protector
Verifique gue las piezas no est6n
dafadas. No use piezas dafiadas.
AVISO: Si necesita ayuda o si faltan
piezas o hay piezas dafadas. No use
piezas dafiadas, Ilame aI
1-888-235-5878.
MONTAJE
_J!_ADVERTENCIA: Si recibi6 el
aparato ya armado, repita todos los
pasos para asegurarse de gue est6
correctamente armado y que todos los
fijadores est6n bien ajustados.
• Extienda el tubo hasta gue quede
trabado en su lugar.
AJUSTE DEL MANGO AUXlLIAR
1. Afloje Ia tuerca mariposa o la peril-
Ia en Ia manija.
2. Haga rotar Ia manija en el tobo has-
ta que quede en posici6n vertical,
col6queIa en una posici6n c6moda y
vuelva a ajustar Ia tuerca mariposa.
PARA INSTALAR EL PROTECTOR
_!_ADVERTENClA: El protector
deber_ instalarse correctamente. El
protector provee protecci6n parcial
contra el riesgo de objetos arrojados
hacia el usuario y terceros. Viene equi-
pado con un cuchilla limitadora de
Iinea de lea que corta el exceso de
Iinea, dej_ndolo del largo adecuado.
El cuchilla limitadora de linea (que
queda en la superficie inferior del pro-
tector) es filoso y corta.
AMISO: Si el protector no est_ instalada
correctamente, su aparato sufrira dafios
(incluyendo fallas del motor) directa-
mente.
1. Alinie la flecha de instalaci6n de la
protector con la flecha de instala-
ci6n de la caja del motor (vea la
ilustraci6n).
2. Inserte la protector en la caja del
motor. Asegt)rese que la linea cor-
tadora est6 libre de rotary que no
este atrapada entre la protector y
Ia caja del motor.
14
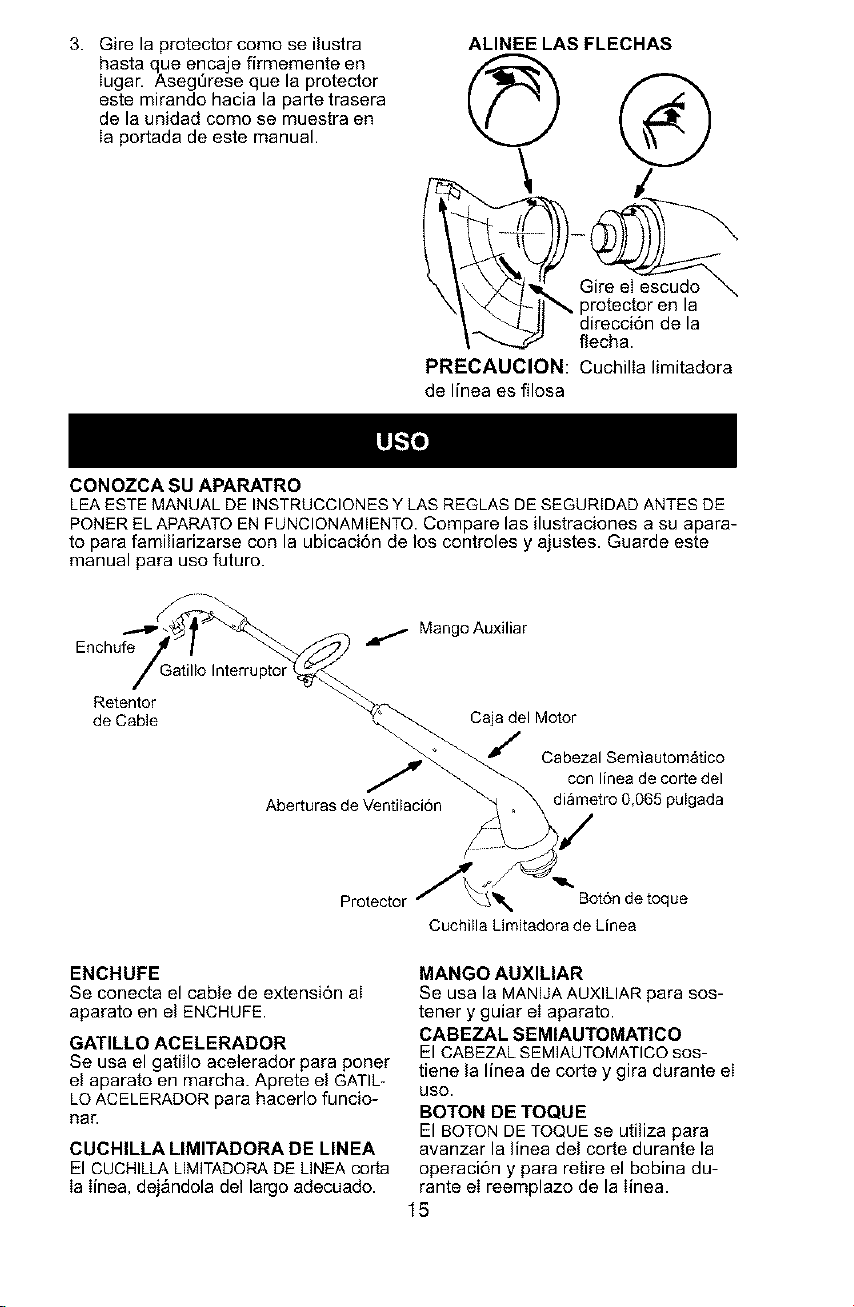
3. Gire la protector como se ilustra
hasta que enca e firmemente en
Iugar. AsegQrese que la protector
este mirando hacia la parte trasera
de la unidad como se muestra en
Ia portada de este manual.
ALINEE LAS FLECHAS
©®
direcci6n de la
flecha.
PRECAUCION: CuchilIa limitadora
de linea es filosa
CONOZCA SU APARATRO
LEA ESTE MANUAL DE INSTRUCCIONES Y LAS REGLAS DE SEGURtDAD ANTES DE
PONER EL APARATO EN FUNCIONAMIENTO. Compare las ilustraciones a su apara-
to para familiarizarse con la ubicaci6n de los controles y ajustes. Guarde este
manual para uso futuro.
Enchufe
Mango Auxiliar
Retentor
de Cable
Aberturas de Ventibaci6n
Caja del Motor
_ Cabezal Semiautom_tico
con linea de corte del
diametro 0_065 pubgada
ENCHUFE
Se conecta el cable de extensi6n aI
aparato en el ENCHUFE.
GATILLO ACELERADOR
Se usa el gatillo acelerador para porter
el aparato en marcha. Aprete el GATIL-
LO ACELERADOR para hacerlo funcio-
Ra£
CUCHILLA LIMITADORA DE LINEA
El CUCHILLA LIMITADORA DE UNEA corta
Ia Iinea, dej_ndola del largo adecuado.
Bot6n de toque
Cuchiila LJmJtadora de Linea
MANGO AUXlLIAR
Se usa la MANIJA AUXILIAR para sos-
tener y guiar eI aparato.
CABEZAL SEMIAUTOMATICO
El CABEZAL SEMIAUTOMATICO sos-
tiene la linea de corte y gira durante eI
USO.
BOTON DE TOQUE
El BOTON DE TOQUE se utiliza para
avanzar la linea del corte durante la
operaci6n y para retire el bobina du-
rante eI reemplazo de la Iinea.
15
USO DEL APARATO
Use exclusivamente el voltaje especifi-
cado en el aparato.
ELIJA UN CABLE DE EXTENSION
Cuadro de Clasificaci6n de Cables
Largo de Cable Clasificaci6n
7,5 rn (25 pies) Calibre 18
15 rn (50 pies) Calibre 16
30 rn (100 pies) Calibre 16
Hay cables de extensi6n disponibles
en Sears para este aparato.
Cable de Extensi6n
(Calibre 16) ............ 71-85708
ENCHUFE EL CABLE DE EXENSION
AL APARATO
Haga una vuelta en eI cable de exten-
si6n, p_sela por la rnanija y al rededor
del gancho. AsegL]rese que el enchufe
y el cable est_n firmernente y fuerte-
rnente conectados.
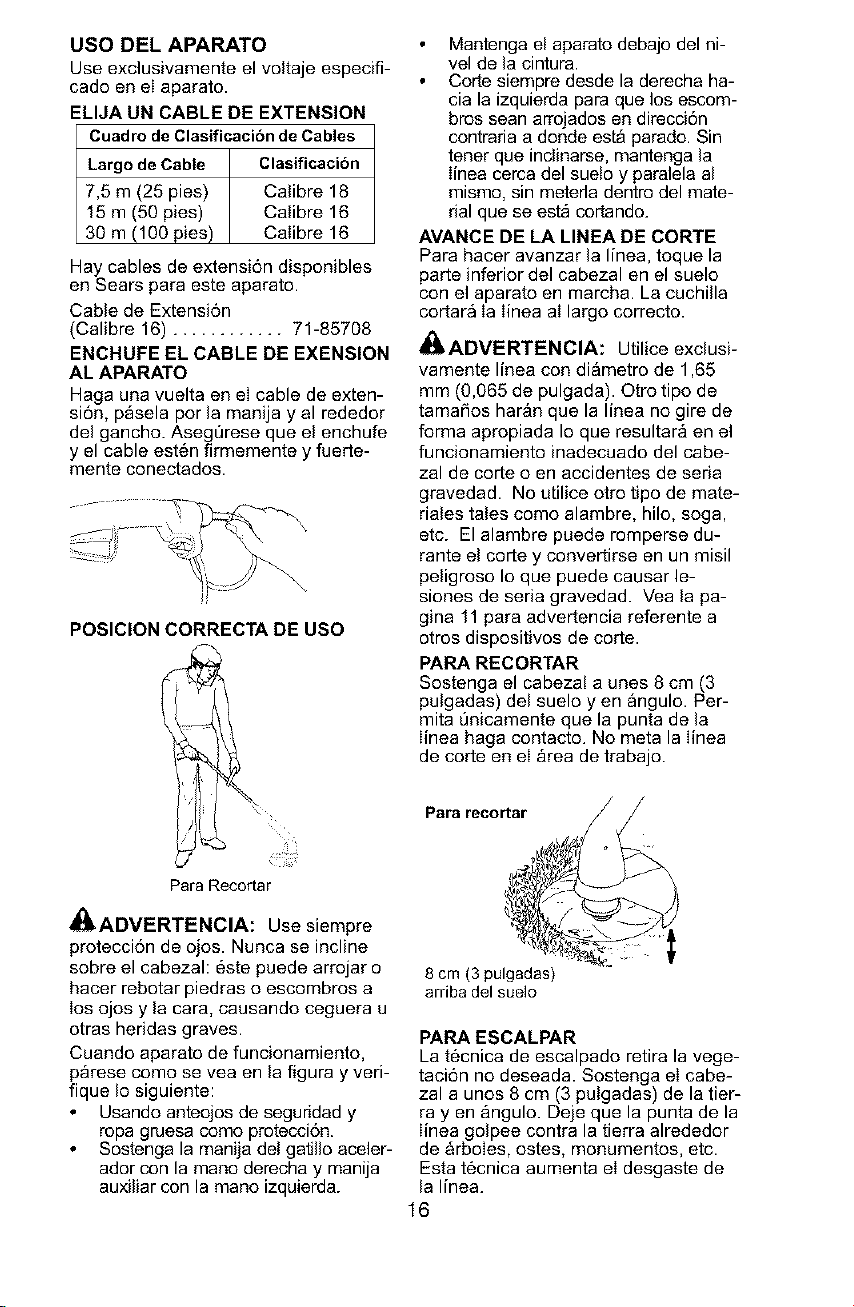
POSICION CORRECTA DE USO
Mantenga el aparato debajo del ni-
vel de la cintura.
Corte siempre desde la derecha ha-
cia la izquierda para que los escorn-
bros sean arrojados en direcci6n
contraria a donde est& parado. Sin
tener que inclinarse, rnantenga la
Iinea cerca del sueto y paralela al
rnisrno, sin rneterla dentro del mate-
rial que se est_ cortando.
AVANCE DE LA LINEA DE CORTE
Para hacer avanzar la linea, toque la
parte inferior del cabezal en el suelo
con el aparato en marcha. La cuchilla
cortar_ Ia Iinea aI largo correcto.
,_IkADVERTENCIA: Utilice exclusi-
vamente linea con di_metro de 1,65
rnm (0,065 de pulgada). Otro tipo de
tamafios har&n que la linea no gire de
forrna apropiada Io que resultar_ en el
funcionamiento inadecuado del cabe-
zal de corte o en accidentes de seria
gravedad. No utilice otto tipo de rnate-
riales tales corno alambre, hilo, soga,
etc. El alarnbre puede romperse du-
rante el corte y convertirse en un misil
peligroso Io que puede causar le-
siones de seria gravedad. Vea la pa-
gina 11 para advertencia referente a
otros dispositivos de corte.
PARA RECORTAR
Sostenga el cabeza! a unes 8 cm (3
pulgadas) del suelo yen _ngulo. Per-
rnita Qnicarnente que la punta de la
Iinea haga contacto. No meta la Iinea
de corte en el &tea de trabajo.
Para Recortar
,_!I_ADVERTENCIA: Use siempre
protecci6n de ojos. Nunca se incline
sobre el cabezal: 6ste puede arrojar o
hacer rebotar piedras o escombros a
los ojos y la cara, causando ceguera u
otras heridas graves.
Cuando aparato de funcionamiento,
p&rese como se vea en la figura y veri-
fique Io siguiente:
Usando anteojos de seguridad y
ropa gruesa como protecci6n.
Sostenga la manija del gatillo aceler-
ador con la mano derecha y manija
auxiliar con la rnano izquierda.
Para recortar
8 cm (3 pulgadas)
arriba del suelo
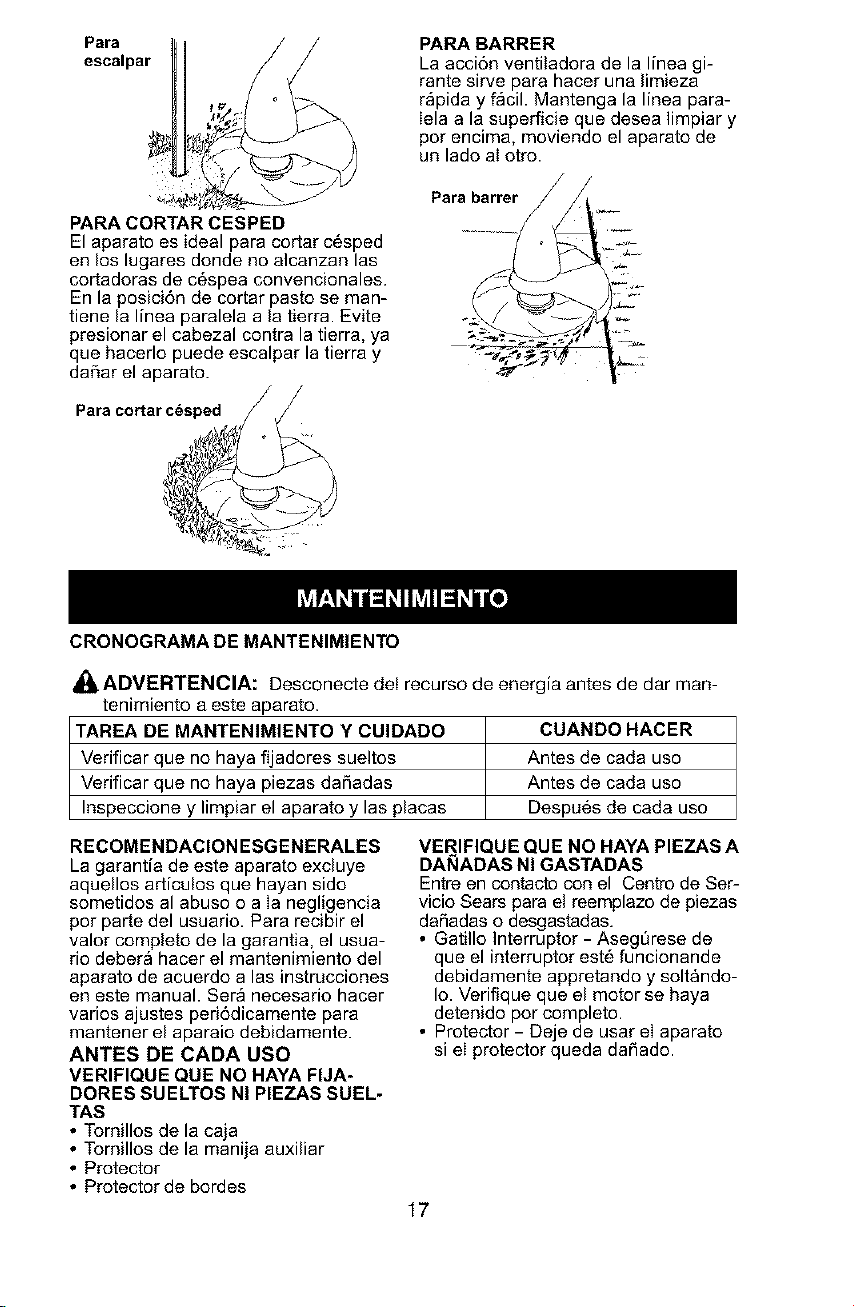
PARA ESCALPAR
La t6cnica de escalpado retira la vege-
taci6n no deseada. Sostenga eI cabe-
zal a unos 8 cm (3 pulgadas) de la tier-
ray en _ngulo. Deje que la punta de la
Iinea golpee contra la tierra alrededor
de _rboIes, ostes, monumentos, etc.
Esta t6cnica aumenta el desgaste de
la line&
16
Para
escalpar
PARA CORTAR CESPED
El aparato es ideal para cortar c6sped
en los lugares donde no alcanzen las
cortadoras de c6spea convencionales.
En le posici6n de cortar pasto se man-
tiene la linea paralele ala tierra. Evite
presionar el cabezal contra la tierre, ye
que hecerlo puede escalper la tierra y
daSer el aparato.
Paraco_arc6sped
PARA BARREn
La acci6n ventiladore de la linea gi-
rante sirve pare hacer una limieze
r_pida y f_cil. Mentenga le linea pare-
Iela ala superficie que desea limpiar y
por encime, moviendo el aparato de
un lado aI otto.
Para barrer
CRONOGRAMA DE MANTENIMIENTO
_1_ ADVERTENCIA: Desconecte det recurso de eeergla antes de dar man-
tenimiento a este aparato.
TAREA DE MANTENIMIENTO Y CUlDADO CUANDO HACER
Verificar que no haya fijadores sueltos Antes de cada uso
Verificar que no haya piezas daSadas Antes de cada uso
Inspeccione y limpiar el aparato y las places Despues de cada uso
RECOMENDACION ESGENERALES
La garantia de este aparato excluye
aquellos articulos que hayan sido
sometidos al abuso o a Ia negligencia
por parte del usuerio. Pare recibir el
valor completo de la gerantia, el usua-
rio deber_ hacer el mantenimiento del
aperato de ecuerdo alas instrucciones
en este manual. Ser& necesario hacer
varios ajustes peri6dicamente pare
mantener el aparaio debidamente.
ANTES DE CADA USO
VERIFIQUE QUE NO HAYA FIJA-
DORES SUELTOS NI PIEZAS SUEL-
TAS
• Tornillos de la caja
• Tornillos de la manija auxiliar
• Protector
• Protector de hordes
VERIFIQUE QUE NO HAYA PIEZAS A
DA_IADAS NI GASTADAS
Entre en contecto con el Centre de Ser-
vicio Sears pare el reemplazo de piezas
daSadas o desgastedes.
• Gatillo Interruptor - Asegt]rese de
que el interruptor est_ funcionande
debidamente eppretando y solt_ndo-
Io. Verifique que el motor se heya
detenido por completo.
• Protector - Deje de user el aparato
si el protector queda daSado.
17
DESPUES DE CADA USO
INSPECCIONE Y LIMPIAR EL APA-
RATO Y LAS PLACAS
• Despu6s de que cada uso, inspec-
cione la aparato completa para saber
si hay piezas flojas o dafiadas. Limpie
el aparato y las placas usando un tra-
po hL]medo con detergente suave.
• Seque el aparato con un trapo Iimpio
y seco.
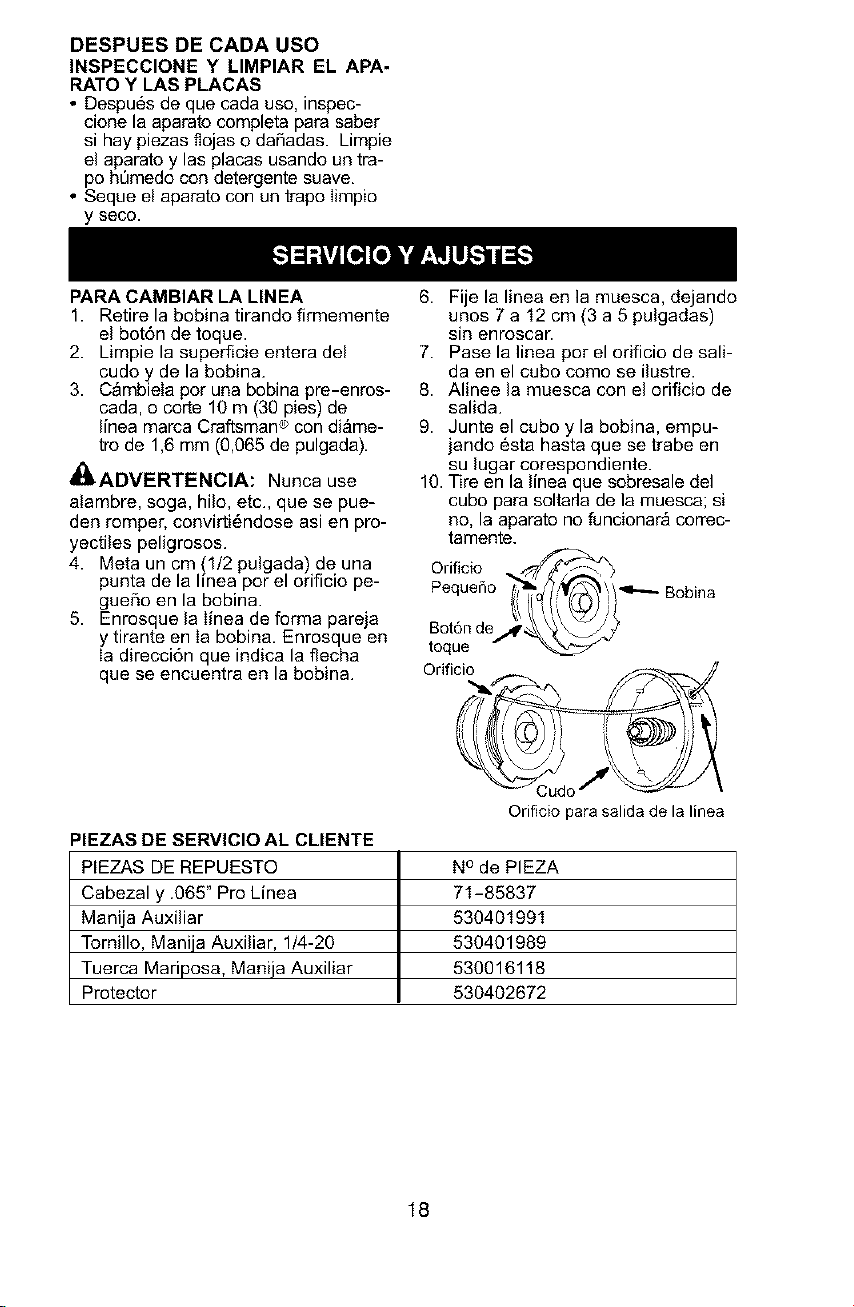
PARA CAMBIAR LA LINEA
1. Retire la bobina tirando firmemente
el bot6n de toque.
2. Limpie la superficie entera del
cudo y de la bobina.
3. C&mbieIa por una bobina pre-enros-
cada, o corte 10 m (30 pies) de
linea marca Craftsman ® con di_me-
tro de 1,6 mm (0,065 de pulgada).
_ADVERTENCIA: Nunca use
alambre, soga, hilo, etc., que se pue-
den romper, convirti_ndose asi en pro-
yectiles peligrosos.
4. Meta un cm (1/2 pulgada) de una
punta de la linea por el orificio pe-
guefio en la bobina.
5. Enrosque la Iinea de forma pareja
y tirante en Ia bobina. Enrosque en
Ia direcci6n que indica la fJecha
que se encuentra en la bobina.
6. Fije la linea en la muesca, dejando
unos 7 a 12 cm (3 a 5 pulgadas)
sin enroscar.
7. Pase la linea por el orificio de sali-
da en el cubo como se ilustre.
8. Alinee la muesca con el orificio de
salida.
9. Junte el cubo y la bobina, empu-
jando 6sta hasta que se trabe en
su lugar corespondiente.
10. Tire en la linea que sobresale del
cubo para soltada de la muesca; si
no, la aparato no funcionar& correc-
tamente.
Orificio _
Peque_o _ Bobina
Bot6n dei_,_ _V_,J
toque
PIEZAS DE SERVIClO AL CLIENTE
PIEZAS DE REPUESTO
Cabezal y .065" Pro Linea
Manija Auxiliar
Tornillo, Maniia Auxiliar, 1/4-20
Tuerca Mariposa, Manija Auxiliar
Protector
Oriflcio para salida de la linea
N° de PIEZA
71-85837
530401991
530401989
530016118
530402672
18
_IbADVERTENCIA: Realice los si-
guientes pasos despu_s de cada uso:
• Pare el motor y desconecte el aparato
de la corriente el6ctrica siempre que
no est_ en uso.
• Cuando cargue el aparato en las man-
os, mantenga el motor apagado.
• Guarde el aparato de modo que el lim-
itador de linea no pueda causar heft-
das.
• Guarde el aparato y el cabIe de exten-
si6n al abrigo de la intemperie, desen-
chufados, en un lugar alto, seco y
fuera del alcance de los niSos.
• Guarde el aparato con todos Ios pro-
tectores en su lugar correspondiente.
Cologue el aparato de modo que
ningQn objeto filoso pueda causar her-
idas accidentaimente.
TABLA DIAGNOSTICA
ADVERTENCIA: Siempre desconecte la unidad antes de hacer cualquiera
de las reparaciones recomendadas que estan listadas siguientemente que
no requieran que la aparato este en operaci6n.
SINTOMA CAUSA SOLUCION
E] cabezal de 1. Se esta metiendo ]a I#/ea 1. Corte con ]a punta de la linea
corte se detiene en el material que se Qnicamente.
bajo carga o no est_ cortando.
gira cuando se 2. Fal]a e]_ctfica. 2. Entre en contacto con el Servicio
apreta el gatillo Sears (yea parte trasera del manual).
interrupto£ 3. Inspeccione la caja de fusibles.
4. Retire los escombros.
La linea no I. Ve6fique ]a trayectoria de la {inea.
ava nza O se
rompe a] cortar.
3. Interruptor de circuito
accionado.
4. Escombros parando el
cabezal.
1. Trayectoria incorrecta de
la linea en e] cabezal.
2. La linea esta enroscada
de forma incorrecta en la
bobina.
3. Diametro incorrecto de la
line&
4. Insuficiencia de linea
afuera del cabezal
6. Acumulaci6n de tierra
tapa.
1. Diametro incorrecto de la
line&
2. Bobina incorrecta.
3. Se esta metiendo la ]inea
en el material que se est_
cortando.
1. Trayectoda incorrecta de
]a linea en el cabeza].
2. Bobina da5ada.
2. Rebobinado nuevamente la linea de
forma pareja y tirante.
3. Uso s6]o linea de] diametro correcto
(0,065 de pulgada/1,65 mm).
4. Retire la tapa y saque 10 cm
(4 pulgadas) de linea hacia afuera.
5. Limpie la tapa.
La linea se I. Uso s6]o linea de] diametro correcto
funde en la (0,065 de pulgada/1,65 mm).
bobina. 2. Uso la bobina apropiada.
3. Corte con la punta de la linea
plenamente extendida.
La linea avanza 1. Verifique la trayectoria de la linea.
col/stantel:qente.
2. Cambie la bobina.
Uso o desgaste 1. Trayectoria incorrecta de 1. Veriflque la trayectoria de la {inea.
excesivo de la la linea en e] cabea].
line& 2. Diametro incorrecto de la 2. Cambie la bobina.
linea.
3. Se esta metiendo la ]inea 3. Corte con la punta de ]a linea
en el material que se plenamente extendida.
esta cortando.
4. Los dientes de ]a bobina 4. Cambie la bobina.
esten gastados o daiiados.
La linea retro- 1. Insuficiencia de linea 1. Retire ]a tapa y saque 10 cm
cede al cabe- afuera del cabezaL (4 pulgadas) de linea hacia afuera.
zal. 2. Diametro incorrecto de 2. Uso s6]o linea de] diametro correcto
la line& (0,065 de pulgada/1,65 ram).
19
