
Leading innovation
UltraHighDefinition4K
TelevisionUser'sGuide:
65L9400U
58L8400U
If you need assistance:
Toshiba's Support Web site support.toshiba.corn
For more information, see "Troubleshooting" on page 173 in this guide.
Owner's Record
The model number and serial number are on the back and side of your television.
Print out this page and write these numbers in the spaces below. Refer to these
numbers whenever you communicate with your Toshiba dealer about this Television.
Model name:
Serial number:
Register your Toshiba Television at register.toshiba.corn
Note: To display a High Definition
picture, the TV must be receiving a
High Definition signal (such as an over-
the-air High Definition TV broadcast, a
High Definition digital cable program,
or a High Definition digital satellite
program). For details, contact your TV
antenna installer, cable provider, or
satellite provider.
GMA300039011
9/14
Downloaded from www.ManualsFile.com manuals search engine
2
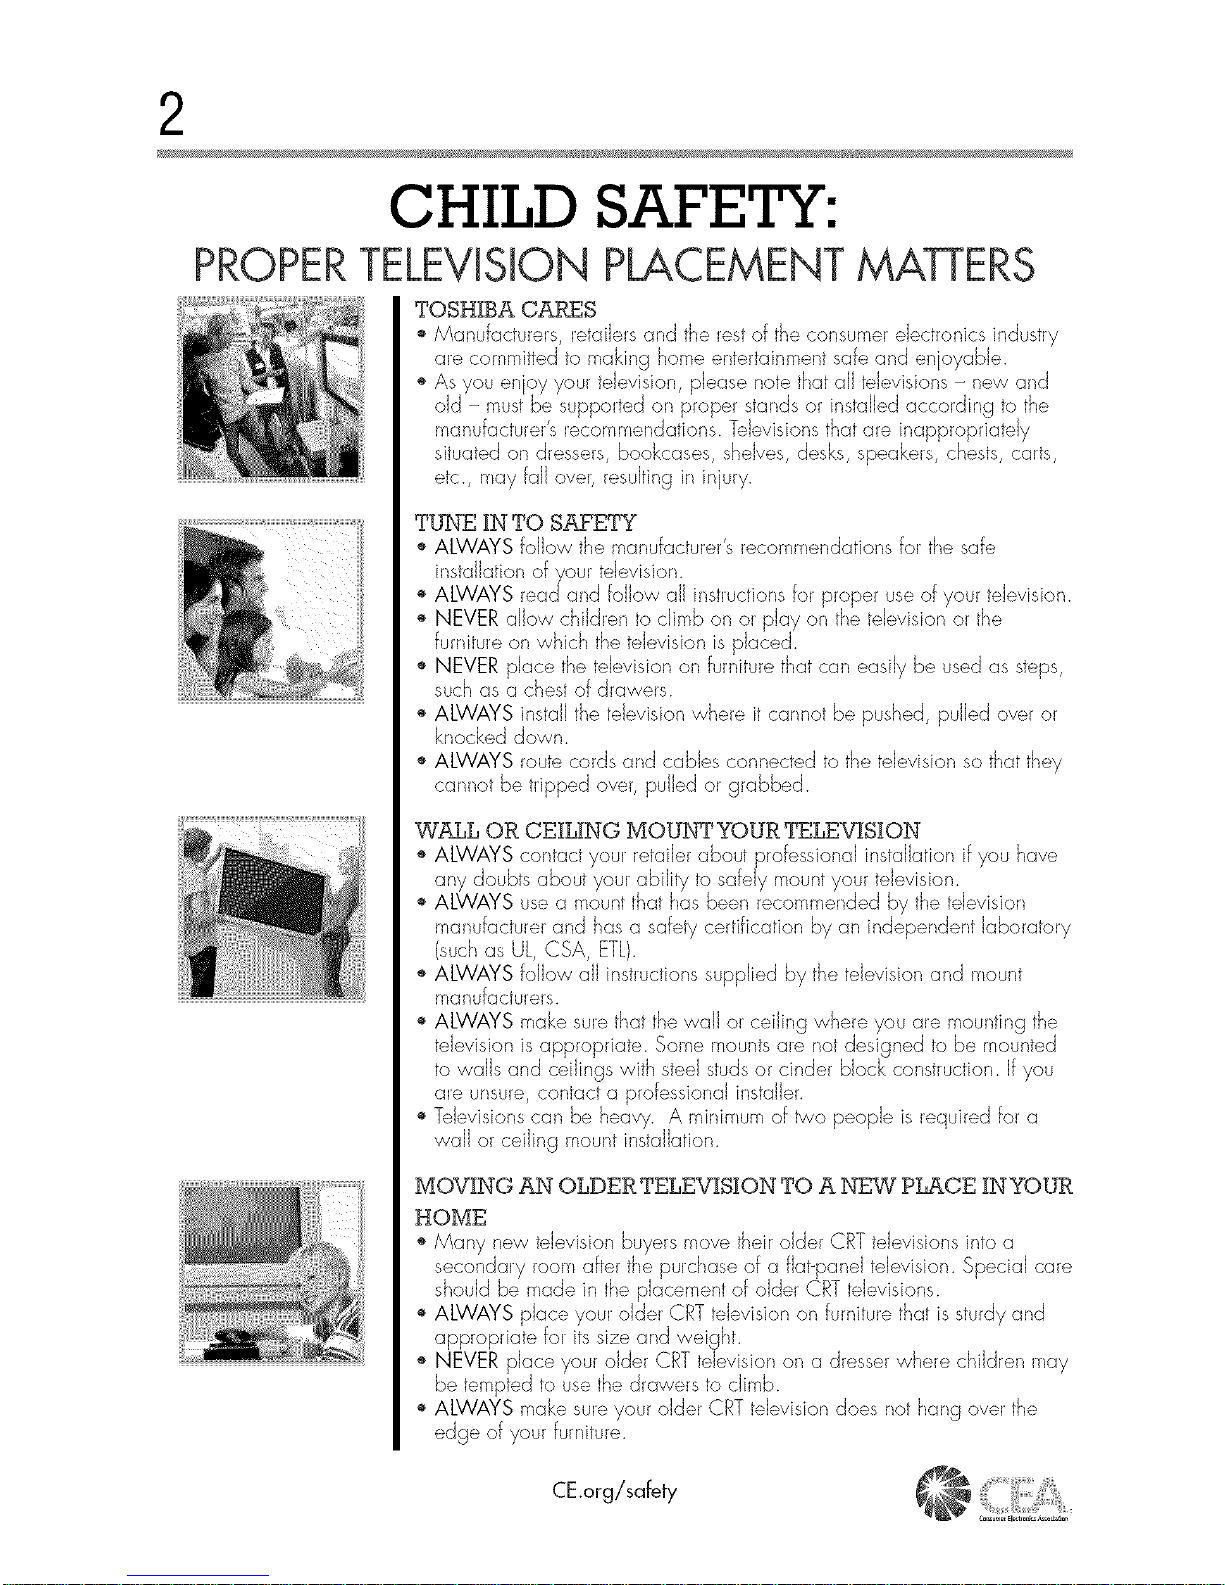
CHILD SAFETY:
PROPERTELEViSiON PLACEMENT MATTERS
TOSHIBA CARES
o Manufacturers, retailers and the restof the consumer electronics industry
are committed to making home entertainment safe and enjoyable.
o As you en oy your television, please note that all televisions - new and
old - must be supported on proper stands or installed according to the
etc., may fall over, resulting in injury.
TUNE IN TO SAFETY
_,ALWAYS follow the manufacturer's recommendations for the safe
installation ofyour television.
_,ALWAYS readand follow all instructions for plopel use of your television.
_, NEVER allow children to climb on or play on the tdevision or the
furniture on which the television is placed.
_, NEVER place the television on furniture that car/easily be used as steps,
such as a chest of drawers.
_,ALWAYS install the television where it cannot be pushed, pulled over or
knocked down.
_,ALWAYS route cords and cables connected to the television so that they
cannot be tripped over, pulled or grabbed.
WALL OR CEILING MOUNTYOUR TELEVISION
_' ALWAYS contact your retailer about professional installation if you have
any doubts about your ability to safely mount your television.
_,ALWAYS use a mount that has been recamrr_ended by the television
manufacturer and has a safety certification by an independent laboratory
(such as UL, CSA, ETL).
_,ALWAYS follow all instructions supplied by the television and mount
manufacturers.
_,ALWAYS make surethat the wall or ceiling where you are mounting the
television is appropriate. Same mounts are not designed to be mounted
to walls and ceilings with steel studsor cinder block construction. If you
are unsure, contact a professional installer.
_,Televisions can be heavy. A minimum of _a people is required for a
wall or ceiling mount ir/staJJatian.
MOVING AN OLDER TELEV]S]ON TO A NEW PLACE IN YOUR
HOME
_,Many new television buyers move their older CRT televisions into a
secondary room after the purchase of a flat-panel television. Special care
should be made ir/the placement of older CRT televisions.
_,ALWAYS place your older CRT television on furniture that is sturdy and
appropriate for itssize and weight.
_, NEVER place youl older CRT television on a dresser where children may
be tempted to use the drawers to climb.
_,ALWAYS make sureyour older CRT television does not hang ovel the
edge of your furniture.
CE.org/safety
e
Downloaded from www.ManualsFile.com manuals search engine
3
Dear Customer,
Thank you for purchasing this Toshiba LED TV.
This document will help you use the many exciting
features of your new LED TV. Before operating your
LED TV, carefully read this document completely.
Safety Precautions
WARNING: TO REDUCE THE RISK OF FIRE
OR ELECTRIC SHOCK, DO NOT EXPOSE THIS
APPLIANCE TO RAIN OR MOISTURE.
WARRING: TO REBUCE THE RISK OF ELECTRIC
SHOCK, OO HOT REMOVE COVER (OR RACK),
HO USER-SERVICEABLE PARTS IHSIOEo REFER
8ERVICIHG TO QUALIFIEO SERVICE PERSONHEL
The lightning flash with arrowhead
symbol, within an equilateral triangle,
is intended to alert the user to the
presence of uninsulated "dangerous
voltage" within the product's
enclosure that may be of sufficient
magnitude to constitute a risk of
electric shock to persons.
The exclamation point within an
equilateral triangle is intended to
alert the user to the presence of
important operating and maintenance
(servicing) instructions in the literature
accompanying the appliance.
WARNING
Improper tocation and installation of a television
can lead to the death of your child. Never place the
television on furniture or in a location where children
can climb up on and tip over the television. Please
refer to the Child Safety information on page 2
and item 26) on page 5 in the Important Safety
Instructions/Installation section.
WARHIHG
To prevent injury, this apparatus must be securely
attached to a sturdy, level, stable surface/wall in
accordance with the installation instructions. See item
26) on page 5.
JWARNING: If you decide to wall mount this
television, always use a mounting bracket that has
been Listed by an independent laboratory (such as
UL, CSA, ETL) and is appropriate for the size and
weight of this television. The use of inappropriate or
non-Listed mounting brackets could result in serious
I bodily injury and/or property damage. See "To Display
your LED TV using a Wail Bracket:" on page 7.
NSTET8 CATVIHSTALLERS
This is a reminder to call the CATV system installer's
attention to Article 820-40 of the U.S. NEC, which
provides guidelines for proper grounding and, in
particular, specifies that the cable ground shall be
connected to the grounding system of the building,
as close to the point of cable entry as practical. For
additional antenna grounding information, see items
33) and 34) on page 6.
Important Safety instructions
1) Read these instructions.
2) Keep these instructions.
3) Heed all warnings.
4) Follow all instructions.
5) Do not use this apparatus near water.
6) Clean only with dry cloth.
7) Do not block any ventilation openings. Install in
accordance with the manufacturer's instructions.
8) Do not install near any heat sources such
as radiators, heat registers, stoves, or other
apparatus (including amplifiers) that produce heat.
9) Do not defeat the safety
purpose of the polarized or
grounding type plug.
A polarized plug has two
blades with one wider than the
other= A grounding type plug
has two blades and a third grounding prong. The
wide blade or the third prong are provided for your
safety= If the provided plug does not fit into your
outlet, consult an electrician for replacement of
the obsolete outlet.
10) Protect the power cord from being walked on
or pinched, particularly at plugs, convenience
receptacles, and the point where they exit from
the apparatus.
11) Only use attachments/accessories specified
by the manufacturer.
12) Use only with the cart, stand,
tripod, bracket, or table specified
by the manufacturer, or sold with
the apparatus. When a cart is
used, use caution when moving the
cart/apparatus combination to avoid injury from
tip-over=
13) Unplug this apparatus during lightning storms
or when unused for long periods of time.
14) Refer all servicing to qualified service
personnel. Servicing is required when the
apparatus has been damaged in any way, such
as power-supply cord or plug is damaged, liquid
has been spilled or objects have fallen into the
apparatus, the apparatus has been exposed to
rain or moisture, does not operate normally, or
has been dropped.
Downloaded from www.ManualsFile.com manuals search engine
4
AdditionalSafetyPrecautions
14a) CAUTION: If the TV is dropped and the cabinet
or enclosure surface has been damaged or the
TV does not operate normally, take the following
precautions:
* ALWAYS turn off the TV and unplug the power
cord to avoid possible electric shock or fire.
* NEVER allow your body to come in contact with
any broken glass or liquid from the damaged
television. The LCD panel inside the TV contains
glass and a toxic liquid. If the liquid comes in
contact with your mouth or eyes, or your skin
is cut by broken glass, rinse the affected area
thoroughly with water and contact your doctor
immediately.
* ALWAYS contact a service technician to inspect
the TV any time it has been damaged or
dropped.
15) CAUTION:
* To reduce the risk of electric shock, do not
use the polarized plug with an extension cord,
receptacle, or other outlet unless the blades
can be inserted completely to prevent blade
exposure.
* To prevent electric shock, match wide biade of
plug to wide slot; fuliy insert.
16) CAUTION:
* Do not tet children swallow any small parts
included on or with the product or play with the
plastic bag. Keep the small parts and the plastic
bag out of the reach of children.
17) CAUTmON:
* Do not tet water or other liquids come into
contact with the product, as it may result in
damage.
18) WARNING:
* To prevent the spread of fire, keep candies or
other open flames away from this product at all
times.
* Keep the product away from direct sunlight, fire
or a heat source such as a heater. This may
reduce the product lifetime or result in fire.
Installation, Care,and Service
InstaJJation
Foilow these recommendations and precautions and
heed all warnings when installing your TV:
19) WARNmNG: NEVER expose batteries
to excessive heat such as sunshine,
fire etc.
20)ALWAYS piug the product into an outlet that is
located in such a manner that it can be easiiy
unplugged in case the product requires service.
21) NEVER route the product's power cord inside a
walt or similar enclosed area.
22) Never modify this equipment. Changes or
modifications may void: a) the warranty, and b)
the user's authority to operate this equipment
under the rules of the Federal Communications
Commission.
23) DANGER: RISK OF
SERIOUS PERSONAL
INJURY, DEATH, OR
EQUIPMENT DAMAGE
Never place the TV on an unstable
cart, stand, or table. The TV may falI, causing
serious personal injury, death, or serious damage
to the TV.
24)When selecting a location for the TV,
* NEVER ailow any part of the TV to hang over
the edge of the supporting furniture,
* NEVER place the TV on tall furniture (for
example, entertainment centers or bookcases)
without anchoring both the furniture and the TV
to a suitable support,
* Never piace cloth or other material between the
TV and the supporting furniture.
* NEVER ailow children to climb on the TV.
25) To avoid damage to this product, never place or
store the TV in direct sunlight; hot, humid areas;
or areas subject to excessive dust or vibration.
Downloaded from www.ManualsFile.com manuals search engine
5
26)
L9480USeries:
Always place the TV on a sturdy, level, stable
surface that can support the weight of the unit.
Secure the TV using one of the following methods:
(1) Secure the TV with a sturdy strap to a wall
stud, pillar, or other immovable structure. When
connecting the strap:
• attach the strap to the TV using the hooks on
the back of the TV, the clips on the pedestal, or
the hote in the base of the pedestal as available.
• make sure the strap is tight, secure, and parallel
to the floor.
Sturdy strap
(as short as possible)
TV Side TV Top
(2) Secure the TV using the pedestal mounting
screws holes or the fail-prevention band.
• Place the TV on a sturdy surface that has
sufficient thickness and screw the pedestal or
band onto the surface.
• If secured to furniture or other movable objects,
the furniture must be secured to an immovable
object using the method shown in item (1)
above.
TV Bac_ Mounting screws (large)
Screw holes
When using one fall-prevention band
TV Bac_
Mounting screw
(small)
Viounting screw
(large)
Fall-prevention band
When using two fall-prevention bands
TVBack
Remove the screws and clips.
oAIthough the clips will not be used, do
not dispose of them, and keep them in a
safe place.
Fall-prevention band
Secure the
fall-prevention band
to the pedestal
usingthe screws
removed above.
Mounting screws
(large)
Fall-prevention band
L848OUSeries:
Always place the TV on a sturdy, level, stable
surface that can support the weight of the unit.
Secure the TV using the following method:
Secure the TV with a sturdy strap to a wall
stud, pillar, or other immovable structure. When
connecting the strap:
• attach the strap to the TV using the hooks on
the back of the TV, the clips on the pedestal, or
the hote in the base of the pedestal as available.
• make sure the strap is tight, secure, and parallel
to the floor.
Sturdy strap
(as short as possible)
TV Side TV Top
Downloaded from www.ManualsFile.com manuals search engine
6
27) The apparatus shalt not be exposed to dripping or
splashing, and that no objects filled with liquids,
such as vases, shalt be placed on the apparatus.
28) Never block or cover the slots or openings in the
TV cabinet back, bottom, and sides. Never place
the TV:
• on a bed, sofa, rug, or similar surface;
• too close to drapes, curtains, or walls; or
• in a confined space such as a bookcase, built-in
cabinet, or any other place with poor ventilation.
29) Always leave a space of at least 4 (four) inches
around the TV. The slots and openings are
provided to protect the TV from overheating and
to help maintain reliable operation of the TV.
30) Never allow anything to rest on or roll over the
power cord, and never place the TV where the
power cord is subject to wear or abuse.
31) Never overload walt outlets and extension cords.
32) Always operate this equipment from a 120V AC,
60 Hz power source.
33)Always make sure the antenna system is properly
grounded to provide adequate protection against
voltage surges and built-up static charges (see
Section 810 of the National Electric Code).
34)
• When installing a rooftop antenna, use extreme
care to make sure you are never in a position
where your body (or any item you are in contact
with, such as a ladder or screwdriver) can
accidentally touch overhead power lines.
Never locate the antenna near overhead power
lines or other electrical circuits.
• Never attempt to install any of the following
during lightning activity: a) an antenna system;
or b) cables, wires, or any home theater
component connected to an antenna or phone
system.
Care
For better performance and safer operation of your
TOSHIBA TV, follow these recommendations and
precautions:
35) If you use the TV in a room where the temperature
is 32 ° F (0° C) or below, the picture brightness
may vary until the LCD warms up. This is not a
sign of malfunction.
36) WARNING: RISK OF SERIOUS
PERSONAL INJURY OR EQUIPMENT
DAMAGE!
• Never use chemicals (such as air fresheners,
cleaning agents, etc.) on or near the TV
pedestal. Studies indicate that plastics may
weaken and crack over time from the combined
effects of chemical agents and mechanical
stress (such as the weight of the TV). Failure to
follow these instructions could result in serious
injury and/or permanent damage to TV and TV
pedestal.
• Always unplug the TV before cleaning. Gently
wipe the display panel surface (the TV screen)
using a dry, soft cloth (cotton, flannel, etc.).
A hard cloth may damage the surface of the
panel. Avoid contact with alcohol, thinner,
benzene, acidic or alkaline solvent cleaners,
abrasive cleaners, or chemical cloths, which
may damage the surface. Never spray volatile
compounds such as insecticide on the cabinet.
Such products may damage or discolor the
cabinet.
37) Never hit, press, or place anything on the back
cover. These actions witl damage internal parts.
38)
WARNING:
RiSK OF ELECTR|C SHOCK!
Never spilt liquids or push objects of ally kind into
the TV cabinet slots.
39) During a lightning storm, do not touch the
connecting cables or product.
40) For added protection of your TV from lightning and
power surges, always unplug the power cord and
disconnect the antenna from the TV if you leave
the TV unattended or unused for long periods of
time.
41)Always unplug the TV to completely disconnect
from mains power. When the TV is turned off
using the on/off switch, it is not completely
disconnected from power and a minute amount of
current is still consumed.
42) During normal use, the TV may make occasional
snapping or popping sounds. This is normal,
especially when the unit is being turned on or off.
If these sounds become frequent or continuous,
unplug the power cord and contact a Toshiba
Authorized Service Provider.
Downloaded from www.ManualsFile.com manuals search engine
7
43) WARNING: RiSK OF SERIOUS
PERSONAL INJURY OR EQUIPMENT
DAMAGE!
Never strike the screen with a sharp or heavy
object.
44). The LCD screen of this product can be damaged
by ultraviolet radiation from the sun. When
selecting a location for the television, avoid
locations where the screen may be exposed to
direct sunlight, such as in front of a window.
* Never touch, press, or place anything on the
LCD screen. These actions will damage the
LCD screen. If you need to clean the LCD
screen follow the instructions in item 36) on
page 6.
Service
45)
WARNING:
RISK OF ELECTRIC SHOCK!
Never attempt to service the TV yourself. Opening
and removing the covers may expose you to
dangerous voltage or other hazards. Failure
to follow this WARNING may result in death or
serious injury. Refer atl servicing not specified
in this manual to a Toshiba Authorized Service
Provider.
46) If you have the TV serviced:
* Ask the service technician to use only
replacement parts specified by the manufacturer.
* Upon completion of service, ask the service
technician to perform routine safety checks
to determine that the TV is in safe operating
condition.
Choosinga location for yourLEDTV
To Display your LED TV on the included Pedestal
Stand:
Observe the following safety precautions:
1) Read and follow the pedestal stand assembly
instructions included with the pedestal.
CAUTION: Before beginning pedestal assembly,
carefully lay the front of the LCD Panel face down
on a flat, cushioned surface such as a quilt or
blanket. Leave the bottom of the unit protruding
over the edge of the surface and assemble the
pedestal as in the Quick Start Guide.
Note: Extreme care should always be used when
attaching the pedestal stand to avoid damage to
the LCD panel.
2) Place the TV on a sturdy, level surface that can
support the weight of the TV.
3) Be sure to secure the TV to a walt, pillar, surface,
or other immovable structure see item 26) on
page 5 for additional detaits.
To BispJay yoor LEDTV nsiog a WaJJ Bracket:
If you decide to wail mount your LED TV, always use
a wall bracket Listed by an independent laboratory
(such as UL, CSA, ETL) that is appropriate for the
size and weight of the TV:
CAUTION: Two or more people are required for
installation.
1) Unplug and remove any cables and/or other
component connectors from the rear of the TV.
2) Remove the screws of the VESA Mounting
Pattern shown in the tabte, if applicable.
CAUTION: Do not use the screws removed from
the back cover to attach the wail mount bracket to
the TV.
3) Always use the screws supplied or recommended
by the wail mount manufacturer.
4) Follow the instructions provided with your wail
bracket. Before proceeding, make sure the
appropriate bracket(s) are attached to the wail and
the back of the TV as described in the instructions
provided with the wail bracket.
5) After attaching the appropriate bracket(s) to the
walt and the back of the TV, remove the pedestat
stand from the TV, as described in this instruction
document.
6) VESA Mounting Pattern
65" (L9400U) 400x400 mm M6
58" (L8400U) 400x400 mm M8
Downloaded from www.ManualsFile.com manuals search engine
8
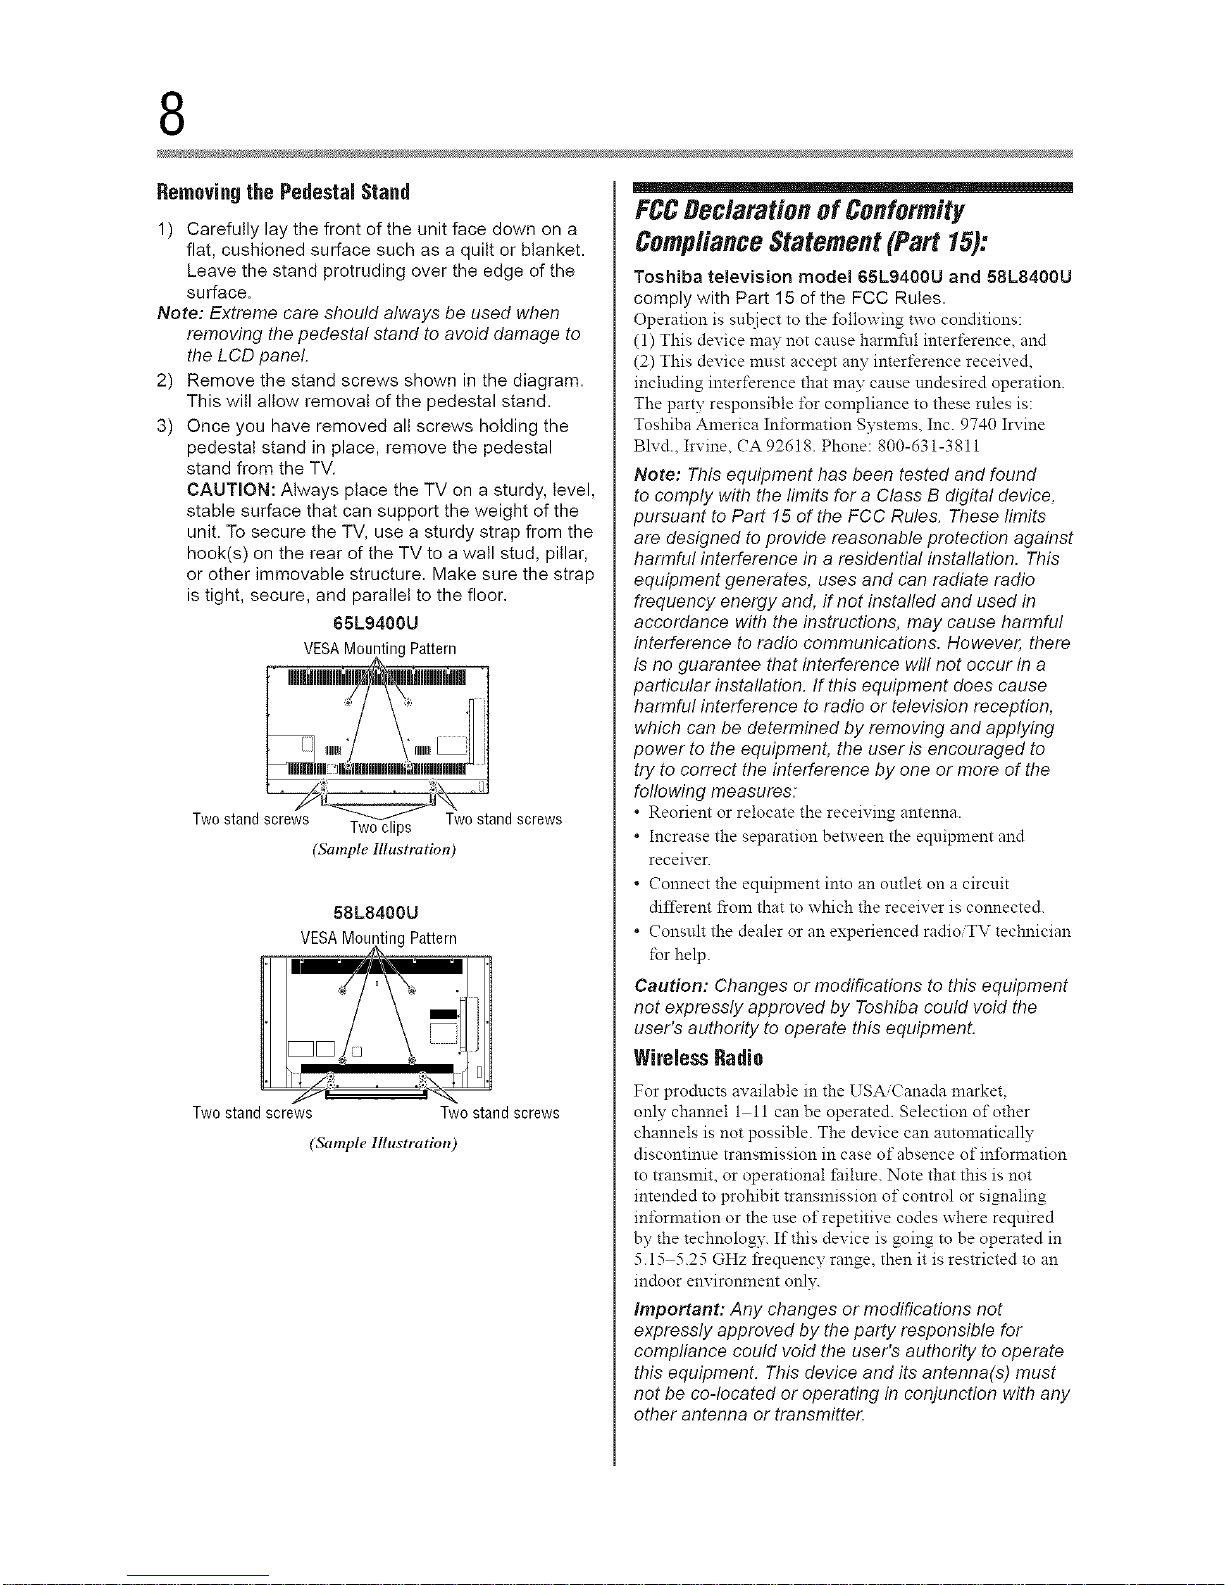
RemovingthePedestalStand
1) Carefully lay the front of the unit face down on a
flat, cushioned surface such as a quilt or blanket.
Leave the stand protruding over the edge of the
surface.
Note: Extreme care should always be used when
removing the pedestal stand to avoid damage to
the LCD panel.
2) Remove the stand screws shown in the diagram.
This will allow removal of the pedestal stand.
3) Once you have removed all screws holding the
pedestal stand in place, remove the pedestal
stand from the TV.
CAUTION: Always place the TV on a sturdy, level,
stable surface that can support the weight of the
unit. To secure the TV, use a sturdy strap from the
hook(s) on the rear of the TV to a wall stud, pillar,
or other immovable structure. Make sure the strap
is tight, secure, and parallel to the floor.
65L9400U
VEgAMountingPattern
......Hi
Twostand screws _-_'__w0//\\ stand screws
Twoclips
(Sample Illustration)
58L8400U
VESAMounting Pattern
Two stand screws Two stand screws
(Sample Illustration)
FCCBec/aration of Conformity
Compliance Statement(Part 15):
Toshiba television model 65L9400U and 58L8400U
comply with Part 15 of the FCC Rules.
Operation is subject to the _bllowing two conditions:
(1) This device may not cause harmflfl interference, and
(2) This device must accept any interference received,
including imerf_rence that may cause undesired operation.
The party responsible for compliance to these rules is:
Toshiba America In_brmation Systems, Inc. 9740 Irvine
Blvd., Irvine, CA 92618. Phone: 800-d31-3811
Note: This equipment has been tested and found
to comply with the limits for a Class B digital device,
pursuant to Part 15 of the FCC Rules. These limits
are designed to provide reasonable protection against
harmful interference in a residential installation. This
equipment generates, uses and can radiate radio
frequency energy and, if not installed and used in
accordance with the instructions, may cause harmful
interference to radio communications. However, there
is no guarantee that interference will not occur in a
particular instaflation. If this equipment does cause
harmful interference to radio or television reception,
which can be determined by removing and applying
power to the equipment, the user is encouraged to
try to correct the interference by one or more of the
following measures:
Reorient or relocate the receiving antenna.
. Increase the separation between the equipment and
receiver.
. Connect the equipment imo an outlet on a circuit
diIt?rem from that to which the receiver is connected.
. Consult the dealer or an experienced radioiTV technician
tbr help.
Caution: Changes or modifications to this equipment
not expressly approved by Toshiba could void the
user's authodty to operate this equipment.
WirelessRadio
For products availabie in the USA Canada market,
only channel 1 ll can be operated. Selection of other
channels is not possible. The device can automatically
discontinue transmission in case of absence of infbrmation
to transmit, or operational Ihilure. Note that this is not
intended to prohibit transmission of control or signaling
inlbrmation or the use of repetitive codes where required
by the technology. If this device is going to be operated in
5.15 5.25 GHz fl'equency range, then it is restricted to an
indoor environment only.
important: Any changes or modifications not
expressly approved by the party responsible for
compliance could void the user's authority to operate
this equipment. This device and its antenna(s) must
not be co-located or operating in conjunction with any
other antenna or transmitten
Downloaded from www.ManualsFile.com manuals search engine
9
FCC Radiation Exposure Statement: This equipment
complies witi_ FCC radiation exposure limits set forth
for an uncontrolled environment. This equipment
should be installed and operated with minimum
distance 20cm between the radiator & your body
importantnotesabout yourTV
The following symptoms are technical limitations of
LCD Display technology and are not an indication of
malfunction; therefore, Toshiba is not responsible for
perceived issuesresulting from these symptoms.
1) All afterimage (ghost) may appear on the screen
if a fixed, non-moving image appears for a long
period of time. The afterimage is not permanent
and wilt disappear in a short period of time.
2) The LCD panel contained in this TV is
manufactured using an extremely high level
of precision technology; however, there may
be an occasional pixet (dot of light) that does
not operate properly (does not light, remains
constantly lit, etc.). This is a structural property of
LCD technology, is not a sign of malfunction, and
is not covered under your warranty. Such pixels
are not visible when the picture is viewed from a
normal viewing distance.
Note: Interactive video games ti_at involve shooting a
"gun" type ofjoystick at an on-screen target may not
work with this TE
To ensure protection of your personal data, Toshiba
recommends that you reset atl TV settings when
you recycle your TV or transfer to others= To reset
your TV, please access via menu settings, selecting
"Reset TV". See "Resetting to Factory Defaults" on
page 100 for further details.
TrademarkInformation
. AutoView, ClearScan, ColorMaster, CotorStream,
CQ Engine, DynaLight, GameTimer, Native Mode,
PixelPure, Quantum Black, Sonic Separation,
TheaterWide, and TosLink are trademarks
or registered trademarks of Toshiba America
Information Systems, Inc., and/or Toshiba
Corporation.
. ActiveX is a registered trademark of the Microsoft
Corporation.
. Android, Google Play, and YouTube are trademarks
of Google Inc.
. Apple, iPhone, and iTunes are trademarks of Apple
Inc., registered in the U.S. and other countries.
. Btu-ray Disc TM, Blu-ray TM, and the Iogos are
trademarks of the Blu-ray Disc Association.
. DivX ®,DivX Certified ®, DivX Plus _ HD and
associated loges are trademarks of Rovi
Corporation or its subsidiaries and are used under
license.
Covered by one or more of the following U.S.
patents:
7,295,673; 7,460,668; 7,515,710; 7,519,274
rrIDOLB'_ " Manufactured under license from
DiGiTAL PLUS
Dotby Laboratories. Dotby and the
double-D symbol are trademarks of
Dotby Laboratories.
_;z d_l_ _ . For DTS patents, see http://patents.
P_,,,_,,,s00,,_dts.com. Manufactured under license
from DTS Licensing Limited.
DTS, the Symbol, & DTS and the
Symbol together are registered
trademarks, and DTS Premium
Sound is a trademark of DTS, Inc.
© DTS, inc. All Rights Reserved.
. The terms HDMI and HDMI High-Definition
Multimedia Interface, and the HDMI logo are
trademarks or registered trademarks of HDMI
Licensing LLC in the United States and other
countries.
. Intel and the InteI logo are trademarks of Intel
Corporation in the U.S. and/or other countries.
, MPEG Layer-3 audio coding technology licensed
from Fraunhofer IIS and Thomson.
. Netflix is a registered trademark of Netflix, Inc.
. Designed with UEI Technology TM, Under License
from Universal Electronics Inc.
Portions © UE] 2010-2014.
. VUDU TM, and VUDU TM Movies & TV are trademarks
or registered trademarks of VUDU, Inc.
, Wi-Fi is a registered trademark of the Wi-Fi
Alliance _.
. Atl other brand and product names are trademarks
or registered trademarks of their respective
companies.
. THIS PRODUCT IS LICENSED UNDER THE
AVC PATENT PORTFOLIO LICENSE FOR THE
PERSONALAND NONCOMMERCIAL USE
OF A CONSUMER TO (i) ENCODE VIDEO IN
COMPLIANCE WITH THE AVC STANDARD
("AVC VIDEO") AND/OR (ii) DECODE AVC
VIDEO THAT WAS ENCODED BY A CONSUMER
ENGAGED IN A PERSONALAND NON-
COMMERCIAL ACTIVITY AND/OR WAS
OBTAINED FROM AVIDEO PROVIDER LICENSED
TO PROVIDE AVC VIDEO. NO LICENSE IS
GRANTED OR SHALL BE IMPLIED FORANY
OTHER USE=ADDITIONAL INFORMATION MAY
BE OBTAINED FROM MPEG LA, LLC. SEE
HTTP://WWW.MPEGLA.COM
. THIS PRODUCT IS LICENSED UNDER THE
VC-1 PATENT PORTFOLIO LICENSE FOR
THE PERSONALAND NONCOMMERCIAL USE
Downloaded from www.ManualsFile.com manuals search engine
10
OF A CONSUMER TO (i) ENCODE VIDEO IN
COMPLIANCE WITH THE VC-1 STANDARD
("VC-1 VIDEO") AND/OR (ii) DECODE VC-I
VIDEO THAT WAS ENCODED BYA CONSUMER
ENGAGED IN A PERSONALAND NON-
COMMERCIAL ACTIVITY AND/OR WAS
OBTAINED FROM AVIDEO PROVIDER LICENSED
TO PROVIDE VC-1 VIDEO. NO LICENSE IS
GRANTED OR SHALL BE IMPLIED FOR ANY
OTHER USE. ADDITIONAL INFORMATION MAY
BE OBTAINED FROM MPEG LA, LLC. SEE
HTTP://WWW.MPEGLA.COM
" THIS PRODUCT IS LICENSED UNDER THE
MPEG-4 VISUAL PATENT PORTFOLIO LICENSE
FOR THE PERSONALAND NON-COMMERCIAL
USE OF A CONSUMER FOR (i) ENCODING
VIDEO IN COMPLIANCE WITH THE MPEG-4
VISUAL STANDARD ("MPEG-4 VIDEO")AND/
OR (ii) DECODING MPEG-4 VIDEO THAT WAS
ENCODED BY A CONSUMER ENGAGED IN A
PERSONAL AND NON-COMMERCIAL ACTIVITY
AND/OR WAS OBTAINED FROM A VIDEO
PROVIDER LICENSED BY MPEG LATO PROVIDE
MPEG-4 VIDEO. NO LICENSE IS GRANTED
OR SHALL BE IMPLIED FOR ANY OTHER USE.
ADDITIONAL INFORMATION INCLUDING THAT
RELATING TO PROMOTIONAL,INTERNALAND
COMMERCIAL USES AND LICENSING MAY BE
OBTAINED FROM MPEG powered LA,LLC. SEE
HTTP://WWWMPEGLA.COM
Copyright
_! 2014 bv Toshiba America In_Lrmation Systems, Inc.
All rights reserved. Under the copyright laws, this guide
caunot be reproduced in any _Brn: without the prior written
permission of Toshiba. No patent liability is ass:uned,
however, with respect to the use of the intbrmation
contained herein.
m_
Notice
The information contaiued in this manual, iucluding but not
limited to any product specifications, is su{zject to change
without notice.
TOSHIBA AMERICA INFOR_IATION SYSTEMS,
INC. AND TOSHIBA OF CANADA LIMITED
(COLLECTIVELY TOSHIBA) PROVIDES
NO WARRANTY WITH REGARD TO THIS
MANUAL OR ANY OTHER INFORMATION
CONTAINED HEREIN AND HEREBY EXPRESSLY
DISCLAIMS ANY IMPLIED WARRANTIES OF
MERCHANTABILITY OR FITNESS FOR ANY
PARTICULAR P[ RPOSE WITH REGARD TO
ANY OF THE FOREGOING. TOSHIBA ASSUMES
NO LIABILITY FOR ANY DAMAGES INCURRED
DIRECTLY OR INDIRECTLY FROM ANY
TECHNICAL OR TYPOGRAPHICAL ERRORS
OR OMISSIONS CONTAINED HEREIN OR FOR
DISCREPANCIES BETWEEN THE PROD[ CT
AND THE MAN{ AL. IN NO EVENT SHALL
TOSHIBA BE LIABLE FOR ANY INCIDENTAL,
CONSEQ{ ENTIAL, SPECIAL, OR EXEMPLARY
DAMAGES, WHETHER BASED ON TORT,
CONTRACT OR OTHER_¥ISE, ARISING OUT
OF OR IN CONNECTION WITH THIS MAN{ AL
OR ANY OTHER INFORMATION CONTAINED
HEREIN OR THE USE THEREOF.
Downloaded from www.ManualsFile.com manuals search engine
Contents
Chapter 1 Introduction ................................................... 19
Safetyicons...............................................................19
Features....................................................................20
Overviewof installation,setup,and use....................22
TVfront andside panelcontrols and connections.....24
Frontpanel..........................................................24
Left side...............................................................25
TV backpanelcontrols andconnections...................25
Backpanelcontrols .............................................26
Backpanelconnections.......................................27
Chapter2: ConnectingYourTV.......................................28
Overviewof cabletypes.............................................28
Coaxialcable(F-type)........................................ 28
StandardAVcables(red/white/yellow).............. 28
Componentvideo cables(red/green/blue)......... 29
HDMI®cable (with HDMI®Logo)....................... 29
Dual-wandIRblastercable................................ 29
Opticalaudiocable............................................ 30
Analog RGB(15-pin)computer cable................ 30
LANcable............................................................30
Aboutthe connection illustrations.......................31
11
Downloaded from www.ManualsFile.com manuals search engine
2 Contents
Chapter 3:
Connectinganantenna,satellitereceiver,and/or cable
TV box................................................................31
Connectinga Blu-rayTM/DVDplayerwith
ColorStreamTM or aVCRwith compositevideo...33
Connectingremote IRdevices...................................35
Usingthe IR blasterOUTterminal .......................35
Connectingadigital audiosystem.............................38
Connectingan HDMI®device....................................39
Usingthe TV remoteand HDMI®CECControlto
control otherdevices..........................................41
Connectingan HDMI®audiosystem.........................42
Connectingacomputer.............................................44
Connectingacomputerto the TV'sPCIN
terminal..........................................................44
Connecta computerto the TV'sHDMI®
terminal..........................................................46
Connectingto a home network.............................. 47
Connectingthe TVdirectlyto acomputer
without an Internetconnection ................. 47
Connectingthe TVto ahome networkwithout an
Internetconnection.................................... 48
Connectingthe TVto ahome networkwith an
Internetconnection- wired........................ 49
Connectingthe TVto ahome networkwith an
Internetconnection- wireless.................... 51
Attachingthe cablecover
(onlyfor L9400USeries)................................ 52
Using the Remote Control .............................. 53
Controlling otherdevices..........................................53
Installing batteries.....................................................53
Remotecontrol effectiverange.................................55
Learningaboutthe remotecontrol............................56
Downloaded from www.ManualsFile.com manuals search engine
Chapter4: Initial Setup and Menu ................................... 58
Initial setup...............................................................58
Performingthe initial setup.................................59
Navigatingthe menusystem...............................70
QuickMenu.........................................................71
Chapter5:
Chapter6:
Settingupyour TV.........................................72
Howto navigatethe menu.........................................72
Changinginitialsettings ......................................72
Individual settings...............................................72
Storingchannelsin memory (optional) ...............74
Skippingchannels...............................................76
Skippingvideo inputs..........................................76
LabelinganalogTVchannels...............................77
Labelingvideo inputs...........................................77
Basic features ................................................. 78
Tuning Channels........................................................78
Tuningto the nextprogrammedchannel.............78
Tuningto aspecific channel(programmedor
unprogrammed)........................................... 78
UsingChannelReturn.....................
Selectingthe video inputto view..........
Usingclosedcaptions..........................
AnalogCOmode.............................
Digital CCsettings..........................
Settingthe PINcode............................
Enteringa newPINcode................
Changingor deletingyour PINcode
ForgottenPINcode.........................
Usingparentalcontrols .............................................84
BlockingTVprograms and moviesby rating
(V-Chip).........................................................84
Downloadingan additionalrating system............84
Displayingratings................................................87
Unlockingprograms............................................87
................. 78
................. 79
................. 80
................. 80
................. 81
................. 82
................. 82
................. 83
................. 83
Downloaded from www.ManualsFile.com manuals search engine
4 Contents
Lockingspecificchannels....................................
Lockingvideo inputs ......................................
Settingatime limit for games.........................
Lockingthe control panel...............................
UsingHDMI®CECControl....................................
Controlling HDMI®CECplaybackdevices.......
HDMI®CECControl input sourceselection.....
Adjusting the amplifier's audio.......................
OtherHDMI®CECControlfunctions...............
Viewingthe HDMI®signal information ................
Changingthe HDMI®Input Mode.......................
Usingyour computerwith the TV.......................
Adjusting the image......................................
Settingthe timer to turn onthe TV.....................
Settingthe sleeptimer .......................................
SettingNoSignalPowerDown..........................
SettingActiveStandbyMode.............................
SettingWakeon LANStandbyMode..................
DisplayingTVstatus information .......................
Viewing support information..............................
...87
...88
...88
...89
...89
...90
...91
...91
...92
...93
...93
...94
...94
...95
...96
...97
...97
...98
...99
...99
Resettingto FactoryDefaults..................................100
Powerfailure...........................................................100
Chapter7:
PictureandSoundControls.........................101
Selectingthe picturesize.........................................101
Scrollingthe picture................................................106
Usingthe Auto Aspectfeature.................................106
Usingthe 4:3 Stretch..............................................107
Adjusting the picture...............................................107
Selectingthe picture mode................................107
Adjusting the picture quality..............................108
Usingthe advancedpicturesettingsfeatures..........109
EdgeEnhancer...................................................109
DynamicContrast..............................................109
DynaLigWM.......................................................110
ClearScanTM .......................................................110
Downloaded from www.ManualsFile.com manuals search engine
MPEGNR..........................................................111
DNR(DynamicNoiseReduction)......................111
AmbientLightSensor........................................112
ColorMasterTM ....................................................112
BaseColorAdjustment......................................112
ColorTemperature.............................................113
DynamicRangeRestoration(DRR)
(onlyfor L9400USeries).............................113
Resettingto the factory default..........................113
Settingthe expertpicture settings...........................114
TestPattern.......................................................114
RGBFilter..........................................................114
ExpandedColor.................................................115
White Balance....................................................115
Adjusting the audio.................................................116
Mutingthe sound..............................................116
Selectingstereo/SAPbroadcasts.................... 116
Selectingthe TV Mounting (Wall/Stand)......... 117
Selectingthe Sound Mode.............................. 117
Usingthe SonicSeparationTM ......................... 117
Adjusting the volume balance......................... 118
Adjusting the audiobalance............................ 118
Adjusting the AdvancedSoundSettings......... 119
TruVolume TM ...................................................... 120
TVSpeakersOn/Off...........................................120
Settingthe PrimaryAudio Language.................120
Selectingthe optical audiooutput format ..........121
Selectingthe analogaudiooutput format ..........122
DigitalAudio Selection.......................................123
Usingthe Dolby®Digital DynamicRangeControl
feature..........................................................123
Downloaded from www.ManualsFile.com manuals search engine
6 Contents
Chapter 8:
Advancedfeatures........................................124
Usingyour homenetwork.......................................124
Settingupthe Network............................................126
WirelessSetup ..................................................126
AdvancedNetworkSetup...................................131
NetworkConnectionTest...................................134
Usingthe software keyboard...................................135
Entertext usingthe software keyboard..............136
Performinga SoftwareUpgrade..............................137
Viewingthe SoftwareLicenses................................137
Using Intel®WiDi/wireless display........................138
Changingthe Intel®WiDi DeviceName..............139
DeviceList.........................................................139
Usingthe FlipBarfeatures......................................140
Settingupthe FlipBar.......................................140
Selectingprograms usingthe FlipBar...............142
Changingthe FlipBarsettings...........................143
Resettingthe Flip Barsettings...........................144
Usingthe CloudPortalService................................145
Usingthe CloudPortalServicefeatures..................145
eManual.............................................................146
Featureapps......................................................146
Netfiix® .............................................................146
VUDUTM Movies& TV........................................147
Internet..............................................................148
MediaShare(Videos,Music, and Photos)..........151
MediaSharespecifications.................................151
Basicoperation..................................................152
Viewing moviefiles............................................155
Playingmusicfiles.............................................161
Viewing photo files ............................................163
Search...............................................................166
NetworkDeviceSetup.............................................167
ExternalControlSetup.......................................167
Settingup the MediaRendererfeature..............168
Downloaded from www.ManualsFile.com manuals search engine
Chapter 9: CloudPortalCompanionApps.....................170
UsingAppson aTabletor Smart phone..................170
Apps Control Profile................................................171
Pairing.....................................................................172
Chapter 10: Troubleshooting ........................................... 173
Generaltroubleshooting..........................................173
Pictureproblems.....................................................174
Soundproblems......................................................176
Remotecontrol problems........................................176
Channeltuning problems........................................176
Closedcaption problems.........................................177
Ratingblocking (V-Chip)problems.........................177
HDMI_ CECControl operation.................................177
HDMI_ problems.....................................................178
Networkproblems...................................................178
Wireless network problems.....................................180
MediaShareproblems.............................................180
CloudPortal ............................................................181
Light Indicator.........................................................181
PowerOn/Standbylight ..........................................181
If the problem persistsaftertrying the solutions.....181
AppendixA:Specifications...............................................182
Televisionsystem....................................................182
Channelcoverage....................................................182
Powersource..........................................................183
Powerconsumption ................................................183
Audio power............................................................183
Speakertype ...........................................................183
Video/audioterminals .............................................183
Video/audioinput ..............................................183
ColorStreamTM(componentvideo) HDinput.......183
HDMI_ input......................................................183
Digital audiooutput ...........................................184
PCinput.............................................................184
Downloaded from www.ManualsFile.com manuals search engine
8 Contents
Wirelessconnection................................................184
Ethernet.............................................................184
USB...................................................................184
Dimensionswith tablestand...................................184
Weight (mass) with stand.......................................184
Operatingconditions...............................................184
Suppliedaccessories...............................................185
Acceptablesignal formats for PCIN,and HDMI_ ...186
PCINsignalformats..........................................186
HDMI_signalformats........................................187
4KVideoSupport formats .................................188
Operatingthe TVwith combination buttons............189
AppendixB:External Keyboard Layout............................. 190
InternationalKeytable.......................................193
Index .............................................................................194
Downloaded from www.ManualsFile.com manuals search engine
ChapterI
Introduction
Safetyicons
This manual contains safety instructions that must be observed to avoid
potential hazards that could result in personal iniuries, damage to your
equipment, or loss of data. These safety cautions have been classified
according to the seriousness of the risk, and icons highlight these
instructions as follows:
Indicatesanimminentlyhazardoussituationwhich,ifnotavoided,willresultin
deathorseriousinjury.
Indicatesapotentiallyhazardoussituationwhich,ifnotavoided,couldresultin
deathorseriousinjury.
Indicatesapotentiallyhazardoussituationwhich,ifnotavoided,mayresultin
minorormoderateinjury.
N _
Indicatesapotentiallyhazardoussituationwhich,ifnotavoided,mayresultin
propertydamage.
NOTE Providesimportantinformation.
19
Downloaded from www.ManualsFile.com manuals search engine
0 Introduction
Features
Features
The following are just a few of the many exciting features of your new
Toshiba Ultra High Definition 4K TV:
•:. Integrated digital tuning (8VSB ATSC and QAM) --
Eliminates the need for a separate digital converter set-top box (in
most cases).
•:. 3840 x 2160 display resolution.
•:. 4K Ultra HD Resolution--provides stunning Ultra HD (3840 x
2160) which is four times the pixet resolution ofFutt HD with over
8 million pixels. This creates amazing picture detail for the ultimate
and most realistic viewing experience. Smaller pixets also allow
you to sit twice as close so you can utilize a larger screen size in an
existing space.
olo Four HDMr_--Digital, High-Definition Multimedia Interfaces with
1080p and 4K input support.
•:. HDMI _ capabilities ARC (Audio Return Channel)--Enabtes the
audio signal of the TV to be sent to an AV amplifier via an HDMI _
cable. See "HDMI ®ARC (Audio Return Channel) feature" on page
43.
•:. HDMr _CEC Control--Allows control of external devices from
the TV remote via HDMI _ connection. See "Using the TV remote
and HDMI ®CEC Control to control other devices" on page 41.
.t. ColorStream TM HD--High-resolution component video input.
.t. Digital Audio Out--Optical audio connection with Dolby :_Digital
or DTS _optical output fommt, see "Connecting a digital audio
system" on page 38.
.t. CQ EngineT_L-Toshiba's 3rd Generation Quad+Dual Core 4K
Processor utilizes a 5 Point hnage Enhancement System for superior
4K Ultra HD images. Enhancemems include: PixelPure TM, Motion
Interpolation, Dynamic Detail Enhancement, Color Restoration, and
Dynamic Noise Reduction.
•**oDNR--Dynamic Noise Reduction technology that filters out video
noise without decreasing picture sharpness, see "DNR (Dynamic
Noise Reduction)" on page 111.
•:. Dynamic Range Restoration (DDR)--by analyzing the incoming
video signal, this system enhances specific bright areas to restore the
image brilliance and depth to cinema quality, see "Dynamic Range
Restoration (DRR) (only for L9400U Series)" on page 113.
Downloaded from www.ManualsFile.com manuals search engine
Introduction 21
Features
olo PixelPureW_L-Advanced Resolution Restoration allows you
to watch all of your favorite progranmfing in 4K UHD. hnage
resolution from antenna, cable, satellite, Bin-ray DiscTM, home
video camera, and even video games are all precisely converted to
4K pixet resolution.
olo Wide Color Gamut--Enhanced LED panels produce a wider
spectrum of colors to create image color that is noticeably more
vibrant and more realistic.
ol. Quantum Black TM Local Dimming--Technology gives precise
control of the LED backlighting allows for images with both deep
blacks and bright whites for dramatically improved contrasts.
ol. DTS Premium Sound TM Features--Your TV includes DTS
Premium Sound TM Features such as DTS TruSurround TM, TruBass,
TruVolume, TruDiatog TM, Depth Rendering, and DTS Sound TM.
• DTS TruSurround TM delivers an immersive virtual surround
experience over front facing speaker configurations, complete
with rich bass, high frequency detail and clear dialog.
.l. Edge Enhancer--Enhanced video processing that defines the edges
and textures for greater image details to make the picture look crisp
and clear, see "Edge Enhancer" on page 109.
PC IN (Analog RGB)--Computer Input terminal, see "Connecting
a computer" on page 44.
IR Blaster Out--Controls infrared remote controlled devices from
the TV.
Built-in WLAN--Atlows the television to access your home
wireless network.
Intel :_WiDi--Technology allows direct wireless connection
between the TV and Intet_'WiDi equipped computers or mobile
devices.
ColorMasterT_L-Technology that gives you precise control of hue,
saturation, and brightness for six primary colors: Red, Green, Blue,
Yellow, Magenta, and Cyan. See "ColorMaster TM''on page 112.
ClearScan TM 240 Hz (for L9400U series)--Technology uses both
frame interpolation technology and advanced backtight control with
image synchronization to significantly increase the TV refresh rate
for an even clearer fast motion video. See "ClearScan TM''on page
110.
Downloaded from www.ManualsFile.com manuals search engine
2 Introduction
Overview of installation, setup, and us
o*.. ClearScan TM 120Hz (for L8400U series)--Technology utilizes
advanced backtight control with image synchronization to double
the television refresh rate for clearer fast motion video. This
technology is ideal for watching action movies, sports andvideo
games. See "ClearScan TM''on page 110.
•:. DynaLightX_L-Backtight control monitors the brighmess of each
video frame and automatically adjusts backtight intensity based on
the content to create higher dynamic contrast, for deeper blacks and
increased depth. See "DynaLight TM''on page 110.
•:. AutoViewT_L-Attows you to automatically adjustpicture settings
including brightness, contrast, gamma, color saturation, and
sharpness based on ambient room light conditions and incoming
picture content to create the best possible picture settings without
any manual adjustment.
o*.oSound SeparationT_L-Teclmotogy allows you to control the mix
between the TV vocals and the background sounds, see "Using the
Sonic Separation TM''on page 117.
o:o MediaShare--Allows you to view photo files and play music or
movie flies, see "MediaShare (Videos, Music, and Photos)" on page
151.
o*.. Flip Bar--An icon bar at the bottom of the screen that flips to show
three different lists (Favorite Channels, Yesterday, and Last Week)
so you can easily find the channels you like to watch the most, see
"Using the Flip Bar features" on page 140.
o:. Cloud Portal--Enhanced content discovery includes real time
streaming news, true social interaction features, and mobile device
interaction. See "Using the Cloud Portal Service features" on page
145.
Overviewof installation,setup,anduse
Follow these steps to set up your TV and begin using its many exciting
features.
1 Carefully read the important safety, installation, care, and service
information. Keep this manual for future reference.
2 To choose a location for the TV:
Read "hnportant notes about your TV" on page 9.
Place the TV on a sturdy, level, stable surface that can support
the weight of the unit. Secure the TV to a wall, pillar, or other
inmmvabte structure, see 24) on page 4.
Downloaded from www.ManualsFile.com manuals search engine
Introduction 23
Ovetwiew of installadon, setup, and use
•*.o Place theTV in a location where light does not reflecton the
screen.
Place the TV Par enough from walls and other objects to
allow proper ventilation. Inadequate ventilation may cause
overheating, which will damage the TV. THIS TYPE OF
DAMAGE IS NOT COVERED UNDER THE TOSHIBA
LIMITED WARRANTY.
3 Do not plug in any power cords until after you have connected all
cables and devices to your TV.
4 Before connecting cables or devices to the TV, review the functions
of the TV's colmections and controls, see "Overview of cable types"
on page 28.
5 Connect your other electronic device(s) to the TV, see "Connecting
Your TV" on page 28.
6 Install the batteries in the remote control, see "Installing batteries"
on page 53.
7 See "Using the Remote Control" on page 53 for an overview of
the buttons on the remote control.
8
After connecting all cables and devices, plug in the power cords for
your TV and other devices. Then press the POWER button on the
TV control panel or remote control to turn on the TV.
NOTN IftheTVstopsrespondingtothebuttonsontheremotecontrolorTV
controlpanelandyoucannotturntheTVoffor on,unplugthepowercords
forafewsecondsandthenplugtheminandtry again.
9 See "Navigating the menu system" on page 70 for a quick
overview of navigating the TV's menu system.
10 Program channels into the TV's channel memory, see "Auto
Tuning" on page 74.
11 For details on using the TV's features, see chapters 6, 7, and 8.
12 For help, refer to "Troubleshooting" on page 173.
13 For technical specifications, see "Specifications" on page 182.
Downloaded from www.ManualsFile.com manuals search engine
4 introduction
TV fhont and side panel controls" and connection
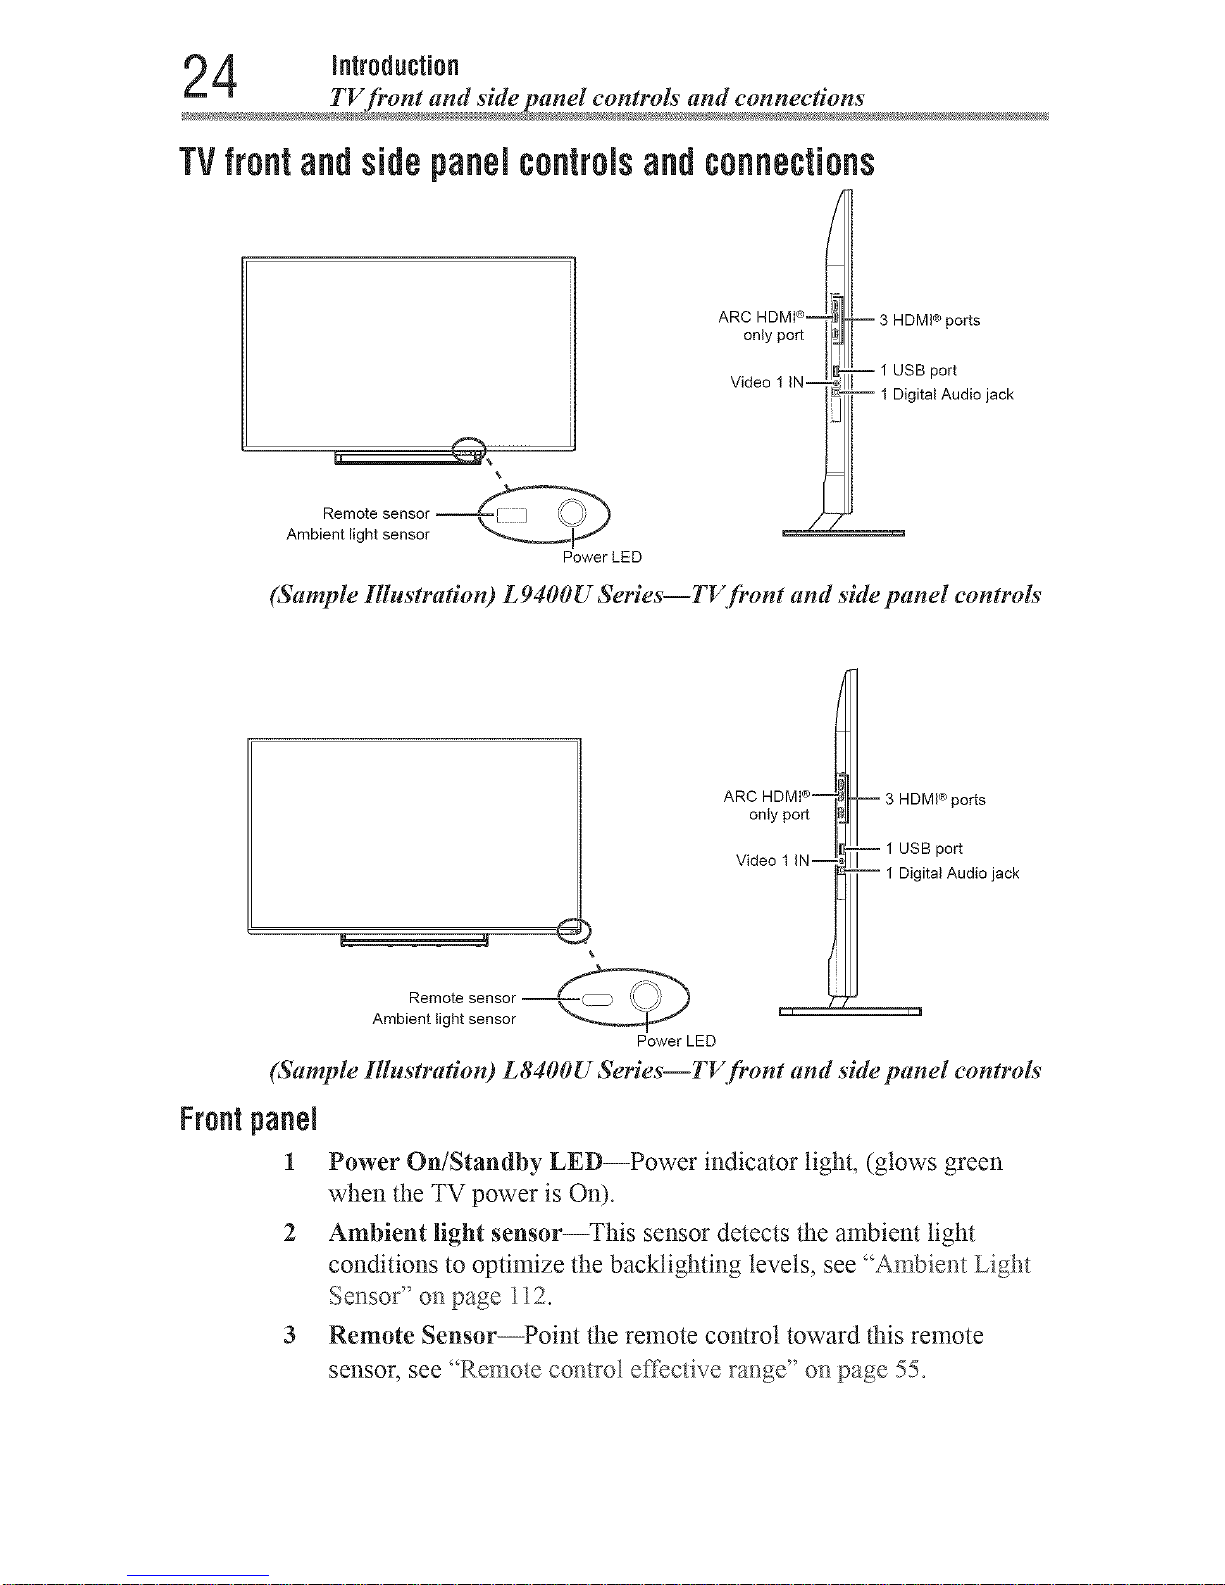
TVfrontandsidepanelcontrolsandconnections
Remote sensor
Ambient light sensor
Power LED
ARC HDMI ®-
only port
Video 1 IN--
-- 3 HDMI® ports
-- 1 USB port
-- 1 Digital Audio jack
(Sample Illustration) L9400U Series--TV front and side panel controls
Remote
Ambient light sensor
ARC H DMI®--q_t__
3 HDMI ® ports
onlyport N I
i
...... ]_1_-1 USB port
woeo ] irJ--z% II ital Audio jack
Power LED
(Sample Illustration) L8400U Series--TV front and side panel controls'
Frontpanel
1
Power On/Standby LED--Power indicator light, (glows green
when the TV power is On).
2 Ambient light sensor--This sensor detects the ambient light
conditions to optimize the backlighting levels, see _Ambier_t Light
Sensor" on page 112.
3 Remote Sensor--Point the remote control toward this remote
sensoc see '%emote control effective ravage"on page 55.
Downloaded from www.ManualsFile.com manuals search engine
Introduction 25
TV back panel controls and connections
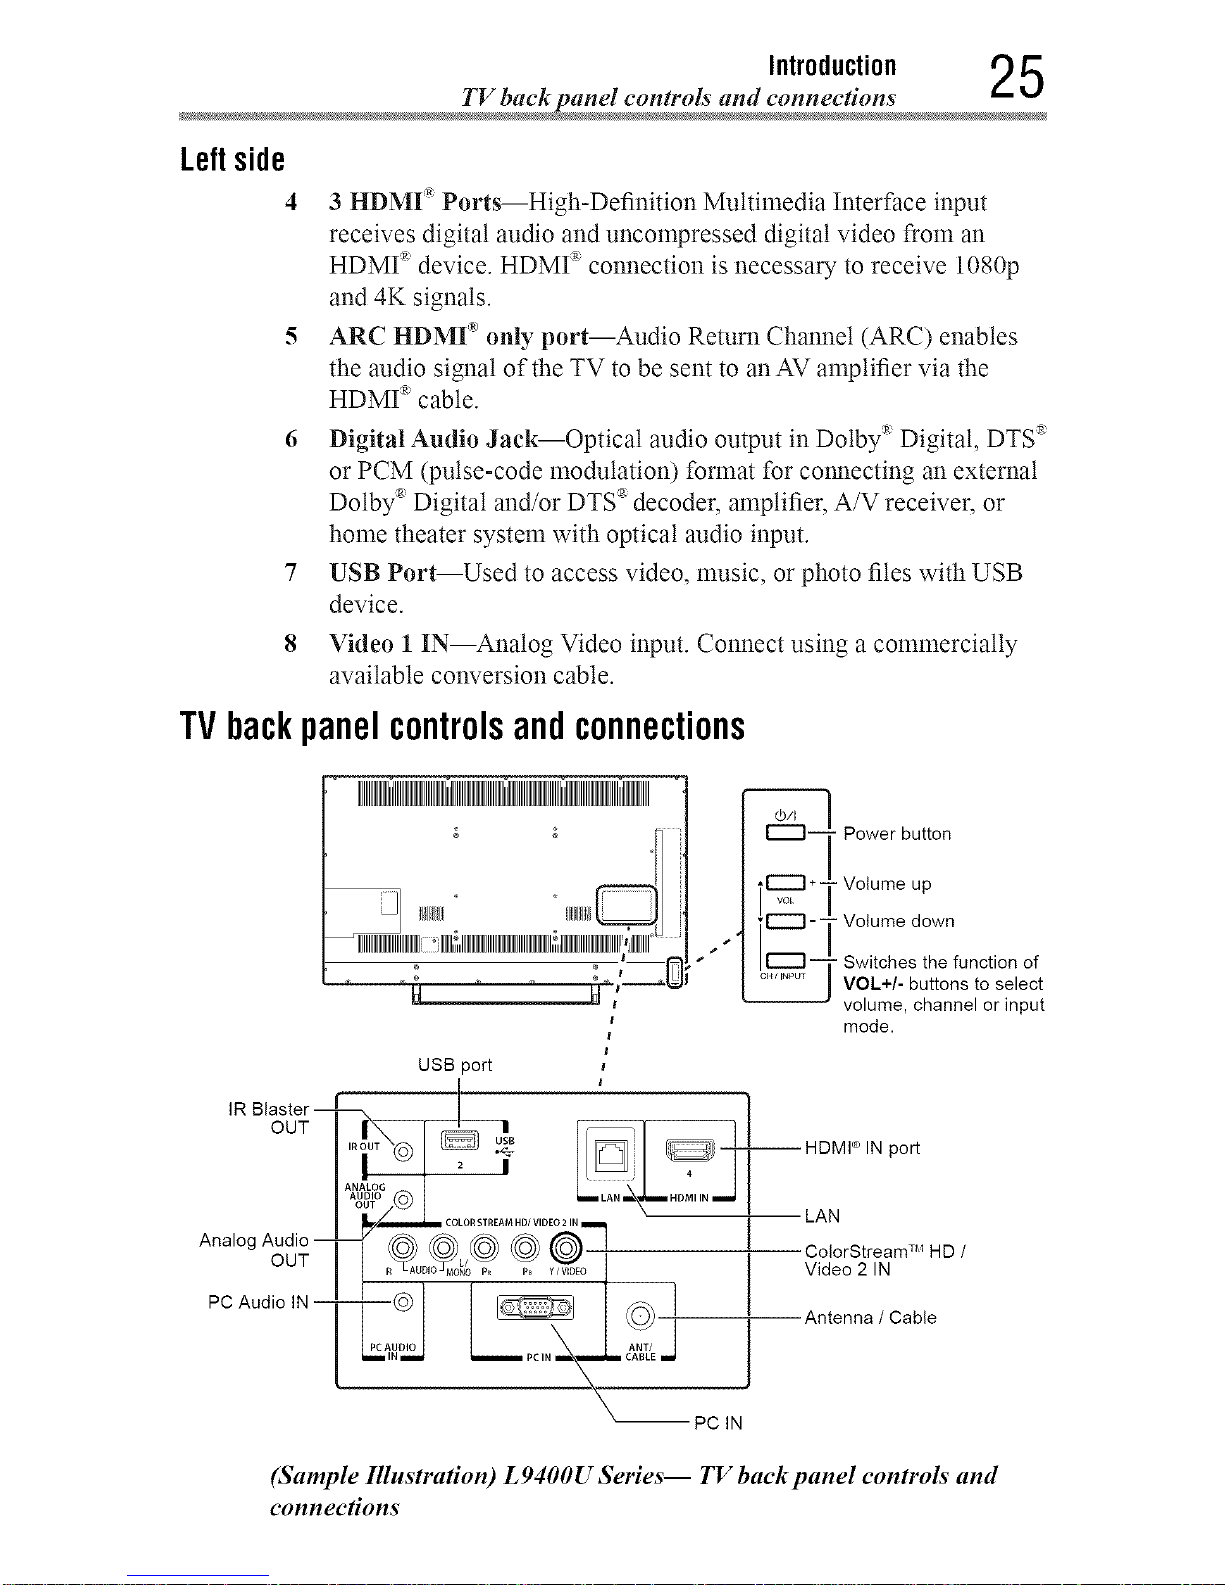
Leftside
4
6
7
8
3 HDMI "_"Ports--High-Definition Multimedia Interface input
receives digital audio and uncompressed digital video from an
HDMP' device. HDMP connection is necessary to receive 1080p
and 4K signals.
ARC HDM[ _'only port--Audio Return Channel (ARC) enables
the audio signal of the TV to be sent to anAV amplifier via the
HDMP' cable.
Digital Audio Jack--Optical audio output in Dolby®Digital, DTS '_
or PCM (pulse-code modulation) format for connecting an external
Dolby ®Digital and/or DTS '_decoder, amplifier, A/V receiver, or
home theater system with optical audio input.
USB Port--Used to access video, music, or photo flies with USB
device.
Video 1 IN--Analog Video input. Connect using a commercially
available conversion cable.
TVbackpanelcontrolsandconnections
IR
OUT
NNINNNNIIINNNNNNHdNII
ss ,*¸
_ Power button
Volume up
_ Volume down
Switches the function of
VOL+/- buttons to select
volume, channel or input
mode.
--HDMI ® IN port
Analog
OUT
PC Audio
1
LAN
ColorStream TM HD /
Video 2 IN
Antenna / Cable
-- PC IN
(Sample Illustration) L 9400U Series-- TV back panel controls and
connections
Downloaded from www.ManualsFile.com manuals search engine
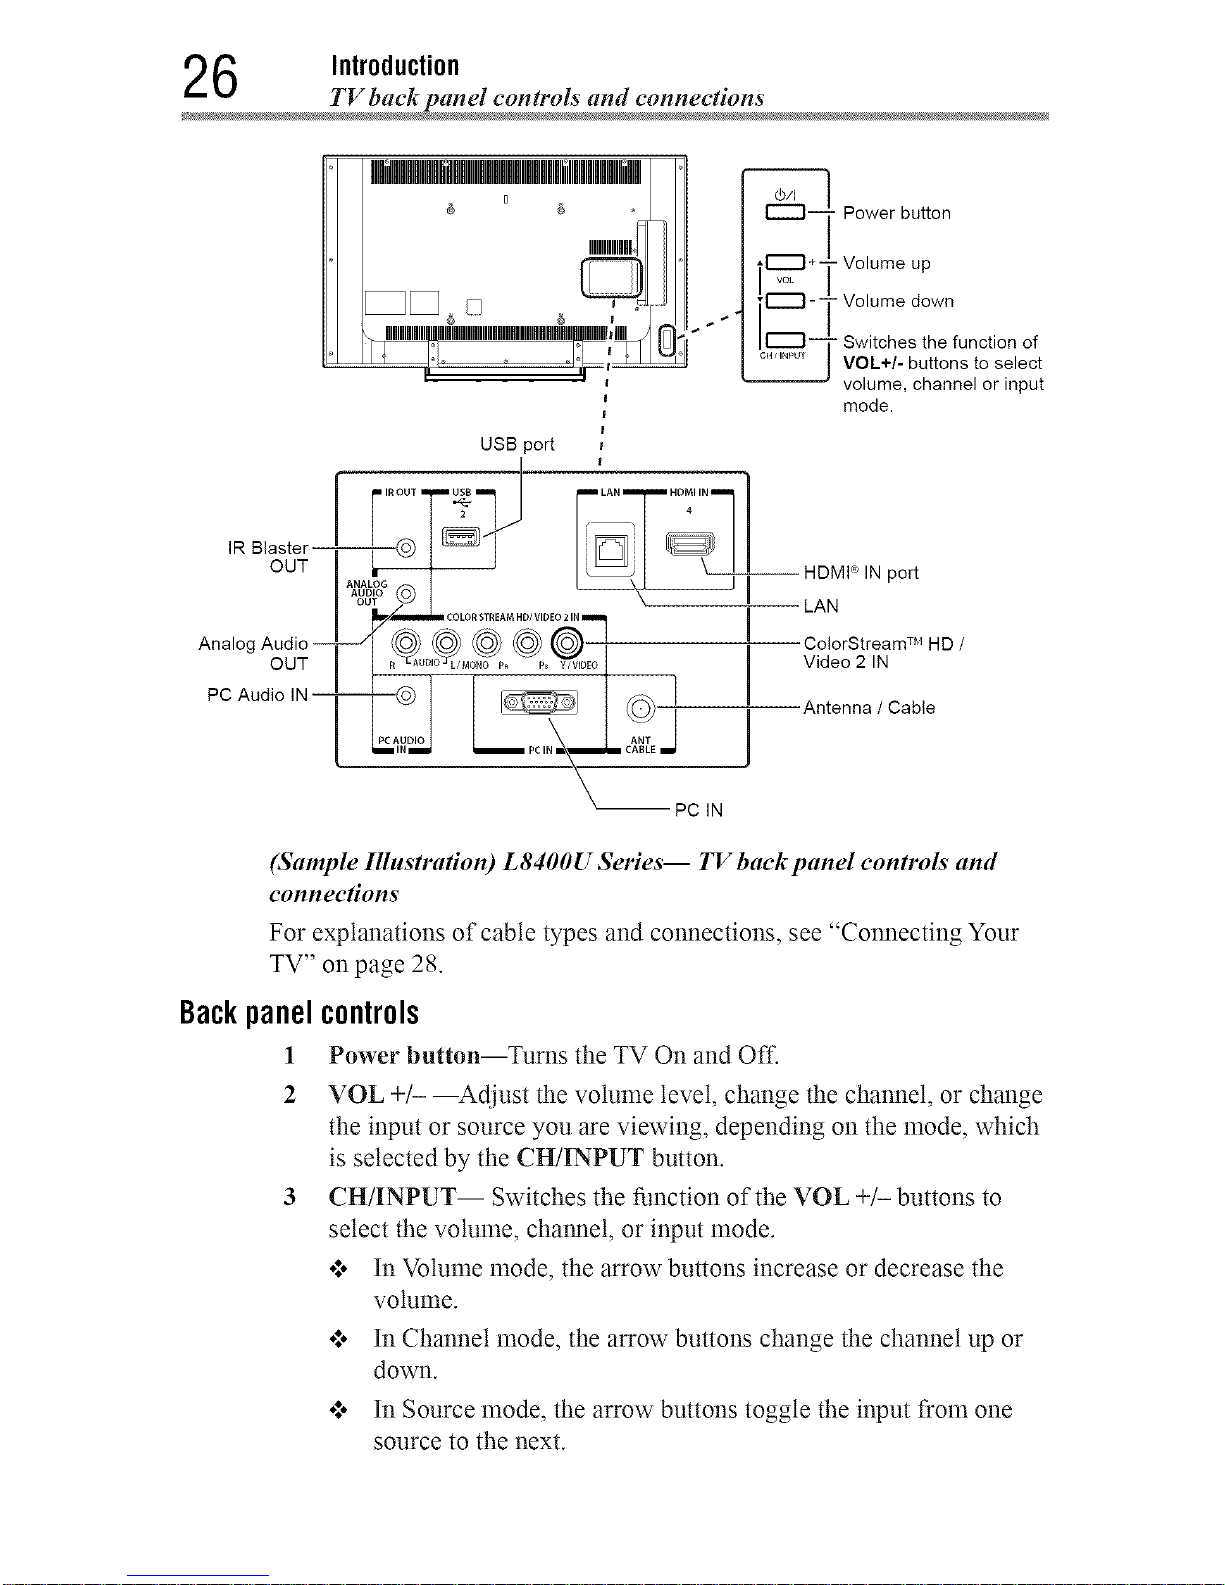
6 Introduction
TV back panel controls and connections
IR Blaster--
OUT
Analog Audio --
OUT
PC Audio IN--
UlNIIIIIIIIJlIIIIIIIIIIIIIIIIilIIIIIIIIill'_
" Av_oc ÷-
|
USB port
R OUT _ LAN HDMI IN
-- HDMP IN pert
I_AN
D/VIDEO21
-:tol tl
Pc
i IN _ _ PC IN i_ CABLE
PC IN
Power button
Volume up
Volume down
Switches the function of
VOL+/- buttons to select
volume, channel or input
mode.
ColorStream TM HD /
Video 2 IN
Antenna / Cable
(Sample Illnstra#on) L8400U Series-- TV back panel controls and
connections
For explanations of cable types and connections, see "Connecting Your
TV" on page 28.
Backpanelcontrols
1 Power button--Turns the TV On and Off.
2 VOL +/- --Adjust the volume level, change the channel, or change
the input or source you are viewing, depending on the mode, which
is selected by the CH/INPUT button.
3 CH/INPUT-- Switches the function of the VOL +/- buttons to
select the volume, channel, or input mode.
o:* In Volume mode, the arrow buttons increase or decrease the
volume.
o:* In Channel mode, the arrow buttons change the channel up or
down.
o:, In Source mode, the arrow buttons toggle the input from one
source to the next.
Downloaded from www.ManualsFile.com manuals search engine
Introduction 27
TV back panel controls aml connections
Backpanel
4
5
6
7
8
10
11
12
The mode of the VOL +/- buttons change in the following order
each time the button is pressed:
Channel _ Input _ Volume
connections
LAN IN--Connects the TV to your home network.
HDMF IN--High-Definition Multimedia Interface input receives
digital audio and uncompressed digital video from an HDMI _'
device. HDMI _ connection is necessary to receive 1080p and 4K
signals.
Analog Audio Out--Analog audio outputs for connecting an audio
amplifier.
PC IN--For use when connecting a personal computer.
ANT/CABLE--Antenna input that supports analog (NTSC) and
digital (ATSC) off-air antenna signals and analog and digital Cable
TV (QAM) signals.
ColorStream TM HD/Video 2 IN--These include standard A/
V connections, see "Connecting a Blu-rayTM/DVD player with
ColorStream TM or a VCR with composite video" on page 33.
PC Audio IN--Connect this to output audio from the PC connected
to the PC IN terminal.
IR Blaster OUT--Used to connect and control infrared remote-
controlled devices.
USB Port--Used to access video, music, or photo files with USB
device.
NOTN Component/Standard(composite)videocablescarryonlyvideo
information;separateaudiocablesarerequired.
Downloaded from www.ManualsFile.com manuals search engine
Chapter2
ConnectingYourTV
Overviewof cabletypes
Before purchasing cables, know the connector types your devices require.
You can purchase cables from most stores that sell audio/video devices.
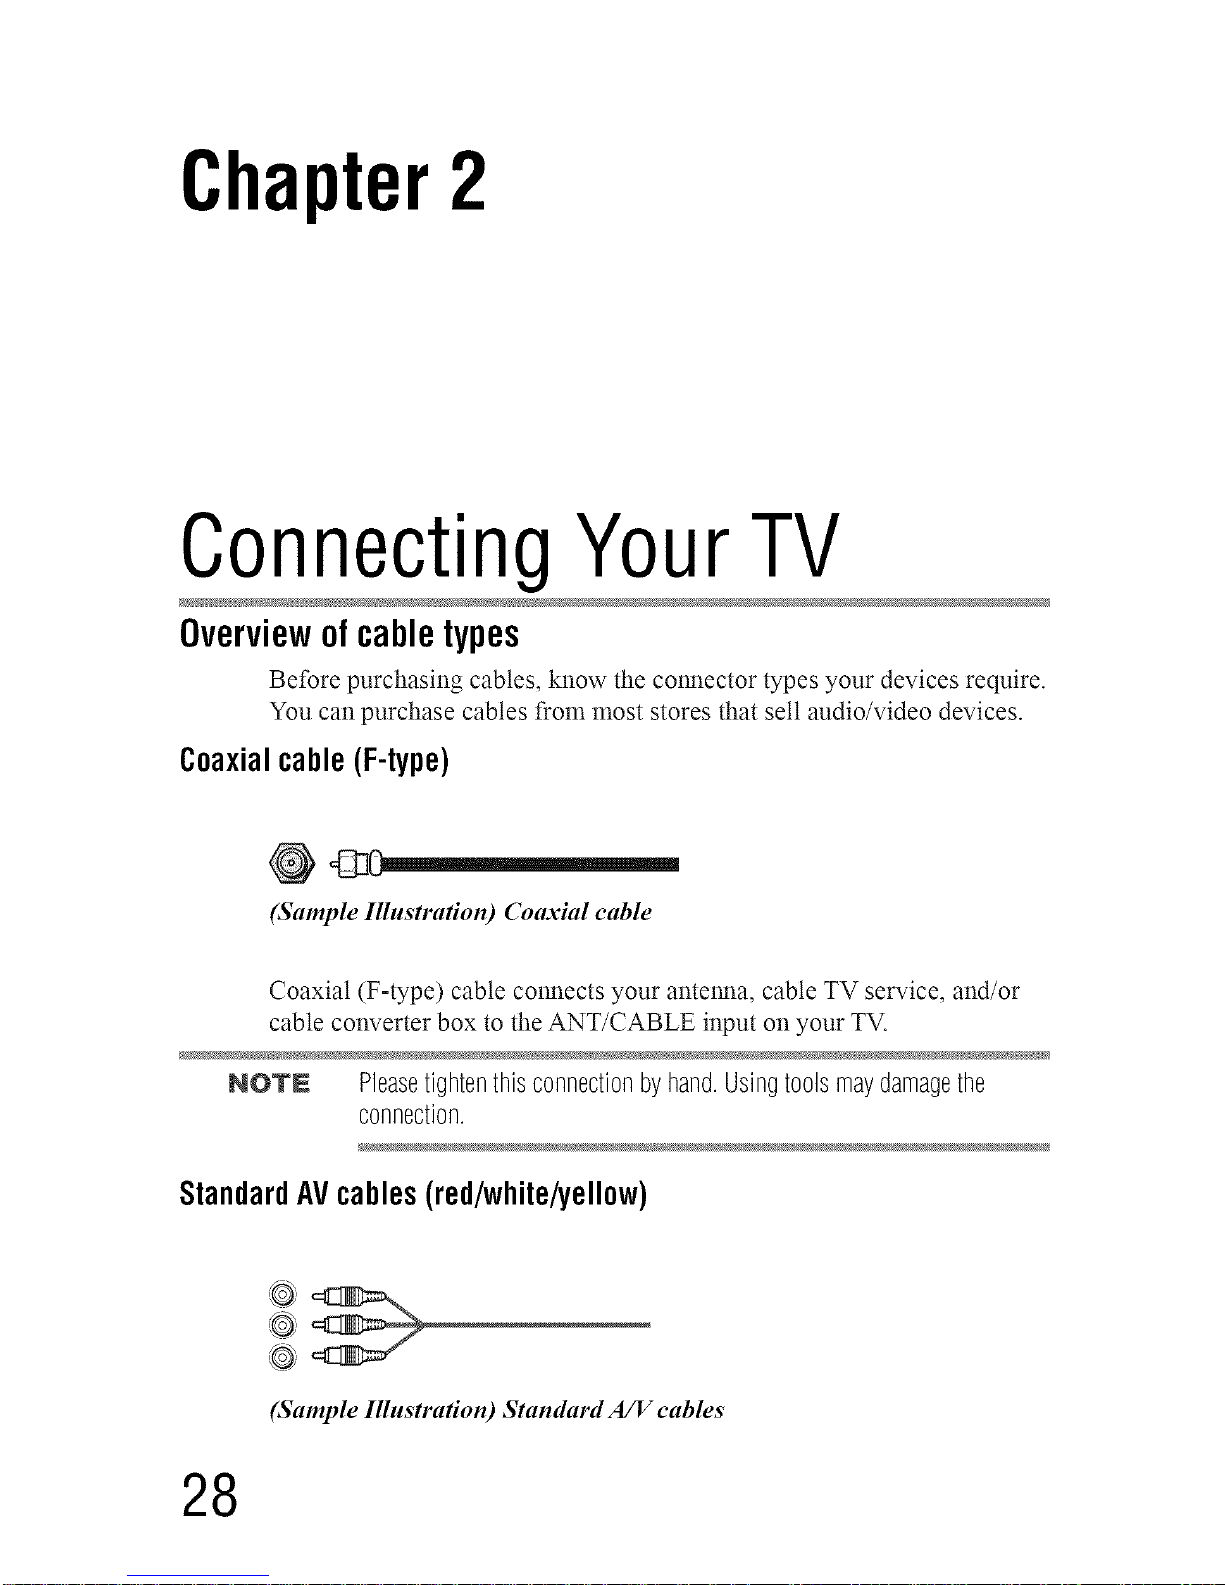
Coaxialcable (F-type)
(Sample Illustration) Coaxial cable
Coaxial (F-type) cable connects your antenna, cable TV service, and/or
cable converter box to the ANT/CABLE input on your TV.
NOVN Pleasetightenthisconnectionbyhand.Usingtoolsmaydamagethe
connection.
StandardAVcables (red/white/yellow)
@
,@
(Sample Illustration) Standard A/V cables
28
Downloaded from www.ManualsFile.com manuals search engine
Connecting YourTV 2 9
Ovetwiew of cable types
Standard A/V cables (composite video) usually come in sets of three, and
connect to video devices with analog audio and composite video output.
These cables (and the related inputs on your TV) are typically color-
coded according to use: yellow for video, red for stereo right audio, and
white for stereo left (or mono) audio.
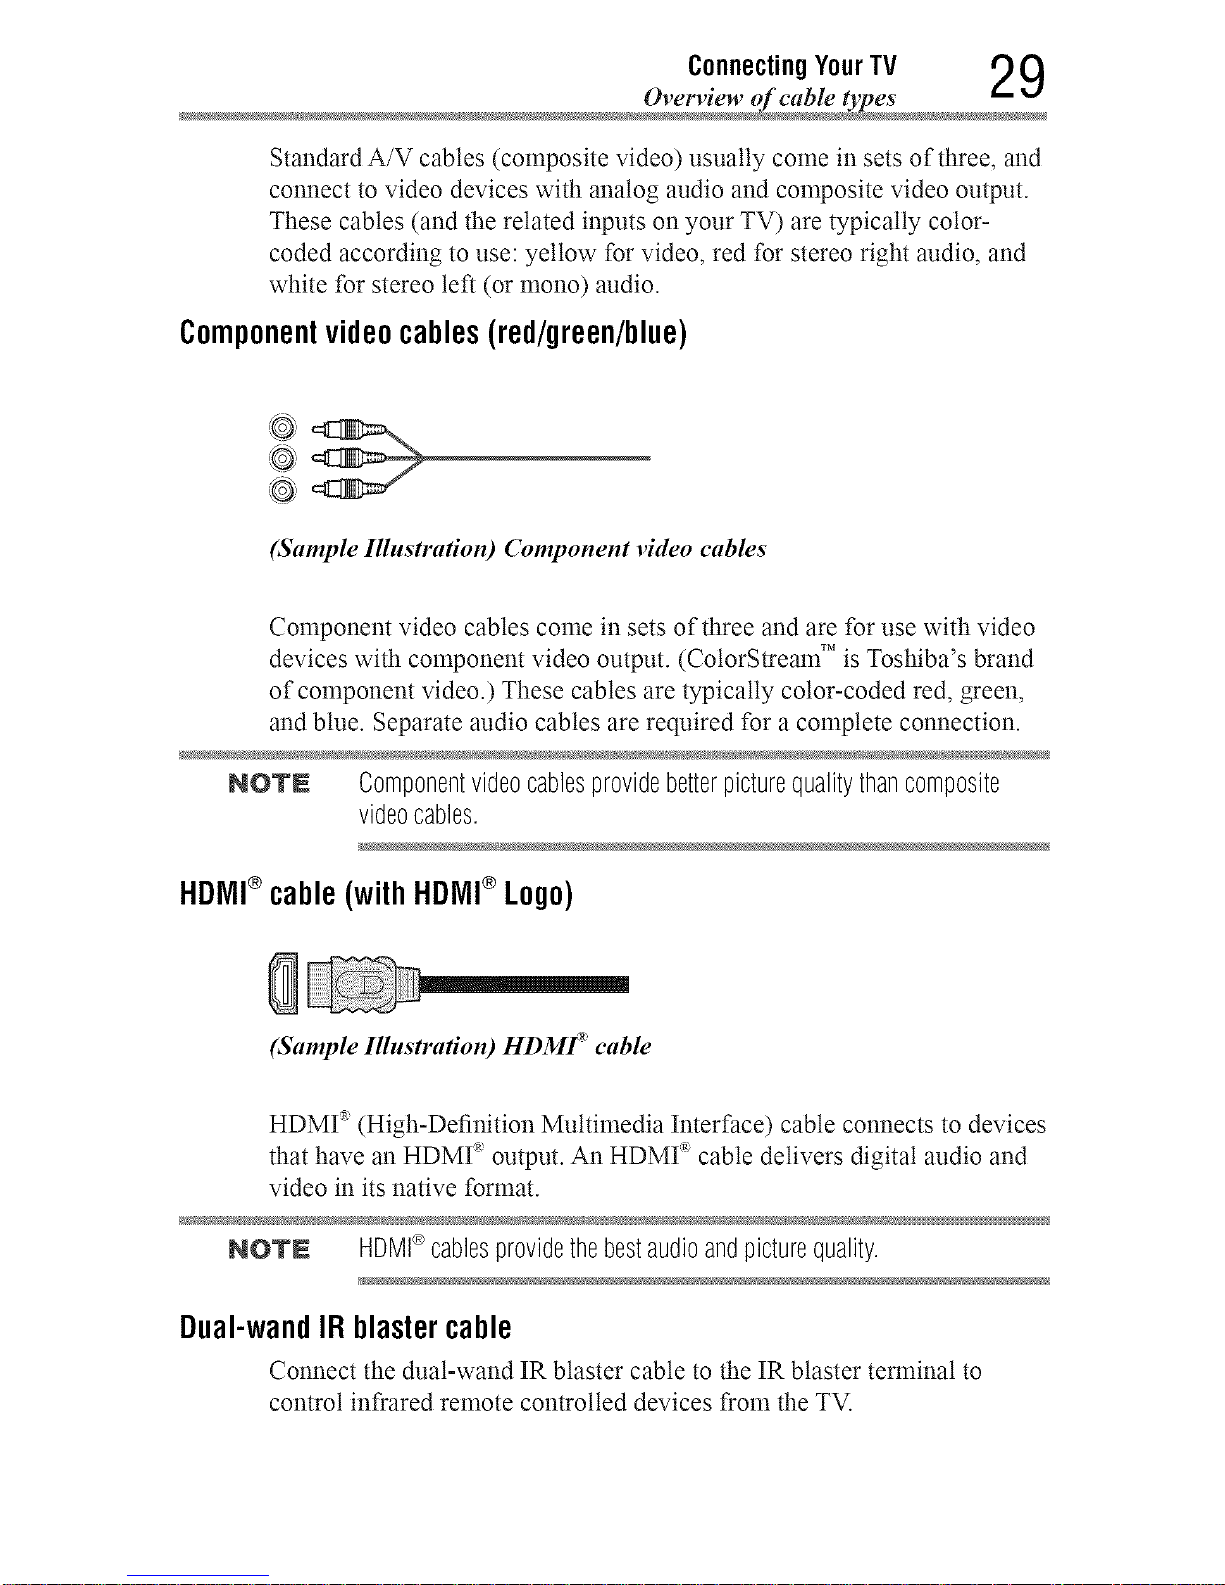
Componentvideocables(red/green/blue)
(Sample Illustration) Component video cables
Component video cables come in sets of three and are for use with video
devices with component video output. (CotorStream TM is Toshiba's brand
of component video.) These cables are typically color-coded red, green,
and blue. Separate audio cables are required for a complete connection.
NOlrN Componentvideocablesprovidebetterpicturequalitythancomposite
videocables.
HDIVll®cable (with HDIVll®Logo)
(Sample Illustration) HDMF _ cable
HDMr _(High-Definition Multimedia Interface) cable connects to devices
that have an HDMP' output. An HDMI _ cable delivers digital audio and
video in its native format.
NOTN HDMI®cablesprovidethebestaudioandpicturequality.
Dual-wandIR blastercable
Connect the dual-wand IR blaster cable to the IR blaster terminal to
control infrared remote controlled devices from the TV.
Downloaded from www.ManualsFile.com manuals search engine
0 ConnectingYourTV
Overview of cable types
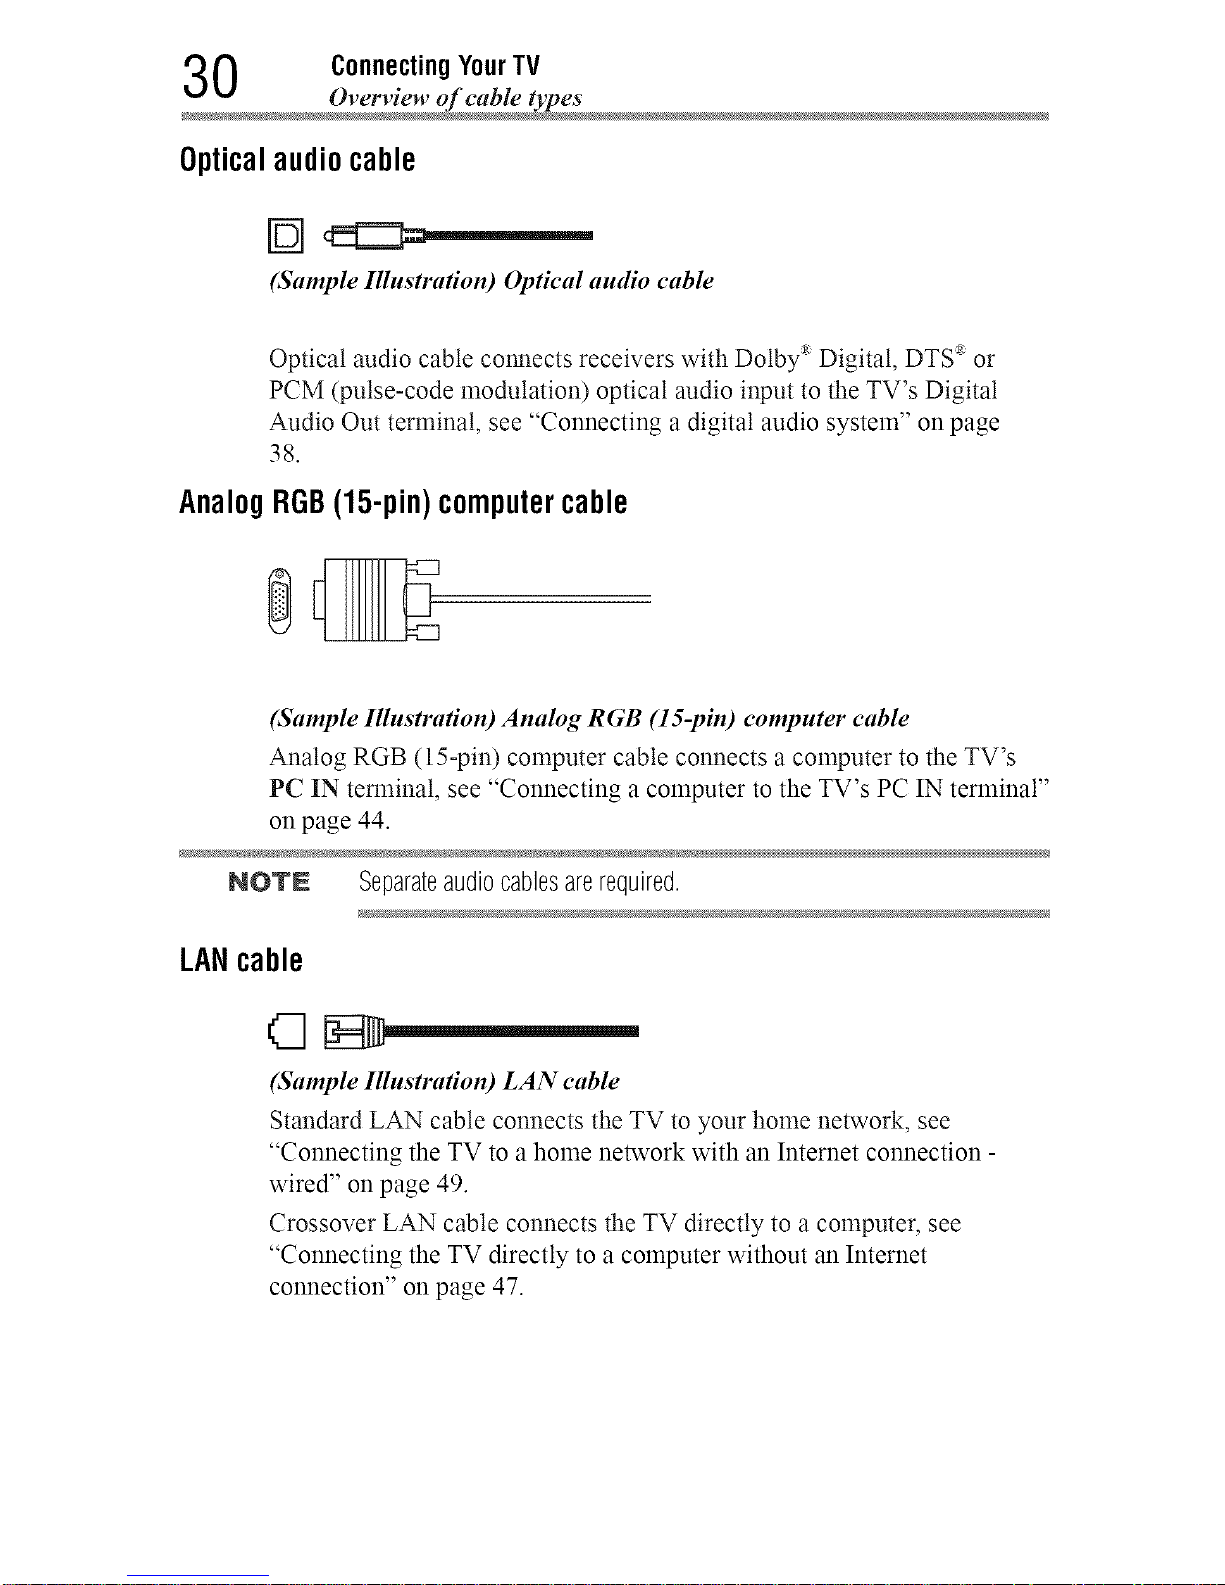
Opticalaudio cable
(Sample Illnstra#on) Optical audio cable
Optical audio cable connects receivers with Dolby _ Digital, DTS '_or
PCM (pulse-code modulation) optical audio input to the TV's Digital
Audio Out terminal, see "Connecting a digital audio system" on page
38.
AnalogRGB(15-pin)computercable
(Sample Illnstra#on) Analog RGB (IS-pin) computer cable
Analog RGB (15-pin) computer cable connects a computer to the TV's
PC IN terminal, see "Connecting a computer to the TV's PC IN terminal"
on page 44.
NOTN Separateaudiocablesarerequired.
LANcable
(Sample Illustration) LAN cable
Standard LAN cable connects the TV to your home network, see
"Connecting the TV to a home network with an Internet connection -
wired" on page 49.
Crossover LAN cable connects the TV directly to a computer, see
"Connecting the TV directly to a computer without an Internet
connection" on page 47.
Downloaded from www.ManualsFile.com manuals search engine
Connecting YourTV 3 1
_mnecting an antenna, satellite receiver, and cable TV b
Abouttheconnectionillustrations
You can connect different types and brands of devices to your TV in
several different configurations. The connection illustrations in this
manual are representative of typical device connections only. The input/
output terminals on your devices may differ from those illustrated. For
details on connecting and using your specific devices, refer to the owner's
manual of each device.
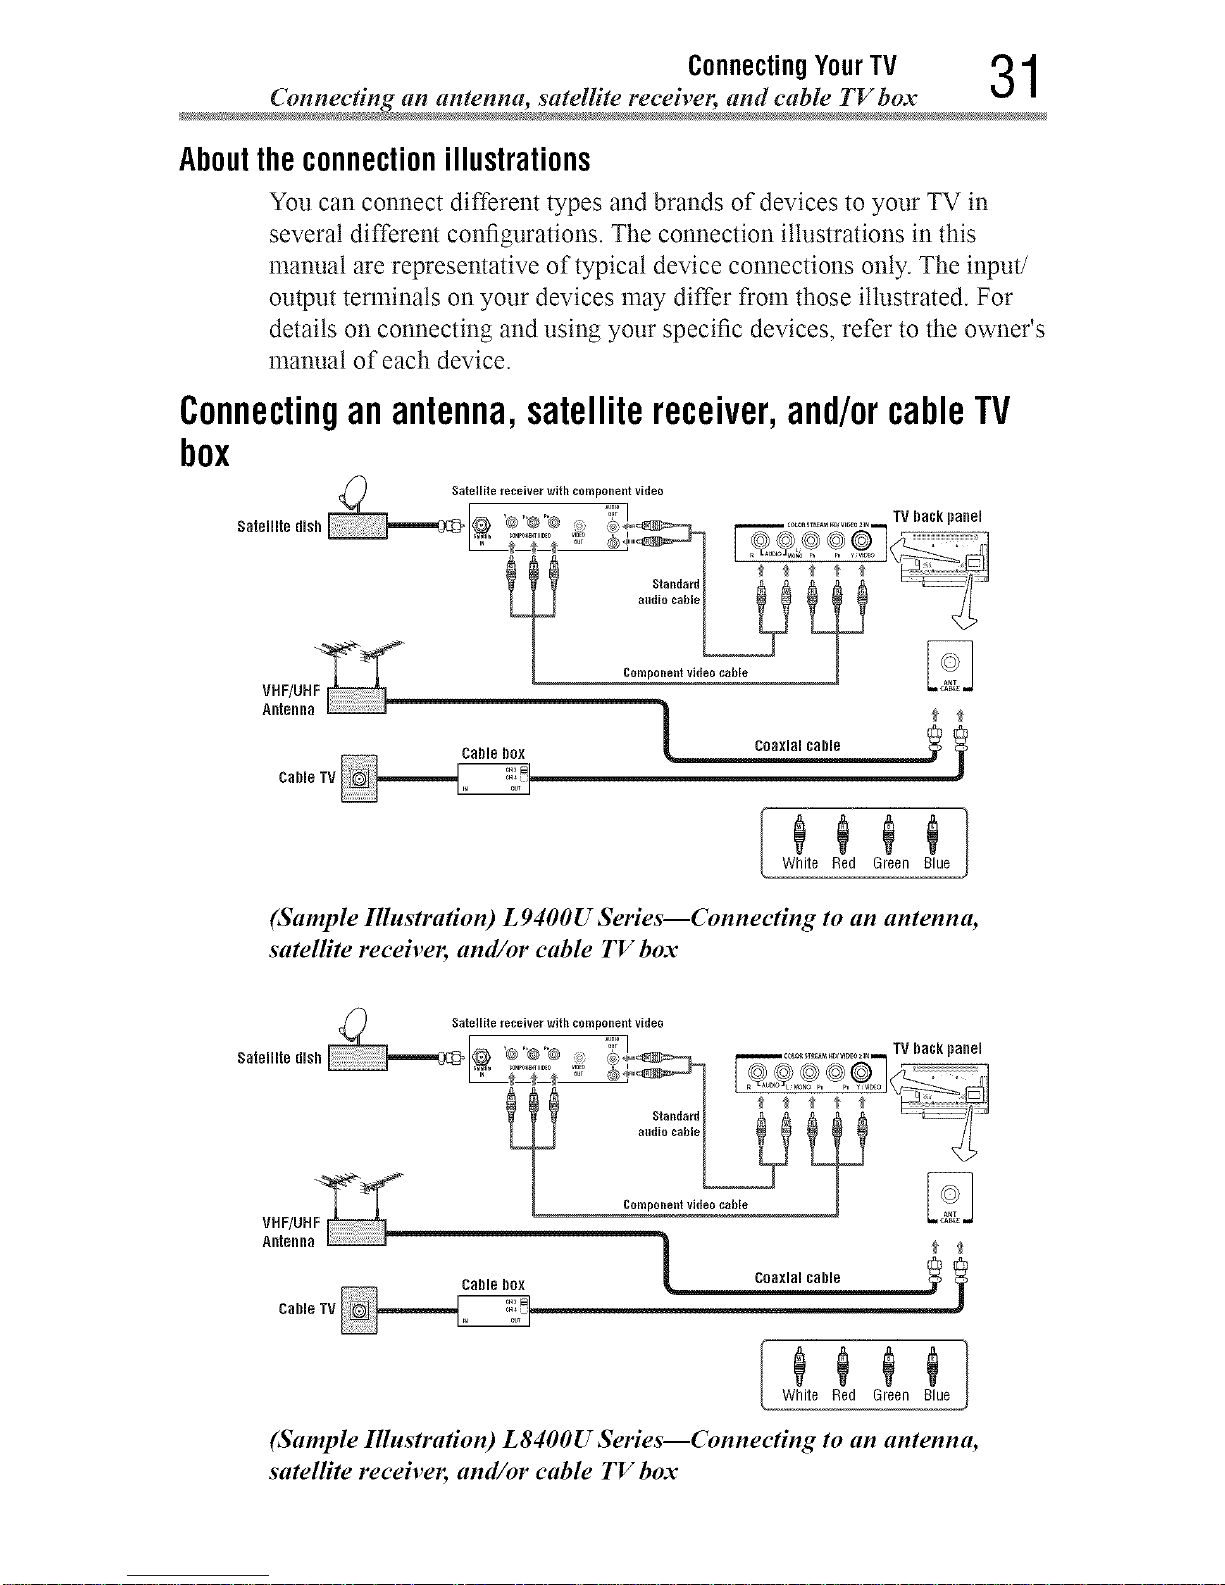
Connectinganantenna,satellitereceiver,and/orcableTV
box
Cable box _
White Red Green Blue
(Sample Illustration) L9400U Series--Connecting to an antenna,
satelHte receiver, and/or cable TV box
Cable box _
White Red Green Blue
(Sample Illustration) L8400U Series--Connecting to an antenna,
satelHte receiver, and/or cable TV box
Downloaded from www.ManualsFile.com manuals search engine
2 ConnectingYourTV
_mnecting an antenna, satellite receiver, and cable TV b
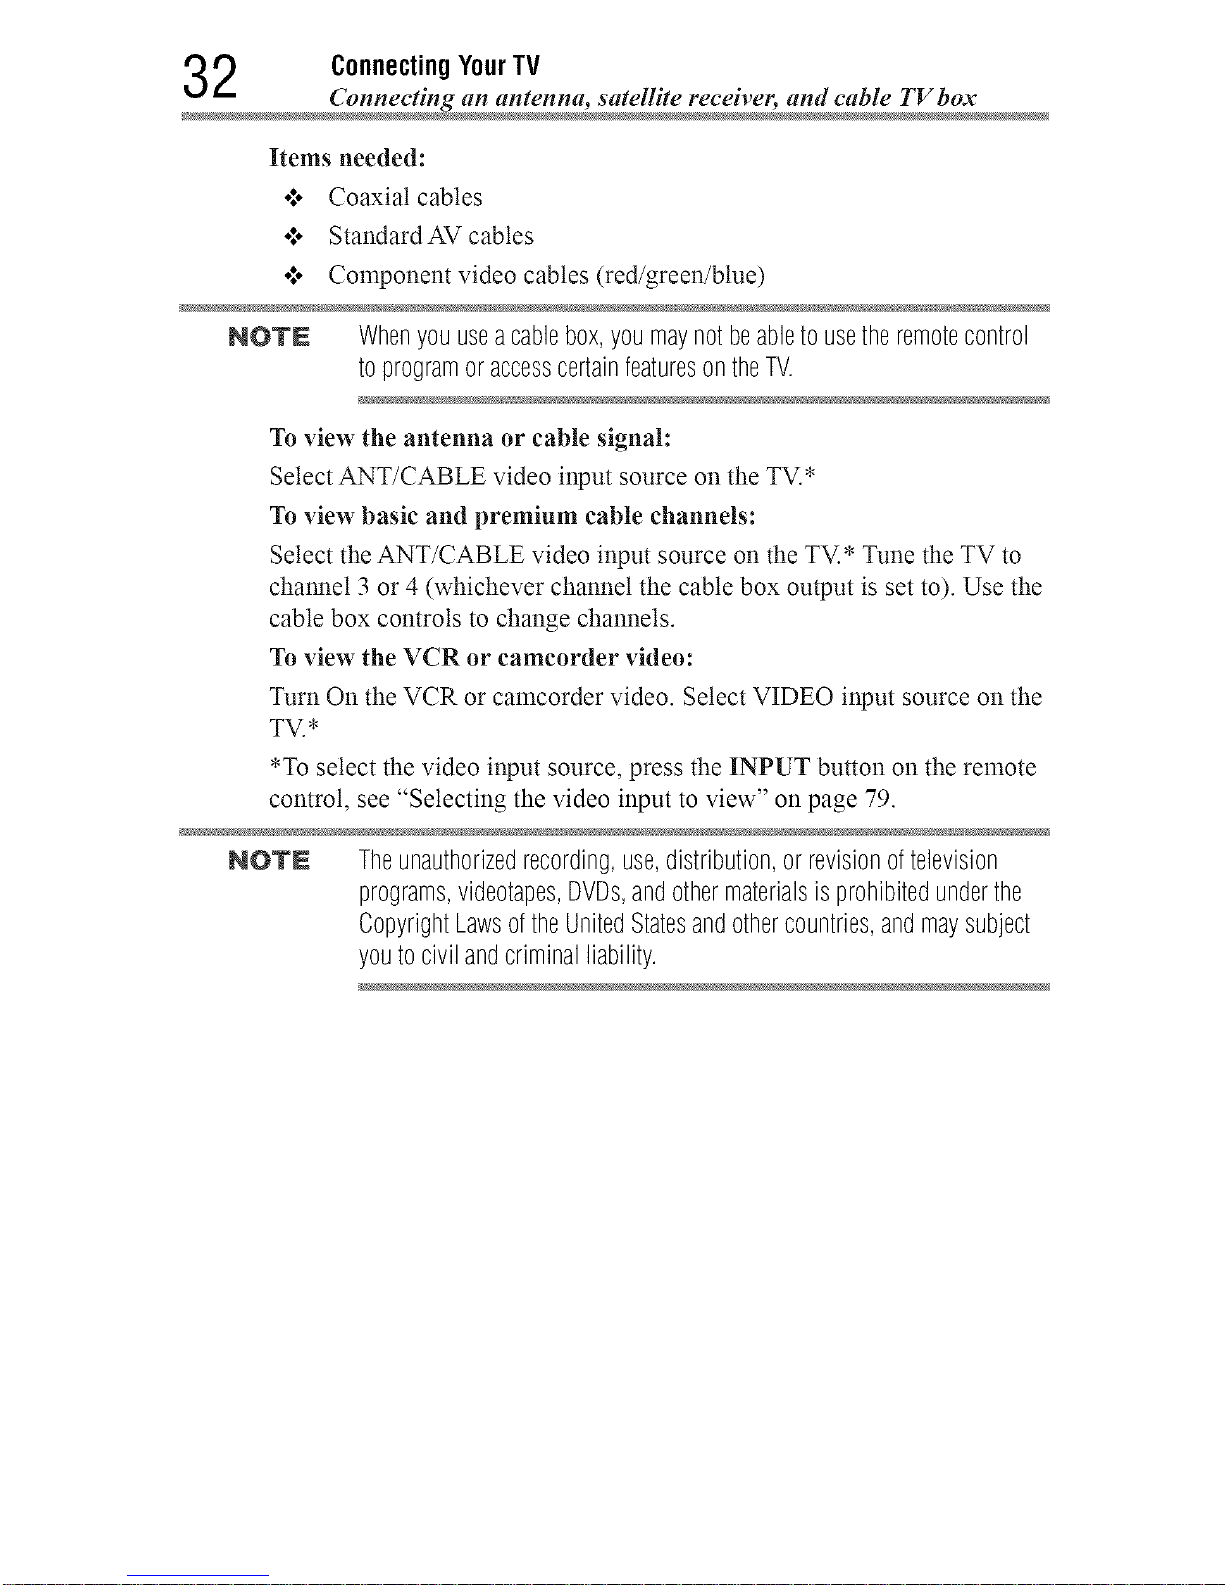
Items needed:
•:o Coaxial cables
°:o Standard AV cables
•:* Component video cables (red/green/blue)
NOTN Whenyouuseacablebox,youmaynotbeabletousetheremotecontrol
toprogramoraccesscertainfeaturesontheTV.
To view the antenna or cable signal:
Select ANT/CABLE video input source on the TV.*
To view basic and premium cable channels:
Select the ANT/CABLE video input source on the TV.* Tune the TV to
channel 3 or 4 (whichever channel the cable box output is set to). Use the
cable box controls to change channels.
To view the VCR or camcorder video:
Turn On the VCR or camcorder video. Select VIDEO input source on the
TV.*
•To select the video input source, press the INPUT button on the remote
control, see "Selecting the video input to view" on page 79.
NOTE Theunauthorizedrecording,use,distribution,or revisionoftelevision
programs,videotapes,DVDs,andothermaterialsis prohibitedunderthe
CopyrightLawsoftheUnitedStatesandothercountries,andmaysubject
youtocivil andcriminalliability.
Downloaded from www.ManualsFile.com manuals search engine

Connecting YourTV 3 3
ConnectingaB/u-rayT_VDVDplayerwithColorStreamTM ora VCRw#h compositevide
Connectinga Blu-ray+"/DVDplayerwithColorStreamTM ora
VCRwithcompositevideo
Yellow White Red Green Blue
_. _ TV bacl_panel
Blu-rayTM/DVDplayer
(Sttmple Illustration) L 9400U Series--Connecting a Blu-rayTM/D VD
player with ColorStream TM or a VCR with composite video
Standard A/Vcable
Blu-rayTM/DVDplayer
.......... Yellow White Red Green Blue
TV back panel
(Sttmple Illustration) L 8400U Series--Connecting a Blu-rayTM/D VD
player with ColorStream TM or a VCR with composite video
Downloaded from www.ManualsFile.com manuals search engine
4 Connecting YourTV
ConnectingaBlu-rayTM/DVDphtyerwithColorStreamTM oraVCRwithcompositevide
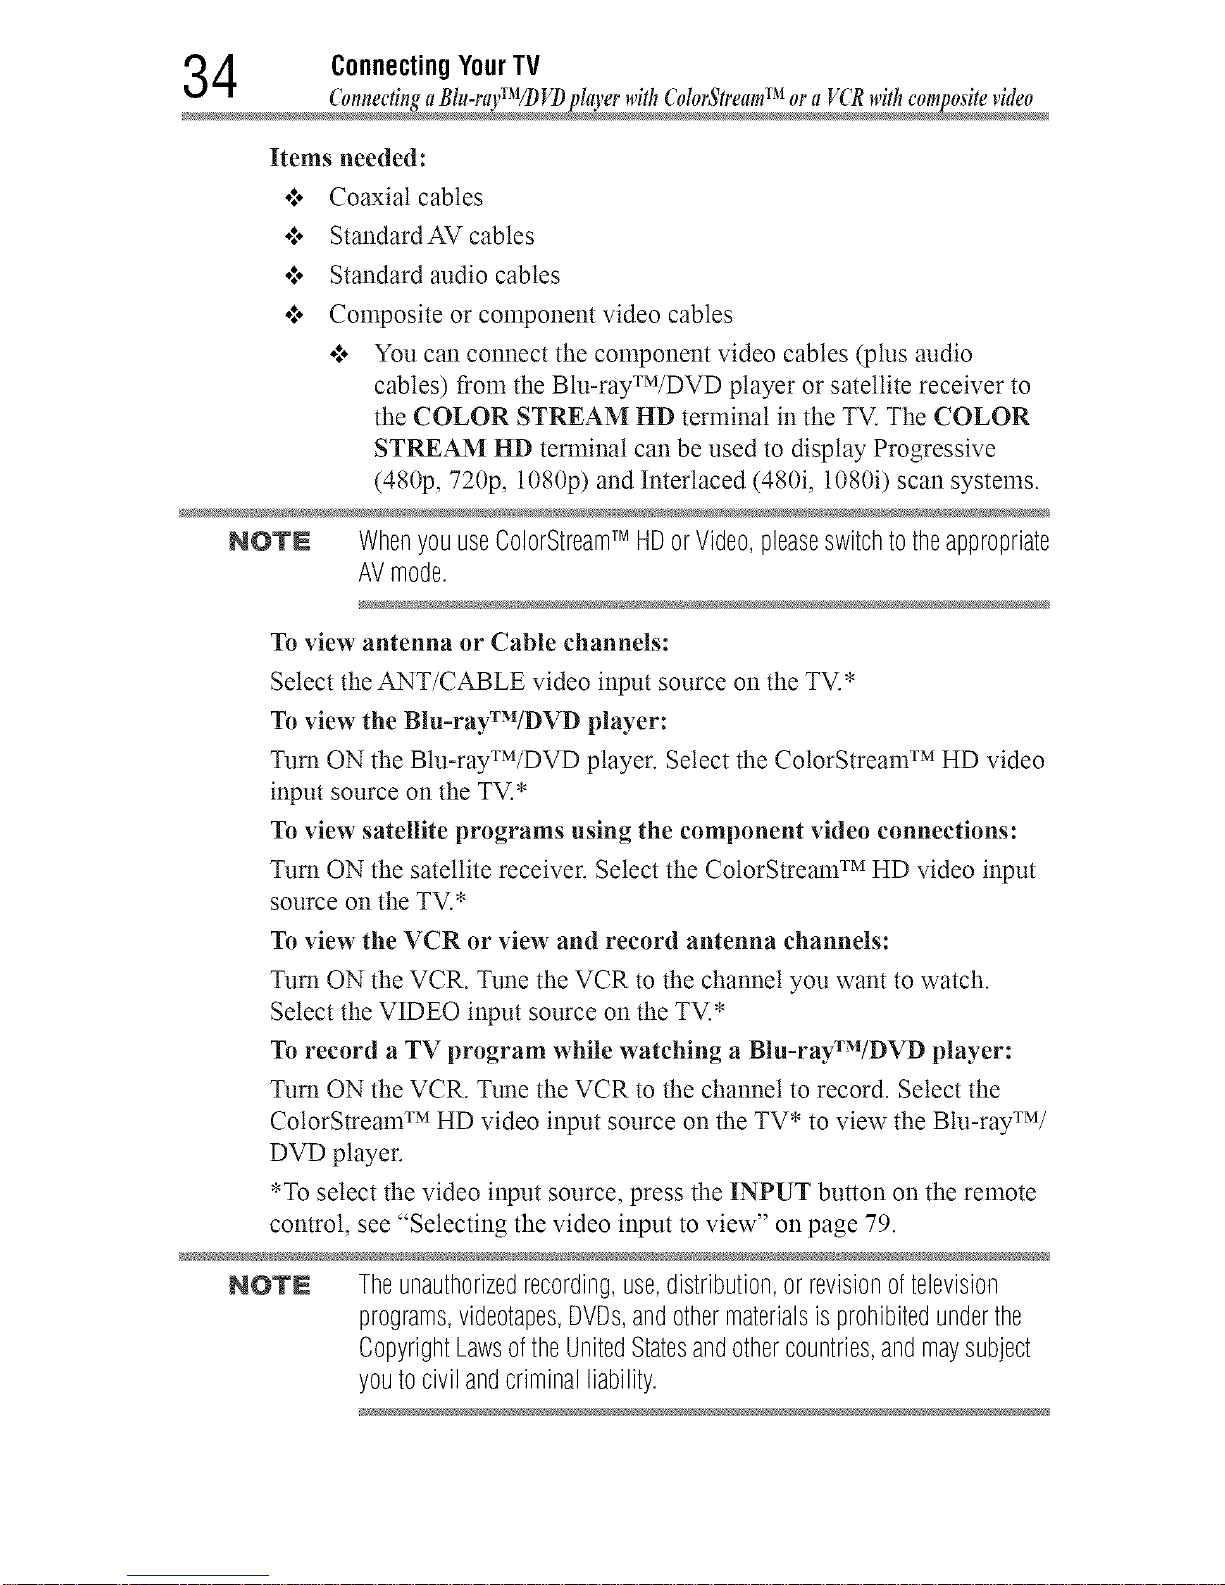
Items needed:
•:. Coaxial cables
•1o Standard AV cables
•:* Standard audio cables
•1o Composite or component video cables
•1o You can connect the component video cables (plus audio
cables) from the Btu-rayXM/DVD player or satellite receiver to
the COLOR STREAM HD terminal in the TV. The COLOR
STREAM HD terminal can be used to display Progressive
(480p, 720p, 1080p) and Interlaced (480i, 1080i) scan systems.
NOTN WhenyouuseColorStreamTM HDorVideo,pleaseswitchtotheappropriate
AVmode.
To view antenna or Cable channels:
Select the ANT/CABLE video input source on the TV.*
To view the Blu-rayTM/DVD player:
Turn ON the Btu-rayXM/DVD player. Select the ColorStream TM HD video
input source on the TV.*
To view satellite programs using the component video connections:
Turn ON the satellite receiver. Select the ColorStream TM HD video input
source on the TV.*
To view the VCR or view and record antenna channels:
Turn ON the VCR. Tune the VCR to the channel you want to watch.
Select the VIDEO input source on the TV.*
To record a TV program while watching a Blu-rayTM/DVD player:
Turn ON the VCR. Tune the VCR to the channel to record. Select the
CotorStream TM HD video input source on the TV* to view the Blu-rayXM/
DVD player.
•To select the video input source, press the INPUT button on the remote
control, see "Selecting the video input to view" on page 79.
NOTN Theunauthorizedrecording,use,distribution,orrevisionoftelevision
programs,videotapes,DVDs,andothermaterialsisprohibitedunderthe
CopyrightLawsoftheUnitedStatesandothercountries,andmaysubject
youtocivil andcriminalliability.
Downloaded from www.ManualsFile.com manuals search engine
ConnectingYourTV 3 5
_mnecting remote IR device
ConnectingremoteIR devices
Usingthe IR blaster OUTterminal
You can use the TV's IR OUT terminal to remotely operate many infrared
remote-controlled devices enclosed in an entertainment center or similar
cabinet.
Items needed:
o*.oDual-wand IR blaster cable (see "Dual-wand IR blaster cable" on
page 29)
o:* Other cables as required to connect the device(s) to the TV (see
"Overview of cable types" on page 28)
See the remote IR blaster setup section (see page 65).
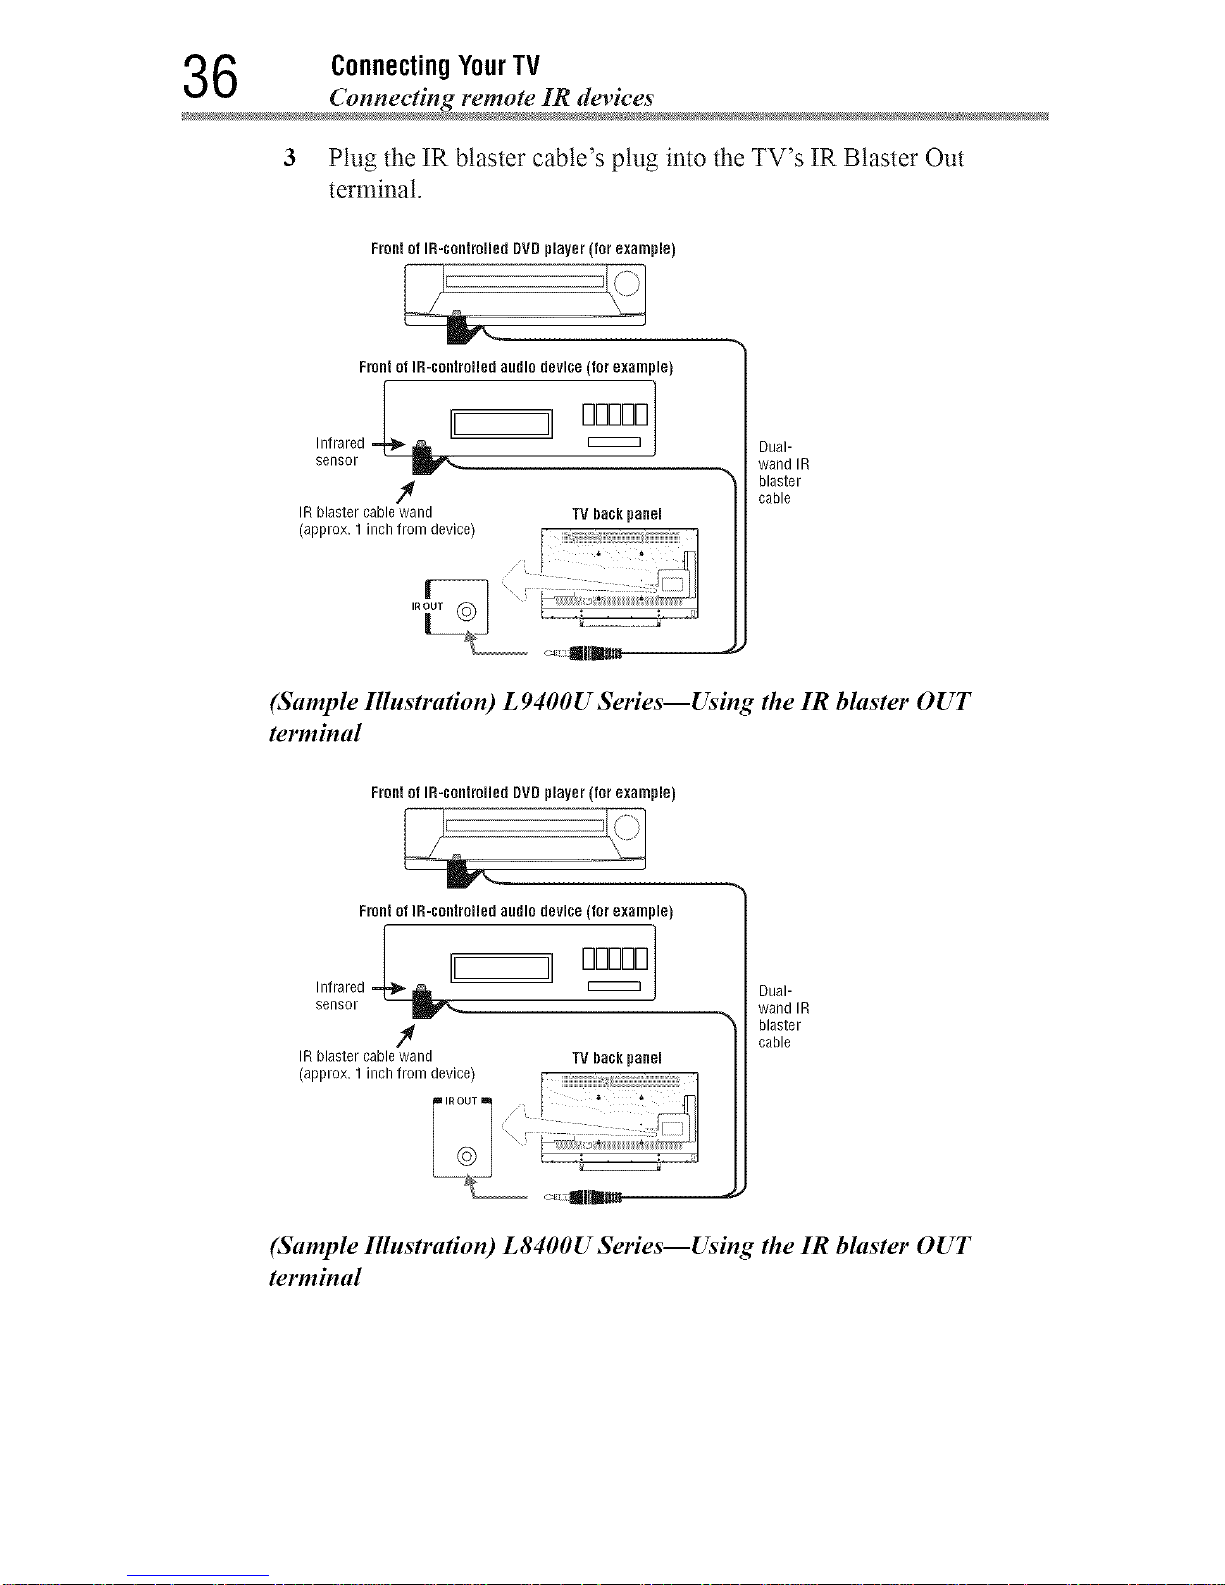
To connect the IR blaster cable:
1 Locate the infrared sensor on the front of your device. This sensor
is marked on some devices. Ifyou are having issues locating the
device's infrared sensor, see "If you cannot locate the device's
infrared sensor:" on page 37.
2 Align one of the IR blaster cable's wands approximately 1inch
away from the infrared sensor on the front of the device and attach
it using double-sided mounting tape. If you have a second device,
attach the second wand in a similar manner.
NOlr£ Ifyoudonothaveaseconddevice,coilthesecondwandwitharubber
bandandleaveitbehindtheTV.
Downloaded from www.ManualsFile.com manuals search engine
6 ConnectingYourTV
_mnec_ing remote IR devices
3 Plug the IR blaster cable's plug into the TV's IR Blaster Out
terminal.
Front of IR-controlled DVD player (for example)
Front ot IR-controlled audio device (for example)
IRblaster cable wand TV back panel
_approx.t,onbtrom°L-°_ __:fdev'ne_ i@:!- 1
i_
Dual-
wand IR
blaster
cable
(Sample Ilhtstra#on) L 9400U Series--Using the IR blaster OUT
terminal
Front of IR-controiied DVD player (for example)
Front ot IR-controlled audio devine (for example)
Dual-
wand IR
blaster
cable
(Sample Ilhtstra#on) L8400U Series--Using the IR blaster OUT
terminal
Downloaded from www.ManualsFile.com manuals search engine
Connecting YourTV 3 7
Connecting remote IR device
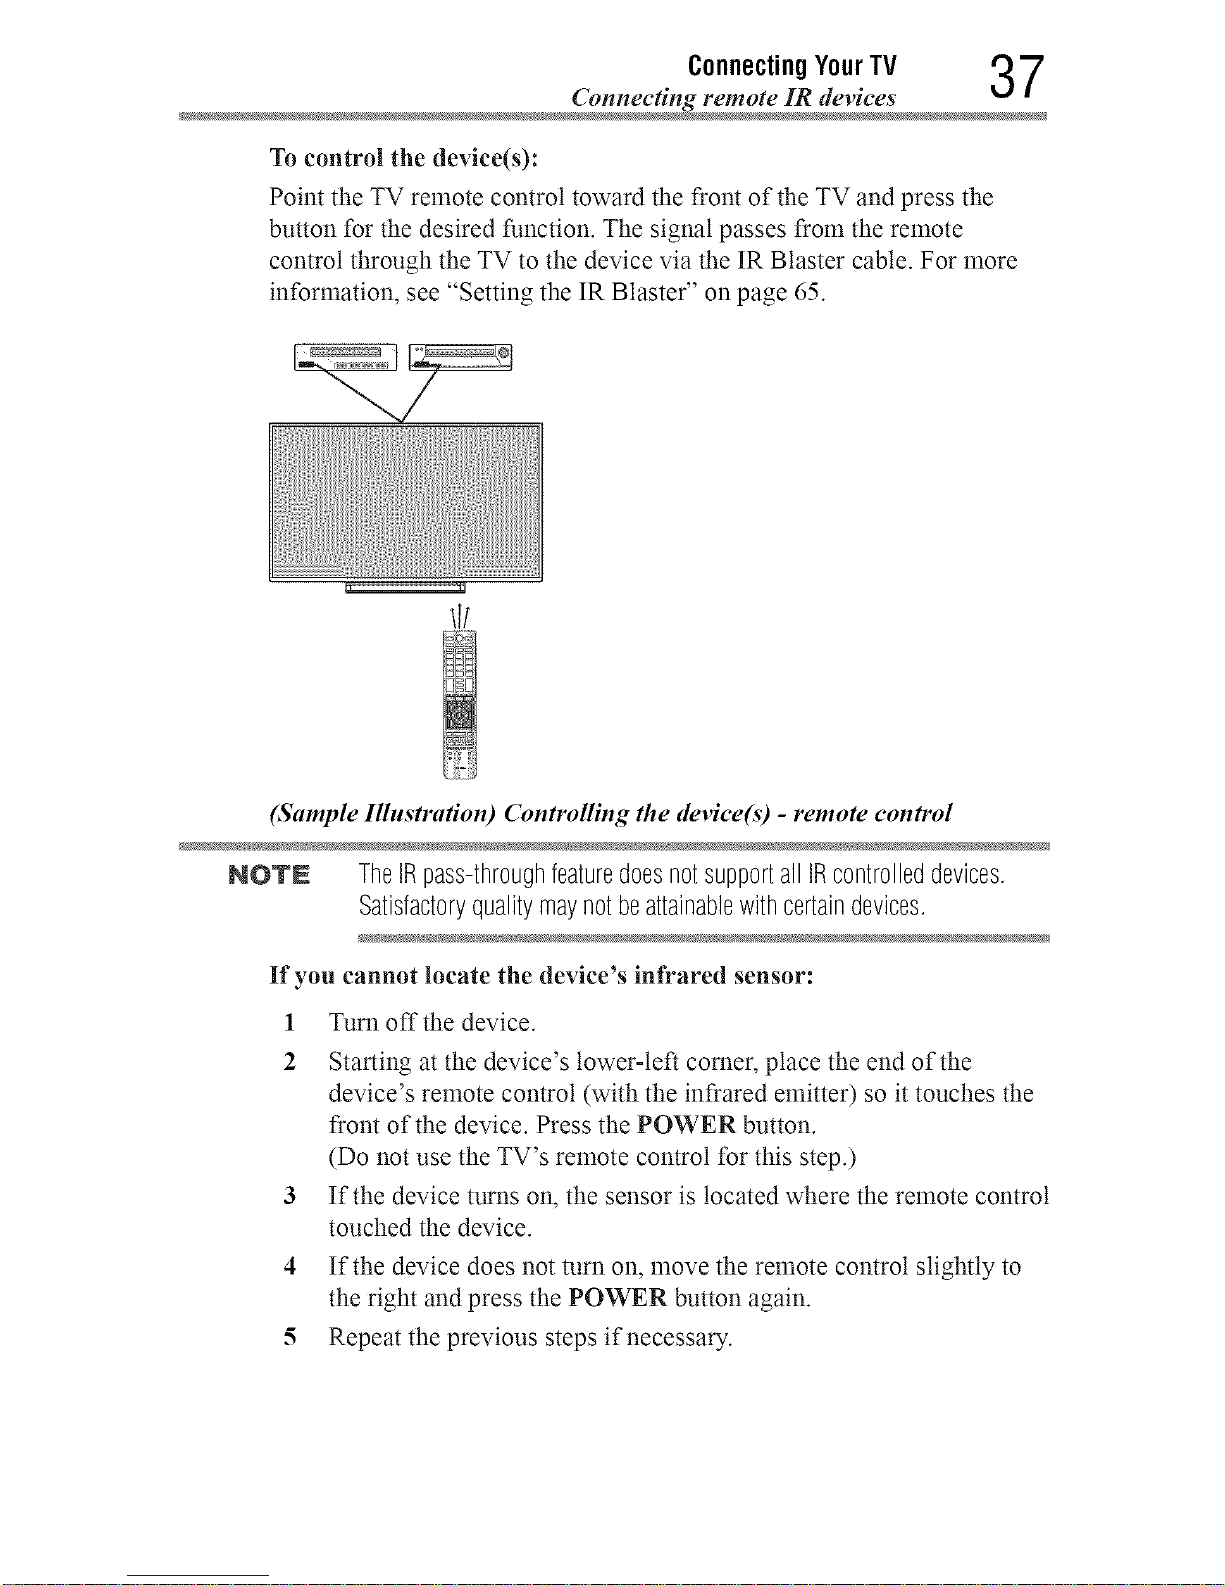
To control the device(s):
Point the TV remote control toward the front of the TV and press the
button for the desired function. The signal passes from the remote
control through the TV to the device via the IR Blaster cable. For more
information, see "Setting the IR Blaster" on page 65.
(Sample Illustration) Controlling the device(s) - remote control
NOTE TheIRpass-throughfeaturedoesnotsupportall IRcontrolleddevices.
Satisfactoryqualitymaynotbeattainablewithcertaindevices.
If you cannot locate the device's infrared sensor:
1 Turn off the device.
2 Starting at the device's lower-left corner, place the end of the
device's remote control (with the infrared emitter) so it touches the
front of the device. Press the POWER button.
(Do not use the TV's remote control for this step.)
3 If the device turns on, the sensor is located where the remote control
touched the device.
4 If the device does not turn on, move the remote control slightly to
the right and press the POWER button again.
5 Repeat the previous steps if necessary.
Downloaded from www.ManualsFile.com manuals search engine
8 ConnectingYourTV
(_mnecting a digital audio syste
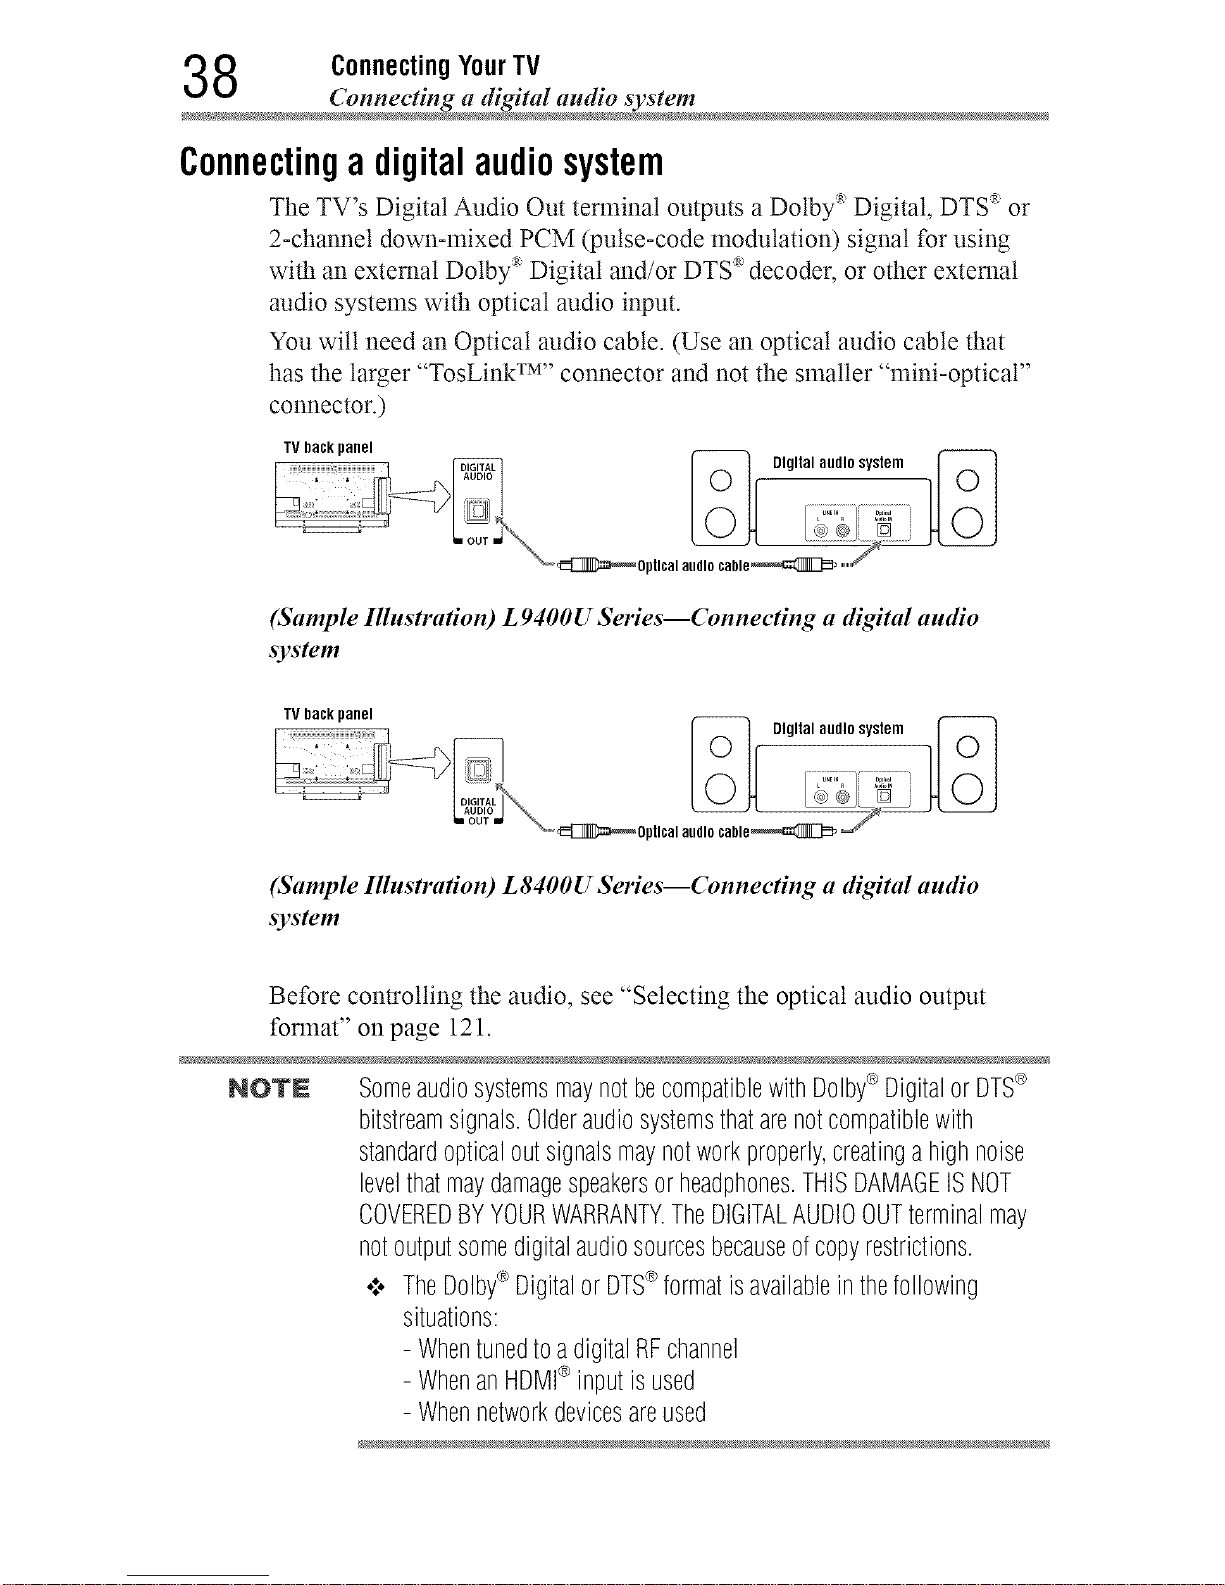
Connectinga digitalaudiosystem
The TV's Digital Audio Out terminal outputs a Dolby :_Digital, DTS '_or
2-channel down-mixed PCM (pulse-code modulation) signal for using
with an external Dolby :_Digital and/or DTS _'decoder, or other external
audio systems with optical audio input.
You will need an Optical audio cable. (Use an optical audio cable that
has the larger "TosLink TM''connector and not the smaller "mini-optical"
connector.)
TV back panel
_ Digital aedlosyslem ]_
pllcal aMIo ¢able_ ,,,,,,,,,_'
(Sample Illustration) L 9400U Series--Connecting a digital audio
system
TV back panel
_ Digital audlosyslem 1_-]
ptlcalaudiocable_ _=_f"
(Sample Illustration) L8400U Series--Connecting a digital audio
system
Before controlling the audio, see "Selecting the optical audio output
format" on page 121.
NOTE SomeaudiosystemsmaynotbecompatiblewithDolby®Digitalor DTS_>
bitstreamsignals.Olderaudiosystemsthatarenotcompatiblewith
standardopticaloutsignalsmaynotworkproperly,creatinga highnoise
levelthatmaydamagespeakersorheadphones.THISDAMAGEISNOT
COVEREDBYYOURWARRANTY.TheDIGITALAUDIOOUTterminalmay
notoutputsomedigitalaudiosourcesbecauseofcopyrestrictions.
¢ TheDolby®Digitalor DTS_>formatisavailableinthefollowing
situations:
- Whentunedtoa digitalRFchannel
- WhenanHDMI®inputis used
- Whennetworkdevicesareused
Downloaded from www.ManualsFile.com manuals search engine
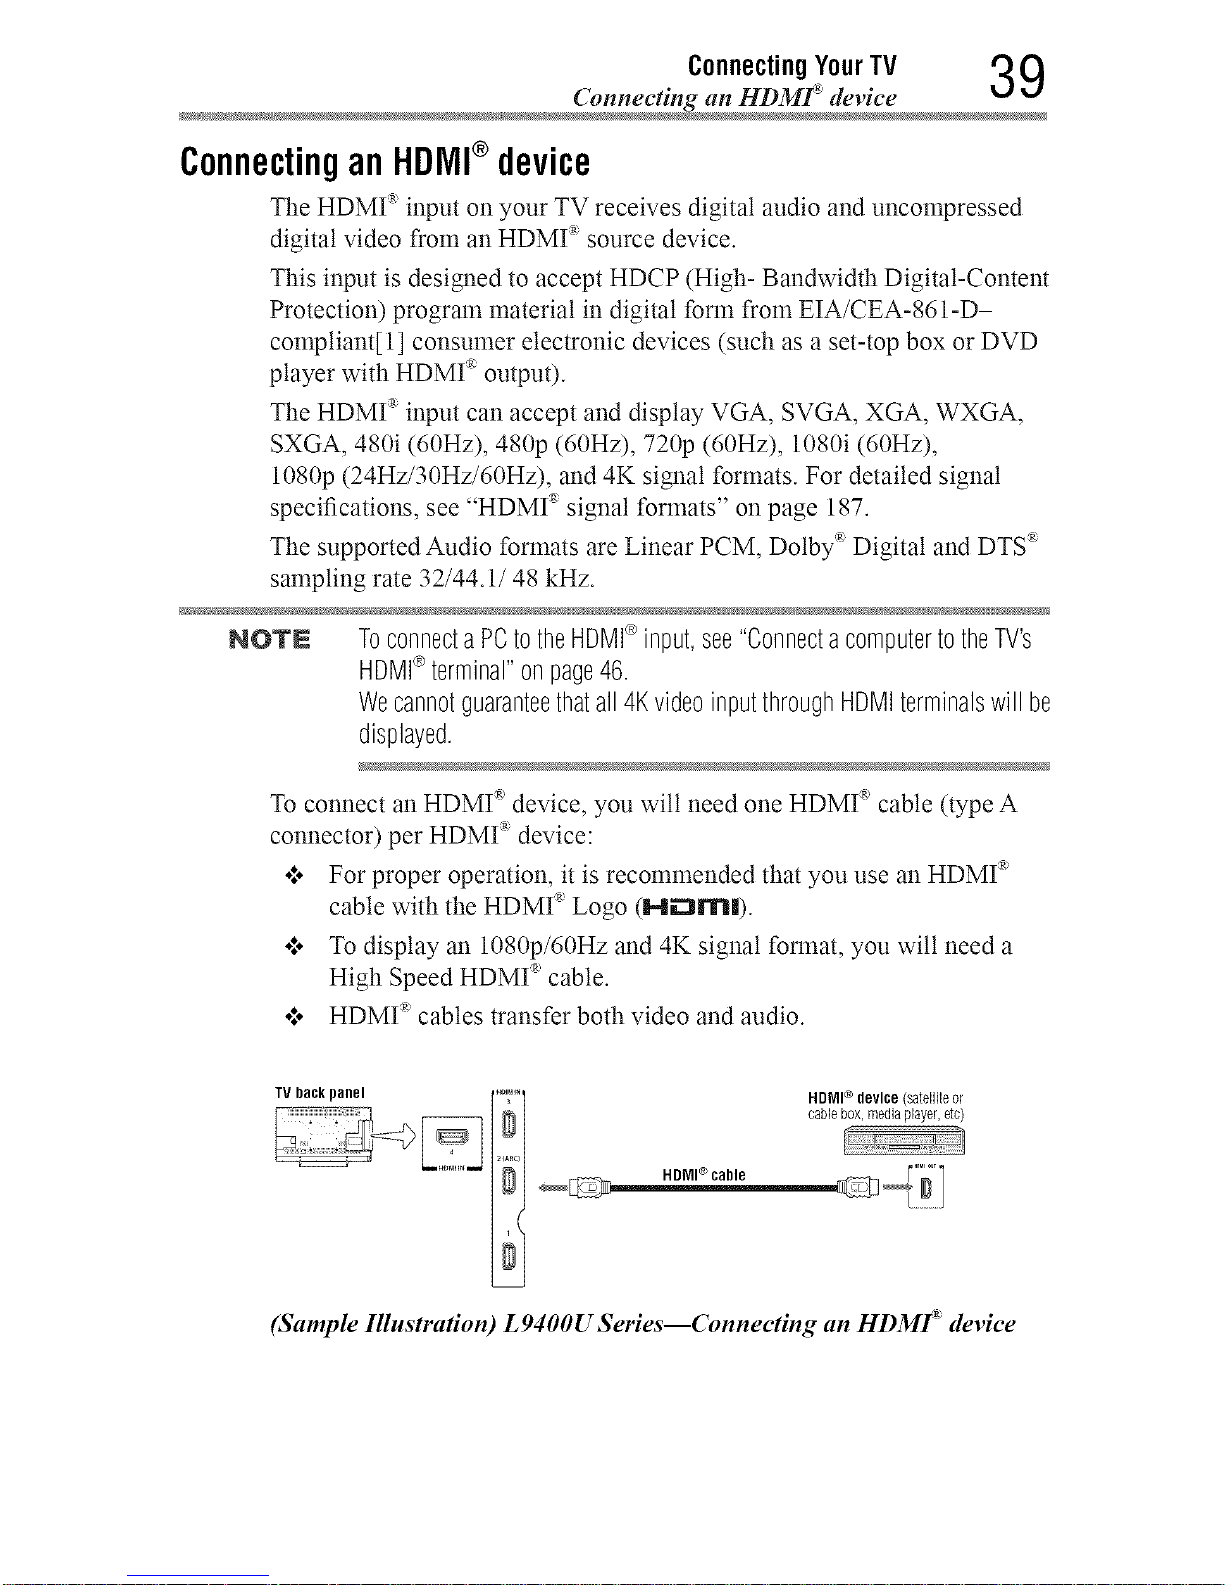
Connecting YourTV 3 9
Connecting an HDMF devic
Connectingan HDMI®device
The HDMI _ input on your TV receives digital audio and uncompressed
digital video from an HDMI '_source device.
This input is designed to accept HDCP (High- Bandwidth Digital-Content
Protection) program material in digital form from EIA/CEA-861-D-
compliant[ 1] consumer electronic devices (such as a set-top box or DVD
player with HDMI '_output).
The HDMI '_input can accept and display VGA, SVGA, XGA, WXGA,
SXGA, 480i (60Hz), 480p (60Hz), 720p (60Hz), 1080i (60Hz),
1080p (24Hz/30Hz/60Hz), and 4K signal formats. For detailed signal
specifications, see "HDMI _ signal formats" on page 187.
The supported Audio formats are Linear PCM, Dolby :_Digital and DTS *
sampling rate 32/44.1/48 kHz.
NOTE Toconnecta PCtotheHDMI®input,see"ConnectacomputertotheTV's
HDMI®terminal"onpage46.
Wecannotguaranteethatall 4KvideoinputthroughHDMIterminalswill be
displayed.
To connect an HDMI _'device, you wilt need one HDMI _'cable (type A
,g
connector) per HDMI device:
ol. For proper operation, it is recommended that you use an HDMI _
cable with the HDMI _'Logo (Hi_:3m|).
o:. To display an 1080p/60Hz and 4K signal format, you wilt need a
High Speed HDMI _'cable.
o:. HDMI _'cables transfer both video and audio.
TV DacRpanel ®
HDMI device (satelliteor
cablebox,mediaplayer,etc)
(Sample Illustration) L 9400U Series--Connecting an HDMf device
Downloaded from www.ManualsFile.com manuals search engine
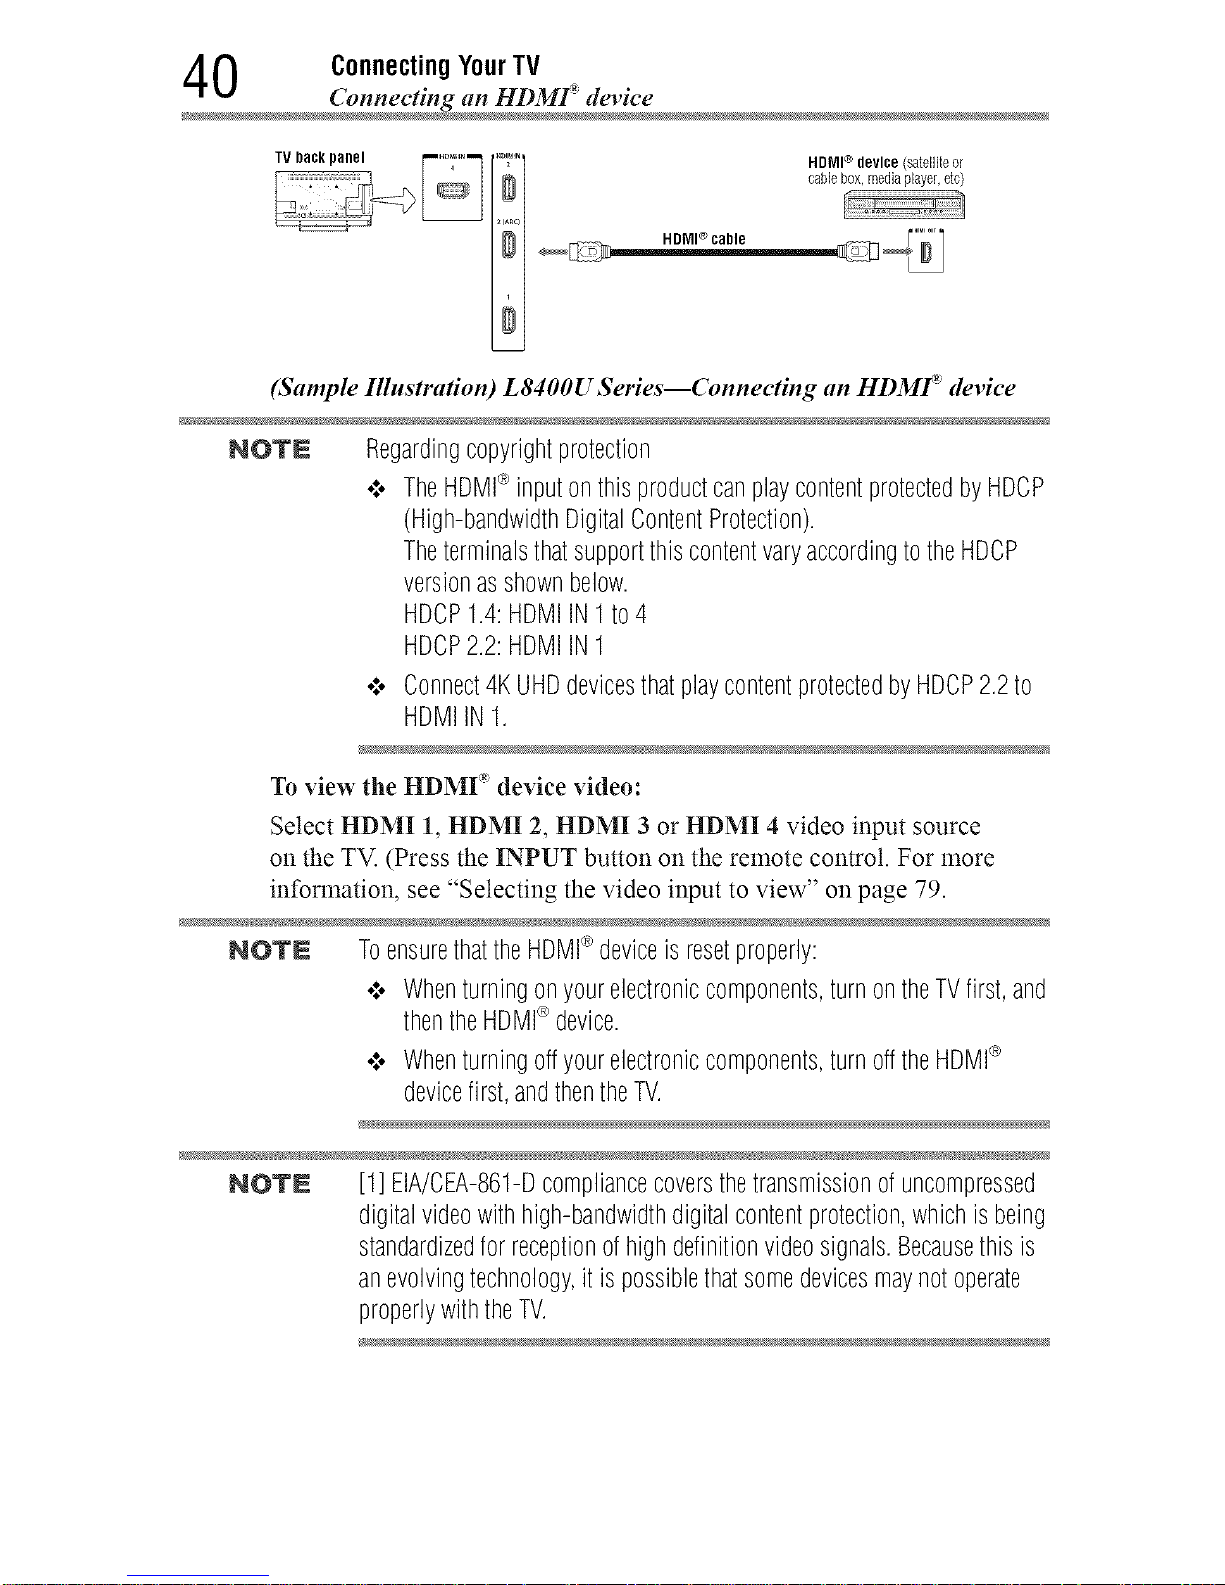
0 ConnectingYourTV
(_mnecting an HI)MF devic
HDMI® device (satelliteor
cablebox,mediaplayer,etc)
Select HDMI 1, HDMI 2, HDMI 3 or HDMI 4 video input source
on the TV. (Press the INPUT button on the remote control. For more
information, see "Selecting the video input to view" on page 79.
NOTN ToensurethattheHDMI®deviceis resetproperly:
•:. Whenturningonyourelectroniccomponents,turnontheTVfirst,and
thentheHDMI_>device.
•_. Whenturningoffyourelectroniccomponents,turnofftheHDMI®
devicefirst,andthentheTV.
N _
NOTN [1] EIA/CEA-861-Dcompliancecoversthetransmissionofuncompressed
digitalvideowithhigh-bandwidthdigitalcontentprotection,whichisbeing
standardizedfor receptionofhighdefinitionvideosignals.Becausethisis
anevolvingtechnology,it ispossiblethatsomedevicesmaynotoperate
properlywiththeTV.
(Sample Illustration) L8400U Series--Connecting an HDMI _ device
NOTE Regardingcopyrightprotection
•:. TheHDMI®inputonthisproductcanplaycontentprotectedbyHDCP
(High-bandwidthDigitalContentProtection).
TheterminalsthatsupportthiscontentvaryaccordingtotheHDCP
versionasshownbelow.
HDCP1.4:HDMIIN1 to4
HDCP2.2:HDMIIN1
•:. Connect4KUHDdevicesthatplaycontentprotectedbyHDCP2.2to
HDMIIN1.
® o o
To view the HDMI device v_deo:
Downloaded from www.ManualsFile.com manuals search engine
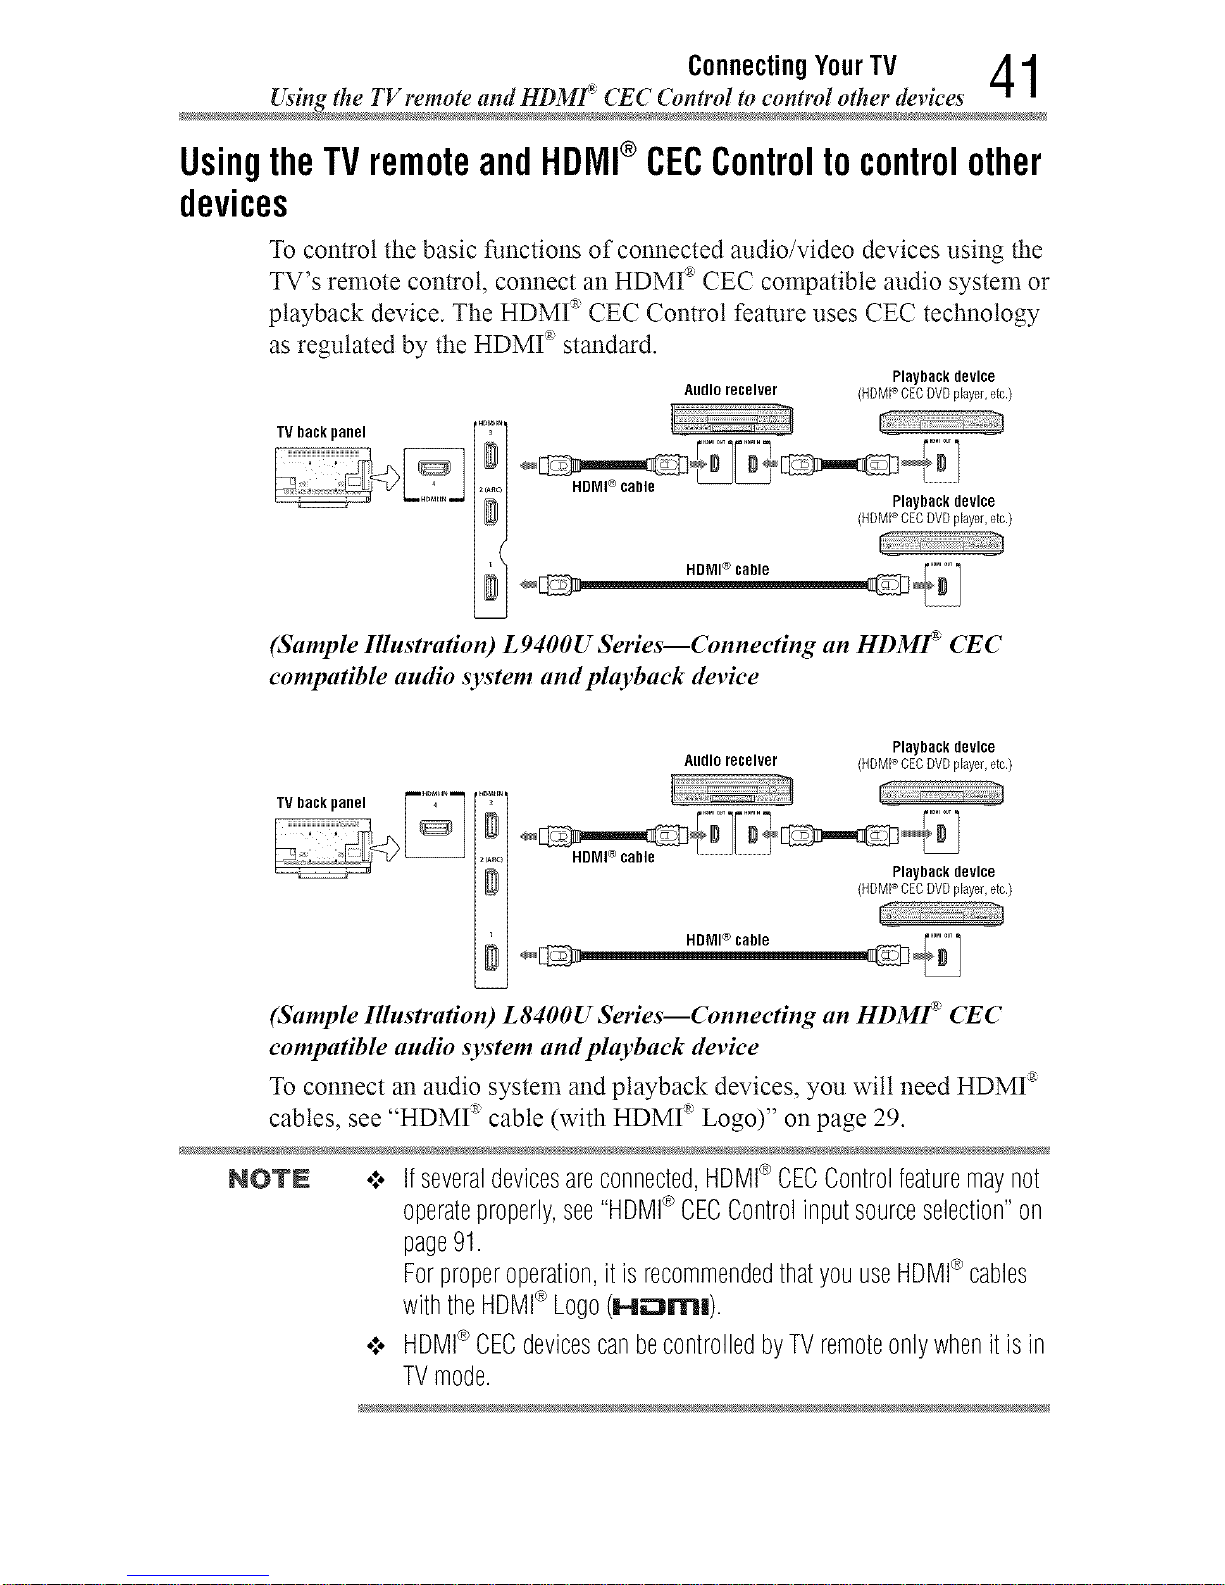
Connecting YourTV 4 1
Usingthe TV remote and HDMf: CEC Control to control other device
UsingtheTVremoteandHDMI®CECControlto controlother
devices
To control the basic functions of connected audio/video devices using the
TV's remote control, connect an HDMI _'CEC compatible audio system or
playback device. The HDMI _ CEC Control feature uses CEC technology
as regulated by the HDMI _ standard.
PlaybacR device
Audioreceiver (HDMPCECDVDpFayer,etc.)
TV back panel
HDMI ® cable
HDNI® cable
Playback device
(HDMPOEODVDphyer,etc.)
(Sample Illustration) L9400U Series--Connecting an HDMf CEC
compatible audio system and playback device
Playback device
Andlo receiver (HDMPCEC DVD pFayer,etc.)
...... L_: z'J
TV Ilack panel ["'"°'_'""] , ";" _h_
, _._ HDMI ® cable ................................................. Playback device
(HOMP CEO DVD pFayer,etc.)
(Sample Illustration) L8400U Series--Connecting an HDMf CEC
compatible audio system and phtyback device
To connect an audio system and playback devices, you wilt need HDMI _
cables, see "HDMI _ cable (with HDMI _ Logo)" on page 29.
NOTN o:o Ifseveraldevicesareconnected,HDMI®CECControlfeaturemaynot
operateproperly,see"HDMI®CECControlinputsourceselection"on
page91.
Forproperoperation,itis recommendedthatyouuseHDMI®cables
withtheHBMI¢ Logo(I-lz:::JrrH).
•:. HDMI®CECdevicescanbecontrolledbyTVremoteonlywhenitisin
TVmode.
Downloaded from www.ManualsFile.com manuals search engine

2 ConnectingYourTV
Connecting an HDMf audio syste
Before controlling the devices:
o:o For an explanation of setup and operations, see "Other HDMI ®CEC
Control functions" on page 92.
*:o Configure the connected devices. See each device's operation
manual.
NOT£ Thisfeatureis limitedto modelsincorporatingToshiba'sHDMI®CEC
Controlfeature.However,Toshibaisnotliableforthoseoperations.Seethe
individualinstructionmanualsforcompatibilityinformation.
When using an external AV amplifier the picture and sound may not be
properly synchronized. In this case, adjust the delay time of the sound on
the AV amplifier.
NOTN Thecontrolrangeofthedelaytimediffersaccordingtothedeviceyouuse.
ConnectinganHDMI®audiosystem
If your HDMI _ audio system supports ARC, audio from the TV can be
sent to the audio system via an existing HDMI _ cable.
You wilt need an HDMI _ cable.
TV back panel
AV amplifier that nu_wt_ II
(Sample Illustration) L 9400U Series-- Connecting to HDMf ARC
Downloaded from www.ManualsFile.com manuals search engine
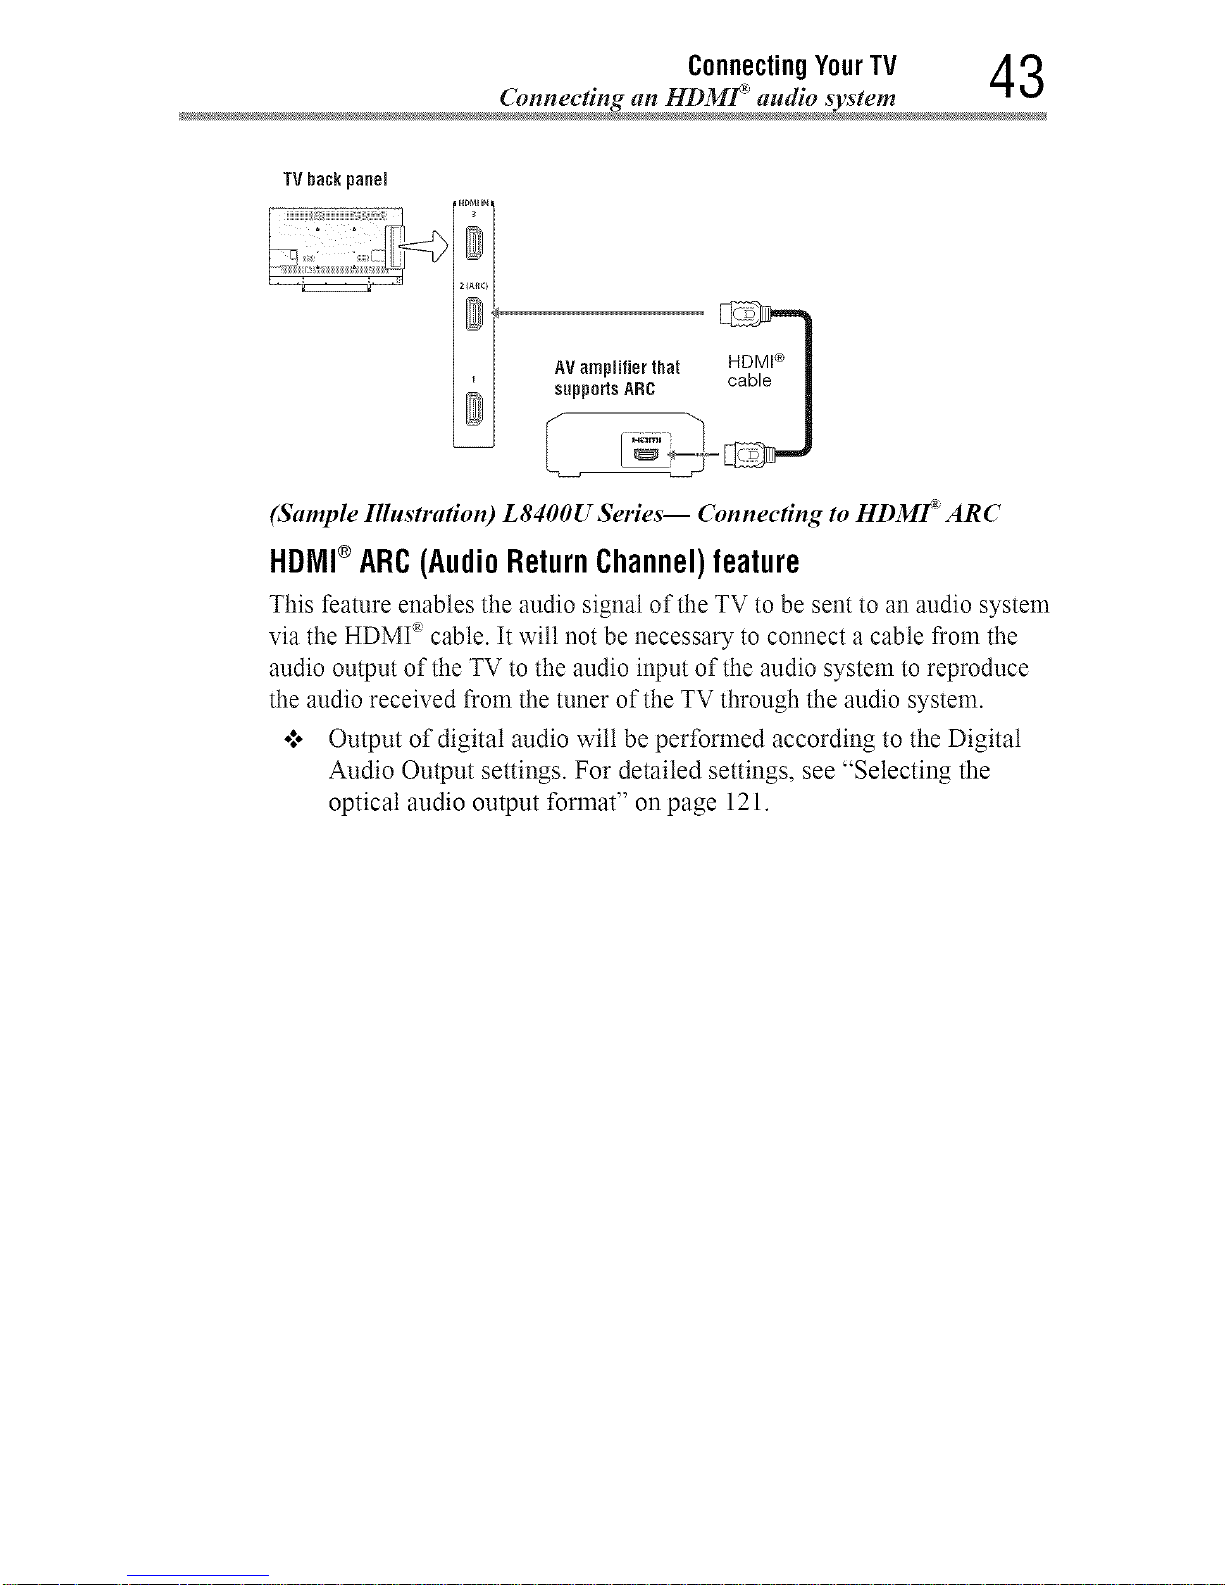
Connecting YourTV 4 3
Connecting an HI)Mr _audio syste
AV amplifier that
(Sample Illustration) L8400U Series-- Connecting to HD3/If ARC
HDIVll®ARC(AudioReturnChannel)feature
This feature enables the audio signal of the TV to be sent to an audio system
via the HDMI _cable. It will not be necessary to connect a cable from the
audio output of the TV to the audio input of the audio system to reproduce
the audio received from the tuner of the TV through the audio system.
o:o Output of digital audio wilt be performed according to the Digital
Audio Output settings. For detailed settings, see "Selecting the
optical audio output format" on page 121.
Downloaded from www.ManualsFile.com manuals search engine
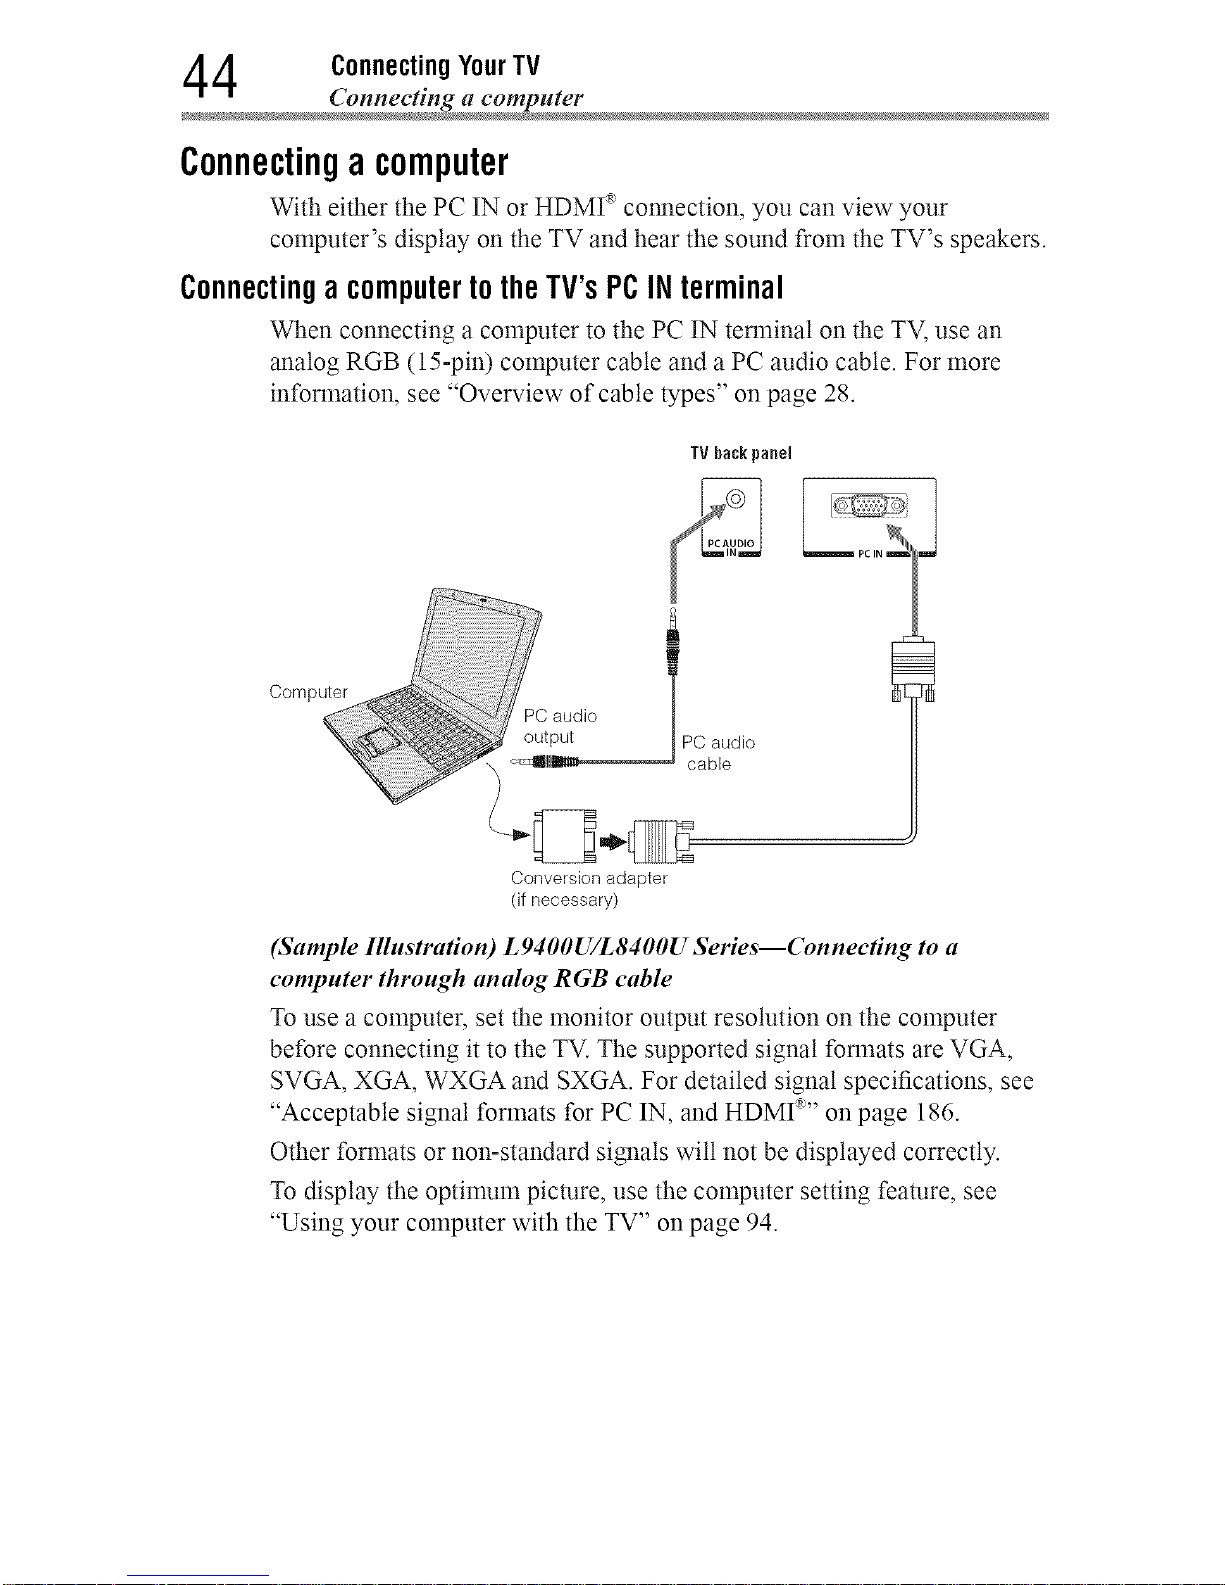
4 ConnectingYourTV
_mnecting a compute
Connectinga computer
With either the PC IN or HDMI _'connection, you can view your
computer's display on the TV and hear the sound from the TV's speakers.
Connectinga computerto theTV's PC IN terminal
When connecting a computer to the PC IN terminal on the TV, use an
analog RGB (15-pin) computer cable and a PC audio cable. For more
information, see "Overview of cable types" on page 28.
TV hackpanel
PC audio i
output PC audio
_-_11111_, came
Conversion adapter
(if necessary)
(Sample Illustra#on) L9400U/L8400U Series--Connec#ng to a
computer through analog RGB cable
To use a computer, set the monitor output resolution on the computer
before connecting it to the TV. The supported signal fonnats are VGA,
SVGA, XGA, WXGA and SXGA. For detailed signal specifications, see
"Acceptable signal formats for PC IN, and HDMI _'' on page 186.
Other formats or non-standard signals will not be displayed correctly.
To display the optimum picture, use the computer setting feature, see
"Using your computer with the TV" on page 94.
Downloaded from www.ManualsFile.com manuals search engine
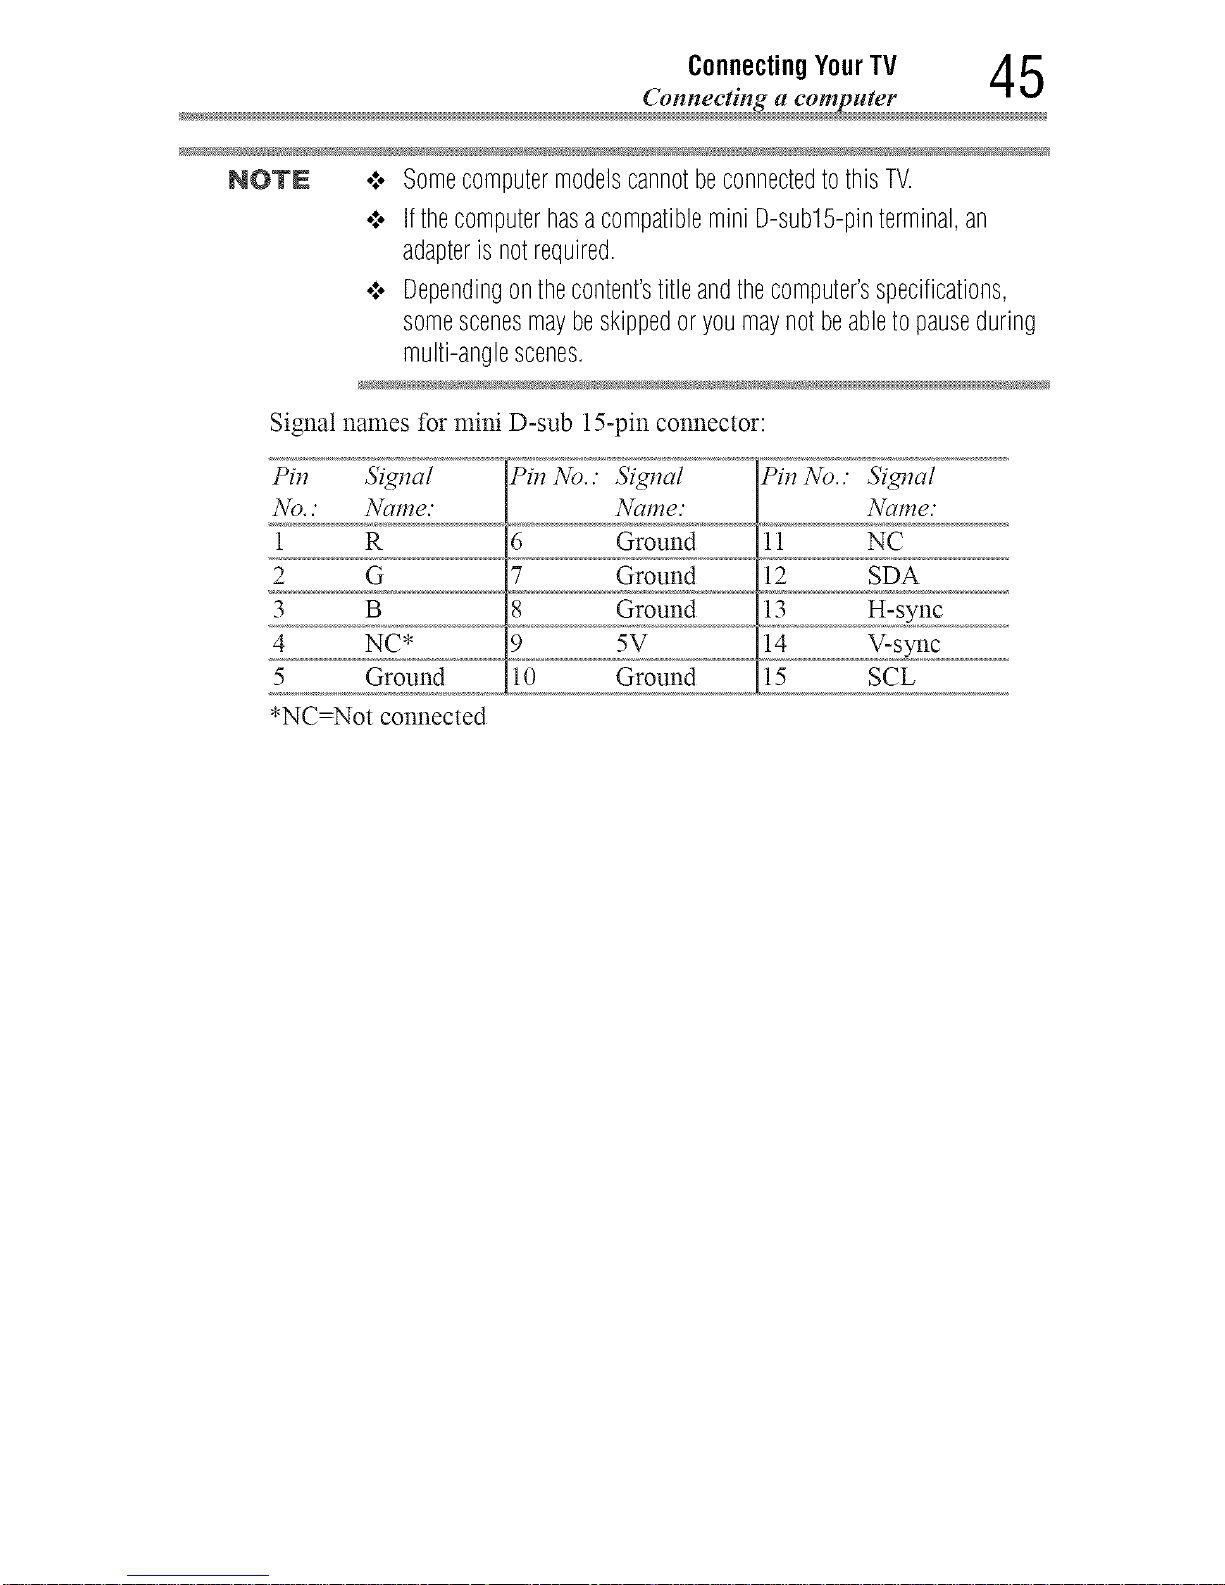
Connecting YourTV 4 5
NOTE o:.SomecomputermodelscannotbeconnectedtothisTV.
o:o IfthecomputerhasacompatibleminiD-sub15-pinterminal,an
adapteris notrequired.
o:o Dependingonthecontent'stitleandthecomputer'sspecifications,
somescenesmaybeskippedor youmaynotbeabletopauseduring
multi-anglescenes.
Signal names for mini D-sub 15-pin connector:
I°il_ 5'igl_a/ I°il_No.." 5'igl_a/ Pil_No.." 5'igl_a/
No.." Name." Name." Name."
1 R 6 Ground 11 NC
2 G 7 Ground 12 SDA
3 B 8 Ground 13 H-sync
4 NC* 9 5V 14 V-sync
5 Ground 10 Ground 15 SCL
*NC=Not connected
Downloaded from www.ManualsFile.com manuals search engine
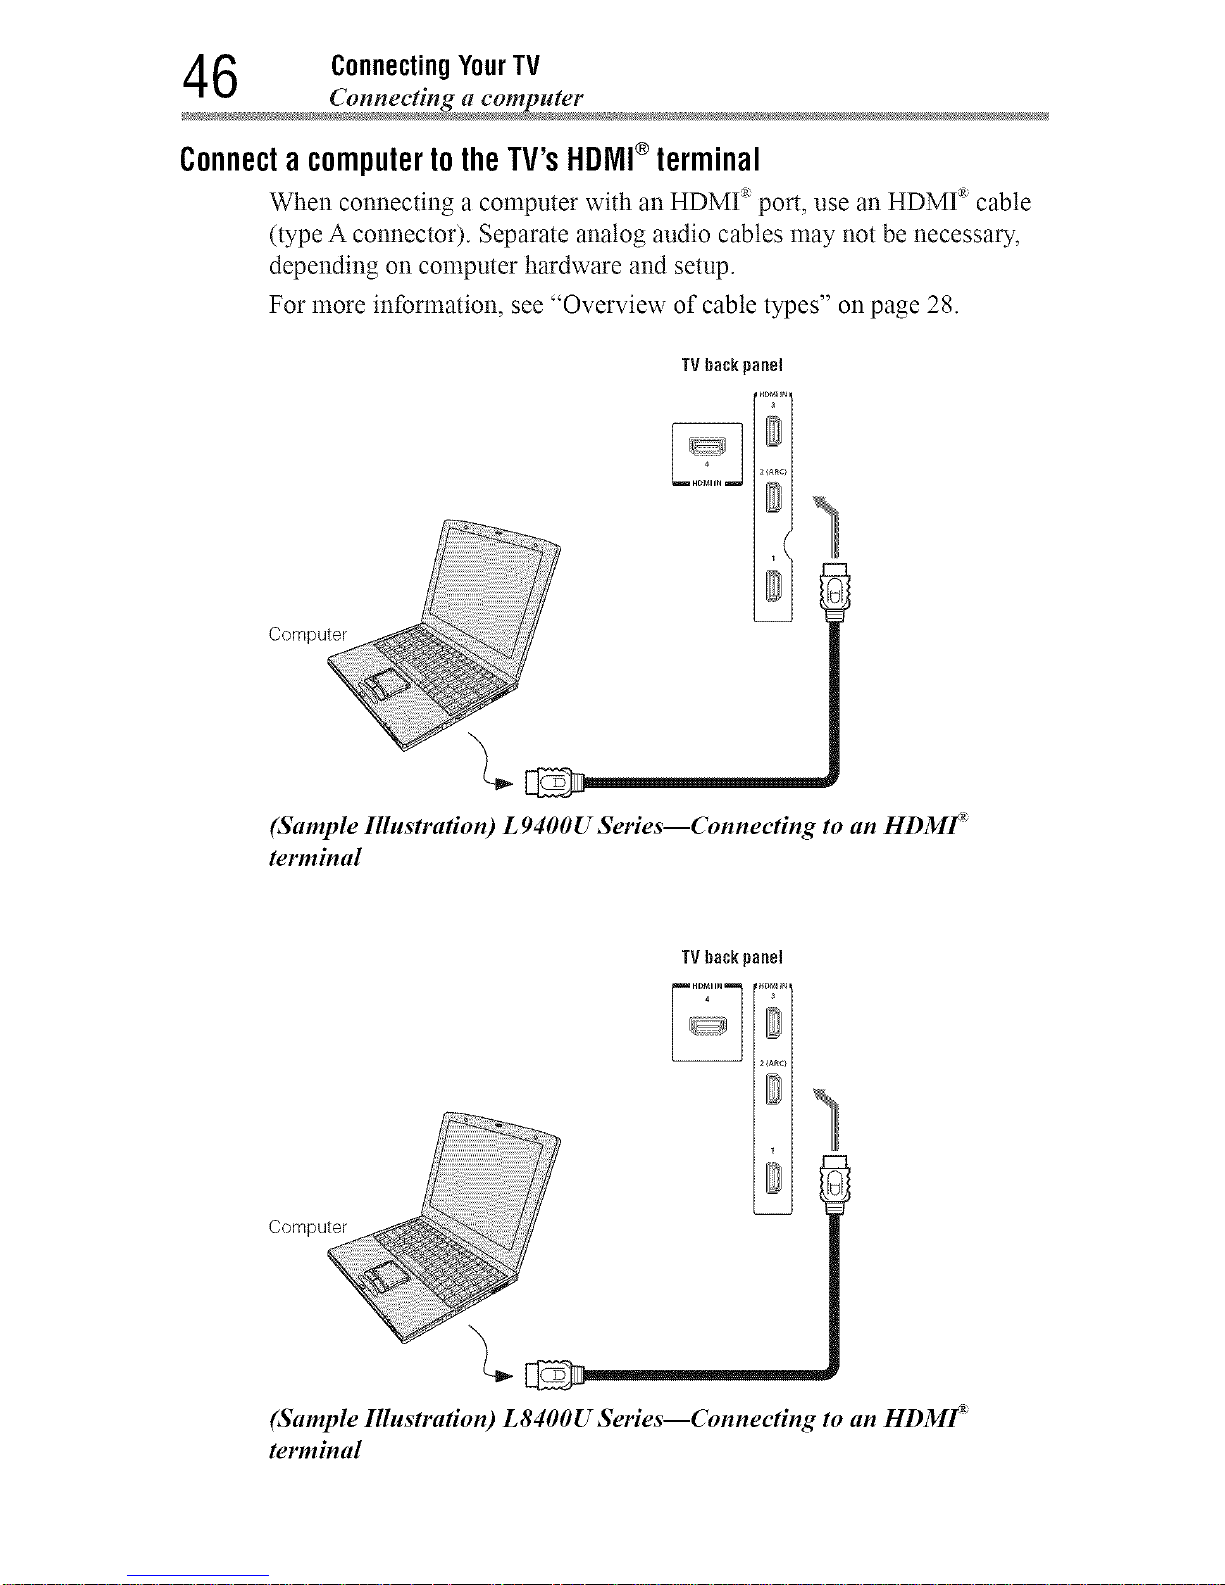
6 ConnectingYourTV
Connecting a compute
ConnectacomputertotheTV'sHDIVll®terminal
When connecting a computer with an HDMI :_port, use an HDMI _ cable
(type A connector). Separate analog audio cables may not be necessary,
depending on computer hardware and setup.
For more information, see "Overview of cable types" on page 28.
TV back panel
(Sample Illustra#ou) L 9400U Series--Connecting to an HDMF
terminal
TV backpanel
1
Computer
(Sample Illustration) L8400U Series--Connecting to an HDMF
terminal
Downloaded from www.ManualsFile.com manuals search engine

Connecting YourTV 4 7
The supported signal formats are VGA, SVGA, XGA, WXGA,
SXGA, 480i (60Hz), 480p (60Hz), 720p (60Hz), 1080i (60Hz), 1080p
(24Hz/30Hz/60Hz), and 4K formats. For signal specifications, see
"Acceptable signal formats for PC IN, and HDMI >' on page 186.
NQTN .:. Theedgesofthepicturemaybehidden.
•:. Ifreceivinga480i,480p,720p,1080i,or1080psignalprogram,
NativeModeTM scalesthevideoto displaytheentirepicturewithinthe
bordersofthescreen(i.e.no overscanning).
Connectingtoahomenetwork
The LAN port allows your Toshiba TV to connect to your home network.
You can use this home network to access photos, movies, and music files
that are stored on a cmmected media server and play them on your TV.
ConnectingtheTVdirectlytoacomputerwithoutan Internetconnection
You wilt need a Crossover LAN cable.
TV backpanel
Computer
(Sample Illustration) L 9400U Series--Connecting a computer without
Internet connection
TV back panel
Computer
4B
(Sample Illustration) L8400U Series--Connecting a computer without
Internet connection
Downloaded from www.ManualsFile.com manuals search engine
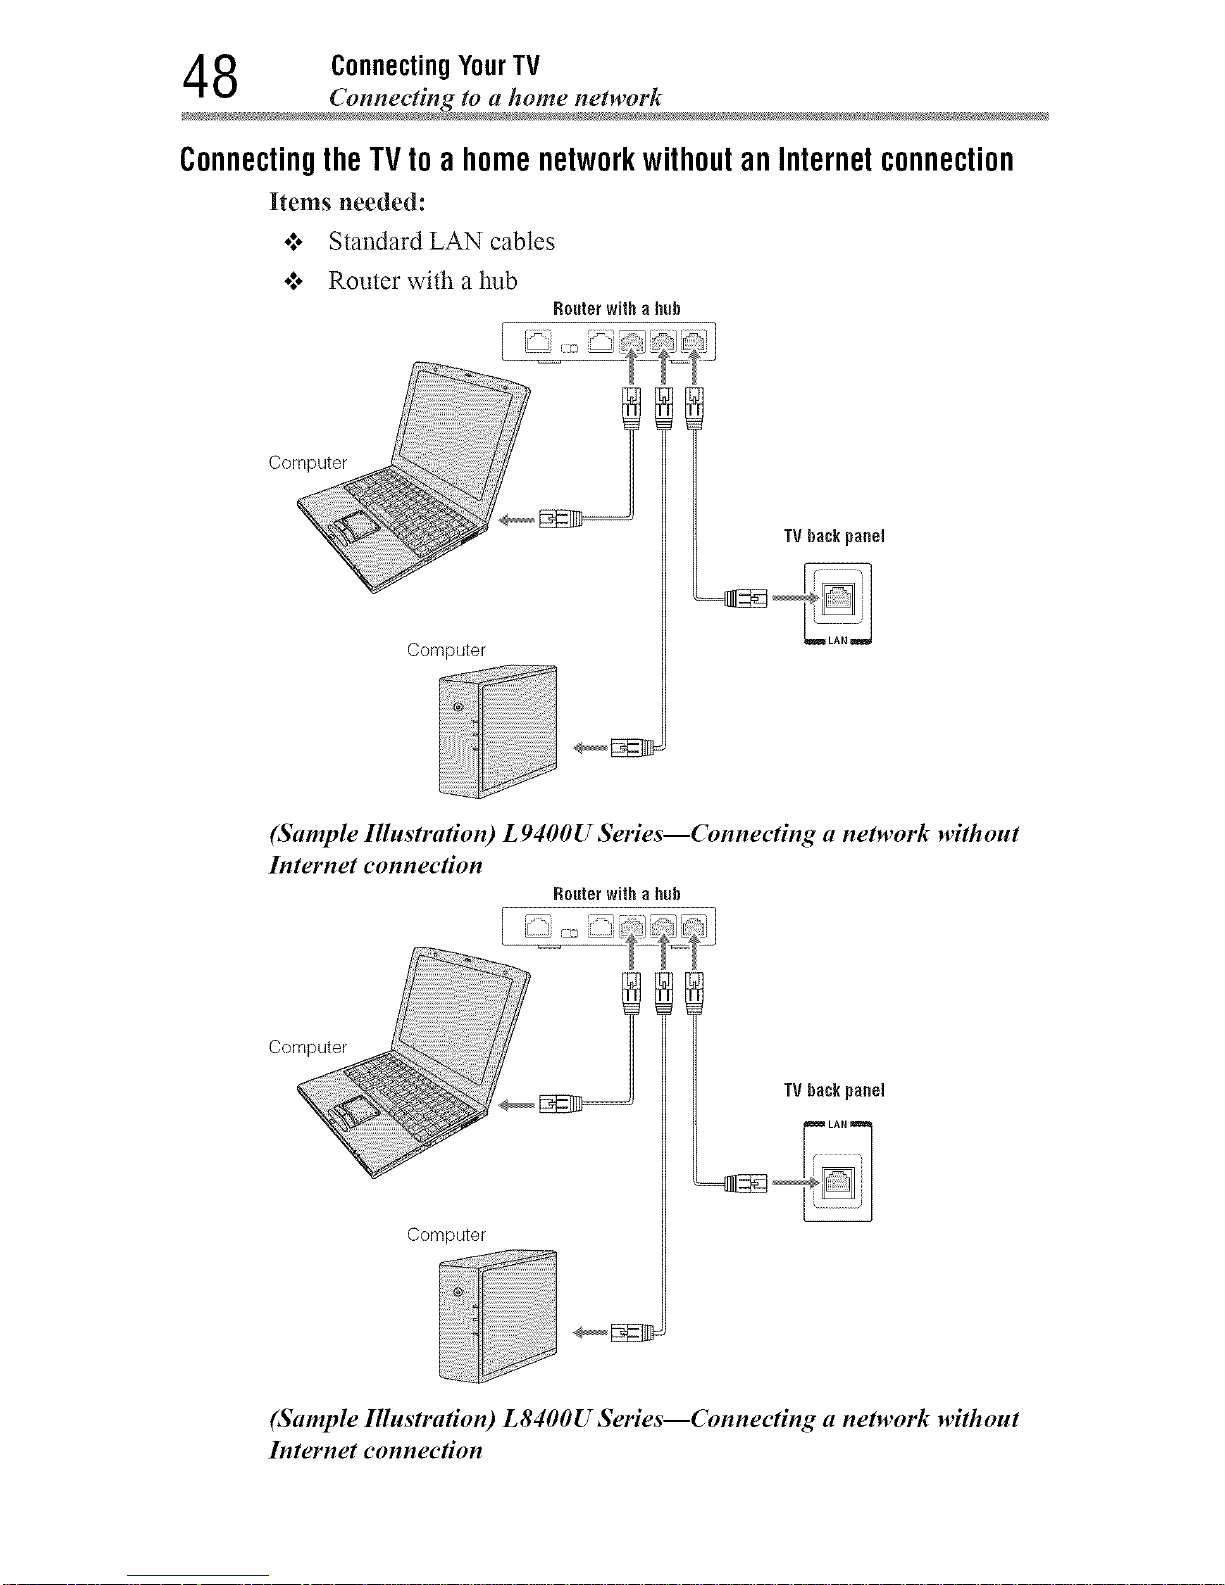
8 ConnectingYourTV
Connecting to a home networ
Connectingthe TV to a home networkwithoutan Internetconnection
Items needed:
•:. Standard LAN cables
o*.o Router with a hub
Routerwith a huh
Computer
Computer
TVhack panel
(Sample Illustration) L 9400U Series--Connecting a network without
Iuternet eonneeKon
Routerwith a lmh
Computer __
Computer
TVhack panel
(Sample Illustration) L8400U Series--Connecting a network without
Iuternet connection
Downloaded from www.ManualsFile.com manuals search engine

Connecting YourTV 4 9
ConnectingtheTVtoa homenetworkwithanInternetconnection-
wired
Items needed:
o:o Coaxial or telephone cable (depending on your modem type)
o:o Standard LAN cables
o*.oRouter with Hub
o*.oModem (DSL or cable)
Nodem (DSL orcable} Routerwitha huh
1 i
Cable or
Phone jack
I
2
m2,3
Computer
TV hackpanel
2
(Sample Illustration) L 9400U Series--Connecting with Internet
connection - wired
Downloaded from www.ManualsFile.com manuals search engine
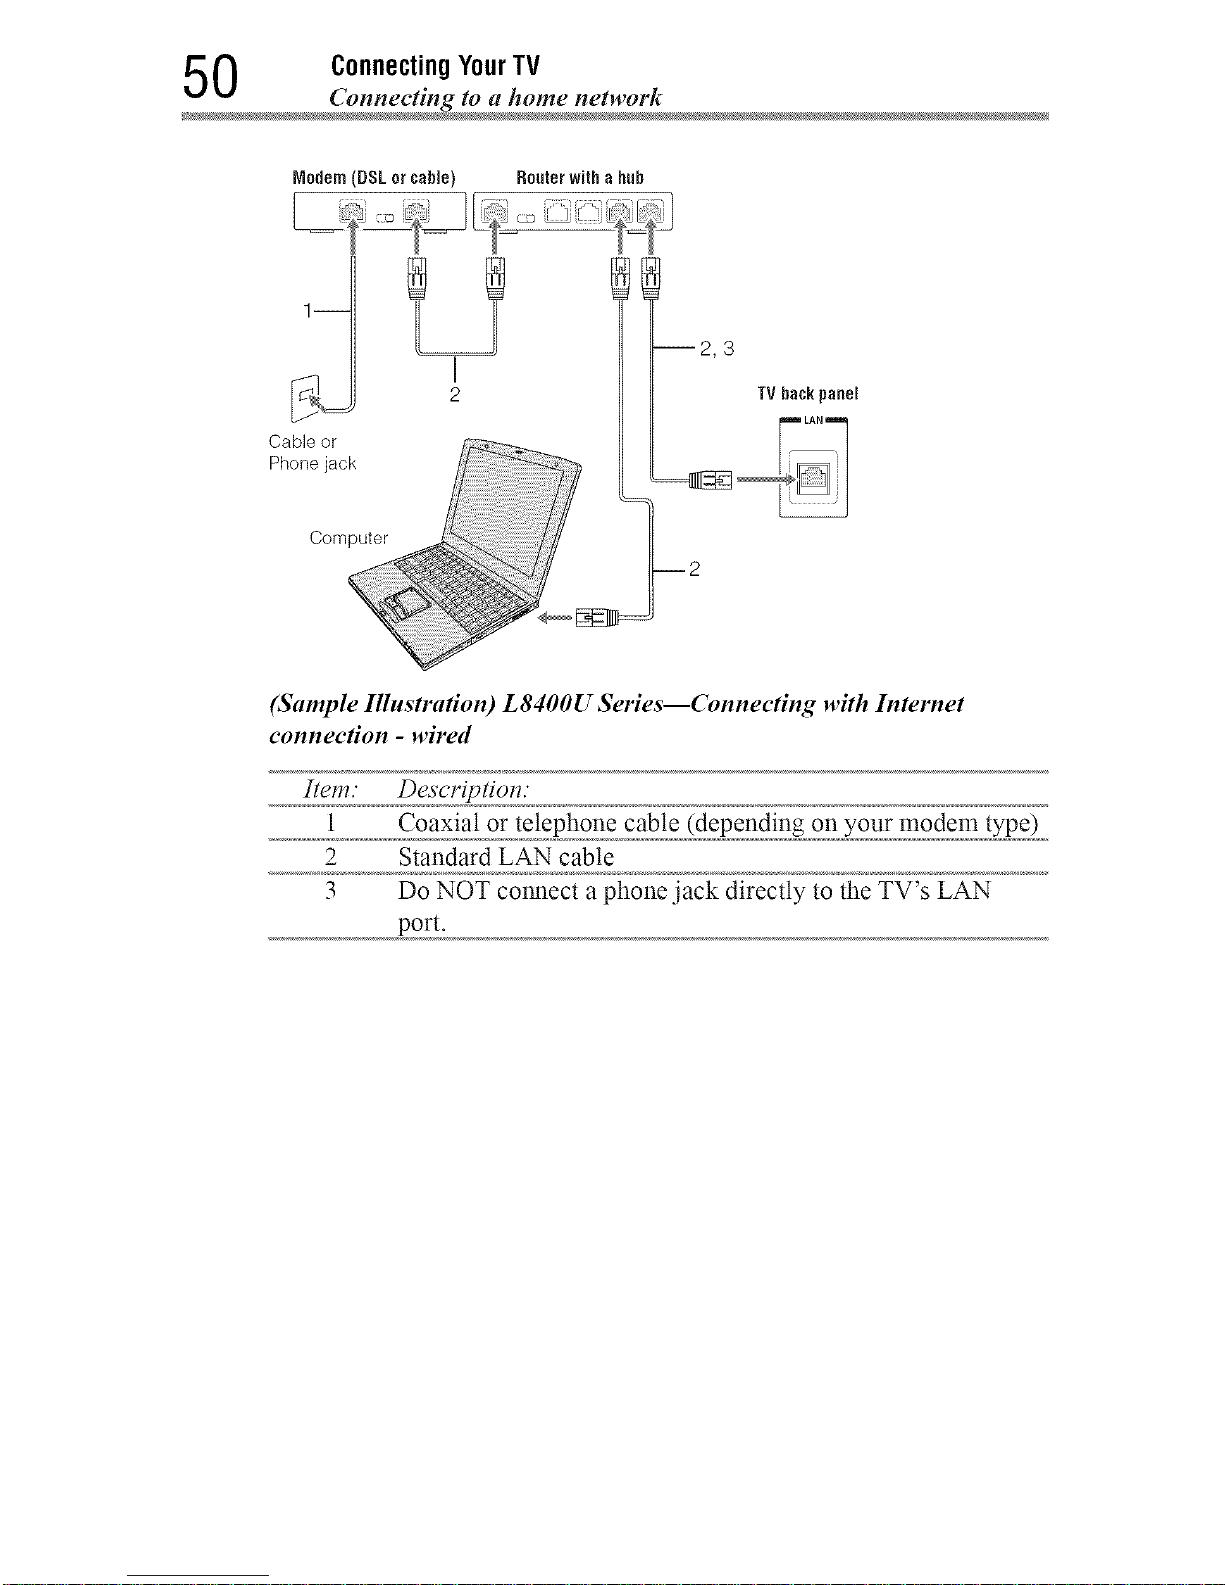
0 ConnectingYourTV
_mnecting to a home networ
Modem (DSL orcable) Routerwitha huh
I
2
--2,3
TVhackpanel
Computer 2
(Sample Illustration) L8400U Series--Connecting with Internet
eonnee#on - wired
Item." Descriptiol_."
1 Coaxial or telephone cable (depending on your modem type)
2 Standard LAN cable
3 Do NOT colmect a phone jack directly to the TV's LAN
port.
Downloaded from www.ManualsFile.com manuals search engine
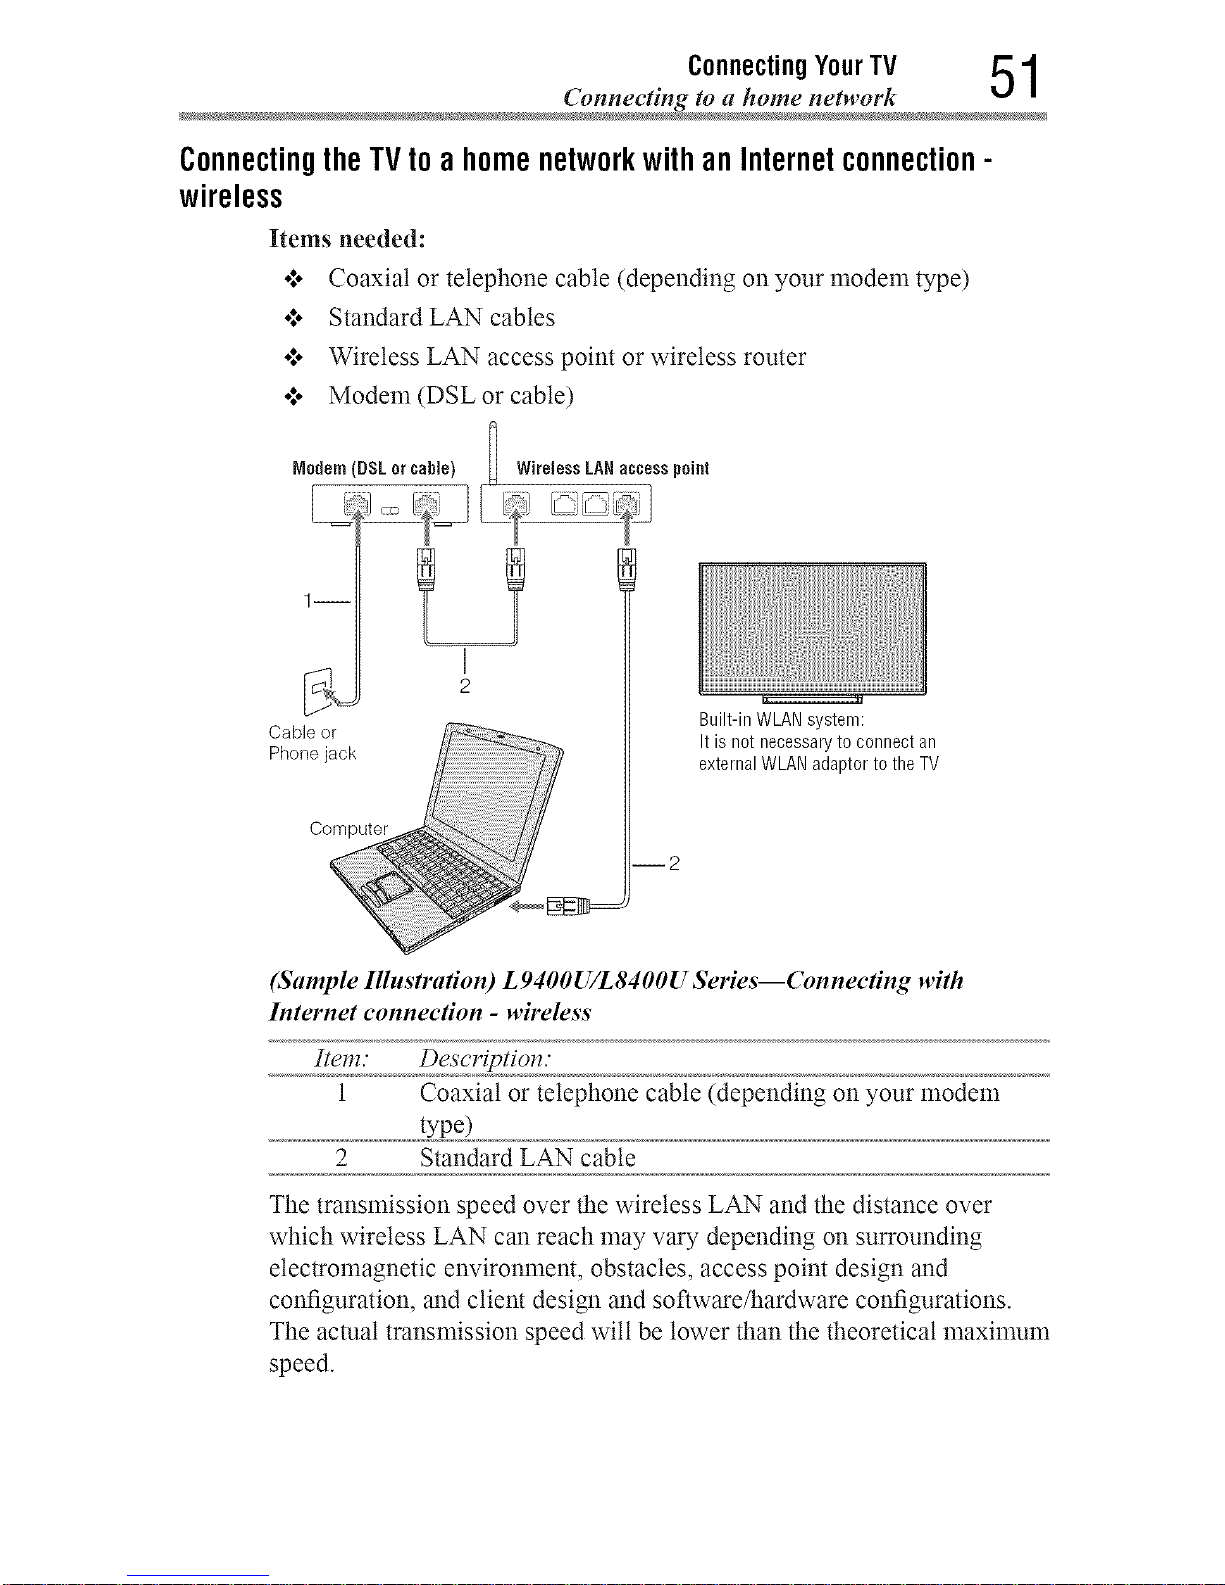
Connecting YourTV 51
ConnectingtheTVtoa homenetworkwithanInternetconnection-
wireless
Items needed:
o:. Coaxial or telephone cable (depending on your modem type)
o:* Standard LAN cables
o:* Wireless LAN access point or wireless router
o:, Modem (DSL or cable)
8
Nodem (DSI or cane) I Wireless IAN access point
I
2
Built-in WLAN system:
It is not necessary to connect an
external WLAN adaptor to the TV
Cable or_
Phone jack
Computer
i2
(Sample Illustration) L9400U/L8400U Series--Conneeting with
Internet connection - wireless
Item." Descriptiol_."
1 Coaxial or telephone cable (depending on your modem
type)
2 Standard LAN cable
The transmission speed over the wireless LAN and the distance over
which wireless LAN can reach may vary depending on surrounding
electromagnetic environment, obstacles, access point design and
configuration, and client design and software/hardware configurations.
The actual transmission speed wilt be lower than the theoretical maximum
speed.
Downloaded from www.ManualsFile.com manuals search engine
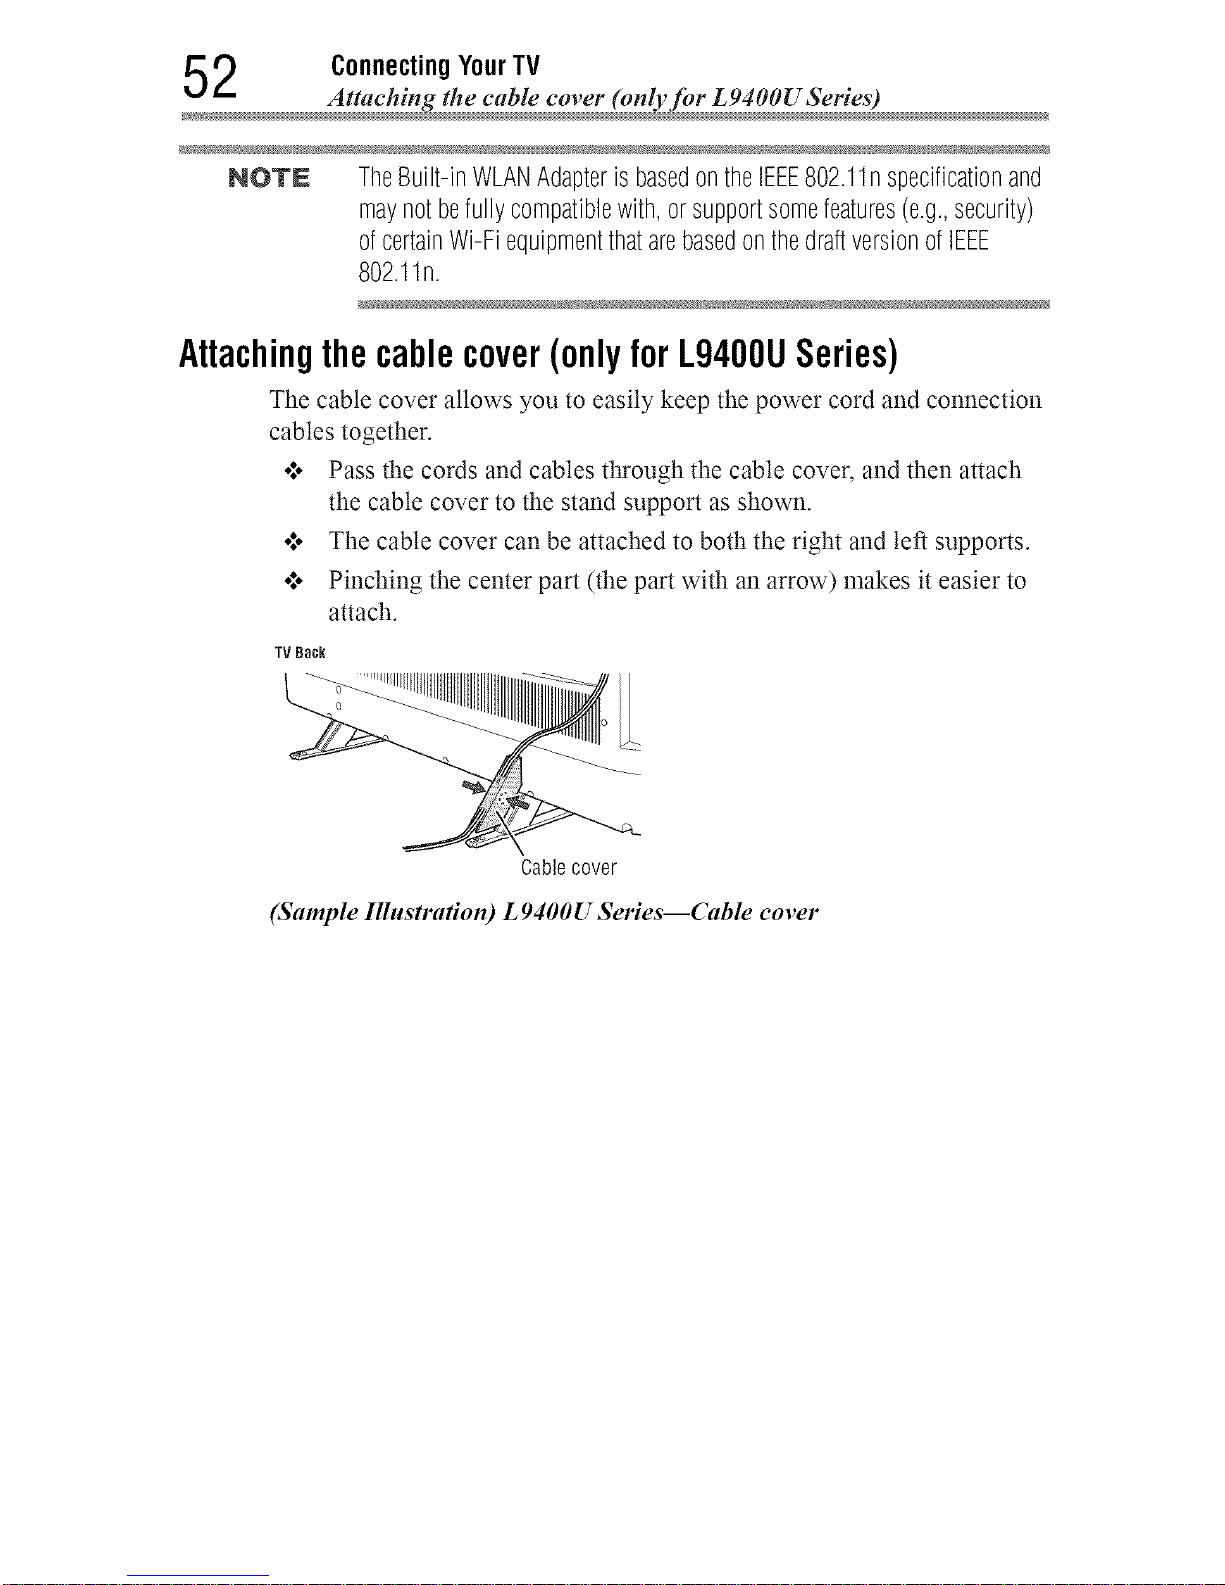
2 Connecting YourTV
Attaching the cable covet" (only for L9400U Series)
NOTE TheBuilt-inWLANAdapteris basedontheIEEE802.11nspecificationand
maynotbefullycompatiblewith,orsupportsomefeatures(e.g.,security)
ofcertainWi-FiequipmentthatarebasedonthedraftversionofIEEE
802.11n.
Attachingthecablecover(onlyforL9400USeries)
The cable cover allows you to easily keep the power cord and connection
cables together.
•*.. Pass the cords and cables through the cable cover, and then attach
the cable cover to the stand support as shown
•*.. The cable cover can be attached to both the right and left supports
•*.. Pinching the center part (the part with an arrow) makes it easier to
attach
TV Bac_
Cablecover
(Sample Illnstradon) L 9400U Series--Cable cover
Downloaded from www.ManualsFile.com manuals search engine
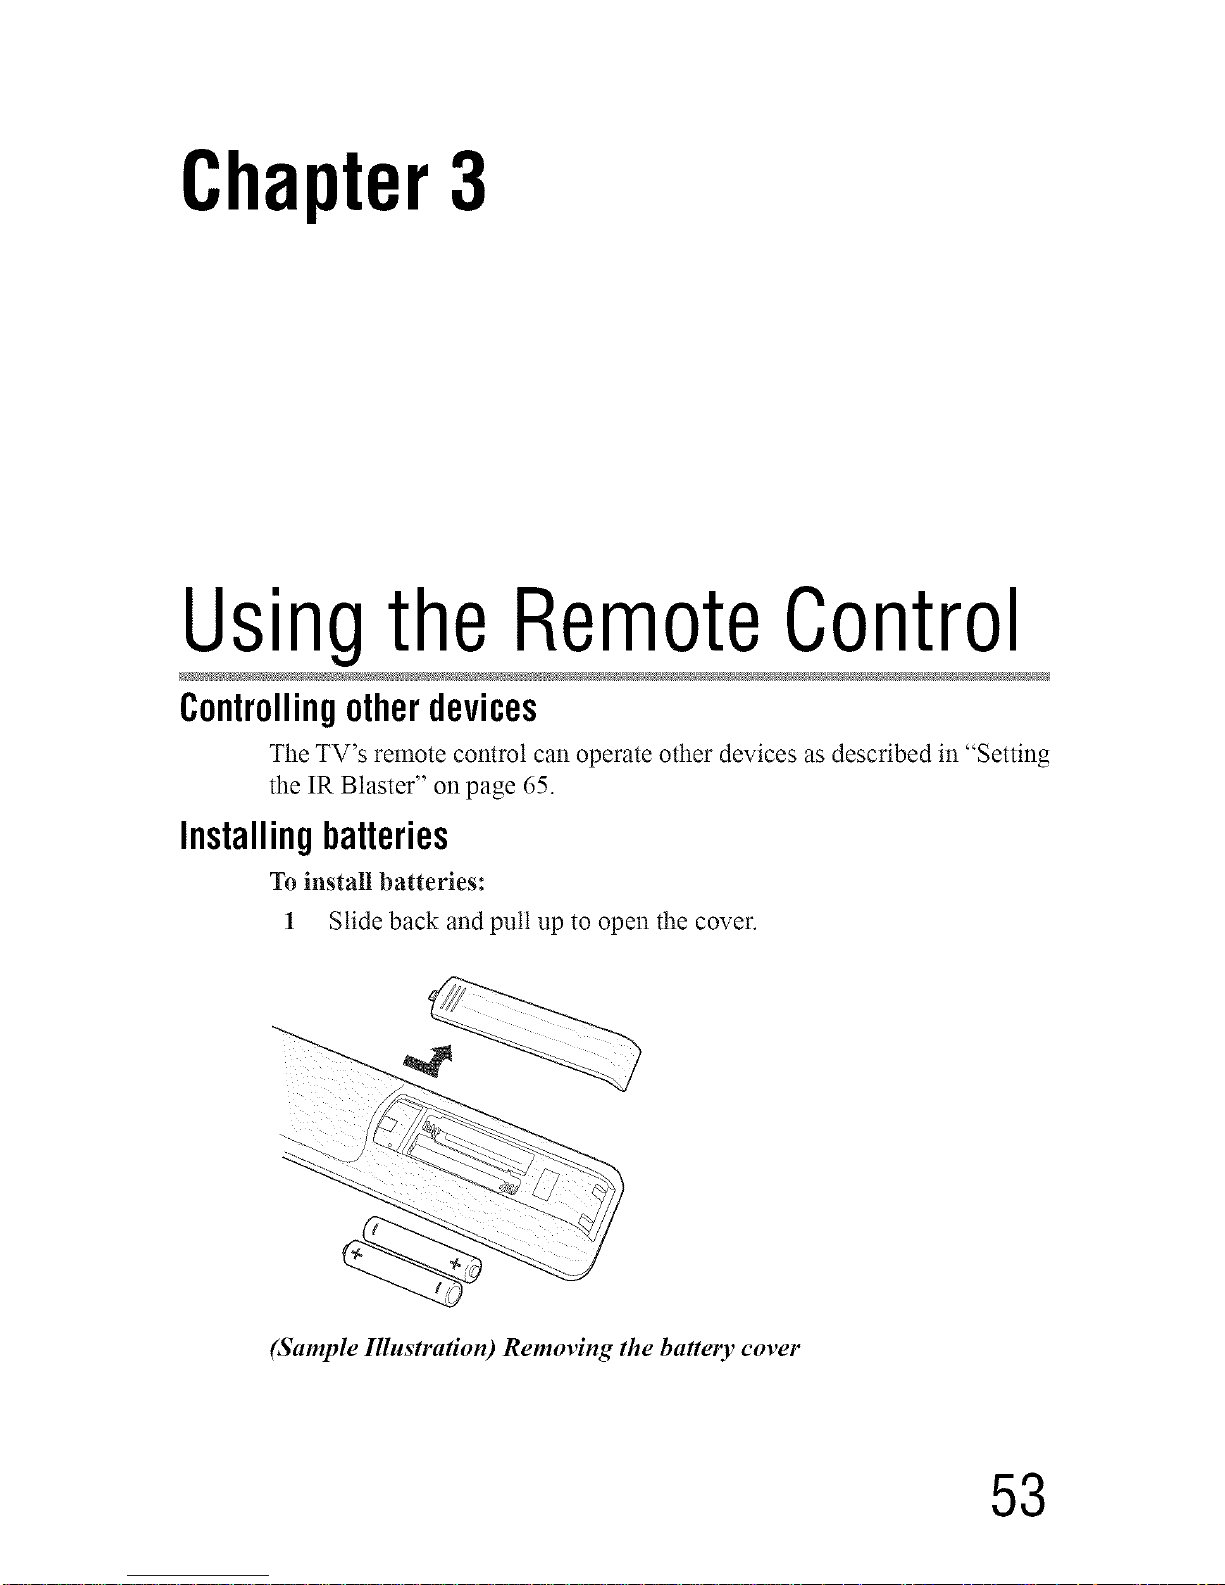
Chapter3
Usingthe RemoteControl
Controllingotherdevices
The TV's remote control can operate other devices as described in "Setting
the IR Blaster" on page 65.
Installingbatteries
To install batteries:
1 Slide back and putt up to open the cover.
(Sample Illustration) Removing the battery cover
53
Downloaded from www.ManualsFile.com manuals search engine
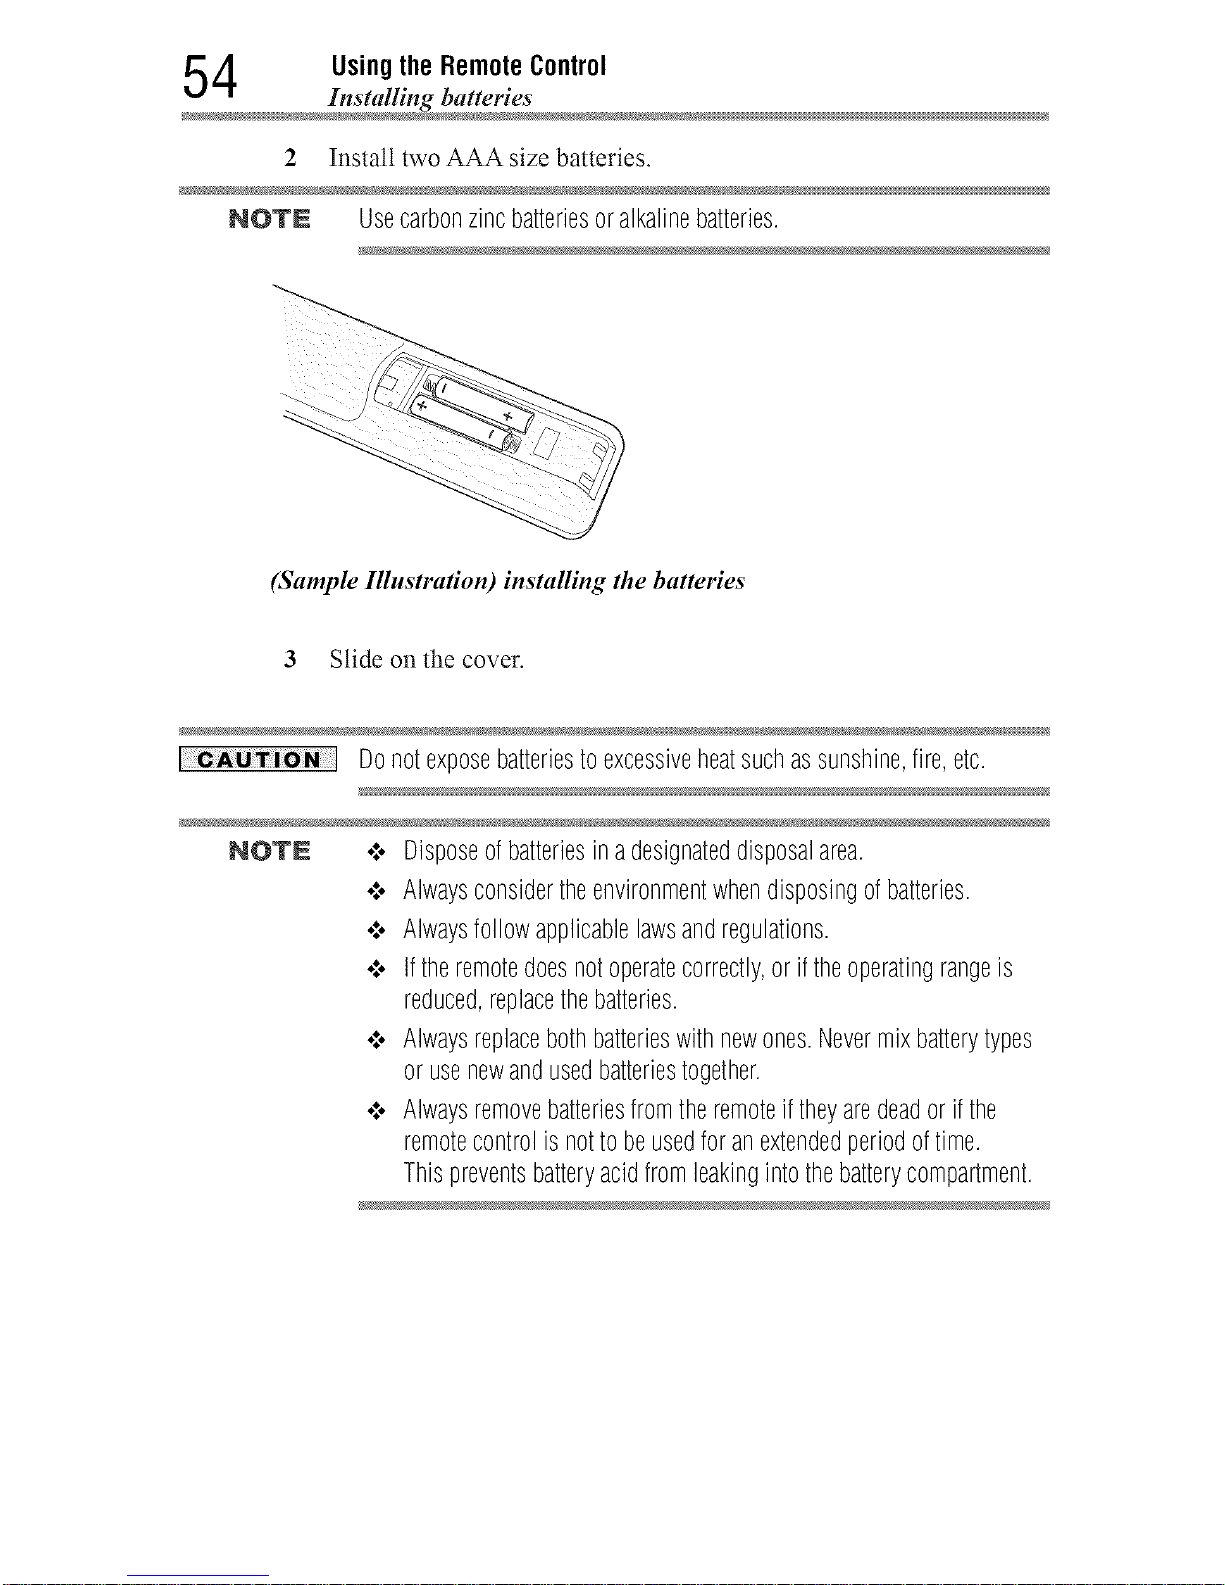
4 UsingtheRemoteControl
Installing batteries
2 Install two AAA size batteries.
NOTN Usecarbonzincbatteriesoralkalinebatteries.
(Sample Illustration) installing the batteries
3 Slide onthe cover.
Donotexposebatteriestoexcessiveheatsuchassunshine,fire,etc.
NOTE ¢ Disposeofbatteriesina designateddisposalarea.
¢ Alwaysconsidertheenvironmentwhendisposingofbatteries.
¢ Alwaysfollowapplicablelawsandregulations.
¢ Iftheremotedoesnotoperatecorrectly,or iftheoperatingrangeis
reduced,replacethebatteries.
¢ Alwaysreplacebothbatterieswithnewones.Nevermixbatterytypes
orusenewandusedbatteriestogether.
¢ Alwaysremovebatteriesfromtheremoteiftheyaredeador ifthe
remotecontrolisnottobeusedforanextendedperiodoftime.
Thispreventsbatteryacidfromleakingintothebatterycompartment.
Downloaded from www.ManualsFile.com manuals search engine
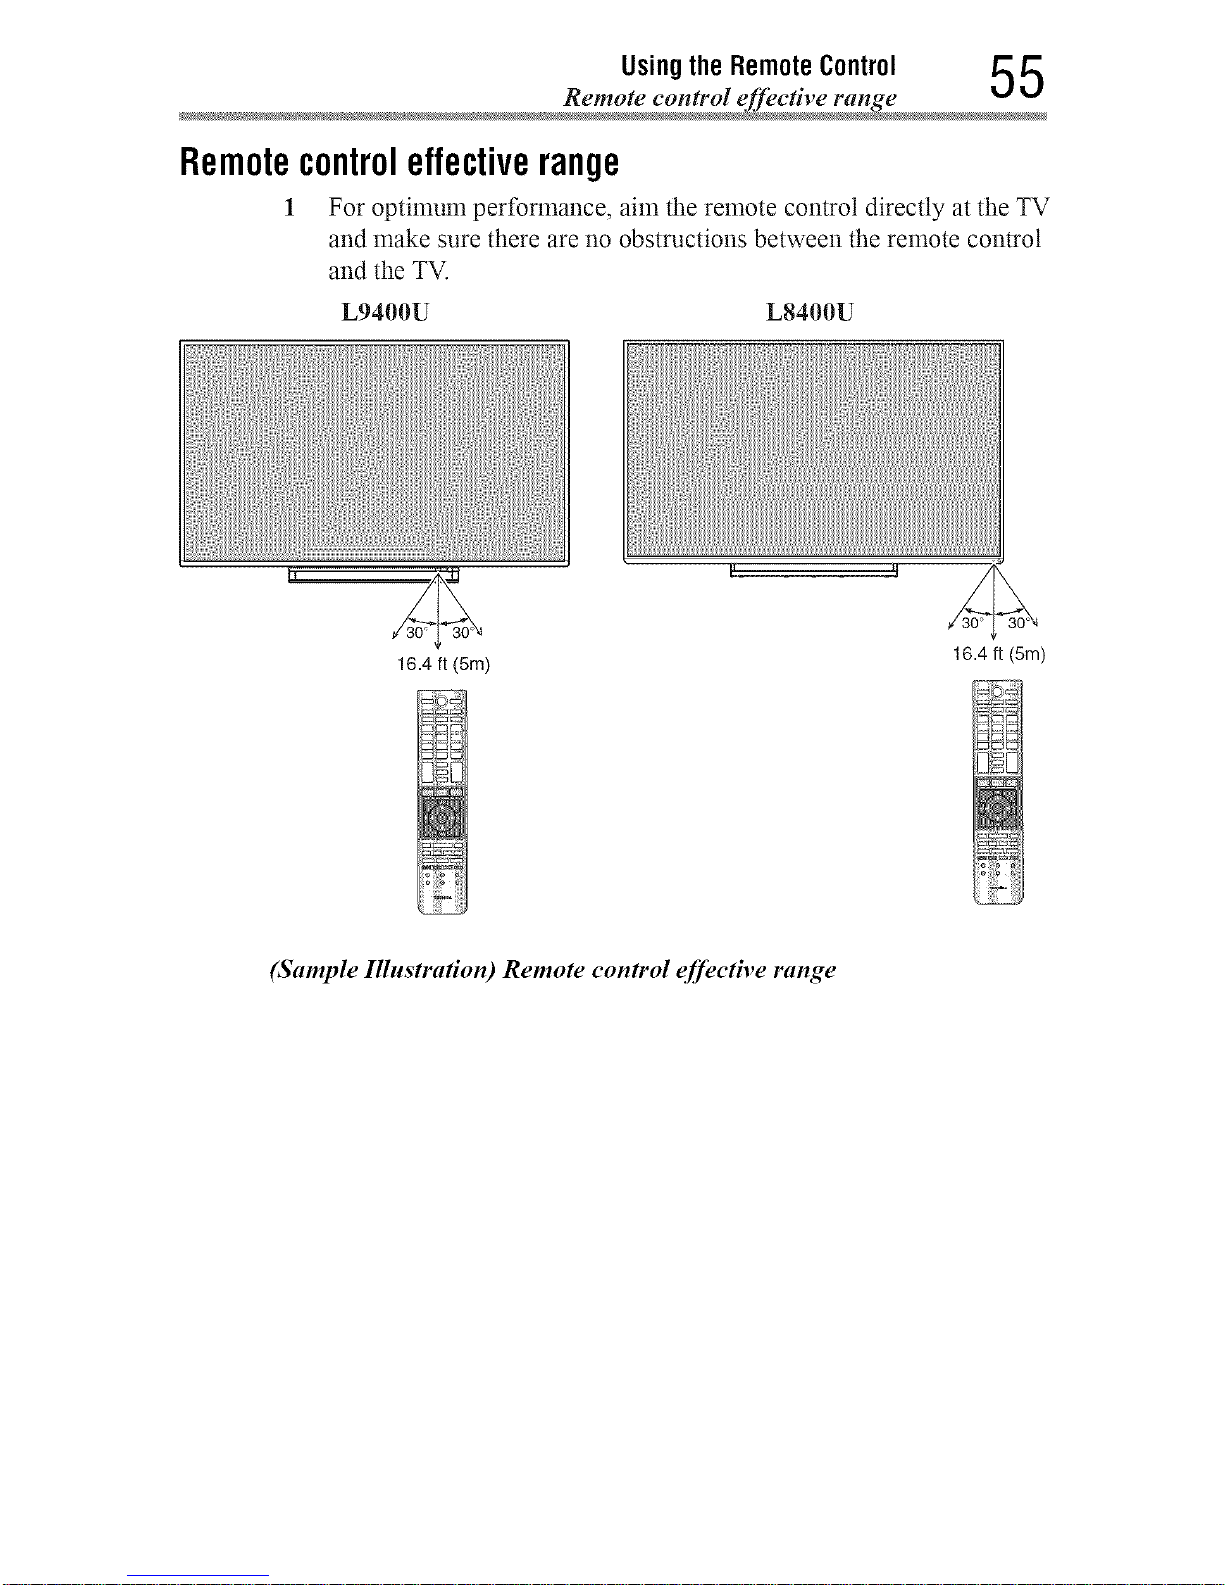
UsingtheRemoteControl 5 5
Remote control effective range
Remotecontroleffectiverange
1 For optimum performance, aim the remote control directly at the TV
and make sure there are no obstructions between the remote control
and the TV.
L9400U L8400U
16.4 ft (5m)
16.4 ft (Sin)
(Sample IllnstraKon) Remote control effective range
Downloaded from www.ManualsFile.com manuals search engine
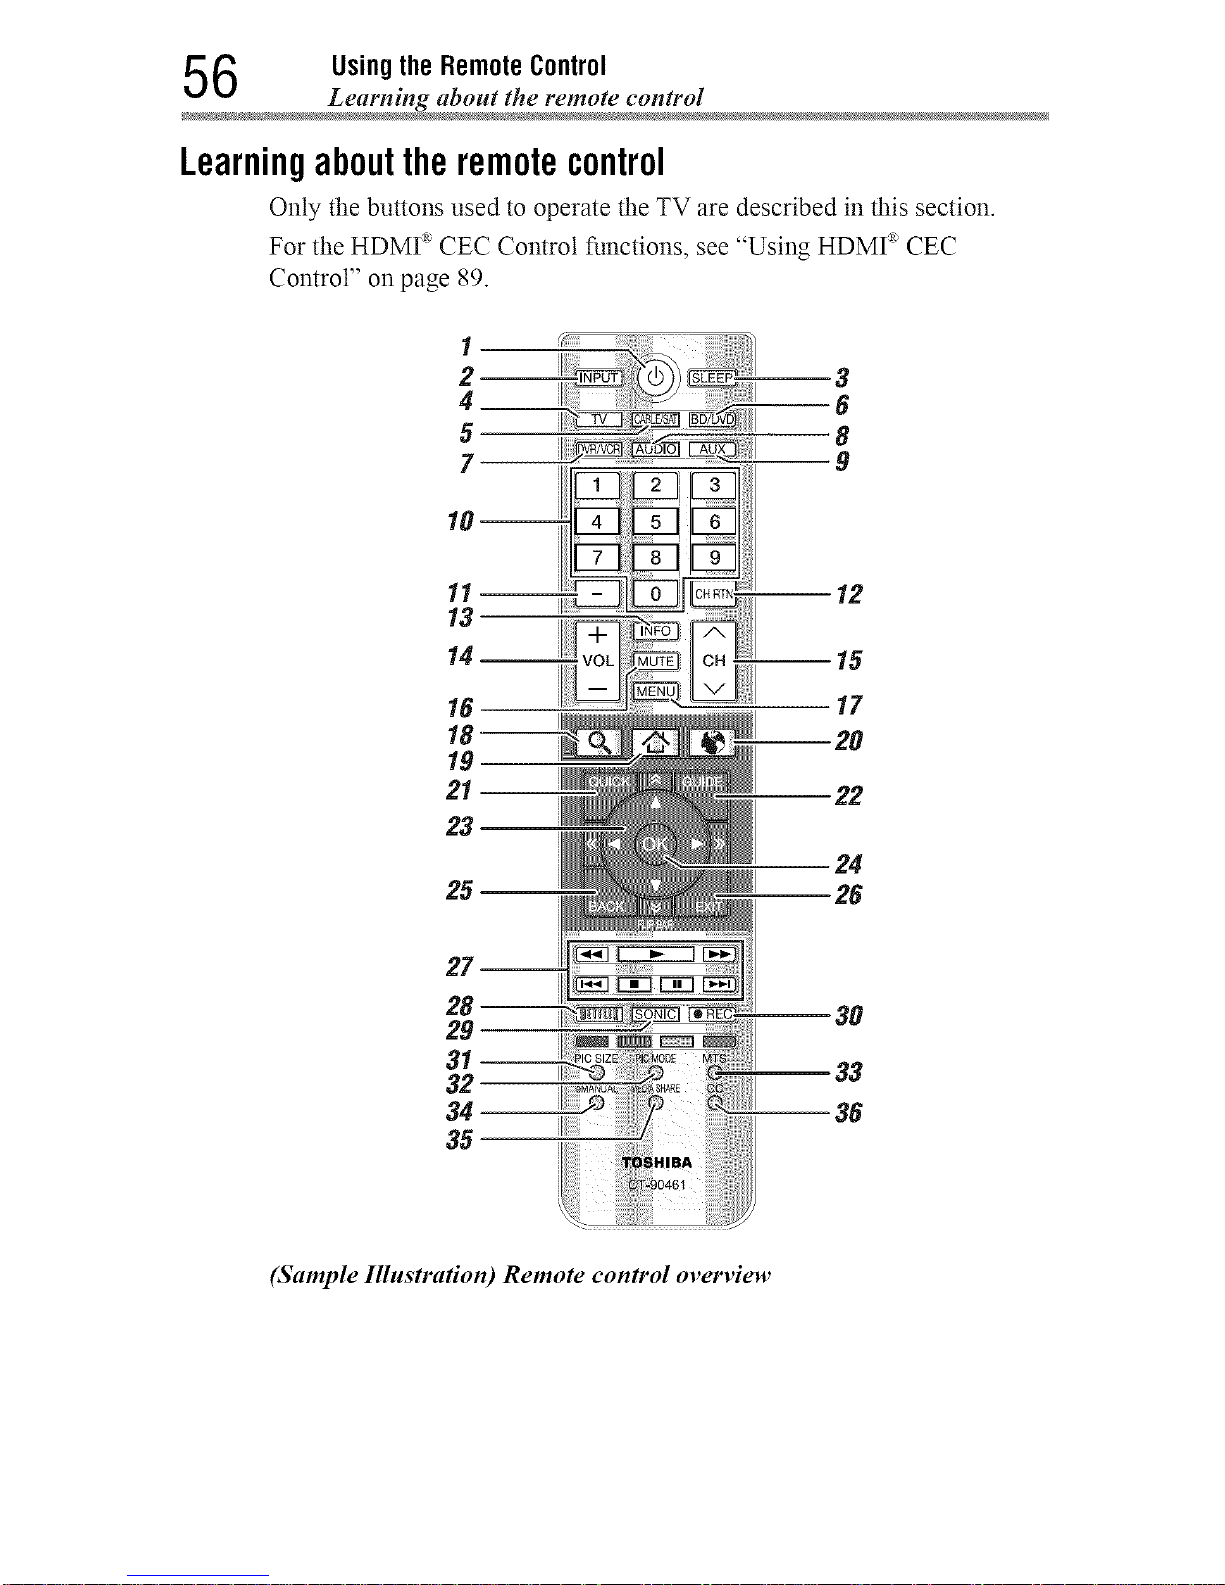
6 UsingtheRemoteControl
Learning about the remote contro
Learningabouttheremotecontrol
Only the buttons used to operate the TV are described in this section.
For the HDMI _ CEC Control functions, see "Using HDMI _ CEC
Control" on page 89.
1
2--
4__
5
7--
3
8
m9
10--
11
13
16
18--
19
21
23
25
7--
3O
33
36
(Sample Illustration) Remote control overview
Downloaded from www.ManualsFile.com manuals search engine

UsingtheRemoteControl 5 7
Learning about the remote control
NOTE Theerrormessage"NotAvailable"mayappearifyoupressabuttonfora
functionthatisnotavailable.
Item: Description;
1 POWERbutton
2
3
4
6
7
8
9
10
11
12
13
14
15
16
17
18
19
20
INPUTbutton
SLEEPbutton
TVbutton
Cable/Satellite
button
BD/DVDbutton
DVR/VCRbutton
Audiobutton
Auxiliarybutton
ChannelNumber
buttons(0-9)
(-) button
CH RTNbutton
INFObutton
VOL(+/ -) buttons
CH(A/V) buttons
MUTEbutton
MENUbutton
SEARCHbutton
HOMEbutton
INTERNETbutton
Function: Item:
TurnstheTVOnandOff.When 21
thelV is on,thepowerLED 22
indicatorontheTVfrontglows
green. 23
Selectsthevideoinputsource.
Accessesthesleeptimer.
Setstheremotecontrolmodeto
controlthe device:TV, CABLE/
SAT,BD/DVD, DVR/VCR,
AUDIO,orAUX.
Directlytuneschannels.
Enters2-part channelnumbers.
Returnstothe lastviewed
channelorsource.
DisplaysTV statusinformation
aswellasprogramdetails,when
available.
Adjuststhevolumelevel.
Cyclesthroughprogrammed
channels.
Reducesorturns offthesound.
AccessesthemainTV menu
system.
AccessestheSearchAll
function.
AccessestheCloud Portal
HOME.
Launchesthewebbrowseron-
screen.
24
25
26
27
28
29
3O
31
32
33
34
35
36
Descr¢)tion: Function:
QUICKbutton Launchesthe Quickmenu.
GUIDEbutton Launchesthe MediaGuide
applicationon-screen.
(A/V/4/I_.) Selectsoradjustsprogramming
menuswhena menuison-
screen.
(_/_v/,(_[ / >D) Scrollsthe pageup,down,left,
andright.
FLIPBAR(_v)button AccessestheFlipBar.
OKbutton Selectsthehighlighteditemson
thescreen.
BACKbutton Returnstothepreviousscreen.
EXITbutton Closeson-screenmenus.
(ID,,,-/44/_/_,,q/ _ : PLAYbutton
_,,i/l!/ll) 44 : REWINDbutton
1_ : FASTFORWARDbutton
i,,_ :SKIP-BACKbutton
_,,,_d: SKIP-FORWARDbutton
I : STOPbutton
II: PAUSEbutton
NETFLIXbutton Launchesthe Netflix®
applicationon-screen.
SONICbutton Accessesthe SonicSeparationTM
function.
RECbutton Usedforexternaldevices.
PICSIZEbutton Cyclesthroughthepicturesizes.
PICMODEbutton Selectsthepicturemode.
MTSbutton AccessestheMTSoptions.
eMANUALbutton DisplaystheeManual.
Internetconnectionrequired.
MEDIASHARE AccessestheMediaShare
button function.
CCbutton Accessesthedosed-caption
feature.
Downloaded from www.ManualsFile.com manuals search engine
Chapter4
InitialSetupandMenu
Initial setup
When you first turn on or reset the TV, the Menu Language screen
appears.
NOTE o:oYoucanstopinitialsetupbypressingtheEXITbutton.However,if you
do notfinishChannel Tuningsetting,theQuickSetup screenwill
appeareverytimeyouturnonyourTV.
•:. TheEXITbuttondoesnotworkuntilafteryouhavesettheStore/
HomeMode setting.
58
Downloaded from www.ManualsFile.com manuals search engine
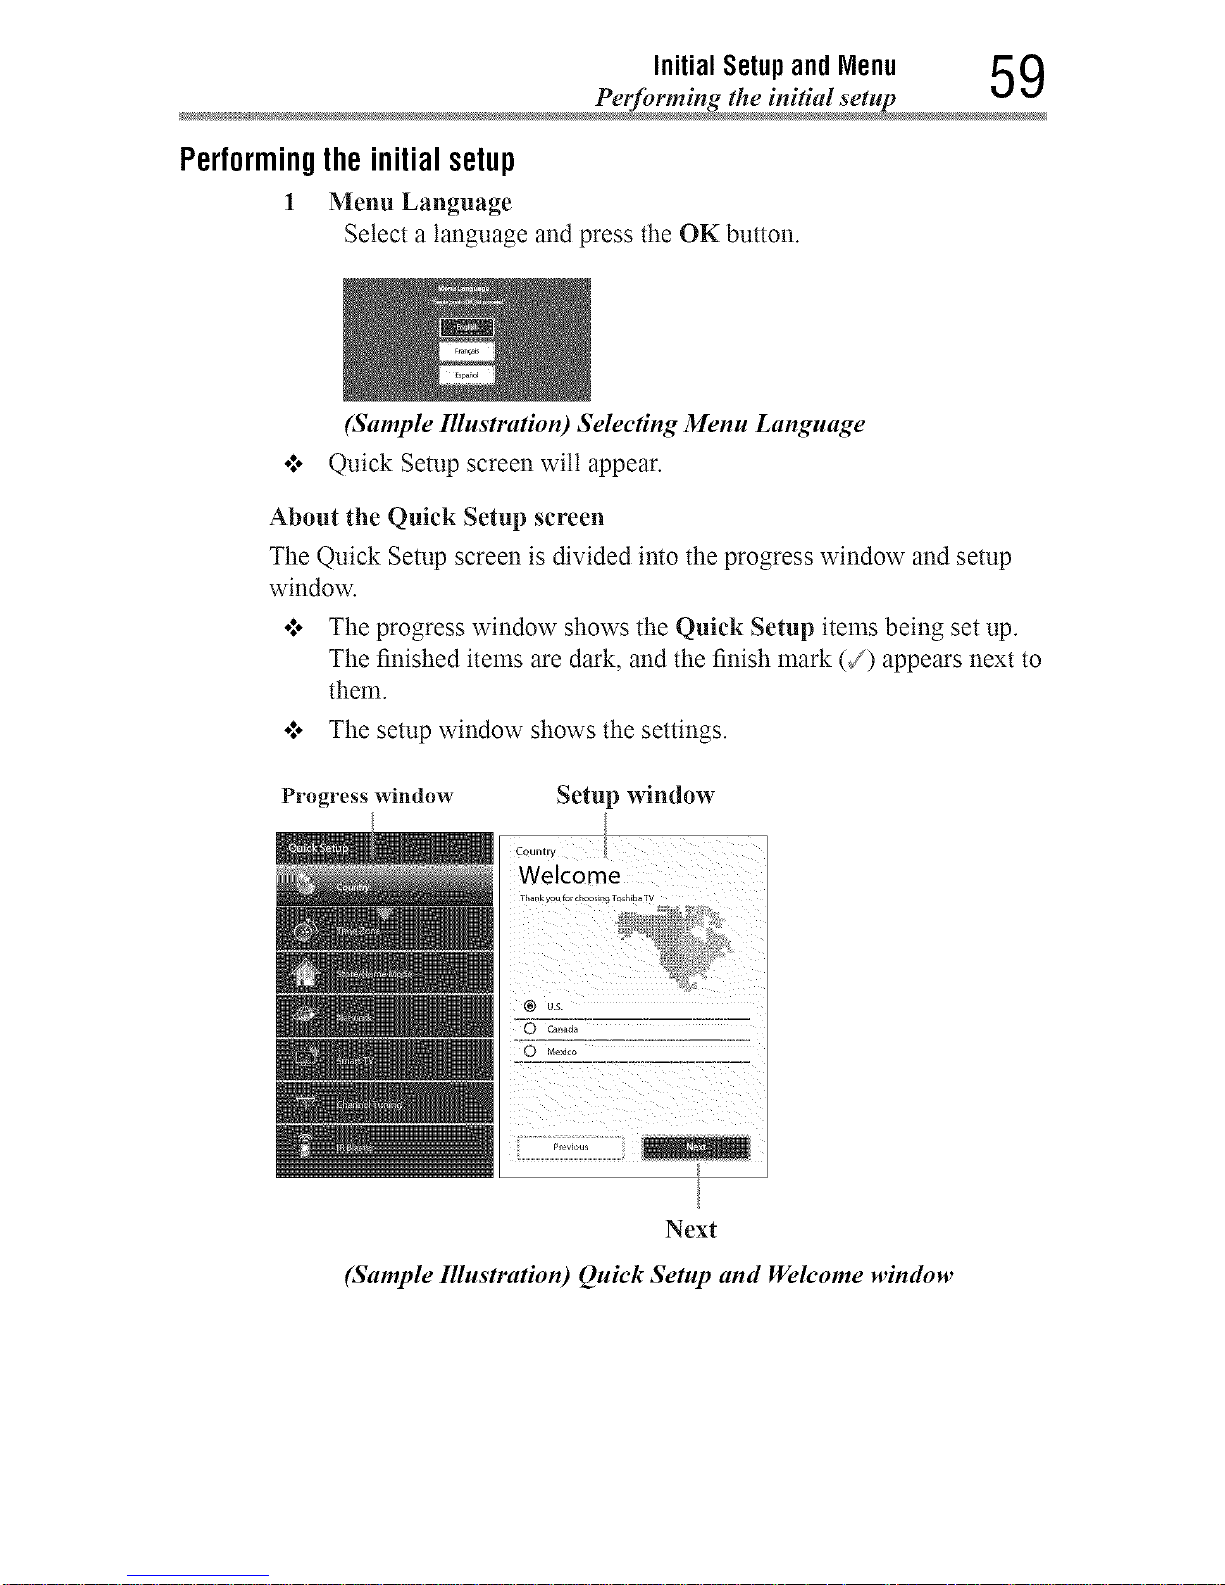
Initial Setup and Menu 5 9
Performing the initial set
Performingthe initialsetup
1 Menu Language
Select a language and press the OK button.
(Sample Illustration) Selecting Menu Language
o**oQuick Setup screen wilt appear.
About the Quick Setup screen
The Quick Setup screen is divided into the progress window and setup
window.
o*,oThe progress window shows the Quick Setup items being set up.
The finished items are dark, and the finish mark (/) appears next to
them.
o*,oThe setup window shows the settings.
Progress window Setup window
Welcome
!
Next
(Sample Illustration) Quick Setup and Welcome window
Downloaded from www.ManualsFile.com manuals search engine
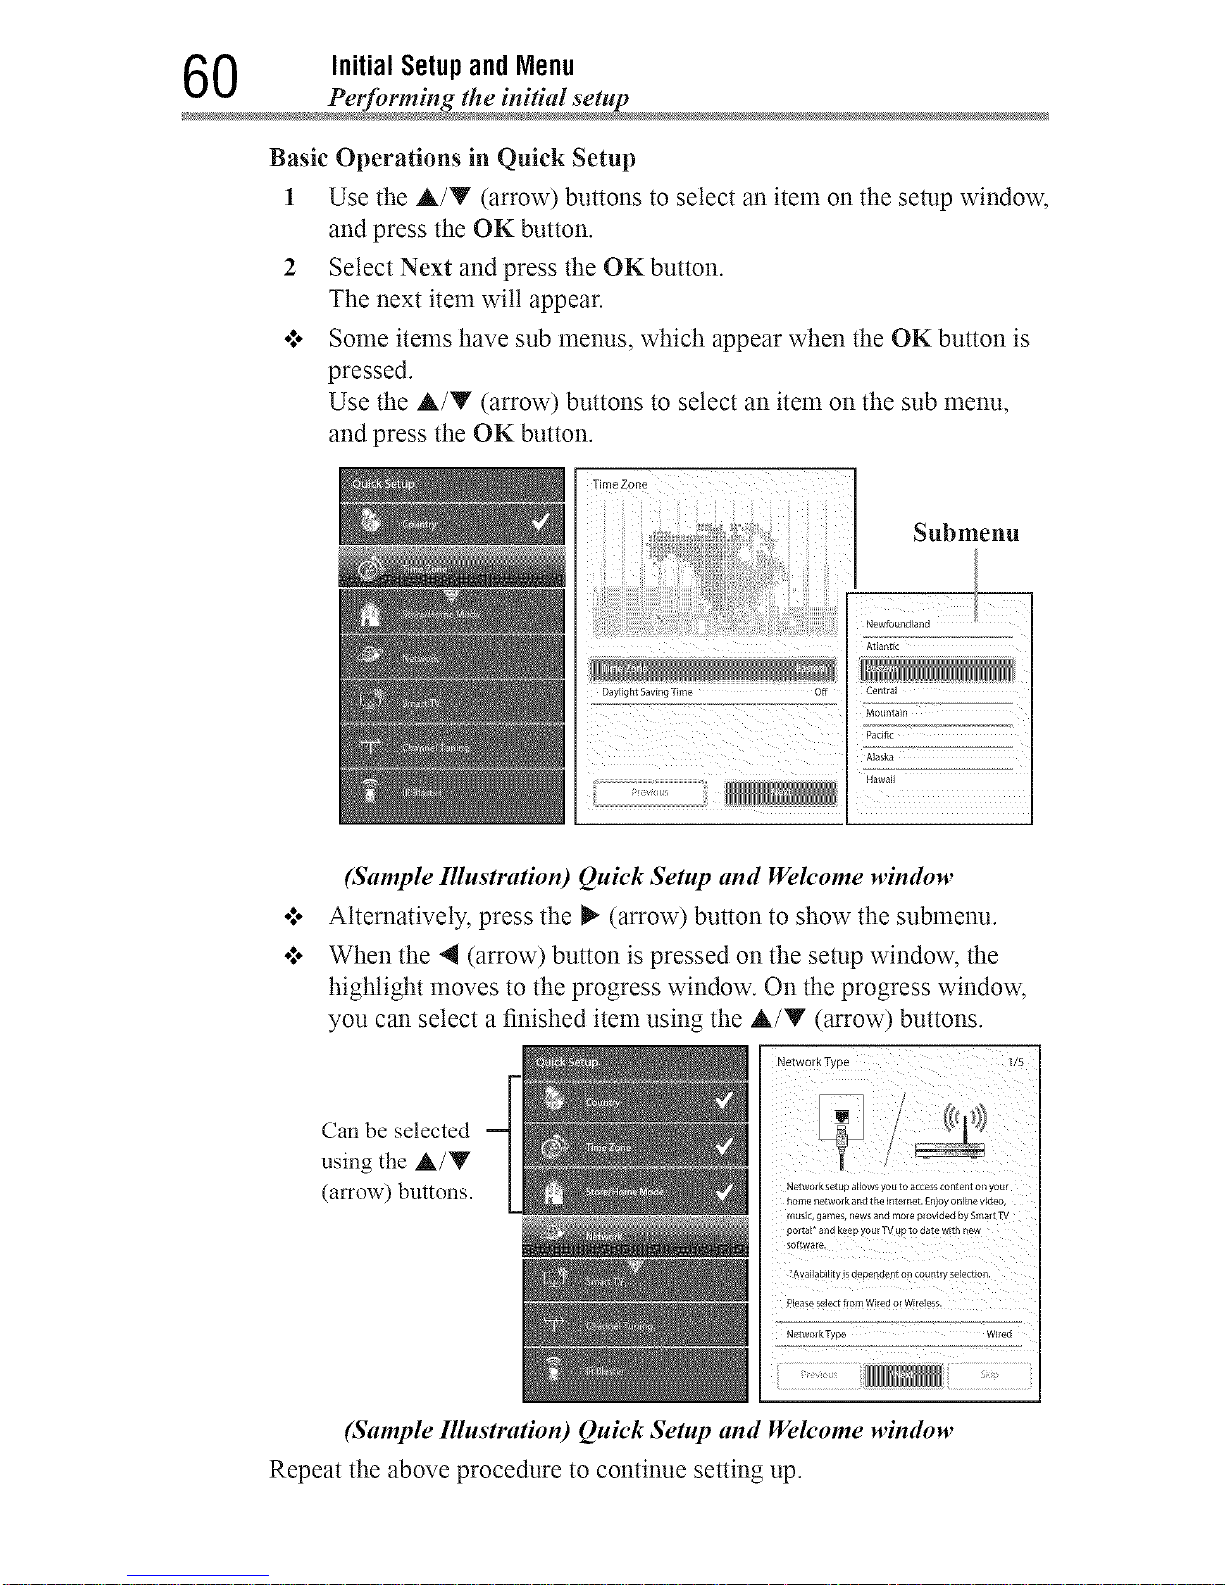
0 Initial Setupand Menu
Pel_rming the initial setup
Basic Operations in Quick Setup
1 Use the A/Y (arrow) buttons to select an item on the setup window,
and press the OK button.
2 Select Next and press the OK button.
The next item wilt appear.
o*.oSome items have sub menus, which appear when the OK button is
pressed.
Use the A/Y (arrow) buttons to select an item on the sub menu,
and press the OK button.
Time Zone
Submenu
Atlantic
(Sample Illustration) Quick Setup and Wek'ome wimlow
Alternatively, press the _ (arrow) button to show the submenu.
When the 4 (arrow) button is pressed on the setup window, the
highlight moves to the progress window. On the progress window,
you can select a finished item using the A/V (arrow) buttons.
Can be selected
using the A/Y
(arrow) buttons.
Networ k set up a_[ows you to access content on your
home networ kand t heinter net. Enjoy online video,
music, games, news and mor_ provided by Smart TV
portaF and keep your TV upto date with Elew
software,
_Ava_labNty is depe#dent on country se[ert_on.
Please select from Wired or WEreless.
NetworkType Wired
(Sample Illustration) Quick Setup and Welcome window
Repeat the above procedure to continue setting up.
Downloaded from www.ManualsFile.com manuals search engine
Initial Setupand Menu 61
Petfin_ming the initial set
Performing the QuickSetup
1 Country
Select a country then press the OK button.
Select Next.
Time Zone
Select Time Zone, and select a time zone from the submenu.
Select Daylight Saving Time, and select On or Off from the
submenu.
Select Next.
Store/Home Mode
Select Store/Home Mode, and select Home or Store from the
submenu.
To use at home, select Home.
Select Next.
NOT£ StoreModeisonlyavailableiftheTVissettoStoreModeatinitialsetup.
ThisoptionishiddenintheHomeMode.
TV Mounting
Select Stand or Wall according to the way the TV is installed.
o*.oIf you are attaching the pedestal stand to the TV, select Stand.
o:. If you are mounting the TV on a wall, select Wall.
•1. Select Next.
Network
•*.. To make full use of the functions, it is reconmaended that you
set up a network and connect to the Internet.
To start the Network Setup, select Next on the screen or to skip
the setup, select Skip. If you skip this setup, you can setup the
Network at any time through the Network menu.
Network setup
1 Select Network Type, and select Wired, Wireless or No
Network from the sub menu.
Select Next.
•*.o If you select Wired, proceed to the Network Connection
Test (Step 3). If you selected Wireless, please proceed to
the following step.
•*.o When you select No Network, skip to step 6 on page
63.
Downloaded from www.ManualsFile.com manuals search engine
2 Initial Setupand Menu
Performing the initial setup
2 Select Wireless Setup, and select Easy Setup, Assisted
Setup, or Manual Setup from the sub menu.
Select Next.
NOTE .:o EasySetup. IfyourAccessPoint(AP)supportsWi-Fi Protected
Setup,thismethodcanbeused.Wi-FiProtectedSetupisastandard
designedtosimplifytheconnectionofwirelessLANequipmentand
thesetupofnetworksecurityfeatures.
•:. Assisted Setup (setupusingtheAP'snotificationinformation).
TheNetworkName,Authentication,andEncryptionaredecidedbased
on informationfromtheARYouneedtomanuallysettheSecurityKey
forthismethod.
•:. Manual Setup (toinputallsettingsmanually).
Once your wired or wireless network has been comqgured,
perform a Network Connection Test.
Anetwork connection test screen will appear while the test
is being performed. If the test was successful, the successful
connection screen wilt appear.
If the network connection test failed, the connection failure
screen will appear.
For more information, see "Setting up the Network" on page
126.
4 Press the OK button.
When the network can be accessed, Software Upgrade
availability check starts automatically. When Software
Upgrade is completed, proceed to the next step.
NOTN Inordertosecureyourhomenetwork,it isstronglyrecommendedthatyou
useawirelessaccesspointwithencryption.
Downloaded from www.ManualsFile.com manuals search engine
Initial Setupand Menu 63
Performing the initial set
Smart TV
Power Management
Select Active Standby Mode, and select On or Off.
When Active Standby Mode is turned On, screens such as the
Menu screen and Internet screen appear more quickly thanusual
when the power is turned on from standby.
o:. The TV consumes more power when this is set to On.
Select Wake on LAN Standby Mode, and select On or Off.
When the TV is connected to the home network via LAN with the
Wake on LAN Standby Mode in On, your TV can be turned on
by control from Apps.
Select Next.
Companion Device
1 Select Enable Control, and select On or Off from the sub
menu.
When On is selected, you can control the TV power on and
off using companion devices such as a tablet or smartphone.
2 Select Media Renderer, and select On or Off from the sub
nlenu.
When On is selected, the Media Renderer function can be
used.
3 Select Next.
7 Channel Tuning
Select Antenna or Cable, and select Start Scan.
Auto Tuning will start.
While scanning is in progress, the Auto Tuning Progress screen
appears.
NOTN .:. Ifyoudonotwanttoscanchannels,youdonotneedtomakea
selectionforChannel Tuning.SelectSkip toskipthis step.
•".. Ifyouwanttostopscanning,pressingtheEXITbuttonwhilescanning
isin process.
Downloaded from www.ManualsFile.com manuals search engine
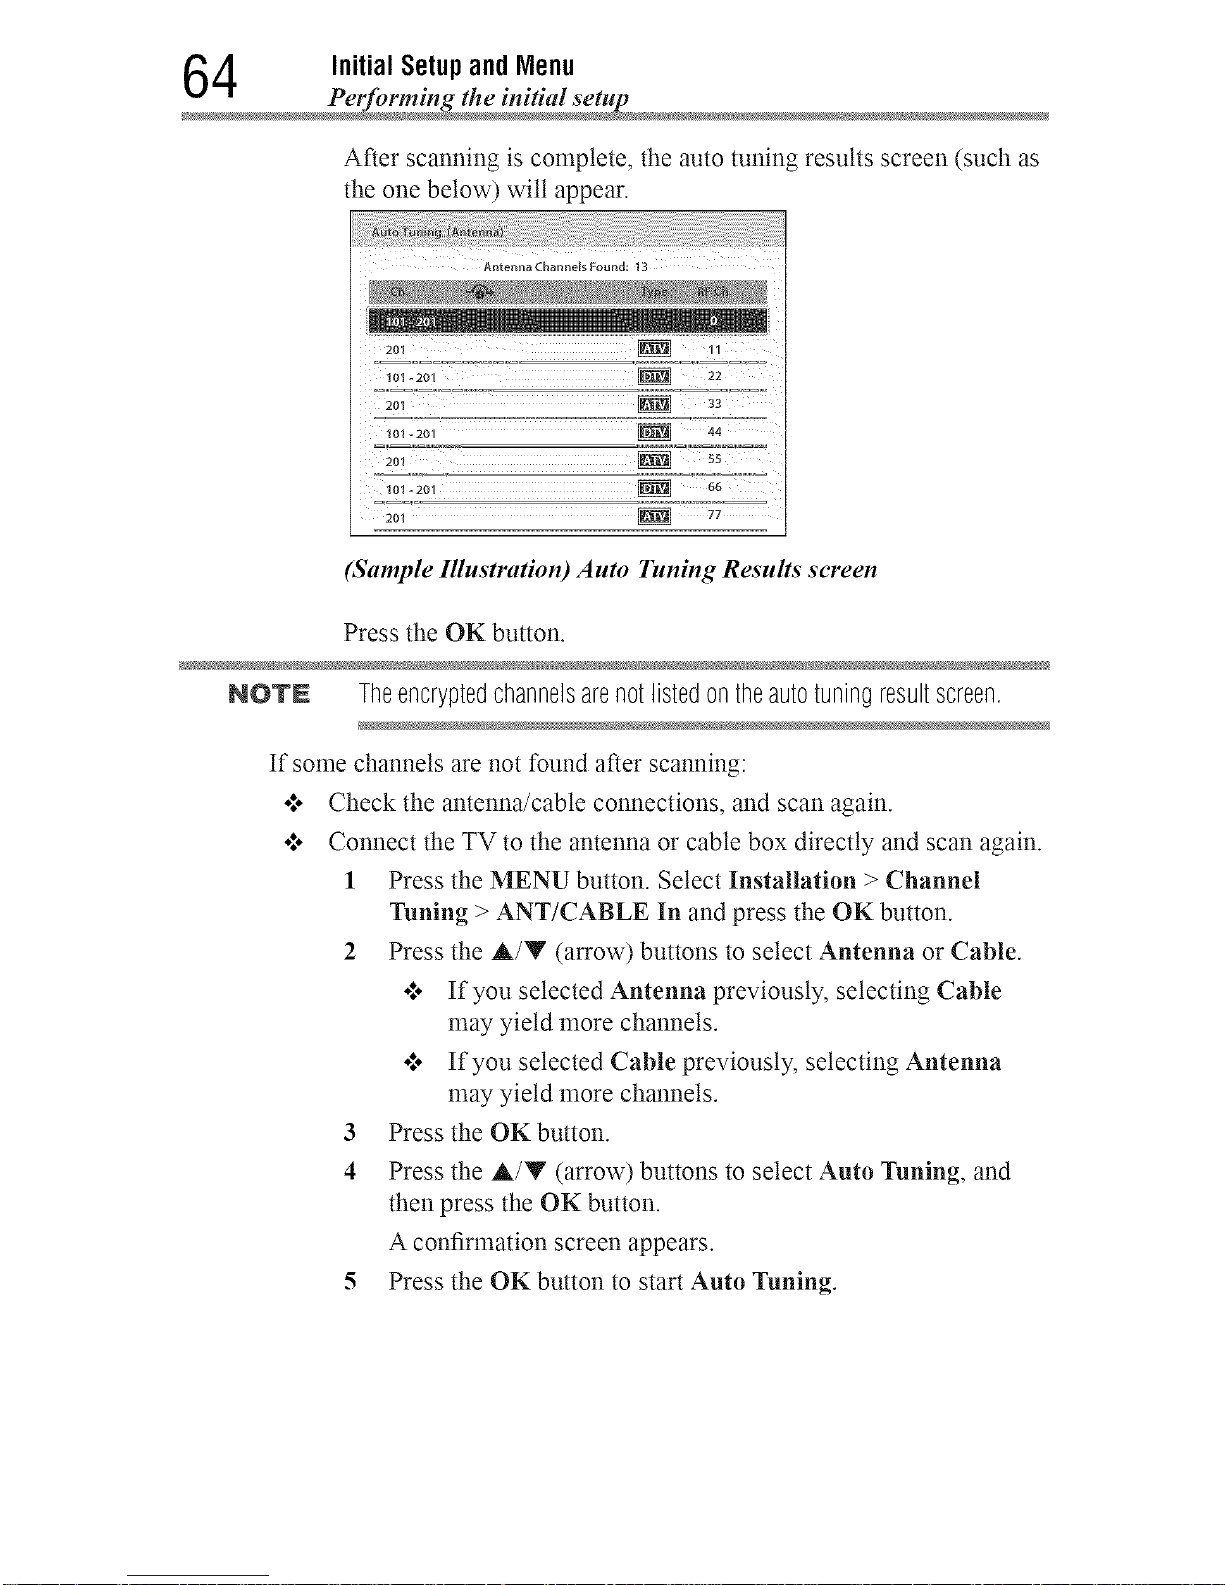
4 Initial Setupand Menu
Pel_rming the initial setup
After scanning is complete, the auto tuning results screen (such as
the one below) wilt appear.
Antenna Channels Found: 13
201 _ 33
_Z:2oT _ 77!°°"
2o_ _-"!_ ....
_o_-_o_ g!N 667!!!_
201 _ 77
(Sample Illustration) Auto Tuning Results screen
Press the OK button.
NOTN Theencryptedchannelsarenotlistedontheautotuningresultscreen.
If some channels are not found after scanning:
o:o Check the antenna/cable connections, and scan again.
o:o Connect the TV to the antenna or cable box directly and scan again.
1 Press the MENU button. Select Installation > Channel
Tuning > ANT/CABLE In and press the OK button.
2 Press the A/Y (arrow) buttons to select Antenna or Cable.
€. If you selected Antenna previously, selecting Cable
may yield more channels.
•:o If you selected Cable previously, selecting Antenna
may yield more channels.
3 Press the OK button.
4 Press the A/Y (arrow) buttons to select Auto Tuning, and
then press the OK button.
A confirmation screen appears.
5 Press the OK button to start Auto Tuning.
Downloaded from www.ManualsFile.com manuals search engine
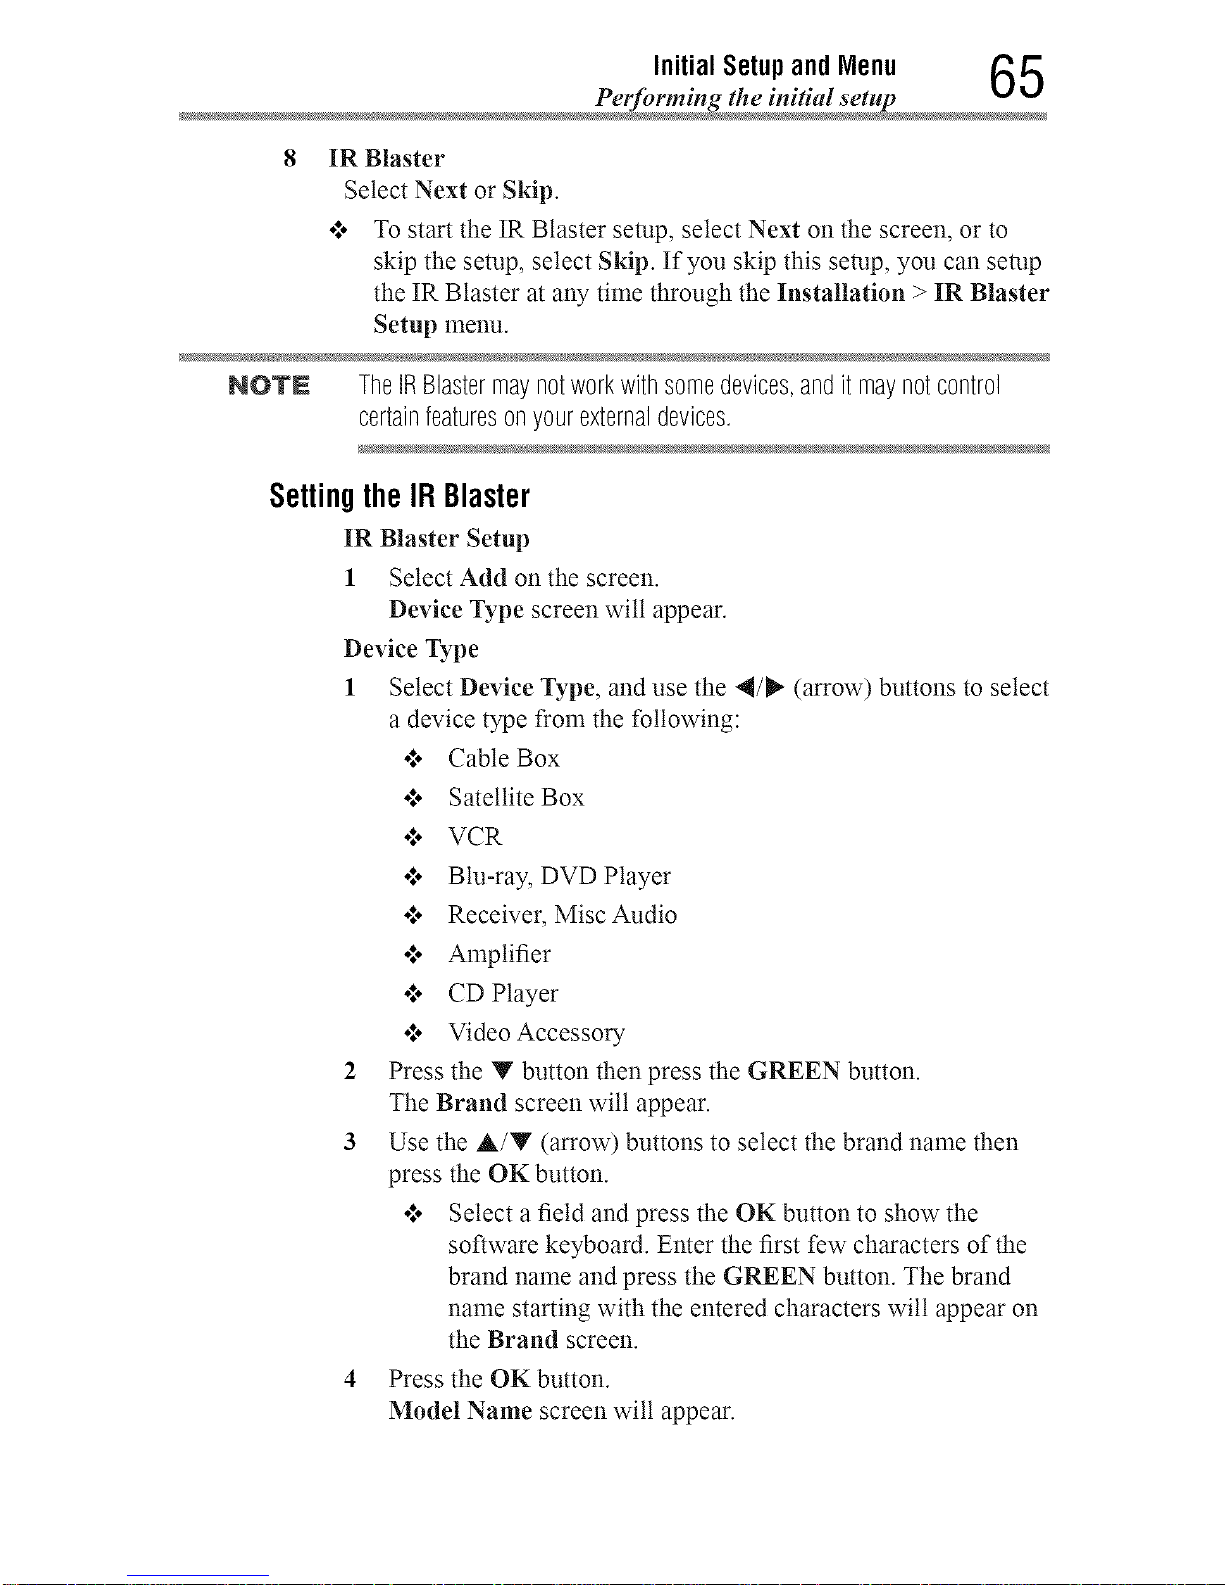
Initial Setup and Menu _
Performing the initial set t,l _.,I
8 IRBlaster
Select Next or Skip
•:. To start the IR Blaster setup, select Next on the screen, or to
skip the setup, select Skip If you skip this setup, you can setup
the IR Blaster at any time through the Installation > IR Blaster
Setup menu
NOTE TheIRBlastermaynotworkwithsomedevices,andit maynotcontrol
certainfeaturesonyourexternaldevices.
Selling theIRBlaster
IR Blaster Setup
1 Select Add onthe screen
Device Type screen wilt appear
Device Type
1 Select Device Type, and use the 4/_ (arrow) buttons to select
a device type from the following:
•:. Cable Box
•:o Satellite Box
•:o VCR
•:o Blu-ray, DVD Player
o**oReceiver, Misc Audio
o:. Amplifier
o**oCD Player
°:* Video Accessory
2 Press the Y button then press the GREEN button.
The Brand screen wilt appear.
3 Use the A/Y (arrow) buttons to select the brand name then
press the OK button.
o:* Select a field and press the OK button to show the
software keyboard. Enter the first few characters of the
brand name and press the GREEN button. The brand
name starting with the entered characters wilt appear on
the Brand screen.
4 Press the OK button.
Model Name screen wilt appear.
Downloaded from www.ManualsFile.com manuals search engine

6 Initial Setupand Menu
Pel_n"ming the initial setup
Model Name
1
2
Press the GREEN button.
The Model Name screen wilt appear.
Use the A/V (arrow) buttons to select the model name then
press the OK button.
o:o Select a field and press the OK button to show the
software keyboard. Enter the first few characters of the
model name and press the GREEN button. The model
name starting with the entered characters will appear on
the Model Name screen.
NOlr£ Youdonotneedtosetbothmodelnameandcodeset.IfyouselectModel
NameandpressOK,itwill takeyoudirectlytotheinput & Node key
screenandskipthecodeset.
Thecodesetshouldbeselectedonlywhenyouknowthecodeset.
Code Set
1 Use the 4/P" (arrow) buttons to select the code.
o:. After the code is selected, press the RED button to show
the Test screen. The test wilt start automatically.
NO'rN IfamodelhasmorethanoneCodeSet,a messagewill appearstating"This
modelhasmorethanoneCodeSet.Pleaseselectandtestyourpreferred
CodeSet."Youwill needtochooseacodesetusingtheA/T (arrow)
buttonsandperformtheTestoptiontoensurethecorrectCodeSethas
beenselected.
2 Press the OK button.
Input & Mode Key screen wilt appear.
Input & Mode Key
1 Use the 4/_ (arrow) buttons to select the TV input to which
the IR device is connected.
•:, --- (Appears when Device Type is set to Receiver, Misc
Audio or Amplifier)
•*,, ANT/CABLE
o**oVideo 1
o**oVideo2
o*,oColorStream HD
Downloaded from www.ManualsFile.com manuals search engine
Initial Setup and Menu _7
Performing the initial set tJr
o:. HDMI 1
+*,oHDMI 2
+*,oHDMI 3
o*,oHDMI 4
•",o PC
2 Press the Y (arrow) button.
3 Use the 4/_ (arrow) buttons to select device mode key.
o*,oCABLE/SAT
•*,o BD/DVD
o*,oDVR/VCR
o:. AUDIO
•:. AUX
4 Press the OK button.
•:, When Device Type is set to Receiver, Mist Audio or
Amplifier, the Volume Control screen wilt appear.
•:, When Device Type is set to Cable Box, Satellite Box or
Blu-ray, DVD Player, the Guide Preferences screen wilt
appear.
•:, When Device Type is set to VCR, CD Player or Video
Accessory, press the OK button on the IR Blaster Setup
complete screen.
Flip Bar Wizard screen will appear.
Volume Control
1 Use the 4/_" (arrow) buttons to set up the Volume control to
select:
o:* TV (this is the default)
•:. External
The Volume + or - and MUTE buttons will control the
External equipment through the IR blaster.
2 Press the OK button.
Press the OK button on the IR Blaster Setup complete screen.
Flip Bar Wizard screen wilt appear.
Guide Preferences
1 Use the 4/_ (arrow) buttons to set up the Guide preferences
to select:
ol. TV MediaGuide
•:. External Device Guide
Downloaded from www.ManualsFile.com manuals search engine
8 Initial Setupand Menu
Performing the initial setup
Press the Y (arrow) button to select Interval Time.
o*,o0.125 sec
o*,o 0.25 sec
o*,, 0.375 sec
o*,, 0.5 sec
•*,o 0.625 sec
o*,, 0.75 sec
o*,, 0.875 sec
•,*, 1 sec
o*,, After the interval time is selected, press the RED button to
show the Test screen. The test wilt start automatically.
3 Press the OK button.
Press the OK button on the IR Blaster Setup complete screen.
Flip Bar Wizard screen wilt appear.
9 Flip Bar
The Flip Bar is an icon bar at the bottom of the screen that flips
to show three different lists (Favorite Channels, Yesterday, and
Last Week) so you can easily find the channels that you like to
watch the most. Up to 10 thumbnails can be displayed.
NOTN .:. TimeinformationisrequiredfortheFlipBar.Timeinformationis
receivedthroughanetworkconnectionordigitalbroadcastsignals.
A networkconnectionisrecommendedforcorrectlyreceivingtime
information.
Whenreceivingtimeinformationthroughdigitalbroadcastsignals,it
isrequiredtosetthechanneltoreceivetimeinformationin theFlip
BarWizardandselectthis channeleachtimetheTVisturnedon.
•".. Iftimeinformationisnotbeingreceivedcorrectly,recordsof
previouslywatchedchannelsmaynotbestoredproperly.
•".. Therecordsofpreviouslywatchedchannelsmaybeerased.
•:. Tosetachannelfromanexternalinput,firstsettheIRBlastersettings.
Register channels from devices connected through IR Blaster, and
DTV or cable TV channels.
1
2
Select Next and press the OK button.
Read the information on screen, and select Agree after
confirming the contents. Then select Next and press the OK
button.
Downloaded from www.ManualsFile.com manuals search engine
Initial Setupand Menu 69
Petfi_rming the initial set
3
4
A Favorite Channels registration prompt screen appears.
To set Favorite Channels, select Yes and press the OK button.
Register a channel.
o:* Up to 10 channels can be set forAntenna/Cabte and
external input devices.
To register an Antenna/Cable channel:
1 Press the A/Y (arrow) buttons to select a channel.
2 Press the OK button and the channel marked with j_ wilt
be set in Favorite Channels.
To register a channel received through an external input
device:
1 Press the 4/_" (arrow) buttons to change the input.
2 Press the YELLOW button.
3 Use the number buttons (0-9) to enter the Channel
number to register, then press the OK button.
4 When the focus has moved to the Channel Name, press
the OK button.
5
When the software keyboard appears, emer the Channel
Name.
For how to use the software keyboard, refer to "Using the
software keyboard" on page 135.
To register another channel for the same external input
device, press the Y (arrow) button to move the focus
to an empty space and repeat the procedure from step 2
onwards.
5 When you have finished setting channels, press the GREEN
button.
The currem time screen appears.
6 Select Next and press the OK button.
Ifyou are not connected to a network, select a channel to
obtain time information.
7 Select Done and press the OK button.
Downloaded from www.ManualsFile.com manuals search engine
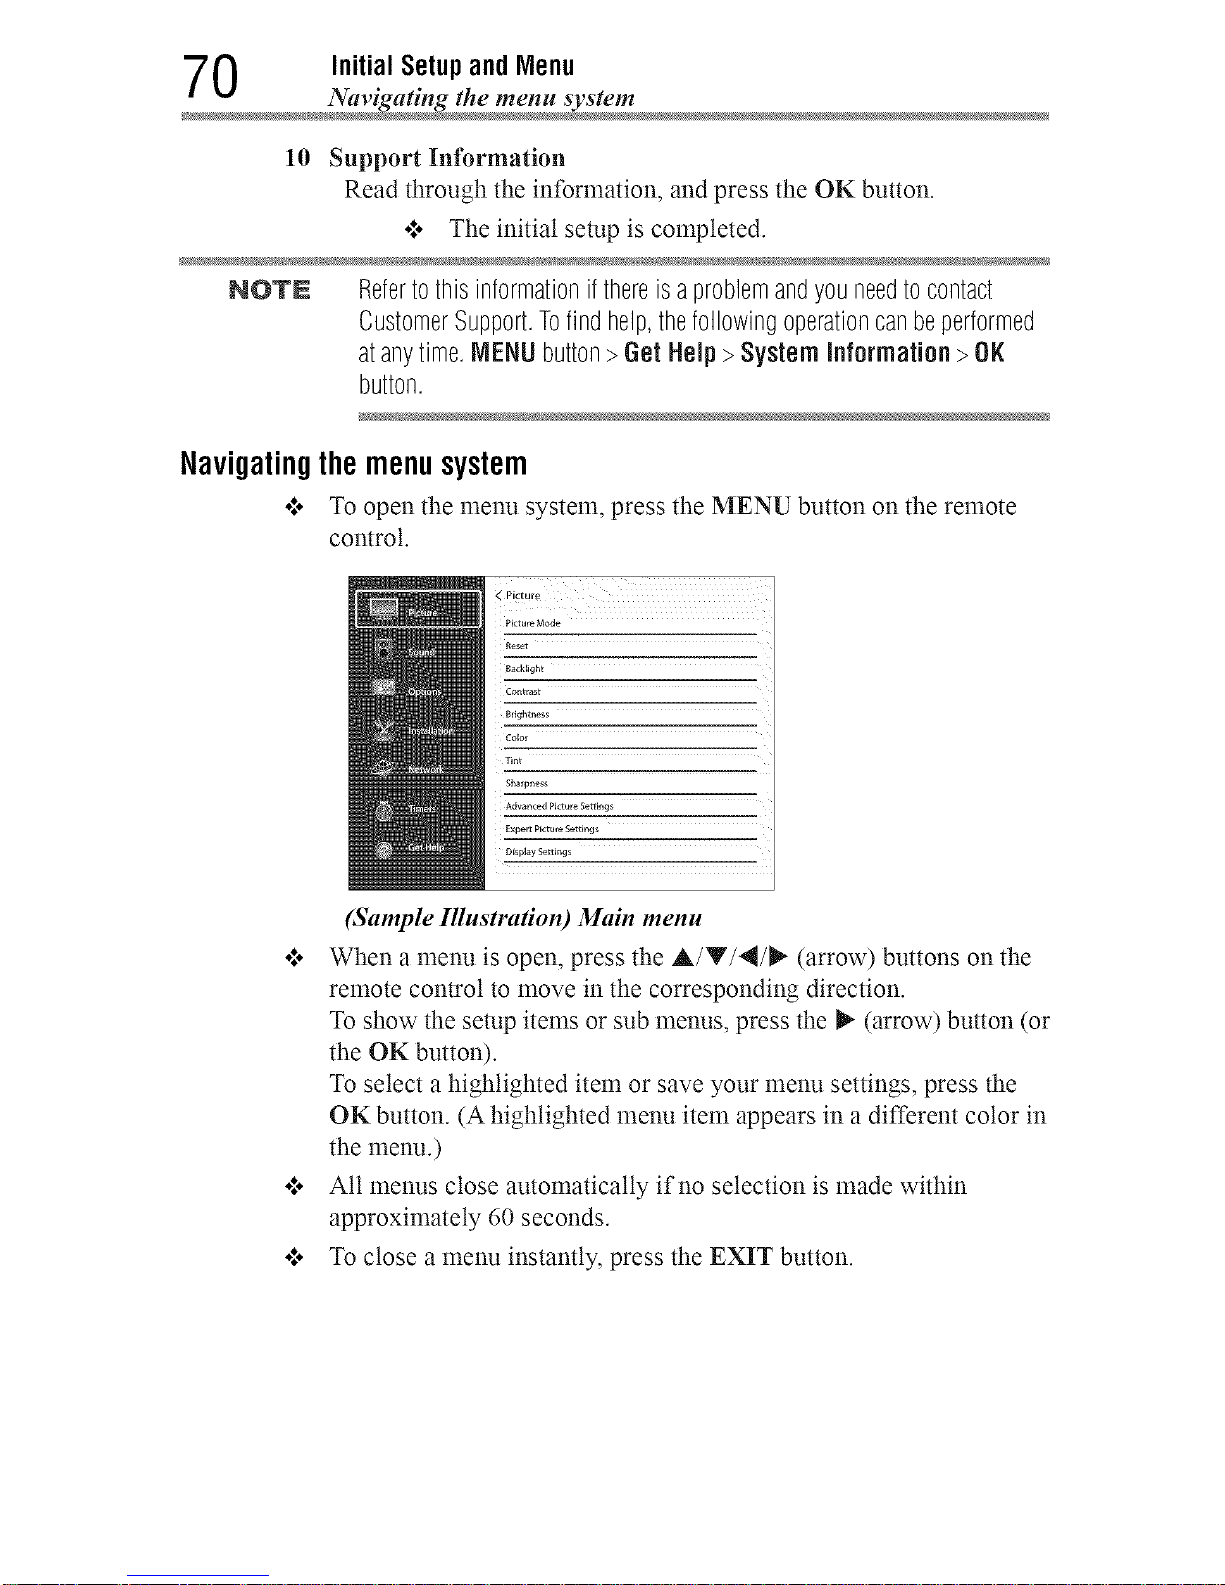
0 Initial Setupand Menu
Navigating the menu syste
10 Support Information
Read through the information, and press the OK button.
•=o The initial setup is completed.
NOTN Refertothis informationifthereisaproblemandyouneedtocontact
CustomerSupport.Tofindhelp,thefollowingoperationcanbeperformed
atanytime.MENUbutton>Get Help> SystemInformation >OK
button.
Navigatingthemenusystem
o:o To open the menu system, press the MENU button on the remote
control.
< Picture
PictureMode
_eset
8ack_ight
Contrast
m
_r_ghtness
Tint
Sharpness
AdwncedpictureSettings
E×pertPictureSett_ng_
O_pl_yS_tt_ng_
(Sample Illustration) Main menu
olo When a menu is open, press the A/Y/4/_ (arrow) buttons on the
remote control to move in the corresponding direction.
To show the setup items or sub menus, press the _- (arrow) button (or
the OK button).
To select a highlighted item or save your menu settings, press the
OK button. (A highlighted menu item appears in a different color in
the menu.)
o:. All menus close automatically if no selection is made within
approximately 60 seconds.
olo To close a menu instantly, press the EXIT button.
Downloaded from www.ManualsFile.com manuals search engine
Initial Setup and Menu 71
Quick Menu
QuickIVlenu
Quick menu helps you access some options more quickly.
Press the QUICK button to display the Quick menu and press the A/Y
(arrow) buttons to select an option.
NOTN Quickmenuitemsdifferdependingonthecurrentmode.
Quick Menu Item Page
]_n_t_e]®WiU['/wirelessdisplay page138
PictureMode page107
PictureSize page101
SleepTimer page96
HDMICECDeviceControl page91
Speakers page120
WirelessInformation page130
IntervalTime page164
Repeat page157
,,Uevo[ceJon!o[ma
Chapter5
Settingupyour TV
Howtonavigatethemenu
•:. Press the MENU button. Select Installation, Main menu, Submenu,
and then press the OK or EXIT button.
Changinginitial settings
From Quick Setup:
1 Press the MENU button.
2 Select Installation > Quick Setup, and press the OK button.
A confirmation message appears.
3 Press the 4/_ (arrow) buttons to select Yes.
4 Press the OK button.
To change settings, see "Initial setup" on page 58.
Individual settings
MenuLanguage
You can choose from three different language settings (English, Fran_ais,
and Espafiol). The TV displays menus and messages in your preferred
language.
1 Press the MENU button.
2 Select Installation > Menu Language and press the OK button.
3 Press the A/Y (arrow) buttons to select your preferred language.
4 Press the OK button.
72
Downloaded from www.ManualsFile.com manuals search engine
Setting up yourTV 73
Individual se_tings
Country
You can select the country in which you reside.
1 Press the MENU button.
2 Select Installation > Country and press the OK button.
3 Press the A/Y (arrow) buttons to select the country.
4 Press the OK button.
TimeZone
This setting allows you to specify the correct time zone for your region.
1 Press the MENU button.
2 Select Installation > Time Zone and press the OK button.
3 Press the A/Y (arrow) buttons to select your time zone.
4 Press the OK button.
DaylightSavingTime
1 Press the MENU button.
2 Select Installation > Daylight Saving Time and press the OK
button.
3 Press the A/Y (arrow) buttons to select On or Off.
4 Press the OK button.
Store/ HomeNode
You can select Store or Home to designate the TV location. Select Home
for normal home use.
1 Press the MENU button.
2 Select Installation > Store / Home Mode and press the OK button.
3 Press the A/V (arrow) buttons to select Home or Store.
4 Press the OKbutton.
NOTN StoreModeisonlyavailableiftheTVissettoStoreModeatinitialsetup.
ANT/CABLEIn
This setting configures the antenna input source for the ANT/CABLE
terminal.
1 Press the MENU button.
2 Select Installation > Channel Tuning > ANT/CABLE In and
press the OK button.
Downloaded from www.ManualsFile.com manuals search engine
4 SettingupyourTV
Storing channels in memoty (opdona
3 Press the A/Y (arrow) buttons to select Antenna or Cable.
4 Press the OKbutton.
Storingchannelsinmemory(optional)
To make sure your TV stops only on the channels you want when you press
the CH A/Y buttons on the remote control or the control panel, store
those channels in the TV's memory.
AutoTuning
NOTE Youmustsetuptheantenna!cableinputsourcefirst.See"Initialsetup"on
page58.
You can set up the TV to detect all active channels in your area and store
them in its memory. Then you can manually store or skip individual
channels from memory.
Option: Description:
Cable Note:IfyouselectCable,autotuningdeletespreviouslystoredchannels
frommemory.
Thissetuprequiressometime,butyoudonotneedtorepeatthesetup
unlessyourcableTVservice'slineupchangessignificantly.
Antenna Toskipanantennasourcechannelandremoveitfrommemory,setthe
channeltobeskipped.See"Skippingchannels"onpage76.
NO'rN Totunetochannelsnotstoredinmemory,usebuttons0-9 andtheDASH
buttonontheremotecontrol.
1 Press the MENU button.
2 Select Installation > Channel Tuning > Auto Tuning, and then
press the OK button.
A confirmation screen appears.
3 Press the OK button to start Auto Tuning or press the EXIT button
to abort.
The TV cycles through the channels and stores all active channels
in memory.
4 To view the progranmaed channels, press the CH A/Y buttons.
Downloaded from www.ManualsFile.com manuals search engine
Settingup yourTV 7 5
Storing channels in memot T (optiona
AntennaAmplifier
Set this if the broadcast waves received are too weak or strong and the
picture is difficult to see. When this is set to On, the received broadcast
waves will be amplified.
Press the MENU button.1
2
Select Installation > Channel Tuning > Antenna Amplifier, and
then press the OK button.
3 Press the A/Y (arrow) buttons to select DTV or ATV.
To configure the settings for digital broadcasts select DTV.
To configure the settings for analog broadcasts select ATV.
4 Press the A/Y (arrow) buttons to select On or Off.
ManualTuning
After storing channelsin memory,you canmanually enterchannelsif the
channelnumber isknown.
1 Press the MENU button.
2 Select Installation > Channel Tuning > Manual Tuning, and then
press the OK button.
3 Use buttons 0-9 on the remote control to enter the channel number
(for example, 56).
4 Press the OK button to begin Manual Tuning.
The channels found are listed at the bottom of the screen.
Option: Description:
ATV Analogchannel
DTV Digitalchannel
Downloaded from www.ManualsFile.com manuals search engine
6 Settingup yourTV
Skipping channels
Skippingchannels
To prevent a channel from being viewed, you can set it to be skipped.
1 Press the MENU button.
2 Select Options > Channel Options and then press the OK button.
The list of channels appears.
ch Typo Lobol-_
2ol _ [] []
(Sample hmtge) Channel options
3 Press the 4/_" (arrow) buttons to select the Skip cotunm (_,.) and
press the A/Y (arrow) buttons to select a channel to skip.
4 Press the OKbutton.
The box is selected.
5 To clear the selection, press the OK button.
NOTE YoucannottuneskippedchannelsusingtheCH A orv buttons.Use
buttons0-9 andtheDASHbuttonontheremotecontrol.
Skippingvideoinputs
You can set video inputs to be skipped when selecting inputs in the Input
selection screen.
Toturnonskip
1 Press the MENU button.
2 Select Options > Input Options > Input Labeling and press the
OK button.
3 Press the A/Y (arrow) buttons to select the item you wish to skip.
Then press the RED button to turn on Skip.
Toturnoff skip
Press the RED button again to turn off Sldp.
Downloaded from www.ManualsFile.com manuals search engine
Settingup yourTV 7 7
Labeling analog TV channels
LabelinganalogTVchannels
1 Press the MENU button.
2 Select Options > Channel Options, and then press the OK button.
The list of channels appears.
Ch Typo Label _*
2oi _ [] []
2o, _ [] []
(Sample hnage) (71annel options
3 Press the A/Y (arrow) buttons to select a channel to label.
4 Press the OKbutton.
The Software Keyboard window appears.
5 Input a name using the Software Keyboard, see "Using the software
keyboard" on page 135.
6 Press the GREEN button.
Labelingvideoinputs
The input labels are shown in the input selector and banner displays. You
can label video inputs according to the devices you have connected to the
TV.
1
2
Press the MENU button.
Select Options > Input Options > Input Labeling and press the
OK button.
3 Press the A/Y (arrow) buttons to select the item you wish to label.
Press the 4/_" (arrow) buttons to select Receiver, Cable, DVD,
Game, PC, Recorder, Satellite, VCR or Blu-ray.
4 Repeat Step 3 for other video inputs.
Downloaded from www.ManualsFile.com manuals search engine
Chapter6
Basicfeatures
TuningChannels
Tuningtothenextprogrammedchannel
Press the CH A/Y buttons on the remote control or TV control panel.
Tuningtoaspecificchannel(programmedorunprogrammed)
_annel: Description:
Analog Usethe0-9 buttonsontheremotecontrol.(Forexample,to selectchannel
125,press1,2, 5.),andthenpresstheOKbutton.
Digital Usethe0-9 buttonsontheremotecontrolto enterthemajorchannel
number.(andpresstheDASHbuttonif needed,(Forexample,toselect
digitalchannel125-1,press1,2,5,-, 1.)),andthenpresstheOKbutton.
UsingChannelReturn
You can switch between two channels without entering a channel number
each time. This feature also works for external inputs.
1 Select the first channel you want to view.
2 Select a second channel using the Channel Number buttons (and
press the DASH button if needed).
3 Each time you press the CH RTN button, the TV switches between
the last two channels that were tuned.
78
Downloaded from www.ManualsFile.com manuals search engine
Basicfeatures 79
Selecting the video input to view
Selectingthevideoinputtoview
To select the video input to view:
1 Press the INPUT button.
2 Change the input:
o:. Press 0-7.
o:* Repeatedly press the A/Y (arrow) buttons and then press the
OK button.
o:* Repeatedly press the INPUT button.
Inputs
0 ANT/GABLE
1 VideoI
2 Video2/ ColorStreamHD
3 HDMII
4 HDMI2
5 HDMI3
6 HDMI4
7 PO
NOTE o:° Youcanlabelthevideoinputsourcesaccordingtothespecificdevices
youhaveconnectedtotheTV,see"Labelingvideoinputs"onpage
77.
¢ Youcanskipsources,see"Skippingvideoinputs"onpage76.
¢ Inputsthataresettobeskippedwill beskippedwhenselectingby
repeatedlypressingtheINPUTbuttonortheA/T (arrow)buttons.
¢ Youcanselectinputsthataresetto beskippedusingthenumber
buttons.
¢ If oneor moreHDMI_>CECdevicesareconnectedtoanHDMI_>input,
theiconappearsintheinputselector.Inthiscase,thelabelwillnot
appearin theinputselector.
To select an HDMI ':_'CEC device:
1 Press the ,A./T (arrow) buttons to select an HDMI input.
2 Press the P,-(arrow) button. The list of HDMI '_CEC devices for that
input appears.
3 If the input has multiple HDMI '_CEC devices, press the A/Y
(arrow) buttons to select a device.
4 Press the OK button.
Downloaded from www.ManualsFile.com manuals search engine
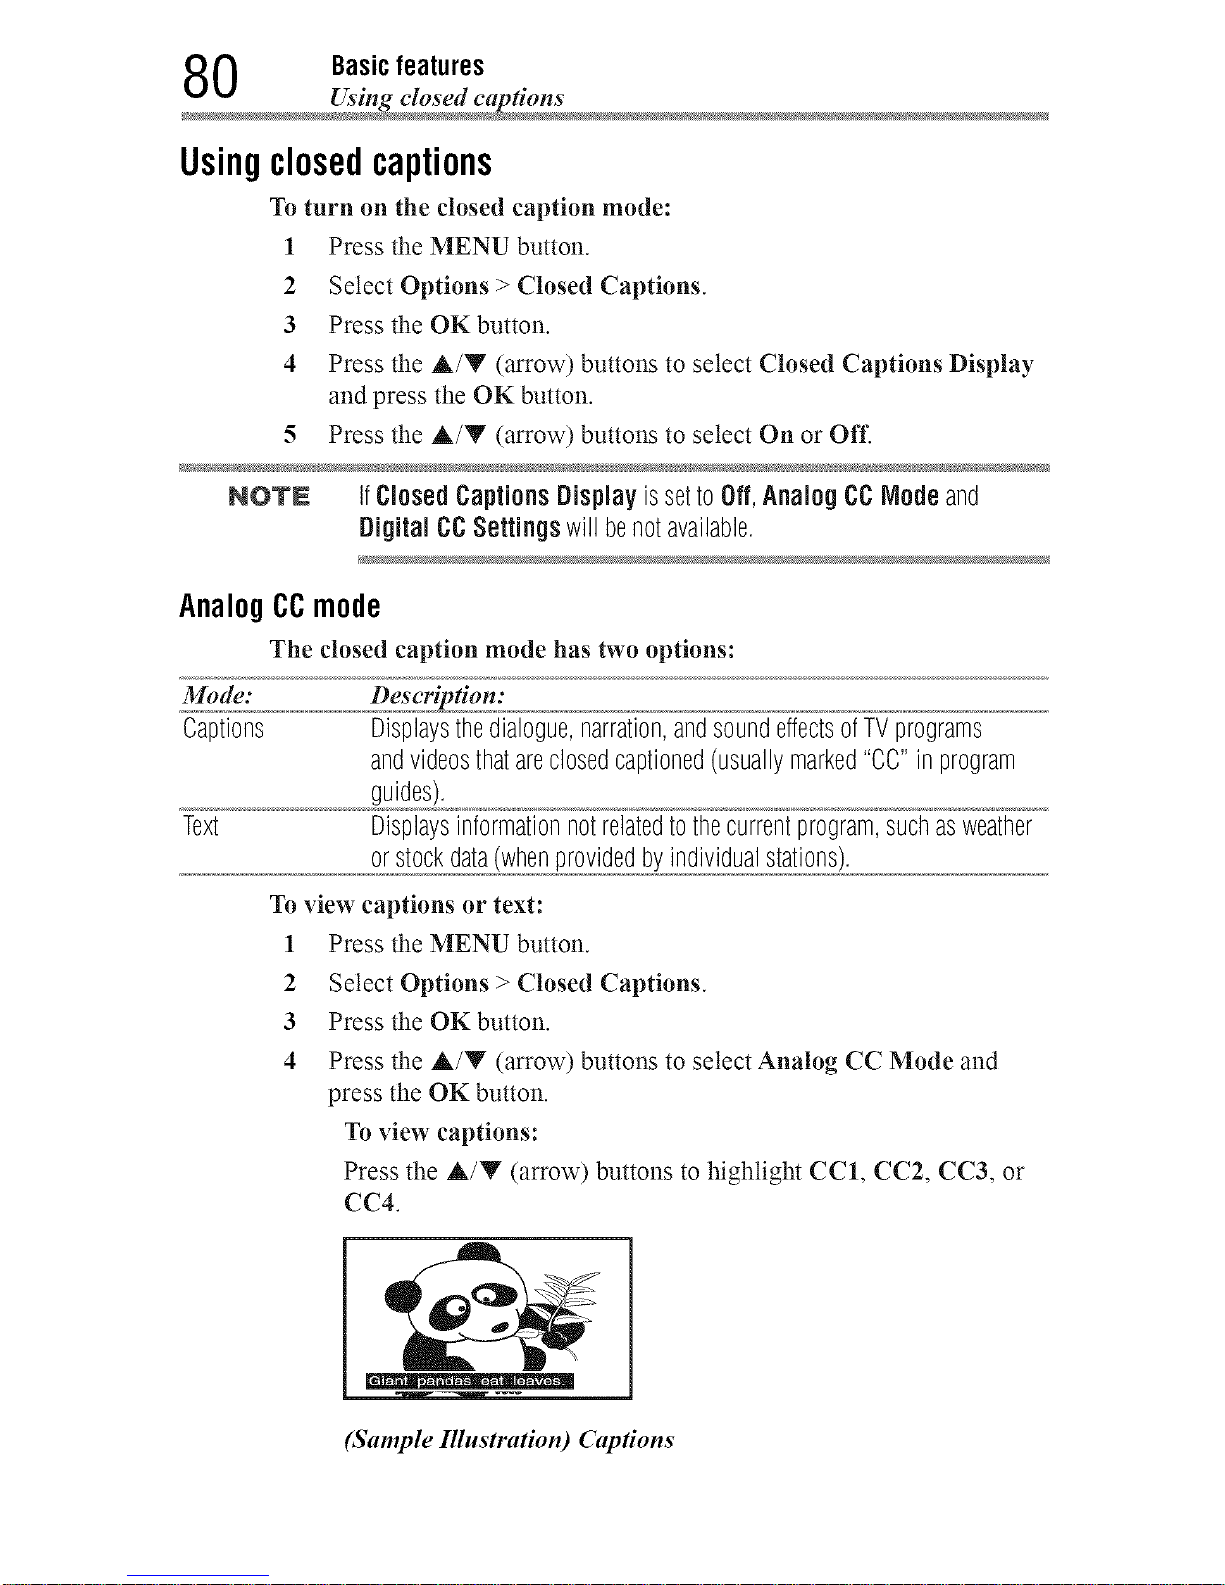
0 Basicfeatures
Using closed caption
Usingclosedcaptions
To turn on the closed caption mode:
1 Press the MENU button.
2 Select Options > Closed Captions.
3 Press the OKbutton.
4 Press the A/'V (arrow) buttons to select Closed Captions Display
and press the OK button.
5 Press the A/Y (arrow) buttons to select On or Off.
NOTN IfClosedCaptionsDisplayissettoOff,AnalogCCNodeand
DigitalCCSettings will benotavailable,
AnalogCCmode
The closed caption mode has two options:
Mode: Description:
Captions Displaysthedialogue,narration,andsoundeffectsofTVprograms
andvideosthatareclosedcaptioned(usuallymarked"CC"in program
guides).
Text Displaysinformationnotrelatedtothecurrentprogram,suchasweather
orstockdata(whenprovidedbyindividualstations).
To view captions or text:
1 Press the MENU button.
2 Select Options > Closed Captions.
3 Press the OKbutton.
4 Press the &/Y (arrow) buttons to select Analog CC Mode and
press the OK button.
To view captions:
Press the A/Y (arrow) buttons to highlight CC1, CC2, CC3, or
CC4.
o .o 9° =. =o =
(Sample Illustration) Captions
Downloaded from www.ManualsFile.com manuals search engine
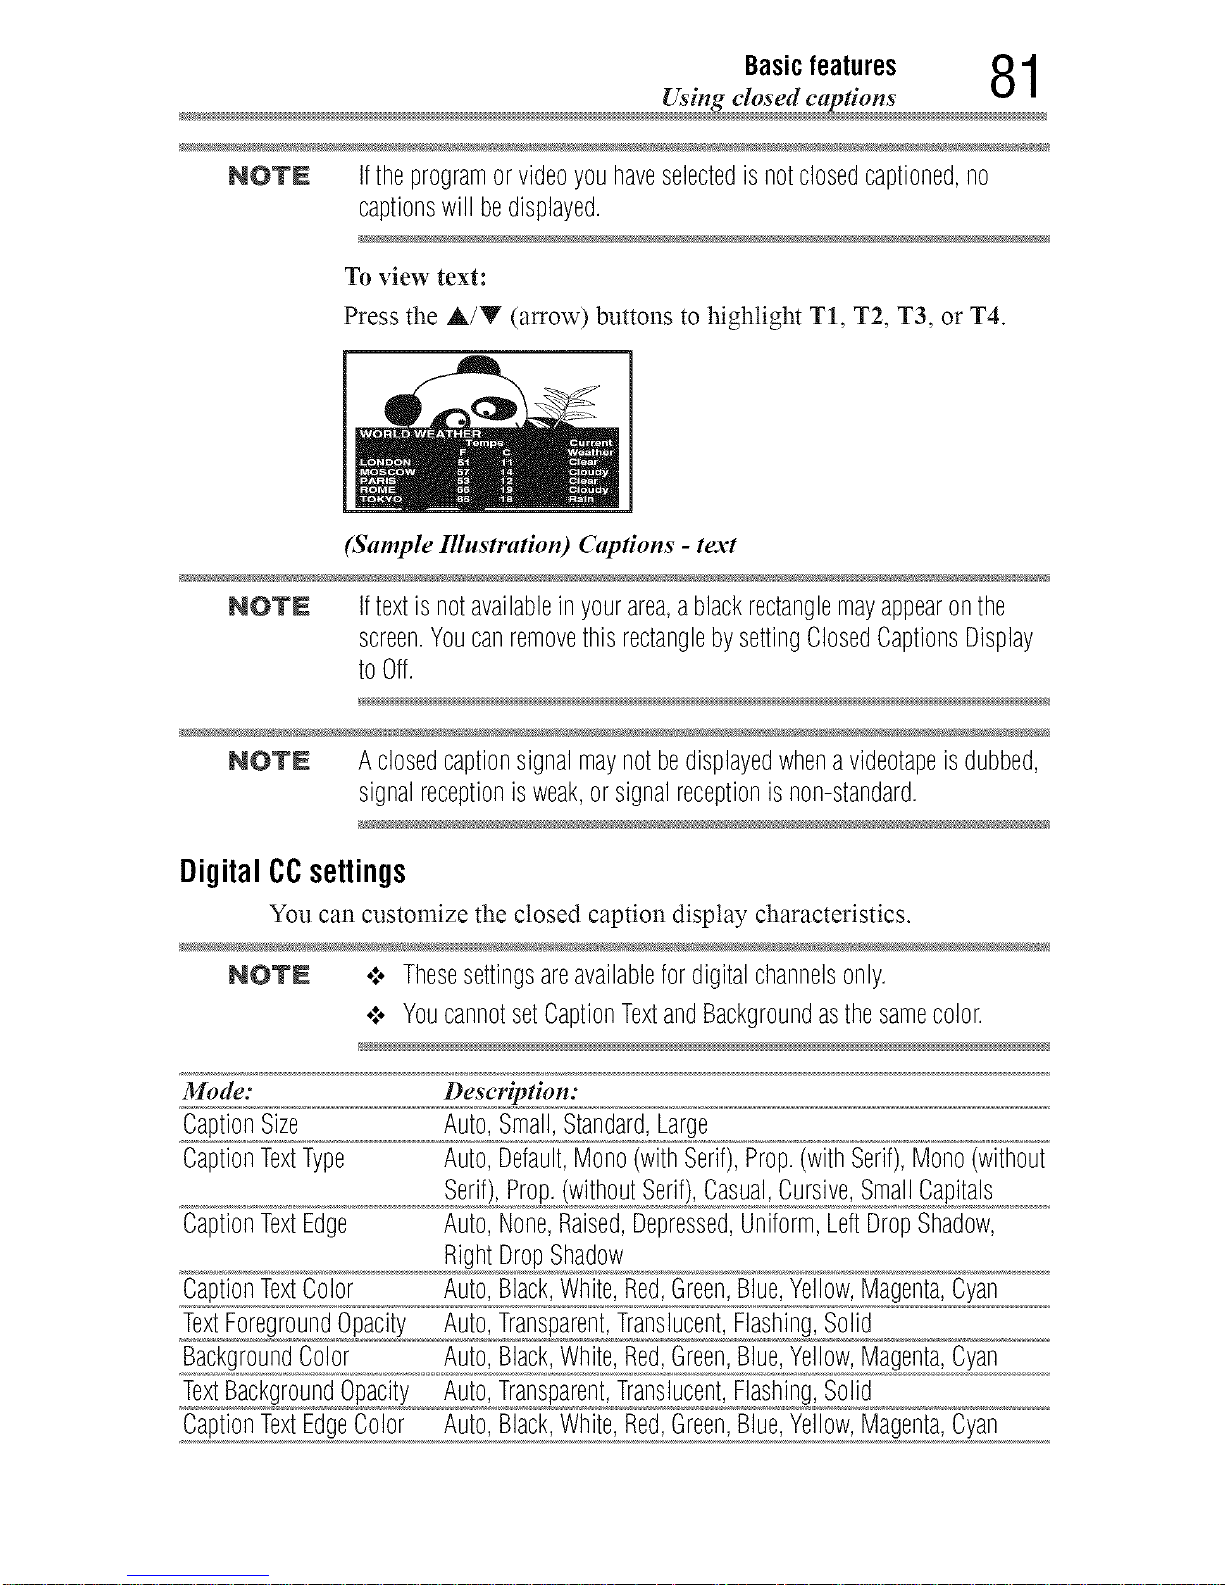
Basicfeatures 81
Using closed captions
NOTE Iftheprogramor videoyouhaveselectedisnotclosedcaptioned,no
captionswill bedisplayed.
To view text:
Press the A/Y (arrow) buttons to highlight T1, T2, T3, or T4.
(Sample Illustration) Captions - text
NOTE Iftextisnotavailableinyourarea,a blackrectanglemayappearonthe
screen.Youcanremovethis rectanglebysettingClosedCaptionsDisplay
toOff.
NOTE A closedcaptionsignalmaynotbedisplayedwhenavideotapeisdubbed,
signalreceptionisweak,or signalreceptionisnon-standard.
DigitalCCsettings
You can customize the closed caption display characteristics.
NOTN .:o Thesesettingsareavailablefordigitalchannelsonly.
¢ YoucannotsetCaptionTextandBackgroundasthesamecolor.
N _
Mode: Description:
CaptionSize Auto,Small,Standard,Large
CaptionTextType Auto,Default,Mono(withSerif),Prop.(withSerif),Mono(without
Serif),Prop.(withoutSerif),Casual,Cursive,SmallCapitals
CaptionTextEdge Auto,None,Raised,Depressed,Uniform,LeftDropShadow,
RightDropShadow
CaptionTextColor Auto,Black,White,Red,Green,Blue,Yellow,Magenta,Cyan
TextForegroundOpacity Auto,Transparent,Translucent,Flashing,Solid
BackgroundColor Auto,Black,White,Red,Green,Blue,Yellow,Magenta,Cyan
TextBackgroundOpacity Auto,Transparent,Translucent,Flashing,Solid
CaptionTextEdgeColor Auto,Black,White,Red,Green,Blue,Yellow,Magenta,Cyan
Downloaded from www.ManualsFile.com manuals search engine
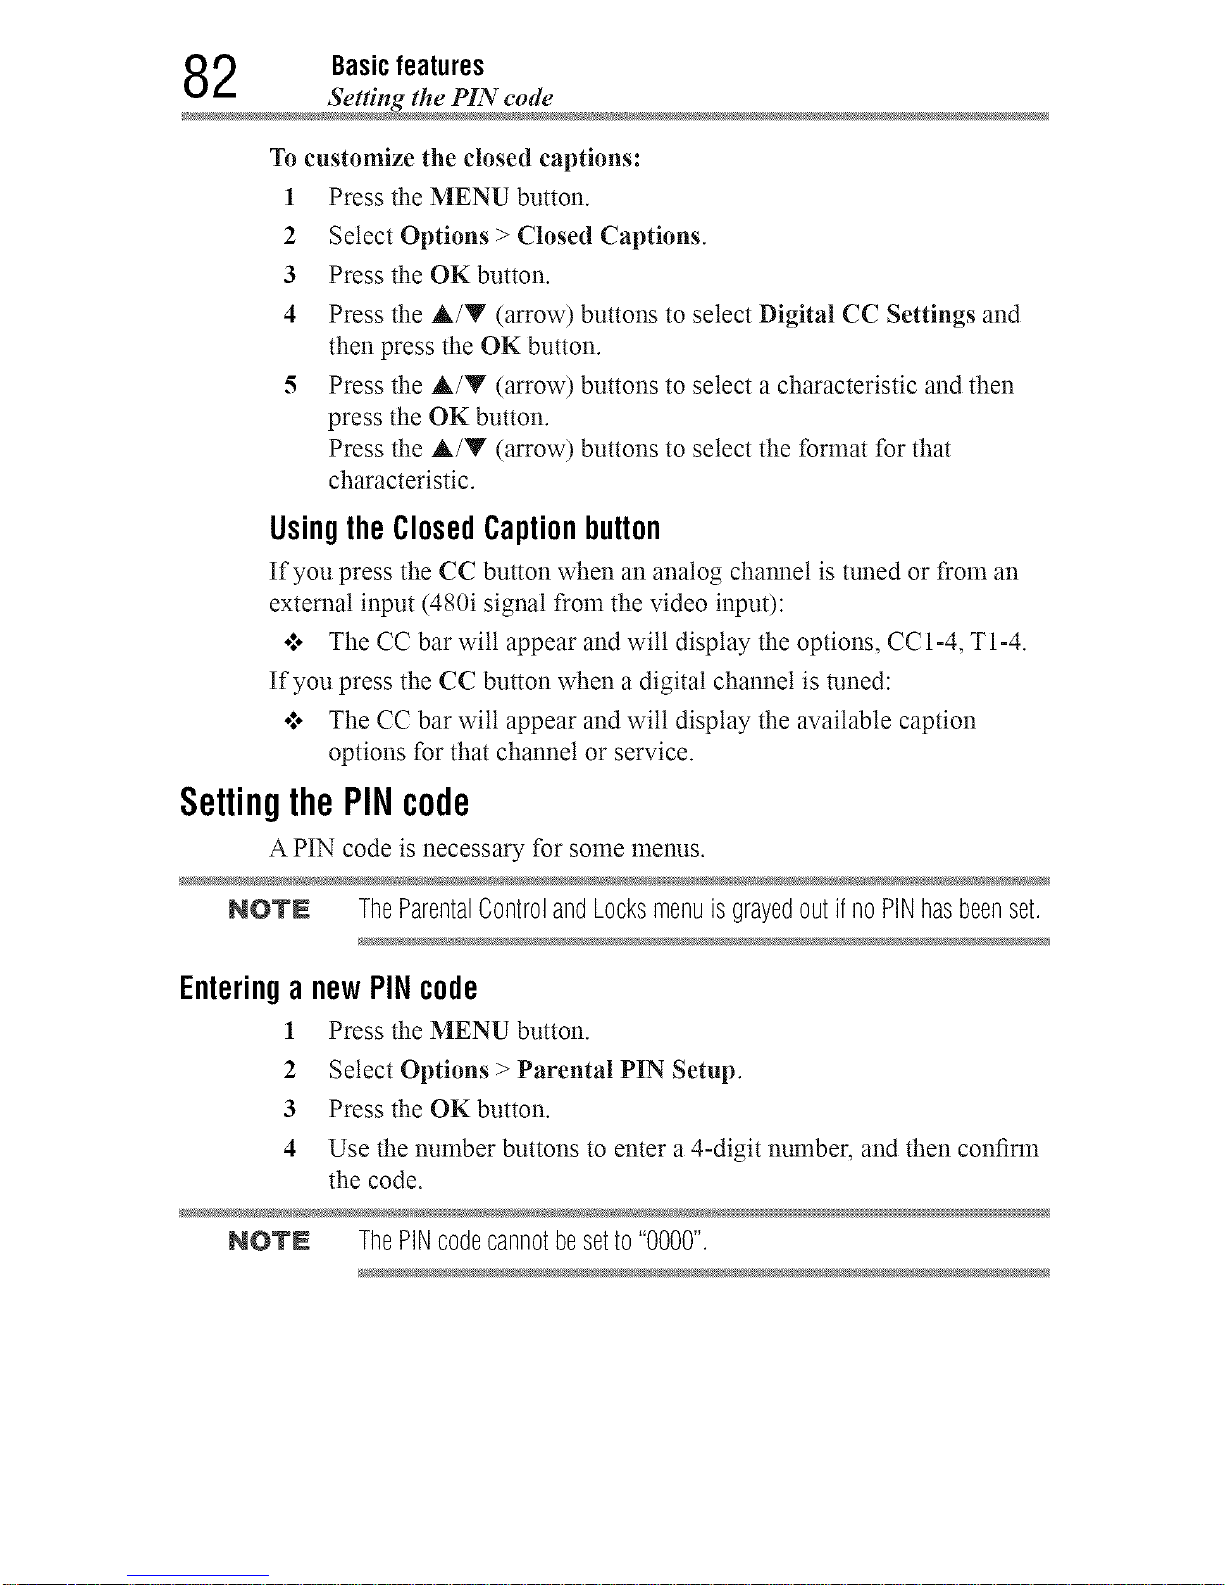
2 Basicfeatures
Se_ting _he PIN code
To customize the closed captions:
1 Press the MENU button.
2 Select Options > Closed Captions.
3 Press the OKbutton.
4 Press the &/Y (arrow) buttons to select Digital CC Settings and
then press the OK button.
5 Press the &/Y (arrow) buttons to select a characteristic and then
press the OK button.
Press the &/Y (arrow) buttons to select the format for that
characteristic.
Usingthe ClosedCaptionbutton
If you press the CC button when an analog cham_et is tuned or from an
external input (480i signal from the video input):
o**oThe CC bar wilt appear and wilt display the options, CC 1-4, T 1-4.
If you press the CC button when a digital channel is tuned:
o**oThe CC bar wilt appear and wilt display the available caption
options for that channel or service.
SettingthePINcode
A PIN code is necessary for some menus.
No'rN TheParentalControlandLocksmenuisgrayedoutifno PiNhasbeenset.
Enteringa newPINcode
1 Press the MENU button.
2 Select Options > Parental PIN Setup.
3 Press the OKbutton.
4 Use the number buttons to enter a 4-digit number, and then confirm
the code.
NO'rN ThePiNcodecannotbesetto "0000".
Downloaded from www.ManualsFile.com manuals search engine
Basicfeatures 83
Setting the PiN code
Changingor deletingyourPIN code
1 Press the MENU button.
2 Select Options > Parental PIN Setup.
3 Press the OK button.
4 Use the number buttons to enter your 4-digit PIN code.
5 Select Change PIN or Delete PIN, and then press the OK button.
NOTN .:. ThePINcodecannotbesetto "0000".
•".. IfyoudeletethePiNcode,thesettingsofParentalControlsandLocks
arereset.
Forgotten
!
2
3
4
5
6
PIN code
Pressthe MENU button.
Select Options > Parental PIN Setup.
Press the OK button.
Press the INFO button 4 times quickly.
Select Change PIN and press the OK button.
Enter a new PIN code.
Downloaded from www.ManualsFile.com manuals search engine
4 Basicfeatures
Using parental controls
Usingparentalcontrols
BlockingTV programsand moviesby rating (V-Chip)
Some TV programs and movies include signals that classify the content
of the program (as unsuitable for younger viewers). The V-Chip feature
in this TV detects the signals and blocks the programs according to the
ratings you select.
NOTN TheV-Chipfeaturein thisTVsupportstheU.S.V-Chipsystemonly.
1 Press the MENU button.
2 Select Options > Parental Control and Locks.
3 Press the OKbutton.
4 Enteryour 4-digit PIN code.
5 Press the A/V (arrow) buttons to select Enable Rating Blocking
and press the OK button.
6 Press the A/V (arrow) buttons to select On.
7 Press the A/Y (arrow) buttons to select Edit Rating Limits, and
then press the OK button.
The Edit Rating Limits screen appears.
8 Press the A/Y/4/_ (arrow) buttons.
9 Press the OK button to select a level of blocking.
A box with an "X" indicates a rating that will be blocked. As you
highlight a rating, the rating's definition appears at the bottom of
the screen.
10 Select Done and then press the OK button.
NOTN Thisfeaturewill notbeavailableifnoPiNcodeisset.
Downloadingan additionalrating system
An additional rating system may be available for use in selectively
blocking TV programs and movies.
NOTN Thecurrentlytunedstationmustbereceivinga digitalsignalbeforean
additionalratingsystemcanbedownloaded.
1 Press the MENU button.
2 Select Options > Parental Control and Locks.
Downloaded from www.ManualsFile.com manuals search engine

Basicfeatures 85
Using paten ml con trols
Press the OK button.3
4 Enteryour 4-digit PIN code.
The Parental Control and Locks screen appears.
5 Press the A/Y (arrow) buttons to select Enable Rating Blocking
and press the OK button.
6 Press the A/V (arrow) buttons to select On.
7 Press the A/Y (arrow) buttons to select Edit Rating Limits, and
then press the OK button.
The Edit Rating Limits screen appears.
8 Select Alt RS, and then press the OK button.
The Edit Alternate Ratings screen appears.
NOTN .:. TheAir RSbuttonis onlyavailableifanadditionalratingsystemis
currentlyavailable.
•".. Thedownloadmaytakeseveralminutes.
•".. TheinformationdisplayedontheAlternateRatingsscreendependson
theconfigurationoftheadditionalratingsystemavailableatthetime
ofdownload.
9 Press the A/V/4/_ (arrow) buttons.
10 Press the OK button to select the desired level of blocking. A box
with an "X" indicates the rating that wilt be blocked.
NOTN .:. Youcanonlydownloadtheadditionalratingsystemonce.Youcannot
downloadupdatesiftheybecomeavailable.
•".. Theadditionalratingsystemisnotdesigned,transmitted,or controlled
bytheTVor Toshiba,noristheavailabilityofanadditionalrating
systemdeterminedor controlledbyToshiba.
Similarly,theratingofprogramsinanadditionalratingsystemisnot
determined,transmitted,or controlledbytheTVorToshiba.
•".. Theadditionalratingsystemisanevolvingtechnology;therefore,
availability,content,andformatmayvary.
Downloaded from www.ManualsFile.com manuals search engine

6 Basicfeatures
Using parental controls
Rating system
Independent rating system for broadcasters:
Ratings: Description and Content themes:
TV-MA MatureAudienceOnly(Thisprogramis specificallydesignedto beviewed
byadultsandthereforemaybeunsuitableforchildrenunder17.L)Crudeor
indecentlanguageS)ExplicitsexualactivityV) Graphicviolence
TV-14 ParentsStronglyCautioned(Thisprogramcontainssomematerialthat
manyparentswouldfindunsuitableforchildrenunder14yearsofage).
D)IntenselysuggestivedialogueL)Strong,coarselanguageS)Intense
sexualsituationsV)Intenseviolence
TV-PG ParentalGuidanceSuggested(Thisprogramcontainsmaterialparents
mayfind unsuitableforyoungerchildren).D)SomesuggestivedialogueL)
InfrequentcoarselanguageS)SomesexualsituationsV)Moderateviolence
TV-G GeneralAudience(Mostparentswouldfindthisprogramsuitableforall
ages).
TV-Y7, DirectedtoOlderChildren(Thisprogramisdesignedforchildrenage7and
TV-Y7FV above.
NOTE:Programsinwhichfantasyviolencemaybemoreintenseormore
P,,,mve ........
TV-Y All Children(Thisprogramisdesignedtobeappropriateforall children).
Independent rating system for movies
Ratings: Description and Content themes:
X X-rated(Foradultsonly)
NC-17 Notintendedforanyone17andunder
R Restricted(Under17requiresaccompanyingparentoradult)
PG-13 ParentsStronglyCautioned(Somematerialmaybeinappropriateforchildren
under13)
PG ParentsStronglyCautioned(Somematerialmaybeinappropriateforchildren
under13)
G GeneralAudience(Appropriateforall ages)
Indication other than rating system
Display: Description:
NONE TheprogramisratedNone.
(Noratingappears) Noratinginformationisprovided.
NOTN Ifyouplacean"X"intheboxnextto"Rated"None"",programsrated"None"
or "NotRated"willbeblocked;Programsthatdonotprovideanyrating
informationwill notbeblocked.
Downloaded from www.ManualsFile.com manuals search engine
Basicfeatures 87
Locking spec_c channels
Displayingratings
To display the rating of the program you are watching, press the INFO
button on the remote control.
Unlockingprograms
If you try to tune to a program that exceeds the rating limits you have set,
the TV wilt enter program lock mode and a warning message will appear
on screen. Follow the instructions to temporarily unlock the program.
Lockingspecificchannels
A channel that is configured as Locked cannot be viewed unless the PIN
code is entered first, see "Setting the PIN code" on page 82.
1 Press the MENU button.
2 Select Options > Channel Options.
3 Press the OK button.
The list of channels appears.
_ol-2o- _ [] []
2o. _ [] []
(Sample Illustration) (Tzannel opdons
Press the _- (arrow) button and then press the A/Y (arrow) buttons
to select a channel in the lock column, and then press the OK
button.
5 You must enter your PIN code to lock channels.
NOTN IfnoPINcodehasbeenset,awarningappears.See,"SettingthePINcode"
on page82.
6 The box is selected. To clear the selection, press the OK button.
Downloaded from www.ManualsFile.com manuals search engine
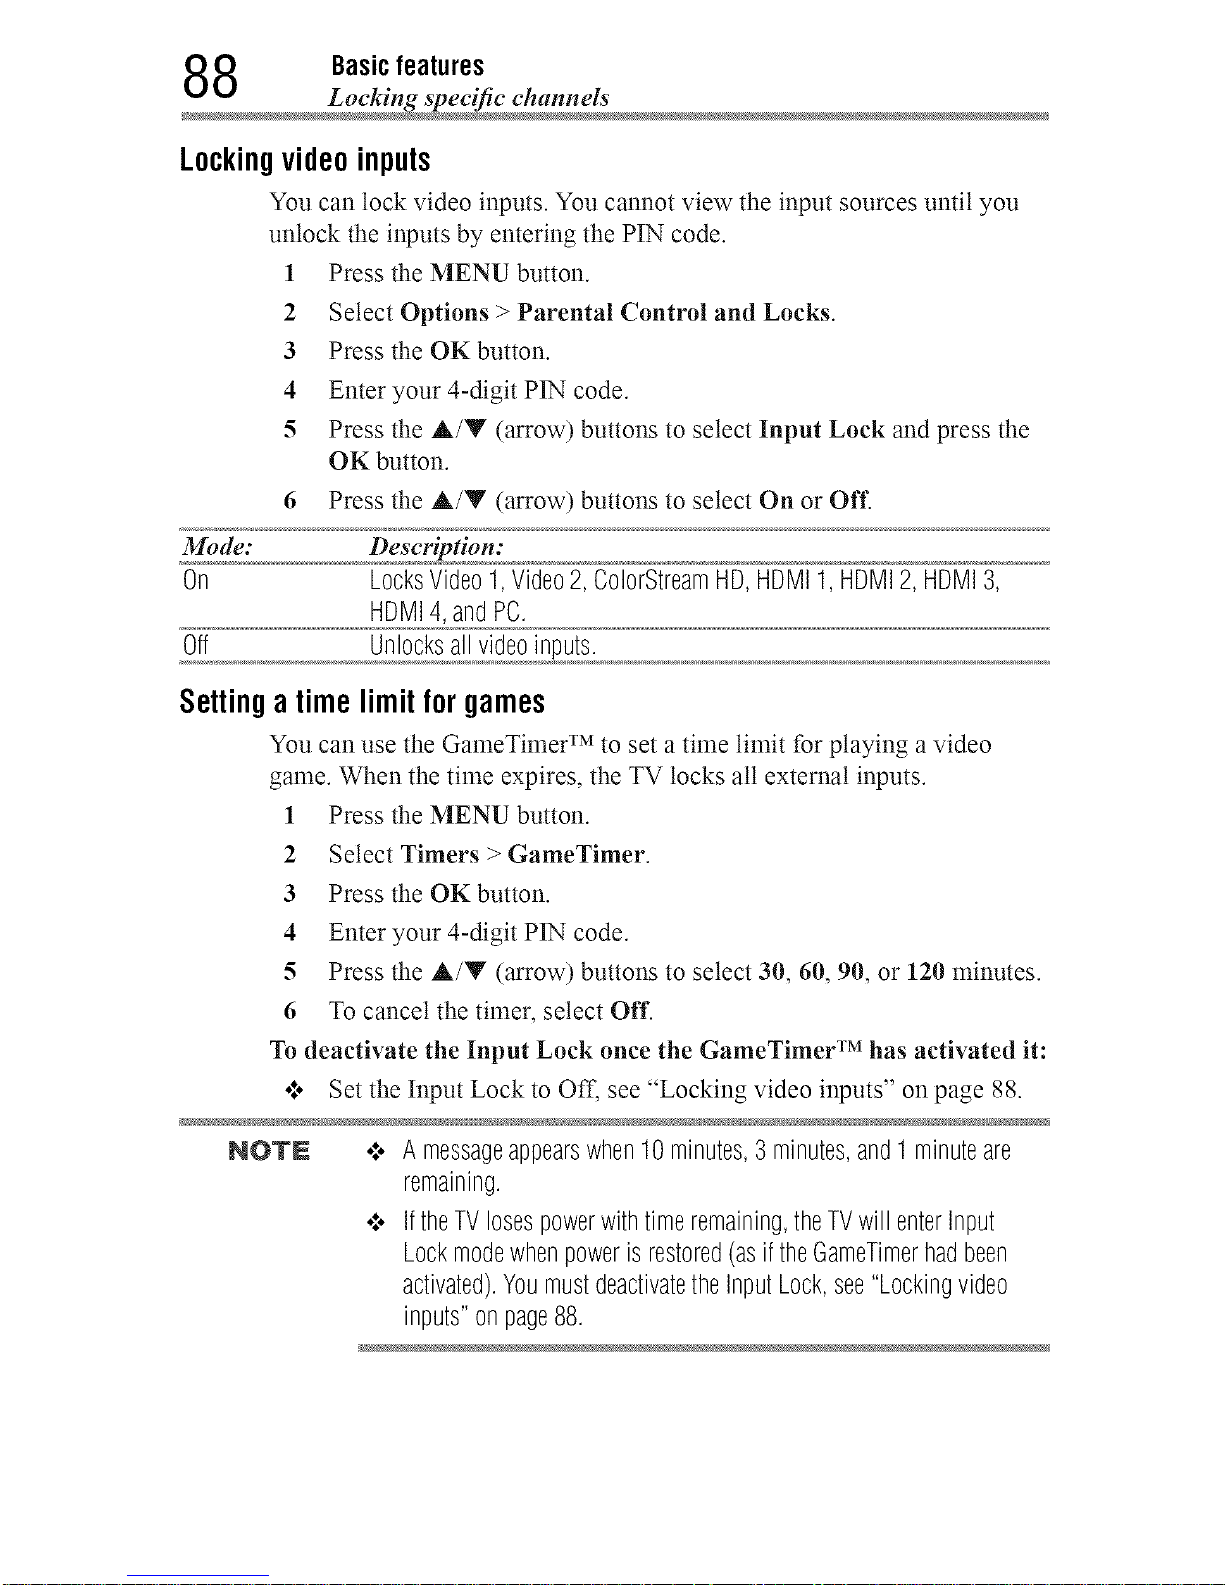
8 Basicfeatures
Locking spec_c channels
Lockingvideoinputs
You can lock video inputs. You cannot view the input sources until you
unlock the inputs by entering the PIN code.
1 Press the MENU button.
2 Select Options > Parental Control and Locks.
3 Press the OK button.
4 Enteryour 4-digit PIN code.
5 Press the A/Y (arrow) buttons to select Input Lock and press the
OK button.
6 Press the &/Y (arrow) buttons to select On or Off.
Mode: Descriptiom
On LocksVideo1,Video2, ColorStreamHD,HDMII, HDMI2, HDMI3,
HDMI4,andPC.
Off Unlocksall videoinputs.
Selling atime limitfor games
You can use the GameTimer TM to set a time limit for playing a video
game. When the time expires, the TV locks all external inputs.
1 Press the MENU button.
2 Select Timers >GameTimer.
3 Press the OK button.
4 Enteryour 4-digit PIN code.
5 Press the &/Y (arrow) buttons to select 30, 60, 90, or 120 minutes.
6 To cancel the timer, select Off.
To deactivate the Input Lock once the GameTimer TM has activated it:
gig Set the Input Lock to Off, see "Locking video inputs" on page 88.
NOTN .*.. A messageappearswhen10minutes,3 minutes,and1minuteare
remaining.
¢ IftheTVlosespowerwithtimeremaining,theTVwillenterInput
Lockmodewhenpowerisrestored(asiftheGameTimerhadbeen
activated).YoumustdeactivatetheInputLock,see"Lockingvideo
inputs"onpage88.
Downloaded from www.ManualsFile.com manuals search engine
Basicfeatures 89
Using HI)M[ _CEC _mtrol
Lockingthe controlpanel
You can lock the control panel to prevent your settings from being
changed accidentally (by children, for example). When Panel Lock is set
to On, none of the controls on the control panel operate except POWER.
1 Press the MENU button.
2 Select Options > Panel Lock and press the OK button.
3 Press the A/Y (arrow) buttons to select On.
NO'rN WhenPanel LockissettoOn,"PanelLock"appearsonscreenwhenthe
buttonsontheTVcontrolpanelotherthanPOWERarepressed.Control
panelPOWERbuttoncannotturnontheTVfromstandbymode.
To unlock the control panel:
o**oSelect Off in Step 3 above.
UsingHDMI®CECControl
This feature uses CEC technology and allows you to control Toshiba
HDMI _ CEC compatible devices from the TV remote control via HDMI _'
connection.
Toset HDIVll®CECControlSetup
1 Press the MENU button.
2 Select Options > HDMI CEC Control Setup and press the OK
button.
3 Press the A/Y (arrow) buttons to select Enable HDMI CEC
Control and press the OK button.
4 Press the A/Y (arrow) buttons to select On.
NOTN IfyousetEnableHDNI CECControl toOff,theotheritemsunder
HDIVllCECControlSetup willbegrayedout.
Downloaded from www.ManualsFile.com manuals search engine
0 Basicfeatures
Using HDMf _CEC Contro
5 Press the A/Y (arrow) buttons to select an item and press the OK
button.
Press the A/Y (arrow) buttons to select On or the desired mode:
ol. TVAuto Power: On/Off
.!o Auto Standby: On/Off
.to Amplifier Control: On/Off
.l. Initial Speaker Setting: TV Speakers/Amplifier
NOTN Thesefunctionsdependontheconnecteddevices.
414
AT4_
OK
RED,GREEN,
YELLOW,BLUE
0-9 buttons
ControllingHDiVll®CECplaybackdevices
With your TV's remote control, you can control the connected HDMI _
CEC playback device (DVD player, etc.) you are watching.
Button: Description:
Beginsplayback
[] Stopsplayback
Skipsforward.
Skipsbackward.
Fastforward
Rewind/reverse
Menunavigation,etc.
Enterscontentwitha menu
Controlsvariousoperation
Controlsvariousoperation,e.g.tuningtoaspecificchannelforthe
tunerdevice
ChannelA/'T Changestothenextavailablechannelup ordownin thesequence
NOTE Thesefunctionsdependontheconnecteddevices.
Downloaded from www.ManualsFile.com manuals search engine
Basicfeatures 91
Using HDMff CEC _mtrol
HDIVll®CECPlayer Controlmenu functions
1 Press the QUICK button to open the Quick menu.
2 Select HDMI CEC Device Control, and then press the OK button.
3 Press the A/Y (arrow) buttons to select the item you want to
control, and then press the OK button.
Item: Description:
Power TurnstheselecteddeviceOnandOff
RootMenu Accessestheselecteddevice'stopmenu
ContentsMenu AccessesthecontentlistwhentheOKbuttonis pressed
SetupMenu Accessesthedevice'ssetupmenu
Audio Selectsthedevice'ssound
Eject Ejectsthedevice'smedia
NOT£ Thesefunctionsdependontheconnecteddevices.
TheHDMI®CECDeviceControlitemisnotavailableunderthefollowing
conditions:
¢ A non-HUMI®inputisselected
¢ TheEnableHDIVIICECControl itemissettoOff
•:. TheconnectedHDMI*>CECdeviceisnota playback,recordingor
tunerdevice
HDIVll®CECControlinputsourceselection
If an HDMff CEC device with HDMff switching capability (e.g. an
amplifier) is connected to the HDMI _ input, you can select another
HDMff CEC device that is connected to the master HDMff' device.
Use the INPUT button on the remote control or the control panel, see
"Learning about the remote control" on page 56.
Adjustingthe amplifier's audio
Using the TV's remote control, you can adjust or mute the sound volume
of your audio system.
o:. The VOL (+ -) buttons adjust the volume level.
ol. The MUTE button turns offthe sound.
1 Press the MENU button.
2 Select Options > HDMI CEC Control Setup and press the OK
button.
Downloaded from www.ManualsFile.com manuals search engine

2 Basicfeatures
Using HDMF CEC Contro
3 Press the A/Y (arrow) buttons to select Initial Speaker Setting
and press the OK button.
4 Press the &/Y (arrow) buttons to select Amplifier.
NOTE ConfirmthataconnectedHDMI_>CECdevice(suchasDVDplayer,etc.)is
selectedfortheAmplifierinputsource.
NOTN o:, Youcanalsousethisfunctionwhentheaudiosystemisconnectedto
theTV'sDIGITALAUDIOOUTterminal(notHDMI®connection).
Selectadigitalaudioinputmodeontheamplifier.
•_, Thesefunctionsdependonthedeviceconnected.
Other HDIVll® CEC Control functions
When Enable HDMI CEC Control and all items in the HDMI _ CEC
Control Setup menu are set to On, the following functions will be
enabled:
/¢e//i:
TVAutoPower
AutoStandby
AmplifierControl
InitialSpeaker
Setting
Description:
IfanHD*M_'[®'CECdeviceisturnedon,theTVturnsonautomatically.
IftheTVisturnedoff,itwill sendamessagetoturnoffall ofthe
HDMI®CECdevicesconnectedtotheTV.
IfAmplifier ControlissettoOn,youcanadjustthesoundvolumeor
turnoffthesoundusingtheremotecontrol.
Withthisitem,youcansetyouraudiooutputpreferencetotheTV
SpeakersortheAmplifier.Whenthis itemissettoAmplifier,the
remotecontrolcanbeusedtoadjustormutethevolumeoftheaudio.
Theremotecontrolwill onlycontroltheamplifier,ifanHDMI®CEC
compatibleaudiosystemisconnected.
NOTE Whenyouturnontheaudiosystem,changeitsinputsource,oradjustthe
soundvolume,thesoundwill beoutputfromtheaudiosystem'sspeakers
evenifTVSpeakershasbeenselected.TurntheTVoffandonagainto
outputthesoundfromtheTVspeakers.
Downloaded from www.ManualsFile.com manuals search engine

Basicfeatures 93
Viewing the HDMf _signal infi_rmatio
ViewingtheHDMI®signalinformation
1 Press the MENU button.
2 Select Options > HDMI Information Display and press the OK
button.
3 Press the A/Y (arrow) buttons to select On.
4 Press the INFO button.
iP4....
HDMI Information is shown (Resolution, Scan Type, Frame Rate,
Aspect, Bit Depth, Color Space, RGB/YUV, Chroma Format), and
the normal banner and signal information bam_er appear.
NOTN ,*,oThesignalinformationbannerwillappearwhenthisfeatureis setto
OnandyouwatchanHDMI®inputandpresstheINFObutton.The
signalinformationwilldisappearafter60 seconds.
¢ IfyoupresstheNFO buttonwhenthisfeatureissettoOff,onlythe
normalbannerwillappear.
ChangingtheHDMI®InputMode
Change this when the 4K UHD picture signal that is being output from a
4K UHD device connected to HDMI IN 2 or 3 is a high speed signal.
•:* Normally you should use the default setting (Mode 2).
1 Change the input to the HDMI input you wish to change (HDMI 2
or HDMI 3)
2 Press the MENU button.
3 Select Options > Input Options > HDMI2 Input Mode or
HDMI3 Input Mode and press the OK button.
4 Press the A/Y (arrow) buttons to select Mode I or Mode 2.
Mode 1: Select this when you want to ptay 4K UHD pictures from
a 4K UHD compliant device in higher definition. If the
pictures do not display properly, select Mode 2.
Mode 2: This is the default mode (Mode 2 is compliant with 4K
UHD picture signals)
NOTN .:. Node 1 supportsthefollowing4KUHDpicturesignals.
Supportedupperbitratelimit:6 Gbps
4Kpicturesignal:4:4:4or4:2:2 60 Hz
Basedoninterimtestingstandards.Specificationsaresubjectto
change.
Downloaded from www.ManualsFile.com manuals search engine
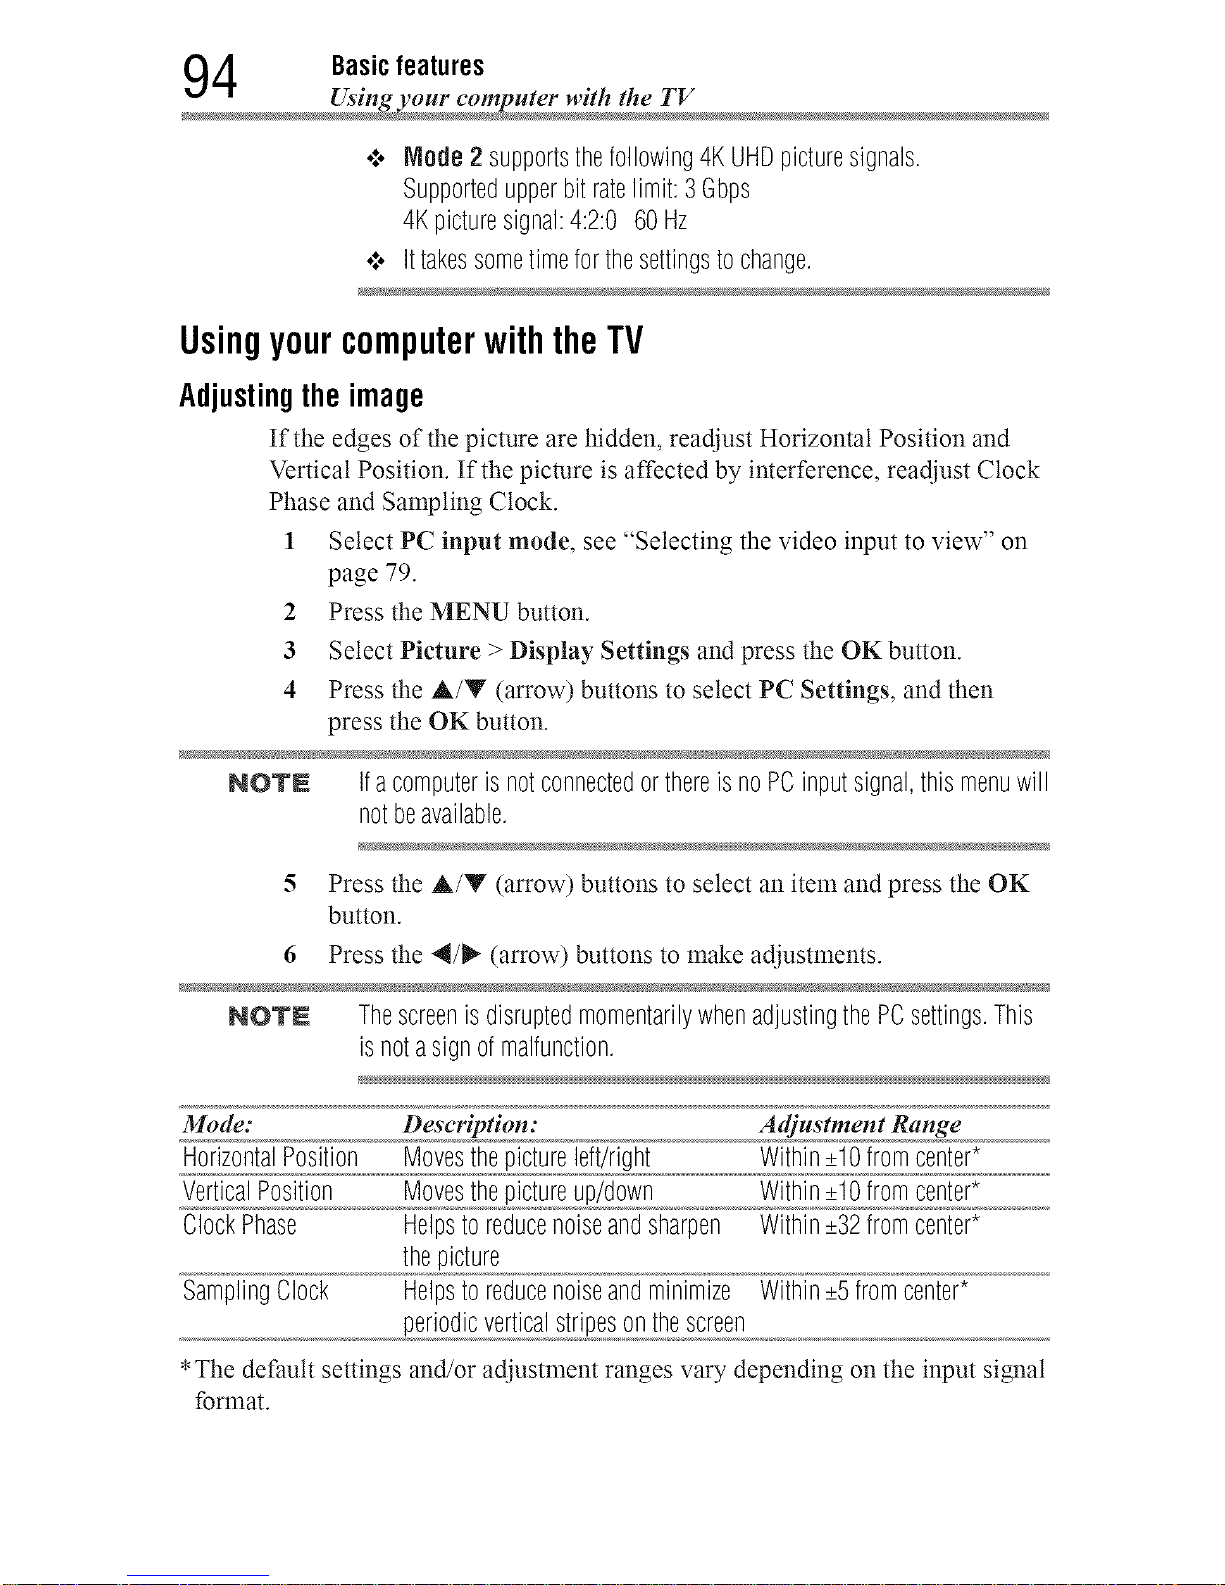
4 Basicfeatures
Using your computer with the TV
o:o Mode2 supportsthefollowing4KUHDpicturesignals.
Supportedupperbitratelimit:3 Gbps
4Kpicturesignal:4:2:0 60Hz
¢ Ittakessometimeforthesettingstochange.
UsingyourcomputerwiththeTV
Adjustingtheimage
If the edges of the picture are hidden, readjust Horizontal Position and
Vertical Position. If the picture is affected by interference, readjust Clock
Phase and Sampling Clock.
1 Select PC input mode, see "Selecting the video input to view" on
page 79.
2 Press the MENU button.
3 Select Picture > Display Settings and press the OK button.
4 Press the A/Y (arrow) buttons to select PC Settings, and then
press the OK button.
NOTE Ifacomputeris notconnectedorthereisnoPCinputsignal, this menuwill
notbeavailable.
5 Press the A/Y (arrow) buttons to select an item and press the OK
button.
6 Press the 4/_ (arrow) buttons to make adjustments.
NOTE ThescreenisdisruptedmomentarilywhenadjustingthePCsettings.This
isnotasignofmalfunction.
Mode: Description: Adjustment Range
HorizontalPosition Movesthepictureleft/right Within_+10fromcenter*
VerticalPosition Movesthepictureup/down Within_+10fromcenter*
ClockPhase Helpsto reducenoiseandsharpen Within_+32fromcenter*
thepicture
SamplingClock Helpsto reducenoiseandminimize Within_+5fromcenter*
periodicverticalstripesonthescreen
*The default settings and/or adjustment ranges vary depending on the input signal
format.
Downloaded from www.ManualsFile.com manuals search engine
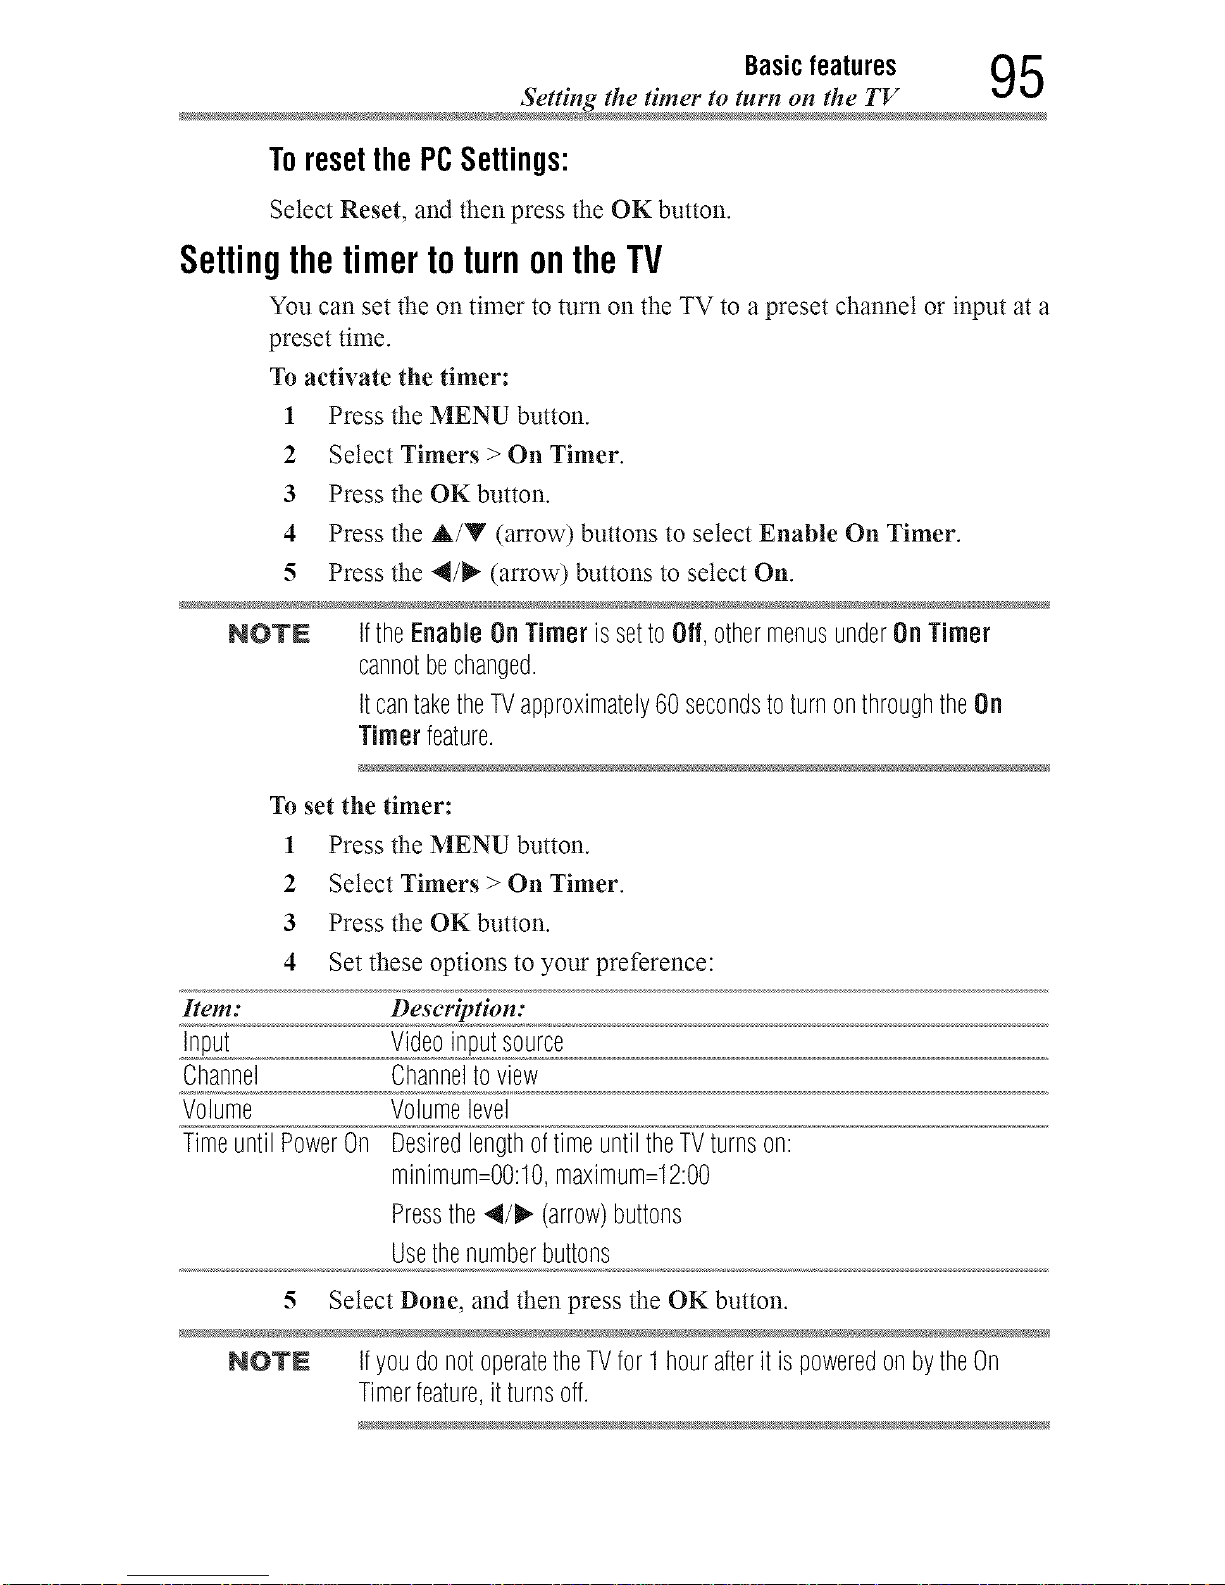
Basicfeatures 95
Setting the timer to turn on the TV
Toreset the PCSettings:
Select Reset, and then press the OK button.
SettingthetimertoturnontheTV
You can set the on timer to turn on the TV to a preset channel or input at a
preset time.
To activate the timer:
1 Press the MENU button.
2 Select Timers > On Timer.
3 Press the OKbutton.
4 Press the &/Y (arrow) buttons to select Enable On Timer.
5 Press the 4/_ (arrow) buttons to select On.
NQTN IftheEnableOnTimer issettOOff,othermenusunderOnTimer
cannotbechanged.
ItcantaketheTVapproximately60secondstoturnonthroughtheOn
Timer feature.
1 Press the MENU button.
2 Select Timers > On Timer.
3 Press the OK button.
4 Set these options to your preference:
Item: Description:
Input Videoinputsource
Channel Channeltoview
Volume Volumelevel
TimeuntilPowerOn DesiredlengthoftimeuntiltheTVturnson:
minimum=O0:10,maximum=12:00
Pressthe4/_ (arrow)buttons
Usethenumberbuttons
5 Select Done, and then press the OK button.
NO'rN IfyoudonotoperatetheTVfor I hourafteritis poweredonbytheOn
Timerfeature,it turnsoff.
To set the timer:
Downloaded from www.ManualsFile.com manuals search engine
6 Basicfeatures
Setting the sleep timer
To cancel the timer:
1 Press the MENU button.
2 Select Timers > On Timer.
3 Press the OKbutton.
4 Press the &/Y (arrow) buttons to select Enable On Timer.
5 Press the 4/_" (arrow) buttons to select Off.
Settingthesleeptimer
You can set the TV to turn off after a specific amount of time
(maxinmna = 12 hours).
Using the remote control:
1 Press the SLEEP button.
2 Set the amount of time until the TV turns off.
•:. Repeatedly press the SLEEP button to increase the time.
•:. Press the &/Y (arrow) buttons to increase or decrease the time.
Using the on-screen menus:
1 Press the MENU button.
2 Select Timers > Sleep Timer.
3 Press the OKbutton.
4 Select the amount of time until the TV turns off.
•:. Use the number buttons.
ol. Press the A/Y (arrow) buttons to increase or decrease the time.
NO'rN Ifapowerfailureoccurs,thesleeptimersettingmaybecleared.
To display the time remaining until the TV turns off, press the SLEEP
button.
To cancel the sleep timer, press the SLEEP button repeatedly or press the
A/Y (arrow) buttons until it is set to 0 minutes.
NO'rN Whenthefollowingfeaturesareset,thefeaturethatissetforthenearest
timewill function.
•:. SleepTimer
•:. Autoshutdownafter1 hourofinactivity(afterpoweringonbyOn
Timer)
•_. Nosignalautopoweroff (afterapproximately15minutesofnosignal)
Downloaded from www.ManualsFile.com manuals search engine

Basicfeatures 97
Setting No Sigmd Power Down
SettingNoSignalPowerDown
When an input's setting in this feature is set to On, The TV will
automatically turn itself off after about 15 minutes if no signal is detected.
You can change each input's setting to Off: ANT/CABLE or External
Inputs.
1 Press the MENU button.
2 Select Options > Power Management > No Signal Power Down,
and then press the OK button.
3 Press the A/Y (arrow) buttons to select the item you want to
change and press the OK button.
4 Press the A/Y (arrow) buttons to select On or Off.
5 Press the EXIT button.
NOTE .:o DefaultsettingforeachinputisOn.
•:. Awarningmessagewill appear1minutebeforeturningoff.
SettingActiveStandbyMode
When Active Standby Mode is turned On, screens such as the Menu
screen and Internet screen appear more quickly than usual when the
power is turned on from standby.
•:o The TV consumes more power when this is set to On.
1 Press the MENU button.
2 Select Options > Power Management > Active Standby Mode
and press the OK button.
3 Press A/Y (arrow) buttons to select On.
NOTS Thisfeatureisgrayedout,whenStore/ HomeNode issettoStore.
Downloaded from www.ManualsFile.com manuals search engine

8 Basicfeatures
Setting Wltke on LAN Standby Mo
SettingWakeonLANStandbyMode
When the TV is connected to the home network via LAN with the Wake
on LAN Standby Mode On, your TV can be turned on by control from
Apps.
1 Press the MENU button.
2 Select Options > Power Management > Wake on LAN Standby
Mode and press the OK button.
3 Press the A/V (arrow) buttons to select On.
NOTE .:. Dependingonthedeviceconnectedtothehomenetwork,itmaytakea
whilefortheTVtoturnon.
•".. Dependingonthedeviceconnectedtothehomenetwork,thisfeature
maynotwork.
•".. ActiveStandbyrequiresmorepowerconsumptionthanduringNormal
Standby.
•".. AfterthechangefromPowerOnstatetoActiveStandby,theremaybe
a periodofseveralsecondswhentheTVcannotreceivetheoperation
fromaremotecontrolorexternalapparatus.
•".. WhentheActive Standby Mode is settoOnandthenetwork
connectiontypeissettoWired, thisfeatureisautomaticallysetto
On.
Downloaded from www.ManualsFile.com manuals search engine
Basicfeatures 99
Displaying TV status informatio
DisplayingTVstatus information
To display TV status information, press the INFO button.
The following information wilt be displayed (if applicable):
•:o Current input (ANT/CABLE, Video, etc.)
o:* Either "CABLE" (for cable TV) or "ANT" (for over-the-air
broadcasts), if ANT/CABLE is the current input
o:, Channel mm_ber (if in ANT/CABLE mode)
o:o Input label (if set)
o:* Digital signal strength indicator (for ATSC/QAM signals only)
o:* Stereo, Mono, or SAP audio status (when in HDMI _ input mode,
PCM)
o:. Video resolution
o:* Aspect ratio of incoming video signal (4:3 or 16:9)
o:o V-Chip rating stares (if available)
o:o GameTimer (if set)
o:o Channel Label (if set or received)
To close the screen, press the INFO button again.
The following additional information (only available for ANT/CABLE
input) wilt display for digital chalmets (if applicable):
•:. Title
•:o Duration
•:o Detailed description
•:o Next program's information
Viewingsupportinformation
1 Press the MENU button.
2 Select Get Help > System Information.
3 Press the OK button to display support information containing Web/
Customer service numbers for US, Canada, and Mexico.
Downloaded from www.ManualsFile.com manuals search engine
1 O0 Basicfeatures
Resetting to FactorT Default
ResettingtoFactoryDefaults
You can reset all settings and channels to Factory Defaults.
1 Press the MENU button.
2 Select Installation > Reset TV.
3 Enter your PIN code (if a PIN code has been set).
A confirmation screen appears.
4 Select Yes, and then press the OK button.
The TV wilt turn off automatically.
To cancel the reset:
•1. Press the 4/_ (arrow) buttons to select No, and then press the OK
button.
Powerfailure
If power is lost while you are watching the TV, the Last Mode Memory
feature automatically turns on the TV when power is restored.
Downloaded from www.ManualsFile.com manuals search engine
Chapter7
PictureandSound
Controls
Selectingthepicturesize
You can view many program formats in several picture sizes-- Native
Mode TM,4:3, Full, TheaterWide 1, TheaterWide 2, TheaterWide 3,
Normal, Quad FHD and 4K Native.
NOTN .**. Thepicturesizeillustrationsareexamplesonly.Theformatofthe
image(inanyofthepicturesizes)dependsontheformatofthesignal
youarecurrentlywatching.Selectthepicturesizethatdisplaysthe
currentprograminthewaythatlooksbesttoyou.
•".. Usingthesefunctionstochangethepicturesize(i.e.,changingthe
height/widthratio)foranypurposeotherthanyourprivateviewing
maybeprohibitedundertheCopyrightLawsoftheUnitedStatesand
othercountries,andmaysubjectyoutocivilandcriminalliability.
•".. Somepicturesizesmaynotbeavailabledependingontheformatof
thesignalbeingreceived.
•".. IfyouselectaTheaterWideTMpicturesize,thetopandbottomedges
ofthepicture(includingsubtitlesorcaptions)maybehidden.Toview
theseedges,adjustthePicturePositionortryviewingtheprogramin
4:3orFull,see"Scrollingthepicture"onpage106.
101
Downloaded from www.ManualsFile.com manuals search engine
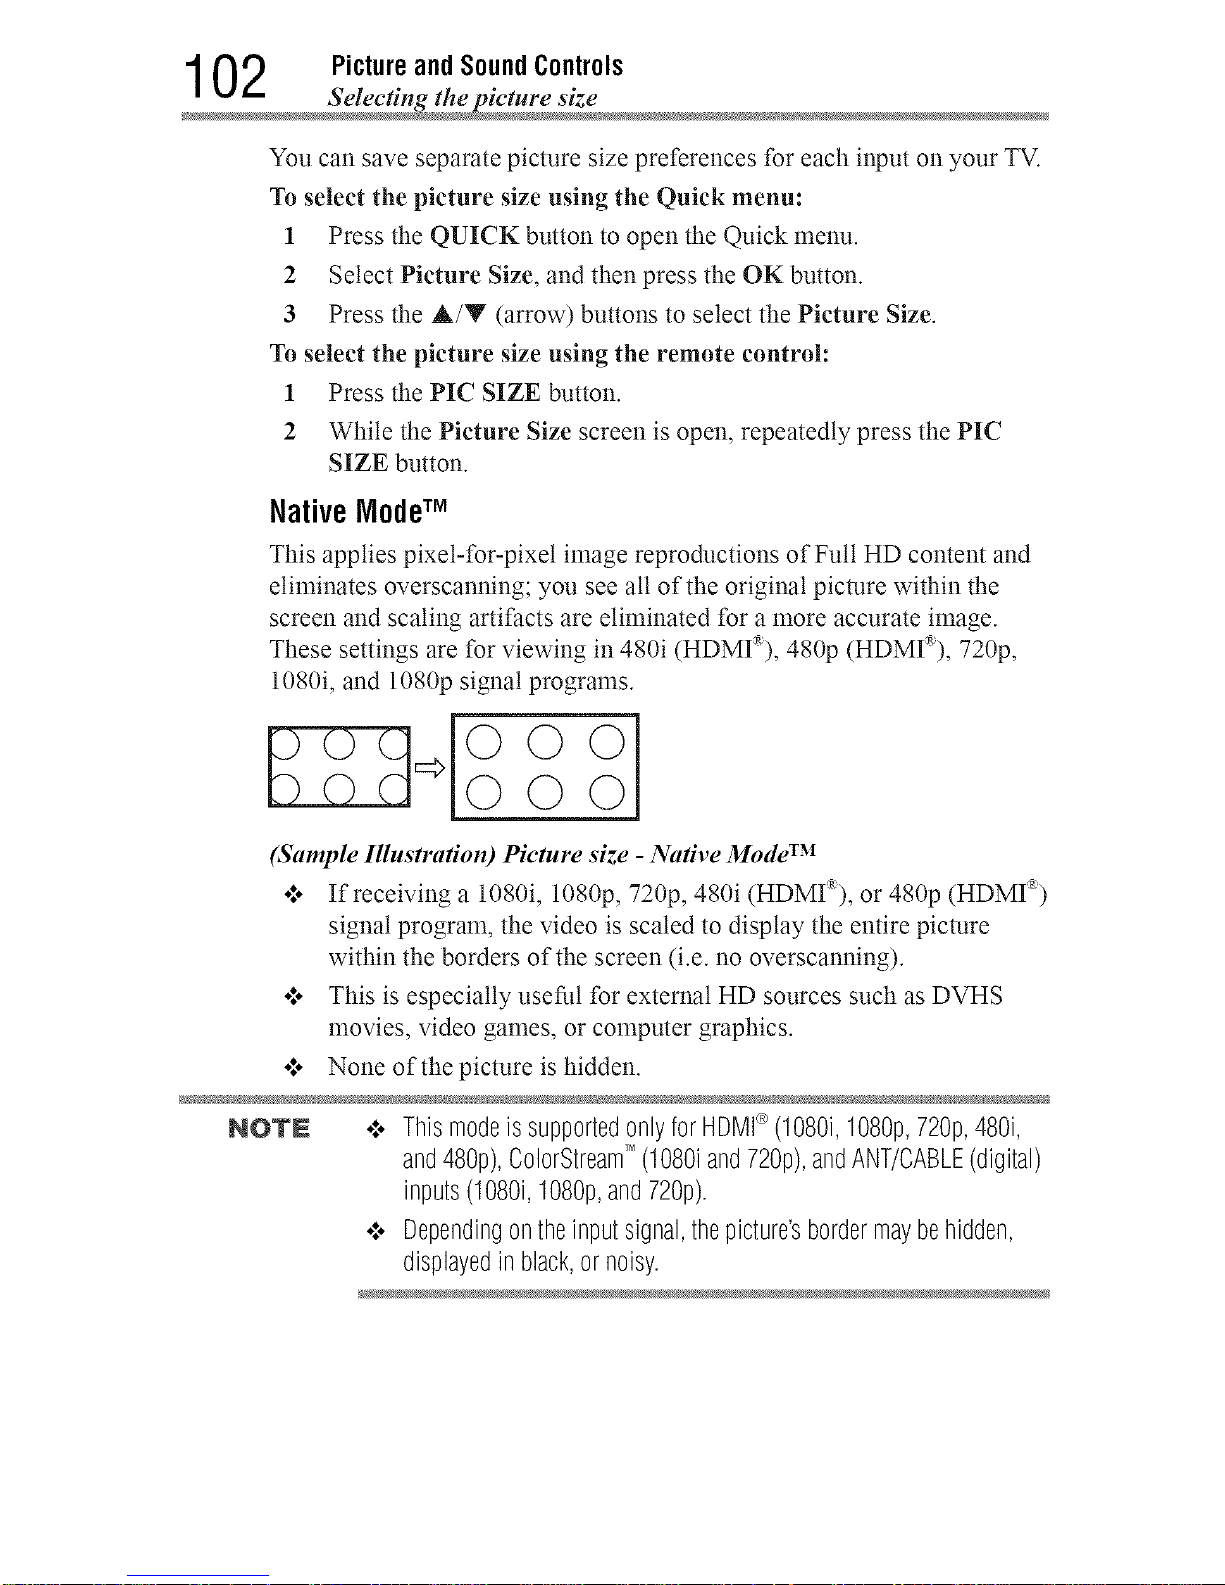
1 02 Picture and SoundControls
Selecting the picture siz
You can save separate picture size preferences for each input on your TV.
To select the picture size using the Quick menu:
1 Press the QUICK button to open the Quick nlenu.
2 Select Picture Size, and then press the OK button.
3 Press the &/Y (arrow) buttons to select the Picture Size.
To select the picture size using the remote control:
1 Press the PIC SIZE button.
2 While the Picture Size screen is open, repeatedly press the PIC
SIZE button.
NativeModeTM
This applies pixet-for-pixet image reproductions of Full HD content and
eliminates overscanning; you see all of the original picture within the
screen and scaling artifacts are eliminated for a more accurate image.
These settings are for viewing in 480i (HDMI_'), 480p (HDMI_'), 720p,
1080i, and 1080p signal programs.
(Sample Illustration) Picture size - Native Mode TM
.l. If receiving a 1080i, 1080p, 720p, 480i (HDMI_), or 480p (HDMI _)
signal program, the video is scaled to display the entire picture
within the borders of the screen (i.e. no overscanning).
.l. This is especially useful for external HD sources such as DVHS
movies, video games, or computer graphics.
•1. None of the picture is hidden.
NOTN .:. Thismodeis supportedonlyforHDMI_>(108% 108%,720p,48%
and480p),ColorStreamTM (1080iand72%),andANT/CABLE(digital)
inputs(108% 108%,and720p).
•:. Dependingontheinputsignal,thepicture'sbordermaybehidden,
displayedin black,or noisy.
Downloaded from www.ManualsFile.com manuals search engine
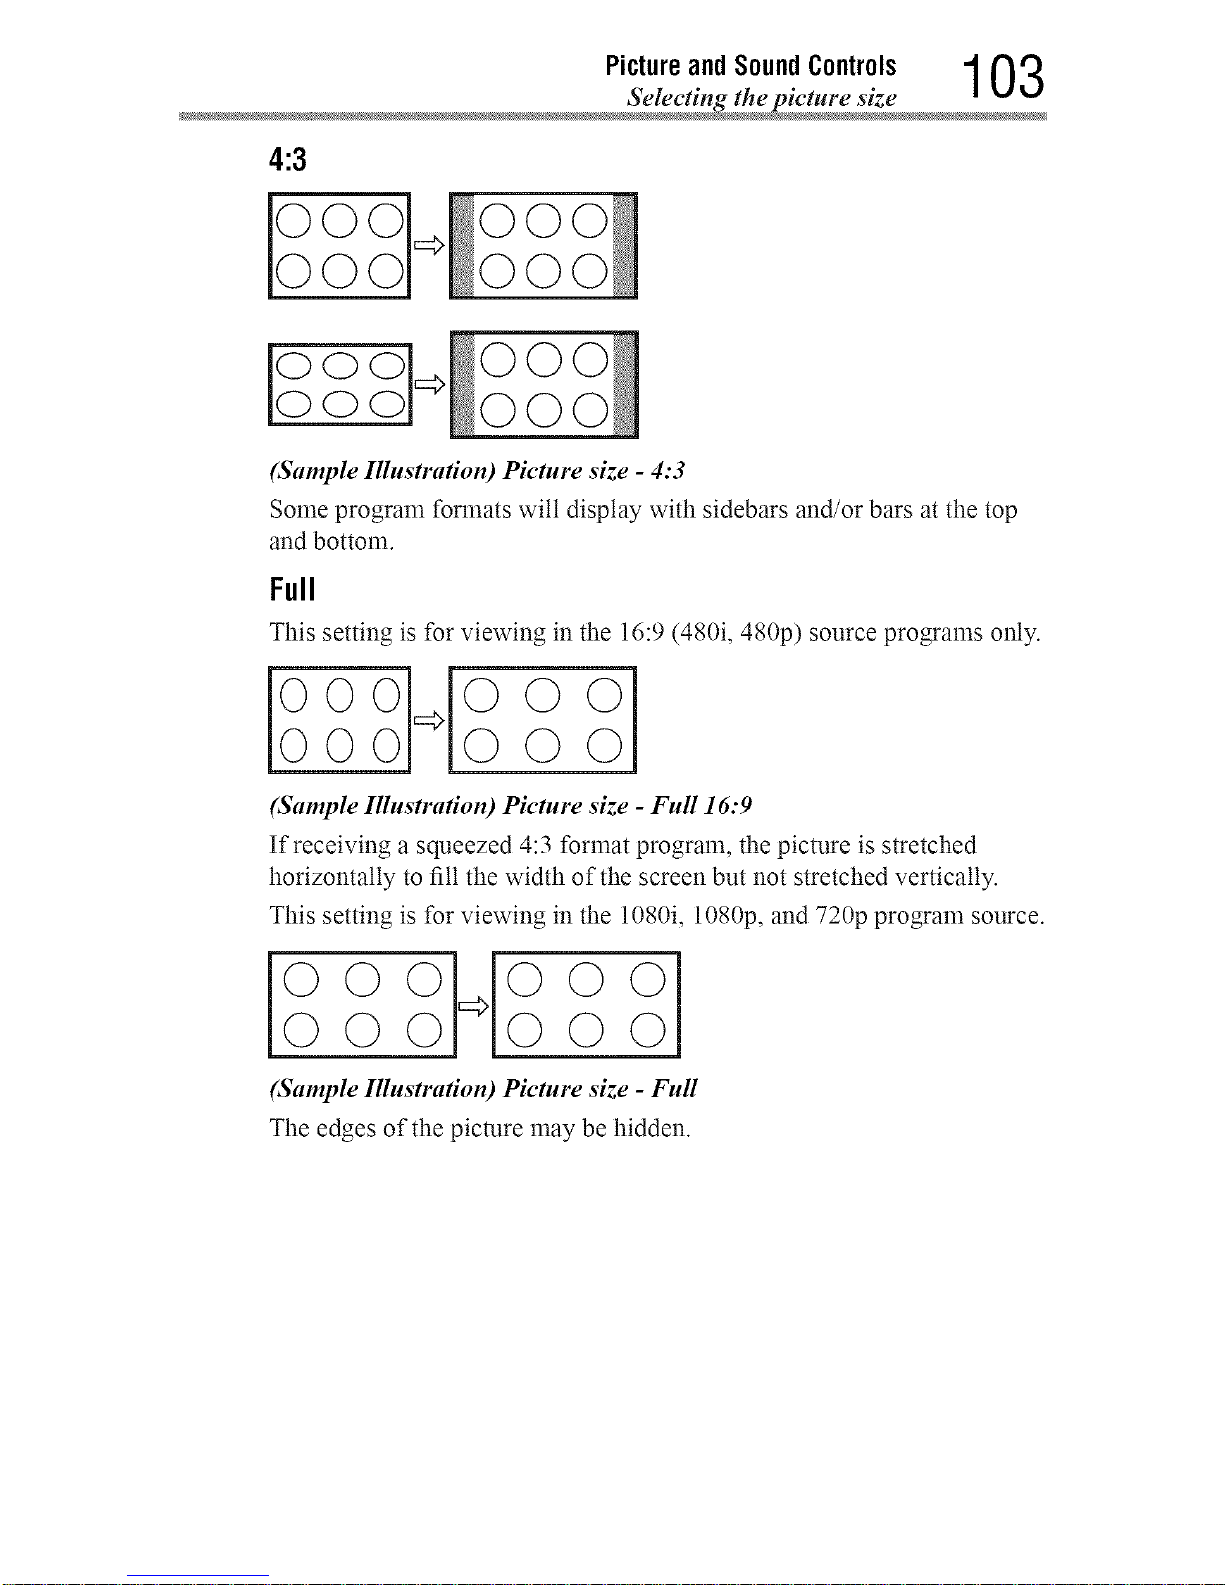
Pictureand Sound Controls 1 03
Selecting thepicture siz
4:3
0 000
ooo O0
oo O0
(Sample Illustration) Picture size - 4:3
Some program formats wilt display with sidebars and/or bars at the top
and bottom.
Full
This setting is for viewing in the 16:9 (480i, 480p) source programs only.
00_000
(Sample Illustration) Picture size - Full 16:9
If receiving a squeezed 4:3 format program, the picture is stretched
horizontally to fill the width of the screen but not stretched vertically.
This setting is for viewing in the 1080i, 1080p, and 720p program source.
000_000
(Sample Illustration) Picture size - Full
The edges of the picture may be hidden.
Downloaded from www.ManualsFile.com manuals search engine
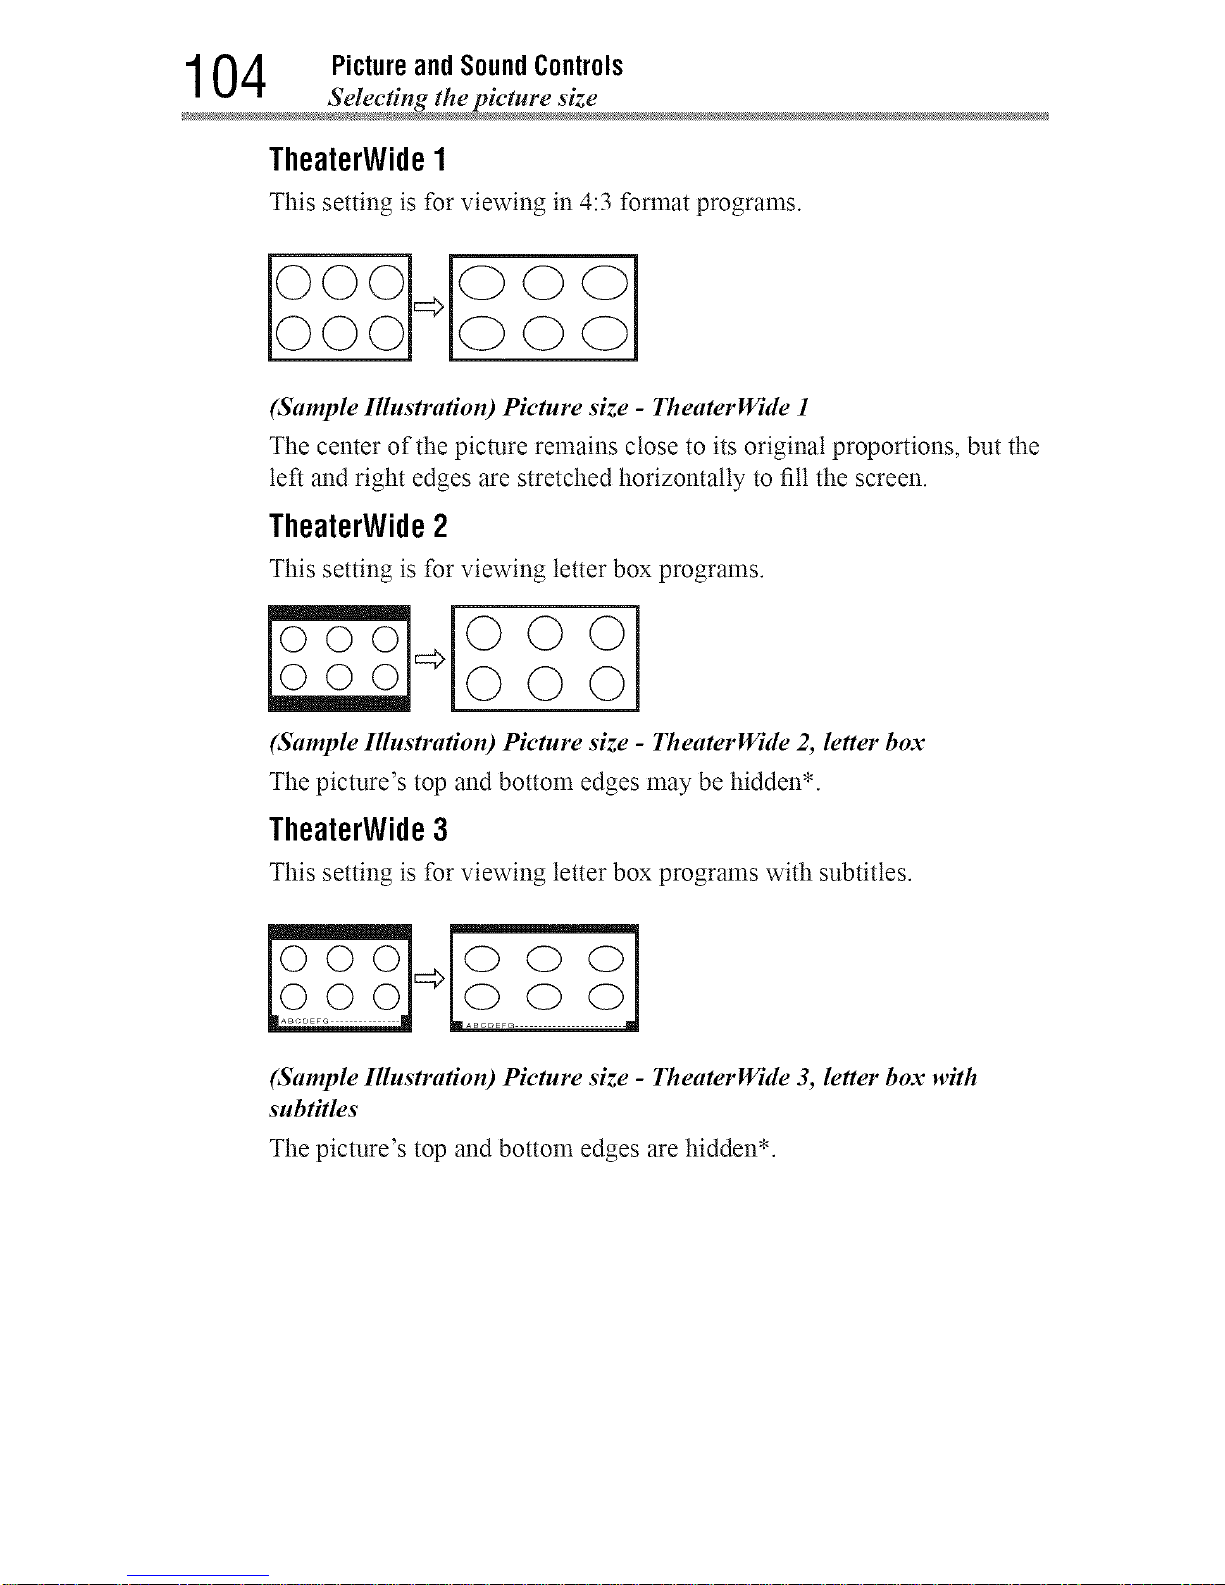
1 04 Picture and Sound Controls
Selecting the picture siz
TheaterWide1
This setting is for viewing in 4:3 format programs.
(Sample Illustration) Picture size- TheaterWide 1
The center of the picture remains close to its original proportions, but the
left and right edges are stretched horizontally to fill the screen.
TheaterWide 2
This setting is for viewing letter box progralns.
ooo [0 0 0
l
(Sample Illustration) Picture size- TheaterWide 2, letter box
The picture's top and bottom edges may be hidden*.
TheaterWide 3
This setting is for viewing letter box programs with subtitles.
(S.mple Illustration) Picture size - TheaterWide 3, letter box w#h
subtitles
The picture's top and bottom edges are hidden*.
Downloaded from www.ManualsFile.com manuals search engine
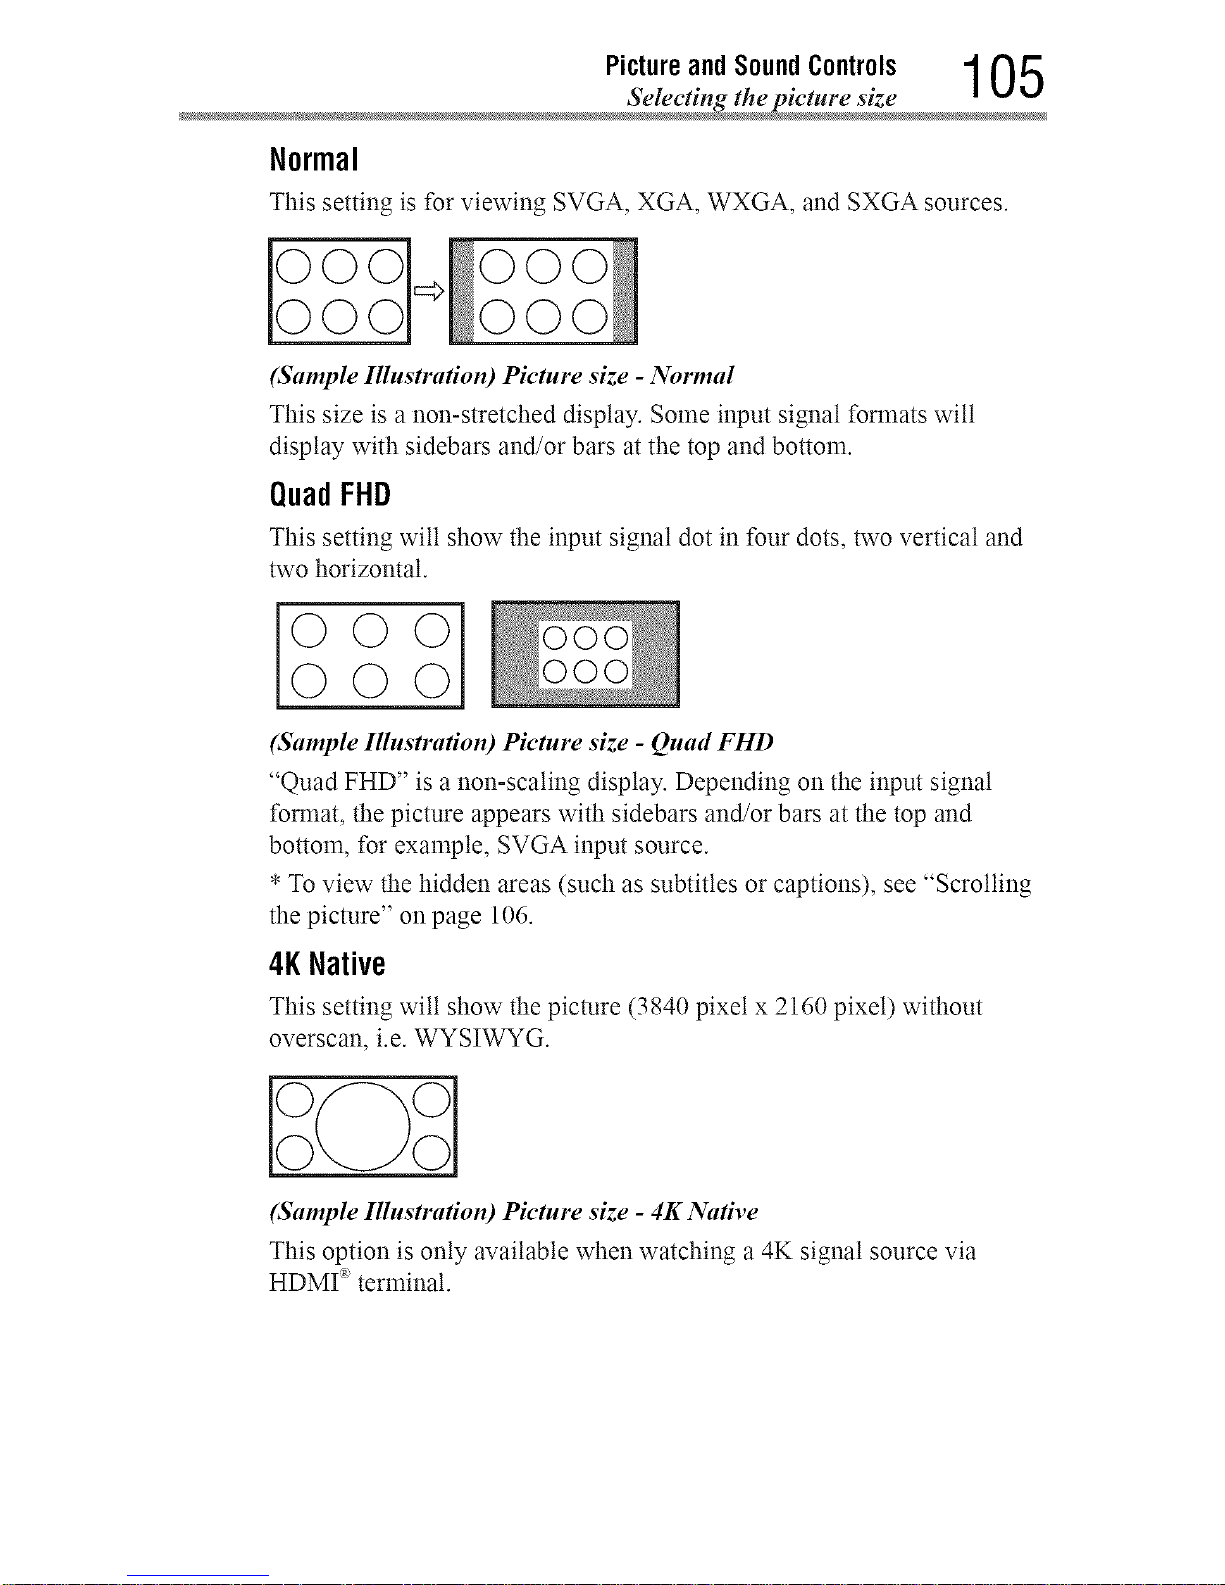
Picture and Sound Controls 1 05
Selecting thepicture siz
Normal
This setting is for viewing SVGA, XGA, WXGA, and SXGA sources.
0 000
(Sample Illustration) Picture size - Normal
This size is a non-stretched display. Some input signal formats will
display with sidebars and/or bars at the top and bottom.
QuadFHD
This setting wilt show the input signal dot in four dots, two vertical and
two horizontal.
000 i
OOO
(Sample Illustration) Picture size - Quad FHD
"Quad FHD" is a non-scaling display. Depending on the input signal
format, the picture appears with sidebars and/or bars at the top and
bottom, for example, SVGA input source.
*To view the hidden areas (such as subtitles or captions), see "Scrolling
the picture" on page 106.
4KNative
This setting wilt show the picture (3840 pixet x 2160 pixet) without
overscan, i.e. WYSIWYG.
ioo0oo
(Sample Illustration) Picture size - 4K Native
This option is only available when watching a 4K signal source via
HDMI _ terminal.
Downloaded from www.ManualsFile.com manuals search engine
1 06 Picture and Sound Controls
Scrolling the pictur
Scrollingthepicture
If the edges of the picture are hidden, you can adjust the image's position.
NOTN .**.Youcanadjustthepicturepositionwhenthepicturesizeissetto
TheaterWide2 orTheaterWide3.
¢ WhenviewingCloudPortal,MediaShareorInternetcontent,this
featureisnotavailable.
1 Press the MENU button.
2 Select Picture > Display Settings > Picture Position and press the
OK button.
3 Press the A/Y (arrow) buttons to select Vertical Position and press
the OK button.
4 Press the 4/_ (arrow) buttons to make the appropriate adjusmaents.
The adjustnaent range is from -5 to +10.
UsingtheAutoAspectfeature
When this feature is set to On, the TV wilt automatically select the picture
size when one of the following input sources is received:
***o480i, 480p, 720p, 1080i digital signal from the ANT/CABLE input
._o 480i, 480p, 720p, 1080i, 1080p, or VGA (60 Hz) signal from the
HDMI _ 1/2/3/4 input
NOTN TheautoaspectratiofeatureisnotapplicabletothePCinput.
1 Press the MENU button.
2 Select Picture > Display Settings > Auto Aspect and press the OK
button.
3 Press the A/Y (arrow) buttons to select On.
4 Press the EXIT button.
Downloaded from www.ManualsFile.com manuals search engine
Pictureand SoundControls 107
Using the 4:3 Stretch
Usingthe4:3Stretch
When 4:3 Stretch is activated, the TV displays 4:3 programs as a full-
screen picture.
NOTN ThisfeatureisavailablewhenAutoAspectissettoOn.
1 Press the MENU button.
2 Select Picture > Display Settings > 4:3 Stretch and press the OK
button.
3 Press the A/Y (arrow) buttons to select On.
4 Press the EXIT button.
Adjustingthepicture
Selecting the picture mode
The Toshiba Ultra High Definition 4K televisions provide a series of
preset Picture Modes with color, contrast, and other setting specifically
tuned for different types of video content. You can select your desired
picture settings from the modes described below.
Mode: Descripden:
AutoViewTM Automaticallyadjustsmultiplepicturesettingsincludingbrightness,
contrast,gamma,colorsaturation,andsharpnessbasedonambientroom
lightconditionsandincomingpicturecontenttocreatethebestpossible
picturesettingswithoutanymanualadjustment.
Dynamic Maximizescontrast,colorsaturation,sharpness,andbrightnesstocreate
morevividanddynamicimages.
Standard Standardpicturesettings
Movie Optimizesthebacklight,contrast,brightness,colorsaturation,sharpness,
colortemperature,noisereduction,andmotioncompensationtocreatethe
perfectpicturesettingsforwatchingmoviesin adarkroom.
Game Reroutesthevideosignalto bypassselectinternalTVcircuitryandshorten
signal-to-screentimeforreducedcontrollerdelayandfastervideogaming
action.
PC Finetunesthevideoprocessingandoptimizessharpness,colorsaturation,
aspectratio,colortemperature,andnoisereductiontoproducethebest
picturesettingswhendisplayingvideofroma PCora laptop.
Downloaded from www.ManualsFile.com manuals search engine
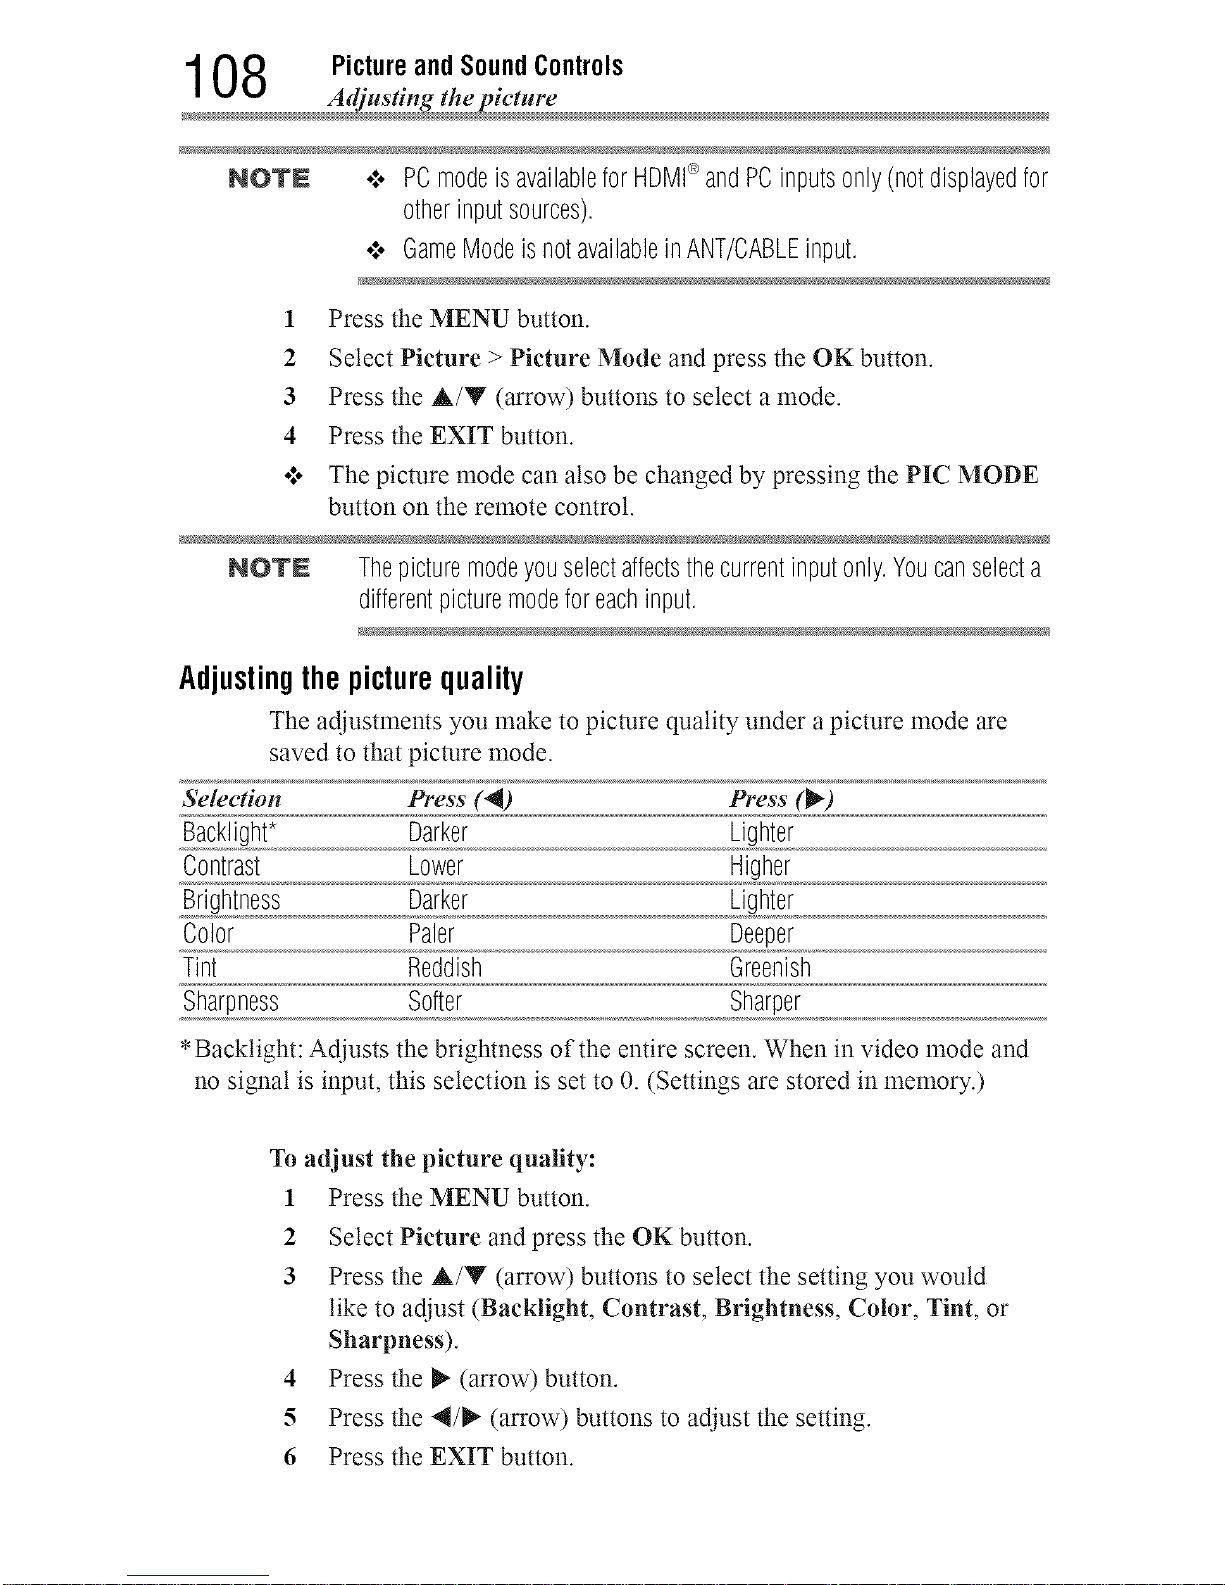
1 08 Picture and Sound Controls
Adjusting the picture
NOTE o:o PCmodeisavailableforHDMI®andPCinputsonly(notdisplayedfor
otherinputsources).
•_. GameModeisnotavailablein ANT/CABLEinput.
1 Press the MENU button.
2 Select Picture > Picture Mode and press the OK button.
3 Press the &/Y (arrow) buttons to select a mode.
4 Press the EXIT button.
•_o The picture mode can also be changed by pressing the PIC MODE
button on the remote control.
NO'rN Thepicturemodeyouselectaffectsthecurrentinputonly.Youcanselecta
differentpicturemodeforeachinput.
Adjustingthe picturequality
The adjustments you make to picture quality under a picture mode are
saved to that picture mode.
&'election Press (4) Press (t_)
Backlight* Darker Lighter
Contrast Lower Higher
Brightness Darker Lighter
Color Paler Deeper
Tint Reddish Greenish
Sharpness Softer Sharper
*Backtight: Adjusts the brightness of the entire screen. When in video mode and
no signal is input, this selection is set to 0. (Settings are stored in memory.)
To adjust the picture quality:
1 Press the MENU button.
2 Select Picture and press the OK button.
3 Press the &/Y (arrow) buttons to select the setting you would
like to adjust (Backlight, Contrast, Brightness, Color, Tint, or
Sharpness).
4 Press the _ (arrow) button.
5 Press the 4/_ (arrow) buttons to adjust the setting.
6 Press the EXIT button.
Downloaded from www.ManualsFile.com manuals search engine
Picture and Sound Controls 109
Using the adwmced picture settings features
NOTE .:. Anypicturesettingsthatyouadjustaffectthecurrentinputonly.
Youcanadjustthepicturequalityseparatelyforeachinput.
•:. Dependingona Sharpnessvalue,theEdgeEnhancereffectmaybe
reduced.
To reset to the factory defaults:
1 Press the MENU button.
2 Select Picture > Reset.
3 Press the OK button.
A confirmation screen appears.
4 Press the 4/_" (arrow) buttons to select Yes, and then press OK.
Usingtheadvancedpicturesettingsfeatures
EdgeEnhancer
If the Edge Enhancer set to On, the clarity levels can be adjusted
automatically.
1 Press the MENU button.
2 Select Picture > Advanced Picture Settings > Edge Enhancer
and press the OK button.
3 Press the A/Y (arrow) buttons to select On.
4 Press the EXIT button.
NOTE .:o Thisfeaturemaynotworkproperlydependingonthecontent.
•:. Noisemayappearontheimagedependingonthedeviceconnectedto
theTV(e.g.adevicewithaspecificenhancerfunction).
DynamicContrast
Dynamic Contrast detects changes in picture quality that affect the
appearance of your contrast settings and then automatically adjusts the
video.
1 Press the MENU button.
2 Select Picture > Advanced Picture Settings > Dynamic Contrast
and press the OK button.
3 Press the A/Y (arrow) buttons to select High, Low, or Off.
4 Press the EXIT button.
Downloaded from www.ManualsFile.com manuals search engine
1 1 0 Picture and Sound Controls
Using _he advanced pic_ure se_tings fea_ure
DynaLightTM
The DynaLight TM dynamic backtight control monitors the brighmess
of each video frame and automatically adjusts backtight intensity based
on the content to create higher dynamic contrast, for deeper blacks and
increased depth.
1 Press the MENU button.
2 Select Picture > Advanced Picture Settings > DynaLight and
press the OK button.
3 Press the &/Y (arrow) buttons to select High, Low or Off.
4 Press the EXIT button.
ClearScan TM
L9400U Series: ClearScan TM 240Hz uses both frame interpolation
technology and advanced backtight control with image synchronization to
significantly increase the TV refresh rate for a clear fast motion video.
L8400U Series: ClearScan TM 120Hz technology utilizes advanced
backtight control with image synchronization to double the television
refresh rate for clearer fast motion video. This technology is ideal for
watching action movies, sports and video games.
1 Press the MENU button.
2 Select Picture > Advanced Picture Settings > ClearScan and
press the OK button.
3 Press the A/Y (arrow) buttons to select one of the following
settings.
L9400U Series: Cinema, Smooth, Standard, or Off
L8400U Series: Cinema, Smooth, or Off
4 Press the EXIT button.
NOTN IfthepicturemodeissettoGameor PCmode,thisfeatureisautomatically
notavailable.
Downloaded from www.ManualsFile.com manuals search engine
Picture and Sound Controls 1 1 1
Using the adwmced picture settings feature
MPEGNR
The MPEG noise reduction feature allows you to reduce visible
interference caused by MPEG compression.
1 Press the MENU button.
2 Select Picture > Advanced Picture Settings > Noise Reduction
and press the OK button.
3 Press the A/Y (arrow) buttons to select MPEG NR and press the
OK button.
4 Press the A/Y (arrow) buttons to select Low, Middle, High, or
Off.
5 Press the EXIT button.
NOTE IfthepicturemodeissettoGameor PC,thisfeatureisnotavailable.
DNR(Dynamic Noise Reduction)
DNR is a Dynamic Noise Reduction technology that filters out video
noise without decreasing picture sharpness for clean, crystal-clear images.
For the best results, use lower settings, as picture quality may be greatly
reduced if the setting is too high.
1 Press the MENU button.
2 Select Picture > Advanced Picture Settings > Noise Reduction
and press the OK button.
3 Press the A/Y (arrow) buttons to select DNR and press the OK
button.
4 Press the A/Y (arrow) buttons to select Low, Middle, High, Auto,
or Off.
5 Press the EXIT button.
NOTE IfthepicturemodeissettoGameor PC,thisfeatureisnotavailable.
Downloaded from www.ManualsFile.com manuals search engine
1 1 2 Picture and Sound Controls
Using the advanced pic_ure settings feature
AmbientLight Sensor
When the ambient light function of Auto Brightness Sensor is set to On,
the TV optimizes the backtighting levels to suit ambient light conditions.
1 Press the MENU button.
2 Select Picture > Advanced Picture Settings > Auto Brightness
Sensor and press the OK button.
3 Press the &/Y (arrow) buttons to select On or Off.
4 Press the EXIT button.
NOTN WhenthepicturemodeissettoAutoView,thisfeatureisautomaticallyset
to On.
Colorlasteff M
The ColorMasteF Mfeature allows you to adjust standard colors.
1 Press the MENU button.
2 Select Picture > Advanced Picture Settings > ColorMaster and
press the OK button.
3 Press the &/Y (arrow) buttons to select On or Off.
4 Press the EXIT button.
BaseColorAdjustment
When ColorMaster TM is set to On, the list of base colors appears.
You can select a base color to adjust.
1 Press the MENU button.
2 Select Picture > Advanced Picture Settings > Base Color
Adjustment.
3 Press the OKbutton.
The Base Color Adjustment screen appears.
4 Press the &/Y (arrow) buttons to select a color. Press the _- (arrow)
button.
5 Press the 4/_" (arrow) buttons to select Hue, Saturation, or
Brightness.
6 Press the &/V (arrow) buttons to adjust the setting.
7 Repeat Steps 4 through 6 to adjust other colors. To reset the
adjustments to the factory defaults, select Reset on the screen, and
then press the OK button. (A confirmation screen appears. Press the
al/_ (arrow) buttons to select Yes, and then press the OK button.)
Downloaded from www.ManualsFile.com manuals search engine
Picture and Sound Controls 1 1 3
Using the adwmced picture settings feature
ColorTemperature
1 Press the MENU button.
2 Select Picture > Advanced Picture Settings > Color Temperature
and press the OK button.
3 Select Color Temperature andpress the OK button. Press the &/
Y (arrow) buttons to select Cool, Medium, or Warm.
4 Press the OKbutton.
5 Select Color Temperature andpress the OK button. Press the &/
Y (arrow) buttons to select the Red Level, Green Level, or Blue
Level.
6 Press the _ (arrow) button.
7 Press the 4/_ (arrow) buttons to adjust the level. The adjustment
range is -10 (tess of selected color) to +10 (more of selected color).
8 Press the EXIT button.
NOTE ThisfeatureisnotavailableinStandardandMoviemode.
DynamicRangeRestoration(DRR)(onlyfor L9400USeries)
By analyzing the incoming video signal, this system enhances specific
bright areas to restore the image brilliance and depth to cinema quality.
1 Press the MENU button.
2 Select Picture > Advanced Picture Settings > DRR and press the
OK button.
3 Press the &/Y (arrow) buttons to select On or Off.
NOTE Itmaynotbepossibletochangethepicturesettingsforcontentwithsmall
pictures,photographsetc.
Resettingtothefactorydefault
1 Press the MENU button.
2 Select Picture > Advanced Picture Settings > Reset.
3 Press the OKbutton.
A confirmation screen appears.
4 Select Yes, and then press the OK button.
Downloaded from www.ManualsFile.com manuals search engine
1 1 4 Picture and Sound Controls
Setting _he expetq pic_ure se_ting
Settingtheexpertpicturesettings
NOTE ThisfeatureisonlyavailableinStandardandMoviemode.
TestPattern
When the test pattern is on screen, you can navigate the Picture submenus
without removing the image. When you move to a non-Picture menu, or
close the menus, regular video will be restored.
1 Press the MENU button.
2 Select Picture > Expert Picture Settings > Test Pattern and press
the OK button.
3 Press the A/Y (arrow) buttons to select On.
4 Adjust picture settings.
NOTN Thisfeatureisnotavailablewhenusingthe4KHDMI¢>input.
RGBFilter
This feature individually enables or disables the red, green, and blue
components of the picture to allow for more accurate adjustment of each
color.
1 Press the MENU button.
2 Select Picture > Expert Picture Settings > RGB Filter and press
the OK button.
3 Press the A/Y (arrow) buttons to select Red, Green, or Blue to
adjust.
4 Press the i_ (arrow) button.
5 Press the A/Y (arrow) buttons to select On, and then press the OK
button.
6 Press the V (arrow) button to select Color or Tint, and then press
the OK button.
7 Press the 4/1_" (arrow) buttons to adjust.
8 Press the EXIT button.
NOTN Itisnotpossibletoturnoffall threecolorssimultaneously.
Downloaded from www.ManualsFile.com manuals search engine
Pictureand Sound Controls 1 1 5
Setting the expert picture setting
ExpandedColor
This feature allows the TV to produce brighter colors.
1 Press the MENU button.
2 Select Picture > Expert Picture Settings > Expanded Color and
press the OK button.
3 Press the A/Y (arrow) buttons to select On or Off.
4 Press the EXIT button.
WhileBalance
WindowDisplay
This feature displays the Window Pattern to adjust the white balance.
1 Press the MENU button.
2 Select Picture > Expert Picture Settings > White Balance and
press the OK button.
3 Press the A/Y (arrow) buttons to select Window Display and press
the OK button.
4 Press the A/Y (arrow) buttons to select On.
5 Adjust thepicture settings.
NOTE Thisfeatureisnotavailablewhenusingthe4KHDMI_>input.
Selling Type
You can adjust the white balance setting.
2P White Balance:
1 Press the MENU button.
2 Select Picture > Expert Picture Settings > White Balance >
Setting Type and press the OK button.
3 Press the A/Y (arrow) buttons to select 2P and press the OK
button.
4 Press the A/Y (arrow) buttons to select 2P White Balance and
press the OK button.
5 Press the A/Y (arrow) buttons to select Red-Offset, Green-Offset,
Blue-Oft_et, Red-Gain, Green-Gain, or Blue-Gain.
6 Press the _ (arrow) button.
7 Press the 4/_" (arrow) buttons to adjust.
Downloaded from www.ManualsFile.com manuals search engine
1 1 6 Picture and Sound Controls
Adjusting the audi
10P White Balance:
1 Press the MENU button.
2 Select Picture > Expert Picture Settings > White Balance >
Setting Type and press the OK button.
3 Press the A/Y (arrow) buttons to select 10P and press the OK
button.
4 Press the A/Y (arrow) buttons to select 10P White Balance and
press the OK button.
5 Press the A/Y (arrow) buttons to select IRE, Red, Green, or Blue.
6 Press the _ (arrow) button.
7 Press the 4/_" (arrow) buttons to adjust.
Adjustingtheaudio
Mutingthesound
Press the MUTE button to partially reduce (1/2 Mute) or turn off (Mute)
the sound. Each time you press the MUTE button, the nmte mode
changes in the following order: 1/2 Mute, Mute, Volume, 1/2 Mute, etc.
NOTN Ifyoumodifyitemsin theSound menuwhileMuteisactive,Muteis
cancelled.
Selectingstereo/SAPbroadcasts
The MTS (nmtti-channet TV sound) feature is only available for analog
signals on the ANT/CABLE input. When the TV receives a stereo or SAP
(second audio program) broadcast, the icon STEREO or SAP appears on
screen when the INFO button is pressed.
To listen in stereo sound:
1 Press the MENU button.
2 Select Sound > MTS and press the OK button.
3 Press the A/V (arrow) buttons to select Stereo.
4 Press the EXIT button.
NOTN o:, YoucantypicallyleavetheTVin Stereomodebecauseitoutputsthe
typeofsoundbeingbroadcast(stereoormonaural).
¢ Ifthesoundisnoisy,selectMono.
•_. Ifthereisnosoundin SAPmode,selectStereo.
Downloaded from www.ManualsFile.com manuals search engine
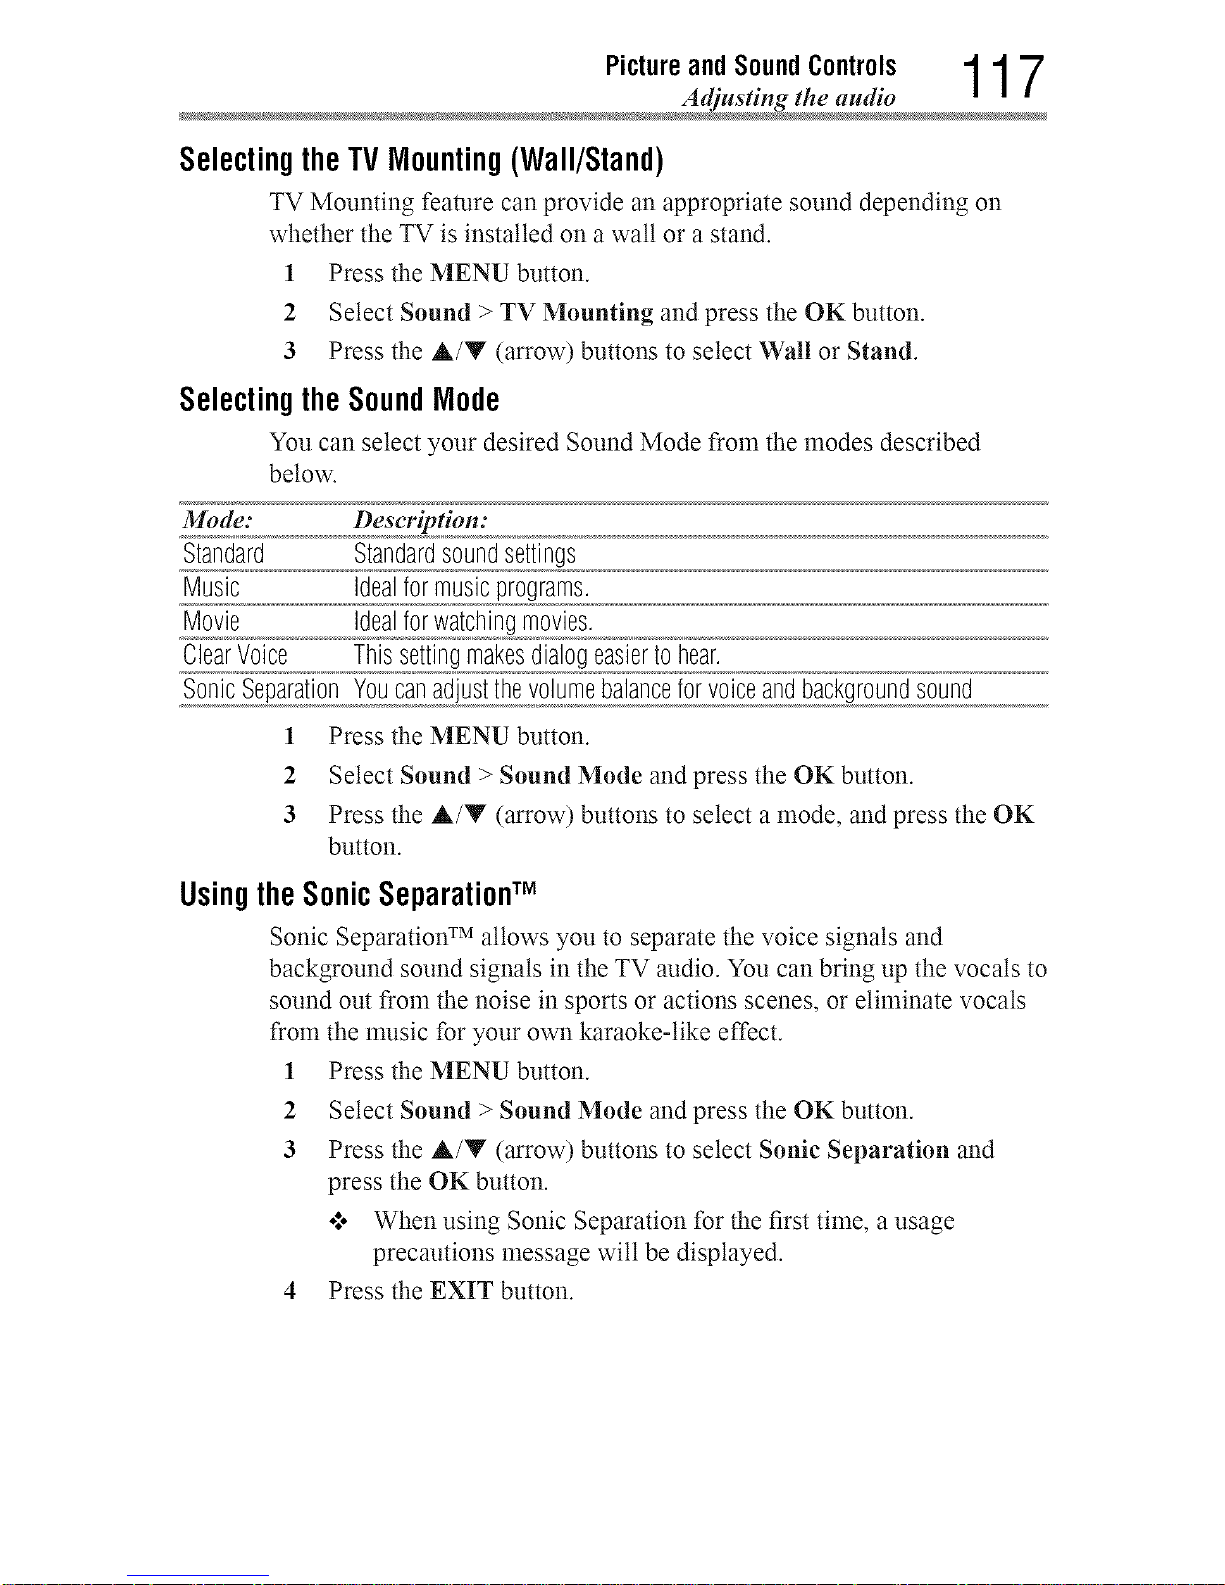
Picture and Sound Controls 1 1 7
Adjusting the audi
SelectingtheTVMounting(Wall/Stand)
TV Mounting feature can provide an appropriate sound depending on
whether the TV is installed on a watt or a stand.
1 Press the MENU button.
2 Select Sound > TV Mounting and press the OK button.
3 Press the A/Y (arrow) buttons to select Wall or Stand.
SelectingtheSoundMode
You can select your desired Sound Mode from the modes described
below.
Mode: Description:
Standard Standardsoundsettings
Music Idealformusicprograms.
Movie Idealforwatchingmovies.
ClearVoice Thissettingmakesdialogeasiertohear.
SonicSeparationYoucanadjustthevolumebalanceforvoiceandbackgroundsound
1 Press the MENU button.
2 Select Sound > Sound Mode and press the OK button.
3 Press the A/Y (arrow) buttons to select a mode, and press the OK
button.
UsingtheSonicSeparationTM
Sonic Separation TM allows you to separate the voice signals and
background sound signals in the TV audio. You can bring up the vocals to
sound out from the noise in sports or actions scenes, or eliminate vocals
from the music for your own karaoke-like effect.
1 Press the MENU button.
2
3
Select Sound > Sound Mode and press the OK button.
Press the A/Y (arrow) buttons to select Sonic Separation and
press the OK button.
o*.. When using Sonic Separation for the first time, a usage
precautions message will be displayed.
4 Press the EXIT button.
Downloaded from www.ManualsFile.com manuals search engine
1 1 8 Picture and Sound Controls
Adjusting the audi
Adjustingthevolumebalance
1 Press the MENU button.
2 Select Sound > Sonic Separation and press the OK button.
3 Press the 4/_ (arrow) buttons to adjust the volume balance.
•*.o Press the 4 (arrow) button to increase the vocals and reduce the
background sounds.
°!o Press the _- (arrow) button to increase the background sounds.
4 Press the EXIT button.
NOTE .:. Increasingthevocalsandreducingthebackgroundsoundsishelpful
forpeoplewhowantto heardialogueclearlyin dramaorcinema
programs.
•".. Thissettingistemporary.WhenyouswitchtheTVto standby,or
changethechannelorexternalinput,thevalueis restoredtothe
previoussetting.
•".. SonicSeparationTM hasbeendesignedforprivateuseand
entertainmentinyourhomeenvironment.Pleasenotethatanyunlawful
use,includingpublicand/orcommercialuse,couldleadtocopyright
infringementoftheholder'srights.Toshibaasksyoutorespectthe
intellectualpropertyrightsofthirdparties.
•".. TheeffectofSonicSeparationTM dependsonthecontentused.
•".. Ifthecontentismono,theremaybelittleeffect.
•".. SonicSeparationTM mayamplifythenoisethatisincludedin the
content.
•".. ThevolumemaywobblewhenyouenableSonicSeparationTM.
•".. SonicSeparationTM takesafewsecondstoexertafterenablingit,
changingcontentandchangingvolume.
•:. SonicSeparationTM maynotworkwithsomeapplications.
Adjusting the audio balance
You can adjust the audio balance.
1 Press the MENU button.
2 Select Sound > Balance and press the OK button.
3 Press the 4/_ (arrow) buttons to adjust the balance.
4 Press the EXIT button.
Downloaded from www.ManualsFile.com manuals search engine
Picture and Sound Controls 1 1 9
Adjusting the audi
Adjustingthe AdvancedSound Settings
NOTE AdvancedSoundSettingcanbeusedwhentheSoundModeissetto
Standard.
Adjustingthe range
Use the Sound Equalizer to adjust the sound quality to your liking.
Press the MENU button.1
2
Select Sound > Advanced Sound Settings > Sound Equalizer and
press the OK button.
Press the 4/_" (arrow) buttons to select a frequency band, and press
the &/Y (arrow) buttons to adjust the level for that band.
To return to the previous settings, select Cancel and press the OK
button.
To return to the default settings, select Reset and press the OK
button.
4 Press the EXIT button.
Usingthe TruDialogTM
The TruDiatog TM feature is dialog enhancement for clear and intelligible
vocals.
1 Press the MENU button.
2 Select Sound > Advanced Sound Settings > TruDialog and press
the OK button.
3 Press the A/Y (arrow) buttons to select On or Off.
4 Press the EXIT button.
Usingthesurroundsoundfeature
You can select your desired surround mode from the modes described
below.
Mode: Description:
TruSurroundTM Highqualitysurroundsoundandexpandedsoundfieldovertwospeakers
DepthRender,,,,,,,,,,,,,,,,_)ong_ooooNea_[_an,,,,,,,,,,,d!_ardepthsooundoo!_!e!doo!ooroaog!eg,!erosenseoooto!mmeo[s)ogn_...............................
1 Press the MENU button.
2 Select Sound > Advanced Sound Settings > Surround and press
the OK button.
3 Press the A/Y (arrow) buttons to select Off, TruSurround or
Depth Rendering.
4 Press the EXIT button.
Downloaded from www.ManualsFile.com manuals search engine
1 2 0 Picture and Sound Controls
Adjusting the audi
TruVolumeTM
Use the TruVolume TM feature to maintain a volume, despite volume
spikes or changes in content sources.
1 Press the MENU button.
2 Select Sound > TruVolume and press the OK button.
3 Press the A/Y (arrow) buttons to select On or Off.
4 Press the EXIT button.
NOTN ThissettingcannotbeusedwhentheTVSpeakersaresettoOff.
TV SpeakersOn/Off
This feature allows you to turn the TV speakers off when connecting the
audio system.
1 Press the MENU button.
2 Select Sound > TV Speakers and press the OK button.
3 Press the A/Y (arrow) buttons to select On or Off.
To turn on the built-in speakers:
1 Choose On in step 3 above.
Setting the Primary AudioLanguage
You can set the Primary Audio Language of the digital broadcast.
1 Press the MENU button.
2 Select Sound > Primary Audio Language and press the OK
button.
3 Press the A/Y (arrow) buttons to select English, Fran_ais, or
Espafiol.
4 Press the EXIT button.
Downloaded from www.ManualsFile.com manuals search engine
Picture and Sound Controls 1 2 1
Adjusting the audi
Selectingtheopticalaudiooutputformat
You can select the optical audio output format when you connect a
Dotby :_Digital and/or DTS _'decoder or other digital audio systems to the
TV's Digital Audio Out terminal.
AudioFormat
1 Press the MENU button.
2 Select Sound > Digital Audio Output > Audio Format and press
the OK button.
3 Press the A/Y (arrow) buttons to select Auto or PCM.
4 Press the EXIT button.
AudioDelay
1 Press the MENU button.
2
Select Sound > Digital Audio Output > Audio Delay and press the
OK button.
Press the
Auto:
Manual:
A/Y (arrow) buttons to select Auto or Manual.
This mode automatically adjusts the audio timing to meet
the video tinting.
The time lag might be large between the image and sound
depending on the connected equipment (amplifier etc.). In
that case, select Manual.
You can manually adjust the audio signal timing to meet
the video signal timing.
4 Press the EXIT button.
Downloaded from www.ManualsFile.com manuals search engine
1 2 2 Picture and Sound Controls
Adjusting the audi
Delay Adjustment
1 Press the MENU button.
2 Select Sound > Digital Audio Output > Delay Adjustment and
press the OK button.
3 Press the 4/_" (arrow) buttons to adjust the audio signal timing (0 -
250ms) to meet the video signal timing.
4 Press the EXIT button.
NOTE o:.ThisfeatureisgrayedoutwhenAudio Delay isinAuto mode.
•:. Atimelagwill occurwhenthevideosignalor audiosignalischanged.
Adjustthetimingaccordingly.
•:. Whenadjustingthetiming,turndownthevolumeoftheAVequipment
usedasfaraspossible.
Dependingontheequipment,noiseetc.mayoccurwhenthesignalis
changed.
•:. Dependingontheconnectedequipment(amplifier,etc.),adjustment
maynotbepossible.
•:. Whentheopticalaudiooutputsetting(Auto,--_PCM)is changed,it
maybenecessarytoadjustthetimingagain.
•:. DonotuseotherthanforaudiooutputfromtheAVamplifier,etc.
(Malfunctionmayoccur)
Selectingtheanalogaudiooutputformat
Set the type of analog audio that is output from the ANALOG AUDIO
OUT terminal.
1 Press the MENU button.
2
3
Select Sound > Analog Audio Output and press the OK button.
Press the A/Y (arrow) buttons to select Fixed or Variable.
Fixed: Audio is output at a constant volume level.
Variable: The volume level can be adjusted on the TV.
4 Press the EXIT button.
Downloaded from www.ManualsFile.com manuals search engine
Picture and Sound Controls 1 2 3
Adjusting the audi
DigitalAudioSelection
You can switch to DTV broadcast digital audio.
1 Press the MENU button.
2 Select Sound > Digital Audio Selection and press the OK button.
3 Press the 4/_ (arrow) buttons to select your preferred language.
4 Press the EXIT button.
NOTE ThisoperationcannotbeperformedwhenreceivingATVbroadcastsor
watchingexternallyinputvideo.
Usingthe Dolby®Digital Dynamic RangeControlfeature
You can further compress Dolby _ Digital and Dolby _'Digital Plus
dynamic range so you can switch from digital to analog broadcasts at the
same dynamic range.
1 Press the MENU button.
2 Select Sound > Dynamic Range Control and press the OK button.
3 Press the A/Y (arrow) buttons to select On.
NOTE ThisfeatureisavailablewhenDolbyceDigitalor Dolby_ DigitalPlusisinput
totheTVinthefollowingsituations:
¢ WhentunedtoadigitalRFchannel
¢ WhenanHDMI®inputisused
¢ Whennetworkdevicesareused
ThisfeaturewillalsoaffectDigital Audio Outputwhentheopticalaudio
outputformatis settoPCM.
Downloaded from www.ManualsFile.com manuals search engine
Chapter8
Advancedfeatures
Usingyourhomenetwork
o:. This TV can share videos, music, and photos across your home
network and other connected products through the MediaShare
feature. In order to do this, you wilt have to configure the network
settings on your TV, see "MediaShare (Videos, Music, and Photos)"
on page 151.
•*.o If you want to use your home network with an Internet connection,
you will have to configure the network settings on your TV.
If necessary, change the network settings, see "Setting up the
Network" on page 126.
If you use Internet services, see the following note before use.
NOTE o:oSomefeaturesmayrequireanalways-onbroadbandInternet
connection,firmwareupdate,and/oradditionalbandwidth.
•:. ThirdpartyInternetservicesarenotprovidedbyToshiba,may
changeorbediscontinuedatanytime,andmaybesubjecttothird
partyrestrictions.Toshibamakesnowarranties,representations,or
assurancesaboutthecontent,availability,orfunctionalityofthird
partycontentorservices.ThirdpartyInternetservicesmayrequire
thecreationofaseparateaccountthroughacomputerwithInternet
access,andpaymentofone-timeand/orrecurringcharges.
124
Downloaded from www.ManualsFile.com manuals search engine
Advancedfeatures 1 2 5
Using your home network
Services and features available through the Cloud Portal may be changed
or removed at ally time. Services and features depicted or listed here and
provided through the Cloud may not be available to you in your region.
Not all services may be available in all languages.
WhenusingaWirelessnetworkconnection
Wireless LANand your Health:
Wireless LAN products, like other radio devices, emit radio frequency
electromagnetic energy. However, the level of energy emitted by Wireless
LAN devices is much less than the electromagnetic energy emitted by
wireless devices like mobile phones.
Because Wireless LAN products operate within the guidelines found
in radio frequency safety standards and reconmlendations, Toshiba
believes Wireless LAN is safe for use by consumers. These standards
and recommendations reflect the consensus of the scientific conmmnity
and result from deliberations ofpanets and committees of scientists who
continually review and interpret the extensive research literature.
In some situations or enviromnents, the use of Wiretess LAN may be
restricted by the proprietor of the building or responsible representatives
of the organization. Such restrictions may apply in environments where
the risk of interference to other devices or services is perceived or
identified as harmful.
If you are uncertain of the policy that applies to the use of wireless
devices in a specific organization or environment, you are encouraged to
ask for authorization to use the Wireless LAN device prior to turning on
the equipment.
Usingthe TV in a wireless LANenvironment:
o',o It is recommended to use IEEE 802.11a or IEEE 802.11n on 5 GHz
for audio and SD video streaming.
o',o It is recommended to use IEEE 802.11n on 5 GHz for HD video
streaming.
o:* It is recommended that the encoding rate of video content be 20
Mbps or less.
o',o It is not reconmlended to use 2.4 GHz for audio and video
streaming.
o',o Content playback may be interrupted by surrounding interference.
Downloaded from www.ManualsFile.com manuals search engine
1 2 6 Advanced features
Setting up the Networ
SettinguptheNetwork
You can select the Network Type.
1 Press the MENU button.
2 Select Network > Network Setup > Connection Type and press
the OK button.
3 Press the A/Y (arrow) buttons to select Wired, Wireless or No
Network.
4 Press the OKbutton.
•*.o If you select Wired, see Advanced Neta ork Setup" on page
131.
If you select Wireless, see the next section.
WirelessSetup
NOTE ContinuedAP(AccessPoint)connectionis notguaranteed.
ConnectionmaybelostwhilewatchingTV.
There are three methods for wireless setup:
o.*oEasy Setup (Wi-Fi Protected Setup) - ifAP supports Wi-Fi
Protected Setup, this can be used.
o*.oWi-Fi Protected Setup is a standard designed to simplify
the connection of wireless LAN equipment and the setup of
network security features.
o*.oAssisted Setup (setup using the AP's notification information) -
Network Name, Authentication, and Encryption are decided based
on information from the AP. You need to manually set the Security
Key.
o.*oManual Setup - requires manually entering all settings.
NOTE .:o Inordertosecureyourhomenetwork,it isstronglyrecommendedthat
youuseawirelessaccesspointwithencryption.
•:. WhenEncryptionis setto"None",datatransmittedoverawireless
LANisnotsecurelyprotected.Unauthorizedusersmayaccessyour
dataandnetworkwithoutappropriatesecuritymeasures.Selectingan
encryptionsettingfromyourToshibaTVandusinga securenetwork
forwirelessLANtransmissionsmayhelpavoidunauthorizedaccess
toyourimportantdataand/orTV.Toshibadisclaimsanyandall
responsibilityor liabilityresultingfromanywirelesstransmissions
overtheInternetthroughyourToshibaTV.
Downloaded from www.ManualsFile.com manuals search engine
Advancedfeatures 1 2 7
Setting up the Network
EasySetupusing PBC(Pushbuttonconfiguration)
Press the MENU button.1
2
3
4
5
6
7
Select Network > Network Setup > Wireless Setup and press the
OK button
Press the A/Y (arrow) buttons to select Easy Setup and press the
OK button.
Press the A/Y (arrow) buttons to select PBC.
Press the Y (arrow) button to select Start Scan, and then press the
OK button.
Following the on-screen instructions, push the appropriate button on
your AR
When a screen reporting that "Wireless Configuration is complete"
appears, press the OK button.
To cancel searching for the AP:
•:. Press the BACK button while searching for the AP. A message
appears. Press the 4/_" (arrow) buttons to select Yes, and then press
the OK button.
EasySetupusing PIN (Personal IdentificationNumber)
1 Press the MENU button.
2 Select Network > Network Setup > Wireless Setup and press the
OK button.
3 Press the A/Y (arrow) buttons to select Easy Setup and press the
OK button.
4 Press the A/Y (arrow) buttons to select PIN.
5 Press the Y (arrow) button to select Start Scan, and then press the
OK button.
The Scan screen appears.
6 Enter the PIN displayed on this screen into your computer or AP.
7 Press the A/Y (arrow) buttons to select the desired AP, and then
press the OK button.
NOTN ChecktheMACaddressonthelabelor inthemanualoftheAPandselect
anAP.
8 When a screen reporting that "Wireless Col_guration is complete"
appears, press the OK button.
Downloaded from www.ManualsFile.com manuals search engine
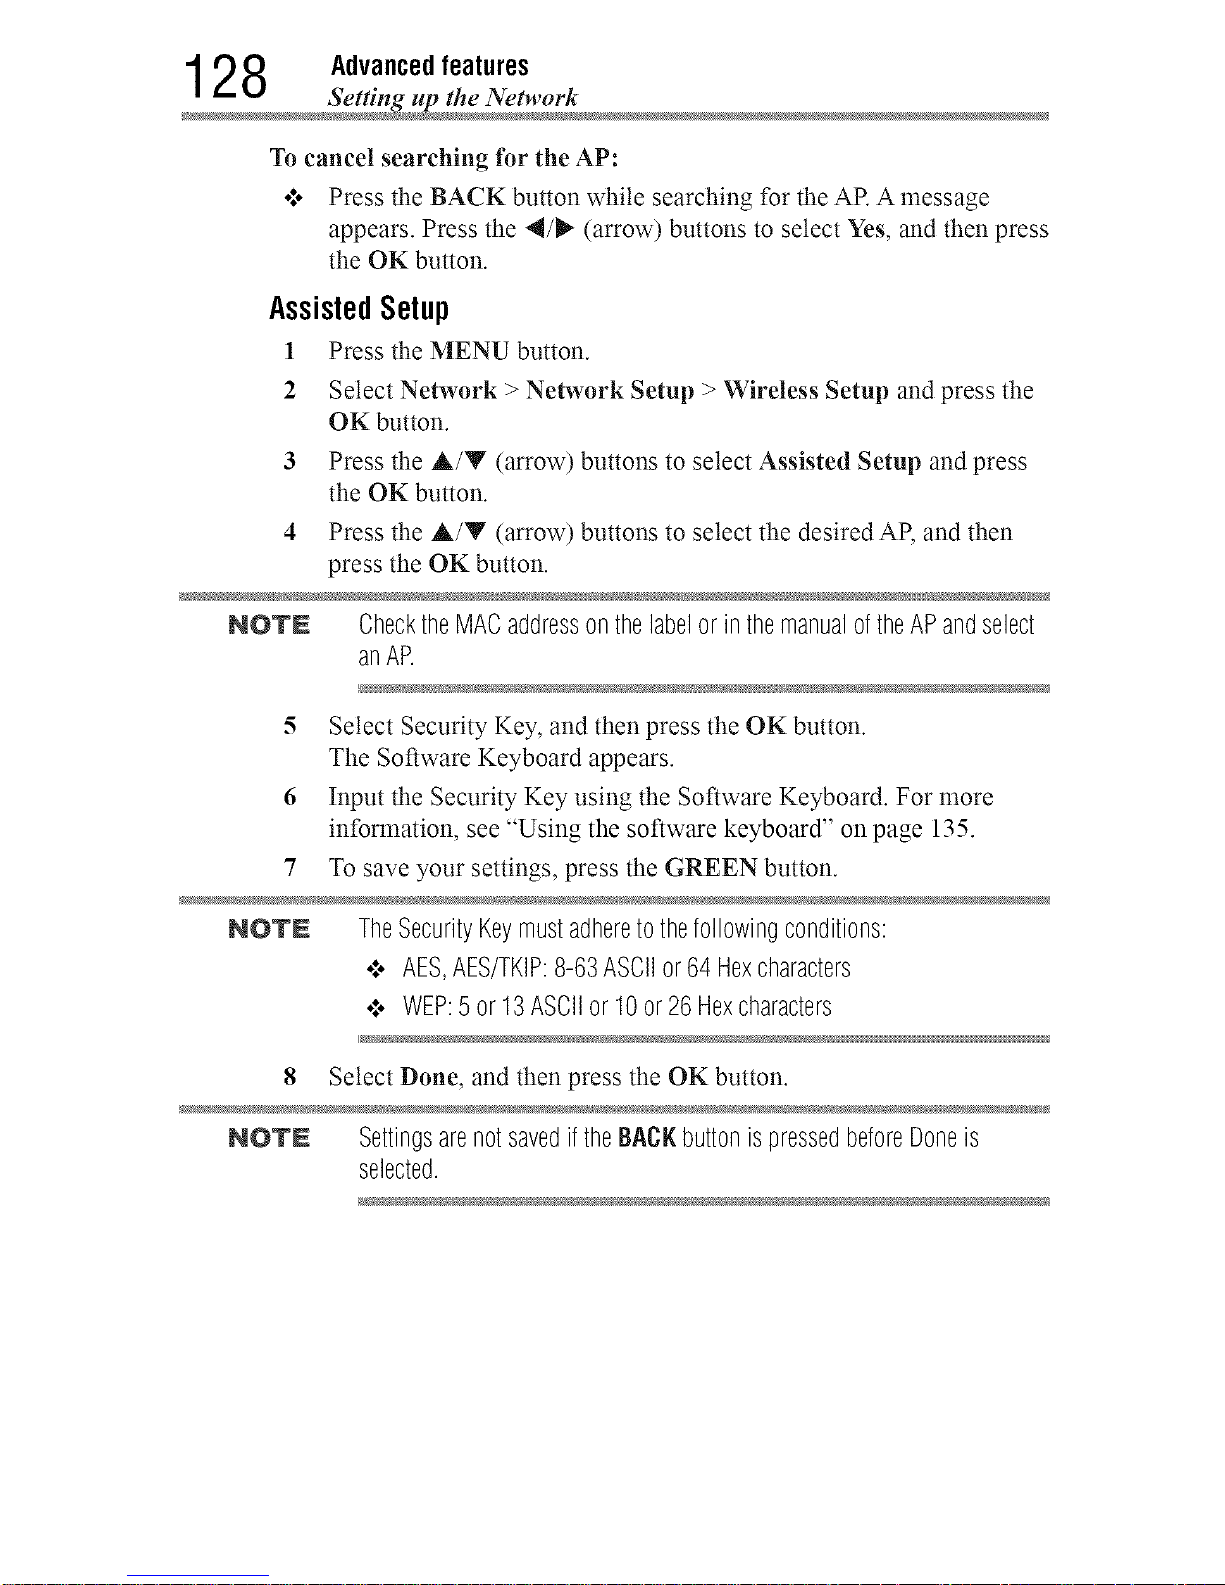
1 2 8 Advanced features
Setting up the Networ
To cancel searching for the AP:
•:. Press the BACK button while searching for the AP. A message
appears. Press the 4/_" (arrow) buttons to select Yes, and then press
the OK button.
AssistedSetup
1 Press the MENU button.
2 Select Network > Network Setup > Wireless Setup and press the
OK button.
3 Press the A/T (arrow) buttons to select Assisted Setup and press
the OK button.
4 Press the A/Y (arrow) buttons to select the desired AP, and then
press the OK button.
NO'rN ChecktheMACaddressonthelabelor inthemanualoftheAPandselect
anAP.
5 Select Security Key, and then press the OK button.
The Software Keyboard appears.
6 Input the Security Key using the Software Keyboard. For more
information, see "Using the software keyboard" on page 135.
7 To save your settings, press the GREEN button.
NO'rN TheSecurityKeymustadheretothefollowingconditions:
•:. AES,AES/TKIP:8-63ASCIIor64 Hexcharacters
•_. WEP:5 or13ASCIIor 10or 26Hexcharacters
8 Select Done, and then press the OK button.
NO'rN Settingsarenotsavedif theBACKbuttonispressedbeforeDoneis
selected.
Downloaded from www.ManualsFile.com manuals search engine
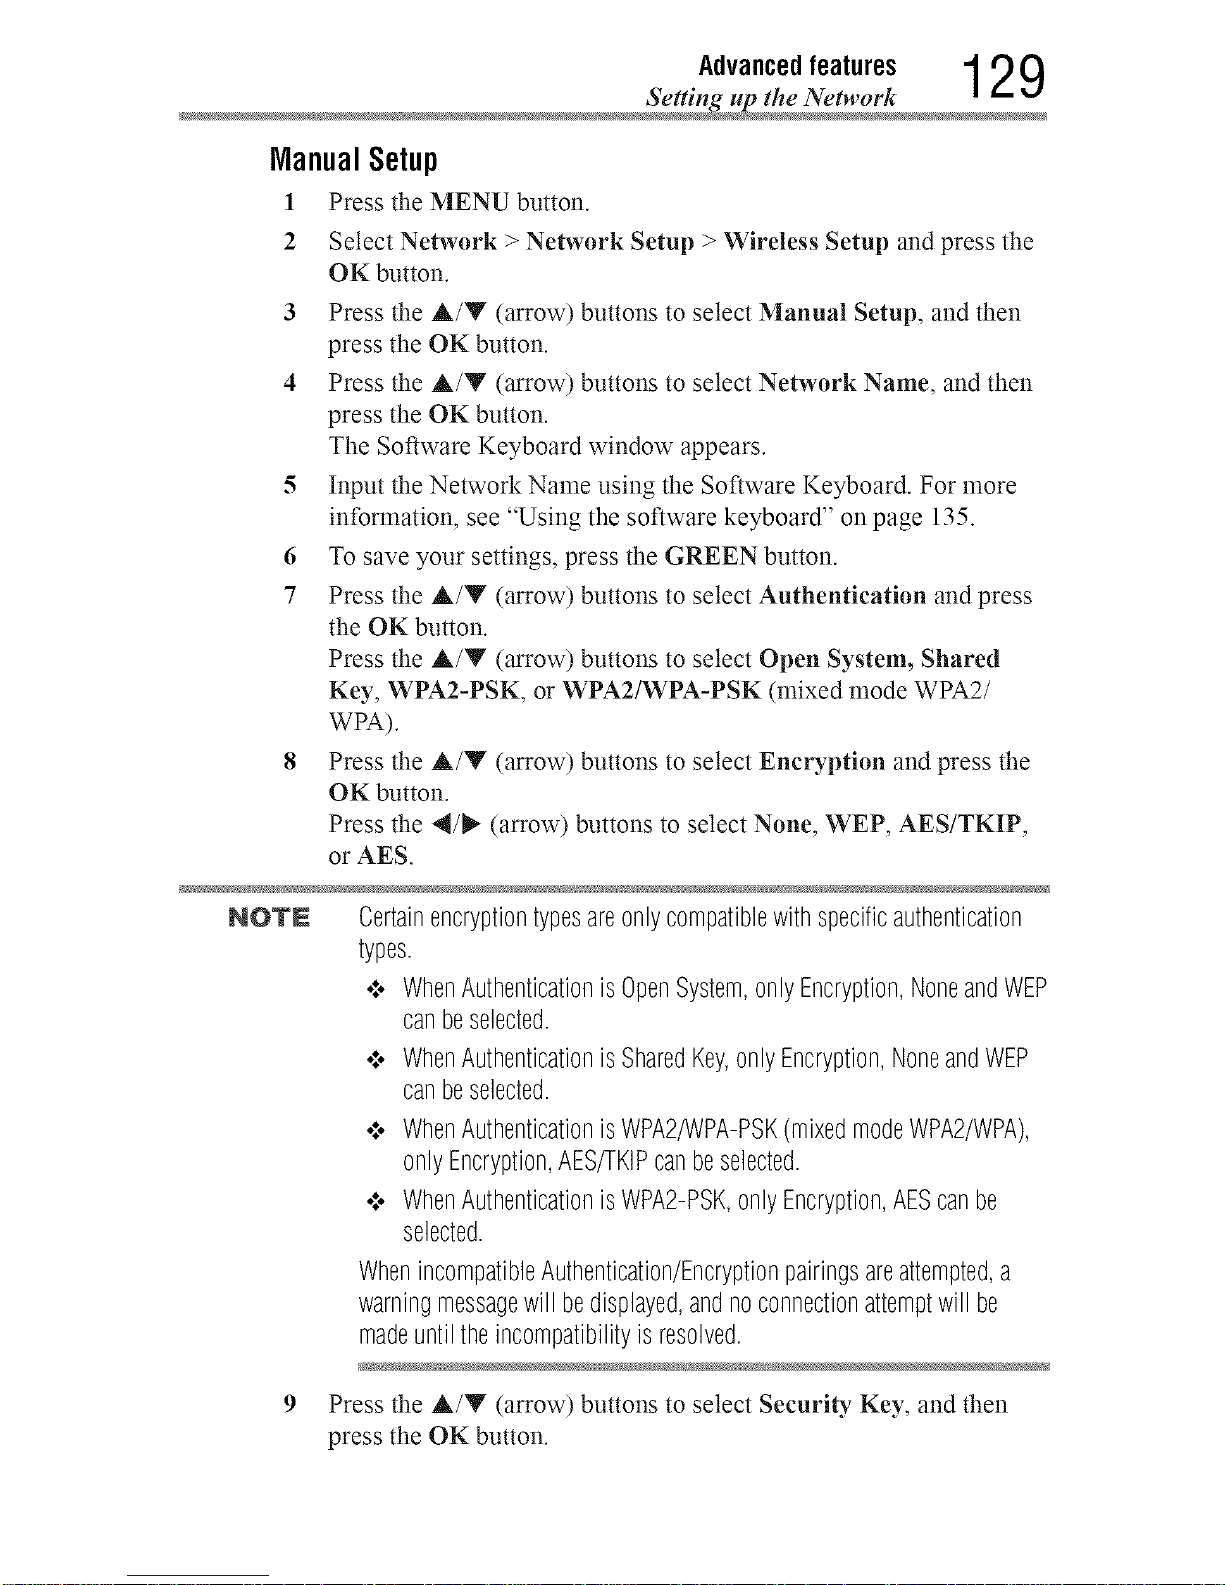
Advancedfeatures 1 2 9
Setting up the Network
ManualSetup
1 Press the MENU button.
2 Select Network > Network Setup > Wireless Setup and press the
OK button.
3 Press the &/Y (arrow) buttons to select Manual Setup, and then
press the OK button.
4 Press the &/Y (arrow) buttons to select Network Name, and then
press the OK button.
The Software Keyboard window appears.
5 Inputthe Network Name using the Software Keyboard. For more
information, see "Using the software keyboard" on page 135.
6 To save your settings, press the GREEN button.
7 Press the A/Y (arrow) buttons to select Authentication and press
the OK button.
Press the A/Y (arrow) buttons to select Open System, Shared
Key, WPA2-PSK, or WPA2/WPA-PSK (mixed mode WPA2/
WPA).
8 Press the A/Y (arrow) buttons to select Encryption and press the
OK button.
Press the 4/_" (arrow) buttons to select None, WEP, AES/TKIP,
or AES.
NOTN Certainencryptiontypesareonlycompatiblewithspecificauthentication
types.
¢ WhenAuthenticationisOpenSystem,onlyEncryption,NoneandWEP
canbeselected.
¢ WhenAuthenticationisSharedKey,onlyEncryption,NoneandWEP
canbeselected.
¢ WhenAuthenticationisWPA2/WPA-PSK(mixedmodeWPA2/WPA),
onlyEncryption,AES/TKIPcanbeselected.
¢ WhenAuthenticationisWPA2-PSK,onlyEncryption,AEScanbe
selected.
WhenincompatibleAuthentication/Encryptionpairingsareattempted,a
warningmessagewill bedisplayed,andnoconnectionattemptwill be
madeuntiltheincompatibilityisresolved.
9 Press the &/Y (arrow) buttons to select Security Key, and then
press the OK button.
Downloaded from www.ManualsFile.com manuals search engine
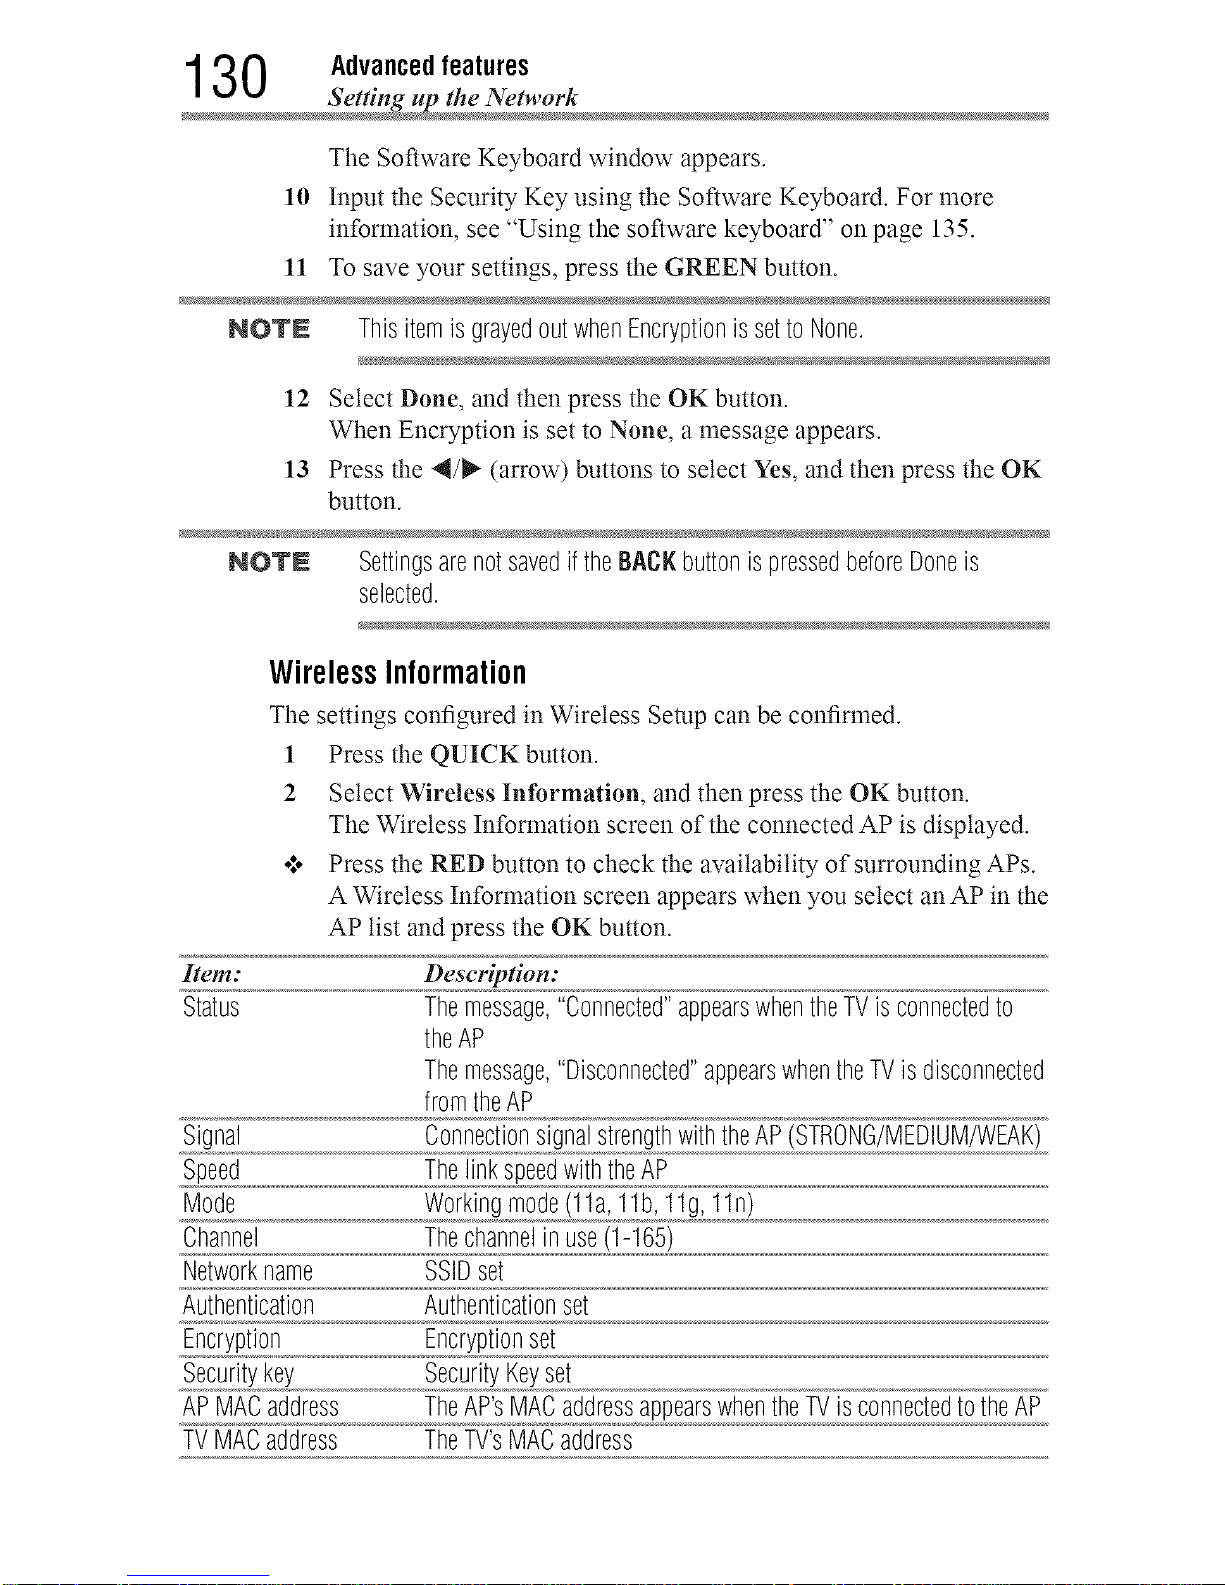
130 Advanced features
Setting up the Networ
The Software Keyboard window appears.
10 Input the Security Key using the Software Keyboard. For more
information, see "Using the software keyboard" on page 135.
11 To save your settings, press the GREEN button.
NOTE ThisitemisgrayedoutwhenEncryptionissetto None.
12 Select Done, and then press the OK button.
When Encryption is set to None, a message appears.
13 Press the 4/i_ (arrow) buttons to select Yes, and then press the OK
button.
NOTN Settingsarenotsavedif theBACKbuttonispressedbeforeDoneis
selected.
WirelessInformation
The settings configured in Wireless Setup can be confirmed.
1 Press the QUICK button.
2 Select Wireless Information, and then press the OK button.
The Wireless Information screen of the connected AP is displayed.
*:. Press the RED button to check the availability of surrounding APs.
A Wireless Information screen appears when you select an AP in the
AP list and press the OK button.
_em: Descriptien:
Status Themessage,"Connected"appearswhentheTVisconnectedto
theAP
Themessage,"Disconnected"appearswhentheTVisdisconnected
fromtheAP
Signal ConnectionsignalstrengthwiththeAP(STRONG/MEDIUM/WEAK)
Speed ThelinkspeedwiththeAP
Mode Workingmode(11a,11b,11g,11n)
Channel Thechannelin use(1-165)
Networkname SSIDset
Authentication Authenticationset
Encryption Encryptionset
Securitykey SecurityKeyset
APMACaddress TheAP'sMACaddressappearswhentheTVisconnectedtotheAP
TVMACaddress TheTV'sMACaddress
Downloaded from www.ManualsFile.com manuals search engine
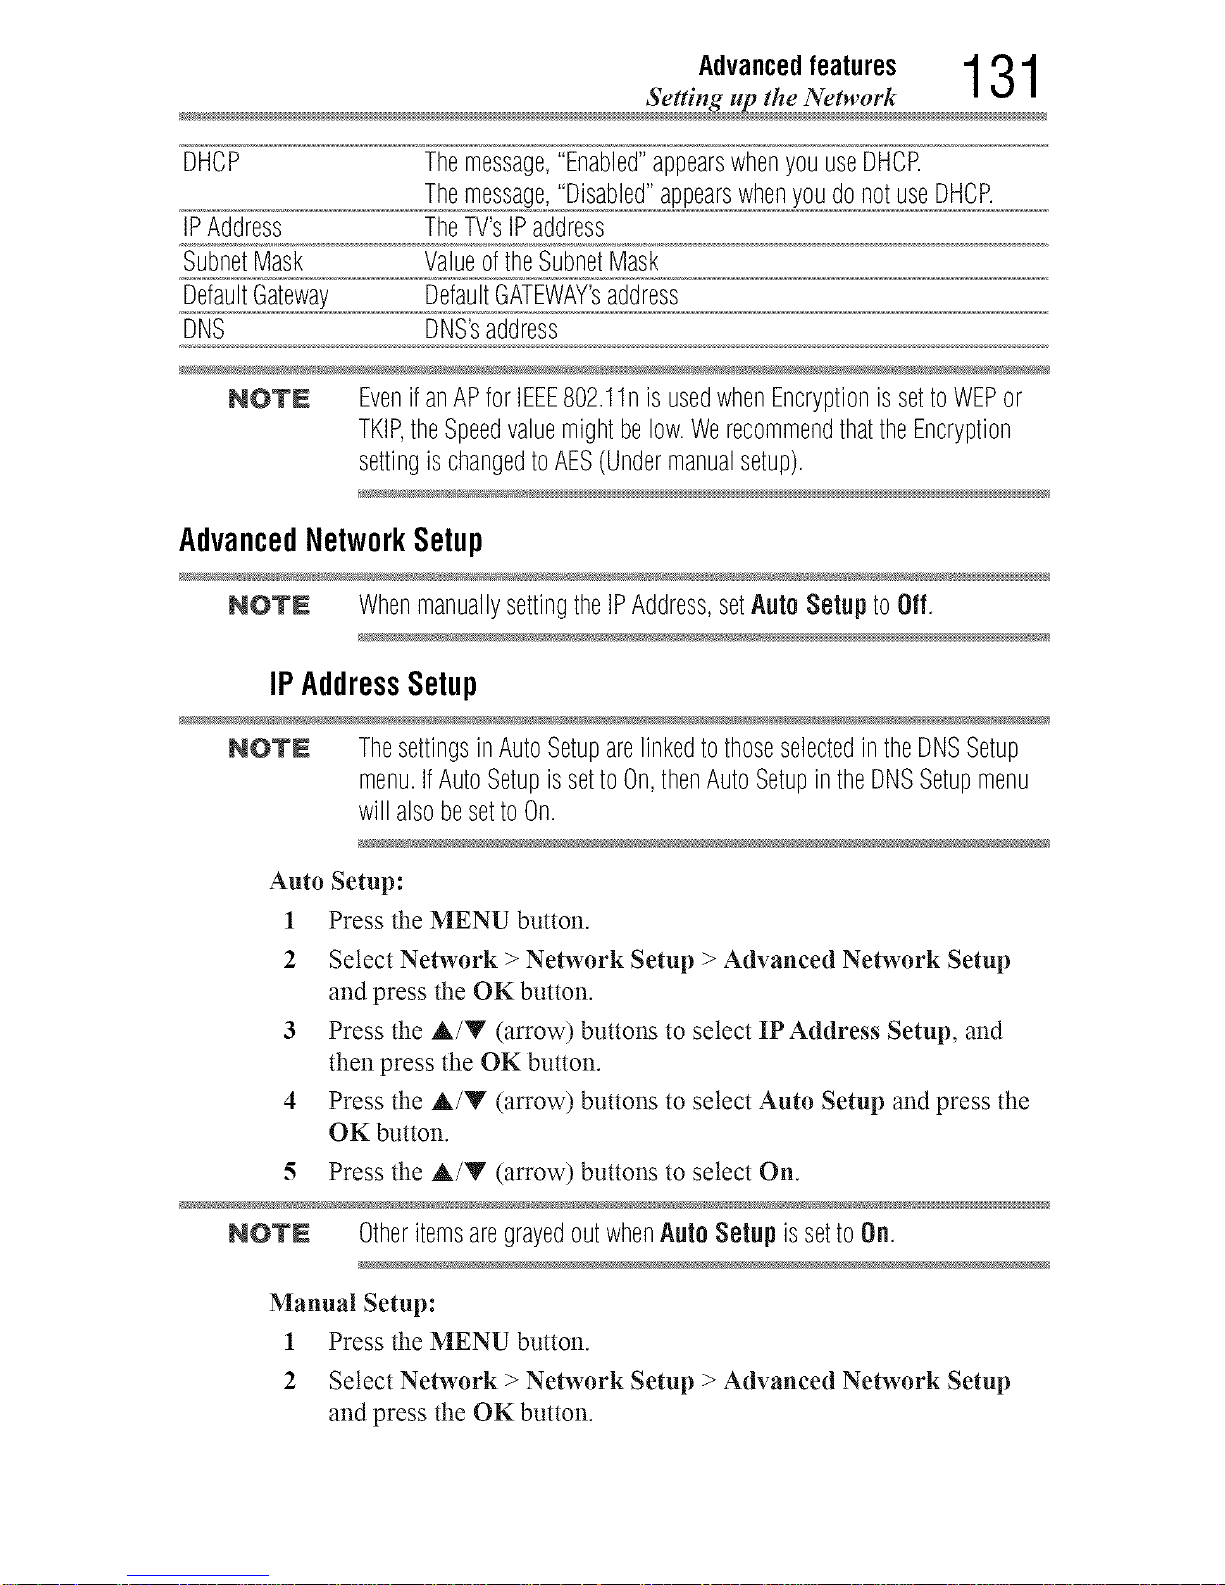
Advancedfeatures 1 3 1
_ Setting up the Network
DHCP Themessage,"Enabled"appearswhenyouuseDHCR
Themessage,"Disabled"appearswhenyoudonotuseDHCR
IPAddress TheTV'sIPaddress
SubnetMask ValueoftheSubnetMask
DefaultGateway DefaultGATEWAY'saddress
DNS DNS'saddress
NOTE Evenif anAPforIEEE802.11nis usedwhenEncryptionissettoWEPor
TKIP,theSpeedvaluemightbelow.WerecommendthattheEncryption
settingischangedtoAES(Undermanualsetup).
AdvancedNetworkSetup
NOTE WhenmanuallysettingtheIPAddress,setAuto Setupto Off.
IPAddressSetup
NOTE ThesettingsinAutoSetuparelinkedtothoseselectedintheDNSSetup
menu.IfAutoSetupissetto0n,thenAutoSetupin theDNSSetupmenu
will alsobesettoOn.
Auto Setup:
1 Press the MENU button.
2 Select Network > Network Setup > Advanced Network Setup
and press the OK button.
3 Press the A/Y (arrow) buttons to select IPAddress Setup, and
then press the OK button.
4 Press the A/Y (arrow) buttons to select Auto Setup and press the
OK button.
5 Press the A/Y (arrow) buttons to select On.
NOTN OtheritemsaregrayedoutwhenAuto Setup issetto On.
Manual Setup:
1 Press the MENU button.
2 Select Network > Network Setup > Advanced Network Setup
and press the OK button.
Downloaded from www.ManualsFile.com manuals search engine
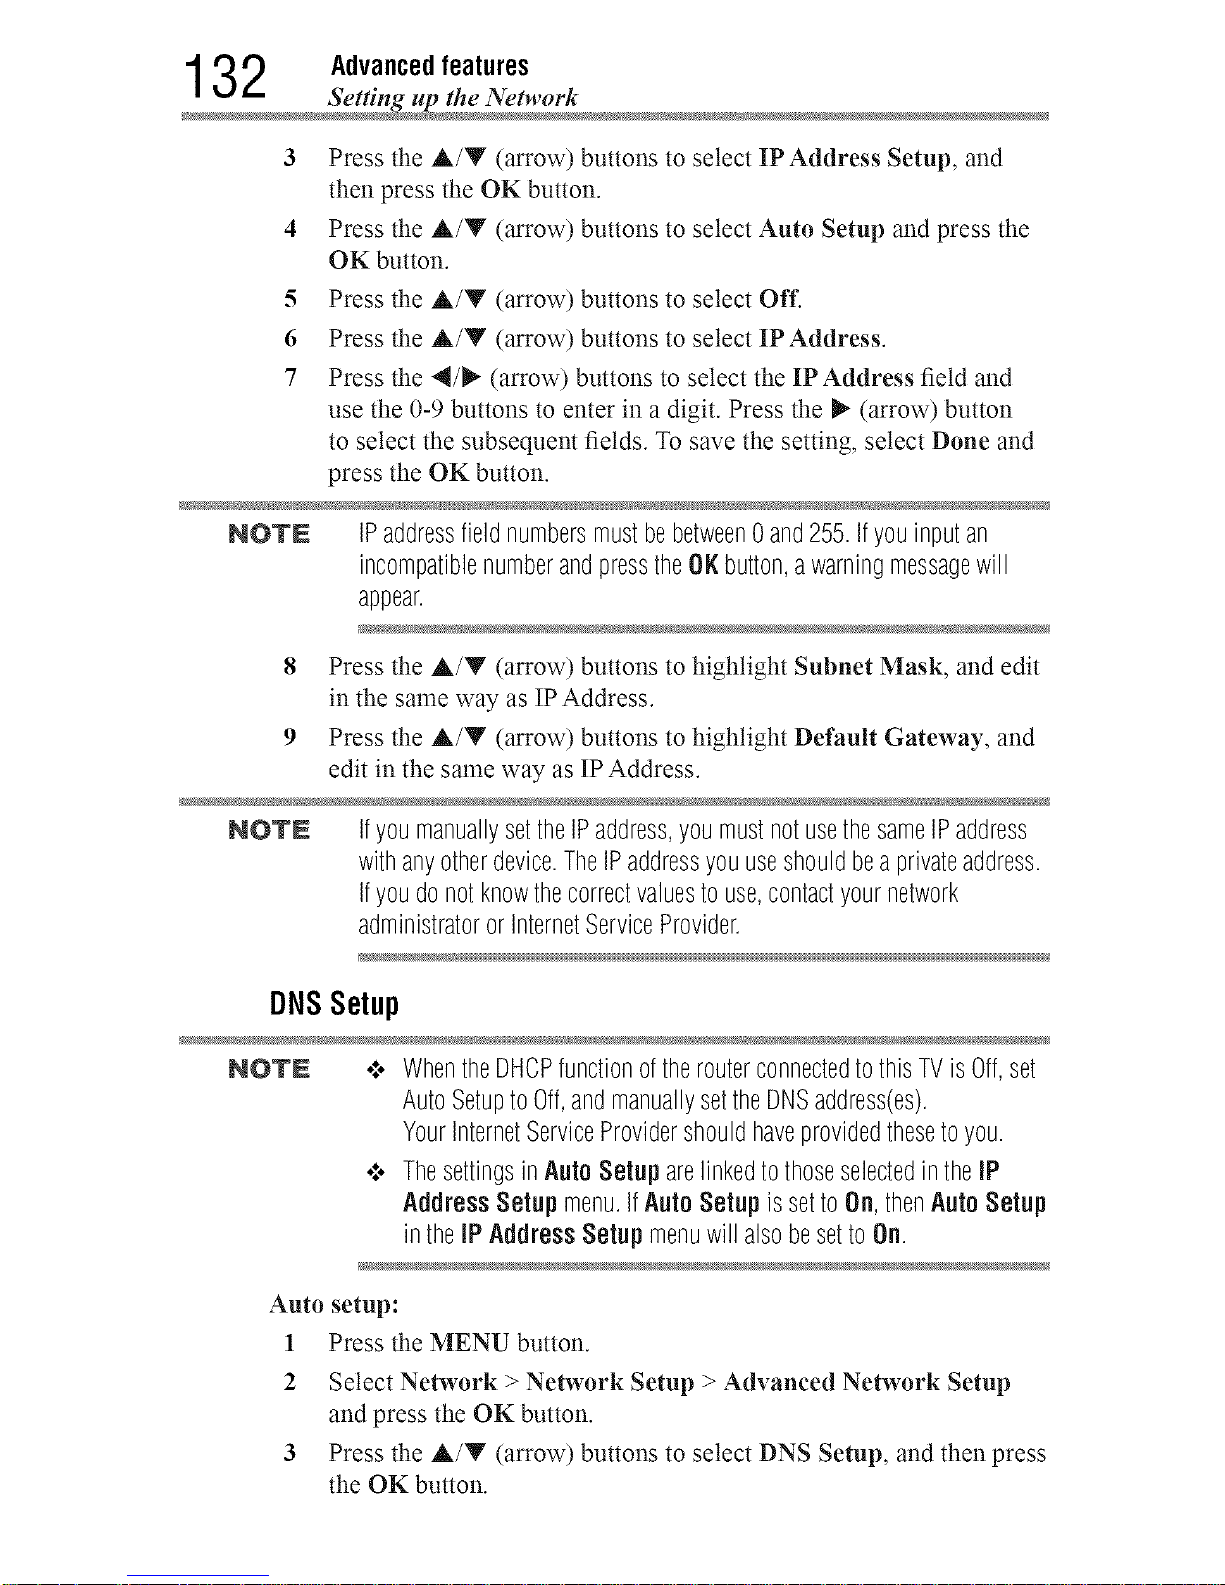
1 3 2 Advanced features
Setting up the Networ
3
4
5
6
7
Press the &/Y (arrow) buttons to select IP Address Setup, and
then press the OK button.
Press the A/Y (arrow) buttons to select Auto Setup and press the
OK button.
Press the &/V (arrow) buttons to select Off.
Press the A/Y (arrow) buttons to select IP Address.
Press the 4/_" (arrow) buttons to select the IP Address field and
use the 0-9 buttons to enter in a digit. Press the _- (arrow) button
to select the subsequent fields. To save the setting, select Done and
press the OK button.
NOTN IPaddressfieldnumbersmustbebetween0and255.If youinputan
incompatiblenumberandpresstheOKbutton,awarningmessagewill
appear.
8 Press the A/V (arrow) buttons to highlight Subnet Mask, and edit
in the same way as IPAddress.
9 Press the A/V (arrow) buttons to highlight Default Gateway, and
edit in the same way as IP Address.
NOTN ifyoumanuallysettheIPaddress,youmustnotusethesameIPaddress
withanyotherdevice.TheIPaddressyouuseshouldbeaprivateaddress.
Ifyoudonotknowthecorrectvaluestouse,contactyournetwork
administratororInternetServiceProvider.
DNSSetup
NOTE o:. WhentheDHOPfunctionoftherouterconnectedtothisTVis0ff,set
AutoSetuptoOff,andmanuallysettheBNSaddress(es).
YourInternetServiceProvidershouldhaveprovidedthesetoyou.
•:. Thesettingsin AutoSetup arelinkedtothoseselectedintheIP
AddressSetupmenu.ifAuto Setupissetto On,thenAutoSetup
inthe[P AddressSetupmenuwill alsobesettoOn.
Auto setup:
1 Press the MENU button.
2 Select Network > Network Setup > Advanced Network Setup
and press the OK button.
3 Press the &/Y (arrow) buttons to select DNS Setup, and then press
the OK button.
Downloaded from www.ManualsFile.com manuals search engine
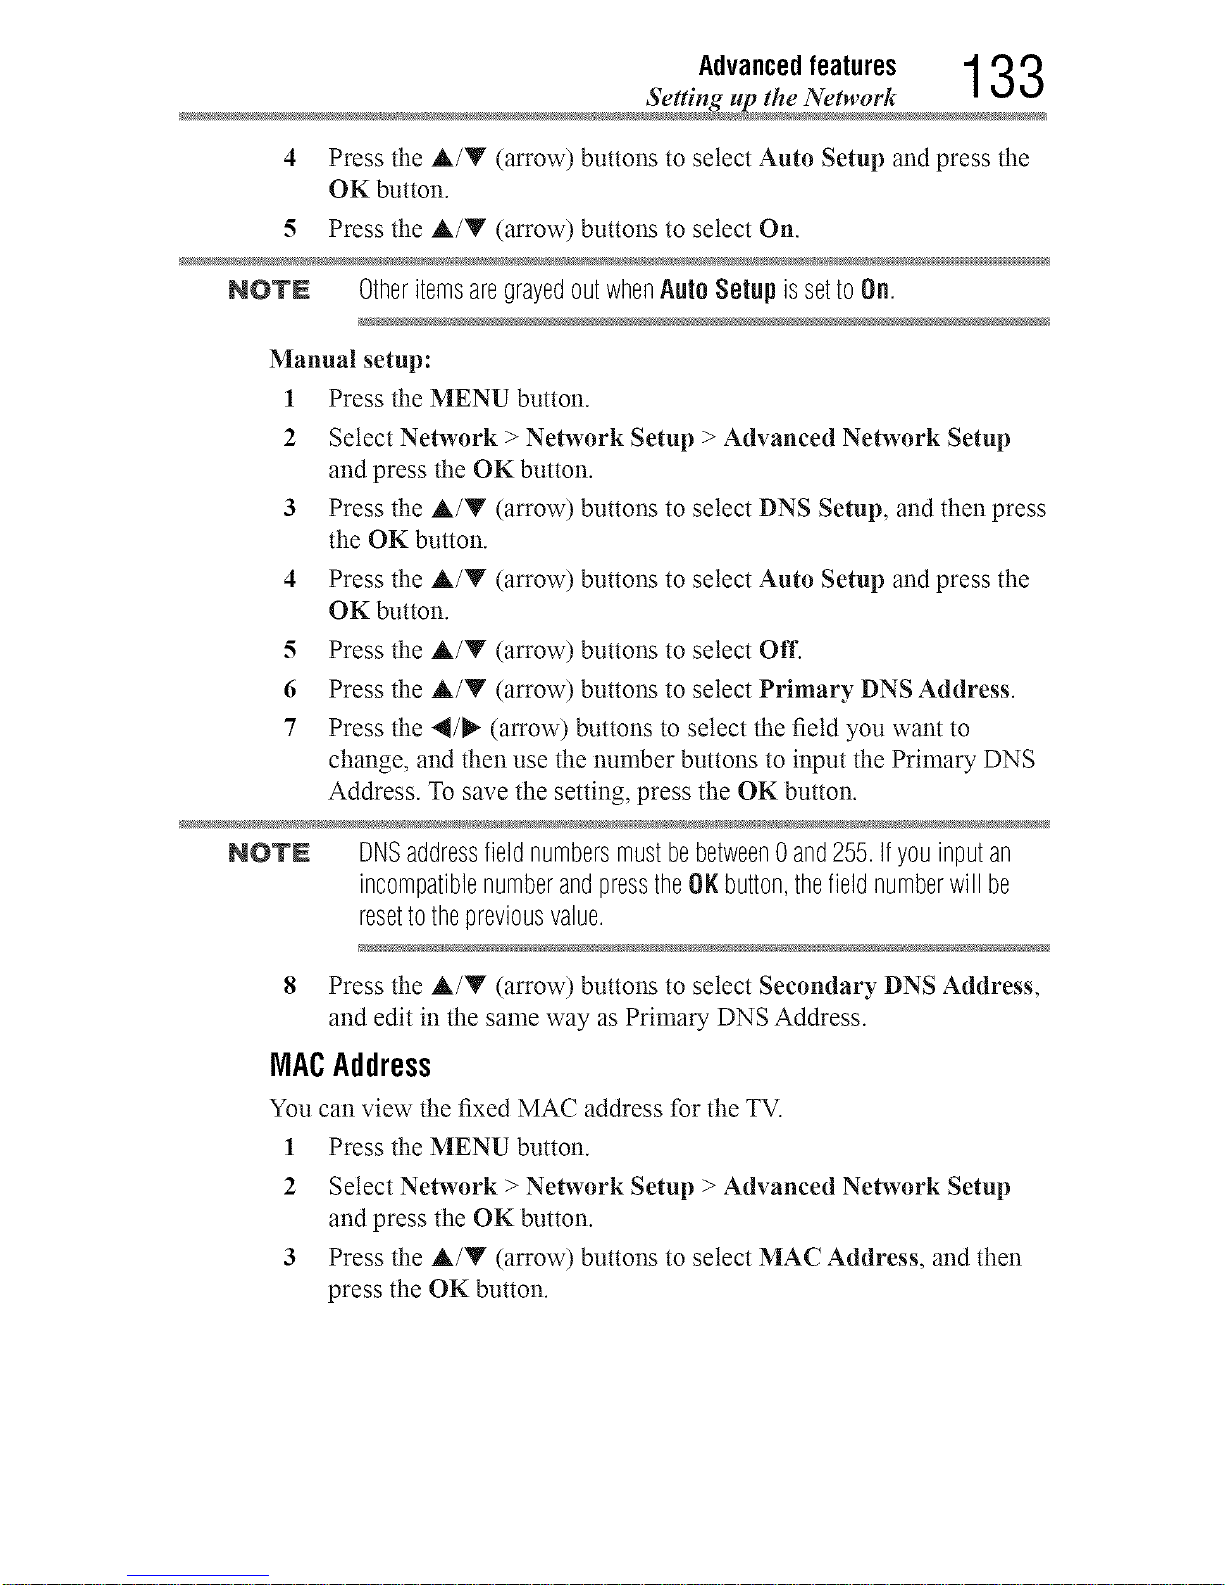
Advancedfeatures 133
Setting up the Network
4 Press the A/Y (arrow) buttons to select Auto Setup and press the
OK button.
5 Pressthe A/Y (arrow) buttonsto selectOn.
NO'rN OtheritemsaregrayedoutwhenAuto Setup issetto 0n.
Manual setup:
1 Press the MENU button.
2 Select Network > Network Setup > Advanced Network Setup
and press the OK button.
3 Press the A/V (arrow) buttons to select DNS Setup, and then press
the OK button.
4 Press the A/Y (arrow) buttons to select Auto Setup and press the
OK button.
5 Press the A/Y (arrow) buttons to select Off.
6 Press the A/Y (arrow) buttons to select Primary DNS Address.
7 Press the 4/_" (arrow) buttons to select the field you want to
change, and then use the number buttons to input the Primary DNS
Address. To save the setting, press the OK button.
NO'rN DNSaddressfieldnumbersmustbebetween0 and255.Ifyouinputan
incompatiblenumberandpresstheOKbutton,thefieldnumberwill be
resettothepreviousvalue.
8 Press the A/Y (arrow) buttons to select Secondary DNS Address,
and edit in the same way as Primary DNS Address.
MACAddress
You can view the fixed MAC address for the TV.
1 Press the MENU button.
2 Select Network > Network Setup > Advanced Network Setup
and press the OK button.
3 Press the A/Y (arrow) buttons to select MAC Address, and then
press the OK button.
Downloaded from www.ManualsFile.com manuals search engine
1 34 Advancedfeatures
Se_ting up the Networ
Network ConnectionTest
This function checks Internet connectivity.
1 Press the MENU button.
Select Network > Network Setup > Network Connection Test,
and then press the OK button.
A message appears to indicate whether the connection was
successful or not.
NOTN FavorableNetworkConnectionTestresultsdonotguaranteeanInternet
Connection.Dependingonthesituation,someInternetfeaturesmaynotbe
available.
To cancel Network Connection Test, press the EXIT button while
searching for the Internet co_mection.
Downloaded from www.ManualsFile.com manuals search engine

Advancedfeatures 135
Using the software keyboar
Usingthesoftwarekeyboard
You can enter text using the software keyboard.
The software keyboard window wilt appear when you press the OK
button on a field that accepts character input.
NO'rN .t. WhenusingtheSmartTVfeatures,softwarekeyboardavailability
dependsontheInternetservicebeingaccessed.
•",, Inadditiontothefollowinglayout,somebuttonsmayappearonthe
leftpartofthesoftwarekeyboard.
9 8 7
(Sample Illustration) Software keyboard
Item: Description:
1 Textentryfield PresstheOH[buttononthis field,caretmoving.
2 Symbol Switchestosymbolcharacters
3 Open DisplaystheMulti LineInputfield.If itdoesnotwork,the
buttonwill begrayedout.
4 Done Saveswhatevertextwasentered,exitsthesoftwarekeyboard
andentersthattextintotheappropriatetextfieldonthe
previousscreen.
5 Delete Deletesonecharactertotheleftofthecursor
6 Numberpad Inputsnumbers.Inkeypad,thesekeysareusedtoselecta
characterforentry.
7 LineBreak EnterstheLineBreak.
8 SwitchLanguage DisplaystheSwitchKeyboardLanguagepopupscreen.
9 Shift Switchesthekeyboardlayouttocapitallettersandother
symbols.
Downloaded from www.ManualsFile.com manuals search engine
136 Advanced features
Using the software keyboar
Entertextusingthesoftwarekeyboard
1 Highlight the desired character on the on-screen software keyboard.
2 Press the OKbutton.
3 Repeat Step 1 and 2 until you have entered all desired text.
4 Select Done or press the GREEN button to save your settings and
return to the previous screen.
NOTN iftheBACK buttonispressed,changesarenotsavedandthesoftware
keyboardwindowisclosed.
Input operation on the remote control:
Item: Description:
OK Inputstheselectedcharacter
0-9 Thesekeysareusedtoselectacharacterforentry.
,A/T/4/_ Movesthecharacterhighlight
RED Deletesonecharactertotheleftofthecursor
GREEN Done
YELLOW ShortcutkeyforShift
BACK Closesthesoftwarekeyboardwindowwithoutsavingchanges
To enter French or Spanish characters, an external keyboard must be used.
Please see "External Keyboard Layout" on page 190.
Downloaded from www.ManualsFile.com manuals search engine
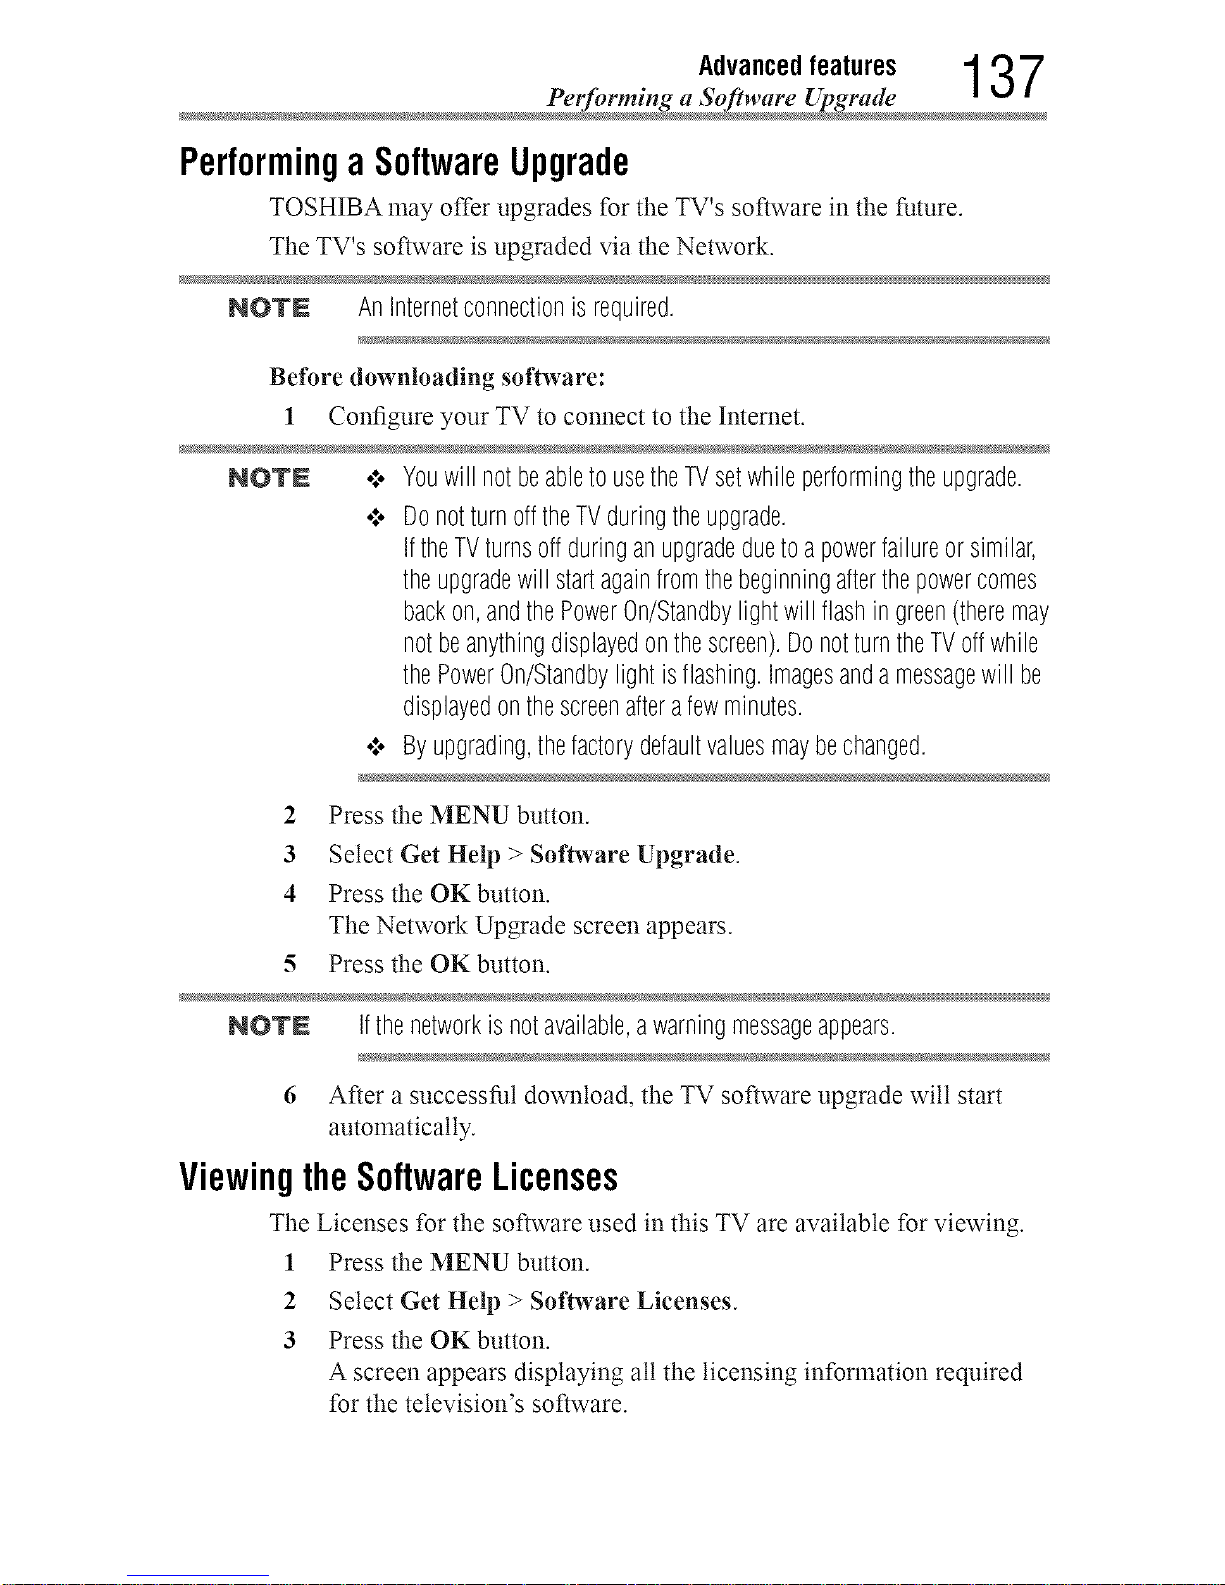
Advancedfeatures 1 3 7
Performing a Software Upgra
PerformingaSoftwareUpgrade
TOSHIBA may offer upgrades for the TV's software in the future.
The TV's software is upgraded via the Network.
NOTN AnInternetconnectionis required.
Before downloading software:
1 Configure your TV to connect to the Internet.
NOTN .:. Youwill notbeabletousetheTVsetwhileperformingtheupgrade.
•".. DonotturnofftheTVduringtheupgrade.
IftheTVturnsoff duringanupgradeduetoa powerfailureorsimilar,
theupgradewill startagainfromthebeginningafterthepowercomes
backon,andthePowerOn/Standbylightwillflashin green(theremay
notbeanythingdisplayedonthescreen).DonotturntheTVoffwhile
thePowerOn/Standbylightisflashing.Imagesandamessagewill be
displayedonthescreenafterafewminutes.
•:. Byupgrading,thefactorydefaultvaluesmaybechanged.
2 Press the MENU button.
3 Select Get Help > Software Upgrade.
4 Press the OK button.
The Network Upgrade screen appears.
5 Press the OKbutton.
NOTN Ifthenetworkis notavailable,awarningmessageappears.
6 After a successful download, the TV software upgrade wilt start
automatically.
ViewingtheSoftwareLicenses
The Licenses for the software used in this TV are available for viewing.
1 Press the MENU button.
2 Select Get Hell) > Software Licenses.
3 Press the OKbutton.
A screen appears displaying all the licensing information required
for the television's software.
Downloaded from www.ManualsFile.com manuals search engine
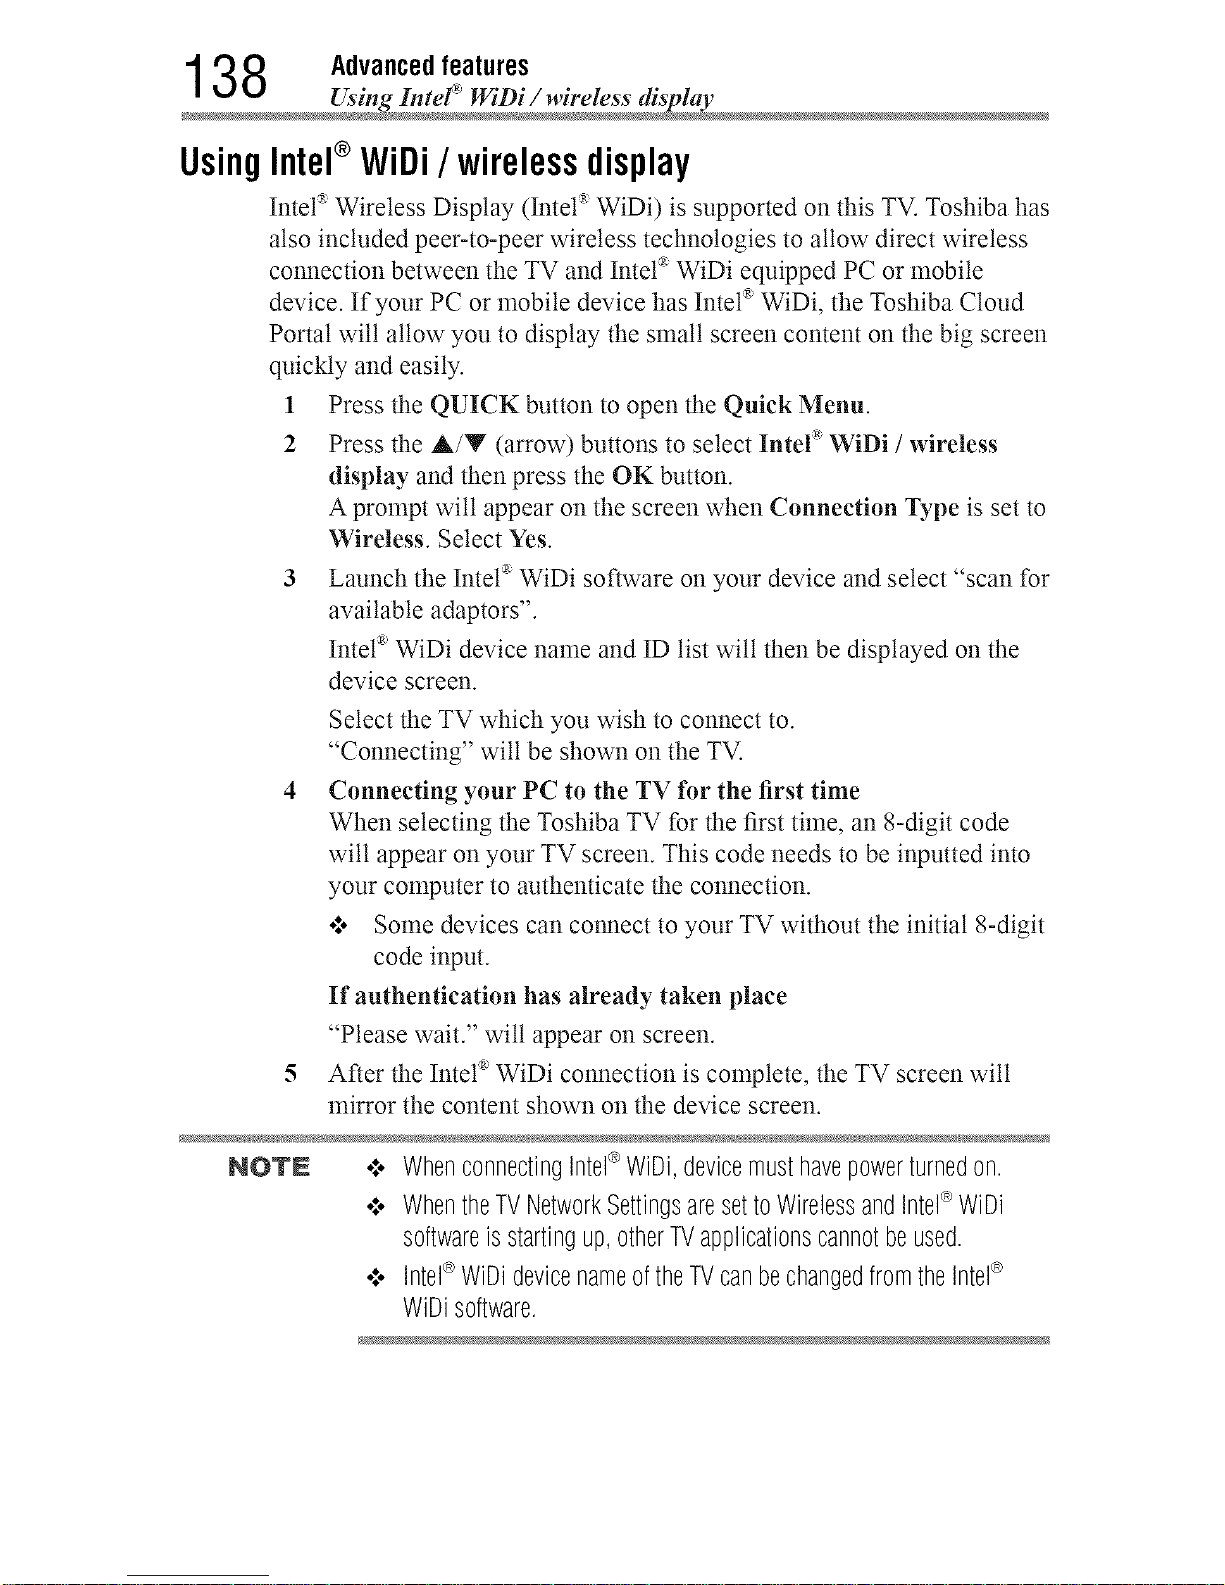
138 Advanced features
Using Inter _ WiDi / wireless displ
UsingIntel®WiDi/ wirelessdisplay
Intel'_Wireless Display (Intet ®WiDi) is supported on this TV. Toshiba has
also included peer-to-peer wireless technologies to allow direct wireless
connection between the TV and Intet_ WiDi equipped PC or mobile
device. If your PC or mobile device has Intel _'WiDi, the Toshiba Cloud
Portal wilt allow you to display the small screen content on the big screen
quickly and easily.
1 Press the QUICK button to open the Quick Menu.
2 Press the A/Y (arrow) buttons to select Inte[ _WiDi / wireless
display and then press the OK button.
A prompt will appear on the screen when Connection Type is set to
Wireless. Select Yes.
3 Launch the Intet ®WiDi software on your device and select "scan for
available adaptors".
Intet_'WiDi device name and ID list will then be displayed on the
device screen.
Select the TV which you wish to connect to.
"Connecting" wilt be shown on the TV.
4 Connecting your PC to the TV for the first time
When selecting the Toshiba TV for the first time, an 8-digit code
will appear on your TV screen. This code needs to be inputted into
your computer to authenticate the connection.
olo Some devices can connect to your TV without the initial 8-digit
code input.
If authentication has already taken place
"Please wait." wilt appear on screen.
5 After the Intel _'WiDi connection is complete, the TV screen will
mirror the content shown on the device screen.
NOT£ .:. WhenconnectingIntel®WiDi,devicemusthavepowerturnedon.
•".. WhentheTVNetworkSettingsaresettoWirelessandIntel®WiDi
softwareisstartingup,otherTVapplicationscannotbeused.
•".. Intel®WiDidevicenameoftheTVcanbechangedfromtheIntel®
WiDisoftware.
Downloaded from www.ManualsFile.com manuals search engine
Advancedfeatures 1 3 9
Using Inter _ WiDi / wireless displ
To exit Intel :_WiDi / wireless display:
Exit Intel'_Wireless Display by pushing the disconnect button on Intet:_'
WiDi software on the device or by pressing the EXIT button on the TV
remote control.
NOT£ Ifthedevicehasbeeninactiveforsometime,theIntel®WiDiconnection
will bedisconnectedautomatically.
Changingthe Intel®WiDi DeviceName
The TV's Intet_'WiDi device name can be changed.
1 Press the MENU button.
2 Select Network > Network Device Setup >Inte[ _ WiDi / wireless
display Setup and press the OK button.
3 Press the A/Y (arrow) buttons to select Inte[ _WiDi / wireless
display Device Name and press the OK button.
4 Select Device Name and press the OK button.
The Software Keyboard window will appear.
5 Input the Intet _'WiDi device name by using the software keyboard.
Press the GREEN button.
6 Select Done and press the OK button to save your setting.
DeviceList
Device List displays a list of MAC addresses for previously connected
devices that have been connected before. The nmxinmm number that can
be stored is 20.
If the list runs out of space, the least-recently-used MAC address wilt be
deleted and the new MAC address wilt be added automatically.
1 Press the MENU button.
2 Select Network > Network Device Setup >Inte[ _ WiDi / wireless
display Setup and press the OK button.
3 Press the A/Y (arrow) buttons to select Device List and press the
OK button.
Device List wilt appear.
The registered device can be deleted one by one by pressing the RED
button in the list.
When doing so, the following text can be seen "Do you want to
unregister this device? Yes/No". Select Yes.
Downloaded from www.ManualsFile.com manuals search engine
1 4 0 Advanced features
Using the Flip Bar feature
UsingtheFlipBarfeatures
The Flip Bar function adds thumbnails of programs currently being
broadcast for set channels, the channel being watched at the same time
the previous day, or the chalmet being watched at the same time one week
previously to the bottom of the screen, malting it easy for you to choose a
channel. Up to l0 thumbnails can be displayed.
Thumbnails can be displayed at the bottom of the screen for the following
types of channels.
• Favorite Channels: Channels set as Favorite Channels.
• Yesterday*: The channel being watched at the same time the previous
day.
• Last Week*: The channel being watched at the same time one week
previously.
• Starting with the channel being watched at the same time, up to
l0 thumbnails can be displayed for channels watched afterward,
measured at intervals of 30 minutes. A channel nmst have been
watched for at least 2 minutes to be included.
NOTN o:, TimeinformationisrequiredfortheFlipBar.Timeinformationis
receivedthroughanetworkconnectionordigitalbroadcastsignals.
A networkconnectionisrecommendedforcorrectlyreceivingtime
information.
Whenreceivingtimeinformationthroughdigitalbroadcastsignals,it
isrequiredtosetthechanneltoreceivetimeinformationin theFlip
BarWizardandselectthis channeleachtimetheTVisturnedon.
¢ Iftimeinformationisnotbeingreceivedcorrectly,recordsof
previouslywatchedchannelsmaynotbestoredproperly.
¢ Therecordsofpreviouslywatchedchannelsmaybeerased.
¢ WhenAutoTuningisperformed,therecordof previouslywatched
channelsiserased.
¢ An"ULTRAHD4K"iconappearsinthumbnailsforchannelsusing4K
picturesignals.
SettinguptheFlipBar
Set up the Flip Bar before use. Channels from devices connected through
IR Blaster, and DTV or cable TV channels can be registered.
1 Press the MENU button.
2 Select Options > Flip Bar Setup and press the OK button.
Downloaded from www.ManualsFile.com manuals search engine
Advancedfeatures 1 4 1
Using the Flip Bar feature
3 Press the A/Y (arrow) buttons to select Flip Bar Wizard.
The setup screen appears.
4 Select Next and press the OK button.
5 Read the information on screen, and select Agree after confirming
the contents. Then select Next and press the OK button.
6 To set Favorite Channels, select Yes and press the OK button.
7 Register a channel.
o:o Up to 10 channels can be set forAntenna/Cabte and external
input devices.
To register an Antenna/Cable channel:
1 Press the A/Y (arrow) buttons to select a channel.
2 Press the OK button and the channel marked with J will be
set in Favorite Channels.
To register a channel received through an external input device:
1 Press the 4/_" (arrow) buttons to change the input.
•:. If some channels are already registered, press the Y
(arrow) button to move the focus to the empty space at
the bottom.
2 Press the YELLOW button.
3 Use the number buttons (0-9) to enter the Channel number to
registec then press the OK button.
4 When the focus has moved to the Channel Name, press the
OK button.
5 When the software keyboard appears, enter the Channel
Name.
For how to use the software keyboard, refer to "Using the
software keyboard" on page 135.
o:o To change registered channels, refer to "Changing the Favorite
Channel contents" on page 143.
8 When you have finished setting channels, press the GREEN button.
The current time screen appears.
9 Select Next and press the OK button.
If you are not connected to a network, select a channel to obtain
time information and press the ON button.
10 Select Done and press the OK button.
The Flip Bar setup is complete.
Downloaded from www.ManualsFile.com manuals search engine
1 4 2 Advanced features
.... Using the Flip Bar features
NOTE .:. Tosetachannelfromanexternalinput,firstsettheIRBlastersettings.
•:. IfyoudeleteadevicefromIRBlasterSetup,anyFavoriteChannels
registeredfromthatdevicewillalsobedeleted.
SelectingprogramsusingtheFlipBar
Display thumbnails on the bottom of the screen and select your desired
program.
1 Press the FLIP BAR (_v)button while watching TV broadcast or an
external input.
Thumbnails wilt be displayed at the bottom of the screen.
Up to 10 thumbnails can be displayed.
2 Press the A/Y (arrow) buttons to cycle between thumbnail channel
types (Favorite Channels, Yesterday and Last Week).
When the TV has not acquired any time information, only Favorite
Channel can be displayed.
NOTE WhentheTVhasnotacquiredanytimeinformationandYesterday
or LastWeek is selected,a messagepromptingyoutoacquiretime
informationmayappear.If youpresstheOKbutton,theTVchangestothe
channelsetfortimeinformationacquisition,andthethumbnaildisplay
disappears.
PresstheFLIPBAR(_) buttonagaintousetheFlipBar.
3 Press the 4/_ (arrow) buttons to select the thumbnail of the
channel you want to watch, and press the OK button.
Deletingthehistoryinformationforthumbnailsdisplayedfor
Yesterdayor LastWeek
1 Use the A/Y/4/I_" (arrow) buttons to select Trash, and press the
OK button.
All information for channels with thumbnails displayed will be
deleted.
NOTN .:. Thumbnailsmaynotbedisplayeddependingonthebroadcast
conditions.
•:. Thumbnailsfortimeperiodsotherthanthatbeingwatchedwill notbe
displayed.
•:. TochangetheFavoriteChannelcontents,selectOptions >Flip Bar
Setup >FavoriteChannels.
Downloaded from www.ManualsFile.com manuals search engine
Advancedfeatures 1 4 3
Using the Flip Bar feature
ChangingtheFlipBarsettings
Change the Favorite Channel contents or reset the previously watched
chalmet information.
ChangingtheFavoriteChannelcontents
1 Press the MENU button.
2 Select Options > Flip Bar Setup and press the OK button.
3 Press the A/Y (arrow) buttons to select Favorite Channels, and
then press the OK button.
4 Change a registered channel.
o:o Up to 10 channels can be set forAntenna/Cabte and external
input devices.
To change a registered Antenna/Cable channel:
1 Press the &/Y (arrow) buttons to select a channel.
2 Press the OK button and the channel marked with €" wilt be
set in Favorite Channels.
To change a registered channel received through an external
input device:
1 Press the 4/_ (arrow) buttons to change the input.
2 Select the channel to change and press the YELLOW button.
3 Use the 0-9 buttons to change the Channel and press the OK
button.
4 When the focus has moved to the Channel Name, press the
OK button.
5 Change the Channel Name when the software keyboard
appears.
For how to use the software keyboard, refer to "Using the
software keyboard" on page 135.
5 When you have finished setting channels, press the GREEN button.
Yesterdaythumbnaildisplaysettings
1 Press the MENU button.
2 Select Options > Flip Bar Setup and press the OK button.
3 Press the &/Y (arrow) buttons to select Yesterday.
4 Press the 4/_ (arrow) buttons to select On or Off.
If Off is selected, Yesterday thumbnails wilt not be displayed.
Downloaded from www.ManualsFile.com manuals search engine
1 4 4 Advanced features
Using the Flip Bar feature
LastWeekthumbnail display settings
1 Press the MENU button.
2 Select Options > Flip Bar Setup and press the OK button.
3 Press the &/Y (arrow) buttons to select Last Week.
4 Press the 4/_ (arrow) buttons to select On or Off.
If Off is selected, Last Week thumbnails wilt not be displayed.
Resettingthe Flip Barsettings
If the Flip Bar settings are reset, user viewing information and Favorite
Channels settings are deleted.
1 Press the MENU button.
2 Select Options > Flip Bar Setup and press the OK button.
3 Press the &/Y (arrow) buttons to select Flip Bar Reset, and then
press the OK button.
A confirmation screen appears.
4 Press the 4/1_" (arrow) buttons to select Yes, and then press the OK
button.
The Flip Bar settings are reset.
Downloaded from www.ManualsFile.com manuals search engine
Advancedfeatures 145
Using the Cloud Portal Setwic
UsingtheCloudPortalService
Smart TV with Cloud Portal offers a smarter connected experience with
faster operation and new services. Whether you want to co_mect to your
favorite content streaming from:
o*.othe Internet
o*.oyour home network
•1. mobile devices
You can also connect with people with Toshiba's unique Personal
Messaging or Family Calendar features.
For additional features, see "Cloud Portal Companion Apps" on page
170.
NO'rN YouneedtoconnecttotheInternetbeforeusingthisfeature,see"Setting
uptheNetwork"onpage126.
1 Press the_ button.
The menu screen of the Cloud Portal service is displayed.
2 Press the A/Y/4/_ to select a Cloud Portal service, and press the
OK button.
UsingtheCloudPortalServicefeatures
NO'rN 4 YouneedtoconnecttotheInternetbeforeusingthisfeature,see
"SettinguptheNetwork"onpage126.
•".. Certainservicesmaynotbecurrentlyavailableinyourarea.
•".. Notallapplicationsareavailablein all languages.
•".. Userregistrationor Ioginmayberequiredtousesomeservices.
•".. Somefeaturesmayrequireanalways-onbroadbandInternet
connection,firmwareupdate,and/oradditionalbandwidth.
•".. ThirdpartyInternetservicesarenotprovidedbyToshiba,maychange
or bediscontinuedatanytimeandmaybesubjecttoInternetservice
providerrestrictions.Toshibamakesnowarranties,representations,
or assurancesaboutthecontent,availabilityorfunctionalityofthird-
partycontentorservices.UseofthirdpartyInternetservicesmay
requirethecreationofaseparateaccountthroughacomputerwith
Internetaccessand/orpaymentofone-timeand/orrecurringcharges
andmembership.Notall thirdpartyservicesmaybeavailableonor
compatiblewiththis product.Inordertoexperiencethefullsuggested
capabilitiesofthisproduct,fully-compatibledevicesmayberequired.
Downloaded from www.ManualsFile.com manuals search engine
1 4 6 Advanced features
.... Using the Cloud Portal Setwice features
NOTE .:. If thedisplayofthedateandtimeiswrong,trytoturnofftheTV,and
turnitonagain.
•".. ThemenuitemsforfeaturesliketheAppsmaychangeintheupgrade
process.
eManual
The eManuat provides on-screen, context-sensitive, instructions that
describe the TV features.
To access the eManuat, press the eMANUAL button on the remote
control. Or you can access the eManuat through the icon on the Cloud
Portal pages.
NOTE AnactiveInternetconnectionis requiredtousetheeManualfeature.
Featureapps
With easier content discovery, Cloud Portal puts you closer than ever
to the things you love-- like Netflix '_',along with video on demand,
broadcast progranm_ing, the Web, even music, photos and videos on your
home network.
NOTE Appswill varybycountryandavailabilitymaychangein thefuturewith
respecttocurrentapps.
Netflix ®
Watching movies with Netflix ®
1 Press the NETFLIX on the remote control.
2 Follow the on-screen instructions.
After having activated Netflix '_player and prepared an Instant Queue,
movies and TV episodes in your Instant Queue will appear on the TV
screen. Select the desired content using the remote control.
NOTE .:. TheresolutionofvideocontentstreamedfromNetfli/evaries
dependingonthecommunicationspeedandbit-rateandiscontrolled
byNetflix_>.
•".. Futureupgradescanchangethescreensandmessagesdisplayedin
theNetflix_>feature.
Downloaded from www.ManualsFile.com manuals search engine
Advancedfeatures 1 4 7
Using the Cloud Portal Service feature
o:oNetflix_>issupportedintheU.S.andCanada,andmaynotbeavailable
in othercountriesor regions.
To close Netflix '_,press the EXIT button.
To confirm the Netflix ESN (Electronic Serial Number):
1 Press the MENU button.
2 Select Network > Smart Apps Setup > Netflix Setup and press the
OK button.
3 Press the &/Y (arrow) buttons to select ESN, and then press the
OK button.
The Netflix ESN screen appears.
To deactivate your device:
1 Press the MENU button.
2 Select Network > Smart Apps Setup > Netflix Setup and press the
OK button.
3 Press the &/T (arrow) buttons to select Deactivation, and then
press the OK button.
4 Press the 4/_" (arrow) buttons to select Yes, and then press the OK
button.
VUDUTM Movies & TV
VUDU TM Movies & TV offers on-demand service that offers high
definition movies on the Web and nmch more.
1 Press the/_" button
The menu screen of the Cloud Portal service is displayed.
2 Press the A/Y/4/_ (arrow) buttons to select VUDU TM Movies &
TV, and then press the OK button.
NOTE o:o UseofVUDUTM Movies& TVrequiresa workingbroadbandInternet
connection(1 MbpsorhigherforSDvideo,2.25Mbpsorhigherfor
HDvideo,and4.5Mbpsor higherforHDXvideo).
¢ Certainservicesandfeaturesmaynotbeavailableinall countries.
To close VUDU TM Movies & TV, press the EXIT button.
Downloaded from www.ManualsFile.com manuals search engine
1 4 8 Advanced features
Using the Cloud Portal Service feature
To deactivate your device:
1 Press the MENU button.
2 Select Network > Smart Apps Setup > VUDU Deactivation.
3 Press the OKbutton.
4 Press the 4/_" (arrow) buttons to select Yes, and then press the OK
button.
Internet
OpenWebBrowser
The open web browser with HTML5 video and audio coders which allow
you to explore the web the way you want. Search for, bookmark, and
browse your favorite sites to enjoy the content you want, with simple,
intuitive navigation.
The web browser on this device:
o1. Does not support platform-dependent technologies such as
ActiveX _'.
olo Only supports preinstatted plug-ins.
o1. May not support media formats other than the following: JPEG /
PNG / GIF.
o1. Uses a single built-in font. Some text may not be displayed as
intended.
o1. Does not support downloading of flies or fonts.
o1. Is a TV browser. It may work differently than PC browsers.
°:o Does not support parental control or locks in the content, and it is
the responsibility of the user to monitor browser usage by minors.
NOTN Somepagesmaynotbedisplayedcorrectlyormaydisplaydifferentlyon
differentdevices.
Downloaded from www.ManualsFile.com manuals search engine
Advancedfeatures 1 4 9
Using the (Toud Portal Service feature
Usingthe web browser
l Connect to the network.
2 Press the _ button on the remote control to access the web browser
page.
3 Use the A/Y/4/I_ (arrow) buttons to select the URL Address Bar
and press the OK button.
4 Enter the desired URL address by using the software keyboard, see
"Using the software keyboard" on page 135.
Press the GREEN button when finished.
5 You can now browse websites on your TV using the A/V/4/I_
(arrow) buttons on the remote control.
NOTN o*..WhenyoupresstheGREENbuttonwhilebrowsingwebcontent,you
canusethe,A/'V/4/P,. (arrow)buttonsontheremotecontrolin
mousecontrolmode.
•:. YoucanuseaWirelessQWERTYkeyboardinadditiontothesoftware
keyboard(wirelesskeyboardnotincluded).
Browsingfavorite websites
l Connect to the network.
2 Press the _ button on the remote control to access the web browser
page.
3 Use the A/Y/4/_ (arrow) buttons to select the Favorites STAR
icon on the browser menu bar and press the OK button.
NOTN Byaddingfrequentlyvisitedwebsitesto Favorites,youcanbrowsethem
easily.
Youcanviewtheaddressesofthewebsitesyouvisitedpreviously.
4 Select the item or folders to move to the desired URL address and
press the OK button.
NOTN YoucanpresstheGREENbuttonontheremoteforthumbnailviewofall
yourfavorites.
5 You can now browse websites on your TV using the A/Y/4/_
(arrow) buttons on the remote control.
Downloaded from www.ManualsFile.com manuals search engine
150 Advanced features
_ Using the Cloud Portal Service features
NOTE WhenyoupresstheGREENbuttonwhilebrowsingwebcontent,you
canusetheA/T/4/I_ (arrow)buttonsontheremotecontrolin mouse
controlmode.
Addingfavorite websites
l Connect to the network.
2 Press the _ button on the remote control to access the web browser
page.
3 Follow "Using the web browser" on page 149 to display your
desired website.
4 Press the Navigation buttons to scroll to Favorites STAR on the
Browser Menu Bar and press the OK button.
NOTN Byaddingfrequentlyvisitedwebsitesto Favorites,youcanbrowsethem
easily.
Youcanviewtheaddressesofthewebsitesyouvisitedpreviously.
5 Press the OK button to save the desired website to your favorites.
NO'rN Thedesiredwebsiteishighlightedanddisplayedonthetoprowwiththe+
(Add)icon.
The+(Add)iconwillchangetoa pageiconafterthewebsitehasbeen
savedtofavorites.
6 Press the BACK button on the remote to return to browsing your
website.
Downloaded from www.ManualsFile.com manuals search engine
Advancedfeatures 1 5 1
Using the Cloud Portal Service feature
IVlediaShare(Videos,Mlusic,andPhotos)
MediaShare provides a simple graphic interface to quickly access and
share videos, music, and image flies across your home network and other
connected devices.
To access the MediaShare Service, press the MEDIA SHARE button on
the remote or select the MediaShare tab from the Cloud Portal pages.
NOTN .:.TouseMediaSharepleaseconfigurethenetworksettingsonyourTV.
Formoreinformation,see"Connectingtoahomenetwork"onpage
47.
•:. Donotinsert/removeUSBdevicewhilein use.
•:. TheMENUbuttonisnotavailablewhileusingtheMediaSharefeature.
IVlediaSharespecilications
Devices:
o:o USB device: USB Mass Storage Class devices (MSC)
•:o Connected Media Server:
Your computer (for example)
NOTN .:. Connectivityisnotguaranteedforalldevices.
•:. Somefunctionalitymaybelostwitha USBHUBconnection.
Supported file system:
o:o FAT16 and FAT32 (USB device)
NOTN Youmustobtainanyrequiredpermissionfromcopyrightownersto
downloador usecopyrightedcontent.Toshibacannotanddoesnotgrant
suchpermission.
Downloaded from www.ManualsFile.com manuals search engine
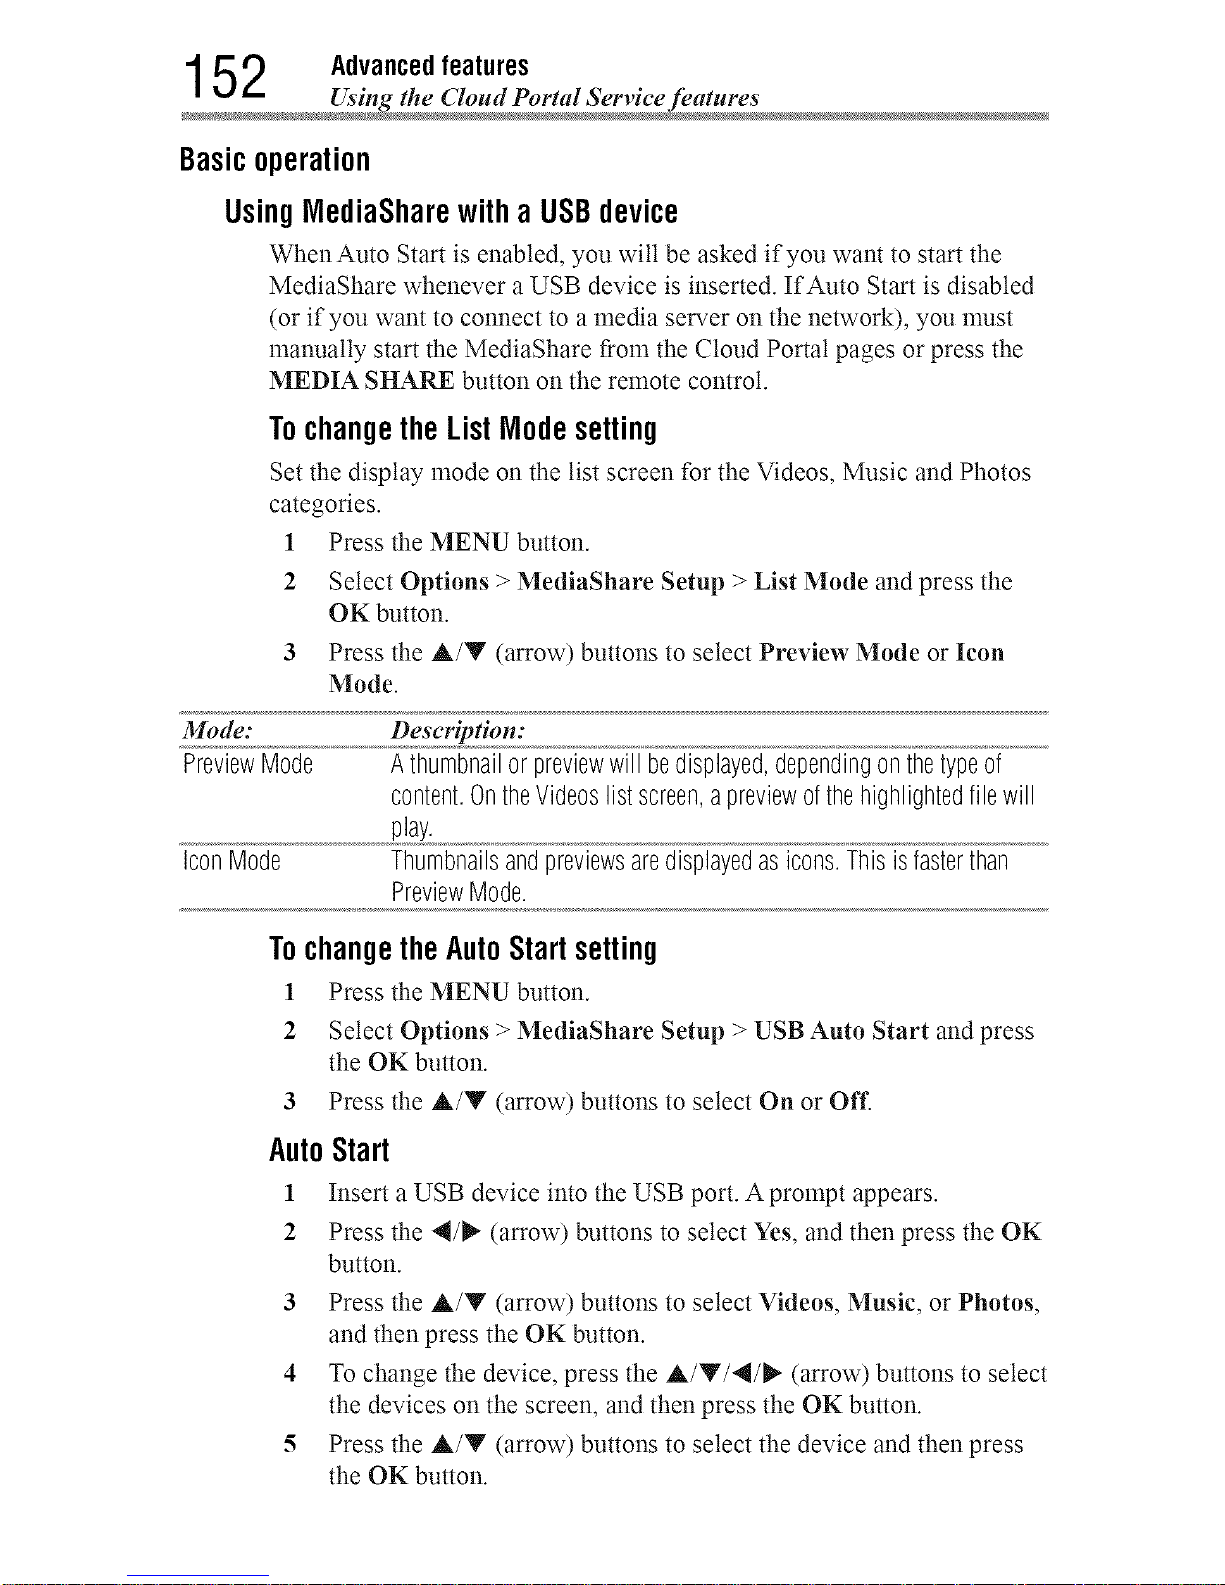
1 5 2 Advanced features
Using the Cloud Portal Service feature
Basicoperation
UsingIVlediaSharewitha USBdevice
WhenAuto Start is enabled, you will be asked if you want to start the
MediaShare whenever a USB device is inserted. If Auto Start is disabled
(or if you want to connect to a media server on the network), you nmst
manually start the MediaShare from the Cloud Portal pages or press the
MEDIA SHARE button on the remote control.
Tochangethe List Mlodesetting
Set the display mode on the list screen for the Videos, Music and Photos
categories.
1 Press the MENU button.
2
3
Select Options > MediaShare Setup > List Mode and press the
OK button.
Press the &/V (arrow) buttons to select Preview Mode or Icon
Mode.
Mode: Description:
PreviewMode A thumbnailor previewwill bedisplayed,dependingonthetypeof
content,OntheVideoslist %reen,apreviewofthehighlightedfilewill
play,
IconMode Thumbnailsandpreviewsaredisplayedasicons,Thisisfasterthan
PreviewMode,
TochangetheAutoStart setting
1 Press the MENU button.
2 Select Options > MediaShare Setup > USB Auto Start and press
the OK button.
3 Press the &/Y (arrow) buttons to select On or Oil'.
AutoStart
1 Insert a USB device into the USB port. A prompt appears.
2 Press the 4/_" (arrow) buttons to select Yes, and then press the OK
button.
3 Press the &/Y (arrow) buttons to select Videos, Music, or Photos,
and then press the OK button.
4 To change the device, press the &/Y/4/_ (arrow) buttons to select
the devices on the screen, and then press the OK button.
5 Press the &/Y (arrow) buttons to select the device and then press
the OK button.
Downloaded from www.ManualsFile.com manuals search engine
Advancedfeatures 153
Using the Cloud Portal Service feature
6 Press the A/V (arrow) buttons to select OK and then press the OK
button.
NOTE IfAutoStartissettoOff,youcanstarttheMediaShare(MediaPlayer)
manually.
ManualStart
1 Insert a USB device into the USB port.
2 Press the MEDIA SHARE button.
3 To change the device, press the A/Y/4/_ (arrow) buttons to select
the devices on the screen, and then press the OK button.
4 Press the A/Y (arrow) buttons to select the device and then press
the OK button.
5 Press the A/Y (arrow) buttons to select OK and then press the OK
button.
Toselectafile inthe listofcontents
Sort
!
2
Press the A/Y/4/_" (arrow) buttons to select a file or folder.
File:
Press the OK button to play or view.
Folder:
Press the OK button to move to the next layer, or press the BACK
button to return to the previous layer.
Select Sort and press the OK button.
Press the A/Y (arrow) buttons to select the sorting rule (File
Name, New or Old) and press the OK button.
3 Select OK and press the OK button.
NOTE Sortingmaytakealittletime.
Downloaded from www.ManualsFile.com manuals search engine
1 54 Advancedfeatures
Using the Cloud Portal Setwice fea_ure
Toclosethe IVlediaShare
1 Press the EXIT button.
2 Press the 4/_" (arrow) buttons to select Yes and then press the OK
button.
The TV will return to the last-viewed cham_el or video input.
NOTN Youcanalsoreturntothelastviewedchannelorvideoinputbypressing
theBACKbuttonseveraltimeswhilemediaisstopped.(Thenumberof
timesthattheBACKbuttonmustbepressedchangesaccordingtothe
layeryouarein.)
UsingIVlediaSharewitha MlediaServer
You need to configure a home network before using this feature, see
"Setting up the Nemrork" on page 126.
1 Press the MEDIA SHARE button.
2 To change the device press the A/Y/4/_ (arrow) buttons to select
the Devices button on the screen, and then press the OK button.
3 Press the A/Y (arrow) buttons to select the device and then press
the OK button.
4 Press the A/Y (arrow) buttons to select OK and then press the OK
button.
Toselect a file inthe list ofcontents
Sort
!
2
Press the A/Y/4/_ (arrow) buttons to select a file or folder.
File:
Press the OK button to play or view.
Folder:
Press the OK button to move to the next layer, or press the BACK
button to return to the previous layer.
Select Sort and press the OK button.
Press the A/Y (arrow) buttons to select the sorting rule (Title, New
or Old) and press the OK button.
3 Select OK and press the OK button.
NO'rN .:. Sortingmaytakealittletime.
•_. DependingontheMediaserver,thisfunctionmaynotbeusable.
Downloaded from www.ManualsFile.com manuals search engine
Advancedfeatures 1 5 5
Using _he Cloud Portal Service feature
Toclosethe IVlediaShare
1 Press the EXIT button.
2 Press the 4/_" (arrow) buttons to select Yes and then press the OK
button.
The TV will return to the last-viewed cham_el or video input.
NOTN Youcanalsoreturntothelastviewedchannelorvideoinputbypressing
theBACKbuttonseveraltimeswhilemediaisstopped.(Thenumberof
timesthattheBACKbuttonmustbepressedchangesaccordingtothe
layeryouarein.)
Todisplaythe deviceinformation
1 Press the QUICK button to open the Quick menu in list mode or
Multi View mode.
2 Press the A/Y (arrow) buttons to select Device Information.
Viewingmoviefiles
BasicPlayback
1 Select a file, see "To select a file in the list of contents" on page 153.
2 Press the OK button or PLAY button to begin playback.
NOTE Dependingonthefilesize,it maytakesometimetostartplayback.
3 Pressthe STOP button to stop playback.
The screen returns to the list.
If playback finishes before the STOP button is pressed, the screen
returns to the list.
NOTN WhentherepeatmodeissettoAll, thenextfilewillstartplaying
automatically.
Downloaded from www.ManualsFile.com manuals search engine
156 Advanced features
Using the Cloud Portal Service feature
ResumePlayback
You can resume playback from where it was last stopped.
•:* Press the STOP button while playing the movie to memorize the
stopped position.
If the same file is selected and played, playback will resume from
the last stopped position.
NOTE .:. IfyouplaydifferentcontentorexitMediaShare,thememorized
stoppedpositionwill bedeleted.
•:. Thisfunctionmaynotbeavailabledependingonthecontent.
Topauseplayback
°_o Press the PAUSE button during playback.
o:* To resume normal playback, press the PLAY button.
NOTE ThePAUSEbuttonoroperationsduringPausemaynotbefunctional
dependingoncontentor mediaserver.
Tolocatea specificfile
•:. Press the Skip Reverse or Skip Forward button repeatedly to
access the desired file.
•1. (_): Playback starts from the beginning of the current file or
previous file.
•1. (_): To locate subsequent flies.
Toplay infastreverseorfastforwarddirections
•:. Press the 44 or _ button during playback. Each time you press
the 44 or _ button, the playback speed will change.
NOTE Thesefeaturesmaynotbeoperabledependingonthecontentormedia
server.
Downloaded from www.ManualsFile.com manuals search engine
Advancedfeatures 1 5 7
Using the Cloud Portal Service feature
To setthe repeat mode
1 Press the QUICK button.
2 Press the A/Y (arrow) buttons to select Repeat.
The current repeat setting appears.
3 Press the _ (arrow) button.
4 Press the A/V (arrow) buttons to select Off, All, or 1.
5 Press the BACK button.
Mode: Description:
Off Thecontentisplayedbackonlyonce
All All contentsin thesamefolderarerepeatedlyplayedback
1 Thesamecontentis repeatedlyplayedback
ToselectamoviefromPlayList(exceptforMediaRenderer
function)
While playing a movie, you can select a different movie from the Play
List.
1 Press the QUICK button to open the Quick Menu.
2 Press the A/V (arrow) buttons to select Play List and press the OK
button.
The Movie List wilt appear.
3 Press the A/V (arrow) buttons to select a file name.
Todisplaythefile statusinformation
1 Press the INFO button during playback.
The information wilt be displayed at the bottom of the screen.
2 Press the INFO button again to hide the information.
NO'rN Theinformationmaynotcorrectlydisplaydependingonthecontentor
mediaserver.
Downloaded from www.ManualsFile.com manuals search engine

158 Advanced features
Using the Cloud Portal Setwice feature
ToregisteryourTVtoa DivX®account:
This TV allows you to play back files purchased or rented from DivX _
Video-On Demand (VOD) services. When you purchase or rent DivX *
VOD flies on the Intemet, you wilt be asked to enter a registration code.
1 Press the MENU button.
2 Select Options > MediaShare Setup > DivX _'VOD and press the
OK button.
3 Press the A/Y (arrow) buttons to select DivX _'VOD Registration,
and then press the OK button.
4 The DivX _'VOD window will appear and you will see the
registration code. For details on registration, please visit the DivX _
website at
http://vod.divx.com
5 Copy the activation file to a memory device and play it on the TV.
Tounregisteryourdevice:
1 Press the MENU button.
2 Select Options > MediaShare Setup > DivX _'VOD and press the
OK button.
3 Press the A/Y (arrow) buttons to select DivX _'VOD
Deregistration, and then press the OK button.
4 A confirmation message wilt appear. Select Yes and press the OK
button.
5 The DivX _'VOD window wilt appear and you will see the
deregistration code. For details on registration, please visit the
DivX _website at
http://vod.divx.com
ABOUT DIVX VIDEO: DivX * is a digital video format created by DivX,
LLC, a subsidiary of Rovi Corporation. This is an official DivX Certified _'
device that has passed rigorous testing to verify that it plays DivX video.
Visit divx.com for more information and software tools to convert your
files into DivX videos.
ABOUT DIVX VIDEO-ON-DEMAND: This DivX Certified _ device
must be registered in order to play purchased DivX Video-on-Demand
(VOD) movies. To obtain your registration code, locate the DivX
VOD section in your device setup menu. Go to vod.divx.com for more
information on how to complete your registration.
Downloaded from www.ManualsFile.com manuals search engine
Advancedfeatures 1 5 9
Using the Cloud Portal Service feature
DivX Certified _'to play DivX _ and DivX Plus_'HD (H.264/MKV) video
up to 1080p HD including premium content.
NOTN Certainservicesandfeaturesmaynotbeavailablein allcountries.
Toplayback DivXPlus®HD content:
o:o To play in fast reverse or fast forward directions, press the 44 or
II_ button during playback. Each time you press the 44 or _
button, the playback speed wilt change.
o:o If the content contains no chapter, this TV generates original chapter
point in 10% increments for 10 chapters in total, that are accessible
by using the Number buttons on the remote control.
During playback, press the _ button to skip to the begilming of the next
chapter. When the _ button is pressed twice in succession, it will repeat
two times of above. If the _ button is pressed at the last chapter, the
confirmation message wilt appear. If Yes is selected, playback will skip to
the beginning of the next content.
Press the M,4button to skip to the beginning of the current chapter.
When the _,_ button is pressed twice in succession, it wilt skip to the
begilming of the previous chapter. If the _ button is pressed twice
continuously at the first chapter, playback of the current content will stop
and the confirmation message will appear. If Yes is selected, playback
will skip to the beginning of the previous content.
o:o Press the A (arrow) button to skip to the beginning of the previous
contem.
Press the Y (arrow) button to skip to the beginning of the next
contem.
The Number button is used for direct jump.
For example: If you press the 3 button and then press the OK button,
playback will jump to the beginning of 3rd chapter.
NOTN .:o Dependingonthecontentdatawillnotbeoperated
¢ Theplaybackspeed(4141/1_) maynotchangedependingonthe
stream
Downloaded from www.ManualsFile.com manuals search engine
1 60 Advancedfeatures
Using the Cloud Portal Service feature
UsingMultiTitleandAlternativeTimelinesMultiTitle
DivX Plus_ HD files may contain up to 100 titles.
You can change the title (It contains same video file) by pressing the RED
button.
When the RED button is pressed, it will display the title change window
at the bottom on the screen (same as Subtitle orAudio change window).
The title is changed cyclically each time the RED button is pressed.
Playback starts from the beginning of the title, which is selected by the A
or V (arrow) buttons.
olo Pressing the al/_, (arrow) buttons also changes the multi title.
NOTN Dependingonthecontentdatawill notbeoperated.
Filespecifications:
USB device use:
•**oFile format: MPEG2 PS, MPEG2 TS, MPEG-2 VOB, AVI, MOV,
MP4, ASF, DivX, Xvid, MKV, Flash Video (FLV1), 3GPP, Motion
JPEG
•**oVideo: MPEG2, H.265, H.264, MPEG-4 part2, DivX, Xvid, VC-
I(WMV), Sorenson H.263(FLV1), JPEG
_ • .
•**oAudio: MPEG1-Layer2/MPEGI-Layer./Dolby Dlgltat (AC3)/
DTS'_/LPCM, AAC, WMA7/8/9, ADPCM
•**oMaximum number of files: 1000 per folder
o:* Maximum video resolution: 640x480 (Motion JPEG), 2560 x 1920
@ 30fps (H.264), 4096 x 2160 @ 30fps (H.265), 1920 x 1080 (other)
Content on a connected Media Server:
olo File format: MPEG2 PS, MPEG2 TS, MP4
olo Video: MPEG2(PS), H.264, VC-I(WMV)
olo Audio: LPCM/MPEG1-Layer2/MPEG2-Layer2/Dolby _ Digital
(AC3)/AAC
°_o Maximum number of files: 1000 per folder
•:. Maximum video resolution: 1920 x 1080
NOTN Itmaynotbepossibletousecertainplaybackordisplaysomefiles.In
somecasescertainfilesandserversmaynotsupportplaybackfeatures,
suchaspause.
Downloaded from www.ManualsFile.com manuals search engine
Advancedfeatures 1 61
Using the Cloud Portal Service feature
Playingmusicfiles
BasicPlayback
1 Select a file, see "To select a file in the list of contents" on page 153.
Press the OK button or PLAY button to begin playback.
*:o All the music files in the same folder will be played one after
another. When all of the nmsic files have been played, the TV
returns to the list of contents.
NOTE Dependingonthefilesize,it maytakesometimetostartplayback.
2 Press the STOP button to stop playback.
The screen returns to the list.
Topauseplayback
1 Press the PAUSE button during playback.
2 To resume normal playback, press the PLAY button.
NOTS ThePAUSEbuttonor operationsduringPausemaynotbefunctional
dependingoncontentor mediaserver.Certainprocessesmaytakesome
timetocomplete.
Tolocatea specificfile
o:. Press the SKIP REVERSE or SKIP FORWARD button repeatedly
to access the desired file.
o:o (_): Playback starts from the beginning of the current file or
previous file.
o:o (_): To locate subsequent files.
Toplay infastreverseorfastforwarddirections
°:o Press the 44 or _1_ button during playback. Each time you press
the 44 or _ button, the playback speed will change.
NOTS Thesefeaturesmaynotbeoperabledependingonthecontentormedia
server.
Downloaded from www.ManualsFile.com manuals search engine
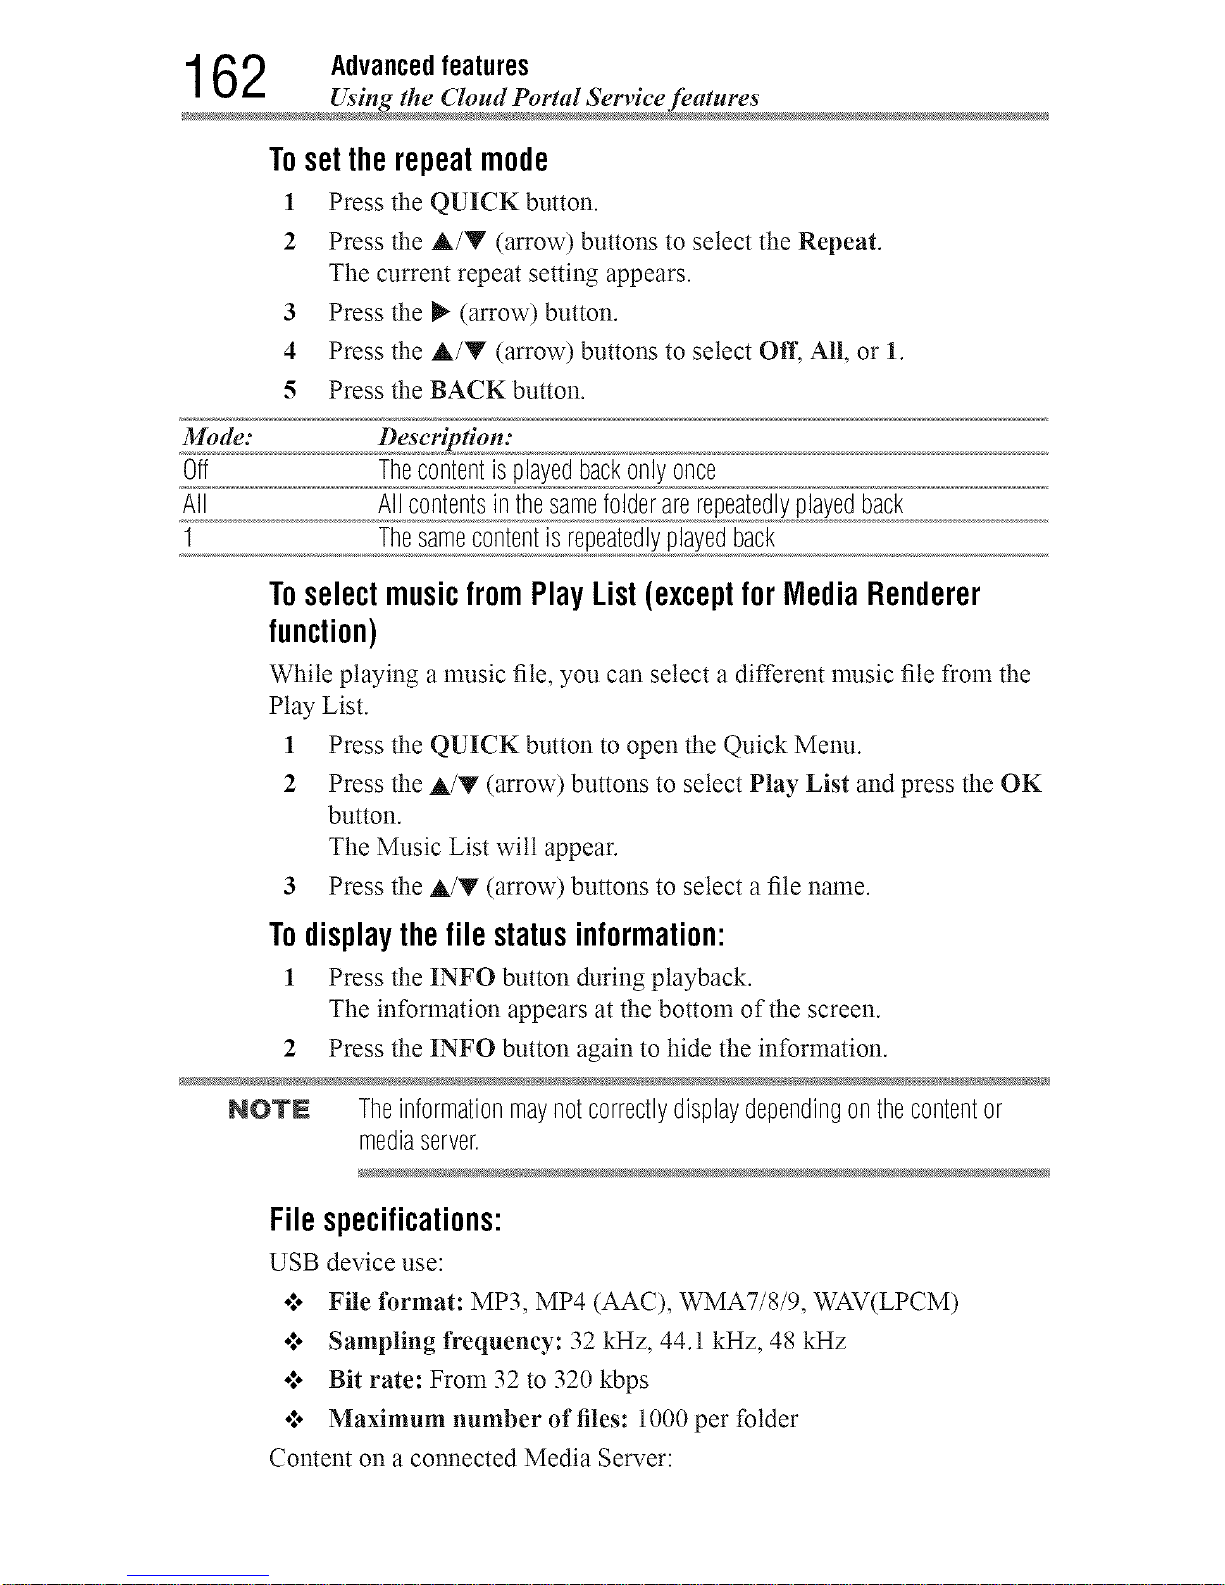
1 62 Advancedfeatures
Using the Cloud Portal Setwice feature
To setthe repeat mode
1 Press the QUICK button.
2 Press the A/Y (arrow) buttons to select the Repeat.
The current repeat setting appears.
3 Press the _ (arrow) button.
4 Press the A/Y (arrow) buttons to select Off, All, or 1.
5 Press the BACK button.
Mode: Description:
Off Thecontentisplayedbackonlyonce
All All contentsin thesamefolderarerepeatedlyplayedback
1 Thesamecontentis repeatedlyplayedback
Toselectmusicfrom PlayList (exceptfor MediaRenderer
function)
While playing a nmsic file, you can select a different nmsic file from the
Play List.
1 Press the QUICK button to open the Quick Menu.
2 Press the A/V (arrow) buttons to select Play List and press the OK
button.
The Music List will appear.
3 Press the A/V (arrow) buttons to select a file name.
Todisplaythe file statusinformation:
1 Press the INFO button during playback.
The information appears at the bottom of the screen.
2 Press the INFO button again to hide the information.
NOTE Theinformationmaynotcorrectlydisplaydependingonthecontentor
mediaserver.
Filespecifications:
USB device use:
•**oFile format: MP3, MP4 (AAC), WMA7/8/9, WAV(LPCM)
•:. Sampling frequency: 32 kHz, 44.1 kHz, 48 kHz
.t. Bit rate: From 32 to 320 kbps
.t. Maximum number of files: 1000 per folder
Content on a colmected Media Server:
Downloaded from www.ManualsFile.com manuals search engine
Advancedfeatures 1 63
Using the Cloud Portal Service feature
•**. File format: MP3, MP4 (AAC), WMA9 std, LPCM
o**oSampling frequency: 32 kHz, 44.1 kHz, 48 kHz
•_o Bit rate: From 32 to 320 kbps
o**oMaximum number of files: 1000 per folder
NOVN Itmaynotbepossibletousecertainplaybackfeaturesor displaysome
files.Insomecasescertainfilesandserversmaynotsupportplayback
features,suchasfast-forward.
Viewing photofiles
Multi View mode
This view mode allows you to search for photos in a grid format.
These pictures are displayed using thumbnail data in each image file.
1 Press the A/Y/4/_ (arrow) buttons to move the highlight by one
window.
If all of the photos will not fit in one screen, when pressing the A
(arrow) button at the top thumbnail, the screen wilt scroll up one by
one. Similarly, when pressing the Y (arrow) button at the bottom
thumbnail, the screen wilt scroll down one by one.
When you select a folder, press the OK button to move to the next
layer.
Press the BACK button to move back to the previous layer.
Press the OK button to view the selected photo in Single View
mode.
NOVN o:° Displayingthumbnaildatamaytaketime.
¢ InordertousetheA/T (arrow)buttonstoscrollthescreen,there
mustbeenoughcontenttotakeuptwoscreens.
Downloaded from www.ManualsFile.com manuals search engine
1 64 Advancedfeatures
Using the Cloud Portal Setwice feature
SingleViewmode
In this view mode, only files located in the selected directory are
displayed. When moving from Multi View mode to Single View mode,
the currently selected photo appears.
1 On Multi view mode, press the A/V/4/_ (arrow) buttons to select
a file, and then press the OK button.
2 Press the 4/1_" (arrow) buttons to view the next or previous file.
NOTE SingleviewmodeischangedtoMultiViewmodewhentheBACKbuttonis
pressed.
Slide Show mode
This view allows you to watch a slide show of the photos. In this mode,
only files located in the selected directory appear.
1 To switch to Slide Show mode, press the OK button while in Single
View mode.
To return to Single View mode, press the OK button again.
2 Press the 4/_" (arrow) buttons to view the next or previous file.
Node settings
Press the QUICK button to open the Quick menu while in Single
View mode or Slide Show mode.
1
2 Press the A/Y (arrow) buttons to select the item (Interval Time or
Repeat).
3 Press the I_ (arrow) button.
4 Press the A/Y (arrow) buttons to adjust the setting.
5 Press the BACK button to return to Single View mode or Slide
Show mode.
Mode: Description:
IntervalTime Setsatimeintervalatwhichtoviewphotos
Repeat Displaysphotosinthesamedirectoryrepeatedly(On/Off)
Downloaded from www.ManualsFile.com manuals search engine
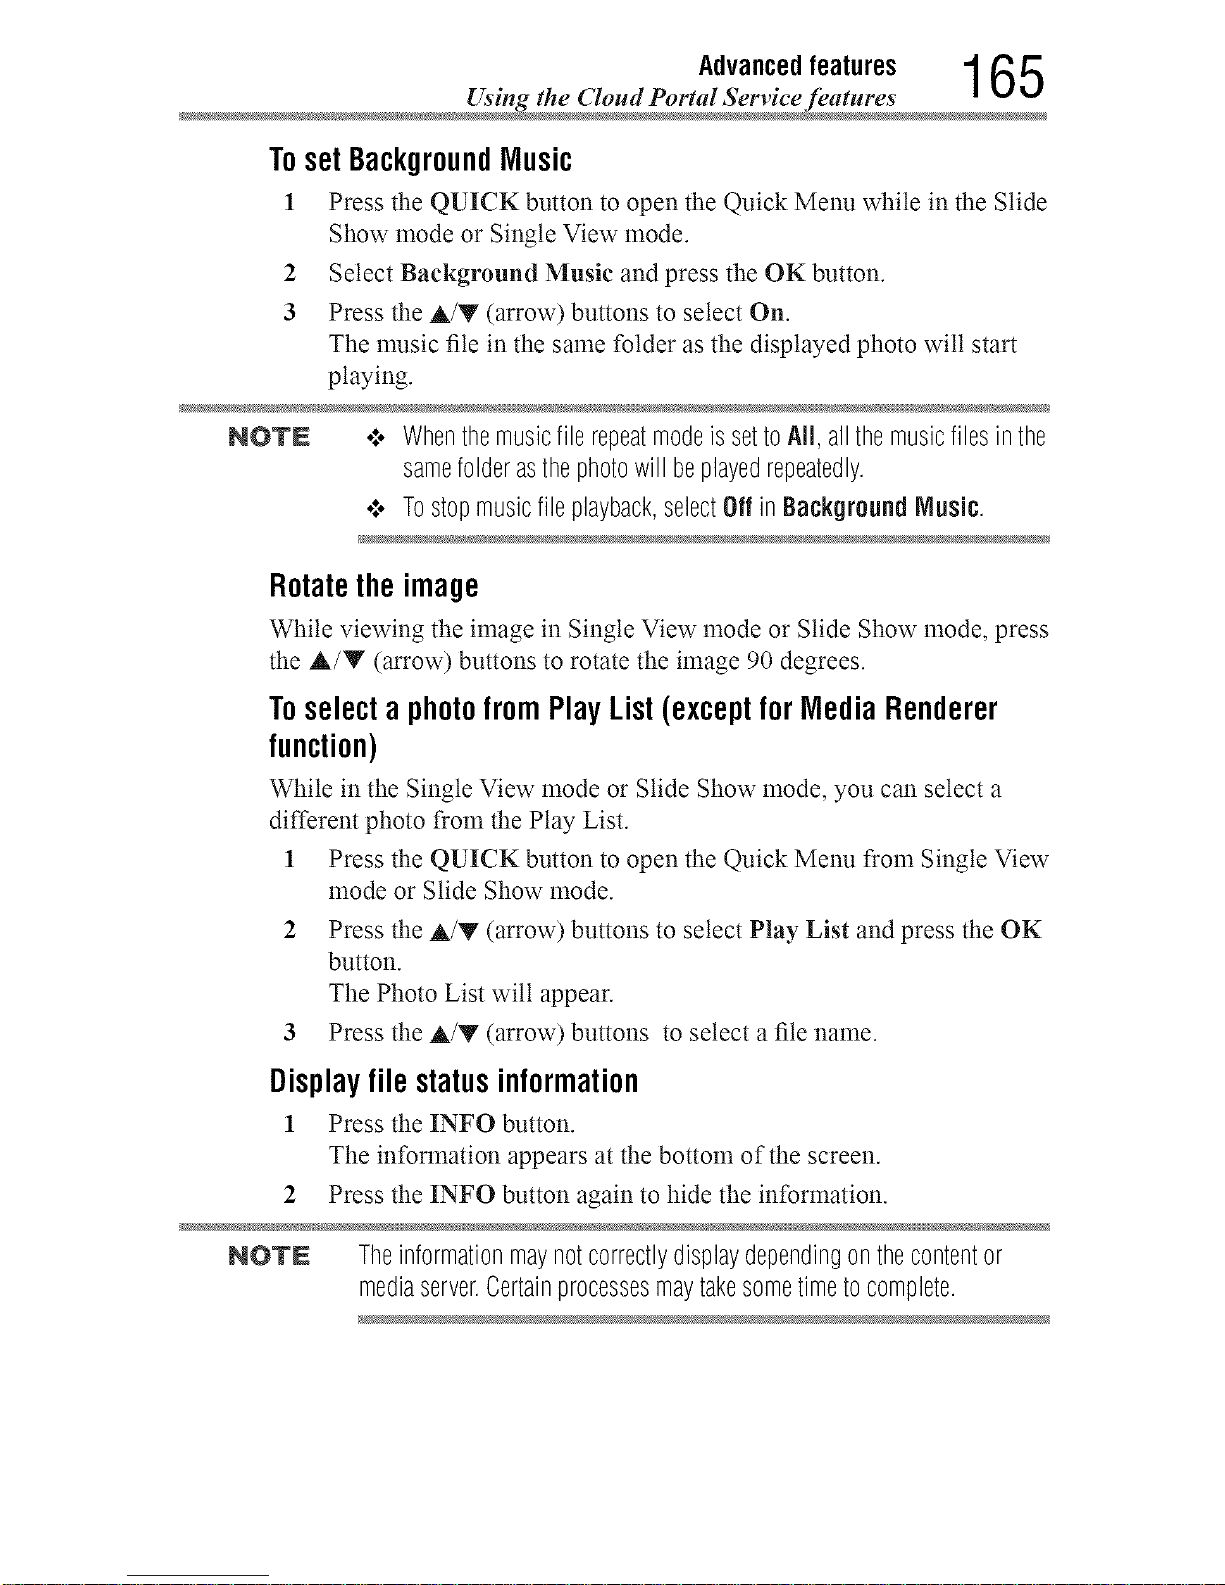
Advancedfeatures 1 6 5
Using _he Cloud Portal Service feature
Toset BackgroundMusic
1 Press the QUICK button to open the Quick Menu while in the Slide
Show mode or Single View mode.
2 Select Background Music and press the OK button.
3 Press the A/V (arrow) buttons to select On.
The nmsic file in the same folder as the displayed photo will start
playing.
NOTN .:. Whenthemusicfile repeatmodeissettoAll, all themusicfilesinthe
samefolderasthephotowill beplayedrepeatedly.
•:. Tostopmusicfileplayback,selectOffinBackground Nusic.
Rotatethe image
While viewing the image in Single View mode or Slide Show mode, press
the A/Y (arrow) buttons to rotate the image 90 degrees.
Toselect a photofromPlay List(except for Media Renderer
function)
While in the Single View mode or Slide Show mode, you can select a
different photo from the Play List.
1 Press the QUICK button to open the Quick Menu from Single View
mode or Slide Show mode.
2 Press the A/V (arrow) buttons to select Play List and press the OK
button.
The Photo List wilt appear.
3 Press the A/V (arrow) buttons to select a file name.
Displayfile statusinformation
1 Press the INFO button.
The information appears at the bottom of the screen.
2 Press the INFO button again to hide the information.
NOTE Theinformationmaynotcorrectlydisplaydependingonthecontentor
mediaserver.Certainprocessesmaytakesometimetocomplete.
Downloaded from www.ManualsFile.com manuals search engine
1 66 Advancedfeatures
Using the Cloud Portal Setwice fea_ure
Filespecifications:
USB device use:
o/o Data compatibility: JPEG Exifver 2.2
•:, File format: JPEG
o/, Maximum viewable resolution: 15360 × 8640 (JPEG:Base-line),
1024 × 768 (JPEG:Progressive)
°/, Maximum number of files: 1000 per folder
Content on a connected Media:
o/, Data compatibility: JPEG Exifver 2.2
•:, File format: JPEG
•/, Maximum photo resolution: 4096 x 4096
•:, Maximum number of files: 1000 per folder.
Search
To search for content,
1 Select the search.
2 Enter in keyword and the search wilt search for:
•:. Media Server
Videos: Title name
Music: Title name/Artist name/Album name
Photos: Title name
•_. USB device
Videos/Music/Photos: File name
NOTE Foldersarenotsubjecttothesearchfunction.
3 The retrieval result is displayed.
4 Select one of the searchresutts.
5 The selected content wilt play.
NOTN o:. Thesearchretrievalstopswhencontentisbeingplayed.
¢ Thekeywordusedtosearchcanbeupto50characterslong.
Downloaded from www.ManualsFile.com manuals search engine
Advancedfeatures 167
Network Device Setup
The results screen shows different categories of media: Videos,
Music and Photos. Select the V below a category and press the
OK button to display results only for that category of media on the
screen.
o:* To return to the previous display, select A and press the OK button.
NetworkDeviceSetup
In order to set the access of the External Control Setup, Media
Renderer, or Device Name Setup, you nmst use the Network Device
Setup menu.
ExternalControlSetup
1 Press the MENU button.
2 Select Network > Network Device Setup > External Control
Setup and press the OK button.
3 Use the A/Y (arrow) buttons to select and set Enable Control to
On or Off.
To access the Home Control Profile:
1 Press the MENU button.
2 Select Network > Network Device Setup > External Control
Setup and press the OK button.
3 Use the A/Y (arrow) buttons to select and set Enable Control to
On.
4 Use the A/Y (arrow) buttons to select Home Control Profile and
press the OK button.
The Home Control Profile window will appear.
5 Use the A/V (arrow) buttons to select Home control Profile and
press the OK button.
6 Use the A/Y (arrow) buttons to navigate to the User Name or
Password field. Input the user name and password using the
Software Keyboard.
o:, For more information, see "Using the software keyboard" on page
135.
Downloaded from www.ManualsFile.com manuals search engine

1 68 Advancedfeatures
_ Network Device Setup
NOTE 0nlythe0-9 andcapital/lowercaseA-Zcharactersmaybeusedfortheuser
nameandpassword.
Toset usingAuto Identify:
User Name and Password in Home Control Profile before using
Identify.
Press the MENU button.
Set a
Auto
1
2
3
4
5
Select Network > Network Device Setup > External Control
Setup and press the OK button.
Use the A/Y (arrow) buttons to select and set Enable Control to
On.
Use the A/Y (arrow) buttons to select Home Control Profile and
press the OK button.
Use the A/Y (arrow) buttons to select Auto Identify and press the
OK button.
6 Press the OKbutton.
SettinguptheMediaRendererfeature
The TV can be configured as a Media Renderer. When operating as a
Media Renderer, the TV displays content provided by mobile devices or
PCs. The selection of the media is done by the media controller.
The TV can play photo, movie, or audio flies when operating as a Media
Renderer.
1 Press the MENU button.
2 Select Network > Network Device Setup > Media Renderer and
press the OK button.
3 Press the A/T (arrow) buttons to select On or Off; and then press
the OK button.
DeviceNamesetup
The device name as a Media Renderer can be changed.
1 Press the MENU button.
2 Select Network > Network Device Setup > Device Name Setup
and press the OK button.
3 Select the Device Name field. Press the OK button.
The Software Keyboard screen appears.
Downloaded from www.ManualsFile.com manuals search engine

Advancedfeatures 169
Network Device Setup
4 Input the device name by using the Software Keyboard. To save
your setting, press the GREEN button.
5 Select Done. Press the OK button.
NOTE Themaximumnumberofcharactersallowedforthedevicenameis15.
0nly 0-9,A- Z(uppercaseonly),"-" canbeusedinthedevicename.
Downloaded from www.ManualsFile.com manuals search engine
Chapter9
CloudPortalCompanion
Apps
UsingAppsona TabletorSmartphone
Toshiba provides apps for tablets and smart phones. The Cloud Portal
Companion App allows you to read, reply to, and compose Cloud Portal
Messages, and create Cloud Portal Calendar Events. This expands the
Cloud Portal experience to other devices and locations. Another great
feature of the Cloud Portal Companion App is the ability to use your
mobile devices as simple yet powerful touch screen remote controls for
your TV.
NOTN Appswill varybycountryandavailabilitymaychangein thefuturewith
respecttocurrentapps.
These apps are available using a compatible iPhone _' and tablets powered
by Android TM.You can download these apps through the Google Play TM
store or the iTunes _.
In order to use these apps, you must configure the settings through the
Apps Control Profile.
NOTN ,,:oSomefeaturesmayrequireanalways-onbroadbandInternet
connection,firmwareupdate,and/oradditionalbandwidth.
¢ ThirdpartyInternetservicesarenotprovidedbyToshiba,maychange
or bediscontinuedatanytime,andmaybesubjecttoInternetservice
providerrestrictions.Toshibamakesnowarranties,representations,
or assurancesaboutthecontent,availability,orfunctionalityofthird-
170
Downloaded from www.ManualsFile.com manuals search engine
AppsCollaboration 1 71
Apps Control Profil
partycontentorservices.Useofthird-partyInternetservicesmay
requirethecreationofaseparateaccountthroughacomputerwith
Internetaccessand/orpaymentofone-timeand/orrecurringcharges
andmembership.Notall third-partyservicesmaybeavailableonor
compatiblewiththis product.Inordertoexperiencethefullsuggested
capabilitiesofthisproduct,fully-compatibledevicesmayberequired.
•:. AppscanonlybeusedwhenyourTVandyourtabletor smartphone
areconnectedtotheInternet.
•:. SomeappfeaturesmayrequiretheTVandsmartphone/tablettobeon
thesamehomenetworkconnection.
•:. Startingandoperationofthis servicemaytakeseveralminutes.
•:. Softwareupdatesmaybeneededinordertousethisservice.
•:. Inordertoexperiencethefullsuggestedcapabilitiesofthis product,
fully-compatibledevicesmayberequired.
•:. Certainfeaturesmaynotbeavailableinyourarea.
•:. CompanionAppsavailablethroughtheCloudmaybechangedor
removedatanytime.NotalloperatingsystemAppsmaybecompatible
withtheCloud.ServicesandfeaturesavailablethroughtheCloud
Portalmaybechangedor removedatanytime.Servicesandfeatures
depictedor listedhereandprovidedthroughtheCloudPortalmaynot
beavailabletoyouinyourregion.Notall servicesmaybeavailablein
all languages.
•:. Assoonastheapplicationis deployed,thisfeaturecanbeused.
AppsControlProfile
To select the Apps Control Profile
1 Press the MENU button.
2 Select Network > Network Device Setup > External Control
Setup and press the OK button.
3 Press the &/Y (arrow) buttons to select and set Apps Control
Profile and press the OK button.
The Apps Control Profile window will appear.
4 Press the &/Y (arrow) buttons to select Device Registration Setup
and press the OK button.
The Device Registration Setup window will appear.
5 Use the &/Y (arrow) buttons to select the Companion Device ID.
6 Select the Cancel, All, or Delete buttons.
Downloaded from www.ManualsFile.com manuals search engine
1 72 AppsCollaboration
_ Pairing
NOTE o:. Ifthemaximumnumberof registereddevices(20)isexceeded,no
additionaldevicescanberegistered.Deleteunnecessarydevices
beforeregisteringa newdevice.
o:. Whenre-registeringadevicewhichhasbeendeletedfromthelist,
pairingmustbecarriedoutagain.
To enable the New Device Detection:
1 Press the MENU button.
2 Select Network > Network Device Setup > External Control
Setup and press the OK button.
3 Press the A/Y (arrow) buttons to select and set Apps Control
Profile and press the OK button.
The Apps Control Profile window will appear.
4 Press the A/Y (arrow) buttons to select New Device Detection and
press the OK button.
5 Use the A/V (arrow) buttons to select Enable or Disable.
6 Press the OK button to submit.
Pairing
To use Apps, it is necessary to connect a compatible tablet or smart phone
and this TV to your home network, and carry out pairing (using a 4 or 8
digit password to authenticate the device).
Refer to the Apps manual for more details about pairing.
NOTE .:. PairingwithexternaldevicescannotbecarriedoutwhentheTVis
connectedtoanunencryptedwirelessLANaccesspoint.Activatethe
encryptionsettingsforthewirelessLANaccesspointbeforecarrying
outPairing.
•".. WhentheEnableControl is notsettoONinExternalControl
Setup,AppsfunctionsincludingPairingcannotbeused.
Downloaded from www.ManualsFile.com manuals search engine
Chapter10
Troubleshooting
Generaltroubleshooting
Before calling a service technician, review this chapter or visit the
Toshiba Technical Support Website at "support.toshiba.corn" for possible
causes/solutions for the problem you are experiencing.
Before you begin to troubleshoot any problem, first unplug the TV from
the AC watt outlet, wait approximately one minute, and then plug the
TV back into the AC wall outlet. If the problem still exists attempt to
troubleshoot the problem.
Black box on screen.
The closed caption feature is set to one of the Text modes (T1, T2, T3, or
T4). Set the closed caption feature to Off, see "Using closed captions" on
page 80.
TV stops responding to controls.
If the TV stops responding to the buttons on the remote control or TV
control panel and you cannot turn off the TM press and hold the POWER
button on the remote control or TV control panel for several seconds to
reset the TV. If the TV does not power off using this method, unplug the
TV from the AC wall outlet and plug it back in.
If you cause a static discharge when touching the TV and the TV fails to
function, simply unplug the TV from the AC outlet and plug it back in.
The TV should return to normal operation.
173
Downloaded from www.ManualsFile.com manuals search engine
174 Troubleshooting
Picture problem
Other problems.
If your TV's problem is not addressed in this Troubleshooting chapter or
the reconnnended solution has not worked, use the Reset Factory Defaults
procedure, see "Resetting to Factory Defaults" on page 100.
TV will not turn on.
Check the AC watt outlet by trying another device in the AC wall outlet.
Ensure the power cord is plugged in properly, and then press the POWER
button.
Replace the batteries in the remote control, see "Installing batteries" on
page 53.
Try the control panel buttons on the TV.
Pictureproblems
General picture problems.
Check the antenna/cable connections, see "Connecting Your TV" on page
28.
Press INPUT on the remote control or on the TV and select a valid video
input source, see "Selecting the video input to view" on page 79. If
you have no picture after selecting an Input source, check the device
connected to that input for proper operation. For device connection
details, see "Connecting Your TV" on page 28.
Antenna reception may be poor. Use a highly directional outdoor antenna
(if applicable).
The station may be having broadcast difficulties. Try another channel.
Adjust the picture quality, see "Using the advanced picture settings
features" on page 109.
If Edge Enhancer does not achieve a sharper picture, change the
Sharpness value to increase the sharpness level, see "Edge Enhancer" on
page 109.
Video Input Selection problems.
If the Input Selection window does not appear when you press INPUT
on the remote control or the TV control panel, press INPUT a second
time. The TV displays the next video input source and the Input Selection
screen.
Cannot view external signals.
If you cannot view signals from external devices connected to VIDEO 1,
VIDEO 2, ColorStream HD, HDMI 1, HDMI 2, HDMI 3, HDMI 4 or PC,
Downloaded from www.ManualsFile.com manuals search engine
Troubleshooting 1 7 5
Picture problem
ensure that the Input Lock is set to Off, see "Locking video inputs" on
page 88.
Poor display color or no color.
Check for proper hookup connections between your devices.
The station may be having broadcast difficulties. Try another channel.
Adjust the Tint and/or Color, see "ColorMaster TM''on page 112.
Poor composite picture.
If the TV is connected to an external A/V device (e.g. DVD player, video
game system, set-top box, etc.) try using a ColorStream or HDMr _'video
connection instead.
Picture and sound are out of sync.
As with all products that contain a digital display, this may occur in
rare instances, when viewing certain content (e.g. television broadcasts,
video games, DVDs). The cause may include, without limitation, video
processing within the TV, video processing in an attached gaming system,
and video processing or different compression rates used by broadcasters
in their programnaing.
Try the following:
•1. If the TV is connected to an A/V receiver that has a progrannnabte
audio delay feature, use this feature to help syncl_onize the sound
to the picture.
.t. If the proNem occurs only on certain TV channels, inform your
local broadcast, cable, or satellite provider.
•1. Turn off and unplug the TV from the AC wall outlet for a few
seconds and plug it back in.
Downloaded from www.ManualsFile.com manuals search engine
176 Troubleshooting
Soundproblem
Soundproblems
Check the antenna/cable connections, see "Connecting a digital audio
system" on page 38.
The station may be having broadcast difficulties. Try another channel.
The sound may be muted. Press the VOL (+ -) buttons or MUTE button.
If you are connected to a computer using either the PC IN terminal or
an HDMr _ terminal, make sure that the Rear Shared Audio setting is
properly set, see "Connecting a digital audio system" on page 38.
Remotecontrolproblems
Remove all obstructions between the remote control and the TV.
Replace the remote control's batteries, see "Installing batteries" on page
53.
Your TV's remote control may not operate certain features on your
external device. Refer to the owner's manual for your other device to
determine its available features. If your TV remote control does not
operate a specific feature on another device, use the remote control that
came with the device, see "Learning about the remote control" on page
56.
If the TV still does not act as expected, perform the Reset Factory
Defaults procedure, see "Resetting to Factory Defaults" on page 100.
Channeltuningproblems
Ensure that the remote control is set to the correct device mode, see
"Learning about the remote control" on page 56.
The Auto Tuning feature may have erased the channel from memory. To
add the channel to the channel memory, see "Manual Tuning" on page
75.
The Lock feature may have blocked the channel. To unbtock the channel,
see "Unlocking programs" on page 87.
If you cannot tune digital channels, check the antenna configuration, see
"Initial setup" on page 58. If the problem persists, clear all channels
from the channel list and reprogram channels into memory, see "Storing
channels in memory (optional)" on page 74. For additional information,
see "TV stops responding to controls." on page 173. If the problem
persists, use the Reset Factory Defaults procedure, see "Resetting to
Factory Defaults" on page 100.
Downloaded from www.ManualsFile.com manuals search engine
Troubleshooting 177
_?osed caption problem
Closedcaptionproblems
If the program or video you have selected is not closed captioned, no
captions appear on the screen.
If text is not available, a black rectangle may appear. If this happens, turn
offthe closed caption feature, see "Using closed captions" on page 80.
A closed caption signal may not display correctly under the following
circumstances:
o**oThe recording is dubbed
•:, The signal reception is weak
•:* The signal reception is nonstandard
For additional information, see "Using closed captions" on page 80.
Ratingblocking(V-Chip)problems
Forgotten PIN code.
When the PIN code screen appears, press the INFO button 4 times within
approximately 5 seconds. The old PIN code is cleared, see "Forgotten
PIN code" on page 83.
The V-Chip feature is available for U.S. V-Chip systems only, see "Using
parental controls" on page 84.
HDMI®CECControloperation
HDMI _ CEC Control feature is available for Toshiba HDMI _ CEC
compatible devices.
HDMF cables.
Ensure that HDMI _ cables with the (I-I_rrl|) Logo are used.
The HDMF CEC operation is not working correctly.
When the connected HDMr _'CEC device does not work correctly after
you have changed the device's settings, turn offthe TV and unplug the
power cord. After approximately one minute, plug the power cord in and
turn on the TV. You may also try using a different HDMr _'cable.
If several devices are connected, the HDMI _ CEC Control feature may
not operate properly. Maize sure the CEC function is set to On in the TV
settings and that the controlling device(s) support CEC.
Read the instruction manual of the connected HDMr _'CEC device.
Downloaded from www.ManualsFile.com manuals search engine
178 Troubleshooting
HDMF problem
HDMI®problems
HDMI _ cables.
Ensure that HDMI :_cables with the (Hi:3rrl|) Logo are used, see
"Connecting an HDMI _ device" on page 39.
Networkproblems
Cannot connect to the Internet.
Check the modem and its incoming cable/telephone connections, see
"Connecting to a home network" on page 47.
Confirm your modem's operation.
Ensure that your IP address is set up correctly, see "IP Address Setup" on
page 131.
No network connection.
If using a wired network connection, check to ensure that the LAN cables
are connected properly, see "Connecting the TV to a home network with
an Internet connection - wired" on page 49.
Ensure that the modem and router power cords are plugged in and the
devices are operating properly.
Ensure that your IP address is set up correctly, see "IP Address Setup" on
page 131.
Check to ensure proper operation of other network connected devices.
Network Setup fails (Auto).
Check to ensure that the LAN cables are connected properly, see
"Connecting the TV to a home network with an Internet connection -
wired" on page 49.
DHCP is not enabled on the router, or no router is present. Refer to your
router's documentation for instructions on enabling DHCP. If your router
does not support DHCR you nmst manually set up the IP address.
Internet service is not available. Check your cabte/DSL modem or contact
your ISP for Internet service issues.
Network Setup fails (Manual).
Ensure that the TV IP address is not the same as any other device on the
network.
o_, Example: IP address 192.168.0.100 and IP address 192.168.0.101
are different addresses on the same network.
Make sure the TV IP address is on the same subnet as the networked
computer.
Downloaded from www.ManualsFile.com manuals search engine
Troubleshooting 1 7 9
Network problem
Example of proper setup: The computer has the IP address
192.168.0.100 with the Subnet mask 255.255.255.0, the TV has the
IP address 192.168.0.101 with the Subnet mask 255.255.255.0; both
are on the same subnet.
Example of improper setup: The computer has the IP address
192.168.1.100 with the Subnet mask 255.255.255.0, the TV has the
IP address 192.168.0.10l with the Subnet mask 255.255.253.0; they
are on different subnets.
Unstable network connection.
When using a wired home network connection, unplug the LAN cables,
and then reconnect them.
When using a wireless home network connection:
o*,oReboot the router:
1 Remove AC power from the router and the television for
approximately one minute.
2 Reconnect AC power to the router.
3 Reconnect AC power to the television and turn it On.
4 After approximately two minutes, check connection stability.
o*,oConnect with LAN cables, if possible, and check connection
stability.
o:* Repeat the wireless network setup procedure and check connection
stability.
The media server name is not displayed.
The LAN cables, if used, are not connected properly, see "Connecting the
TV to a home network with an Internet connection - wired" on page 49.
The WLAN, if used, is not configured properly.
The network setup on the Server is incorrect. Make sure both the media
server and TV are using the same network type (DHCP/manuat) and have
compatible network settings.
Too many devices are connected. You cannot connect more than 32
sharing devices at one time.
The media server is not turned On.
The "server" is not a media server device.
Check the firewall and streaming settings on the media server.
Downloaded from www.ManualsFile.com manuals search engine
1 80 Troubleshooting
Wireless ne_work problem
Wirelessnetworkproblems
Check that the router/AP (Access point) power is On.
After starting wireless network setup, confirm that the network is
configured properly by performing the network colmection test, see
"Network Connection Test" on page 134.
Check the router/AP's connection status.
If the router/AP does not support Wi-Fi Protected Setup, Easy Setup (PBC)
will not work even if the push-button is pressed, see "Wireless Setup" on
page 126.
If the available router/AP list is not displayed in Easy Setup (PIN) or
Assisted Setup, the power of the router/AP may be Off. Check that it is
On, and then try restarting the scan for available routers/APs, see "Easy
Setup using PIN (Personal Identification Number)" on page 127.
Refer to the router/AP's instruction manual.
IVlediaShareproblems
Ensure that the devices (TV and Server) are connected correctly.
Incorrect functionality may occur when using a USB HUB colmection.
Photo flies that were processed and edited using the computer's
application software may not be viewabte.
When viewing content that supports two or more formats the TV may
select one format automatically.
Copyright protected content stored on the media server may not be
playable on the TV.
Content playback stability may be affected by heavy network traffic.
Content originally recorded on a computer may not play correctly.
Set the media sharing of the media server to the correct settings,
according to the media server instruction manual.
Confirm that the contents of either the media server or the USB storage
device are in formats that are supported by this TV, see "MediaShare
specifications" on page 151.
Depending on the media servec access may be limited by the MAC
address. Set the server according to the media server's instruction manual.
This TV's MAC Address can be confirmed in the Network Setup portion
of the User Menu, see "MAC Address" on page 133.
Downloaded from www.ManualsFile.com manuals search engine
Troubleshooting 1 81
gToud Portal
For Connected MediaShare
Depending on the media server, it may take time to display the list.
Media Renderer
Depending on the state of this TV, the Media Controller may not be able
to control a Media Renderer playback.
If Media Renderer playback starts regardless of the user's intention, set
Media Renderer to Off.
CloudPortal
Cloud Portal Freezes on the TV screen.
Power off or unplug the Television to reset the TV and turn the TV back
on. Then try the Cloud Portal again
Pause or delay while navigating Cloud Portal features and apps.
Check the Internet connection to the Cloud Portal for speed and stability
LightIndicator
The Power light on the front of the TV indicates the TV's status, as
described below.
PowerOn/Standbylight
Green:
*:o The TV is On and operating properly.
Red:
°;* The power is in Standby.
No Light:
.:. The power is Off.
Iftheproblempersistsaftertryingthesolutions
In the U.S., visit Toshiba Customer Support Center on the web at
"support.toshiba.corn".
Downloaded from www.ManualsFile.com manuals search engine
AppendixA
Specifications
NOTE o:.Thismodelcomplieswiththespecificationslistedbelow
•:. Designsandspecificationsaresubjecttochangewithoutnotice
•:. Thismodelmaynotbecompatiblewithfeaturesand/orspecifications
thatmaybeaddedinthefuture
Televisionsystem
NTSC standard
ATSC standard 8VSB
Digital Cable 64 QAM, 256 QAM; in-the-clear, unencrypted
Channelcoverage
VHF 2 through 13
UHF 14 through 69
Mid band (A-8 through A-l, A through I)
Cable TV Super band (J through W)
Hyper band (AA through ZZ, AAA, BBB)
Ultra band (65 through 94, 100 through 135)
182
Downloaded from www.ManualsFile.com manuals search engine

S,,eo,,,oa,,o.. 183
Powcr sollrce
Powersource
120 VAC, 60 Hz
Powerconsumption
65L9400U 3.6 A (maximun_ current)
0.3 W in Standby mode (No Network)
58L8400U 1.9 A (maximun_ current)
0.3 W in Standby mode (No Network)
Audiopower
12.5 W+ 12.5 W
12.5 W+ 12.5 W
Speakertype
65L9400U
58L8400U
12/11 inch (3 cm) x 3 7/9 inch (9.6 cm) x 2 pcs
]
2/11 inch (3 cm) x 3 7/9 inch (9.6 cm) x 2 pcs
Video/audioterminals
Video/audio input
1! V (p-p), 75 ohm, negative NTSC.
sync,
ColorStreamTM (componentvideo) HD input
Y: 1V (p-p), 75 olm_
PR: 0.7V (p-p), 75 ohm
Video PB: 0.7V (p-p), 75 ohm
Suggested formats: 1080p (60Hz), 1080i (60Hz), 720p
(60Hz), 480p, 480i
200 mV (m_s) 22 k olnn or greater
Audio
HDMI®input
HDMI _ compliant Lip Sync, ARC (HDMI IN 2)
HDCP compliant Revision 1.4 (HDMI IN 2 to 4)
Revision 2.2 (HDMI IN 1)
Suggested formats See table on page 186
HDMI _Audio Dolby _'Digital, DTS '_and 2-channel Linear-PCM;
32/44.1/48 kHz sampling frequency; 16/20/24 bits per
sample
Downloaded from www.ManualsFile.com manuals search engine
1 84 Specifications
Wireless connection
Digitalaudiooutput
Optical type
PCinput
15-Pin D-sub Analog RGB
Wirelessconnection
Standard IEEE 802.11 a/b/g/n/
5.15-5.35 GHz, 5.4%5.725 GHz, 5.725-5.850 GHz,
Frequency Range 2.400-2.473 GHz
Security WPA2, mixed mode WPA2/WPA, WER open
Ethernet
IEEE 802.3.
USB
Universal Serial Bus Specification, Revision 1.1.
Universal Serial Bus Specification, Revision 2.0.
Dimensionswithtablestand
65L9400U
58L8400U
Width 57.5" (1461 nm_)
Height 35.3" (896 nm_)
Depth 12.0" (304 ram)
Width 51.4" (1306 nm_)
Height 31.8" (808 1ran)
Depth 12.7" (323 mm)
Weight(mass)withstand
65L9400U 58.5 lbs (26.5 kg)
58L8400U 57.1 lbs (25.9 kg)
Operatingconditions
Temperature 32° - 95° F (0° - 35°C)
Humidity 20 - 80% (no moisture condensation)
Downloaded from www.ManualsFile.com manuals search engine
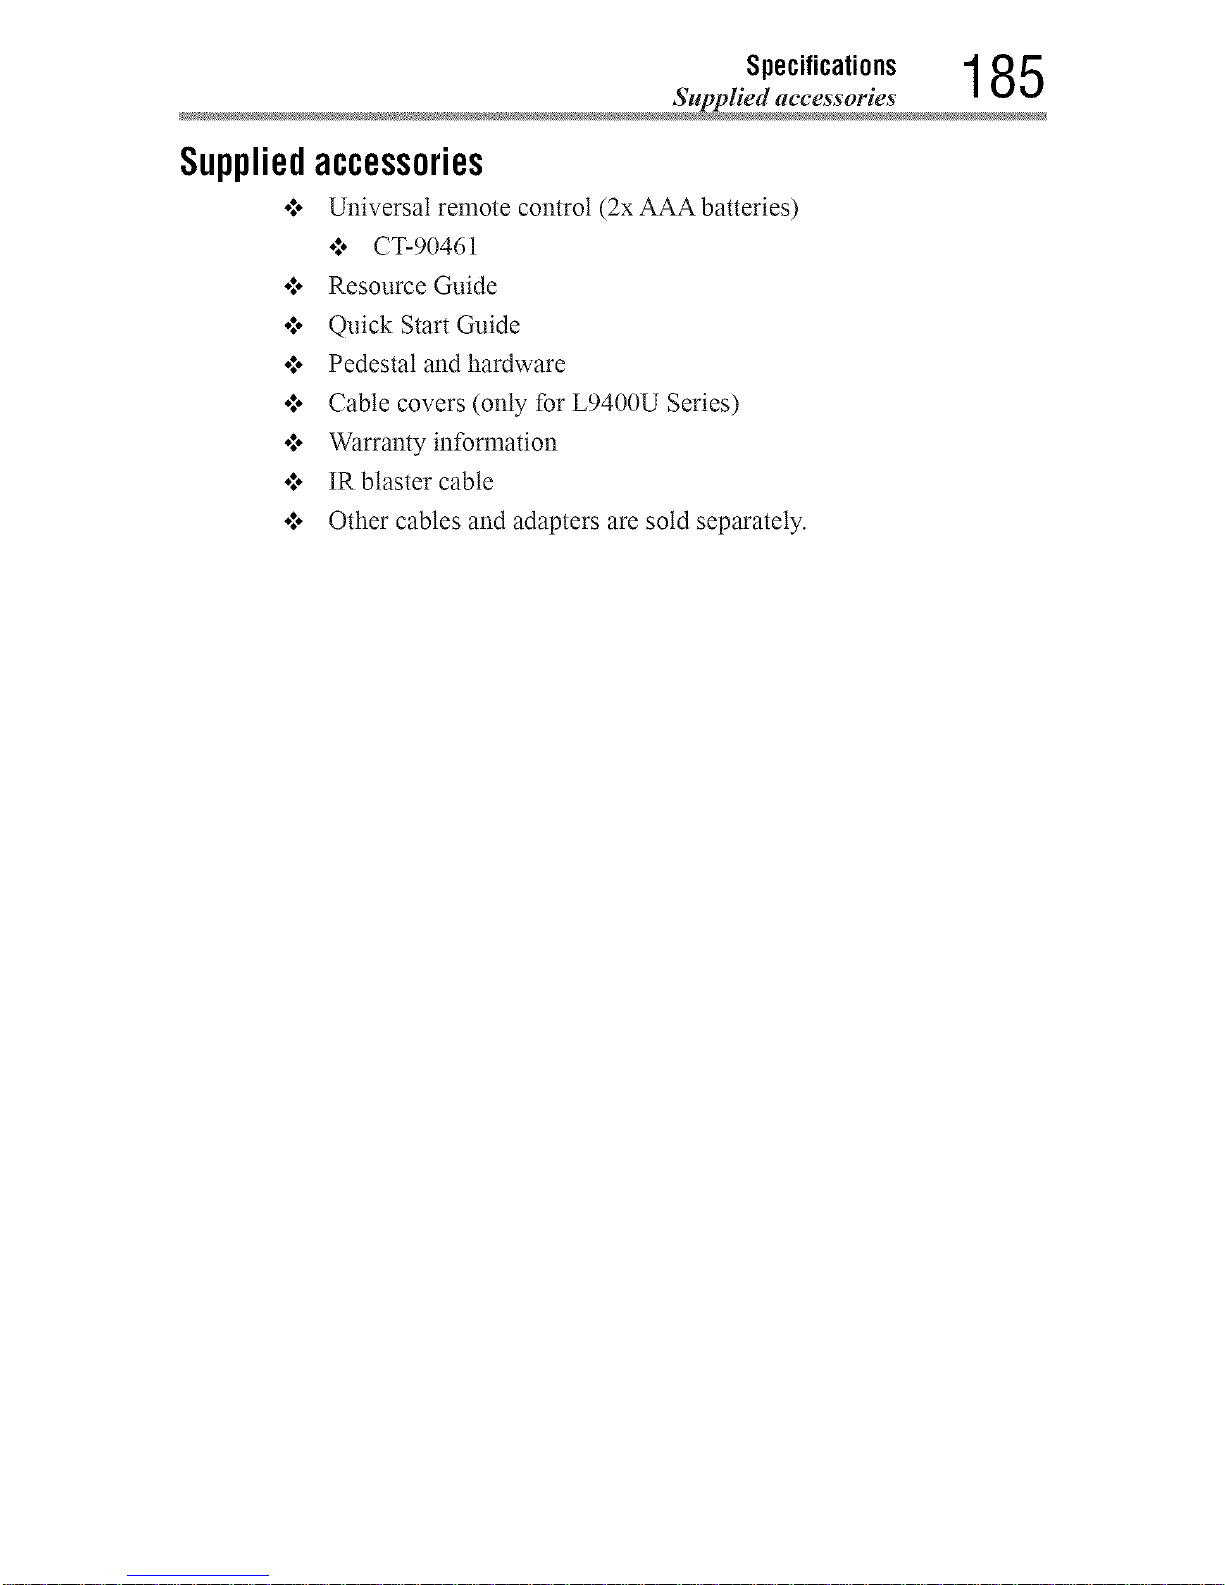
Specifications 1 85
Supplied accessorie
Suppliedaccessories
•:o Universal remote control (2x AAA batteries)
o:o CT-90461
o:o Resource Guide
o:o Quick Start Guide
o:o Pedestal and hardware
o:o Cable covers (only for L9400U Series)
o:o Warranty information
o:o IR blaster cable
o:o Other cables and adapters are sold separately.
Downloaded from www.ManualsFile.com manuals search engine
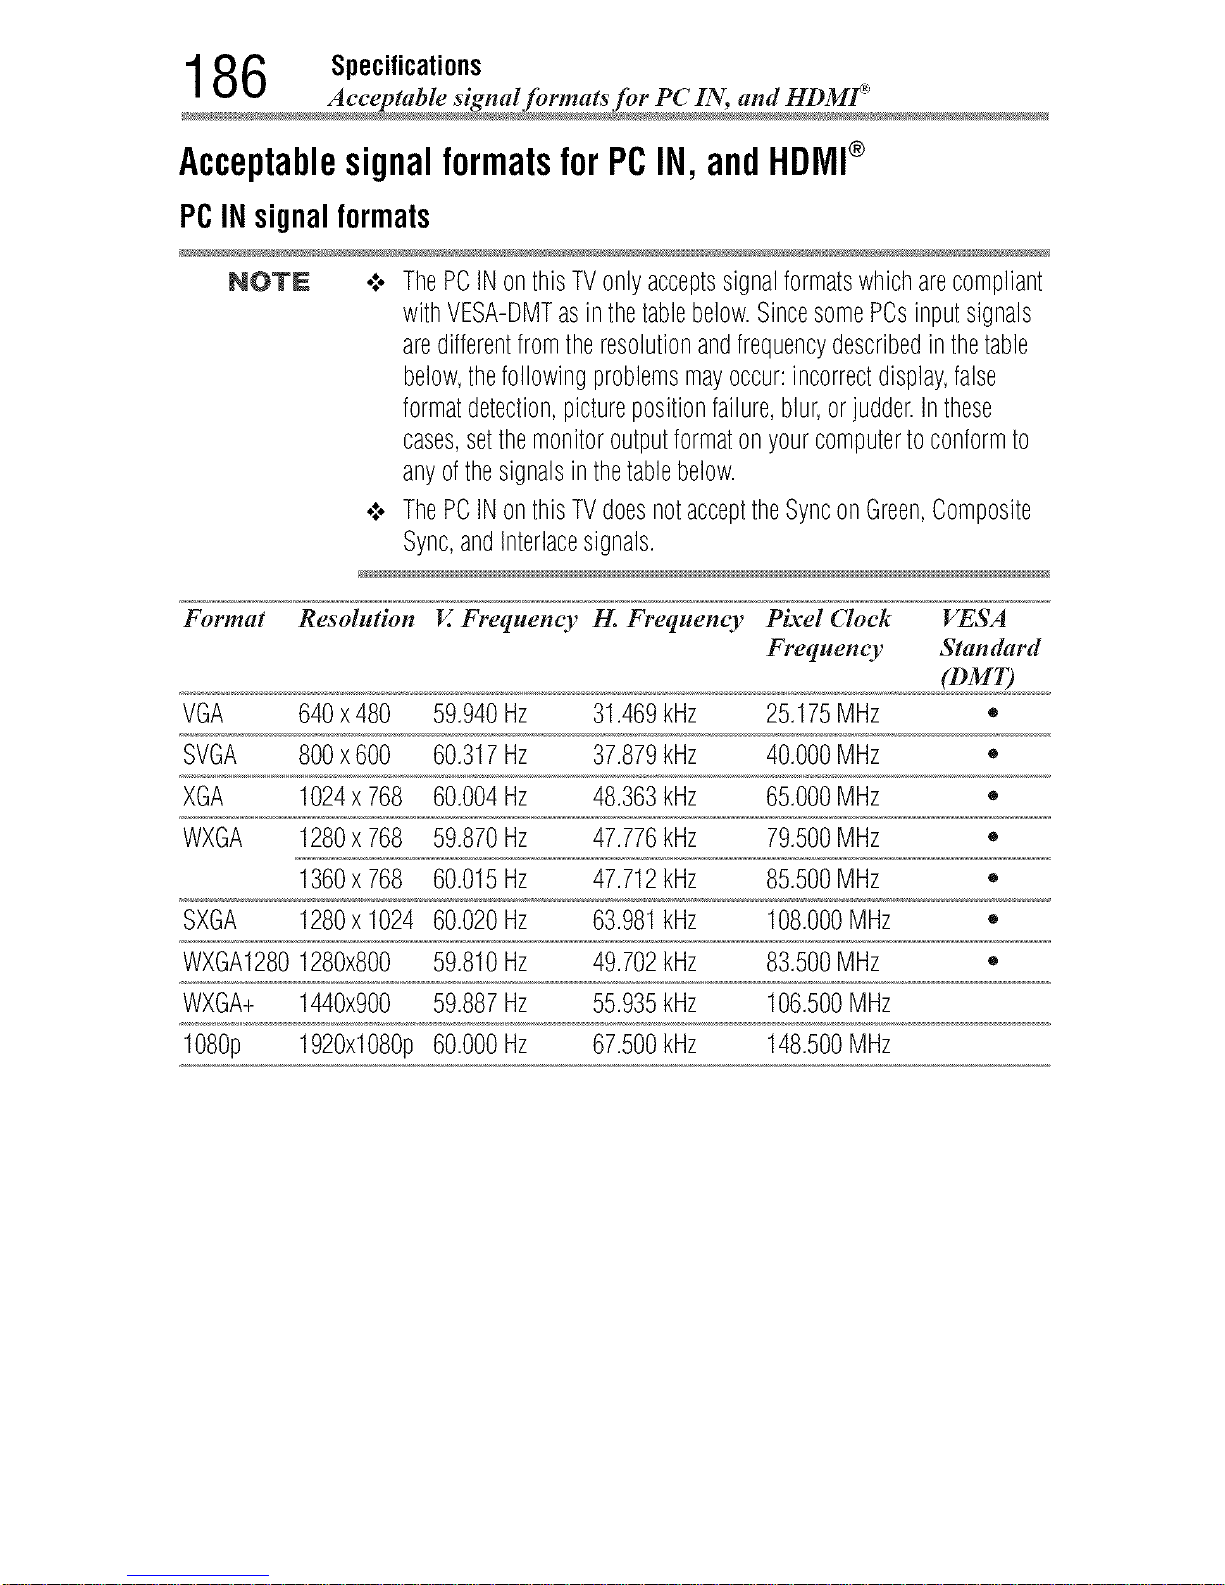
1 86 Specifications
Acceptable signal formats for PC IN, and HD
AcceptablesignalformatsforPCIN,andHDMI®
PCIN signal formats
NOTE .:. ThePCINonthisTVonlyacceptssignalformatswhicharecompliant
withVESA-DMTasin thetablebelow.SincesomePCsinputsignals
aredifferentfromtheresolutionandfrequencydescribedin thetable
below,thefollowingproblemsmayoccur:incorrectdisplay,false
formatdetection,picturepositionfailure,blur,orjudder.Inthese
cases,setthemonitoroutputformaton yourcomputertoconformto
anyofthesignalsinthetablebelow.
•:. ThePCINonthisTVdoesnotaccepttheSynconGreen,Composite
Sync,andInterlacesignals.
Format Resolution V_Frequent T I-L Frequent T Pixel (7oek VESA
Frequent T Standard
(DMT)
VGA 640x480 59.940Hz 31.469kHz 25.175MHz •
SVGA 800x600 60.317Hz 37.879kHz 40.000MHz •
XGA 1024x 768 60.004Hz 48.363kHz 65.000MHz •
WXGA 1280x 768 59.870Hz 47.776kHz 79.500MHz •
1360x 768 60.015Hz 47.712kHz 85.500MHz •
SXGA 1280x 1024 60.020Hz 63.981kHz 108.000MHz •
WXGA12801280x800 59.810Hz 49.702kHz 83.500MHz •
WXGA+ 1440x900 59.887Hz 55.935kHz 106.500MHz
1080p 1920x1080p60.000Hz 67.500kHz 148.500MHz
Downloaded from www.ManualsFile.com manuals search engine
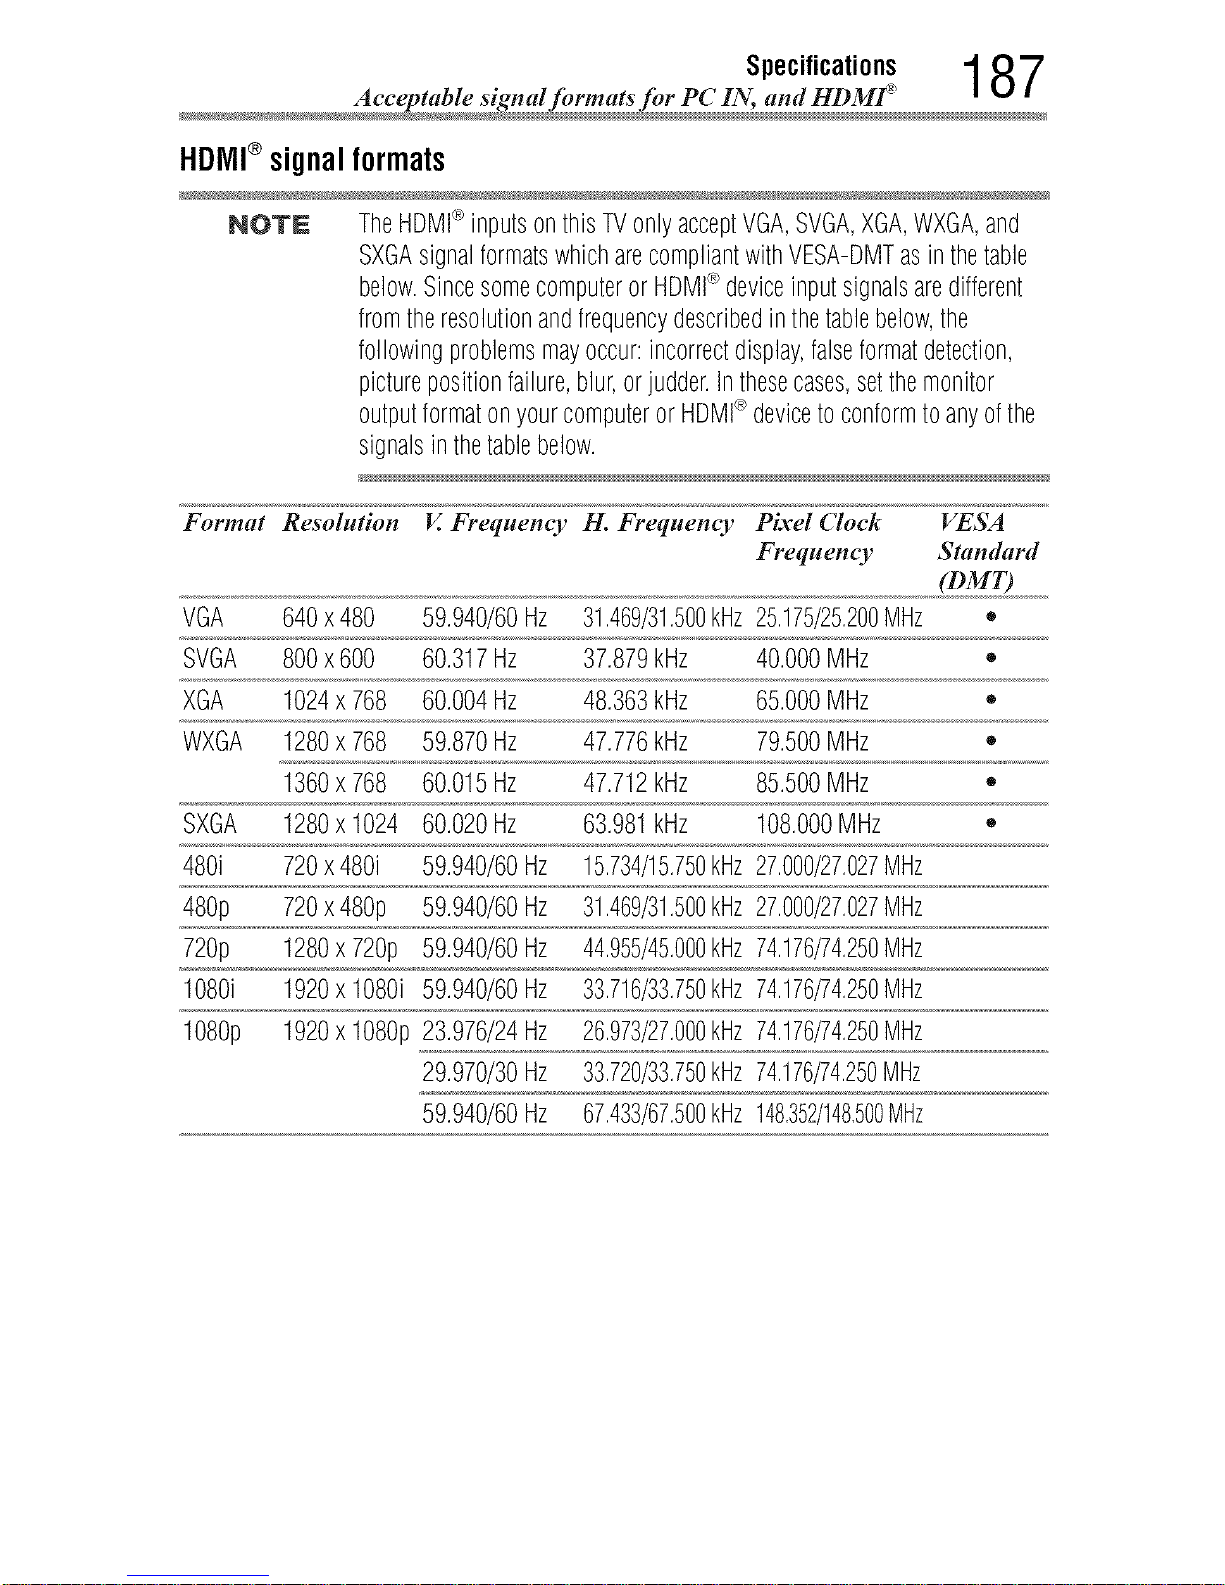
Specifications 1 8 7
Acceptable signal formats for PC IN, and HD
HDIVll®signal formats
NOTE TheHDMI®inputsonthisTVonlyacceptVGA,SVGA,XGA,WXGA,and
SXGAsignalformatswhicharecompliantwithVESA-DMTasin thetable
below.Sincesomecomputeror HDMI_>deviceinputsignalsaredifferent
fromtheresolutionandfrequencydescribedinthetablebelow,the
followingproblemsmayoccur:incorrectdisplay,falseformatdetection,
picturepositionfailure,blur,orjudder.Inthesecases,setthemonitor
outputformatonyourcomputeror HDMI_>devicetoconformtoanyofthe
signalsinthetablebelow.
Format Resolution V. Frequency H. Frequency Pixel (7oek VESA
Frequent T Standard
(DMT)
VGA 640x480 59.940/60Hz 31.469/31.500kHz25.175/25.200MHz •
SVGA 800x600 60.317Hz 37.879kHz 40.000MHz •
XGA 1024x 768 60.004Hz 48.363kHz 65.000MHz •
WXGA 1280x 768 59.870Hz 47.776kHz 79.500MHz •
1360x 768 60.015Hz 47.712kHz 85.500MHz ,,
SXGA 1280x 1024 60.020Hz 63.981kHz 108.000MHz •
480i 720x480i 59.940/60Hz 15.734/15.750kHz27.000/27.027MHz
480p 720x480p 59.940/60Hz 31.469/31.500kmz27.000/27.027MHz
720p 1280x720p 59.940/60Hz 44.955/45.000kmz74.176/74.250Mmz
1080i 1920x 1080i 59.940/60Hz 33.716/33.750kHz74.176/74.250MHz
1080p 1920x 1080p23.976/24Hz 26.973/27.000kHz74.176/74.250MHz
29.970/30Hz 33.720/33.750kHz74.176/74.250Mmz
59.940/60Hz 67.433/67.500kmz148,352/148,500MHz
Downloaded from www.ManualsFile.com manuals search engine
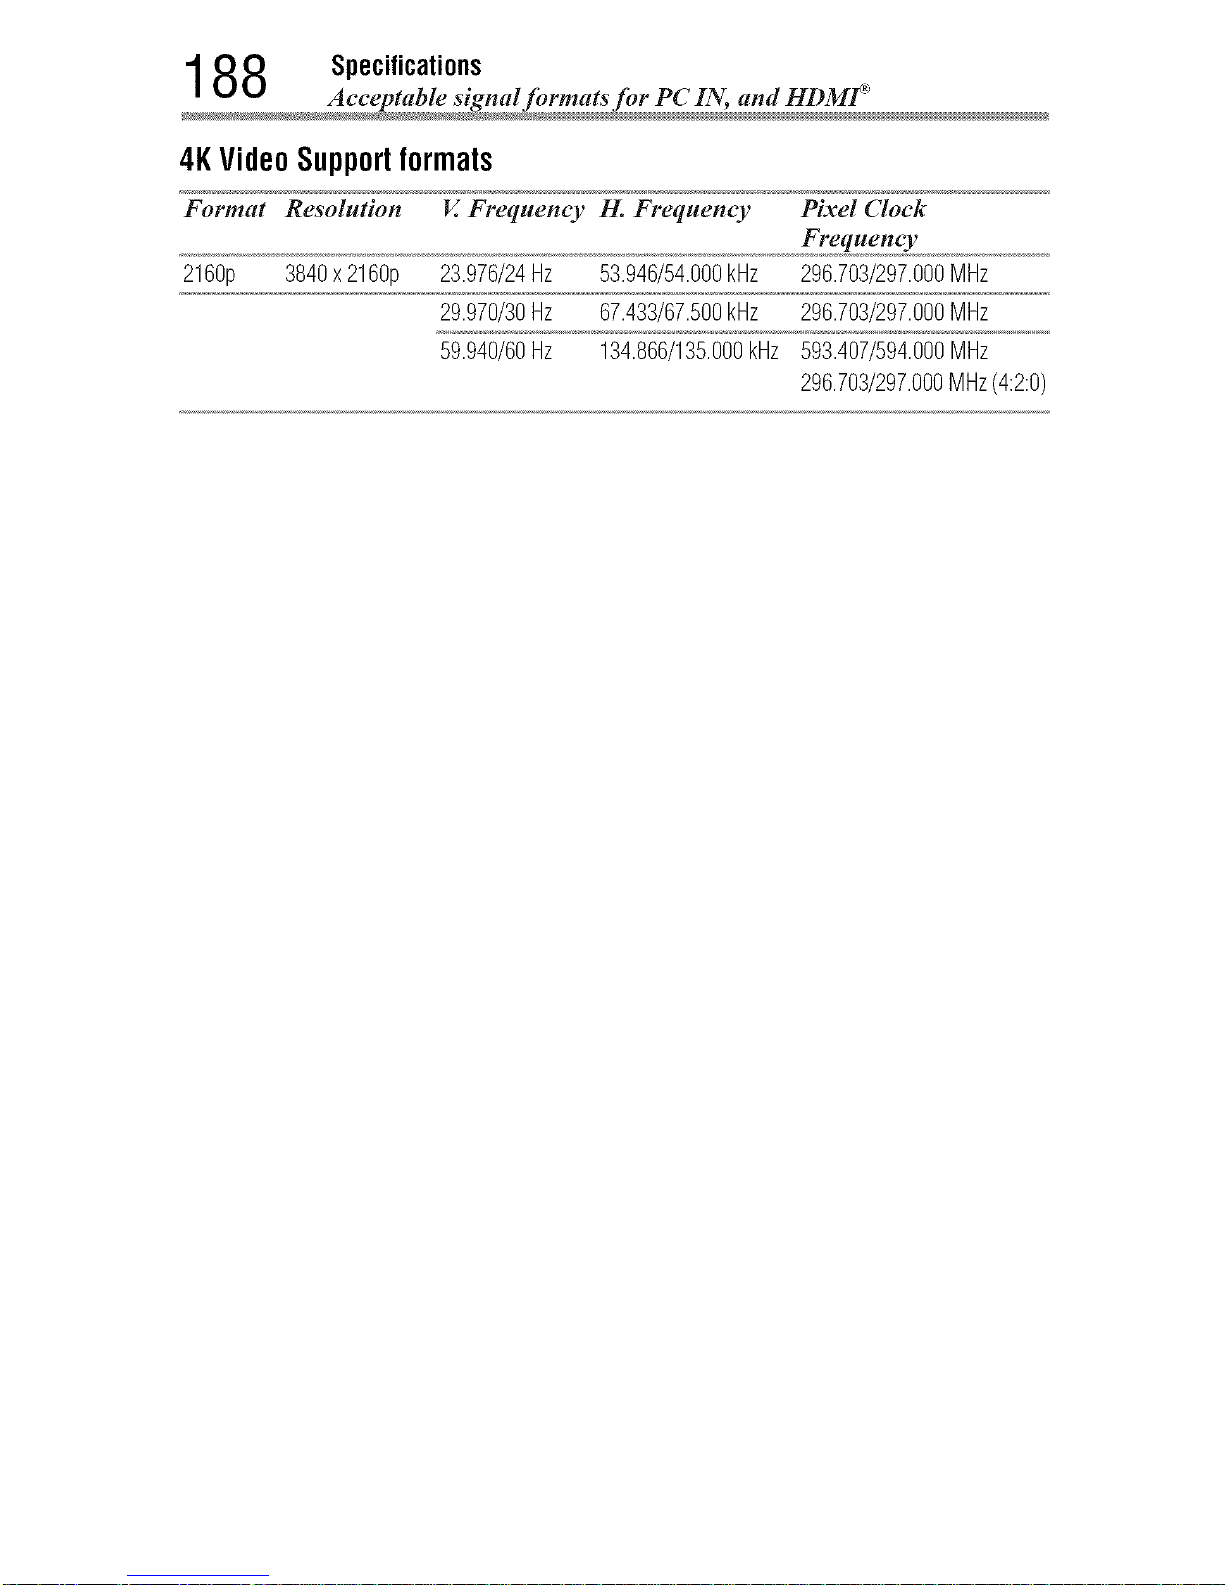
1 88 Specifications
Acceptable signal formats for PC IN, and HD
4K Video Supportformats
Format Resolution V. Frequency H. Frequency
2160p 3840x 2160p 23.976/24Hz 53.946/54.000kHz
29.970/30Hz 67.433/67.500kHz
59.940/60Hz 134.866/135.000kHz
Pixel (7oek
Frequency
296.703/297.000MHz
296.703/297.000MHz
593.407/594.000Mmz
296.703/297.000MHz(4:2:0)
Downloaded from www.ManualsFile.com manuals search engine
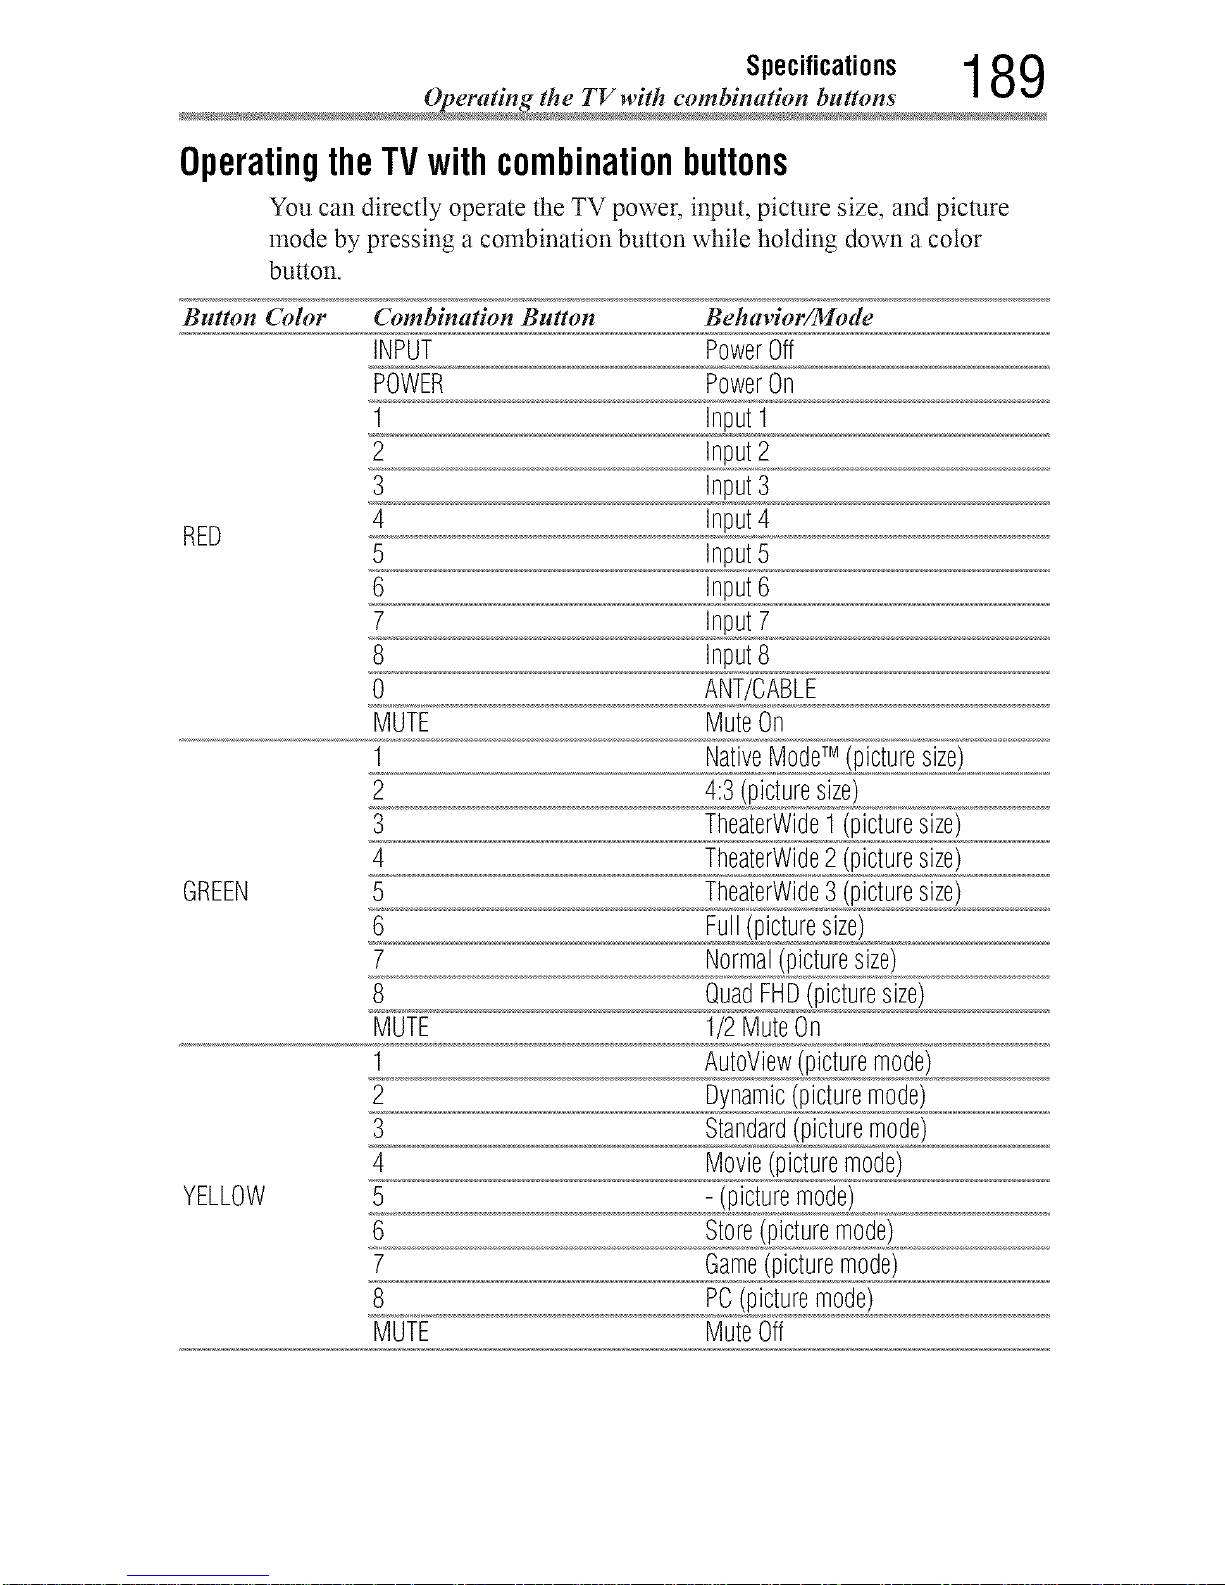
189
OperatingtheTVwithcombinationbuttons
You can directty operate the TV power, input, picture size, and picture
mode by pressing a combination button while holding down a color
button.
Button Color Combination Button Behavior/Mode
INPUT PowerOff
POWER PowerOn
1 InputI
2 Input2
3 Input3
4 Input4
RED
5 Input5
6 Input6
7 Input7
8 input8
0 ANT/CABLE
MUTE MuteOn
1 NativeModeTM (picturesize)
2 4:3(picturesize)
3 TheaterWideI (picturesize)
4 TheaterWide2 (picturesize)
GREEN 5 TheaterWide3 (picturesize)
6 Full(picturesize)
7 Normal(picturesize)
8 QuadFHD(picturesize)
MUTE 1/2MuteOn
1 AutoView(picturemode)
2 Dynamic(picturemode)
3 Standard(picturemode)
4 Movie(picturemode)
YELLOW 5 - (picturemode)
6 Store(picturemode)
7 Game(picturemode)
8 PC(picturemode)
MUTE MuteOff
Downloaded from www.ManualsFile.com manuals search engine
AppendixB
ExternalKeyboardLayout
o:, In order to enter French or Spanish characters, an external keyboard
nmst be used.
o*,oThe external keyboard nmst be purchased separately.
•:* For how to use the external keyboard, refer to the User's Guide
that comes with the keyboard.
Setting the keyboardlayout
Before entering French or Spanish characters, configure the following
setting on the TV:
1 Press the MENU button.
2 Select Options > External Keyboard Layout.
3 Press the OK button.
4 Press the &/Y (arrow) buttons to select U.S. International Layout
and press the OK button.
For how to enter characters, refer to the table below:
NO'rN Theinputcharactersmaybedifferentfromthetablebelowdependingon
thesituationyouareenteringcharacters.
190
Downloaded from www.ManualsFile.com manuals search engine
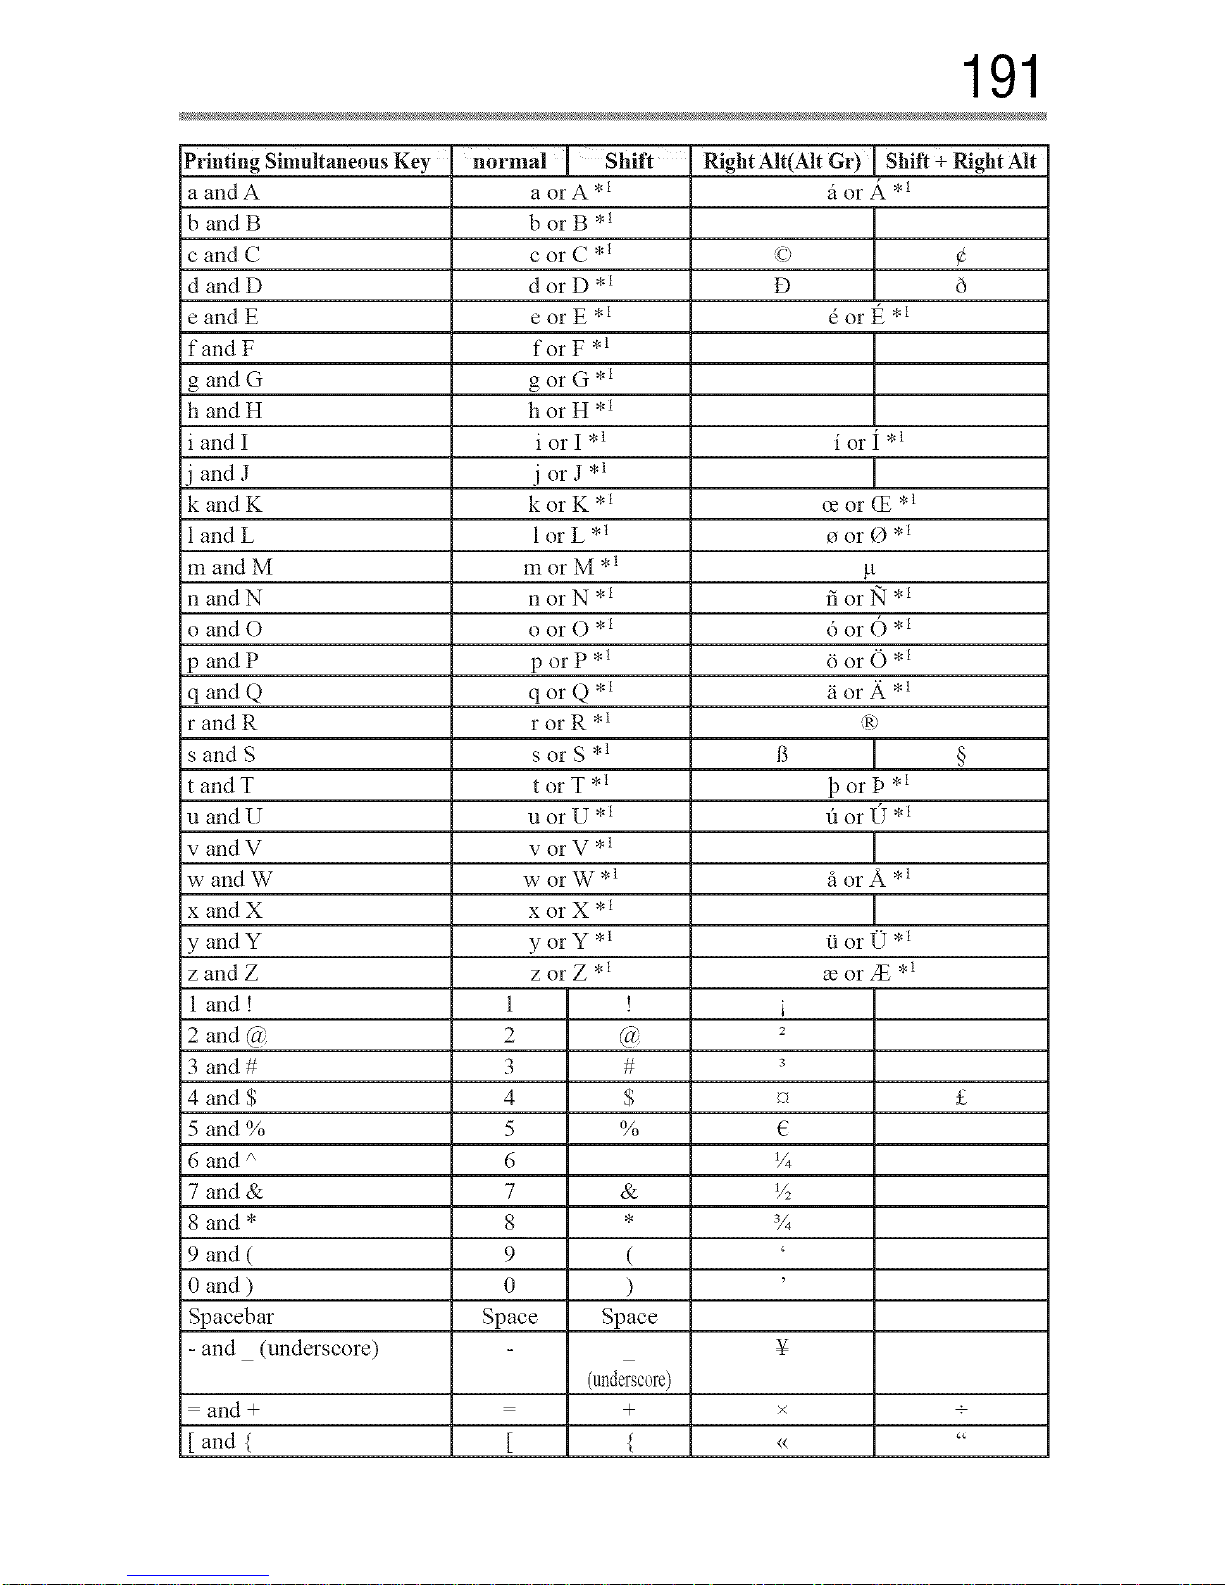
191
Printing Simultaneous Key normal ' Shift Right Alt(Alt Gr) Shift + Right Alt
a and A a or A *l it or A *
b and B b or B *_
c and C c or C *_ (c) ¢
d and D d or D *_ D
e and E e or E ,l 6 or t_ ,l
fand F for F ,1
g and G g or G *_
h and H h or H ,1
i and I i or I ,l i or I ,l
j and J j or J *l
kandK korK *_ ce or (£ .1
| and L | or L*l o or 0 ,l
m and M m or M * l !-t
nandN norN *l fiorlq *_
o and O o or O ,l 6 or () ,l
p and P p or P*l 6 or O*l
qand Q qorQ *_ _iorA *_
r and R r or R ,l dry'
s and S s or S ,l B §
tandT torT *_ 13orP *_
u and U u or U * l "dor (7 * l
v and V v or V * l
w and W w or W*l fi or A ,l
x and X x or X *l
yandY yorY *l Oor(T *l
zand Z zorZ *l morse ,1
I and ! 1 ! i
2 and @ 2 @ 2
3 and # 3 # 3
4 and $ 4 $ _ £
5 and % 5 % {2
6 and i, 6 1/4
7 and & 7 & V:
8 and * 8 * 3/4
9 and ( 9 ( '
0 and ) 0 ) '
Spacebar Space Space
- and (underscore) ¥
(underscore)
= and + = + × +
[ and { [ { << "
Downloaded from www.ManualsFile.com manuals search engine
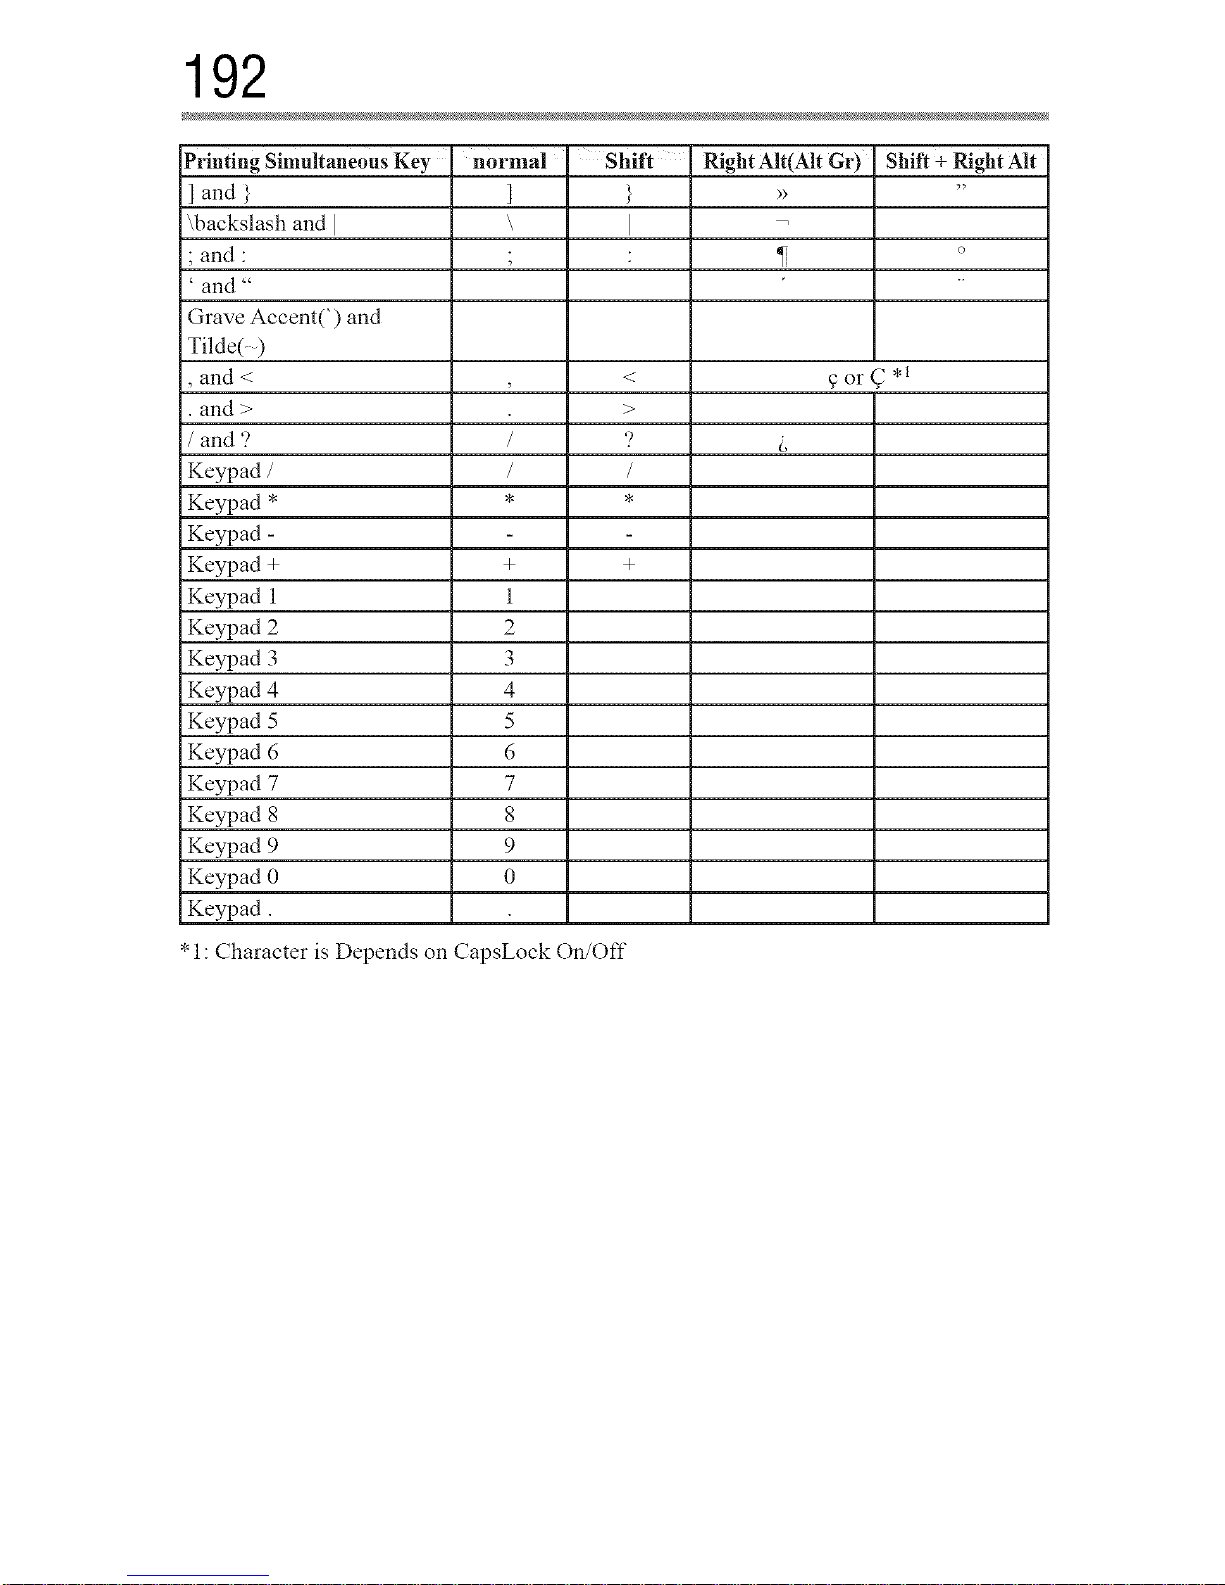
192
Printing Simultaneous Key
] and }
\backslash and I
•and "
' and "
Grave Accent(') and
Tilde(- )
, and < , <
•and > >
/ and ? / ')
Keypad / / /
Keypad * * *
Keypad -
Keypad + + +
Keypad 1 1
Keypad 2 2
Keypad 3 3
Keypad 4 4
Keypad 5 5
Keypad 6 6
Keypad 7 7
Keypad 8 8
Keypad 9 9
Keypad 0 0
Keypad.
• 1: Character is Depends on CapsLock On/Off
normal Shift
]
\ ]
Right Air(Air Gr)
Shift + Right Alt
o
9orC *_
Downloaded from www.ManualsFile.com manuals search engine
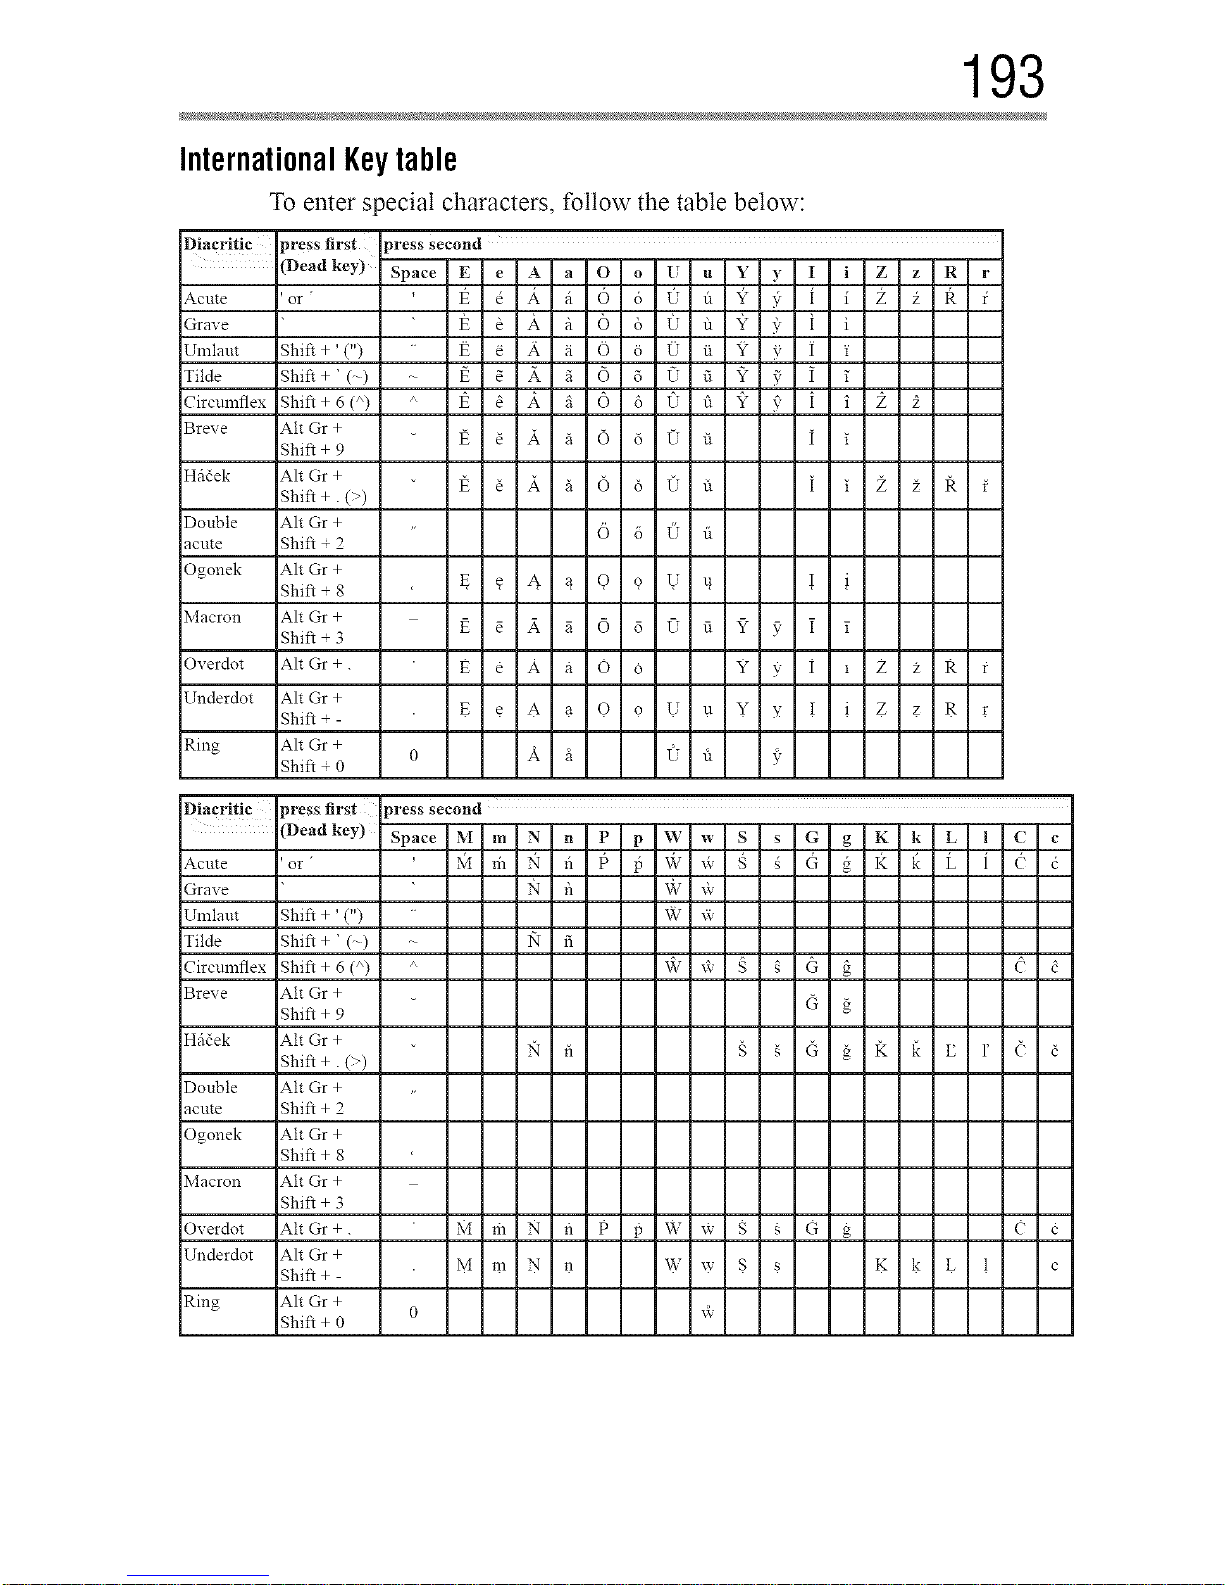
193
International Keytable
To enter special characters, follow the table below:
Diacritic press first press second
" (Deadkey) Space E e A a O o U , V-'2-J.L..L _-----_-R-L
Acute 'or " I_ _ A fi 6 6 (I d _7 }. I i Z i R f
Grave
Ulniaut Shift + '(")
Tilde Shift + ' (-)
Circulnflex Shift + 6 (/') a
Breve Alt Gr +
Shift + 9
Hfi_ek Alt Gr +
Shift +. (-)
Double Alt Gr +
acute Shift ÷ 2
Ogonek Alt Gr +
Shift ÷ 8
Macron Alt Gr +
Shift + 3
Overdot Alt Gr +.
Underdot Alt Gr +
Shift + -
Ring Alt Gr +
0
Shift + 0
_ i a 6 i, <; a ? 5 i i 2
e i a 6 c_ 0
g _ 4 _ 9 _ U u
E e A a O 6 Y 5_ i * £ z R
E. €.A.a.O. 9.U.u.Y >: ! . i .Z.z.g. r
k a <: f_ f
Diacriltic press first press second
(Deadkey) Space M m N n P p W w S s G g K k L l C c
Acute 'or '
Grave
Un]iaut Shift + ' (")
Tilde Shift + ' (-)
Circulnflex Shift + 6 (a)
Breve Alt Gr +
Shift + 9
Hfi{ek Alt Gr +
Shift +. (-)
Double Alt Gr +
acute Shift + 2
Ogonek Alt Gr +
Shift + 8
Macron Alt Gr +
Shift + 3
Overdot Alt Gr +.
Underdot Alt Gr +
Shift + -
Ring Alt Gr +
Shift + 0
6
M m N fl P p W x_- $ _ O g ¢ e
M.m.N. n W w $ _ K. k . L. i c
0 w
Downloaded from www.ManualsFile.com manuals search engine
Index
Numerics
4:3 stretch
using 107
A
advanced picture settings
Ambient Light Sensor 112
Base Color Adjusm_ent !12
CtearScan" 110
Color Temperature 1! 3
ColorMasteF M! 12
DNR Ill
DynaLigh( " 110
Dynamic Contrast 109
Edge Enhancer 109
MPEG NR 111
resetting to factory default 113
using 109
audio
adjusting balance 118
adjusting range 120
Dolby :_Digital Dynamic Range
Control 123
muting sound 116
optical audio output format 121
TruDialog _'_119
TruVolume T_"120
Auto Aspect
using 106
c
cables
analog RGB (15-pin) 30
coaxial (F-type) 28
component video (red/green/blue)
29
Dual-wand IR blaster cable 29
HDMI :_29
LAN 30
optical audio 30
overview of cables 28
standard A/V (red/white/yellow)
28
channels
auto tuning 74
channel return 78
labeling analog TV channels
77
labeling video inputs 77
locking specific channels 87
194
Downloaded from www.ManualsFile.com manuals search engine
,.,ex 195
manual tuning 75
next progranmaed channel 78
skipping 76
skipping video inputs 76
specific channel 78
storing in memory 74
closed captions
Analog CC mode 80
button 82
Digital CC settings 81
using 80
computer
adjusting image 94
to the TV's HDMI _ 46
using with the TV 94
connecting
a computer 44
audio system 38
cable TV 3!
camcorder 32
computer to TV's PC IN 44
DVD player with ColorStream"
32
HDMI _'audio system 42
HDMI _'device to HDMI _'input
39
IR devices 35
satellite receiver 31
to a computer (no Internet
connection) 47
to a home network 47
to a home network (no Internet
connection) 48
to a home network (wired Internet
connection) 49
to a home network (wireless
Internet connection) 51
TV's HDMI _'46
VCR 32
VCR and antenna 31
control other devices
HDMI_-CEC Control 41
control panel
lock 88
controlling other devices
TV remote 41
E
expert picture settings
RGB Filter ll4
setting 114
Test Pattern 114
White Balance 115
External Control Setup 167
F
Factory Defaults
reset 100
favorites
adding 150
browsing 149
features 20
Flip Bar
using 140
H
HDMI _'
viewing signal information 93
HDMI _'CEC
adjusting amplifier's audio 91
controlling playback devices
90
input source selection 91
other functions 92
HDMI _'CEC Control
using 89
HDMI _ settings feature
using 9!
home network
using 124
Downloaded from www.ManualsFile.com manuals search engine
I
icon
safety 19
IR Blaster Out terminal
using 35
IR Blaster setup 65
M
Media Renderer
device name setup 168
setup 168
MediaShare (Media Player)
basic operation 152
playing music files 161
specifications 151
viewing movie files 155
viewing photo files 163
N
network
advanced setup 131
connection test !34
DNS setup 132
quick setup 61
setup 126
wireless setup 126
Network Device Setup 167
no signal power down
set 97
0
overview
installation 22
setup 22
use 22
p
parental controls
blocking programsknovies by
rating (V-Chip) 84
using 84
picture
adjusting 107
adjusting quality 108
picture mode
selecting 107
picture size
4:3 103
4K Native 105
Full 103
Native Mode TM 102
Normal 105
Quad FHD 105
selecting 101
TheaterWide 1 104
TheaterWide 2 104
TheaterWide 3 104
PIN code
changing 83
deleting 83
entering new PIN code 82
forgotten 83
setting PIN code 82
power failure 100
program ratings
displaying 87
unlocking programs 87
Q
quick setup
channel tuning 63
country 61
IR Blaster 65
network 61
smart TV 63
store / home mode 61
time zone 61
R
rating system 85
downloading additional 84
Downloaded from www.ManualsFile.com manuals search engine
,.,ex 197
S
safety
icons 19
scrolling the picture 106
SmartTV
using 145
Netflix '_'146
software keyboard
using 135
software licenses
show 137
software upgrade
performing 137
specifications
acceptable signal formats 186
audio power 183
channel coverage 182
ColorStream TM HD input 183
Digital audio output 184
ethernet 184
HDMI ""input 183
HDMI _'signal formats 186
mass (weight) 184
operating conditions 184
PC IN signal formats 186
PC input 184
power consumption 183
power source 183
remote, combination buttons
189
speaker type 183
supplied accessories 185
TV system 182
USB 184
video/audio terminals 183
wireless connection 184
support information
show 99
l
time limit
set for games 88
timer
sleep timer 96
turn on TV 95
troubleshooting 173
channel tuning proNems 176
closed caption problems 177
contact Toshiba 181
HDMI :_178
HDMr _ CEC Control problems
177
light indicator 181
light indicator functions 18!
MediaShare (Media Player)
problems ! 80
network problems 178
picture problems 174
Rating blocking problems 177
remote control problems 176
sound problems 176
wireless network problems 180
TV connections
front 24
side 24
TV panel connections
back 27
TV panel controls
front 24
left side 24
side 24
TV remote
control other devices 53
effective range 55
functionality 56
install batteries 53
TV status information
show 99
Downloaded from www.ManualsFile.com manuals search engine