
M1H-ZP5-254D-1
USER MANUAL
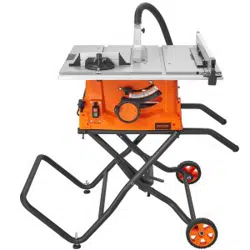
BENCH-TYPE CIRCULAR SAW


Have product questions? Need technical suppo? Please feel free to contact us:
CustomerSe[email protected]
NEED HELP? CONTACT US!
This is the original instruction, please read all manual instructions carefully before
operating. VEVOR resees a clear interpretation of our user manual. The appear-
ance of the product shall be subject to the product you received. Please forgive us
that we won't inform you again if there are any technology or software updates
on our product.
Bench-Type
Circular Saw
01
02
SAFETY INSTRUCTION
Warning - To reduce the risk of inju, user must read instructions
manual carefully .
Danger! Read all safety regulations and instructions.
Keep all safety regulations and instructions in a safe place for future use.
This product is of protection class II. That means it is equipped
with enhanced or double insulation.
The product complies with the applicable European directives and
an evaluation method of conformity for these directives was done.
Caution! Wear a breathing mask. Dust which is injurious to health
can be generated when working on wood and other materials.
Never use the device to work on any materials containing asbestos!
Caution! Wear ear-mus. The impact of noise can cause damage
to hearing
Caution! Wear safety goggles. Sparks generated during working or
splinters, chips and dust emitted by the device can cause loss of
sight.
This symbol, placed before a safety comment, indicates a kind of
precaution, warning, or danger. Ignoring this warning may lead to
an accident. To reduce the risk of inju, re, or electrocution,
please always follow the recommendation shown below.
Caution! Risk of inju! Do not reach into the running saw blade.

03
1) Work area safety
a) Keep work area clean and well-lit. Cluttere and dark areas invite accidents.
b) Do not operate power tools in explosive atmospheres, such as in the presence of
ammable liquids, gases or dust. Power tools create sparks that may ignite dust or
fumes.
c) Keep children and bystanders away while operating a power tool. Distractions can
cause you to lose control.
2) Electrical safety
a) Power tool plugs must match the outlet. Never modify the plug in any way. Do not
use any adapter plugs with eahed (grounded) power tools. Unmodied plugs and
matching outlets will reduce risk of electric shock.
b) Avoid body contact with eahed or grounded suaces such as pipes, radiators,
ranges and refrigerators. There is an increased risk of electric shock if your body is
eahed or grounded.
c) Do not expose power tools to rain or wet conditions. Water entering a power tool
will increase the risk of electric shock.
d) Do not abuse the cord. Never use the cord for caring, pulling or unplugging the
power tool. Keep cord away from heat, oil, sharp edges or moving pas. Damaged
or entangled cords increase the risk of electric shock.
e) When operating a power tool outdoors, use an extension cord suitable for
outdoor use. The use a cord suitable for outdoor use reduces the risk of
electric shock.
f) If operating a power tool in a damp location is unavoidable, use a residual current
device (RCD) protected supply. The use of an RCD reduces the risk of electric shock.
WARNING! Read all safety warnings instructions, illustrations and speci-
cations provided with this power tool. Failure to follow the warnings and instruc-
tions may result in electric shock, re and/or serious inju. The term "power tool" in
the warnings refers to your mains-operated (corded) power tool or batte-operated
(cordless) power tool.
Save all warnings and instructions for future reference.
GENERAL SAFETY REGULATIONS

04
3) Personal safety
a) Stay ale, watch what you are doing and use common sense when operating a
power tool. Do not use a power tool while you are tired or under the inuence of
drugs, alcohol or medication. A moment of inattention while operating power tools
may result in serious personal inju.
b) Use safety equipment. Always wear eye protection. Safety equipment such as
dust mask, non-skid safety shoes, hard hats, or hearing protection
used for appropriate conditions will reduce personal injuries.
c) Prevent unintentional staing. Ensure the switch is in the o-position before
connecting to power source and/or batte pack, picking up or caring the tool.
Caring power tools with your nger on the switch or energizing power tools that
have the switch on invites accidents.
d) Remove any adjusting key or wrench before turning the power tool on. A wrench
or a key left attached to a rotating pa of the power tool may result in personal
inju.
e) Do not overreach. Keep proper footing and balance at all times. This enables
better control of the power tool in unexpected situations.
f) Dress properly. Do not wear loose clothing or jewelle. Keep your hair, clothing
and gloves away from moving pas. Loose clothes, jewelle or long hair can be
caught in moving pas.
g) If devices are provided for the connection of dust extraction and collection
facilities, ensure these are connected and properly used. Use of these devices can
reduce dust-related hazards.
h) Do not let familiarity gained from frequent use of tools allow you to become
complacent and ignore tool safety principles. A careless action can
cause severe inju within a fraction of a second.
4) Power tool use and care
a) Do not force the power tool. Use the correct power tool for your application. The
correct power tool will do the job better and safer at the rate for which it was
designed.
b) Do not use the power tool if the switch does not turn on and o. Any power tool
that cannot be controlled with the switch is dangerous and must be repaired.
c) Disconnect the plug from the power source before making any adjustments,
changing accessories, or storing power tools. Such preventive safety measures
reduce the risk of staing the power tool accidentally.

05
ADDITIONAL SAFETY INSTRUCTIONS FOR TABLE SAWS
d) Store idle power tools out of the reach of children and do not allow persons
unfamiliar with the power tool or these instructions to operate the power tool.
Power tools are dangerous in the hands of untrained users.
e) Maintain power tools. Check for misalignment or binding of moving pas, break-
age of pas and any other condition that may aect the power tools operation. If
damaged, have the power tool repaired before use. Many accidents are caused by
poorly maintained power tools.
f) Keep cutting tools sharp and clean. Properly maintained cutting tools with sharp
cutting edges are less likely to bind and are easier to control.
g) Use the power tool, accessories and tool bits,etc., in accordance with these
instructions and in the manner intended for the paicular type of power tool, taking
into account the working conditions and the work to be peormed. Use of
the power tool for operations dierent from intended could result in a hazardous
situation. Slippe handles and grasping suaces do not allow for safe handling and
control of the tool in unexpected situations.
5) Seice
a) Have your power tool seiced by a qualied repair person using only identical
replacement pas. This will ensure that the safety of the power tool is maintained.
1) Guarding related warnings
a) Keep guards in place. Guards must be in working order and properly mounted. A
guard that is loose, damaged, or not functioning correctly must be repaired or
replaced.
b) Always use saw blade guard, riving knife and anti-kickback device for eve
through–cutting operation. For through-cutting operations where thesaw blade cuts
completely through the thickness of the workpiece, the guard and other safety
devices help reduce the risk of inju.

06
c) Immediately reattach the guarding system after completing an operation (such as
rabbeting, dadoing or resawing cuts) that requires the removal of the guard, riving
knife and/or anti-kickback device. The guard, riving knife, and anti-kickback device
help to reduce the risk of inju.
d) Make sure the saw blade is not contacting the guard, riving knife or the work-
piece before the switch is turned on. Inadveent contact of these items with the saw
blade could cause a hazardous condition.
e) Adjust the riving knife as described in this instruction manual. Incorrect spacing,
positioning and alignment can make the riving knife ineective in reducing the
likelihood of kickback.
f) For the riving knife and anti-kickback device to work, they must be engaged in the
workpiece. The riving knife and anti-kickback device are ineective when cutting
workpieces that are too sho to be engaged with the riving knife and anti-kickback
device. Under these conditions, a kickback cannot be prevented by the riving knife
and antikickback device.
g) Use the appropriate saw blade for the riving knife. For the riving knife to function
properly, the saw blade diameter must match the appropriate riving knife and the
body of the saw blade must be thinner than the thickness of the riving knife and the
cutting width of the saw blade must be wider than the thickness of the riving knife.
2) Cutting procedures warnings
a) DANGER: Never place your ngers or hands in the vicinity or in line with
the saw blade. A moment of inattention or a slip could direct your hand toward the
saw blade and result in serious personal inju.
b) Feed the workpiece into the saw blade or cutter only against the direction of
rotation. Feeding the workpiece in the same direction that the saw blade is rotating
above the table may result in the workpiece, and your hand, being pulled into the
saw blade.
c) Never use the mitre gauge to feed the workpiece when ripping and do not use the
rip fence as a length stop when cross cutting with the mitre gauge. Guiding the
workpiece with the rip fence and the mitre gauge at the same time increases the
likelihood of saw blade binding and kickback.
d) When ripping, always apply the workpiece feeding force between the fence and
the saw blade. Use a push stick when the distance between the fence and the saw
blade is less than 150 mm, and use a push block when this distance is less than 50
mm. “Work helping” devices will keep your hand at a safe distance from the saw
blade.

07
e) Use only the push stick provided by the manufacturer or constructed in accor-
dance with the instructions. This push stick provides sucient
distance for the hand from the saw blade.
f) Never use a damaged or cut push stick. A damaged push stick may break causing
your hand to slip into the saw blade.
g) Do not peorm any operation “freehand”. Always use either the rip fence or the
mitre gauge to position and guide the workpiece. “Freehand” means using your
hands to suppo or guide the workpiece, in lieu of a rip fence or mitre gauge.
Freehand sawing leads to misalignment, binding and kickback.
h) Never reach around or over a rotating saw blade. Reaching for a workpiece may
lead to accidental contact with the moving saw blade.
i) Provide auxilia workpiece suppo to the rear and/or sides of the saw table for
long and/or wide workpieces to keep them level. A long and/or wide workpiece has a
tendency to pivot on the table’s edge, causing loss of control, saw blade binding and
kickback.
j) Feed workpiece at an even pace. Do not bend or twist the workpiece. If jamming
occurs, turn the tool o immediately, unplug the tool then clear the jam. Jamming
the saw blade by the workpiece can cause kickback or stall the motor.
k) Do not remove pieces of cut-o material while the saw is running. The material
may become trapped between the fence or inside the saw blade guard and the saw
blade pulling your ngers into the saw blade. Turn the saw o and wait until the saw
blade stops before removing material.
l) Use an auxilia fence in contact with the tabletop when ripping workpieces less
than 2 mm thick. A thin workpiece may wedge under the rip
fence and create a kickback.
3) Kickback causes and related warnings
Kickback is a sudden reaction of the workpiece due to a pinched, jammed saw blade
or misaligned line of cut in the workpiece with respect to the saw blade or when a
pa of the workpiece binds between the saw blade and the rip fence or other xed
object.
Most frequently during kickback, the workpiece is lifted from the table by the rear
poion of the saw blade and is propelled toward the operator.
Kickback is the result of saw misuse and/or incorrect operating procedures or
conditions and can be avoided by taking proper precautions as given below.

08
a) Never stand directly in line with the saw blade. Always position your body on the
same side of the saw blade as the fence. Kickback may propel the workpiece at high
velocity toward anyone standing in front and in line with the saw blade.
b) Never reach over or in the back of the saw blade to pull or suppo the workpiece.
Accidental contact with the saw blade may occur or kickback may drag your ngers
into the saw blade.
c) Never hold and press the workpiece that is being cut o against the rotating saw
blade. Pressing the workpiece being cut o against the saw blade will create a
binding condition and kickback.
d) Align the fence to be parallel with the saw blade. A misaligned fence will pinch the
workpiece against the saw blade and create kickback.
e) Use a feather board to guide the workpiece against the table and fence when
making non-through cuts such as rabbeting, dadoing or resawing cuts. A feather-
board helps to control the workpiece in the event of a kickback.
f) Use extra caution when making a cut into blind areas of assembled workpieces.
The protruding saw blade may cut objects which can cause kickback.
g) Suppo large panels to minimize the risk of saw blade pinching and kickback.
Large panels tend to sag under their own weight. Suppo(s) must be placed under
all poions of the panel overhanging the tabletop.
h) Use extra caution when cutting a workpiece that is twisted, knotted, warped or
does not have a straight edge to guide it with a mitre gauge or along the fence. A
warped, knotted, or twisted workpiece is unstable and causes misalignment of
the ke with the saw blade, binding and kickback.
i) Never cut more than one workpiece, stacked veically or horizontally. The saw
blade could pick up one or more pieces and cause kickback.
j) When restaing the saw with the saw blade in the workpiece, centre the saw
blade in the ke so that the saw teeth are not engaged in the material. If the saw
blade binds, it may lift up the workpiece and cause kickback when the saw is
restaed.
k) Keep saw blades clean, sharp, and with sucient set. Never use warped saw
blades or saw blades with cracked or broken teeth. Sharp and properly set saw
blades minimize binding, stalling and kickback.

09
4) Table saw operating procedure warnings
a) Turn o the table saw and disconnect the power cord when removing the table
inse, changing the saw blade or making adjustments to the riving knife, antikick-
back device or saw blade guard, and when the machine is left unattended.
Precautiona measures will avoid accidents.
b) Never leave the table saw running unattended. Turn it o and don’t leave the tool
until it comes to a complete stop. An unattended running saw is an uncontrolled
hazard.
c) Locate the table saw in a well-lit and level area where you can maintain good
footing and balance. It should be installed in an area that provides enough room to
easily handle the size of your workpiece. Cramped, dark areas, and uneven slippe
oors invite accidents.
d) Frequently clean and remove sawdust from under the saw table and/or the dust
collection device. Accumulated sawdust is combustible and may self-ignite.
e) The table saw must be secured. A table saw that is not properly secured may
move or tip over.
f) Remove tools, wood scraps, etc. from the table before the table saw is turned on.
Distractions or potential jams can be dangerous.
g) Always use saw blades with correct size and shape (diamond versus round) of
arbor holes. Saw blades that do not match the mounting hardware of the saw will
run o-centre, causing a loss of control.
h) Never use damaged or incorrect saw blade mounting means such as anges, saw
blade washers, bolts or nuts. These mounting means were specially designed for
your saw, for safe operation and optimum peormance.
i) Never stand on the table saw, do not use it as a stepping stool. Serious inju
could occur if the tool is tipped or if the cutting tool is accidentally
contacted.
j) Make sure that the saw blade is installed to rotate in the proper direction. Do not
use grinding wheels, wire brushes, or abrasive wheels on a table saw. Improper saw
blade installation or use of accessories not recommended may cause serious inju

10
SAFETY INSTRUCTIONS FOR THEHANDLING OF SAW BLADES
1. Only use inseion tools if you have mastered their use.
2.Obsee the maximum speed. The maximum speed specied on the inseion tool
may not be exceeded. If specied, obsee the speed range.
3. Obsee the motor / saw blade direction of rotation.
4. Do not use any inseion tools with cracks. So out cracked inseion tools.
Repairs are not permitted.
5. Clean grease, oil and water o of the clamping suaces.
6. Do not use any loose reducing rings or bushes for the reduction of holes on saw
blades.
7. Make sure that xed reducer rings for securing the inseion tool have the same
diameter and have at least 1/3 of the cutting diameter.
8. Make sure that xed reducer rings are parallel to each other.
9. Handle inseion tool with caution. They are ideally stored in the original package
or special containers. Wear protective gloves in order to improve grip and to fuher
reduce the risk of inju.
10. Prior to the use of inseion tools, make sure that all protective devices are
properly fastened.
11. Prior to use, make sure that the inseion tool meets the technical requirements
of this electric tool and is properly fastened.
12. Only use the supplied saw blade for sawing operations in wood, materials similar
to wood, plastics and non-ferrous metals (except for magnesium and alloys contain-
ing magnesium).

11
LAYOUT AND ITEMS SUPPLIED
1. LAYOUT
1. Front rip fence rail with ruler
2. Miter gauge assembly
3. Blade guard assembly
4. Table inse
5. Rip fence assembly
6. Right extension table
7. T-slot
8. Rip fence lock lever
9. Lock/release lever
10. Dust chute
11. Power cord wrap posts
12. Stand release latch
13. Folding stand
14. Riving knife
15. Suction hose
16. Blade height / Bevel angle adjust
wheel
17. Switch
18. Reset
19. Bevel angle lock
20. Push stick
21. Car handles (folded position)
22. Stand in folded position
23. Wrenches

12
PROPER USE
2. ITEMS SUPPLIED
Please check that the aicle is complete as specied in the scope of delive. If pas
are missing, please contact our seice center or the sales outlet and upon presen-
tation of a valid bill of purchase. Also, refer to the warranty table in the seice
information at the end of the operating instructions.
The bench-type circular saw is designed for the slitting and cross-cutting (only with
the cross stop) of all types of timber commensurate with the machine‘s size. The
equipment is not to be used for cutting any type of round wood. The equipment is to
be used only for its prescribed purpose. Any other use is deemed
Danger!
The equipment and packaging material are not toys. Do not let children play with
plastic bags, foils or small pas. There is a danger of swallowing or suocating!
• Saw Blade Guard
• Push Stick
• Miter Gauge
• Rip Fence
• Extraction Hose
• Folding Stand
• Wrench
• Installation Material
• Safety &Original Operating Instructions
• Open the packaging and take out the equipment with care.
• Remove the packaging material and any packaging and/or transpoation
braces (if available).
• Check to see if all items are supplied.
• Inspect the equipment and accessories for transpo damage.
• If possible, please keep the packaging until the end of the guarantee period.

13
to be a case of misuse. The user / operator and not the manufacturer will be liable
for any damage or injuries of any kind caused as a result of this.
Please note that our equipment has not been designed for use in commercial, trade
or industrial applications. Our warranty will be voided if the machine is used in
commercial, trade or industrial businesses or for equivalent purposes.
The equipment is to be operated only with suitable saw blades (saw blades made of
HM or CV) It is prohibited to use any type of HSS saw blade and cutting-o wheel.
To use the equipment properly you must also obsee the safety information, the
assembly instructions and the operating instructions to be found in this manual.
To use the equipment properly you must also obsee the safety information, the
assembly instructions and the operating instructions to be found in this manual. All
persons who use and seice the equipment have to be acquainted with these
operating instructions and must be informed about the equipment‘s potential
hazards. It is also imperative to obsee the accident prevention regulations in force
in your area. The same applies to the general rules of health and safety at work.
The manufacturer will not be liable for any changes made to the equipment nor for
any damage resulting from such changes. Even when the equipment is used as
prescribed it is still impossible to eliminate ceain residual risk factors.
The following hazards may arise in connection with the machine‘s construction and
design:
• Contact with the saw blade in the uncovered saw zone.
• Reaching into the running saw blade (cut injuries).
• Kick-back of workpieces and pas of workpieces.
• Saw blade fracturing.
• Catapulting of faulty carbide tips from the saw blade.
• Damage to hearing if essential ear-mus are not used.
• Harmful emissions of wood dust when used in closed rooms.

14
AC Motor ......................................................................................................................... 120V ~ 60Hz
Rated Current........................................................................................................................... 15A
IdleSpeed n
0
..................................................................................................................... 5000 RPM
Cutting-O Wheel ..................................................................................... Ø254xØ15.875x2.8mm
Number Of Teeth ....................................................................................................................... 40
Main Table Size .............................................................................................................. 650x 576mm
Rip Capacity For Right .......................................................................................................... 625 mm
Cutting Height Max. ......................................................................................................... 85 mm / 90°
................................................................................................................................................... 55 mm / 45°
Height Adjustment .................................................................................................Innite 0 -85mm
Tilting Saw Blade ..........................................................................................................Innite 0 - 45°
Extractor Socket .................................................................................................................. Ø 35 mm
Weight ..............................................................................................................................Approx. 27.5kg
Operating mode S6 25%: Continuous operation with idling (cycle time 10 minutes).
To ensure that the motor does not become excessively hot, it may only be operated
for 25% of the cycle at the specied rating and must then be allowed to idle for 75%
of the cycle.
Danger!
Sound and vibration
Sound and vibration values were measured in accordance with EN 61029.
LpA sound pressure level ............... 91 dB(A)
KpA unceainty ........................................ 3 dB
LWA sound power level ................. 104 dB(A)
KWA unceainty ....................................... 3 dB
The quoted values are emission values and not necessarily reliable workplace values.
Although there is a correlation between emission and immission levels it is impossi-
ble to draw any ceain conclusions as to the need for additional precautions.
Factors with a potential inuence on the actual immission level at the workplace
include the duration of impact, the type of room, and other sources of noise, etc.,
e.g. the number of machines and other neighboring operations. Reliable workplace
values may also va from count to count. With this information, the user should
at least be able to make a better assessment of the dangers and risks involved.
TECHNICAL DATA

15
Wear ear-mus.
The impact of noise can cause damage to hearing.
Keep the noise emissions and vibrations to a minimum.
• Only use appliances that are in peect working order.
• Seice and clean the appliance regularly.
• Adapt your working style to suit the appliance.
• Do not overload the appliance.
• Have the appliance seiced whenever necessa.
• Switch the appliance o when it is not in use.
Caution!
Residual risks
Even if you use this electric power tool in accordance with instructions, ceain
residual risks cannot be ruled out. The following hazards may arise in connection
with the equipment’s construction and layout:
1. Lung damage if no suitable protective dust mask is used.
2. Damage to hearing if no suitable ear protection is used.
BEFORE STARTING THE EQUIPMENT
Before you connect the equipment to the mains supply make sure that the data on
the rating plate is identical to the mains data.
Warning! The maximum permissible system impedance is 0.340Ω at the inteace
point of the user’s supply. The manufacto should declare it in the equipment
instruction manual and instruct the user to determine in consultation with the
supply authority, if necessa, that the equipment is connected only to a supply of
that impedance or less.
Warning!
Always pull the power plug before making adjustments to the equipment.
• Unpack the bench-type circular saw and check it for damage that may have
occurred in transit.
• The machine has to be set up where it can stand rmly, e.g. on a workbench, or it
must be bolted to a strong base.
• All covers and safety devices have to be properly tted before the machine is
switched on.
• It must be possible for the saw blade to run freely.
16
• When working with wood that has been processed before, watch out for foreign
bodies such as nails or screws, etc.
• Before you actuate the On/O switch, make sure that the saw blade is correctly
tted and that the machine’s moving pas run smoothly.
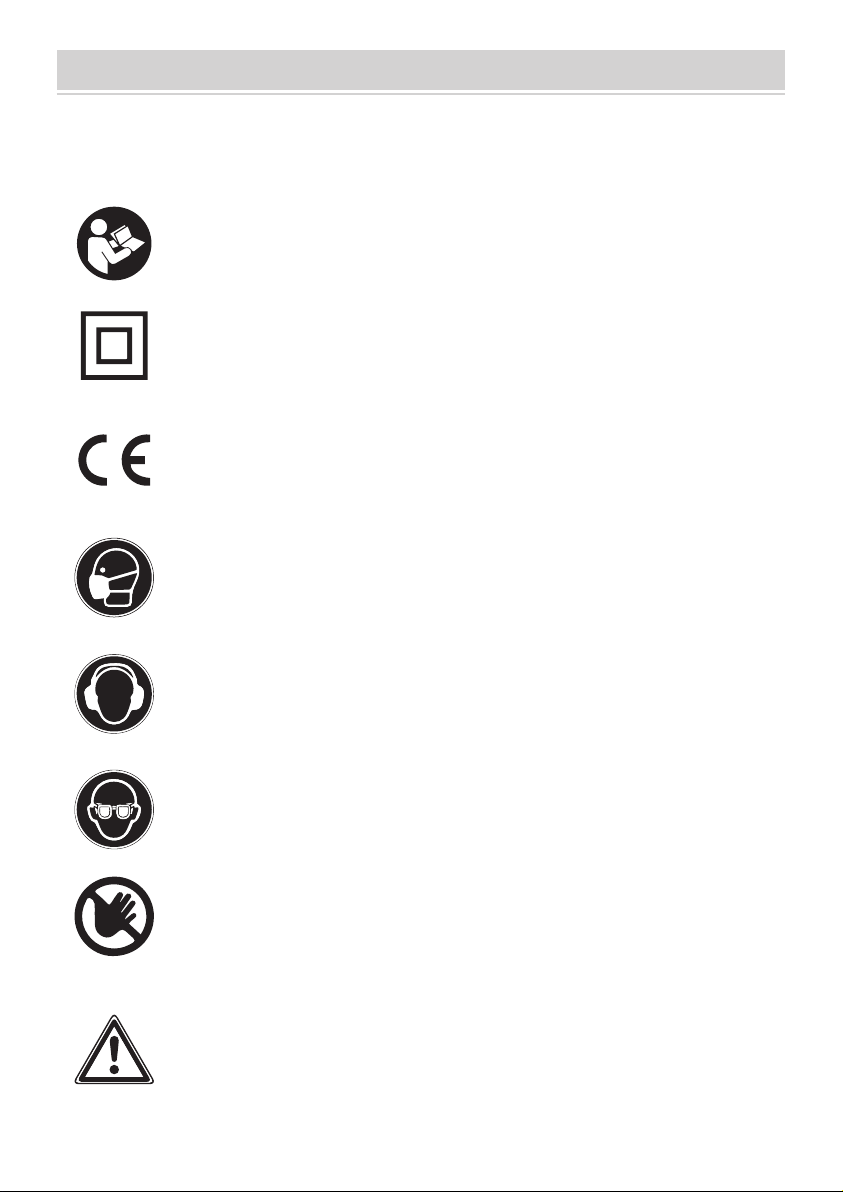
Assembly of folding stand
(Fig.1 & Fig.2)
1. Mount join pipe(D) on wheel bracket(C) with screws and nylon hex nuts.
2. Mount two handles(A) to U-shaped bracket (B)using carriage bolts, plastic
spacers and nylon hex. nuts.
3. Mount foot bracket (E) to handle(A) using carriage bolts, plastic spacers and
nylon hex. nuts.
4. Mount wheel bracket (C) to foot bracket (E) and U-shaped bracket (B) using
carriage bolts, plastic spacers and nylon hex. nuts.
5. Remove the wheel cap and remove mounting hardware inside wheel. Mount the
wheels to wheel bracket using large washers and nylon hex. nuts. Install wheel caps
once wheels are installed.
6. The stand is now completely assembled and should look like the stand.
ASSEMBLY& ADJUSTMENTS
Fig. 2
Fig. 1

17
Mounting of the saw on folding stand
1. Position the saw on top of the stand (choose which orientation best suits you).
Use 4 screws and nylon hex. nuts to secure job site saw to stand.
Accesso storage and folding/unfolding stand (Fig.3 )
Note: Before folding stand, remove all workpieces from the table. Remove and
securely store all loose accessories such as the miter gauge, rip fence, blade guard,
and push stick.Lower saw blade below the tabletop.
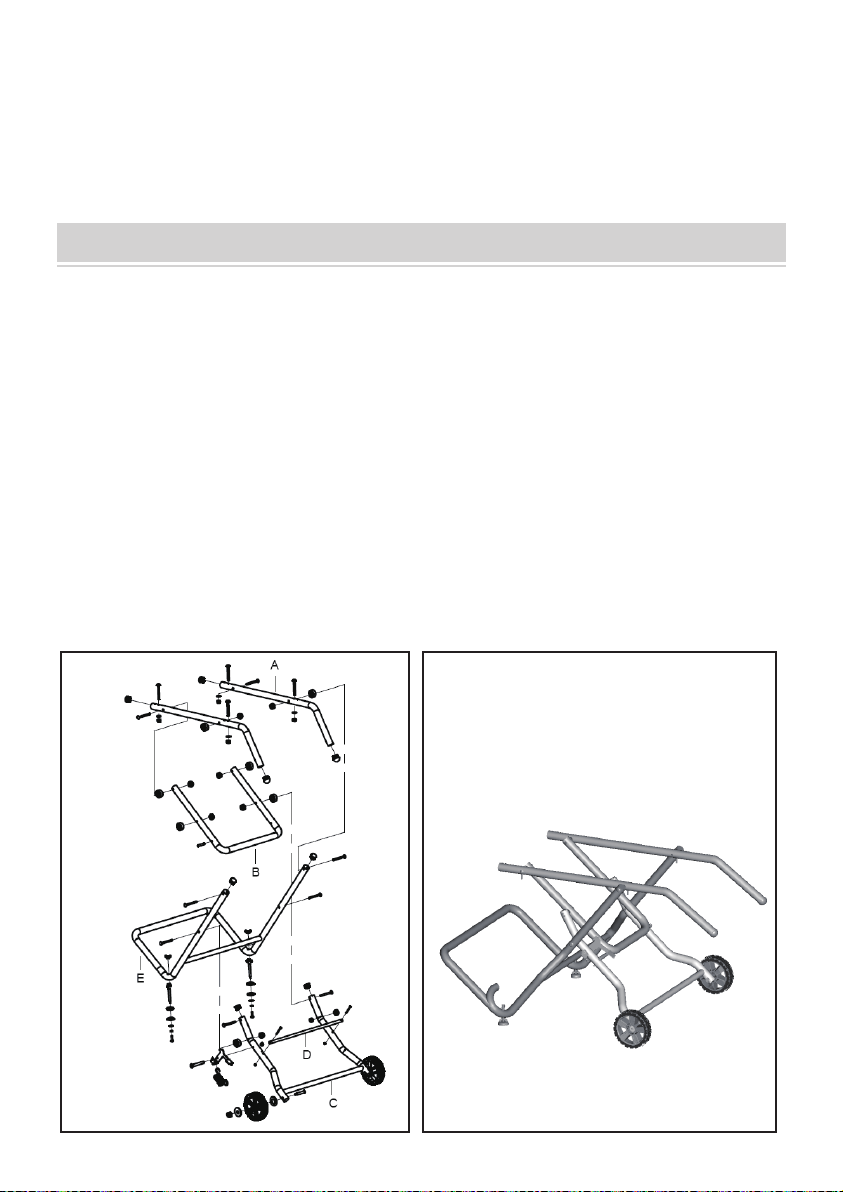
Folding stand for storage and transpoation purposes- (Fig.3 )
1. Push the stand release latch (A) and at the same time, grasp the stand handles (B)
and lift them up and away from the saw body. Push the job site saw until the release
latch clicks and locks the stand. The stand and saw assembly can now be pivoted
and rolled away.
Unfolding stand for use at the jobsite-
1. Push the stand release latch (A) and at the same time, grasp the stand handles (B)
and pull them down towards you. Push down until the release latch clicks and locks
the stand. The stand and saw assembly can now be used for cuts.
Fig. 3
18
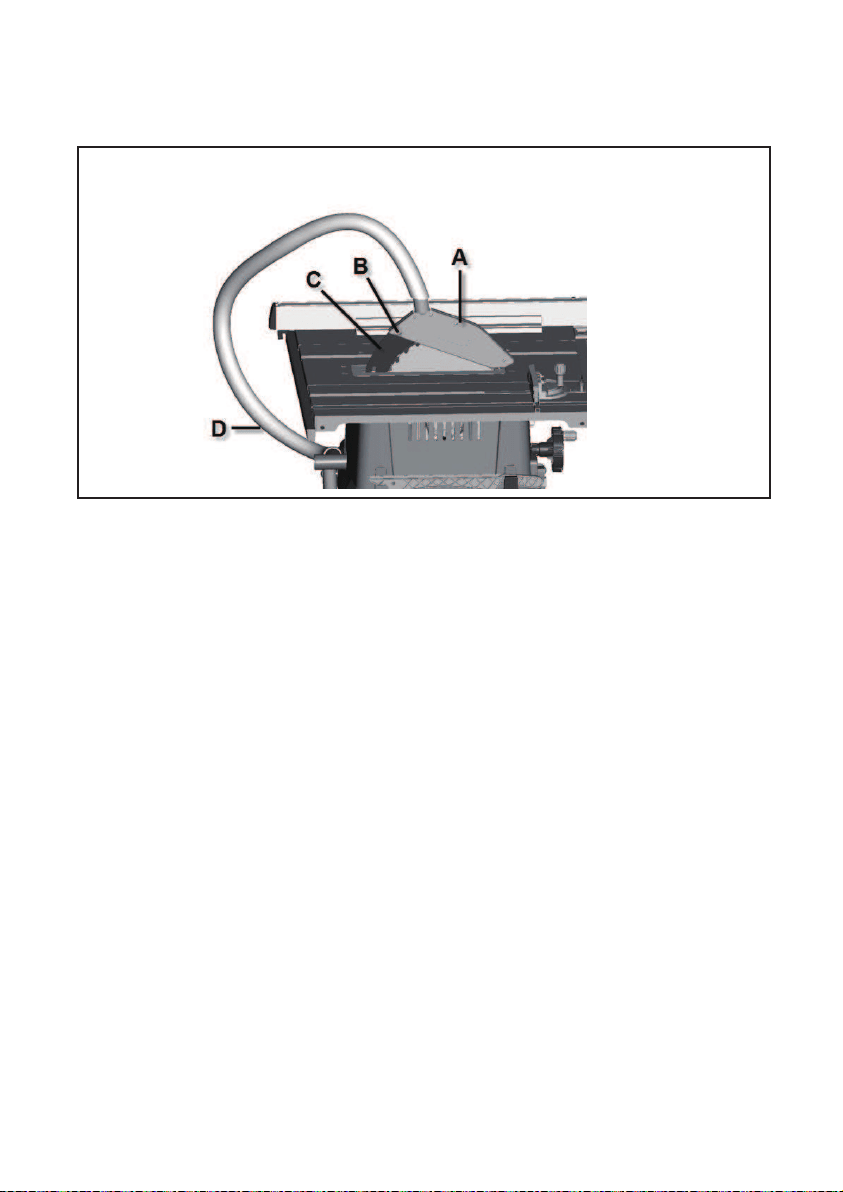
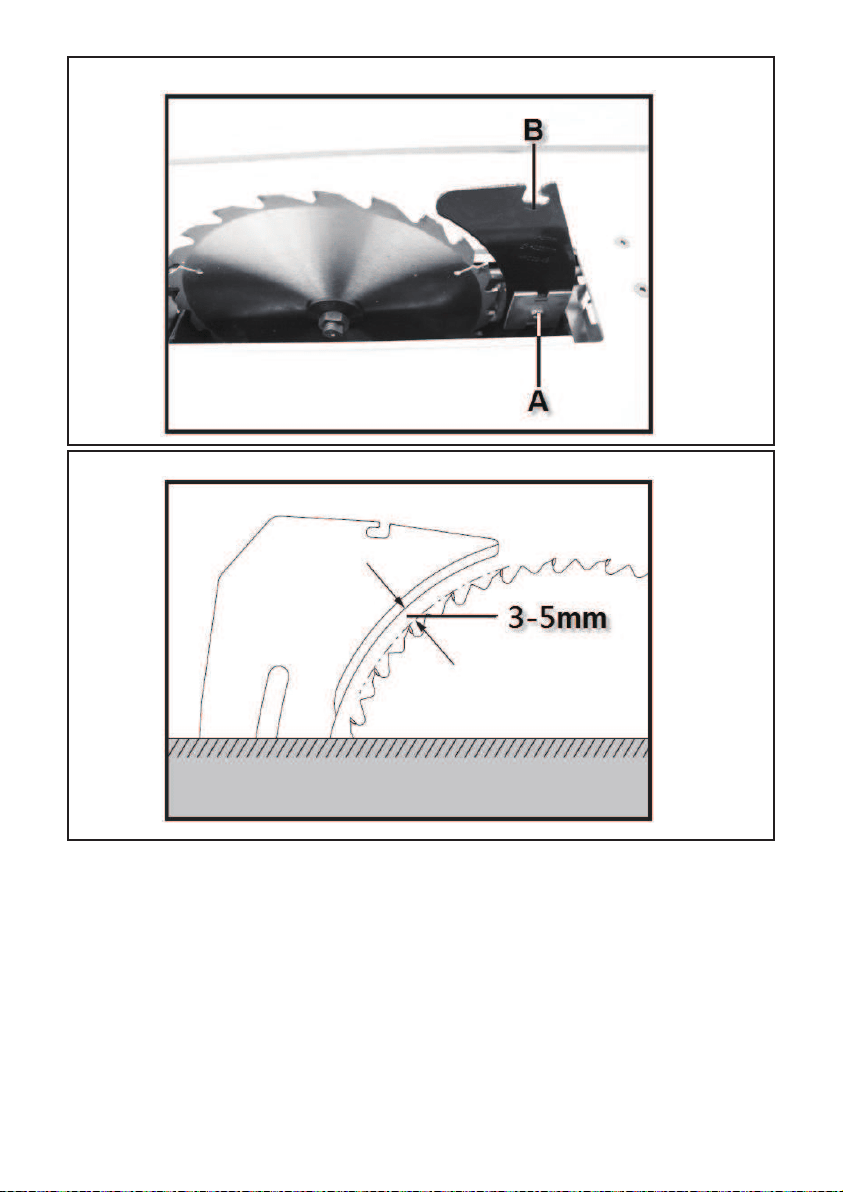
Mounting blade guard (Fig. 4)
Mount the saw blade guard(A) together with the bolt(B) on top of the riving
knife(C), so that the bolt is rmly seated in the slot of the riving knife(C).
Adjusting riving knife (Fig. 5 & Fig.6 )
Remove the table inse from the table top by pulling it upwards. Turn the elevation
hand wheel clockwise and raise the blade to its highest position above the table.
Loosen the mounting bolt(A) in order to pull out the splitting wedge until the right
distance is adjusted.
The riving knife(B) consists of a metal piece, slightly thinner than the blade, that
helps to keep the blade ke open to prevent kickback.The distance between the saw
blade and the riving knife must be 3mm-5mm. Tighten the mounting bolt(A) again
and mount the bench inse.
Fig. 4
Do not screw in the bolt(B) too tightly; the saw blade guard(A) must move freely.
Plug the suction hose(D) on to the suction adapted and the connecting piece of the
saw blade guard(A). Connect a suitable splint collector onto the suction adapter.
Dis-assembly is peormed in reverse order.
Caution! The saw blade guard(A) must be lowered onto the workpiece before
staing the sawing operation.
19
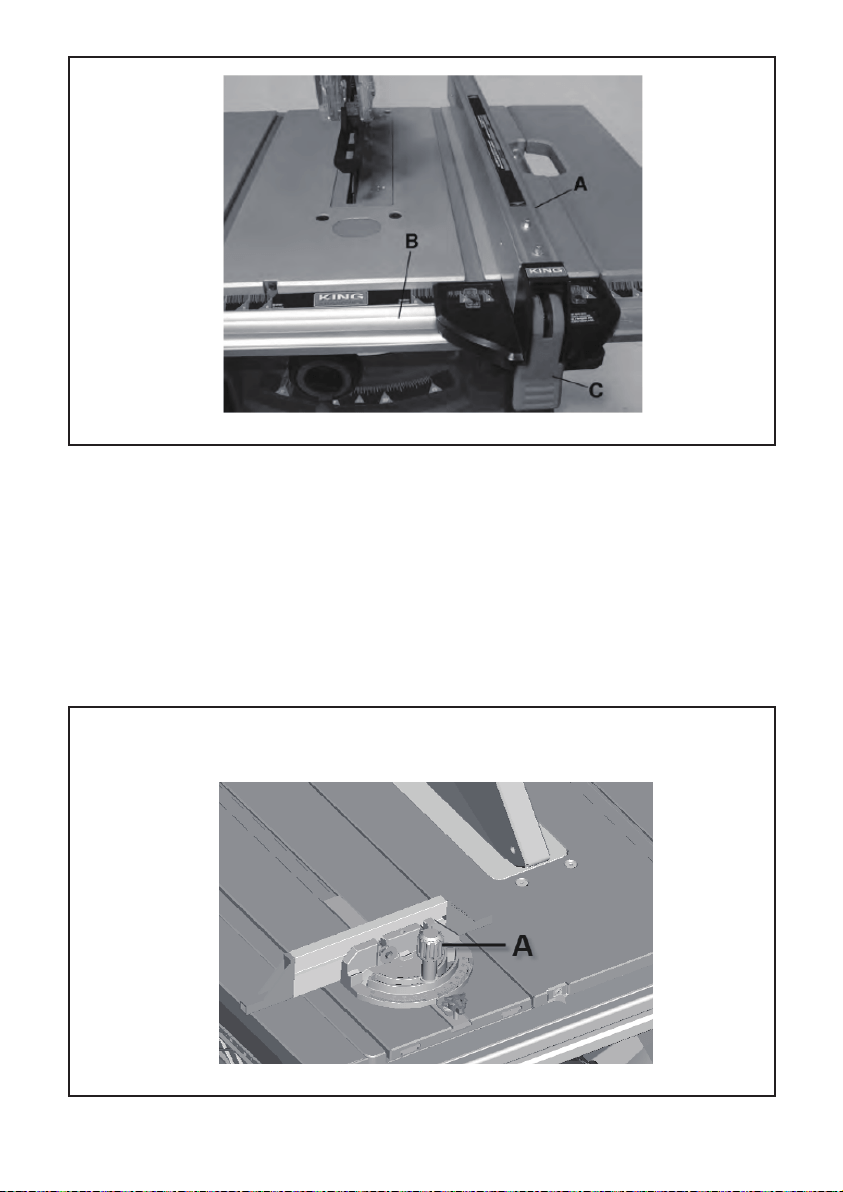
Mounting rip fence on table & adjustments(Fig. 7)
1.Position the front of the rip fence(A) on the front rail (B). Lower the back end of
the rip fence on the rear rail. Check to make sure the rip fence slides freely on the
rails.
2.Lower rip fence locking lever(C) to automatically align and secure the rip fence in
place.
Fig. 5
Fig. 6
20
Mounting and adjusting miter gauge(Fig. 8)
When crosscutting and the blade is set at 90° or 45°to the table, the miter gauge
can be used in either T-slot on the table. When crosscutting and the blade is tilted,
use T-slot on right side of table where the blade is tilted away from your hands and
miter gauge.
1.To adjust the miter gauge, loosen lock handle (A) and set the miter gauge body
with scale so the indicator aligns to the desired cutting angle, then re-tighten lock
handle.
Fig. 7
Fig. 8
21
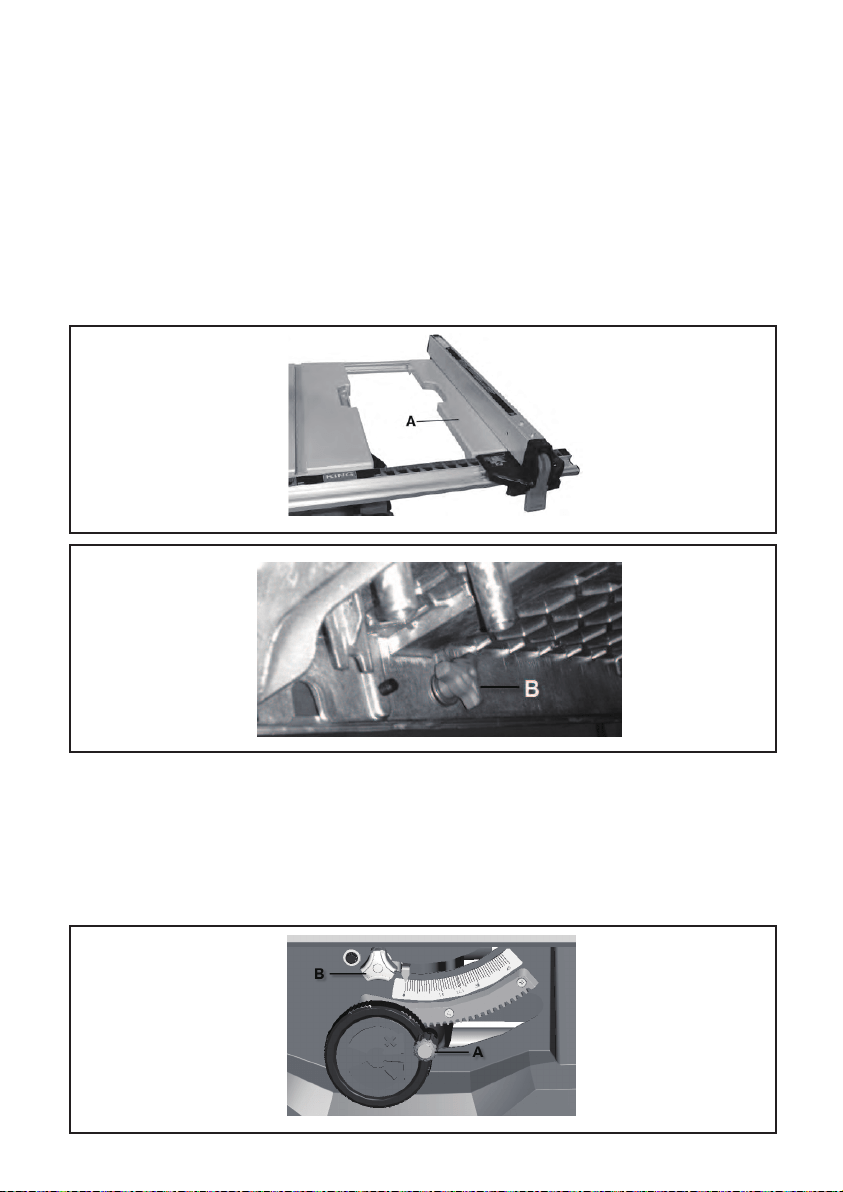
Adjusting the extendable extension table(Fig. 9 & Fig. 10)
The extension table allows the user to increase the length of the table for greater
ripping capacity. To use the extension table;
1.Unlock or remove the rip fence from the table.
2.Unlock the extension table(A) by loosen the extension lock lever (B), slide the
extension to the desired width. Use the scale on the front rail when a specic width
is desired.
3. Once the extension is in the desired position,tighten the lock lever(B) to secure
the extension in place. The rip fence can now be installed as shown in.
4.Lock lever(B) is under the table.
Adjusting the blade height (Fig. 11)
The blade height should be set higher (above) the top of the work-piece to cut.
Turn the round handle(A) to set the blade to the required depth.
- Anticlockwise: smaller cutting depth
- Clockwise: larger cutting depth.
Fig. 9
Fig. 10
Fig. 11
23
Adjusting the blade angle (for beveled cuts)
Note: A 90° cut has a 0° bevel angle and a 45° cut has a 45° bevel angle.
1.Unlock the bevel locking lever (B).
2. Push in and then turn the exterior hand wheel (A) to adjust the blade bevel angle,
turning it counterclockwise increases the bevel angle of the blade.
3. Once the desired bevel angle is achieved, lock the bevel locking lever(B).
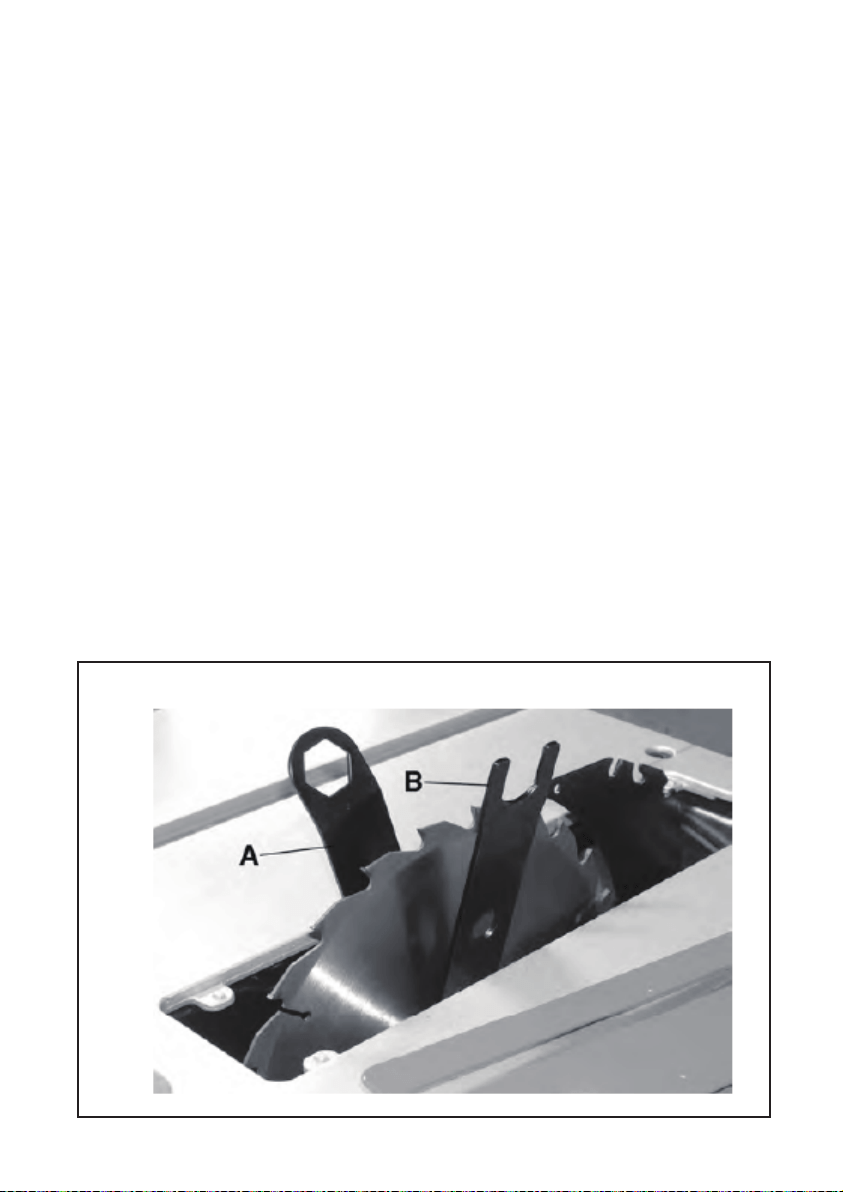
Installing/changing blade(Fig. 12 & Fig.13 )
Warning! Disconnect power cord from power source before installing/changing
blade.
1. Uninstall the blade guard assembly from the riving knife. Then remove the table
inse to gain access to the blade arbor.
2.Raise the blade to its highest position above the table.
3. Place the open end of one of the adjustment wrenches(A) on the at poion of
the inside blade ange to prevent the saw arbor and blade from rotating. Then place
the closed end of the second adjustment wrench (B) on arbor nut
(A) and turn the arbor nut counterclockwise, remove arbor nut and outside blade
ange (B).
4. Place new blade on arbor (D) making sure the blade teeth point downwards
towards the front of the table saw.
5. Replace outside blade ange (B) and arbor nut (A) on arbor shaft and tighten
with arbor wrenches.
6. Reinstall the table inse, then the blade guard ngers assembly.
Fig. 12

24
USING THE SAW
Fig. 13
Fig. 14
The operation of power tools involves a ceain amount of hazard for the opera-
tor.Before attempting regular work we recommend you get the feel of operations
using scrap lumber to check settings. Read entire instructions before you sta to cut
workpiece. Always pay attention to safety precautions to avoid personal inju.
1. ON/OFF switch (Fig. 14)
• To turn the saw on, press the green button “I”. Wait for the blade to reach its
maximum speed of rotation before commencing with the cut.
• To turn the machine o again, press the red button “O”.

25
2. RESET BUTTON (OVERLOAD PROTECTOR)
This saw comes with an overload reset button (B) If the saw motor over heats, a
safety mechanism stops the motor automatically due to motor over-heating or low
voltage. To prevent motor over-heating, reduce load on motor or check
voltage.
Allow motor to cool down, then press the reset button and resta the saw. If the saw
does not resta, wait an additional 5 minutes before restaing.
Cross cutting
Cross cutting requires the use of the miter gauge to position and guide the work.
Place the work against the miter gauge and advance both the miter gauge and work
toward the saw blade. The miter gauge may be used in either table T-slot, however,
most operators prefer the left groove for average work. When bevel cutting (blade
tilted), use the right side table T-slot so that it doesn’t inteere with the tilted saw
blade. The blade guard must be used. The riving knife to prevent the saw ke from
closing.
Sta the cut slowly and hold the work rmly against the miter gauge and the table.
One of the rules in running a saw is that you never hang onto or touch a free piece
of work. Hold the suppoed piece, not the free piece that is cut o. The feed in cross
cutting continues until the work is cut in two, then the miter gauge and work are
pulled back to the staing point. Before pulling the work back it is good practice
to give the work a little sideways shift to move the work slightly away from the saw
blade. Never pick up any sho length of free work from the table while the saw is
running. A sma operator never touches a cut-o piece unless it is at least a foot
long. Never use the rip fence as a cut-o gauge when cross cutting.
Ripping
Ripping is the operation of making a length wise cut through a board, the rip fence
is used to position and guide the work. One edge of the work rides against the rip
fence while the at side of the board rest on the table. Since the work is pushed
along the fence, it must have a straight edge and make solid contact with the table.
The blade guard must be used. The guard has anti-kickback ngers and a riving
knife to prevent the saw ke from closing.

26
Sta the motor and advance the work holding it down and against the fence. Never,
stand in the line of the saw cut when ripping. Hold the work with both hands and
push it along the fence and into the saw blade. The work can then be fed through
the saw blade with one or two hands. When this is done the work will either stay on
the table, tilt up slightly and be caught by the rear end of the guard or slide o the
table to the oor. Alternately,the feed can continue to the end of the table, after
which the work is lifted and brought back along the outside edge of the fence. The
waste stock remains on the table and is not touched with the hands until the saw
is stopped unless it is a large piece allowing safe removal.
Making a non-through cut
Non-through cuts can be made with the grain (ripping) or across the grain (cross
cut). Non-through cuts are needed for cutting grooves, rabbets and dadoes. This is
the only type of cut that the blade gets covered by the workpiece and is made
without the blade guard and anti-kickback nger assemblies installed. Make sure
the blade guard are re-installed after this type of cut is done. For non-through cuts,
position the riving knife in the “down” position, set the blade to the correct height
and tighten the blade height lock knob.Turn on the saw and allow the blade to come
up to speed, use push sticks to feed workpiece into blade.
Danger!
If the power cable for this equipment is damaged, it must be replaced by the
manufacturer or its after-sales seice or similarly trained personnel to avoid danger
REPLACING THE POWER CABLE

27
Always pull out the mains power plug before star-ting any cleaning work.
1. Cleaning
• Keep all safety devices, air vents and the motor housing free of di and dust as far
as possible. Wipe the equipment with a clean cloth or blow it with compressed air at
low pressure.
• We recommend that you clean the device immediately each time you have nished
using it.
• Clean the equipment regularly with a moist cloth and some soft soap. Do not use
cleaning agents or solvents; these could at-tack the plastic pas of the equipment.
Ensure that no water can seep into the device. The ingress of water into an electric
tool increases the risk of an electric shock.
2. Carbon brushes
In case of excessive sparking, have the carbon brushes checked only by a qualied
electrician. Danger! The carbon brushes should not be rep laced by anyone but a
qualied electrician.
3. Maintenance
There are no pas inside the equipment which require additional maintenance.
4. Ordering replacement pas:
Please quote the following data when ordering replacement pas:
• Type of machine
• Aicle number of the machine
• Identication number of the machine
• Replacement pa number of the pa required
The equipment is supplied in packaging to preteen it from being damaged in
transit. The raw materials in this packaging can be reused or recycled. The equip-
ment and its accessories are made of various types of material, such as metal and
plastic. Never place defective equipment in your household refuse. The equipment
should be taken to a suitable collection center for proper disposal. If you do not
know the whereabouts of such a collection point, you should ask in your local
council oces.
CLEANING, MAINTENANCE AND ORDERING OF SPARE PARTS
DISPOSAL AND RECYCLING

Manufacturer: Zhejiang Huafeng Electric Tools Co., Ltd.
Address: No.2111 Huafeng Road, Fucun Town, Jindong District, Free Trade
Experimental Zone, 321037 Jinhua City, Zhejiang,PEOPLE'S REPUBLIC OF CHINA
MADE IN CHINA
Store the equipment and accessories in a dark and d place at above freezing
temperature. The ideal storage temperature is between 5 and 30 °C. Store the
electric tool in its original packaging.
STORAGE


E-mail: CustomerSeice@vevor.com