Loading ...
Loading ...
Loading ...
o
When the input channel is set to “INT” for
both [CH1] and [CH2]
1
Set the [AUDIO SELECT CH-1 AUTO/
MANU] switch to “MANU”.
2
Turn the [CH-1] recording level adjustment
knob to adjust the level.
When the built-in microphone and the [AUX]
input terminal are used, the recording levels of
[CH1] and [CH2] are interlocked.
This
is also effective when the [AUDIO SELECT
CH-1 AUTO/MANU] switch is set to [CH2].
Memo :
0
Select [Limiter Mode] or [Int. Mic Stereo
Enhancer] in the menu to set the recording
audio.
0
For the reference level to be recorded to an SD
card, set
[Main Menu] B [A/V Set] B [Audio
Set] B [Ref. Level] to “-20dB”, “-18dB”, or
“-12dB”. (common for CH1/CH2)
(A P113
[ Ref. Level ] )
0
The operations of the [CH-2] recording level
adjustment knob and [AUDIO SELECT CH-2
AUTO/MANU] switch are disabled.
0
When
[Main Menu] B [A/V Set] B [Audio Set] B
[CH1 INT] and [CH2 INT] are set to “Int. Mic L”
and “AUX R” respectively, or set to “Int. Mic R”
and “AUX L” respectively, the settings of the
[AUDIO SELECT CH-1 AUTO/MANU] and
[AUDIO SELECT CH-2 AUTO/MANU] switches
become independent. In this case, the recording
level settings of CH1 and CH2 are also
independent.
Automatic Adjustment Mode
0
Set the [AUDIO SELECT CH-1/CH-2 AUTO/
MANU] switch to “AUTO” or press and hold the
[FULL AUTO] button to set to “ON” to enter
Automatic Adjustment mode. The audio
recording level is set automatically according to
the input level.
0
When the [FULL AUTO] button is set to “ON”,
mode switching with the [AUDIO SELECT CH-1/
CH-2 AUTO/MANU] switch is disabled.
Memo :
0
When [Main Menu] B [A/V Set] B [Audio Set] B
[Limiter] is set to “Off” while in the automatic
adjustment mode, the limiter operates at
-6 dBFS.
0
When [A/V Set] B [Audio Set] B [Audio On FULL
AUTO] is set to “SW Set”, you can switch the
audio recording mode with the [AUDIO SELECT
CH-1/CH-2 AUTO/MANU] switch on the camera
recorder even if the [FULL AUTO] button is set
to “ON”.
(A P
115 [ Audio On FULL AUTO ] )
Setting the Audio recording Level in the
Main Menu
* Enabled only when the handle unit is not
attached.
1
Select [Main Menu]
B [A/V Set] B [Audio
Set]
B [Audio Level].
0
The
[Audio Level] screen appears.
.
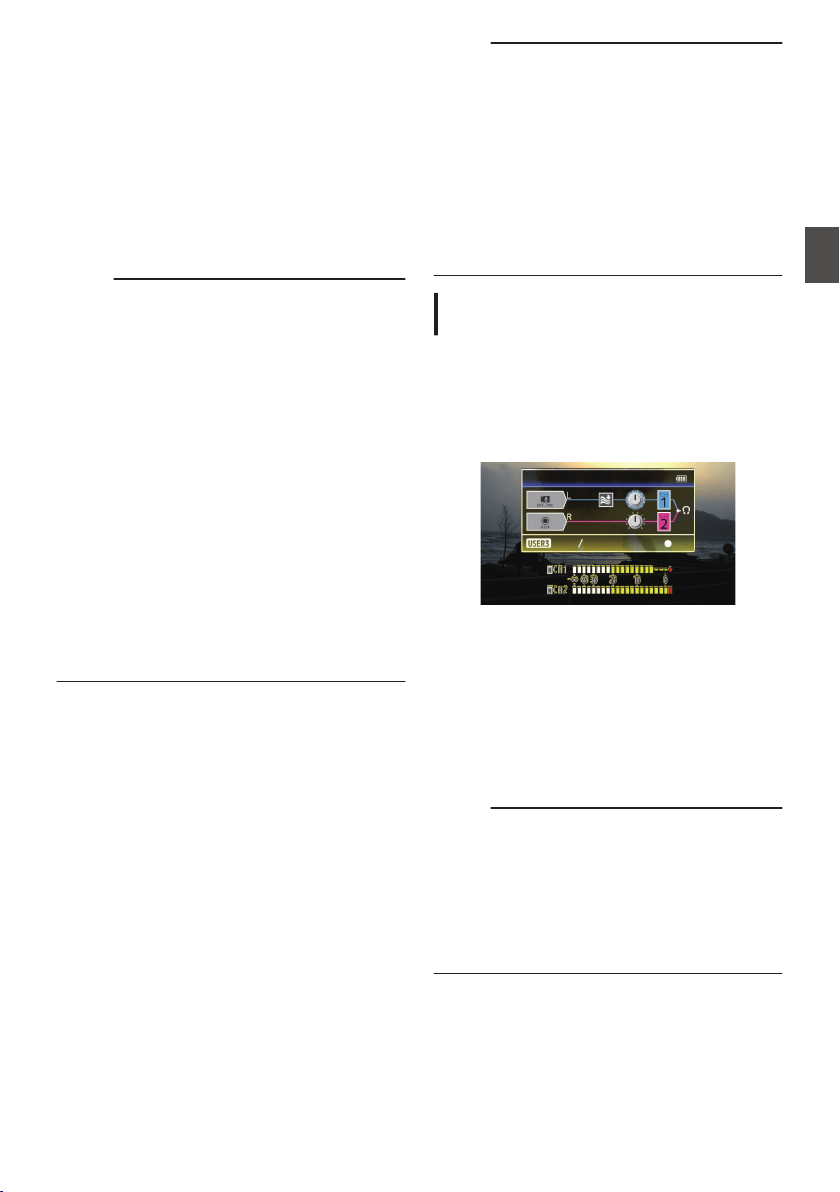
Audio Level
Manual
Auto
Set
* The contents displayed on the screen vary
depending on the various settings.
2
Select “Auto” or “Manual” using the
[LOLUX/3]
button.
0
If “Auto”
is selected, the audio recording level
will be automatically adjusted.
0
If “Manual” is selected, the volume appears
on the screen. Use the cross-shaped button
(H I) to adjust the volume.
Memo :
0
When the [FULL AUTO] button is set to “On” and
[Audio On FULL AUTO] in the menu is set to
“Auto”, the audio recording level cannot be
selected.
0
If both CH1 and CH2 are set to the built-in
microphone or to AUX, settings for CH2 will not
be
displayed, and the settings for CH1 will apply
to CH2.
Audio Recording
67
Shooting
Loading ...
Loading ...
Loading ...