Home
Bookmarks
Home
Brother
Brother TD-2125N User Manual
Page 68
User Manual - Page 68
For TD-2125N.
Page 68/98
Page 1
Page 2
Page 3
Page 4
Page 5
Page 6
Page 7
Page 8
Page 9
Page 10
Page 11
Page 12
Page 13
Page 14
Page 15
Page 16
Page 17
Page 18
Page 19
Page 20
Page 21
Page 22
Page 23
Page 24
Page 25
Page 26
Page 27
Page 28
Page 29
Page 30
Page 31
Page 32
Page 33
Page 34
Page 35
Page 36
Page 37
Page 38
Page 39
Page 40
Page 41
Page 42
Page 43
Page 44
Page 45
Page 46
Page 47
Page 48
Page 49
Page 50
Page 51
Page 52
Page 53
Page 54
Page 55
Page 56
Page 57
Page 58
Page 59
Page 60
Page 61
Page 62
Page 63
Page 64
Page 65
Page 66
Page 67
Page 68
Page 69
Page 70
Page 71
Page 72
Page 73
Page 74
Page 75
Page 76
Page 77
Page 78
Page 79
Page 80
Page 81
Page 82
Page 83
Page 84
Page 85
Page 86
Page 87
Page 88
Page 89
Page 90
Page 91
Page 92
Page 93
Page 94
Page 95
Page 96
Page 97
Page 98
Contents
Table of Contents
Search
Previous
Next
Bookmarks
Loading ...
Loading ...
Loading ...
Chapter 8
62
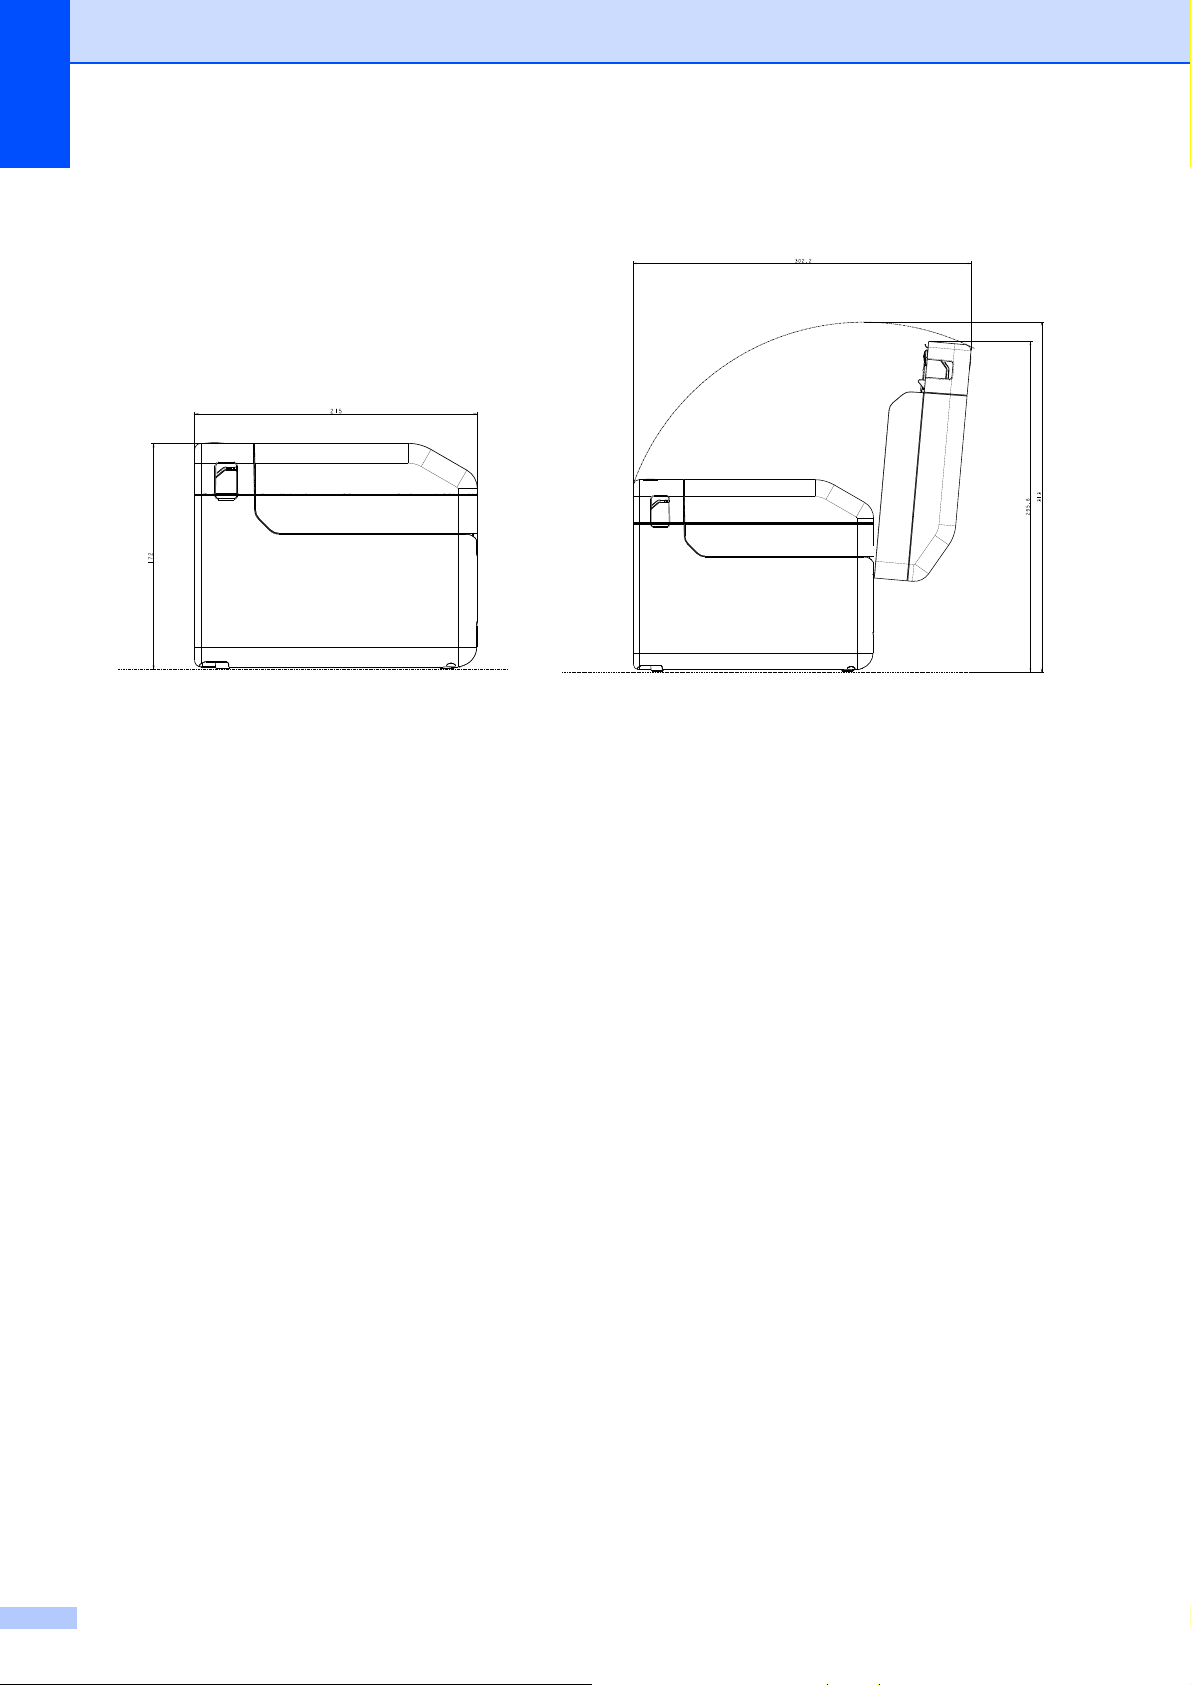
Side view
8
Loading ...
Loading ...
Loading ...
<
65
66
67
68
69
70
>
File type: PDF
File name: 95371055_td-2125n.pdf
File size: 3.17 MB
File Language: English
Pages: 98
Author: Brother
Published: 2023-01-14
Updated: 2023-04-06
Download File
Table of Contents
×
USERâS GUIDE TD-2020A/TD-2125N/TD-2135N/TD-2125NWB/TD-2135NWB
1
Introduction
2
Symbols Used in This Document
2
IMPORTANT NOTICE
2
Trademarks
3
Table of Contents
4
1 Getting Started
7
General Description
7
Power Supply
9
Connecting to an AC Power Outlet
9
Installing the Printer Driver and Software
9
Registering Paper Size Information With the Printer
10
2 Printing
11
Operation Panel
11
LED Indicators
11
Button Functions
12
Inserting the Media Roll
13
Checking the Sensor Position
15
Cutting Roll Paper
16
Printing the Printer Setup Information
17
Connecting the Computer and Printer
19
USB Cable Connection
19
Wired LAN Connection (TD-2125N/TD-2135N/TD-2125NWB/TD-2135NWB only)
19
Wireless LAN Connection
20
Without Using a Wi-Fi Router/Access Point (Wireless Direct)
21
Using Infrastructure Mode and Wireless Direct Simultaneously
22
Using Wi-Fi Protected Setup⢠(WPS)
22
Connect the Printer to a Computer Using a Bluetooth Connection
23
Printing
24
Making Prints Lighter or Darker
24
Printer Driver Options
25
3 Printer Setting Tool
26
About the Printer Setting Tool
26
Before Using the Printer Setting Tool
26
Using the Printer Setting Tool
26
Communication Settings (TD-2125N/TD-2135N/TD-2125NWB/TD-2135NWB only)
28
Settings Dialog Box
28
Menu Bar
29
General Tab
30
Wired LAN/Wireless LAN Tabs (TD-2125NWB/TD-2135NWB only)
30
Wireless Direct Tab (TD-2125NWB/TD-2135NWB only)
32
Bluetooth Tab (TD-2125NWB/TD-2135NWB only)
33
Applying Setting Changes to Multiple Printers
33
Device Settings
34
Settings Tabs
35
Menu Bar
40
P-touch Template Settings
41
P-touch Template
41
P-touch Template Settings Dialog Box
42
Paper Size Setup
44
Paper Size Setup Dialog Box
44
Distributing Paper Formats
47
4 Other Functions
48
Mass Storage Functions
48
Mass Storage Feature
48
Using the Mass Storage Feature
48
Change Printer Settings Using Web Based Management
49
Software Development Kit
50
5 Maintaining the Printer
51
Print Head Maintenance
51
Platen Roller Maintenance
51
Media Exit Maintenance
52
Label Peeler (Optional) Maintenance (TD-2125N/TD-2135N/TD-2125NWB/TD-2135NWB only)
52
6 LED Indicators
53
LED Indicators
53
7 Troubleshooting
55
Overview
55
Troubleshooting Tips
55
Error Messages for Touchpanel Display (Optional) (TD-2125N/TD-2135N/TD-2125NWB/TD-2135NWB Only)
63
8 Specifications
65
Product Specifications
65
Product Dimension
67
9 Using the RJ25 to DB9M Serial Adapter (Optional: PA-SCA-001)
69
Connecting the Computer and Printer With the RJ25 to DB9M Serial Adapter
69
Product Specifications
69
10 Using the Touchpanel Display (Optional: PA-TDU-001) (TD-2125N/TD-2135N/TD-2125NWB/TD-2135NWB only)
70
General Description
70
LCD
70
Main Screen
70
Touchpanel
71
Information About Replacing the Touchpanel
72
Printing With the Touchpanel Display
73
Touchpanel Display Settings
74
Specifying Settings From the Touchpanel
74
Creating a Label Layout
78
Creating a Template
78
Linking a Database to a Template
80
Transferring the Label Layout to the Printer
82
Selecting the Touchpanel
83
Selecting the Data Assigned to Keys on the One-touchpanel
84
Creating a One-touchpanel
85
Printing the Label
85
Printing Using the Basic Control Panel
85
Printing Using the One-touchpanel
87
Printing a Different Date/Time Than the Printer's Internal Clock
88
Printing Using a Barcode Reader
89
Label Layouts on the Printer (Checking, Deleting and Log)
89
Replacing the Time/Date Battery
90
Frequently Asked Questions
91
Product Specifications
92
11 Using the Label Peeler (Optional: PA-LP-001) (TD-2125N/TD-2135N/TD-2125NWB/TD-2135NWB only)
93
Inserting the Media Roll
93
Printer Driver Settings
96
After Printing
97
Product Specifications
97
Search:
×
Search