Loading ...
Loading ...
Loading ...
ENGLISH
10
Fig.S
18
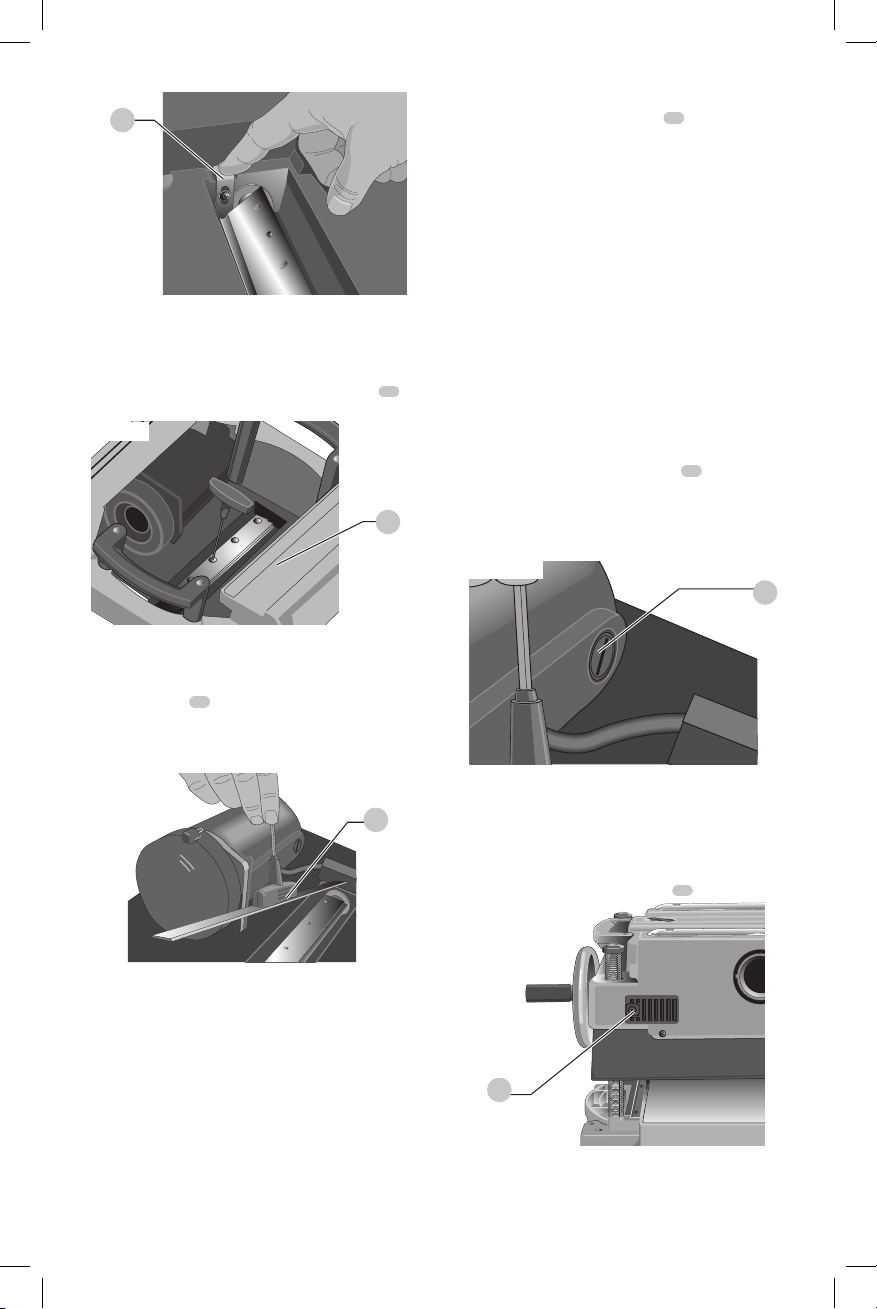
WARNING: Keep your fingers away from the
cutterhead at all times. Use the tool provided to
handle theknives.
8. Use the T-wrench to remove the eight screws on the
knife clamp and set them in the small screws bin
19
on
the front panel of the planer (Fig.T).
Fig.T
19
9. Use the magnets on the top of the T-wrench to attract
the knife clamp and lift it off of the cutterhead. One of
the knives should now beexposed.
10. Use the magnet
20
on the top of the T-wrench (Fig.S)
to attract the knife. Avoid touching it with yourfingers.
NOTE: Before installing the knife, ensure the cutterhead and
knife are free of debris, clean if needed.
Fig.U
20
If Only One Side of the Knife Is Worn
1. Rotate the knife around so that the sharp, unused edge
hangs over the end of the cutterhead where it will cut
the material. Be sure to set the oblong holes in the knife
over the pins machined on thecutterhead.
2. Reset the knife clamp over the knife. Be sure to align the
beveled edge on the clamp with the sharp, cutting edge
of the knife. If these are not aligned correctly, the clamp
will not secure the knifeproperly.
3. Install the screws into the clamp and tightensufficiently.
NOTE: Make sure all screws are tightenedsufficiently.
To Access the Other Two Knives
1. Depress the cutterhead lock lever
18
as shown in
FigureS.
2. Use the piece of scrap wood to carefully turn the
cutterhead until it locks into place revealing another
knifeclamp.
3. Follow the same knife change procedure
indicatedabove.
4. Repeat the procedure for the last dullknife.
After Installing New Knives
1. Insert the round end of the dust shroud into the fan
housing and rotate it down to lock it intoplace.
2. Place the three wing nuts back into theshroud.
3. Screw the top cover of the planer back onto theunit.
NOTE: The planer will not operate if the top cover is not
placedcorrectly.
Brush Change (Fig. V, W)
Your planer is equipped with brush caps
21
that are
external to the motor. If your brushes need to be replaced,
begin by acquiring a new set from a
DeWALT
service center
or a dealer authorized to service
DeWALT
products. Use only
identical
DeWALT
brushes.
Fig.V
21
To Replace the Brushes on your Planer
(Fig. V, W)
1. Use the T-wrench to remove the top cover and brush
cover screen on theplaner.
2. Use a flathead screwdriver to unscrew the brush cap
located in the right, rear of the unit
22
.
Fig.W
22
3. Do the same for the brush cap located on the side of the
motor, inside the planercover.
4. Place the new brushes into the brushholders.
Loading ...
Loading ...
Loading ...