Loading ...
Loading ...
Loading ...

English
English
22 23
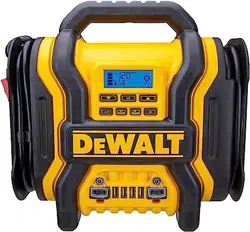
USB Ports
The USB Power Button and the four USB Ports are located on the front
of the unit; the USB Power/Fault Indicator is a translucent ring around
each of the USB Ports. Refer to Fig. 2 to locate.
Important Notes Concerning the USB Ports
1. The four USB Ports provide a combined total of 6.2A. The two left
USB Ports provide a total of 3.1A (5V each). The two right USB
Ports provide a total of 3.1A (5V each).
2. When the USB Ports are in use, the unit will monitor for the following
USB fault conditions on all the USB Ports: low battery voltage fault,
overload and short circuit. If a fault condition exists in either of the
USB Ports, the USB Power/Fault Indicators will flash blue. In any
of these cases, the backlit LCD screen will continuously display
the following:
The Fault Icon will flash. The USB Ports will automatically shut
down. Should this occur:
a. Disconnect the USB-powered device and press the USB Power
Button again to turn off the USB Ports immediately.
b. Make sure the unit does not need to be recharged.
c. Allow the unit to cool down for several minutes before attempting
to use the USB Ports again.
d. If an individual USB device is within specifications and the fault
occurs, have the USB device checked for malfunction and do
not continue to use it with these USB Ports.
3. This unit’s USB Ports do not support data communication. They
only provide power to external USB-powered devices.
4. Some household USB-powered electronics will not operate with
this unit.
USING THE USB PORTS
1. Press the USB Power Button to turn on all of the USB Ports. A
beep will sound, the USB Power/Fault Indicators around each of the
four USB Ports will light blue and the LCD screen will continuously
display the following:
The Battery Status Icon and Battery Voltage Indicator will light
solid, as well as the USB Icon, indicating the USB ports are ready
to use.
2. Plug the USB-powered device into the USB power port(s) and
operate normally.
3. Press the USB Power Button again to turn off the USB Ports.
Periodically check the unit’s battery status on the backlit LCD screen.
Four solid bars in the battery icon indicates a full battery. When the
battery level is nearly empty with only one solid bar or completely empty
with 4 empty bars, the unit must be recharged at this time or the unit’s
built-in low voltage protection will activate. The empty Battery Status
Icon will flash for a short period of time before automatic shut down.
IMPORTANT: Make sure the USB Ports are turned off when the unit
is being recharged or stored.
LED Area Light
The built-in LED Area Light consists of two banks of two LEDs (one on
the right hand side, one on the left hand side of the back of the unit).
It is controlled by the Area Light Power Button on the control panel
(refer to Fig. 2 to locate).
1. Press the Area Light Power Button once to turn the light on.
2. Press the Area Light Power Button again to turn the area light off.
When the Area Light Power Button is pressed to turn it on, a beep will
sound. The backlit LCD screen will turn on for 10 seconds (only) and
will then continuously display the Battery Status Icon and the Battery
Voltage Indicator.
Periodically check the unit’s battery status on the backlit LCD screen.
Four solid bars in the battery icon indicates a full battery. When the
battery level is nearly empty with only one solid bar or completely empty
with 4 empty bars, the unit must be recharged at this time or the unit’s
built-in low voltage protection will activate. The empty Battery Status
Icon will flash for a short period of time before automatic shut down.
IMPORTANT: Make sure the Area Light is turned off when the unit is
being recharged or stored.
Care and Maintenance
WARNING: To reduce the risk of injury, turn the unit off and
disconnect it from any power source before installing and removing
accessories, before adjusting or when performing maintenance. An
accidental start-up can cause injury.
Never submerge this unit in water. Dirt and grease may be removed
from the exterior of the unit using a cloth or soft non-metallic brush.
Never let any liquid get inside the unit; never immerse any part of the
unit into a liquid.
WARNING: Shock hazard. Disconnect the 12 Volt AC Charging
Adapter before cleaning the unit.
There are no user-replaceable parts. Periodically inspect the condition
of adapters, connectors and wires. Contact manufacturer to replace
any components that have become worn or broken.
THE INTERNAL BATTERY
All batteries lose energy from self-discharge over time and more rapidly
at higher temperatures. When the unit is not in use, we recommend
that the battery is charged at least every 30 days.
BATTERY REPLACEMENT
The battery should last the service life of the unit. Service life is
dependent on a number of factors including but not limited to the
number of recharge cycles, and proper care and maintenance of the
battery by the end user. Contact manufacturer for any information you
may need.
SAFE BATTERY DISPOSAL
Contains a maintenance-free, sealed, non-spillable, lead
acid battery, which must be disposed of properly. Recycling
is required. Failure to comply with local, state and federal
regulations can result in fines, or imprisonment.
Please recycle.
WARNING: To reduce the risk of serious injury or property
damage:
• Do not dispose of the battery in fire as this may result in an explosion.
• Before disposing of the battery, protect exposed terminals with
heavy-duty electrical tape to prevent shorting (shorting can result
in injury or fire).
• Do not expose battery to fire or intense heat as it may explode.
DXAEPS14_ManualENSP_020221.indd 22-23DXAEPS14_ManualENSP_020221.indd 22-23 2/2/2021 10:56:31 AM2/2/2021 10:56:31 AM
Loading ...
Loading ...
Loading ...