Loading ...
Loading ...
Loading ...

English
English
12 13
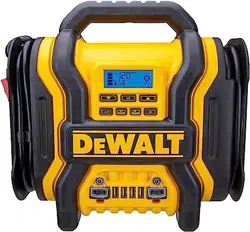
Overview
COMMON ACTIONS AND UNIT RESPONSES
The following actions turn the unit on and activate the LCD screen:
Press the LED Area Light
Power Button. (Refer to the
"LED Area Light" section.)
A beep will sound and the Area
Light will turn on. The backlight
will turn on for 10 seconds (only).
The LCD screen will continue
to display the Battery Status
Icon and Battery Voltage Indicator.
The unit remains on until the LED
Area Light Power Button is pressed
again to turn it off.
Press the Alternator
Check Button. (Refer to the
"Alternator Check" section.)
A beep will sound and the backlit
LCD screen will display the Battery
Status Icon, and the Alternator
Icon will flash. The unit remains on
until the Alternator Check Button is
pressed again to turn it off.
Press the AC Power Button.
(Refer to the “120V AC Power
Outlets” section.)
A beep will sound and the backlit
LCD screen will display the Battery
Status Icon; and the Digital Display
shows “AC”, indicating the dual
AC outlets are ready to use. The
unit remains on until the AC Power
Button is pressed again to turn
it off.
Press the USB Power
Button. (Refer to the "USB
Ports" section.)
A beep will sound and the
backlight will turn on for 10
seconds (only). The LCD screen
will display the Battery Status Icon,
Battery Voltage Indicator, and the
USB Icon; and the USB Power/
Fault Indicators will light solid blue
indicating the four USB Ports are
active. The unit remains on until
the USB Power Button is pressed
again to turn it off.
Press the Compressor
Power Button. (Refer to
the "Portable Compressor"
section.)
A beep will sound and the backlit
LCD screen will display the Battery
Status Icon, "XXX" PSI and the
Compressor Icon. If no further
actions are taken after 1 minute,
the unit will display the Battery
Status Icon and Battery Voltage
Indicator for 10 seconds before
automatically turning off.
Whenever the clamps are
properly connected to a
battery (refer to the "Jump
Starter" section) …
… a beep will sound and the
backlit LCD screen will display
the Battery Status Icon, Battery
Voltage Indicator, the Clamp Icons,
and the “+” and ”–” signs, as
well as the flashing Jump Starter
Icon. The unit remains on until the
clamps are disconnected from the
battery.
If the red and black clamps
touch each other (refer to
the "Jump Starter" section) …
… the backlit LCD screen will
display the Battery Status Icon
and Battery Voltage Indicator. The
Clamp Icons, “+” and ”–” signs and
the Alarm Icon will flash. The unit
will sound a two-second warning
every ten seconds continuously
until the clamps are separated.
If the clamp connections
to the battery’s positive
and negative terminals are
reversed (refer to the "Jump
Starter" section) …
… the backlit LCD screen will
display the Battery Status Icon,
Battery Voltage Indicator, and the
Clamp Icons. The Alarm Icon, the
“+” and ”–” signs and the Reverse
Polarity Icons will flash and the unit
will sound a warning continuously
until the clamps are disconnected
from the battery.
When the unit is charging
or recharging using the
supplied Charging Adapter
(refer to the "Charging/
Recharging" section) …
… the backlight will turn on for 10
seconds (only). The LCD screen
will continue to display the Battery
Status Icon and Battery Voltage
Indicator. The bars on the Battery
Status Icon will change from empty
to solid (bottom to top) repeatedly.
NOTE: The unit will automatically power off once ALL the functions
and the charging process are turned off.
Viewing Battery Status
The Battery Status Icon and Battery Voltage Indicator indicate the
battery charge level as follows.
• If the battery charge level is at full capacity, four solid bars will display.
• If the battery is partially charged, two or three solid bars will display.
• If the battery is nearly empty, one solid bar will display. The unit should
be charged at this time.
• If the battery is completely empty, four blank bars will display. The
unit MUST be charged at this time or the unit’s built-in low voltage
protection will activate. The empty Battery Status Icon will flash for
a short period of time before automatic shut down. The unit will not
operate until the battery is recharged.
Charging/Recharging
Lead-acid batteries require routine maintenance to ensure a full charge
and long battery life. All batteries lose energy from self-discharge over
time and more rapidly at higher temperatures. Therefore, batteries need
periodic charging to replace energy lost through self-discharge. When
the unit is not in frequent use, manufacturer recommends the battery
should be recharged at least every 30 days and after each use.
Important Charging Notes
1. This unit is delivered in a partially charged state – you must fully
charge it before using it for the first time. Initial AC charge should
be for 40 hours or until the Battery Status Icon shows 4 solid bars.
DXAEPS14_ManualENSP_020221.indd 12-13DXAEPS14_ManualENSP_020221.indd 12-13 2/2/2021 10:56:31 AM2/2/2021 10:56:31 AM
Loading ...
Loading ...
Loading ...