Loading ...
Loading ...
Loading ...
20
44 45
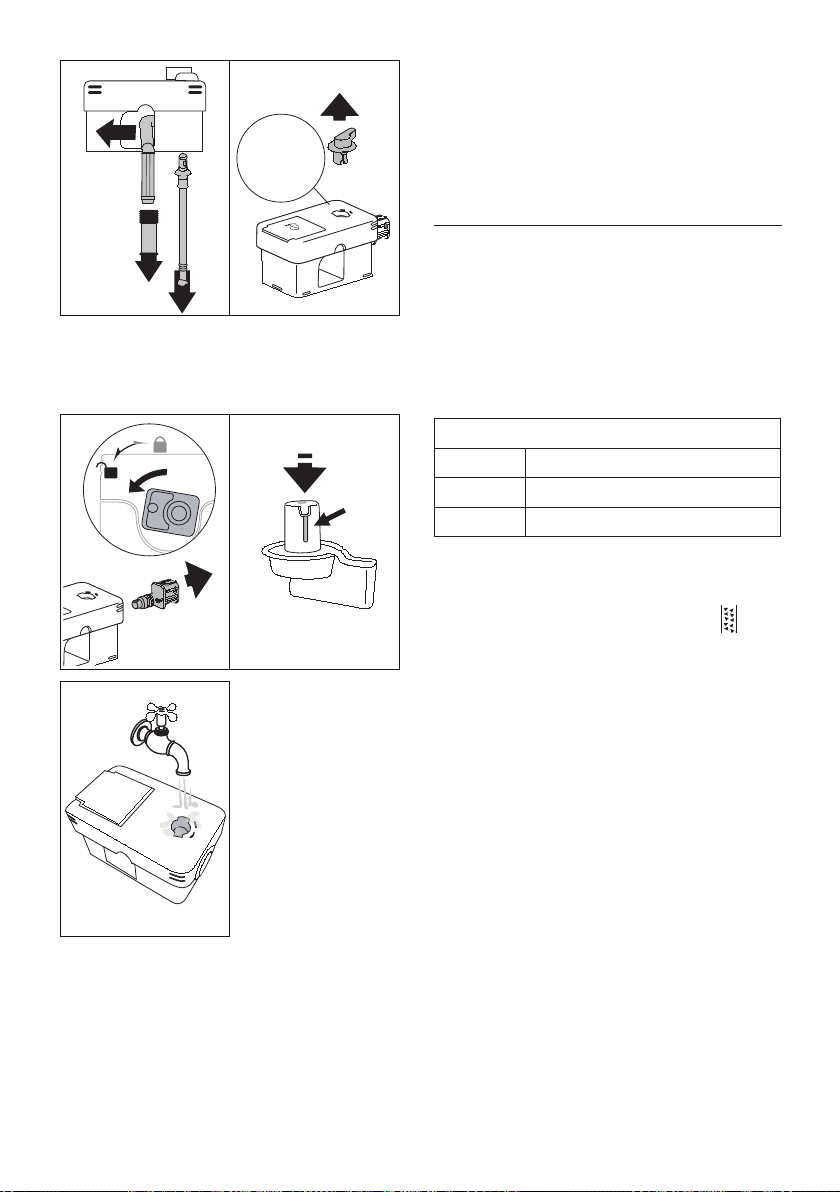
Insert
3. Turn the froth adjustment dial (D3) clockwise to the "In-
sert" position (g. 45) and pull;
4. Turn and remove the milk container connector (D5)(g.
46).
46 47
5. All components and the
container are dishwasher
safe, placing them in the
top basket. If you do not
have a dishwasher, wash
by hand as described in
the note at the end of the
section.
6.
Make sure there are no
milk residues on the hol-
low and groove under the
dial (g. 47):
If necessary,
scrape the groove with a toothpick;
7. Rinse inside the froth adjustment dial seat and milk con-
tainer connector hole with running water (g. 48);
8. Check that the intake tube and spout are not clogged with
milk residues;
9. Reassemble all the lid components;
10. Attach the lid back on the milk container.
48
Please note: washing by hand
Washing in a dishwasher guarantees the perfect hygiene of all
the milk container components. When washing by hand, wash
all components of the milk container thoroughly withhot water
and immerse them in a basin of hot water for 30 minutes before
proceeding as described in point (6).
17. DESCALING
U
Important!
• Before use, read the instructions and the labelling on the
descaler pack.
• It is important to use De’Longhi descaler only. Using un-
suitable descaler and/or performing descaling incorrectly
may result in faults not covered by the manufacturer's
guarantee.
• Descaler could damage delicate surfaces. If the product is
accidentally spilt, dry immediately.
To descale
Descaler De’Longhi descaler
Container Recommended capacity: 2 l
Time ~50min
Descale the appliance when the corresponding message ap-
pears on the display (B5). To descale the appliance immediately,
press "OK" and follow the instructions from point (8).
To descale the appliance later, press "Cancel". The symbol
(B7) appears on the homepage (B) to remind you that the ap-
pliance needs descaling. (The message appears each time you
turn the appliance on).
To access the descaling menu:
1. On the display
, press the settings menu icon
(B6);
2. Select "Descale";
3. Press "Next" to enter the guided descaling procedure;
4. Press "OK" to start;
5. Insert the hot water spout
(C7) (g. 7);
6. Remove and empty the drip tray (A24) and coee grounds
container (A25) (g. 11), then put both back in the appli-
ance and press "Next";
7. Remove the water tank(A20), lift the lid(A19) and (if in-
serted) remove the lter(C7);
8.
Pour the descaler into the tank up to the level A marked in-
side the tank (equal to one 100ml packet), then add water (1
litre) up to level B (g. 49). Put the water tank (with lid) back
in the appliance, close the front door and press "Next"
;
9. Place an empty 2 litres container under the spouts (g. 8).
Press OK to start descaling ("Back" to go back to the previ-
ous screen or "Cancel" to exit the procedure, remembering
to remove the descaling solution from the tank)
Loading ...
Loading ...
Loading ...