Loading ...
Loading ...
Loading ...
18
when you make the next coees, the grounds container will ll
up more than expected and clog the machine.
16.4 Cleaning the drip tray and drip tray grille
Important!
The drip tray (A24) is tted with a level indicator (A23) (red)
showing the amount of water it contains (g. 33). Before the
indicator protrudes from the cup tray (A21), the drip tray must
be emptied and cleaned, otherwise the water may overow the
edge and damage the appliance, the surface it rests on or the
surrounding area. To remove the drip tray, proceed as follows:
1. Remove the drip tray and grounds container (A25) (g. 32);
2. Check the condensate tray (red) and empty if necessary;
3. Remove the cup tray
(A21), and drip tray grille
(A22), then empty the
drip tray and grounds
container and wash all
components.
4. Put the drip tray complete
with grille and grounds
container back in the
appliance.
Important!
When removing the drip tray, the grounds container must be
emptied, even if it contains few grounds. If this is not done,
when you make the next coees, the grounds container will ll
up more than expected and clog the machine.
16.5 Cleaning the inside of the machine
Danger of electric shock!
Before cleaning internal parts, the machine must be turned o
(see section “5. Turning the appliance o”) and unplugged from
the mains power supply. Never immerse the machine in water.
1. Check regularly (about once a month) that the inside of the
appliance (accessible after removing the drip tray (A24))
is not dirty. If necessary, remove coee deposits with the
brush (C5) supplied and a sponge.
2. Remove all residues with a vacuum cleaner (g. 34).
34 35
33
16.6 Cleaning the water tank
Clean the water tank (A20) regularly, about once a month and
whenever you replace the water softener lter (C7).
1. Remove the water tank (g. 3), remove the water softener
lter (if present) and rinse it with running water;
2. Empty the water tank and clean with a damp cloth and a
little washing up liquid. Rinse thoroughly with water;
3. Put the lter back in the appliance (g. 35), ll the tank
with fresh water up to the MAX level (marked inside) (g.
4), put the tank back (g. 5);
4. (models with water softener lter only) Deliver 100ml of hot
water to reactivate the lter.
Please note:
If the appliance is not used for more than 3-4 days, you should
clean the tank as described above.
16.7 Cleaning the coee spouts
Clean the coee spouts (A16) and (A17) when requested by the
appliance (about once a month) as described below.
Please note:
To clean later, press "Cancel". The next time the appliance is
turned on, the message is displayed again.
36
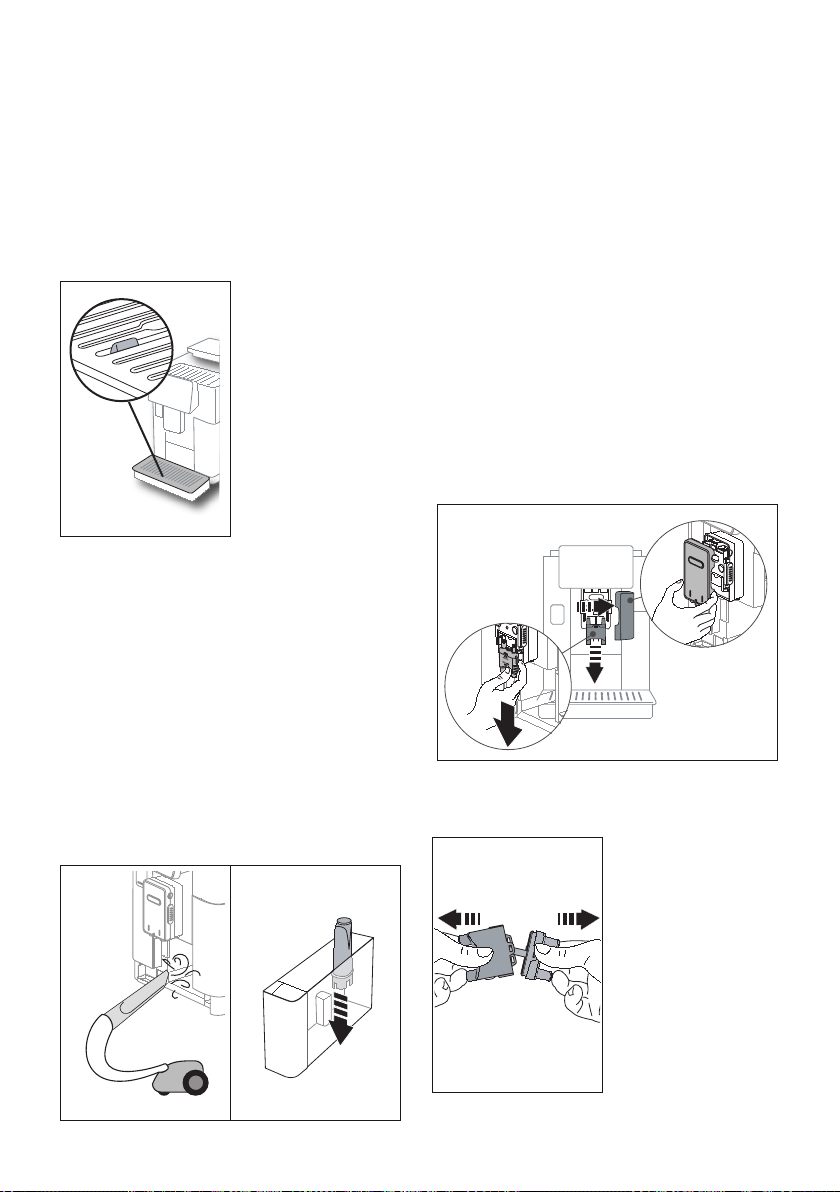
1. Remove the central outlet cover (A15) by pulling outwards,
then remove the coee spouts downwards (g. 36). Press
“Next”;
2. Separate the two spouts
(A16) and (A17) (g. 37);
3. Rinse the spouts with
running water (g. 38).
We recommend washing
in a dishwasher. Alterna-
tively, wash thoroughly
with warm water and mild
washing-up liquid;
4. Clean the seat of the re-
movable spouts with a
sponge (g. 39);
37
Loading ...
Loading ...
Loading ...