Loading ...
Loading ...
Loading ...
- 5 -
Revision 12/2022
Copyright © 2022, Fast ČR, a.s.
Preparing for operation
Warning:
Before you start assembling or disassembling the
accessories of the c, check that it is turned off and
disconnected from the power socket. Attaching
an attachment while the multi-function head is
connected to mains power, may result in it being
accidentally turned on and serious subsequent
injuries.
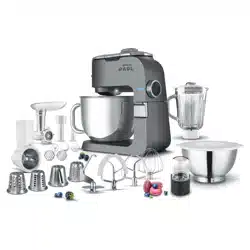
Selecting an attachment type
Attachment type Operation
Balloon whisk B1
It is used for whisking whole eggs or egg whites,
whipped cream, foamy creams, etc. Do not use it for
beating or kneading doughs.
Beater B2
It is used for beating light and medium heavy yeast-
free doughs, for preparing sauces, creams, cake
mixes, fillings, etc. Do not use it for kneading heavy
doughs.
Kneading hook
B3
It is used for kneading various types of doughs
including heavy and thick doughs such as for
example bread dough, pizza dough, fresh pastry
doughs, etc.
Elastic beater B4
It is used for beating dessert creams, instant
puddings, mayonnaise, sponge cake dough, etc. Do
not use it for kneading heavy doughs.
Adding ingredients into the bowl
• Put the ingredients that you wish to process into the stainless steel
bowl. No more than 2.7 kg of dough may be processed per batch.
• The maximum number of egg whites that can be whisked at once
is 12.
• We recommend that you do not fill the bowl past the level of the 4 l
mark. If an insufficient amount of ingredients are put in the bowl (less
than 0.3 litres of dough), then they may not be optimally processed.
Mounting attachments
• Place the stand mixer on an even, dry and stable surface, for example
on akitchen countertop.
• Use one hand to gently push down the multi-function head A7 and
press the release lock A9 with the other. This will release the multi-
function head. Tilt the multi-function head upwards all the way, so that
aclick is heard.
• Select an attachment and slide it on to the mounting shaft A2. Turn
the attachment clockwise to secure it in position. Lightly pull the
attachment downwards with one hand to check that it is properly
attached.
Mounting the bowl
• Insert the stainless steel bowl into the base A13 and secure it in place
by turning it clockwise (towards the closed padlock symbol). When
the bowl is properly attached, it cannot be separately lifted out of the
base.
• Use one hand to push down the release lock A9 and the other to push
down the multi-function head A7 so that it clicks into place.
Using the transparent bowl cover
• If you decide to use the transparent cover, first mount the large circular
cover G2 on to the bowl so that it is properly seated along the entire
perimeter of the bowl. Then click the top cover G1 on to the circular
cover.
. . . . . . . . . . . . . . . . . . . . . . . . . . . . . . . . . . . . . . . . . . . . . . . . . . . . . . . . . . . . . . . . . . . . . . .
OPERATION
• Connect the power cord to an el. power socket.
• Use the control knob to set the required speed level from 1 to 6. We
recommend to start at alower speed and to increase it gradually. You
can change the speed setting even while the appliance is running. We
recommend that runny doughs and sauces are processed at lower
speed levels; this will prevent ingredients from splashing out. As soon
as they are mixed together, increase the speed to the required level.
Attention:
Items such as spoons, kitchen knives, forks, etc. must
not be placed into the appliance during operation as
this could result in injury or damage to the appliance.
Releasing stuck-on ingredients
• In the event that an ingredient (e.g. dough) sticks to the edge of the
bowl, turn off the stand mixer by setting the control knob to the OFF
position and disconnect it from the power socket.
• In the event that the bowl cover was used, first remove it. Then tilt
open the multi-function head. For better visibility into the bowl, it is
possible to turn on illumination by setting the control knob to position
F3.
• Using an ordinary scraper, remove the stuck-on ingredient on the
edge of the bowl and put it into the middle of the bowl.
• Tilt the multi-function head back into the operating position and put on
the transparent bowl cover. Continue processing.
Operating time of the stand mixer
• When beating, whisking or kneading, do not leave the appliance in
continuous operation for longer than 10 minutes.
• When kneading thick, heavy dough, do not allow the appliance to run
for longer than 5 minutes.
• After one of the mentioned times has elapsed, turn off the appliance
and allow it to cool down. The appliance can be used again after 30
minutes.
• If you wish to run the appliance at maximum speed for ashort time,
set the control knob to position P. Do not leave the stand mixer in this
mode for longer than 30 seconds, there is arisk of overheating.
Quick guide to processing ingredients
Attachment type Ingredients
Maximum
load
Processing
time
Speed
selection
Balloon whisk B1
Egg whites 12 pcs 4 min 5-6
Whipping
cream
1 l 6–8 min 5-6
Beater B2 and
elastic beater B4
Cake dough 2.7 kg 6 min 3-4
Kneading hook
B3
Bread dough
Pizza dough
1 kg 4–5 min 1-2
Note:
The above processing times are only areference. To prevent
ingredients from splattering out of the bowl, select an initial
speed level of 1 or 2. Then set ahigher
speed as required. For easier mixing of dough we
recommended soft margarine or butter.
When whipping egg whites, the bowl and the beater must
be perfectly clean and dry. Even asmall amount of fat may
result in that the egg whites will not be whipped to the desired
snowy consistency.
Whipping cream should be cooled to atemperature of 6°C
prior to being whipped.
Prior to processing them, allow the ingredients used for
making various doughs to rest at room temperature.
Ending operation and disassembling the accessories
• After you have finished using the appliance, set the control knob to the
OFF position and disconnect the power cord from the power socket.
• If you used the transparent bowl cover, remove it. Snap the top cover
G1 out of the large circular cover and then take the circular cover G2
off the bowl.
• Use one hand to gently push down the multi-function head A7 and
press the release lock A9 with the other. This will release the multi-
function head. Tilt the multi-function head upwards all the way, so that
aclick is heard.
• Turn the attachment anticlockwise to release it, and then remove it.
• Turn the stainless steel bowl anticlockwise (towards the open padlock
symbol) and take it off the base.
• Move the multi-function head back to the horizontal position.
Loading ...
Loading ...
Loading ...