Loading ...
Loading ...
Loading ...
- 4 -
Revision 12/2022
Copyright © 2022, Fast ČR, a.s.
BEFORE FIRST USE
• Prior to using this appliance, please read the user‘smanual thoroughly,
even in cases, when one has already familiarised themselves with
previous use of similar types of appliances. Only use the appliance in
the manner described in this user’smanual. Keep this user‘smanual in
asafe place where it can be easily retrieved for future use. In the event
that you hand this appliance over to somebody else, make sure to also
include this user‘smanual.
• We recommend saving the original cardboard box, packaging material,
purchase receipt and responsibility statement of the vendor or warranty
card for at least the duration of the legal liability for unsatisfactory
performance or quality. In the event of transportation, we recommend
that you pack the appliance in the original box from the manufacturer.
• Carefully unpack the appliance and take care not to throw away any
part of the packaging before you find all the parts of the appliance.
. . . . . . . . . . . . . . . . . . . . . . . . . . . . . . . . . . . . . . . . . . . . . . . . . . . . . . . . . . . . . . . . . . . . . . .
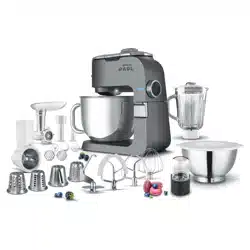
DESCRIPTION OF THE APPLIANCE AND ACCESSORIES
A1 Removable cover of the front
attachment hub for the meat
grinder or the slicing and
grating attachments
A2 Mounting shaft
A3 Transparent cover with feed
hole, two-part (see fig. G)
A4 6-litre stainless steel bowl for
processing food
A5 Stand
A6 Removable cover of the top
blender attachment hub
A7 Tilt-out multi-function head
A8 Control knob used to variably
set the speed level 1-2-3-4-
5-6, to set the pulse level (P),
illumination
and to turn off
the appliance (OFF).
A9 Multi-function head release
and tilt-down lock
A10 Anti-slip feet for stability of the
appliance during operation
A11 Button for releasing the meat
grinder from the attachment
hub / head
A12 Front attachment hub for
meat grinder and grater
A13 Base for stainless steel bowl
A14 Top attachment hub for
blender
. . . . . . . . . . . . . . . . . . . . . . . . . . . . . . . . . . . . . . . . . . . . . . . . . . . . . . . . . . . . . . . . . . . . . . .
B1 Balloon whisk
B2 Beater
B3 Kneading hook
B4 Elastic beater
B5 Lid for stainless steel bowl
. . . . . . . . . . . . . . . . . . . . . . . . . . . . . . . . . . . . . . . . . . . . . . . . . . . . . . . . . . . . . . . . . . . . . . .
C1 Inner cap
C2 Outer lid with ahole for adding
ingredients
C3 Blending jar with 1.5 l capacity
C4 Blade assembly
C5 Base for mounting/removing
the blender from the
attachment hub
. . . . . . . . . . . . . . . . . . . . . . . . . . . . . . . . . . . . . . . . . . . . . . . . . . . . . . . . . . . . . . . . . . . . . . .
D1 Grinder
D2 Screw shaft
D3 Grinding blade
D4 Fine grinding plate
D5 Screw ring
D6 Medium fine grinding plate
D7 Coarse grinding plate
D8 Pusher
D9 Aluminium hopper
D10 Grinding chamber
D11 Sausage stuffer attachment
D12 Conical attachment
D13 Cookie maker
D14 Separator
D15 Kebab maker
D16 Cookie maker holder
. . . . . . . . . . . . . . . . . . . . . . . . . . . . . . . . . . . . . . . . . . . . . . . . . . . . . . . . . . . . . . . . . . . . . . .
E1 Pusher
E2 Grater
E3 Fine grating cone
E4 Attachment screw ring
E5 Coarse grating cone
E6 Slicing cone
E7 Potato mashing cone
. . . . . . . . . . . . . . . . . . . . . . . . . . . . . . . . . . . . . . . . . . . . . . . . . . . . . . . . . . . . . . . . . . . . . . .
F1 PULSE mode for increasing
the speed to maximum for
ashort time.
The control knob must be
manually held in this position.
Releasing it will automatically
set it back to the OFF position.
F2 Appliance OFF
F3 Illumination
F4 Speed levels 1-6
. . . . . . . . . . . . . . . . . . . . . . . . . . . . . . . . . . . . . . . . . . . . . . . . . . . . . . . . . . . . . . . . . . . . . . .
G1 Top cover G2 Circular cover
. . . . . . . . . . . . . . . . . . . . . . . . . . . . . . . . . . . . . . . . . . . . . . . . . . . . . . . . . . . . . . . . . . . . . . .
H1 Grinding jar H2 Blade assembly
. . . . . . . . . . . . . . . . . . . . . . . . . . . . . . . . . . . . . . . . . . . . . . . . . . . . . . . . . . . . . . . . . . . . . . .
INTENDED USE OF THE APPLIANCE
• The stand mixer is intended for processing astandard amount of food in
the household. It is suitable for blending, whipping, kneading, grinding,
grating, making pasta or cookies or for stuffing smoked goods.
. . . . . . . . . . . . . . . . . . . . . . . . . . . . . . . . . . . . . . . . . . . . . . . . . . . . . . . . . . . . . . . . . . . . . . .
BEFORE FIRST USE
• Before first use, thoroughly wash all the parts that come into contact
with food (stainless steel bowl, transparent cover, accessories B1 to
B5, the complete blender C1 to C5, the complete grinder D1 to D16,
the grater E1 to E7 and parts of the grinder H1 and H2) using warm
water and aneutral kitchen detergent. Then rinse everything with
clean water and allow it to dry naturally or dry it out thoroughly using
awiping cloth.
Attention:
Accessories B1 to B5, the metal parts of the meat
grinder D1 and the grater E2 are not intended for
washing in adishwasher. Other removable parts may
be washed in adishwasher.
When washing the blade assembly A21, take special
care to avoid injury on the sharp cutting edges.
• Wipe the outer parts of the stand A5 and the multi-function head A7
using alightly dampened wiping cloth.
Attention:
Do not rinse or submerge the stand A5 or the multi-
function head A7 and its power cord in water. Neither
the stand nor the multi-function head are intended for
washing in adishwasher.
. . . . . . . . . . . . . . . . . . . . . . . . . . . . . . . . . . . . . . . . . . . . . . . . . . . . . . . . . . . . . . . . . . . . . . .
BEATING, WHIPPING AND KNEADING
Planetary mixing system
• The stand mixer is equipped with aplanetary mixing system, which
works on the principle of adual rotation of the attachment. The
attachment rotates anticlockwise along the inner perimeter of the
bowl while rotating around its own axis in the opposite direction. This
ensures that ingredients inside the bowl are processed thoroughly
and evenly.
EN
Multifunctional stand mixer
User’smanual
Loading ...
Loading ...
Loading ...