Loading ...
Loading ...
Loading ...
11
10
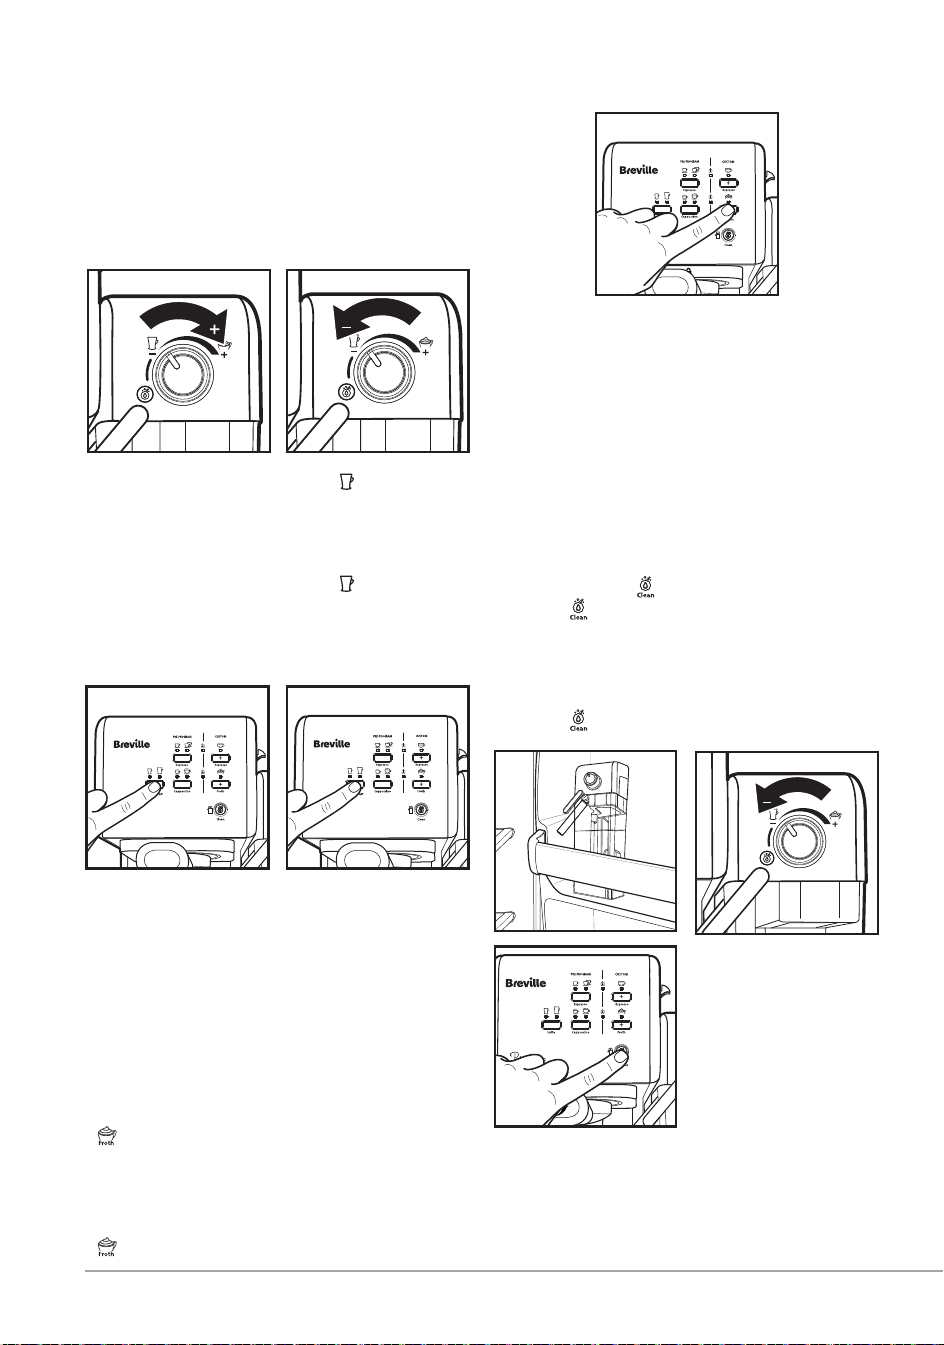
PREPARING LATTE
Prior to preparing your latte, adjust the level
of frothed milk according to your preference
by turning the Froth Control Knob to the right
for more foam (cappuccino) and to the left for
less foam (latte).
a. Press the Latte Button “ ” once to
brew a small cup of latte. The indicator
light for a small cup of latte will turn
on. It will start blinking; indicating that
a small cup of latte is brewing.
b. Press the Latte Button “ ” twice to
brew a large cup of latte. The indicator
light for large cup of latte will turn on.
It will start blinking; indicating that a
large cup of latte is brewing.
The unit will start brewing latte according
to your selection. The unit will stop
automatically after the brewing process
and the light will become solid, indicating
that the cycle has been completed. Your
delicious latte is now ready to be enjoyed!
PREPARING FROTHED MILK
The Breville
®
One-Touch CoffeeHouse also
allows you to prepare frothed milk alone.
Press the Manual Foam “Froth” Button
“ ” if you wish to add more foam to your
beverage or to prepare frothed milk for
any other beverage, e.g. macchiato, hot
chocolate, chai latte, etc. Once nished,
press the Manual Foam “Froth” Button
“ ” once again to stop it.
MORE FOAM LESS FOAM
a.
x1x1
b.
x2x2
AFTER PREPARING YOUR BEVERAGES
WITH MILK
Once you are done preparing your
beverage with milk, you can either store
the unit’s milk reservoir directly in the
refrigerator (ready to be used for the next
time) or dispose of the leftover milk.
Place a large empty cup (with at least 325
mL/ 11 . oz. capacity) under the frothed
milk dispensing tube. Turn the Froth
Control Knob counter clockwise to the
clean position “ ”
then press the Clean
button “ ” to activate the clean function.
Let the unit dispense the water through the
tube until it comes out clear. The unit will
automatically stop when the clean cycle
is completed, or you can press the clean
button “ ” to stop the process.
x1x1
x1x1
CLEANING LIGHT WILL REMAIN
ILLUMINATED WHEN YOUR MACHINE
IS READY FOR A CLEANING CYCLE.
Always switch off, unplug and allow to cool
before removing parts and cleaning
CLEANING THE MILK RESERVOIR AND
FROTHING TUBE
Although you can store the milk reservoir with
leftover milk in the refrigerator, it is important
to clean the reservoir and frothing tube
regularly to avoid clogging and residue build-
up. In order to clean the milk reservoir, please
follow the instructions listed below:
1. Remove the milk reservoir from the unit
by lifting up the milk reservoir release
button and simultaneously sliding the
milk reservoir out.
2. Remove the lid of the reservoir.
3. Dispose of any milk left, then rinse
and wash the milk reservoir and its
lid thoroughly with warm soapy water.
Make sure to rinse and dry them well.
Do not use abrasive cleaners and
scouring pads, as they will scratch the
nish.
NOTE: The milk reservoir is also
dishwasher safe (top rack). Do not
place the lid of the milk reservoir in the
dishwasher.
4. Fill milk reservoir with water, not above
the MAX ll line. Place milk reservoir
back onto unit, lifting up on reservoir
release button and simultaneously
sliding milk reservoir in, holding
reservoir by the lid.
5. Place a large empty cup under the froth
dispensing tube.
6. Turn the Froth Control Knob counter
clockwise to the clean position “
” then press the Clean “ ” button to
activate the clean function. The unit will
start releasing steam through the froth
dispensing tube. Let the cleaning cycle
run until you no longer see any milk
coming out of the tube, or let the cycle
run until it stops automatically.
7. Dispose of any water left in the milk
reservoir and place it back in the unit.
You should feel the milk reservoir lock
in place.
DEEP CLEANING THE FILTERS
Make sure to deep clean your lter every
90 days for optimal brewing performance.
Follow these disassembly instructions and
rinse the pieces in a large bowl of warm
water. Once rinsed thoroughly, wipe dry and
reassemble.
CLEANING THE FILTERS
1. To remove the detachable bottom
covers from under the lters, rotate
them counterclockwise towards the
unlock icon “ ”.
2. Wash the detachable bottom covers
and lters with warm soapy water.
Make sure to rinse and dry them well.
3. Place the detachable bottom covers
back onto the lters by inserting them
in their place and then rotating them
clockwise (away from the unlock icon
“ ”) until you hear it click.
Unlock
Step1
Step2 Step3
Lift
Push
Remove
Remove
Seal
Remove
Filter
Unlock
Step1
Step2
Step3
Lift
Push
Remove
Remove
Seal
Remove
Filter
Unlock
Step1 Step2
Step3
Lift
Push
Remove
Remove
Seal
Remove
Filter
Loading ...
Loading ...
Loading ...