
Tchibo GmbH D-22290 Hamburg · 109547HB_GFT · 2022-08
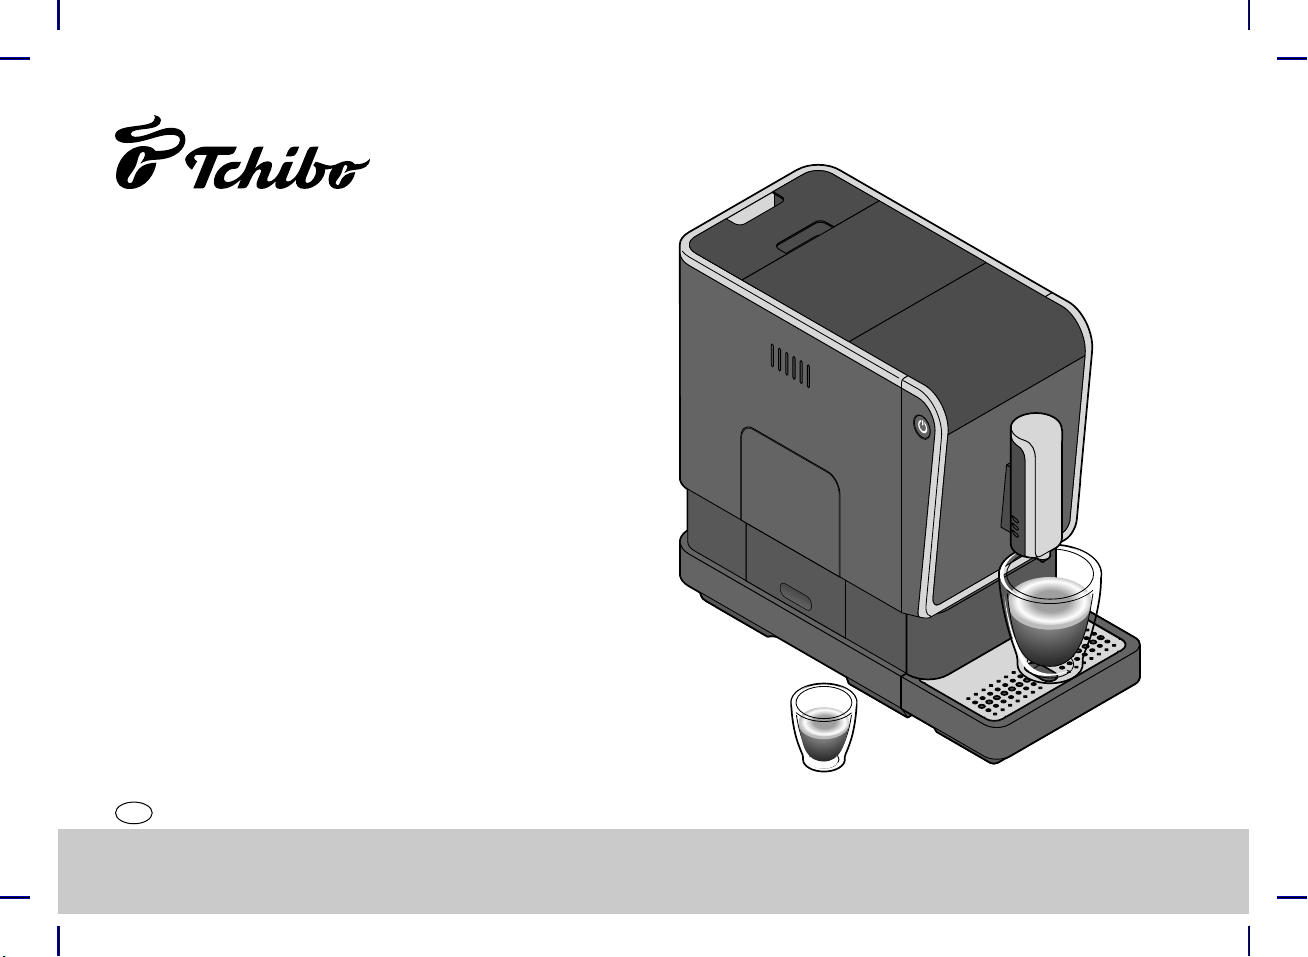
The Tchibo
Bean to Brew Machine
Keep for future use!
en
Operating instructions and warranty
109547 en Kaffeevollautomat_USA_v4.indd 1109547 en Kaffeevollautomat_USA_v4.indd 1 31.08.22 09:4531.08.22 09:45

2
Contents
3 About these instructions
3 Intended use
3 Location
4 IMPORTANT SAFETY
INSTRUCTIONS
8 At a glance (delivery contents)
10 Removing protective films and
packaging materials
11 Initial operation – prior to first
use
13 Switching on the machine
13 Adjusting the height of the
coffee spout
14 Rinsing the machine
15 Make a coffee
16 Empty coffee grounds container,
leftover water tray
and drip bowl
17 Preheating the cup
17 Adjusting the strength of the
coffee - b
oost button
17 Adjusting the amount of the
beverage
18 Adjusting the grinding degree
19 Expansion for the coffee bean
compartment
20 Adjusting the automatic rinsing
cycle
21 Standby mode
21 Cleaning
23 Cleaning the brewing unit
25 Descaling
27 For a long period of non-use
28 Problems / solutions
28 User instructions
29 Technical specifications
29 Disposal
109547 en Kaffeevollautomat_USA_v4.indd 2109547 en Kaffeevollautomat_USA_v4.indd 2 31.08.22 09:4531.08.22 09:45

3
About these instructions
This product is equipped with safety features. Nevertheless, read the safety warn-
ings carefully andonly use the product as described in these instructions to avoid
accidental injury or damage.
Keep this manual for future reference.
If you pass this product on to another person, remember to give them these
instructions.
Symbols in these instructions:
This symbol warns you of the
danger of injury.
This symbol warns you of the
danger of injury caused by
electricity.
The signal word DANGER warns ofsevere injury anddanger to life.
The signal word WARNING warns ofpotential severe injury anddanger to life.
The signal word CAUTION warns of minor injury.
The signal word NOTICE warns of possible damage to the device.
This indicates additional information.
Intended use
The coffee machine has been devised for the following uses:
•Preparing espresso and other coffee beverages from whole
(ungr
ound), roasted coffee beans.
•For household only.
The machine has not been devised for processing beans that
are caramelized or sugar-coated, raw coffee (green, unroast-
ed beans), beans mixed with raw coffee, or loose coffee
grounds.
Location
Set up the machine in a dry, indoor room. Choose a location
that is adequately ventilated and protects the machine from
overheating. Avoid rooms with high humidity or high dust
content.
109547 en Kaffeevollautomat_USA_v4.indd 3109547 en Kaffeevollautomat_USA_v4.indd 3 31.08.22 09:4531.08.22 09:45

4
IMPORTANT SAFETY INSTRUCTIONS
IMPORTANT SAFEGUARDS
1. Read all instructions.
2. Do not touch hot surfaces. Use handles or knobs.
3. To protect against fire, electric shock and injury to
persons do not immerse cord or plugs in water or
other liquid.
4. Close supervision is necessary when any appliance is
used by or near children.
5. Unplug from outlet when not in use and before
cleaning. Allow to cool before putting on or taking
off parts, and before cleaning the appliance.
6. Do not operate any appliance with a damaged cord or
plug or after the appliance malfunctions, or has been
damaged in any manner. Return appliance to the
nearest authorized service facility for examination,
repair or adjustment.
7. The use of accessory attachments not recommended
by the appliance manufacturer may result in fire,
electric shock or injury to persons.
8. Do not use outdoors.
9. Do not let cord hang over edge of table or counter,
or touch hot surfaces.
10. Do not place on or near a hot gas or electric burner,
or in a heated oven.
11. Always attach plug to appliance first, then plug cord
into the wall oullet. To disconnect, turn any control
to “off,” then remove plug from wall outlet.
12. Do not use appliance for other than intended use.
SAVE THESE INSTRUCTIONS.
DANGER
Danger to life from electric shock
•Do not use the machine if the machine, connecting cord
or mains plug is damaged or if the machine has been
dropped.
•Only connect the machine to a properly installed, grounded
wall socket. The mains voltage must comply with the
requirements stated in the machine’s technical specifi-
cations.
•Remove the mains plug from the wall socket if a fault
occurs.
109547 en Kaffeevollautomat_USA_v4.indd 4109547 en Kaffeevollautomat_USA_v4.indd 4 31.08.22 09:4531.08.22 09:45

5
•Always pull on the mains plug, not the cord.
•To disconnect the machine fully from the mains, unplug
the mains plug from the wall socket.
•Never touch the mains plug with wet hands.
WARNING
Risk of injury to children
•Children must not be allowed to play with the appliance.
Keep children under 8 years and animals away from the
appliance and the power cord.
•This device can be used by children from the age of 8
years, provided they are supervised or have been instruct-
ed in the safe use of the device and understand the result-
ing dangers.
•Do not allow children to clean the appliance unless they are
over 8 years old and supervised. The device is mainte-
nance-free.
• Keep packaging materials away from children.
There is a risk of suffocation!
•The magnets attached to the drip tray and the cover of the
brewing unit may come loose and be swallowed or inhaled
by children. Magnets connecting inside the body can lead
to serious injuries. In the case that magnets are swallowed
or inhaled, seek medical advice immediately.
Risk of injury to people restricted in their capability of
operating electrical appliances
•This machine can be used by persons with reduced physi-
cal, sensory or mental capabilities, or who lack experience
or knowledge, provided they are supervised or have been
trained in the safe use of the machine and understand the
resulting dangers.
Risk of burns/scalds by hot liquids
•Do not touch the coffee spout during or immediately after
use. Avoid contact with coffee or hot water being dis-
pensed from the spout.
CAUTION
Health risks from germs and aggressive substances
•Empty the leftover water tray, the container for the coffee
grounds and the
drip bowl every day: Observe the specified
cleaning intervals.
•If you will not be using the machine for a prolonged period,
empty and clean the water tank, coffee bean compartment,
drip bowl and container for the coffee grounds.
109547 en Kaffeevollautomat_USA_v4.indd 5109547 en Kaffeevollautomat_USA_v4.indd 5 31.08.22 09:4531.08.22 09:45

6
•Change the water in the water tank daily to prevent germs
from collecting.
•Use only the cleaning and descaling agents listed in this
manual as well as the relevant cleaning utensils to clean
this machine. The use of other cleaning agents can lead to
health hazards.
Risk of burns from hot surfaces
•The brewing unit becomes hot when preparing a drink. Do
not remove the brewing unit during or shortly after use.
•After use, the surfaces of the heating element still have
residual heat.
• To move the machine, always hold it by the outer casing.
Lift the machine to move it. Do not lift the machine by the
drip bowl with drip grid, as it is only lightly attached by
magnets.
NOTICE
Possible machine damage
•Do not clean the machine with a water jet. Do not place it in
a position where it could be cleaned with a water jet.
•Do not put the machine or any part of it in the dishwasher.
•Only use the machine with the container for the coffee
grounds and the leftover water tray inserted.
•Always pour fresh, cold tap or other drinking water into the
water tank. Do not use carbonated mineral water or any
other liquids.
• Never fill the coffee bean
compartment with beans that
are caramelized or sugar-coated, raw coffee (green,
unroasted beans), beans mixed with raw coffee, or loose
coffee powder. Doing so could damage the machine.
•Grinder settings may only be adjusted while the grinder is
operating.
•Descale the machine as soon as the machine indicates that
this is necessary.
•Place the machine on a solid, straight, level surface that is
well illuminated and resistant to water and heat.
•Do not place the machine on a hob or immediately next to
a hot oven, radiator or anything similar, to ensure that the
casing does not melt.
•Ensure sufficient ventilation around the coffee system. Do
not cover it with dishtowels or similar objects during use.
•A short detachable power-supply cord is provided to reduce
risks resulting from becoming entangled in or tripping over
a longer cord. Do not use a longer detachable power-
supply cord or extension cord.
109547 en Kaffeevollautomat_USA_v4.indd 6109547 en Kaffeevollautomat_USA_v4.indd 6 31.08.22 09:4531.08.22 09:45

7
•Route the connecting cord in such a way that it cannot be
tripped over. Do not let the connecting cord hang down
from the surface the machine is put on, so that the
machine cannot be pulled down by it.
•Keep all cards with magnetic strips, such as credit cards,
debit cards, etc. away from the
drip bowl and the cover for
the brewing unit and all the magnets built into these parts.
The cards could become damaged. Also keep magnetic
memory storage media and all devices that are affected by
magnetism or may sustain functional impairment away
from the machine.
•The machine is equipped with non-slip feet. Work surfaces
often have varnished or plastic finishes and are treated
with a variety of care products. Some of these may contain
substances that react adversely to the non-slip feet and
soften them. If necessary, place a non-slip mat under the
machine.
109547 en Kaffeevollautomat_USA_v4.indd 7109547 en Kaffeevollautomat_USA_v4.indd 7 31.08.22 09:4531.08.22 09:45
8
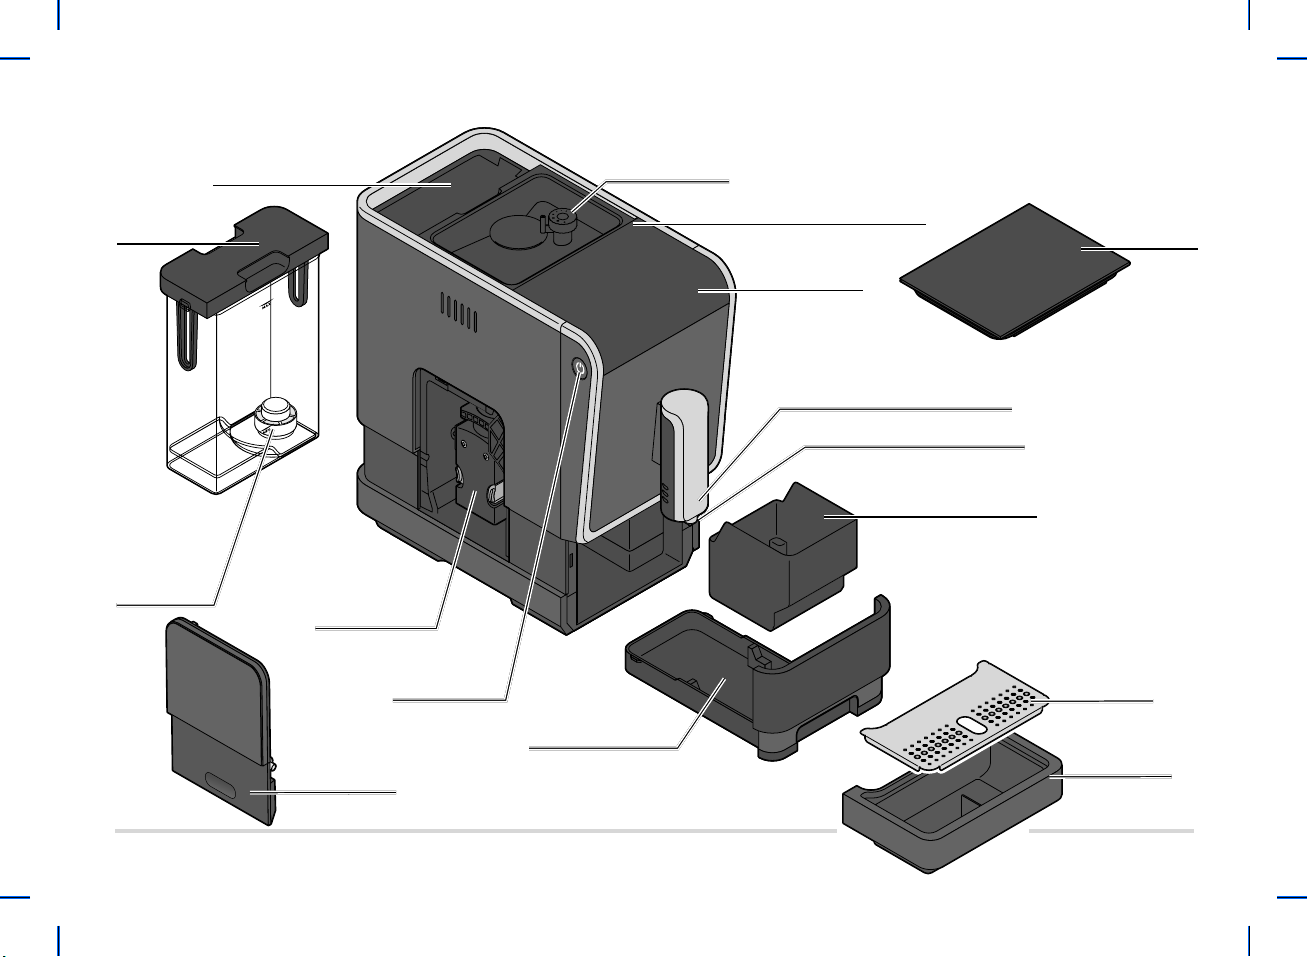
At a glance (delivery contents)
Opening for the
water tank
Grind adjuster
Coffee bean compartment 5.6 oz. (160 g)
Control panel
Cover for the
coffee bean
compartment
Height-adjustable coffee spout
Coffee spout opening
Coffee grounds container
Drip grid
Drip bowl
Leftover water tray
On/off button
Brewing unit
Cover for the
brewing unit
Filter
(for filtering
out limescale
or other parti-
cles)
Water tank
109547 en Kaffeevollautomat_USA_v4.indd 8109547 en Kaffeevollautomat_USA_v4.indd 8 31.08.22 09:4531.08.22 09:45
9
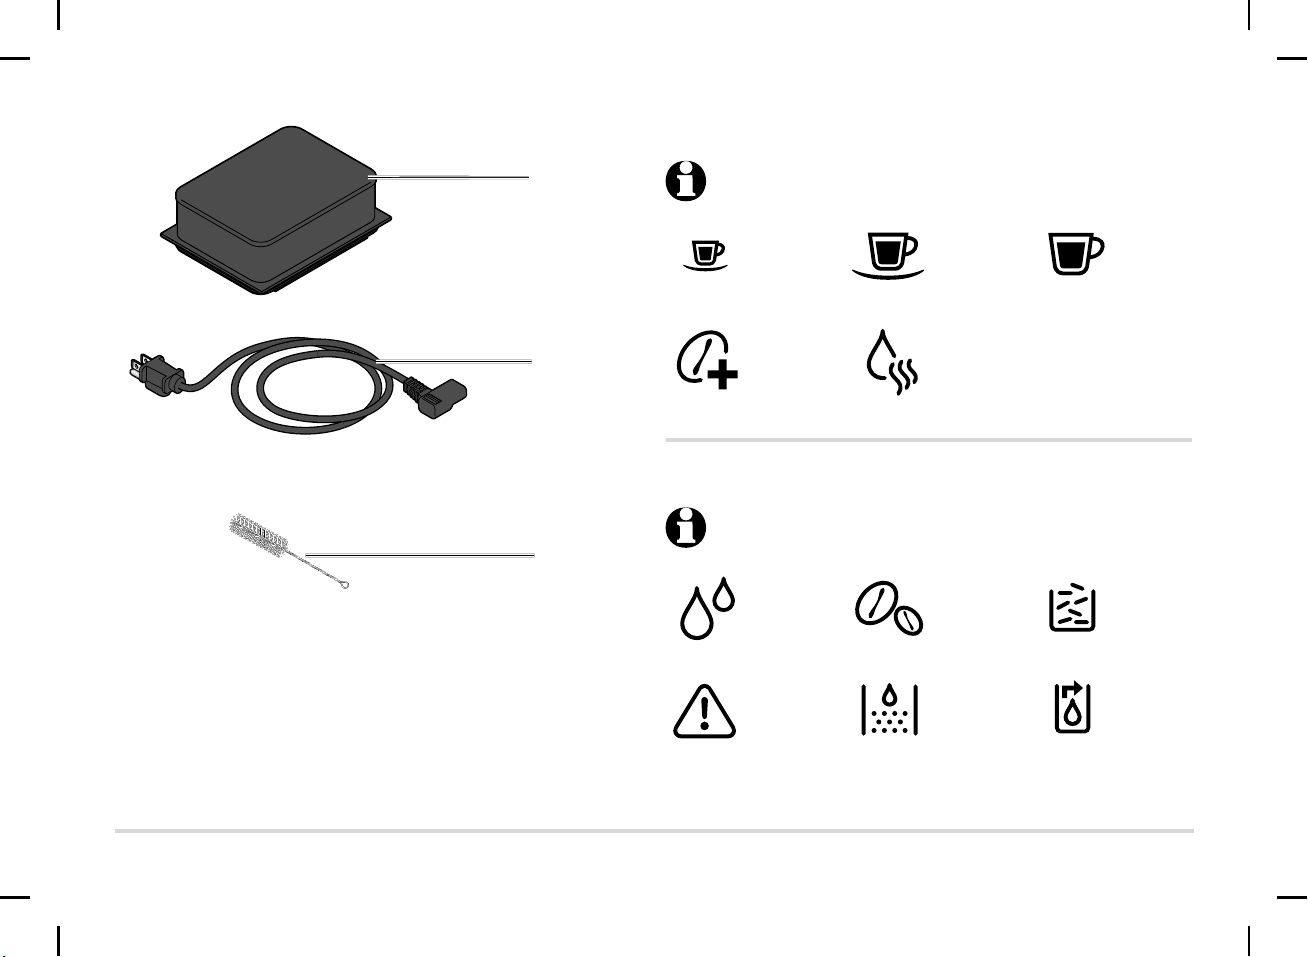
Expansion for the
coffee bean
compartment
Connecting cord
Cleaning brush
Control buttons (white)
The control buttons are only visible when the machine is switched on.
Make an
espresso
Boost
button
Make a
regular
coffee
Rinsing/
heat cup
Make a
large
coffee
Warning lights (orange)
The warning lights only light up when the machine requires maintenance.
Refill
water
Brewing unit
Refill beans
Descale
Empty
coffee
grounds
Empty
system
109547 en Kaffeevollautomat_USA_v4.indd 9109547 en Kaffeevollautomat_USA_v4.indd 9 31.08.22 09:4531.08.22 09:45
10
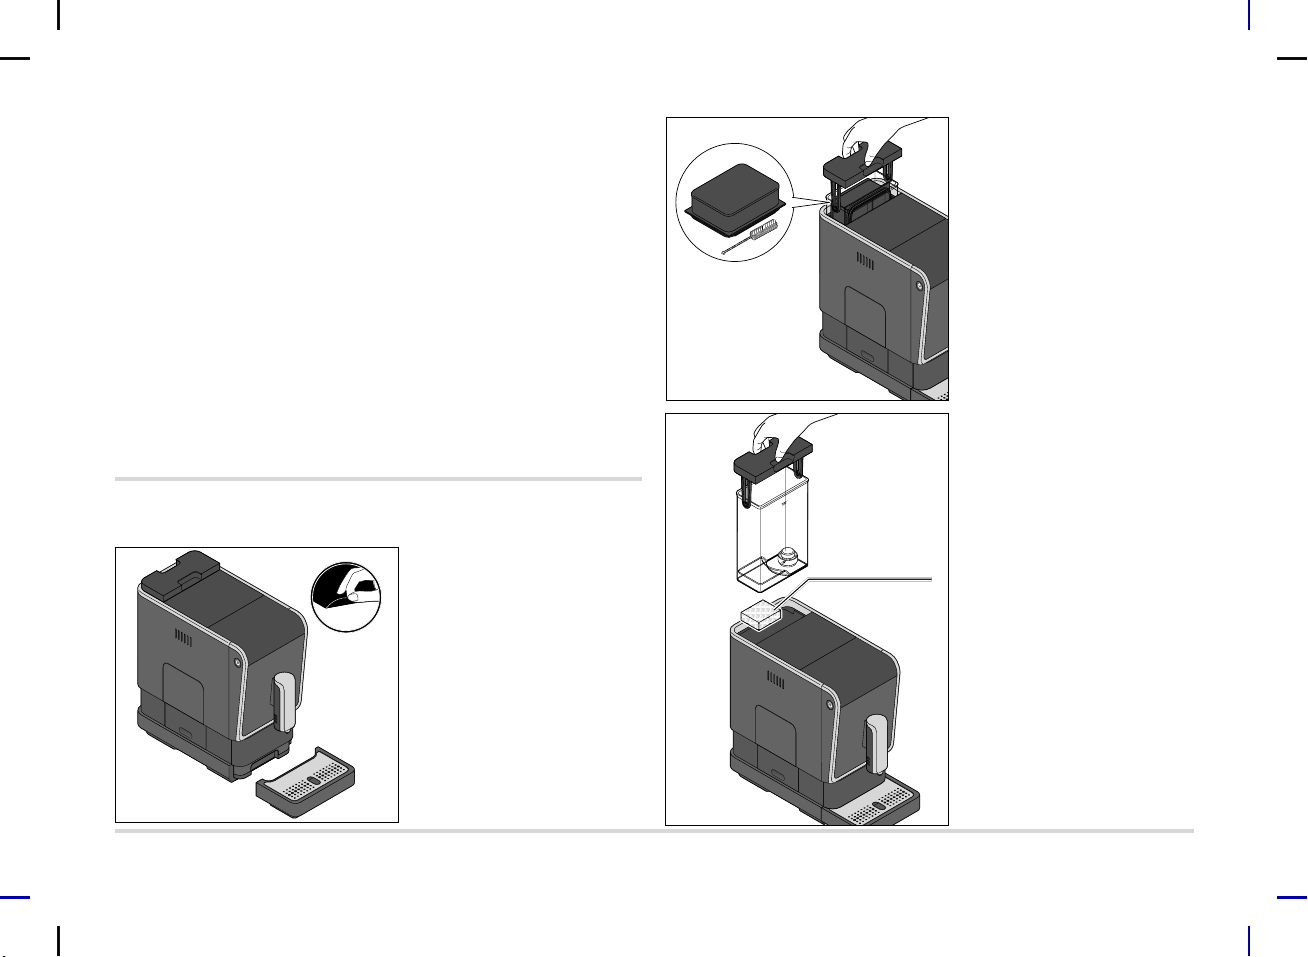
Removing protective films and packaging materials
1. Take the machine out of the
packaging.
2. Pull all protective films off of the
machine and remove all packag-
ing materials.
3. Pull the water tank up and out.
In the water tank you will find
the expansion piece for the
coffee bean compartment and
the cleaning brush.
Take these out of the tank.
transport
protection piece
4. Remove the transport protection
piece underneath the water tank.
5. Clean the water tank with a little
washing-up liquid. Then rinse it
out thoroughly under running
water and dry it.
6. Reinsert the water tank in the
machine and push it down as far
as it will go.
Packaging material
The packaging material protects the unit during shipping.
The original packaging can be kept for future transport of the unit.
Keep the packaging in the event you ever need to return the unit.
109547 en Kaffeevollautomat_USA_v4.indd 10109547 en Kaffeevollautomat_USA_v4.indd 10 31.08.22 09:4631.08.22 09:46
11
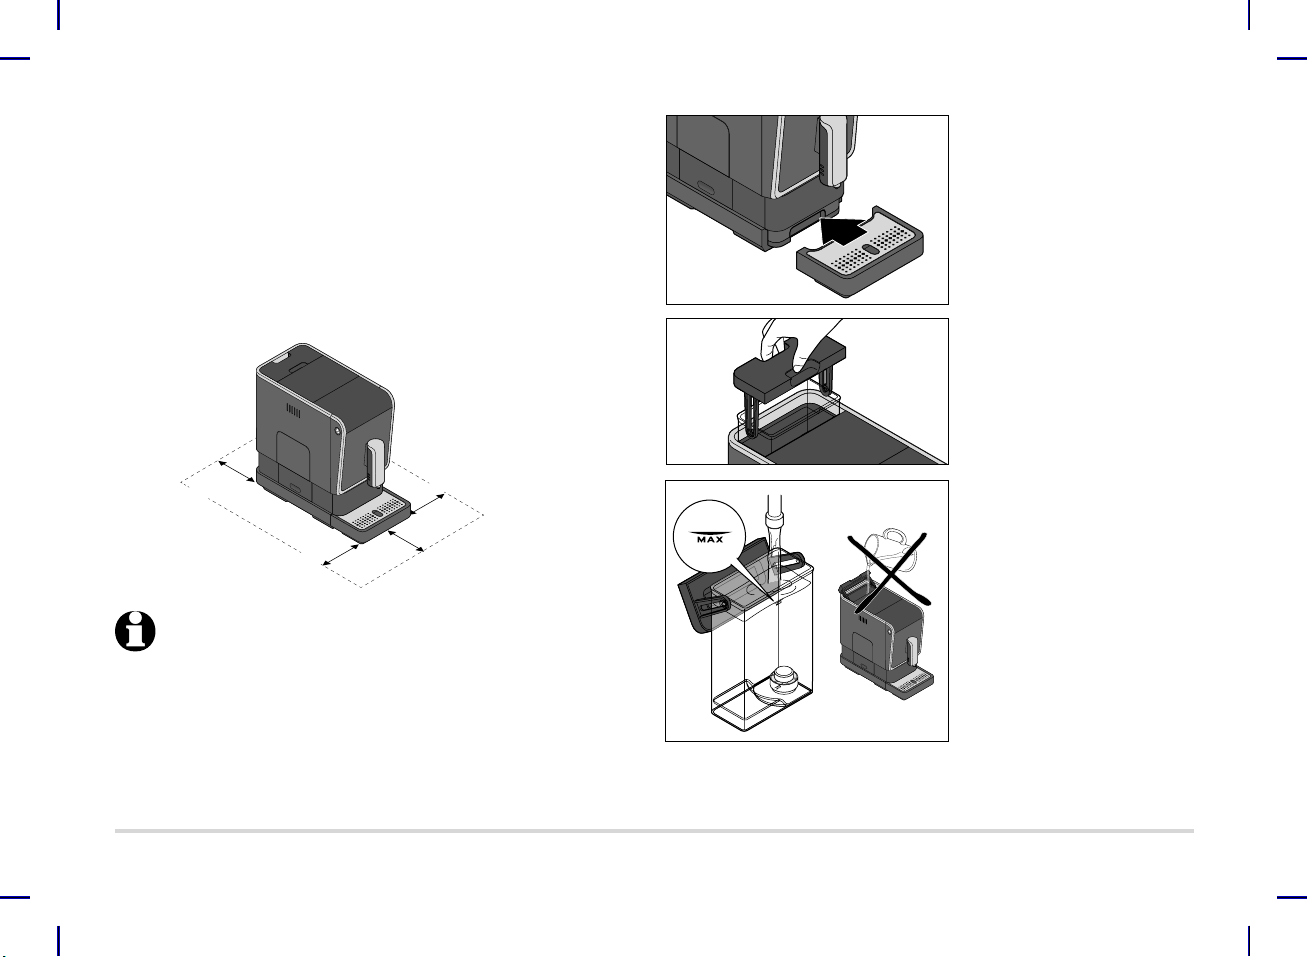
Initial operation – prior to first use
1. Place the machine ...
... on a level worktop or surface that is not sensitive to moisture.
... close to a wall socket. The length of the connecting cord
is approx. 31.5 in. (80 cm).
... at a distance of at least 39.4 in. (1 m) to hot, flammable surfaces
(hobs, ovens, heaters, etc.).
... at least 5.9 in. (150 mm) away from walls.
150 mm
150 mm
150 mm
The figure shows the drip bowl with drip grid to illustrate the real space
requirement. Observe this for the machine installation location.
The machine must not be carried by the drip bowl.
2. Push the drip bowl and drip grid
all the way into the machine as
illustrated.
The drip bowl is held in place by
magnets.
3. Pull the water tank up and out of
the machine.
4. Fill the water tank with fresh,
cold tap water or drinking water
up to the MAX mark.
NOTICE: Never fill water
directly into the tank while
the water tank is still in the
machine! Otherwise, the
machine could be damaged.
109547 en Kaffeevollautomat_USA_v4.indd 11109547 en Kaffeevollautomat_USA_v4.indd 11 31.08.22 09:4631.08.22 09:46
12
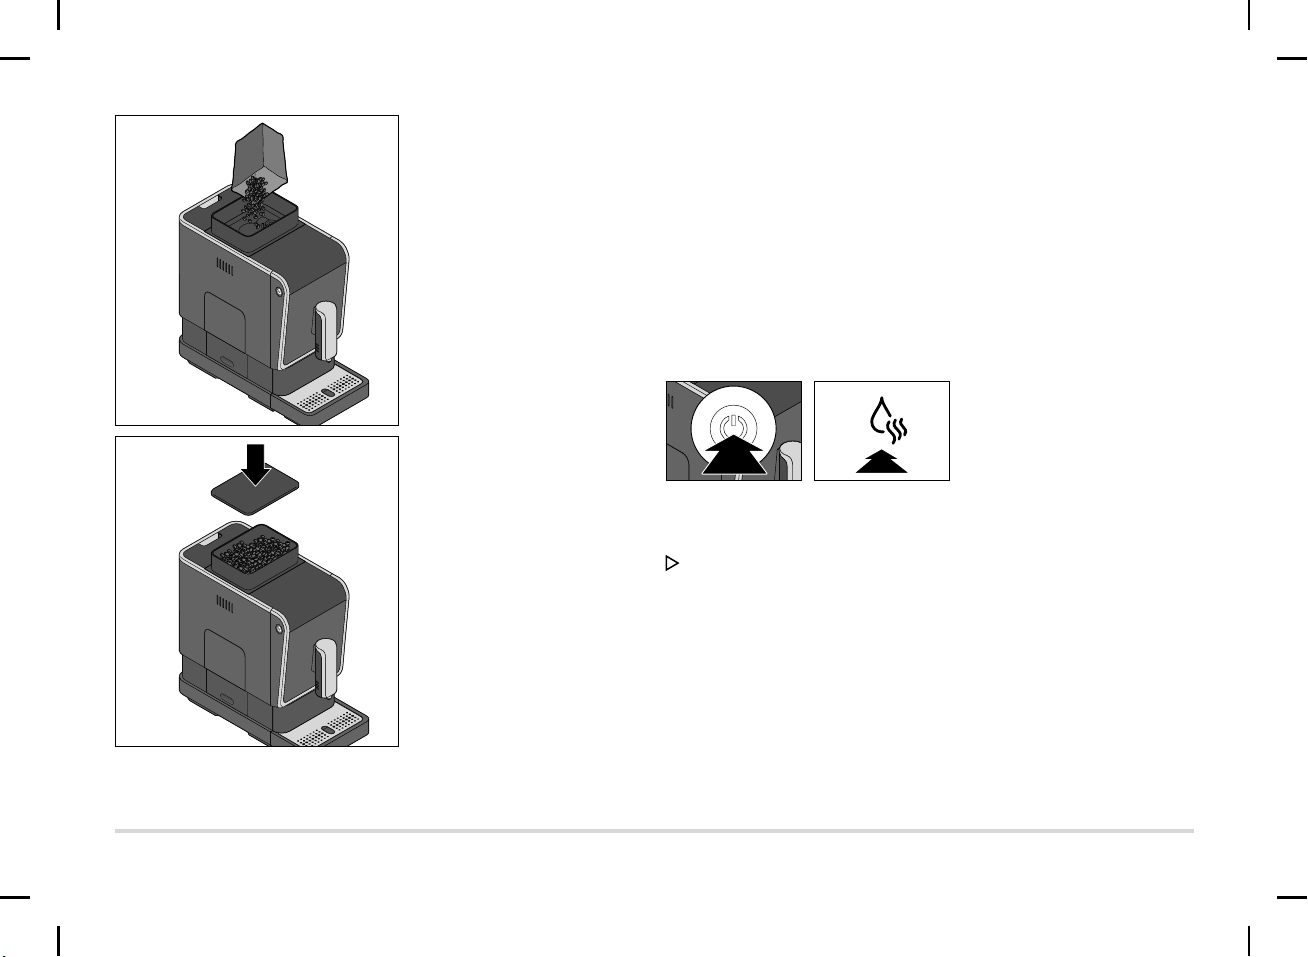
8. Place the lid back on the coffee
bean compartment.
Press the lid all the way on so that
the aroma protection seal can
optimally protect the aroma of the
coffee beans.
9. Plug the connecting plug into the
back of the machine.
10. Insert the mains plug into an
easily accessible wall socket.
11. Press the on/off switch to switch
on the machine.
The rinsing/hot water button flashes
and the heating up process starts.
The pump starts after a few seconds. A small amount of water is flushed through
the system and dispensed into the dri
p bowl.
CAUTION - Risk of burns from hot liquids
Hot water or coffee from the coffee spout may cause burns.
• Do not touch the coffee spout during and shortly after use of the machine.
5. Reinsert the water tank in the
machine and push it down as far
as it will go.
6. Remove the lid from the coffee
bean compartment.
7. Fill as many coffee beans into the
coffee bean compartment as you
will need for one day.
Approx. 5.6 oz. (160 g) fits into
the coffee bean compartment.
The coffee bean compartment
can also be extended to hold
a capacity of approx. 10.6 oz.
(300 g) (see the “Expansion for
the coffee bean compartment”
chapter).
109547 en Kaffeevollautomat_USA_v4.indd 12109547 en Kaffeevollautomat_USA_v4.indd 12 31.08.22 09:4731.08.22 09:47
13
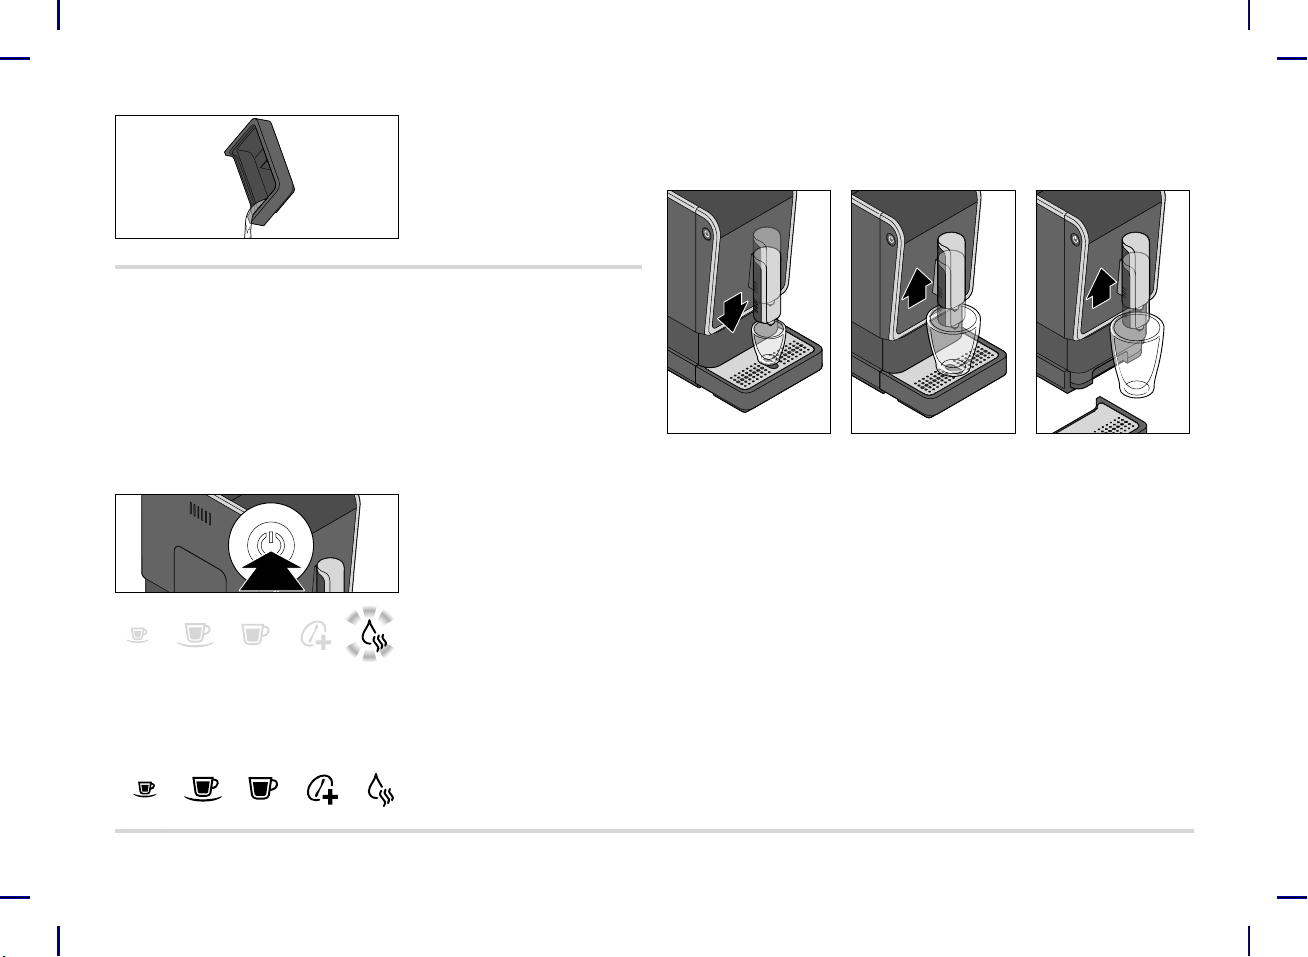
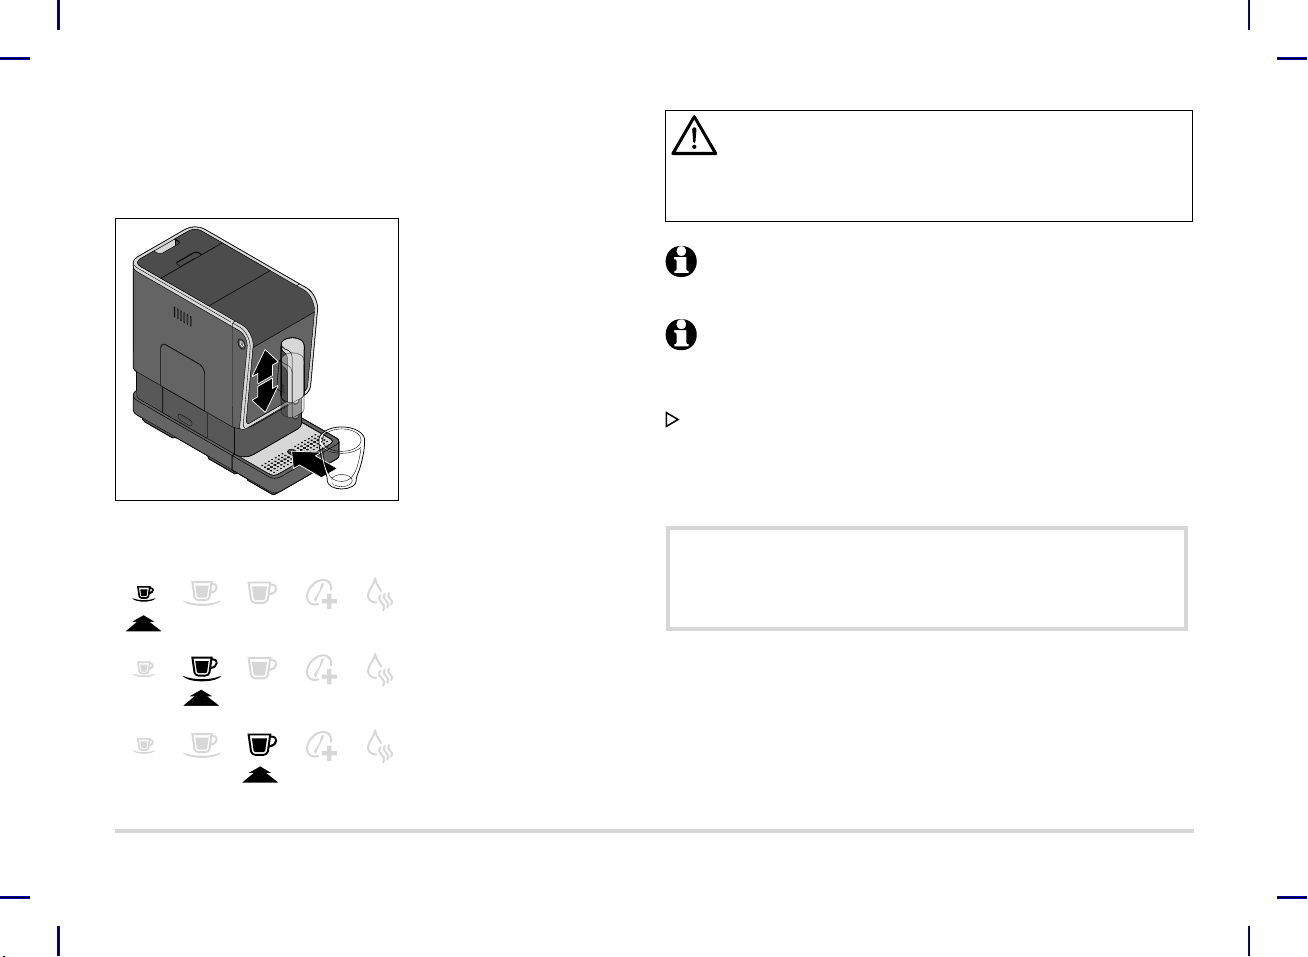
Adjusting the height of the coffee spout
You can adjust the height of the coffee spout to match the size of the cup.
For espresso cups, slide
the coffee spout down-
wards.
For large cups, slide the
coffee spout upwards.
For tall glasses, slide the
coffee spout upwards
and remove the drip
bowl.
Switching on the machine
Prerequisites:
• The machine is switched off.
• The power plug is plugged into the socket.
• The water tank is full.
• The coffee bea
n compartment is full.
To switch on the machine, proceed as follows:
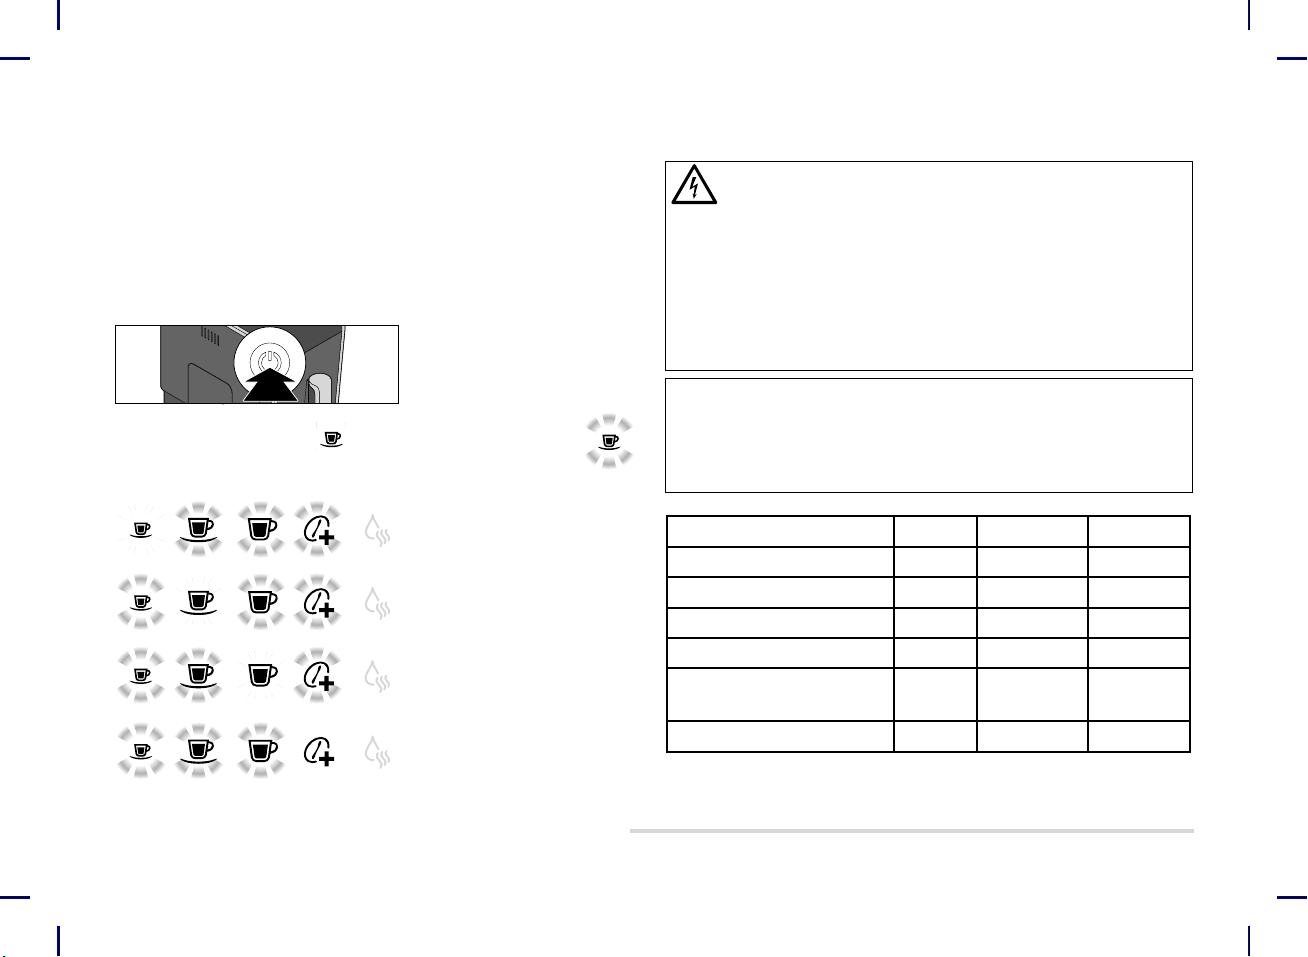
1. Press the on/off switch to switch
on the machine.
The rinsing/hot water button
flashes and the heating up pro-
cess starts.
The pump starts after a few seconds. A small amount of water is flushed through
the system and dispensed into the drip
bowl.
As soon as all the buttons remain
permanently lit, the machine will be
ready.
12. Pour out the water in the drip
bowl if necessary.
13. Rinse out the machine twice as
described in the "Rinsing the
machine" chapter. The machine
is then ready for use.
109547 en Kaffeevollautomat_USA_v4.indd 13109547 en Kaffeevollautomat_USA_v4.indd 13 31.08.22 09:4731.08.22 09:47
14
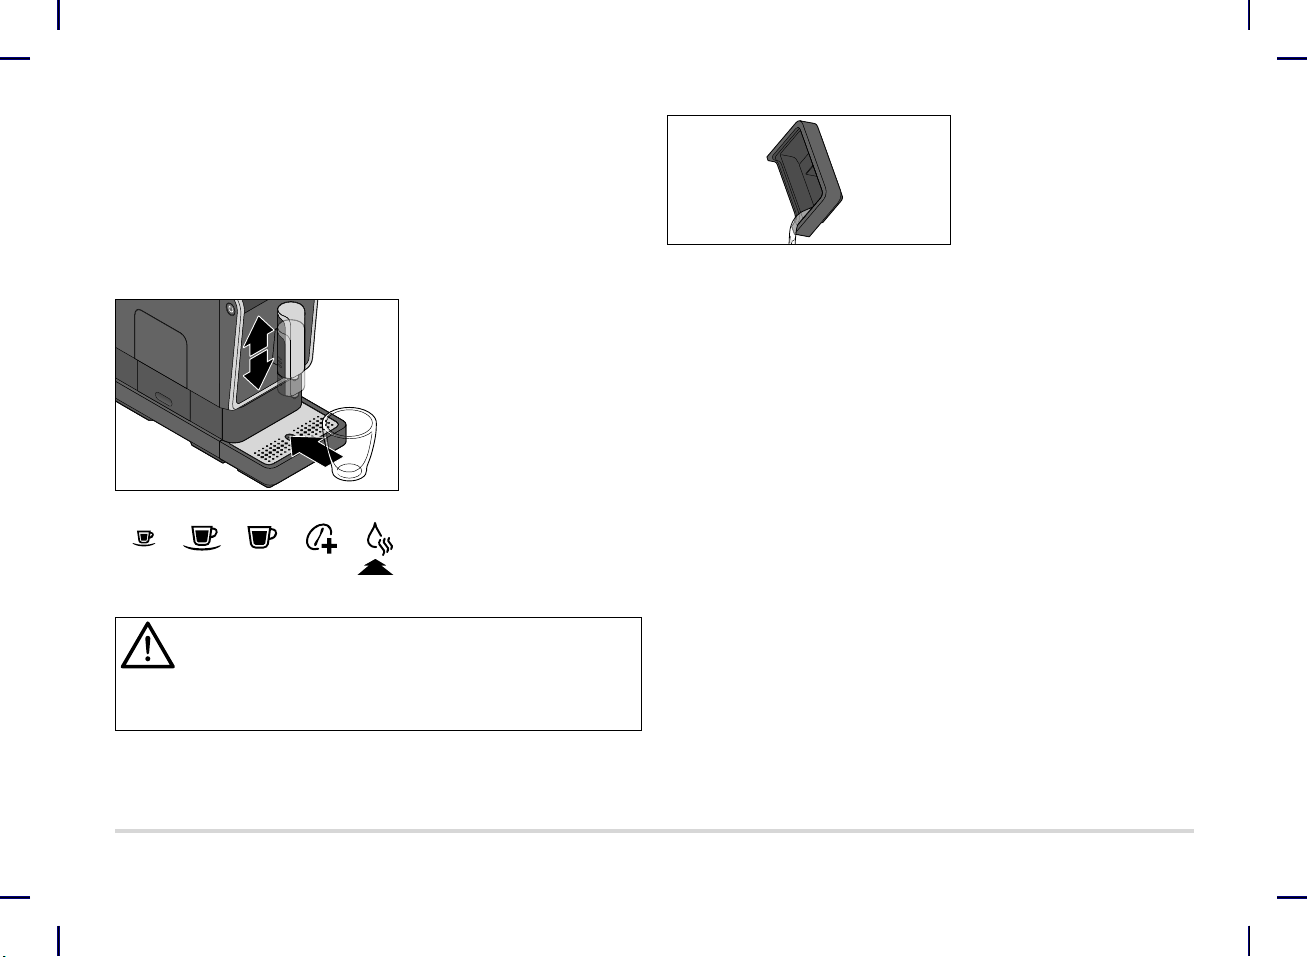
Rinsing the machine
After switching the machine on for the first time or if you have not used the ma-
chine for longer than two days, rinse the machine by allowing two cups of water
to flow through it.
Prerequisite:
• The machine is switched on and ready for operation.
1. Slide the coffee spout up or down
as required.
2. Place an empty container under-
neath the coffee spout.
3. Press the rinsing/hot water-
button. The pump will flush water
through the system to be dis-
pensed into the container below.
CAUTION - Risk of burns from hot liquids
Hot water or coffee from the coffee spout may cause burns.
•Do not touch the coffee spout during and shortly after use of the machine.
4. Pour the water away.
5. Repeat steps 2 to 4.
6. Pour out the water in the drip
bowl if necessary.
109547 en Kaffeevollautomat_USA_v4.indd 14109547 en Kaffeevollautomat_USA_v4.indd 14 31.08.22 09:4731.08.22 09:47
15
CAUTION - Risk of burns from hot liquids
Hot water or coffee from the coffee spout may cause burns.
• Do not touch the coffee spout during and shortly after use of the machine.
A small amount of coffee is pre-brewed so that the aroma can best unfold.
This process can be identified by the short pause at the beginning of the
brewing process.
If there is too little water in the tank while making coffee, the machine will
stop the brewing process.
The brewing process will automatically resume once the water tank has
been filled and reinserted in the machine.
If you would like to stop the brewing process prematurely, press the same
coffee button again while brewing.
Tip: You can change the amount of the beverage. Learn more about how to do
this in the "Adjusting the amount of the beverage" chapter.
Default settings upon purchasing the machine:
Espresso 2 US.fl.oz. (59 ml)
Regular coffee 6 US.fl.oz. (177 ml)
Large coffee 8 US.fl.oz. (237 ml)
Make a coffee
Prerequisite:
• The machine is switched on and ready for operation.
1. Adjust the height of the coffee
spout as required.
2. Place a cup under the coffee
spout.
3. Press the button for the type of
coffee you would like:
Espresso or
Regular coffee or
Large coffee.
The grinding and brewing process starts and stops automatically.
109547 en Kaffeevollautomat_USA_v4.indd 15109547 en Kaffeevollautomat_USA_v4.indd 15 31.08.22 09:4831.08.22 09:48
16
Empty coffee grounds container,
leftover water tray
and drip bowl
When the coffee grounds
container is full (after
10 brewings), the "Empty
coffee grounds" symbol
will light up. The machine
must be switched on, and
the coffee grounds con-
tainer must be outside the
machine for at least 5 sec-
onds.
This causes the "Empty
coffee grounds" symbol to
disappear after the con-
tainer is put back into the
machine.
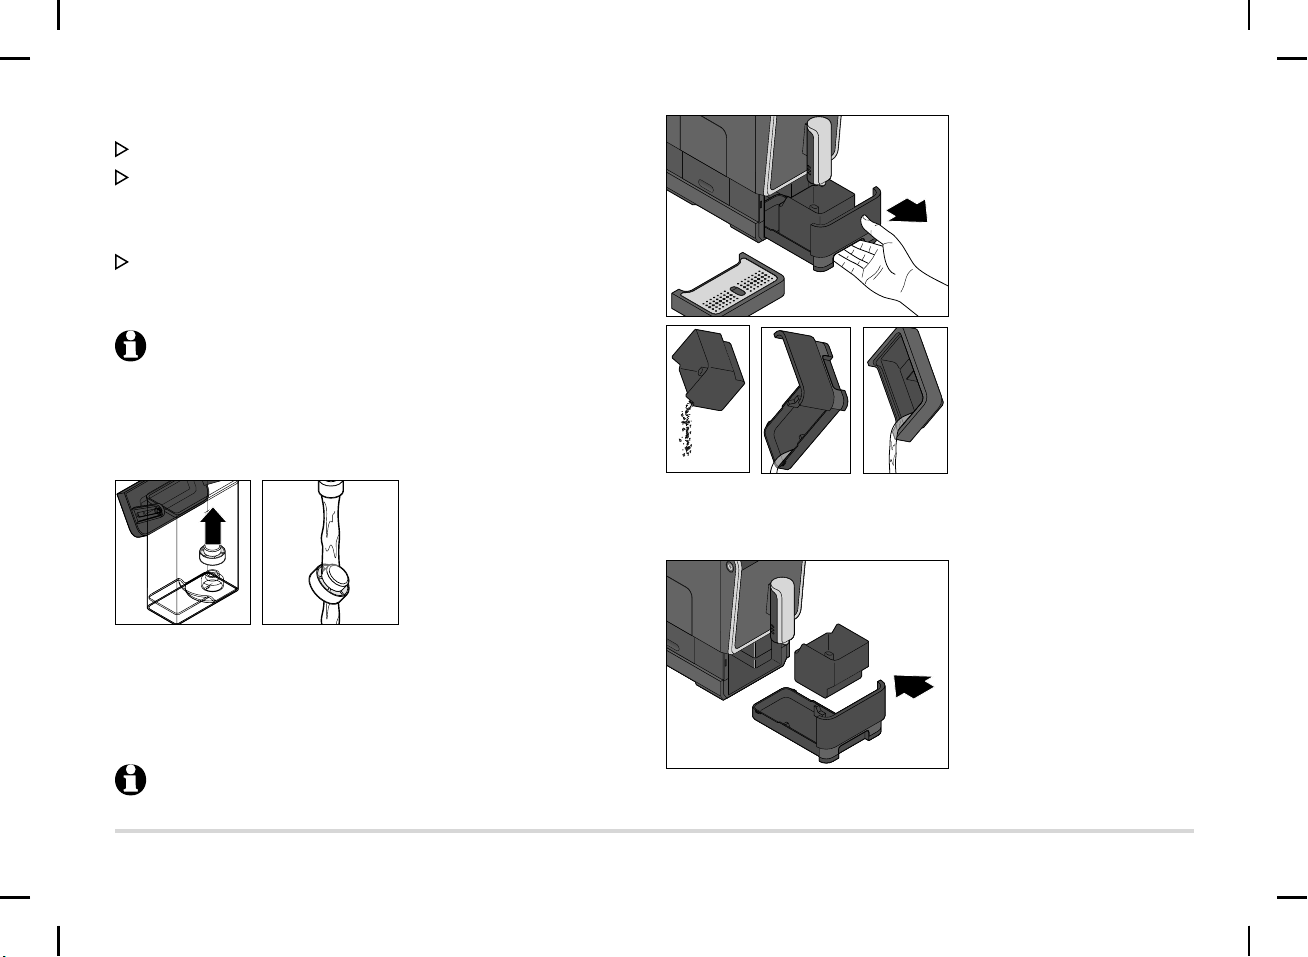
1. Regularly empty the leftover
water tray, the coffee grounds
container, and the d
rip bowl:
Remove the drip bowl.
Pull the leftover water tray with
the coffee grounds container out
of the machine.
2. Empty the coffee grounds con-
tainer, the leftover water tray
and the drip bowl.
3. Insert the coffee grounds con-
tainer into the leftover water
tray and put the parts back into
the machine.
4. Place the drip grid in the drip
bowl and connect the parts to
the machine.
109547 en Kaffeevollautomat_USA_v4.indd 16109547 en Kaffeevollautomat_USA_v4.indd 16 31.08.22 09:4831.08.22 09:48
17
Preheating the cup
Fill the cup with hot water and then pour it away shortly before using the cup.
This helps espresso, regular coffee and large coffee taste their best.
The hot water dispensed is only suitable for preheating cups. It is NOT
suitable for the preparation of tea or other instant drinks.
Prerequisite:
• The machine is switched on and ready for operation.
Press the rinsing/hot water but-
ton. About 1.7 US.fl.oz. (50 ml) hot
water will be dispensed into the
cup below. Pour the water away
before starting the brewing
process.
Adjusting the strength of the coffee - boost button
Prerequisite:
• The machine is switched on and ready for operation.
1. If you would like the coffee to be
stronger, first press the Boost
button before pressing one of
the coffee buttons. The Boost
button flashes.
2. Press the desired coffee button
to start the grinding and brewing
process. The coffee will then be
prepared with more beans.
Adjusting the amount of the beverage
You can change the preset settings for the water quantity permanently. You can
customize the setting for each type of coffee: One each for espresso, regular cof-
fee and large coffee.
Default settings upon purchasing the machine:
Espresso 2 US.fl.oz. (59 ml) – Regular coffee 6 US.fl.oz. (177 ml) -
Large coffee 8 US.fl.oz. (237 ml)
The amount of drinks can be set between approx 0.8 US.fl.oz. (25 ml) and
8.4 US.fl.oz. (250 ml).
Prerequisite:
• The machine is switched on and ready for operation.
Espresso, regular coffee and large coffee
1. Press the desired coffee button
to start the grinding and brewing
process.
2. Wait until the beans have been ground.
3. As soon as the coffee starts
being dispensed, press and hold
the coffee button.
4. Release the button as soon as
the desired amount has been
dispensed into the cup.
The setting is saved and two beeps sound in confirmation.
If the settings are not to your taste, simply repeat the procedure to change them
again.
109547 en Kaffeevollautomat_USA_v4.indd 17109547 en Kaffeevollautomat_USA_v4.indd 17 31.08.22 09:4831.08.22 09:48

18
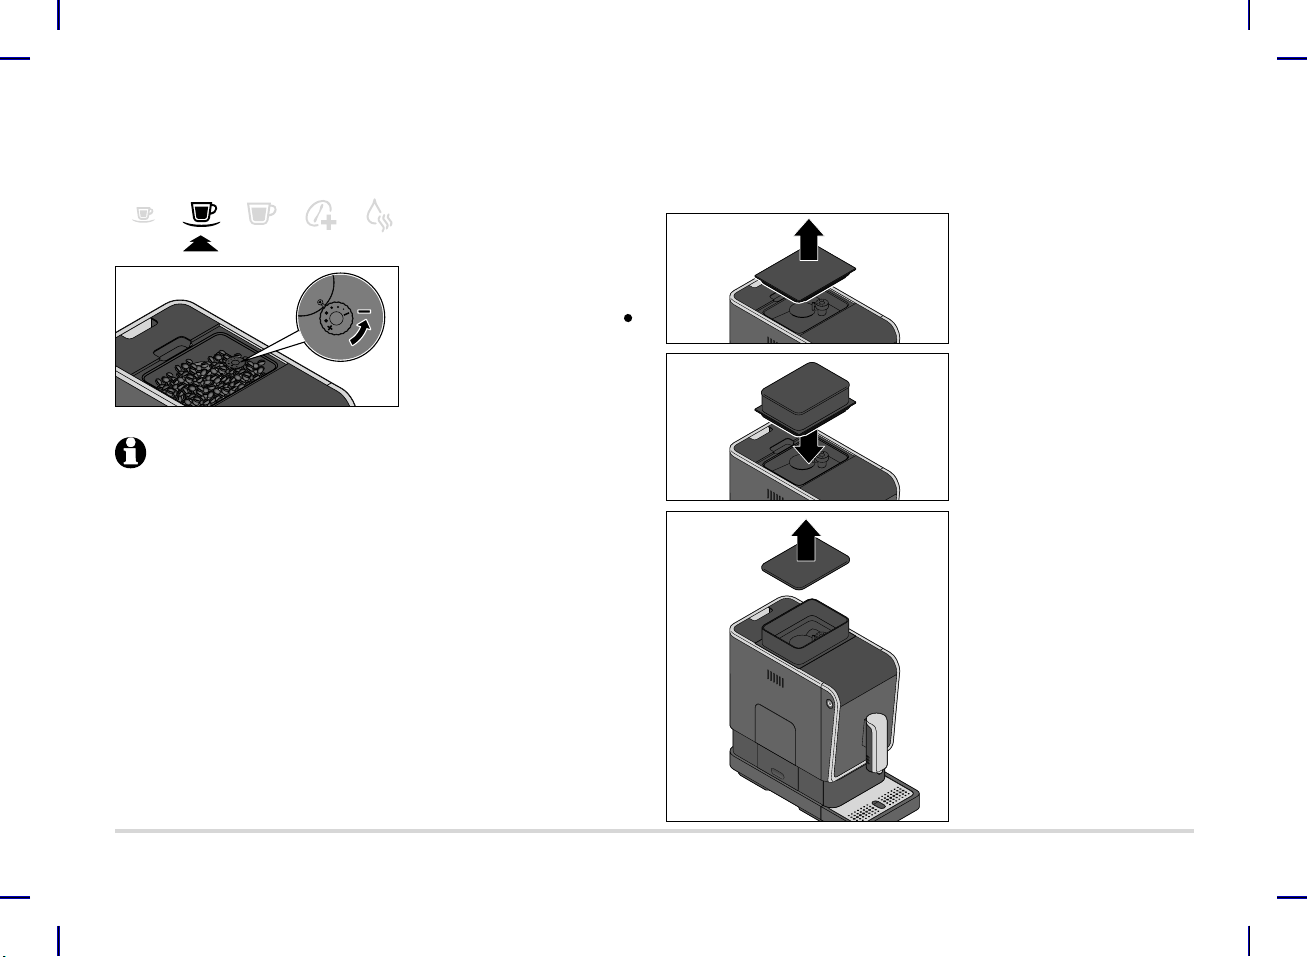
Adjusting the grinding degree
NOTICE - Damage to property
•Grinder settings may only be adjusted while the grinder is operating.
•Adjust the grind degree settings in small increments, and observe the changes
after 1 - 2 cups of coffee, before carrying out any new adjustments.
Prerequisite:
• The machine is switched on and ready for operation.
1. Place an empty cup under the
coffee spout.
2. Remove the lid from the coffee
bean compartment.
The grind regulator is located in
the coffee bean compartment.
It is preset to level 2 upon deliv-
ery.
M To adjust the grinding degree more coarsely, follow steps 3 and 4.
For a finer adjustment of the grinding degree, follow steps 5 and 6.
Increasing the coarseness of the grind
Increase the coarseness of the grind when you want the coffee to flow more
quickly, for example if the coffee is too strong for your taste.
3. Press one of the three coffee
buttons, e.g. regular coffee.
4. While the coffee is being
ground, turn the grind regulator
clockwise toward + to a larger
dot .
Restoring the factory settings
You can restore the original settings for the amount of beverage.
1. Press and hold both the on/off
switch and the boost button
(for approx. 5 seconds) until
2 beeps sound.
2. Release the buttons.
Then the factory settings for the water quantity have been restored.
109547 en Kaffeevollautomat_USA_v4.indd 18109547 en Kaffeevollautomat_USA_v4.indd 18 31.08.22 09:4831.08.22 09:48
19
Increasing the fineness of the grind
Increase the fineness of the grind when you want the coffee to flow more slowly
and have more aroma, for example if the coffee is too weak for your taste.
5. Press one of the three coffee
buttons, e.g. regular coffee.
6. While the coffee is being ground,
turn the grind regulator clock-
wise toward - to a smaller dot .
If the grinding degree setting is too fine, the coffee may flow very slowly.
Expansion for the coffee bean compartment
You can increase the capacity of the coffee bean compartment from 5.6 oz. (160 g)
to 10.6 oz. (300 g). Proceed as follows:
1. Remove the lid from the coffee
bean compartment.
2. Insert the expansion into the
opening of the coffee bean com-
partment as illustrated. Press it
all the way in.
3. Take the lid off of the expansion.
109547 en Kaffeevollautomat_USA_v4.indd 19109547 en Kaffeevollautomat_USA_v4.indd 19 31.08.22 09:4931.08.22 09:49
20
4. Fill coffee beans into the coffee
bean compartment.
5. Place the lid back on the expan-
sion. Press the lid all the way on
so that the aroma protection seal
can optimally protect the aroma
of the coffee beans.
Adjusting the automatic rinsing cycle
At the factory, the machine is preset that the automatic rinsing cycle only starts
when the machine is cold. If the machine was already in operation shortly before
being switched on and is therefore still warm, the machine will not rinse again.
Only after it has cooled down sufficiently, a new rinse cycle is initiated.
You can adjust the rinse cycle so that it takes place automatically each time the
machine is switched on again:
Prerequisite:
• The machine is switched on and ready for operation.
1. Press and hold both the on/off
switch and the rinsing button for
approx. 5 seconds until
2 beeps sound.
2. Release the buttons.
The automatic rinse cycle now takes place each time the machine is switched on
again.
To restore the original, temperature-dependent state, proceed in the same
way.
109547 en Kaffeevollautomat_USA_v4.indd 20109547 en Kaffeevollautomat_USA_v4.indd 20 31.08.22 09:4931.08.22 09:49
21
Cleaning
DANGER – Risk of fatal electric shock
An electric shock will result in serious injury or death.
•Remove the mains plug from the wall socket before cleaning the machine.
•Never immerse the machine, mains plug or connecting cord in water or any
other liquids.
•Do not clean the machine with a water jet. Clean it only as described in the
following instructions.
NOTICE – Material damage due to incorrect cleaning
Incorrect cleaning can damage the machine.
•Do not use any caustic, aggressive or abrasive products for cleaning.
•Do not clean the machine or parts of it in the dishwasher.
Daily Weekly If required
Casing x x
Clean the water tank x
Rinse the water tank x
Filter x
Coffee grounds container, left-
over water tray, drip bowl
x x
Brewing unit x
Standby mode
Always switch the machine into standby mode using the on/o
ff switch after use.
The machine will then use very little energy. If no button is pressed for about ten
minutes, the machine will automatically switch to standby mode. This is both a
safety function and a way to save energy. You have the choice between four
lengths of time after which the machine should switch off automatically:
10 minutes, 20 minutes or 30 minutes or 120 minutes. The different switch-off
times can be set as follows:
1. When switching the machine on
or off, press and hold the on/off
switch for approx. 5 seconds.
A beep will sound.
One button lights up constantly
, the other three buttons are flashing .
The button lit up permanently shows the set switch-off time.
If the espresso button lights up,
the machine will switch off after
10 minutes.
If the regular coffee button lights
up, the machine will switch off
after 20 minutes.
If the large coffee button lights
up, the machine will switch off
after 30 minutes.
If the boost button lights up,
the machine will switch off after
120 minutes.
2. Press the button that corresponds
to the desired switch-off time.
Two signal beeps will sound.
109547 en Kaffeevollautomat_USA_v4.indd 21109547 en Kaffeevollautomat_USA_v4.indd 21 31.08.22 09:4931.08.22 09:49
22
Cleaning the casing
Wipe the casing with a soft, damp cloth.
Also wipe the compartment for the leftover water tray with a soft, damp cloth
as required.
Clean the water tank
Clean the water tank with a little washing-up liquid.
Then rinse it out thoroughly under running water and dry it.
The water tank is not dishwasher safe.
Rinse the water tank under running water daily. This will prevent limescale
deposits or other particles clogging the filter on the bottom of the water
tank.
Cleaning the filter
The filter in the water tank can be removed in order to remove limescale and
similar deposits.
1. Pull the filter up and out.
2. Rinse it off under running water.
3. Then reinsert it in the opening in the water tank, pressing it in as far as it will
go.
Cleaning the leftover water tray, the coffee grounds container and the dri
p
bowl/grid
The machine has a built-in counting function that resets automatically
when the coffee grounds container is emptied. The machine must therefore
be switched on during cleaning.
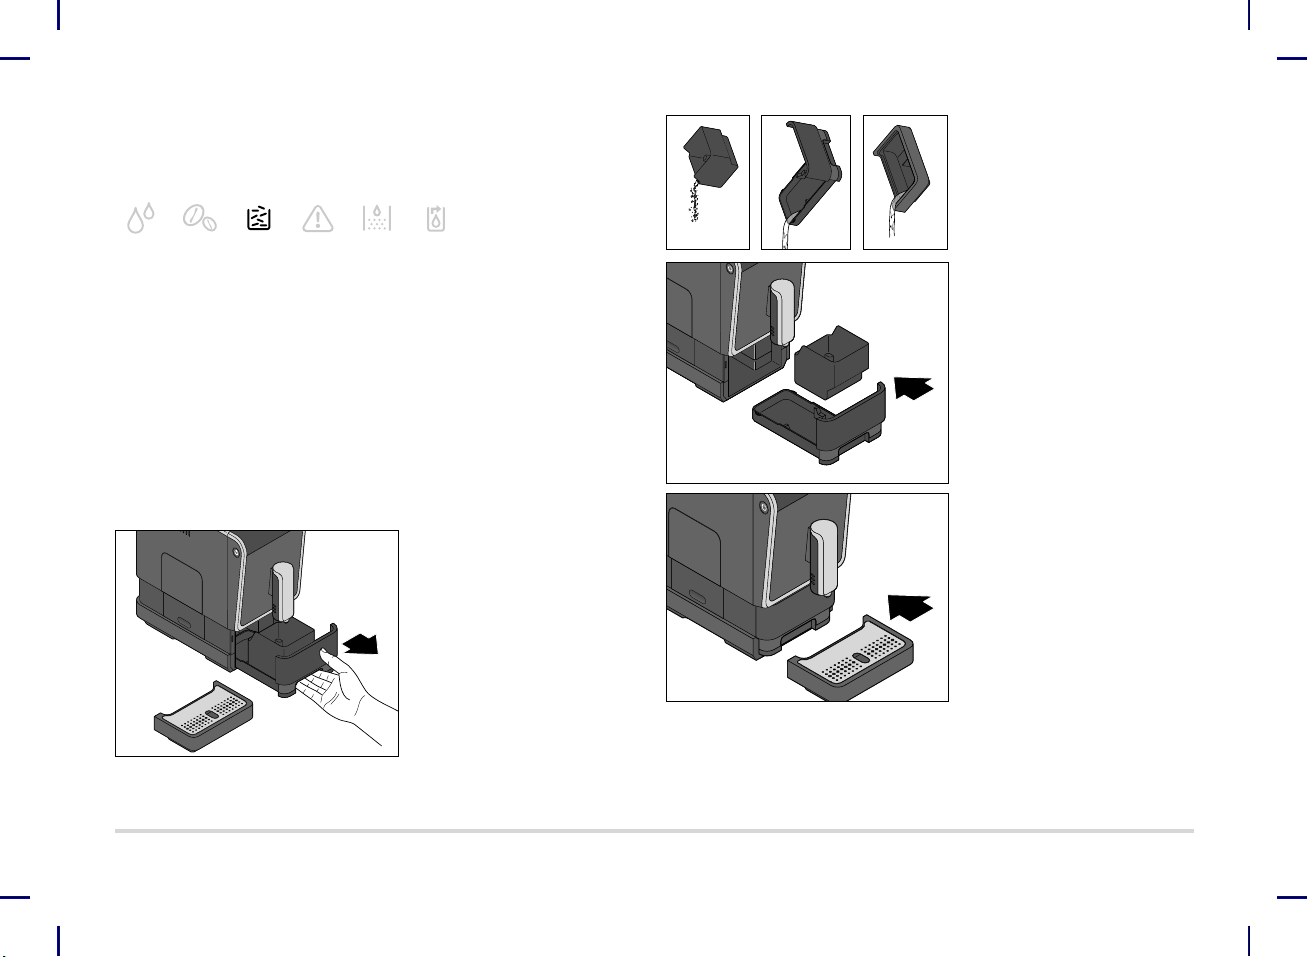
1. Remove the drip bowl.
2. Pull the leftover water tray with
the coffee grounds container out
of the machine.
3. Empty the coffee grounds con-
tainer, the leftover water tray
and the drip bowl.
4. Wash all parts using a
washing-up liquid. Dry all parts
thoroughly.
5. Insert the coffee grounds con-
tainer into the leftover water
tray and put the parts back into
the machine. The leftover water
tray must have been outside the
machine for at least 5 seconds
for the counting function to re-
set.
109547 en Kaffeevollautomat_USA_v4.indd 22109547 en Kaffeevollautomat_USA_v4.indd 22 31.08.22 09:4931.08.22 09:49
23
6. Place the drip grid in the drip
bowl and connect the parts to
the machine.
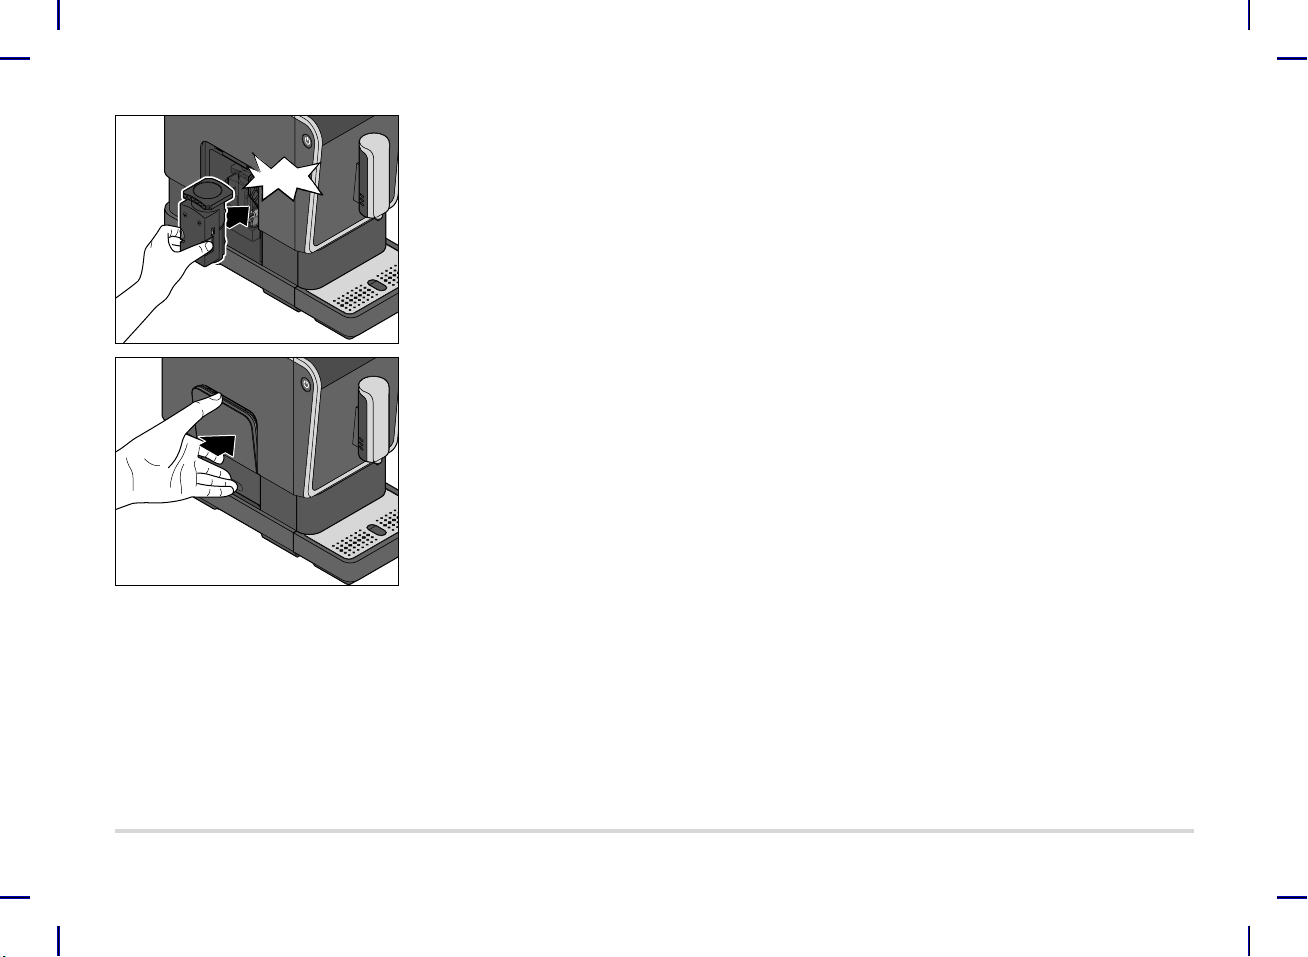
Cleaning the brewing unit
CAUTION - Danger of burns from a hot brewing unit
The brewing unit becomes hot when preparing a drink.
•Do not clean the brewing unit during or shortly after use.
•Switch off the machine and let the brewing unit cool down before cleaning it.
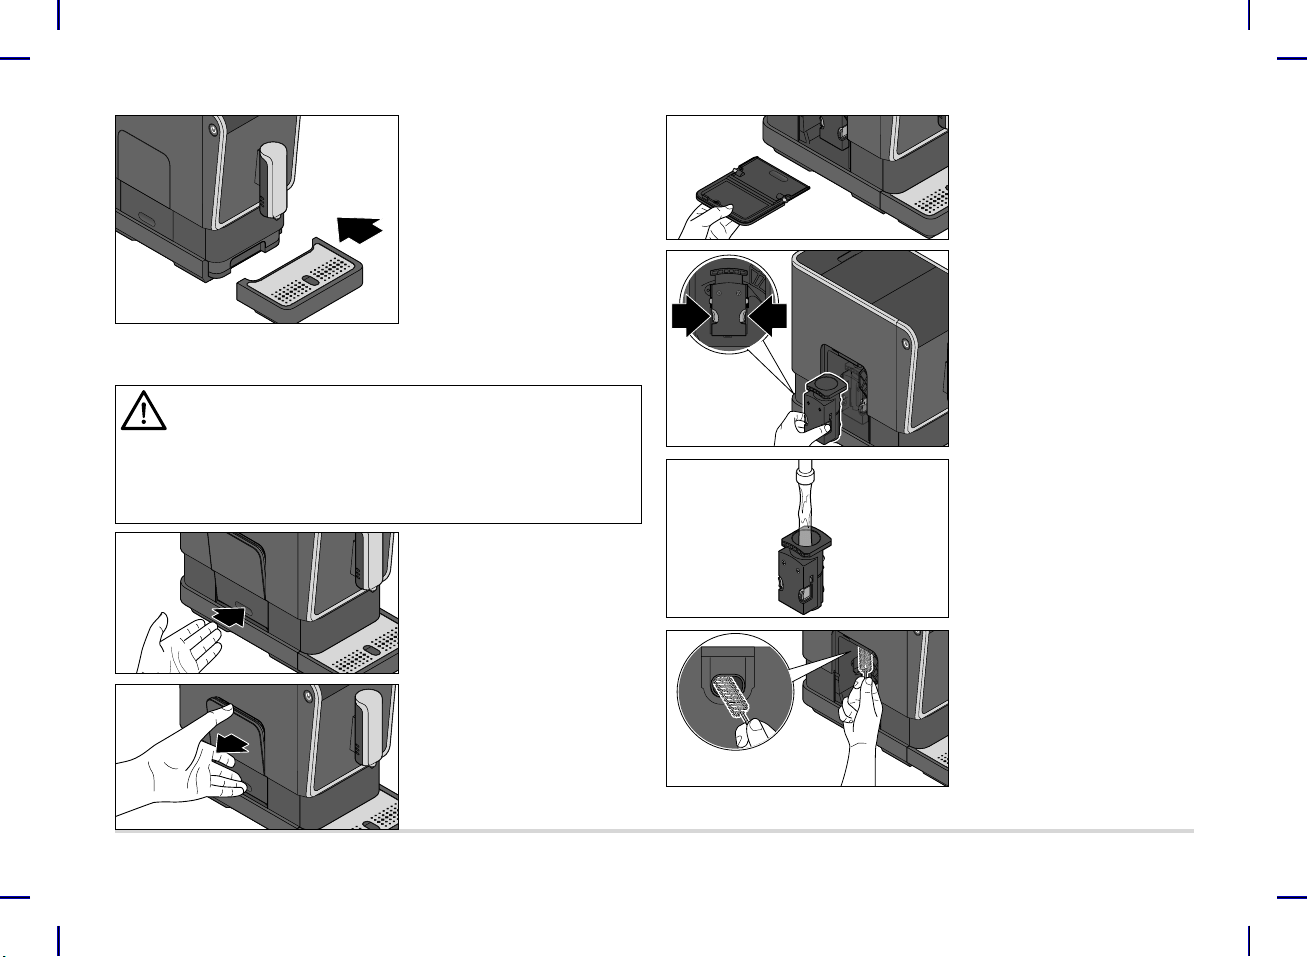
1. Press on the lower part of the
brewing unit cover as illustrated.
The cover folds out a little at the
top.
2. Take hold of the cover at the top.
3. Remove the cover from the
machine.
4. Firmly press and hold the two
orange-colored buttons and pull
the brewing unit straight forward
out of the machine.
5. Rinse the brewing unit under
warm, running water.
6. Then let the brewing unit dry
completely.
7. Use the supplied cleaning brush
to remove any leftover coffee
grounds or powder from the
brewing unit compartment.
109547 en Kaffeevollautomat_USA_v4.indd 23109547 en Kaffeevollautomat_USA_v4.indd 23 31.08.22 09:5031.08.22 09:50
24
Click !
8. Press the brewing unit back into
the machine using some force,
and without pressing the
orange-colored buttons.
You should hear and feel the
brewing unit lock into place.
The brewing unit must be
firmly seated in the holder.
9. Set the cover back into the
machine over the brewing unit.
It is held in place by magnets.
109547 en Kaffeevollautomat_USA_v4.indd 24109547 en Kaffeevollautomat_USA_v4.indd 24 31.08.22 09:5031.08.22 09:50

25
Descaling
NOTICE - Material damage due to limescale
Formation of limescale could damage the machine.
•Descale the machine as soon as the machine indicates that this is
necessary.
This increases its service life and saves energy.
• Do not use any descaling agents made on the basis of formic acid.
•Use a standard, liquid, descaling agent suitable for coffee and espresso
machines. Other agents may damage materials in the machine and/or have
no effect.
• The descaling process cannot be interrupted. If the descaling process
was nevertheless interrupted (for example by a power failure), it must be
completed the next time the machine is switched on.
The use of the machine is blocked and not possible.
• Do not open the side door or try to turn the brewing unit when the power
is off. The brewing unit will set itself to the correct position the next time
it is switched on.
When the "Descale" symbol
lights up in the display, the
machine needs to be des-
caled.
Descale the machine within the next few days. Do not wait any longer, otherwise
so much limescale may collect that a descaling agent will no longer have any
effect.
The descaling process takes about 15 minutes.
Do not leave the machine unattended during the descaling process.
Prerequisite:
• The machine is switched on and ready for operation.
1. Pull the water tank up and out of
the machine.
2. Pour a standard, liquid, descaling
agent suitable for coffee and
espresso machines into the
empty water tank. Add water up
to the MAX mark. Follow the
manufacturer's instructions for
the liquid descaler.
3. Reinsert the water tank in the
machine and push it down as far
as it will go.
4. Place an empty container (with a
capacity of at least 17 US.fl.oz
(500 ml)) under the coffee spout.
Remove the drip bowl.
You will need to empty this
container several times during
the descaling phase.
We recommend using two
containers. This facilitates the
emptying process.
109547 en Kaffeevollautomat_USA_v4.indd 25109547 en Kaffeevollautomat_USA_v4.indd 25 31.08.22 09:5031.08.22 09:50
26
5. Press and hold both the on/off
switch and the espresso button
(for approx. 5 seconds) until
2 beeps sound.
6. Release the buttons.
The "Descale" symbol is lit
up and ...
... the espresso button
flashes.
7. Press the espresso button
to start the descaling process.
The "Descale" symbol
flashes.
The descaling process begins. The descaling process takes about 15 minutes.
The machine pumps descaling solution into the pipes several time
s at short
intervals. Each time, a small amount of water runs into the container.
8. Pour out the dispensed water in
time to ensure that the container
does not overflow.
When finished, the "Descal-
ing" symbol lights up, and
the "Fill water" symbol and
...
... the espresso button
flash.
9. Take the water tank out of the
machine.
10. Thoroughly clean the water tank
as described in the "Cleaning"
chapter / section "Cleaning the
water tank".
Rinsing phase
11. Place an empty container (with
a capacity of at least 17 US.fl.oz
(500 ml)) under the coffee spout.
Remove the drip bowl if neces-
sary.
You will possibly need to empty
this container several times
during the rinsing
phase.
12. Fill the water tank with cold tap
water up to the MAX mark.
13. Reinsert the water tank in the
machine and push it down as far
as it will go.
The "Refill water" symbol
goes out and the rinsing
phase begins automatically
after a few seconds.
109547 en Kaffeevollautomat_USA_v4.indd 26109547 en Kaffeevollautomat_USA_v4.indd 26 31.08.22 09:5131.08.22 09:51
27
About half of the water in the tank is rinsed through the machine.
The machine will then pause for about 1 minute. Then the second half of the
water in the tank is rinsed through the machine. Afterwards, the machine will
automatically switch into standby mode. The descaling process is completed.
For a long period of non-use
If you do not use the machine for a longer period of time, for example when you
go on holiday, we recommend cleaning the machine for hygienic reasons. Follow
the steps from the "Cleaning” chapter.
Remove the water from the piping system of the machine.
Prerequisite:
• The machine is switched on and ready for operation.
1. Place an empty container (with
a capacity of at least 8.4 US.fl.oz
(250 ml)) under the coffee spout.
Remove the drip bowl if neces-
sary.
2. Press and hold both the regular
coffee button and the on/off
switch (for approx. 5 seconds)
until 2 beeps sound.
3. Release the buttons.
The "Empty system"
symbol flashes.
4. Pull the water tank out of the
machine and pour away any
remaining water in the water tank.
The "Empty system"
symbol now lights up
permanently.
The pump transports the remaining water out of the pipes of the machine.
It stops automatically as soon as there is no more water inside. The residual water
runs into the container beneath the spout.
Afterwards, the machine will automatically switch into standby mode.
5. Reinsert the water tank in the
machine and push it down as far
as it will go.
When you wish to use the machine again at a later time, proceed as described in
the “Initial operation – prior to first use” chapter.
109547 en Kaffeevollautomat_USA_v4.indd 27109547 en Kaffeevollautomat_USA_v4.indd 27 31.08.22 09:5131.08.22 09:51
28
Problems / solutions
The "Refill water" symbol is lit up.
Is the water tank empty? Remove the water tank, fill it with fresh water
and put it back into the machine. The pump starts automatically and
continues with the brewing process, for example.
Was the water tank pulled out of the machine during brewing process?
This will immediately stop the brewing process. Put the water tank
back into the machine.
The "Refill beans" symbol is lit up.
Is the coffee bean compartment empty? Fill beans into the coffee bean
compartment. The coffee beans will automatically be pulled into the
grinder and ground during the next grinding/brewing process.
The "Empty coffee grounds" symbol is lit up or flashing.
Is the container for the coffee grounds full? Empty the coffee grounds
container. Wait at least 5 seconds. Put the coffee grounds container to-
gether with the leftover water tray back into the machine (see chapter
"Emptying the coffee grounds container, leftover tray and drip tray").
Is the leftover water tray with the container for the coffee grounds not
correctly inserted in the machine? Remove the parts and put them
back into the machine correctly (see step 3 in the chapter "Emptying
the coffee grounds container, leftover water tray and d
rip bowl”).
The "Brewing unit" symbol is lit up.
Is the brewing unit or the brewing unit cover not correctly in place?
Remove the brewing unit cover and make sure the brewing unit is firm-
ly in place (see "Cleaning" chapter / section "Cleaning the brewing
unit").
The "Descale" symbol is lit up.
The machine needs to be descaled. Do this within the next couple of
days. Do not wait any longer, otherwise so much limescale may collect
that a descaling agent will no longer have any effect. A self-induced
defect of this kind will not be covered by the warranty. Proceed as
described in the “Descaling” chapter.
User instructions
The coffee is not hot enough.
Especially in the case of espresso, the quantity of coffee is so small compared
with the size of the cup that it cools down quickly. A cold cup intensifies the cool-
ing effect. Warm up the cup beforehand (see chapter "Preheating the cup").
The coffee is too weak.
Adjust the grinder to a finer setting.
Press the boost button to make the coffee stronger.
The coffee flows slowly out of the coffee spout.
This happens when the grinding degree is very finely adjusted. Adjust the grinder
to a coarser setting.
The machine takes an unusually long amount of time to heat up.
The coffee or hot water is only being dispensed in small amounts.
The machine needs to be descaled even if the "Descale" symbol is not lit up.
Proceed as described in the “Descaling” chapter.
Additional information and helpful video instructions are available on the Internet
at: https://www.tchibo.com
109547 en Kaffeevollautomat_USA_v4.indd 28109547 en Kaffeevollautomat_USA_v4.indd 28 31.08.22 09:5131.08.22 09:51
29
Technical specifications
Product number: 398 498
Mains voltage: 120 V ~ 60 Hz
Power: 1350 watts
Power consumption
when turned off: 0.5 watts
Protection class: I
Pump pressure: 275.6 psi (19 bar)
Sound pressure level: < 80 dB(A)
Dimensions (W x D x H): 7.1 in. x 15.7 in. x 12.4 in. (18 x 40 x 31.5 cm)
Weight 18.1 lbs (8.2 kg)
Automatic switch-off: After 10, 20, 30, or 120 minutes
Preset brew quantities: Large coffee 8 US.fl.oz. (237 ml)
Regular coffee 6 US.fl.oz. (177 ml)
Espresso 2 US.fl.oz. (59 ml)
Coffee grounds container: approx. 10 portions
Headquarters: Tchibo GmbH
Überseering 18
22297 Hamburg
Germany
In the course of product improvement, we reserve the right to make technical and
optical modifications to the product.
FULLY AUTOMATIC COFFEE MACHINE
E514673
Disposal
The product and its packaging have been manufactured from valuable materials
that can be recycled. This reduces the amount of refuse and helps to preserve
the environment.
Dispose of the packaging and sort materials by type. Make use of the local facili-
ties provided for collecting paper, cardboard and lightweight packaging.
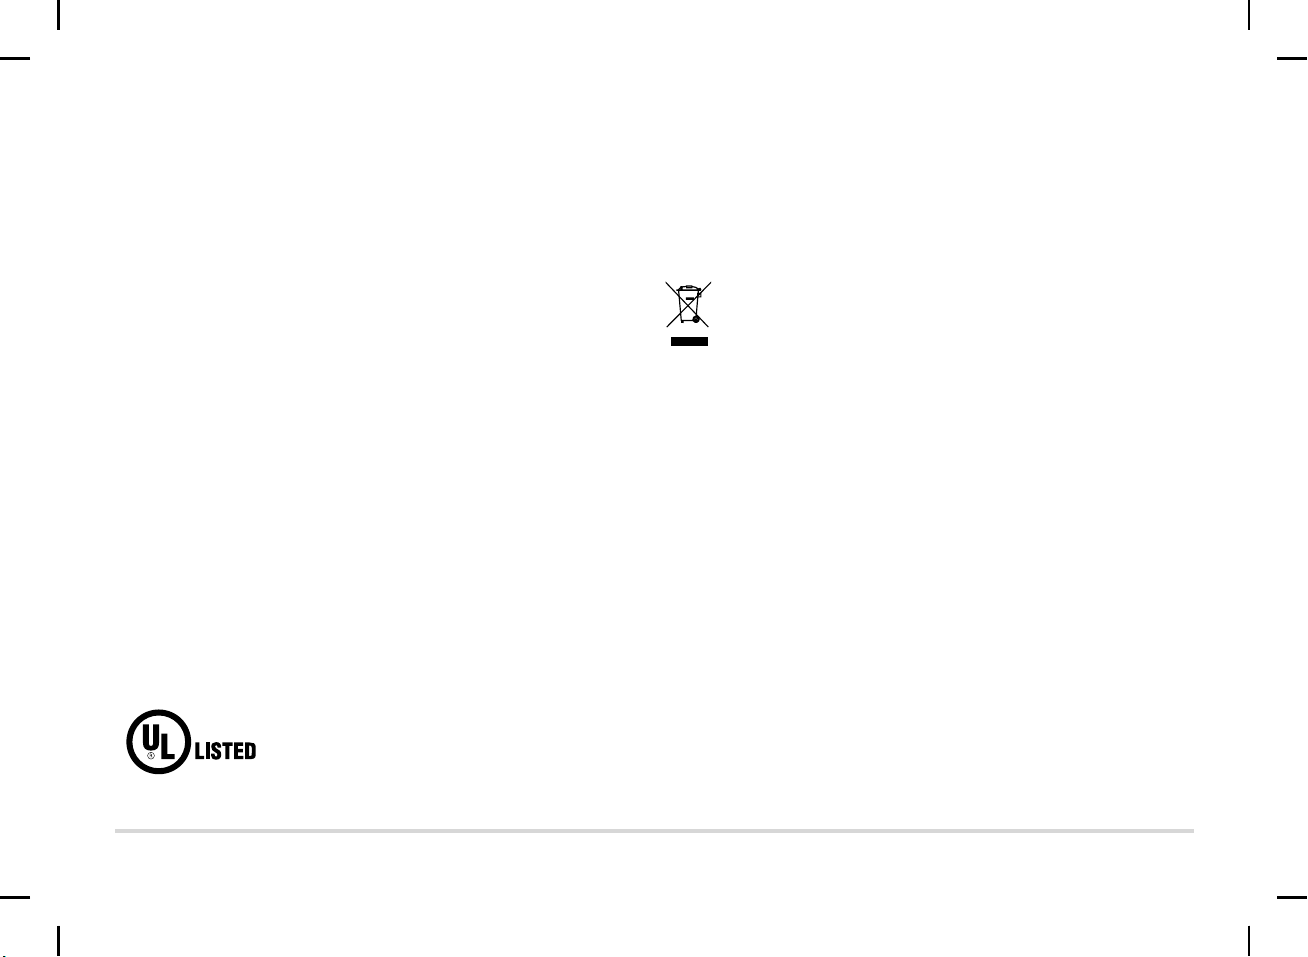
Appliances marked with this symbol must not be disposed of along
with household refuse!
Customer Service USA
Napco, Inc.
Phone: 888-824-4261
Opening Times: 8:30 am - 4 pm CST
Email: info@tchibo.us
Website: www.tchibo.us
Product number: 398 498
109547 en Kaffeevollautomat_USA_v4.indd 29109547 en Kaffeevollautomat_USA_v4.indd 29 31.08.22 09:5131.08.22 09:51

109547 en Kaffeevollautomat_USA_v4.indd 30109547 en Kaffeevollautomat_USA_v4.indd 30 31.08.22 09:5131.08.22 09:51

109547 en Kaffeevollautomat_USA_v4.indd 31109547 en Kaffeevollautomat_USA_v4.indd 31 31.08.22 09:5131.08.22 09:51

32
109547 en Kaffeevollautomat_USA_v4.indd 32109547 en Kaffeevollautomat_USA_v4.indd 32 31.08.22 09:5131.08.22 09:51
