

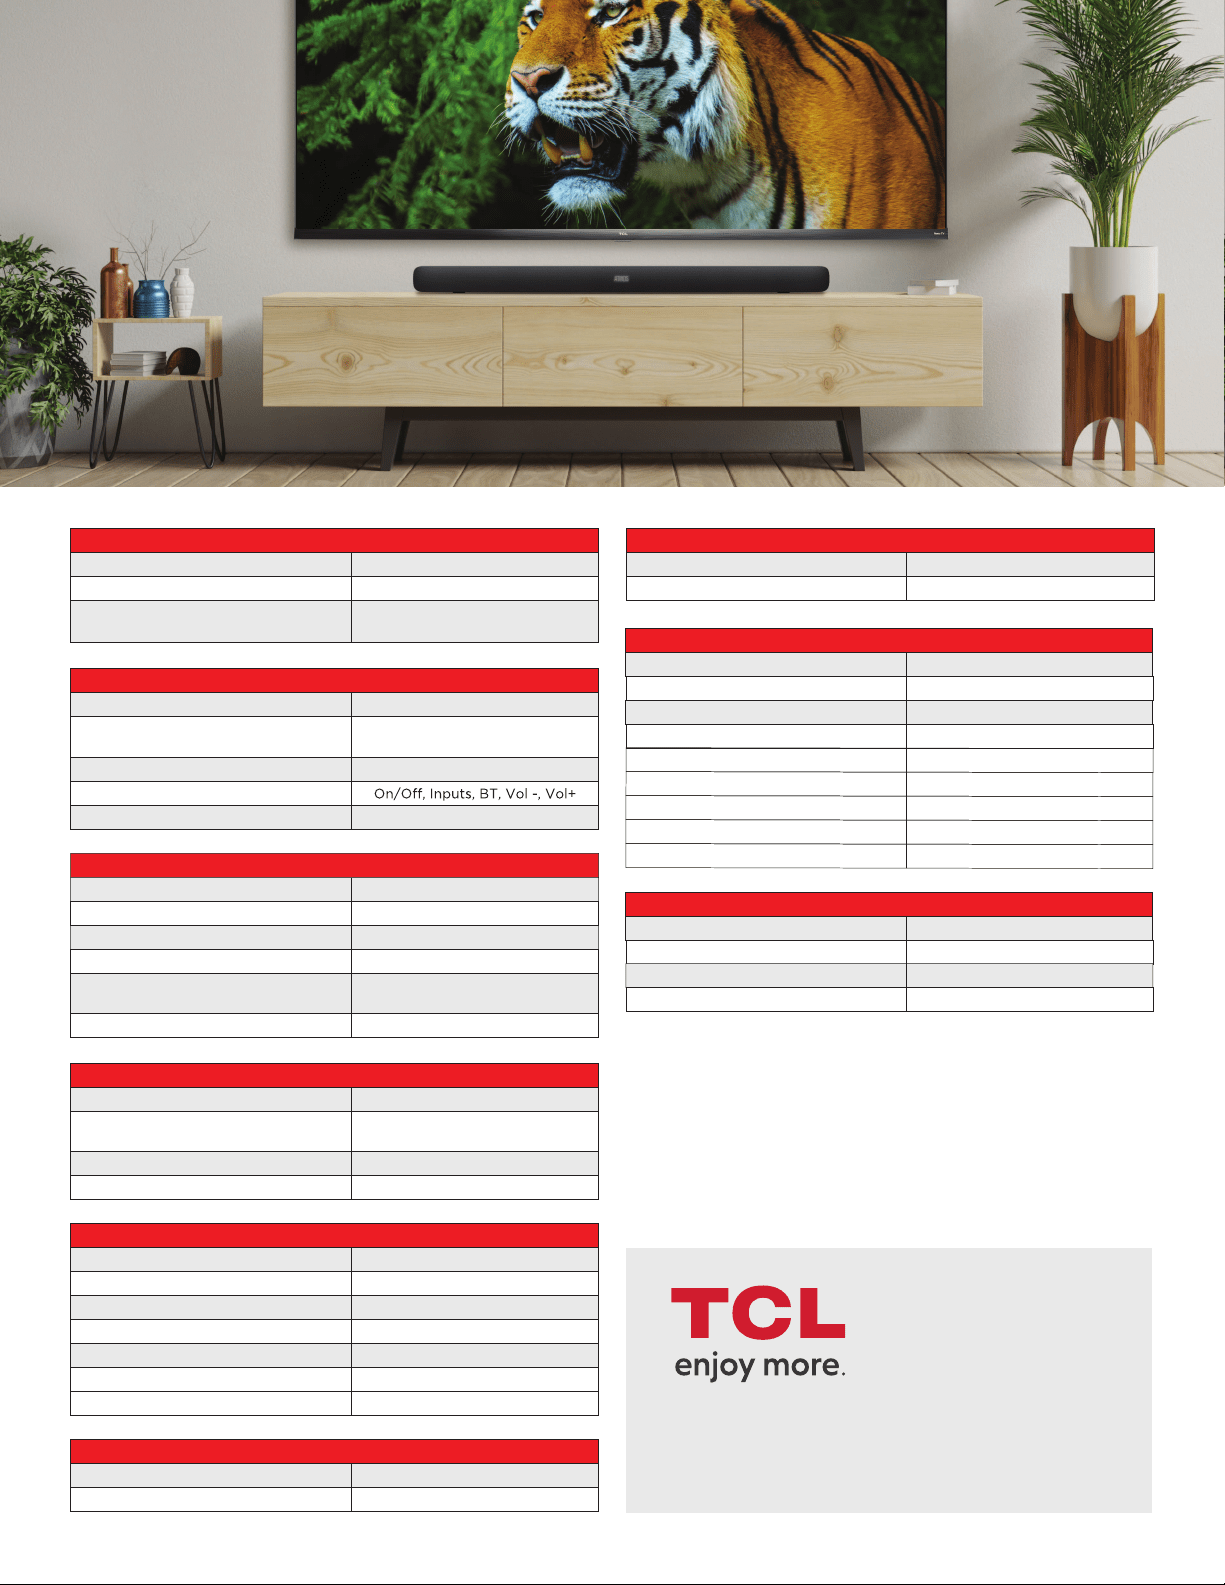
Quick Start Guide
Alto 8i
2.1 Channel Sound Bar with Dolby Atmos & Dual Built-in Subwoofers
Safety
instructions
QSG
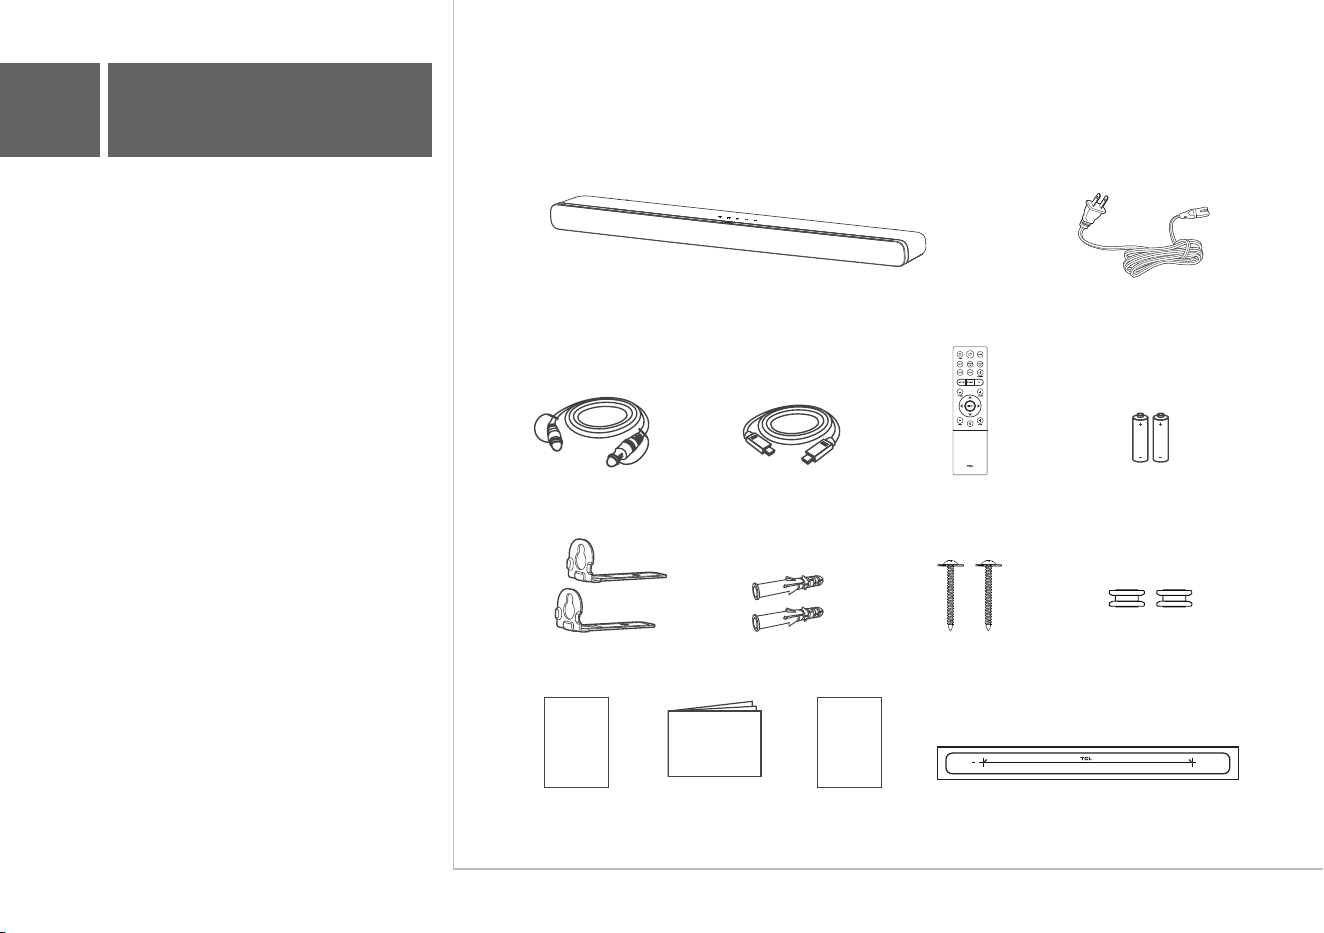
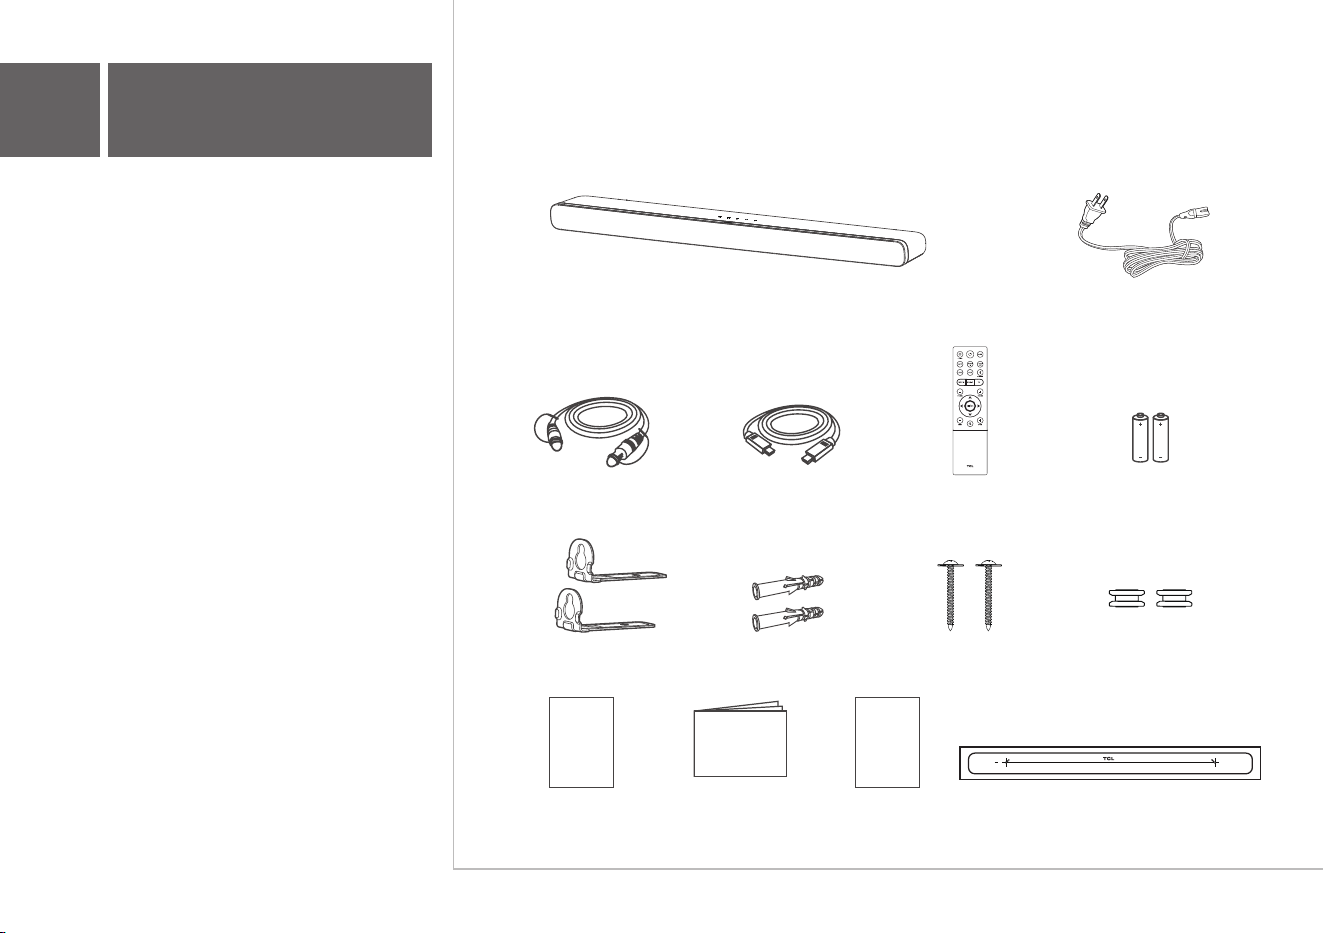
AC power cord
HDMI cable
Optical cable
Remote control
AAA battery x 2
Wall mount bracket x 2 Wall anchor x 2 Wall mounting screw x 2 Sleeve x 2
Wall mount templateQuick Start GuideSafety leaflet
Warranty
card
Warranty card
1
What's in the box
Make sure you read all the safety information
before you use this product.
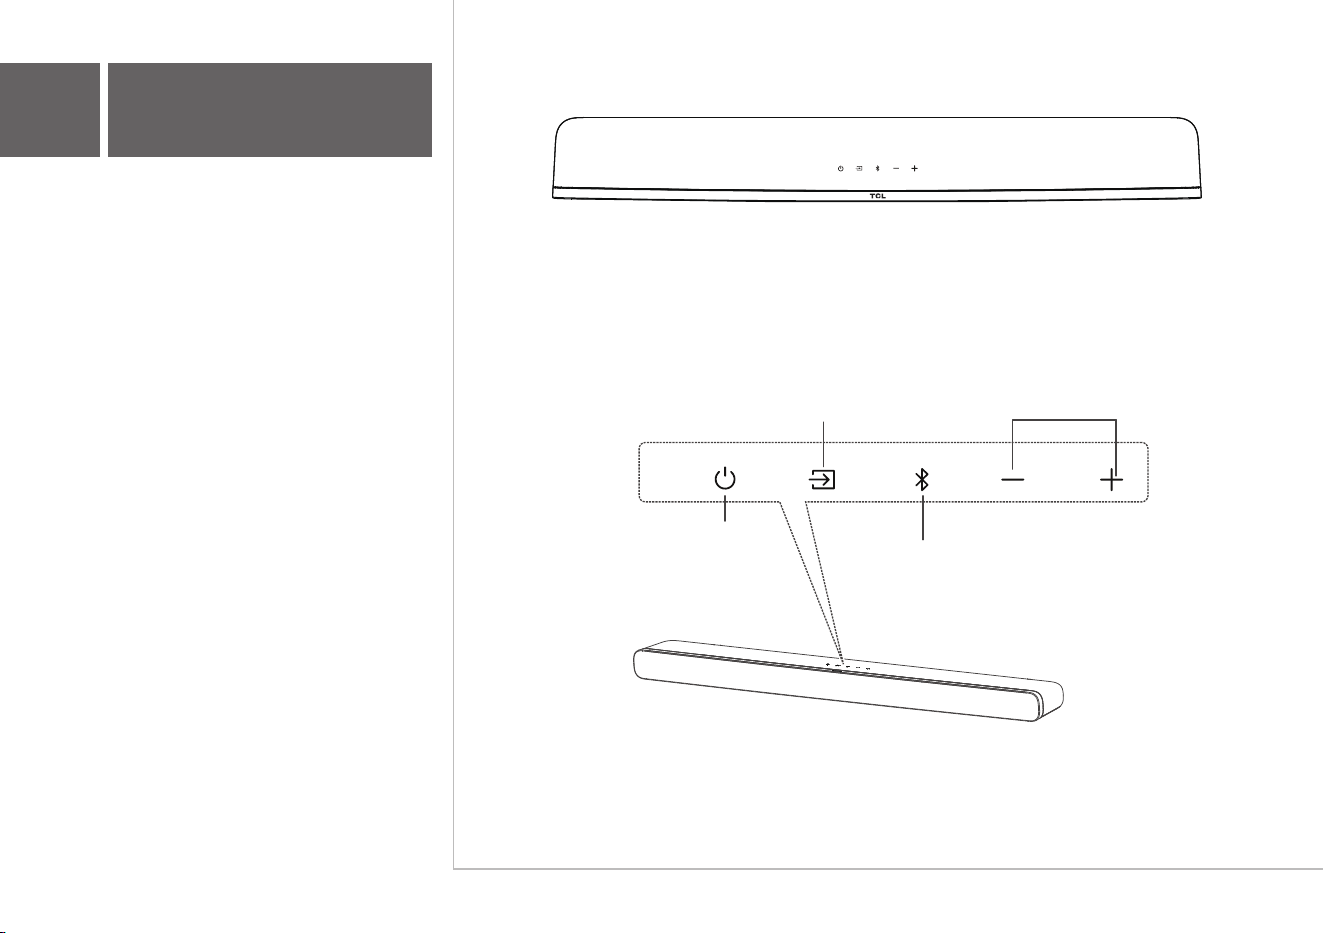
Sound Bar main unit

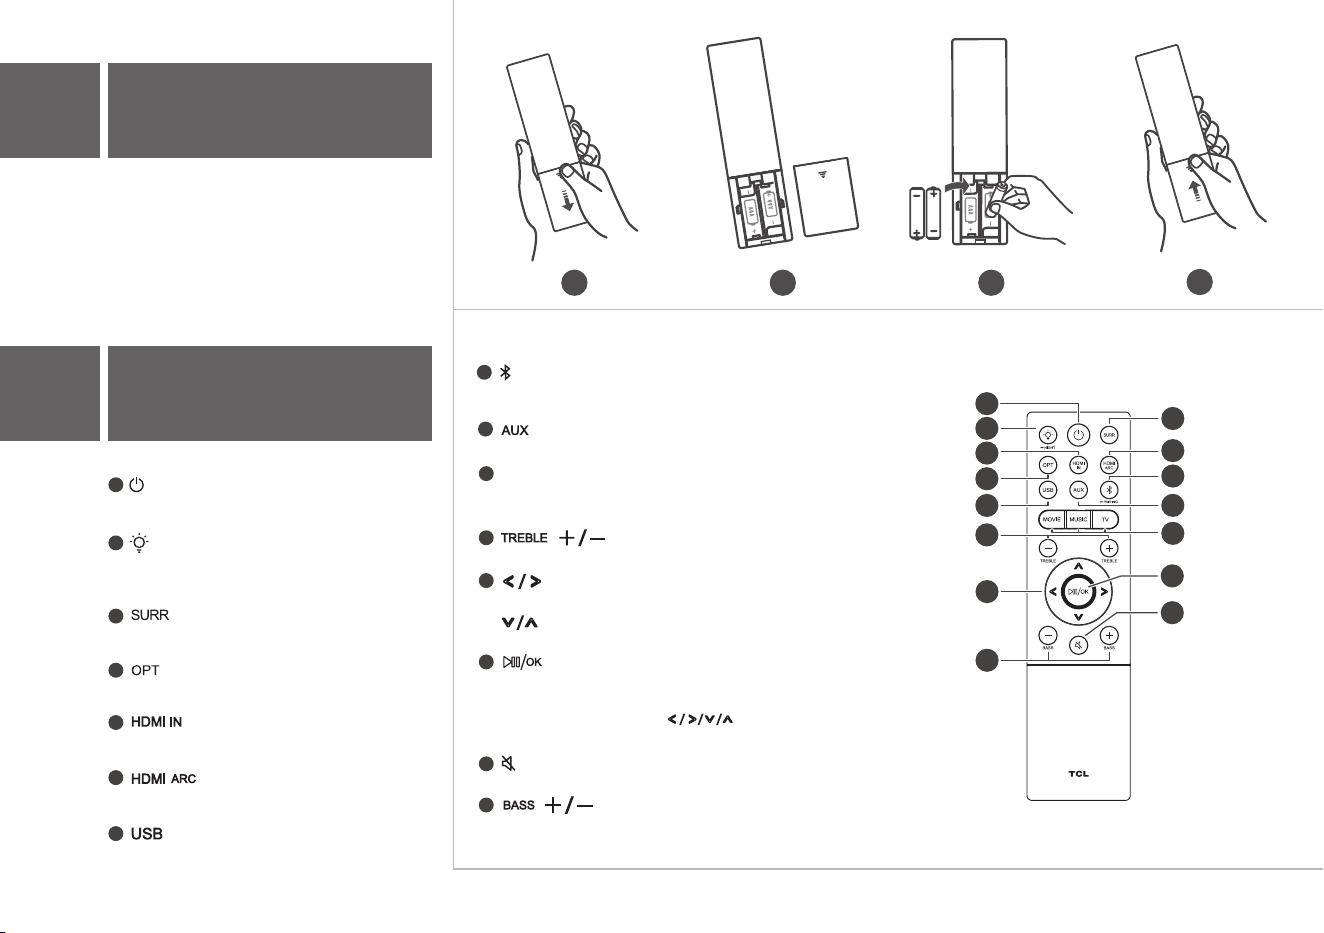
Press to select the Bluetooth source.
Press and hold to enter pairing mode.
Press to switch the audio source
among HDMI ARC/HDMI IN/
OPT/BT
AUX/USB modes.
Press to increase
or decrease the
volume level.
Sound Bar main unit
Volume buttons:Source button:
Power button:
Bluetooth button:
Press to enter SLEEP
mode. Press and hold to
enter STANDBY mode
2a
Overview
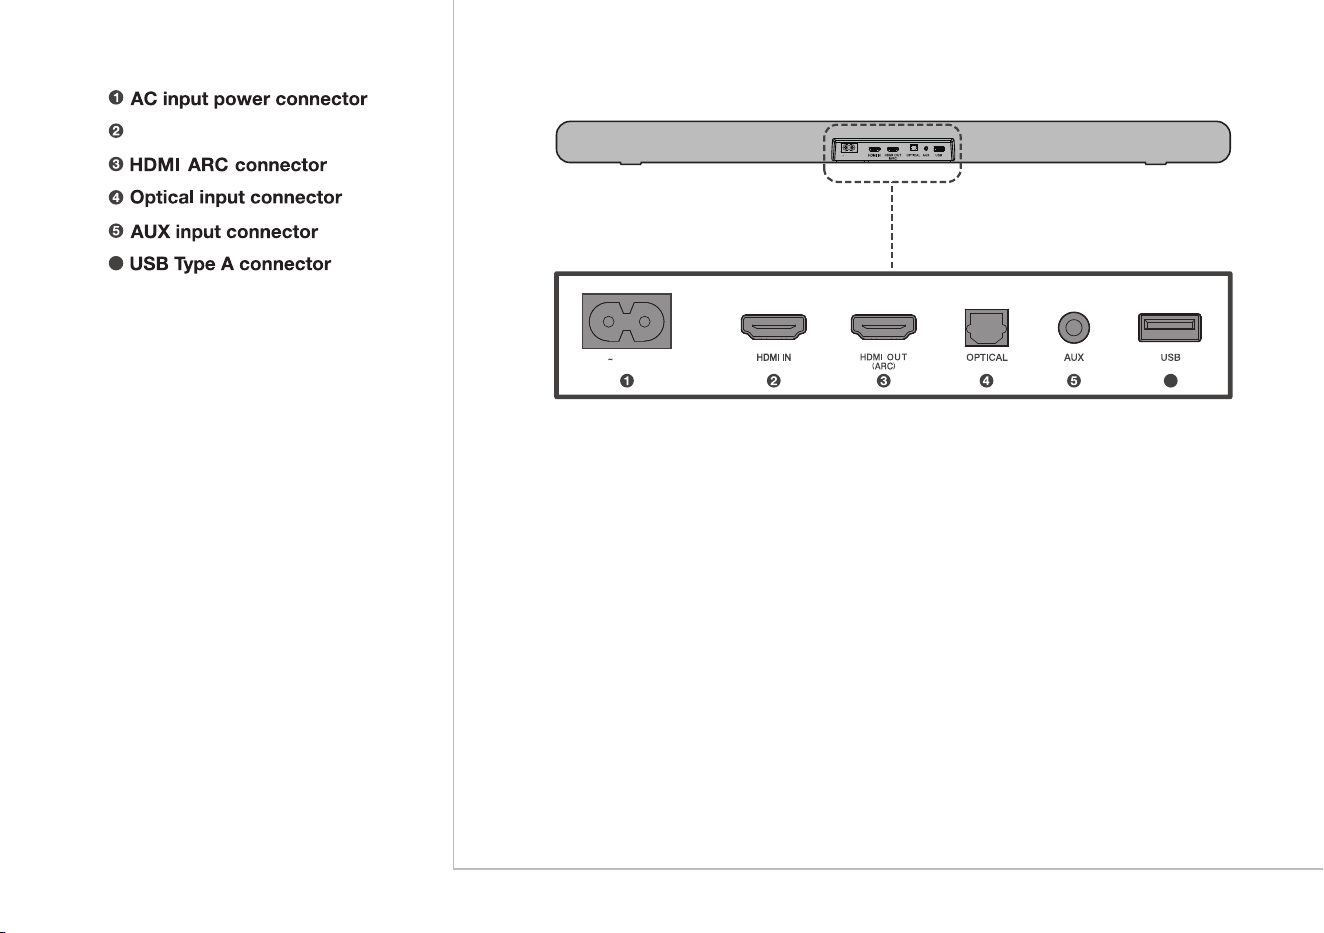
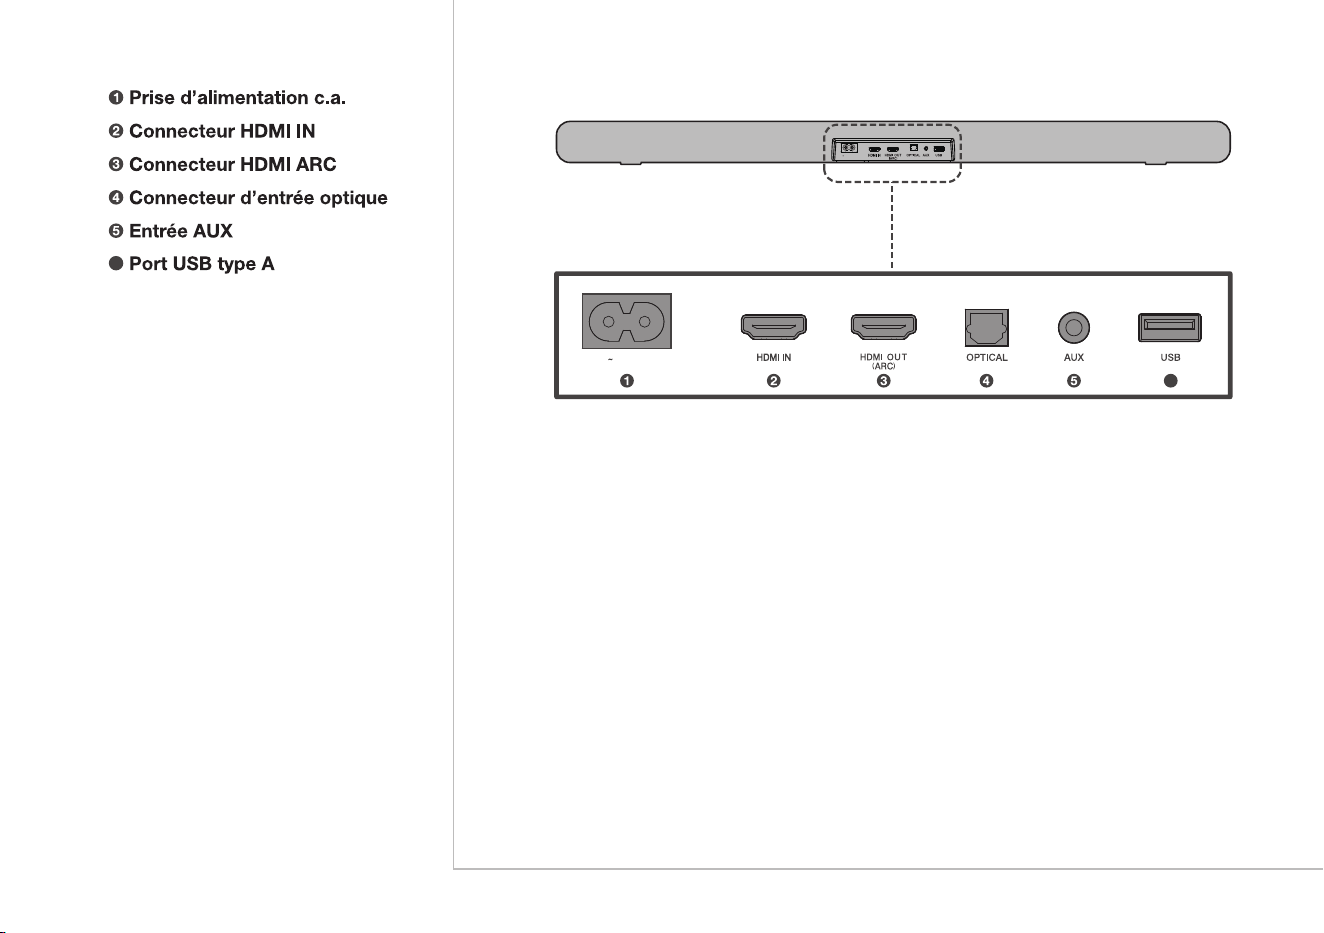
AC IN
HDMI IN connector
6
AC IN
6
> 2"
TV
TV
3
2
5
6
TV
20.2"
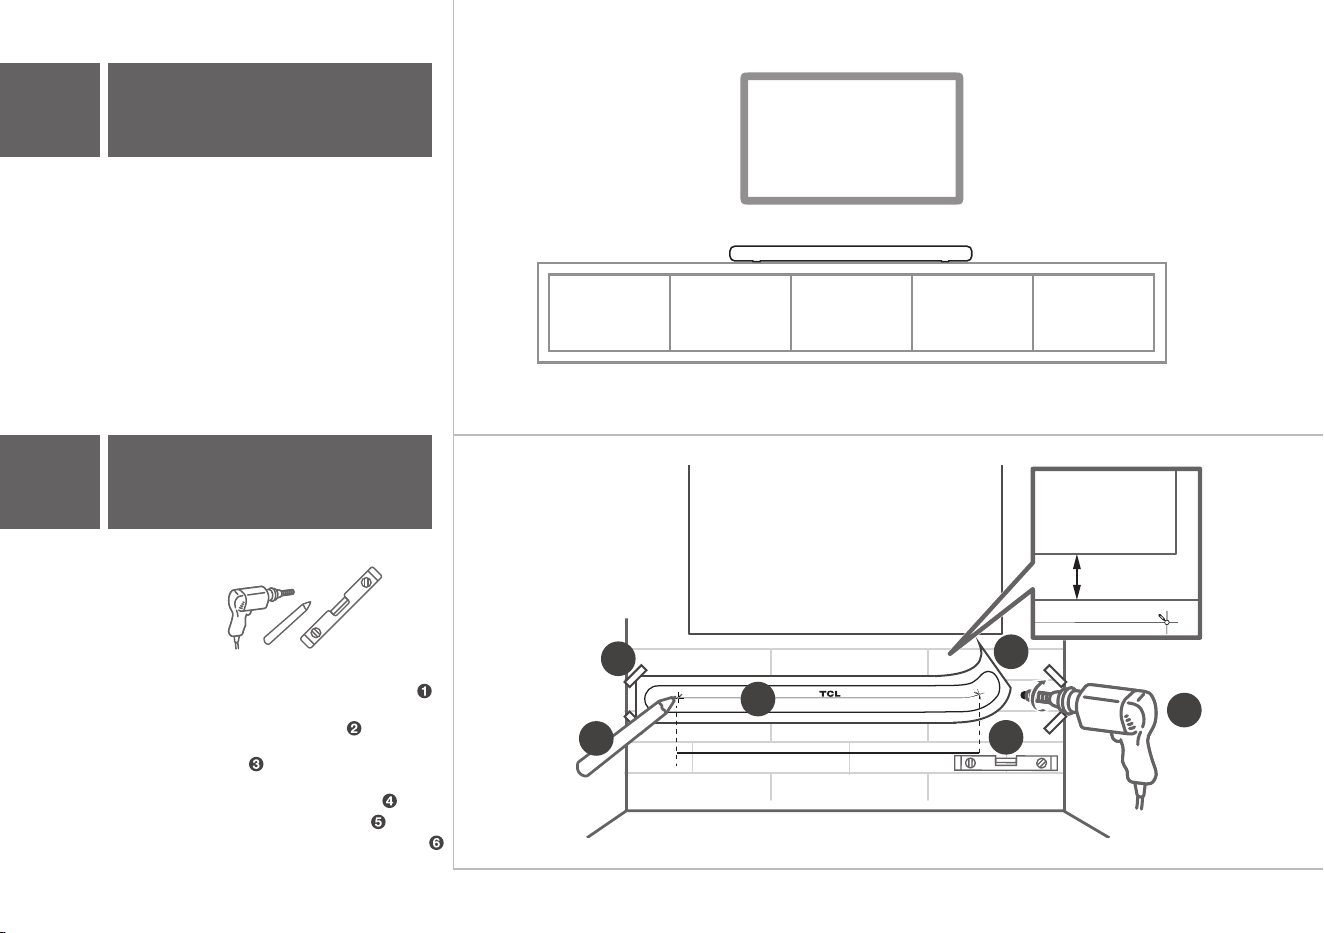
The ideal place to position the Sound Bar is
centered underneath your TV.
4
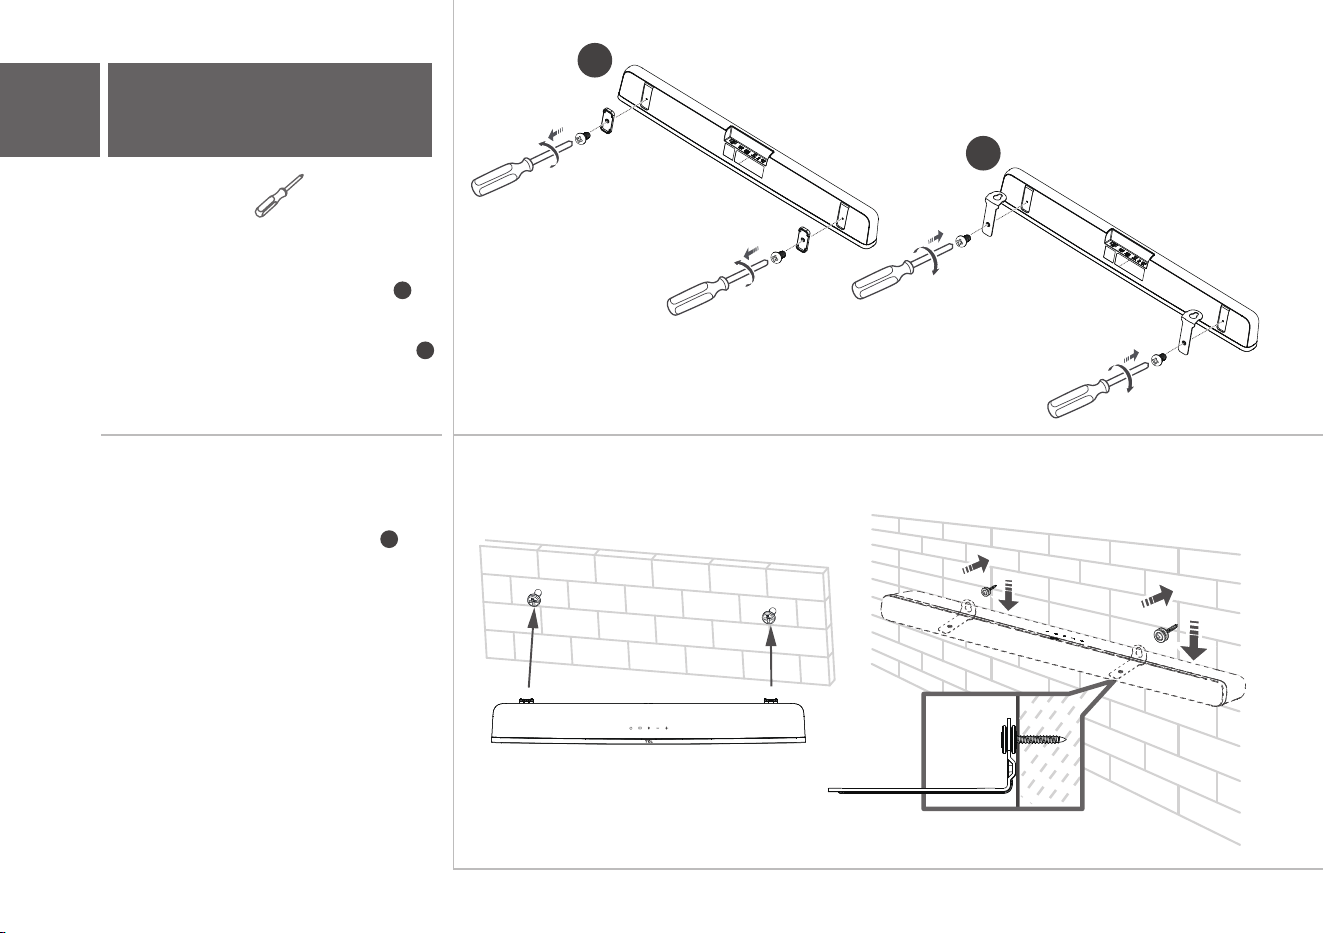
Wall mount your Sound Bar
3a
Place your Sound Bar
1
3b
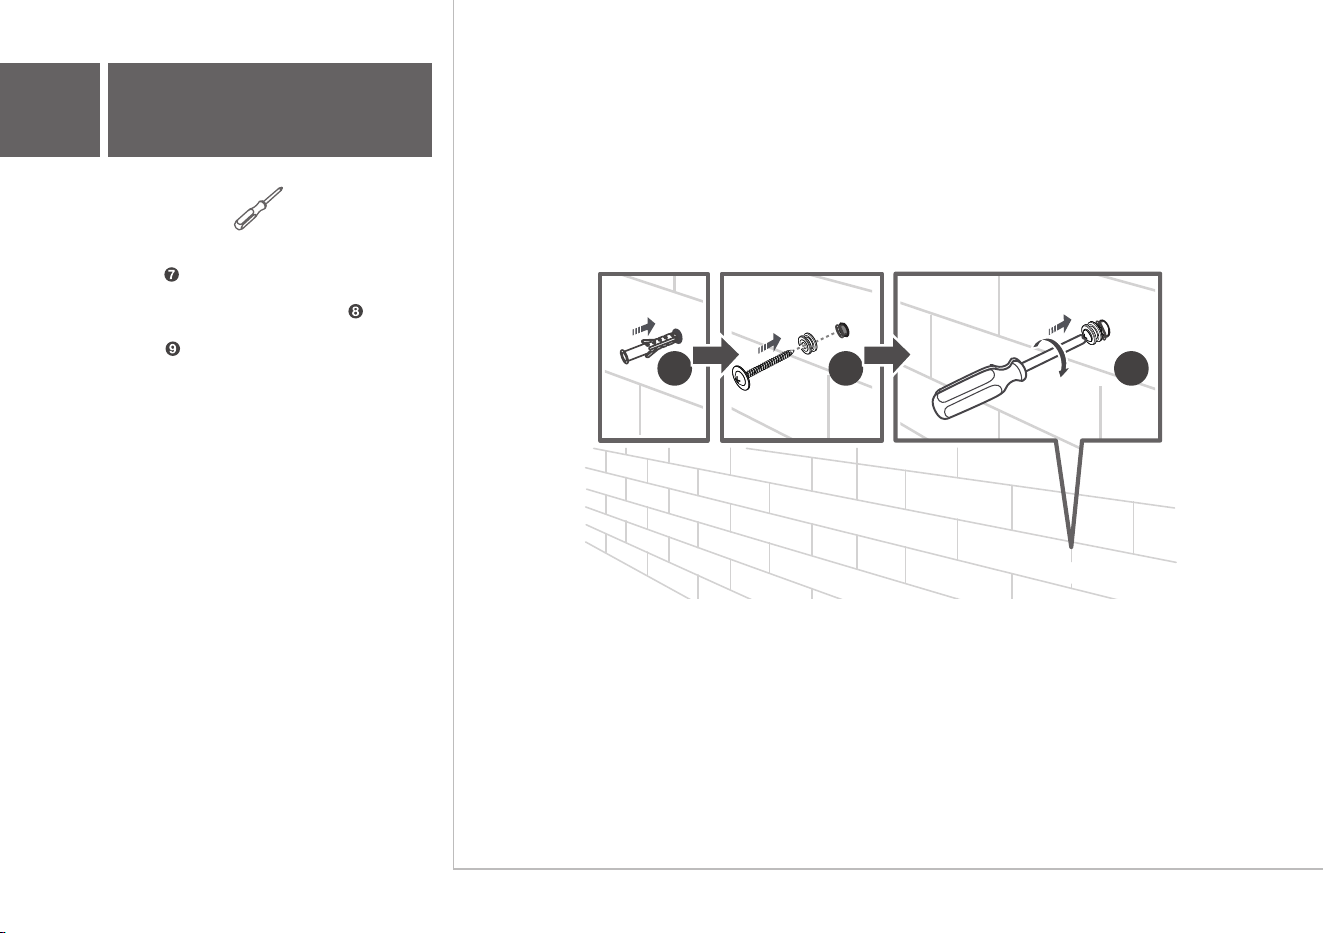
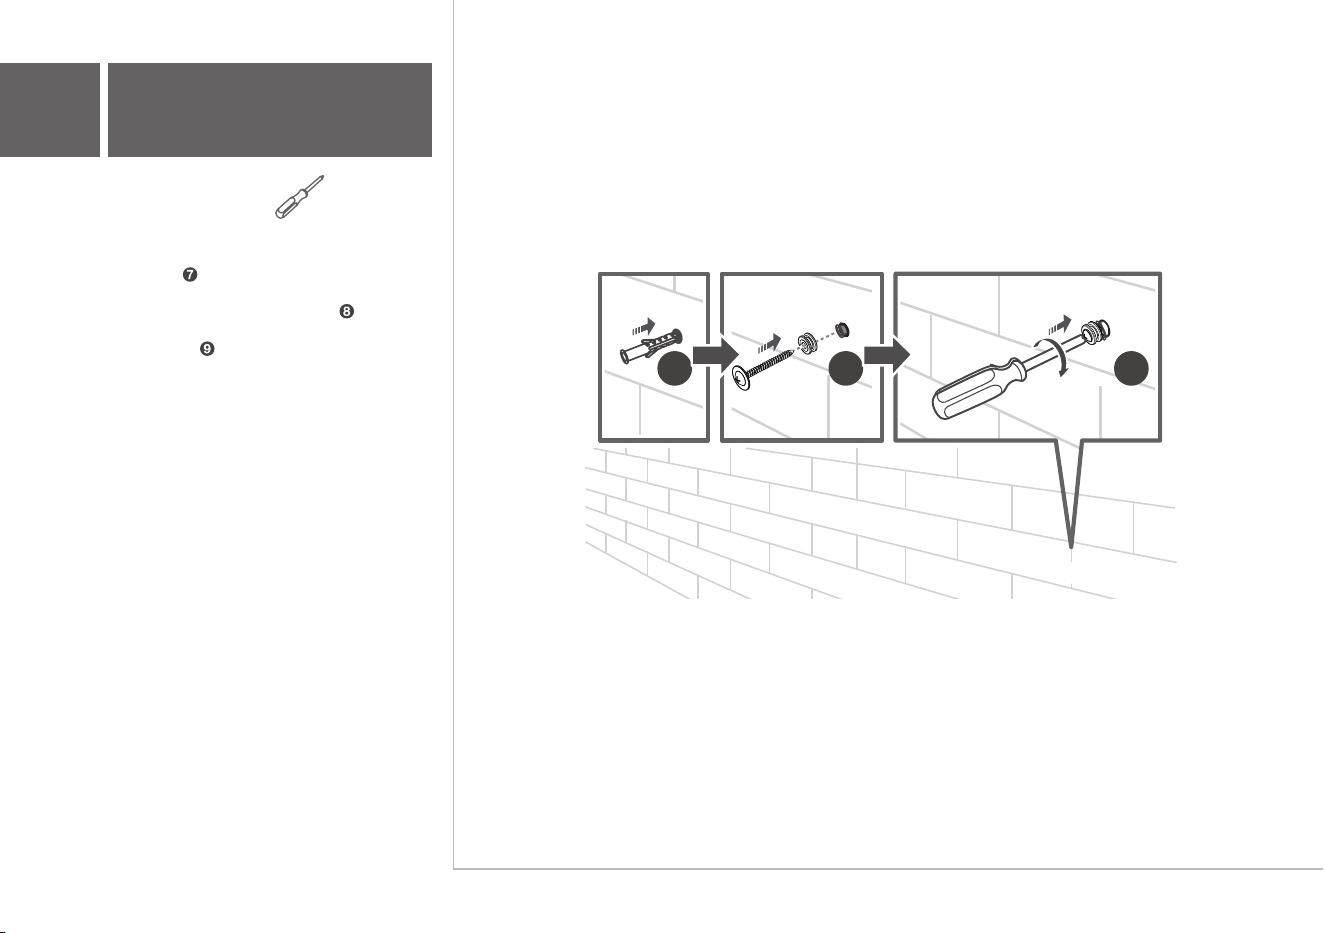
Required tools:
• Place the supplied wall mount template on the
wall. Make sure the wall mount template is at
least 2 inches below the center of the TV.
• Use a level to make
sure the wall mount
template is positioned accurately.
• Use the tape to stick the wall mount template
firmly on the wall.
• Mark on the wall using each marking on the
template through the mounting holes.
• Take away the wall mount template.
• Drill a screw hole at each marking on the wall.
7 8 9
Required tools:
• Insert the wall anchors in the holes on the
wall.
• Insert the supplied screws with the sleeves
into the hole of the wall anchors.
• Fix and tighten the wall bracket screws on the
wall.
3b
Wall mount your Sound Bar
10
11
3b
Wall mount your Sound Bar
Required tools:
• Unscrew the rubber cushions from the
bottom of the sound bar and set them aside
for potential use in the future.
• Attach the included wall bracket mounts to
the sound bar in the same holes the rubber
cushions were removed from.
• With the brackets now attached to the sound
bar, pick up the sound bar and attach it to the
wall screws, similar to how you would hang a
picture. Make sure everything is tight.
10
11
12

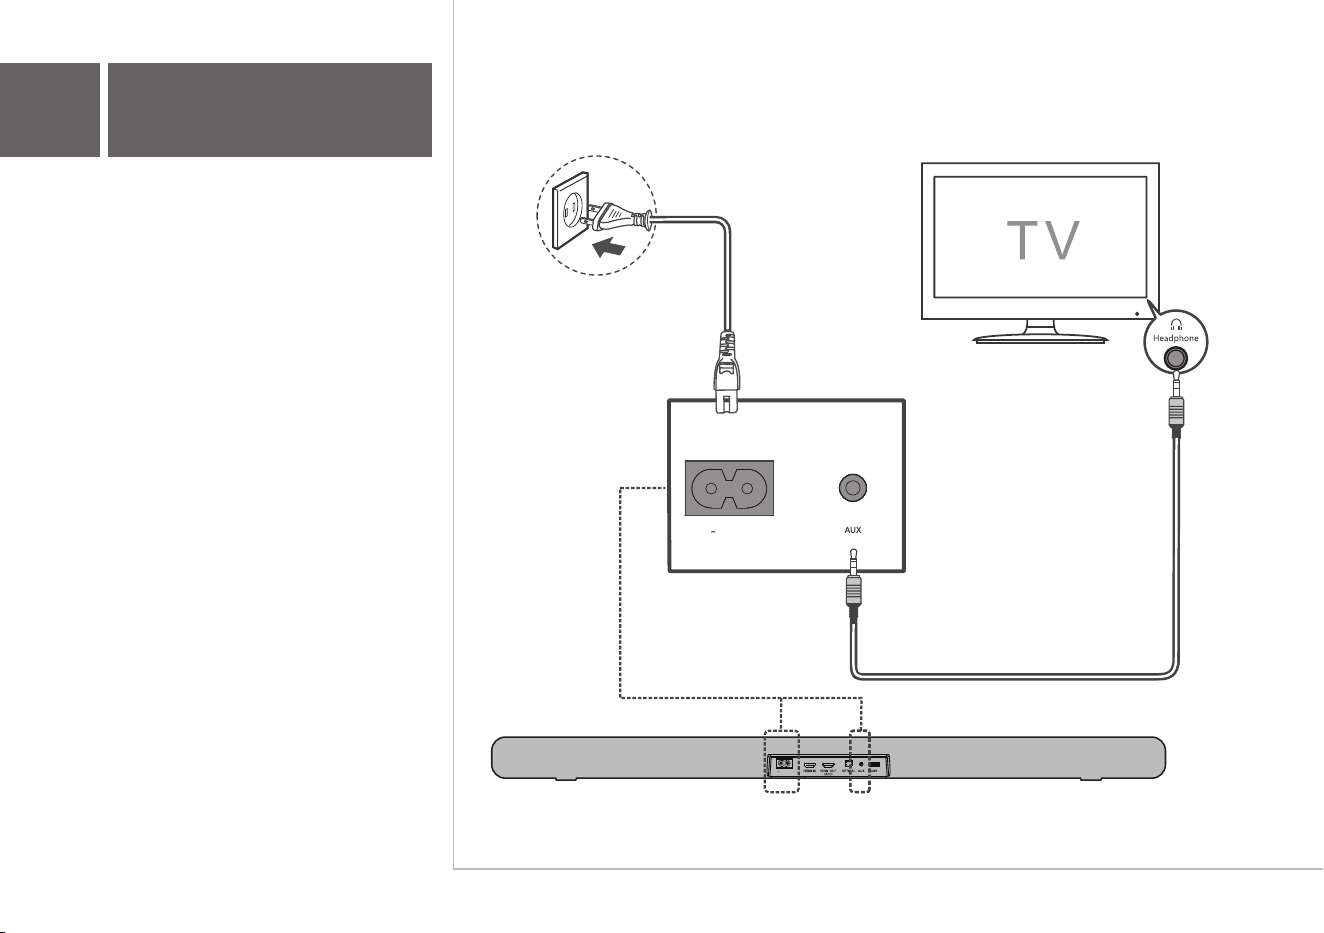
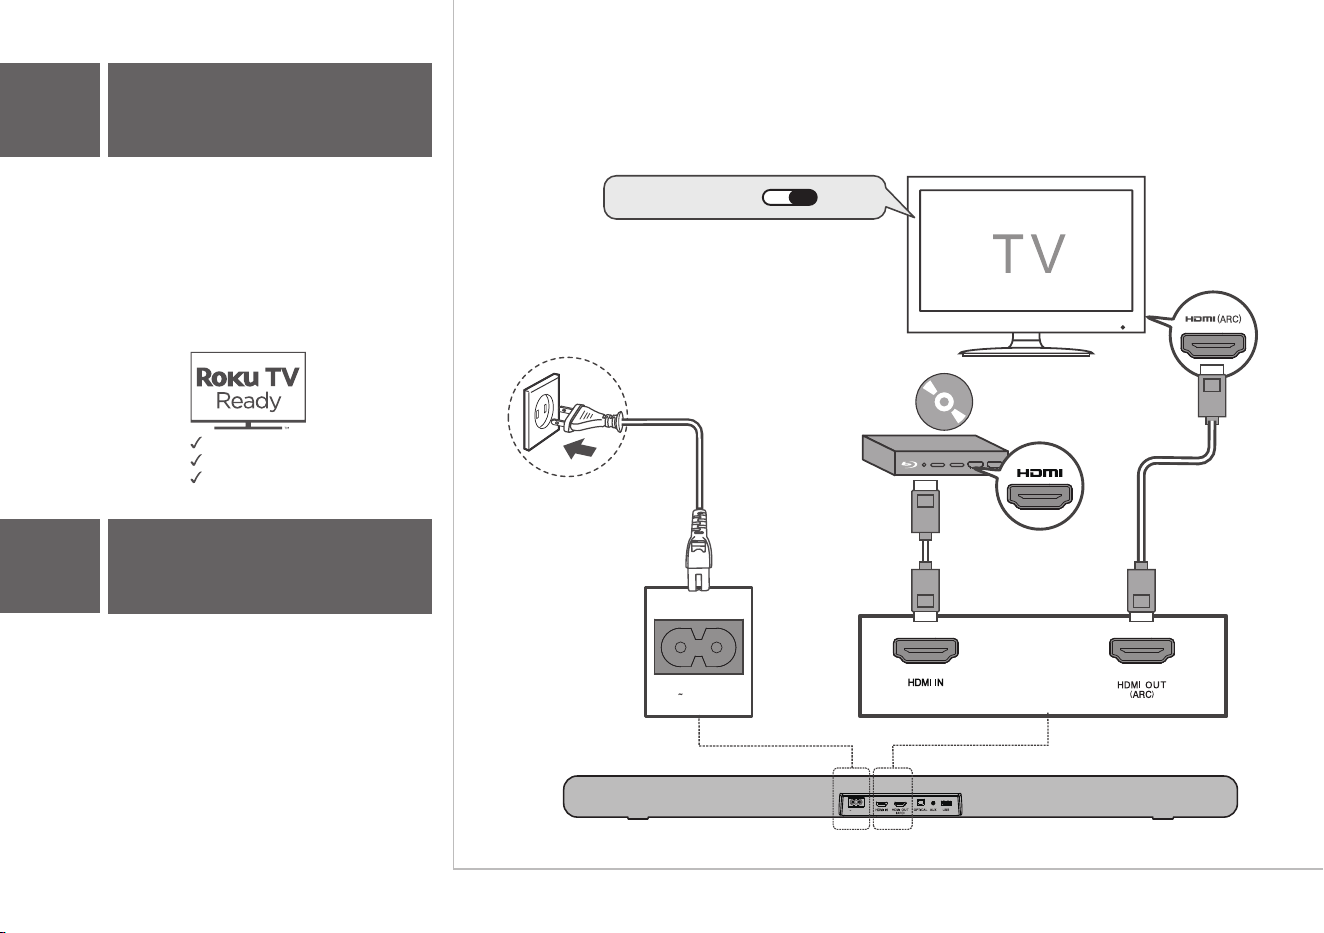
AC IN
Connect the Sound Bar with your TV through the
supplied HDMI cable.
Optional
Connect the Sound Bar to the power supply with
the supplied power cord.
4a
HDMI-ARC
4
Connect to your TV
There are 3 ways to connect your sound bar to the TV
(listed in order that we recommend): HDMI ARC (refer
to 4a), Optical (refer to 4b), and AUX (refer to 4c)
Note: HDMI-ARC is recommended. If you have a
Roku TV, simply plug in the HDMI and follow the Roku
TV Ready on-screen instructions.
HDMI CEC ON
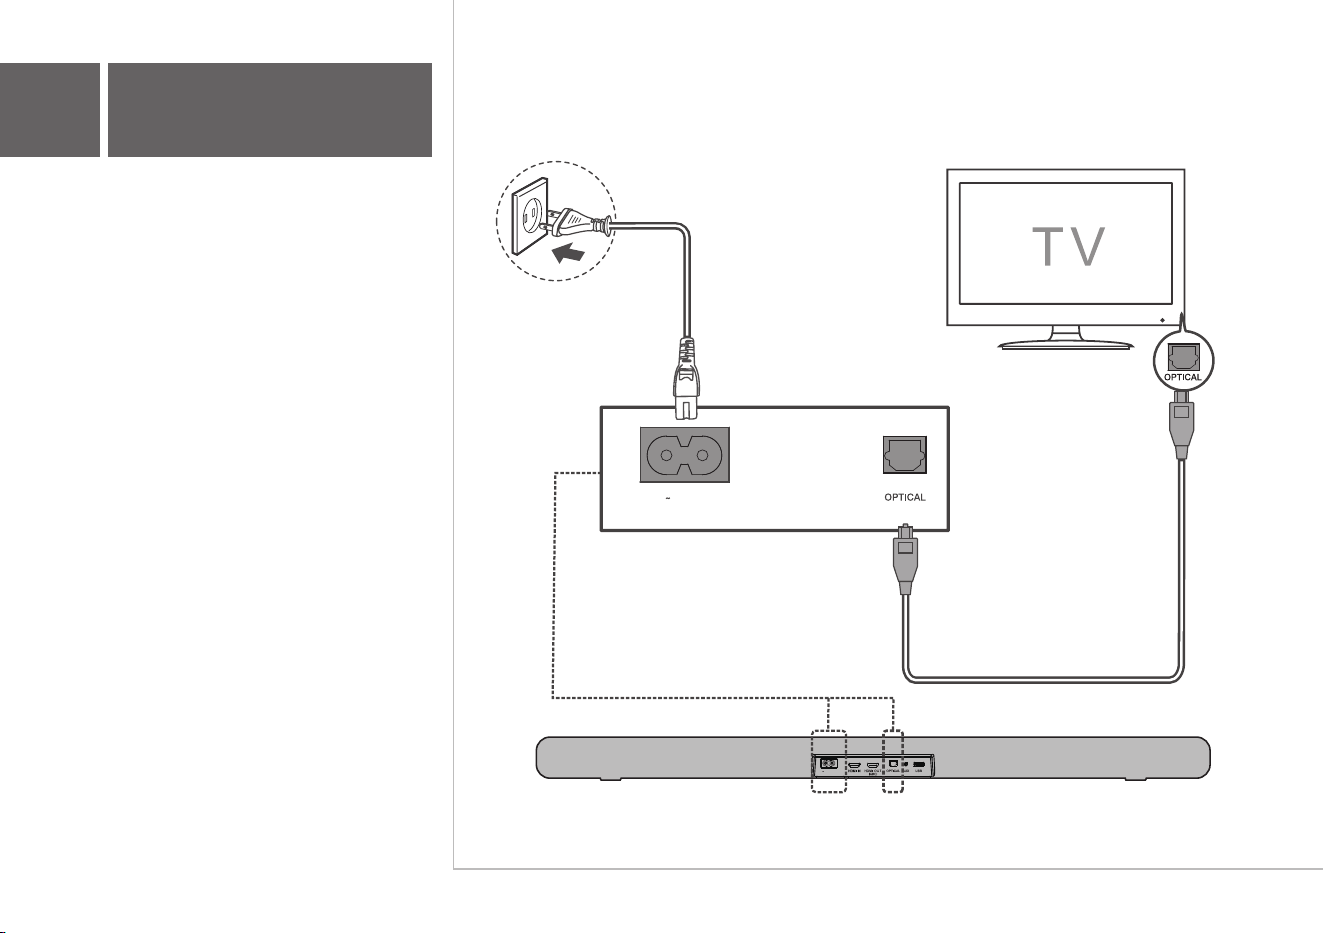
AC IN

AC IN
AC IN
Connect the Sound Bar with your TV through the
supplied Optical cable.
Connect the Sound Bar to the power supply with
the supplied power cord.
4b
Optical
AC IN
Connect the Sound Bar with your TV through
AUX cable (not supplied).
Connect the Sound Bar to the power supply with
the supplied power cord.
4c
AUX
AC IN
1 2 3
4
Battery type: 1.5V AAA Alkaline battery x 2
5b
Using the Remote
5a
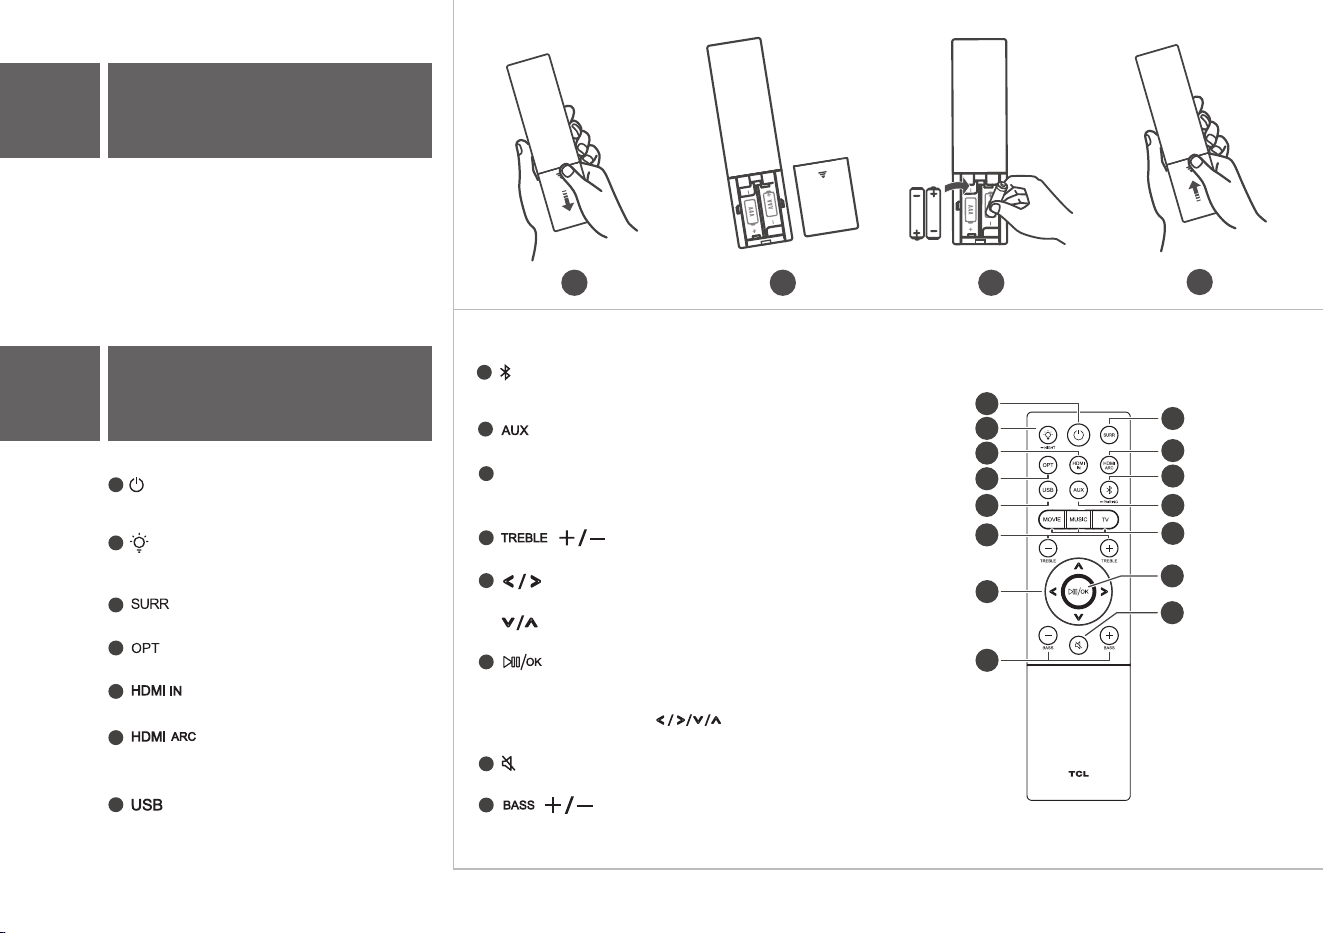
Install or replace the remote
batteries
Press to enter Sleep mode.
Press and hold to enter Standby mode.
Press to adjust the brightness of the display. Press
and hold for 3 seconds to enter Night mode.
Press to turn on/off Dolby vertical surround.
1
2
3
4
5
Press to switch the audio source to Optical mode.
Press to switch the audio source to HDMI IN mode.
Press to switch the audio source to USB source.
Press to switch the audio source to Bluetooth mode.
Press and hold to enter pairing mode.
Press to switch the audio source to AUX mode.
7
8
9
10
11
12
Switch to previous or next music. (Under Bluetooth or USB mode)
13
Decrease or increase the volumn level.
14
Press to play/pause the music. (Under Bluetooth or USB mode)
In Standby mode or Sleep mode, press and hold for 5 seconds to
15
Press to mute or unmute the sound.
Increase or decrease the bass sound effect.
to view options. And press
Press to select the equalizer (EQ) effect when you are watching TV,
movie or listening to music.
Press to switch the audio source to HDMI OUT
(ARC) mode.
6
enter Menu, and then press
OK to confirm.
MOVIE / MUSIC / TV
Increase or decrease the treble sound effect.
2
1
4
5
7
12
15
11
6
10
9
3
13
14
8

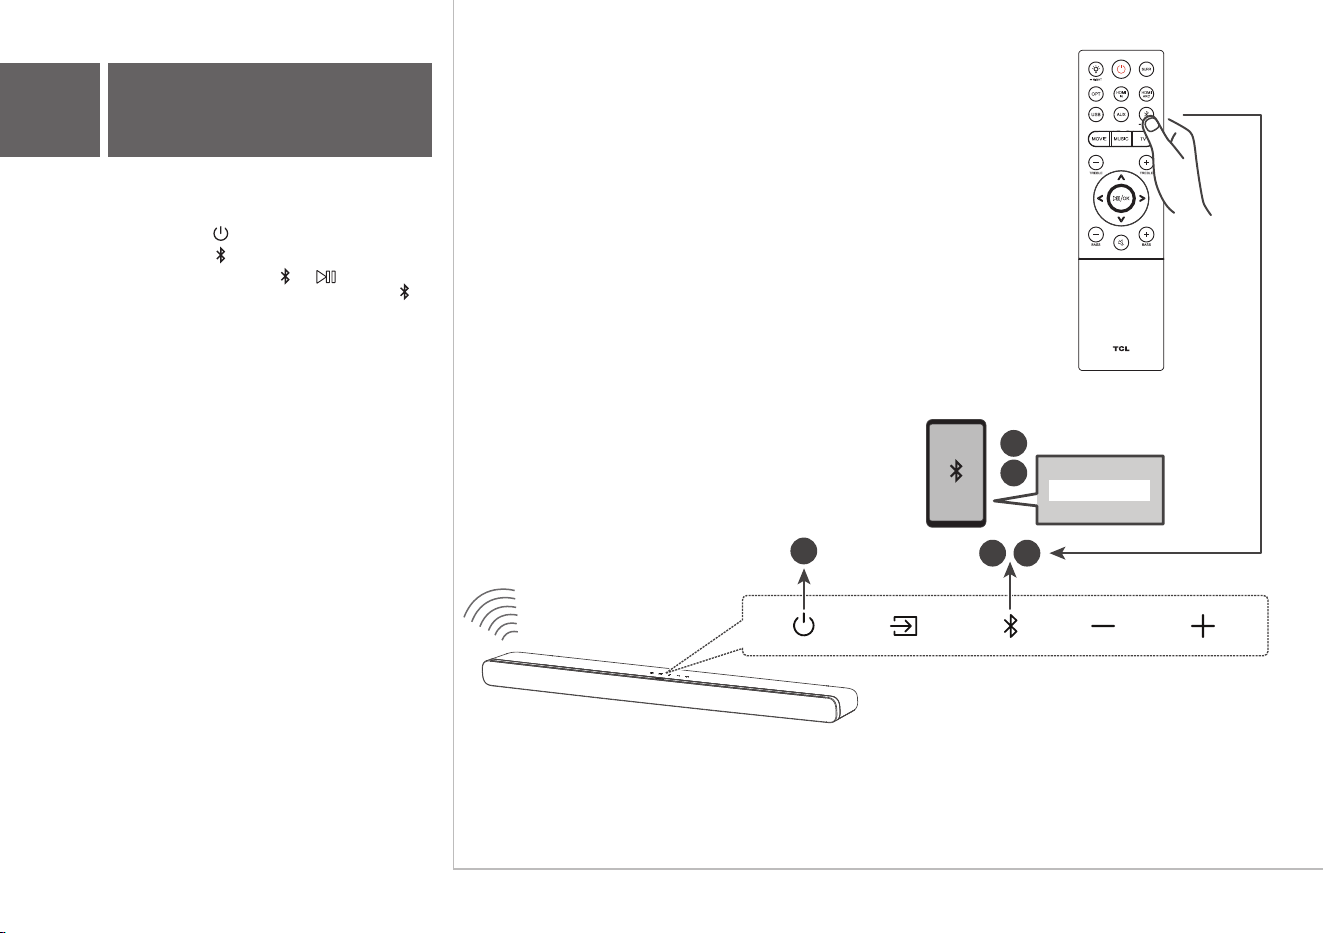
You can stream music from your mobile device
via Bluetooth.
1. Press .
2. Press .
3. Press and hold or on the remote control
or press and hold on your sound bar.
> You hear a sound signal.
> The Sound Bar is ready to pair.
4. Power on your Bluetooth device and activate
its Bluetooth function.
5. Select TCL Alto 8i.
> You hear a sound signal.
> Pairing is successful.
6. If you want to re-pair with another device,
please repeat step 3.
3
5
4
2
TCL Alto 8i
1
6a
Pair with your
Bluetooth device

LED Indications
SLEEP
STDBY
HDMI1 IN
HDMI2 ARC
USB
BT
AUX
OPT
The LED display on the Sound Bar gives
you information about the status of the
Sound Bar.
7
Sound Bar LED Display
HELLO
Sound Bar status
Enter sleep mode (LED flashes slowly)
HDMI ARC
Enter standby mode (LED keeps lighting on)
HDMI IN
BT
PAIR
In pairing mode
USB
AUX
OPT
Brightness of the screen
Surround on / off
Volume
Equalizer effect
Treble + / -
Bass + / -
In night mode
DIM 1 / DIM 2
SURR ON / SURR OFF
V 22
movie / music / tv
tre-3 tre+3
bas-3 bas+3
night
Audio format detected
PCM AUDIO ... DOLBY ATMOS

FAQ
Does this Sound Bar work with any TV?
Yes, the Sound Bar is compatible with any TV that has one of the
ports below:
1. HDMI supporting ARC (preferred)
2. Optical audio output (TOSLink)
3. Headphone output
When the Sound Bar and TV are both on, there is an echo
effect.
If you use HDMI-ARC connection, please check if the
HDMI-CEC feature of your TV is turned on. This feature may be
called T-Link, Anynet+, SimpLink, BRAVIA Link, EasyLink or
VIERA Link .
If using optical or AUX connection, simply mute the TV speaker.
How many sound modes are available?
Four sound modes - Movie, Music, TV and Night.
All technology names mentioned are the trademarks or registered trademarks of their respective companies.

TS 8111_NA _QSG _V1.5
support.tclusa.com
support.tclcanada.com
or

Guide de démarrage rapide
Alto 8i
Barre de son 2.1 avec audio Dolby Atmos et
double caisson de basses intégré

Safety
instructions
QSG
Cordon d’alimentation
Câble HDMI
Câble optique
Télécommande
Piles AAA x 2
Supports de montage mural x 2 Ancrage mural x 2 Vis de fixation murale x 2 Douille x 2
Gabarit de montage mural
Guide de
démarrage rapide
Feuillet sur la sécurité
Warranty
card
Carte de garantie
1
Contenu de la boîte
Veuillez lire toutes les informations de sécurité
avant d’utiliser ce produit
Barre de son
Appuyez pour sélectionner l’entrée
Bluetooth. Maintenez la touche enfoncée
pour entrer en mode jumelage.
Appuyez pour alterner entre les entrées
audio des modes HDMI ARC, HDMI IN,
optique, Bluetooth, auxiliaire ou USB.
Appuyez pour
augmenter ou diminuer
le niveau de volume.
Barre de son
Touches de volume:Touche d’entrée:
Touche de mise
en marche
Touche Bluetooth:
Appuyez pour entrer en
mode Veille. Appuyez et
maintenir pour entrer en
mode Attente.
2a
Survol
AC IN
6
AC IN
6

> 2 po (5,1 cm)
TV
TV
3
2
5
6
TV
20,2 po (51,31 cm)
L’endroit idéal pour placer votre barre de son se
trouve au centre, sous votre téléviseur.
4
Fixez votre barre de
son au mur
3a
Installez votre barre de son
1
3b
Outils nécessaires:
• Placez le gabarit de montage mural fourni sur
le mur. Assurez-vous que le gabarit se trouve
au moins 2 po (5,1 cm) en dessous de votre
téléviseur.
• Utilisez un niveau pour vous assurer que le
gabarit de montage mural est positionné avec
précision.
• Utilisez le ruban adhésif pour coller le gabarit
de montage mural fermement au mur.
• Faites une marque sur le mur en utilisant
chaque repère du gabarit à travers les trous de
fixation.
• Retirez le gabarit de montage mural.
• Percez un trou dans chaque repère sur le mur.
Outils nécessaires:
• Insérez les ancrages muraux dans les trous
du mur.
• Insérez les vis fournies avec les douilles dans
les trous des ancrages muraux.
• Fixez et serrez les vis des supports muraux
sur le mur.
7 8 9
3b
Fixez votre barre de
son au mur
Outils nécessaires:
• Dévissez les coussins en caoutchouc du bas
de la barre de son et mettez-les de côté
pour une utilisation éventuelle à l'avenir.
• Fixez les supports muraux inclus à la barre
de son dans les mêmes trous que ceux où
les coussins en caoutchouc ont été retirés.
10
11
3b
Fixez votre barre de
son au mur
• Les supports étant maintenant fixés à la barre
sonore, prenez-la et fixez-la aux vis murales,
comme vous le feriez pour un tableau.
Assurez-vous que tout est bien serré.
10
11
12
AC IN
Connectez la barre de son au téléviseur avec le
câble HDMI fourni.
Optionnel
Branchez la barre de son à l’alimentation
électrique avec le cordon fourni.
4a
Connexion HDMI ARC
4
Branchez votre téléviseur
Il y a 3 façons de connecter votre barre de son au
téléviseur (énumérées dans l'ordre que nous
recommandons): HDMI ARC (voir 4a), Optique (voir
4b) et AUX (voir 4c).
Remarque: on recommande la connexion HDMI ARC.
Si vous avez un téléviseur Roku, il suffit de brancher le
câble HDMI et de suivre les instructions à l'écran de
Roku.
Installation simple
Une télécommande
Réglages rapides
HDMI CEC ON
AC IN
AC IN
AC IN
Connectez la barre de son à votre téléviseur avec
le câble optique fourni.
Branchez la barre de son à l'alimentation
électrique avec le cordon fourni.
4b
Connexion optique

AC IN
Connectez la barre de son à votre téléviseur avec
le câble auxiliaire (non fourni).
Branchez la barre de son à l'alimentation
électrique avec le cordon fourni.
4c
Connexion AUX (auxiliaire)
AC IN
1 2 3
4
Type de pile: alcaline AAA 1,5 V x 2
5b
Utilisation de la
télécommande
5a
Installez ou remplacez les
piles de la télécommande
Appuyez pour entrer en mode Veille
Appuyez et maintenez pour entrer en mode Attente.
Appuyez pour ajuster la luminosité de l’écran.
Appuyez et maintenez pendant 3 secondes pour
entrer en mode Nuit.
Appuyez pour allumer ou fermer l’ambiophonie
verticale Dolby.
1
2
3
4
5
Appuyez sur cette touche pour passer l’entrée audio
en mode Optique.
Appuyez sur cette touche pour passer l’entrée audio
en mode HDMI.
Appuyez sur cette touche pour passer l’entrée audio
en mode HDMI ARC.
Appuyez sur cette touche pour passer l’entrée audio
en mode USB.
Appuyez sur cette touche pour passer l’entrée audio en mode Bluetooth.
Appuyez et maintenez pour entrer en mode jumelage.
Appuyez sur cette touche pour passer l’entrée audio en mode AUX.
7
8
9
10
11
12
Passe à la musique suivante ou précédente (modes Bluetooth ou USB).
13
Augmente ou diminue le niveau du volume.
14
Appuyez pour lire ou mettre en pause la musique.
En mode Attente ou Veille, appuyez et maintenez pendant 5 secondes pour
ouvrir le Menu, puis appuyez pour voir les choix. Et appuyez sur
Ok pour confirmer.
15
Appuyez pour couper ou réactiver le son.
Augmente ou diminue les basses.
Appuyez pour sélectionner l’effet égalisation (EQ) lorsque vous regardez
une émission télé, un film ou écoutez de la musique.
6
MOVIE / MUSIC / TV
Augmente ou diminue les sons aigus.
2
1
4
5
7
12
15
11
6
10
9
3
13
14
8
À partir de votre appareil mobile, vous pouvez
diffuser de la musique par Bluetooth.
1. Appuyez sur .
2. Appuyez sur .
3. Appuyez et maintenez ou sur la
télécommande ou appuyez et maintenez
sur votre barre de son.
> Un signal sonore se fait entendre.
> La barre de son est prête pour le jumelage.
4. Allumez votre appareil Bluetooth et activez sa
fonction Bluetooth.
5. Sélectionnez TCL Alto 8i.
> Un signal sonore se fait entendre.
> Le jumelage est réussi.
6. Si vous désirez faire un nouveau jumelage avec
un autre appareil, veuillez répéter l’étape 3.
3
5
4
2
TCL Alto 8i
1
6a
Jumelage de votre
appareil Bluetooth

Indications DEL
SLEEP
STDBY
HDMI1 IN
HDMI2 ARC
USB
BT
AUX
OPT
L’état de la barre de son est indiqué sur
l’afficheur DEL.
7
Affichage DEL de
la barre de son
HELLO
État de la barre de son
Passe en mode Veille
(la diode DEL clignote lentement)
Entrée HDMI ARC
Passe en mode Attente
(la diode DEL reste allumée)
Entrée HDMI IN
BT
PAIR
Mode jumelage
USB
AUX (auxiliaire)
OPT (optique)
Luminosité de l’écran
Active ou désactive l’ambiophonie
Volume
Effet d’égalisation
Aigus + / -
Basses + / -
Mode nuit
DIM 1 / DIM 2
SURR ON / SURR OFF
V 22
movie / music / tv
tre-3 tre+3
bas-3 bas+3
night
Format audio détecté
PCM AUDIO ... DOLBY ATMOS

FAQ
Cette barre de son fonctionne-t-elle avec n’importe quel
téléviseur ?
Oui, la barre de son est compatible avec tous les téléviseurs
qui possèdent un des ports ci-dessous :
1. HDMI prenant en charge l'ARC (connexion préférable)
2. Sortie audio optique (TOSLink)
3. Sortie casque
Lorsque la barre de son et le téléviseur sont tous deux
allumés, il y a un effet d'écho.
Si vous utilisez une connexion HDMI ARC, veuillez vérifier si la
fonction HDMI CEC de votre téléviseur est activée. Cette
fonction peut être appelée T-Link, Anynet+, SimpLink, BRAVIA
Link, EasyLink ou VIERA Link*.
Si vous utilisez une connexion optique ou AUX, il suffit de couper
le son du téléviseur.
Combien de modes sonores sont disponibles ?
Il y a 4 modes audio : film, musique, émission télé et nuit.
Tous les noms de technologies mentionnés sont des marques de commerce ou des marques déposées appartenant à leurs sociétés respectives.

TS 8111_NA _QSG _V1.5
support.tclusa.com ou
support.tclcanada.com
Ne pas retourner le produit au magasin
Prenez garde lorsque vous
retirez la barre de son
Appelez-nous d’abord pour toutes questions
Nous sommes
prêts à vous aider
Soutien TCL:
Œ
™ ™
™
Tous droits réservés.
