
Loading ...
Loading ...
Loading ...
- 7 -
Revision 06/2022
Copyright © 2022, Fast ČR, a.s.
6. To start the descaling process, press button B11.
Note:
In the event that you wish to return to the stand-by mode at
this stage, press button
B7.
7. The indicator light B5
will flash during the descaling process.
Take care to prevent scalding by hot water or the escaping steam.
Do not interrupt the process in this phase.
8. Once the water in the water tank A1 is used up, the indicator light B1
and button B11 will start flashing. Empty out the remaining
contents of the water tank A1 and fill it up to the maximum water
mark with clean water. When the filled water tank A1 is inserted back
into the appliance, indicator light B1
will turn off. The descaling
process will continue to run.
Note:
If necessary, empty out the container underneath the brew
head A5. Nevertheless, be careful when handling the
container since the water inside may be very hot.
9. When the self cleaning process is complete, the espresso machine
will turn off automatically.
. . . . . . . . . . . . . . . . . . . . . . . . . . . . . . . . . . . . . . . . . . . . . . . . . . . . . . . . . . . . . . . . . . . .
DRAINING THE INTERNAL LINES
• It is recommended to drain the internal lines when you plan on
not using the appliance for and extended period of time, before
transporting it, etc.
1. In the stand-by mode, simultaneously press and hold down buttons
B7 and B12 for 5seconds.
2. The indicator light B6
will start flashing.
3. Remove the water tank A1 from the appliance. Indicator B6
will
be lit. This signals that the draining of the internal lines is running.
Note:
If you press button
B7 before taking out the water tank A1,
you will return back to the stand-by mode.
4. When the internal line draining process is complete, the espresso
machine will turn off automatically.
. . . . . . . . . . . . . . . . . . . . . . . . . . . . . . . . . . . . . . . . . . . . . . . . . . . . . . . . . . . . . . . . . . . .
CLEANING THE GROUND COFFEE OUTLET
• During use, ground coffee may accumulate on the walls of the
ground coffee outlet and therefore it is necessary to clean it regularly
(depending on the frequency of use).
1. Slide out and remove the service access door A11 – see figure G1.
Press the steaming unit A10 release buttons and take it out – see
figure G2.
2. Carefully tilt the espresso machine and using brush A12, carefully
remove any dirty material from the walls of the ground coffee
outlet– see figure H.
3. After cleaning it out, insert the steaming unit A10 and the service
access door A11 back in their place.
Storage
• When not using the appliance for an extended period of time,
disconnect the power plug from the power socket, allow the appliance
to cool down and clean it according to the instructions provided above.
• Before storing it, check that the appliance and all its accessories are
thoroughly clean and dry.
• Store the appliance in adry, clean and well-ventilated location not
exposed to extreme temperatures and out of children'sreach.
. . . . . . . . . . . . . . . . . . . . . . . . . . . . . . . . . . . . . . . . . . . . . . . . . . . . . . . . . . . . . . . . . . . .
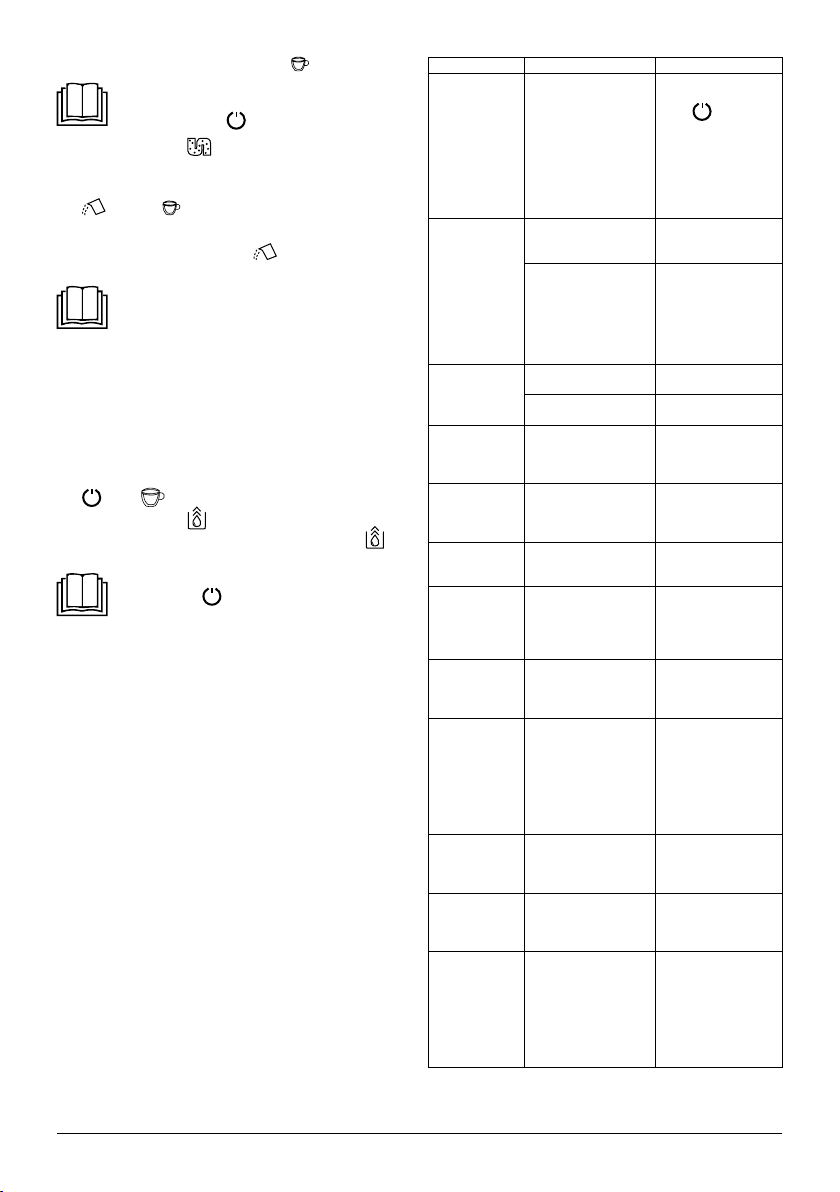
TROUBLESHOOTING
• The following table lists potential problems that may be encountered
during the use of the espresso machine. Nevertheless, if the problem
persists, turn off the espresso machine, disconnect the power plug
from the power socket and contact an authorised service centre.
Problem Cause Solution
The appliance is
not working.
It is not connected to
apower socket.
Connect it to aworking
power socket and press
button
B7.
Check that the power
cord is properly
connected to the socket
in the appliance and
that the plug is properly
inserted in the power
socket.
There is no
response when
abutton is
pressed or the
response is
delayed.
Electromagnetic
interference of the
appliance is occurring.
Turn off the appliance
and turn it back on again
after several minutes.
The touch panel is soiled.
Turn off the appliance,
disconnect it from the
power socket and clean
the panel using aclean,
lightly dampened cloth
and then thoroughly
wipe it dry.
Coffee is not
warm enough.
Cups have not been
warmed up.
Warm up the cups.
The steaming unit A10 is
too cold.
Flush it out three times
before brewing coffee.
Coffee is not
flowing out the
spout.
Prior to this you used
the drain internal lines
function.
Press the dispensing hot
water button until water
starts flowing from the
spout.
The first cup
does not taste
particularly good.
There is an insufficient
amount of ground coffee
inside the steaming
unit A10.
Pour out of the first
coffee that you brewed.
The next cup will now be
in order.
The coffee lacks
froth.
The coffee beans are
not fresh.
Use fresh coffee beans
or try using adifferent
brand of coffee.
Touch buttons
do not function
properly.
The touch buttons are
not pressed properly.
It is necessary to use the
appliance from the front.
Press the bottom part
of the icon of the touch
button.
The appliance
heats up for too
long.
The appliance is soiled
by limescale deposits.
Descale it according
to the instructions
contained in section
"Descaling".
The water tank
A1 is removed
or it is running
out of water, but
the respective
indicator light
is not signalling
anything.
The area around the
connector at the bottom
of the water tank A1 is
damp or wet.
Thoroughly dry out any
moisture or water in the
vicinity of the connector.
The inner drip tray
A7 is filled with
alarge amount of
water.
The coffee is ground
too fine, which prevents
water from flowing
through.
While the coffee grinder
is running, set acoarser
grind level.
The coffee
is dispensed
too slowly or
intermittently.
The coffee is ground
too fine, which prevents
water from flowing
through.
While the coffee grinder
is running, set acoarser
grind level.
The insufficient
coffee beans
indicator light
is flashing even
though there is
asufficient amount
of coffee beans in
the hopper.
The internal ground
coffee outlet is clogged.
Clean out the ground
coffee outlet of the
appliance according
to the instructions in
section "Cleaning the
ground coffee outlet".
Loading ...
Loading ...