
Loading ...
Loading ...
Loading ...
- 6 -
Revision 06/2022
Copyright © 2022, Fast ČR, a.s.
when it is subsequently fully steamed, its flavour will be developed fully,
and its aromatic compounds and essential oils will be fully extracted.
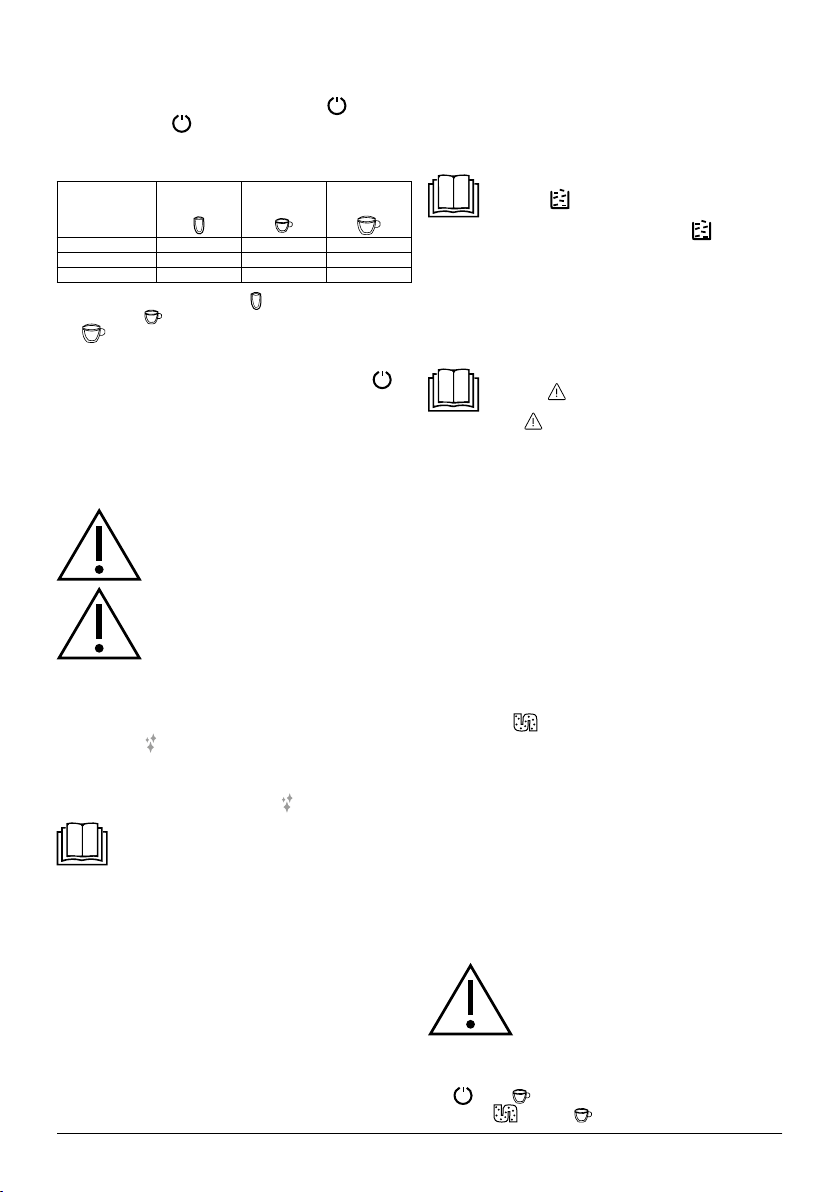
1. In the stand-by mode, press and hold down button
B7 for
5seconds. Button
B7 will start flashing and at the same time
other buttons will also be flashing or lit depending on the mode that
is set.
Hot water
button
Espresso coffee
button
Lungo coffee
button
ECO mode
Lit Bliká Flashing
Fast mode
Flashing Lit Flashing
Default settings
Flashing Flashing Lit
2. To set the ECO mode, press button
B10, to set the fast mode,
press button B11 and to reset to default settings, press button
B12. After setting amode, 2beeps will be made. In the event
that you attempt to set amode that is already set, the appliance will
not react to the button being pressed.
3. If you do not wish to change the mode settings, press button
B7 once more, or wait 5seconds until the appliance automatically
switches back to the stand-by mode.
. . . . . . . . . . . . . . . . . . . . . . . . . . . . . . . . . . . . . . . . . . . . . . . . . . . . . . . . . . . . . . . . . . . .
CLEANING AND MAINTENANCE
• Disconnect the power plug from the power socket and allow the
appliance to cool down before cleaning it.
Warning:
For cleaning, do not use cleaning products with an
abrasive effect, solvents, etc. that could damage the
appliance. No part of this appliance is intended for
washing in adishwasher.
Warning:
To prevent the risk of injury by electrical shock, do not
submerge the appliance, power cord or power plug in
water or any another liquid.
Quick clean
• The quick clean function is suitable for quickly removing dirty material
from the brew head A5 and the tubing lines.
1. Place acup, mug or glass underneath the brewing head A5.
2. Press button
B9 once. The espresso machine will automatically
start the quick clean function. Water will automatically start flowing
out of the brew head A5.
3. The quick clean process will automatically stop, however, it may
also be stopped by again pressing button
B9.
Note:
We recommend starting the quick clean function after every
use.
. . . . . . . . . . . . . . . . . . . . . . . . . . . . . . . . . . . . . . . . . . . . . . . . . . . . . . . . . . . . . . . . . . . .
EVERYDAY CLEANING AND MAINTENANCE
• Timely cleaning and maintenance is very important for operating the
appliance and extending its lifetime.
• Before cleaning, turn off the appliance, disconnect it from the power
socket and allow it to cool down.
Drip tray and the coffee grounds container
• Remove the outer drip tray A8 – see figure F1. Empty out all its
contents over asink, and wash it using clean water and then dry it
thoroughly.
• Be careful not to burn yourself when handling the drip tray A8. It may
contain hot water
• Slide out the inner drip tray A7 with the coffee grounds container A6
– see figure F2.
• Empty out the coffee grounds container A6 and wash it with clean
water. Then dry it thoroughly. Empty out the inner drip tray A7 and if
dirty, wipe it with aclean dampened cloth and then dry it thoroughly.
• Install the inner drip tray A7, coffee grounds container A6 and the
outer drip tray A8 back in their place.
Note:
If the icon B3
lights up while the espresso machine is
running, it means that the coffee grounds container A6 is full
and needs to be emptied out. If the icon B3
starts flashing,
it means that the coffee grounds container A6 is not inserted.
Steaming unit
• Slide out and remove the service access door A11 – see figure G1.
Press the steaming unit A10 release buttons and take it out – see
figure G2. Wash it under running water and dry it out thoroughly.
• Install the steaming unit A10 properly in its place and attach the
service access door A11.
Note:
If the icon B4
lights up, it means that the steaming unit
A10 is not inserted in its place or is not correctly installed. If
icon B4
is flashing, the service access door A11 is open or
incorrectly installed.
Water tank
• Take out the water tank A1, rinse it out with clean water with the
addition of asmall amount of neutral dishwashing detergent. Then
rinse it out thoroughly using clean water, dry it and put it back in its
place.
Coffee bean hopper
• Only clean the coffee bean hopper A3 with aclean, dry cloth or paper
towel. Do not clean it with water.
Outer surface of the espresso machine
• To clean the outer surface of the appliance, use aclean, lightly
dampened cloth. Then wipe everything so that it is thoroughly dry.
. . . . . . . . . . . . . . . . . . . . . . . . . . . . . . . . . . . . . . . . . . . . . . . . . . . . . . . . . . . . . . . . . . . .
DESCALING
• If indicator B5
lights up during operation, it is necessary to start
the descaling function.
• The appliance will work best when the descaling function is used
regularly, at least once per month, or more frequently based on the
hardness of the water that is used. This will extend its lifetime and
improve power efficiency because limescale deposits negatively affect
electricity consumption.
1. Fill the water tank A1 all the way to the maximum water mark
according to the instructions contained in chapter »Filling the water
tank«.
2. Add descaling agents specially intended for descaling espresso
machine type appliances into the water tank A1. This agent can be
purchased in standard retail chains. Follow the instructions on the
manufacturer'spackaging when dosing the purchased descaling
agent.
Warning:
For descaling, do not use vinegar, etc. Otherwise, the
appliance could be damaged.
3. Insert the power plug into apower socket.
4. Place asufficiently large container underneath the brew head A5.
5. In the stand-by mode, simultaneously press and hold down buttons
B7 and B11 for 5seconds. Abeep is made and the indicator
light B5
and button B11 will flash.
Loading ...
Loading ...
Loading ...