6 BISSELL.com 3
1. Locate stretch hose where it
connects to the hose elbow on
back of machine. Clean debris.
2. Locate clear foot hose under hose holder. Remove two screws
and clear clogs and debris in the hose using a long narrow
object. Replace screws and re-attach stretch hose by sliding over
inlet and rotating upwards towards the lock position.
Note: If the debris cannot be reached through the hose, follow the instructions for cleaning the air
passageway in “Maintaining the Brush Roll and Belts” section.
Cleaning the Hose and Foot
WARNING To reduce the risk of electric shock, turn power switch OFF and disconnect plug from electrical outlet
before performing maintenance or troubleshooting checks.
©2022 BISSELL Inc. All rights reserved.
Part Number 1631065 07/22 RevH
Every Purchase Saves Pets
™
BISSELL proudly supports BISSELL Pet Foundation® and its mission to help save homeless pets.
When you buy a BISSELL® product, you help save pets, too. We’re proud to design products that help
make pet messes, odors and pet homelessness disappear. Visit BISSELLsavespets.com to learn more.
Warranty
Limited 2-year warranty, may vary by state. Visit support.BISSELL.com or call 1-800-237-7691 for
complete warranty information.
For a comprehensive walkthrough of your product and support tips, visit support.BISSELL.com.
Troubleshooting
Important Safety Instructions ................................2
What’s in the Box? ......................................................... 2
Assembly .............................................................................. 3
Using Your Vacuum ....................................................... 3
Cleaning Above Floors ................................................4
Emptying and Cleaning the Dirt Tank ..............4
Cleaning the Filter .......................................................... 5
Maintaining the Brush Roll and Belts ................ 5
Maintaining the TurboBrush® Tool ......................6
Cleaning the Hose and Foot....................................6
Troubleshooting ............................................................... 6
Warranty ............................................................................... 6
CLEANVIEW® COMPACT TURBO
UPRIGHT VACUUM
3437 SERIES
Meet your new BISSELL product!
Go to support.BISSELL.com for a comprehensive walkthrough
of your new purchase, including videos, tips, support, and more.
Want to get started right away? This guide has all the information
you need to set up your new product. Let’s take a look…
WARNING Before using your vacuum, make sure that the dirt tank is in locked position and that all filters,
both pre and post-filters, are in place. DO NOT operate your vacuum without these filters.
• To reduce the risk of electric shock, turn power switch OFF and disconnect plug from electrical outlet before performing
maintenance or troubleshooting checks.
1. Insert handle into base with
tab facing back of vacuum.
Push down until it clicks.
2. Wrap power cord around
upper and lower cord wraps.
3. Attach TurboBrush® tool
holder to handle by lining up
the hole with the indent on
handle.
Attach tools by inserting onto
on-unit tool holders.
1. Twist upper Quick Release™
cord wrap down to remove cord.
2. Connect power cord plug to
a polarized outlet.
3. Press the red power button
with your foot to turn the
vacuum ON
and OFF .
4. Step on recline pedal and
pull handle back towards you.
Note: To maneuver under
furniture, step and hold
the pedal to further recline
machine.
5. Turn dial on foot to desired
height setting.
Tip: For best performance,
adjust to the lowest practical
setting. If your vacuum is
difficult to push, adjust to the
next higher setting.
6. To turn machine OFF ,
step on the power switch
pedal.
Once finished, loop power
cord around cord wraps.
Clip to power cord to secure.
Note: Some Berber carpets may fuzz with wear. Repeated strokes in the same area may enhance this
condition.
Using Your Vacuum
Assembly
Go to support.BISSELL.com for assembly videos.
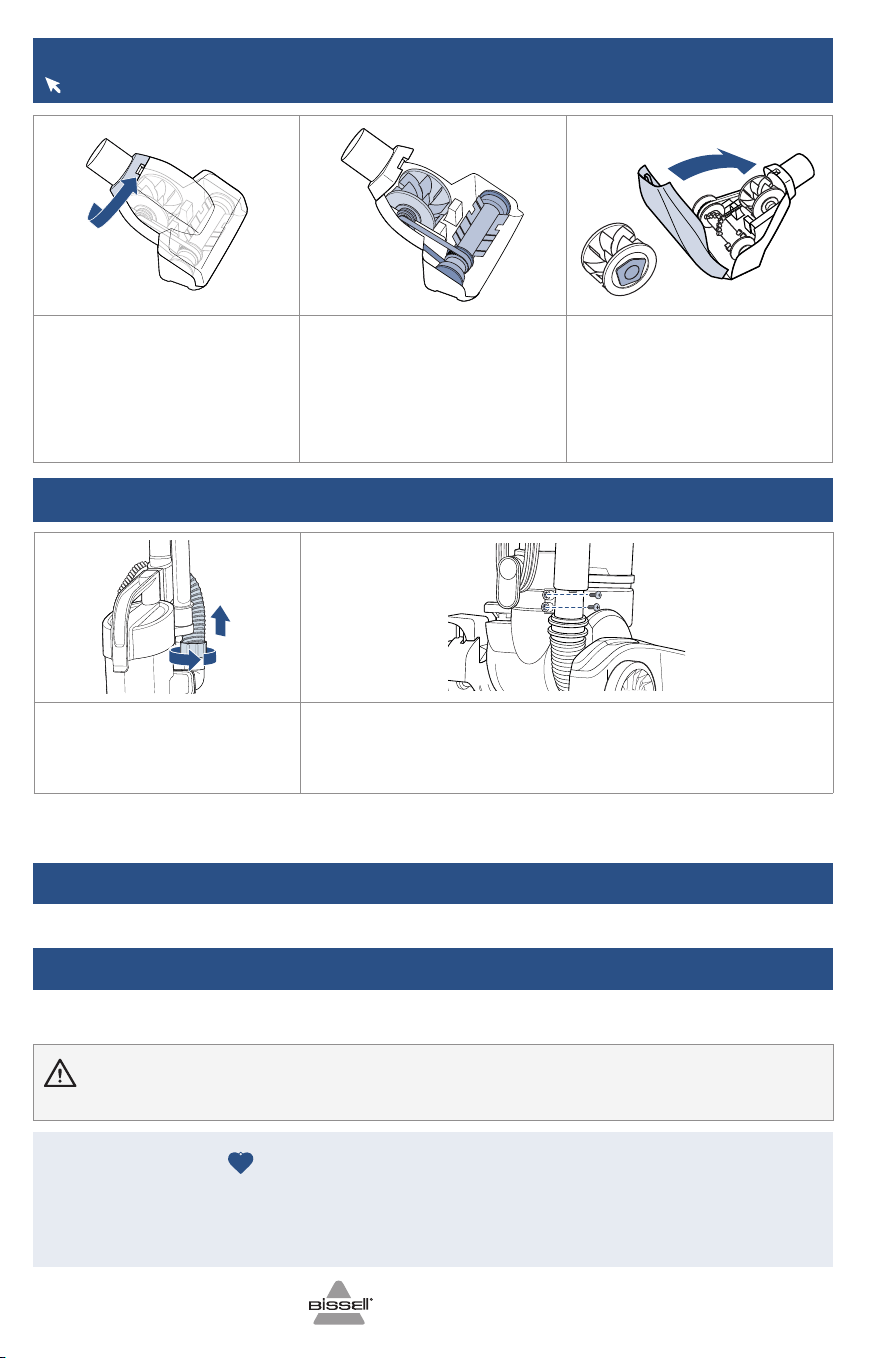
Maintaining the TurboBrush® Tool
For more helpful maintenance tips, check out support.BISSELL.com.
1. Twist gray collar counter-
clockwise until slot appears,
then separate faceplate.
2. Remove brush roll, belt
and paddle wheel. Inspect
for damages and replace if
necessary.
3. To reassemble, align two
clips on each end of paddle
wheel with belt on and pop
back into place. Place brush
roll with belt back in. Faceplate
will not close properly if all
parts are not aligned correctly.
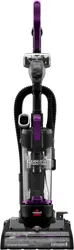
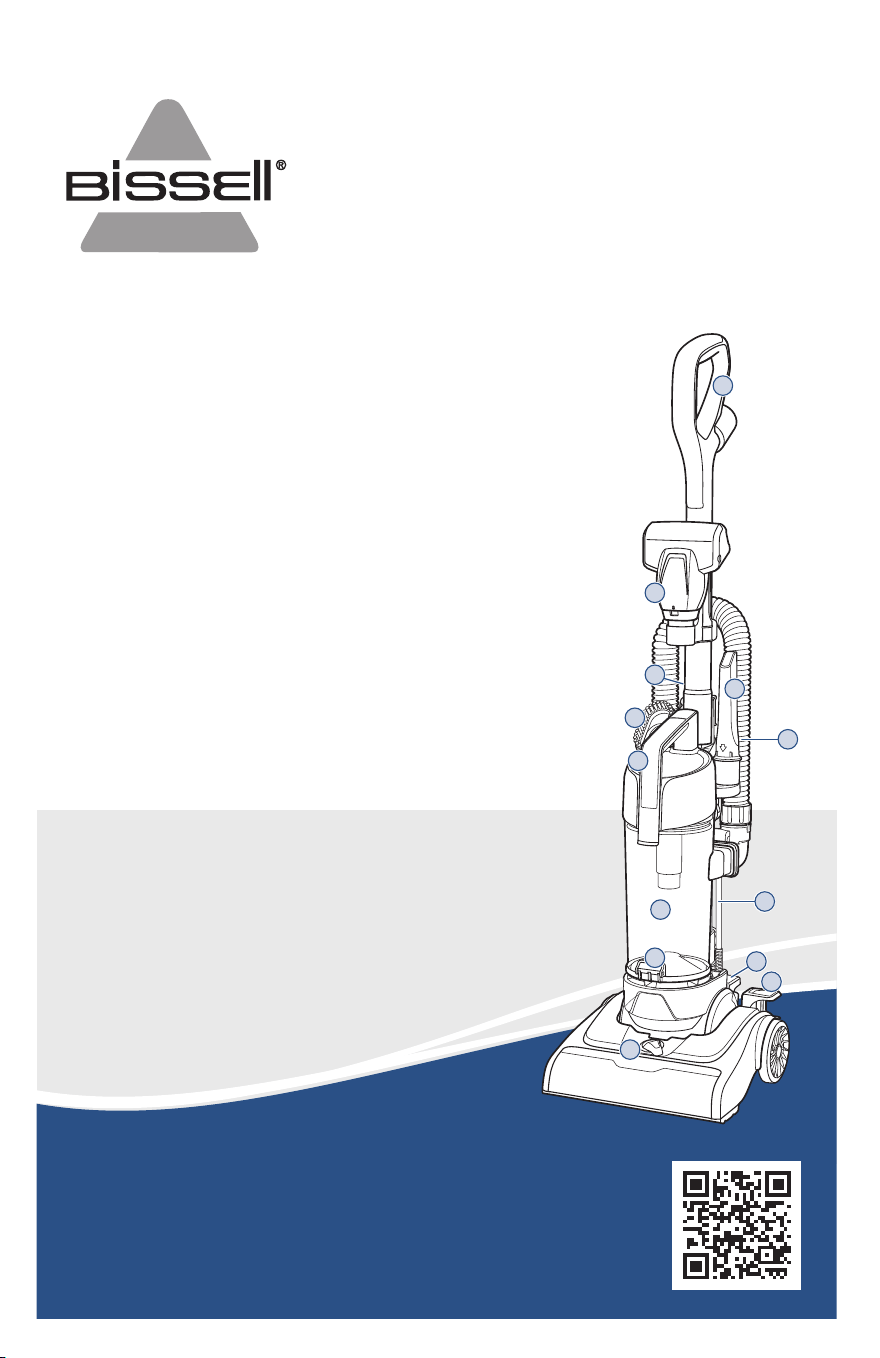
Product Overview
1. Extension Wand
2. TurboBrush® Tool
3. Crevice Tool
4. Tank Release Button
5. Dirt Tank
6. Dirt Tank Empty Button
7. Handle Recline Pedal
8. Extension Wand Release
9. Dusting Brush
10. Stretch Hose
11. Power Cord
12. Power Switch Pedal
13. Height Adjustment Knob
1
2
3
4
9
5
6
7
10
11
12
8
13
2 BISSELL.com BISSELL.com 4 BISSELL.com 5
IMPORTANT SAFETY INSTRUCTIONS
WARNING
TO REDUCE THE RISK OF FIRE, ELECTRIC SHOCK OR INJURY:
• Always connect to a polarized outlet (one slot is wider than the other). Do
not modify the polarized plug to fit a non-polarized outlet or extension cord.
• Do not leave vacuum cleaner when it is plugged in. Unplug from outlet
when not in use and before servicing.
• Do not use outdoors or on wet surfaces.
• Do not allow to be used as a toy. Close attention is necessary when used by
or near children.
• Do not use for any purpose other than described in this user guide. Use only
manufacturer’s recommended attachments.
• Do not use with damaged cord or plug. If appliance is not working as it
should, has been dropped, damaged, left outdoors, or dropped into water,
have it repaired at an authorized service center.
• Do not pull or carry by cord, use cord as a handle, close a door on cord, or
pull cord around sharp edges or corners. Do not run appliance over cord.
Keep cord away from heated surfaces.
• Do not unplug by pulling on cord. To unplug, grasp the plug, not the cord.
• Do not handle plug or vacuum cleaner with wet hands.
• Do not put any object into openings. Do not use with any opening blocked;
keep openings free of dust, lint, hair, and anything that may reduce air flow.
• Keep hair, loose clothing, fingers, and all parts of body away from openings
and moving parts.
• Turn OFF all controls before plugging or unplugging vacuum cleaner.
• Use extra care when cleaning on stairs.
• Do not use to pick up flammable or combustible materials (lighter fluid,
gasoline, kerosene, etc.) or use in areas where they may be present.
• Do not use vacuum cleaner in an enclosed space filled with vapors given
off by oil-based paint, paint thinner, some moth-proofing substances,
flammable dust, or other explosive or toxic vapors.
• Do not use to pick up toxic material (chlorine bleach, ammonia, drain
cleaner, etc.).
• Do not pick up anything that is burning or smoking, such as cigarettes,
matches, or hot ashes.
• Do not use without filters in place.
• Do not pick up hard or sharp objects such as glass, nails, screws, coins, etc.
• Use only on dry, indoor surfaces.
• Keep appliance on a level surface.
• Do not carry the vacuum cleaner while it is running.
• Unplug before connecting or disconnecting the TurboBrush® Tool.
• Plastic film can be dangerous. To avoid danger of suffocation, keep away
from children.
• Do not plug in your vacuum cleaner UNTIL you are familiar with all
instructions and operating procedures.
• To reduce the risk of electrical shock, turn power switch OFF and disconnect
polarized plug from electrical outlet BEFORE performing maintenance or
troubleshooting checks.
• When finished using the product, wrap cord around cord wrap for storage.
Store unit indoors in a dry location in an area where the product is not likely
to get damaged.
• Any other maintenance or servicing not included in this manual should be
performed by an authorized service representative.
SAVE THESE INSTRUCTIONS
THIS MODEL IS FOR HOUSEHOLD USE ONLY.
COMMERCIAL USE OF THIS UNIT VOIDS THE MANUFACTURER’S WARRANTY.
READ ALL INSTRUCTIONS BEFORE USING YOUR APPLIANCE.
When using an electrical appliance, basic precautions should be observed, including the following:
THIS APPLIANCE HAS A POLARIZED PLUG To reduce the risk of
electric shock, this appliance has a polarized plug (one blade is wider than the other). This plug will fit in a polarized outlet only
one way. If the plug does not fit fully in the outlet, reverse the plug. If it still does not fit, contact a qualified electrician to install a
proper outlet. Do not change the plug in any way.
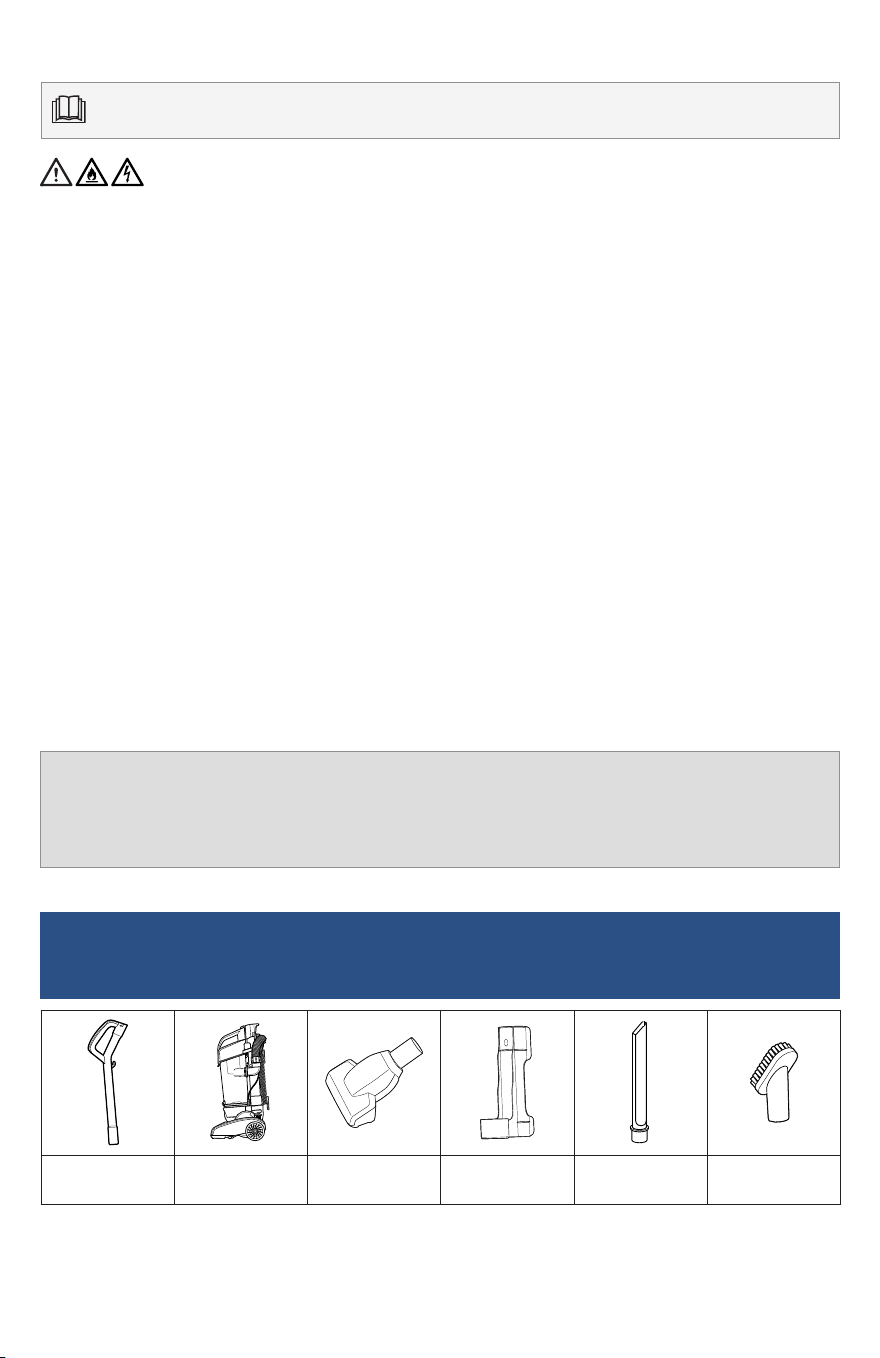
Upper Handle Base Unit TurboBrush®
Tool
TurboBrush®
Tool Holder
Crevice Tool Dusting Brush
What’s in the Box?
Standard accessories may vary by model.To identify what should be included with your purchase,
please refer to the “Carton Contents” list located on the carton top flap.
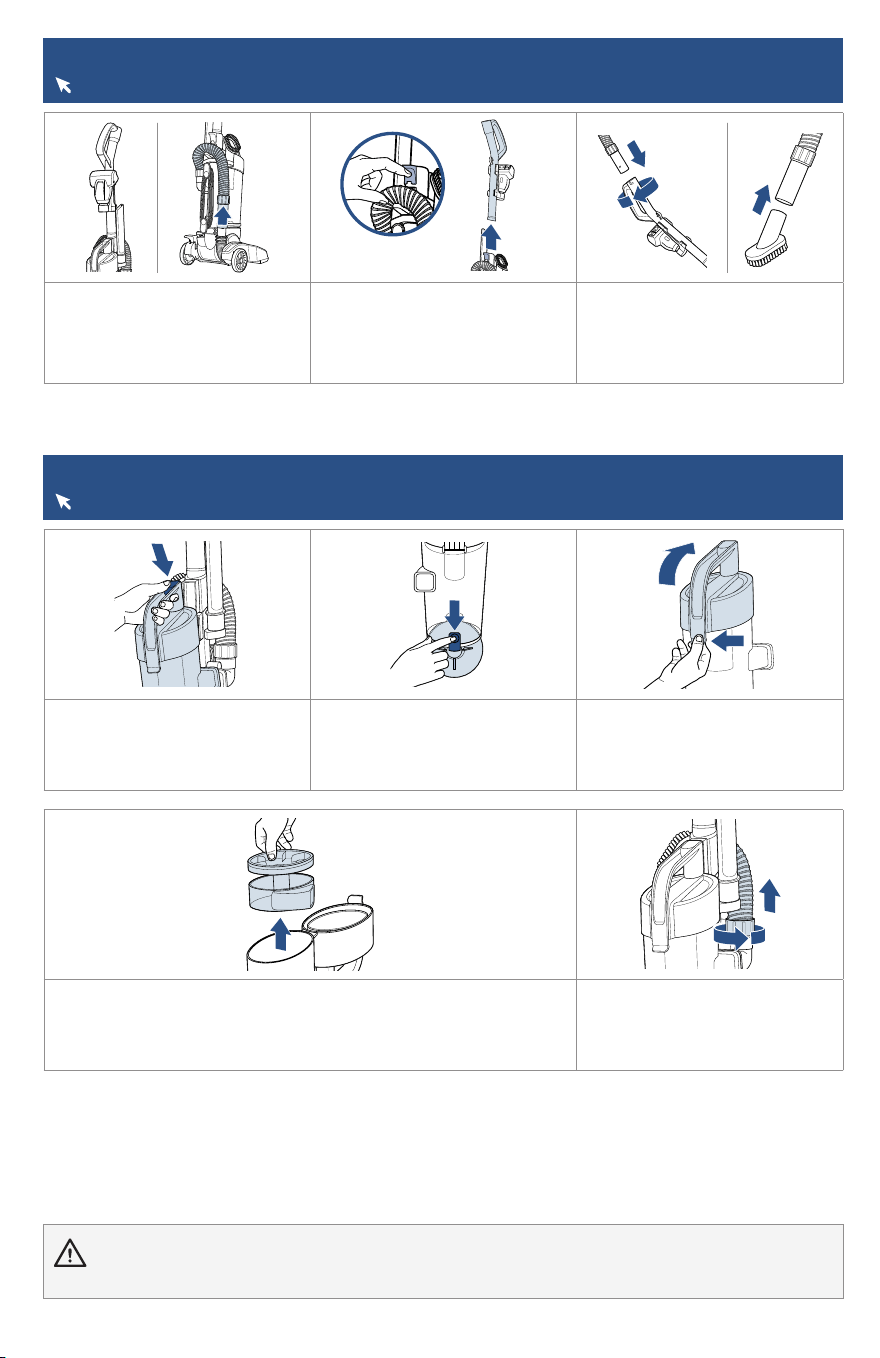
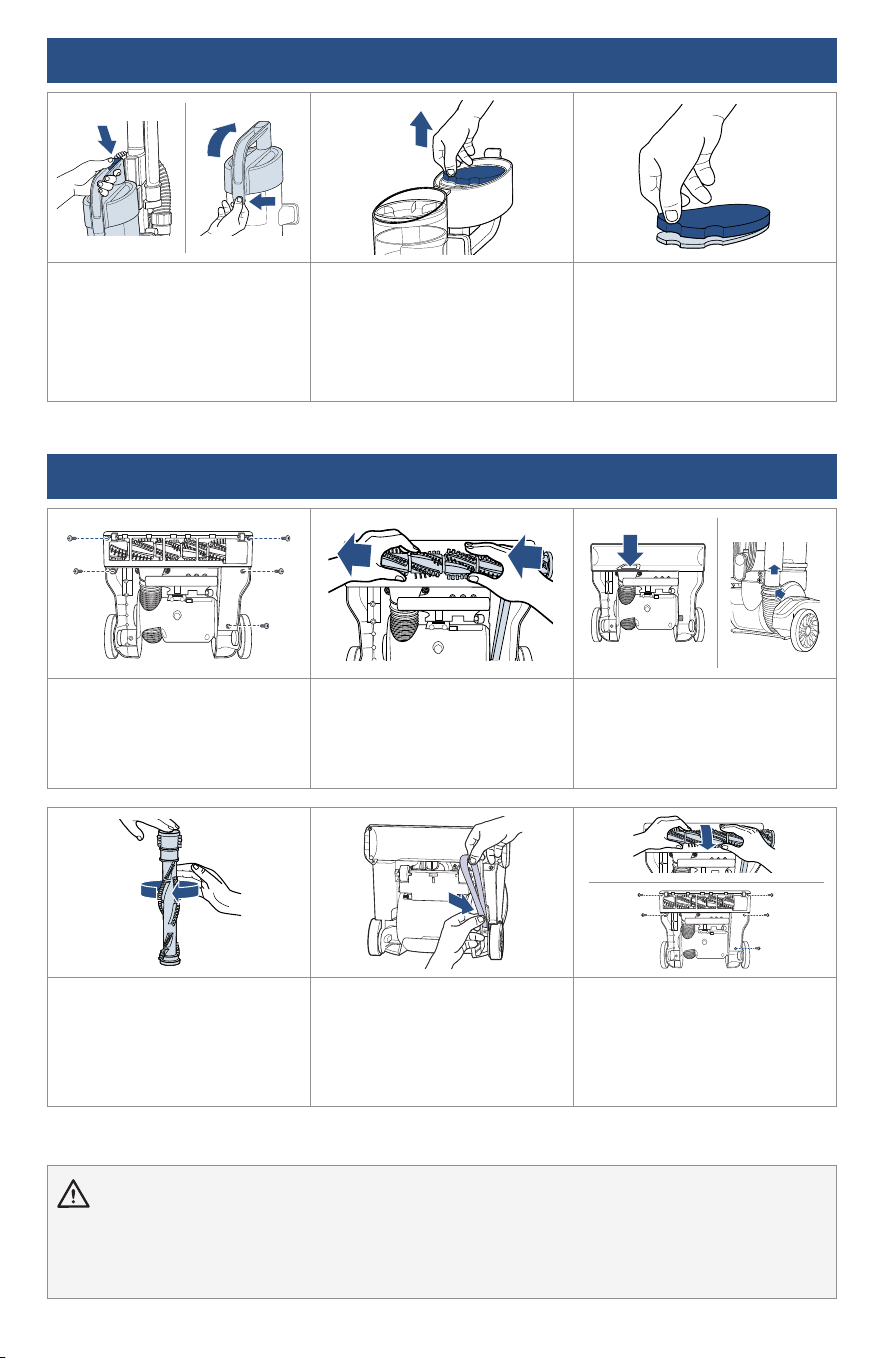
1. Push the dirt tank release
button on top of tank handle
to remove.
Open lid by lifting release
latch. Filter is located inside
the dirt tank lid.
2. Pull filter to remove. Hand
wash with warm water and
mild detergent. Let dry for
24 hours.
3. Reinstall filter with white
mesh first and black foam
facing outward. Align filter
with lid.
Note: Replace filter if it is excessively dirty, damaged or torn.
1. Lay vacuum down with
brush roll facing up. Remove
(5) screws with a Phillips-head
screwdriver. Lift brush cover
to remove.
2. Pull brush roll at both ends
to remove. Clean debris from
brush roll, motor pulley and
drive belt. Replace if needed.
3. Check air passageway for
obstructions.
Twist hose counterclockwise
to remove and check for clogs.
4. Test the brush by holding
on end and spinning. It should
spin freely several times from
one flick. If not, the brush will
need to be replaced.
5. Grasp drive belt, remove
from motor shaft, discard.
Loop new drive belt over
motor shaft and stretch
over the brush roll in space
provided between bristles.
6. Align brush roll with belt
and turn several times in the
direction of the wheels to align.
Reinstall the brush cover and
(5) screws.
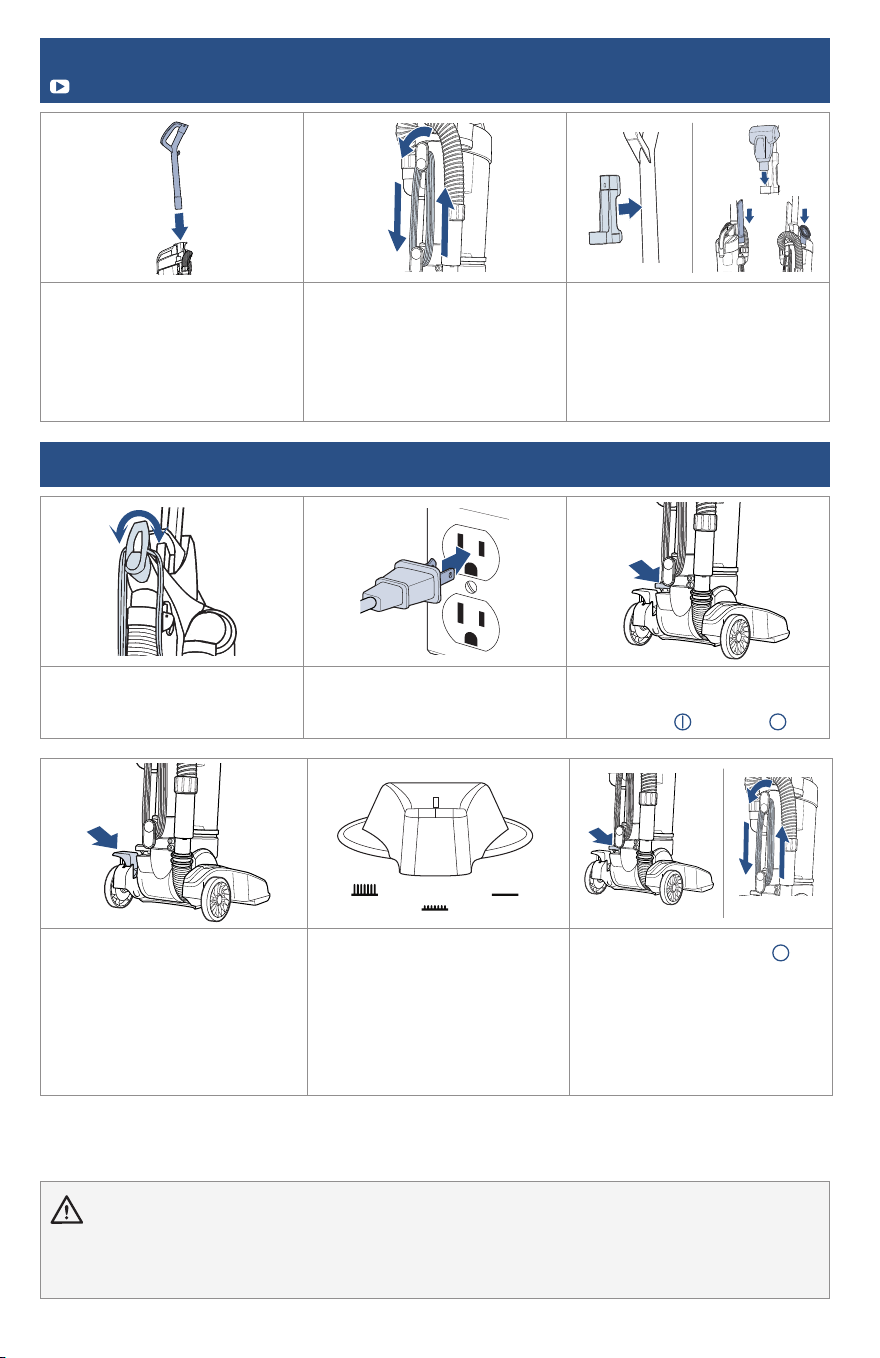
1. Raise handle to upright
position.
Grasp hose and pull up to
remove from hose holder.
2. For extended reach, remove
extension wand by pressing
the release lever and pulling
handle out of body.
3. Insert hose into extension
wand and twist to lock.
Attach desired tool by pushing
onto hose or extension wand.
Note: The brush roll will continue to rotate while using your vacuum for above floor cleaning.
To prevent carpet damage, do not lean on the vacuum or let the power foot tilt forward.
1. To remove dirt tank, push
the release button on top of
tank handle.
2. Hold dirt tank over garbage
bin and press the release
button. Snap bottom back into
place.
3. Open dirt tank lid by lifting
the release latch.
4. Remove primary separator by lifting out of the dirt tank.
Tank and separator can be hand washed with warm water and
mild detergent. Rinse well and let air dry completely.
Not dishwasher safe.
5. Remove hose by twisting to
unlock and pulling up. Check
for clogs before reassembling.
Cleaning Above Floors
For additional support videos and information, visit support.BISSELL.com.
Emptying and Cleaning the Dirt Tank
For additional support videos and information, visit support.BISSELL.com.
WARNING To reduce the risk of electrical shock, turn power switch OFF and disconnect polarized plug from
electrical outlet BEFORE performing maintenance or troubleshooting checks.
Cleaning the Filter
Maintaining the Brush Roll and Belts
WARNING
• To reduce the risk of electric shock, turn power switch OFF and disconnect plug from electrical outlet before performing
maintenance or troubleshooting checks.
• Do not operate vacuum with damp or wet filters, as well as without filters or the dirt tank in place. Allow components to dry
before reassembling the dirt tank.
2 BISSELL.com BISSELL.com 4 BISSELL.com 5
IMPORTANT SAFETY INSTRUCTIONS
WARNING
TO REDUCE THE RISK OF FIRE, ELECTRIC SHOCK OR INJURY:
• Always connect to a polarized outlet (one slot is wider than the other). Do
not modify the polarized plug to fit a non-polarized outlet or extension cord.
• Do not leave vacuum cleaner when it is plugged in. Unplug from outlet
when not in use and before servicing.
• Do not use outdoors or on wet surfaces.
• Do not allow to be used as a toy. Close attention is necessary when used by
or near children.
• Do not use for any purpose other than described in this user guide. Use only
manufacturer’s recommended attachments.
• Do not use with damaged cord or plug. If appliance is not working as it
should, has been dropped, damaged, left outdoors, or dropped into water,
have it repaired at an authorized service center.
• Do not pull or carry by cord, use cord as a handle, close a door on cord, or
pull cord around sharp edges or corners. Do not run appliance over cord.
Keep cord away from heated surfaces.
• Do not unplug by pulling on cord. To unplug, grasp the plug, not the cord.
• Do not handle plug or vacuum cleaner with wet hands.
• Do not put any object into openings. Do not use with any opening blocked;
keep openings free of dust, lint, hair, and anything that may reduce air flow.
• Keep hair, loose clothing, fingers, and all parts of body away from openings
and moving parts.
• Turn OFF all controls before plugging or unplugging vacuum cleaner.
• Use extra care when cleaning on stairs.
• Do not use to pick up flammable or combustible materials (lighter fluid,
gasoline, kerosene, etc.) or use in areas where they may be present.
• Do not use vacuum cleaner in an enclosed space filled with vapors given
off by oil-based paint, paint thinner, some moth-proofing substances,
flammable dust, or other explosive or toxic vapors.
• Do not use to pick up toxic material (chlorine bleach, ammonia, drain
cleaner, etc.).
• Do not pick up anything that is burning or smoking, such as cigarettes,
matches, or hot ashes.
• Do not use without filters in place.
• Do not pick up hard or sharp objects such as glass, nails, screws, coins, etc.
• Use only on dry, indoor surfaces.
• Keep appliance on a level surface.
• Do not carry the vacuum cleaner while it is running.
• Unplug before connecting or disconnecting the TurboBrush® Tool.
• Plastic film can be dangerous. To avoid danger of suffocation, keep away
from children.
• Do not plug in your vacuum cleaner UNTIL you are familiar with all
instructions and operating procedures.
• To reduce the risk of electrical shock, turn power switch OFF and disconnect
polarized plug from electrical outlet BEFORE performing maintenance or
troubleshooting checks.
• When finished using the product, wrap cord around cord wrap for storage.
Store unit indoors in a dry location in an area where the product is not likely
to get damaged.
• Any other maintenance or servicing not included in this manual should be
performed by an authorized service representative.
SAVE THESE INSTRUCTIONS
THIS MODEL IS FOR HOUSEHOLD USE ONLY.
COMMERCIAL USE OF THIS UNIT VOIDS THE MANUFACTURER’S WARRANTY.
READ ALL INSTRUCTIONS BEFORE USING YOUR APPLIANCE.
When using an electrical appliance, basic precautions should be observed, including the following:
THIS APPLIANCE HAS A POLARIZED PLUG To reduce the risk of
electric shock, this appliance has a polarized plug (one blade is wider than the other). This plug will fit in a polarized outlet only
one way. If the plug does not fit fully in the outlet, reverse the plug. If it still does not fit, contact a qualified electrician to install a
proper outlet. Do not change the plug in any way.
Upper Handle Base Unit TurboBrush®
Tool
TurboBrush®
Tool Holder
Crevice Tool Dusting Brush
What’s in the Box?
Standard accessories may vary by model.To identify what should be included with your purchase,
please refer to the “Carton Contents” list located on the carton top flap.
1. Push the dirt tank release
button on top of tank handle
to remove.
Open lid by lifting release
latch. Filter is located inside
the dirt tank lid.
2. Pull filter to remove. Hand
wash with warm water and
mild detergent. Let dry for
24 hours.
3. Reinstall filter with white
mesh first and black foam
facing outward. Align filter
with lid.
Note: Replace filter if it is excessively dirty, damaged or torn.
1. Lay vacuum down with
brush roll facing up. Remove
(5) screws with a Phillips-head
screwdriver. Lift brush cover
to remove.
2. Pull brush roll at both ends
to remove. Clean debris from
brush roll, motor pulley and
drive belt. Replace if needed.
3. Check air passageway for
obstructions.
Twist hose counterclockwise
to remove and check for clogs.
4. Test the brush by holding
on end and spinning. It should
spin freely several times from
one flick. If not, the brush will
need to be replaced.
5. Grasp drive belt, remove
from motor shaft, discard.
Loop new drive belt over
motor shaft and stretch
over the brush roll in space
provided between bristles.
6. Align brush roll with belt
and turn several times in the
direction of the wheels to align.
Reinstall the brush cover and
(5) screws.
1. Raise handle to upright
position.
Grasp hose and pull up to
remove from hose holder.
2. For extended reach, remove
extension wand by pressing
the release lever and pulling
handle out of body.
3. Insert hose into extension
wand and twist to lock.
Attach desired tool by pushing
onto hose or extension wand.
Note: The brush roll will continue to rotate while using your vacuum for above floor cleaning.
To prevent carpet damage, do not lean on the vacuum or let the power foot tilt forward.
1. To remove dirt tank, push
the release button on top of
tank handle.
2. Hold dirt tank over garbage
bin and press the release
button. Snap bottom back into
place.
3. Open dirt tank lid by lifting
the release latch.
4. Remove primary separator by lifting out of the dirt tank.
Tank and separator can be hand washed with warm water and
mild detergent. Rinse well and let air dry completely.
Not dishwasher safe.
5. Remove hose by twisting to
unlock and pulling up. Check
for clogs before reassembling.
Cleaning Above Floors
For additional support videos and information, visit support.BISSELL.com.
Emptying and Cleaning the Dirt Tank
For additional support videos and information, visit support.BISSELL.com.
WARNING To reduce the risk of electrical shock, turn power switch OFF and disconnect polarized plug from
electrical outlet BEFORE performing maintenance or troubleshooting checks.
Cleaning the Filter
Maintaining the Brush Roll and Belts
WARNING
• To reduce the risk of electric shock, turn power switch OFF and disconnect plug from electrical outlet before performing
maintenance or troubleshooting checks.
• Do not operate vacuum with damp or wet filters, as well as without filters or the dirt tank in place. Allow components to dry
before reassembling the dirt tank.
6 BISSELL.com 3
1. Locate stretch hose where it
connects to the hose elbow on
back of machine. Clean debris.
2. Locate clear foot hose under hose holder. Remove two screws
and clear clogs and debris in the hose using a long narrow
object. Replace screws and re-attach stretch hose by sliding over
inlet and rotating upwards towards the lock position.
Note: If the debris cannot be reached through the hose, follow the instructions for cleaning the air
passageway in “Maintaining the Brush Roll and Belts” section.
Cleaning the Hose and Foot
WARNING To reduce the risk of electric shock, turn power switch OFF and disconnect plug from electrical outlet
before performing maintenance or troubleshooting checks.
©2022 BISSELL Inc. All rights reserved.
Part Number 1631065 07/22 RevH
Every Purchase Saves Pets
™
BISSELL proudly supports BISSELL Pet Foundation® and its mission to help save homeless pets.
When you buy a BISSELL® product, you help save pets, too. We’re proud to design products that help
make pet messes, odors and pet homelessness disappear. Visit BISSELLsavespets.com to learn more.
Warranty
Limited 2-year warranty, may vary by state. Visit support.BISSELL.com or call 1-800-237-7691 for
complete warranty information.
For a comprehensive walkthrough of your product and support tips, visit support.BISSELL.com.
Troubleshooting
Important Safety Instructions ................................2
What’s in the Box? ......................................................... 2
Assembly .............................................................................. 3
Using Your Vacuum ....................................................... 3
Cleaning Above Floors ................................................4
Emptying and Cleaning the Dirt Tank ..............4
Cleaning the Filter .......................................................... 5
Maintaining the Brush Roll and Belts ................ 5
Maintaining the TurboBrush® Tool ......................6
Cleaning the Hose and Foot....................................6
Troubleshooting ............................................................... 6
Warranty ............................................................................... 6
CLEANVIEW® COMPACT TURBO
UPRIGHT VACUUM
3437 SERIES
Meet your new BISSELL product!
Go to support.BISSELL.com for a comprehensive walkthrough
of your new purchase, including videos, tips, support, and more.
Want to get started right away? This guide has all the information
you need to set up your new product. Let’s take a look…
WARNING Before using your vacuum, make sure that the dirt tank is in locked position and that all filters,
both pre and post-filters, are in place. DO NOT operate your vacuum without these filters.
• To reduce the risk of electric shock, turn power switch OFF and disconnect plug from electrical outlet before performing
maintenance or troubleshooting checks.
1. Insert handle into base with
tab facing back of vacuum.
Push down until it clicks.
2. Wrap power cord around
upper and lower cord wraps.
3. Attach TurboBrush® tool
holder to handle by lining up
the hole with the indent on
handle.
Attach tools by inserting onto
on-unit tool holders.
1. Twist upper Quick Release™
cord wrap down to remove cord.
2. Connect power cord plug to
a polarized outlet.
3. Press the red power button
with your foot to turn the
vacuum ON
and OFF .
4. Step on recline pedal and
pull handle back towards you.
Note: To maneuver under
furniture, step and hold
the pedal to further recline
machine.
5. Turn dial on foot to desired
height setting.
Tip: For best performance,
adjust to the lowest practical
setting. If your vacuum is
difficult to push, adjust to the
next higher setting.
6. To turn machine OFF ,
step on the power switch
pedal.
Once finished, loop power
cord around cord wraps.
Clip to power cord to secure.
Note: Some Berber carpets may fuzz with wear. Repeated strokes in the same area may enhance this
condition.
Using Your Vacuum
Assembly
Go to support.BISSELL.com for assembly videos.
Maintaining the TurboBrush® Tool
For more helpful maintenance tips, check out support.BISSELL.com.
1. Twist gray collar counter-
clockwise until slot appears,
then separate faceplate.
2. Remove brush roll, belt
and paddle wheel. Inspect
for damages and replace if
necessary.
3. To reassemble, align two
clips on each end of paddle
wheel with belt on and pop
back into place. Place brush
roll with belt back in. Faceplate
will not close properly if all
parts are not aligned correctly.
Product Overview
1. Extension Wand
2. TurboBrush® Tool
3. Crevice Tool
4. Tank Release Button
5. Dirt Tank
6. Dirt Tank Empty Button
7. Handle Recline Pedal
8. Extension Wand Release
9. Dusting Brush
10. Stretch Hose
11. Power Cord
12. Power Switch Pedal
13. Height Adjustment Knob
1
2
3
4
9
5
6
7
10
11
12
8
13