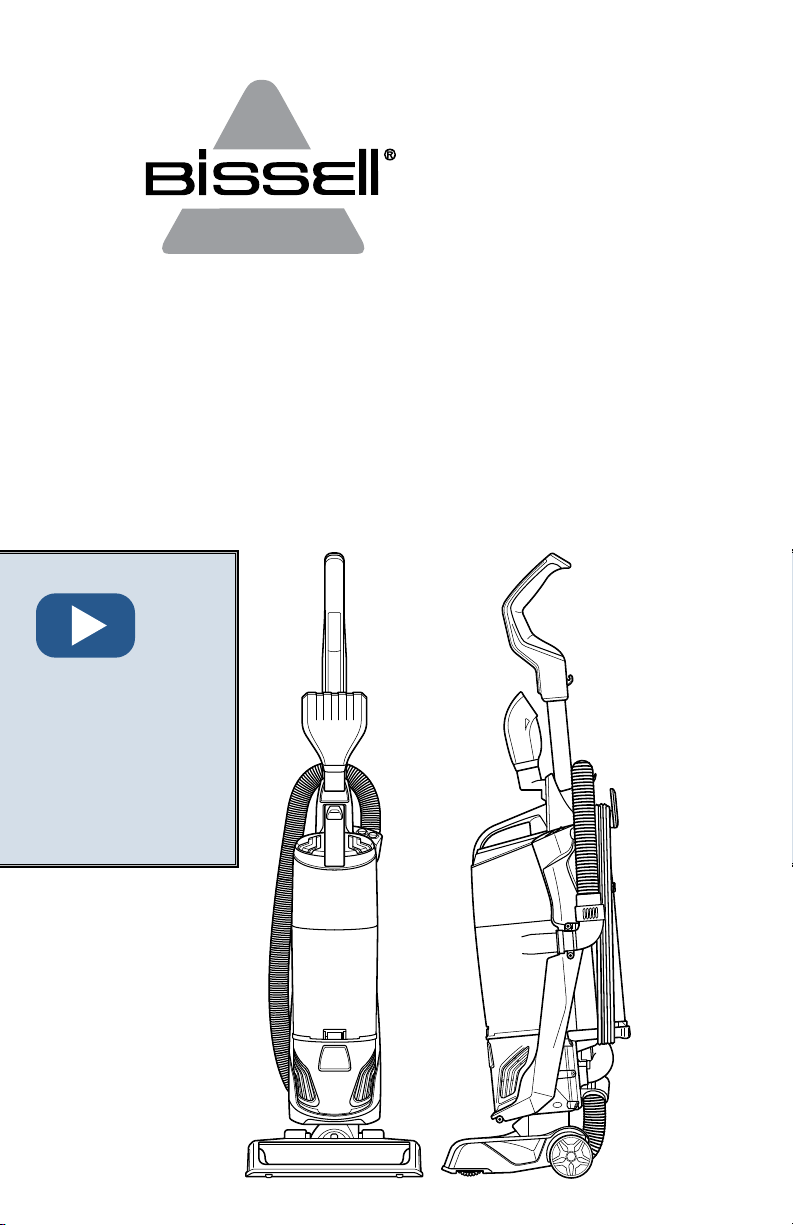
POWERGLIDE
®
Vacuum
___________
USER GUIDE
2215 SERIES
More of a video
person? Look for this
icon and go online
for an instructional
how-to video at
www.BISSELL.com
www.BISSELL.com
2
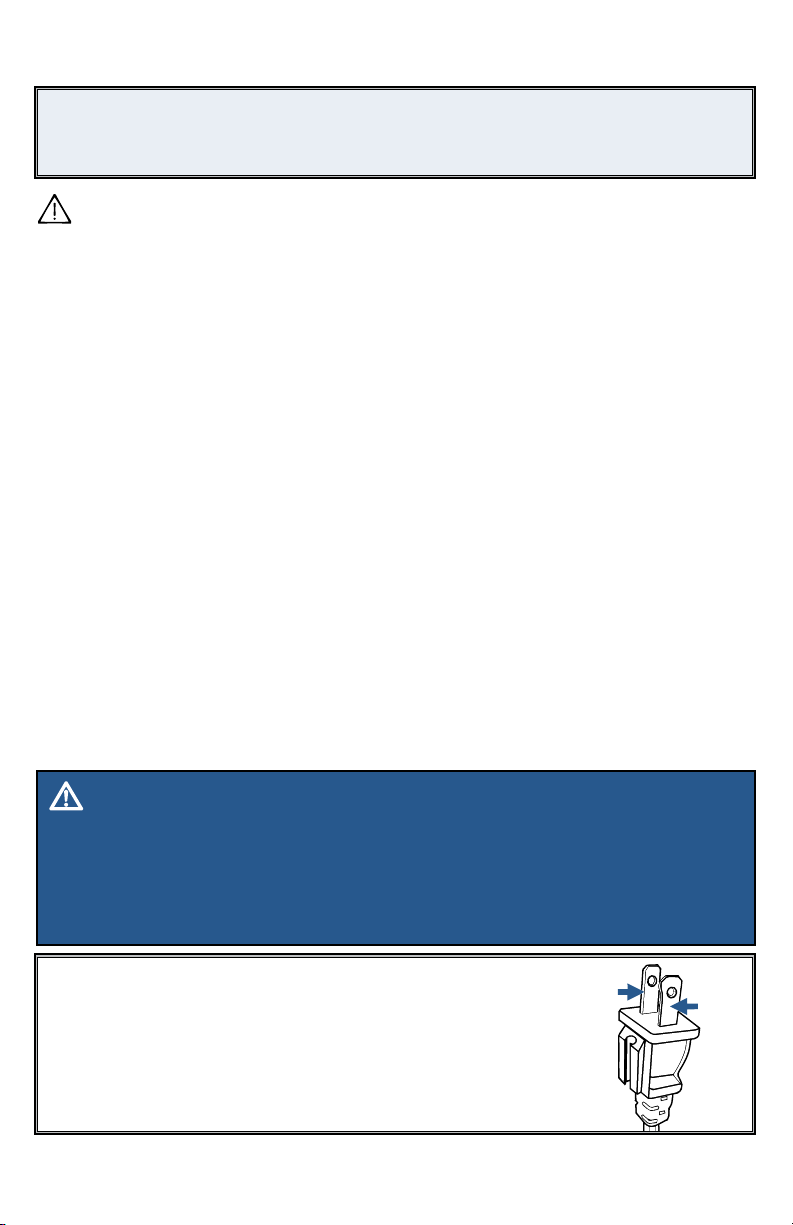
IMPORTANT SAFETY INSTRUCTIONS
WARNING
TO REDUCE THE RISK OF FIRE,
ELECTRIC SHOCK, OR INJURY:
» Always connect to a polarized
outlet (one slot is wider than
the other). Do not modify the
polarized plug to fit a non-
polarized outlet or extension cord.
» Do not leave vacuum cleaner
when it is plugged in. Unplug
from outlet when not in use
and before servicing.
» Do not use outdoors or on
wet surfaces.
» Do not allow to be used as a toy.
Close attention is necessary when
used by or near children.
» Do not use for any purpose other
than described in this User’s
Guide. Use only manufacturer’s
recommended attachments.
» Do not use with damaged cord or
plug. If appliance is not working
as it should, has been dropped,
damaged, left outdoors, or
dropped into water, have it repaired
at an authorized service center.
» Do not pull or carry by cord, use
cord as a handle, close a door on
cord, or pull cord around sharp
edges or corners. Do not run
appliance over cord. Keep cord
away from heated surfaces.
» Do not unplug by pulling on
cord. To unplug, grasp the plug,
not the cord.
» Do not handle plug or vacuum
cleaner with wet hands.
» Do not put any object into
openings. Do not use with any
opening blocked; keep openings
free of dust, lint, hair, and anything
that may reduce air flow.
» Keep hair, loose clothing, fingers,
and all parts of body away from
openings and moving parts.
» Turn off all controls before
plugging or unplugging
vacuum cleaner.
» Use extra care when cleaning
on stairs.
» Do not use to pick up flammable
or combustible materials (lighter
fluid, gasoline, kerosene, etc.)
or use in areas where they may
be present.
» Do not use vacuum cleaner in an
enclosed space filled with vapors
given off by oil base paint, paint
thinner, some moth proofing
substances, flammable dust, or
other explosive or toxic vapors.
» Do not use to pick up toxic
material (chlorine bleach,
ammonia, drain cleaner, etc.).
» Do not pick up anything that is
burning or smoking, such as
cigarettes, matches, or hot ashes.
» Do not use without filters in place.
» Do not pick up hard or sharp
objects such as glass, nails, screws,
coins, etc.
» Use only on dry, indoor surfaces.
» Keep appliance on a level surface.
» Do not carry the vacuum cleaner
while it is running.
» Unplug before connecting or
disconnecting the TurboEraser®
Tool.
READ ALL INSTRUCTIONS BEFORE USING YOUR UPRIGHT VACUUM.
Always connect to a polarized outlet (one slot is wider than the other). Unplug from outlet when not in
use and before conducting maintenance. When using an electrical appliance, basic precautions should be
observed, including the following:
This model is for household use only.
SAVE THESE INSTRUCTIONS
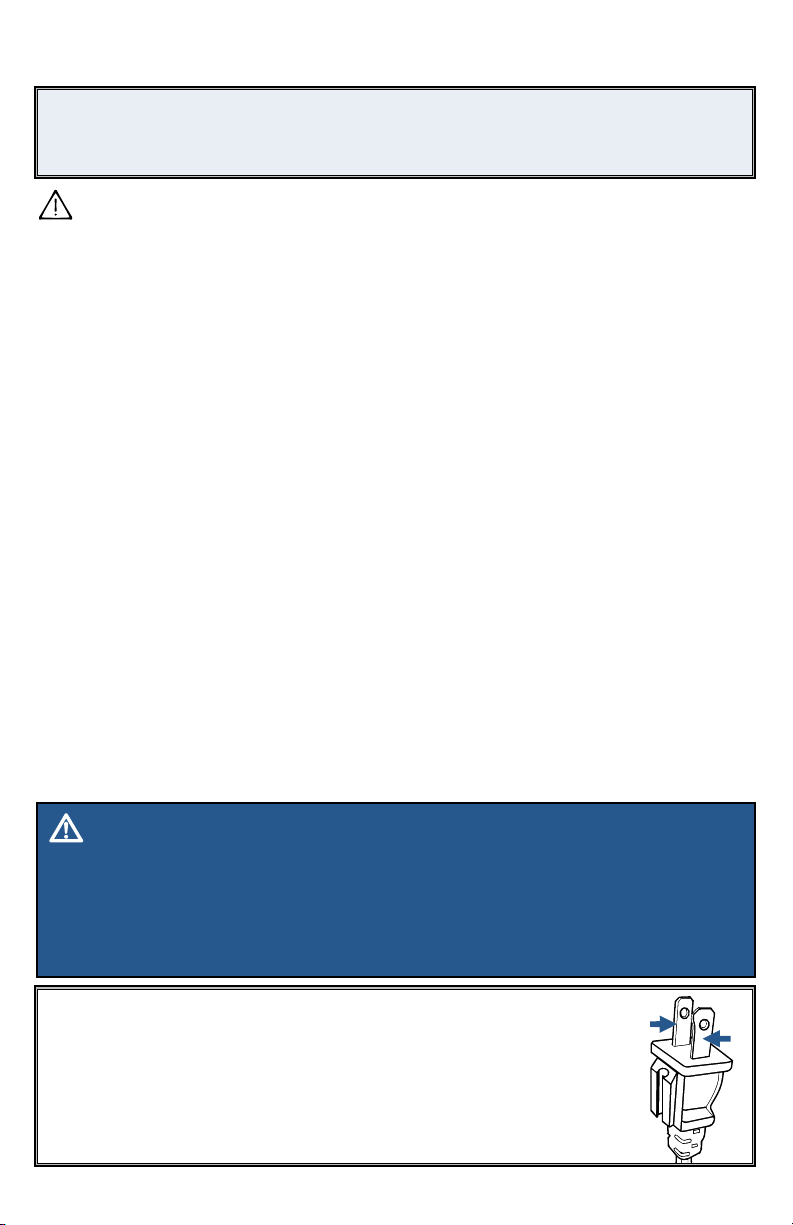
THIS APPLIANCE HAS
A POLARIZED PLUG
To reduce the risk of electric shock, this appliance has a polarized plug (one blade
is wider than the other). This plug will fit in a polarized outlet only one way. If the
plug does not fit fully in the outlet, reverse the plug. If it still does not fit, contact a
qualified electrician to install a proper outlet. Do not change the plug in any way.
Hot
Neutral
WARNING
›› Plastic film can be dangerous. To avoid danger of suocation, keep away from children.
›› Do not plug in your vacuum cleaner UNTIL you are familiar with all instructions and
operating procedures.
›› To reduce the risk of electrical shock, turn power switch o and disconnect polarized
plug from electrical outlet BEFORE performing maintenance or troubleshooting checks.
www.BISSELL.com
3
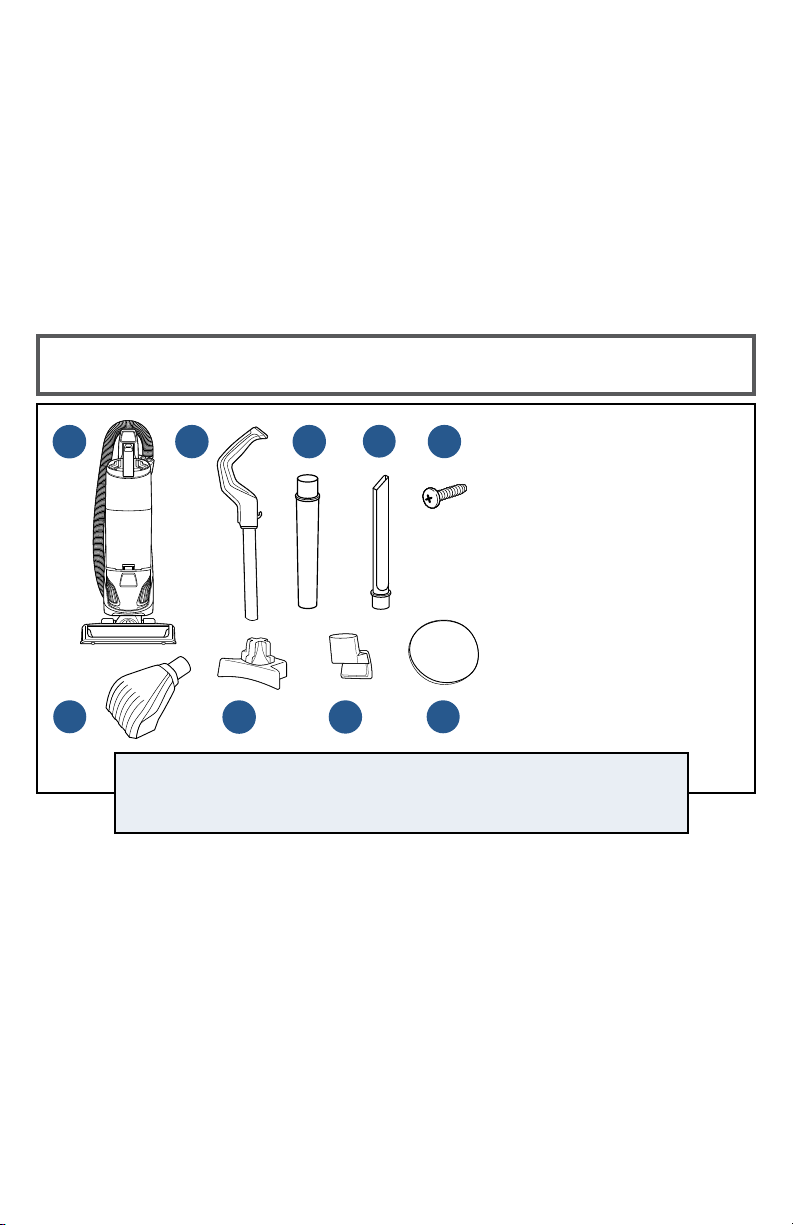
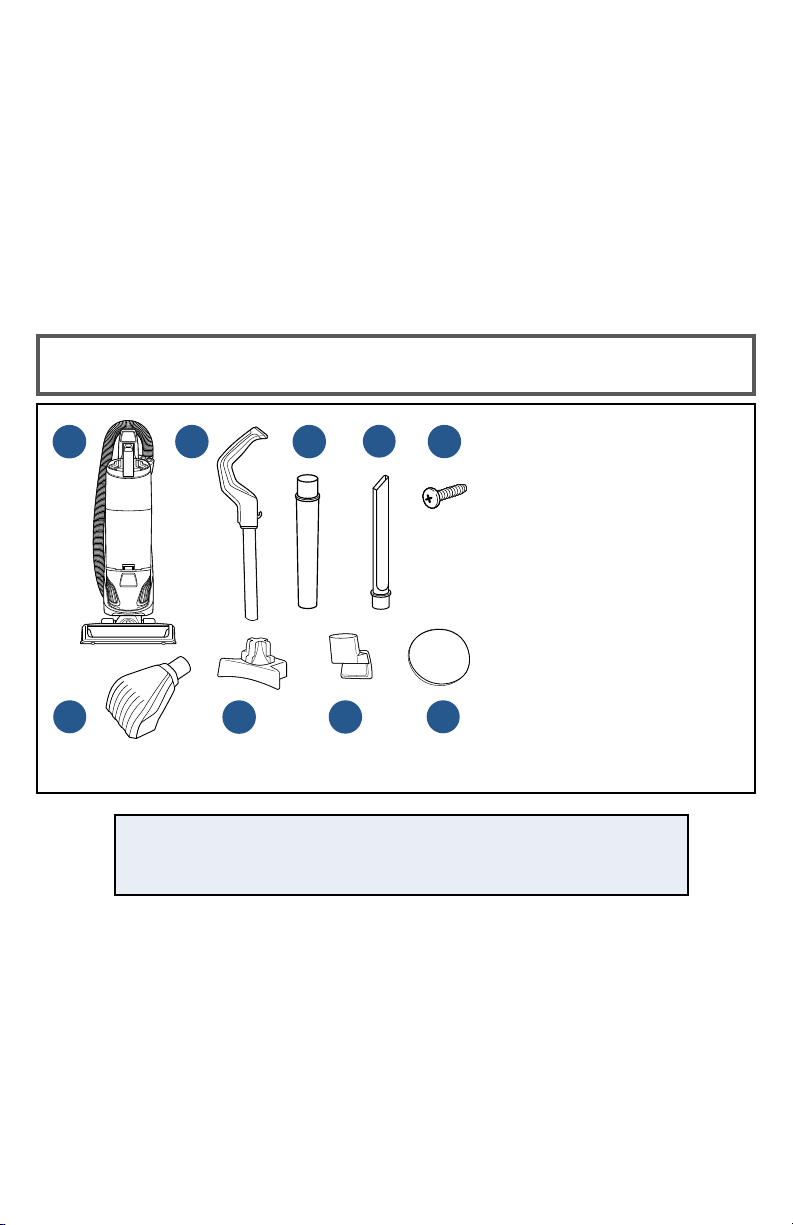
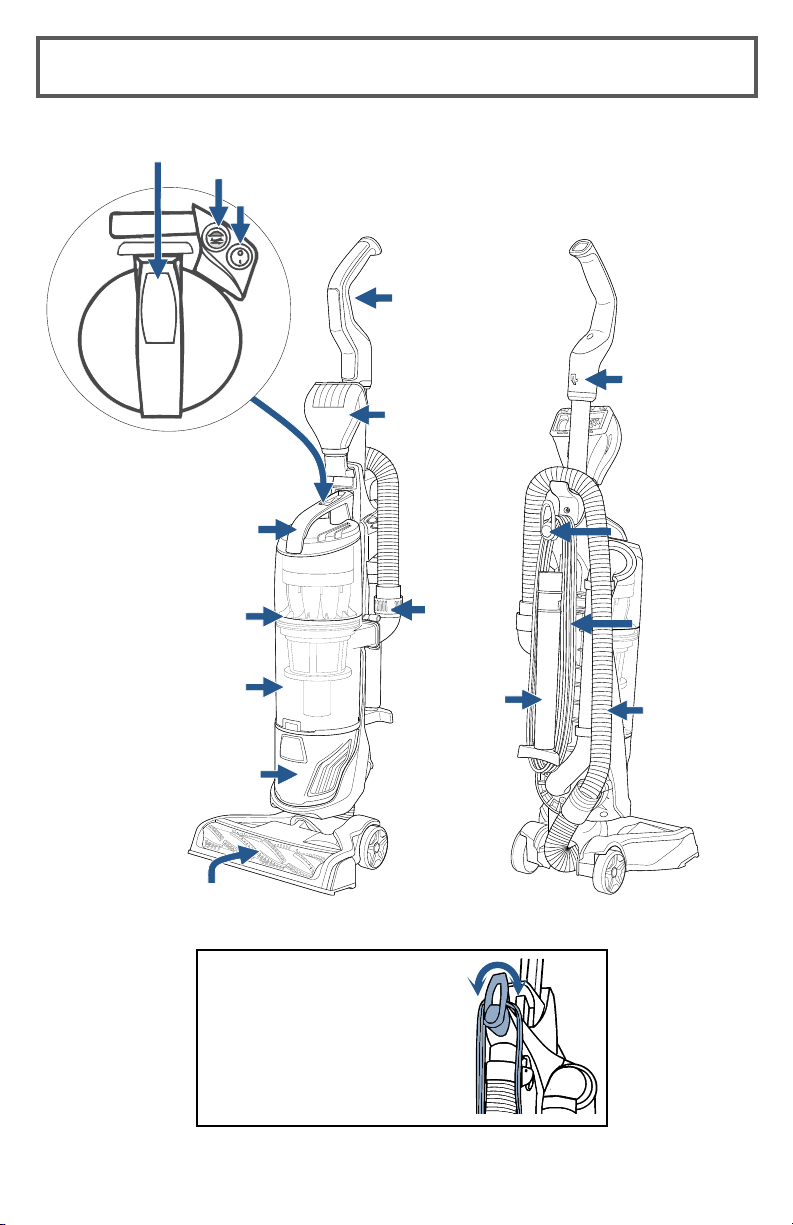
1. Base Unit
2. Upper Handle
3. Extension Wand
4. Crevice Tool
(stores inside Extension Wand)
5. Screw (taped to handle)
6. TurboEraser® Tool
(with Tangle-Free Turbine)
7. Cord Wrap Base
8. TurboEraser® Tool Holder
9. Febreze™ Pet Odor
Eliminator Style 1214 Filter
What’s In The Box?
Thanks for buying a BISSELL vacuum!
We love to clean and we’re excited to share one of our innovative products
with you. We want to make sure your vacuum works as well as it does today
for years to come, so this guide has tips on using (pages 6-7), maintaining
(pages 8-9), and if there is a problem, troubleshooting (page 12).
In just a few simple assembly steps, you’ll be ready to vacuum. Flip to page 5
and let’s get started!
Safety Instructions...........2
Product View................4
Assembly ...................5
Operations ................6-7
Maintenance & Care .......8-9
Troubleshooting ............10
Warranty/Service ............11
Product Registration........12
NOTE: Standard accessories may vary by model. To identify what
should be included with your purchase, please refer to the “Carton
Contents” list located on the carton top flap.
1
2
3
4
5
6
7
8
9
www.BISSELL.com
4
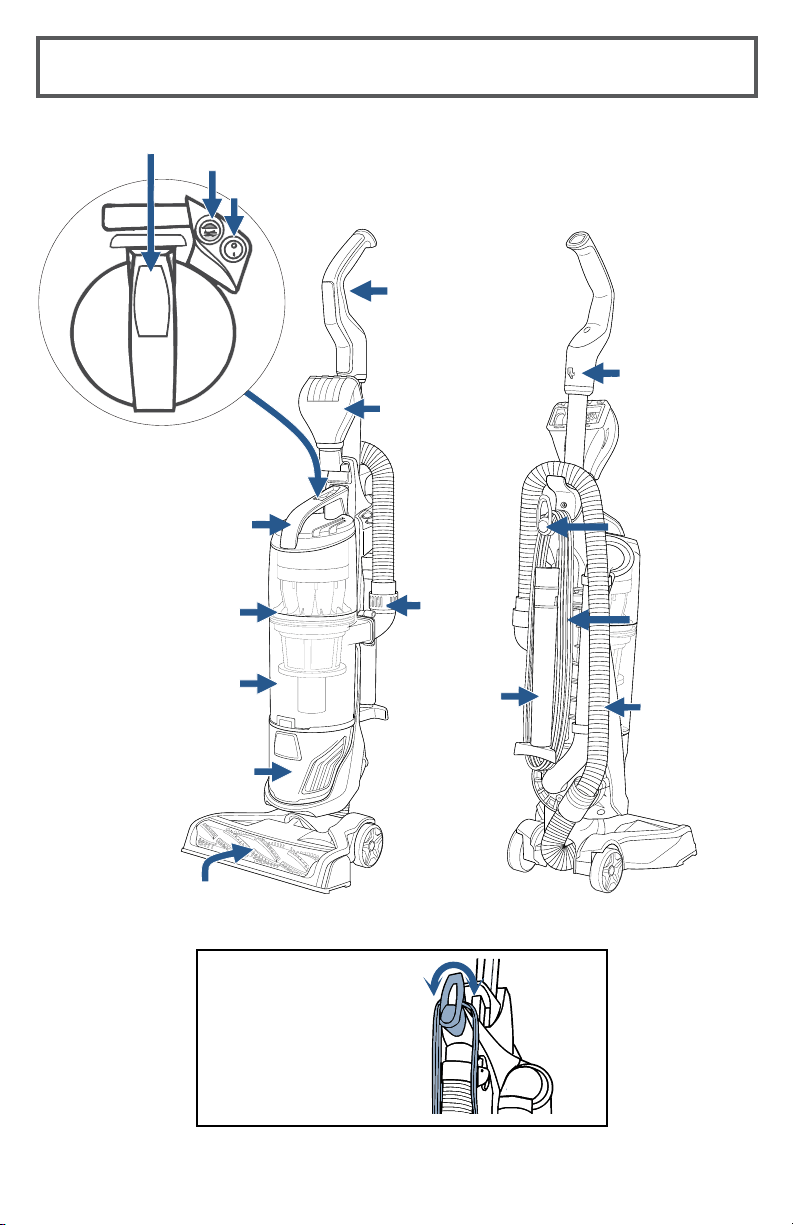
Product View
Twist Cord Release
down to quickly
remove cord
Cord Release
and Storage
Cord
Cord Release
TurboEraser®
Tool with
Tool Holder
Cord Clip
Stretch
Hose
Carry
Handle
Filters
Dirt
Container
Post-Motor
Filter
Brush Roll
Variable
Suction
Control
Extension
Wand
(Crevice Tool
stored inside)
Handle
Dirt Container
Release Button
Power Brush Button
Power Button
Empty
www.BISSELL.com
5
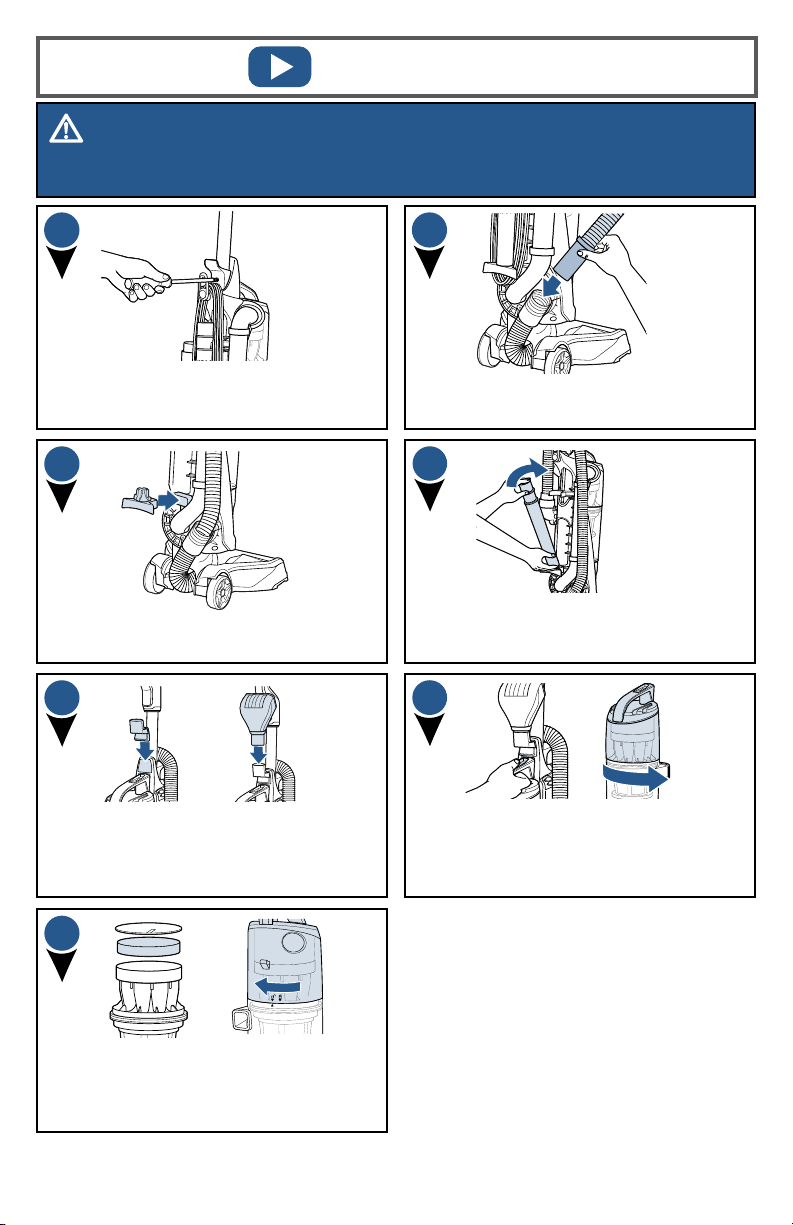
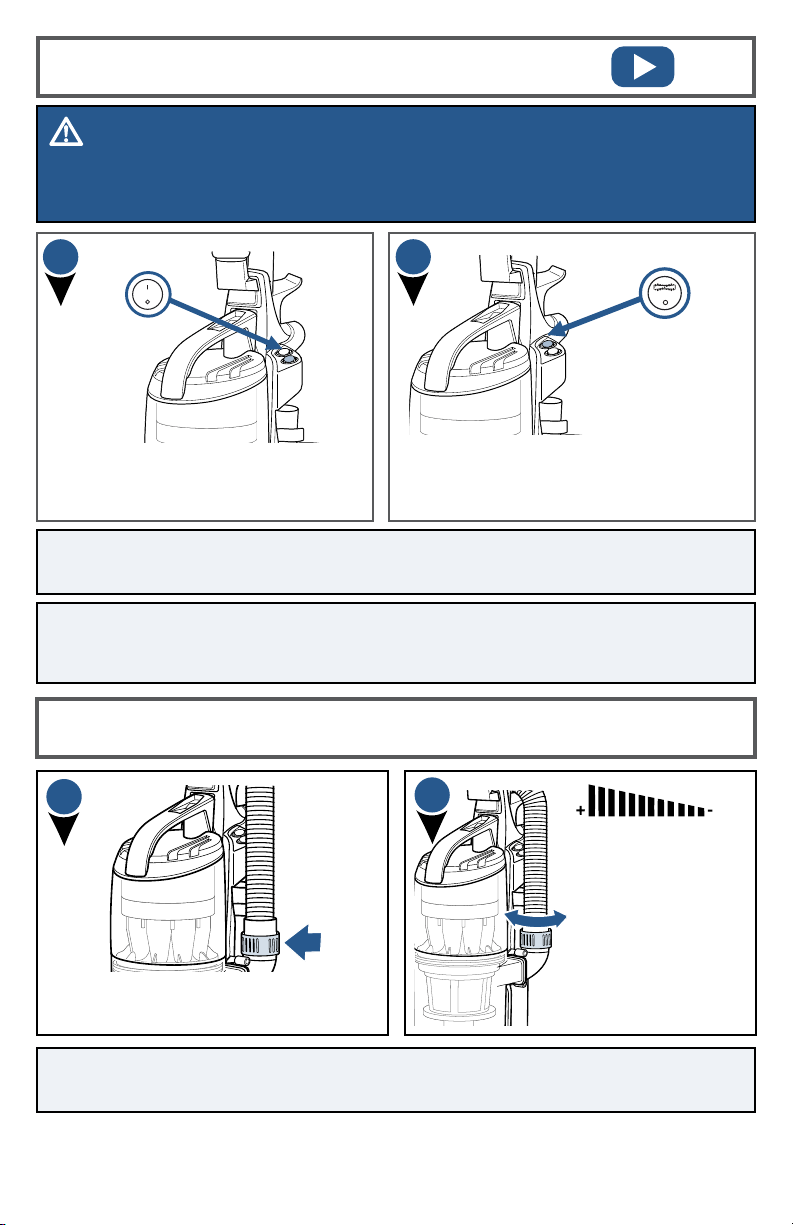
Assembly
WARNING
Do not plug in your vacuum until you are familiar with all instructions and operating
procedures.
Snap lower cord wrap to the lower back
of unit. Wrap the vacuum cord.
Place crevice tool (inside extension
wand) and extension wand onto the
lower cord wrap base.
Insert upper handle into vacuum base.
Attach with the screw that is taped to
the handle.
Push handle end into the base of
vacuum on the opposite side.
1
2
3
4
5
6
Slide TurboEraser® Tool Holder into place
on the front of the vacuum where the
handle meets the vacuum base. Place
TurboEraser® Tool into tool holder.
To install the optional Febreze™ Filter,
press the tank release button and pull
container from vacuum. Twist top of the
tank right to unlock and remove.
5
Remove the pre-motor filter and replace
with the Febreze™ Filter. Place top back
on tank, line arrow with the unlock
graphic and twist left to lock in place.
www.BISSELL.com
6
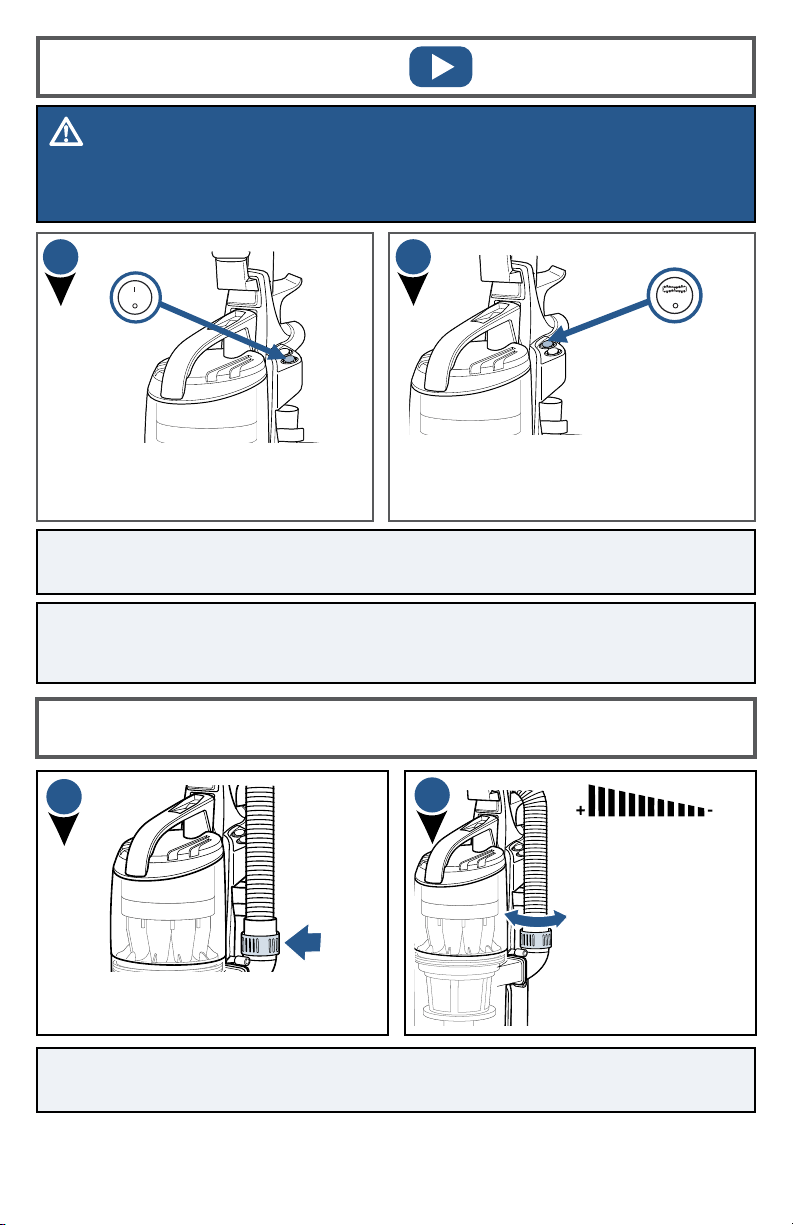
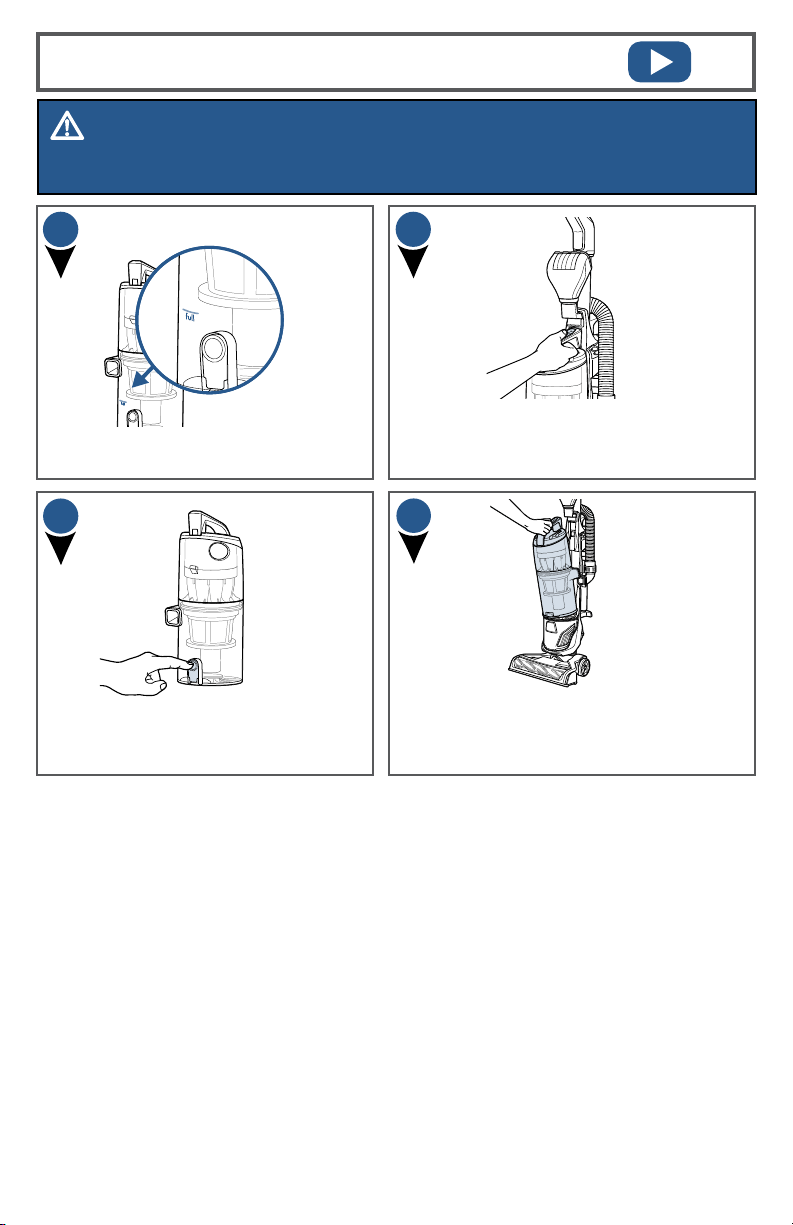
PowerBrush Switch
Press the Brush Roll switch to run the
PowerBrush for carpet cleaning (brush roll
is on when light on switch is illuminated).
Turn vacuum on by pressing Power
Switch on (I - ON and O - OFF).
WARNING
Before using your vacuum, make sure that the dirt container is in locked position and
that all filters, both pre and post-filters are in place. DO NOT operate your vacuum without
these filters.
1
2
NOTE: Turn the Brush Roll OFF when vacuuming hard or delicate surfaces that
may be caught by the rotating brush. This could include hard wood, tiled floors,
small area rugs or frieze carpets that have long delicate fibers or threads.
NOTE: The brush roll will automatically shut o when vacuum is locked in upright
position, recline to reactivate.
Brush Roll
On/O Switch
Power
On/O
Switch
Adjusting the Variable Suction
Locate the Variable Suction Control Valve
on the Hose Wand Base.
Decrease the amount
of suction for cleaning
delicate carpets,
curtains, rugs, or
if difficult to push/
pull by twisting the
variable suction valve
counterclockwise.
NOTE: The vacuum will come with the Variable Suction Valve closed for full
suction power.
sucon control
Twist Valve - Marker
moves to indicate
suction level
FULL REDUCED
Full
Suction
Reduced
Suction
1
2
www.BISSELL.com
7
WARNING
To reduce the risk of electrical shock, turn power switch o and disconnect polarized plug
from electrical outlet before performing maintenance or troubleshooting checks.
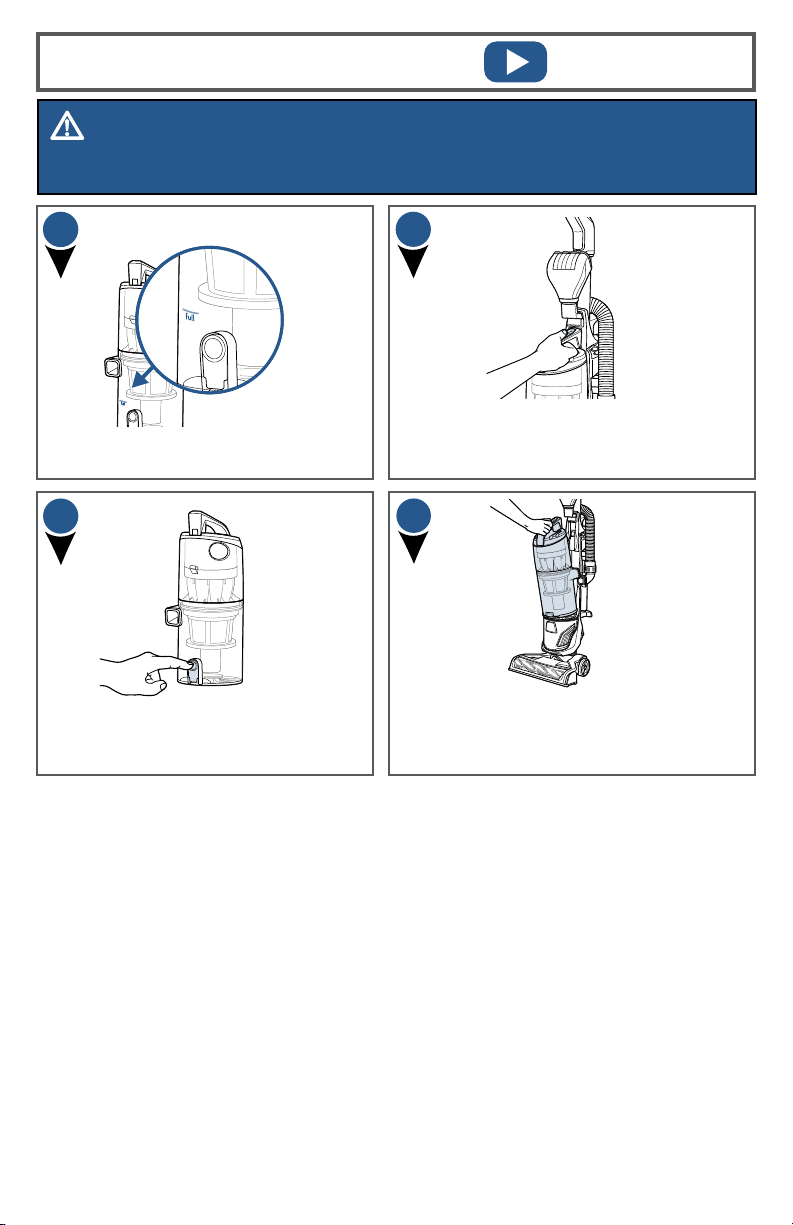
Emptying the Dirt Tank
With vacuum unplugged, press the tank
release button, grab the handle to pull dirt
container away from vacuum.
Vacuum tank is full, time to empty!
Close bottom of container and place back
on the vacuum. Be sure you place the
front of the tank first and push back to
“click” into place.
Holding dirt container over a trash
bin, press tank empty button.
1
2
3
4
www.BISSELL.com
8
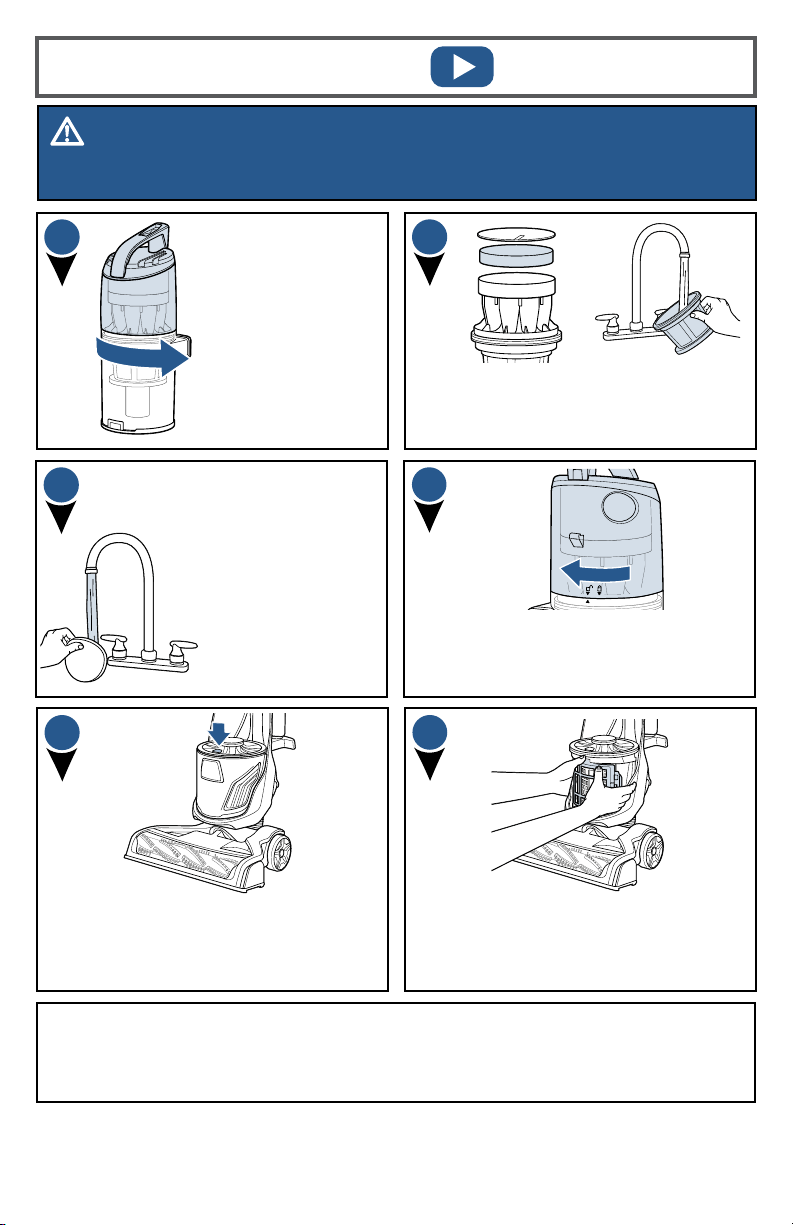
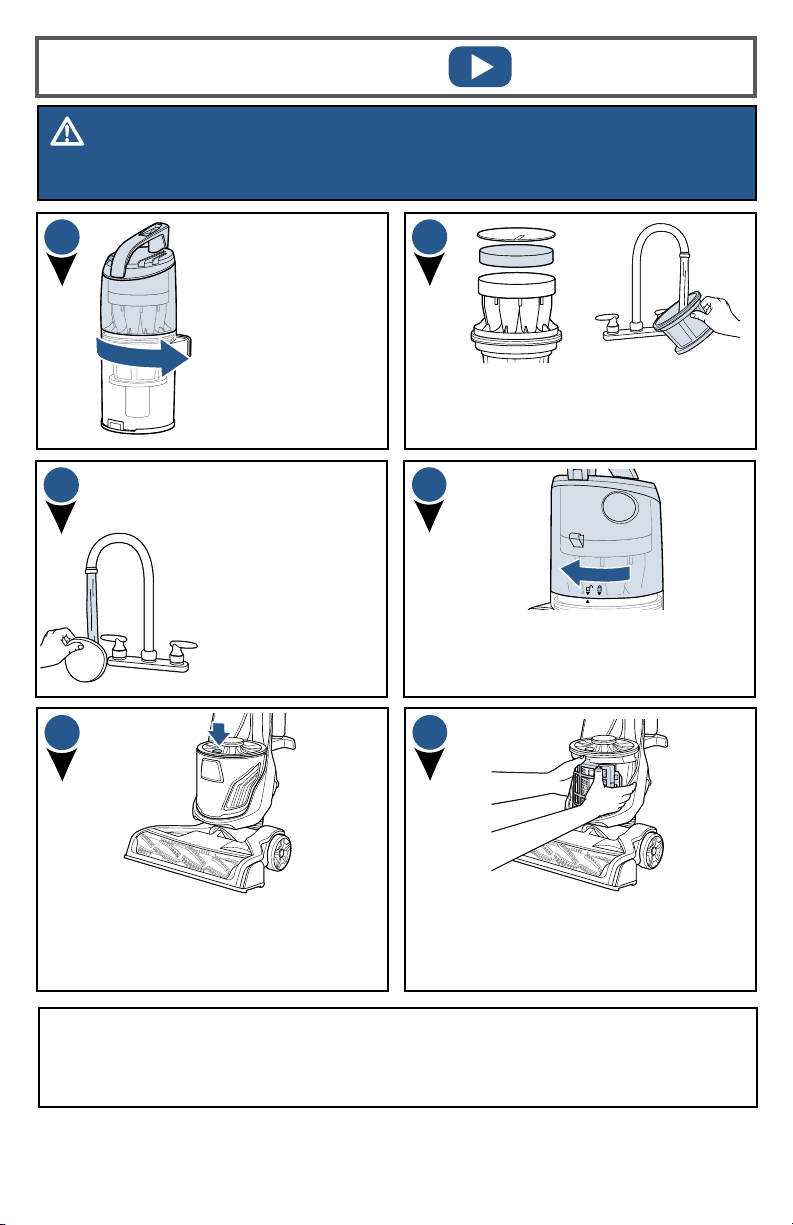
With vacuum
unplugged, press
the Tank Release
Button and pull
the dirt container
away from vacuum.
Twist top right to
separate the tank.
Replace the post-motor filter by first
inserting ribs on the left side of the filter
into the left side of the filter housing
then snapping the right side into place.
Replace the filter cover door.
Remove pre-motor filters and check for
dirt on BOTH sides. Separator Screen
can be rinsed and dried as well.
When reassembling, place top tank
piece last lining up the top tank unlock
graphic with lower tank arrow and twist
left to lock into place.
WARNING
Do not operate vacuum with damp or wet filters, as well as without filters or the Dirt
Container in place. Allow components to dry before reassembling the Dirt Container.
Cleaning the Filters
1
2
4
5
6
With dirt container removed, press red
release button to access post-motor
filter. Tap the post-motor filter against
the side of the trash can to shake out
dirt (do not wash filter).
Clean pre-motor
foam filter with mild
detergent. When
completely dry, return
to top of dirt container.
Thin fiber filter should
be on top with black
tab side facing up.
3
Parts & Supplies
For Parts and Supplies, go to www.BISSELL.com and enter
your model number in the search field.
www.BISSELL.com
9
Replace Brush & Belt
Unplug and
turn vacuum
over. Unscrew
7 Phillips head
screws to
remove cover.
Pull roller straight out and slide belt off
motor gear. Replace roller and/or belt.
Inspect brush roll
by placing it on its
end and spin. The
brush roll should
spin freely, multiple
times by one flick.
If it doesn’t, replace
brush roll. Inspect
belt, replace if
damaged.
Pinching belt around brush roll and
hook back around the motor gear.
Rotate brush roll into place and line
up end caps to reinsert into vacuum.
Re-attach bottom cover with 7 screws.
1
2
3
4
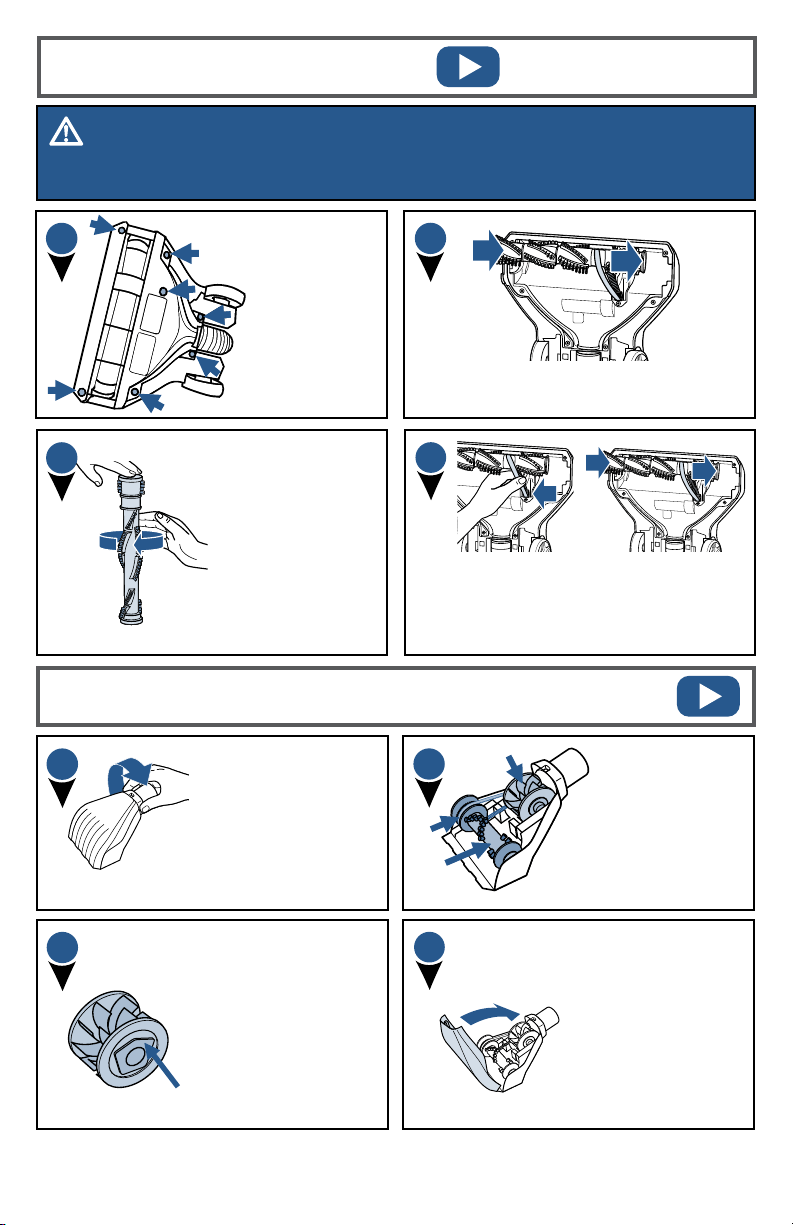
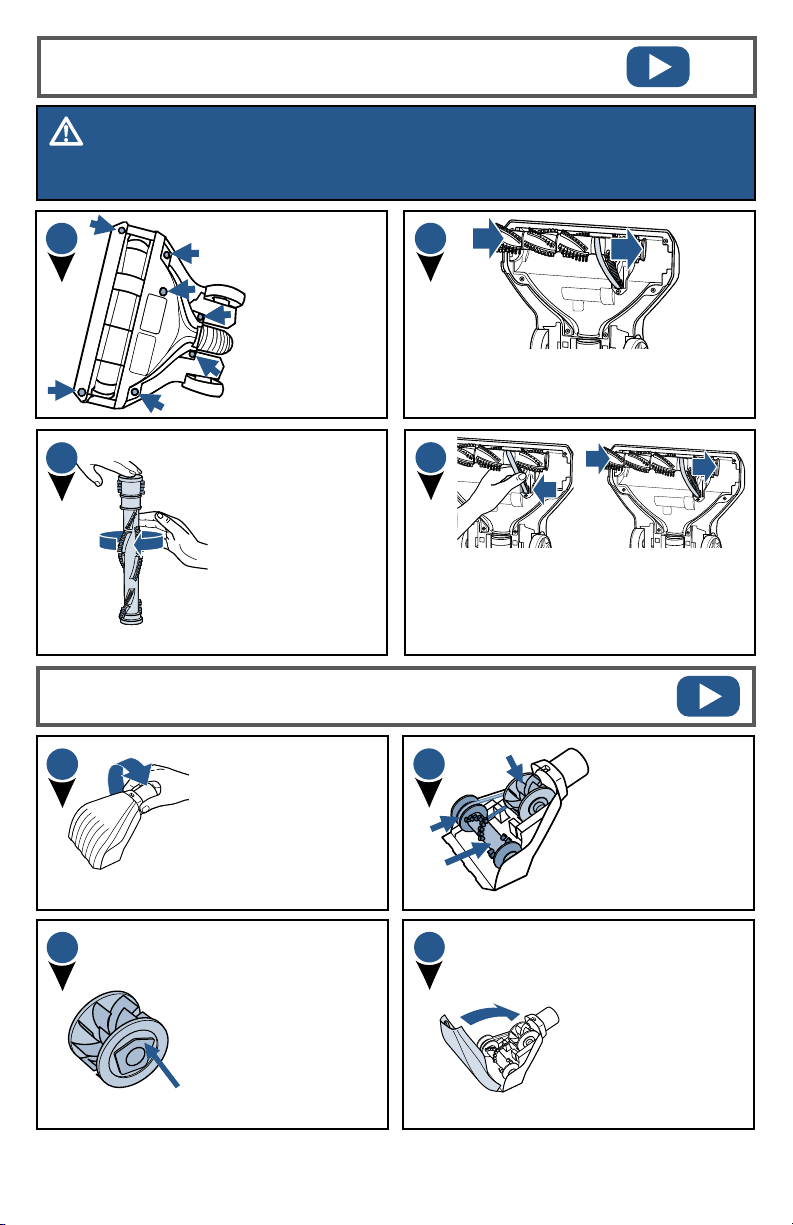
Maintain the Pet TurboEraser® Tool
Twist gray collar counter-
clockwise, until slot appears,
and then separate faceplate.
Remove brush roll,
belt, and paddle
wheel. Inspect
for damages and
replace if necessary.
To reassemble, align
two clips on each end
of paddle wheel with
belt on and pop back
into place.
Replace brush roll
with belt, making sure
all parts are aligned
correctly.
To put faceplate
back on, align the
tabs in the top of
the cover and place
it down to “click”
into place.
Paddle Wheel
Belt
Roller
1
2
3
4
WARNING
To reduce the risk of electrical shock, turn power switch o and disconnect polarized plug
from electrical outlet before performing maintenance or troubleshooting checks.

www.BISSELL.com
10
Parts & Supplies
For Parts and Supplies, go to www.BISSELL.com and enter
your model number in the search field.
Problem Possible causes Remedies
PowerBrush
doesn’t
rotate
The PowerBrush power switch
is turned off.
Make sure PowerBrush switch is on.
Vacuum is locked in upright
position.
Recline vacuum and switch on the
PowerBrush.
PowerBrush has lodged debris or
other entanglements, keeping the
brush from rotating.
Check the PowerBrush and
remove debris.
Vacuum
won’t pick
up dirt
Filters are dirty.
Rnse pre-motor filter and tap dust
from post-motor filter. Allow enough
time for pre-motor filter to dry
properly before reinserting.
The Main Hose is not connected. Locate the Main Hose and reconnect
by pushing the hose connection to
secure the latch.
There is a crack or hole in the
Main Hose.
If there is a crack or hole, order a new
Main Hose from the BISSELL website.
The Triple Action Brush Roll
bristles are worn.
Replace the Triple Action Brush Roll.
There is a clog in the vacuum. Remove debris and any other
entanglements that may be
restricting its rotation.
The Dirt Container is not seated
correctly.
Press the Empty Button to release the
Dirt Container and reseat properly.
Dirt is
escaping
from the
vacuum
The Dirt Container is full. Empty the Dirt Container.
Filters are missing. Check to see if all of the Pre-Motor
and Post-Motor filters are in place.
If needed, order replacement filters
from bissell.com.
The Dirt Container is not seated
properly.
Press the Empty Button and remove the
Dirt Container. Insert the bottom first
and pivot the Dirt Container towards
the vacuum. Listen for a “click” sound,
indicating that it snapped into place.
Troubleshooting
WARNING
To reduce the risk of electric shock, turn power switch o and disconnect plug from
electrical outlet before performing maintenance or troubleshooting checks.

www.BISSELL.com
11
If your BISSELL product should require service:
Contact BISSELL Consumer Care to locate a BISSELL Authorized Service Center in your area.
If you need information about repairs or replacement parts, or if you have questions about
your warranty, contact BISSELL Consumer Care.
This warranty gives you specific legal rights,
and you may also have other rights which
may vary from state to state. If you need
additional instruction regarding this warran-
ty or have questions regarding what it may
cover, please contact BISSELL Consumer
Care by E-mail, telephone, or regular mail
as described below.
Limited Five-Year Warranty
Subject to the *EXCEPTIONS AND
EXCLUSIONS identified below, upon receipt
of the product BISSELL will repair or replace
(with new or remanufactured components
or products), at BISSELL’s option, free of
charge from the date of purchase by the
original purchaser, for five years any
defective or malfunctioning part.
See information below on "If your BISSELL
product should require service".
This warranty applies to product used for
personal, and not commercial or rental
service. This warranty does not apply to
fans or routine maintenance components
such as filters, belts, or brushes. Damage or
malfunction caused by negligence, abuse,
neglect, unauthorized repair, or any other
use not in accordance with the User's Guide
is not covered.
BISSELL IS NOT LIABLE FOR INCIDENTAL
OR CONSEQUENTIAL DAMAGES OF ANY
NATURE ASSOCIATED WITH THE USE OF
THIS PRODUCT. BISSELL’S LIABILITY WILL
NOT EXCEED THE PURCHASE PRICE OF
THE PRODUCT.
Some states do not allow the exclusion or
limitation of incidental or consequential
damages, so the above limitation or
exclusion may not apply to you.
*EXCEPTIONS AND EXCLUSIONS FROM
THE TERMS OF THE LIMITED WARRANTY
THIS WARRANTY IS EXCLUSIVE AND
IN LIEU OF ANY OTHER WARRANTIES
EITHER ORAL OR WRITTEN. ANY IMPLIED
WARRANTIES WHICH MAY ARISE
BY OPERATION OF LAW, INCLUDING
THE IMPLIED WARRANTIES OF
MERCHANTABILITY AND FITNESS FOR
A PARTICULAR PURPOSE, ARE LIMITED
TO THE FIVE YEAR DURATION FROM
THE DATE OF PURCHASE AS DESCRIBED
ABOVE.
Some states do not allow limitations on
how long an implied warranty lasts so the
above limitation may not apply to you.
Website:
www.BISSELL.com
E-mail:
www.BISSELL.com/email-us
Call:
BISSELL Consumer Care
1-800-237-7691
Monday – Friday 8am - 10pm ET
Saturday 9am - 8pm ET
Sunday 10am - 7pm ET
Warranty
Service
Please do not return this product to the store.
Other maintenance or service not included in the manual should be
performed by an authorized service representative.
For any questions or concerns, BISSELL is happy to be of service.
Contact us directly at 1-800-237-7691.
NOTE: Please keep your original sales receipt. It provides proof of date of
purchase in the event of a warranty claim.

12
©2017 BISSELL Homecare, Inc
Grand Rapids, Michigan
All rights reserved. Printed in China
Part Number 161-3387 12/17 RevB
Visit our website at: www.BISSELL.com
Registering is quick, easy and offers you benefits over the lifetime of your product.
You’ll receive:
Visit www.BISSELL.com/registration!
Visit the BISSELL website: www.BISSELL.com
When contacting BISSELL, have model number of cleaner available.
Please record your Model Number: ___________________
Please record your Purchase Date: ___________________
NOTE: Please keep your original sales receipt. It provides proof of purchase
date in the event of a warranty claim. See Warranty page for details.
BISSELL Rewards Points
Automatically earn points for
discounts and free shipping on
future purchases.
Faster Service
Supplying your information now
saves you time should you need to
contact us with questions regarding
your product.
Product Support Reminders
and Alerts
We’ll contact you with any
important product maintenance
reminders and alerts.
Special Promotions
Optional: Register your email
to receive notice of offers,
contests, cleaning tips and more!
We c’t wait to ar from y!
Rate this product and let us (and millions
of your closest friends) know what you think!
www.BISSELL.com
Parts & Supplies
For Parts and Supplies, go to www.BISSELL.com and enter
your model number in the search field.
Register your product today!
POWERGLIDE
®
Aspiradora
___________
GUÍA DEL USUARIO
SERIE 2215
¿Prefiere ver videos?
Busque este icono y
mire nuestro video
instructivo en línea en
www.BISSELL.com
www.BISSELL.com
14
INSTRUCCIONES IMPORTANTES DE SEGURIDAD
» Conéctela siempre a un tomacorriente
polarizado (una ranura es más ancha
que la otra). No modifique el enchufe
polarizado para que se ajuste a un
tomacorriente o extensión eléctrica
no polarizados.
» No deje la aspiradora sin supervisión
cuando esté enchufada. Desenchúfela
del tomacorriente cuando no esté en
uso y antes de repararla.
» No la utilice en exteriores ni en
superficies húmedas.
» No permita que se use como un
juguete. Es necesaria una estricta
supervisión cuando los niños la
utilicen o estén cerca.
» No use este electrodoméstico para
otro fin que no sea el especificado
en esta Guía del usuario. Use solo
los accesorios recomendados por el
fabricante.
» No la utilice si el enchufe o el cable
están dañados. Si el electrodoméstico
no funciona correctamente, ha
sufrido caídas, se ha dañado, se ha
dejado en el exterior o se ha caído al
agua, llévelo a un centro de servicio
autorizado para su reparación.
» No jale la aspiradora ni la transporte
del cable, no use el cable como
manija, no cierre puertas sobre el
cable ni jale del cable alrededor de
esquinas o bordes filosos. No pase
el electrodoméstico por encima del
cable. Mantenga el cable alejado de
superficies calientes.
» No jale del cable para desenchufarlo.
Para desenchufarlo, tome el enchufe,
no el cable.
» No manipule el enchufe ni la
aspiradora con las manos mojadas.
» No coloque ningún objeto en las
aberturas. No use la aspiradora si hay
aberturas bloqueadas. Mantenga las
aberturas libres de polvo, pelusas,
cabellos o cualquier objeto que
pueda reducir el flujo de aire.
» Mantenga el cabello, las ropas
holgadas, los dedos y todas las partes
del cuerpo lejos de aberturas y piezas
en movimiento.
» Apague todos los controles antes de
enchufar o desenchufar la aspiradora.
» Tenga sumo cuidado cuando limpie
sobre escaleras.
» No la use para aspirar líquidos
inflamables o combustibles (líquido
para encendedores, gasolina,
queroseno, etc.) ni la use en áreas en
que estos estén presentes.
» No use la aspiradora en un ambiente
cerrado lleno de los vapores
despedidos por pinturas a base de
aceite, disolventes de pintura, algunas
sustancias repelentes de polillas,
polvo inflamable u otros vapores
explosivos o tóxicos.
» No la use para aspirar materiales
tóxicos (blanqueador de cloro,
amoníaco, limpiador para desagüe,
etc.).
» No aspire objetos encendidos o
humeantes, tales como cigarrillos,
fósforos o cenizas calientes.
» No la use si los filtros no están en
su lugar.
» No aspire objetos duros o filosos
tales como vidrio, clavos, tornillos,
monedas, etc.
» Úsela solo en superficies secas e
interiores.
» Mantenga el electrodoméstico
sobre una superficie nivelada.» No
transporte la aspiradora mientras está
funcionando.» Desenchúfela antes de
conectar o desconectar el accesorio
para mascotas TurboEraser®.
LEA TODAS LAS INSTRUCCIONES ANTES DE USAR SU ASPIRADORA VERTICAL.
Conéctela siempre a un tomacorriente polarizado (una ranura es más ancha que la otra).
Desenchúfela del tomacorriente cuando no esté en uso y antes de realizarle mantenimiento.
Al usar electrodomésticos, debe respetar las siguientes medidas de precaución básicas:
Este modelo es solo para uso doméstico.
GUARDE ESTAS INSTRUCCIONES
ESTE ELECTRODOMÉSTICO TIENE
UN ENCHUFE POLARIZADO
Para reducir el riesgo de descarga eléctrica, este electrodoméstico posee un enchufe polarizado
(una clavija es más ancha que la otra). Este enchufe se inserta en un tomacorriente polarizado de
una sola manera. Si el enchufe no encaja por completo en el tomacorriente, inviértalo. Si aún no
encaja, póngase en contacto con un electricista calificado para instalar el tomacorriente
apropiado. No cambie el enchufe de ninguna manera.
Caliente
Neutra
ADVERTENCIA
›› La película plástica puede ser peligrosa. Para evitar el riesgo de sofocación, manténgala alejada de los niños.
›› No enchufe su aspiradora HASTA haber comprendido todas las instrucciones y procedimientos de funcionamiento.
›› Para reducir el riesgo de descarga eléctrica, lleve el interruptor de encendido a la posición de apagado y desconecte el
enchufe polarizado del tomacorriente ANTES de realizar mantenimiento a la unidad o solucionar problemas.
ADVERTENCIA
PARA DISMINUIR EL RIESGO DE INCENDIO, DESCARGAS ELÉCTRICAS O LESIONES:
www.BISSELL.com
15
1. Unidad básica
2. Manija superior
3. Tubo de extensión
4. Boquilla estrecha
(almacenado en el interior del tubo
de extensión)
5. Tornillos (adheridos a la manija)
6. Accesorio TurboEraser®
(con turbina que no se enreda)
7. Base para cable y manguera
8. Soporte para accesorio
TurboEraser®
9. Filtro estilo 1214 que elimina
el mal olor de las mascotas
Febreze™
Lo que hay en la caja
Gracias por comprar una aspiradora BISSELL.
Amamos la limpieza y estamos ansiosos por compartir uno de nuestros innovadores
productos con usted. Queremos asegurarnos de que durante los siguientes años su
aspiradora funcione igual que hoy. Por eso, esta guía presenta sugerencias sobre el uso
(páginas 18-19), el mantenimiento (páginas 20-21) y, si hay algún problema, la solución
de problemas (página 22).
En tan solo unos pasos de ensamblaje, estará todo listo para que pueda aspirar. Vaya a
la página 5 y comencemos.
Instrucciones de seguridad..14
Vista del producto ..........16
Ensamblaje.................17
Funcionamiento ......... 18-19
Mantenimiento y cuidado
..20-21
Solución de problemas......22
Garantía/Servicio ...........23
Registro del producto.......24
NOTA: Los accesorios estándares pueden variar según el modelo. Para saber
qué incluye su compra, consulte la lista “Contenido de la caja” ubicada en la
solapa superior de la caja.
1
2
3
4
5
6
7
8
9
www.BISSELL.com
16
Vista del producto
Gire hacia abajo la
liberación del cable para
retirarlo rápidamente.
Liberación del cable
y almacenamiento
Cable
Cable de
liberación
Soporte con
accesorio
TurboEraser®
Sujetador
del cable
Manguera
extensible
Manija de
transporte
Filtros
Contenedor
de suciedad
Filtro
posmotor
Cepillo giratorio
Control de
succión
variable
Tubo de
extensión
(accesorio para
ranuras al interior)
Manija
Dirt Container
Release Button
Power Brush Button
Power Button
Vacío
Botón de liberación del
contenedor de suciedad
Botón de encendido del cepillo
Botón de encendido

www.BISSELL.com
17
Ensamblaje
ADVERTENCIA
No enchufe la aspiradora hasta que no comprenda todas las instrucciones y los
procedimientos de funcionamiento.
Adhiera la abrazadera para el cable inferior a la
parte inferior de la unidad. Enrolle el cable de la
aspiradora.
El accesorio para ranuras (se almacena al
interior de la vara de extensión) y la vara de
extensión se coloca en la base donde se enrolla
el cable inferior.
Coloque con el tornillo que está adherido a
la manija.
Presione el extremo de la manguera en la base
de la aspiradora en el lado opuesto.
1
2
3
4
5
6
Deslice el soporte TurboEraser® en su lugar en la
parte frontal de la aspiradora donde la manija se
encuentra con la base de la aspiradora. Coloque
el accesorio TurboEraser® en el soporte.
Para instalar el filtro opcional Febreze™,
presione el botón de liberación del tanque y
retire el tanque de la aspiradora. Gire la parte
superior del tanque hacia la derecha para
desbloquear y retirar.
5
Retire el filtro premotor y reemplácelo por el
filtro Febreze™. Coloque la parte superior en el
tanque, alinee la flecha con el gráfico de bloqueo
y gire hacia la izquierda para asegurarlo en su
lugar.
www.BISSELL.com
18
Interruptor del cepillo eléctrico
Presione el interruptor del cepillo giratorio para
encender el cepillo eléctrico para la limpieza de
alfombras (el cepillo giratorio está encendido
cuando se enciende la luz en el interruptor).
Encienda la aspiradora al presionar el
interruptor de alimentación en la posición
de encendido (I:encendido y O:apagado).
ADVERTENCIA
Antes de usar la aspiradora, asegúrese de que el contenedor de suciedad esté en la posición de
bloqueo y de que todos los filtros, tanto el prefiltro como el posfiltro, estén en su lugar. NO utilice la
aspiradora sin estos filtros.
1
2
NOTA: apague el cepillo giratorio cuando esté aspirando fuerte o cuando superficies delicadas puedan
quedar atrapadas en el cepillo giratorio. Esto puede incluir pisos de madera dura, pisos de cerámica,
pequeñas áreas de alfombras o alfombras de pelo frisado que tienen fibras o hilos largos y delicados.
NOTA: el cepillo giratorio se apagará automáticamente cuando la aspiradora esté bloqueada en
posición vertical. Reclínela para reactivarla
Interruptor
de encendido/
apagado del
cepillo giratorio
Interruptor
de encendido/
apagado de la
alimentación
Ajuste de la succión variable
Ubique la válvula de control de la succión
variable en la base de la vara de la manguera.
Disminuya la cantidad
de succión para limpiar
alfombras delicadas,
cortinas o tapetes o si es
difícil presionar o jalar al
girar la válvula de succión
variable en dirección
contraria a las manecillas
del reloj.
NOTA: la aspiradora incluirá la válvula de succión variable cerrada, para una potencia total
de succión.
sucon control
Twist Valve - Marker
moves to indicate
suction level
FULL REDUCED
Full
Suction
Reduced
Suction
1
2
www.BISSELL.com
19
ADVERTENCIA
Para reducir el riesgo de descarga eléctrica, lleve el interruptor de encendido a la posición de apagado y desconecte
el enchufe polarizado del tomacorriente antes de realizar mantenimiento a la unidad o solucionar problemas.
Vaciado del tanque de suciedad
Con la aspiradora desconectada, presione el botón
de liberación de tanque y jale la manija para retirar
el contenedor de suciedad de la aspiradora.
La aspiradora está llena. Es hora de
vaciarla.
Cierre la parte inferior del contenedor y vuelva a
colocarlo en la aspiradora. Asegúrese de colocar
el frente del tanque primero y presione para que
haga clic al acomodarse en su sitio.
Mientras sostiene el contenedor de
suciedad sobre un cesto de basura,
presione el botón para vaciar el tanque.
1
2
3
4
www.BISSELL.com
20
Con la aspiradora
desconectada, presione
el botón de liberación
de tanque y jale el
contenedor de suciedad
de la aspiradora. Gire la
tapa hacia la derecha para
separarla del tanque.
Reemplace el filtro posmotor al insertar los lados que
se encuentran en la parte izquierda del filtro en el
lado izquierdo de la carcasa del filtro y luego calce
a presión el lado derecho en su lugar. Reemplace la
puerta de la cubierta del filtro.
Retire los filtros premotor y revise AMBOS lados en
busca de suciedad. La pantalla separadora también se
puede enjuagar y secar de la misma forma.
Al volver a ensamblar, coloque la parte superior en el
tanque, alinee el gráfico de bloqueo con la flecha del
tanque inferior y gire hacia la izquierda para
asegurarlo en su lugar.
ADVERTENCIA
No use la aspiradora con filtros húmedos o mojados, tampoco la use sin filtros o sin que el contenedor de
suciedad esté en su lugar. Deje secar los componentes antes de volver a ensamblar el contenedor de suciedad
.
Para limpiar los filtros
1
2
4
5
6
Una vez retirado el contenedor de suciedad, presione
el botón rojo de liberación para acceder al filtro
posmotor. Coloque el filtro posmotor al lado del
basurero para sacar la suciedad (no lave el filtro).
Límpie el filtro con detergente
suave. Cuando esté
completamente seco, regrese
la parte superior al contenedor
de suciedad. El filtro de fibra
delgado debe estar encima con
la lengüeta negra hacia arriba.
3
Piezas y suministros
Para consultar sobre piezas y suministros, visite el sitio www.BISSELL.com
e ingrese el número de modelo en el campo de búsqueda..
www.BISSELL.com
21
Reemplace el cepillo y la correa
Desenchufe y gire la
aspiradora de modo
que la parte inferior
quede hacia arriba.
Desatornille los 7
tornillos Phillips para
retirar la cubierta.
Jale hacia afuera el rodillo y deslice la correa fuera
del engranaje del motor. Coloque nuevamente el
rodillo o la correa.
Inspeccione el cepillo
giratorio colocándolo en
su extremo y girándolo.
El cepillo giratorio
debe girar libremente
varias veces con solo un
golpecito. Si no lo hace,
reemplace el cepillo
giratorio. Inspeccione la
correa, reemplace si está
dañada.
Apriete la correa alrededor del cepillo giratorio y
engánchela nuevamente alrededor del engranaje del
motor. Gire el cepillo giratorio para acomodarlo en su
sitio y alinee las tapas exteriores para volver a colocar
la aspiradora. Vuelva a colocar la cubierta de la parte
inferior con 7 tornillos.
1
2
3
4
Mantenimiento del accesorio Pet TurboEraser®
Gire el collar gris en dirección
contraria a las manecillas del reloj
hasta que aparezca la ranura; luego
separe la placa frontal.
Extraiga el cepillo
giratorio, la correa y
la rueda de la paleta.
Inspeccione en búsqueda
de daños y reemplace las
piezas si es necesario.
Para volver a ensamblar, alinee
dos sujetadores en cada
extremo de la rueda de la
paleta con la correa puesta y
coloque en su lugar.
Reemplace el cepillo giratorio
con la correa y asegúrese de
que todas las piezas estén
alineadas correctamente.
Para volver a colocar la
placa frontal, alinee las
lengüetas en la parte
superior de la cubierta y
vuelva a colocarla en su
lugar deslizándola hacia
abajo hasta que escuche
un “clic”.
Rueda de la paleta
Correa
Cepillo
giratorio
1
2
3
4
ADVERTENCIA
Para reducir el riesgo de descargas eléctricas, apague el interruptor de encendido y desconecte el
enchufe del tomacorriente antes de realizar verificaciones de mantenimiento o de solución de problemas.

www.BISSELL.com
22
Piezas y suministros
Para consultar sobre piezas y suministros, visite el sitio www.BISSELL.com
e ingrese el número de modelo en el campo de búsqueda.
Problema
Causas posibles Soluciones
El cepillo eléctrico
no gira
El interruptor de alimentación del cepillo
eléctrico está apagado.
Asegúrese de que el interruptor del cepillo
eléctrico esté en posición de encendido.
La aspiradora está bloqueada en posición
vertical.
Recline la aspiradora y encienda el cepillo eléctrico.
El cepillo eléctrico tiene suciedad atascada o
algunos enredos, lo que evita que el cepillo
gire.
Revise el cepillo eléctrico y retire la suciedad.
La aspiradora no
aspira la suciedad
Los filtros están sucios. Enjuague el filtro premotor y sacuda el polvo del
filtro postmotor. Espere lo suficiente para que el
filtro premotor se seque bien antes de volver a
insertarlo.
La manguera principal no está conectada. Ubique la manguera principal y vuelva a
conectarla presionando la conexión para
asegurar el pestillo.
Hay una fisura u orificio en la manguera
principal.
Si hay una fisura o un orificio, pida una nueva
manguera principal en la página web de BISSELL.
Las cerdas del cepillo giratorio de triple
acción están desgastadas.
Reemplace el cepillo giratorio de triple acción.
Hay una obstrucción en la aspiradora. Elimine la suciedad y cualquier enredo que
pudiera limitar la rotación.
El contenedor de suciedad no está colocado
correctamente.
Presione el botón de vaciado para liberar el
contenedor de suciedad y vuelva a colocarlo de
forma adecuada.
La suciedad sale
de la aspiradora
El contenedor de suciedad está lleno. Vacíe el contenedor de suciedad.
No están colocados los filtros.
Verifique que todos los filtros premotor y postmotor
se encuentren en su lugar. Si lo necesita, haga un
pedido de los filtros en bissell.com.
El contenedor de suciedad no está colocado
de forma adecuada.
Presione el botón de vaciado y retire el contenedor
de suciedad. Inserte primero la parte inferior y gire
el contenedor de suciedad hacia la aspiradora.
Escuche un "clic" que indicará que se colocó en
su lugar.
Solución de problemas
ADVERTENCIA
Para reducir el riesgo de descargas eléctricas, apague el interruptor de encendido y desconecte el enchufe
del tomacorriente antes antes de realizar verificaciones de mantenimient
o o de solución de problemas.

www.BISSELL.com
23
Si su producto BISSELL necesita reparación:
Póngase en contacto con Atención al Consumidor de BISSELL para ubicar un centro de servicio autorizado de BISSELL en su área.
Si necesita información sobre reparaciones o piezas de repuesto, o si tiene preguntas sobre la garantía, póngase en contacto
con Atención al Consumidor de BISSELL.
Esta garantía le otorga derechos legales específicos, pero
puede que también tenga otros derechos que varían según
el estado. Si necesita instrucciones adicionales con respecto
a esta garantía o tiene preguntas sobre lo que esta cubre,
póngase en contacto con Atención al Consumidor de
BISSELL por correo electrónico, teléfono o correo regular,
como se describe a continuación.
Garantía limitada de cinco años
Sujeta a las *EXCEPCIONES Y EXCLUSIONES detalladas a
continuación, presentando el comprobante de compra del
producto, BISSELL reparará o reemplazará (con compo-
nentes o productos nuevos o fabricados nuevamente), a
discreción de BISSELL, sin costo para el comprador original
a partir de la fecha de compra y durante cinco años, cual-
quier pieza defectuosa o con mal funcionamiento.
Consulte la información a continuación sobre “Si su produc-
to BISSELL necesita un servicio de mantenimiento”.
Esta garantía se aplica al producto utilizado para el servicio
personal y no comercial o de alquiler. Esta garantía no se
aplica a los ventiladores o a los componentes de manten-
imiento de rutina como filtros, correas o cepillos. Los daños
o el mal funcionamiento causados por negligencia, uso
inadecuado, descuido, reparación no autorizada o cualquier
otro uso que no se ajuste a la Guía del usuario no están
cubiertos.
BISSELL NO SE HACE RESPONSABLE POR NINGÚN
DAÑO ACCIDENTAL O RESULTANTE, DE NINGUNA
NATURALEZA, RELACIONADO CON EL USO DE ESTE
PRODUCTO. LA RESPONSABILIDAD DE BISSELL NO
SUPERARÁ EL PRECIO DE COMPRA DEL PRODUCTO.
ALGUNOS ESTADOS NO PERMITEN LA EXCLUSIÓN
O LIMITACIÓN DE LOS DAÑOS ACCIDENTALES O
RESULTANTES, DE MODO QUE ES POSIBLE QUE LA
EXCLUSIÓN O LIMITACIÓN ANTERIOR NO SE APLIQUEN
EN SU CASO.
*EXCEPCIONES Y EXCLUSIONES DE LOS TÉRMINOS DE
LA GARANTÍA LIMITADA
ESTA GARANTÍA ES EXCLUSIVA Y REEMPLAZA A
CUALQUIER OTRA GARANTÍA ORAL O ESCRITA.
CUALQUIER GARANTÍA IMPLÍCITA QUE PUEDA SURGIR
POR UNA OPERACIÓN LEGAL, QUE INCLUYA LAS
GARANTÍAS IMPLÍCITAS DE COMERCIABILIDAD E
IDONEIDAD PARA UN PROPÓSITO EN PARTICULAR,
ESTÁ LIMITADA A CINCO AÑOS DE DURACIÓN A
PARTIR DE LA FECHA DE COMPRA COMO SE DETALLÓ
ANTERIORMENTE.
Algunos estados no permiten limitaciones sobre el tiempo
de duración de una garantía implícita, de modo que la
limitación antes descrita puede no aplicarse en su caso.
Sitio Web:
www.BISSELL.com
Correo electrónico
www.BISSELL.com/email-us
Llame a:
Atención al Consumidor de BISSELL1-800-237-7691
De lunes a viernes de 8a.m. a 10p.m., hora del Este
Sábados de 9a.m. a 8p.m., hora del Este
Domingos de 10a.m. a 7p.m., hora del Este
Garantía
Reparación
No devuelva este producto a la tienda.
Cualquier otro mantenimiento o reparación que no se incluya en el manual debe ser realizado por un
representante de servicio autorizado.
Si tiene alguna pregunta o duda, BISSELL se complace en ayudarlo. Póngase en contacto con nosotros
directamente llamando al 1-800-237-7691.
NOTA: conserve el recibo de venta original. Es el comprobante de la fecha de
compra en caso de una reclamación de garantía.

24
©2017 BISSELL Homecare, Inc
Grand Rapids, Michigan
Todos los derechos reservados.
Impreso en China
Número de pieza: 161-3387 12/17 RevC
Visite nuestro sitio Web en: www.BISSELL.com
Registrarse es rápido, fácil y le ofrece beneficios para todo el período de vida útil del producto.
Usted recibirá:
Visite www.BISSELL.com/registration.
Visite el sitio Web de BISSELL: www.BISSELL.com
Cuando se ponga en contacto con BISSELL, tenga a mano el número de modelo de la limpiadora.
Registre su número de modelo: ___________________
Registre su fecha de compra: ___________________
NOTA: conserve el recibo de venta original. Es el comprobante de la fecha de compra en caso
de una reclamación de garantía. Para obtener más detalles, consulte la página de Garantía.
Puntos de recompensa BISSELL
Obtenga puntos de manera automática
para descuentos y entregas a domicilio
gratis en compras futuras.
Servicio más rápido
Si envía la información ahora, ahorrará
tiempo por si necesita ponerse en
contacto con nosotros con preguntas
relacionadas con el producto.
Recordatorios y alertas del
centro de servicio de productos
Nos pondremos en contacto con usted
ante cualquier recordatorio y alerta
importante relacionada con el
mantenimiento del producto.
Promociones especiale
Opcional: registre su correo electrónico
para recibir notificaciones de ofertas,
concursos, consejos de limpieza y más.
Nos enctaría saber de usd.
Nos encantaría saber de usted.
Califique este producto y háganos saber (a nosotros
y a millones de sus amigos cercanos) lo que piensa.
www.BISSELL.com
Piezas y suministros
Para consultar sobre piezas y suministros, visite el sitio www.BISSELL.com
e ingrese el número de modelo en el campo de búsqueda..
¡Registre su producto hoy!