


rice
porridge
soup
steam
steak
pizza
baking
pasta
fry
soft fry
stew
cooking
yogurt
jam
sous vide
warm up
my recipe
start delay
D
b
d e
g
f
h
i
j
a
c

6
zh
主要用途
主要用途
请仔细阅读、遵守使用说明书并妥善保管,以备将来使用!请阅读所有说
明!在将本电器转让给其他人时附上说明书。
若未遵守正确使用电器的说明,制造商对造成的任何损害概不承担责
任。本电器仅供家庭使用。
本电器适用于清蒸、煎炒、烘焙、红烧、炖煮、高温杀菌和加热食品以及食
物保温等。不得将其用于加工其他物品或物质。所有食材都必须卫生无
公害。在操作过程中,必须遵守厨房卫生的相关规定。
电器应只用于其目标用途。只能针对预期和描述的食物使用预设程序。
X“烹饪时间” 参见第22页
只能根据操作说明使用相关热源。仅适用各电器型号相对应的供应商原
装零件。尤其要确保基本电器和电器盖符合规定的兼容要求,且由同一
制造商提供。
锅具和附件只能与基本电器配合使用。
仅限在室温及海拔 2000 米以下的室内使用本电器。
重要安全信息
对于有身体、感官或精神缺陷的人员或缺乏经验和知识的人员 (包括儿
童),除非能得到监督或指导,否则不得使用本电器。请勿让儿童靠近本
电器和电源线,且不得让儿童操作本电器。严禁儿童玩耍本电器。儿童不
得对本电器进行清洁和用户保养。
W 电击和着火危险!
■ 本电器只能通过正确安装的接地插座连接到交流电源。确保已正确
安装家用电源的保护导线系统。
■ 务必按照铭牌上的技术规范连接和操作本电器。若电源线和/或电器
损坏,请勿使用本电器。为防止发生事故,仅限由我们的客户服务部门
进行维修。
■ 若本电器电源线损坏,务必使用售后服务部门提供的专用连接导线
进行更换。
■ 切勿将电器连接到定时开关或遥控插座上。电器开启时必须有人看
管 !
■ 如果发生故障,立即拔下插头或断开电源。
■ 不得让电源线接触高温零件,或者在锐利边缘上拖拽电源线。
■ 切勿将电器或电源线浸入水中或用洗碗机清洁。请勿使用蒸汽清洁
本电器。
■ 每次使用后,无人照看本电器时,在装配、拆卸和清洁之前以及出现故
障时,都必须断开本电器与电源的连接。
W 有烫伤危险!
■ 本电器使用蒸汽压力进行烹饪。使用不当有烫伤风险。在使用电器之
前,请检查是否正确关闭。参见使用说明书。
■ 每次使用电器之前,应定期检查蒸汽阀门开孔,确保其不堵塞。检查安
全阀 (15、16、17) 和零件(6、23) 是否存在并正确安装。

7
zh
重要安全信息
切记:过压保护设备 (17) 必须能自由移动。 X“13. 检查安全设备!”
参见第11页
■ 切勿以使用说明书指出的维护说明以外的任何方式改造安全系统。
X“保养和日常清洁” 参见第19页
■ 电器中必须放入锅具才能使用。
■ 在使用烹饪程序之前,请检查电器是否正确关闭。
■ 电器运行时,外壳、锅具和金属部件被加热!只能使用随附的工具取出
锅具和附件。请戴上烤箱手套。
■ 电器内产生高温蒸汽。不要倾斜和倾倒本电器。
■ 电器有压力时,移动电器要非常小心。切勿触碰任何灼热表面。使用手
柄。必要时使用正确的防护。
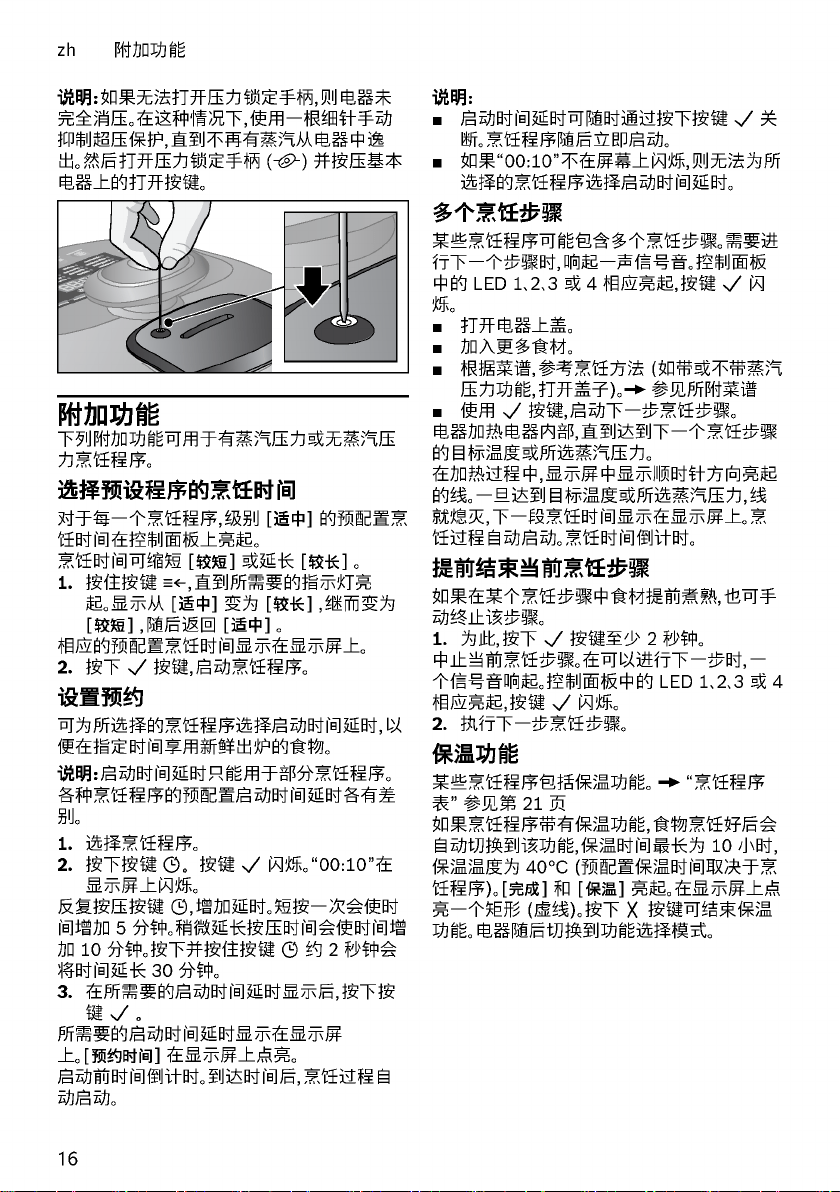
■ 切勿用力打开电器!除非已经检查确认内部压力已经完全降低,否
则不得打开电器。参见使用说明书。 X“使用蒸汽压力烹饪” 参见
第14页
■ 切勿在启用蒸汽压力功能后使用电器烘焙或油炸食物。
■ 为了防止沸腾或泡沫溢出风险,切勿使用高温程序煮汤或类似的液
体,如烘焙、煎炒(油炸)等,也不得手动设置 100°C 以上温度进行上
述烹饪。
■ 制备软性食物后,在打开盖子之前轻轻摇晃电器,防止食物喷溅。
■ 在烹饪带皮肉类后 (如牛舌),肉类会在压力下膨胀,此时不可刺破肉
皮,否则有烫伤风险。
■ 打开上盖时要小心。
■ 必须等电器充分冷却后才能拿取或清洁!有明显褪色、裂缝或其他损
坏的部件或者定位不正确的部件必须以原装部件进行更换。
W 有健康危险!
真空低温烹饪是一种以较低的温度进行烹饪的方法。请特别注意安全说
明和建议的烹饪方法! X“低温慢煮烹饪” 参见第13页
W 窒息危险!
切勿让儿童玩耍包装材料。
W 重要信息!
■ 不要使用本产品烹饪或存储酸性食物 (PH<5)。
■ 切勿将电器放在加热的烤箱中。
■ 在使用或清洗之后,应打开电器盖子,至少干燥 30 分钟,防止形成冷
凝。
■ 每次使用后或长时间未使用重新使用之前,务必彻底清洁本机器。
X“保养和日常清洁” 参见第19页
W 小心!
■ 在安装电器时,请确保电器上方和后方没有敏感的表面和电器,否则
可能会因温度的变化和蒸汽逸出而损坏。
■ 切勿用锅铲或勺子搅拌热油,也不得留在热锅中。它们可能会融化!
■ 切勿不加水就启用带蒸汽压力功能的电器,否则会导致严重损坏。

8
zh
重要安全信息
感谢您购买新的博世电器。
在随后几页的操作说明中,您将会找到安全使
用本电器的有用信息。
请阅读这些操作说明并严格遵守。这将确保您
能够长时间享用本电器,令您对自己的选择充
满自信。
请保管好使用说明,以备日后使用或供下一任
所有者使用。
您可以在我们的网站上找到更多关于产品的
信息。
制造商:
博西家用电器(中国)有限公司
中国江苏省南京市中山路 129 号中南国际大
厦 20、21 楼
执行标准:
GB 4706.1-2005
家用和类似用途电器的安全 第 1 部分:通用
要求
GB 4706.19-2008
家用和类似用途电器的安全 - 加热液体的特
殊要求
内容
主要用途 ����������������������������������������������������������������6
重要安全信息 ��������������������������������������������������������6
概览 �������������������������������������������������������������������������9
控制面板 ����������������������������������������������������������������9
首次使用前 ��������������������������������������������������������� 10
准备 ���������������������������������������������������������������������� 12
附加功能 ������������������������������������������������������������� 16
使用插件 ������������������������������������������������������������� 17
调节设置选项 ����������������������������������������������������� 18
儿童锁 ������������������������������������������������������������������19
保养和日常清洁�������������������������������������������������19
环保型处理 ��������������������������������������������������������� 20
保修 ���������������������������������������������������������������������� 20
烹饪程序表 ��������������������������������������������������������� 21
烹饪时间 ������������������������������������������������������������� 22
型号总览和技术参数 ���������������������������������������� 23
专用附件 ������������������������������������������������������������� 24
故障排除 ������������������������������������������������������������� 24
全国统一客户服务热线:
4008855888
客户服务电子邮箱:
公司网站:
www.bosch-home.cn
技术数据:
电气连接
(电压 – 频率)
220-240 V~
50/60 Hz
额定功率 1200W
尺寸
(高 x 宽 x 深)
300 x 320 x 400
mm

9
zh
概览
概览
X 图 A
1 带蒸汽加压功能的多功能烹饪锅(基本电
器)
2 上盖
3 控制面板
4 压力阀
5 快速泄压键
6 可拆卸蒸汽出口
7 可拆卸冷凝水盘
8 开盖按键
9 不粘内锅
10 内锅把手
11 电源连接线
12 可提把手
13 可拆卸式上盖插件
14 密封环
15 安全阀
16 蒸汽阀
17 过压保护
18 上盖插件安装轴
19 固定螺丝
20 蒸汽释放室
21 带密封的蒸汽阀开口
22 白色蒸汽释放杆
23 阀塞
24 过压保护手动解锁
X 图 B
25 可拆卸式油炸篮
26 蒸架,2部分
27 锅铲
28 汤勺
29 量杯
30 带警告标记的电源线
31 使用说明书
32 食谱书
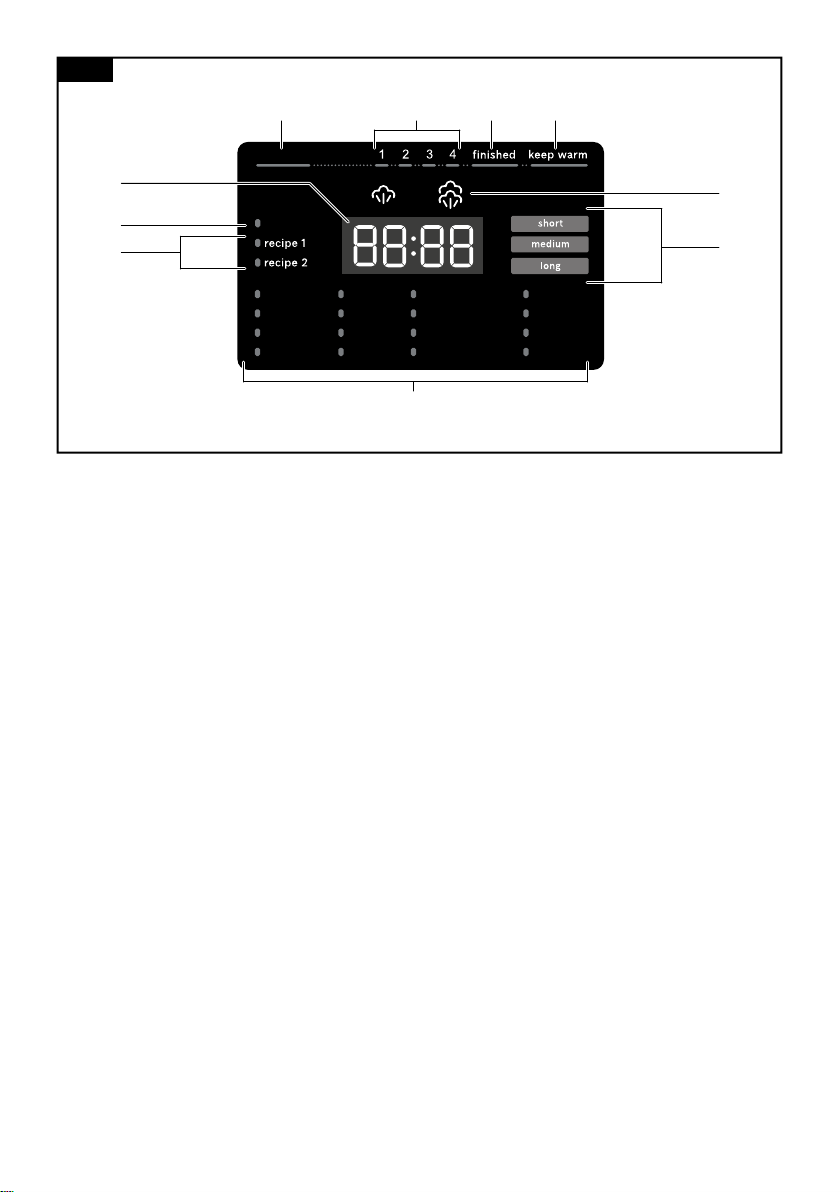
控制面板
控制面板包括控制部分(按键)和指示部分
(LED灯)。按键可用于选择单个烹饪程序以及
调节各种设置选项 (例如选择蒸汽压力功能、
烹饪温度/时间)。各种设置通过 LED 指示灯
或显示屏指示。
控制部分
X 图 C
B
待机
从待机模式切换到功能选择模式,反之
亦然。
A
设置预约
可根据所选择的烹饪程序选择启动时
间延时。
D
从列表中选择烹饪程序 (h)
反复按压按键 D 可逐个显示各个烹饪
程序。相应的 LED 指示灯在控制面板
中亮起。
E
调节烹饪时间
针对烹饪程序预先配置的烹饪时间 [
]可缩短 [ ]或延长 [ ]。相
应的指示灯 (g) 亮起。相应的预设烹饪
时间显示在显示屏上 (a)。
F
调节烹饪时间
根据用户需求调节烹饪时间。
C
调节烹饪温度
根据用户需求调节烹饪温度。对于启用
了蒸汽压力功能的烹饪程序,温度为对
应设定的温度 (f),无法进行调节。
L
蒸汽压力功能
蒸汽压力功能“低蒸汽压力” [ K ] 或“
高蒸汽压力” [ L ] 可通过按压按
键 L 进行选择。相应指示灯 (f) 亮
起。 X“使用蒸汽压力烹饪” 参见
第14页
G
确认程序
按压按键 G 启动所选择的烹饪程序。
H
删除设置或取消程序
按压按键 H 删除设置或停止先前已经
启动的一个程序。
显示部分
X 图 D
a 显示屏
显示剩余时间或温度。
b
显示已启动预约功能。显示屏 (a) 显示设
定的预约时间,时间结束时,烹饪程序启动。
c 烹饪时间 / 程序进度
显示单个烹饪步骤以及程序进度。如需多
个烹饪步骤 (例如,在油炸程序下加热油之
后再添加原料),这些步骤由LED灯 1、2、3
或 4 直观地显示。如果需要执行后续烹饪
步骤,同时发出声音信号。
d
表明食物已烹饪完毕。显示屏 (a) 闪烁并
显示“00:00”。同时响起一声信号音。


13
zh
准备
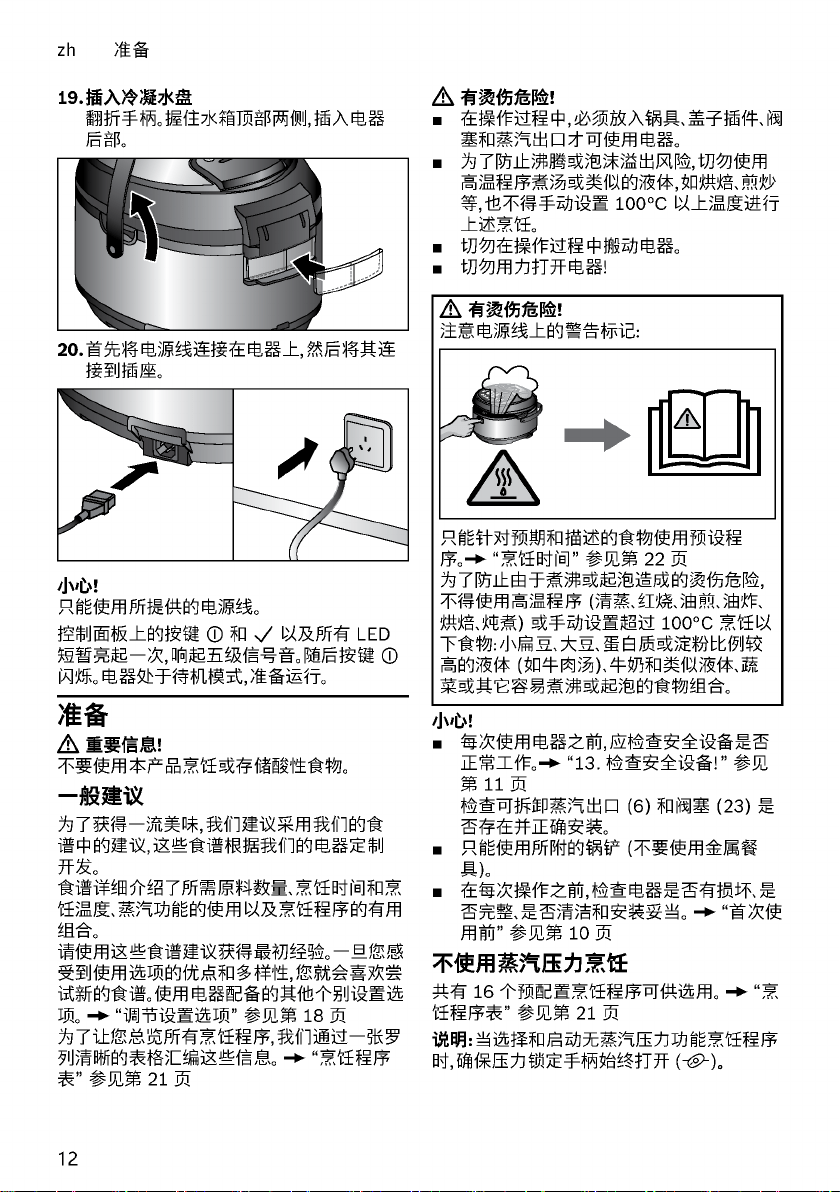
1. 电器准备就绪。将所需食材放入电器。为
此,打开盖子,把原料倒入锅中。锅内的测
量刻度也可以用来读取数量。
小心!
■ 锅具加水量最多为 4升。在制备烹饪过程
中会膨胀的食物时,如米饭或干菜,锅具最
多加一半容量的食材。
2. 关闭电器门。按下盖子,使其咔嗒一声卡入
到位。
3. 按下按键 B,以便访问功能选择模式。
在功能选择模式下,所需要的烹饪程序被选中,
并在电器上进行所有设置。按键 B 和指示灯
[
]常亮。按键 G 闪烁。“00:00”显示
在显示屏上。
说明:
■ 某些烹饪程序或步骤在盖子打开时进
行。X 参见所附菜谱
■ 如果在 5 分钟内没有在控制面板上进行
输入,电器将自动切换到待机模式。
1. 按下按键 D,直到选中所需要的烹饪程序。
控制面板上对应的LED灯亮起,所选烹饪程序
的预设烹饪时间闪烁。
2. 按下 G 按键,启动烹饪程序。
电器加热内胆,直到达到目标温度。在加热过
程中,显示屏中显示顺时针方向亮起的线。
一旦达到目标温度,线就熄灭,烹饪时间就显示
在显示屏上。
烹饪过程自动启动。
说明:当程序 [
]或 [ ]被选中后,反复
响起声音信号,显示屏和按键 G 闪烁,直到放
入食物并按下按键 G。
烹饪时间倒计时。
烹饪会产生蒸汽,蒸汽从电器逸出,防止形成
过高压力。
在烹饪过程中升高或降低温度
如果在烹饪阶段当前温度设置过高或过低,可
在烹饪过程中相应增大 (最大+10°C) 或降低
(最大-10°C)。
如要升高温度,按下并按住 C 按键。当前温度
将在显示屏上短暂显示,随后按照 1°C 的增幅
增加,直到达到最大值 (+10°C)。按下并按住
按键,直至温度达到所需增值水平。
如要降低温度,按下并按住 C 按键。当前温度
将在显示屏上短暂显示,随后开始按照 1°C 的
增幅增加,直到达到最大值 (+10°C)。达到最
大值后,显示器将返回最小值 (20°C 以下)。按
下并按住按键,直至温度达到所需降低水平。
按下 G 按键,继续烹饪程序。
说明:如果没有按下 G 按键确认,烹饪程序将
按照先前设置的温度继续进行。
当烹饪程序结束时,响起一个信号音,指示
灯 [
]和按键 G 亮起,或者启动保温功
能。X“保温功能” 参见第16页
显示屏闪烁并显示“00:00”。
3. 打开电器的上盖,取出做好的食物享用。
W 有烫伤危险!
■ 在烹饪过程中,电器中可能会蓄积大量蒸
汽。打开盖子时要小心。不要斜靠在电器
上盖上。
■ 使用过的锅具和各种插件可能非常烫。必
须使用合适的手柄或烤箱手套。
小心!
在烹饪过程中形成冷凝。定期倒空冷凝水箱。
说明:
■ 随时可按下 H 按键停止烹饪程序。电器随
后切换到功能选择模式。
■ 某些烹饪程序可能包含多个烹饪步骤。
X“多个烹饪步骤” 参见第16页
在烹饪过程中延长烹饪时间
如果食材在烹饪程序即将结束前还没有完全
煮熟,可以延长烹饪时间。
1. 为此按下并按住 F 按 键 。
当前烹饪时间将在显示屏上短暂显示,随后按
照 1 分钟的增幅增加。
2. 按下并按住该按键,直至达到所需的烹饪
时间。
3. 使用 G 按键启动新设置的烹饪时间。
说明:烹饪时间最多可延长 30 分钟。如果超过
所需要的烹饪时间,按住按键 F,直至达到最
大值。随后该设置将跳回 5 分钟。
低温慢煮烹饪
低温慢煮烹饪是一种以较低的温度在真空下
进行烹饪的方法。
低温慢煮烹饪是一种以温和、低脂的方法来制
备肉类、鱼类、蔬菜和甜点的烹饪方法。真空包
装机可用于将食物热封在特殊的密封、耐热的
包装袋中。
W 有健康危险!
真空低温烹饪是一种以较低的温度进行烹饪
的方法。因此,遵守下面的应用和卫生说明非
常重要:
■ 只能使用质量上乘的新鲜食物。


17
zh
使用插件
使用插件
使用油炸篮
为了使用 [
]程序用热油烹饪肉、鱼、烘焙
食品,有必要使用炸篮。
说明:为了获得一流美味,我们建议采用我们的
食谱中的建议。X 参见所附菜谱
实例:烹饪程序 [
]
W 有烫伤危险!
■ 油炸时切勿使用蒸汽压力功能。对于烹饪
程序 [
]自动禁用该功能。
■ 最多加油至 [1�0 I] 标记处。
■ 请勿油炸超过300g的新鲜食物以及冷冻
食物。
■ 在烹饪过程中,电器中可能会蓄积大量蒸
汽。打开上盖时要小心。不要斜靠在电器
上盖上。
■ 使用过的锅具和各种插件可能非常烫。必
须使用夹盘器、合适的手柄或烤箱手套。
■ 切勿用锅铲或汤勺搅拌热油。
1. 打开电器上盖。
2. 锅具加油量最多为 1升。锅内的测量刻度
也可以用来读取数量。
3. 盖上上盖。
4. 在功能选择模式下,选择烹饪程序 [
]
X“烹饪程序表” 参见第21页
5. 按下 G 按键,启动烹饪程序。
油被加热。达到目标温度后,响起一声信号音,
按键 G 闪烁。
6. 将食物装入油炸篮进行油炸。
7. 打开电器上盖。
8. 用所提供的手柄将油炸篮放在锅具上,然
后拿掉手柄。
9. 不要盖上上盖。
10. 按下 G 按键,启动烹饪程序。
当烹饪程序结束时,响起一个信号音。
11. 如要把油炸食品沥干,可用手柄抬起油炸
篮,挂在内胆边缘。
使用蒸架
蒸制蔬菜、肉和鱼时,必须使用蒸架。蒸架分为
2 个部分,可以同时分别蒸制不同食材 (比如
下面蒸蔬菜,上面蒸鱼)。
说明:
■ 为了获得一流美味,我们建议采用我们的
食谱中的建议。
■ 蒸架可在有蒸汽压力功能和无蒸汽压力功
能的情况下使用。
实例:不带蒸汽压力功能的烹饪程序 [
]
W 有烫伤危险!
■ 最多加水至 [0�5 J] 标记处。
■ 在烹饪过程中,电器中可能会蓄积大量蒸
汽。打开上盖时要小心。不要斜靠在电器
上盖上。
■ 使用过的锅具和各种插件可能非常烫。必
须使用合适的手柄或烤箱手套。
1. 打开电器上盖。
2. 锅具加水量最多为 0.5升。锅内的测量刻
度也可以用来读取数量。
3. 将蒸架下层放入内锅。
4. 蒸制不同食材时,下半部分的加水量最多
到达下部边缘。
5. 放好上半部分,加入其他食材。
6. 盖上上盖。
7. 在功能选择模式下,选择烹饪程序 [
]
X“烹饪程序表” 参见第21页
8. 按下 G 按键,启动烹饪程序。
当烹饪程序结束时,响起一个信号音,按键 G
闪烁。
9. 打开电器上盖。
10. 抬起蒸架上、下部分,从锅具中取出。

18
zh
调节设置选项
调节设置选项
烹饪时间和烹饪温度或蒸汽压力的预配置值
可以根据个人需要和菜谱指南进行调整。
调节烹饪时间
1. 在功能选择模式下,按住按键 D,直到选中
所需要的烹饪程序。
相应 LED 在控制面板上亮起,相应烹饪程序
的预设烹饪时间显示。
2. 按下按键 F 一 次 。
预设烹饪时间在显示屏上闪烁。
3. 按住按键 F,直到显示所需要的烹饪时间。
当短暂按下按键 F 时,烹饪时间增幅为 1 分
钟。时间增加到预设的最大值,然后返回到预
设的最小值。当按下按键 F 较长时间时,烹饪
时间增幅为 10 分钟。
4. 所需要的烹饪时间显示后,按下按键 G。
带设定烹饪时间的烹饪程序启动。
如果在选定的程序中,需要分别调整所有烹饪
步骤的时间,则在启用相应烹饪步骤之前,重复
第 2 点到第 4 点。
说明:这些设置未保存。如果再次选中烹饪程
序,预设的烹饪时间将再次显示在显示屏上。
调节烹饪温度
对于不带蒸汽压力功能的烹饪程序,可分别选
择温度。
1. 在功能选择模式下,按住按键 D,直到选中
所需要的烹饪程序。
相应 LED 在控制面板上亮起,相应烹饪程序
的预设烹饪时间显示。
2. 按下按键 C 一 次 。
预设的烹饪温度在显示屏上闪烁。
3. 按住按键 C,直到显示所需要的烹饪温度。
当短暂按下按键 C 时,烹饪温度增幅为 5°C。
温度升高到预设的最大值,然后返回到预设的
最小值。当按下按键 C 较长时间时,温度增幅
为 10°C。
4. 所需要的烹饪温度显示后,按下按键 G。
带设定烹饪温度的烹饪程序启动。
如果在选定的程序中,需要分别调整所有烹饪
步骤的温度,则在启用相应烹饪步骤之前,重复
第 2 点到第 4 点。
说明:这些设置未保存。如果再次选中该烹饪
程序,预设的烹饪温度将再次显示在显示屏
上。
设置蒸汽压力
对于带预设蒸汽压力功能的烹饪程序,可通
过“低蒸汽压力” [ K ] 或“高蒸汽压力” [ L ]
分别选择温度。
1. 在功能选择模式下,按住按键 D,直到选中
所需要的烹饪程序。
相应 LED 在控制面板上亮起,相应烹饪程序
的预设烹饪时间显示。此外,“低蒸汽压力”指
示灯 [ K ] 或 “高蒸汽压力”指示灯 [ L ] 亮
起 。
说明:如果 [ K ] 或 [ L ] 不亮起,蒸汽压力功
能不可用于所选程序。
2. 按下按键 L 可切换 [ K ] 和 [ L] 。
3. 如果所需要的蒸汽压力显示,按下按键
G。
带设定蒸汽压力功能的烹饪程序启动。
说明:这些设置未保存。如果再次选中该烹饪
程序,设定蒸汽压力功能将再次显示在显示
屏上。
[
](手动)
快速设置模式,用于定制烹饪过程的蒸汽压力
功能、烹饪时间和温度设置。
在功能选择模式下,按键 B 和指示灯
[
]常亮。按键 G 闪烁。“00:00”显示
在显示屏上。
说明:如要开启蒸汽压力功能,必须关闭压力
锁手柄 (N)。指示灯 [ K ] 亮起。
调节烹饪时间
1. 按下按键 F 一 次 。
“00:00”在显示屏上闪烁。
2. 按住按键 F,直到显示所需要的烹饪时间。
设置烹饪温度或蒸汽压力
3. 不带蒸汽压力功能:必须始终打开压力锁
定手柄 (M)。按下按键 C 一次。“0000”在
显示屏上闪烁。必须反复按压按键 C,直 到
显示所需要的烹饪温度。
或
带蒸汽压力功能:必须关闭压力锁定手柄
(N)。按下按键 L 可切换 [ K ] 和 [ L ]
。
4. 按下按键 G,使用所选择的设置启动。
电器加热锅具,直到达到目标温度或蒸汽压
力 。
一旦达到目标温度或蒸汽压力,线就熄灭,下
一段烹饪时间显示在显示屏上。烹饪过程自
动启动。

19
zh
儿童锁
[
]/ [ ]– 保存个人
烹饪程序
带定制时间/温度和蒸汽压力的个人烹饪
程序可以保存在存储位置 [
]和
[
]下。
说明:
■ 如果您以前没有保存过任何个人烹饪程
序,显示屏不会显示任何数值。
■ 如要开启蒸汽压力功能,必须关闭压力锁
定手柄 (N)。
1. 在功能选择模式下,按下按键 D 一 次 。
LED [
]亮起。预设的烹饪时间显示
在显示屏上。
保存烹饪时间
2. 按下按键 F 一 次 。
显示屏闪烁。LED 1 (烹饪程序 1) 在控制面
板中亮起。
3. 按住按键 F,直到显示所需要的烹饪时间。
当短暂按下按键 F 时,烹饪时间增幅为 1 分
钟。当按下按键 F 较长时间时,烹饪时间增幅
为 10 分钟。时间增加到预设的最大值,然后返
回到预设的最小值。
保存烹饪温度或蒸汽压力:
4. 烹饪温度:按下按键 C 一次。预设的烹饪温
度显示在显示屏上。反复按压按键 C,直 到
显示所需要的烹饪温度。
或
蒸汽压力:按下按键 L 可切换 [ K ] 和
[ L] 。
5. 按下并按住按键 G (>2秒),从而保存设
置值。
说明:可以为一个烹饪步骤设置和保存温度或
蒸汽压力。上次选择的值会被保存。
为了设置其他烹饪步骤,重复第 2 点到第 6
点。最多可设置 3 个烹饪步骤。
所保存的烹饪程序 [
]可通过功能选
择模式照常选择。
说明:为了在 [
]下保存第二个个人
烹饪程序,可使用上述 [
]的相同过
程 。
如要删除个人烹饪程序,执行下列步骤:
1. 在功能选择模式下,按下按键 D 一 次 。
LED [
]亮起。所保存的烹饪时间显
示在显示屏上。
2. 按下按键 F 一 次 。
显示屏闪烁。LED 1 (烹饪程序 1) 在控制面
板中亮起。
3. 按下并按住按键 H (>2秒)。
[
]的设置被删除。
说明:为了删除第二个个人烹饪程序
[
],可使用上述 [ ]的相同
过 程 。
儿童锁
在烹饪过程中,可以启用、停用儿童锁。如果儿
童锁启用,则控制面板上的所有按键都被锁定,
无法继续在电器上进行设置。
W 警告
当儿童锁启用后,无法更改或终止烹饪过程。
必须首先停用儿童锁。
按下下列按键组合:
1. 启用
同时按下并按住按键 C 和 F,保持 3 秒。
响起一声短信号音。儿童锁已启用。
2. 停用
再次同时按下并按住按键 C 和 F,保持 3
秒。响起一声短信号音。儿童锁关断。
保养和日常清洁
W 电击危险
■ 请勿将电器浸入水中。
■ 请勿使用蒸汽清洁本电器。
■ 清洁电器之前请拔掉电器电源。
小心!
■ 请勿使用任何含酒精或烈性成分的清洁
剂。
■ 请勿使用任何锋利、尖锐或金属的物体。
■ 请勿使用砂布或清洁剂。
每次使用后都必须彻底清洁本电器。
1. 让电器完全冷却。
2. 打开压力锁定手柄 (N)。
3. 按下基本电器上的打开按键,打开盖子。
4. 取出内锅、盖子插件、蒸汽出口、阀塞、冷
凝水箱和附件。 X“首次使用前” 参见
第10页
清洁基本电器
1. 用柔软的湿布擦拭电器的外部,使其晾干。
2. 用柔软的湿布擦拭电器的内部,使其晾干。
3. 用干燥的微纤维布清洁控制面板。
清洁盖子插件、蒸汽出口和阀塞
1. 用清洁剂和软布或海绵清洗各个部件。
2. 用干净的水冲洗并晾干。

20
zh
环保型处理
小心!
下列部件不适用于洗碗机:可拆卸上盖插件、
紧固螺丝、蒸汽出口和阀塞。
清洁锅具、冷凝水箱和附件
1. 用清洁剂和软布或海绵清洗各个部件。
2. 用干净的水冲洗并晾干。
下列部件适用于洗碗机:内锅、冷凝水箱、油炸
篮 、蒸 架 、锅 铲 、汤 勺 、量 杯 。
小心!
清洗后,再次更换基本电器上的所有干燥部件,
并检查安全装置的功能。 X“首次使用前” 参
见第10页
环保型处理
J
请以环保方式处置包装。
对本设备根据有关电气和电子设备报
废的欧洲规定 2012/19/EU
(wasteelectrical and electronic
equipment — WEEE)进行标记。该
规定管理在欧洲范围内对报废设备的
回收和再生。
请 咨 询 专 业 零 售 商 ,了 解 可 用 的 处 置
方式。
保修
该设备的保修条款将由售出国的销售代表来
确定。 您可向售出此设备的经销商详细了解
这些条款。
当根据保修条款进行任何索赔时、 必须出具
销售凭证或收据。
如有更改、 恕不另行通知。

21
zh
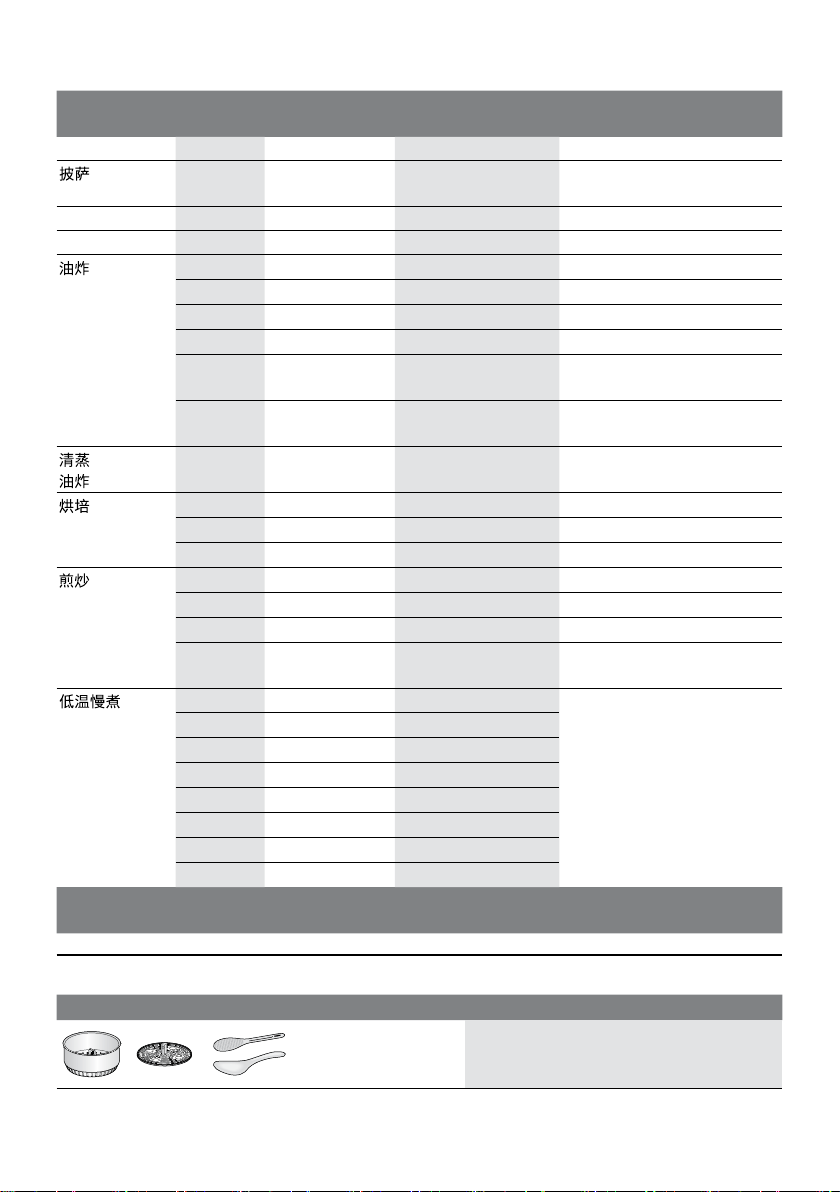
烹饪程序表
烹饪程序表
AutoCook Pro 为您提供 50 个烹饪程序。其中包括 16 个基本程序,每个程序有 3 个时间设置
选项,以及 2 个附加的蒸汽压力功能。下表包含了各种烹饪程序的最重要数据。
程序 烹饪步骤数 自动保温
功能
蒸汽压力功
能可用
上盖是否
打开
可设定温度和烹饪时间
1 —
G
打开 / 关
闭*
用户自设菜谱的 2 个存储位置
1-3 —
G
打开 / 关
闭*
烹饪各种米饭
1
G G
关闭
烹饪各种粥类食谱
短 :1
中 :2
长 :2
G G
关闭
烹饪各种汤
短 :1
中 :2
长 :2
G G
打开 / 关
闭*
蒸制蔬菜、肉和鱼 (必须使用蒸架)
1
G G
关闭
烹饪不同熟度的牛排
2 — —
关闭/
打开*
烹饪不同类型的披萨
1 — — 关闭
面团最重 1000g,包括面粉和水 (比
例:54ml 水放 100g 面粉)
1 — — 关闭
烹饪意大利面食
1 — —
关闭/
打开*
煎炒蔬菜、肉、鱼
1
G
— 打开
少量食物油炸 (如鱼、肉、烘焙食品等)。必
须使用油炸篮。不适用于冷冻食材。
1 — — 打开
红烧蔬菜、肉、鱼
短 :1
中 :2
长 :2
G G
打开 / 关
闭*
烹饪食物
1
G G
关闭
制备酸奶
1 — — 关闭
腌渍水果酱
1 — — 打开
* 取决于菜谱 / 烹饪步骤 – “盖子关闭”用于激活的蒸汽压力功能
关于正确使用程序的说明以及关于食材、分量和烹饪时间的信息,请参见所附菜谱。

22
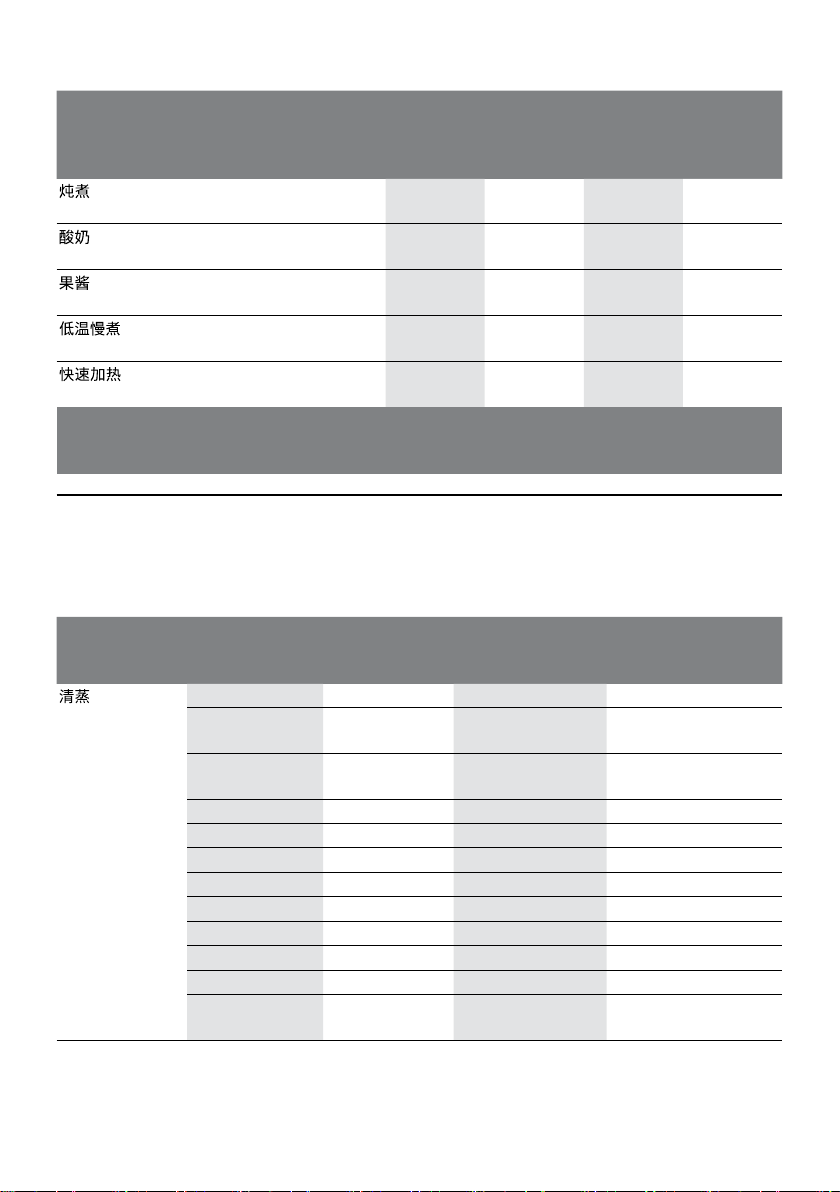
zh
烹饪时间
程序 烹饪步骤数 自动保温
功能
蒸汽压力功
能可用
上盖是否
打开
在真空袋里温和地烹饪食物
1 — — 关闭
加热冷餐 (熟食)
1
G
— 关闭
* 取决于菜谱 / 烹饪步骤 – “盖子关闭”用于激活的蒸汽压力功能
关于正确使用程序的说明以及关于食材、分量和烹饪时间的信息,请参见所附菜谱。
烹饪时间
下表列出各种烹饪菜式的烹饪时间。下列烹饪时间取决于食物的厚度和均匀度,应被视为最短
时间建议。相应地调节烹饪时间。对于冷冻食物,延长烹饪时间至少 20%。
程序 设置 时间 (无蒸汽压
力功能)
食物 推荐数量 (最大)
中 30 分钟 新鲜青豆 500g (800g)
短 10 分钟 花椰菜
(相同大小的小花)
500g (800g)
长 50 分钟 土豆
(中等大小,整个)
500g (1200g)
短 10 分钟 鱼块 500g (1000g)
中 30 分钟 肉丸 500g (700g)
短 10 分钟 鸡蛋 x 8 (x 12)
中 30 分钟 饺子 500g (600g)
短 5 分钟 西兰花 500g (800g)
短 3 分钟 豌豆 500g (800g)
中 30 分钟 胡萝卜 500g (800g)
中等 30 分钟 鸡胸 500g (800g)
中 30 分钟 甜菜根
(中等大小,整个)
500g (800g)
较短 25分钟 圆粒米 300 g (450 g) 米,
400 ml (600 ml) 水
适中 40分钟 圆粒米 300 g (900g) 米,
400 ml (1120 ml) 水
较长 80分钟 糙米 280 g (1260 g) 米,
480 ml (1280ml) 水
较短 60分钟 圆粒米 150 g (360 g) 米,
1280 ml (2880 ml) 水
适中 90分钟 圆粒米,红豆等 150 g (360 g) 米,
1280 ml (2880 ml) 水
较长 60分钟+10分钟 圆粒米,猪肝等 150 g (360 g) 米,
1280 ml (2880 ml) 水
较短 9分钟+4分钟 牛排 260 g, 3cm厚
适中 12分钟+4分钟 牛排 260 g, 3cm厚
23
zh
型号总览和技术参数
程序 设置 时间 (无蒸汽压
力功能)
食物 推荐数量 (最大)
较长 30分钟+4分钟 牛排 260 g, 3cm厚
较短 14分钟 冷冻披萨胚,青红椒,
洋葱等
8寸,1cm 厚
适中 19分钟 面团,青红椒,洋葱等 100 g 面团,其他配料适量
较长 21分钟 面团,青红椒,洋葱等 140 g 面团,其他配料适量
中 20 分钟 鸡腿 300 g
短 10 分钟 草菇 200 g
中 20 分钟 意式面卷 300 g
短 10 分钟 鱼块 200 g
短 10 分钟 维也纳炸小牛排 (
火鸡)
200 g
短 10 分钟 维也纳炸小牛排 (
猪肉)
200 g
+
短 +
短
10 分钟 +
10 分钟
生蔬菜 (如花椰菜) 200 g
长 60 分钟 猪前腿肉 1500 g
中等 40 分钟 肉饼 800 g
长 60 分钟 蛋糕 500 g
中 15 分钟 蔬菜 300 g
中 15 分钟 鱼 200 g
中 15 分钟 肉 500 g
短 手动设置:5分
钟
洋葱 200 g
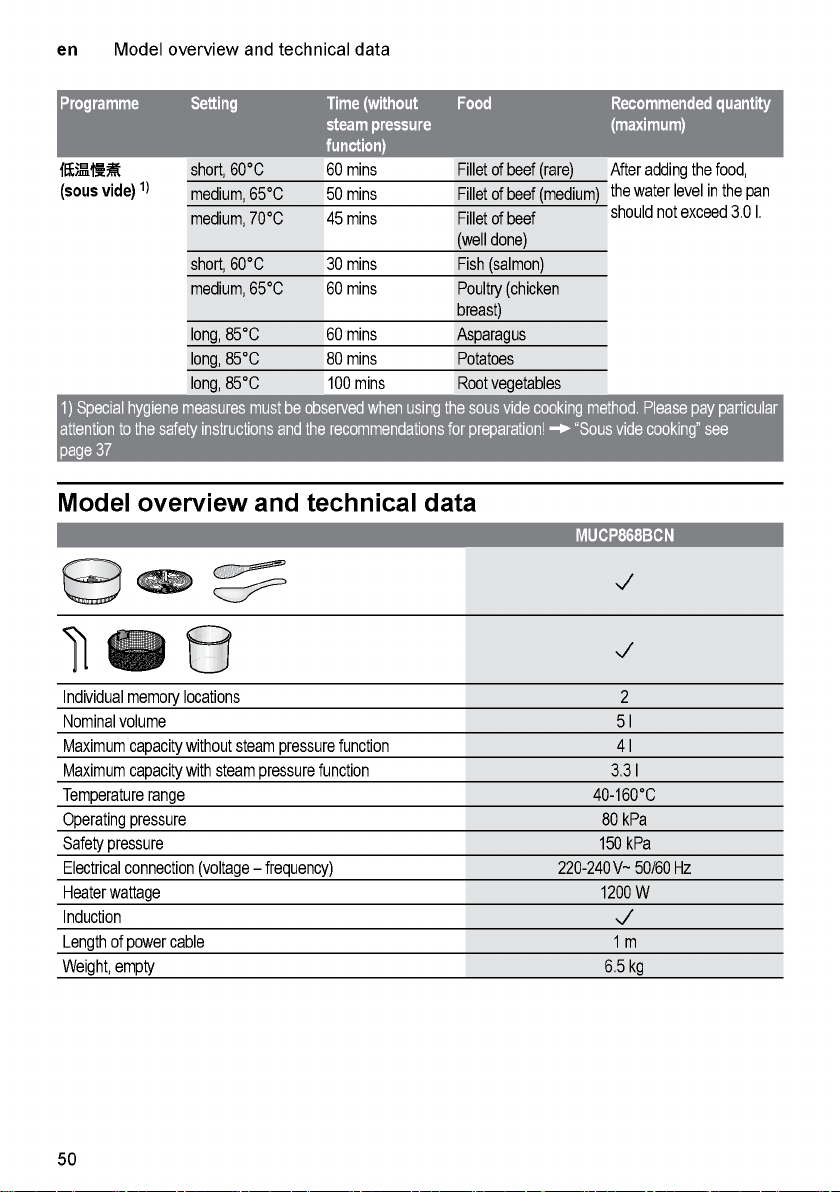
1)
短,60°C 60 分钟 牛肉片 (生) 放入食物后,锅内的水位不
应超过 3.0升。
中,65°C 50 分钟 牛肉片 (五分熟)
中,70°C 45 分钟 牛肉片 (全熟)
短,60°C 30 分钟 鱼 (三文鱼)
中,65°C 60 分钟 家禽 (鸡胸)
长,85°C 60 分钟 芦笋
长,85°C 80 分钟 土豆
长,85°C 100 分钟 根茎蔬菜
1) 使用真空烹饪法时必须注意特别的卫生措施。请特别注意安全说明和建议的烹饪方法!
X“真空低温烹饪”参见 13
型号总览和技术参数
MUCP868BCN
G


25
zh
故障排除
问题 原因 补救措施
烹饪好的饭菜烧焦。 锅具下有脏东西。 彻底清洁锅具和电器内部。
锅具变形。 请联系客户服务。
电器出现故障。
传感器出现故障。
电器沸腾溢出。 食物超过容量。 调节分量。
温度过高。 降低温度。
所选烹饪程序要求打开盖子烹
饪食物。
打开电器上盖。
LED 照明灯不亮。 电器关断。 开启本电器。
电源线出现故障。 请联系客户服务。
灶头不起作用。 电器出现故障。 请联系客户服务。
灶头损坏。
水流出电器。 电器具有溢出保护。
冷凝水箱装满溢出。
倒掉冷凝水箱中的水。取出锅具,用
布擦拭电器内部,使其晾干。切勿让
水进入电器内部。
无法打开电器的压力锁
定手柄。
食物阻塞了过压锁,压力锁定
手柄被阻塞。
按章节 X“手动释放蒸汽” 参见
第15页 中所述进行操作。如果
问题继续存在,请联系客户服务 。
在打开蒸汽压力功能之
后,蒸汽仍然不断从蒸汽
出口逸出。
阀塞未正确塞入阀门。 断开电器电源,令其冷却。拆下蒸汽
出口,将阀塞正确塞入阀门。
显示屏
P
这不是故障。蒸汽自动释放。 等待蒸汽完全逸出,或手动释放蒸
汽。
显示屏
开
对于不带蒸汽压力功能的烹
饪程序,压力锁定手柄关闭
( N) 。
打开压力锁定手柄 (M),停用蒸汽
压力功能。
显示屏
关
对于带蒸汽压力功能的烹饪程
序,压力锁定手柄打开 ( M) 。
关闭压力锁定手柄 (M),启用蒸汽
压力功能。
显示屏
E1~E6
电器出现故障。 中止烹饪程序。断开电器电源。重新
开启电器。如果问题继续存在,请联
系客户服务 。
显示屏
E0
电路故障。 断开电器电源,重启。如果问题继续
存在,请联系客户服务 。
显示屏
E1
锅具损坏、电器中不存在锅具
或使用的不是原装锅具。
放入原装锅具。如果问题继续存在,
请联系客户服务 。
显示屏
E2、E5、E6 或 E7
电器过热。 断开电器电源,令其冷却。等电器冷
却后重新启动电器。
电器短路。 断开电器电源并联系客户服务。
显示屏
E3
电源电压太高。 请联系电力公司。请专家检查电源。
显示屏
E4
电源电压太低。
显示屏
E8
通信故障 等电器冷却后重新启动电器。


27
en Intended use
Intended use
Please read and follow the operating instructions carefully
and keep them for later reference! Please read all instructions!
Enclose these instructions when you give this appliance to
someone else.
If the instructions for correct use of the appliance are not observed,
the manufacturer’s liability for any resulting damage will be excluded.
This appliance is intended for domestic use only.
The appliance is suitable for cooking with steam pressure, cooking,
baking, roasting, stewing, steam-cooking, soft frying, pasteurising and
heating up food, as well as keeping food warm. It must not be used
for processing other substances or objects. All ingredients must be
hygienically faultless. During handling, the rules of kitchen hygiene
must be observed.
The appliance should only be used for its intended purpose. Use
the preparation programs only for the intended and described food.
X “Cooking times” see page 48
The relevant heat source may only be used in accordance with the
operating instructions. Only use the manufacturer's original spare
parts in conformity with the individual appliance model. In particular,
make sure that a basic appliance and a lid that are specified as being
compatible are from the same manufacturer. Only use the pan and
the accessories with the basic appliance.
Only use the appliance indoors at room temperature and up to
2000 m above sea level.
Important safety information
This appliance may not be used by persons (including children)
with reduced physical, sensory or mental capabilities or a lack
of experience and/or knowledge unless they have been given
supervision or instruction. Keep children away from the appliance
and connecting cable and do not allow them to use the appliance.
Children must not play with the appliance. Cleaning and user
maintenance must not be performed by children.
W Risk of electric shock and fire!
■ The appliance may only be connected to a power supply with
alternating current via a correctly installed socket with earthing.
Ensure that the protective conductor system of the domestic
supply has been correctly installed.
■ Connect and operate the appliance only in accordance with the
specifications on the rating plate. Do not use the appliance if the
power cord and/or appliance are damaged. To prevent hazards,
the appliance may only be repaired by customer service.

28
en Important safety information
■ If the power cord of this appliance is damaged, it must be replaced
with a special connection cord, which is available from our after-
sales service.
■ Never connect the appliance to timer switches or remote-
controllable sockets. Never leave the appliance unattended while it
is switched on!
■ If there is a fault, pull out the mains plug immediately or switch off
the power supply.
■ The mains cable must not come into contact with hot parts or be
pulled across sharp edges.
■ Never immerse the appliance or the mains cable in water or place
it in the dishwasher. Do not steam-clean the appliance.
■ After each use, whenever the appliance is unsupervised, prior to
assembly, prior to disassembly, prior to cleaning and in the event
of an error, the appliance must always be disconnected from the
mains.
W Risk of scalding!
■ The appliance uses steam pressure for cooking. There is a risk of
scalding with improper use of the appliance. Before heating the
appliance, check that it has been properly closed. Refer to the
operating instructions.
■ Before using the appliance each time, regularly check the steam
valve openings to make sure that they are not blocked. Check
whether all safety valves (15, 16, 17) and parts (6, 23) are
present and correctly installed. Please always remember that the
overpressure protection device (17) must be able to move freely.
X “13. Check safety devices!” see page 33
■ Never tamper with the safety systems in any manner that goes
beyond the maintenance instructions described in the operating
instructions. X “Care and daily cleaning” see page 46
■ During operation, the appliance must never be used without the
pan inserted.
■ Before starting a preparation programme, check whether the
appliance has been properly closed.
■ The housing, pan and metallic components heat up while the
appliance is in use! The pan and the accessories may only be
removed using the tools provided. Use oven gloves.
■ Hot steam is generated in the appliance. Do not lean over the
appliance.
■ Move the appliance with great care whenever it is under pressure.
Do not touch any hot surfaces. Use the handles. Use appropriate
protection if necessary.

29
en Important safety information
■ Never use force to open the appliance! Do not open the
appliance until you have checked that the internal pressure has
been completely reduced. Refer to the operating instructions.
X “Preparation with steam pressure” see page 38
■ Never use the appliance to roast or soft fry food with the steam
pressure function activated.
■ To prevent the risk of boiling or bubbling over, never use
programmes with high temperatures such as baking, (deep) frying,
etc. or manual settings in excess of 100°C for cooking soups or
similar liquids.
■ After preparing doughy food, shake the appliance slightly before
opening the lid to prevent the food spraying out.
■ After preparing meat still with the skin on it (e.g. ox tongue) that
can swell up under pressure, do not pierce the skin while swollen
as there is a risk of scalding.
■ Open the lid with care.
■ Only transport or clean the appliance once it has fully cooled down!
Parts that show visible discolouration, cracks or other damage or
are not seated correctly must be replaced with original spare parts.
W Health risk!
Sous-vide cooking is a method of cooking at low temperatures.
Please pay particular attention to the safety instructions and the
recommendations for preparation! X “Sous-vide cooking” see
page 37
W Risk of suffocation!
Do not allow children to play with packaging material.
W Important!
■ Do not cook or store acid food with this product.
■ Never place the appliance in a heated oven.
■ After usage or cleaning, allow the appliance to dry for at
least 30 minutes with the lid open to prevent the formation of
condensation.
■ It is essential to clean the appliance thoroughly after each use or
after it has not been used for an extended period. X “Care and
daily cleaning” see page 46
W Caution!
■ When installing the appliance, ensure that there are no sensitive
surfaces and appliances above and behind the appliance that may
be damaged by the temperature development and the escaping
steam.
■ Never use spatulas or cooking spoons with hot fat or oil or leave in
a hot pan. They might melt!

30
en Important safety information
■ Never use the appliance with the steam pressure function without
adding water as this may cause serious damage.
Congratulations on the purchase of your
new Bosch appliance.
On the following pages of these operating
instructions you will find useful information
for safe use of this appliance.
Please read these operating instructions
carefully and observe all instructions.
This ensures you will be able to enjoy this
appliance for a long time, and the results will
confirm your choice of this appliance.
Retain these operating instructions for
subsequent use or for the next owner.
You can find further information about our
products on our website.
Manufacturer:
BSH Home Appliances (China) Co., Ltd.
20/F,21/F, CN International Mansion,
129 Zhongshan Road, Nanjing,
Jiangsu Province, PRC.
Applicable standards:
GB 4706.1-2005
Household and similar electrical
appliances – Safety Part 1: General
requirements
GB4706.19-2008
Household and similar electrical appliances –
Safety – Particular requirements for heating
liquids
Contents
Intended use .............................................. 27
Important safety information ...................... 27
Overview .................................................... 31
Control panel .............................................. 31
Before using for the first time ..................... 32
Preparation ................................................. 35
Additional functions .................................... 40
Using inserts .............................................. 42
Customised setting options ........................ 43
Child lock .................................................... 45
Care and daily cleaning ............................. 46
Disposal...................................................... 46
Guarantee .................................................. 46
List of preparation programmes ................. 47
Cooking times ............................................ 48
Model overview and technical data ........... 50
Special accessories ................................... 51
Troubleshooting ......................................... 51
Careline:
4008855888
Service E-mail:
Company website:
www.bosch-home.com
Technical specifications:
Electrical connection
(voltage – frequency)
220 -240V~
50/60 Hz
Power rating 1200 W
Dimensions
(H x W x D)
300 x 320 x 400 mm

31
en Overview
Overview
X Fig. A
1 Multi-cooker with steam pressure
function (basic appliance)
2 Lid
3 Control panel
4 Pressure locking handle
5 Steam release button
6 Removable steam outlet
7 Removable condensation tank
8 Opening button for the lid
9 Pan with non-stick coating
10 Pan handles
11 Mains connection
12 Carrying handle
13 Removable lid insert
14 Sealing ring
15 Safety valve
16 Steam valve
17 Overpressure protection
18 Mount for lid insert
19 Fastening screw
20 Steam release chamber
21 Steam valve opening with seal
22 White steam release lever
23 Valve plug
24 Manual unlocking for overpressure
protection
X Fig. B
25 Frying basket with removable handle
26 Steamer insert, 2-part
27 Spatula
28 Ladle
29 Measuring cup
30 Mains cable with warning label
31 Operating instructions
32 Recipe book
Control panel
The control panel consists of controls
(buttons) and indicators (LEDs). The
buttons can be used to select the individual
preparation programmes and adopt the
different setting options (e.g. to select steam
pressure function, preparation temperature /
time). The settings are indicated via the
illuminated LEDs and/or the display.
Controls
X Fig. C
B
Standby
Switches from standby mode to
function selection mode and back
again.
A
Set the start time delay
The start time delay can be set for the
selected preparation programme.
D
Select a preparation programme
from the list (h)
The individual preparation
programmes are displayed one after
another by repeatedly pressing button
D. The corresponding LED lights up
in the control panel.
E
Adjust the preparation time
The pre-configured preparation time
[
] (medium) for a preparation
programme can be shortened
[
] (short) or lengthened
[
] (long). The corresponding
indicator (g) lights up. The
corresponding pre-configured
preparation time is shown in the
display (a).
F
Set a customised preparation time
For customised adjustment of the
preparation time.
C
Set a customised preparation
temperature
For customised adjustment of
the preparation temperature. For
preparation programmes with
enabled steam pressure function, the
temperature is pre-configured (f) and
cannot be adjusted individually.
L
Steam pressure function
The steam pressure functions
“low steam pressure” [ K ] or
“high steam pressure” [ L ] are
selected by pressing button L. The
respective indicators (f) light up.
X “Preparation with steam pressure”
see page 38
G
Confirm the programme
Pressing button G starts the selected
preparation programme.


35
en Preparation
Preparation
W Important!
Do not cook or store acid food with this
product.
General recommendations
For the best and tastiest results, we
recommend using the suggestions in our
recipe book, which was specially developed
for use with the appliance.
The recipe book features detailed informa-
tion on the required quantities of ingredients,
recommendations for the preparation time
and the preparation temperature, use of the
steam pressure function and useful combina-
tions of the preparation programmes.
Use these recipe recommendations in
order to gain initial experience. Once you
appreciate the benefits and the variety of the
usage options, you will enjoy experimenting
with new recipes. Use the individual setting
options additionally offered by the appliance.
X “Customised setting options” see
page 43
To provide you with an overview of all
preparation programmes, we have compiled
this information in a clearly arranged table.
X “List of preparation programmes” see
page 47
W Risk of scalding!
■ During operation, the appliance must
never be used without the pan, lid insert,
valve plug and steam outlet inserted.
■ To prevent the risk of boiling or bubbling
over, never use programmes with high
temperatures such as baking, (deep)
frying, etc. or manual settings in excess
of 100°C for cooking soups or similar
liquids.
■ Never move the appliance during
operation.
■ Never use force to open the appliance!
W Risk of scalding!
Note the warning label on the power cable:
Use the preparation programs only for the
intended and described food. X “Cooking
times” see page 48
To prevent the risk of scalding caused
by boiling or bubbling over, never use
high temperature programs (steam,
stew, fry, soft frying, baking, cooking) or
manual settings above 100°C to cook the
following foods: lentils, soy, liquids with a
high proportion of protein or starch (eg.
soup with beef), milk and similar liquids,
vegetables or other food combinations
prone to boiling or bubbling over.
Caution!
■ Before using the appliance each time,
check that the safety devices are in
working order. X “13. Check safety
devices!” see page 33
Check whether removable steam outlet
(6) and valve plug (23) are present and
correctly installed.
■ Use only the spatula provided for stirring
(do not use metal cutlery).
■ Each time prior to operation, check the
appliance for damage, completeness,
cleanliness and proper installation.
X “Before using for the first time” see
page 32
Preparation without steam
pressure
There are 16 pre-configured preparation
programmes available to choose from.
X “List of preparation programmes” see
page 47

36
en Preparation
Note: When selecting and starting the
preparation programme without the steam
pressure function, make sure that the
pressure locking handle is open at all
times (M).
1. The appliance is ready to use. Fill the
appliance with the desired ingredients.
To do this, open the lid and pour the
ingredients into the pan. The measuring
scale on the inside of the pan can also
be used to read the quantity.
Caution!
■ Fill the pan with a maximum of 4 litres.
Only fill the pan at most half-full when
preparing food that expands during
cooking, e.g. rice or dried vegetables.
2. Close the appliance. Press the lid down
until it clicks into place.
3. Press button B to access function
selection mode.
The desired preparation programme is
selected in function selection mode and all
settings of the appliance are made. Button
B and the indicator [
] (my recipe)
are permanently lit. Button G flashes.
“00:00” is shown in the display.
Notes:
■ Certain preparation programmes or steps
are carried out with the lid open. X See
recipe book provided
■ If no input is made on the control
panel within 5 minutes, the appliance
automatically switches to standby mode.
1. Keep pressing button D until the desired
preparation programme is selected.
The corresponding LED lights up in the
control panel and the pre-configured
preparation time for the selected preparation
programme flashes.
2. Press button G to start the preparation
programme.
The appliance heats up the pan until the
target temperature is reached. During
the heating phase, lines that light up in a
clockwise direction appear in the display.
Once the target temperature is reached,
the lines go out and the preparation time is
shown in the display.
The preparation process starts automatically.
Note: When the programme [
] (pasta)
or [
] (soft fry) is selected, a repeating
audible signal is emitted and the display
and button G flash until the food has been
added and button G has been pressed.
The preparation time counts down.
Cooking produces steam, which escapes
from the appliance to prevent excess
pressure from building up.
Increasing or reducing the
temperature during preparation
If the current temperature has been set
too high or too low during preparation, this
can also be increased (by +10°C max.) or
decreased (by -10°C max.) accordingly
during the cooking process.
To increase the temperature, press and
hold button C. The current temperature will
be briefly shown on the display and will
then increase in 1°C increments until the
maximum value is reached (+10°C). Press
and hold the button until the temperature is
at the increased level desired.
To reduce the temperature, press and
hold button C. The current temperature will
be briefly shown on the display and will
initially increase in 1°C increments until the
maximum value is reached (+10°C). Once
the maximum value has been reached, the
display will jump back to the minimum value
(20°C lower). Press and hold the button
until the temperature is at the reduced level
desired.
To continue with the preparation programme,
press button G.
Note: If button G is not pressed, the
preparation programme will continue with the
temperature that was previously set.
When the preparation programme ends,
an audible signal sounds, and the indicator
[
] (finished) and button G light up, or the
keep warm function is activated. X “Keep
warm function” see page 41
The display flashes and shows “00:00”.
3. Open the lid of the appliance and serve
the meal that has been prepared.

37
en Preparation
W Risk of scalding!
■ During preparation, large amounts of
steam accumulate in the appliance.
Always open the lid with care. Do not
lean over the lid of the appliance.
■ The pan and any inserts that are used
may be very hot. Always use suitable
handles or oven gloves.
Caution!
Condensation is formed during cooking.
Empty the condensation tank regularly.
Notes:
■ The preparation programme can be
stopped at any time using button H.
The appliance subsequently switches to
function selection mode.
■ Certain preparation programmes can
consist of several preparation steps.
X “Multiple preparation steps” see
page 41
Extending the preparation time
during preparation
If the ingredients are not yet fully cooked
shortly before the end of a preparation
programme, the preparation time can be
extended.
1. To do this, press and hold button F.
The current preparation time will be briefly
shown on the display and will then increase
in 1-minute increments.
2. Press and hold the button until the
desired preparation time has been
reached.
3. Activate the newly set preparation time
using button G.
Note: The preparation time can only be
extended by a maximum of 30 minutes. If
the desired preparation time is exceeded,
hold button F until the maximum value is
reached. The setting will then jump back to 5
minutes.
Sous-vide cooking
Sous-vide cooking is a method of cooking
under a vacuum at low temperatures.
Sous-vide cooking is a gentle, low-fat
method of preparing meat, fish, vegetables
and desserts. A vacuum-packing machine is
used to heat-seal the food in a special air-
tight, heat-resistant cooking bag.
W Health risk!
Sous-vide cooking is a method of cooking at
low temperatures. As a result, it is important
that you always follow the application and
hygiene instructions below:
■ Use only fresh, good-quality food.
■ Wash and disinfect your hands. Use
disposable gloves or cooking/grill tongs.
■ Take extra care when preparing critical
food, such as poultry, eggs and fish.
■ Always prepare poultry at min. 65°C.
■ Always thoroughly rinse and/or peel fruit
and vegetables.
■ Always keep work surfaces and chopping
boards clean. Use different chopping
boards for different types of food.
■ Maintain the cold chain. Make sure that
you only interrupt it briefly to prepare
the food, and then return the food in its
vacuum-sealed bag to the refrigerator for
storage before you cook it.
■ Food is suitable for immediate con-
sumption only. Once the food is cooked,
consume it immediately. Do not store it
after cooking – not even in the refrigera-
tor. It is not suitable for reheating.
Vacuum-sealing bags
■ When using the sous-vide cooking
method, only use heat-resistant vacuum-
sealing bags designed for this purpose.
■ Do not cook the food in the bag you
bought it in (e.g. portions of fish). These
bags are not suitable for sous-vide
cooking.
Vacuum-sealing
■ Use a chamber vacuum-sealing machine
that can create a vacuum of at least 99%
to vacuum-seal the food. This is the only
way to achieve an even heat transfer and
therefore a perfect cooking result.

39
en Preparation
Caution!
■ Never heat up the appliance under steam
pressure without having added water or
other liquids beforehand. Add at least
250 ml of water.
■ Fill the pan with a maximum of 3.3 litres.
Only fill the pan at most half-full when
preparing food that expands during
cooking, e.g. rice or dried vegetables.
3. Close the appliance. Press the lid
down for this purpose until it clicks into
place and close the pressure locking
handle (N).
An audible signal sounds. The steam
pressure function is switched on.
4. Press button B to access function
selection mode.
The desired preparation programme
is selected in function selection mode
and all settings of the appliance are
made. Button B and the indicators
[
] (my recipe) and [ K ] are
permanently lit. Button G flashes. “00:00” is
shown in the display.
Note: If no input is made on the control
panel within 5 minutes, the appliance
automatically switches to standby mode.
5. Keep pressing button D until the desired
preparation programme is selected.
The corresponding LED lights up in the
control panel and the pre-configured
preparation time for the selected preparation
programme flashes. The indicator “low steam
pressure” [ K ] or “high steam pressure” [ L ]
lights up. Press button L to switch between
[ K ] and [ L ].
Note: If [ K ] or [ L ] does not light up, the
steam pressure function is not available for
the selected programme.
6. Press button G to start the preparation
programme.
The appliance heats up the pan until the
pre-configured steam pressure is reached.
During the heating phase, lines that light up
in a clockwise direction appear in the display.
Once the pre-configured steam pressure is
reached, the lines go out and the preparation
time is shown in the display.
The preparation process starts automatically.
The preparation time counts down.
Once the preparation time is completed, an
audible signal sounds, the display flashes
and shows “P”. Steam automatically escapes
from the appliance intermittently to reduce
the pressure in the appliance interior.
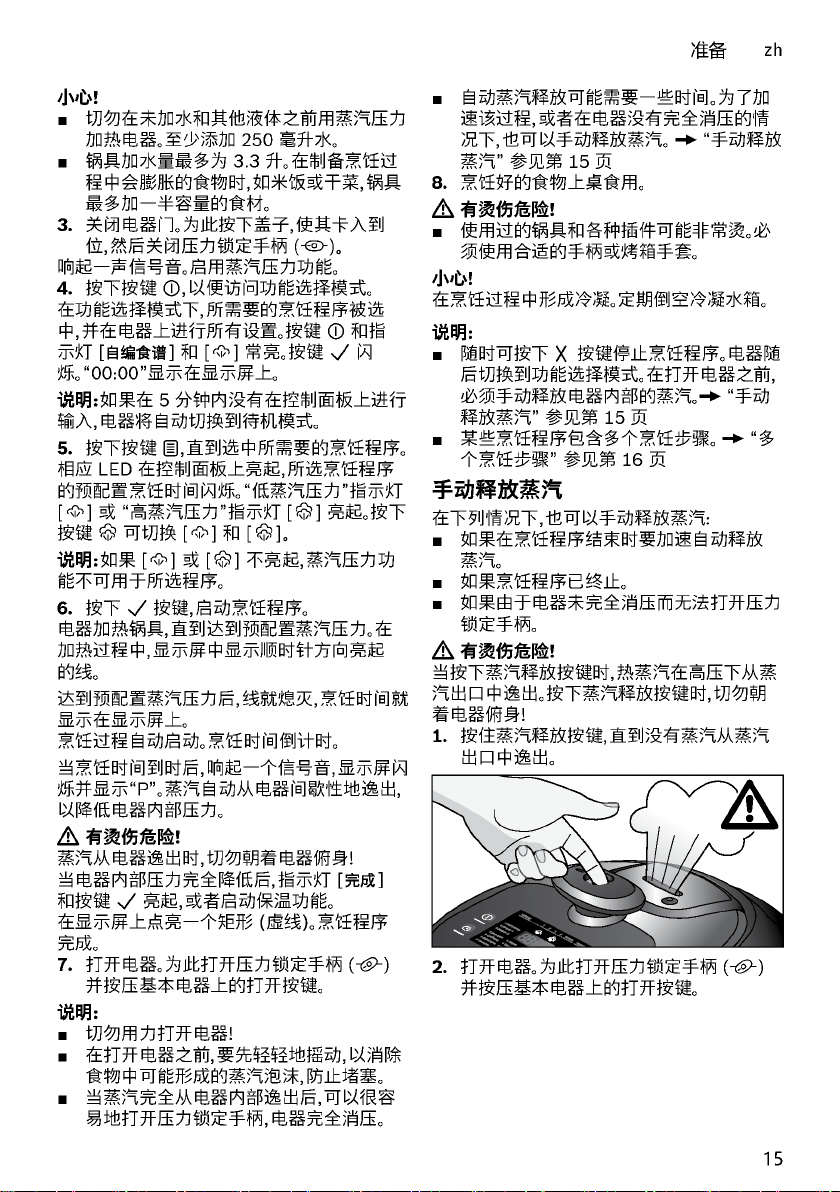
W Risk of scalding!
Never bend over the appliance while steam
is escaping from it!
When the pressure in the appliance interior
has been completely reduced, the indicator
[
] (finished) and button G light up or the
keep warm function is activated.
A rectangle lights up in the display (dotted
lines). The preparation programme is
completed.
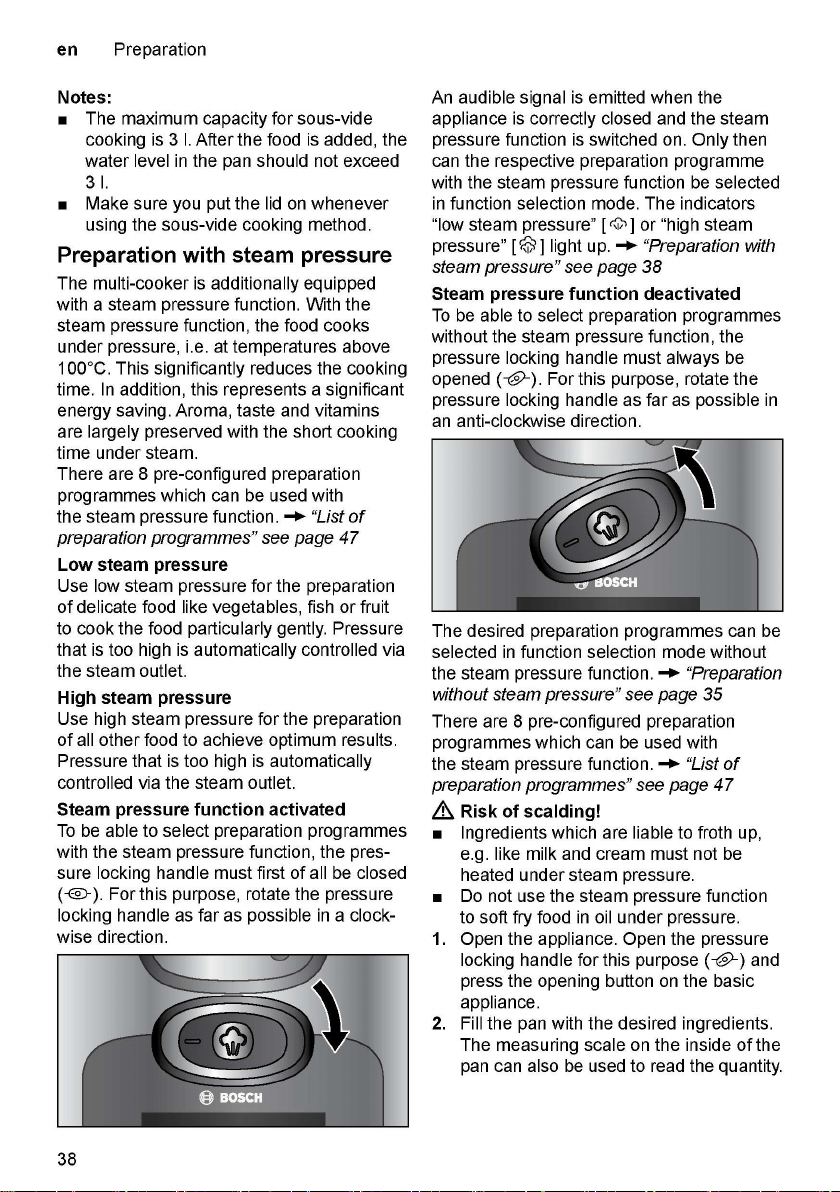
7. Open the appliance. Open the pressure
locking handle for this purpose (M) and
press the opening button on the basic
appliance.
Notes:
■ Never use force to open the appliance!
■ Always shake the appliance gently
before opening in order to dissolve any
steam bubbles that may have formed in
the food and to prevent blocking.
■ The pressure locking handle can be
easily opened when the steam has
completely escaped from the appliance
interior and the appliance is fully
depressurised.
■ Automatic steam release can take some
time. In order to accelerate the process
or if the appliance is not completely
depressurised, the steam can also be
released manually. X “Release steam
manually” see page 40
8. Serve the prepared meal.
W Risk of scalding!
■ The pan and any inserts that are used
may be very hot. Always use suitable
handles or oven gloves.
Caution!
Condensation is formed during cooking.
Empty the condensation tank regularly.


41
en Additional functions
Note: The start time delay can only be set
for certain preparation programmes. The
pre-configured start time delay varies among
these preparation programmes.
1. Select the preparation programme.
2. Press button A. Button G flashes.
“00:10” flashes in the display.
Press button A repeatedly to increase the
displayed time. A brief press increases the
time by 5 minutes. A slightly longer press
increases the time by 10 minutes. Pressing
and holding button A for around 2 seconds
increases the time by 30 minutes.
3. Press button G when the desired start
time delay is displayed.
The desired start time delay is shown in the
display. [
] (start delay) lights up in
the display.
The time until the start counts down. Once
this time has elapsed, the preparation
process starts automatically.
Notes:
■ The start time delay can be switched
off at any time by pressing button G.
The preparation programme then starts
immediately.
■ If “00:10” does not flash in the display,
a start time delay cannot be set for the
selected preparation programme.
Multiple preparation steps
Certain preparation programmes can consist
of several preparation steps. An audible
signal sounds once the next step is required.
In the control panel, LEDs 1, 2, 3 or 4 are
shown accordingly and button G flashes.
■ Open the lid of the appliance.
■ Add additional ingredients.
■ Depending on the recipe, refer to the
preparation method (e.g. with or without
steam pressure function, open lid).
X See recipe book provided
■ Start the next preparation step using
button G.
The appliance heats up the appliance interior
until the target temperature or the selected
steam pressure of the next preparation step
is reached.
During the heating phase, lines that light up
in a clockwise direction appear in the display.
Once the target temperature or selected
steam pressure is reached, the lines go out
and the next preparation time is shown in
the display. The preparation process starts
automatically. The preparation time counts
down.
Prematurely terminating the
current preparation step
If the ingredients are cooked ahead of time
during one of the preparation steps, the step
can also be terminated manually.
1. To do this, press button G for at least
2 seconds.
This will terminate the current preparation
step. An audible signal will then sound as
usual once the next step can be carried out.
In the control panel, LEDs 1, 2, 3 or 4 are
shown accordingly and button G flashes.
2. Perform the next preparation step.
Keep warm function
Certain preparation programmes include the
keep warm function. X “List of preparation
programmes” see page 47
If the preparation programme features the
keep warm function, this is switched on auto-
matically once the dish is ready and keeps
the dish warm for up to 10 hours at 40°C
(pre-configured keep warm time depending
on the preparation programme). [
] (fin-
ished) and [
] (keep warm) light up.
A rectangle lights up in the display (dotted
lines). The keep warm function can be ended
using button H. The appliance subsequently
switches to function selection mode.

42
en Using inserts
Using inserts
Using the frying basket
To prepare meat, fish, baked items etc. in hot
oil using the [
] (soft fry) programme, it is
necessary to use the soft frying basket.
Note: For the best and tastiest results, we
recommend using the suggestions in our
recipe book. X See recipe book provided
Example: Preparation programme
[
] (soft fry)
W Risk of scalding!
■ Never use the steam pressure function
when soft frying. It is automatically
disabled for the preparation programme
[
] (soft fry).
■ Fill with oil or deep-frying fat up to the
mark [ 1.0 I ] at maximum.
■ Do not use more than 300 g fresh or
defrosted food when frying.
■ During preparation, large amounts of
steam may accumulate in the appliance.
Open the lid with care. Do not lean over
the lid of the appliance.
■ The pan and any inserts that are used
may be very hot. Always use pan tongs,
suitable handles or oven gloves.
■ Never use spatulas or ladles with hot fat
or oil.
1. Open the lid of the appliance.
2. Fill the pan with a maximum of 1 litre of
oil. The measuring scale on the inside
of the pan can also be used to read the
quantity.
3. Put the lid on.
4. In function selection mode, select the
preparation programme [
] (soft fry)
X “List of preparation programmes” see
page 47
5. Press button G to start the preparation
programme.
The oil is heated. Once the target
temperature is reached, an audible signal
sounds and button G flashes.
6. Fill the frying basket with food for
soft frying.
7. Open the lid of the appliance.
8. Place the frying basket in the pan using
the handle supplied and remove the
handle.
9. Do not put the lid on.
10. Press button G to start the preparation
programme.
Once the preparation programme ends, an
audible signal sounds.
11. To drain the deep-fried food, lift the frying
basket using the handle and hang on the
edge of the pan using the flange.
Using the steamer insert
It is necessary to use the steamer insert for
the purpose of steam-cooking vegetables,
meat and fish. The 2-part steamer insert
enables different ingredients to be steamed
separately at the same time (e.g. vegetables
in the bottom part and fish in the top part).
Notes:
■ For the best and tastiest results, we
recommend using the suggestions in our
recipe book.
■ The steamer insert can be used with and
without the steam pressure function.
Example: Preparation programme
[
] (steam) without steam pressure
function
W Risk of scalding!
■ Fill with water up to the mark [ 0.5 J ] at
maximum.
■ During preparation, large amounts of
steam may accumulate in the appliance.
Open the lid with care. Do not lean over
the lid of the appliance.

43
en Customised setting options
■ The pan and any inserts that are used
may be very hot. Always use suitable
handles or oven gloves.
1. Open the lid of the appliance.
2. Fill the pan with a maximum of 0.5 litres
of water. The measuring scale on the
inside of the pan can also be used to
read the quantity.
3. Hang the bottom part of the steamer
insert in the pan.
4. For steam-cooking different ingredients,
fill the bottom part up to the lower edge.
5. Position the top part and add additional
ingredients.
6. Put the lid on.
7. In function selection mode, select the
preparation programme [
] (steam)
X “List of preparation programmes” see
page 47
8. Press button G to start the preparation
programme.
Once the preparation programme ends, an
audible signal sounds and button G flashes.
9. Open the lid of the appliance.
10. Lift the top part and the bottom part of
the steamer insert out of the pan.
Customised setting options
The pre-configured values for the prepara-
tion time and the preparation temperature or
steam pressure can be adapted to individual
needs and the recipe guidelines.
Setting the preparation time
1. In function selection mode, keep
pressing button D until the desired
preparation programme is selected.
The corresponding LED lights up in the
control panel and the pre-configured
preparation time for this preparation
programme is shown.
2. Press button F once.
The pre-configured preparation time flashes
in the display.
3. Keep pressing button F until the desired
preparation time is displayed.
When button F is briefly pressed, the
preparation time is increased by 1 minute.
The time increases up to the pre-configured
maximum value and then returns to the
pre-configured minimum value. When
button F is pressed for a longer period, the
preparation time is increased by 10 minutes.
4. Once the desired preparation time is
displayed, press button G.
The preparation programme with the set
preparation time is started.
If the time needs to be adjusted individually
for all preparation steps in a selected
programme, then repeat points 2 to 4 prior to
starting the respective preparation step.
Note: These settings are not saved. If this
preparation programme is selected again,
the pre-configured preparation time will be
shown in the display once more.
Setting the preparation
temperature
For preparation programmes without the
steam pressure function, the temperature
can be selected individually.
1. In function selection mode, keep
pressing button D until the desired
preparation programme is selected.
The corresponding LED lights up in the
control panel and the pre-configured
preparation time for this preparation
programme is shown.
2. Press button C once.
The pre-configured preparation temperature
flashes in the display.
3. Keep pressing button C until the desired
preparation temperature is displayed.

44
en Customised setting options
When button C is briefly pressed, the
preparation temperature is increased by
5°C. The temperature increases up to the
pre-configured maximum value and then
returns to the pre-configured minimum value.
When button C is pressed for a slightly
longer period, the temperature is increased
by 10°C.
4. Once the desired preparation
temperature is displayed, press
button G.
The preparation programme with the set
preparation temperature is started.
If the temperature needs to be adjusted
individually for all preparation steps in a
selected programme, then repeat points 2 to
4 prior to starting the respective preparation
step.
Note: These settings are not saved. If this
preparation programme is selected again,
the pre-configured preparation temperature
will be shown in the display once more.
Setting the steam pressure
For preparation programmes with pre-set
steam pressure function, the temperature
can be selected via “low steam pressure”
[ K ] or “high steam pressure” [ L ].
1. In function selection mode, keep
pressing button D until the desired
preparation programme is selected.
The corresponding LED lights up in the
control panel and the pre-configured
preparation time for this preparation
programme is shown. The indicator
“low steam pressure” [ K ] or “high steam
pressure” [ L ] additionally lights up.
Note: If [ K ] or [ L ] does not light up, the
steam pressure function is not available for
the selected programme.
2. Press button L to switch between [ K ]
and [ L ].
3. If the desired steam pressure is
displayed, press button G.
The preparation programme is started with
the set steam pressure function.
Note: These settings are not saved. If this
preparation programme is selected again,
the set steam pressure function will be
shown in the display once more.
[
] (my recipe) (manual)
Quick setting mode for customising the
steam pressure function, preparation time
and temperature setting for a cooking
process.
In function selection mode, button B and
the indicator [
] (my recipe) are
permanently lit. Button G flashes. “00:00” is
shown in the display.
Note: In order to switch on the steam
pressure function, the pressure locking
handle must be closed (N). The indicator
[ K ] lights up.
Setting the preparation time
1. Press button F once.
“00:00” flashes in the display.
2. Keep pressing button F until the desired
preparation time is displayed.
Setting the preparation temperature or
steam pressure
3. Without steam pressure function: The
pressure locking handle must be opened
(M). Press button C once. “0000”
flashes in the display. Button C must then
be pressed repeatedly until the desired
preparation temperature is displayed.
or
With steam pressure function: The
pressure locking handle must be closed
(N). Press button L to switch between
[ K ] and [ L ].
4. Press button G to start with the selected
settings.
The appliance heats up the pan until the
target temperature or the steam pressure is
reached.
Once the target temperature or steam
pressure is reached, the lines go out and the
next preparation time is shown in the display.
The preparation process starts automatically.

45
en Child lock
[
] (recipe 1) /
[
] (recipe 2) –
saving personal preparation
programmes
Personal preparation programmes with
customised time / temperature and steam
pressure function can be saved under the
memory locations [
] (recipe 1) and
[
] (recipe 2).
Notes:
■ If you have not previously saved any
personal preparation programmes, the
display does not show any values.
■ In order to switch on the steam pressure
function, the pressure locking handle
must be closed (N).
1. In function selection mode, press
button D once.
The LED [
] (recipe 1) lights up. The
pre-configured preparation time is shown in
the display.
Saving the preparation time:
2. Press button F once.
The display flashes. LED 1 (preparation step
1) lights up in the control panel.
3. Keep pressing button F until the desired
preparation time is displayed.
When button F is briefly pressed, the prepa-
ration time is increased by 1 minute. When
button F is pressed for a longer period, the
preparation time is increased by 10 minutes.
The time increases up to the pre-configured
maximum value and then returns to the
pre-configured minimum value.
Saving the preparation temperature or
steam pressure:
4. Preparation temperature: Press
button C once. The pre-configured
preparation temperature is shown in the
display. Press button C repeatedly until
the desired preparation temperature is
displayed.
or
Steam pressure: Press button L to
switch between [ K ] and [ L ].
5. Press and hold button G (>2 seconds)
to save the set values.
Note: Either the temperature or the steam
pressure can be set and stored for one
preparation step. The value last selected
is saved.
In order to programme other preparation
steps, repeat points 2 to 6. Up to 3
preparation steps can be programmed.
The saved preparation programme
[
] (recipe 1) can be selected as
usual via function selection mode.
Note: To save a second personal
preparation programme under
[
] (recipe 2), use the same process
as described above for [
] (recipe 1).
To delete a personal preparation
programme, perform the following steps:
1. In function selection mode, press
button D once.
The LED [
] (recipe 1) lights up.
The saved preparation time is shown in the
display.
2. Press button F once.
The display flashes. LED 1 (preparation step
1) lights up in the control panel.
3. Press and hold button H (>2 seconds).
The settings for [
] (recipe 1) are
deleted.
Note: To delete the second
personal preparation programme
[
] (recipe 2), use the same process
as described above for [
] (recipe 1).
Child lock
The child lock can be activated and deac-
tivated during a preparation process. If the
child lock has been activated, all buttons on
the control panel are locked and settings can
no longer be made on the appliance.
W Warning
When the child lock is active, the preparation
processes cannot be changed or terminated.
The child lock must be deactivated first.
Press the following button combination:
1. Activate
Press and hold buttons C and F
simultaneously for 3 seconds. A short
audible signal sounds. The child lock is
activated.

46
en Care and daily cleaning
2. Deactivate
Press and hold buttons C and F
simultaneously for 3 seconds once again.
A short audible signal sounds. The child
lock is switched off.
Care and daily cleaning
W Risk of electric shock
■ Never immerse the appliance in water.
■ Do not steam-clean the appliance.
■ Unplug the appliance before cleaning it.
Caution!
■ Do not use any cleaning agents
containing alcohol or spirits.
■ Do not use any sharp, pointed or metal
objects.
■ Do not use abrasive cloths or cleaning
agents.
The appliance must be thoroughly cleaned
after each use.
1. Let the appliance cool down completely.
2. Open the pressure locking handle (M).
3. Press the opening button on the basic
appliance to open the lid.
4. Remove the pan, lid insert, steam outlet,
valve plug, condensation tank and
accessories. X “Before using for the
first time” see page 32
Cleaning the basic appliance
1. Wipe the outside of the appliance with a
soft, damp cloth and dry off.
2. Wipe the interior of the appliance with a
soft, damp cloth and dry off.
3. Clean the control panel using a dry
micro-fibre cloth.
Cleaning the lid insert, steam
outlet and valve plug
1. Clean the individual parts with a deter-
gent solution and a soft cloth or sponge.
2. Rinse with clean water and dry off.
Caution!
The following parts are not suitable
for the dishwasher: removable lid insert,
fastening screw, steam outlet and valve plug.
Cleaning the pan, condensation
tank and accessories
1. Clean the individual parts with a deter-
gent solution and a soft cloth or sponge.
2. Rinse with clean water and dry off.
The following parts are suitable for
dishwashers: pan, condensation tank,
frying basket with handle, steamer inserts,
spatula, ladle and measuring beaker.
Caution!
After cleaning, replace all dried individual
parts again on the basic appliance and
check the functionality of the safety devices.
X “Before using for the first time” see
page 32
Disposal
J
Dispose of packaging in an environ-
mentally-friendly manner. This
appliance is labelled in accordance
with European Directive 2012/19/EU
concerning used electrical and
electronic appliances (waste electrical
and electronic equipment – WEEE).
The guideline determines the frame-
work for the return and recycling
of used appliances as applicable
throughout the EU. Please ask your
specialist retailer about current
disposal facilities.
Guarantee
The guarantee conditions for this appliance

47
en List of preparation programmes
List of preparation programmes
AutoCook Pro offers you a total of 50 preparation programmes. They consist of 16 basic pro-
grammes, each with 3 time setting options, as well as 2 additional steam pressure functions.
The following table contains the most important data for the various preparation programmes.
Programme Number of
preparation
steps
Keep warm
function
available
Steam
pressure
function
available
Lid
(my recipe)
Customised setting for the desired temperature
and preparation time
1 —
G
Open /
closed*
(recipe 1&2)
2 memory locations for personal recipes
1-3 —
G
Open /
closed*
(rice)
Preparing rice
1
G G
Closed
(porridge)
Preparing porridge
short: 1
medium: 2
long: 2
G G
Closed
(soup)
Preparing soups and stews
short: 1
medium: 2
long: 2
G G
Open /
closed*
(steam)
Steam-cooking vegetables, meat and fish
(steamer insert required)
1
G G
Closed
(steak)
Preparing steak
2 — —
Closed /
open*
(pizza)
Preparing pizza
1 — — Closed
(baking)
The maximum quantity of dough is 1000 g flour
with water (ratio: 54 ml water to 100 g flour)
1 — — Closed
(pasta)
Cooking pasta dishes
1 — —
Closed /
open*
(fry)
Frying vegetables, meat and fish
1
G
— Open
(soft fry)
Soft frying of small quantities (e.g. meat, fish,
baked items etc.). Soft frying basket required. Not
suitable for frozen ingredients.
1 — — Open
(stew)
Stewing vegetables, meat and fish
short: 1
medium: 2
long: 2
G G
Open /
closed*
* Depending on recipe / preparation step – “Lid closed” for activated steam pressure function
Please see the recipe book provided for notes on correct use of the programmes and for information on
ingredients, quantities and cooking times.
48
en Cooking times
Programme Number of
preparation
steps
Keep warm
function
available
Steam
pressure
function
available
Lid
(cooking)
Cooking food
1
G G
Closed
(yogurt)
Preparing yogurt
1 — — Closed
(jam)
Preserving fruit as jams
1 — — Open
(sous vide)
Gently cooking foods in a vacuum bag
1 — — Closed
(warm up)
Warming up cold (pre-cooked) meals
1
G
— Closed
* Depending on recipe / preparation step – “Lid closed” for activated steam pressure function
Please see the recipe book provided for notes on correct use of the programmes and for information on
ingredients, quantities and cooking times.
Cooking times
The following table contains an overview of the cooking times for various dishes. The
following cooking times depend on the thickness and consistency of the foods and should
be viewed as recommendations for minimum times. Adjust cooking times accordingly. With
frozen food extend the cooking time by at least 20%.
Programme Setting Time (without
steam pressure
function)
Food Recommended quantity
(maximum)
(steam) medium 30 mins Green beans (fresh) 500 g (800 g)
short 10 mins Cauliflower
(same-sized florets)
500 g (800 g)
long 50 mins Potatoes
(medium-sized, whole)
500 g (1200 g)
short 10 mins Fish fillet 500 g (1000 g)
medium 30 mins Meatballs 500 g (700 g)
short 10 mins Eggs x 8 (x 12)
medium 30 mins Dumplings 500 g (600 g)
short 5 mins Broccoli 500 g (800 g)
short 3 mins Peas 500 g (800 g)
medium 30 mins Carrots 500 g (800 g)
medium 30 mins Chicken breast 500 g (800 g)
medium 30 mins Beetroot
(medium-sized, whole)
500 g (800 g)

49
en Cooking times
Programme Setting Time (without
steam pressure
function)
Food Recommended quantity
(maximum)
(rice) short 25 mins Round grain rice 300 g (450 g) rice,
400 ml (600 ml) water
medium 40 mins Round grain rice 300 g (900 g) rice,
400 ml (1120 ml) water
long 80 mins Brown rice 280 g (1260 g) rice,
480 ml (1280 ml) water
(porridge) short 60 mins Round grain rice 150 g (360 g),
1280 ml (2880 ml) water
medium 90 mins Round grain rice, red
bean etc
150 g (360 g) rice,
1280 ml (2880 ml) water
long 60 mins + 10 mins Round grain rice, pork
liver etc
150 g (360 g),
1280 ml (2880 ml) water
(steak) short 9 mins + 4 mins steak 260 g, 3 cm thickness
medium 12 mins + 4 mins steak 260 g, 3 cm thickness
long 30 mins + 4 mins steak 260 g, 3 cm thickness
(pizza) short 14 mins Frozen dough, green
red pepper, onion etc
8 inch, 1 cm thickness
medium 19 mins Dough, green red
pepper, onion etc
100 g dough, other
ingredinets
long 21 mins Dough, green red
pepper, onion etc
140 g dough, other
ingredinets
(soft fry) medium 20 mins Chicken legs 300 g
short 10 mins Button mushrooms 200 g
medium 20 mins Cannelloni 300 g
short 10 mins Fish fillet 200 g
short 10 mins Wiener schnitzel
(turkey)
200 g
short 10 mins Wiener schnitzel (pork) 200 g
(steam) +
(soft fry)
short +
short
10 mins +
10 mins
Raw vegetables
(e.g. cauliflower)
200 g
(baking) long 60 mins Shoulder of pork 1500 g
medium 40 mins Meat loaf 800 g
long 60 mins Cake 500 g
(fry)
medium 15 mins Vegetables 300 g
medium 15 mins Fish 200 g
medium 15 mins Meat 500 g
short manual setting:
5 mins
Onions 200 g
51
en Special accessories
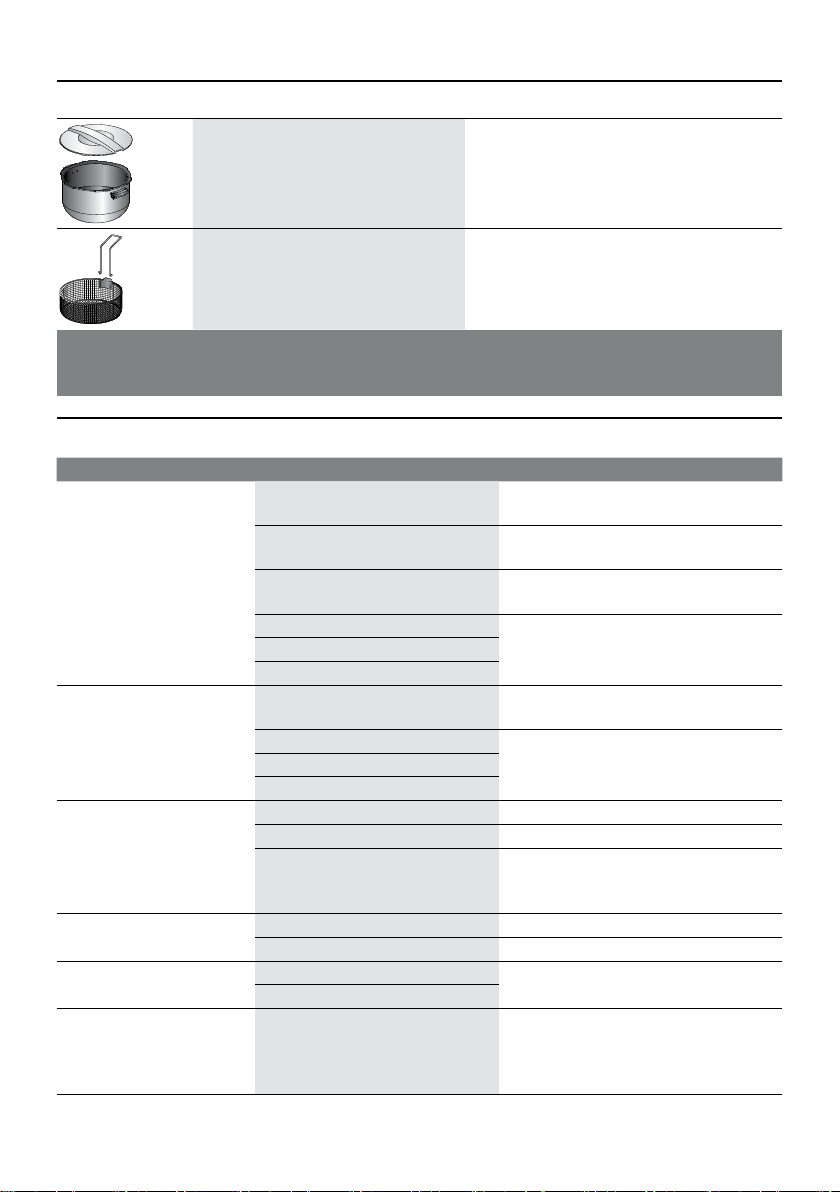
Special accessories
MAZ8BI
Stainless steel pan, polished, with a non-
stick coating and storage lid*; suitable
for the induction multi-cooker with steam
pressure function MUC88...
5-litre pan; dishwasher-safe; very robust pan; 3
mm thick; stainless steel polished exterior; non-
stick coating; lid* for the practical storage of food
in the pan, e.g. in the refrigerator
MAZ0FB
Frying basket
Stainless steel basket with removable handle for
easy handling; dishwasher-safe
*The storage lid is not supplied as standard with the appliance. It is only supplied with pans as a special
accessory. If an accessory is not included in the product package, it can be purchased via trade stockists or
customer service.
Troubleshooting
Problem Cause Remedy
The prepared meal is
half-raw.
Filled beyond capacity. Do not fill the pan beyond the marking
[ 4.0 litres ]!
The ratio of the amount of water and
the ingredients is incorrect.
Adjust the ratio of the amount of water and
the ingredients.
Foreign objects in the appliance
interior.
Remove all foreign objects. Do not use
any water for this purpose!
The pan is deformed. Contact customer service.
Fault in the appliance.
Fault in the sensor.
The prepared meal is burnt. There is dirt underneath the pan. Thoroughly clean the pan and the
appliance interior.
The pan is deformed. Contact customer service.
Fault in the appliance.
Fault in the sensor.
The appliance boils over. Filled beyond capacity. Adjust the amount.
The temperature is too high. Reduce the temperature.
The selected preparation
programme requires the meal to be
cooked with the lid open.
Open the lid of the appliance.
LED does not light up. The appliance is switched off. Switch on the appliance.
Fault in the power cord. Contact customer service.
The hotplate does not
function.
Fault in the appliance. Contact customer service.
The hotplate is damaged.
Water is flowing out of the
appliance.
The appliance features overflow
protection.
The condensation tank is full and
overflowing.
Remove water from condensation tank.
Remove the pan and use a cloth to rub
the appliance interior dry. Ensure that no
water enters the appliance interior.

52
en Troubleshooting
Problem Cause Remedy
The pressure locking handle
of the appliance cannot be
opened.
Food is obstructing the
overpressure lock and the pressure
locking handle is blocked.
Proceed as described in chapter
X “Release steam manually” see
page 40. If the problem persists,
contact customer service.
Steam constantly escapes
from the steam outlet, even
though the steam pressure
function is switched on.
The valve plug is not properly
placed on the valve.
Disconnect the appliance from the power
supply and allow to cool down. Remove
the steam outlet and place the valve plug
properly on the valve.
Display screen
P
This is not an error. The steam is
released automatically.
Wait until the steam has been released
completely or release steam manually.
Display screen
OPEn
Pressure locking handle closed
(N) for a preparation programme
without steam pressure function.
Open pressure locking handle (M) to
deactivate the steam pressure function.
Display screen
CLOSE
Pressure locking handle open
(M) for a preparation programme
with steam pressure function.
Close the pressure locking handle (N)
to activate the steam pressure function.
Display screen
E1~E6
Fault in the appliance. Abort the preparation programme. Discon-
nect the appliance from the power supply.
Switch the appliance on again. If the
problem persists, contact customer service.
Display screen
E0
Electric circuit malfunction. Disconnect the appliance from the power
supply and restart. If the problem persists,
contact customer service.
Display screen
E1
Pan is damaged or not present in
appliance or not original pan was
used.
Insert the original pan. If the problem
persists, contact customer service.
Display screen
E2, E5, E6 or E7
The appliance has overheated. Disconnect the appliance from the power
supply and allow to cool down. Restart the
appliance once it has cooled down.
Short-circuit in the appliance. Disconnect the appliance from the power
supply and contact customer service.
Display screen
E3
Mains voltage too high. Contact electricity provider or grid
operator. Have the power supply checked
by an expert.
Display screen
E4
Mains voltage too low.
Display screen
E8
Communication failure Restart the appliance once it has cooled
down.
Display screen
E12
When selecting a programme with
a high temperature (e.g. “soft fry”),
unsuitable ingredients have been
added (e.g. water). The programme
is aborted to prevent overpressure.
Remove the unsuitable ingredients
from the pan. Clean pan and then fill
correctly (e.g. with oil for the programme
“soft fry”). Leave the lid open depending
on the programme selected X “List of
preparation programmes” see page 47.
Restart preparation programme.
If you are unable to solve the problem, always call the hotline!
You will find the telephone numbers at the back of these instructions.

0,40 €
/ min
0,40 €
/ min
DE Deutschland, Germany
BSH Hausgeräte Service GmbH
Zentralwerkstatt für kleine Hausgeräte
Trautskirchener Strasse 6-8
90431 Nürnberg
Online Auftragsstatus, Filterbeutel-
unter: www.bosch-home.com
Reparaturservice, Ersatzteile &
Tel.: 0911 70 440 040
mailto:[email protected]
erreichbar.
AE United Arab Emirates,
BSH Home Appliances FZE
Jebel Ali Free Zone – Dubai
Tel.: 04 881 4401
mailto:[email protected]
www.bosch-home.com/ae
AL Republika e Shqiperise,
Albania
Rr. Shkelqim Fusha, Selite,
Pallati “Matrix Konstruksion”,
mailto:[email protected]
Rruga e Kavajes,
Tel.: 4 480 6061
mailto:[email protected]
AT Österreich, Austria
BSH Hausgeräte Gesellschaft mbH
1100 Wien
Online Reparaturannahme,
www.bosch-home.at
Reparaturservice, Ersatzteile & Zubehör,
mailto:vie-stoerungsannahme@ bshg.com
Sie erreichbar.
AU Australia
Clayton, Victoria 3168
Tel.: 1300 369 744*
Fax: 1300 306 818
mailto:[email protected]
www.bosch-home.com.au
BA Bosna i Hercegovina,
Bosnia-Herzegovina
71000 Sarajevo
mailto:[email protected]
BE Belgique, België, Belgium
BSH Home Appliances S.A. – N.V.
Laarbeeklaan 74
1090 Bruxelles – Brussel
mailto:[email protected]
www.bosch-home.be
BG Bulgaria
mailto:[email protected]
www.bosch-home.bg
BH Bahrain,
Khalaifat Est.
Manama
mailto:[email protected]
BY Belarus,Беларусь
CH Schweiz, Suisse,
Svizzera, Switzerland
BSH Hausgeräte AG
Bosch Hausgeräte Service
Reparaturservice, Ersatzteile & Zubehör,
mailto:[email protected]
mailto:[email protected]
www.bosch-home.ch
CY Cyprus,Κύπρος
Tel.: 7777 8007
mailto:bsh.service.cyprus@
cytanet.com.cy
CZ ČeskáRepublika,CzechRepublic
www.bosch-home.com/cz
DK Danmark, Denmark
Telegrafvej 4
Tel.: 44 89 80 18
EE Eesti, Estonia
11313 Tallinn
mailto:[email protected]
www.simson.ee
www.renerk.ee
ES España, Spain
Parque Empresarial PLAZA,
www.bosch-home.es
FI Suomi, Finland
Soittajahinta on kiinteästä verkosta ja
FR France
01 40 10 11 00
Service Consommateurs:
mailto:[email protected]
Accessoires:
www.bosch-home.fr
GB Great Britain
Wolverton
www.bosch-home.co.uk
for exact charges.
Kundendienst – Customer Service
06/18

06/18
GR Greece,Ελλάς
Central Branch Service
mailto:[email protected]
www.bosch-home.gr
HK Hong Kong,
North Block, Skyway House,
Tai Kok Tsui, Kowloon
Hong Kong
mailto:[email protected]
www.bosch-home.com.hk
HR Hrvatska, Croatia
10000 Zagreb
Fax: 01 6403 603
mailto:[email protected]
www.bosch-home.com/hr
HU Magyarország,Hungary
mailto:[email protected]
www.bosch-home.com/hu
IE Republic of Ireland
Walkinstown
www.bosch-home.ie
for exact charges
IL Israel
1, Hamasger St.
www.bosch-home.co.il
IN India,Bhārat,
Mumbai 400 093
www.bosch-home.com/in
* Mo-Sa: 8.00am to 8.00pm
IS Iceland
Noatuni 4
www.sminor.is
IT Italia, Italy
Via. M. Nizzoli 1
mailto:[email protected]
www.bosch-home.com/it
KZ Kazakhstan,Қазақстан
Astana
mailto:[email protected]
480096 Almaty
Kombitechnocentr
Zhambyl st. 117
480096 Almaty
mailto:[email protected]
www.cts.kz
TOO Evrika Service
Shimkent 160018
mailto:[email protected]
www.evrika.com
www.avservice.kz
LB Lebanon,
Teheni, Hana & Co.
P.O. Box 90449
LT Lietuva, Lithuania
www.senukai.lt
Fax: 037 331 363
mailto:[email protected]
www.agservice.lt
mailto:[email protected]
www.balticcontinent.lt
03116 Vilnius
mailto:[email protected]
www.emtoservis.lt
LU Luxembourg
Reparaturen: [email protected]
Ersatzteile: [email protected]
www.bosch-home.com/lu
LV Latvija, Latvia
1067 Riga
mailto:[email protected]
www.serviscentrs.lv
1039 Riga
mailto:[email protected]
www.baltijasserviss.lv
Sia Elektronika-Serviss
1004 Riga
Tel.: 067 71 70 60
mailto:[email protected]
www.elektronika.lv
MD Moldova
ME Crna Gora, Montenegro
Elektronika komerc
mailto:[email protected]
MK Macedonia,Makeдoния
GORENEC
1000 Skopje
mailto:[email protected]
MT Malta
Mriehel BKR 14

06/18
MV Raajjeyge Jumhooriyyaa,
Maledives
lintel.com.mv
NL Nederlande, Netherlands
Taurusavenue 36
mailto:bosch-contactcenter@
bshg.com
www.bosch-home.nl
NO Norge, Norway
Grensesvingen 9
0661 Oslo
mailto:[email protected]
www.bosch-home.no
NZ New Zealand
Mairangi Bay
mailto:[email protected]
www.bosch-home.co.nz
PL Polska, Poland
Domowego sp. z o.o.
Al. Jerozolimskie 183
Centrala Serwisu
mailto:[email protected]
www.bosch-home.pl
PT Portugal
bshg.com
www.bosch-home.pt
RO România, Romania
BSH Electrocasnice srl.
Sos. Bucuresti-Ploiesti,
mailto:[email protected]
www.bosch-home.ro
RU Russia,Россия
www.bosch-home.com
SA Kingdom Saudi Arabia,
BOSCH Service centre,
P.O.Box 7997
mailto:[email protected]
www.aljelectronics.com.sa
SE Sverige, Sweden
BSH Home Appliances AB
Tel.: 0771 19 70 00 local rate
mailto:[email protected]
www.bosch-home.se
SG Singapore,
#01-01 Techplace 1
mailto:[email protected]
www.bosch-home.com.sg
SI Slovenija, Slovenia
Litostrojska 48
1000 Ljubljana
mailto:[email protected]
www.bosch-home.com/si
SK Slovensko, Slovakia
mailto:[email protected]
www.bosch-home.com/sk
TH Thailand,
Bangkapi, Huay Kwang
Bangkok, 10310
www.bosch-home.com/th
* Mo-Sa: 8.00am to 6.00pm
TR Türkiye, Turkey
BSH Ev Aletleri Sanayi
ve Ticaret A.S.
Fatih Sultan Mehmet Mahallesi
mailto:[email protected]
www.bosch-home.com/tr
TW Taiwan,
台湾
我們期盼您不斷的鼓勵與指導,
任何咨詢或服務需求,
歡迎洽詢客服專線
台北市內湖區洲子街80號11樓
11F., No.80, Zhouzi St., Neihu Dist.
Taipei City 11493
Tel.: 0800 368 888
mailto:[email protected]
www.bosch-home.com.tw
UA Ukraine,Україна
mailto:[email protected]
www.bosch-home.com.ua
XK Kosovo
Service-General SH.P.K.
rr.Magjistralja Ferizaj Prishtine
70000 Ferizaj
XS Srbija, Serbia
mailto:informacije.servis-sr@
bshg.com
www.bosch-home.rs
ZA South Africa
Fax: 086 617 1780
mailto:[email protected]
www.bosch-home.com/za


全国统一客户服务热线:
4008855888
客户服务电子邮箱:
公司网站:
www.bosch-home.cn
立即在MyBosch上为您的电器注册,便可直接获得如下福利:
•
专家级电器使用提示与技巧
• 保修延长选项
•
附件和备件折扣
•
易于获得数字手册和所有电器数据
•
便于享受博世家电服务
注册免费而简单 - 同样针对移动电话
:
www.bosch-home.cn/welcome
针对博世家电的专家级建议,需要博世专家帮助解决问题或维修 。
了解博世支持您的各种方式。
www.bosch-home.com/service
随附的服务目录中列出了所有国家的联系信息。
总经销商:
博西家用电器(中国)有限公司
中国江苏省南京市中山路129号中南国际大厦20、21楼
感谢您购买博世家电!
需要帮助吗?
可以从此处获取。
8001089736
*8001089736*
(980730)