
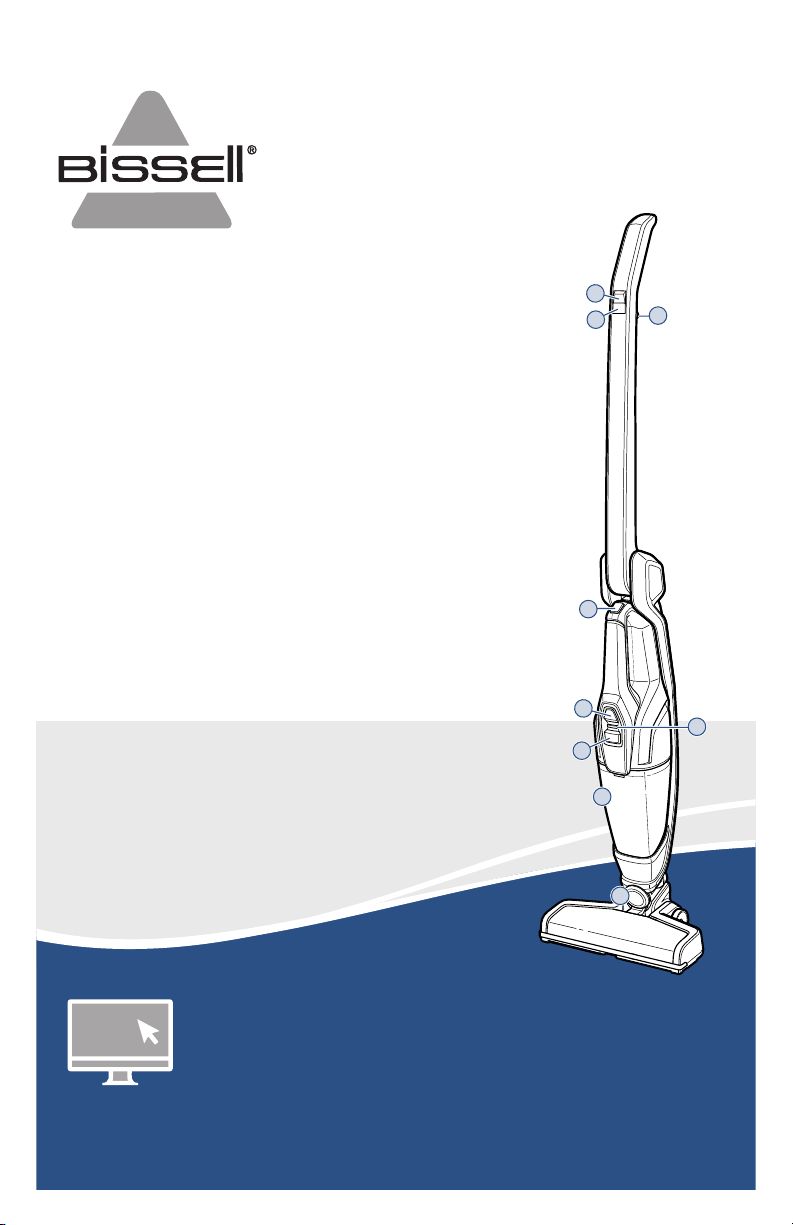
Product Overview
1. Power Button
2. Brush Roll On/Off Button
3. 2-Way Folding Handle
Release Trigger
4. Hand Vacuum Release Button
5. Hand Vacuum Power Button
6. Dirt Tank Release Button
7. Charging Light Indicator
8. Dirt Tank
9. Swivel Head
Go online for a comprehensive walkthrough
of your new purchase!
This guide has everything you need to get ready for first use,
including setting up, using and maintaining your machine,
but online you’ll find additional resources like tips and
troubleshooting, videos, product registration, parts, and more.
Go to support.BISSELL.com.
What’s in the Box? ......................................................... 2
Assembling and Charging Your Vacuum ....... 3
LED Display Status .........................................................3
Using the 2-Way Folding Handle .........................3
Using the Hand Vacuum ............................................ 4
Emptying the Dirt Tank...............................................4
Cleaning the Filters ........................................................ 5
Maintaining the Brush Roll ........................................6
Troubleshooting ............................................................... 7
Warranty ............................................................................... 7
READYCLEAN® CORDLESS
2-IN-1 LIGHTWEIGHT VACUUM
3190 SERIES
2
6
1
5
3
4
7
8
9
2 BISSELL.com
IMPORTANT SAFETY INSTRUCTIONS
WARNING
TO REDUCE THE RISK OF FIRE, ELECTRIC SHOCK OR INJURY:
» Do not use outdoors or on wet surfaces.
» Do not allow to be used as a toy. Close attention is necessary when used by
or near children.
» Do not use for any purpose other than described in this user guide. Use only
manufacturer’s recommended attachments.
» Do not use with damaged cord or plug. If appliance is not working as it
should, has been dropped, damaged, left outdoors, or dropped into water,
have it repaired at an authorized service center.
» Do not put any object into opening.
» Do not use with any opening blocked.
» Do not unplug by pulling on cord. To unplug, grasp the plug, not the cord.
» Do not handle charger, including charger plug and charger terminal with
wet hands.
» Do not charge the machine outdoors.
» Use only the charger supplied by the manufacturer to recharge.
» Do not incinerate the appliance even if it is severely damaged. The batteries
can explode in a fire.
» Keep openings free of dust, lint, hair, and anything that may reduce airflow.
» Keep hair, loose clothing, fingers, and all parts of body away from openings
and moving parts.
» Use extra care when cleaning stairs.
» Do not use to pick up flammable or combustible materials (lighter fluid,
gasoline, kerosene, etc.) or use in areas where they may be present.
» Do not pick up toxic material (chlorine bleach, ammonia, drain cleaner, etc.).
» Do not use vacuum cleaner in an enclosed space filled with vapors given
off by oil-based paint, paint thinner, some moth-proofing substances,
flammable dust, or other explosive or toxic vapors.
» Do not pick up hard or sharp objects such as glass, nails, screws, coins, etc.
» Do not pick up anything that is burning or smoking, such as cigarettes,
matches or hot ashes.
» Do not use without Dirt tank or filters in place.
» Use only on dry, indoor surfaces.
» Always turn OFF this appliance before connecting or disconnecting the
motorized nozzle.
» Do not pull or carry charger by the cord, use cord as a handle, close a door
on cord, or pull cord around sharp edges or corners. Do not run appliance
over cord.
» Prevent unintentional starting. Ensure the switch is in the OFF-position
before picking up or carrying the appliance. Carrying the appliance with
your finger on the switch or energizing appliance that have the switch on
invites accidents.
» Under abusive conditions, liquid may be ejected from the battery; avoid
contact. If contact accidentally occurs, flush with water. If liquid contacts
eyes, additionally seek medical help. Liquid ejected from the battery may
cause irritation or burns.
» Do not use appliance that is damaged or modified. Damaged or modified
batteries may exhibit unpredictable behavior resulting in fire, explosion or
risk of injury.
» Do not expose appliance to fire or excessive temperature. Exposure to fire
or temperature above 130°C/265°F may cause explosion.
» Follow all charging instructions and do not charge the appliance outside of
the temperature range specified in the instructions. Charging improperly
or at temperatures outside of the specified range may damage the battery
and increase the risk of fire.
» Have servicing performed by a qualified repair person using only identical
replacement parts. This will ensure that the safety of the product is
maintained.
» Do not modify or attempt to repair the appliance except as indicated in the
instructions for use and care.
» Keep the temperature range of between 40-104°F when charging battery,
storing machine or during use.
» Use only with charger E-TEK, Model ZD12D140080US.
» Recharge only with the charger specified by the manufacturer. A charger
that is suitable for one type of battery pack may create a risk of fire when
used with another battery pack.
SAVE THESE INSTRUCTIONS
THIS MODEL IS FOR HOUSEHOLD USE ONLY.
COMMERCIAL USE OF THIS MACHINE VOIDS THE MANUFACTURER’S WARRANTY.
READ ALL INSTRUCTIONS BEFORE USING YOUR APPLIANCE.
When using an electrical appliance, basic precautions should be observed, including the following:
WARNING
This product contains Lithium-Ion rechargeable batteries. DO NOT mix Lithium-Ion batteries with general household waste.
According to Federal and State regulations, removal and proper disposal of Lithium-Ion batteries is required.
For specific battery disposal instructions please contact Call2Recycle at 877-723-1297 or visit www.call2recycle.org.
For full instructions on battery removal for recycling visit support.BISSELL.com.
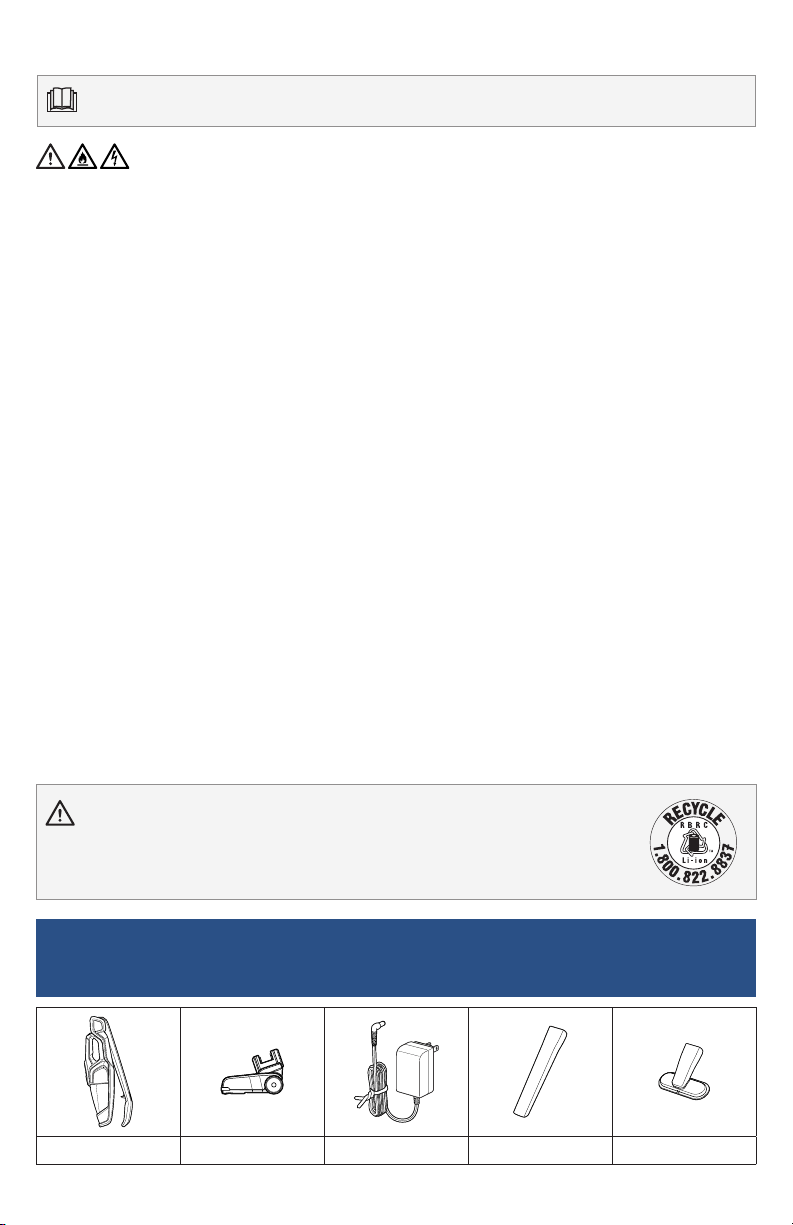
Body Foot Charging Adapter Crevice Tool Upholstery Tool
What’s in the Box?
Standard accessories may vary by model.To identify what should be included with your purchase,
please refer to the “Carton Contents” list located on the carton top flap.
BISSELL.com 3
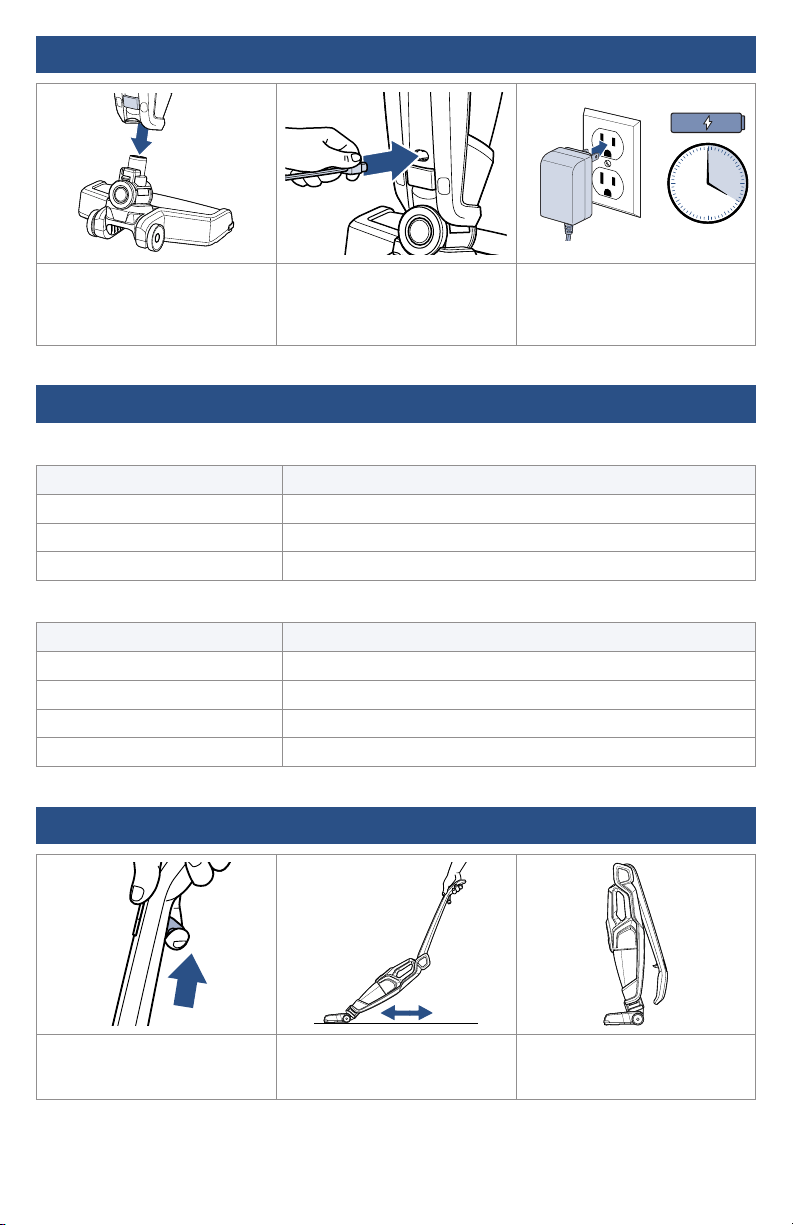
Assembling and Charging Your Vacuum
4h
1. Insert foot into body of the
vacuum until you hear a “click”.
2. Insert charging adapter plug
into the charging port on the
back of the machine.
3. Plug the adapter into
the wall outlet. Charge the
machine completely for at
least 4 hours prior to first use.
LED Display Status
During Charging
Battery Status Light Status
Charging Blinking red light (1 second)
Fully Charged Green light (on 10 minutes, then blinks every 1 minute)
Charger, Battery or Motor Error Red and green blinking light, contact Consumer Care
During Use
Battery Status Light Status
In Use Solid green light
Low Power Blinking red light
No Power Solid red light (3 seconds)
Brush Stall Solid red light, then machine shuts OFF
Using the 2-Way Folding Handle
1. Pull the 2-Way Folding
Handle release trigger to fold
the handle.
2. Fold the handle forward to
easily clean underneath low
places.
3. Fold the handle back for
easy storage.

4 BISSELL.com
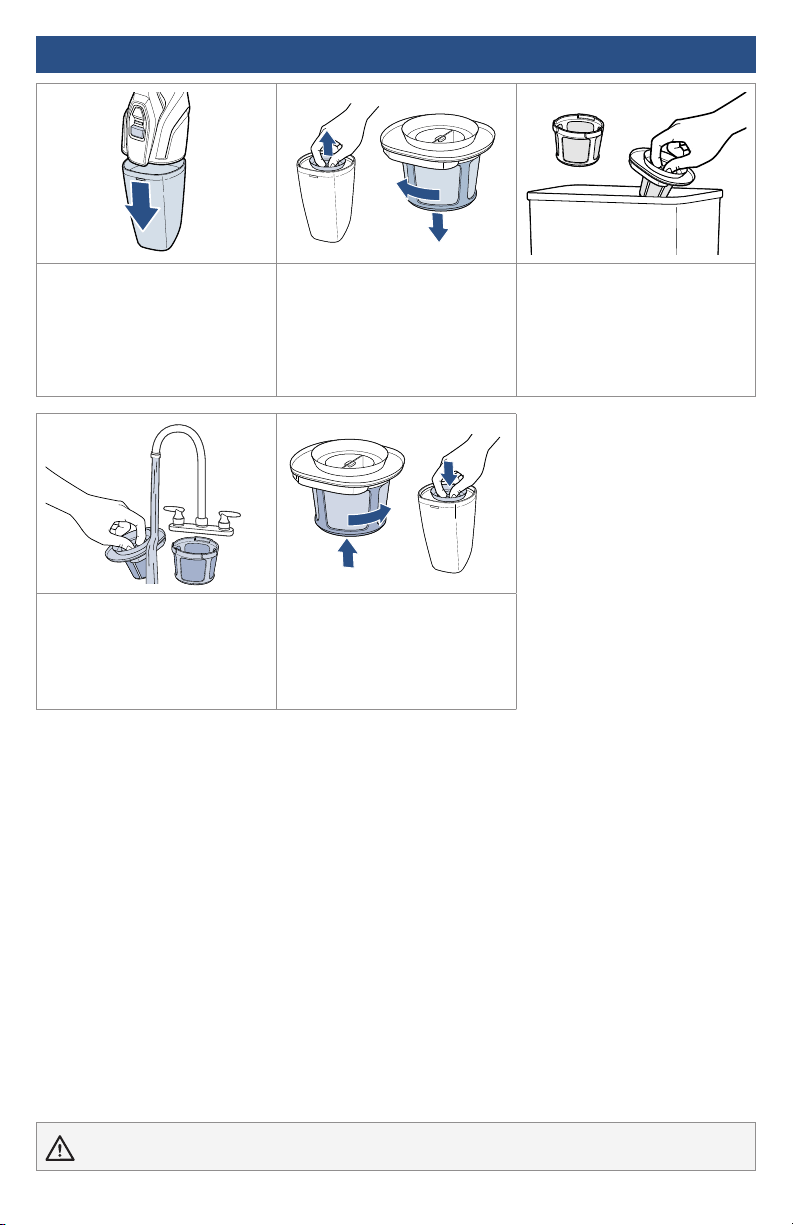
Emptying the Dirt Tank
Using the Hand Vacuum
1. Make sure the vacuum is
OFF. Remove the hand vacuum
by pressing the release button
on its top handle.
2. Hold the hand vacuum
vertically and press the release
button on the front to release
the dirt tank.
3. Grasp filter tabs and pull
up to remove filter assembly
and empty dirt into waste
container.
4. Replace filter assembly in
the dirt tank, then snap the dirt
tank back into place on the hand
vacuum.
1. Press the button on top of
the hand vacuum handle and
lightly pull to remove it from
the machine.
2. Press the power button to
begin cleaning.
3. Insert the desired tool firmly
into the hand vacuum nozzle.
WARNING To reduce the risk of fire, electric shock or injury, turn power OFF and disconnect plug from
electrical outlet before performing maintenance or troubleshooting.
BISSELL.com 5
Cleaning the Filters
1. Turn power OFF and remove
the dirt tank as directed in
the “Emptying the Dirt Tank”
section.
2. Grasp filter tabs and lift up
to remove the washable filter
assembly from the dirt tank.
Grip the filter assembly, turn
counter-clockwise and pull
down to remove filter from
filter screen.
3. Tap firmly against the inside
of a waste container to remove
any visible dirt.
4. Rinse the filter and screen
in warm water to clean. Let dry
completely.
5. Replace filter into the filter
screen and turn clockwise to
lock into place. Reattach filter
assembly into the dirt tank and
attach to hand vacuum until it
snaps securely in place.
WARNING Do not operate your machine with damp or wet filters or without filters in place.
6 BISSELL.com
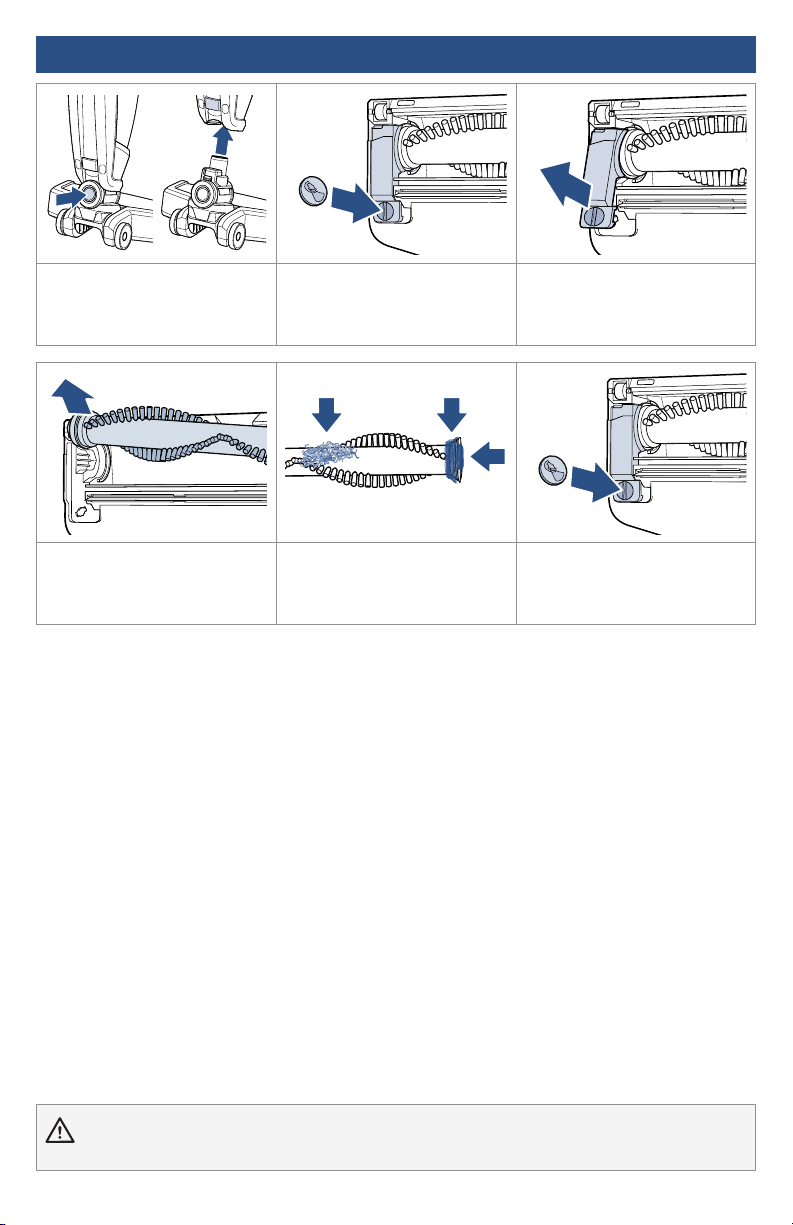
Maintaining the Brush Roll
1. Make sure the vacuum is
OFF. Press the vacuum foot
release button to disconnect it
from the vacuum.
2. Turn the foot over and find
the brush roll cover tab. Turn
the screw counter-clockwise
with a coin.
3. Slide the tab down to
unlock and lift the corner cover
piece.
4. Grasp the brush roll and
remove from the foot.
5. Remove hair wrap from
brush roll, brush roll endcap
and end of brush roll.
6. Place the clean brush roll
back into the foot and use a
coin to turn lock clockwise to
screw into place.
WARNING To reduce the risk of fire, electric shock or injury, turn power OFF and disconnect plug from
electrical outlet before performing maintenance or troubleshooting.

BISSELL.com 7
Problem Possible Cause Remedies
Vacuum won’t
turn ON
Battery isn’t fully charged. Charge battery. Follow charging battery
instructions on page 3.
Wrong charger is being used. Be sure to use only the charger supplied with
your product. The label on the detachable hand
vacuum will list which charger can be used.
Brush roll
not turning
Brush roll is jammed. Remove obstruction. Follow instructions on
page 6.
Brush roll needs to be reset. Turn machine OFF and clean the brush roll and
brush roll endcap area following instructions
on page 6. The LED light will reset when the
machine is turned ON.
Broken brush roll. Visit BISSELL.com to order replacement parts.
Vacuum
cleaner has
low suction
Dirt tank is full. Empty dirt tank.
Dirt tank isn’t installed
properly.
Position dirt tank correctly and snap firmly into
place.
Foot is loose. Make sure foot is fully inserted into body of
machine.
Filters need cleaning. Follow filter instructions on page 5.
Filters need replacing. Visit BISSELL.com to order replacement parts.
Clog or obstruction in foot
area.
Detach foot from body and look for and remove
clog from brush chamber.
Visible dirt
escaping from
cleaner
Dirt tank is full of debris. Empty dirt tank.
Filter assembly is missing or
installed incorrectly.
Check filter for correct installation.
Dirt tank installed incorrectly. Position dirt tank correctly and snap firmly into
place.
Vacuum won’t
charge
Wrong charger is being used. Use only the charger that comes with the
machine.
Hand vacuum may not be
installed in place properly.
Remove the hand vacuum and install it properly.
Vacuum won’t
turn on and
LED light is
solid red
Brush roll stalled by debris. Turn machine OFF and clear the brush roll and
brush roll endcap area following instructions
on page 6. The LED light will reset when the
machine is turned ON.
Note: Any other servicing should be performed by an authorized service representative.
Troubleshooting
Below are some of the issues you may run into. If you don’t see the issue you’re experiencing
below, visit support.BISSELL.com.
Warranty
1-Year limited warranty, may vary by state. Visit support.BISSELL.com or call 1-800-237-7691
for complete warranty information.

But wait, there’s more!
Join us online for a complete guide to your new product, including
troubleshooting, product registration, parts, and more.
Go to support.BISSELL.com.
VIDEOSINFOREGISTER PARTS SUPPORT
We’re Waggin’ Our Tails!
BISSELL® proudly supports BISSELL Pet Foundation® and its mission to
help save homeless pets. When you buy a BISSELL product, you help
save pets, too. We’re proud to design products that help make pet
messes, odors and pet homelessness disappear.
Visit BISSELLsavespets.com to learn more.
©2021 BISSELL Inc. All rights reserved.
Part Number 1625481 12/20 RevA
