
SELF-PROPELLED FIELD TRIMMER
HYFT60SP
Instruction Manual
YOU MUST read and understand the full safety instruction manual first.
!

Introduction
Thank You For Purchasing Your HYUNDAI Product
We work very hard to give all of our customers the best possible service. If you have any
problems, before leaving negative feedback, please contact us to give us a chance to resolve
the issue. We would be delighted if you left us positive feedback! Thank you for purchasing this
product.
Important!
This manual has been produced by Hyundai Power Products and should be kept with the
product. Please read and understand these instructions before you use your product. Failure to
do this may result in personal injury or damage to the product.
The safety precautions and warnings are to ensure your safety and protect you from harm or
damage to the product.
The information contained in this manual was accurate at the time of production, however
HYUNDAI Power Products may make modifications to the product without notification.
WARNING : READ THE INSTRUCTION BOOKLET THOROUGHLY BEFORE
USING THE MACHINE. Keep for future reference and pass it on if the machine is
loaned or sold to another user.
!

Contents
Features........................................................4-5
Unboxing..........................................................6
Unboxing Safety.....................................6
Box Contents..........................................6
Assembly.....................................................7-11
Assembly Safety.....................................7
Assemble Handle Bars...........................8
Attach Clutch Handles...........................8
Mount The Wheels.................................9
Fit The Protection Guard........................9
Mount The Trimmer Line......................10
Mount The Gas Lever...........................10
Mount The Start Cord..........................11
Preparation...............................................12-13
Adding Oil............................................12
Checking Oil Level................................12
Changing / Draining Oil........................12
Adding Fuel..........................................13
Starting / Stopping..................................14-16
Before Each Use..................................14
Starting.................................................15
Stopping...............................................16
After Each Use.....................................16
Operating........................................................17
Cutting Height Adjustment...................17
Maintenance.............................................18-25
Maintenance Safety..............................18
Checking Your Machine.......................18
Maintenance Schedule.........................19
Cleaning................................................20
Transportation......................................21
Storage............................................22-23
Spark Plug............................................24
Air Filter.................................................25
Troubleshooting............................................26
Technical Data.........................................27-28
Specifications.......................................27
Spare Parts...........................................28
Recycling And Disposal................................29
Our Product Range.......................................30
Useful Information.........................................31
Our YouTube Channel..........................31
Warranty...............................................31
Manual Updates...................................31
Returning Your Product........................31
Leaving A Review.................................31
Ordering Spare Parts............................31
Contact Us.....................................................32
Product Information......................................33
Information...........................................33
Service Record.....................................33
Notes...............................................................34
Declaration Of Conformity...........................35
19
4
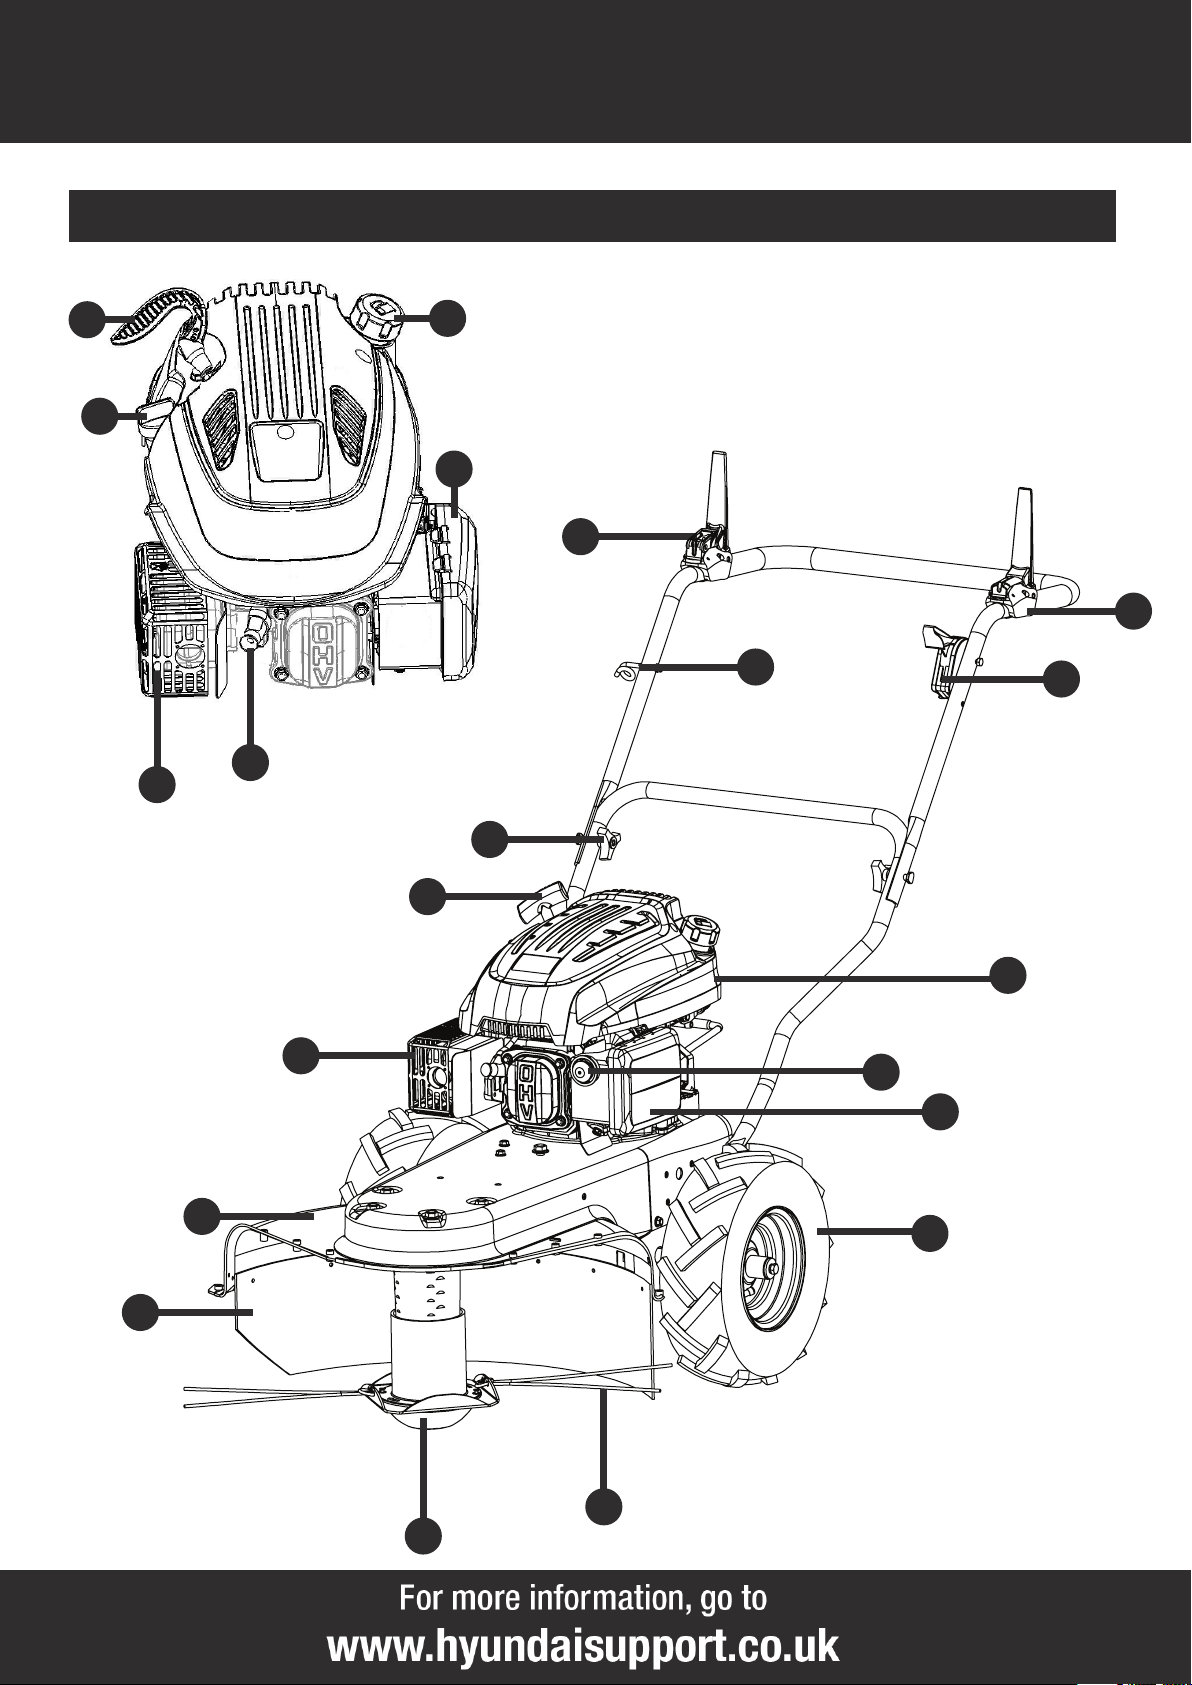
Features
HYFT60SP Features
10
2
3
4
5
7
6
8
9
1
11
12
13
14
15
15
16
17
10
18
12

5
Features
Trimmer Activation Handle
Engages the rotation of the trimmer head.
1
Self-Propelled Handle
Propels the machine forward. All you have to do is control the path the machine takes.
2
Throttle Lever
Controls engine speed.
3
Engine
173cc Hyundai engine.
4
Wheel
Two large heavy-duty wheels.
5
Trimmer Line
6
Trimmer Head
7
Rubber Cover
8
Guard
9
Start Cord
Pulling the starter grip operates the recoil starter to crank the engine.
HYFT60SP Features
10
Primer Button
Injects fuel directly into the carburettor for cold starts.
Air Filter
Prevents dust, dirt and other contaminants from getting into the engine.
12
11
Start Cord Holder
This holds the starter cord close to the handle.
13
Handle Knob
Use this to adjust and tighten the handle bars.
Exhaust
WARNING - HIGH TEMPERATURE.
15
14
Spark Plug
16
Dipstick / Oil Filler Cap
Fill engine oil here.
17
Fuel Tank Cap
Fill fresh unleaded petrol here.
18

19
6
Unboxing
WARNING! Unboxing and assembling the machine should be done on a flat, stable surface
with enough room. Disposal of the packaging should be done in accordance with the local
regulations in force.
Carefully remove the product from the packaging and examine it for any sign of damage caused
during shipping. Lay the contents out and check them. If any part is damaged or missing, you
must not use the machine. Contact HYUNDAI Power Products immediately. You must keep the
packaging material in case the machine needs to be returned or repaired.
WARNING! Some of the packaging material may be harmful to children. Keep out of reach of
children.
Ensure that you have all the accessories and tools you need for assembly and operation including
the suitable personal protective equipment.
Unboxing Safety
!
!
!
• User Manual
• Safety Manual
• HYFT60SP
Box Contents

7
Assembly
CAUTION - This guide is meant to serve as a quick reference for operating your HYUNDAI
machine. We always advise reading the manual in full before operation.
CAUTION - For OUTDOOR use ONLY. Petrol machines produce carbon monoxide –
poisonous, colourless and odourless gas that can cause serious injury or death. Petrol is highly
flammable, always handle with extreme care and in a well ventilated area.
NOTE - Images may vary depending on model.
NOTE - The machine can be supplied with some parts already assembled. Prior to assembly,
check all items have been received.
NOTE - This machine is shipped without fuel and oil and MUST be filled before use. Failure to
do so may cause damage to the engine that will not be covered by warranty.
Assembly Safety
!
!
!
!
!
!
We recommend that you fill out the information on page 33. If you need to contact an
authorised dealer or customer service for information on servicing, you may need to
provide this information.
There is also a service record so you can keep track of your machine service dates.

19
8
Assembly
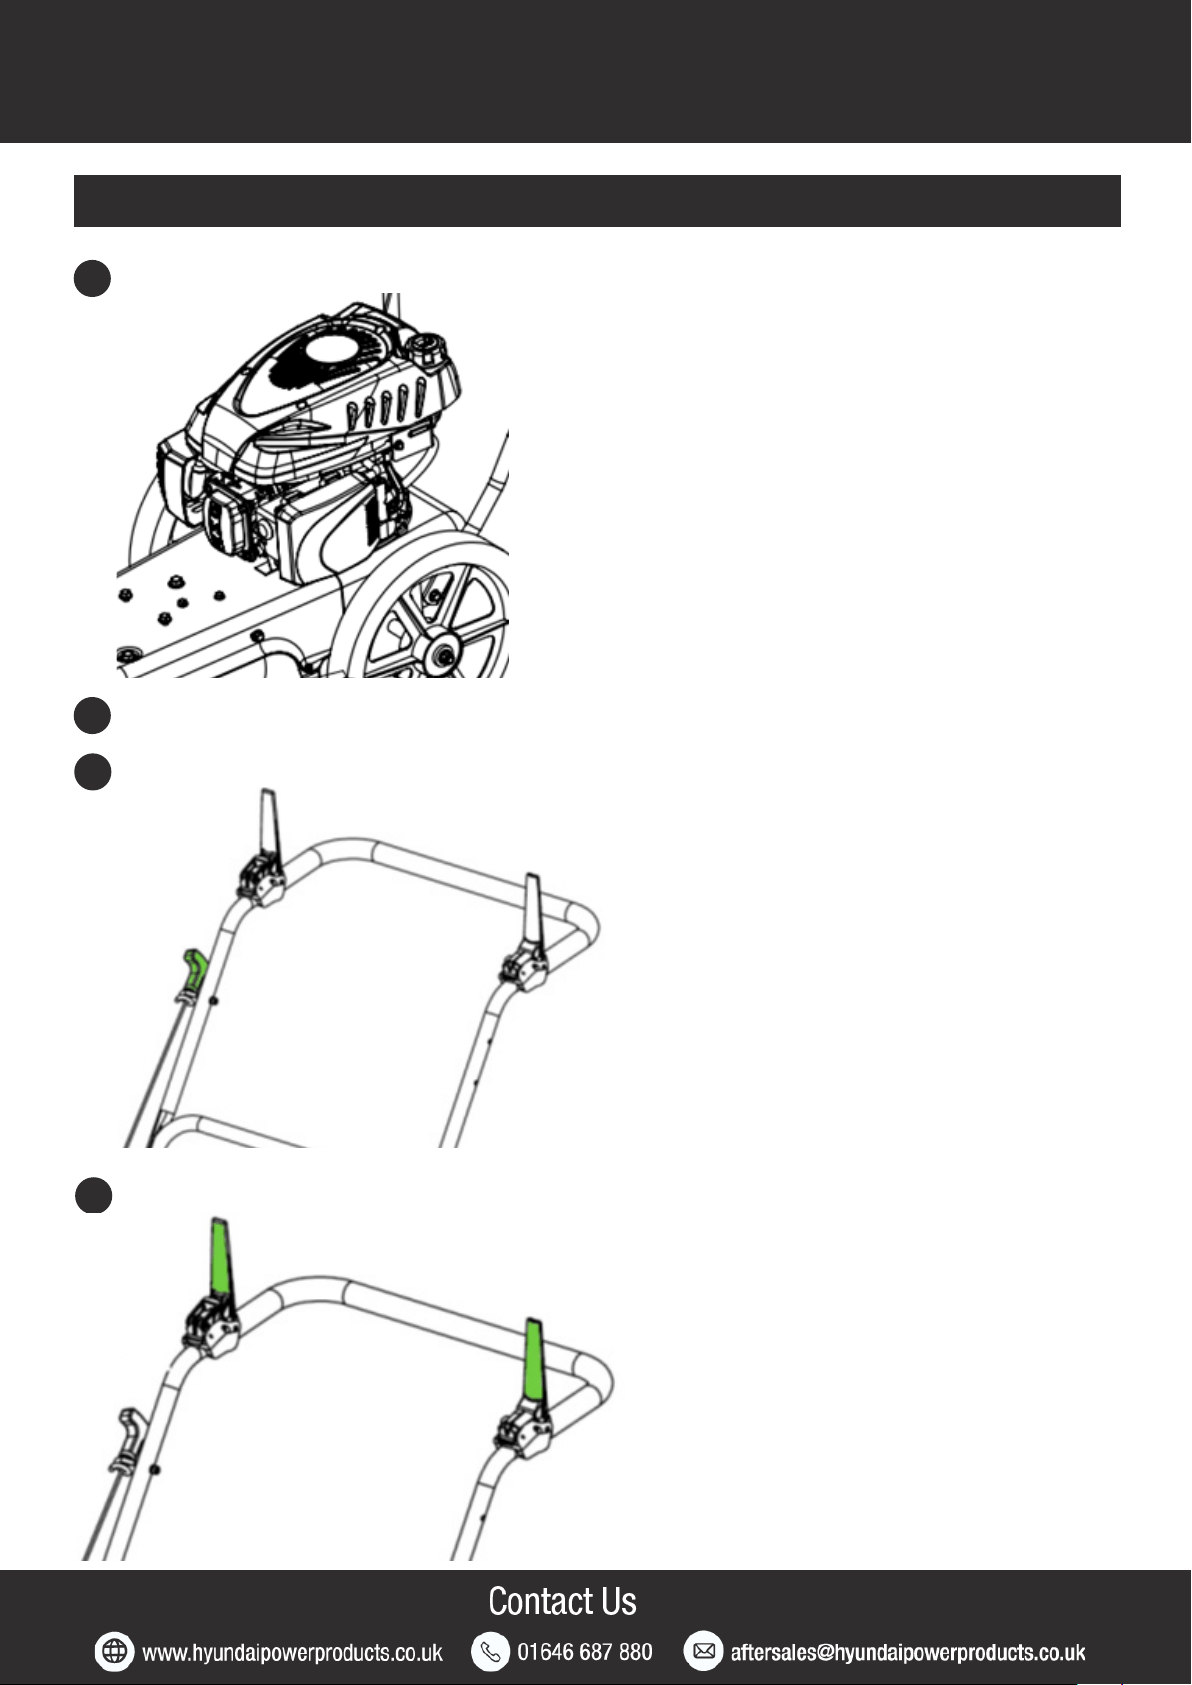
Mount lower handlebar with 4 bolts on the console. After that mount the upper handlebar. The
spacers need to be on the inside (as shown).
Step 1 : Assemble Handle Bars
Attach the clutch handles on the handlebar, (as shown). Cable which comes out from right side of
chassis, should be attached to right side of handlebar. Equivalent for left side.
Step 2 : Attach Clutch Handles
9
Assembly
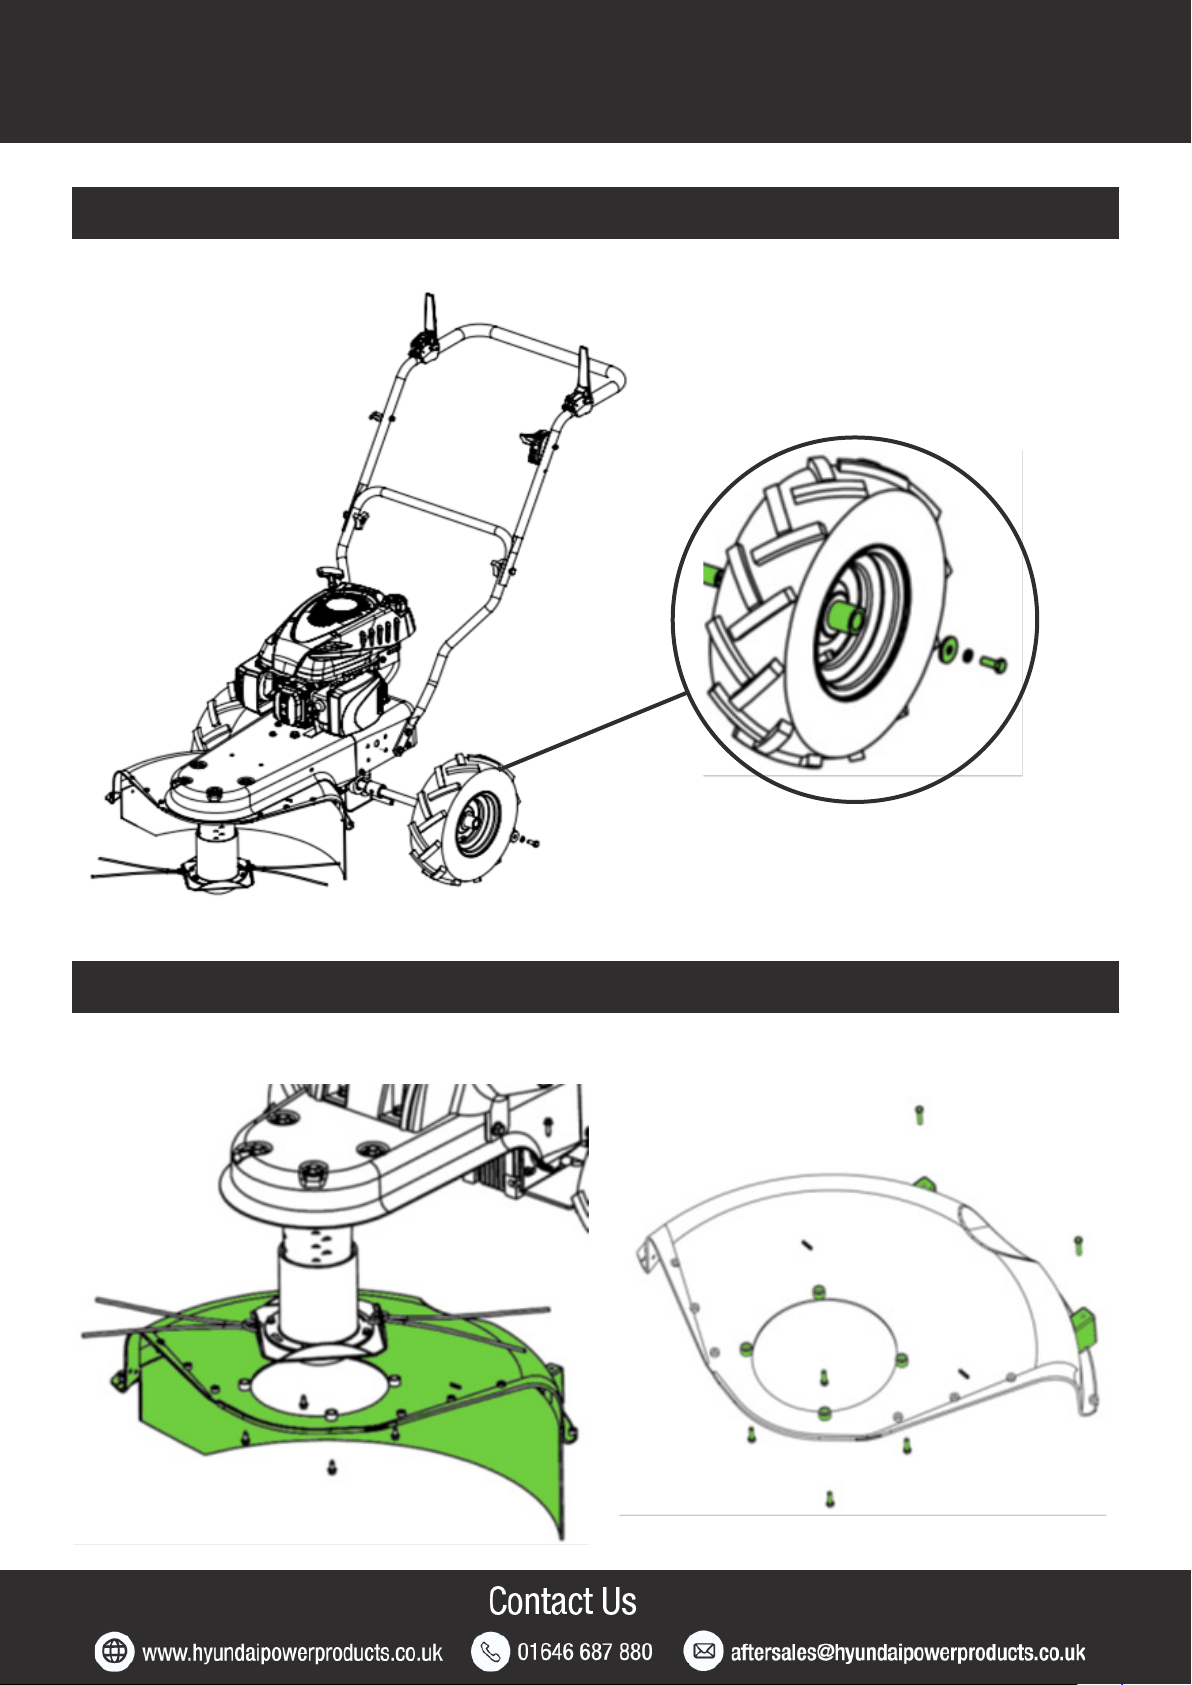
Mount the wheels with the bolts (as shown). The spacers need to be between the wheel and the
bolt.
Step 3 : Mount The Wheels
Fit the protection guard on the machine (as shown).
Step 4 : Fit The Protection Guard
1 2 3
19
10
Assembly
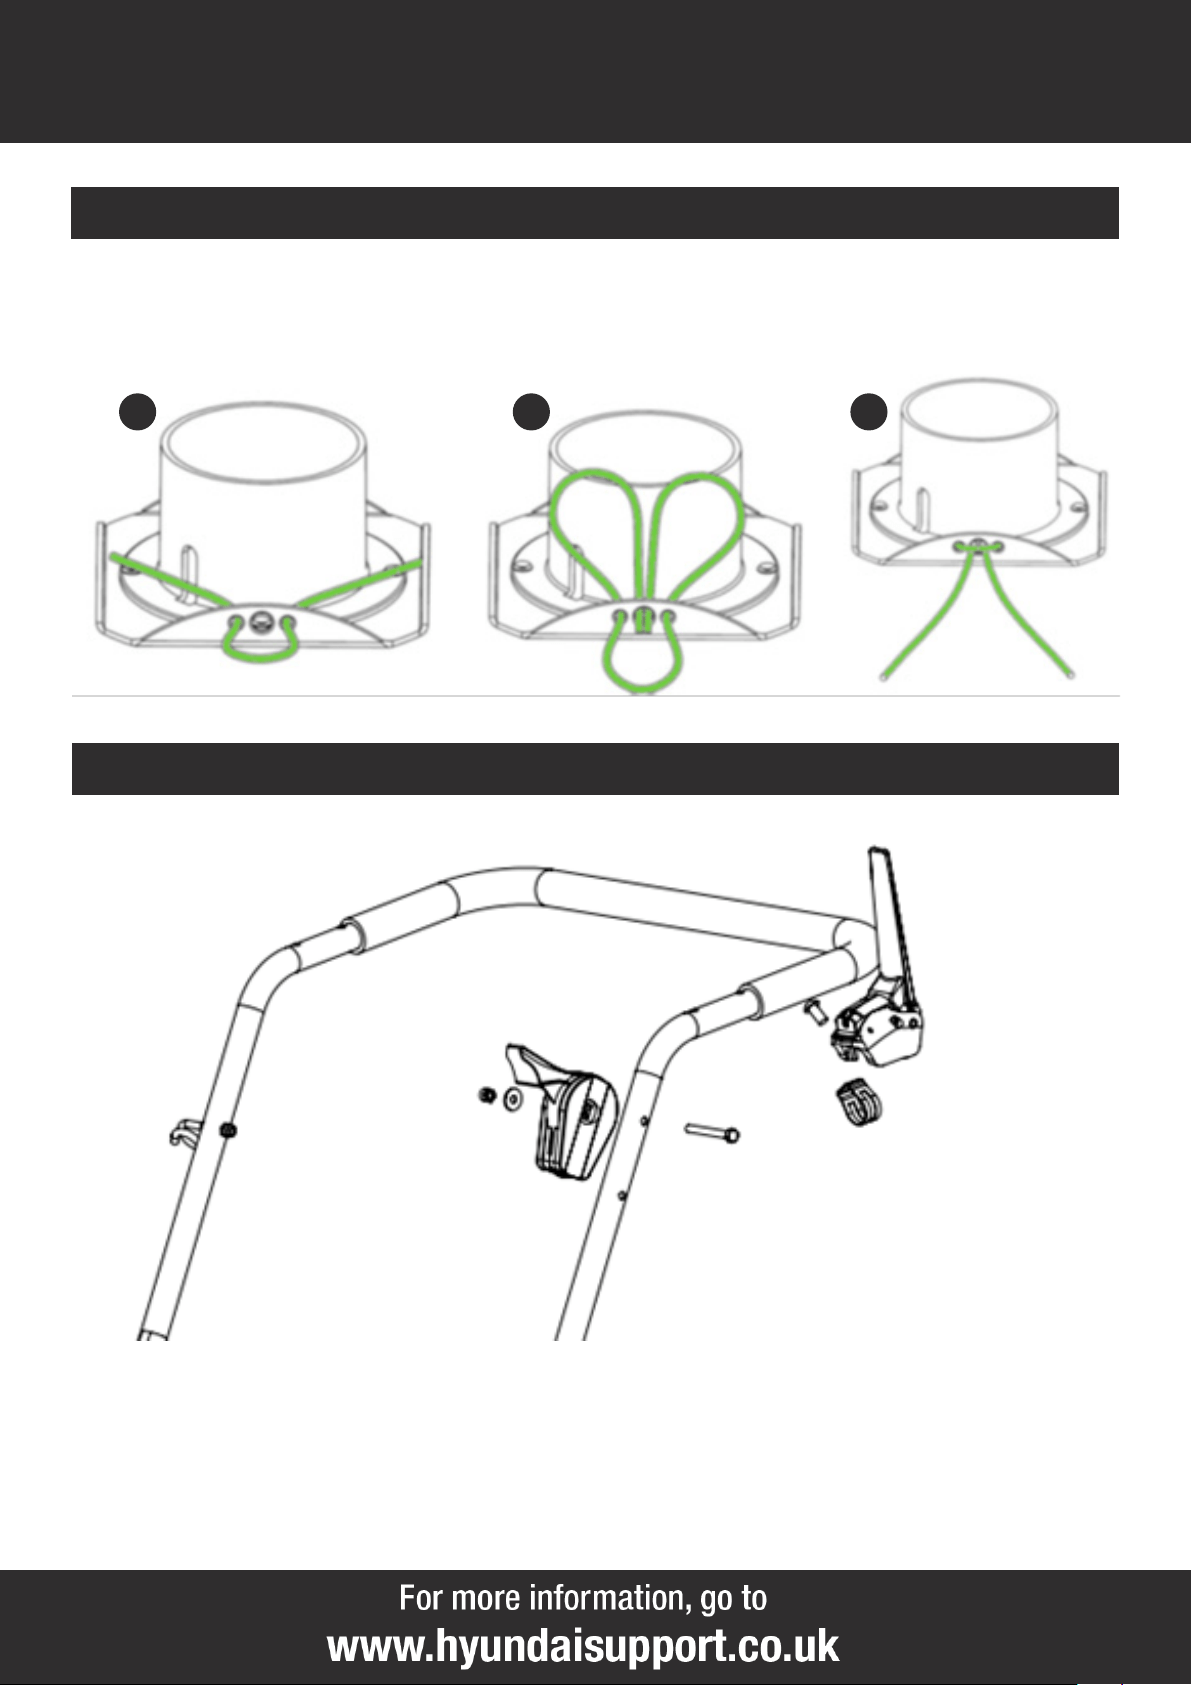
Mount the trimmer line. Follow the procedure in the steps shown below.
The trimmer line must have length of max. 52 cm and must always be attached in pairs, one each
side of the trimmer head.
Step 5 : Mount The Trimmer Line
Mount the throttle lever on the handle, as shown.
Step 6 : Mount The Gas Lever

11
Assembly
Pull gently the starter cord from the engine. Attach the starter grip on the rack of handlebar.
Step 7 : Mount The Start Cord

19
12
Preparation
Oil Type : SAE 30 or 15w40 Engine Oil
Oil Capacity : 600ml
Adding Oil
NOTE - The machine is delivered without oil in the engine. All machines are tested and inspected
so there may be some residual oil left in the machine so please fill with caution.
Remove the oil filler cap.
1
Fill with fresh SAE 30 or 15W40 engine oil to the upper mark on the
dipstick. DO NOT overfill.
2
Once the correct amount of oil has been added, refit the dipstick securely.
3
Changing / Draining Oil
To reduce fire hazards, check there is no oil and/or fuel leaks on a regular basis.
It is highly recommended to change the engine oil every 100 hours or 12 months. This will ensure
the machine will function properly over time.
There are different ways you can empty the oil:
• The oil can be discharged at a specialised servicing centre.
• You can use an oil syringe to suction the oil out through the filler spout, bearing in mind you
may need to repeat the operation several times in order to completely empty the tank.
• Gently tilt the machine with the air filter facing upwards and allow the excess oil to drain from
the dipstick port, in to a suitable container.
Remember to top-up with oil before using the machine again.
Checking Oil Level
Remove the oil filler cap and wipe the dipstick clean.
1
Remove the dipstick and check the oil level. It should be up to the upper mark on the dipstick.
2
If the oil level is too low, add SAE 30 or 15W40 engine oil to the upper mark on the dipstick. DO
NOT overfill. The oil level should not be above the upper mark on the dipstick. If you do overfill,
read the ‘Changing / Draining Oil’ section below for more information on draining oil.
3
Once the correct amount of oil has been added, refit the dipstick securely.
4

13
Preparation
Fuel Type : Fresh Straight Unleaded Petrol
Fuel Capacity : 1L
Adding Fuel
NOTE - The machine is delivered without petrol. All machines are tested and inspected so there
may be some residual petrol left in the machine so please fill with caution.
Remove the fuel tank cap.
1
Fill the fuel tank with fresh straight unleaded petrol. Allow a 25mm gap from the top of the tank,
then refit the cap securely. DO NOT mix petrol with oil and clean up any spills immediately.
NOTE - DO NOT overfill. The fuel tank only needs to contain enough fuel to complete the days
work. If you run out of fuel, refilling must only be done once the engine has cooled down. Fuel
stored within the machine for 28 days or more can go stale and should be drained before further
use.
NOTE - Make sure not to drip petrol onto the plastic parts to prevent damaging them and remove
all traces of spilt petrol immediately. The warranty will not cover damage to plastic parts caused
by petrol.
2
Refit the fuel filler cap securely and clean up any fuel spilt before starting the engine.
3
Make sure you read the fuel safety before handling fuel.

19
14
Starting / Stopping
Before Each Use
Always ensure that the machine is in a safe working condition. Inspect and check safety devices
and guards and check all nuts, bolts and screws are secure.
1
Check the oil level and fill the fuel tank.
2
Make sure you know how to stop the machine and ensure you are familiar with emergency stop.
3
The gears are delivered pre-greased. However, always ensure they are well greased before each
use.
4
Start the machine following the instructions and stay clear of the machine’s moving parts.
5
YOU MUST read and understand the full safety instruction manual before starting the
machine.
!
CAUTION - For OUTDOOR use ONLY. Petrol machines produce carbon monoxide –
poisonous, colourless and odourless gas that can cause serious injury or death. Petrol is highly
flammable, always handle with extreme care and in a well ventilated area.
!
15
Starting / Stopping
Starting
Pump the primer bulb 3-6 times. See below.
1
Set the throttle lever to the max. position.
2
Pull the start cord to start the engine. Always feed the start cord back into the engine by hand.
3
4
Activate the trimmer activation handle and the self-propelled handle.

Stopping
Release both clutch handles.
1
Set the throttle lever to the stop position.
2
19
16
Starting / Stopping
After Each Use
Examine the machine for damage.
1
Clean the machine if necessary.
2
CAUTION - The engine and exhaust will remain hot for a while after use. Ensure the engine
and exhaust has cooled before carrying out any maintenance, refuelling or storage.
!

17
Operating
Cutting Height Adjustment
You can adjust the cutting height on the trimmer head between 45-90mm.
To adjust the trimmer height, loosen the two 4mm allen screws. Then you can adjust the trimmer
head up and down. Tighten both screws again once the cutting height is chosen.
1 2
3
Each scale line is 7mm apart.

19
18
Maintenance
Maintenance Safety
!
IMPORTANT - Routine and accurate maintenance is essential for maintaining original
machine safety and performance levels.
WARNING - Before cleaning or doing maintenance work, you need to stop the engine,
disconnect the spark plug cable and read the relevant instructions. You need to wear proper
clothing and protective gloves whenever your hands are at risk.
If there are worn or damaged parts, never use the machine. Faulty or worn-out parts must be
replaced and not repaired. You must only use original spare parts. The use of non-original and/or
incorrectly fitted parts will jeopardize the safety of the machine. This may also cause accidents or
personal injuries for which the manufacturer is under no circumstance liable or responsible.
Any maintenance operations or adjustments not explained in this manual must be carried out
by your Dealer or a specialised Service Centre with the necessary knowledge and equipment to
ensure that the work is done correctly maintaining the machine’s original safety level. Any
operations performed in unauthorised centres or by unqualified persons will invalidate the
Warranty and all obligations and responsibilities of the Manufacturer.
Be very careful during adjustment of the machine to prevent entrapment of the fingers
between moving parts and fixed parts of the machine.
!
!
!
!
!
Checking Your Machine
When checking your machine, we recommend you:
• Check for worn or damaged parts
• Make sure all nuts, screws and bolts are tight
• Make sure all warning stickers are in place and not damaged
• Check for oil / fuel leaks

Maintenance Schedule
19
Maintenance
Routine and accurate maintenance is essential for maintaining original machine safety and
performance levels.
It is recommended that the following maintenance schedule is followed.
Maintenance Before
Each Use
After Each
Use
Every 3
Months Or
25 Hours
Every 6
Months Or
50 Hours
Every
Year Or
100 Hours
Every Two
Years Or
250 Hours
Check Machine.
See page 18.
X
Clean Machine.
See page 20.
X
Change Engine
Oil
See page 12.
X
Spark Plug
See page 24.
Check Replace
Air Filter
See page 25.
Clean Replace
Drain Fuel And
Clean Tank
X
Check Fuel Pipe
For Leaks
Take To Dealer.
X
Check Valve
Clearance
Take To Dealer.
X
Clean
Combustion
Chamber
Take To Dealer.
X

19
20
Maintenance
CAUTION - DO NOT use a hose pipe or pressure washer to clean the engine. Water can
damage the engine or contaminate the fuel system.
NOTE Engine must be switched off and spark plug lead disconnected.
!
!
After Each Use
• You must remove grass and mud from the machine to prevent it from drying. This will cause
problems the next time the machine is used.
• Wipe the machine down with a damp cloth.
• For larger build ups of debris, use a scraper or similar product.
• Dry the machine completely to prevent rust from forming.
• Make sure not to drip petrol onto the plastic parts to prevent damaging them and remove all
traces of spilt petrol immediately. The warranty will not cover damage to plastic parts caused by
petrol.
• Remove the trimmer head from the trimmer axle to remove wedged grass etc from the rotor
shaft.
Regularly
• Paint on internal chassis parts may start to flake over time due to abrasive action of cut grass. If
this happens, you should touch-up with rust-proof paint to prevent rusting that could corrode the
metal. You can also use a light oil or silicone spray to prevent rust.
• Avoid using solvents when cleaning plastic parts. Most plastics are susceptible to damage from
various types of commercial solvents and may be damaged by their use.
Cleaning

21
Maintenance
Whenever the machine is to be handled, lifted, transported or tilted, you must:
Transportation
Wear sturdy work gloves.
1
Hold the machine at the points that offer a safe grip, taking into account the weight and
relative distribution of the same.
2
Use an appropriate number of people for the weight of the machine and the characteristics of
the vehicle or the place where it must be placed or collected.
3
You must make sure that machine movements to not cause petrol leaks, damage or injuries.
4
During transport, make sure to fasten the machine securely with cables or straps.
5
The machine must be transported on a flat surface.
6

19
22
Maintenance
Short Term
After use, please follow the below steps before storing your machine.
Storage
Allow the engine to fully cool down.
1
Clean the machine. See the ‘Cleaning’ section.
2
Store the machine following the guidelines above.
3
Where To Store
!
Store in a cool, dry place away from sources of ignition and varying changes in temperature.
Store on a flat and level surface with all wheels on the ground.
DO NOT stack other items on top of the machine when in storage.
Store the machine in a safe place, out of the reach of children or anyone who is not familiar
with operation.
To reduce fire hazards, keep the engine, silencer, and petrol storage area free of grass,
leaves, or excessive grease. Do not leave containers full of cut grass inside storage areas.
DO NOT store the machine with fuel in the tank in an area where the fuel vapours could reach
an open flame, a strong heat source or a spark.
DO NOT store a machine that has not been given time to fully cool down. Engine must be
cooled down fully before storage.
!
!
!
!
!
!

23
Maintenance
Long Term
If storing the machine for a period of 30 days or more, you must follow proper storage and
winterisation guidelines to avoid any possible issues with the machine. Incorrect storage can lead
to possible fueling or engine issues that will not be covered by the warranty.
Allow the engine to fully cool down.
1
Drain all the fuel from the fuel tank and then run the machine until it has completely run out of
fuel to clear the remaining fuel from the fuel lines and carburettor.
2
Drain the oil from the engine.
3
With the machine drained from all fluids, follow the cleaning instructions in the ‘Cleaning’
section.
4
Follow the maintenance section and check, service or replace serviceable items if required.
Visually inspect the machine and replace or repair any worn parts.
5
Lightly grease all moving parts on the machine.
6
Refill engine oil with new SAE 30 or 15w40 engine oil, fill to the upper mark on the dipstick.
7
Remove the spark plug and pour 1 teaspoon of fresh engine oil down the cylinder bore. Cover
the spark plug hole with a lint free clean cloth, ensuring no dirt or debris falls into the cylinder
chamber and gently pull the recoil starter handle to coat the cylinder bore with the fresh oil.
Refit the spark plug.
8
Preparation To Re-Use
Check oil level before using.
1
Check spark plug is inserted correctly.
2
Fill engine with fresh unleaded petrol that has not been stored for periods of more than 30 days.
3

19
24
Maintenance
Spark Plug
For good performance, the spark plug must be properly gapped and free of deposits.
You MUST allow the engine to cool down before carrying out any maintenance.
1
Always replace with the same model spark plug as fitted.
2
To check spark plug, remove spark plug cap.
3
Remove spark plug using the supplied spark plug wrench.
4
Clean the spark plug electrode, making sure that there is no damage to the insulator or electrode.
5
The spark plug gap should be 0.70mm to 0.80mm. Check the gap by using a feeler gauge. Adjust
as necessary by carefully bending the side electrode to achieve the correct gap.
6
Refit the cleaned and adjusted spark plug by hand to avoid cross-threading.
7
After spark plug seats then tighten as necessary with a spark plug wrench but avoid
over-tightening.
8
Re-attach the spark plug cap.
9
25
Maintenance
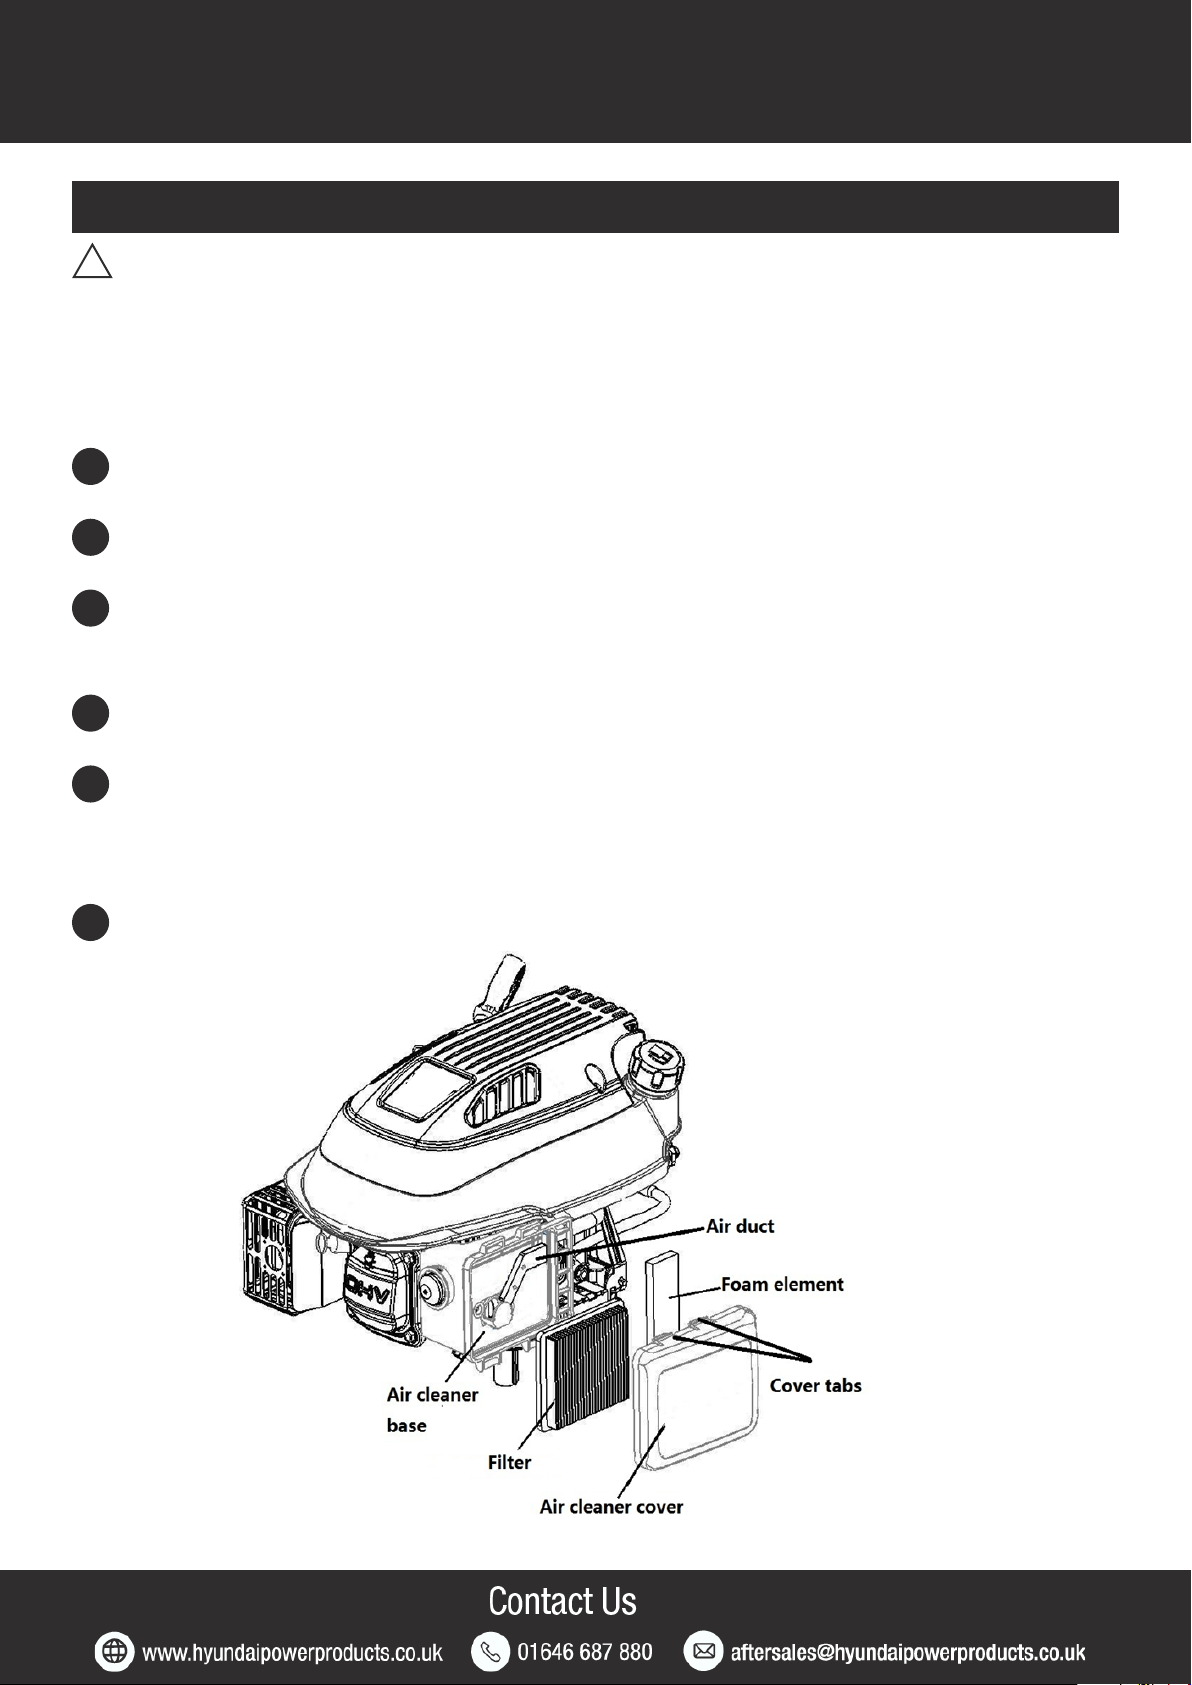
Air Filter
To gain access to the air filter press the 2 cover tabs.
1
Remove filter, check for contamination and clean or replace as required.
2
Clean the filter by tapping it several times on a hard service to remove dirt, or blow air through it
using an air gun not exceeding 30psi.
3
Also clean the foam pre-filter. Wash in detergent and let dry.
4
Never use a brush to clean the filter it will only drive dirt into the fibres of the filter.
Wipe dirt from the air cleaner body by using a moist rag, be careful to prevent dirt or
debris entering in to the carburettor.
5
Reinstall the filter and cover.
6
CAUTION - A dirty air filter will restrict the air flow to the carburettor, which will reduce engine
efficiency.
When using the machine in very dusty areas you must clean or replace the air filter more often.
Never operate the machine without the air filter being fitted it can cause damage to the engine
which is not covered by warranty.
!

19
26
Troubleshooting
Problem Possible Cause Possible Solution
Engine runs
poorly
Engine
Overheats
Poor trimming
performance
1
2
3
4
5
6
7
8
9
10
Connect spark plug.
Prime engine.
Inspect or replace spark plug.
Add fuel.
Clean carburettor or fuel line.
For carburettor cleaning, take the
unit to an authorised service centre.
Wait several minutes before starting.
Move throttle lever to correct position.
Drain oil fuel and add fresh petrol.
Inspect lever and wire. Replace if
damaged or defective.
11
Clean or replace air filter.
1
2
3
4
5
6
7
8
9
10
11
Spark plug disconnected.
Engine not primed.
Defective or incorrectly gapped spark
plug.
Fuel tank empty or low.
Dirty carburettor or fuel line.
Carburettor dirty.
Engine flooded.
Throttle control lever incorrect
position.
Stale petrol.
Defective throttle control lever or wire.
Dirty air filter.
1
2
3
4
Bad spark plug.
Dirty air filter.
Carburettor out of adjustment.
Stale petrol.
1
2
3
4
Replace spark plug.
Replace air filter.
Adjust carburettor. Take the unit to an
authorised service centre.
Drain old petrol and replace with fresh
fuel.
1
2
3
Engine cooling system clogged.
Carburettor out of adjustment.
Oil level is low.
1
2
3
Clean debris system, engine screen
and cooling fins.
Adjust carburettor. Take the unit to an
authorised service centre.
Add oil.
1
Trimmer line length is too short.
1
Replace the line.
1
2
3
4
Set screws for trimmer head is lose.
Trimmer line lengths are substantially
different.
Loose nuts or bolts.
Broken trimmer head.
1
2
3
4
Tighten set screws.
Adjust trimmer line to approximately
equal lengths.
Check all bolts and nuts, including
engine bolts.
Replace broken part.
Trimmer
vibrates
Engine does
not start

27
Technical Data
Specifications
Model HYFT60SP
Engine Type IC175
Engine Size 173cc
Engine Power 3kW
Max. Engine Speed 2800rpm
Fuel Tank Capacity & Fuel Type 1L Unleaded Petrol
Oil Capacity & Oil Type 600ml SAE30 or 15W40
Rated Speed 2800rpm
Drive Type Self-Propelled
Start Method Recoil
Height Adjustment Yes
Working Height 45-90mm
Working Width 60cm
Trimmer Line 4mm
Wheel Size 13”
Measured Sound Level 104dB(A)
Guaranteed Sound Level 104dB(A)
Vibrations 4.2m/s2
Net Weight 45kg

19
28
Technical Data
Spare Parts
Part Part Number
Recoil IC175RECOIL
Wheel HYFT60SPWHEEL
Throttle Cable HYFT60SPTHROTTLECABLE
Clutch Cable HYFT60SPCLUTCHCABLE
Engine Oil SAE 30 or 15W40 600MLSAE30OIL
Only use original spare parts: The use of non-original and/or incorrectly fitted parts will jeopardize
the safety of the machine, may cause accidents or personal injuries for which the Manufacturer is
under no circumstance liable or responsible.

29
Recycling And Disposal
We do not offer a takeback scheme for the recovery of Waste Electrical Electronic
Equipment (WEEE) & Batteries. Instead the responsibility to dispose of WEEE and/or
Batteries is passed onto you by us.
So when it becomes necessary to dispose of your machine you must take it to your
local Civic Amenity Site. For further information please contact your local Authority
for disposal advice.
You MUST make sure that all unused oil and fuel is disposed of correctly either beforehand
or at your local Civic Amenity Site.
• Under NO circumstances must any fuel or oil be put down any drains.
• Certain products contain WEEE waste which should not be disposed of in your domestic waste.
• You MUST recycle WEEE in accordance with your local authority or recycling centre.
• Certain products contain batteries which should not be disposed of in your domestic waste.
• You MUST recycle batteries in accordance with your local authority or recycling centre.
• Unwanted packaging and materials should be stored and taken to a recycling centre so it can
be disposed of in a manner which is compatible with the environment.
We are a Member of the VALPAK National Compliance Scheme and our registration number is
RM08660. For further information about disposal please contact your Local Authority.
You can also get more advice and guidance about recycling at the following website
http://www.recycle-more.co.uk
Should you pass this product on to another user either sold or loaned, you MUST pass on this
user manual. This will make sure that all other users can use and maintain this machine safely.
1. Environmental protection should be a priority of considerable importance when using the
machine, for the benefit of both social coexistence and the environment in which we live. Try not
to cause any disturbance to the surrounding area.
2. You must comply with local regulations and provisions for the disposal of packaging, oils,
petrol, filters, damaged parts or any elements which have a strong impact on the environment.
This waste must not be disposed of as normal waste. It needs to be separated and taken to
specified waste disposal centres where the material will be recycled.
3. You must comply with local regulations for the disposal of waste materials after mowing.
4. When disposing, do not pollute the environment with the machine, but hand it over to a
disposal centre, in accordance with the local laws in force.
Recycling And Disposal
Environmental Protection

Generators
Leisure Inverter, Petrol, Diesel And Built-In
Motorhome Generators
Pressure Washers
Petrol, Diesel And Electric Pressure Washers
Water Pumps
Submersible, Clean And Dirty Water And
Professional Chemical Water Pumps
Lawnmowers
Petrol, Cordless, Electric, Roller, Self Propelled,
Electric Start And Robotic Lawnmowers
Grass Trimmers And Brush Cutters
Petrol, Cordless, Electric And Wheeled Grass
Trimmers And Brush Cutters
Chainsaws
Petrol, Cordless And Electric Chainsaws
Hedge Trimmers
Petrol And Cordless Hedge Trimmers
Leaf Blowers
Petrol, Electric, Cordless, Backpack And 3 -in-1
Leaf Blowers
Log Splitters
Horizontal, Vertical, Petrol And Electric Log
Splitters
Wood Chippers
Petrol And Electric Start Wood Chippers
Tillers
Petrol Garden Tiller And Cultivator
Earth Augers And Trenchers
Petrol Earth Augers And Heavy Duty Trenchers
Compactor Plates
Petrol Compactor Plates
Cement Mixers
Portable Electric Cement Mixers
If you would like more information on any of
these products, please contact our sales team
on 01646 687880 or visit our website
www.hyundaipowerproducts.co.uk
Mini Dumpers
4-Wheel Drive Mini Dumpers And Tracked
Dumpers
Yard Sweeper
Self Propelled Yard Sweeper Power Brush
Scarifiers
Petrol Lawn Scarifier And Aerator
Stump Grinders
Petrol 4-Stroke Stump Grinders
Welders And Plasma Cutters
MIG, TIG, MMA, ARC Welders And Plasma Cutters
Power Tools And Tool Chests
Electric And Cordless Power Tools And Filled Tool
Chests
Vacuum Cleaners
Wet And Dry Vacuum Cleaners
Engines
Petrol And Electric Start Engines
Battery Chargers / Starters
6V, 12V, 24V Battery Chargers, Jump Starters And
Hydraulic Floor Jack
Air Compressors
Home, Domestic, DIY And Professional Use Air
Compressors
Lighting Towers
Mobile Lighting Towers With Diesel Generators
Portable Power Stations
Camping Power Packs And Solar Chargers
And More
We Are Constantly Expanding Our Range With
New Products
19
30
Our Product Range

31
Useful Information
Check Out Our YouTube Channel
Our videos on YouTube include:
• Unboxing
• Assembly of your machine
• How to service your machine
• Products in use
• ‘How To’ videos
• Product features
Go to www.hyundaisupport.co.uk or search ‘Hyundai Power Products’ in YouTube.
Warranty
Proof of purchase will be required before you make a warranty claim.
Full warranty terms and conditions can be found on the HYUNDAI POWER PRODUCTS website:
www.hyundaipowerproducts.co.uk
Manual Updates
Our manuals are constantly being reviewed and updated. Should you find an error, omission or
something unclear, please contact us for assistance.
We reserve the right to make any modifications without prior notice whenever necessary.
Our latest manuals are also placed online.
All our manuals can be downloaded at: www.hyundaipowerproducts.co.uk
Returning Your Product
If you are returning your product, please contact the dealer for their returns policy.
Leaving A Review
We work very hard to give all of our customers the best possible service. If you have any
problems, before leaving negative feedback, please contact us to give us a chance to resolve the
issue. We would be delighted if you left us positive feedback!
To leave a review, please go to: uk.trustpilot.com/review/hyundaipowerequipment.co.uk
Ordering Spare Parts
Only use original spare parts: The use of non-original and/or incorrectly fitted parts will jeopardize
the safety of the machine, may cause accidents or personal injuries for which the Manufacturer is
under no circumstance liable or responsible.

19
32
Need Help? Talk To Our Experts
Our friendly aftersales team will be more than happy to help you.
Phone
Call our team on 01646 687880, open Monday-Friday 8.30am-5pm.
Email
Online Live Chat
Go to www.hyundaipowerproducts.co.uk
Live chat is open Monday-Friday from 8.30am-5pm.
Post
Genpower Limited, Isaac Way, Pembroke Dock, Pembrokeshire, SA72 4RW, UK.
Contact Us

33
Product Information
Date Of Purchase: ........................................................................................................................
Dealer Name:.................................................................................................................................
Dealer Phone:................................................................................................................................
Model Number:.............................................................................................................................
Serial Number:..............................................................................................................................
As soon as you have purchased the machine, we recommend that you fill out the
following. If you need to contact an authorised dealer or customer service for
information on servicing, you may need to provide the following information.
The model number and serial number can be found on the grey specification sticker on
your machine.
1st Service
Date Of Service..............................
Next Service Due...........................
2nd Service
Date Of Service..............................
Next Service Due...........................
3rd Service
Date Of Service..............................
Next Service Due...........................
4th Service
Date Of Service..............................
Next Service Due...........................
Information
Service Record

19
34
Notes

35
Declaration Of Conformity
EC Declaration of Conformity
We hereby declare that the machine detailed in this declaration complies to all the relevant
provisions of the following EC directives.
• 2006/42/EC The Machinery Directive
• 2014/30/EU Annex ll Electromagnetic Compatibility Directive
• 2016/1628/EC The Emission of Gaseous and Particulate Pollutants from internal Combustion
engines
• 2000/14/EC Noise Emissions in the Environment by Equipment for use Outdoors.
And is in conformity with the applicable requirements of the following documents:
• EN ISO 3744:2010
• EN ISO 11094:1991
• EN ISO 12100:2010
• EN ISO 1679-1:1988/A1:2011
• EN ISO 14982:2009
• EN ISO 14910:2007/A1:2009
Declaration for 2000/14/EC Noise Emissions in the Environment by Equipment for use Outdoors.
Notified Body for EC Directive 2000/14/EC TÜV SUD (Shanghai) Co., Ltd.
Model Type Cutting Width Measured
Sound Power
Guaranteed
Sound Power
Engine Speed
(rpm)
HYFT60SP
HYYW70
Petrol Field
Trimmer
Petrol Yard
Weeder
600mm
700mm
104dB(A)
104dB(A)
104dB(A)
104dB(A)
2800
2800
Product Details:
Brand: Hyundai
Model: HYFT60SP, HYYW70
Description: Petrol Rotary Trimmer
Name and address of technical documentation holder and EU distributor:
Genpower Ltd, Isaac Way, Pembroke Dock, Pembrokeshire, SA72 4RW, UK.
Signed by: Roland Llewellin, Managing Director
Date: 06/07/2020

Importer:
GENPOWER LTD
Isaac Way, London Road,
Pembroke Dock, UNITED KINGDOM, SA72 4RW
T: +44 (0) 1646 687 880 F: +44 (0) 1646 686 198
www.hyundaipowerproducts.co.uk
Imported/Distributed by Genpower Ltd for The United Kingdom & Ireland
Licensed by Hyundai Corporation, Korea
