Loading ...
Loading ...
Loading ...
E-63
To perform magnetic declination correction
Important!
• While performing the correction operation, keep the watch level without
moving it.
1. In the Digital Compass Mode, pull out the crown.
2. Press
B
twice.
• This will cause DE
C and the current magnetic declination setting
to appear on the digital display.
3. Rotate the crown to change the magnetic declination direction and
angle settings as desired.
• Magnetic declination angle direction settings are described below.
OFF
:
No magnetic declination correction performed. The magnetic
declination angle with this setting is 0°
.
E
: When magnetic north is to the east (east declination)
W
: When magnetic north is to the west (west declination)
• You can select a value within the range of W 90° to E 90° with
th
ese settings.
• You can disable (OFF) ma
gnetic declination correction by pressing
A
and
C
at the same time.
• The illustration, for example, shows the value you should input
an
d the direction setting you should select when the map shows a
magnetic declination of 1° west.
4. After calibration is complete, push the crown back in.
l
l
l
l
l
l
l
l
l
l
l
l
Magnetic declination
angle value
Magnetic declination angle
direction value (E, W, or OFF)
E-62
6. Turn over the watch so its face is pointed at the ground.
7. As shown in the illustration, as the watch is pointed downwards and
parallel with the ground, press
A
.
• This starts calibration of Point 3.
• WA
IT i
s shown on the display while calibration is being performed.
• The watch will beep once when calibration is successful. OK wil
l
also appear on the display.
• If the watch beeps twice and
1 is displayed again, perform the
operation from step 3 again.
8. Push the crown back in to complete the calibration operation.
ground
AL
E-61
4. Rotate the watch 180 degrees, still pointed upwards.
5. With the watch still pointed upwards and parallel with the ground, press
A
.
• This starts calibration of Point 2.
•
WAIT is shown on the display while calibration is being
performed.
• When calibration is successful, the words TURN an
d OVER will
alternate on the display.
• If
1 is displayed again, perform the operation from step 3 again.
l
l
l
l
l
l
l
l
l
l
E-60
• If two beeps sound and the display in step 1 appears again, perform the operation from step 2
again.
3. Push the crown back in.
• This completes the calibration operation.
To perform 3-point calibration
Important!
• Proper declination correction will not be possible if the watch is on a
metal surface or a magnetized surface.
• Make sure that you calibrate the fi rst two points carefully so they are
pointed 180 degrees away from each other.
• Calibrate the third point by carefully turning the watch over, so the face
points 180 degrees from its position when pointed upwards.
1. In the Digital Compass Mode, pull out the crown.
2. Press
B
.
• This will cause
1 to appear on the digital display, with up arrow ( )
fl a s h i n g .
3. As shown in the illustration, as the watch is pointed upwards and
parallel with the ground, press
A
.
• This starts calibration of Point 1.
• WAIT w
ill be shown on the digital display while calibration of Point
1 is in progress. OK, Turn180° will appear on the digital display if
calibration is successful, and then
2 will appear.
• If
1 is displayed again, press
C
again and re-measure.
l
l
l
l
l
l
l
l
l
l
ground
LA
E-59
Note
• Allow your wrist to turn as you move your arm.
• Separate your arm from your body as much as possible as you move it.
• The calibration measurement result can be confi rmed by the sound and display. Move your arm
for 15 seconds or more until you understand the result.
• When calibration is successful, a beep will sound. Also OK wi
ll be displayed.
E-58
Figure 8 calibration and 3-point calibration precautions
• You should perform fi gure 8 calibration or 3-point calibration in an environment that is the same as that
where you plan to be taking direction readings. If you plan to take direction readings in an open fi
eld,
for example, calibrate in an open fi eld.
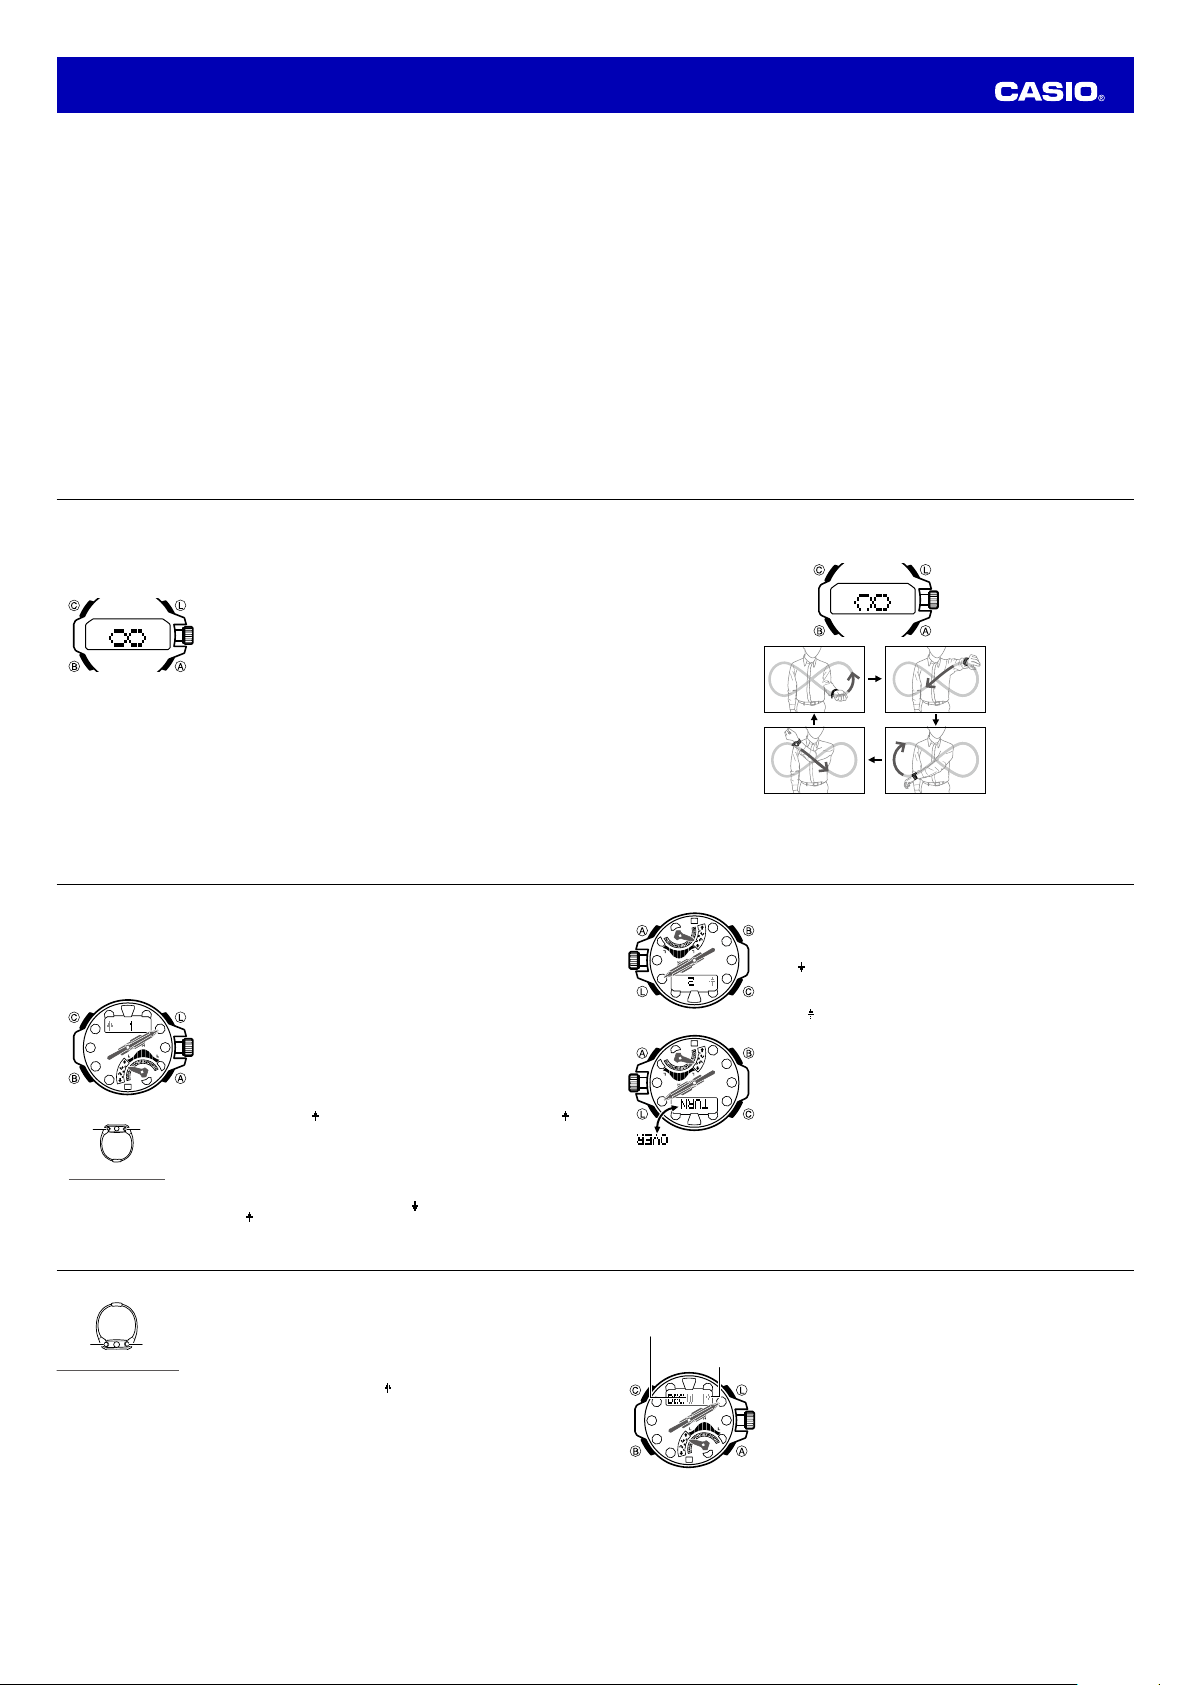
To perform fi gure 8 calibration
1. In the Digital Compass Mode, pull out the crown.
2. Press
A
.
• Move your arm in a fi gure 8 pattern as shown in the illustration.
• This will cause a fi gure 8 calibration animation to appear on the
watch display. Start moving your hand after confi rming that the
animation is displayed.
E-57
Calibrating the Bearing Sensor
You should calibrate the bearing sensor whenever you feel that the direction readings being produced by
the watch are off.
•
Figure 8 Calibration, 3-point Calibration
You should perform calibration whenever direction readings produced by the watch do not match those
of another reliable compass, and before setting off on a trek or climb. Leave the watch on your wrist
when performing fi
gure 8 calibration. When performing 3-point calibration, remove the watch from your
wrist. Both calibration methods calibrate the bearing sensor. You can use either method for calibration.
Important!
• If the readings produced by the digital compass of this watch are different from those of the other
compass, perform fi
gure 8 calibration or 3-point calibration of the digital compass to ensure more
accurate readings. Accurate measurements and/or calibration will not be possible in an area exposed
to strong magnetic force and indoors (especially inside reinforced concrete structure). In this case,
moving outdoors, away from the source of magnetism for measurement and calibration is
recommended.
•
Magnetic Declination Correction
With magnetic declination correction, you input a magnetic declination angle (difference between
magnetic north and true north), which allows the watch to indicate true north. You can perform this
procedure when the magnetic declination angle is indicated on the map you are using. Note that you can
input the declination angle in whole degree units only, so you may need to round off the value specifi
ed
on the map. If your map indicates the declination angle as 7.4°, you should input 7°. In the case of 7.6°
input 8°. For 7.5° you can input 7° or 8°.
E-56
Note
• The watch will return to the Timekeeping Mode about 60 seconds after the direction reading
op
eration is complete.
• Pressing
B
wi
ll return to the Timekeeping Mode even if a reading operation is in progress.
Important!
• If the second hand does not point exactly at 12 o’clock after you perform step 2 above, perform the
operation under “Hand Home Position Adjustment” (page E-40) to adjust it.
• If the digital display contents start to fl ash after you perform a reading operation, it means that
abnormal magnetism has been detected. Move away from any potential source of strong magnetism
and try taking a reading again. If the problem occurs when you try again, continue to keep away from
the source of strong magnetism, perform fi
gure 8 calibration or 3-point calibration, and then try taking a
reading again. For more information, refer to “To perform fi gure 8 calibration” (page E-58), “To perform
3-point calibration” (page E-60) and “Location” (page E-65).
Digital Compass Readings
• After the fi rst reading is obtained, the watch will continue to take digital compass readings automatically
each second for up to 60 seconds. After that, the reading operation will stop automatically.
• The margin of error for the angle value and the direction indicator is ±11 degrees while the watch is
horizontal (in relation to the horizon). If the indicated direction is northwest (
NW
) and 315 degrees, for
example, the actual direction can be anywhere from 304 to 326 degrees.
• You can calibrate the bearing sensor if you suspect the direction reading is incorrect.
• Any ongoing direction reading operation is paused temporarily while the watch is performing an alert
operation (daily alarm, Hourly Time Signal, countdown timer alarm) or while illumination is turned on (by
pressing
L
). The direction reading operation resumes for its remaining duration after the operation
that caused it to pause is fi
nished.
Operation Guide 5477
Loading ...
Loading ...
Loading ...