Loading ...
Loading ...
Loading ...
E-55
To take a direction reading
The watch’s Digital Compass corrects to level automatically when it is diffi cult to control your posture while
mountain climbing, etc. (Auto Level Correction)
•
- - -
is displayed when the angle is too great.
1. Point the 12 o’clock position of the watch in the direction you want to read.
2. While in the Timekeeping Mode or a sensor mode, use
A
to cycle through the sensor modes until
COMP
appears on the display.
• See “Selecting a Mode” (page E-30). A direction reading operation starts automatically when you enter
t
h
e Digital Compass Mode.
• Starting a digital compass operation will cause the second hand to move momentarily to the 12
o’c
lock position. After that, it will indicate magnetic north.
315°
0°
Objective
Bearing Indication
Meaning
Bearing to objective:
Northwest
N: North
E: East
W: West
S: South
Bearing
angle to
objective
North
E-54
Taking Direction Readings
You can use the Digital Compass Mode to determine the direction of north, and to check your bearing to a
destination.
• For information about what you can do to improve digital compass reading accuracy, see “Calibrating
the Bearing Sensor” (page E-57) and “Digital Compass Precautions” (page E-64).
E-53
To record the barometric pressure
While taking barometric pressure readings, hold down
A
for at least two seconds.
• This records the barometric pressure along with the current date and time.
• The watch will return to the Barometer Mode screen automatically after recording is complete.
Barometer Precautions
• The pressure sensor built into this watch measures changes in air pressure, which you can then apply
to your own weather predictions. It is not intended for use as a precision instrument in offi cial weather
prediction or reporting applications.
• Sudden temperature changes can affect pressure sensor readings. Because of this, there may be
some error in the readings produced by the watch.
E-52
To calibrate the pressure sensor
1. Take a reading with another measurement device to determine the
exact current barometric pressure.
2. While in the Timekeeping Mode or a sensor mode, use
A
to cycle
through the sensor modes until
BARO
appears on the display.
3. Pull out the crown. This will cause the current barometric pressure
reading value to fl ash on the digital display.
4. Rotate the crown to adjust the barometric pressure value.
• The calibration unit is 1 hPa (0.05 inHg).
• To return the currently fl ashing value to its initial factory default
s
e
tting, press
A
and
C
at the same time. OFF will appear at
the fl ashing location for about one second, followed by the initial
default value.
5. After you complete calibration, push the crown back in.
Recording Barometric Pressure
You can use the procedure in this section to create a record of your current barometric pressure, along
with the date and time of the reading. You can later recall a record to view it.
Important!
• The watch has memory that is shared for storage of up to 40 data records, including barometric
pressure data. Note that recording new data when there are 40 data records in memory causes the
oldest record to be deleted automatically to make room for the new record. See “Viewing Recorded
Data” (page E-87).
l
l
l
l
l
l
l
l
l
l
l
l
l
E-51
To enable or disable barometric pressure change indication
In the Timekeeping Mode or Barometer Mode, hold down
C
for at least two seconds. Wait until
INFO
appears on the left side of the display and the current setting (
ON
or
OFF
) fl ashes on the right. Use this
screen to enable or disable barometric pressure change indication.
•
BARO
is shown on the digital display while indication is enabled.
• The small hand acts as a barometric pressure change indicator while
ON
, and as a Tide Graph indicator while
OFF
.
• Barometric pressure change indication is not performed when there is
no signifi
cant barometric pressure change.
• Note that barometric pressure change indication will turn off
automatically 24 hours after you turn it on or if battery power goes low.
• Note that time calibration signal reception and power saving (page E-19)
are disabled while barometric pressure change indication is enabled.
• Note that barometric pressure change indication cannot be enabled
while the watch’s battery is low.
Pressure Sensor Calibration
The pressure sensor built into the watch is calibrated at the factory and normally requires no further
adjustment. If you notice serious errors in the pressure readings produced by the watch, you can calibrate
the sensor to correct the errors.
Important!
• Incorrectly calibrating the barometric pressure sensor can result in incorrect readings. Before
performing the calibration procedure, compare the readings produced by the watch with those of
another reliable and accurate barometer.
E-50
Important!
• To ensure proper results, take barometric readings under conditions where the altitude remains
constant.
Example
– In a lodge or campground
– On the ocean
• A change in altitude causes a change in barometric pressure. Because of this, correct readings are
impossible. Do not take readings while ascending or descending a mountain, etc.
Enabling or Disabling Barometric Pressure Change Indication
You can enable or disable barometric change indication as desired. When indication is enabled, the watch
will take a barometric pressure reading every two minutes, regardless of the mode it is in.
• When
BARO
is shown on the display, it means that barometric pressure change indication is enabled.
• When
BARO
is not on the display, it means that barometric pressure change indication is disabled.
E-49
Barometric Pressure Change Indications
Your watch analyzes past barometric pressure readings and uses a barometric pressure change indication
to inform you about changes in pressure. If the watch detects a signifi cant change in barometric pressure,
it will beep, a fl ashing arrow that indicates the direction of the pressure change will be displayed, and the
small hand will point to the arrow mark. This means you could start taking barometric pressure readings
after reaching a lodge or camp area, and then check the watch the next morning for changes in pressure.
You will then be able to plan your day’s activities accordingly. Note that you can enable or disable display
of the barometric pressure change indicator as desired.
Barometric pressure change is indicated in the Barometer Mode, while the Barometric Pressure Graph is
displayed in the Timekeeping Mode (page E-33).
Reading the Barometric Pressure Change indication
Small Hand and Digital Display Meaning
Sudden fall in pressure.
Sudden rise in pressure.
Sustained rise in pressure, changing to a fall.
Sustained fall in pressure, changing to a rise.
• Barometric change indication is no performed if there has been no noteworthy change in barometric
pressure.
E-48
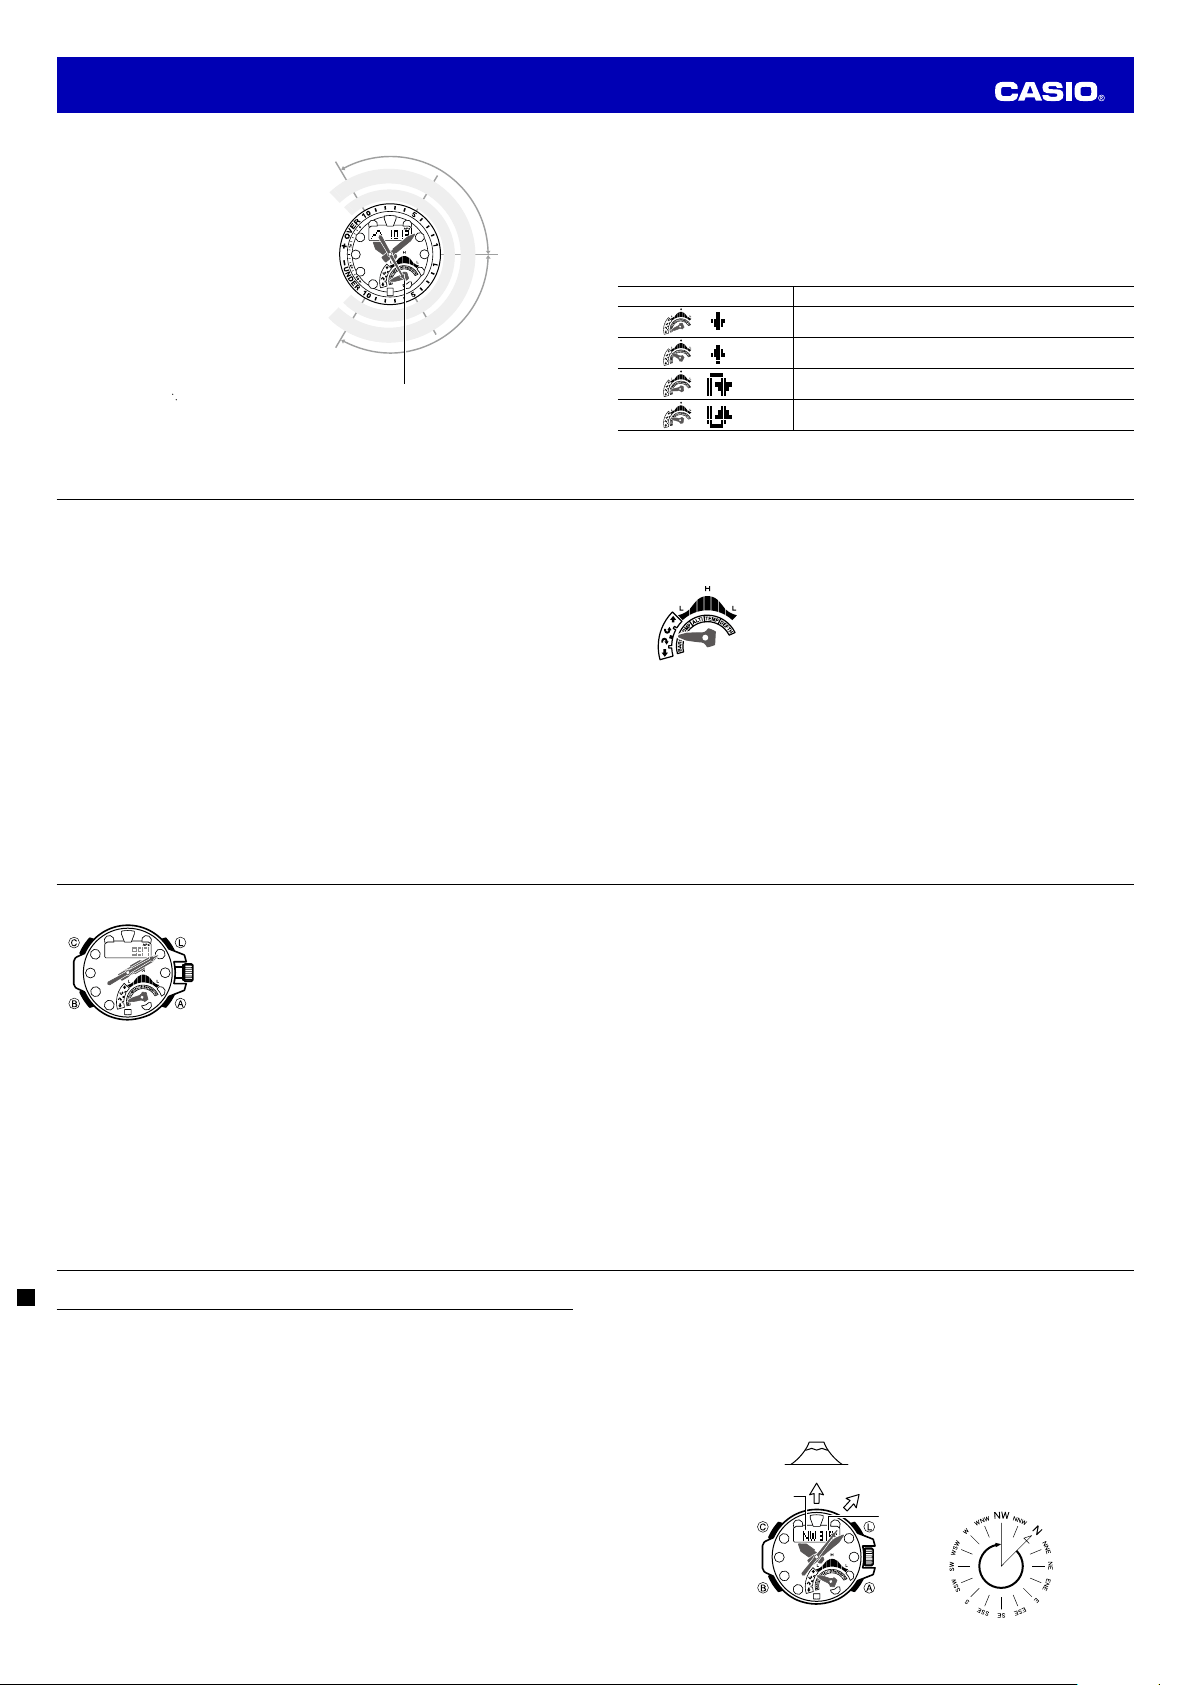
Reading Barometric Pressure Differential Pointer
Pressure differential is indicated in the
range of ±10 hPa (0.3 inHg), in 1-hPa (0.03
inHg) units.
• The nearby illustration, for example,
shows what the second hand would
indicate when the calculated pressure
differential is approximately – 5 hPa
(approximately –0.15 inHg).
• The second hand will point to
+ OVER
or
– UNDER
if the barometric
pressure differential is outside the
allowable range of the scale.
• The second hand will move to 9 o’clock
if a reading is outside the altimeter
measurement range, or if a reading error
occurs.
• Barometric pressure is calculated and
displayed using hPa as the standard.
The barometric pressure differential also
can be read in inHg units as shown in
the illustration (1 hPa
=
0.03 inHg).
• To toggle between barometric pressure
differential indication and the current
time seconds count on the digital
display, press
C
.
Current pressure
greater than most
recent measured
pressure
Current pressure
less than most
recent measured
pressure
inHg values
hPa values
Barometric pressure
differential pointer
–10
–5
5
–0.3
–0.15
0.15
00
0.3
10
Operation Guide 5477
Loading ...
Loading ...
Loading ...