R
R
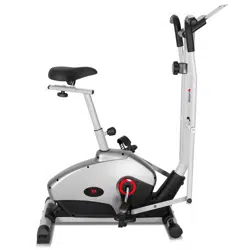
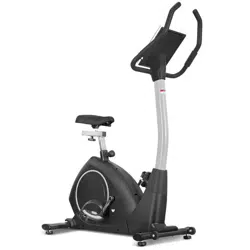
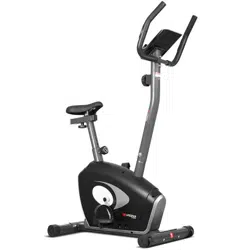
V-Cycle Smart Exercise
Bike with NeoWatt
USER MANUAL
NOTE:
Product may vary slightly from the item pictured due
to model upgrades. This manual may be subject to
updates or changes. Up to date manuals are available
through our website at www.lifespanfitness.com.au
Read all instructions carefully before using
this product. Retain this owner’s manual for
future reference.
IMPORTANT
All nuts and bolts are to be checked and tightened on
a regular basis. This includes pedals and other moving
parts. Failure to do so may cause damage to your
threads and void your warranty.
WARNING: Read all instructions before using this machine.
It is important your machine receives regular maintenance to
prolong its useful life. Failing to regularly maintain your machine
may void your warranty.
Please keep this manual with you at all times.
• The bike is for home use only.
• Please correctly connect the power adapter before use.
• To avoid injury, warm up before using the bike.
• Incorrect or excessive training can result in serious injury.
• To avoid accidents, keep the bike out of the reach of children and
pets.
• To avoid getting hurt, keep your hands away from any moving
parts of the bike.
• Use only original parts from the manufacturer. Changes or
modifications to this unit voids the warranty.
• In case of malfunction, stop using the bike immediately.
• Make sure to secure your feet with the pedal straps while using
the bike.
• The bike should be placed on a solid, level and horizontal
surface.
• Allow a clearance of 60cm on each side of the bike.
• Perform regular maintenance for optimal performance and
longevity. To ensure safety, the bike must be checked for wear
and damage on a regular basis.
• Children under the age of 14, persons with reduced physical,
sensory or mental capabilities, as well as persons with a lack of
knowledge must be given supervision or instruction before using
the bike. DO NOT allow children to perform maintenance without
supervision or to play with the bike.
• This adapter has passed CQC certification and can be used with
this bike only. Do not use it with any other products. In case of
any damage, please consult the manufacturer or an authorized
agency for replacement.
I. IMPORTANT SAFETY INSTRUCTIONS II. DAILY STORAGE AND MAINTENANCE
• This bike is for indoor home use only. Do not store the bike
outdoors, near water, or at high humidity levels.
• Please store in a place with shade and shelter to avoid any
damage to the surface.
• Inspect regularly all screws or parts that need fastening.
• Inspect bike seat regularly. Tighten the nuts whenever they
get loose. Inspect the cranks and pedals regularly. Tighten
them if necessary.
• Clean the bike regularly.
Product name:
Model:
Color:
Display:
Wireless
connection:
Equitment type:
Resistance type:
Drive:
Adaptor Input:
Adaptor Output:
Rated voltage:
Max weight:
Height range:
Equipment class:
Dimension:
Net weight:
SPECIFICATION
AI-POWERED EXERCISE
BIKE
MG-C05
Gray
Nixie tube
Bluetooth
Crank training
Speed independent
Belt drive
AC 100-240V, 50-60Hz
DC 24V, 2A
DC 24V
120kg
150-190cm
HB
1020 x 510 x 1250 mm
35kg
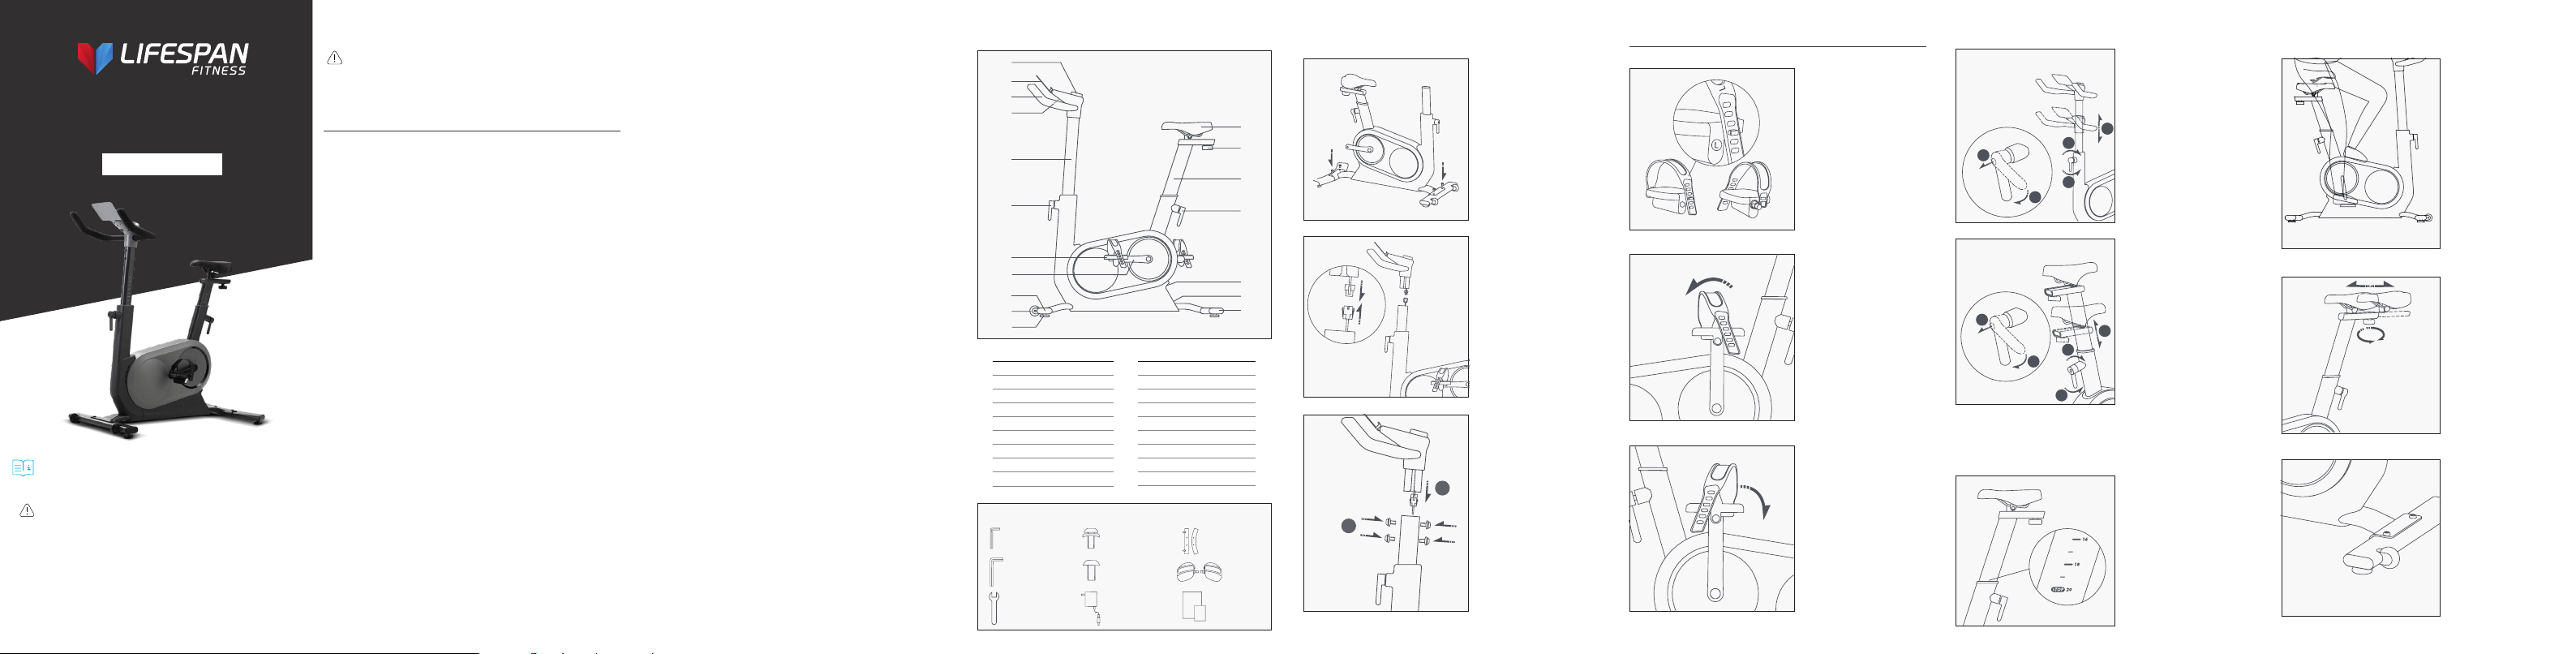
III. EXPLODED DIAGRAM
1
2
5
6
7
8
11
15
16
18
3
4
9
10
12
13
14
17
Part No. Description
1
Console
2
Pad holder
3
Handlebar
4
USB port
5
Console post
6
Handlebar holder
7
Pedal
8
Crank
9
Front stabilizer
Part No.
Description
10
Transport wheels
11
Leveling feet
12
Rear stabilizer
13
Power port
14
Power Switch
15
Seatpost holder
16
Seatpost
17
Seat adjuster
18
Saddle
TOOLS
5mm socket
head wrench x 1
Power Adapter x 1
Bike Stabiliser
x 2
Pedals x 2
User Manual x 1
5mm socket
head wrench x 1
15mm Allen
wrench x 1
M6 screws x 4
M10 screws x 4
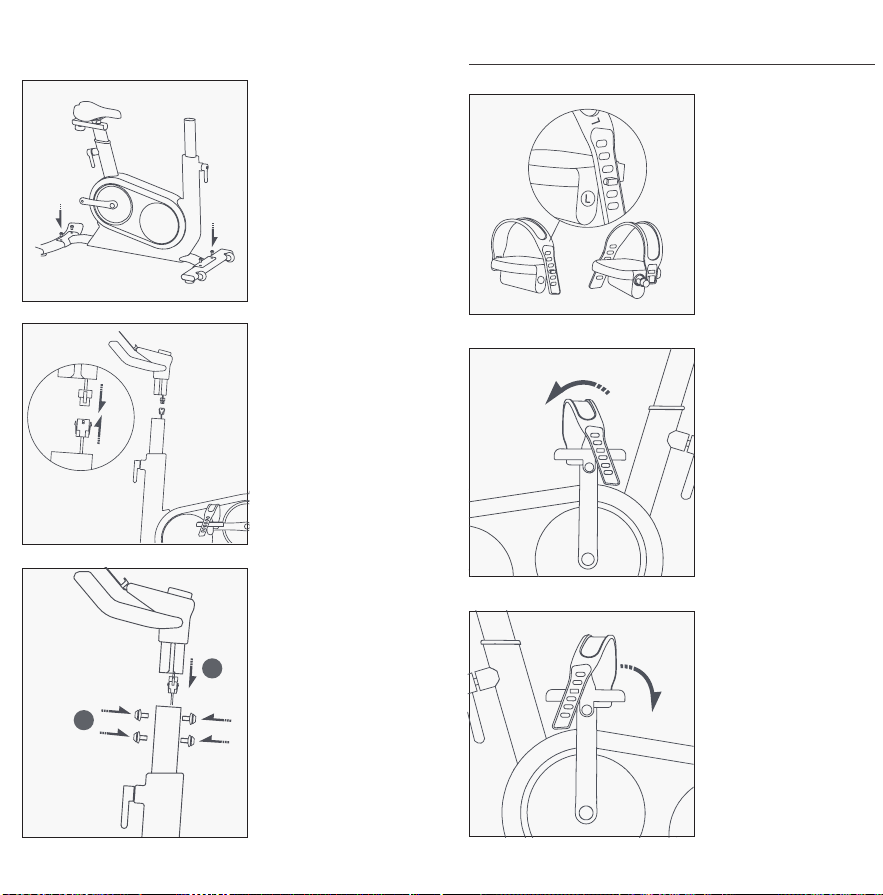
IV. ASSEMBLY INSTRUCTIONS INSTALL THE PEDALS
STEP 7. Handlebar Height Adjustment STEP 10. Set the Seat Height
STEP 1
Place the front and rear
stabilizer as indicated.
Manually tighten the
FOUR M10 screws.
Tighten with a 6mm Allen
wrench.
STEP 2
Connect the cord inside of
the handlebars to the cord
inside of the bike unit. Pay
attention to the direction
of the handlebars when
connecting.
STEP 3. Mount
Handlebars
First, manually spin the
FOUR M6 screws with
your hands as tight as
possible. Then, tighten
and lock in the FOUR M6
screws with the 5mm
Allen Wrench.
WARNING: Make sure to
place the screw shim
properly, with the
cambered surface clung
to the post.
1
2
STEP 4. Install
Pedal Straps
Feed the left (L) and right
(R) Pedal Straps into the
matching pedals; notched
side facing inwards.
L
L
STEP 5. Install
Left Pedal
STEP 8. Seat
Adjustment
Install the Left Pedal
(marked with an L) onto the
left crank. First, manually
tighten the screw
with your hands (turning
counter—clockwise).
Then, use the 15 mm
Open- End Wrench to fully
tighten (turning counter-
clockwise).
L
L
STEP 6. Install
Right Pedal
Install the Right PedaI
(marked with an R) onto
the right crank. First,
manually tighten the
screw with your hands
(turning clockwise). Then,
use the 15 mm Open-end
Wrench to fully tighten
(turning clockwise).
1. Turn the handlebar holder
counterclockwise to loosen
the console post.
2. Adjust the handlebar to a
proper height.
3. Turn the handlebar holder
clockwise to tighten.
4. Pull the handlebar holder
outwards.
5. Turn the handlebar holder
to a vertically downward
direction.
Sit on the saddle and
place you heel on the
pedal. Make sure the
crank arm which is
currently supporting
your foot is point down
and in line with the
seatpost. You are at
the correct seat height
if your leg is fully
extended. That means
you leg is straight, but
without overextending
your knee.
N
P
O
Q
R
1. Turn the Seatpost holder
counterclockwise to loosen
the console post
2. Adjust the seatpost to a
proper height.
3. Turn the Seatpost holder
clockwise to tighten.
4. Pull the Seatpost holder
outwards.
N
P
O
Q
R
5. Turn the Seatpost holder to a vertically downward direction.
Caution: It is important to keep the Seatpost holder vertically
downwards as projecting handles with interfere with your
movements.
STEP 9. Seat
Adjustment
Maximum height.
For you safety, make sure to
keep STOP mark inside the
frame while adjusting the
seat height.
STEP 11. Seat
Depth Adjustment
Turn the Below
Seat Knob counter
clockwise to loosen.
Move the seat forward
or back. Turn the
knob clockwise to
tighten.
STEP 12.
Bike Stabillization
Rotate each leveling
foot until the bike
rests firmly on the
floor.

R
R
V-Cycle Smart Exercise
Bike with NeoWatt
USER MANUAL
NOTE:
Product may vary slightly from the item pictured due
to model upgrades. This manual may be subject to
updates or changes. Up to date manuals are available
through our website at www.lifespanfitness.com.au
Read all instructions carefully before using
this product. Retain this owner’s manual for
future reference.
IMPORTANT
All nuts and bolts are to be checked and tightened on
a regular basis. This includes pedals and other moving
parts. Failure to do so may cause damage to your
threads and void your warranty.
WARNING: Read all instructions before using this machine.
It is important your machine receives regular maintenance to
prolong its useful life. Failing to regularly maintain your machine
may void your warranty.
Please keep this manual with you at all times.
• The bike is for home use only.
• Please correctly connect the power adapter before use.
• To avoid injury, warm up before using the bike.
• Incorrect or excessive training can result in serious injury.
• To avoid accidents, keep the bike out of the reach of children and
pets.
• To avoid getting hurt, keep your hands away from any moving
parts of the bike.
• Use only original parts from the manufacturer. Changes or
modifications to this unit voids the warranty.
• In case of malfunction, stop using the bike immediately.
• Make sure to secure your feet with the pedal straps while using
the bike.
• The bike should be placed on a solid, level and horizontal
surface.
• Allow a clearance of 60cm on each side of the bike.
• Perform regular maintenance for optimal performance and
longevity. To ensure safety, the bike must be checked for wear
and damage on a regular basis.
• Children under the age of 14, persons with reduced physical,
sensory or mental capabilities, as well as persons with a lack of
knowledge must be given supervision or instruction before using
the bike. DO NOT allow children to perform maintenance without
supervision or to play with the bike.
• This adapter has passed CQC certification and can be used with
this bike only. Do not use it with any other products. In case of
any damage, please consult the manufacturer or an authorized
agency for replacement.
I. IMPORTANT SAFETY INSTRUCTIONS II. DAILY STORAGE AND MAINTENANCE
• This bike is for indoor home use only. Do not store the bike
outdoors, near water, or at high humidity levels.
• Please store in a place with shade and shelter to avoid any
damage to the surface.
• Inspect regularly all screws or parts that need fastening.
• Inspect bike seat regularly. Tighten the nuts whenever they
get loose. Inspect the cranks and pedals regularly. Tighten
them if necessary.
• Clean the bike regularly.
Product name:
Model:
Color:
Display:
Wireless
connection:
Equitment type:
Resistance type:
Drive:
Adaptor Input:
Adaptor Output:
Rated voltage:
Max weight:
Height range:
Equipment class:
Dimension:
Net weight:
SPECIFICATION
AI-POWERED EXERCISE
BIKE
MG-C05
Gray
Nixie tube
Bluetooth
Crank training
Speed independent
Belt drive
AC 100-240V, 50-60Hz
DC 24V, 2A
DC 24V
120kg
150-190cm
HB
1020 x 510 x 1250 mm
35kg
III. EXPLODED DIAGRAM
1
2
5
6
7
8
11
15
16
18
3
4
9
10
12
13
14
17
Part No. Description
1
Console
2
Pad holder
3
Handlebar
4
USB port
5
Console post
6
Handlebar holder
7
Pedal
8
Crank
9
Front stabilizer
Part No.
Description
10
Transport wheels
11
Leveling feet
12
Rear stabilizer
13
Power port
14
Power Switch
15
Seatpost holder
16
Seatpost
17
Seat adjuster
18
Saddle
TOOLS
5mm socket
head wrench x 1
Power Adapter x 1
Bike Stabiliser
x 2
Pedals x 2
User Manual x 1
5mm socket
head wrench x 1
15mm Allen
wrench x 1
M6 screws x 4
M10 screws x 4
IV. ASSEMBLY INSTRUCTIONS INSTALL THE PEDALS
STEP 7. Handlebar Height Adjustment STEP 10. Set the Seat Height
STEP 1
Place the front and rear
stabilizer as indicated.
Manually tighten the
FOUR M10 screws.
Tighten with a 6mm Allen
wrench.
STEP 2
Connect the cord inside of
the handlebars to the cord
inside of the bike unit. Pay
attention to the direction
of the handlebars when
connecting.
STEP 3. Mount
Handlebars
First, manually spin the
FOUR M6 screws with
your hands as tight as
possible. Then, tighten
and lock in the FOUR M6
screws with the 5mm
Allen Wrench.
WARNING: Make sure to
place the screw shim
properly, with the
cambered surface clung
to the post.
1
2
STEP 4. Install
Pedal Straps
Feed the left (L) and right
(R) Pedal Straps into the
matching pedals; notched
side facing inwards.
L
L
STEP 5. Install
Left Pedal
STEP 8. Seat
Adjustment
Install the Left Pedal
(marked with an L) onto the
left crank. First, manually
tighten the screw
with your hands (turning
counter—clockwise).
Then, use the 15 mm
Open- End Wrench to fully
tighten (turning counter-
clockwise).
L
L
STEP 6. Install
Right Pedal
Install the Right PedaI
(marked with an R) onto
the right crank. First,
manually tighten the
screw with your hands
(turning clockwise). Then,
use the 15 mm Open-end
Wrench to fully tighten
(turning clockwise).
1. Turn the handlebar holder
counterclockwise to loosen
the console post.
2. Adjust the handlebar to a
proper height.
3. Turn the handlebar holder
clockwise to tighten.
4. Pull the handlebar holder
outwards.
5. Turn the handlebar holder
to a vertically downward
direction.
Sit on the saddle and
place you heel on the
pedal. Make sure the
crank arm which is
currently supporting
your foot is point down
and in line with the
seatpost. You are at
the correct seat height
if your leg is fully
extended. That means
you leg is straight, but
without overextending
your knee.
N
P
O
Q
R
1. Turn the Seatpost holder
counterclockwise to loosen
the console post
2. Adjust the seatpost to a
proper height.
3. Turn the Seatpost holder
clockwise to tighten.
4. Pull the Seatpost holder
outwards.
N
P
O
Q
R
5. Turn the Seatpost holder to a vertically downward direction.
Caution: It is important to keep the Seatpost holder vertically
downwards as projecting handles with interfere with your
movements.
STEP 9. Seat
Adjustment
Maximum height.
For you safety, make sure to
keep STOP mark inside the
frame while adjusting the
seat height.
STEP 11. Seat
Depth Adjustment
Turn the Below
Seat Knob counter
clockwise to loosen.
Move the seat forward
or back. Turn the
knob clockwise to
tighten.
STEP 12.
Bike Stabillization
Rotate each leveling
foot until the bike
rests firmly on the
floor.
R
R
V-Cycle Smart Exercise
Bike with NeoWatt
USER MANUAL
NOTE:
Product may vary slightly from the item pictured due
to model upgrades. This manual may be subject to
updates or changes. Up to date manuals are available
through our website at www.lifespanfitness.com.au
Read all instructions carefully before using
this product. Retain this owner’s manual for
future reference.
IMPORTANT
All nuts and bolts are to be checked and tightened on
a regular basis. This includes pedals and other moving
parts. Failure to do so may cause damage to your
threads and void your warranty.
WARNING: Read all instructions before using this machine.
It is important your machine receives regular maintenance to
prolong its useful life. Failing to regularly maintain your machine
may void your warranty.
Please keep this manual with you at all times.
• The bike is for home use only.
• Please correctly connect the power adapter before use.
• To avoid injury, warm up before using the bike.
• Incorrect or excessive training can result in serious injury.
• To avoid accidents, keep the bike out of the reach of children and
pets.
• To avoid getting hurt, keep your hands away from any moving
parts of the bike.
• Use only original parts from the manufacturer. Changes or
modifications to this unit voids the warranty.
• In case of malfunction, stop using the bike immediately.
• Make sure to secure your feet with the pedal straps while using
the bike.
• The bike should be placed on a solid, level and horizontal
surface.
• Allow a clearance of 60cm on each side of the bike.
• Perform regular maintenance for optimal performance and
longevity. To ensure safety, the bike must be checked for wear
and damage on a regular basis.
• Children under the age of 14, persons with reduced physical,
sensory or mental capabilities, as well as persons with a lack of
knowledge must be given supervision or instruction before using
the bike. DO NOT allow children to perform maintenance without
supervision or to play with the bike.
• This adapter has passed CQC certification and can be used with
this bike only. Do not use it with any other products. In case of
any damage, please consult the manufacturer or an authorized
agency for replacement.
I. IMPORTANT SAFETY INSTRUCTIONS II. DAILY STORAGE AND MAINTENANCE
• This bike is for indoor home use only. Do not store the bike
outdoors, near water, or at high humidity levels.
• Please store in a place with shade and shelter to avoid any
damage to the surface.
• Inspect regularly all screws or parts that need fastening.
• Inspect bike seat regularly. Tighten the nuts whenever they
get loose. Inspect the cranks and pedals regularly. Tighten
them if necessary.
• Clean the bike regularly.
Product name:
Model:
Color:
Display:
Wireless
connection:
Equitment type:
Resistance type:
Drive:
Adaptor Input:
Adaptor Output:
Rated voltage:
Max weight:
Height range:
Equipment class:
Dimension:
Net weight:
SPECIFICATION
AI-POWERED EXERCISE
BIKE
MG-C05
Gray
Nixie tube
Bluetooth
Crank training
Speed independent
Belt drive
AC 100-240V, 50-60Hz
DC 24V, 2A
DC 24V
120kg
150-190cm
HB
1020 x 510 x 1250 mm
35kg
III. EXPLODED DIAGRAM
1
2
5
6
7
8
11
15
16
18
3
4
9
10
12
13
14
17
Part No. Description
1
Console
2
Pad holder
3
Handlebar
4
USB port
5
Console post
6
Handlebar holder
7
Pedal
8
Crank
9
Front stabilizer
Part No.
Description
10
Transport wheels
11
Leveling feet
12
Rear stabilizer
13
Power port
14
Power Switch
15
Seatpost holder
16
Seatpost
17
Seat adjuster
18
Saddle
TOOLS
5mm socket
head wrench x 1
Power Adapter x 1
Bike Stabiliser
x 2
Pedals x 2
User Manual x 1
5mm socket
head wrench x 1
15mm Allen
wrench x 1
M6 screws x 4
M10 screws x 4
IV. ASSEMBLY INSTRUCTIONS INSTALL THE PEDALS
STEP 7. Handlebar Height Adjustment STEP 10. Set the Seat Height
STEP 1
Place the front and rear
stabilizer as indicated.
Manually tighten the
FOUR M10 screws.
Tighten with a 6mm Allen
wrench.
STEP 2
Connect the cord inside of
the handlebars to the cord
inside of the bike unit. Pay
attention to the direction
of the handlebars when
connecting.
STEP 3. Mount
Handlebars
First, manually spin the
FOUR M6 screws with
your hands as tight as
possible. Then, tighten
and lock in the FOUR M6
screws with the 5mm
Allen Wrench.
WARNING: Make sure to
place the screw shim
properly, with the
cambered surface clung
to the post.
1
2
STEP 4. Install
Pedal Straps
Feed the left (L) and right
(R) Pedal Straps into the
matching pedals; notched
side facing inwards.
L
L
STEP 5. Install
Left Pedal
STEP 8. Seat
Adjustment
Install the Left Pedal
(marked with an L) onto the
left crank. First, manually
tighten the screw
with your hands (turning
counter—clockwise).
Then, use the 15 mm
Open- End Wrench to fully
tighten (turning counter-
clockwise).
L
L
STEP 6. Install
Right Pedal
Install the Right PedaI
(marked with an R) onto
the right crank. First,
manually tighten the
screw with your hands
(turning clockwise). Then,
use the 15 mm Open-end
Wrench to fully tighten
(turning clockwise).
1. Turn the handlebar holder
counterclockwise to loosen
the console post.
2. Adjust the handlebar to a
proper height.
3. Turn the handlebar holder
clockwise to tighten.
4. Pull the handlebar holder
outwards.
5. Turn the handlebar holder
to a vertically downward
direction.
Sit on the saddle and
place you heel on the
pedal. Make sure the
crank arm which is
currently supporting
your foot is point down
and in line with the
seatpost. You are at
the correct seat height
if your leg is fully
extended. That means
you leg is straight, but
without overextending
your knee.
N
P
O
Q
R
1. Turn the Seatpost holder
counterclockwise to loosen
the console post
2. Adjust the seatpost to a
proper height.
3. Turn the Seatpost holder
clockwise to tighten.
4. Pull the Seatpost holder
outwards.
N
P
O
Q
R
5. Turn the Seatpost holder to a vertically downward direction.
Caution: It is important to keep the Seatpost holder vertically
downwards as projecting handles with interfere with your
movements.
STEP 9. Seat
Adjustment
Maximum height.
For you safety, make sure to
keep STOP mark inside the
frame while adjusting the
seat height.
STEP 11. Seat
Depth Adjustment
Turn the Below
Seat Knob counter
clockwise to loosen.
Move the seat forward
or back. Turn the
knob clockwise to
tighten.
STEP 12.
Bike Stabillization
Rotate each leveling
foot until the bike
rests firmly on the
floor.
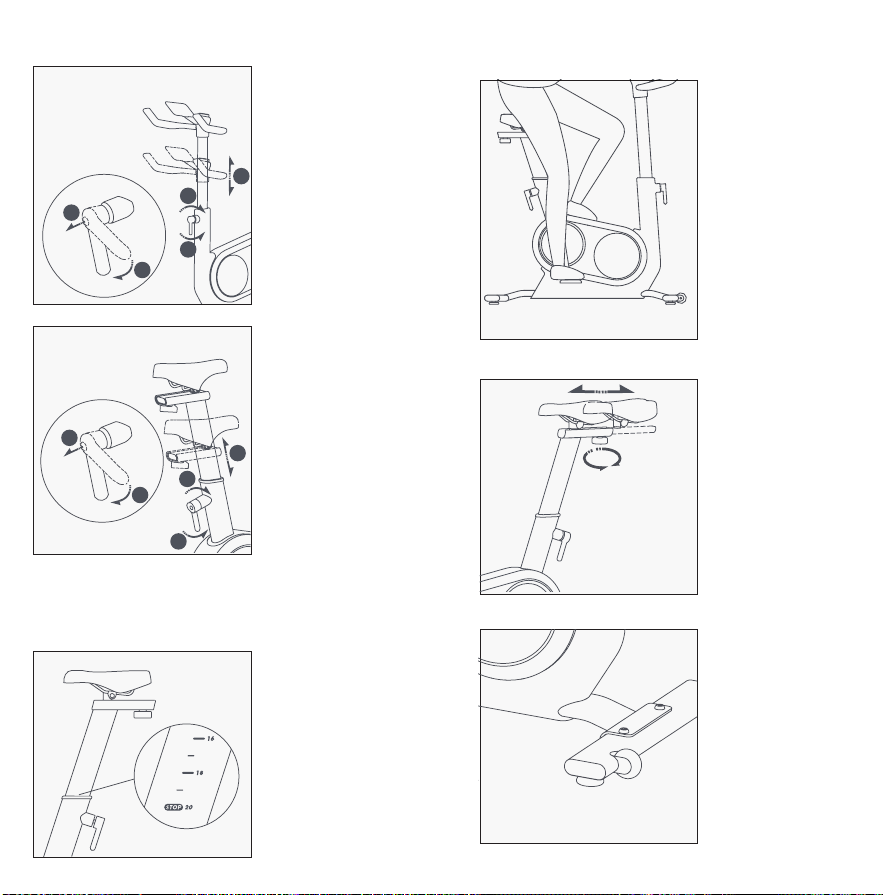
POWER PORT
Connect the Power Adapter to the Power Port at
back of the bike above the rear Stabilzer. Ensure
the bike is connected to the suitable power source,
then fip the Power Switch to "-" to power on.
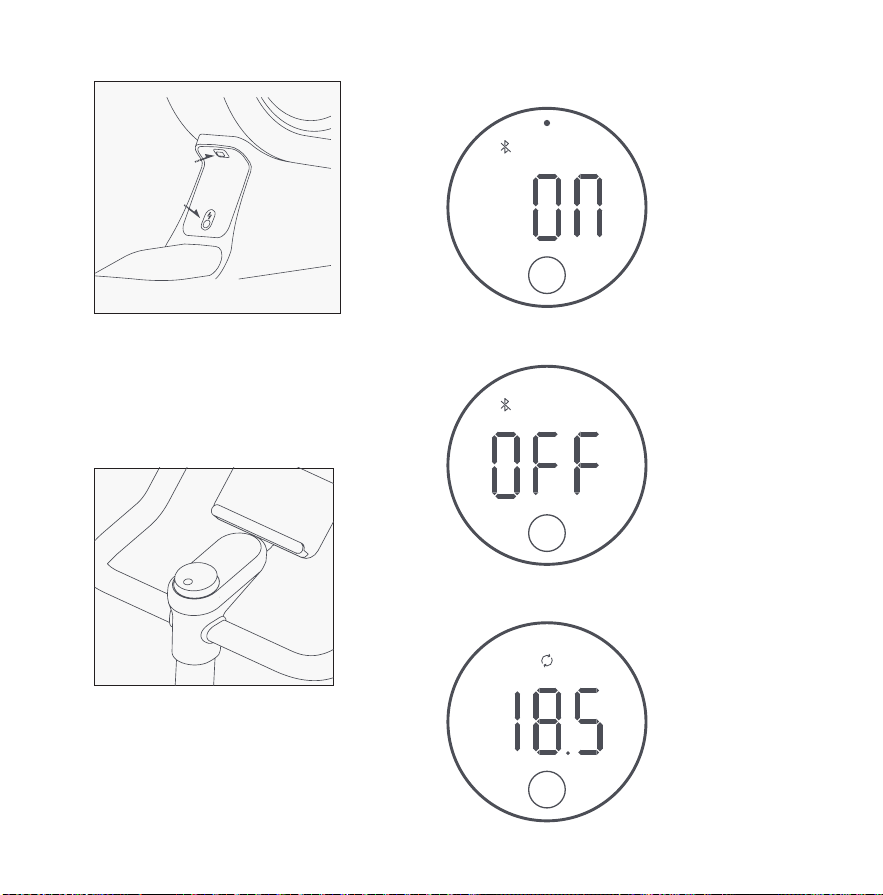
V. FUNCTION
POWER SWITCH
POWER PORT
CONSOLE
The Console works by either rotating its metal frame or
pressing the knob.
UNITS:
N.m: Newton meter, unit of torque
W: Unit of Power
R/min: Revolutions per minute, unit of frequency.
HOW TO USE THE CONSOLE
kø �ã
Bluetooth ON
Bluetooth OFF
Rotate the metal frame
to adjust
Turn on NEXGIM App and
search your bike to connect.
When connected, the Bluetooth
indicator on the console
stays on.
Touch the bottom middle
area of the console to enter
Bluetooth interface. Press
and hold the knob to turn
it off. When disconnected,
you will need to manually
reconnect your bike in the
App.
Under resistance mode,
rotate the metal frame to
adjust resistance.
DATA DISPLAY AND SWITCH
Duration Resistance (Gear)
N·m
Power Cadence
w
r/min
Slightly touch the bottom middle area of the console
panel to change data display.
Press the knob to control
When you are taking a riding course or an
immersive road riding on the App, press the
knob to pause (when paused, the indicating
lines flash); press the knob again to retrieve;
press and hold the knob to end riding (when
ended, the indicating lines keep displayed).
VI. EXERCISE GUIDE
PLEASE NOTE:
Before beginning any exercise program, consult your physician.
This is important especially if you are over the age of 45 or
individuals with pre-existing health problems.
The pulse sensors are not medical devices. Various factors,
including the user’s movement, may affect the accuracy of heart
rate readings. The pulse sensors are intended only as an exercise
aid in determining heart rate trends in general.
Exercising is great way to control your weight, improving your
fitness and reduce the effect of aging and stress. The key to
success is to make exercise a regular and enjoyable part of your
everyday life.
The condition of your heart and lungs and how efficient they
are in delivering oxygen via your blood to your muscles is an
important factor to your fitness. Your muscles use this oxygen
to provide enough energy for daily activity. This is called aerobic
activity. When you are fit, your heart will not have to work so hard.
It will pump a lot fewer times per minute, reducing the wear and
tear of your heart.
So as you can see, the fitter you are, the healthier and greater you
will feel.
WARM UP
Start each workout with 5 to 10 minutes of stretching and
some light exercises. A proper warm-up increases your body
temperature, heart rate and circulation in preparation for
exercise. Ease into your exercise.
After warming up, increase the intensity to your desired exercise
program. Be sure to maintain your intensity for maximum
performance. Breathe regularly and deeply as you exercise.
COOL DOWN
Finish each workout with a light jog or walk for at least 1 minute.
Then complete 5 to 10 minutes of stretching to cool down. This will
increase the flexibility of your muscles and will help prevent post-
exercise problems.
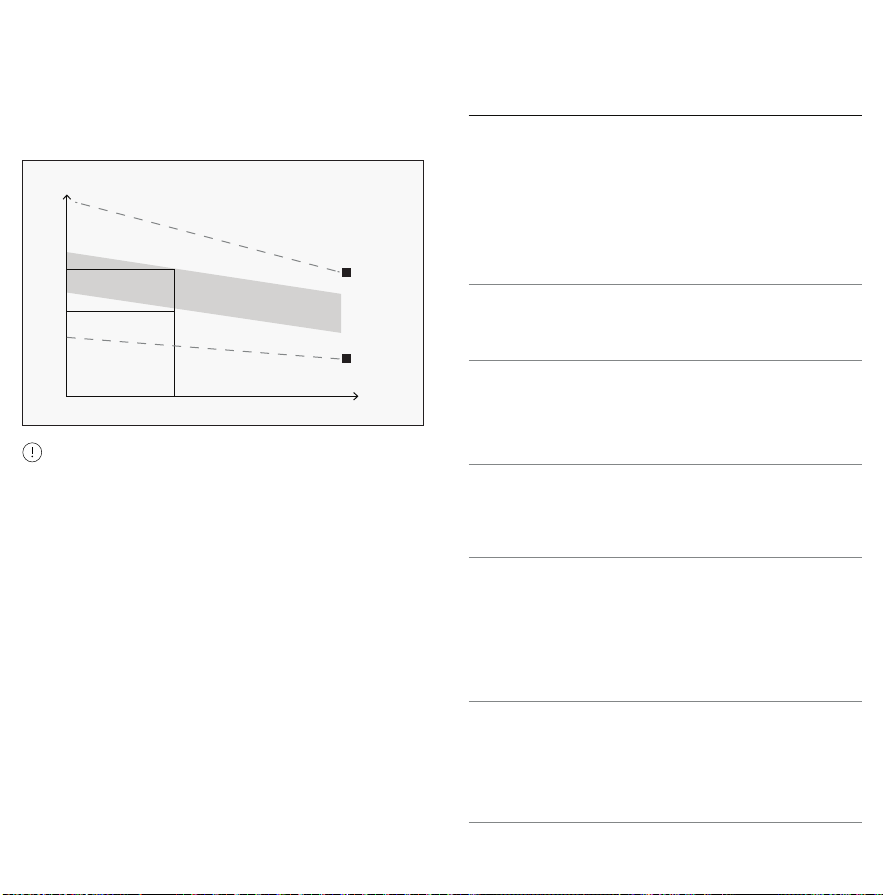
WORKOUT GUIDELINES
This is how your pulse should behave during general fitness
exercise. Remember to warm up and cool down for a few
minutes.
TARGET ZONE
MAXIMUM
85%
70%
COOL DOWN
AGE
HEART RATE
200
180
160
140
120
100
80
20 25 30 35 40 45 50 55 60 65 70 75
THANK YOU FOR CHOOSING
V-CYCLE SMART EXERCISE BIKE
TROUBLESHOOTING
This is an AI — Powered Exercise Bike tailor-made for home
use. It is inbuilt with intelligent motor damping, known as the
black technology for cyclist training, which provides two very
different, yet both scientific training modes-constant resistance
and constant power. The bike adopts power and cadence sensor
technologies to collect real-time accurate training data, and,
with the help of machine learning and AI algorithm, to generate
scientific workout plans customized for you. We will also upgrade
our mobile APP from time to time to bring you smarter and richer
indoor cycling experience.
VIII. WARRANTY
AUSTRALIAN CONSUMER LAW
Many of our products come with a guarantee or warranty from
the manufacturer. In addition, they come with guarantees that
cannot be excluded under the Australian Consumer Law. You are
entitled to a replacement or refund for a major failure and
compensation for any other reasonably foreseeable loss or
damage.
You are entitled to have the goods repaired or replaced if the goods
fail to be of acceptable quality and the failure does not amount to a
major failure. Full details of your consumer rights may be found at
www.consumerlaw.gov.au.
Please visit our website to view our full warranty terms and
conditions:
http://www.lifespanfitness.com.au/warranty-repairs
WARRANTY AND SUPPORT
warranty or support issues.
For all warranty or support related enquiries, please lodge a
support ticket first by sending us an email.
SCAN QR CODE
TO DOWNLOAD
This product supports BLE, FTMS, CSCS,
CPS and is compatible with HRS sensors
that support heart rate monitoring.
V-CYCLE APP
Problem Solution
Noise while
pedaling
1. Remove the pedals from the cranks,
turn the pedal axis, in case of smooth
turning, mount the pedals back. Con-
sult the service personnel for replace-
ment in case of not smooth turning of
the pedal axis.
2. Rotate the cranks. Tighten the cranks
screws in case of noise.
Wobbly
Handebars
Use a 5mm socket head wrench to
tighten the four screws on the han-
dlebars
Unstable
bike
seat
Adjust the seat to your proper height;
use a monkey wrench to fasten the
nuts on both sides under the seat
saddle.
Unstable
bike
Tighten the four screws on the four
leveling feet using a 6mm socket head
wrench
No display
on console
1.Re-connect the power adapter.
2.Make sure the power adapter is
properly
connected to the bike.
Make sure the power button is turned
to "-" postition
Failure
with
Bluetooth
connection
Restart your bike and your phone or
pad, then re- connect.

POWER PORT
Connect the Power Adapter to the Power Port at
back of the bike above the rear Stabilzer. Ensure
the bike is connected to the suitable power source,
then fip the Power Switch to "-" to power on.
V. FUNCTION
POWER SWITCH
POWER PORT
CONSOLE
The Console works by either rotating its metal frame or
pressing the knob.
UNITS:
N.m: Newton meter, unit of torque
W: Unit of Power
R/min: Revolutions per minute, unit of frequency.
HOW TO USE THE CONSOLE
kø �ã
Bluetooth ON
Bluetooth OFF
Rotate the metal frame
to adjust
Turn on NEXGIM App and
search your bike to connect.
When connected, the Bluetooth
indicator on the console
stays on.
Touch the bottom middle
area of the console to enter
Bluetooth interface. Press
and hold the knob to turn
it off. When disconnected,
you will need to manually
reconnect your bike in the
App.
Under resistance mode,
rotate the metal frame to
adjust resistance.
DATA DISPLAY AND SWITCH
Duration Resistance (Gear)
N·m
Power Cadence
w
r/min
Slightly touch the bottom middle area of the console
panel to change data display.
Press the knob to control
When you are taking a riding course or an
immersive road riding on the App, press the
knob to pause (when paused, the indicating
lines flash); press the knob again to retrieve;
press and hold the knob to end riding (when
ended, the indicating lines keep displayed).
VI. EXERCISE GUIDE
PLEASE NOTE:
Before beginning any exercise program, consult your physician.
This is important especially if you are over the age of 45 or
individuals with pre-existing health problems.
The pulse sensors are not medical devices. Various factors,
including the user’s movement, may affect the accuracy of heart
rate readings. The pulse sensors are intended only as an exercise
aid in determining heart rate trends in general.
Exercising is great way to control your weight, improving your
fitness and reduce the effect of aging and stress. The key to
success is to make exercise a regular and enjoyable part of your
everyday life.
The condition of your heart and lungs and how efficient they
are in delivering oxygen via your blood to your muscles is an
important factor to your fitness. Your muscles use this oxygen
to provide enough energy for daily activity. This is called aerobic
activity. When you are fit, your heart will not have to work so hard.
It will pump a lot fewer times per minute, reducing the wear and
tear of your heart.
So as you can see, the fitter you are, the healthier and greater you
will feel.
WARM UP
Start each workout with 5 to 10 minutes of stretching and
some light exercises. A proper warm-up increases your body
temperature, heart rate and circulation in preparation for
exercise. Ease into your exercise.
After warming up, increase the intensity to your desired exercise
program. Be sure to maintain your intensity for maximum
performance. Breathe regularly and deeply as you exercise.
COOL DOWN
Finish each workout with a light jog or walk for at least 1 minute.
Then complete 5 to 10 minutes of stretching to cool down. This will
increase the flexibility of your muscles and will help prevent post-
exercise problems.
WORKOUT GUIDELINES
This is how your pulse should behave during general fitness
exercise. Remember to warm up and cool down for a few
minutes.
TARGET ZONE
MAXIMUM
85%
70%
COOL DOWN
AGE
HEART RATE
200
180
160
140
120
100
80
20 25 30 35 40 45 50 55 60 65 70 75
THANK YOU FOR CHOOSING
V-CYCLE SMART EXERCISE BIKE
TROUBLESHOOTING
This is an AI — Powered Exercise Bike tailor-made for home
use. It is inbuilt with intelligent motor damping, known as the
black technology for cyclist training, which provides two very
different, yet both scientific training modes-constant resistance
and constant power. The bike adopts power and cadence sensor
technologies to collect real-time accurate training data, and,
with the help of machine learning and AI algorithm, to generate
scientific workout plans customized for you. We will also upgrade
our mobile APP from time to time to bring you smarter and richer
indoor cycling experience.
VIII. WARRANTY
AUSTRALIAN CONSUMER LAW
Many of our products come with a guarantee or warranty from
the manufacturer. In addition, they come with guarantees that
cannot be excluded under the Australian Consumer Law. You are
entitled to a replacement or refund for a major failure and
compensation for any other reasonably foreseeable loss or
damage.
You are entitled to have the goods repaired or replaced if the goods
fail to be of acceptable quality and the failure does not amount to a
major failure. Full details of your consumer rights may be found at
www.consumerlaw.gov.au.
Please visit our website to view our full warranty terms and
conditions:
http://www.lifespanfitness.com.au/warranty-repairs
WARRANTY AND SUPPORT
warranty or support issues.
For all warranty or support related enquiries, please lodge a
support ticket first by sending us an email.
SCAN QR CODE
TO DOWNLOAD
This product supports BLE, FTMS, CSCS,
CPS and is compatible with HRS sensors
that support heart rate monitoring.
V-CYCLE APP
Problem Solution
Noise while
pedaling
1. Remove the pedals from the cranks,
turn the pedal axis, in case of smooth
turning, mount the pedals back. Con-
sult the service personnel for replace-
ment in case of not smooth turning of
the pedal axis.
2. Rotate the cranks. Tighten the cranks
screws in case of noise.
Wobbly
Handebars
Use a 5mm socket head wrench to
tighten the four screws on the han-
dlebars
Unstable
bike
seat
Adjust the seat to your proper height;
use a monkey wrench to fasten the
nuts on both sides under the seat
saddle.
Unstable
bike
Tighten the four screws on the four
leveling feet using a 6mm socket head
wrench
No display
on console
1.Re-connect the power adapter.
2.Make sure the power adapter is
properly
connected to the bike.
Make sure the power button is turned
to "-" postition
Failure
with
Bluetooth
connection
Restart your bike and your phone or
pad, then re- connect.
POWER PORT
Connect the Power Adapter to the Power Port at
back of the bike above the rear Stabilzer. Ensure
the bike is connected to the suitable power source,
then fip the Power Switch to "-" to power on.
V. FUNCTION
POWER SWITCH
POWER PORT
CONSOLE
The Console works by either rotating its metal frame or
pressing the knob.
UNITS:
N.m: Newton meter, unit of torque
W: Unit of Power
R/min: Revolutions per minute, unit of frequency.
HOW TO USE THE CONSOLE
kø �ã
Bluetooth ON
Bluetooth OFF
Rotate the metal frame
to adjust
Turn on NEXGIM App and
search your bike to connect.
When connected, the Bluetooth
indicator on the console
stays on.
Touch the bottom middle
area of the console to enter
Bluetooth interface. Press
and hold the knob to turn
it off. When disconnected,
you will need to manually
reconnect your bike in the
App.
Under resistance mode,
rotate the metal frame to
adjust resistance.
DATA DISPLAY AND SWITCH
Duration Resistance (Gear)
N·m
Power Cadence
w
r/min
Slightly touch the bottom middle area of the console
panel to change data display.
Press the knob to control
When you are taking a riding course or an
immersive road riding on the App, press the
knob to pause (when paused, the indicating
lines flash); press the knob again to retrieve;
press and hold the knob to end riding (when
ended, the indicating lines keep displayed).
VI. EXERCISE GUIDE
PLEASE NOTE:
Before beginning any exercise program, consult your physician.
This is important especially if you are over the age of 45 or
individuals with pre-existing health problems.
The pulse sensors are not medical devices. Various factors,
including the user’s movement, may affect the accuracy of heart
rate readings. The pulse sensors are intended only as an exercise
aid in determining heart rate trends in general.
Exercising is great way to control your weight, improving your
fitness and reduce the effect of aging and stress. The key to
success is to make exercise a regular and enjoyable part of your
everyday life.
The condition of your heart and lungs and how efficient they
are in delivering oxygen via your blood to your muscles is an
important factor to your fitness. Your muscles use this oxygen
to provide enough energy for daily activity. This is called aerobic
activity. When you are fit, your heart will not have to work so hard.
It will pump a lot fewer times per minute, reducing the wear and
tear of your heart.
So as you can see, the fitter you are, the healthier and greater you
will feel.
WARM UP
Start each workout with 5 to 10 minutes of stretching and
some light exercises. A proper warm-up increases your body
temperature, heart rate and circulation in preparation for
exercise. Ease into your exercise.
After warming up, increase the intensity to your desired exercise
program. Be sure to maintain your intensity for maximum
performance. Breathe regularly and deeply as you exercise.
COOL DOWN
Finish each workout with a light jog or walk for at least 1 minute.
Then complete 5 to 10 minutes of stretching to cool down. This will
increase the flexibility of your muscles and will help prevent post-
exercise problems.
WORKOUT GUIDELINES
This is how your pulse should behave during general fitness
exercise. Remember to warm up and cool down for a few
minutes.
TARGET ZONE
MAXIMUM
85%
70%
COOL DOWN
AGE
HEART RATE
200
180
160
140
120
100
80
20 25 30 35 40 45 50 55 60 65 70 75
THANK YOU FOR CHOOSING
V-CYCLE SMART EXERCISE BIKE
TROUBLESHOOTING
This is an AI — Powered Exercise Bike tailor-made for home
use. It is inbuilt with intelligent motor damping, known as the
black technology for cyclist training, which provides two very
different, yet both scientific training modes-constant resistance
and constant power. The bike adopts power and cadence sensor
technologies to collect real-time accurate training data, and,
with the help of machine learning and AI algorithm, to generate
scientific workout plans customized for you. We will also upgrade
our mobile APP from time to time to bring you smarter and richer
indoor cycling experience.
VIII. WARRANTY
AUSTRALIAN CONSUMER LAW
Many of our products come with a guarantee or warranty from
the manufacturer. In addition, they come with guarantees that
cannot be excluded under the Australian Consumer Law. You are
entitled to a replacement or refund for a major failure and
compensation for any other reasonably foreseeable loss or
damage.
You are entitled to have the goods repaired or replaced if the goods
fail to be of acceptable quality and the failure does not amount to a
major failure. Full details of your consumer rights may be found at
www.consumerlaw.gov.au.
Please visit our website to view our full warranty terms and
conditions:
http://www.lifespanfitness.com.au/warranty-repairs
WARRANTY AND SUPPORT
warranty or support issues.
For all warranty or support related enquiries, please lodge a
support ticket first by sending us an email.
SCAN QR CODE
TO DOWNLOAD
This product supports BLE, FTMS, CSCS,
CPS and is compatible with HRS sensors
that support heart rate monitoring.
V-CYCLE APP
Problem Solution
Noise while
pedaling
1. Remove the pedals from the cranks,
turn the pedal axis, in case of smooth
turning, mount the pedals back. Con-
sult the service personnel for replace-
ment in case of not smooth turning of
the pedal axis.
2. Rotate the cranks. Tighten the cranks
screws in case of noise.
Wobbly
Handebars
Use a 5mm socket head wrench to
tighten the four screws on the han-
dlebars
Unstable
bike
seat
Adjust the seat to your proper height;
use a monkey wrench to fasten the
nuts on both sides under the seat
saddle.
Unstable
bike
Tighten the four screws on the four
leveling feet using a 6mm socket head
wrench
No display
on console
1.Re-connect the power adapter.
2.Make sure the power adapter is
properly
connected to the bike.
Make sure the power button is turned
to "-" postition
Failure
with
Bluetooth
connection
Restart your bike and your phone or
pad, then re- connect.

POWER PORT
Connect the Power Adapter to the Power Port at
back of the bike above the rear Stabilzer. Ensure
the bike is connected to the suitable power source,
then fip the Power Switch to "-" to power on.
V. FUNCTION
POWER SWITCH
POWER PORT
CONSOLE
The Console works by either rotating its metal frame or
pressing the knob.
UNITS:
N.m: Newton meter, unit of torque
W: Unit of Power
R/min: Revolutions per minute, unit of frequency.
HOW TO USE THE CONSOLE
kø �ã
Bluetooth ON
Bluetooth OFF
Rotate the metal frame
to adjust
Turn on NEXGIM App and
search your bike to connect.
When connected, the Bluetooth
indicator on the console
stays on.
Touch the bottom middle
area of the console to enter
Bluetooth interface. Press
and hold the knob to turn
it off. When disconnected,
you will need to manually
reconnect your bike in the
App.
Under resistance mode,
rotate the metal frame to
adjust resistance.
DATA DISPLAY AND SWITCH
Duration Resistance (Gear)
N·m
Power Cadence
w
r/min
Slightly touch the bottom middle area of the console
panel to change data display.
Press the knob to control
When you are taking a riding course or an
immersive road riding on the App, press the
knob to pause (when paused, the indicating
lines flash); press the knob again to retrieve;
press and hold the knob to end riding (when
ended, the indicating lines keep displayed).
VI. EXERCISE GUIDE
PLEASE NOTE:
Before beginning any exercise program, consult your physician.
This is important especially if you are over the age of 45 or
individuals with pre-existing health problems.
The pulse sensors are not medical devices. Various factors,
including the user’s movement, may affect the accuracy of heart
rate readings. The pulse sensors are intended only as an exercise
aid in determining heart rate trends in general.
Exercising is great way to control your weight, improving your
fitness and reduce the effect of aging and stress. The key to
success is to make exercise a regular and enjoyable part of your
everyday life.
The condition of your heart and lungs and how efficient they
are in delivering oxygen via your blood to your muscles is an
important factor to your fitness. Your muscles use this oxygen
to provide enough energy for daily activity. This is called aerobic
activity. When you are fit, your heart will not have to work so hard.
It will pump a lot fewer times per minute, reducing the wear and
tear of your heart.
So as you can see, the fitter you are, the healthier and greater you
will feel.
WARM UP
Start each workout with 5 to 10 minutes of stretching and
some light exercises. A proper warm-up increases your body
temperature, heart rate and circulation in preparation for
exercise. Ease into your exercise.
After warming up, increase the intensity to your desired exercise
program. Be sure to maintain your intensity for maximum
performance. Breathe regularly and deeply as you exercise.
COOL DOWN
Finish each workout with a light jog or walk for at least 1 minute.
Then complete 5 to 10 minutes of stretching to cool down. This will
increase the flexibility of your muscles and will help prevent post-
exercise problems.
WORKOUT GUIDELINES
This is how your pulse should behave during general fitness
exercise. Remember to warm up and cool down for a few
minutes.
TARGET ZONE
MAXIMUM
85%
70%
COOL DOWN
AGE
HEART RATE
200
180
160
140
120
100
80
20 25 30 35 40 45 50 55 60 65 70 75
THANK YOU FOR CHOOSING
V-CYCLE SMART EXERCISE BIKE
TROUBLESHOOTING
This is an AI — Powered Exercise Bike tailor-made for home
use. It is inbuilt with intelligent motor damping, known as the
black technology for cyclist training, which provides two very
different, yet both scientific training modes-constant resistance
and constant power. The bike adopts power and cadence sensor
technologies to collect real-time accurate training data, and,
with the help of machine learning and AI algorithm, to generate
scientific workout plans customized for you. We will also upgrade
our mobile APP from time to time to bring you smarter and richer
indoor cycling experience.
VIII. WARRANTY
AUSTRALIAN CONSUMER LAW
Many of our products come with a guarantee or warranty from
the manufacturer. In addition, they come with guarantees that
cannot be excluded under the Australian Consumer Law. You are
entitled to a replacement or refund for a major failure and
compensation for any other reasonably foreseeable loss or
damage.
You are entitled to have the goods repaired or replaced if the goods
fail to be of acceptable quality and the failure does not amount to a
major failure. Full details of your consumer rights may be found at
www.consumerlaw.gov.au.
Please visit our website to view our full warranty terms and
conditions:
http://www.lifespanfitness.com.au/warranty-repairs
WARRANTY AND SUPPORT
Please email us at [email protected] for all
warranty or support issues.
For all warranty or support related enquiries, please lodge a
support ticket first by sending us an email.
SCAN QR CODE
TO DOWNLOAD
This product supports BLE, FTMS, CSCS,
CPS and is compatible with HRS sensors
that support heart rate monitoring.
V-CYCLE APP
Problem Solution
Noise while
pedaling
1. Remove the pedals from the cranks,
turn the pedal axis, in case of smooth
turning, mount the pedals back. Con-
sult the service personnel for replace-
ment in case of not smooth turning of
the pedal axis.
2. Rotate the cranks. Tighten the cranks
screws in case of noise.
Wobbly
Handebars
Use a 5mm socket head wrench to
tighten the four screws on the han-
dlebars
Unstable
bike
seat
Adjust the seat to your proper height;
use a monkey wrench to fasten the
nuts on both sides under the seat
saddle.
Unstable
bike
Tighten the four screws on the four
leveling feet using a 6mm socket head
wrench
No display
on console
1.Re-connect the power adapter.
2.Make sure the power adapter is
properly
connected to the bike.
Make sure the power button is turned
to "-" postition
Failure
with
Bluetooth
connection
Restart your bike and your phone or
pad, then re- connect.