Loading ...
Loading ...
Loading ...
En
12
Using hot loops
With this function, loops can be saved and called out.
! Only the loop in point is actually saved. Up to eight hot loops can be
set and saved per track.
1 Press the [HOT CUE] mode button while pressing the
[SHIFT] button.
The [HOT CUE] mode button flashes, and the unit switches to the hot
loop mode.
2 During playback, press a performance pad.
The loop in point is set at the hot cue slot and loop playback starts.
! The length of the loop at this time is the number of beats set for
auto looping.
The loop in points are assigned to the performance pads as shown
below.
Loop 1 Loop 2 Loop 3 Loop 4
Loop 5 Loop 6 Loop 7 Loop 8
! With the hot loop function, the hot cue point is used as the loop in
point.
If a performance pad at which a hot cue point is already set is
pressed, loop playback starts from that hot cue point.
3 During loop playback, press the [PARAM.1/
PARAM.2c] button.
The loop length is cut in half.
The same effect can be achieved by turning the [AUTO LOOP] control
counterclockwise.
4 During loop playback, press the [PARAM.1/
PARAM.2d] button.
The loop length is doubled.
The same effect can be achieved by turning the [AUTO LOOP] control
clockwise.
5 During loop playback, press the [PARAM.1/
PARAM.2c] or [PARAM.1/PARAM.2d] button while
pressing the [SHIFT] button.
The loop moves, remaining the same length (loop shift).
6 While pressing the [SHIFT] button, press the same
performance pad.
The track returns to the set loop in point and loop playback continues.
7 Press the same performance pad again.
Loop playback is canceled.
Using auto loops
When a performance pad is pressed, a loop with the number of beats
assigned to the pad is set, and loop playback continues even when you
release your finger from the pad.
1 Press the [ROLL] mode button while pressing the
[SHIFT] button.
The [ROLL] mode button flashes and the unit switches to the auto loop
mode.
2 Press the [PARAM.1/PARAM.2c] or [PARAM.1/
PARAM.2d] button.
The auto loop beats assigned to the performance pad switch each time
one of the button is pressed.
The following four settings can be made:
1 4 beats from 1/32
2 8 beats from 1/16
3 16 beats from 1/8
4 32 beats from 1/4
For example, when set to “16 beats from 1/8”, the pad’s setting is as
shown below.
1/8 beat 1/4 beat 1/2 beat 1 beat
2 beats 4 beats 8 beats 16 beats
The beat range set for auto looping is displayed on the computer’s
screen.
3 Press a performance pad.
A loop with the number of beats assigned to the pad that was pressed
is played.
4 Press the [PARAM.1/PARAM.2c] or [PARAM.1/
PARAM.2d] button while pressing the [SHIFT] button.
The loop moves, remaining the same length (loop shift).
5 Press the same performance pad again.
Loop playback is canceled.
Using manual loops
With this function, any section of the track can be played in a loop.
1 Press the [SLICER] mode button while pressing the
[SHIFT] button.
The [SLICER] mode button flashes and the unit switches to the manual
loop mode.
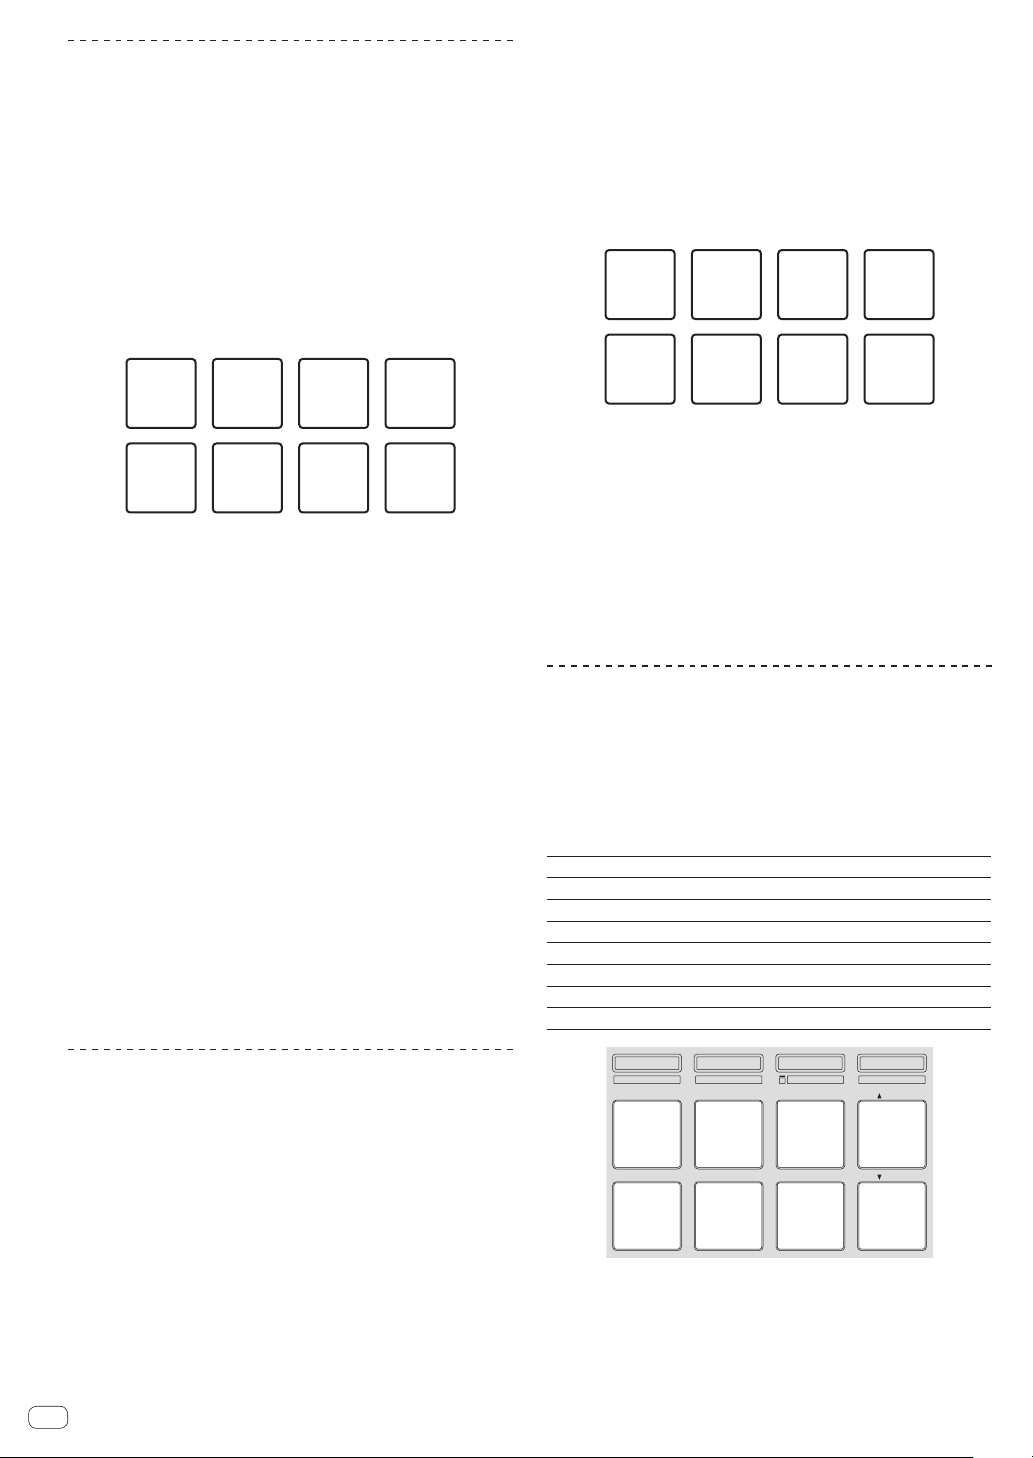
In the manual loop mode, the respective performance pads function as
described below.
Pad 1 Not used
Pad 2 Loop active (no move to loop in point)
Pad 3 Save loop in free loop slot (for auto loops only)
Pad 4 Move cursor among loop slots (upwards)
Pad 5 Set loop in point
Pad 6 Set loop out point
Pad 7 Resume loop playback/cancel loop playback
Pad 8 Move cursor among loop slots (downwards)
HOT CUE
HOT LOOP
ROLL
AUTO LOOP
SLICER
MANUAL LOOP
SAMPLER
VELOCITY
IN OUT
LOOPACTIVE
RELOOP
/
EXIT
SAVE
SLOT
SLOT
1 2 3 4
5 6 7 8
2 Press pad 4 or pad 8 to select the loop slot at which
you want to save the loop.
When the loop is set, it is automatically saved in the loop slot selected
here.
If a new loop is set while a loop slot at which a loop is saved is selected,
the saved loop is overwritten with the new loop.
Loading ...
Loading ...
Loading ...