
Battery Camera Set up Guide
Content List
• How to Contact Us
• Set up Guide
• Can not Turn on the Camera
• VicoHome Does not Generate QR Code
• Camera Cannot Scan QR Code on VicoHome
• Camera Can Scan QR Code But Fails to Connection
• How to Change/Reset the WiFi Network
• How Does the RST Button Work
How to Contact Us
If you have any questions or issues, you can contact us by submitting feedback on
VicoHome or emailing [email protected].
Set up Guide
• Before setting up
1. Download the VicoHome app and make sure it has been updated to the latest
version, and then sign up for a VicoHome account.
2. Fully charge your camera before setting it up the first time. This can take up to 8
hours. Once fully charged, the indicator light will switch from solid yellow to solid
green.
• Make the camera enter QR code scanning mode
1. Press and hold the camera power button for about 3s to turn it on. When it is on,
you can hear a startup sound and see the blue light on.
2. Confirm the camera enters the scanning mode: when the camera is in the
scanning mode, you will hear a repeated “Ding Dong Ding Dong” sound and see
the flashing blue light at the same time.
Usually, the camera without network configuration can get into the scanning mode
automatically after it is turned on. If it fails to enter the scanning mode automatically,
you can double-click the camera power button to manually make it enter the
scanning mode.
• Prepare Wi-Fi network QR code using the VicoHome app
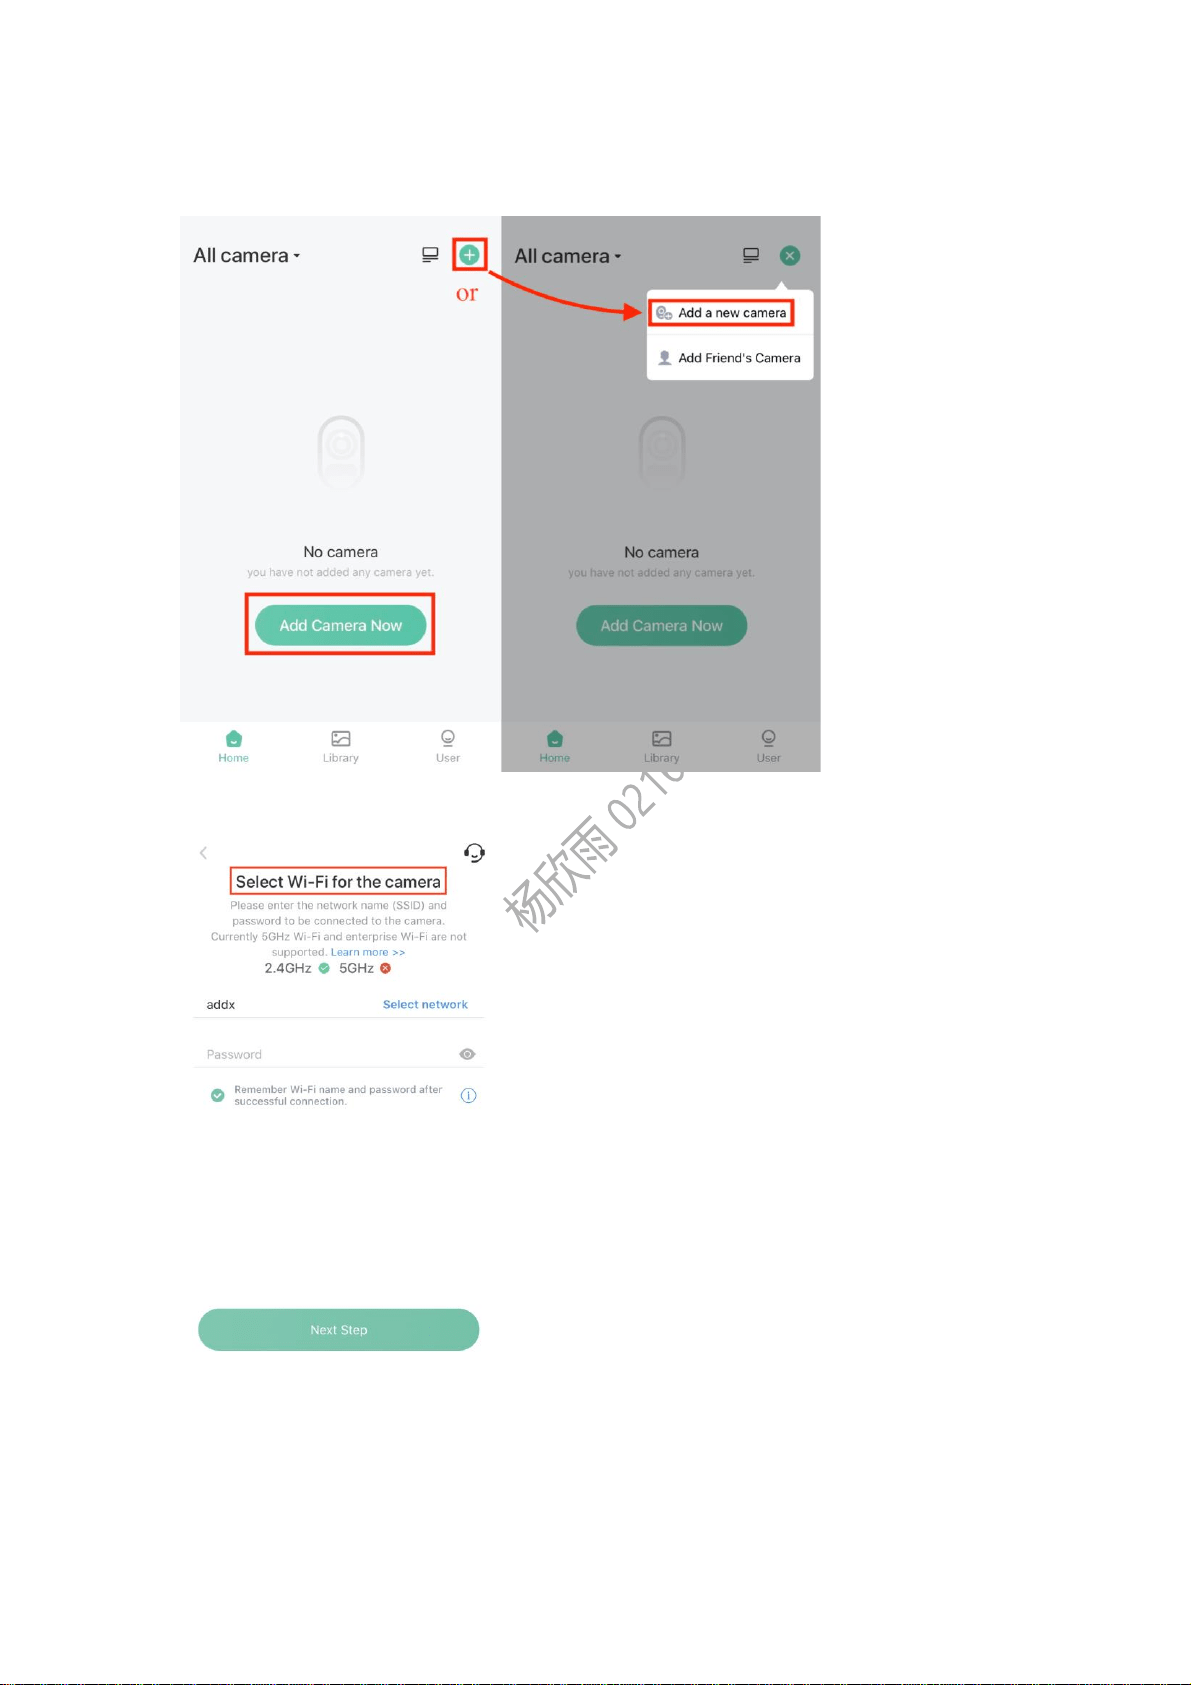
1. Open the VicoHome app, tap Add Camera Now. Or tap + plus icon on the top
right and then tap Add a new camera.
2. Follow the prompts until you enter Select Wi-Fi for the camera screen.
3. Select Wi-Fi, or manually enter the name of your Wi-Fi, and then enter the
password of the Wi-Fi to generate the WiFi network QR code.
Please note that the camera only supports 2.4G Wi-Fi.

• Take the camera to scan the generated QR code
Take the camera to scan the generated QR code. If the camera successfully scans
the QR code, it will make a beep sound Ding.
Please make sure the camera lens is clean.
The QR code should be 6
~
12 inches in front of the camera. You can slowly move
the camera back and forth to adjust the distance to get the best focus.
Please do it in an environment that is not too bright or too dark.
• Name the camera and set a location for the camera
Name your camera and choose/add/edit the location where your camera will be
installed.

• Automatic Camera Upgrade
Usually, the camera will upgrade the firmware to the latest version automatically after
being added to the app, so please wait for a while. After the camera is upgraded, you
will see the added camera on the home screen. You're all set!
Once your camera is set up successfully, you can mount it.
Why can't I turn on the camera?

• No battery
With an extremely low battery, the camera won't be turned on. You need to charge it
with AC power before using it. Or you can plug in the AC power and then turn on the
camera.
The specification of the power adapter should be 5V/1.5A or 5V/1A.
The length of the charging cable should not be too long, generally not longer than
16ft.
The camera indicates a solid yellow light for charging and a solid green light for a
full charge. It will take 6~8 hours to fully charge the camera.
• Broken power button
Once confirming the power button is broken, or the camera loops rebooting, please
contact us for a replacement.
• Battery Issue
The camera might have a battery issue if it still cannot be turned on after charging for
several hours. In this case, please contact us for technical support.
What to do if VicoHome does not generate a QR code
of the Wi-Fi network?
• Please check the network connection of your mobile phone and make sure it's
good and stable. Then re-enter this page to fresh the QR code.
• Please make sure you've installed the latest version of the VicoHome app.
• Please Kill the app and reopen it to try again.
• If possible, use another phone to add your camera.
• If it still does not work, please contact us for technical support.
Why can't the camera scan the QR?
When adding a camera, please scan the QR code generated in the VicoHome app. If
you scan the QR code on the camera body, the app will jump to the help article of
adding a camera. If you want to add the camera that has already been added on the
phone of your family or friend, you need to ask him/her to generate a share QR code
to scan. The below cases apply to add a camera:
• The camera is not in the scanning mode
Please turn on the camera and then double click the power button to make the
camera enter this mode, in which you will see the flashing blue light and hear a
repeated "Ding Dong Ding Dong" sound.
• The camera lens is not clean
Please remove the plastic protective film first. And please clean the camera lens if it

is dirty and when doing that please try to avoid leaving a fingermark.
• The camera can not find focus
Please slowly move the camera back and forth to the QR code to find the focus. And
please scan the QR code in an environment neither too bright nor too dark.
• Other problems
Please contact us for technical support.
Why does the camera fail to connect with Wi-Fi after
successfully scanning the QR code?
Camera reports "Wi-Fi SSID not found"
• Please check the name of Wi-Fi and make sure it is correct.
• Please place the camera near the Wi-Fi router and make sure the router is
connected to a power source.
• Please note that our camera only supports 2.4GHz Wi-Fi.
Camera reports "Wi-Fi password error"
• Please double-check the password you entered and make sure it is correct and
case-sensitive.
• And please pay attention to special characters, e.g. white space.
Camera reports "Cloud service connection fail"
• This means it fails to build the connection with our cloud server.
• Please check if your router is connected to an available network.
• Please try to restart the router and re-connect.
• If possible, please try another WI-FI.
更新版本:
If the camera reports "Cloud service connection fail", it means the camera fails to
build the connection with our cloud server. To solve the issue,
1. Please make sure your Wi-Fi router is connected to an available network.
2. If it is but the issue still exists, please try to restart your Wi-Fi router and try again.
3. If the issue still exists after restarting your Wi-Fi router, it's very possible that
there is some restriction(s) on the Wi-Fi router. In this case, you can try the below:
a. Remove the restriction on the Wi-Fi router: enter the router's admin address
in the browser address bar (usually the admin address will be written on the
router‘s body) -> enter the admin password to go into the admin site -> click LAN
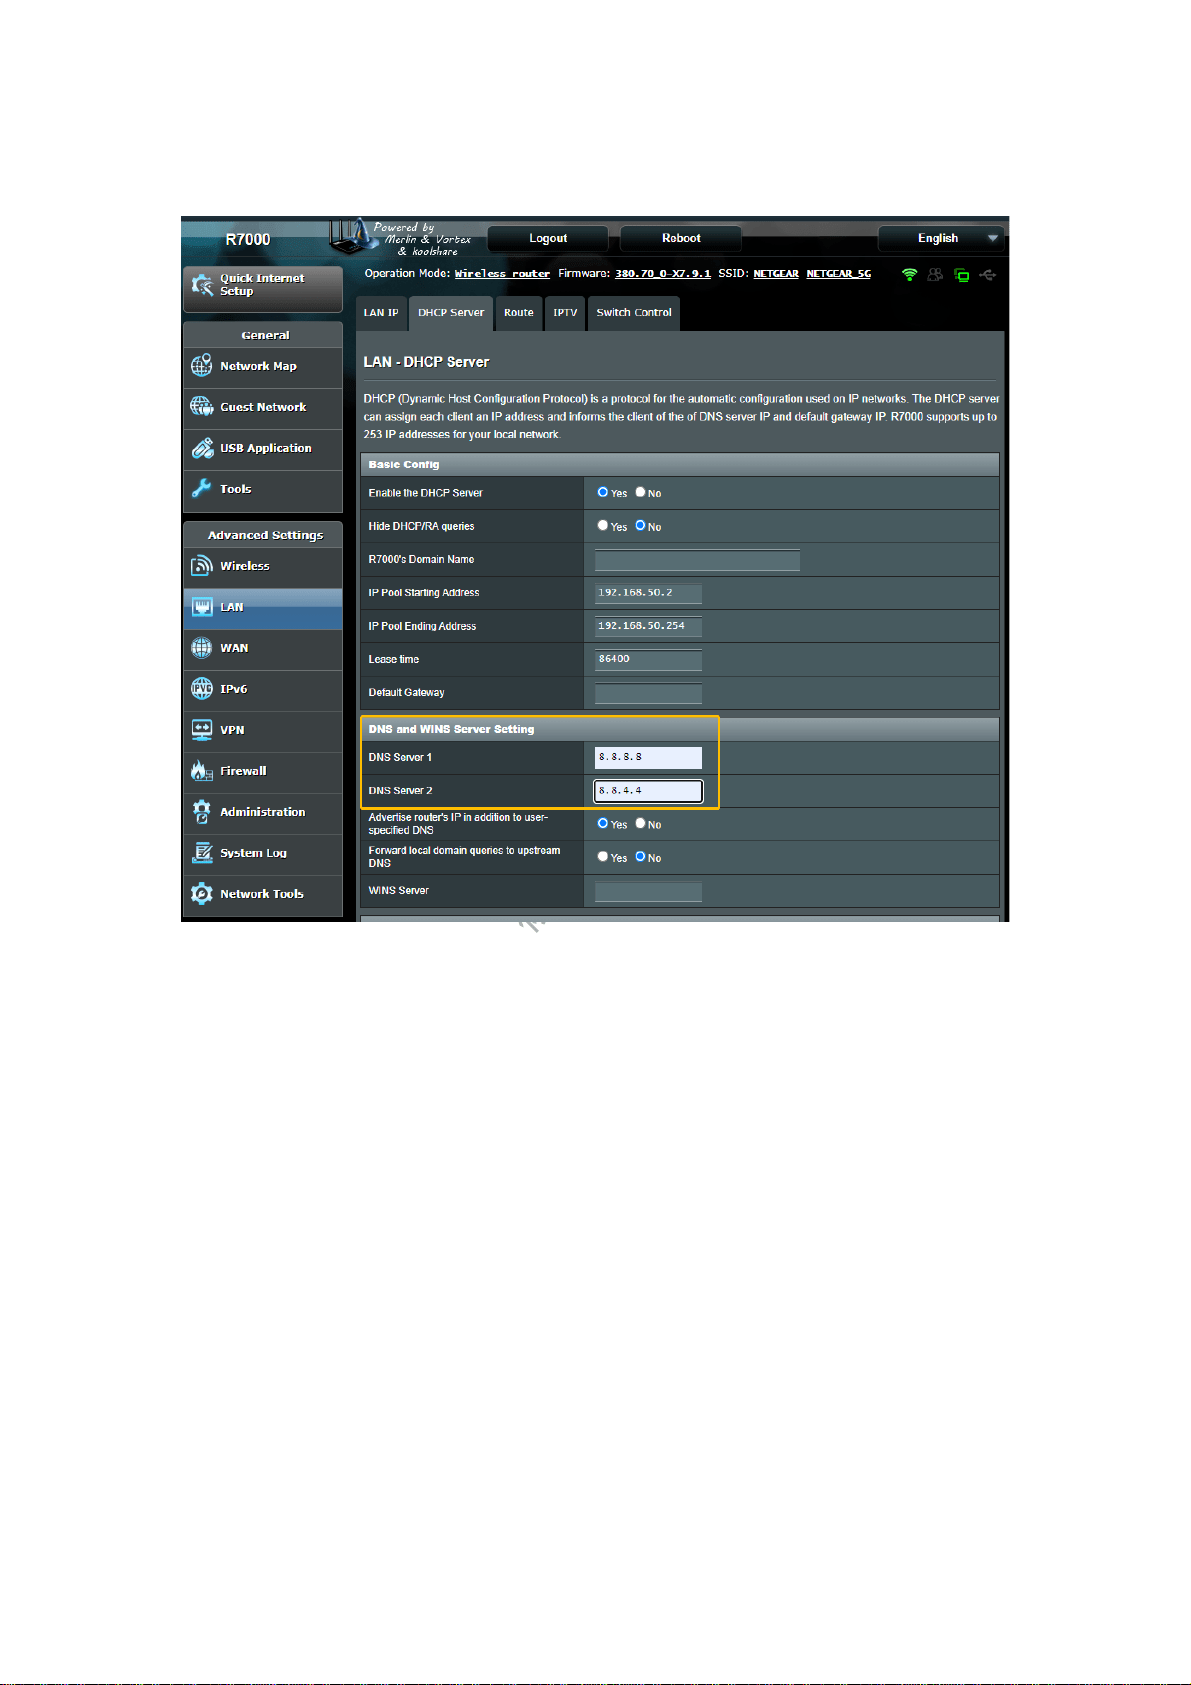
-> click DHCP Server-> Set Server 1 as 8.8.8.8 and Server 2 as 8.8.4.4 under
DNS and WINS Server Setting (you can refer to the attached picture).
2. If possible, reset your Wi-Fi router and re-configure your Wi-Fi router.
3. Try another Wi-Fi or hotspot of another phone.
Camera reports "Retrieving IP timeout"
• This means there are too many devices connected to the router so the camera
fails to get an IP from it.
• Please delete some unused devices. You may need to contact your router
administer.
• Please try to restart the router and re-connect.
• Please try another WI-FI.
Camera reports "Authentication error"
• Please make sure that your Wi-Fi network is not an enterprise network
connection method.
• Please note the camera only supports networks with a security level below
WPA-2, including WPE, WPA, and WPA2. You may need to check it by checking

the settings of your Wi-Fi router.
Camera reports nothing
• Please contact us for technical support with the serial number of your camera so
that we can check the connection log on our server to locate the problem. The serial
number is written on the label attached to the camera, starting with
"S/N:AICXXXXXXX".
How to change/reset the Wi-Fi network connected with
the camera?
1. Turn on the camera and then double click its power button to make it enter the
QR code scanning mode. In this mode, you will see the flashing blue light and hear
a continuous tip sound "Ding dong ding dong".
2. In the VicoHome app, you can follow the "Add a new camera" steps to reset the
network. You can also tap camera setting sign -> tap > extension icon-> tap Wi-Fi
name(SSID)-> tap Change Wi-Fi to reset the network.
If our system finds a camera is bound under the same VicoHome account, all the
settings of the camera will be kept the same.
How does the RST (reboot) button work?
Resetting can totally cut off the power of the camera so that all the temporal status of
the camera can be cleared. It is used to fix some corner-case issues of the system.
Please note that if you want to reset the network of the camera, you need to double
click the power button to make the camera enter the QR code scanning mode after
resetting, then try to re-add the camera to the app.
How to reset?
• CG1: Open the back shell of the camera, and then open the rubber plug on
the side of the camera. Next press the pinhole with the pin included in the box or a
pointed object like a needle. After releasing the pin/pointed object, the camera will
restart automatically in which you will see the blue light on and hear a startup sound.
• CG2 CG3 CG4 CG6 CG7: Open the USB silicone cover at the bottom of the
camera and press the pinhole with the pin included in the box or a pointed object like
a needle. After releasing the pin/pointed object, the camera will restart automatically
in which you will see the blue light on and hear a startup sound.
• G0: Open the USB silicone cover at the bottom of the camera and press the
pinhole with the pin included in the box or a pointed object like a needle. After
releasing the pin, the camera will restart automatically and you will see the white
light flash once.

• CQ1: Open the USB silicone cover at the top of the camera and press the
pinhole with the pin included in the box or a pointed object like a needle. After
releasing the pin/pointed object, the camera will restart automatically in which you will
see the blue light on and hear a startup sound.
• CB0: Unplug and re-plug to ensure the power adapter and the power cable are
connected properly. Next find the reset hole on the top of the camera, and long-
press the reset hole for 3s with the pin included in the box or a pointed object. After
releasing the hole, you will hear a reset sound and the camera will automatically
rotate. The completion of the rotation means the reset is successful.
• CB1 CB2 CB3: Unplug and re-plug to ensure the power adapter and the power
cable are connected properly. Next please rotate the "head" of the camera vertically
to find the reset button and then press and hold it for 3s. After releasing the hole,
you will hear a reset sound and the camera will automatically rotate. The completion
of the rotation means the reset is successful.
• DB1: After taking the doorbell off the bracket, press and hold the power button
for 3 seconds to reboot it. If it doesn't respond, you can reset the doorbell by poking
the Reboot hole with a pin. You will find the reboot hole near the right side of the
body label. Please open the silicone cover, press the reboot hole with the pin
included in the box or a pointed tool like a paperclip, and gently apply pressure on
the pin/pointed tool. After releasing the pin/pointed tool, the camera will restart
automatically in which you will see the indicator light on, and hear a startup sound.
