
H
This manual contains important information on safety measures
and operational features of the Kolibri Automatic Bill Counter. Please
read it carefully before operating your machine and keep it for future
reference. While every effort has been made to include all features
into this user manual, specifications stated may not reect all features
of the latest software versions. If you have any questions about your
Kolibri Automatic Bill Counter and its operation, please contact technical
support at www.kolibriusa.com/contact/.

Table of Contents:
1. INTRODUCTION
1.1 About the Kolibri Automatic Bill Counter_________________________________________ 1
1.2 Important Safety Notes _________________________________________________________ 1
1.3 Box Contents __________________________________________________________________ 2
1.4 Product Specifications _________________________________________________________ 2
1.5 Views of the Kolibri Automatic Bill Counter ______________________________________ 3
1.6 Control Panel __________________________________________________________________ 4
1.7 Home Screen __________________________________________________________________ 5
2. GETTING STARTED
2.1 Powering Up ___________________________________________________________________ 6
2.2 Loading the Hopper ____________________________________________________________ 6
2.3 Carrying the Unit _______________________________________________________________ 8
3. OPERATING MODES AND FUNCTIONS
3.1 Auto & Manual Mode ___________________________________________________________ 8
3.2 Count Mode ___________________________________________________________________ 9
3.3 Add Mode _____________________________________________________________________ 9
3.4 Batch Mode ____________________________________________________________________ 9
3.5 Add + Batch Mode ____________________________________________________________ 10
4. DETECTION FEATURES
4.1 UV Counterfeit Detection ______________________________________________________ 10
4.2 MG Counterfeit Detection ______________________________________________________ 11
4.3 IR Detection ___________________________________________________________________ 11
4.4 Half Note Detection ___________________________________________________________ 11
4.5 Double Note Detection ________________________________________________________ 12
4.6 Chain Note Detection __________________________________________________________ 12
5. MAINTENANCE, TROUBLESHOOTING AND SERVICE
5.1 Maintenance __________________________________________________________________ 13
5.2 Feed Gap Adjustment _________________________________________________________ 16
5.3 Sensitivity Settings ____________________________________________________________ 18
5.4 Troubleshooting ______________________________________________________________ 19
5.5 Warranty ______________________________________________________________________ 22
5.6 Contact Information ___________________________________________________________ 23

1.1 About the Kolibri Automatic Bill Counter
Thank you for choosing the Kolibri Automatic Bill Counter.
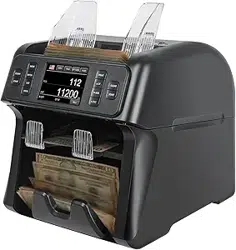
The Kolibri Automatic Bill Counter is a cash processing machine that is sophisticated,
but simple to operate. It saves time and reduces counting errors by swiftly and precisely
counting stacks of bills at the speed of 1500 bills per minute. The Kolibri Automatic Bill
Counter also comes with many built-in features and reliable counterfeit detection while
maintaining high level performance.
1.2 Important Safety Notes
When using this product, basic safety precautions should always be followed, including
the following:
• Do not use this product in areas where it may be exposed to water or any other
liquids.
• Unplug this product from the wall outlet before cleaning. Use a damp cloth or
air duster to clean the unit.
• To avoid the risk of electrical shock, do not disassemble this unit. Disassembling
will expose you to dangerous voltages and other safety risks. Incorrect
reassembly may cause electrical shock when the unit is subsequently used.
• Only use this product with the power cord supplied with it. Plug the power
cord into a properly grounded wall outlet. Do not remove the grounding pin
from the power cord. Failure to properly ground the unit can result in severe
injury or fire.
• Make sure the device is placed on a at surface. Do not operate the unit in
areas with high temperature, humidity or smoke as these conditions may
impede performance.
• This product is designed for indoor use in a well-ventilated environment. Keep
the unit away from direct sunlight and strong magnetic elds which may
interfere with the counterfeit detection sensors.
• When not using the unit for an extended period of time, disconnect the power
cord from the wall outlet.
INTRODUCTION
1.
1

1.3 Box Contents
- Kolibri Automatic Bill Counter
- External Display
- Power Cord
- User Manual
- Accessories
1.4 Product Specifications
Counting speed: 1500 bills per minute
Hopper capacity: 200 bills
Stacker capacity: 200 bills
Weight: 10.6 lbs (4.8 kg)
Dimensions: 11.4’’ x 9.8’’ x 6.9’’ (290mm x 250mm x 175mm)
Power source: AC 100V, 60Hz, < 80W
2
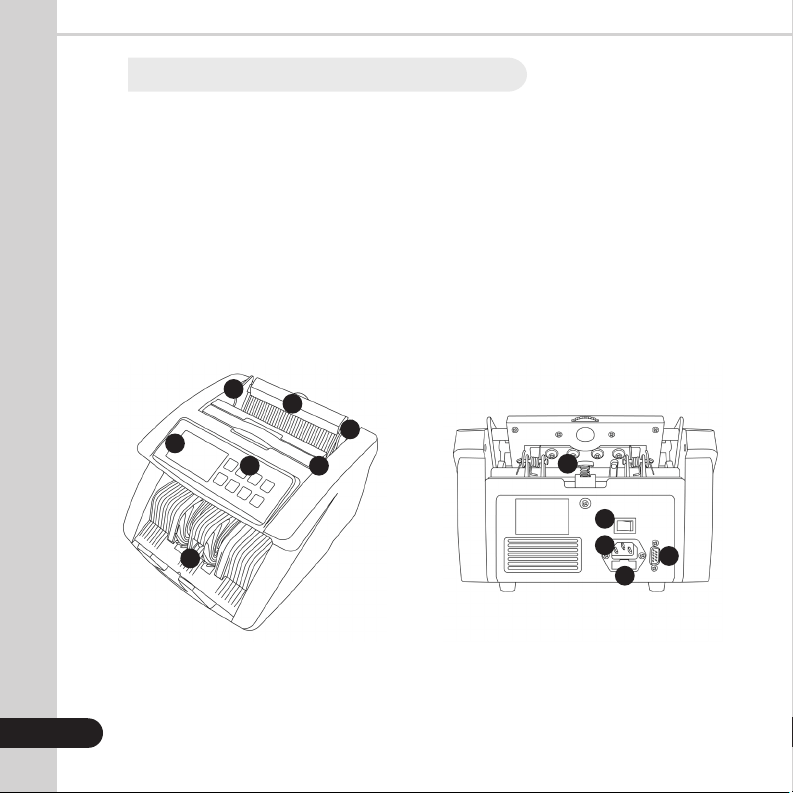
1. Hopper
2. Bill Guides
3. Carrying Handle
4. Control Panel
5. Screen
6. Stacker
7. Feed Gap Adjuster
8. Power Switch
9. RS-232M Port
10. Fuse
11. AC Power
1.5 Views of the Kolibri Automatic Bill Counter
3
FRONT VIEW BACK VIEW
1
2
34
5
6
7
8
9
10
11
2
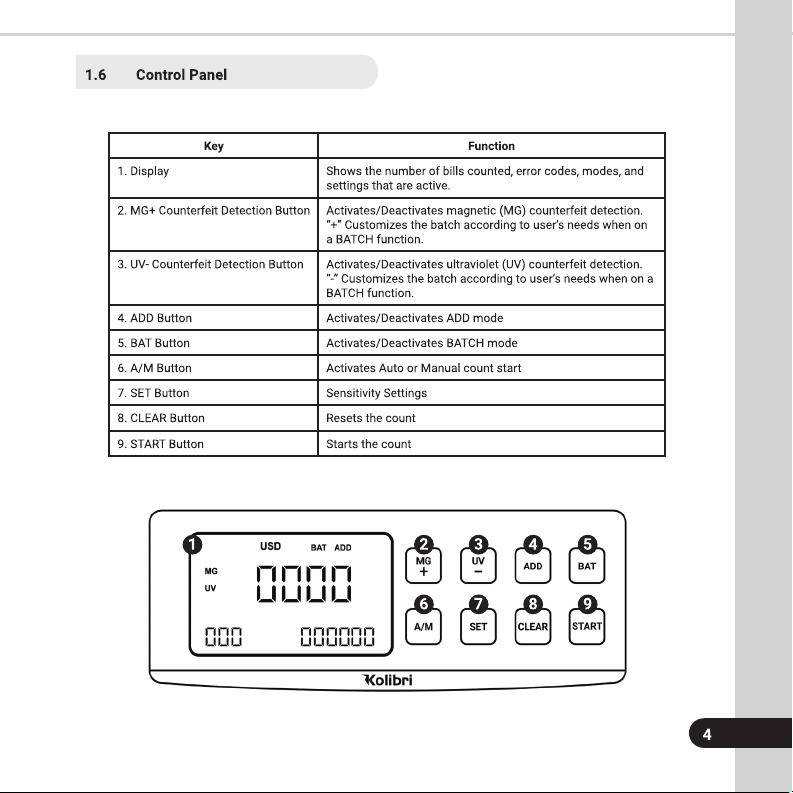
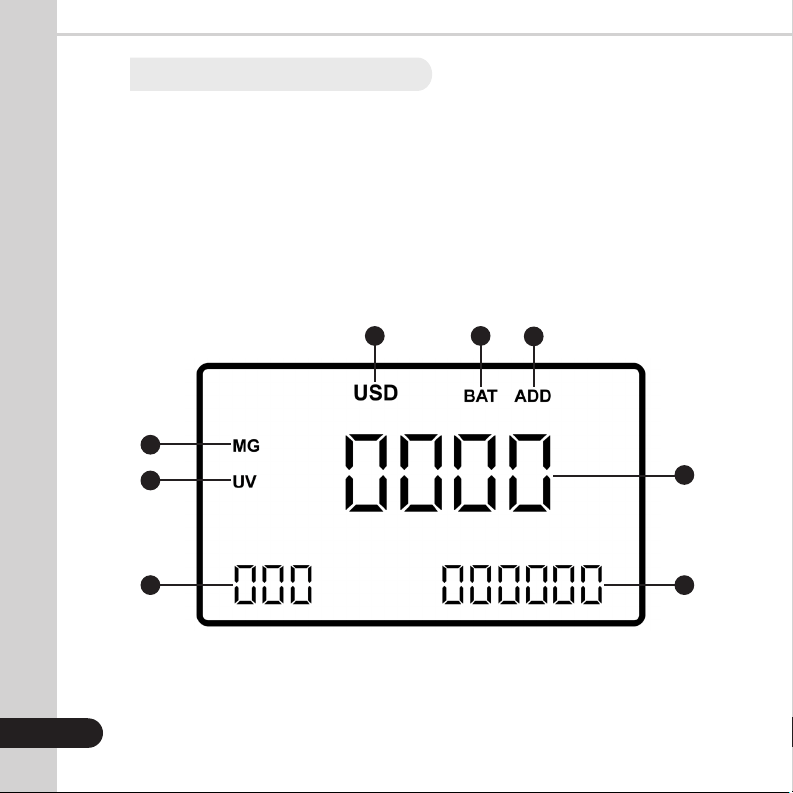
1. USD - Currency
2. BATCH Function (Activated)
3. ADD Function (Activated)
4. Number of Bills Counted
5. Total Number of Bills Counted
6. Selected Batch Amount (Activated)
7. UV Detection (Activated)
8. MG Detection (Activated)
1.7 Home Screen
5
1 2
3
4
56
7
8
6
GETTING STARTED
2.
2.1 Powering Up
Ensure the hopper and stacker are empty. Then, attach the provided power cable to the
power inlet on the back of the machine. Make sure to plug the power cable into a three-
prong outlet and turn on the power switch located on the back of the machine .
The unit will load and conduct a self-checking. The screen will display “0” when the unit
is ready to operate.
2.2 Bill Loading
In order to avoid jams, it is important to correctly load the hopper. Kolibri recommends
not to use more than 200 bills at a time. Follow the 3-step loading technique below to
ensure smooth bill feeding.
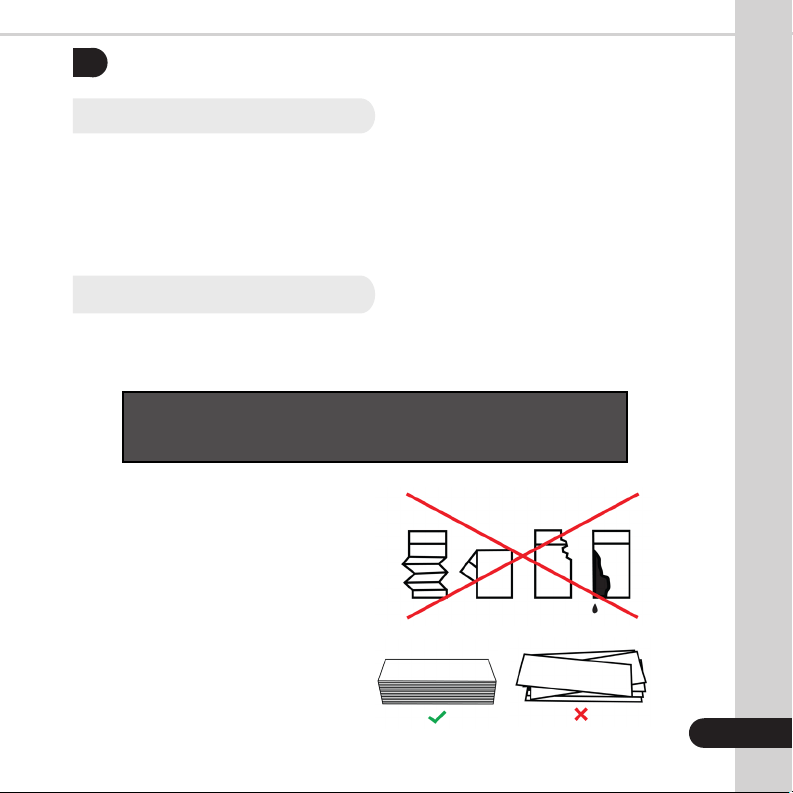
WARNING: Hazardous moving parts!
Do not place fingers, hair, clothes, etc. near the moving parts.
7
STEP 1:
Correct or remove the bills that
are severely wrinkled, damaged or
folded. Square the bill stack.
STACK IT
7
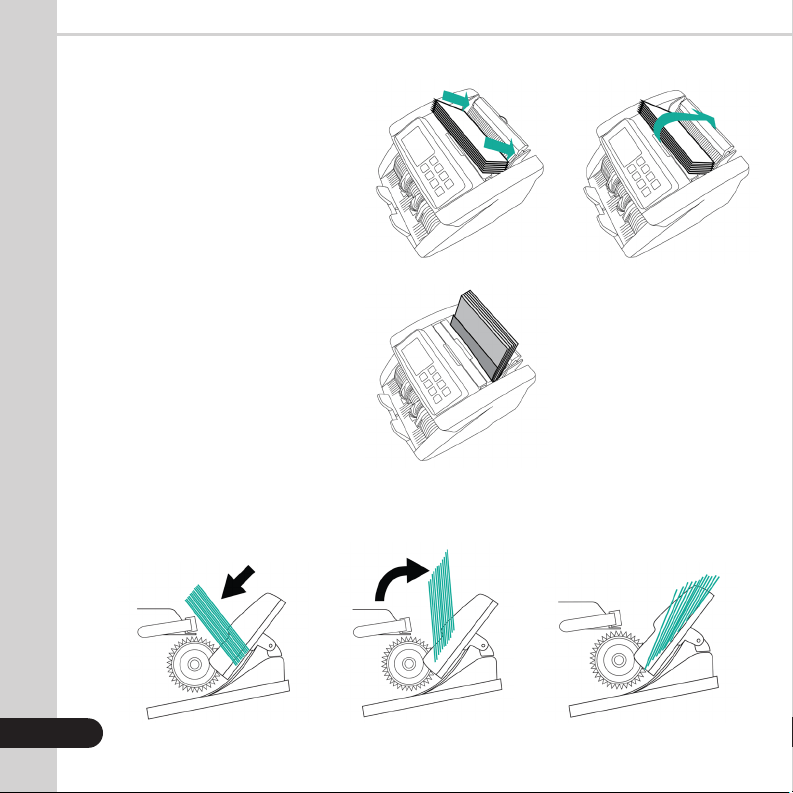
PLACE IT FLIP IT
STEP 2:
Place the bill stack on the carrying
handle, with the bottom of the
stack touching the bill guide plate.
As it is shown in the illustration.
STEP 3:
Flip the bill stack towards the rear
of the machine so the stack is now
leaning against the bill guide plate
The bills will load automatically
(unless in manual mode).
Below is a side view of the bill loading technique. All bills must be between the rollers and the
feeding plate to be counted smoothly.
OPERATING MODES & FUNCTIONS
3.
3.1 Auto & Manual Mode
After turning the machine on for the first time it will default to AUTO mode. In this mode
the machine starts counting automatically. To operate in MANUAL mode, press the
“A/M” button on the control panel. Machine will beep twice, indicating that MANUAL
mode is activated. If the machine is set to operate in MANUAL mode, it will stop counting
automatically; the “START” button must be pressed to begin each count. To go back to
AUTO mode, press “A/M” button again. Machine will beep once indicating activation of
the AUTO mode.
8
1. Grasp the handle. 2. Pull the handle up.
2.3 Carrying the Unit

3.2 Count Mode
After turning the machine on it will default to count mode. To count bills, place them
in the hopper and follow the procedure described in 2.2 Bill Loading. The machine will
start counting automatically (if in AUTO mode) and move the bills from the hopper
to the stacker as it counts them. The machine will stop counting when the hopper is
completely emptied and the counted number of bills will be displayed on the screen.
Remove the bills from the stacker and place another stack into the hopper to count
another batch of bills. When the bills are removed from the stacker the screen will clear
itself of the previous count, or it can be cleared by pressing the “CLEAR” button.
3.3 Add Feature
This feature is available by pressing the “ADD” button. When this function is activated,
an “ADD” indicator is displayed on the home screen. The machine counts multiple stacks
of bills and keeps track of the total number of bills will be displayed on the bottom right
corner of the screen. When ready to count the next stack of bills, empty the stacker and
load the new stack to be counted into the hopper. The unit will continue counting and
add the new count to the total. To exit ADD mode, press the “ADD” button again.
3.4 Batch Feature
This feature is available by pressing the “BAT” button. When this function is activated, the
“BAT” indicator will be displayed on the screen along with the batch size. The machine
counts a preset number of bills. It beeps and stops counting when the batch number
has been reached, even if bills remain in the hopper. By default, the batch size is preset
to 100. You may press the “BAT” button repeatedly to cycle through different preset
batch quantities (100, 50, 20, 10), or use the “MG/+” and “UV/-” buttons to manually
select a desired batch size. To exit the BATCH function, press the “BAT” button until the
“BAT” indicator disappears from the screen.
9

3.5 Add + Batch Feature
This feature batches the desired quantity of bills and monitors the runnig total at the
same time. To activate this function, press the “ADD” and “BAT” button until both the
“BAT” and the “ADD” indicators are displayed on the screen. By default, the batch size
is preset to 100. Use the “MG/+” and “UV/-” buttons to manually select your desired
batch size. To exit the ADD+BATCH feature, press the “ADD” and “BAT” buttons until the
indicators on the screen disappear.
DETECTION FEATURES
4.
4.1 UV Counterfeit Detection
The Kolibri Automatic Bill Counter can identify bills suspected of being counterfeit using
an ultraviolet light detection system. This function is available in all modes by pressing
the “UV” button until the “UV” indicator is displayed on the screen.
When a suspect bill is detected, the unit will stop, beep and display the error code “E01”
on the screen. The unit will not stop beeping or start until the suspect bill is removed from
the stacker, and the “START” button is pressed. The suspect bill will not be added to the
count.
Please note that a suspect UV bill does not necessarily mean that the bill is counterfeit.
There are several reasons a genuine bill may be recognized as counterfeit. Possible
reasons for a bill to be indicated as suspect include: detergent washed bills, direct
sunlight exposure, worn out bills, excessively dirty bills or advanced counterfeiting
techniques used to produce the bill. Separate equipment may be required to determine
definitively whether a note is counterfeit.
10

4.2 MG Counterfeit Detection
The Kolibri Automatic Bill Counter can identify bills suspected of being counterfeit by
utilizing magnetic ink detection. This function is available in all modes by pressing the
“MG” button until the “MG” indicator is displayed.
When a suspect bill is detected, the unit will stop, beep and display the error code “E02”
on the screen. The unit will continue to beep until the suspect bill is removed from the
stacker, and the “START” button is pressed. The suspect bill will not be added to the
count.
Please note that a suspect MG bill does not necessarily mean that the bill is counterfeit.
There are several reasons a genuine bill may be recognized as counterfeit. Possible
reasons for a bill to be indicated as suspect include: worn out bills, excessively dirty bills
or advanced counterfeiting techniques used to produce the bill. Separate equipment may
be required to determine definitively whether a note is counterfeit.
4.3 IR Detection
The Kolibri Automatic Bill Counter can identify bills by their size and thickness utilizing
infrared detection. By default, this function is always on in all modes in order to identify
half note, double note, or chain note errors.
4.4 Half Note Detection
The Kolibri Automatic Bill Counter incorporates infrared light sensors that notify users
if a half note passes through the counting mechanism. This function is activated
automatically in all modes. If the unit detects a half note, it will stop, beep and display
the error code “HLF” on the screen. The unit will continue to beep until action is taken. To
clear the error, all bills must be removed from the stacker and recounted.
11

4.5 Double Note Detection
Bills may stick to each other due to excessive dirt, folding or various other reasons. The
Kolibri Automatic Bill Counter uses infrared light sensors to determine whether two bills
are stuck together. This feature is active automatically in all modes. If a double bill is
encountered the unit will stop, beep and display the error code “dbL” on the screen. The
unit will continue beeping until action is taken. To clear the error, all bills must be removed
from the stacker and recounted.
4.6 Chain Note Detection
The Kolibri Automatic Bill Counter utilizes infrared light sensors and a self checking
system that alerts the user in rare cases when several notes pass through the counting
mechanism at once. This feature is activated in all modes. If the unit detects a chain
error, it will stop, beep and display the error code “CHn” on the screen. The unit will
continue beeping until action is taken. To clear the error, all bills must be removed from
the stacker and recounted.
12

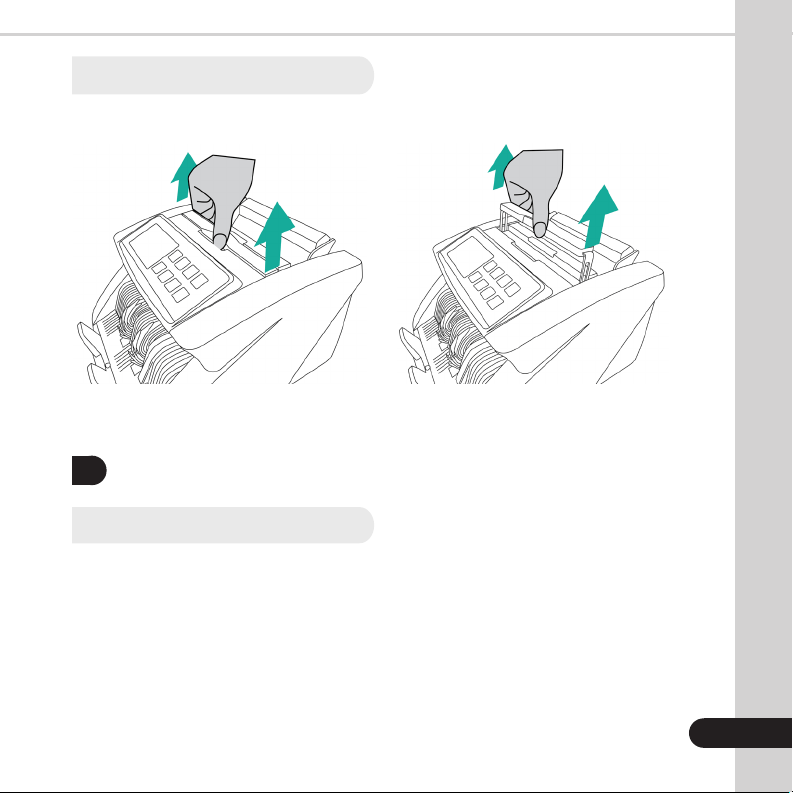
5.1 Maintenance
ATTENTION: Always power off the unit and disconnect from power source before
cleaning.
Most operational problems can be avoided by regular care and preventative
maintenance. Taking regular care of the Kolibri Automatic Bill Counter will significantly
increase its lifetime.
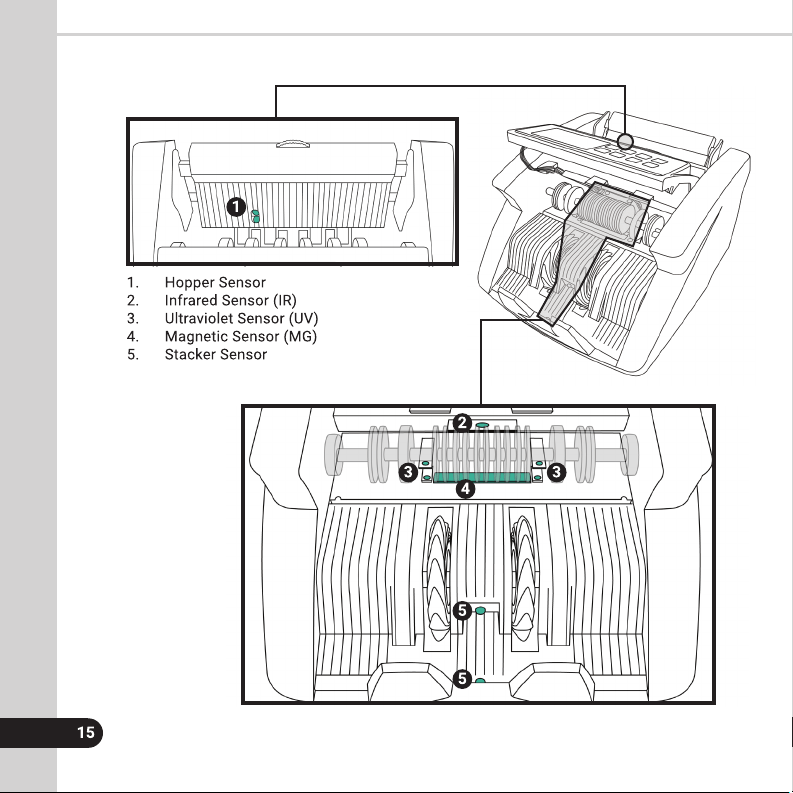
All parts of the Kolibri Automatic Bill Counter need daily care and cleaning. Pay closed
attention to the sensors, which are delicate components. If only dust or other foreign
matter adheres to the sensors, it may cause various problems during operation of the
machine. Dirty sensors can affect the Kolibri’s Automatic Bill Counter’s performance
and cause genuine bills to be rejected. It is suggested that the user performs weekly
maintenance on the unit to maintain top performance.
For best results, it is recommended to use an air duster and a soft bristle brush to
remove any dusy or debris from the interior of the unit. When not using the machine for
an exrended period, cover it with the provided dust cover to prevent dust from settling
inside.
• To avoid malfunction caused by foreign objects, please clean your machine frequently
• Clean Hopper and Stacker sensors with the provided soft bristle brush or a dry
cloth frequently
• Clean the sensors with the provided soft bristle brush or a dry cloth frequently
• Rubber rollers may be cleaned with a slightly damp cloth. You may use a small
amount of isopropyl alcohol to dampen the cloth and clean the rollers. Wait until the
rollers are completely dry before turning on the machine.
13
MAINTENANCE, TROUBLESHOOTING AND SERVICE
5.
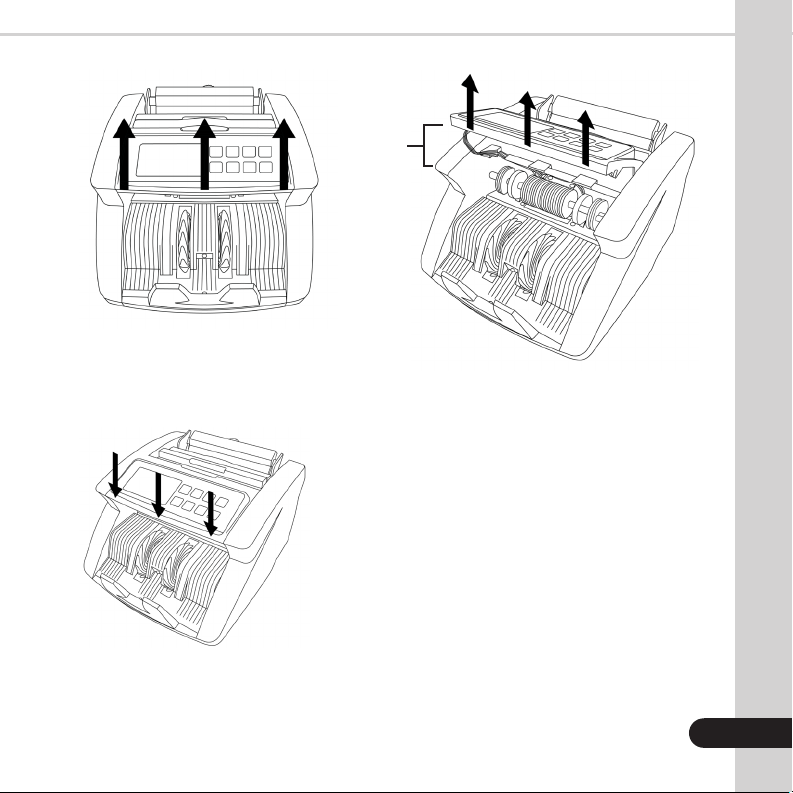
14
2 inches
1. Place fingers under control
panel and thumbs on the
side panels.
3. Secure sensor housing and
control panel back to the
initial position.
2. Lift control panel about 2 inches.
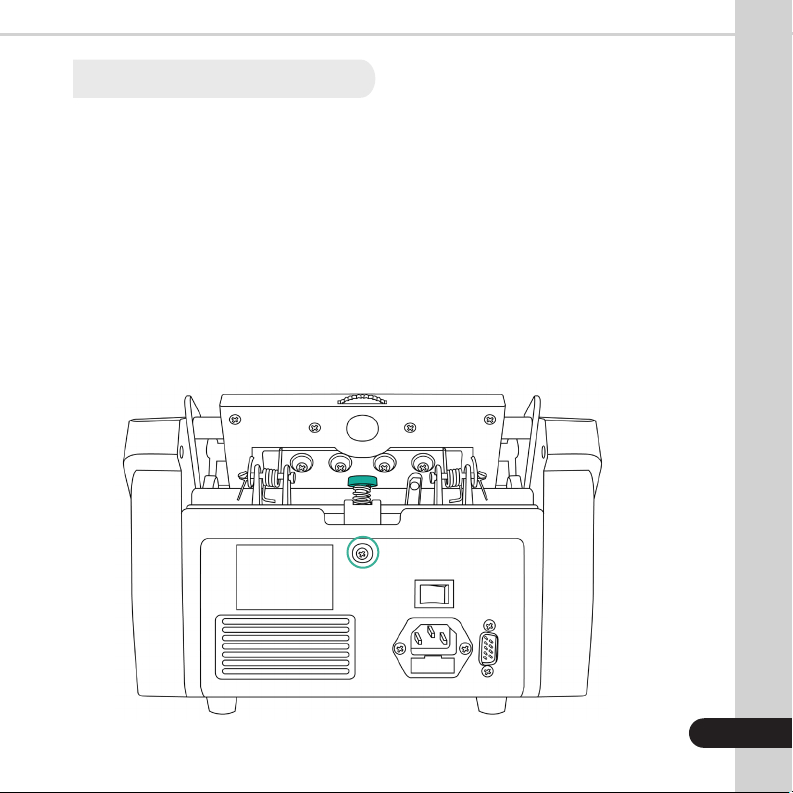
5.2 Feed Gap Adjustment
Sometimes, during the transportation or shipment of the unit, the adjustments of the feed
mechanism may loosen. This can also happen during normal wear and tear, and can lead
to DOUBLE/CHAIN errors.
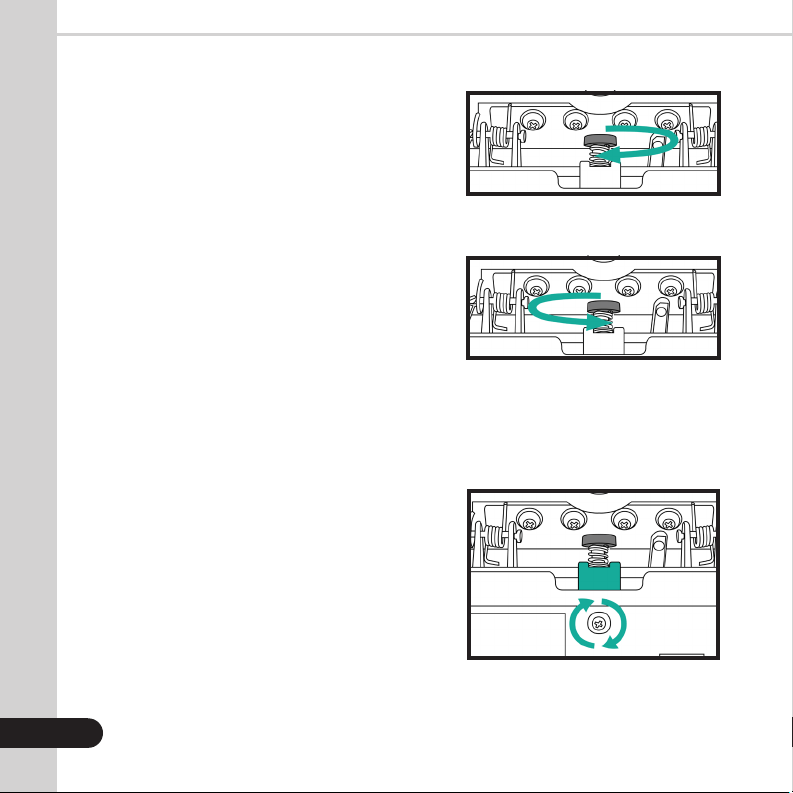
The feed gap is the actual height of the bill feed path and should be turned to just about
the thickness of a single bill. If the feed gap is too wide, the user may experience a high
amount of DOUBLE/CHAIN errors which are caused by more than one bill entering the
scanning path at one time. If the feed gap is too tight, the unit may not be able to pass
bills into the scanning path or catch on bills and tear them.
To adjust the feed gap properly, you will need a philips screwdriver (not included).
1. Ensure the machine is turned off.
2. Locate the feed gap adjustment knob (green) and the fixing plate screw (green
circle) at the back of the machine (loosen before performing any adjustment)
16
18
17
3a. If more than one bill is being pulled into
the feed mechanism (Double/Chain
errors), turn the knob clockwise
(decrease gap Adjust 1 turn, then
re-test the machine to see if the
problem is corrected. Repeat if
necessary.
NOTE: If the feed gap is adjusted too narrow,
chain error, bill jams and tears can occur.
3b. If Chain error or bill jamming is seen
on the input, turn the knob
counterclockwise (increase gap).
Adjust 1 turn, then re-test the machine.
Repeat as necessary.
NOTE: If the feed gap is adjusted too wide,
double and half errors can occur.
Clockwise
Counterclockwise
Fixing Plate & Screw
4. Fix the adjusted position by
tightening (clockwise) the fixing
plate screw.
IMPORTANT NOTE:
The Kolibri Automatic Bill Counter’s feed
gap adjustment can be sensitive during
adjustments. DO NOT overturn each
adjustment or you may overshoot the
optimum gap. We recommend testing with
a stack of bill after each adjustment turn.
In order to enter the sensitivity settings menu, press and hold the “SET” button for 3
seconds, or until “-C00” code displays in the bottom right corner of the screen. Press the
“BAT” button to cycle through the different codes (refer to the Sensitivity Codes Table).
When on the desired code you can use the “MG+” butto or the “UV-” button to adjust the
settings accordingly. Once adjusted, place a finger on the hopper sensor to save and exit
the sensitivity settings menu. Codes are listed below for reference.
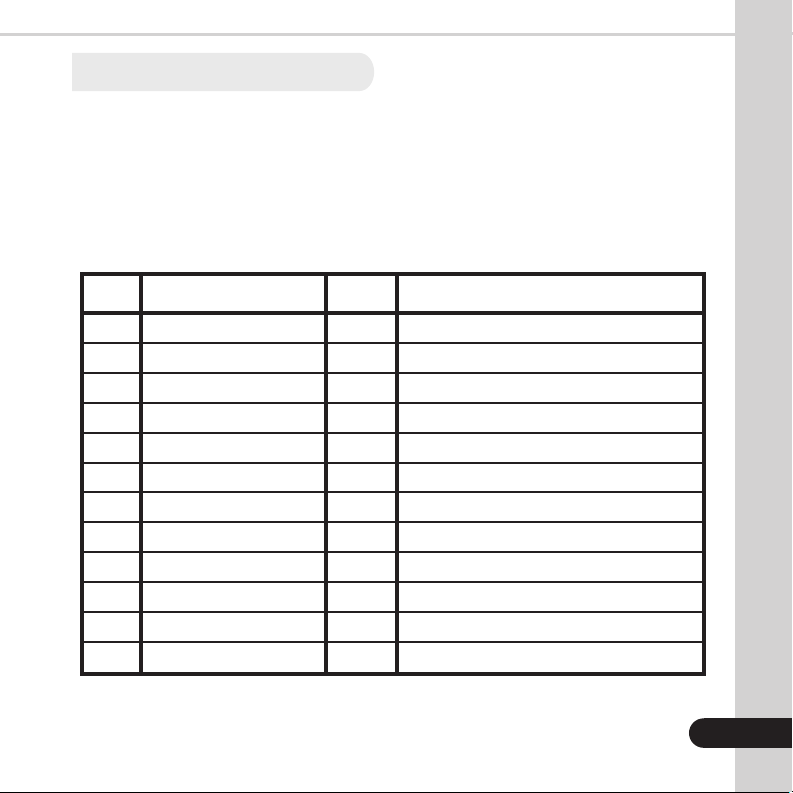
SENSITIVITY CODES TABLE
19
18
CODE
C00
H-C01
-C04
H-C07
-C08
H-C09
H-C10
-C24
-C25
-C26
-C28
-C35
DETAIL
Voice Switch
Voice Volume
External Display
Stop Line
Alarm Last Time
Hopper Sensor Sensitivity
Stacker Sensor Sensitivity
Double Note Sensitivity
UV Sensor Sensitivity
MG Sensor Sensitivity
Counting Threshold
Button Beep
SETTING
0
1
1
40
0
150
125
20
120
5
220
1
ADJUSTMENT
0 = off / 1 = on
0 = off / larger number = louder sound
0 = off / 1 = on
larger number = quicker stop
0 = shut / 1 = open
larger number = higher sensitivity
larger number = higher sensitivity
larger number = higher sensitivity
0 = close / larger number = higher sensitivity
0 = close / larger number = higher sensitivity
0 = off / 1 = on
5.3 Sensitivity Settings
19
5.4 Troubleshooting
In order to enter the sensitivity settings menu, press and hold the “SET” button for 3
seconds, or until “-C00” code displays in the bottom right corner of the screen. Press the
“BAT” button to cycle through the different codes (refer to the Sensitivity Codes Table).
When on the desired code you can use the “MG+” button or the “UV-” button to adjust the
settings accordingly. Once adjusted, place a finger on the hopper sensor to save and exit
the sensitivity settings menu. Codes are listed below for reference.
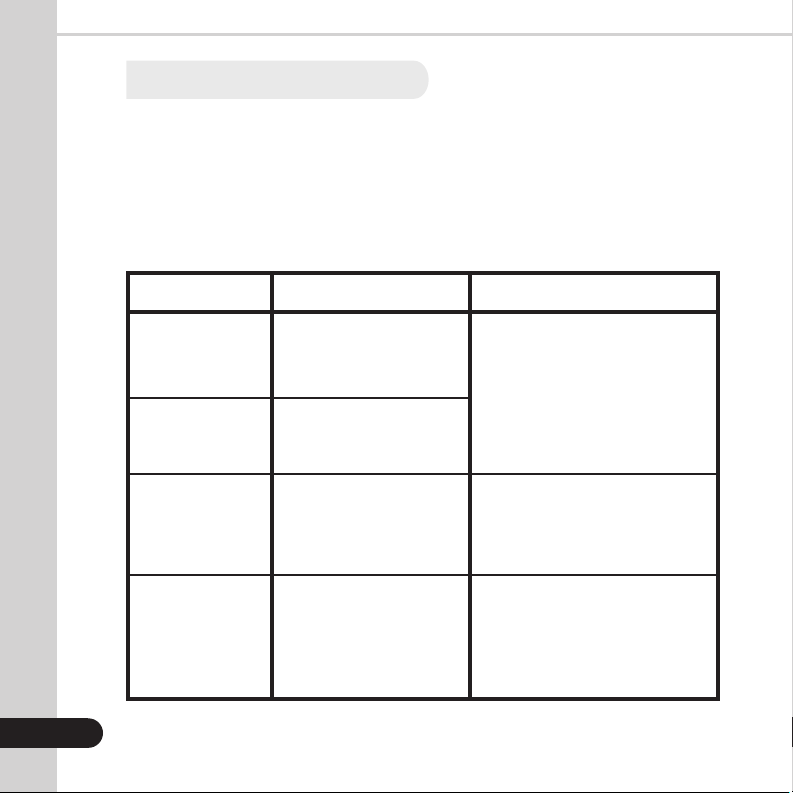
Error Message Display:
ERROR MESSAGE
E01
E02
CHn
HLF
CAUSE
Suspect bill detected by
ultraviolet detection or UV
detection issue.
Suspect bill detected by
magnetic detection or MG
detection issue.
Two or more bills passed
as one.
The last counted bill does
not confirm size of the bill
or the bill might be torn or
folded.
SOLUTION
Remove top bill from stacker. This
bill is not added to count. Press
start to continue.
Ensure bills are loaded properly.
Remove all bills from stacker. Bills
are not added to the total count.
Recount.
Ensure top bills in the stacker are
standard size and or not folded.
Remove all bills from stacker. Bills
are not added to the total count.
Recount.
20
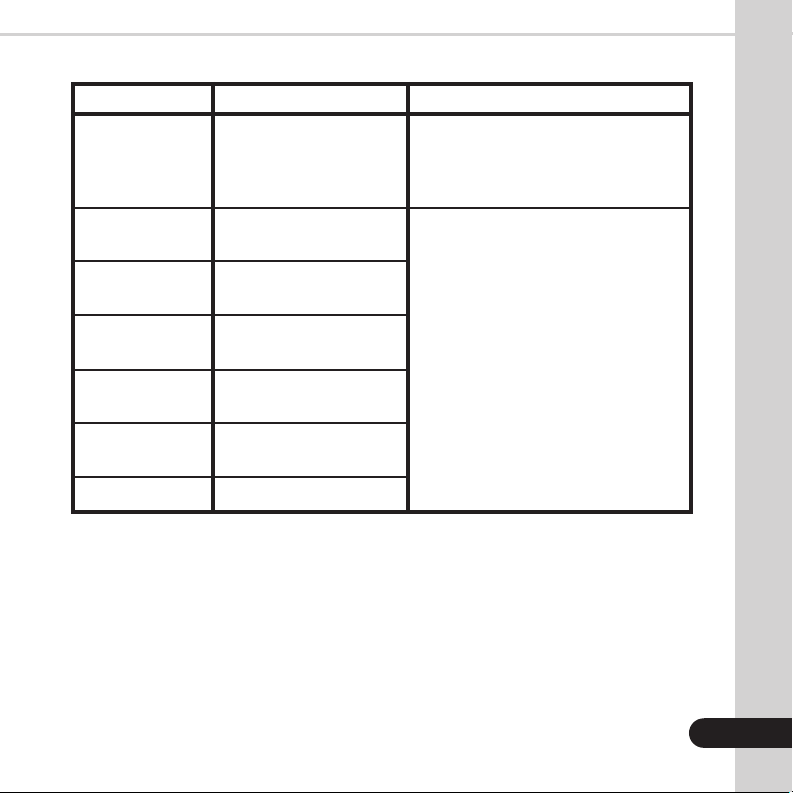
Error Message Display (continued):
ERROR MESSAGE
dbL
FE3
FE2
FE7
FE1
FE6
FEA
CAUSE
The last counted bill is a
double note or has double
detection issue.
Issue with the left counting
sensor.
Issue with the right
counting sensor.
Issue with the encoder
sensor.
Issue with the feeding
sensor.
Issue with the stacker
sensor.
Issue with the UV sensor.
SOLUTION
Ensure top bills in stacker are not stuck
together. Remove all bills from stacker.
Bills are not added to the total count.
Recount.
Clean the sensor. See section 5.1
Maintenance for location of sensors.
21
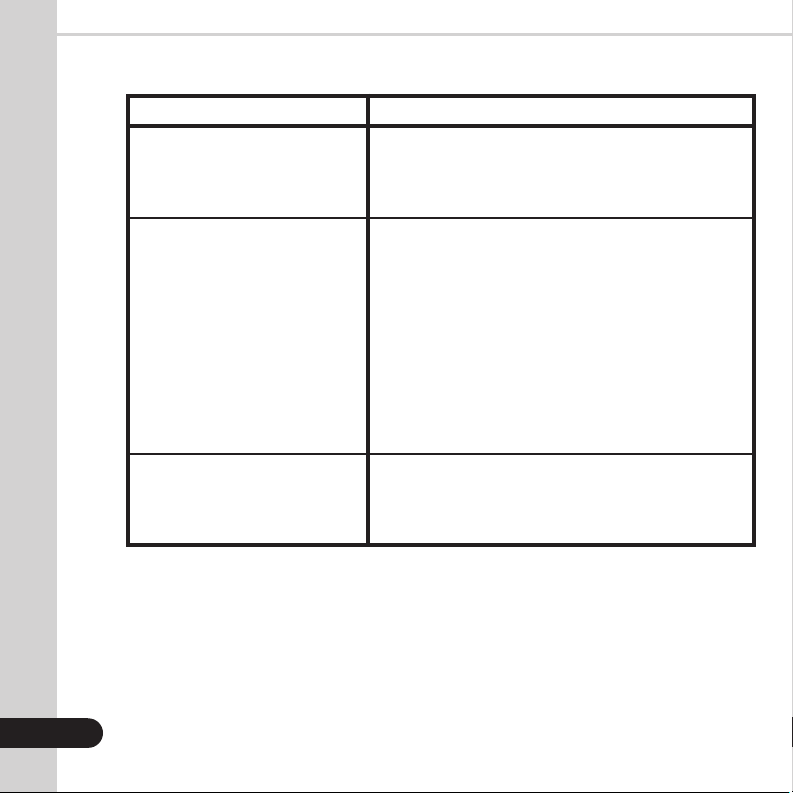
PROBLEM DESCRIPTION
Machine does not turn on.
Machine failes to detect
counterfeit notes.
Bills are jammed.
CAUSE/ACTION
Ensure the power cord is connected properly. Check
the fuse in the fuse compartment and replace it if
necessary. Contact Kolibri’s technical service center
if the issue persists.
1. Bills were incorrectly inserted into the hopper.
2. Turn off the machine and turn it back on.
3. The feed gap is too wide. This may happen when
brand new notes are counted as their thickness
differs greatly from used notes to which the machine’s
gap is adjusted for by default. Narrow the gap slightly
by turning the feed gap adjuster (refer to section 1.5,
rear and front view) counterclockwise by one turn at
a time and try counting again. Repeat the procedure
until a suitable gap width is reached. If the resistance
against the bill feels too strong, loosen the gap by
turning the screw clockwise.
Turn off the machine. Remove any jammed bills.
Look for any foreign objects inside the unit (paper
clips, rubber bands, etc.). Remove foreign objects,
if any. Recount.
Other Possible Errors:

22
5.5 Warranty
The Kolibri Automatic Bill Counter is warranted for a period of one year from the date of
purchase.
In most cases a unit malfunction can easily be corrected by performing a thorough
cleaning.
• Customer should allow the manufacturer the time and opportunity to test and
diagnose the machine to determine warranty and non-warranty claims.
• After receiving and unpacking the unit, customer shall keep the package and its user
manual. Warranties are canceled in the event the device is transported in a non
original packaging or operation/maintenance conditions are not met.
• Company is not responsible for unit malfunction due to improper maintenance,
storage, or transportation including, but not limited to mechanical damage.
• Manufacturer is entitled to introduce updated software, not described in the
current user manual.
Non-Warranty Service:
The manufacturer can perform maintenance and cleaning for an extra fee. For a non-
warranty repair or maintenance quotation, contact our Technical Support team.
Warranty service is not available in the following cases:
• Cleaning of the unit from dust and mud.
• Operation or maintenance rules requirements set in the user manual are not met.
• There is mechanical damage to the unit, or the sealed portions of the unit have been
opened or tampered with.
• There are foreign objects or liquid inside the unit.

5.6 Contact Information
Technical Support contact information:
http://kolibriusa.com/contact/
When contacting Technical Support, please have the following available:
• Product Model - Located on the back of the machine.
• Serial Number - Located on the bottom of the machine.
• Nature of the problem - What happened, and when did it happen? Did the machine
display an error message?
• Steps already taken to resolve the problem and the results.
23


Kolibri™
©2020 Printed in China.
Specifications subject to change without notice.
www.KolibriUSA.com
KKR12032020