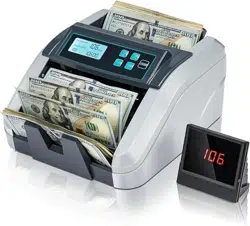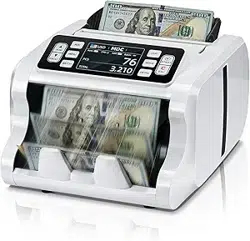

Banknote Counter
VS-35
User Manual

VS-35 User Manual V1.1
1
Table Of Contents
Table Of Contents .......................................................................... 1
1. Machine overview ........................................................................2
1.1 Safety Instructions .......................................................................................................................... 2
1.2 Installation Instructions ................................................................................................................... 3
1.3 Machine and Accessories ...............................................................................................................4
1.4 Appearance of Machine ..................................................................................................................4
1.5 Technical Parameters ..................................................................................................................... 7
1.6 Startup Readiness .......................................................................................................................... 8
1.7 Banknote Arrangement ...................................................................................................................8
1.8 Counting error reporting code ........................................................................................................ 9
2. Introduction of machine functions ......................................................... 11
2.1 Introduction to Usage Features .................................................................................................... 11
2.1.1 Display interface and touch screen interface description ..................................................11
2.1.2 Operation Instructions for Function Keys .......................................................................... 12
2.1.3 Automatic/Manual Mode Settings ...................................................................................... 12
2.1.4 Currency Counting Mode Selection ...................................................................................13
2.1.5 Currency Speed Setting .....................................................................................................17
2.1.6 Face/Orientation switching function ...................................................................................18
2.1.7 View banknote counting details ......................................................................................... 20
2.1.8 Check the details of the error report of suspected banknotes .......................................... 20
2.1.9 Preset number and amount settings ..................................................................................21
2.1.10 Accumulation Mode Settings ............................................................................................23
2.1.11 User settings .....................................................................................................................25
2.1.12 System setup ....................................................................................................................32
2.2 Printer Connection Settings ..........................................................................................................36
2.2. 1 Machine baud rate setting .................................................................................................36
3. Maintenance instructions ................................................................ 38
3.1 Software Upgrade .........................................................................................................................38
3.1. 1 U disk preparation ............................................................................................................. 38
3.1. 2 Software Upgrade ............................................................................................................. 39
3.2 Daily cleaning instructions ............................................................................................................40
3.2. 1 Clean hopper sensor .........................................................................................................40
3.2. 2 Clean banknote feeding block and banknote twisting block ............................................ 41
3.2. 3 Clean banknote stacker sensor ........................................................................................ 41
3.2. 4 Clean the sensors inside the upper and lower guide plates ............................................ 41
3.2. 5 Clean the sensors inside the upper and lower channel plates ........................................ 43
3.3 Common faults and corresponding descriptions ..........................................................................43

VS-35 User Manual V1.1
2
1. Machine overview
1.1 Safety Instructions
Special Reminder:
This product is used to count the banknotes described in the specification. Please do not use this
product for other purposes. Due to the different specifications and safety standards of power supply,
this product is only used in corresponding countries or regions, and may not be used in other
countries or regions.
Please understand that the items recorded in this manual are subject to change without prior notice.
The appearance and technical specifications of this manual are subject to change without prior
notice. Therefore, if the actual product is different from the contents in this manual, please
understand.
No alteration or modification of this product in any form is permitted without the express written
authorization of the Company.
This machine is designed for indoor use. Please do not install or use it outdoors.
Please do not install it in places where it can't bear the weight of this product or in inclined and
uneven places.
Do not use or place diluent and other combustibles, flammable materials and volatile materials
around/inside this product.
Do not over-bend the power cord, or put heavy and sharp objects on the machine.
Do not use this product in excessively humid environment.
Please avoid the interference of strong light and strong magnetic field.
When the machine is not in use, please turn off the machine switch. Prevent curtains and various
entanglements from being involved in the machine.
When cleaning the machine, please turn off the machine switch in advance.
VS-35 User Manual V1.1
3
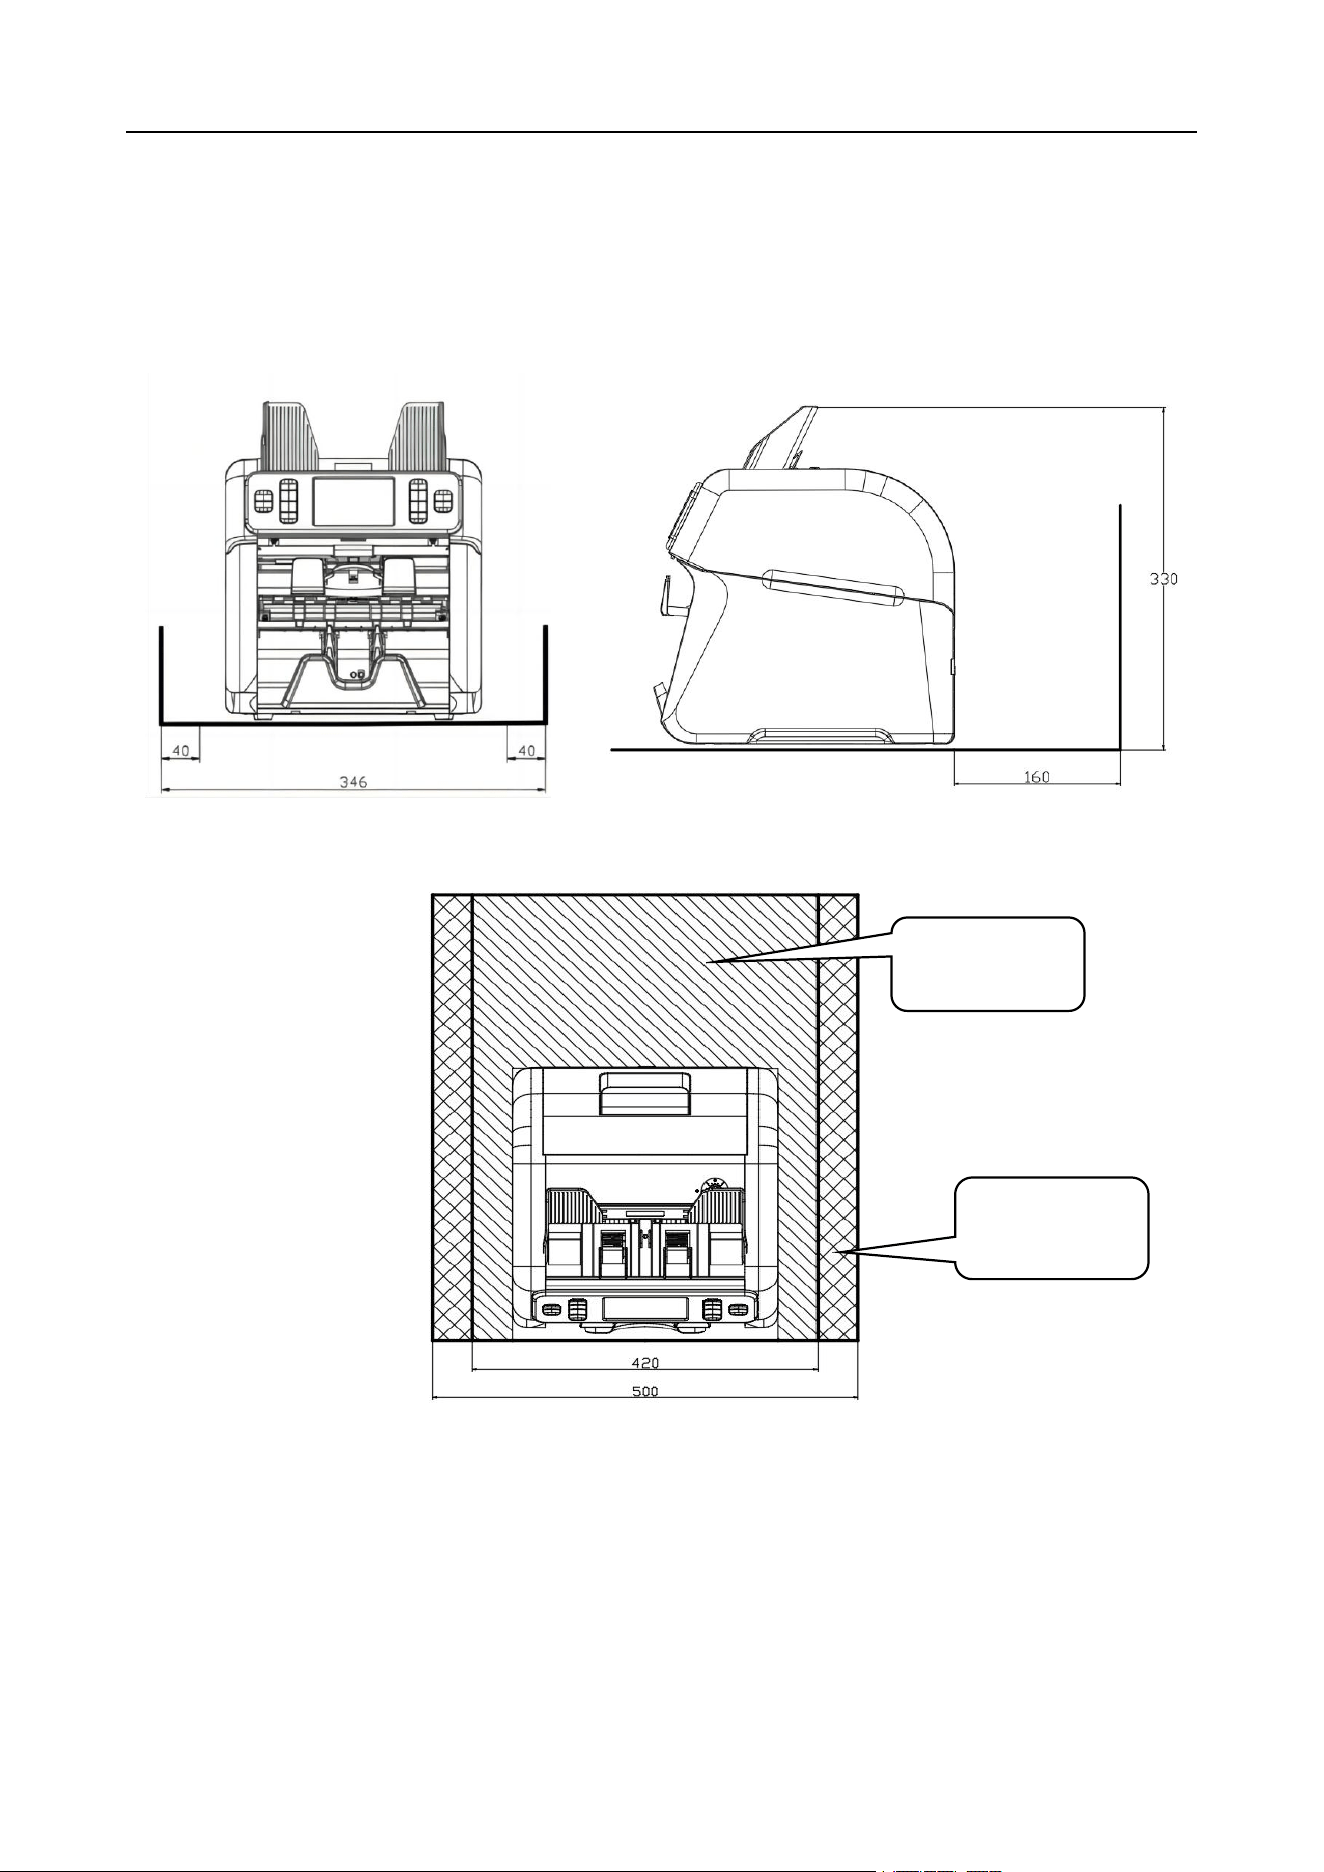
1.2 Installation Instructions
As shown in Figure 1 below, please keep away from the surrounding walls and reserve sufficient
operating space for placing banknotes, opening, or closing the cover plate, etc., and leave room for
maintenance.
Figure 1
Unit (mm)
Maintenance
space
Installation
space
VS-35 User Manual V1.1
4
1.3 Machine and Accessories
Machine
1pcs
Note Guider (left)
1pcs
Note Guider (right)
1pcs
User Manual
1pcs
Power Cord
1pcs
Cleaning Brush
1pcs
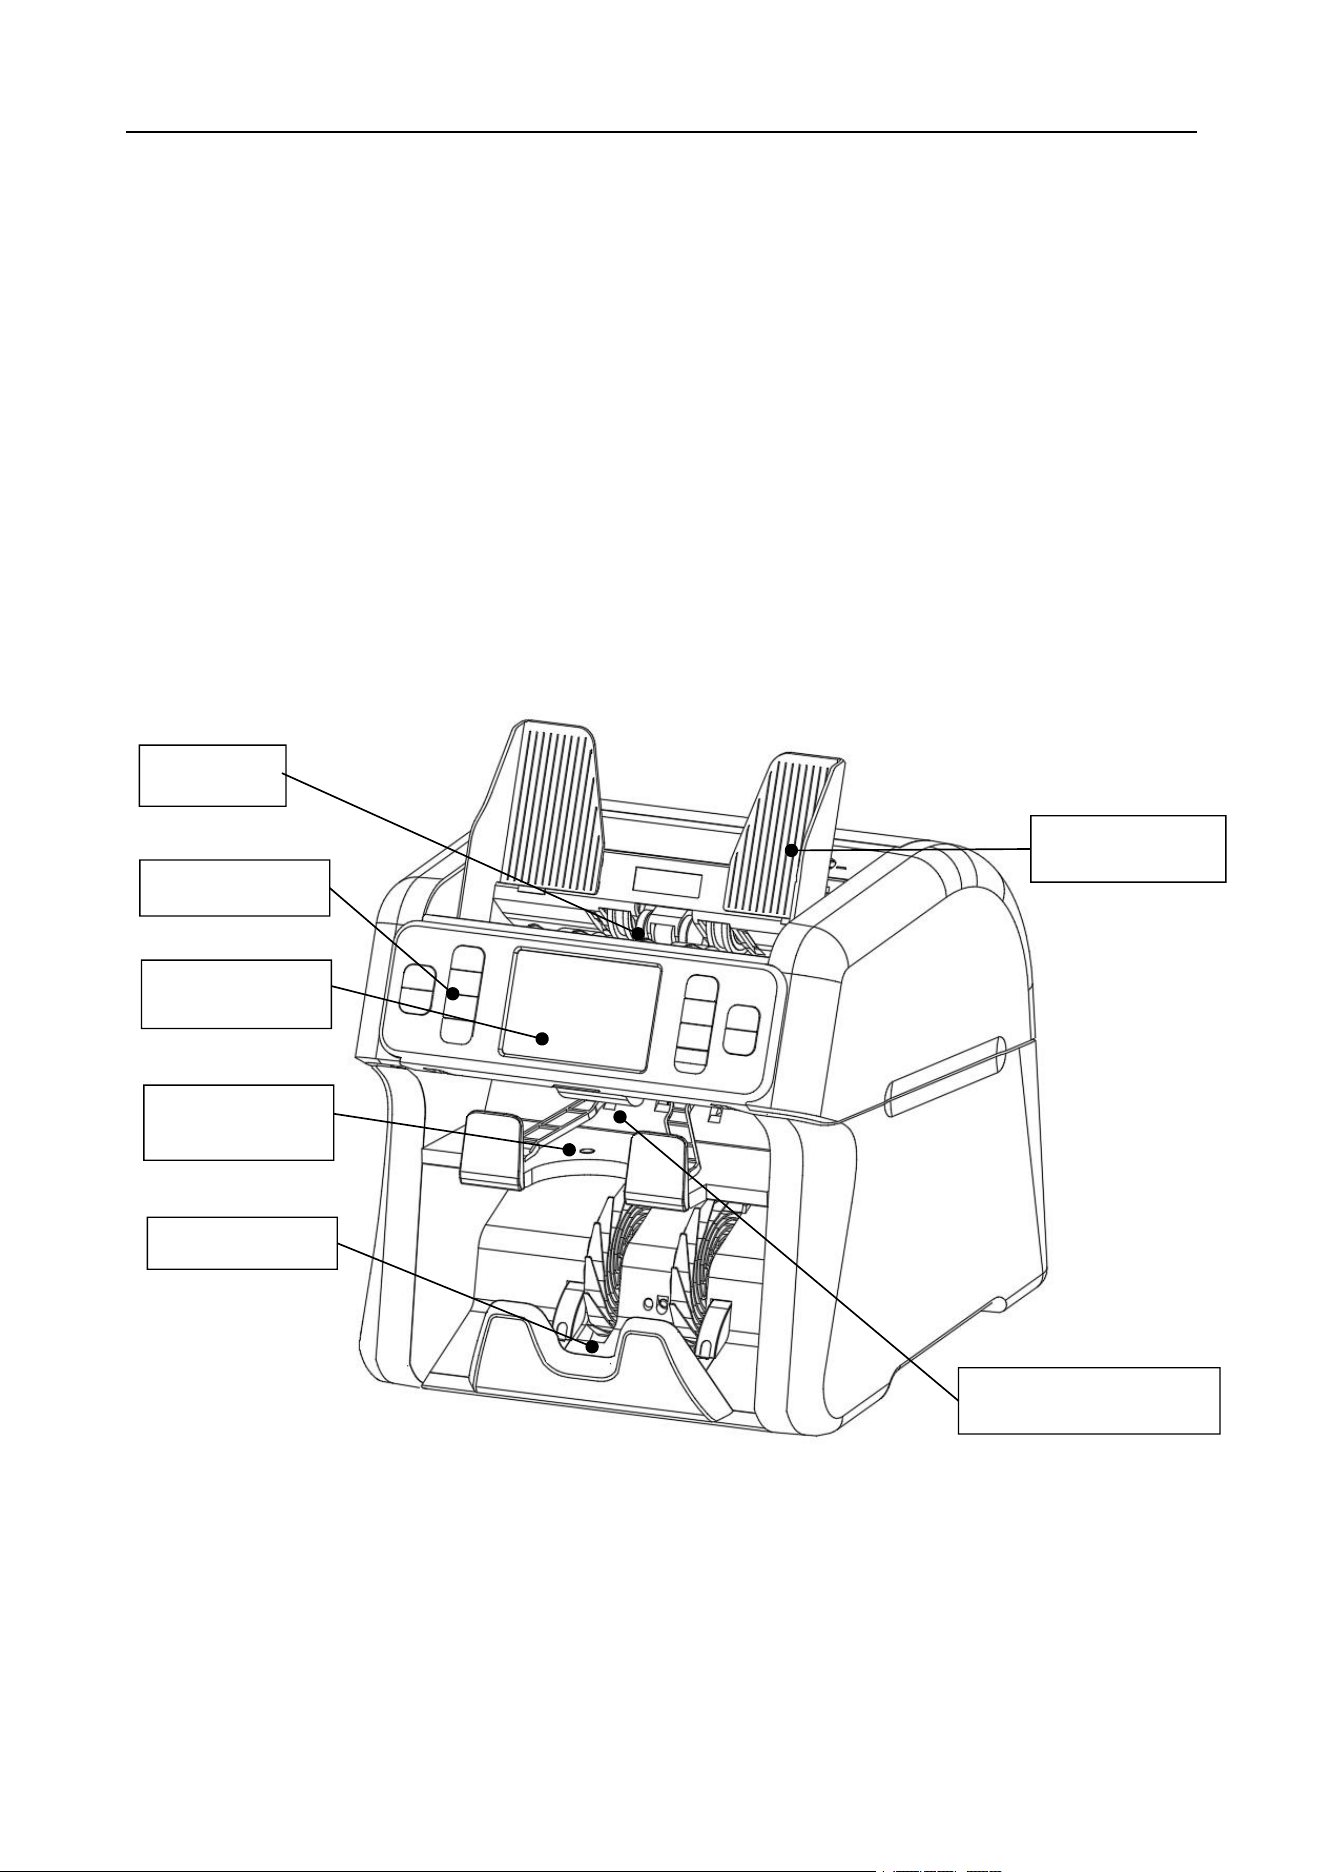
1.4 Appearance of Machine
1.4. 1 Facade Appearance
Figure 2
Note Guider
Stacker
Reject Pocket
Display
Hopper
Key Buttons
Front lid open button
VS-35 User Manual V1.1
5
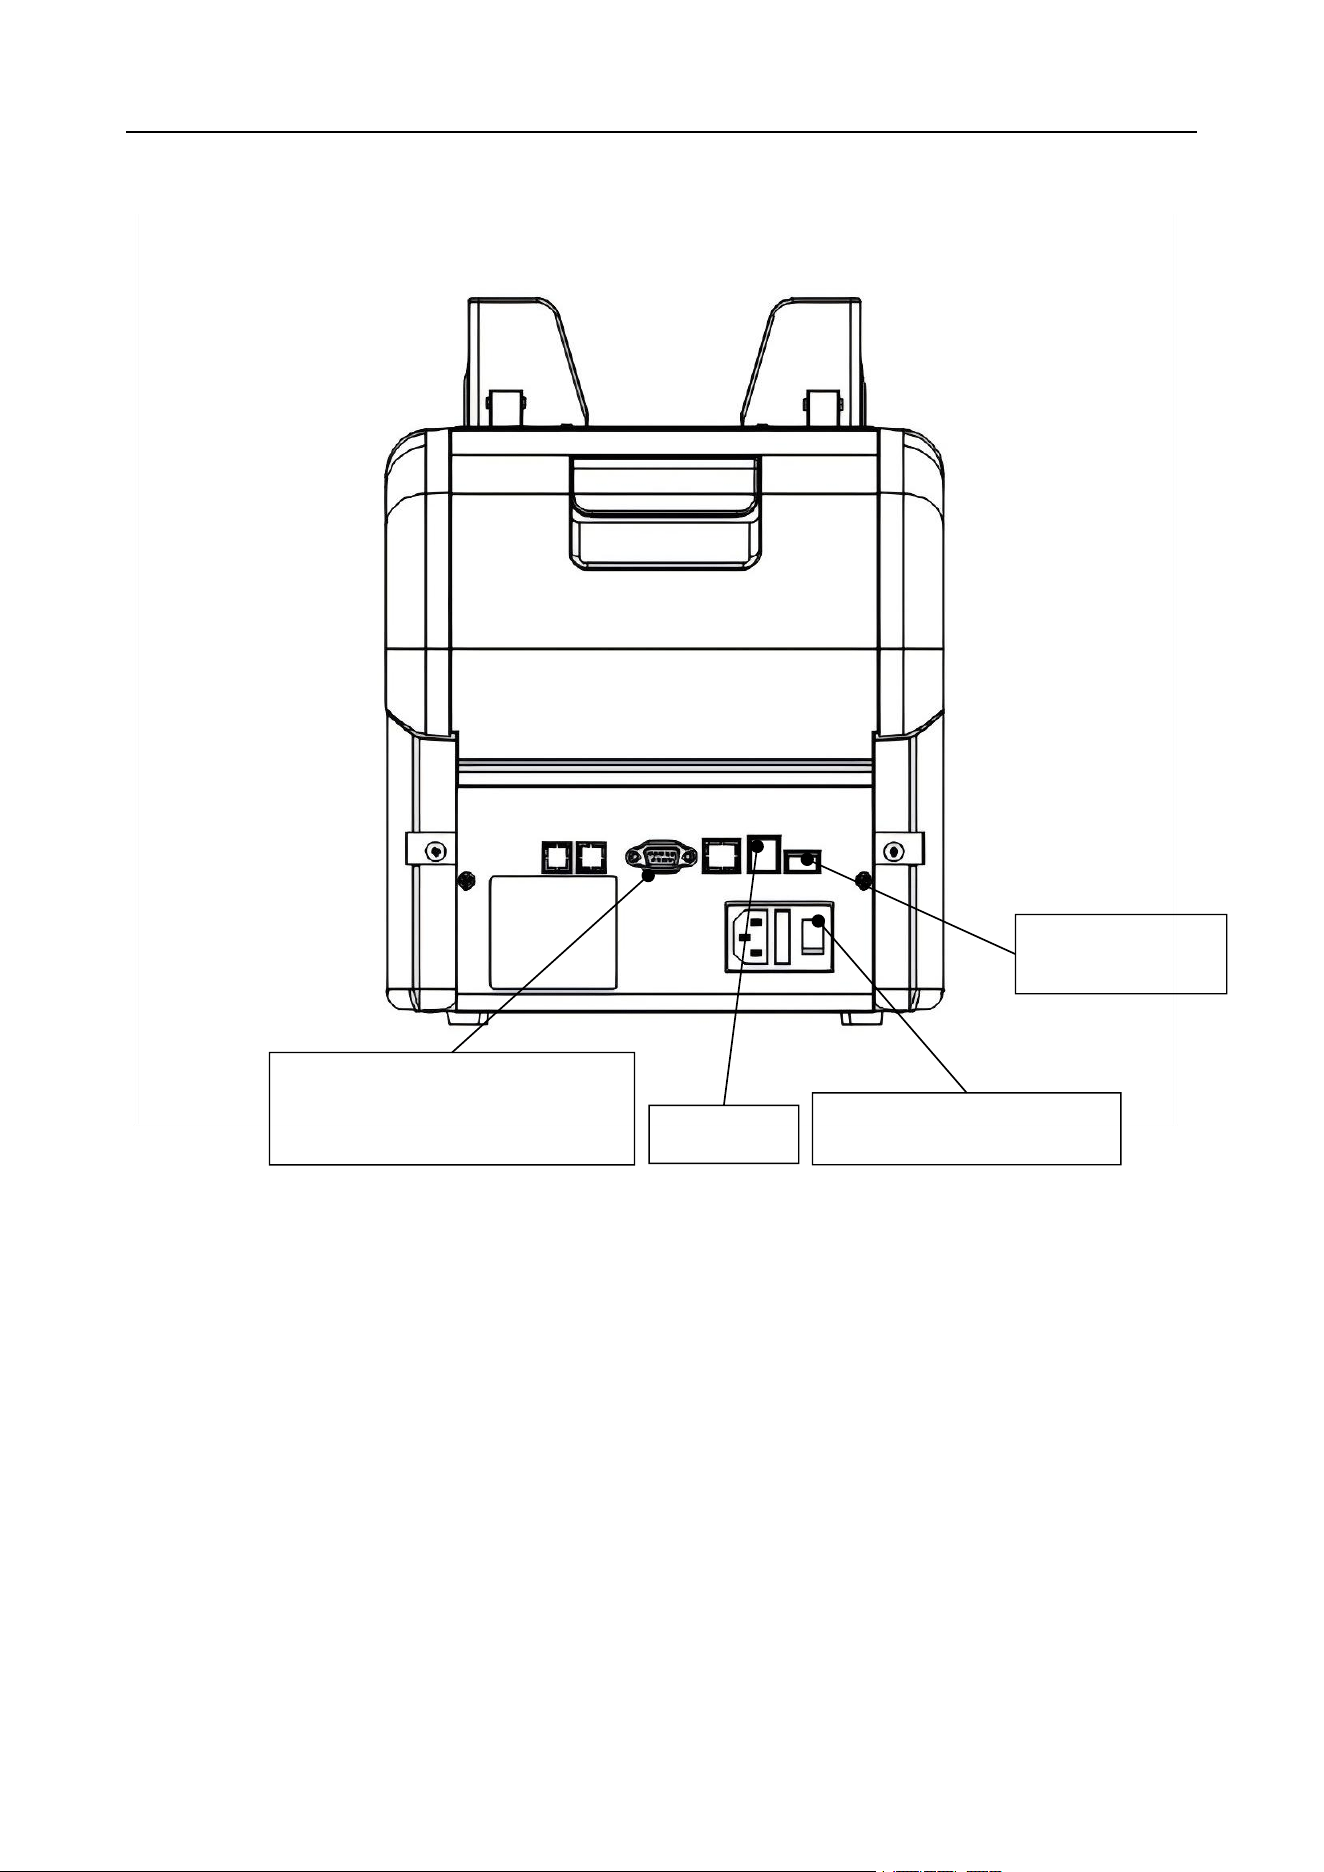
1.4. 2 Back Appearance
Figure 3
Power jack, power switch
RS232 port for communication
with Printer or PC
RJ12
USB interface

VS-35 User Manual V1.1
6
1.4. 3 Top appearance
Figure 4
Back lid open
button
Feed gap
adjustment knob
VS-35 User Manual V1.1
7
1.5 Technical Parameters
Overall dimensions ( length×width ×height )
265x280x290mm
weight
9.5 kg
Hopper Capacity
600pcs
Stack Capacity
200pcs
Reject pocket capacity
50~100pcs
Display screen
4-inch TFT screen
Interface
RS-232/RJ12/USB
Currency capacity
Support up to 4 countries
Multi Currency Counting capacity
Support up to 4 countries
Sortable banknote dimension
100x55mm--180x85mm
Sortable banknote thickness
0.05mm~0.12mm
banknote counting speed
800/1000/1200 pcs/min (MIX, SDC, CNT
mode)
Counting mode
Mix Count/ Single denomination sort/
Face sort/ Orientation sort/Piece Count
Mode
Preset number
1~200
Preset amount
1~9,999,9999
Counterfeit detection function
UV/MG/MT/CIS
Power requirements
AC100-240V, 50/60 Hz ± 10%
Power consumption
Standby ≤ 8 W, operation ≤ 50 W
Use environment
Ambient temperature (0 ~ 40 C)/humidity
(40 ~ 90%)
Air pressure (70-106kpa)
Storage environment
Ambient temperature (-40 ~ 55
C)/humidity (10 ~ 95%)
Air pressure (70-106kpa)
VS-35 User Manual V1.1
8
1.6 Startup Readiness
1) Warm Tip: In order to ensure the smooth counting of banknotes, please install the left and right note
guider before using the machine.
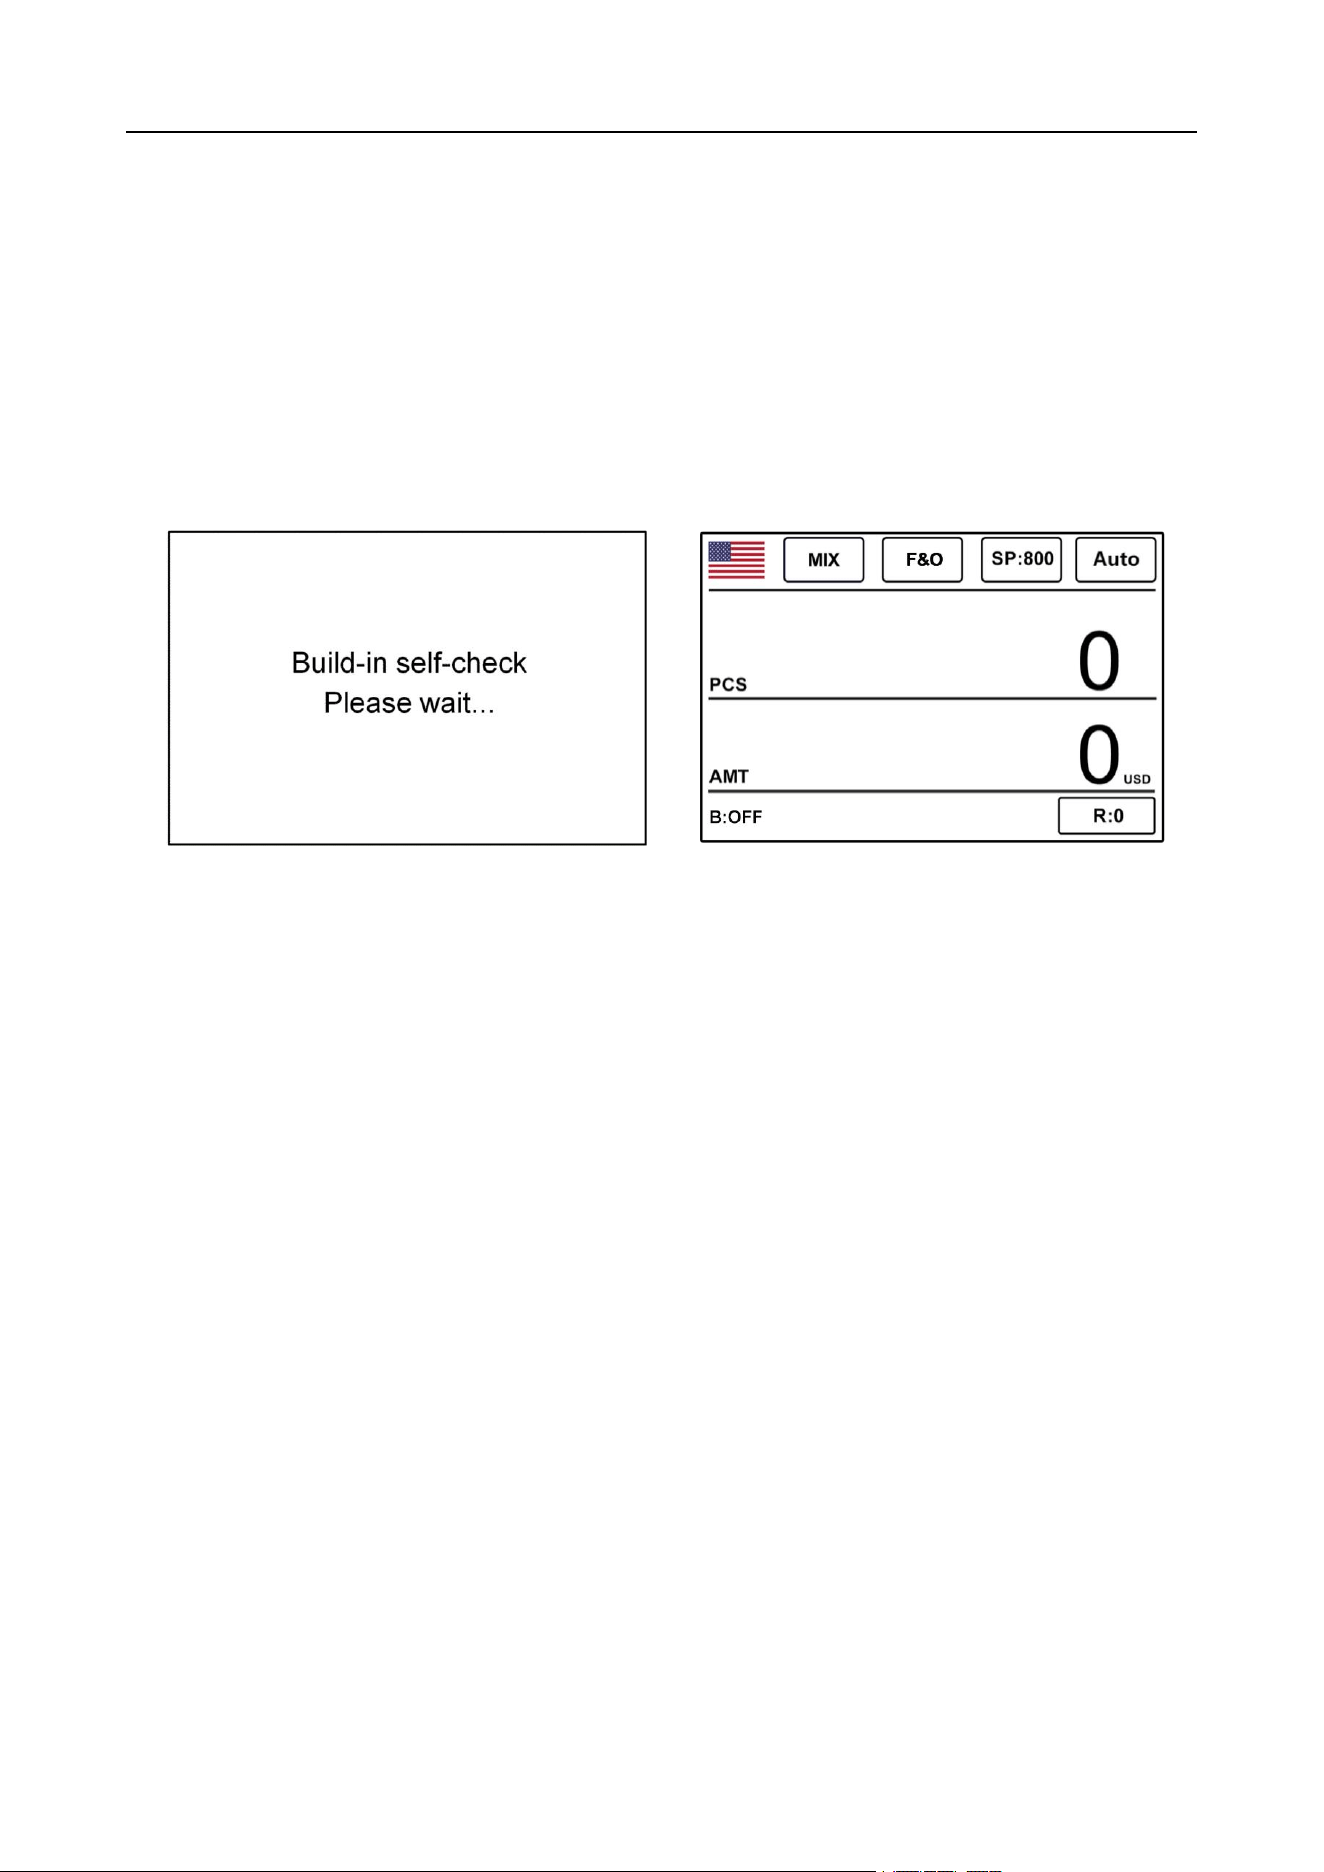
2) After connecting the power supply to the machine, turn on the power switch. First, the machine enters
the loading interface. After loading, the machine enters the self-checking interface, as shown in Figure 5.
After the self-test is successful, the machine enters the main interface, which takes about 1 minute, as
shown in Figure 6 below:
Figure 5 Figure 6
1.7 Banknote Arrangement
1) Please sort the banknotes to be counted according to their size and put them into the banknote
hopper. If there are folds and arches in the counted banknotes, they should be sorted in advance to
ensure the smoothness of banknote counting.
2) In the process of counting banknotes, it is necessary to adjust the limit positions of the left and right
note guiders according to the maximum size of the current counting banknotes, so as to ensure that the
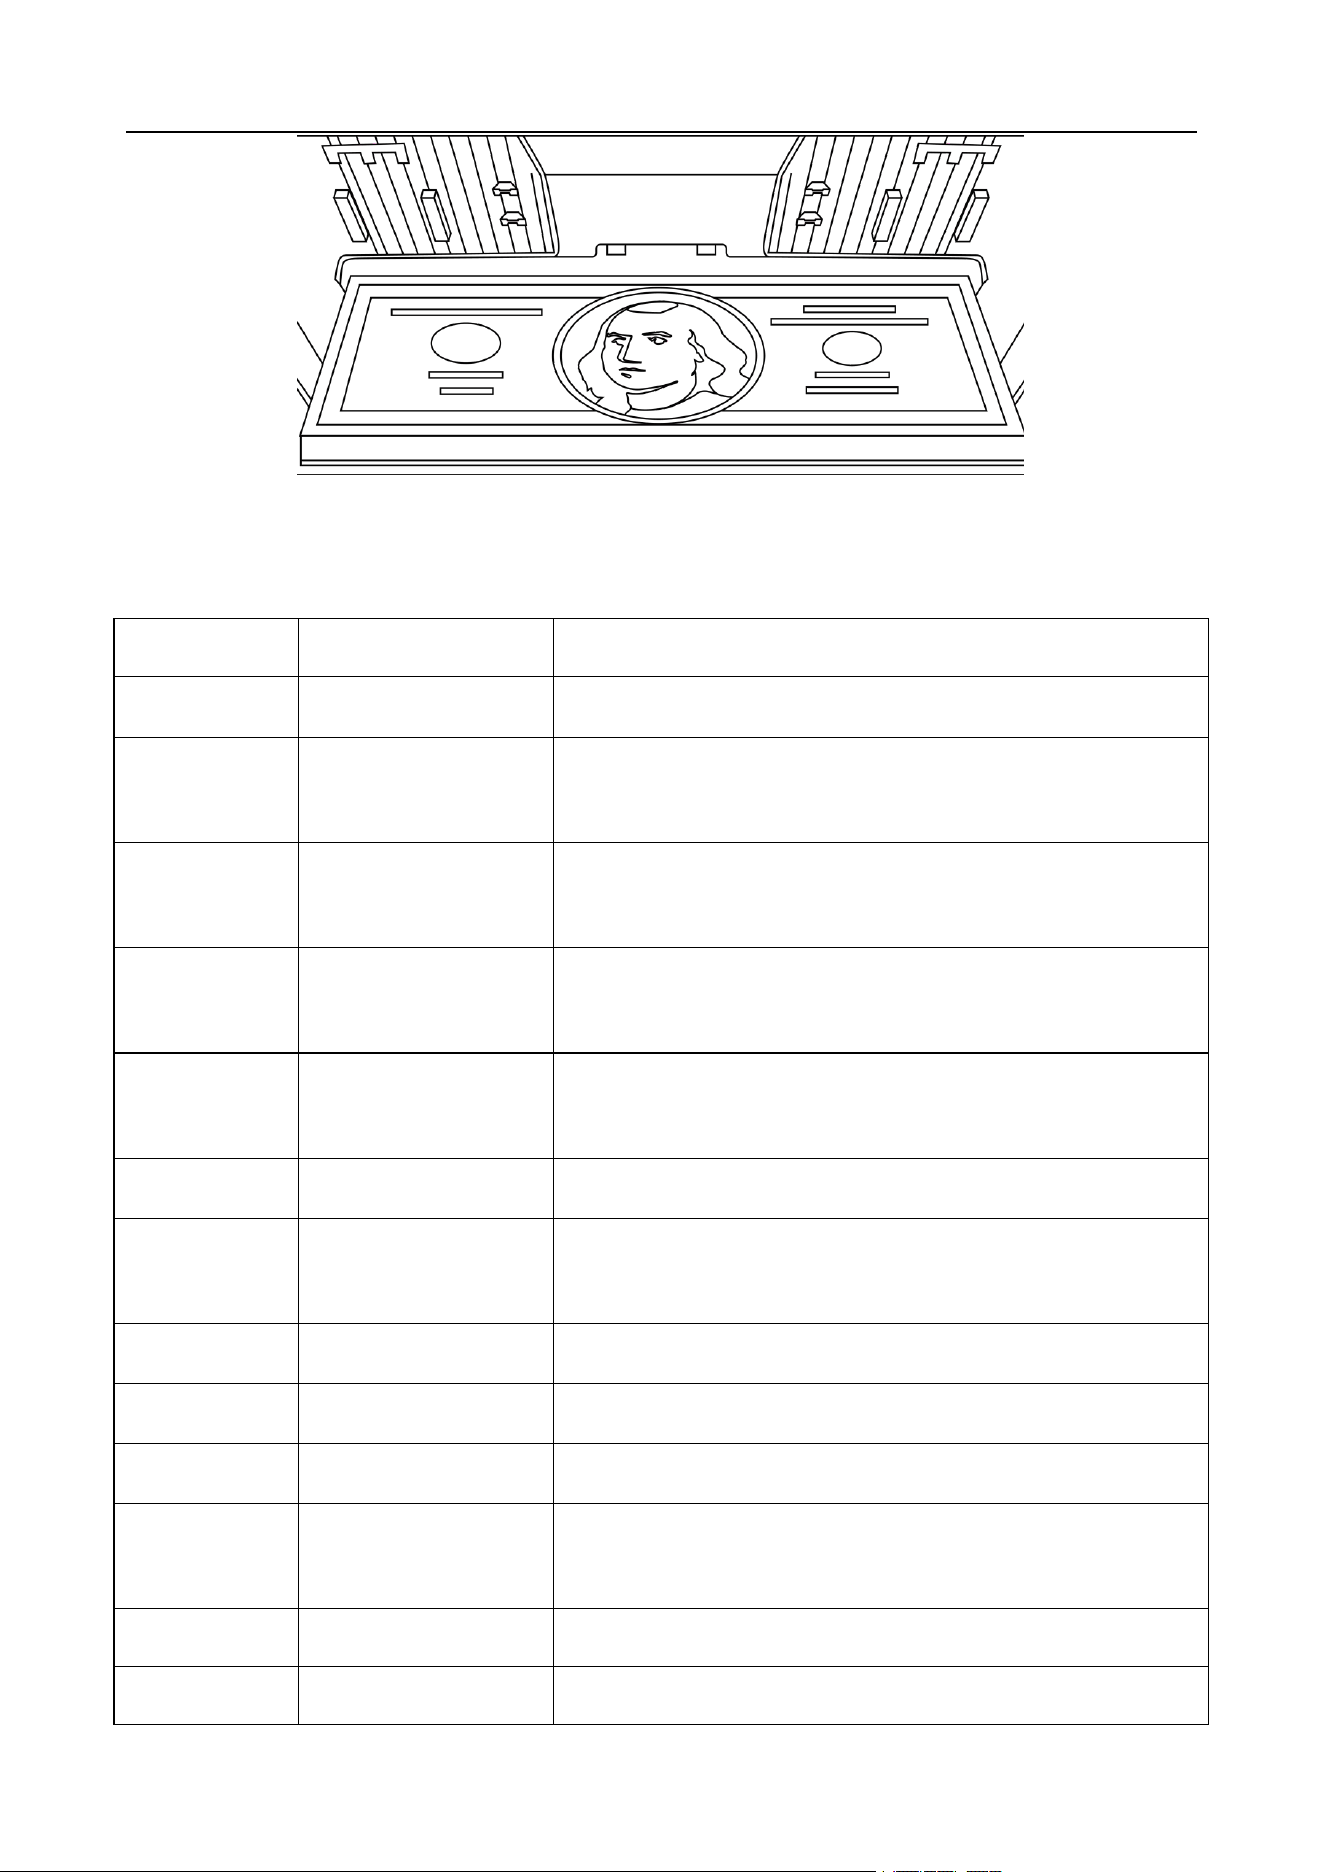
banknotes can be accurately identified by relevant sensors. Take US dollars as an example, please sort
out the banknotes first, and then adjust the limit position of the note guider according to the largest size
of banknotes. Finally, put the banknotes into the hopper for counting, as shown in Figure 7:
VS-35 User Manual V1.1
9
Figure 7
1.8 Counting error reporting code
Error code
Cause
Solution
ERROR-001
Stacker Full
Stacker is full, please remove the banknotes from stacker.
ERROR-002
MG Quantity
Side MG quantity abnormal, please put the banknotes in the
middle of hopper.
ERROR-003
MG Position
Side MG position abnormal, please put the banknotes in the
middle of hopper.
ERROR-004
MT Quantity
Middle MG quantity abnormal, please check the banknotes
or put the banknotes in the middle of hopper.
ERROR-005
MT Code
Middle MG code abnormal, please check the banknotes
or put the banknotes in the middle of hopper.
ERROR-006
UV
UV reflection abnormal, please check the banknotes
ERROR-007
Double
Double notes detected, please check the banknotes and feed
gap of machine.
ERROR-008
Half
Half note detected, please check the banknotes.
ERROR-009
Long
Abnormal length, please check the feed gap of machine.
ERROR-010
Short
Abnormal width, please check the banknotes.
ERROR-011
Gap
Chained notes detected, please check if the feed gap is too
loose.
ERROR-012
IMG Timeout
Please recount
ERROR-013
IMG Size Unknown
Size abnormal, please check the banknotes and feed gap of

VS-35 User Manual V1.1
10
machine
ERROR-014
IMG ORT Unknown
Not recognized, please check the banknotes and feed gap of
machine.
ERROR-015
IMG Version
Different version detected, please check machine's note
version setting.
ERROR-016
IMG FACE
Different face detected, please check if the face sort is turned
on.
ERROR-017
IMG ORT
Different face detected, please check if the orientation sort is
turned on.
ERROR-018
IMG Angle
Feed angle abnormal, please check if the feed gap is the
same on both sides.
ERROR-019
IR OVD
IR image abnormal, please check the banknotes or recount.
ERROR-020
IR MT
IR image abnormal, please check the banknotes or recount.
ERROR-021
IR Hole Or Dog-ear
Damaged or folded note detected, please sort the banknotes
and recount.
ERROR-022
IR Dog-Ear
Folded note detected, please sort the banknotes and recount.
ERROR-023
IMG DIRT
Dirty note detected, please check the banknotes or recount.
ERROR-024
IR Feature1
IR image abnormal, please check the banknotes or recount.
ERROR-025
IR Feature2
IR image abnormal, please check the banknotes or recount.
ERROR-026
IR Feature3
IR image abnormal, please check the banknotes or recount.
ERROR-027
IR Feature4
IR image abnormal, please check the banknotes or recount.
ERROR-028
IR Feature5
IR image abnormal, please check the banknotes or recount.
ERROR-029
IR Feature6
IR image abnormal, please check the banknotes or recount.
ERROR-030
IR Feature7
IR image abnormal, please check the banknotes or recount.
ERROR-031
IR Feature8
IR image abnormal, please check the banknotes or recount.
ERROR-032
IMG FACE ORT
Different face/orientation detected, please check if the
face/orientation sort is turned on.
ERROR-036
IR Feature9
IR image abnormal, please check the banknotes or recount.
VS-35 User Manual V1.1
11
ERROR-037
IR Feature10
IR image abnormal, please check the banknotes or recount.
ERROR-038
IR Feature11
IR image abnormal, please check the banknotes or recount.
ERROR-049
IR Feature12
IR image abnormal, please check the banknotes or recount.
ERROR-040
IR Feature13
IR image abnormal, please check the banknotes or recount.
ERROR-041
IR Feature14
IR image abnormal, please check the banknotes or recount.
ERROR-042
IR Feature15
IR image abnormal, please check the banknotes or recount.
ERROR-043
Image Double Notes 1
Double notes detected, please check the banknotes or
recount.
ERROR-044
Image Double Notes 2
Double notes detected, please check the banknotes or
recount.
ERROR-045
Image Double Notes 3
Double notes detected, please check the banknotes or
recount.
2. Introduction of machine functions
2.1 Introduction to Usage Features
2.1.1 Display interface and touch screen interface description
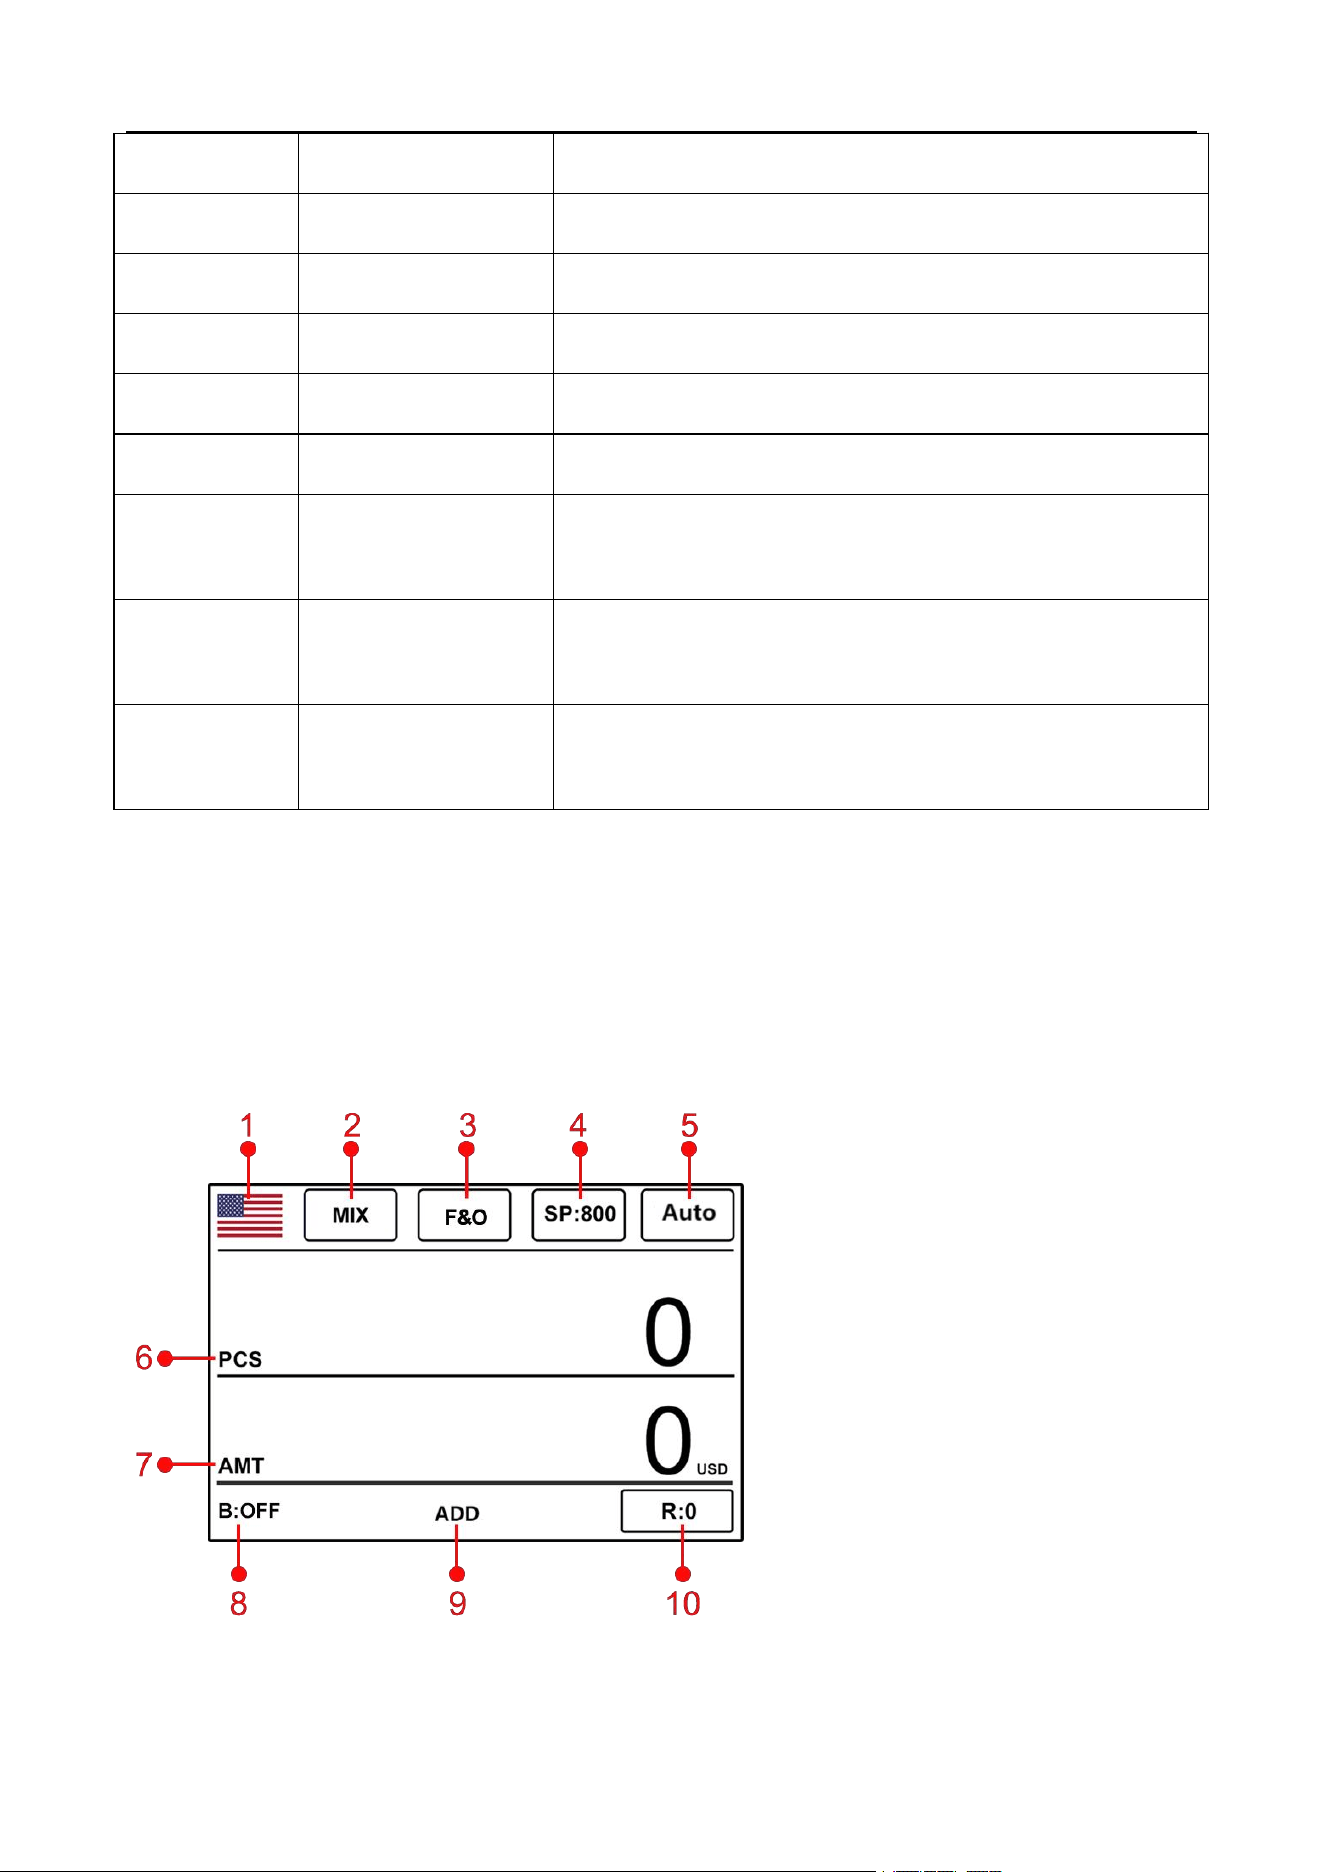
Figure 8
1. Currency selection key
2. Switch key of banknote counting mode
3. Face/Orientation sort switch key
4. banknote counting speed switch key
5. Automatic/Manual Mode Switch Key
6. Number of banknote counted
7. Amount of counting
8. Current preset number
9. Accumulation Mode
10. Number of rejected banknotes

VS-35 User Manual V1.1
12
2.1.2 Operation Instructions for Function Keys
MODE Banknote counting MODE switch key.
BATCH Preset Quantity and Amount Switch Key.
LIST Counting details view key.
MENU Function setting key.
PRINT Data PRINT key
CF 1. Counterfeit detection gear switch key; 2. Select the key up.
ADD 1. Accumulation function key; 2. Select the key down.
ESC Return key to return to the previous interface when setting the function.
START 1. Start the machine manually; 2. Select the Save key after entering,
confirming or modifying functions.
CLEAR CLEAR key.
2.1.3 Automatic/Manual Mode Settings
The " " key in the upper right corner of the display screen is the manual/automatic start
mode switching key. Touch it and the startup mode will be changed.
Automatic mode: The word " " will appear in the upper right corner of the display screen,
as shown in Figure 9. At this time, put the banknotes into the banknote inlet of the machine, and the
machine will automatically count the banknotes.
Manual mode: The word " " will appear in the upper right corner of the display screen. At
this time, the banknotes are put into the hopper of the machine, and the machine will not automatically
count the banknotes. You must press the "START" key on the right before the machine counts the
banknotes.
VS-35 User Manual V1.1
13
Figure 9
2.1.4 Currency Counting Mode Selection
2.1.4.1 Single national currency mode
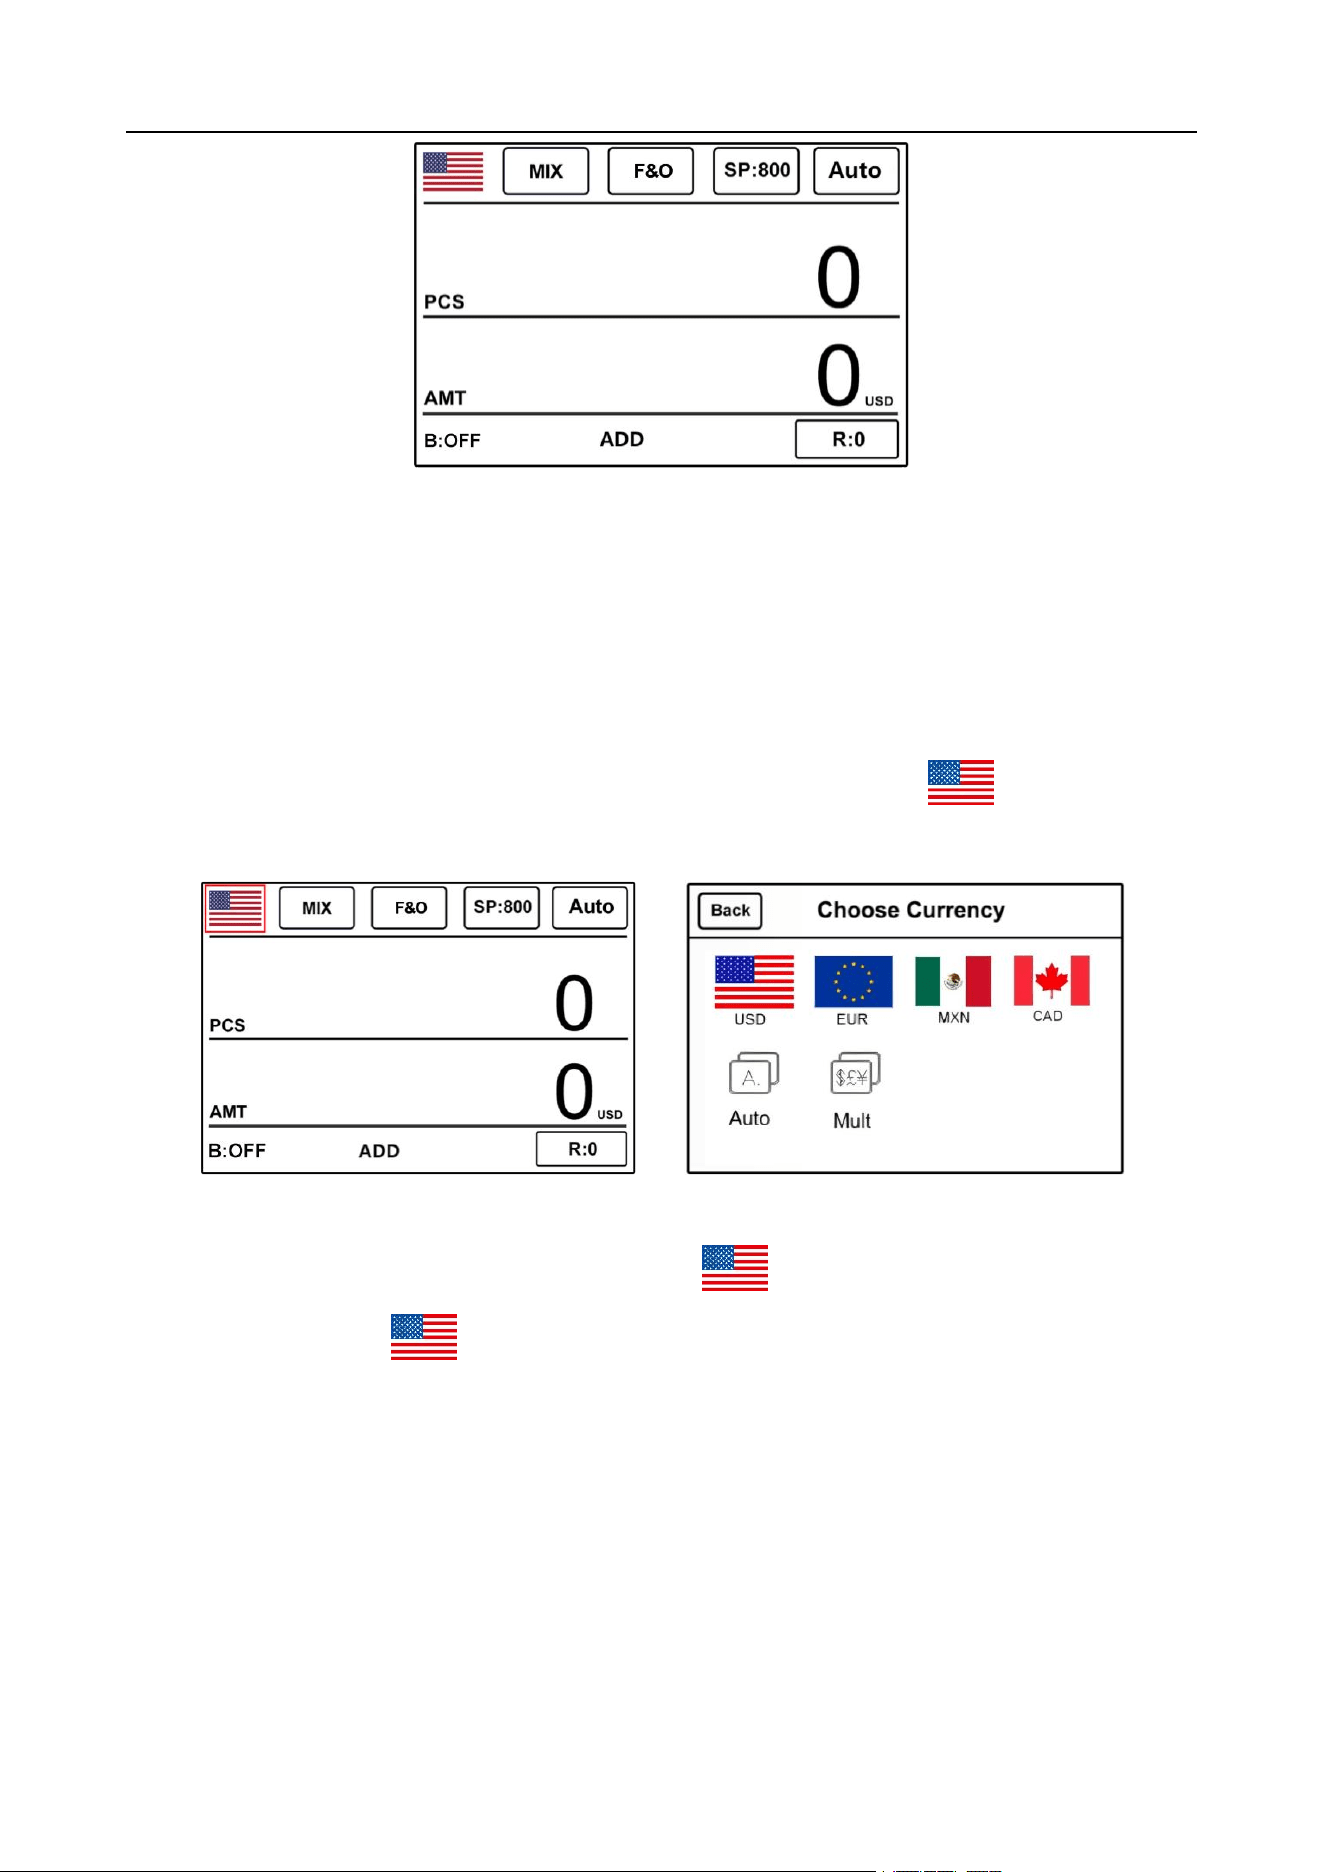
Under the main interface of the machine, as shown in Figure 10, you can enter the "Choose
Currency" interface to select currencies of different countries by touching the " " logo pattern in the
upper left corner of the display screen, as shown in the following 11:
Figure 10 Figure 11
Take the dollar as an example. After touching the " " button, the display screen returns to the
main interface, and the " " logo graphic is displayed in the upper left corner, indicating that the
machine is in the mode of counting US dollar bills.
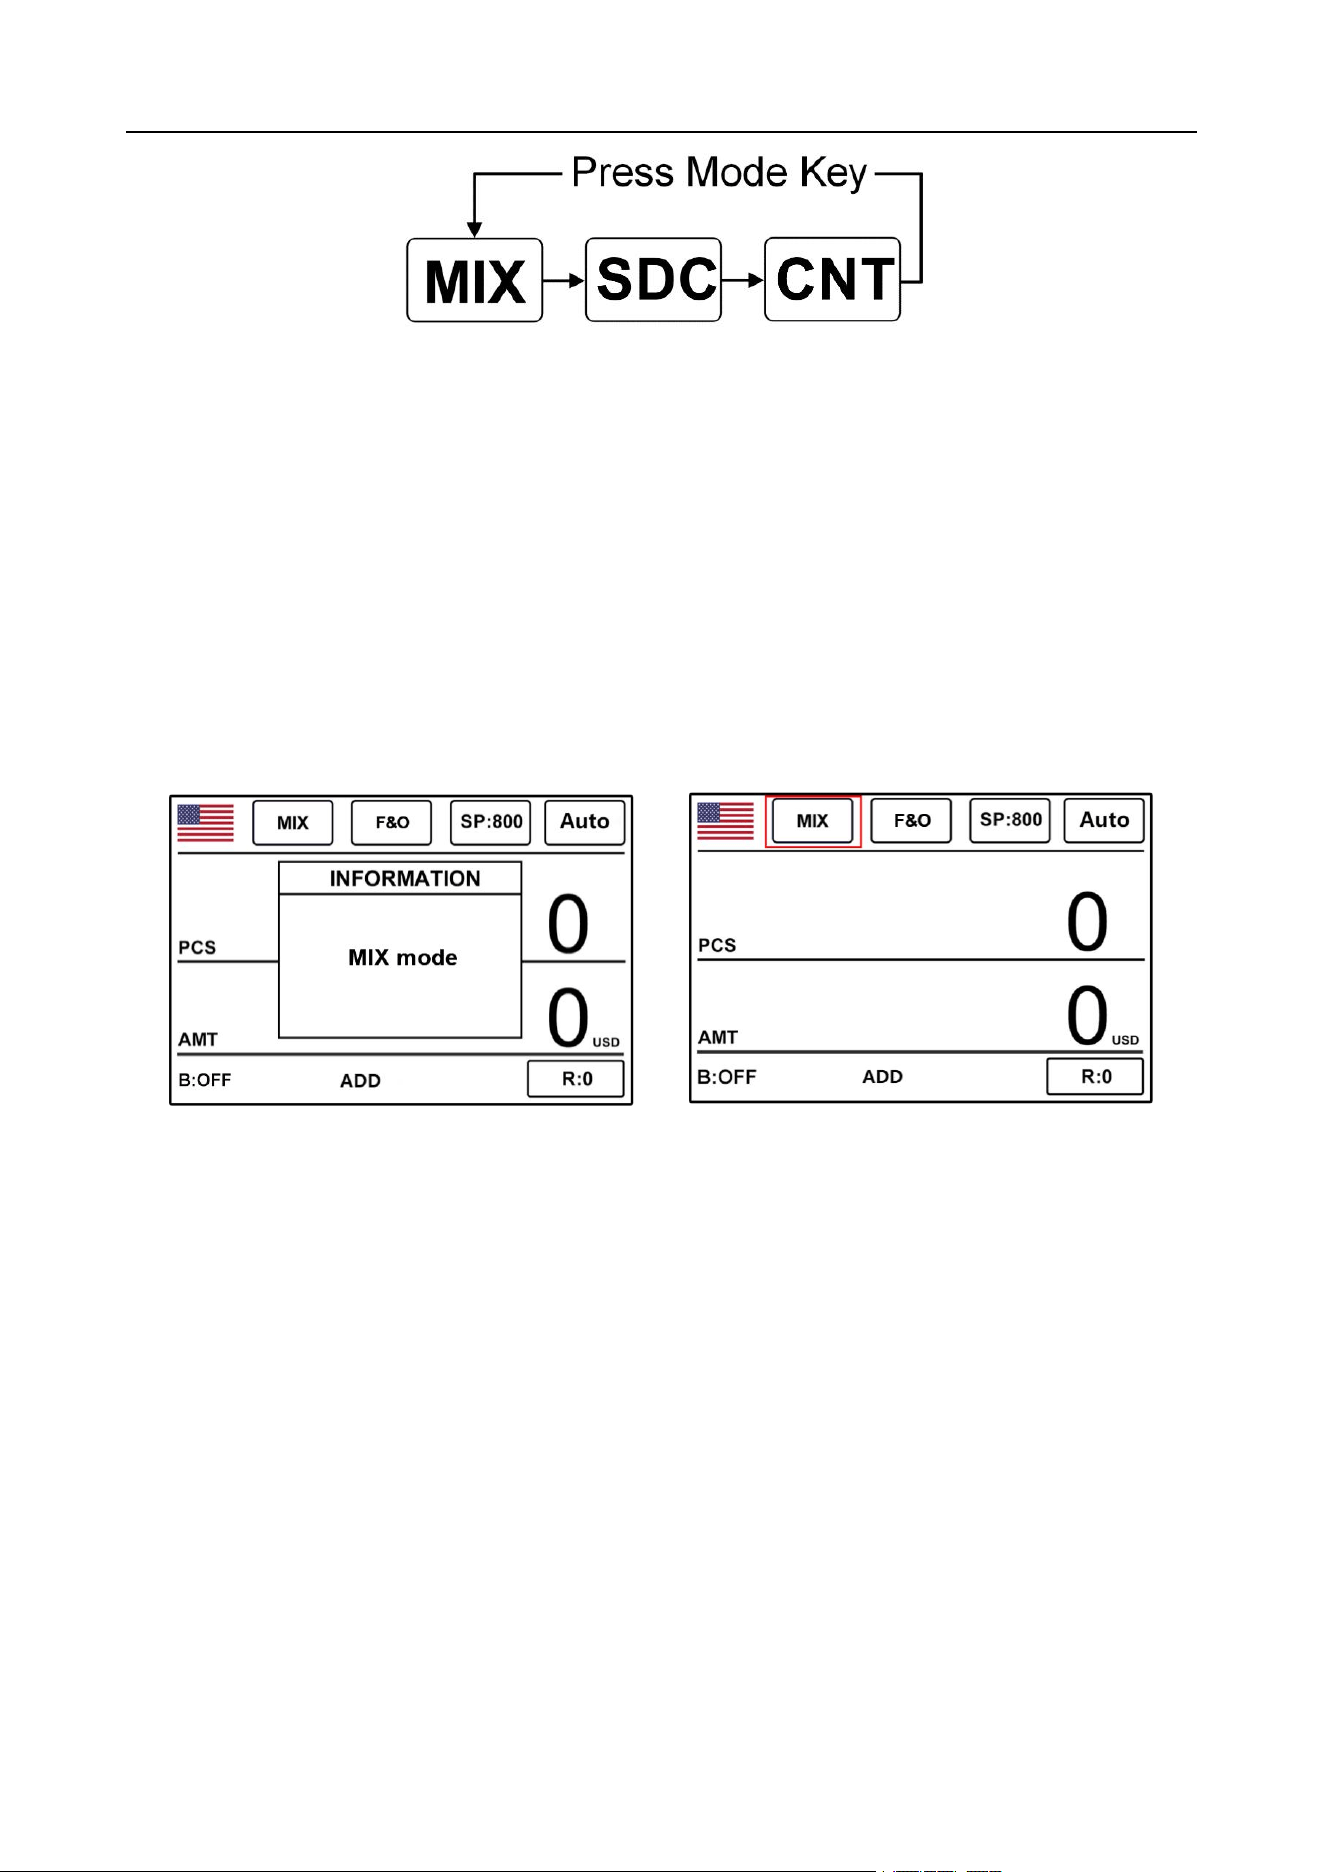
By pressing the "MODE" key on the left side of the keypad or clicking "MIX" on the top of the display
screen, the three counting modes can be cyclically switched, and the three counting modes are cycled
according to MIX-SDC-CNT, as shown in Figure 12 below.
VS-35 User Manual V1.1
14
Figure 12
2.1.4.2 < MIX > Mixed count mode
Figures 13 and 14 below show the interface of the mixed denomination counting mode in the
automatic state of the machine. In this mode, the machine will count all denominations of the same
national currency, and record the detailed information of the banknotes counted, including the total
amount and total number of banknotes in the stacker, which is convenient for users to view. When this
mode is selected, the machine will count at the default speed (L: 800 sheets/min; M: 1000 sheets/min,
H: 1200 sheets/min, 3 optional).
Figure 13 Figure 14
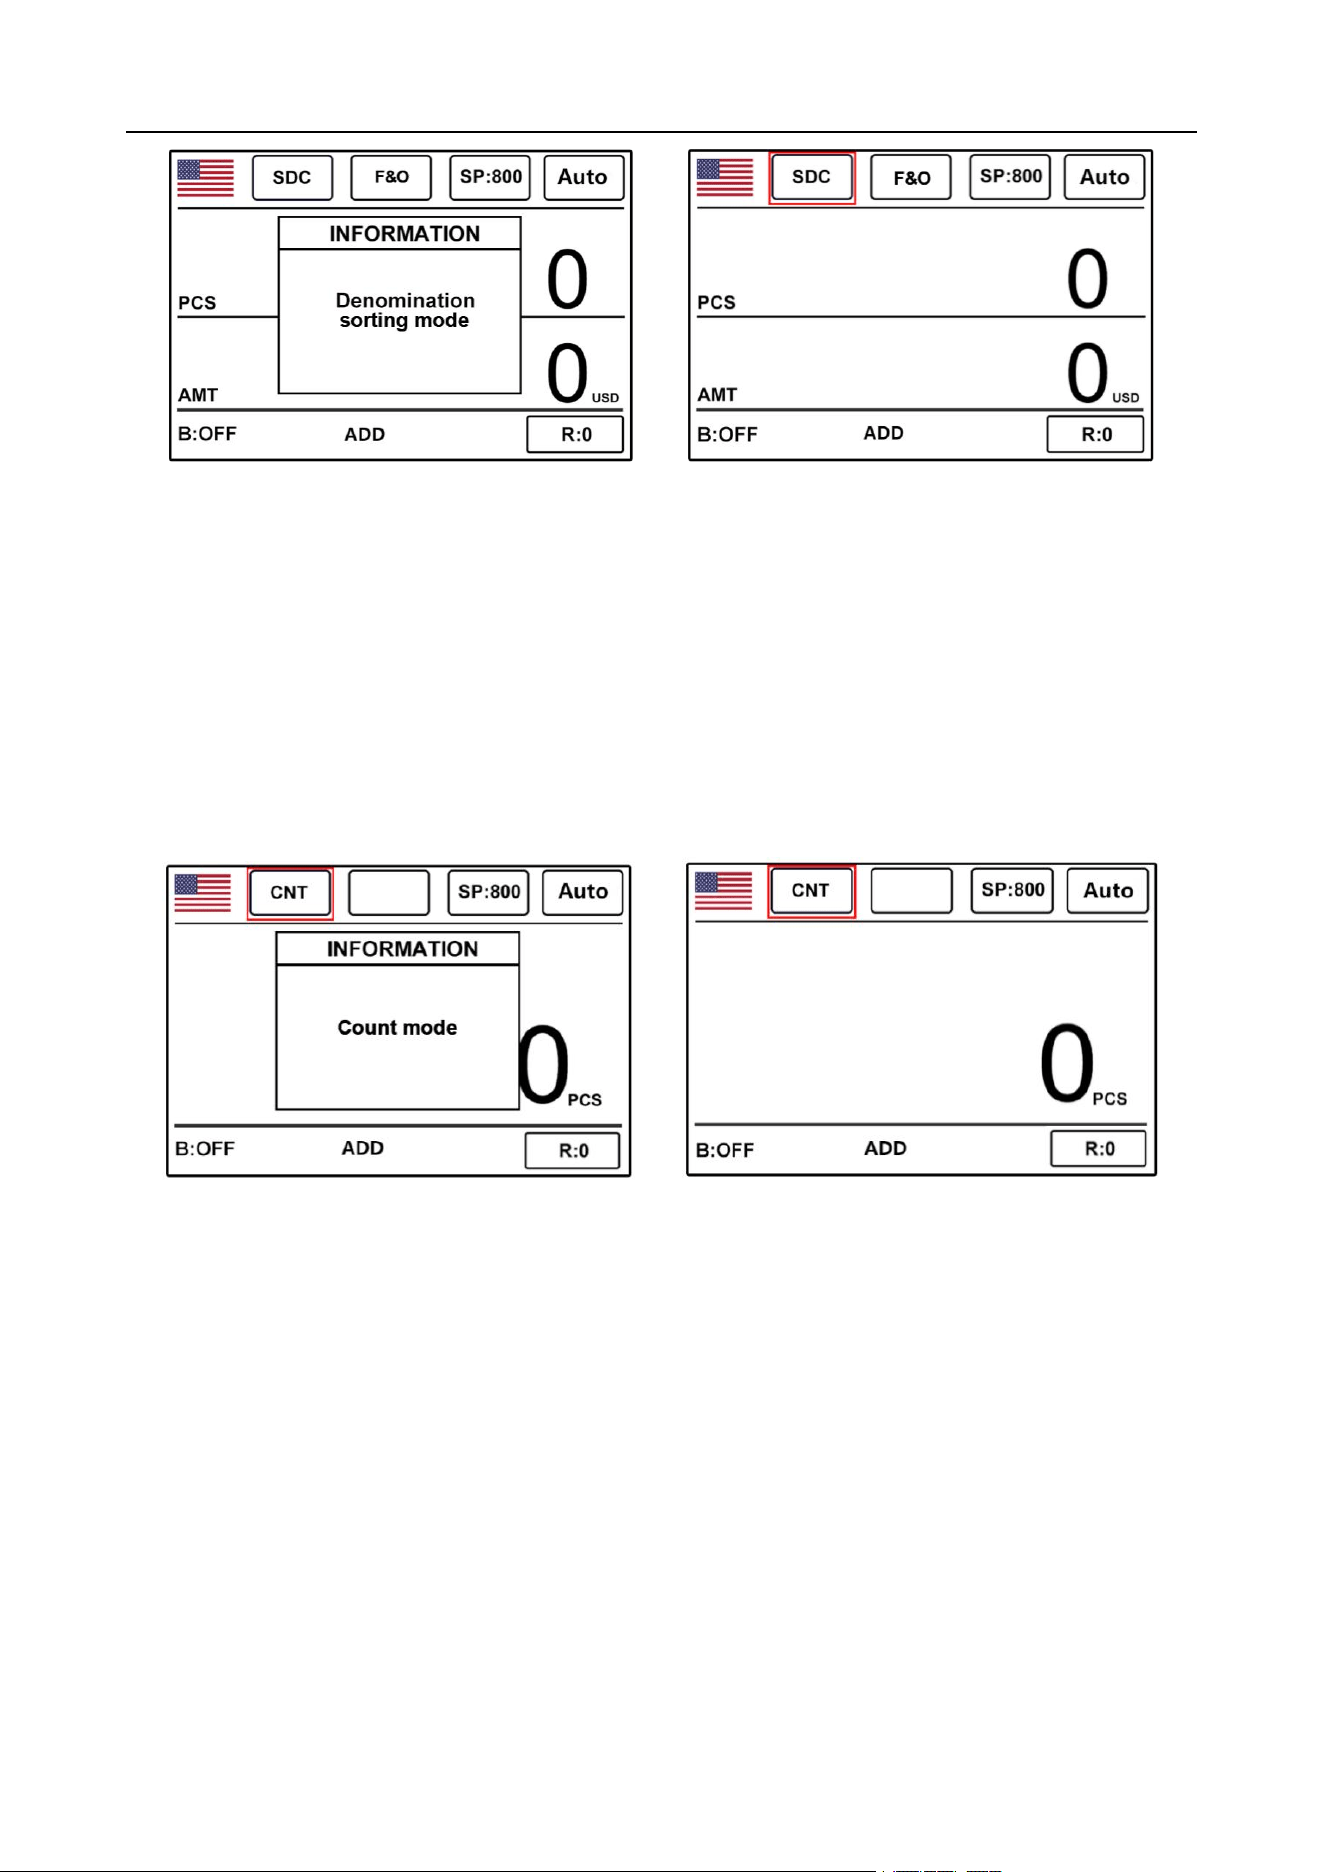
2.1.4.3 < SDC > Single denomination counting mode
Figures 15 and 16 below show the single denomination counting mode in the automatic state of the
machine. In this mode, the machine will count the banknotes of currency and the same denomination
with the first banknote to be counted as a reference, and at the same time count the detailed information
of banknotes in the stacker, including total amount and the total number of banknotes, which is
convenient for users to view (note: currencies of different denominations cannot be placed in this mode,
otherwise the currencies will be kicked into the reject pocket). When this mode is selected, the
machine will count at the default speed (L: 800 sheets/min; M: 1000 sheets/min, H: 1200 sheets/min,
3 optional).
VS-35 User Manual V1.1
15
Figure 15 Figure 16
2.1.4.4 < CNT > Piece Count Mode
Figs. 17 and 18 show the interface where the machine only counts the quantity in the automatic
state. This model does not limit currency, but only counts the number of banknotes. When this
mode is selected, the machine counts at the default speed (L: 800 sheets/min; M: 1000 sheets/min,
H: 1200 sheets/min, 3 optional).
Figure 17 Figure 18
Note: In MIX mixed counting mode and SDC single denomination counting mode, the machine
has image, magnetic image detection, UV detection and double detection functions. In CNT
counting mode, only the Double detection function is available.
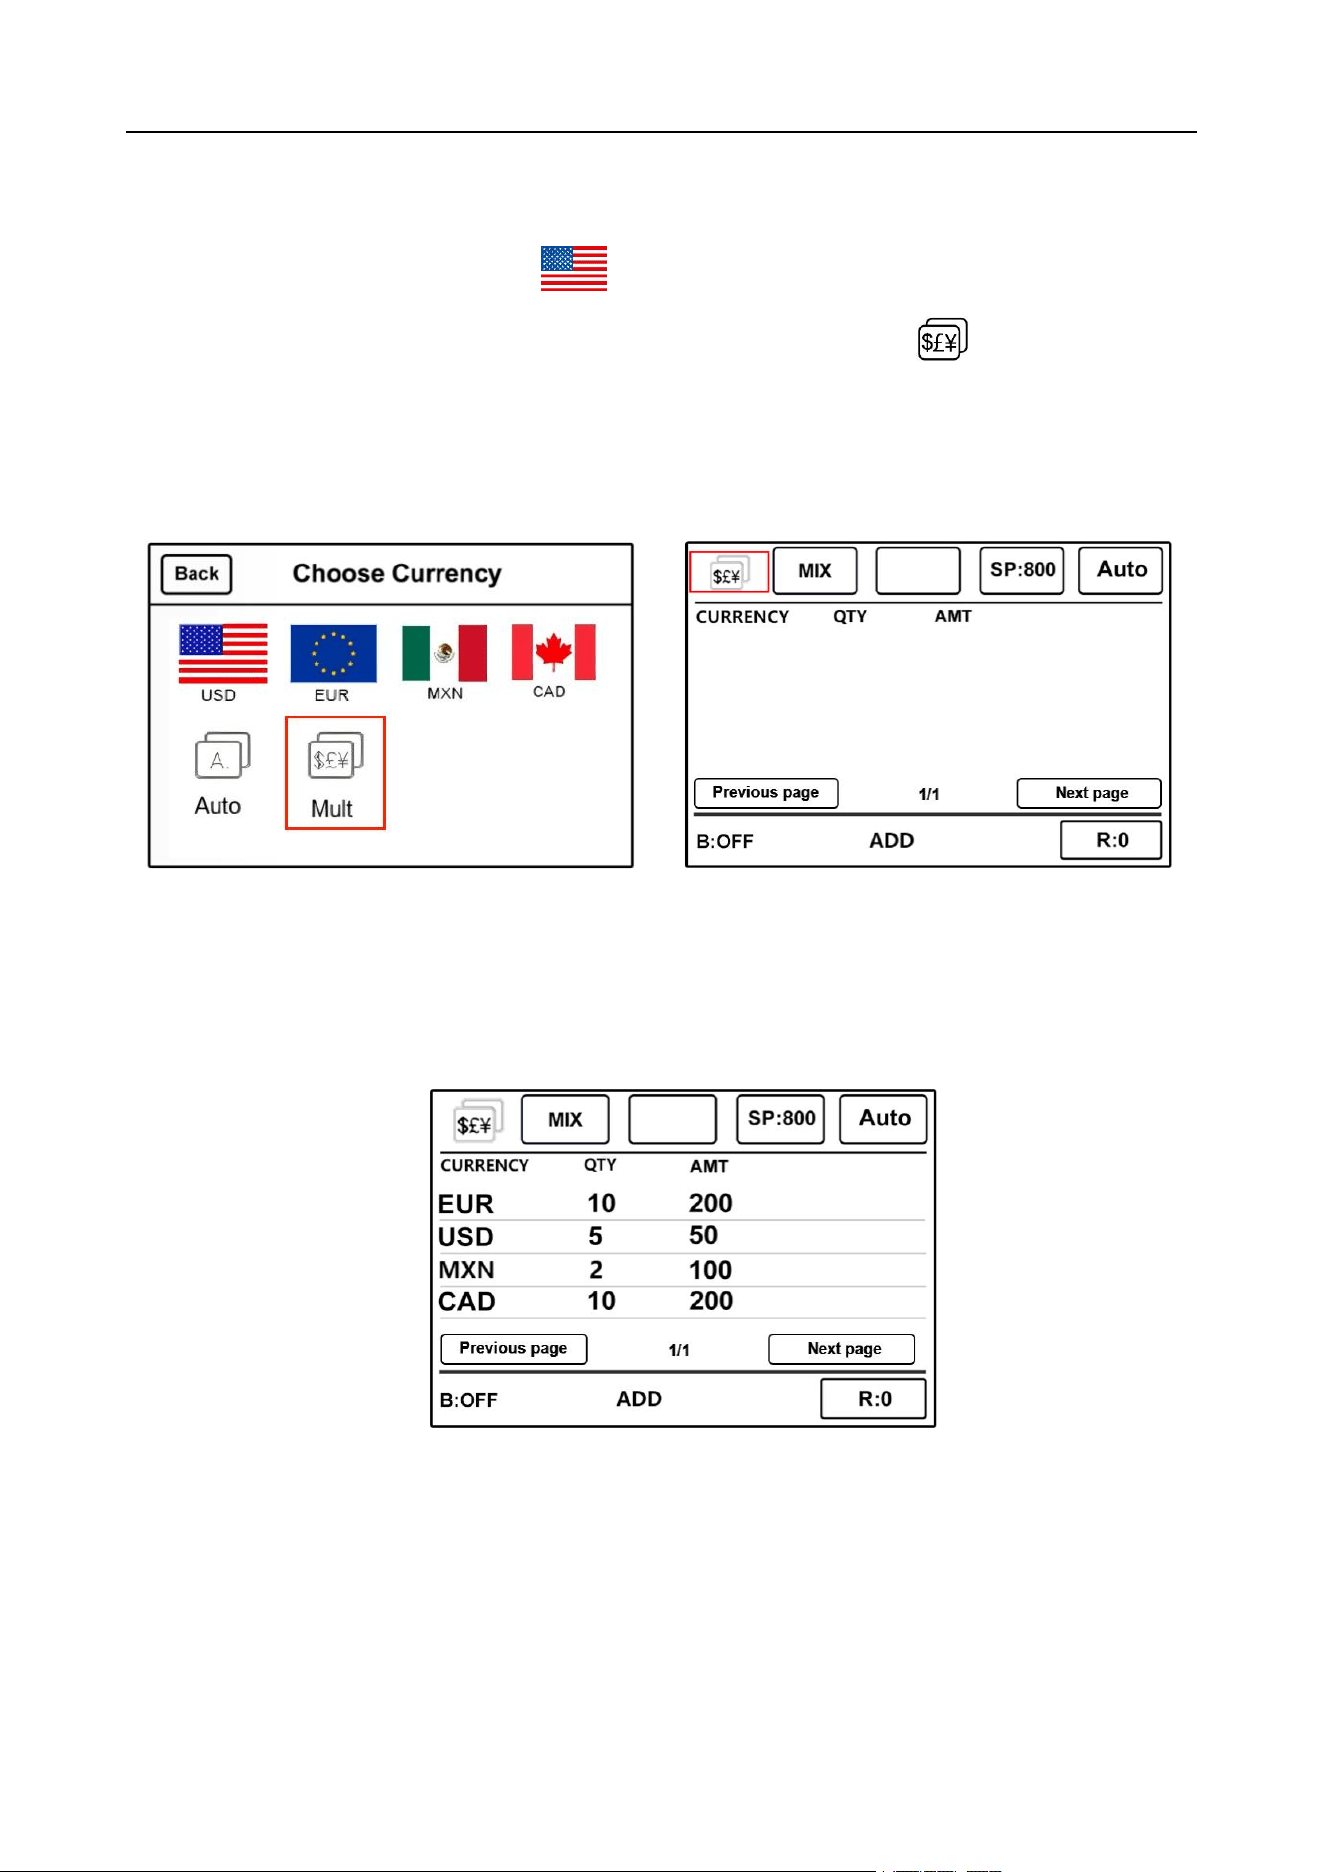
2.1.4.5 Multi-country mixed counting mode
Multi-country mixed counting: The currencies of various countries are mixed together and put
into the machine for counting, and the quantity and amount of each currency are displayed
according to the currency name. Note: The machine can only recognize the supported national
VS-35 User Manual V1.1
16
currency displayed by the machine. Unsupported currencies will be kicked into the reject pocket.
Please change the machine counting mode to MIX mixed counting mode first.
Under main interface, touch the " " sign in the upper left corner of the display screen to
enter the currency selection interface, as shown in Figure 19. Then click " " Multi-country mixed
denomination counting mode, and the display screen will automatically switch to the main interface.
The currencies of the four existing countries in the software are displayed (all the currencies
displayed here are set by the customer). Figure 20 below shows:
Figure 19 Figure 20
Example: Put a handful of banknotes (including US dollars, Euros, Mexican peso and
Canadian dollars) into the machine for counting. Details of counted banknotes are shown in Figure
21 below:
Figure 21
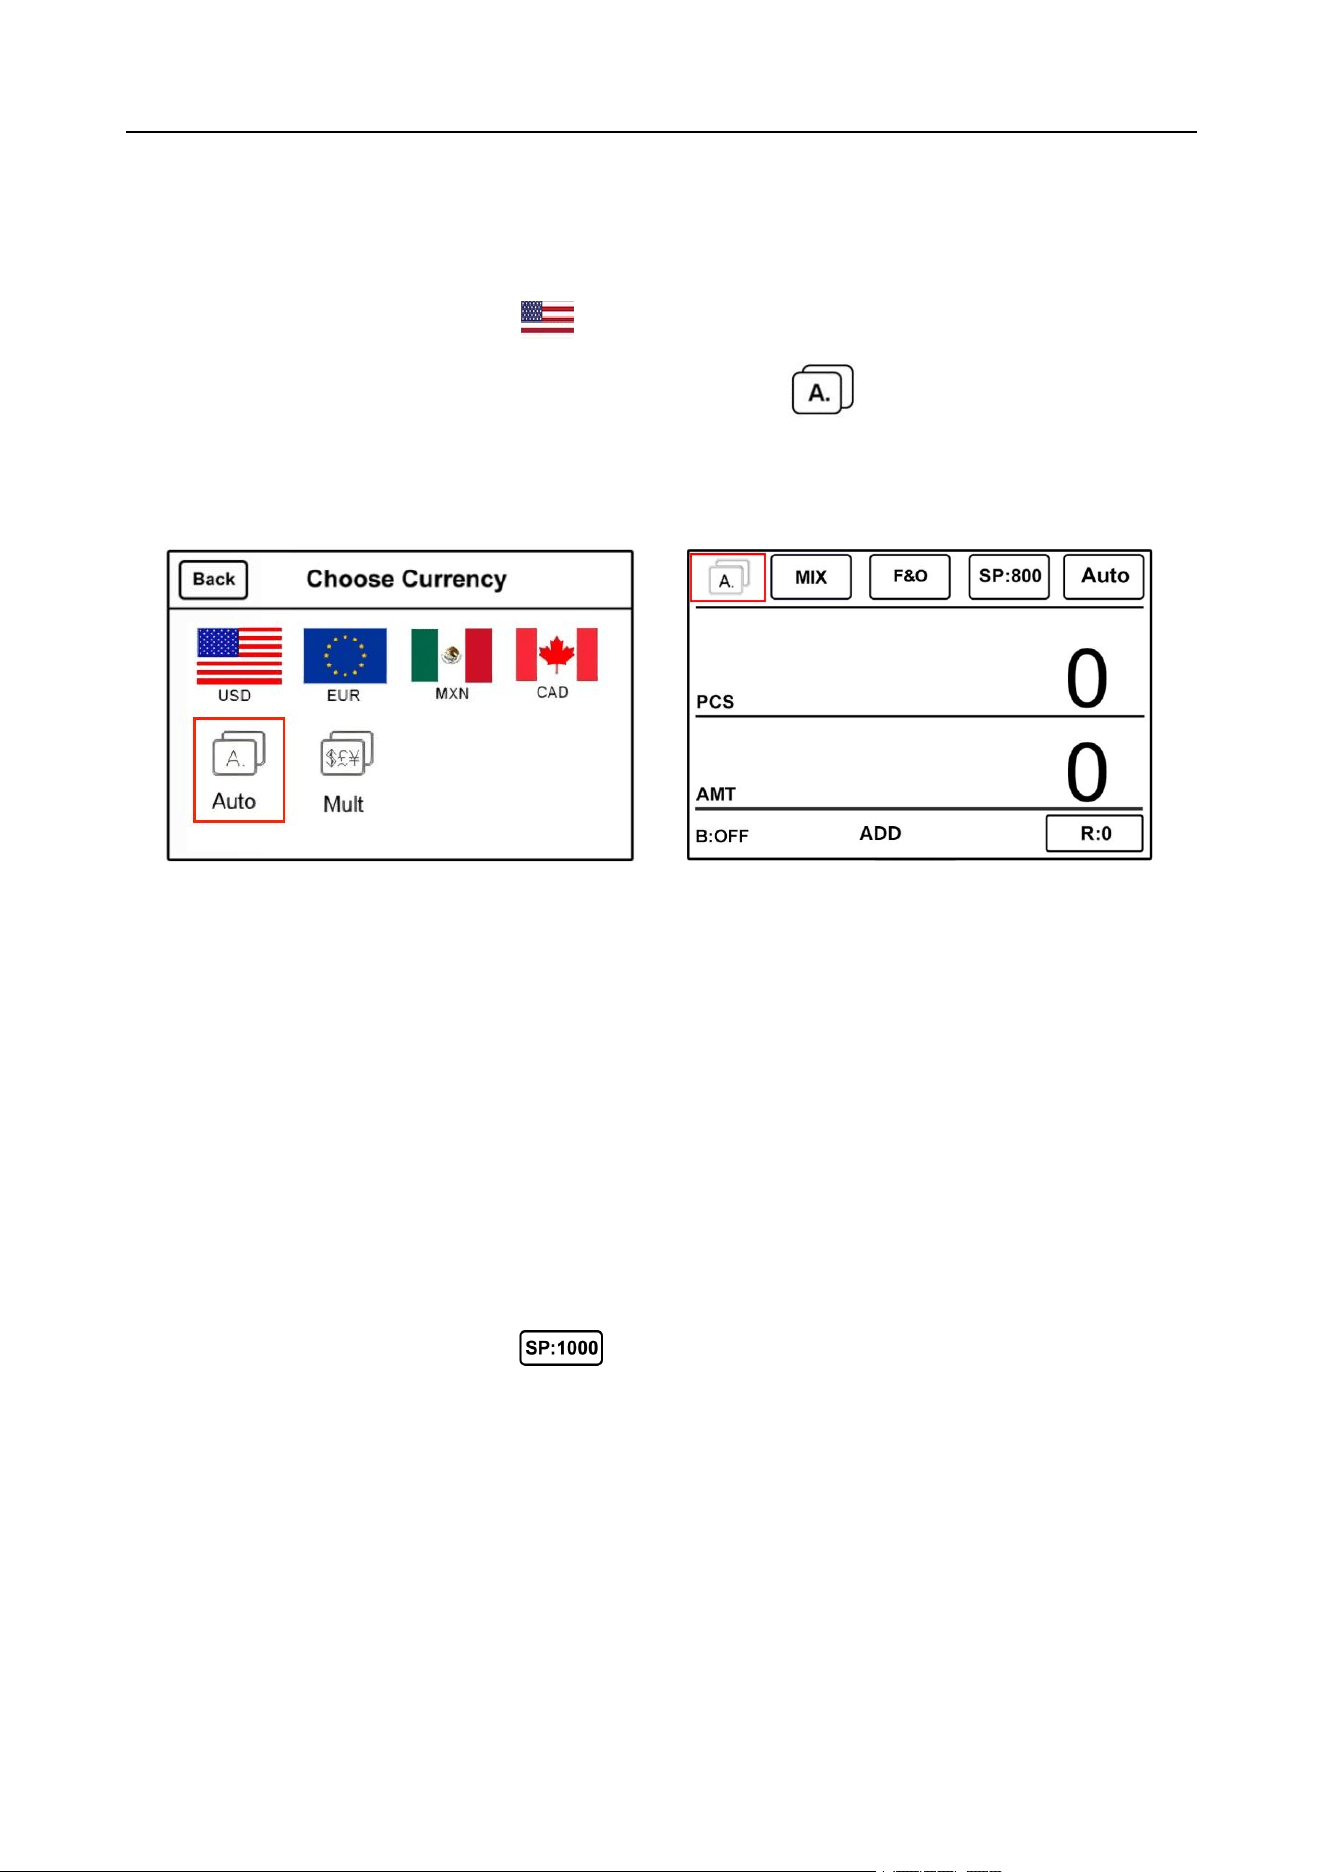
2.1.4.6 Automatic recognition mode
Automatic recognition: Automatic recognition of currency types placed in the machine. In the
process of counting banknotes, the machine recognizes banknotes of all denominations in the same
VS-35 User Manual V1.1
17
country based on the first banknote passing through the sensor. When banknotes from other countries is
recognized, Unsupported currencies will be kicked into the reject pocket. The machine can only
recognize the currency of the country shown in the program.
Under main interface, touch the " " sign in the upper left corner of the display screen to enter
the currency selection interface, as shown in Figure 22. Click " " Automatic Recognition Mode,
and the display screen will automatically jump to the main interface after selection, as shown in
Figure 23 below:
Figure 22 Figure 23
In automatic recognition mode, there are two counting modes: MIX mixed counting mode and SDC
single denomination counting mode. Customers can choose operations according to their own needs. It
is recommended that customers choose MIX mixed counting mode for automatic identification.
2.1.5 Currency Speed Setting
The machine has three counting speed options: high speed (1200PCS/min), medium speed
(1000PCS/min) and low speed (800PCS/min). In any counting mode, you can switch different banknote
counting speeds by touching the " " key on the main screen. As shown in the red box
identification in Figure 24 below, SP: 1000 indicates that the machine is in the mid-range counting speed
mode at this time.
VS-35 User Manual V1.1
18
Figure 24
The following table shows the corresponding count speeds for each count speed gear in each count
mode:
banknote counting
mode
H
M
L
MIX
1200PCS/min
1000PCS/min
800PCS/min
SDC
1200PCS/min
1000PCS/min
800PCS/min
CNT
1200PCS/min
1000PCS/min
800PCS/min
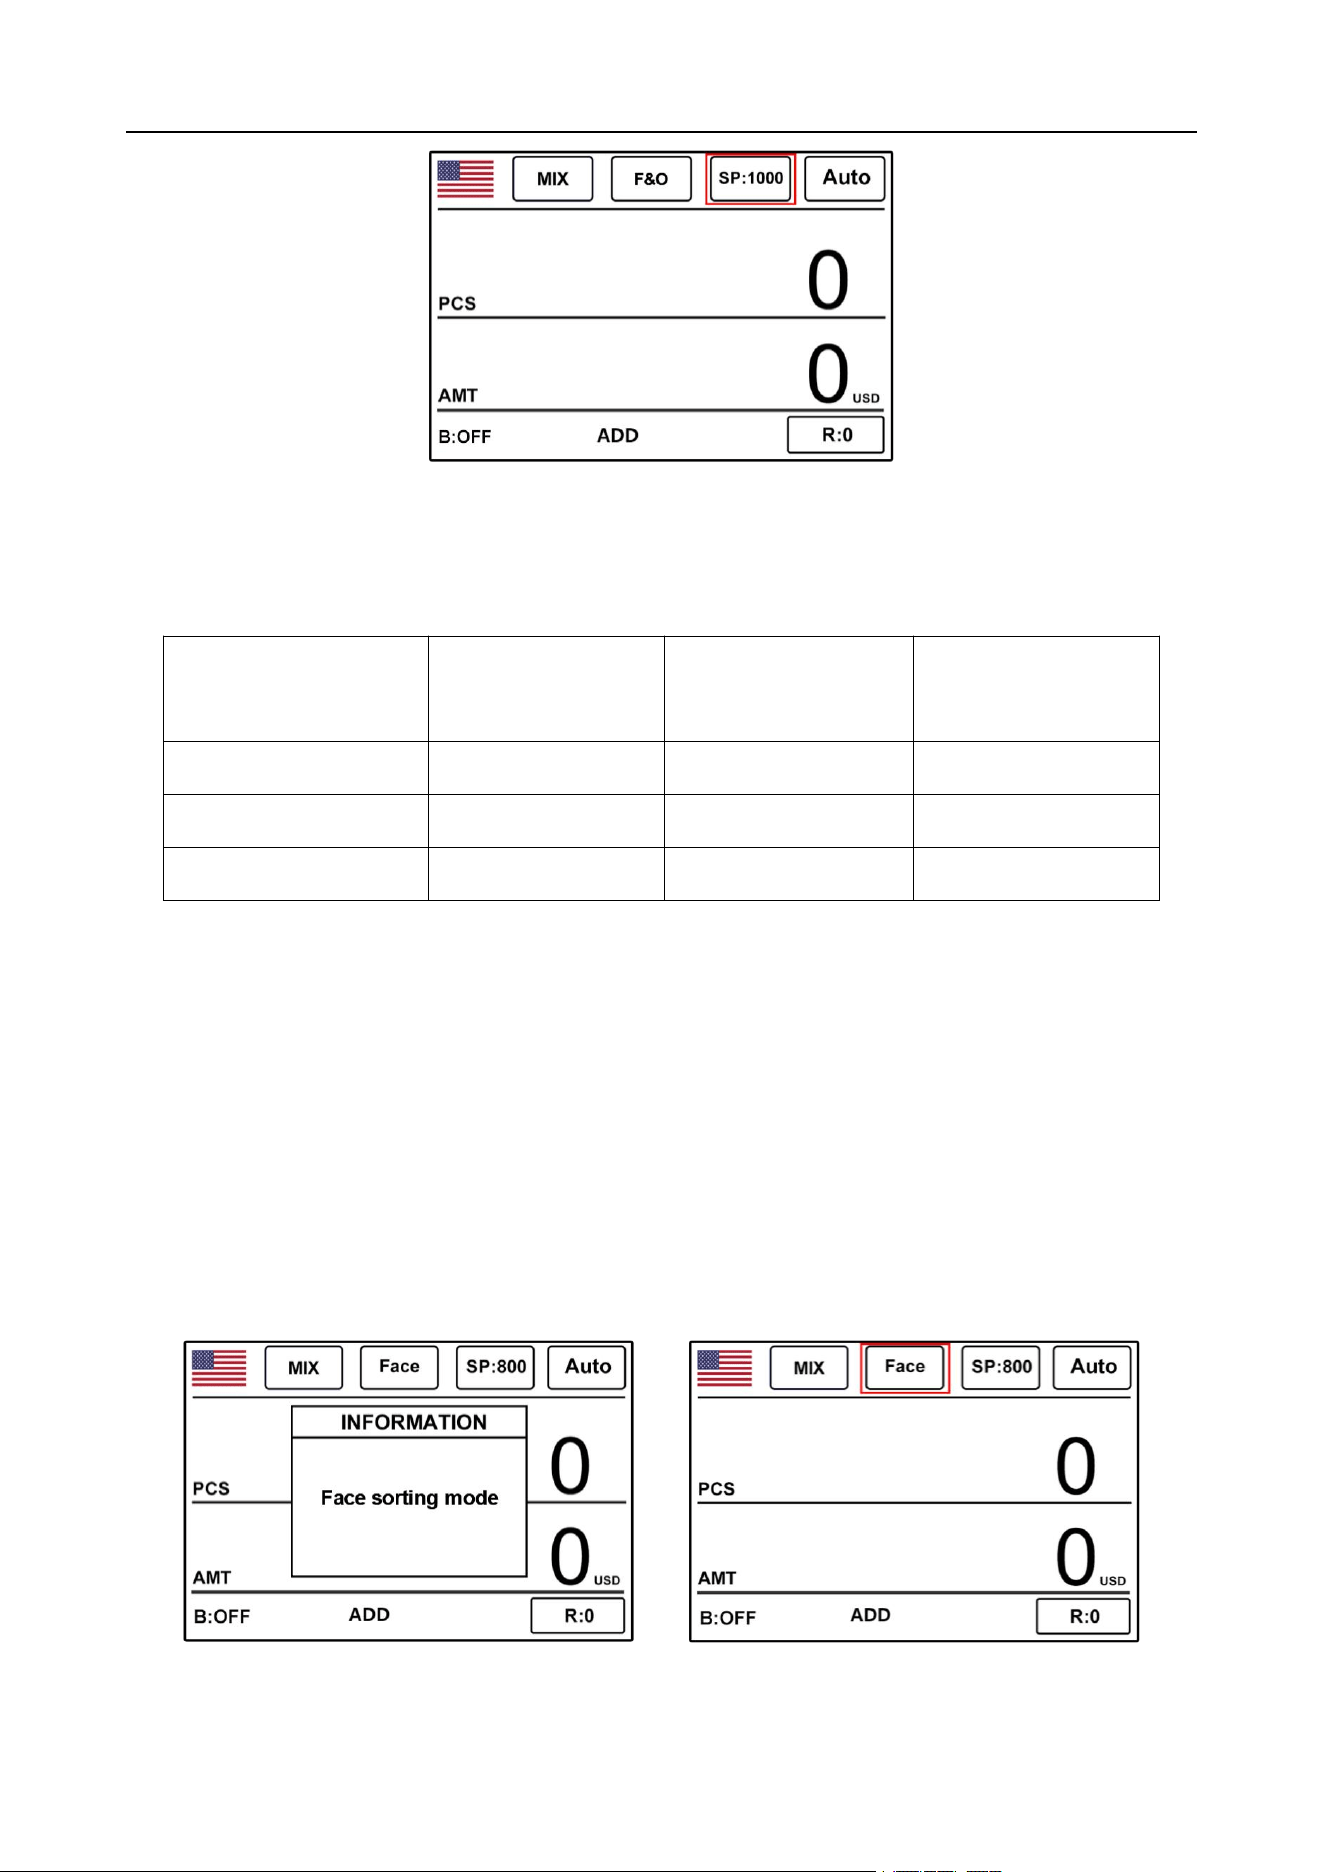
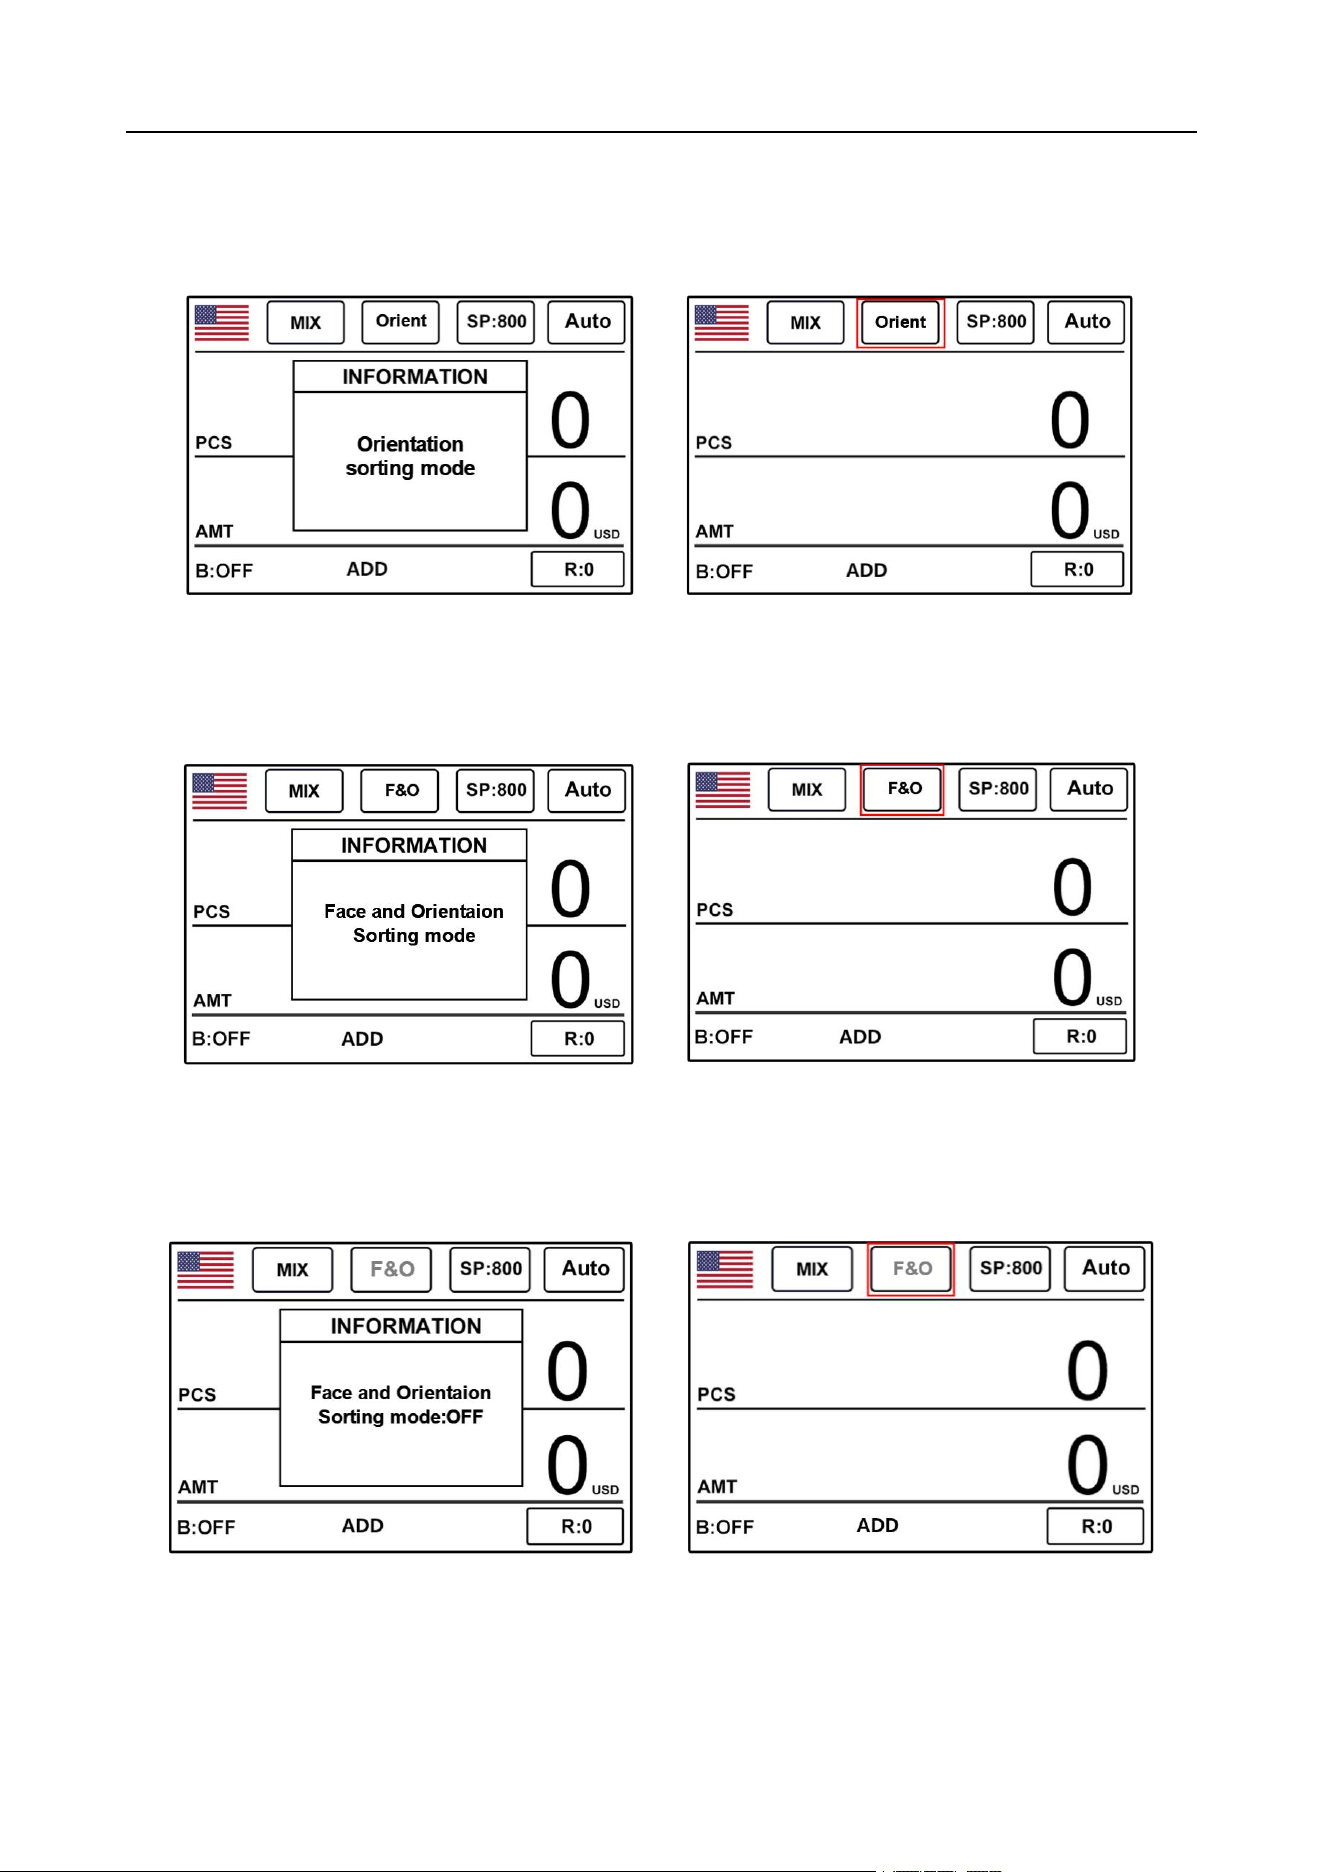
2.1.6 Face/Orientation switching function
1) In MIX mixed counting mode or SDC single-denomination counting mode, customers can
arrange banknotes by touching the screen face(face)-Ort(orientation)-F/O(face/orientation)-close,
and switching different functions in sequence. The machine is turned off by default.
2) As shown in Figures 25 and 26, the face sorting function is turned on. At this time, when the
banknotes are counted, the machine will take the first face of the banknote as the standard, and the
banknotes with different faces will be kicked into the reject pocket.
Figure 25 Figure 26
VS-35 User Manual V1.1
19
3) As shown in Figures 27 and 28, the currency orientation (ort) function is turned on. At this time,
the machine takes the orientation of the first banknote as the standard, and banknotes with different
orientations will be kicked into the reject pocket.
Figure 27 Figure 28
4) As shown in figs. 29 and 30, the face/orientation (F/O) function is turned on at the same time. At
this time, banknotes with different facing directions will be kicked into the reject pocket.
Figure 29 Figure 30
5) As shown in figs. 31 and 32, the face/orientation (F/O) function is turned off, and the shadow
changes from white to gray.
Figure 31 Figure 32
Tip: It is recommended that customers use this function for face arrangement first and then for
orientation arrangement.
VS-35 User Manual V1.1
20
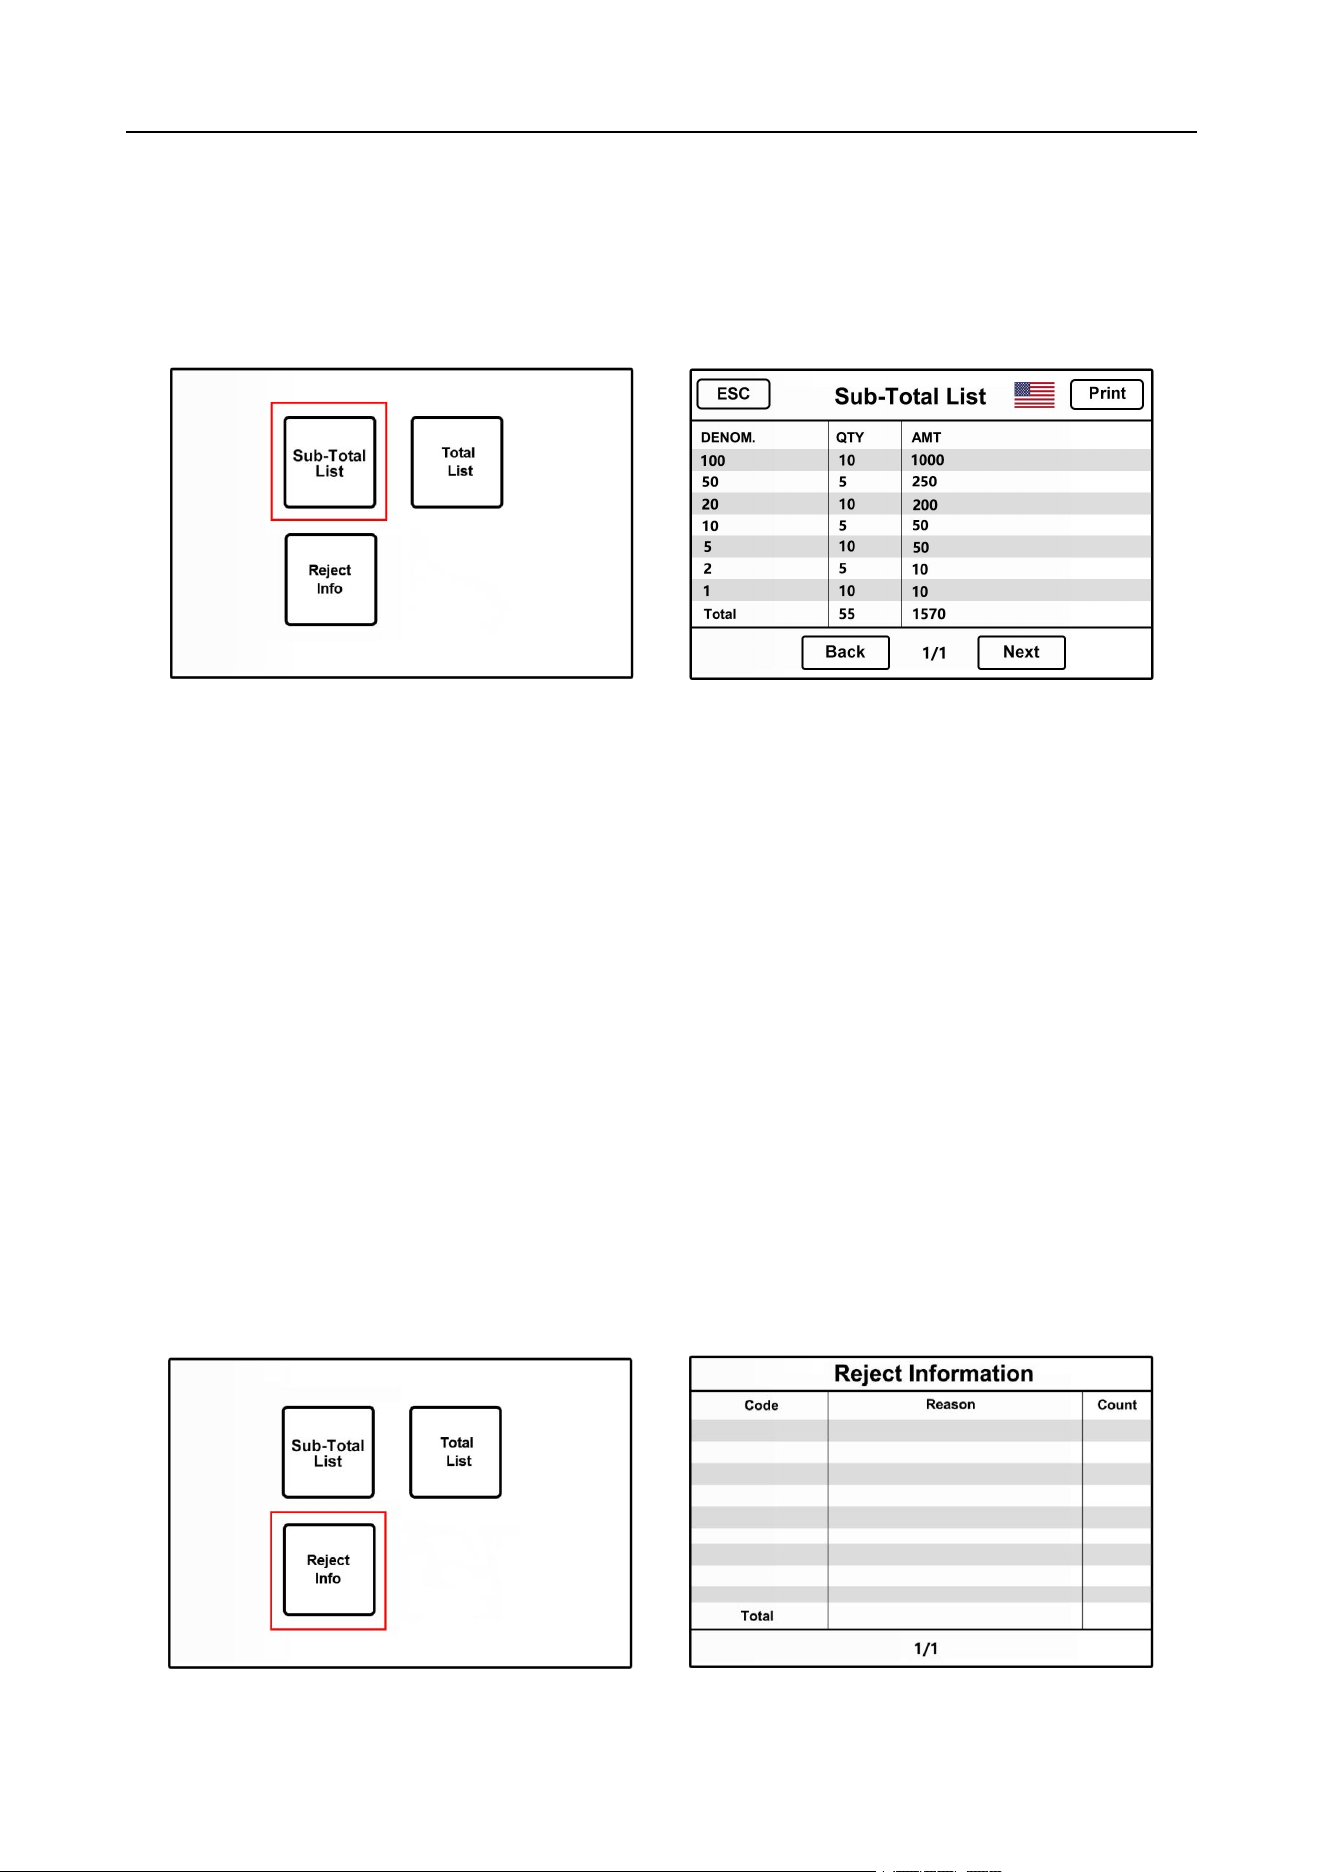
2.1.7 View banknote counting details
In MIX mixed counting mode or SDC single denomination counting mode, press the "LIST" key
on the left side of the frame after counting, as shown in Figure 33, and touch "Sub-Total List" to view
the details of counting, as shown in Figure 34, taking US dollars as an example.
Figure 33 Figure 34
This interface is used to view the number of banknotes of the corresponding country
denomination and the total amount of that denomination, as well as the total amount of all
banknotes. To exit the interface, Please press the “ESC” key on the right side or the “ESC” key on
the upper left corner of the screen to exit this interface.
2.1.8 Check the details of the error report of suspected
banknotes
After counting, if there are suspicious banknotes in the reject pocket if you want to see the reason
for rejecting banknotes, please press the "LIST" key to enter, and then touch "Reject Info" as shown in
Figure 35. The interface can view the detailed information, as shown in Figure 36 below. If you need to
exit the current interface, please press the "ESC" key on the lower right side to exit.
Figure 35 Figure 36
VS-35 User Manual V1.1
21
2.1.9 Preset number and amount settings
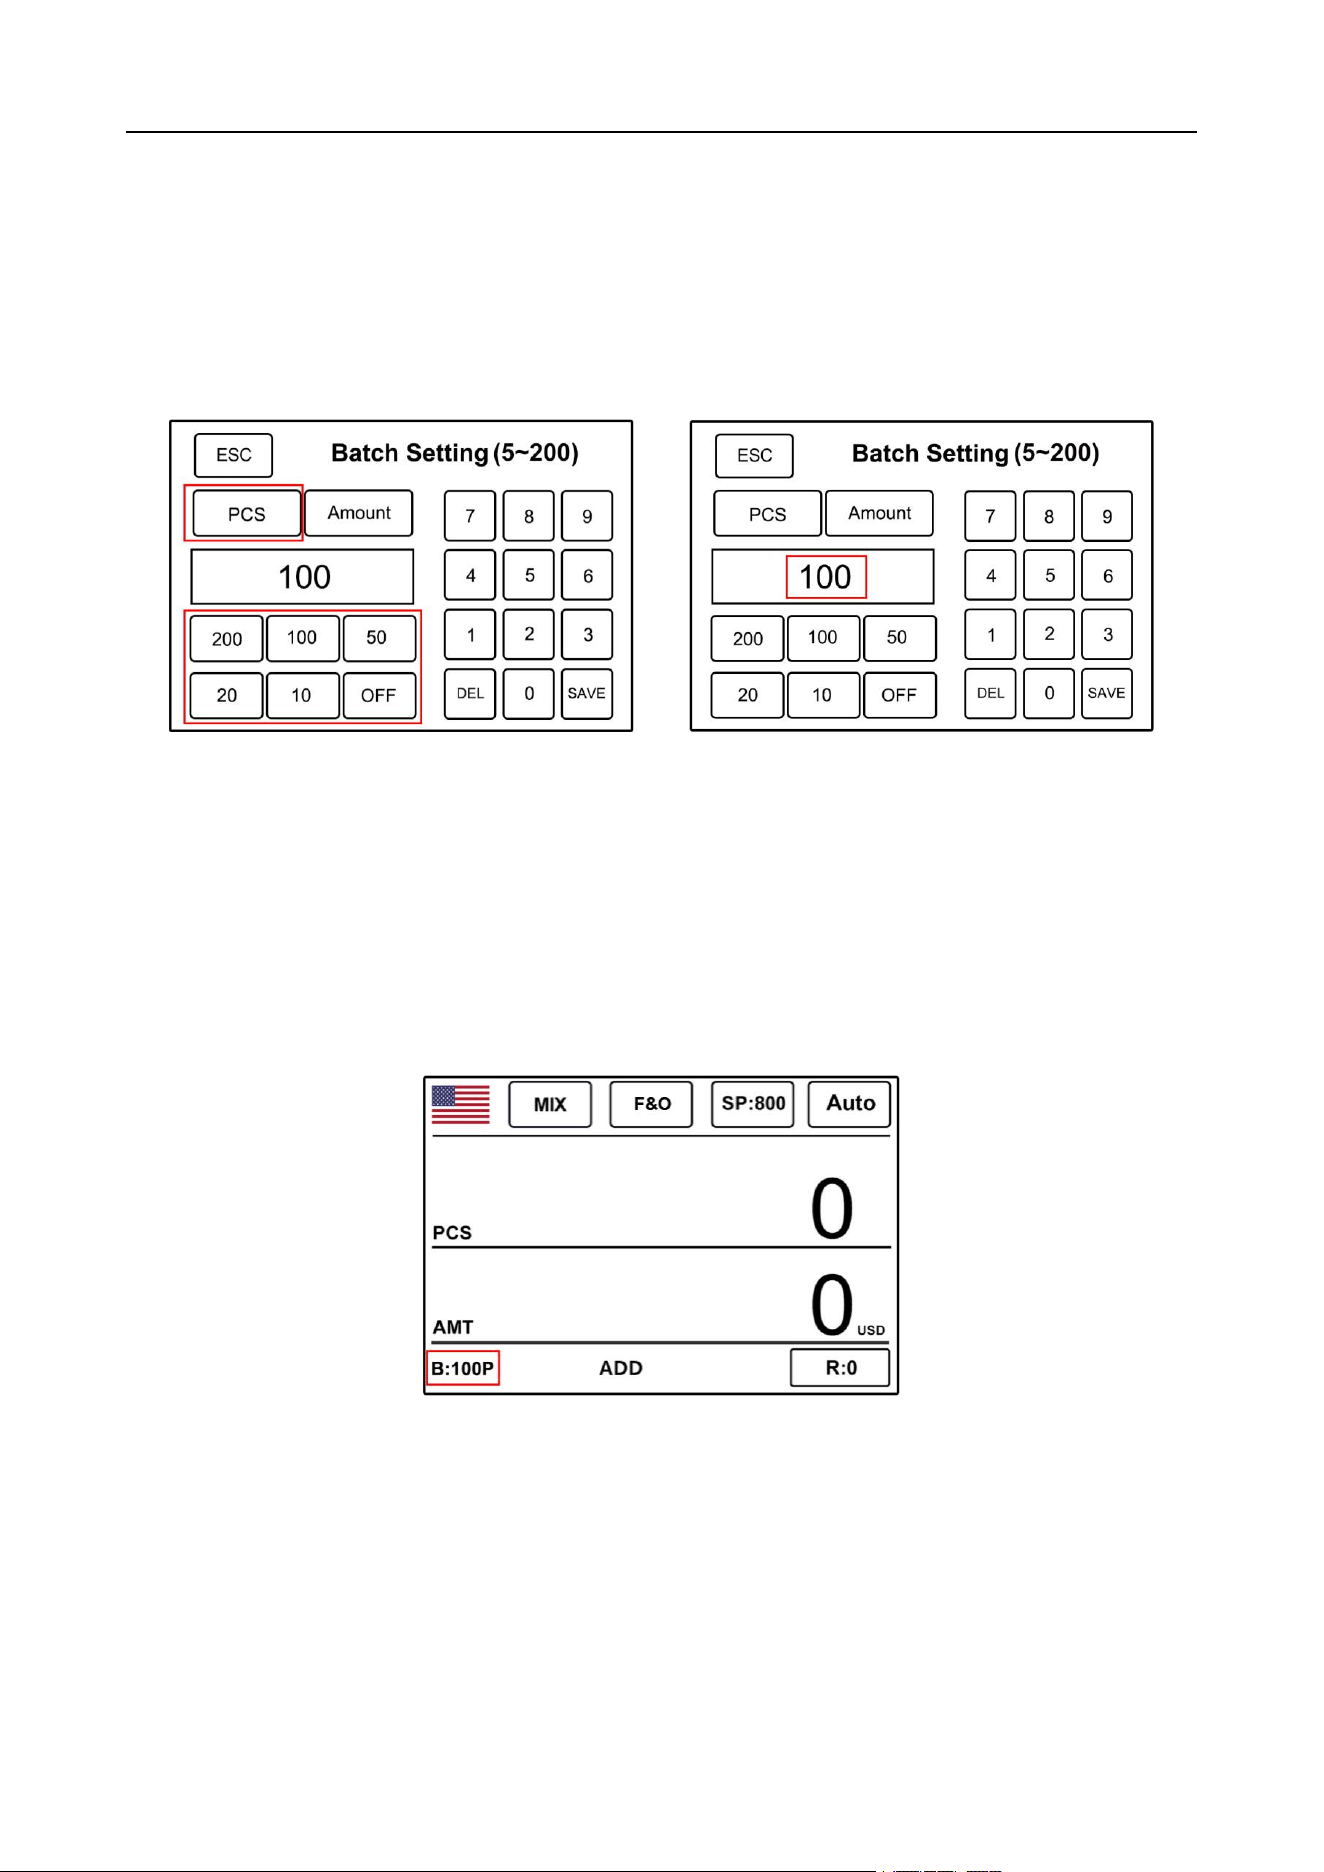
2.1.9.1 Default preset number settings
1) Press the "BATCH" key to set the default preset value, as shown in Figure 37. Select "PCS", and the
shadow will change from gray to yellow. The default preset value is "10P/20P/50P/100P/200P". Example:
As shown in Figure 38, 100 in the white box indicates setting the default preset value of 100.
Figure 37 Figure38
2) Click the “SAVE” key on the lower right corner of the screen to confirm, click the "ESC" key in the
upper left corner of the screen or the "ESC" key on the right side, and the machine will return to the
main interface, as shown in Figure39. The "B: 100P" logo is displayed in the lower left corner of the
main interface. When the preset number is "0", the default preset number of the machine is 200.
When the preset number reaches 200, the machine will automatically stop running.
Figure 39
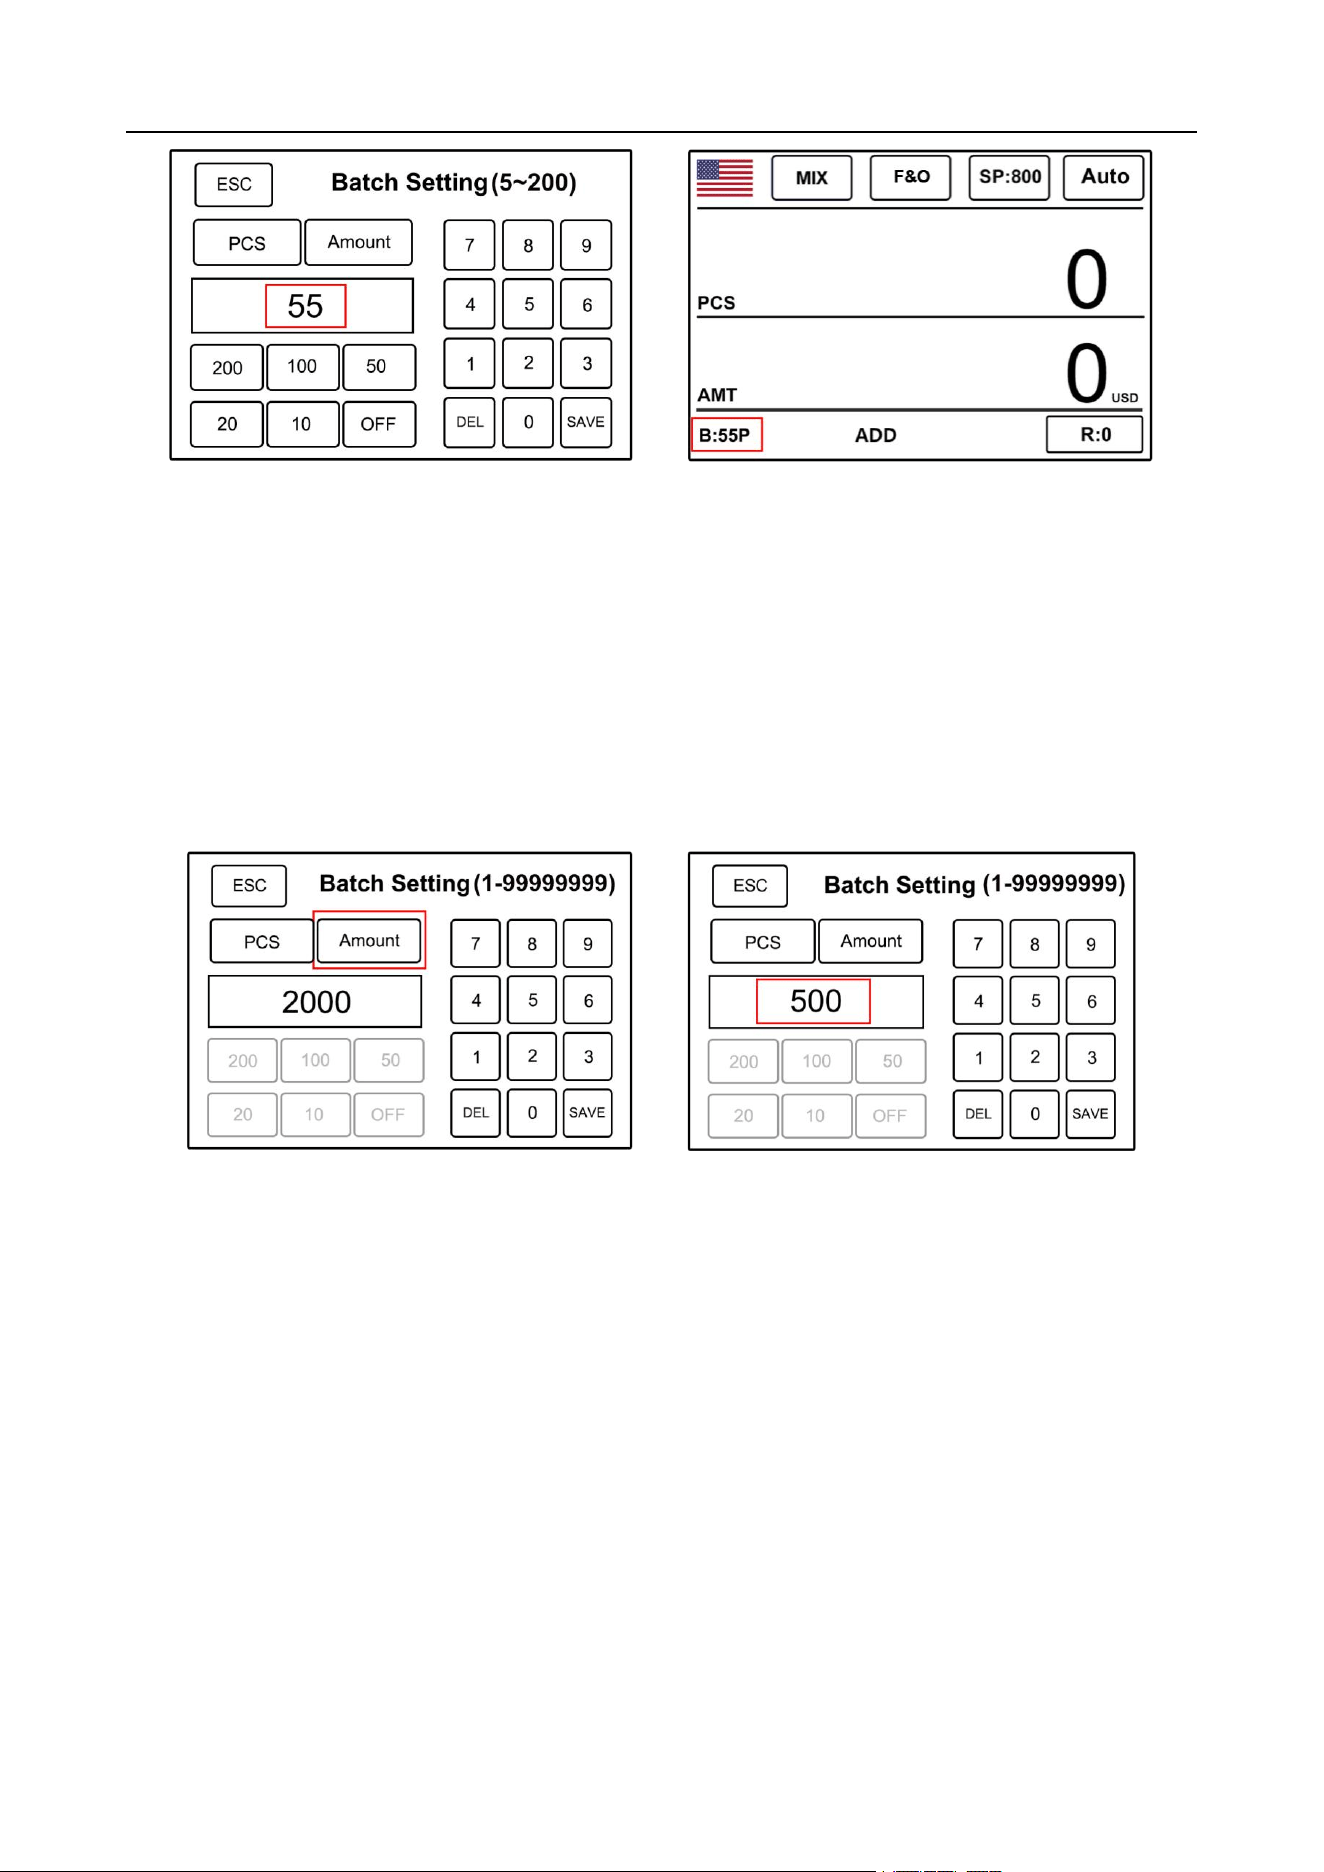
3) Customized preset values: Click the numeric keypad on the right and enter values within "1 ~ 200".
Example: As shown in Figure 40, enter 55, then press the "START" key to confirm, and the machine will
automatically return to the main interface. As shown in Figure 41, the "B: 55P" logo is displayed in the
lower left corner of the main interface. Note: When the preset number exceeds 200, the machine cannot
save the default preset number of 200.
VS-35 User Manual V1.1
22
Figure 40 Figure 41
2.1.9.2 Preset Amount Settings
1) Press the "BATCH" key to preset the amount. As shown in Figure 42, select "Amount" shadow to
change from gray to yellow, and the Amount can be preset in the range of "1 ~ 99999999". Enter the
preset Amount through the numeric keypad on the right, for example; As shown in Figure 43, the preset
amount is 500.
Figure 42 Figure 43
2) Click the “SAVE” key on the lower right corner of the screen to confirm, and click the “ESC” key on the
upper left corner or the right side of the screen, the machine returns to the main interface. as shown in
Figure 44. The "B: 500A" logo is displayed in the lower left corner of the main interface. Note: The value
and amount preset can only preset one of them at a time, and the machine defaults to the value preset.
VS-35 User Manual V1.1
23
Figure 44
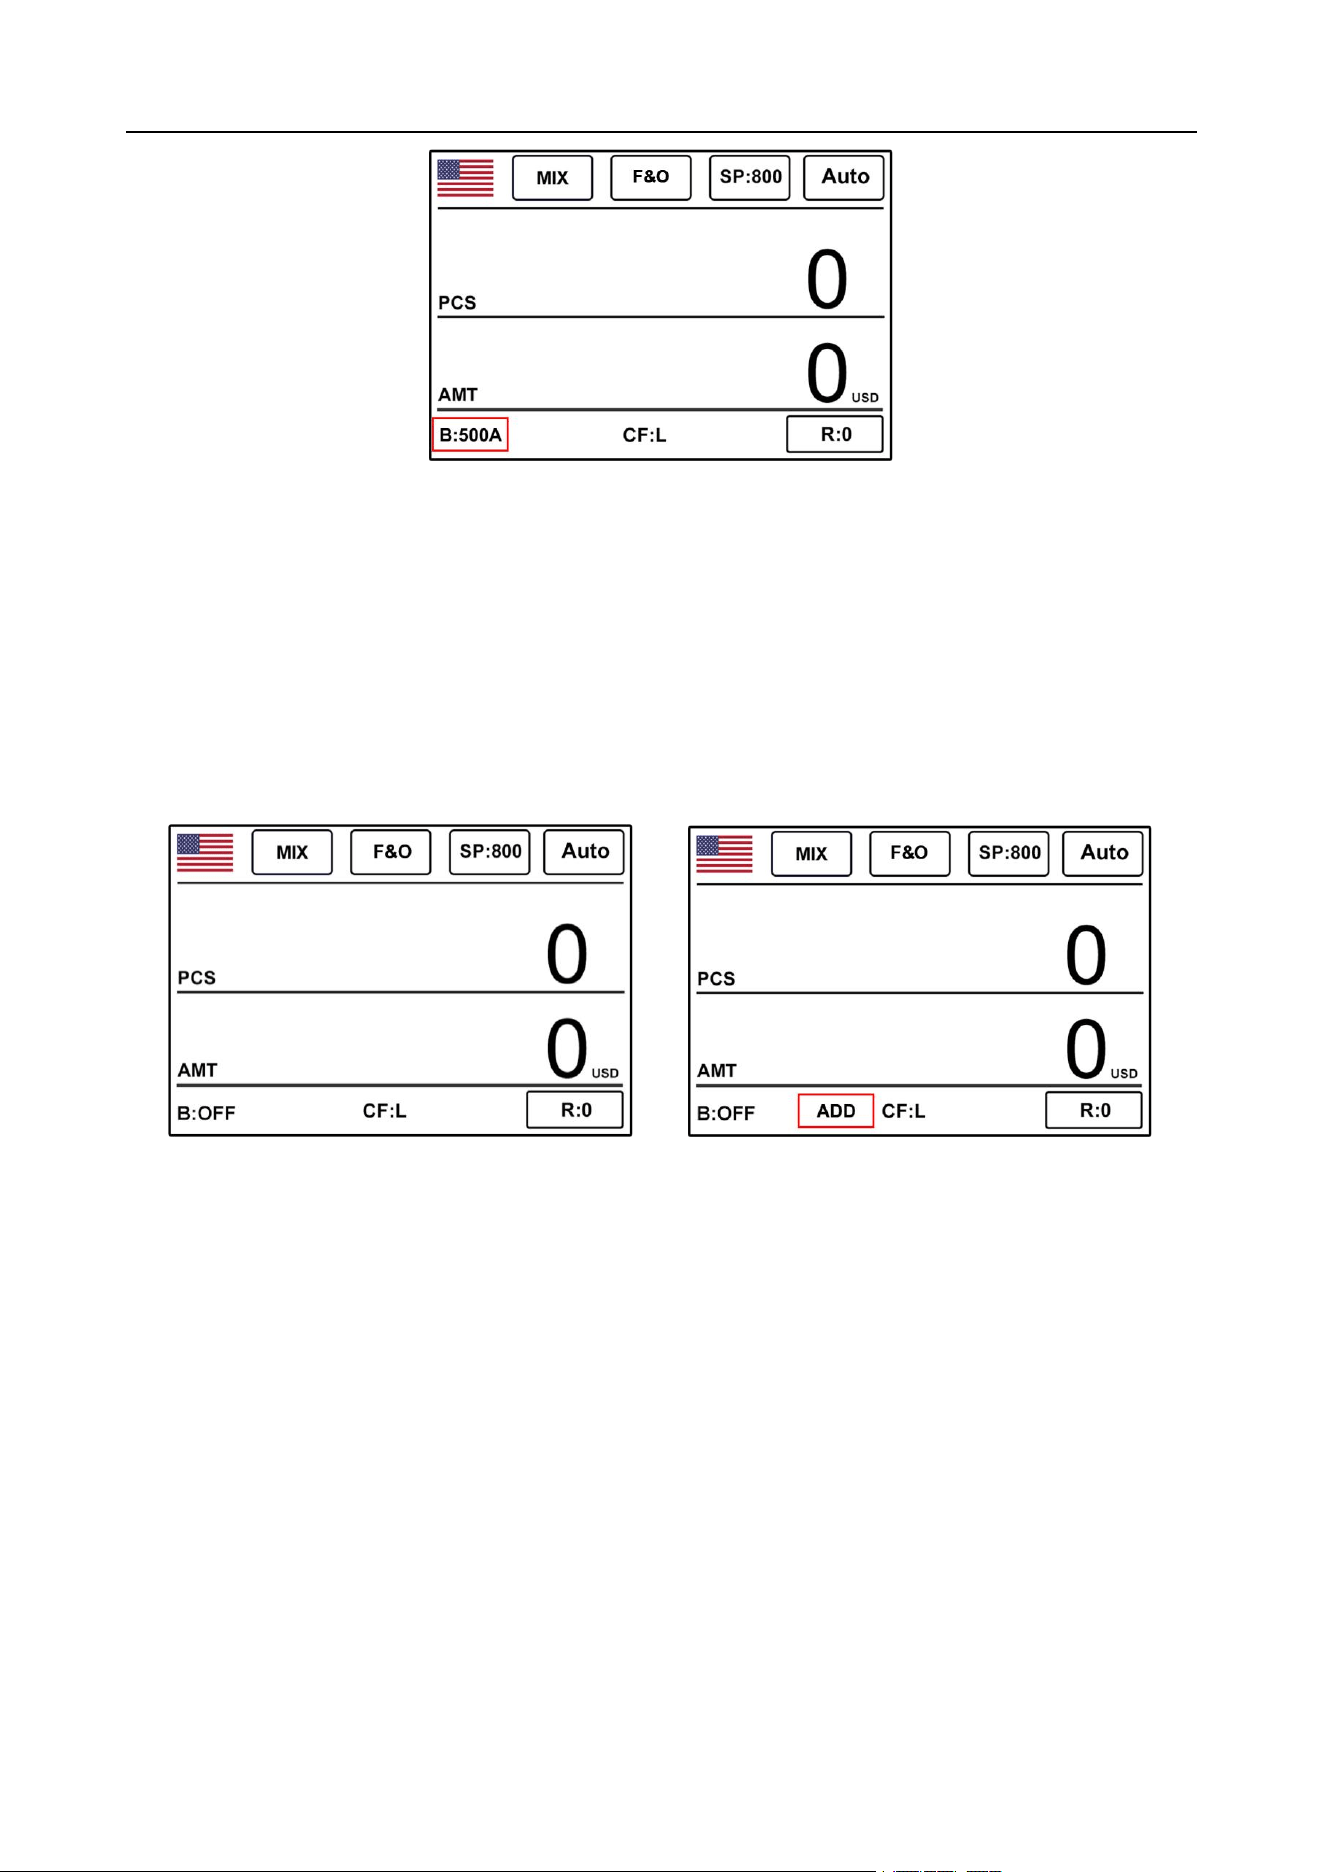
2.1.10 Accumulation Mode Settings
In any counting mode, you can turn on the machine's accumulation function by pressing the "ADD"
key on the left. At the same time, the letter "ADD" will appear at the bottom of the main interface. Fig. 45
shows the closed state of the accumulation mode. Fig. 46 shows the accumulation mode on the state.
Figure 45 Figure 46
1) Accumulation function is turned off: Put a banknote in the machine for counting, and the machine will
display the number and amount of banknotes counted this time after counting. After taking out all the
banknotes in the stacker, put them back into the banknotes for counting. After counting, the machine will
only display the banknote information counted this time, but not the banknote information counted
before.
2) Accumulation function is turned on: Put a banknote into the machine for the first count, and the
machine will display the number and amount of banknotes counted this time after the count is completed.
After taking out all the banknotes in the stacker, put them back into the banknotes for the second count.
When the banknotes are not removed from the stacker after counting, the machine will display the
number and amount of banknotes counted for the second time. When the banknotes are removed from
VS-35 User Manual V1.1
24
the reject pocket, the machine will accumulate the number and amount of the banknotes counted for the
second time and the first time. At this time, press CLEAR key to CLEAR the first currency information,
and then press CLEAR key to CLEAR all currency information.
3) During the counting process, if there is a malfunction or abnormality such as jammed banknotes,
which may lead to inaccurate counting results, the machine will automatically delete the information of
the counted banknotes and prompt to recount.
4) When switching currencies in automatic recognition mode, the accumulation function will fail.
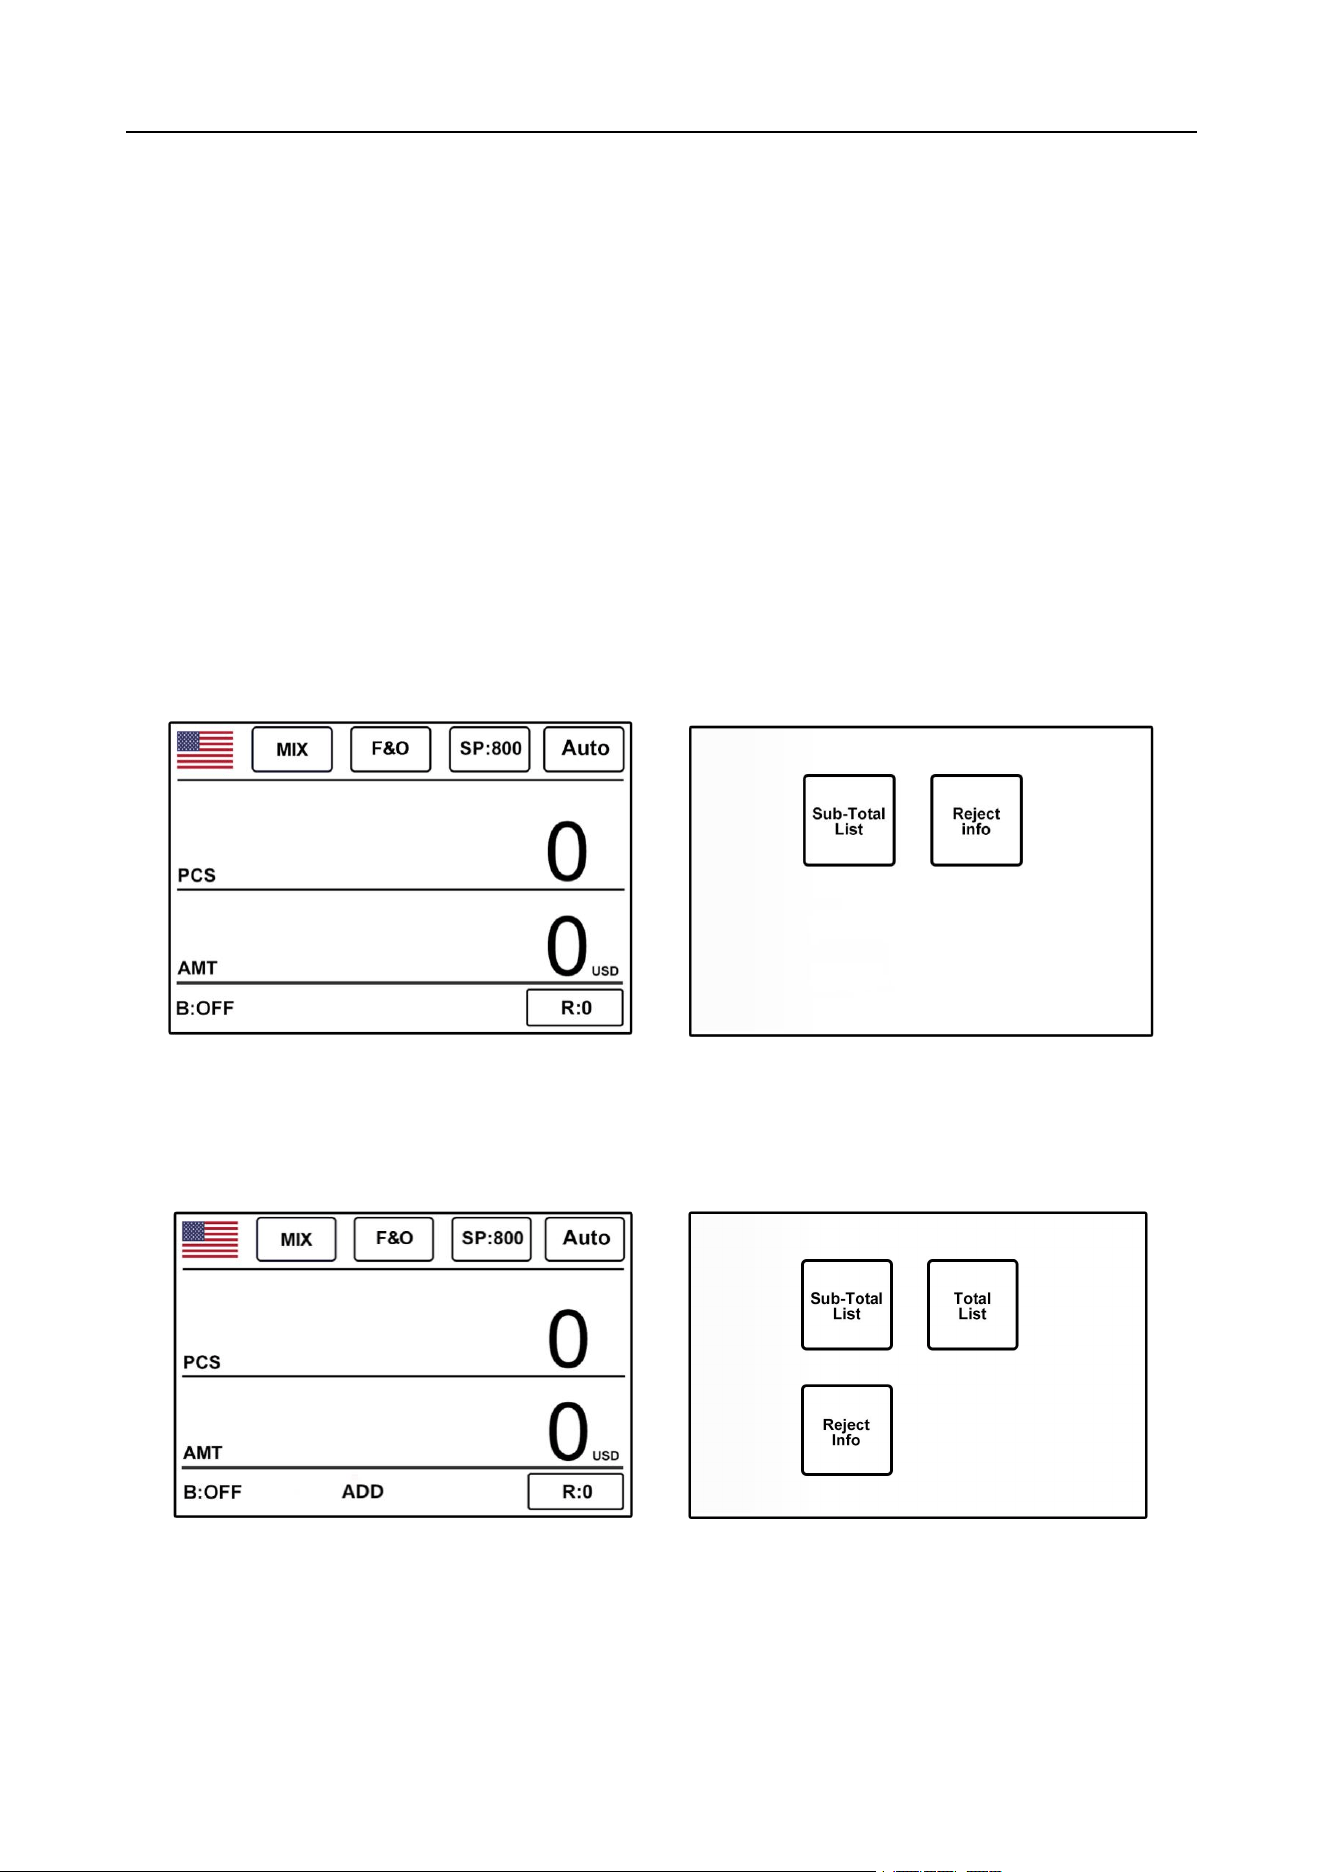
2.1.10.1 History Counting Total List View
1) When the accumulation function is not turned on, as shown in Figure47, pressing the LIST key cannot
view the historical list of counting banknotes, as shown in Figure 48.
Figure 47 Figure 48
2)When the accumulation function is turned on, as shown in Figure 49, press the LIST key to view the
total list of banknote counting history, as shown in Figure 50.
Figure 49 Figure 50
3)Take USD as an example: After counting banknotes for the first time on the main page, touch "Total
List" to enter the interface, as shown in Figure 51, which is the details the first counting total list. Return
to the main interface, and count banknotes again, as shown in Figure 52, which is the details the two
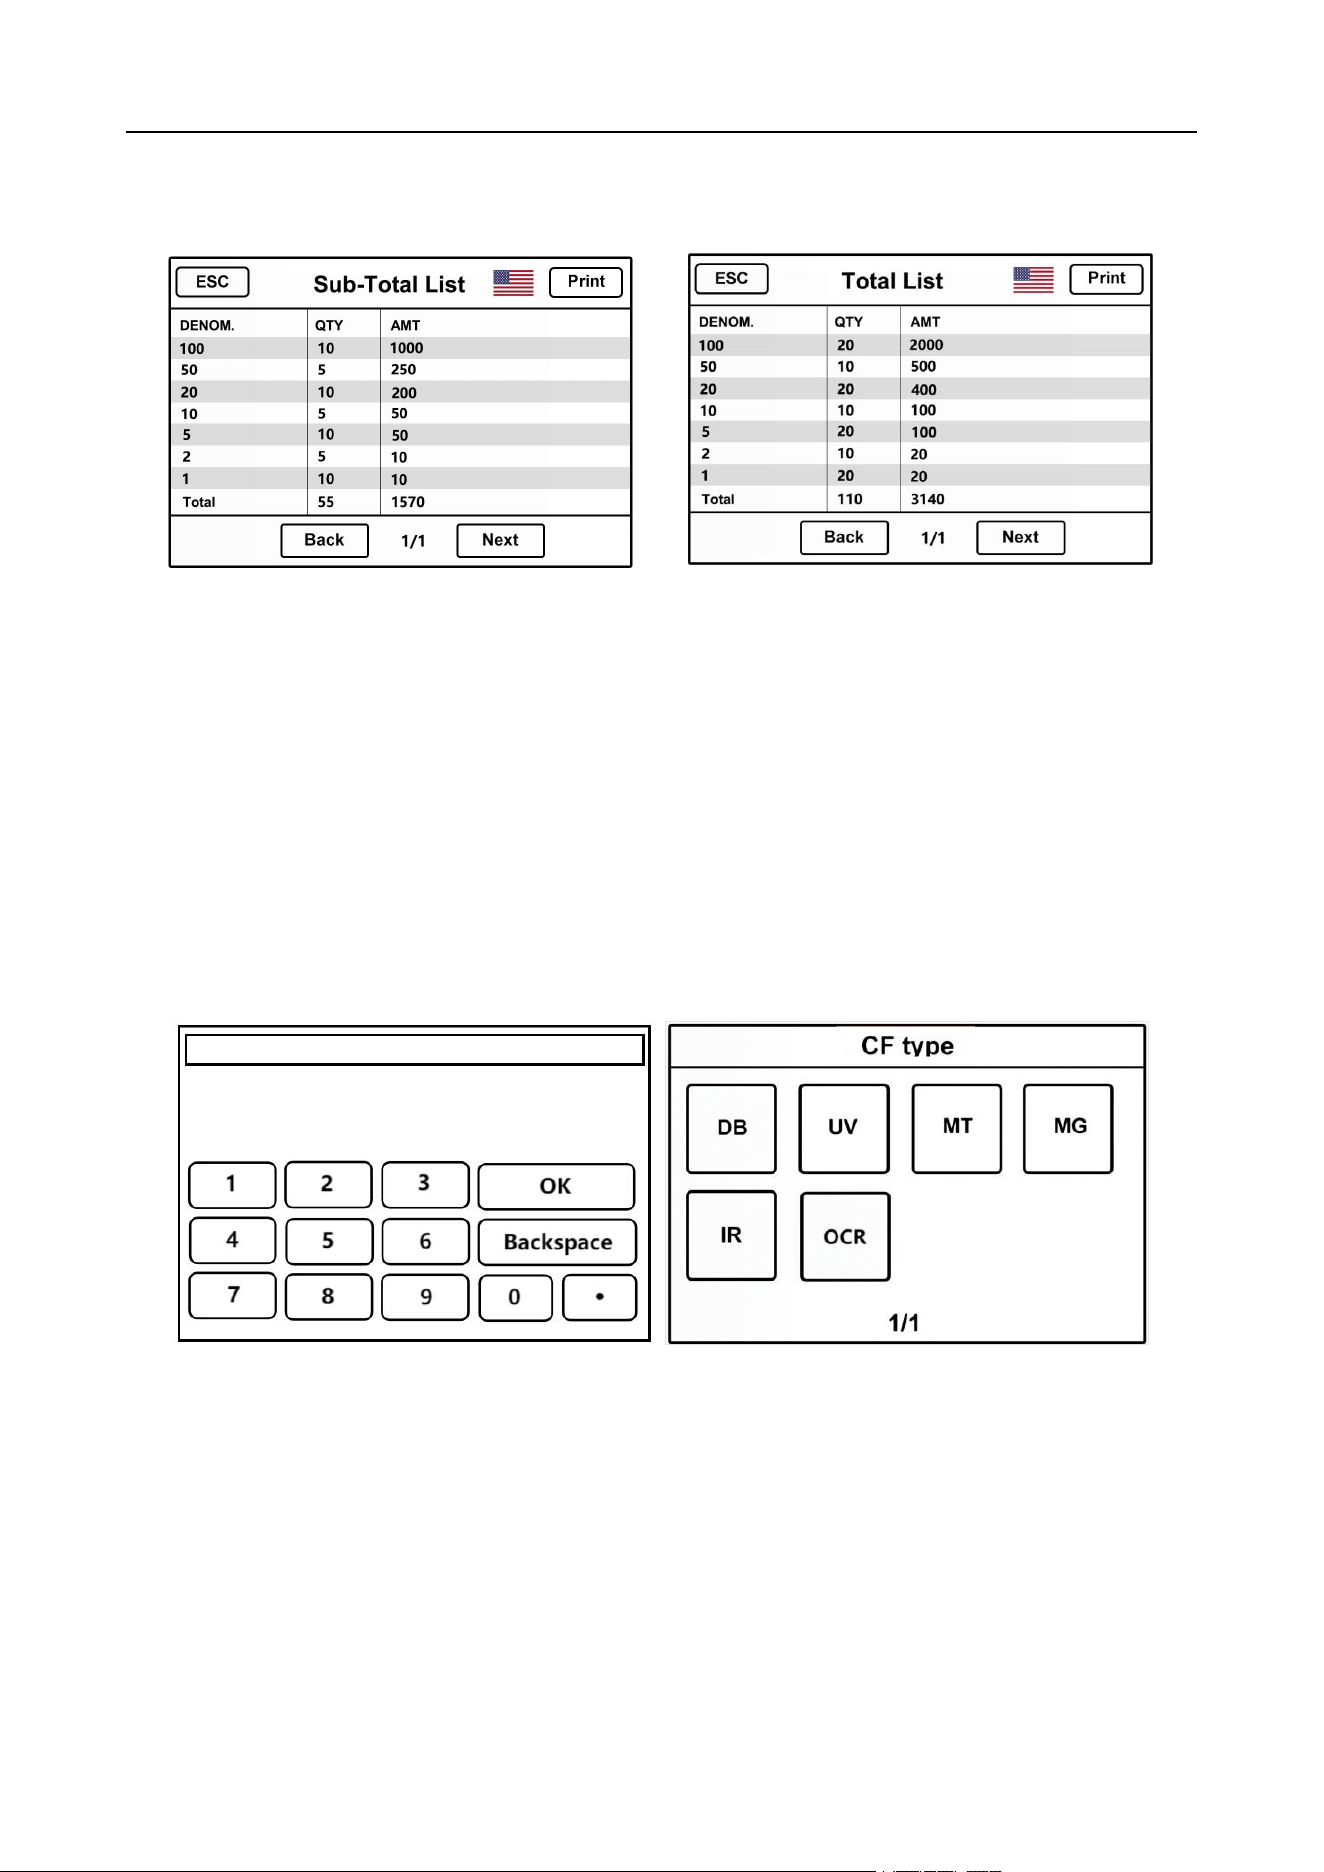
VS-35 User Manual V1.1
25
counting total lists, and so on. To exit the current interface, press ESC. Note: When the accumulation
function is turned off, the last historical total list will be cleared.
Figure 51 Figure 52
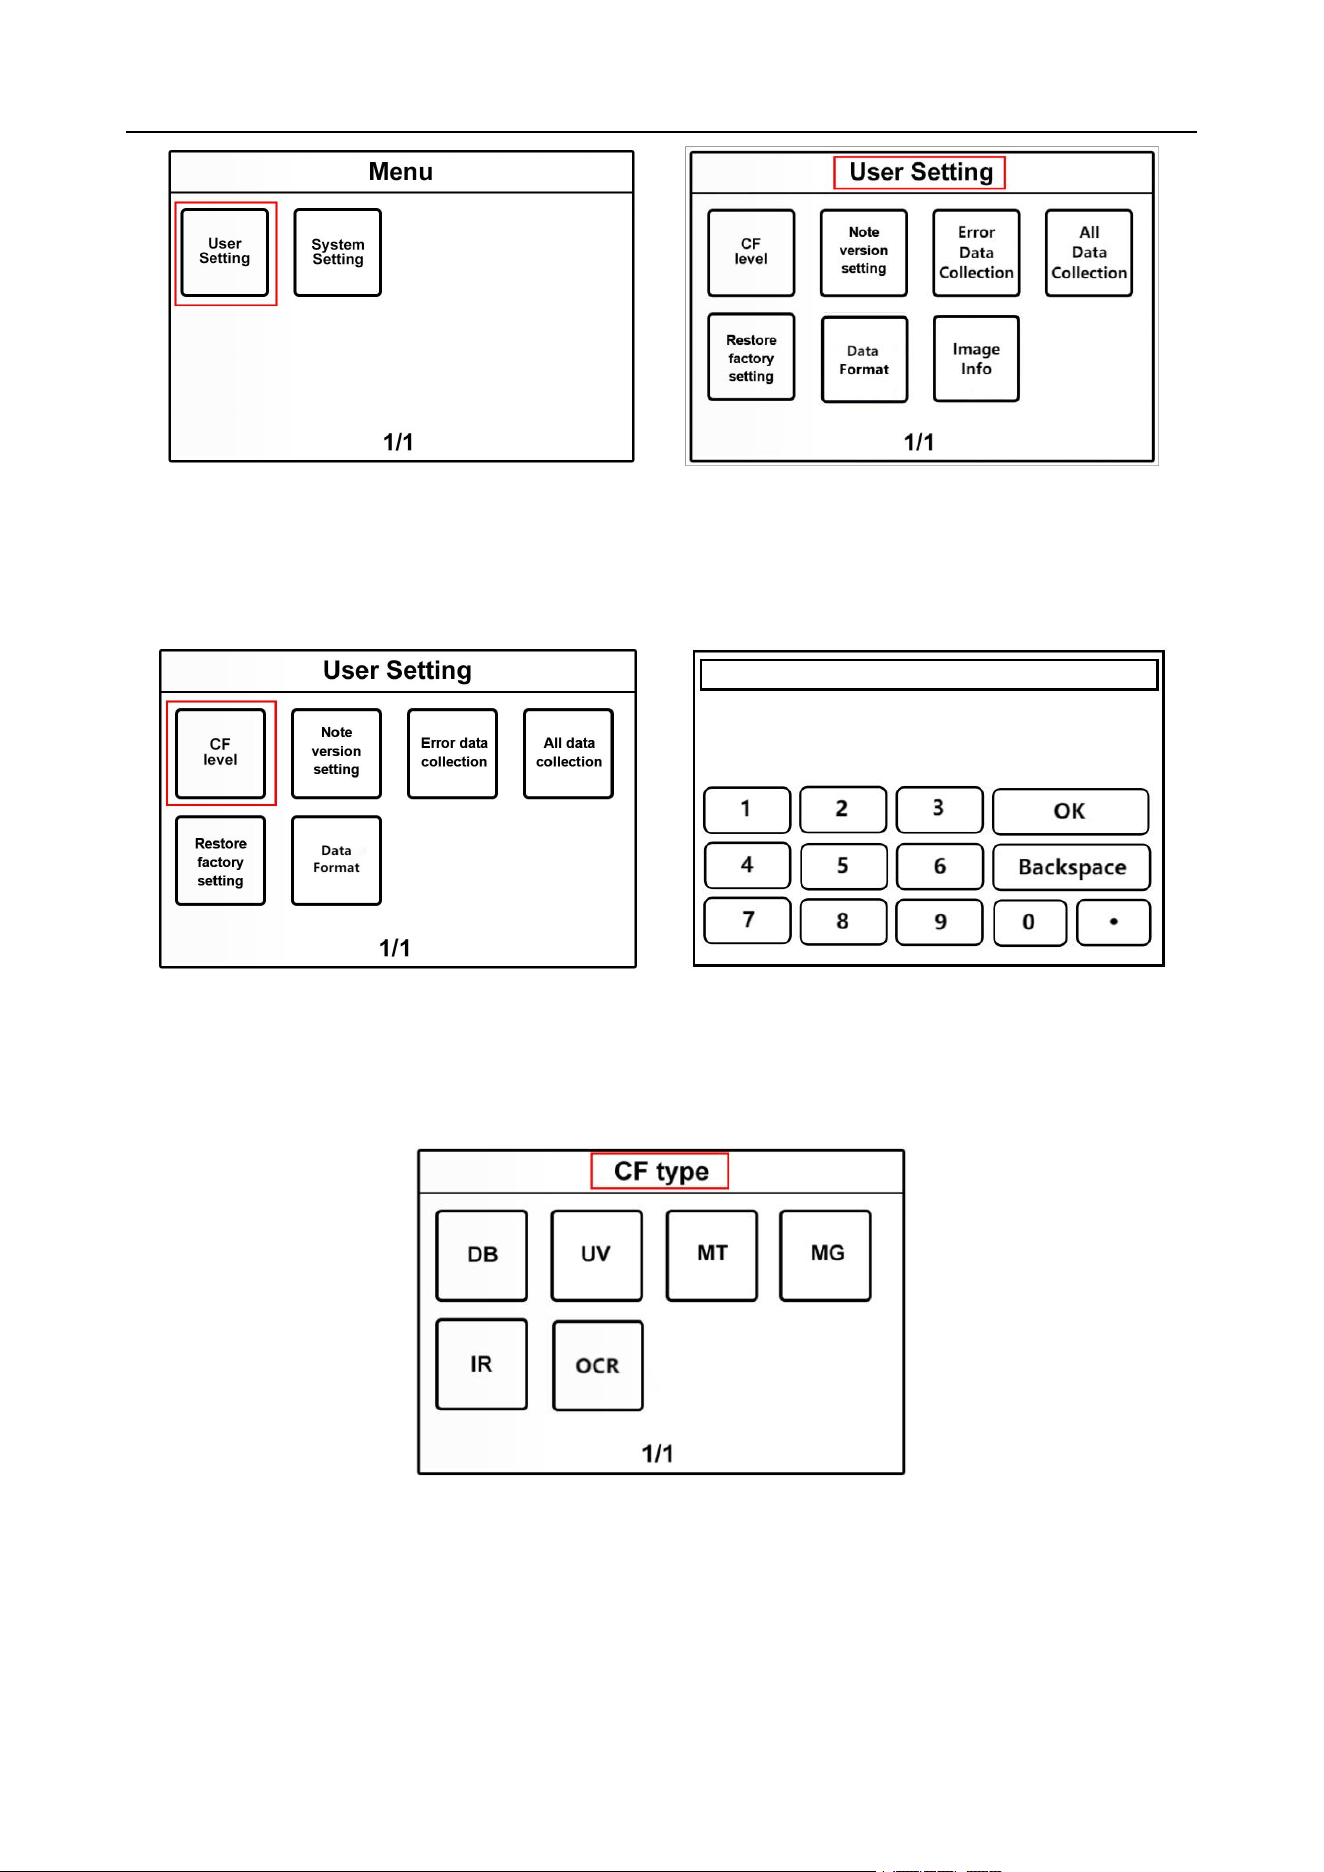
2.1.11 User settings
2.1.11.1 Simple Counterfeit Detection Gear Setting
You can press the right “CF” key to set up the simple counterfeit detection gear, when you click the
right “CF” key, the interface will automatically switch to the password input interface, see Figure 53. Input
the correct password to enter the background detection gear setting interface, see Figure 54. For the
specific settings, please refer to 2.1.11.2 Counterfeit Gear Setting.
Figure 53 Figure 54
2.1.11.2 Counterfeit Detection Gear Setting
1) Press the "Menu" key on the left to enter the "Menu" interface, and then touch "User Setting" as
shown in Figure 55. Then go to the "User Setting" interface, as shown in Figure 56.
VS-35 User Manual V1.1
26
Figure 55 Figure 56
2) As in Fig. 57, touch the first “CF level” button on the display, you need to input the correct password to
enter the gear setting interface, see Fig. 58.
Figure 57 Figure 58
3)After the password is input correctly, it will enter the interface of CF type, see Fig. 59. Customers can
set different detection type according to the actual demand of counting.
Figure 59
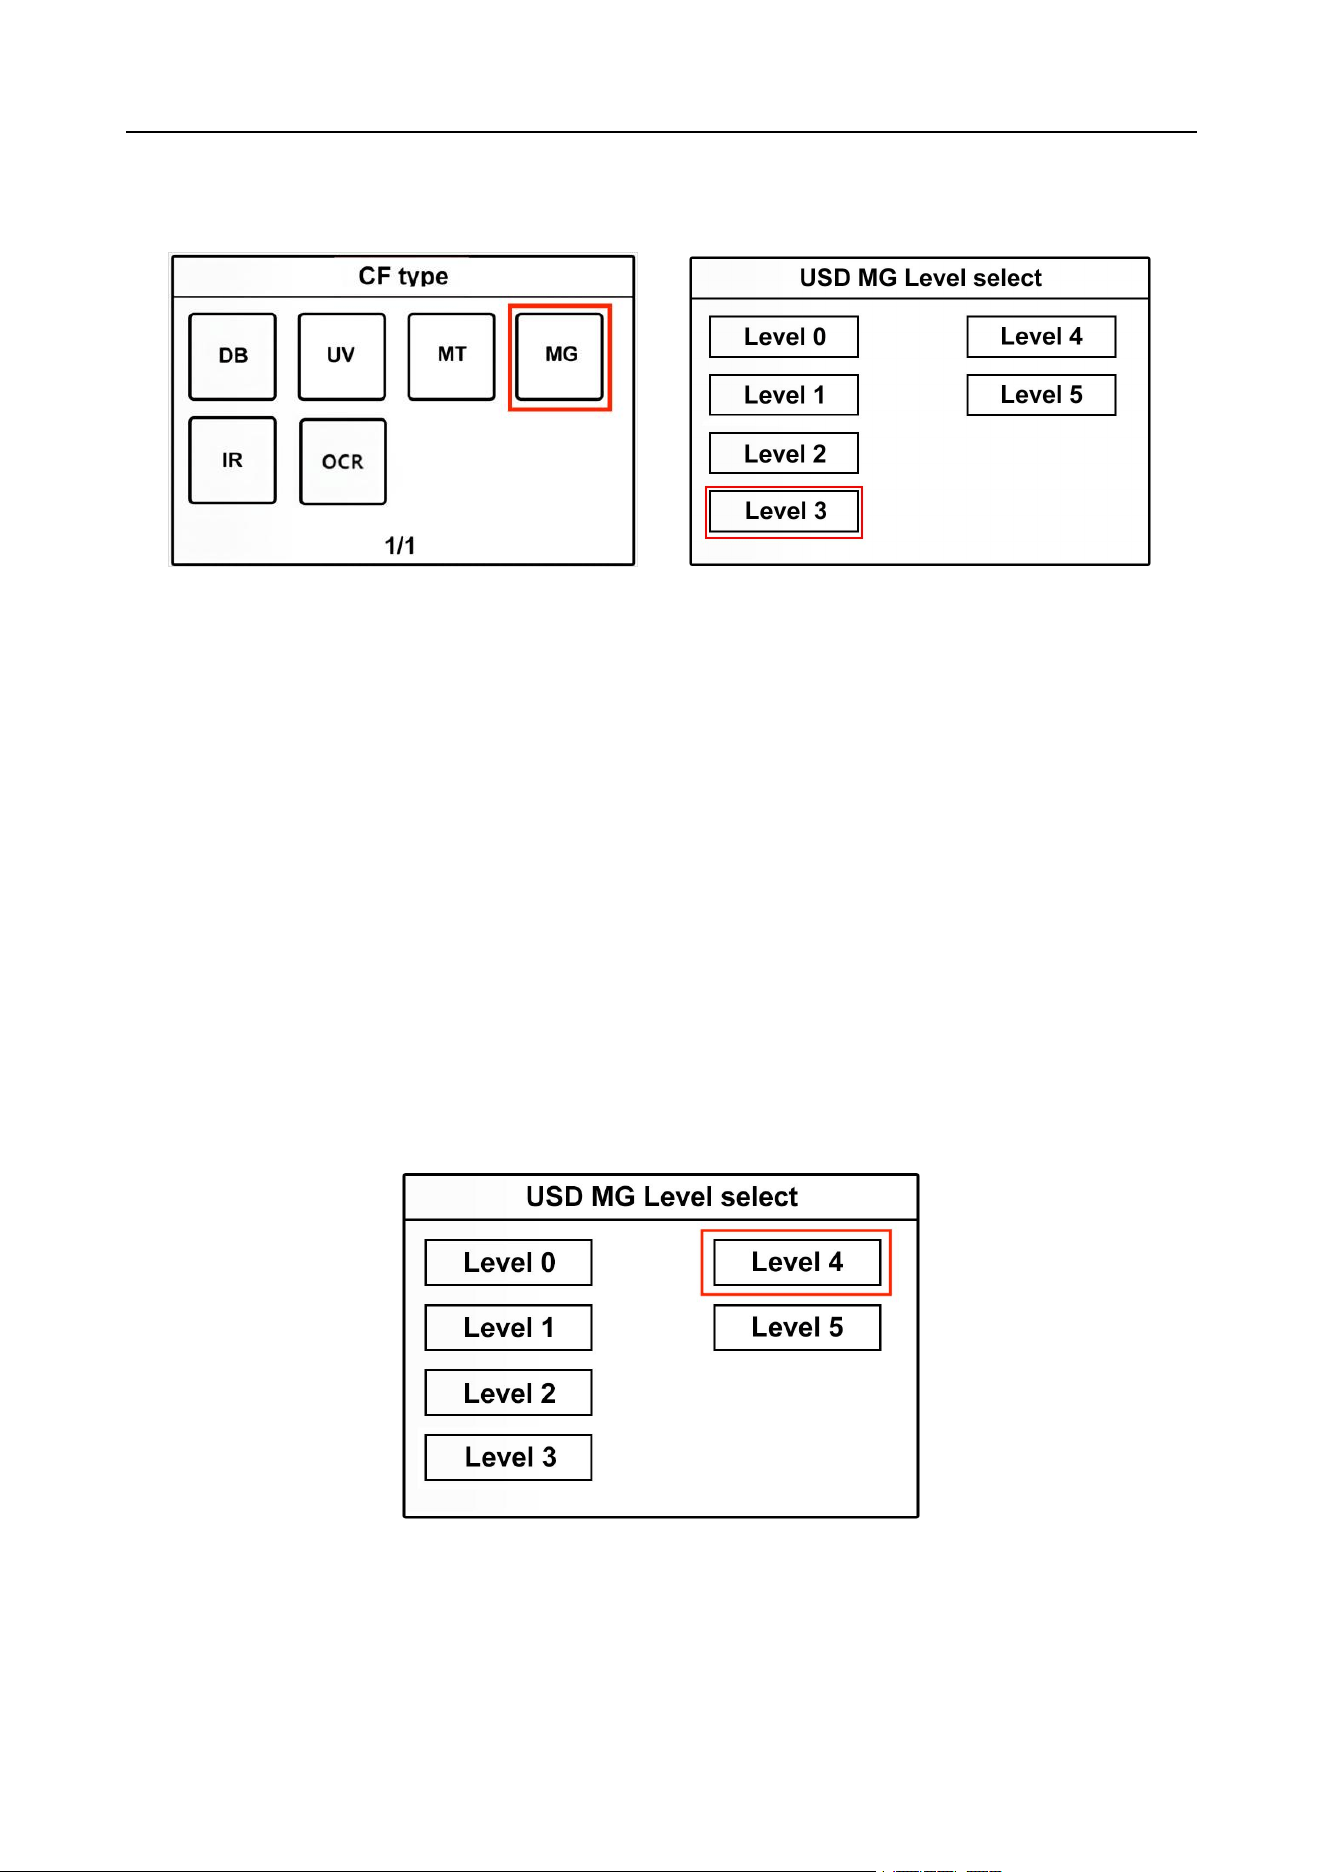
4)If the customer wishes to change the MG counterfeit detection level in the middle range, please do
the following:
VS-35 User Manual V1.1
27
a) We click on “MG” as shown in Figure 60 to enter the USD MG Level select interface. The default level
of the machine is “Level 3”, as shown in Figure 61:
Figure 60 Figure 61
b)Example: We want to improve the counterfeit detection level of "MG". We choose "Level 4", and each
counterfeit detection level has 6 gears, ranging from 0 to 5. 0 represents the ability to detect counterfeit
off, 1 represents the weakest ability to detect counterfeit, and 5 represents the strongest ability to detect
counterfeit. A low detection level enhances the smooth counting of genuine banknotes but at the same
time reduces the ability to catch counterfeit notes, while a high detection level enhances the ability to
catch counterfeit notes but at the same time may result in the error reports. Therefore, when the rate of
errors is high, you can lower the MG detection level, and when counterfeit notes cannot be caught, you
can increase the MG detection level. The customer can change the gear value according to the actual
demand, and the shadow will turn white when selecting which gear, as shown in Figure 62. After
selection, the machine can automatically save and return to the previous interface.
Figure 62
VS-35 User Manual V1.1
28
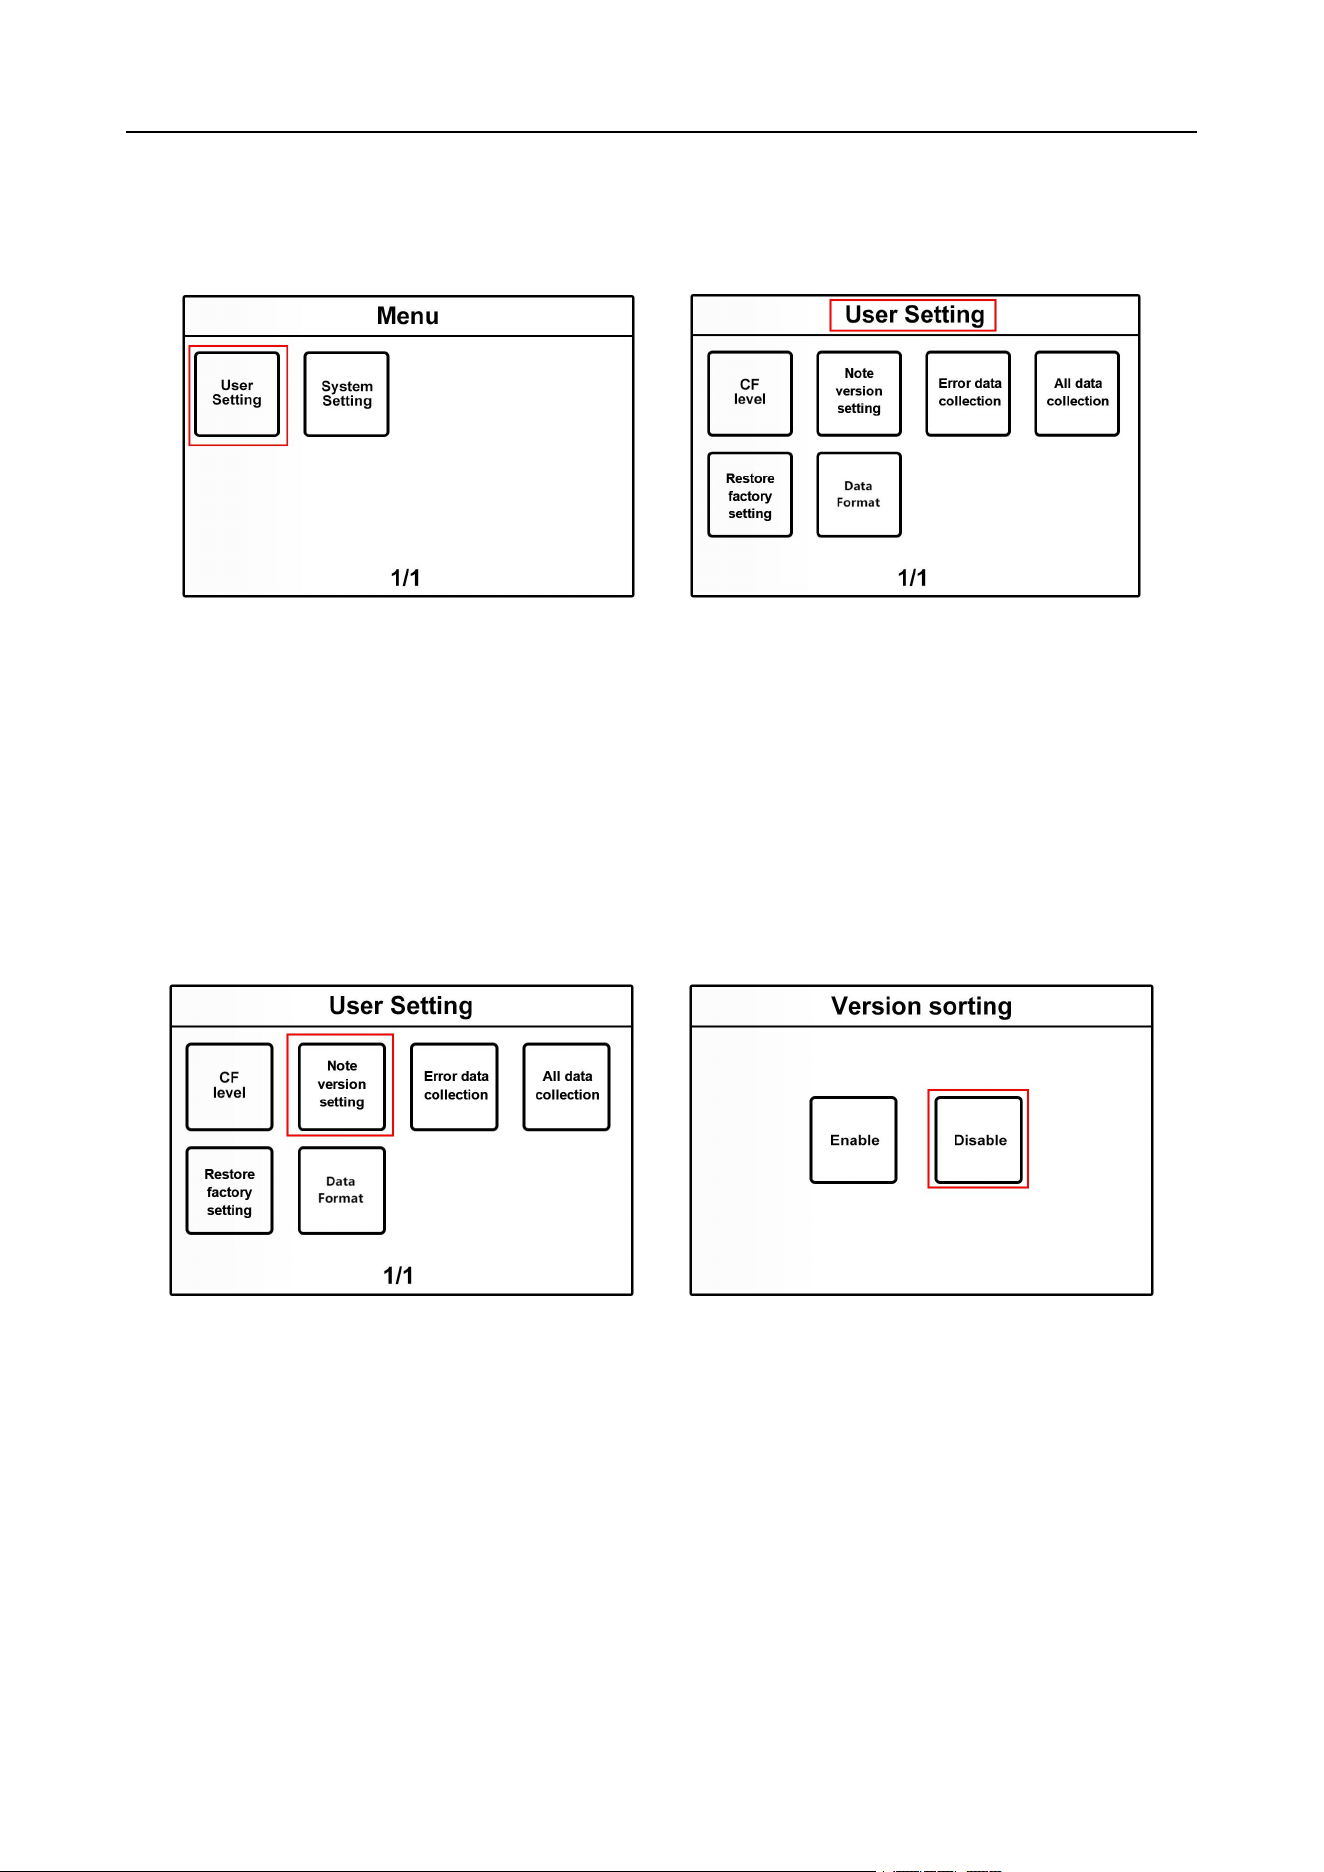
2.1.11.3 Version sorting function settings
1) Press the "Menu" key to enter the "Menu" interface. Then touch "User Setting", as shown in Figure 63.
Enter the "User Setting" interface, as shown in Figure 64.
Figure 63 Figure 64
2)Touch the second item "Note version setting" to enter the interface, as shown in Figure 65. Customers
can choose settings in this interface. Enable is turned on and disable is turned off. This function is only
valid in single count mode. In version sorting mode, the machine will kick different versions of banknotes
into the reject pocket and put the same version into the stacker. This function is turned off by default, as
shown in Figure 66. After selection, the shadow changes from grey to yellow, and the machine can
automatically save and return to the previous interface.
Figure 65 Figure 66
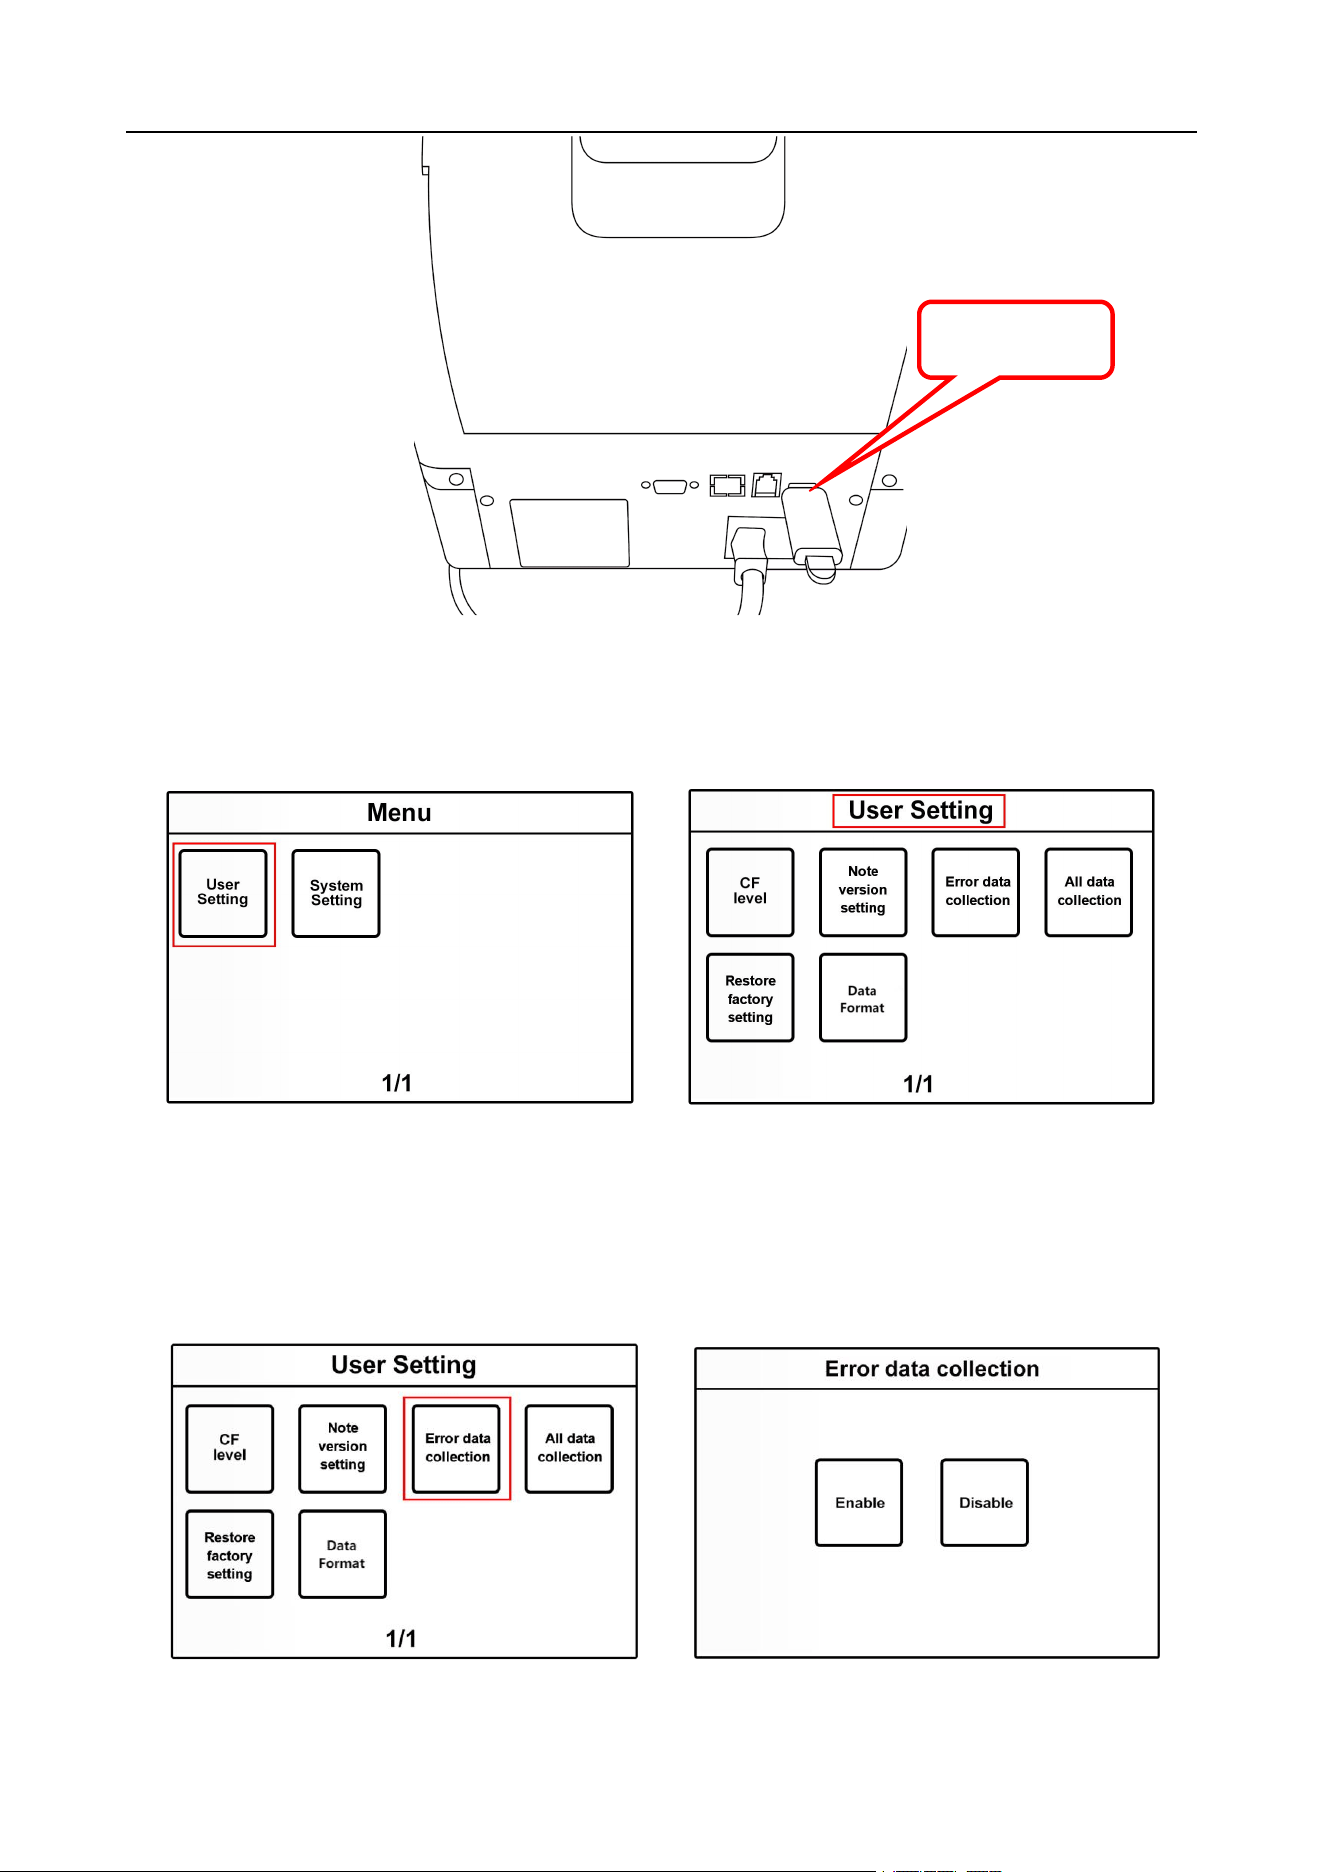
2.1.11.4 Error image collection settings
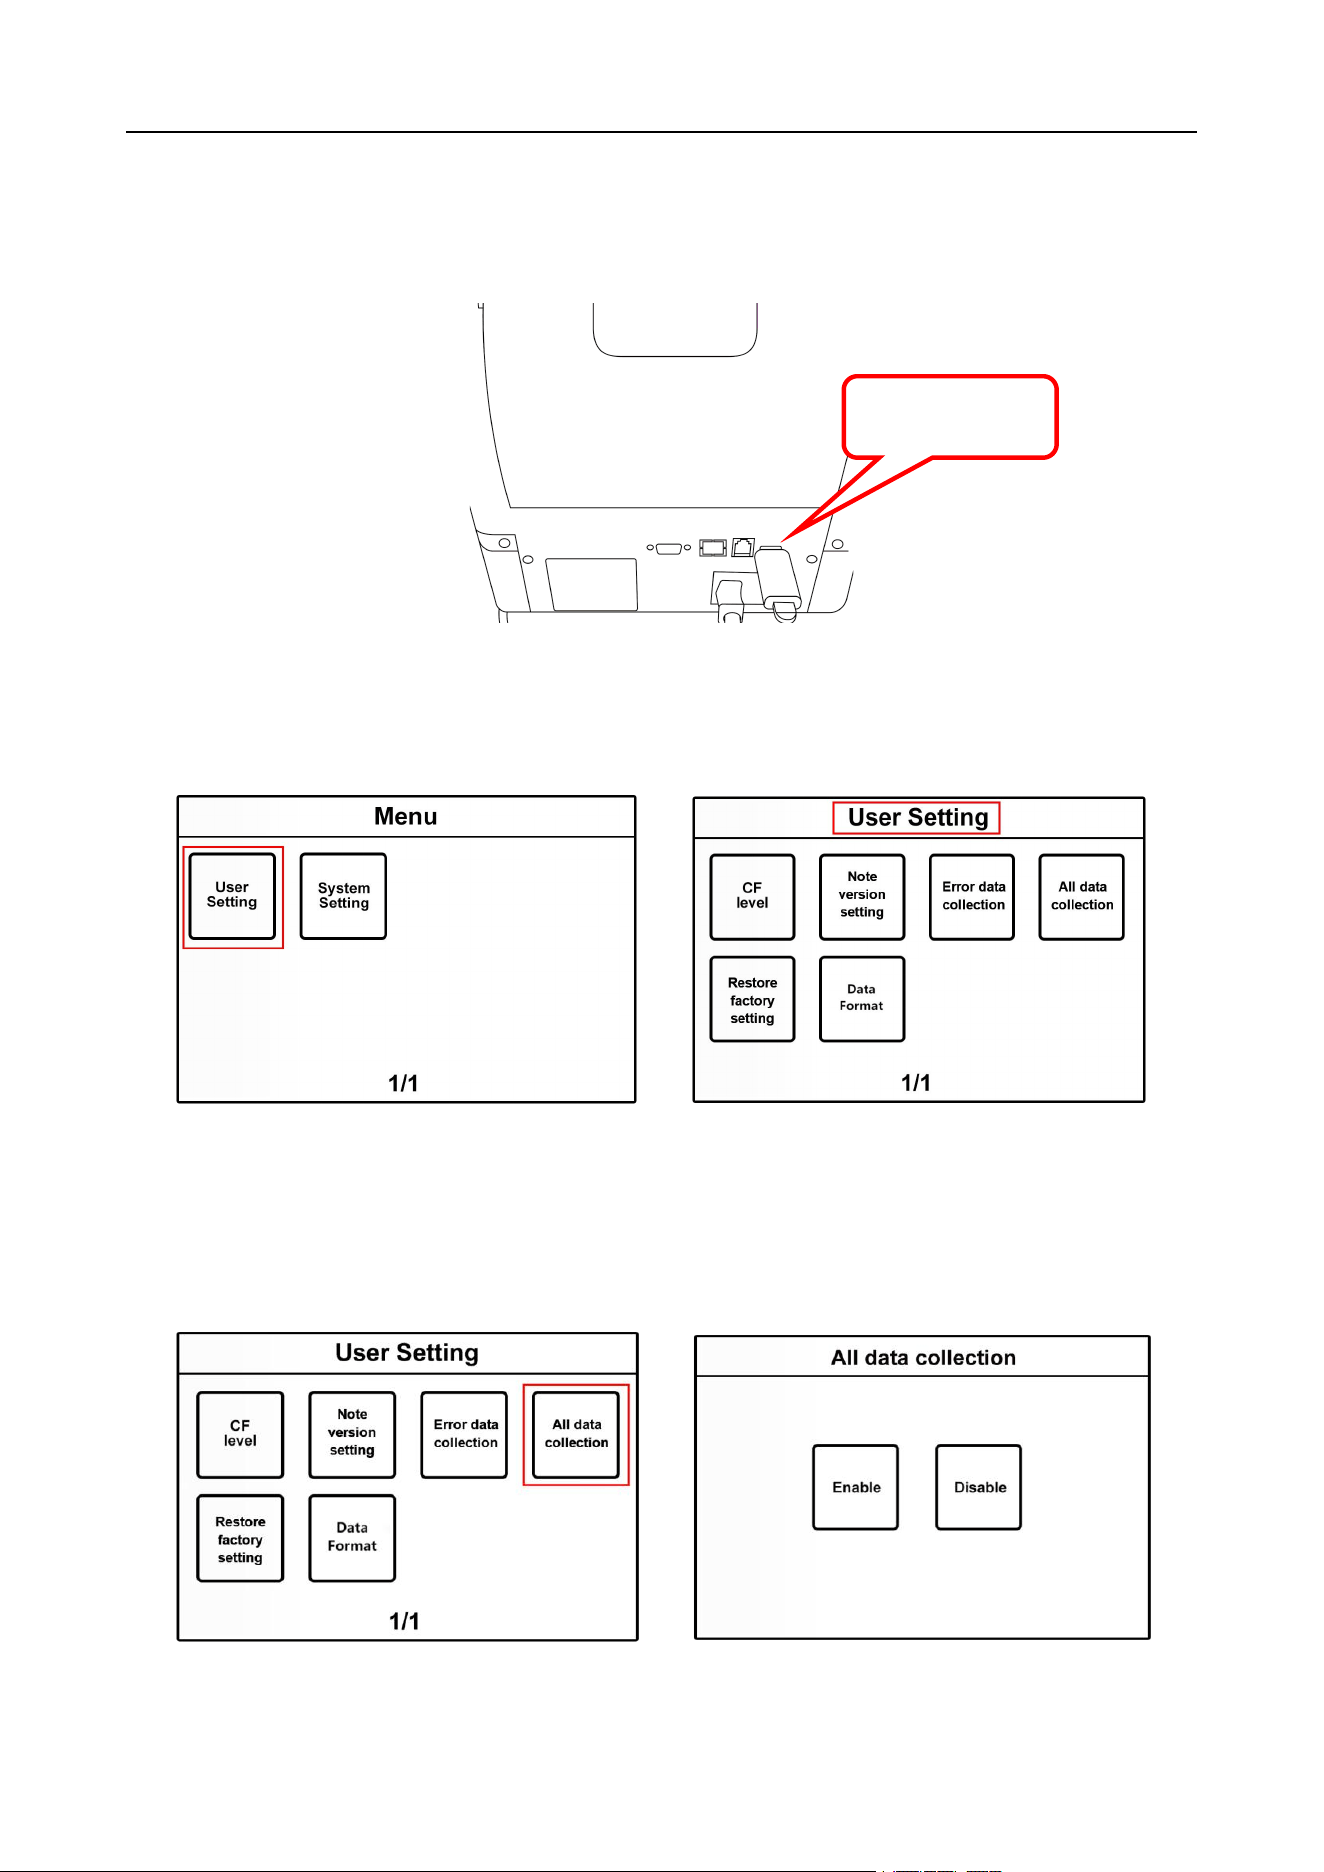
1) Plug the USB flash drive before collecting, as shown in Figure 67.
VS-35 User Manual V1.1
29
Figure 67
2) Press the "Menu" key to enter the "Menu" interface. Then click User Settings, as shown in Figure 68.
Enter the "User Settings" interface, as shown in Figure 69.
Figure 68 Figure 69
3)Click "Error data collection" to enter the interface. As shown in Figure 70, it is not collected by default.
Customers can choose to set Enable on or Disable off in this interface, as shown in Figure 71. After
selection, the shadow changes from gray to yellow.
Figure 70 Figure 71
USB interface
VS-35 User Manual V1.1
30
2.1.11.5 All Data Collection Settings
1) The USB disk should be inserted before collection, as shown in Fig. 72, and the machine should
display the connection status of USB disk.
Figure 72
2) Press the "Menu" key to enter the "Menu" interface. Then touch "User Setting", as shown in Figure 73.
Enter the "User Setting" interface, as shown in Figure 74.
Figure 73 Figure 74
3) Click "All data collection" to enter the interface. As shown in Figure 75, it is not collected by default.
Customers can choose to Enable or Disable, as shown in Figure 76. After selection, the shadow
changes from gray to yellow.
Figure 75 Figure 76
USB interface
VS-35 User Manual V1.1
31
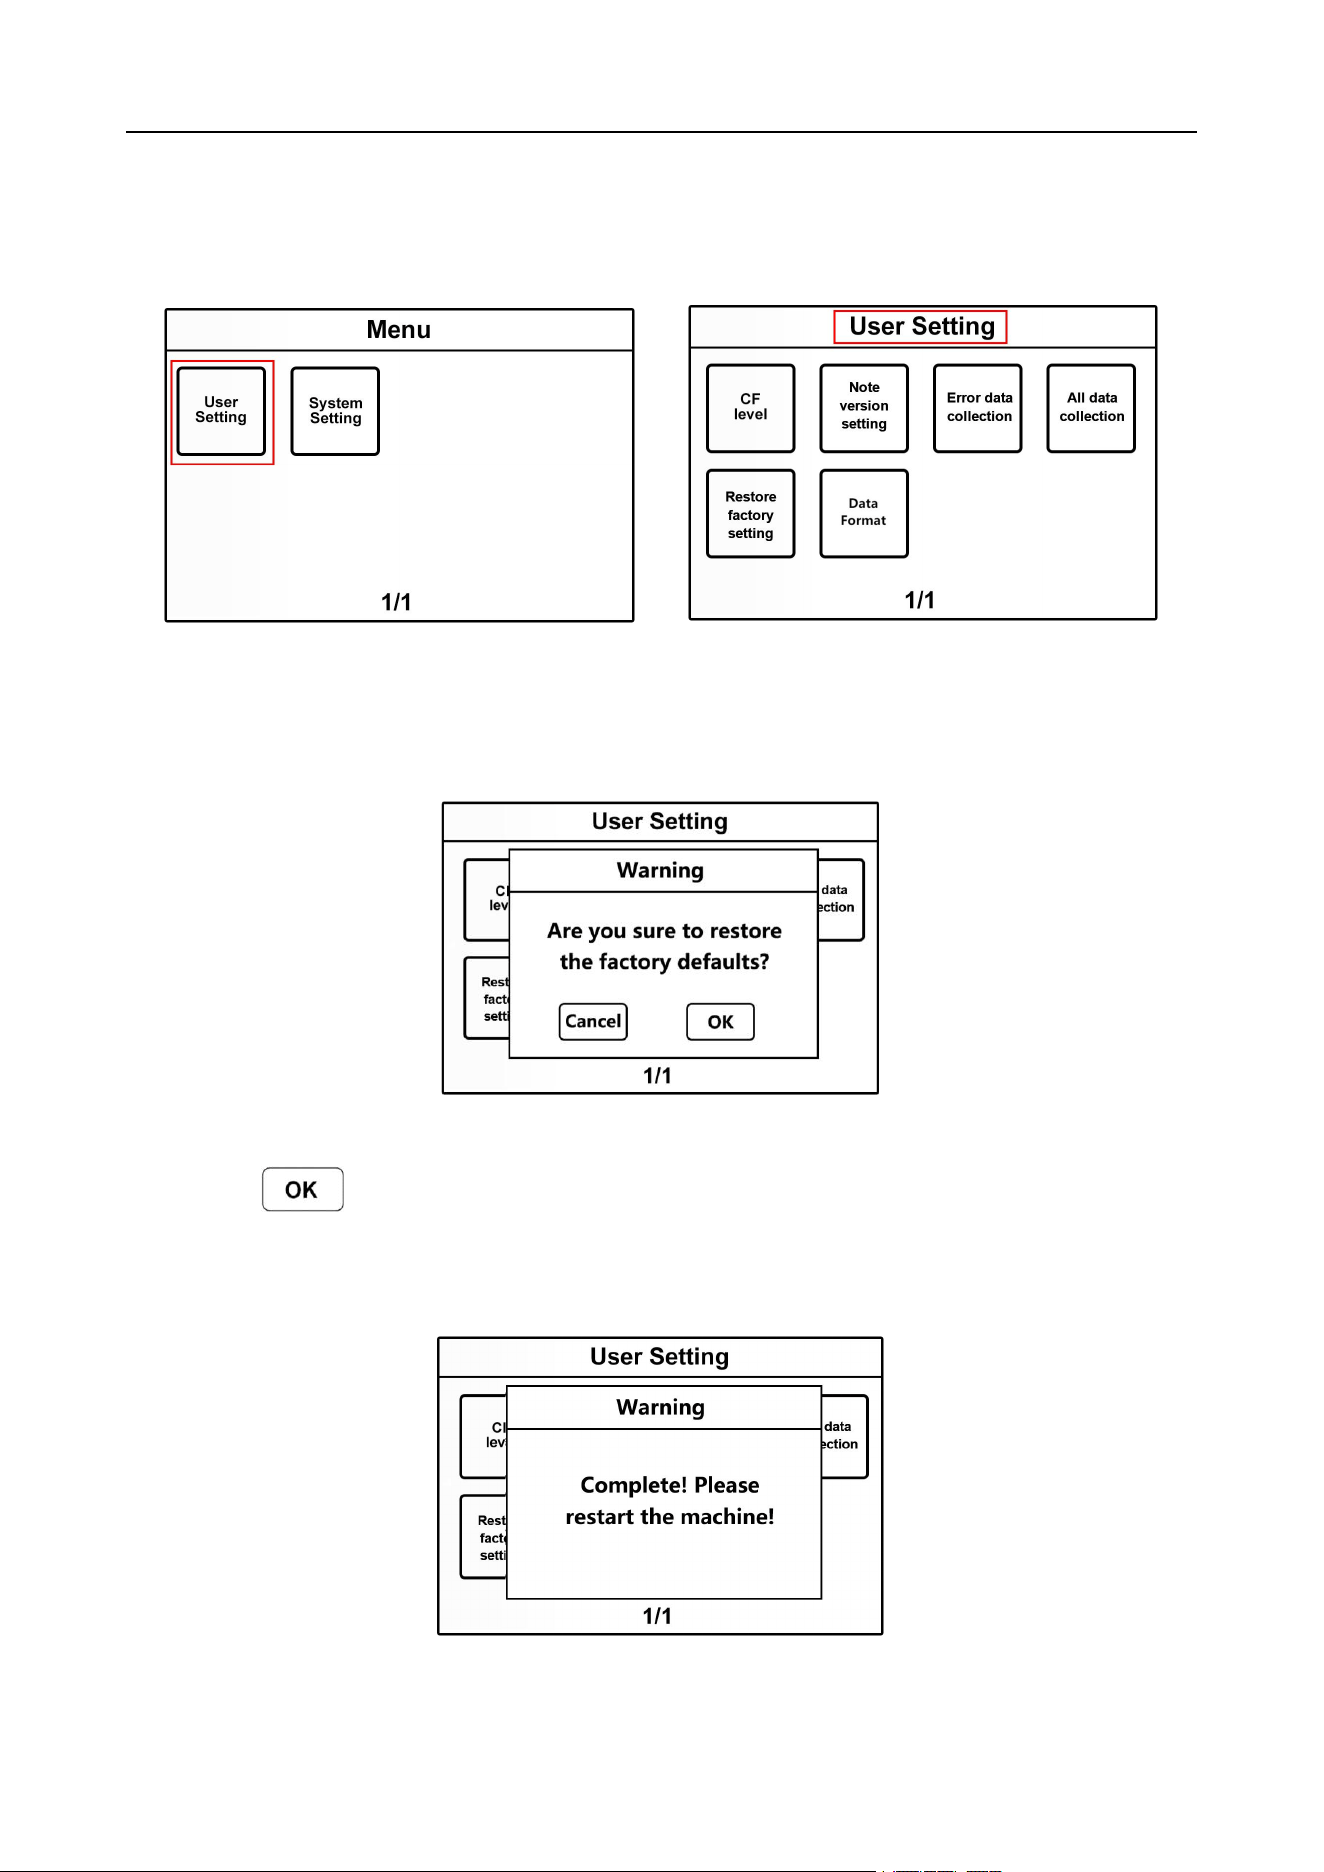
2.1.11.6 Restore factory settings
1) Press the "Menu" key to enter the "Menu" interface. Then touch "User Setting", as shown in Figure 77.
Enter the "User Setting" interface, as shown in Figure 78.
Figure 77 Figure 78
2) Touch the "Restore factory setting" key to enter the interface of restoring factory settings, as shown in
Figure 79 below:
Figure 79
3) Click the " " key to restore the factory settings, and restore all other settings except the initial
time and date settings to the initial state. Restart the machine after restoring factory settings, as shown in
Figure 80 below:
Figure 80
VS-35 User Manual V1.1
32
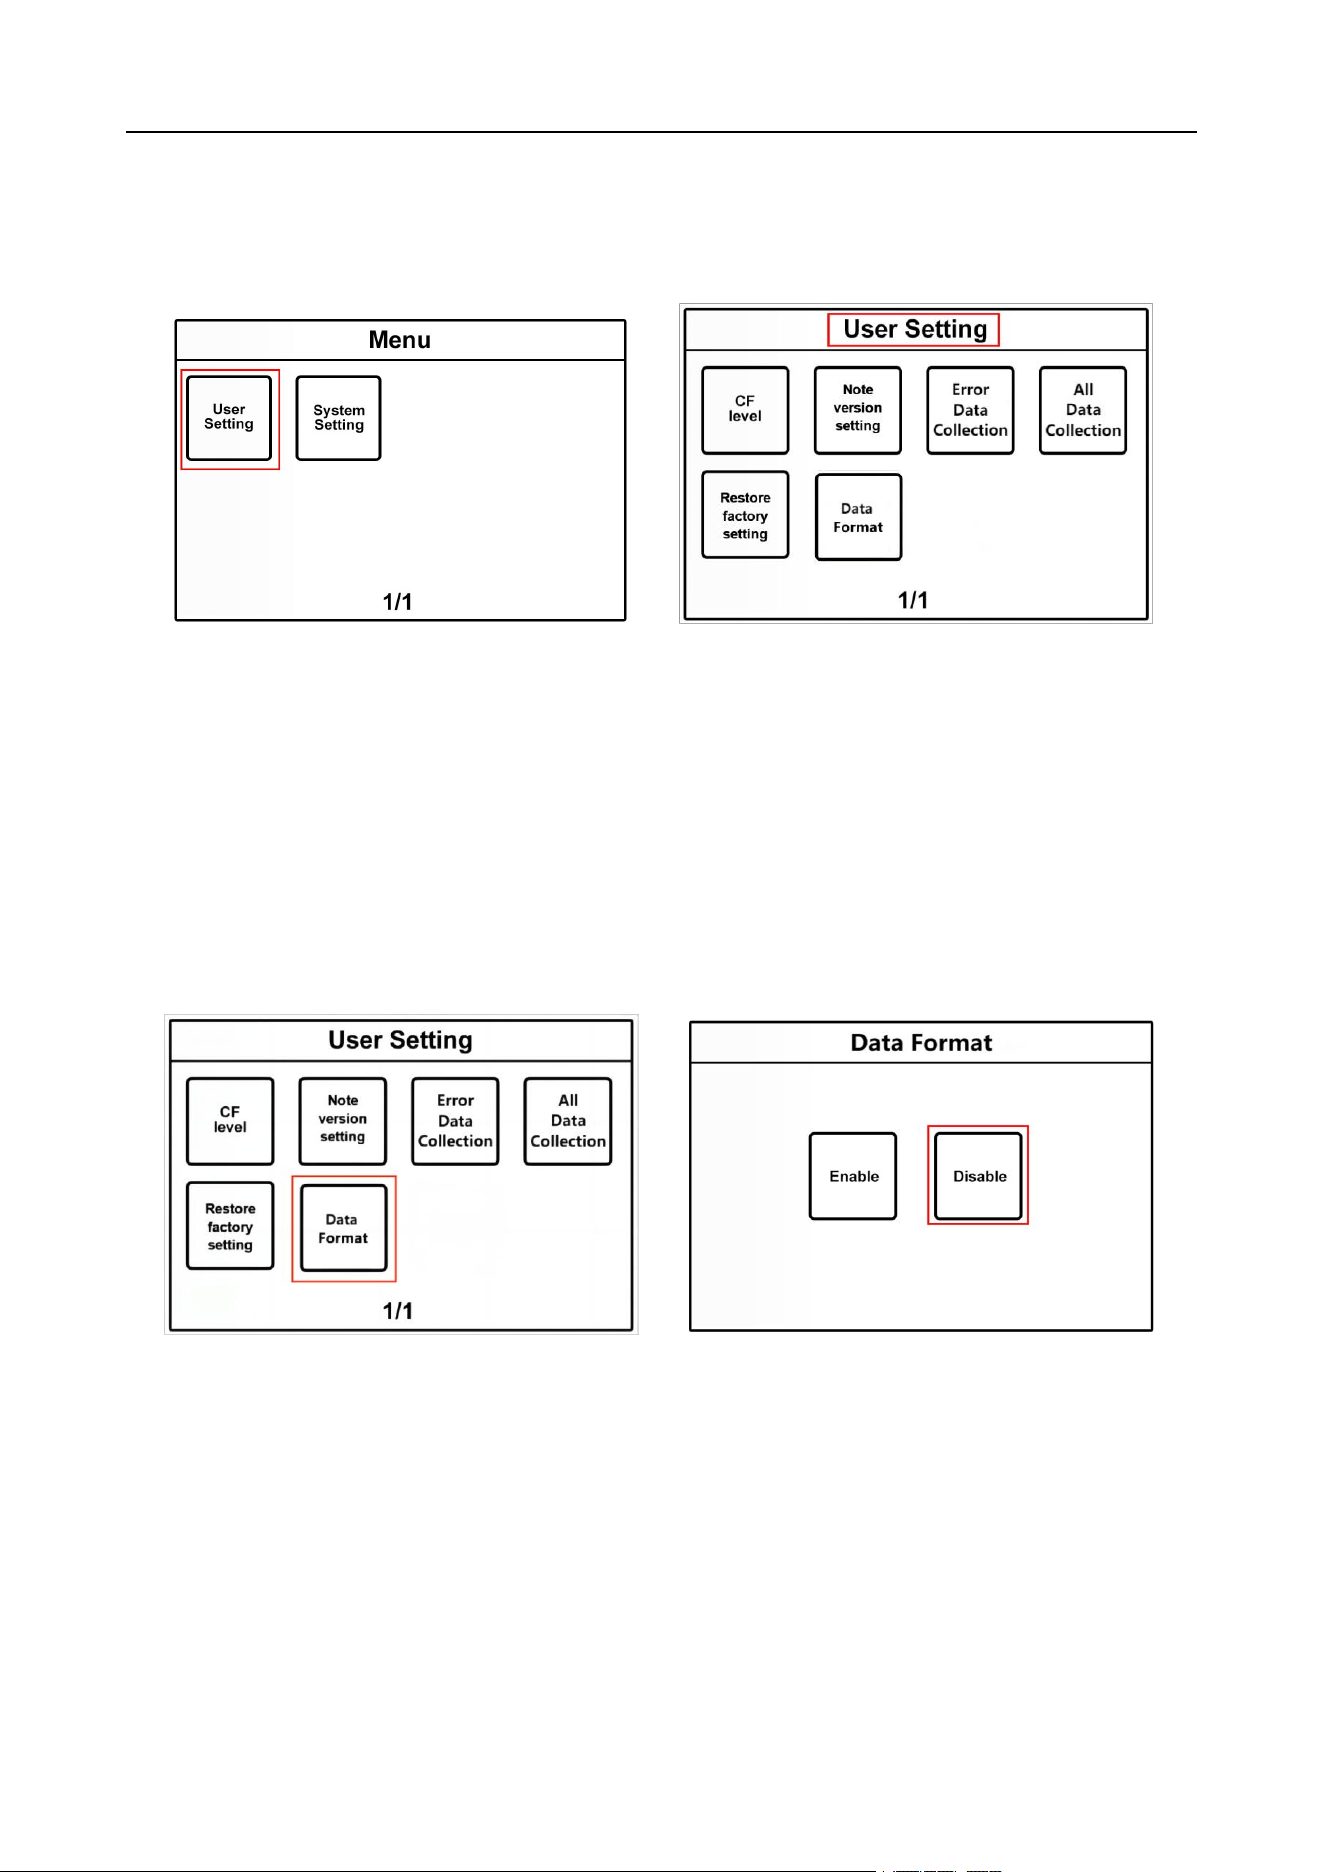
2.1.11.7 Data Format settings
1) Press the "Menu" key to enter the "Menu" interface. Then touch "User Setting", as shown in Figure 81.
Enter the "User Setting" interface, as shown in Figure 82.
Figure 81 Figure 82
2)Click the sixth item “Data Format” to enter the interface as shown in Figure 83. Customers can choose
settings in this interface. “Enable” means the semicolon function is turned on, and the count details in the
main interface will be displayed in the format including the semicolon symbol; “Disable” means the
semicolon function is turned off. By default, this function is off, as shown in Figure 84. After selection, the
shading changes from gray to yellow and the machine can automatically save and return to the previous
screen.
Figure 83 Figure 84
2.1.12 System setup
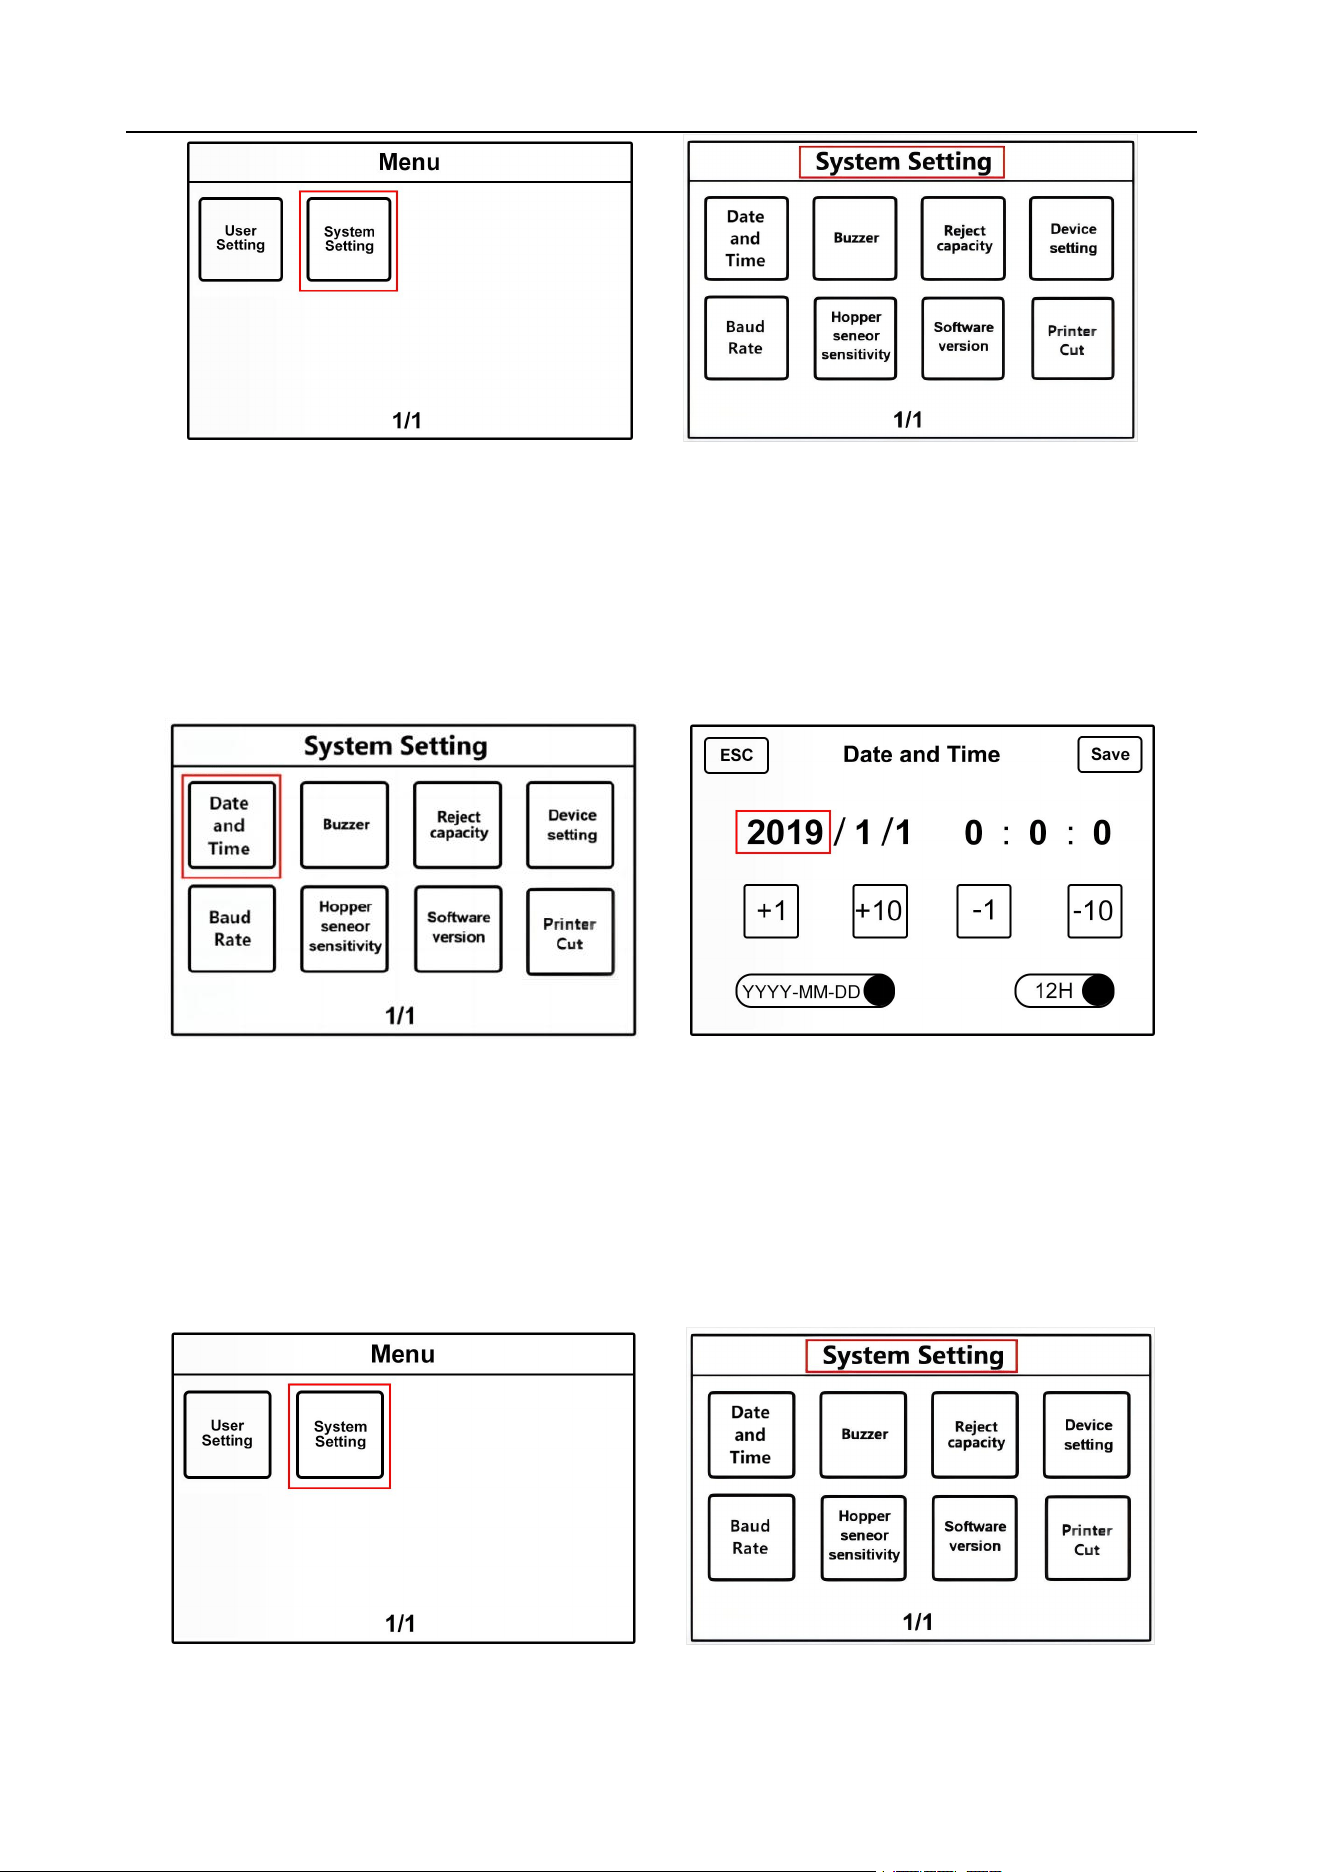
2.1.12.1 Time and date settings
1) Press the "Menu" key on the left to enter the "Menu" interface. Then touch "System Setting", as shown
in Figure 85. Enter the "System Setting" interface, as shown in Figure 86.
VS-35 User Manual V1.1
33
Figure 85 Figure 86
2) Touch the first item "Date and Time" to enter the interface, as shown in Figure 87 below. Touch the
values of time and date, and the font shading will turn white. At this time, customers can modify the time
and date according to their own needs. Please press the "Save" key on the right to save after
modification,as shown in Figure 88 below.
Figure 87 Figure 88
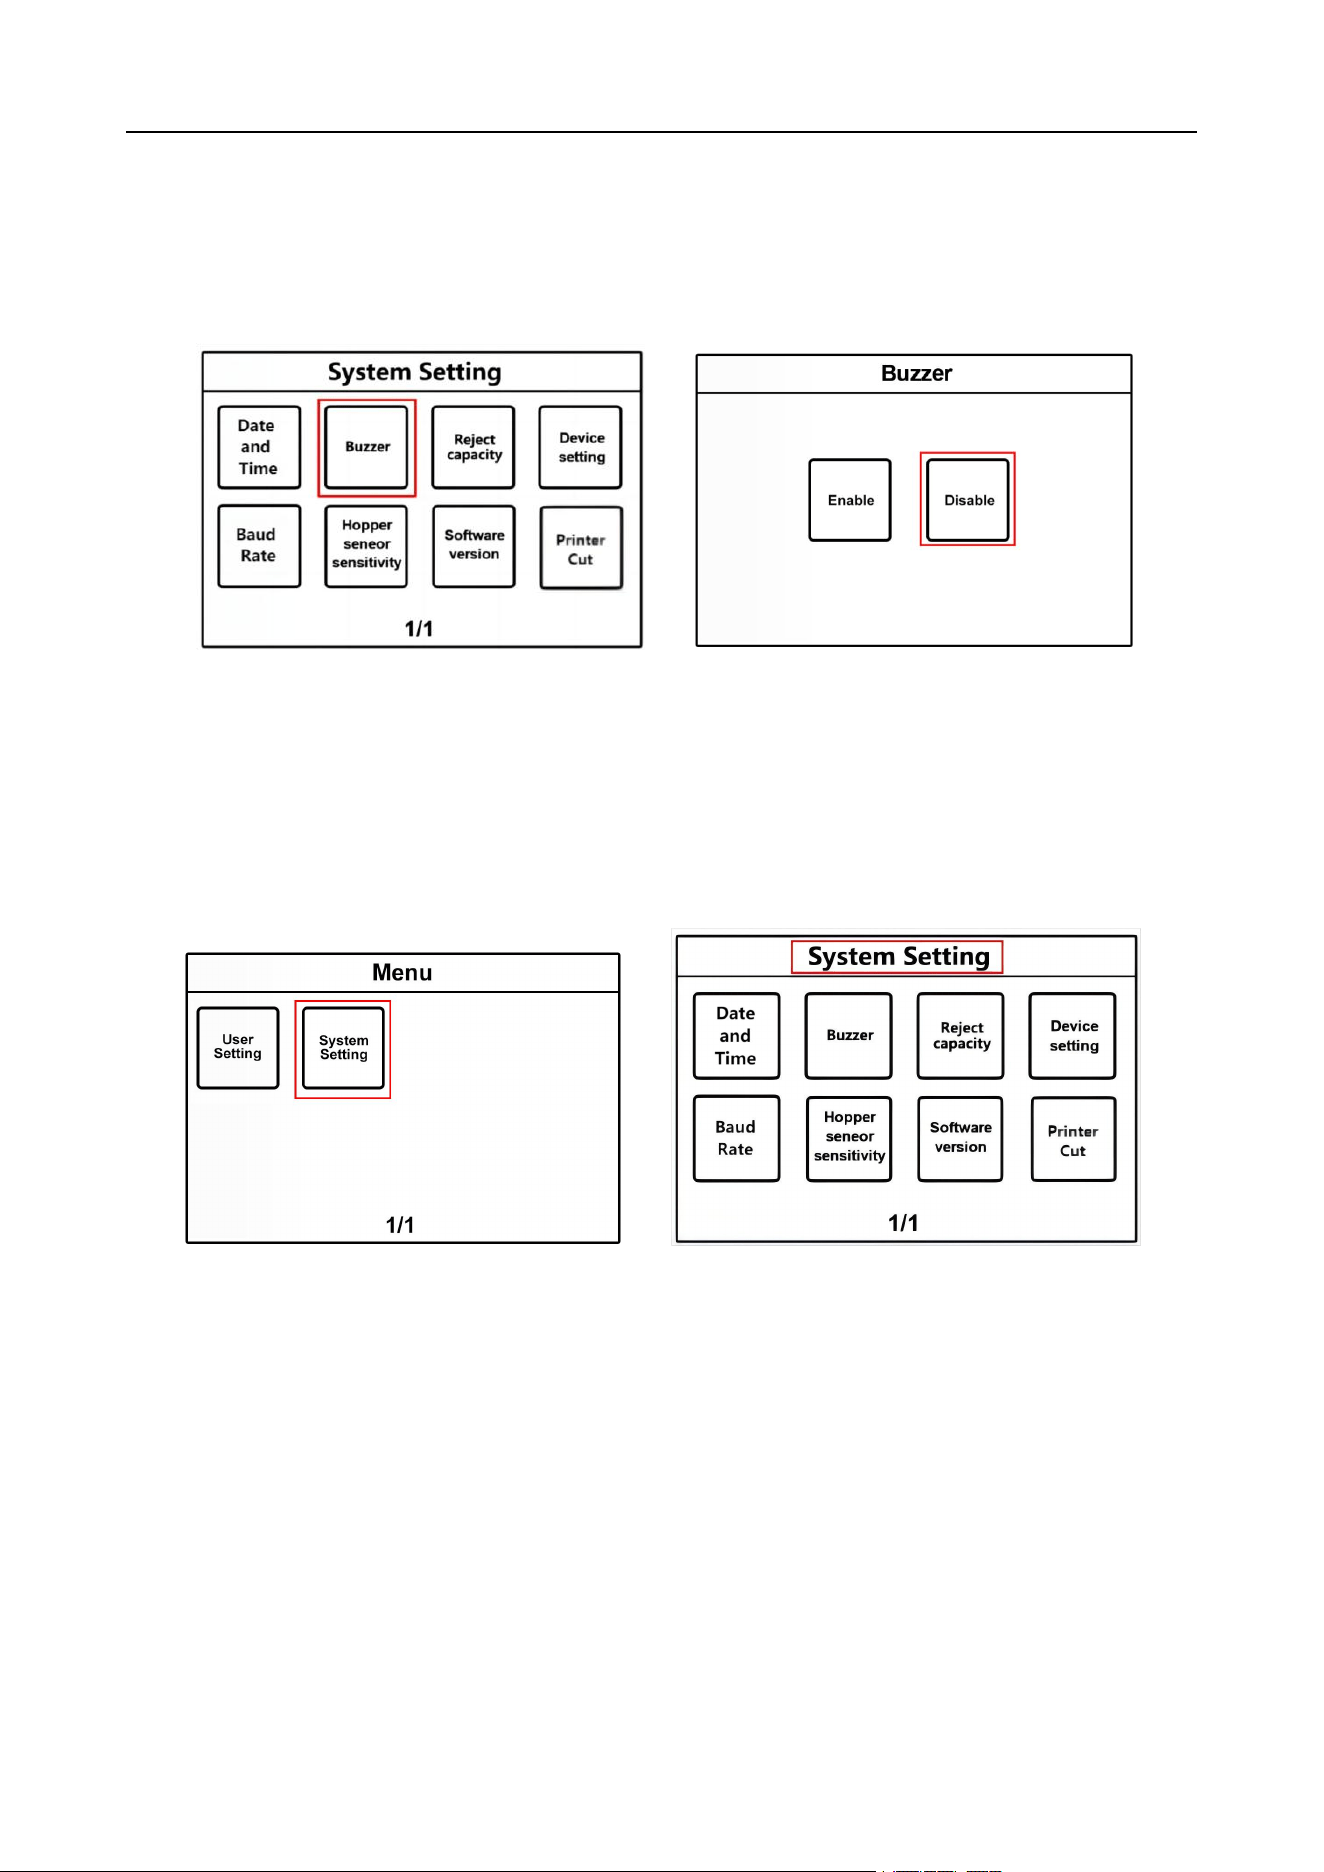
2.1.12.2 Buzzer Settings
1) Press the "Menu" key on the left to enter the "Menu" interface. Then touch "System Setting", as shown
in Figure 89. Enter the "System Setting" interface, as shown in Figure 90.
Figure 89 Figure 90
VS-35 User Manual V1.1
34
2) Touch the second item "Buzzer" to enter the Buzzer setting interface, as shown in Figure 91 below.
Customers can choose settings in this interface, Enable or Disable. The machine is turned off by default.
Figure 92. After selection, the shadow changes from gray to yellow, and the machine can automatically
save and return to the previous interface.
Figure 91 Figure 92
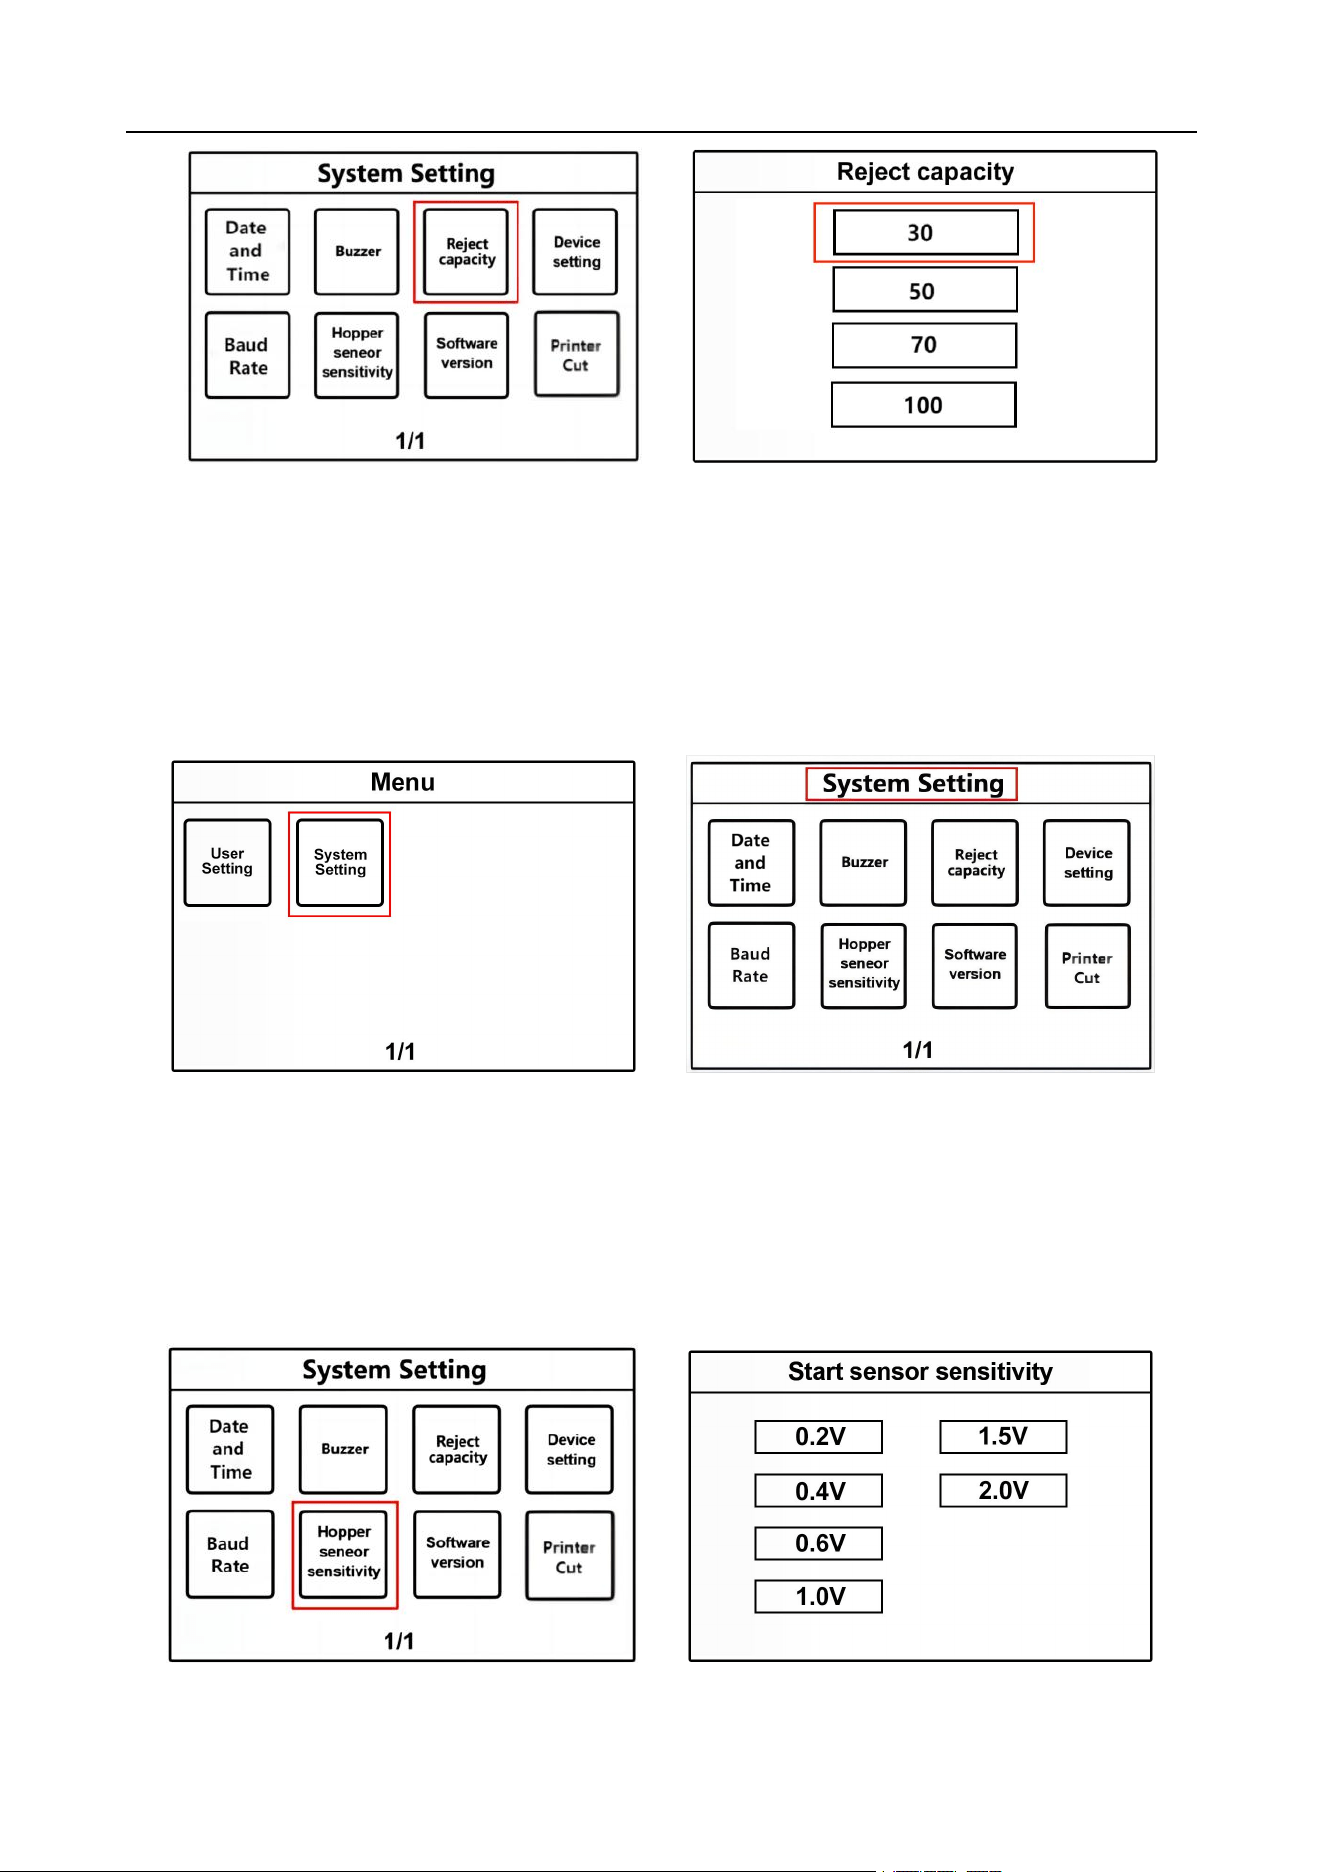
2.1.12.3 Setting of banknote rejection capacity
1) Press the "Menu" key on the left to enter the "Menu" interface. Then touch "System Setting", as shown
in Figure 93. Enter the "System Setting" interface, as shown in Figure94.
Figure 93 Figure 94
2) As shown in Figure 95, touch "Reject capacity" to enter the banknote rejection capacity setting
interface, and the default is 30. Figure 96 below shows. The capacity has three values of 30/50/70/100.
Customers can choose according to their needs. The shadow of the corresponding value will turn white,
and the machine will automatically keep it and return to the previous interface.
VS-35 User Manual V1.1
35
Figure 95 Figure 96
2.1.12.4 QT Start Sensor Sensitivity Setting
1) Press the "Menu" key on the left to enter the "Menu" interface. Then touch "System Setting", as shown
in Figure 97. Enter the "System Setting" interface, as shown in Figure 98.
Figure 97 Figure 98
2) As shown in Figure 99, touch "Hopper seneor sensitivity" to enter the setup interface. There are six
gears, and the default is 0.2 V, as shown in Figure 100. Customers can choose according to their needs,
and the shadow of the corresponding gear will turn white, and the machine can automatically save and
return to the previous interface.
Figure 99 Figure 100
VS-35 User Manual V1.1
36
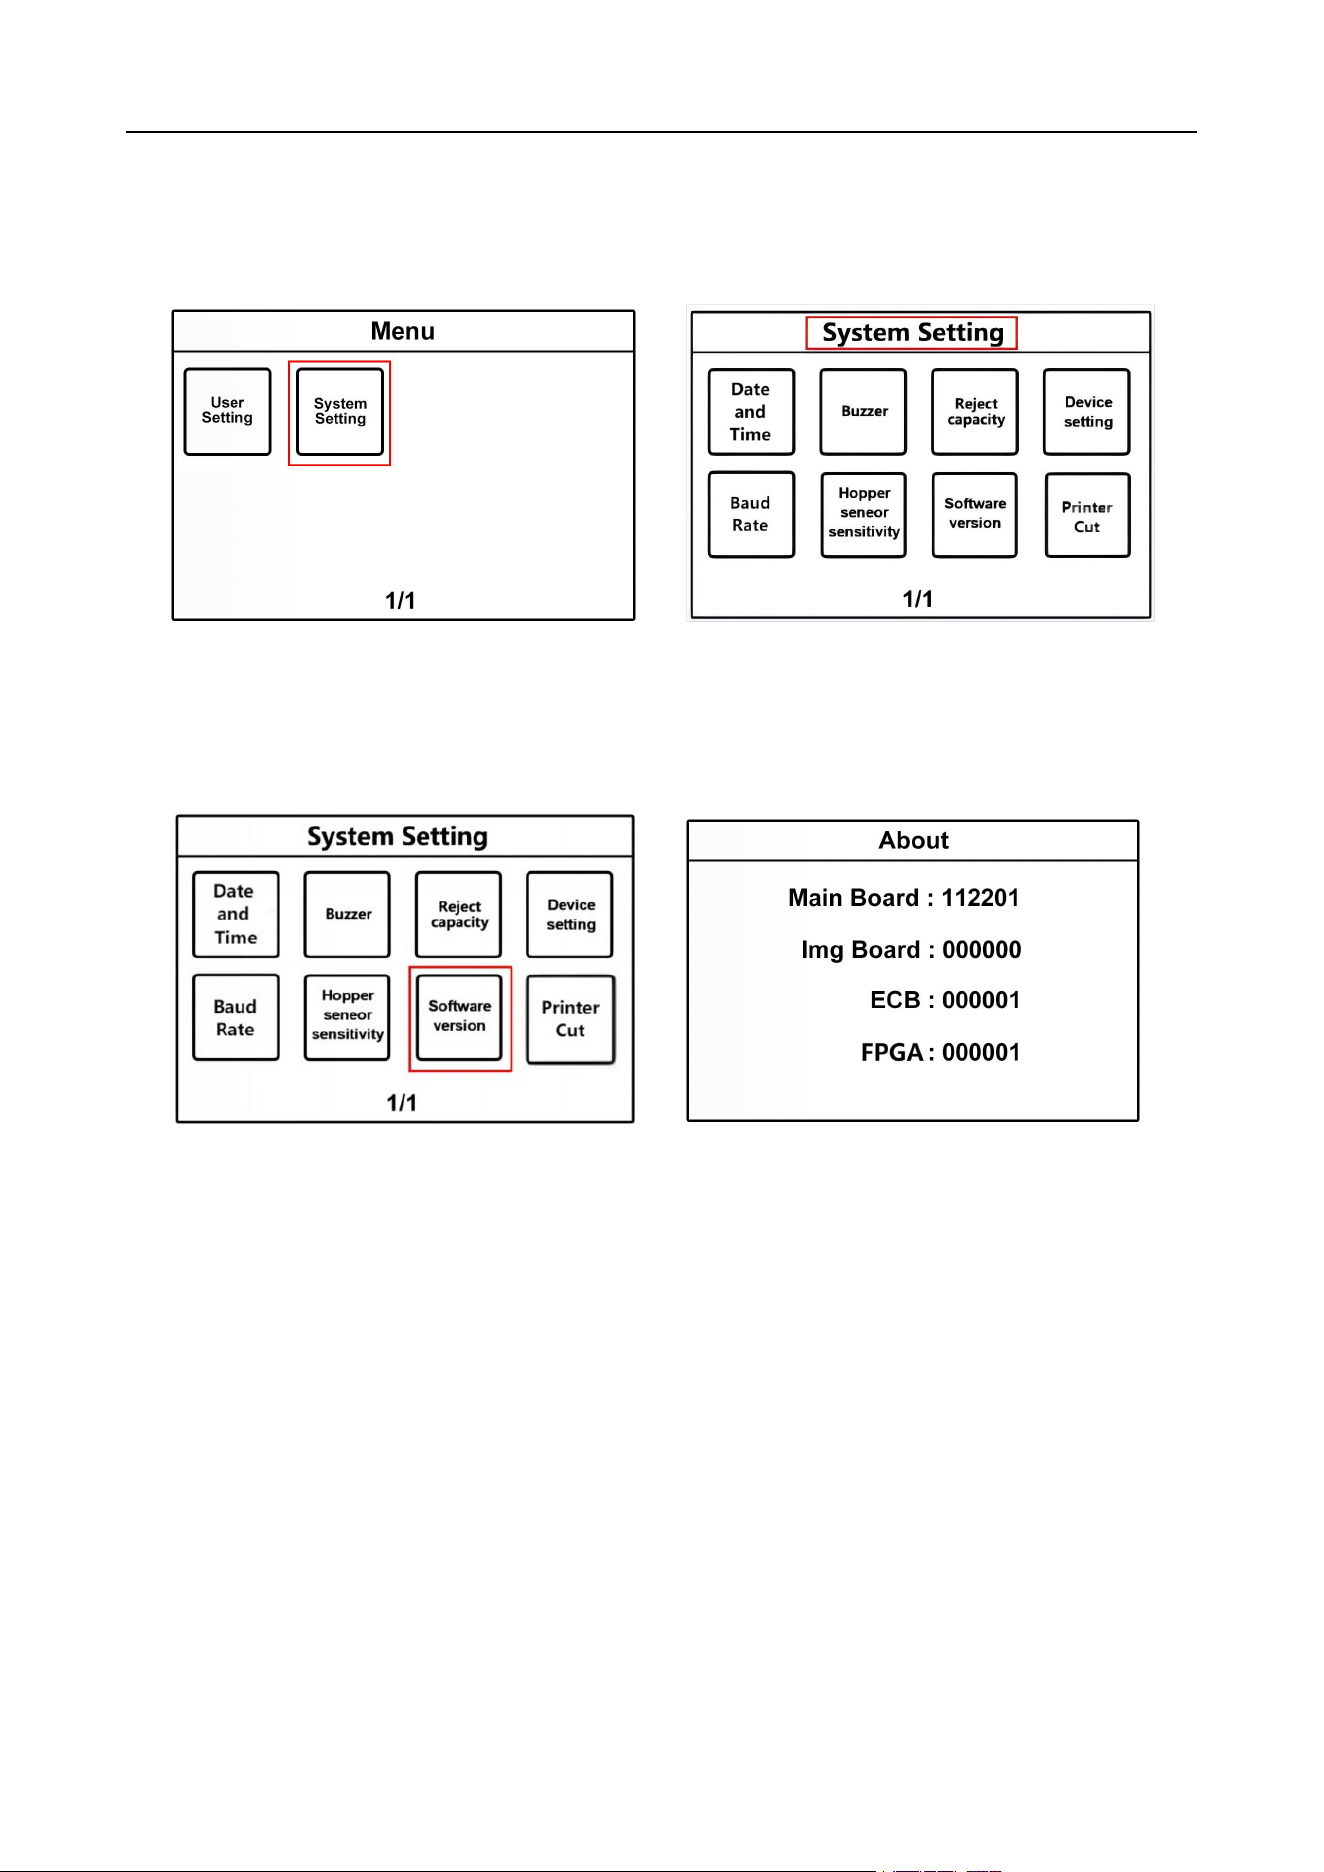
2.1.12.5 Software version view
1) Press the "Menu" key on the left to enter the "Menu" interface. Then touch "System Setting", as shown
in Figure 101. Enter the "System Setting" interface, as shown in Figure 102.
Figure 101 Figure 102
2) As shown in Figure 103, touch "Software version" to enter the interface. Customers can view various
software versions through this interface, as shown in Figure 104.
Figure103 Figure 104
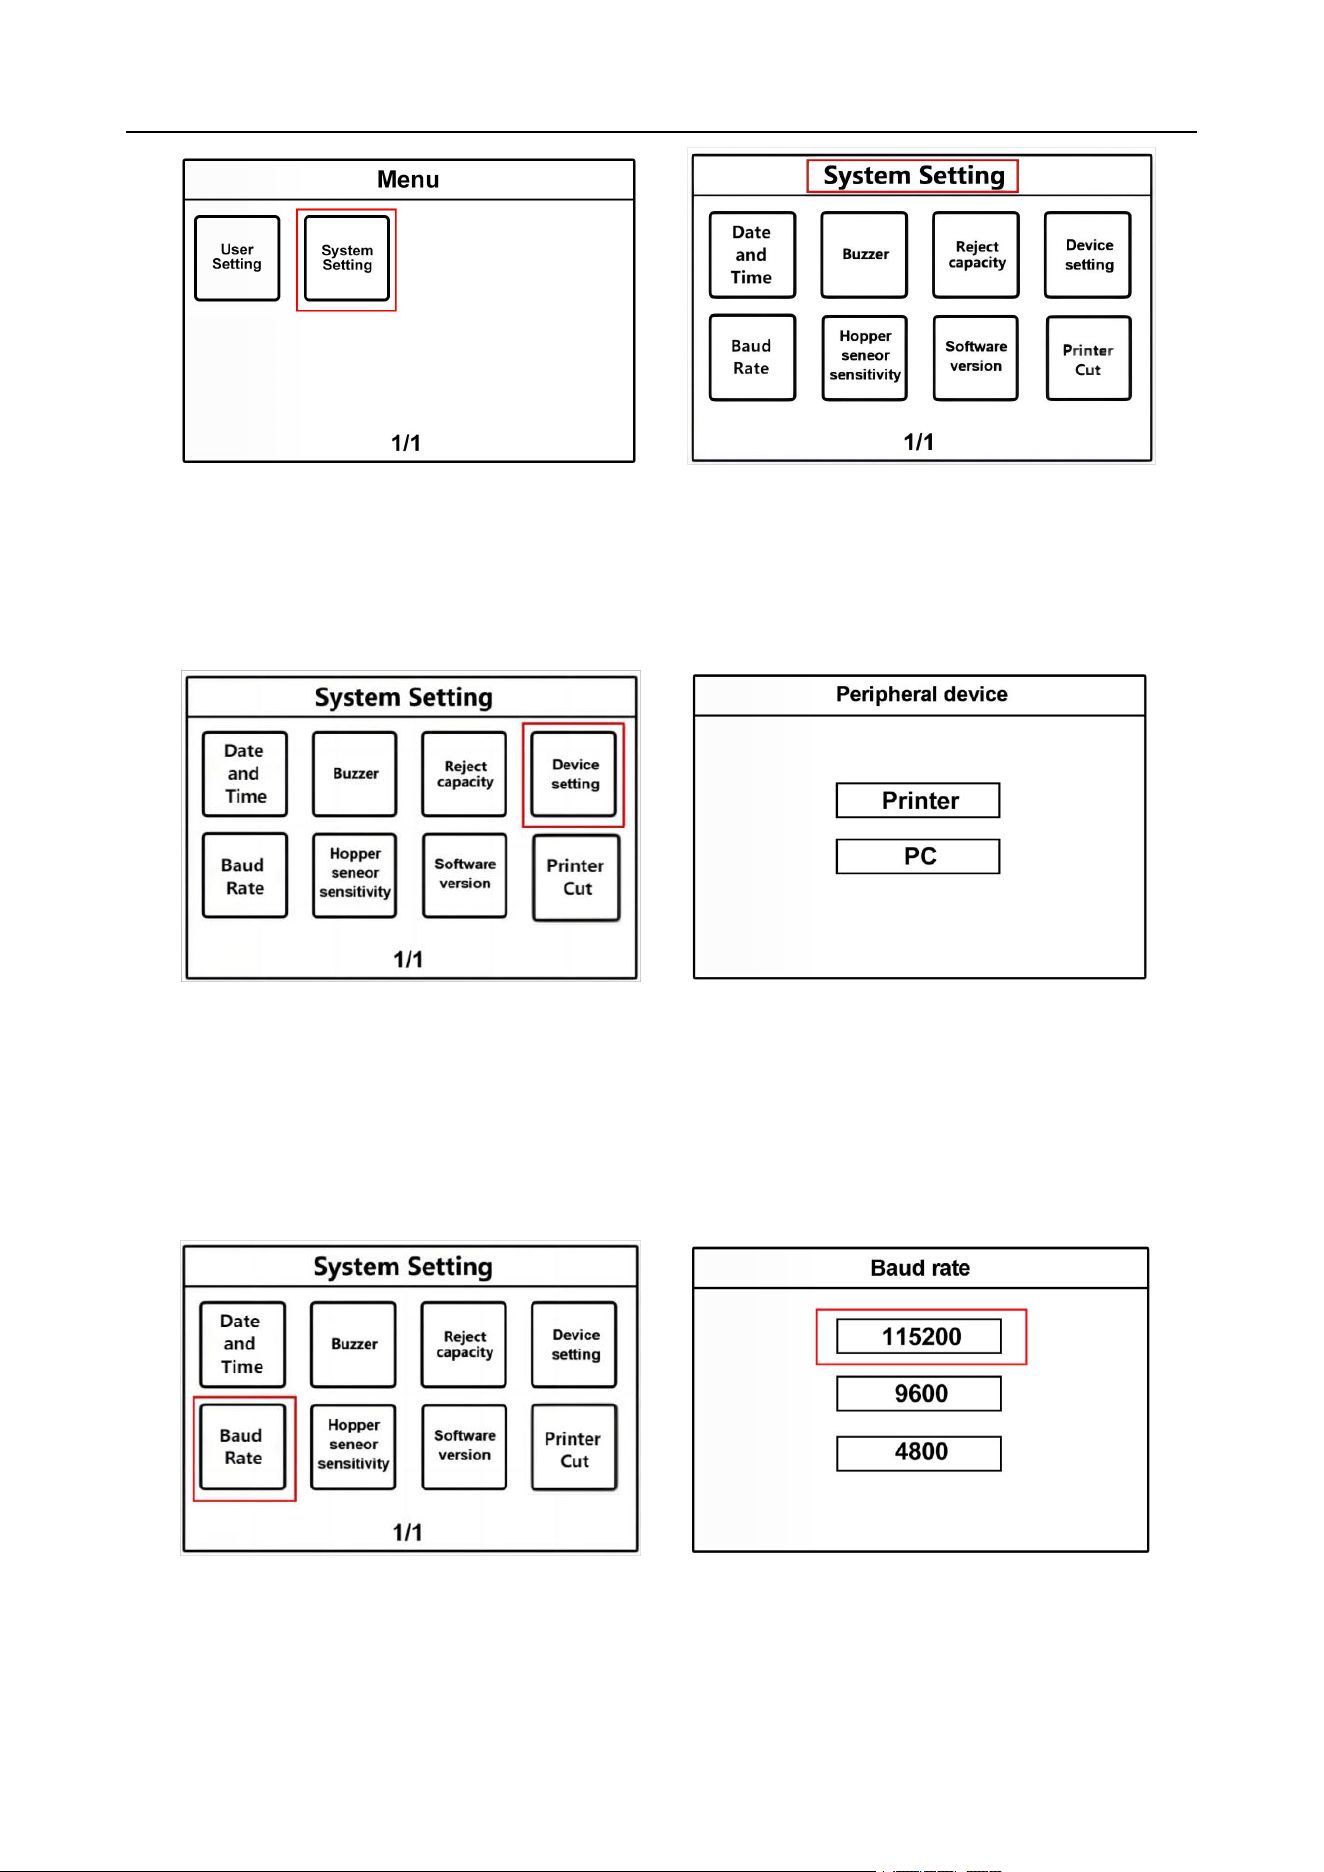
2.2 Printer Connection Settings
2.2.1 Machine baud rate setting
1) If you have purchased a serial thermal printer. Please confirm the corresponding baud rate according
to the printer instructions.
2) Press the "Menu" key on the left to enter the "Menu" interface. Then touch "System Setting", as shown
in Figure 105. Enter the "System Setting" interface, as shown in Figure 106
VS-35 User Manual V1.1
37
Figure 105 Figure 106
3) As shown in Figure 107, touch "Device setting" to enter the interface. You can choose printer and PC,
and the corresponding serial port shadow will turn white, as shown in Figure 108. We choose printer.
After selection, the machine will automatically save and return to the previous interface.
Figure 107 Figure 108
4) As shown in Figure 109, in the "System Settings" interface, touch "Baud Rate" to enter the interface.
Customers can set the baud rate in this interface, select the corresponding baud rate value shadow will
turn white, the machine can automatically save and return to the previous interface. The machine's
factory default baud rate is "115200" as shown in Figure 110 below.
Figure 109 Figure 110
5) Connect the printer to the power supply, connect one end of the data line in the printer box to the
printer, and connect the other end to the RS232 interface of the machine.

VS-35 User Manual V1.1
38
6) After the external printer is connected and can be printed, press the "LIST" key to enter the LIST
viewing interface, and then press the "PRINT" key, or it can be printed directly on the main interface, and
the printer will PRINT the banknote counting details. The printed format is shown in Figure 111 below.
Figure 111
7) If you encounter other problems, please contact us and we will provide the perfect solution.
3. Maintenance instructions
3.1 Software Upgrade
3.1.1 U disk preparation
1) The software upgrade of this product adopts the U-disk upgrade method.
2) Please plug the U-disk into your PC first, and create a new folder named "GIN" at the bottom of the
root directory of the U-disk, as shown in Figure 112 below.
Figure 112
VS-35 User Manual V1.1
39
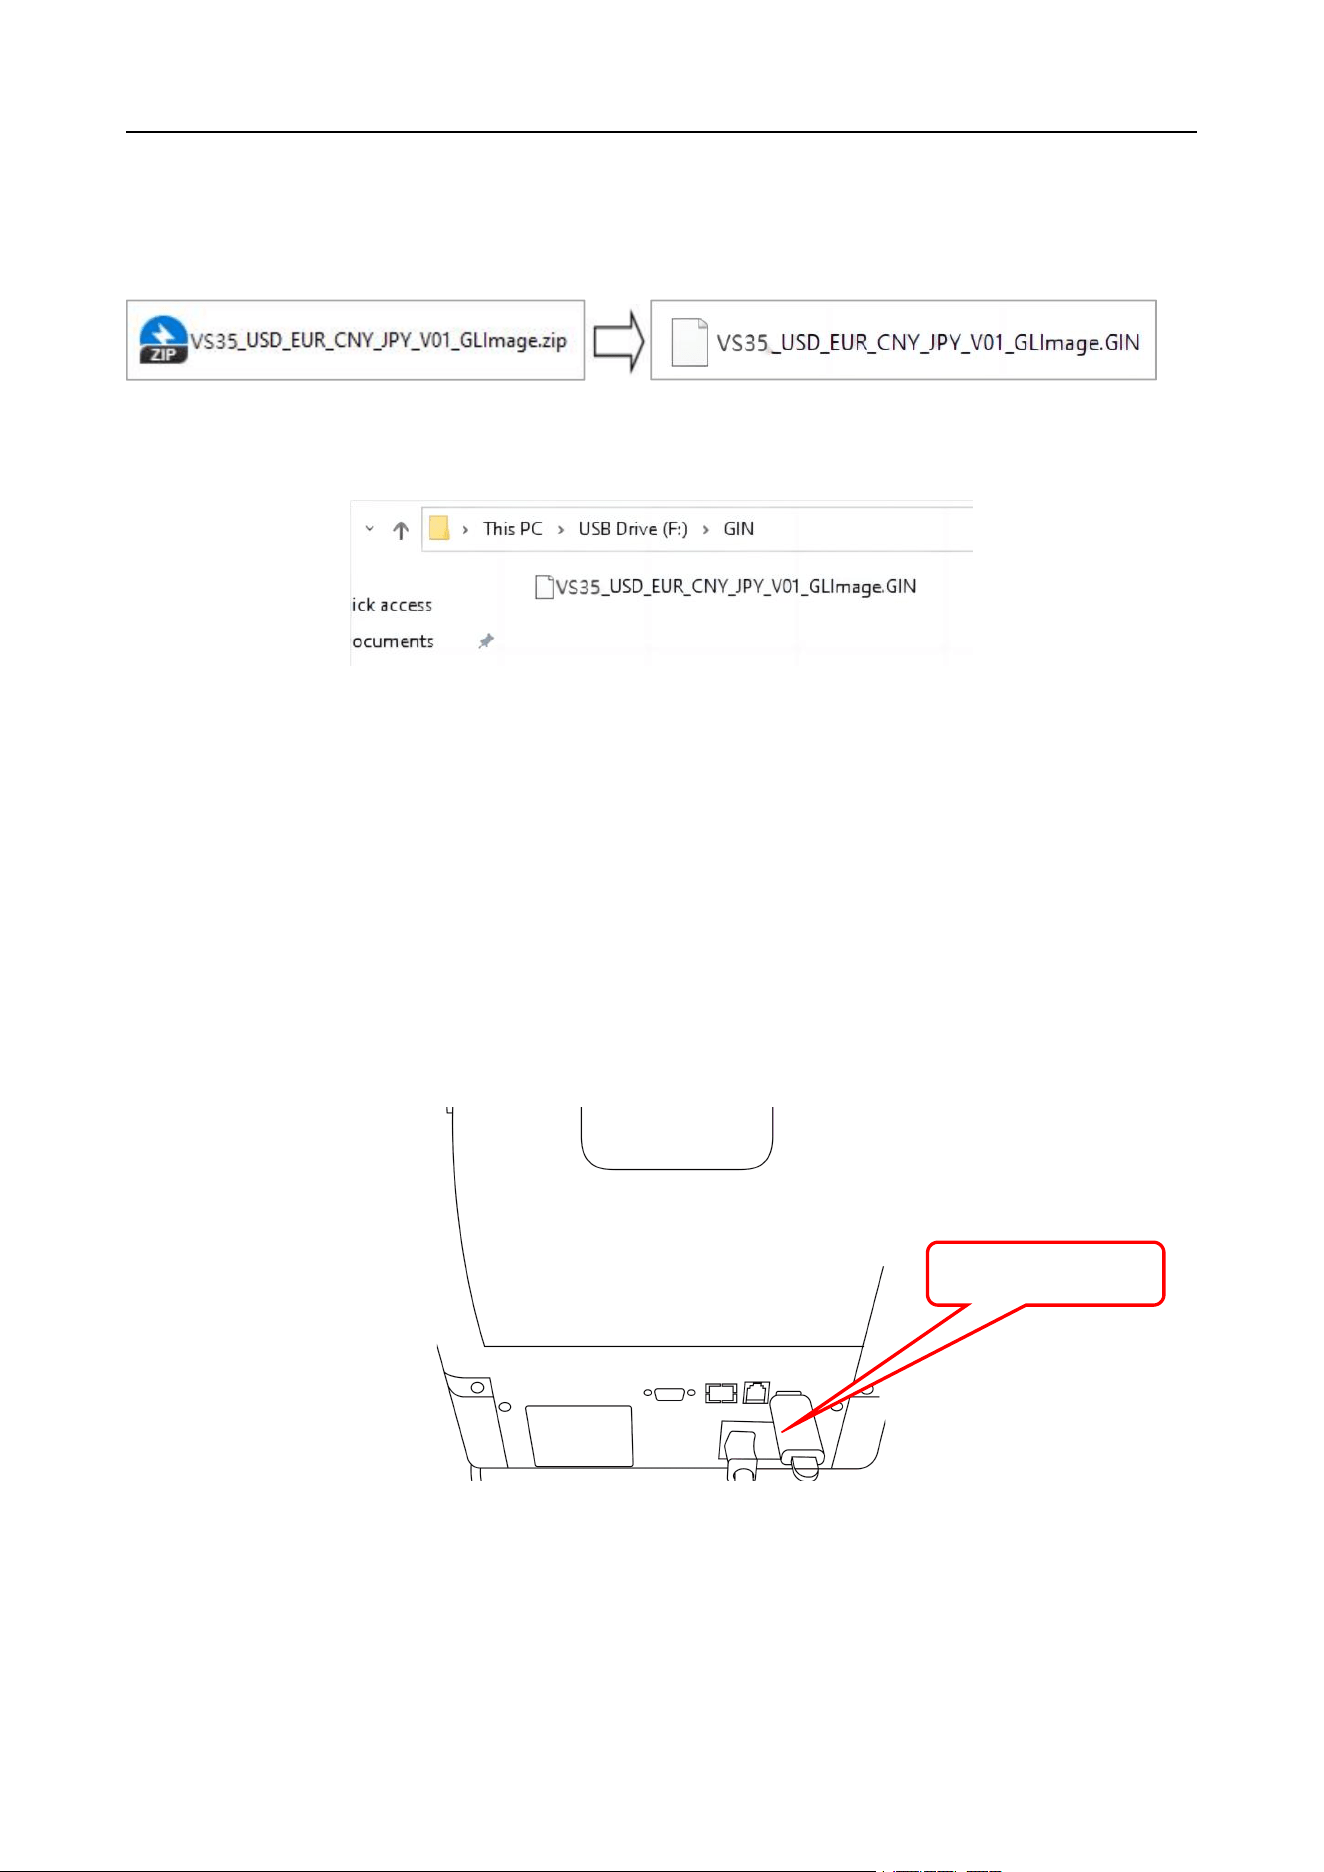
3) Please extract the application software in .rar or .zip format provided by our company (e.g. VS35 _
GLImage.rar) and get the application software with the suffix ".GIN" (e.g. VS35_GLImage.GIN). GIN"
format (e.g.VS35_GLImage.GIN).
4) Copy the application in ".GIN" format to the bottom of the folder named "GIN" in the root directory of
the USB flash drive, as shown in Figure 113 below.
Figure 113
Special reminder: Please do not modify the name or suffix name (i.e. .GIN) of the application
software, otherwise the machine will not recognize the software in the USB flash drive, resulting in
software upgrade failure.
3.1.2 Software Upgrade
1) In the shutdown state, insert the USB disk into the USB interface of the machine, as shown in
Figure 114 below:
Figure 114
2) Turn on the power supply of the machine, and the machine automatically reads the software on
the U disk for upgrading. The upgrade interface appears as shown in Figure 115. After the software
upgrade is successful, the machine will be prompted to restart, as shown in Figure 116 below. Pull
USB interface
VS-35 User Manual V1.1
40
out the U disk first, and then restart the machine. After the machine self-test is completed, it will
automatically enter the main interface, and the machine software upgrade is completed. This
process takes about 5 minutes.
Figure 115 Figure 116
3.2 Daily cleaning instructions
Any dust, dirt or other substance that adheres to the sensor will interfere with the normal
operation of the sensor and lead to incorrect counting results. Therefore, clean the sensor daily with
the included cleaning tool as needed.
Please turn off the power switch before cleaning to prevent electric shock or other injuries.
Please do not use chemicals such as benzene, diluents or water, which may cause the
machine to fade or crack.
3.2.1 Clean hopper sensor
As shown in Figure 117, clean the start sensor with a clean brush or cloth.
Figure 117
Hopper sensor
VS-35 User Manual V1.1
41
3.2.2
Clean banknote feeding block and banknote twisting block
As shown by the arrows in Figure 118 below, clean the banknote feeding block and banknote
twisting block with a clean brush or cleaning cloth.
Figure 118
3.2.3 Clean banknote stacker sensor
As shown in Figure 119 below, clean the banknote stacker sensor with a clean brush or
cleaning cloth.
Figure 119
3.2.4
Clean the sensors inside the upper and lower guide plates
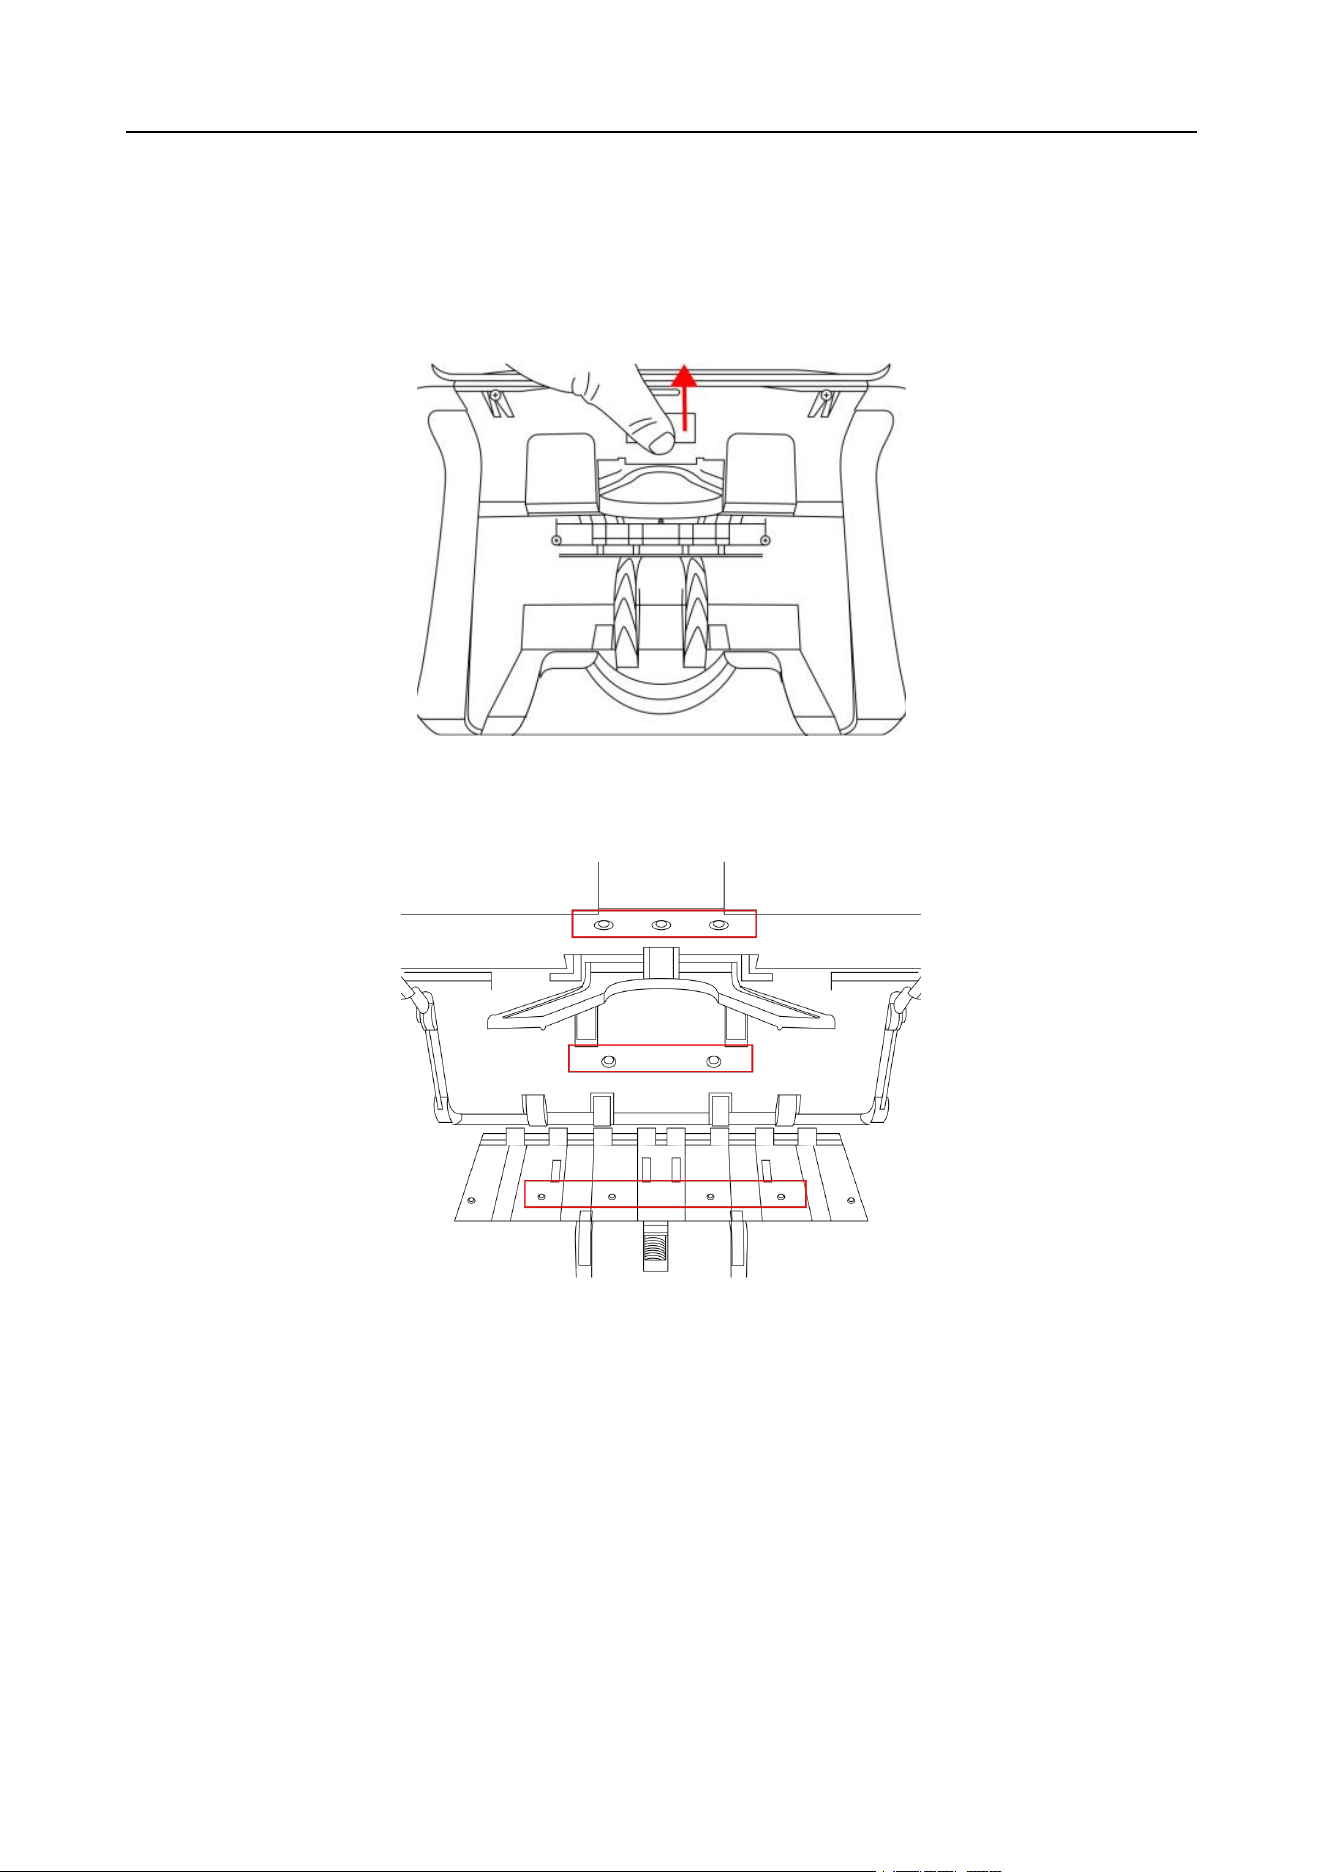
1) Press upward and inward in the direction of the arrow in Figure 120 to open the back cover.
Stacker sensor
VS-35 User Manual V1.1
42
Figure 120
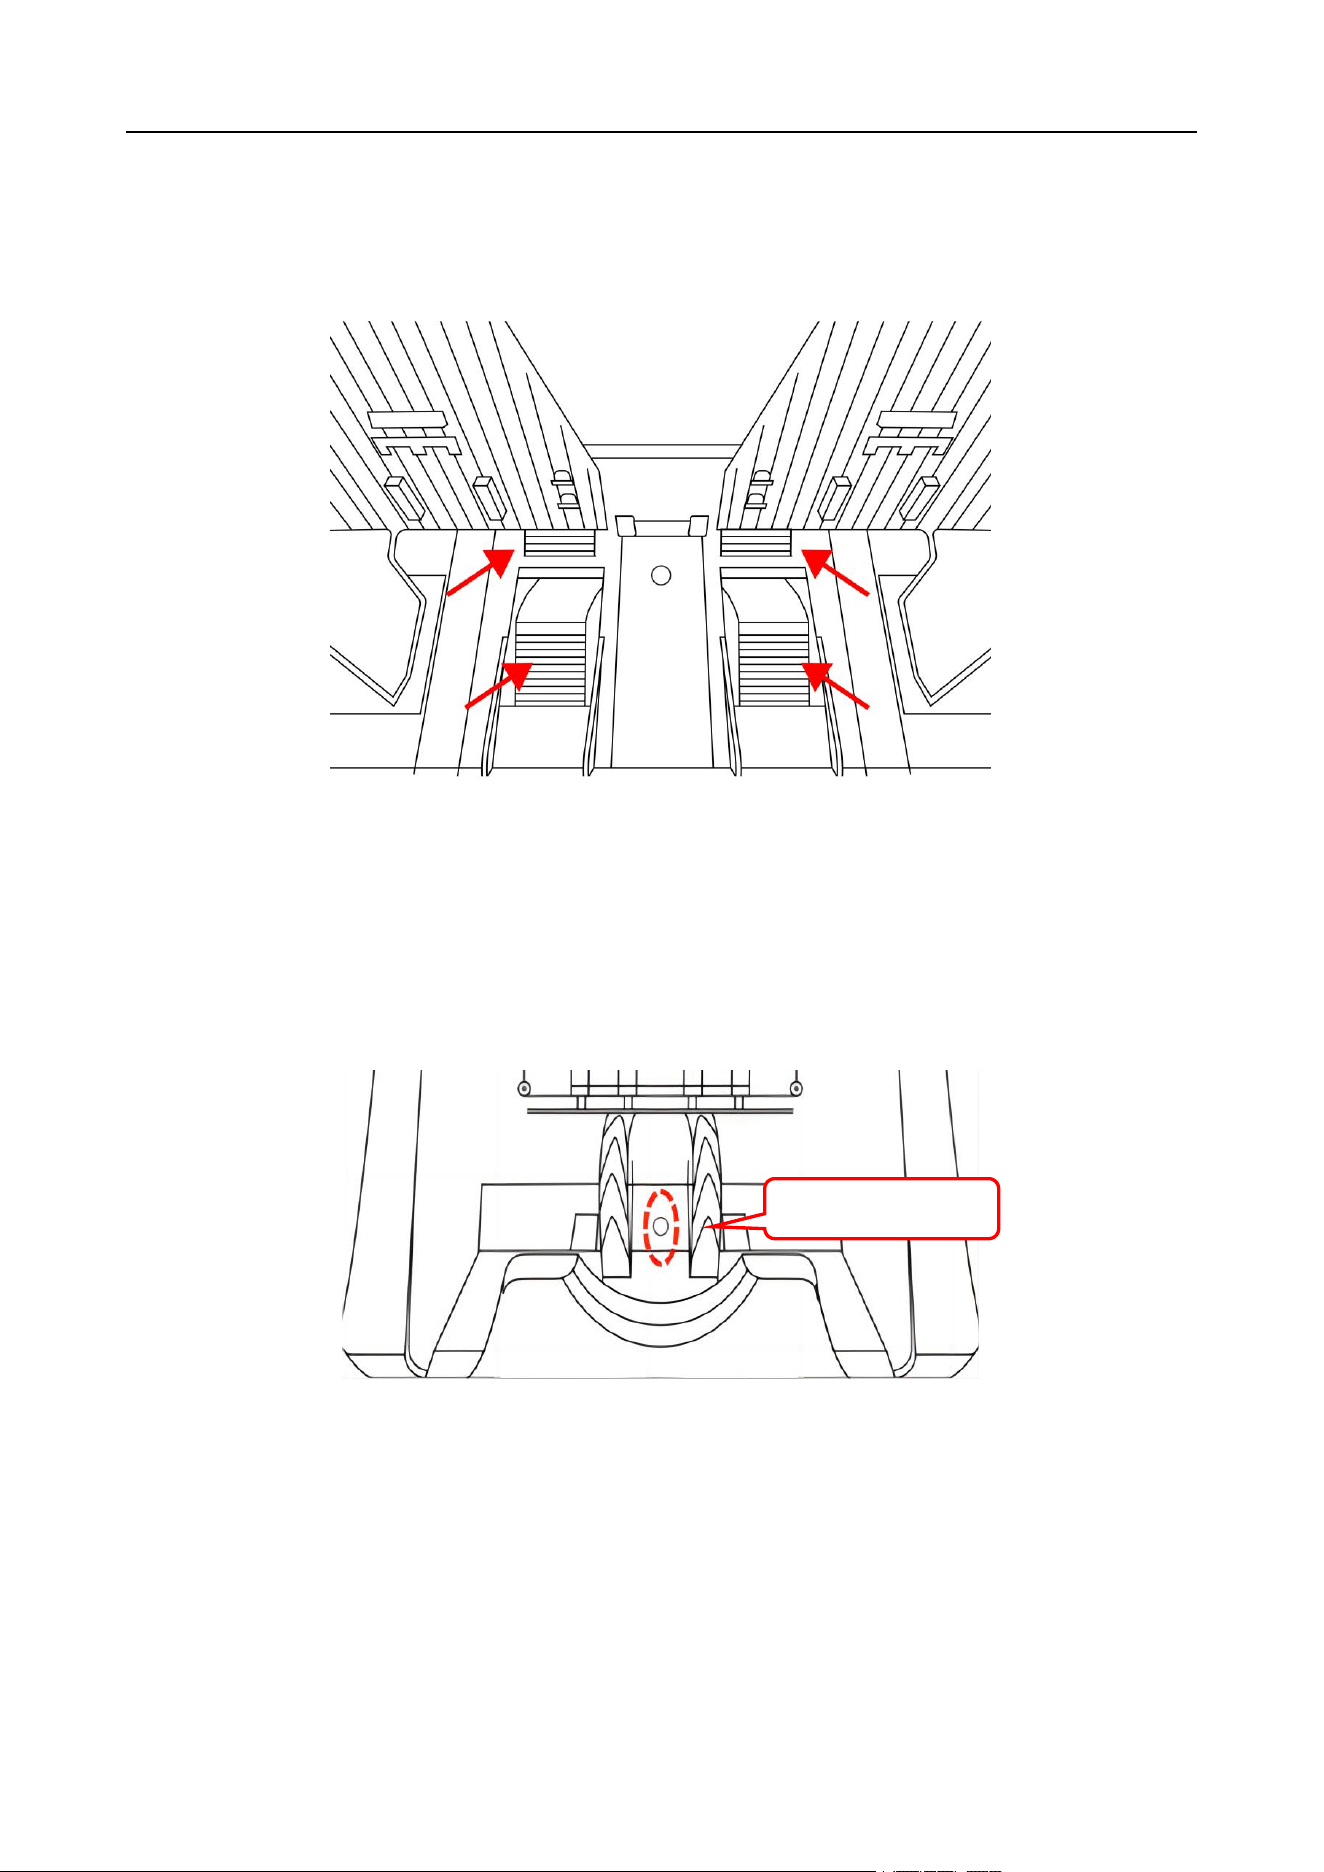
2) As shown in Figure 121, wipe the CIS sensor of Mark 1 in one direction with a dust-free cloth, and
clean the brush stick of Mark 2 and the lower UV sensor of Mark 3 with a nylon brush.
Figure 121
3) As shown in Figure 122, wipe the IR light source strip with a dust-free cloth in one direction, and
then clean the UV, PS1, MG and MT sensors with a clean brush.
Figure 122
VS-35 User Manual V1.1
43
3.2.5 Clean the sensors inside the upper and lower channel
plates
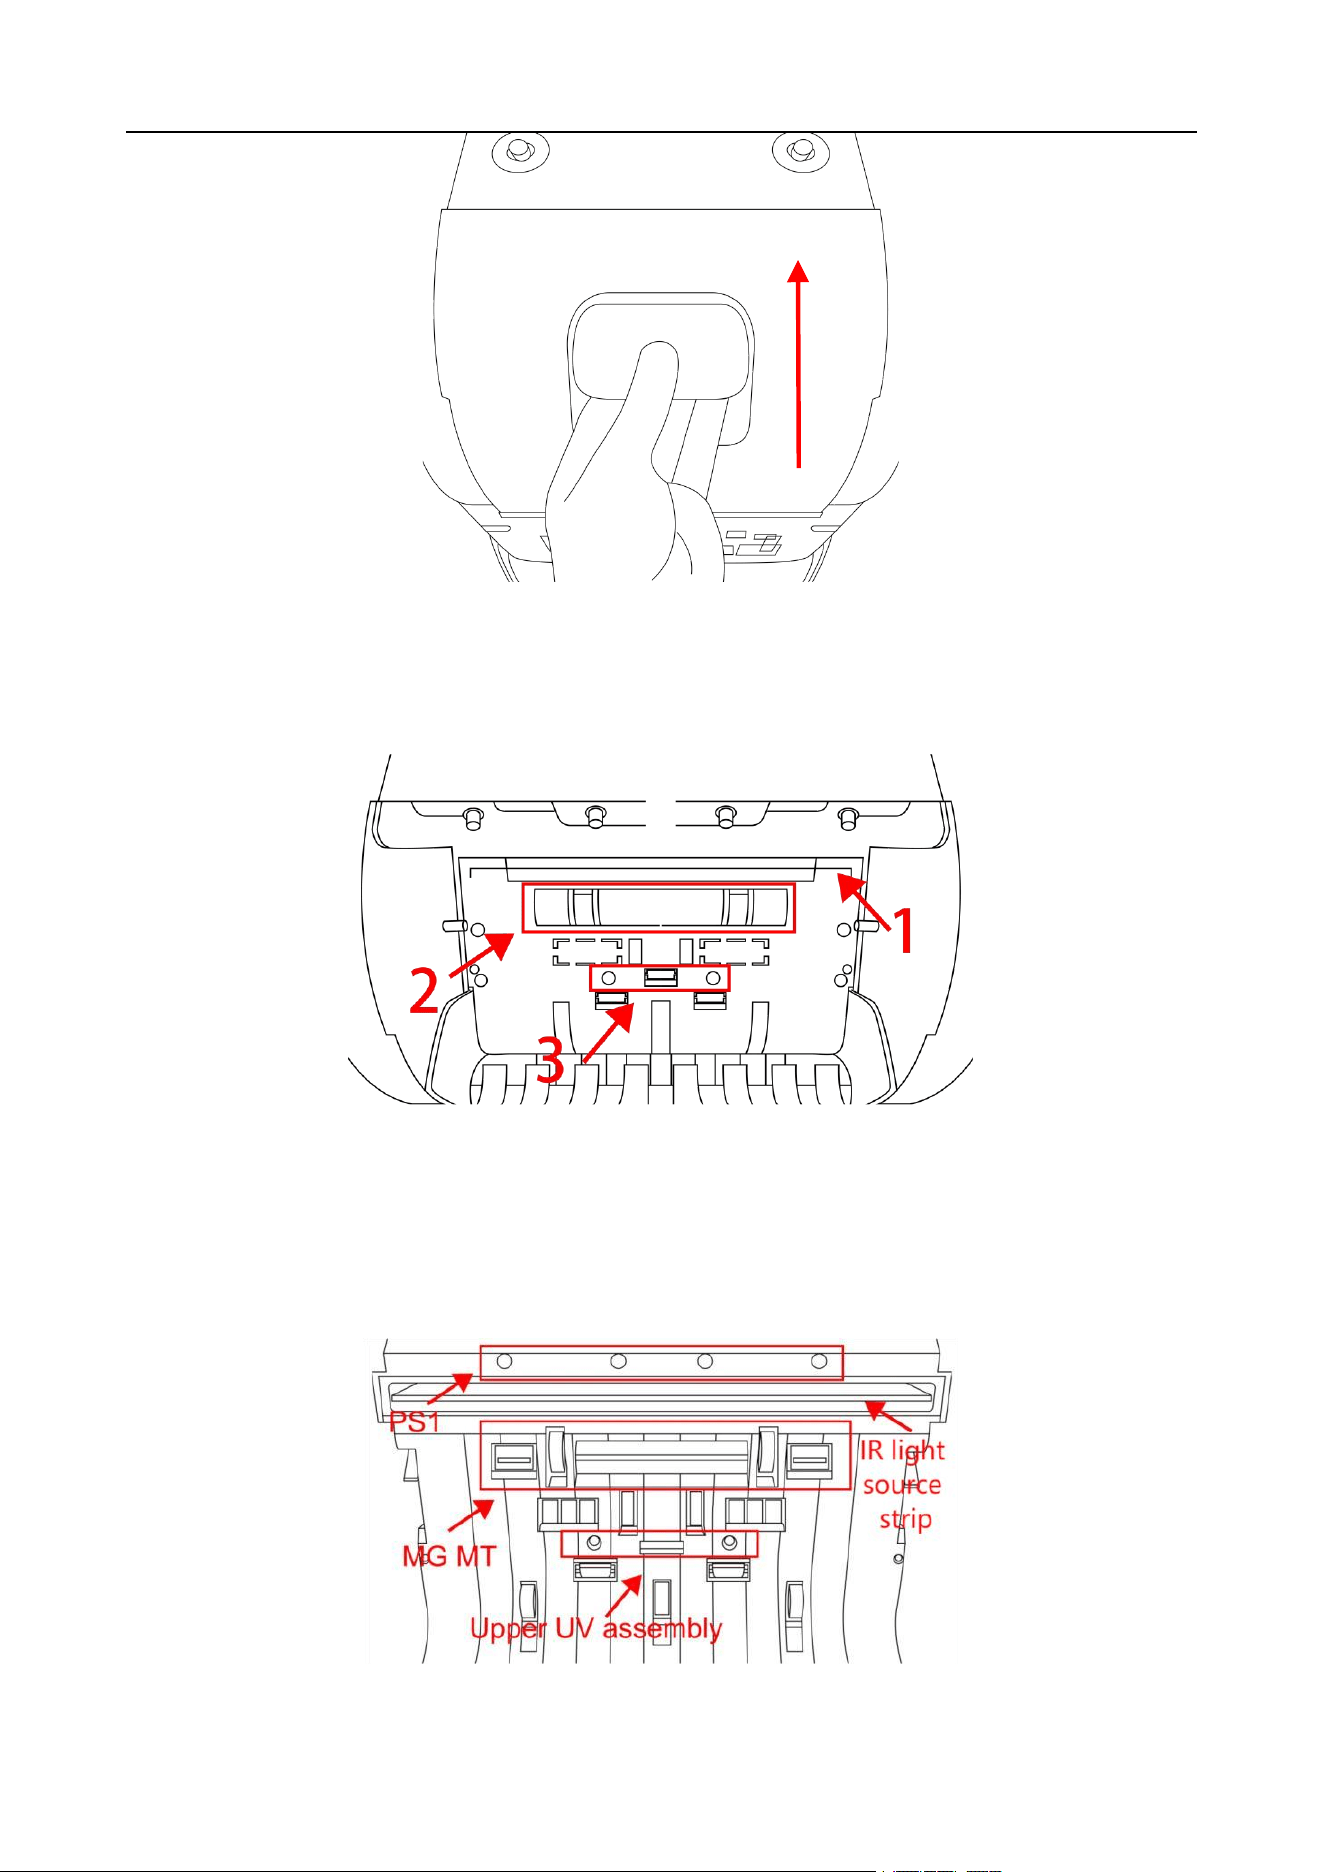
1) Press upward in the direction of the arrow in Figure 123 to open the upper and lower channel
plates.
Figure 123
2) Clean the sensor lights in the red box in Figure 124 below with a clean brush.
Figure 124
3.3 Common faults and corresponding descriptions
In the process of using the machine, the machine may appear abnormal state, resulting in
abnormal operation, and the machine will display the corresponding fault information. The following
provides the phenomena when the machine fails. Please refer to the maintenance manual for
specific treatment methods. If the user still cannot solve the problem according to the maintenance
manual, please contact us.

VS-35 User Manual V1.1
44
Fault description of boot self-test:
Error code
Error position
Reasons
Troubleshooting
Hopper Error
Hopper sensor
The hopper sensor
is blocked
Check the sensor for dust accumulation
or occlusion.
Stacker Error
Stacker sensor
The stacker sensor
is blocked
Check the sensor for dust accumulation
or occlusion.
Check whether the sensor harness falls
off
Lower
Passenger
Error
Upper and
lower channel
plates
The upper and
lower passage
plates are opened
Check whether the channel is open or
has foreign items
Upper
Passenger
Error
Upper and
lower partitions
The upper and
lower partitions are
opened
Check whether the channel is open or
has foreign items
*** In order to continuously improve our products, we reserve the right to change the
instructions. ***