Loading ...
Loading ...
Loading ...
4 Press START/STOP to begin preheating. The
progress bar will begin illuminating. It will
take approximately 3 minutes for the unit to
preheat.
5 When preheating is complete, the unit will beep
and “ADD FOOD” will appear on the display.
6 Open the hood and place ingredients in the
crisper basket. Once the hood is closed,
cooking will begin and the timer will start
counting down.
7 For best results, we recommend shaking
ingredients frequently. When you open the
hood, the unit will pause. Use silicone-tipped
tongs or oven mitts to shake the basket.
When done, replace the basket and close
the
hood
. Cooking will automatically resume
after
hood
is closed.
8 When cook time is complete, the unit will beep
and END will appear on the display.
NOTE: While preheating is strongly recommended
for best results, you can skip it by pressing
the Skip Preheat Button
. “ADD FOOD” will
appear on the display. Open the hood and
place ingredients in the crisper basket. Once
the hood is closed, cooking will begin and the
timer will start counting down.
NOTE: To check your food’s internal doneness,
press MANUAL for 2 seconds and the food’s
internal temperature will appear on the screen.
Press and hold button again to exit mode.
USING THE NINJA® FOODI® SMART XL GRILL – CONT.
7 When cook time is complete, the unit will
beep and END will appear on the display.
Air Crisp
1 Place cooking pot in the unit with the indent on
the pot aligned with the bump on the main unit.
Place the crisper basket in the pot. Ensure the
splatter shield is in place, then close the hood.
2 Press the AIR CRISP button. The default
temperature setting will display. Use the set
of arrows to the left of the display to adjust
the temperature up to 400°F.
3 Use the set of arrows to the right of the display
to adjust the cook time, in 1-minute increments,
up to 1 hour, or, if using the thermometer, refer to
Using the Foodi™ Smart Thermometer section.
4 Press START/STOP to begin
preheating.
The
progress bar will begin illuminating. It will
take approximately 10 minutes for the unit to
preheat.
5 When preheating is complete, the unit will
beep and “ADD FOOD” will appear on the
display.
6 Open the hood and place ingredients on the
grill grate. Once the hood is closed, cooking will
begin and the timer will start counting down.
NOTE: If batch cooking, refer to page 8 for
instructions.
NOTE: To use the thermometer just to check your
food’s internal doneness, press MANUAL for 2
seconds and the food’s internal temperature will
appear on the screen. Press and hold button
again to exit mode.
To turn on the unit, plug the power cord into a wall outlet, then press the button.
To turn on the unit, plug the power cord into a wall outlet, then press the button.
Grill
1 Place the cooking pot in the unit with the
indent on the pot aligned with the bump on
the main unit. Then place the grill grate in the
pot with the handles facing up. Ensure the
splatter shield is in place, then close the hood.
2 Press the GRILL button. The default
temperature setting will display. Use the set of
arrows to the left of the display to adjust the
temperature up to MAX.
3 Use the set of arrows to the right of the display
to adjust the cook time, in 1-minute increments,
up to 30 minutes, or, if using the thermometer,
refer to the instructions on previous pages.
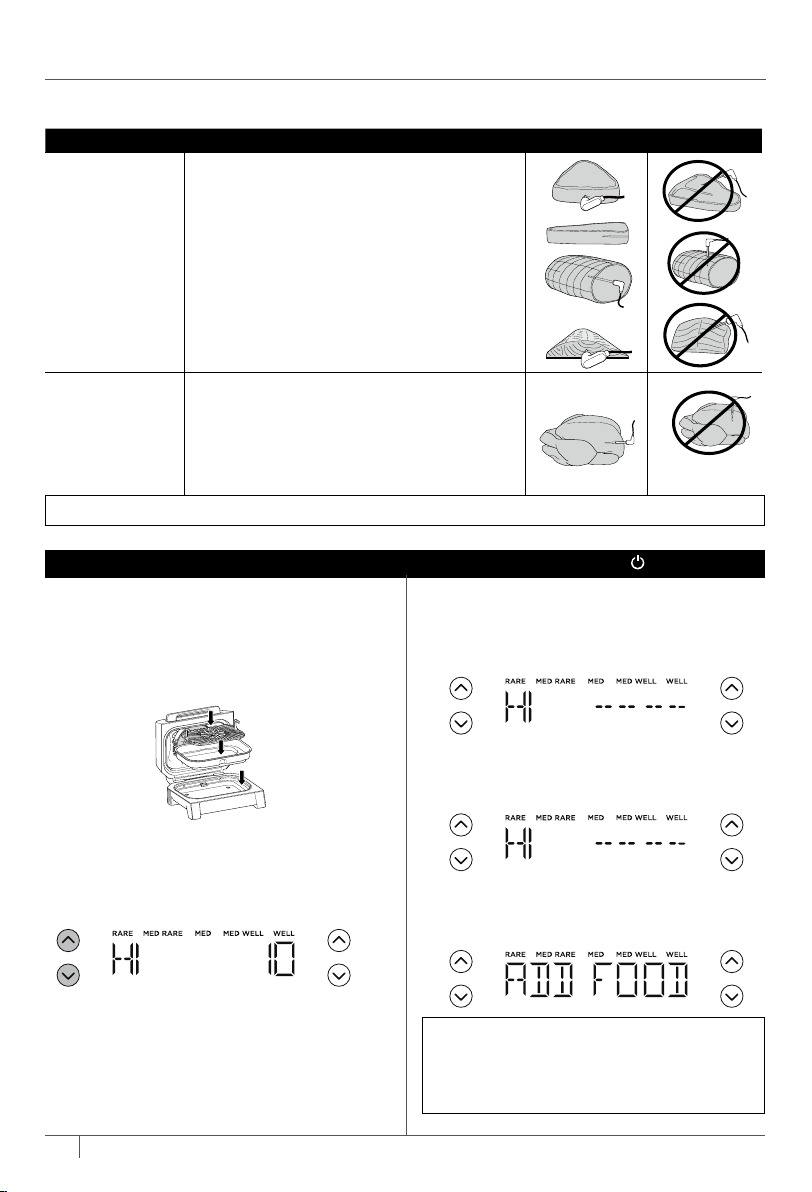
HOW TO CORRECTLY INSERT THE THERMOMETER
NOTE: DO NOT use the thermometer with frozen protein or for cuts of meat thinner than 1 inch.
FOOD TYPE: PLACEMENT CORRECT INCORRECT
Steaks
Pork chops
Lamb chops
Chicken breasts
Burgers
Tenderloins
Fish fillets
• Insert thermometer horizontally into the center
of the thickest part of the meat.
• Make sure the thermometer is close to
(but not touching) the bone and away from
any fat or gristle.
• Make sure the tip of the thermometer is
inserted straight into the center of the meat,
not angled toward the bottom or top of it.
NOTE: The thickest part of the fillet may not be the
center. It is important that the end of the thermometer
hits this area so that desired results are achieved.
Whole chicken
• Insert thermometer horizontally into the
thickest part of the breast, parallel to, but not
touching, the bone.
• Make sure the tip reaches the center of the
thickest part of the breast and doesn’t go all
the way through the breast into the cavity.
8 9
ninjakitchen.com
ninjakitchen.com
Loading ...
Loading ...
Loading ...