
User Manual
020-002053-01
Christie HS Series 4K

NOTICES
COPYRIGHT AND TRADEMARKS
Copyright © 2023 Christie Digital Systems USA, Inc. All rights reserved.
All brand names and product names are trademarks, registered trademarks or trade names of their respective holders.
GENERAL
Every effort has been made to ensure accuracy, however in some cases changes in the products or availability could occur which may not be reflected in this
document. Christie reserves the right to make changes to specifications at any time without notice. Performance specifications are typical, but may vary
depending on conditions beyond Christie's control such as maintenance of the product in proper working conditions. Performance specifications are based on
information available at the time of printing. Christie makes no warranty of any kind with regard to this material, including, but not limited to, implied warranties
of fitness for a particular purpose. Christie will not be liable for errors contained herein or for incidental or consequential damages in connection with the
performance or use of this material. Our centers of excellence for manufacturing in Kitchener, Ontario, Canada and in Shenzhen, China are ISO 9001:2015
Quality Management System-certified.
Christie is committed to making our documents free from language bias; however, we are not responsible for the language used on any linked or third-party
documentation.
For the most current technical documentation and office contact information, visit www.christiedigital.com.
WARRANTY
Products are warranted under Christie's standard limited warranty, the details of which are available at https://www.christiedigital.com/help-center/warranties/
or by contacting your Christie dealer or Christie.
PREVENTATIVE MAINTENANCE
Preventative maintenance is an important part of the continued and proper operation of your product. Failure to perform maintenance as required, and in
accordance with the maintenance schedule specified by Christie, will void the warranty.
REGULATORY (if applicable)
The product has been tested and found to comply with the limits for a Class A digital device, pursuant to Part 15 of the FCC Rules. These limits are designed to
provide reasonable protection against harmful interference when the product is operated in a commercial environment. The product generates, uses, and can
radiate radio frequency energy and, if not installed and used in accordance with the instruction manual, may cause harmful interference to radio communications.
Operation of the product in a residential area is likely to cause harmful interference in which case the user will be required to correct the interference at the user’s
own expense. Changes or modifications not expressly approved by the party responsible for compliance could void the user's authority to operate the equipment.
CAN ICES-003 (A) / NMB-003 (A)
이 기기는 업무용 (A 급 ) 으로 전자파적합등록을 한 기기이오니 판매자 또는 사용자는 이점을 주의하시기 바라며 , 가정 외의 지역에서 사용하는 것을 목적으로 합니다 .
ENVIRONMENTAL
The product is designed and manufactured with high-quality materials and components that can be recycled and reused. This symbol means that electrical
and electronic equipment, at their end-of-life, should be disposed of separately from regular waste. Please dispose of the product appropriately and according
to local regulations. In the European Union, there are separate collection systems for used electrical and electronic products.
If printing this document, consider printing only the pages you need and select the double-sided option.
Please help us to conserve the environment we live in!
NOTATION
Learn the hazard and information symbols used in the product documentation.
Danger! If not avoided, the following could result in death or serious injury.
Warning! If not avoided, the following could result in death or serious injury.
Caution! If not avoided, the following could result in minor or moderate injury.
Notice. If not avoided, the following may result in equipment or property damage.

HS Series 4K User Manual 3
020-002053-01 Rev. 1 (05-2023)
Copyright © 2023 Christie Digital Systems USA, Inc. All rights reserved.
If printed, please recycle this document after use.
Content
Introduction . . . . . . . . . . . . . . . . . . . . . . . . . . . . . . . . . . . . . . . . . . . . . . . . . . . . . . 8
Models . . . . . . . . . . . . . . . . . . . . . . . . . . . . . . . . . . . . . . . . . . . . . . . . . . . . . . . . . . . . .8
Safet y and war ning guidelines . . . . . . . . . . . . . . . . . . . . . . . . . . . . . . . . . . . . . . . . . . . . 8
AC/ power precaut ions . . . . . . . . . . . . . . . . . . . . . . . . . . . . . . . . . . . . . . . . . . . . . . . . 9
I nst allation safet y and warning guidelines . . . . . . . . . . . . . . . . . . . . . . . . . . . . . . . . . . 9
Laser safet y precaut ions . . . . . . . . . . . . . . . . . . . . . . . . . . . . . . . . . . . . . . . . . . . . . . 9
Light int ensit y hazard dist ance . . . . . . . . . . . . . . . . . . . . . . . . . . . . . . . . . . . . . . . . . 10
Product labels . . . . . . . . . . . . . . . . . . . . . . . . . . . . . . . . . . . . . . . . . . . . . . . . . . . . 12
Proj ect or overview . . . . . . . . . . . . . . . . . . . . . . . . . . . . . . . . . . . . . . . . . . . . . . . . . . . 14
Cont act your dealer . . . . . . . . . . . . . . . . . . . . . . . . . . . . . . . . . . . . . . . . . . . . . . . . . . . 14
Key feat ures . . . . . . . . . . . . . . . . . . . . . . . . . . . . . . . . . . . . . . . . . . . . . . . . . . . . . . . . 14
How t he proj ect or works . . . . . . . . . . . . . . . . . . . . . . . . . . . . . . . . . . . . . . . . . . . . . . . 15
List of com ponent s . . . . . . . . . . . . . . . . . . . . . . . . . . . . . . . . . . . . . . . . . . . . . . . . . . . 15
Product docum ent ation . . . . . . . . . . . . . . . . . . . . . . . . . . . . . . . . . . . . . . . . . . . . . . . . 16
Relat ed docum entation . . . . . . . . . . . . . . . . . . . . . . . . . . . . . . . . . . . . . . . . . . . . . . 16
Technical support . . . . . . . . . . . . . . . . . . . . . . . . . . . . . . . . . . . . . . . . . . . . . . . . . . . . 16
Addit ional inform at ion . . . . . . . . . . . . . . . . . . . . . . . . . . . . . . . . . . . . . . . . . . . . . . . . . 17
Installation and setup . . . . . . . . . . . . . . . . . . . . . . . . . . . . . . . . . . . . . . . . . . . . . . 18
Site requirem ent s . . . . . . . . . . . . . . . . . . . . . . . . . . . . . . . . . . . . . . . . . . . . . . . . . . . . 18
Physical operat ing environm ent . . . . . . . . . . . . . . . . . . . . . . . . . . . . . . . . . . . . . . . . 18
Pow er connect ion . . . . . . . . . . . . . . . . . . . . . . . . . . . . . . . . . . . . . . . . . . . . . . . . . . 18
Proj ect or com ponents . . . . . . . . . . . . . . . . . . . . . . . . . . . . . . . . . . . . . . . . . . . . . . . . . 19
Front view . . . . . . . . . . . . . . . . . . . . . . . . . . . . . . . . . . . . . . . . . . . . . . . . . . . . . . . 19
Rear view . . . . . . . . . . . . . . . . . . . . . . . . . . . . . . . . . . . . . . . . . . . . . . . . . . . . . . . 19
Left view . . . . . . . . . . . . . . . . . . . . . . . . . . . . . . . . . . . . . . . . . . . . . . . . . . . . . . . . 20
Right view . . . . . . . . . . . . . . . . . . . . . . . . . . . . . . . . . . . . . . . . . . . . . . . . . . . . . . . 20
Built -in keypad . . . . . . . . . . . . . . . . . . . . . . . . . . . . . . . . . . . . . . . . . . . . . . . . . . . . . . 21
I nput/ output ( I / O) panel . . . . . . . . . . . . . . . . . . . . . . . . . . . . . . . . . . . . . . . . . . . . . . . 22
I R rem ot e keypad . . . . . . . . . . . . . . . . . . . . . . . . . . . . . . . . . . . . . . . . . . . . . . . . . . . . 23
Posit ioning t he display . . . . . . . . . . . . . . . . . . . . . . . . . . . . . . . . . . . . . . . . . . . . . . . . . 25
Turning on t he proj ector . . . . . . . . . . . . . . . . . . . . . . . . . . . . . . . . . . . . . . . . . . . . . . . 26
Turning off t he proj ect or . . . . . . . . . . . . . . . . . . . . . . . . . . . . . . . . . . . . . . . . . . . . . . . 26
LED st atus indicator . . . . . . . . . . . . . . . . . . . . . . . . . . . . . . . . . . . . . . . . . . . . . . . . . . 27

HS Series 4K User Manual 4
020-002053-01 Rev. 1 (05-2023)
Copyright © 2023 Christie Digital Systems USA, Inc. All rights reserved.
If printed, please recycle this document after use.
Content
St at us LED . . . . . . . . . . . . . . . . . . . . . . . . . . . . . . . . . . . . . . . . . . . . . . . . . . . . . . . 27
Shut ter LED . . . . . . . . . . . . . . . . . . . . . . . . . . . . . . . . . . . . . . . . . . . . . . . . . . . . . . 27
Adjusting the size and position . . . . . . . . . . . . . . . . . . . . . . . . . . . . . . . . . . . . . . 28
Sett ing t he im age size pr eset . . . . . . . . . . . . . . . . . . . . . . . . . . . . . . . . . . . . . . . . . . . . 28
Set ting t he digit al size of display im age . . . . . . . . . . . . . . . . . . . . . . . . . . . . . . . . . . . . . 29
Sett ing t he digit al posit ion of display im age . . . . . . . . . . . . . . . . . . . . . . . . . . . . . . . . . . 29
Geom etry correct ion . . . . . . . . . . . . . . . . . . . . . . . . . . . . . . . . . . . . . . . . . . . . . . . . . . 29
Enabling geom et ry corr ect ion . . . . . . . . . . . . . . . . . . . . . . . . . . . . . . . . . . . . . . . . . . 29
Sav ing geom et ry correction . . . . . . . . . . . . . . . . . . . . . . . . . . . . . . . . . . . . . . . . . . . 29
Applying geom et ry corr ect ion . . . . . . . . . . . . . . . . . . . . . . . . . . . . . . . . . . . . . . . . . . 30
Enabling basic im age blending . . . . . . . . . . . . . . . . . . . . . . . . . . . . . . . . . . . . . . . . . 30
Blending m ultiple im ages . . . . . . . . . . . . . . . . . . . . . . . . . . . . . . . . . . . . . . . . . . . . . 31
Downloading a blend from t he proj ect or m em ory . . . . . . . . . . . . . . . . . . . . . . . . . . . . 31
Adj ust ing horizont al k eyst one . . . . . . . . . . . . . . . . . . . . . . . . . . . . . . . . . . . . . . . . . . 32
Adj ust ing t he vertical keyst one . . . . . . . . . . . . . . . . . . . . . . . . . . . . . . . . . . . . . . . . . 32
Adj usting hor izont al pincushion . . . . . . . . . . . . . . . . . . . . . . . . . . . . . . . . . . . . . . . . 32
Adj ust ing vert ical pincushion . . . . . . . . . . . . . . . . . . . . . . . . . . . . . . . . . . . . . . . . . . 33
Adj ust ing 4- corner . . . . . . . . . . . . . . . . . . . . . . . . . . . . . . . . . . . . . . . . . . . . . . . . . 33
Enabling aut o warp filt er . . . . . . . . . . . . . . . . . . . . . . . . . . . . . . . . . . . . . . . . . . . . . 33
Adj ust ing warp filt er . . . . . . . . . . . . . . . . . . . . . . . . . . . . . . . . . . . . . . . . . . . . . . . . 34
Reset ting geom et ry corr ect ion set ting . . . . . . . . . . . . . . . . . . . . . . . . . . . . . . . . . . . . 34
Configuring warp and blend . . . . . . . . . . . . . . . . . . . . . . . . . . . . . . . . . . . . . . . . . . . . . 34
Warping an im age . . . . . . . . . . . . . . . . . . . . . . . . . . . . . . . . . . . . . . . . . . . . . . . . . . 34
Downloading a warp from t he proj ect or m em ory . . . . . . . . . . . . . . . . . . . . . . . . . . . . . 35
Perform ing aut o warp and blend . . . . . . . . . . . . . . . . . . . . . . . . . . . . . . . . . . . . . . . . 35
Adjusting the image settings . . . . . . . . . . . . . . . . . . . . . . . . . . . . . . . . . . . . . . . . 36
Adj ust ing the bright ness . . . . . . . . . . . . . . . . . . . . . . . . . . . . . . . . . . . . . . . . . . . . . . . 36
Adj ust ing t he cont rast . . . . . . . . . . . . . . . . . . . . . . . . . . . . . . . . . . . . . . . . . . . . . . . . . 36
Adj ust ing the color space . . . . . . . . . . . . . . . . . . . . . . . . . . . . . . . . . . . . . . . . . . . . . . . 36
Adj ust ing the im age sharpness . . . . . . . . . . . . . . . . . . . . . . . . . . . . . . . . . . . . . . . . . . . 37
Set ting up 3D display . . . . . . . . . . . . . . . . . . . . . . . . . . . . . . . . . . . . . . . . . . . . . . . . . 37
Sett ing 3D m ode . . . . . . . . . . . . . . . . . . . . . . . . . . . . . . . . . . . . . . . . . . . . . . . . . . 37
Sett ing 3D form at . . . . . . . . . . . . . . . . . . . . . . . . . . . . . . . . . . . . . . . . . . . . . . . . . . 37
I nvert ing 3D signal . . . . . . . . . . . . . . . . . . . . . . . . . . . . . . . . . . . . . . . . . . . . . . . . . 38
Select ing t he 3D sync input signal . . . . . . . . . . . . . . . . . . . . . . . . . . . . . . . . . . . . . . . 38
Sett ing t he 3D sync output signal . . . . . . . . . . . . . . . . . . . . . . . . . . . . . . . . . . . . . . . 39
Sett ing t he fram e delay . . . . . . . . . . . . . . . . . . . . . . . . . . . . . . . . . . . . . . . . . . . . . . 39

HS Series 4K User Manual 5
020-002053-01 Rev. 1 (05-2023)
Copyright © 2023 Christie Digital Systems USA, Inc. All rights reserved.
If printed, please recycle this document after use.
Content
Sett ing t he sync delay . . . . . . . . . . . . . . . . . . . . . . . . . . . . . . . . . . . . . . . . . . . . . . . 39
Configuring the video set t ings . . . . . . . . . . . . . . . . . . . . . . . . . . . . . . . . . . . . . . . . . . . . 39
Adj ust ing black and w hit e video . . . . . . . . . . . . . . . . . . . . . . . . . . . . . . . . . . . . . . . . 39
Adj ust ing the color balance . . . . . . . . . . . . . . . . . . . . . . . . . . . . . . . . . . . . . . . . . . . 40
Configuring pict ure set tings . . . . . . . . . . . . . . . . . . . . . . . . . . . . . . . . . . . . . . . . . . . . . 40
Applying custom ized user configuration set ting . . . . . . . . . . . . . . . . . . . . . . . . . . . . . . . . 41
Edit ing custom ized pict ure set ting . . . . . . . . . . . . . . . . . . . . . . . . . . . . . . . . . . . . . . . . . 41
Sett ing t he cont r ast rat io . . . . . . . . . . . . . . . . . . . . . . . . . . . . . . . . . . . . . . . . . . . . . . . 42
Enabling t he im age freeze . . . . . . . . . . . . . . . . . . . . . . . . . . . . . . . . . . . . . . . . . . . . . . 42
Sett ing t he high dynam ic range . . . . . . . . . . . . . . . . . . . . . . . . . . . . . . . . . . . . . . . . . . 43
Adj ust t he color of t he im age . . . . . . . . . . . . . . . . . . . . . . . . . . . . . . . . . . . . . . . . . . . . 43
Adj ust ing prim ary colors . . . . . . . . . . . . . . . . . . . . . . . . . . . . . . . . . . . . . . . . . . . . . 44
Sett ing t he w all color . . . . . . . . . . . . . . . . . . . . . . . . . . . . . . . . . . . . . . . . . . . . . . . 45
Sett ing t he wall color autom at ically . . . . . . . . . . . . . . . . . . . . . . . . . . . . . . . . . . . . . . 45
Adj usting t he im age set tings aut om at ically . . . . . . . . . . . . . . . . . . . . . . . . . . . . . . . . . . . 45
Adj ust ing t he im age with autom at ic focus . . . . . . . . . . . . . . . . . . . . . . . . . . . . . . . . . 45
Sett ing t he wall color autom at ically . . . . . . . . . . . . . . . . . . . . . . . . . . . . . . . . . . . . . . 46
Balancing t he im age color aut om at ically . . . . . . . . . . . . . . . . . . . . . . . . . . . . . . . . . . . 46
Adj ust ing advanced im age set tings . . . . . . . . . . . . . . . . . . . . . . . . . . . . . . . . . . . . . . . . 47
Adj usting t he color value based on gam m a set t ing . . . . . . . . . . . . . . . . . . . . . . . . . . . 47
Adj ust ing the w hit e peaking . . . . . . . . . . . . . . . . . . . . . . . . . . . . . . . . . . . . . . . . . . . 47
Adj ust ing the color t em perat ure . . . . . . . . . . . . . . . . . . . . . . . . . . . . . . . . . . . . . . . . 47
Sav ing user set tings for data recovery . . . . . . . . . . . . . . . . . . . . . . . . . . . . . . . . . . . . 48
Configuring system settings . . . . . . . . . . . . . . . . . . . . . . . . . . . . . . . . . . . . . . . . 49
Changing t he language . . . . . . . . . . . . . . . . . . . . . . . . . . . . . . . . . . . . . . . . . . . . . . . . 49
Adj ust ing lens set tings . . . . . . . . . . . . . . . . . . . . . . . . . . . . . . . . . . . . . . . . . . . . . . . . . 49
Viewing t he lens t ype . . . . . . . . . . . . . . . . . . . . . . . . . . . . . . . . . . . . . . . . . . . . . . . 49
Aligning t he im age w ith focus, zoom , and aut o focus . . . . . . . . . . . . . . . . . . . . . . . . . . 50
Adj ust ing t he im age with autom at ic focus . . . . . . . . . . . . . . . . . . . . . . . . . . . . . . . . . 50
Adj ust ing lens posit ion . . . . . . . . . . . . . . . . . . . . . . . . . . . . . . . . . . . . . . . . . . . . . . 50
Saving lens sett ing . . . . . . . . . . . . . . . . . . . . . . . . . . . . . . . . . . . . . . . . . . . . . . . . . 51
Applying t he previous lens sett ing . . . . . . . . . . . . . . . . . . . . . . . . . . . . . . . . . . . . . . . 51
Locking t he lens m ot or . . . . . . . . . . . . . . . . . . . . . . . . . . . . . . . . . . . . . . . . . . . . . . 51
Reset ting t he lens to hom e posit ion . . . . . . . . . . . . . . . . . . . . . . . . . . . . . . . . . . . . . . 51
Select ing screen im age orient at ion . . . . . . . . . . . . . . . . . . . . . . . . . . . . . . . . . . . . . . . . 52
Adj ust ing on- screen display m enus . . . . . . . . . . . . . . . . . . . . . . . . . . . . . . . . . . . . . . . . 52
Det erm ining t he on- screen display posit ion . . . . . . . . . . . . . . . . . . . . . . . . . . . . . . . . 52
Showing m essages . . . . . . . . . . . . . . . . . . . . . . . . . . . . . . . . . . . . . . . . . . . . . . . . . 52

HS Series 4K User Manual 6
020-002053-01 Rev. 1 (05-2023)
Copyright © 2023 Christie Digital Systems USA, Inc. All rights reserved.
If printed, please recycle this document after use.
Content
Set ting t he t r ansparency of t he on- screen display posit ion . . . . . . . . . . . . . . . . . . . . . . 53
Changing t he splash screen . . . . . . . . . . . . . . . . . . . . . . . . . . . . . . . . . . . . . . . . . . . 53
Sett ing t im e out for on- screen display . . . . . . . . . . . . . . . . . . . . . . . . . . . . . . . . . . . . 53
Set ting up password prot ect ion . . . . . . . . . . . . . . . . . . . . . . . . . . . . . . . . . . . . . . . . . 54
Changing passwor d . . . . . . . . . . . . . . . . . . . . . . . . . . . . . . . . . . . . . . . . . . . . . . . . . 54
Sett ing up pow er m ode . . . . . . . . . . . . . . . . . . . . . . . . . . . . . . . . . . . . . . . . . . . . . . . . 54
Sett ing t he st andby m ode . . . . . . . . . . . . . . . . . . . . . . . . . . . . . . . . . . . . . . . . . . . . 54
Sett ing t he AC power . . . . . . . . . . . . . . . . . . . . . . . . . . . . . . . . . . . . . . . . . . . . . . . 55
Sett ing t he t im e for auto shut dow n . . . . . . . . . . . . . . . . . . . . . . . . . . . . . . . . . . . . . . 55
Sett ing t he sleep t im er . . . . . . . . . . . . . . . . . . . . . . . . . . . . . . . . . . . . . . . . . . . . . . 55
Enabling high altit ude sett ing . . . . . . . . . . . . . . . . . . . . . . . . . . . . . . . . . . . . . . . . . . . . 55
Sett ing t he proj ect or com m unication . . . . . . . . . . . . . . . . . . . . . . . . . . . . . . . . . . . . . . . 56
Enabling t he 12V Tr igger . . . . . . . . . . . . . . . . . . . . . . . . . . . . . . . . . . . . . . . . . . . . . . . 56
Configuring communications . . . . . . . . . . . . . . . . . . . . . . . . . . . . . . . . . . . . . . . . 57
Sett ing netw ork environm ent . . . . . . . . . . . . . . . . . . . . . . . . . . . . . . . . . . . . . . . . . . . . 57
Adj ust ing LAN set ting . . . . . . . . . . . . . . . . . . . . . . . . . . . . . . . . . . . . . . . . . . . . . . . 57
Using t he web int erface . . . . . . . . . . . . . . . . . . . . . . . . . . . . . . . . . . . . . . . . . . . . . . 58
Logging on t o t he web user int erface . . . . . . . . . . . . . . . . . . . . . . . . . . . . . . . . . . . . . 58
Sett ing t he system notificat ion . . . . . . . . . . . . . . . . . . . . . . . . . . . . . . . . . . . . . . . . . . . 58
Using t he RS- 232C interface . . . . . . . . . . . . . . . . . . . . . . . . . . . . . . . . . . . . . . . . . . . 59
Re- connect ing t he net work . . . . . . . . . . . . . . . . . . . . . . . . . . . . . . . . . . . . . . . . . . . . 59
Adj ust ing WLAN sett ing . . . . . . . . . . . . . . . . . . . . . . . . . . . . . . . . . . . . . . . . . . . . . . 60
Adj ust ing net wor k set t ing . . . . . . . . . . . . . . . . . . . . . . . . . . . . . . . . . . . . . . . . . . . . 60
Sett ing serial port baud rate . . . . . . . . . . . . . . . . . . . . . . . . . . . . . . . . . . . . . . . . . . . 60
Enabling serial port echo . . . . . . . . . . . . . . . . . . . . . . . . . . . . . . . . . . . . . . . . . . . . . 60
Sett ing t he proj ect or address . . . . . . . . . . . . . . . . . . . . . . . . . . . . . . . . . . . . . . . . . . 61
Adj ust ing the back light sett ings . . . . . . . . . . . . . . . . . . . . . . . . . . . . . . . . . . . . . . . . . . 61
Sett ing t he hot key . . . . . . . . . . . . . . . . . . . . . . . . . . . . . . . . . . . . . . . . . . . . . . . . . . . 61
Configuring dat e and t im e sett ings . . . . . . . . . . . . . . . . . . . . . . . . . . . . . . . . . . . . . . . . 62
Scheduling event s . . . . . . . . . . . . . . . . . . . . . . . . . . . . . . . . . . . . . . . . . . . . . . . . . . . . 62
Sett ing up a schedule . . . . . . . . . . . . . . . . . . . . . . . . . . . . . . . . . . . . . . . . . . . . . . . 63
Configuring light settings . . . . . . . . . . . . . . . . . . . . . . . . . . . . . . . . . . . . . . . . . . 65
Sett ing light source m ode . . . . . . . . . . . . . . . . . . . . . . . . . . . . . . . . . . . . . . . . . . . . . . 65
Adj ust ing the light power . . . . . . . . . . . . . . . . . . . . . . . . . . . . . . . . . . . . . . . . . . . . . . . 66
Diagnostic tools . . . . . . . . . . . . . . . . . . . . . . . . . . . . . . . . . . . . . . . . . . . . . . . . . . 67
Viewing proj ect or inform at ion . . . . . . . . . . . . . . . . . . . . . . . . . . . . . . . . . . . . . . . . . . . . 67

HS Series 4K User Manual 7
020-002053-01 Rev. 1 (05-2023)
Copyright © 2023 Christie Digital Systems USA, Inc. All rights reserved.
If printed, please recycle this document after use.
Content
Select ing a test pat tern . . . . . . . . . . . . . . . . . . . . . . . . . . . . . . . . . . . . . . . . . . . . . . . . 67
Restoring fact ory default sett ings . . . . . . . . . . . . . . . . . . . . . . . . . . . . . . . . . . . . . . . . . 68
Configuring input settings . . . . . . . . . . . . . . . . . . . . . . . . . . . . . . . . . . . . . . . . . . 69
Sett ing m ain input source . . . . . . . . . . . . . . . . . . . . . . . . . . . . . . . . . . . . . . . . . . . . . . 69
Set ting second input source . . . . . . . . . . . . . . . . . . . . . . . . . . . . . . . . . . . . . . . . . . . . . 69
Enabling second input source . . . . . . . . . . . . . . . . . . . . . . . . . . . . . . . . . . . . . . . . . . . . 69
Swapping m ain input and second input source . . . . . . . . . . . . . . . . . . . . . . . . . . . . . . . . 70
Set ting t he size of second input source . . . . . . . . . . . . . . . . . . . . . . . . . . . . . . . . . . . . . 70
Set ting up t he display layout wit h t wo input sources . . . . . . . . . . . . . . . . . . . . . . . . . . . . 70
I nput sources layout and size . . . . . . . . . . . . . . . . . . . . . . . . . . . . . . . . . . . . . . . . . . 70
Set ting t he t im ing det ect ion m ode . . . . . . . . . . . . . . . . . . . . . . . . . . . . . . . . . . . . . . . . . 71
Sett ing t he input searching m et hod . . . . . . . . . . . . . . . . . . . . . . . . . . . . . . . . . . . . . . . . 71
Set ting up the backup input . . . . . . . . . . . . . . . . . . . . . . . . . . . . . . . . . . . . . . . . . . . . . 72
Adj ust ing the sub im age . . . . . . . . . . . . . . . . . . . . . . . . . . . . . . . . . . . . . . . . . . . . . . . 72
Enabling low latency m ode . . . . . . . . . . . . . . . . . . . . . . . . . . . . . . . . . . . . . . . . . . . . . . 72
Configuring the EDI D sett ing . . . . . . . . . . . . . . . . . . . . . . . . . . . . . . . . . . . . . . . . . . . . 73
Configuring the HDMI out put . . . . . . . . . . . . . . . . . . . . . . . . . . . . . . . . . . . . . . . . . . . . 73
Signal connectivity specifications . . . . . . . . . . . . . . . . . . . . . . . . . . . . . . . . . . . . . 74
HDMI 1/ HDMI 2 video form ats . . . . . . . . . . . . . . . . . . . . . . . . . . . . . . . . . . . . . . . . . . . . 75
Display Port video form at s . . . . . . . . . . . . . . . . . . . . . . . . . . . . . . . . . . . . . . . . . . . . . . 78
12G-SDI video form at s . . . . . . . . . . . . . . . . . . . . . . . . . . . . . . . . . . . . . . . . . . . . . . . . 81
HDBaseT video form at s . . . . . . . . . . . . . . . . . . . . . . . . . . . . . . . . . . . . . . . . . . . . . . . . 82
Pict ure- in- pict ure/ picture- by- pict ure ( PI P/ PBP) com patibility . . . . . . . . . . . . . . . . . . . . . . . 85
Regulatory . . . . . . . . . . . . . . . . . . . . . . . . . . . . . . . . . . . . . . . . . . . . . . . . . . . . . . 86
Safet y . . . . . . . . . . . . . . . . . . . . . . . . . . . . . . . . . . . . . . . . . . . . . . . . . . . . . . . . . . . . 86
Laser safety . . . . . . . . . . . . . . . . . . . . . . . . . . . . . . . . . . . . . . . . . . . . . . . . . . . . . . . . 86
Elect ro- m agnet ic com pat ibilit y . . . . . . . . . . . . . . . . . . . . . . . . . . . . . . . . . . . . . . . . . . . 86
Em issions . . . . . . . . . . . . . . . . . . . . . . . . . . . . . . . . . . . . . . . . . . . . . . . . . . . . . . . 86
I m m unity . . . . . . . . . . . . . . . . . . . . . . . . . . . . . . . . . . . . . . . . . . . . . . . . . . . . . . . 87
California law on securit y . . . . . . . . . . . . . . . . . . . . . . . . . . . . . . . . . . . . . . . . . . . . . 87
Environm ent al . . . . . . . . . . . . . . . . . . . . . . . . . . . . . . . . . . . . . . . . . . . . . . . . . . . . . . 87

HS Series 4K User Manual 8
020-002053-01 Rev. 1 (05-2023)
Copyright © 2023 Christie Digital Systems USA, Inc. All rights reserved.
If printed, please recycle this document after use.
Introduction
This m anual is int ended for Christie- qualified inst allers and t rained operators of t he proj ect or.
For com plet e HS Series 4K product docum entat ion and t echnical support , go t o
www.christiedigital.com.
This pr oj ect or is int ended for use in a non- cinem a environm ent .
Models
The following m odels are support ed for the HS Series 4K.
• 4K13- HS
• 4K13A- HS
• 4K22- HS
• 4K22A- HS
Safety and warning guidelines
This proj ector m ust be operat ed in an environm ent t hat m eet s the operating range specification.
Use only the att achm ent s and/ or accessories recom m ended by Christ ie. Use of others m ay result in
the risk of fir e, shock, or personal inj ury.
Warning! I f not avoided, t he following could result in deat h or serious inj ur y.
• Do not ex pose t he product t o m oist ure.
• Do not operat e t he pr oduct wit hout all of it s covers in place.
• This product m ust be inst alled w it hin a restrict ed access locat ion not accessible by t he general
public.
• Only per sonnel who are t rained on t he precaut ions for t he r est rict ed access location can be
gr ant ed entry t o t he area.
• FI RE HAZARD! Keep hands, clot hes, and all com bust ible m aterial away from t he concent rat ed
light beam of t he proj ect or.
• TRI P OR FI RE HAZARD! Posit ion all cables where they cannot cont act hot sur faces, be pulled, be
tripped over, or dam aged by persons walking on or obj ects rolling over t he cables.
• SHOCK HAZARD! Disconnect t he product from AC befor e inst alling, m oving, serv icing, cleaning,
rem oving com ponent s, or opening any enclosure.
• A m inim um of t wo people or appropriat ely r at ed lift equipm ent is r equired t o safely lift , inst all, or
m ove t he product .
• OPTI CAL RADI ATI ON HAZARD! Disconnect t he pow er plug from t he AC out let if t he product is not
being used for an ext ended period of t im e.
• Do not allow anyt hing t o r est on t he power cord.
• Always pr ovide pr oper vent ilat ion for t he product t o prevent overheating.

HS Series 4K User Manual 9
020-002053-01 Rev. 1 (05-2023)
Copyright © 2023 Christie Digital Systems USA, Inc. All rights reserved.
If printed, please recycle this document after use.
Introduction
AC/power precautions
Read all safet y and warning guidelines before powering on t he proj ector.
Installation safety and warning guidelines
Read all safet y and warning guidelines before inst alling t he proj ector.
Laser safety precautions
Read all safet y and warning guidelines before inst alling or operat ing t he proj ect or.
Caution! I f not avoided, t he following could result in m inor or m oderat e injury.
• Only Christie- qualified technicians are perm it t ed t o open product enclosures.
• All procedures m ust be perfor m ed by Christie- qualified t echnicians.
Notice. I f not avoided, t he follow ing m ay r esult in equipm ent or propert y dam age.
• Always use a lens plug when inst alling or m oving the product. This prevents contam inant s from
ent ering t he product .
• Only use cleaning solutions r ecom m ended by Christ ie. All ot her cleaning solutions m ay cause
pr oduct dam age and void t he warrant y.
Warning! I f not avoided, t he following could result in deat h or serious inj ur y.
• FIRE HAZARD! Do not use a power cord, har ness, or cable t hat appear s dam aged.
• FI RE OR SHOCK HAZARD! Do not overload power out let s and ext ension cords.
• SHOCK HAZARD! Only use the AC power cord provided w it h t he product or recom m ended by
Christie.
• FI RE AND SHOCK HAZARD! Do not at t em pt operation unless t he power cord, power socket , and
power plug m eet t he appr opriat e local r at ing standar ds.
• SHOCK HAZARD! Do not at tem pt operat ion if t he AC supply is not wit hin t he specified volt age
and curr ent , as specified on t he license label.
• SHOCK HAZARD! The AC pow er cord m ust be insert ed int o an out let w it h grounding.
• SHOCK HAZARD! Disconnect t he product from AC befor e inst alling, m oving, serv icing, cleaning,
rem oving com ponent s, or opening any enclosure.
• I nst all t he product near an easily accessible AC receptacle.
Warning! I f not avoided, t he following could result in deat h or serious inj ur y.
• LASER RADI ATI ON HAZARD! This proj ect or has a built - in Class 4 Laser m odule. Never at tem pt to
disassem ble or m odify t he laser m odule.
• Any operat ion or adj ust m ent not specifically inst ructed in the User m anual creat es t he risk of
hazardous laser radiat ion exposur e.
• Do not operat e t he pr oduct wit hout all of it s covers in place.
• Do not look directly int o the lens w hen t he light source is on. The extrem ely high bright ness can
cause per m anent eye dam age.
• Only Christ ie- qualified t echnicians who are knowledgeable about t he hazards associat ed wit h
laser use, high- volt age, and high t em peratures generat ed by t he product are aut horized to
assem ble, inst all, and service t he Christ ie Laser Proj ect ion Syst em .
• Do not look directly int o the lens w hen t he light source is on. The extrem ely high bright ness can
cause per m anent eye dam age. Class 1 laser product of I EC/ EN 60825- 1: 2014 and Risk Group 2
according t o I EC 62471- 5: 2015.
HS Series 4K User Manual 10
020-002053-01 Rev. 1 (05-2023)
Copyright © 2023 Christie Digital Systems USA, Inc. All rights reserved.
If printed, please recycle this document after use.
Introduction
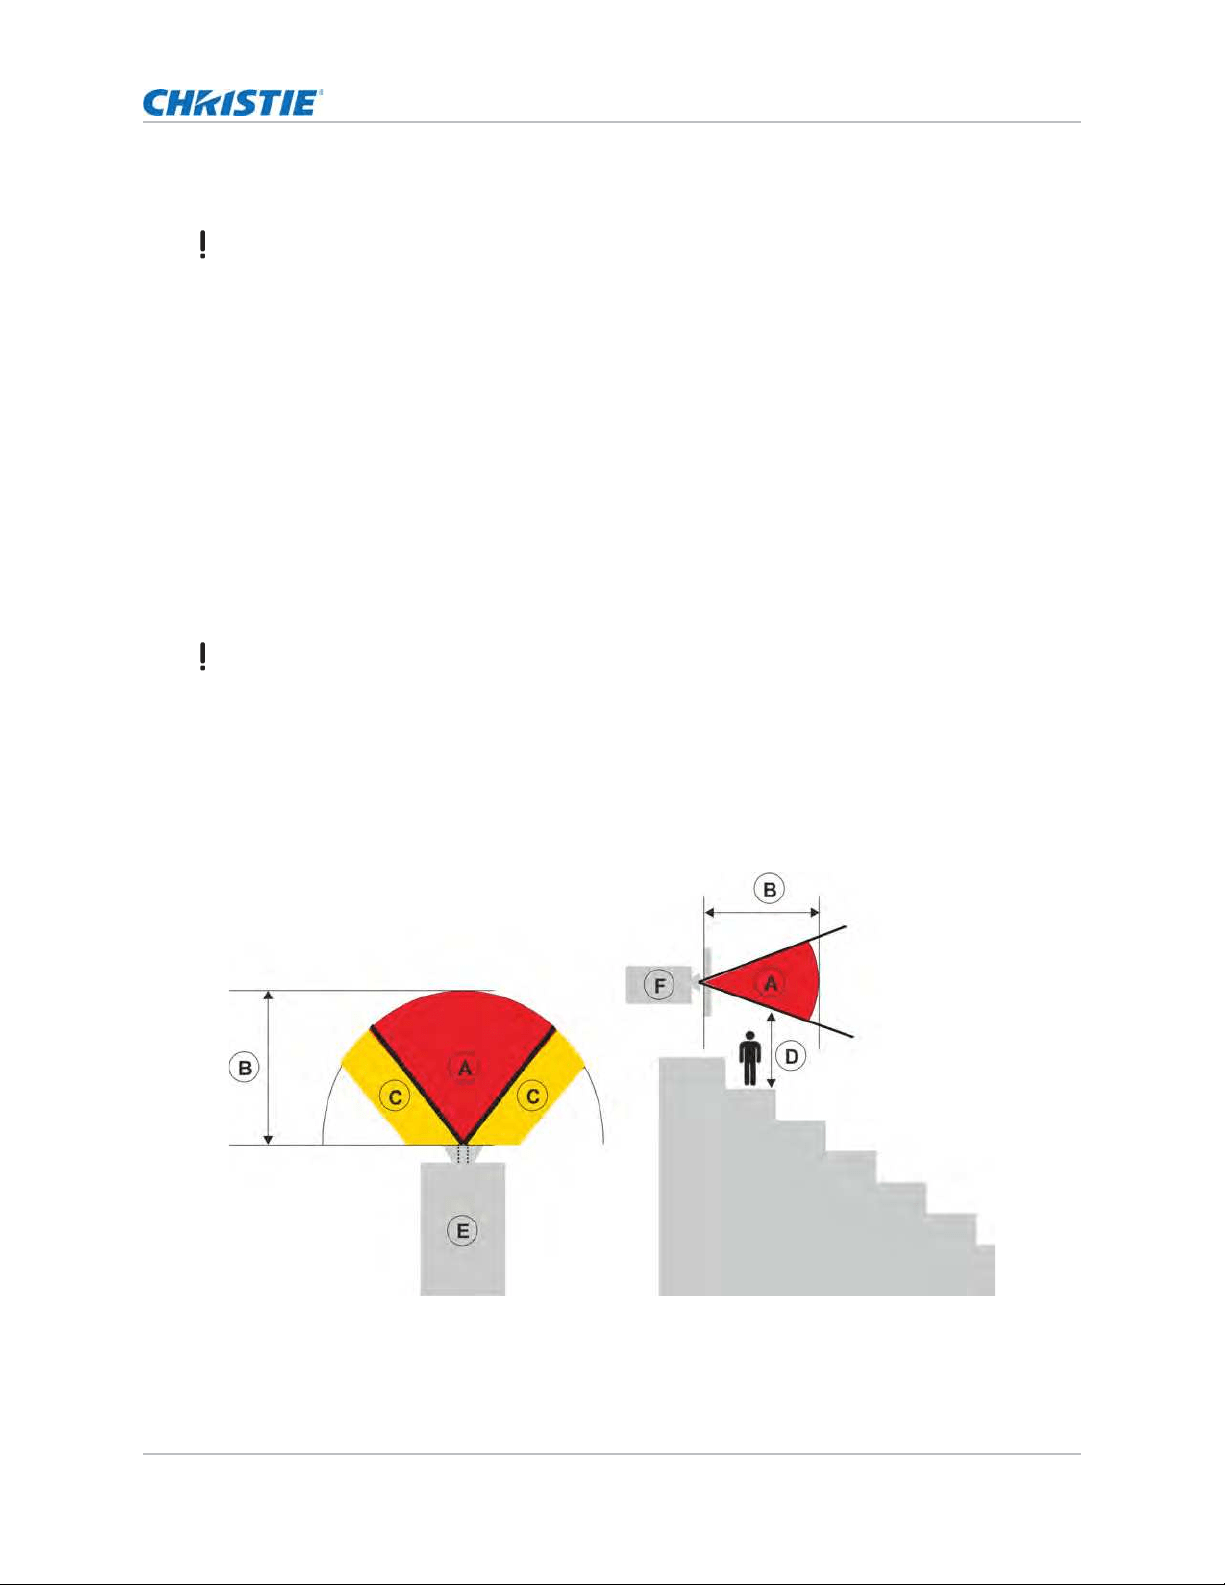
Light intensity hazard distance
This proj ect or has been classified as Risk Group 3 according t o t he I EC 62471- 5: 2015 st andard due
to possible hazardous optical and t herm al radiat ion being em it t ed.
The following diagram shows t he zones for optical and skin hazard dist ances:
Warning! I f not avoided, t he following could result in deat h or serious inj ur y.
• I nst all t he product so users and the audience cannot enter t he r estrict ed area at eye level.
• I nst all t he product out of reach.
• LASER RADI ATI ON! Do not look direct ly int o t he laser beam of t he rem ote.
• Com plies wit h 21 CFR 1040.10 and 1040.11 except for conform ance as a Risk Gr oup 2 LI P as
defined in I EC 62471- 5: Ed. 1.0. For m ore inform ation see Laser Not ice No. 57, dat ed May 8,
2019. I EC 60825- 1: 2014: CLASS 1 LASER PRODUCT - RI SK GROUP 2.
• For 4K13- HS, 4K13A- HS, 4K22- HS, and 4K22A-HS, no direct exposure t o t he beam shall be
perm itt ed, RG3 I EC 62471- 5 when inst alled with 140- 110103- XX lens
( t hr ow rat io 1.5- 2.0) or of a higher Throw r at io lens.
Warning! I f not avoided, t he following could result in deat h or serious inj ur y.
• PERMANENT/ TEMPORARY BLI NDNESS HAZARD! No dir ect exposure t o t he beam m ust be
per m it t ed.
• PERMANENT/ TEMPORARY BLI NDNESS HAZARD! Oper at ors m ust cont rol access t o t he beam
within the hazard dist ance or inst all t he product prevent ing pot ent ial exposure of t he spectat ors'
eyes from being in t he hazard dist ance. Hazard zone shall be no lower t han 3.0 m et ers ( 9.8 feet )
above t he floor. I n addit ion, horizont al clearance t o the hazard zone shall be a m inim um 2.5
m et ers ( 8.2 feet ) .
• EXTREME BRIGHTNESS! Do not place reflective object s in t he product light pat h.

HS Series 4K User Manual 11
020-002053-01 Rev. 1 (05-2023)
Copyright © 2023 Christie Digital Systems USA, Inc. All rights reserved.
If printed, please recycle this document after use.
Introduction
• A—Hazar d zone. The region of space w here the proj ect ion light from t he laser illum inated
proj ector is above em ission lim it s for Risk Group 3. The light int ensit y m ay cause eye dam age
aft er a m om ent ary or brief exposure ( before a person can aver t his or her eyes away from t he
light source) . The light m ay cause skin burns t o occur.
• B—Hazard dist ance. Operat ors m ust cont rol access t o t he beam w it hin the hazard distance or
inst all t he product prevent ing pot ent ial exposure of t he spectators' eyes from being in t he
hazard distance.
• C—No access zone. Horizont al clearance of t he no access zone shall be a m inim um of 2.5
m et ers ( 8.2 feet) .
• D—Vert ical dist ance t o hazard zone. The hazard zone shall be no low er t han 3.0 m et ers ( 9.8
feet ) above t he floor.
• E—Represent s the t op view of the proj ector.
• F—Represent s t he side view of t he proj ect or.
For inform at ion detailing t he hazard dist ance for each lens, refer t o t he
Christie HS Series 4K Installation and Setup Guide (P/N: 020-002055-XX).
For installations in the United States
The following m ust be in place for laser- illum inat ed proj ect or inst allat ions in t he Unit ed States:
• Any hum an access t o the hazard zone, if applicable, m ust be r est rict ed by barriers t o enforce
the no access zone.
• Per m anent show inst allat ions containing Risk Group 3 laser- illum inated proj ectors m ust m eet
the following condit ions:
• I nst alled by Christ ie or by Christ ie- authorized and t rained inst allers. Refer t o the
EXTERNAL - Laser safet y awareness t raining
( Course code: CS- ELSA-01) on t he http://www.christieuniversity.com sit e.
• Per form ed according t o instruct ions provided by Christ ie.
• Ensure t he proj ection syst em is securely m ount ed or im m obilized t o prevent unintended
m ovem ent or m isalignm ent of t he proj ect ions.
• Tem porary show installations cont aining Risk Group 3 laser- illum inated proj ect ors m ay be
inst alled by Christie or sold or leased only t o valid laser light show variance holders ( laser light
show m anufact urers) for im age proj ect ion applications. Such m anufacturers m ay current ly hold
a valid variance for product ion of Class I I I b and I V laser light shows and/ or for incorporation of
the Risk Group 3 laser- illum inat ed proj ect ors int o t heir show s. This requirem ent applies also t o
dealers and dist ribut ors of t hese laser- illum inat ed proj ectors.
• The Christ ie Laser Proj ect ion Sy st em I nst allat ion Checklist m ust be fully com plet ed aft er the
checklist can be found as a separat e docum ent in t he accessory box wit h the m anual.
• Cert ain US stat es have addit ional laser regulat ory requirem ent s. Go t o www.christiedigital.com
for furt her inform at ion.
HS Series 4K User Manual 12
020-002053-01 Rev. 1 (05-2023)
Copyright © 2023 Christie Digital Systems USA, Inc. All rights reserved.
If printed, please recycle this document after use.
Introduction
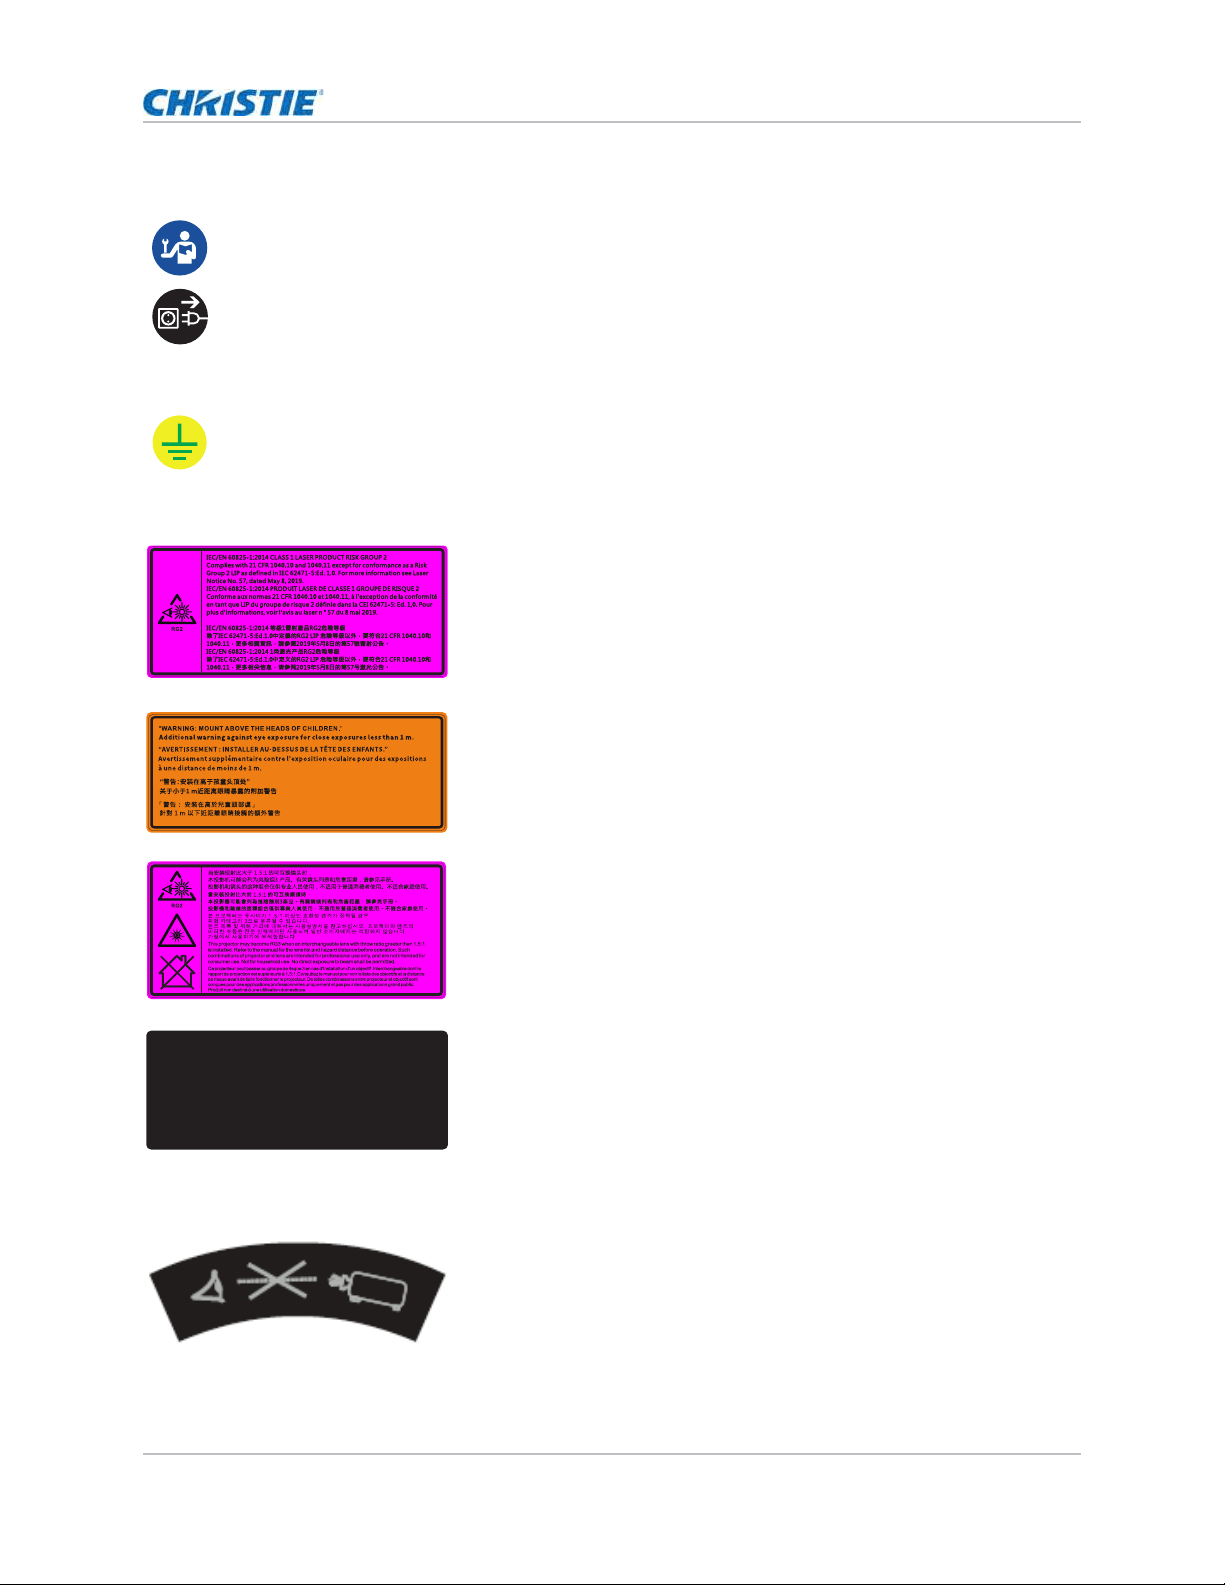
Product labels
Learn about the labels t hat m ay be used on t he product . Labels on your product m ay be yellow or
black and w hit e.
General hazards
Hazard warnings also apply t o accessories once t hey are installed in a Christie product that is
connect ed t o power.
Fire and Shock Hazard
To prevent fir e or shock hazar ds, do not expose t his product to rain or m oisture.
Do not alt er t he power plug, overload t he power out let , or use it w ith ext ension Cords.
Do not rem ove t he product enclosure.
Only Christ ie- qualified t echnicians are aut horized t o serv ice t he product.
Electrical Hazard
Risk of elect ric shock.
Do not rem ove the product enclosure.
Only Christ ie- qualified t echnicians are aut horized t o ser vice t he product .
General hazard.
Electric shock hazard. To avoid personal inj ury, disconnect all power sources befor e perform ing
m aint enance or service.
Electrocut ion hazard. To avoid personal inj ur y, always disconnect all power sour ces befor e
per for m ing m aint enance or service procedures.
Fire hazard. To avoid personal inj ur y and proper t y dam age, follow t he instruct ions provided in
this docum ent .
Hot surface hazard. To avoid per sonal inj ur y, allow the product t o cool for t he recom m ended cool
down t im e before perform ing m aintenance or service.
Burn hazard. To avoid personal inj ury, allow t he product t o cool for t he recom m ended cool down
tim e before perfor m ing m aint enance or service.
Moving part s hazard. To avoid per sonal inj ury, keep hands clear and loose clot hing t ied back.
Fan hazard. To avoid personal inj ury, keep hands clear and loose clot hing t ied back. Always
disconnect all power sources before perform ing m aint enance or service procedures.
Volt age hazard. To avoid personal inj ury, always disconnect all power sources before perform ing
m aint enance or service procedures.
Not for household use.
HS Series 4K User Manual 13
020-002053-01 Rev. 1 (05-2023)
Copyright © 2023 Christie Digital Systems USA, Inc. All rights reserved.
If printed, please recycle this document after use.
Introduction
Mandatory action
Electrical labels
Laser labels
Additional safety hazard
Consult t he service m anual.
Disconnect all pow er sources before perform ing m aint enance or service procedures.
I ndicat es t he presence of an eart h ground.
This proj ect or has been classified as Class 1 Laser Product- Risk Group 2
according to t he I EC 60825- 1: 2014 and I EC 62471- 5: 2015 st andard.
I ndicat es a light hazard. Do not look direct ly into t he lens. The ext rem e
high bright ness can cause perm anent eye dam age.
Class 1 Laser Product- Risk Group 2 according to Class 1 I EC 60825-
1: 2014 and I EC 62471- 5: 2015.
Mount above t he heads of childr en. When wit hin 1 m of the product , avoid
eye exposure t o avoid t em porary or perm anent eye dam age.
4K22- HS and 4K22A- HS m ay becom e RG3 when an int er changeable lens
with t hrow rat io greater from 1.5- 2.0: 1 is inst alled.
4K13- HS and 4K13A- HS m ay becom e RG3 when an int er changeable lens
with t hrow rat io greater from 2.0- 4.0: 1 is inst alled.
FDA laser variance ( US proj ect ors only) .
This product is in conform it y wit h perform ance st andar ds for laser
pr oduct s under 21 CFR 1040, except wit h r espect t o t hose charact erist ics
authorized by Variance Num ber 2016- V- 1838 effect ive on Decem ber 4,
2018.
Do not look direct ly int o t he lens. The ext r em ely high bright ness can
cause perm anent eye dam age.
Christie Digital Systems Canada Inc.
809 Wellington Street North
Kitchener, Ontario N2G 4Y7
Canada
This product is in conformity with performance standards
for laser products under 21 CFR 1040, except with respect
to those characteristics authorized by Variance Number
2016-V-1838 eective on December 4, 2018.
U.S.A Only

HS Series 4K User Manual 14
020-002053-01 Rev. 1 (05-2023)
Copyright © 2023 Christie Digital Systems USA, Inc. All rights reserved.
If printed, please recycle this document after use.
Introduction
Projector overview
The HS Series 4K is a high bright ness, high- resolut ion video graphics one- chip laser- based
proj ector. The proj ector is available in 4K resolut ion and uses Digit al Light Processing ( DLP™)
technology from Texas I nst rum ent s. I t is prim arily designed for fixed installat ion and secondary
applicat ions including rental- st aging and LBE ( Locat ion Based Ent ert ainm ent ) . This product is used
for professional applicat ions and is not for dom estic use.
Contact your dealer
Record t he inform at ion about your proj ector and keep t his inform at ion w it h your records t o assist
wit h t he servicing of your proj ector. I f you encount er a problem wit h your Christ ie proj ect or, cont act
your dealer.
Key features
• 4K 3840 x 2160 resolut ion
• High pict ure qualit y wit h superb bright ness perform ance
• Lens suit e opt ions for inst allat ion flexibilit y
• Pow ered lens adj ustm ent wit h lens m em ory function
• Proj ect ion lens com pat ibility:
• 360 degrees proj ection
• 3D blending and auto warping
• Support s fog filt er as an optional accessory
• Full HD 3D t echnology with fram e sequent ial up t o 120 Hz
• Support 4K 3D dual pipe
Purchase record
Dealer:
Dealer or Christ ie Sales/ Service cont act phone num ber:
Proj ect or serial num ber:
The serial num ber can be found on t he license label located on t he display panel
Purchase dat e:
I nst allat ion date:
Ethernet settings
Default gat eway
Proj ect or I P address
Subnet m ask

HS Series 4K User Manual 15
020-002053-01 Rev. 1 (05-2023)
Copyright © 2023 Christie Digital Systems USA, Inc. All rights reserved.
If printed, please recycle this document after use.
Introduction
• Suppor t 1920 x 1080@240Hz
• Christ ie Twist ™ and Myst ique™ allows for easy and quick blending and warping.
Support for Mystique™ cam era based alignm ent syst em ( sold separat ely)
• A wide range of connectivit y including HDMI , HDBaseT, and 3D input s
• I nt egrated HDBaseT solut ion supports 4K video st ream ing t hrough RJ45
• SNMP t raps and em ail notifications
• 10- bit im age processor elect ronics wit h m odular design
• All video form at s can be resized t o full screen eit her horizont ally or vert ically while m aint aining
aspect ratio.
• The proj ector can be operat ed using any of the following:
• The built- in keypad, t he infrared ( I R) r em ot e keypad, a wired rem ot e keypad, or a PC/
device using serial com m unications ( Ethernet or RS232)
• A web page using Ethernet, or fr om a PC or device using a w ireless USB dongle ( opt ional)
How the projector works
The HS Series 4K proj ect ors accept a variety of input signals for a wide range of com m ercial
proj ection applicat ions.
Designed wit h solid- st at e illum inat ion light sources and phosphor t echnology, t he red, green and
blue color elem ent s are segm ent ed t hrough a phosphor wheel and m odulat ed by one Digital
Microm irror Device ( DMD) panel responding t o incom ing data st ream s of digit ized red, green, and
blue color inform at ion. As t hese digital st ream s flow from t he source, light from t he responding on
pixels of the DMD panel is reflect ed, converged, and proj ect ed t o t he screen t hrough proj ect ion
lenses, where all pixel reflections are superim posed in shar p full- color im ages.
List of components
This pr oj ect or com es wit h all t he item s list ed below. Check t o m ake sure your package is com plet e.
I f anyt hing is m issing, cont act your dealer.
• AC power cord
• IR remote keypad
• Product Safety Guide

HS Series 4K User Manual 16
020-002053-01 Rev. 1 (05-2023)
Copyright © 2023 Christie Digital Systems USA, Inc. All rights reserved.
If printed, please recycle this document after use.
Introduction
Product documentation
For installat ion, setup, and user inform at ion, see t he product docum entation available on t he
Christ ie Digit al System s USA I nc. websit e at www.christiedigital.com. Read all instruct ions before
using or ser vicing t his pr oduct .
1. Access t he docum ent at ion from the Christ ie website:
• Go t o t his URL: http://bit.ly/2JtghsE or
https://www.christiedigital.com/en-us/business/products/projectors/1-chip-dlp/hs-series
• Scan the QR code using a QR code reader app on a sm art phone or t ablet.
2. On t he product page, select t he m odel and swit ch t o t he Downloads tab.
Related documentation
Addit ional inform at ion on t he proj ect or is available in t he following docum ents.
• HS Series 4K Installation and Setup Guide (P/N: 020-002055-XX)
• HS Series 4K Product Safety Guide (P/N: 020-002052-XX)
• HS Series 4K Service Manual (P/N: 020-002054-XX)
• HS Series 4K Serial Commands Technical Reference (P/N: 020-103737-XX)
• Twist User Guide (P/N: 020-101380-XX)
• Mystique Operate Instruction Sheet (P/N: 020- 102382-XX)
Technical support
Technical support for Christie Ent erprise product s is available at :
• Nort h and Sout h Am erica: + 1- 800- 221- 8025 or Support .Am ericas@christ iedigit al.com
• Europe, Middle East , and Africa: + 44 ( 0) 1189 778111 or Support.EMEA@christ iedigital.com
• Asia Pacific ( support .apac@christ iedigital.com ) :
• Aust ralia: + 61 ( 0) 7 3624 4888 or t ech-Australia@christ iedigit al.com
• China: + 86 10 6561 0240 or t ech- support China@christ iedigit al.com
• I ndia: + 91 ( 80) 6708 9999 or t ech-I ndia@christ iedigit al.com
• Japan: 81- 3- 3599- 7481

HS Series 4K User Manual 17
020-002053-01 Rev. 1 (05-2023)
Copyright © 2023 Christie Digital Systems USA, Inc. All rights reserved.
If printed, please recycle this document after use.
Introduction
• Singapore: + 65 6877- 8737 or t ech- Singapore@christ iedigital.com
• Sout h Korea: + 82 2 702 1601 or t ech- Korea@christ iedigit al.com
• Christ ie Professional Services: + 1- 800- 550- 3061 or NOC@christiedigit al.com
Additional information
Lens t ype for 4K ( 4K22- HS, 4K22A- HS, 4K13- HS, 4K13A- HS) .
Lens type 140-142108-
XX
140-144100-
XX
140-115108-
XX
140-109101-
XX
140-110103-
XX
140-111104-
XX
140-116109-
XX
140-145101-
XX
Thr ow Rat io 0.38 0.65 - 0.75 1.02 - 1. 36 1.2 - 1.5 1.5 - 2 .0 2.0 - 4 .0 4.0 - 7 .2 7.2 - 1 0.8
Projection
Lens
Ult ra Short Thr ow Shor t Throw Wide Zoom Wide Zoom St andard Long Zoom Ult ra- Long Zoom Ult ra- Long Throw
Zoom Rat io No Zoom 1.15X 1.33X 1.25X 1. 33X 2X 1.8X 1.5X

HS Series 4K User Manual 18
020-002053-01 Rev. 1 (05-2023)
Copyright © 2023 Christie Digital Systems USA, Inc. All rights reserved.
If printed, please recycle this document after use.
Installation and setup
Learn how t o install, connect, and optim ize the proj ect or display.
Site requirements
To safely install and operat e t he proj ect or, the inst allat ion locat ion m ust have r est rict ed access for
aut horized personnel only and m eet t hese m inim um r equirem ent s.
Physical operating environment
Provides specificat ions for t he operat ing environm ent .
Power connection
The proj ector uses an AC power syst em allowing t he proj ector t o operat e at full bright ness wit h a
power supply of 100 t o 240 VAC. Operating t he device out side of t he volt age range m ay cause
unsat isfact ory operat ion or dam age to t he proj ect or. To ensure safet y operat ion, only use t he AC
power cord provided wit h t he pr oduct or recom m ended by Christie.
Item Specification
Am bient t em perature ( operating) 0 to 40° C ( 32 to 104° F) for 0 to 762 m eters ( 0 t o 2500 feet )
0 to 35° C ( 32 to 95° F) for 762 t o 1524 m eters ( 2500 to 5000 feet)
0 to 30° C ( 32 to 86° F) for 1524 to 3048 m et er s ( 5000 t o 10,000 feet )
St orage tem perat ure range -10 t o 60° C (14 t o 140° F)
Hum idit y range 10% to 85% RH ( m axim um ) , non condensing
St orage hum idit y range 5% t o 90% RH ( m axim um ) , non condensing
Operat ing alt itude 3048 m eters (10,000 feet ) m axim um
Model name Power requirements
4K13- HS, 4K13A- HS • 100- 240 VAC, 50/ 60Hz, 11 A
• 100- 120 VAC, 50/ 60Hz, 11 A
• 220- 240 VAC, 50/ 60Hz, 5 A
4K22- HS, 4K22A- HS • 100- 240 VAC, 50/ 60Hz, 13.5 A
• 100- 120 VAC, 50/ 60Hz, 13.5 A
• 220- 240 VAC, 50/ 60Hz, 8.5 A
HS Series 4K User Manual 19
020-002053-01 Rev. 1 (05-2023)
Copyright © 2023 Christie Digital Systems USA, Inc. All rights reserved.
If printed, please recycle this document after use.
Installation and setup
Projector components
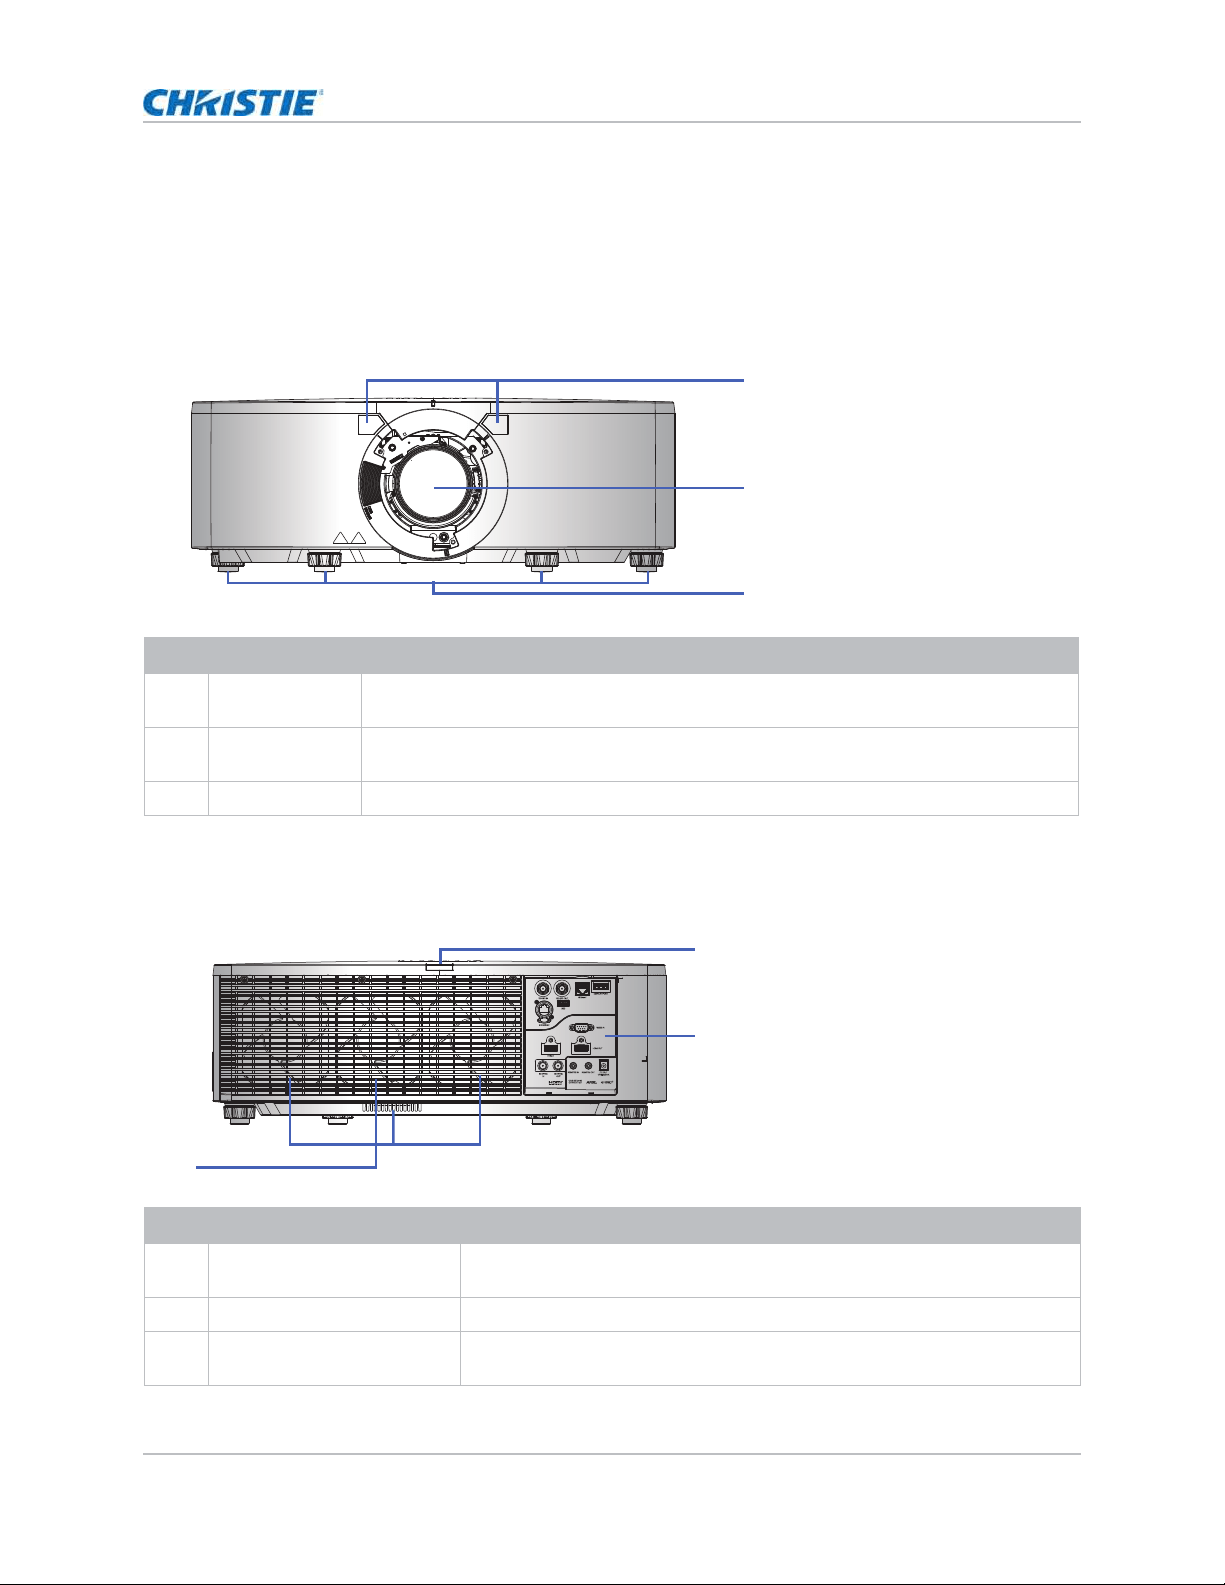
I dent ify t he m ain com ponent s of t he proj ect or.
Front view
I dent ify t he m ain com ponent s on the front of t he proj ector.
Rear view
I dent ify t he m ain com ponent s on the rear of t he proj ect or.
ID Part name Description
1 Front I R sensor Receives signals from t he I R r em ot e keypad. Keep t he signal path t o t he sensor
unobstructed for unint er rupt ed com m unicat ion with t he proj ect or.
2 Pr oj ect ion lens Allows aut om ated lens cont r ol and adj ust m ent : vert ical and horizont al offsets, zoom ,
and focus.
3 Adj ust able feet Raises or lowers t he feet t o lev el t he proj ect or.
ID Part name Description
1 Rear I R sensor Receives signals from t he I R rem ot e keypad. Keep t he signal pat h
unobstructed for unint er rupt ed com m unicat ion w it h t he proj ect or.
2 I nput / Output ( I / O) panel Connect s the proj ect or t o ext er nal dev ices.
3 Cooling air vent s (exhaust) Provides cooling t o t he proj ect or. Keep t hese vent s unobst ructed t o prevent
the proj ect or from overheat ing.
1
2
3
1
2
3
HS Series 4K User Manual 20
020-002053-01 Rev. 1 (05-2023)
Copyright © 2023 Christie Digital Systems USA, Inc. All rights reserved.
If printed, please recycle this document after use.
Installation and setup
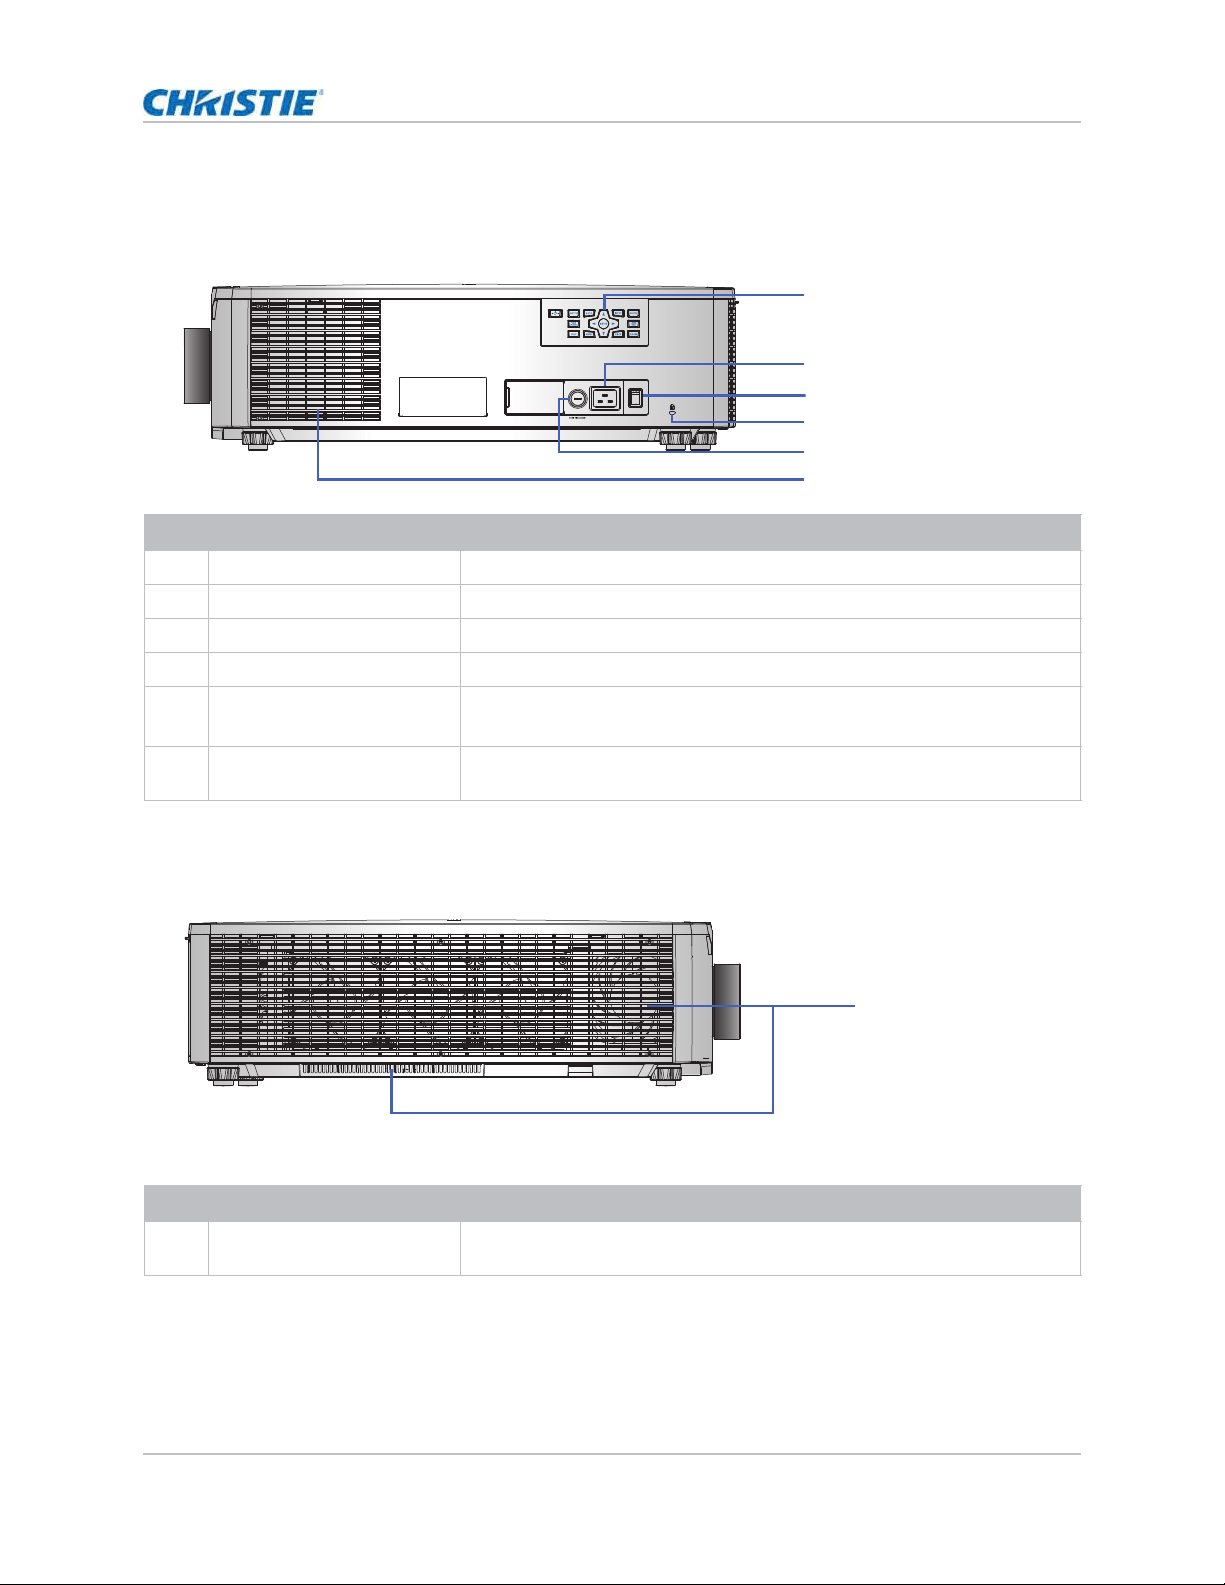
Left view
I dent ify t he m ain com ponent s on the left side of t he proj ector.
Right view
I dent ify t he m ain com ponent on t he right side of t he proj ect or.
ID Part name Description
1 Built- in keypad Cont rols t he proj ector.
2 AC input Connect s t o t he supplied power adapt er.
3 Power but ton Power s the proj ect or on or off.
4 Kensingt on lock Secures t he project or t o count er t ops, tables, and so on.
5 Fuse • 4K13- HS/ 4K13A- HS: T15A/ 250VAC
• 4K22- HS/ 4K22A- HS: T20A/ 250VAC
6 Cooling air vent s (int ake) Provides cooling t o t he proj ect or. Keep t hese vent s unobst ructed t o pr event
the proj ect or from overheat ing.
ID Part name Description
1 Cooling air vent s (int ake) Provides cooling t o t he proj ect or. Keep t hese vent s unobst ructed t o pr event
the proj ect or from overheat ing.
1
2
3
4
5
6
1
HS Series 4K User Manual 21
020-002053-01 Rev. 1 (05-2023)
Copyright © 2023 Christie Digital Systems USA, Inc. All rights reserved.
If printed, please recycle this document after use.
Installation and setup
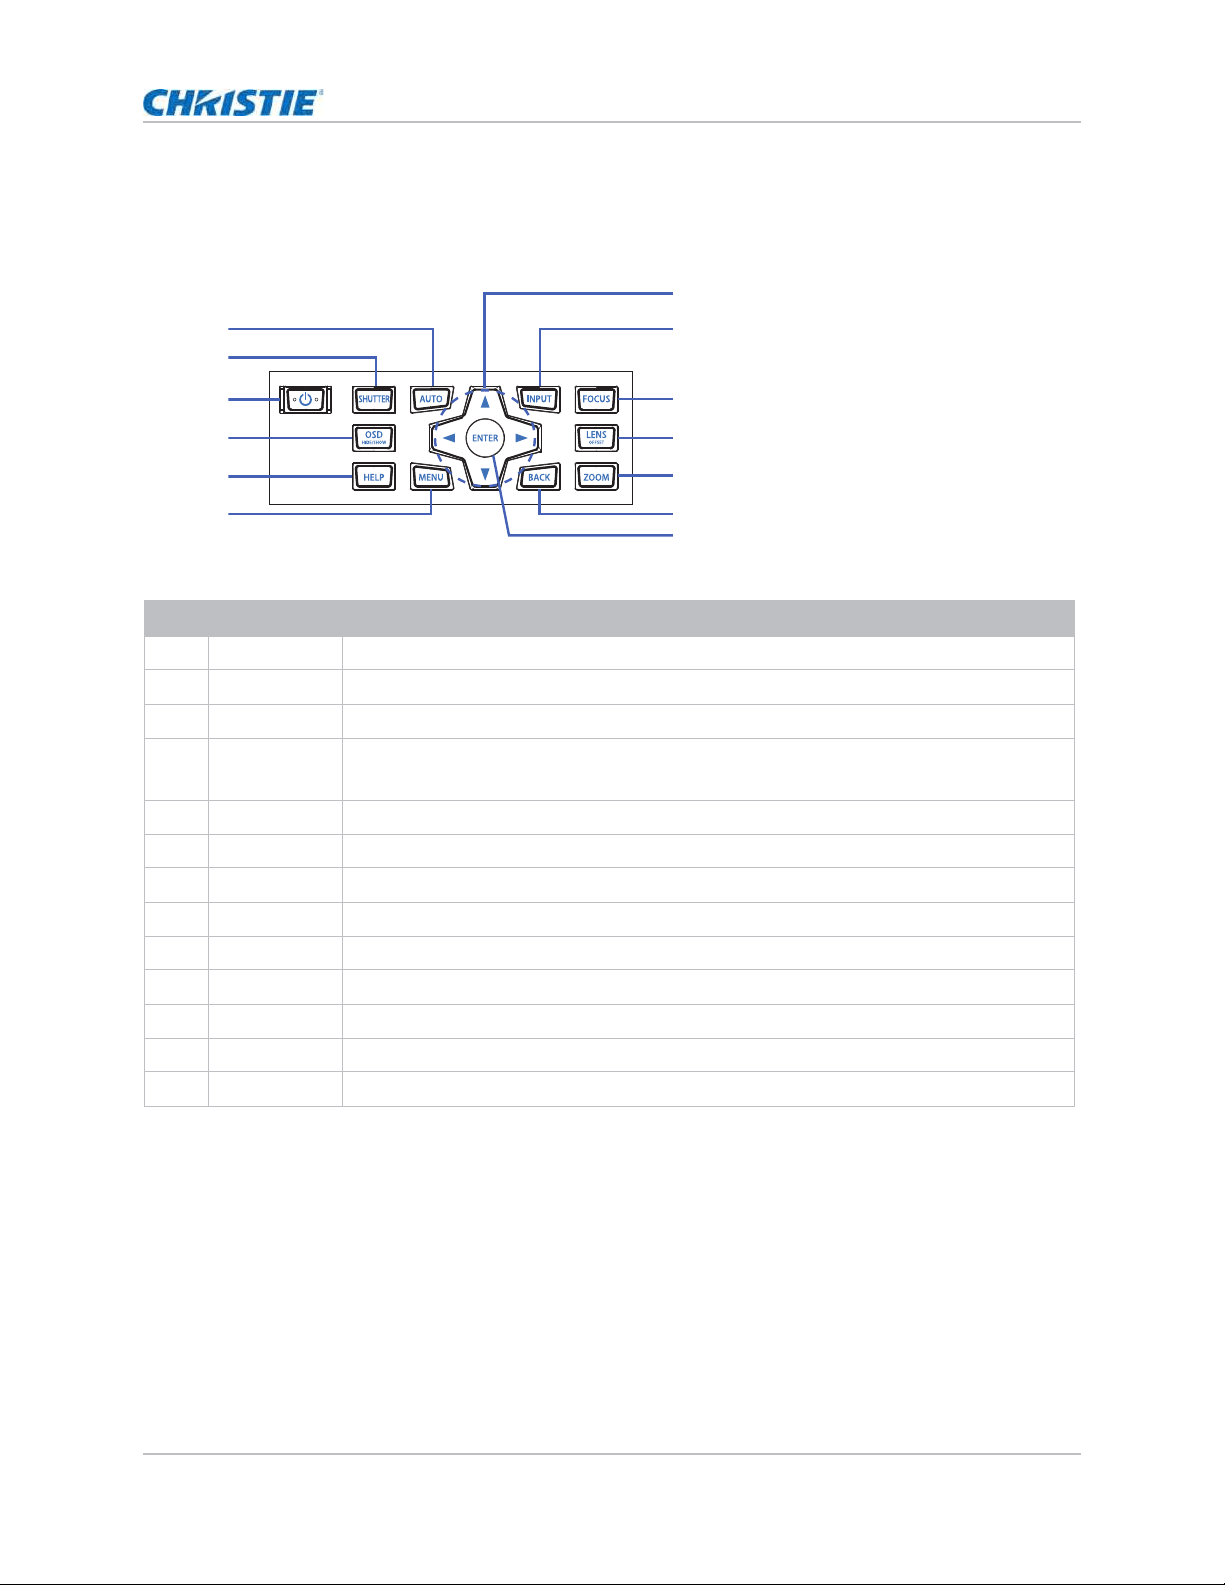
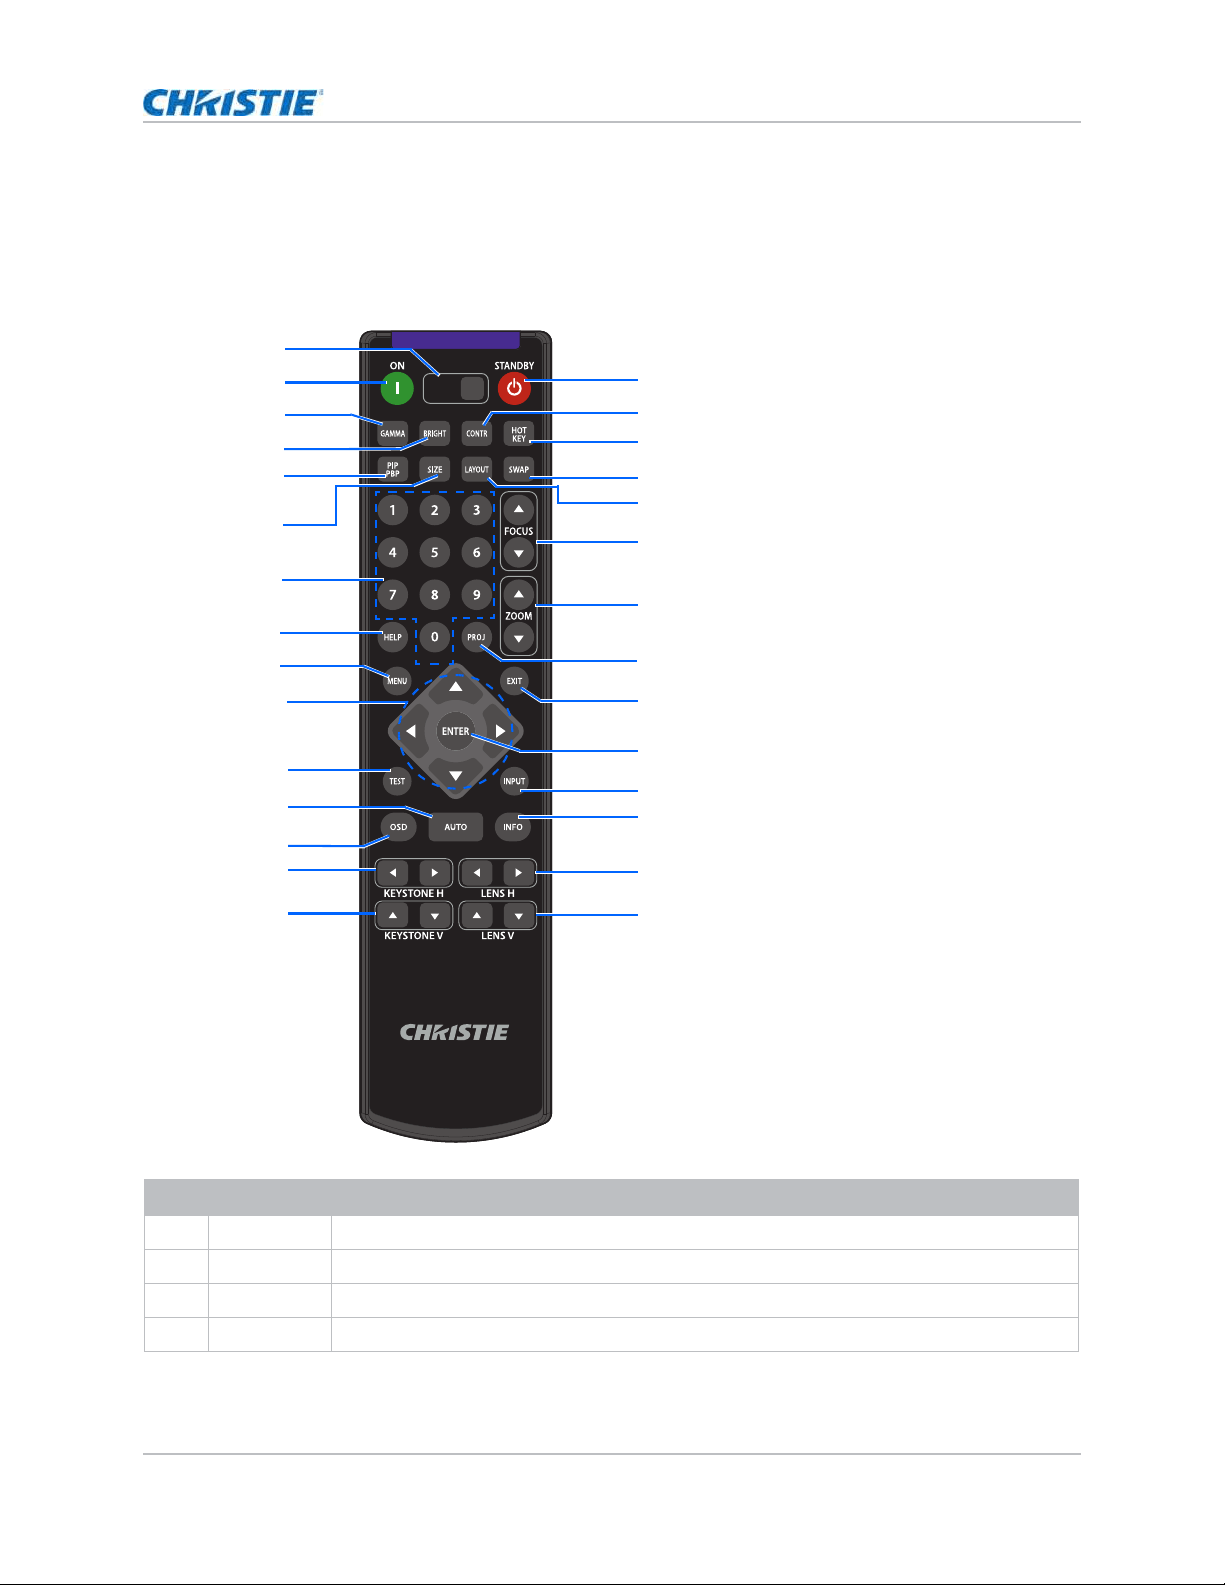
Built-in keypad
The built- in keypad cont rols t he proj ect or.
ID Button Description
1 AUTO Aut om at ically opt im izes an im age.
2 SHUTTER Displays or blanks the video im age.
3 POWER Turns t he proj ector on or off.
4OSD
HI DE/ SHOW
Hides or show s t he on- screen display ( OSD) m enus.
5 HELP Displays t he inst ructions for source connect ion.
6MENU Displays the menus.
7 Ar row Keys Adj ust s a set t ing up or down, or navigat e w it hin a m enu.
8 I NPUT Selects an input for t he m ain or pict ur e in picture/ pict ure by pict ure ( PI P/ PBP) im age.
9 FOCUS Adj ust s t he focus.
10 LENS OFFSET Adj usts t he lens vert ical or hor izont al offset sett ing.
11 ZOOM Adj ust s t he zoom .
12 BACK Ret urns t o t he pr evious level or exit s t he m enus if at t op level.
13 ENTER Confirm s the it em selection.
7
1
2
3
4
5
6
8
9
10
11
12
13
HS Series 4K User Manual 22
020-002053-01 Rev. 1 (05-2023)
Copyright © 2023 Christie Digital Systems USA, Inc. All rights reserved.
If printed, please recycle this document after use.
Installation and setup
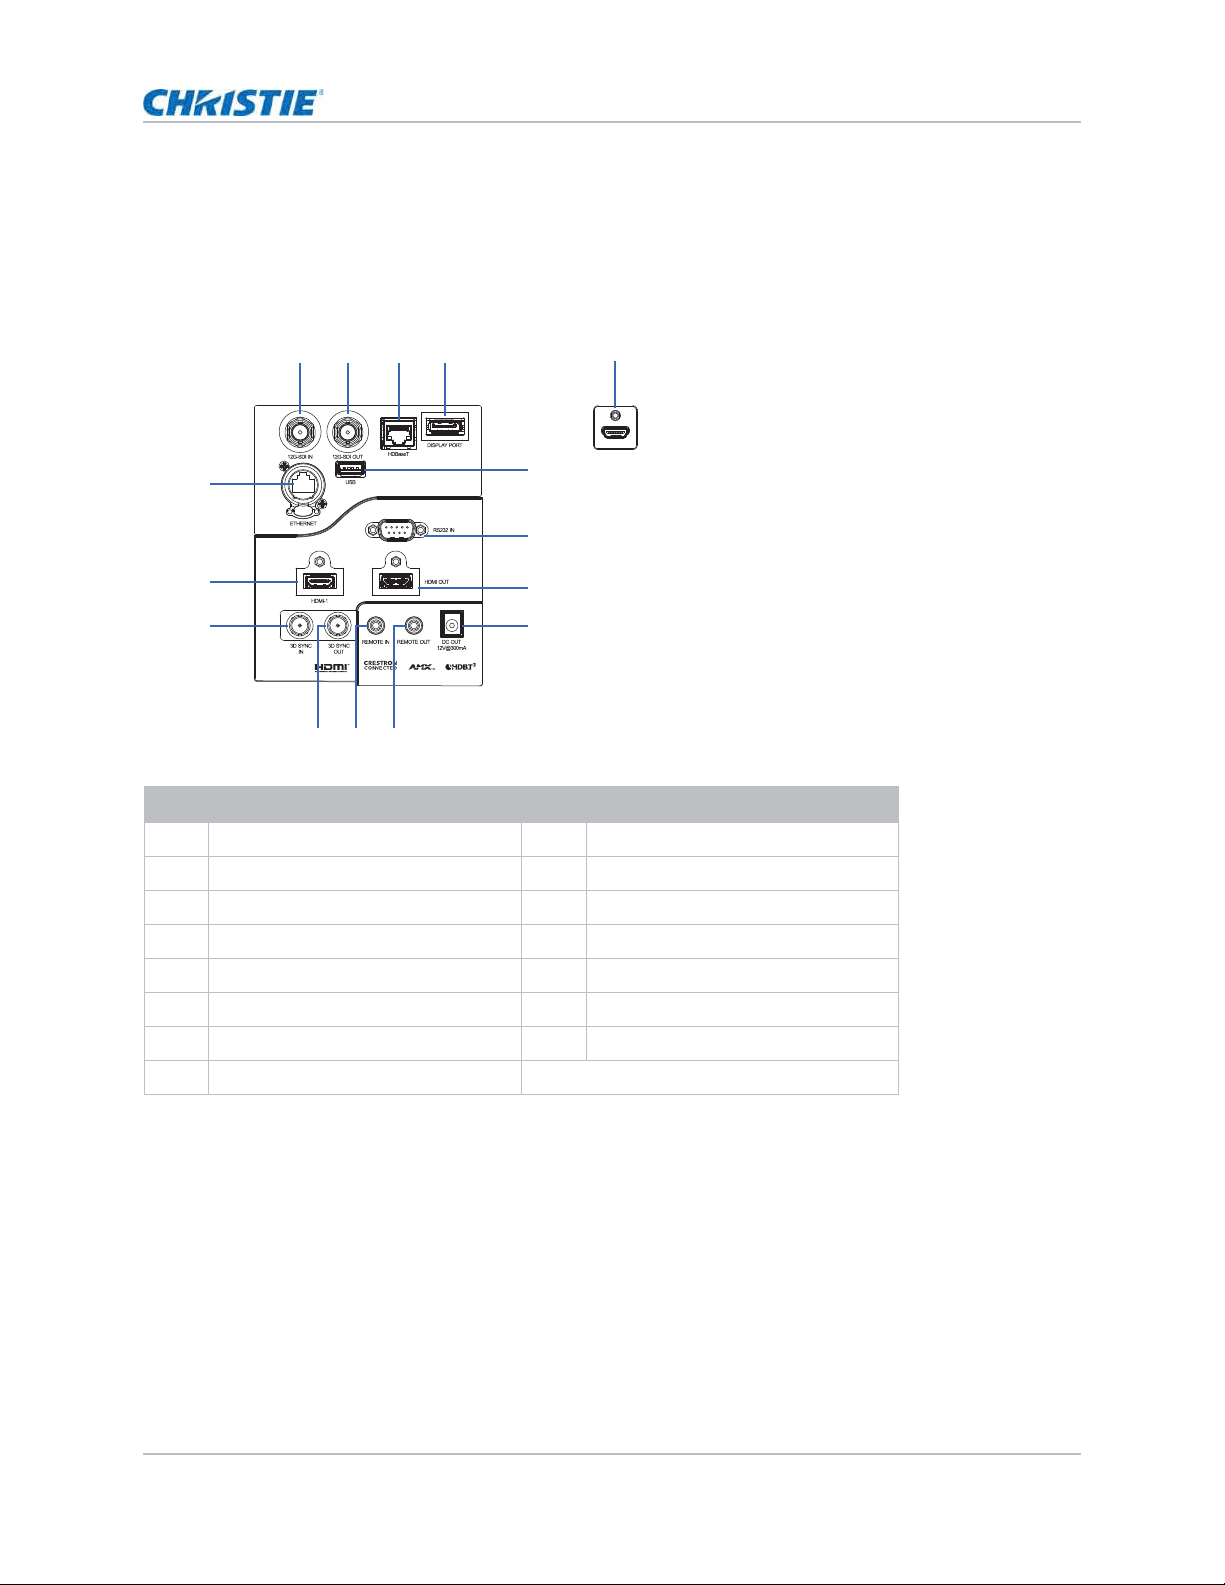
Input/output (I/O) panel
I dent ify t he com ponent s of t he I nput / Out put ( I / O) panel.
ID Connector name ID Connector name
1 12G-SDI I N 9 DC OUT
2 12G- SDI OUT 10 REMOTE OUT
3 HDBaseT 11 REMOTE I N
4 DI SPLAY PORT 12 3D SYNC OUT
5HDMI-2 133D SYNC IN
6 USB ( 5 V/ 500 m A) 14 HDMI - 1
7 RS232 I N 15 ETHERNET (10/ 100 Mbps)
8HDMI OUT
1 2 3 4
10
9
8
7
6
13
14
15
1112
5
Rear view Bottom view
HS Series 4K User Manual 23
020-002053-01 Rev. 1 (05-2023)
Copyright © 2023 Christie Digital Systems USA, Inc. All rights reserved.
If printed, please recycle this document after use.
Installation and setup
IR remote keypad
The I R rem ot e keypad com m unicat es wit h t he proj ect or by way of wireless com m unications.
I f you choose t o use a cable, not supplied, it m ust be 20 m ( 65.6 feet) or less. I f t he lengt h of cable
exceeds 20 m ( 65.6 feet ) , t he I R rem ot e keypad m ay not wor k correct ly.
ID Button Description
1 SHUTTER Displays or blanks t he video im age.
2 ON Turns the proj ect or on.
3 GAMMA Adj ust s the m id- range levels.
4 BRIGHT Adj ust s t he am ount of light in t he im age.
SHUTTER
VGA
HDMI2 DVI-D
BNC
DP
3G-SDI HDBaseT
PRESENT.
CVBS
HDMI1
16
17
18
19
20
21
22
24
25
26
27
28
29
1
2
3
4
5
6
7
8
9
10
11
12
13
14
15
23

HS Series 4K User Manual 24
020-002053-01 Rev. 1 (05-2023)
Copyright © 2023 Christie Digital Systems USA, Inc. All rights reserved.
If printed, please recycle this document after use.
Installation and setup
5PIP
PBP
Tu r n s p i ct u r e
- in- pict ure/ pict ure-by- pict ure ( PI P/ PBP) on or off.
6 SI ZE Adj ust s t he PIP/ PBP size.
7 Num ber Keys Enter a num ber, such as a channel, value, and so on. The on- screen display ( OSD)
indicates if a function is not support ed.
8 HELP Displays t he instruct ions for source connect ion.
9MENU Displays the menus.
10 Ar row Keys Adj ust s a sett ing up or down t o navigate wit hin a m enu.
11 TEST Display s a test pat ter n.
12 AUTO Aut om at ically opt im izes an im age.
13 OSD Hides or shows OSD m enus.
14 KEYSTONE H Adj usts t he horizont al keystone.
15 KEYSTONE V Adj usts t he vert ical keyst one.
16 STANDBY Turns t he proj ect or off.
17 CONTR Adj ust s the difference bet ween dark and light .
18 HOT KEY Selects y our preset key quickly.
19 SWAP Swaps t he m ain and PI P/ PBP im ages.
20 LAYOUT Adj ust s t he PI P/ PBP layout .
21 FOCUS Adj usts t he focus t o im prove im age clar it y as r equired.
22 ZOOM Adj ust s the zoom t o achieve a required im age size.
23 PROJ Changes t he I R r em ot e keypad I D.
• To assign an I D, select PROJ + < 1 t o 9> .
• To r et urn t o t he universal I R r em ot e I D, select PROJ + 0.
24 EXI T Ret urns t o t he previous level or exit s m enus if at t he t op level.
25 ENTER Select s a highlight ed m enu item , or changes or accepts a value.
26 I NPUT Select s an input for t he m ain or PI P/ PBP im age.
27 I NFO Displays t he proj ect or inform at ion.
28 LENS H Adj ust s the posit ion of t he im age horizontally.
29 LENS V Adj ust s the posit ion of t he im age vert ically.
ID Button Description
HS Series 4K User Manual 25
020-002053-01 Rev. 1 (05-2023)
Copyright © 2023 Christie Digital Systems USA, Inc. All rights reserved.
If printed, please recycle this document after use.
Installation and setup
Positioning the display
When you select a position for t he pr oj ector, consider t he size and shape of your screen, t he
location of your pow er out lets, and t he dist ance bet ween t he proj ect or and t he rest of your
equipm ent . Follow t hese general guidelines:
• Position t he proj ect or on a flat sur face at a right angle t o t he screen. The proj ect or ( wit h t he
st andard lens) m ust be at least
1.6 m (5.2 feet) from t he proj ect ion screen.
• Position t he project or t o t he required dist ance from t he screen. The dist ance from the lens of
the proj ect or t o t he screen, t he zoom set ting, and t he video form at det erm ine t he size of t he
proj ected im age.
• Det erm ine t he lens t hrow rat io.
For m ore inform at ion det ailing t he t hrow ratio for each lens, refer t o t he HS Series 4K Lens
Throw Ratios Technical Reference (P/N: 020-103738-XX).
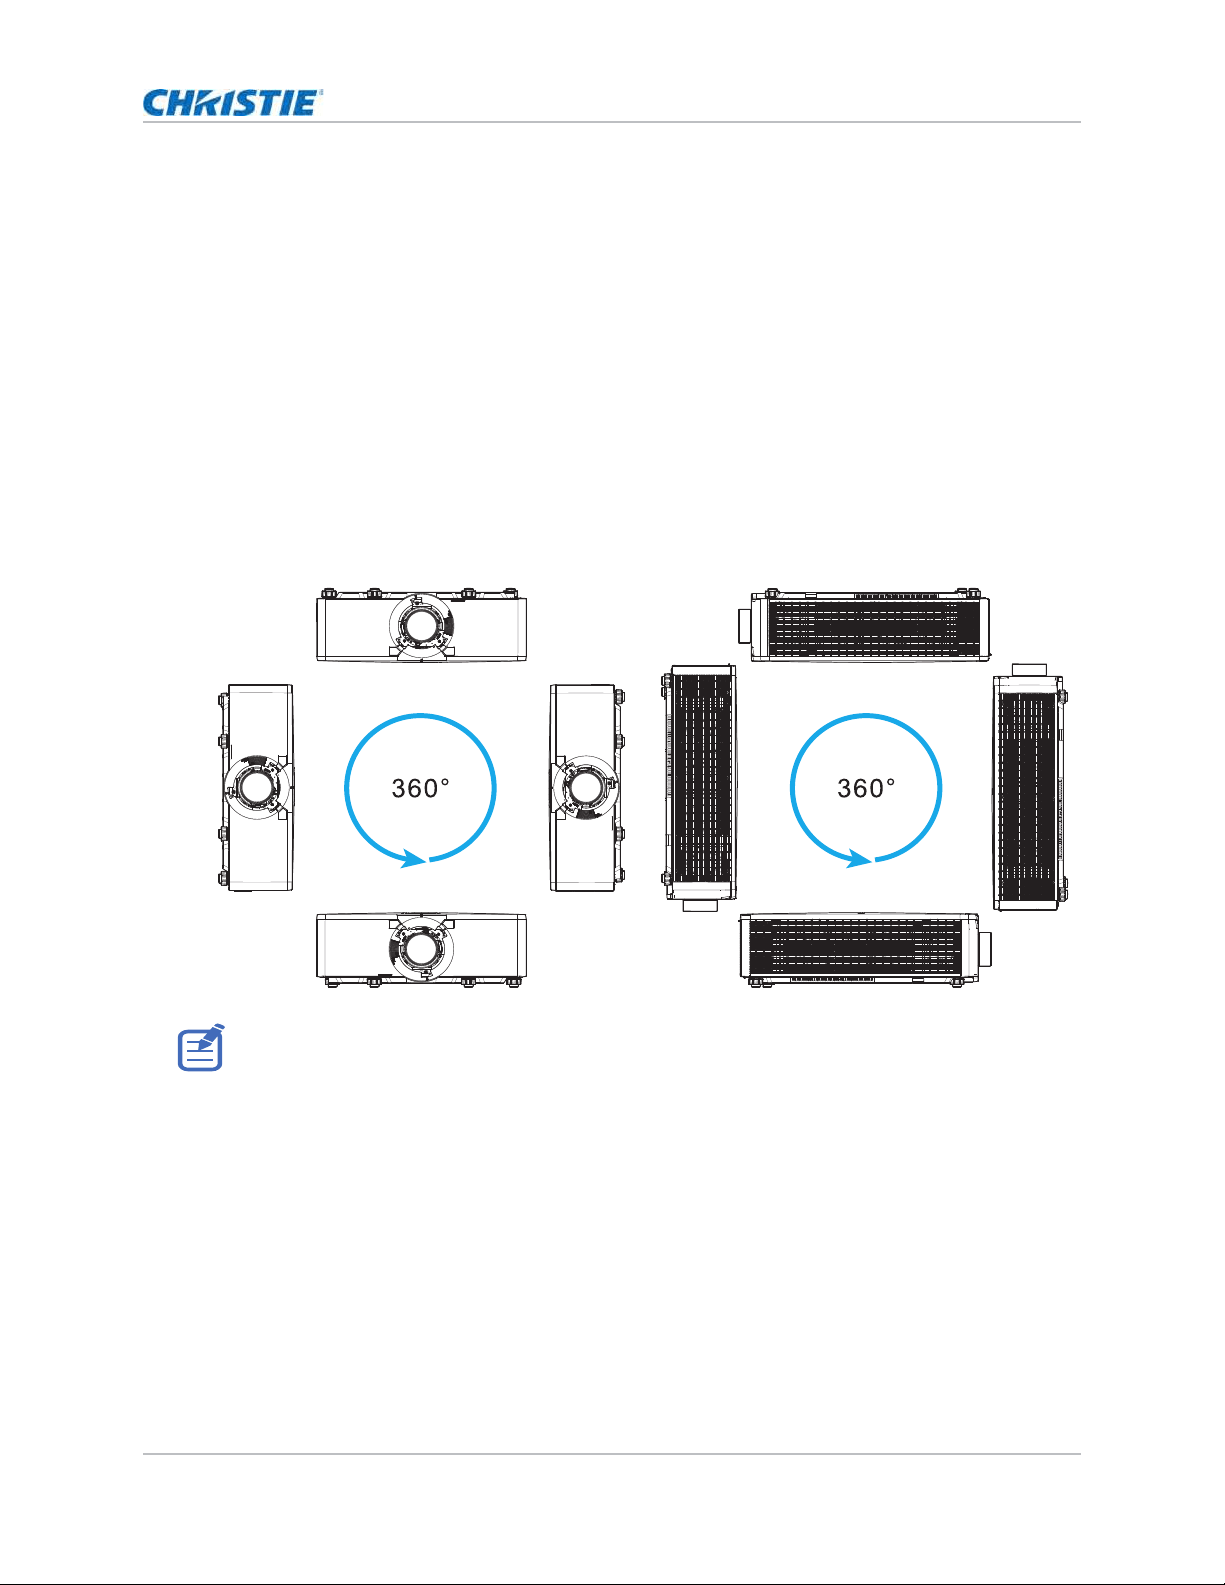
• 360 degree free orient ation operation
When installing t he pr oj ector in portrait or ient ation, Christ ie recom m ends t he built in keypad and
power inputs face upwards. This allows access t o t he built in keypad and power connect ions during
operat ion.

HS Series 4K User Manual 26
020-002053-01 Rev. 1 (05-2023)
Copyright © 2023 Christie Digital Systems USA, Inc. All rights reserved.
If printed, please recycle this document after use.
Installation and setup
Turning on the projector
The proj ector cables m ust be securely connected before t urning t he power on.
1. Plug t he pr oj ect or in t o AC power.
The Power but ton on t he built in keypad is illum inat ed when t he power cables are connected.
2. Ensure t he lens has been inst alled in t he proj ect or by a Christ ie- qualified service t echnician.
3. Ensure no one or no obj ect s are in t he beam path before t urning on t he proj ect or.
4. To t urn on t he proj ector, on t he I R rem ot e keypad on t he built- in keypad select .
The st at us LED is green wit h a long blink.
5. To select an input source and t urn it on, on t he I R rem ot e keypad select INPUT.
Available input sources ar e HDMI1, HDMI2, Display Port, 12G-SDI, and HDBaseT.
The proj ector det ects t he source you select ed and displays t he im age.
6. I f using the proj ect or for t he first tim e, select a preferred language from t he Main Menu aft er
the st art up screen is displayed.
Turning off the projector
Power off t he proj ector in preparation for inspect ion or m aint enance.
1. To t urn the proj ect or off, on t he I R rem ote keypad or built- in keypad select .
A war ning m essage appears on t he displayed im age.
2. To confirm your select ion, select again.
I f you do not select again, t he war ning m essage disappears aft er t hree seconds and t he
proj ector rem ains on.
Warning! Failure t o com ply wit h t he following could result in deat h or serious inj ury.
• Do not look int o t he proj ect or lens when t he laser is on. The bright light m ay result in perm anent
eye dam age.
• I nstalling or r eplacing a lens m ust be done by a Christ ie-qualified ser vice technician t o avoid
exposure t o dangerous em ission levels.
HS Series 4K User Manual 27
020-002053-01 Rev. 1 (05-2023)
Copyright © 2023 Christie Digital Systems USA, Inc. All rights reserved.
If printed, please recycle this document after use.
Installation and setup
LED status indicator
LED st atus indicat or helps ident ify t he pr oj ect or st at e. LEDs are defined below.
Status LED
I dent ify t he LED stat e colors and m eaning.
Shutter LED
I dent ify t he shut t er LED st at e colors and m eaning.
LED status Projector state
Off AC power is off ( wit hout AC plugged in) .
Green ( flashing) Proj ect or is st art ing up.
Green ( solid) Syst em is operat ing norm ally.
Blue ( flashing) Pr oj ect or is cooling down.
Blue ( solid) Proj ect or is in st andby m ode.
Yellow ( flashing) A pr oblem exist s wit h t he proj ect or t hat does not cause it to shut down.
Exam ples of warnings include: filt er needs changing, one of t he pum ps is dam aged, or a
fan is operating at full speed due to over t em perature of laser diode ( LD) driver.
Yellow ( solid) The end user is t ur ning off t he pr oj ect or w hile it is in a warning st ate.
Red ( flashing) An error w it h t he proj ect or exist s causing it t o shut dow n.
Exam ples of errors include: fan failur e, over t em perature, w rongly installed filt er, or color
wheel ( CW) failure.
Red ( solid) The user is turning off t he proj ect or while it is in an error stat e.
White ( flashing) Proj ect or is in Firm ware Upgrade Mode.
LED status Projector state
Off Proj ect or is on and an im age is displayed. Shut t er is open.
Magent a ( solid) Proj ect or is on and t he im age is blank. Shut t er is closed.

HS Series 4K User Manual 28
020-002053-01 Rev. 1 (05-2023)
Copyright © 2023 Christie Digital Systems USA, Inc. All rights reserved.
If printed, please recycle this document after use.
Adjusting the size and
position
Adj ust t he proj ect or’s size and posit ion. Christie recom m ends warm ing t he lens before com plet ing
these procedures as focus m ay change as t he lens warm s.
Setting the image size preset
Set t he im age size preset t o display the im age in its native resolut ion or t o resize by m axim izing t he
height , w idt h, bot h height and w idth, or t o the m axim um size while keeping t he original aspect
rat io.
1. Select Menu > Size & Position > Size Presets.
2. Select t he appropriate size preset :
• Auto—Displays with t he det ect ed size.
• Native—Display s in it s native resolut ion.
• 4:3—Retains 4: 3 aspect rat io.
• Letterbox—Makes t he act ive cont ent enlarge t o t he full screen.
• Full Size—Fills t he screen, regardless of t he source.
• Full Width—Fills display widt h and keep aspect rat io.
• Full Height—Fills display height and keep aspect rat io.
• Custom—St ret ches t he display horizont ally and vert ically wit hout cut ting t he im age
display.
• 3D Mode—Displays 3D content . All ot her it em s are grayed out , if 3D Mode is select ed.
3. To confirm t he select ion, select ENTER.

HS Series 4K User Manual 29
020-002053-01 Rev. 1 (05-2023)
Copyright © 2023 Christie Digital Systems USA, Inc. All rights reserved.
If printed, please recycle this document after use.
Adjusting the size and position
Setting the digital size of display image
These funct ions are sim ilar t echnologies as in- cam era im age processing. Use Digit al Horz Zoom or
Digit al Vert Zoom t o enlarge or t o com pr ess t he display im age horizont ally or vert ically.
1. Select Menu > Size & Position > Digital Horz Zoom or Digital Vert Zoom.
2. Adj ust t he slider by arrow keys or select ENTER t o input t he value you select ed.
3. Aft er inputt ing the value, select ENTER t o apply.
Setting the digital position of display image
Change t he posit ion of t he proj ect or's display im age horizont ally or vert ically.
1. Select Menu > Size & Position > Digital Horz Shift or Digital Vert Shift.
2. Adj ust t he slider by arrow keys or select ENTER t o input t he value you selected.
3. Aft er inputt ing the value, select ENTER t o apply.
Geometry correction
Modify t he geom etry of t he display im age direct ly on t he proj ect or.
Connect ing t o Christ ie Twist and Myst ique grays out the geom etry correction set tings on t he
proj ect or. Uploading warp and blend from Tw ist and Mystique overwrites t he currently applied
geom et ry correct ion set tings. See
Configuring warp and blend on page 34 for m ore det ails.
Enabling geometry correction
Enable or disable t he geom et ry correct ion function including Warp, Blend, Keystone, Pincushion, 4-
Cor ner, Auto War p Filt er, and Manual Warp Filt er.
1. Select Menu > Size & Position > Geometry Correction > Geometry Enable.
2. To enable t he sett ing, select ENTER.
Saving geometry correction
Save t he warp and blend sett ings t o t he proj ector m em ory. The blend m em ory saves t he edge blend
set t ings, w hile t he warp m em ory saves t he sett ings of Keystone, Pincushion, 4- Corner, Manual Warp
Filt er, and im age war p.
1. Select Menu > Size & Position > Geometry Correction > Warp Memory > Save Warp or
Blend Memory > Save Blend.
2. To save t he geom et ry sett ing, select a record.
One proj ect or can save up t o four warps and four blends.
3. To confirm t he select ion, select ENTER.
Digit al Horz Shift is only available aft er adj ust ing t he Digit al Horz Zoom , and Digit al Ver t Shift is only
available aft er adj ust ing t he Digit al Vert Zoom .

HS Series 4K User Manual 30
020-002053-01 Rev. 1 (05-2023)
Copyright © 2023 Christie Digital Systems USA, Inc. All rights reserved.
If printed, please recycle this document after use.
Adjusting the size and position
Applying geometry correction
Apply t he previously saved geom et ry sett ing t o t he proj ect or.
1. Before applying t he previous geom et ry sett ing, save the geom et ry sett ing t o t he proj ector.
See
Saving geometry correction on page 29 for further inform at ion.
2. Select Menu > Size & Position > Geometry Correction > Warp Memory > Apply Warp
or Blend Memory > Apply Blend.
3. To apply t he specific geom et r y set ting, select t he required record.
4. To confirm t he select ion, select ENTER.
5. To erase t he applied geom et ry set ting, select Off.
Enabling basic image blending
Configure blends direct ly on t he proj ector t o increase or decrease t he borders of an individual
im age, so it blends wit h a neighboring im age t o creat e a single, seam less im age.
You can set blends on a proj ect or when not using Christ ie Twist and Mystique. Connecting to Twist
and Mystique grays out the blend sett ings on t he proj ect or. Applying blends from Twist and
Myst ique overw r ites t he blends direct ly set on t he proj ectors.
1. Select Menu > Size & Position > Geometry Correction > Blend Area.
2. Choose a side to blend in wit h t he ot her proj ectors.
3. To set up t he st art ing posit ion, select Start Pixel.
4. Adj ust t he slider by arrow keys or select ENTER t o input t he starting posit ion.
5. Aft er inputt ing the st arting posit ion, select ENTER.
6. To set up the size of blend area, select Pixel Height.
7. Adj ust t he slider by arrow keys or select ENTER t o input t he widt h of blend area.
8. Aft er inputt ing the size of blend ar ea, select ENTER.
9. To set t he gam m a value of t he blend area, select Blend Gamma.
10. Aft er select ing a gam m a value, select ENTER.
11. To apply the set tings, select Enable.
12. Select ENTER.
13. To save t he blend sett ing, select Menu > Size & Position > Geometry Correction > Blend
Memory > Save Blend.
14. To set up the ot her side of blend area, repeat st ep 2 t o 13.

HS Series 4K User Manual 31
020-002053-01 Rev. 1 (05-2023)
Copyright © 2023 Christie Digital Systems USA, Inc. All rights reserved.
If printed, please recycle this document after use.
Adjusting the size and position
Blending multiple images
Use Chr ist ie Tw ist t o m anually configure edge blends and apply t hem to t he proj ect ors.
Christ ie Twist Prem ium and Twist Pro offer advanced blending opt ions. Refer t o t he Christie websit e
( www.christiedigital.com) for product inform ation and docum ent ation.
1. Connect the proj ect or and com put er to t he sam e net work and subnet .
2. To add a proj ect or t o a com puter, from t he Twist m enu, select Home > Add.
• To m anually connect t he proj ector with Twist , use port 3003.
• Connect ing t o Twist grays out the Geom et ry Correct ion set tings on t he proj ect or.
3. Select a record num ber t o save t he blend sett ing.
You can save up t o four blend set tings.
4. I n Twist , configure edge blend set tings.
Use t he t est pat terns in Twist t o assist in adj ust ing t he blend ar ea.
For m ore inform at ion about creat ing blend files in Twist , refer t o Twist User Guide (P/N: 020-
101380-XX).
5. To send t he blend sett ings t o t he proj ector, on t he canvas, right- click a proj ect or window and
select Send Blend.
6. Repeat step 2 t o 5 for the r em aining proj ect ors.
For m ultiple proj ect ors, use Twist t o ident ify t he proj ect ors.
7. To save t he warp file on t he project or, select File > Save or Save As.
When rem oving t he proj ect or from Twist , or closing t he program , t he proj ector aut om at ically
saves t he current ly applied blend set tings t o its blend m em ory.
8. To change the nam e when saving blends on t he proj ector, or updat e t he m em ory locat ion of t he
blend, select Properties.
The changed nam e shows on bot h Twist and t he proj ect or.
Downloading a blend from the projector memory
Use Twist t o download t he blend file saved on t he proj ect or m em ory.
1. Before downloading t he previous blend file, save t he blend set t ing t o t he proj ector m em ory.
2. On t he canvas, click a proj ect or w indow.
3. Select File > Blend/Mask/B.U.
4. I n the Download Blend dialog, select t he r equired record.
5. To download t he select ed blend sett ing, select OK.
6. To apply the blend set ting t o t he proj ector, on t he canvas, right- click a proj ect or window and
select Send Blend.
HS Series 4K User Manual 32
020-002053-01 Rev. 1 (05-2023)
Copyright © 2023 Christie Digital Systems USA, Inc. All rights reserved.
If printed, please recycle this document after use.
Adjusting the size and position
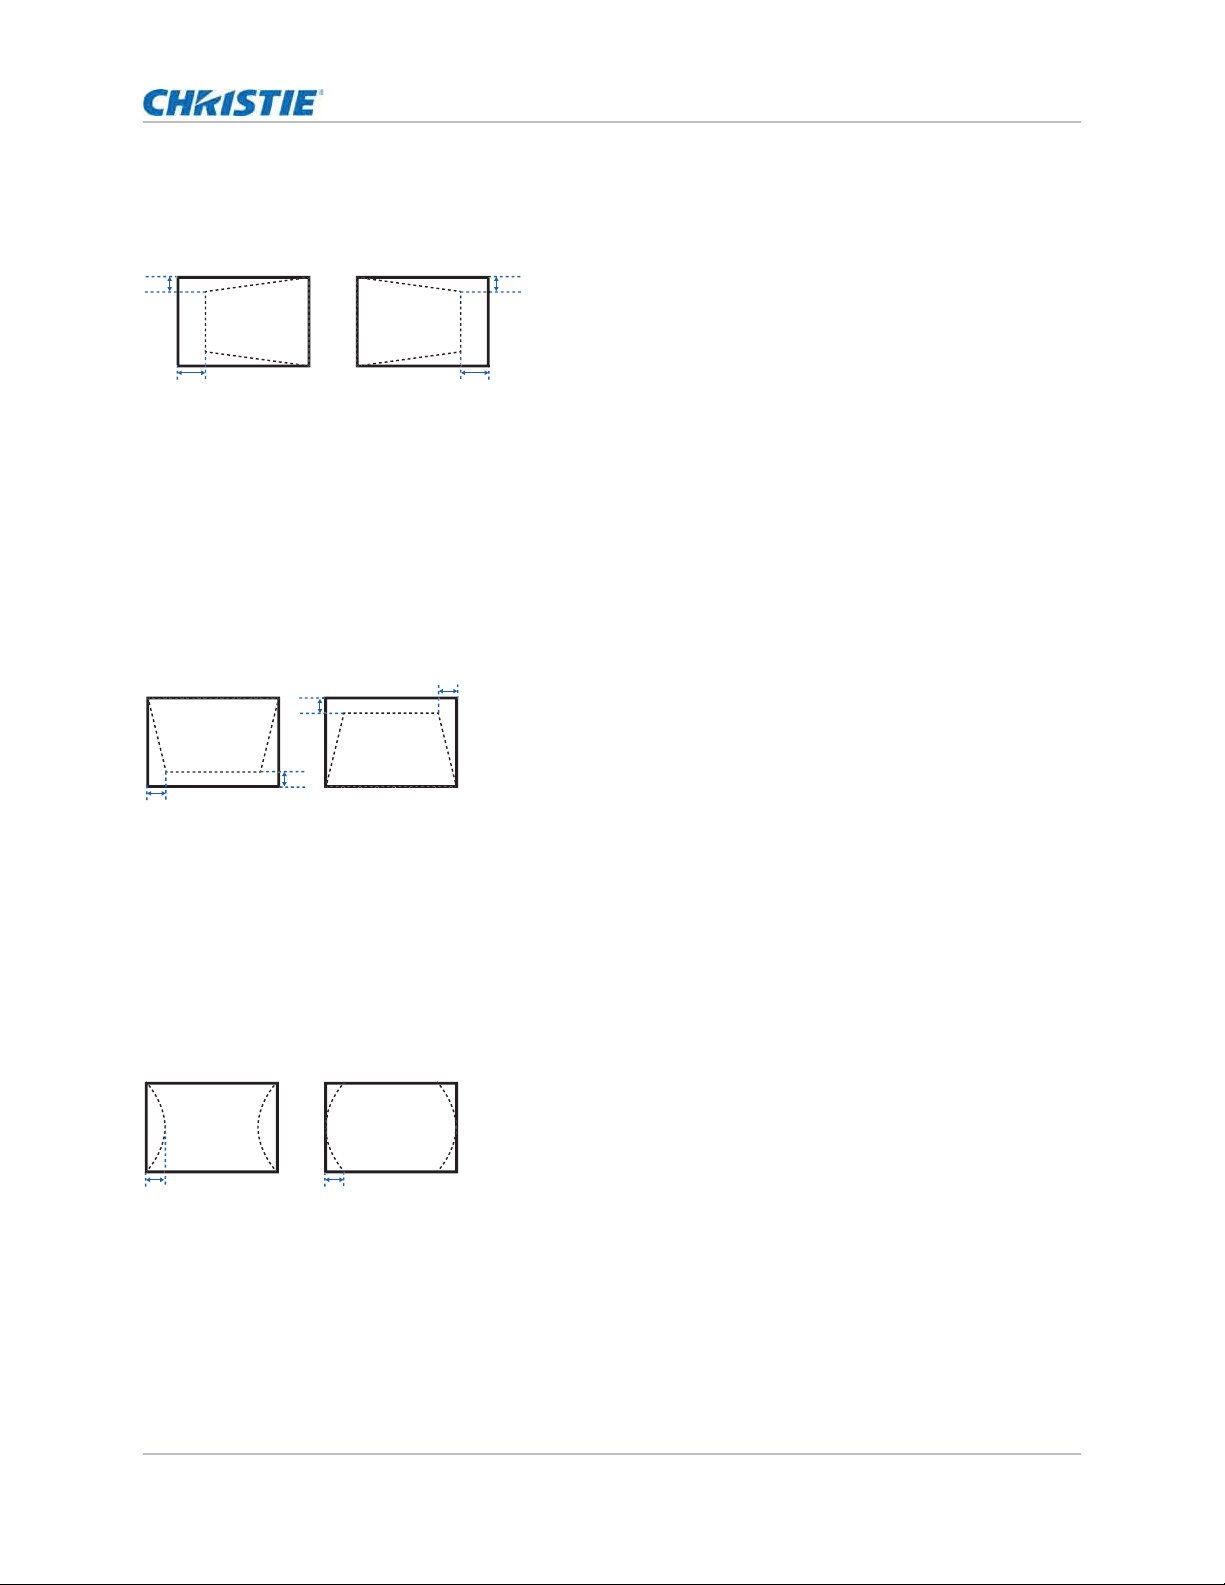
Adjusting horizontal keystone
Use horizontal keyst one to correct a keyst oned im age shape in which the left and right borders of
the im age are unequal in lengt h, and t he t op and bot t om are slant ed t o one of t he sides.
1. Select Menu > Size & Position > Geometry Correction > Keystone > Horz Keystone.
2. To adj ust t he horizont al keyst one, adj ust the slider by arrow keys or select ENTER to input t he
value you select ed.
3. Aft er inputt ing the value, select ENTER t o apply.
Adjusting the vertical keystone
Use vert ical keyst one t o cor r ect a key st oned im age shape in which t he t op and bott om borders of
the im age are unequal in lengt h, and both sides of t he im age are inclined t oward t he t op or bott om
edge.
1. Select Menu > Size & Position > Geometry Correction > Keystone > Vert Keystone.
2. To adj ust t he vert ical keyst one, adj ust the slider by arrow keys or select ENTER to input the
value you select ed.
3. Aft er inputt ing the value, select ENTER t o apply.
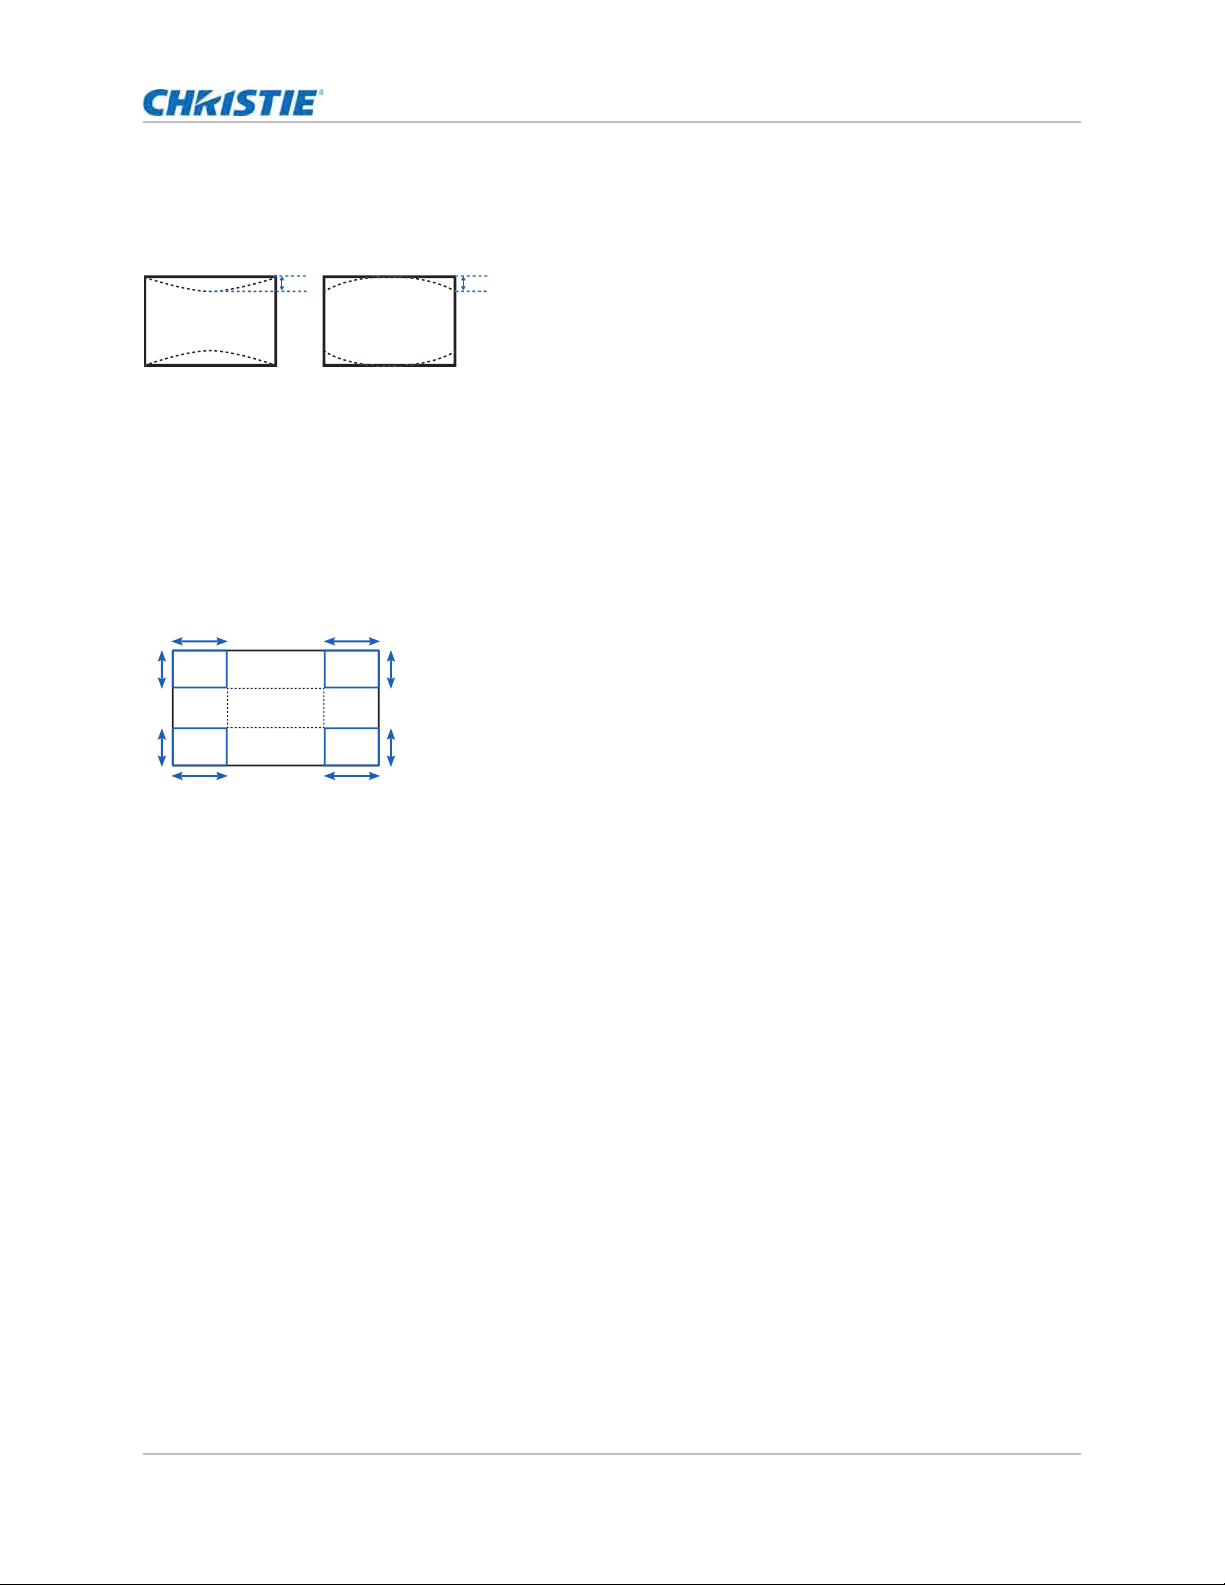
Adjusting horizontal pincushion
Use horizont al pincushion t o cor rect a pinched im age shape in which t he horizont al st raight lines
are curved inwards or horizontal st raight lines are curved out wards from the cent er.
1. Select Menu > Size & Position > Geometry Correction > Pincushion > Horz Pincushion.
2. To adj ust t he horizont al pincushion, adj ust t he slider by arrow keys or select ENTER to input
the value you select ed.
3. Aft er inputt ing the value, select ENTER t o apply.
B
A
B
A
B
A
B
A
A B
HS Series 4K User Manual 33
020-002053-01 Rev. 1 (05-2023)
Copyright © 2023 Christie Digital Systems USA, Inc. All rights reserved.
If printed, please recycle this document after use.
Adjusting the size and position
Adjusting vertical pincushion
Use vert ical pincushion t o correct a pinched im age shape in which t he vert ical st raight lines are
curved inwards or vert ical st raight lines are curved out wards from t he cent er.
1. Select Menu > Size & Position > Geometry Correction > Pincushion > Vert Pincushion.
2. To adj ust t he vert ical pincushion, adj ust t he slider by arrow keys or select ENTER t o input t he
value you select ed.
3. Aft er inputt ing the value, select ENTER t o apply.
Adjusting 4-corner
Use 4- corner t o correct t he four corners of t he proj ect or's display im age.
1. Select Menu > Size & Position > Geometry Correction > 4-Corner.
2. Select t he corner and t he direct ion t o adj ust .
3. To m ove t he corner, adj ust t he slider by arrow keys or select ENTER t o input t he value.
4. Aft er inputt ing the value, select ENTER t o apply.
5. To adj ust t he ot her corner or dir ection, repeat step 2 t o 4.
Enabling auto warp filter
I m prove the sharpness of the im age and reduce t he ghosting aut om at ically aft er geom et ry
correction, such as keystone, pincushion, 4- corner, and warping.
1. Select Menu > Size & Position > Geometry Correction > Auto Warp Filter.
2. To enable t he sett ing, select ENTER.
A B
A A
B
B
B
B
AA

HS Series 4K User Manual 34
020-002053-01 Rev. 1 (05-2023)
Copyright © 2023 Christie Digital Systems USA, Inc. All rights reserved.
If printed, please recycle this document after use.
Adjusting the size and position
Adjusting warp filter
I m prove the sharpness of the im age after geom et ry cor r ect ion, such as keyst one, pincushion, 4-
corner, and warping. Adj ust the warp filt er m anually to reduce t he ghost ing.
1. Select Menu > Size & Position > Geometry Correction > Manual Warp Filter.
2. To reduce t he ghost ing in different direction, select Horz Filter or Vert Filter.
3. Adj ust t he slider by arrow keys or select ENTER t o input t he value.
4. Aft er inputt ing the value, select ENTER t o apply.
Resetting geometry correction setting
Reset all geom et ry cor r ect ion param eters back t o default , including warp and blend set tings.
1. Select Menu > Size & Position > Geometry Correction > Reset to Default.
2. Select ENTER.
Configuring warp and blend
By blending m ult iple im ages, you can com bine several proj ect ors t o creat e a larger and seam less
im age. When t he proj ect ion scr een is not perfectly flat or rot at ed at an angle, w arp t he im age to fit
on the irregular surface.
Warping an image
Christ ie Twist offer various m anual warping opt ions t o adj ust the im age shape wit h m inim al
perform ance im pact. Refer t o t he Christ ie websit e ( www.christiedigital.com) for pr oduct inform at ion
and docum ent ation.
1. Connect the proj ect or and com put er to t he sam e net work and subnet .
2. To add a proj ect or t o a com puter, from t he Twist m enu, select Home > Add.
• To m anually connect t he proj ector with Twist , use port 3003.
• Connect ing t o Twist grays out the Geom et ry Correct ion set tings on t he proj ect or.
3. Select a record num ber t o save t he war p.
You can save up t o four warp set tings.
4. I n Twist , configure war p set tings.
Use t he t est pat terns in Twist t o help wit h im age shaping.
For m ore inform at ion about creat ing warp files in Twist , refer t o Twist User Guide (P/N: 020-
101380-XX).
5. To send t he warp set tings t o t he proj ect or, on t he canvas, r ight -click a proj ect or w indow and
select Send Warp.
Christie Twist can be upgraded t o Tw ist Prem ium and Twist Pro t hat pr ovides m ore advanced warping
feat ures. Refer t o t he Christ ie websit e ( www.christiedigital.com) for product inform at ion and
docum entat ion.

HS Series 4K User Manual 35
020-002053-01 Rev. 1 (05-2023)
Copyright © 2023 Christie Digital Systems USA, Inc. All rights reserved.
If printed, please recycle this document after use.
Adjusting the size and position
6. To save t he warp sett ings on t he proj ect or, select File > Save or Save As.
When rem oving t he proj ect or from Twist , or closing t he program , t he proj ector aut om at ically
saves t he current ly applied warp sett ings to its warp m em ory.
7. To change t he nam e when saving warps on t he proj ect or, or updat e t he m em or y locat ion of t he
warp, select Properties.
The changed nam e shows on bot h Twist and t he proj ect or.
Downloading a warp from the projector memory
Use Twist t o download t he warp file saved on t he proj ect or m em ory.
1. Before downloading t he previous warp file, save t he warp sett ing t o t he pr oj ect or m em ory.
2. On t he canvas, click a proj ect or w indow.
3. Select File > Warp.
4. I n t he Download from Mem ory Locat ion list, select t he required record.
5. To download t he select ed warp sett ing, select OK.
6. To apply the warp set t ing t o t he proj ect or, on the canvas, right- click a proj ect or window and
select Send Warp.
Performing auto warp and blend
Use Myst ique ( sold separately) t o per form autom at ic warp, blend, and m ore advanced geom et ry
set t ings. Mystique is an aut om ated cam era- based alignm ent and recalibrat ion solut ion t hat let s you
quickly stage, inst all, align, calibrat e, and m aint ain m ult i- proj ection syst em s.
Refer t o t he Christ ie w ebsit e ( www.christiedigital.com) for product inform at ion and docum ent at ion.

HS Series 4K User Manual 36
020-002053-01 Rev. 1 (05-2023)
Copyright © 2023 Christie Digital Systems USA, Inc. All rights reserved.
If printed, please recycle this document after use.
Adjusting the image
settings
Learn how t o adj ust the proj ect or im age.
Adjusting the brightness
Adj ust t he int ensit y of t he im age.
1. Select Menu > Image Settings > Brightness.
2. Adj ust t he slider by arrow keys or select ENTER t o input t he value.
3. Aft er inputt ing the value, select ENTER t o apply.
Adjusting the contrast
Adj ust the degree of difference bet ween t he lightest and darkest part s of the im age and changes
the am ount of black and white in t he im age.
1. Select Menu > Image Settings > Contrast.
2. Adj ust t he slider by arrow keys or select ENTER t o input t he value.
3. Aft er inputt ing the value, select ENTER t o apply.
Adjusting the color space
Det erm ine how t he color com ponent s are decoded for accurat e color in t he display.
1. Select Menu > Image Settings > Color Space.
2. I f proj ect or does not det ect t he correct input signal while Auto is enabled, disable Auto by
select ing ENTER t o select color space m anually.
3. To m at ch up wit h t he input signal, select appropriat e color space:
• Auto
• RGB

HS Series 4K User Manual 37
020-002053-01 Rev. 1 (05-2023)
Copyright © 2023 Christie Digital Systems USA, Inc. All rights reserved.
If printed, please recycle this document after use.
Adjusting the image settings
• RGB Full
• RGB Limited
• YUV
• REC709
• REC601
4. To confirm t he select ion, select ENTER.
Adjusting the image sharpness
Adj ust the edge clarit y of t he im age.
1. Select Menu > Image Settings > Detail.
2. Select the sharpness:
• Maximum
• High
• Normal
3. To confirm t he select ion, select ENTER.
Setting up 3D display
Use t he funct ions in 3D Display m enu t o m ake t he t im ing adj ust m ent and envir onm ent necessary
for displaying 3D im ages.
Setting 3D mode
Set up t he 3D m ode according t o the 3D input signal.
1. Select Menu > Image Settings > 3D Display > 3D Mode.
2. Select t he appropriate 3D m ode:
• Act ive 3D
• Passive 3D
3. To confirm t he select ion, select ENTER.
Setting 3D format
Set up t he 3D form at according t o t he 3D input signal.
• Proj ect ing t he im age in 4K 3D/ 4K 3D Dual Pipe for m at m ay display a few j itt er effects. This is
considered as a norm al behavior.
• 4K 3D Dual Pipe has lim ited warping options w hen processing im age distort ion corr ect ion such as
keyst one and pincushion.
• 4K 3D/ 4K 3D Dual Pipe form at is support ed only w it h HDMI 1 and HDMI 2 sources.

HS Series 4K User Manual 38
020-002053-01 Rev. 1 (05-2023)
Copyright © 2023 Christie Digital Systems USA, Inc. All rights reserved.
If printed, please recycle this document after use.
Adjusting the image settings
1. Select Menu > Image Settings > 3D Display > 3D Enable.
2. Select t he appropriate 3D form at :
• Auto
• Frame Packing
• Side by Side
• Top and Bot t om
• Frame Sequential
• Dual Pipe
• 4K 3D
• 4K 3D Dual Pipe
• Off
3. To confirm t he select ion, select ENTER.
Inverting 3D signal
3D im ages consist of a series of im ages ( fram es) t hat alternat e quickly between t wo slight ly
different view point s, corresponding t o our left and right eyes. When t hese fram es are displayed
fast enough and viewed wit h 3D glasses synchronized t o t he left / right (L/ R) changes, the result ing
im age appears wit h t he sam e dept h and perspect ive that is sensed in t he real world.
I f t he proj ect or generat es t he sync int ernally and cont ent is displayed without 3D sync in the cable
connect ed t o t he proj ect or, t he cont ent has a 50% chance of being displayed with t he left / right eyes
swapped. This funct ion is used for swapping t he sequence of t he im age to m ake t he result ing im age
appear norm ally.
1. Select Menu > Image Settings > 3D Display > 3D Invert.
2. To swap, select ENTER.
Selecting the 3D sync input signal
This funct ion is used for select ing t he 3D sync input opt ion.
1. Select Menu > Image Settings > 3D Display > 3D Sync In Select.
2. Select t he appropriate 3D sync in set t ing.
• Auto—I f an ext ernal 3D sync input is det ect ed, t he proj ect or uses aut om at ically t he
ext ernal sync input . I f no ext ernal sync input is det ect ed, the proj ector uses t he int ernal
3D sync to display the content .
For m ulti- threaded applicat ions, if the 3D enable funct ion is set t o Fram e Sequent ial,
Christ ie recom m ends t o connect t he source device t o t he proj ect or using 3D Sync I n
port . The Fram e Delay funct ion m akes sure a synchronized display for m ult iple
proj ectors.
• Internal—The proj ect or generat es t he 3D sync int ernally and content is displayed.
• External—The proj ect or uses an ext ernal 3D sync input t o display t he cont ent .
3. To confirm t he select ion, select ENTER.

HS Series 4K User Manual 39
020-002053-01 Rev. 1 (05-2023)
Copyright © 2023 Christie Digital Systems USA, Inc. All rights reserved.
If printed, please recycle this document after use.
Adjusting the image settings
Setting the 3D sync output signal
This funct ion is used for cont rolling and processing t he 3D sync output signal.
1. Select Menu > Image Settings > 3D Display > 3D Sync Out.
2. Select t he appropriate 3D sync out sett ing.
• To Emitter—I f the 3D sync out port is connect ed t o an em it ter, select To Emitter t o
transm it 3D signal t o em itt er and give t o 3D glasses.
• To Next Projector—Multiple pr oj ectors 3D applicat ion only. Select To Next Projector
when t he 3D sync out port is not connected t o an em it t er.
3. To confirm t he select ion, select ENTER.
Setting the frame delay
Adj ust t he fram e delay output through t he proj ect or.
I t will int roduce som e delay, t ypically used in m ult i- m achine synchronizat ion for delay alignm ent .
1. Select Menu > Image Settings > 3D Display > Frame Delay.
2. Adj ust t he slider by arrow keys or select ENTER t o input t he value.
3. Aft er inputt ing the value, select ENTER t o apply.
Setting the sync delay
Adj ust t he sync delay which elim inat es t he odd colors and cross talk caused by t im ing difference.
Sync delay is t he t im e difference bet ween t he first 3D signal being given and t he result being
execut ed from t he current proj ector.
1. Select Menu > Image Settings > 3D Display > Sync Delay.
2. Adj ust t he slider by arrow keys or select ENTER t o input t he value.
3. Aft er inputt ing the value, select ENTER t o apply.
Configuring the video settings
Configure the video set tings t o opt im ize t he im age perform ance, such as applying color t o black and
white videos, reducing lum inance com ponent noise, and so on.
Adjusting black and white video
Adj ust a video im age from black and whit e t o fully sat urated color. This feat ure is for video sources
only.
1. Select Menu > Image Settings > Video Options > Color.
2. Adj ust t he slider by arrow keys or select ENTER t o input t he value.
3. Aft er inputt ing the value, select ENTER t o apply.

HS Series 4K User Manual 40
020-002053-01 Rev. 1 (05-2023)
Copyright © 2023 Christie Digital Systems USA, Inc. All rights reserved.
If printed, please recycle this document after use.
Adjusting the image settings
Adjusting the color balance
Adj ust the red- green color balance in NTSC video im ages. NTSC, nam ed aft er t he Nat ional
Television Syst em Com m it t ee, is t he analog video color syst em used in North Am erica and m ost of
the Sout h Am erica count r ies. This feat ure is for NTSC video sources only.
1. Select Menu > Image Settings > Video Options > Tint.
2. Adj ust t he slider by arrow keys or select ENTER t o input t he value.
3. Aft er inputt ing the value, select ENTER t o apply.
Configuring picture settings
Depending on display cont ent , choose t he m ost suit able pict ure set tings. Different pict ure set tings
have different color t em perat ure, bright ness, and so on.
1. Select Menu > Image Settings > Picture Settings.
2. Select t he appropriate pict ure set ting:
• Video—Used for t heat er applicat ion. I t set s t he color t em perat ure to 6000K w it h 70% of
m axim um bright ness.
• Bright—Used for large size or high bright ness applicat ion. I t sets t he color tem perature
to 7500K wit h 100% bright ness.
• Enhanced—Used for im ages wit h richly saturat ed and vivid color. I t is based on
brightness m ode.
• REC709—Used for high- definition t elevision. I t set s t he color t em perat ure t o 6500K w it h
80% of the m axim um bright ness.
• DICOM SIM—Used for high cont rast cont ent , such as X-ray diagram . I t sets t he color
tem perat ure t o 7500K with 65% bright ness.
• Blending—Used for m ult iple proj ect or application. I t set s t he color t em perat ure t o
7000K wit h 85% of m axim um bright ness.
• HDR—Used for displaying high dynam ic range cont ent for deepest blacks, bright est
whites, and vivid cinem at ic color using REC.2020 color gam ut .
• 3D—Used t o display t he 3D cont ent . For m ore inform at ion on configuring 3D sett ings,
see
Setting up 3D display on page 37.
• High Frame Rate—Used for displaying 2D input signal at 240Hz.
• User—Cust om ized pict ure set t ing. See Editing customized picture setting on page 41
for furt her details of cr eat ing a custom ized pict ure set ting.
3. Select ENTER.

HS Series 4K User Manual 41
020-002053-01 Rev. 1 (05-2023)
Copyright © 2023 Christie Digital Systems USA, Inc. All rights reserved.
If printed, please recycle this document after use.
Adjusting the image settings
Applying customized user configuration setting
Apply t he previously saved user custom ized picture sett ing t o t he proj ector.
1. Before applying t he custom ized pict ure set t ing, adj ust t he pict ure set ting and save it using
Menu > Image Settings > Picture Settings > User opt ion.
2. Select Menu > Image Settings > Apply t o User.
• User Video
• User Bright
• User Enhanced
• User REC709
• User DICOM SIM
• User Blending
• User HDR
• User 3D
• User High Frame Rate
3. To apply the specific pict ure set ting, select t he required sett ing.
4. To confirm t he select ion, select ENTER.
Editing customized picture setting
Edit the previously saved custom ized pict ure set ting.
1. Select Menu > Image Settings > User configuration.
2. Select the cust om ized im age set ting you want t o m odify:
• User-Video
• User-Bright
• User- Enhanced
• User- REC709
• User-DICOM SIM
• User-Blending
• User-HDR
• User-3D
• User-High Frame Rate
3. Select ENTER.

HS Series 4K User Manual 42
020-002053-01 Rev. 1 (05-2023)
Copyright © 2023 Christie Digital Systems USA, Inc. All rights reserved.
If printed, please recycle this document after use.
Adjusting the image settings
Setting the contrast ratio
Use cont rast enhancem ent funct ion t o raise t he cont rast rat io.
1. Select Menu > Image Settings > Contrast Enhancement.
2. Select t he appropr iat e calculation m ethod for contrast rat io:
• Dynamic Black
TM
—Adj usts t he cont rast ratio depending on t he cont ent s by m inim izing
the black levels in t he proj ect ed im age while elect ronically increasing t he gain in the
im age. The result is enhanced det ail and increased cont rast ratio of 6500: 1.
• Speed—Adj ust s t he speed of t he light source correct ion. The value ranges from 1 t o 15.
A lower value m akes t he correct ion slower and less aggressive while a higher value
results in t he faster correct ion.
• Strength—Sets t he st r engt h of t he dynam ic contrast adj ustm ent . The value ranges from
0 t o 3, t he higher t he value the st ronger t he correct ion.
• Level—Adj usts t he light source when t he bright ness level of t he current cont ent get s
lower t han t he set value. The value ranges from 50 to 100, indicat ing 50% t o 100% of
the constant bright ness. The higher t he value, t he larger t he range t o adj ust t he light
source.
• Real Black—Turns off t he laser light while proj ecting black cont ent .
• Lights Out Timer—Sets a t im er for t he laser light t o turn off aft er det ect ing black
cont ent .
• Lights Out Signal Level—Set s a black level value as t he t hreshold for the Real Black
funct ion. The value can be select ed from 0 t o 255, with 0 being t he darkest black and
255 being t he bright est .
• Lights On Threshold—Set s t he light s on value t o elim inat e t he Real Black effect. The
funct ion is activat ed when t he screen bright ness is higher t han t he value of bot h t he
Lights On Threshold and t he Light s Out Signal Level. The Light s on Threshold value
ranges from 0 to 127.
• Reset to Default—Resets all cont ract enhancem ent set t ings t o t he default fact ory
default s.
3. To confirm t he select ion, select ENTER.
Enabling the image freeze
Pause t he display screen despit e any change in t he sour ce device.
1. Select Menu > Image Settings > Image Freeze.
2. To pause t he screen, select Image Freeze.
3. To unfreeze t he screen, select any butt on on t he keypad or rem ot e cont rol.
4. Select Yes.

HS Series 4K User Manual 43
020-002053-01 Rev. 1 (05-2023)
Copyright © 2023 Christie Digital Systems USA, Inc. All rights reserved.
If printed, please recycle this document after use.
Adjusting the image settings
Setting the high dynamic range
High dynam ic range ( HDR) is set to increase t he dynam ic range which allows t he full spect rum of
the im age t o be seen. HDR significant ly expands t he range of cont rast rat io and color t o show a
m ore realist ic and nat ural im age. After enabling t his funct ion, you can see det ails in t he dark, at the
sam e t im e, t he bright part of t he im age is st ill visible.
1. Select Menu > Image Settings > HDR.
2. Select appropriat e set ting for HDR:
• Auto—Aut o det ect HDR cont ent .
• Level—Select an appropriat e HDR effect .
• HDR1—Low HDR effect, used for bright im ages t o incr ease t he color sat uration.
• HDR2—Medium HDR effect , used for st andar d im ages t o m ake t hem look m ore
realist ic and nat ural.
• HDR3—Medium HDR effect , used for video cont ent t o im prove im age details.
• HDR4—St rong HDR effect, used t o im prove im age det ails in dark scenes.
3. To confirm t he select ion, select ENTER.
Adjust the color of the image
Calibrat e t he accuracy of prim ary colors and t he wall color, which can change because of light ing
and environm ental factors. Light ing and ot her environm ent al fact ors m ay slightly change how t hese
colors appear on your screen. While t he change is negligible in m ost cases, you m ay prefer t o
recover the originally intended color perform ance before t rying t o m at ch colors from several
proj ectors.
• The HDR function only w or ks w hen t he proj ector is receiving signal from the HDMI input . You m ust
set Pict ure Sett ings t o Bright .
• Enabling HDR disables t he picture- in- picture/ pict ure- by- picture ( PI P/ PBP) function.

HS Series 4K User Manual 44
020-002053-01 Rev. 1 (05-2023)
Copyright © 2023 Christie Digital Systems USA, Inc. All rights reserved.
If printed, please recycle this document after use.
Adjusting the image settings
Adjusting primary colors
To achieve consistency use a color m et er t o m easure t he native prim ary colors-red, green, blue,
and white, as t hey appear on t he screen. Use hue, sat uration and gain ( HSG) t o adj ust each color
com ponent t o essent ially calibrat e a project or t o it s surroundings, com pensat ing for fact ors such as
screen t y pe, lam p and/ or am bient light ing, and im proves color accuracy and consistency in a gr oup
of proj ectors. I t ensures a good start ing point for furt her custom izing and m at ching; however, is not
crit ical for all installat ions.
1. Select Menu > Image Settings > Color Matching > HSG Adjustment.
2. To view a specific color while adj ust ing, select ENTER t o enable Auto Test Pattern.
3. Select one prim ary color ( red, green, blue, cyan, m agent a, or yellow) .
4. To edit hue of t he prim ary color, adj ust t he slider or ent er t he color values of t he prim ary color
com ponent you select ed unt il sat isfied wit h t he colors.
Hue values reflect t he num ber of degrees of rot at ion ar ound t he wheel from t he original color of
the pixel. I ncreasing t he value indicat es counterclockwise rotat ion and decreasing t he value
indicat es clockwise rot at ion.
5. To confirm t he select ion, select ENTER.
6. To edit sat urat ion of t he prim ary color, adj ust t he slider or ent er t he color values of t he prim ary
color com ponent you select ed unt il sat isfied wit h t he colors.
Sat urat ion values reflect the color shift ing away from t he prim ary color or t oward white.
7. To confirm t he select ion, select ENTER.
8. To edit gain of t he prim ary, adj ust the slider or ent er t he color values of t he prim ary color
com ponent you select ed unt il sat isfied wit h t he colors.
I ncreasing value indicates increasing t he lightness, and decreasing t he value indicates
decreasing it t o black.

HS Series 4K User Manual 45
020-002053-01 Rev. 1 (05-2023)
Copyright © 2023 Christie Digital Systems USA, Inc. All rights reserved.
If printed, please recycle this document after use.
Adjusting the image settings
9. To confirm your select ion, select ENTER.
10. Repeat st eps 3 to 9 for each prim ary color com ponent , except whit e.
11. To edit t he color of white by t hree com ponent s—red, blue and green—adj ust t he slider or ent er
the values unt il you are satisfied wit h t he white.
12. To confirm your select ion, select ENTER.
13. To reset t he prim ary colors to t heir defaults, select Reset to Default.
14. To reset back t o default sett ing, select ENTER.
Setting the wall color
Set t he wall color so t he proj ector can enhance t he color perform ance custom ized for the specific
wall.
1. Select Menu > Image Settings > Color Matching > Wall Color.
2. Select t he preferred sett ing:
• White
• Gray 130
• Light Yellow
3. Select ENTER.
Setting the wall color automatically
Set t he wall color autom at ically so the proj ect or can enhance t he color perform ance custom ized for
the specific wall.
1. Select Menu > Image Settings > Color Matching > Auto Wall Color.
2. Select ENTER.
Adjusting the image settings automatically
Adj ust various im age set t ings aut om at ically, including focus, wall color, and color uniform it y.
Adjusting the image with automatic focus
Adj ust t he im age focus aut om at ically with cam era kit.
1. Display an im age or t est pat tern t hat can be used t o analyze im age focus.
2. Select Menu > Image Settings > Auto Image Settings > Auto Focus.
• Aut o wall color opt ion is disabled and grayed out if t he picture m ode is set t o 3D or High Fram e
Rat e wit h t he current source or change t o no source st atus. ( The cam era does not support 1x color
wheel speed.)
• Aut o wall color opt ion is also disabled and grayed out if the cam era is not det ect ed.

HS Series 4K User Manual 46
020-002053-01 Rev. 1 (05-2023)
Copyright © 2023 Christie Digital Systems USA, Inc. All rights reserved.
If printed, please recycle this document after use.
Adjusting the image settings
3. Select ENTER.
Setting the wall color automatically
Set t he wall color autom at ically so the proj ect or can enhance t he color perform ance custom ized for
the specific wall.
1. Select Menu > Image Settings > Auto Image Settings > Auto Wall Color.
2. Select ENTER.
Balancing the image color automatically
Balance t he im age color aut om at ically wit h aut o color uniform it y.
1. Select Menu > Image Settings > Auto Image Settings > Auto Color Uniformity.
2. Select appropriat e option for im age color uniform ity:
• Enable—Enables or disables t he auto color uniform ity funct ion.
• Calibration—Starts adj usting t he im age color.
• Target Selection—Select s a calibrat ion t arget .
• Reset—Rest ores fact ory sett ings.
3. Select ENTER.
• Aut o focus opt ion is disabled and grayed out if the picture m ode is set t o 3D or High Fram e
Rate wit h t he current source or change t o no source st at us.
( The cam era does not support 1x color wheel speed.)
• Aut o focus opt ion is also disabled and grayed out if the cam era is not det ect ed or lens lock
option is enabled.
• Aut o wall color opt ion is disabled and grayed out if t he pict ure m ode is set t o 3D or High Fram e Rate
with t he current source or change t o no source st at us. ( The cam era does not support 1x color
wheel speed.)
• Aut o wall color opt ion is also disabled and grayed out if t he cam era is not det ected.
• I m age color calibrat ion opt ion is disabled and grayed out if t he aut o color uniform it y opt ion is
disabled/ unchecked and t he pict ur e m ode is set t o 3D or High Fram e Rat e wit h t he current source
or change to no source st atus. ( The cam era does not support 1x color wheel speed.)
• Target select ion and reset opt ions ar e disabled and grayed out if the aut o color uniform it y opt ion is
disabled/ unchecked.

HS Series 4K User Manual 47
020-002053-01 Rev. 1 (05-2023)
Copyright © 2023 Christie Digital Systems USA, Inc. All rights reserved.
If printed, please recycle this document after use.
Adjusting the image settings
Adjusting advanced image settings
Adj ust t he color value based on gam m a, whit e peaking, color t em perat ure, and save user set tings
for dat a recovery.
Adjusting the color value based on gamma setting
Adj ust the color values t o give a m ore det ailed displayed im age.
1. Select Menu > Image Settings > Advanced Image Settings > Gamma.
2. Select appropriate option:
• Video
• Film
• Bright
• CRT
• DICOM
• HDR—Only available if t he pict ure m ode is set to HDR.
3. Select ENTER.
Adjusting the white peaking
Use whit e peaking t o adj ust t he color of white. The m axim um value of whit e peaking, 100, can
increase t he bright ness of whit e t o near 100% .
1. Select Menu > Image Settings > Advanced Image Settings > White Peaking.
2. Adj ust t he slider by arrow keys or select ENTER t o input t he value.
3. Select ENTER.
Adjusting the color temperature
Adj ust the color t em perat ure as expressed in degrees Kelvin.
1. Select Menu > Image Settings > Advanced Image Settings > Color Temperature.
2. Select appropriate color tem perat ure:
• Warmest—Set s the color tem perat ure t o 5500K.
• Warm—Sets t he color t em perature t o 6500K.
• Cool—Set s t he color t em perat ure t o 7500K.
3. Select ENTER.

HS Series 4K User Manual 48
020-002053-01 Rev. 1 (05-2023)
Copyright © 2023 Christie Digital Systems USA, Inc. All rights reserved.
If printed, please recycle this document after use.
Adjusting the image settings
Saving user settings for data recovery
Creat e a recovery copy of all the user data. This inform ation can be used lat er t o recover sett ings if
necessary.
1. Select Menu > Image Settings > Advanced Image Settings > Backup Restore > Save.
2. To save t he user dat a, select an em pt y record.
One proj ect or can save up t o five backups.
3. To confirm t he select ion, select ENTER.
4. Select Menu > Image Settings > Advanced Image Settings > Backup Restore >
Restore.
5. To rest ore a specific backup, select the required record.
6. To st art rest oring data, select ENTER.
• The recovery copy does not include infor m at ion about t he source and functions t hat can be
operat ed directly from t he rem ot e cont r ol and do not save t he value aft er t he next pow er on.
For exam ple, I m age Freeze.
• All ot her funct ion values ar e saved to t he recovery copy, except for t he following:
• Configurat ion > Lens Set tings
• Configurat ion > Com m unicat ions > LAN/ WLAN
• Size & Position > Geom etry Correction
• Configuration > Menu Pr efer ences > PI N Pr ot ect
• Configurat ion > Dat e and Tim e
• Configurat ion > Schedule

HS Series 4K User Manual 49
020-002053-01 Rev. 1 (05-2023)
Copyright © 2023 Christie Digital Systems USA, Inc. All rights reserved.
If printed, please recycle this document after use.
Configuring system
settings
Learn how t o configure t he syst em sett ings.
Changing the language
Choose t he language you want displayed on proj ect or display panel and on- screen display.
1. Select Menu > Configuration > Language.
You can also select Menu > Language.
2. Select t he appropriat e language.
3. Select ENTER.
Adjusting lens settings
Adj ust various lens sett ings including focus, zoom , lens posit ion, m em orizing lens posit ion and
locking the lens m ot ors.
Viewing the lens type
View t he proj ector lens t ype:
• Undefined Lens
• TR 0.65 - 0.75
• TR 1.02 - 1.36
• TR 1.2 - 1.5
• TR 1.5 - 2.0
• TR 2.0 - 4.0
• TR 4.0 - 7.2
• TR 7.2 - 10.8
• TR 0.38

HS Series 4K User Manual 50
020-002053-01 Rev. 1 (05-2023)
Copyright © 2023 Christie Digital Systems USA, Inc. All rights reserved.
If printed, please recycle this document after use.
Configuring system settings
Aligning the image with focus, zoom, and auto focus
Adj ust t he im age focus aut om at ically with cam era kit.
1. Adj ust t he im age focus aut om at ically wit h cam era kit.
2. Select FOCUS on keypad or rem ot e cont rol.
You can also select Menu > Configuration > Lens Settings > Focus.
3. Use t he up and down arrow keys t o adj ust t he focus of t he im age.
4. To exit t he m enu, select EXIT.
5. To adj ust t he focus aut om atically, select Menu > Configuration > Lens Settings > Auto
Focus.
6. Select ENTER.
7. Select ZOOM on keypad or rem ote cont rol.
You can also select Menu > Configuration > Lens Settings > Zoom.
8. Use t he up and down arrow keys t o zoom in or out of the im age.
9. To exit t he m enu, select EXIT.
10. To refine your adj usts, repeat st eps 2 to 7.
Adjusting the image with automatic focus
Adj ust t he im age focus aut om at ically with cam era kit.
1. Display an im age or t est pat tern t hat can be used t o analyze im age focus.
2. Select Menu > Configuration > Lens Settings > Auto Focus.
3. Select ENTER.
Adjusting lens position
Shift t he lens t o t he specific posit ion.
1. Display an im age or t est pat tern t hat can be used t o analyze im age locat ion.
2. Select LENS on keypad or LENS H/LENS V on rem ot e cont rol.
You can also select Menu > Configuration > Lens Settings > Lens Shift.
3. Use t he arrow keys to adj ust t he lens posit ion.
4. To exit t he m enu, select EXIT.
• Aut o focus opt ion is disabled and grayed out if t he pict ure m ode is set t o 3D or High Fram e Rate
wit h the current source or change to no source stat us.
( The cam era does not support 1x color wheel speed) .
• Aut o focus opt ion is also disabled and grayed out if t he cam era is not det ected or lens lock opt ion
is enabled.

HS Series 4K User Manual 51
020-002053-01 Rev. 1 (05-2023)
Copyright © 2023 Christie Digital Systems USA, Inc. All rights reserved.
If printed, please recycle this document after use.
Configuring system settings
Saving lens setting
Save t he lens posit ion. One proj ector can save m axim um up t o five lens set tings.
1. Select Menu > Configuration > Lens Settings > Lens Shift Memory > Save Current
Settings.
2. To save t he lens set ting, select an em pt y record.
3. To confirm t he select ion, select ENTER.
Applying the previous lens setting
Apply t he previously saved lens sett ing t o t he project or.
1. Before applying t he previous lens sett ing, you need t o save t he lens sett ing.
See
Saving lens setting on page 51 for furt her det ails.
2. Select Menu > Configuration > Lens Settings > Lens Shift Memory > Apply Position.
3. To apply specific lens set t ing, select t he requir ed record.
4. To confirm t he select ion, select ENTER.
Locking the lens motor
Prevent all lens m otors from m oving. I t disables t he zoom , focus, and offset sett ings, locking out
any changes and overriding all other lens features. This feature prevent s accident al lens posit ion
changes in m ult iple proj ectors inst allat ions.
1. Select Menu > Configuration > Lens Settings > Lock all Lens Motors.
2. To enable locking of all lens m ot ors, select Locked.
3. To unlock all lens m otors, select Allow.
4. To confirm t he select ion, select ENTER.
Resetting the lens to home position
Set t he lens offset back t o t he hom e posit ion.
1. Select Menu > Configuration > Lens Settings > Lens Calibration.
You can also select LENS on keypad or LENS H/LENS V on r em ot e control.
2. Select ENTER.
3. To st art t he lens calibration, select OK.
To m ake sure t he lens shift is funct ioning properly, Chr ist ie recom m ends calibrat ing the lens every
tim e t he lens are changed.

HS Series 4K User Manual 52
020-002053-01 Rev. 1 (05-2023)
Copyright © 2023 Christie Digital Systems USA, Inc. All rights reserved.
If printed, please recycle this document after use.
Configuring system settings
Selecting screen image orientation
Specify t he orient ation t o use for t he im age. The proj ect or support s front proj ect ion, rear
proj ection, front proj ection invert ed, or rear pr oj ect ion invert ed.
1. To invert t he proj ect ion im age, select Menu > Configuration > Ceiling Mount.
2. Select appropr iat e ceiling m ount set tings:
• Off—Disables the ceiling m ount set ting.
• On—Enables t he ceiling m ount sett ing.
• Auto—Det ects t he orientat ion autom at ically.
3. To confirm t he im age orient at ion, select ENTER.
4. To do a rear proj ect ion, select Menu > Configuration > Rear Projection.
5. To swap, select ENTER.
Adjusting on-screen display menus
Adj ust various on- screen display ( OSD) sett ings including t he posit ion, OSD t ransparency and
tim ing for OSD to disappear.
Determining the on-screen display position
Adj ust t he locat ion of t he on- screen display ( OSD) m enus.
1. Select MENU > Configuration > Menu Preferences > Menu Horz Offset or Menu Vert
Offset.
2. To determ ine t he locat ion on t he screen where you want t he OSD t o appear, adj ust t he slider by
arrow keys or select ENTER t o input t he value.
3. Aft er inputt ing the value, select ENTER t o apply.
Showing messages
Enable or disable t he on screen m essage dialogs. For exam ple, input source, I P Address, Slot
infor m at ion, Gam m a inform at ion, and so on.
1. Select Menu > Configuration > Menu Preferences > Show Messages.
2. To swap, select ENTER.

HS Series 4K User Manual 53
020-002053-01 Rev. 1 (05-2023)
Copyright © 2023 Christie Digital Systems USA, Inc. All rights reserved.
If printed, please recycle this document after use.
Configuring system settings
Setting the transparency of the on-screen display position
Change t he on- screen display ( OSD) m enus background t o be t ranspar ent . As t he value increases,
m ore of t he im age behind t he m enu is visible.
1. Select MENU > Configuration > Menu Preferences > Menu Transparency.
2. Adj ust t he slider by arrow keys or select ENTER t o input t he value.
3. Aft er inputt ing the value, select ENTER t o apply.
Changing the splash screen
Select splash screen which is the screen wit h no source is displayed.
1. Select Menu > Configuration > Menu Preferences > Splash Screen Setup.
2. Select t he appropr iat e splash screen:
• Factory Logo
• Blue
• Black
• White
3. Select ENTER.
Setting time out for on-screen display
Adj ust t he t im e for on- screen display t o disappear.
1. Select Menu > Configuration > Menu Preferences > Menu Time Out.
2. Select t he appropriat e t im e:
• Off
• 1 Min
• 3 Min
3. Select ENTER.
I f t he pr oj ect or has not det ect ed an input sour ce, t he Menu Transparency function is off.

HS Series 4K User Manual 54
020-002053-01 Rev. 1 (05-2023)
Copyright © 2023 Christie Digital Systems USA, Inc. All rights reserved.
If printed, please recycle this document after use.
Configuring system settings
Setting up password protection
Prot ect your proj ect or wit h a passw ord. Once enabled, you m ust ent er t he password before you can
proj ect an im age.
1. Select Menu > Configuration > Menu Preferences > PIN Protect.
2. Ent er a password by num ber keys.
3. To confirm the password, select OK.
Changing password
Change t he current password t o a new password.
1. Select Menu > Configuration > Menu Preferences > Change PIN.
2. Ent er current password by num ber keys.
3. Select OK.
4. Ent er new password by num ber keys.
5. Select OK.
6. To confirm the password, ent er new password again by num ber keys.
7. Select OK.
Setting up power mode
Adj ust various proj ect or's power set tings including t he shut down t im e, sleep t im er, and st andby
m ode.
Setting the standby mode
Det erm ine which st andby m ode t he pr oj ect or is in when AC power on.
1. Select Menu > Configuration > Power Management > Standby Mode.
2. Select t he appropriate m ode:
• 0.5W mode—Less power consum pt ion which does not have t he abilit y t o m onit or t he
proj ector over a net w ork cable in st andby m ode.
• Communication mode—More power consum pt ion in st andby m ode which allows you t o
m onit or t he pr oj ect or over a network cable.
3. Select ENTER.
Com m unicat ion m ode is the proj ect or’s default st andby m ode. Aft er perform ing factory r eset,
m anually set t he standby m ode to 0.5W m ode to have less power consum pt ion ( < 0.5W) .

HS Series 4K User Manual 55
020-002053-01 Rev. 1 (05-2023)
Copyright © 2023 Christie Digital Systems USA, Inc. All rights reserved.
If printed, please recycle this document after use.
Configuring system settings
Setting the AC power
Enable or disable t o power on t he pr oj ector direct ly.
1. Select Menu > Configuration > Power Management > AC Power On.
2. To t oggle, select ENTER.
Setting the time for auto shutdown
Set up a t im e for aut om atically t urns off t he project or aft er no signal is det ect ed for a preset
num ber of m inut es. I f an act ive signal is received before t he proj ect or powers down, the im age is
displayed.
1. Select Menu > Configuration > Power Management > Auto Shutdown.
2. Select t he appropriate t im e t o aut om atically turn off t he proj ector when t here is no signal.
3. To confirm t he select ion, select ENTER.
Setting the sleep timer
Set up a t im e for aut om atically power off the proj ect or, aft er it has been on for a specified am ount
of t im e.
1. Select Menu > Configuration > Power Management > Sleep Timer.
2. Select t he appropriate t im e t o autom at ically t urn off t he proj ect or.
3. To confirm t he select ion, select ENTER.
Enabling high altitude setting
Enable high altit ude m ode when alt it udes > / = 2000 m . The fan operat es at high speed t o ensure
sufficient air flow for high alt it udes; however, t he noise level of t he pr oj ect or is increased.
1. Select Menu > Configuration > High Altitude.
2. To t oggle, select ENTER.

HS Series 4K User Manual 56
020-002053-01 Rev. 1 (05-2023)
Copyright © 2023 Christie Digital Systems USA, Inc. All rights reserved.
If printed, please recycle this document after use.
Configuring system settings
Setting the projector communication
Enable t he receivers and t he wired keypad t o com m unicate with t he proj ector from t he rem ot e. The
front and t op I R sensors receive t ransm issions from the I R rem ot e. Keep t he t ransm ission pat h t o
these sensors unobst ruct ed for uninterrupt ed com m unicat ions with t he pr oj ect or.
1. Select Menu > Configuration > IR Control.
2. To enable t he top I R sensor, select Top.
3. To confirm t he select ion, select ENTER.
4. To enable t he front I R sensor, select Front.
5. To confirm t he select ion, select ENTER.
6. To enable t he signal fr om t he HDBaseT Box, select HDBaseT.
7. To confirm t he select ion, select ENTER.
Enabling the 12V Trigger
The 12V t r igger is used for elect r ical proj ect or screens. The proj ect or screen is aut om at ically
lowered or raised when t he proj ector is swit ched on or off.
1. Select Menu > Configuration > 12V Trigger.
2. To t oggle, select ENTER.

HS Series 4K User Manual 57
020-002053-01 Rev. 1 (05-2023)
Copyright © 2023 Christie Digital Systems USA, Inc. All rights reserved.
If printed, please recycle this document after use.
Configuring
communications
Define and cont rol how single or m ult iple proj ect ors are linked with each ot her and wit h cont rolling
device.
Setting network environment
Det erm ine t he com m unication sett ings such as net work set up, serial port inform ation, and so on.
Adjusting LAN setting
Set up net work configurat ion for wire net working.
1. Select Menu > Configuration > Communications > LAN.
2. Set up t he appropriate sett ing:
• MAC Address—Displays t he net work MAC address value.
• Network Status—Displays t he network status
• LAN Interface—Displays t he LAN int erface. Select eit her RJ-45 or HDBaseT and select
ENTER t o save.
• DHCP—Enables or disables t he DHCP t o aut om at ically get I P address, subnet m ask, and
so on.
• IP Address—Assigns t he net work I P address.
• Subnet Mask—Assigns t he net work subnet m ask.
• Default Gateway—Assigns t he net work default gat eway.
• Primary DNS—Assigns t he prim ary DNS.
• Secondary DNS—Assigns t he secondary DNS.
3. To apply the LAN sett ings, select Apply.

HS Series 4K User Manual 58
020-002053-01 Rev. 1 (05-2023)
Copyright © 2023 Christie Digital Systems USA, Inc. All rights reserved.
If printed, please recycle this document after use.
Configuring communications
Using the web interface
To cont rol t he proj ector t hrough t he web int erface, do t he follow ing:
1. St art up t he w eb browser on your com put er or m obile devices.
2. Ent er the I P address set on t he project or int o t he URL of t he web br owser.
3. Enter t he user nam e and password t o login. After a successful login, you can cont rol t he
proj ector over t he web int erface.
Logging on to the web user interface
Log int o t o the web user int erface by following t he st eps below.
1. Connect the proj ect or to AC and power it on.
2. When t he net work is available, connect t he proj ect or and com put er t o t he sam e net work.
a. To check t he proj ect or address in a wired net work, select Menu > Configuration >
Communications > LAN > IP Address.
b. To check t he proj ect or address in a wireless network, select Menu > Configuration >
Communications > WLAN > Default Gateway.
3. I f t he net work is unavailable, connect the project or t o t he com put er wit h an RJ45 cable.
a. Set t he Default Gat eway and Subnet Mask of t he com put er t o m atch t he proj ector.
b. Set t he I P address of t he com put er t o m atch the first three num bers of t he proj ect or.
For exam ple, if t he proj ector I P address is 192.168.000.100, set t he com put er I P address
to 192.168.000.xxx, where xxx is not 100.
4. Open a w eb browser and t ype t he proj ect or addr ess in t he browser address bar.
5. I n t he Usernam e field, ent er the usernam e.
The default usernam e is adm in.
6. I n t he Password field, ent er t he password.
The default password is adm in.
7. Select Login.
Setting the system notification
Configure t he Sim ple Net work Managem ent Protocol ( SNMP) set tings for receiving notifications
from t he system direct ly t o t he em ail. SNMP provides net work adm inist rat ors with a com m on way
to m anage t heir network devices from a single rem ot e locat ion. Adm inistrat ors can use t he SNMP
int erface t o query a num ber of devices t o see t heir current st at us or configuration. Operat ors can
change configuration values and configure t rap not ifications to be sent when certain event s occur
( for exam ple, loss of signal, power st ate change, and so on) .
Em ails are sent t o t he m ail server configured in t he proj ect or set tings. Up t o t wo user em ail
account s can be select ed. I m port ant inform at ion regarding t he event is locat ed in t he body cont ent
of t he em ail.

HS Series 4K User Manual 59
020-002053-01 Rev. 1 (05-2023)
Copyright © 2023 Christie Digital Systems USA, Inc. All rights reserved.
If printed, please recycle this document after use.
Configuring communications
SNMP t raps are not ificat ions sent from t he proj ect or. They are only received by a t rap receiver ( MI B
Browser) in t he com put er.
1. From t he web user int erface, select Network > Notification.
See
Using the web interface on page 58 for furt her inform at ion.
2. Set up t he appropriate SNMP set t ing:
• SNMP Read Community—Plain text passw ord t hat m ust also be ent ered in t he MI B
browser. This password allows various sett ings in t he proj ect or t o be queried.
• SNMP Location—Use as a descript ion t o where a proj ect or is locat ed in a building. SNMP
em ails sent specify t his locat ion.
• Trap IP Address—Fill in t his field with t he I P address of t he com put er, on w hich you
want t o view received t raps from t he project or.
• Sender Email—Set the em ail account as t he source of t he syst em not ificat ions.
• SMTP Server—Enter t he I P address of t he m ail server.
• Recipient—Ent er up t o t wo em ail account s t o receive t he system notification.
3. Set t he SNMP actions for the syst em event s:
• Disabled—Disable em ail not ificat ion
• SNMP Trap—Send t he not ificat ion t o t he t rap r eceiv er ( MI B Browser ) .
• Email—Send t he not ificat ion t o the em ail recipient .
• SNMP Trap and Email—Send t he not ificat ion t o t he t rap receiver and t he em ail
recipient .
4. To apply the not ification set tings, select Save.
Using the RS-232C interface
To cont rol t he proj ector t hrough t he RS-232C int erface, do t he following:
1. Connect your com put er and t he proj ector directly using t he RS- 232 cable.
2. Set t he sam e baud rat e in bot h your com puter and proj ector.
Use com m ands t o control t he proj ector.
Re-connecting the network
Aft er t he net work is disconnected and t im eout using RJ- 45/ HDBaseT/ Wifi, t he browser refreshes t he
page aut om atically and show HTTP404 ( Not Found) error m essage.
I f user want s t o re- cont rol t he proj ect or, t he user m ust login in t he control page wit h t he account
and password again.

HS Series 4K User Manual 60
020-002053-01 Rev. 1 (05-2023)
Copyright © 2023 Christie Digital Systems USA, Inc. All rights reserved.
If printed, please recycle this document after use.
Configuring communications
Adjusting WLAN setting
Set up net work configurat ion for wireless net working.
1. Select Menu > Configuration > Communications > WLAN.
2. Set up t he appropriate sett ing:
• SSID—Displays t he SSI D of t he wireless net work.
• Enable—Enables or disables t he w ireless funct ionalit y.
• Start IP—Assigns the st art I P address of t he wireless net work.
• End IP—Assigns t he end I P address of t he w ireless net work.
• Subnet Mask—Assigns t he subnet m ask of t he wireless.
• Default Gateway—Assigns t he gat eway of t he wireless.
3. To apply the WLAN set tings, select Apply.
Adjusting network setting
Set up net work configuration set t ing, such as reset back t o default .
1. Select Menu > Configuration > Communications > Network.
2. Set up t he appropriate net work sett ing:
• Show Network Message—Enables or disables t o display of t he net work m essage.
• Reset to Default—Reset s the net work configurat ion set ting, including LAN set ting and
WLAN set t ing, t o default .
3. To apply the net wor k configurat ion, select ENTER.
Setting serial port baud rate
Select t he serial port and baud rat e.
1. Select Menu > Configuration > Communications > Serial Port Baud rate.
2. Set up t he appropr iat e baud rat e.
3. To confirm t he select ion, select ENTER.
Enabling serial port echo
Enable or disable t o allow the CLI pass t hrough.
1. Select Menu > Configuration > Communications > Serial Port Echo.
2. To swap, select ENTER.

HS Series 4K User Manual 61
020-002053-01 Rev. 1 (05-2023)
Copyright © 2023 Christie Digital Systems USA, Inc. All rights reserved.
If printed, please recycle this document after use.
Configuring communications
Setting the projector address
Assign an address t o t he proj ect or for I R rem ot e connect ion.
1. To set t he proj ect or address, select Menu > Configuration > Communications > Projector
Address.
2. Select specific num ber for t his proj ector from 0 t o 9.
3. To m at ch up with t he proj ect or address, select PROJ and specific num ber key.
The proj ector responds t o t he I R rem ot e set to t he sam e address as the proj ect or or t o t he I R
rem ot e set t o address 0.
Adjusting the back light settings
Control t he back light behavior and t im eout sett ing for t he keypad and st at us LED.
1. Select Menu > Configuration > Backlight Preferences > Keypad Backlight.
2. Select t he appropriate sett ing for keypad backlight .
3. To confirm t he select ion, select ENTER.
4. Select Menu > Configuration > Backlight Preferences > Status LED.
5. Select t he appropriate sett ing for st at us LED.
6. To confirm t he select ion, select ENTER.
Setting the hot key
To direct ly call out a funct ion wit hout going t hrough t he layers of t he on- screen display ( OSD)
m enus, select a specific funct ion for a hot key. To access t his funct ion, select HOT KEY on t he
rem ot e cont rol.
1. Select Menu > Configuration > Hot-Key Settings.
2. Select t he one function for t he hot key:
• Size Preset s
• Pict ure Set tings
• Default Value
• Detail
• Cont rast Enhancem ent
• Light Source Mode
• Image Freeze
• I nform ation
• Disable Warp/ Blend
When t he hot key is set t o Disable Warp/ Blend, select ing the hot key once disables t he current ly
applied warp and blend. Selecting t he hot key again enables the function and r et urns t he warp and
blend to t he screen.

HS Series 4K User Manual 62
020-002053-01 Rev. 1 (05-2023)
Copyright © 2023 Christie Digital Systems USA, Inc. All rights reserved.
If printed, please recycle this document after use.
Configuring communications
3. To set t he select ed function as t he hot key, select ENTER.
Configuring date and time settings
Configure the date and t im e set tings of t he proj ect or. Make sure t hese set tings are accurate if you
want t o use t he schedule feat ure.
1. Select Menu > Configuration > Date and Time.
2. Set up t he appropriate sett ing:
• Clock Mode—Set s t he clock m ode t o Local or Net work. A NTP Server is required if t he
clock m ode is set to Net work.
• Date—Set s a date for the proj ect or. The dat e form at is Year/ Mont h/ Dat e.
• Time—Set s t he t im e for the proj ect or.
• Daylight Saving Time—Configures t he daylight saving sett ings if required.
• NTP Server—Select s a NTP Server for t he net work clock m ode.
• Time Zone—Select s an appropriate t im e zone for t he net work clock m ode.
• Update Interval—Set s t he date and t im e updat e int erval.
3. To apply the dat e and t im e sett ings, select Apply.
Scheduling events
Schedule feat ure allows you t o schedule various proj ect or functions at the given date and t im e.
1. Select Menu > Configuration > Schedule.
2. View or set up t he appropriat e set ting:
• Date and Time—Adj ust s t he dat e and tim e for t he proj ect or.
• Schedule Mode—Enables t he schedule m ode if you want t o schedule proj ect or
funct ions.
• View Today—Displays event s scheduled for the current day.
• Monday to Sunday—Set s up schedule for days of a week.
• Event 01-016—See st ep 5 in Setting up a schedule on page 63 for a full list of
available actions.
• Copy Events To—I f several days of a week have t he sam e schedule, creat e a fully
scheduled day, select Copy Events To, and select t hese days of t he week where
you want t o copy t he full schedule.
• Reset Schedule—Reset s all of t he schedule set tings t o t he fact ory default s.

HS Series 4K User Manual 63
020-002053-01 Rev. 1 (05-2023)
Copyright © 2023 Christie Digital Systems USA, Inc. All rights reserved.
If printed, please recycle this document after use.
Configuring communications
Setting up a schedule
1. Select Menu > Configuration > Schedule.
2. Select t he appropriate day of t he w eek when you want t o schedule event s and select ENTER.
The schedule t able for the selected day is show n.
3. Select t he first event slot and select ENTER.
The event subm enu is shown.
4. Select the Time when t he chosen event m ust occur, for exam ple at 11 AM.
5. Select t he appropriate act ion t o t ake place:
• Power Set tings
• Off/On
• Power On
• 0.5W Mode
• Com m unication Mode
• I nput Source
• Off
• HDMI1
• HDMI2
• Display Port
• 12G-SDI
• HDBaseT
• Light Source Mode
• Off
• Constant Power
• Const ant I nt ensit y
• ECO 1
• ECO 2
• Shut ter
• Off
• Shut ter On
• Shut ter Off
6. To confirm t he select ion, select ENTER.
7. Select EXIT and ret urn t o t he schedule t able of t he select ed day.

HS Series 4K User Manual 64
020-002053-01 Rev. 1 (05-2023)
Copyright © 2023 Christie Digital Systems USA, Inc. All rights reserved.
If printed, please recycle this document after use.
Configuring communications
8. Repeat st eps 2 to 7 t o schedule m ore event s for t he selected day.
You can schedule up t o 16 events per day. To access t he events on t he next page, select t he
arrow keys.
9. To schedule event s for ot her days, select EXIT t o ret urn t o t he m ain Schedule m enu and repeat
st eps 2 t o 8.

HS Series 4K User Manual 65
020-002053-01 Rev. 1 (05-2023)
Copyright © 2023 Christie Digital Systems USA, Inc. All rights reserved.
If printed, please recycle this document after use.
Configuring light
settings
Learn how t o configure t he light set tings.
Setting light source mode
Set up light source m ode depending t he environm ent .
1. Select Menu > Light Source > Light Source Mode.
2. Select appropr iat e light source m ode:
• Constant Power—Enable Const ant Power t o set t he proj ect or bright ness t o a specific
level cont rolled by t he laser diode pow er. See
Adjusting the light power on page 66 for
furt her det ails of sett ing t he laser diode pow er.
I f const ant power is enabled in t he proj ect or t hen this funct ion is activat ed when t he
volt age is below 140 Vac. For exam ple, if const ant power in 4K22- HS is set t o 77 t hen t he
proj ector will keep t he laser diode power at 85% which is around ~ 1300W.
• Constant Intensity—After enabling Const ant Power, select Constant I nt ensit y t o
m aint ain current const ant bright ness and color set t ings. This funct ion can rem ain at
current sett ing for longer period of t im e t han Const ant Power m ode and is used for long-
term proj ect ing or blending.
Perform light sensor calibrat ion before enabling Const ant I nt ensit y.
When Const ant I nt ensit y is enabled, Dynam ic Black and Real Black funct ions are
aut om atically disabled.
When Pict ure Set t ings is changed under Constant I nt ensit y, t he light source m ode
aut om atically changes back t o Const ant Power..
• ECO 1 (80%)—Set t he proj ect or t o 80% const ant bright ness and color set tings.
• ECO 2 (50%)—Set t he proj ector t o 50% constant bright ness and color set tings.
3. Select ENTER.

HS Series 4K User Manual 66
020-002053-01 Rev. 1 (05-2023)
Copyright © 2023 Christie Digital Systems USA, Inc. All rights reserved.
If printed, please recycle this document after use.
Configuring light settings
Adjusting the light power
Set t he value of the laser diode power. The power levels can be m anaged to obtain the bright est
pict ure or longest light source life. The m inim um sett ing of t he light power is 30% bright ness and color
set t ing, and t he m axim um is 100% bright ness and color set ting.
1. Select Menu > Light Source > Constant Power.
2. Adj ust t he slider by arrow keys or select ENTER t o input t he value you select ed.
3. Aft er inputt ing the value, select ENTER t o apply.

HS Series 4K User Manual 67
020-002053-01 Rev. 1 (05-2023)
Copyright © 2023 Christie Digital Systems USA, Inc. All rights reserved.
If printed, please recycle this document after use.
Diagnostic tools
Follow t hese pr ocedures t o help diagnose issues with HS Ser ies 4K proj ect ors.
Viewing projector information
View t he st at us of t he proj ector, source inform at ion, light source inform at ion, and com m unicat ion
infor m at ion. The inform at ion is read- only.
1. To view t he st atus of t he proj ect or, such as m odel nam e, serial num ber, and so on, select Menu
> Information > Status Info.
2. To view source inform at ion, such as act ive source, signal form at , and so on, select Menu >
Information > Source Info.
3. To view backup input inform at ion, such as backup input status, backup input change, and so
on, select Menu > Information > Backup Input Info.
4. To view t he com m unicat ion inform at ion, such as net wor k st at us, pr oj ect or's I P address, subnet ,
and so on, select Menu > Information > Communications Info.
5. To view t he light source inform at ion, such as t ot al proj ect or hours and laser diode ( LD) hours,
select Menu > Information > Light Source Info.
6. To view t he firm ware inform at ion, such as firm ware ( FW) version, and so on, select Menu >
Information > Firmware Version Info.
Selecting a test pattern
Use t he proj ector's t est pat terns t o assist wit h configurat ion of t he proj ect or and t o diagnose any
issues t hat m ay occur.
1. Select Test Pat tern on rem ot e control.
You can also select t he t est pat terns from Menu > Test Pattern.
2. Scroll t hrough t he list of t est patt erns by left and right arrow keys on rem ot e cont rol.
3. Select t he required t est pat t ern.
4. To confirm your select ion, select ENTER.

HS Series 4K User Manual 68
020-002053-01 Rev. 1 (05-2023)
Copyright © 2023 Christie Digital Systems USA, Inc. All rights reserved.
If printed, please recycle this document after use.
Diagnostic tools
Restoring factory default settings
Rest oring factory sett ings r em oves all custom device sett ings.
1. Select MENU > Configuration > Service.
2. Ent er the service passw ord.
3. Select Factory Reset.
All cust om ized set tings are set to t he default fact ory set t ings.
4. At the confirm at ion prom pt , select OK.
To avoid warranty violat ion, only Christie- qualified technicians can reset fact or y default s.

HS Series 4K User Manual 69
020-002053-01 Rev. 1 (05-2023)
Copyright © 2023 Christie Digital Systems USA, Inc. All rights reserved.
If printed, please recycle this document after use.
Configuring input
settings
Learn how t o configure t he input source and pict ure in pict ure ( PI P) / pict ure by picture ( PBP)
set t ings.
Setting main input source
Set up t he active input t o be used as t he m ain im age.
1. Select Menu > Input Switching & PIP > Main Input.
2. To select t he active input , select ENTER.
Setting second input source
Select an act ive input t o be used as t he pict ure in picture ( PI P) / pict ure by pict ure ( PBP) . Before
set t ing t he second input source, m ake sure t o enable PI P/ PBP otherwise t his it em is disabled.
1. Select Menu > Input Switching & PIP > PIP/PBP Input.
2. To select another act ive input , select ENTER.
Enabling second input source
To act ivat e the picture in pict ure ( PI P)/ picture by pictur e ( PBP) set ting, swit ch on t his funct ion.
1. Select Menu > Input Switching & PIP > PIP/PBP Enable.
2. To swap, select ENTER.
To updat e t he PI P/ PBP m ode, run t he Input Switching & PIP > Auto Image Resync funct ion.
Auto I m age Resync synchronizes t he m ain input and t he sub input sources sim ult aneously.

HS Series 4K User Manual 70
020-002053-01 Rev. 1 (05-2023)
Copyright © 2023 Christie Digital Systems USA, Inc. All rights reserved.
If printed, please recycle this document after use.
Configuring input settings
Swapping main input and second input source
Swit ch t he m ain input source wit h second input source. Befor e t his act ion, m ake sure t o enable
pict ure- in- pict ure/ picture- by- picture.
1. Select Menu > Input Switching & PIP > Swap.
2. To swap, select ENTER.
Setting the size of second input source
Set t he size of pict ure- in- picture ( PI P)/ pict ure- by-pict ure ( PBP) . Before t his act ion, m ake sure t o
enable PI P/ PBP. See Input sources layout and size on page 70 for furt her det ails of t he layout and
size.
1. Select Menu > Input Switching & PIP > Size.
2. Select the appropriat e size, sm all, m edium or lar ge, for PI P/ PBP input source.
3. To confirm t he select ion, select ENTER.
Setting up the display layout with two input
sources
Set t he display locat ion for m ain input source and second input source on t he screen. Before t his
action, m ake sure t o enable PI P/ PBP. See Input sources layout and size on page 70 for furt her
det ails of t he layout and size.
1. Select Menu > Input Switching & PIP > Layout.
2. Select t he appropriate layout .
3. To confirm t he select ion, select ENTER.
Input sources layout and size
A P indicat es t he prim ary source region ( light er color) and an ast erisk ( * ) indicat es bot h regions are
the sam e size.
PIP/PBP layout PIP/PBP size
Small Medium Large
PBP, Main Left
*
PBP, Main Top
*
P
P
P
P
P
P
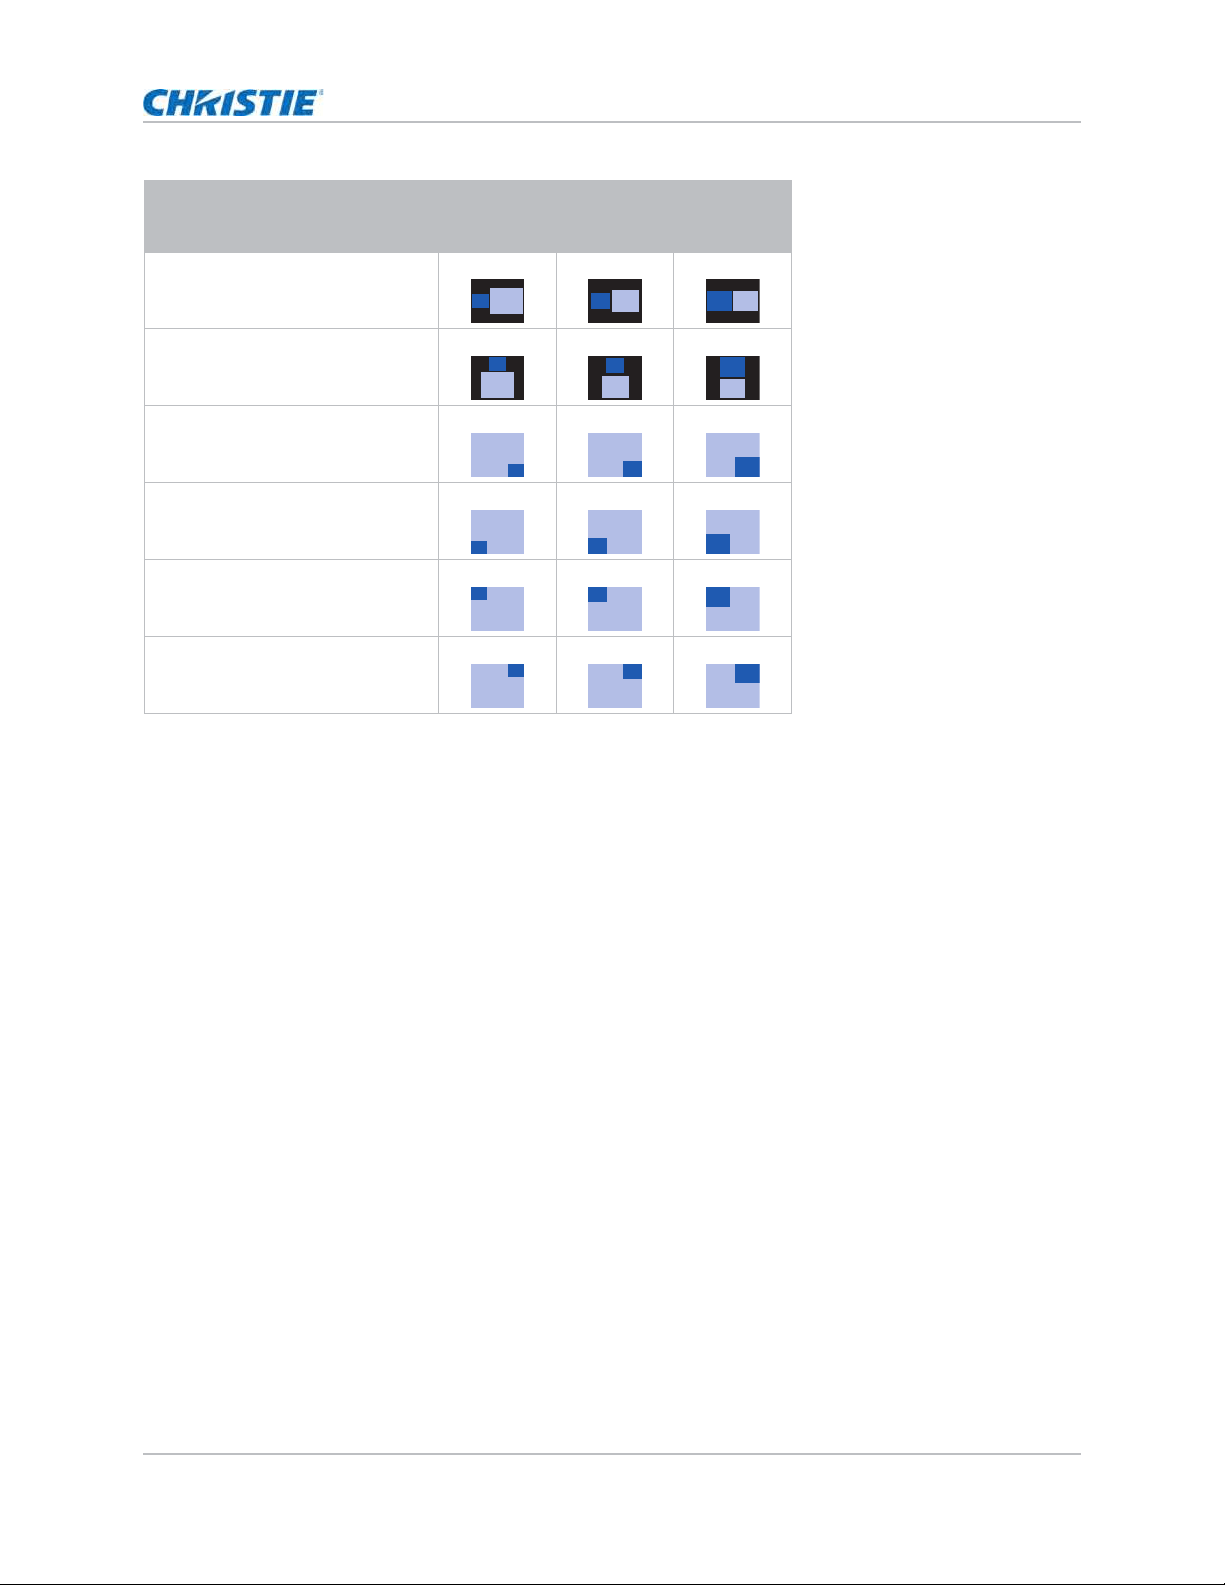
HS Series 4K User Manual 71
020-002053-01 Rev. 1 (05-2023)
Copyright © 2023 Christie Digital Systems USA, Inc. All rights reserved.
If printed, please recycle this document after use.
Configuring input settings
Setting the timing detection mode
Set t im ing det ection m ode t o enhanced or norm al to support addit ional PC t im ings. When the
proj ected pict ure is not com plet ed, this function is used t o adj ust t he pict ure.
1. Select Menu > Input Switching & PIP > Auto Image Resync.
2. Select t he appropriate m ode:
• Normal—I f t he input signal source has been plugged t o t he sam e port on t he proj ect or
and not been r eplugged, t he proj ect or can process t he signal at a fast er speed.
• Enhanced—Every t im e t he proj ect or receives the signal, it analyzes the source signal
and verifies t he int egrit y of it. This ensures t he opt im al im age quality but consum es m ore
tim e.
3. To confirm t he select ion, select ENTER.
Setting the input searching method
Set t he m ost suited m et hod for searching input source.
1. Select Menu > Input Switching & PIP > Input key.
2. Select t he appropriat e searching m ethod:
• Change Sources—Changes t he source m anually by select ing INPUT on t he keypad or
rem ot e cont rol.
PBP, Main Right
*
PBP, Main Bott om
*
PI P, Sub Bot tom Right
PI P, Sub Bot t om Left
PI P, Sub Top Left
PI P, Sub Top Right
PIP/PBP layout PIP/PBP size
Small Medium Large
P
P
P
P
P
P
P
P
P
P
P
P
P
P
P
P
P P

HS Series 4K User Manual 72
020-002053-01 Rev. 1 (05-2023)
Copyright © 2023 Christie Digital Systems USA, Inc. All rights reserved.
If printed, please recycle this document after use.
Configuring input settings
• List all Sources—Select s listing all t he input sources available for select ion.
• Auto Sources—Aut om atically searches t he source.
3. To confirm t he select ion, select ENTER.
Setting up the backup input
Use t he Backup I nput function t o set up t wo input sources wit h t he sam e tim ing specificat ion using
the HDMI switch/ split t er. Upon loss of one input source due t o the dam aged cable, t he pr oj ect or
aut om at ically swit ches t o t he ot her source. The swit ching t im e is less t han 1 second.
1. Select Menu > Input Switching & PIP > Backup Input.
2. Set up t he appropriate sett ing:
• Auto Switch—Select s t he checkbox t o enable aut om at ically sw itch t o backup input
source when the current signal fails.
• Current Signal—Shows t he current active signal.
• First Input—Selects t he first input . When t he selected source is activated, t he on- screen
display ( OSD) m enu displays the signal’s Resolut ion, Horz Refresh, and Color Space.
• Second Input—Select s t he second input . When t he select ed source is act ivat ed, t he
OSD m enu displays t he signal’s Resolut ion, Horz Refresh, and Color Space.
Adjusting the sub image
Adj ust t he im age relat ed set t ings for t he sub source in PI P m ode.
1. Select Menu > Input Switching & PIP > Adjust Sub Image.
2. Select t he appropriate color space for t he sub source:
Enabling low latency mode
Enable t he Low Lat ency Mode t o m inim ize t he input lag. This function is used for live broadcasting,
st ream ing m edia, and sim ilar installat ions.
1. Select Menu > Input Switching & PIP > Low Latency Mode.
2. Select t he appropriate m ode.
• Normal—No functional restrictions but longer delay t im e.
• Ultra—Reduces latency in 2D m ode but set s restrictions when warping t he im age.
Ult ra does not support 3D, input t im ings outside t he range of 60fps, 120fps and 240fps,
PI P/ PBP m ode, and im age freeze.
3. To confirm t he select ion, select ENTER.
• The support ed sources are HDMI 1, HDMI 2, Display Port , and HDBaseT.
• PI P/ PBP, Aut o Source, 3D, and 120Hz t im ing condit ions are not suppor t ed.
• The prim ary and secondary source m ust have t he sam e Resolut ion, Horz Refresh/ Fram e Rat e, and
Color Space set t ings.

HS Series 4K User Manual 73
020-002053-01 Rev. 1 (05-2023)
Copyright © 2023 Christie Digital Systems USA, Inc. All rights reserved.
If printed, please recycle this document after use.
Configuring input settings
Configuring the EDID setting
Enable or disable the Ext ended Display I dent ificat ion Dat a ( EDI D) for HDMI 2.0 t o play v ideos fr om
hardware devices, such as DVD players.
The m ost com m only used HDMI versions are HDMI 1.4 and 2.0, with differences in bandwidt h.
HDMI 1.4 has lim ited rate of 2K. 4K22- HS and 4K13- HS proj ect ors are com patible wit h bot h HDMI
1.4 and HDMI 2.0.
When t he proj ect or is connected t o a hardware device support ing HDMI 1.4 only, disable t he EDI D
for HDMI 2.0 t o play the videos proper ly.
1. Select Menu > Input Switching & PIP > EDID.
2. Select the HDMI 1, HDMI 2, or HDBaseT it em where you want t o enable EDI D.
3. Set 1.4 or 2.0.
4. To confirm t he sett ing, select ENTER.
Configuring the HDMI output
Set t he default HDMI out put port .
1. Select Menu > Input Switching & PIP > HDMI Out put.
2. Select HDMI 1 or HDMI 2 as t he HDMI out put .
3. To confirm t he sett ing, select ENTER.
I f m ult iple pr oj ect ors are connect ed t o each ot her in a daisy chain, t he HDR signal out put is
det erm ined by t he fir st proj ector and PC handshake.

HS Series 4K User Manual 74
020-002053-01 Rev. 1 (05-2023)
Copyright © 2023 Christie Digital Systems USA, Inc. All rights reserved.
If printed, please recycle this document after use.
Signal connectivity
specifications
I dent ify t he signal connect ivit y specifications for HS Series 4K proj ect ors.
The list of form at s list ed below are not exhaustive and ot her form ats m ay be supported. For m ore
inform at ion, cont act Christ ie Technical Support .

HS Series 4K User Manual 75
020-002053-01 Rev. 1 (05-2023)
Copyright © 2023 Christie Digital Systems USA, Inc. All rights reserved.
If printed, please recycle this document after use.
Signal connectivity specifications
HDMI1/HDMI2 video formats
I dent ify t he video form at s for t he HDMI 1/ HDMI 2 input .
Signal
type
Signal
format
Resolution Aspect ratio V sync
(Hz)
RGB YCbCr 4:4:4 YCbCr
4:2:2
8 bit
10 bit 12 bit 8 bit 10 bit 12 bit 8 bit
PC XGA 1024 x 768 1.33 4: 3 60 V V V V V V V
70VVVVV VV
XGA 1024 x 768 75 V V V V V V V
85VVVVV VV
120 V V V V V V V
SXGA 1152 x 864 75 V V V V V V V
1152 x 870 1.32 75 V V V V V V V
WXGA 1280 x 768 1.67 5: 3 60 V V V V V V V
75VVVVV VV
85VVVVV VV
1280 x 800 1.6 16: 10 60 V V V V V V V
75VVVVV VV
85VVVVV VV
SXGA 1280 x 960 1.33 4: 3 60 V V V V V V V
85VVVVV VV
1280 x 1024 1.25 5: 4 60 V V V V V V V
75VVVVV VV
85VVVVV VV
WXGA 1360 x 768 1.78 16: 9 60 V V V V V V V
1366 x 768 V V V V V V X
SXGA+ 1400 x 1050 1.33 4: 3 V V V V V V V
WXGA+ 1440 x 900 1.6 16: 10 60 V V V V V V V
75VVVVV VV
85VVVVV VV
WXGA+ + 1600 x 900 1.78 16: 9 60 V V V V V V V
UXGA 1600 x 1200 1.33 4: 3 50 V V V V V V V
60VVVVV VV
WSXGA+ 1680 x 1050 1.6 16: 10 V V V V V V V
WUXGA RB 1920 x 1200RB 50 V V V V V V V
60VVVVV VV

HS Series 4K User Manual 76
020-002053-01 Rev. 1 (05-2023)
Copyright © 2023 Christie Digital Systems USA, Inc. All rights reserved.
If printed, please recycle this document after use.
Signal connectivity specifications
TV HDTV
( 1080i)
1920 x 1080 1.78 16: 9 50 V V V V V V V
59.94 V V V V V V V
60VVVVV VV
HDTV
( 720p)
1280 x 720 50 V V V V V V V
59.94 V V V V V V V
60VVVVV VV
120 V V V V V V V
HDTV
( 1080p)
1920 x 1080 23.98 V V V V V V V
24VVVVV VV
25VVVVV VV
29.97 V V V V V V V
30VVVVV VV
50VVVVV VV
59.94 V V V V V V V
60VVVVV VV
120 V V V V V V V
Mandat or y
3D
Fram e
Pack in g
( 1080p)
1920 x 1080 23.98 V V V V V V V
24VVVVV VV
Fram e
Pack in g
( 720p)
1280 x 720 50 V V V V V V V
59.94 V V V V V V V
60VVVVV VV
Side by Side
( 1080i)
1920 x 1080 50 V V V V V V V
59.94 V V V V V V V
60VVVVV VV
Side by Side
( 1080p)
24VVVVV VV
50VVVVV VV
59.9 V V V V V V V
60VVVVV VV
To p a n d
Bot t om
( 720p)
1280 x 720 50 V V V V V V V
59.94 V V V V V V V
60VVVVV VV
To p a n d
Bot t om
( 1080p)
1920 x 1080 23.98 V V V V V V V
24VVVVV VV
59.9 V V V V V V V
60VVVVV VV
Signal
type
Signal
format
Resolution Aspect ratio V sync
(Hz)
RGB YCbCr 4:4:4 YCbCr
4:2:2
8 bit
10 bit 12 bit 8 bit 10 bit 12 bit 8 bit

HS Series 4K User Manual 77
020-002053-01 Rev. 1 (05-2023)
Copyright © 2023 Christie Digital Systems USA, Inc. All rights reserved.
If printed, please recycle this document after use.
Signal connectivity specifications
( V) : Video form at is supported.
( X) : Video form at is not support ed.
Fram e
Sequential
3D
XGA 1024 x 768 1.33 4: 3 120 V V V V V V V
HDTV 1280 x 720 1.78 16: 9 V V V V V V V
1080p 1920 x 1080 V V V V V V V
60VVVVV VV
WUXGA 1920 x 1200 1.6 16: 10 V V V V V V V
4K 3840 x 2160 3840 x 2160 1.78 16: 9 24 V V V V V V V
25VVVVV VV
30VVVVV VV
50VXXVX XV
60VXXVX XV
4096x21 60
SMPTE
4096 x 2160 1.90 24 V V V V V V V
25VVVVV VV
30VVVVV VV
50VXXVX XV
60VXXVX XV
Dual Pipe 1080p 1920x1080 1.78 16: 9 60 V V V V V V V
4K 3D
( Passive
3D)
3840x2160 3840x2160 V X X V X X V
4K 3D
Dual Pipe
( Passive
3D)
60VXXVX XV
High
Fram e
Rat e
1080p 1920x1080 240 V X X V X X V
Signal
type
Signal
format
Resolution Aspect ratio V sync
(Hz)
RGB YCbCr 4:4:4 YCbCr
4:2:2
8 bit
10 bit 12 bit 8 bit 10 bit 12 bit 8 bit

HS Series 4K User Manual 78
020-002053-01 Rev. 1 (05-2023)
Copyright © 2023 Christie Digital Systems USA, Inc. All rights reserved.
If printed, please recycle this document after use.
Signal connectivity specifications
Display Port video formats
I dent ify t he video form at s for t he Display Port input .
Signal
type
Signal
format
Resolution Aspect ratio V sync
(Hz)
RGB YCbCr 4:4:4 YCbCr
4:2:2
8 bit
10 bit 12 bit 8 bit 10 bit 12 bit 8 bit
PC XGA 1024 x 768 1.33 4: 3 60 V V V V V V V
70VVVVV VV
75VVVVV VV
85VVVVV VV
120 V V V V V V V
SXGA 1152 x 864 75 V V V V V V V
1152 x 870 1.32 75 V V V V V V V
WXGA 1280 x 768 1.67 5: 3 60 V V V V V V V
75VVVVV VV
85VVVVV VV
1280 x 800 1.6 16: 10 60 V V V V V V V
75VVVVV VV
85VVVVV VV
TV SXGA 1280 x 960 1.33 4: 3 60 V V V V V V V
85VVVVV VV
1280 x 1024 1.25 5: 4 60 V V V V V V V
75VVVVV VV
85VVVVV VV
WXGA 1360 x 768 1.78 16: 9 60 V V V V V V V
1366 x 768 V V V V V V V
SXGA+ 1400 x 1050 1.33 4: 3 V V V V V V V
WXGA+ 1440 x 900 1.6 16: 10 60 V V V V V V V
75VVVVV VV
85VVVVV VV
WXGA+ + 1600 x 900 1.78 16: 9 60 V V V V V V V
UXGA 1600 x 1200 1.33 4: 3 50 V V V V V V V
60VVVVV VV
WSXGA+ 1680 x 1050 1.6 16: 10 V V V V V V V
WUXGA RB 1920 x 1200RB 50 V V V V V V V
60VVVVV VV
HS Series 4K User Manual 79
020-002053-01 Rev. 1 (05-2023)
Copyright © 2023 Christie Digital Systems USA, Inc. All rights reserved.
If printed, please recycle this document after use.
Signal connectivity specifications
TV HDTV
( 1080i)
1920 x 1080 1.78 16: 9 50 V V V V V V V
59.94 V V V V V V V
60VVVVV VV
HDTV
( 720p)
1280 x 720 50 V V V V V V V
59.94 V V V V V V V
60VVVVV VV
120 X X X X X X X
HDTV
( 1080p)
1920 x 1080 23.98 V V V V V V V
24VVVVV VV
25VVVVV VV
29.97 V V V V V V V
30VVVVV VV
50VVVVV VV
59.94 V V V V V V V
60VVVVV VV
120 V V V V V V V
Mandat or y
3D
Fram e
Pack in g
( 1080p)
1920 x 1080 23.98 X X X X X X X
24XXXXX XX
Fram e
Pack in g
( 720p)
1280 x 720 50 X X X X X X X
59.94 X X X X X X X
60XXXXX XX
Side by Side
( 1080i)
1920 x 1080 50 X X X X X X X
59.94 X X X X X X X
60XXXXX XX
Side by Side
( 1080p)
24XXXXX XX
50XXXXX XX
59.9 X X X X X X X
60XXXXX XX
To p a n d
Bot t om
( 720p)
1280 x 720 50 X X X X X X X
59.94 X X X X X X X
60XXXXX XX
Signal
type
Signal
format
Resolution Aspect ratio V sync
(Hz)
RGB YCbCr 4:4:4 YCbCr
4:2:2
8 bit
10 bit 12 bit 8 bit 10 bit 12 bit 8 bit

HS Series 4K User Manual 80
020-002053-01 Rev. 1 (05-2023)
Copyright © 2023 Christie Digital Systems USA, Inc. All rights reserved.
If printed, please recycle this document after use.
Signal connectivity specifications
( V) : Video form at is supported.
( X) : Video form at is not support ed.
Mandat or y
3D
To p a n d
Bot t om
( 1080p)
1920 x 1080 1.78 16: 9 23.98 X X X X X X X
24XXXXX XX
59.9 X X X X X X X
60XXXXX XX
Fram e
Sequential
3D
XGA 1024 x 768 1.33 4: 3 120 V V V V V V V
HDTV 1280 x 720 1.78 16: 9 V V V V V V V
1080p 1920 x 1080 V V V V V V V
60VVVVV VX
WUXGA 1920 x 1200 1.6 16: 10 V V V V V V V
4K 3840 x 2160 3840 x 2160 1.78 16: 9 24 V X X V X X V
25VXXVX XV
30VXXVX XV
50VXXVX XV
60VXXVX XV
4096x2160
SMPTE
4096 x 2160 1.90 24 V X X V X X V
25VXXVX XV
30VXXVX XV
50VXXVX XV
60VXXVX XV
4K 3D
( Passive
3D)
3840x2160 3840x2160 1.78 16: 9 60 V X X V X X V
4K 3D
Dual Pipe
( Passive
3D)
VXXVX XV
High
Fram e
Rat e
1080p 1920x1080 240 V X X V X X V
Signal
type
Signal
format
Resolution Aspect ratio V sync
(Hz)
RGB YCbCr 4:4:4 YCbCr
4:2:2
8 bit
10 bit 12 bit 8 bit 10 bit 12 bit 8 bit
HS Series 4K User Manual 81
020-002053-01 Rev. 1 (05-2023)
Copyright © 2023 Christie Digital Systems USA, Inc. All rights reserved.
If printed, please recycle this document after use.
Signal connectivity specifications
12G-SDI video formats
I dent ify t he video form at s for t he 12G-SDI input .
( V) : Video form at is supported.
( X) : Video form at is not support ed.
Signal type Signal format Resolution Aspect ratio V sync (Hz) YCbCr 4:2:2
10 bit
SD- SDI SDTV ( 480i) 720 x 480 1.5 3: 2 59.94 V
SDTV ( 576i) 720 x 576 1.25 5: 4 50 V
HD-SDI HDTV ( 720p) 1280 x 720 1.78 16: 9 50 V
59.94 V
60 V
HDTV (1080i) 1920 x 1080 50 V
59.94 V
60 V
HDTV ( 1080p) 23.98 V
24 V
25 V
29.97 V
30 V
3GA- SDI HDTV ( 1080p) 50 V
59.94 V
60 V
12G-SDI
( SMPTE ST-
2082- 10)
3840x2160p 3840x2160 24 V
25 V
30 V
50 V
60 V
HS Series 4K User Manual 82
020-002053-01 Rev. 1 (05-2023)
Copyright © 2023 Christie Digital Systems USA, Inc. All rights reserved.
If printed, please recycle this document after use.
Signal connectivity specifications
HDBaseT video formats
I dent ify t he video form at s for t he HDBaseT input .
Signal
type
Signal
format
Resolution Aspect ratio V
Sync
(Hz)
RGB YCbCr 4:4:4 YCbCr
4:2:2
8 bit
10 bit 12 bit 8 bit 10 bit 12 bit 8 bit
PC XGA 1024 x 768 1.33 4: 3 60 V V V V V V V
70VVVVV VV
75VVVVV VV
85VVVVV VV
120 V V V V V V V
SXGA 1152 x 864 75 V V V V V V V
1152 x 870 1.32 75 V V V V V V V
WXGA 1280 x 768 1.67 5: 3 60 V V V V V V V
75VVVVV VV
85VVVVV VV
1280 x 800 1.6 16: 10 60 V V V V V V V
75VVVVV VV
85VVVVV VV
TV SXGA 1280 x 960 1.33 4: 3 60 V V V V V V V
85VVVVV VV
1280 x 1024 1.25 5: 4 60 V V V V V V V
75VVVVV VV
85VVVVV XV
WXGA 1360 x 768 1.78 16: 9 60 V V V V V V V
1366 x 768 V V V V V V V
SXGA+ 1400 x 1050 1.33 4: 3 V V V V V V V
WXGA+ 1440 x 900 1.6 16: 10 60 V V V V V V V
75VVVVV VV
85VVVVV VV
WXGA+ + 1600 x 900 1.78 16: 9 60 V V V V V V V
UXGA 1600 x 1200 1.33 4: 3 50 V V V V V V V
60VVVVV XV
WSXGA+ 1680 x 1050 1.6 16: 10 V V V V V V V
WUXGA RB 1920 x 1200RB 50 V V V V V V V
60VVVVV XV
HS Series 4K User Manual 83
020-002053-01 Rev. 1 (05-2023)
Copyright © 2023 Christie Digital Systems USA, Inc. All rights reserved.
If printed, please recycle this document after use.
Signal connectivity specifications
TV HDTV
( 1080i)
1920 x 1080 1.78 16: 9 50 V V V V V V V
59.94 V V V V V V V
60VVVVV VV
HDTV
( 720p)
1280 x 720 50 V V V V V V V
59.94 V V V V V V V
60VVVVV VV
120 V V V V V V V
HDTV
( 1080p)
1920 x 1080 23.98 V V V V V V V
24VVVVV VV
25VVVVV VV
29.97 V V V V V V V
30VVVVV VV
50VVVVV VV
59.94 V V V V V V V
60VVVVV VV
120 V V V V V V V
Mandat or y
3D
Fram e
Pack in g
( 1080p)
1920 x 1080 23.98 V V V V V V V
24VVVVV VV
Fram e
Pack in g
( 720p)
1280 x 720 50 V V V V V V V
59.94 V V V V V V V
60VVVVV VV
Side by Side
( 1080i)
1920 x 1080 50 V V V V V V V
59.94 V V V V V V V
60VVVVV VV
Side by Side
( 1080p)
24VVVVV VV
50VVVVV VV
59.9 V V V V V V V
60VVVVV VV
To p a n d
Bot t om
( 720p)
1280 x 720 50 V V V V V V V
59.94 V V V V V V V
60VVVVV VV
To p a n d
Bot t om
( 1080p)
1920 x 1080 23.98 V V V V V V V
24VVVVV VV
59.9 V V V V V V V
60VVVVV VV
Signal
type
Signal
format
Resolution Aspect ratio V
Sync
(Hz)
RGB YCbCr 4:4:4 YCbCr
4:2:2
8 bit
10 bit 12 bit 8 bit 10 bit 12 bit 8 bit
HS Series 4K User Manual 84
020-002053-01 Rev. 1 (05-2023)
Copyright © 2023 Christie Digital Systems USA, Inc. All rights reserved.
If printed, please recycle this document after use.
Signal connectivity specifications
( V) : Video form at is supported.
( X) : Video form at is not support ed.
Fram e
Sequential
3D
XGA 1024 x 768 1.33 4: 3 120 V V V V V V V
HDTV 1280 x 720 1.78 16: 9 V V V V V V V
1080p 1920 x 1080 V V V V V V V
60VVVVV VV
WUXGA 1920 x 1200 1.6 16: 10 V V V V V V V
4K 3840 x 2160 3840 x 2160 1.78 16: 9 24 V V V V V V V
25VVVVV VV
30VVVVV VV
50VXXVX XV
60VXXVX XV
4096x21 60
SMPTE
4096 x 2160 1.90 24 V X X V X X V
25VXXVX XV
30VXXVX XV
50VXXVX XV
60VXXVX XV
4K 3D
( Passive
3D)
3840x2160 3840x2160 1.78 16: 9 60 V X X V X X V
4K 3D
Dual Pipe
( Passive
3D)
VXXVX XV
High
Fram e
Rat e
1080p 1920x1080 240 V X X V X X V
Signal
type
Signal
format
Resolution Aspect ratio V
Sync
(Hz)
RGB YCbCr 4:4:4 YCbCr
4:2:2
8 bit
10 bit 12 bit 8 bit 10 bit 12 bit 8 bit

HS Series 4K User Manual 85
020-002053-01 Rev. 1 (05-2023)
Copyright © 2023 Christie Digital Systems USA, Inc. All rights reserved.
If printed, please recycle this document after use.
Signal connectivity specifications
Picture-in-picture/picture-by-picture (PIP/PBP)
compatibility
The following t able det ails t he pict ure- in- picture/ picture- by- picture ( PI P/ PBP) com pat ibility.
• (V) : PI P/ PBP com binat ions are enabled.
HDMI-1
HDMI-2
Display
Port
HDBaseT 12G-SDI
HDMI - 1
V
V
VV
HDMI - 2
V
V
VV
Display Port
VV VV
HDBaseT
VVV
V
12G-SDI
VVV
V

HS Series 4K User Manual 86
020-002053-01 Rev. 1 (05-2023)
Copyright © 2023 Christie Digital Systems USA, Inc. All rights reserved.
If printed, please recycle this document after use.
Regulatory
This pr oduct conform s to t he following regulat ions relat ed t o product safet y, environm ent al
requirem ent s and elect rom agnet ic com patibilit y ( EMC).
Safety
• I EC 62368- 1: 2018 - Audio/ Video, I nform ation And Com m unicat ion Technology Equipm ent -
Part 1: Safet y Requirem ent s
• EN/ BS 62368- 1: 2014 + A11: 2017 - Audio/ Video, I nform at ion And Com m unicat ion Technology
Equipm ent - Part 1: Safety Requirem ent s
• UL 62368- 1: 2018 - Audio/ Video, I nform at ion And Com m unication Technology Equipm ent - Part
1: Safet y Requir em ent s
• CSA CAN/ CSA- 22.2 No. 62368- 1: 2018 - Audio/ Video, I nform at ion And Com m unication
Technology Equipm ent - Part 1: Safet y Requir em ent s
Laser safety
• I EC/ EN 62471- 5 - Photobiological safet y of lam ps and lam p syst em s - Par t 5: I m age proj ectors
• I EC/ EN 60825- 1: 2014 - Safet y of Laser Products - Part 1: Equipm ent Classification and
Requirem ent s
Electro-magnetic compatibility
Emissions
• FCC CFR47, Part 15, Subpart B, Class A - Unint ent ional Radiat ors
• CAN I CES- 003 ( A) / NMB- 003 ( A)
• CISPR 32/ EN 55032, Class A – Electrom agnet ic Com pat ibility of Mult im edia Equipm ent –
Em ission Requirem ents
• I EC 61000- 3- 2/ EN61000- 3- 2 - Lim it s for Harm onic Current Emissions
• I EC 61000- 3- 3/ EN61000- 3- 3 - Lim it at ions of Volt age Changes, Volt age Fluct uat ions, and Flicker

HS Series 4K User Manual 87
020-002053-01 Rev. 1 (05-2023)
Copyright © 2023 Christie Digital Systems USA, Inc. All rights reserved.
If printed, please recycle this document after use.
Regulatory
Immunity
• CISPR 35/ EN 55035 Electrom agnet ic com patibilit y of m ult im edia equipm ent - I m m unit y
requirem ent s
California law on security
• California Law Requir ing I nt ernet Connect ed Devices To I nclude Reasonable Securit y Features
( California Civil Code Sect ion 1798.91.04)
Environmental
• EU Directive ( 2011/ 65/ EU) on t he rest riction of t he uses of cert ain hazardous substances
(RoHS) in elect rical and electronic equipm ent and t he applicable official am endm ent ( s)
• EU Directive ( 2012/ 19/ EU) on waste and elect rical and electronic equipm ent ( WEEE) and t he
applicable official am endm ent ( s)
• Regulat ion ( EC) No 1907/ 2006 concerning t he Regist rat ion, Evaluat ion, Authorizat ion and
Rest riction of Chem icals ( REACH) and the applicable official am endm ent ( s)
• China Minist ry of I nform at ion I ndustry Order No.39 ( 02/ 2006) on the cont rol of pollut ion
caused by elect ronic inform at ion product s, hazardous subst ances concent ration lim it s ( SJ/
T11363- 2006) , and t he applicable product m arking requirem ent ( SJ/ T11364- 2006)

For the most current technical documentation, visit www.christiedigital.com.
Christie Digital Systems Canada Inc.
Kitchener
ph: 519 744 8005
Christie Digital Systems USA, Inc.
Cypress
ph: 714 236 8610
Corporate of¿ ces
United Kingdom
ph: +44 (0) 118 977 8000
United Arab Emirates
ph: +971 4 3206688
Spain
ph: +34 91 633 9990
Singapore
ph: +65 6877 8737
Republic of South Africa
ph: +27 (0)11 510 0094
Korea (Seoul)
ph: +82 2 702 1601
Japan (Tokyo)
ph: 81 3 3599 7481
India
ph: +91 (080) 6708 9999
Germany
ph: +49 2161 664540
France
ph: +33 (0) 1 41 21 44 04
Russian Federation
and Eastern Europe
ph: +36 (0) 1 47 48 100
China (Shanghai)
ph: +86 21 6278 7708
China (Beijing)
ph: +86 10 6561 0240
Brazil
ph: +55 (11) 2548 4753
Australia
ph: +61 (0) 7 3624 4888
Worldwide of¿ ces
Italy
ph: +39 (0) 2 9902 1161
Independant sales
consultant of¿ ces
Mexico
ph: +52 55 4744 1790
United States (New York)
ph: 646 779 2014
United States (Arizona)
ph: 602 943 5700
