User Manual
Versatile 2.4G Wireless USB Microphone


Foreword
Main Features
Notice
Thanks for purchasing Comica VDLive10 USB
●
Dual-channel 2.4G Wireless USB Microphone, Global Free
Frequency
●
Switchable Simplex / Duplex Transmission, Support Two-way
Monitoring and Interaction
●
Wide Compatibility for Phone, Computer, Camera, etc.
●
Intelligent Noise Reduction, Working Distance Up to 50m (Open
Area)
●
3.5mm Analog and USB Digital Two Output Modes
●
Support Stereo Mode for all Compatible Devices
●
Rechargeable Storage Case
●
IPS Screen for Intuitive Operation and Usage
●
Mono/Stereo Switch, Volume Adjustment and Mute Functions,etc.
●
Internal and External MIC Two Input Modes
●
Low Latency<20ms, Stable Transmission
Some cameras are not compatible with 3.5mm TRRS-TRRS
audio cable, it's necessary to purchase 3.5mm TRS-TRS
audio cable by yourself
Don't block the antenna position to avoid any poor signal
generated when using
Please power the transmitter and receiver o when charging
1
Tips
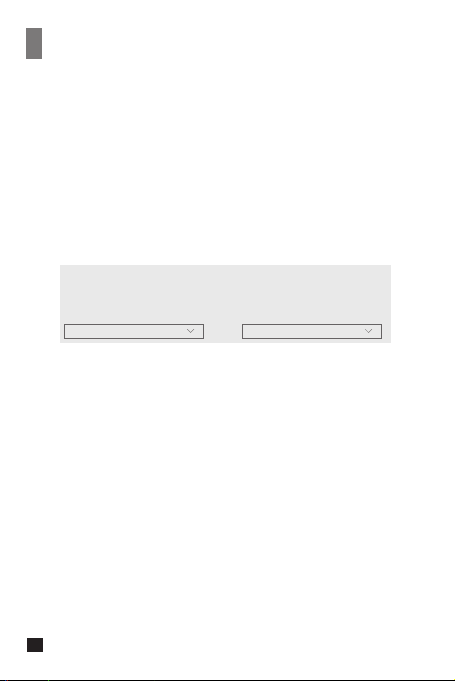
1. VDLive10 USB is universal for USB and 3.5mm interface devices.
When used in smartphone, the system will compulsorily choose
VDLive10 USB
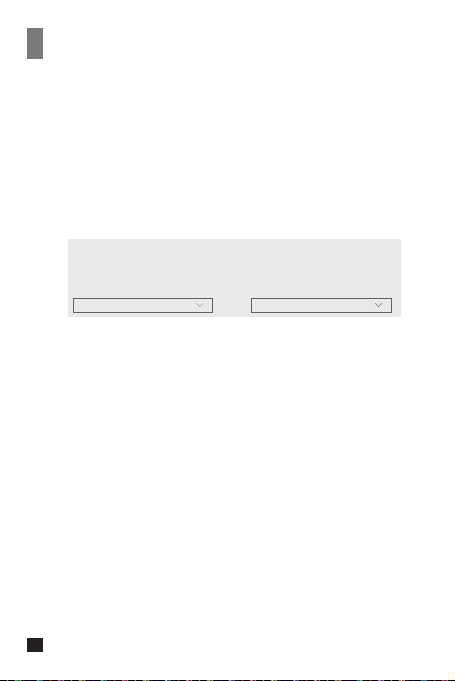
2. When used in computer, please follow the steps below:
① Insert VDLive10 USB into the computer
② Click sound setting and set the “Comica_VDLive10” as the input
and output device
Sound
Output
Choose your output device
Comica_VDLive10
Input
Choose your input device
Comica_VDLive10
2
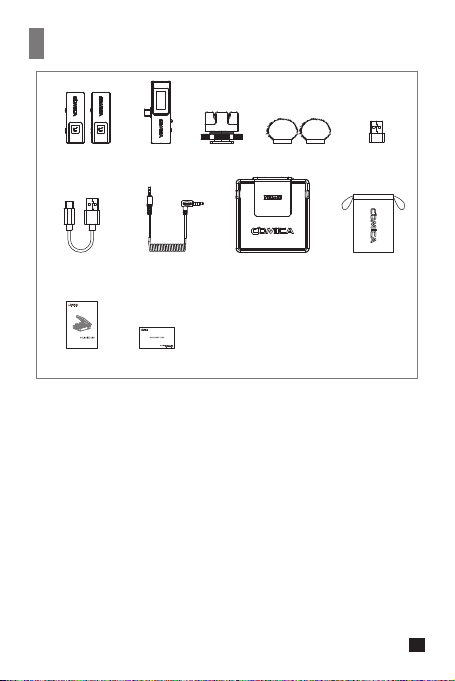
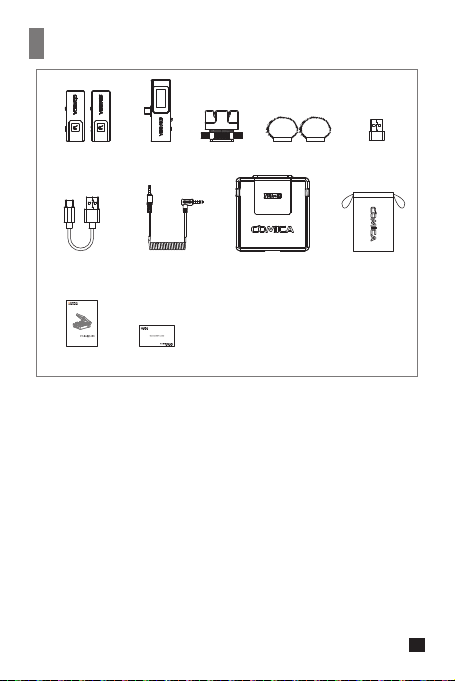
Packing List
① Transmitter(TX)
② Receiver (RX)
③ Cold Shoe Mount
④ Wind Mu
⑤ USB C-USB A Adapter
⑥ Charging Cable
⑦ 3.5mm TRRS-TRRS Audio Cable
⑧ Charging Case
⑨ Carry Case
⑩ User Manual
⑪ Warranty Card
①x2 ② ③ ④x2 ⑤
⑥ ⑦ ⑧ ⑨
⑩ ⑪
User Manual
Multi-functional 2.4G Wireless USB Microphone
3
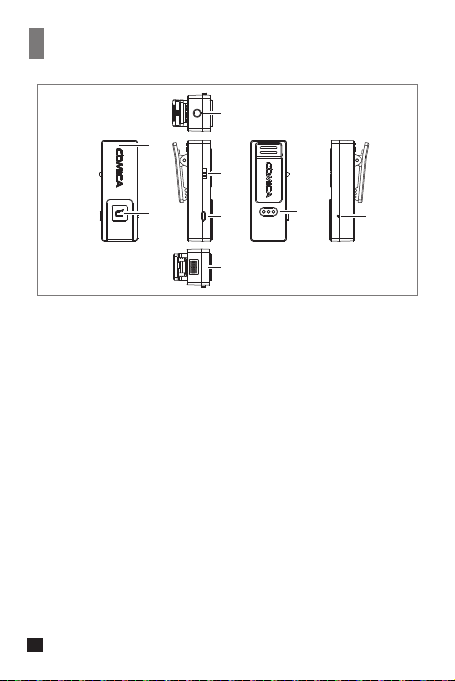
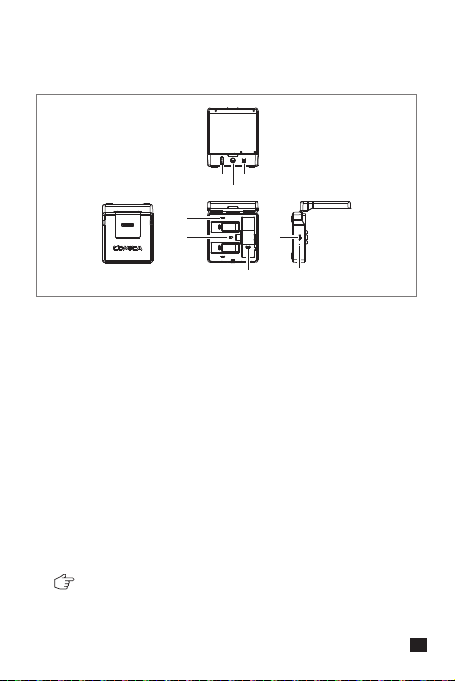
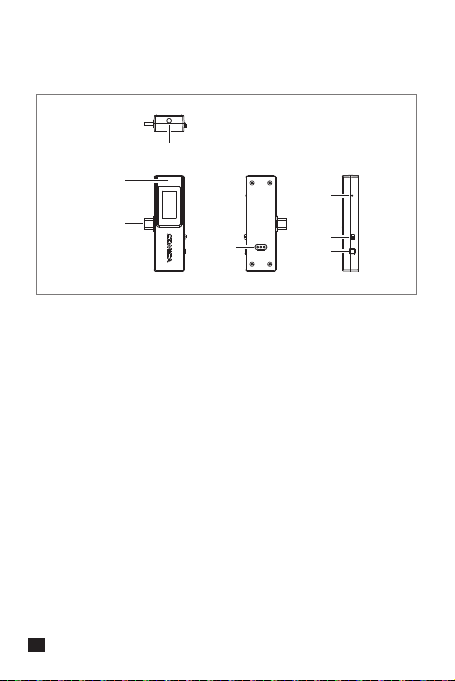
Components and Instruction
Transmitter(TX):
①
②
③
④
⑤
⑥
⑦
⑧
Built-in Antenna
Working Status Indicator Light (Orange light on: paired;
Orange light flashing: unpaired; Red light on: MIC mute)
3.5mm TRS External Mic Port(Simplex Mode)
Monitoring Port(Duplex Mode)
S↑/ OFF / D↑↓ Switch Button ( S↑: Simplex mode;
OFF: Power o;D↑↓: Duplex mode)
Volume / Mute Adjustment Button (Short press to adjust 4-level
volume; long press to mute)
Charging Metal Contact
Reset Hole
Internal Mic
⑦
②
①
⑥
③
④
⑤
⑧
4
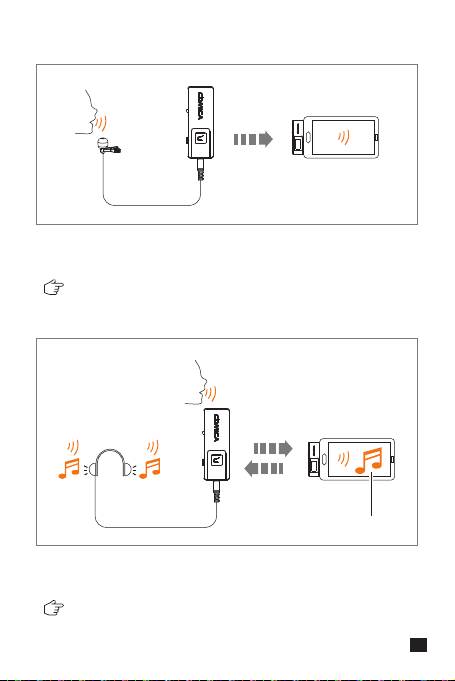
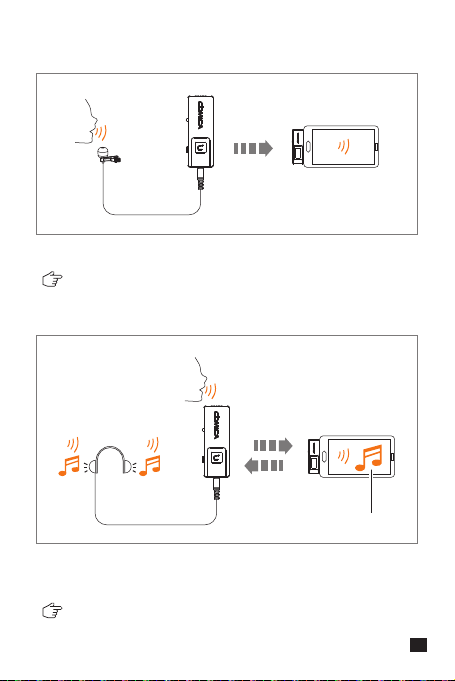
Simplex mode monitoring: audio of transmitter
Duplex mode monitoring: audio of transmitter + audio of the
platform on the device connected by the receiver
The transmitter audio is transmitted to the receiver unidirectionally,
audio can only be monitored in receiver
Two way transmission of audio between transmitter and receiver,
audio can be monitored in transmitter and receiver
Simplex mode:
Duplex mode:
Device Audio
5
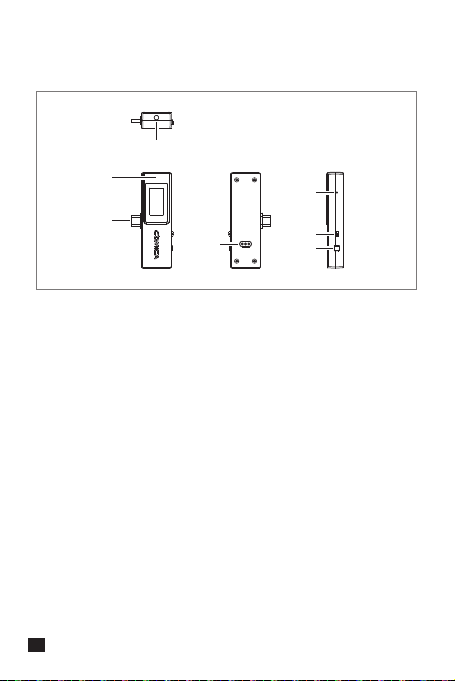
Receiver (RX)
①
②
③
④
⑤
⑥
⑦
3.5mm Audio Output Port ( 3.5mm analog output mode)
Monitoring Port ( USB digital output mode)
Built-in Antenna
USB-C Plug
Charging Metal Contact
Reset Hole
ON/OFF Switch Button (ON: Power on; OFF: Power o )
M/S Switch Button (M: mono mode; S: stereo mode; Short
press to switch)
③
②
⑦
⑥
④
⑤
①
6
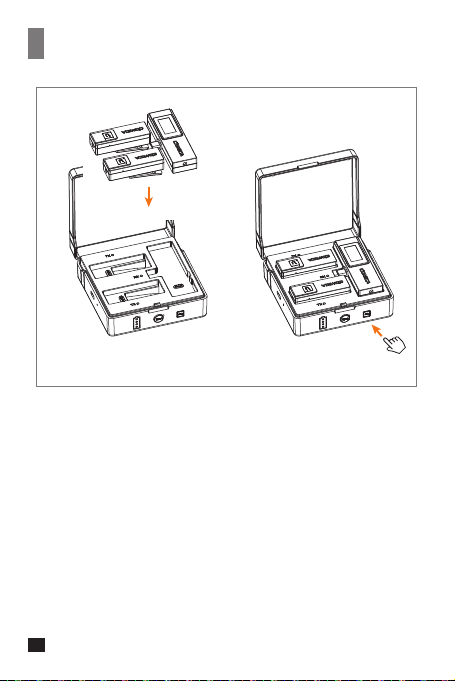
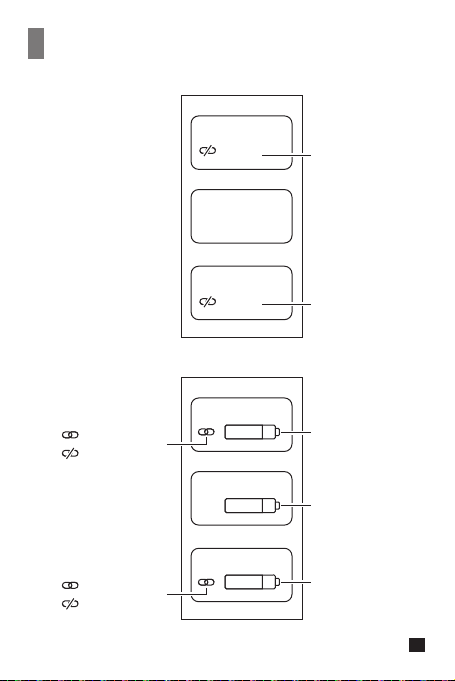
Charging Case
⑧
⑥
③
②
①
⑦
⑤
④
Please power the transmitter and receiver o when charging
①
②
③
④
⑤
⑥
⑦
⑧
Power Indicator Light (There are four power indicator lights,
one of which represents 25% of the power)
Switch Button (Press it to open the charging case)
Pairing Button (Long press to pair)
Transmitter Charging Status Indicator Light (Red light on:
charging; Blue light on: fully charged)
Receiver Charging Status Indicator Light (Red light on:
charging; Blue light on: fully charged)
Charging Metal Contact
USB-C Charging Port
Reset Hole
7

Pairing Method
① ②
① Put the transmitter and receiver into the charging case
② Long press the pairing button to pair
8
TX A
TX B
RX
TX A
Pair...
Pair...
Pair...
TX B
RX
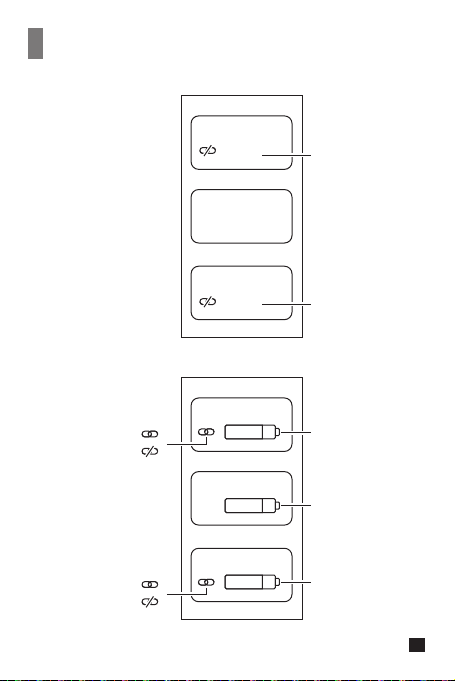
Screen Display Instruction of Receiver (RX)
Group A paired
Group A unpaired
Receiver power
Transmitter A power
Group B paired
Group B unpaired
Transmitter B power
Transmitter A
is pairing
Transmitter B
is pairing
9
A
A
A
Vol 3
M
M
S
B
Vol 3
USB digital output mode
3.5mm analog output mode
Stereo
Mono
Receiver power
Transmitter power
Transmitter
signal strength
Transmitter volume
Group A paired
Group A unpaired
Transmitter audio
dynamic bar
B
B
Group B paired
Group B unpaired
Group A is left channel and group B is right channel
10
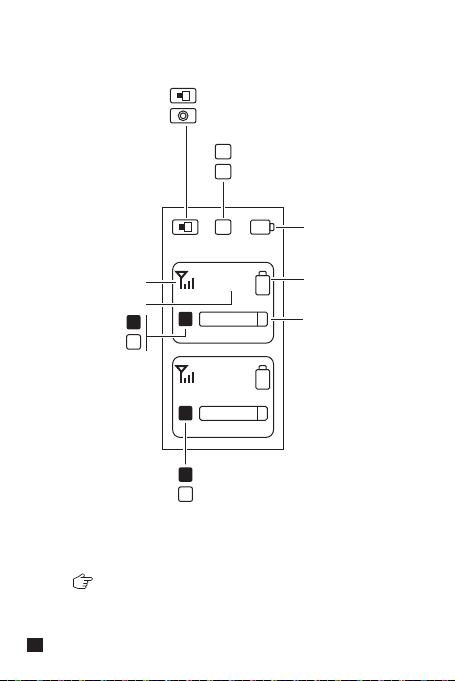
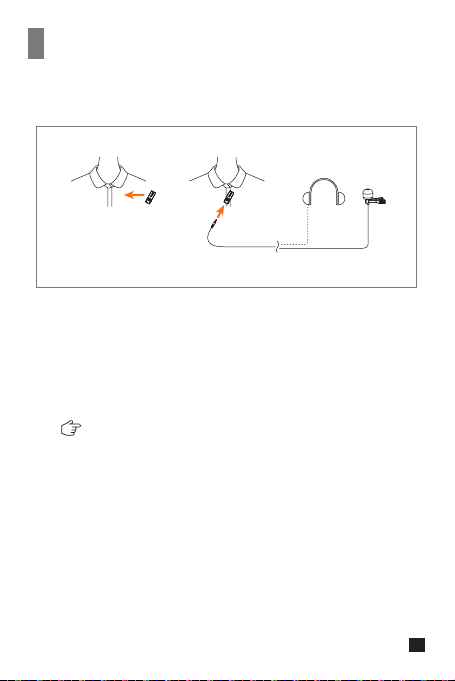
Installation
1.In Simplex Mode
① Switch the S↑/OFF/D↑↓ switch button to S↑
(Simplex mode)
② You can choose to use internal mic or external mic to satisfy
your recording demands
When using an external mic, the internal mic is
automatically turned o
2.In Duplex Mode
① Switch the S↑/OFF/D↑↓ switch button to D↑↓
(Duplex mode)
② Install the transmitter on the collar so that the internal mic
points to the sound source
③ Insert the headphone into the monitoring port to monitor
Transmitter(TX)
① ②
11

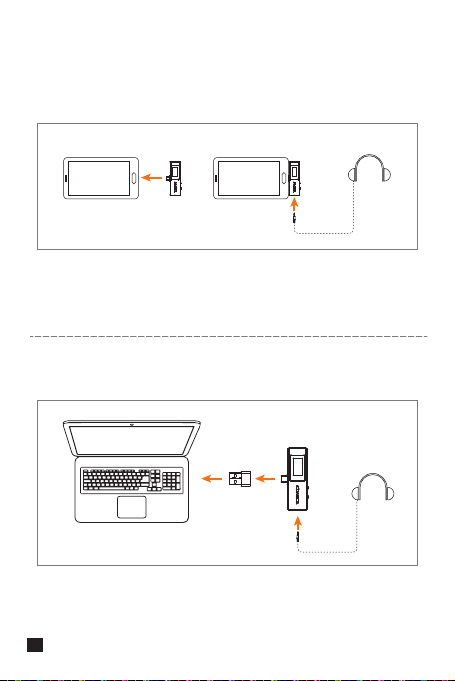
① ②
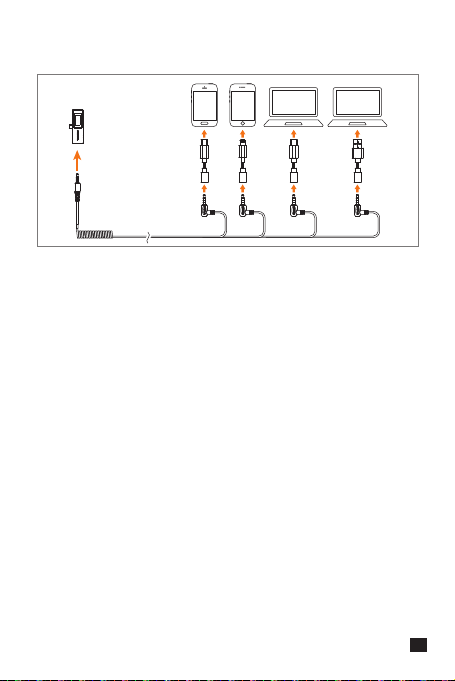
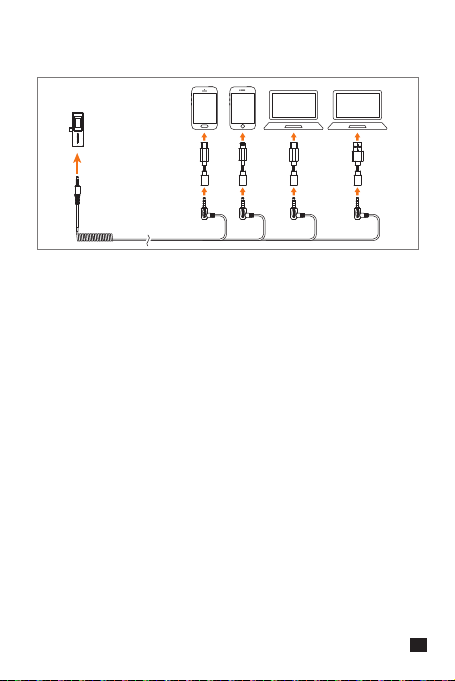
1. USB Digital Output Mode
① USB-C device
.Insert the receiver to the USB-C device
.You can choose to whether insert the headphone to monitor or
not based on your needs
② USB-A device
.Connect the receiver and USB-A device via the USB C-USB A adapter
.You can choose to whether insert the headphone to monitor or not
based on your needs
Receiver (RX)
12

③ Lightning device
. Connect the receiver and Lightning device via the USB C
-Lightning adapter(Please purchase USB C-Lightning adapter by
yourself)
. You can choose to whether insert the headphone to monitor or not
based on your needs
13
① ②
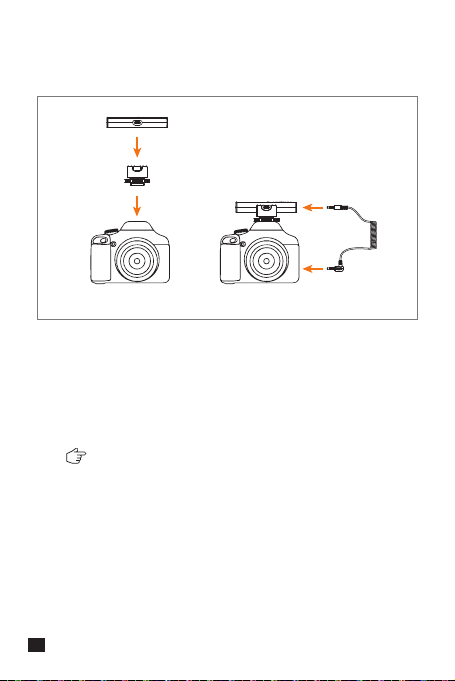
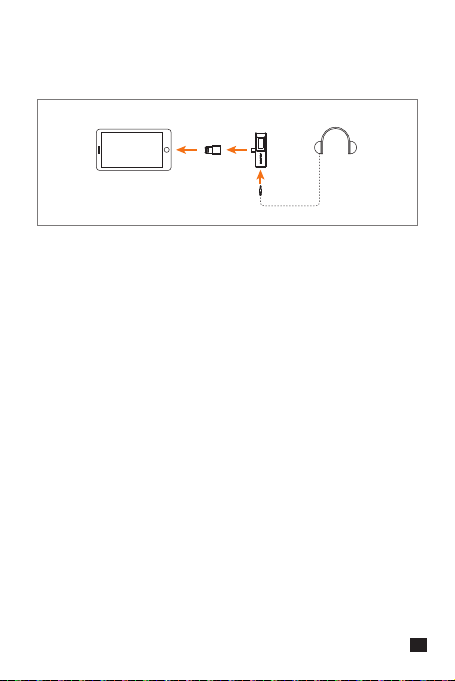
2. 3.5mm Analog Output Mode
① 3.5mm TRS camera
Some cameras are not compatible with 3.5mm
TRRS-TRRS audio cable, it's necessary to purchase
3.5mm TRS-TRS audio cable by yourself
. Mount the receiver to the camera through the cold shoe mount
. Connect the receiver and camera via 3.5mm TRRS-TRRS audio
cable or 3.5mm TRS-TRS audio cable (Please purchase 3.5mm
TRS-TRS audio cable by yourself)
14
② USB devices
. Work with USB devices via corresponding adapter
(Please purchase adapter by yourself)
15
Specification
Wireless Type
Antenna
Polar Pattern
Frequency Response
S/N
Equivalent Noise
SPL
Dynamic Range
Sound Delay
Sensitivity
Interface
Battery
Charging Time
Standby Time
Net Weight
Dimension
Operating Temperature
Storage Temperature
2.4GHz
Built-in Antenna
Omnidirectional
80Hz ~ 20kHz
70dB
24dBA
Internal Mic: 110dB
Internal Mic: 86dB
<20ms
Internal Mic: -30±2dB
TX: 3.5mm
RX: USB-C & 3.5mm
Charging Case: USB-C
TX: 95mAh 3.8V
RX: 90mAh 3.7V
Charging Case: 1000mAh 3.7V
TX: 2 Hours
RX: 2 Hours
Charging Case: 4 Hours
TX: 5 Hours
RX: 5 Hours
Charging Case: 3 times for two transmitters and
one receiver charged simultaneously
TX: 14g
RX: 20g
Charging Case: 167g
TX: 20x53x21 mm
RX: 33x76x13 mm
Charging Case: 96x99x37 mm
0℃ ~ 50℃
-20℃ ~ 60℃
16

产品使用说明书
2.4G无线多功能USB麦克风


前言
产品主要功能
注意事项
感谢您购买科唛VDLive10 USB
●
双通道2.4G无线USB麦克风,全球通用频段
●
可选单/双向传输,支持双向监听与交互
●
一机通用,广泛兼容手机、电脑、相机等设备
●
智能降噪,50m无线传输距离(空旷距离)
●
3.5mm模拟及USB数字双输出模式
●
支持所有设备的立体声输出
●
可收纳多功能充电盒
●
IPS显示屏,可视化操作及使用
●
单声道/立体声切换、音量可调、静音等多功能
●
内置和外置MIC两种输入方式
●
低音频延迟<20ms,稳定传输
部分相机不兼容3.5mm TRRS-TRRS音频连接线,需自行购买
3.5mm TRS-TRS音频连接线使用
使用过程中尽量不要遮挡内置天线位置,否则会影响信号传输
充电时请把发射器和接收器调至关机状态
1
提示
1. VDLive10 USB通用于USB和3.5mm接口的设备。当用于手机时,系
统会强制性使用VDLive10 USB
2. 当用于电脑时,请按以下步骤进行操作:
① 将VDLive10 USB插入电脑
② 打开声音设置界面,选择“Comica_VDLive10”为输出和输入设备
声音
输出
选择输出设备
Comica_VDLive10
输入
选择输入设备
Comica_VDLive10
2
包装清单
① 发射器(TX)
② 接收器(RX)
③ 冷靴座
④ 防风毛
⑤ USB C-USB A转接器
⑥ 充电线
⑦ 3.5mm TRRS-TRRS音频连接线
⑧ 充电盒
⑨ 便携袋
⑩ 说明书
⑪ 保修卡
①x2 ② ③ ④x2 ⑤
⑥ ⑦ ⑧ ⑨
⑩ ⑪
User Manual
Multi-functional 2.4G Wireless USB Microphone
3

部件介绍及说明
① 内置天线
② 工作状态指示灯(橙灯常亮:已配对;橙灯闪烁:未配对;
红灯常亮:MIC静音)
③ 3.5mm TRS外置麦克风插孔(单向模式)
耳机监听孔(双向模式)
④ S↑/ OFF/ D↑↓切换按钮
(S↑:单向模式; OFF:关闭发射器; D↑↓:双向模式;)
⑤ 音量/静音调节按钮(短按调节4级音量;长按静音)
⑥ 充电金属触点
⑦ 复位孔
⑧ 内置咪头
发射器(TX):
⑦
②
①
⑥
③
④
⑤
⑧
4
发射器音频数据单向传输至接收器,只可接收器单向监听
发射器与接收器音频数据双向传输,发射器与接收器可相互监听
单向模式:
双向模式:
设备音频
单向模式监听:发射端MIC声音
双向模式监听:发射端MIC声音 + 接收端所连接设备上运行
平台的声音
5
① 3.5mm音频输出孔(3.5mm模拟输出模式)
耳机监听孔(USB数字输出模式)
② 内置天线
③ USB-C插头
④ 充电金属触点
⑤ 复位孔
⑥ ON / OFF开关按钮
(ON:打开接收器;OFF:关闭接收器)
⑦ M/S切换按钮(M为单声道,S为立体声,短按即可切换)
接收器(RX):
③
②
⑦
⑥
④
⑤
①
6

⑧
⑥
③
②
①
⑦
⑤
① 电量指示灯(总共有四格电量,每格代表25%电量)
② 打开按钮(按下打开充电盒)
③ 配对按钮(长按配对)
④ 发射器充电状态指示灯(红灯: 充电中: 蓝灯: 已充满电)
⑤ 接收器充电状态指示灯(红灯: 充电中: 蓝灯: 已充满电)
⑥ 充电金属触点
⑦ USB-C充电插口
⑧ 复位孔
充电盒:
充电时请把发射器与接收器调至关机状态
④
7
配对方法
① 把发射器与接收器放进充电盒
② 长按配对按钮进行发射器与接收器的配对
① ②
8
TX A
TX B
RX
TX A
Pair...
Pair...
Pair...
TX B
RX
接收器(RX)屏幕显示
A通道配对成功
A通道配对失败
接收器电量
A发射器电量
B通道配对成功
B通道配对失败
B发射器电量
A发射器配对中
B发射器配对中
9
A
A
A
Vol 3
M
M
S
B
Vol 3
USB数字输出模式
3.5mm模拟输出模式
立体声
单声道
接收器电量
发射器电量
发射器信号强度
发射器音量大小
A通道配对成功
A通道配对失败
发射器音频动态条
B
B
B通道配对成功
B通道配对失败
A通道为左声道,B通道为右声道
10
安装方法
1.单向模式
① 将S↑/OFF/D↑↓切换按钮切换到S↑(单向模式)
② 您可以选择使用内置麦克风或外置麦克风,以满足您的录制需求
当使用外置麦克风时,内置麦克风会自动关闭
2.双向模式
① 将S↑/OFF/D↑↓切换按钮切换到D↑↓(双向模式)
② 把发射器安装到衣领上,使内置麦克风指向音源方向
③ 将耳机插入发射器耳机监听孔进行监听
① ②
发射器(TX)
11
1.USB数字输出模式下使用
① USB-C设备
.把接收器插入USB-C设备
.可根据您的需求选择是否插入耳机进行监听
② USB-A设备
.使用USB C-USB A转接器连接接收器和USB-A设备
.可根据您的需求选择是否插入耳机进行监听
接收器(RX)
① ②
12
③ Lightning设备
.使用USB C-Lightning转接器连接接收器和Lightning设备
(USB C-Lightning转接器请自行购买)
.可根据您的需求选择是否插入耳机进行监听
13

.通过冷靴座把接收器安装到相机上
.使用3.5mm TRRS-TRRS音频连接线或3.5mm TRS-TRS音频连接线
连接接收器与相机(3.5mm TRS-TRS音频连接线请自行购买)
① ②
部分相机不兼容3.5mm TRRS-TRRS音频连接线,需自行购买
3.5mm TRS-TRS音频连接线使用
2. 3.5mm模拟输出模式下使用
① 3.5mm TRS相机
14
② USB设备
.需搭配相关转接器使用(转接器请自行购买)
15

无线类型
天线
麦克风指向性
麦克风频率响应
系统信噪比
系统等效噪声
最大声压级
动态范围
声音延迟
灵敏度
接口类型
电池类型
充电时间
续航时间
净重
尺寸
工作温度
存储温度
2.4GHz
内置天线
全指向
80Hz ~ 20kHz
70dB
24dBA
内置麦:110dB
内置麦:86dB
<20ms
内置麦:-30±2dB
TX:3.5mm接口
RX:USB-C接口 & 3.5mm接口
充电盒:USB-C接口
TX:95mAh 3.8V
RX:90mAh 3.7V
充电盒:1000mAh 3.7V
TX:2小时
RX:2小时
充电盒:4小时
TX:5小时
RX:5小时
充电盒:满电状态同时给2个发射器和
1个接收器充电,约3次
TX:14 g
RX:20 g
充电盒:167 g
TX:20x53x21 mm
RX:33x76x13 mm
充电盒:96x99x37 mm
0℃ ~ 50℃
-20℃ ~ 60℃
规格参数
16


Email: [email protected]