
Loading ...
Loading ...
Loading ...
8.3.4 Clean the components
NOTICE
Improper cleaning!
Damage to the appliance.
u
Only use soft cleaning cloths and ph-neutral all-purpose
cleaners.
Clean with a soft, clean cloth, lukewarm water and some
detergent:
- Door rack
- Shelf
- Dividing shelf*
- VarioSafe*
- EasyFresh-Safe cover
- Drawer
Please note: Do not remove the magnet on the drawer. The
magnet ensures the functionality of the IceMaker.*
- Divider in the IceMaker drawer
Clean with a damp cloth:
- Retractable rails
Please note: The grease in the tracks is used for lubrication
and must not be removed!
Wash in the dishwasher up to 60 °C:
- Bottle rack
- Holder of the dividing shelf
- IceMaker water tank and water tank lid*
- Egg rack
- Ice cube tray*
- Ice cube scoop*
u
To disassemble components: see the relevant section.
u
Clean the components.
8.3.5 Cleaning the IceMaker*
There are various options for cleaning the IceMaker.
Cleaning is required in the following cases:
q
Initial operation
q
If out of use for more than 48 hours.
Ensure that the following conditions are met:
q
Water tank is clean and has been filled. (see 7.9.1 Fill the
water tank)
q
IceMaker drawer is emptied.
q
IceMaker drawer is in place.
q
The IceMaker is activated. (see 6.2 Control concept)
First use or after a long period of non-use
Clean the IceMaker with the TubeClean function.
u
Place a 1.5 l empty container (max. height 10 cm) into the
drawer under the IceMaker.
u
Activate the TubeClean function. (see 6.2 Control concept)
w
The rinse process is prepared (max. 60 min.): Symbol
flashes.
w
Water pipes are rinsed: Symbol flashes.
w
Rinsing process is complete: Function turns off automati-
cally.
u
Remove the IceMaker drawer and remove the container.
u
Clean the IceMaker drawer with warm water and a little
detergent.
u
Push the IceMaker drawer in.
w
The system starts making ice cubes automatically.
u
Dispose of any ice cubes that were made 24 hours after the
first ice cubes.
If cleaning is required
Clean the IceMaker by hand.
u
Remove the IceMaker drawer and clean with warm water
and a little detergent.
u
Push the IceMaker drawer in.
w
The system starts making ice cubes automatically.
8.3.6 After cleaning
u
Wipe the appliance and the components dry.
u
Connect and switch on the appliance.
u
Activate SuperFrost (see 6.3 Functions) .
The temperature is cold enough:
u
Place the food inside.
u
Repeat cleaning regularly.
9 Customer help
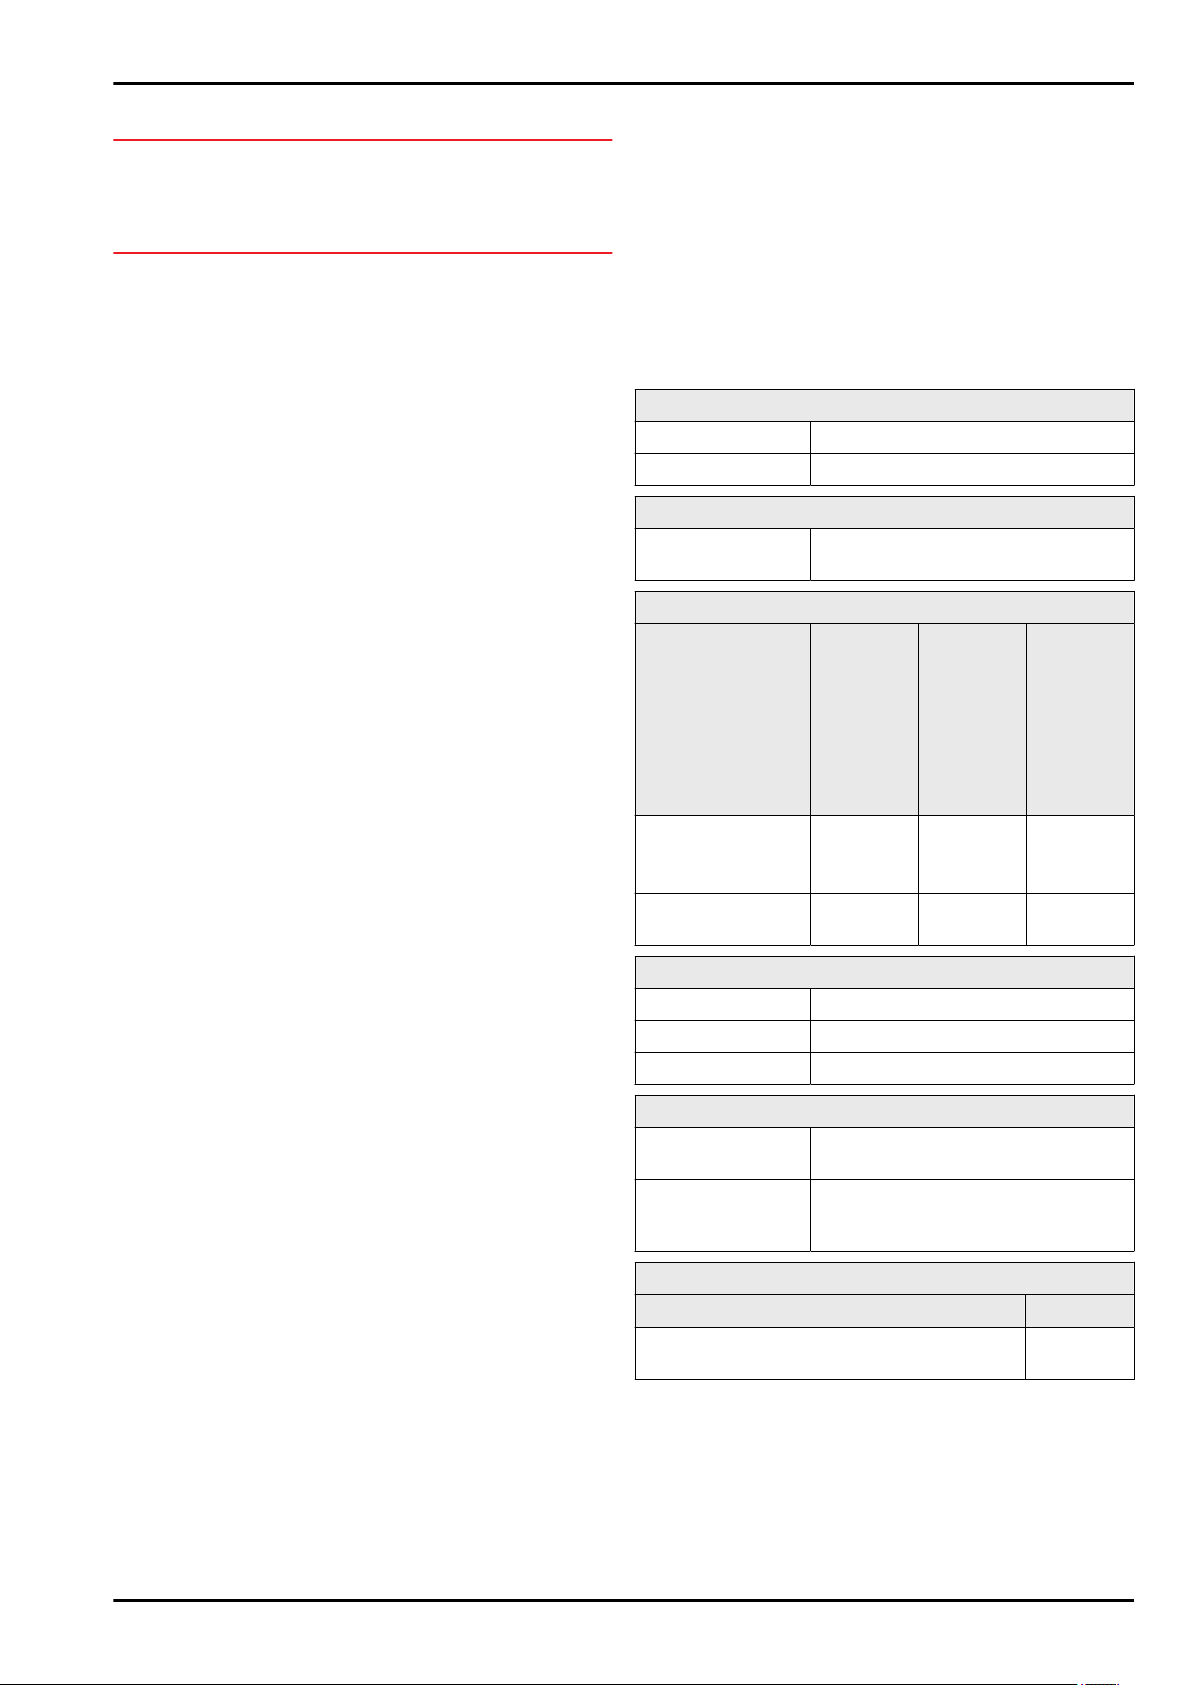
9.1 Technical specifications
Temperature range
Cooling 2 °C to 9 °C
Freeze -26 °C to -15 °C
Maximum freezer quantity / 24 hrs
Freezer compart-
ment
See the type plate under “Freezer
goods … /24 hours”
Maximum component capacity
Features Appliance
width 55 cm
(see Instal-
lation
Guide,
Appliance
Dimen-
sions)
Appliance
width 60 cm
(see Instal-
lation
Instruc-
tions, Appli-
ance
Dimen-
sions)
Appliance
width 70 cm
(see Instal-
lation
Guide,
Appliance
Dimen-
sions)
Drawer
Freezer compart-
ment
12 kg 12 kg
Glass shelf in the
freezer section
35 kg 35 kg 55 kg
Maximum size baking tray
Width 466 mm
Depth 386 mm
Height 50 mm
Ice cube production*
Ice cube produc-
tion / 24 h
At a temperature of -18 °C: 1.2 kg of ice
cubes
Maximum ice
cube production /
24 hours
With the MaxIce function on: 1.5 kg of
ice cubes
Lighting
Class
1
Light source
This product contains a light source that meets
energy efficiency rating G
LED
1 The appliance may contain light sources with different energy
efficiency classes. The lowest energy efficiency class is indi-
cated.
Customer help
20 * Depending on model and options
Loading ...
Loading ...
Loading ...