
6
1. FUNDAMENTAL SAFETY WARNINGS
• The appliance is not intended for use by persons (including children) with reduced phys-
ical, sensory or mental capabilities, or lack of experience and knowledge, unless they
have been given supervision or instruction concerning use of the appliance by a person
responsible for their safety.
• Children should be supervised to ensure that they do not play with the appliance.
• Designated use: this appliance is designed and made to prepare beverages based on
coee, milk and hot water. Any other use is considered improper and thus dangerous.
The manufacturer is not liable for damage deriving from improper use of the appliance.
• The surface of the heating element remains hot after use and the outside of the appli-
ance may retain the heat for several minutes depending on use.
• Clean all the components thoroughly, taking particular care with parts in contact with
the milk.
• Cleaning and user maintenance shall not be made by children without supervision.
• Never clean by immersing the appliance in water.
• IMPORTANT: to prevent damage to the appliance, do not clean with alkaline detergents;
use a soft cloth and, where applicable, neutral detergent.
• This is an household appliance only. It is not intended to be used in: sta kitchen areas in
shops, oces and other working environments; farm houses; by clients in hotels, motels
and other residential type environments; bed and breakfast type environments.
• If the plug or power cord is damaged, it must be replaced by customer services only to
avoid all risk.
• Appliances with removable cord: avoid splashes of water on the power cord connector or
socket at the back of the appliance.
• IMPORTANT: Models with glass surfaces: do not use the appliance if the surface is
cracked.
• The coee maker must not be placed inside a cabinet or kitchen unit during use
FOR EUROPEAN MARKETS ONLY:
• This appliance can be used by children aged from 8 years and above if they have been
given supervision or instruction concerning use of the appliance in a safe way and
understand the hazards involved. Cleaning and user maintenance shall not be made
by children unless they are above 8 years old and supervised. Keep the appliance and
power cord away from children under 8 years of age.
7
• The appliance can be used by persons with reduced physical, sensory or mental capa-
bilities or lack of experience and knowledge if they are supervised or have been given
instruction concerning use of the appliance in a safe way and if they understand the
hazards involved.
• Children shall not play with the appliance.
• Always unplug the appliance when left unattended and before assembly, taking apart
or cleaning.
Surfaces marked with this symbol become hot during use (the symbol is present in
certain models only).
Read the manual thoroughly before
installing and using the appliance. This
will ensure best results and maximum
safety.
2.
SAFETYWARNINGS
Danger! Failure to observe the warning may result
in life threatening injury by electric shock.
This is an electrical appliance and may cause electric shock.
You should therefore follow these safety warnings:
• Never touch the appliance with damp hands or feet.
• Never touch the plug with damp hands.
• Make sure the socket used is freely accessible at all times,
enabling the appliance to be unplugged when necessary.
• Unplug directly from the plug only. Never pull the cord as
you could damage it.
• To disconnect the appliance completely you must unplug it
from the mains socket.
• If the appliance is faulty, do not attempt to repair.
Turn it o, unplug from the mains socket and contact Cus-
tomer Services.
• Before cleaning the appliance, turn it o, unplug from the
mains socket and allow to cool.
Important: Failure to observe the warning could
result in injury or damage to the appliance.
Keep all packaging (plastic bags, polystyrene foam) away from
children.
None of the components or accessories is dish-
washer safe.
Danger of burns! Failure to observe the warning
could result in scalds or burns.
This appliance produces hot water and steam may form while
it is in operation. Avoid contact with splashes of water or hot
steam.
2.1 Installing the appliance
Important!
When you install the appliance, you should respect the follow-
ing safety warnings:
• The appliance gives o heat. After positioning the appli-
ance on the worktop, leave a space of at least 3 cm be-
tween the surfaces of the appliance and the side and rear
walls and at least 25 cm above the coee maker.
• Water penetrating the coee machine could cause
damage.
Do not place the appliance near taps or sinks.
• The appliance could be damaged if the water it contains
freezes.
Do not install the appliance in a room where the tempera-
ture could drop below freezing point.
• Arrange the power cord in such a way that it cannot be
damaged by sharp edges or contact with hot surfaces (e.g.
electric hot plates).
2.2 Connecting the appliance
Important!
Check that the mains power supply voltage corresponds to that
indicated on the rating plate on the bottom of the appliance.
Connect the appliance to an eciently earthed socket with a
minimum current rating of 10A only and installed in compliance
with current standards.
If the power socket does not match the plug on the appliance,
have the socket replaced with a suitable type by a qualied
electrician.

8
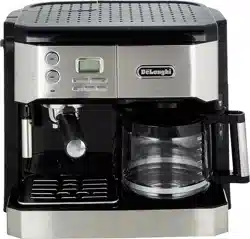
3. DESCRIPTION PAGE 3
3.1 Description of the appliance
A1. Espresso coee water tank lid
A2. Espresso coee water tank
A3. Chlorine lter extraction handle
A4. Chlorine lter holder
A5. Filter holder for drip coee
A6. Water ll compartment
A7. Drip coee warming plate
A8. Espresso coee cup tray
A9. Drip tray
A10. Cappuccino maker
A11. Steam dial for cappuccino
A12. Espresso coee ON/standby switch
3.2 Description control panel
B1. Express coee/hot water button with light
B2. Steam button with light
B3. "Espresso" ON light
B4 Display
B5 Drip coee ON/OFF button with light
B6 AUTO button (auto-start) for drip coee with AUTO ON
light
B7 “HOUR” button (hour)
B8 “MIN” button (minutes)
B9 “1-4” cup button with light
3.3 Description of the accessories
C1. Espresso coee lter holder
C2. One-cup or one-pod espresso coee lter
C3. Two-cup espresso coee lter
C4. Coee measure with presser
C5. Permanent lter
C6. Jug for drip coee
C7. Water softener lter for espresso coee water tank (*cer-
tain models only)
C8. Chlorine lter
3.4 Chlorine lter
The lter eliminates the taste of chlorine from the water. To in-
stall, proceed as follows:
• Extract the lter holder from its housing by pulling it up-
wards (g. 1).
• Remove the chlorine lter from the plastic bag and rinse in
tap water (g. 2).
• Open the lter holder and carefully position the lter as
shown in g. 2.
• Close the lter holder (g. 2) and replace in its housing.
Press down as far as it will go.
• The chlorine lter must be replaced every 80 cycles and
always after six months of operation.
Please note:
Buy De'Longhi original lters only.
4. SETTING UP THE APPLIANCE
The rst time you use the machine, all accessories and the inter-
nal circuits must be washed through as follows:
• DRIP COFFEE: Deliver two jugs of coee without using
ground coee.
• ESPRESSO COFFEE: The rst time you use the appliance,
wash all accessories and rinse the internal circuits by pro-
ceeding as though you were making coee until you have
used at least two tanks of water.
5. MAKING DRIP COFFEE
5.1 Setting the time
The rst time you connect the appliance to the mains electricity
supply, 0:00 ashes on the display.
To set the time, proceed as follows:
1. Press the "hour" button (g. 3) for at least 2 seconds until
the number on the display corresponding to the hours
starts to increase.
2. Before the display stops ashing (about 5 seconds), set the
time by pressing the "hour" button repeatedly.
3. Set the minutes by pressing the "min" button repeatedly
(g. 3). (To scroll through the minutes quickly, press and
hold the button).
4. After setting the time, wait 5 seconds. When the display
stops ashing, the time is set.
To change the time, press the "hour" button for about 2
seconds, then follow the procedure from point 2.
Please note: If there is a power failure, the setting will not be
saved.
5.2 Programming auto-start (AUTO)
You can set the time you want the drip coee to be prepared
automatically.
First make sure the time has been set correctly.
To set auto-start (e.g. the time you want the coee to be ready),
proceed as follows:
1. Press the “AUTO” button (g. 4) for about 2 seconds until
0:00 ashes on the display.
2. Before the display stops ashing (about 5 seconds), set the
time by pressing the "hour" button repeatedly.
3. Set the minutes by pressing the "min" button repeatedly .
4. After 5 seconds, the display stops ashing and the set time
will be saved.
9
5. After programming the appliance as described above,
press the AUTO button to prepare the coee at the required
time (the AUTO light comes on).
Please note:
• To change the auto-start time, press the AUTO button for
about 2 seconds, then set the new time as described in
point 2.
• Important: at the set time, the appliance starts making the
drip coee. The espresso coee section does not come on.
5.3 Keep-warm function
After delivering the drip coee, the warming plate stays on for a
certain length of time to keep the coee in the jug hot. The ap-
pliance then switches o automatically (the ON light goes o).
The keep-warm time can be varied as follows:
1. Press the ON/OFF button (g. 5) for about 2 seconds until
0:30 ashes on the display.
2. Change the period of time by pressing the HOUR (and MIN)
button repeatedly.
3. Wait 5 seconds. When the display stops ashing, the time
is set.
Please note:
If the time set is 0:00, the appliance goes o (the period of time
can be set from 1 minute to 11 hours and 59 minutes).
5.4 “1-4” cups button
If you want to make just a few cups, after pressing the "ON/
OFF" button, press the "1-4" button to improve the avour. This
feature activates a unique brewing process, releasing water into
the lter slowly, wetting the ground coee gradually for a better
avour and aroma.
To enable the function, press the "1-4" button (g. 6). The light
on the button comes on.
To disable the function, press the button again.
Do not use this function when making a whole jug of coee.
The function can also be used in AUTO mode.
5.5 How to make drip coee
• Open the lter holder by rotating it towards the right (g.
7).
• Fill the jug with fresh clean water up to the level indicated
for the number of cups of coee you want to make, taking
care not to exceed the MAX level (g. 8).
• Then pour the water into the coee maker tank
(g. 9).
• Insert the permanent lter in the lter holder (g. 10).
• Place the ground coee in the lter using the measure pro-
vided and distribute evenly (g. 11). As a general rule, use
one level measure of coee (about 7 grams) for each cup
you want to make (for example, 10 measures for 10 cups).
• Close the lter holder, close the jug with the lid and place it
on the warming plate.
• Press the ON/OFF button. The light on the button indicates
that the coee maker is operating.
• After a few moments, the coee starts percolating.
It is normal for the appliance to give o steam during operation.
Once brewed, to keep the coee warm, place the jug on the
warming plate and leave the appliance turned on (with the light
on the "ON/OFF" button on). The coee in the jug will be kept at
the right temperature.
• To turn the appliance o, press the ON/OFF button.
6. MAKING ESPRESSO COFFEE
6.1 Preheating the coee unit
To obtain espresso coee at the right temperature, the coee
machine must be preheated:
1. Press the ON/OFF button (g. 12) to turn the appliance on.
The light comes on.
2. Place the lter in the lter holder (g. 13). Make sure the
projection on the lter is inserted correctly in the corre-
sponding slot. Attach the lter holder with lter to the
appliance (g. 14) without adding coee. Use the smaller
lter to make one coee or the larger lter to make two
coees.
3. Place a cup under the lter holder. Use the same cup as will
be used to prepare the coee in order to preheat it.
4. Wait for the light to come on, then immediately
turn the selector dial to the position (g. 15). Deliver
water until the light goes o, then stop delivery by press-
ing the same button and empty the cup.
(It is normal for a small and harmless pu of steam to be given
o when removing the lter holder).
6.2 How to make espresso coee using ground
coee
1. After preheating the appliance as described in the previous
paragraph, use the smaller lter to make one coee or the
larger lter to make two coees.
2. To make just one coee, place one level measure of ground
coee (about 7 g) in the lter. (g. 16). To make two cof-
fees, place two loosely lled measures (about 6+6 g) of
ground coee in the lter. Fill the lter a little at a time to
prevent the ground coee from overowing.
Important:
to ensure correct operation, before placing the ground coee in
the lter holder, clean the lter of ground coee residues left
from the previous brewing.
3. Distribute the ground coee evenly and press lightly with
the presser (g. 17).
10
Correct pressing of the ground coee is essential to obtain
a good espresso. If pressing is excessive, coee delivery
will be slow and the froth will be dark. If pressing is too
light, coee delivery will be too rapid and the froth will be
skimpy and light coloured.
4. Remove any excess coee from the rim of the lter holder
and attach to the appliance. Rotate rmly (g. 14) to avoid
water leaking out.
5. Place the cup or cups (ideally preheated by rinsing with a
little hot water) under the lter holder spouts (g. 18).
6. Make sure the
light is on (if o, wait until it comes
on), then press the
button (g. 15) until the required
quantity is obtained. To interrupt, press the button again.
7. To remove the lter holder, turn the handle from right to
left.
Danger of burns
To avoid splashes, never remove the lter holder while the ap-
pliance is delivering coee.
8. To dispose of the used coee, block the lter in place
using the lever incorporated in the handle, then empty
the grounds by turning the lter holder upside down and
tapping it rmly (g. 19).
9. To turn the machine o, press the ON/OFF button on the
left side.
6.3 How to prepare espresso coee using pods
1. Preheat the appliance as described in the section "PRE-
HEATING THE COFFEE UNIT", making sure the lter holder
is attached. This obtains a hotter coee.
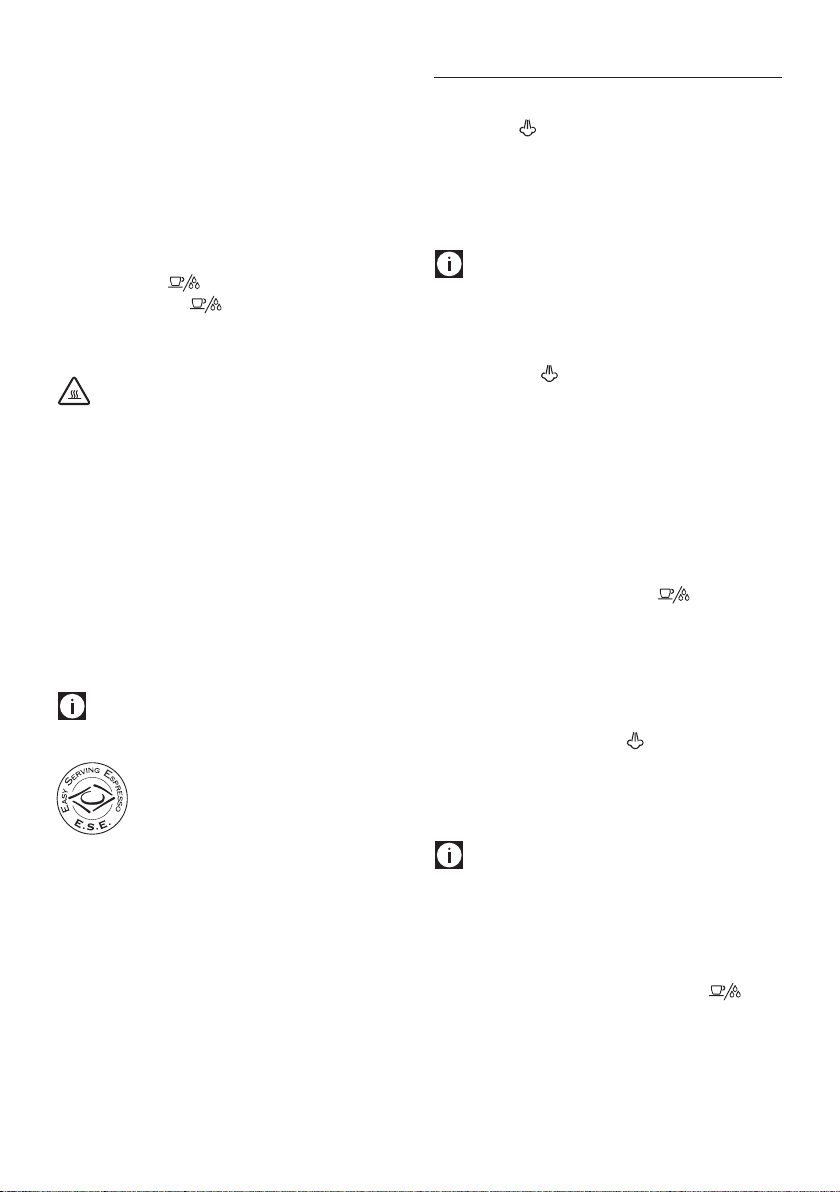
Please note:
Use pods conforming to the ESE standard, indicated on the pack
by the following mark:
The ESE standard is a system accepted by leading
pod producers and enables espresso coee to be
prepared simply and cleanly.
2. Place the small one-cup or pod lter in the lter holder,
making sure the projection is correctly inserted in the cor-
responding slot as shown in g. 13.
3. Insert the pod, centring it as far as possible on the lter
(g. 20). Always follow the instructions on the pod pack to
position the pod on the lter correctly.
4. Attach the lter holder to the appliance. Always turn as far
as it will go (g. 14).
5. Proceed as in points 5, 6 and 7 in the previous section.
7. HOW TO PREPARE CAPPUCCINO
1. Prepare the espresso coees as described in the previous
sections, using suciently large cups.
2. Press the
button. The corresponding light comes on
(g. 21).
3. In the meantime, ll a recipient with about 100 grams of
milk for each cappuccino to be prepared. In choosing the
size of the recipient, bear in mind that the milk doubles or
triples in volume.
Please note:
You are recommended to use skimmed or semi-skimmed milk at
refrigerator temperature (about 5°C).
4. Place the recipient containing the milk under the cappucci-
no maker.
5. Wait until the light comes on (g. 21). The light comes
on to indicate that the boiler has reached the ideal temper-
ature for steam production. When the boiler is heating up,
it is normal for a small quantity of water and steam to be
delivered into the drip tray.
6. Extract the cappuccino maker by pushing upwards and ro-
tating it towards the left (g. 22). During this operation,
avoid touching the boiler outlet as it is hot. Then place the
recipient containing the milk under the cappuccino maker.
7. Dip the cappuccino maker in the milk for a few millimetres
(g. 23). Turn the steam dial to the ON position (g.
24). The milk now starts to increase in volume and take on
a creamy appearance;
8. When the milk has doubled in volume, immerse the cap-
puccino maker deeply and continue heating the milk.
When the required temperature is reached (60°C is ideal),
interrupt steam delivery by rotating the steam dial to the
OFF position and pressing the button.
9. Pour the frothed milk into the cups containing the coee
prepared previously. The cappuccino is ready. Sweeten to
taste and if desired, sprinkle the froth with a little cocoa
powder.
Please note:
• To prepare more than one cappuccino, rst make all the
coees then at the end prepare the frothed milk for all the
cappuccinos;
• To make coee again after the milk has been frothed, rst
cool the boiler, or the coee will be burnt. To cool, place a
container under the boiler outlet, press the button
(g. 15) and deliver water until the OK light goes o. Press
the button and make the coee as described in the previ-
ous paragraphs.
You are recommended to deliver steam for a
maximum of 60 seconds and never to froth
milk more than three times consecutively.
11
Important!
For hygiene reasons, the cappuccino maker should always be
cleaned after use.
Proceed as follows:
1. Deliver a little steam for a few seconds (points 2 and 5 of
the previous section) by turning the steam dial (g. 24).
This causes the cappuccino maker to discharge any milk
left inside. Press the ON/OFF button to turn the appliance
o.
2. Grip the cappuccino maker tube rmly in one hand and
with the other rotate the cappuccino maker anticlockwise
and pull o (g. 25).
3. Remove the cappuccino maker nozzle by pulling it
downwards.
4. Wash the cappuccino maker and connection nozzle thor-
oughly with warm water.
5. Make sure the two holes shown by the arrows in g. 26 are
not blocked. If necessary, clean with a pin.
6. Put the connection nozzle back, pushing it upwards to in-
sert it in the tube.
7. Replace the cappuccino maker by pushing it upwards and
rotating it clockwise.
8. HOT WATER
1. Press the ON/OFF button (g. 12) to turn the appliance
on.The light comes on.
1. Wait until the
light comes on.
2. Place a recipient under the cappuccino maker.
3. When the
light comes on, press the button
(g. 15) and at the same time turn the steam dial position
ON position (g. 24). Hot water comes out of the
cappuccino maker;
4. To interrupt hot water delivery, press the
button
again and turn the steam dial to OFF.
You should not deliver hot water for more
than 60 seconds.
9. CLEANING
Danger!
• Never immerse the coee maker in water. It is an electrical
appliance!
• Before cleaning the outside of the appliance, turn it o,
unplug from the mains socket and allow to cool.
9.1 Espresso coee lter cleaning and
maintenance
About every 300 coees or when the coee is delivered from the
lter holder a drop at a time or not at all, clean the ground coee
lters and lter holder as follows:
• Remove the lter from the lter holder.
• Remove the lter cap (g. 27) by unscrewing in the direc-
tion indicated by the arrow on the cap.
• Remove the frother from the container by pushing it from
the plastic part.
• Remove the gasket.
• Rinse all components and clean the metal lter thoroughly
in hot water using a brush (g. 28). Make sure the holes in
the metal lter are not blocked. If necessary, clean with a
pin (g. 29).
• Replace the lter and gasket on the plastic disk as shown in
g. 30. Make sure to insert the pin on the plastic disk into
the hole in the gasket indicated by the arrow in g. 30.
• Replace the assembly in the steel lter container (g. 31),
making sure the pin is inserted in the hole in the support
(see arrow in g. 31).
• Finally, screw on the cap..
Failure to clean as described above invalidates the guarantee.
9.2 Cleaning the boiler outlet
About every 300 coees, the espresso boiler outlet must be
cleaned as follows:
• Make sure the appliance is not hot and that it is unplugged
from the mains;
• Using a screwdriver, unscrew the screw xing the boiler
outlet lter (g. 32);
• Remove the boiler outlet;
• Clean the boiler with a damp cloth (g. 32);
• Clean the outlet lter thoroughly in hot water using a
brush. Make sure the holes are not blocked. If necessary,
clean with a pin (g. 29).
• Rinse with running water and brush.
• Replace the outlet lter, making sure it is correctly posi-
tioned on the gasket.
Failure to clean as described above invalidates the guarantee.
9.3 Other cleaning operations
1. Do not use solvents or abrasive cleaning products. Use a
soft cloth only.
2. Clean the lter holder, lters, drip tray and water tank
regularly.
To empty the drip tray, extract the cup tray grille, empty
the water and clean the grille with a cloth: then reassem-
ble the drip tray.
12
Danger!
Never immerse the appliance in water. It is an electrical
appliance.
10. DESCALING
10.1 Descaling the espresso unit
We recommend descaling the coee maker about every 200
coees. We recommend using commercially available De’Longhi
descaler.
Proceed as follows:
1. Remove the water softener lter (if present) and ll the
tank with the descaler solution, obtained by diluting the
descaler with water following the instructions on the pack.
2. Press the ON/OFF button (g. 12) to turn the appliance on.
The ON light comes on.
3.
Make sure the lter holder is not attached and place a re-
cipient under the cappuccino maker;
4. Press the button and
deliver about 1/4 of the solu-
tion in the tank. At intervals, turn the steam dial to deliver
water from the cappuccino maker.
Stop delivery by press-
ing the
button and leave the solution to work for
about 5 minutes;
5.
Repeat point 4 another 3 times, until the tank is empty;
6.
To eliminate residues of descaler solution, rinse the tank
well and ll it with clean water (without descaler);
7. Press the button (g. 15)
and deliver water until the
tank is empty;
8.
Repeat points 6 and 7.
Failure to clean as described above invalidates the guarantee.
10.2 Descaling the drip coee unit
Over time, calcium in the water may cause obstructions, reduc-
ing the eciency of the coee maker. You are recommended to
descale the coee maker about every 40 coees. To descale, al-
ways use special commercially available descaling products for
drip coee makers.
1. Dilute the product in the jug, following the instructions on
the descaler pack;
2. Remove the chlorine lter and pour the solution into the
tank;
3. Place the jug on the warming plate;
4. Press the button, deliver the equivalent of one cup
then turn the appliance o;
5. Leave the solution to work for 15 minutes, then repeat op-
erations 4 and 5.
6. Turn the appliance on and deliver the water until the tank
is completely empty.
7. Rinse by operating the appliance with water only at least 3
times (3 complete tanks of water).
Important!
If you do not descale the drip coee unit, after prolonged use,
the ON/OFF light (B5) ashes and you can no longer make drip
coee. If this occurs, unplug the appliance from the mains sock-
et, then plug in again and perform two descaling cycles imme-
diately as described in the relevant section.
11. TECHNICAL DATA
Mains voltage:
220-240V/50-60Hz
Absorbed power:
1750 W
Size LxDxH:
371 x 282 (or 369) x 324 mm
Pressure: 15 bar
“Espresso" boiler ”: Stainless steel
“Espresso” water tank capacity: 1.2 L
Drip coee water tank capacity: 1.4 L
Cord length: 1200 mm
Weight: 6.2 kg
This product complies with European regulation no.
1935/2004 on materials and articles intended to come
into contact with food.
12. DISPOSING OF THE APPLIANCE
The appliance must not be disposed of with house-
hold waste, but taken to an authorised waste separa-
tion and recycling centre.

13
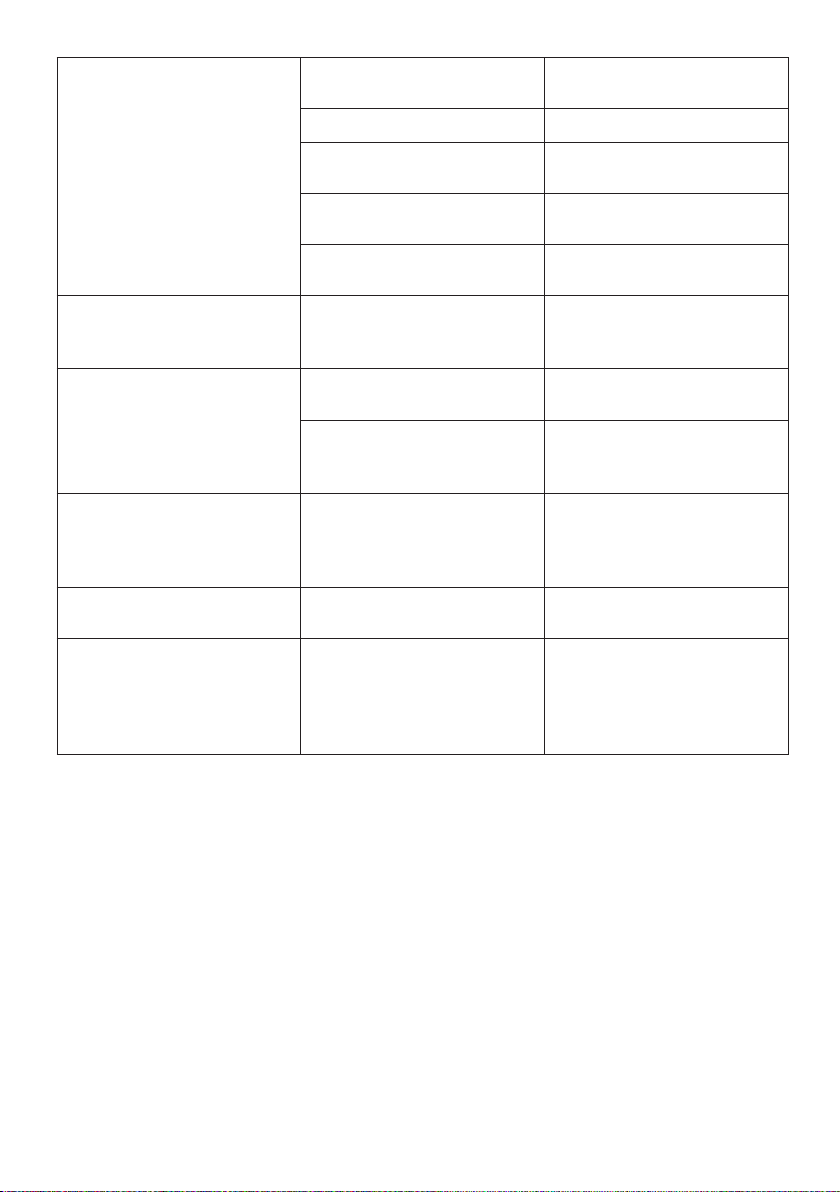
PROBLEM POSSIBLE CAUSE SOLUTION
No espresso coee is delivered No water in the tank Fill the tank with water
The holes in the lter holder are blocked Clean the lter holder spout holes
The espresso boiler outlet is blocked Clean as described in the section “9.2
Cleaning the boiler outlet”
The espresso lter is blocked Clean as described in the section “9.1
Espresso coee lter cleaning and
maintenance”
Scale in the water circuit Descale as described in section “10.1 Des-
caling the espresso unit”
The tank is not correctly in place and the
valve on the bottom is not open
Press the tank down lightly to open the
valve on the bottom
The espresso coee drips from the edges
of the lter holder rather than the holes
The lter holder is inserted incorrectly Attach the lter holder correctly and ro-
tate as far as it will go.
The espresso boiler gasket has lost
elasticity
Have the espresso boiler gasket replaced
by Customer Services
The holes in the lter holder spouts are
blocked
Clean the spout holes
The pump is excessively noisy The water tank is empty Fill the water tank
The water tank is not correctly in place
and the valve on the bottom is not open
Press the tank down lightly to open the
valve on the bottom
The espresso coee is cold The espresso OK indicator light was not on
when the coee switch was pressed
Wait until the espresso OK indicator light
comes on
The appliance was not preheated. Preheat as described in the section “6.1
Preheating the coee unit”
The cups were not preheated Preheat the cups by rinsing with hot
water
Descale the water circuit Descale as described in section “10.1 Des-
caling the espresso unit”
The espresso coee froth is light coloured
(the coee is delivered from the spout too
fast)
The ground coee is not pressed down
rmly enough
Press the ground coee down more rmly
(g. 18)
There is not enough ground coee Increase the quantity of coee
The ground coee is too coarse Use only ground coee for espresso coee
makers
The wrong type of ground coee is being
used
Use a dierent type of ground coee
13. TROUBLESHOOTING
Below is a list of some of the possible malfunctions.
If the problem cannot be resolved as described, contact Customer Services.
14
The coee froth is too dark (delivered
from the spout too slowly)
The ground coee is pressed down too
rmly
Press the coee down less rmly
There is too much ground coee Reduce the quantity of ground coee
The espresso boiler outlet is blocked Clean as described in section “9.2 Clean-
ing the boiler outlet”
The ground coee is too ne or damp Use only ground coee for espresso coee
makers and make sure it is not damp
The wrong type of ground coee is being
used
Use a dierent type of ground coee
The lter holder cannot be attached to
the appliance
Too much coee in the lter Use the measure supplied and make sure
you are using the correct lter for the type
of preparation
No milk froth is formed when making
cappuccino
Milk not cold enough Always use semi-skimmed milk at refrig-
erator temperature
Cappuccino maker dirty Thoroughly clean the holes in the cappuc-
cino maker, in particular those indicated
in g. 26
The coee has an acid taste Inadequate rinsing after descaling After descaling rinse the appliance as
indicated in section “10.1 Descaling the
espresso unit” or “10.2 Descaling the drip
coee unit”
The drip coee takes a long time to
percolate
Descale the drip coee unit Descale as described in section “10.2 Des-
caling the drip coee unit”
The ON/OFF light (B5) ashes and drip
coee cannot be made
The drip coee unit has not been descaled
as often as indicated
Unplug the appliance from the mains
socket, then plug in again. Perform the
descaling procedure at least twice (see
section “10.2 Descaling the drip coee
unit”).
